using adp mobile solutions on android and … · how to view company news and events ..... 31 how...
TRANSCRIPT

Using ADP Mobile Solutions on Android and Smartphone Devices
MA_22607
Job Aid V04211422607ATD
© 2013-2014 ADP, Inc. Confidential and proprietary information, for internal purposes only. Release Date July 2012; Revised April, 2014

Table of Contents
MA_22607 .............................................................................................................................................. 1
Table of Contents .......................................................................................................................................... 2
Introduction ................................................................................................................................................... 1
Using This Job Aid .................................................................................................................................. 1
Contents ................................................................................................................................................. 1
ADP Mobile Solutions on Android and Smartphone Devices ................................................................. 1
How to Download the Native Android Application ........................................................................................ 2
How to Download the Application on your Phone .................................................................................. 2
How to Download the Application from the Web .................................................................................... 2
Logging on ADP Mobile Solutions ................................................................................................................ 3
How to Access ADP Mobile Solutions Using a Password ...................................................................... 3
Notes ................................................................................................................................................ 4
How to Access ADP Mobile Solutions Using a PIN ................................................................................ 5
Using the ADP Mobile Solutions Springboard ........................................................................................ 7
Forgot Your PIN Number ........................................................................................................................ 9
Forgot Your Password .......................................................................................................................... 12
Mobile.adp.com/security - ADP Mobile Security ............................................................................ 13
Accessing and Changing ADP Mobile Solutions Settings .......................................................................... 14
How to Access ADP Mobile Solutions Setting Options ........................................................................ 14
How to View and Change Preferences ................................................................................................ 14
Changing Preferences – I Want to Save/Not Save my User ID ..................................................... 15
Changing Preferences – I Want to Log On with a Password ......................................................... 16
Changing Preferences – I Want to Log On with a PIN .................................................................. 17
How to View the Privacy Statement ..................................................................................................... 19
How to View the Terms of Use ............................................................................................................. 19
How to View System Requirements ..................................................................................................... 20
How to View FAQs ............................................................................................................................... 20
How to Access Help ............................................................................................................................. 21
How to Submit Feedback ............................................................................................................... 22
Viewing Information Via ADP Mobile Solutions .......................................................................................... 23
How to View a List of Pay Statements ................................................................................................. 23
How to View Pay Statement Details ..................................................................................................... 23
How to Display Hourly and Salary Pay Rates ...................................................................................... 24
How to View Tax Statements ............................................................................................................... 26
How to View the Corporate Directory ................................................................................................... 29

How to View Company News and Events ............................................................................................ 31
How to View Your Portal Message Center ........................................................................................... 33
Procedure ....................................................................................................................................... 33
How to View Active Retirement Savings Plans/Funds ......................................................................... 35
How to Display Vested Retirement Plan Balances by Source ............................................................. 36
How to View Retirement Plan Details ................................................................................................... 37
How to View Your Benefits Plans ......................................................................................................... 38
Procedure ....................................................................................................................................... 38
How to View Your ADP Flexible Spending Accounts ........................................................................... 40
View FSA Accounts ........................................................................................................................ 40
Flexible Spending Account Details Screen .................................................................................... 41
View FSA Cards ............................................................................................................................. 42
ALINE Card (PayCard) ................................................................................................................................ 44
How to Enroll for an ALINE Card .......................................................................................................... 44
User Accesses ALINE Card Before Enrollment is Complete ......................................................... 48
User Is Not Eligible for ALINE Card ............................................................................................... 48
How to Activate the ALINE Card .......................................................................................................... 49
How to Request Direct Deposit Information ......................................................................................... 50
How to View Direct Deposit Information ............................................................................................... 52
ALINE Activity Search .................................................................................................................... 53
View ATM Locations ...................................................................................................................... 54
Employee Calendar ..................................................................................................................................... 55
Description ............................................................................................................................................ 55
Procedure: How to View Events in the Employee Calendar ................................................................ 56
Working with Your Time Sheet ................................................................................................................... 58
Description ............................................................................................................................................ 58
GPS Geo-Location Feature .................................................................................................................. 58
Clock Format ........................................................................................................................................ 58
How to Clock In or Clock Out ............................................................................................................... 58
How to View a Time Sheet ................................................................................................................... 61
How to Enter Time on the Time Sheet ................................................................................................. 62
How to Change Time on the Time Sheet ............................................................................................. 64
How to Delete an Entry on the Time Sheet .......................................................................................... 66
How to Approve Your Time Sheet ........................................................................................................ 69
How to View Timecard Exceptions ....................................................................................................... 70
How to Notify Your Manager of Late Arrival ......................................................................................... 72
How to Notify Your Manager of an Absence ........................................................................................ 74

Manager Tasks ........................................................................................................................................... 76
My Team ............................................................................................................................................... 76
My Team – Team Tab .................................................................................................................... 76
My Team – Tasks Tab ................................................................................................................... 76
How to View and Approve a Time Sheet .............................................................................................. 77
How to View and Correct Exceptions ................................................................................................... 80
Paid Time Off (PTO) ............................................................................................................................. 83
Paid Time Off (PTO) for Enterprise eTIME .......................................................................................... 84
How to View Your PTO Balances .................................................................................................. 84
How to View Time Off Requests .................................................................................................... 86
How to Request Time Off ............................................................................................................... 89
Paid Time Off (PTO) for ezLaborManager ........................................................................................... 92
How to View Your PTO Balances .................................................................................................. 92
Balances Functionality ................................................................................................................... 94
How to View Time Off Requests .................................................................................................... 95
How to Request Time Off ............................................................................................................... 98
How to /Update Cancel a Request for Time Off .......................................................................... 102
How to Accept/Cancel Partially Approved Time Off Requests ........................................................... 105
Procedure ..................................................................................................................................... 105
How to Approve a Time Off Request (Enterprise eTIME and ezLaborManager) ............................... 106
How to Partially Approve a Time Off Request .................................................................................... 108
Paid Time Off (PTO) for AutoPay ....................................................................................................... 111
How to View Your PTO Balances ................................................................................................ 111
How to Approve a Time Off Request (Time Off in ADP Workforce Now V5.1 or Higher) .................. 113

© 2013-2014 ADP, Inc. Using ADP Mobile Job Aid 1
Introduction
Using This Job Aid
This job aid contains the procedures you need to support the ADP Mobile Solutions client administrators and client employees who use the ADP Mobile Solutions application.
Contents
Use this job aid to assist client administrators to perform the following end-user tasks and to support their employees as they perform these tasks in ADP Mobile Solutions.
ADP Mobile Solutions on Android and Smartphone Devices
ADP Mobile Solution is available through both a:
Web-based application (Smartphone devices)
Native application (Android devices)

© 2013-2014 ADP, Inc. Using ADP Mobile Job Aid 2
How to Download the Native Android Application
How to Download the Application on your Phone
To download the ADP Mobile Solutions native Android application, on your device:
1. Access Google Play.
2. Search for ADP Mobile Solutions.
3. Select and download the ADP Mobile Solutions application.
Note: There are several ADP applications on Google Play, including RUN, the Small Business Solutions (SBS) application for ADP Mobile. The client user must select ADP Mobile Solutions.
How to Download the Application from the Web
To download the ADP Mobile Solutions native Android application from the web:
1. On your PC, in your web browser, access play.google.com.
2. Select Android Apps.
3. In the Search field, type ADP Mobile Solutions.
4. Following the instructions on Google Play, install the ADP Mobile Solutions application.
Note: There are several ADP applications on Google Play, including RUN, the Small Business Solutions (SBS) application for ADP Mobile. The client user must select ADP Mobile Solutions.

© 2013-2014 ADP, Inc. Using ADP Mobile Job Aid 3
Logging on ADP Mobile Solutions
Before beginning these procedures, the user must have:
A registered user profile on the ADP Portal (or)
iPay Statements with a user ID and password
The first time users access ADP Mobile Solutions, they must use a user ID and password. They may then choose to access ADP Mobile Solutions using a PIN number.
How to Access ADP Mobile Solutions Using a Password
Complete the following steps to access the ADP Mobile Solutions application using a password.
Step Action
1 Access ADP Mobile Solutions:
Smartphone device: In the mobile default browser, type https://mobile.adp.com.
Android device: On your phone, select the ADP Mobile Solutions application.
Result: The ADP Mobile Solutions login screen displays.
2 Enter the ADP Portal user ID and then select Submit.
Result: The ADP Mobile Solutions Password screen displays.

© 2013-2014 ADP, Inc. Using ADP Mobile Job Aid 4
Step Action
3 Enter the ADP Portal password and then select Log In.
Result: If this is the first time a user accesses ADP Mobile Solutions, the Terms of Use screen displays.
Note: This screen only displays to authenticated users.
4 If the Terms of Use screen displays, select Accept.
Note: If the user selects Cancel, ADP Mobile Solutions does not allow the user to log in.
Result: The ADP Mobile Solutions springboard displays.
Notes
The logon process authenticates the Security Management Services (SMS) LDAP setup for Mobile ESS. LDAP is a separate iSI environment for ADP Mobile Solutions ESS.
The client must have a mobile-enabled product in Security Management Services (SMS), e.g. NAS Portal, MAS Portal, iPay Statements.
If a user is suspended or deleted, the user’s access flag must be updated. Synchronization occurs every 24 hours.

© 2013-2014 ADP, Inc. Using ADP Mobile Job Aid 5
How to Access ADP Mobile Solutions Using a PIN
Complete the following steps to access the ADP Mobile Solutions application using a PIN.
Step Action
1 Access ADP Mobile Solutions:
Smartphone device: In the mobile default browser, type https://mobile.adp.com.
Android device: On your phone, select the ADP Mobile Solutions application.
Result: The ADP Mobile Solutions logon screen displays.
2 Enter ADP Portal user ID and then select Submit.
Result: The ADP Mobile Solutions PIN screen displays.

© 2013-2014 ADP, Inc. Using ADP Mobile Job Aid 6
Step Action
3 Enter the PIN and then select Log In.
Result: The ADP Mobile Solutions springboard displays.

© 2013-2014 ADP, Inc. Using ADP Mobile Job Aid 7
Using the ADP Mobile Solutions Springboard
The icons on the Springboard are dynamic. Only icons for applications to which the client subscribes display.
Icon Displays for clients that
Pay
Use ADP iPay Statements or AutoPay via iPay
Directory
Have an ADP Corporate Directory using Portal Company Directory R8.8 and ADP Workforce Now V5.1 or higher
News
Use News through Portal R8.8, via Portal R8.8, ADP Workforce Now V5.1 or higher, MyTotalSource, or MyResource
Clock
Use one of the following systems:
ezLaborManager V18.3 or higher ADP Workforce Now V5.1 or higher MyTotalSource ezLaborManager MyResource ezLaborManager (System Of Record, or
SOR, will provide if user has Clock, Time Sheet or Late/Absent)
Enterprise eTIME Hosted v6.1.5 or higher (SOR will provide if user has Clock or Time Sheet)
Time Sheet
Use one of the following systems:
ezLaborManager v18.3 or higher ezLaborManager ADP Workforce Now V5.1 or higher MyTotalSource ezLaborManager MyResource ezLaborManager (SOR will provide if user has
Time Clock, Time Sheet or Late/Absent) Enterprise eTIME Hosted v6.1.5 or higher (SOR will provide if
user has Clock or Time Sheet )
Late/Absent
Use ezLaborManager V18.3 or higher, or Essential Time & Attendance in ADP, Work Force Now 5.1 or higher (SOR will provide if user has Time Clock, Time Sheet or Late/Absent)

© 2013-2014 ADP, Inc. Using ADP Mobile Job Aid 8
Icon Displays for clients that
Retirement
Use ADP 401K products and iPay Statements
Note: The clients need to be setup with Netsecure ADP 401K or have an integration configured between ADP 401K & iPay.
Benefits
Use Health and Welfare Service Engine (HWSE v.17 and v.18.5), Integrated HR Benefits (HRB) or MyTotalSource.
Spending Account
Use flexible spending accounts with ADP
Time Off
Use ezLaborManager V18.3 or higher or Enterprise eTIME 6.1.6 or higher
Aline PayCard
Use Aline PayCard (TPC)
Inbox
Use Message Center from Portal R8 and ADP Workforce Now V5.1 or higher

© 2013-2014 ADP, Inc. Using ADP Mobile Job Aid 9
Forgot Your PIN Number
Complete the following steps to reset your PIN number.
Step Action
1 Access ADP Mobile Solutions:
Smartphone device: In the mobile default browser, type https://mobile.adp.com.
Android device: On your phone, select the ADP Mobile Solutions application.
Result: The ADP Mobile Solutions login screen displays.
2 Enter your ADP Portal user ID and then select Log In.
Result: The ADP Mobile Solutions PIN screen displays.

© 2013-2014 ADP, Inc. Using ADP Mobile Job Aid 10
Step Action
3 On the ADP Mobile Solutions login screen, select Forgot?
Result: The Get New PIN screen displays.
4 Type your ADP Portal user ID and password, and then select Submit.
Result: The Enter PIN screen displays.

© 2013-2014 ADP, Inc. Using ADP Mobile Job Aid 11
Step Action
5 On the Enter PIN screen:
• Enter a PIN number.
• Re-enter the PIN number.
• Select Submit.
Result: The PIN Reset Successful screen displays.
6 Select Log In.
Result: The Login screen displays.

© 2013-2014 ADP, Inc. Using ADP Mobile Job Aid 12
Forgot Your Password
Complete the following steps to reset your password.
Step Action
1 Access ADP Mobile Solutions:
Smartphone device: In the mobile default browser, type https://mobile.adp.com.
Android device: On your phone, select the ADP Mobile Solutions application.
Result: The ADP Mobile Solutions login screen displays.
2 Enter your ADP Portal user ID and then select Submit.
Result: The ADP Mobile Solutions PIN screen displays.

© 2013-2014 ADP, Inc. Using ADP Mobile Job Aid 13
Step Action
3 On the ADP Mobile Solutions login screen, select Forgot?
Result: The Forgot Password screen displays. The user is instructed to access the URL mobile.adp.com/security from a desktop browser.
Mobile.adp.com/security - ADP Mobile Security
The URL mobile.adp.com/security redirects the user to the corresponding Security Management Services page.

© 2013-2014 ADP, Inc. Using ADP Mobile Job Aid 14
Accessing and Changing ADP Mobile Solutions Settings
How to Access ADP Mobile Solutions Setting Options
To view ADP Mobile Solutions settings, at the top of the ADP Mobile Solutions Springboard, select
Result: The Settings screen displays.
How to View and Change Preferences
The user can change the following preferences:
Preference Usage
I want to save my User ID User ID displays on the ADP Mobile Solution Login screen.
If the user clears the cookies on the mobile device browser, then the user must re-enter the user ID the next time the user launches the application.
I don’t want to save my User ID User ID does not display on the ADP Mobile Solution Login screen.
I want to login with a password When accessing the application, the user is prompted for a password.
I want to login with a PIN When accessing the application, the user is prompted for a PIN number.

© 2013-2014 ADP, Inc. Using ADP Mobile Job Aid 15
Changing Preferences – I Want to Save/Not Save my User ID
Complete the following steps to save / not save the user ID on the ADP Mobile Solutions Login screen:
Step Action
1 On the ADP Mobile Solutions Settings screen, select Preferences.
Result: The ADP Mobile Solutions Preferences screen displays.
2 To save your user ID on the ADP Mobile Solutions Login screen, select I want to save my User ID or I don’t want to save my User ID.
Result: The ADP Mobile Solutions Preferences screen redisplays.

© 2013-2014 ADP, Inc. Using ADP Mobile Job Aid 16
Changing Preferences – I Want to Log On with a Password
Complete the following steps to change your log on password preference:
Step Action
1 On the ADP Mobile Solutions Settings screen, select Preferences.
Result: The ADP Mobile Solutions Preferences screen displays.
2 To save your user ID on the ADP Mobile Solutions Login screen, select I want to log in with a password.
Result: The ADP Mobile Solutions Preferences screen redisplays.

© 2013-2014 ADP, Inc. Using ADP Mobile Job Aid 17
Changing Preferences – I Want to Log On with a PIN
Complete the following steps to change your log on PIN preference:
Step Action
1 On the ADP Mobile Solutions Settings screen, select Preferences.
Result: The ADP Mobile Solutions Preferences screen displays.
2 To save your user ID on the ADP Mobile Solutions Login screen, select I want to log in with a PIN.
Result: The ADP Mobile Solutions PIN screen displays.

© 2013-2014 ADP, Inc. Using ADP Mobile Job Aid 18
Step Action
3 On the Enter PIN screen
• Enter a PIN number.
• Re-enter the PIN number.
• Select Submit.
Result: The ADP Mobile Solutions Preferences screen displays.

© 2013-2014 ADP, Inc. Using ADP Mobile Job Aid 19
How to View the Privacy Statement
To view the privacy statement, on the ADP Mobile Solutions Settings screen, select Privacy.
Result: The Privacy screen displays.
To return to the Settings screen, select Back.
How to View the Terms of Use
To view the license agreement, on the ADP Mobile Solutions Settings screen, selects Terms of Use.
Result: The terms of Use screen displays.
To return to the Settings screen, select Back.

© 2013-2014 ADP, Inc. Using ADP Mobile Job Aid 20
How to View System Requirements
To view system requirements, on the ADP Mobile Solutions Settings screen, select Requirements.
Result: The Requirements screen displays.
To return to the Settings screen, select Back.
How to View FAQs
To view FAQs, on the ADP Mobile Solutions Settings screen, select FAQ.
Result: The FAQ screen displays.
To return to the Settings screen, select Back.

© 2013-2014 ADP, Inc. Using ADP Mobile Job Aid 21
How to Access Help
Complete the following steps to access help:
Step Action
1 On the ADP Mobile Solutions Settings screen, select Help.
Result: The ADP Mobile Solutions Help screen displays.
2 To view a specific help topic, select the option.
3 To return to the Settings screen, select Back.

© 2013-2014 ADP, Inc. Using ADP Mobile Job Aid 22
How to Submit Feedback
Complete the following steps to submit feedback on the ADP Mobile Solutions application:
Step Action
1 On the ADP Mobile Solutions Settings screen, select Feedback.
Result: The ADP Mobile Solutions Feedback screen displays.
2 Enter the feedback and then select Submit Feedback.
Note: The comments / suggestions field is limited to 1000 characters.

© 2013-2014 ADP, Inc. Using ADP Mobile Job Aid 23
Viewing Information Via ADP Mobile Solutions
How to View a List of Pay Statements
Complete the following steps to view a list of pay statements for the last five pay periods (if available).
Step Action
1 Access the ADP Mobile Solutions Springboard.
2 On the ADP Mobile Solutions Springboard, select Pay.
Result: The ADP Mobile Solutions Pay screen displays. For each pay statement, net pay, hours worked, and check date display.
How to View Pay Statement Details
Complete the following steps to view details about an individual pay statement.
Step Action
1 On either the ADP Mobile Solutions Pay screen, for the pay statement you want to view, select >.
Result: The ADP Mobile Solutions Pay details screen displays.
2 To view year-to-date details for the pay statement, at the top of the screen, select Year to Date.

© 2013-2014 ADP, Inc. Using ADP Mobile Job Aid 24
Step Action
Result: The ADP Mobile Solutions Pay Year to Date screen displays.
3 To return to the current period details screen, at the top of the screen, select This Period.
4 Determine what you want to do.
IF you want to: THEN select:
Return to a list of pay statements Back
Return to the springboard Pay
How to Display Hourly and Salary Pay Rates
Employees receive notification in their Inbox indicating that they have been paid.
Step Action
1 On the ADP Mobile Solutions springboard, Select Pay.
Result: The Pay Summary Screen displays.
2 Select a date and select > to display pay statement details for a specific pay period.

© 2013-2014 ADP, Inc. Using ADP Mobile Job Aid 25
Step Action
Result: The Pay Statement details screen displays.
The Net Pay amount reflects the total hours worked for the selected pay period.
The breakdown for each earning code displays.
Each earning code displays the following information:
- Earning Code Name
- Earning Amount
- Pay Period Hours
- Pay Rate

© 2013-2014 ADP, Inc. Using ADP Mobile Job Aid 26
How to View Tax Statements
Complete the following steps to view tax statements.
Step Action
1 Access the ADP Mobile Solutions Springboard.
2 On the ADP Mobile Solutions Springboard, select Pay.
Result: The ADP Mobile Solutions Pay screen displays.
3 Select Tax Statements.
Result: The ADP Mobile Solutions Tax Statements screen displays. It lists:
Current year W-2 for each employer
If available, W-2 information for previous 2 years
Note: In this example, only tax years 2011 and 2012 display.

© 2013-2014 ADP, Inc. Using ADP Mobile Job Aid 27
Step Action
4 To view W-2 information, select the > associated with the W-2.
Result: The selected W-2 information displays.

© 2013-2014 ADP, Inc. Using ADP Mobile Job Aid 28
Step Action
5 To view the W-2 Wage and Tax statement, select View Statement.
Result: The ADP Mobile Password screen displays.
6 Enter your ADP Mobile password and select Log In.
Result: The W-2 displays.
Note:
Android and Blackberry devices download the W-2 and opens it in the PDF viewer app.
For devices using Safari, the W-2 opens the PDF in a new tab.

© 2013-2014 ADP, Inc. Using ADP Mobile Job Aid 29
How to View the Corporate Directory
Complete the following steps to view information in the corporate directory.
Step Action
1 Access the ADP Mobile Solutions Springboard.
2 On the ADP Mobile Solutions Springboard, select Directory.
Result: The ADP Mobile Solutions Directory screen displays.
3 To find a contact, in the Search field, enter the first three characters of the contact’s first or last name.
Result: The Directory Search results screen displays.

© 2013-2014 ADP, Inc. Using ADP Mobile Job Aid 30
Step Action
4 On the Directory Results screen, select the contact name.
Results: The Contact screen displays.
Note: If specific fields in the contact details do not exist, those labels are not displayed. Contact details fields are:
First name
Middle name
Last name
Preferred name
Job Title
Department
Employment Status
Reports To & contact info
Address
Phone
Email address
Photo
5 Determine what you want to do.
IF you want to: THEN on the Contact page:
Call a contact Select the contact’s phone number.
E-mail a contact Select the contact’s e-mail address.
6 Determine what you want to do.
IF you want to: THEN select:
Return to the corporate directory list Back
Return to the springboard Contact

© 2013-2014 ADP, Inc. Using ADP Mobile Job Aid 31
How to View Company News and Events
Complete the following steps to view company news and events:
Step Action
1 Access the ADP Mobile Solutions Springboard.
2 On the ADP Mobile Solutions Springboard, select News.
Result: The News screen displays.
© 2013-2014 ADP, Inc. Using ADP Mobile Job Aid 32
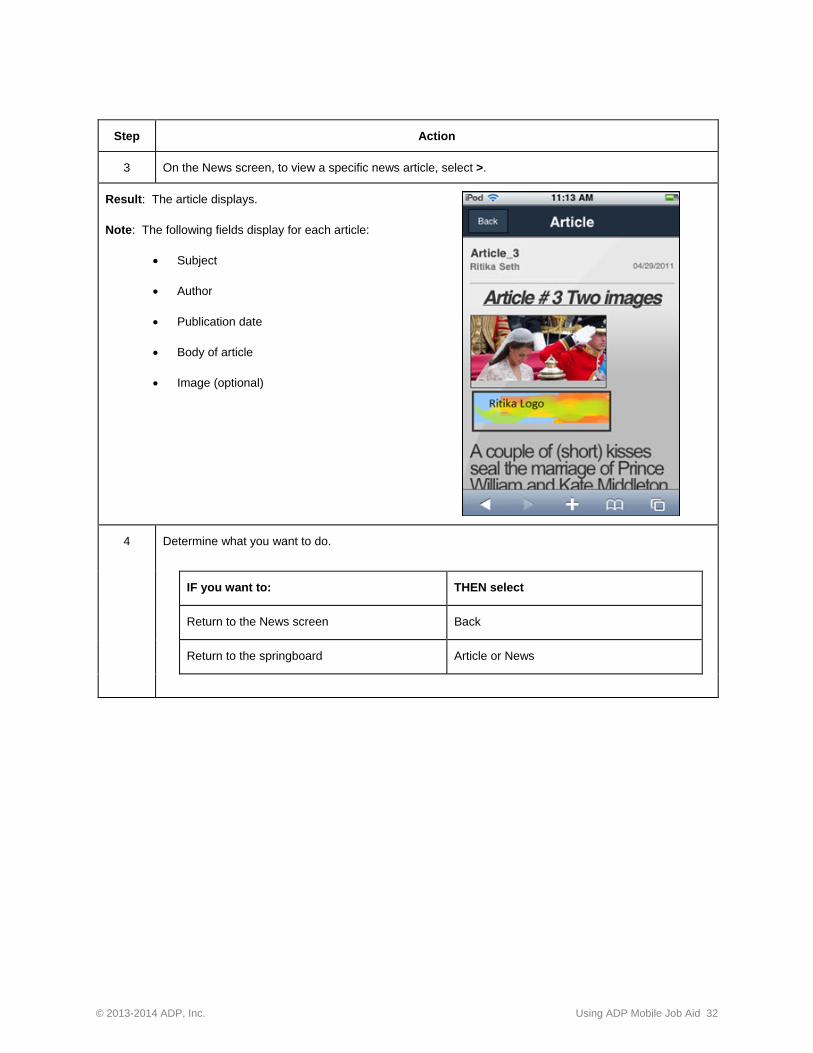
Step Action
3 On the News screen, to view a specific news article, select >.
Result: The article displays.
Note: The following fields display for each article:
Subject
Author
Publication date
Body of article
Image (optional)
4 Determine what you want to do.
IF you want to: THEN select
Return to the News screen Back
Return to the springboard Article or News

© 2013-2014 ADP, Inc. Using ADP Mobile Job Aid 33
How to View Your Portal Message Center
Using ADP Mobile, users can view Portal Message Center tasks and notifications.
Note: Messages are display-only. You cannot act upon any message from within ADP Mobile Solutions.
Procedure
You use the following steps to view your Portal Message Center using ADP Mobile.
Step Action
1 Access the ADP Mobile Solutions Springboard.
2 On the ADP Mobile Solutions Springboard, select Inbox.
Result: The ADP Mobile Solutions Inbox screen displays.
All unread messages have a blue icon and date. After the message is read, the highlighting disappear sand the icon becomes black.
The pencil icon ( ) indicates a task.
The Exclamation icon ( ) indicates a notification.
3 To view details about a task, select >.
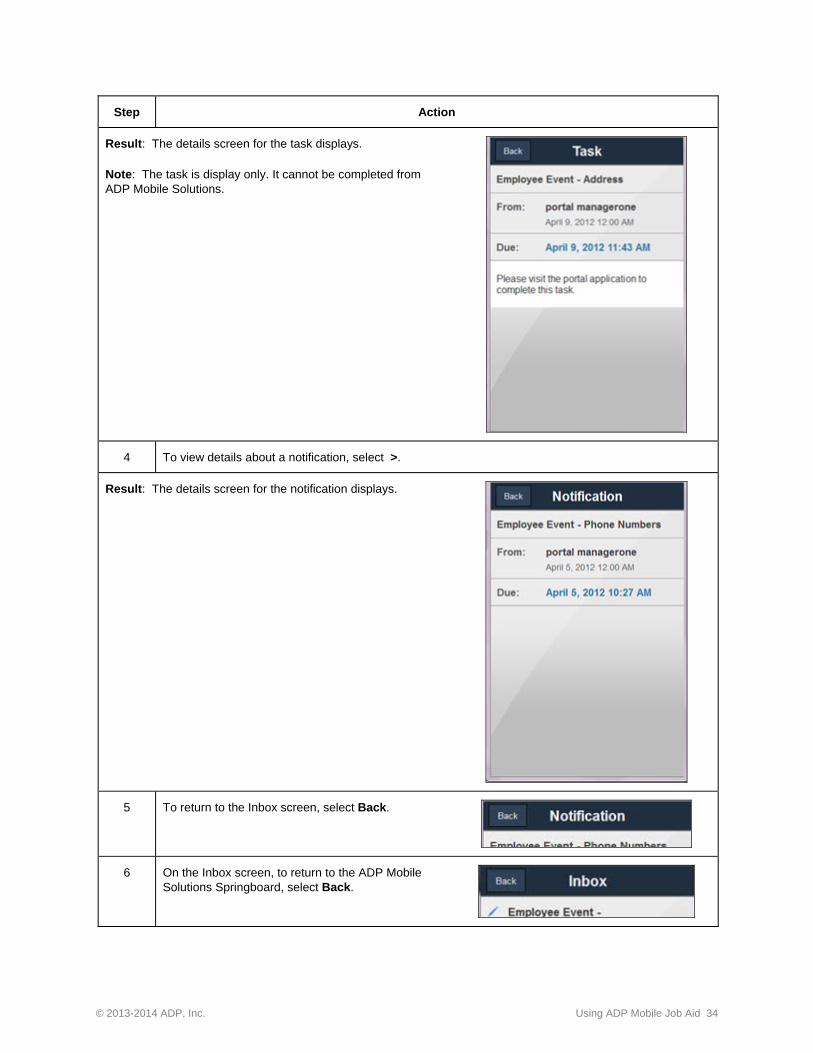
© 2013-2014 ADP, Inc. Using ADP Mobile Job Aid 34
Step Action
Result: The details screen for the task displays.
Note: The task is display only. It cannot be completed from ADP Mobile Solutions.
4 To view details about a notification, select >.
Result: The details screen for the notification displays.
5 To return to the Inbox screen, select Back.
6 On the Inbox screen, to return to the ADP Mobile Solutions Springboard, select Back.

© 2013-2014 ADP, Inc. Using ADP Mobile Job Aid 35
How to View Active Retirement Savings Plans/Funds
Employees use the following procedure to view their active retirement plans and investment funds.
Step Action
1 On the ADP Mobile Solutions springboard, select Retirement.
Result: The Retirement screen displays.
Note: The following fields display:
The total balance across all plans
The amount, valuation date, and text associated with the item
A summary list for each of the plans
A chevron ( > ) associated with each of the plans
A “Disclosure” message
The summary screen displays all active plans and investment funds that do not have a "0" balance.

© 2013-2014 ADP, Inc. Using ADP Mobile Job Aid 36
How to Display Vested Retirement Plan Balances by Source
Employees use the following procedure to view their balances by source.
Step Action
1 To view details of specific plan/fund, on the Retirement screen, select a plan and then select >.
Result: The Details screen displays the following:
The vested balance details by source.
A breakdown of all contributions – by both percentage and flat dollar amounts.

© 2013-2014 ADP, Inc. Using ADP Mobile Job Aid 37
How to View Retirement Plan Details
Complete the following steps to view retirement plans and plan details:
Step Action
1 On the ADP Mobile Solutions Retirement screen, to view a specific plan, select > for the plan.
Result: The plan screen displays.
2 Determine what you want to do.
IF you want to: THEN select:
Return to the Retirement screen Back
Return to the springboard The plan name at the top of the screen or Retirement

© 2013-2014 ADP, Inc. Using ADP Mobile Job Aid 38
How to View Your Benefits Plans
Note: Benefits information is available only to ADP Workforce Now V2 clients or ADP Workforce Now V5.1 or higher clients.
This feature is for HR/Benefits only. It does not include HR eXpert.
Procedure
You use the following steps to view your benefits plans using ADP Mobile.
Step Action
1 Access the ADP Mobile Solutions Springboard.
2 On the ADP Mobile Solutions Springboard, select Benefits.
Result: The ADP Mobile Solutions Benefits / Current Elections screen displays.
3 To view detail about a specific current benefit, select >.
4 To view details about future / pending elections, select Future Elections.

© 2013-2014 ADP, Inc. Using ADP Mobile Job Aid 39
Step Action
5 To view details about a specific benefit, select >.
Result: The details screen for the selected benefit displays.
6 To return to the Benefits screen, select Back.
7 On the Benefits screen, to return to the ADP Mobile Solutions Springboard, select Back.

© 2013-2014 ADP, Inc. Using ADP Mobile Job Aid 40
How to View Your ADP Flexible Spending Accounts
Mobile users can view ADP flexible spending account information including account name, balance, and goal amount. They can also view their last three payments, claims, and contributions.
View FSA Accounts
You use the following steps to view your ADP flexible spending accounts using ADP Mobile Solutions.
Step Action
1 Access the ADP Mobile Solutions Springboard.
2 On the ADP Mobile Solutions Springboard, select Spending Acct.
Result: The ADP Mobile Solutions Spending Acct screen displays.
3 Select Accounts.
4 To view details about a specific account, select >.
Result: The details screen for the selected FSA displays.
4 To return to the Spending Accounts screen, select Back.

© 2013-2014 ADP, Inc. Using ADP Mobile Job Aid 41
Step Action
5 On the Spending Accounts screen, to return to the ADP Mobile Solutions Springboard, select Back.
Flexible Spending Account Details Screen
The FSA details screen lists the last three claims, payments, and contributions.

© 2013-2014 ADP, Inc. Using ADP Mobile Job Aid 42
View FSA Cards
You use the following steps to view the cards associated with your ADP flexible spending accounts.
Step Action
1 Access the ADP Mobile Solutions Springboard.
2 On the ADP Mobile Solutions Springboard, select Spending Acct.
Result: The ADP Mobile Solutions Spending Acct screen displays.
3 Select Cards.
Result: The cards list screen displays.
Note:
All cards assigned to the spending account display in the list.
Each card displays the following information:
- Last 4 digits of the card
- Name and Last name of card holder
- Spending account plan to which this card is assigned
- Card status: e.g.: Activate
4 To activate or report a card lost or stolen, select >.

© 2013-2014 ADP, Inc. Using ADP Mobile Job Aid 43
Step Action
Result: The ADP Mobile Solutions screen for that card displays.
Note: Selecting Activate or Lost/Stolen initiates a phone call to the FSA call center.

© 2013-2014 ADP, Inc. Using ADP Mobile Job Aid 44
ALINE Card (PayCard)
Users can register for and view ALINE card information.
How to Enroll for an ALINE Card
Employees use the following procedure to enroll for an ALINE card.
Step Action
1 On the ADP Mobile Solutions springboard, select ALINE Card.
Result: The ALINE Card screen displays.
Note: If the user is not eligible for an ALINE card, a message is displayed.
2 Select Enroll.
Result: The Enroll screen displays.

© 2013-2014 ADP, Inc. Using ADP Mobile Job Aid 45
Step Action
3 Complete the fields and then select Next.
Result: The Enroll (address) screen displays.

© 2013-2014 ADP, Inc. Using ADP Mobile Job Aid 46
Step Action
4 Complete the fields and then select Next.
Result: The ADP Mobile Solutions server verifies the information and the Enroll screen redisplays.
Note: If the user enters invalid information, the screen redisplays with error messages.

© 2013-2014 ADP, Inc. Using ADP Mobile Job Aid 47
Step Action
Note: If the address entered varies from available addresses, the user is presented with a list of addresses.
5 Verify the information and then select Submit.
Result: A confirmation message displays.

© 2013-2014 ADP, Inc. Using ADP Mobile Job Aid 48
User Accesses ALINE Card Before Enrollment is Complete
If a user selects the ALINE Card Chiclet before the enrollment is complete, the following message displays.
User Is Not Eligible for ALINE Card
If a user selects the ALINE Card chiclet, but is not eligible for an ALINE card, the following screen displays.

© 2013-2014 ADP, Inc. Using ADP Mobile Job Aid 49
How to Activate the ALINE Card
Employees use the following procedure to activate the ALINE card.
Step Action
1 On the ADP Mobile Solutions springboard, select ALINE Card.
Result: The ALINE Card screen displays.
2 Select the ALINE Card image.
Result: You are presented with a number to call to activate the card.

© 2013-2014 ADP, Inc. Using ADP Mobile Job Aid 50
How to Request Direct Deposit Information
Employees use the following procedure to access the direct deposit routing information required to load the ALINE card from an outside account.
Step Action
1 On the ADP Mobile Solutions springboard, select ALINE Card.
Result: The ALINE Card screen displays.

© 2013-2014 ADP, Inc. Using ADP Mobile Job Aid 51
Step Action
2 Select Direct Deposit to request (if authorized) or view (if previously requested and approved) the routing information.
Result: The Direct Deposit screen displays.
3 Select Request.
Result: The Direct Deposit (confirmation) screen displays.

© 2013-2014 ADP, Inc. Using ADP Mobile Job Aid 52
How to View Direct Deposit Information
Employees use the following procedure to view the direct deposit routing information that was already requested and approved.
Step Action
1 On the ADP Mobile Solutions springboard, select ALINE Card.
Result: The ALINE Card screen displays.
2 Select Direct Deposit.
Result: The Direct Deposit screen displays the routing information needed to load the card.
Note: - A password is required to view this information.

© 2013-2014 ADP, Inc. Using ADP Mobile Job Aid 53
ALINE Activity Search
To search for a specific item,
1. Select the Search Activity field.
Result: The Search Activity options display.
2. Select an option and complete your search.

© 2013-2014 ADP, Inc. Using ADP Mobile Job Aid 54
View ATM Locations
When you select on the list of activities:
On your mobile phone, if you allow your location to be captured (via GPS), a map with locations displays.
If you do not have GPS enabled, you can enter address criteria in the Search field.
To view details about a location, select a red pin.
To get directions to the location, select Direction To Here or Direction From Here.

© 2013-2014 ADP, Inc. Using ADP Mobile Job Aid 55
Employee Calendar
Description
The Employee Calendar allows employees to view events on a calendar, such as work schedules and vacation days, by day, month, or list view. Employees can also select a calendar item to view additional details that may be available.
The calendar is read-only. Employees cannot update any information from within the calendar.
The client’s system-of-record (SOR) for Time determines the events that display on the calendar. The following table identifies the calendar events that display for each SOR.
Calendar Event ezLaborManager Enterprise eTIME ADP Workforce Now
Work schedule X X X
Personal days X X
Vacation days X X
Pay days X
Blackout days X
US holidays X

© 2013-2014 ADP, Inc. Using ADP Mobile Job Aid 56
Procedure: How to View Events in the Employee Calendar
Use the following procedure to view events in the calendar.
Step Action
1
On the ADP Mobile Solutions springboard, select Calendar.
Result: The Calendar displays in Month View.
2
To change the view, select Today or List.
Result: The Calendar displays the selected view.
Day View:
List View:

© 2013-2014 ADP, Inc. Using ADP Mobile Job Aid 57
Step Action

© 2013-2014 ADP, Inc. Using ADP Mobile Job Aid 58
Working with Your Time Sheet
Description
Depending on the ADP Mobile Solutions features that the client administrator has activated, client employees may have the ability to clock in and out or update their timesheets via ADP Mobile Solutions.
For employees who have the ability to clock in and clock out via ADP Mobile Solutions, a Clock icon displays on their ADP Mobile Solutions Springboard.
For employees who have the ability to view and update their timesheets, a Timesheet icon displays on their ADP Mobile Solutions Springboard.
GPS Geo-Location Feature
The GPS Geo-Location feature allows a user to clock in within a geographical range of the user’s office location. This feature is enabled/disabled by the client administrator. If the GPS Geo-Location feature is enabled, it determines if a user is at an approved location to perform a time entry action.
Clock Format
The format of the clock is determined by the client. It can be a 12 hour or 24 hour clock.
The displayed time may be different from the device time or user’s local time. The clock time uses the user company’s local time.
How to Clock In or Clock Out
Complete the following steps to clock in or out using ADP Mobile Solutions:
Step Action
1 Access the ADP Mobile Solutions Springboard.
2 On the ADP Mobile Solutions Springboard, select Clock.
Result: The ADP Mobile Solutions Clock screen displays.
Notes:
The number of buttons and their label texts are determined by the client configuration.
Example: There is a single button that is used to show both Clock In and Clock Out.
The buttons are active only if the user can take an action.
Example: If the user’s shift hasn’t started or if the user is too far from the valid geo location, the buttons are not active.
The following fields display:
Punches completed for the last 24 hours

© 2013-2014 ADP, Inc. Using ADP Mobile Job Aid 59
Step Action
3 Select the punch.
Result: The selected punch screen displays.
Notes:
The following fields display:
Action = punch selected
Current time
Latitude and longitude = captured at the time when the punch was selected
If transfer levels are configured, the Transfer screen displays. It includes the following fields:
Action = punch selected
Current time
Latitude and longitude = captured at the time when the punch was selected
Department
4 To select a department, select Select.

© 2013-2014 ADP, Inc. Using ADP Mobile Job Aid 60
Step Action
Result: The Department screen displays.
5 Select the department.
Result: The Transfer screen redisplays.
6 Select Confirm.
Result: The initial Clock screen displays an “Entry has been recorded” message.

© 2013-2014 ADP, Inc. Using ADP Mobile Job Aid 61
How to View a Time Sheet
Complete the following steps to view a time sheet.
Step Action
1 Access the ADP Mobile Solutions Springboard.
Note: For employees who view and update timesheets, a Time Sheet icon displays on their Springboard.
2 On the ADP Mobile Solutions Springboard, select Timesheet.
Result: The ADP Mobile Solutions Time Sheet screen displays.
Note: The Time Sheet screen displays:
Days in the pay period
Total hours for the selected day
Total hours for the pay period
Saved time entries for the selected date
Illustration: Timesheet Illustration: Timesheet displaying date with entries displaying date with no entry
3 To view information for a specific date, select the date.
Result: The information displays below the dates.

© 2013-2014 ADP, Inc. Using ADP Mobile Job Aid 62
How to Enter Time on the Time Sheet
Complete the following steps to enter time into the time sheet:
Step Action
1 On the ADP Mobile Solutions Time Sheet screen, select the date.
2 Select +.
Result: The Add Time screen for the selected date displays.
Note: If there is a default value for the “worked hours” earnings code, the other fields associated with the default earnings code. are displayed
In example on the right, the default “worked hours” earnings code is Worked.
3 To change the earnings code, select >.
Result: The Entry screen displays.

© 2013-2014 ADP, Inc. Using ADP Mobile Job Aid 63
Step Action
4 Select the earnings code.
Result: The Add Time screen redisplays.
5 Enter Start Time and End Time and then select Save.
Result: The Time Sheet screen displays an “Entry has been added” message.

© 2013-2014 ADP, Inc. Using ADP Mobile Job Aid 64
How to Change Time on the Time Sheet
Complete the following steps to change time on the time sheet:
Step Action
1 On the ADP Mobile Solutions Time Sheet screen, select the date.
Result: The Time Sheet screen for the selected date displays.
2 For the time entry you want to change, select >.
Result: The Entry screen displays.
Note: The Edit option displays only if the user is authorized to edit the entry.

© 2013-2014 ADP, Inc. Using ADP Mobile Job Aid 65
Step Action
3 Select Edit.
Result: The Edit Time Sheet screen displays.
4 Update the fields and then select Save.
Result: The Time Sheet screen displays.

© 2013-2014 ADP, Inc. Using ADP Mobile Job Aid 66
How to Delete an Entry on the Time Sheet
Complete the following steps to change time on the time sheets:
Step Action
1 On the ADP Mobile Solutions Time Sheet screen, select the date.
Result: The Time Sheet screen for the selected date displays.
2 For the time entry you want to change, select >.
Result: The Entry screen displays.
Note: The Edit option displays only if the user is authorized to edit the entry.

© 2013-2014 ADP, Inc. Using ADP Mobile Job Aid 67
Step Action
3 Select Edit.
Result: The Edit Time Sheet Entry screen displays.
Note: The Delete option displays only if the user is authorized to delete the entry.
4 Select Delete.
Result: The Delete Entry confirmation screen displays.
5 Select Confirm.

© 2013-2014 ADP, Inc. Using ADP Mobile Job Aid 68
Step Action
Result: The Time Sheet screen displays.

© 2013-2014 ADP, Inc. Using ADP Mobile Job Aid 69
How to Approve Your Time Sheet
Employees use the following procedure to approve their Timesheets.
Step Action
1 On the ADP Mobile Solutions springboard, select Time Sheet.
Result: The Time Sheet screen displays.
2 Select Approve Time Sheet.
Result: The Time Sheet for the selected period displays.
3 Select Approve.
Result: The Time Sheet is approved by the employee.
© 2013-2014 ADP, Inc. Using ADP Mobile Job Aid 70
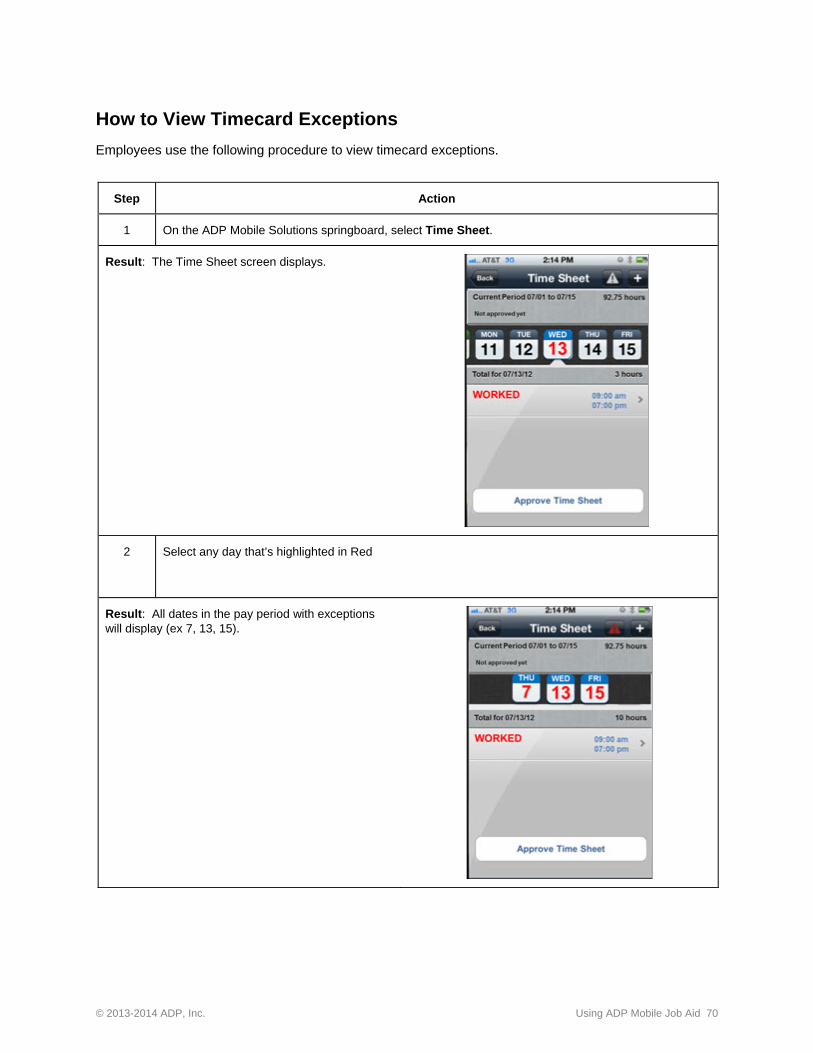
How to View Timecard Exceptions
Employees use the following procedure to view timecard exceptions.
Step Action
1 On the ADP Mobile Solutions springboard, select Time Sheet.
Result: The Time Sheet screen displays.
2 Select any day that’s highlighted in Red
Result: All dates in the pay period with exceptions will display (ex 7, 13, 15).

© 2013-2014 ADP, Inc. Using ADP Mobile Job Aid 71
Step Action
3 Select any one of the dates highlighted to view, edit, correct that days’ timesheet exceptions
Result: The exceptions for the selected date display.

© 2013-2014 ADP, Inc. Using ADP Mobile Job Aid 72
How to Notify Your Manager of Late Arrival
Complete the following steps to notify your manager of a late arrival.
Note: This screen is only seen by ezLaborManager (ezLM) clients and ADP Workforce Now Essential Time & Attendance clients.
Step Action
1 Access the ADP Mobile Solutions Springboard.
2 On the ADP Mobile Solutions Springboard, select Late/Absent.
Result: The Late Arrival screen displays.
3 Select Today or Tomorrow.
4 Enter late arrival time.
5 Enter a comment.
Note: Comments are optional.

© 2013-2014 ADP, Inc. Using ADP Mobile Job Aid 73
Step Action
6 Click Save.
Rule: A late arrival notification cannot be changed after it is sent.
Result: The Late Arrival screen displays with a confirmation that your notification was sent.

© 2013-2014 ADP, Inc. Using ADP Mobile Job Aid 74
How to Notify Your Manager of an Absence
Complete the following steps to notify your manager of an absence:
Note: This screen is only seen by ezLM clients and ADP Workforce Now Essential Time & Attendance clients.
Step Action
1 Access the ADP Mobile Solutions Springboard.
2 On the ADP Mobile Solutions Springboard, select Late/Absent.
Result: The Late Arrival/Absence screen displays.
2 Select Absence.
Result: The Absence screen displays.
3 Select a reason code.
4 Select Today or Tomorrow.

© 2013-2014 ADP, Inc. Using ADP Mobile Job Aid 75
Step Action
5 Enter a comment.
Note: Comments are optional.
6 Click Save.
Rule: An absence notification cannot be changed after it is sent.
Result: The Absence screen displays with a confirmation that your notification was sent.

© 2013-2014 ADP, Inc. Using ADP Mobile Job Aid 76
Manager Tasks
My Team
A manager uses the My Team screen to:
View, edit, and approve time sheets View and correct exceptions Approve a time off request (Enterprise eTIME and ezLaborManager)
My Team – Team Tab
The My Team screen has two tabs, Team and Tasks. The Team tab, shown below, lists all employees currently assigned to this manager.
My Team – Tasks Tab
The Tasks tab lists all tasks a manager can perform.

© 2013-2014 ADP, Inc. Using ADP Mobile Job Aid 77
How to View and Approve a Time Sheet
Managers use the following procedure to view and approve a team member’s time sheet.
Step Action
1 On the ADP Mobile Solutions springboard, select My Team.
Result: The My Team screen displays.
2 Select Tasks.
Result: The My Team, Tasks tab displays.

© 2013-2014 ADP, Inc. Using ADP Mobile Job Aid 78
Step Action
3 Select Time Sheets.
Result: The My Team, Time Sheets screen displays.
4 Select an employee and select >.
Result: The Time Sheet for the selected employee displays.

© 2013-2014 ADP, Inc. Using ADP Mobile Job Aid 79
Step Action
5 Select Approve Time Sheet.
Result: The Time Sheet for the selected employee displays.
6 Select Approve.
Result: The Time Sheet for the selected employee is approved.

© 2013-2014 ADP, Inc. Using ADP Mobile Job Aid 80
How to View and Correct Exceptions
Managers use the following procedure to view and correct a team member’s exceptions.
Step Action
1 On the ADP Mobile Solutions springboard, select My Team.
Result: The My Team screen displays.
2 Select Tasks.
Result: The My Team, Tasks tab displays.

© 2013-2014 ADP, Inc. Using ADP Mobile Job Aid 81
Step Action
3 Select Time Sheets.
Result: The My Team, Time Sheets screen displays.
4 Select an employee and select >.
Result: The time sheet for the selected employee displays and all dates in the pay period with exceptions will display in red (ex 7, 13, 15).

© 2013-2014 ADP, Inc. Using ADP Mobile Job Aid 82
Step Action
5 Select any one of the highlighted dates to view those days with exceptions.
Result: The Time Sheet screen displays those days with exceptions
6 Select a date and then select >.
Result: The exceptions for the selected date display.
7 Correct, note or approve the exception. This could include adding / editing punch times, applying the schedule for that day or just making a note that it’s been reviewed without an action.

© 2013-2014 ADP, Inc. Using ADP Mobile Job Aid 83
Paid Time Off (PTO)
This Paid Time Off section is organized in the following categories:
Paid Time Off Availability A table describing when the Time Off option is available in ADP Mobile and what system feeds the information to ADP Mobile.
Paid Time Off for Enterprise eTIME Procedures for using ADP Mobile Solutions to view PTO balances, view and request time off.
Paid Time Off for ezLaborManager Procedures for using ADP Mobile Solutions to view PTO balances, view and request time off, and update and/or cancel time off requests.
Paid Time Off for AutoPay Procedure for using ADP Mobile Solutions to view PTO balances.

© 2013-2014 ADP, Inc. Using ADP Mobile Job Aid 84
Paid Time Off (PTO) for Enterprise eTIME
Using ADP Mobile, users can view and request time off.
How to View Your PTO Balances
You use the following steps to view your PTO balances using ADP Mobile.
Step Action
1 Access the ADP Mobile Solutions Springboard.
Result: The ADP Mobile Solutions Springboard displays.
2 On the ADP Mobile Solutions Springboard, select Time Off.
Result: The Time Off screen displays.
Notes:
The default view shows the balances for the current day.
The current 36 months accrual period and previous 12 months are presented to the user.
The user can scroll down to view additional time off balances.

© 2013-2014 ADP, Inc. Using ADP Mobile Job Aid 85
Step Action
3 To view PTO balances as of a specific date, select As of Today, and then select the date.
4 On the Time Off screen, to return to the ADP Mobile Solutions Springboard, select Back.

© 2013-2014 ADP, Inc. Using ADP Mobile Job Aid 86
How to View Time Off Requests
You use the following steps to view time off requests.
Step Action
1 Access the ADP Mobile Solutions Springboard.
2 On the ADP Mobile Solutions Springboard, select Time Off.
Result: The Time Off screen displays.
3 Select Requests.

© 2013-2014 ADP, Inc. Using ADP Mobile Job Aid 87
Step Action
Result: The Requests Submitted screen displays.
The Requests tab displays all time off requests grouped by status.
Summary information for each request is available.
- Request status
- Request policy (type)
- Day/date when it starts
- Duration
Request details may be available. This is controlled by the SOR.
4 To view details about a request, select >.
Result: The Requested Period screen displays.
Details may include:
Comments
Approve by date
List of requested periods and their policy types
5 To view additional details, select >.

© 2013-2014 ADP, Inc. Using ADP Mobile Job Aid 88
Step Action
Result: The Time Request screen displays.
Details may include:
Policy period
Start date & time
End date & time
Or
Start date & time and duration
© 2013-2014 ADP, Inc. Using ADP Mobile Job Aid 89
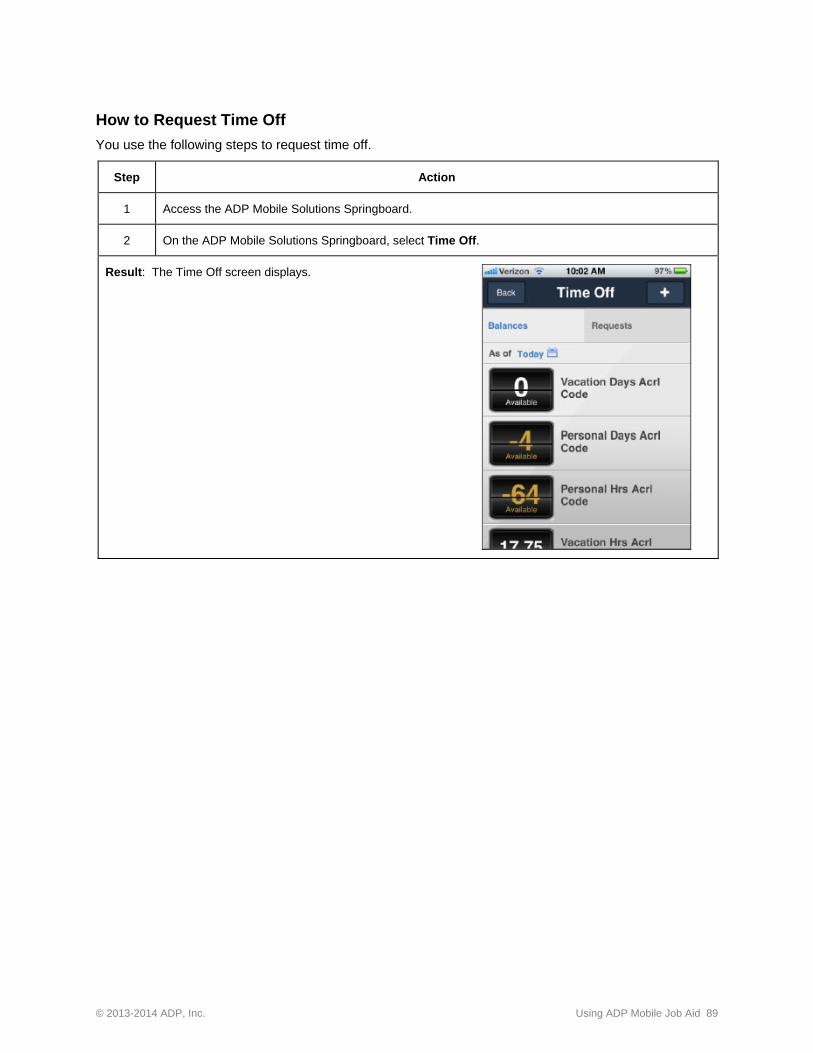
How to Request Time Off
You use the following steps to request time off.
Step Action
1 Access the ADP Mobile Solutions Springboard.
2 On the ADP Mobile Solutions Springboard, select Time Off.
Result: The Time Off screen displays.

© 2013-2014 ADP, Inc. Using ADP Mobile Job Aid 90
Step Action
3 On the title bar, select + and then select Add Period.
Result: The Time Request screen displays.

© 2013-2014 ADP, Inc. Using ADP Mobile Job Aid 91
Step Action
4 To select a PTO type, select > to select the PTO type.
5 To select a start and end date, select Start and End.
6 Select Save.
7 Select Submit.
Result: The submit notification screen displays.
8 Select Back to return to the Requests screen.

© 2013-2014 ADP, Inc. Using ADP Mobile Job Aid 92
Paid Time Off (PTO) for ezLaborManager
Using ADP Mobile, users can view and request time off.
How to View Your PTO Balances
You use the following steps to view your PTO balances using ADP Mobile.
Step Action
1 Access the ADP Mobile Solutions Springboard.
Result: The ADP Mobile Solutions Springboard displays.
2 On the ADP Mobile Solutions Springboard, select Time Off.
Result: The Time Off screen displays.
Notes:
The default view shows the balances for the current day.
The current 36 months accrual period and previous 12 months are presented to the user.
The user can scroll down to view additional time off balances.

© 2013-2014 ADP, Inc. Using ADP Mobile Job Aid 93
Step Action
3 On the Time Off screen, to return to the ADP Mobile Solutions Springboard, select Back.

© 2013-2014 ADP, Inc. Using ADP Mobile Job Aid 94
Balances Functionality
The Balances tab provides information about the user’s time off requests. All requests are grouped by policies (vacation, personal, sick, etc).
Step Action
1 To view different request statuses (available, scheduled, used, etc), you select the amount in the cell.
Result: When a request status changes, the balance amount changes accordingly.
2 To view detail balances information for a policy, select >.
Result: When detail screen displays.

© 2013-2014 ADP, Inc. Using ADP Mobile Job Aid 95
How to View Time Off Requests
You use the following steps to view time off requests.
Step Action
1 Access the ADP Mobile Solutions Springboard.
2 On the ADP Mobile Solutions Springboard, select Time Off.
Result: The Time Off screen displays.
3 Select Requests.

© 2013-2014 ADP, Inc. Using ADP Mobile Job Aid 96
Step Action
Result: The Request screen displays.
The Requests tab displays all time off requests grouped by status.
Summary information for each request is available.
- Request status
- Request policy (type)
- Day/date when it starts
- Duration
Request details may be available. This is controlled by the SOR.
4 To view details about a request, select >.
Result: The Time Request screen displays.
Details may include:
Comments
Approve by date
List of requested periods and their policy types
5 To view additional details, select >.

© 2013-2014 ADP, Inc. Using ADP Mobile Job Aid 97
Step Action
Result: The Time Request screen displays.
Details may include:
Policy period
Start date & time
End date & time
Or
Start date & time and duration

© 2013-2014 ADP, Inc. Using ADP Mobile Job Aid 98
How to Request Time Off
You use the following steps to request time off.
Step Action
1 Access the ADP Mobile Solutions Springboard.
2 On the ADP Mobile Solutions Springboard, select Time Off.
Result: The Time Off screen displays.
3 On the title bar, select +.

© 2013-2014 ADP, Inc. Using ADP Mobile Job Aid 99
Step Action
Result: The Time Off Request screen displays.
4 Select Add Period.

© 2013-2014 ADP, Inc. Using ADP Mobile Job Aid 100
Step Action
Result: The Time Off Request screen displays.
5 Enter details for time off request and then select Save.

© 2013-2014 ADP, Inc. Using ADP Mobile Job Aid 101
Step Action
6 Select Submit.
© 2013-2014 ADP, Inc. Using ADP Mobile Job Aid 102
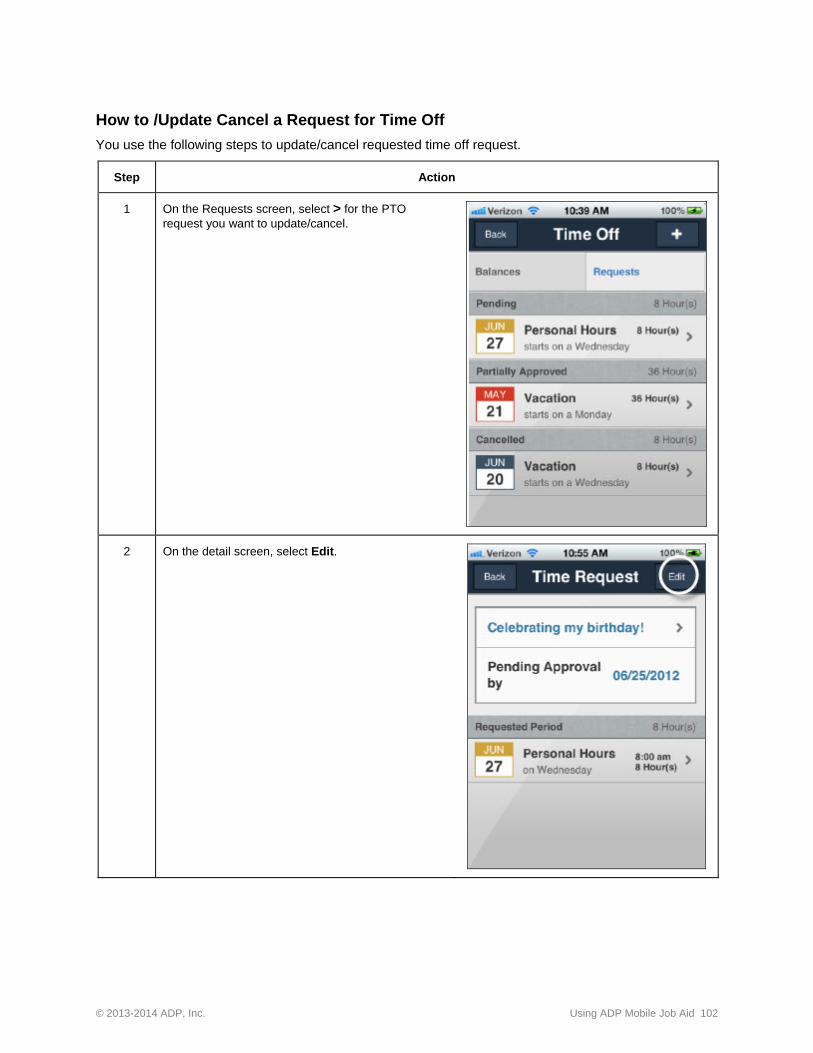
How to /Update Cancel a Request for Time Off
You use the following steps to update/cancel requested time off request.
Step Action
1 On the Requests screen, select > for the PTO request you want to update/cancel.
2 On the detail screen, select Edit.

© 2013-2014 ADP, Inc. Using ADP Mobile Job Aid 103
Step Action
3 To update the request, update the fields to be changed and select Submit.
4 To cancel a request:
1. Select Cancel Request.
2. Select OK.

© 2013-2014 ADP, Inc. Using ADP Mobile Job Aid 104
Step Action
Result: The cancel confirmation screen displays.

© 2013-2014 ADP, Inc. Using ADP Mobile Job Aid 105
How to Accept/Cancel Partially Approved Time Off Requests
Managers may partially approve an employee’s time off request. When this happens, the employee can accept the partial approval or cancel the time off request (ezLaborManager or ADP Workforce Now Essential Time & Attendance only).
Procedure
The employees use the following procedure to accept or cancel a partial time off approval.
Step Action
1 In ADP Mobile Solutions, access a list of your time off requests.
2 Select a request and then select >.
Result: The exceptions for the selected date display.
3 To accept the partial approval, select Accept Partial Approval.
To cancel your request, select Cancel.

© 2013-2014 ADP, Inc. Using ADP Mobile Job Aid 106
How to Approve a Time Off Request (Enterprise eTIME and ezLaborManager)
Managers use the following procedure to approve a time off request.
Step Action
1 On the ADP Mobile Solutions springboard, select My Team.
Result: The My Team screen displays.
2 Select Tasks.
Result: The My Team, Tasks tab displays.
© 2013-2014 ADP, Inc. Using ADP Mobile Job Aid 107
Step Action
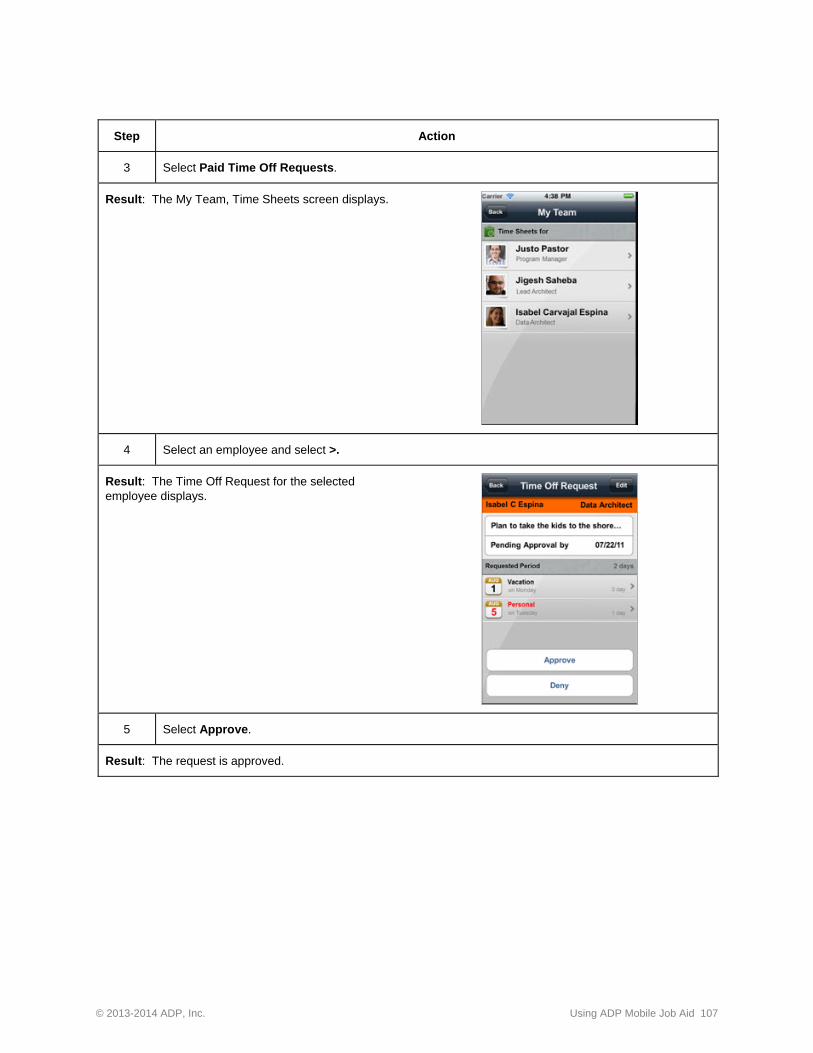
3 Select Paid Time Off Requests.
Result: The My Team, Time Sheets screen displays.
4 Select an employee and select >.
Result: The Time Off Request for the selected employee displays.
5 Select Approve.
Result: The request is approved.

© 2013-2014 ADP, Inc. Using ADP Mobile Job Aid 108
How to Partially Approve a Time Off Request
A time off request can contain requests for multiple days off.
Example: In one time off request, an employee requests Monday, June 3, and Friday, June 7.
If an employee has a request with multiple days, a manager can approve one request and deny other requests.
Example: The manager approves the request for Monday, June 3, but denies the request for Friday, June 7.
Managers use the following procedure to partially approve a time off request.
Step Action
1 On the ADP Mobile Solutions springboard, select My Team.
Result: The My Team screen displays.
2 Select Tasks.
Result: The My Team, Tasks tab displays.

© 2013-2014 ADP, Inc. Using ADP Mobile Job Aid 109
Step Action
3 Select Paid Time Off Requests.
Result: The My Teams, Time Off requests screen displays.
4 Select an employee and select >.
Result: The Time Off Request for the selected employee displays.

© 2013-2014 ADP, Inc. Using ADP Mobile Job Aid 110
Step Action
5 Select a request and select >.
Result: The Time Off Request for the selected employee displays.
6 To approve the request, select Approve.
To deny the request, select Deny.
Result: The Time Off Request screen displays.
7 To approve the remaining requests, select Approve Remaining.
To deny the remaining requests, select Deny Remaining.

© 2013-2014 ADP, Inc. Using ADP Mobile Job Aid 111
Paid Time Off (PTO) for AutoPay
Using ADP Mobile, users can view and request time off.
How to View Your PTO Balances
You use the following steps to view your PTO balances using ADP Mobile.
Step Action
1 Access the ADP Mobile Solutions Springboard.
Result: The ADP Mobile Solutions Springboard displays.
2 On the ADP Mobile Solutions Springboard, select Time Off.
Result: The Time Off screen displays.

© 2013-2014 ADP, Inc. Using ADP Mobile Job Aid 112
Step Action
3 To view additional information for a time off type, select >.
Result: The ADP Mobile Solutions screen for the selected type displays.
4 On the Time Off screen, to return to the ADP Mobile Solutions Springboard, select Back.
© 2013-2014 ADP, Inc. Using ADP Mobile Job Aid 113
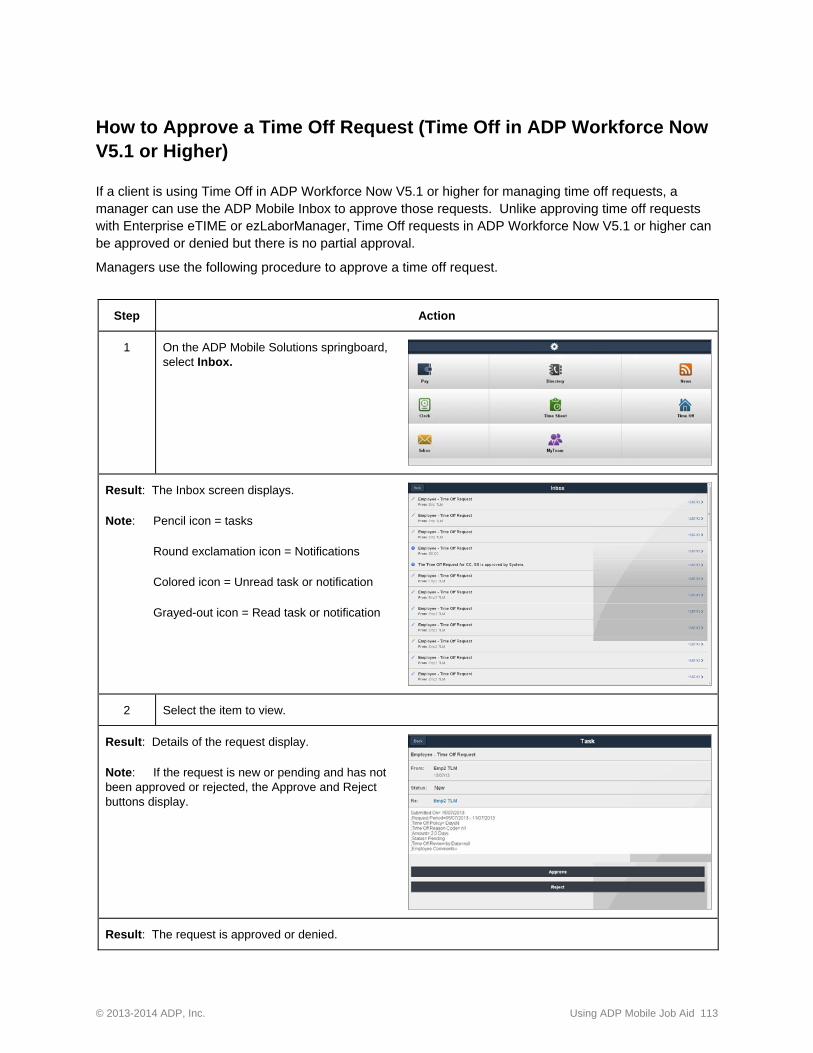
How to Approve a Time Off Request (Time Off in ADP Workforce Now V5.1 or Higher)
If a client is using Time Off in ADP Workforce Now V5.1 or higher for managing time off requests, a manager can use the ADP Mobile Inbox to approve those requests. Unlike approving time off requests with Enterprise eTIME or ezLaborManager, Time Off requests in ADP Workforce Now V5.1 or higher can be approved or denied but there is no partial approval.
Managers use the following procedure to approve a time off request.
Step Action
1 On the ADP Mobile Solutions springboard, select Inbox.
Result: The Inbox screen displays.
Note: Pencil icon = tasks
Round exclamation icon = Notifications
Colored icon = Unread task or notification
Grayed-out icon = Read task or notification
2 Select the item to view.
Result: Details of the request display.
Note: If the request is new or pending and has not been approved or rejected, the Approve and Reject buttons display.
Result: The request is approved or denied.