user's guide.pdf · authorization from touchstone. the following pages will demonstrate how to...
TRANSCRIPT

Touchstone Technologies, Inc.
1500 Industry Road, Suite H,
Hatfield, Pa. 19440
Tel: 267-222-8687
Fax: 267-222-8697
www.touchstone-inc.com
Copyright 2002 - 2018

WinSIP User’s Guide
Copyright 2002, 2018 Touchstone Technologies, Inc. All Rights Reserved 2
Table of Contents Introduction ........................................................................................................... 7
Installation Types .................................................................................................. 9 WinSIP on CD-ROM .......................................................................................... 9 WinSIP via E-Mail.............................................................................................. 9 WinSIP via the Internet ...................................................................................... 9
WinSIP Installation .............................................................................................. 10
Install Screen 1 - Preparing Setup Wizard ...................................................... 10 Install Screen 2 - Beginning the Installation .................................................... 11 Install Screen 3 - Beginning the Installation .................................................... 12 Install Screen 4 - End-User License Agreement ............................................. 13 Install Screen 5 - Readme Information ............................................................ 14
Install Screen 6 - Customer Information .......................................................... 15 Install Screen 7 - Destination Folder ............................................................... 16
Install Screen 8 - Ready to Install .................................................................... 17
Install Screen 10 - Installation Complete ......................................................... 19 CrypKey Installation ........................................................................................ 20 WinPcap Installation ........................................................................................ 21
WinPCap Install Screen 1 - Welcome to the Installation Wizard .................. 21 WinPcap Install Screen 2 - End-User License Agreement ........................... 22
WinPcap Install Screen 3 - Installation Progress ......................................... 23 WinPcap Install Screen 4 - Installation Complete ........................................ 24
Installation of Microsoft Visual C++ Redistributables ...................................... 25
Redistributables Install Screen 1 ..................................................................... 25 Redistributables Install Screen 2 ..................................................................... 26
Redistributables Install Screen 3 ..................................................................... 26 Running WinSIP for the First Time ...................................................................... 27
Obtaining the WinSIP Authorization Code ....................................................... 27 Overview ............................................................................................................. 28
Edit View ......................................................................................................... 28
Main View ........................................................................................................ 29 Detail View ...................................................................................................... 30
File Descriptions .............................................................................................. 31 Setting up WinSIP ............................................................................................... 31 User Interface ..................................................................................................... 32
Modes of operation.......................................................................................... 32 Initiate Calls ................................................................................................. 32
Answer Calls ................................................................................................ 32 Unattended Answer Mode ........................................................................... 33
Proxy Server ................................................................................................ 33 Registration Test .......................................................................................... 33 Multi-line Initiate ........................................................................................... 33 Multi-line Answer ......................................................................................... 34 TestML Script ............................................................................................... 34
The Edit View ...................................................................................................... 35

WinSIP User’s Guide
Copyright 2002, 2018 Touchstone Technologies, Inc. All Rights Reserved 3
The Main View .................................................................................................... 37
The Detail View ................................................................................................... 39 Call Trace Sub-View ........................................................................................ 40
Call Metrics Sub-View ..................................................................................... 41 Call Summary Sub-View ................................................................................. 42 Audio Summary Sub-View .............................................................................. 43 Audio QoS Sub-View ....................................................................................... 44 Video Summary Sub-View .............................................................................. 45
Session Info Sub-View .................................................................................... 46 WinSIP Menu Commands ................................................................................... 47
File .................................................................................................................. 47 Edit .................................................................................................................. 49 Options ............................................................................................................ 50
Tools ............................................................................................................... 51 Peering Fabric ................................................................................................. 52
View ................................................................................................................ 53
Help ................................................................................................................. 54 Creating Call Files ............................................................................................... 55
Generating a Call File ...................................................................................... 55
General Page .................................................................................................. 57 Call Timers ...................................................................................................... 59
Local Information ............................................................................................. 61 Authentication Information ............................................................................... 63 Remote Information ......................................................................................... 65
DTMF Events .................................................................................................. 67 Hold/Unhold .................................................................................................... 70
Call Transfer .................................................................................................... 71 Generating Partner Files ................................................................................. 73
Settings ............................................................................................................... 74 SIP Options ..................................................................................................... 74
UAC Options (Initiate modes only) ............................................................... 75
UAS Options (Answer modes only) ............................................................. 75 UAS Authentication ...................................................................................... 75
PRACK ........................................................................................................ 76 SDP Options ................................................................................................ 76 Dialog Timers ............................................................................................... 76
Session Timer .............................................................................................. 77 UAC Request Options ................................................................................. 78
SIP DSCP/TOS Options .............................................................................. 78 Call Start/Stop Limits ................................................................................... 78
Media Options ................................................................................................. 79 General ........................................................................................................ 80 Start Media .................................................................................................. 80 Audio Capabilities ........................................................................................ 80 Edit Audio Codecs… .................................................................................... 81 Edit Playlist .................................................................................................. 83

WinSIP User’s Guide
Copyright 2002, 2018 Touchstone Technologies, Inc. All Rights Reserved 4
Video Capabilities ........................................................................................ 84
Edit Video Codecs… .................................................................................... 84 Channel Attributes ....................................................................................... 85
Media DSCP/TOS Options .......................................................................... 86 DTMF Events ............................................................................................... 86
Proxy/Registrar Options .................................................................................. 88 Proxy Server ................................................................................................ 89 Registrar ...................................................................................................... 89
Proxy Options (SIMPLE) .............................................................................. 90 Registration Options .................................................................................... 90
Error Injection Options ..................................................................................... 91 Enable Error Injection .................................................................................. 92 Parser/Transaction Matching Errors ............................................................ 92
UAC Errors .................................................................................................. 92 UAS Errors................................................................................................... 92
Advanced ........................................................................................................ 94
Media Path Confirmation ............................................................................. 95 Media Recording .......................................................................................... 96 Call Rate Optimization ................................................................................. 97
XML Templates ............................................................................................ 97 Tone Detect Confirmation ............................................................................ 98
Calls Block Option ....................................................................................... 98 Custom Headers Options ................................................................................ 99
Custom Header .......................................................................................... 100
Apply to ...................................................................................................... 100 Reports Options ............................................................................................ 101
Call Summary Report ................................................................................ 102 Session Summary Report .......................................................................... 102
Logging Options ............................................................................................ 103 Log File ...................................................................................................... 104 Log Level ................................................................................................... 104
Dump Statistics every ................................................................................ 105 File Limitations ........................................................................................... 105
Preferences Options...................................................................................... 106 Protocol ..................................................................................................... 107 Retransmission Times (t1 in milliseconds) ................................................. 107
System ....................................................................................................... 107 Call Analysis .............................................................................................. 107
Calculate Call Rates .................................................................................. 108 Automata ................................................................................................... 108
Multi-Line Emulation .................................................................................. 108 Error Options ............................................................................................. 108 Auto View Switching .................................................................................. 108
Directories Options ........................................................................................ 109 Support Options ............................................................................................ 111 Peer Options ................................................................................................. 113

WinSIP User’s Guide
Copyright 2002, 2018 Touchstone Technologies, Inc. All Rights Reserved 5
Local Identity .............................................................................................. 114
Options ...................................................................................................... 114 Database .......................................................................................................... 115
Peering Details.................................................................................................. 116 Peer Filter ...................................................................................................... 117 Add New ........................................................................................................ 117 Configure ....................................................................................................... 118 Subscriptions ................................................................................................. 118
Publications ................................................................................................... 118 Send Message .............................................................................................. 118
New TestML Script Wizard ............................................................................... 119 TestML File Information ................................................................................. 119 TestML Script Preferences ............................................................................ 120
TestML Script Type ....................................................................................... 121 TestML Script Options ................................................................................... 122
XML Script Editor .......................................................................................... 123
CODEC(s) ......................................................................................................... 124 Audio ............................................................................................................. 124 Video ............................................................................................................. 125
Create New CODEC ..................................................................................... 125 WinSIP Command Line Automation .................................................................. 126
"Rolling" log files ............................................................................................... 127 FAQ .................................................................................................................. 128 Appendix A ....................................................................................................... 133
Transferring a License ................................................................................... 133 Step One - Import License, Media Initialization.......................................... 135
Step Two - Export License ......................................................................... 137 Step Three - Install exported license ......................................................... 141
License Transfer Instruction Chart ................................................................ 144 Appendix B - Installing WinSIP for Limited Users ............................................. 146
Prior to Installation of any Touchstone Software ........................................... 146
Procedure .................................................................................................. 146 Changing a User’s Rights .......................................................................... 147
Important Note ........................................................................................... 147 Appendix C - Choosing a Network Card ........................................................... 148
Custom Driver Settings ................................................................................. 148
Appendix D - MySQL Installation ...................................................................... 150 MySQL Install Screen 1 - Welcome to the installation Wizard ....................... 151
MySQL Install Screen 2 - Setup Type ........................................................... 152 MySQL Install Screen 3 - Ready to Install ..................................................... 153
MySQL Install Screen 4 - Installing ............................................................... 154 MySQL Install Screen 5 - Installing ............................................................... 155 MySQL Install Screen 6 - Installing ............................................................... 156 MySQL Install Screen 7 - Setup Wizard Complete ........................................ 157 MySQL Install Screen 8 - Welcome to the Server service Setup. ................. 158 MySQL Install Screen 9 - Configuration Selection ........................................ 159

WinSIP User’s Guide
Copyright 2002, 2018 Touchstone Technologies, Inc. All Rights Reserved 6
MySQL Install Screen 10 - Server Instance Configuration ............................ 160
MySQL Install Screen 11 - Database Type Selection ................................... 161 MySQL Install Screen 12 - Connection Configuration Selection ................... 162
MySQL Install Screen 13 - Connection Type Selection ................................. 163 MySQL Install Screen 14 - Character Set Selection ...................................... 164 MySQL Install Screen 15 - Setup Type ......................................................... 165 MySQL Install Screen 16 - MySQL Server Instance Configuration ............... 166 MySQL Install Screen 17 - Execute the Configuration Settings. ................... 167
MySQL Install Screen 18 - Configuration Progress ....................................... 168 Installing the MySQL Tools ............................................................................... 169
MySQL Tools Install Screen 1 - Welcome to the installation Wizard ............. 170 MySQL Tools Install Screen 2 - License Agreement ..................................... 171 MySQL Tools Install Screen 3 - Destination Folder ....................................... 172
MySQL Tools Install Screen 4 - Setup Type Selection .................................. 173 MySQL Tools Install Screen 5 - Ready to Install ........................................... 174
MySQL Tools Install Screen 6 - Installation Status ....................................... 175
MySQL Tools Install Screen 7 - Enterprise ................................................... 176 MySQL Tools Install Screen 8 - Enterprise ................................................... 177 MySQL Tools Install Screen 9 - Wizard Complete ........................................ 178
Post-Installation Activities ................................................................................. 179 Configuring MySQL Schema ......................................................................... 179

WinSIP User’s Guide
Copyright 2002, 2018 Touchstone Technologies, Inc. All Rights Reserved 7
Introduction The WinSIP Bulk Call Generator is a high performance SIP signaling and media load generator that is fully compliant with the IETF SIP specification RFC 3261. WinSIP is capable of generating thousands of simultaneous calls using commercial off the shelf (COTS) hardware. This allows you to determine the investment you are willing to make to achieve the performance level you desire. Using a standard single processor desktop computer, WinSIP’s performance rivals that of much more expensive solutions that require highly specialized hardware to achieve similar results. WinSIP goes one step above the others by providing real-time call flow analysis of SIP signaling, tracking errors over extended periods of testing, and allowing you to control the level of verbosity of logged events. These capabilities are invaluable in determining endpoint compliance, detecting network failures and latency and generally troubleshooting SIP network paths. WinSIP allows you to construct test scenarios which model the real world environment by giving you the flexibility to control all aspects of your calls. WinSIP’s intuitive user interface allows you to generate test scripts (call files) containing thousands of calls in less than one minute. Call files and individual call attributes can easily be modified or fine-tuned using a simple, familiar spreadsheet type interface. WinSIP call files can also be exported to your favorite spreadsheet program, which could allow advanced users to generate their own templates to further refine or model testing scenarios. In conclusion, WinSIP is the ideal tool for generating SIP and media traffic loads without requiring special hardware investments. WinSIP can be an invaluable tool to aid in the testing and debugging of new or recently deployed SIP networks. Best of all, WinSIP users can begin generating real world scenarios within minutes of installing the software! The WinSIP software is copy protected and is licensed for use on a single machine. Please make sure that you install WinSIP on the machine you intend to use it on. Installation of WinSIP on multiple machines is not possible without authorization from Touchstone. The following pages will demonstrate how to install, setup, and get started with WinSIP. Please read the following pages carefully. They are the keys to your success. Note: WinSIP is designed for the advanced 32 bit/ 64 bit Windows operating systems. WinSIP supports any Windows OS including Windows10 and Windows server 2012.

WinSIP User’s Guide
Copyright 2002, 2018 Touchstone Technologies, Inc. All Rights Reserved 8
Version 4.2.0 Summary Enhancements:
Call capacity enhancement for Windows 7 and Windows 8.
64bit version of WinSIP. Bug Fixes:
Tone Detect Confirmation report is changed from "" to "Failed"
Busy Here after 100 trying was not stopping "Dialog Create Timeout Timer".
Call not starting after Call Data and Session Summary report overwrite option.
Added %T for timestamp to Session Summary Report.
SDP was not sent in 200Ok message if the session refresh invite does not have SDP.
To Tag was missing for 487 Request Terminated Message.
Remote Media IPAddress and Ports was not updating for Re-Invite message for session refresh Invite Messages.

WinSIP User’s Guide
Copyright 2002, 2018 Touchstone Technologies, Inc. All Rights Reserved 9
Installation Types
WinSIP on CD-ROM If you received WinSIP on CD-ROM, please follow the following procedure:
Insert the WinSIP CD in your CD-ROM drive.
The installation program should start automatically. If it does not, use Windows Explorer to browse the CD and double-click the Setup.exe file.
Continue to the next section.
WinSIP via E-Mail If you received WinSIP via E-Mail, please follow the following procedure:
Double-click on the e-mail attachment.
Select “Save to Disk” option and select a temporary folder to store the self-extracting file.
Use Windows Explorer to browse to the folder you saved the self-extracting file in.
Double-click the self-extracting file. Select a folder to extract the files to.
Use Windows Explorer to browse to the folder you extracted the files in and double-click the Setup.exe file.
Continue to the next section in this document.
WinSIP via the Internet If you downloaded WinSIP via the internet, please use the following procedure:
WinSIP’s setup.exe is compressed using WinZip. Download winsip.zip and extract the setup.exe to a temporary location on the destination computer.
Double-click on the Setup.exe file.
Continue to the next section in this document.

WinSIP User’s Guide
Copyright 2002, 2018 Touchstone Technologies, Inc. All Rights Reserved 10
WinSIP Installation Note: To install WinSIP with a “Limited User” account please follow instructions in Appendix A. The following screens will appear during the installation process. Please follow the directions carefully using the “Next” button to navigate forward and the “Back” button to return to a previous page.
Install Screen 1 - Preparing Setup Wizard Wait for the wizard to complete or press the “Cancel” to quit the installation.

WinSIP User’s Guide
Copyright 2002, 2018 Touchstone Technologies, Inc. All Rights Reserved 11
Install Screen 2 - Beginning the Installation Press the “Next” button to continue the installation or “Cancel” to quit.

WinSIP User’s Guide
Copyright 2002, 2018 Touchstone Technologies, Inc. All Rights Reserved 12
Install Screen 3 - Beginning the Installation Press the “Next” button to continue the installation or “Cancel” to quit.

WinSIP User’s Guide
Copyright 2002, 2018 Touchstone Technologies, Inc. All Rights Reserved 13
Install Screen 4 - End-User License Agreement Carefully read the End-User License Agreement. If you accept the terms, select the “I Accept” option, if you do not; select the “I do not accept” option. Press the “Next” button to continue the installation or “Cancel” to quit.

WinSIP User’s Guide
Copyright 2002, 2018 Touchstone Technologies, Inc. All Rights Reserved 14
Install Screen 5 - Readme Information Press the “Next” button to continue the installation or “Cancel” to quit.

WinSIP User’s Guide
Copyright 2002, 2018 Touchstone Technologies, Inc. All Rights Reserved 15
Install Screen 6 - Customer Information Please fill in your customer information. Press the “Next” button to continue the installation or “Cancel” to quit.

WinSIP User’s Guide
Copyright 2002, 2018 Touchstone Technologies, Inc. All Rights Reserved 16
Install Screen 7 - Destination Folder Please select the folder that you would like to install WinSIP and its components in. Press the “Next” button to continue the installation or “Cancel” to quit.
WinSIP User’s Guide
Copyright 2002, 2018 Touchstone Technologies, Inc. All Rights Reserved 17
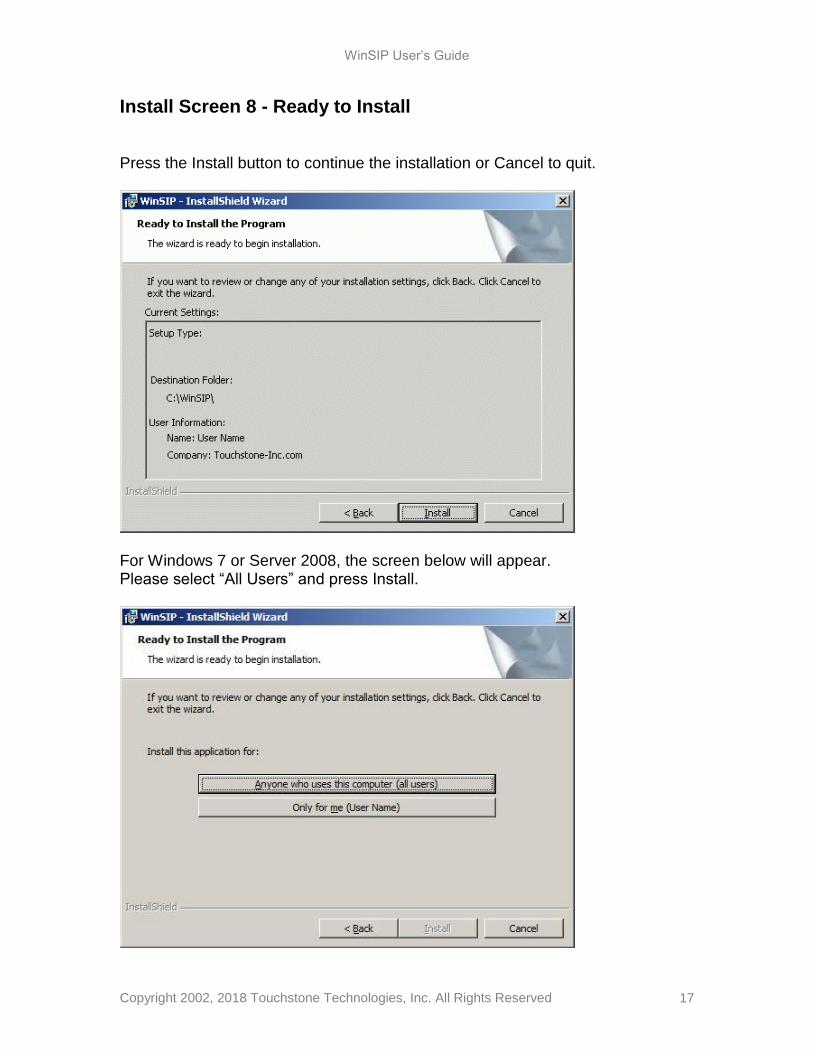
Install Screen 8 - Ready to Install Press the Install button to continue the installation or Cancel to quit.
For Windows 7 or Server 2008, the screen below will appear. Please select “All Users” and press Install.

WinSIP User’s Guide
Copyright 2002, 2018 Touchstone Technologies, Inc. All Rights Reserved 18
Install Screen 9 - Installing WinSIP This screen will appear during the installation to inform you of the progress. Typically, this screen will only appear for a very brief period of time.

WinSIP User’s Guide
Copyright 2002, 2018 Touchstone Technologies, Inc. All Rights Reserved 19
Install Screen 10 - Installation Complete This screen will appear at the completion of the installation process. Any errors that may have occurred will be reported at this time. Should you encounter any errors, please contact Touchstone for technical assistance at +267.222.8687 or [email protected]. Press the “Finish” button to complete the installation.

WinSIP User’s Guide
Copyright 2002, 2018 Touchstone Technologies, Inc. All Rights Reserved 20
CrypKey Installation After you press Finish button, CrypKey will automatically get installed your machine. Once it gets installed below screen will popup. Hit OK to Proceed.
In future, if you want to transfer the license to another machine, please see Appendix A, which gives you the step by step procedure for the license transfer.

WinSIP User’s Guide
Copyright 2002, 2018 Touchstone Technologies, Inc. All Rights Reserved 21
WinPcap Installation Before the installation is complete, it is necessary to install the WinPcap driver. If you have installed other products that use this driver (such as Ethereal), you will probably need to restart the computer after installation. The following screens will appear during the WinPcap installation process. Please follow the directions carefully using the “Next” button to navigate forward and the “Back” button to return to a previous page. If you get below pop up, please press OK to force install the WinPcap Driver.
WinPCap Install Screen 1 - Welcome to the Installation Wizard
Press the “Next” button to continue or the “Cancel” to quit the installation.

WinSIP User’s Guide
Copyright 2002, 2018 Touchstone Technologies, Inc. All Rights Reserved 22
WinPcap Install Screen 2 - End-User License Agreement
Carefully read the License Agreement. If you accept the terms, press the “I Agree” button, if you do not, press the “Cancel” button.
Press the “Next” button to continue the installation or “Cancel” to quit.

WinSIP User’s Guide
Copyright 2002, 2018 Touchstone Technologies, Inc. All Rights Reserved 23
WinPcap Install Screen 3 - Installation Progress
This screen will appear during the installation process.

WinSIP User’s Guide
Copyright 2002, 2018 Touchstone Technologies, Inc. All Rights Reserved 24
WinPcap Install Screen 4 - Installation Complete
The following screen will appear at the completion of the WinPcap installation.
Press the Finish button to complete the installation.

WinSIP User’s Guide
Copyright 2002, 2018 Touchstone Technologies, Inc. All Rights Reserved 25
Installation of Microsoft Visual C++ Redistributables After the WinSIP installation has finished a pop-up window will be display prompting for the installation of the Microsoft Visual C++ Redistributables.
Redistributables Install Screen 1 Make sure the check box to accept the terms is checked then click on the “Install” button.

WinSIP User’s Guide
Copyright 2002, 2018 Touchstone Technologies, Inc. All Rights Reserved 26
Redistributables Install Screen 2 Installation Progress window is now displayed.
Redistributables Install Screen 3 Click the “Finish” button to continue.

WinSIP User’s Guide
Copyright 2002, 2018 Touchstone Technologies, Inc. All Rights Reserved 27
Running WinSIP for the First Time WinSIP software is copy protected and is licensed for use on a single machine. The first time you run WinSIP, you will be provided with a site code. You must contact Touchstone in order to obtain the authorization code to enable the software. Once the software is authorized, it may not be installed on any other machines without a new authorization code from Touchstone. If you have installed the software on a machine in error, do not authorize that installation. Re-install it on the appropriate machine prior to contacting Touchstone for the authorization code.
Obtaining the WinSIP Authorization Code When you first run WinSIP the following authorization dialog will appear:
In the field labeled “Site Code” a series of numbers and letters will appear. To authorize the application, contact Touchstone with the exact value of the site code field. Touchstone will provide the code to enter in the “Authorization Code” field. You must enter this exactly as it is provided to you in order to enable the software. Once you have enabled the software, you are just moments away from being able to construct your first test scenarios!

WinSIP User’s Guide
Copyright 2002, 2018 Touchstone Technologies, Inc. All Rights Reserved 28
Overview WinSIP’s main user-interface is divided into three main components:
Edit View
Main View
Detail View
Edit View This spreadsheet-like view allows quick, intuitive editing of fields, columns or blocks of data.

WinSIP User’s Guide
Copyright 2002, 2018 Touchstone Technologies, Inc. All Rights Reserved 29
Main View This multi-column view is the main control panel for defining the contents of a session (i.e. selecting the calls to be run) and launching additional or stopping calls within that session.

WinSIP User’s Guide
Copyright 2002, 2018 Touchstone Technologies, Inc. All Rights Reserved 30
Detail View This view presents the session detail information. Active calls, call flows and media stream QoS details are provided within its tabular style interface.

WinSIP User’s Guide
Copyright 2002, 2018 Touchstone Technologies, Inc. All Rights Reserved 31
File Descriptions Call Files: Typically, call files are generated and edited via the Edit View. WinSIP call files are ASCII text files with field value separated by tab characters. This format allows users desiring so to use commercial spreadsheets, word processors or scripting tools such as PERL to generate call files that match their specific scenario requirements. Call files represent the individually controllable attributes of calls within a session. Parameter Files: Parameter files contain the system settings that are common from call to call. The attributes of the parameter file in conjunction with the call file determine the characteristics of a session. Session Settings: These settings include the session and user-defined preferences as well as application state information.
Setting up WinSIP WinSIP’s factory defaults are set to allow you to get up-and-running quickly in point-to-point mode. You should review these settings by accessing the Options | Settings menu option and reviewing each of the tabs. The online help provides specific information on the each of the fields. We highly recommend that you run calls between two WinSIPs to ensure that the network connections are functioning and that the settings are configured properly. In order to run WinSIP with a proxy server (or device providing proxy-type services), you will need to configure the Proxy/Registration settings from the Options | Settings menu. In addition, the remote address of the call file should coincide with the initial target, not the eventual endpoint. When you enter WinSIP for the first time or when you select “New Call File”, WinSIP provides the call generation screens to allow you to define the call file properties. This is the quickest and easiest way to enter thousands of calls in just a few minutes. You may of course, cancel out of this screen and enter the information freeform if desired.

WinSIP User’s Guide
Copyright 2002, 2018 Touchstone Technologies, Inc. All Rights Reserved 32
User Interface
Modes of operation The first step in preparing to run WinSIP is to determine which mode you would like to operate in. WinSIP offers the following modes of operation:
Initiate Calls
This mode initiates (places) calls during the session. The selected calls are placed in a start queue which can have a ‘garden hose’ effect on call start-up. This queue can run wide-open, without putting any limit on the number of calls which can start simultaneously or it can let a prescribed number start in any given second. Calls may also have their own individual start delays to form a more random pattern, simulating real-world conditions. In initiate mode, each call will run its prescribed amount of repetitions (or indefinitely until stopped by the user) for the duration you have entered. You may stop or terminate the calls at any time.
Answer Calls
This mode responds to inbound calls during the session. The selected calls are started immediately and look for inbound INVITEs with IDs that match the scripted Local ID field. In answer mode, each call will run its prescribed amount of repetitions (or indefinitely until stopped by the user) for the duration you have entered. You may stop or terminate the calls at any time.

WinSIP User’s Guide
Copyright 2002, 2018 Touchstone Technologies, Inc. All Rights Reserved 33
Unattended Answer Mode
This mode responds to unscripted inbound calls arriving on the well-know port for the currently selected IP address. No scripted calls may be selected during this time. You may stop or terminate the calls at any time.
Proxy Server
This mode serves as a simple proxy server/registrar on the well-known port for the currently selected IP address.
Registration Test
In registration test mode, each call will register/unregister its prescribed amount of repetitions (or indefinitely until stopped by the user) for the duration you have entered.
Multi-line Initiate
This mode initiates (places) calls during the session. The selected calls are placed in a start queue which can have a ‘garden hose’ effect on call start-up. This queue can run wide-open, without putting any limit on the number of calls which can start simultaneously or it can let a prescribed number start in any given second. Calls may also have their own individual start delays to form a more random pattern, simulating real-world conditions. In multi-line initiate mode, each call will run its prescribed amount of repetitions (or indefinitely until stopped by the user) for the duration you have entered. This mode allows both the answer and initiate side to have the same Call ID’s. Also, calls going through multi-line initiate/answer use a proxy serve and only the first call is registered. You may stop or terminate the calls at any time.

WinSIP User’s Guide
Copyright 2002, 2018 Touchstone Technologies, Inc. All Rights Reserved 34
Multi-line Answer
This mode responds to inbound calls during the session. The selected calls are started immediately and look for inbound INVITEs with IDs that match the scripted Local ID field. In multi-line answer mode, each call will run its prescribed amount of repetitions (or indefinitely until stopped by the user) for the duration you have entered. This mode allows both the answer and initiate side to have the same Call ID’s. Also, calls going through multi-line initiate/answer use a proxy serve and only the first call is registered. You may stop or terminate the calls at any time.
TestML Script
This mode selects the TestML scripting engine instead of the internal engine. This mode does not have the concept of “Initiator” or “Answerer” but rather relies on the script for statefulness and awareness.

WinSIP User’s Guide
Copyright 2002, 2018 Touchstone Technologies, Inc. All Rights Reserved 35
The Edit View This is the view designed to facilitate editing individual call parameters and manipulating call files. This view has a spreadsheet style interface.
To enter ‘edit mode’, position your cursor over a data cell (any cell except ‘Status’), hold down the ‘Alt’ key and press the left mouse button. You may now edit the value within that field. To move between fields, you may use the following keys: Tab: This moves one column to the right (wrapping to the next line at the end). Shift + Tab: This moves one column to the left (wrapping to the previous line at the beginning). Down Arrow: This moves one row down (wrapping to the first line at the end). Up Arrow: This moves one row up (wrapping to the last line at the top).

WinSIP User’s Guide
Copyright 2002, 2018 Touchstone Technologies, Inc. All Rights Reserved 36
Any of the previous actions validate (and if successful, update) the data in the current cell prior to navigation. To exit edit mode and validate and update the data, press the enter key. To exit edit mode and discard the data, press the escape (Esc) key. To edit an entire column of data, press the column-heading button. To edit selected values within a column, select the desired rows and press the column-heading button. To insert a new row, highlight a row that you want the new row inserted BEFORE and press the insert (Ins) key. To delete a row or rows, highlight the item(s) to be deleted and press the delete (Del) key. All editing actions are supported by full multi-level undo and redo functions. The following menu of options is available by right-clicking the mouse anywhere within the spreadsheet:

WinSIP User’s Guide
Copyright 2002, 2018 Touchstone Technologies, Inc. All Rights Reserved 37
The Main View This is the view designed to facilitate starting and stopping call sessions. This view has two main columns, available calls and selected calls. When you first load WinSIP, all calls in the call file will be in the left most column (available calls).
To move all calls to the selected column, you may simply press the [>>] or [Add All] buttons. There are a number of ways to move individual or groups of calls, each user will have their own personal preference, but here they are. Drag and Drop: Select one or more calls from either list and ‘drag and drop’ them onto the target list. Double click the selected calls: This moves the entire group to the opposing list. Select a sequence of calls: Enter the call range you would like to move in the ‘Select: [x] to [y]’ fields and press the [>>] or [<<] buttons.

WinSIP User’s Guide
Copyright 2002, 2018 Touchstone Technologies, Inc. All Rights Reserved 38
Both columns offer extended selection (i.e. you may select a disjoint group of calls by holding down the control (Ctrl) key and pressing the left mouse button). When you have the appropriate calls for your session in the selected list and have set the application mode to ‘Initiate’ or ‘Answer’, you are ready to begin your session. The available calls column offers the following options when you right click within it:
The selected calls column offers the following options when you right click within it:

WinSIP User’s Guide
Copyright 2002, 2018 Touchstone Technologies, Inc. All Rights Reserved 39
The Detail View This is the view designed to facilitate monitoring individual call elements and overall session status. To view the details on a specific call click on the desired call and the details will then be displayed in the lower half of the window. The values on this screen are updated once every second.
The main display sheet shows the calls currently being run. The call name, user ID, physical address, address of record, successful calls, unsuccessful call attempts audio packets sent/received and video packets sent/received. Also, it shows the highest, lowest, and average call rate. This can be set to display in hourly mode or up to the second as well as an instantaneous or cumulative view. The tabs below are individual call elements, such as SIP messages sent/received, audio media jitter and packet/frame/byte counts and video media jitter and packet/picture/byte counts. Also included is a call monitor, which is a graphical representation of the calls active at each time ‘sampling’.

WinSIP User’s Guide
Copyright 2002, 2018 Touchstone Technologies, Inc. All Rights Reserved 40
The following menu of options is available by right-clicking the mouse anywhere within the grid:
Call Trace Sub-View This sub-view allows the user to view the request and response messages sent and received by the selected call.

WinSIP User’s Guide
Copyright 2002, 2018 Touchstone Technologies, Inc. All Rights Reserved 41
Call Metrics Sub-View This sub-view displays the various durations and delays regarding audio, video, ring time, time to answer, time to register, response time, etc.
The following metrics are displayed in this sub-view:
Time To Register
First Response Time
Post-Dial Delay
Ring Duration
Time To Answer
Time To Connect
Inbound Audio Delay
Outbound Audio Delay
Outbound Audio Duration
Inbound Video Delay
Outbound Video Delay
Outbound Video Duration
Tear-Down Time
Time Connected
Signaling Latency
End-to-End Time
Time To Un-Register
Media Path Confirmation

WinSIP User’s Guide
Copyright 2002, 2018 Touchstone Technologies, Inc. All Rights Reserved 42
Call Summary Sub-View This sub-view displays the quantities and types of requests and responses sent, received, and retransmitted.
The following transmissions are quantified in this sub-view:
Requests Received
Requests Sent
Responses (1xx, 2xx, . . ., 6xx)
Request Retransmits
Response Retransmits

WinSIP User’s Guide
Copyright 2002, 2018 Touchstone Technologies, Inc. All Rights Reserved 43
Audio Summary Sub-View This sub-view displays a variety of information regarding the audio transmissions including jitter; inter-packet interval; packets sent, received, and lost; audio frames; path configuration; codec type; bytes transmitted; stream address; status and bandwidth.
The following metrics are listed for both inbound and outbound transmissions:
Stream Address
Media Type
Packets
Bytes
Packets Lost
Average Bandwidth
Current Bandwidth
DTMF Events
Status
Lowest, Highest, and Current Jitter
Lowest, Highest, and Current Inter-Packet Interval
Media Path Confirmation
Tone Confirmation

WinSIP User’s Guide
Copyright 2002, 2018 Touchstone Technologies, Inc. All Rights Reserved 44
Audio QoS Sub-View This sub-view provides a real-time display of the R-factor and MOS scores for each stream. The R-factor/MOS scoring feature is a non-intrusive measurement technique available for the WinSIP Application. WinSIP passively measures the characteristics of live VoIP calls and reports quality scores in real-time. The algorithm used to obtain the R-Factor/MOS quality scores accurately models the way that time-varying impairments, most notably burst packet loss and possible jitter buffer discards, affect perceived speech quality.
The following transmissions are quantified in this sub-view:
Media Type
Optimal Listening R Factor
Actual Listening R Factor
Conversational R Factor
Optimal Listening MOS Score
Actual Listening MOS Score
Conversational MOS Score
P.862 Raw MOS Score
Stream Quality Index (SQI)
Packet Loss Rate
Burst Packet Loss Rate
Good Packets
Lost Packets
Discarded Packets

WinSIP User’s Guide
Copyright 2002, 2018 Touchstone Technologies, Inc. All Rights Reserved 45
Video Summary Sub-View This sub-view displays a variety of information regarding the video transmissions including jitter; latency; packets sent, received, and lost; video pictures; path configuration; codec type; bytes transmitted; status and bandwidth.
The following metrics are listed for both inbound and outbound transmissions:
Stream Address
Media Type
Packets
Bytes
Packets Lost
Video Pictures
Picture Rate
Bandwidth
Status
Lowest, Highest, and Current Jitter
Lowest, Highest, and Current Inter-Packet Interval

WinSIP User’s Guide
Copyright 2002, 2018 Touchstone Technologies, Inc. All Rights Reserved 46
Session Info Sub-View This sub-view allows the user to view a summary of the session regarding all of the calls.
The following quantifications and metrics are displayed in this sub-view:
Active Calls
Current Calls
Requests Received
Requests Sent
Responses (1xx, 2xx, . . ., 6xx)
Request Retransmits
Response Retransmits

WinSIP User’s Guide
Copyright 2002, 2018 Touchstone Technologies, Inc. All Rights Reserved 47
WinSIP Menu Commands
File
The File menu offers the following commands: New Call File: Creates a new, empty WinSIP call file. New TestML Script: Opens TestML wizard to create new XML scripts. Open: Opens an existing WinSIP call file. Save: Saves the current WinSIP call file using the same file name. Save As: Saves the current WinSIP call file to a specified file name.

WinSIP User’s Guide
Copyright 2002, 2018 Touchstone Technologies, Inc. All Rights Reserved 48
Load Parameter File: Loads an existing WinSIP parameter file. Save Parameter File As: Saves the current WinSIP parameter file to a specified file name. Load TestML Script: Loads a previously saved TestML script.
Load Codec File: Loads a previously saved codec file. Save Codec File As: Saves the current codec file under a different name. Import Calls: Imports calls from a WinSIP call file or exchange file into the current call file. Export Calls: Exports calls from the current WinSIP call file to an exchange or call file. Generate Call File: Generates a new, populated WinSIP call file. Generate Partner File: Generates a new, mirror-image WinSIP call file to be used by another WinSIP application. Print: Prints a WinSIP call file. Print Preview: Displays the WinSIP call file on the screen as it would appear printed. Print Setup: Selects a printer and printer connection. Start All Calls: Starts all selected calls Stop All Calls: Stops all active calls, gracefully. Terminate All Calls: Terminates all active calls, abruptly. Recent File List: Displays the name and number of the sixteen (16) most recently used files. Select one of these entries to open that file. Exit: Exits WinSIP.

WinSIP User’s Guide
Copyright 2002, 2018 Touchstone Technologies, Inc. All Rights Reserved 49
Edit
The Edit menu offers the following commands: Undo: Reverse previous editing operation. This is a full, multi-level undo. Redo: Reverse previous undo operation. This is a full, multi-level redo. Cut: Deletes data from the document and moves it to the clipboard. Copy: Copies data from the document to the clipboard. Paste: Pastes data from the clipboard into the document.

WinSIP User’s Guide
Copyright 2002, 2018 Touchstone Technologies, Inc. All Rights Reserved 50
Options
The Options menu offers the following commands: Settings: Change or review the current WinSIP settings. Set Local IP Address: Change or review the current local IP Address. Integrity Check: Checks the call and parameter files for integrity. Reset Log File: Deletes the current contents of the log file.

WinSIP User’s Guide
Copyright 2002, 2018 Touchstone Technologies, Inc. All Rights Reserved 51
Tools
The Tools menu offers the following commands: Ping: Allows you to run a ping utility to test line-of-sight availability of a device or address on the network. TraceRoute: Allows you to run a TraceRoute test to a device or address on the network. Import Media from PCAP Trace Files: This utility allows you to “RIP” media streams from a WinPCAP (Ethereal/WireShark) capture file for later replay by the generator. Play Audio File:
G.711 Alaw File: This tool allows you to convert G.711 Alaw file to WAV file and automatically starts playing in Windows Media Player.
G.711 Ulaw File: This tool allows you to convert G.711 Ulaw file to WAV file and automatically starts playing in Windows Media Player.
Check TestML Script: This tool will check the current loaded XML script and report if there are any errors in the scripting.

WinSIP User’s Guide
Copyright 2002, 2018 Touchstone Technologies, Inc. All Rights Reserved 52
Peering Fabric
The Peering Fabric menu offers the following commands: Peer Details: View the details of peer statuses. Start Peering Fabric: Enables/starts WinSIP communications with other
Touchstone products (e.g. remotely control other WinSIP/WinEyeQ instances).
Stop Peering Fabric: Disables peer communications with other Touchstone
products.

WinSIP User’s Guide
Copyright 2002, 2018 Touchstone Technologies, Inc. All Rights Reserved 53
View
The View menu offers the following commands: Main View: Switches the current view to the main view. Edit View: Switches the current view to the edit view. Detail View: Switches the current view to the detail. Xml Editor: Switches the current view to the Xml editor. Proxy View: Switches the current view to the proxy view. Call Data Record Report: View the CDR report (if it exists). Session Summary Report: View the Session Summary report (if it exists). Log File: Displays the current WinSIP log file. Error Log: Displays the current WinSIP error log file. Processes: Displays the current WinSIP processes information. Grid Lines: Shows or hides the gridlines on the edit view.

WinSIP User’s Guide
Copyright 2002, 2018 Touchstone Technologies, Inc. All Rights Reserved 54
Toolbar: Show or hide the tool bar. Status Bar: Show or hide the status bar. Auto Size Columns: Automatically sizes the columns to the optimum size for the data or restores them to their pre-defined sizes.
Help
The Help menu offers the following commands, which provide you assistance with this application: Help Topic: Offers you an index to topics on which you can get help. Contact Support: With this option you can contact support with your questions. Licensing Information: Displays the status of your current license. About WinSIP: Displays the version number of this application.

WinSIP User’s Guide
Copyright 2002, 2018 Touchstone Technologies, Inc. All Rights Reserved 55
Creating Call Files When running in initiate or answer mode, it is necessary to create a call file and select one or more calls to run. The simplest way of creating a call file is to use the generate call file option. Call files may be created by hand if so desired. This would be accomplished via the edit view.
Generating a Call File WinSIP provides an easy, fill-in-the-blank method of generating large test files quickly. When this option is selected from the file menu or the edit view, the following dialog will appear:

WinSIP User’s Guide
Copyright 2002, 2018 Touchstone Technologies, Inc. All Rights Reserved 56
This screen contains eight (8) pages, each of which corresponds to a section of fields within the call file. These pages include:
General Page
Call Timers Page
Local Page
Authentication Page
Remote Page
DTMF Events Page
Hold/Unhold Page
Call Transfer Page All fields on these pages must be completed. Default values are provided in the fields for which they are appropriate.

WinSIP User’s Guide
Copyright 2002, 2018 Touchstone Technologies, Inc. All Rights Reserved 57
General Page
This screen contains the information pertaining to the general properties of the test script. The fields included on the general page are: Filename: Fill in the name of the file or use the ‘Browse’ button located on the right side of the field to select an existing file to overwrite. Calls: Enter the number of calls you would like this script to contain.

WinSIP User’s Guide
Copyright 2002, 2018 Touchstone Technologies, Inc. All Rights Reserved 58
Call Duration: This field may be one of two settings, either manual or timed. If you select timed, you may generate the values as fixed, incremental or random. The appropriate fields will appear as the selection changes. All visible fields must be filled out. Frequency: This determines how many times the calls will be run. The choices are: Single, Repeating and Specified. If the choice is anything other than single, the stop on error field will become visible. Check the stop on error field only if you do not want WinSIP to continue trying calls that have failed for any reason.

WinSIP User’s Guide
Copyright 2002, 2018 Touchstone Technologies, Inc. All Rights Reserved 59
Call Timers There are five call timers available to model real-world scenarios. Each of these fields has two or more of the following options to define the values within the call file: None: Not used. Fixed: All calls will use the stated value Incremental: Calls will use an increasing value based upon the initial value and a specified increment Random: Calls will use random values between a specified floor (minimum) and ceiling (maximum).

WinSIP User’s Guide
Copyright 2002, 2018 Touchstone Technologies, Inc. All Rights Reserved 60
The fields included on the call timers page are: Initial Start Delay: This is the delay, on a per-call basis, that will occur prior to sending the initial INVITE transaction (first call iteration only). Post Dial Delay (Answer mode only): This is the delay, on a per-call basis, that will occur prior to sending the 180 Ringing or 200 OK transactions. Ring Time (Answer mode only): This is the delay, on a per-call basis, that will occur between the 180 Ringing responses and the 200 OK response. Inter-Call Restart Delay: This is the delay, on a per-call basis, that will occur prior to sending the INVITE transaction (second and subsequent successful call iterations). Post-Error Restart Delay: This is the delay, on a per-call basis, that will occur prior to sending the INVITE transaction (second and subsequent failed call iterations).

WinSIP User’s Guide
Copyright 2002, 2018 Touchstone Technologies, Inc. All Rights Reserved 61
Local Information This screen contains the information pertaining to the local properties of the test script. Each of these fields has two or more of the following options to define the values within the call file: Fixed: All calls will use the stated value Incremental: Calls will use an increasing value based upon the initial value and a specified increment Random: Calls will use random values between a specified floor (minimum) and ceiling (maximum).

WinSIP User’s Guide
Copyright 2002, 2018 Touchstone Technologies, Inc. All Rights Reserved 62
The fields included are: ID/Number: Fill in the value of the local ID. Choose incremental to generate incremental value (e.g. Local1, Local2, etc.), fixed to set all ID’s to the same value (not a good idea, but possible) or random to generate a random ID for each call. Address: Enter the address to be used for the calls. This may be either fixed or incremental. Port: Enter the port that you would like to use for the calls. This may be either fixed or incremental. Audio Codec: Select the audio codec to be used for this call or “none” for no audio. This list represents the currently advertised codecs in the Options | Settings | Media audio section. Video Codec: Select the video codec to be used for this call or “none” for no video. This list represents the currently advertised codecs in the Options | Settings | Media video section. Display Name: Enter the display name for the call. This may be fixed, incremental, or random. Local URL: This is a display-only field that previews the formatting of the SIP URL.

WinSIP User’s Guide
Copyright 2002, 2018 Touchstone Technologies, Inc. All Rights Reserved 63
Authentication Information Each of these fields has two or more of the following options to define the values within the call file: Fixed: All calls will use the stated value Incremental: Calls will use an increasing value based upon the initial value and a specified increment Random: Calls will use random values between a specified floor (minimum) and ceiling (maximum).

WinSIP User’s Guide
Copyright 2002, 2018 Touchstone Technologies, Inc. All Rights Reserved 64
The fields included are: Username: Set a username for a call ID or you leave it blank. Password: Set a password to access the call ID or you leave it blank.

WinSIP User’s Guide
Copyright 2002, 2018 Touchstone Technologies, Inc. All Rights Reserved 65
Remote Information This screen contains the information pertaining to the remote properties of the test script. Each of these fields has two or more of the following options to define the values within the call file: Fixed: All calls will use the stated value Incremental: Calls will use an increasing value based upon the initial value and a specified increment Random: Calls will use random values between a specified floor (minimum) and ceiling (maximum).

WinSIP User’s Guide
Copyright 2002, 2018 Touchstone Technologies, Inc. All Rights Reserved 66
The fields included are: ID/Number: Fill in the value of the remote ID. Choose incremental to generate incremental value (e.g. Remote1, Remote2, etc.), fixed to set all ID’s to the same value (not a good idea, but possible) or random to generate a random ID for each call. Address: Enter the address to be used for the calls. This may be either fixed or incremental. Port: Enter the port that you would like to use for the calls. This may be either fixed or incremental. Display Name: Enter the display name for the call. This may be fixed, incremental, or random. Target URL: This is a display-only field that previews the formatting of the SIP URL.

WinSIP User’s Guide
Copyright 2002, 2018 Touchstone Technologies, Inc. All Rights Reserved 67
DTMF Events This screen contains the information pertaining to the DTMF properties of the test script. Each of these fields has two or more of the following options to define the values within the call file: Fixed: All calls will use the stated value Incremental: Calls will use an increasing value based upon the initial value and a specified increment Random: Calls will use random values between a specified floor (minimum) and ceiling (maximum).

WinSIP User’s Guide
Copyright 2002, 2018 Touchstone Technologies, Inc. All Rights Reserved 68
The fields included are: Delay (6): Fill in the delay of the event sequence in milliseconds. Use zero (0) to send the sequence immediately. This delay occurs prior to sending the sequence. Event Sequence (6): The DTMF event sequence to be sent. Valid values are any combination of the following characters: 0-9, A,B,C,D, F(Flash), * and #. Type (6): You may select from fixed or incremental (note: incremental only affects the sequences, not the delay values). Using the value from the scenario above, the following DTMF event sequences would be generated: P3000;2156726550#;P1500;1234#;P2000;2155551212 P3000;2156726551#;P1500;1234#;P2000;2155551213 P3000; 2156726558#;;P1500;1234#;P2000;2155551220 P3000; 2156726559#;;P1500;1234#;P2000;2155551221 The DTMF events field indicates the DTMF events that should be sent during this call. This field has no effect if the enable DTMF events option is not selected in the media preferences page. The syntax employed in WinSIP for DTMF events is as follows: P[xxxx] Pause for [xxxx] milliseconds ; Event sequence delimiter 0-9,A,B,C,D,F,*, # Note: F signifies the ‘Flash’ function DTMF events are transmitted a configurable number of times each. The number of transmissions, power, duration, and packet type are configurable on the media preferences page. Examples of DTMF event strings: P3000;2156726550#;P1500;1234#;P2000;2155551212 This command pauses for 3000 milliseconds (3 seconds) then sends the sequence 2156726550#, pauses for 1500 milliseconds (1.5 seconds) then sends

WinSIP User’s Guide
Copyright 2002, 2018 Touchstone Technologies, Inc. All Rights Reserved 69
the sequence 1234# and pauses for 2000 milliseconds (2 seconds( then sends the sequence 2155551212. The actual events sent based upon three (3) transmissions per event would be: 222111555666777222666555555000###111222333444###222111555555555555111222111222 Up to 6 event sequences may be scripted for each call. This implementation is in accordance with RFC 2833, Section 3, ‘Named Telephony Events’.

WinSIP User’s Guide
Copyright 2002, 2018 Touchstone Technologies, Inc. All Rights Reserved 70
Hold/Unhold
The fields included are: Hold/Unhold Sequences During Call: This option you set the sequence of hold and unhold. Repeating mode will repeat the hold process and the single mode will place the call on hold only once. Interval Until/Between Sequences: This is the time intervals between 2 hold sequences. Hold Duration: This option is the specific time the call is placed on hold.

WinSIP User’s Guide
Copyright 2002, 2018 Touchstone Technologies, Inc. All Rights Reserved 71
Call Transfer
The fields included are: Type: Sets the call transfer type to do so when ringing (blind), transfer after the answer (Consultative), or not transfer at all (None). ID/Number: Fill in the value of the remote ID. Choose incremental to generate incremental value (e.g. Remote1, Remote2, etc.), fixed to set all ID’s to the same value (not a good idea, but possible) or random to generate a random ID for each call. Address: Enter the address to be used for the calls. This may be either fixed or incremental.

WinSIP User’s Guide
Copyright 2002, 2018 Touchstone Technologies, Inc. All Rights Reserved 72
Port: Enter the port that you would like to use for the calls. This may be either fixed or incremental. Target URL: This is a display-only field that previews the formatting of the SIP URL. Note: For call transfer to work properly the Hold values must be manually entered into the call file. Values that must be entered are:
Hold Frequency
Value must be set to “Single”
Hold Interval
Value entered in seconds.
Hold Duration
Value entered in seconds.

WinSIP User’s Guide
Copyright 2002, 2018 Touchstone Technologies, Inc. All Rights Reserved 73
Generating Partner Files WinSIP provides an automated method of generating a ‘mirror-image’ of the test script for use by another WinSIP endpoint. This file is usually referred to as a ‘partner file”. When this option is selected from the file menu or the edit view you will be presented with the “Save As” dialog box:
WinSIP will automatically swap the following fields:
Local and remote addresses
Local and remote ports
Local and remote IDs
Local and remote aliases You will then be given the opportunity to load the partner file for use or viewing:

WinSIP User’s Guide
Copyright 2002, 2018 Touchstone Technologies, Inc. All Rights Reserved 74
Settings WinSIP provides parameter file editing through the Options | Settings menu choice. The following section describes these screens and settings in detail.
SIP Options Use this command to view or change the global SIP settings. The following dialog will appear:

WinSIP User’s Guide
Copyright 2002, 2018 Touchstone Technologies, Inc. All Rights Reserved 75
The fields included are:
UAC Options (Initiate modes only)
SDP offer in INVITE: .This option enables/disables the offering SDP in the initial INVITE request from WinSIP.
UAS Options (Answer modes only)
Send 100 Trying: If enabled, WinSIP will send a 100 Trying response to inbound INVITE requests. Send 180 Ringing: If enabled, WinSIP will send a 180 Ringing response to inbound INVITE requests. Send 183 Session Progress: If enabled, WinSIP will send a 183 Session progress response to inbound INVITE requests. SDP in 180 Ringing: If checked, WinSIP will respond with of an SDP offer or answer in the 180 ringing when a PRACK is expected. Allow Re-Invite: This option allows re-invite handling. Ignore Re-Invite: If checked, it simply drops the re-INVITE request. If not checked, and Allow Re-Invite is not checked, it responds with a 488 Not Acceptable Here. Home Port: This determines which port on the selected adapter WinSIP is homed on (listening port).
UAS Authentication
Authenticate REGISTER: If checked, WinSIP will send your preference of 401 Authentication Required or 407 Proxy Authentication Required to inbound REGISTER requests (Proxy mode only). Authenticate INVITE: If checked, WinSIP will send your preference of 401 Authentication Required or 407 Proxy Authentication Required to inbound INVITE requests. Authenticate BYE: If checked, WinSIP will send your preference of 401 Authentication Required or 407 Proxy Authentication Required to inbound BYE requests.

WinSIP User’s Guide
Copyright 2002, 2018 Touchstone Technologies, Inc. All Rights Reserved 76
Include Algorithm Parameter in challenge response: This option forces inclusion of the “algorithm=md5” parameter in the authorization response.
PRACK
Support PRACK: Enable this option to add a Supported: header with the 100rel value to the INVITE request. Require PRACK: Enable this option to add a Require: header with the 100rel value to the INVITE request.
SDP Options
Increment SDP Version: By enabling this option, you can increment the SDP version number by 1 in each outgoing Re-Invites.
Dialog Timers
Dialog Creation Idle Timeout: This field specifies the number of seconds to wait before the dialog create timeout occurs. A value of zero (0) specifies an indefinite period. A value between five (5) and thirty-six hundred (3,600 seconds/1 hour) activates a timer for that period. The timer begins (for the UAC/Initiator), when the first non-final response is received (codes 100–199) and ends when a final response (200 or greater) is received. For the UAS (answerer) it begins when the INVITE request is responded to with a 100-299 code and ends when an ACK is received. Dialog Close Idle Timeout: This field specifies the number of seconds to wait before the dialog close timeout occurs. A value of zero (0) specifies an indefinite period. A value between five (5) and thirty-six hundred (3,600 seconds/1 hour) activates a timer for that period. The timer begins when a BYE message is sent and ends when a final (200 or greater) response is received. No Answer Timer: Initiate mode only, this field specifies the number of seconds to wait before the dialog is cancelled when an endpoint is alerting but not answered. A value of zero (0) specifies an indefinite period. A value between five (1) and thirty-six hundred (3,600 seconds/1 hour) activates a timer for that period. The timer begins when a 180 Ringing response message is received and ends when a final (200 or greater) response is received.

WinSIP User’s Guide
Copyright 2002, 2018 Touchstone Technologies, Inc. All Rights Reserved 77
Session Timer
Support Session Timer: This field enables or disables Session Timer support. If this option is enabled, the following options are available: Require Session Timer: Enable this option to add a Require: header with the ‘timer’ value to the INVITE request. Initiate Session Timer: This option forces the inclusion of Session-Expires: and Min-SE: headers in INVITE requests. Suppress Supported Line: This option suppresses the “Supported: timer” header while still maintaining support for all timer functions. Session Interval: The session interval in seconds. This corresponds to the value of the duration field of the Session-Expires: header. Minimum SE Interval: The minimum session interval in seconds. This value must be ten (10) or greater (up to the Session Interval value), this field adds a Min-SE: header with the desired duration value. Refresh Lead Time: The number of seconds prior to session expiration the application should try to refresh the session. This value must be between 5 and one half of the Min-SE value. Refresher: This field determines whether the local or the remote machine should play the role of session refresher. Refresher Mechanism: This field determines which method (re-INVITE or UPDATE) the local machine will use to initiate session refreshes. Renegotiation Refresher Roles Every Transaction: When enabled, this option does not add the ‘refresher=’ parameter on the Session-Expires: header, allowing for the other endpoint to determine whether it wishes to assume the role of refresher. When two WinSIPs are “back-to-back” enabling this option on both sides creates a “ping-pong” refresher effect.

WinSIP User’s Guide
Copyright 2002, 2018 Touchstone Technologies, Inc. All Rights Reserved 78
UAC Request Options
Send Port in Request URI: If enabled, this option always adds the port number in the Request URI. Send Port In To/From Header: If enabled, this option always adds the port number in the To/From Header.
SIP DSCP/TOS Options
This option allows you to set value for the DSCP/TOS (Type of Service) for sending the signaling packets.
Call Start/Stop Limits
Maximum Call Start Rate: Allows you to control the call start rate via a ‘garden hose’ effect. A value of zero (0) starts the calls as fast as possible. A value between one (1) and one thousand (1,000) will allow up to the specified number of calls per second to start.
Note: This field represents the maximum call start rate. The actual call presentation rate may be lower depending upon the call signaling, latency of the unit under test, call durations, programmed delays, hardware limitations, and the current call load.
Maximum Call Stop Rate: Allows you to control the call stop rate via a ‘garden hose’ effect. A value of zero (0) hangs up the calls as fast as possible. A value between one (1) and one thousand (1,000) will hang-up up to the specified number of calls per second.
Note: This field represents the maximum call stop rate. The actual call stop rate may be lower depending upon the latency of the unit under test, call signaling, programmed delays, hardware limitations, and the current call load.

WinSIP User’s Guide
Copyright 2002, 2018 Touchstone Technologies, Inc. All Rights Reserved 79
Media Options Use this command to view or change the global media settings. The following dialog will appear:

WinSIP User’s Guide
Copyright 2002, 2018 Touchstone Technologies, Inc. All Rights Reserved 80
The fields included are:
General
RTP Enabled: This option enables/disables the sending of RTP media. Mirror Inbound Streams: This option does not generate media, but “mirrors” or “echoes” data received on the inbound channel. First RTP Port: This option specifies the RTP first port to be used when opening RTP channels. The values may be between forty thousand (40,000) and sixty thousand (60,000). The values below forty thousand are reserved for WinSIP SIP protocol messages. First RTCP Port: This option specifies the RTP first port to be used when opening RTCP channels. The values may be between forty thousand (40,001) and sixty thousand (60,000). The values below forty thousand are reserved for WinSIP SIP protocol messages.
Start Media
UAC: This Block gives an option to start media after a particular message is received. For example if you want to start media as soon as you get 180 Ringing Response, you have to select the 180 Ringing option in the UAC box. UAS: This Block gives an option to start media after a particular message is sent. For example if you want to start media as soon as you send 100 Trying Response, you have to select the 180 Trying option in the UAS box.
Audio Capabilities
Available: This indicates which audio capabilities are available to advertise in the SDP offer. Selected: This indicates which audio capabilities to advertise in the SDP offer.

WinSIP User’s Guide
Copyright 2002, 2018 Touchstone Technologies, Inc. All Rights Reserved 81
Edit Audio Codecs…
Under the Audio Capability section of the ‘Settings | Media’ tab, clicking on the Edit Codecs… command button will display an Audio Codec Maintenance dialog box. The following are the descriptions of the available options.
Name: This is the display name used to identify this particular codec. Codec Type: This field represents the value used in the RTP header to identify this particular codec. Sub Type: This field is used internally to identify codec variants (i.e. different codec definitions which have the same codec type value. PTime: This field determines the amount of audio (in milliseconds) contained within each packet.

WinSIP User’s Guide
Copyright 2002, 2018 Touchstone Technologies, Inc. All Rights Reserved 82
Play List: The play list allows you to select audio clips that are played in sequence. Each clip may be played once, a specified number of repetitions, a specified period of time, or continuously. If the end of a play list is reached prior to call termination, the entire list is repeated until the call is terminated. Add Multiple: This option allows you to select multiple audio files at one time. The files will be placed in the playlist in the order of files selected. Audio Packet Definition: This section defines the packetization of the audio stream. The following explains each option:
By Packet Size: Defines the audio packet size by the payload bytes contained in each packet (e.g. G.711 at 20ms contains 160 bytes, at 10 ms 80 bytes, at 60 ms 480 bytes),
By Frame Properties: Defines the audio packet in terms of audio frames per packet and frame size (e.g. G.711 audio frames are 1 ms each. Each frame is 8 bytes, therefore: 20 ms of G.711 contains 20 frames * 8 bytes each or 160 total bytes).
Packetized only: Packetized format is one of the stream capture options and can be used to add or “learn” new CODECs and media streams. For instance, WinSIP does not natively support G.722.2 (wideband CODEC). You may add a new CODEC definition for G.722.2 and advertise it in WinSIP and then record the incoming stream in “packetized” format. You may then replay the stream by selecting the “packetized” audio packet definition type and WinSIP will use the information recorded in the packetized file to replay the stream even if the packet size varies (for example, AMR packets may vary in size).
SDP: This section contains the SDP elements for each CODEC.
Rtpmap entry: The SDP rtpmap entry for the CODEC.
Initial mode: This option allows you to set the initial mode for setting the attribute to recv, or send, or both (sendrecv) audio in SDP.
Attributes: CODEC specific SDP attributes to be added for this CODEC.

WinSIP User’s Guide
Copyright 2002, 2018 Touchstone Technologies, Inc. All Rights Reserved 83
Edit Playlist
With the Audio Codec Maintenance dialog box displayed, clicking on the Playlist command button will display an Edit Playlist dialog box. The following are the descriptions of the available options.
File: The name of the file containing the audio clip. Loop Type: The type of loop to be applied to this file. The following loop types are available:
Play once: The clip is played end-to-end a single time.
Continuous loop: The clip is played repeatedly.
Note: If this is used in any position besides the last in the list, the list will not progress past this point.
Timed loop: The clip is played for the specified period of time irrespective of the number of times the clip must be looped through or the position in the clip.
Specified repetitions: The loop is played end-to-end the specified number of times irrespective of the duration of the clip.
Note: If the call duration exceeds the length of audio defined in the playlist, the entire playlist will repeat until the call terminates.

WinSIP User’s Guide
Copyright 2002, 2018 Touchstone Technologies, Inc. All Rights Reserved 84
Video Capabilities
Available: This indicates which video capabilities are available to advertise in the SDP offer. Selected: This indicates which video capabilities to advertise in the SDP offer.
Edit Video Codecs…
Name: This is the display name used to identify this particular codec. Codec Type: This field represents the value used in the RTP header to identify this particular codec. Sub Type: This field is used internally to identify codec variants (i.e. different codec definitions which have the same codec type value.

WinSIP User’s Guide
Copyright 2002, 2018 Touchstone Technologies, Inc. All Rights Reserved 85
Format: With this option you can select the format of outgoing Video, such as H.261, H.263, etc. Video Clip: The name and location of the file containing the video clip. Frame Rate: With this option you can send either a particular frame per packet or you can send default frames per packet. If the value is not the default value for the Video format you selected the adjacent default button will be activated. Default button will change the value of frames per packet to default value of the Video format you selected. SDP: This section contains the SDP elements for each CODEC.
Rtpmap entry: The SDP rtpmap entry for the CODEC. Initial mode: This option allows you to set the initial mode for setting the attribute to recv, or send, or both (sendrecv) video in SDP. Attributes: CODEC specific SDP attributes to be added for this CODEC.
Channel Attributes
Transmit on / Receive on: These fields determine the number of calls that transmit/receive data. If a specific number is entered, then that many calls, in sequence starting with the first call you selected to run, transmit and/or receive data accordingly. If “all” is entered, then all of the calls you have selected to run will transmit and/or receive data accordingly. Goal: This group of buttons specifies the outbound media goal.
Perfect Media: A goal of perfect media places the emphasis on transmitting media as close as possible to the perfect interval or frame rate. Maximum Connections: A goal of maximum connections places the emphasis on opening the maximum number of calls with audio and/or video streams. Best Balance: A goal of best balance tries to balance quality and quantity.
RTCP Enabled: Enable or Disable RTCP. RTCP Attribute in SDP: If checked, this option adds the following attribute line to the SDP:
a=rtcp: [RTCP port number]

WinSIP User’s Guide
Copyright 2002, 2018 Touchstone Technologies, Inc. All Rights Reserved 86
Media DSCP/TOS Options
Audio RTP: This option allows you to set value for the DSCP/TOS (Type of Service) for sending the Audio RTP packets.
Audio RTCP: This option allows you to set value for the DSCP/TOS (Type of Service) for sending the Audio RTCP packets.
Video RTP: This option allows you to set value for the DSCP/TOS (Type of Service) for sending the Video RTP packets.
Video RTCP: This option allows you to set value for the DSCP/TOS (Type of Service) for sending the Video RTCP packets.
DTMF Events
This group of items enables/disables DTMF events, specifies the number of transmissions per DTMF digit, specifies the power of the transmission and the duration of the tone and the packet type of the telephone event. Enable Events: This option gives the ability to send or not to send the DTMF events.
RFC 2833 - Section 3: This option will use RFC 2833 method to send the DTMF events.
SIP INFO Method: This option will use INFO method to send the DTMF events; it sends the DTMF events in SIP messages.
Duration: Duration of the tone, how long the button is pressed.
RFC 2833 - Section 3
Power: The power level to be encoded into the DTMF packets.
Packet Type: The packet type identifier for the DTMF packets (user type from 96 to 127). Transmissions: Selects the number of transmissions of each DTMF digit. End Bit Transmissions: Selects the number of End Bit transmissions of each DTMF digit.

WinSIP User’s Guide
Copyright 2002, 2018 Touchstone Technologies, Inc. All Rights Reserved 87
Sequence: You can set the sequence of the each DTMF event to be incremental or duplicate.
SIP INFO Method
Interval: The time between the information messages.

WinSIP User’s Guide
Copyright 2002, 2018 Touchstone Technologies, Inc. All Rights Reserved 88
Proxy/Registrar Options Use this command to view or change the global proxy server and registrar settings. The following dialog will appear:

WinSIP User’s Guide
Copyright 2002, 2018 Touchstone Technologies, Inc. All Rights Reserved 89
The fields included are:
Proxy Server
Use Proxy Server: This enables/disable proxy server and registrar services. Emulate Gateway: This option does not set the address of record to that of the proxy but rather forces it to the local address (from the local address in the call file). Configure as outbound proxy: Direct all requests and responses to the proxy without regard to the contents of the SIP Via or Contact headers. Proxy Server Address: This field is the IP address or the fully qualified domain name (FQDN) of the proxy server to contact. Proxy Server Port: This field specifies the proxy server port to be used.
Registrar
Send Registration Requests: This option sends Registration Request to IP address present in the “Registration Address” box. Register and Un-register between each call: With this option each call will Register and Un-register between every cycle. Registrar Address: This field is the IP address or the fully qualified domain name (FQDN) of the registrar to contact for REGISTER/un-REGISTER requests (this is usually the same as the proxy server but may be different) Registrar Port: This field specifies the registrar port to be used. Registration TTL: This field specifies the time-to-live of the registration binding (in seconds). Send (re) REGISTER (n) seconds before expiration: Specifies the lead time for registration binding refreshes in seconds.

WinSIP User’s Guide
Copyright 2002, 2018 Touchstone Technologies, Inc. All Rights Reserved 90
Proxy Options (SIMPLE)
Send Messages Waiting Notifications: This option allows you to send the notifications, when an endpoint is registered or unregistered. Messages Waiting: This option allows you to set the message waiting option in the notifications of the registration.
Registration Options
Send Port in REGISTER request URI: Enables/disables the sending of the port in REGISTER request URI (address in REGISTER request header). Send Port in REGISTER To/From headers: Enables/disables the sending of the port in REGISTER request To and From headers. Send Expires Parameter In Contact Header: This option will add the Expire Parameter in the Contact Header. Send Expires Header: This option will send the Expire Parameter in Expire Header. Enable Registration Delay: Enables/disables the option to specify the delay to be used prior to sending the initial REGISTER request.
Register Delay: This option allows you to specify the delay between REGISTER requests sent by WinSIP to the registrar. This field gives you the flexibility to ‘throttle back’ registrations so as not to overload a proxy/registrar
Un-Register Delay: This option allows you to specify the delay between (un)REGISTER requests sent by WinSIP to the registrar. This field gives you the flexibility to ‘throttle back’ un-registrations so as not to overload a proxy/registrar.

WinSIP User’s Guide
Copyright 2002, 2018 Touchstone Technologies, Inc. All Rights Reserved 91
Error Injection Options

WinSIP User’s Guide
Copyright 2002, 2018 Touchstone Technologies, Inc. All Rights Reserved 92
The fields included are:
Enable Error Injection
Click check box if error injection is to be enabled.
Parser/Transaction Matching Errors
Change Call ID: This option changes the Call ID in the 200 OK response from Answer Side. Illegal Sequence (Cseq) Number: This option changes the Sequence (Cseq) number of a Response to an illegal Sequence (Cseq) number (i.e. ‘0’). Drop Required Header: This option will drop the ‘From‘ header from the 200 OK Response message. Drop/Change Branch Parameter: This option will change the Branch Parameter of 200 OK Response message. Affect all calls or % of calls: All Call’s option makes the above selected changes in every call whereas ‘ % of Calls’ Option makes selected changes to particular percentage of total number of calls.
UAC Errors
Don’t send ACK: This option makes UAC side not to send ACK. This Option is used in UAC side only. Affect all calls or % of calls: All Call’s option makes the above selected changes in every call whereas ‘ % of Calls’ Option makes selected changes to particular percentage of total number of starting calls.
UAS Errors
INVITEs
No errors: This option will not inject any errors in INVITE messages.
Don’t respond (at all): With this option the UAS side will not respond any incoming INVITE Messages. UAS side will be working as if it never saw the incoming INVITE messages.

WinSIP User’s Guide
Copyright 2002, 2018 Touchstone Technologies, Inc. All Rights Reserved 93
Don’t send 200 OK: With this option the UAS side will not Send 200 Ok to incoming INVITE Messages.
Send custom response: With this option, you can send a custom Code and custom Text in your INVITE message.
Code: You can send a custom Code in your message.
Test: You can send a Custom Text along with the custom Code in your header.
Affect all calls or % of calls: All Call’s option makes the above selected changes in every call whereas ‘ % of Calls’ Option makes selected changes to particular percentage of total number of starting calls.
BYEs
No errors: This option will not inject any errors in BYE messages.
Don’t respond: With this option the UAS side will not respond any incoming BYE Messages. UAS side will be working as if it never saw the incoming BYE messages.
Send custom response: With this option, you can send a custom Code and custom Text in your BYE message.
Code: You can send a Custom Code in your message.
Test: You can send a Custom Text along with the Custom Code in your header.
Affect all calls or % of calls: All Call’s option makes the above selected changes in every call whereas ‘ % of Calls’ option makes selected changes to particular percentage of total number of starting calls.

WinSIP User’s Guide
Copyright 2002, 2018 Touchstone Technologies, Inc. All Rights Reserved 94
Advanced

WinSIP User’s Guide
Copyright 2002, 2018 Touchstone Technologies, Inc. All Rights Reserved 95
The fields included are:
Media Path Confirmation
Media path confirmation is used to determine whether devices that do transcoding are sending the streams to the proper destination. WinSIP uses RFC 2833 compliant DTMF packets to determine path correctness. Enabled: Enables or disables the media path confirmation tests. Test Type: Determines the test to be run. Valid values are:
Local-ID: single pass. The initiating WinSIP sends its local ID via DTMF to the answerer. Upon receipt of the complete initiator’s ID, the answerer responds with a local ID sequence of its own. Once the initiator receives the confirmation ID, that pass is considered completed successfully.
Ping-Pong-ID: double pass. The initiating WinSIP sends the remote ID via DTMF to the answerer. Upon receipt of its ID, the answerer responds by sending its local ID in a sequence of its own. Once the initiator receives the confirmation ID, it then sends a sequence containing its local ID. Upon receipt of the remote ID, the answerer responds by sending the same ID in a confirmation sequence. Once the initiator receives the confirmation ID, that pass is considered completed successfully.
Call-ID: single pass: The initiating WinSIP sends the call-id via DTMF to the answerer. Upon receipt of the complete call-id, the answerer responds with a call-id sequence of its own. Once the initiator receives the confirmation call-id, that pass is considered completed successfully.
Failure Timeout: The amount of time to wait between sequences before the test is considered a failure. Initial Delay: The amount of time to delay prior to initiating the test. Delay Between Tests: The amount of time to delay between test iterations. Maximum Repetitions: The number of times to repeat the test. Valid values are between 1 and 1,000.

WinSIP User’s Guide
Copyright 2002, 2018 Touchstone Technologies, Inc. All Rights Reserved 96
Media Recording
Record Audio Streams: Enables/disables the recording of audio streams. It is highly recommended that this option be enabled when running lower volumes of traffic. All streams within the "Receive On:" realm will be recorded. The file names will have the format: "audio[ip address].[time/date].[codec name]". Format: The output format for the audio recording. Valid values are "raw" and "packetized".
Raw Format: This format records only the contents of the stream. WinSIP can record and replay the following raw codec types.
G.711 Alaw, G.711 µlaw, G.722.1, G.723 5.3k, G.723 6.3k, G.728, G.729a, AMR NB (NetMeeting 12.2 Kb).
Packetized: Any RTP audio stream that can be replayed at a specified fixed inter-packet interval.
Set Custom Audio File Name: With this option you can set your own custom name for the audio files recorded. Record Video Streams: Enables/disables the recording of audio streams. It is highly recommended that this option be enabled when running lower volumes of traffic. All streams within the "Receive On:" realm will be recorded. The file names will have the format: "video[ip address].[time/date].[codec name]" Format: The output format for the video recording. Valid values are "raw" and "packetized".
Raw Format: This format records only the contents of the stream. WinSIP can record and replay the following raw codec types.
H.261 and H.263.
Packetized: Any RTP video stream that can be replayed at a specified frame rate and indicates framing with the marker bit of the RTP header.
Set Custom Video File Name: With this option you can set your own custom name for the video files recorded.

WinSIP User’s Guide
Copyright 2002, 2018 Touchstone Technologies, Inc. All Rights Reserved 97
Call Rate Optimization
Call rate optimization is an algorithm which when enabled, searches for the highest error-free rate attainable by the unit or device under test (UUT/DUT). Enable Optimization: The option enables the algorithm (note: to enable the algorithm, you must also have defined a maximum call start rate). Lock on optimum rate: This determines whether the system should use the first rate determined to be successful (when checked) or whether to continually to try to increase the rate during the test (not checked).
XML Templates
Use XML Request Templates: Each WinSIP has a “WinSIP.xml” file in its root directory (default: C:\WinSIP) which contains XML templates for each SIP request message. These templates allow for insertion of system-defined values from the data dictionary (see below for example). In addition, there are 10 “User-defined” input elements available for each call where the user can enter values that can be varied on a call-by-call basis. Sample XML Request Template:
<message name="invite.with.sdp"> <![CDATA[ INVITE sip:[input.remote.id]@[dialog.remote.request.addr]:[dialog.remote.request.port];transport=[system.ip.protocol] SIP/2.0 [dialog.route.set] From: [input.local.name] <sip:[input.local.id]@[dialog.local.aor.addr]:[dialog.local.aor.port]>;tag=[transaction.local.tag] To: [input.remote.name] <sip:[input.remote.id]@[dialog.remote.aor.addr]:[dialog.remote.aor.port]> Via: SIP/2.0/[system.ip.protocol] [input.local.address]:[input.local.port];branch=[transaction.branch] Call-ID: [transaction.callid] CSeq: [transaction.local.cseq] INVITE
User-Agent: [system.user.agent.id] Contact: sip:[input.local.id]@[input.local.address]:[input.local.port] Allow: [system.transactions.supported] Accept: application/sdp Supported: 100rel, timer Session-Expires: 60;refresher=uac Min-SE: 30
Accept-Language: en Accept-Encoding: identity/text/xml
Max-Forwards: 70 [transaction.custom.headers]

WinSIP User’s Guide
Copyright 2002, 2018 Touchstone Technologies, Inc. All Rights Reserved 98
[transaction.authorization.header] Content-Type: application/sdp Content-Disposition: dialog Content-Length: [transaction.content.length]
[dialog.local.sdp] ]]>
</message>
Tone Detect Confirmation
Enable Tone Detect Confirmation: Enabling this option will perform Tone Detection test. This option will detect tone from the incoming audio and check the correct order (1500Hz - 1000Hz - 2000Hz) of the tone to report as passed or failed. Sensitivity: This option allows you to set the sensitivity of the Tone Detect Test to report as passed of failed.
Calls Block Option
Enabled: Check this box to enable the Block Call Option. This gives the ability to start a particular size block of calls. No further blocks will run unless all calls from the previous block have completed. Block Size: This option allows you to set the block size of the calls. Default Duration: In the call file, if the call duration is set to manual, then the value entered here will replace the manual duration within the call file.

WinSIP User’s Guide
Copyright 2002, 2018 Touchstone Technologies, Inc. All Rights Reserved 99
Custom Headers Options This allows you to create custom headers that are sent in specified requests and responses.

WinSIP User’s Guide
Copyright 2002, 2018 Touchstone Technologies, Inc. All Rights Reserved 100
The fields included are:
Custom Header
Enter the custom header you wish to use in this field, and press the “Save” button to apply it to the selected request or response.
Apply to
Request: Check a box in here to select a request (or multiple requests) to which you wish to apply a custom header.
Select All: Selects all the request messages to apply the custom header.
Clear All: Removes the custom headers from all of the request messages. Response: Check a box in here to select a response (or multiple responses) to which you wish to apply a custom header.
Select All: Selects all the response messages to apply the custom header.
Clear All: Removes the custom headers from all of the response messages.
Enabled: Shows the list of the custom headers available for the selected request(s) or response(s). It also allows you to enable and disable specific headers.
Edit: Allows you to alter the header you have selected.
Replicate: Copies the selected header and pastes it at the end of the list.
Remove: Removes the selected header from the list.
Move Up: Moves the header up in the list, which is the order it will also be displayed when triggered.
Move Down: Moves the header down in the list, which is the order it will also be displayed when triggered.

WinSIP User’s Guide
Copyright 2002, 2018 Touchstone Technologies, Inc. All Rights Reserved 101
Reports Options

WinSIP User’s Guide
Copyright 2002, 2018 Touchstone Technologies, Inc. All Rights Reserved 102
The fields included are:
Call Summary Report
This report contains detailed call metrics including IDs, addresses, call metrics, media metrics, durations and intervals similar to a CDR report Format: Selects the format in which the report will be written (HTML, ASCII, or Tab Delimited). Location/Name: The location and name of the file in which the report should be saved.
Session Summary Report
This report contains “snapshots” of the WinSIP system during tests. Format: Selects the format in which the report will be written (HTML, ASCII, or Tab Delimited). Interval: The interval at which the session “snapshots” should be recorded Location/Name: The location and name of the file in which the report should be saved. Add Timestamp: This option allows you to add a timestamp at the end of the file name. With this option each saved file will be unique. Warn before overwriting existing reports: If checked, notifies the user if two files share the same name and asks whether they wish to overwrite it or not.

WinSIP User’s Guide
Copyright 2002, 2018 Touchstone Technologies, Inc. All Rights Reserved 103
Logging Options Use this command to view or change the global logging settings. The following dialog will appear:

WinSIP User’s Guide
Copyright 2002, 2018 Touchstone Technologies, Inc. All Rights Reserved 104
The fields included are:
Log File
This field represents the name and location of the current log file. If there is no path specified, the log file resides in the WinSIP install directory (the same directory as the WinSIP.exe file). The button to the right of the field provides browse capabilities.
Log Level
This field represents the level at which logging will occur during the operation of the application. The following levels are available:
All: This option logs everything. It will generate a very large amount of information and should not be used when running at high call rates or over extended periods of time due to negative performance impact and disk space requirements. Trace: This option generates messages for the following levels: Trace, Debug, Information, Warnings and Errors. Use this option for debugging WinSIP when looking for a known application error. It generates a very large amount of information and should not be used when running at high call rates or over extended periods of time due to negative performance impact and disk space requirements. Debug: This option generates messages for the following levels: Debug, Information, Warnings and Errors. Use this option for debugging WinSIP when looking for possible application error. It generates a large amount of information and should not be used when running at high call rates or over extended periods of time due to negative performance impact and disk space requirements. Information: This option generates messages for the following levels: Information, Warnings and Errors. Use this option for debugging problems that may be due to error conditions on the remote connection. It generates information on connections, request and responses for each call. This mode may be run at high call rates or over extended periods of time. Warnings: This option generates messages for the following levels: Warnings and Errors. Use this option for normal testing. Errors: This option generates error messages only. Use this option to minimize the size of the log file. None: Use this option to turn off logging. Note: the session start and end markers are still logged even with this option.

WinSIP User’s Guide
Copyright 2002, 2018 Touchstone Technologies, Inc. All Rights Reserved 105
Reset log file each session: This option clears the log file upon re-starting WinSIP if the previous instance had exited normally. In the event of an abnormal termination, the previous instances log file contents will be preserved.
Dump Statistics every
This option dumps a snapshot of the session statistics every (n) seconds. This timer is only in effect when there is an active session.
File Limitations
Constraints: Defines how the logs are saved and when a new log is created. Can be set to a set interval of time, specific time of day, specific size of the log file, or does not need to be constrained at all.

WinSIP User’s Guide
Copyright 2002, 2018 Touchstone Technologies, Inc. All Rights Reserved 106
Preferences Options Use this command to view or change the global personal preferences settings. The following dialog will appear:

WinSIP User’s Guide
Copyright 2002, 2018 Touchstone Technologies, Inc. All Rights Reserved 107
The fields included are:
Protocol
UDP: Select either UDP or TCP/IP for SIP signaling.
Use Unique Sending Ports: This option allows the signaling message from a unique port for each call. Use Fixed Sending Port: This option allows the signaling message from a fixed port for all the calls.
TCP/IP: Select either UDP or TCP/IP for SIP signaling.
Use Fixed Sending Port: This option allows the signaling message from a fixed port for all the calls.
Delay between TCP/IP connects: Specifies the time to delay between TCP/IP connections at startup. Some applications cannot handle a burst of connection attempts. Use this field to specify how long to wait between connections. Use Unique Sending Ports: This option allows the signaling message from a unique port for each call. Use Fixed Sending Port: This option allows the signaling message from a fixed port for all the calls.
Retransmission Times (t1 in milliseconds)
This option allows you to specify the t1 value for six different ranges of concurrent call activity. Higher activity may require a longer period between retries.
System
Internet Browser: The location and name of the browser used to view HTML formatted files.
Call Analysis
Trace All Calls: Automatically traces all active calls for the duration of the session. Use this option to capture all call traces during a session.

WinSIP User’s Guide
Copyright 2002, 2018 Touchstone Technologies, Inc. All Rights Reserved 108
Trace Error Calls: If any results in an error, checking this option will cause the call trace of that call to be saved. Display New Calls: Enables/disables displaying of calls on the detail view in ‘New Call’ mode.
Calculate Call Rates
This setting specifies whether to calculate call rates on a per-hour or per-second basis.
Automata
Perform Validity Check Before Starting Session: This option will perform a validity check and will report if any call is duplicated with same name, local ID etc. before starting the session
Multi-Line Emulation
Enable: Check box to enable multi line emulation or leave unchecked for disabled.
Error Options
Busy Here and Cancel as Errors: Allows the user to specify whether he/she considers Busy and Cancelled calls errors or not.
Auto View Switching
Switch from Main View to Detail View on Start Calls: This option automatically switches from the main view to the detail view when calls are started. Switch from Edit View to Detail View on Start Calls: This option automatically switches from the edit view to the detail view when calls are started.

WinSIP User’s Guide
Copyright 2002, 2018 Touchstone Technologies, Inc. All Rights Reserved 109
Directories Options Use this command to view or change the global directories settings. The following dialog will appear:

WinSIP User’s Guide
Copyright 2002, 2018 Touchstone Technologies, Inc. All Rights Reserved 110
The fields included are: Call Files: Specifies the default directory for call files. Parameter Files: Specifies the default directory for parameter files. Log Files: Specifies the default directory for log files. Trace Files: Specifies the default directory for trace files. Media Files: Specifies the default directory for media files.

WinSIP User’s Guide
Copyright 2002, 2018 Touchstone Technologies, Inc. All Rights Reserved 111
Support Options

WinSIP User’s Guide
Copyright 2002, 2018 Touchstone Technologies, Inc. All Rights Reserved 112
The fields included are: Enable support system: With this option enabled, you can contact support with any questions along with sending files to support with the touch of a button.
Connect anonymously: This option allow you to contact support anonymously.
Use this identity: This option allows you give your identity to support.
Name: Provides a text box to enter your contact name.
Company: Provides a text box to enter your company name.
E-Mail: Provides a text box to enter your email address.

WinSIP User’s Guide
Copyright 2002, 2018 Touchstone Technologies, Inc. All Rights Reserved 113
Peer Options

WinSIP User’s Guide
Copyright 2002, 2018 Touchstone Technologies, Inc. All Rights Reserved 114
Local Identity
Name: The display name (caller id) of this peer. ID: The globally unique realm identifier of this peer. Address: The IP address on which this peer communicates. Port: The port on which this peer communicates. Private: Disables "public" mode (advertises or responds to public broadcast queries).
Options
Automatically Display Peer List: Enables the displaying of the peer list when one or more peers are detected. This also enables status pop-up mode when certain events occur (e.g. when a new peer joins, when a notifying peer leaves, etc.). Automatically Subscribe to Peer List: Automatically subscribes to status events for all peers. Disable LAN Peer (Discovery) Broadcast: Disables the LAN Peer broadcast and will not any Peer broadcast messages.

WinSIP User’s Guide
Copyright 2002, 2018 Touchstone Technologies, Inc. All Rights Reserved 115
Database
Enable Database: This option allows you to enable/disable Database. Database address: With this option you can configure the WinSIP to store the Call Data Reports to either localhost or to available remote database. To send data to remote location database, you have to install the database as mentioned in the Appendix D and use the same peer schema. Once the database is ready in remote location, you have to put the IP Address of remote location under Database address option. Database port: With this option you can set the port on which your local or remote database will be listening. Nuke: With this option you can delete all the database records. Once the records are deleted you cannot retain the records. For Installing MySQL Database for WinSIP, please see Appendix D.

WinSIP User’s Guide
Copyright 2002, 2018 Touchstone Technologies, Inc. All Rights Reserved 116
Peering Details Peers window give the information regarding the peers available with in the network and information of the peered applications on the network.

WinSIP User’s Guide
Copyright 2002, 2018 Touchstone Technologies, Inc. All Rights Reserved 117
Peer Filter With Peer Filter option, you can set the filters according to your specific requirement or point of interest.
No Filter: With No Filters enabled, will show all the peered application on the network.
Like Types Only: This option allows you to set the particular type applications in which you are interested or want to see or get information
Add New This option allows you to add a Remote Peer IP address or FQDN. After adding the remote IP address, you can check for peered application on that IP address.

WinSIP User’s Guide
Copyright 2002, 2018 Touchstone Technologies, Inc. All Rights Reserved 118
Configure This option allows you to configure the peered application. You can configure settings like application mode, number of calls, start and stop calls.
Subscriptions This option allows you to set the subscriptions from the remote peer application. Subscriptions are as follows, Status, Call Summary, Watch Summary, and Error Summary. You have an option to select any report/summary, according your requirements.
Publications This option gives the information regarding your publications to other peered applications.
Send Message With this option you can send a custom Instant message to the peered applications.

WinSIP User’s Guide
Copyright 2002, 2018 Touchstone Technologies, Inc. All Rights Reserved 119
New TestML Script Wizard With TestML Script Wizard, you can create new xml scripts with an easy step by step procedure.
TestML File Information
Name: This option allows you to set the filename of the new XML script. Description: This option allows you to write the description of the new XML script. Location: This option allows you to set the location of the new XML script to be stored.

WinSIP User’s Guide
Copyright 2002, 2018 Touchstone Technologies, Inc. All Rights Reserved 120
TestML Script Preferences
Include comments in the script: Enabling this option will put comments and information about the xml script functions. Include script tracing elements (logging): This option will put logging information of the scripts. Line Spacing: This option allows you to choose the spacing between lines.

WinSIP User’s Guide
Copyright 2002, 2018 Touchstone Technologies, Inc. All Rights Reserved 121
TestML Script Type
Typical SIP UAC (Initiate Calls): This option will create the XML scripts as User Agent Client or Initiator. Typical SIP UAS (Answer Calls): This option will create the XML scripts as User Agent Server or Answerer.

WinSIP User’s Guide
Copyright 2002, 2018 Touchstone Technologies, Inc. All Rights Reserved 122
TestML Script Options
Include Registration Support: This option will create a Registration process in the XML scripts. Include Cancel Support: This option will create a Cancel process in the XML scripts. Include Hold/Un-hold Support: This option will create a Hold/Un-hold process in the XML scripts. Include Blind Transfer Support: This option will create a Blind Transfer process in the XML scripts. Include Attended Transfer Support: This option will create an Attended Transfer process in the XML scripts.

WinSIP User’s Guide
Copyright 2002, 2018 Touchstone Technologies, Inc. All Rights Reserved 123
XML Script Editor XML Script Editor: This option allows you to change or edit the current XML script. You can make the changes according to your scenario and save the changes.

WinSIP User’s Guide
Copyright 2002, 2018 Touchstone Technologies, Inc. All Rights Reserved 124
CODEC(s)
Audio G.711 ULAW: This CODEC uses 20 frames per packet by default over a 64kb/s bandwidth connection. This delivers high quality audio packets using pulse code modulation which is compressed into 8 bit samples, converting 12 and 16 bit samples to 8 bit when necessary. G.711 ALAW: This CODEC uses 20 frames per packet by default over a 64kb/s bandwidth connection. This delivers high quality audio packets using pulse code modulation which is compressed into 8 bit samples, converting 12 and 16 bit samples to 8 bit when necessary. G.722 Mode 1: This CODEC uses 60 frames per packet by default over a 64kb/s bandwidth connection. G.723.1: This CODEC uses 3 frames per packet by default over either a 5.3kb/s or a 6.3kb/s bandwidth connection. Like G.729, it too is unreliable for transmitting music, DTMF tones, or fax tones. G.728: This CODEC uses 6 frames per packet by default over a 16kb/s bandwidth connection. G.729: This CODEC uses 6 frames per packet by default over an 8kb/s bandwidth connection. This compresses audio samples into 10 millisecond sections. AMR NM: This CODEC uses 4 frames by default over a 12.2kb/s bandwidth connection. iLBC (internet Low Bitrate Codec): This codec is designed for narrow band speech and results in a payload bit rate of 13.33 kbit/s with an encoding frame length of 30 ms and 15.20 kbps with an encoding length of 20 ms.

WinSIP User’s Guide
Copyright 2002, 2018 Touchstone Technologies, Inc. All Rights Reserved 125
Video H.261: This CODEC uses 15 frames per packet by default. It was originally developed to handle ISDN transmissions, capable of handling data rates between 40kb/s and 2Mb/s. This was meant to handle transmissions whose data rates were divisible by 64kb/s. MPEG4: This file has been recorded in a Packetized format by an answering WinSIP to an incoming call from MPEG4 device. H.263: This CODEC uses 15 frames per packet by default. This can replace H.261 at all bitrates due to its design as an evolution of the H.261 CODEC H.263+: This file has been recorded in a Packetized format by an answering WinSIP to an incoming call from H.263+ device. H.264: This file has been recorded in a Packetized format by an answering WinSIP to an incoming call from H.264 device.
Create New CODEC 1) Please go to (Options | Settings | Media | Audio/Video Capabilities) and press "Edit Codec" option. A pop up window "Audio/Video Codec Maintenance" will open. There you can add a codec with name, codec type, sub type, and SDP attributes. Once the codec is added, please select the codec for Selected in Audio/Video Capabilities. 2) Then go to (Options | Settings | Advanced | Audio/Media Recording) and Check "Record Audio/Video Streams" and select Packetized format option. 3) Start WinSIP. Send the Audio/Video stream to WinSIP which you want to record. WinSIP will record and save the new Audio/Video stream in a Packetized format once the call is completed. 4) Then in WinSIP, go to (Options | Settings | Media | Audio/Video Capabilities), press "Edit Codec" option. Select the codec name in "Audio/Video Codec Definitions" and press "Edit" option. And select the saved video clip (which was recorded and saved by WinSIP) with Packetized format in Audio/video stream definition and press "Apply".

WinSIP User’s Guide
Copyright 2002, 2018 Touchstone Technologies, Inc. All Rights Reserved 126
WinSIP Command Line Automation Command Line Automation The automation of WinSIP either from the command line, through the Windows Scheduler or via integration with test management systems.
The ability to launch WinSIP with a particular call file using the current settings.
The ability to launch WinSIP with a particular session file containing call file, parameter file and log file settings.
The ability to automatically start the session.
The ability to define the session duration. The following section describes each of these mechanisms in detail: When running from a command interface (Start | Run, DOS window, Window scheduler etc.) please remember that any path or file name contain spaces (blanks) must be enclosed with double quotes (e.g. c:\WinSIP\Call Files\MyCallFile.cll must be entered as "c:\WinSIP\Call Files\MyCallFile.cll" due to the space in "..\Call Files\... To start WinSIP with a prescribed call file, simply enter the call file name on the command line: c:\WinSIP\WinSIP.exe "c:\WinSIP\Call File\MyCallFile.cll"
c:\WinSIP\WinSIP.exe /Run "c:\WinSIP\Call File\MyCallFile.cll" (Automatic Start) To start WinSIP with a prescribed session file simply enter use the "/cf" flag followed by the session file name on the command line: WinSIP /cf [session file]
Both of the preceding forms load the specified files but do not automatically start the session. To automate the running of WinSIP specify /Run on the command line: WinSIP /Run
When run in this mode, WinSIP will load the call file, select all of the calls and run the session until:
1. All of the calls stop (by running a specified number of times). 2. The user presses the stop or terminate button.

WinSIP User’s Guide
Copyright 2002, 2018 Touchstone Technologies, Inc. All Rights Reserved 127
At the end of the session, the application will automatically exit. By specifying a duration in hours, minutes and seconds, WinSIP will run the script for that period of time, stop the calls gracefully and then exit the application. For example, to run WinSIP for a four hour test, you may specify: WinSIP /Run 04:00:00
Of course, you may specify combinations of the flags. To specify a six hour test using the session file Six Hour Test.ssn in your WinSIP directory, the command line may look something like: c:\WinSIP\WinSIP.exe /Run 06:00:00 /cf "c:\WinSIP\Six Hour Test.ssn"
"Rolling" log files We have also been receiving requests to add rolling log files to the call generators as well as WinEyeQ. This release of WinSIP incorporates the following new logging capabilities: There are four types of constraints: None: This option acts as the legacy version, placing no constraints on the log file. By Size: This option constrains the log file based on a specified size (in megabytes). At Interval: This option constrains the log file based on a specified time interval (in HH:MM:SS). Time of Day: This option constrains the log file based on a specified time of day (in HH:MM:SS 24-hour format). The initial log file will use the user-specified file name. Each successive log file will add a numeric value between the file and extension. For example, if the file name you have chosen is the default WinSIP.log, the first file would be WinSIP.log. Subsequent files would be WinSIP.001.log, WinSIP.002.log, etc.

WinSIP User’s Guide
Copyright 2002, 2018 Touchstone Technologies, Inc. All Rights Reserved 128
FAQ Q: How do I enable DTMF? A: To enable DTMF setting, please go to (Options | Settings | Media | DTMF Events) and check Enable Events. DTMF can be sent in either one of the methods RFC 2833 (tone) or INFO method. DTMF events can be set in the call file. Open the call file in the "Edit View" and press "DTMF Events" tab, a pop window will come up. There you can fill out the events you want to send out. For example, if you want send digit "1" after 5 seconds, please put P5000;1 in the value box. You can set different DTMF events for each call also. You can either right click the call and go to properties or double click on the call and it will take you to the properties page. Q: How many concurrent calls does the software support? A: The performance of WinSIP depends upon hardware configurations and parameter settings like audio codec, video codec, etc. More the powerful machine more will be WinSIP's performance. Similarly you can do more number of calls with G.729 codec than G.711 codec. Q: How do I create a Media Test file for WinSIP? A: There are three methods to create media test files for WinSIP: 1. Extract media streams from a WinPcap file.
From the Tools menu in WinSIP, select Import Media from Pcap trace files.
Select the Pcap file that contains the EVRC streams, click Open, click Next.
The next screen will display all of the RTP streams in that file. They are listed by payload type, SSRC, sending address, receiving address.
Select the stream you want to extract and click next.
Type in the name of the media stream you want the media to be extracted to and click save.
Finally click Extract to generate the file.
The file that is created will be a Touchstone packetized media file suitable for WinSIP to send.
2. Convert a wav file to a packetized EVRC media stream:
If you have a wav file that you want to convert to a Touchstone packetized EVRC file, click the Tools menu | Convert Audio File option. This wav file must be in the 16 bit, mono, 8000 Hz PCM format.
Enter the name of the wav file on the Input file line. The packetized file name will be automatically generated.
Click the Wav To Packetized EVRC button.

WinSIP User’s Guide
Copyright 2002, 2018 Touchstone Technologies, Inc. All Rights Reserved 129
The file that is created will be a Touchstone packetized media file suitable for WinSIP to send.
3. Capture Incoming media streams from WinSIP:
Click the Options menu | Settings option. Click on the Advanced tab.
Check Record Audio Streams and select Packetized Format.
Start WinSIP.
When a call is made to WinSIP, it will save the input audio stream in the WinSIP folder.
The file that is created will be a Touchstone packetized media file suitable for WinSIP to send.
Q: How do I add a new Audio or Video codec to WinSIP? A: For recording and adding Audio/Video codec, please follow the procedure as given below 1) Please go to (Options || Settings || Media || Audio/Video Capabilities) and press "Edit Codec" option. A pop up window "Audio/Video Codec Maintenance" will open. There you can add the codec name, codec type, sub type, and SDP attributes. Once the codec is added, please select the codec under the Audio/Video Capabilities on the Media settings tab. 2) Then go to (Options || Settings || Advanced || Audio/Media Recording) and Check "Record Audio/Video Streams" and select “Packetized” format option. 3) Start WinSIP, place a call to WinSIP and send the desired Audio/Video stream to WinSIP. WinSIP will record and save the new Audio/Video stream in a Packetized format once the call is completed. 4) Then in WinSIP, go to (Options || Settings || Media || Audio/Video Capabilities), press "Edit Codec" option. Select the codec name in "Audio/Video Codec Definitions" and press "Edit" option. Press "Playlist" option and select the saved Audio/video clip (which was recorded and saved by WinSIP) with Packetized format in Audio/Video stream definition and press "Apply". Q: While testing with a Proxy some of the calls did not terminate correctly. A: Please check the value for “Duration” on both the Initiate and Answer side and verify they are not set to the same value. Both sides will send the BYE at same time and this will introduce a race condition. One side will get call completed and other side will wait and timeout and lot of error will be logged. Please set either Initiator as terminator or answer side as terminator. The other option is you can set different duration on both sides.

WinSIP User’s Guide
Copyright 2002, 2018 Touchstone Technologies, Inc. All Rights Reserved 130
Q: If you see lot of retransmits of Invite request or Register request messages. A: For Invite messages, if you keep some value (like 20) in "Maximum Call Start/Stop Rate", it will reduce the number of retransmits. You can find "Maximum Call Start/Stop Rate" at (Options || Settings... || SIP Options || Call Start/Stop Limits). For Register messages, you can put a value in “Register/Un-Register Delay”. You can “Register/Un-Register Delay” at (Options || Settings... || Registration Options). Q: While testing with a Proxy the calls do not unregister when clicking on the stop button. A: If you hit the stop button twice its equivalent to clicking on the terminate button. The calls terminate right away and the calls will not unregister. Q: While running a test, the CPU Usage is very high. A: The hardware you are running the test with has reached its limit. There are several things you can do to minimize the CPU Usage.
1. If you keep some value (i.e. 20) in "Maximum Call Start/Stop Rate", it will reduce the no of retransmits. You can find "Maximum Call Start/Stop Rate" at (Options | Settings... | SIP Options | Call Start/Stop Limits).
2. If you are running with receive on all channels reducing the number of receiving channels.
3. Reducing the number of calls running. 4. Please uncheck "Record Audio/Video in Packetized" option while running
calls in repeating mode. Q: During a call WinSIP detected a latency value between 18.5 and 21.0 ms, this value seems high, is this correct? A: "Latency" can also be thought of as "inter-packet interval". This looks like a typical G.711 stream at 20 ms framing. Therefore, using the input values of 18.50 and 21.0 as two inter-packet intervals, you would attain a resultant jitter of around 1.25 ms, which is in the excellent range. Q: How do I use XML Templates? A:
1. In Edit View, Please find User Field 1, User Field 2, etc. and please select the User Field X (X = User Field number) and add your custom field.
2. Please open WinSIP.xml from WinSIP folder in notepad or any xml editor.
Please add [input.user.field.X] where you want to add your custom field.

WinSIP User’s Guide
Copyright 2002, 2018 Touchstone Technologies, Inc. All Rights Reserved 131
For example, if you want to add a custom field in contact line of Invite message, as shown below
INVITE sip:[email protected]:5060;transport=TCP SIP/2.0 Via: SIP/2.0/TCP 120.249.0.148:5060;branch=z9hG4bK12e2ccc4e203787e0a8e548e4516e1 Max-Forwards: 70 From: Initiate01 <sip:[email protected]:5060>;tag=ebea-91de-33c5-6bb3 To: Answer01 <sip:[email protected]:5060> User-Agent: WinSIP/2.6.0 Call-ID: 5d7c-58228234-0001-Call1 CSeq: 1 INVITE Contact: Initiate01 <sip:[email protected]:5060;transport=TCP>My Custom Field Allow:INVITE,ACK,BYE,CANCEL,OPTIONS,UPDATE,REFER,SUBSCRIBE,NOTIFY,MESSAGE,INFO Accept: application/sdp Accept-Language: en Content-Type: application/sdp Content-Disposition: session Content-Length: 187
Go to Edit View, Select User Field 1, and add “My Custom Field” and save it.
Then Open WinSIP.xml, and add [input.user.field.1] at the end of the contact line, like
INVITE sip:[input.remote.id]@[dialog.remote.request.addr]:[dialog.remote.request.port]; transport=[system.ip.protocol] SIP/2.0 [dialog.route.set] Via: SIP/2.0/[system.ip.protocol][input.local.address]:[input.local.port];branch=[transaction.branch] Max-Forwards: 70 From:[input.local.name]sip:[input.local.id]@[dialog.local.aor.addr]:[dialog.local.aor.port]>;tag=[transaction.local.tag] To: [input.remote.name] <sip:[input.remote.id]@[dialog.remote.aor.addr]:[dialog.remote.aor.port]> User-Agent: [system.user.agent.id] Call-ID: [transaction.callid] CSeq: [transaction.local.cseq] INVITE Contact: sip:[input.local.id]@[input.local.address]:[input.local.port][input.user.field.1] Allow: [system.transactions.supported] Accept: application/sdp Accept-Language: en Content-Type: application/sdp Content-Disposition: dialog Content-Length: [transaction.content.length]
After editing and saving WinSIP.xml, Please go to (Option | Settings | Advanced | XML Templates) in WinSIP and Enable “Use XML Request Templates”. Custom field can be added in all messages and anywhere within a particular message.

WinSIP User’s Guide
Copyright 2002, 2018 Touchstone Technologies, Inc. All Rights Reserved 132
Q: I have been unable to get WinSIP working when pointing to either the Mediation server or the OCS server. It just sits at "Registering", the error log or call trace shows a (401 Unauthorized). What should I do next? A: In our test, we talked to the Mediation Server. The topology was as follows: ------------------ ----------- ---------- ----------- --------------- | WinSIP (1) | ---------> | MS (1) | ---------> | OCS | ---------> | MS (2) | -------> | WinSIP (1) |
------------------ ----------- ---------- ----------- --------------- (SIP over TCP) (SIP over TLS) (SIP over TLS) (SIP over TCP) (RTP over UDP) (RTP over SRTP) (RTP over SRTP) (RTP over UDP) G.711 uLaw MS WB MS WB G.711 uLaw
In the Microsoft world, standards-based components (e.g. WinSIP) must go through Mediation Server to access the OCS services. Only “OCS-enabled” applications can talk to the core. The primary key is that Mediation Server only allows TCP. The WinSIP Initiator and Answerer username/password fields must match accounts that are provisioned in OCS. Once we configured this it worked perfectly and we were able to conclude the tests.

WinSIP User’s Guide
Copyright 2002, 2018 Touchstone Technologies, Inc. All Rights Reserved 133
Appendix A
Transferring a License The method of transferring a license is the same for all Touchstone Technologies products. For demonstration purposes WinSIP will be used to explain the license transfer procedure. At the time of installation there are two options for licensing WinSIP. The first is to have a new key issued from Touchstone Technologies, and the second is to transfer a license from an existing WinSIP application to the newly installed version of WinSIP. Touchstone’s software licenses are fully transferable from PC to PC within a customer’s physical location. To transfer a license to a different location, please contact Touchstone Technologies at 267.222.8687. A floppy diskette or USB memory device is required to transfer a license. There are three basic steps in transferring a license:
Initialize transfer media on the PC with newly installed WinSIP.
Export license from the PC with the originally installed WinSIP.
Import license to the PC with newly installed WinSIP. Note: Touchstone Technologies licenses will have to be re-issued if:
The original installation directory of WinSIP is:
o Copied or moved to a new directory on the original PC. o Copied or moved to a different PC. o Renamed
One of the hidden files (deltapts.ckn or deltapts.inf) is deleted or modified.
The license service (crypserv.exe) is stopped or uninstalled.

WinSIP User’s Guide
Copyright 2002, 2018 Touchstone Technologies, Inc. All Rights Reserved 134
After a new installation is finished and the application is run for the first time an ‘Authorizing WinSIP’ screen will appear, click on the ‘Advanced’ button, an expanded dialog will be displayed:
Press the ‘Import License’ button to begin the license transfer procedure.

WinSIP User’s Guide
Copyright 2002, 2018 Touchstone Technologies, Inc. All Rights Reserved 135
Step One - Import License, Media Initialization
The first step of the ‘Import License’ transfer requires initialization of a diskette or USB device that will be used as the ‘License Transfer Media’.
To initialize the transfer media, select the drive to be used as the transfer device, insert the transfer media and press the ‘Next’ button. Note: If you have completed this step from a previous execution of WinSIP and already have the initialized transfer media, click the checkbox and then click the ‘Next’ button. When step one is complete the transfer media is initialized.

WinSIP User’s Guide
Copyright 2002, 2018 Touchstone Technologies, Inc. All Rights Reserved 136
The Import License step two dialog will then appear:
The next step is to eject or unplug the transfer media and take it to the PC that has the license you want to remove. Note: For USB devices please follow the correct unplug procedure for your device.

WinSIP User’s Guide
Copyright 2002, 2018 Touchstone Technologies, Inc. All Rights Reserved 137
Step Two - Export License
On the PC that you have selected to remove the WinSIP license, click on the ‘Help’ menu and then select ‘Licensing Information’. The Following dialog will appear:
Next click on the ‘Advanced’ button to expand the dialog:
Now click on the ‘Export License’ button.

WinSIP User’s Guide
Copyright 2002, 2018 Touchstone Technologies, Inc. All Rights Reserved 138
A warning dialog will be displayed next. This box has a warning to read the procedure carefully and that the version of WinSIP running will be disabled after the procedure is completed.
If you are certain you want to transfer this license, press ‘Yes’, if not, press ‘No’. The existing WinSIP application will not be uninstalled nor will any WinSIP files be removed from the WinSIP directory, the software will just be disabled. Later if you wish, you can re-enable the application with a new license from Touchstone or with a WinSIP license transferred from another PC. Step one of the export procedure displays the following dialog:
Click the ‘Next’ button.

WinSIP User’s Guide
Copyright 2002, 2018 Touchstone Technologies, Inc. All Rights Reserved 139
Step two of the license export procedure displays the following dialog:
Insert the transfer media that was initialized from ‘Step One - Media Initialization’, select the drive to be used as the transfer device and press the ‘Next’ button.

WinSIP User’s Guide
Copyright 2002, 2018 Touchstone Technologies, Inc. All Rights Reserved 140
When the license has been successfully exported, the following dialog will appear:
When the ‘Finish’ button is pressed, the application will terminate. This completes the license export. Remove and take the ‘License Transfer Media’ to the newly installed WinSIP. Note: For USB devices please follow the correct unplug procedure for your device.

WinSIP User’s Guide
Copyright 2002, 2018 Touchstone Technologies, Inc. All Rights Reserved 141
Step Three - Install exported license
The PC with the newly installed version of WinSIP should still have the following screen displayed, ‘Import License - Step 2’:
After the license export procedure is complete, and you have the exported license on the transfer media, insert the media and then press the ‘Next’ button.

WinSIP User’s Guide
Copyright 2002, 2018 Touchstone Technologies, Inc. All Rights Reserved 142
Select the proper ‘License Transfer Media’:
Press the ‘Next’ button when done.

WinSIP User’s Guide
Copyright 2002, 2018 Touchstone Technologies, Inc. All Rights Reserved 143
When the license has been successfully imported, the following dialog will appear:
The newly installed WinSIP is now fully enabled and ready to run when you press the ‘Finish’ button.

WinSIP User’s Guide
Copyright 2002, 2018 Touchstone Technologies, Inc. All Rights Reserved 144
License Transfer Instruction Chart
Action New Installation Existing Installation
1.Install New Software Select the machine on which you would like to install the new instance of the product and follow the installation instructions. Once installed, run the application and the licensing dialog will appear.
2. Initialize License Transfer Media
When the new installation asks for the Authorization code, press the ‘Advanced’ button then, press the ‘Import License’ button. This will bring up a dialog that asks you to initialize a ‘License Transfer Media Device’. This device may be a diskette or USB device. Enter the letter of the drive where the transfer media is located and press the ‘Next’ button. Once you have pressed the ‘Next’ button, you may remove the License Transfer Device. You must then take that diskette or USB device to the PC that has the license you want to export.

WinSIP User’s Guide
Copyright 2002, 2018 Touchstone Technologies, Inc. All Rights Reserved 145
Action New Installation Existing Installation
3. Export License Run the application on the PC that has the license you want to export, go to the Help menu and press Licensing Information. Press the ‘Advanced’ button to reveal the advanced options. Once visible, press the ‘Export License’ button. Follow the step-by-step directions to export the license onto the License Transfer Media Device. Remove the License Transfer Media Device. The existing installation is now deactivated. Return to the new installation.
4. Import License Insert your License Transfer Device into the appropriate device. Follow the instructions to import the license. The new installation is now activated.

WinSIP User’s Guide
Copyright 2002, 2018 Touchstone Technologies, Inc. All Rights Reserved 146
Appendix B - Installing WinSIP for Limited Users
Prior to Installation of any Touchstone Software For any Touchstone Technologies software installation the user MUST BE logged on as the Administrator and / or have Administrator rights. If Touchstone Technologies Software is going to be installed on a computer that has multiple users including users with limited rights the minimum setting required to run the software is a “Power User”. The basic “User” setting does not have enough rights to run the programs no matter how it is installed. For limited user account installations please follow the following procedure precisely.
Procedure
To install Touchstone Technologies Test Tools with limited user accounts follow the below procedure:
1. Log on as Administrator.
2. Run the setup.exe file of choice.
3. During the Installation wizard a screen will be display whose subject heading is “Customer Information”. Please make sure the “Anyone” radial button is selected before clicking the Next button.
4. At the Destination Folder screen make sure to enter a different path by
using the Change button.
5. Change the Installation directory to the units shared directory, (i.e. C:\Documents and Settings\All Users\WinSIP)
6. Continue following the instructions until the installation is finished.
WinSIP User’s Guide
Copyright 2002, 2018 Touchstone Technologies, Inc. All Rights Reserved 147
Changing a User’s Rights
If a user’s account is set to a "Limited" or basic “User” rights, Touchstone Technologies software will not run. The minimum rights setting must be “Power User”. To change a user’s rights, follow the procedure below.
1. Log on as administrator.
2. On the desktop right click on My Computer, select "Manage".
3. Select "Local User & Groups"; then select "Users" to view list.
4. Right click on the user of choice, and then select properties.
5. Select "Member of Tab", and then click on "Add".
6. Click on the "Advanced" button, and then click on "Find Now" button.
7. Select "Power User" from list.
8. Click "OK", "OK", and “OK" to close windows.
Important Note
All Touchstone applications that need to be run by users who do not have administrative rights have to be installed in My Computer\Shared Documents folder. This folder can be located either thru My Computer or thru explore at "C:\Documents & Settings\All Users\ WinSIP”.

WinSIP User’s Guide
Copyright 2002, 2018 Touchstone Technologies, Inc. All Rights Reserved 148
Appendix C - Choosing a Network Card It has been found through extensive testing that different network adapters have a wide range of performance values. The recommended NIC card is the Intel Pro/1000 GT Desktop Adapter. The manufacturer product code for this network card is PWLA8391GT.
Custom Driver Settings Open the Computer Management Console and select the Intel Pro 1000 GT network adapter.
Right click on the Intel Pro/1000 GT adapter and select properties from the shortcut menu. With the properties displayed select the Advanced tab.

WinSIP User’s Guide
Copyright 2002, 2018 Touchstone Technologies, Inc. All Rights Reserved 149
The following changes will increase the performance of this network adapter. Set the Interrupt Moderation Rate to OFF.
Make sure all four of the offload properties are set to ON.

WinSIP User’s Guide
Copyright 2002, 2018 Touchstone Technologies, Inc. All Rights Reserved 150
Appendix D - MySQL Installation To save WinSIP records for later use, it is necessary to install MySQL Database and MySQL Tools. WinSIP 4.0 has been tested with MySQL 5.1.46 Please go to the MySQL website (www.mysql.com) and select the appropriate download for your Operating System. MySQL Component: MySQL 5.1.46 Community Server Once you have downloaded the MySQL applications, double click on mySQL-5.x.xx-win32.zip to extract and start the installation.

WinSIP User’s Guide
Copyright 2002, 2018 Touchstone Technologies, Inc. All Rights Reserved 151
To install and configure the MySQL program please follow the below instructions:
MySQL Install Screen 1 - Welcome to the installation Wizard Press the “Next” button to continue the installation.
Press the “Next” button to continue the installation.

WinSIP User’s Guide
Copyright 2002, 2018 Touchstone Technologies, Inc. All Rights Reserved 152
MySQL Install Screen 2 - Setup Type
This screen will appear next during the installation process.
Make sure that the “Typical” option is selected as above. Press the “Next” button to continue the installation.
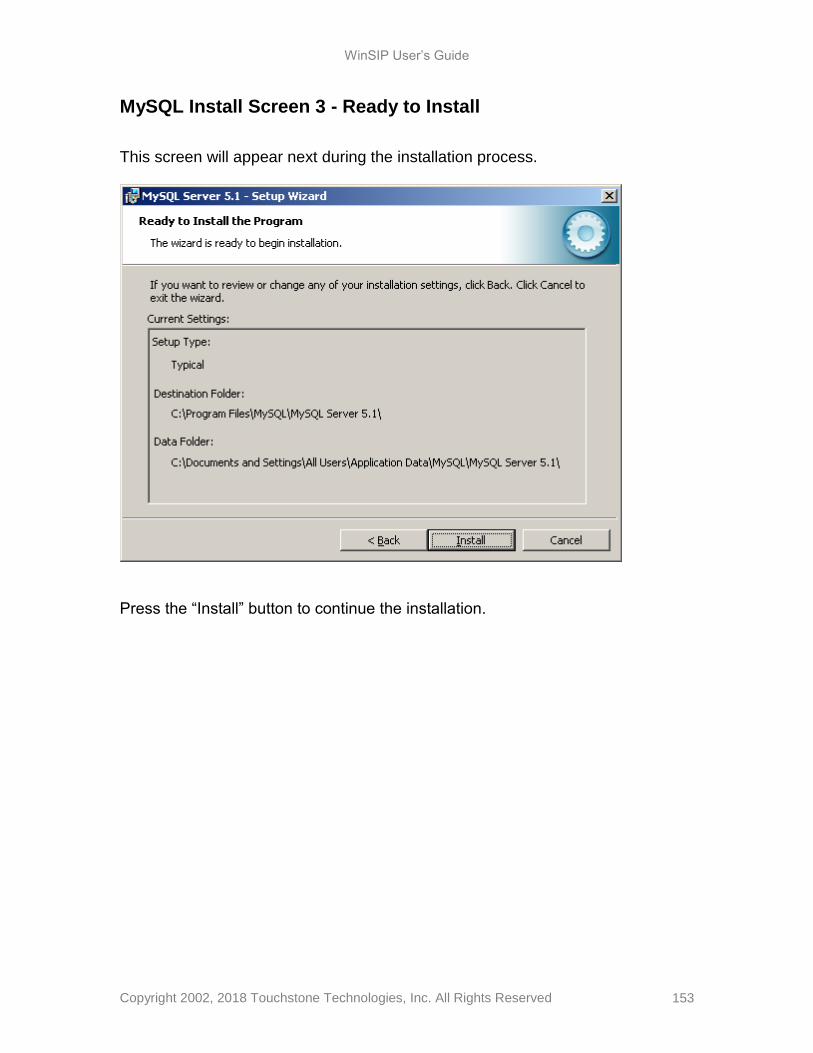
WinSIP User’s Guide
Copyright 2002, 2018 Touchstone Technologies, Inc. All Rights Reserved 153
MySQL Install Screen 3 - Ready to Install
This screen will appear next during the installation process.
Press the “Install” button to continue the installation.

WinSIP User’s Guide
Copyright 2002, 2018 Touchstone Technologies, Inc. All Rights Reserved 154
MySQL Install Screen 4 - Installing
This screen will appear next during the installation process.
When complete, press the “Next” button to continue the installation.

WinSIP User’s Guide
Copyright 2002, 2018 Touchstone Technologies, Inc. All Rights Reserved 155
MySQL Install Screen 5 - Installing This screen will appear next during the installation process.
Press the “Next” button to continue the installation.

WinSIP User’s Guide
Copyright 2002, 2018 Touchstone Technologies, Inc. All Rights Reserved 156
MySQL Install Screen 6 - Installing
This screen will appear next during the installation process.
Press the “Next” button to continue the installation.

WinSIP User’s Guide
Copyright 2002, 2018 Touchstone Technologies, Inc. All Rights Reserved 157
MySQL Install Screen 7 - Setup Wizard Complete
This screen will appear next during the installation process.
MySQL database installation is now complete. The next screens will configure the MySQL service. Select the “Configure the MySQL Server now” option and press the “Finish” button to complete the installation and begin the configuration. The “register the MySQL Server now” is optional. If desired the MySQL application can be registered.

WinSIP User’s Guide
Copyright 2002, 2018 Touchstone Technologies, Inc. All Rights Reserved 158
MySQL Install Screen 8 - Welcome to the Server service Setup.
This screen will appear next during the installation process.
Press the “Next” button to continue the installation.

WinSIP User’s Guide
Copyright 2002, 2018 Touchstone Technologies, Inc. All Rights Reserved 159
MySQL Install Screen 9 - Configuration Selection
This screen will appear next during the installation process.
Select the “Detailed Configuration” option and press the “Next” button to continue the configuration.

WinSIP User’s Guide
Copyright 2002, 2018 Touchstone Technologies, Inc. All Rights Reserved 160
MySQL Install Screen 10 - Server Instance Configuration
This screen will appear next during the installation process.
Select the “Server Machine” option and press the “Next” button to continue the configuration.

WinSIP User’s Guide
Copyright 2002, 2018 Touchstone Technologies, Inc. All Rights Reserved 161
MySQL Install Screen 11 - Database Type Selection
This screen will appear next during the installation process.
Select the “Non-Transactional Database Only” option to install only the MyISAM database. Press the “Next” button to continue the configuration.

WinSIP User’s Guide
Copyright 2002, 2018 Touchstone Technologies, Inc. All Rights Reserved 162
MySQL Install Screen 12 - Connection Configuration Selection
This screen will appear next during the configuration process.
Select the “Decision Support (DSS)/OLAP” option to properly configure the MySQL database. Press the “Next” button to continue the configuration.

WinSIP User’s Guide
Copyright 2002, 2018 Touchstone Technologies, Inc. All Rights Reserved 163
MySQL Install Screen 13 - Connection Type Selection
This screen will appear next during the configuration process.
Select the “Enable TCP/IP Networking” option. Set the “Port Number” field to “3306”. Select the “Enable Strict Mode” option. Press the “Next” button to continue the configuration.

WinSIP User’s Guide
Copyright 2002, 2018 Touchstone Technologies, Inc. All Rights Reserved 164
MySQL Install Screen 14 - Character Set Selection
This screen will appear next during the configuration process.
Select the “Standard Character Set” option and press the “Next” button to continue the installation.

WinSIP User’s Guide
Copyright 2002, 2018 Touchstone Technologies, Inc. All Rights Reserved 165
MySQL Install Screen 15 - Setup Type
This screen will appear next during the configuration process.
Select the “Install As Windows Service” option. Select the “MySQL” service from the “Service Name” option. You may choose to (or not to) select the “Include Bin Directory in Windows PATH” option. Press the “Next” button to continue the configuration.

WinSIP User’s Guide
Copyright 2002, 2018 Touchstone Technologies, Inc. All Rights Reserved 166
MySQL Install Screen 16 - MySQL Server Instance Configuration
This screen will appear next during the installation process.
Select the “Modify Security Settings” option. Select and enter the new root account password. This password is for the root user and can be anything you would like. Re-enter the new root account password. Press the “Next” button to continue the configuration.

WinSIP User’s Guide
Copyright 2002, 2018 Touchstone Technologies, Inc. All Rights Reserved 167
MySQL Install Screen 17 - Execute the Configuration Settings. This screen will appear next during the installation process.
Press the “Execute” button to complete the configuration.

WinSIP User’s Guide
Copyright 2002, 2018 Touchstone Technologies, Inc. All Rights Reserved 168
MySQL Install Screen 18 - Configuration Progress
This progress screen will appear next during the configuration process.
Press the “Finish” button to close the Wizard. MySQL Installation and Server configuration is now complete.

WinSIP User’s Guide
Copyright 2002, 2018 Touchstone Technologies, Inc. All Rights Reserved 169
Installing the MySQL Tools Locate and double-click the “mysql-gui-tools-5.0-rxx-win32.msi” file. The default file location is “C:\WinSIP\Database\ mysql-gui-tools-5.0-rxx-win32.msi”. The following MSI Installer screen will briefly appear:

WinSIP User’s Guide
Copyright 2002, 2018 Touchstone Technologies, Inc. All Rights Reserved 170
MySQL Tools Install Screen 1 - Welcome to the installation Wizard This screen will appear next during the configuration process.
Press the “Next” button to continue the installation.

WinSIP User’s Guide
Copyright 2002, 2018 Touchstone Technologies, Inc. All Rights Reserved 171
MySQL Tools Install Screen 2 - License Agreement This screen will appear next during the installation process.
Select the “I accept the terms in the license agreement” and press the “Next” button to continue.

WinSIP User’s Guide
Copyright 2002, 2018 Touchstone Technologies, Inc. All Rights Reserved 172
MySQL Tools Install Screen 3 - Destination Folder This screen will appear next during the installation process.
Select the desired location for the MySQL tools and press the “Next” button to continue.

WinSIP User’s Guide
Copyright 2002, 2018 Touchstone Technologies, Inc. All Rights Reserved 173
MySQL Tools Install Screen 4 - Setup Type Selection This screen will appear next during the installation process.
Select the “Complete” option and press the “Next” button to continue.

WinSIP User’s Guide
Copyright 2002, 2018 Touchstone Technologies, Inc. All Rights Reserved 174
MySQL Tools Install Screen 5 - Ready to Install This screen will appear next during the installation process.
Press the “Install” button to continue.

WinSIP User’s Guide
Copyright 2002, 2018 Touchstone Technologies, Inc. All Rights Reserved 175
MySQL Tools Install Screen 6 - Installation Status This screen will appear next during the installation process.
This screen will automatically take you to the next screen when complete. If it does not, press the “Next” button when it becomes enabled.

WinSIP User’s Guide
Copyright 2002, 2018 Touchstone Technologies, Inc. All Rights Reserved 176
MySQL Tools Install Screen 7 - Enterprise This screen will appear next during the installation process.
Press the “Next” button to continue the MySQL installation.

WinSIP User’s Guide
Copyright 2002, 2018 Touchstone Technologies, Inc. All Rights Reserved 177
MySQL Tools Install Screen 8 - Enterprise This screen will appear next during the installation process.
Press the “Next” button to continue the MySQL installation.

WinSIP User’s Guide
Copyright 2002, 2018 Touchstone Technologies, Inc. All Rights Reserved 178
MySQL Tools Install Screen 9 - Wizard Complete This screen will appear next during the installation process.
Press the “Finish” button to complete the MySQL installation.

WinSIP User’s Guide
Copyright 2002, 2018 Touchstone Technologies, Inc. All Rights Reserved 179
Post-Installation Activities The following post-installation steps must be performed in order to test and utilize the newly installed software.
Configuring MySQL Schema Creating the MySQL database schema and WinSIP user account. WinSIP requires a MySQL database schema named “Peer”. Located in the C:\WinSIP\Database directory is the file called Peer Schema.sql. This file is the MySQL script for creating the database schema. You must load this schema and create a user for “WinSIP”. The following details the steps required to configure the MySQL database. From the Windows “Start” button, locate the “MySQL” program group on the Start Menu.

WinSIP User’s Guide
Copyright 2002, 2018 Touchstone Technologies, Inc. All Rights Reserved 180
Select the “MySQL” Administrator option. The following screen will appear
Enter a name for the stored connection and the password of the root user. When the screen is complete, press the “OK” button.

WinSIP User’s Guide
Copyright 2002, 2018 Touchstone Technologies, Inc. All Rights Reserved 181
The following screen will appear:
Select the item marked “Restore”. Select the button labeled “Open Backup File”.

WinSIP User’s Guide
Copyright 2002, 2018 Touchstone Technologies, Inc. All Rights Reserved 182
The following screen will appear:
Use this dialog to browse to the WinSIP installation folder and locate the “Database” folder (C:\WinSIP\Database). In the database folder, locate and select the “Peer Schema.sql” file and press the “Open” button.

WinSIP User’s Guide
Copyright 2002, 2018 Touchstone Technologies, Inc. All Rights Reserved 183
The Restore screen will now appear as below:
Press the “Start Restore” button.

WinSIP User’s Guide
Copyright 2002, 2018 Touchstone Technologies, Inc. All Rights Reserved 184
The following screen will appear:
When the restore operation is complete press the “Close” button. The schema has successfully been loaded. Select the “Catalogs” option from the options left list. Ensure that the “Peer” catalog is in the list. Select the “peer” catalog.

WinSIP User’s Guide
Copyright 2002, 2018 Touchstone Technologies, Inc. All Rights Reserved 185
The following screen will appear:
Confirm that the tables appear in the catalog as above. Select the “User Administration” option from the list.

WinSIP User’s Guide
Copyright 2002, 2018 Touchstone Technologies, Inc. All Rights Reserved 186
The screen will appear as below:
Select the “Add new user” button. Set the “MySQL User” field to “WinSIP” (this is case sensitive). Do not set a password for this user. Confirm that you wish to not set a password for this user by skipping the “Confirm Password” field. Press the “Apply Changes” button.

WinSIP User’s Guide
Copyright 2002, 2018 Touchstone Technologies, Inc. All Rights Reserved 187
The screen should now appear as below (note the new user “WinSIP” in the bottom list on the left).
The next step is to set the schema privileges for the new “WinSIP” user.

WinSIP User’s Guide
Copyright 2002, 2018 Touchstone Technologies, Inc. All Rights Reserved 188
Select the tab labeled “Schema Privileges” and the following screen will appear:
Select the Schema “peer” from the “Schemata” column. Click on each of the following privileges, “SELECT”, “INSERT”, “UPDATE”, and “DELETE”. Use the “<” button to move each of the privileges to the “Assigned Privileges” column.

WinSIP User’s Guide
Copyright 2002, 2018 Touchstone Technologies, Inc. All Rights Reserved 189
The screen should appear as below:
Press the button labeled “<” to assign the privileges.

WinSIP User’s Guide
Copyright 2002, 2018 Touchstone Technologies, Inc. All Rights Reserved 190
The screen will appear as below:
Press the “Apply changes” button. The database is now fully configured. You may close the MySQL Administrator.

WinSIP User’s Guide
Copyright 2002, 2018 Touchstone Technologies, Inc. All Rights Reserved 191
Touchstone Technologies, Inc. 1500 Industry Road
Suites H Hatfield, PA. 19044
www.touchstone-inc.com
Copyright 2002, 2013 Touchstone Technologies Inc. All Rights Reserved