user’s manual - atrump.com · sw4000 user’s manual 2 ver5.13 safety precaution warning do not...
TRANSCRIPT

SW4000 USER’S MANUAL
VER5.13 1
SW4000SW4000SW4000SW4000 Seri Seri Seri Serieeees DROs DROs DROs DRO
USER’S MANUAL VER5.13
SW4000-2 DRO for 2 axes
SW4000-3 DRO for 3 axes
SW4000E DRO for EDM

SW4000 USER’S MANUAL
2 VER5.13
Safety Precaution
Warning
� Do not use the display unit with voltages other than the indicated power voltage(AC
100-240V, 50-60HZ), and do not connect multiple plugs to a single out-layer as this
may result in fire or electric shock.
� Do not damage, modify, excessively bend, pull on, place heavy objects on or heat
the power cord, as this may damage the power cord and result in fire or electric
shock.
� Do not handle the power plug with wet hands as this may result in electric shock.
� Do not open the cover of the display unit to disassemble or modify the unit or to
replace the fuses, because .this may result in burns. These actions may also damage
the internal circuitry.
Caution
� When unplugging the power plug, do not pull on the power cord as this may
damage the cord and result in fire or electrical shock. Be sure to grip the power plug
when unplugging it from the socket.
� The unit does not have an explosion-proof structure. Therefore, do not use the unit
in an atmosphere charged with inflammable gases as this may result in fire.
� When the unit will not be used for an extended period of time, be sure to unplug the
power plug from the socket for safety.
� Be sure to turn off the power before connecting or disconnecting power and signal
connections in order to prevent damage or misoperation.
� The unit does not have an earthquake-proof structure. Therefore, do not use the unit
in moving areas or areas exposed to strong shocks.

SW4000 USER’S MANUAL
VER5.13 3
Principle SW4000 series DRO provides displaying distance and position for machine tool, grinding machine,
milling machine and EDM. Its principle is as follow:
linear scale WE6800 DRO
Move scale,generate signal A,B
couter the number of A,B Display distance
SW4000 Serial DRO Specifications Input power voltage 100 V - 240V
Power consumption MAX.15W
Operating temperature 0º- 40º(32--104ºF)
Storing temperature 0º- 40º(-4--104ºF)
Relative humidity < 90%
Weight 1.45Kg
Dimension 295 X 185 X 45 (Unit: mm)
Coordinate No 2(SW4000-2), 3 (SW4000-3,SW4000-E)
Interface of linear scale 9PD/7PD/15PD
Scale Signal TTL, drive capacity > 10 mA
Resolution of scale 0.05μm,0.1μm,0.2μm,0.5μm,1μm,2μm,5μm,10μm,20μm,50μm
Pitch of linear scale 0.02mm
Precision of scale High grade ±(3+3L / 1000) , standard grade ±(5+5L/ 1000)
SW4000E
EDM interface Output a on/off signal, drive capacity >100mA
Options
RS232 interface A pin for TX signal, a pin for RX signal
Edge detection High voltage 5V, drive capacity > 10mA
SW4000 USER’S MANUAL
4 VER5.13
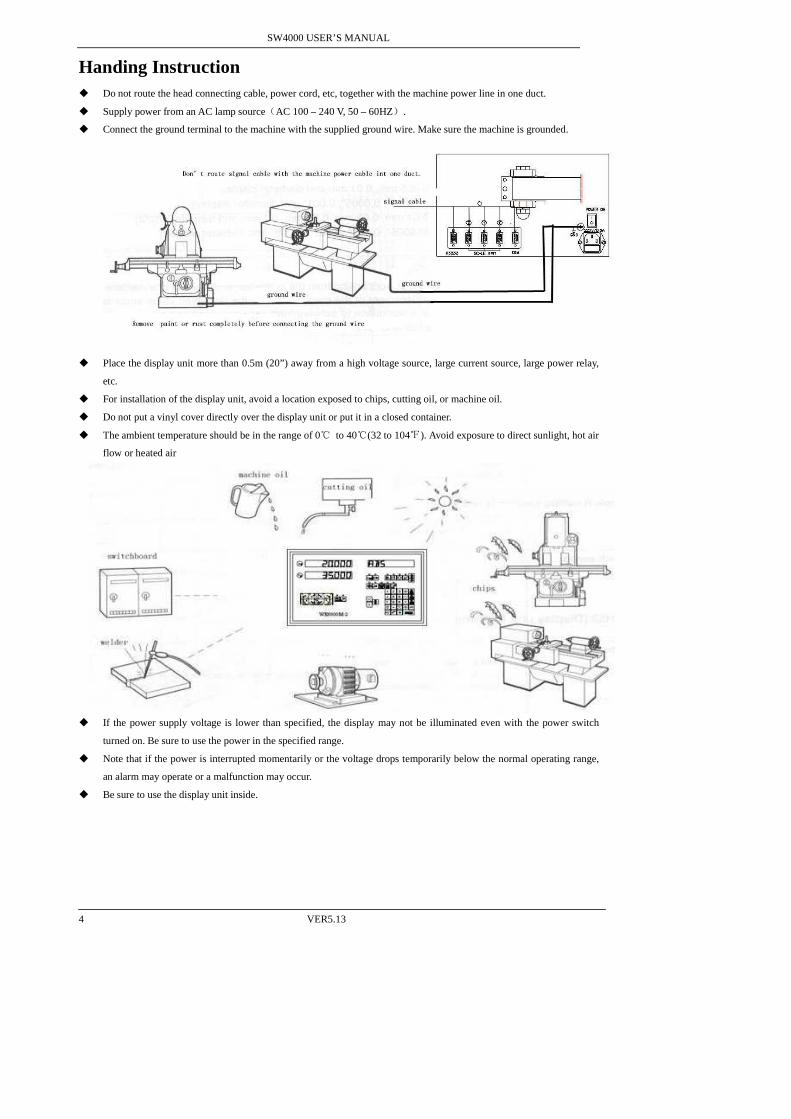
Handing Instruction � Do not route the head connecting cable, power cord, etc, together with the machine power line in one duct.
� Supply power from an AC lamp source(AC 100 – 240 V, 50 – 60HZ).
� Connect the ground terminal to the machine with the supplied ground wire. Make sure the machine is grounded.
� Place the display unit more than 0.5m (20”) away from a high voltage source, large current source, large power relay,
etc.
� For installation of the display unit, avoid a location exposed to chips, cutting oil, or machine oil.
� Do not put a vinyl cover directly over the display unit or put it in a closed container.
� The ambient temperature should be in the range of 0℃ to 40℃(32 to 104℉). Avoid exposure to direct sunlight, hot air
flow or heated air
� If the power supply voltage is lower than specified, the display may not be illuminated even with the power switch
turned on. Be sure to use the power in the specified range.
� Note that if the power is interrupted momentarily or the voltage drops temporarily below the normal operating range,
an alarm may operate or a malfunction may occur.
� Be sure to use the display unit inside.

SW4000 USER’S MANUAL
VER5.13 5
Contents Chapter 1. INTRODUCTION.................................................................................................7
1.1 Front Panel .............................................................................................................7 1.2 Back Panel..............................................................................................................8 1.3 Description of Key Function..................................................................................9 1.4 Interface................................................................................................................11 1.5 Coordinate System ...............................................................................................12
Chapter 2. BASIC OPERATION ..........................................................................................13 2.1 Power on...............................................................................................................13 2.2 Zeroing .................................................................................................................13 2.3 Preset Data to Designated Axis ............................................................................14 2.4 Toggle display unit between mm and inch...........................................................15 2.5 Mid-point Calculation ..........................................................................................15 2.6 Set the Shrinkage Mode .......................................................................................16 2.7 Absolute / Incremental / 1000 groups SDM ........................................................17 2.8 Clear All SDM Datum..........................................................................................18 2.9 Search the Absolute Reference Point of Scale (RI) .............................................19 2.10 Clear the Error message .......................................................................................20 2.11 Lathe Function .....................................................................................................20 2.12 Filter display value...............................................................................................21
Chapter 3 1000 groups SDM coordinate...............................................................................22 3.1 Zeroing at the Current Point.................................................................................22 3.2 Preset datum of SDM Coordinate ........................................................................24
Chapter 4 SPECIAL FUNCTION.........................................................................................26 4.1 Bolt Hole Circle ...................................................................................................26 4.2 Bolt Hole Line......................................................................................................28 4.3 ARC Processing ...................................................................................................30 4.4 Slope Processing ..................................................................................................34 4.5 Auto Edge Detection............................................................................................37
Chapter 5. EDM ....................................................................................................................39 5.1 Setting EDM Parameters......................................................................................40 5.2 EDM machining...................................................................................................41 5.2.1 Example for Mode 1 with Plus Depth..................................................................41 5.2.2 Example for Mode 1 with Minus Depth ..............................................................42 5.2.3 Example for Mode 2.............................................................................................44 5.2.4 Example for Mode 3.............................................................................................45 5.2.5 Example for Mode 4 with Minus Depth ..............................................................46 5.2.6 Example for Mode 6.............................................................................................48 5.2.7 Example for Mode 7.............................................................................................49 5.3 Combination of BHC: BHL and EDM Function .................................................51
Chapter 6 CALCULATOR FUNCTION ............................................................................53 6.1 Enter and exit Calculator Function ......................................................................53 6.2 Calculating Example ............................................................................................53 6.3 Transferring the Calculated Results to Selected Axis ..........................................53 6.4 Transferring the Current Display Value in Window to Calculator.......................54
Chapter 7 INITIAL SYSTEM SETTINGS...........................................................................55 7.1 Enter/Exit Initial System Settings ........................................................................55
SW4000 USER’S MANUAL
6 VER5.13
7.2 Setting the type of DRO.......................................................................................56 7.3 Setting Positive Direction for Counter.................................................................56 7.4 Setting Linear Compensation...............................................................................57 7.5 Toggle Between R/D Display Mode ....................................................................59 7.6 Setting Z axis Dial................................................................................................60 7.7 Setting the Resolution of Scale ............................................................................61 7.8 Setting Relay Mode..............................................................................................62 7.9 Setting the EDM Mode ........................................................................................63 7.11 Enable / Disable ERROR Signal..........................................................................64 7.12 Setting Shrinkage Ratio........................................................................................65 7.13 Enable/Disable EDM Depth Compensation.........................................................65 7.14 Setting the Slope Machining Parameter...............................................................66 7.15 Setting Lathe Mode..............................................................................................67 7.16 Setting RI MODE.................................................................................................67 7.17 Enable/Disable Edge Detection............................................................................68 7.18 Toggle between Linear Scale and Rotary Encoder..............................................69 7.19 Step Mode of ARC...............................................................................................69 7.20 Angle Display Mode ............................................................................................70 7.21 Angle display type................................................................................................71 7.22 Load default setup ................................................................................................71
Chapter 8 TROUBLES HOOTING ......................................................................................74

SW4000 USER’S MANUAL
VER5.13 7
Chapter 1 Brief Introduction
1.1 Front Panel
4000-2:
SW4000-3:.
Axis Selection
INC/ABS Switch
SDM Switch
ARC Type
Y-Zero
55 66 77 88
11 22 33 44
X-Zero
X/Y-window Lathe Function
Temparary Quit
EnterCentrial Finding
Clearing
AC π
-1N
O
ENTER
Shrinkage
RI Finding
Inch/Metric Switch
Calculator
Item Selection
Shift
SlopeARC BHC BHL
Message-window
SW4000arar
Axis Selection
INC/ABS Switch
SDM Switch
ARC Type
Z-Zero
Y-Zero
55 66 77 88
11 22 33 44
X-Zero
X/Y/Z-window
Lathe Function
Temparary Quit
EnterCentrial Finding
Clearing
AC π
-1N
O
ENTER
Shrinkage
RI Finding
Inch/Metric Switch
Calculator
Item Selection
Shift
SlopeARC BHC BHL
Message-window
SW4000arar

SW4000 USER’S MANUAL
8 VER5.13
SW4000E:
1.2 Back Panel
Y0
Z0
INCABS 0
999
X0
XYZ
π ENTERAC
Y
X
Z
712
0
4
INCHMM
RI
1
H
-1Tan98
5 6 -1Cos
N
2 3
O
-1Sin
-1
Axis Selection
INC/ABS Switch
SDM Switch
Z-Zero
Y-Zero
X-Zero
X/Y/Z-window
Temparary Quit
EnterCentrial Finding
Clearing
Shrinkage
RI Finding
Inch/Metric Switch
Calculator
Item Selection
Shift
EDM RUN
EDMDEEP
BHC BHL
Message-window
SW4000arar

SW4000 USER’S MANUAL
VER5.13 9
1.3 Description of Key Function
KEY MARK KEY NAME FUNCTION SW4000-2 SW4000-3 SW4000E
1 X/Y/Z-Zero Zero selected axis. No
2 X Y Z Axis Selection Select axis to operate. No Z
3 INCHMM Inch/Metric Switch Toggle display unit between metric and inch.
4 12 Center Finding Half a display value of an axis.
5 ABS
INC
ABS/IINC Switch Toggle between ABS/INC coordinate.
6 RI
RI Finding Find the origin of the linear scale.
7 Shrinkage Toggle between shrinkage and unshrinkage.
8 999
0 SDM Switch Second data memory.
9 0 ─ 9 Numeric Key Enter number.
10 . Decimal Point Enter decimal point.
11 +- +/- Sign Enter +/- sign.
12 ENTER Enter Confirm operation.
13 AC Clearing Cancel incorrect operation.
14 XY Temporary Quit
1. Leave processing temporarily to return
normal display state.
2. Enter auto edge detect function.
X X
15 XYZ Temporary Quit
1. Leave processing temporarily to return
normal display state.
2. Enter auto edge detection.
X
16 Calculator Enter /quit calculating state.
17 NO
-1
N-1
Shift
1 Calculate inverse trigonometric unction in
calculating function.
2 Enter No. of SDM coordinate.
18 -1sin
-1cos
-1tan
Trigonometric
Function
Calculate trigonometric or inverse
trigonometric.
19 + - .. Add: Decrease:
Multiple: Divide
Operate adding: decreasing: multiplying:
dividing.
20 Radical Sign Square root or square.

SW4000 USER’S MANUAL
10 VER5.13
21 π Circumference
Ratio Enter circumference ratio.
22 Equality Sign Make calculating result.
23 H
Set EDM Set parameters of EDM. X X
24
Start EDM Enter EDM processing. X X
25
BHC Process holes displayed equally on a circle.
26 BHL Process holes displayed equally on a line.
27
ARC Simple R cutting function X
28
SLOPE Process a slope. X
29 YX+ Lathe Function Enter or exit lathe function. X X
30 X+ Y
Z Lathe Function Enter or exit lathe function. X X
31 Item Selection Stroll up or down to select.
Note: “X” indicates this model has no such a function.

SW4000 USER’S MANUAL
VER5.13 11
1.4 Interface
A Linear Scale Interface
1) 9PD Connector
2) 15PD Connector
3) 7Pin Connector
3 RXD ORG
COLOR
NC4
965
IN-
IN+
PIN NAME
23
1 NC
54
GNDNC
BLKYELRED
ORGBRW
BRW
COLOR
2 NC
7 FG
21
PIN
TXDNC
NAME
56
43
+5VRI
BA
5 RI
1 OV
43
12
BA
+5V0V
SHILD WIRE
YEL
REDORG
YEL
BLK
543
RIBA
12
+5V0V
ORGYELBRWBLKRED
PIN NAME COLOR
PIN NAME COLOR
PIN NAME COLORREDBLKBRWYELORG
B RS232 Interface
C EDM InterfaceCOMMON NORMAL CLOSE
NORMAL OPEN

SW4000 USER’S MANUAL
12 VER5.13
1.5 Coordinate System
SW4000 DRO is an instrument which can measure position of work piece when processing.
Coordinate system must be definite first for more efficiency and accuracy.
YZ planeXZ p lane
XY planeX
ZY
In horizontal plane, the X axis is parallel with the operator; Y axis is perpendicular to X axis. Z-axis is
perpendicular to horizontal plane. Positive direction of axis is set as the figure. It also can be changed as
customer.
The value of one point position is the distance relative to the origin of coordinate.
For a work-piece as Figure A, the value of each point position is as the Figure B when point O is the origin
of coordinate.
A
B
C
D E
o
H
G
F
X
F(-32,-8)
B(-32,8)
A(-18,18)
Y
H(18,18)
G(32,8)
E(18,-18)
C(-32,-8)
D(-18,-18)
Fig B

SW4000 USER’S MANUAL
VER5.13 13
Chapter 2 BASIC OPERATION
2.1 Power on
Function: Power on then SW4000 enter normal display state.
It can memorize the following parameter after power on.
A. The scale position where power off;
B. ABS/INC/SDM mode;
C. Shrinkage is enabled or disable;
D. Metric/Imperial mode;
The origin of the linear scale must be searched again if the scale is moved when power off.
Note: Normal display state
The state DRO automatically enters after on or exit from “STEUP”. In normal
display state, X window, Y window and Z window displays the current value of
X axis, Y axis and Z axis separately. The message window displays “ABS”,
“ INC” or “SDM XXX” (indicate the Number of SDM coord inate, with a range
of 000—999).When user switch among ABS/INC/SDM, MM/INCH or shrinkage / Un-shrinkage, DRO will not
leave this state. When you enter CALCULATOR function, input data to X (or Y or Z) axis, function of searching
the Reference point (RI) of the linear scale or special function (BHC: BHL: ARC: SLOPE PROCESSING and
EDM function): DRO is not in the normal display state.
2.2 Zeroing
Function: Zero the designated axis in normal display state. Zeroing is used to set the current point as datum
point.
Note: 1 The axis can’t be zeroed when DRO is in other states (for example: in the state of calculating function
or in special function). DRO should return normal display state;
2 The axes can be zeroed in ABS/INC/SDM states;
3 When zero in ABS coordinate, INC display value is cleared simultaneously. Zeroing in INC
coordinate has no effect on ABS and SDM display value.
4 Press the zero key of the same axis will cancel above zero operation
if the scale kept still after zero.
5 zero is means that set the current point as the origin point of current axis.
Example 1: Set the point O (as the figure illustrated) as datum
STEPS:
1) Return normal display state;
2) Move the machine table: and align the lathe tool with point O.
The DRO displays as the right figure.
3) Press to zero X axis,
0X
Y

SW4000 USER’S MANUAL
14 VER5.13
Press to zero Y axis.
2.3 Preset Data to designed axis
Function: Preset a value to current position for a designed axis in normal display state.
NOTES: 1 Axis can not be preset while the DRO is in other states (e.g. calculating function or special function).
DRO should return normal display state before presetting data.
2 Axis can be preset in ABS/INC/SDM state.
3 In SDM state, input mode “0” means that the display value is equal to the enter value; input mode
“1” means that the display value is equal to the negative of enter value.
4 The range of input value is that the minimum value to the maximum value which could be displayed
in the designated window.
Example: Machine the work-piece from the figure (a) to figure (b), and the plane C
is the datum and counting direction is right.
STEPS:
1. Move the machine table, and align the lathe tool to plane B.
2 Return normal display state;
3 Press X , “0” is flashing in X window, waiting for entering a data;
4 Press 1 0 +- in turn, which means the preset data is “-10”;
If incorrect value is inputted: press AC to cancel and input again;
NOTE: If in SDM state and SDM input mode is “1”, +- needn’t be inputted.
Otherwise +- must be inputted.
5. Press ENTER
to confirm the data that your input and end
presetting it to X axis;
6. Moving the machine table until “-28.000” is displayed in X window.
Now it is the position of plane A.
7. Y axis, Z axis can be preset in the same way.

SW4000 USER’S MANUAL
VER5.13 15
2.4 Toggle display unit between mm and inch
Function: Length can be displayed either in “mm” (metric) or “inch” (imperial). Display unit can be
toggled between mm and inch.
Example: Display value toggle from mm to inch
STEPS:
1. DRO returns normal display state. The LED of INCH is off, which
means the current unit is mm (metric);
2. Press INCHMM , then the LED of INCH/mm is on, which means the
display unit is inch now.
3. It is invalid to toggle between mm and inch while axis is encoder.
NOTE: If in imperial, the LED of INCH is on; and i n metric unit, the LED
of NCH is off.
2.5 Mid-point Calculation
Function: Set the center of work piece as datum by halving the displayed
value.
Example: Set the center of rectangle as datum as the right figure.
STEPS:
1. Place the work piece on the machine table, with line AB parallel with
X axis, line AD parallel to Y axis;
2. DRO returns normal display state, move machine table and align the
lathe tool with point A;
Press to zero X axis, press to zero Y axis;
3. Align lathe tool with point C by moving machine table;
Press 12 , X in turn to halve the X axis display value;
Press 12 , Y in turn to halve the Y axis display value;

SW4000 USER’S MANUAL
16 VER5.13
4. Move the machine table until “0.000” is displayed in X
window and Y window. The position (where the lathe tool
is) is the work-piece’s center.
Note: 1. If you do other operation after axis half, please press12 , will cancel above operation,
and X-axis display value return to normal.
2. It is invalid to mid-point calculation while axis is encoder.
2.6 Set the Shrinkage Mode
Function: With this function, you can process the mould tools according to the dimension of the finished
products without calculating dimension separately.
display value = actual value x shrink ratio.
STEPS:
A. unshrinkage � shrinking
1. DRO returns normal display state;
2. Press and don’t release. The Y window
displays the current shrinkage ratio, the message
window displays “SURE AGN”, which means
you need to confirm once again.
3. Press ENTER to enter shrinkage state; press any
other key to return former state.
NOTE: I should not be released and press ENTER
simultaneously to enter shrinkage state;
LED of shrinkage flashes in shrinkage mode;
II You can view the shrink ratio by making use of this function: press will display shrink ratio of Y
axis; Then press any key can return normal state;
III The signal light of shrink ratio will flick er while in shrinkage.
B. shrinkage � unshrinking.
1. DRO returns normal display state;
2. Press , now DRO is in unshrinking mode, LED of shrinkage is off;
shrinkage ratio

SW4000 USER’S MANUAL
VER5.13 17
2.7 Absolute / Incremental / 1000 groups SDM
Function: The SW4000 series DRO has 3 display modes: the absolute mode (ABS); the incremental mode
(INC) and 1000 groups Second Data Memory (SDM) with the range of 000 to 999.
1. Zero point of work-piece is set at the origin point of ABS coordinate;
2 The relative distance between datum of ABS and SDM remains unchanged when ABS datum is
changed.
3. If one point in ABS is zeroed, the point in INC is zeroed automatically; yet if one point in INC is
zeroed, the point in ABS will remain unchanged.
I. toggle among ABS/INC/SDM coordinate
These three display modes can be changed only in normal display state.
ABS � INC Press ABS
INC
;
INC � ABS Press ABS
INC
;
SDM �INC Press ABS
INC
to enter ABS or INC. If in ABS: press ABS
INC
again.
SDM �ABS Press ABS
INC
to enter ABS or INC. If in INC: press ABS
INC
again.
INC � SDM Press 999
0
ABS � SDM Press 999
0
II. Set the new number of SDM in SDM mode
STEPS:
1. Enter SDM mode;
2. Press N
O
-1
(two axes DRO) or (three axes
DRO), message window flashes, waiting for
inputting a new number of SDM;
3. Enter a new number. for example, enter 6 6 6 .
4. Confirm new SDM number.
Press N
O
-1
(two axes DRO) or (three axes DRO), then the message window stops
flashing and the number of SDM is changed to 666.
III: Increase/Decrease the SDM number
DRO return normal display state with the display mode SDM, press to decrease the number
of SDM by 1; press to increase the number of SDM by 1.
Example: If the current SDM number is 777, and the message window displays “SDM 777”,
press , then the message window will display “SDM 776”, which means the

SW4000 USER’S MANUAL
18 VER5.13
current SDM number is 776.
If the current SDM number is 777 and the message window displays “SDM 777”,
press , then the message window will displays “SDM
778”, which means the current SDM number is 778.
If a work-piece as the figure is to be machined where the datum plane is
plane E, the coordinate can be set as the following steps:
1. Return normal display state with ABS coordinate;
2. Move the machine table until the lathe tool is aligned with
plane E, then zero X axis;
3. Move the machine table until the lathe tool is aligned with the plane
D. Change SDM number to SDM 000, and press to zero X
axis. Then the NO.000 SDM coordinate’s datum is set at plane D.
4. Move the machine table until the lathe tool is aligned with plane C,
press to change SDM to SDM 001, and then press to zero
X axis, and the SDM 001 with the datum plane C is set.
5. Move the machine table until the lathe tool touches the plane B, the
DRO will display as the right.
6: Move the machine table until the lathe tool touches the plane A, the
DRO will display as the right.
2.8 Clear All SDM Datum
Function: Clear the Datum of all SDM 0 - 999. After clearing, the display value in SDM coordinate is
equal to the value in ABS coordinate.
STEPS:
1. Return normal display state;
2. Press ABS
INC
and AC simultaneously for 2 seconds, and the message window displays “CLS
SDM” and flashes, which means it is clearing now. About ten seconds later, the clearing is
completed and “CLS OK” is displayed in message window temporary and DRO return normal
display state.
CA B D E

SW4000 USER’S MANUAL
VER5.13 19
2.9 Search the Absolute Reference Point of Scale (RI)
Function: An absolute datum should be set when a work-piece is machined. There are two cases:
� When the machine table is going in high speed, the machine
table can’t stop immediately but continue going further because
of inertia when power is off suddenly. There will be distance ∆L
between the actual position and the position in the DRO
memorize. That is to say the display value is not the actual value
of the position when power is on again.
� If the machine table is moved without intention when DRO is
off.
How to restore the preset ABS and correct display value?
These questions can be solved easily with this function of search RI.
STEPS:
1. DRO is set in ABS coordinate.
2. Press RI
, then the message window displays “SEL AXIS”;
3. Select the axis which need search RI. For instance: select Y axis, then
press Y . “FD.Y REF” is displayed in message window, and Y
window flashes.
4. Move the machine table. The buzzer sounds when RI is searched, then
Y window stops flashing and displays the value of the current
position, the DRO returns normal display state.
In the course of searching, press AC to quit this operation.
The machine table is moved when DRO is off. How to restore the former absolute ABS coordinate
and correct display value?
Take SW4000-2 as an example.
STEPS:
1) This operation (searching the absolute origin point of the
scale) is necessary when a linear scale is installed or the
default parameter is loaded. Or the ABS coordinate would
not be restored.
2) Set the point O as the datum of ABS. (Move the machine
Y
0X
0 AX
Y
0X
Y

SW4000 USER’S MANUAL
20 VER5.13
3) table until the lathe tool is aligned with point O, and zero
the X axis, Y axis)
3) The machine table is moved when power is off;
4) Power on, switch to ABS coordinate. The DRO maybe
displays as the right.
5) Search the RI of X axis and Y axis. After RI is found, the
ABS coordinate is restored.
6) Align the lathe tool with point O, “0.000” is displayed in
X window and Y window, which means the point O is the
origin and the ABS coordinate is restored.
NOTE:
� The linear scale has a RI every 50 mm. For the sake of search identical RI, move the scale around the red
mark “ ” to search RI.△△△△
� Setup correct RI mode is a premise.
2.10 Clear the Error message
If ERROR message is enabled, the message window will display “E1” if the signal of phase A and
phase B of the linear scale changes at the same time; the message window will display “E2” if the linear
scale runs too fast; the window will display “E3” if these two conditions occur simultaneously. When error
information appears, the display value has an error of 1-2 count. So users need search RI to restore ABS
coordinate. If you think that doesn’t affect your work, press AC to clear error message and continue your
work. .
Example : When signal of A phase and B phase is same in Y
axis the window displays as the right figure.
Press AC to clear the error information. Y window
displays the value, but it is error. The difference between the
display value and the true value is about 1- 2 times of
resolution. For instance, the resolution of scale is 5µm; the
difference is 5-10µm.
2.11 Lathe Function
As the right figure, if two scales are installed
in one axis, the position of the work-piece should
be the sum of these two values (X+Y) in this

SW4000 USER’S MANUAL
VER5.13 21
direction. It is called lathe function.
A. lathe mode 0: normal display (the lathe
function is disabled).
B. lathe mode 1: X window value = the value of X axis position + the value of Y axis position.
C. lathe mode 2: X window value = the value of X axis position + the value of Z axis position.
STEPS:
1. Set the lathe mode in initial system settings;
2. In normal display state press (three axes display) or YX+ (two axes display) to enter lathe
function. Then the LED of the lathe function will be on (If the lathe mode is 0, the lathe function is
disabled and the LED is off);
3. In lathe state, press (three axes display) or YX+ (two axes display) to exit the lathe function:
and the LED turns off.
A. If in normal display state: the value of the position is as the
right.
B. In lathe mode 1, the DRO will display as the following:
X window display value = value of X axis position +
value of Y axis position
C. In lathe mode 2, the DRO will display as the
following:
X window display value = value of X axis position +
value of Z axis position
2.12 Filter display value
When machine a work-piece by grinder, the display value varies quickly due to the vibration of
grinder. User can’t see display value clearly. SW4000 series DRO provides display value filter function to
disable the quake change of display value.
STEP:
1) Enter display value filter function.
In normal display state, pressN
O
-1
and ENTER
simultaneously, enter display value filter function.
2) Exit display value filter function.
Press N
O
-1
, exit display value filter function.

SW4000 USER’S MANUAL
22 VER5.13
Chapter 3 1000 groups SDM coordinate
SW4000 has three display modes: the absolute mode (ABS), the incremental mode (INC) and the
1000 groups second data memory (SDM 0—SDM999).
ABS datum of the work-piece is set at the beginning of the processing and the 1000 group SDM is
set relative to ABS coordinate.
1000 group SDM coordinate can be divided into several segments, and every segment stores data of
one work-piece. If one segment has 20 groups SDM coordinate, DRO can be divided into 50 segments
and can store data of 50 work-pieces.
SDM 000 ------ SDM 019 data of the first work-piece
SDM 020 ------ SDM 039 data of the second work-piece
SDM 040 ------ SDM 059 data of the third work-piece
……
SDM 960 ------ SDM 979 data of 49th work-piece
SDM 980 ------ SDM 999 data of 50th work-piece
Example: The ABS datum is the center point O,
the point E, F, G, H needed processing are set
as datum of SDM 000 —SDM 003.
Two ways to set SDM coordinates:
1) Zeroing at the current point.
2) Presetting datum of SDM coordinate.
3.1 Zeroing at the Current Point
At first set the center point of the work-piece as the origin of the ABS, then align the lathe tool with
point E, F, G, H by moving the machine table and zero them. It is the position to process where the “0.00”
appears in X window, Y window by moving the machine table whether in ABS or in SDM coordinate.
STEPS:
1. Set the center of rectangular point O as the datum of ABS
Make line AB parallel with X axis: line AD parallel with Y axis.
When position lathe tool to point O
Zero X axis and Y axis in SDM 000;
Zero X axis and Y axis in SDM 001;
Zero X axis and Y axis in SDM 002;
Zero X axis and Y axis in SDM 003;
2. Set the point E as the datum of SDM 000.
SDM 000: align the lathe tool with point E and zero
X axis, Y axis. DRO displays as the right.
Y
O
X
C
OD
A
E
H
G
F

SW4000 USER’S MANUAL
VER5.13 23
Press ,
3. Set the point F as the datum of SDM 001.
In SDM 001 and align the lathe tool with point F,
then zero X axis, Y axis. DRO displays as the right:
Press ,
4. Set the point G as the origin of SDM 002.
In SDM 002, align the lathe tool with point G, and
zero X axis, Y axis. DRO displays as the right.
Press ,
5. Set the point H as the origin of SDM 003.
In SDM 003, align the lathe tool with point H, and
zero X axis, Y axis. DRO displays as the right.
Press , ;
6. Machine the work-piece according to the preset SDM coordinate;
7. Machine another work-piece according to the same blueprint. You only need set the center point
as the datum of ABS. It is not necessary to set SDM coordinate again, as SDM can be set
automatically. Point E, F, G, and H is the zero point of SDM 000, SDM 001, SDM 002, and SDM
F
G
H
E

SW4000 USER’S MANUAL
24 VER5.13
003 respectively. Point can be machined when enter corresponding SDM coordinate and “0.000”
appears in screen by moving machine table. This function can save great plenty of time in
production.
3.2 Preset datum of SDM Coordinate
Compared with the way of zeroing at current point, the another way (presetting datum of SDM
coordinate) can set zero point of SDM more accurately and quickly without moving the machine table.
As the figure showed right, center point is the datum of
ABS, the position of point E, F, G, H is (-60, -45), (60, -45),
(60, 45), (-60, 45) in ABS coordinate.
A Enter SDM 000 and preset the position of point O
as (60, 45), which means the point E is the datum
of SDM 000;
B Enter SDM 001, preset the position of point O as
(-60, 45), which means the point F is the datum of SDM 001;
C Enter SDM 002 and set the position of point O as (-60, -45), which means the point G is the
datum of SDM 002;
D Enter SDM 003, preset the position of point O as (60, -45), witch means the point H is the
datum of SDM 003;
Pay attention that the preset value is negative to the actual value of position in ABS. If set “SDM
DIR” as “1” in initial system settings, the caution is not necessary. The value DRO accepts is equal to the
negative of the enter value.
STEPS:
1. Set “SDM DIR” as “1” in initial system settings;
2. Set the center point of the work-piece as the datum of ABS;
Line AB is parallel to X axis, line AD is parallel to Y axis.
Move machine table; align the milling cutter with point O.
The machine table remain still while presetting;
3 Set point E as the datum of SDM 000;
Enter SDM 000.
The position of point E is (-60, -45), press.
C
OD
A
E
H
G
F
O
XY

SW4000 USER’S MANUAL
VER5.13 25
X 6 0 +-
ENTER in turn;
Y 4 5 +-
ENTER in turn;
4 Set point F as the datum of SDM 001;
Enter SDM 001.
The position of point F is (60, -45), press
X 6 0 ENTER
in turn ;
Y 4 5 +-
ENTER in turn;
5 Set point G as the datum of SDM 002;
Enter SDM 002.
The position of G is (60, 45), press
X 6 0 ENTER
in turn;
Y 4 5 ENTER
in turn;
6 Set point H as the datum of SDM 003;
Enter SDM 003
The position of point H is (-60, 45), press
X 6 0 +-
ENTER in turn;
Y 4 5 ENTER
in turn;
SW4000 USER’S MANUAL
26 VER5.13
Chapter 4 SPECIAL FUNCTIONS
SW4000 series DRO has special function as the following except measuring and positioning:
Bolt Hole Circle (BHC);
Bolt Holt Line (BHL);
ARC Processing (only for SW4000-2, SW4000-3);
Slope Processing (only for SW4000-2, SW4000-3);
Electrode discharging machining (EDM, only for SW4000E);
Please refer Coordinate System (in Chapter 1) before reading this section.
4.1 Bolt Hole Circle
Function description:
SW4000 series DRO has the function of BOLT HOLE CIRCLE (BHC) .This function can simplify
the pressing of multiple holes which are attributed equally around the circumference of a circle. The DRO
will guide operator to enter the following parameters:
RADIUS Radius of circle
ST.ANGLE Starting angle that the center of the first
hole on the circle
END.ANGLE Ending angle that the center of the last hole
on the circle
HOLE NUM Hole number
DIRECT Angle direction.
Angle has two directions: counterclockwise and
clockwise. “0” indicates that it is counterclockwise
from ST.ANGLE to END.ANGLE; “1” indicates it is
clockwise from ST.ANGLE to END.ANGLE. As the
following figure, the ST.ANGLE is 0º, END.ANG is
240º. The figure (B) illustrates the arc while angle
direction is counterclockwise; figure (C) illustrates the arc while angle direction is clockwise.
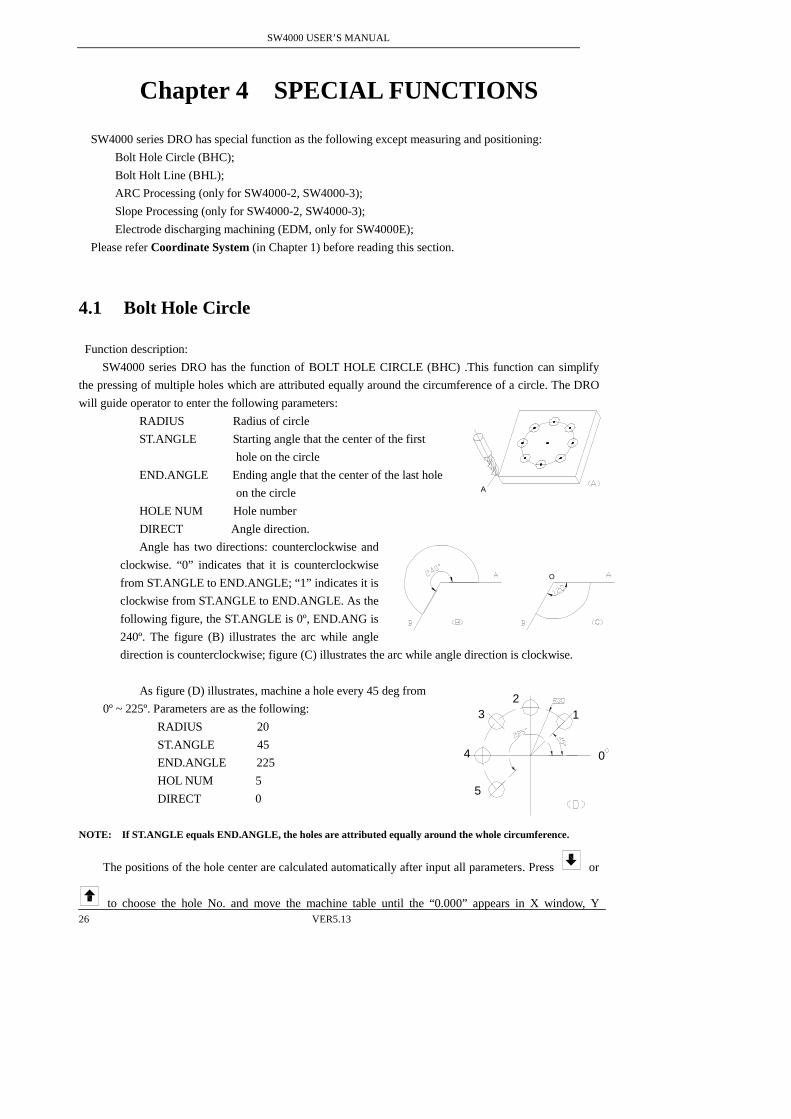
As figure (D) illustrates, machine a hole every 45 deg from
0º ~ 225º. Parameters are as the following:
RADIUS 20
ST.ANGLE 45
END.ANGLE 225
HOL NUM 5
DIRECT 0
NOTE: If ST.ANGLE equals END.ANGLE, the holes are attributed equally around the whole circumference.
The positions of the hole center are calculated automatically after input all parameters. Press or
to choose the hole No. and move the machine table until the “0.000” appears in X window, Y
A
O
2
5
0
1
4
3

SW4000 USER’S MANUAL
VER5.13 27
window. It is the position to process a hole.
Example: Machine holes on circumference as the figure (E).
RADIUS 20mm
ST.ANGLE 0º
END.ANGLE 300º
HOLE NUM 6
DIRECT 0
STEPS:
1. Set display unit to metric in normal state;
Move the machine table until the machine tool is aligned with
the center of the circle, then zero X axis, Y axis.
2. Press to enter Bolt Hole Circle function.
If all parameters have been set, press ENTER to process directly.
3. Input radius
Y window displays the formerly preset radius; message window
displays “RADIUS”.
Press 2 0 ENTER in turn.
NOTE:
If “0” is inputted as the radius, the DRO will be requested to input again.
If incorrect parameter has been input and you haven’t pressed ENTER
, press AC
to cancel and input
again; if you have pressed ENTER
and begin to set another parameter, you should press to return
RADIUS set and input again. Other parameters can be deal with in the same way.
4. Input ST.ANGLE
Message window displays “ST.ANGLE”; Y window displays
the former preset starting angle.
Press 0 ENTER in turn;
5. Input ending angle
Message window displays “END.ANGLE”; Y window
displays the former angle.
Press 3 0 0 ENTER in turn.
former starting angle
former ending angle

SW4000 USER’S MANUAL
28 VER5.13
6. Input the number of hole.
Message window displays “HOLE NUM”; Y window
displays the former number.
Press 6 ENTER in turn.
NOTE: If “0” or “1” is inputted as the number of ho les, the DRO
will point out this mistake and remind inputting again.
7. Input angle direction.
Message window displays “DIRECT”, Y window
displays the former preset direction;
Press 0 ENTER in turn;
8. Message window displays “HOLE 1”;
It is the position of the first hole to punch where the
“0.000” is displayed in X window and Y window by
moving the machine table.
9. After finishing the first hole, press
Message window displays “HOLE 2”;
Move the machine table, the “0.000” is displayed in X
window and Y window. It is the position of the second
hole.
NOTE: Press or to change holes number.
10. Process the holes 3rd –6th in the same way.
11. After processing all holes, press to return normal display state.
NOTE: In the course of BOLT HOLE CIRCLE processing, pressing (three axes display) or XY
(two axes
display) can leave BOLT HOLE CIRCLE function temporarily and return normal display state in order to
check the position. And press (three axes display) or XY
(two axes display) again to return BOLT
HOLE CIRCLE function.
4.2 Bolt Hole Line
Function: SW4000 series DRO provides BOLT HOLE LINE (BHL) function. This function can
simplify the processing multiple holes whose centers are attributed equally on one line.
The following parameters are needed to be input:
LINE DIS Line distance (distance between the center of first hole and the center of the last
hole)

SW4000 USER’S MANUAL
VER5.13 29
LINE ANG Line angle (angle between the line and the positive X axis)
HOLE NUM Number of holes
DRO will calculate the positions of the hole after all the parameters have been entered. Press
or to select the No. of hole and move the machine until “0.000” is displayed in X window and Y
window. It is the position of hole to machine.
Example:
LINE DIS 150mm
LINE ANG 30º
HOLE NUM 6
STEPS:
1. Set display unit to metric and the shrinkage is not
taken into consideration.
Move the machine table until the machine tool is
aligned with the center point of the first hole, and
zero X axis, Y axis.
2. Press to enter BOLT HOLE LINE function;
If all parameters have been entered, press ENTER
to start processing directly.
3. Input line distance.
Y window displays the former preset line distance,
and the message window displays “LINE DIS”.
Press 1 5 0 ENTER
in turn;
NOTE: If “0” is input as the line distance: the DRO will not
accept and remind the operator to input again.
4. Input line angle.
The message window displays “LINE ANG”; Y
window displays the former preset line angle.
Press 3 0 ENTER
in turn.
5. Input the number of hole.
Message window displays “HOLE NUM”, Y
window displays the former preset hole number.
Press 6 ENTER
in turn, processing begins.
former preset distance
former pressetted angle
former presetted hole number
XY

SW4000 USER’S MANUAL
30 VER5.13
NOTE: If “0” or “1” is input as hole number, DRO wi ll not
accept and remain user to input again.
6. Message window displays “HOLE 1”;
Move the machine table until “0.000”appears in X
window and Y window, it is the center of the first hole
to punch.
7. After finishing the first hole, press , and the
message window displays “HOLE 2”;
Move the machine table until “0.000” appears in X
and Y window, and then you can punch the second
hole at this point.
NOTE: Press or to transform among holes.
8. Process the holes 3rd –6th in the same way.
9. Press to return normal display state when
finishing processing.
NOTE:
In the course of BHL processing, you can press (three axes display) or XY
(two axes display) to
leave this function temporarily and return normal display of X, Y, Z axis in order to check the position which
the DRO calculated. Then press (three axes display) or XY
(two axes display) again to return BHL
function.
4.3 ARC Processing
This function is only for SW4000-2, SW4000-3.
It is waste to using numerical control lathe to process arc in the simple product or small production.
This function makes it convenient to process arc with normal lathe. Parameter “MAX CUT” is the arc
length each process. The smaller the MAX CUT, the more smooth the arc plane and the longer processing
time.
A. Process XZ, YZ plane
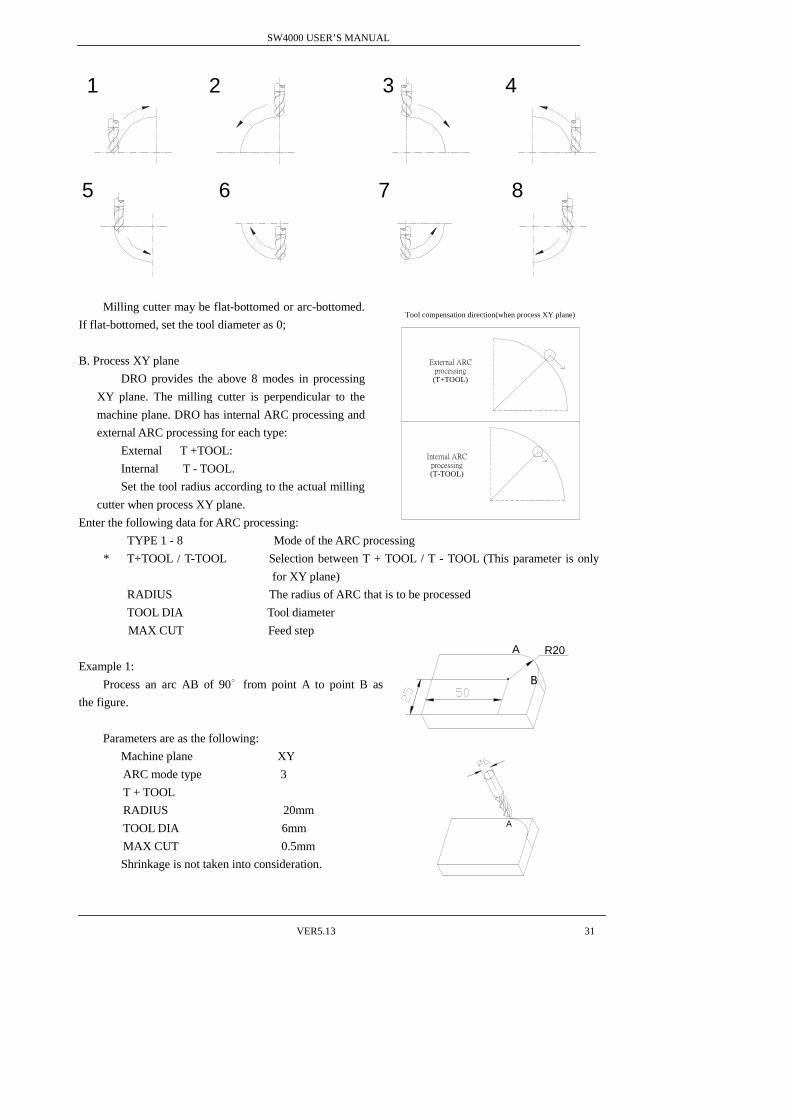
There are 8 modes as the following when processing arc in XZ or YZ plane:
SW4000 USER’S MANUAL
VER5.13 31
4
5 6
1 2
7
3
8
Milling cutter may be flat-bottomed or arc-bottomed.
If flat-bottomed, set the tool diameter as 0;
B. Process XY plane
DRO provides the above 8 modes in processing
XY plane. The milling cutter is perpendicular to the
machine plane. DRO has internal ARC processing and
external ARC processing for each type:
External T +TOOL:
Internal T - TOOL.
Set the tool radius according to the actual milling
cutter when process XY plane.
Enter the following data for ARC processing:
TYPE 1 - 8 Mode of the ARC processing
* T+TOOL / T-TOOL Selection between T + TOOL / T - TOOL (This parameter is only
for XY plane)
RADIUS The radius of ARC that is to be processed
TOOL DIA Tool diameter
MAX CUT Feed step
Example 1:
Process an arc AB of 90 from point A to point B as ∘
the figure.
Parameters are as the following:
Machine plane XY
ARC mode type 3
T + TOOL
RADIUS 20mm
TOOL DIA 6mm
MAX CUT 0.5mm
Shrinkage is not taken into consideration.
Internal ARC processing (T-TOOL)
Tool compensation direction(when process XY plane)
External ARC processing (T+TOOL)
A
B
R20
A

SW4000 USER’S MANUAL
32 VER5.13
STEPS:
1. Set display unit is metric, and the LED of the
shrinkage is off.
2. Move the machine table until the lathe tool is
aligned with point A, then zero X axis and Y axis;
3. Enter ARC processing state;
Press to enter ARC processing state.
If all parameters have been set: press ENTER
to process directly.
4. Select machine plane;
Press X ENTER
to select XY.
NOTE: X indicates XY plane;
Y indicates YZ plane;
Z indicates ZX plane;
You can also press N
O
-1
(two axes display) or N-1
(three axes
display) to switch plane among XY plane, YZ plane and ZX plane.
5. Select processing mode:
Message window displays “TYPE 1-8”, and Y window
displays the former processing mode;
Press 3 ENTER
in turn to select mode 3, and then
enter ARC type;
6. Select T + TOOL mode:
Press + ENTER
to select the external arc processing;
NOTE: + indicates T + TOOL mode (external arc processing);
- indicates T – TOOL mode (internal arc processing).
7. Set ARC radius
Message window displays “RADIUS”, and Y window
displays the former arc radius;
Press 2 0 ENTER in turn to input the arc radius.
NOTE: If “0” as the arc radius is input: the DRO wi ll display error
message and wait another number.

SW4000 USER’S MANUAL
VER5.13 33
8. Set Tool diameter.
Message window displays “TOOL DIA”;
Y window displays the former preset diameter
Press 6 ENTER
in turn to enter the tool diameter.
9. Set the feed step.
Message window displays “MAX CUT”;
Y window displays the former feed step.
Press 0 .
5 ENTER in turn to input the feed step.
NOTE: If “0” is inputted as the feed step, the DRO will not accept
and wait for inputting another data.
10. Process ARC
Message window displays “POIN 1”. Process when
the “0.000” appears in X window and Y window. Then
you have finished the first point. Press to switch
to the second point and repeat the same step. Process
in this way until the message window displays “POIN
74”. Pressing or can select processing
point.
11. Press to exit ARC processing after machining is over.
NOTE:
○○○○1 In the ARC process, pressing (three axes display) or XY
(two axes display) can leave this function
temporarily to return normal display of X, Y, and Z axis in order or check the position the DRO has
calculated. Press (three axes display)或或或或XY
(two axes display) to return ARC function.
②②②② Processing or can switch among the parameters in the course of the presetting parameter.
Example 2:
Process the ARC EF as the figure from point E to point F.
Parameters are set as following:
Machine plane: XZ
TYPE: 4
RADIUS: Actual radius of the arc
TOOL DIA: 0 (flat-bottomed tool)
MAX CUT: preset as the costumer
B
A
O E
F

SW4000 USER’S MANUAL
34 VER5.13
Example 3:
Process the ARC DE as the figure from point D to point
E. Parameters are as the following:
Machine plane: XZ
TYPE: 6
RADIUS: Actual radius of the arc
TOOL DIA: Actual value (actual tool)
MAX CUT: preset as the costumer
Example 4:
Process the ARC DE as the figure from point D to point E.
Parameters are as the following:
Machine plane: YZ
TYPE: 7
RADIUS: Actual radius of the arc
TOOL DIA: Actual value (actual tool)
MAX CUT: preset as the costumer
Note: For SW4000-2, it is not installed with Z-axis, please press or to simulate position
of Z-axis, simulate moving to the former process point, and simulate moving to
the next process point.
Steps:
1: set “STEP MODE” as “Z STEP” in setup mode, and set Z-axis dial (default value is
2.5mm);
2: Before machining, at first, align lathe with the beginning point Z of R, zero Z axis;
3: In machining process, message window displays simulate height of Z axis, which indicates
simulate height of Z axis while machining;
As right figure, while machining XZ plane, X
window display position of X axis, X axis is
finished when displaying “0.000” in X window;
In Y window, the former 2 number indicates number of dial, and the following 5 number
indicates scale number of dial, which means that machining to this scale for current
point.
While machining YZ plane, Y window display position of Y axis, and when this window
displays “0.000”, which indicates the machining is finished in Y direction; In X window,
the former 2 number indicates number of dial, and the following 5 number indicates
scale number of dial, which means that machining to this scale for current point.
4.4 Slope Processing
This function is only for SW4000-2, SW4000-3.
Function: This function can calculate the position of every
processing point automatically in processing slope. Only the following parameters need to be inputted:
Z S
TE
P
MAX CUT
A D O
E
DO
E

SW4000 USER’S MANUAL
VER5.13 35
INCLE: Set machine plane XY, YZ or XZ plane
INCL.ANG: the inclination angle of the slope
MAX CUT: the slope length each time processing
Note:
Z STEP and MAX.CUT are defined as the figure.
DRO will calculate the position of each processing on
the slope automatically when all parameters have been input.
Press or to select the processing point and
process until “0.000” appears in the window.
Example 1:
Process the slope AB as the figure. The
parameters are as following:
INCLE: XZ
INCL.ANG 45°
MAX.CUT 1.2mm
STEPS:
1. Set display unit to metric;
Set the SLOP.MODE 1 in initial system settings.
Note: If the third parameter isn’t Z STEP, set the SLOP.MODE 0.
Move the machine table until the lathe tool is aligned
with the starting point A, then zero X axis and Z axis.
Press , in normal display state.
2. Press to enter slop processing
Press ENTER
to start processing directly if all parameter
have been set.
3. Select machine plane.
Press Z ENTER in turn to select the XY plane.
Note: Press X indicates XY plane;
Press Y indicates YZ plane;
Press Z indicates ZX plane;

SW4000 USER’S MANUAL
36 VER5.13
You can also press N
O
-1
(two axes display) or N-1
(three axes display) to switch among XY plane, YZ plane
or ZX plane.
4. Enter INCL.ANG.
Message window displays “INCL ANG”; Y window
displays the former INCL.ANG.
Press 4 5 ENTERin turn.
5. Enter MAX.CUT.
Message window displays “MAX CUT”; Y window
displays the former MAX.CUT.
Press 1 . 2 ENTER
in turn;
NOTE: If “0” is inputted as MAX CUT, DRO will not a ccept
and wait for another data.
6. Processing
Message window displays “POIN 1”;
Processes slop when the “0.000” appears; then press to process the next point.
7. Press or to select point.
8. Press to return normal display state after processing is over.
Note: For SW4000-2, it is not installed with Z-axis, please press or to simulate position
of Z-axis, simulate moving to the former process point, and simulate moving to
the next process point.
Steps:
1: Set Z axis dial in internal system setup;
2: Before machining, align the start point Z point with lathe, then set Z axis as “0.000”;
3. While machining XZ plane, X window display position of X axis, X axis is finished when
“0.000” appears in X window; In Y window, the former 2 number indicates number of
dial, and the following 5 number indicates scale number of dial, which means that
machining to this scale for current point.
While machining YZ plane, Y window display position of Y axis, and when this window
displays “0.000”, which indicates the machining is finished in Y direction; In X window, the
former 2 number indicates number of dial, and the following 5 number indicates scale
number of dial, which means that machining to this scale for current point.

SW4000 USER’S MANUAL
VER5.13 37
In slope processing, operator can press (three axes) or XY (two axes) to exit, return to
normal display, making use of this you can confirm position of DRO. And then press (three
axes) or XY (two axes) return to slope processing.
4.5 Auto Edge Detection
Function:
� Searching border automatically;
� Measuring dimension of work-piece;
� Searching for the center of work-piece.
NOTE: This is an additional function. It needs additional pay.
Example:
Radius of EDGE DETECTOR 5 mm
Work-piece dimension on X axis 65 mm
Measure by using the linear scale installed at X axis.
STEPS:
1. Set display unit to metric.
2. Press (three axes display) or XY (two axes display)
to enter AUTO EDGE DETECTION.
Message window displays “SEL AXIS”;
Y window displays the radius of the edge detector; the sign of
the value displayed is the sign when the detector touches the
first edge.
3. Input the radius and sign of the detector.
Press 5 +-
ENTER in turn, and then the Y window
displays “-5.000”.
NOTE: You can skip this step if the diameter is set well.
4. Select axis, take X axis for example.
Press X to select X axis.
“0.000” flashes in X window, waiting for detecting edge.
Y window, Z window display the value of the current
position.
Press Y to select Y axis; press Z to select Z axis
in the same way.

SW4000 USER’S MANUAL
38 VER5.13
5. Move the EDGE DETECTOR to touch the first edge,
then the X window will display the position of the
detector with “-5.000”. The displayed value in X
window is the measure value. You can touch the edge
many times.
6. Move the EDGE DETECTOR to touch another edge.
The X window will show the length of the work-piece
with “65.000”;
7. Press 12 to exit this function. Move the EDGE DETECTOR until the X window displays
“0.000”, which means that this position is the center of the work-piece at the X axis direction.
NOTE: 1. Pressing (three axes display) or XY
(two axes display) will exit this function when in EDGE
DETECTION function.
2. If you detect edge only, you needn’t do step 6 and 7.
3. If do not find the center point, you needn’t do step 7.
格格格格式化式化式化式化:::: 項目符號及編號

SW4000 USER’S MANUAL
VER5.13 39
Chapter 5 EDM
(ELECTRICAL DISCHARGE MACHINING)
Note: Only SW4000-E provides EDM function. DRO will send out a signal and machining will stop as soon as the display value is equal to the
expectant .
SW40000E is equipped with 7 EDM modes:
MODE 1 manual mode 1
MODE 2 automatic mode 1
MODE 3 manual mode 2
MODE 4 manual mode 3
MODE 5 manual mode 4
MODE 6 automatic mode 2
MODE 7 automatic mode 3
EDM mode is set in initial system settings.
NOTES: Pay attention to the relay mode.
Table 1: the difference between 7 EDM modes: (X: No have; √: Have; ↑: Up; ↓: Down)
EDM
MODE Edge detect
Direction of machining as
depth is minus
Exit EDM after machine
first hole Z axis direction
1 X ↓ √ ↓
2 √ No minus depth X ↓
3 X ↓ X ↓
4 X ↑ √ ↓
5 X ↑ X ↓
6 √ ↓(No plus depth) X ↑
7 √ ↓ X ↑
Positive direction of Z axis is down except mode 6: which means the display value will increase with
the increasing depth during machining.
SW4000E provides fireproof function. During EDM, charcoal will be produced on the machined
surface. With accumulating charcoal, the electrode will beyond liquid level, which could lead a fire. If
fireproof height is set, EDM will stop, the DRO will send an alarm and fire is avoided.
processing direction
processing direction
Fig 1 : Difference among EDM modes
-A -A
-B-B
starting position
target position
target position
starting position
MODE1,3 MODE 4~7
electrode
workpiece
firep
roof
he
ight
Fig.3 : fireproof hight
positive direction
Z
Fig 2
negative direction
SW4000 USER’S MANUAL
40 VER5.13
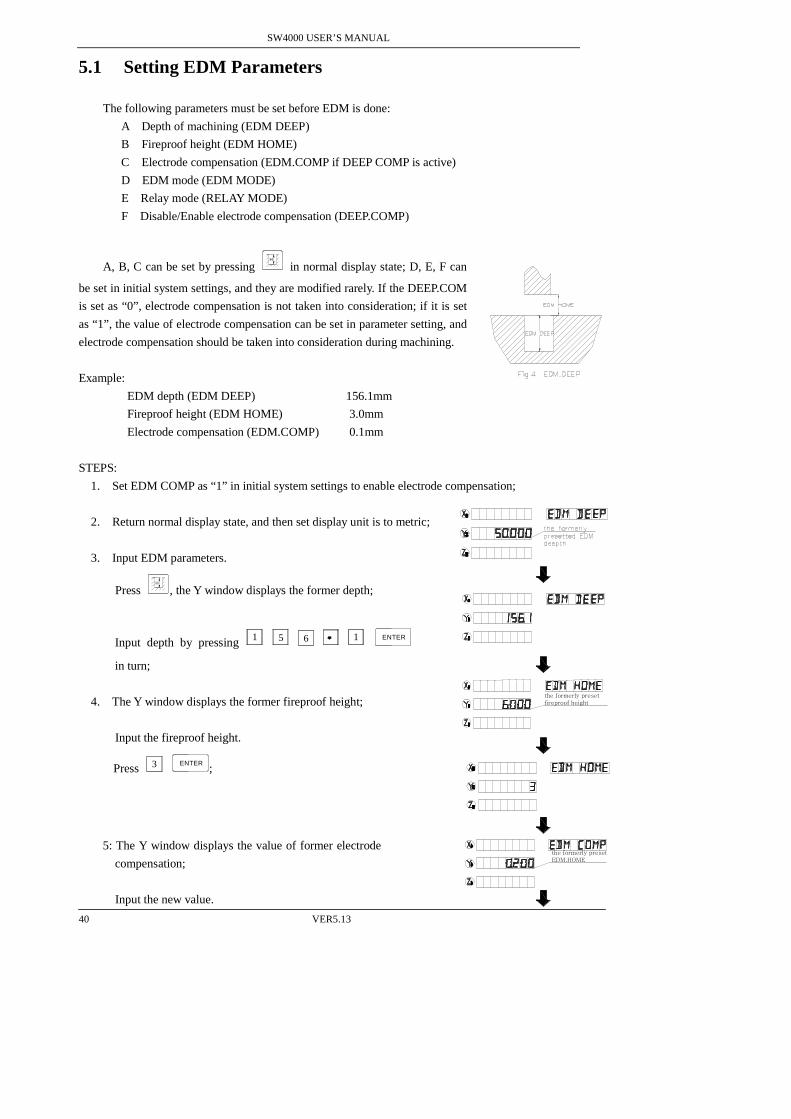
5.1 Setting EDM Parameters
The following parameters must be set before EDM is done:
A Depth of machining (EDM DEEP)
B Fireproof height (EDM HOME)
C Electrode compensation (EDM.COMP if DEEP COMP is active)
D EDM mode (EDM MODE)
E Relay mode (RELAY MODE)
F Disable/Enable electrode compensation (DEEP.COMP)
A, B, C can be set by pressing H
in normal display state; D, E, F can
be set in initial system settings, and they are modified rarely. If the DEEP.COM
is set as “0”, electrode compensation is not taken into consideration; if it is set
as “1”, the value of electrode compensation can be set in parameter setting, and
electrode compensation should be taken into consideration during machining.
Example:
EDM depth (EDM DEEP) 156.1mm
Fireproof height (EDM HOME) 3.0mm
Electrode compensation (EDM.COMP) 0.1mm
STEPS:
1. Set EDM COMP as “1” in initial system settings to enable electrode compensation;
2. Return normal display state, and then set display unit is to metric;
3. Input EDM parameters.
Press H
, the Y window displays the former depth;
Input depth by pressing 1 5 6 .
1 ENTER
in turn;
4. The Y window displays the former fireproof height;
Input the fireproof height.
Press 3 ENTER;
5: The Y window displays the value of former electrode
compensation;
Input the new value.
the formerly preset fireproof height
the formerly preset EDM.HOME
SW4000 USER’S MANUAL
VER5.13 41
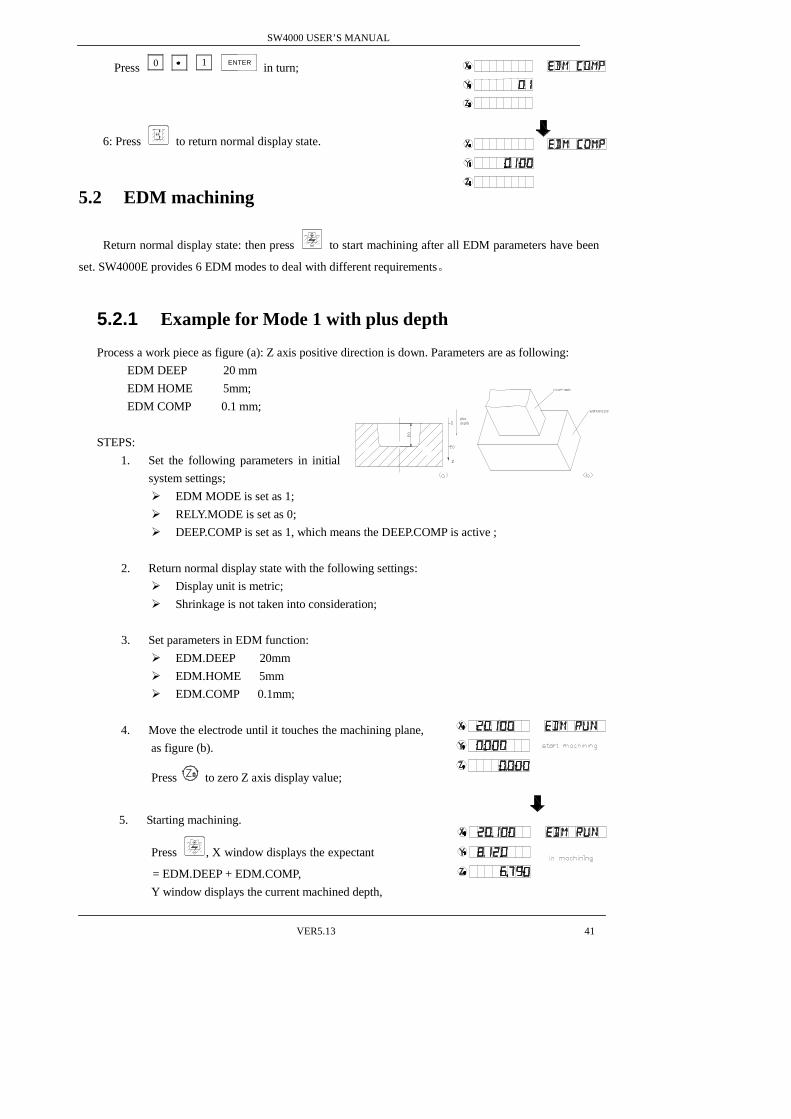
Press 0 .
1 ENTER
in turn;
6: Press H
to return normal display state.
5.2 EDM machining
Return normal display state: then press to start machining after all EDM parameters have been
set. SW4000E provides 6 EDM modes to deal with different requirements。
5.2.1 Example for Mode 1 with plus depth
Process a work piece as figure (a): Z axis positive direction is down. Parameters are as following:
EDM DEEP 20 mm
EDM HOME 5mm;
EDM COMP 0.1 mm;
STEPS:
1. Set the following parameters in initial
system settings;
� EDM MODE is set as 1;
� RELY.MODE is set as 0;
� DEEP.COMP is set as 1, which means the DEEP.COMP is active ;
2. Return normal display state with the following settings:
� Display unit is metric;
� Shrinkage is not taken into consideration;
3. Set parameters in EDM function:
� EDM.DEEP 20mm
� EDM.HOME 5mm
� EDM.COMP 0.1mm;
4. Move the electrode until it touches the machining plane,
as figure (b).
Press to zero Z axis display value;
5. Starting machining.
Press , X window displays the expectant
= EDM.DEEP + EDM.COMP,
Y window displays the current machined depth,
Z
plus depth

SW4000 USER’S MANUAL
42 VER5.13
Z window displays the current position of electrode,
Message window displays “EDM RUN”;
6. When Z window displays value = EDM.DEEP +
EDM.COMP = 20.1, the buzzer will sound and
message window will display “BACKWARD”, and
then the machining stops and the electrode
withdraws.
The actual machined depth is 20mm when Z
window displays value = EDM.DEEP +
EDM.COMP = 20.1 because of electrode wear.
During electrode withdrawing, Z window displays
the current position of electrode, X window displays
the preset value (EDM.DEEP + EDM.COMP), Y
window displays the formerly preset depth;
The DRO will quit EDM and return normal display state
when the electrode withdraws higher than the fireproof height;
The DRO will exit EDM automatically if the electrode
doesn’t withdraw in 25 seconds.
The LED of will flash if EDM.COMP is active during machining;
Pressing can exit EDM in the course of EDM machining;
Note: In the course of EDM, by pressing or XY
, the operator can temporarily quit EDM function and
return normal display state in order to watch the position of X, Y, Z axis. Press or XY
again to
return EDM function.
5.2.2 Example for Mode 1 with Minus Depth
Machine the work-piece as the figure (c), Z axis
positive direction is down.
Parameters as following:
EDM.DEEP -20 mm;
EDM.HOME 55mm;
STEPS:
1. Set the following parameters in initial system settings;
� EDM MODE is 1;
� RELY.MODE is 0;
� DEEP.COMP is 0, electrode compensation is disenabled;
Z
(d)

SW4000 USER’S MANUAL
VER5.13 43
2. Return normal display state with the following settings:
� Display unit is metric;
� Shrinkage is not taken into consideration;
3. Set the parameters in EDM function;
� EDM.DEEP -20mm
� EDM.HOME 55mm
4. Move the electrode until it touches the machining
planes as figure (d),
Press to zero z axis;
Move the electrode to the position as figure (e).
5. Starting EDM.
Press ,
X window displays the expectant
= EDM.DEEP + EDM.COMP,
Y window displays the current machined depth;
Z window displays the current position of the
electrode,
Message window displays “EDM RUN”;
6. When Z axis displays the value = EDM.DEEP
= -20.000, the buzzer sounds, message window
displays “BACKWARD”. Then the machining
stops and the electrode withdraw;
During withdrawing the electrode, Z window
displays the current position of the electrode, X
window displays the preset EDM deep and Y
window displays the machined depth;
The DRO will exit the EDM function and return
normal display state if the electrode doesn’t
withdraw in 25 seconds;
The DRO will quit the EDM function when the
electrode beyond the fireproof height
(EDM.HOME).
Press to exit the EDM function during
machining;
in processing
(e)

SW4000 USER’S MANUAL
44 VER5.13
5.2.3 Example for Mode 2
DRO must be connected with the edge detector sensor. Press to enter EDM, Z axis is
zeroed automatically and machining begins when the electrode touches the machining plane. As soon
as process to the expected depth, the relay sends out a signal to withdraw the electrode and stop EDM
machining. When the electrode beyond fireproof height, move the machine table to next hole to
machine another hole without pressing . Mode 2 can process multiple holes conveniently.
Characteristics for MODE 2:
� The DRO connected with sensor which can detect edge and zero display value automatically.
� The DRO needn’t exit EDM to machine next hole.
� EDM.DEEP can’t be minus;
� Z axis positive direction and machining direction is down;
� The electrode waste is very small and negligible;
Process six holes in one work-piece as figure (f) Z axis direction is down.
Parameters are as following:
A. EDM.DEEP 20.1 mm
B. EDM.HOME 5mm;
Take the mode of detecting and zeroing Z axis automatically.
STEPS:
1. Set the following parameters in initial system settings:
① EDM MODE is set 2;
② RELY.MODE is set0;
③ DEEP.COMP is set 0, electrode compensation is disabled;
2. Enter the normal display state with the following setting:
① Display unit is metric;
② Shrinkage is not taken into consideration;
3. Set parameters;
○1 EDM.DEEP 20.100mm
○2 EDM.HOME 5mm
4. Press , the DRO will display as the right.
5. By moving the electrode until it touched the machining
plane, the z axis will be zeroed automatically.
6. Start EDM
X window displays the expectant = EDM.DEEP;
Y window displays the current machined depth;
Z window displays the current position of the electrode,
( F )

SW4000 USER’S MANUAL
VER5.13 45
Message window displays “EDM RUN”;
7. When the Z window displays value = EDM.DEEP = 20.1,
the buzzer sounds and the message window displays
“BACK WARD”, and then the machining stops and the
electrode withdraw;
During the electrode withdrawing:
Z window displays the current position of the electrode;
X window displays value = EDM.DEEP + EDM.COMP;
Y window displays the formerly machined depth.
If the electrode doesn’t exit in 25 seconds, the DRO will
enter the steps to machine another hole by repeating steps
5-7.
If the electrode beyond the fireproof height (EDM
HOME), the DRO will enter the steps to process another
hole by repeating steps 5~7.
Press to exit EDM when machining completes.
Press to exit EDM during machining.
Note: The LED for flashes during machining if DEEP.COMP is enabled.
5.2.4 Example for Mode 3
Compared with Mode 1 Mode 3 hasn’t the function of fireproof height. DRO can exit EDM only
when the electrode goes down again. The datum will not change because z axis is not zeroed again to
machine next hole. This mode is only used in case of the electrode waste is too small where waste to be
neglected.
Process the work-piece as figure (F) in 5.2.3, Z axis direction is down;
EDM.DEEP 20 .100mm
STEPS:
1. Set the following parameters in initial system settings;
� EDM MODE is set 3;
� RELY.MODE is set 0;
� DEEP.COMP is set 0, depth compensation is disabled;
2. Return normal display state with the following setting;
� Display unit is metric;
� Shrinkage is not taken into consideration
3. Set parameters in EDM;
electrode begin withdrawing

SW4000 USER’S MANUAL
46 VER5.13
EDM.DEEP 20.100mm
4. Move the electrode until it touches the machining plane
as the figure (b), press to zero z axes;
5. Start EDM. Press ,
X window displays the expectant = EDM.DEEP=20.100,
Y window displays the current machined depth;
Z window displays the current position of electrode;
Message window displays “EDM RUN”;
6. When the Z window displays value = EDM.DEEP =
20.100, the buzzer sounds and the message window
displays “BACKWARD”, then the machining stops
and the electrode withdraws.
During the electrode withdrawing:
Z window displays the current position of electrode;
X window displays the preset EDM.DEEP;
Y window displays the former machined depth.
Press to process next hole by repeating the
steps 5-6 if the electrode withdraws above datum.
7. Machining is finished, and then electrode goes back to
a certain height. press , MM axis display “EDM
RUN”. Press to exit EDM.
5.2.5 Example for Mode 4 with Minus Depth
MODE 4 has the same steps as MODE 1 and MODE 5 has the same steps as MODE 3.The
difference between mode 4 and mode 1, mode 5 and mode 3 is the machining direction when the
EDM.DEEP is minus. This difference is showed at table (1).
Machine a work-piece as figure (G).
STEPS:
1. Set the following parameters in initial system settings;
� EDM MODE is set as 4;
� RELY.MODE is set as 0;
� DEEP.COMP is set as 0, which means
DEEP.COMP is disabled;
2. Return the normal display state with the following
machining direction
Z
(H )
EDM HOME
workpiece
electrode

SW4000 USER’S MANUAL
VER5.13 47
setting;
� Display unit is metric;
� Shrinkage is not taken into consideration.
3. Set the following parameters in EDM function;
� EDM.DEEP -20mm
� EDM.HOME 10mm
Height of withdrawing is defined as the
figure (H) DRO will exit EDM if electrode is
below EDM HOME.
4. Move the electrode until it touches the machining plane
as figure (I).
Press to zeroing Z axis;
5. Start EDM.
Press , then
X window displays the expectant =
EDM. DEEP + EDM.COMP;
Y window displays the current machined depth;
Z window displays the current position of electrode
Message window displays “EDM RUN”;
6. When the Z window displays the value = EDM.DEEP =
-20.000, the buzzer sounds and the message window
display “BACKWARD”. Then the machining stops and
the electrode withdraw.
During withdrawing electrode:
Z window displays the current position of electrode;
X window displays the preset EDM.DEEP;
Y window displays the former machined depth;
The DRO will quit EDM and return normal display state
automatically if the electrode doesn’t exit in 25 seconds.
The DRO will quit EDM function and return normal
display state when the electrode withdraws exceeds the
height of the withdrawing.
Press to quit during the machining;
Note: Mode 5 and mode 4 is same if depth is minus. The step of mode 5 is same with mode 2.
(I )
workpiece
electrode
in withdrawing
SW4000 USER’S MANUAL
48 VER5.13
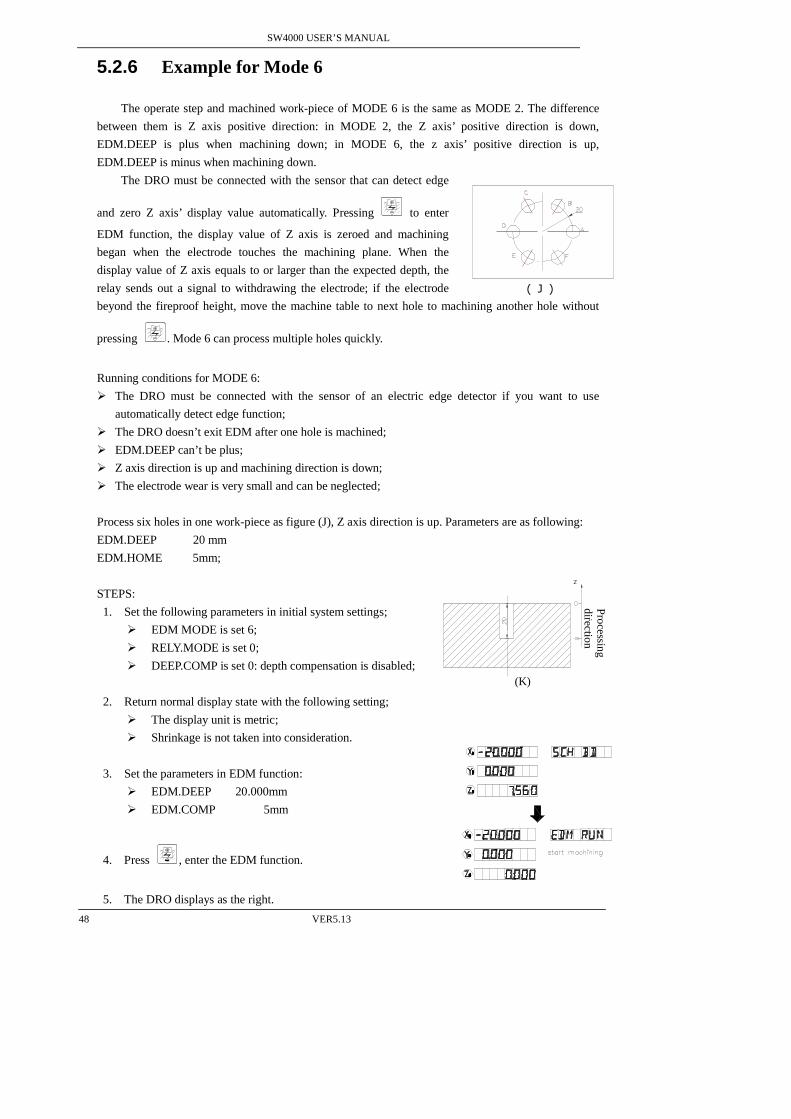
5.2.6 Example for Mode 6
The operate step and machined work-piece of MODE 6 is the same as MODE 2. The difference
between them is Z axis positive direction: in MODE 2, the Z axis’ positive direction is down,
EDM.DEEP is plus when machining down; in MODE 6, the z axis’ positive direction is up,
EDM.DEEP is minus when machining down.
The DRO must be connected with the sensor that can detect edge
and zero Z axis’ display value automatically. Pressing to enter
EDM function, the display value of Z axis is zeroed and machining
began when the electrode touches the machining plane. When the
display value of Z axis equals to or larger than the expected depth, the
relay sends out a signal to withdrawing the electrode; if the electrode
beyond the fireproof height, move the machine table to next hole to machining another hole without
pressing . Mode 6 can process multiple holes quickly.
Running conditions for MODE 6:
� The DRO must be connected with the sensor of an electric edge detector if you want to use
automatically detect edge function;
� The DRO doesn’t exit EDM after one hole is machined;
� EDM.DEEP can’t be plus;
� Z axis direction is up and machining direction is down;
� The electrode wear is very small and can be neglected;
Process six holes in one work-piece as figure (J), Z axis direction is up. Parameters are as following:
EDM.DEEP 20 mm
EDM.HOME 5mm;
STEPS:
1. Set the following parameters in initial system settings;
� EDM MODE is set 6;
� RELY.MODE is set 0;
� DEEP.COMP is set 0: depth compensation is disabled;
2. Return normal display state with the following setting;
� The display unit is metric;
� Shrinkage is not taken into consideration.
3. Set the parameters in EDM function:
� EDM.DEEP 20.000mm
� EDM.COMP 5mm
4. Press , enter the EDM function.
5. The DRO displays as the right.
( J )
(K)
Pro
cessin
g d
irection
Z

SW4000 USER’S MANUAL
VER5.13 49
Move the electrode until it touches the machining
plane as figure (K); display value of z axis is zeroed
automatically.
6. Start machining;
X window displays the expectant = EDM.DEEP;
Y window displays the current machined depth;
Z window displays the current position of the electrode;
Message window displays “EDM RUN”;
7. When Z window displays the value = EDM.DEEP =
-20.000, the buzzer sounds and the message window
displays “BACKWARD”, and then the machining stops
and the electrode withdraw.
During withdrawing electrode :
Z window displays the current position of the electrode;
X window displays the preset value = EDM.DEEP +
EDM.COMP;
Y window displays the formerly preset depth;
If the electrode doesn’t exit in 25 seconds; the DRO will
machine another hole by repeating steps 5~7.
When the electrode withdraw beyond fireproof (EDM.
HOME), the DRO will machine another hole by repeating
steps 5~7.
Press to quit EDM when machining completes.
Press to quit EDM during machining.
Note: The LED for flashes during machining if DEEP.COMP is enabled.
5.2.7 Example for Mode 7
The operate step and machined work-piece of MODE 7 is alike
as MODE 5. The difference is that DRO must detect edge while
entering EDM function in MODE 7.
Process work-piece as figure (f): Z axis direction is down. Parameters are as following:
EDM.DEEP 20.100 mm
EDM.HOME 5.000mm;
F
B
A
C
(f)
D
E

SW4000 USER’S MANUAL
50 VER5.13
STEPS:
1. Set the following parameters in initial system settings;
� EDM MODE is set 7;
� RELY.MODE is set 0;
� DEEP.COMP is set 0, depth compensation is disenabled;
2. Return normal display state with the following setting;
� The display unit is metric;
� Shrinkage is not taken into consideration.
3. Set the parameters in EDM function:
� EDM.DEEP 20.100mm
� EDM.COMP 5mm
4. Press , the DRO displays as the right.
Move the electrode until it touches the machining
plane, display value of Z axis is zeroed automatically.
Or you can zero the Z axis by press the key .
Press , X window displays the expectant = EDM.DEEP
= 20.100,
Y window displays the current machined depth;
Z window displays the current position of the electrode;
Message window displays “EDM RUN”;
5. When Z window displays the value = EDM.DEEP =
20.100, the buzzer sounds and the message window
displays “BACKWARD”, and then the machining stops
and the electrode withdraw.
During withdrawing electrode :
Z window displays the current position of the electrode;
X window displays the preset value = EDM.DEEP +
EDM.COMP;
Y window displays the formerly preset depth;
When the electrode beyond fireproof height (EDM.
HOME), the message window displays “EDM RUN” and
the DRO will machine the next hole by repeating steps 4.
6. Press to quit EDM when machining completes which in
Message window displays “EDM RUN”.

SW4000 USER’S MANUAL
VER5.13 51
( L )
5.3 Combination of BHC: BHL and EDM Function
SW4000E can use EDM to machine holes when in BHC or BHL function.
Example: Process 6 holes with depth of 20mm as the figure (L) showing.
STEPS:
1. Set the following parameters in initial system setting:
EDM.MODE = 1;
RELAY.MODE = 0;
EDM.COMP = 0;
2. Set EDM.DEEP= 20mm; EDM.HOME =3mm;
3. Set point O as datum in user coordinate system;
4. Press to enter BHC function and set parameters:
ST.ANGLE = 0º; END.ANGLE = 0º;
RADIUS = 20mm; HOLE.NUM = 6;
DIRECTION = 0;
5. After all parameter set, the message window will display “HOLE 1”. Move the machine table
until “0.000” displays in X, Y window; it is the position of point A. And then press to enter
EDM function to process hole A. After hole A is machined, DRO returns BHC.
6. Process hole B.
Press and the message window will display “HOLE 2”. Move the machine table until
“0.000” displays in X, Y window; it is the position of point B. And then press to enter
EDM function to process hole B. After hole B is machined, DRO returns BHC.
7. Process hole C, D, E, F in the same way.
Press to return normal display state when all holes
finished.
Example 2: Process 6 holes with depth 10mm as the figure
showing.
STEPS:
1. Set the following parameters in initial system setting:
EDM MODE = 1,
XY

SW4000 USER’S MANUAL
52 VER5.13
RELAY MODE = 0,
EDM COMP = 0;
2. Set EDM.DEEP 10mm; EDM.HOME 3mm;
3. Set the point O as datum for user coordinate system;
4. Press to enter BHL function and set parameters:
LINE.DIS=150mm; LINE.ANG=30
HOLE.NUM=6
5. After all parameter setting, the message window will display “HOLE 1”. Move the machine
table until “0.000” displays in X, Y window; it is the position of centre of the first hole. And then
press to enter EDM function to process hole 1. After hole 1 is machined, DRO returns
BHC.
6. Press hole 2;
Press and the message window will display “HOLE 2”. Move the machine table until
“0.000”displays in X, Y window; it is the position of centre of the second hole. And then press
to enter EDM function to process hole 2. After hole 2 is machined, DRO returns BHL.
7. Process other holes in the same way.
Press to return normal display state when all holes are machined.

SW4000 USER’S MANUAL
VER5.13 53
Chapter 6 CALCULATOR FUNCTION
SW4000 provides arithmetic operation such as plus, minus, multiply and divide, which convenient for
operator to processing work piece according to the drawing.
6.1 Enter and exit Calculator Function
In normal display state: press to enter calculator function
In calculator state: press to exit calculator function
6.2 Calculating Example
Example 1: 123 + 76 × 58 - 892 / 63
1 2 3 + 7 6 5 8 - 8 9 2 .. 6 3
Example 2: 358 + 456 × sin -1(-0.5)
3 5 8 + 4 5 6 0 .
5 +- N
O
-1
-1sin
Note:
1 If incorrect data is inputted, press AC to cancel and input again.
2 Error would occur when calculating incorrectly, such as “0” is used as divisor or proceeding
arcsine when absolute value is more than 1. In this case, the message window will display
“ERR…” You can cancel this error message by pressing AC and input data again.
3 The absolute value of inputted data and calculated result should be in the range of 0.000001 to
9999999, otherwise it can’t be displayed.
6.3 Transferring the Calculated Results to Selected Axis
After calculating is finished, user can
press to transfer the calculated result to X axis, then the X window will display this value;
Press to transfer the calculated result to Y axis, then the Y window will display this value;
Press to transfer the calculated result to Z axis, then the Z window will display this value.

SW4000 USER’S MANUAL
54 VER5.13
6.4 Transferring the Current Display Value in Window to
Calculator
In calculator state:
Press X to transfer the display value in X window to calculator.
Press Y to transfer the display value in Y window to calculator.
Press Z to transfer the display value in Z window to calculator.

SW4000 USER’S MANUAL
VER5.13 55
Chapter 7 INITIAL SYSTEM SETTINGS
Function:
Set various parameters according to actual operation.
Parameter Items:
SEL SYS Setting the number of linear scale
DIRECT Setting positive direction for counter
LIN COMP Setting linear compensation
R OR D Radius/Diameter Mode
Z DIAL Setting Z axis Dial
RESOLUTE Setting the resolution of scale
RELAY.MOD Setting relay mode
EDM MODE Setting EDM mode
SDM DIR Setting the input mode of SDM
ERROR Enable / Disable error message display
SHRINK Setting shrinkage ratio
DEEP.COMP Enable/Disable the electrode compensation
SLOP.MODE Setting the slope machining mode
LATH.MODE Setting the lathe mode
RI MODE Setting RI mode
AUTO. SCH Detecting the edge automatically or not
AXIS.TYPE Setting the type of axis
STEP.MODE Select the step mode in ARC processing
ANGE.MODE Select the angle display mode
ANGE.TYPE Select the angle display type
ALL CLS Clearing all customer setting and return default setting
NOTE: what you have changed (except “ALL.CLS”) would not been saved if you quit “SETUP” (initial system
settings) without selecting “EXIT” item.
7.1 Enter/Exit Initial System Settings
Press ENTER to enter initial system setting after DRO
powers on in 1 second: then “SETUP” displays in message window.
Press or to select the item you want to change.
If you want to quit initial settings: press or until
“EXIT” appears in message window and pressENTER
.

SW4000 USER’S MANUAL
56 VER5.13
7.2 Setting the type of DRO
Because SW4000 series DROs (two axes or three axes DRO) share the same software and their
functions have some differences. DRO type must be set before use. ALL CLS has no effect on type of
DRO.
1. Enter “SETUP” and press or until “SEL SYS”
appears in message window;
2. Press ENTER , then Y window displays “2” or “3”.
“2” means the DRO type is SW4000-2;
“3” means the DRO type is SW4000-3 or SW4000E.
3. If press 2 , Y window displays “2”;
If press 3 , Y window displays “3”;
4. Press ENTER
to save your selection and exit this item;
Press AC to cancel your operation and exit this item;
7.3 Setting Positive Direction for Counter
If the linear scale is installed as the figure
(facing operators):
Direction “0” means the display value
will increase when scale moves from right to
left and decrease when scale moves from left
to right.
Direction “1” means the display value will increase when scale moves from left to right and
decrease when scale moves from right to left.
The counting direction of the scale is set by the erector, and the operator had better not change it.
Default: 0
STEPS:
1. Enter “SETUP” and then press or until
“DIRECT” appears in message window.
2. Press ENTER
to enter direction setup;
X window, Y window and Z window display “0” or

SW4000 USER’S MANUAL
VER5.13 57
“1” separately. “0” means the opposite counter direction
for “1” , in other words, “0” means A signal exceed B
signal and the counts increase during counting. Vice
versa.
Message window displays “SEL AXIS”, which
means the next step is to select axis.
3. Select axis
Press X to change X axis counting direction;
Press Y to change Y axis counting direction;
Press Z to change Z axis counting direction;
4. Press ENTER
to confirm your selection and exit.
Press AC to cancel your change and exit.
7.4 Setting Linear Compensation
Definition Linear error: There is always an error between actual measure value and standard value. If it is
distributed around the scale travel linearly, the error is defined as linear error. For
example, the scale valid length is 400mm.if the measure value is 400mm and the
standard value is 400.040mm: There is a △L of 40µm. If 40µm is distributed around
the scale linearly, there is a △L of 10µm when the scale travels 100mm; a △L of
20µm when the scale travels 200mm; a △L of 30µm when the scale travels 300mm.
Linear compensation: Compensate the linear error to make display value equals to standard value.
NOTES: The linear compensation is set by erector. Operator had better not change it, or the accuracy of
linear scale will be worse.
Default coefficient: 0
The calculation of compensation coefficient:
coefficient =
Example:
Measurement 400.000mm
Standard value 400.040mm
Compensation value (400.000 - 400.040) X 1000, 000 / 400 = -100
Unit: µm/m;
Set linear error compensation: X axis is 100; Y axis is 50; Z axis is –100.
STEPS:
(measurement - standard value) X 1000,000
standard value

SW4000 USER’S MANUAL
58 VER5.13
1. Enter “SETUP”, then press or until message
window displays “LIN COMP”.
2. Press ENTER
,
X window, Y window, Z window displays the former
linear error compensation coefficient separately.
Message window displays “SEL AXIS” which indicates
that the next step is to select axis.
3. Select axis
Press X to select X axis.
Note: Press X to select X axis. Data in X window flashes which
indicating that you can input the linear error compensation
for X axis;
Press Y to select Y axis. Data in Y window flashes which
indicating that you can input the linear error compensation
for Y axis;
Press Z to select Z axis. Data in Z window flashes which
indicating that you can input the linear error compensation
for Z axis;
Message window displays “ENTR.PPM”, indicating it
is waiting for a data to be inputted.
4. Press 1 0 0 ENTER
in turn;
If incorrect number is input, press AC to cancel and
input again.
5. Input the error compensation coefficient for Y axis;
Press Y 5 0 ENTER
in turn;
Input the error compensation coefficient for Z axis;
Press Z 1 0 0 +-
ENTER in turn.
6. Press ENTER
to confirm your setting and exit linear error
compensation setup.

SW4000 USER’S MANUAL
VER5.13 59
7.5 Toggle Between R/D Display Mode

SW4000 USER’S MANUAL
60 VER5.13
In common case, the display value is the distance between lathe tools and the coordinate origin. This
display mode is called MODE R. When process cylinder given diameter measurement, diameter is the
double distance between lathe tool and coordinate datum. The DRO will display the diameter in MODE D
Default mode: mode R.
STEPS:
1. Enter “SETUP” and press or until the message
window displays “R OR D”;
2. Press ENTER
,
X window, Y window and Z window displays “0” or “1”
separately.
“0” is mode R, which means the display value equals the
actual measurement. “1” is mode D where the display value
equals the double actual measurement.
Message window displays “SEL AXIS”, which indicates the
next step is to select axis;
3. Select axis
Press X to change the R/D mode of X axis;
Press Y to change the R/D mode of Y axis;
Press Z to change the R/D mode of Z axis;
4. Press ENTER
to save your change and exit;
Press AC to cancel your change and exit.
7.6 Setting Z axis Dial
Z axis Dial should be set if Z axis is emulated for SW4000-2 and only install linear scale for X, Y axis.
Z axis Dial means the distance the Z axis travels when screw runs a revolution.
Default value: 2.5mm
Set Z axis Dial 2.4 mm:
1. Enter “SETUP”, then press or until message
window displays “Z DIAL”;
2. Press ENTER ,
Y window displays the former Z axis Dial;
Message window displays “Z DIAL”;

SW4000 USER’S MANUAL
VER5.13 61
3. Input the Z axis Dial;
Press 2 .
4 in turn to input Z axis Dial;
If incorrect data has been inputted, press AC to cancel
and input again;
If a minus has been inputted, the DRO will accept its
absolute value instead.
4. Press ENTER
to confirm your setting and exit Z DAIL
setup.
7.7 Setting the Resolution of Scale
Different scale has different resolution. SW4000 DRO can connect with 10 kinds of scale, and
these resolutions are 0.05µm, 0.1µm, 0.2µm, 0.5µm, 1µm, 2µm, 5µm, 10µm, 20µm, 50µm. The
resolution must be set to match the linear scale. This parameter is set by erector, operator had better not
change it.
Default resolution: 5µm
Set the resolution of X axis, Y axis, Z axis as 1um.
STEPS:
1. Enter “SETUP” and press or until
“RESOLUTE” appears in message window;
2. Press ENTER
,
X window, Y window and Z window displays the
former resolution of each axis separately. Message window
displays “SEL AXIS”, which indicates the next step is to
select axis.
3. Select axis.
Press X to change the resolution of X axis, then data in X
windows flashes.
Press Y to change the resolution of Y axis, then data in Y
windows flashes.
PressZ to change the resolution of Z axis, then data in Z
windows flashes.

SW4000 USER’S MANUAL
62 VER5.13
4. Press or to scroll through 0.05, 0.10, 0.20, 0.50,
1.00, 2.00, 5.00, 10.00, 20.00, 5 0.00. Press ENTER
to
select “1.00” when it appears and return “SEL.RXIS” state.
Press AC to cancel your selection.
5. Set the resolution of Y axis: Z axis by repeating step 3-4.
6. Press ENTER
to exit “RESOLUTE” setup.
7.8 Setting Relay Mode
The relay will send out an ON/OFF signal when
process to target position. EDM.Relay interface has
three pins: common, normal close and normal
open.SW4000E provides four Relay modes. Operator
can set it according to your circuit.
Normal close and common pin:
RELAY MODE Power ON ENTER EDM PROCESS TO
TARGET POSITION EXIT EDM Power off
1 close close open close open
2 open open close open open
3 close open close close open
4 open close open open open
Default value: MODE 2.
STEPS:
1. Enter “SETUP”, then press or until the
message window displays “RELAY.MOD”;
2. Press ENTER
, then the Y window displays “0” or “1”;
COLOR
NC4
965
IN-
IN+NORMAL
OPEN
PIN NAME
23
1COMMON NORMAL CLOSE
NC
BLKYELRED
ORGBRW
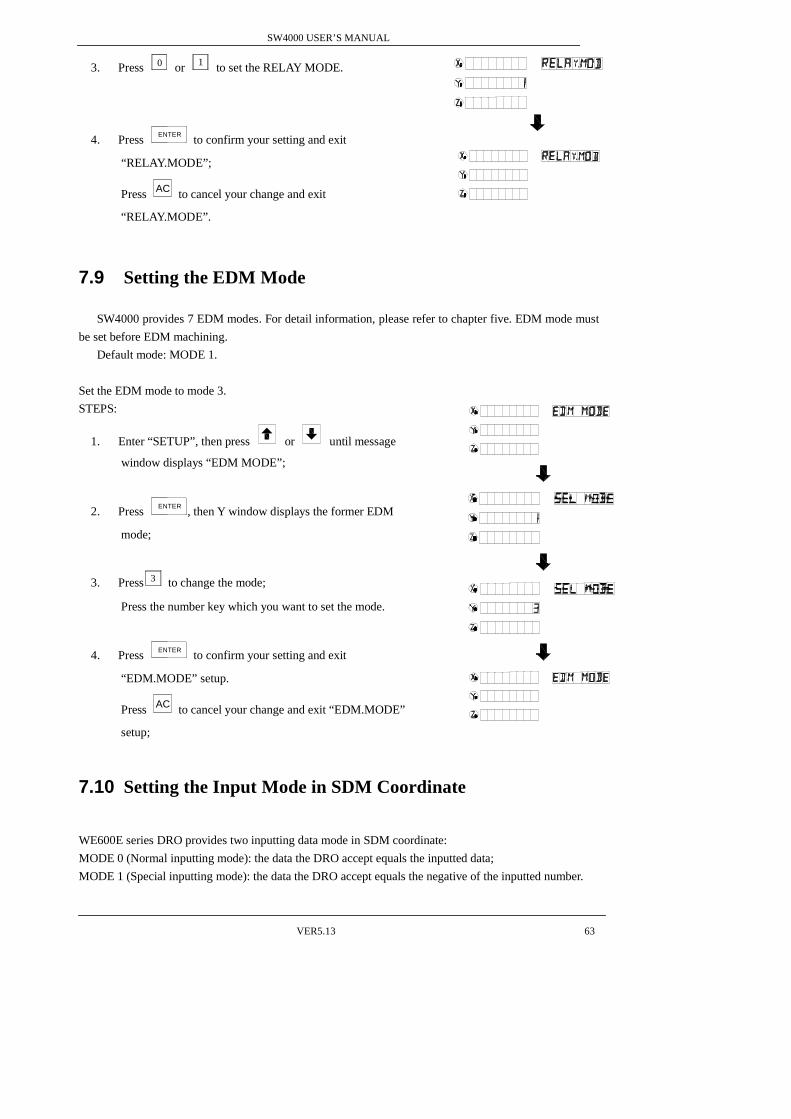
SW4000 USER’S MANUAL
VER5.13 63
3. Press 0 or 1 to set the RELAY MODE.
4. Press ENTER
to confirm your setting and exit
“RELAY.MODE”;
Press AC to cancel your change and exit
“RELAY.MODE”.
7.9 Setting the EDM Mode
SW4000 provides 7 EDM modes. For detail information, please refer to chapter five. EDM mode must
be set before EDM machining.
Default mode: MODE 1.
Set the EDM mode to mode 3.
STEPS:
1. Enter “SETUP”, then press or until message
window displays “EDM MODE”;
2. Press ENTER
, then Y window displays the former EDM
mode;
3. Press3 to change the mode;
Press the number key which you want to set the mode.
4. Press ENTER
to confirm your setting and exit
“EDM.MODE” setup.
Press AC to cancel your change and exit “EDM.MODE”
setup;
7.10 Setting the Input Mode in SDM Coordinate
WE600E series DRO provides two inputting data mode in SDM coordinate:
MODE 0 (Normal inputting mode): the data the DRO accept equals the inputted data;
MODE 1 (Special inputting mode): the data the DRO accept equals the negative of the inputted number.

SW4000 USER’S MANUAL
64 VER5.13
Example: Set SDM mode 1.
1. Enter “SETUP”, then press or until the
message window displays “SDM DIR”;
2. Press ENTER
,
Y window displays the former SDM mode;
3. Press 1 to set the SDM mode 1;
NOTE: press 0 to set the SDM mode 0.
4. Press ENTER
to confirm your setting and exit
“SDM.MODE”.
Press AC to cancel your change and exit “SDM.MODE”.
7.11 Enable / Disable ERROR Signal
SW4000 serial DRO provides the function of checking whether the counting signal is normal or not.
It can display the ERROR information if some error occurs in counting signal. User can enable or disable
this function.
“0” means no error information will be displayed and the DRO continue to work when there is some
wrong with linear scale or encoder:
“1” means error information will be displayed when error occurs.
Default setting: 0 (disable display error message).
Example: Enable display ERROR message.
STEPS:
1. Enter “SETUP”, then press or until “ERROR”
appears in message window;
2. Press ENTER
,
Y window displays the former “0”;
3. Press 1 to change it to enable error message;
Note: press 0 to change to disable error message.
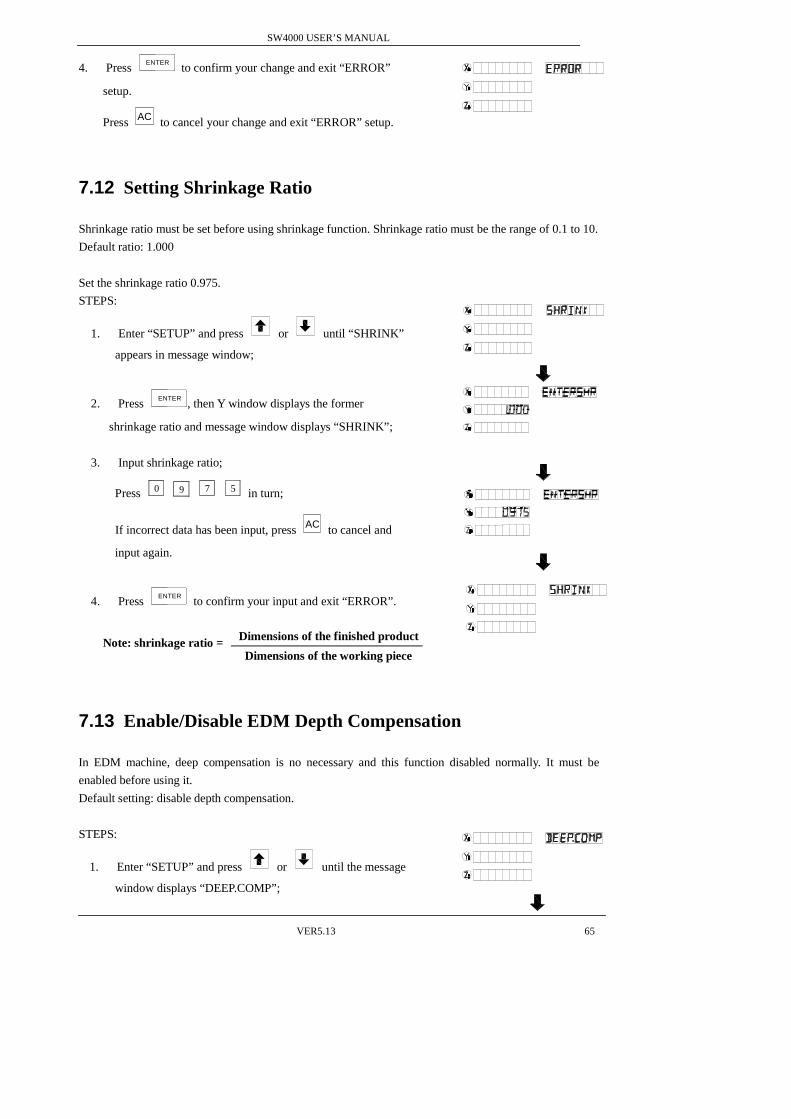
SW4000 USER’S MANUAL
VER5.13 65
4. Press ENTER
to confirm your change and exit “ERROR”
setup.
Press AC to cancel your change and exit “ERROR” setup.
7.12 Setting Shrinkage Ratio
Shrinkage ratio must be set before using shrinkage function. Shrinkage ratio must be the range of 0.1 to 10.
Default ratio: 1.000
Set the shrinkage ratio 0.975.
STEPS:
1. Enter “SETUP” and press or until “SHRINK”
appears in message window;
2. Press ENTER
, then Y window displays the former
shrinkage ratio and message window displays “SHRINK”;
3. Input shrinkage ratio;
Press 0 9 7 5 in turn;
If incorrect data has been input, press AC to cancel and
input again.
4. Press ENTER
to confirm your input and exit “ERROR”.
Note: shrinkage ratio =
7.13 Enable/Disable EDM Depth Compensation
In EDM machine, deep compensation is no necessary and this function disabled normally. It must be
enabled before using it.
Default setting: disable depth compensation.
STEPS:
1. Enter “SETUP” and press or until the message
window displays “DEEP.COMP”;
Dimensions of the finished product
Dimensions of the working piece

SW4000 USER’S MANUAL
66 VER5.13
2. Press ENTER
,
Y window displays the former setting.
“0” means deep compensation is disabled;
“1” means deep compensation is enabled;
3. Press 0 or 1 to change mode of depth
compensation;
4. Press ENTER
to confirm your change and exit.
7.14 Setting the Slope Machining Parameter
Parameter can be set in two ways in slope machining :
A Set the step of second axis (Z STEP) in one plane: for XY plane, set
the step of Y axis; for YZ plane and XZ plane set the step of Z axis.
B Set MAX CUT.
Default setting: the step of the second axis (Z STEP).
Set the slope machining parameter MAX CUT.
STEPS:
1. Enter “SETUP” and press or until message
window displays “SLOP.MODE”;
2. Press ENTER
,
Y window displays the former parameter mode;
Press 1 to select MAX CUT parameter mode;
Note: Press 0 to select Z STEP parameter mode.
4. Press ENTER
to save the change and exit this item.
Press AC to cancel your change and exit this item.
Z S
TE
P
MAX CUT

SW4000 USER’S MANUAL
VER5.13 67
7.15 Setting Lathe Mode
Lathe mode 0: Disable lathe function;
Lathe mode 1: X window display value = the position of X axis + the position of Y axis;
Lathe mode 2: X window display value = the position of X axis + the position of Z axis;
Default mode: disable lathe mode.
Set the lathe as mode 1.
STEPS:
1. Enter “SETUP” and press or until the message
window displays “LATH.MODE”;
2. Press ENTER
,
then the Y window displays the former lathe mode;
3. Set the new lathe mode;
Press 1 .
Note: press 2 or 1
or 0 to change the lathe mode.
4. Press ENTER
to confirm your change and exit “LATHMODE”.
7.16 Setting RI MODE
SW4000 provides 8 RI modes: mode 1 to mode 8, every mode has its corresponding wave of A, B and
RI.
Default mode: MODE 1
Set RI MODE 5 for X axis .
STEPS:
1. Enter “SETUP”, then press or until the message
window displays “RI MODE”;
2. Press ENTER :
X window, Y window and Z window displays the former
RI mode respectively, message window displays “SEL
AXIS” which indicating the next step is to select axis;

SW4000 USER’S MANUAL
68 VER5.13
3. Select axis;
Press X to change RI mode of X axis. The number in X
window flashes;
Press Y to change RI mode of Y axis, and the data in Y
window flashes;
Press Z to change RI mode of Z axis, and the data in Z
window flashes;
4. Press or , then “1”, “2”, “3”, “4”, “5”, “6”, “7”,
“8” will be displayed in turn;
When “5” is displayed in message window, press ENTER
to
change RI mode and return “SEL.AXIS” state.
Press AC to cancel your selection and return “SEL.AXIS”
state.
5. Press ENTER
to exit “RI.MODE” setup.
7.17 Enable/Disable Edge Detection
Function: SW4000 series DRO can zero Z axis display value in normal display state when an external
signal is detected if edge detection is enabled
0: Edge detection is disabled, The DRO doesn’t zero Z axis display value in normal display state
when external signal detected.
1: Edge detect is enable. The DRO zeroes Z axis display value in normal display state when an
external signal is detected.
Default value: 0 (edge detection is disable)
Example: Enable edge detection
STEPS:
1. Enter “SETUP”, then press or until message
window displays “AUTO.SCH”;
2. Press ENTER
, then Y window will display the former setting;
3. Press 1 to enable edge detects;

SW4000 USER’S MANUAL
VER5.13 69
Note: press 0 to disable edge detects.
4. Press ENTER
to confirm your selection and exit.
7.18 Toggle between Linear Scale and Rotary Encoder
Both linear scale and rotary encoder can be installed in any axis. The linear scale is used to measure
distance; the rotary encoder is used to measure angle.
Default: linear scale.
Set rotary encoder in Z axis.
STEPS:
1. Enter “SETUP” and press or until the message
window displays “AXIS.TYPE”;
2. Press ENTER
:
X, Y, Z window displays the former type.
“LINEA” means linear scale.
“ENCODE” means rotary encoder.
Message window displays “SEL AXIS”, which means the next
step is to select axis.
3. Set Z axis are installed with rotary
Press Z until display in Z window is “ENCODE”;
Note: Press X to change X axis;
Press Y to change Y axis;
Press Z to change in Z axis;
4. Press ENTER to confirm your new set and exit.
Press AC to cancel your new set and exit.
7.19 Step Mode of ARC
In ARC function, if the plane is not XY, you can setup the step mode. There are two modes. Mode 0 is Z
STEP mode and Mode 1 is MAX CUT mode.
Default setting: Z STEP.

SW4000 USER’S MANUAL
70 VER5.13
For example, set the mode as STEP mode.
STEPS:
1. Enter “SETUP” and press or until the message
window displays “STEP. MODE”;
2. Press ENTER
,
Y window displays the former setting.
“0” means Z STEP;
“1” means MAX CUT;
The message window displays “SEL MODE” , which means
selecting step mode of ARC next step.
3. Set mode as STEP mode.
Press 1 , then Y window displays the changed mode.
4. Press ENTER
to confirm your change and exit “STEP.MODE”.
Press AC to cancel your new set and exit.
7.20 Angle Display Mode
SW4000 provides 3 angle display modes. In Mode 1, the angle is in the range of 0° to 360°; in mode 2,
the angle is in the range of -360° to 360°; and in mode 3, the angle is in the range of -180° to 180°.
Default mode: MODE 1.
Set the EDM mode as mode 2.
STEPS:
1. Enter “SETUP”, then press or until message
window displays “ANGL. MODE”;
2. Press ENTER , then Y window displays the former angle
mode;
The message window displays “SEL MODE” , which means
to select angle display mode next step.
3. Set the angle display mode as mode 2.
Press 2 then the Y window displays the changed mode;
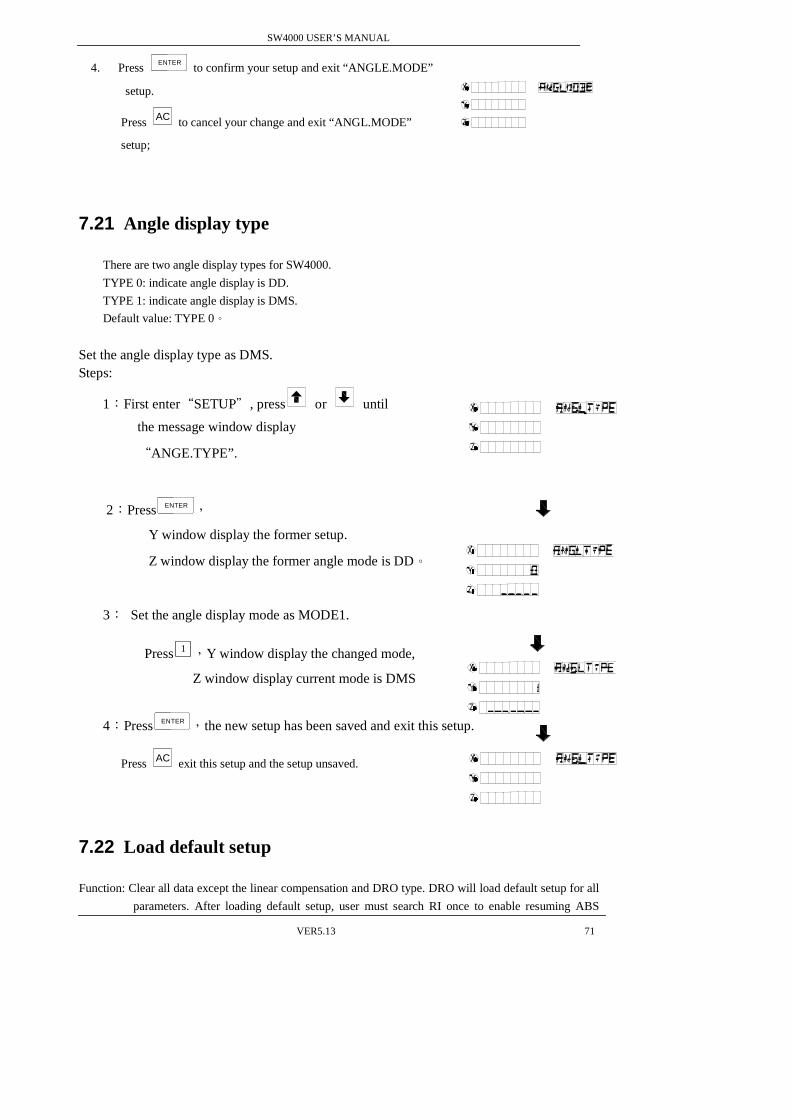
SW4000 USER’S MANUAL
VER5.13 71
4. Press ENTER
to confirm your setup and exit “ANGLE.MODE”
setup.
Press AC to cancel your change and exit “ANGL.MODE”
setup;
7.21 Angle display type
There are two angle display types for SW4000.
TYPE 0: indicate angle display is DD.
TYPE 1: indicate angle display is DMS.
Default value: TYPE 0。
Set the angle display type as DMS. Steps:
1:First enter“SETUP”, press or until
the message window display
“ANGE.TYPE”.
2:Press ENTER ,
Y window display the former setup.
Z window display the former angle mode is DD。
3: Set the angle display mode as MODE1.
Press1 ,Y window display the changed mode,
Z window display current mode is DMS
4:Press ENTER ,the new setup has been saved and exit this setup.
Press AC exit this setup and the setup unsaved.
7.22 Load default setup
Function: Clear all data except the linear compensation and DRO type. DRO will load default setup for all
parameters. After loading default setup, user must search RI once to enable resuming ABS

SW4000 USER’S MANUAL
72 VER5.13
datum function; otherwise to resume the datum by RI is unable.
STEPS:
1. Enter “SETUP”, then press or until the
message window displays “ALL CLS”;
2. Press ENTER
and message windows display “PASSWORD”
indicating the operator to input password. At this moment,
there are two selections:
A Press AC to quit “ALL.CLS”;
B Enter the correct password to clear all
parameters and load default setup;
3. Input the password;
Press 1 9 9 9 ENTERin turn to load default value.
The message window displays “WAITING”, which means
the clearing is going on.
4. Return normal display state after loading default setup is
finished.
The default setup for all parameters is as following:
� Counting direction is mode 0;
� The R/D is mode R ;
� Z DIAL = 2.5mm;
� Resolution = 5µm;
� EDM mode is MODE 1;
� Relay mode is mode 0;
� Shrinkage ration 1.000;
� Input mode in SDM as 0, display value = input value;
� Deep compensation is disabled;
� Lathe function is disabled;
� Slope machining parameter is Z step;
� RI MODE is mode 8;
� Disable the edge detection;
� Linear scale is installed for any axis;
� Angle display mode is mode 1: 0~360;

SW4000 USER’S MANUAL
VER5.13 73
� Angle display type is 0: DD;
� ARC machining parameter is Z step.
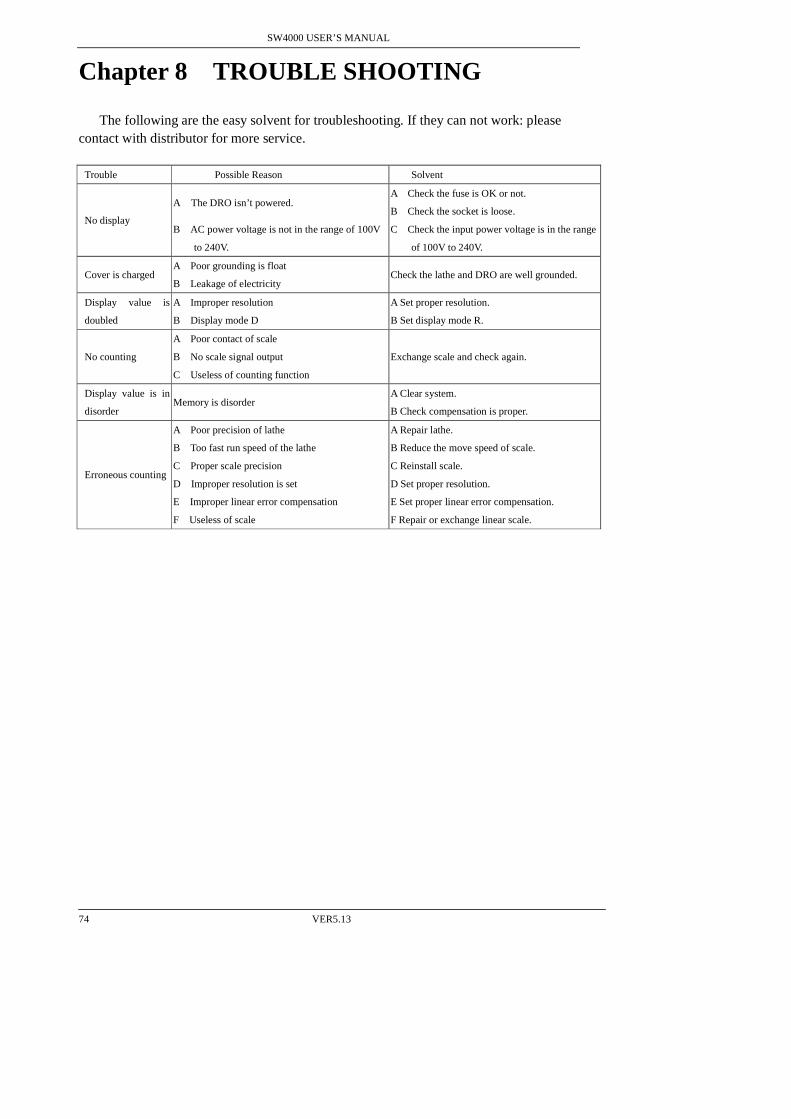
SW4000 USER’S MANUAL
74 VER5.13
Chapter 8 TROUBLE SHOOTING
The following are the easy solvent for troubleshooting. If they can not work: please contact with distributor for more service.
Trouble Possible Reason Solvent
No display
A The DRO isn’t powered.
B AC power voltage is not in the range of 100V
to 240V.
A Check the fuse is OK or not.
B Check the socket is loose.
C Check the input power voltage is in the range
of 100V to 240V.
Cover is charged A Poor grounding is float
B Leakage of electricity Check the lathe and DRO are well grounded.
Display value is
doubled
A Improper resolution
B Display mode D
A Set proper resolution.
B Set display mode R.
No counting
A Poor contact of scale
B No scale signal output
C Useless of counting function
Exchange scale and check again.
Display value is in
disorder Memory is disorder
A Clear system.
B Check compensation is proper.
Erroneous counting
A Poor precision of lathe
B Too fast run speed of the lathe
C Proper scale precision
D Improper resolution is set
E Improper linear error compensation
F Useless of scale
A Repair lathe.
B Reduce the move speed of scale.
C Reinstall scale.
D Set proper resolution.
E Set proper linear error compensation.
F Repair or exchange linear scale.