user manual - ditron.eu · user manual safe money automatic safe 7 3. installation the correct...
TRANSCRIPT

USER MANUAL
CODE MPD483. REV. 1.0

User Manual Safe Money automatic safe
2
Summary
1. PRESENTATION OF THE PRODUCT ........................................................................................................ 4
1.1 OVERALL DIMENSIONS .................................................................................................................. 4
1.1 SAFE MONEY PRESENTATION VIEWS ............................................................................................ 5
2. ELECTRICAL AND SAFETY CHARACTERISTICS ........................................................................................ 6
2.1 ELECTRICAL CHARACTERISTICS ...................................................................................................... 6
2.2 SAFETY RULES ................................................................................................................................ 6
3. INSTALLATION ....................................................................................................................................... 7
3.1 TURNING ON .................................................................................................................................. 7
3.2 FIXING INSTRUCTIONS ON THE SURFACE ...................................................................................... 8
4. OPERATION ......................................................................................................................................... 10
4.1 LOADING AND CASH REGISTER .................................................................................................... 10
4.2 DISABLING ACCEPTANCE OF BANKNOTES ................................................................................... 10
4.3 MAXIMUM PAYOUT LEVEL .......................................................................................................... 11
4.4 LEVEL EMPTYING ......................................................................................................................... 11
4.5 TOTAL EMPTYING ........................................................................................................................ 11
5. MAINTENANCE .................................................................................................................................... 12
5.1 COIN FEEDER ................................................................................................................................ 12
5.2 PAYOUT ........................................................................................................................................ 12
5.3 COIN FEEDER STATE ..................................................................................................................... 13
5.3.1 Table of errors during the sale ............................................................................................ 13
5.4 REMOVE THE LOCKED COINS ....................................................................................................... 14
5.4.1 Coin feeder disconnected .................................................................................................... 14
5.4.2 Coin feeder coins removal ................................................................................................... 14
5.4.3 Hopper coin removal ........................................................................................................... 15
5.5 PAYOUT STATE ............................................................................................................................. 16
5.5.1 Errors table .......................................................................................................................... 16
5.5.2 Payout disconnection .......................................................................................................... 17
5.6 REMOVE LOCKED BANKNOTES .................................................................................................... 18
5.6.1 Manual emptying of banknotes .......................................................................................... 18
5.7 BANKNOTE COLLECTION .............................................................................................................. 19
5.8 FIRMWARE UPDATE ..................................................................................................................... 20
5.9 MACHINE CLEANING .................................................................................................................... 20

User Manual Safe Money automatic safe
3
5.9.1 Cleaning NV200 ................................................................................................................... 20
5.8.2 Coin feeder cleaning ............................................................................................................ 21
5.9.3 Hopper sensor cleaning ....................................................................................................... 22
6. SAFEMONEY INTERFACING WITH THIRD PARTY SW ......................................................................... 23
6.1 GENERAL DESCRIPTION ............................................................................................................... 23
6.2 PROTOCOL ................................................................................................................................... 23
6.3 DESCRIPTION OF THE FILES.......................................................................................................... 24
6.4 SAFEMONEY MANAGEMENT PANEL ........................................................................................... 26
6.4.1 Definition of Operator Profile .............................................................................................. 26
6.4.2 LOADING function ............................................................................................................... 28
6.4.3 MANAGEMENT function ...................................................................................................... 29
6.4.4 CONFIGURATION function ................................................................................................... 30

User Manual Safe Money automatic safe
4
1. PRESENTATION OF THE PRODUCT
The packaging contains:
Basic model automatic safe
Five pairs of keys
User Manual
USB connection cable
Power cable
Warning sticker
1.1 OVERALL DIMENSIONS
FRONT VIEW SIDE VIEW REAR VIEW
TOP VIEW OVERALL DIMENSIONS MEASUREMENTS EXPRESSED IN “mm”

User Manual Safe Money automatic safe
5
1.1 SAFE MONEY PRESENTATION VIEWS 1) coin slot K1 key for opening the front door
2) banknotes K2 key for removing the cash box - PayOut release
3) coin change bowl K3 coins key for removing the smart hopper
4) front door K4 key for emptying the coin feeder
5) printer compartment * (accessory) K5 key for opening the cash box
6) banknote reader display
7) Smart Payout module (component NV200)
8) Smart coin
9) floor fixing base* (accessory)
10) feet
11) USB input
12) On/OFF button
13) power supply
CONNECTOR PANEL
REAR VIEW

User Manual Safe Money automatic safe
6
2. ELECTRICAL AND SAFETY CHARACTERISTICS
2.1 ELECTRICAL CHARACTERISTICS
Supply voltage 220 - 230 VAC
Power frequency 50 – 60 Hz
AC current (typical) 2A/230VAC
Inrush current 40A/230VAC
2.2 SAFETY RULES SAFEMONEY complies with the following EU electrical safety and electromagnetic compatibility standards
and is EC certified:
EN 61000-6-3 electromagnetic compatibility standards for standard emissions in residential, commercial and light industrial environments
EN 61000-6-1 electromagnetic compatibility standards for immunity in residential, commercial and light industrial environments
EN 62368-1 Part 1: Security requirements for audio/video systems, information technology and communication systems
EN 62233 Measurement methods for electromagnetic fields of household and similar electrical appliances with reference to human exposure
ATTENTION - HEAVY MATERIAL! The SAFEMONEY machine can weigh more than 30 kg
when fully assembled.
CAUTION! IT IS MANDATORY to connect the machine to a network point with a ground
connection.

User Manual Safe Money automatic safe
7
3. INSTALLATION
The correct installation of the machine provides for it being arranged on a perfectly horizontal
surface.
The machine prepares 4 anchoring holes for fixing it to the floor. By removing the support feet, it is
possible to fix the SAFEMONEY, by means of a plate, to an appropriately prepared surface. For
drilling the surface, use the anchor plate as DIMA.
See the fixing instructions on the following pages.
3.1 TURNING ON The SAFEMONEY product must be powered at a mains voltage (230 VAC) from an outlet that can
supply a current of at least 2 A; the product is protected against overload currents and short-circuits.
The SAFEMONEY is switched on by switching the power switch (located on the back) from the “O”
position to the “I” position.
The machine is managed through its USB interface from a PC or a similar device that functions as
the “Master”.
The power supply connector, to which the special cable, the switch and the mentioned above USB
port must be connected are placed on the back of the machine.

User Manual Safe Money automatic safe
8
3.2 FIXING INSTRUCTIONS ON THE SURFACE
NB: the fixing plate is an accessory that can be purchased separately.
FIXING INSTRUCTIONS ON THE SURFACE
It is possible to fix the automatic cash register on the floor, through the threaded holes of the feet:
(A) from inside the case of the automatic cash register to the floor
(B) from the support surface to the automatic cash register
Fixing plate
FOR ASSEMBLY VER. (A) 3 M6X ALLEN SCREWS (17 mm + FLAT THICKNESS) with countersunk head 1 ALLEN SCREW M8 (17mm + FLAT THICKNESS) FOR ASSEMBLY (B) 4 ALLEN SCREWS M8 (17mm + FLAT THICKNESS)
Screws
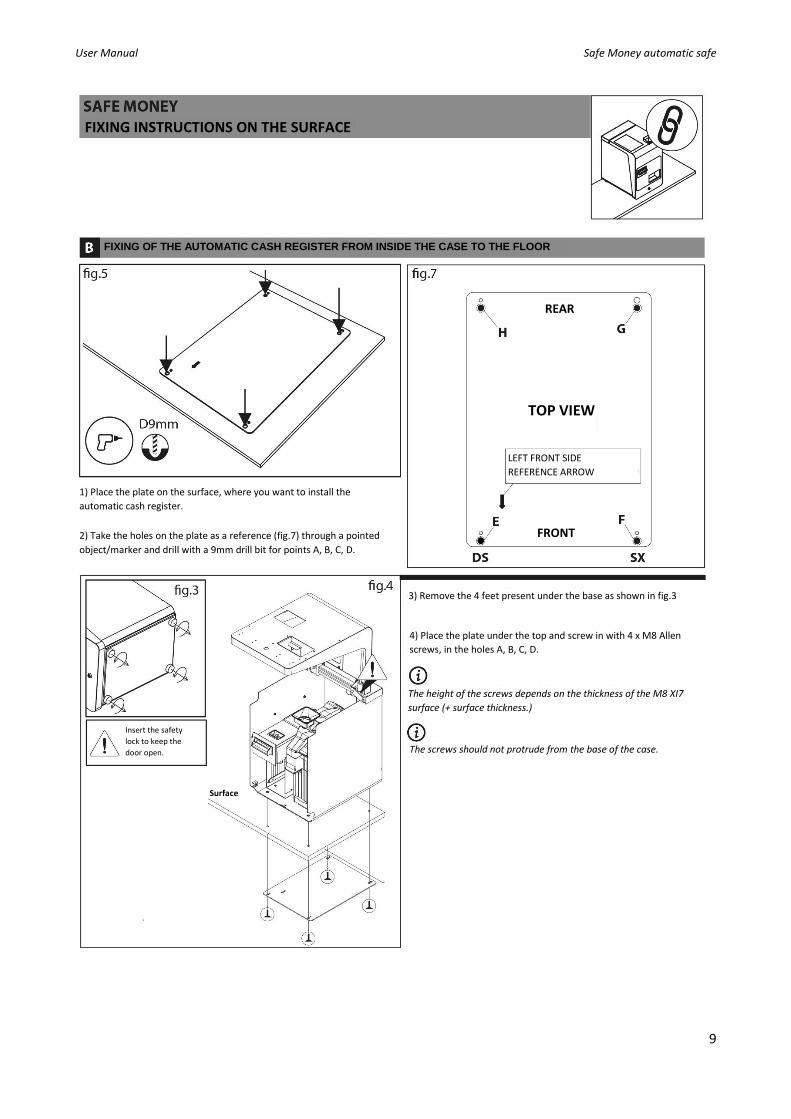
FIXING OF THE AUTOMATIC CASH REGISTER FROM INSIDE THE CASE TO THE FLOOR
REAR
FRONT
LEFT FRONT SIDE
REFERENCE ARROW
TOP VIEW
Surface
1) Place the plate on the surface, where you want to install the automatic cash register.
4) Unhook the Smart money module, to reach the hole in the
base (D)
6) Insert the fourth M8 screw into hole C, from the plate
towards the case, as shown in fig.4
Insert the safety
lock to keep the
door open.
2) Take the holes on the plate (fig.2) as a reference with a pointed object/marker and drill with a 7mm drill bit for points A, B, D and 9 mm for point C.
3) Remove the 4 feet present under the base as shown in fig.3
5) Place the plate under the surface and screw in with 3 M6
countersunk head screws, in holes A, B, D
5) Proceed to re-insert the Smart Money module inside the
case and close the automatic cash register
The height of the screws depends on the thickness of
the surface Min. 17mm + surface thickness
User Manual Safe Money automatic safe
9
FIXING INSTRUCTIONS ON THE SURFACE
FIXING OF THE AUTOMATIC CASH REGISTER FROM INSIDE THE CASE TO THE FLOOR
REAR
FRONT
LEFT FRONT SIDE
REFERENCE ARROW
TOP VIEW
Surface
Insert the safety
lock to keep the
door open.
1) Place the plate on the surface, where you want to install the
automatic cash register.
2) Take the holes on the plate as a reference (fig.7) through a pointed
object/marker and drill with a 9mm drill bit for points A, B, C, D.
3) Remove the 4 feet present under the base as shown in fig.3
4) Place the plate under the top and screw in with 4 x M8 Allen
screws, in the holes A, B, C, D.
The height of the screws depends on the thickness of the M8 XI7
surface (+ surface thickness.)
The screws should not protrude from the base of the case.

User Manual Safe Money automatic safe
10
4. OPERATION
4.1 LOADING AND CASH REGISTER For the correct operation of the machine it is necessary to set up a cash register necessary to satisfy
the customer's requests (e.g. there are some shops which provide amounts greater than €0.05
and\or €5.00, for which the correct loading of the machine will be using the minimum
recommended for coins and banknotes and a larger number for the aforementioned
denominations) *.
1 cent = 10 Coins
2 cents = 20 Coins
5 cents = 20 Coins
10 cents = 40 Coins
20 cents = 40 Coins
50 cents = 40 Coins
1 euro = 40 Coins
2 euros = 40 Coins
5 euros = 10 banknotes
10 euros = 8 banknotes
20 euros = 6 banknotes
50 euros = 2 banknotes
* the management of money and banknotes is defined by the software
4.2 DISABLING ACCEPTANCE OF BANKNOTES At the back of the nv200 module there is an 8-pin switch with which it is possible to define the
denominations of the banknotes to be accepted.
By default, the switch has all the pins set to OFF which means that the machine accepts all banknote
denominations (from €5 to €500).
Below is the summary table of the various pins of the switch:
PIN FUNCTION OFF (default) ON
1 Barcode Reader Accepted NOT accepted
2 €5 banknote Accepted NOT accepted
3 €10 banknote Accepted NOT accepted
4 €20 banknote Accepted NOT accepted
5 €50 banknote Accepted NOT accepted
6 €100 banknote Accepted NOT accepted
7 €200 banknote Accepted NOT accepted
8 Programming

User Manual Safe Money automatic safe
11
4.3 MAXIMUM PAYOUT LEVEL The payout (device that manages the issue of banknotes) allows you to keep recycling up to a
maximum of 70 banknotes. The banknotes that exceed the number defined in the maximum level
will be sent to the stacker which, in turn, allows the management of 600 banknotes. The banknotes
in the stacker will not be reused for recycling.
4.4 LEVEL EMPTYING This operation allows the recycler and the hopper to be emptied, leaving the previously set cash
register levels in the machine. The coins will be emptied from the hopper into the change bowl. The
banknotes will be inserted into the stacker, so at the end of the operation it will be necessary to
empty the stacker.
4.5 TOTAL EMPTYING The total emptying is divided by the various units of which SAFEMONEY is made up.
Empty all coins: issues all the coins in the hopper. The coins will be emptied from the hopper into
the change bowl.
Empty all banknotes: all the banknotes will be put into the stacker.
Empty all stacker: operation to be done only after removing the stacker from the pay-out.

User Manual Safe Money automatic safe
12
5. MAINTENANCE
5.1 COIN FEEDER PROBLEM POSSIBLE CAUSE SOLUTION
The device does not work or no
recognized coin
Not connected correctly
to the hopper
Make sure the device is correctly
connected to the hopper and is closed
The coins are jammed during
payment
The coin channel may be
dirty
Clean the coin channel using the
spatula supplied
Lack of acceptance of coins and
block of the machine
Coins jammed in the tail
rotor
Open the device lid and unlock the
rotor
5.2 PAYOUT PROBLEM POSSIBLE CAUSE SOLUTION
The device does not accept
banknotes
Not connected properly Make sure that the device is
connected correctly, check the green
LED on the hopper
The banknotes are blocked The banknote channel may
be dirty
Clean the banknote channel as
described in the manual
Failure to accept banknotes
block of the machine
Banknote jammed Open the device lid and release the
banknote

User Manual Safe Money automatic safe
13
5.3 COIN FEEDER STATE
Fast flashing Fast flashing during start-up Flashing x 2 Flashing x 3 Slow flashing
Bootloader mode Calibration Error During calibration Fraudulent action. idle and not enabled (SSP)
Slow flashing Alternate Flashing
idle and not enabled (CC2) DES Trusted Channel (CC2 DES enabled)
Slow flashing Enabled
5.3.1 Table of errors during the sale LED N DESCRIPTION ACTION GREEN 1 DEVICE ACTIVE
RED 1 DEVICE DISABLED Enable the device
RED 2 ERROR DURING CALIBRATION Contaminated optical sensor. Clean the optical sensor, if the problem persists, return the device for assistance
RED 3 THE ENCRYPTION KEY IS NOT SET
Set the key
RED 4 COIN JAMMED Turn off the power, remove the coins manually, try turning the disc to remove the locked coins. If the problem persists, return the device to service.
RED 5 FRAUD ATTEMPT DETECTED The photocell on the coin slot has dimmed. Turn the SAFEMONEY off and on again. If the problem persists, return the device to service.
RED 6 EMPTY DEVICE, NO MONEY INSIDE
RED 7 ERROR CHECKSUM Return the device to service.
RED 8 SENSOR NOT INITIALIZED Return the device to service.
RED 9 COVER REMOVED
LED STATUS

User Manual Safe Money automatic safe
14
5.4 REMOVE THE LOCKED COINS 5.4.1 Coin feeder disconnected
1. Press the handle at the base of the hopper to release the device. 2. Open the lock with the appropriate key. 3. At the same time pull the machine outwards.
5.4.2 Coin feeder coins removal
1. Push the lever upwards 2. Lift the plastic lid upwards 3. Remove the locked coins

User Manual Safe Money automatic safe
15
5.4.3 Hopper coin removal 1. Press the lever located near the coin outlet and open the lid. 2. Open the lock with the appropriate key. 3. Move the block on the back upwards 4. Push the OPEN lid backwards!
5. Manually remove all coins from inside. 6. Remove the coins from inside the disc. 7. Turn the disc anticlockwise very carefully.

User Manual Safe Money automatic safe
16
5.5 PAYOUT STATE
5.5.1 Errors table
FLASHES DESCRIPTION ACTION 0 0 NO ERROR
1
1 BANKNOTE PATH OPEN Close the path of the banknotes
2 BANKNOTE JAMMED Remove the obstruction and follow the banknote reader cleaning procedure
3 DEVICE NOT INITIALIZED Return the device to service.
2
1 STACKER REMOVED Reposition the stacker
2 STACKER JAMMED Remove the jam in the stacker
3
1 ERROR CHECKSUM FIRMWARE Return the device to service.
2 ERROR CHECKSUM INTERFACE Return the device to service.
3 ERROR CHECKSUM DATASET Return the device to service.
4 ERROR CHECKSUM EEPROM Return the device to service.
4
1 POWER SUPPLY TOO LOW Check the power supply with the help of a tester
2 POWER SUPPLY TOO HIGH Check the power supply with the help of a tester
3 PAPER SIZE ERROR Reprogram the size
4 RESET Turn the SAFEMONEY off and on again
5 1 FIRMWARE ERROR Reprogram the device

User Manual Safe Money automatic safe
17
5.5.2 Payout disconnection
1. Open the front door 2. Turn the protection plate
3. Open the lock with the appropriate key. 4. Press the release button. 5. Remove Payout.
User Manual Safe Money automatic safe
18
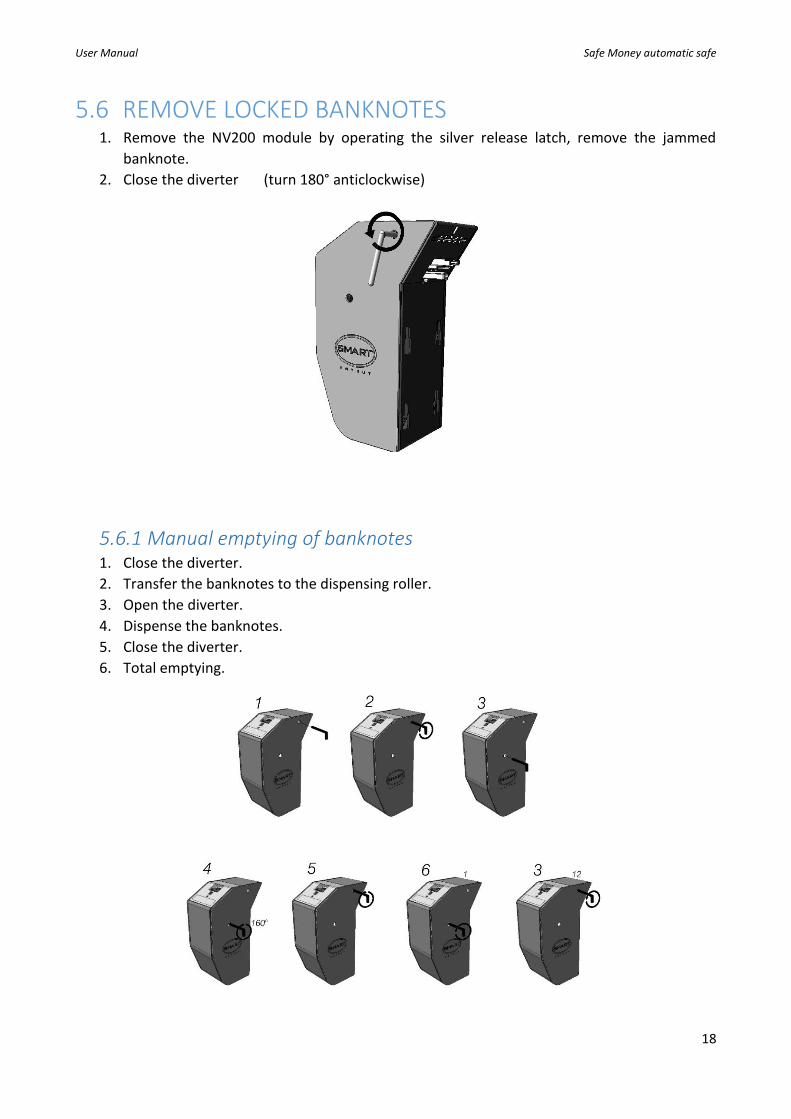
5.6 REMOVE LOCKED BANKNOTES 1. Remove the NV200 module by operating the silver release latch, remove the jammed
banknote.
2. Close the diverter (turn 180° anticlockwise)
5.6.1 Manual emptying of banknotes 1. Close the diverter.
2. Transfer the banknotes to the dispensing roller.
3. Open the diverter.
4. Dispense the banknotes.
5. Close the diverter.
6. Total emptying.

User Manual Safe Money automatic safe
19
5.7 BANKNOTE COLLECTION For the collection of banknotes it is necessary to extract the appropriate cash-box below the payout
form. In summary, the following steps must be performed:
1. Open the front door
2. Turn the protection plate
3. Open the lock below using the appropriate key.
4. Bring the cash-box towards you by pulling the appropriate handle
5. Turn the cash-box over and open the lock
6. Take out the banknotes

User Manual Safe Money automatic safe
20
5.8 FIRMWARE UPDATE CAUTION ! The SAFEMONEY product is subject to MANDATORY upgrade! The firmware update allows the recognition of new banknotes issued by the EUROPEAN CENTRAL BANK, until the complete replacement of all denominations of banknotes in circulation. Updating the FW is also necessary to recognise the new fake banknotes on the market and to improve the functioning of readers and dispensers.
5.9 MACHINE CLEANING To clean the machines IT IS STRICTLY FORBIDDEN TO USE AGGRESSIVE AGENTS, SUCH AS
DENATURED ALCOHOL. CLEANING MUST BE CARRIED OUT WITH THE MACHINE DISCONNECTED
FROM THE ELECTRICAL MAINS.
It is advisable to provide for the cleaning of the devices on a monthly basis.
5.9.1 Cleaning NV200 1. Operate the release latch.
2. Fully open the path of the banknote
3. Determine the path.
4. Determine the dragging mechanisms.

User Manual Safe Money automatic safe
21
5.8.2 Coin feeder cleaning Thoroughly clean the conduit that carries the coins to the rotor above. It is advisable to use a spatula
with non-aggressive fibres so as not to damage the machine.
Thoroughly clean the conduit that carries the coins to the rotor above. It is advisable to use a
spatula with non-aggressive fibres so as not to damage the machine.
Disc for coins deviation. Clean the disc and inserts
with a cloth. Pay attention to the coin aligning
shoulders
Keep clean and free of debris from dirty coins
Module for coin verification. Do not remove or alter
in any way
Path of the coins subject to dirt given the friction of
the coins. Wipe thoroughly with a cloth to remove
debris
This sensor must be cleaned superficially

User Manual Safe Money automatic safe
22
5.9.3 Hopper sensor cleaning 1. Remove the coin exit cover
2. Remove the front panel by pulling the panel from the other to the bottom and right
For the correct operation of the product, it is advisable to fully empty the machine on a weekly basis in addition
to cleaning it.
User Manual Safe Money automatic safe
23
6. SAFEMONEY INTERFACING WITH THIRD PARTY
SW
This GUIDE describes the communication operations with the automatic SAFEMONEY
distributor through the exchange of information via file.
6.1 GENERAL DESCRIPTION
To speed up the interfacing time, a MANAGEMENT PANEL (see paragraph 6.3), a machine
developed for Windows, is supplied together with the automatic distributor.
.Net Framework 4 is required for installation.
The machine management panel allows the external software to interact with the automatic
distributor through the exchange of information via text file.
With the installation of the SAFEMONEY software, the C:\Safe Money\ folder, in which
communication with the .txt file will take place, is created automatically.
The path for writing and reading files is: C:\Safe Money\.
A third-party Sw who wants to interface with the Safe Money automatic automatic cash register
must comply with the communication protocol described below
6.2 PROTOCOL
1. Write in the C:\SAFE MONEY\ folder a file called tobepaid.txt containing the amount to be paid in cents with a 9-digit number (for example if you have to pay 5 euros, the file must contain the following expression: 000000500 )
2. Pending the paid.txt file.
At the time that the amount entered is equal or higher, SW Safe Money will delete the
tobepaid.txt file and write a paid.txt file containing the amount entered. For example, if €10
is paid, the file would count 000001000.
The amount.txt file, which is created as soon as credit is entered and updated whenever the
credit increases.
The third-party SW can cancel a transaction by writing the void.txt file.

User Manual Safe Money automatic safe
24
The third-party SW can, using:
The dispensed.txt file, know the total dispensed by the automatic distributor.
The notdispensed.txt file, know the total not dispensed by the automatic distributor.
the connected.txt file, know if the distributor is connected and working properly
the file disconnected.txt, know if the distributor is disconnected or not working properly
the getLevels.txt file, know the current values of the current distributor levels
The management of the deletion of the paid.txt and amount.txt files is left entirely to
the third-party SW that interfaces with the SAFEMONEY.
6.3 DESCRIPTION OF THE FILES
TOBEPAID.TXT
The “tobepaid.txt” file allows you to start a new transaction. The file must contain the total
amount of the transaction expressed in cents with a 9-digit formatted number.
Example: if the amount of the transaction is 5 EURO, the contents of the file must have the
following text 000000500. The file is deleted when the transaction ends
The tobepaid.txt file can also contain a negative amount, for example: -000000500, in this case
the automatic cash register will directly provide the amount (to be used in the event of
withdrawal, for example, pay suppliers, winnings, etc.).
VOID.TXT
The “void.txt” file allows you to interrupt an open transaction. The third-party SW can send the
void.txt file to cancel the current transaction. The content of the file is irrelevant, it can also be
empty. If, at the time of cancellation, there is a credit paid, the credit is automatically returned
to the customer.
AMOUNT.TXT
The “amount.txt” file is generated by the SAFEMONEY Software and contains the partially paid
amount. It is expressed with a 9-digit formatted number and is updated every time the credit
increases.
This file to the third-party software to know the partial amount inserted in the SAFEMONEY.
The deletion of this file must be managed by the third-party software.
User Manual Safe Money automatic safe
25
PAID.TXT
The “paid.txt” file is generated by the SAFEMONEY Software when the transaction has ended.
It contains the total amount paid in a 9-digit formatted number. The deletion of this file must
be managed by the third-party software.
DISPENSED.TXT
The “dispensed.txt” file is generated by the SAFEMONEY Software at the end of each payment.
It contains the total dispensed from the automatic distributor expressed with a 9-digit
formatted number.
NOTDISPENSED.TXT
The “notdispensed.txt” file is generated by the SAFEMONEY Software in the event that it is not
possible to pay the full amount. It contains the total not supplied by the automatic distributor
with a 9-digit formatted number.
CONNECTED.TXT
The “connected.txt” file, generated by the SAFEMONEY Software, allows you to know the status
of the automatic distributor. In this case, it is connected and works properly.
DISCONNECTED.TXT
The “disconnected.txt” file, generated by the SAFEMONEY Software, allows you to know the
status of the automatic distributor. In this case, it is disconnected and does not work properly.
GETLEVELS.TXT
The file “getLevels.txt”, allows you to know the current level of coins and banknotes inside the
automatic distributor. The third-party software creates the file inside the C:\Safe Money folder
(the content may be empty). The SAFEMONEY software in response to this file generates
another file called levels.xml the content of which is divided into 3 nodes: coins, banknotes and
stacker (cash register). Each of the three categories contains as many nodes as it contains
available channels, where the “value” attribute indicates the value of the channel.
(2=0.02EUR…, 500)5.00EUR). The text of each node indicates the number of pieces.

User Manual Safe Money automatic safe
26
6.4 SAFEMONEY MANAGEMENT PANEL After the SAFEMONEY is connected and licensed, the following main screen of the MANAGEMENT
PANEL opens.
Figure 1 - Start screen
6.4.1 Definition of Operator Profile
Figure 2 - Home screen
User Manual Safe Money automatic safe
27
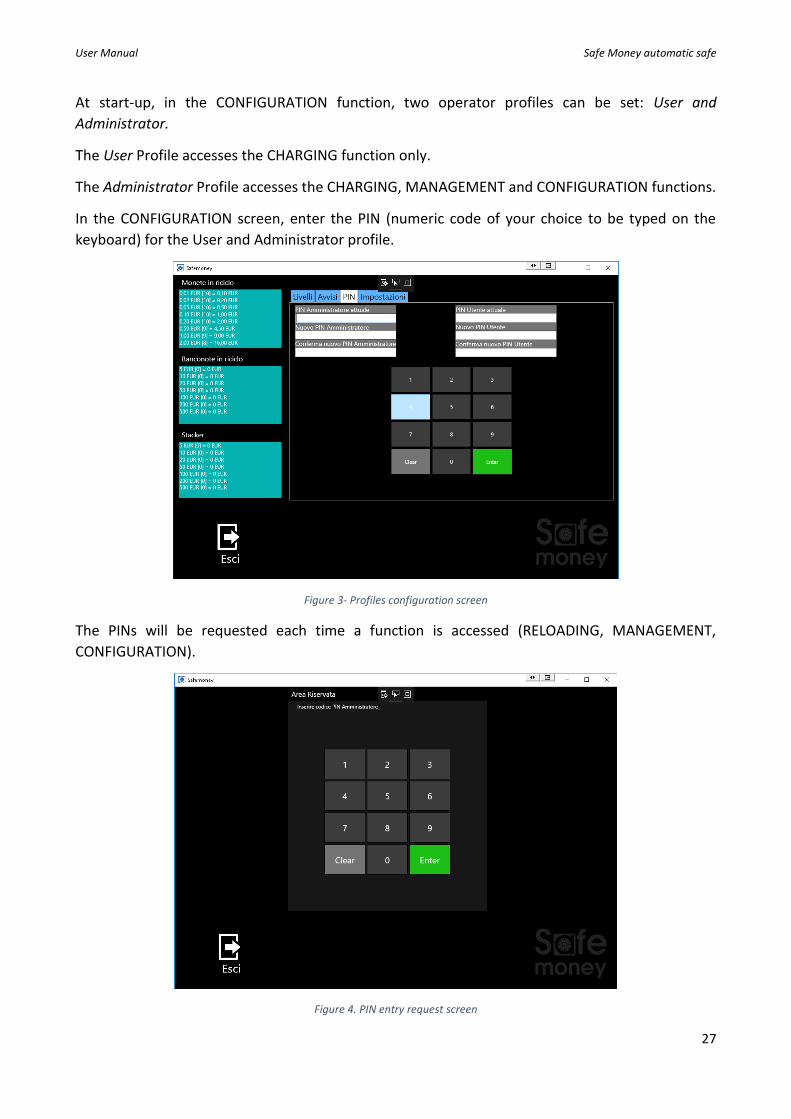
At start-up, in the CONFIGURATION function, two operator profiles can be set: User and
Administrator.
The User Profile accesses the CHARGING function only.
The Administrator Profile accesses the CHARGING, MANAGEMENT and CONFIGURATION functions.
In the CONFIGURATION screen, enter the PIN (numeric code of your choice to be typed on the
keyboard) for the User and Administrator profile.
Figure 3- Profiles configuration screen
The PINs will be requested each time a function is accessed (RELOADING, MANAGEMENT,
CONFIGURATION).
Figure 4. PIN entry request screen

User Manual Safe Money automatic safe
28
6.4.2 LOADING function
The LOADING function can be accessed with both the User and Administrator profiles.
The LOADING function allows you to perform a Banknote/Coin loading operation (if set in Configuration>Settings).
To carry out the LOADING, insert the coins or banknotes into the machine and click on the END LOADING button.
The CHANGE function allows you to change banknotes into coins or vice versa, by setting the denominations you want in the relevant screen. It will not be possible to select denominations that are not available
Figure 5 - Loading
Figure 6 - Change

User Manual Safe Money automatic safe
29
Figure 7 - Change-Dispense- Set the denominations
6.4.3 MANAGEMENT function The MANAGEMENT function can only be accessed with the Administrator profile.
The MANAGEMENT function allows you to carry out GENERAL or WITHDRAWAL operations. Among
the GENERAL operations we find:
- Emptying
- Check banknotes in recycling
- Transaction control
- Total control not dispensed
-
Figure 8 - GENERAL General Management Panel

User Manual Safe Money automatic safe
30
Emptying operation. Upstream, a number of coins and banknotes have been defined in
CONFIGURATION to make SAFEMONEY work.
The emptying operations are: Emptying to the cash register level and Emptying everything.
With the Emptying to the cash register level, the coins exceeding the set levels are emptied and the
excess notes are transferred to the stacker.
Recycling banknote verification operation. Check to see how the recycle status is set. By default it is
set to AUTOMATIC mode.
Transaction control operation. Display logs of all operations performed.
Total control operation not dispensed. It is a panel that shows the cases in which it was not possible
to dispense the change or make a withdrawal.
Among the MANAGEMENT functions we also find the WITHDRAWAL function: this operation allows
you to select the denominations or set the FREE mode for dispensing the cash to be withdrawn.
Simply enter the amount and click on the DISPENSE button.
Figure 9 - Withdrawal panel
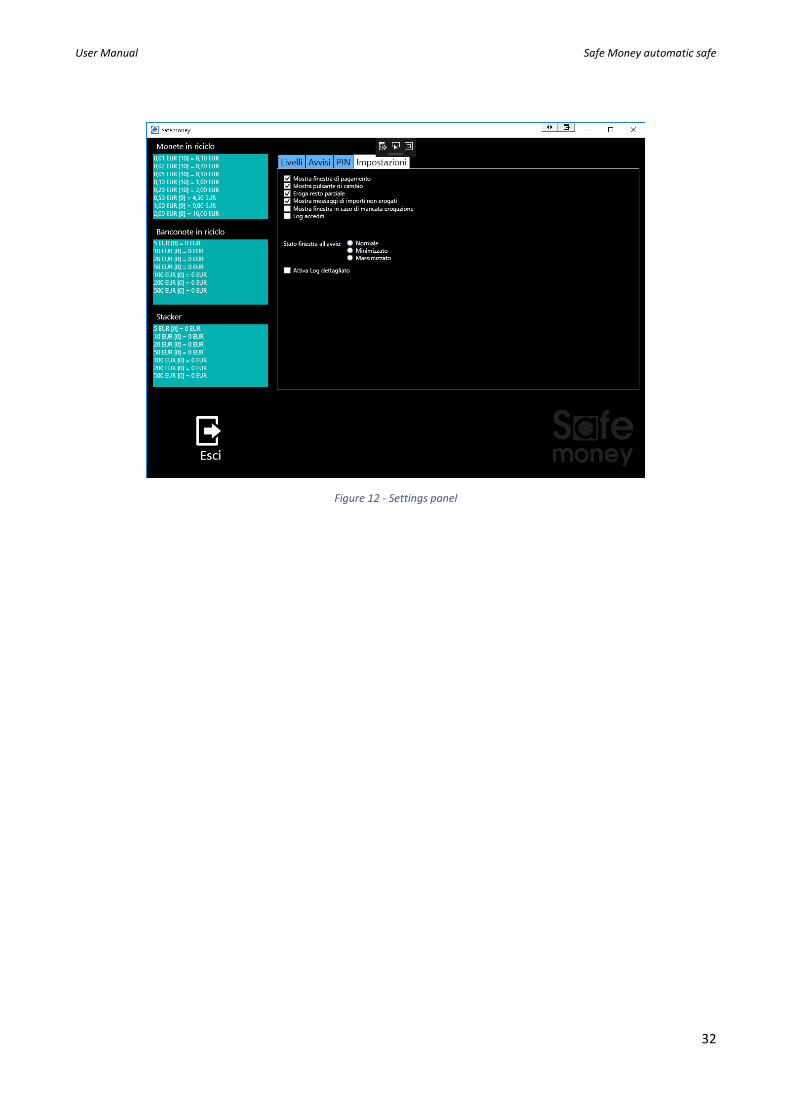
6.4.4 CONFIGURATION function The CONFIGURATION function can only be accessed with the Administrator profile.
The CONFIGURATION function allows you to perform the following operations:
- Configuration of the levels - Configuration of the notification alerts for the levels
- USER PIN and ADMINISTRATOR PIN setting
- Operating options setting

User Manual Safe Money automatic safe
31
The Level Configuration operation allows you to set the coin cash register level, banknote and maximum
banknote level.
The Alert Configuration operation allows you to receive notifications when the set level is reached
The PIN setting operation has already been described in paragraph 6.3.2.
The operation options setting operation allows you to set the panel according to certain criteria.
Figure 10 - Levels panel
Figure 11 - Alerts Panel
User Manual Safe Money automatic safe
32
Figure 12 - Settings panel

User Manual Safe Money automatic safe
33
All information contained in this manual may be subject to change by Ditronetwork Srl without any prior notice.
For any information or further details, contact the Ditronetwork Technical Assistance Service
DITRONETWORK S.r.l.
Registered office
Address: Via F. Caracciolo, 15
80122 Naples - Italy
Operating office
Address: Via Antiniana, 115
80078 Pozzuoli (NA) - Italia
Tel: (+39) 081 2428557 | Fax: (+39) 081 2428552
E-mail: [email protected]