user guide template - sabre as data collector · data collection portal user guide 4 confidential...
TRANSCRIPT

User Guide Data Collection Website
Version 1.1

Document Edition 1.1 (Oct 2016)
Template Version 2.3
This documentation is the confidential and proprietary intellectual
property of the Sabre Airline Solutions® business. Any
unauthorized use, reproduction, preparation of derivative works,
performance or display of this document or software represented
by this document, without the express written permission of Sabre
Airline Solutions is strictly prohibited.
Sabre®, the Sabre logo, Sabre Airline Solutions, the Sabre Airline
Solutions logo, Sabre Travel Network®, the Sabre Travel Network
logo, Sabre AirCentre®, Sabre AirVision®, SabreSonic® CSS are
trademarks and/or service marks of an affiliate of Sabre Inc. All
other trademarks, service marks and trade names are the property
of their respective owners.
© 2016 Sabre Inc. All rights reserved.

Table of Contents
User Guide i Confidential and Proprietary Sabre Airline Solutions
Table of Contents
1 D a t a C o l l e c t i o n P o r t a l
1.1 Navigation ...................................................................................................................................................... 1 1.2 Data Collection Home Page Project Dashboard ............................................................................................ 1
1.2.1 Filtering the Data Collection Dashboard .......................................................................................... 2 1.3 Data Collection Details Table ......................................................................................................................... 2
1.3.1 1.3.1 Filtering the Data Collection Details Table .............................................................................. 3 1.3.2 Assigning Roles and Dates to a Section .......................................................................................... 4
1.4 Editing a Section ............................................................................................................................................ 5 1.4.1 Section Form Details ....................................................................................................................... 6 1.4.2 Drop Menus ..................................................................................................................................... 6 1.4.3 Dynamic Tables ............................................................................................................................... 7 1.4.4 Text Boxes ....................................................................................................................................... 7 1.4.5 Additional Comments ....................................................................................................................... 8 1.4.6 PrePopulation Table ...................................................................................................................... 10 1.4.7 Uploading Documents in the Data Collector .................................................................................. 10
1.5 Submitting a Data Collector.......................................................................................................................... 11 1.6 Submitting a Request to Edit ........................................................................................................................ 12 1.7 Setting Up Alerts .......................................................................................................................................... 13
1.7.1 Creating an Alert ............................................................................................................................ 13 1.7.2 Creating Alerts for All Forms .......................................................................................................... 15 1.7.3 Filtering Set Up Alerts Table .......................................................................................................... 17

Data Collection Portal
User Guide 1 Confidential and Proprietary Sabre Airline Solutions
1 Data Collection Portal
This user guide is for the Data Collection Portal, which you can access directly by going to
https://asdatacollection.sabrenow.com/ . To activate a Sabre product, customers can submit the needed
information by filling out a series of web forms.
The Data Collection process is critical to the overall implementation and activation of the Sabre solution.
Having complete and accurate information allows Sabre to correctly set up and configure the system.
As the form owner, please provide the information requested, which should summarize your airline’s
business requirements. Once you submit the form, it will be sent to Sabre for review. Once that process is
complete, Sabre will frame and configure the system, so submit the forms by the due date to ensure a
timely implementation.
1.1 Navigation
Use the navigation bar to access information on the Data Collector Website.
1.2 Data Collection Home Page Project Dashboard
With the Data Collection Dashboard, you can track the status of Data Collectors that were initialized to
activate a product.
The dashboard summarizes the number of sections in each Data Collector and their status:
• In Progress: The Data Collection process has begun and is in progress.
• Submitted: The filled in Section (form) is submitted for review to Sabre.
• Completed: The submitted Section is reviewed and approved by Sabre.
• Request to Edit: Customer has requested to edit a completed Section.
• Under Edit: Customer request to edit is approved and Section is being edited.
1

Data Collection Portal
User Guide 2 Confidential and Proprietary Sabre Airline Solutions
1.2.1 Filtering the Data Collection Dashboard
You can filter the Data Collection Dashboard to display only a specific Data Collector. The filtered
results will display in the Data Collection Details Table.
To filter based on Data Collectors
1. Click on a Data Collector in the Data Collection Dashboard.
Only the filtered Data Collector appears in the Data Collector Dashboard. All the sections that belong
to the filtered Data Collector will appear in the Data Collection Details Table.
2. To remove filtering, click on Remove Filter at the top right corner of the dashboard.
This will remove the applied filter. All the Data Collectors and their related sections will appear in the
Data Collection Details Table.
1.3 Data Collection Details Table
The Data Collection Details table provides section level details for Data Collectors such as:
• Sections: A hyperlink that opens the Data Collection form
• Status: Shows the status for each section of the Data Collector
• Sabre Manager: Shows the Sabre Manager assigned to the Data Collector
• Sabre Owner: Shows the person within Sabre that will be the main point of contact assigned to the
Sections
• Airline Manager: Shows the Airline Manager assigned to the Data Collector
• Airline Owner: Shows the person within the Airline that will be the main point of contact assigned to
the Sections

Data Collection Portal
User Guide 3 Confidential and Proprietary Sabre Airline Solutions
• Delivery Director: Shows the Delivery Director of the area
• Due Date: Date by which Sabre needs to receive information to set up the partition. After this date,
Sabre must review and approve that changes can be made. Commercial discussions might be
necessary.
• Cutoff Date: Date from which freeze period starts. No changes are allowed after this date.
The Data Collectors are also grouped into a wider category called Solution Family.
1.3.1 1.3.1 Filtering the Data Collection Details Table
You can use the Quick Search option to filter the Data Collection Details Table.
To filter the Data Collection Details Table
1. Click an option from the Quick Search drop menu.
2. Type the value you want to filter with and select Enter or click on the Apply quick search icon (The
Solutions Family is filtered by Inventory in the example below.
The Solutions Family would then be filtered by Inventory.
3. To remove the filter, click on All fields in the Quick Search drop menu.
4. Delete the value in the filter by cell.
5. Select Enter or the Apply quick search icon.
Data Collection Portal
User Guide 4 Confidential and Proprietary Sabre Airline Solutions
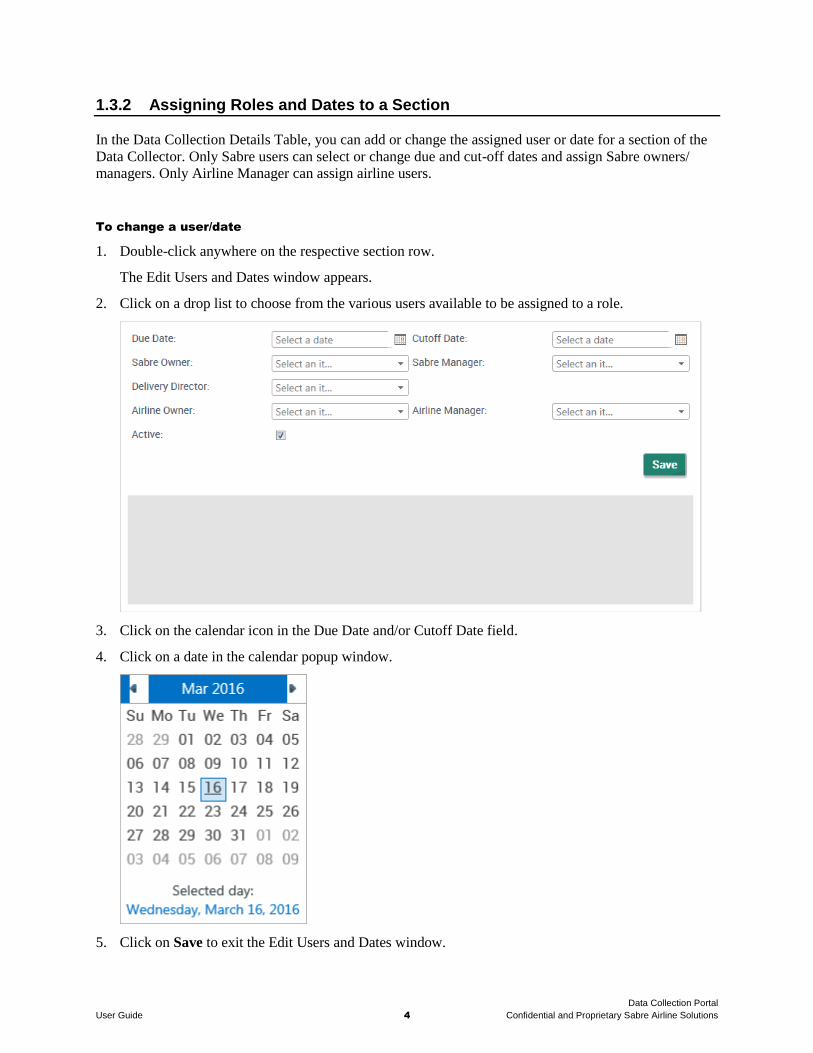
1.3.2 Assigning Roles and Dates to a Section
In the Data Collection Details Table, you can add or change the assigned user or date for a section of the
Data Collector. Only Sabre users can select or change due and cut-off dates and assign Sabre owners/
managers. Only Airline Manager can assign airline users.
To change a user/date
1. Double-click anywhere on the respective section row.
The Edit Users and Dates window appears.
2. Click on a drop list to choose from the various users available to be assigned to a role.
3. Click on the calendar icon in the Due Date and/or Cutoff Date field.
4. Click on a date in the calendar popup window.
5. Click on Save to exit the Edit Users and Dates window.

Data Collection Portal
User Guide 5 Confidential and Proprietary Sabre Airline Solutions
1.4 Editing a Section
You can edit a section of the Data Collector.
To edit a section of the Data Collector
1. Click on the hyperlink to open a section of the Data Collector.
For the example below, we want to edit the Ancillary Overview section.
Your internet browser opens a new tab to display the section.
2. Define each item in the displayed section of the Data Collector.
Remember, the options you select will affect what items will appear as you edit the Data Collector.
And how you define an item may also differ.
3. Click on the question, answer it, and then click on Apply Changes.
4. If you want to add comments and labels to the question (to highlight and action need), click on Add
Comment and it will take you to appropriate window.
5. Once you have finished, click on Save All.
6. Click Print to Pdf if you want a copy of the Data Collector.
7. Click on Close to exit the open section of the Data Collector. The Please Confirm window appears.
8. Click on Save to save your work on that section of the Data Collector. OR
9. Click on Don’t Save to clear that section of the Data Collector.
OR

Data Collection Portal
User Guide 6 Confidential and Proprietary Sabre Airline Solutions
Click on Cancel to resume editing that section of the Data Collector. You will see a message
confirming you’ve saved your work.
1.4.1 Section Form Details
Click on the arrow key at the top right corner of the form across the form header if you want to contract
the section. It provides all the general information about the form along with the Sabre and Airline
Owner, Step Owner (who has to take action on the form) and last person who edited the form.
The form’s Overview document will provide you with additional background information to fill out the
data collector. Click on the Product Overview button to download. You will also find general instructions
on how to answer questions and a legend that describes the icons used throughout the form.
1.4.2 Drop Menus
Most items require you to select an option from a drop menu. For example, if your carrier wants to print
the issuing airline code on the Bag Tag, you would click on Yes, on Main Bag Tag from the drop menu
for item 2.1.

Data Collection Portal
User Guide 7 Confidential and Proprietary Sabre Airline Solutions
1.4.3 Dynamic Tables
Also, depending on what options you select, you may be required to include additional information in a
Dynamic Table.
To use a dynamic table
• Click on Add to enter a row.
• Double click on a row or click on Edit to change information on that row.
• Click on Cancel to cancel a partially answered row.
1.4.4 Text Boxes
You may also type any additional information you want Sabre to be aware of while setting up your
carrier’s partition and add files if appropriate.
Note You will still have to mail Sabre for any changes or questions. This text box is just for reference
and not a mode of communication.

Data Collection Portal
User Guide 8 Confidential and Proprietary Sabre Airline Solutions
1.4.5 Additional Comments
If you have additional questions or comments, you can select the Add Comment hyperlink. Any questions
or comments applied to a data collector question will appear the activity log.
To add questions or comments
1. Go to the Additional Comments area and click on Add Comment.
2. Click on a check box for the item you want attached to that question, for example “Review Later”.
3. Click on Add Comment.
The Add Comment window appears.
4. Type a question or remark and indicate the comment type.

Data Collection Portal
User Guide 9 Confidential and Proprietary Sabre Airline Solutions
5. Click on Save.
6. Click on respective labels to flag a specific question, highlight it, or tag it for further follow up.
7. After saving, an icon will appear by the question and may highlight text:

Data Collection Portal
User Guide 10 Confidential and Proprietary Sabre Airline Solutions
1.4.6 PrePopulation Table
When you click on the populate button, information from previous data collectors will appear in the
prepopulation table. You will not have to add that information again. Whenever you pre populate, if there
is any data on that table from before, that data will be deleted and replaced by the prepopulated data.
1.4.7 Uploading Documents in the Data Collector
There are data collectors that will require you to attach a document to a form. In which case, you may
download a template, fill in the required information, and then attach the document to the data collector.
To upload a file to data collector form
1. Click on the template file on the right to open the Excel spreadsheet.
2. Fill out the spreadsheet a save your changes.
3. Click on Add.
4. Fill in the file description.
5. Click on the box that says “Click here to attach file”.
6. Click Save before you exit the data collection form.

Data Collection Portal
User Guide 11 Confidential and Proprietary Sabre Airline Solutions
1.5 Submitting a Data Collector
Complete each section of a Data Collector and submit it for review. As the Airline Owner, you may
submit the section to the Airline Manager or submit it directly to the Sabre. Check your airline’s internal
processes before submitting a section of the Data Collector.
To submit a section of the Data Collector
1. Fill out the entire section of the Data Collector.
2. Click on one of the following options based on your process:
a. Submit to Airline Manager
b. Submit to Sabre
The Information Window appears.
3. Type a comment in the window to include any additional information you want to send to the
reviewer. The text will appear in the Comments section of the Data Collector section.
4. Click Save.
The reviewer receives an email informing them a section of the Data Collector was submitted for review.
Typically, the Airline Manager reviews the section and sends it back to the Airline Owner if any changes
are to be made. If no changes are required, the Airline submits the section to the Sabre for review. Sabre
can then reject the submission and send it back to Airline or can approve the submission and complete the
process.
Once Sabre approves the submission, the section’s status changes to Completed and the Airline is
restricted from editing the section.
Note To edit a section after it is marked Completed, the Airline must send a request to the Sabre. (See
Submitting a Request to Edit.)
Data Collection Portal
User Guide 12 Confidential and Proprietary Sabre Airline Solutions
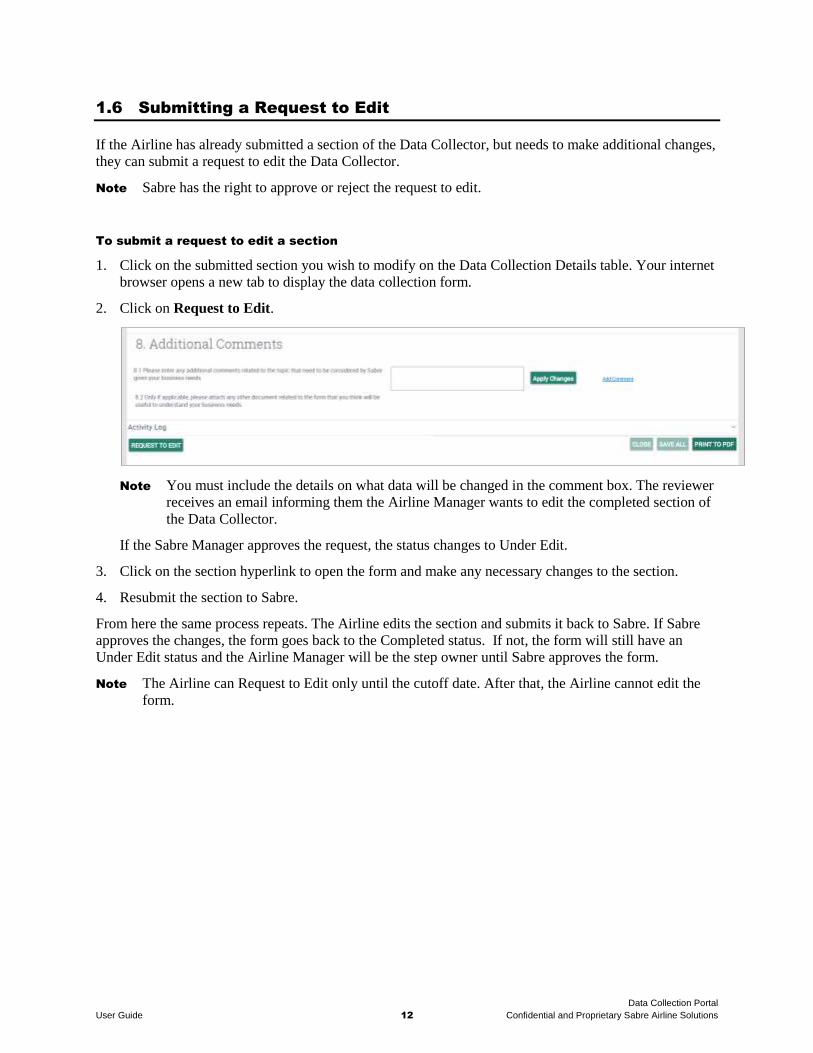
1.6 Submitting a Request to Edit
If the Airline has already submitted a section of the Data Collector, but needs to make additional changes,
they can submit a request to edit the Data Collector.
Note Sabre has the right to approve or reject the request to edit.
To submit a request to edit a section
1. Click on the submitted section you wish to modify on the Data Collection Details table. Your internet
browser opens a new tab to display the data collection form.
2. Click on Request to Edit.
Note You must include the details on what data will be changed in the comment box. The reviewer
receives an email informing them the Airline Manager wants to edit the completed section of
the Data Collector.
If the Sabre Manager approves the request, the status changes to Under Edit.
3. Click on the section hyperlink to open the form and make any necessary changes to the section.
4. Resubmit the section to Sabre.
From here the same process repeats. The Airline edits the section and submits it back to Sabre. If Sabre
approves the changes, the form goes back to the Completed status. If not, the form will still have an
Under Edit status and the Airline Manager will be the step owner until Sabre approves the form.
Note The Airline can Request to Edit only until the cutoff date. After that, the Airline cannot edit the
form.

Data Collection Portal
User Guide 13 Confidential and Proprietary Sabre Airline Solutions
1.7 Setting Up Alerts
You can receive email notifications when someone changes the status of a Data Collector form. Email
Notification can be subscribed for at a from level.
1.7.1 Creating an Alert
To subscribe to an email notification
1. Click on the Set Up Alerts hyperlink in the project home page.
Your internet browser opens a new tab to display the Set Up Alerts page.
2. For this example, double-click on one section in the Set Up Alerts table.
3. Click on the status you want to set up alert for.

Data Collection Portal
User Guide 14 Confidential and Proprietary Sabre Airline Solutions
4. Click on Save to save your changes to the Set Up Alert table.
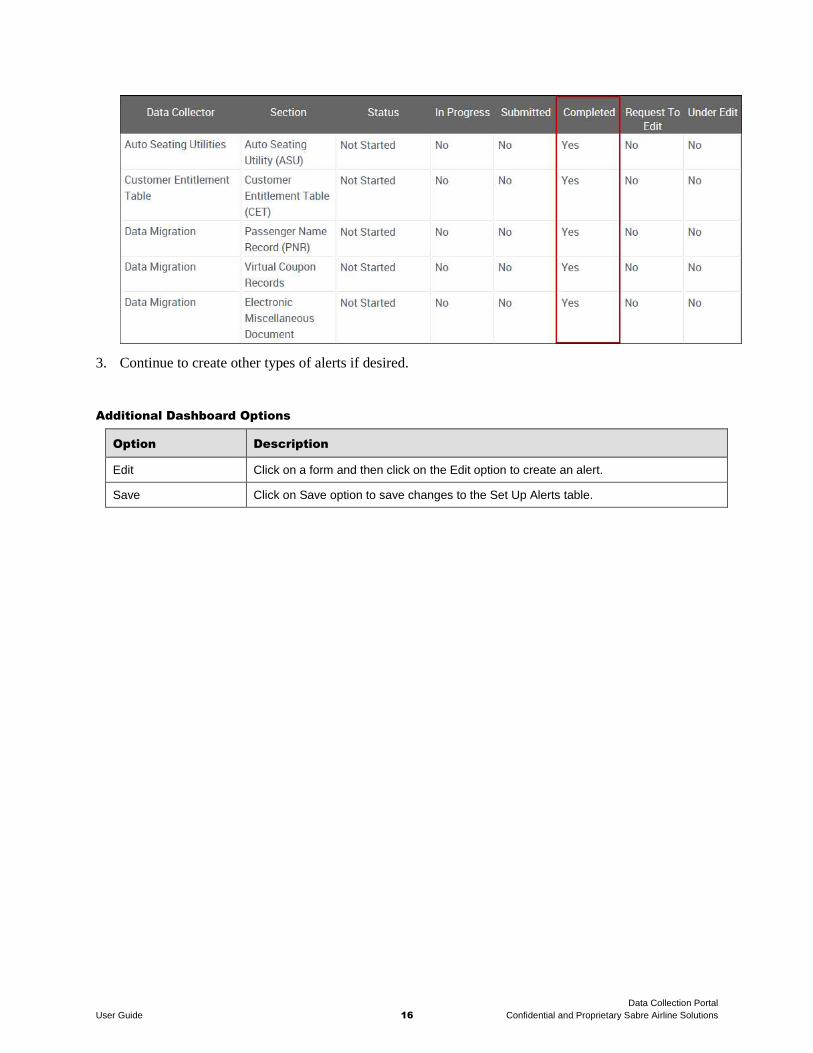
You have created an alert. Notice that the table has been updated and that the word Yes is listed in the
Completed column. In this example, you will receive an email when the Auto Seating Utility (ASU)
section reaches the Completed status.
Note No indicates that you will not receive an email.

Data Collection Portal
User Guide 15 Confidential and Proprietary Sabre Airline Solutions
1.7.2 Creating Alerts for All Forms
You can create alerts for all the forms listed in the Set Up Alerts table without having to click on each
individual form. You will then receive an email alerting you when a form has received the status
specified.
To create alerts for all the forms
1. Click on any subscription option:
a. Click on the Select All In Progress check box to create In Progress alerts.
b. Click on the Select All Submitted check box to create Submitted alerts.
c. Click on the Select All Completed check box to create Completed alerts.
d. Click on the Select All Request to Edit check box to create Request to Edit alerts.
e. Click on the Select All Under Edit check box to create Under Edit alerts.
The table will be regenerated based on the check box you selected. (It will do this each time you click
on a check box.)
A pop-up window will appear after all the alerts are created.
2. Click on OK to close the window.
Notice that the table has been updated and that the word Yes is listed in the Completed column. In
this example, you will receive an email when any of the forms listed in the Set Up Alerts table
receives the Completed status.
Note No indicates that you will not receive an email.
Data Collection Portal
User Guide 16 Confidential and Proprietary Sabre Airline Solutions
3. Continue to create other types of alerts if desired.
Additional Dashboard Options
Option Description
Edit Click on a form and then click on the Edit option to create an alert.
Save Click on Save option to save changes to the Set Up Alerts table.

Data Collection Portal
User Guide 17 Confidential and Proprietary Sabre Airline Solutions
1.7.3 Filtering Set Up Alerts Table
You can apply a filter so only what you specify in your search criteria appears in the Set Up Alerts table.
To filter the Set Up Alerts table
1. Click on the Quick Search drop menu.
a. All fields - search all the fields of the table
b. Data Collector – search all Data Collector fields
c. Section – search all Section fields
d. Status – search all Status fields
e. In Progress – search all In Progress fields
f. Submitted – search all Submitted fields
g. Completed – search all Completed fields
h. Request to Edit – search all Request to Edit fields
i. Under Edit – search all Under Edit fields
2. In the second Quick Search field, type what you want you want to filter by.
For example, type Yes or No, the name of a data collector, the status, etc. In the example below, we
will filter the table for items that have the word Yes in the Completed field.
3. Click on the apply filter icon located to the right of second Quick Search field.
The Set Up Alerts table redisplays and is filtered based on your search criteria.