user guide -...
TRANSCRIPT
User Guide
[02855] 23, Inchon-ro 22-gil, Seongbuk-gu, Seoul, KoreaTEL : 02-2193-9600 E-mail : [email protected]
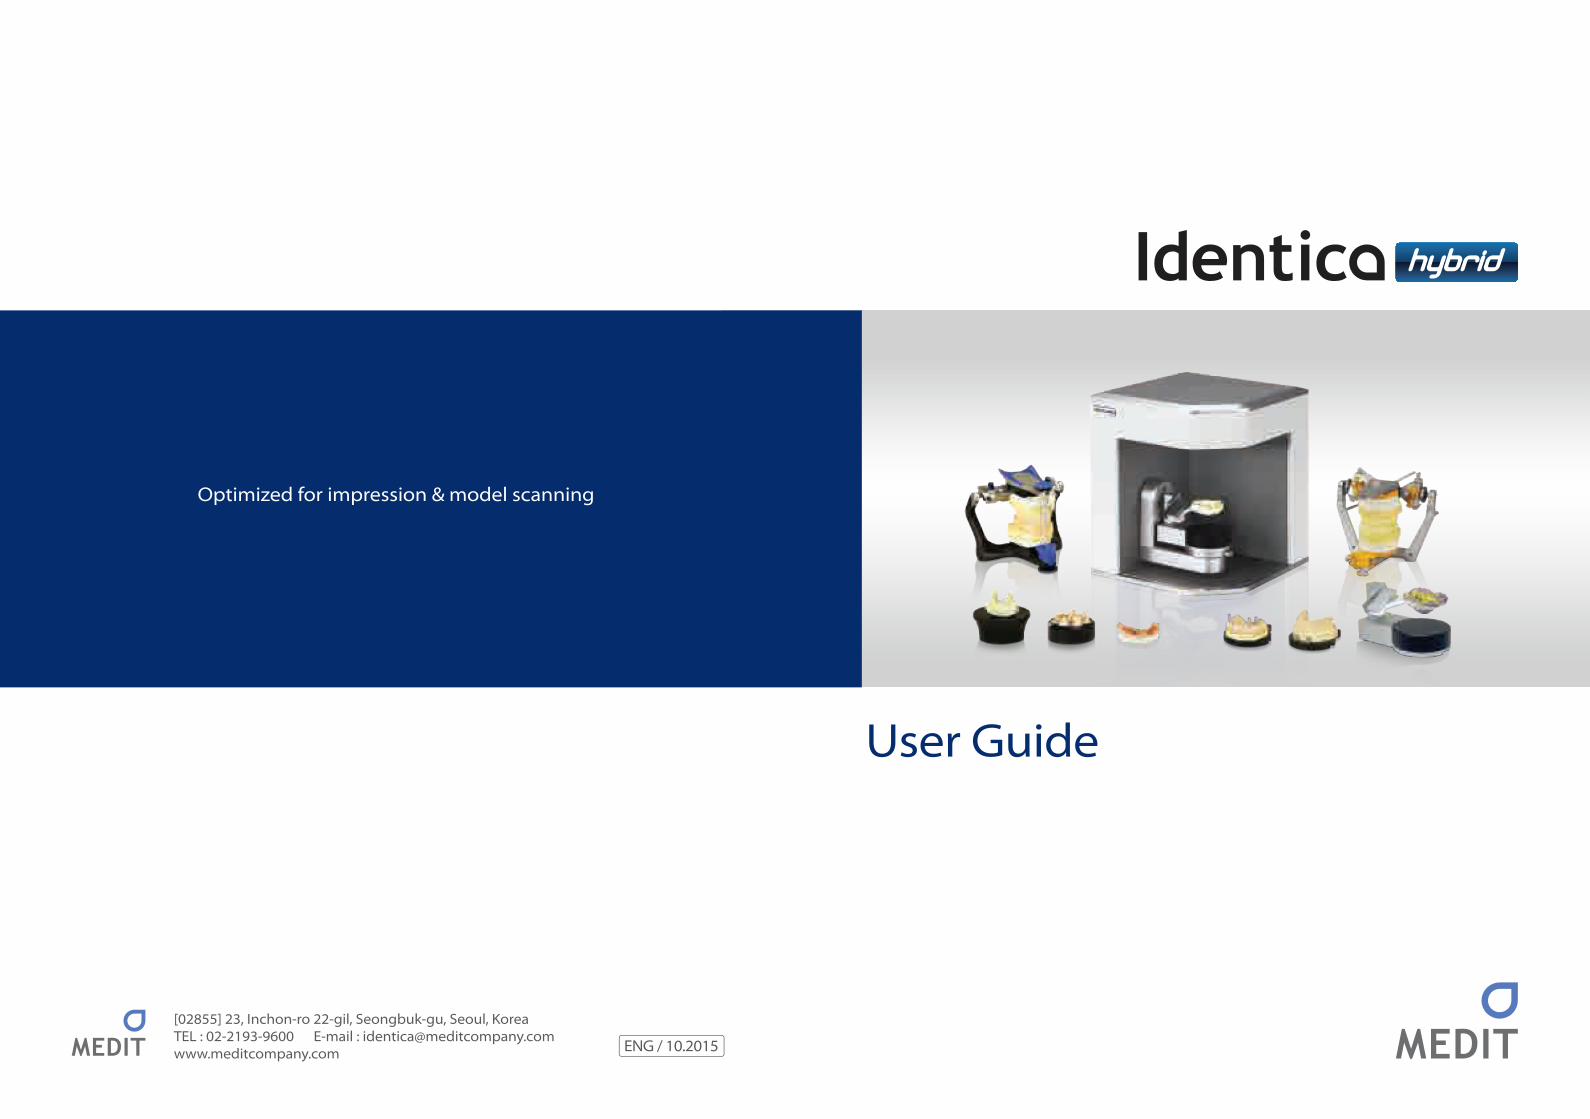
Optimized for impression & model scanning
ENG / 10.2015

Identica Hybrid User Guide

5Table of Contents
Table of Contents
Greetings 7 Introduction 7
General information 9 Indications 10 Work�ow 10 Scanner and Scanning Software 11
Before use 13 Unpacking and Installation 14 Box contents 14 Product speci�cations PC requirements 17
Product installation 19 Step 1 : Software installation 20 Step 2 : Hardware installation 22 Precautions for use 23
Using Identica Hybrid 27 How to use Identica 28 How to use Identica Scan 38
Appendix - Scan case 61 3 Unit Bridge case 62 Waxup case 80 Single Impression case 88 Doble Impression case 95 Implant scan adapter case 101 Flexible multi-die 109

6
Identica Hybrid User Guide

7Greetings
Greetings
Introduction
Thank you for buying Identica Hybrid.Medit specializes in scanners and CAD/CAM solutions for dentists and dental technicians. Medit’s Identica Hybrid scanner can be used to quickly and easily generate high-quality 3D data in open STL format, helping to increase your productivity and e�ciency. Also, Medit’s scanners are easy to use for anyone in the o�ce. This manual will help guide you through in-stallation and operation.
Caution Please read this manual completely before using your Identica Hybrid Scanner.

8
Identica Hybrid User Guide

9General information
General information
IndicationsWork�owScanner and Scanning Software
10
Identica Hybrid User Guide
Indications
Identica hybrid’s indications are as follows:- Single coping- Bridge framework- Anatomical copings and framework- Full Anatomic crown- Full anatomical bridge- Inlay / Onlay / Inlay Bridge- Veneers- Single wax up / Wax up bridge- Over-press crowns and bridges- Post & core- Telescope- Customized abutments- Implant bars and bridges- Removable partial design- Orthodontics- Virtual articulation
Work�ow
Identica Hybrid is designed to provide high-quality scan data for any type and any sized lab. Identica Hybrid’s intuitive and user-friendly software gives users the ability to �nish scans quickly and easily. Scanning with Identica Hybrid’s specialized impression scanning feature makes it possible to see signi�cant time savings – up to one day in some cases.
1) Create order - Set up the tooth settings of the restoration in Identica software or CAD software.
2) Model or impression scanning - Depending on the settings from the previous step, scan using a stone model. - Scan an impression directly to create a restoration.
3) CAD work - Convert the design data to NC data using a CAM program.
4) CAM work - Convert the design data to NC data using a CAM program.
5) Milling - Create a restoration using a milling machine with the NC data.

11General information
6) Finish - Process the �nished restoration.
Scanner and Scanning Software
1) ScannerIdentica Hybrid is designed to scan a wide range of dental models and impressions for fast and accurate data. With triple camera scanning technology, accuracy and precision is guaranteed, and with some of the fastest scanning speeds in the world, a full arch can be scanned in only 16 seconds. Identica Hybrid maximizes convenience by improving existing work-�ows with new innovative technologies. In addition, Identica Hybrid’s new 3-axis arm makes it easy to scan impressions in one step.
2) Scanning SoftwareWith Identica software, Identica Scan, and with Updater3, updates are automatic. Identica Software’s user-friendly and intui-tive design makes it easy to acquire scan data. It also features a �exible multi-die scan function that saves time and increas-es productivity by decreasing scan steps while also increasing accuracy for matching scan data.

12
Identica Hybrid User Guide

13Before use
Before use
Unpacking and InstallationBox contentsProduct Speci�cationsPC requirements
14
Identica Hybrid User Guide
Unpacking and Installation
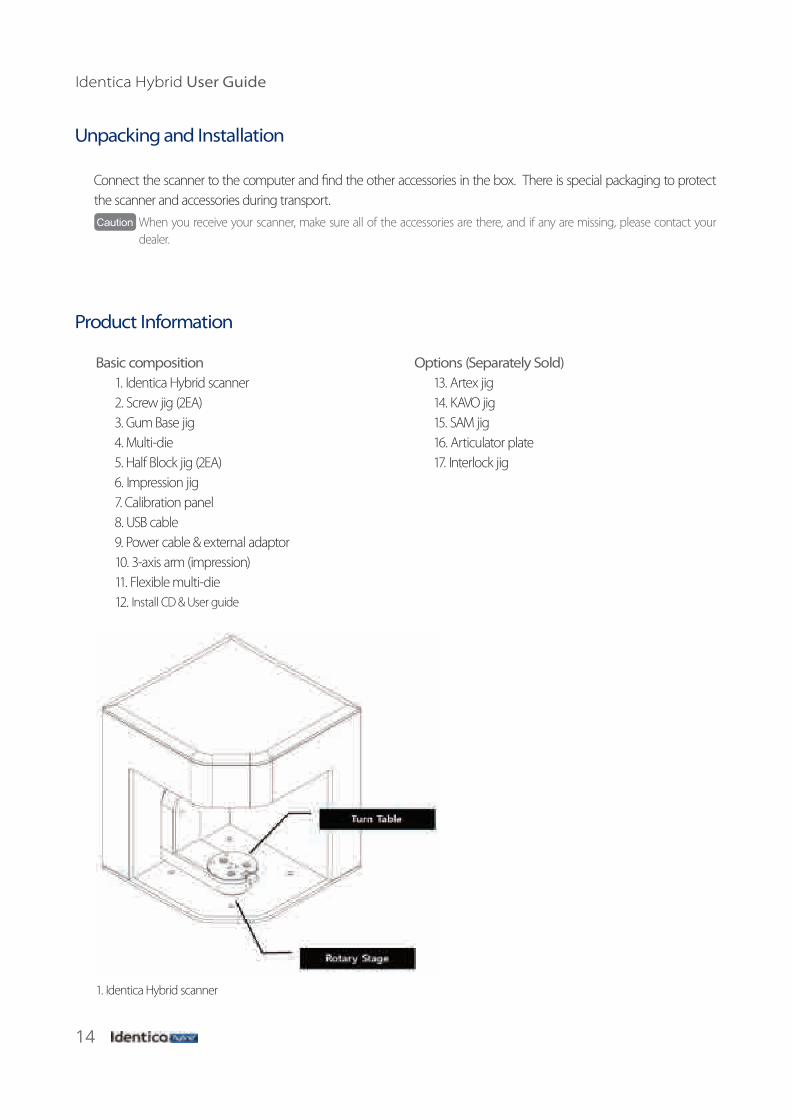
Connect the scanner to the computer and �nd the other accessories in the box. There is special packaging to protect the scanner and accessories during transport.Caution When you receive your scanner, make sure all of the accessories are there, and if any are missing, please contact your
dealer.
Product Information
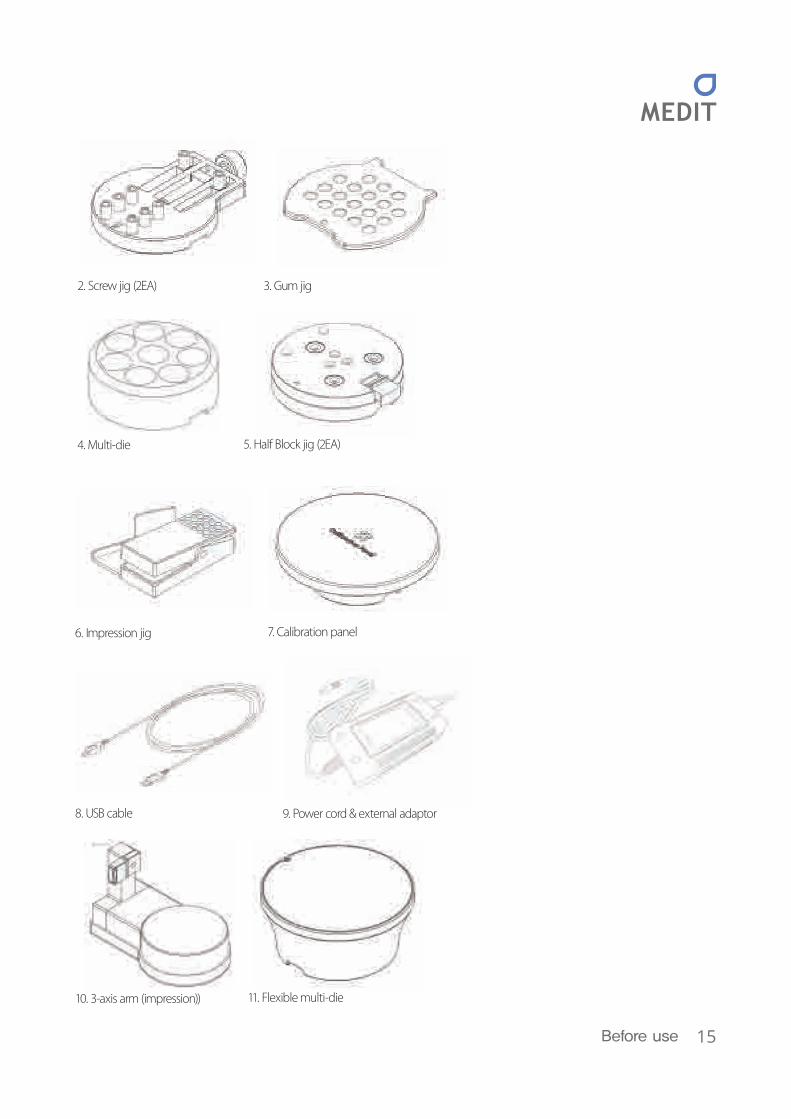
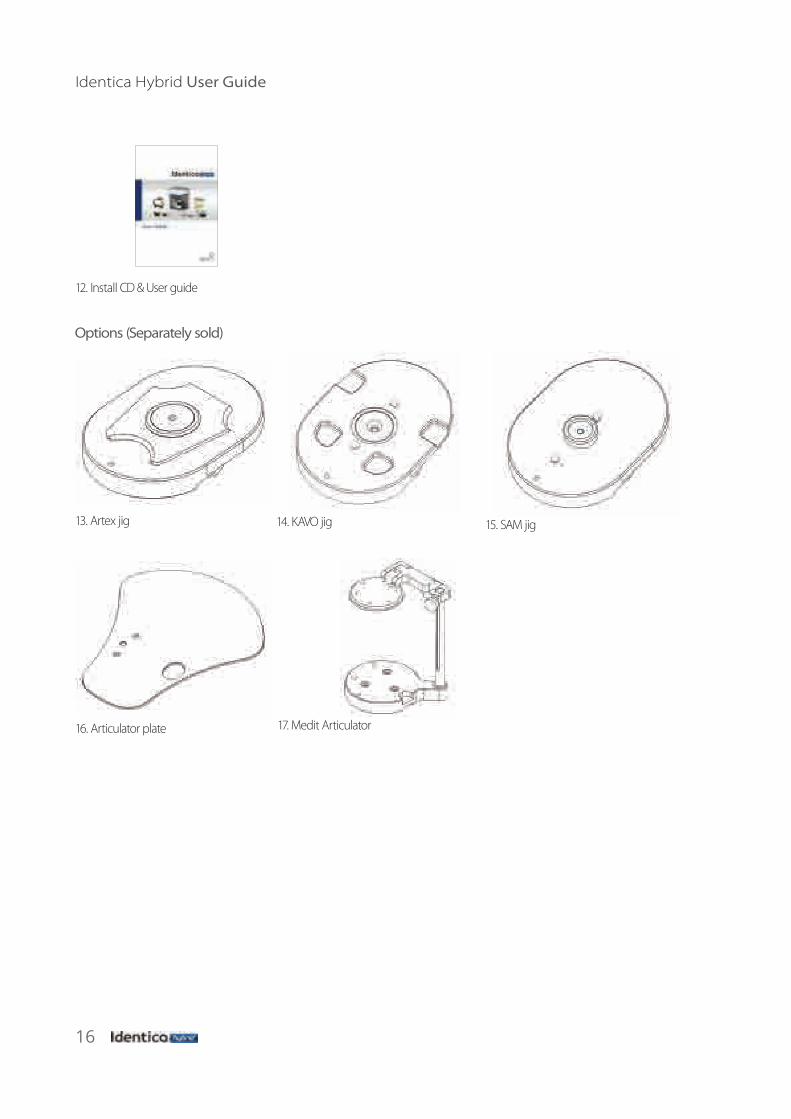
Basic composition1. Identica Hybrid scanner2. Screw jig (2EA)3. Gum Base jig4. Multi-die5. Half Block jig (2EA)6. Impression jig7. Calibration panel8. USB cable9. Power cable & external adaptor10. 3-axis arm (impression)11. Flexible multi-die12. Install CD & User guide
Options (Separately Sold)13. Artex jig14. KAVO jig15. SAM jig16. Articulator plate17. Interlock jig
1. Identica Hybrid scanner
15Before use
2. Screw jig (2EA) 3. Gum jig
4. Multi-die 5. Half Block jig (2EA)
6. Impression jig 7. Calibration panel
8. USB cable 9. Power cord & external adaptor
10. 3-axis arm (impression)) 11. Flexible multi-die
16
Identica Hybrid User Guide
Options (Separately sold)
12. Install CD & User guide
13. Artex jig 14. KAVO jig 15. SAM jig
16. Articulator plate 17. Medit Articulator

17Before use
Product Speci�cationsCategory DescriptionsCamera resolution Mono 1.3 (MP), Color 5.0 (MP)Point spacing 0.065 mmScan region 80mm x 60mm x 60mmScan principle Phase-shifting optical triangulation, Triple camera methodSize 290mm x 290mm x 340 mmWeight 16 kgLight source LED, 50 ANSI-lumensLight color Real BlueConnection method USB 3.0 B TypePower AC 100 ~ 240V, 50~60 Hz
PC Speci�cations
We suggest that you use Identica Hybrid with a PC that exceeds the minimum PC requirements.We cannot guarrantee proper operation with a PC that does not meet the minimum PC requirements.
Caution It is designed for USB 3.0 port. It must be connected to a USB 3.0 port.Caution Cannot run on Windows 32 bit and Mac OS.Caution Before installaing the scan software, check for a Windows update and make sure the mainboard, VGA card, and USB drivers
have been updated recently.
PC Speci�cations
Minimum RequirementsCPU Intel i5 2.6G or higher / equicalent AMD CPURAM 8G or higherGraphic Card NVIDIA GeForce GTS 450 (1GB) of higher / equivalent ATI graphic cardO/S Windows 7 64 Bit (do not use 32 Bit)
Recommended RequirementsCPU Intel i7-3770 @ 3.40GHz or higherRAM 16G or higherGraphic Card NVIDIA GeForce GTX 950 (2GB) or higherO/S Windows 7 64 Bit (do not user 32 Bit)

18
Identica Hybrid User Guide
19Product installation
Product installation
First, install Identica Software on your computer before connecting.
Step 1 : Software installationStep 2 : Hardware installationPrecautions for use
20
Identica Hybrid User Guide
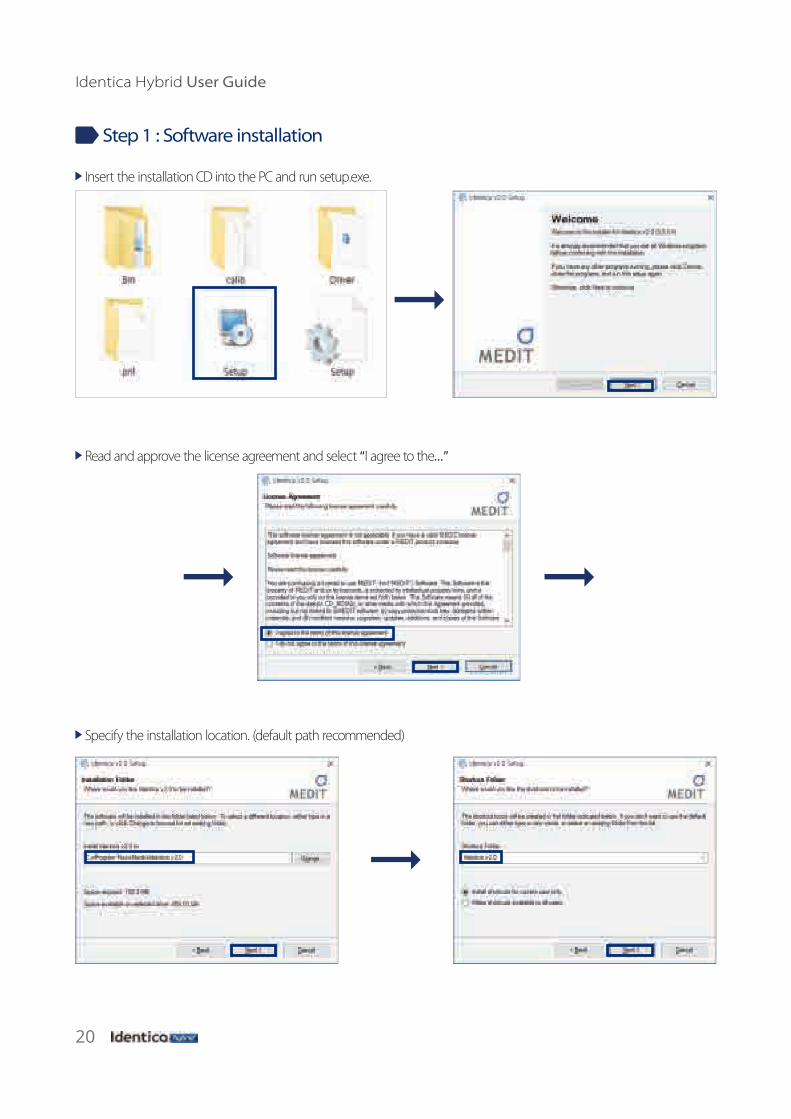
Step 1 : Software installation
Insert the installation CD into the PC and run setup.exe.
Read and approve the license agreement and select “I agree to the…”
Specify the installation location. (default path recommended)
21Product installation
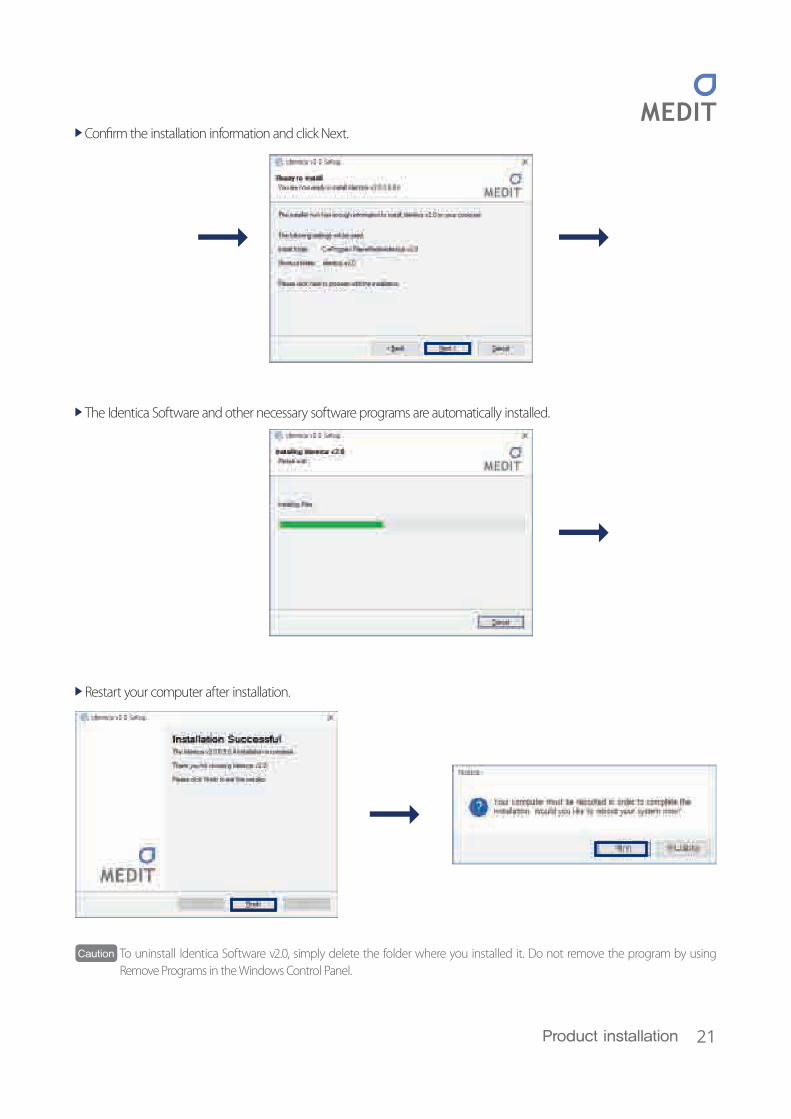
Con�rm the installation information and click Next.
The Identica Software and other necessary software programs are automatically installed.
Restart your computer after installation.
Caution To uninstall Identica Software v2.0, simply delete the folder where you installed it. Do not remove the program by using
Remove Programs in the Windows Control Panel.
22
Identica Hybrid User Guide
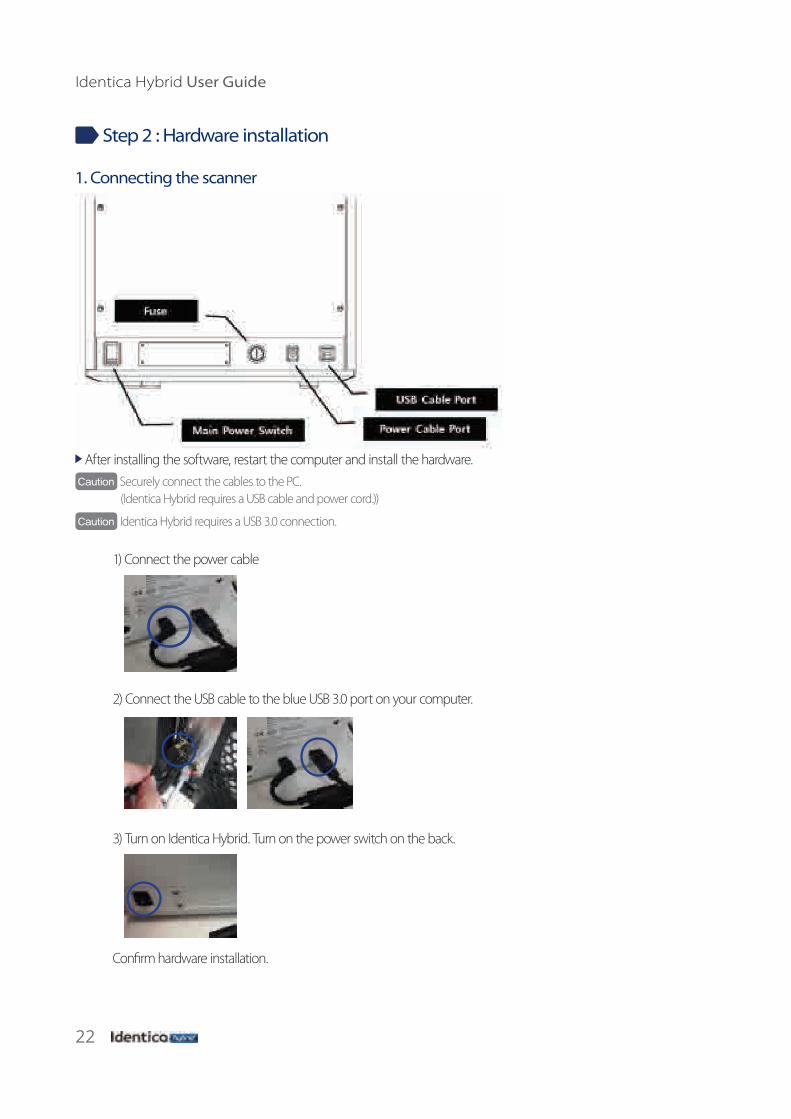
Step 2 : Hardware installation
1. Connecting the scanner
After installing the software, restart the computer and install the hardware. Caution Securely connect the cables to the PC.
(Identica Hybrid requires a USB cable and power cord.))
Caution Identica Hybrid requires a USB 3.0 connection.
1) Connect the power cable
2) Connect the USB cable to the blue USB 3.0 port on your computer.
3) Turn on Identica Hybrid. Turn on the power switch on the back.
Con�rm hardware installation.

23Product installation
Con�rm MEDIT USB Remote NDIS Network Device.
Check the cameraCheck to see if two cameras are registered.
Precautions for use
General precautions Only quali�ed persons should use this machine.
Installation precautions Install the machine in a place not a�ected by water, air pressure, temperature, high humidity, dust, salt, ion, and other environmental factors. Pay special attention to external hazards such as slope, vibration, and shock. Do not install the machine in a chemical storage area or any place where there are gas emissions. Install the machine in a well-ventilated place. Take special care about power frequency, voltage, and allowable current (or power consumption).

24
Identica Hybrid User Guide
Cautions before using this machine Make sure that every component is correctly connected and �xed. Make sure that the machine is correctly recognized in your computer’s Device Manager. Do not move your machine by applying force to its scanning arm.
Cautions when using this machine Do not give shock or vibration to the machine during use. Do not turn o� the power of Identica Hybrid while using it. Do not block the vent while the machine is in use. If there is smoke or a strange smell, immediately turn o� the power switch, disconnect the power cord, and contact the manufacturer. Remove the power cord from the machine if not in use for an extended time.
All repairs should be done by the manufacturer or a Medit approved repair center. Users should not disassemble or reassemble their scanner. Doing so will void the warranty. Do not modify this machine for any reason. Unapproved modi�cations will result in a voided warranty.
Maintenance If the machine has not been used for a while, check for proper installation and calibration. Check to make sure that the scan data is correct. Periodically clean this machine with a dry cloth and make sure to not let water or moisture inside the machine. Do not clean this machine with corrosive detergent or antiseptic solution. Always turn o� the power when checking the inside of the machine. Do not use a spray can or spray any material toward the scanner. Do not touch the mirror inside the scanner.

25Product installation
Instructions for storage Lightly wipe the surface with a dry cloth while taking care to not let water, other liquids, or other foreign materials
contaminate the machine. Keep the machine in a safe place to that it will not be damaged due to carelessness. Environmental conditions for use
Temperature range: 0 ℃ - 35 ℃Relative humidity: 20% - 75%
Environmental conditions for transport and storageTemperature range: -5 ℃ - 45 ℃Relative humidity: 20% - 80%

26
Identica Hybrid User Guide

27Using Identica Hybrid
Using Identica Hybrid
How to use IdenticaHow to use Identica Scan
28
Identica Hybrid User Guide
How to use Identica
Software GUI (Graphic User Interface) Con�guration
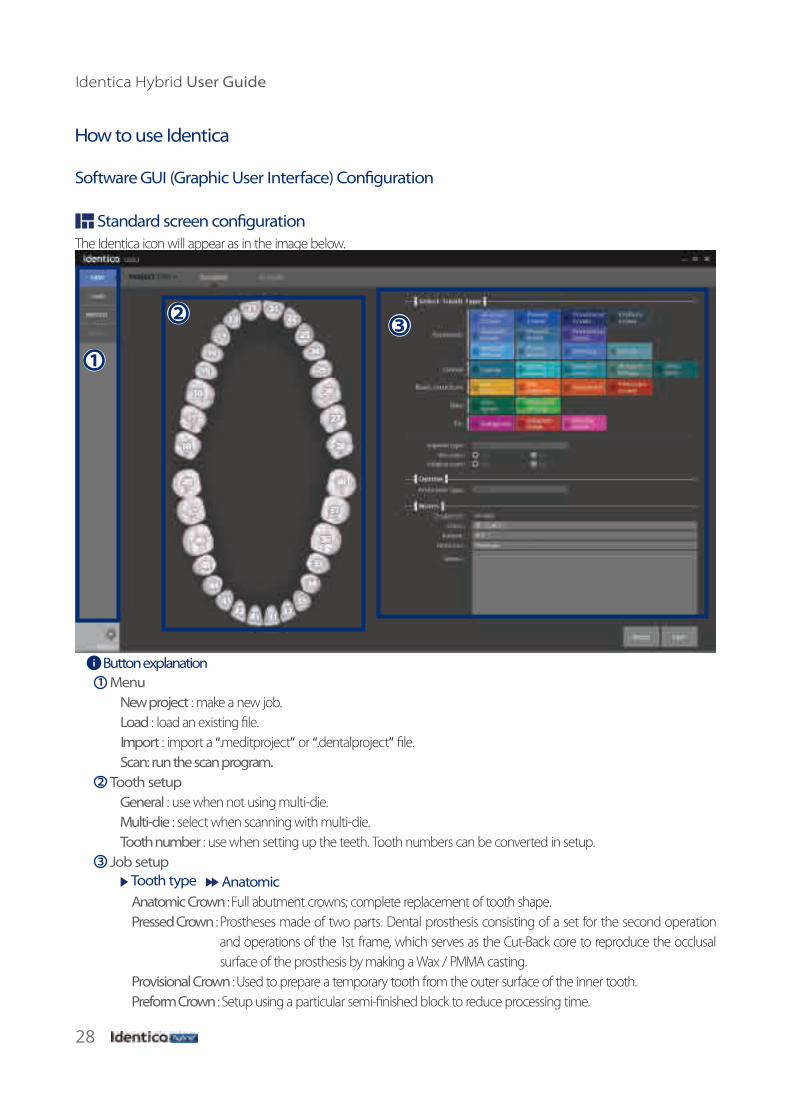
Standard screen con�gurationThe Identica icon will appear as in the image below.
Button explanation1 Menu
New project : make a new job.Load : load an existing �le.Import : import a “.meditproject” or “.dentalproject” �le.Scan: run the scan program.
2 Tooth setupGeneral : use when not using multi-die.Multi-die : select when scanning with multi-die.Tooth number : use when setting up the teeth. Tooth numbers can be converted in setup.
3 Job setup Tooth type AnatomicAnatomic Crown : Full abutment crowns; complete replacement of tooth shape.Pressed Crown : Prostheses made of two parts. Dental prosthesis consisting of a set for the second operation
and operations of the 1st frame, which serves as the Cut-Back core to reproduce the occlusal surface of the prosthesis by making a Wax / PMMA casting.
Provisional Crown : Used to prepare a temporary tooth from the outer surface of the inner tooth.Preform Crown : Setup using a particular semi-�nished block to reduce processing time.
1
23
29Using Identica Hybrid
Anatomic Pontic : Setup a full contour pontic. By default the link for the bridge is created if pontics are connected to the adjacent restoration.
Pressed Pontic : Setup a pontic having the same function as a Pressed CrownProvisional Pontic : Setup a pontic for a provisional crown (unlike a provisional crown of which inner side tooth
is prepped). Anatomic Waxup : Setup for making an abutment and copied restoration made from a scanned waxup resto-
ration (for making replicated restoration).Waxup Pontic : Setup for making a replicated restoration from a scanned waxup restoration on the pontic part
(for making replicated restoration). Inlay/Onlay : Septup for making inlay or onlay over a preparation tooth. Veneer : Setup for making a veneer or laminate over an abutment. Tooth type FrameCutback Coping : Cutback to create space for a ceramic from a restoration. Simple Coping : For making a �xed thickness cap restoration over the abutment. Cutback Pontic : Cutback to create space for ceramic from a restoration of a pontic. Cutback Waxup : Scan and replicate a preparation tooth and contour waxup restoration, and cutback, or
shrink, the part for a ceramic restoration. Simple Inlay : Setup for an inlay restoration with �xed thickness over the preparation tooth for inlay. (Usually,
complete a job with ceramic.) Tooth type Basic structureBar Pillar : the portion of a bar that connects to the implant. Bar Segment : the portion of a bar that provides connection between the pillars.Attachment : Setup the preparation teeth for making the Attachment.Telescopic Crown : Setup for making the inner coping for Telescopic Crown
Tooth type Bite SplintBite Splint : Used for night-guards, mouth guards, and orthodontic appliances. BiteSplint Missing : Setup a missing tooth from a bitesplint Tooth type EtcBite Splint : Used for night-guards, mouth guards, and orthodontic appliances. BiteSplint Missing : Setup a missing tooth from a bitesplint
Tooth type Implant type None : when a preparation tooth is not an implant restoration. Custom Abutment : When using a scanbody to create an implant custom abutment. Custom Abutment Manual Positioning : When scanning a titanium link or interface without using a scan-
body and designing an abutment above it Screw Retained : Setup for making a �xed restoration using a screw retained above the implant external type
abutment. Screw Retained Manual Positioning : When making a SCRP crown.
Tooth type Situ Scan Situ scan : Setup when you have a situ scan or study model to create a restoration.
Tooth type Gingiva ScanGingiva : Select when you scan a gingiva separately.

30
Identica Hybrid User Guide
Tooth type Antagonist OptionNone : Choose when you do not select the antagonist in the arch.Medit or Etc : Select when scanning an antagonist, scanning a upper/lower jaw using another jig instead of an
articulator plate. Artex : Select when scanning an antagonist using artex articulator and its plate.Kavo : Select when scanning an antagonist using Kavo articulator and its plate Sam : Select when scanning an antagonist using Sam articulator and its plate Etc (Use Articulator plate) : Select when using an articulator plate with a large articulator.
NotesProject ID : Enter project IDClinic : Enter clinic informationPatient : Enter patient informationTechnician : Enter information on the technician working on this jobMemo : Enter special notes about this job
Setup job and runEnter job information
Enter the information in order as seen below:
1. Select the type of prosthesis. The selected prosthesis is displayed in a different color depending on the type.
Refer to "Setting the teeth" (prosthesis type) for more information.
2. When working with an antagonist, select the antagonist in the arch.
1
2
3
31Using Identica Hybrid
If scanning an antagonist, you must select at least one tooth on the other side of the arch as an “antagonist.”3. Select whether there is a bridge or not with the connector between selected restorations
By default the bridge is created to adjacent restorations with the pontic- Taupe : There is a bridge- Gray : There is no bridge (If you need a bridge, click connection points)- Red : Not able to create a bridge – If the material of adjacent restoration is di�erent each other- If there are no connectors : In case the selected restoration does not have a bridge.
4. Leave a note about dentists/patients/workers in the notes section 1
Save and scanComplete the work information, and click ‘save’ on 2 . All the work and information will be added to the database and a folder will be created. All the work and related information will be saved into a folder. Once the work is saved, the ‘scan’ button will be activated. You can start scanning if click ‘Scan’ 3 . The activation of the icon and its function can be di�erent depending on the work type.
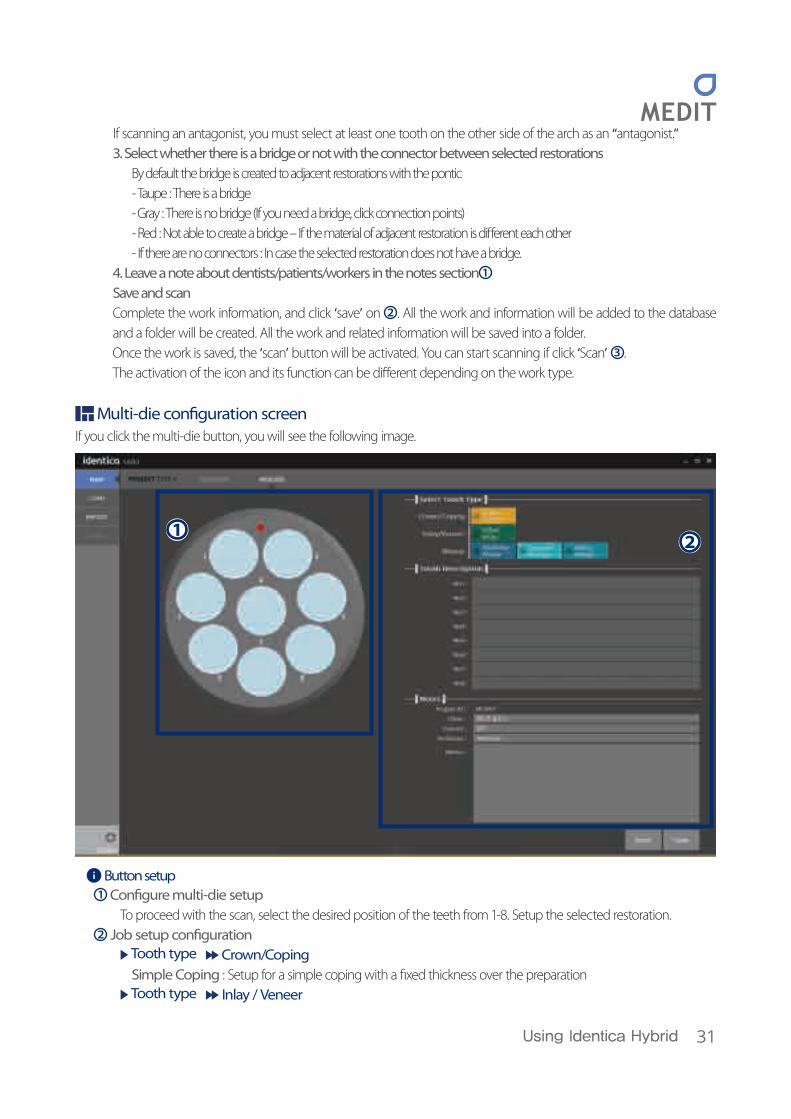
Multi-die con�guration screenIf you click the multi-die button, you will see the following image.
Button setup1 Con�gure multi-die setup
To proceed with the scan, select the desired position of the teeth from 1-8. Setup the selected restoration.2 Job setup con�guration
Tooth type Crown/CopingSimple Coping : Setup for a simple coping with a �xed thickness over the preparation
Tooth type Inlay / Veneer
12

32
Identica Hybrid User Guide
Simple Inlay : Setup for a simple inlay with a �xed thickness over the inlay preparation
Tooth type WaxupAnatomic waxup : Scan the full anatomic waxup to create the framework for the prep teeth.Pontic waxup : Scan the full anatomic waxup to create the framework for the pontic base.Cutback waxup : Scan the full anatomic waxup, and cut it back to create the framework. Selective reduction
(marking parts that stay unreduced) is also possible.
NotesProject ID : Enter the project IDClinic : Enter clinic informationPatient : Enter patient informationTechnician : Enter technician informationMemo : Enter any special notes
Register job and runEnter job information
Enter the job information in order as seen below:
1. Select the type and location of the prosthesis in the multi-die. The selected prosthesis is displayed in a di�erent color.
2. Enter descriptions for the positions of the abutments in the multi-die.
1
2
33Using Identica Hybrid
3. Enter necessary information for the dental clinic, patient, and job.4. Save and scan
After inputting the information, click “Save” 1 . The stored job information is added to the database and a task folder is created. This folder contains all of the data associated with the job.
When the job is saved, the “Scan” 2 button is activated. Click “Scan” when you are ready to begin scanning.
Icons and their corresponding functions can vary depending on the type of operation.
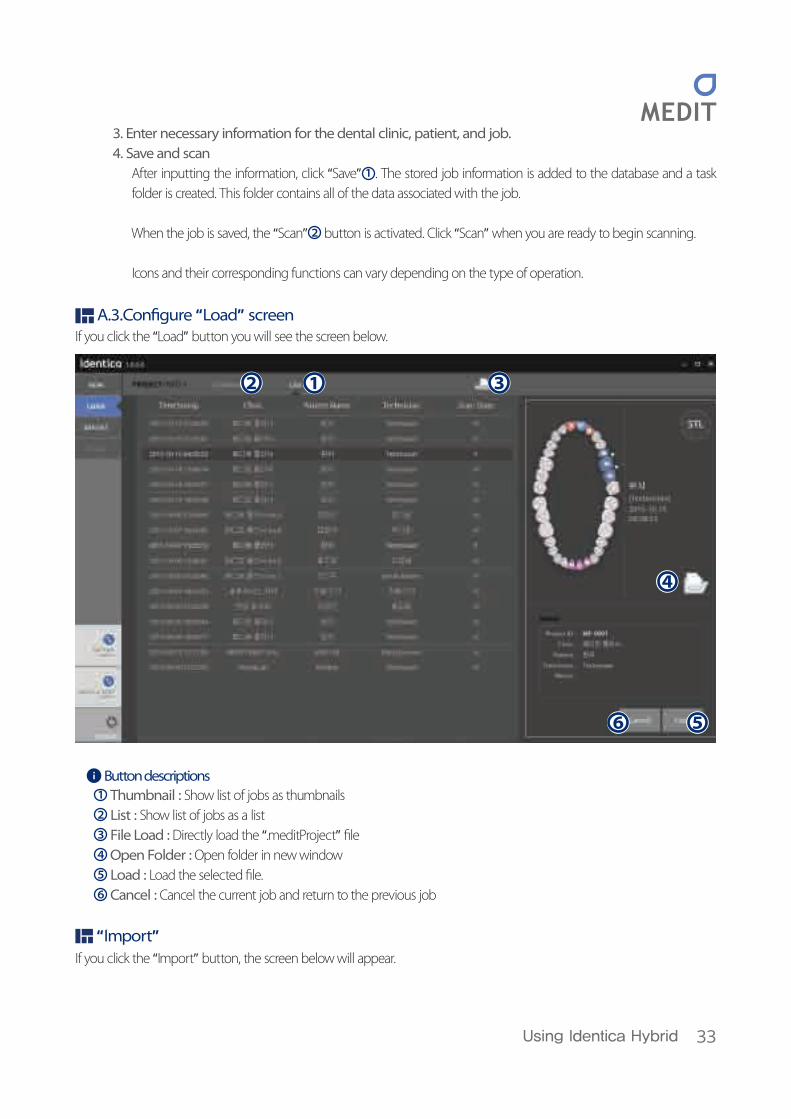
A.3. Con�gure “Load” screenIf you click the “Load” button you will see the screen below.
Button descriptions1 Thumbnail : Show list of jobs as thumbnails2 List : Show list of jobs as a list3 File Load : Directly load the “.meditProject” �le4 Open Folder : Open folder in new window5 Load : Load the selected �le.6 Cancel : Cancel the current job and return to the previous job
“Import”If you click the “Import” button, the screen below will appear.
12 3
4
56
34
Identica Hybrid User Guide
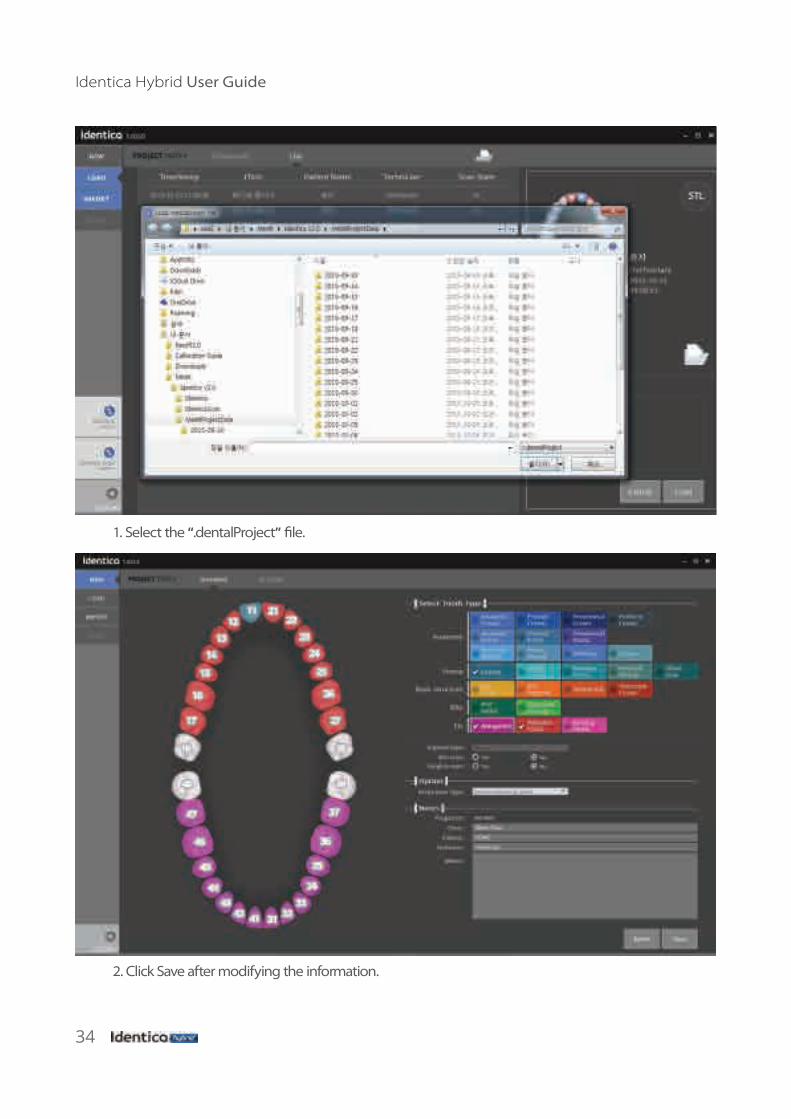
1. Select the “.dentalProject” �le.
2. Click Save after modifying the information.
35Using Identica Hybrid
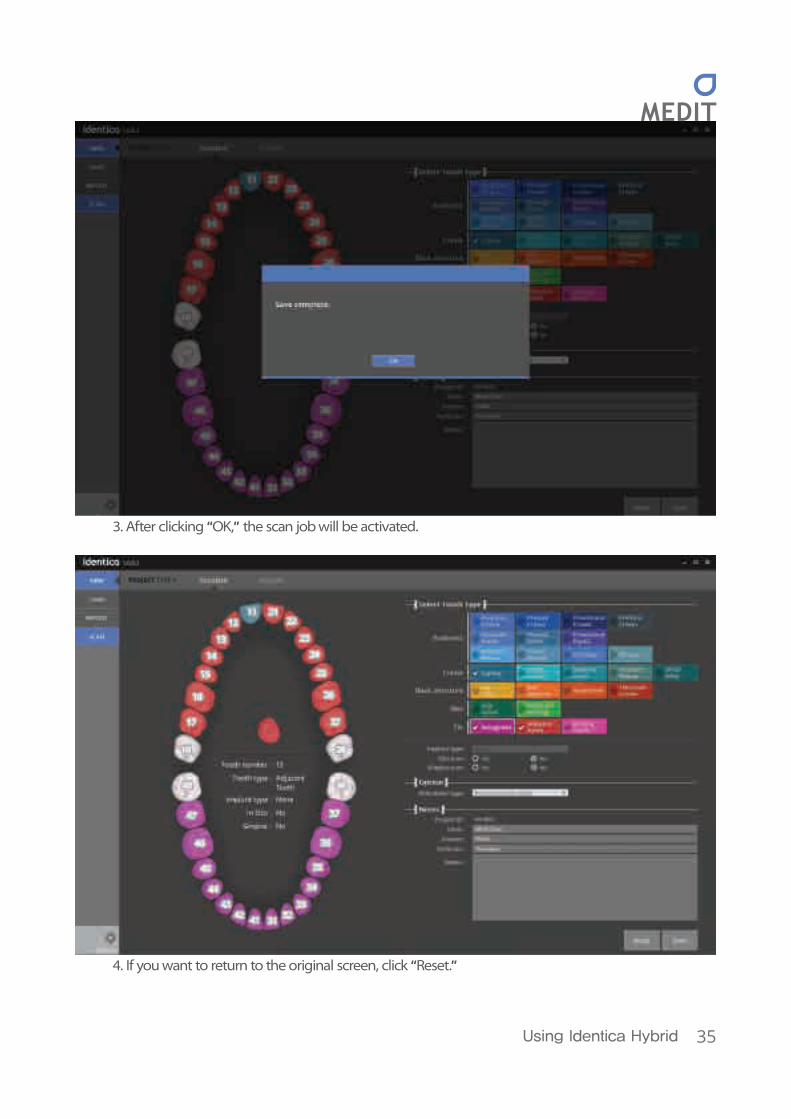
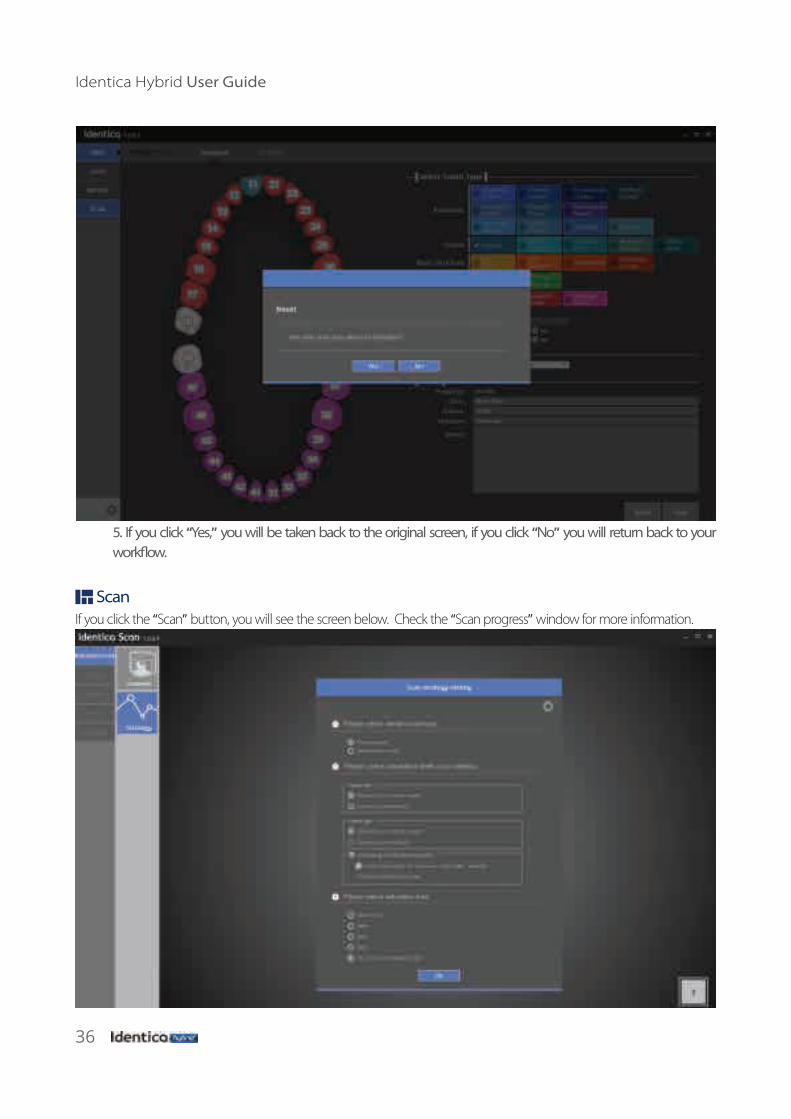
3. After clicking “OK,” the scan job will be activated.
4. If you want to return to the original screen, click “Reset.”
36
Identica Hybrid User Guide
5. If you click “Yes,” you will be taken back to the original screen, if you click “No” you will return back to your work�ow.
ScanIf you click the “Scan” button, you will see the screen below. Check the “Scan progress” window for more information.
37Using Identica Hybrid
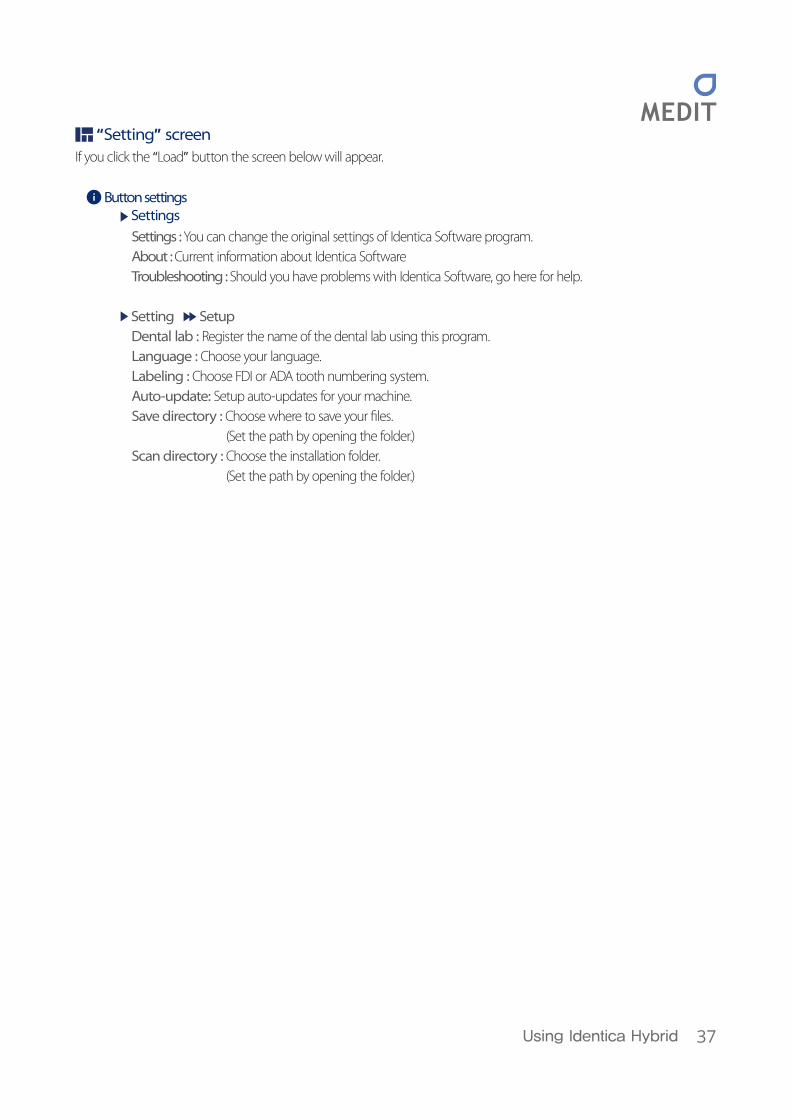
“Setting” screenIf you click the “Load” button the screen below will appear.
Button settings SettingsSettings : You can change the original settings of Identica Software program.About : Current information about Identica SoftwareTroubleshooting : Should you have problems with Identica Software, go here for help.
Setting SetupDental lab : Register the name of the dental lab using this program.Language : Choose your language.Labeling : Choose FDI or ADA tooth numbering system.Auto-update: Setup auto-updates for your machine.Save directory : Choose where to save your �les.
(Set the path by opening the folder.)Scan directory : Choose the installation folder.
(Set the path by opening the folder.)
38
Identica Hybrid User Guide
How to scan with IdenticaWhen you �nish the preparation stage in Identica Software, click the “Scan” button to start the scanning program.
Before use
Check before use
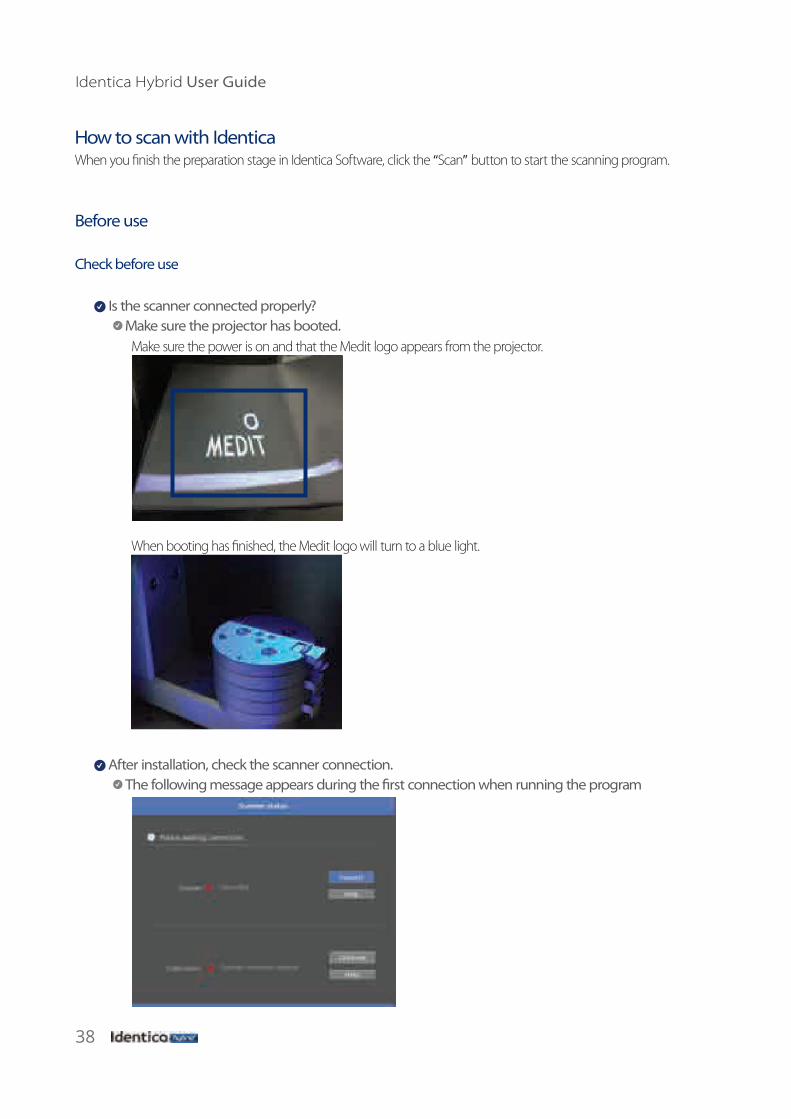
Is the scanner connected properly? Make sure the projector has booted.
Make sure the power is on and that the Medit logo appears from the projector.
When booting has �nished, the Medit logo will turn to a blue light.
After installation, check the scanner connection. The following message appears during the �rst connection when running the program
39Using Identica Hybrid
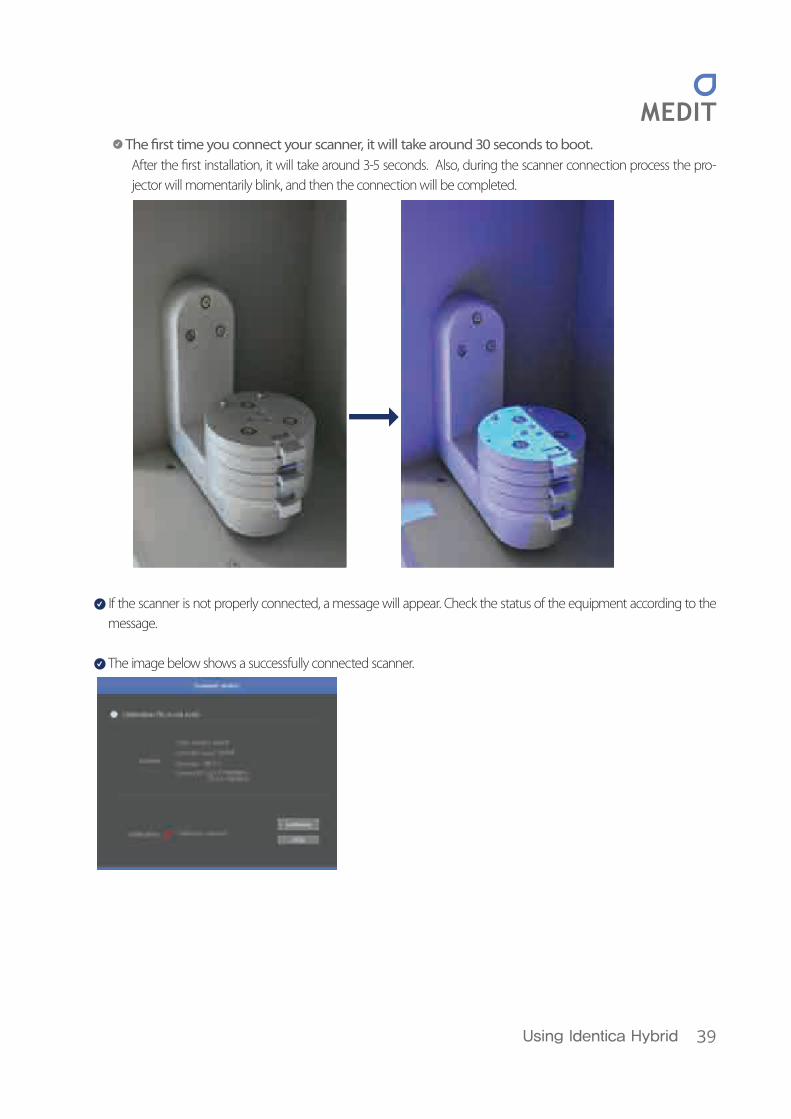
The �rst time you connect your scanner, it will take around 30 seconds to boot.After the �rst installation, it will take around 3-5 seconds. Also, during the scanner connection process the pro-jector will momentarily blink, and then the connection will be completed.
If the scanner is not properly connected, a message will appear. Check the status of the equipment according to the message.
The image below shows a successfully connected scanner.
40
Identica Hybrid User Guide
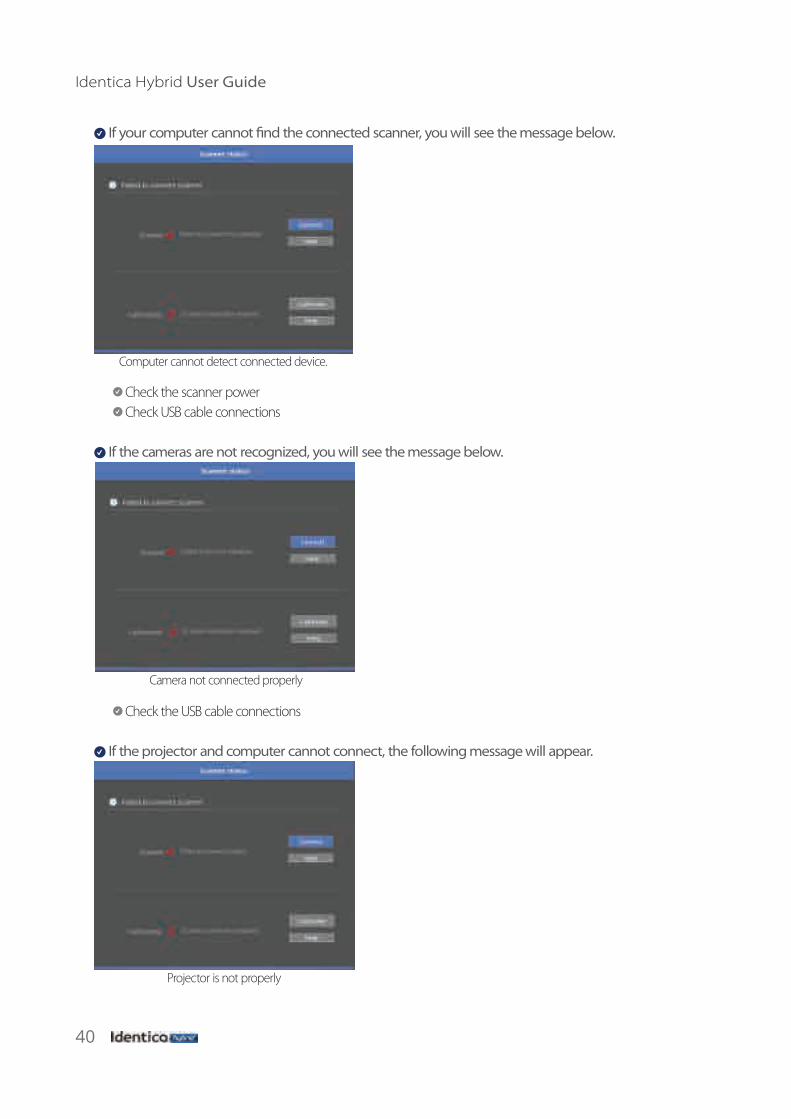
If your computer cannot �nd the connected scanner, you will see the message below.
Check the scanner power Check USB cable connections
If the cameras are not recognized, you will see the message below.
Check the USB cable connections
If the projector and computer cannot connect, the following message will appear.
Computer cannot detect connected device.
Camera not connected properly
Projector is not properly
41Using Identica Hybrid
Check the projector connection. (check the network adapter in Device Manager)
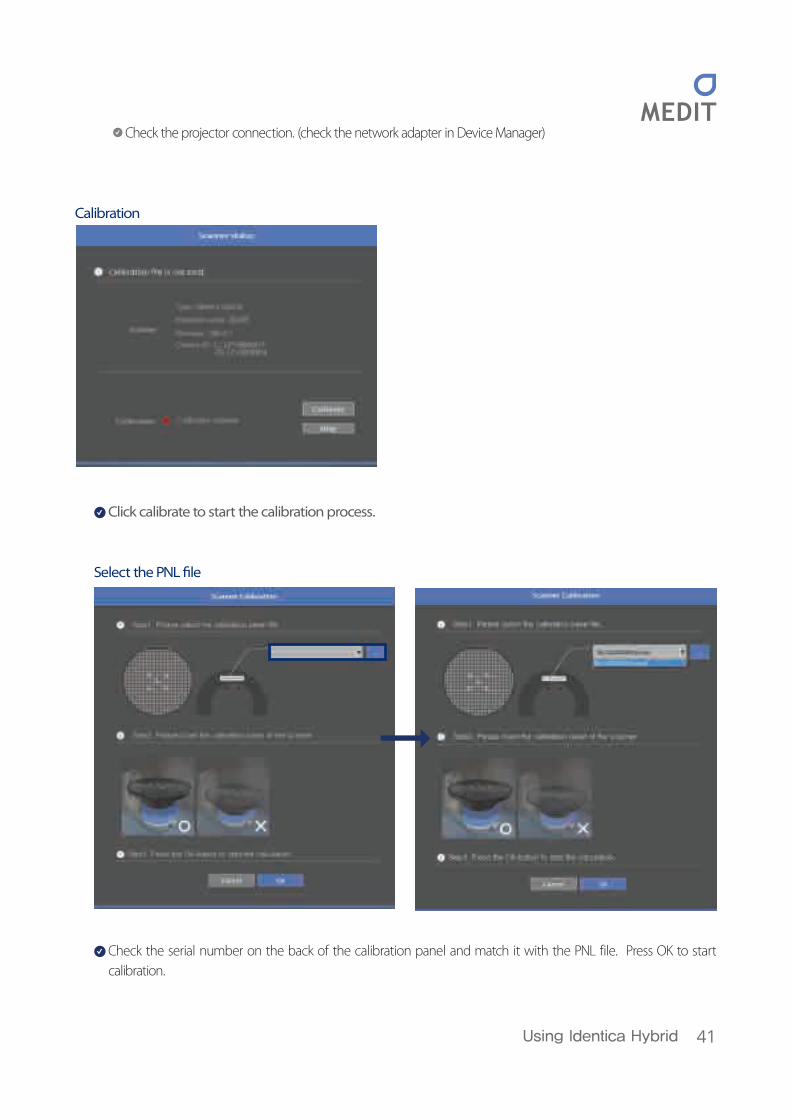
Calibration
Click calibrate to start the calibration process.
Select the PNL �le
Check the serial number on the back of the calibration panel and match it with the PNL file. Press OK to start calibration.
42
Identica Hybrid User Guide
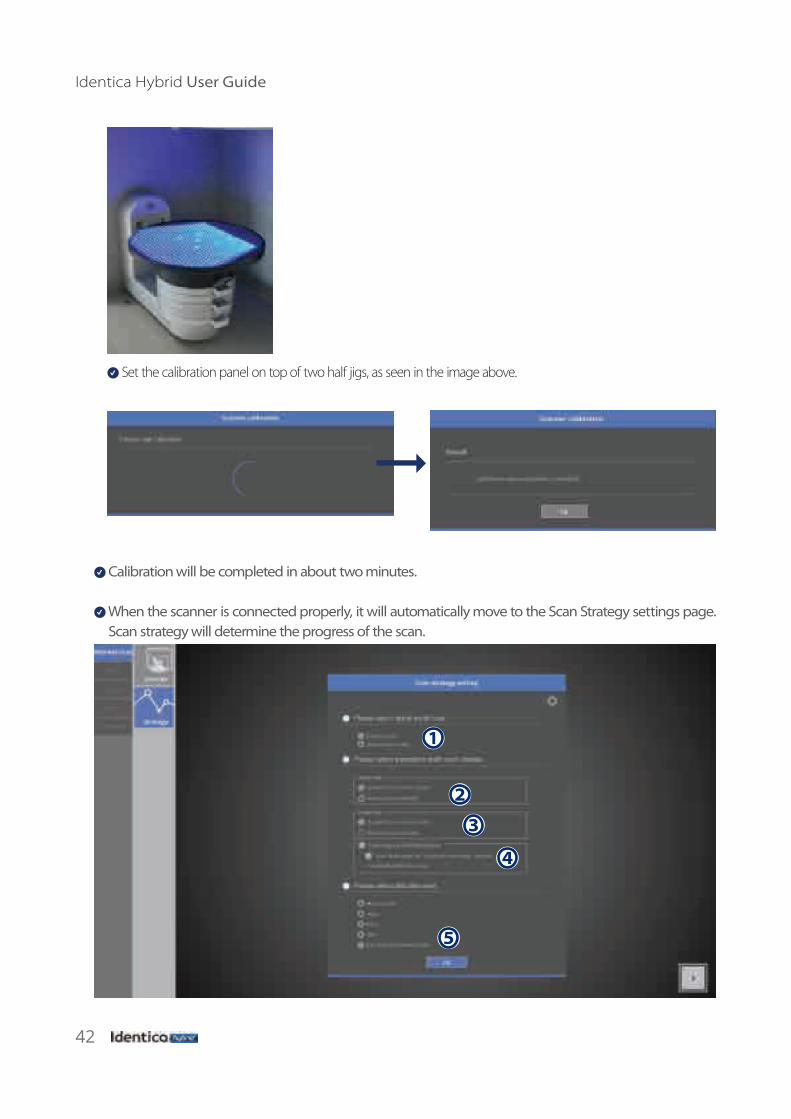
Set the calibration panel on top of two half jigs, as seen in the image above.
Calibration will be completed in about two minutes.
When the scanner is connected properly, it will automatically move to the Scan Strategy settings page. Scan strategy will determine the progress of the scan.
1
2
3
4
5
43Using Identica Hybrid
Preparation - Strategy1 Select the type of model to be scanned
- Stone model or impression2 Select the abutment for the upper jaw
- Choose whether to scan an upper preparation using a base or whether to use use a multi-die.(If you use a base and the preparations are adjacent, divide it into two groups and start scanning. If you use a multi-die and the number of preparations is over 8, divide them into two group and start scanning. Normally, use of multi-die is recommended as it saves time.)
3 Set the same scan method for the upper and lower jaw4 Set the use for the �exible multi-die
When this feature is enabled, the scan settings for the upper and lower jaw are disabled.5 Select the scan strategy for the articulator
When �nished with setup, select OK and move to the next step.
Use a model’s base for a single coping/ Select ETC (use articulator plate) for articulators , and select OK to move to the next step.
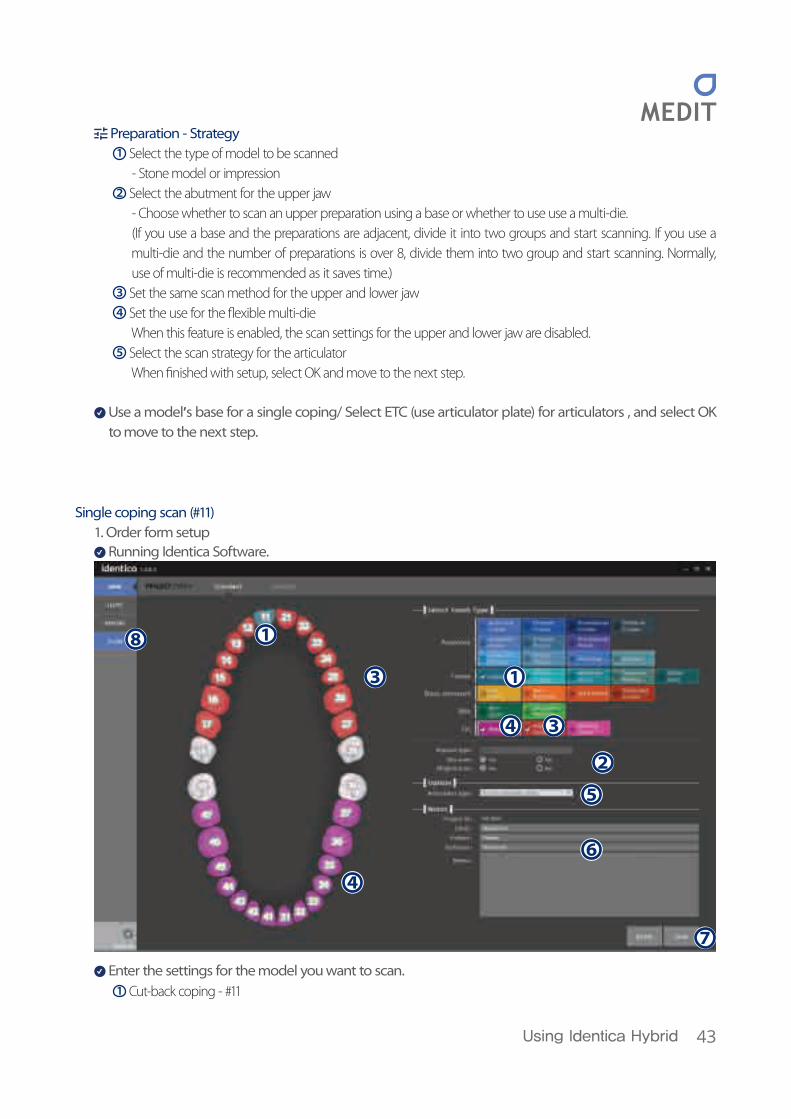
Single coping scan (#11)1. Order form setup
Running Identica Software.
Enter the settings for the model you want to scan.1 Cut-back coping - #11
1
3
4
1
4 3
2
5
6
7
8
44
Identica Hybrid User Guide
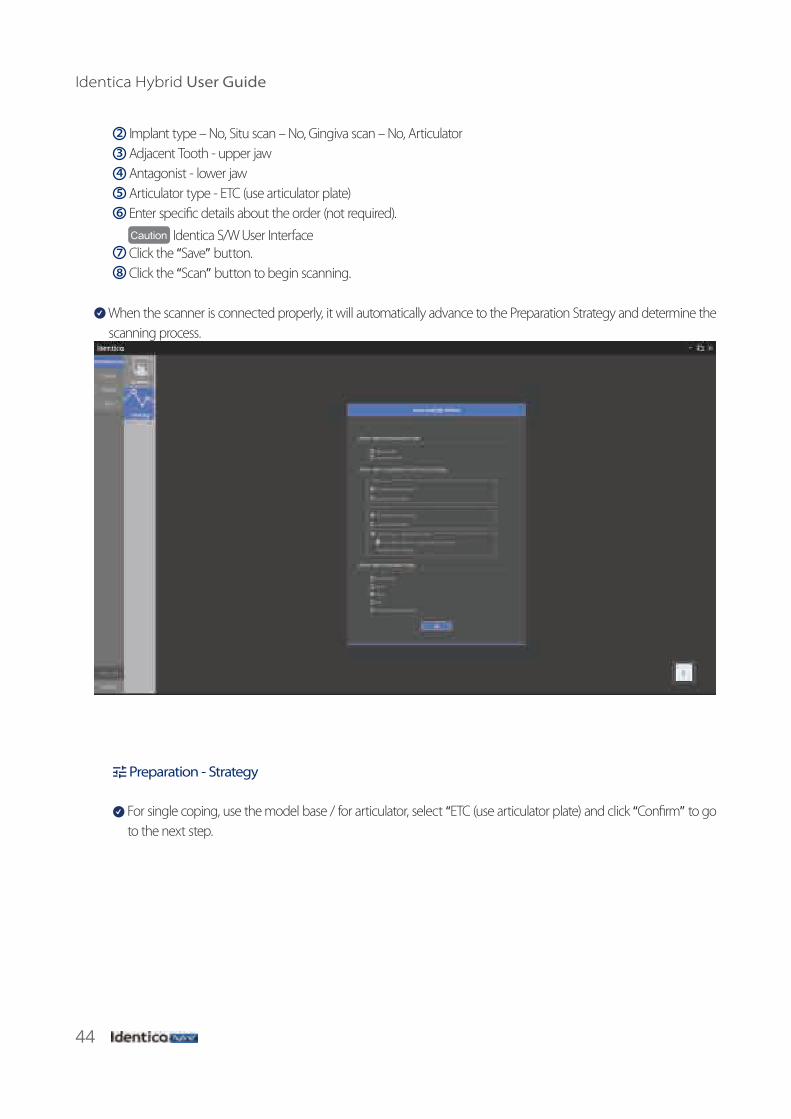
2 Implant type – No, Situ scan – No, Gingiva scan – No, Articulator3 Adjacent Tooth - upper jaw4 Antagonist - lower jaw5 Articulator type - ETC (use articulator plate)6 Enter speci�c details about the order (not required).
Caution Identica S/W User Interface7 Click the “Save” button.8 Click the “Scan” button to begin scanning.
When the scanner is connected properly, it will automatically advance to the Preparation Strategy and determine the scanning process.
Preparation - Strategy
For single coping, use the model base / for articulator, select “ETC (use articulator plate) and click “Con�rm” to go to the next step.
45Using Identica Hybrid
Scan
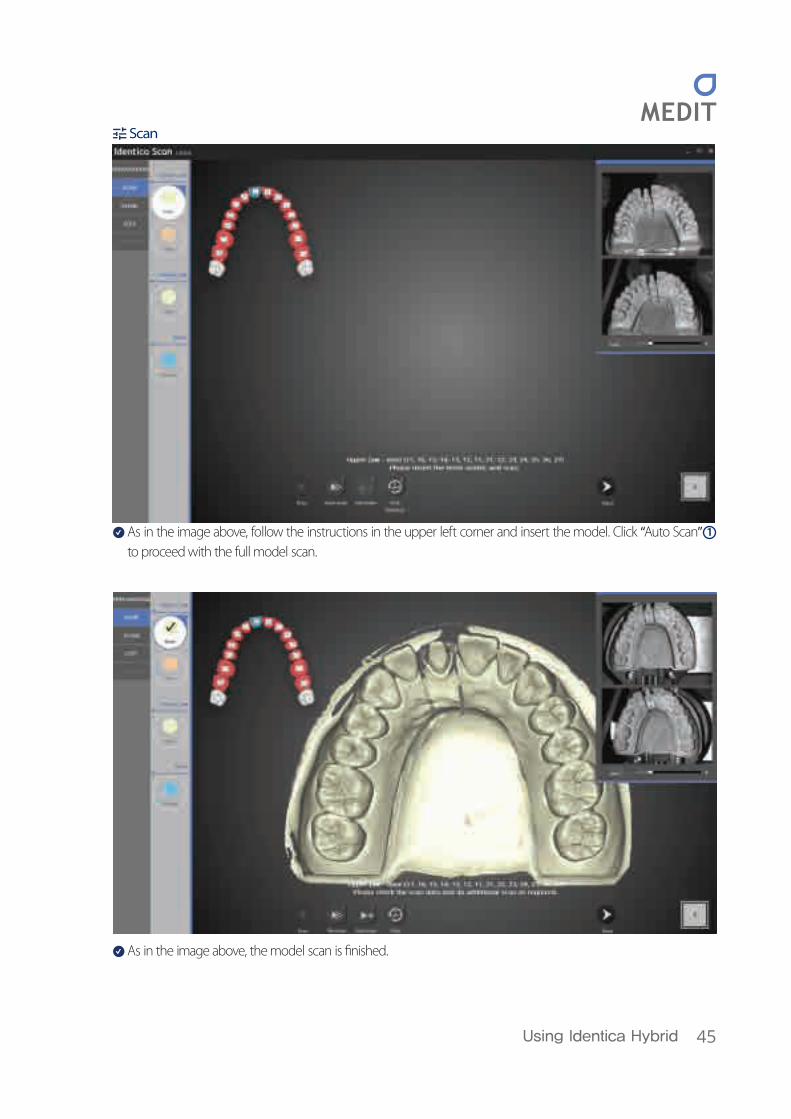
As in the image above, follow the instructions in the upper left corner and insert the model. Click “Auto Scan” 1 to proceed with the full model scan.
As in the image above, the model scan is �nished.
46
Identica Hybrid User Guide
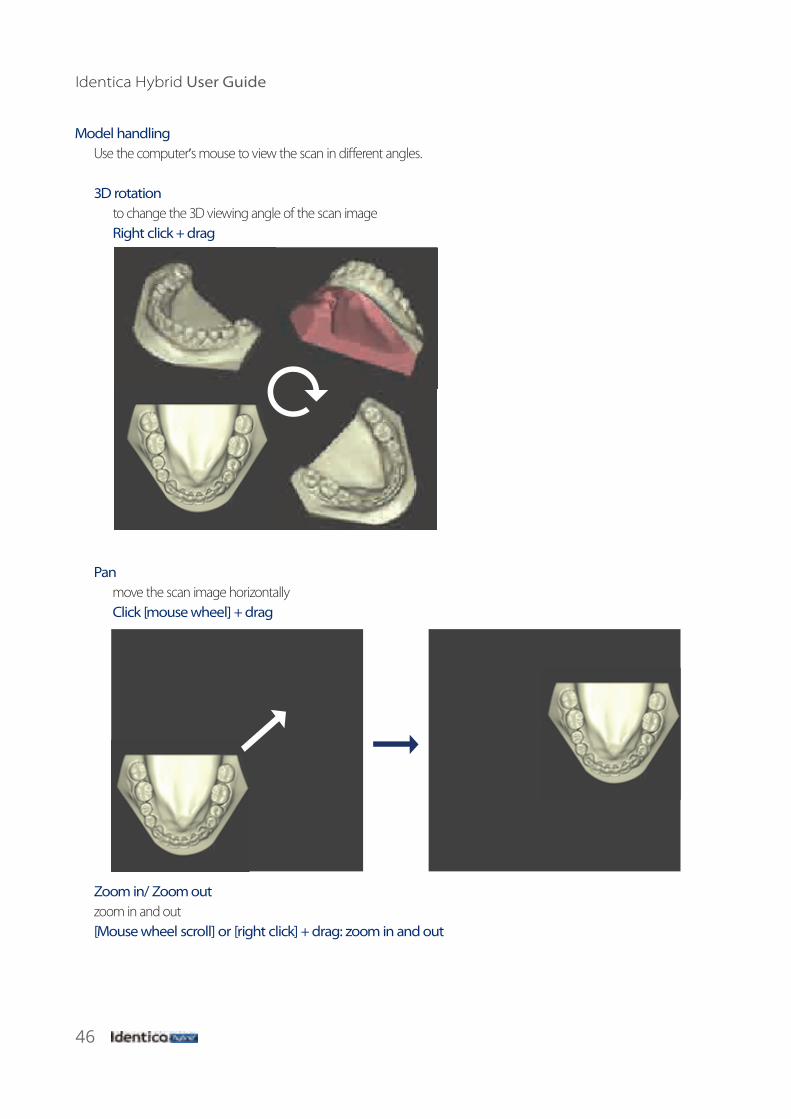
Model handlingUse the computer’s mouse to view the scan in di�erent angles.
3D rotationto change the 3D viewing angle of the scan imageRight click + drag
Panmove the scan image horizontallyClick [mouse wheel] + drag
Zoom in/ Zoom out zoom in and out [Mouse wheel scroll] or [right click] + drag: zoom in and out
47Using Identica Hybrid
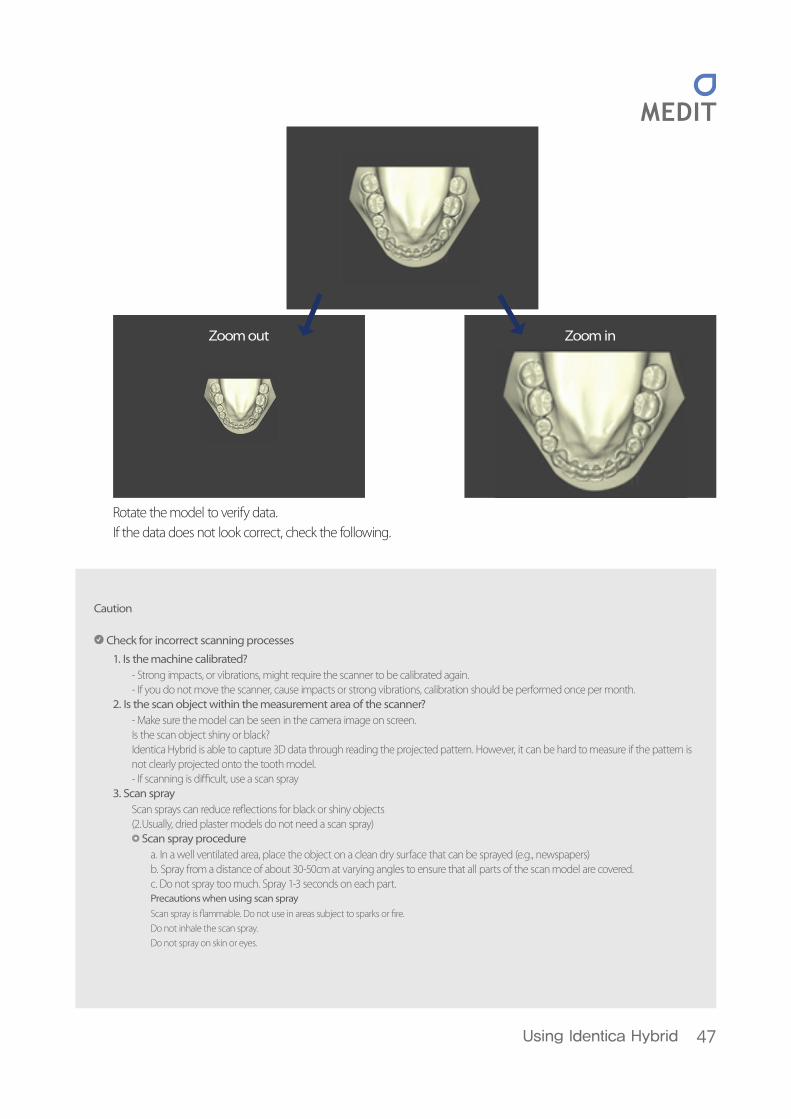
Rotate the model to verify data.If the data does not look correct, check the following.
Zoom out Zoom in
Caution
Check for incorrect scanning processes
1. Is the machine calibrated?- Strong impacts, or vibrations, might require the scanner to be calibrated again.- If you do not move the scanner, cause impacts or strong vibrations, calibration should be performed once per month.
2. Is the scan object within the measurement area of the scanner?- Make sure the model can be seen in the camera image on screen.Is the scan object shiny or black?Identica Hybrid is able to capture 3D data through reading the projected pattern. However, it can be hard to measure if the pattern is not clearly projected onto the tooth model.- If scanning is di�cult, use a scan spray
3. Scan sprayScan sprays can reduce re�ections for black or shiny objects(2. Usually, dried plaster models do not need a scan spray)
Scan spray procedurea. In a well ventilated area, place the object on a clean dry surface that can be sprayed (e.g., newspapers)b. Spray from a distance of about 30-50cm at varying angles to ensure that all parts of the scan model are covered.c. Do not spray too much. Spray 1-3 seconds on each part.Precautions when using scan sprayScan spray is �ammable. Do not use in areas subject to sparks or �re.Do not inhale the scan spray.Do not spray on skin or eyes.
48
Identica Hybrid User Guide
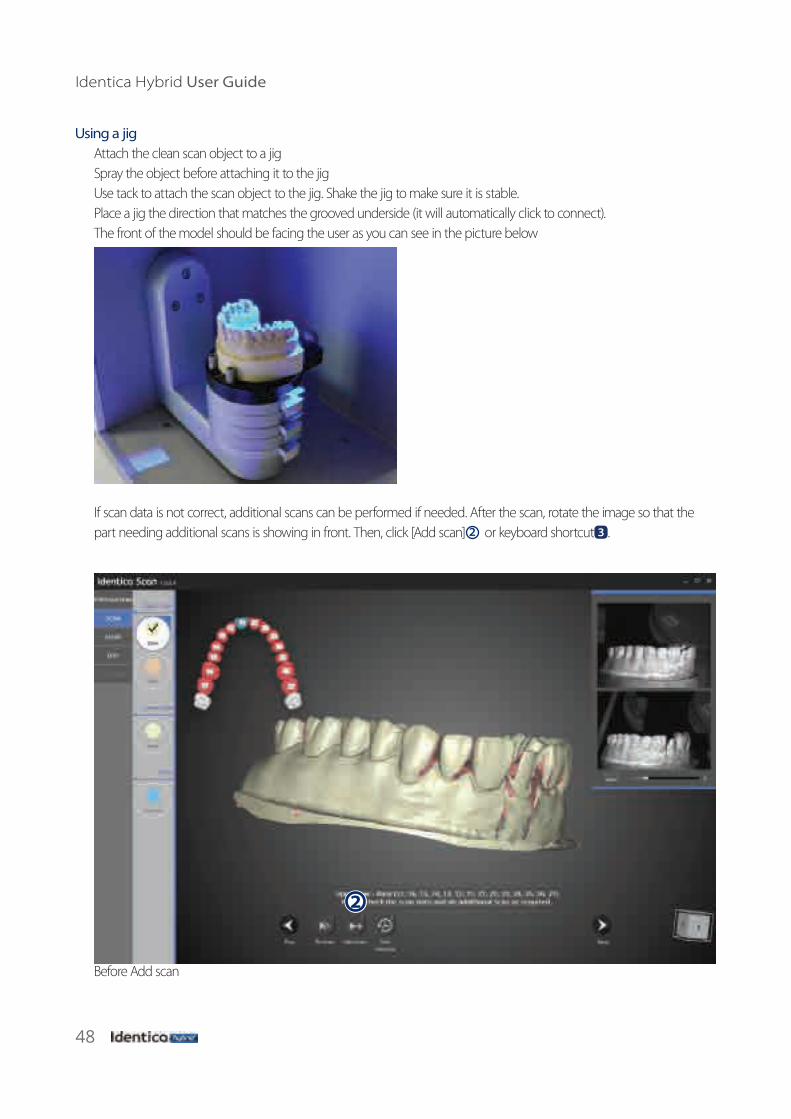
Using a jigAttach the clean scan object to a jigSpray the object before attaching it to the jigUse tack to attach the scan object to the jig. Shake the jig to make sure it is stable.Place a jig the direction that matches the grooved underside (it will automatically click to connect). The front of the model should be facing the user as you can see in the picture below
If scan data is not correct, additional scans can be performed if needed. After the scan, rotate the image so that the part needing additional scans is showing in front. Then, click [Add scan] 2 or keyboard shortcut 3 .
Before Add scan
2
49Using Identica Hybrid
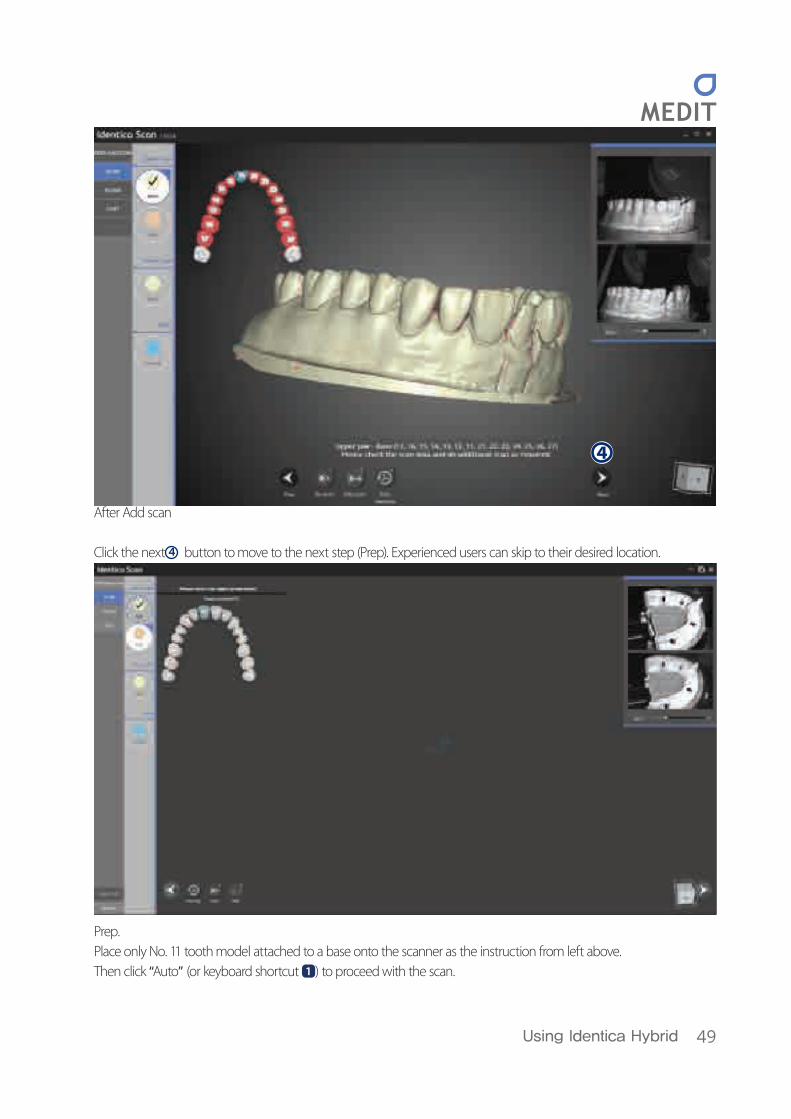
After Add scan
Click the next 4 button to move to the next step (Prep). Experienced users can skip to their desired location.
Prep.Place only No. 11 tooth model attached to a base onto the scanner as the instruction from left above.Then click “Auto” (or keyboard shortcut 1 ) to proceed with the scan.
4
50
Identica Hybrid User Guide
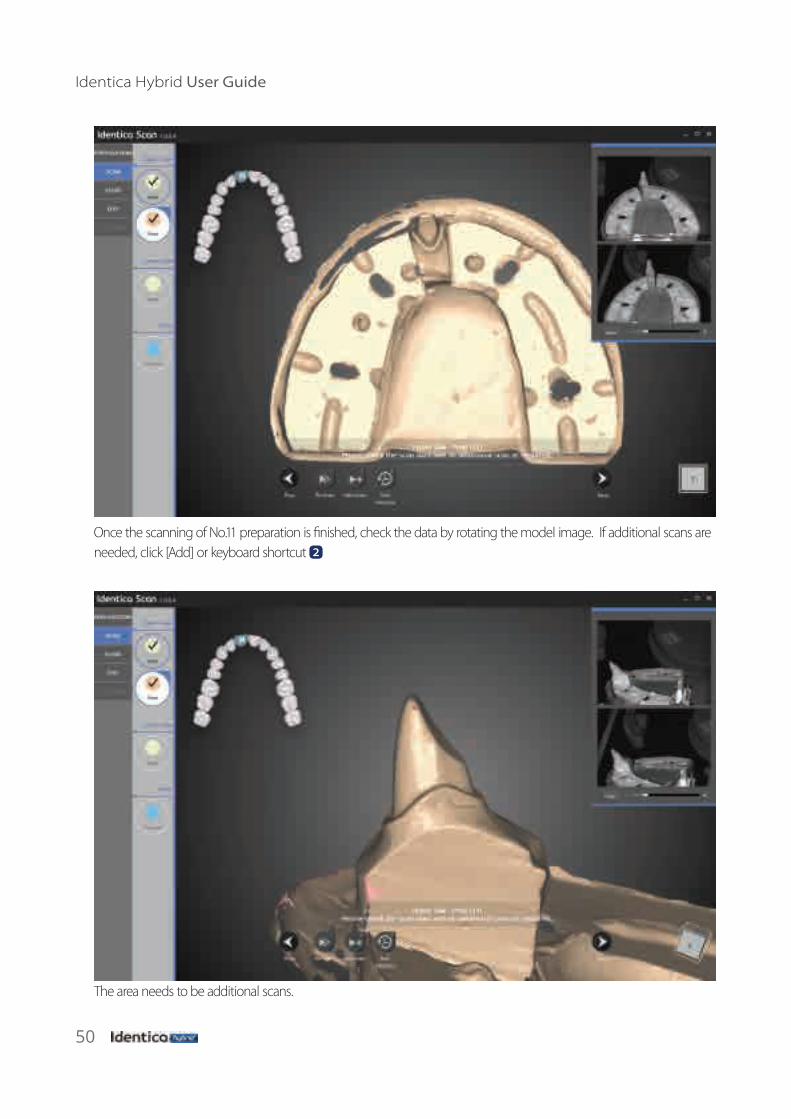
Once the scanning of No.11 preparation is �nished, check the data by rotating the model image. If additional scans are needed, click [Add] or keyboard shortcut 2
The area needs to be additional scans.
51Using Identica Hybrid
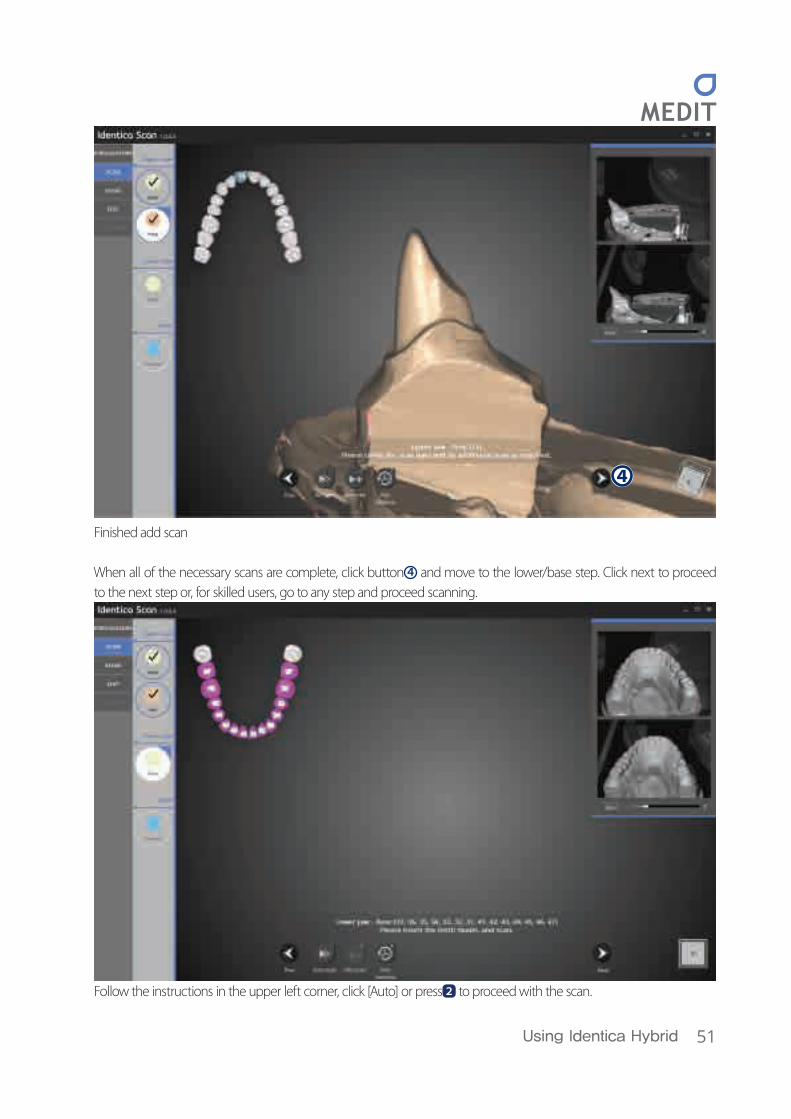
Finished add scan
When all of the necessary scans are complete, click button 4 and move to the lower/base step. Click next to proceed to the next step or, for skilled users, go to any step and proceed scanning.
Follow the instructions in the upper left corner, click [Auto] or press 2 to proceed with the scan.
4

52
Identica Hybrid User Guide
When the lower/base scan is complete, rotate the image to see if additional scans are needed. If needed, click “Add scan” or keyboard shortcut 2 .
(Normally there is no need of additional scans for antagonist.)When the additional scans are complete, click keyboard shortcut 4 . to move to the next step for the bite scan. Experienced users can move to any step they wish.

53Using Identica Hybrid
Follow the instructions in the upper left corner for mounting the articulator plate and articulator onto the scanner. Place the articulator plate as seen in the image below.
As seen in the image below, place the articulator on the articulator plate. Then, scanning will proceed capturing 4 cuts.
Articulator scan, 1st position. Aticulator scan, last position.
54
Identica Hybrid User Guide
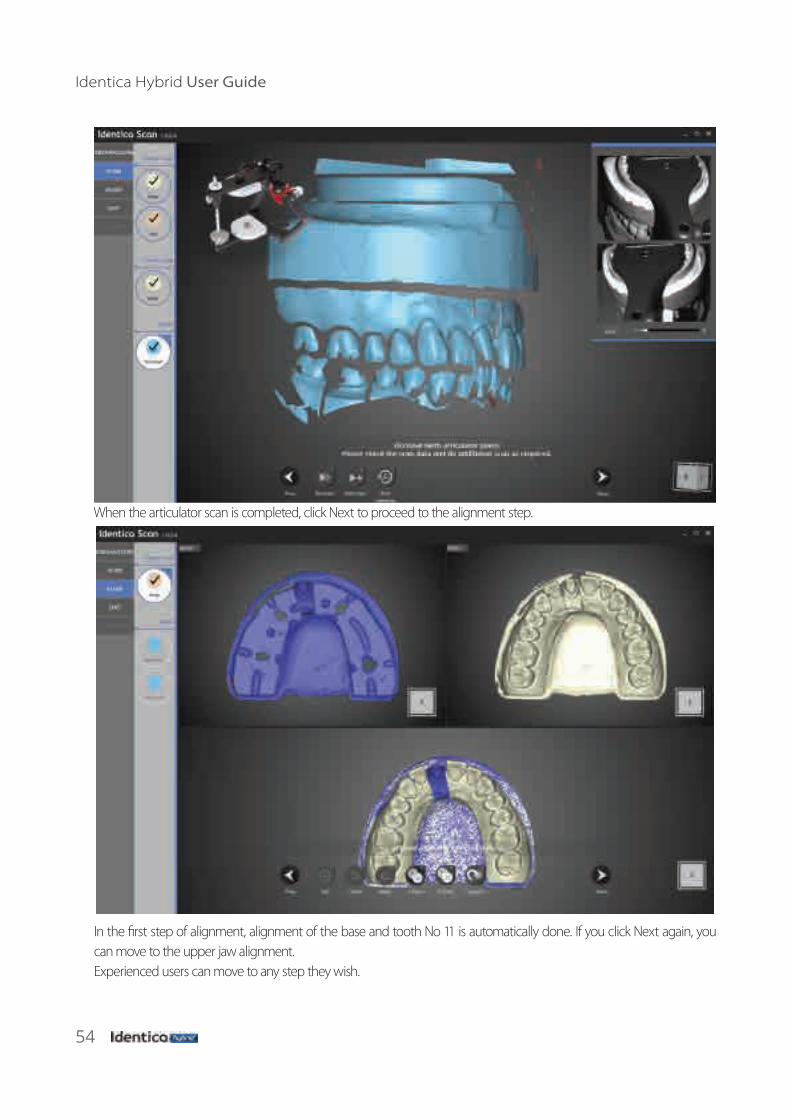
When the articulator scan is completed, click Next to proceed to the alignment step.
In the �rst step of alignment, alignment of the base and tooth No 11 is automatically done. If you click Next again, you can move to the upper jaw alignment.Experienced users can move to any step they wish.
55Using Identica Hybrid
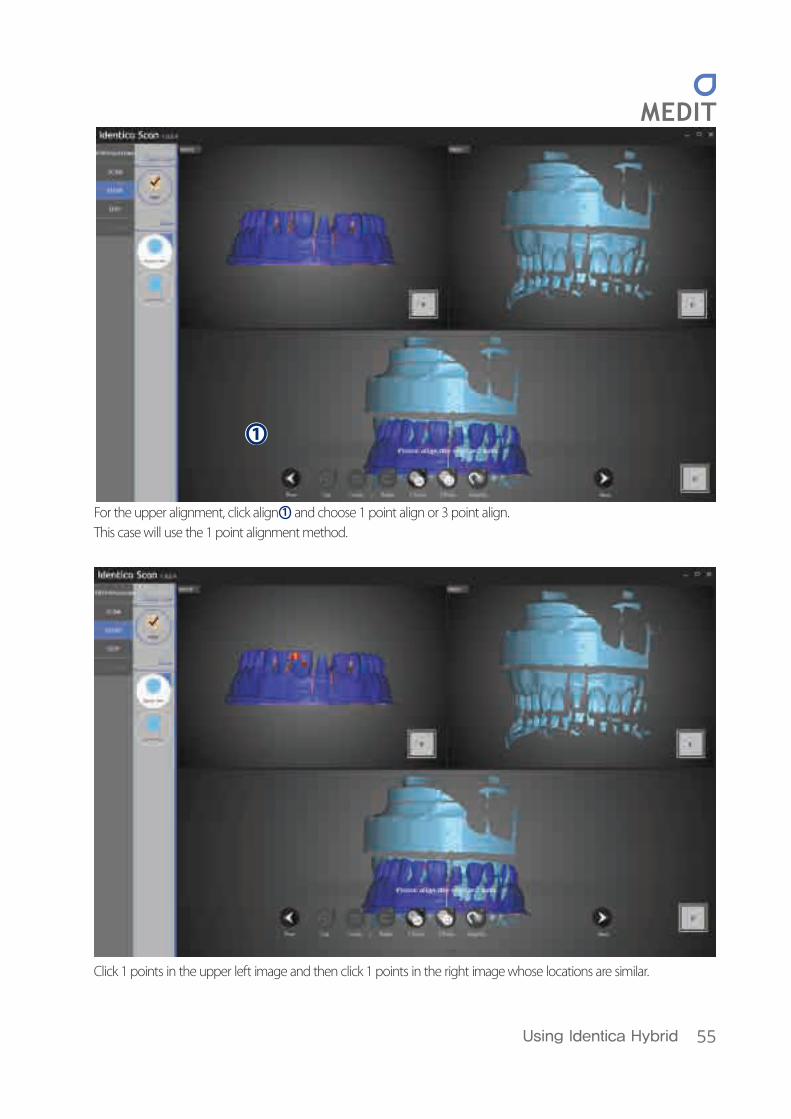
For the upper alignment, click align 1 and choose 1 point align or 3 point align.This case will use the 1 point alignment method.
Click 1 points in the upper left image and then click 1 points in the right image whose locations are similar.
1
56
Identica Hybrid User Guide
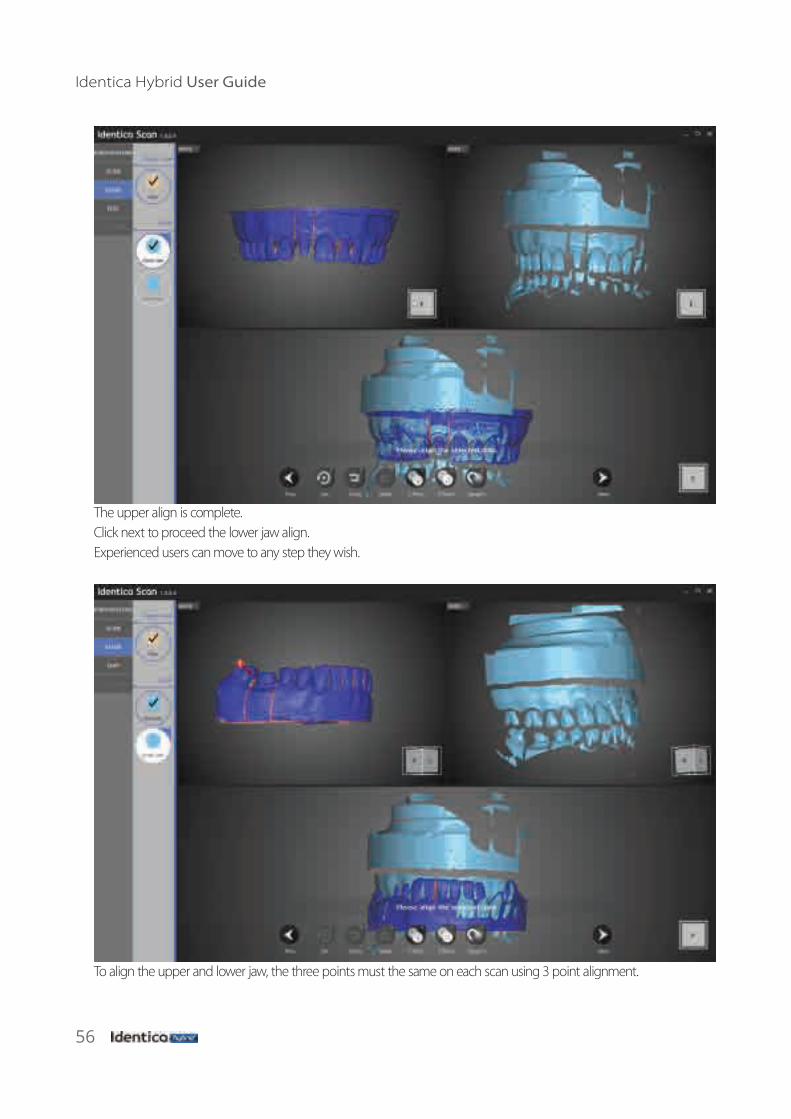
The upper align is complete. Click next to proceed the lower jaw align. Experienced users can move to any step they wish.
To align the upper and lower jaw, the three points must the same on each scan using 3 point alignment.
57Using Identica Hybrid
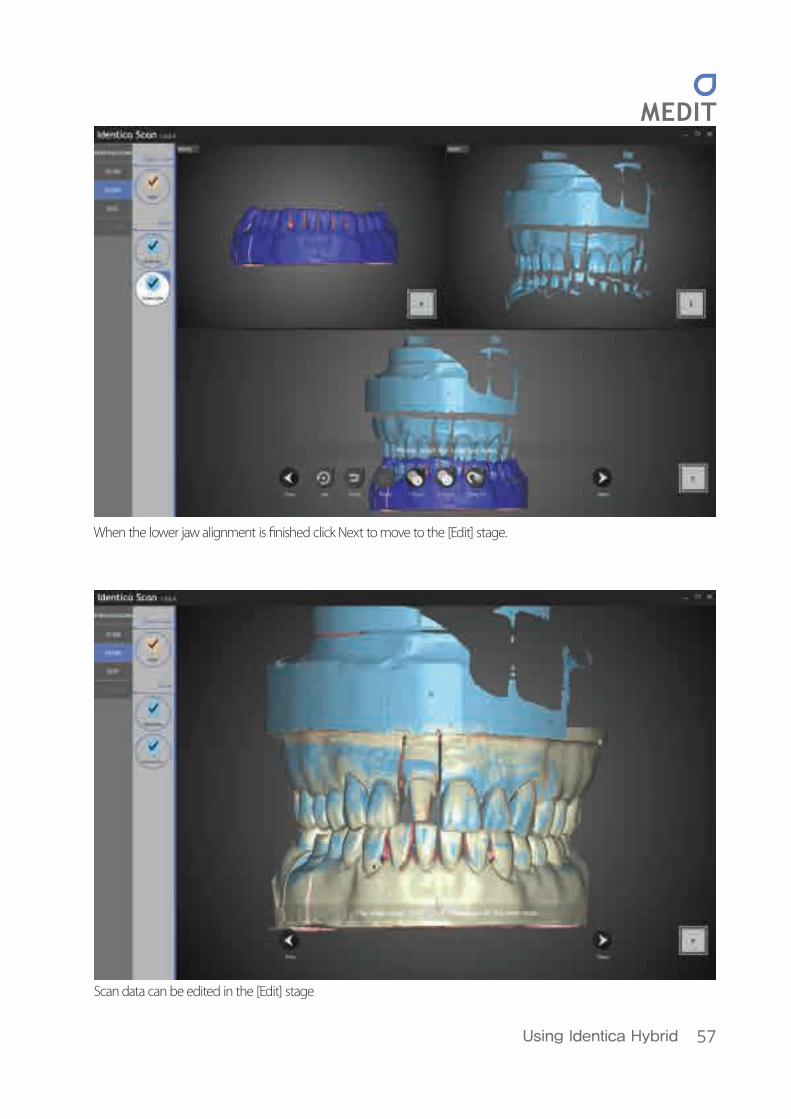
When the lower jaw alignment is �nished click Next to move to the [Edit] stage.
Scan data can be edited in the [Edit] stage

58
Identica Hybrid User Guide
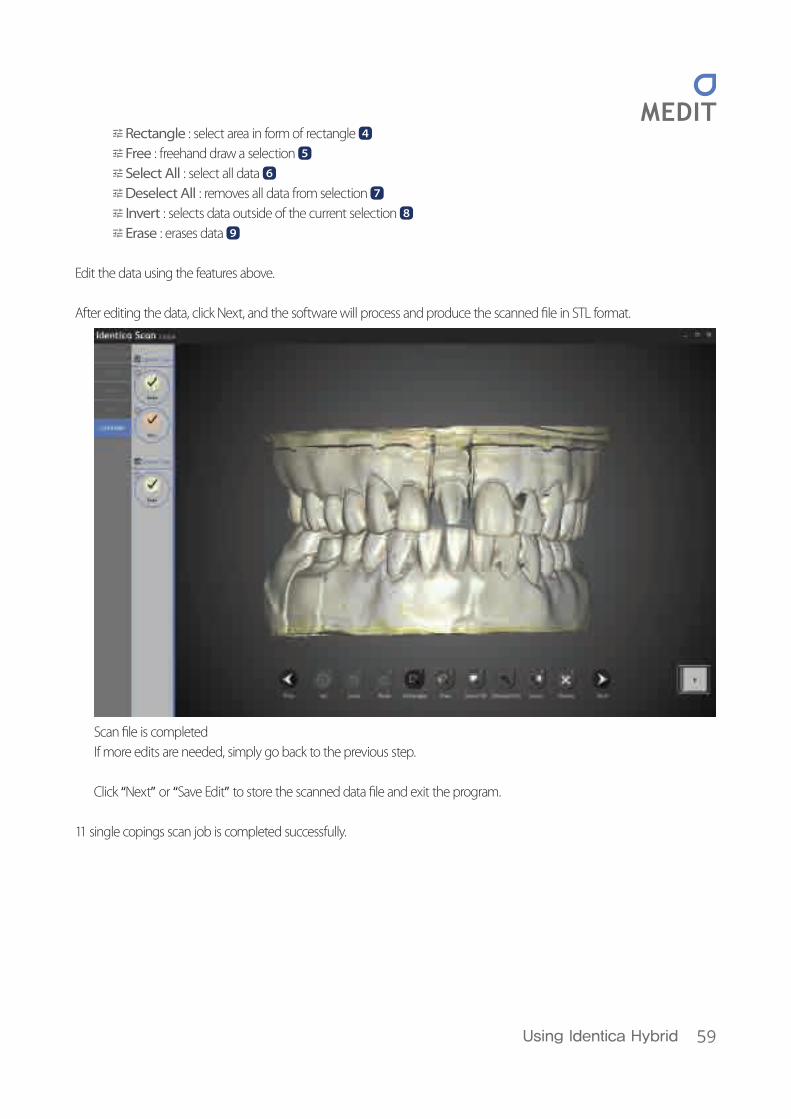
1 Only the selected parts of the model can be seen.You can select di�erent views by making the model or preparation teeth visible or invisible.
Icon descriptions (at bottom of screen): Init : go back to initial data [keyboard shortcut 1
Undo : undo latest edit 2
Redo : after undo-ing, reverts back to edited state 3
1
59Using Identica Hybrid
Rectangle : select area in form of rectangle 4
Free : freehand draw a selection 5
Select All : select all data 6
Deselect All : removes all data from selection 7
Invert : selects data outside of the current selection 8
Erase : erases data 9
Edit the data using the features above.
After editing the data, click Next, and the software will process and produce the scanned �le in STL format.
Scan �le is completedIf more edits are needed, simply go back to the previous step.
Click “Next” or “Save Edit” to store the scanned data �le and exit the program.
11 single copings scan job is completed successfully.

60
Identica Hybrid User Guide
61Appendix - Scan case
Appendix - Scan case
3 Unit BridgeWaxupSingle ImpressionDouble ImpressionImplant scan adapterFlexible multi-die

62
Identica Hybrid User Guide
3 Unit BridgeTooth setup
- Enter the scan settings for the model to scan. Refer to tooth settings
* Implant type – None, Situ scan – No, Gingiva – NoArticulator - Medit / Etc.- Click the “Save” button.- Click the “Scan” button to begin scanning.
The �rst time you connect your scanner, it will take around 30 seconds to boot. After the �rst installation, it will take around 3-5 seconds. Also, during the scanner connection process the projector will momentarily blink, and then the connection will be completed.
When the scanner is connected properly, it will automatically advance to the Preparation Strategy and determine the scanning process.
63Appendix - Scan case
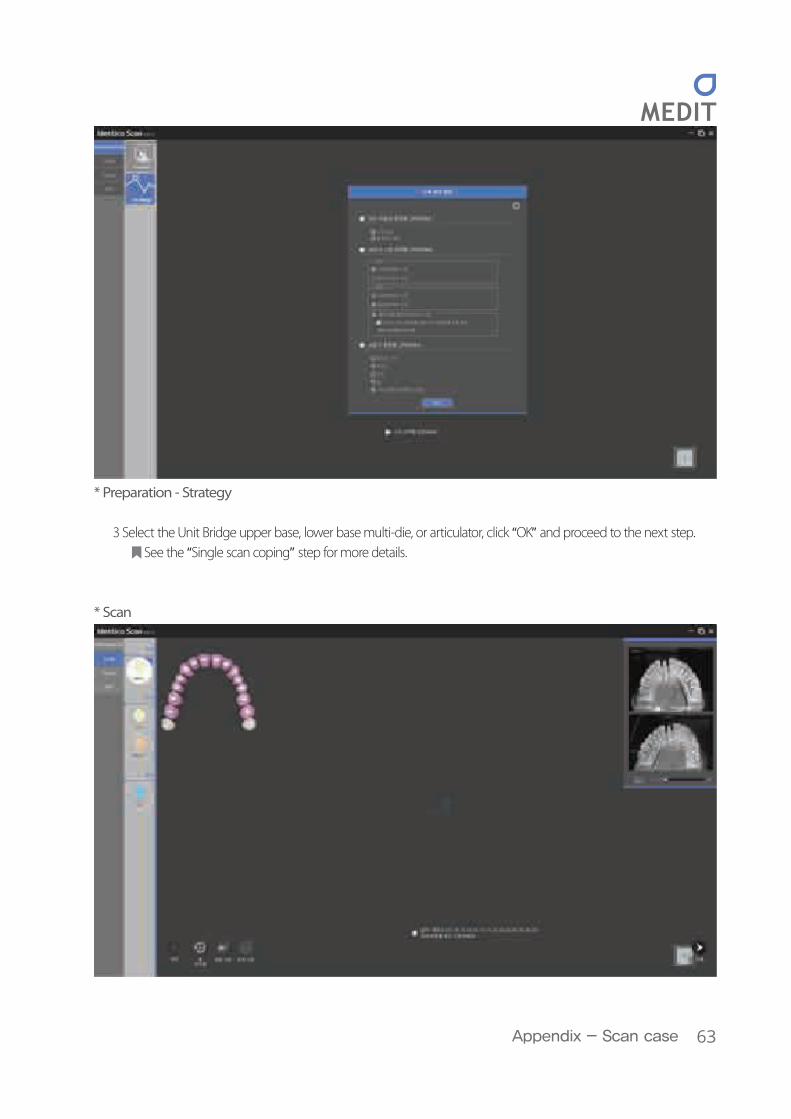
* Preparation - Strategy
3 Select the Unit Bridge upper base, lower base multi-die, or articulator, click “OK” and proceed to the next step. See the “Single scan coping” step for more details.
* Scan
64
Identica Hybrid User Guide
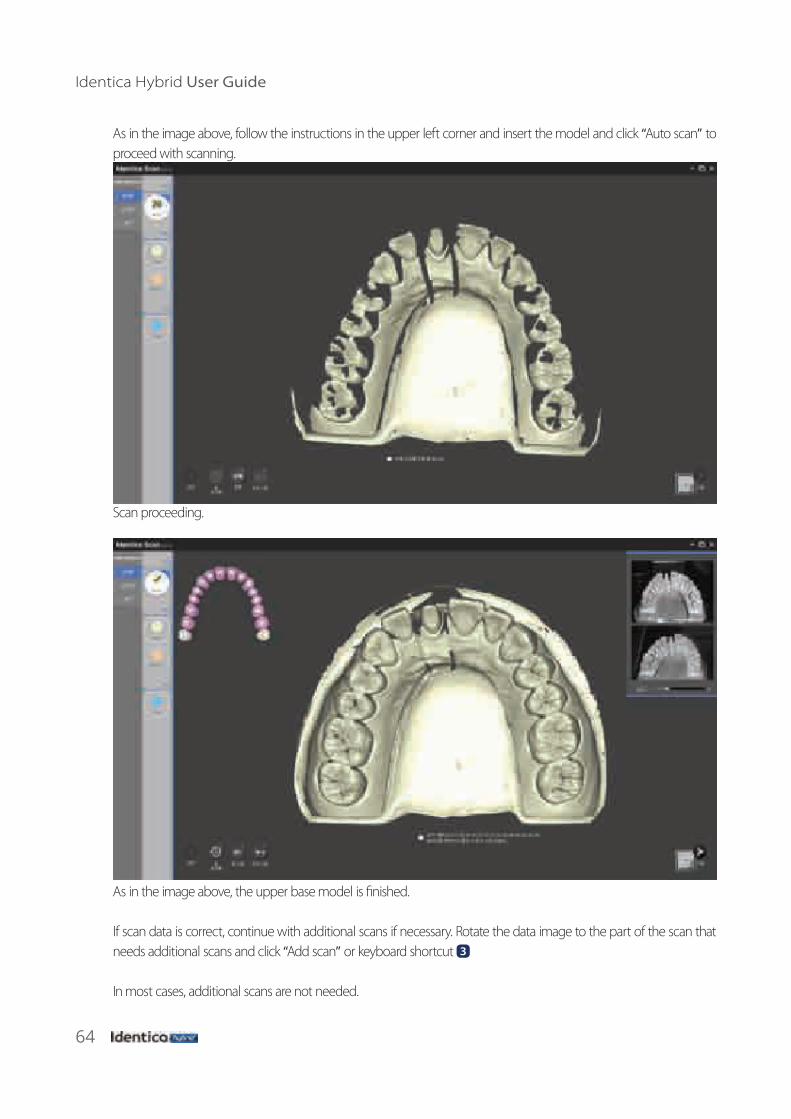
As in the image above, follow the instructions in the upper left corner and insert the model and click “Auto scan” to proceed with scanning.
Scan proceeding.
As in the image above, the upper base model is �nished.
If scan data is correct, continue with additional scans if necessary. Rotate the data image to the part of the scan that needs additional scans and click “Add scan” or keyboard shortcut 3
In most cases, additional scans are not needed.
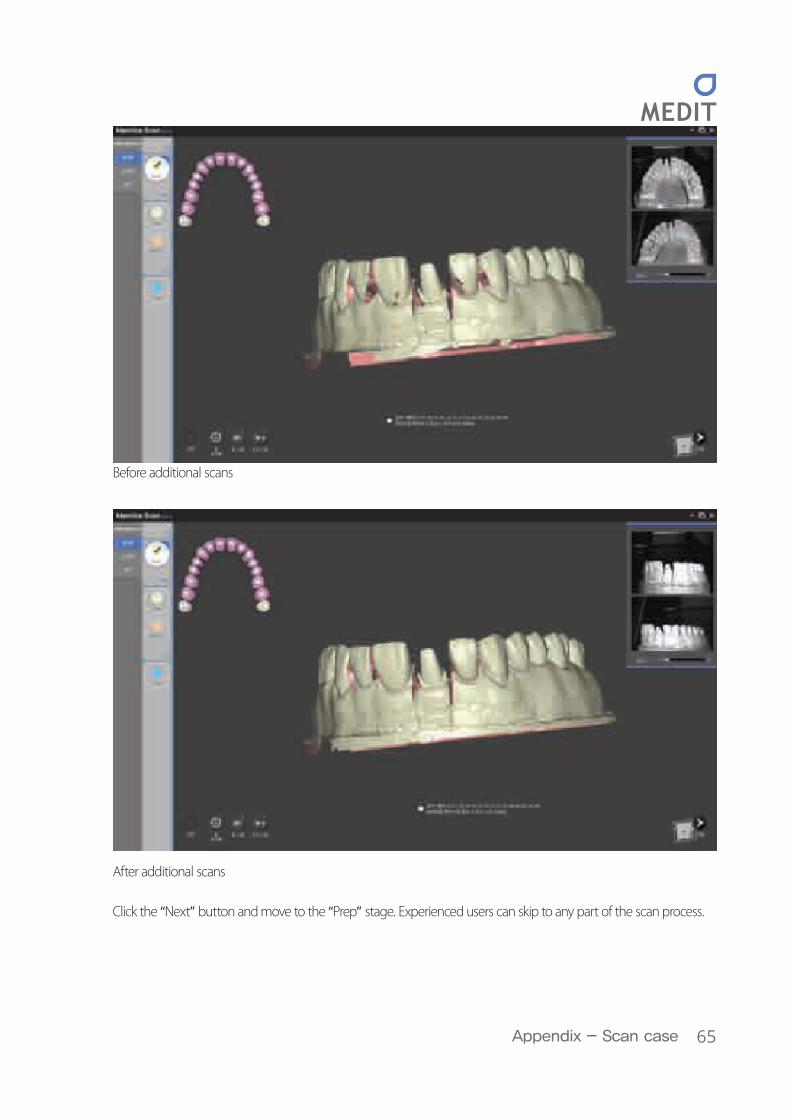
65Appendix - Scan case
Before additional scans
After additional scans
Click the “Next” button and move to the “Prep” stage. Experienced users can skip to any part of the scan process.
66
Identica Hybrid User Guide
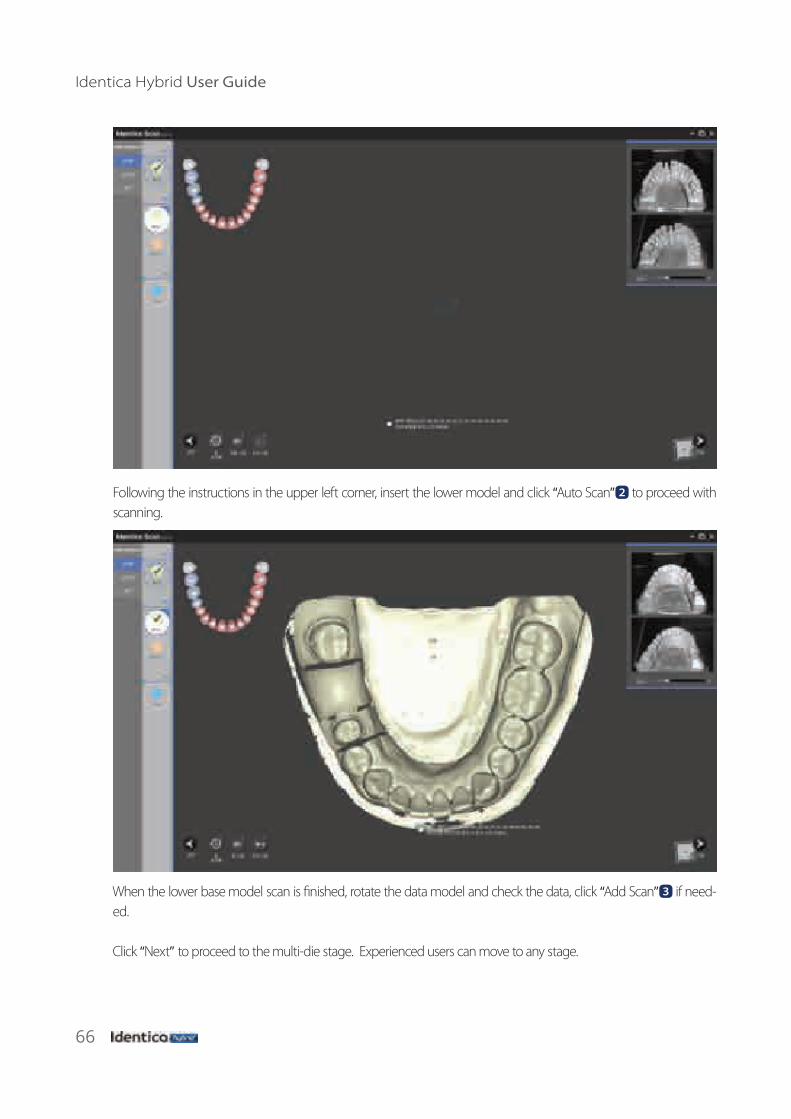
Following the instructions in the upper left corner, insert the lower model and click “Auto Scan” 2 to proceed with scanning.
When the lower base model scan is �nished, rotate the data model and check the data, click “Add Scan” 3 if need-ed.
Click “Next” to proceed to the multi-die stage. Experienced users can move to any stage.
67Appendix - Scan case
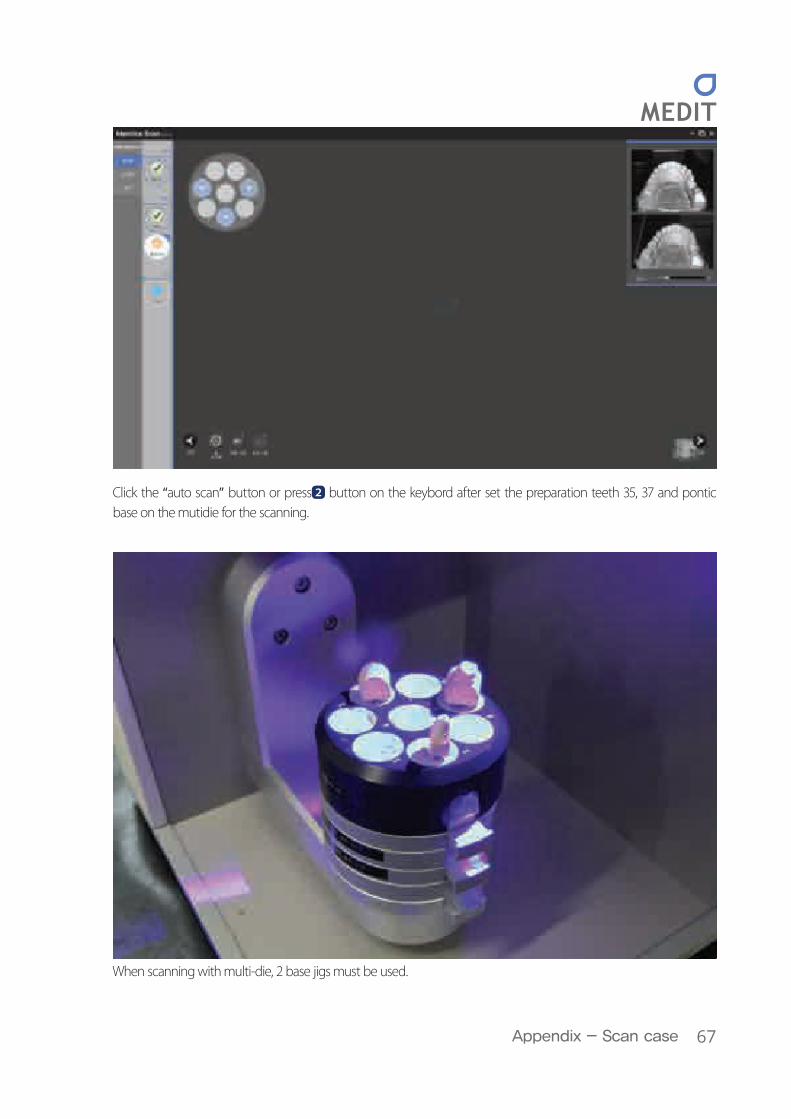
Click the “auto scan” button or press 2 button on the keybord after set the preparation teeth 35, 37 and pontic base on the mutidie for the scanning.
When scanning with multi-die, 2 base jigs must be used.
68
Identica Hybrid User Guide
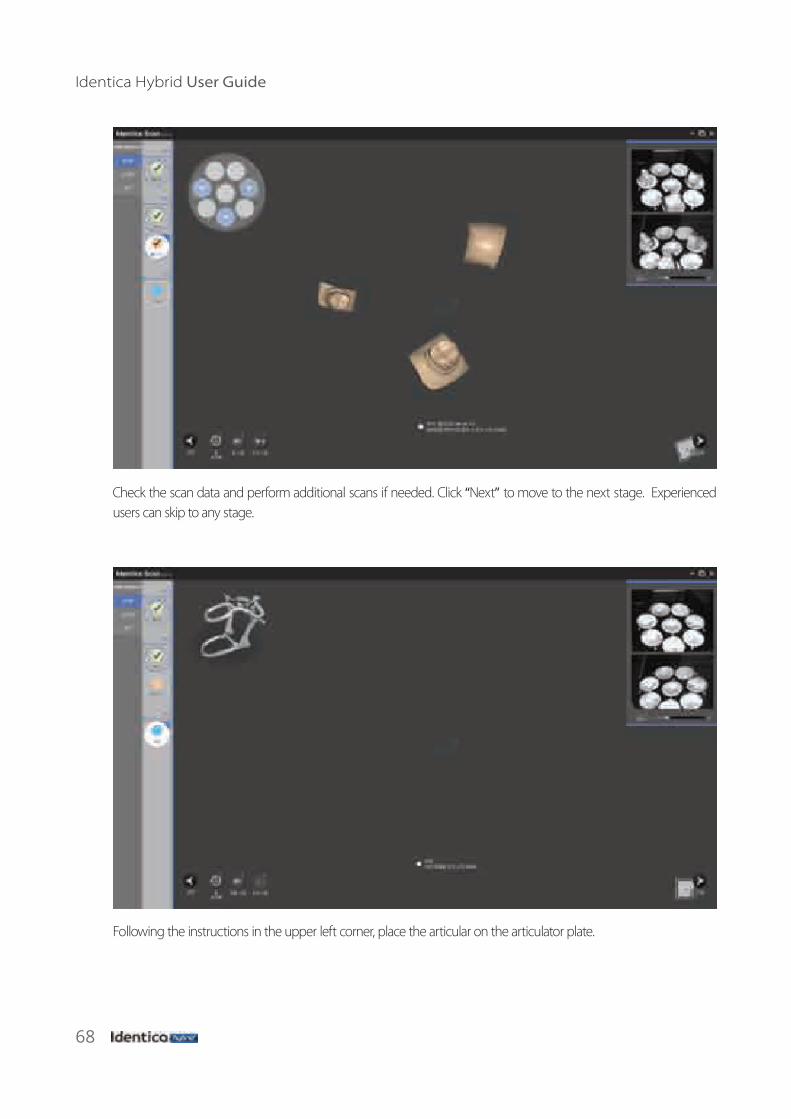
Check the scan data and perform additional scans if needed. Click “Next” to move to the next stage. Experienced users can skip to any stage.
Following the instructions in the upper left corner, place the articular on the articulator plate.

69Appendix - Scan case
Use a screw jig when scanning two upper/lower base models.
Final articulator scan image
When the articulator scan is �nished, click the “Next” button and move to the “Alignment” stage.

70
Identica Hybrid User Guide
Use 1 point or 3 point alignment and click on the corresponding points in each scan image using alignment points.
Click 1 points in the upper left image and then click 1 points in the right image whose locations are similar.
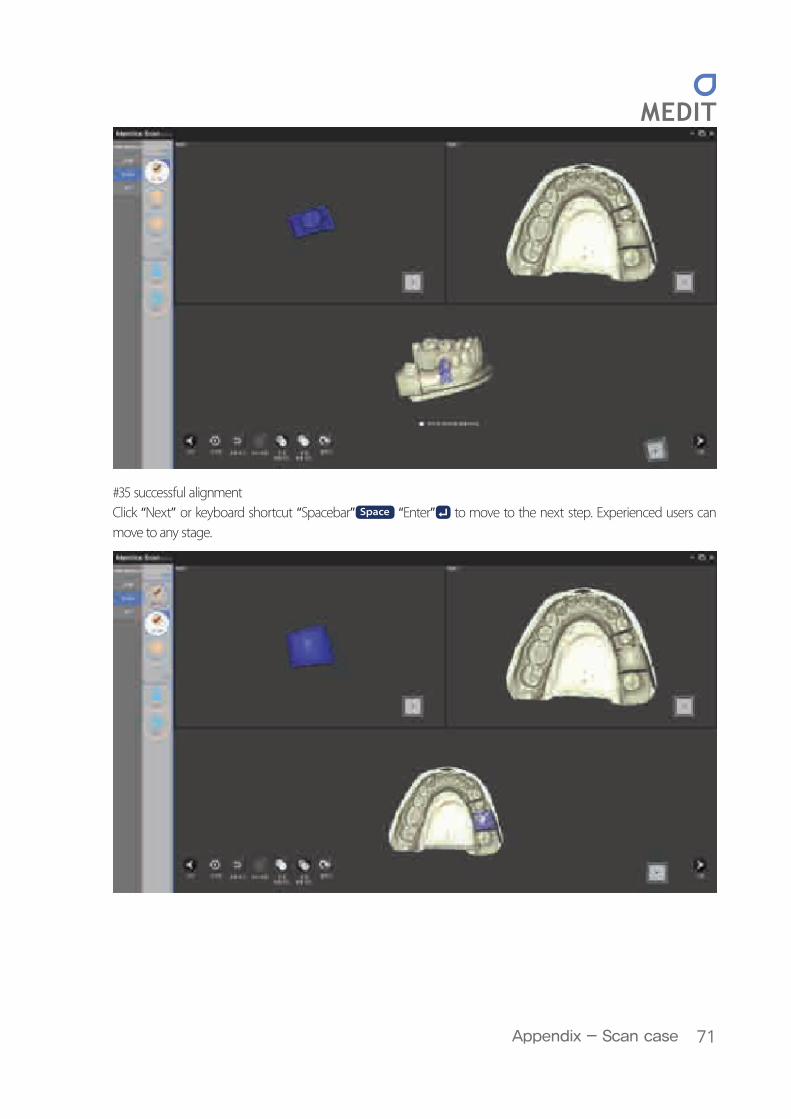
71Appendix - Scan case
#35 successful alignment Click “Next” or keyboard shortcut “Spacebar” Space “Enter” to move to the next step. Experienced users can move to any stage.
72
Identica Hybrid User Guide
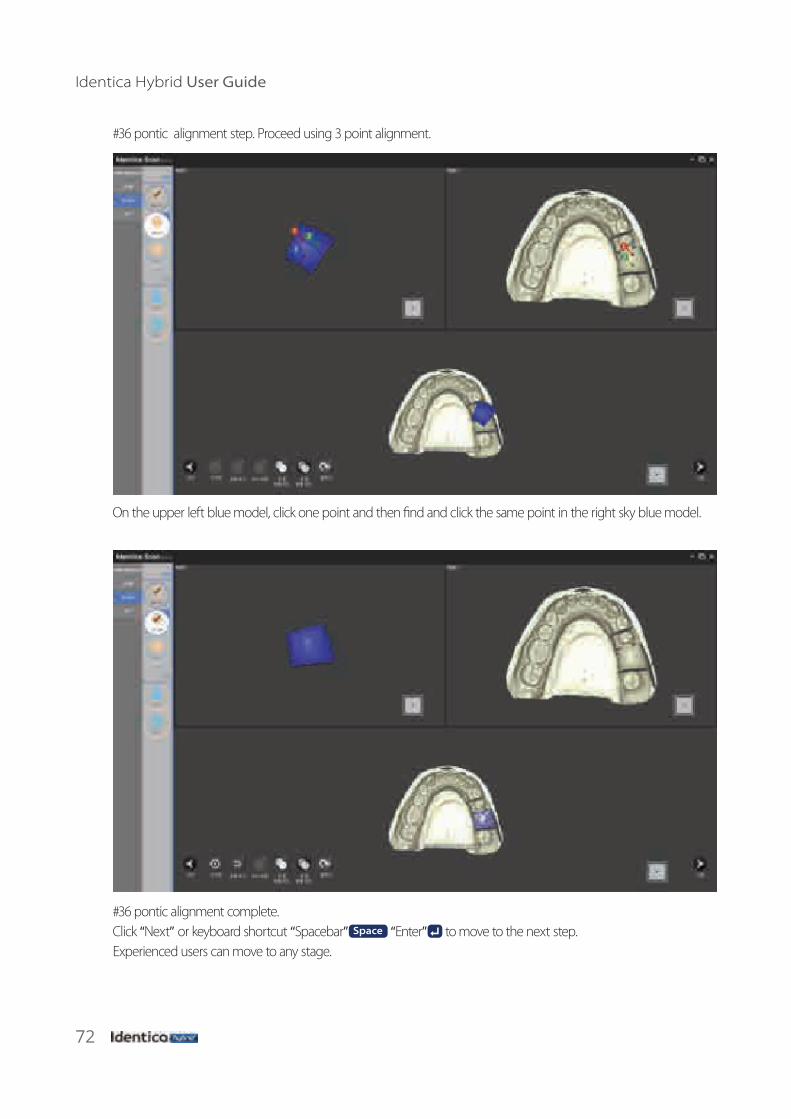
#36 pontic alignment step. Proceed using 3 point alignment.
On the upper left blue model, click one point and then �nd and click the same point in the right sky blue model.
#36 pontic alignment complete.Click “Next” or keyboard shortcut “Spacebar” Space “Enter” to move to the next step.Experienced users can move to any stage.
73Appendix - Scan case
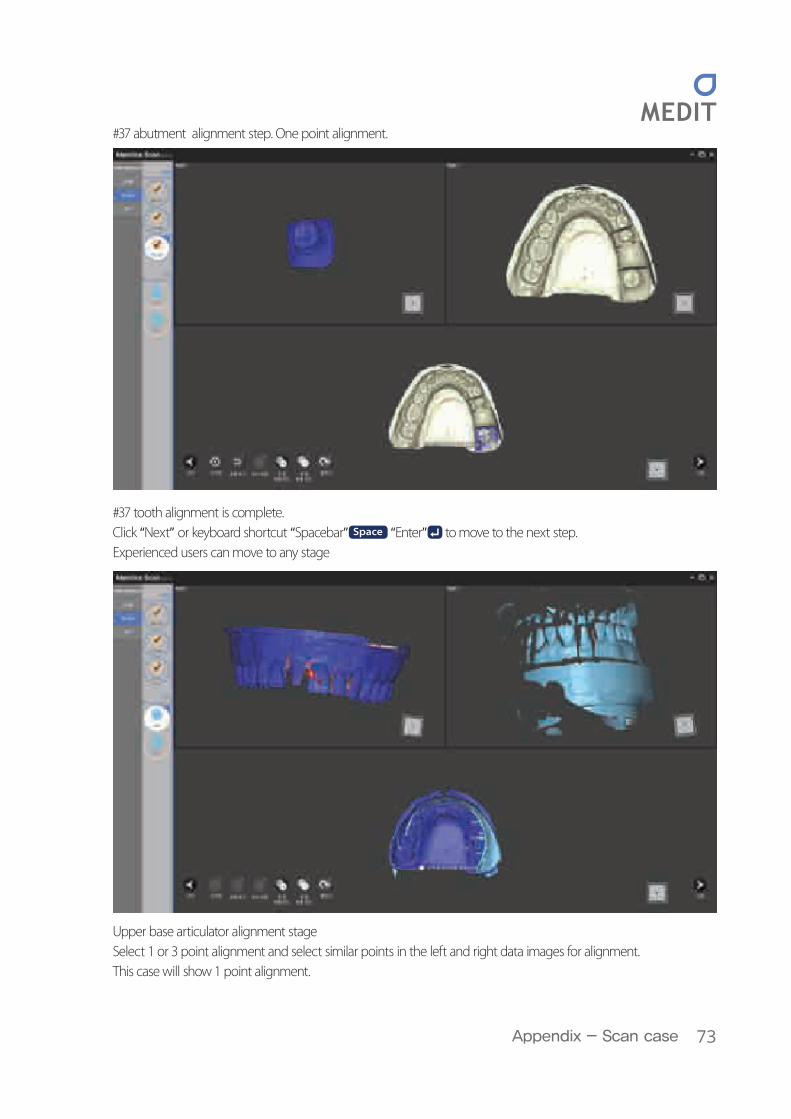
#37 abutment alignment step. One point alignment.
#37 tooth alignment is complete. Click “Next” or keyboard shortcut “Spacebar” Space “Enter” to move to the next step.Experienced users can move to any stage
Upper base articulator alignment stage Select 1 or 3 point alignment and select similar points in the left and right data images for alignment.This case will show 1 point alignment.
74
Identica Hybrid User Guide
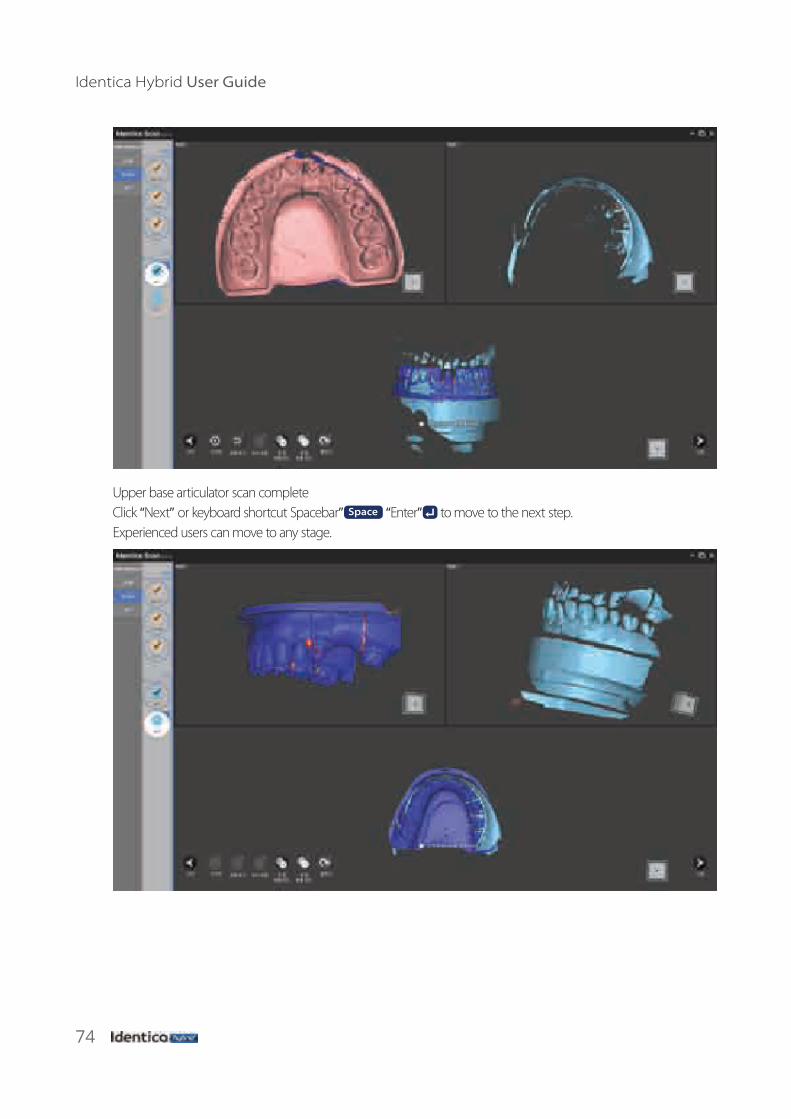
Upper base articulator scan complete Click “Next” or keyboard shortcut Spacebar” Space “Enter” to move to the next step.Experienced users can move to any stage.
75Appendix - Scan case
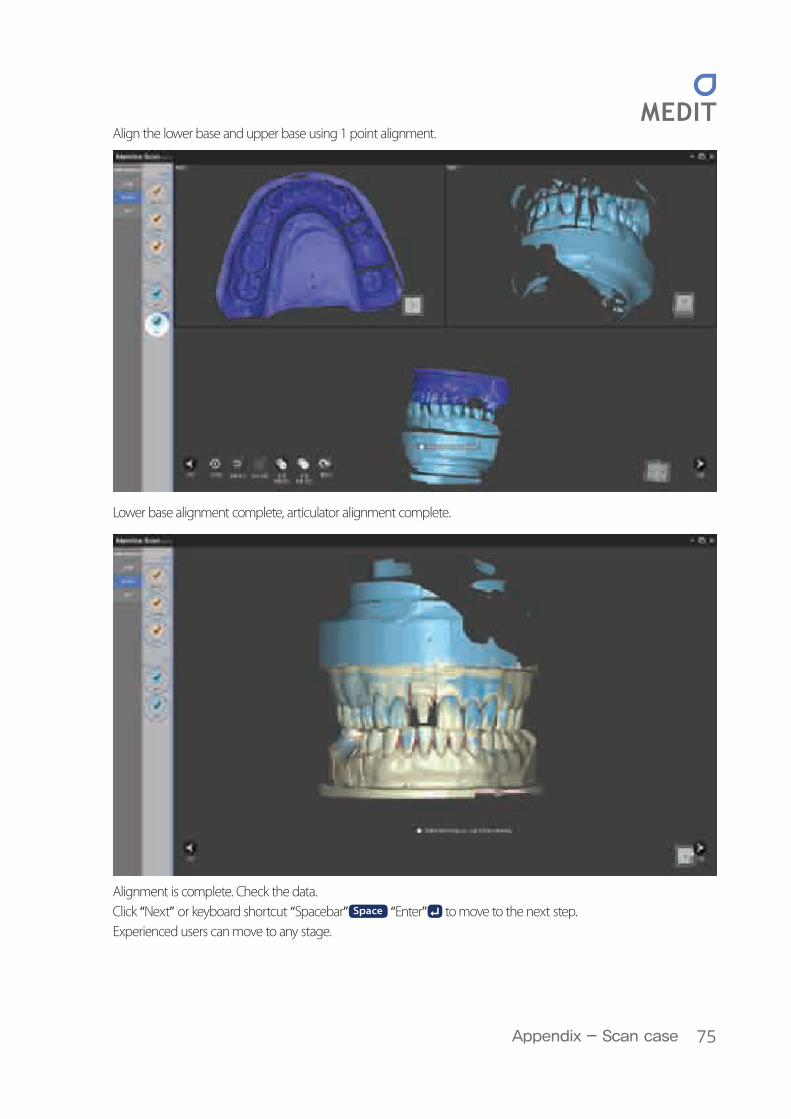
Align the lower base and upper base using 1 point alignment.
Lower base alignment complete, articulator alignment complete.
Alignment is complete. Check the data.Click “Next” or keyboard shortcut “Spacebar” Space “Enter” to move to the next step.Experienced users can move to any stage.
76
Identica Hybrid User Guide
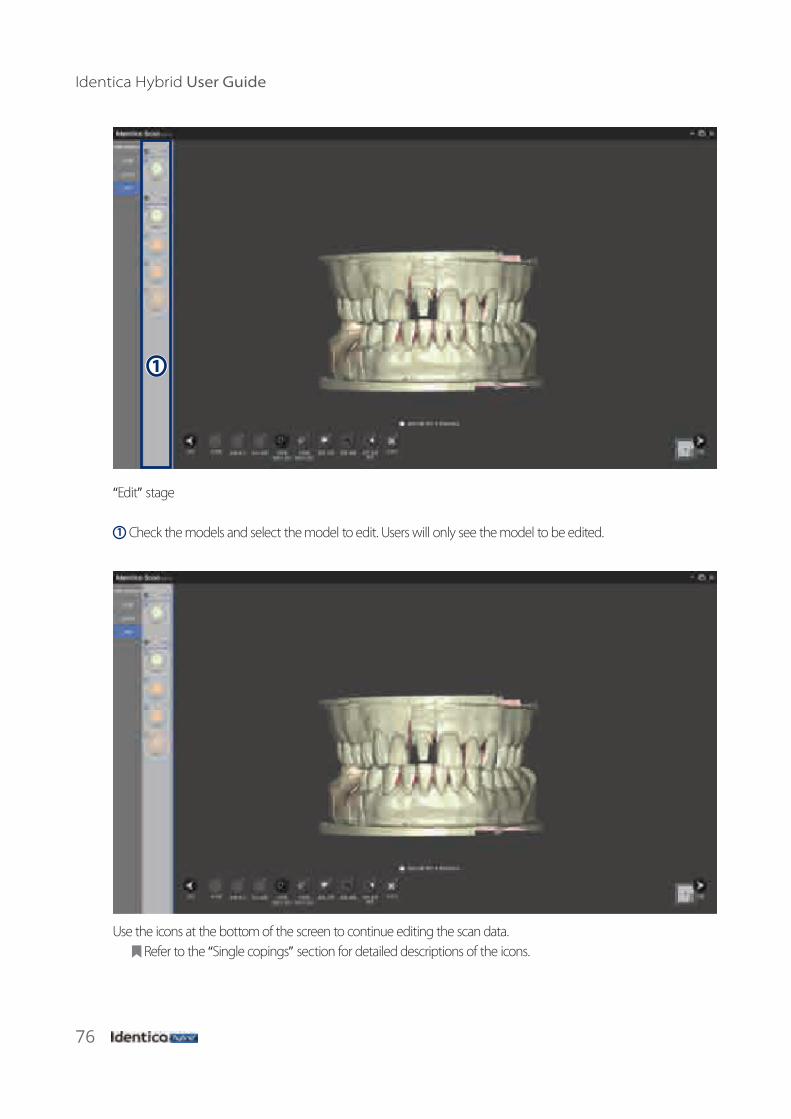
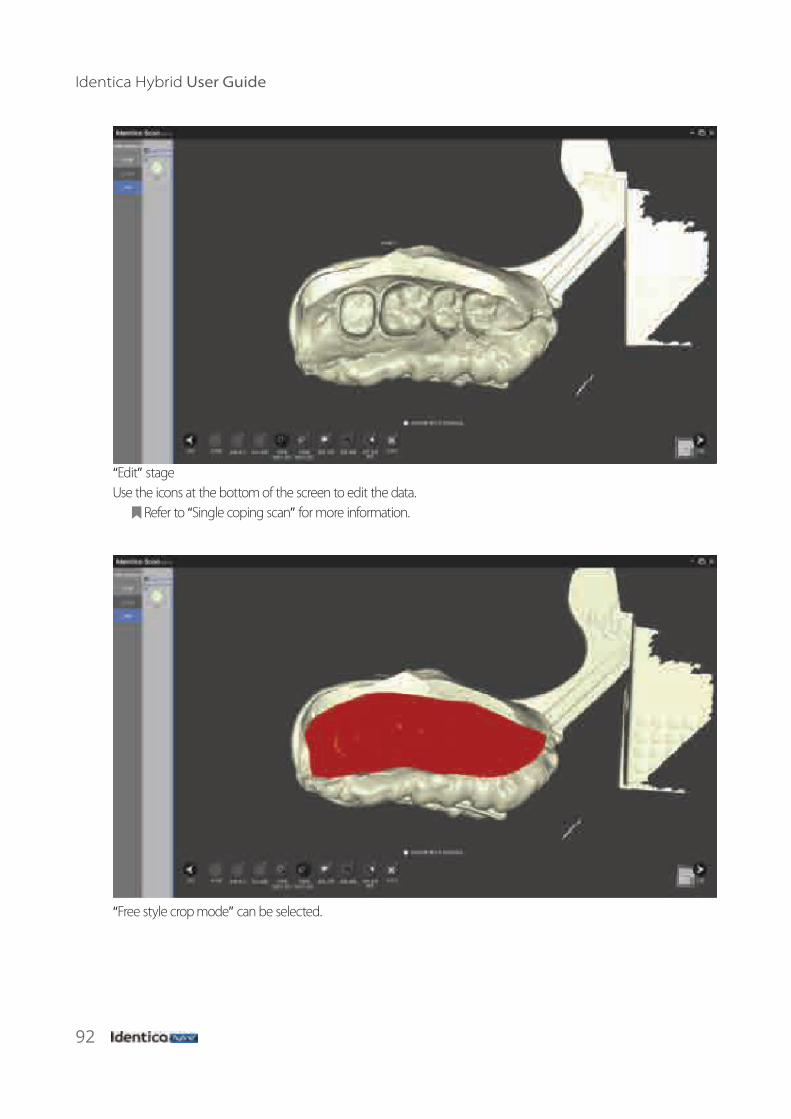
“Edit” stage
1 Check the models and select the model to edit. Users will only see the model to be edited.
Use the icons at the bottom of the screen to continue editing the scan data. Refer to the “Single copings” section for detailed descriptions of the icons.
1
77Appendix - Scan case
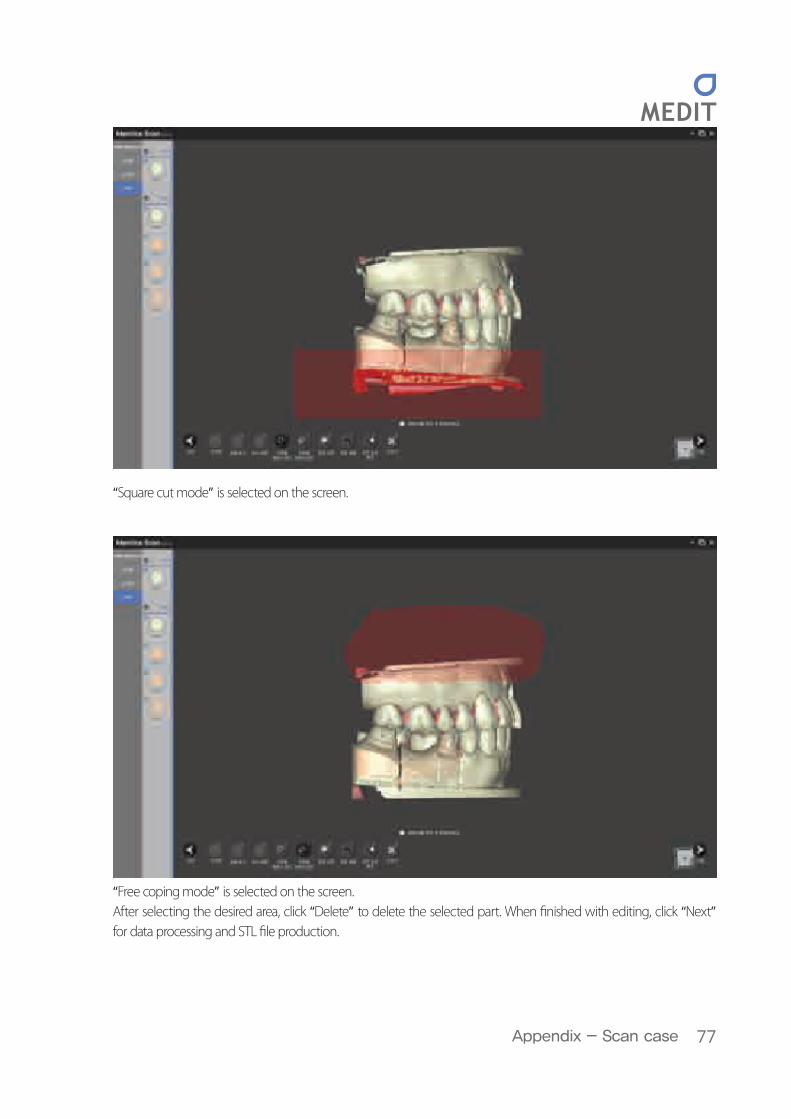
“Square cut mode” is selected on the screen.
“Free coping mode” is selected on the screen. After selecting the desired area, click “Delete” to delete the selected part. When �nished with editing, click “Next” for data processing and STL �le production.

78
Identica Hybrid User Guide
Scan �le production is complete. Editing is still possible as shown in the previous step.
Click “Next” or click “Save Exit” 1 .
When the scanning is completely �nished a prompt will appear. Click “Yes” to save the scanned data and exit the program.
#35-37 3 Unit Bridge scan jobs are successfully completed.
79Appendix - Scan case
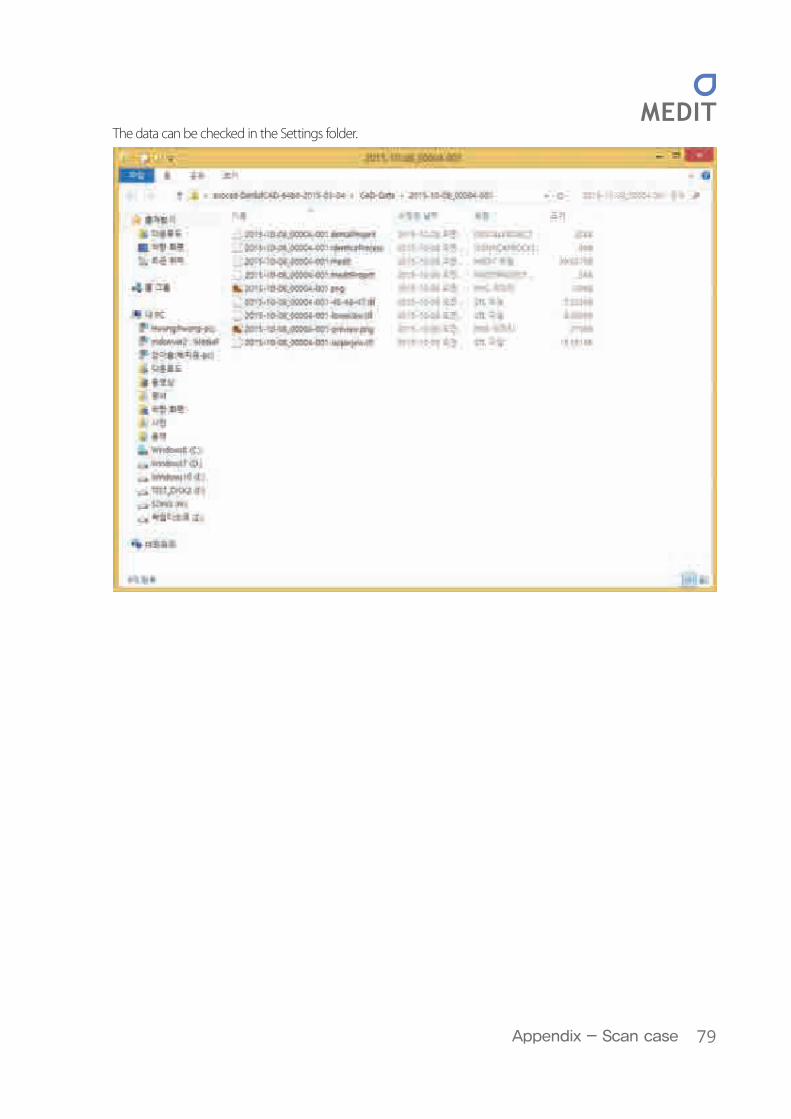
The data can be checked in the Settings folder.
80
Identica Hybrid User Guide
Waxup
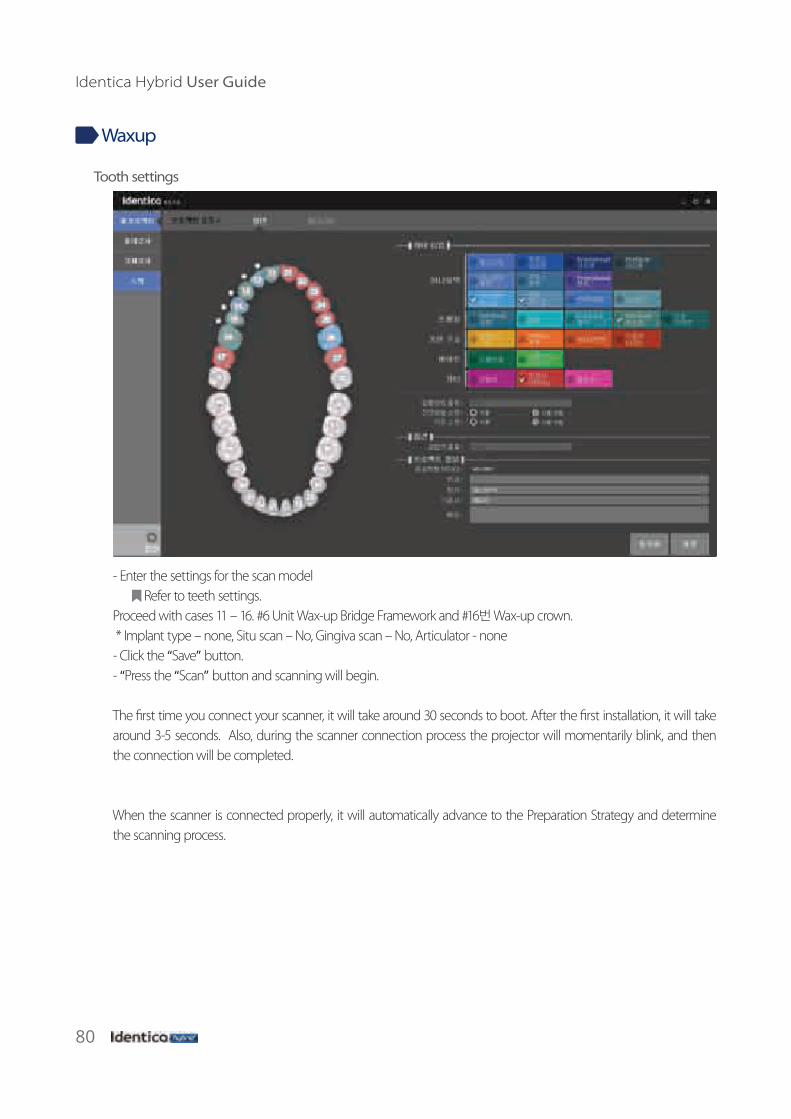
Tooth settings
- Enter the settings for the scan model Refer to teeth settings.
Proceed with cases 11 – 16. #6 Unit Wax-up Bridge Framework and #16번 Wax-up crown. * Implant type – none, Situ scan – No, Gingiva scan – No, Articulator - none- Click the “Save” button.- “Press the “Scan” button and scanning will begin.
The �rst time you connect your scanner, it will take around 30 seconds to boot. After the �rst installation, it will take around 3-5 seconds. Also, during the scanner connection process the projector will momentarily blink, and then the connection will be completed.
When the scanner is connected properly, it will automatically advance to the Preparation Strategy and determine the scanning process.
81Appendix - Scan case
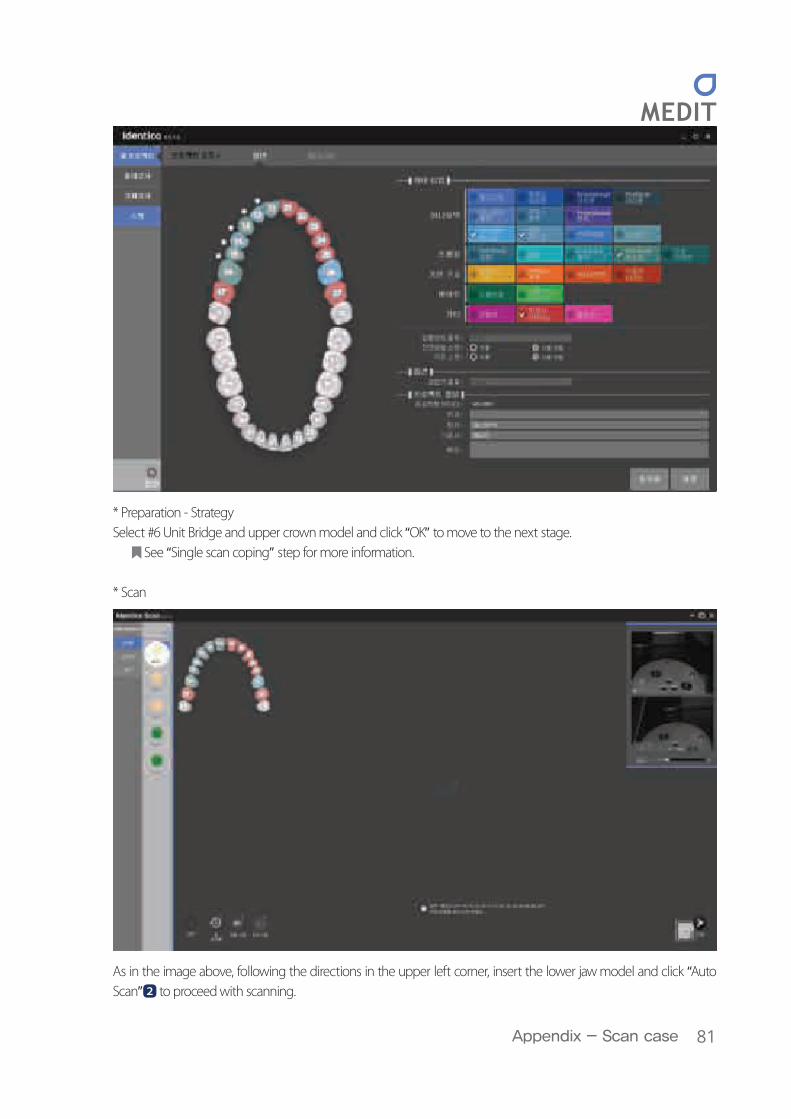
* Preparation - StrategySelect #6 Unit Bridge and upper crown model and click “OK” to move to the next stage.
See “Single scan coping” step for more information.
* Scan
As in the image above, following the directions in the upper left corner, insert the lower jaw model and click “Auto Scan” 2 to proceed with scanning.
82
Identica Hybrid User Guide
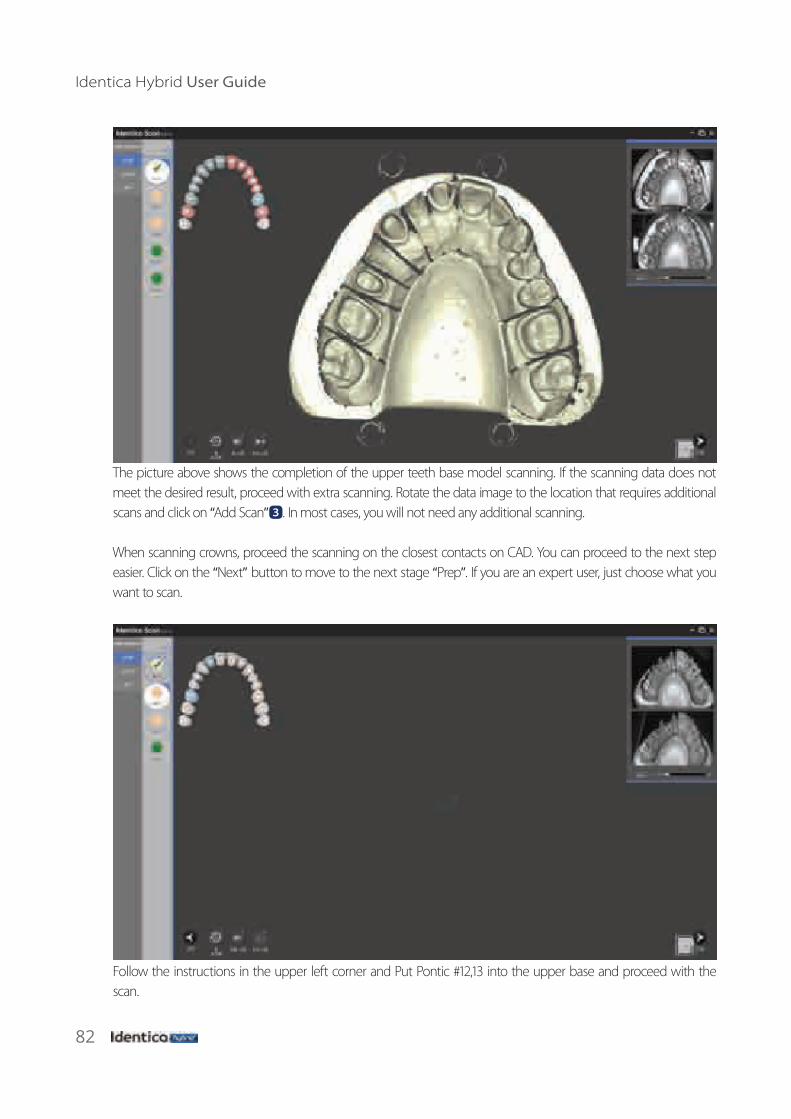
The picture above shows the completion of the upper teeth base model scanning. If the scanning data does not meet the desired result, proceed with extra scanning. Rotate the data image to the location that requires additional scans and click on “Add Scan” 3 . In most cases, you will not need any additional scanning.
When scanning crowns, proceed the scanning on the closest contacts on CAD. You can proceed to the next step easier. Click on the “Next” button to move to the next stage “Prep”. If you are an expert user, just choose what you want to scan.
Follow the instructions in the upper left corner and Put Pontic #12,13 into the upper base and proceed with the scan.
83Appendix - Scan case
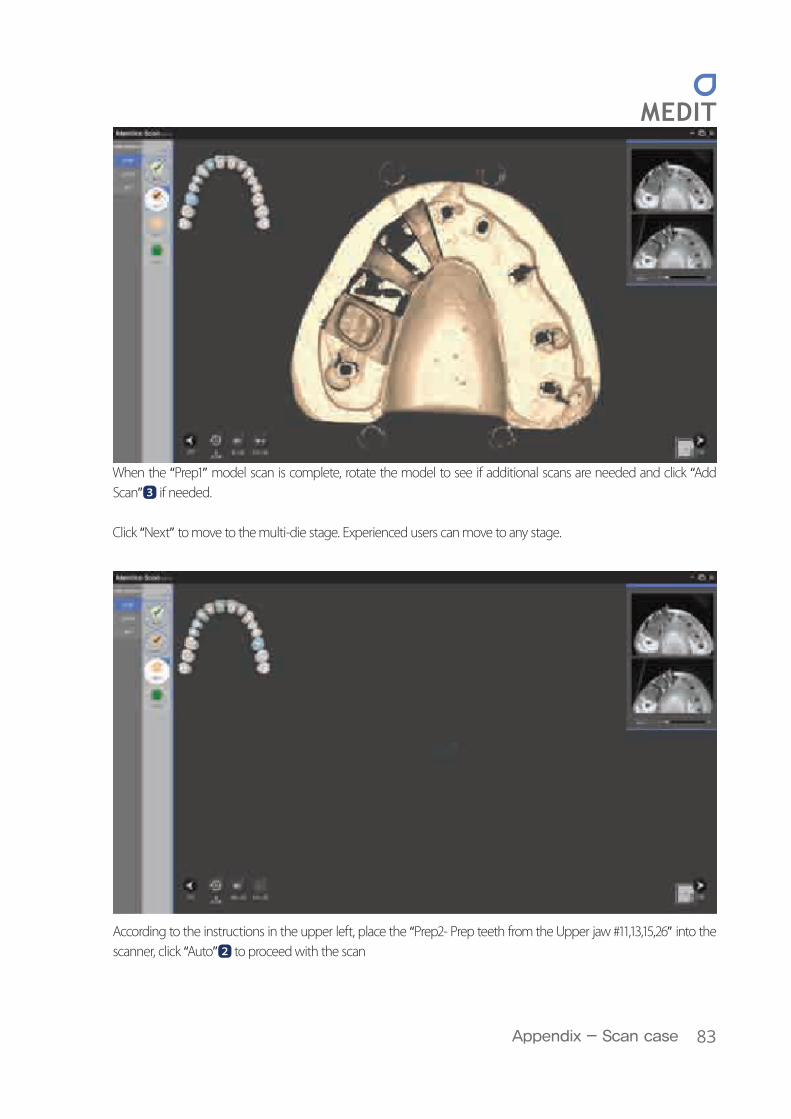
When the “Prep1” model scan is complete, rotate the model to see if additional scans are needed and click “Add Scan” 3 if needed.
Click “Next” to move to the multi-die stage. Experienced users can move to any stage.
According to the instructions in the upper left, place the “Prep2- Prep teeth from the Upper jaw #11,13,15,26” into the scanner, click “Auto” 2 to proceed with the scan
84
Identica Hybrid User Guide
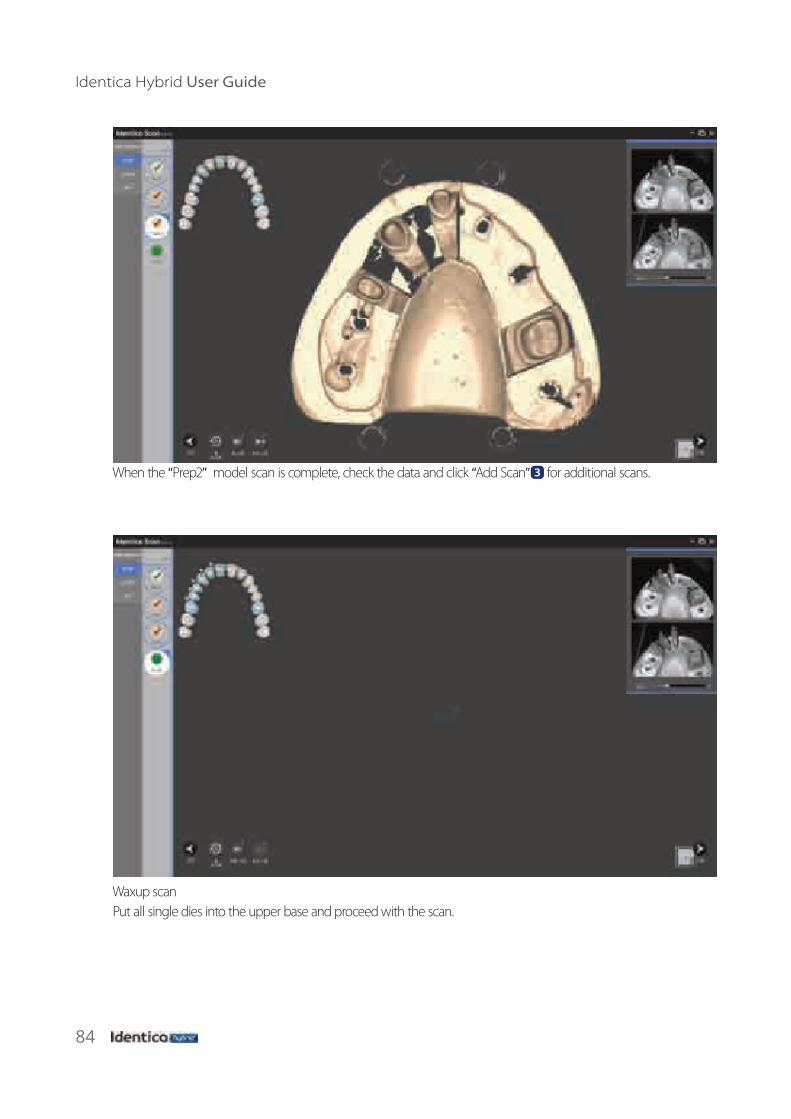
When the “Prep2” model scan is complete, check the data and click “Add Scan” 3 for additional scans.
Waxup scanPut all single dies into the upper base and proceed with the scan.
85Appendix - Scan case
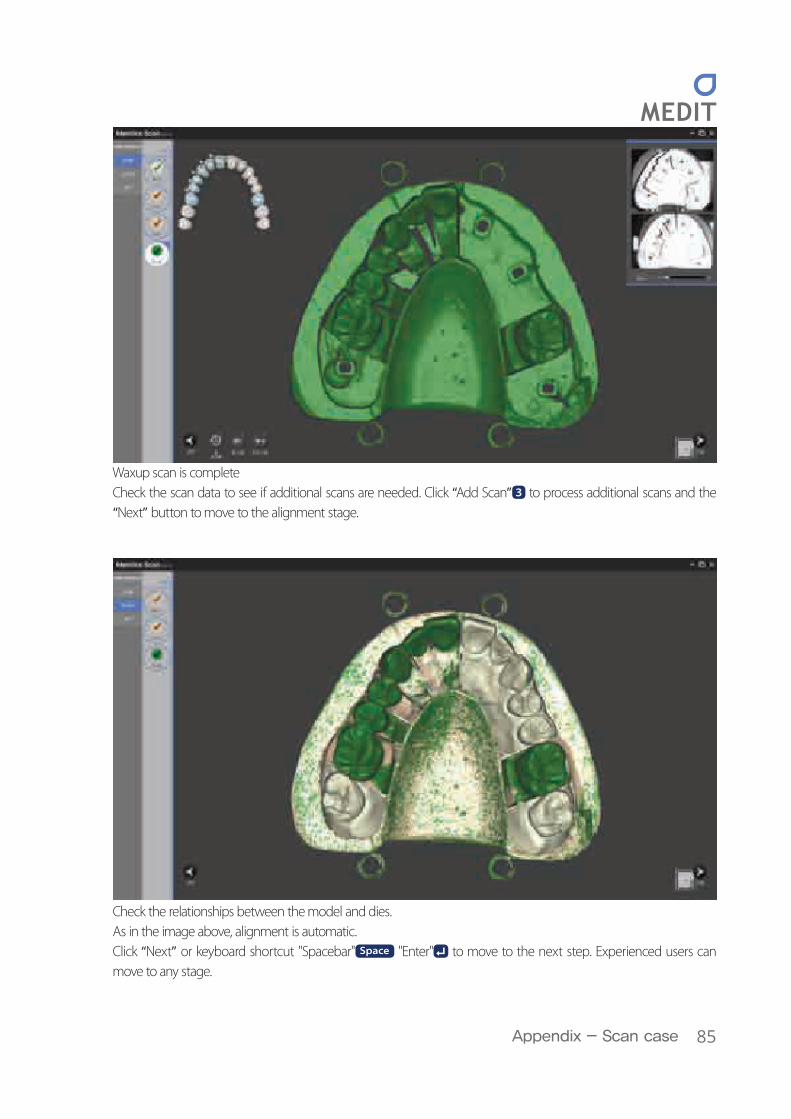
Waxup scan is completeCheck the scan data to see if additional scans are needed. Click “Add Scan” 3 to process additional scans and the “Next” button to move to the alignment stage.
Check the relationships between the model and dies.As in the image above, alignment is automatic.Click “Next” or keyboard shortcut "Spacebar" Space "Enter" to move to the next step. Experienced users can move to any stage.
86
Identica Hybrid User Guide
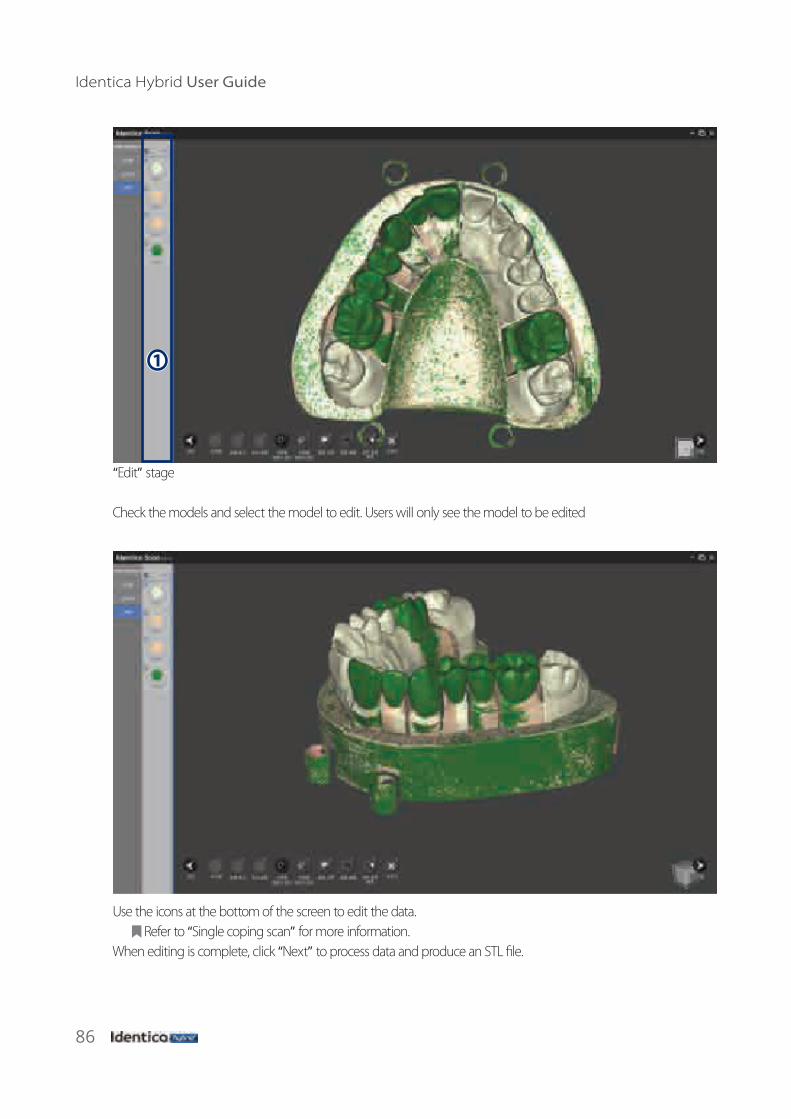
“Edit” stage
Check the models and select the model to edit. Users will only see the model to be edited
Use the icons at the bottom of the screen to edit the data. Refer to “Single coping scan” for more information.
When editing is complete, click “Next” to process data and produce an STL �le.
1
87Appendix - Scan case
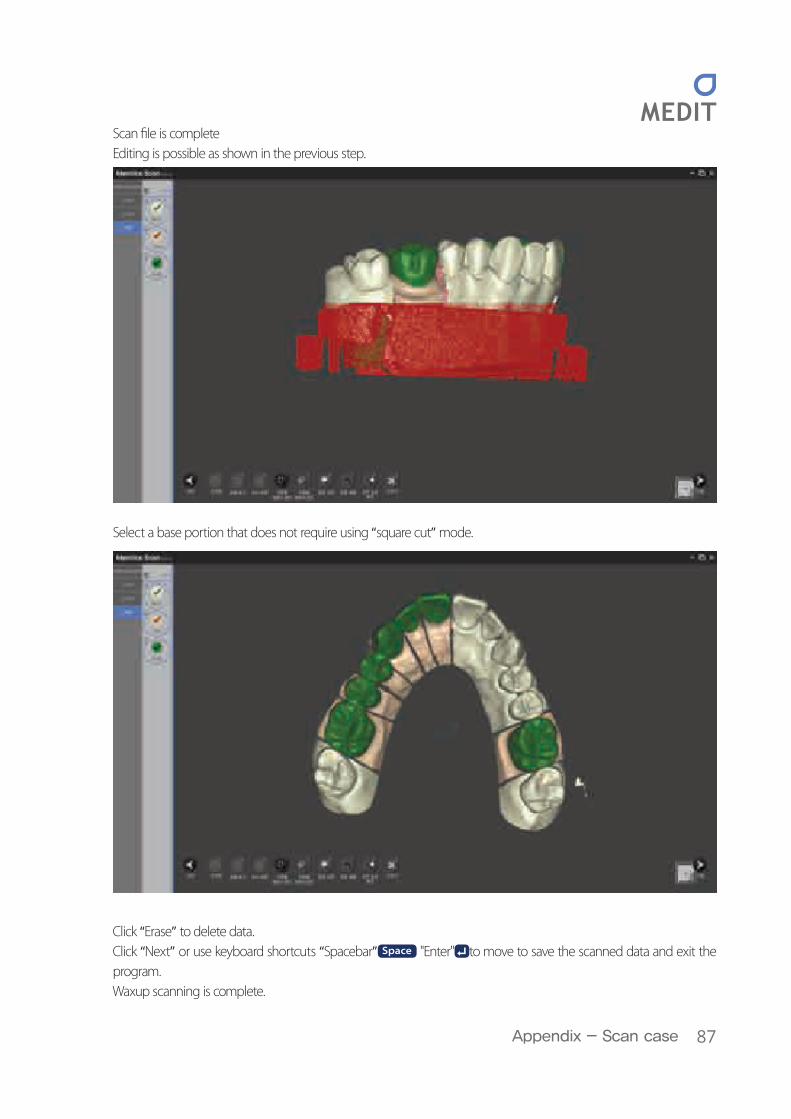
Scan �le is completeEditing is possible as shown in the previous step..
Select a base portion that does not require using “square cut” mode.
Click “Erase” to delete data. Click “Next” or use keyboard shortcuts “Spacebar” Space "Enter" to move to save the scanned data and exit the program.Waxup scanning is complete.
88
Identica Hybrid User Guide
Single Impression
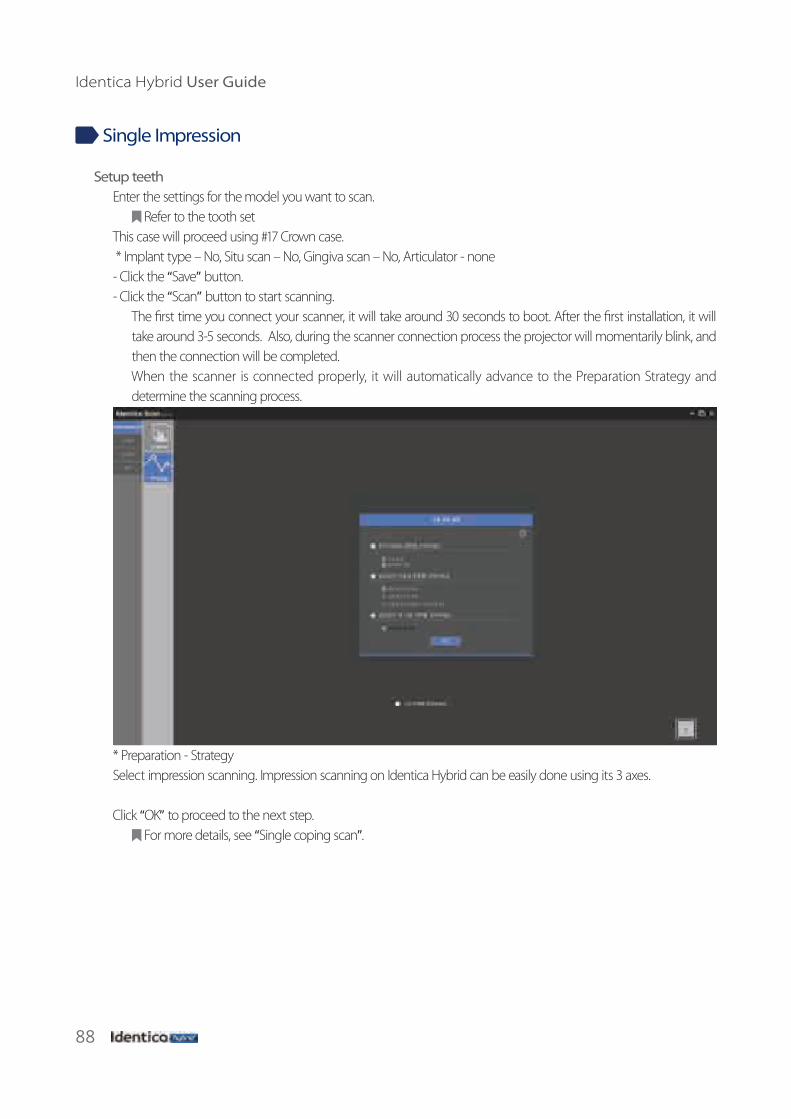
Setup teethEnter the settings for the model you want to scan.
Refer to the tooth setThis case will proceed using #17 Crown case. * Implant type – No, Situ scan – No, Gingiva scan – No, Articulator - none- Click the “Save” button.- Click the “Scan” button to start scanning.
The �rst time you connect your scanner, it will take around 30 seconds to boot. After the �rst installation, it will take around 3-5 seconds. Also, during the scanner connection process the projector will momentarily blink, and then the connection will be completed.When the scanner is connected properly, it will automatically advance to the Preparation Strategy and determine the scanning process.
* Preparation - StrategySelect impression scanning. Impression scanning on Identica Hybrid can be easily done using its 3 axes.
Click “OK” to proceed to the next step. For more details, see “Single coping scan”.
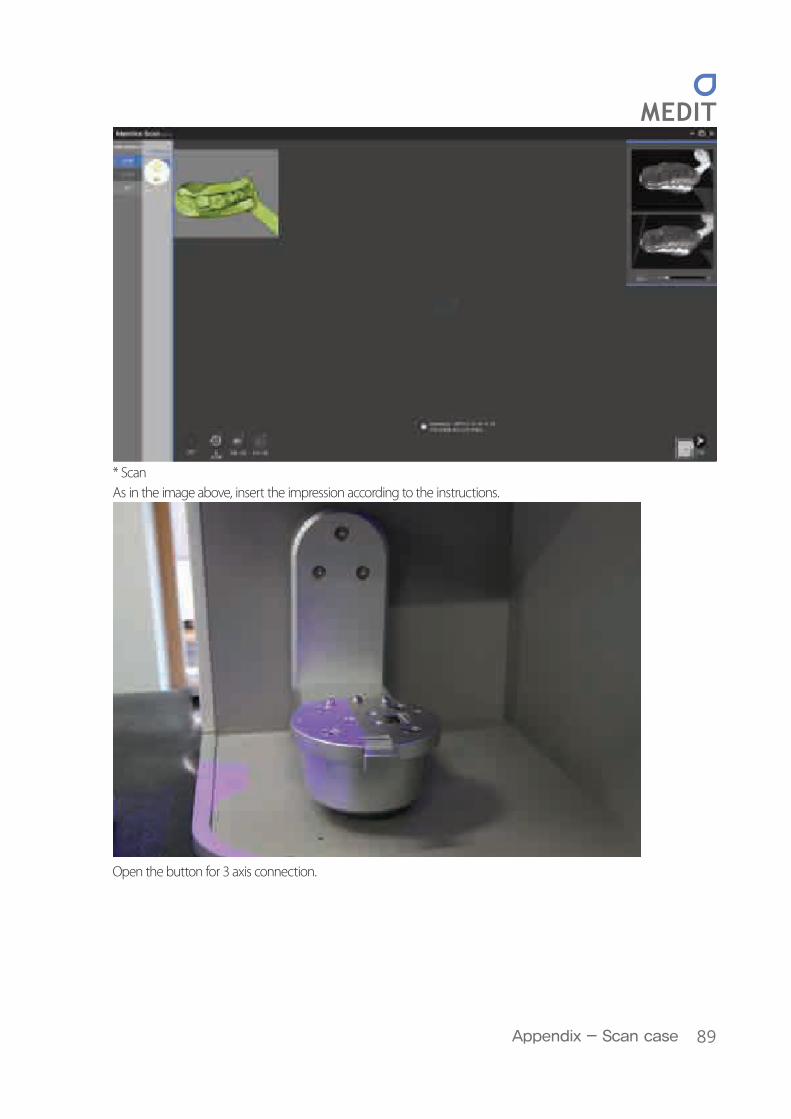
89Appendix - Scan case
* ScanAs in the image above, insert the impression according to the instructions.
Open the button for 3 axis connection.
90
Identica Hybrid User Guide
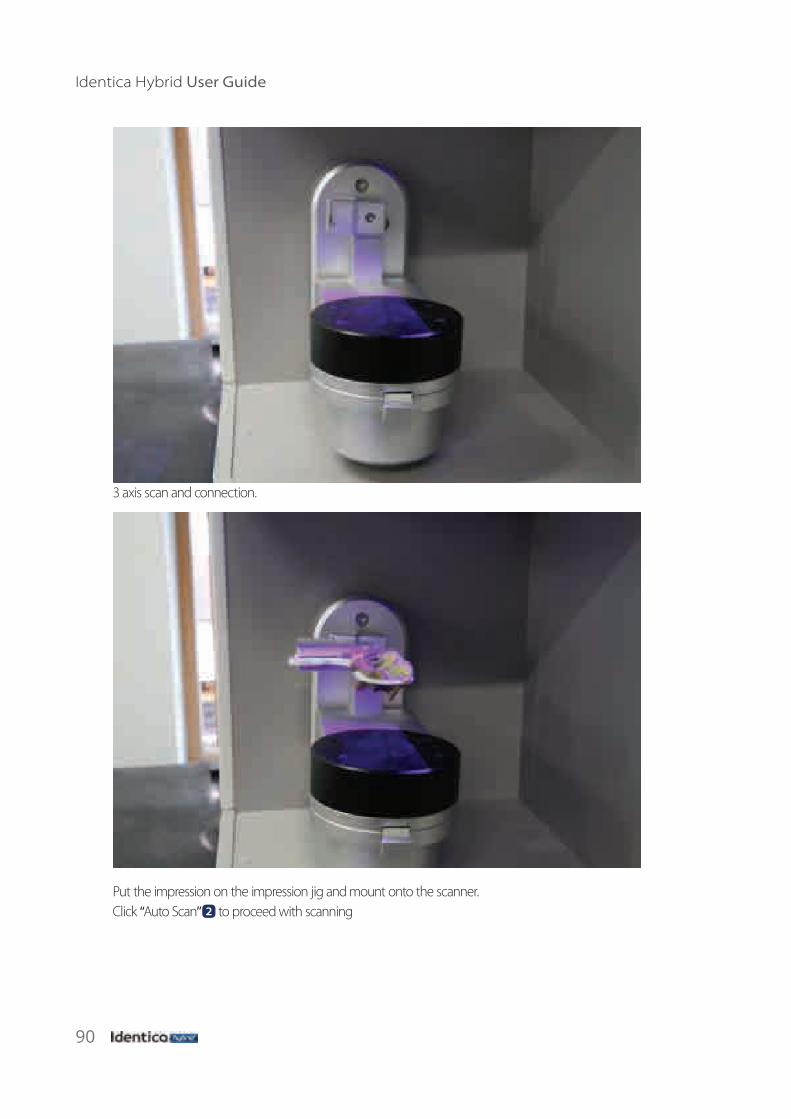
3 axis scan and connection.
Put the impression on the impression jig and mount onto the scanner. Click “Auto Scan” 2 to proceed with scanning
91Appendix - Scan case
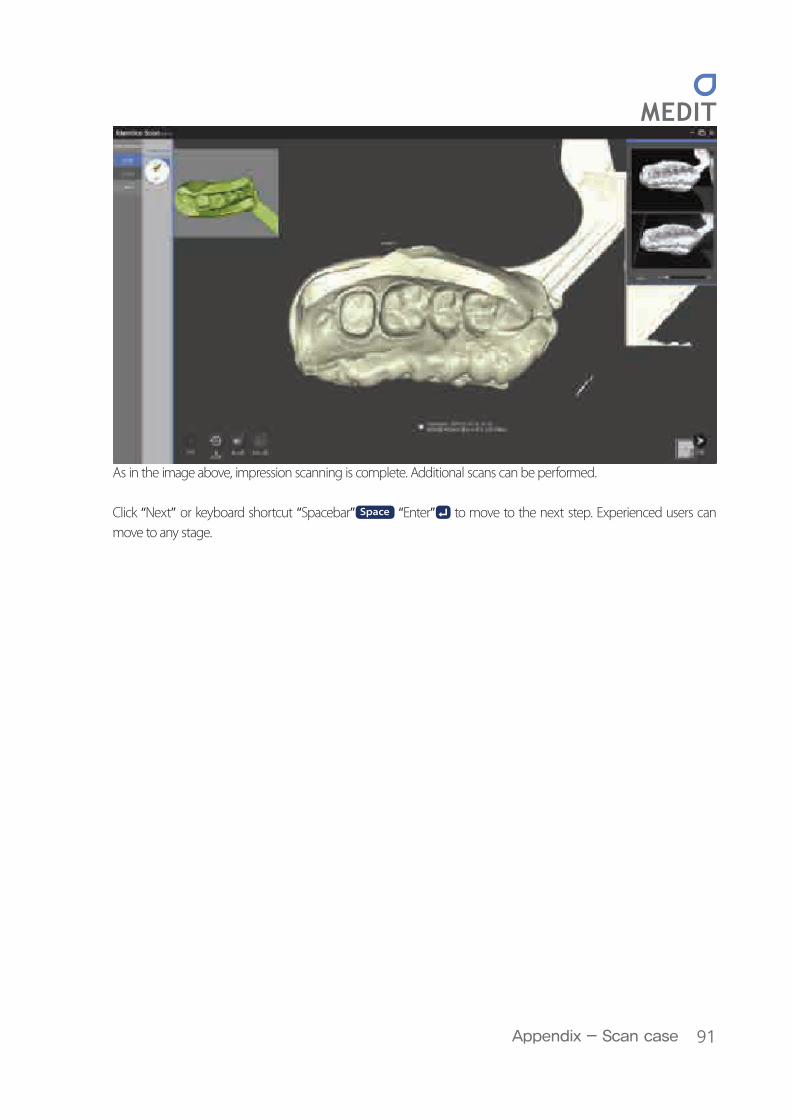
As in the image above, impression scanning is complete. Additional scans can be performed.
Click “Next” or keyboard shortcut “Spacebar” Space “Enter” to move to the next step. Experienced users can move to any stage.
92
Identica Hybrid User Guide
“Edit” stageUse the icons at the bottom of the screen to edit the data.
Refer to “Single coping scan” for more information.
“Free style crop mode” can be selected.
93Appendix - Scan case
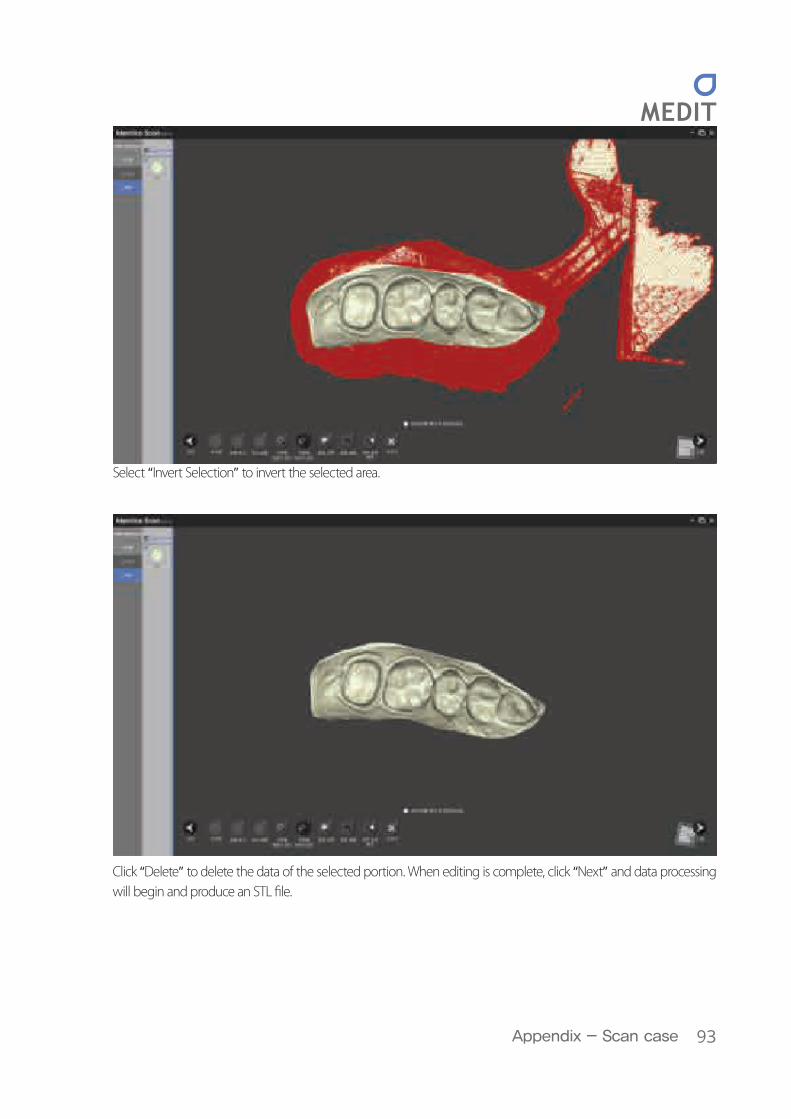
Select “Invert Selection” to invert the selected area.
Click “Delete” to delete the data of the selected portion. When editing is complete, click “Next” and data processing will begin and produce an STL �le.

94
Identica Hybrid User Guide
Scan �le production is complete. Editing is possible as seen in the previous step.Click “Next” or use keyboard shortcuts “Spacebar” Space "Enter” to move to save the scanned data and exit the program. Single Impression scanning is complete.The data can be checked in the Settings folder.
95Appendix - Scan case
Double impression
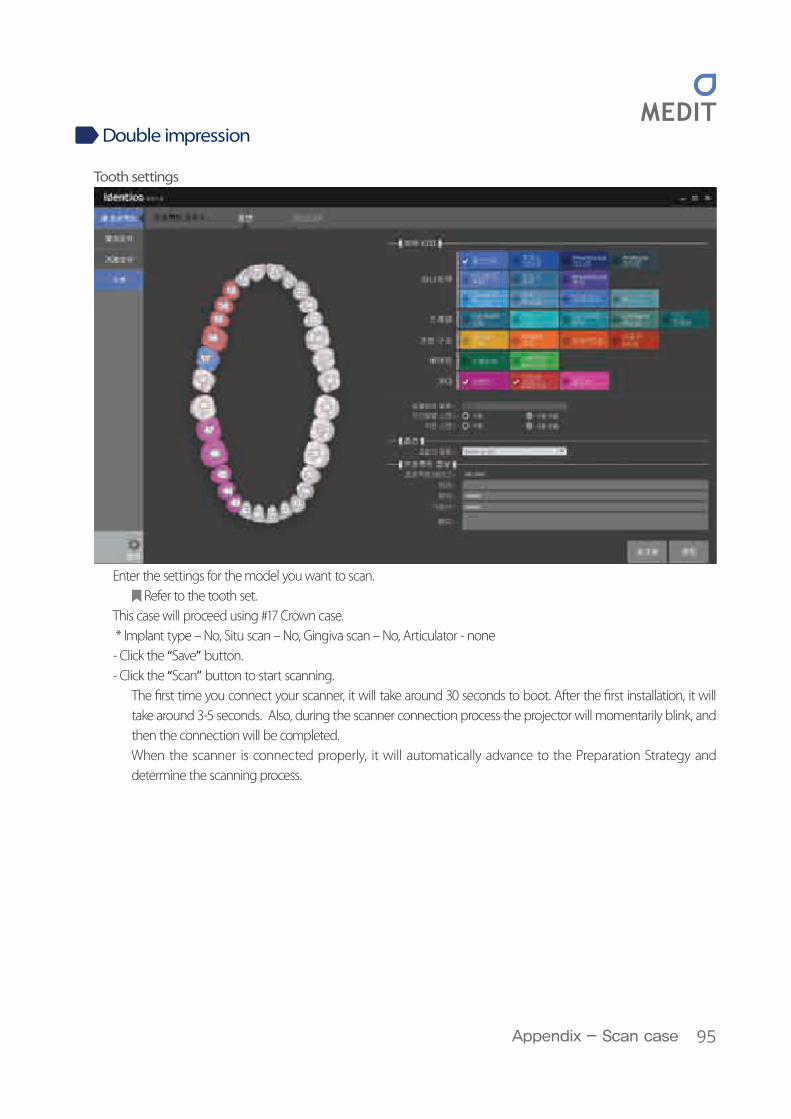
Tooth settings
Enter the settings for the model you want to scan. Refer to the tooth set.
This case will proceed using #17 Crown case. * Implant type – No, Situ scan – No, Gingiva scan – No, Articulator - none- Click the “Save” button.- Click the “Scan” button to start scanning.
The �rst time you connect your scanner, it will take around 30 seconds to boot. After the �rst installation, it will take around 3-5 seconds. Also, during the scanner connection process the projector will momentarily blink, and then the connection will be completed.When the scanner is connected properly, it will automatically advance to the Preparation Strategy and determine the scanning process.
96
Identica Hybrid User Guide
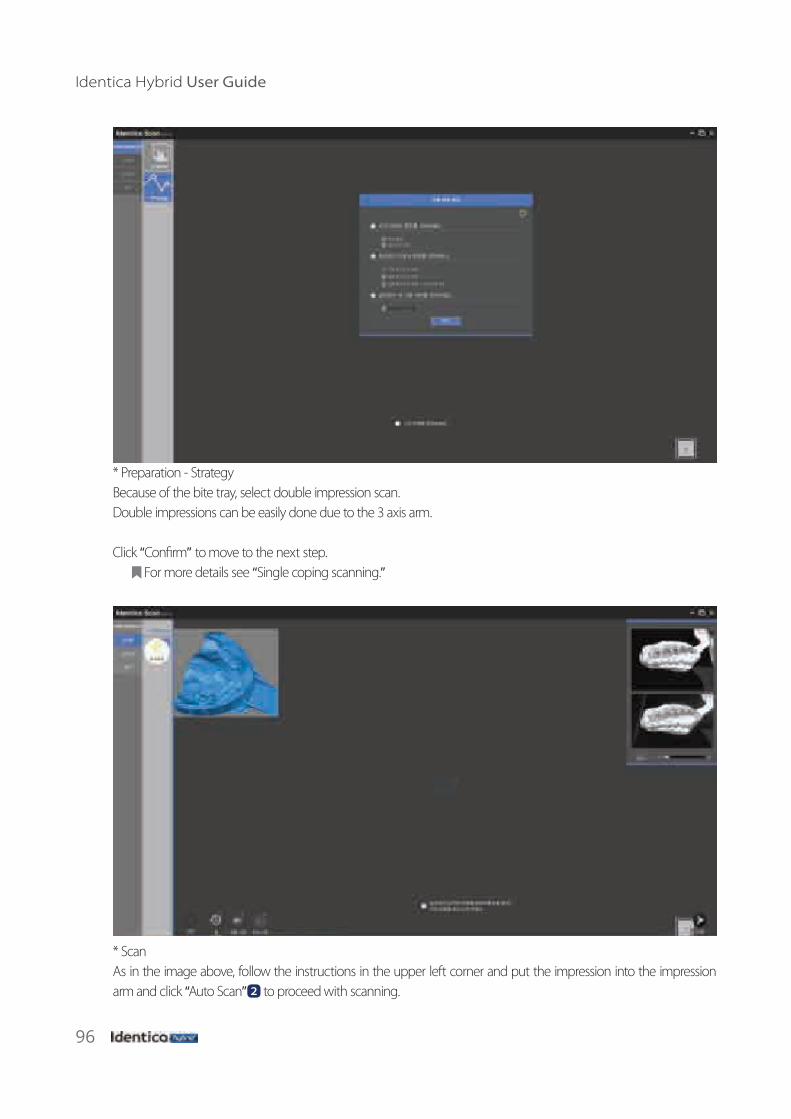
* Preparation - StrategyBecause of the bite tray, select double impression scan.Double impressions can be easily done due to the 3 axis arm.
Click “Con�rm” to move to the next step. For more details see “Single coping scanning.”
* ScanAs in the image above, follow the instructions in the upper left corner and put the impression into the impression arm and click “Auto Scan” 2 to proceed with scanning.
97Appendix - Scan case
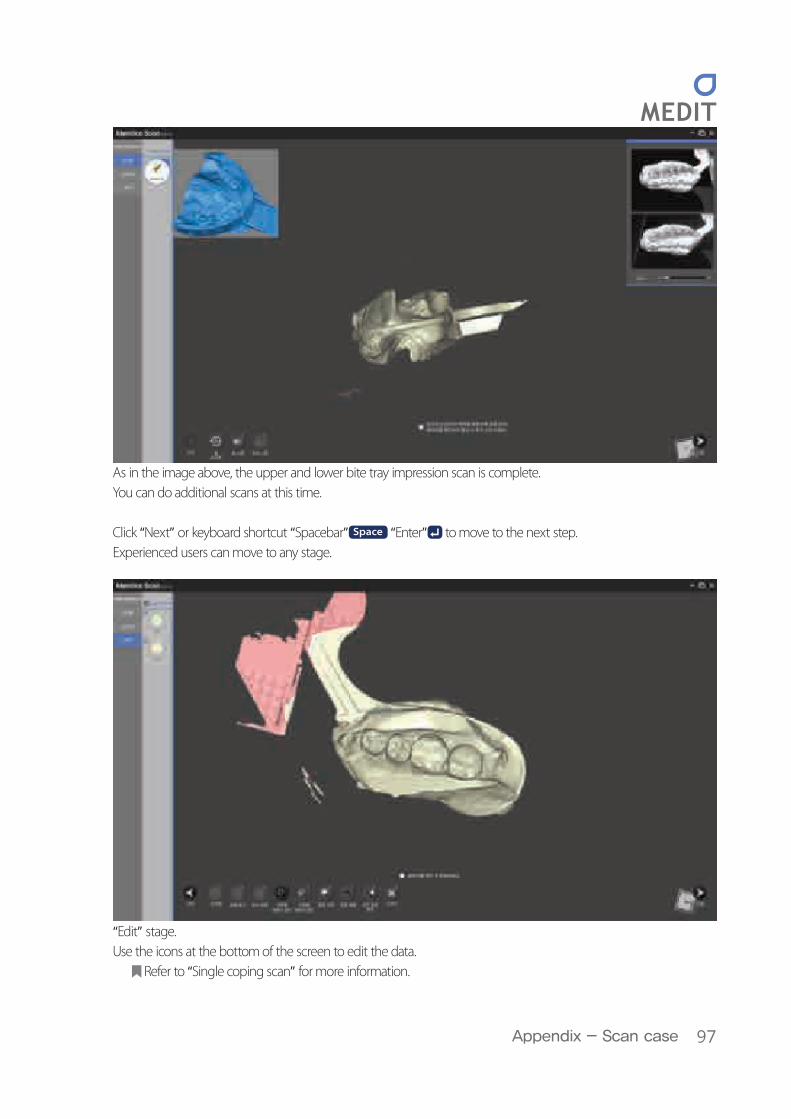
As in the image above, the upper and lower bite tray impression scan is complete.You can do additional scans at this time.
Click “Next” or keyboard shortcut “Spacebar” Space “Enter” to move to the next step.Experienced users can move to any stage.
“Edit” stage.Use the icons at the bottom of the screen to edit the data.
Refer to “Single coping scan” for more information.
98
Identica Hybrid User Guide
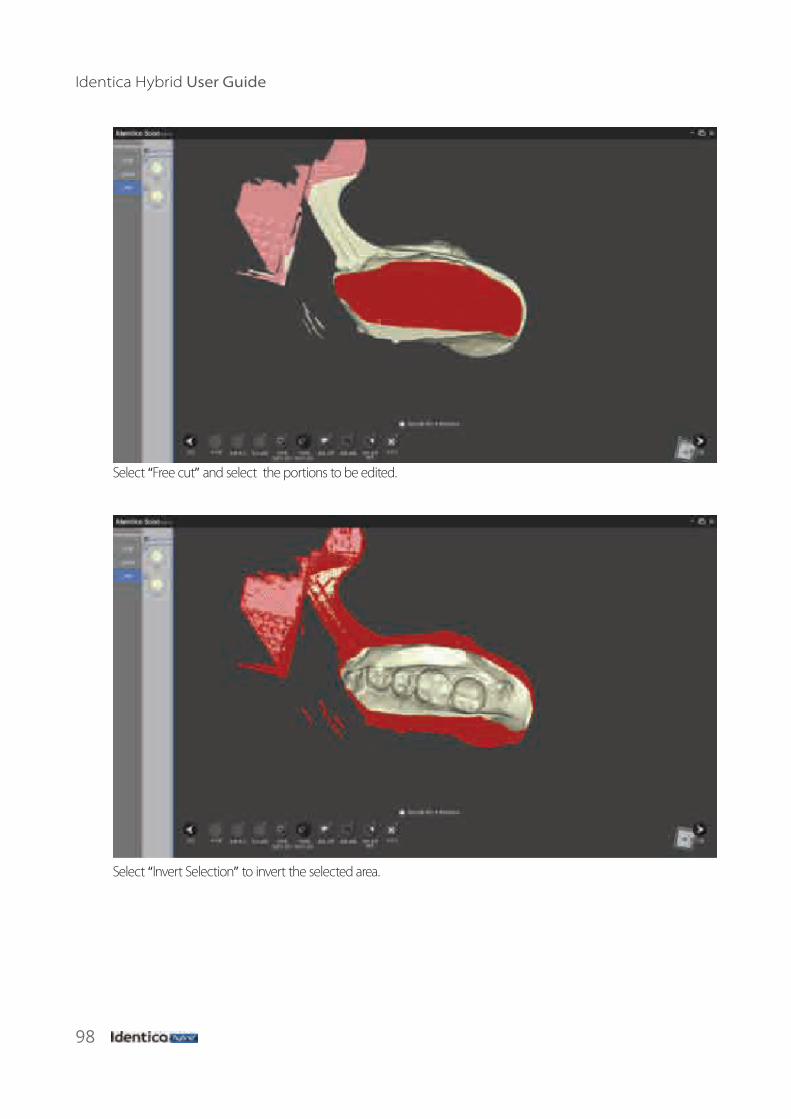
Select “Free cut” and select the portions to be edited.
Select “Invert Selection” to invert the selected area.
99Appendix - Scan case
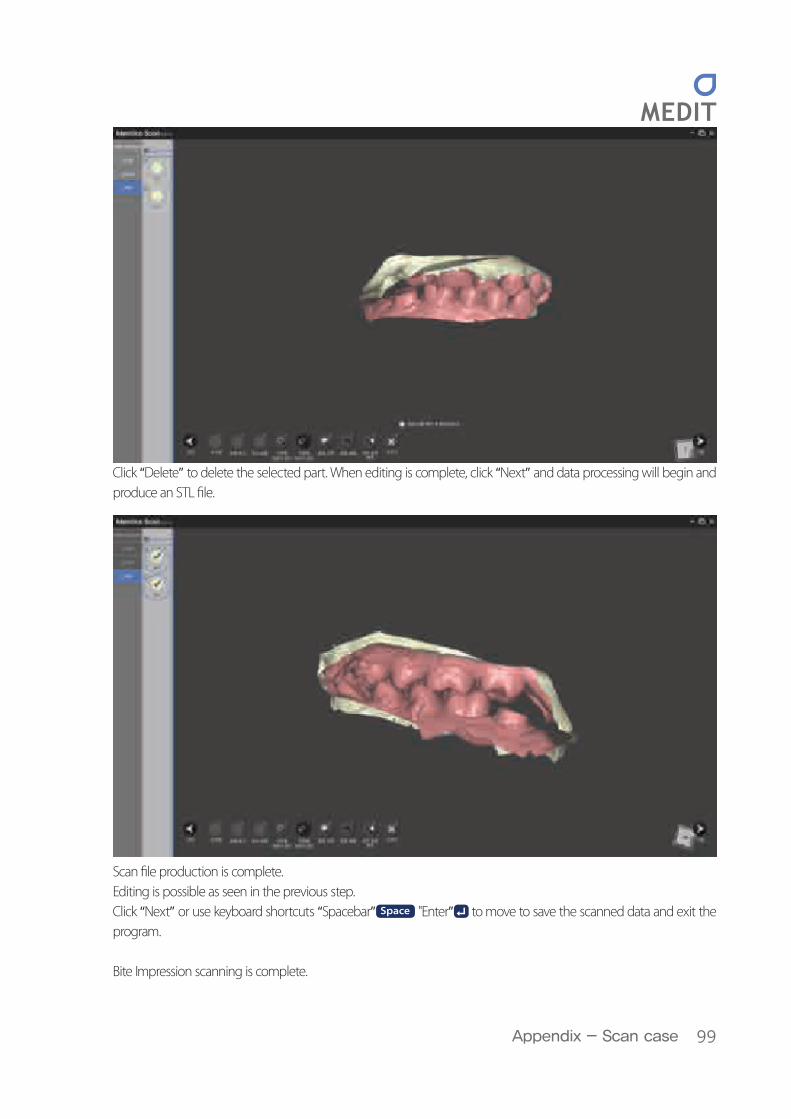
Click “Delete” to delete the selected part. When editing is complete, click “Next” and data processing will begin and produce an STL �le.
Scan �le production is complete.Editing is possible as seen in the previous step.Click “Next” or use keyboard shortcuts “Spacebar” Space "Enter” to move to save the scanned data and exit the program.
Bite Impression scanning is complete.
100
Identica Hybrid User Guide
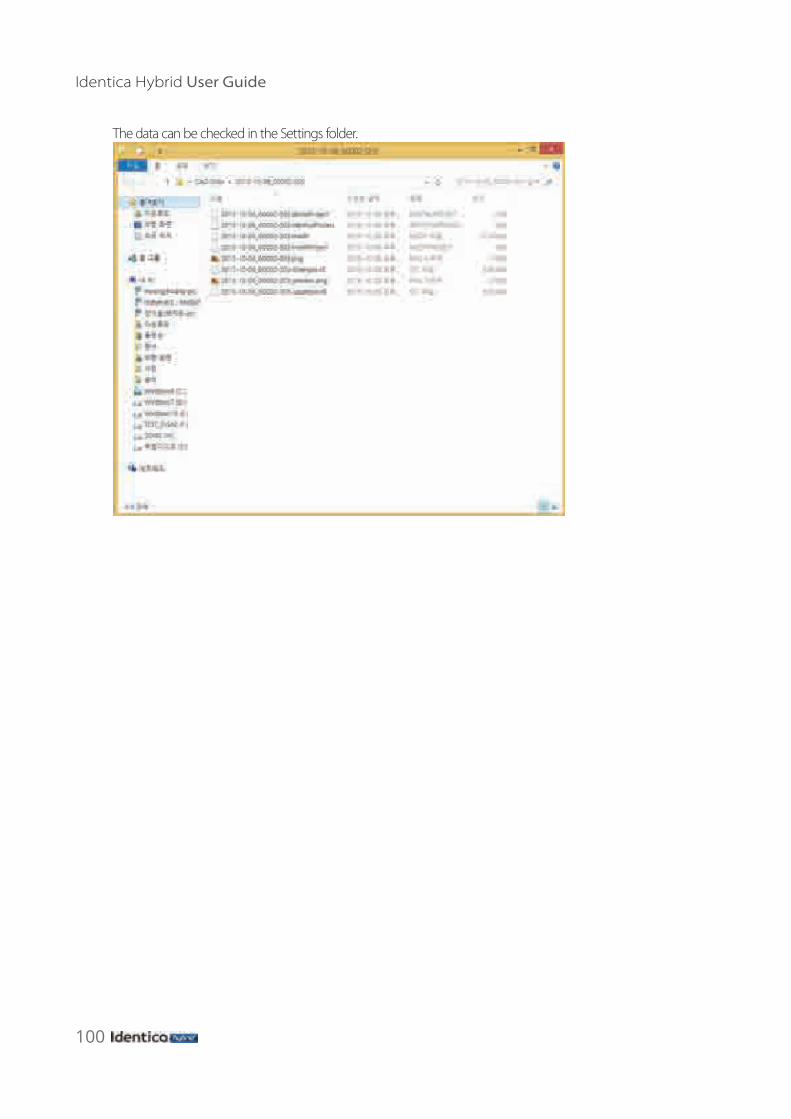
The data can be checked in the Settings folder.

101Appendix - Scan case
Implant scan adapter
1. Order form and teeth settings- Running Identica Software.
Enter the settings for the model to scan.1 Bar Pillar – 16, 14, 12, 22, 24, 262 Implant type – Retained Screw, Situ scan – No, Gingiva Scan – No, Articulator3 Bar Segment – 17, 15, 13, 11, 21, 23, 25, 274 Implant type – None, Situ scan – No, Gingiva Scan – No, Articulator5 Articulator type - None6 Enter the order details (not required).
Refer to the Identica S/W User Interface.7 Press the “Save” button.8 Press the “Scan” button to begin scanning.
When the scanner is properly connected, it will automatically proceed to the Preparation – Strategy to determine the scanning process.
102
Identica Hybrid User Guide
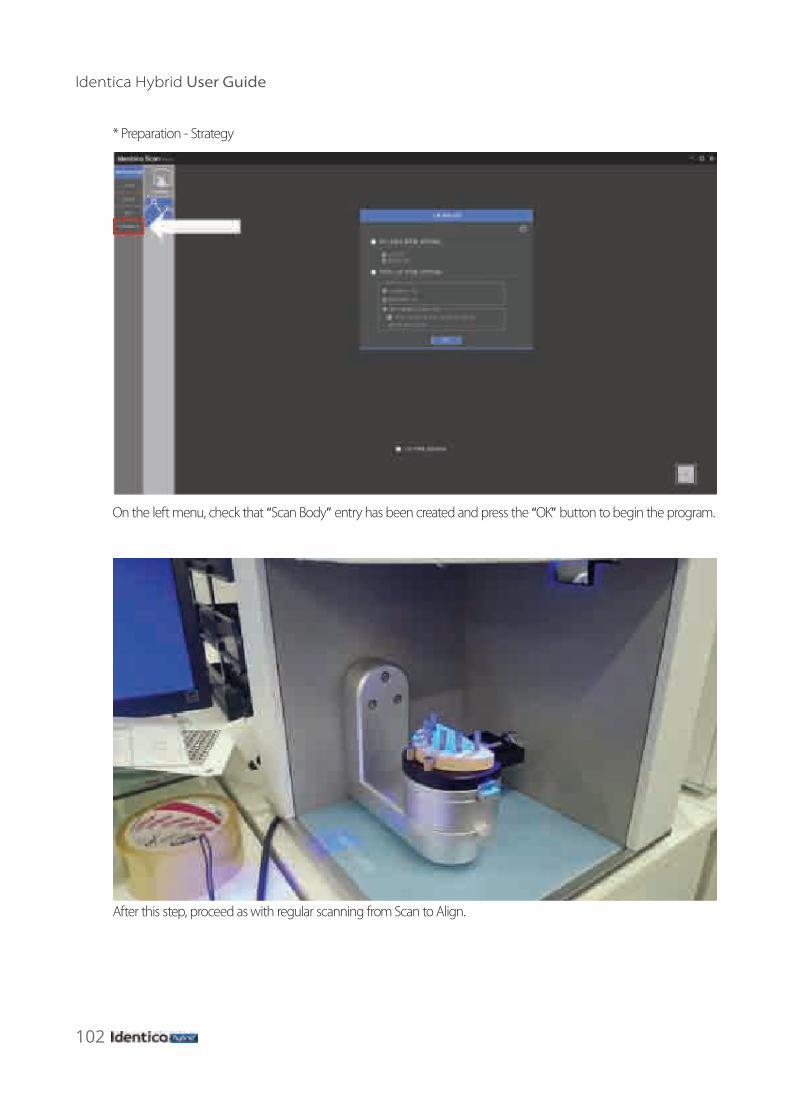
* Preparation - Strategy
On the left menu, check that “Scan Body” entry has been created and press the “OK” button to begin the program.
After this step, proceed as with regular scanning from Scan to Align.
103Appendix - Scan case
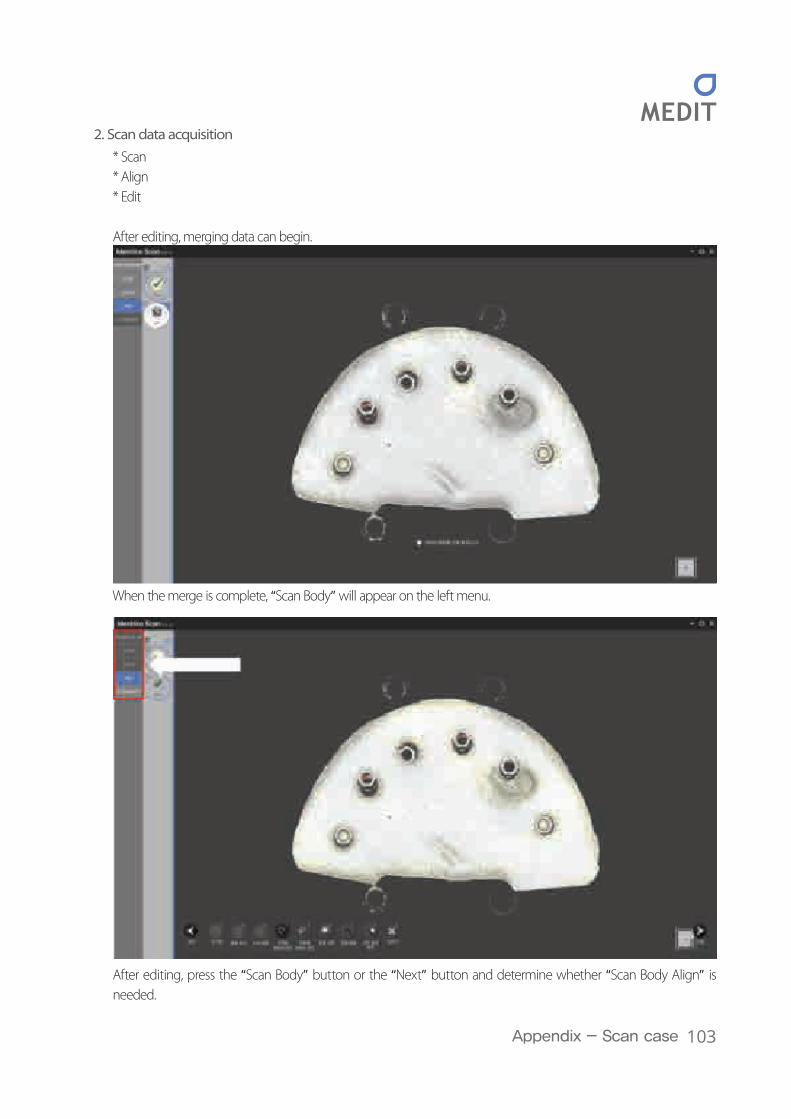
2. Scan data acquisition* Scan* Align* Edit
After editing, merging data can begin.
When the merge is complete, “Scan Body” will appear on the left menu.
After editing, press the “Scan Body” button or the “Next” button and determine whether “Scan Body Align” is needed.
104
Identica Hybrid User Guide
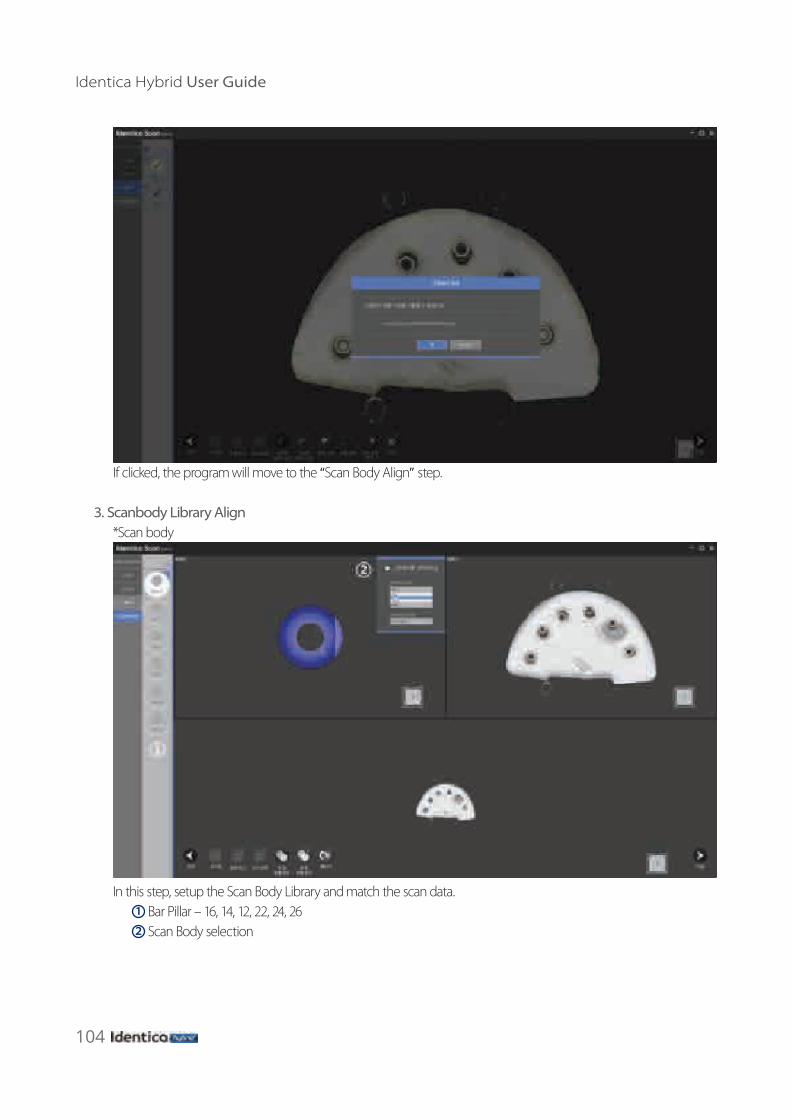
If clicked, the program will move to the “Scan Body Align” step.
3. Scanbody Library Align*Scan body
In this step, setup the Scan Body Library and match the scan data.1 Bar Pillar – 16, 14, 12, 22, 24, 262 Scan Body selection

105Appendix - Scan case
Select the Scan Body type and check that it is displayed properly in the upper left corner.
Afterwards, the Align step is the same as the sorting the scan data and library.

106
Identica Hybrid User Guide
After checking alignment, additional alignment can be processed if needed.
Each Bar Pillar is aligned with the scanbody library.
107Appendix - Scan case
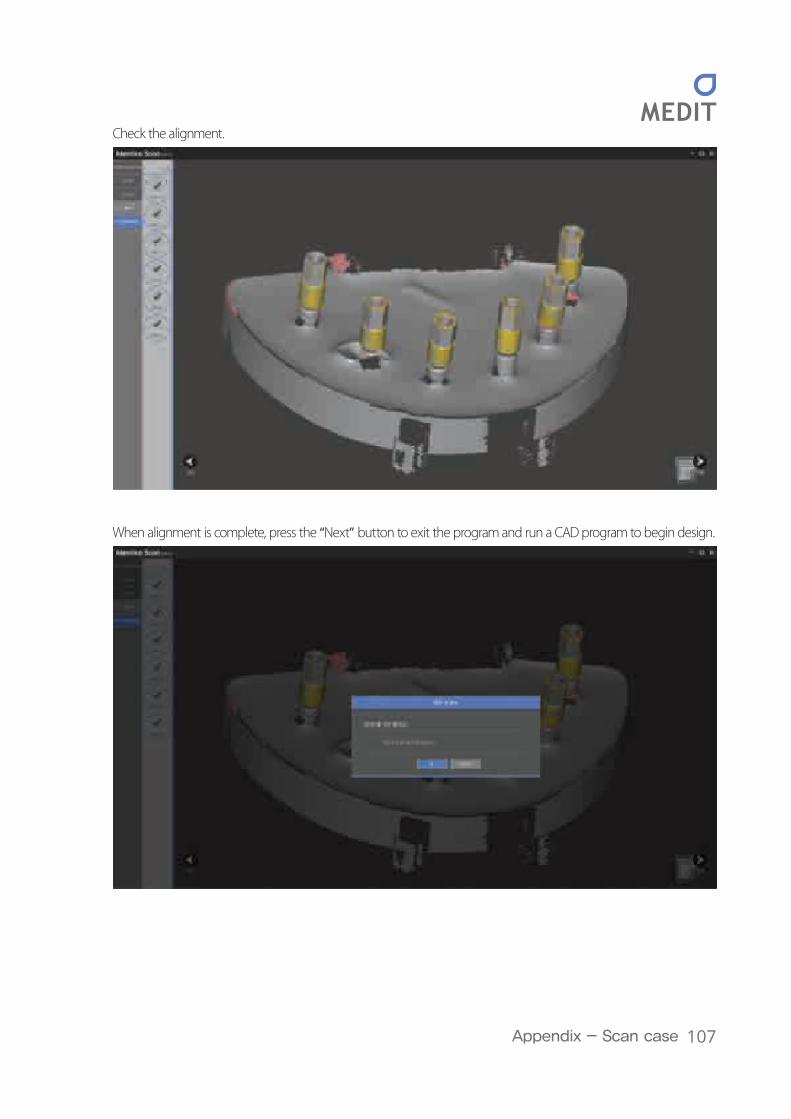
Check the alignment.
When alignment is complete, press the “Next” button to exit the program and run a CAD program to begin design.
108
Identica Hybrid User Guide
109Appendix - Scan case
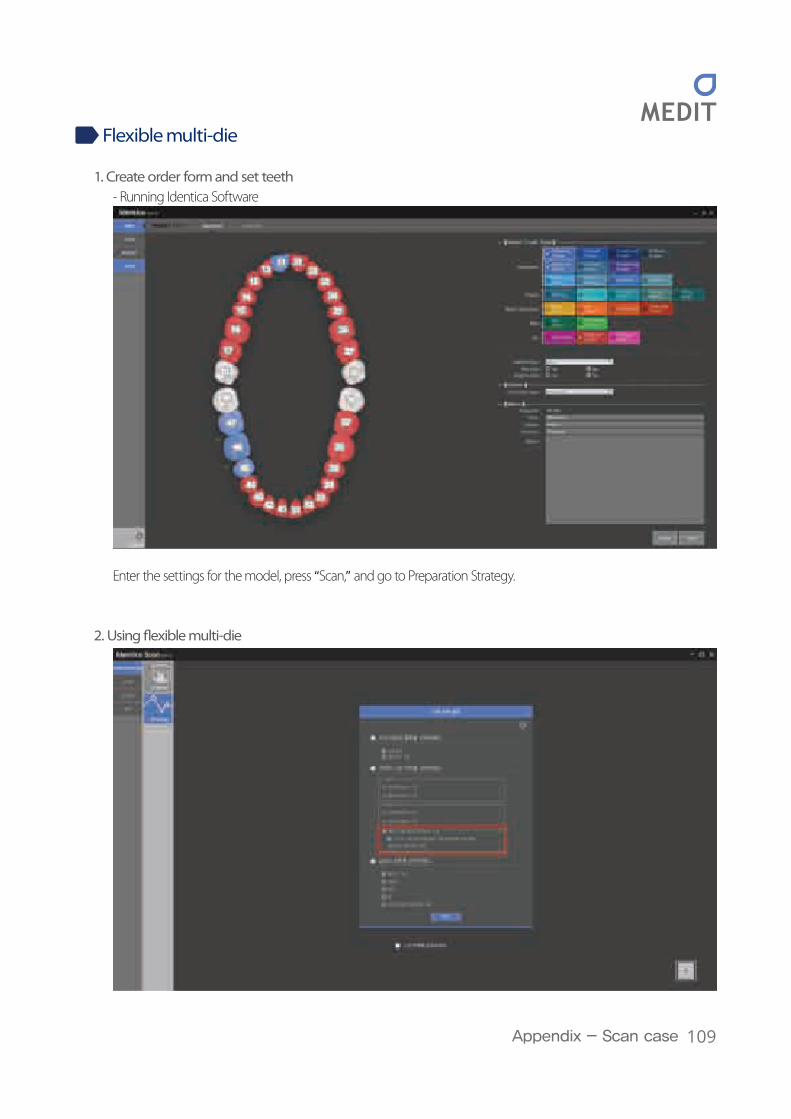
Flexible multi-die
1. Create order form and set teeth- Running Identica Software
Enter the settings for the model, press “Scan,” and go to Preparation Strategy.
2. Using �exible multi-die
110
Identica Hybrid User Guide
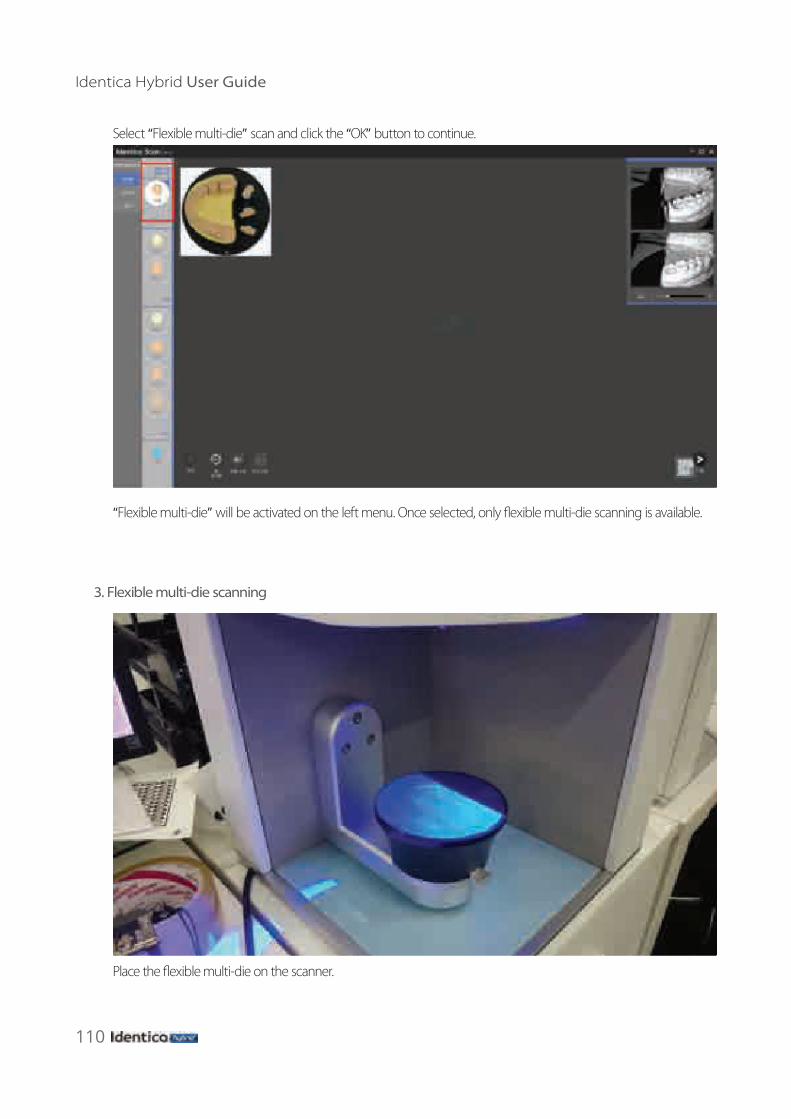
Select “Flexible multi-die” scan and click the “OK” button to continue.
“Flexible multi-die” will be activated on the left menu. Once selected, only �exible multi-die scanning is available.
3. Flexible multi-die scanning
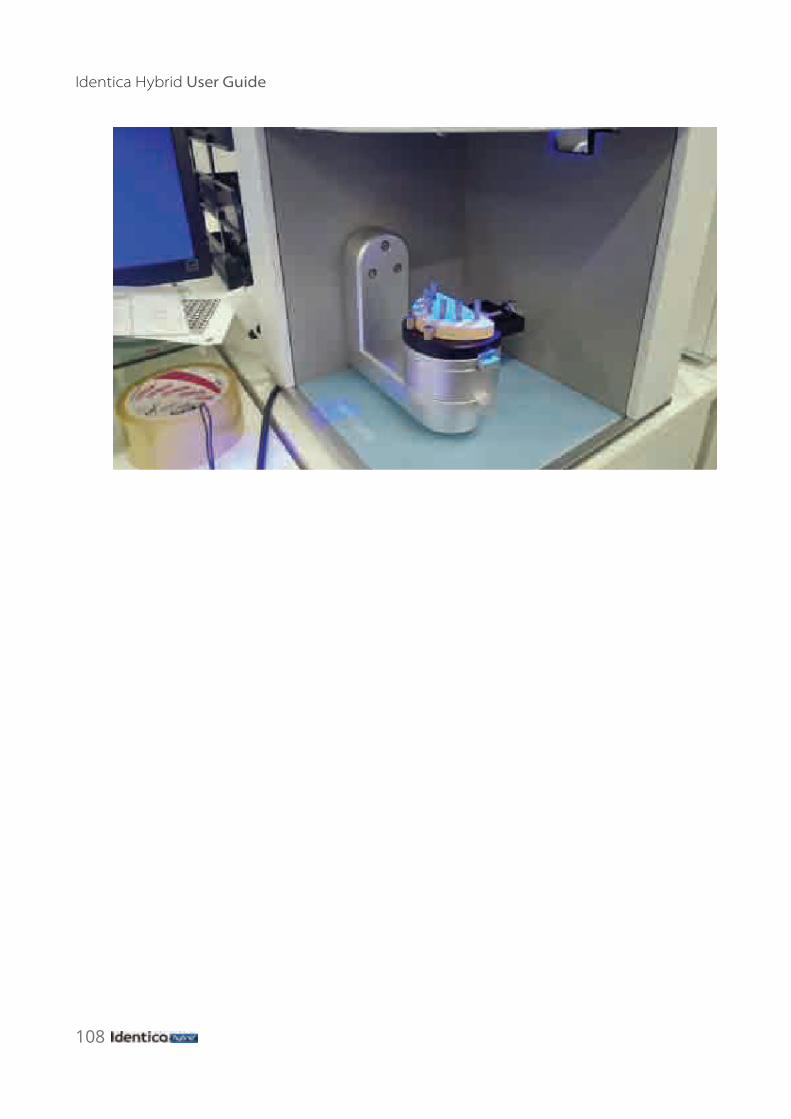
Place the �exible multi-die on the scanner.
111Appendix - Scan case
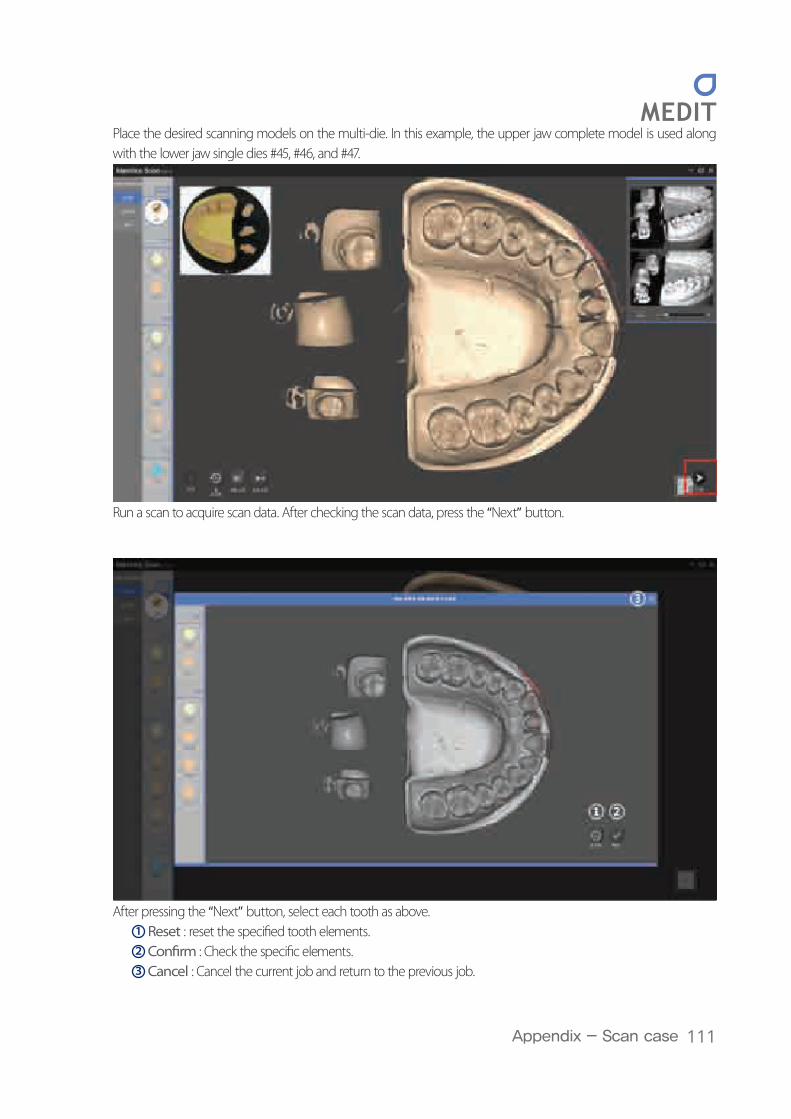
Place the desired scanning models on the multi-die. In this example, the upper jaw complete model is used along with the lower jaw single dies #45, #46, and #47.
Run a scan to acquire scan data. After checking the scan data, press the “Next” button.
After pressing the “Next” button, select each tooth as above.1 Reset : reset the speci�ed tooth elements.2 Con�rm : Check the speci�c elements.3 Cancel : Cancel the current job and return to the previous job.
112
Identica Hybrid User Guide
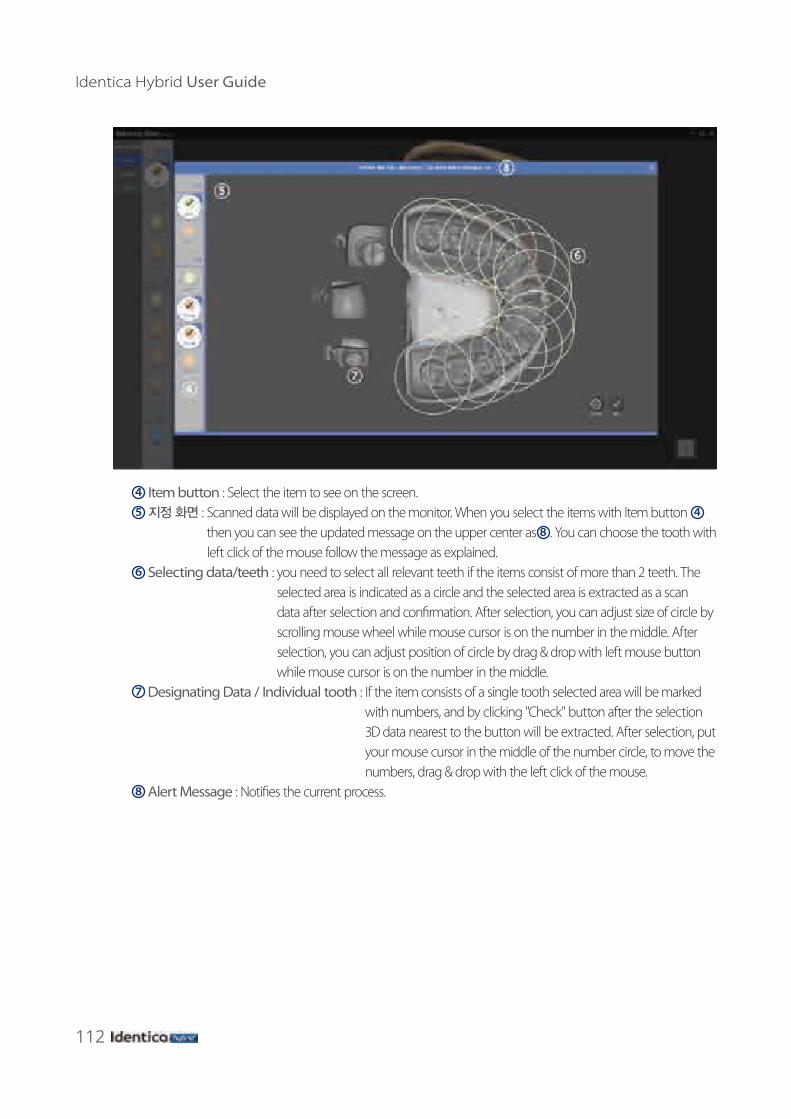
4 Item button : Select the item to see on the screen.5 지정 화면 : Scanned data will be displayed on the monitor. When you select the items with Item button 4
then you can see the updated message on the upper center as 8 . You can choose the tooth with left click of the mouse follow the message as explained.
6 Selecting data/teeth : you need to select all relevant teeth if the items consist of more than 2 teeth. The selected area is indicated as a circle and the selected area is extracted as a scan data after selection and con�rmation. After selection, you can adjust size of circle by scrolling mouse wheel while mouse cursor is on the number in the middle. After selection, you can adjust position of circle by drag & drop with left mouse button while mouse cursor is on the number in the middle.
7 Designating Data / Individual tooth : If the item consists of a single tooth selected area will be marked with numbers, and by clicking "Check" button after the selection 3D data nearest to the button will be extracted. After selection, put your mouse cursor in the middle of the number circle, to move the numbers, drag & drop with the left click of the mouse.
8 Alert Message : Noti�es the current process.
113Appendix - Scan case
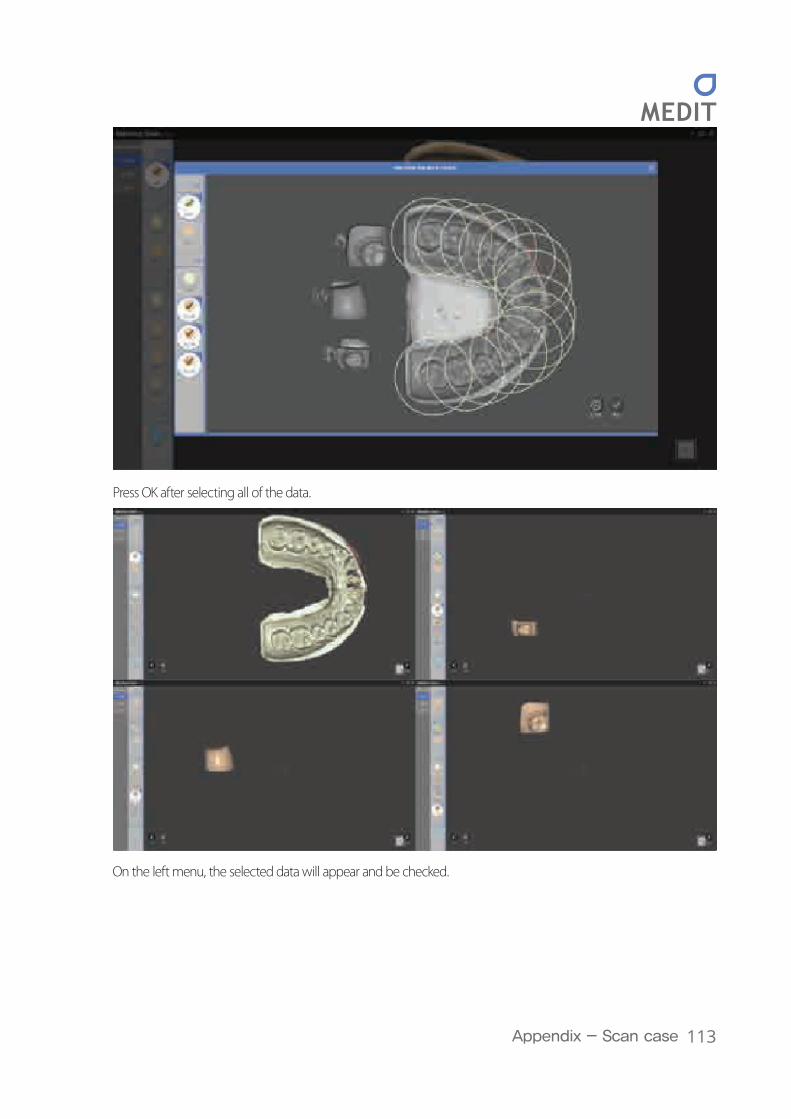
Press OK after selecting all of the data.
On the left menu, the selected data will appear and be checked.
114
Identica Hybrid User Guide
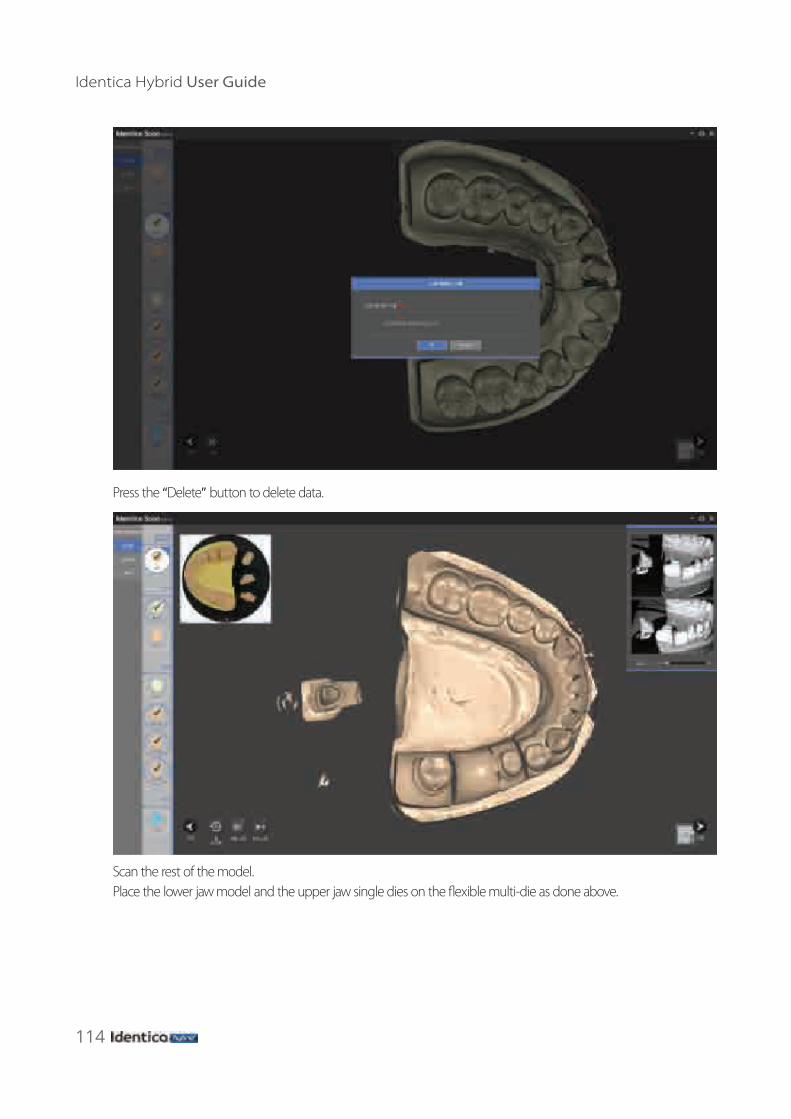
Press the “Delete” button to delete data.
Scan the rest of the model.Place the lower jaw model and the upper jaw single dies on the �exible multi-die as done above.
115Appendix - Scan case
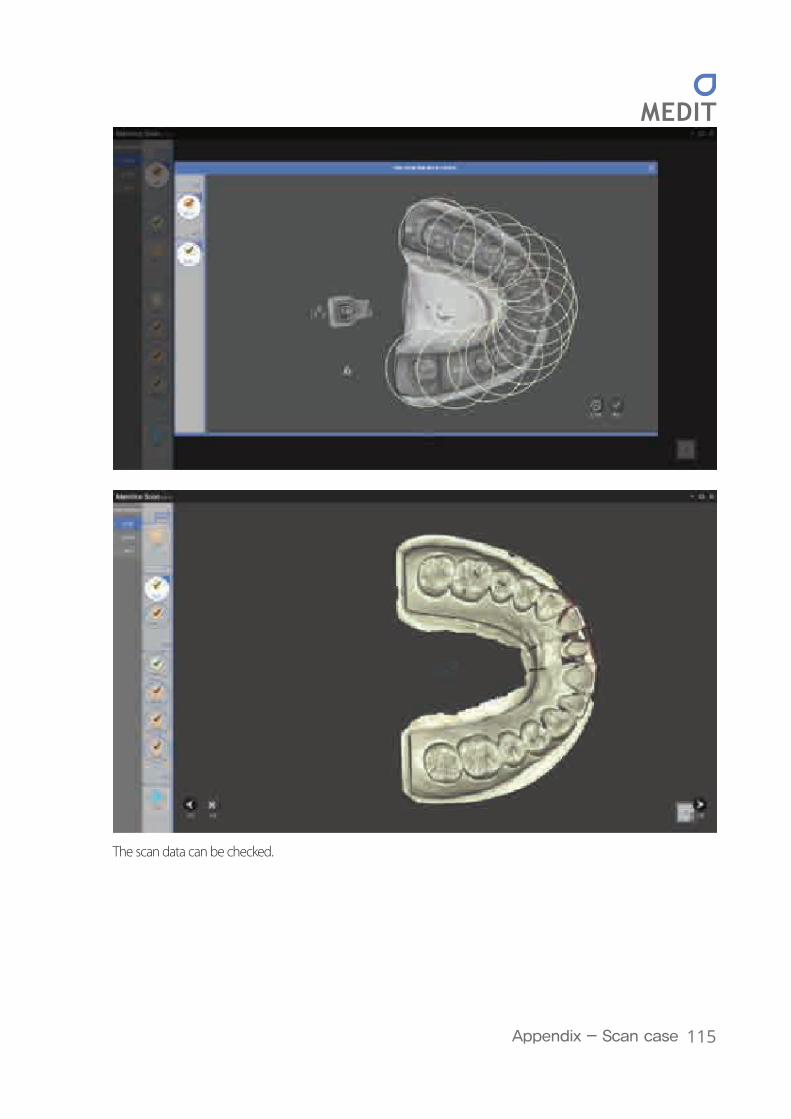
The scan data can be checked.
116
Identica Hybrid User Guide
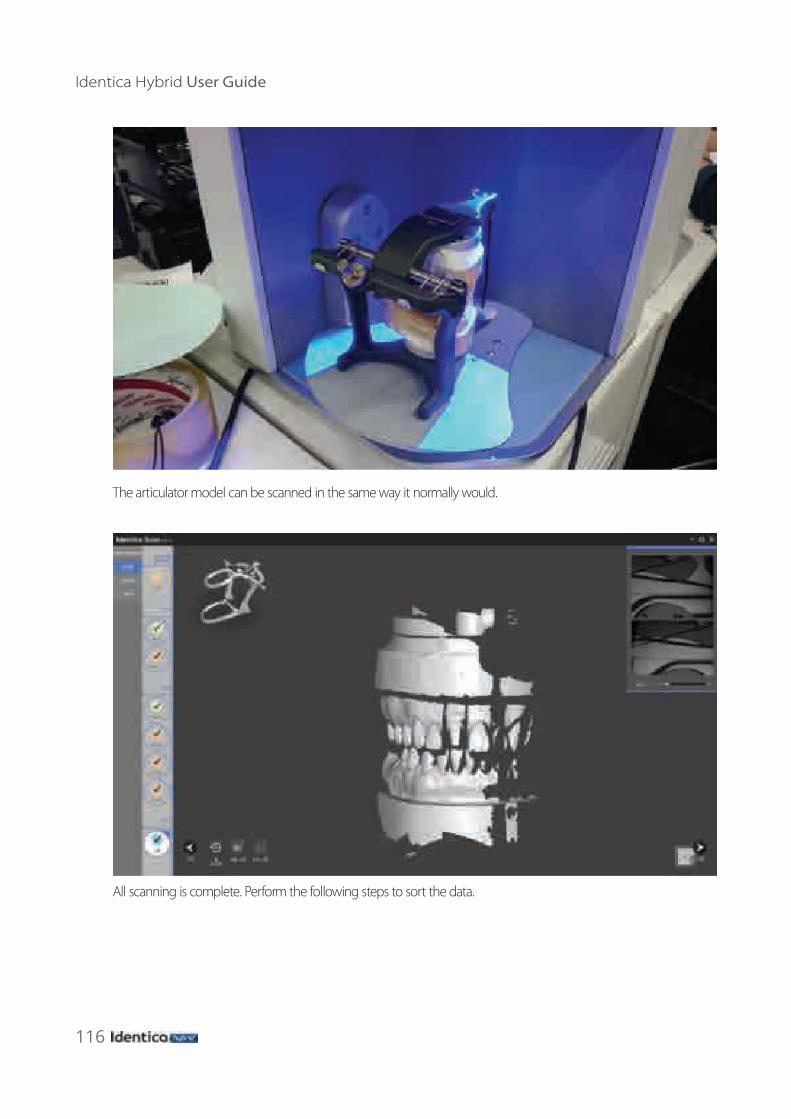
The articulator model can be scanned in the same way it normally would.
All scanning is complete. Perform the following steps to sort the data.

117Appendix - Scan case