user guide for the golden tree modification request...
TRANSCRIPT

Page 1 of 49
User Guide for the Golden Tree Modification Request System:
COST CENTERS & PROJECT CODES
Created September 2011

Page 2 of 49
Table of Contents
Topic Page
Background 3
Access to Golden Tree Modification System 3
Cost Centers
Adding a New Cost Center 4
Modifying an Existing Cost Center 11
Inactivating/Reactivating a Cost Center 15
Withdrawing/Unwithdrawing Cost Center Request 20
Project Codes
Adding a New Project Code 25
Modifying an Existing Project Code 32
Inactivating/Reactivating a Project Code 36
Withdrawing/Unwithdrawing a Project Code Request 41
Viewing Requests 46
Contacts 49

Page 3 of 49
Background Cost Centers and Project Codes are values established in the UCR Financial System (UCRFS) to assist departments and/or Organizations to track transactions. These codes are defined by departments and used at the discretion of the campus departments. These codes do not have any “institutional” meaning like the account, activity, fund or function codes and are not required as part of a transaction’s Full Accounting Unit (FAU). Although there is no institutional value associated with these codes, the use of these codes may be very important to your department financial management to assist in the tracking and reporting of revenue and/or expenses. Access Access to the Golden Tree Modification System is granted by departmental System Access Administrators (SAA) via the Enterprise Access Control System (EACS) for specific Accountability Structures. At this time, there are two roles available in this application: Transactor-CC/PC and Courtesy Copy-CC/PC. The Transactor-CC/PC roles allows the user to request new cost centers and project codes, modify titles of existing cost centers and project codes, and inactivate/re-activate existing cost centers and project codes for their Accountability Structure(s). The Courtesy Copy-CC/PC role only provides the user with an e-mail as cost centers and project codes are added, modified, and inactivated/re-activated for a given Accountability Structure. Future phases of this application will involve other Full Accounting Unit (FAU) data elements such as activity codes and fund numbers. Users assigned the Transactor-CC/PC role will access the Golden Tree Modification System from their list of Authorized Applications in R’Space.

Page 4 of 49
COST CENTERS Adding a New Cost Center STEP 1: If the transactor has been granted access to the Golden Tree Modification System for more than one
Accountability Structure, the user must select the appropriate Accountability Structure from their drop down menu and click on “continue”. Note: users assigned to one Accountability Structure will by-pass this step.

Page 5 of 49
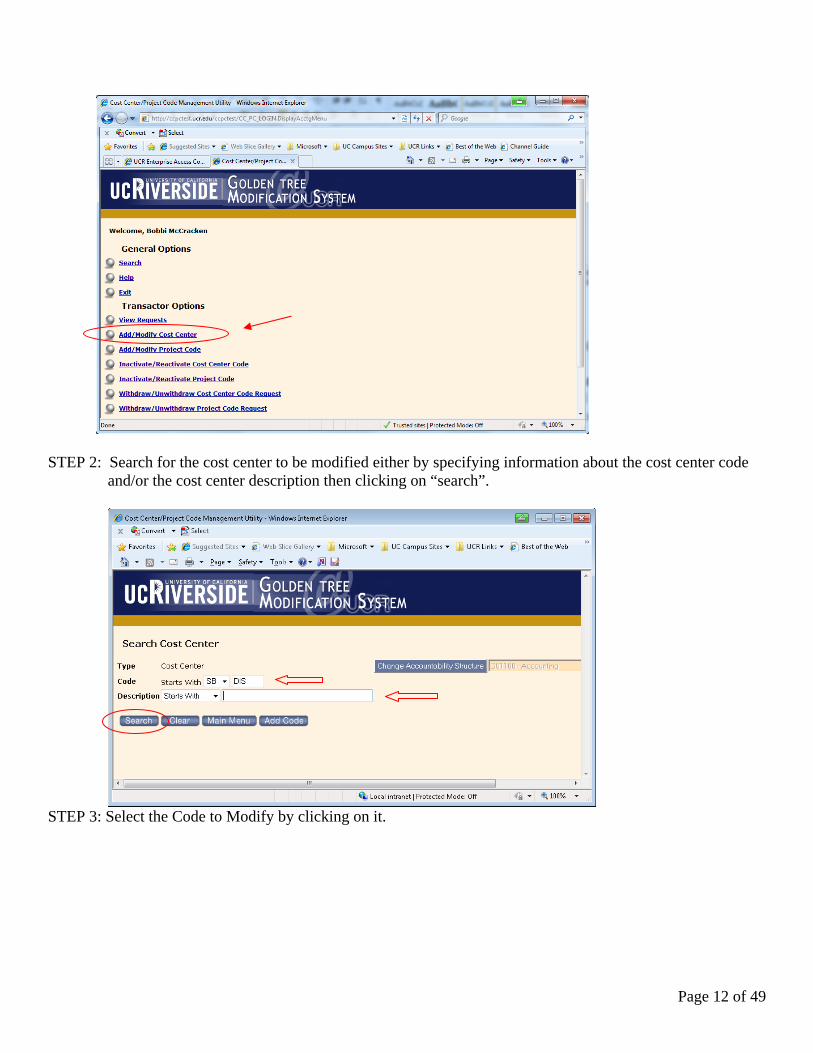
STEP 2: Under the menu Transactor Options, click on Add/Modify Cost Center.
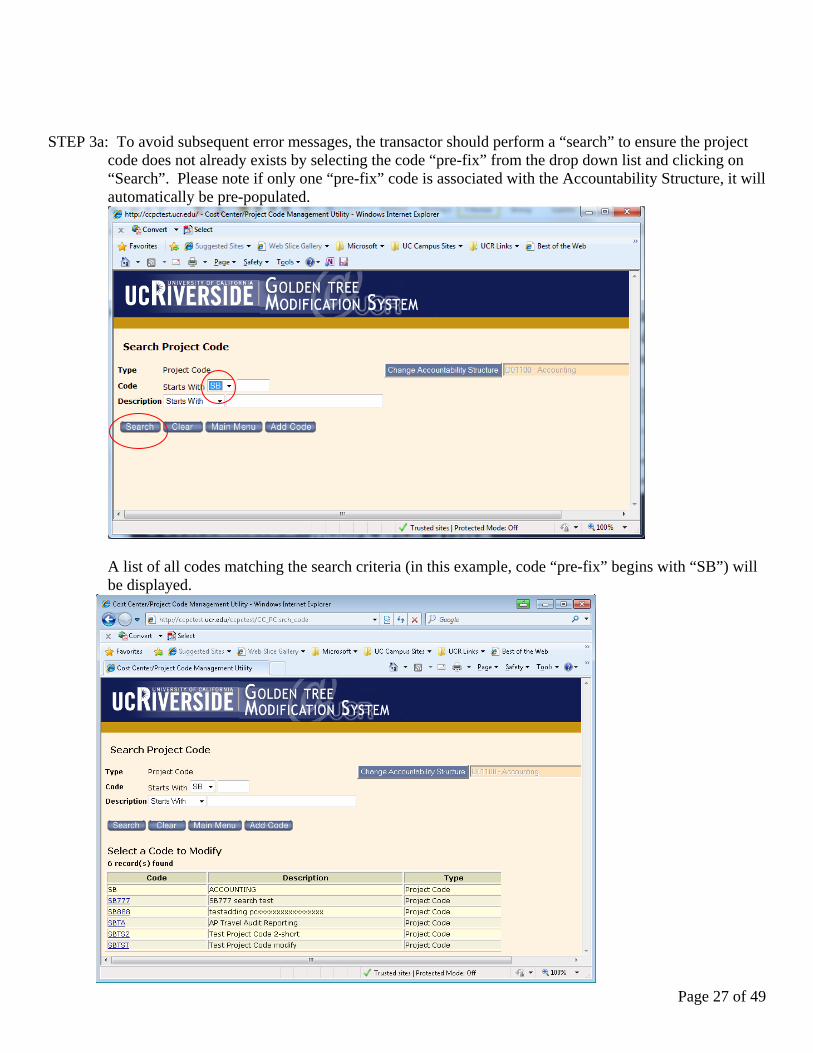
STEP 3a: To avoid subsequent error messages, the transactor should perform a “search” to ensure the cost
center code does not already exists by selecting the code “pre-fix” from the drop down list and clicking on “Search”. Please note if only one “pre-fix” code is associated with the Accountability Structure, it will automatically be pre-populated.

Page 6 of 49
A list of all codes matching the search criteria (in this example, code “pre-fix” begins with “SB”) will be displayed.
Depending upon the volume of cost centers associated with a particular Accountability Structure, searches can also be performed on specific codes by entering additional information in the field next to the code “pre-fix”.

Page 7 of 49
If a match to the search criteria exists, it will be displayed (in this example, the cost center code begins with “SBT”.
STEP 3b: To avoid duplicate cost centers with the same description, the transactor should also perform a “search” to ensure the description has not previously been assigned to a different cost center code.

Page 8 of 49
Note the description search can be performed by using either “starts with” or “contains” function. Click on “search”.
If a match exists, it will be displayed.
STEP 4: If the code does not exist, click on “Add Code” to request a new cost center code.

Page 9 of 49
STEP 5: All fields designated in red italics are required.
a. Under the “Code Requested” area, select the appropriate two-digit pre-fix for the new Cost Center from the drop down list.
b. Enter up to three characters (alpha and/or numeric) in the field next to the pre-fix. The total Cost Center value (pre-fix plus suffix) may not exceed 5 characters.
c. Enter the Short Description (up to 10 characters). This is an optional field. d. Enter the Long Description (up to 30 characters). This is a required field. This description will
appear on the Golden Tree Viewer as well as the FAU description field of the various UCR applications.
e. A Comment can be optionally included. Special instructions to Accounting should be included here.
f. Click on “Submit” to forward the request to Accounting. (“Save and Exit” will save the item as “work-in-progress” for submission at a later time. “Cancel” will delete the action.)
In the example below, the user is completing a request to add Cost Center “SBSLP”.

Page 10 of 49
STEP 6: A confirmation that the request has been successfully submitted will display. Please allow 7-10 working days for your request to be processed.
STEP 7: The requestor will receive an e-mail when the request has been approved or denied by the Accounting Office. Please note that all other Cost Center/Project Code Transactors and Courtesy Copy roles associated

Page 11 of 49
with the same Accountability Structure will also be copied on the e-mail. Question will be directed to the individual that initiated the cost center request. When the code has been approved, it will appear on the Golden Tree Viewer. If the code is denied, the e-mail will include the reason.
“MODIFYING” an existing Cost Center’s Description Please note Transactors have the ability to modify the description of any cost center under their Accountability Structure(s); there is no approval process required by the Accounting Office. However, department financial manager may want to develop departmental procedures and guidelines for Transactors. STEP 1: Determine the Cost Center Description requiring modification. Under the menu Transactor Options, click on Add/Modify Cost Center.
Please note that all other Transactors and Courtesy Copy roles for this Accountability Structure will be copied on the e-mail notification.
Questions about the cost center will be directed to the individual that initiated the request
Page 12 of 49
STEP 2: Search for the cost center to be modified either by specifying information about the cost center code
and/or the cost center description then clicking on “search”.
STEP 3: Select the Code to Modify by clicking on it.

Page 13 of 49
STEP 4: Modify the description(s) and click on “Update”. Remember: the Long Description is a mandatory
field and can be a maximum of 30 characters long; this is the description that appears on Golden Tree Viewer as well as the FAU description field of the various UCR applications. The Short Description is optional and can be a maximum of 10 characters long and is only displayed in the UCRFS Chart-field Attributes screen. Comments are optional, but it is recommended that this field be used to document the reason for the description modification.

Page 14 of 49
STEP 5: The system will ask the user to confirm the change; click on “Submit” to proceed (to withdraw the modification, click on “Cancel”.)
A confirmation that the request has been successfully submitted will display.
STEP 6: An e-mail will be sent to all Transactors and Courtesy Copy roles confirming the modification to the Cost Center.

Page 15 of 49
“INACTIVATING” or “REACTIVATING” a Cost Center

Page 16 of 49
Please note Transactors have the ability to inactivate and reactivate any cost center under their Accountability Structure(s); there is no approval process required by the Accounting Office. However, department financial managers may want to develop departmental procedures and guidelines for Transactors. STEP 1: Determine the cost center to inactivate or reactivate. Under the menu Transactor Options, click on Inactivate/Reactivate Cost Center Code
STEP 2: Search for the Cost Center to be “inactivated” (or “reactivated”).

Page 17 of 49
STEP 3a-Inactivating a Cost Center: From the Search grid displayed, click on “Inactivate” under the Action column. The system will query UCRFS to determine if the code is eligible to be inactivated. A code is eligible to be inactivated if there is no current fiscal year activity in the Actuals ledger under the cost center AND there are no encumbrance balances associated with the cost center. Please note this process may take several seconds to complete while the sytem queries the database.

Page 18 of 49
If the code is eligible for “inactivation”, the system will update the first five characters of the Cost Center description to “INACT” and updates the code status to “I” for Inactive. This Cost Center will no longer be available for use on transactions.
Upon inactivation, an e-mail will be sent to all Transactors and Courtesy Copy roles associated with the Accountability Structure. Questions will be directed to the individual that initiated the inactivation request.

Page 19 of 49
STEP 3b-Reactivating a Cost Center: From the Search grid displayed, click on “Reactivate” under the Action column.
Once “reactivate” is clicked, the Cost Center description will automatically update to remove “INACT” from the cost center description and the Status will change to “A” for Active. The code is now available for use.

Page 20 of 49
An e-mail will be sent to all Transactors and Courtesy Copy roles associated with the Accountability Structure. Questions will be directed to the individual that initiated the re-activation request.

Page 21 of 49
WITHDRAW/UNWITHDRAW a Cost Center Request When a Transactor selects “Save and Exit” when adding a new cost center, the item will remain in the Accountability Structures “work-in-progress”. If the code will not be added, the Transactor may “withdraw” the request to add the cost center to remove the request from the work in progress grid. Additionally, items that have previously been withdrawn can be “un-withdrawn” and returned to the work in progress status. STEP1: Determine the cost center request to withdraw or un-withdraw. Under the menu Transactor Options, click on Withdraw/Unwithdraw Cost Center Code
STEP 2a-Withdrawing a request: Search the Work In Progress for the pending cost center code by selecting the appropriate code pre-fix, selecting WIP-Dept under the status field, and clicking on “search”.

Page 22 of 49
The codes matching the search criteria will display in the grid. Click on “Withdraw” under the Action column to remove the item from the department work in progress grid:
The system will display the following screen where comments regarding the reason for the withdrawl can be entered. Click on “Submit” to withdraw the request.

Page 23 of 49
A confirmation will display. An e-mail confirmation will not be sent.
STEP 2b: Unwithdrawing a previously withdrawn request: Search the Work In Progress for the pending cost center code by selecting the appropriate code pre-fix, selecting Withdraw under the status field, and clicking on “search”.

Page 24 of 49
The codes matching the search criteria will display in the grid. Click on “Unwithdraw” under the Action column to move the item back to the department work in progress grid:
The system will display the following screen where comments regarding the reason for the un-withdrawing can be entered. Click on “Submit” to un-withdraw the request.

Page 25 of 49
A confirmation of the action will display. An e-mail confirmation will not be sent. The code will now appear in the department Work In Progress grid.

Page 26 of 49
PROJECT CODES Adding a New Project Code STEP 1: If the transactor has been granted access to the Golden Tree Modification System for more than one
Accountability Structure, the user must select the appropriate Accountability Structure from their drop down menu and click on “continue”. Note: users assigned to one Accountability Structure will by-pass this step.
STEP 2: Under the menu Transactor Options, click on Add/Modify Project Code.
Page 27 of 49
STEP 3a: To avoid subsequent error messages, the transactor should perform a “search” to ensure the project
code does not already exists by selecting the code “pre-fix” from the drop down list and clicking on “Search”. Please note if only one “pre-fix” code is associated with the Accountability Structure, it will automatically be pre-populated.
A list of all codes matching the search criteria (in this example, code “pre-fix” begins with “SB”) will be displayed.

Page 28 of 49
Depending upon the volume of project codes associated with a particular Accountability Structure, searches can also be performed on specific codes by entering additional information in the field next to the code “pre-fix”.
If a match to the search criteria exists, it will be displayed (in this example, the project code begins
with “SB” followed by the letter “T”.

Page 29 of 49
STEP 3b: To avoid duplicate cost centers with the same description, the transactor should also perform a “search” to ensure the description has not previously been assigned to a different cost center code. Note the description search can be performed by using either “starts with” or “contains” function. Click on “search”.
If a match exists, it will be displayed.

Page 30 of 49
STEP 4: If the desire code does not exist, click on “Add Code” to request a new project code.
STEP 5: All fields designated in red italics are required.
a. Under the “Code Requested” area, select the appropriate two-digit pre-fix for the new Project Coder from the drop down list.
b. Enter up to three characters (alpha and/or numeric) in the field next to the pre-fix. The total Project Code value (pre-fix plus suffix) may not exceed 5 characters. c. Special Note: Project Codes do not have to begin with the pre-defined prefix. However, if NO prefix is selected, the Project Code must start with a NUMBER; the maximum length of this type of project code is 5 characters. Please be aware, Project Codes beginning with a number are assigned on a first-come- first-serve basis and will not appear under your departmental pre-assigned prefix; so it is important to include your department code within the project code description to readily identify your departmental codes.
d. Enter the Short Description (up to 30 characters). This is a require field. This description displays on the Golden Tree Viewer as well as the FAU description field of the various UCR applications.
e. Enter the Long Description (up to 254 characters). This is a required field. This description appears in the UCRFS Chart field Attributes and should provide additional information regarding how the code will be used.
f. A Comment can be optionally included. Special instructions to Accounting should be included here. g. Click on “Submit” to forward the request to Accounting. (“Save and Exit” will save the item as
“work-in-progress” for submission at a later time. “Cancel” will delete the action.)

Page 31 of 49
In the example below, the user completed a request to add Project Code “SBTA”.

Page 32 of 49
STEP 6: Upon clicking on “submit”, a confirmation that the request has been successfully submitted will display. Please allow 7-10 working days for your request to be processed.
STEP 7: The requestor will receive an e-mail when the request has been approved or denied by the Accounting Office. Please note that all other Cost Center/Project Code Transactors and Courtesy Copy roles associated with the same Accountability Structure will also be copied on the e-mail. Questions will be directed to the individual that initiated the project code request. When the code has been approved, it will appear on the Golden Tree Viewer. If the code is denied, the e-mail will include the reason.
Please note that all other Transactors and Courtesy Copy roles for this Accountability Structure will be copied on the e-mail notification.
Questions will be directed to the individual that initiated the request.

Page 33 of 49
“MODIFYING” an existing Project Code’s Description Please note Transactors have the ability to modify the description of project codes that utilize the “pre-fixes” associated with their Accountability Structure(s)*; there is no approval process required by the Accounting Office. However, department financial managers may want to develop departmental procedures and guidelines for Transactors. * Please note that users may not modify the description of project codes using numeric pre-fixes using this system. STEP 1: Determine the Project Code Description requiring modification. Under the menu Transactor Options, click on Add/Modify Project Code.
STEP 2: Search for the project code to be modified either by specifying information about the project code
and/or the project code description then clicking on “search”. If a search is being performed on the project code description, the query will be performed against the project code short description only.

Page 34 of 49
STEP 3: Select the Code to Modify by clicking on it.
STEP 4: Modify the description(s) and click on “Update”. Remember: the Short Description is a mandatory
field and can be a maximum of 30 characters long; this is the description that appears on Golden Tree Viewer as well as the FAU description field of the various UCR applications. The Long Description can be a maximum of 256 characters long and is only displayed in the UCRFS Chart-field Attributes screen. Comments are optional, but it is recommended that this field be used to document the reason for the description modification.
Page 35 of 49
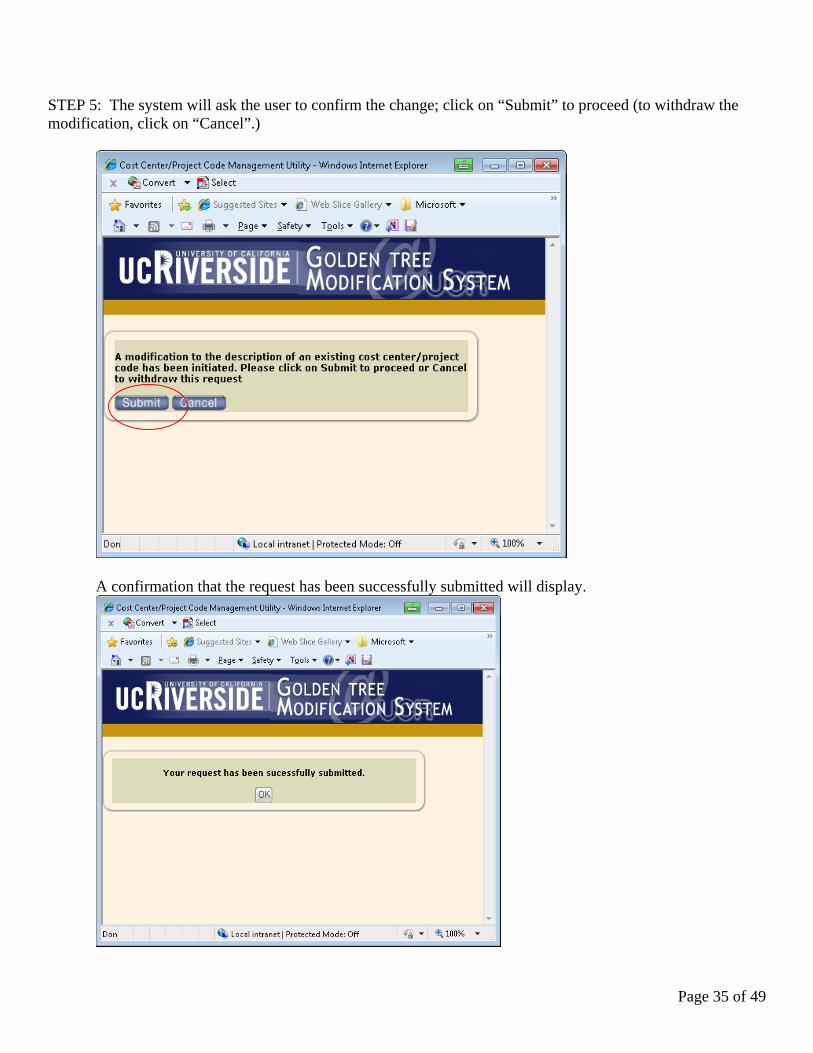
STEP 5: The system will ask the user to confirm the change; click on “Submit” to proceed (to withdraw the modification, click on “Cancel”.)
A confirmation that the request has been successfully submitted will display.

Page 36 of 49
STEP 6: An e-mail will be sent to all Transactors and Courtesy Copy roles confirming the modification to the Project Code. Questions will be directed to the individual that initiated the project code request.

Page 37 of 49
“INACTIVATING” or “REACTIVATING” a Project Code Please note Transactors have the ability to inactivate and reactivate project codes under their Accountability Structure(s)*; there is no approval process required by the Accounting Office. However, department financial managers may want to develop departmental procedures and guidelines for Transactors. * Please note that users may not inactivate/reactivate of project codes using numeric pre-fixes STEP 1: Determine the project code to inactivate or reactivate. Under the menu Transactor Options, click on Inactivate/Reactivate Project Code

Page 38 of 49
STEP 2: Search for the Project Code to be “inactivated” (or “reactivated”).
STEP 3a-Inactivating a Project Code: From the Search grid displayed, click on “Inactivate” under the Action column. The system will query UCRFS to determine if the code is eligible to be inactivated. A code is eligible to be inactivated if there is no current fiscal year activity in the Actuals ledger under the project code AND there are no encumbrance balances associated with the project code. Please note this process may take several seconds to complete while the system queries the database.

Page 39 of 49
If the code is eligible for “inactivation”, the system will update the first five characters of the Project Code description to “INACT” and updates the code status to “I” for Inactive. This Project Code will no longer be available for use on transactions.
An e-mail will be sent to all Transactors and Courtesy Copy roles associated with the Accountability Structure. Questions will be directed to the individual that initiated the project code inactivation.

Page 40 of 49
STEP 3b-Reactivating a Project Code: Search for the code and from the Search results grid, click on “Reactivate” under the Action column.
Once “reactivate” is clicked, the Project Code description will automatically update to remove “INACT” from the project code description and the Status will change to “A” for Active. The code is now available for use.

Page 41 of 49
An e-mail will be sent to all Transactors and Courtesy Copy roles associated with the Accountability Structure. Questions will be directed to the individual that initiated the project code re-activation.

Page 42 of 49
WITHDRAW/UNWITHDRAW a Project Code Request When a Transactor selects “Save and Exit” when adding a new project code, the item will remain in the Accountability Structures “work-in-progress”. If the code will not be added, the Transactor may “withdraw” the request to add the project code and remove the request from the work in progress grid. Additionally, items that have previously been withdrawn can be “un-withdrawn” are returned to the work in progress status. STEP1: Determine the project code request to withdraw or un-withdraw. Under the menu Transactor Options, click on Withdraw/Unwithdraw Project Code
STEP 2a-Withdrawing a request: Search the Work In Progress for the pending project code by selecting the appropriate code pre-fix, selecting WIP-Dept under the status field, and clicking on “search”.

Page 43 of 49
The codes matching the search criteria will display in the grid. Click on “Withdraw” under the Action column to remove the item from the department work in progress grid:
The system will display the following screen where comments regarding the reason for the withdrawl can be entered. Click on “Submit” to withdraw the request.

Page 44 of 49
A confirmation of the withdrawl will display. An e-mail will not be sent.
STEP 2b: Unwithdrawing a previously withdrawn request: Search the Work In Progress for the pending project center code by selecting the appropriate code pre-fix, selecting Withdraw under the status field, and clicking on “search”.

Page 45 of 49
The codes matching the search criteria will display in the grid. Click on “Unwithdraw” under the Action column to move the item back to the department work in progress grid:
The system will display the following screen where comments regarding the reason for un-withdrawing the item can be entered. Click on “Submit” to un-withdraw the request and move back to the work in progress grid.

Page 46 of 49
A confirmation of the action will display. An e-mail will not be sent. The code will now appear in the department Work In Progress grid.

Page 47 of 49
“VIEWING” a Request This functionality can be used to determine the status of a request, to identify the individual that initiated the request, to see the history of a particular code, etc. STEP 1: Under the menu Transactor’s Options, select View Requests.
STEP 2: Enter the desired search criteria and click on “Search”. By default the Accountability Structure will default to the last one used (or selected) by the Transactor. The search results can be limited by entering information in one or more of following fields:
a.) Enter a date range in the “Requested Between” fields; b.) Select “Type” – Cost Center or Project Code; c.) Enter a two-digit prefix in “Code” starts with; d.) Enter part of the description in “Description” starts with. e) Selecting the appropriate “Status”:
i. “WIP-Dept” these are requests saved by the department and not yet “submitted”; ii. “Requested” these are requests that have been “submitted” by the department, but pending
action by the Accounting Office; iii. “WIP-Acctg” these are requests the Accounting Office is still working on; iv. “Activated” these are requests that have been approved/activated; v. “Denies” these are requests that have been rejected by the Accounting Office.

Page 48 of 49
STEP 3: Requests matching the search criteria will be displayed. In the screen shot below, the search criteria was defined as all request initiated between 04/01/2011 and 04/30/2011 for both cost centers and project codes beginning with “SB” under Accountability Structure D01100.
