user guide for cisco works assistant
TRANSCRIPT

User Guide for CiscoWorks Assistant Software Release 1.2
Americas HeadquartersCisco Systems, Inc.170 West Tasman DriveSan Jose, CA 95134-1706 USAhttp://www.cisco.comTel: 408 526-4000
800 553-NETS (6387)Fax: 408 527-0883
Text Part Number: OL-17904-01

THE SPECIFICATIONS AND INFORMATION REGARDING THE PRODUCTS IN THIS MANUAL ARE SUBJECT TO CHANGE WITHOUT NOTICE. ALL STATEMENTS, INFORMATION, AND RECOMMENDATIONS IN THIS MANUAL ARE BELIEVED TO BE ACCURATE BUT ARE PRESENTED WITHOUT WARRANTY OF ANY KIND, EXPRESS OR IMPLIED. USERS MUST TAKE FULL RESPONSIBILITY FOR THEIR APPLICATION OF ANY PRODUCTS.
THE SOFTWARE LICENSE AND LIMITED WARRANTY FOR THE ACCOMPANYING PRODUCT ARE SET FORTH IN THE INFORMATION PACKET THAT SHIPPED WITH THE PRODUCT AND ARE INCORPORATED HEREIN BY THIS REFERENCE. IF YOU ARE UNABLE TO LOCATE THE SOFTWARE LICENSE OR LIMITED WARRANTY, CONTACT YOUR CISCO REPRESENTATIVE FOR A COPY.
The Cisco implementation of TCP header compression is an adaptation of a program developed by the University of California, Berkeley (UCB) as part of UCB’s public domain version of the UNIX operating system. All rights reserved. Copyright © 1981, Regents of the University of California.
NOTWITHSTANDING ANY OTHER WARRANTY HEREIN, ALL DOCUMENT FILES AND SOFTWARE OF THESE SUPPLIERS ARE PROVIDED “AS IS” WITH ALL FAULTS. CISCO AND THE ABOVE-NAMED SUPPLIERS DISCLAIM ALL WARRANTIES, EXPRESSED OR IMPLIED, INCLUDING, WITHOUT LIMITATION, THOSE OF MERCHANTABILITY, FITNESS FOR A PARTICULAR PURPOSE AND NONINFRINGEMENT OR ARISING FROM A COURSE OF DEALING, USAGE, OR TRADE PRACTICE.
IN NO EVENT SHALL CISCO OR ITS SUPPLIERS BE LIABLE FOR ANY INDIRECT, SPECIAL, CONSEQUENTIAL, OR INCIDENTAL DAMAGES, INCLUDING, WITHOUT LIMITATION, LOST PROFITS OR LOSS OR DAMAGE TO DATA ARISING OUT OF THE USE OR INABILITY TO USE THIS MANUAL, EVEN IF CISCO OR ITS SUPPLIERS HAVE BEEN ADVISED OF THE POSSIBILITY OF SUCH DAMAGES.
CCDE, CCSI, CCENT, Cisco Eos, Cisco HealthPresence, the Cisco logo, Cisco Lumin, Cisco Nexus, Cisco Nurse Connect, Cisco Stackpower, Cisco StadiumVision, Cisco TelePresence, Cisco WebEx, DCE, and Welcome to the Human Network are trademarks; Changing the Way We Work, Live, Play, and Learn and Cisco Store are service marks; and Access Registrar, Aironet, AsyncOS, Bringing the Meeting To You, Catalyst, CCDA, CCDP, CCIE, CCIP, CCNA, CCNP, CCSP, CCVP, Cisco, the Cisco Certified Internetwork Expert logo, Cisco IOS, Cisco Press, Cisco Systems, Cisco Systems Capital, the Cisco Systems logo, Cisco Unity, Collaboration Without Limitation, EtherFast, EtherSwitch, Event Center, Fast Step, Follow Me Browsing, FormShare, GigaDrive, HomeLink, Internet Quotient, IOS, iPhone, iQuick Study, IronPort, the IronPort logo, LightStream, Linksys, MediaTone, MeetingPlace, MeetingPlace Chime Sound, MGX, Networkers, Networking Academy, Network Registrar, PCNow, PIX, PowerPanels, ProConnect, ScriptShare, SenderBase, SMARTnet, Spectrum Expert, StackWise, The Fastest Way to Increase Your Internet Quotient, TransPath, WebEx, and the WebEx logo are registered trademarks of Cisco Systems, Inc. and/or its affiliates in the United States and certain other countries.
All other trademarks mentioned in this document or website are the property of their respective owners. The use of the word partner does not imply a partnership relationship between Cisco and any other company. (0903R)
Any Internet Protocol (IP) addresses used in this document are not intended to be actual addresses. Any examples, command display output, and figures included in the document are shown for illustrative purposes only. Any use of actual IP addresses in illustrative content is unintentional and coincidental.
User Guide for CiscoWorks Assistant 1.2 Copyright © 2009 Cisco Systems, Inc. All rights reserved.

OL-17904-01
C O N T E N T S
Notices vii
OpenSSL/Open SSL Project vii
License Issues vii
Preface xi
Audience xi
Document Conventions xii
Product Documentation xii
Related Documentation xiii
Obtaining Documentation, Obtaining Support, and Security Guidelines xiv
C H A P T E R 1 CiscoWorks Assistant - Overview 1-1
Overview of CiscoWorks Assistant 1-1
What’s New in This Release 1-2
Applications Supported by CiscoWorks Assistant 1-4
Dependencies of CiscoWorks Assistant Application 1-5
C H A P T E R 2 Getting Started with CiscoWorks Assistant 2-1
Launching CiscoWorks Assistant 2-1
Using CiscoWorks Assistant Shortcuts 2-4
User Privileges for CiscoWorks Assistant Workflows 2-4
Setting Debug Level 2-4
CiscoWorks Assistant Process and the Dependency Processes 2-5
Launching Online Help 2-6
C H A P T E R 3 Configuring LMS Server Using CiscoWorks Assistant 3-1
Before You Begin 3-1
Logging into CiscoWorks Assistant Server Setup Home Page 3-5
CiscoWorks Assistant Server Setup Home Page 3-5
Managing LMS Servers 3-6
Viewing Server Details 3-7
Adding a Server 3-7
Adding Server Details 3-8
iiiUser Guide for CiscoWorks Assistant

Contents
Accepting Certificate Information 3-9
Setting up the System 3-10
Viewing Server Addition Summary 3-10
Editing Server Details 3-11
Deleting a Server 3-11
Setting up System Identity User 3-13
Setting and Editing the Device Management Mode 3-13
Allocating Device Groups to CiscoWorks Applications 3-15
Viewing Auto Allocation Summary Report 3-16
Viewing Server Management Status 3-17
Setting Default Credential Sets 3-18
Editing a Default Credential Set 3-22
Viewing Credential Sets Status 3-23
Configuring Device Credential Policies 3-24
Adding a Device Credentials Policy 3-24
Editing a Device Credentials Policy 3-25
Deleting a Device Credentials Policy 3-25
Defining the Order of Device Credential Policies 3-26
Viewing Device Credentials Policy Configuration Status 3-26
Adding Devices 3-27
Adding Devices Using Bulk Import From File 3-27
Adding Devices Using Bulk Import From NMS 3-28
Adding Devices Using Common Services Device Discovery 3-30
Setting SNMPv2 Parameters 3-38
Setting SNMPv3 Parameters 3-38
Viewing Add Devices Status 3-40
Deleting SNMPv2 Details 3-41
Deleting SNMPv3 Details 3-41
Managing Devices 3-41
About Device Selector 3-42
Viewing Allocate Devices Status 3-43
Changing ACS Setup 3-44
Configuring the ACS Mode 3-46
Viewing the Configure ACS Mode Status 3-49
Viewing the Configure ACS Mode Result 3-50
Updating ACS Configuration 3-51
Assigning Device Group 3-52
Viewing the Server Setup Summary 3-53
ivUser Guide for CiscoWorks Assistant
OL-17904-01

Contents
C H A P T E R 4 Troubleshooting Your Network Using CiscoWorks Assistant 4-1
Generating Device Troubleshooting Report 4-1
Understanding the Device Troubleshooting Report 4-4
Generating End Host/IP Phone Down Report 4-15
Selecting an End Host From the End Hosts List 4-17
Understanding the End Host Down Report 4-20
Understanding the IP Phone Down Report 4-21
Using Device Selector in Troubleshooting Workflows 4-25
A P P E N D I X A Troubleshooting CiscoWorks Assistant A-1
Frequently Asked Questions A-1
Troubleshooting Server Setup Workflows A-2
Troubleshooting End Host/IP Phone and Device Troubleshooting Workflows A-11
I N D E X
vUser Guide for CiscoWorks Assistant
OL-17904-01

Contents
viUser Guide for CiscoWorks Assistant
OL-17904-01
NoticesThe following notices pertain to this software license.
OpenSSL/Open SSL ProjectThis product includes software developed by the OpenSSL Project for use in the OpenSSL Toolkit (http://www.openssl.org/).
This product includes cryptographic software written by Eric Young ([email protected]).
This product includes software written by Tim Hudson ([email protected]).
License IssuesThe OpenSSL toolkit stays under a dual license, i.e. both the conditions of the OpenSSL License and the original SSLeay license apply to the toolkit. See below for the actual license texts. Actually both licenses are BSD-style Open Source licenses. In case of any license issues related to OpenSSL please contact [email protected].
OpenSSL License:
Copyright © 1998-2007 The OpenSSL Project. All rights reserved.
Redistribution and use in source and binary forms, with or without modification, are permitted provided that the following conditions are met:
1. Redistributions of source code must retain the copyright notice, this list of conditions and the following disclaimer.
2. Redistributions in binary form must reproduce the above copyright notice, this list of conditions, and the following disclaimer in the documentation and/or other materials provided with the distribution.
3. All advertising materials mentioning features or use of this software must display the following acknowledgment: “This product includes software developed by the OpenSSL Project for use in the OpenSSL Toolkit (http://www.openssl.org/)”.
4. The names “OpenSSL Toolkit” and “OpenSSL Project” must not be used to endorse or promote products derived from this software without prior written permission. For written permission, please contact [email protected].
5. Products derived from this software may not be called “OpenSSL” nor may “OpenSSL” appear in their names without prior written permission of the OpenSSL Project.
6. Redistributions of any form whatsoever must retain the following acknowledgment:
“This product includes software developed by the OpenSSL Project for use in the OpenSSL Toolkit (http://www.openssl.org/)”.
viiUser Guide for CiscoWorks Assistant
OL-17904-01
Notices
THIS SOFTWARE IS PROVIDED BY THE OpenSSL PROJECT “AS IS”' AND ANY EXPRESSED OR IMPLIED WARRANTIES, INCLUDING, BUT NOT LIMITED TO, THE IMPLIED WARRANTIES OF MERCHANTABILITY AND FITNESS FOR A PARTICULAR PURPOSE ARE DISCLAIMED. IN NO EVENT SHALL THE OpenSSL PROJECT OR ITS CONTRIBUTORS BE LIABLE FOR ANY DIRECT, INDIRECT, INCIDENTAL, SPECIAL, EXEMPLARY, OR CONSEQUENTIAL DAMAGES (INCLUDING, BUT NOT LIMITED TO, PROCUREMENT OF SUBSTITUTE GOODS OR SERVICES; LOSS OF USE, DATA, OR PROFITS; OR BUSINESS INTERRUPTION) HOWEVER CAUSED AND ON ANY THEORY OF LIABILITY, WHETHER IN CONTRACT, STRICT LIABILITY, OR TORT (INCLUDING NEGLIGENCE OR OTHERWISE) ARISING IN ANY WAY OUT OF THE USE OF THIS SOFTWARE, EVEN IF ADVISED OF THE POSSIBILITY OF SUCH DAMAGE.
This product includes cryptographic software written by Eric Young ([email protected]). This product includes software written by Tim Hudson ([email protected]).
Original SSLeay License:
Copyright © 1995-1998 Eric Young ([email protected]). All rights reserved.
This package is an SSL implementation written by Eric Young ([email protected]).
The implementation was written so as to conform with Netscapes SSL.
This library is free for commercial and non-commercial use as long as the following conditions are adhered to. The following conditions apply to all code found in this distribution, be it the RC4, RSA, lhash, DES, etc., code; not just the SSL code. The SSL documentation included with this distribution is covered by the same copyright terms except that the holder is Tim Hudson ([email protected]).
Copyright remains Eric Young’s, and as such any Copyright notices in the code are not to be removed. If this package is used in a product, Eric Young should be given attribution as the author of the parts of the library used. This can be in the form of a textual message at program startup or in documentation (online or textual) provided with the package.
Redistribution and use in source and binary forms, with or without modification, are permitted provided that the following conditions are met:
1. Redistributions of source code must retain the copyright notice, this list of conditions and the following disclaimer.
2. Redistributions in binary form must reproduce the above copyright notice, this list of conditions and the following disclaimer in the documentation and/or other materials provided with the distribution.
3. All advertising materials mentioning features or use of this software must display the following acknowledgement:
“This product includes cryptographic software written by Eric Young ([email protected])”.
The word ‘cryptographic’ can be left out if the routines from the library being used are not cryptography-related.
4. If you include any Windows specific code (or a derivative thereof) from the apps directory (application code) you must include an acknowledgement: “This product includes software written by Tim Hudson ([email protected])”.
THIS SOFTWARE IS PROVIDED BY ERIC YOUNG “AS IS” AND ANY EXPRESS OR IMPLIED WARRANTIES, INCLUDING, BUT NOT LIMITED TO, THE IMPLIED WARRANTIES OF MERCHANTABILITY AND FITNESS FOR A PARTICULAR PURPOSE ARE DISCLAIMED. IN NO EVENT SHALL THE AUTHOR OR CONTRIBUTORS BE LIABLE FOR ANY DIRECT, INDIRECT, INCIDENTAL, SPECIAL, EXEMPLARY, OR CONSEQUENTIAL DAMAGES (INCLUDING, BUT NOT LIMITED TO, PROCUREMENT OF SUBSTITUTE GOODS OR SERVICES; LOSS OF USE, DATA, OR PROFITS; OR BUSINESS INTERRUPTION) HOWEVER CAUSED AND ON ANY
viiiUser Guide for CiscoWorks Assistant
OL-17904-01

Notices
THEORY OF LIABILITY, WHETHER IN CONTRACT, STRICT LIABILITY, OR TORT (INCLUDING NEGLIGENCE OR OTHERWISE) ARISING IN ANY WAY OUT OF THE USE OF THIS SOFTWARE, EVEN IF ADVISED OF THE POSSIBILITY OF SUCH DAMAGE.
The license and distribution terms for any publicly available version or derivative of this code cannot be changed. i.e. this code cannot simply be copied and put under another distribution license [including the GNU Public License].
ixUser Guide for CiscoWorks Assistant
OL-17904-01

Notices
xUser Guide for CiscoWorks Assistant
OL-17904-01

Preface
This document describes the workflows that make up CiscoWorks Assistant. It provides instructions to configure, administer, and operate CiscoWorks Assistant 1.2.
The CiscoWorks Assistant User Guide is organized as shown in Table 1.
Audience This document provides descriptions and scenarios for system administrators, network managers, and other users who might or might not be familiar with CiscoWorks Assistant. Many of the tools described are accessible to system administrators only.
Table 1 Chapter Organization
Chapter Description
CiscoWorks Assistant - Overview Gives you an overview of CiscoWorks Assistant.
Getting Started with CiscoWorks Assistant
Provides you with the list of launch points for the CiscoWorks Assistant workflows.
You can also review the Privileges that are required for running CiscoWorks Assistant workflows, using the device selector, and setting up the debug log level for CiscoWorks Assistant.
Configuring LMS Server Using CiscoWorks Assistant
Describes how to configure LMS server.
Troubleshooting Your Network Using CiscoWorks Assistant
Describes how to troubleshoot your network using Device Troubleshooting and End Host/IP Phone Down workflows.
Troubleshooting CiscoWorks Assistant Describes the troubleshooting tips for all the CiscoWorks Assistant workflows.
xiUser Guide for CiscoWorks Assistant
OL-17904-01
Preface
Document ConventionsThis document uses the conventions shown in Table 2.
Note Means reader take note. Notes contain helpful suggestions or references to material not covered in the publication.
Caution Means reader be careful. In this situation, you might do something that could result in equipment damage or loss of data.
Product Documentation
Note We sometimes update the printed and electronic documentation after original publication. Therefore, you should also review the documentation on Cisco.com for any updates.
Table 3 describes the product documentation that is available.
Table 2 Document Conventions
Item Convention
Commands and keywords boldface font
Variables for which you supply values italic font
Displayed session and system information screen font
Information you enter boldface screen font
Variables you enter italic screen font
Menu items and button names boldface font
Selecting a menu item in paragraphs Option > Network Preferences
Selecting a menu item in tables Option > Network Preferences
Table 3 Product Documentation
Document Title Available Format
User Guide for CiscoWorks Assistant 1.2 (this document)
• PDF on the LMS 3.2 Product DVD and Documentation DVD.
• On Cisco.com at:
http://www.cisco.com/en/US/products/ps7212/tsd_products_support_series_home.html
xiiUser Guide for CiscoWorks Assistant
OL-17904-01

Preface
Related DocumentationThe CiscoWorks Assistant workflows are dependent on LMS 3.2 applications.
The User Guide and Release Notes for the LMS applications, and Installing and Getting Started With CiscoWorks LAN Management Solution 3.2 document are available in the HTML and PDF formats.
Note We sometimes update the printed and electronic documentation after original publication. Therefore, you should also review the documentation on Cisco.com for any updates.
Table 4 describes additional documentation available.
Release Notes for CiscoWorks Assistant 1.2
• PDF on the LMS 3.2 Product DVD and Documentation DVD.
• On Cisco.com at:
http://www.cisco.com/en/US/products/ps7212/tsd_products_support_series_home.html
Context-Sensitive Online Help
• Select an option from the navigation tree, then click Help.
• Click the Help button in the dialog box.
Table 3 Product Documentation
Document Title Available Format
Table 4 Related Documentation
Document Title Available Format
User Guide for CiscoWorks Common Services 3.3
• PDF on the LMS 3.2 Product DVD and Documentation DVD.
• On Cisco.com at:
http://www.cisco.com/en/US/products/sw/cscowork/ps3996/products_user_guide_list.html
User Guide for CiscoWorks Campus Manager 5.2
• PDF on the LMS 3.2 Product DVD and Documentation DVD.
• On Cisco.com at:
http://www.cisco.com/en/US/products/sw/cscowork/ ps563/products_user_guide_list.html
User Guide for CiscoWorks Resource Manager Essentials 4.3
• PDF on the LMS 3.2 Product DVD and Documentation DVD.
• On Cisco.com at:
http://www.cisco.com/en/US/products/sw/cscowork/ ps2073/products_user_guide_list.html
User Guide for CiscoWorks Device Fault Manager 3.2
• PDF on the LMS 3.2 Product DVD and Documentation DVD.
• On Cisco.com at:
http://www.cisco.com/en/US/products/sw/cscowork/ ps2421/products_user_guide_list.html
xiiiUser Guide for CiscoWorks Assistant
OL-17904-01

Preface
Obtaining Documentation, Obtaining Support, and Security Guidelines
For information on obtaining documentation, submitting a service request, and gathering additional information, see the monthly What’s New in Cisco Product Documentation, which also lists all new and revised Cisco technical documentation, at:
http://www.cisco.com/en/US/docs/general/whatsnew/whatsnew.html
Subscribe to the What’s New in Cisco Product Documentation as a Really Simple Syndication (RSS) feed and set content to be delivered directly to your desktop using a reader application. The RSS feeds are a free service and Cisco currently supports RSS version 2.0.
User Guide for CiscoWorks Internetwork Performance Monitor 4.2
• PDF on the LMS 3.2 Product DVD and Documentation DVD.
• On Cisco.com at:
http://www.cisco.com/en/US/products/sw/cscowork/ ps1008/products_user_guide_list.html
User Guide for CiscoWorks LMS Portal 1.2
• PDF on the LMS 3.2 Product DVD and Documentation DVD.
• On Cisco.com at:
http://www.cisco.com/en/US/products/ps7198/tsd_products_support_series_home.html
User Guide for CiscoWorks Health and Utilization Monitor 1.2
• PDF on the LMS 3.2 Product DVD and Documentation DVD.
• On Cisco.com at:
http://www.cisco.com/en/US/products/ps9303/tsd_products_support_series_home.html
Table 4 Related Documentation
Document Title Available Format
xivUser Guide for CiscoWorks Assistant
OL-17904-01

OL-17904-01
C H A P T E R 1
CiscoWorks Assistant - OverviewThe following sections provide an overview of CiscoWorks Assistant application and all the functionalities that are available in CiscoWorks Assistant.
• Overview of CiscoWorks Assistant
• What’s New in This Release
• Applications Supported by CiscoWorks Assistant
• Dependencies of CiscoWorks Assistant Application
Overview of CiscoWorks AssistantCiscoWorks Assistant is a web-based tool that provides workflows to help you to overcome network management and software deployment challenges. CiscoWorks Assistant is available along with CiscoWorks LAN Management Solution (LMS). This application is installed along with CiscoWorks Common Services.
A workflow is a compilation of tasks that assist you to deploy LMS servers and troubleshoot your network. The CiscoWorks Assistant Engine, which works in the backend, executes the workflows and allows you to navigate between the various tasks.
CiscoWorks Assistant workflows contain functionalities that are available across LMS applications. These functionalities are grouped logically to setup and configure the LMS server and to troubleshoot your network devices.
You can use CiscoWorks Assistant 1.2 only with the following LMS applications’ versions:
• Common Services (CS) 3.3
• CiscoView (CV) 6.1.9
• Campus Manager (CM) 5.2
• Resource Manager Essentials (RME) 4.3
• Device Fault Manager (DFM) 3.2
• Internetwork Performance Monitor (IPM) 4.2
• Health and Utilization Monitor (HUM)1.2
• Integration Utility 1.9
• CiscoWorks LMS Portal 1.2
1-1User Guide for CiscoWorks Assistant

Chapter 1 CiscoWorks Assistant - Overview What’s New in This Release
To know more about LMS applications, see the User Guides:
http://www.cisco.com/web/psa/products/index.html
What’s New in This ReleaseThe following are the new features and enhancements in CiscoWorks Assistant 1.2:
Note We sometimes update the documentation after original publication. Therefore, you should also review the documentation on Cisco.com for any updates. http://www.cisco.com/en/US/products/ps7212/products_user_guide_list.html
• Multiple Default Credential Support in CiscoWorks Assistant
• HUM Features in Troubleshooting Workflow
– Device Availability
– Device Threshold
• RME Features in Troubleshooting Workflow
– Generic Online Diagnostics (GOLD)
– Call Home
– Embedded Event Manager (EEM)
• CiscoWorks Assistant Publisher Process in Daemon Manager
• Enhancing IP Address to IPv6
• Configuring SNMP Fallback Settings
Multiple Default Credential Support in CiscoWorks Assistant
In this release, CiscoWorks Assistant supports Multiple Default Credentials.
In the earlier version, the Default Credentials let you decide whether to apply the default credentials. In this release, you can configure multiple default credentials sets and apply the credential sets while adding and importing devices.
See Adding Devices for more information.
This release has a new step, Device Credentials Policy Configuration in Server Setup Workflow. This step follows the Default Credential Sets step.
See Configuring Device Credential Policies for more information.
In this release, Set Default Credential is renamed as Default Credential Sets. In the Credential Sets page, there is a Credential Set Name link which is newly added in the Default Credentials list panel.
See Setting Default Credential Sets for more information.
HUM Features in Troubleshooting Workflow
The HUM Troubleshooting report contains:
• HUM Device Availability in Troubleshooting Workflow
In this release, the Device Troubleshooting workflow is enhanced to display the Device Availability report for the devices managed by HUM. The details of this report are fetched from the HUM Device Dashboard page.
1-2User Guide for CiscoWorks Assistant
OL-17904-01

Chapter 1 CiscoWorks Assistant - Overview What’s New in This Release
You can use the Device Dashboard link to view more details for the selected device.
You can use the Poller link to create pollers for the selected device. The link goes to the Poller Management Page. The Poller link is displayed only if the device does not have any Device Availability template.
See Understanding the Device Troubleshooting Report for more information.
• HUM Device Threshold in Troubleshooting Workflow
Device Threshold report is displayed as a section of Device Troubleshooting Workflow for the devices managed by HUM. The details of this report are fetched from the HUM Device Dashboard page.
You can use the Device Dashboard link to view more details for the selected device.
You can use the Poller link to create pollers for the selected device. The link goes to the Poller Management Page. The Poller link is displayed only if the device does not have any Device Availability template.
See Understanding the Device Troubleshooting Report for more information.
RME Features in Troubleshooting Workflow
The RME Troubleshooting workflow contains:
• RME Generic Online Diagnostics (GOLD) in Troubleshooting Workflow
The Generic Online Diagnostics (GOLD) report is displayed in the Device Troubleshooting workflow for the devices managed by RME. The details for this report are fetched from the RME Application Programming Interface (API).
See Understanding the Device Troubleshooting Report for more information.
• RME Call Home in Troubleshooting Workflow
The Call Home report is displayed in the Device Troubleshooting workflow for the devices managed by RME. The details for this report are fetched from the RME Application Programming Interface (API).
See Understanding the Device Troubleshooting Report for more information.
• RME Embedded Event Manager in Troubleshooting Workflow
The Embedded Event Manager (EEM) report is displayed in the Device Troubleshooting workflow for the devices managed by RME. The details for this report are fetched from the RME Application Programming Interface (API).
See Understanding the Device Troubleshooting Report for more information.
CiscoWorks Assistant Publisher Process in Daemon Manager
In this release, CiscoWorks Assistant Publisher is a new process added to Daemon Manager. The Daemon Manager is enhanced with this process for the following reasons:
• To minimize the install time. This will prevent ProcSysBus and OpsXMLRuntime processes from restarting unnecessarily during installation.
• To avoid Start Service errors while you are installing CiscoWorks Assistant
• To allow the publisher to run while you are installing CiscoWorks Assistant
• To simplify the Install, Upgrade and Restore processes
This process will run for a maximum of five minutes after starting Daemon Manager. After the process has completed running, a message appears, Administrator has Shutdown the Server.
1-3User Guide for CiscoWorks Assistant
OL-17904-01

Chapter 1 CiscoWorks Assistant - Overview Applications Supported by CiscoWorks Assistant
Enhancing IP Address to IPv6
In this release, CiscoWorks Assistant supports the IPv6 Addressing scheme in the following Device Discovery pages:
• Ping Sweep
• CDP
• SNMP Settings
• Filter Settings
• Global Seed Device
In the Device Troubleshooting home page, the existing IP Address field is enhanced to include the IPv6 devices.
Configuring SNMP Fallback Settings
The SNMP Fallback checkbox in the Discovery window, allows the SNMP details to be reverted to the older version.
See Adding Devices for more information.
Applications Supported by CiscoWorks Assistant CiscoWorks Assistant supports the following workflows:
• Server Setup
The Server Setup workflow helps you to create a Multi-server set up. It also assists you in adding and managing devices and configuring the AAA mode to ACS.
You can add devices to Device and Credential Repository and import these devices across LMS applications. This workflow allows you to add Multiple Default Credential sets and configure policies, based on default credentials. See Chapter 3, “Configuring LMS Server Using CiscoWorks Assistant”.
• Device Troubleshooting
You can identify the root cause for device unreachabililty. The generated Device Troubleshooting report contains the following details for the selected device:
– Alerts and Syslog Messages
– Last configuration change
– Details of the device topology
– Device Credential Verification for RME CDA job
– GOLD, Call Home and EEM reports
– Device availability and threshold reports
– Details on network inconsistencies, misconfiguration in the network device. See Chapter 4, “Troubleshooting Your Network Using CiscoWorks Assistant”.
• End Host/IP Phone Down
You can get the information required to troubleshoot as well as analyze the connectivity issues. See Chapter 4, “Troubleshooting Your Network Using CiscoWorks Assistant”.
1-4User Guide for CiscoWorks Assistant
OL-17904-01

Chapter 1 CiscoWorks Assistant - Overview Dependencies of CiscoWorks Assistant Application
Dependencies of CiscoWorks Assistant ApplicationCiscoWorks Assistant workflow depends on the LMS applications. Some of functionalities will not be available if you have not installed the relevant LMS application.
Table 1-1 describes the CiscoWorks Assistant workflows and the corresponding dependent LMS 3.2 applications.
Table 1-1 CiscoWorks Assistant Workflows and the Dependent LMS Applications
CiscoWorks Assistant Workflows LMS Applications
Server Setup • Manage Servers
• Add Servers
• Change Device Management Mode
• Auto Allocation
• Set Multiple Default Credentials
• Add Devices
• Change ACS Settings
Common Services 3.3 and all LMS 3.2 applications.
Device Troubleshooting Device information • Common Services 3.3 (Device and Credential Repository)
• All installed LMS 3.2 applications.
Connectivity status Common Services 3.3
Topology and Neighbor information
Campus Manager 5.2
Syslog messages Resource Manager Essentials 4.3
Last configuration change Resource Manager Essentials 4.3
Change Audit reports Resource Manager Essentials 4.3
CDA reports Resource Manager Essentials 4.3
DFM Alerts Device Fault Manager 3.2
Discrepancies in this device Campus Manager 5.2
Generic OnLine Diagnostics Resource Manager Essentials 4.3
Call Home Resource Manager Essentials 4.3
Embedded Event Manager Resource Manager Essentials 4.3
Device Availability Health and Utilization Monitor 1.2
Device Threshold Health and Utilization Monitor 1.2
End Host/IP Phone Down End Host down Campus Manager 5.2
IP Phone down Campus Manager 5.2
Log Level Settings — None.
1-5User Guide for CiscoWorks Assistant
OL-17904-01

Chapter 1 CiscoWorks Assistant - Overview Dependencies of CiscoWorks Assistant Application
1-6User Guide for CiscoWorks Assistant
OL-17904-01
OL-17904-01
C H A P T E R 2
Getting Started with CiscoWorks AssistantCiscoWorks Assistant is installed as part of CiscoWorks Common Services. The following topics help you to work with and understand the CiscoWorks Assistant user interface:
• Launching CiscoWorks Assistant
• Using CiscoWorks Assistant Shortcuts
• User Privileges for CiscoWorks Assistant Workflows
• Setting Debug Level
• CiscoWorks Assistant Process and the Dependency Processes
• Launching Online Help
Launching CiscoWorks AssistantCiscoWorks LMS Portal home page is the first page that appears when you launch the LMS application. It serves as an interface, launch point and provides top-level navigation for the frequently used functions in the application.
You can view important statistics and details on the LMS applications installed on your CiscoWorks Server, in a single page instead of navigating through several pages to view the required data.
If you have installed CiscoWorks Server and are logging in for the first time, use the reserved admin user name and password you have specified during installation.
You can launch CiscoWorks Assistant workflows using:
• CiscoWorks Assistant home page (See Launching CiscoWorks Assistant from CiscoWorks LMS Portal.)
• LMS Applications’ home page (See Launching CiscoWorks Assistant Workflows from LMS Applications’ Home Page).
2-1User Guide for CiscoWorks Assistant

Chapter 2 Getting Started with CiscoWorks Assistant Launching CiscoWorks Assistant
Launching CiscoWorks Assistant from CiscoWorks LMS Portal
To launch CiscoWorks Assistant from CiscoWorks LMS Portal:
Step 1 Enter the URL for your CiscoWorks Server in your browser.
http://server_name:port_number
Where server_name is the name of the CiscoWorks Server and port_number is the TCP port used by the CiscoWorks Server. In normal mode (HTTP), the default TCP port for CiscoWorks server is 1741.
For example:
http://ciscoworksserver:1741
Note If you enter, http://server_name:port_number/login.html in your web browser, the CiscoWorks Server will not launch. Also, do not bookmark the URL with the trailing login.html.
• On Windows, CiscoWorks Server always uses the normal mode port 1741 and secure mode port 443 in normal and secure modes. The secure mode port will be changed, when Internet Information Services (IIS) is detected.
• On Solaris, if the default TCP ports are used by other applications, you can select different ports for secure and normal modes during CiscoWorks LMS installation.
For more information, see Installing and Getting Started with CiscoWorks LAN Management Solution 3.2
The login screen appears.
Step 2 Enter the username in the User ID field, and the password for admin user in the Password field of the Login page.
Enter the same admin password that you entered while installing CiscoWorks LMS.
The default username is admin.
Step 3 Click Login or press Enter.
You are now logged into CiscoWorks Server.
After you log into CiscoWorks, the CiscoWorks LMS Portal home page is displayed. The CiscoWorks LMS Portal is the primary user interface and the launch point for all applications.
Step 4 Click the CiscoWorks Assistant link or the Home link under the CiscoWorks Assistant portlet on the CiscoWorks LMS Portal home page.
The CiscoWorks Assistant home page appears in a new window. The CiscoWorks Assistant home page is an easy way to access frequently used operations. The following links are available.
• Workflows
– Server Setup
– Device Troubleshooting
– End Host/IP Phone Down
• Administration
– Log Level Settings
2-2User Guide for CiscoWorks Assistant
OL-17904-01
Chapter 2 Getting Started with CiscoWorks Assistant Launching CiscoWorks Assistant
Launching CiscoWorks Assistant Workflows from LMS Applications’ Home Page
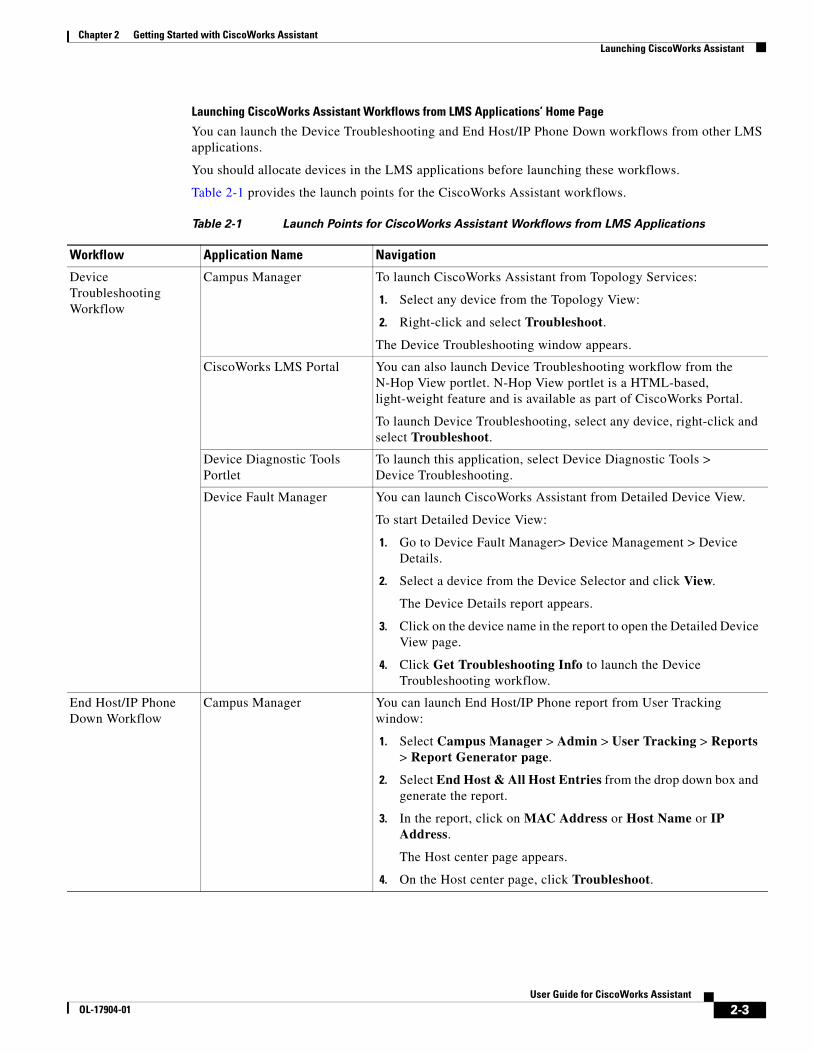
You can launch the Device Troubleshooting and End Host/IP Phone Down workflows from other LMS applications.
You should allocate devices in the LMS applications before launching these workflows.
Table 2-1 provides the launch points for the CiscoWorks Assistant workflows.
Table 2-1 Launch Points for CiscoWorks Assistant Workflows from LMS Applications
Workflow Application Name Navigation
Device Troubleshooting Workflow
Campus Manager To launch CiscoWorks Assistant from Topology Services:
1. Select any device from the Topology View:
2. Right-click and select Troubleshoot.
The Device Troubleshooting window appears.
CiscoWorks LMS Portal You can also launch Device Troubleshooting workflow from the N-Hop View portlet. N-Hop View portlet is a HTML-based, light-weight feature and is available as part of CiscoWorks Portal.
To launch Device Troubleshooting, select any device, right-click and select Troubleshoot.
Device Diagnostic Tools Portlet
To launch this application, select Device Diagnostic Tools > Device Troubleshooting.
Device Fault Manager You can launch CiscoWorks Assistant from Detailed Device View.
To start Detailed Device View:
1. Go to Device Fault Manager> Device Management > Device Details.
2. Select a device from the Device Selector and click View.
The Device Details report appears.
3. Click on the device name in the report to open the Detailed Device View page.
4. Click Get Troubleshooting Info to launch the Device Troubleshooting workflow.
End Host/IP Phone Down Workflow
Campus Manager You can launch End Host/IP Phone report from User Tracking window:
1. Select Campus Manager > Admin > User Tracking > Reports > Report Generator page.
2. Select End Host & All Host Entries from the drop down box and generate the report.
3. In the report, click on MAC Address or Host Name or IP Address.
The Host center page appears.
4. On the Host center page, click Troubleshoot.
2-3User Guide for CiscoWorks Assistant
OL-17904-01
Chapter 2 Getting Started with CiscoWorks Assistant Using CiscoWorks Assistant Shortcuts
Using CiscoWorks Assistant ShortcutsYou can add shortcuts to frequently used CiscoWorks Assistant links in the CiscoWorks LMS Portal. Use these shortcuts to run frequently used tasks and functions.
You can register a URL and add it to either Third Party or Custom Tool under External Links portlet view. You can also register the URLs based on the requirement under Frequently Used Links portlet, which works as an shortcut to reach the required applications homepage.
For more information on Registering Links With CiscoWorks LMS Portal see the User Guide for CiscoWorks LMS Portal. To access this, go to Help > LMS Portal.
You can use the shortcuts as given in Table 2-2.
User Privileges for CiscoWorks Assistant WorkflowsCiscoWorks Assistant uses the privileges that the logged-in user has in the installed applications.
In the Server Setup workflow the system identity user or a Local User with all roles assigned can performing all Manage Servers tasks (CiscoWorks Assistant > Server Setup > Manage Servers).
Setting Debug LevelYou can use this option to set the logging levels for CiscoWorks Assistant packages.
The CiscoWorks Assistant log file (CWA.log) is available in the following location:
• NMSROOT/log (on Windows)
• /var/adm/CSCOpx/log (on Solaris)
The OPSXML logs are available in the following location:
NMSROOT/objects/wfengine/program/TFTP/Backup/DeviceTrace/CScript
To set the log levels:
Step 1 Select CiscoWorks Assistant > Administration > Log Level Settings.
The Set CiscoWorks Assistant Logging Level page appears.
Step 2 Select the appropriate log level from the Logging Level drop-down list.
Table 2-2 CiscoWorks Assistant Shortcut URLs
Task URL1
1. Where, ServerName is the CiscoWorks LMS Server hostname or IP address and PortNumber is the HTTP or HTTPS port number.
CiscoWorks Assistant Home http://ServerName:PortNumber/cwa/CWAHome.jsp
Device Troubleshooting Workflow http://ServerName:PortNumber/cwa/linkDown.do
End Host/IP Phone Down http://ServerName:PortNumber/cwa/endhostDown.do
Server Setup http://ServerName:PortNumber/cwa/serverSetup.do
Log Level Settings http://ServerName:PortNumber/cwa/logLevel.do
2-4User Guide for CiscoWorks Assistant
OL-17904-01
Chapter 2 Getting Started with CiscoWorks Assistant CiscoWorks Assistant Process and the Dependency Processes
Step 3 Select the Enable Engine Logging check box to enable logging for CiscoWorks Assistant Engine.
Step 4 Click Reset to apply the default logging levels.
The default logging level is INFO for CiscoWorks Assistant packages.
When you click Reset, the logging level is set to INFO and the CiscoWorks Assistant Engine logging is disabled.
Step 5 Click Apply after you set the log levels.
A message appears that the log levels have been successfully updated.
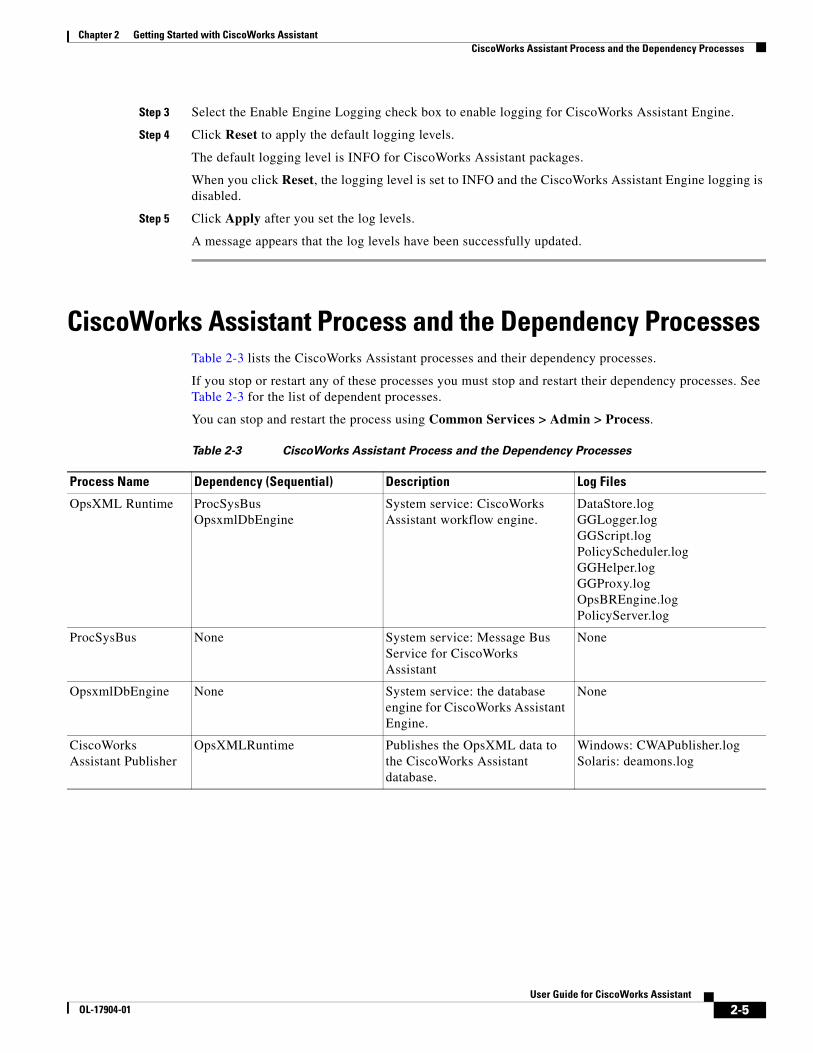
CiscoWorks Assistant Process and the Dependency ProcessesTable 2-3 lists the CiscoWorks Assistant processes and their dependency processes.
If you stop or restart any of these processes you must stop and restart their dependency processes. See Table 2-3 for the list of dependent processes.
You can stop and restart the process using Common Services > Admin > Process.
Table 2-3 CiscoWorks Assistant Process and the Dependency Processes
Process Name Dependency (Sequential) Description Log Files
OpsXML Runtime ProcSysBus OpsxmlDbEngine
System service: CiscoWorks Assistant workflow engine.
DataStore.log GGLogger.log GGScript.log PolicyScheduler.log GGHelper.log GGProxy.log OpsBREngine.log PolicyServer.log
ProcSysBus None System service: Message Bus Service for CiscoWorks Assistant
None
OpsxmlDbEngine None System service: the database engine for CiscoWorks Assistant Engine.
None
CiscoWorks Assistant Publisher
OpsXMLRuntime Publishes the OpsXML data to the CiscoWorks Assistant database.
Windows: CWAPublisher.log Solaris: deamons.log
2-5User Guide for CiscoWorks Assistant
OL-17904-01

Chapter 2 Getting Started with CiscoWorks Assistant Launching Online Help
CiscoWorks Assistant Log File Details
Table 2-4 lists the CiscoWorks Assistant Log File Details.
Launching Online HelpOn the CiscoWorks Assistant home page, click Help to Launch the CiscoWorks Assistant Online help. This Help button is available at the top right corner of your CiscoWorks Assistant home page. The CiscoWorks Online help is launched in a separate browser window.
The complete User Guide can be viewed in the Adobe Portable Document Format (PDF) from within the Online help. To view the PDF, Adobe Acrobat 6.0 or later is required.
Table 2-5 describes the tabs in the CiscoWorks Assistant Online help.
Table 2-4 CiscoWorks Assistant Log File Details
Log File Name Module Windows Solaris Purpose
ProcSysBus and OpsXMLRuntime logs
Server Setup Workflow
OPSXMLRoot/program/logs/*.log
NMSROOT/objects/wfengine/program/OpsXML.log
NMSROOT/objects/wfengine/program/logs/all log files
Maintains the behavior details of CiscoWorks Assistant workflow engine.
Device Trace logs Device Trouble Shooting/End Host/IP Phone Down
OPSXMLRoot/program,/TFTP/Backup/Device Trace/CScript/**
/opt/CSCOpx/objects/wfengine/program/TFTP/Backup/DeviceTrace/CScript/all logs files
Contains the http requests and responses of the URL calls that occur while generating the Endhost/IP Phone Down Troubleshooting report.
Install Logs Install c:\<install-log> /var/tmp/install-log Registers the errors that occurred during installation.
Table 2-5 CiscoWorks Assistant Online Help Tabs
Button Description
Contents (Button)
Displays the Online help table of content for the launched LMS application.
That is, if you have launched Common Services Online help, the table of content for the Common Services application appears.
Index (Button)
Displays the index entries for the launched LMS application.
That is, if you have launched Common Services Online help, the index entries for the Common Services application appears.
2-6User Guide for CiscoWorks Assistant
OL-17904-01
Chapter 2 Getting Started with CiscoWorks Assistant Launching Online Help
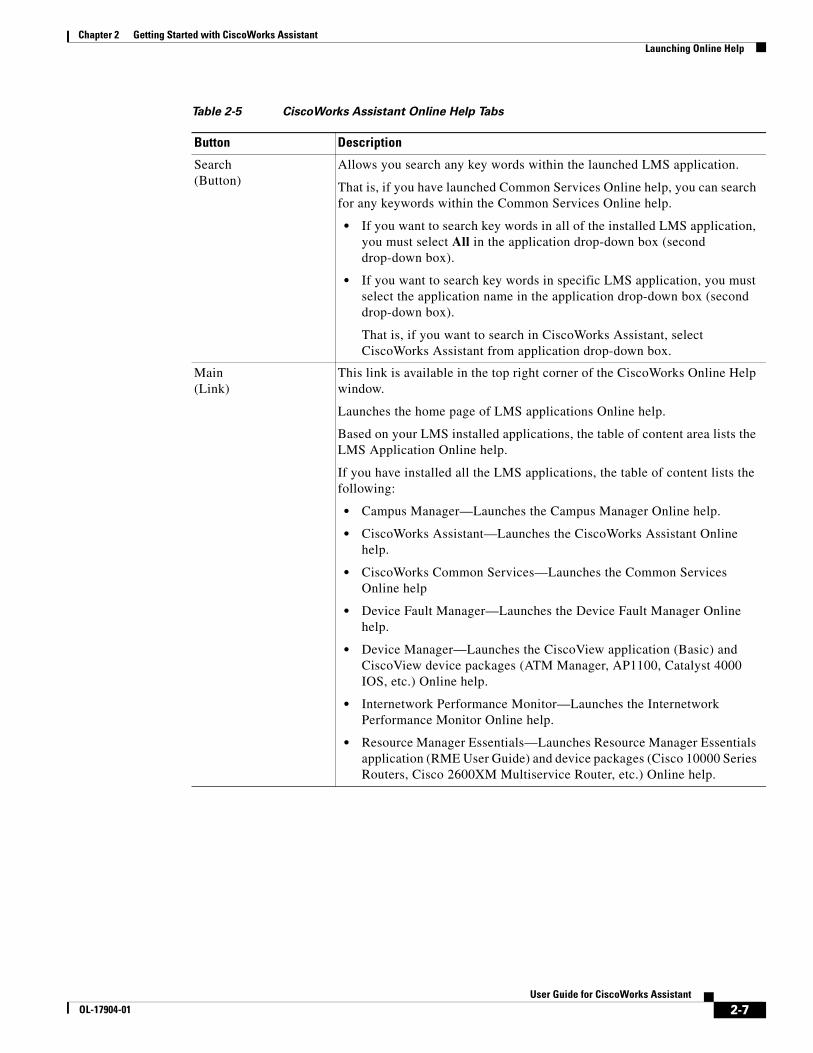
Search (Button)
Allows you search any key words within the launched LMS application.
That is, if you have launched Common Services Online help, you can search for any keywords within the Common Services Online help.
• If you want to search key words in all of the installed LMS application, you must select All in the application drop-down box (second drop-down box).
• If you want to search key words in specific LMS application, you must select the application name in the application drop-down box (second drop-down box).
That is, if you want to search in CiscoWorks Assistant, select CiscoWorks Assistant from application drop-down box.
Main (Link)
This link is available in the top right corner of the CiscoWorks Online Help window.
Launches the home page of LMS applications Online help.
Based on your LMS installed applications, the table of content area lists the LMS Application Online help.
If you have installed all the LMS applications, the table of content lists the following:
• Campus Manager—Launches the Campus Manager Online help.
• CiscoWorks Assistant—Launches the CiscoWorks Assistant Online help.
• CiscoWorks Common Services—Launches the Common Services Online help
• Device Fault Manager—Launches the Device Fault Manager Online help.
• Device Manager—Launches the CiscoView application (Basic) and CiscoView device packages (ATM Manager, AP1100, Catalyst 4000 IOS, etc.) Online help.
• Internetwork Performance Monitor—Launches the Internetwork Performance Monitor Online help.
• Resource Manager Essentials—Launches Resource Manager Essentials application (RME User Guide) and device packages (Cisco 10000 Series Routers, Cisco 2600XM Multiservice Router, etc.) Online help.
Table 2-5 CiscoWorks Assistant Online Help Tabs
Button Description
2-7User Guide for CiscoWorks Assistant
OL-17904-01

Chapter 2 Getting Started with CiscoWorks Assistant Launching Online Help
2-8User Guide for CiscoWorks Assistant
OL-17904-01

OL-17904-01
C H A P T E R 3
Configuring LMS Server Using CiscoWorks AssistantThe Server Setup workflow helps you to setup and manage CiscoWorks LAN management Solution (LMS) servers. It helps you to simplify the deployment and setting up of single or multiple LMS servers.
The Server Setup workflow assists you in:
• Managing LMS Servers—You can add servers, set up System Identity User accounts, and set up the device management mode.
• Setting Default Credential Sets—You can use the Credential Set feature to prevent the management applications from failing if devices added or imported into DCR do not contain all necessary credentials. Credentials are stored in DCR and are not associated with any device.
• Configuring Device Credential Policies—You can configure device credential policies and apply the default credentials for a range of devices to be added or imported to DCR.
• Adding Devices—You can populate the servers with network devices, either by dynamic discovery, or bulk import.
• Managing Devices—You can manage devices in each application after adding them into DCR.
• Changing ACS Setup—You can configure the ACS mode and assign device groups.
This chapter also contains:
• Before You Begin
• Logging into CiscoWorks Assistant Server Setup Home Page
• CiscoWorks Assistant Server Setup Home Page
• Viewing the Server Setup Summary
Before You BeginBefore you start using the Server Setup workflow, review the following topics:
• About Single-Server and Multi-Server Setups
• About AAA Mode
• Related Documentation
• Implications of DCR and SSO Modes on Server Setup Workflow
• Navigating Within Server Setup Workflow
3-1User Guide for CiscoWorks Assistant

Chapter 3 Configuring LMS Server Using CiscoWorks Assistant Before You Begin
About Single-Server and Multi-Server Setups
If the CiscoWorks applications are installed on a single LMS server, the setup is considered as a Single-server setup.
For large deployments, you may opt to have multiple servers for a single managed network by distributing applications across multiple servers for better performance and scaling. This setup is considered as a Multi-server setup. The Multi-server setup requires the various LMS servers part of the setup work in sync with each other.
You will encounter the following terms and concepts while setting up and working on a Multi-server setup:
• Peer Server Certificate Setup
Peer Server Certificates are used to allow one CiscoWorks server to communicate with another using SSL. In a Multi-server set up you have two or more servers on which CiscoWorks applications are installed. CiscoWorks allows you to add the certificate of another CiscoWorks server (a peer server) into its trusted store.
• System Identity Setup
Communication between multiple CiscoWorks servers is enabled by a trust model addressed by certificates and shared secrets. System Identity setup should be used to create a trust user on Slave servers to facilitate communication in Multi-server scenarios. This trust user is called System Identity User. The System Identity User is also used for inter-process communication.
A default System Identify User admin is created during installation. During the installation, you should provide the password for System Identity user. This password can be different from the password you provide for the admin user used to log in to CiscoWorks.
CiscoWorks Assistant allows you to create a System Identity User in all servers that are part of the Multi-server set up.
The System Identity User is a Local User with all privileges. The user will automatically be made a Peer Server User too.
If the LMS server is in ACS mode, the System Identity User should be present in ACS user data base with Super Admin privileges assigned.
• Peer Server Account Setup
Peer Server Account Setup helps you create users who can programmatically login to CiscoWorks servers and perform certain tasks. These users should be set up to enable communication between multiple CiscoWorks servers. Peer Server Account can be set up in Common Services.
• Device and Credentials Repository (DCR)
The DCR lets you manage the device list, and associated credentials and other user-defined device attributes at a single place, in a management domain. In a Multi-server setup, where each server could host one or more LMS application instances, the DCR serves as a single place from where you can manage the device lists and related attributes, for use by all applications in the setup.
DCR helps multiple applications share device lists and credentials using a client-server mechanism, with secured storage and communications. The CiscoWorks applications can read or retrieve the information from this repository.
– In a Single-server scenario, the DCR would be operating in a Standalone mode (default mode after installation)
– In a Multi-server scenario, user should designate one of the servers as the Master and configure the other servers in a Slave mode.
3-2User Guide for CiscoWorks Assistant
OL-17904-01

Chapter 3 Configuring LMS Server Using CiscoWorks Assistant Before You Begin
The Slave servers keep their copy of the DCR data, in sync with the Master DCR.
The Master DCR server refers to the master repository of device list and credential data. There is only one Master repository for each management domain, and it contains the most up-to-date device list and credentials. DCR Slaves are slave instances of DCR on other servers and provide transparent access to applications installed on those servers.
Any change to the repository data occurs first in the Master with the changes being propagated to all the Slaves. There can be more than one Slave in a management domain but any slave can become a master at any time.
In Standalone mode, DCR maintains an independent repository of device list and credential data. It does not participate in a management domain and its data is not shared with any other DCR. It does not communicate with or contain registration information about any other Master, Slave, or Standalone DCR.
Devices newly added in DCR can be managed by an application in following ways
• Auto Allocation Off mode—In this mode, automatic addition of devices to LMS applications is disabled. This mode allows you to selectively add devices to the application from DCR and add the previously deleted devices back into the application.
• Auto Allocation - All Devices—In this mode, all devices in DCR are added to the selected LMS application.
• Auto Allocation - Allocate by Groups mode—In this mode, devices that belong to a specific group in Common Services are added to LMS applications.
The Single Sign On (SSO) feature helps you to use a single session to navigate to multiple CiscoWorks servers without having to authenticate to each of them.
For Single Sign On, one of the CiscoWorks servers needs to be set up as the authentication server. The SSO authentication server is called the Master, and the SSO regular server is called the Slave. If there is no SSO Master server configured in your setup, the local server is selected as SSO Master.
You must perform the following tasks if the server is either configured as Master or Slave:
• Configure the System Identity User and password in both Master and Slave. The System Identity User name and password you specify in Master and Slave should be the same.
• Configure Master’s Self Signed Certificate in Slave.
About AAA Mode
CiscoWorks provides a robust security mechanism to manage identity and access to the CiscoWorks applications, and data in a multi-user environment.
By default, CiscoWorks Server authentication (CiscoWorks Local) is used to authenticate users, and authorize them to access CiscoWorks applications. After authentication, your authorization is based on the privileges that have been assigned to you.
A privilege is a task or an operation defined within the application. The set of privileges assigned to you defines your role. It dictates how much, and what type of system access you have.The CiscoWorks Server authorization scheme has pre-defined roles. In this mode, you cannot change the roles, or the privileges assigned to these roles. However, a user can be assigned a combination of these roles.
CiscoWorks Server can be integrated with Cisco Secure Access Control Server (ACS) to provide improved access control using authentication, authorization, and accounting (AAA). Cisco Secure ACS provides authentication, authorization, and accounting services to network devices that function as AAA clients.
In ACS mode, you can create custom roles to best suit your business workflow and needs. That is, you can create a user, and assign the user with a set of privileges, that would suit your needs.
3-3User Guide for CiscoWorks Assistant
OL-17904-01
Chapter 3 Configuring LMS Server Using CiscoWorks Assistant Before You Begin
CiscoWorks Assistant helps you in changing the login module of all servers part of the multi-server set up to ACS mode. See Changing ACS Setup for details. See also, Adding Server Details.
Implications of DCR and SSO Modes on Server Setup Workflow
The Server Setup workflow assists you in setting up a Multi-server set up. You can add servers, create System Identity Users, modify the device mode, add and manage devices, and change the AAA mode to ACS using the workflow.
If you are installing the CiscoWorks applications for the first time, the setup will be considered as a Single-server setup, and the local host will be displayed in the table.
In a Multi-server setup, the Server Setup workflow runs only on the DCR Master server.
In Server Setup workflow, the local server will be treated as DCR Master server if the setup is converted from Single-server setup to Multi-server setup. That is, using CiscoWorks Assistant if you add another server to a Standalone server, the DCR mode of the Standalone server to which the new server is added will be changed to Master.
A Multi-server setup must have one SSO Master. The other LMS servers must be in SSO Slave mode. If there is no SSO Master server configured in your setup, the local server is set as SSO Master.
If the server is already configured for Multi-server setup, CiscoWorks Assistant automatically performs a Server Discovery to collect all the server information in the setup and displays it. Server Discovery runs once every hour.
The existing server setup will be discovered when you invoke the CiscoWorks Assistant workflow pages, if the last discovery occurred before 60 minutes. Also, Server Discovery runs at the end of the Manage Server tasks and CiscoWorks Assistant collects all the updated information.
If the SSO Master is not reachable, you cannot perform any operation in the Server Setup workflow. Also, if any of the servers is unreachable, you cannot perform the Manage Servers and Change ACS Mode Setup steps.
Navigating Within Server Setup Workflow
If you are starting the workflow for the first time, click Start Setup to enter into the Server Setup workflow.
To get back to the initial Server Setup workflow screen from any other screen, click Cancel.
If you have operated the workflow earlier, and logged out from the CiscoWorks, or closed the browser after a particular task, you can continue from that task. To do this, click Enter Setup.
The links in the Server Setup table-of contents (at the top-left corner of the screen) are disabled after you enter the workflow.
After you enter the Server Setup workflow, you can navigate among the available options using the Back, Skip, Next and Cancel buttons.
• Back button
Takes you to the previous screen. When you click Back, the previous step will not be rolled back. CiscoWorks Assistant does not retain the values you entered previously.
• Skip button
Allows you to skip a task, and get to the next task. For example, if you want to get to the Default Credential Sets page from the Manage Servers page, without getting into the System Identity User Setup or Device Management mode page, click Skip.
3-4User Guide for CiscoWorks Assistant
OL-17904-01

Chapter 3 Configuring LMS Server Using CiscoWorks Assistant Logging into CiscoWorks Assistant Server Setup Home Page
• Next button
Takes you to the screen that is after the current screen.
• Cancel button
Takes you to the initial Server Setup workflow screen from any screens. When the cancel action is performed during the middle of an task or a process, the task or the process will not be terminated, instead it will be executed from background.
CiscoWorks Assistant runs only one instance of Server Setup workflow. You can end an active session of another user if there are no operations running in that session. To end the session, you need to enter the System Identity User details. If any operations are running, you cannot end the session.
Also, multiple operations cannot be initiated by the same user, simultaneously. The operation is allowed only after the operation that is in progress is completed.
To go to the CiscoWorks Assistant home page click Home.
Logging into CiscoWorks Assistant Server Setup Home PageBefore you start with the Server Setup workflow, read the Before You Begin topic to help you understand the features better.
The initial screen for the workflow is the Current System Identity screen.
To access the Server Setup workflow,
Step 1 Enter the system identify username in the Username field.
Step 2 Enter the password relevant to the user specified in the Password field.
Step 3 Click OK.
The Server Application List window appears. See CiscoWorks Assistant Server Setup Home Page for details.
To go back to the CiscoWorks Assistant home page, click Cancel.
CiscoWorks Assistant Server Setup Home PageThe Server Application List window appears after entering the system identify user details in the Current System Identity screen.
Table 3-1 described the fields in the Server Application List window.
Table 3-1 Server Application List Window Details
Field Description
LMS Server IP Address of the LMS server or Display Name of the LMS server.
Reachability Reachability status of the LMS server.
3-5User Guide for CiscoWorks Assistant
OL-17904-01
Chapter 3 Configuring LMS Server Using CiscoWorks Assistant Managing LMS Servers
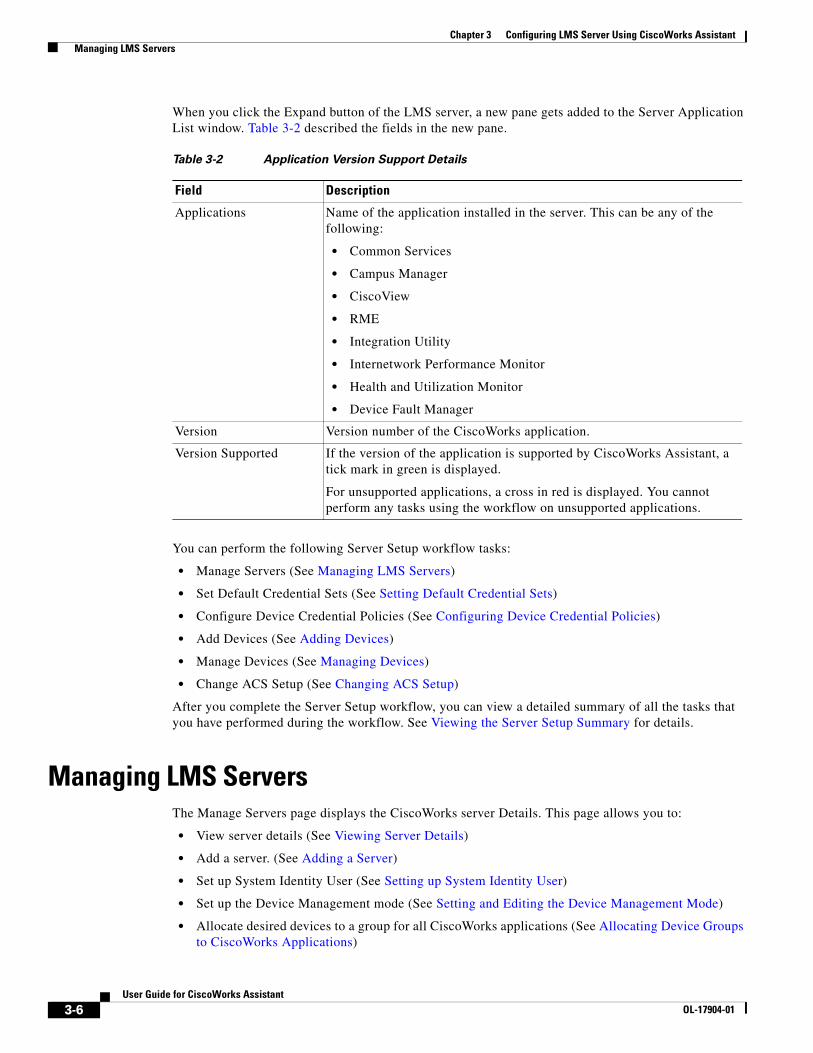
When you click the Expand button of the LMS server, a new pane gets added to the Server Application List window. Table 3-2 described the fields in the new pane.
You can perform the following Server Setup workflow tasks:
• Manage Servers (See Managing LMS Servers)
• Set Default Credential Sets (See Setting Default Credential Sets)
• Configure Device Credential Policies (See Configuring Device Credential Policies)
• Add Devices (See Adding Devices)
• Manage Devices (See Managing Devices)
• Change ACS Setup (See Changing ACS Setup)
After you complete the Server Setup workflow, you can view a detailed summary of all the tasks that you have performed during the workflow. See Viewing the Server Setup Summary for details.
Managing LMS ServersThe Manage Servers page displays the CiscoWorks server Details. This page allows you to:
• View server details (See Viewing Server Details)
• Add a server. (See Adding a Server)
• Set up System Identity User (See Setting up System Identity User)
• Set up the Device Management mode (See Setting and Editing the Device Management Mode)
• Allocate desired devices to a group for all CiscoWorks applications (See Allocating Device Groups to CiscoWorks Applications)
Table 3-2 Application Version Support Details
Field Description
Applications Name of the application installed in the server. This can be any of the following:
• Common Services
• Campus Manager
• CiscoView
• RME
• Integration Utility
• Internetwork Performance Monitor
• Health and Utilization Monitor
• Device Fault Manager
Version Version number of the CiscoWorks application.
Version Supported If the version of the application is supported by CiscoWorks Assistant, a tick mark in green is displayed.
For unsupported applications, a cross in red is displayed. You cannot perform any tasks using the workflow on unsupported applications.
3-6User Guide for CiscoWorks Assistant
OL-17904-01
Chapter 3 Configuring LMS Server Using CiscoWorks Assistant Managing LMS Servers
You can also:
• View Server Addition summary (See Viewing Server Addition Summary)
• View Device Management status (See Viewing Auto Allocation Summary Report)
• View Server Management status (See Viewing Server Management Status)
• Edit a server (See Editing Server Details)
• Delete a server (See Deleting a Server)
Note All the servers you want add to create the Multi-server set up should be DNS resolvable. If not, you will not be able to add servers.
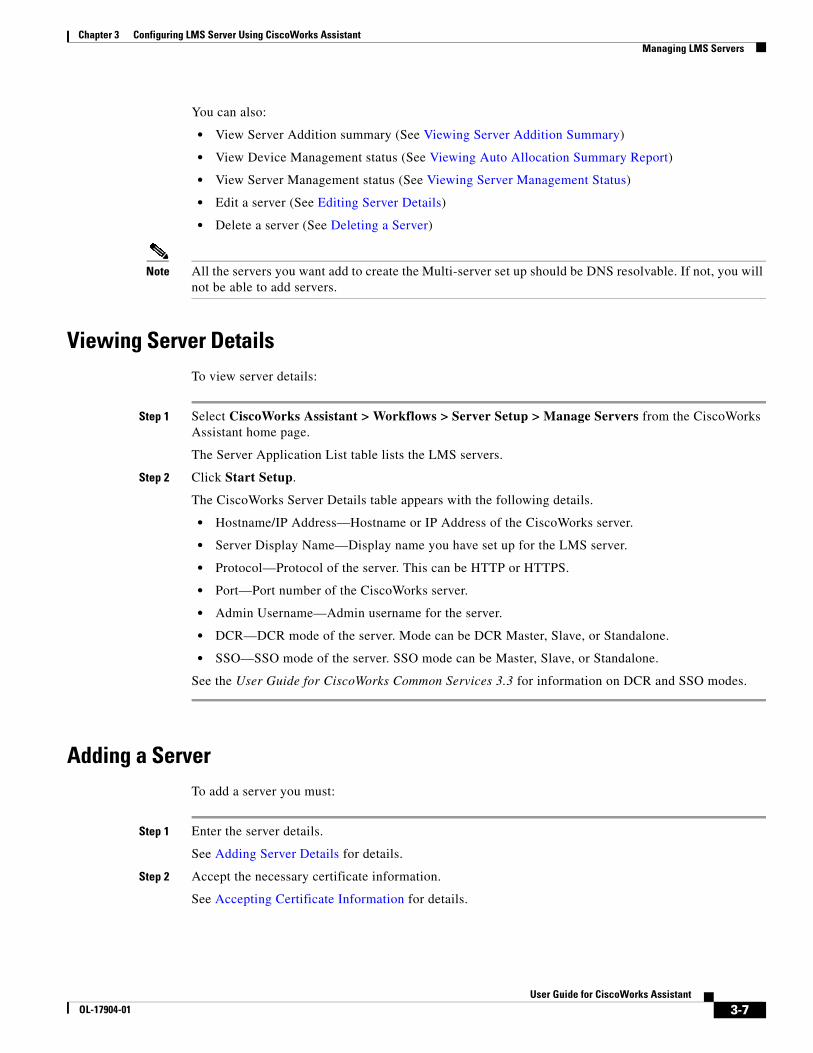
Viewing Server DetailsTo view server details:
Step 1 Select CiscoWorks Assistant > Workflows > Server Setup > Manage Servers from the CiscoWorks Assistant home page.
The Server Application List table lists the LMS servers.
Step 2 Click Start Setup.
The CiscoWorks Server Details table appears with the following details.
• Hostname/IP Address—Hostname or IP Address of the CiscoWorks server.
• Server Display Name—Display name you have set up for the LMS server.
• Protocol—Protocol of the server. This can be HTTP or HTTPS.
• Port—Port number of the CiscoWorks server.
• Admin Username—Admin username for the server.
• DCR—DCR mode of the server. Mode can be DCR Master, Slave, or Standalone.
• SSO—SSO mode of the server. SSO mode can be Master, Slave, or Standalone.
See the User Guide for CiscoWorks Common Services 3.3 for information on DCR and SSO modes.
Adding a ServerTo add a server you must:
Step 1 Enter the server details.
See Adding Server Details for details.
Step 2 Accept the necessary certificate information.
See Accepting Certificate Information for details.
3-7User Guide for CiscoWorks Assistant
OL-17904-01

Chapter 3 Configuring LMS Server Using CiscoWorks Assistant Managing LMS Servers
Step 3 Configure the SMTP server and the E-mail ID.
See Setting up the System for details.
Step 4 Create a trust user on the servers that are part of a Multi- server setup.
See Setting up System Identity User for details.
After you add a server, you can set up the Device Management mode for all applications (See Setting and Editing the Device Management Mode). This determines whether the devices should be managed by the different applications when they are added to the DCR.
You can view a summary of server addition, after you complete the necessary tasks. See Viewing Server Addition Summary for details.
Adding Server Details
To add details to a CiscoWorks server:
Step 1 Select CiscoWorks Assistant > Workflows > Server Setup > Manage Servers.
Step 2 Click Add.
The Add Server dialog box appears.
Step 3 Enter the following server details:
• Hostname/IP Address—Hostname or IP Address of the CiscoWorks server. If the server you add is in DCR Master mode, or if it is the slave of another DCR master, it will not allow you to add the server.
• Administrator Username—Admin username for the server.
• Administrator Password—Admin username for the server.
• Protocol—Protocol of the server. This can be HTTP or HTTPS.
• Port—Port Number of the CiscoWorks server.
If the DCR Master (local server) is in ACS mode, you should enter the Network Device Group (NDG) details.
CiscoWorks Assistant will convert the server you add here into ACS mode, after the Manage Servers workflow has completed.
Select an option “Register all installed applications with ACS” to register all the installed applications with the ACS Server for the first time.
If an application is already registered with ACS, the current registration will overwrite the previous registration.
Hence any custom role that has been created in ACS will be lost for those applications.
If the server you are adding has already been integrated with another ACS server, it will get integrated to the ACS server to which the DCR Master (local server) is integrated, after the successful completion of Manage Servers step.
3-8User Guide for CiscoWorks Assistant
OL-17904-01
Chapter 3 Configuring LMS Server Using CiscoWorks Assistant Managing LMS Servers
You must restart the daemon manager in the server that you have added, after the Manage Server process is complete. If you have added multiple servers, you must restart the daemon manager in all of the servers that you have added.
If the DCR Master is in CiscoWorks Local mode, you cannot add servers that are in ACS mode.
Step 4 Click Next to continue.
The CiscoWorks server is contacted to validate the Device and Credential Repository settings, and to fetch the Certificate information. See Accepting Certificate Information for details.
Accepting Certificate Information
If a CiscoWorks server needs to communicate to another CiscoWorks server, it must possess the certificate of the other server. You can add certificates of any number of peer CiscoWorks servers to the trusted store.
For more information on certificates, and importing peer server certificates, see the following sections in the User Guide for CiscoWorks Common Services 3.3:
• Creating Self Signed Certificates
• Setting up Peer Server Certificate
To view and accept the certificate:
Step 1 Click Next, after adding the server details,
The Server Setup window appears with the following certificate information.
• Version—Certificate version number
• Serial Number—Certificate serial number
• Issued By—Information on the certificate issuing authority.
• Issued To—Information about the certificate holder.
• Effective From—Displays the date from which the certificate is valid.
• Expiry Date—Expiry date of the certificate
• Signature—Signature information of the certificate
• Sign Algorithm—Sign algorithm used by the CiscoWorks for the certificate
Step 2 Select the Accept Certificate check box.
Step 3 Click Next to continue.
The Server Setup window is displayed. You can set the SMTP server and the CiscoWorks E-mail ID to receive e-mails from CiscoWorks server. See Setting up the System for details.
3-9User Guide for CiscoWorks Assistant
OL-17904-01
Chapter 3 Configuring LMS Server Using CiscoWorks Assistant Managing LMS Servers
Setting up the System
The Server Setup window allows you to set up the SMTP server, and the CiscoWorks E-mail ID. The SMTP settings in CiscoWorks Assistant are specific to a server. If you change the SMTP settings in DCR master (local server), the SMTP server name and e-mail ID is set in the DCR master (local server) alone.
To change the SMTP settings in slaves, you need to go to the individual servers and set up SMTP details.
Step 1 Enter the SMTP server details in the SMTP Server field.
This is the system-wide name of the SMTP server used by CiscoWorks applications to deliver reports. The default server name is localhost.
Step 2 Enter the e-mail ID in the CiscoWorks E-mail ID field.
This is the CiscoWorks e-mail ID from which applications send e-mail notifications. There is no default e-mail ID.
These fields will be already populated if the SMTP server and e-mail ID have been set up in the Common Services > Server > Admin > System Preferences screen or using LMS Setup Center.
Step 3 Click OK.
Viewing Server Addition SummaryThe Add Server Summary page provides the following details:
• LMS Server—LMS Server name or IP Address
• Server Display Name—Display name of the newly added server.
• DCR Settings—Displays the current and the new DCR modes of the server.
– Current Settings: DCR mode of the server before it was added to the Multi-server set up.
– New Settings: DCR mode of the server after it was added to the Multi-server set up.
• SSO Settings—Displays the current and the new DCR modes of the server.
– Current Settings: SSO mode of the server before it was added to the Multi-server set up.
– New Settings: SSO mode of the server after it was added to the Multi-server set up.
When you add a server to the existing setup, the added server will become SSO and DCR Slave. However, if you want to make the added server the SSO Master, select the Set as Master check box.
CiscoWorks Assistant does not allow you to convert the DCR mode of the added server from Slave to Master because this could result in applications losing data. You can go to the Setting up System Identity User procedure, after you complete the Add Server procedure.
To go to the Default Credential Sets Page, click Skip.
3-10User Guide for CiscoWorks Assistant
OL-17904-01

Chapter 3 Configuring LMS Server Using CiscoWorks Assistant Managing LMS Servers
Editing Server DetailsTo edit a server:
Step 1 Select CiscoWorks Assistant > Workflows > Server Setup > Manage Servers.
Step 2 Select the server by clicking the Host Name/IP Address radio button, and click Edit.
The Edit Server dialog box appears.
This dialog box has pre-populated values in Hostname/IP address, Protocol, Port and Current SSO Settings fields. All fields in the Edit Server dialog box can be edited, except the Hostname/IP address, Protocol, Port, and Current SSO settings fields.
• If the server is in SSO Slave mode, you can change it to SSO Master, by selecting the Set as Master check box.
• If the server is in SSO Master mode, you can change it to SSO Slave mode by selecting the Set as Slave check box. The Set as Slave check box is not available on the local server.
Step 3 Enter the Server Details and Setup parameters in Edit Server dialog box, and click OK.
Step 4 Click Next.
The New System Identity User window appears.
Step 5 You can either:
• Enter the new System Identity Username and Password, confirm Password, and click Next
Or
• Click Skip to proceed, if you do not want to change the current System Identity User.
The Device Management Mode page appears.
Step 6 Click Next, after you modify the Device Management mode.
See for Setting and Editing the Device Management Mode more information.
If you do not want to change the settings, click Next when you get to this page without making any modifications to the existing Device Management mode. The Skip button is disabled in this page.
The workflow initiates after you click Next. The modifications you made are saved when the tasks are complete.
Deleting a Server To delete a server from the setup:
Step 1 Select CiscoWorks Assistant > Workflows > Server Setup > Manage Servers
Step 2 Select the server by clicking the Host Name/IP Address radio button.
Step 3 Click Delete.
The Delete Confirmation popup appears.
Step 4 Click OK to delete the selected server.
The Marked for Deletion tag appears adjacent to the server you selected in Step 2.
3-11User Guide for CiscoWorks Assistant
OL-17904-01

Chapter 3 Configuring LMS Server Using CiscoWorks Assistant Managing LMS Servers
Step 5 Click Next.
The New System Identity User window appears.
You can skip the New System Identity User procedure if you do not want to change the current System Identity User details. To do this, click Skip.
The Device Management Mode page appears.
Step 6 Click Next in the Device Management Mode page.
You can change the Device Management mode here. This page does not have a Skip button. You need to click Next to proceed with the tasks. The workflow initiates after you click Next.
The server marked for deletion will be removed from the set up after the Manage Servers tasks are complete.
The Marked for Deletion tag appears only for servers that are already added.
If you add a server and delete it immediately after adding it, that is, if you perform the Add Server and the Delete Server tasks in same UI session, the Marked for Deletion tag does not appear in the screen.
In this case, the newly added server is not marked for deletion, and is removed from the screen when you click OK in the Delete Confirmation pop-up.
Retaining a Server Marked for Deletion
To retain a server marked for deletion:
Step 1 Select the server by clicking the Host Name/IP Address radio button.
Step 2 Click Undelete.
The Undelete button appears only if you select a server that is marked for deletion.
The Undelete Confirmation pop up appears
Step 3 Click OK to retain the server.
If you try to add a server that is marked for deletion back to the set up, using the Add button, the Undelete Confirmation pop-up is displayed. Click OK to retain the server in the setup.
After the server is deleted from the setup, the deleted server goes into the DCR Standalone and SSO Standalone modes. The workflow also removes the Trust that is set up from all the deleted servers.
You cannot remove the local server from the setup.
If you remove the SSO Master, you can assign any other server as the SSO Master. If you do not select another server as the SSO Master, the workflow will assign the local server as the SSO Master. If you remove the SSO Master, the Multi-server setup is not removed.
You cannot delete the DCR Master.
In a Multi-server setup that has two servers, the workflow will remove the Multi-server setup if you remove one of the servers. In such a case, the local server switches to the Standalone mode.
3-12User Guide for CiscoWorks Assistant
OL-17904-01

Chapter 3 Configuring LMS Server Using CiscoWorks Assistant Managing LMS Servers
Setting up System Identity UserSystem Identity setup helps you to create a trust user on servers that are part of a Multi-server setup. This user enables communication among servers that are part of a management domain. There can only be one System Identity user for each server.
The System Identity user you configure must be a Peer Server user.
• In the Non-ACS mode, the System Identity user that you create must be a Local user, with all privileges.
• In the ACS mode, the System Identity user should be configured in ACS, with Super Admin privileges, in all applications registered in ACS. You can either configure the System Identity User with the predefined Super Admin role or with a custom role created with all privileges in ACS server.
See User Guide for CiscoWorks Common Services 3.3 for more details on System Identity setup.
Before you set up the System Identity user, you must add the server.
To set up the System Identity user:
Step 1 Select CiscoWorks Assistant > Workflows > Server Setup > Manage Servers.
Step 2 Click Next.
The New System Identity Setup page appears.
If you want to change the System Identity setup values, enter the new System Identity username and password in the text field, re-enter the password in the confirm password field, and click Next to complete the System Identity User setup.
CiscoWorks Assistant ensures the new user you create has all the necessary privileges. CiscoWorks Assistant ensures that the new user you create, has all privileges.
Otherwise, click Skip.
Setting and Editing the Device Management ModeThe Device Management mode determines whether the new devices are automatically managed by CiscoWorks applications.
You have to add your server before you get to this stage. If you are in a Multi-server setup, you must also set up a System Identity user before you begin this task.
See the application-specific User Guides to know more about device management modes in different CiscoWorks applications.
To set the Device Management mode:
Step 1 Click Next, after adding the server or setting up the System Identity User.
The Device Management Mode page appears.
The possible device management modes are given in Table 3-3.
3-13User Guide for CiscoWorks Assistant
OL-17904-01

Chapter 3 Configuring LMS Server Using CiscoWorks Assistant Managing LMS Servers
By default, the Device Management Mode page in CiscoWorks Assistant shows the current status of the device management mode of applications that have been set up in their respective Device Management Settings pages.
Step 2 Select any of the following modes from the drop down list for each CiscoWorks server application installed on the local server (Standalone mode) or installed on all peer servers (Master-Slave mode):
• Auto Allocation Off
• Auto Allocation - All Devices
• Auto Allocation - Allocate by Groups
Note The applications on the peer servers will not be listed when the peer servers are down or if an earlier version of LMS applications is installed on the servers.
Step 3 Click Next.
The workflow performs the assigned tasks when you click Next in the Device Management Mode page. The Manage Servers progress page displays the Server Management status and the Manage Server tasks gets completed here. See Viewing Server Management Status for details.
Step 4 If you have selected the Auto Allocation - Allocate by Groups mode for at least one CiscoWorks application, the Auto Allocation page appears. See Allocating Device Groups to CiscoWorks Applications for details.
Table 3-3 Device Management Modes
Device Management Mode Description
Auto Allocation Off In this mode, automatic addition of devices to LMS applications is disabled. You can use this option to:
• Selectively add devices to the application from DCR.
• Add the previously deleted devices back into the application.
You can manually add the devices to LMS applications even if you have selected other modes for device management.
Auto Allocation - All Devices In this mode, all devices in DCR are added to the selected LMS application. This is also limited by the LMS license you have purchased.
Auto Allocation - Allocate by Groups
In this mode, devices that belong to a specific group in Common Services are added to LMS applications. This is also limited by the LMS license you have purchased.
You must select a group name for all applications that are on installed on local and peer servers.
3-14User Guide for CiscoWorks Assistant
OL-17904-01

Chapter 3 Configuring LMS Server Using CiscoWorks Assistant Managing LMS Servers
Allocating Device Groups to CiscoWorks ApplicationsYou must assign the device groups to CiscoWorks applications when you have configured the device management mode as Auto Allocation - Allocate by Groups. The Auto Allocation page that appears after the Device Management page helps you to perform this task.
The Assign Groups page appears only when at least one CiscoWorks application is configured with Allocate by Groups mode.
To assign the device groups to CiscoWorks applications:
Step 1 Click Next after configuring the Device Management mode.
The Auto Allocation page appears. It displays:
• A list of CiscoWorks applications configured with Auto Allocation - Allocate by Groups mode
• Group Selector
You can click Refresh to get the latest information (device groups) in Device Group Selector.
You can also create new groups or edit groups in the Common Services Group Administration page. To do so, click Group Admin located at the bottom of the Assign Groups page.
Step 2 Select an application from the list of CiscoWorks applications displayed. You can select only one application at a time.
Step 3 Select a group from the Group Selector.
Step 4 Click Apply to save the changes.
To cancel the selection process, click Cancel.
Step 5 Select another application from the list and assign a group from Group Selector.
Step 6 Click Apply to save the changes.
Step 7 Complete assigning groups to all the applications in the list.
Step 8 Click Next.
A detailed report containing the device management status is displayed in tabular format. See Viewing Auto Allocation Summary Report for details.
3-15User Guide for CiscoWorks Assistant
OL-17904-01

Chapter 3 Configuring LMS Server Using CiscoWorks Assistant Managing LMS Servers
Viewing Auto Allocation Summary ReportAfter you have completed assigning device groups to all CiscoWorks applications whose Device Management mode is Auto Allocation - Allocate by Groups, you can see a detailed report of the device management status.
To view the Auto Allocation Report:
Step 1 Click Next on the Auto Allocation page.
The Auto Allocation Summary Report appears with the details given in Table 3-4.
Step 2 Click Next to view the Server Management Status.
Table 3-4 Auto Allocation Summary Report
Field DescriptionServer Name of local or remote CiscoWorks Server.
Application Name of the application in local or peer CiscoWorks Server managing the devices.
Number of Devices Currently Managed
Number of devices managed by the application before the auto allocation of devices to groups.
Number of New Devices After This Rule Change
Number of new devices managed by the application after the auto allocation of devices to groups.
Number of Devices Deleted After This Rule Change
Number of devices deleted and not managed by the application after the auto allocation of devices.
This field is applicable only for Campus Manager. This displays NA for the rest of CiscoWorks Applications.
Total Number of Devices After This Rule Change
Total number of devices managed by the application after the auto allocation of devices.
Current License Limit Number of devices that the LMS License allows the application to manage.
3-16User Guide for CiscoWorks Assistant
OL-17904-01

Chapter 3 Configuring LMS Server Using CiscoWorks Assistant Managing LMS Servers
Viewing Server Management StatusThe Manage Servers progress page that appears after you complete the Device Management mode and Group Assignment setup, displays the status of the Manage Server tasks that you have performed.
For information on setting up Device Management mode, see Setting and Editing the Device Management Mode.
To view the Manage Severs tasks status:
Step 1 Select the Device Management mode and click Next.
The Manage Servers Progress page appears.
This process takes some time to check the status of various tasks.
You can either:
• Set up CiscoWorks Assistant to send you an e-mail notification. You can then exit from the workflow before the tasks are complete.
You can view the status after you get an e-mail notification that the tasks have completed. See Setting up E-mail Notification After Managing Server Tasks for details.
Or
• Wait until the status check has completed to view the status.
The status on the following is displayed:
• System Identity user validation.
• New System Identity user creation, if you have added new System Identity User values.
• Trust removal from all deleted CiscoWorks servers, if you have deleted any servers.
• Trust creation for the newly added server by the System Identity setup configuration and certificate addition.
• Configuring new System Identity user on all servers.
• Configuring SMTP Server and e-mail.
• Device Management mode configuration.
• DCR mode configuration. If you add a Standalone server, it is converted into the Slave of the local server.
– In a Single-server scenario, if you add a new server, the local server is made the Master, and the newly added server is made the Slave.
– In a Multi-server set up, the newly added server is made the Slave of the DCR Master. If the local server (DCR Master) is in ACS mode, the AAA mode of the added server is set as ACS.
• SSO Mode change, if you have changed the SSO mode.
• Server Discovery step to update the CiscoWorks Assistant database.
• Groups allocated for all applications, when the Auto Allocation - Allocate by Groups option is selected.
Step 2 Click on the relevant step link to view the detailed status report for that step.
If a step fails, the Last Accessed URL column in the report will display the shortcut URL for that particular step. It will not display anything, if the step is successful.
3-17User Guide for CiscoWorks Assistant
OL-17904-01
Chapter 3 Configuring LMS Server Using CiscoWorks Assistant Setting Default Credential Sets
Setting up E-mail Notification After Managing Server Tasks
You can exit the workflow after you complete the tasks and return later to view the status. You should do this after getting an e-mail notification.
To do this:
Step 1 Select the Notify me when Manage Servers Tasks are Complete check box, and click OK.
Step 2 Enter the e-mail ID in the text field.
The e-mail ID will be displayed in the text field if you had entered an e-mail ID in the Manage Servers flow. Otherwise, the default e-mail address [email protected] is displayed.
Only one e-mail ID is allowed.
The e-mail ID can contain alphabets, numbers, and special characters ($, _, ^, &, #).
For example:
• Name_12#@abc.co.in
The following message appears:
An e-mail will be sent to the selected E-mail address after the process has completed.
Step 3 Click Cancel.
The initial Server Setup workflow page is displayed.
You will receive an e-mail after the tasks have completed.
Step 4 Click Enter Setup to view the Manage Server status page after you receive the e-mail notification.
Setting Default Credential SetsDCR manages the details of multiple default credential sets. Each Default credential set comprises of the components listed below. The Default credential set can be associated with the each device while adding or importing devices into DCR.
Each default credential set comprises:
• Primary Credentials (Username, Password, Enable Password)
• Secondary Credentials (Username, Password, Enable Password)
• Rx Boot Mode Credentials (Username, Password)
• SNMPv2c/SNMPv1 Credentials (Read-Only Community String, Read-Write Community String)
• SNMPv3 Credentials (Mode, Username, Authentication Password, Authentication Algorithm, Privacy Algorithm, Privacy Password)
• HTTP credentials (Primary HTTP Username and Password, Secondary HTTP Username and Password, HTTP/HTTPS port, Current Mode)
• Auto Update Server Managed Device Credentials (Username and Password)
The recommended multiple default credential sets configurations are set to 50 default credential sets. You can use the default credentials for devices and edit their credentials appropriately. You can configure the default credentials and use them in the applications. Similar to Common Services, if the default credentials cannot be accessed from DCR, CiscoWorks Assistant will not assign the credentials.
3-18User Guide for CiscoWorks Assistant
OL-17904-01

Chapter 3 Configuring LMS Server Using CiscoWorks Assistant Setting Default Credential Sets
All the credential information will be populated from the DCR Master. If the credentials are already available in DCR database, they will be updated by the new values you enter, after setting default credentials.
To set the device credentials:
Step 1 Select CiscoWorks Assistant > Workflows > Server Setup > Default Credential Sets.
The Default Credential Sets page appears.
You can:
• Add Credential Set Name (See Adding Credential Set Name)
• Set Standard credentials (See Setting Standard Credentials)
• Set SNMP credentials (See Setting SNMP Credentials)
• Set HTTP credentials (See Setting HTTP Credentials)
• Set Auto Update Server managed Device Credentials (See Setting Auto Update Server)
• Set Rx Boot Mode credentials (See Setting Rx Boot Mode Credentials)
Step 2 Click Next to complete the Credentials Settings.
The Credential Sets Progress page appears. This page provides the status of the Credential Sets tasks. See Viewing Credential Sets Status.
Adding Credential Set Name
To add the Credential Set name:
Step 1 Click Credential Set Name in the Default Credential Sets page.
The Credential Set page appears.
Step 2 Select Add New from the Credential Set drop-down list.
Step 3 Enter the name of the credential set in the Credential Set Name field. This is mandatory.
The specified name will be appended with the screen name.
Specify the credential set name with the constrains listed below:
• Alphabets A-Z and a-z
• Numbers 0-9
• Special Characters -, _, .
Step 4 Enter the credential set description in the Set Description field.
Step 5 Select a credential type from the Default Credentials list panel and enter the respective credential information. You can select any of these credential types from the panel.
• Standard Credentials
• SNMP Credentials
• HTTP Credentials
• Auto Update Server Managed Device Credentials
• Rx-Boot Mode Credential
3-19User Guide for CiscoWorks Assistant
OL-17904-01

Chapter 3 Configuring LMS Server Using CiscoWorks Assistant Setting Default Credential Sets
Step 6 Enter the following credentials as required:
• Standard Credentials (See Setting Standard Credentials)
• SNMP Credentials (See Setting SNMP Credentials)
• HTTP Credentials (See Setting HTTP Credentials)
• Auto Update Server Managed Device Credentials (See Setting Auto Update Server)
• Rx-Boot Mode Credential (See Setting Rx Boot Mode Credentials)
You must enter a value for at least one credential before applying the default credentials.
Step 7 Click Apply to apply the credential set details in Common Services. You can also apply the changes by clicking Next.
To cancel the changes, click Cancel.
To delete a default credential set, click Remove. A delete confirmation popup appears.
Setting Standard Credentials
To set Standard credentials:
Step 1 Click Standard Credentials in the Default Credential Sets page.
The Standard Credential page appears.
Step 2 Add the following credentials:
• Primary credentials (Username, Password, Enable Password)
• Secondary credentials (Username, Password, Enable Password)
Step 3 Re-enter the passwords in the Verify fields.
Setting SNMP Credentials
To set SNMP credentials:
Step 1 Click SNMP Credentials in the Default Credential Sets page.
The SNMP Credential page appears.
Step 2 Add the following credentials:
• SNMPv2c/SNMPv1 credential
• SNMPv3 credential
You must select the SNMPv3 checkbox to enter the SNMPv3 Credentials. By default, these fields are disabled.
Step 3 Enter the Read-Only Community String and Read-Write Community String for SNMPv2c/SNMPv1 credentials.
3-20User Guide for CiscoWorks Assistant
OL-17904-01

Chapter 3 Configuring LMS Server Using CiscoWorks Assistant Setting Default Credential Sets
Step 4 Select any one of the following security levels in the Mode field for SNMPv3 credentials.
• NoAuthNoPriv
• AuthNoPriv
• AuthPriv
You can enter the SNMPv3 credentials based on the selected mode.
Step 5 Enter the Authentication Username and Authentication Password.
Step 6 Select an Authentication Algorithm from the drop-down list.
The Authentication Algorithm field value can be MD5, SHA-1, or None.
Step 7 Enter the Privacy password.
Step 8 Select a Privacy algorithm from the drop-down list.
The Privacy Algorithm field value can be DES, 3DES, AES128, AES192, AES256, or None.
Step 9 Re-enter the passwords in the Verify fields.
Setting HTTP Credentials
To set HTTP credentials:
Step 1 Click HTTP Credentials in the Default Credential Sets page.
The HTTP Credential page appears.
Step 2 Add the following credentials:
• Primary credential
• Secondary credential
Step 3 Enter the username and passwords for Primary and Secondary credentials.
Step 4 Re-enter the passwords in the Verify fields.
Step 5 Enter:
• HTTP Port
• HTTPS Port
Step 6 Select either HTTP, HTTPS, or None from the Current Mode drop-down list.
Setting Auto Update Server
To set Auto Update Server Managed Device credentials:
Step 1 Click Auto Update Server Managed Device Credentials in the Default Credential Sets page.
The Auto Update Server Managed Device Credential page appears.
Step 2 Enter the username and password.
Step 3 Re-enter the password in the Verify field.
3-21User Guide for CiscoWorks Assistant
OL-17904-01

Chapter 3 Configuring LMS Server Using CiscoWorks Assistant Setting Default Credential Sets
Setting Rx Boot Mode Credentials
To set Rx Boot Mode credentials:
Step 1 Click Rx Boot Mode Credentials in the Default Credential Sets page.
The Rx Boot Mode Credentials page appears.
Step 2 Enter the username and password.
Step 3 Re-enter the password in the Verify field.
Editing a Default Credential SetTo edit a default credential set,
Step 1 Click Credential Set Name in the Default Credential Sets page.
The Credential Set page appears.
Step 2 Select an existing credential set which needs to be edited, from the Credential Set drop-down list.
The details relevant to the selected credential set will be displayed for editing.
Specify the credential set name with the constrains listed below:
• Alphabets A-Z and a-z
• Numbers 0-9
• Special Characters -, _, .
Step 3 Edit the required details, by selecting relevant credential type from the Default Credentials list panel. The available credentials details are:
• Standard Credentials
• SNMP Credentials
• HTTP Credentials
• Auto Update Server Managed Device Credentials
• Rx-Boot Mode Credential
Step 4 Click Apply to apply the changes in Common Services. You can also apply the changes by clicking Next.
To cancel the changes, click Cancel.
3-22User Guide for CiscoWorks Assistant
OL-17904-01
Chapter 3 Configuring LMS Server Using CiscoWorks Assistant Setting Default Credential Sets
Viewing Credential Sets StatusTo view the Credential Sets status:
Step 1 Click Next after entering the credentials.
The Credential Sets Progress page is displayed.
This process takes some time to check the status of various tasks.
You can either:
• Set up CiscoWorks Assistant to send you an e-mail notification. You can then exit from the workflow before the tasks are complete.
You can view the status after you get the e-mail notification that the task have completed. You should do this after getting an e-mail notification.
Or
• Wait until the status check has completed to view the status.
Step 2 Click on the relevant step link to view the detailed status report.
If a step fails, the Last Accessed URL column in the report will display the shortcut URL for this step. It will not display anything, if the step is successful.
See User Guide for CiscoWorks Common Services 3.3 for more information on Default Credentials.
Step 3 Click Next to go to the Configuring Device Credential Policies step. See Configuring Device Credential Policies for details.
You can exit the workflow after you complete the tasks and return later to view the status. You should do this after getting an e-mail notification.
You will receive an e-mail notification only if you have configured the e-mail address. See Setting up E-mail Notification After Managing Server Tasks for details.
3-23User Guide for CiscoWorks Assistant
OL-17904-01

Chapter 3 Configuring LMS Server Using CiscoWorks Assistant Configuring Device Credential Policies
Configuring Device Credential PoliciesYou can configure device credential policies and apply the credentials for a range of devices to be added or imported to DCR. The recommended device credentials policy configurations are set to 50.
You can create device credential policies based on the following policy types:
• IP Address
• Hostname
• Display Name
To configure a device credentials policy:
Step 1 Select CiscoWorks Assistant > Workflows > Server Setup > Device Credentials Policy Configuration.
The Device Credentials Policy Configuration page appears.
You can:
• Add a device credentials policy (See Adding a Device Credentials Policy)
• Edit a device credentials policy (See Editing a Device Credentials Policy)
• Delete a device credentials policy (See Deleting a Device Credentials Policy)
• Define the order of device credential policies (See Defining the Order of Device Credential Policies)
Step 2 Click Next to complete the device credentials policy configuration.
The Device Credentials Policy Configuration Progress page appears. This page provides the status of the policy configuration. See Viewing Device Credentials Policy Configuration Status.
Adding a Device Credentials PolicyTo add a new device credentials policy:
Step 1 Click Add in Device Credentials Policy Configuration page to add a device credentials policy.
The Add Device Credentials Policy Configuration dialog box appears.
Step 2 Construct a rule expression. To do so:
a. Select a parameter from the Select a Policydrop-down list.
The listed parameters are IP Range, Hostname and Display Name.
b. Enter a value for the selected rule parameter in the text field.
Examples are provided with the relevant Online help link below, based on the selection made.
3-24User Guide for CiscoWorks Assistant
OL-17904-01

Chapter 3 Configuring LMS Server Using CiscoWorks Assistant Configuring Device Credential Policies
See the following sections in the Administering Device and Credential Repository of Managing Device and Credentials chapter in User Guide for CiscoWorks Common Services 3.3 for more details:
– Patterns in IP Address Default Credential Set Policy Rules
– Regular Expressions in Default Credential Set Policy Rules
http://www.cisco.com/en/US/products/sw/cscowork/ps3996/products_user_guide_list.html
c. Select a default credential set name or No Default from the Credential Set drop-down list.
Step 3 Click OK to go back to Device Credentials Policy Configuration page.
The policy that you have configured is listed in the Device Credentials Policy Configuration page.
To close the Add Device Credentials Policy Configuration dialog box, click Cancel.
Step 4 Click Next to apply the device credential policies.
The Device Credentials Policy Configuration Progress page appears. See Viewing Device Credentials Policy Configuration Status.
Editing a Device Credentials PolicyTo edit a device credentials policy:
Step 1 Select a policy in the Device Credentials Policy Configuration page.
Step 2 Click Edit.
The Edit Device Credentials Policy Configuration dialog box appears.
This dialog box has pre-populated values.
Step 3 Edit the required details in the Edit Device Credentials Policy Configuration dialog box.
Step 4 Click OK to go back to Device Credentials Policy Configuration page.
The policy that you have edited is listed in the Device Credentials Policy Configuration page.
To close the Edit Device Credentials Policy Configuration dialog box, click Cancel.
Step 5 Click Next to apply the device credential policies.
The Device Credentials Policy Configuration Progress page appears. See Viewing Device Credentials Policy Configuration Status.
Deleting a Device Credentials PolicyTo delete a device credentials policy:
Step 1 Select a policy in the Device Credentials Policy Configuration page.
Step 2 Click Delete.
The Delete Confirmation popup appears.
3-25User Guide for CiscoWorks Assistant
OL-17904-01
Chapter 3 Configuring LMS Server Using CiscoWorks Assistant Configuring Device Credential Policies
Step 3 Click OK to delete the selected policy.
Step 4 Click Next to apply the changes.
The Device Credentials Policy Configuration Progress page appears. See Viewing Device Credentials Policy Configuration Status.
Defining the Order of Device Credential PoliciesTo specify the order of device credential policies:
Step 1 Select a policy in the Device Credentials Policy Configuration page.
Step 2 Click either:
• The Up Arrow icon to move the selected device credentials policy up in the displayed order
or
• The Down Arrow icon to move the selected device credentials policy down in the displayed order.
Step 3 Click Next to apply the changes.
The default credential set policies are applied in the order they appear on the Credentials Sets Policy Configuration page. The default credential set policies appearing at the top of the list are applied first.
The Device Credentials Policy Configuration Progress page appears. See Viewing Device Credentials Policy Configuration Status.
See Administering Device and Credential Repository section in the Managing Device and Credentials chapter of the User Guide for CiscoWorks Common Services 3.3 for more information on Defining the Order of Device Credential Policies:
http://www.cisco.com/en/US/products/sw/cscowork/ps3996/products_user_guide_list.html
Viewing Device Credentials Policy Configuration StatusTo view the Device Credentials Policy Configuration status:
Step 1 Click Next after adding or editing device credentials policy.
The Device Credentials Policy Configuration Progress page is displayed.
You can either:
• Set up CiscoWorks Assistant to send you an e-mail notification. You can then exit from the workflow before the tasks are complete.
You can view the status after you get the e-mail notification that the tasks have completed. See Setting up E-mail Notification After Managing Server Tasks for details.
Or
• Wait until the status check has completed to view the status.
Step 2 Click on the relevant step link to view the detailed status report.
3-26User Guide for CiscoWorks Assistant
OL-17904-01

Chapter 3 Configuring LMS Server Using CiscoWorks Assistant Adding Devices
If a step fails, the Last Accessed URL column in the report displays the shortcut URL for that particular step. It will not display anything, if the step is successful.
Step 3 Click Next to go to the Adding Devices step. See Adding Devices for details.
Adding DevicesYou can add devices to the Device and Credentials Repository (DCR) using the following methods:
• Bulk Import from File (See Adding Devices Using Bulk Import From File)
• Bulk Import from Network Management Station (NMS) (See Adding Devices Using Bulk Import From NMS)
• Common Services Device Discovery (See Adding Devices Using Common Services Device Discovery)
CiscoWorks Assistant allows you to add devices using multiple methods, simultaneously. You can add devices using the Import from File feature, Import from NMS, and Common Services Device Discovery at the same time.
You can also:
• View Add Devices Status (See Viewing Add Devices Status)
• Set SNMP Parameters (See Setting SNMPv2 Parameters and Setting SNMPv3 Parameters)
• Delete SNMP Details (See Deleting SNMPv2 Details and Deleting SNMPv3 Details)
To add devices you can either:
• Select CiscoWorks Assistant > Workflows > Server Setup > Add Devices
Or
• Select Manage Servers, and continue in the wizard mode.
Adding Devices Using Bulk Import From FileTo import from a file:
Step 1 Select the Import From File check box from the Select Methods pane, and click the Import From File link.
The File Information pane appears. This is the default.
Step 2 Enter the file name.
Or
a. Click Browse
The Server Side File selector dialog box appears.
b. Select the filename.
The Server Side File Selector dialog box displays the files on the remote server on which the Server Setup workflow is running.
Step 3 Select either CSV or XML file formats.
3-27User Guide for CiscoWorks Assistant
OL-17904-01
Chapter 3 Configuring LMS Server Using CiscoWorks Assistant Adding Devices
Only CSV 2.0 and CSV 3.0 file formats are supported.
See the User Guide for CiscoWorks Common Services 3.3 for sample CSV and XML files.
Step 4 Select either the Use data from Import source or the Use data from Device and Credential Repository.
This is to resolve conflicts that may occur if the devices are present both in the import source and DCR, but differ in their attributes.
• If you select Use data from Import source, the credentials from the import source will be used, and credentials for the device in DCR will be modified.
• If you select Use data from Device and Credential Repository, the device credentials in DCR will be used.
Step 5 Select any one of the following from the Select A Default Credential Set drop-down list.
• default credential set name
• Policy Configuration
• No Default
Adding Devices Using Bulk Import From NMSTo import from NMS:
• Select CiscoWorks Assistant > Workflows > Server Setup > Add Devices
Or
• Select Manage Servers and continue in the wizard mode.
The NMS Information screen appears.
You can do a bulk import either from:
• Local NMS (See Performing Bulk Import From Local NMS)
Or
• Remote NMS (See Performing Bulk Import From Remote NMS)
Performing Bulk Import From Local NMS
To perform a bulk import from Local NMS:
Step 1 Select the Import From NMS check box from the Select Methods pane, and click the Import From NMS link.
Step 2 Select the Network Management System type from the NMS type drop-down list. HPOV and Netview are supported.
Step 3 Enter the installation location of Network Management System in the Install Location field.
For example: C:\Program Files\HP OpenView
3-28User Guide for CiscoWorks Assistant
OL-17904-01

Chapter 3 Configuring LMS Server Using CiscoWorks Assistant Adding Devices
Step 4 Select either Use data from Import source or Use data from Device and Credential Repository
This is to resolve conflicts that may occur if the devices are present both in the import source and DCR, but differ in their attributes.
• If you select Use data from Import source, the credentials from the import source will be used, and credentials for the device in DCR will be modified.
• If you select Use data from Device and Credential Repository, the device credentials in DCR will be used.
Step 5 Select any one of the following from the Select A Default Credential Set drop-down list.
• default credential set name
• Policy Configuration
• No Default
Performing Bulk Import From Remote NMS
To do a bulk import from Remote NMS:
Step 1 Select the Import From NMS check box from the Select Methods pane, and click the Import From NMS link.
Step 2 Select the Remote NMS check box.
Step 3 Select the Network Management System type from the NMS type drop-down list. HPOV, Netview and ACS are supported.
Step 4 Select the Operating System type from the OS type drop-down list.
Step 5 Enter the host name, root username, and install location in the corresponding fields.
If you select the NMS type as ACS, enter the root password, port and protocol along with the hostname and root username in the corresponding fields.
Step 6 Select either Use data from Import source or Use data from Device and Credential Repository
This is to resolve conflicts that may occur if the devices are present both in the import source and DCR, but differ in their attributes.
• If you select Use data from Import source, the credentials from the import source will be used, and credentials for the device in DCR will be modified.
• If you select Use data from Device and Credential Repository, the device credentials in DCR will be used.
Step 7 Select any one of the following from the Select A Default Credential Set drop-down list.
• default credential set name
• Policy Configuration
• No Default
3-29User Guide for CiscoWorks Assistant
OL-17904-01

Chapter 3 Configuring LMS Server Using CiscoWorks Assistant Adding Devices
Adding Devices Using Common Services Device DiscoveryTo run Discovery:
• Select CiscoWorks Assistant > Workflows > Server Setup > Add Devices.
Or
• Select Manage Servers and continue in the wizard mode.
The Add Devices page appears. This page contains the Run Discovery check box for each server.
To specify Device Discovery Settings:
Step 1 Select the Run Discovery on host_name check box, and click the Run Discovery on host_name link.
The Discovery window appears with the following tabs.
• Discovery Module Tab
• Seed Devices Tab
• SNMP Settings Tab
• Filter Settings Tab
• Global Settings Tab
Step 2 Enter the following details to specify the Discovery settings.
For more information, see the User Guide for Common Services 3.3 on the Discovery Settings.
Discovery Module Tab
The following are the various protocols and options in the Discovery module:
Table 3-5 displays the Layer 3 Discovery Protocols.
Table 3-6 displays the Layer 2 Discovery Protocol.
Table 3-5 Layer 3 Discovery Protocol
Field Description
Address Resolution Protocol (ARP) Internet Protocol that maps IP Address to a MAC address
Border Gateway Protocol (BGP) Exterior gateway protocol.
This protocol uses Border Gateway Peer Table to identify its BGP peer.
Open Shortest Path First Protocol (OSPF)
Interior gateway routing protocol.
Routing Table Queries and analyzes routing tables on seed routers, and discovers the subnets and next-hop routers.
Table 3-6 Layer 2 Discovery Protocol
Field Description
Cisco Discovery Protocol Discovers devices independent of media and protocol used.
This protocol runs on all Cisco-manufactured equipment, including routers, access servers, bridges, and switches.
3-30User Guide for CiscoWorks Assistant
OL-17904-01
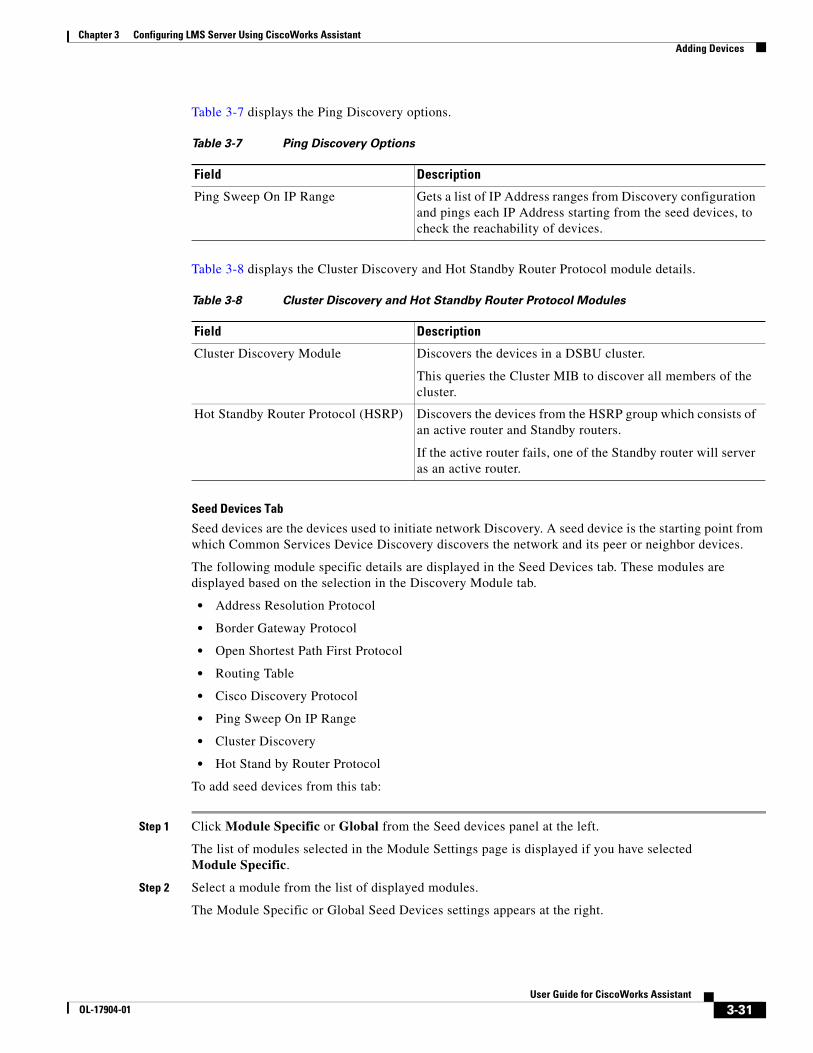
Chapter 3 Configuring LMS Server Using CiscoWorks Assistant Adding Devices
Table 3-7 displays the Ping Discovery options.
Table 3-8 displays the Cluster Discovery and Hot Standby Router Protocol module details.
Seed Devices Tab
Seed devices are the devices used to initiate network Discovery. A seed device is the starting point from which Common Services Device Discovery discovers the network and its peer or neighbor devices.
The following module specific details are displayed in the Seed Devices tab. These modules are displayed based on the selection in the Discovery Module tab.
• Address Resolution Protocol
• Border Gateway Protocol
• Open Shortest Path First Protocol
• Routing Table
• Cisco Discovery Protocol
• Ping Sweep On IP Range
• Cluster Discovery
• Hot Stand by Router Protocol
To add seed devices from this tab:
Step 1 Click Module Specific or Global from the Seed devices panel at the left.
The list of modules selected in the Module Settings page is displayed if you have selected Module Specific.
Step 2 Select a module from the list of displayed modules.
The Module Specific or Global Seed Devices settings appears at the right.
Table 3-7 Ping Discovery Options
Field Description
Ping Sweep On IP Range Gets a list of IP Address ranges from Discovery configuration and pings each IP Address starting from the seed devices, to check the reachability of devices.
Table 3-8 Cluster Discovery and Hot Standby Router Protocol Modules
Field Description
Cluster Discovery Module Discovers the devices in a DSBU cluster.
This queries the Cluster MIB to discover all members of the cluster.
Hot Standby Router Protocol (HSRP) Discovers the devices from the HSRP group which consists of an active router and Standby routers.
If the active router fails, one of the Standby router will server as an active router.
3-31User Guide for CiscoWorks Assistant
OL-17904-01

Chapter 3 Configuring LMS Server Using CiscoWorks Assistant Adding Devices
Step 3 Enter the name of the file with its full path in the From File field, if you want to specify the seed devices from a file.
If you do not know the path, you can click Browse and select a file from the list.
Step 4 Select Use DCR As Seed List, if you want to specify the devices in DCR as seed devices.
This option is not available for the Ping Sweep On IP Range option. You must enter the credentials mentioned in Step 6.
Step 5 Select Jump Router Boundaries to extend Discovery beyond the boundaries set by routers on your network.
This option is available only for CDP Module.
You must be cautious about enabling Discovery to occur beyond router boundaries. This is because Discovery could take much longer if you do not selectively choose the boundaries by excluding specific IP addresses.
Step 6 Enter the following fields which appears only for Ping Sweep On IP Range Discovery module.
• ICMP Retry— No of retries to connect to a device using ICMP protocol if the device is not reachable or network is down. The default is 1 retry.
• ICMP Timeout— Time within which the device should send its response to the network. The default timeout is 1000 milliseconds.
• InterPacket Timeout—Time delay between two ICMP packets. The default timeout is 20 milliseconds.
Step 7 Perform the following if you want to specify the seed devices manually:
a. Click Add to add a new row.
b. Enter the IP Address or hostname of the seed device in the Seed Device field.
c. Enter the number of hops in the Hop Count field.
This field is available for all Discovery modules except Ping Sweep On IP Range.
Hop count limits the scope of Device Discovery. Device Discovery cycle may take a longer time if you enter a greater value of hop count.
You must enter values greater than 1 as hop count.
d. Enter the Subnet Mask in the Subnet Mask field.
The default value is 255.255.255.255. This field is available only for Ping Sweep On IP Range Discovery module.
If you enter a smaller Subnet Mask value, it may result in a longer Discovery cycle because Discovery has to sweep IP Addresses from more networks. The addresses in the Seed Device and Subnet Mask fields also support IPv6.
You can also do the following:
• To add more seed devices, click Add to introduce more rows and enter the seed devices.
• To delete seed devices, select the checkboxes corresponding to the seed devices and click Delete.
SNMP Settings Tab
You can configure SNMP credentials to run Device Discovery. You must configure either SNMPv2 or SNMPv3 credentials by selecting the appropriate radio buttons.
• If you have selected the SNMPv2 radio button, you can select SNMPv2c fallback to SNMPv1.
• If you have selected the SNMPv3 radio button, you can select SNMPv3 fallback to SNMPv2c.
3-32User Guide for CiscoWorks Assistant
OL-17904-01
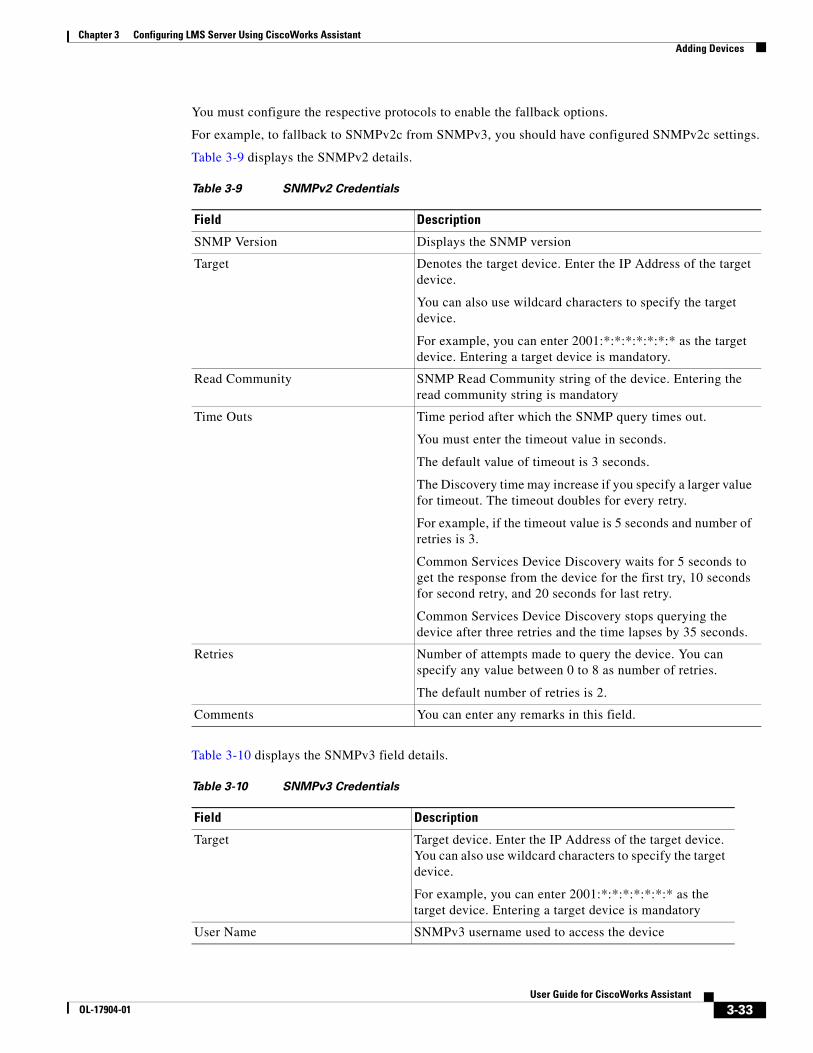
Chapter 3 Configuring LMS Server Using CiscoWorks Assistant Adding Devices
You must configure the respective protocols to enable the fallback options.
For example, to fallback to SNMPv2c from SNMPv3, you should have configured SNMPv2c settings.
Table 3-9 displays the SNMPv2 details.
Table 3-10 displays the SNMPv3 field details.
Table 3-9 SNMPv2 Credentials
Field Description
SNMP Version Displays the SNMP version
Target Denotes the target device. Enter the IP Address of the target device.
You can also use wildcard characters to specify the target device.
For example, you can enter 2001:*:*:*:*:*:*:* as the target device. Entering a target device is mandatory.
Read Community SNMP Read Community string of the device. Entering the read community string is mandatory
Time Outs Time period after which the SNMP query times out.
You must enter the timeout value in seconds.
The default value of timeout is 3 seconds.
The Discovery time may increase if you specify a larger value for timeout. The timeout doubles for every retry.
For example, if the timeout value is 5 seconds and number of retries is 3.
Common Services Device Discovery waits for 5 seconds to get the response from the device for the first try, 10 seconds for second retry, and 20 seconds for last retry.
Common Services Device Discovery stops querying the device after three retries and the time lapses by 35 seconds.
Retries Number of attempts made to query the device. You can specify any value between 0 to 8 as number of retries.
The default number of retries is 2.
Comments You can enter any remarks in this field.
Table 3-10 SNMPv3 Credentials
Field Description
Target Target device. Enter the IP Address of the target device. You can also use wildcard characters to specify the target device.
For example, you can enter 2001:*:*:*:*:*:*:* as the target device. Entering a target device is mandatory
User Name SNMPv3 username used to access the device
3-33User Guide for CiscoWorks Assistant
OL-17904-01

Chapter 3 Configuring LMS Server Using CiscoWorks Assistant Adding Devices
Auth Password SNMP V3 authentication password used to operate the devices in AuthNoPriv and AuthPriv modes.
Auth Algorithm SNMP V3 authentication algorithm used in AuthNoPriv and AuthPriv modes.
The authentication algorithm can be MD5 or SHA-1.
Privacy Password SNMP V3 privacy password of the device in AuthPriv mode.
Privacy Algorithm SNMP V3 privacy algorithm used in AuthPriv mode.
The privacy algorithm can be DES, 3DES, AES128, AES192, and AES256.
Timeout Time period after which the SNMP query times out.
You must enter the timeout value in seconds.
The default value of timeout is 3 seconds.
The discovery time may increase if you specify a larger value for timeout.
The timeout doubles for every retry.
For example, if the timeout value is 5 seconds and number of retries is 3.
Common Services Device Discovery waits for 5 seconds to get the response from the device for the first try, 10 seconds for second retry, and 20 seconds for last retry.
Common Services Device Discovery stops querying the device after 3 retries and the time lapses by 35 seconds.
Retries Number of attempts made to query the device.
You can specify any value between 0 to 8 as number of retries. The default number of retries is 2.
Comments You can enter any remarks in this field.
Table 3-10 SNMPv3 Credentials
Field Description
3-34User Guide for CiscoWorks Assistant
OL-17904-01

Chapter 3 Configuring LMS Server Using CiscoWorks Assistant Adding Devices
Filter Settings Tab
Filters allow you to include or exclude devices from the network. For more information on Filters, see Configuring Discovery Filter Settings section in the User Guide for Common Services 3.3.
You can select a filter from the Use Filter drop-down list.
The supported filters are:
• IP Address
• DNS Domain
• SysObjectID
• SysLocation
You can either include or exclude a filter by selecting either the Include or Exclude radio buttons.
From the filter settings you can Add and Delete a Filter.
To add a filter:
Step 1 Select a filter from the Use Filter drop-down list.
IP Address is the default filter. The address also supports IPv6.
Step 2 Select either the Include or Exclude radio button.
Step 3 Enter the filter in the field corresponding to the Add button.
For SysObjectID filter, you can either enter the value manually or select a SysObjectID from the Device Type Selector. The Device Type Selector appears after you have selected a SysObjectID filter from the Use Filter drop-down list.
Step 4 Click Add.
The filter is added into the Added List field.
To delete the filter, select the filter from the Added List and click Delete.
3-35User Guide for CiscoWorks Assistant
OL-17904-01

Chapter 3 Configuring LMS Server Using CiscoWorks Assistant Adding Devices
Global Settings Tab
In the Global Settings tab, you can view the details shown in Table 3-11.
Table 3-11 Global Settings Tab Details
Field Description
Preferred DCR Display Name
You can set the display name of the discovered devices in DCR as any one of the following:
• IP Address—Preferred management IP Address of the device.
• Hostname—DNS resolvable name of preferred management IP Address. This is the default option.
• FQDN — Fully Qualified Domain Name consisting of a hostname and a domain name.
Select the appropriate radio button in the Preferred DCR Display Name panel.
When you select the preferred management IP Address as None:
• Hostname of the device is added as the display name in DCR.
• Device interface addresses are also added as separate devices in DCR.
Update DCR Display Name
Select this checkbox if you want to update the display name of the devices that already exist in DCR, in the next Device Discovery cycle.
For example, consider a device that is discovered by Common Services Device Discovery, exists in DCR with the display name as its hostname.
If you change the Preferred DCR Display Name to IP Address for the next Device Discovery, Common Services Device Discovery will update the display name of the device as its IP Address in DCR after the next Device Discovery.
The display name of devices are not overwritten in the future Discovery cycles if you have not selected this option.
Use Default Credentials
Select either default credential set name, Policy Configuration or No Default from the Select A Default Credential Set drop-down list, while adding the devices to DCR.
3-36User Guide for CiscoWorks Assistant
OL-17904-01
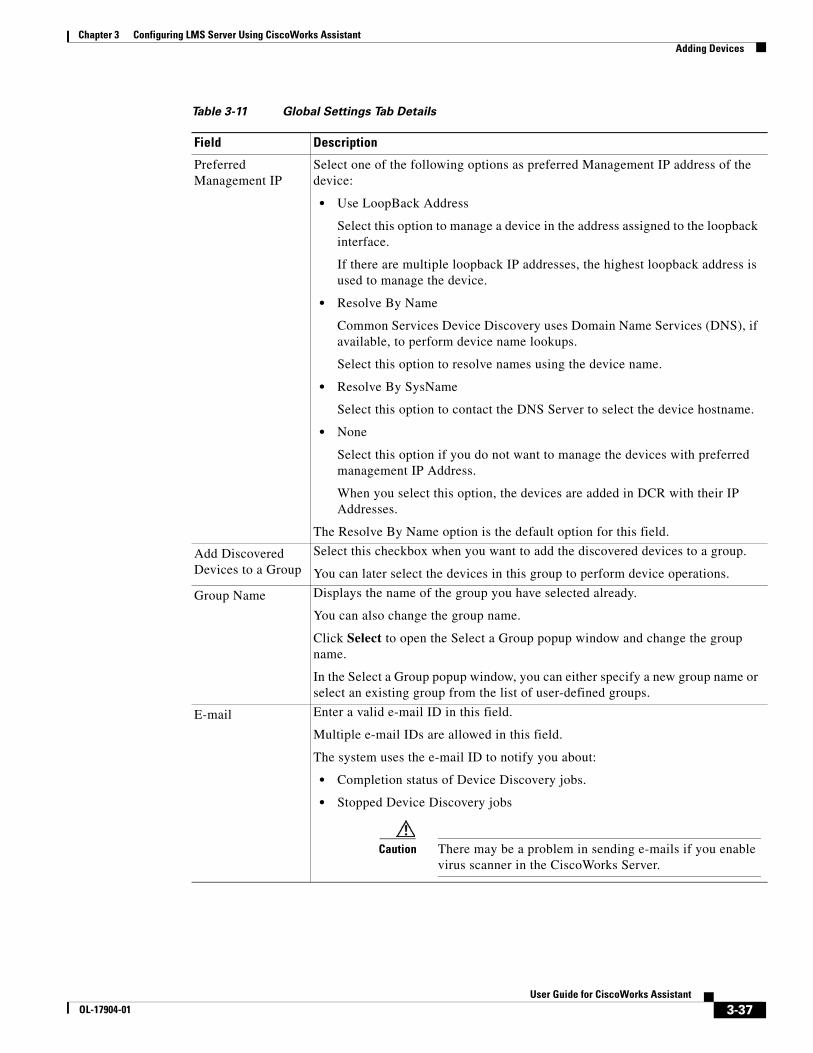
Chapter 3 Configuring LMS Server Using CiscoWorks Assistant Adding Devices
Preferred Management IP
Select one of the following options as preferred Management IP address of the device:
• Use LoopBack Address
Select this option to manage a device in the address assigned to the loopback interface.
If there are multiple loopback IP addresses, the highest loopback address is used to manage the device.
• Resolve By Name
Common Services Device Discovery uses Domain Name Services (DNS), if available, to perform device name lookups.
Select this option to resolve names using the device name.
• Resolve By SysName
Select this option to contact the DNS Server to select the device hostname.
• None
Select this option if you do not want to manage the devices with preferred management IP Address.
When you select this option, the devices are added in DCR with their IP Addresses.
The Resolve By Name option is the default option for this field.
Add Discovered Devices to a Group
Select this checkbox when you want to add the discovered devices to a group.
You can later select the devices in this group to perform device operations.
Group Name Displays the name of the group you have selected already.
You can also change the group name.
Click Select to open the Select a Group popup window and change the group name.
In the Select a Group popup window, you can either specify a new group name or select an existing group from the list of user-defined groups.
E-mail Enter a valid e-mail ID in this field.
Multiple e-mail IDs are allowed in this field.
The system uses the e-mail ID to notify you about:
• Completion status of Device Discovery jobs.
• Stopped Device Discovery jobs
Caution There may be a problem in sending e-mails if you enable virus scanner in the CiscoWorks Server.
Table 3-11 Global Settings Tab Details
Field Description
3-37User Guide for CiscoWorks Assistant
OL-17904-01
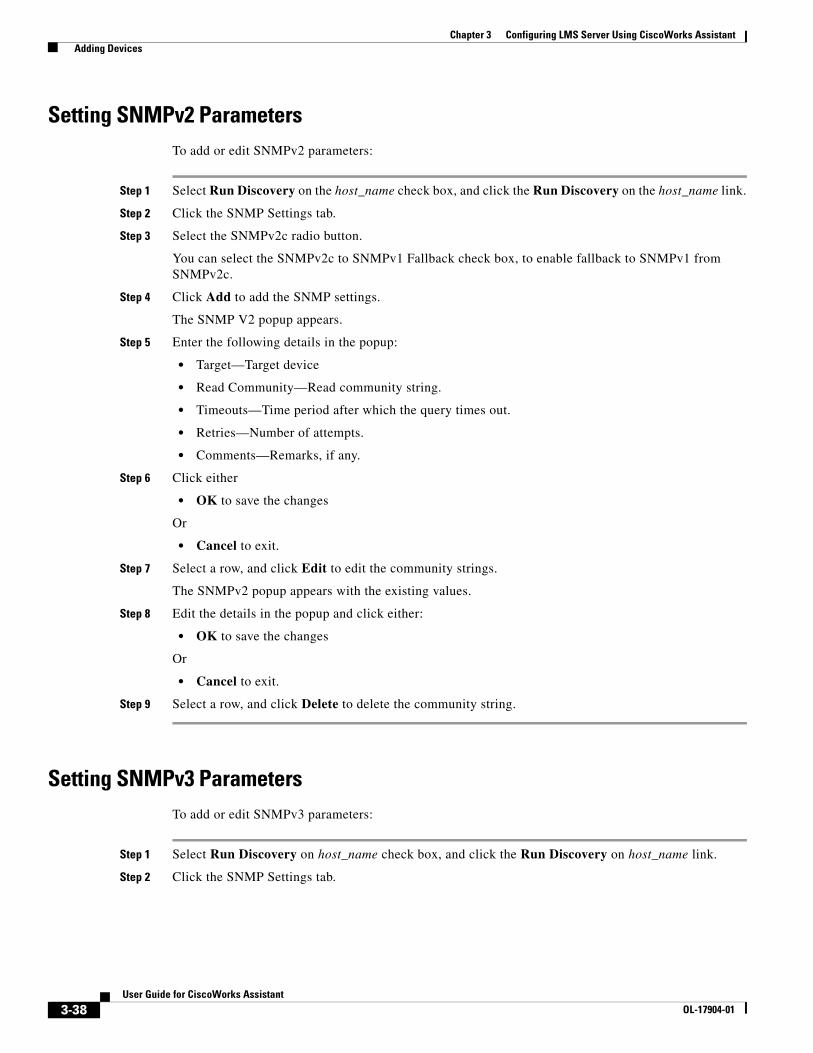
Chapter 3 Configuring LMS Server Using CiscoWorks Assistant Adding Devices
Setting SNMPv2 ParametersTo add or edit SNMPv2 parameters:
Step 1 Select Run Discovery on the host_name check box, and click the Run Discovery on the host_name link.
Step 2 Click the SNMP Settings tab.
Step 3 Select the SNMPv2c radio button.
You can select the SNMPv2c to SNMPv1 Fallback check box, to enable fallback to SNMPv1 from SNMPv2c.
Step 4 Click Add to add the SNMP settings.
The SNMP V2 popup appears.
Step 5 Enter the following details in the popup:
• Target—Target device
• Read Community—Read community string.
• Timeouts—Time period after which the query times out.
• Retries—Number of attempts.
• Comments—Remarks, if any.
Step 6 Click either
• OK to save the changes
Or
• Cancel to exit.
Step 7 Select a row, and click Edit to edit the community strings.
The SNMPv2 popup appears with the existing values.
Step 8 Edit the details in the popup and click either:
• OK to save the changes
Or
• Cancel to exit.
Step 9 Select a row, and click Delete to delete the community string.
Setting SNMPv3 ParametersTo add or edit SNMPv3 parameters:
Step 1 Select Run Discovery on host_name check box, and click the Run Discovery on host_name link.
Step 2 Click the SNMP Settings tab.
3-38User Guide for CiscoWorks Assistant
OL-17904-01
Chapter 3 Configuring LMS Server Using CiscoWorks Assistant Adding Devices
Step 3 Select the SNMPv3 radio button.
You can select the SNMPv3 to SNMPv2c Fallback check box, to enable fallback to SNMPv2c from SNMPv3. You should have configured SNMPv2c settings, to enable fallback to SNMPv2c from SNMPv3.
Step 4 Click Add to add the SNMP settings.
The SNMPv3 popup appears.
Step 5 Enter the following details in the popup window:
• Target—Target device.
• Username—Name of the user who has access to the views configured on the device.
• Password—Password of the user.
• Timeouts—Time period after which the query times out.
• Retries—Number of attempts.
• Authentication—Method of authentication. Either SHA-1 or MD5.
• Comments—Remarks, if any.
Step 6 Click either:
• OK to save the changes.
Or
• Cancel to exit.
Step 7 Select a row, and click Edit to edit the community strings.
The SNMPv3 popup appears with the existing values.
Step 8 Edit the details in the popup and click either:
• OK to save the changes.
Or
• Cancel to exit.
Step 9 Select a row, and click Delete to delete the community string.
3-39User Guide for CiscoWorks Assistant
OL-17904-01

Chapter 3 Configuring LMS Server Using CiscoWorks Assistant Adding Devices
Viewing Add Devices StatusTo view the Add Devices status:
Step 1 Click Next after adding the devices.
The Add Devices Progress page is displayed.
This process takes some time to check the status of various tasks.
You can either:
• Set up CiscoWorks Assistant to send you an e-mail notification. mail notification. You can then exit from the workflow before the tasks are complete.
You can view the status after you get the e-mail notification that the tasks have completed. You should do this only after getting an e-mail notification. See Setting up E-mail Notification After Adding Devices for details.
Or
• Wait until the status check has completed to view the status.
Step 2 Click on the relevant step link to view the detailed status report.
If a step fails, the Last Accessed URL column in the report will display the shortcut URL for that particular step. It will not display anything, if the step is successful.
Click Next to go to Manage Devices Tasks. See Managing Devices for details.
Setting up E-mail Notification After Adding Devices
You can exit the workflow after you complete the tasks and return later to view the status. You should do this after getting an e-mail notification.
To do this:
Step 1 Select the Notify me When Add Devices Tasks are Complete check box, and click OK.
Step 2 Enter the e-mail ID in the text field.
The e-mail ID will be displayed in the text field if you had entered an e-mail ID in the Manage Servers flow. Only one e-mail ID is allowed.
E-mail ID can contain any characters, numbers, and special characters ($, _, ^, &, #). For example:
• Name_12#@abc.co.in
The following message appears:
An e-mail will be sent to the selected E-mail address after the process has completed.
Step 3 Click Cancel.
The initial Server Setup workflow page is displayed.
You will receive an e-mail after the tasks have been completed.
Step 4 Click Enter Setup to view the Add Devices Progress page after you receive the e-mail notification.
3-40User Guide for CiscoWorks Assistant
OL-17904-01
Chapter 3 Configuring LMS Server Using CiscoWorks Assistant Managing Devices
Deleting SNMPv2 DetailsTo delete the SNMPv2 details:
Step 1 Select Run Discovery on the host_name check box, and click the Run Discovery on the host_name link.
Step 2 Click the SNMP Settings tab.
Step 3 Select the row to be deleted.
Step 4 Click Delete.
The Delete SNMPV2 Confirmation dialog box appears.
Step 5 Click OK in the Delete SNMP V2 Confirmation dialog box.
Deleting SNMPv3 DetailsTo delete the SNMPv3 details:
Step 1 Select Run Discovery on the host_name check box, and click Run Discovery on the host_name link.
Step 2 Click the SNMP Settings tab.
Step 3 Select the row to be deleted.
Step 4 Click Delete.
The Delete SNMPV3 Confirmation dialog box appears.
Step 5 Click OK in the Delete SNMPV3 Confirmation dialog box.
Managing DevicesThis page helps you to allocate devices to be managed by the applications installed in the CiscoWorks servers. It lists the CiscoWorks servers and the applications that are present in each server.
You can select devices from the device selector and add them to the application that you want the device to be managed.
You can also:
• Use Device Selector to search for devices in DCR (See About Device Selector)
• View Device Management status (See Viewing Allocate Devices Status)
To manage devices:
Step 1 Select CiscoWorks Assistant > Workflows > Server Setup > Allocate Devices.
The Allocate Devices page appears.
Step 2 Go to the Device Selector and select the devices that you want to add.
3-41User Guide for CiscoWorks Assistant
OL-17904-01

Chapter 3 Configuring LMS Server Using CiscoWorks Assistant Managing Devices
Step 3 Select the applications to which you want to allocate the devices.
Initially, devices must be added to DCR. After a device is added to DCR, you can add it to the applications.
Step 4 Click Add Devices to add.
Or
Click Reset to reset the added devices in the application.
The Manage Devices screen displays:
• LMS Server—LMS Server IP Address
• Applications—Applications installed in the LMS Server
• Selected Devices —Number of devices selected to add in that application
Step 5 Click Next to complete the Manage Devices tasks.
The Device Management Progress page appears. You can view the Device Management status in this page. See Viewing Allocate Devices Status for details.
About Device SelectorThe Device Selector allows you to search for the devices in Device and Credential Repository (DCR). It helps you to locate the devices and perform the device management tasks quickly. With the Device Selector, you need not remember the device type or application group hierarchy to locate the devices.
The devices are categorized under the Device Type based groups, User Defined groups, Subnet Based groups, Application Specific groups or under All Groups.
The CiscoWorks Assistant uses the Common Services Device Selector.
See the Configuring Device Selector section in the Managing Device and Credentials chapter of the User Guide for CiscoWorks Common Services 3.3 for information on using Device Selector:
http://www.cisco.com/en/US/products/sw/cscowork/ps3996/products_user_guide_list.html
You can also access this information from Common Services Online help. From CiscoWorks help, select:
Common Services > Managing Device and Credentials > Configuring Device Selector > Searching Devices.
3-42User Guide for CiscoWorks Assistant
OL-17904-01

Chapter 3 Configuring LMS Server Using CiscoWorks Assistant Managing Devices
Viewing Allocate Devices StatusYou can view the device management status after you complete the Allocate Devices tasks.
To view the status:
Step 1 Click Next after entering the credentials.
The Allocate Devices Progress page appears. This process takes some time to check the status of various tasks.
You can either:
• Set up CiscoWorks Assistant to send you an e-mail notification. mail notification. You can then exit from the workflow before the tasks are complete.
You can view the status after you get the e-mail notification that the tasks have completed. You should do this only after getting an e-mail notification.
See Setting up E-mail Notification After Device Management Tasks for details.
Or
• Wait until the status check has completed to view the status.
Step 2 Click on the step link to view the detailed status report.
Table 3-12 describes the fields in the status report.
Step 3 Click Next to go to the Change ACS Setup tasks. See Changing ACS Setup for details.
Setting up E-mail Notification After Device Management Tasks
You can exit the workflow after you complete the tasks and return later to view the status. You should do this only after getting an e-mail notification.
To do this:
Step 1 Select the Notify me When Manage Devices Tasks are Complete check box, and click OK.
Step 2 Enter the e-mail ID in the text field.
Table 3-12 Status Report Fields
Field Description
Server Host name or IP Address of the local or remote server.
Application Name of the application to which the devices are added after allocation.
Status Status of the Allocate Devices tasks. This status could be Success or Failure.
Last Accessed URL Displays the shortcut URL for a particular step if it fails.
It will not display anything if the step is successful.
Details Displays the details of failure, if the Allocate Devices task for an application is not successful.
It will not display anything if the step is successful.
3-43User Guide for CiscoWorks Assistant
OL-17904-01

Chapter 3 Configuring LMS Server Using CiscoWorks Assistant Changing ACS Setup
The e-mail ID will be displayed in the text field if you had entered an e-mail ID in the Manage Servers flow. Only one e-mail ID is allowed.
The e-mail ID can contain alphabets, numbers, and special characters ($, _, ^, &, #).
For example:
• Name_12#@abc.co.in
The following message appears:
An e-mail will be sent to the selected E-mail address after the process has completed.
Step 3 Click Cancel.
The initial Server Setup workflow page is displayed.
You will receive an e-mail, after the tasks have completed.
Step 4 Click Enter Setup to view the Manage Devices Status page after you receive the e-mail notification.
Changing ACS SetupThe CiscoWorks server provides mechanisms used to authenticate users for CiscoWorks applications. The login module determines the type of authentication and authorization CiscoWorks uses.
By default, the login module is set to the native CiscoWorks authentication mechanism, that is, the CiscoWorks Local Login module. You can change this default value to use Cisco Secure ACS for user authentication and authorization.
In CiscoWorks Local mode, you cannot create custom roles, or modify the predefined roles. Cisco Secure ACS allows you to create custom roles and also limit the access to network devices within LMS using Network Device Groups (NDGs).
The details for setting up the CiscoWorks server for non-ACS mode are available in User Guide for CiscoWorks Common Service 3.3.
Change ACS Setup page shows the ACS Mode Status for each CiscoWorks server in the setup. From this page you can:
• Configure ACS Mode (See Configuring the ACS Mode)
• Assign Device Group (See Assigning Device Group)
The tasks to be performed to complete AAA mode change to ACS can be classified as:
• Cisco Secure ACS Initial Setup Tasks—This includes:
– Adding the ACS administrator user
– Adding CiscoWorks server and devices managed by it as AAA clients in Cisco Secure ACS.
When you change the mode to ACS using CiscoWorks Assistant, you need to manually add the DCR Master server in ACS as an AAA client.
When you change the mode of a Slave, CiscoWorks Assistant adds it to the NDG group you specify.
See Cisco Secure ACS Initial Setup Tasks for details.
• AAA mode configuration in CiscoWorks Assistant—Specifying the Cisco Secure ACS server details and credentials in the Configure ACS Mode page. See Configuring the ACS Mode for details.
3-44User Guide for CiscoWorks Assistant
OL-17904-01

Chapter 3 Configuring LMS Server Using CiscoWorks Assistant Changing ACS Setup
• User Configuration in Cisco Secure ACS—Adding users and defining roles in Cisco Secure ACS. See User Configuration in Cisco Secure ACS for details and pointers to documentation.
You can also perform the following tasks:
• View the ACS mode configuration status after you complete the Configure ACS Mode tasks. See Viewing the Configure ACS Mode Status
• Update the ACS server details using this option. You should have already completed the ACS Mode change to do this. See Updating ACS Configuration
• Assign Device Groups. See Assigning Device Group
Cisco Secure ACS Initial Setup Tasks
You must define an Administrator in ACS server to provide remote access. To access the Cisco Secure ACS HTML interface from a browser on a remote machine, you must log in to Cisco Secure ACS using an administrator account.
You can perform the necessary steps to do this in the Administration Control tab in the ACS UI. See the white paper, CiscoWorks LMS Integration with Cisco Secure ACS, or the User Guide for Cisco Secure ACS 4.1 for detailed information.
You must then add the CiscoWorks server and the devices it manages as AAA clients in ACS. The ACS workflow does not support IPv6 devices. Hence, IPv6 devices will not be added in ACS.
To add CiscoWorks server as an AAA client:
Step 1 In the Cisco Secure ACS navigation bar, click Network Configuration.
The Network Configuration page appears.
Step 2 Do either of the following:
• If you are using Network Device Groups (NDGs), click the name of the NDG to which the AAA client is to be assigned. Then click Add Entry below the AAA Clients table.
If NDG option is not visible, you can enable Network Device Groups in ACS under Interface Configuration > Advanced.
Or
• Click Add Entry below the AAA Clients table, to add an AAA client when you have not enabled NDGs.
The Add AAA Client page appears.
Step 3 In the AAA Client Hostname box, enter the name of your CiscoWorks server (up to 32 characters).
Step 4 In the AAA Client IP Address box, enter the IP address of your CiscoWorks server.
Step 5 In the Key box, enter the Shared Secret key that your CiscoWorks server and ACS use to encrypt the data.
Step 6 From the Authenticate Using list, select TACACS + (CiscoIOS) as the network security protocol used by the AAA client.
Step 7 Click Submit + Restart.
Apart from adding your CiscoWorks server as an AAA client, you also need to add the devices to be managed by the CiscoWorks server as AAA clients to Cisco Secure ACS.
When you are integrating the AAA clients with Cisco Secure ACS, your devices will not be visible from your CiscoWorks server if you have not added them as AAA clients in Cisco Secure ACS.
3-45User Guide for CiscoWorks Assistant
OL-17904-01

Chapter 3 Configuring LMS Server Using CiscoWorks Assistant Changing ACS Setup
For information on adding network device groups and AAA client configuration, see the Network Configuration section of the User Guide for Cisco Secure ACS 4.1.
To change ACS settings:
Step 1 Select CiscoWorks Assistant > Workflows > Server Setup > Change ACS Setup.
The Change ACS Setup page appears.
Change ACS Setup page contains these ACS Mode Status details.
• Server—Name or IP Address of the server.
• Mode—The current mode of the server. It can be ACS or Non-ACS.
If the mode is ACS, a link is displayed. Click this link to view the ACS Connection Status for the server.
Step 2 Select the Change Mode to ACS check box in the Login Module pane to change the login mode to ACS.
If the server is in ACS mode, the Change ACS Setup page will contain the ACS Tasks pane instead of the Login Module pane. The ACS Tasks pane has these radio buttons:
• Update ACS Configuration (See Updating ACS Configuration.)
• Assign Group for missing devices (See Assigning Device Group.)
Configuring the ACS ModeTo change the mode to ACS:
Step 1 Select CiscoWorks Assistant > Workflows > Server Setup > Change ACS Setup.
CiscoWorks Assistant checks whether there are pending devices in DFM and RME. If it finds any pending devices, the Pending Device Count table is displayed. It displays:
• Server—Server name.
• Application—Application that contains pending devices. Value will be DFM or RME.
• Pending Count—Number of pending devices.
• Details—Reason why CiscoWorks Assistant could not fetch the pending devices count.This column will be blank if the pending devices count is found.
Along with the table, a Notification pop up window appears with the following message:
Pending devices exist or could not check for pending devices in some LMS applications
Step 2 Click OK.
Step 3 Click Next.
A confirmation pop up appears with the following message:
LMS server(s) ACS configuration will not be proper if there are pending devices in the LMS applications. Make sure there are no pending devices and click OK to continue.
To get further details on pending devices in the applications, go to:
• RME > Devices > Device Management > Pending Devices
• Device Fault Manager > Device Management > Device Summary
The details are displayed in the screens that appear when you select these menu paths.
3-46User Guide for CiscoWorks Assistant
OL-17904-01

Chapter 3 Configuring LMS Server Using CiscoWorks Assistant Changing ACS Setup
See RME and Device Fault Manager User Guides for more information on pending devices.
The Change ACS Setup page appears after you click OK.
Step 4 Select the Change Mode to ACS check box and click Next to go the Configure ACS Mode page.
Note Ensure that the local server is an AAA client to ACS server.
Step 5 Click OK on the Notification pop-up window to continue with the ACS Mode change.
Step 6 Enter the required information in the ACS Mode Setup table to change the login mode to ACS.
If the DCR Master (local server) is already in ACS mode, the fields other than the passwords and secret keys will be pre-populated.
Table 3-13 describes the fields in the ACS Mode Setup table.
Table 3-13 ACS Mode Setup Fields
Field Description
Server Details
Primary IP Address/Hostname Enter the Primary IP Address/Hostname of the ACS server.
ACS TACACS+ port Enter the ACS TACACS+ port number.
The default port number is 49. You can change the port based on the value configured in ACS.
Secondary IP Address/Hostname Enter the Secondary IP Address/Hostname of the ACS server.
ACS TACACS+ port Enter the ACS TACACS+ port number.
The default port number is 49. You can change the port based on the value configured in ACS.
Tertiary IP Address/Hostname Enter the Tertiary IP Address/Hostname of the ACS server
ACS TACACS+ port Enter the ACS TACACS+ port number.
The default port number is 49. You can change the port based on the value configured in ACS.
Login
ACS Admin Name Enter the administrator username in ACS
ACS Admin Password Enter the administrator password in ACS
Confirm Password Re-enter the administrator password in ACS
ACS Shared Secret Key Enter the secret key shared between ACS and the CiscoWorks server.
Confirm Key Re-enter the ACS Shared Secret key
System Identity
User Name Enter the system identity user name. This user should be already configured in ACS, with all privileges.
Password Enter the system identity password value
Confirm Password Re-enter the password.
3-47User Guide for CiscoWorks Assistant
OL-17904-01
Chapter 3 Configuring LMS Server Using CiscoWorks Assistant Changing ACS Setup
Step 7 Select the Register all Installed Applications with ACS check box, if you are registering the applications for the first time.
In case an application is already registered with ACS, the current registration will overwrite the previous registration. When you select the Register all Installed Applications with ACS check box, you are prompted to confirm whether you want to continue with the settings.
See Common Services Online help for details.
Step 8 Select the HTTP or HTTPS radio button under Current ACS Administrative Access Protocol.
Step 9 Click Next to complete the Mode change.
The Configure ACS Mode Progress page is displayed. You can view the ACS mode configuration status in this page. See Viewing the Configure ACS Mode Status for details.
Note In a Multi-server setup, ACS configuration may fail, when master and slave servers are trying to register the applications at the same time. At the time of failure, repeat the above steps to continue with ACS configuration.
User Configuration in Cisco Secure ACS
The System Identity User has to be created in ACS, and assigned Super Admin role in all applications in ACS.
You should create a user in ACS with the current System Identity username, and assign Super Admin role to that user in all applications in the TACACS + options pane in Group Setup or User Setup UI in ACS.
See Configuring Device Management Command Authorization for a User Group in User Guide for Cisco Secure ACS 4.1.
Note Restart daemon manager after you create the System Identity User in ACS, and assign the Super Admin role for the changes to take effect.
Network Device Group Name
Network Device Group Name Enter the Network Device Group Name value. Network Device Group name should present in the ACS.
This field appears only in a Multi-server set up, when you change the mode of a Slave. You must manually add the local server (DCR Master) as an AAA client in ACS, before you change the mode to ACS.
The workflow converts the other servers part of the Multi-server to ACS mode and also add missing devices to the NDG that you specify here.
Table 3-13 ACS Mode Setup Fields
Field Description
3-48User Guide for CiscoWorks Assistant
OL-17904-01
Chapter 3 Configuring LMS Server Using CiscoWorks Assistant Changing ACS Setup
The final step in integrating CiscoWorks Common Services Software with Cisco Secure ACS is to configure the CiscoWorks users within Cisco Secure ACS. Cisco Secure ACS allows you to define access permissions and policies for the registered CiscoWorks applications either for individual users or for a group of users.
See the following sections of the Cisco Secure ACS User Guide for more information on managing users and user groups:
• User Group Management
• User Management
While adding the user, you can configure access policies to define what the user is authorized to do, depending on the role.
See Configuring Users in ACS section in User Guide for CiscoWorks Common Services 3.3 for information on:
• Assigning Privileges in ACS
• Creating and Modifying Roles in ACS
See also the white paper on CiscoWorks LMS Integration with Cisco Secure ACS, available on Cisco.com
Viewing the Configure ACS Mode Status You can view the ACS mode configuration status after you complete the Configure ACS Mode tasks.
To view the status, click Next after configuring the ACS mode.
The Configure ACS Mode Progress page is displayed.
This process takes some time to check the status of various tasks.
You can either:
• Exit the workflow after you complete the tasks and return later to view the status. You should do this only after getting an e-mail notification. See Setting up E-mail Notification After Configuring ACS Mode for details.
Or
• Wait until the status checks complete to view the status.
The Configure ACS Mode Result page is displayed. See Viewing the Configure ACS Mode Result for details.
Setting up E-mail Notification After Configuring ACS Mode
You can exit the workflow after you complete the tasks and return later to view the status. You should do this after getting an e-mail notification.
To do this:
Step 1 Select the Notify me When ACS Tasks are Complete check box, and click OK.
Step 2 Enter the e-mail ID in the text field.
The e-mail ID will be displayed in the text field if you had entered an e-mail ID in the Manage Servers flow. Only one e-mail ID is allowed.
The e-mail ID can contain alphabets, numbers, and special characters ($, _, ^, &, #).
3-49User Guide for CiscoWorks Assistant
OL-17904-01
Chapter 3 Configuring LMS Server Using CiscoWorks Assistant Changing ACS Setup
For example:
• Name_12#@abc.co.in
The following message appears:
An e-mail will be sent to the selected E-mail address after the process has completed.
Step 3 Click Cancel.
The initial Server Setup workflow page is displayed.
You will receive an e-mail after the tasks have been completed.
Step 4 Click Enter Setup to view the ACS Mode Progress page after you receive the e-mail notification.
Viewing the Configure ACS Mode Result
Configure ACS Mode Result page displays the ACS Connection Status of all servers in the setup. To access the Configure ACS Result page you should have changed the server into ACS Mode.
To view the Configure ACS Mode Result page:
Step 1 Click Next, after the Configure ACS Mode tasks are complete.
The Configure ACS Mode result page appears with the following popup message:
Restart the LMS Daemon Manager of the following servers for the ACS changes to take effect:
<Server details>
Make sure the configured System Identity User is available in ACS Server.
Step 2 Restart daemon manager, and click OK to view the Configure ACS Mode Result page.
To restart daemon manager:
a. Stop daemon manager.
– On Solaris:
Run /etc/init.d/dmgtd stop
– On Windows:
Run net stop CRMdmgtd or net stop crmdmgtd
b. Start daemon manager.
– On Solaris:
Run /etc/init.d/dmgtd start
– On Windows:
Run net start CRMdmgtd or net start crmdmgtd
The following ACS Connection Status details are shown:
• TACACS+ Connectivity With ACS Status—Reachability status of the ACS server
• HTTP/HTTPS Connectivity With ACS—Reachability status of the ACS server using HTTP or HTTPS
• CiscoWorks System Identity User Configuration in ACS— Information on privileges for the ACS server.
3-50User Guide for CiscoWorks Assistant
OL-17904-01
Chapter 3 Configuring LMS Server Using CiscoWorks Assistant Changing ACS Setup
See the Setting up AAA Mode to ACS section in the User Guide for CiscoWorks Common Services 3.3, for further details.
Updating ACS ConfigurationYou can update the ACS server details using this option. You should have already completed the ACS Mode change to do this.
To update ACS server details:
Step 1 Select CiscoWorks Assistant > Workflows > Server Setup > Change ACS Setup
CiscoWorks Assistant checks whether there are pending devices in DFM and RME. If it finds any pending devices, the Pending Device Count table is displayed with the following:
• Server—Server name.
• Application—Application that contains pending devices. Value will be DFM or RME.
• Pending Count—Number of pending devices.
• Details—Reason why CiscoWorks Assistant could not fetch the pending device count.This column will be blank if the pending devices count is found.
Along with the table, a Notification pop up window appears with the following message:
Pending devices exist or could not check for pending devices in some LMS applications
Step 2 Click OK.
Step 3 Click Next.
A confirmation pop up appears with the following message:
LMS server(s) ACS configuration will not be proper if there are pending devices in the LMS applications. Make sure there are no pending devices and click OK to continue.
To get further details on pending devices in the applications, go to:
• RME > Devices > Device Management > Pending Devices
• Device Fault Manager > Device Management > Device Summary
The details are displayed in the screens that appear when you select these menu paths.
See RME and Device Fault Manager User Guides for more information on pending devices.
The Change ACS Setup page appears after you click OK.
Step 4 Select the Update ACS Configuration radio button from the ACS Tasks pane.
The Update ACS Configuration check box appears in the ACS Tasks pane only if the server is in ACS mode.
Step 5 Click Next.
The following popup message appears:
Please ensure that local server is an AAA client to ACS server.
Step 6 Click OK to continue.
The Configure ACS Mode page appears with the pre-populated values in the ACS Mode Setup.
3-51User Guide for CiscoWorks Assistant
OL-17904-01

Chapter 3 Configuring LMS Server Using CiscoWorks Assistant Changing ACS Setup
Step 7 Enter the new details in the ACS Mode Setup window.
You need to provide the current System Identity Username and Password. The NDG should be already be preset in ACS. You must also provide the Shared Secret key.
Step 8 Click Next to complete updating ACS configuration.
Note In a Multi-server setup, ACS configuration may fail, when master and slave servers are trying to register the applications at the same time. At the time of failure, repeat the above steps to continue with ACS configuration.
Step 9 Restart daemon manager for the changes to take effect.
Assigning Device GroupAfter you have integrated the CiscoWorks server with Cisco Secure ACS and assigned appropriate roles to the user you would not be able to see the devices added in DCR if the devices are not added as AAA clients to Cisco Secure ACS. CiscoWorks Assistant lets you add the missing devices into the appropriate NDG in ACS.
Common Services displays a report that has the list of DCR devices that need to be configured in ACS. See Generating Reports in DCR section of the User Guide for CiscoWorks Common Services 3.3, for details.
The Assign Device Group check box appears only if there are missing DCR devices in ACS. You can assign the devices to the appropriate NDG.
To assign device groups:
Step 1 Select CiscoWorks Assistant > Workflows > Server Setup > Change ACS Setup
CiscoWorks Assistant checks whether there are pending devices in DFM and RME. If it finds any pending devices, the Pending Device Count table is displayed with the following details:
• Server—Server name.
• Application—Application that contains pending devices. Value will be DFM or RME.
• Pending Count—Number of pending devices.
• Details—Reason why CiscoWorks Assistant could not fetch the pending device count.This column will be blank if the pending devices count is found.
Along with the table, a Notification pop up window appears with the following message:
Pending devices exist or could not check for pending devices in some LMS applications
Step 2 Click OK.
Step 3 Click Next.
A confirmation pop up appears with the following message:
LMS server(s) ACS configuration will not be proper if there are pending devices in the LMS applications. Make sure there are no pending devices and click OK to continue.
3-52User Guide for CiscoWorks Assistant
OL-17904-01

Chapter 3 Configuring LMS Server Using CiscoWorks Assistant Viewing the Server Setup Summary
To get further details on pending devices in the applications, go to:
• RME > Devices > Device Management > Pending Devices
• Device Fault Manager > Device Management > Device Summary
The details are displayed in the screens that appear when you select these menu paths.
See RME and Device Fault Manager User Guides for more information on pending devices.
The Change ACS Setup page appears after you click OK.
Step 4 Select the Assign group for missing devices radio button in the ACS Tasks pane.
Step 5 Click Next.
The Assign Device Group page appears.
Step 6 Enter the following information in the Export Devices to ACS table to add the missing devices into ACS:
• Server details—IP address and port number of the ACS server.
• Login details—ACS administrator name, password, and the shared secret key.
• Current ACS Administrative Access Protocol—Protocol used to connect to ACS server.
• Network Device Group name—NDG to which you want to add the missing devices.
Step 7 Click Next to complete assigning device group.
Viewing the Server Setup SummaryYou can view a summary of the tasks that you performed during the workflow, after you complete the workflow steps.
To view the summary, click Next after you perform the workflow steps.
The Server Setup Summary page is displayed. with the following details:
• Session Details
• Server Summary
• ACS Summary
• Operation Summary
The information on this page depends on the tasks that you performed.
You need not perform all of the Server Setup workflow tasks to view the Summary. You may skip the steps that you do not need to perform during a workflow session.
For example, you may perform the Manage Servers tasks and skip all the other tasks to get to the Summary page. In such a case, the Summary page displays only the summary related to the Manage Servers tasks.
Session Details
The Session Details table displays the Start Time and the User Name for the current session.
Server Summary
The Server Summary lists all servers in the setup. The fields in the Server Summary and their descriptions are given below.
3-53User Guide for CiscoWorks Assistant
OL-17904-01

Chapter 3 Configuring LMS Server Using CiscoWorks Assistant Viewing the Server Setup Summary
• LMS Server—Host Name or IP Address of the server.
• Protocol—Protocol of the server. This can be HTTP or HTTPS
• Port—Port Number of the CiscoWorks server.
• DCR—DCR mode of the server. Mode can be DCR Master, Slave, or Standalone.
• SSO—SSO mode of the server. SSO Mode can be Master, Slave, or Standalone.
When you click the Expand button of the CiscoWorks server, it lists the applications installed in that server.
ACS Summary
The ACS Summary table lists all the servers and their current mode. The mode can be ACS or Non-ACS.
Operation Summary
The Operation Summary tables display the tasks that you performed during the Server Setup workflow. The fields in the Operation Summary, and their descriptions are given below
• Step—Step Name of the workflow.
• Last run—Date and Time when the step was performed.
• Details—Click the View link to view the Step Summary dialog box.
Click Finish to go to the Server Setup home page and end the current session.
Related Documentation
For more information on Multi-server setups, DCR and SSO, see the latest versions of following documents on Cisco.com:
• User Guide for CiscoWorks Common Services 3.3
http://www.cisco.com/en/US/products/sw/cscowork/ps3996/products_user_guide_list.html
• White Paper on CiscoWorks LMS Integration with Cisco Secure ACS
http://www.cisco.com/en/US/products/sw/cscowork/ps2425/prod_white_papers_list.html
• LMS application User Guides.
http://www.cisco.com/en/US/products/sw/netmgtsw/tsd_products_support_category_home.html
3-54User Guide for CiscoWorks Assistant
OL-17904-01

OL-17904-01
C H A P T E R 4
Troubleshooting Your Network Using CiscoWorks AssistantCisco Works Assistant helps you collect troubleshooting information from all the servers part of the Multi-server setup and display reports.
For Device Troubleshooting workflow and End Host/IP Phone down workflow to work in a Multi-server setup, you should have configured Single Sign-on.
You should also have the same System Identity User configured across all servers that are part of the set up.
The following sections help you understand the Troubleshooting Workflow:
• Generating Device Troubleshooting Report
• Understanding the Device Troubleshooting Report
• Generating End Host/IP Phone Down Report
• Selecting an End Host From the End Hosts List
• Understanding the End Host Down Report
• Understanding the IP Phone Down Report
Generating Device Troubleshooting ReportYou can analyze the root cause for device unreachability. The generated Device Troubleshooting report contains the following details for the selected device:
Note You must install Campus Manager, DFM, HUM and RME to view all these details. If these applications are not installed, some of the reports will not be generated.
• Alerts and Syslog Messages
• Differences between the two archived running configurations.
• Changes in the device configuration file, inventory, and installed image
• Details of the device topology
• Check Device Attributes (CDA) information
• GOLD, Call Home and EEM reports
4-1User Guide for CiscoWorks Assistant

Chapter 4 Troubleshooting Your Network Using CiscoWorks Assistant Generating Device Troubleshooting Report
• Device availability and threshold reports
• Details on network inconsistencies, misconfiguration in the physical and logical layout in the discovered network.
To generate Device Troubleshooting report:
Note View Permission Report (Common Services > Server > Reports) to check if you have the required privileges to perform this task.
Step 1 Select CiscoWorks Assistant > Workflows > Device Troubleshooting.
The Device Troubleshooting window appears.
Step 2 Select a device using the Device Selector (Using Device Selector in Troubleshooting Workflows).
Step 3 Enter the fields described in Table 4-1.
4-2User Guide for CiscoWorks Assistant
OL-17904-01

Chapter 4 Troubleshooting Your Network Using CiscoWorks Assistant Generating Device Troubleshooting Report
Table 4-1 Device Troubleshooting Window Details
Field Name Description
Selected Device The selected device display name or IP Address is populated in this field.
You cannot enter device details in the Selected Device field.
Notify me on Workflow Completion
If you enable this option, you will receive a status report on the Device Troubleshooting report. You can view the detailed report if you click the link available at the end of the e-mail. This will not be available after the data has been purged.
The following is a sample e-mail:
Hi,
Workflow Name: Device Troubleshooting
LMS user: admin
Execution started at: 04/01/2009 01:48:26 PM IST
Status: Workflow successfully completed
User Input Details:
Device IPAddress : 10.77.209.132
Device Name : 10.77.209.132
Step Details:
Reachability Check : Device connected
Trace Route : Trace Route retrieved for the selected device.
Syslog Message : No syslog messages for the selected device.
Audit Report : Audit summary for the selected device.
Generic OnLine Diagnostics : Generic OnLine Diagnostics details for the selected device.
Call Home : Call Home Report for the selected device.
Embedded Event Manager : Embedded Event Manager report for the selected device.
Device Availability : Availability Report for the selected device.
Device Threshold : Threshold Report not found for the selected device.
Device Credential Verification Report : Verification Report for the selected device.
Last Configuration Change : Configuration change fetched for the selected device.
DFM Alerts : Alerts not retrieved
Complete Report can be viewed at :
https://lms-ibm-pc13.cisco.com:19999/cwa/wfReport.do?wfsessionid=OPSBRE.1D3FB6767FDF4C518CA13A0F6195B1A7
Note: This report is not available once purge operation is done.
Regards,
CiscoWorks Assistant.
E-mail ID This field is enabled only if you have selected the Notify me on Workflow Completion field.
Enter an E-mail ID. You can enter multiple e-mail IDs.
For example:
4-3User Guide for CiscoWorks Assistant
OL-17904-01

Chapter 4 Troubleshooting Your Network Using CiscoWorks Assistant Understanding the Device Troubleshooting Report
Step 4 Click Run.
The Device Troubleshooting report appears in a new window. See Understanding the Device Troubleshooting Report for details on the generated report.
The report generation may take a while. You can click Exit to return to the CiscoWorks Assistant home page.
Understanding the Device Troubleshooting ReportThe generated Device Troubleshooting report contains the following tables:
• Device Information
• Reachability Check
• Trace Route
• CDP Neighbors
• Syslog Messages
• DFM Alerts
• Last Configuration Change
• Audit Report
• Generic OnLine Diagnostics
• Call Home
• Embedded Event Manager
• Device Credential Verification Report
• Discrepancy
• Links to Tools and More Device Information
• Device Availability
• Device Threshold
Device Information
This table contains the device information as available in Device and Credential Repository (DCR).
Table 4-2 describes the fields in the Device Information Report.
Table 4-2 Device Information Report Fields
Field Name Description
Name Display Name of the device as entered in DCR.
IP Address IP Address of the device.
4-4User Guide for CiscoWorks Assistant
OL-17904-01
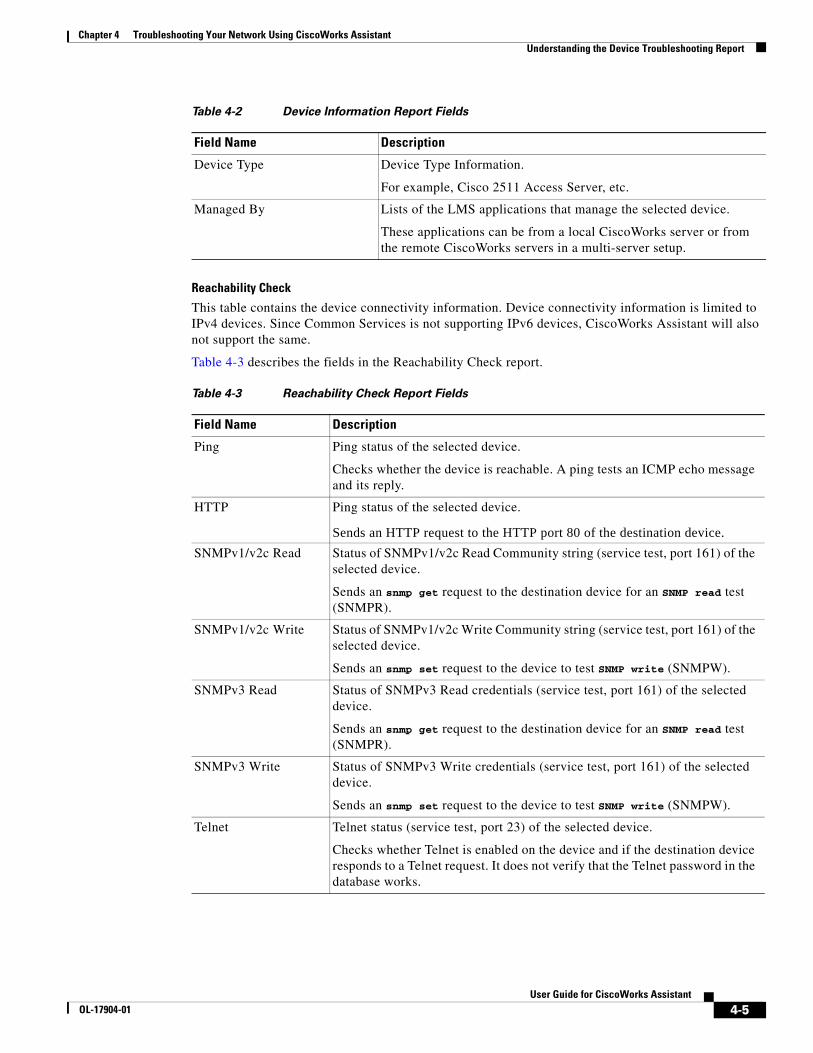
Chapter 4 Troubleshooting Your Network Using CiscoWorks Assistant Understanding the Device Troubleshooting Report
Reachability Check
This table contains the device connectivity information. Device connectivity information is limited to IPv4 devices. Since Common Services is not supporting IPv6 devices, CiscoWorks Assistant will also not support the same.
Table 4-3 describes the fields in the Reachability Check report.
Device Type Device Type Information.
For example, Cisco 2511 Access Server, etc.
Managed By Lists of the LMS applications that manage the selected device.
These applications can be from a local CiscoWorks server or from the remote CiscoWorks servers in a multi-server setup.
Table 4-2 Device Information Report Fields
Field Name Description
Table 4-3 Reachability Check Report Fields
Field Name Description
Ping Ping status of the selected device.
Checks whether the device is reachable. A ping tests an ICMP echo message and its reply.
HTTP Ping status of the selected device.
Sends an HTTP request to the HTTP port 80 of the destination device.
SNMPv1/v2c Read Status of SNMPv1/v2c Read Community string (service test, port 161) of the selected device.
Sends an snmp get request to the destination device for an SNMP read test (SNMPR).
SNMPv1/v2c Write Status of SNMPv1/v2c Write Community string (service test, port 161) of the selected device.
Sends an snmp set request to the device to test SNMP write (SNMPW).
SNMPv3 Read Status of SNMPv3 Read credentials (service test, port 161) of the selected device.
Sends an snmp get request to the destination device for an SNMP read test (SNMPR).
SNMPv3 Write Status of SNMPv3 Write credentials (service test, port 161) of the selected device.
Sends an snmp set request to the device to test SNMP write (SNMPW).
Telnet Telnet status (service test, port 23) of the selected device.
Checks whether Telnet is enabled on the device and if the destination device responds to a Telnet request. It does not verify that the Telnet password in the database works.
4-5User Guide for CiscoWorks Assistant
OL-17904-01

Chapter 4 Troubleshooting Your Network Using CiscoWorks Assistant Understanding the Device Troubleshooting Report
Note SNMPv3 and SSH details will be displayed only if they are enabled and configured for the device.
To know more about device connectivity tools, see the User Guide for Common Services at this location:
http://www.cisco.com/en/US/products/sw/cscowork/ps3996/products_user_guide_list.html
Trace Route
Displays the trace route status of the selected device. It has a maximum of 30 hops. Detects routing errors between the network management station and the target device.
Syslog Messages
This table contains the Syslog messages that are received in the past 24 hours, from the scheduled time of the report. This information is taken from the RME database. The report shows the latest ten Syslog messages. However, only the first four severities will be displayed.
Table 4-4 provides the details of the Syslog messages.
SSHv1 SSHv1 credentials status (service test, port 22) of the selected device.
Checks whether SSH is enabled on the device. If the destination device responds to SSH requests, this also tests whether CiscoWorks server can make SSH requests to that device. It does not verify the password in the database.
SSHv2 SSHv2 credentials status (service test, port 22) of the selected device.
Checks whether SSH is enabled on the device. If the destination device responds to SSH requests, this also tests whether CiscoWorks server can make SSH requests to that device. It does not verify the password in the database.
Table 4-3 Reachability Check Report Fields
Field Name Description
Table 4-4 Syslog Messages
Field Name Description
Device Name Display Name of the device as entered in DCR.
Interface IP address of the interface through which the Syslog was sent out.
Timestamp Date and time the message was logged. This is the timestamp provided by the device.
Syslog daemon provides a timestamp if the device does not send one.
Facility-SubFacility Facility is a hardware device, a protocol, or a module of the system software; for example, SYS. Refer to the Cisco IOS reference manual System Error Messages for a predefined list of facility codes.
SubFacility is the subfacility in the device that generated the Syslog message. In most cases, this is blank.
An example of an entry in this field is SYS-5-CONFIG I.
4-6User Guide for CiscoWorks Assistant
OL-17904-01
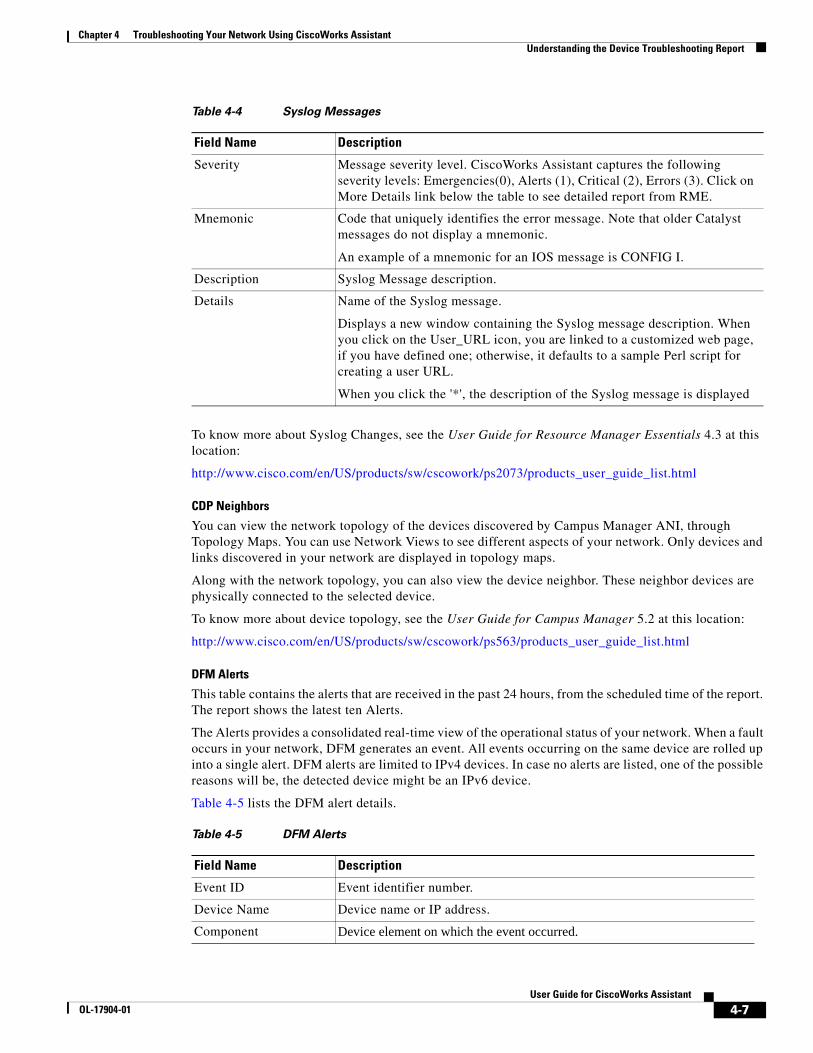
Chapter 4 Troubleshooting Your Network Using CiscoWorks Assistant Understanding the Device Troubleshooting Report
To know more about Syslog Changes, see the User Guide for Resource Manager Essentials 4.3 at this location:
http://www.cisco.com/en/US/products/sw/cscowork/ps2073/products_user_guide_list.html
CDP Neighbors
You can view the network topology of the devices discovered by Campus Manager ANI, through Topology Maps. You can use Network Views to see different aspects of your network. Only devices and links discovered in your network are displayed in topology maps.
Along with the network topology, you can also view the device neighbor. These neighbor devices are physically connected to the selected device.
To know more about device topology, see the User Guide for Campus Manager 5.2 at this location:
http://www.cisco.com/en/US/products/sw/cscowork/ps563/products_user_guide_list.html
DFM Alerts
This table contains the alerts that are received in the past 24 hours, from the scheduled time of the report. The report shows the latest ten Alerts.
The Alerts provides a consolidated real-time view of the operational status of your network. When a fault occurs in your network, DFM generates an event. All events occurring on the same device are rolled up into a single alert. DFM alerts are limited to IPv4 devices. In case no alerts are listed, one of the possible reasons will be, the detected device might be an IPv6 device.
Table 4-5 lists the DFM alert details.
Severity Message severity level. CiscoWorks Assistant captures the following severity levels: Emergencies(0), Alerts (1), Critical (2), Errors (3). Click on More Details link below the table to see detailed report from RME.
Mnemonic Code that uniquely identifies the error message. Note that older Catalyst messages do not display a mnemonic.
An example of a mnemonic for an IOS message is CONFIG I.
Description Syslog Message description.
Details Name of the Syslog message.
Displays a new window containing the Syslog message description. When you click on the User_URL icon, you are linked to a customized web page, if you have defined one; otherwise, it defaults to a sample Perl script for creating a user URL.
When you click the '*', the description of the Syslog message is displayed
Table 4-4 Syslog Messages
Field Name Description
Table 4-5 DFM Alerts
Field Name Description
Event ID Event identifier number.
Device Name Device name or IP address.
Component Device element on which the event occurred.
4-7User Guide for CiscoWorks Assistant
OL-17904-01

Chapter 4 Troubleshooting Your Network Using CiscoWorks Assistant Understanding the Device Troubleshooting Report
To know more about device alerts, see the User Guide for Device Fault Manager 3.2 at this location:
http://www.cisco.com/en/US/products/sw/cscowork/ps2421/products_user_guide_list.html
Last Configuration Change
You can view:
• The time when the running configuration was archived in the Configuration Archive.
• The differences between the two archived running configurations in the Configuration Archive.
To know more about comparing configuration files, see the User Guide for Resource Manager Essentials 4.3 at this location:
http://www.cisco.com/en/US/products/sw/cscowork/ps2073/products_user_guide_list.html
Audit Report
This table contains the last 24 hours changes that happened in your network. Change Audit allows RME applications to log change information to a central repository. Device Configuration, Inventory, and Software Management changes can be logged and viewed using Change Audit.
Table 4-6 describes the Audit Report fields.
Description Description of the alert.
Time Date and time the alert was logged. This is the timestamp provided by the device.
Status Alert status, based on last polling.
• Active—Alert is live.
• Cleared—Alert is no longer live
• Acknowledged—Alert was manually acknowledged by a user
Alert ID Alert identifier number.
Table 4-5 DFM Alerts
Field Name Description
Table 4-6 Audit Report Fields
Field Description
Device Name Display Name of the device as entered in DCR.
Click on the device name to launch the Device Center.
User Name Name of the user who performed the change. This is the name entered when the user logged in. It can be the name under which the RME application is running, or the name using which the change was performed on the device.
Application Name Name of the RME application involved in the network change.
For example, Archive Mgmt, ConfigEditor, CwConfig, etc.
Host Name Host name of the machine from which the user accessed the device or the host name of the RME server.
Creation Time Date and time at which the application communicated the network change or when Change Audit saw the change record.
4-8User Guide for CiscoWorks Assistant
OL-17904-01
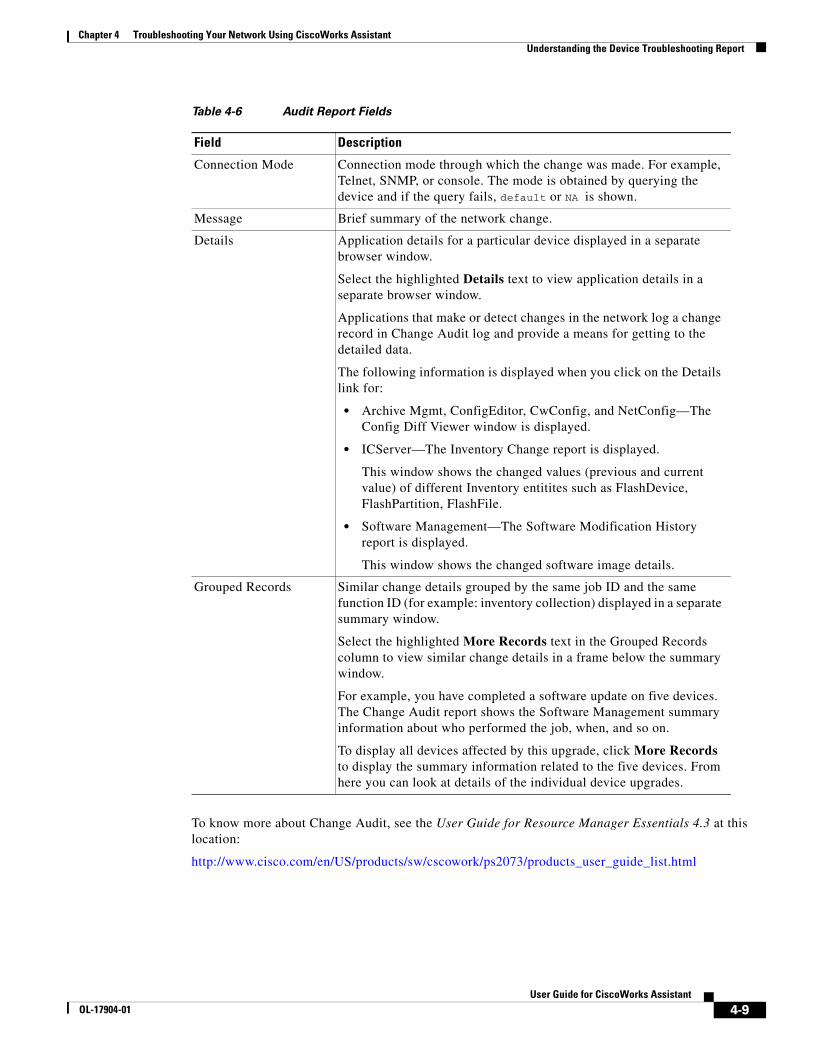
Chapter 4 Troubleshooting Your Network Using CiscoWorks Assistant Understanding the Device Troubleshooting Report
To know more about Change Audit, see the User Guide for Resource Manager Essentials 4.3 at this location:
http://www.cisco.com/en/US/products/sw/cscowork/ps2073/products_user_guide_list.html
Connection Mode Connection mode through which the change was made. For example, Telnet, SNMP, or console. The mode is obtained by querying the device and if the query fails, default or NA is shown.
Message Brief summary of the network change.
Details Application details for a particular device displayed in a separate browser window.
Select the highlighted Details text to view application details in a separate browser window.
Applications that make or detect changes in the network log a change record in Change Audit log and provide a means for getting to the detailed data.
The following information is displayed when you click on the Details link for:
• Archive Mgmt, ConfigEditor, CwConfig, and NetConfig—The Config Diff Viewer window is displayed.
• ICServer—The Inventory Change report is displayed.
This window shows the changed values (previous and current value) of different Inventory entitites such as FlashDevice, FlashPartition, FlashFile.
• Software Management—The Software Modification History report is displayed.
This window shows the changed software image details.
Grouped Records Similar change details grouped by the same job ID and the same function ID (for example: inventory collection) displayed in a separate summary window.
Select the highlighted More Records text in the Grouped Records column to view similar change details in a frame below the summary window.
For example, you have completed a software update on five devices. The Change Audit report shows the Software Management summary information about who performed the job, when, and so on.
To display all devices affected by this upgrade, click More Records to display the summary information related to the five devices. From here you can look at details of the individual device upgrades.
Table 4-6 Audit Report Fields
Field Description
4-9User Guide for CiscoWorks Assistant
OL-17904-01

Chapter 4 Troubleshooting Your Network Using CiscoWorks Assistant Understanding the Device Troubleshooting Report
Generic OnLine Diagnostics
The Generic OnLine Diagnostics (GOLD) report is displayed in Device Troubleshooting workflow for the devices managed by RME. The details for this report is fetched from the RME Application Programming Interface (API).Click the required command from the Command List pane to view the relevant output.
To know more about Generic OnLine Diagnostics, see the User Guide for Resource Manager Essentials 4.3 at this location:
http://www.cisco.com/en/US/products/sw/cscowork/ps2073/products_user_guide_list.html
Call Home
The Call Home report is displayed in Device Troubleshooting workflow for the devices managed by RME. The details for this report is fetched from the RME API. Click the required command from the Command List pane to view the relevant output.
To know more about Call Home, see the User Guide for Resource Manager Essentials 4.3 at this location:
http://www.cisco.com/en/US/products/sw/cscowork/ps2073/products_user_guide_list.html
Embedded Event ManagerThe Embedded Event Manager (EEM) report is displayed in Device Troubleshooting workflow for the devices managed by RME. The details for this report is fetched from the RME API. Click the required command from the Command List pane to view the relevant output.
To know more about Embedded Event Manager, see the User Guide for Resource Manager Essentials 4.3 at this location:
http://www.cisco.com/en/US/products/sw/cscowork/ps2073/products_user_guide_list.html
Device Credential Verification Report
This table contains the device names and credential status for each device. This helps you to ensure that your Device and Credential Repository credentials match your actual device credentials.
This table also lists the devices for which the report is not available.
You can check the device credentials in Table 4-7.
Table 4-7 Device Credential Verification Report Fields
Field Description
Device Name Name of the device for which the credential status is verified.
Read Community SNMP version 2 read community string.
Read community string is verified in RME by performing a read operation on the device through the SNMP transport library and checking the result.
Read Write Community SNMP version 2 write community string.
Read write community string is verified in RME by performing snmpget operation on syslocation variable and snmpset with the value returned by the snmpget operation.
SNMPv3 SNMP version 3 username and password.
SNMPv3 credentials is verified in RME by operating on the device through the SNMP transport library.
4-10User Guide for CiscoWorks Assistant
OL-17904-01

Chapter 4 Troubleshooting Your Network Using CiscoWorks Assistant Understanding the Device Troubleshooting Report
The Credential Verification status for all the above fields could be any one of the following:
• OK— Denotes that the device credentials data in the Device and Credential Repository matches the physical device credentials of the selected device.
• No authentication configured—Device was not configured with authentication mechanism (Telnet/Local Username/TACACS).
• Incorrect—Denotes that the device credentials verification is completed but the device is unreachable or offline or one of the interfaces on the devices is down.
• Wrong Credentials—Denotes that the device credentials data in Device and Credential Repository are wrong.
• Did Not Try—Denotes that the device credentials is not performed either because the credentials do not exist or the enable login mode failed.
• Failed to Connect—Denotes that the connection to device failed because of its non-responding state.
• Not Supported—Denotes the specific credentials are not supported on the device. This could be because of protocol mismatch.
• No Value to Test—Check for device credentials is not performed because device credentials data is not entered.
• Credentials Not Verified—Specific credentials were not verified because they were not selected for verification
Device Troubleshooting Workflow displays the details of last Device Credential Verification job.
If there are no CDA job details available on the CiscoWorks server, you can start an immediate CDA job.
You can use the Run Now link to open the Check Device Credentials page. You can set your options in the Check Device Credentials page and start an immediate CDA job.
Telnet Telnet username and password.
Telnet username and password are verified in RME by trying to log into the device using the Telnet transport library. It also verifies whether the attempt is successful.
Enable by Telnet Telnet username and password in enable mode.
Enable mode password is verified in RME while trying to establish connection using Telnet and entering the enable mode. It also verifies whether the attempt is successful.
SSH SSH username and password.
SSH username and password are verified in RME by trying to log into the device using the SSH transport library. It also verifies whether the attempt is successful.
Enable by SSH SSH username and password in enable mode.
Enable mode password is verified in RME while trying to establish connection using SSH and entering the enable mode. It also verifies whether the attempt is successful.
Table 4-7 Device Credential Verification Report Fields
4-11User Guide for CiscoWorks Assistant
OL-17904-01
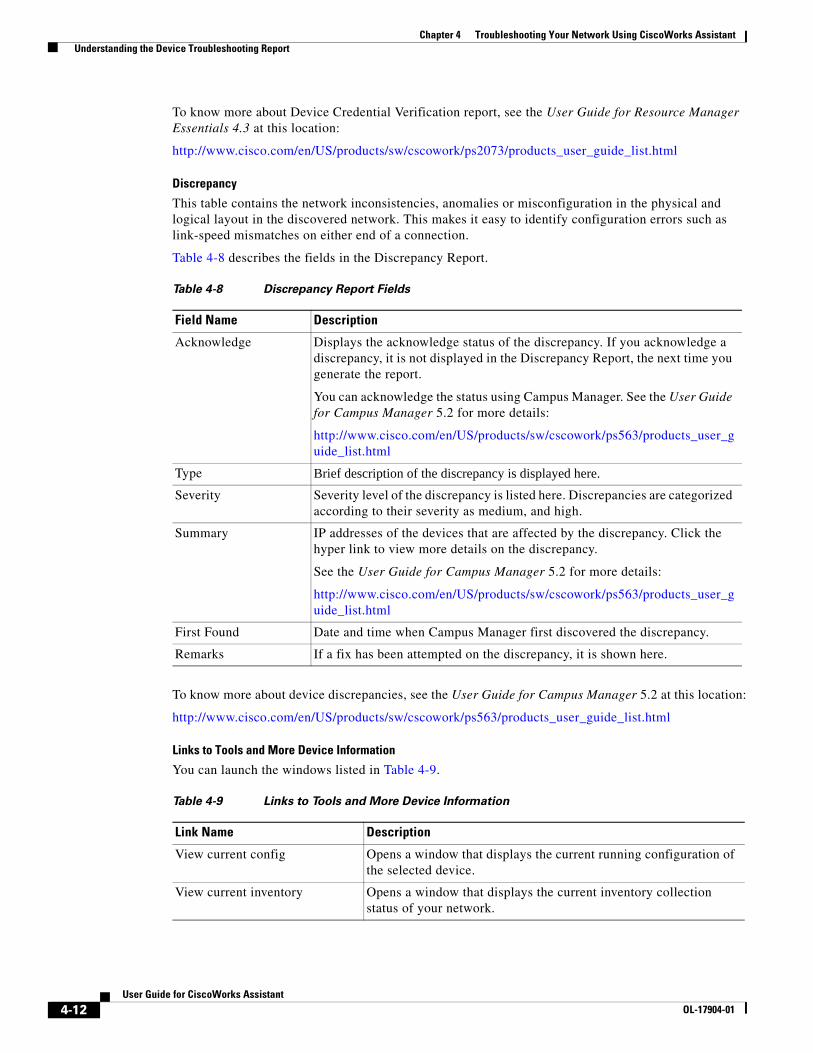
Chapter 4 Troubleshooting Your Network Using CiscoWorks Assistant Understanding the Device Troubleshooting Report
To know more about Device Credential Verification report, see the User Guide for Resource Manager Essentials 4.3 at this location:
http://www.cisco.com/en/US/products/sw/cscowork/ps2073/products_user_guide_list.html
Discrepancy
This table contains the network inconsistencies, anomalies or misconfiguration in the physical and logical layout in the discovered network. This makes it easy to identify configuration errors such as link-speed mismatches on either end of a connection.
Table 4-8 describes the fields in the Discrepancy Report.
To know more about device discrepancies, see the User Guide for Campus Manager 5.2 at this location:
http://www.cisco.com/en/US/products/sw/cscowork/ps563/products_user_guide_list.html
Links to Tools and More Device Information
You can launch the windows listed in Table 4-9.
Table 4-8 Discrepancy Report Fields
Field Name Description
Acknowledge Displays the acknowledge status of the discrepancy. If you acknowledge a discrepancy, it is not displayed in the Discrepancy Report, the next time you generate the report.
You can acknowledge the status using Campus Manager. See the User Guide for Campus Manager 5.2 for more details:
http://www.cisco.com/en/US/products/sw/cscowork/ps563/products_user_guide_list.html
Type Brief description of the discrepancy is displayed here.
Severity Severity level of the discrepancy is listed here. Discrepancies are categorized according to their severity as medium, and high.
Summary IP addresses of the devices that are affected by the discrepancy. Click the hyper link to view more details on the discrepancy.
See the User Guide for Campus Manager 5.2 for more details:
http://www.cisco.com/en/US/products/sw/cscowork/ps563/products_user_guide_list.html
First Found Date and time when Campus Manager first discovered the discrepancy.
Remarks If a fix has been attempted on the discrepancy, it is shown here.
Table 4-9 Links to Tools and More Device Information
Link Name Description
View current config Opens a window that displays the current running configuration of the selected device.
View current inventory Opens a window that displays the current inventory collection status of your network.
4-12User Guide for CiscoWorks Assistant
OL-17904-01

Chapter 4 Troubleshooting Your Network Using CiscoWorks Assistant Understanding the Device Troubleshooting Report
Device Availability
This table contains the HUM device availability information. This information is taken from the HUM Device Dashboard page and presented using graphs.
Table 4-10 describes the fields in the Device Availability Report.
Click Here to create poller link will be displayed, when there are no reports for the selected device. The link will lead you to Poller Management Page where you can create a poller for the selected device.
To know more about Device Availability, see the User Guide for Health and Utilization Monitor 1.2 at this location:
http://www.cisco.com/en/US/products/ps9303/products_user_guide_list.html
SNMP Walk Allows you to trace the MIB tree of a device starting from a given OID for troubleshooting, or gathering information about the selected device.
Packet Capture Captures live data from the CiscoWorks machine to aid in troubleshooting.
Edit Device Credentials Allows you to edit the default credential information for the device. You can edit device information in the Device and Credential Repository.
Telnet Opens a Telnet session of the selected device.
Device Center Opens the Device Center page for the device. You can view the summary and reports for the selected device.
You can perform device-centric activities, such as changing device attributes, updating inventory and Telnet. The activities you can perform depend on the applications that are installed on the CiscoWorks Server.
SNMP Set Sets SNMP object or multiple objects on a device for controlling the device.
Table 4-9 Links to Tools and More Device Information
Link Name Description
Table 4-10 Device Availability Report Fields
Field Description
24 Hours (in percentage) Displays the last 24 hours Device Availability percentage
24 Hours Click to launch a line graph showing device availability details for the last 24 hours.
One Week Click to launch a line graph showing device availability details for the last one week.
One Month Click to launch a line graph showing device availability details for the last one month.
Click here (Link)
The link is available in the bottom of the report.
Launches the Device Dashboard which allows the user to view more details of the selected device.
4-13User Guide for CiscoWorks Assistant
OL-17904-01

Chapter 4 Troubleshooting Your Network Using CiscoWorks Assistant Understanding the Device Troubleshooting Report
Device Threshold
This table contains the device threshold report.
Table 4-11 describes the fields in the Device Threshold Report.
If the poller is not associated with device, the report cannot be generated even though the device is managed by HUM. Click Here to create poller link will be displayed, when there are no reports for the selected device. The link will lead you to Poller Management Page where you can create a poller for the selected device.
To know more about Device Threshold, see the User Guide for Health and Utilization Monitor 1.2 at this location:
http://www.cisco.com/en/US/products/ps9303/products_user_guide_list.html
Table 4-11 Device Threshold Report Fields
Field Description
No. of Thresholds Configured Total number of thresholds configured in the device.
No. of Violations in Last 24 hours Total number of threshold violations that occurred in the last 24 hours. These are categorized based on the severity levels (such as Critical, Medium or Low).
For example, Low: 10, Medium:15, Critical:170
Threshold Name Threshold configured in the device.
Variable Name MIB variable name. For example, cpmCPUTotal15minRev.
Instance Name MIB variable instance for which the threshold is configured. For example, CPU of supervisor.
Severity Severity level of the threshold (such as Critical, Medium or Low)
Time Stamp Time of threshold violation.
More
(link)
By default, only the latest 10 violations are displayed for the device in the Device Threshold Details panel. If you click More, a pop-up window appears displaying details on all the violations in the device.
Click here (Link)
The link is available in the bottom of the report.
Launches the Device Dashboard which allows the user to view more details of the selected device.
4-14User Guide for CiscoWorks Assistant
OL-17904-01
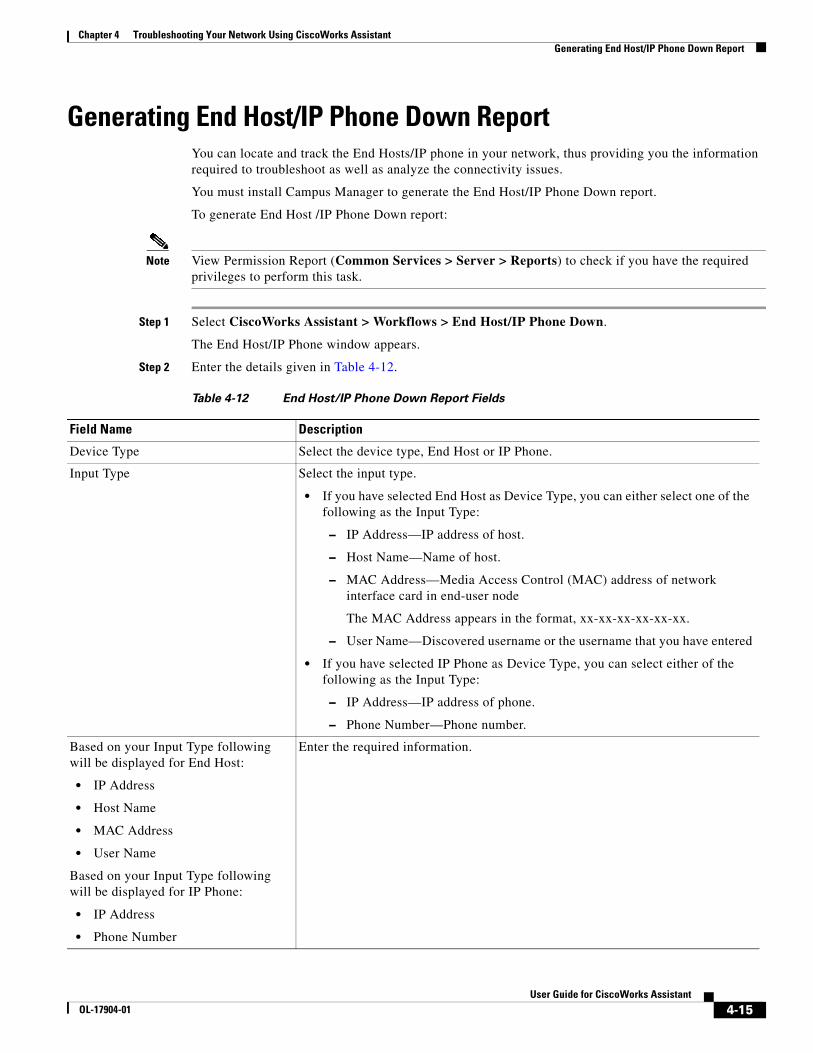
Chapter 4 Troubleshooting Your Network Using CiscoWorks Assistant Generating End Host/IP Phone Down Report
Generating End Host/IP Phone Down ReportYou can locate and track the End Hosts/IP phone in your network, thus providing you the information required to troubleshoot as well as analyze the connectivity issues.
You must install Campus Manager to generate the End Host/IP Phone Down report.
To generate End Host /IP Phone Down report:
Note View Permission Report (Common Services > Server > Reports) to check if you have the required privileges to perform this task.
Step 1 Select CiscoWorks Assistant > Workflows > End Host/IP Phone Down.
The End Host/IP Phone window appears.
Step 2 Enter the details given in Table 4-12.
Table 4-12 End Host/IP Phone Down Report Fields
Field Name Description
Device Type Select the device type, End Host or IP Phone.
Input Type Select the input type.
• If you have selected End Host as Device Type, you can either select one of the following as the Input Type:
– IP Address—IP address of host.
– Host Name—Name of host.
– MAC Address—Media Access Control (MAC) address of network interface card in end-user node
The MAC Address appears in the format, xx-xx-xx-xx-xx-xx.
– User Name—Discovered username or the username that you have entered
• If you have selected IP Phone as Device Type, you can select either of the following as the Input Type:
– IP Address—IP address of phone.
– Phone Number—Phone number.
Based on your Input Type following will be displayed for End Host:
• IP Address
• Host Name
• MAC Address
• User Name
Based on your Input Type following will be displayed for IP Phone:
• IP Address
• Phone Number
Enter the required information.
4-15User Guide for CiscoWorks Assistant
OL-17904-01

Chapter 4 Troubleshooting Your Network Using CiscoWorks Assistant Generating End Host/IP Phone Down Report
UT trigger is limited to IPv4 devices. Acquisition starting process might return failed, in case of IPv6 devices.
Rediscover Select this option if you want to get the latest information from the device. The rediscover is performed only for the selected device.
If this option is not selected, the End Host/IP Phone details are obtained from the existing Campus Manager database.
Switch Check Select this option if you want to check the reachability connection of the Switch/Cisco Call Manager (CCM) to which the End Host/IP Phone is connected.
CiscoWorks Assistant also checks the port status of the End Host/IP Phone. If the device is not reachable then it automatically triggers the Device Troubleshooting workflow.
Notify me on Workflow Completion If you enable this option, you will receive a status report on the End Host/IP Phone Down report. Click on the link in the e-mail to view a detailed report. This will not be available after the data has been purged.
For example: The e-mail will contain:
Hi,
Workflow Name: End Host / IP Phone Down
LMS user: admin
Execution started at: 04/25/2007 06:53:11 PM (GMT)
Status: Workflow successfully completed
User Input Details:
Type : End Host
IP Address : 12.37.209.22
Step Details
Device Connectivity Information : Device Registered with Campus Manager
Rediscover : Could not Discover
Device Connectivity Information : Last Seen after acquisition is same
Complete Report can be viewed at :
http://abcd:1741/cwa/wfReport.do?wfsessionid=xyz1230
Note: This report is not available once purge operation is done.
Regards,
CiscoWorks Assistant.
E-mail ID This field is enabled only if you have selected the Notify me on Workflow Completion field.
Enter an E-mail ID. You can enter multiple e-mail IDs.
For example:
Table 4-12 End Host/IP Phone Down Report Fields
Field Name Description
4-16User Guide for CiscoWorks Assistant
OL-17904-01

Chapter 4 Troubleshooting Your Network Using CiscoWorks Assistant Selecting an End Host From the End Hosts List
Step 3 Click Run.
The End Host/IP Phone report appears in a new window. See Understanding the End Host Down Report and Understanding the IP Phone Down Report.
The report generation may take sometime. You can click Exit to return to the CiscoWorks Assistant home page.
Selecting an End Host From the End Hosts ListThe End Host/IP Phone Down report is generated for only one end host at a time.
During the End Host/IP Phone Down report generation, when there are more than one end hosts available for a specified input type (IP Address, Host Name, MAC Address, or User Name) value, the Multiple End Hosts page appears instead of the End Host/IP Phone Down report.
The Multiple End Hosts page displays a list of all end hosts that match the specified input type. You must select an end host from the list of duplicate end hosts to generate the End Host/IP Phone Down report. By default, the first end host in the list is selected for report generation.
To select an end host for generating End Host/IP Phone Down report:
Step 1 Select CiscoWorks Assistant > Workflows > End Host/IP Phone Down.
The End Host/IP Phone window appears.
Step 2 Enter the required details as explained in Generating End Host/IP Phone Down Report.
Step 3 Click Run.
The Multiple End Hosts page appears with the details shown in Table 4-13 if there are multiple end hosts for a specified input type (IP Address, MAC Address, Host Name, or User Name) value.
:Table 4-13 Multiple End Hosts Page Details
Input Type Multiple End Hosts Page displays ...
IP Address • MAC Address of end hosts corresponding to the specified IP Address.
Or
• Host Name of the end hosts corresponding to the specified IP Address, if there are any duplicate values or no value for MAC Address.
Host Name • IP Address of end hosts corresponding to the specified Host Name.
Or
• MAC Address of the end hosts corresponding to the specified Host Name, if there are any duplicate values or no value for IP Address.
4-17User Guide for CiscoWorks Assistant
OL-17904-01
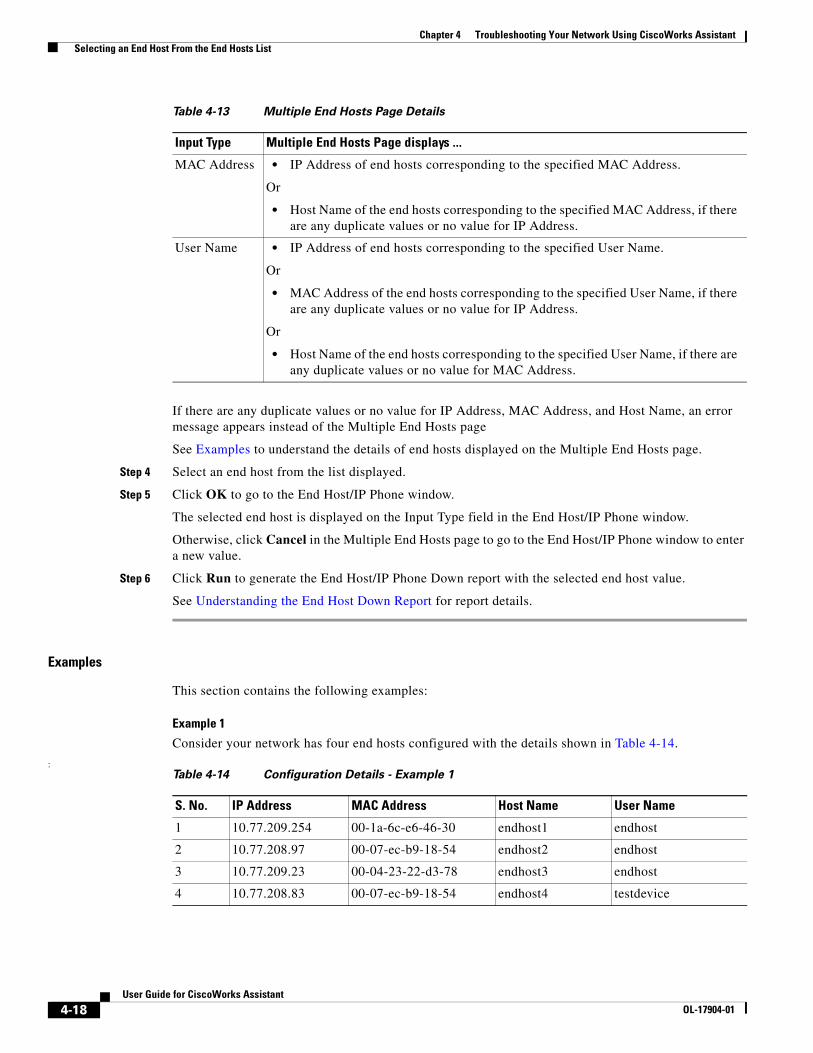
Chapter 4 Troubleshooting Your Network Using CiscoWorks Assistant Selecting an End Host From the End Hosts List
If there are any duplicate values or no value for IP Address, MAC Address, and Host Name, an error message appears instead of the Multiple End Hosts page
See Examples to understand the details of end hosts displayed on the Multiple End Hosts page.
Step 4 Select an end host from the list displayed.
Step 5 Click OK to go to the End Host/IP Phone window.
The selected end host is displayed on the Input Type field in the End Host/IP Phone window.
Otherwise, click Cancel in the Multiple End Hosts page to go to the End Host/IP Phone window to enter a new value.
Step 6 Click Run to generate the End Host/IP Phone Down report with the selected end host value.
See Understanding the End Host Down Report for report details.
Examples
This section contains the following examples:
Example 1
Consider your network has four end hosts configured with the details shown in Table 4-14.
:
MAC Address • IP Address of end hosts corresponding to the specified MAC Address.
Or
• Host Name of the end hosts corresponding to the specified MAC Address, if there are any duplicate values or no value for IP Address.
User Name • IP Address of end hosts corresponding to the specified User Name.
Or
• MAC Address of the end hosts corresponding to the specified User Name, if there are any duplicate values or no value for IP Address.
Or
• Host Name of the end hosts corresponding to the specified User Name, if there are any duplicate values or no value for MAC Address.
Table 4-13 Multiple End Hosts Page Details
Input Type Multiple End Hosts Page displays ...
Table 4-14 Configuration Details - Example 1
S. No. IP Address MAC Address Host Name User Name
1 10.77.209.254 00-1a-6c-e6-46-30 endhost1 endhost
2 10.77.208.97 00-07-ec-b9-18-54 endhost2 endhost
3 10.77.209.23 00-04-23-22-d3-78 endhost3 endhost
4 10.77.208.83 00-07-ec-b9-18-54 endhost4 testdevice
4-18User Guide for CiscoWorks Assistant
OL-17904-01
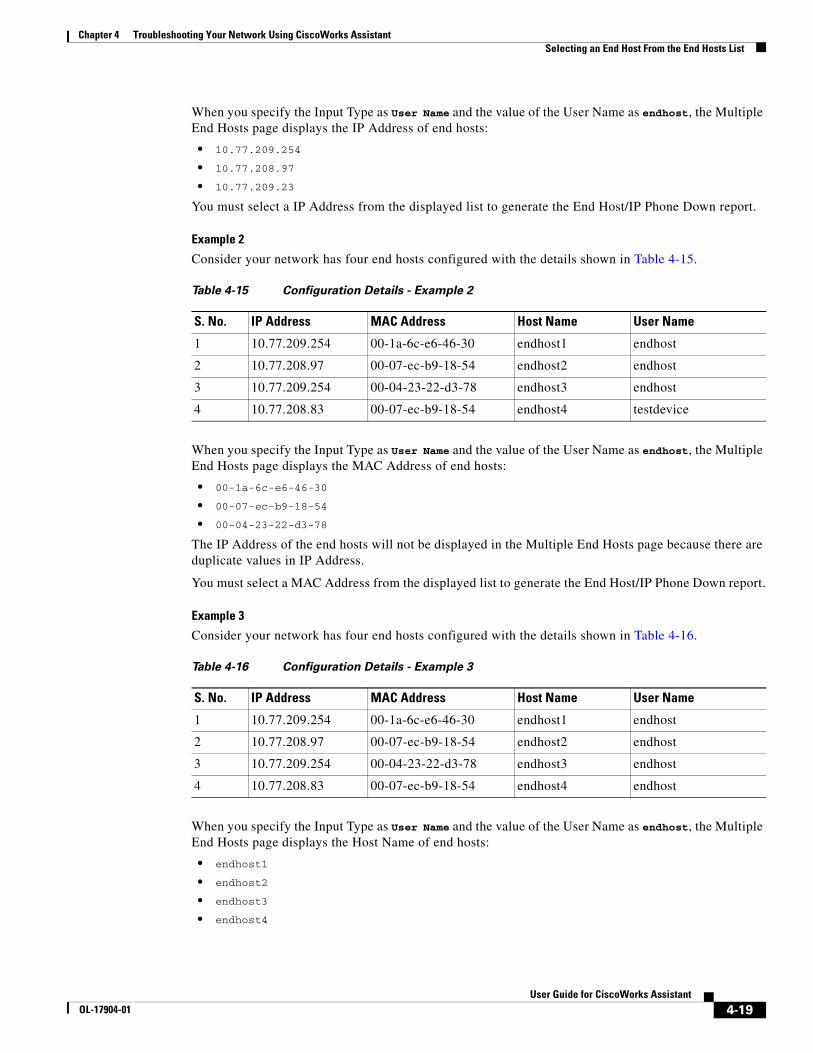
Chapter 4 Troubleshooting Your Network Using CiscoWorks Assistant Selecting an End Host From the End Hosts List
When you specify the Input Type as User Name and the value of the User Name as endhost, the Multiple End Hosts page displays the IP Address of end hosts:
• 10.77.209.254
• 10.77.208.97
• 10.77.209.23
You must select a IP Address from the displayed list to generate the End Host/IP Phone Down report.
Example 2
Consider your network has four end hosts configured with the details shown in Table 4-15.
When you specify the Input Type as User Name and the value of the User Name as endhost, the Multiple End Hosts page displays the MAC Address of end hosts:
• 00-1a-6c-e6-46-30
• 00-07-ec-b9-18-54
• 00-04-23-22-d3-78
The IP Address of the end hosts will not be displayed in the Multiple End Hosts page because there are duplicate values in IP Address.
You must select a MAC Address from the displayed list to generate the End Host/IP Phone Down report.
Example 3
Consider your network has four end hosts configured with the details shown in Table 4-16.
When you specify the Input Type as User Name and the value of the User Name as endhost, the Multiple End Hosts page displays the Host Name of end hosts:
• endhost1
• endhost2
• endhost3
• endhost4
Table 4-15 Configuration Details - Example 2
S. No. IP Address MAC Address Host Name User Name
1 10.77.209.254 00-1a-6c-e6-46-30 endhost1 endhost
2 10.77.208.97 00-07-ec-b9-18-54 endhost2 endhost
3 10.77.209.254 00-04-23-22-d3-78 endhost3 endhost
4 10.77.208.83 00-07-ec-b9-18-54 endhost4 testdevice
Table 4-16 Configuration Details - Example 3
S. No. IP Address MAC Address Host Name User Name
1 10.77.209.254 00-1a-6c-e6-46-30 endhost1 endhost
2 10.77.208.97 00-07-ec-b9-18-54 endhost2 endhost
3 10.77.209.254 00-04-23-22-d3-78 endhost3 endhost
4 10.77.208.83 00-07-ec-b9-18-54 endhost4 endhost
4-19User Guide for CiscoWorks Assistant
OL-17904-01

Chapter 4 Troubleshooting Your Network Using CiscoWorks Assistant Understanding the End Host Down Report
The IP Address or MAC Address of the end hosts will not be displayed in the Multiple End Hosts page because there are duplicate values.
You must select a Host Name from the list to generate the End Host/IP Phone Down report.
Example 4
Consider your network has four end hosts configured with the details shown in Table 4-17.
When you specify the Input Type as User Name and the value of the User Name as endhost, the Multiple End Hosts page will be displayed with Click Here link. Click the link to modify the user name details of the end host. On modifying the User Name with a unique value, the End Host/IP Phone Down report can be generated.
The IP Address, MAC Address or Host Name will not be displayed in the Multiple End Hosts page because there are duplicate values.
Understanding the End Host Down ReportThe algorithm used while generating the End Host Down reports is:
1. CiscoWorks Assistant checks whether Campus Manager Server has discovered the selected End Host.
2. If the selected device is not managed by Campus Manager, the report generation will stop without performing the further steps.
3. If you want to run Discovery again, select Rediscover. Campus Manager rediscovers the End Host and IP phones in the network.
4. If you have selected the Switch Check option, then CiscoWorks Assistant will check the reachability status for the selected device to which the End Host is connected.
It also checks the status of the port to which the End Host is connected to. If the device is not reachable then it automatically triggers the Device Troubleshooting workflow. Device connectivity information is limited to IPv4 devices. Since Campus Manager is not supporting IPv6 devices, CiscoWorks Assistant will also not support the same.
The End Host Down report displays the following information:
• End Host Details
• Device Connectivity Information
• Status Information for the Port
• Rediscover
Table 4-17 Configuration Details - Example 4
S. No. IP Address MAC Address Host Name User Name
1 10.77.209.254 00-1a-6c-e6-46-30 endhost1 endhost
2 10.77.208.97 00-07-ec-b9-18-54 endhost2 endhost
3 10.77.209.254 00-04-23-22-d3-78 endhost1 endhost
4 10.77.208.83 00-07-ec-b9-18-54 endhost3 endhost
4-20User Guide for CiscoWorks Assistant
OL-17904-01
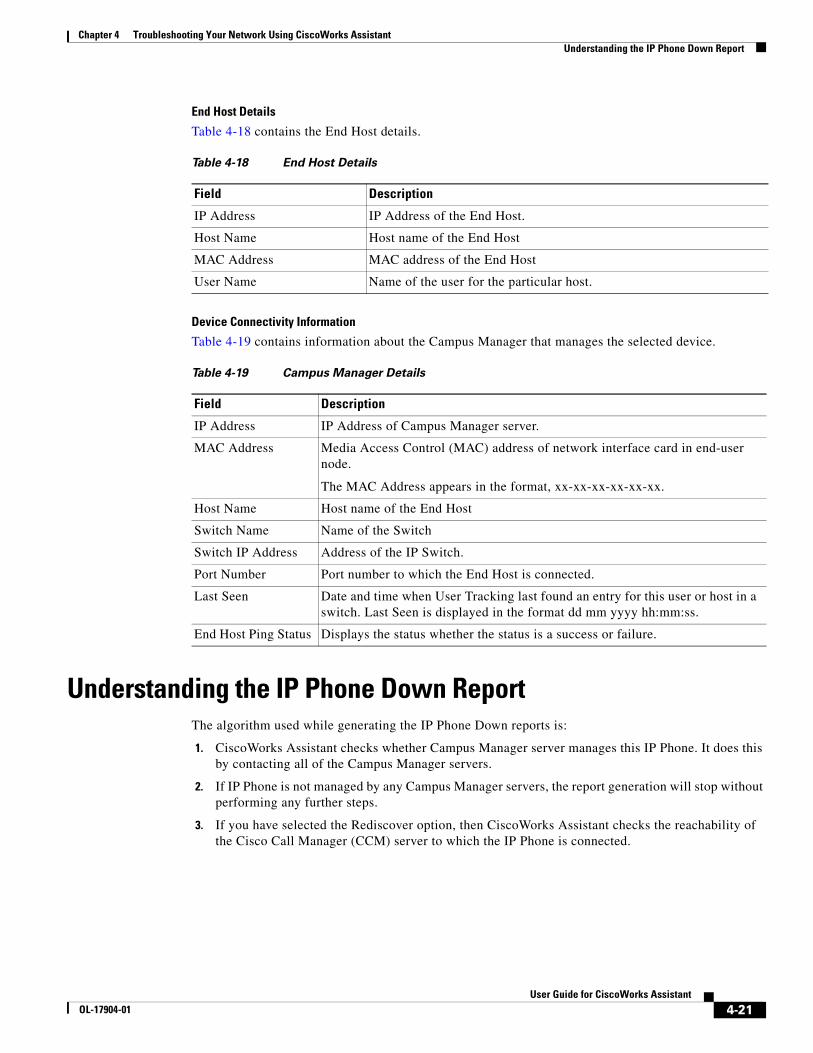
Chapter 4 Troubleshooting Your Network Using CiscoWorks Assistant Understanding the IP Phone Down Report
End Host Details
Table 4-18 contains the End Host details.
Device Connectivity Information
Table 4-19 contains information about the Campus Manager that manages the selected device.
Understanding the IP Phone Down ReportThe algorithm used while generating the IP Phone Down reports is:
1. CiscoWorks Assistant checks whether Campus Manager server manages this IP Phone. It does this by contacting all of the Campus Manager servers.
2. If IP Phone is not managed by any Campus Manager servers, the report generation will stop without performing any further steps.
3. If you have selected the Rediscover option, then CiscoWorks Assistant checks the reachability of the Cisco Call Manager (CCM) server to which the IP Phone is connected.
Table 4-18 End Host Details
Field Description
IP Address IP Address of the End Host.
Host Name Host name of the End Host
MAC Address MAC address of the End Host
User Name Name of the user for the particular host.
Table 4-19 Campus Manager Details
Field Description
IP Address IP Address of Campus Manager server.
MAC Address Media Access Control (MAC) address of network interface card in end-user node.
The MAC Address appears in the format, xx-xx-xx-xx-xx-xx.
Host Name Host name of the End Host
Switch Name Name of the Switch
Switch IP Address Address of the IP Switch.
Port Number Port number to which the End Host is connected.
Last Seen Date and time when User Tracking last found an entry for this user or host in a switch. Last Seen is displayed in the format dd mm yyyy hh:mm:ss.
End Host Ping Status Displays the status whether the status is a success or failure.
4-21User Guide for CiscoWorks Assistant
OL-17904-01

Chapter 4 Troubleshooting Your Network Using CiscoWorks Assistant Understanding the IP Phone Down Report
4. CiscoWorks Assistant also checks the connection status between the CCM Server and the IP Phone. If it is not connected properly the report generation will stop without performing any further steps.
5. If you have selected the Switch Check option, CiscoWorks Assistant checks for the reachability status for the device to which the IP Phone is connected.
CiscoWorks Assistant also checks the port status of the IP Phone to find the cause for the IP Phone down.
The IP Phone Down report displays the following information:
• IP Phone Details
• Device Connectivity Information
• Reachability Information for the CCM Server
• Connection status of IP Phone and CCM Server
• Status Information for the Port
• Reachability Check for the Switch
• Check Status of the Port
• Rediscover
IP Phone Details
Table 4-20 contains the IP Phone details.
Device Connectivity Information
Table 4-21 contains information about the Campus Manager to which the device is managed.
Table 4-20 IP Phone Details
Field Description
Phone Number Phone Number of the IP Phone.
This is displayed only if you have selected Phone Number as the Input Type while generating the IP Phone report.
IP Address IP Address of the IP Phone.
Table 4-21 Campus Manager Details
Field Description
Phone Number Phone Number of the IP Phone.
This is displayed only if you have selected Phone Number as the Input Type while generating the IP Phone report.
IP Address IP Address of the IP Phone.
Campus Manager IP Address of Campus Manager server.
MAC Address Media Access Control (MAC) address of network interface card in end-user node.
The MAC Address appears in the format, xx-xx-xx-xx-xx-xx.
Cisco Call Manager server
IP Address of the Cisco Call Manager.
4-22User Guide for CiscoWorks Assistant
OL-17904-01

Chapter 4 Troubleshooting Your Network Using CiscoWorks Assistant Understanding the IP Phone Down Report
Reachability Information for the CCM Server
You can view the reachability status of the CCM server. This is determined using the Ping protocol.
Connection status of IP Phone and CCM Server
You can view the connection status of the CCM server and the IP Phone.
Status Information for the Port
The status information for the port is displayed only if you have selected the Switch Check option while generating the End Host/IP Phone Down report. If you selected the Switch Check option, you can also verify the device connectivity status.
If you have selected the Switch Check option, the Reachability Check for the Switch table is displayed.
Reachability Check for the Switch
Table 4-22 contains the device reachability information to which the End Host/IP Phone is connected.
Switch Name Name of the Switch.
Switch IP Address IP Address of the Switch.
Port Number Port number to which the End Host is connected.
Last Seen Date and time when User Tracking last found an entry for this user or host in a switch. Last Seen is displayed in the format dd mm yyyy hh:mm:ss.
IP Ping Status Displays the reachability status of the IP Phone.
Table 4-21 Campus Manager Details
Field Description
Table 4-22 Device Reachability Details
Field Description
Ping Ping status of the selected device.
Checks whether the device is reachable. A ping tests an ICMP echo message and its reply.
HTTP Ping status of the selected device.
Sends an HTTP request to the HTTP port 80 of the destination device.
SNMPv1/v2c Read Status of SNMPv1/v2c Read Community string (service test, port 161) of the selected device.
Sends an snmp get request to the destination device for an SNMP read test (SNMPR).
SNMPv1/v2c Write Status of SNMPv1/v2c Write Community string (service test, port 161) of the selected device.
Sends an snmp set request to the device to test SNMP write (SNMPW).
SNMPv3 Read Status of SNMPv3 Read credentials (service test, port 161) of the selected device.
Sends an snmp get request to the destination device for an SNMP read test (SNMPR).
4-23User Guide for CiscoWorks Assistant
OL-17904-01
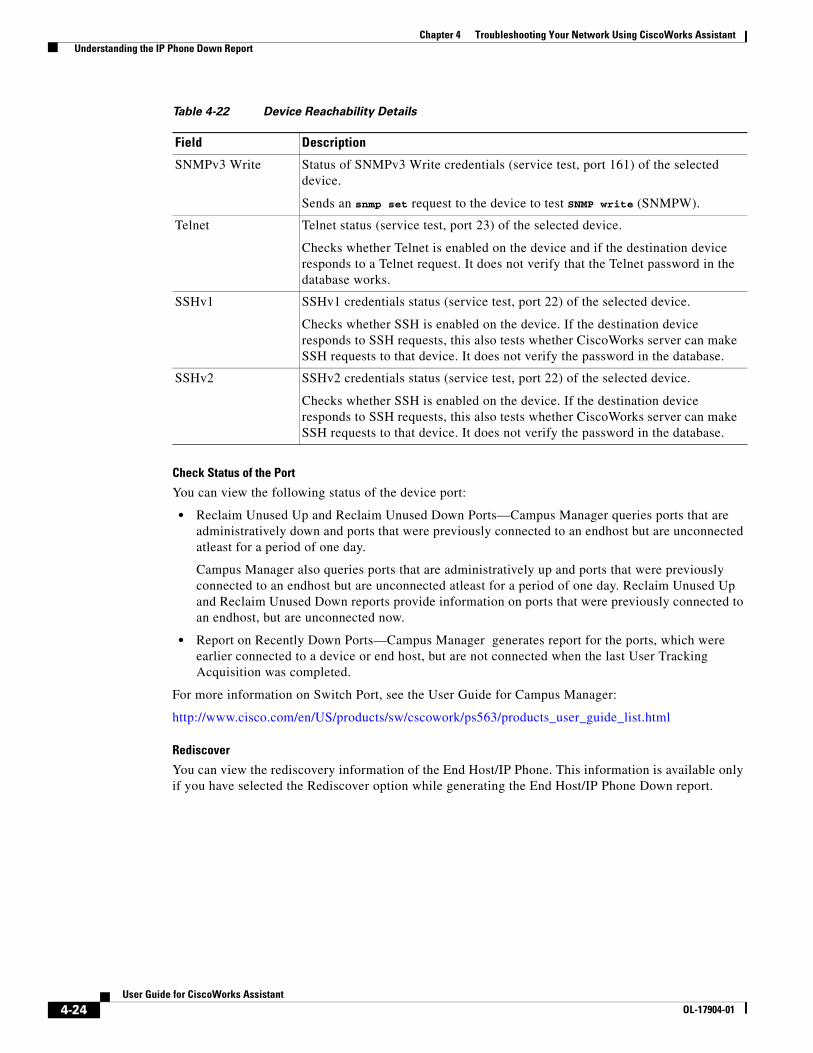
Chapter 4 Troubleshooting Your Network Using CiscoWorks Assistant Understanding the IP Phone Down Report
Check Status of the Port
You can view the following status of the device port:
• Reclaim Unused Up and Reclaim Unused Down Ports—Campus Manager queries ports that are administratively down and ports that were previously connected to an endhost but are unconnected atleast for a period of one day.
Campus Manager also queries ports that are administratively up and ports that were previously connected to an endhost but are unconnected atleast for a period of one day. Reclaim Unused Up and Reclaim Unused Down reports provide information on ports that were previously connected to an endhost, but are unconnected now.
• Report on Recently Down Ports—Campus Manager generates report for the ports, which were earlier connected to a device or end host, but are not connected when the last User Tracking Acquisition was completed.
For more information on Switch Port, see the User Guide for Campus Manager:
http://www.cisco.com/en/US/products/sw/cscowork/ps563/products_user_guide_list.html
Rediscover
You can view the rediscovery information of the End Host/IP Phone. This information is available only if you have selected the Rediscover option while generating the End Host/IP Phone Down report.
SNMPv3 Write Status of SNMPv3 Write credentials (service test, port 161) of the selected device.
Sends an snmp set request to the device to test SNMP write (SNMPW).
Telnet Telnet status (service test, port 23) of the selected device.
Checks whether Telnet is enabled on the device and if the destination device responds to a Telnet request. It does not verify that the Telnet password in the database works.
SSHv1 SSHv1 credentials status (service test, port 22) of the selected device.
Checks whether SSH is enabled on the device. If the destination device responds to SSH requests, this also tests whether CiscoWorks server can make SSH requests to that device. It does not verify the password in the database.
SSHv2 SSHv2 credentials status (service test, port 22) of the selected device.
Checks whether SSH is enabled on the device. If the destination device responds to SSH requests, this also tests whether CiscoWorks server can make SSH requests to that device. It does not verify the password in the database.
Table 4-22 Device Reachability Details
Field Description
4-24User Guide for CiscoWorks Assistant
OL-17904-01
Chapter 4 Troubleshooting Your Network Using CiscoWorks Assistant Understanding the IP Phone Down Report
Using Device Selector in Troubleshooting WorkflowsThe Device Selector allows you to search for the devices in Device and Credential Repository (DCR). It helps you to locate the devices and perform the device management tasks quickly. With this device selector, you need not remember the device type or application group hierarchy to locate the devices.
The devices are categorized under the Device Type based groups, User Defined groups, Subnet Based groups, Application Specific groups or under All Groups.
The CiscoWorks Assistant uses the Common Services device selector.
See the Configuring Device Selector section in the Managing Device and Credentials chapter of the User Guide for CiscoWorks Common Services Device Fault Manager 3.2 for information on using Device Selector:
http://www.cisco.com/en/US/products/sw/cscowork/ps3996/products_user_guide_list.html
You can also access this information from Common Services Online help. From CiscoWorks help, go to CiscoWorks Common Services > Common Services > Managing Device and Credentials > Configuring Device Selector.
4-25User Guide for CiscoWorks Assistant
OL-17904-01

Chapter 4 Troubleshooting Your Network Using CiscoWorks Assistant Understanding the IP Phone Down Report
4-26User Guide for CiscoWorks Assistant
OL-17904-01
OL-17904-01
A
P P E N D I X A Troubleshooting CiscoWorks AssistantThis section contains how to troubleshoot CiscoWorks Assistant.
• Frequently Asked Questions
• Troubleshooting Server Setup Workflows
• Troubleshooting End Host/IP Phone and Device Troubleshooting Workflows
Frequently Asked QuestionsThe following are the frequently asked questions in CiscoWorks Assistant:
• Q.How do I install CiscoWorks Assistant 1.2?
• Q.Can I integrate CiscoWorks Assistant with other LMS application versions?
• Q.I am not able to view some of the information in Device Troubleshooting report. What is the issue?
• Q.I am not able to run the End Host/ IP Phone report. What is the problem?
Q. How do I install CiscoWorks Assistant 1.2?
A. CiscoWorks Assistant 1.2 is part of LMS 3.2 image.
For more information, see Installing and Getting Started with CiscoWorks LAN Management Solution 3.2
Q. Can I integrate CiscoWorks Assistant with other LMS application versions?
A. No, you can integrate CiscoWorks Assistant only with the following LMS application versions:
• Common Services (CS) 3.3
• CiscoView (CV) 6.1.9
• Campus Manager (CM) 5.2
• Resource Manager Essentials (RME) 4.3
• Device Fault Manager (DFM) 3.2
• Internetwork Performance Monitor (IPM) 4.2
• Health and Utilization Monitor (HUM)1.2
• Integration Utility 1.9
A-1User Guide for CiscoWorks Assistant
Appendix A Troubleshooting CiscoWorks Assistant Troubleshooting Server Setup Workflows
Q. I am not able to view some of the information in Device Troubleshooting report. What is the issue?
A. The Device Troubleshooting report depends on the following LMS 3.2 applications. Ensure that you have installed all of these applications:
– Campus Manager (CM) 5.2
– Resource Manager Essentials (RME) 4.3
– Device Fault Manager (DFM) 3.2
– Health and Utilization Monitor (HUM) 1.2
Q. I am not able to run the End Host/ IP Phone report. What is the problem?
A. The End Host/IP Phone report depends on Campus Manager 5.2. You must install Campus Manager application to run this report.
Q. Can I configure a multi-server setup with local server as SSO slave?
A. Yes, you can configure a multi-server setup with local server as SSO slave. When you add a server from Manage Server, a peer certificate will be generated, which allows you to set the added server as master by selecting a checkbox.
Troubleshooting Server Setup WorkflowsTable A-1 lists the errors and their recommended solutions for Server Setup workflows:
Table A-1 Error Messages for Server Setup Workflows
Error Message ID Error Message Probable Cause Possible Action
CWA026 Error while saving log level.
Could not save the new log level into the property file.
This is because the disk space may be full or the properties file may not be available in the system.
Ensure that there is enough free space and the properties file exists on the system.
CWA100 Error occurred when fetching data.
Invalid XML character in the data.
Please try again later.
CWA101 Could not fetch server information from the database.
Server Discovery may be in progress.
Please try again.
CWA102 Could not update the database with new values.
CiscoWorks Assistant runtime process (OpsXMLDbEngine) may not be running.
Check if the OpsXMLDbEngine process is running in the local server.
To do this, go to Common Services > Server > Admin > Processes.
If the process is not running, restart the process and try again.
A-2User Guide for CiscoWorks Assistant
OL-17904-01

Appendix A Troubleshooting CiscoWorks Assistant Troubleshooting Server Setup Workflows
CWA104 Could not get the logged in user details.
Either:
• Browser session terminated.
Or
• Session timed out.
Please log in again.
CWA109 Could not get the workflow instance details.
CiscoWorks Assistant runtime process may not be running.
Check if the OpsXMLDbEngine process is running in the local server.
To do this, go to Common Services > Server > Admin > Processes.
If the process is not running, restart the process and try again.
CWA110 Could not fetch the details from the database.
CiscoWorks Assistant database engine may not be running.
Check if the OpsXMLDbEngine process is running in the local server.
To do this, go to Common Services > Server > Admin > Processes.
If the process is not running, restart the process and please try again.
CWA111 Session was ended by another user.
Another user has ended the active session and started a new session.
Please contact the CiscoWorks Server administrator or Cisco Technical Assistance Center.
CWA112 An operation initiated by the same user is in progress in the backend.
Multiple operations cannot be initiated by the same user simultaneously.
Please try after the operation is completed.
CWA116 Invalid data. Incorrect parameters passed. Please try again.
CWA118 ACS server is not reachable.
ACS server may be down or you may have entered invalid ACS server details.
Enter valid ACS server details and make sure that the ACS server is running.
CWA119 Network Device Group does not exist in ACS server.
— Create the Network Device group in the ACS server.
CWA121 Error while communicating with the DCRServer process.
DCRServer process is not running in the LMS server.
Restart the DCRServer process. To do this, go to Common Services > Server > Admin > Processes and try again.
CWA122 Could not login to local server as System Identity User.
System Identity User details provided is not valid.
Please ensure that the System Identity User is configured and try again.
CWA123 Could not login to the remote server as System Identity User.
The server is not reachable or the System Identity User is not the same as in DCR Master server.
Please ensure that the server is reachable, and the same System Identity User is configured as in DCR Master server, and try again.
Table A-1 Error Messages for Server Setup Workflows (continued)
Error Message ID Error Message Probable Cause Possible Action
A-3User Guide for CiscoWorks Assistant
OL-17904-01

Appendix A Troubleshooting CiscoWorks Assistant Troubleshooting Server Setup Workflows
CWA124 Could not fetch the auto manage mode for the servers.
CiscoWorks Assistant runtime process may not be running.
Check if the OpsXMLDbEngine process is running in the local server.
To do this, go to Common Services > Server > Admin > Processes.
If the process is not running, restart the process and try again.
If the problem persists, contact the CiscoWorks server administrator or Cisco Technical Assistance Center.
CWA125 Could not stop the last run step.
CiscoWorks Assistant runtime process may not be running.
Check if the OpsXMLDbEngine process is running in the local server.
To do this, go to Common Services > Server > Admin > Processes.
If the process is not running, restart the process and please try again.
If the problem persists, contact the CiscoWorks Server administrator or Cisco Technical Assistance Center.
CWA126 Operation in progress for the active session.
Active session was created by another user.
Please try after the operation has completed.
CWA127 Operation timed out for local server.
• Could not get response from the local server. The local LMS server may be very slow
Or
• CiscoWorks Assistant runtime process may not be running.
Check if the OpsXMLDbEngine process is running in the local server.
To do this, go to Common Services > Server > Admin > Processes. If the process is not running, restart the process and please try again.
CWA128 Operation timed out for remote server.
• Could not get response from the LMS server. The remote server may not be accessible or may be very slow.
Or
• CiscoWorks Assistant runtime process may not be running.
Check if the OpsXMLDbEngine process is running in the local server.
To do this, go to Common Services > Server > Admin > Processes. If the process is not running, restart the process and please try again.
CWA129 Could not get the System Identity User details.
— Please try again.
CWA4001 Server name: LMS server is not reachable.
LMS server is unreachable. Make sure the LMS server is reachable.
Table A-1 Error Messages for Server Setup Workflows (continued)
Error Message ID Error Message Probable Cause Possible Action
A-4User Guide for CiscoWorks Assistant
OL-17904-01
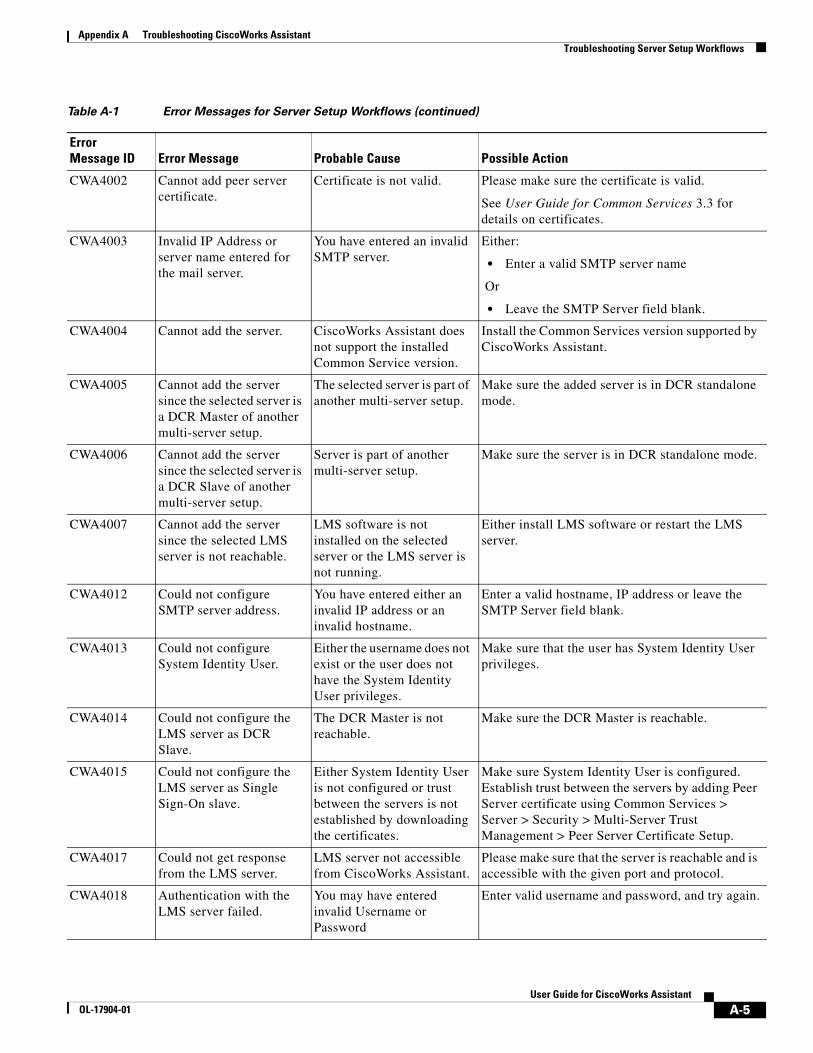
Appendix A Troubleshooting CiscoWorks Assistant Troubleshooting Server Setup Workflows
CWA4002 Cannot add peer server certificate.
Certificate is not valid. Please make sure the certificate is valid.
See User Guide for Common Services 3.3 for details on certificates.
CWA4003 Invalid IP Address or server name entered for the mail server.
You have entered an invalid SMTP server.
Either:
• Enter a valid SMTP server name
Or
• Leave the SMTP Server field blank.
CWA4004 Cannot add the server. CiscoWorks Assistant does not support the installed Common Service version.
Install the Common Services version supported by CiscoWorks Assistant.
CWA4005 Cannot add the server since the selected server is a DCR Master of another multi-server setup.
The selected server is part of another multi-server setup.
Make sure the added server is in DCR standalone mode.
CWA4006 Cannot add the server since the selected server is a DCR Slave of another multi-server setup.
Server is part of another multi-server setup.
Make sure the server is in DCR standalone mode.
CWA4007 Cannot add the server since the selected LMS server is not reachable.
LMS software is not installed on the selected server or the LMS server is not running.
Either install LMS software or restart the LMS server.
CWA4012 Could not configure SMTP server address.
You have entered either an invalid IP address or an invalid hostname.
Enter a valid hostname, IP address or leave the SMTP Server field blank.
CWA4013 Could not configure System Identity User.
Either the username does not exist or the user does not have the System Identity User privileges.
Make sure that the user has System Identity User privileges.
CWA4014 Could not configure the LMS server as DCR Slave.
The DCR Master is not reachable.
Make sure the DCR Master is reachable.
CWA4015 Could not configure the LMS server as Single Sign-On slave.
Either System Identity User is not configured or trust between the servers is not established by downloading the certificates.
Make sure System Identity User is configured. Establish trust between the servers by adding Peer Server certificate using Common Services > Server > Security > Multi-Server Trust Management > Peer Server Certificate Setup.
CWA4017 Could not get response from the LMS server.
LMS server not accessible from CiscoWorks Assistant.
Please make sure that the server is reachable and is accessible with the given port and protocol.
CWA4018 Authentication with the LMS server failed.
You may have entered invalid Username or Password
Enter valid username and password, and try again.
Table A-1 Error Messages for Server Setup Workflows (continued)
Error Message ID Error Message Probable Cause Possible Action
A-5User Guide for CiscoWorks Assistant
OL-17904-01

Appendix A Troubleshooting CiscoWorks Assistant Troubleshooting Server Setup Workflows
CWA4019 Could not fetch peer server certificate from the LMS server.
Certificate is invalid. Make sure that the certificate is valid. If not, re-generate the certificate and restart Daemon Manager
CWA4021 Cannot add the server The selected server is in ACS mode and DCR Master server is in non-ACS mode.
Make sure that the LMS server you have selected is in non ACS mode.
CWA4022 No http response from LMS server
Either:
• The server may be unreachable.
Or
• The server may be down
Click on the step link to see the server details.
• Check whether the server is reachable.
• Restart Daemon Manager.
CWA4023 Cannot add peer certificate
Cannot connect to Host Please make sure that the host is reachable from this server.
CWA4024 System Identity User validation failed.
This could be because:
• The System Identity User you entered may not exist in the ACS server
• The System Identity User may not have the required privileges
• The ACS server may be down or not accessible.
Ensure that:
• The System Identity User is available in the ACS server.
• The System Identity User has all the required privileges.
• The ACS server is running and is accessible.
CWA4500 Invalid file format. Data in the selected file is not in the expected format.
Please see the Online help for the correct file format and reselect the file.
CWA4501 File does not exist. You have selected a non-existent file or the selected file or directory does not have the required permissions.
Select a file with the required permissions.
CWA4507 Could not import from local NMS.
Invalid Install location. Enter valid install location for NMS application
CWA4508 Import from local NMS failed.
NMS daemon may be down. Restart NMS daemon.
CWA4510 You are not authorized to perform the Credential Sets task.
You can configure Default Credentials only if you have required privileges.
Please log in as user with privileges to configure Default Credentials.
CWA4511 Could not connect to ANIServer.
The ANIServer process is not running.
Restart the ANIServer process. To do this, go to Common Services > Server > Admin > Processes.
Table A-1 Error Messages for Server Setup Workflows (continued)
Error Message ID Error Message Probable Cause Possible Action
A-6User Guide for CiscoWorks Assistant
OL-17904-01

Appendix A Troubleshooting CiscoWorks Assistant Troubleshooting Server Setup Workflows
CWA4512 Could not access local NMS server with given NMS username.
Either the User does not exist in the NMS server or does not have enough privileges.
Please enter valid NMS username with required privileges.
CWA4514 ANIServer is initializing. ANIServer is still initializing.
Make sure that ANIServer is started and running. To do this, go to Common Services > Server > Admin > Processes
Local server Server Name is not the DCR master.
LMS server selected to run Server Setup Workflow is DCR slave.
Please go to the DCR master DCR Master Name to run the Server Setup workflow.
Enter the details for importing from NMS.
You have not entered the details to import devices from NMS.
Enter the details to import devices from NMS.
Enter the details for Discovery on Server Name.
Details to run Discovery on the selected server were not entered.
Enter the details to run discovery on the selected server.
Invalid separators found while importing.
The file has invalid separators.
Select a file with valid separator.
File must contain only one seed device in each line. See the CiscoWorks Assistant Online help for supported import file format.
Data is invalid IP Address or Hostname.
— Enter valid IP Address or Hostname [A-Z a-z 0-9_-].
Selected file has invalid data.
You have selected a file with an invalid data format
Select a file with valid data format. File must contain only one seed device in each line. See the CiscoWorks Assistant Online help for details.
Could not upload the file. Either the:
• Upload operation timed out.
Or
• File selected for upload is corrupted.
Please try again.
Username is required. Username field is blank Enter Username.
Password is required. Password field is blank Enter Password.
Invalid Username. Invalid username. Enter valid username. It should have at least five characters.
Password and Confirm Password must be same.
The passwords you have entered do not match.
Make sure both passwords are same.
Could not validate the Username and Password.
Validation of the username and password failed.
Enter correct username and password and try again.
Hostname or IP Address is required.
Hostname/IP Address field is blank.
Enter the Hostname or the IP Address.
Table A-1 Error Messages for Server Setup Workflows (continued)
Error Message ID Error Message Probable Cause Possible Action
A-7User Guide for CiscoWorks Assistant
OL-17904-01

Appendix A Troubleshooting CiscoWorks Assistant Troubleshooting Server Setup Workflows
Hostname or IP Address already exists in the Seed Devices list.
Hostname/IP Address already exists in the Seed Devices list.
Enter a different Hostname or IP Address.
Admin Username is required.
Admin Username field is blank.
Enter Admin Username.
Admin Password is required.
Admin Password field is blank.
Enter Admin Password.
Port is required. Port field is blank Enter the Port number.
Invalid Port. Port entered is not an integer.
Enter a valid integer for the Port.
Invalid CiscoWorks E-mail ID.
You have entered an invalid e-mail ID.
Enter valid e-mail ID.
Target is required. Target field is blank. Enter Target.
Time out should be an integer.
Time out value entered is not an integer.
Enter an integer value.
Invalid Retries. Invalid or no Retry value entered.
Enter valid Retries. Valid range is 0 - 8.
Retries should be an integer.
Retries entered is not an integer.
Enter a valid integer. Valid range is 0 - 8.
Read Community is required.
Read Community field is blank.
Enter Read Community.
Install location is required.
Install Location field is blank
Enter install location.
Import From File is required.
Import From File field is blank.
Enter Import From File details.
File name does not exist in the server.
Selected file does not exist in the server.
Select a file that exists in the server.
Standard Primary Credentials Password and Verify Password must be same.
The passwords you have entered do not match.
Make sure both passwords are the same.
Standard Primary Credentials Enable Password and Verify Password must be same.
The passwords you have entered do not match.
Make sure both passwords are the same.
Standard Secondary Credentials Password and Verify Password must be same.
The passwords you have entered do not match.
Make sure both passwords are the same.
Table A-1 Error Messages for Server Setup Workflows (continued)
Error Message ID Error Message Probable Cause Possible Action
A-8User Guide for CiscoWorks Assistant
OL-17904-01

Appendix A Troubleshooting CiscoWorks Assistant Troubleshooting Server Setup Workflows
Standard Secondary Credentials Enable Password and Verify Password must be same.
The passwords you have entered do not match.
Make sure both passwords are the same.
SNMP Credentials RO Community and Verify must be same.
The community strings you have entered do not match.
Make sure both RO community strings are the same.
SNMP Credentials RW Community and Verify must be same.
The community strings you have entered do not match.
Make sure both RW community strings are the same.
SNMP Credentials Password and Verify Password must be same.
The passwords you have entered do not match.
Make sure both passwords are the same.
HTTP Primary Credentials Username is required.
HTTP Primary Credentials Username field is blank
Enter HTTP Primary Credentials Username.
HTTP Primary Credentials Password and Verify Password must be same.
The passwords you have entered do not match.
Make sure both passwords are the same.
HTTP Secondary Credentials Username is required.
HTTP Secondary Credentials Username field is blank
Enter HTTP Secondary Credentials Username.
HTTP Secondary Credentials Password and Verify Password must be same.
The passwords you have entered do not match.
Make sure both passwords are the same.
Invalid HTTP Port. HTTP port entered is not valid
Enter a valid integer [1-65535].
Invalid HTTPS Port. Enter a valid integer.
HTTPS port entered is not valid
Enter a valid integer [1-65535].
Auto Update Server Password and Verify Password must be same.
The passwords you have entered do not match.
Make sure both passwords are the same.
Rx-Boot Credentials Mode Password and Verify Password must be same.
The passwords you have entered do not match.
Make sure both passwords are the same.
Failed to get SSO Master session details.
SSO Master is not reachable.
Make sure the SSO Master is reachable and please try again after some time.
Select one or many methods to add devices to LMS.
Methods to add the devices were not selected.
Select the methods to add the devices.
Table A-1 Error Messages for Server Setup Workflows (continued)
Error Message ID Error Message Probable Cause Possible Action
A-9User Guide for CiscoWorks Assistant
OL-17904-01

Appendix A Troubleshooting CiscoWorks Assistant Troubleshooting Server Setup Workflows
Enter a valid IP Address or Hostname.
No/Invalid IP Address or Hostname entered.
Enter valid Hostname or IP Address.
IP Address or Hostname exists in the list.
Either the Hostname or the IP Address already exists.
Enter a different Hostname or IP Address.
Since the process has already completed, the e-mail cannot be sent.
The process completed before the e-mail address could be updated.
—
Page is loading. Operation cannot be performed while the page is loading.
Please wait until the page loads completely.
Manage Servers task cannot be run because:
1. LMS servers is unreachable.
2. CiscoWorks Common Services version is not supported by CiscoWorks Assistant.
One or more LMS servers in the Multi-server setup are not reachable or has an LMS version not supported by CiscoWorks Assistant.
Make sure that the LMS servers are reachable and CiscoWorks Common Services version is supported by CiscoWorks Assistant.
Change Mode to ACS task cannot be run because:
• LMS servers is unreachable.
• CiscoWorks Common Services version is not supported by CiscoWorks Assistant.
One or more LMS servers in the Multi-server setup are not reachable or has an LMS version not supported by CiscoWorks Assistant.
Make sure that the LMS servers are reachable and CiscoWorks Common Services version is supported by CiscoWorks Assistant.
SSO Master [SSO Master] is unreachable.
SSO master is not reachable from the DCR master.
Make sure that the SSO Master is reachable from DCR Master and please try again.
Connectivity failure with primary server
Either the:
• Primary ACS server is not reachable.
Or
• Primary ACS server details are incorrect.
Either:
• Restart ACS server.
Or
• Enter valid ACS server details.
NDG name Network Device Group does not exist in primary server.
Specified Network Device Group does not exist in the primary ACS server.
Create the Network Device Group in the primary ACS server.
Error while communicating with device selector.
Either the DCRServer or the OGSServer processes are not running.
Restart DCRServer or OGSServer processes
(Common Services > Server > Admin > Processes).
Table A-1 Error Messages for Server Setup Workflows (continued)
Error Message ID Error Message Probable Cause Possible Action
A-10User Guide for CiscoWorks Assistant
OL-17904-01

Appendix A Troubleshooting CiscoWorks Assistant Troubleshooting End Host/IP Phone and Device Troubleshooting Workflows
Troubleshooting End Host/IP Phone and Device Troubleshooting Workflows
The Table A-2 lists the errors and their recommended solutions for End Host/IP Phone and Device Troubleshooting workflows
Data unchanged. Please edit details to configure default credentials.
Could not fetch the DCR mode of the server.
CiscoWorks Common Services version may not be supported by CiscoWorks Assistant.
Invalid data in DCR configuration file.
Make sure that CiscoWorks Common Services is supported.
Could not fetch the DCR master details.
Common Services version may not be supported by CiscoWorks Assistant.
Invalid data in DCR configuration file.
Make sure that CiscoWorks Common Services is supported.
SSO Master Server Name is unreachable.
SSO master is not reachable from the DCR master.
Make sure that the SSO Master is reachable from DCR Master and please try again.
Table A-1 Error Messages for Server Setup Workflows (continued)
Error Message ID Error Message Probable Cause Possible Action
Table A-2 Error Messages for End Host/IP Phone and Device Troubleshooting Workflows
Error Message ID Error Message Probable Cause Possible Action
CWA001 Cookie is not set. Session is invalid. Please log in and try again.
CWA002 Could not log into server. No response from server. Check the server connection and ensure that the server is reachable.
CWA003 Authentication failed. System Identity User is not set properly.
Check the username and password of the System Identity User.
You can set the System Identity User in the Common Services application (Common Services > Server > Security > System Identity Setup).
CWA004 Could not log into Slave Server.
Session is invalid. Please log in and try again.
CWA005 You are not authorized to access the page.
You do not have the correct privileges.
Please check the Permission Report (Common Services > Server > Reports) and review the required permissions.
Contact the CiscoWorks Server administrator to get the required permission.
A-11User Guide for CiscoWorks Assistant
OL-17904-01

Appendix A Troubleshooting CiscoWorks Assistant Troubleshooting End Host/IP Phone and Device Troubleshooting Workflows
CWA006 License expired. LMS application license expired.
Upgrade your LAN Management Solution license.
Check your license status in the Common Services application (Common Services > Server > Admin > Licensing)
See the User Guide for Common Services 3.3 to upgrade your license.
http://www.cisco.com/en/US/products/sw/cscowork/ps3996/products_user_guide_list.html
CWA007 The selected device does not respond to ping.
This could occur because the device may not be reachable or ICMP is disabled for the selected device.
This could also occur because the response from the CiscoWorks Server is slow.
Please check the device connectivity and the system resources.
CWA008 Could not find the traceroute for the selected device.
The device may not be reached or the response from the CiscoWorks Server may be slow.
Please check the device connectivity and the system resources.
CWA009 Internal server error. The server or the tomcat processes may be down
Restart the daemon manager of the server:
On Windows:
1. Enter net stop crmdmgtd
2. Enter net start crmdmgtd
On Solaris:
1. Enter /etc/init.d/dmgtd stop
2. Enter /etc/init.d/dmgtd start
CWA010 Error while communicating with DCR Server.
Either:
• DCR Master is not reachable
or
• DCR Server process is not running on the LMS server.
Make sure that DCR Master is reachable.
Restart the DCRServer process (Common Services > Server > Admin > Processes).
CWA011 User session expired. You have logged out from the CiscoWorks server.
Log into the CiscoWorks server.
CWA012 ACS user does not have full privileges.
— Contact the CiscoWorks server administrator to get the required permission.
CWA014 No HTTP response. Server is down. Check the server connection.
Table A-2 Error Messages for End Host/IP Phone and Device Troubleshooting Workflows
Error Message ID Error Message Probable Cause Possible Action
A-12User Guide for CiscoWorks Assistant
OL-17904-01

Appendix A Troubleshooting CiscoWorks Assistant Troubleshooting End Host/IP Phone and Device Troubleshooting Workflows
CWA015 Workflow is not supported.
Server discovery workflow could not find the server information.
Required application is not installed.
Check the server connection.
Install the required application. See Dependencies of CiscoWorks Assistant Application.
CWA016 HTTP parse error. — —
CWA019 Could not find Device information in RME
Could not access the device selector.
Restart these processes:
• CMFOGSServer
• CampusOGSServer
• RMEOGSServer
To do this, go to Common Services > Server > Admin > Processes.
CWA020 Switch IP address for the specified End Host /IP Phone is not available.
IP address of the device to which the End Host/IP Phone node is connected is Null in the report.
1. Run Campus Manager Data Collection for the device to which the End Host/IP Phone node is connected.
2. Run UT Acquisition.
See the User Guide for Campus Manager 5.2 at this location:
http://www.cisco.com/en/US/products/sw/cscowork/ps563/products_user_guide_list.html
CWA021 Port number of the switch to which specified End Host/IP Phone connected is not available.
Device port connected to the host is null.
1. Run Campus Manager Data Collection for the device to which the End Host/IP Phone node is connected.
2. Run UT Acquisition.
See the User Guide for Campus Manager 5.2 at this location:
http://www.cisco.com/en/US/products/sw/cscowork/ps563/products_user_guide_list.html
CWA022 VLAN ID for the specified End Host is not available.
VLAN ID associated with port is null.
1. Run Campus Manager Data Collection for the device to which the End Host/IP Phone node is connected.
2. Run UT Acquisition.
See the User Guide for Campus Manager 5.2 at this location:
http://www.cisco.com/en/US/products/sw/cscowork/ps563/products_user_guide_list.html
Table A-2 Error Messages for End Host/IP Phone and Device Troubleshooting Workflows
Error Message ID Error Message Probable Cause Possible Action
A-13User Guide for CiscoWorks Assistant
OL-17904-01

Appendix A Troubleshooting CiscoWorks Assistant Troubleshooting End Host/IP Phone and Device Troubleshooting Workflows
CWA023 Could not find the Last Seen information for the specified End Host /IP Phone.
Date and time when User Tracking last found an entry for End Host /IP Phone in a switch is null.
Run UT Acquisition for the device to which the End Host/IP Phone node is connected.
See the User Guide for Campus Manager 5.2 at this location:
http://www.cisco.com/en/US/products/sw/cscowork/ps563/products_user_guide_list.html
CWA024 Campus Manager is not managing the specified End Host/IP Phone.
— Discover the End Host / IP Phone in Campus Manager and run the workflow.
See the User Guide for Campus Manager 5.2 at this location:
http://www.cisco.com/en/US/products/sw/cscowork/ps563/products_user_guide_list.html
CWA025 Could not launch the workflow.
CiscoWorks Assistant engine may not be running
Restart the daemon manager of the server:
On Windows:
• Enter net stop crmdmgtd
• Enter net start crmdmgtd
On Solaris:
• Enter /etc/init.d/dmgtd stop
• Enter /etc/init.d/dmgtd start
CWA026 Error while saving the log level.
Could not save the new log level into the property file.
This is because the disk space may be full or the properties file may be available in the system.
Ensure that there is enough free space and the properties file exists on the system.
CWA027 CiscoWorks Assistant does not support the installed Campus Manager version.
You have installed an unsupported version of the application.
Upgrade Campus Manager to the version supported by CiscoWorks Assistant.
CWA028 CiscoWorks Assistant does not support the installed Device Fault Manager version.
You have installed an unsupported version of the application.
Upgrade Device Fault Manager to version supported by CiscoWorks Assistant.
CWA029 CiscoWorks Assistant does not support the installed Resource Manager Essentials version.
You have installed an unsupported version of the application.
Upgrade Resource Manager Essentials to version supported by CiscoWorks Assistant.
Table A-2 Error Messages for End Host/IP Phone and Device Troubleshooting Workflows
Error Message ID Error Message Probable Cause Possible Action
A-14User Guide for CiscoWorks Assistant
OL-17904-01

Appendix A Troubleshooting CiscoWorks Assistant Troubleshooting End Host/IP Phone and Device Troubleshooting Workflows
CWA030 CiscoWorks Assistant does not support the installed Internetwork Performance Monitor version.
You have installed an unsupported version of the application.
Upgrade Internetwork Performance Monitor to version supported by CiscoWorks Assistant.
CWA031 CiscoWorks Assistant does not support the installed Integration Utility version.
You have installed an unsupported version of the application.
Upgrade Integration Utility to version supported by CiscoWorks Assistant.
CWA032 CiscoWorks Assistant does not support the installed CiscoView version.
You have installed an unsupported version of the application.
Upgrade CiscoView to version supported by CiscoWorks Assistant.
CWA033 CiscoWorks Assistant does not support the installed Common Services version
You have installed an unsupported version of the application.
Upgrade Common Services to version supported by CiscoWorks Assistant.
CWA034 Cannot get the device information.
Either:
• DCR Master is not reachable
or
• DCR Server process is not running on the LMS server.
Make sure that DCR Master is reachable.
Restart the DCRServer and CMFOGSServer processes (Common Services > Server > Admin > Processes).
CWA035 Cannot run the Troubleshooting workflow while Server Addition is in progress.
The Server Addition process of the Server Setup workflow is running.
Complete the Server Setup workflow and then re-run the Troubleshooting workflow.
CWA036 Cannot run the Server Discovery workflow while Server Addition is in progress.
The Server Addition process of the Server Setup workflow is running.
Complete the Server Setup workflow and then re-run the Trouble shooting workflow.
CWA037 Install Campus Manager before running the End Host/IP Phone workflow.
Campus Manager is not installed
Install Campus Manager and re-run the End Host/IP Phone workflow.
CWA038 The End Host/IP Phone workflow does not support the installed version of Campus Manager
You have installed an unsupported version of Campus Manager.
Install the correct version of Campus Manager.
Table A-2 Error Messages for End Host/IP Phone and Device Troubleshooting Workflows
Error Message ID Error Message Probable Cause Possible Action
A-15User Guide for CiscoWorks Assistant
OL-17904-01

Appendix A Troubleshooting CiscoWorks Assistant Troubleshooting End Host/IP Phone and Device Troubleshooting Workflows
CWA039 Device must have IP Address or Hostname information in DCR for Device Troubleshooting to continue.
IP Address or Host name is not available in the DCR for a selected device.
Set an IP Address or Host Name for the selected device in DCR.
CWA040 CiscoWorks Assistant does not support the installed Health Monitor Utilization version.
You have installed an unsupported version of Health Monitor Utilization.
Install the correct version of Health Monitor Utilization.
Device IP address is Null. — 1. Run Discovery for the device to which the End Host/IP Phone node is connected.
2. Run UT Acquisition.
See the User Guide for Campus Manager 5.2 at this location:
http://www.cisco.com/en/US/products/sw/cscowork/ps563/products_user_guide_list.html
Device Name is Null. — 1. Run Discovery for the device to which the End Host/IP Phone node is connected.
2. Run UT Acquisition.
See the User Guide for Campus Manager 5.2 at this location:
http://www.cisco.com/en/US/products/sw/cscowork/ps563/products_user_guide_list.html
Table A-2 Error Messages for End Host/IP Phone and Device Troubleshooting Workflows
Error Message ID Error Message Probable Cause Possible Action
A-16User Guide for CiscoWorks Assistant
OL-17904-01

OL-17904-01
I N D E X
A
ACS
configure 3-49
updating configuration 3-51
viewing mode result 3-50
Add Devices 3-6
Adding a Device Credentials Policy 3-24
Allocating
device groups 3-15
Auto allocation 3-15
Auto Allocation Summary report 3-16
C
Call Home 4-10
cautions
significance of i-xii
CDA report 4-10
CDP Neighbors 4-7
Change ACS Setup 3-6
CiscoWorks Assistant
Dependencies 1-5
Dependency processes 2-5
Getting Started 2-1
Launching 2-1
launching 2-1
Online help 2-6
Processes 2-5
short-cuts 2-4
User Privileges 2-4
Workflows 1-4
workflows 2-3
Configure Device Credential Policies 3-6
Configuring Device Credentials Policies 3-24
D
Deleting Device Credentials Policy 3-25
Device
assigning 3-52
Device Availability 4-13
Device Credential verification report 4-10
Device groups allocation 3-15
Devices
adding 3-27
adding devices using bulk import from file 3-27
adding devices using bulk import from NMS 3-28
adding using common services device discovery 3-30
information 4-4
managing 3-41
reachability check 4-5
trace route 4-6
viewing 3-40
Device Threshold 4-14
Device Troubleshooting Report 4-4
DFM Alerts 4-7
Discrepancy 4-12
E
Editing a Default Credential Set 3-22
Editing a Device Credentials Policy 3-25
Embedded Event Manager 4-10
End Host Down report 4-20
Error messages
IN-1User Guide for CiscoWorks Assistant

Index
Server Setup workflow A-2
F
Filter Settings tab 3-35
G
Generic OnLine Diagnostics 4-10
Global Settings tab 3-36
L
Last Configuration change 4-8
Launching Online help 2-6
M
Manage Devices 3-6
Manage Servers 3-6
O
Order of Device Credential Policies 3-26
Overview
CiscoWorks Assistant 1-1
P
peer server account setup 3-2
peer server certificate setup 3-2
R
Report
End Host/IP Phone down 4-15
IN-2User Guide for CiscoWorks Assistant
S
Server Details 3-7
Server Setup Workflow 3-1
Set Default credentials 3-6
Setting Debug Level 2-4
Setting Default Credential Sets 3-18
Setting up
ACS Mode 3-44
Device Management Mode 3-13
System Identity User 3-13
Single Sign On 3-3
SNMP
deleting V2 3-41
V2parameter 3-38
V3 3-41
V3parameter 3-38
SNMP setting tab 3-32
standalone 3-3
Summary
3-53
operation 3-54
server 3-53
summary
ACS 3-54
syslog messages 4-6
system identity setup 3-2
T
Troubleshooting CiscoWorks Assistant
Device Troubleshooting, End Host, IP Phone A-2, A-11
Troubleshooting workflows
Device Troubleshooting 4-1
End Host/IP Phone Down 4-15
OL-17904-01

Index
U
Understanding reports
Device Troubleshooting 4-4
End Host Down 4-20
IP Phone Down 4-21
V
Viewing Credential Sets Status 3-23
Viewing Device Credentials Policy Configuration Status 3-26
OL-17904-01
IN-3User Guide for CiscoWorks Assistant
Index
IN-4User Guide for CiscoWorks Assistant
OL-17904-01