user documentation - implementation guide€¢ setup!ayoutube!brand!channel! •...
TRANSCRIPT

Implementation Guide Welcome to the Buddy Media social marketing suite! Now that your channel and admin account have been created, this guide walks through the steps to configure your channel, users and social profiles.
You should complete all steps in the Implementation Setup before proceeding to Implementation Customization. If you have just created your social profiles we also recommend finalizing the names and URLs of each profile before adding to the suite.
Implementation set up: Configure your channel • Add clients to your channel
Implementation customization: Enable your social profiles ConversationBuddy
• Enable a Facebook Page • Enable a Twitter handle • Enable a Google+ Page • Enable a LinkedIn Company Page
ProfileBuddy
• Set Up an application tab on a Facebook Page • Set up a YouTube video channel • Set up a YouTube brand channel • Add additional locales to a tab
Add Users to your channel
• Create users and set permissions

2
Implementation set up: Configure your channel
Add clients to your channel
Setting up your social marketing suite channel to reflect your organization's structure and workflow will help ensure efficient management and usage. Suite channels have the following hierarchy, from the top down:
Channel: A company’s instance of the Buddy Media social marketing suite, encompassing all content, users, and data. Client: A ‘folder’ containing all content for a specific brand or group within the suite. Multiple clients can be created to organize content, permissions, and analytics. Profile: A specific social profile. This could be a Facebook Page, Twitter handle, Google+ Page, etc.
A channel may contain multiple clients, and each client may in turn contain multiple profiles. Depending on the social platform that a profile belongs to, there may be additional levels of hierarchy. Specifically, a Facebook Page profile or YouTube Brand Channel profile may have multiple tabs and/or tab versions. Both user permissions and content can be aggregated across these levels. Required permission level: Channel Admin Actions:
• Add a client under your channel. • Repeat instructions to add additional clients and build out the structure of your channel.
After set-‐up: Once a client is created it can be renamed but not deleted. The info associated with a client can also be edited at any time (photo, address, industry).
Instructions: Add a client to your channel:
1. Log into your Buddy Media channel with the admin account credentials provided to you. 2. Click on your name in the upper right corner of the suite and select Admin from the drop down.
3. Within the admin section, select Add Client.
3
4. Enter the client information within each form field. The Client Name field will determine the name for your client throughout the entire suite and should be representative of the profiles that will be included within the client. Client Name and Industry are the only required fields.
5. Click Save. 6. Repeat these steps to add additional clients under the channel.

4
Implementation Customization: Enable your social profiles ConversationBuddy: Enable a Facebook Page Publish and moderate Facebook Page posts and comments through ConversationBuddy by adding your Facebook Page to the social marketing suite. Once added, you must authorize the Page before ConversationBuddy can post or pull in data. It’s important to note that an individual profile can only be added to a channel/client once, it cannot exist in multiple places. Required permission level: Channel Admin to add a profile to a client, any client user who is also a Facebook Page admin can authorize the profile. Actions:
• Add a Facebook Page to a client. • Authorize the Facebook Page.
After set-‐up: Once a Facebook Page has been added to the suite it cannot be moved to another client or deleted. You can edit the way the Page name appears within the suite to help organize/identify multiple Pages (name changes within the suite only, is not reflected on Facebook). Instructions: Add a Facebook Page to a client:
1. Log into Facebook under a Facebook Page admin account. 2. In the same browser, log into your Buddy Media channel with the admin account credentials
provided to you. 3. Click on your name in the upper right corner of the suite and select Admin from the drop down. 4. Locate the client that the Page should be added to and select Edit to the right of the client
name. (If you have not yet created the client, see page 2 for instructions.) 5. Scroll down to the bottom of the page to view the social account set up area under
Provisioning. 6. Select Add New Page to add a Facebook Page to the client.
7. Enter the Facebook Page URL and click Add. (Note: The Facebook Page must be published and
live on Facebook before it can be added to the suite.)
Authorize the Facebook Page: 1. Log into Facebook under a Facebook Page admin account.

5
2. In the same browser, log into your Buddy Media channel with the admin account credentials provided to you.
3. Click on your name in the upper right corner of the suite and select Profiles from the drop down.
4. Click Authorize to the right of the Page you want to enable. 5. A confirmation message appears when your profile has been successfully authorized.
Repeat these steps to add and authorize additional Facebook Pages.

6
ConversationBuddy: Enable a Twitter handle Publish and moderate Tweets through ConversationBuddy by setting up your Twitter handle within the social marketing suite. To begin, ensure that the Twitter handle account is live. It’s important to note that an individual Twitter handle can only be added to a single channel/client, it cannot exist in multiple places. Required permission level: Channel Admin to add a handle to a client, any client user who has the login credentials to the Twitter account can authorize the profile. Actions:
• Add a Twitter handle to a client. • Authorize the Twitter handle.
After set-‐up: Once a Twitter handle has been added to the suite it can be deleted and re-‐added under a different client, however all historical data will be lost. You cannot edit the way the handle & account name appear in the suite, they are pulled directly from Twitter.
Instructions: Add a Twitter handle to a client:
1. Log into your Buddy Media channel with the admin account credentials provided to you. 2. Click on your name in the upper right corner of the suite and select Admin from the drop down. 3. Locate the client that the Twitter handle should be added to and select Edit to the right of the
client name. (If you have not yet created the client, see page 2 for instructions.) 8. Scroll down to the bottom of the page to view the social account set up area under Provisioning
and select Twitter from the tabs at the top of this section.
4. Click Add New Twitter Account. 5. Enter the name of your Twitter handle without the ‘@’ symbol and click Add. 6. A success message will appear indicating that the Twitter handle has been added.
Authorize the Twitter handle. 1. Log into your Buddy Media channel with the admin account credentials provided to you. 2. Click on your name in the upper right corner of the suite and select Profiles from the drop
down. 3. Click Authorize to the right of the handle you want to enable.
7
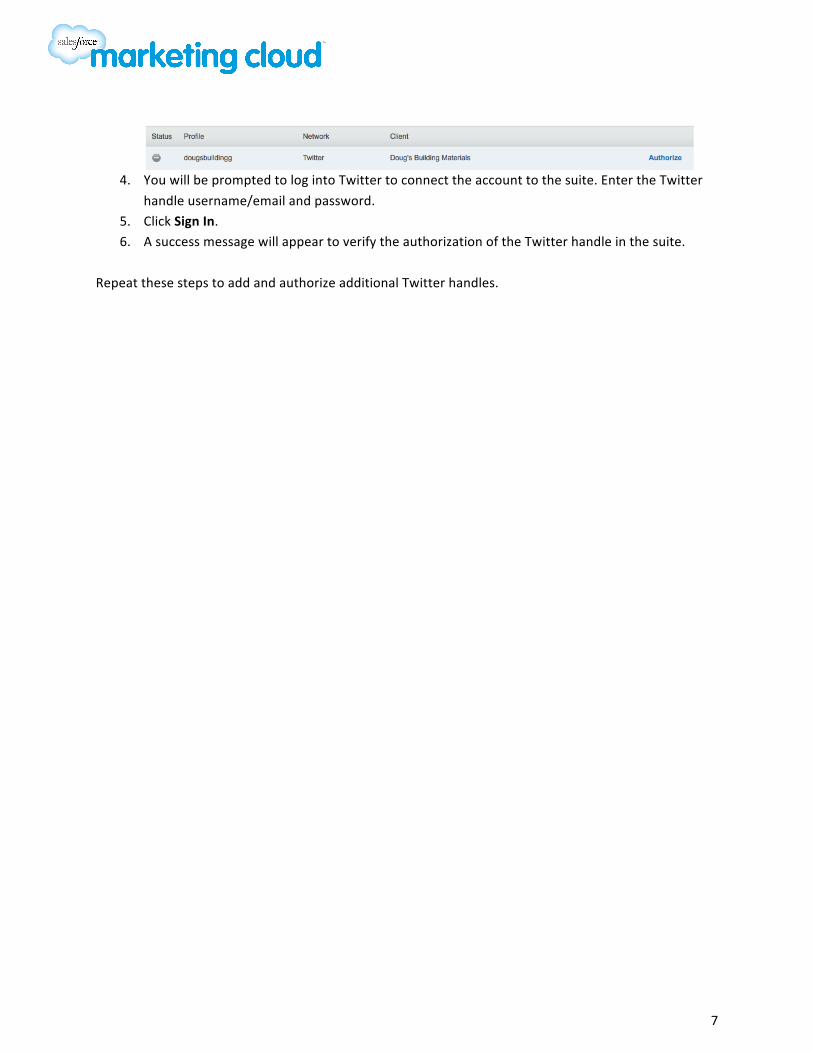
4. You will be prompted to log into Twitter to connect the account to the suite. Enter the Twitter
handle username/email and password. 5. Click Sign In. 6. A success message will appear to verify the authorization of the Twitter handle in the suite.
Repeat these steps to add and authorize additional Twitter handles.
8
ConversationBuddy: Enable a Google+ Page Publish and moderate posts and comments through ConversationBuddy by setting up your Google+ Page within the social marketing suite. Once added, you must authorize the page before ConversationBuddy can post or pull in data. It’s important to note that an individual Google+ page can only be added to a single channel/client, it cannot exist in multiple places. Required permission level: Client Admin to add a page to a client, any client user who has the login credentials to the Google+ account can authorize the profile. Actions:
• Add and authorize a Google+ Page to a client. After set-‐up: Once a Google+ page has been added to the suite it cannot be moved to another client or deleted. You cannot edit the way the page name appears in the suite, it is pulled directly from Google+.
Instructions: Add and authorize a Google+ Page under a client:
1. Log into your Buddy Media channel with the admin account credentials provided to you. 2. Click on your name in the upper right corner of the suite and select Profiles from the drop
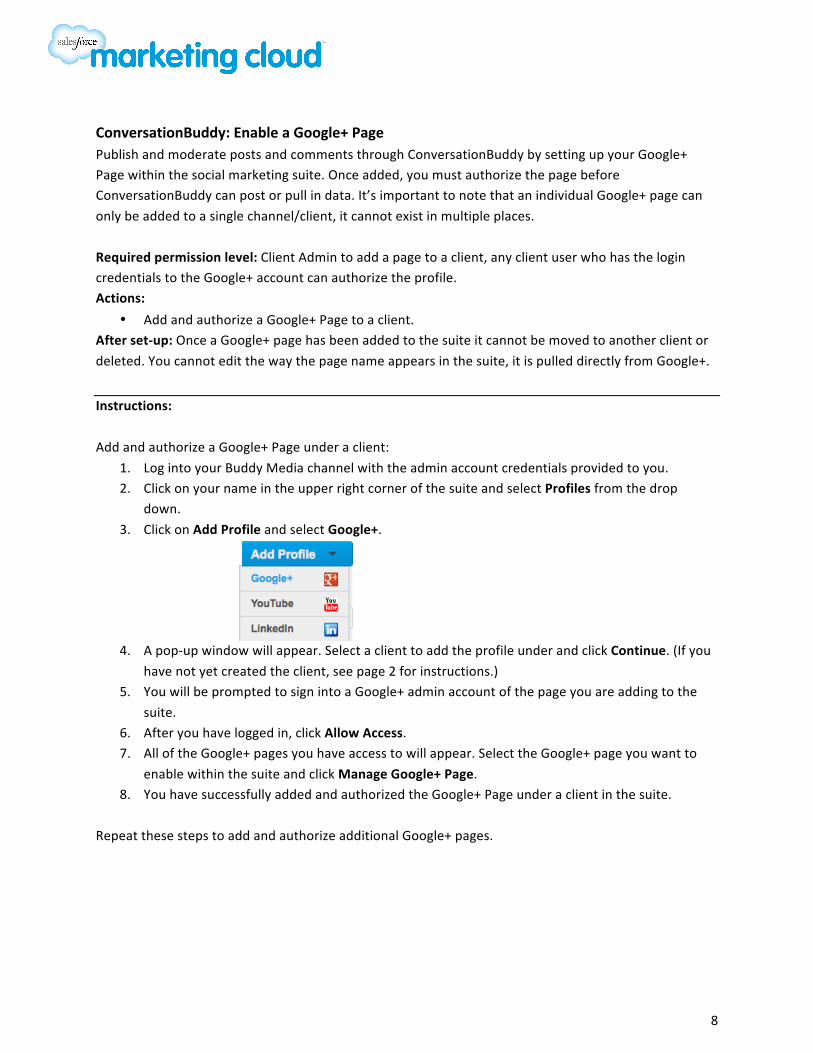
down. 3. Click on Add Profile and select Google+.
4. A pop-‐up window will appear. Select a client to add the profile under and click Continue. (If you
have not yet created the client, see page 2 for instructions.) 5. You will be prompted to sign into a Google+ admin account of the page you are adding to the
suite. 6. After you have logged in, click Allow Access. 7. All of the Google+ pages you have access to will appear. Select the Google+ page you want to
enable within the suite and click Manage Google+ Page. 8. You have successfully added and authorized the Google+ Page under a client in the suite.
Repeat these steps to add and authorize additional Google+ pages.

9
ConversationBuddy: Enable a LinkedIn Company Page
Author and publish posts through ConversationBuddy by setting up your LinkedIn company page within the social marketing suite. Once added, you must authorize the page before ConversationBuddy can post data. It’s important to note that an individual LinkedIn company page can only be added to a single channel/client, it cannot exist in multiple places. Required permission level: Client Admin to add a company page to a client, any client user who has the login credentials to the LinkedIn account can authorize the profile. Actions:
• Add and authorize a LinkedIn company page to a client. After set-‐up: Once a LinkedIn company page has been added to the suite it cannot be moved to another client or deleted. You cannot edit the way the page name appears in the suite, it is pulled directly from LinkedIn.
Instructions: Add and authorize a LinkedIn company page under a client:
1. Log into your Buddy Media channel with the admin account credentials provided to you. 2. Click on your name in the upper right corner of the suite and select Profiles from the drop
down. 3. Click on Add Profile and select LinkedIn.
4. A pop-‐up window will appear. Select a client to add the profile under and click Continue. (If you
have not yet created the client, see page 2 for instructions.) 5. You will be prompted to sign into an admin account of the LinkedIn company page you are
adding to the suite. 6. After you have logged in, click Allow Access. 7. All of the LinkedIn company pages you have access to will appear. Select the LinkedIn company
page you want to enable within the suite. 8. You have successfully added and authorized the LinkedIn company page under a client in the
suite. Repeat these steps to add and authorize additional LinkedIn Company Pages.

10
ProfileBuddy: Set Up an Application Tab on a Facebook Page
To create a Facebook application tab to manage with ProfileBuddy, first create a Facebook application and then provision the tab in the suite using two pieces of application info: application ID and application secret. Required permission level: Channel admin. Must also be a Facebook Verified Developer to create an application on Facebook. (For more info on becoming a verified developer, go to https://developers.facebook.com/) Actions:
• Set up a Facebook application. • Create a ProfileBuddy category. • Connect the Facebook Application to the ProfileBuddy category and page. • Launch the tab on Facebook.
After set-‐up: The Facebook application can be moved into or out of sandbox mode at any time in the application settings on Facebook. A category can be renamed but you cannot change whether it is managed or unmanaged once created. After an application is added to a category it cannot be removed, but you can add multiple applications to a single category. Once a tab is added to a Facebook Page within the suite it cannot be removed. Part 1: Set up a Facebook application:
1. Log into Facebook in a browser window and open https://developers.facebook.com/apps.
2. Click +Create New App in the upper right. 3. Enter the App Name. (This should be the name of your tab and will display on Facebook when
users share content from the tab. You should also set a different name for each application you create. Example: Winter Sweepstakes)
4. Enter the App Namespace. (This should be the same as the App Name, written in lowercase with an underscore in between. [All numbers should be spelled out.] Example: winter_sweepstakes)
5. Click Continue. 6. Fill out the captcha code for the Security Check and click Submit to generate the form. 7. Enter your email address in the Contact Email field. 8. Enter buddymedia.com in the APP Domains field.
9. To keep the tab hidden from your Facebook fans until you are ready to launch, select Enabled
next to Sandbox Mode. (Disable it to launch the tab and make it visible to all fans.)

11
10. Select the check mark to the left of Website with Facebook Login. 11. Enter http://www.buddymedia.com into the Site URL field.
12. Select the check mark to the left of App on Facebook. 13. For Canvas URL enter http://channel.buddymedia.com/fanpage/ 14. For Secure Canvas URL, enter https://channel.buddymedia.com/fanpage/ 15. Set Canvas Width to Fluid.
16. Select the check mark to the left of Page Tab. 17. Enter the Page Tab Name. (This can be the same as the App Name from step 3.) 18. For Page Tab URL, enter http://tabs.buddymedia.com/?id=app ID, located
at the top of the same page
19. For Secure Page Tab URL, enter https://tabs.buddymedia.com/?id=app
ID, from the top of the same page
20. Click Save Changes. 21. Select Roles from the navigation on the left to add additional developers to this app. (The user
creating the app is automatically added as a developer.) 22. Select Add next to Developers and enter the developer name or email in the modal window that
opens. 23. Now that you have set up the application on Facebook, you can then locate the two pieces of
information necessary to identify your app to Buddy Media: the App ID and App Secret. These are listed at the top of the Settings: Basic page. Identify this info and keep it open – you can now take this information to create a category (see pg. 13).
12
Part 2: Create a ProfileBuddy category: A category connects a Facebook application to the Buddy Media suite. The uniquely generated application ID and application secret that have been generated via the application are both added to the category to allow the application to be managed within ProfileBuddy. Determining the type of category you need is the first and most important step. There are three ways to set up categories:
Blank Category: To build and launch a tab that will only be used on one page or tab version, you should choose an Unmanaged Category and leave it blank. Managed Category: To build and launch a category that acts as a template to roll out to multiple pages or tab versions, create a Managed Category. The category will act as a template so that your application tabs have the same look and feel across multiple Facebook Pages. Managed categories are controlled by the channel admin. Channel admins define which sapplets populate tabs, as well as the positioning of those sapplets within the layout. Content within each sapplet can be ‘seeded’ by channel admins. These users have the option of locking seeded content (channel-‐controlled content) or allowing client-‐users to change/update the content (client-‐controlled content) within each sapplet. Unmanaged Category: To build and launch a category that acts as a template, but that can be changed or modified at a tab version level, create an Unmanaged Category. Unmanaged categories are controlled by the client user. Channel admins can suggest which sapplets should be included within the tab, but ultimately client users have the choice of which sapplets to implement, where those sapplets reside within the layout, and what content is used within each sapplet.
After choosing a category type from the list above, follow the instructions below for the type you’ve selected.
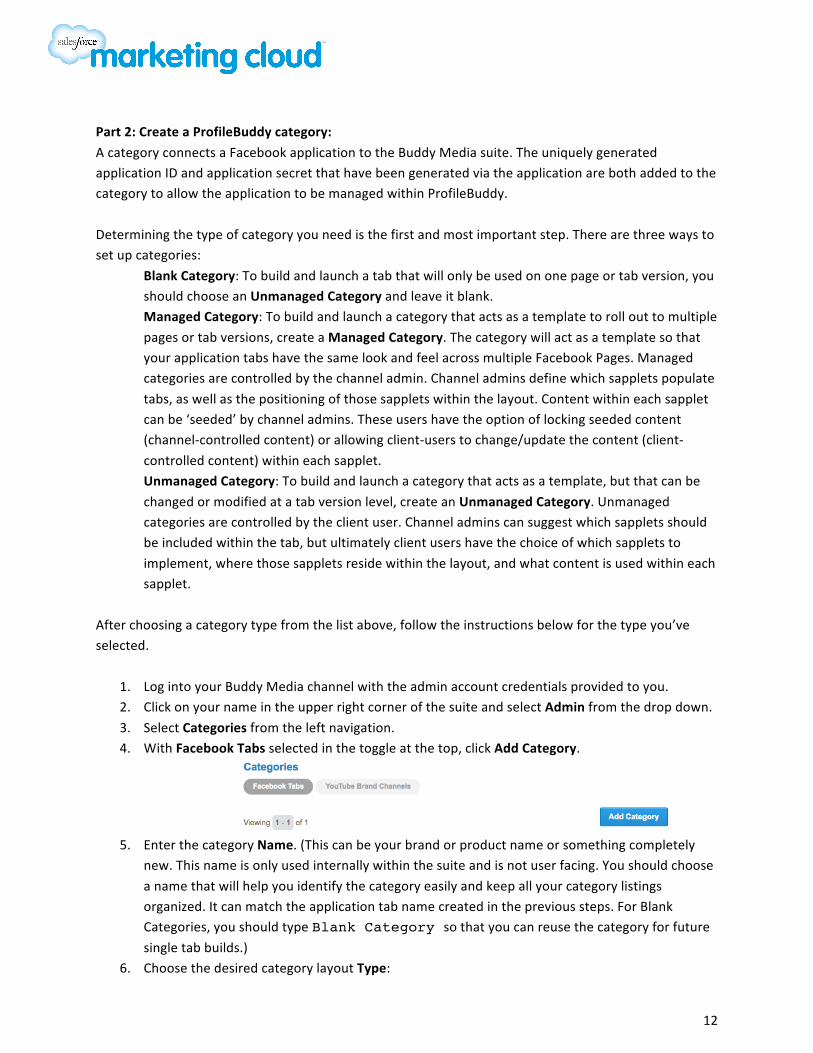
1. Log into your Buddy Media channel with the admin account credentials provided to you. 2. Click on your name in the upper right corner of the suite and select Admin from the drop down. 3. Select Categories from the left navigation. 4. With Facebook Tabs selected in the toggle at the top, click Add Category.
5. Enter the category Name. (This can be your brand or product name or something completely
new. This name is only used internally within the suite and is not user facing. You should choose a name that will help you identify the category easily and keep all your category listings organized. It can match the application tab name created in the previous steps. For Blank Categories, you should type Blank Category so that you can reuse the category for future single tab builds.)
6. Choose the desired category layout Type:

13
a. For Managed Categories, select Managed.
b. For Unmanaged Categories or Blank Categories, select Unmanaged.
7. If you’ve selected an Unmanaged Category, you can choose to Add Managed Header or Add
Managed Footer. These options reserve areas at the top and/or bottom of the layout for channel admins to control sapplets and content.
8. Keep Network set to Facebook. 9. Click Add a New Application to this Category. 10. Enter the App ID and App Secret that were generated after setting up the Facebook application.
11. Click Save. 12. In order to add a category/tab to a page, the category first needs to be published. Now that the
category has been created, you will be defaulted to the Content area of the category. Click Publish in the upper right hand corner to publish the category.
a. If you’ve chosen to create a Blank Category, you can publish the category as soon as it has been created. You should then add the category to a tab and control all content and sapplets from within the tab version in ProfileBuddy.
b. If you’ve chosen to create a Managed Category, you can publish the category as soon as it has been created. Any additional changes you make in the category prior to launch will need to be published. It’s important to note that if you have any client controlled sapplet content, any changes to the seed content will not be reflected once the tab has been added to a page.
c. If you’ve chosen to create an Unmanaged Category, the category should be published after the template has been built within the category and no further changes are needed before rolling out to the tab versions.
To add an application to an existing category, follow these steps:
1. Log into your Buddy Media channel with the admin account credentials provided to you. 2. Click on your name in the upper right corner of the suite and select Admin from the drop down. 3. Select Categories from the left navigation. 4. Click on the category name from the list of existing categories. 5. Once the category edit page loads, click Settings from the left column.

14
6. Click Add a New Application to this Category. 7. Enter the App ID and App Secret that were generated after setting up the Facebook application.
8. Click Save.
Part 3: Connect the Facebook Application to the ProfileBuddy category and page. After a category has been created and published, you can create a ProfileBuddy tab on a Facebook page and connect the category and app:
1. Log into your Buddy Media channel with the admin account credentials provided to you. 2. Click on your name in the upper right corner of the suite and select Admin from the drop down. 3. In the left navigation, click on Clients. 4. Locate the client where the profile you want to add a tab to is located and click Edit. 5. Scroll down to the Provisioning section at the bottom of the client edit page and click Add Tab
next to the Facebook Page you want to add the tab to. 6. Use the drop down under Category/Tab to locate the category you created and the app you
added to that category. 7. Select the Facebook Page to add the application tab to and click Save. 8. Upon selecting a category/tab, you will be defaulted back in the Provisioning section of the
client’s edit page. Click Setup next to the tab name to add the application tab to your Facebook Page.
9. Follow the prompts and instructions within the suite to set up your application tab. The Facebook Page URL will be verified.
10. Click the Add Tab button to complete the process.
11. Click Choose Facebook Pages to open a drop down of all available Pages and select the Page that you want to add the tab to.
12. Click Add Page Tab.

15
13. Once confirmed, you’ll be directed to the layout section of ProfileBuddy to begin making updates to your new tab.
Part 4: Launch the tab on Facebook:
1. After you have built out your sapplets and content within ProfileBuddy, publish all changes live by clicking the Publish button within ProfileBuddy.
2. Log into Facebook in a browser window and open https://developers.facebook.com/apps
3. Select your application from the left rail. 4. Click Edit App from the upper right. 5. Under Basic Info set Sandbox Mode to Disabled.
6. Click Save Changes. 7. The tab is now live on Facebook.
16
ProfileBuddy: Set up a YouTube video channel
Manage YouTube channel videos and playlists through ProfileBuddy by setting up your channel as a profile within the social marketing suite. It’s important to note that an individual YouTube channel can only be added to a single channel/client, it cannot exist in multiple places. Required permission level: Channel admin. Must also have the login credentials to the YouTube account that initially created the channel. Actions:
• Add and authorize a YouTube video channel. After set-‐up: Once a YouTube channel has been added to the suite it cannot be moved to another client or deleted. You cannot edit the way the channel name appears in the suite, it is pulled directly from YouTube. Instructions: Add and authorize a YouTube video channel:
1. Log into your Buddy Media channel with the admin account credentials provided to you. 2. Click on your name in the upper right corner of the suite and select Profiles from the drop
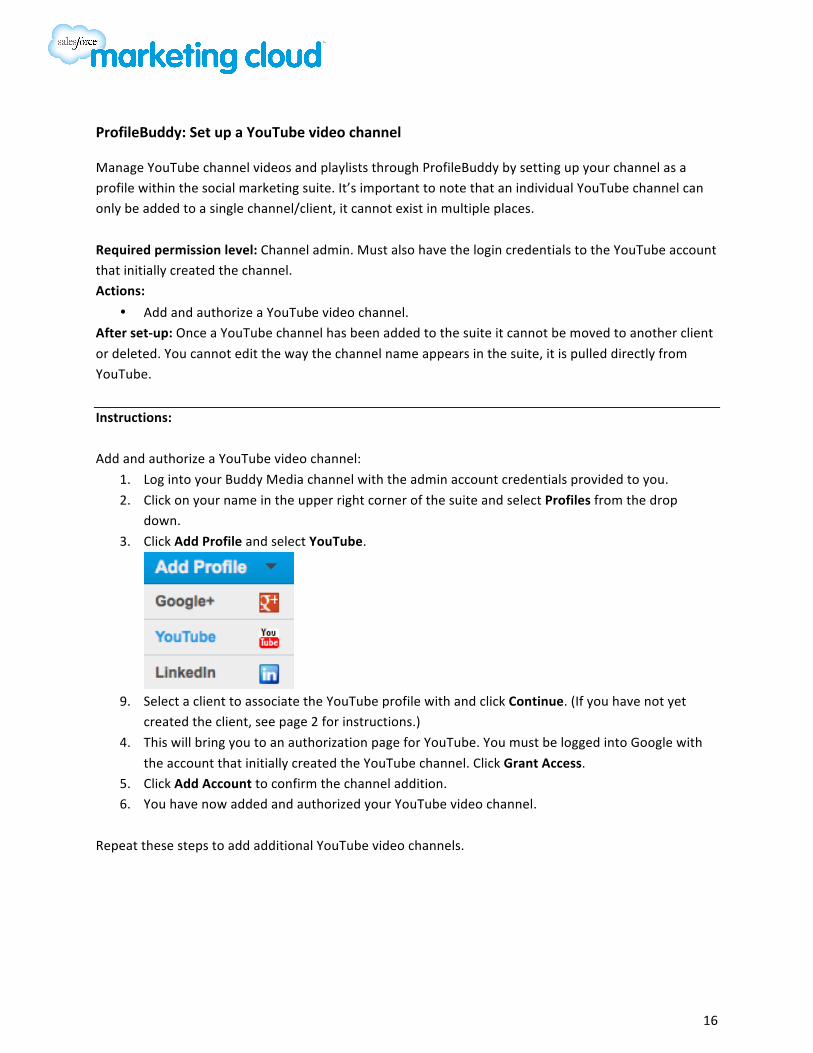
down. 3. Click Add Profile and select YouTube.
9. Select a client to associate the YouTube profile with and click Continue. (If you have not yet
created the client, see page 2 for instructions.) 4. This will bring you to an authorization page for YouTube. You must be logged into Google with
the account that initially created the YouTube channel. Click Grant Access. 5. Click Add Account to confirm the channel addition. 6. You have now added and authorized your YouTube video channel.
Repeat these steps to add additional YouTube video channels.
17
ProfileBuddy: Set up a YouTube brand channel Manage the content found on the custom tab of a YouTube channel by setting up your brand channel in the social marketing suite. To follow the below steps, you will need to have previously set up your YouTube video channel in the suite (see pg. 15). Required permission level: Channel admin. Actions:
• Provision a custom tab for your YouTube brand channel. After set-‐up: A category can be renamed but you cannot change whether it is managed or unmanaged once created. Once a tab is added to a YouTube channel within the suite it cannot be removed.
Instructions: Provision a custom tab for your YouTube brand channel.
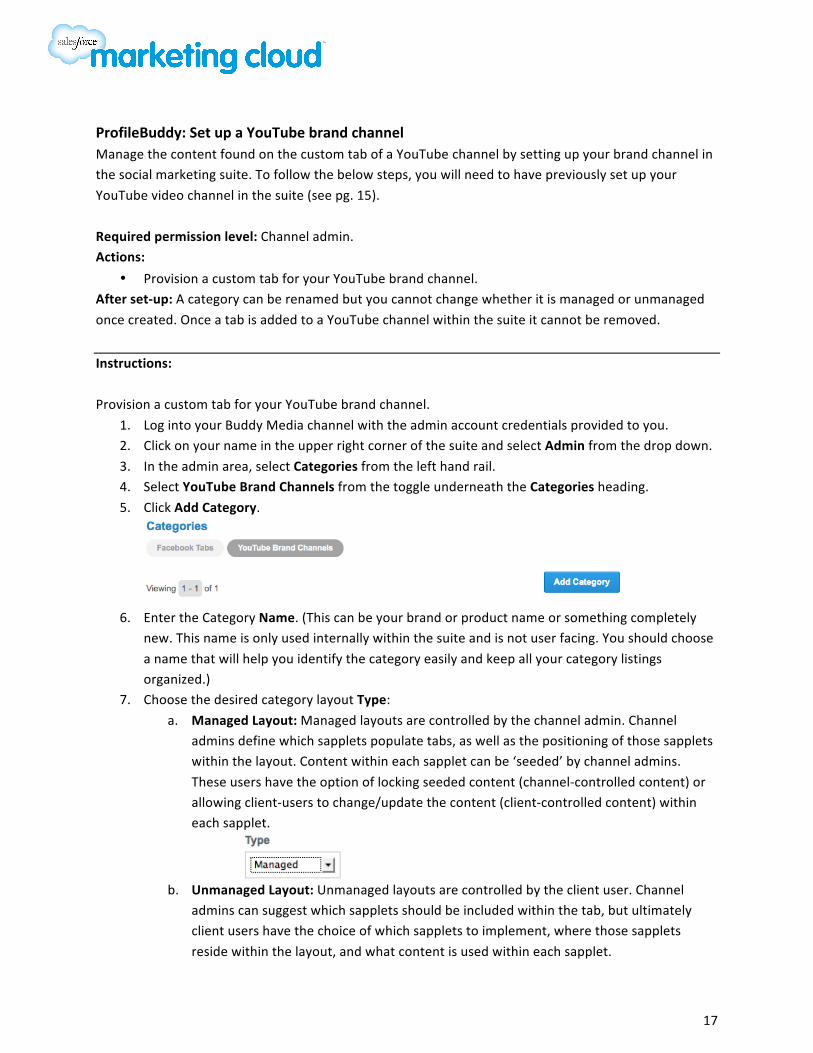
1. Log into your Buddy Media channel with the admin account credentials provided to you. 2. Click on your name in the upper right corner of the suite and select Admin from the drop down. 3. In the admin area, select Categories from the left hand rail. 4. Select YouTube Brand Channels from the toggle underneath the Categories heading. 5. Click Add Category.
6. Enter the Category Name. (This can be your brand or product name or something completely
new. This name is only used internally within the suite and is not user facing. You should choose a name that will help you identify the category easily and keep all your category listings organized.)
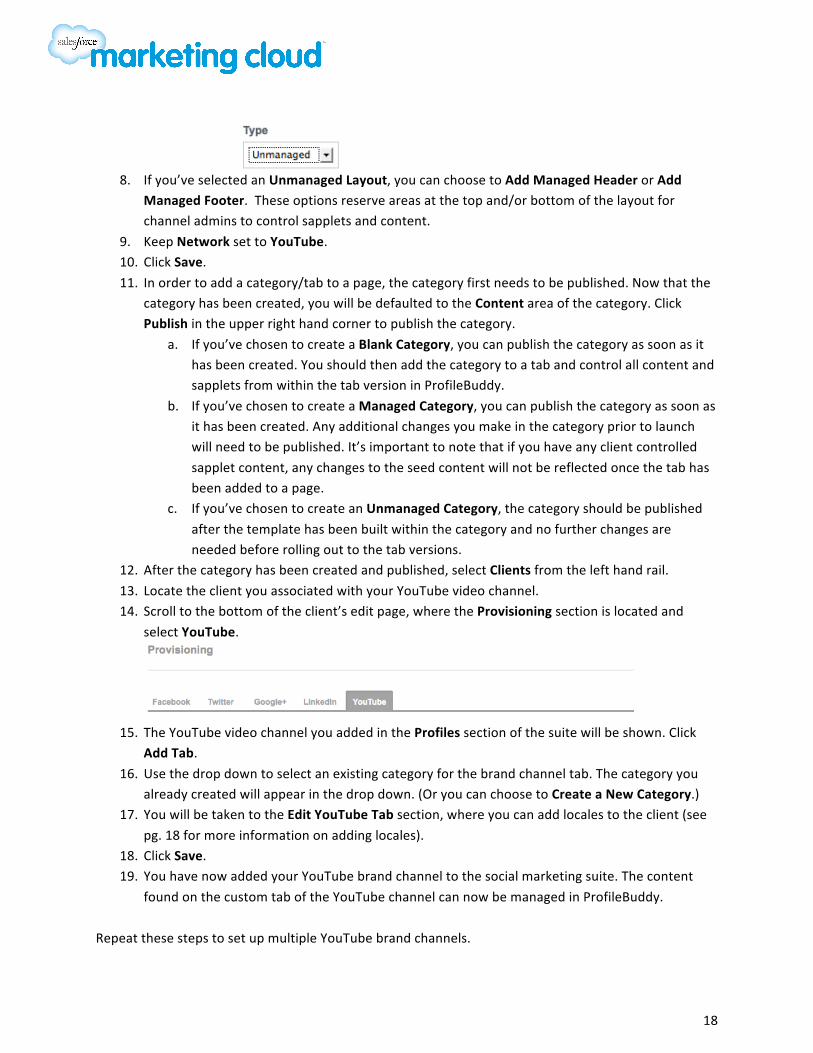
7. Choose the desired category layout Type: a. Managed Layout: Managed layouts are controlled by the channel admin. Channel
admins define which sapplets populate tabs, as well as the positioning of those sapplets within the layout. Content within each sapplet can be ‘seeded’ by channel admins. These users have the option of locking seeded content (channel-‐controlled content) or allowing client-‐users to change/update the content (client-‐controlled content) within each sapplet.
b. Unmanaged Layout: Unmanaged layouts are controlled by the client user. Channel
admins can suggest which sapplets should be included within the tab, but ultimately client users have the choice of which sapplets to implement, where those sapplets reside within the layout, and what content is used within each sapplet.
18
8. If you’ve selected an Unmanaged Layout, you can choose to Add Managed Header or Add
Managed Footer. These options reserve areas at the top and/or bottom of the layout for channel admins to control sapplets and content.
9. Keep Network set to YouTube. 10. Click Save. 11. In order to add a category/tab to a page, the category first needs to be published. Now that the
category has been created, you will be defaulted to the Content area of the category. Click Publish in the upper right hand corner to publish the category.
a. If you’ve chosen to create a Blank Category, you can publish the category as soon as it has been created. You should then add the category to a tab and control all content and sapplets from within the tab version in ProfileBuddy.
b. If you’ve chosen to create a Managed Category, you can publish the category as soon as it has been created. Any additional changes you make in the category prior to launch will need to be published. It’s important to note that if you have any client controlled sapplet content, any changes to the seed content will not be reflected once the tab has been added to a page.
c. If you’ve chosen to create an Unmanaged Category, the category should be published after the template has been built within the category and no further changes are needed before rolling out to the tab versions.
12. After the category has been created and published, select Clients from the left hand rail. 13. Locate the client you associated with your YouTube video channel. 14. Scroll to the bottom of the client’s edit page, where the Provisioning section is located and
select YouTube.
15. The YouTube video channel you added in the Profiles section of the suite will be shown. Click
Add Tab. 16. Use the drop down to select an existing category for the brand channel tab. The category you
already created will appear in the drop down. (Or you can choose to Create a New Category.) 17. You will be taken to the Edit YouTube Tab section, where you can add locales to the client (see
pg. 18 for more information on adding locales). 18. Click Save. 19. You have now added your YouTube brand channel to the social marketing suite. The content
found on the custom tab of the YouTube channel can now be managed in ProfileBuddy. Repeat these steps to set up multiple YouTube brand channels.
19
ProfileBuddy: Add additional locales to a tab
Locales can be updated within a Facebook and YouTube tab to set up tab versions, which allow you to target specific audiences. With ProfileBuddy, users not only have the ability to manage their custom tab at the global level but also at a more localized level through the use of tab versions. Through the creation of tab versions, the content of your tab can be targeted to specific Facebook and YouTube audiences based on location (country) and language. For a Facebook tab, location is determined by a Facebook user’s IP address (where they log into Facebook from) and language is determined by the primary language chosen within their Facebook account settings. For a YouTube tab, location is determined by IP address and language is determined by the language set in the user’s Internet browser. By updating locales and creating tab versions, users visiting your custom tab will be served up the content created for that specific tab version.
Required permission level: Channel admin. Actions:
• Add additional locales to a tab. After set-‐up: A locale can be disabled or deleted, but if deleted all data will be lost. Locales can not be renamed, the reflect the country and language settings on Facebook. The default tab version can be changed at any time by Channel Admins. Instructions: Add locales to a tab.
1. Log into your Buddy Media channel with the admin account credentials provided to you. 2. Click on your name in the upper right corner of the suite and select Admin from the drop down. 3. In the left navigation, click on Clients. 4. Locate the client where the Facebook or YouTube profile resides within and click Edit. 5. Scroll down to the Provisioning section.
a. To update locales for a Facebook tab, locate the Facebook Page and click on the tab name.
b. To update locales for a YouTube tab, select the YouTube portion of the Provisioning section, locate the YouTube brand channel and click on Edit Tab.
6. Scroll down to the Locales section. 7. Add a locale by selecting a country and language from their respective drop downs.
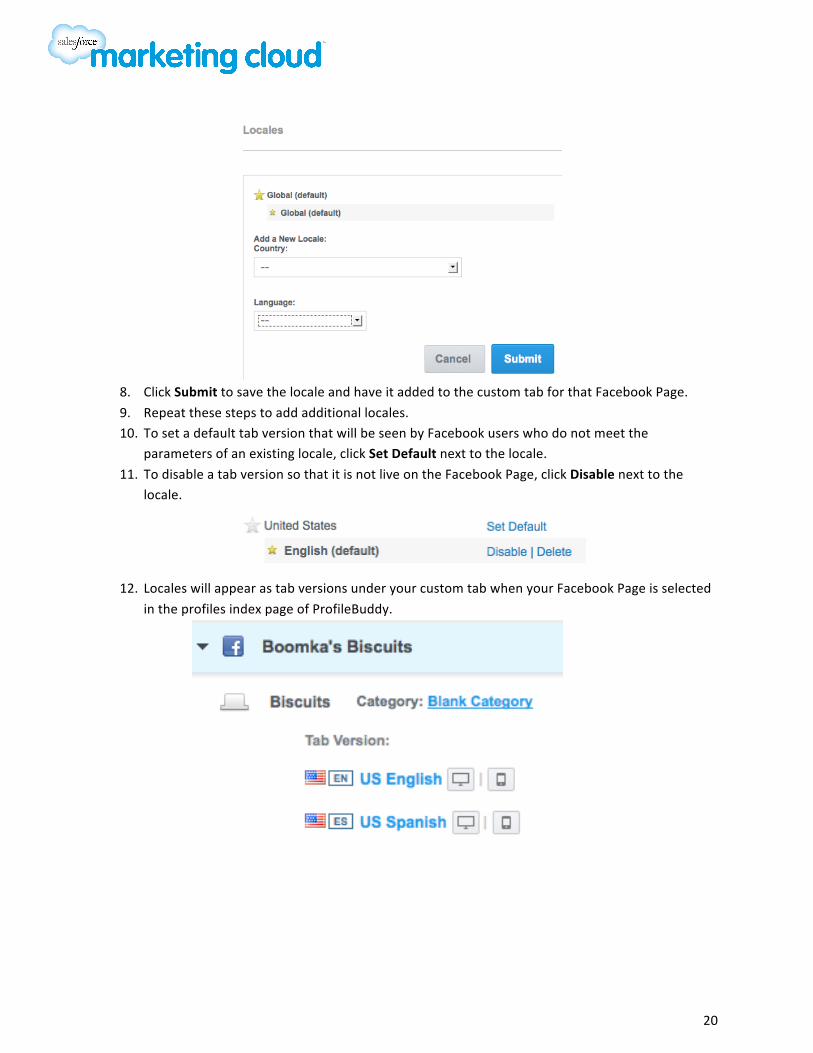
20
8. Click Submit to save the locale and have it added to the custom tab for that Facebook Page. 9. Repeat these steps to add additional locales. 10. To set a default tab version that will be seen by Facebook users who do not meet the
parameters of an existing locale, click Set Default next to the locale. 11. To disable a tab version so that it is not live on the Facebook Page, click Disable next to the
locale.
12. Locales will appear as tab versions under your custom tab when your Facebook Page is selected
in the profiles index page of ProfileBuddy.

21
Create users and set permissions
One of the key features of using the Buddy Media social marketing suite is the ability to create granular permissions that do not exist natively within social networks. Robust options are available for permissions across the suite, so we recommend creating user groups and setting permission levels for each group to reflect the types of user roles within your organization. This allows you to quickly add new users to a group to grant them the correct level of suite access that is appropriate to their role and responsibilities. It is recommended that you finish creating clients within the channel and adding all social profiles before adding users, to ensure that you can set the correct user permissions for each suite user. Basic permission settings include:
Read: The ability to view all content and analytics. Edit Content: The ability to edit or add content or posts that are submitted for review. Schedule & Publish: The ability to publish and/or schedule content.
Required permission level: Channel admin. Actions:
• Create a permissions group. • Create new user accounts. • Add new user accounts into permission group(s). • Repeat steps as needed to enable accounts for all users within your team.
After set-‐up: Permission group names and settings can be changed at any time by Channel Admins. All user information can be changed at any time by the user or a Channel Admin. Passwords can be changed by users or reset by Channel Admins (link to reset will be emailed to user). Individual user permissions can be changed by Channel Admins. Group permissions can be changed at any time and users can be added or removed from a group at any time. Instructions: Create a permissions group:
1. Log into your Buddy Media channel with the admin account credentials provided to you. 2. Click on your name in the upper right corner of the suite and select Admin from the drop down. 3. In the admin section, click on Groups from the left hand rail.
i. 4. Within Groups, click Add Group. 5. Input a Group Name. (A specific name that describes the permissions within the group or the
role type will help keep your permission group names organized and easy to use.)

22
6. Permissions can be applied broadly at the channel level (directly beneath Group Name) with the ability to dive deeper and more granular at the client level, profile level and tab version level. To apply permissions more granularly, scroll to the bottom of the Groups section, select a client and continue moving through the hierarchy of your channel.
7. Whether you’ve chosen a broad or more granular scope, you can begin selecting permission levels that will be applied to the group for that specific scope. Permission dialog fields will expand or will remain restricted from selection based on permission levels previously selected.
8. Click Save. 9. Repeat steps to create additional user groups.
Create new user accounts:
1. Log into your Buddy Media channel with the admin account credentials provided to you. 2. Click on your name in the upper right corner of the suite and select Admin from the drop down. 3. Select Users from the left hand rail. 4. Scroll to the bottom of the page and click Add User. 5. Enter the new user’s First Name, Last Name and Email. 6. Optionally, enter the new user’s Phone, Title, Organization and Time Zone. 7. Click Save. 8. The User Group permissions tree will display. You can set individual permissions for the user
here, or you can toggle to the Groups tab and enter a permissions group name in the Add a Group search box.
NOTE: To add another user as a Channel Admin (someone with FULL permission within the suite that can access the Admin section to add users, profiles, permissions, etc.), you must add the user to the “Channel Admin” user group, which is already configured within each channel.

23
9. Once you have set individual or group permissions, toggle back to the User Group settings, scroll to the bottom of the page, and click Save.
10. You will land on the user overview page. Click Send Welcome Email. An email will be sent to the user’s email with instructions on how to activate their account and set a password. Users must click on the link in the email within 72 hours to activate their account.
To change a user’s permissions or user groups at a later date:
1. Log into your Buddy Media channel with the admin account credentials provided to you. 2. Click on your name in the upper right corner of the suite and select Admin from the drop down. 3. Select Users from the left hand rail. 4. Locate a user to place into the group: scroll through the list of users or use the search box. 5. Click Edit to the right of the user’s name. 6. Scroll to the bottom of the page to find the user’s Access & Permissions section and select
Groups.
7. Click Edit next to any of their existing groups to edit the permissions of that group. Note:
changing the settings in a group will change them for all suite users within that group. 8. To add the user to an additional group, start typing the name of the group in the Add a Group
search field and select the group from the list that appears. 9. Click Save to finalize permission group changes. NOTE: If a user is currently logged in while their
own permissions are being changed the new permissions will be reflected the next time they log in.