user administration : virtual desktop service
TRANSCRIPT

User Administration
Virtual Desktop ServiceNetAppMarch 15, 2022
This PDF was generated from https://docs.netapp.com/us-en/virtual-desktop-service/Management.User_Administration.manage_user_accounts.html on March 15, 2022. Alwayscheck docs.netapp.com for the latest.

Table of Contents
User Administration . . . . . . . . . . . . . . . . . . . . . . . . . . . . . . . . . . . . . . . . . . . . . . . . . . . . . . . . . . . . . . . . . . . . . . . 1
Managing User Accounts . . . . . . . . . . . . . . . . . . . . . . . . . . . . . . . . . . . . . . . . . . . . . . . . . . . . . . . . . . . . . . . . . 1
Managing Data Permissions . . . . . . . . . . . . . . . . . . . . . . . . . . . . . . . . . . . . . . . . . . . . . . . . . . . . . . . . . . . . . . 3
Application Entitlement. . . . . . . . . . . . . . . . . . . . . . . . . . . . . . . . . . . . . . . . . . . . . . . . . . . . . . . . . . . . . . . . . . . 6
Reset User Password . . . . . . . . . . . . . . . . . . . . . . . . . . . . . . . . . . . . . . . . . . . . . . . . . . . . . . . . . . . . . . . . . . . 9
Multi-Factor Authentication (MFA) . . . . . . . . . . . . . . . . . . . . . . . . . . . . . . . . . . . . . . . . . . . . . . . . . . . . . . . . . 23

User Administration
Managing User Accounts
Create New User(s)
Admins can add Users by clicking Workspaces > Users and Groups > Add/import
Users can be added individually or with a bulk import.
Including accurate email and mobile phone # at this stage greatly improves the process ofenabling MFA later.
Once you have created Users, you can click on their name to see details like when they were created, theirconnection status (whether they’re currently logged in or not) and what their specific settings are.
Activating the Virtual Desktop for existing AD users
If users are already present in AD, you can simple activate the users' Virtual Desktop by clicking on the gearnext to their name and then enabling their desktop.
For Azure AD Domain Service only: In order for logins to work, the password hash for Azure ADusers must be synced to support NTLM and Kerberos authentication. The easiest way toaccomplish this task is to change the user password in Office.com or the Azure portal, which willforce the password hash sync to occur. The sync cycle for Domain Service servers can take upto 20 minutes so changes to passwords in Azure AD typically take 20 minutes to be reflected inAADDS and thus in the VDS environment.
Delete user account(s)
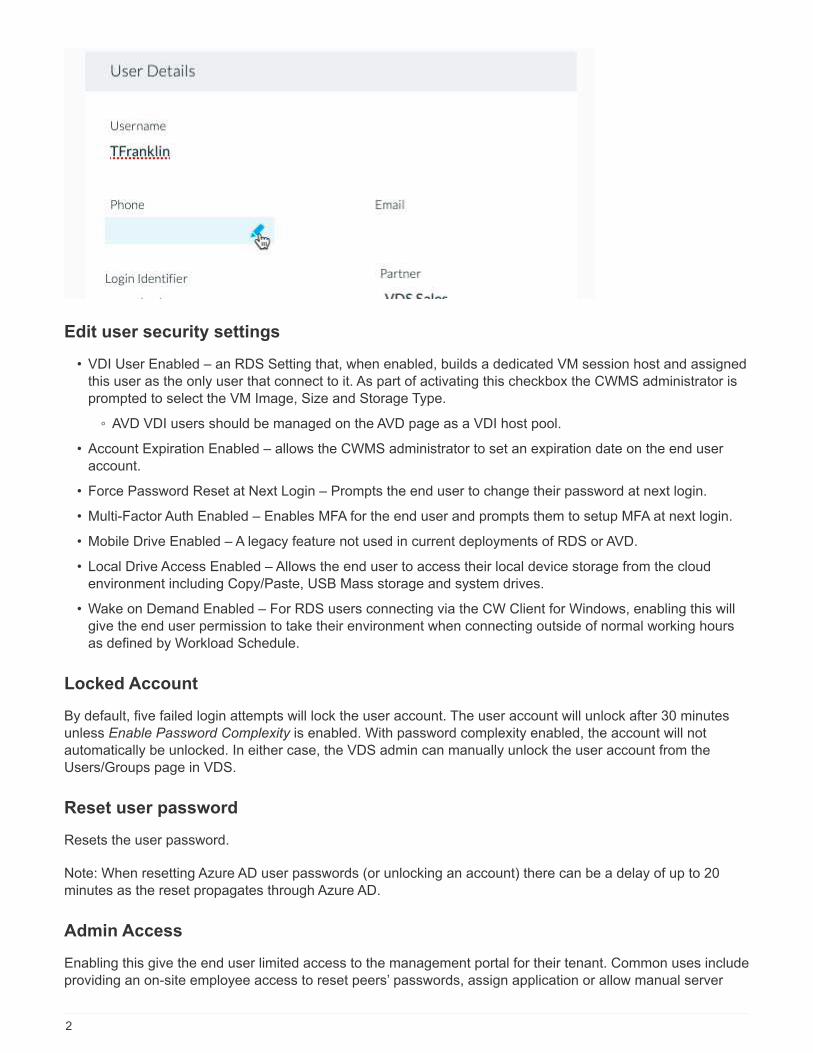
Edit user info
On the user detail page changes can be made the the user details such as username and contact details. Theemail and phone values are used for the Self Service Password Reset (SSPR) process.
1
Edit user security settings
• VDI User Enabled – an RDS Setting that, when enabled, builds a dedicated VM session host and assignedthis user as the only user that connect to it. As part of activating this checkbox the CWMS administrator isprompted to select the VM Image, Size and Storage Type.
◦ AVD VDI users should be managed on the AVD page as a VDI host pool.
• Account Expiration Enabled – allows the CWMS administrator to set an expiration date on the end useraccount.
• Force Password Reset at Next Login – Prompts the end user to change their password at next login.
• Multi-Factor Auth Enabled – Enables MFA for the end user and prompts them to setup MFA at next login.
• Mobile Drive Enabled – A legacy feature not used in current deployments of RDS or AVD.
• Local Drive Access Enabled – Allows the end user to access their local device storage from the cloudenvironment including Copy/Paste, USB Mass storage and system drives.
• Wake on Demand Enabled – For RDS users connecting via the CW Client for Windows, enabling this willgive the end user permission to take their environment when connecting outside of normal working hoursas defined by Workload Schedule.
Locked Account
By default, five failed login attempts will lock the user account. The user account will unlock after 30 minutesunless Enable Password Complexity is enabled. With password complexity enabled, the account will notautomatically be unlocked. In either case, the VDS admin can manually unlock the user account from theUsers/Groups page in VDS.
Reset user password
Resets the user password.
Note: When resetting Azure AD user passwords (or unlocking an account) there can be a delay of up to 20minutes as the reset propagates through Azure AD.
Admin Access
Enabling this give the end user limited access to the management portal for their tenant. Common uses includeproviding an on-site employee access to reset peers’ passwords, assign application or allow manual server
2
wakeup access. Permissions controlling what areas of the console can be seen is set here as well.
Logoff user(s)
Logged on users can be logged off by the VDS admin from the Users/Groups page in VDS.
Applications
Displays the application deployed in this workspace. The check box provisions the apps to this specific user.Complete Application Management documentation can be found here. Access to applications can also begranted from the App interface or to Security Groups.
View/kill user processes
Displays the processes currently running in that user’s session. Processes can be ended from this interface aswell.
Managing Data Permissions
End user perspective
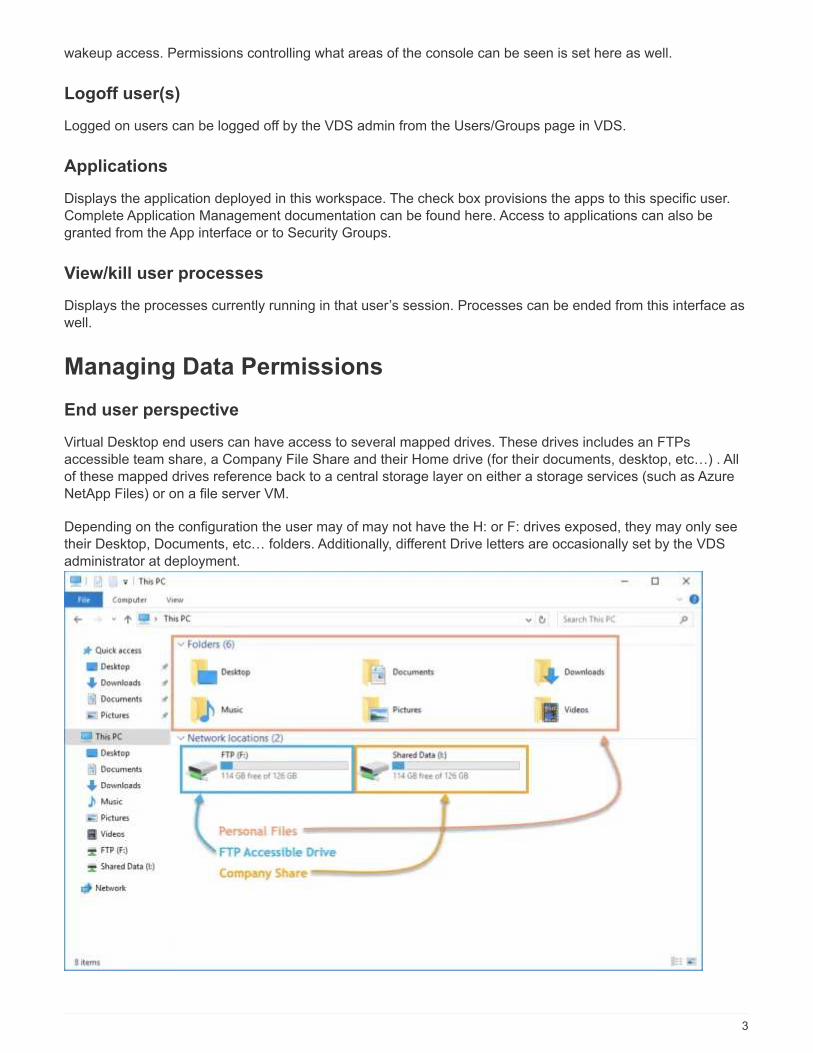
Virtual Desktop end users can have access to several mapped drives. These drives includes an FTPsaccessible team share, a Company File Share and their Home drive (for their documents, desktop, etc…) . Allof these mapped drives reference back to a central storage layer on either a storage services (such as AzureNetApp Files) or on a file server VM.
Depending on the configuration the user may of may not have the H: or F: drives exposed, they may only seetheir Desktop, Documents, etc… folders. Additionally, different Drive letters are occasionally set by the VDSadministrator at deployment.
3

Managing permissions
VDS allows admins to edit security groups and folder permissions, all from within the VDS portal.
Security groups
Security groups are managed by clicking: Workspaces > Tenant Name > Users & Groups > under the GroupsSection
In this section you can:
1. Create new security groups
2. Add/Remove users to the groups
3. Assign applications to groups
4. Enable/Disable Local Drive access to groups
4

Folder permissions
Folder Permissions are managed by clicking: Workspaces > Tenant Name > Manage (in the Folders section).
In this section you can:
1. Add/Delete Folders
2. Assign permissions to user or groups
3. Customize permissions to Read Only, Full Control & None
5
Application Entitlement
Overview
VDS has a robust application automation and entitlement functionality built-in. This functionality allows users tohave access to different applications while connecting to the same session host(s). This is accomplished bysome custom GPOs hiding shortcuts along with automation selectively placing shortcuts on the users’desktops.
This workflow only applies to RDS deployments. For AVD application entitlementdocumentation, please see Application Entitlement Workflow for AVD
Applications can be assigned to users directly or via Security groups managed in VDS.
At a high level, the application provisioning process follows these steps.
1. Add App(s) to App Catalog
2. Add App(s) to the workspace
3. Install the Application on all Session Hosts
4. Select the Shortcut path
5. Assign apps to users and/or groups
Steps 3 & 4 can be fully automated with Scripted Events as illustrated below
6

Video Walkthrough
Add applications to the App Catalog
VDS Application Entitlement starts with the App Catalog, this is a listing of all the applications available fordeployment to end user environments.
To add applications to the catalog, follow these steps
1. Log in to VDS at https://manage.cloudworkspace.com using your primary admin credentials.
2. In the upper right, click the arrow icon next to your User Name and select Settings.
3. Click the App Catalog tab.
4. Click the Add App option in the Application Catalog title bar.
5. To add a group of applications, choose the Import Apps option.
a. A dialog will appear that provides an Excel template to download that creates the correct format for theapplication list.
b. For this evaluation NetApp VDS has created a sample application list for import it can be found here.
c. Click on the Upload area and choose the application template file, click the Import button.
6. To add individual applications, choose the Add App button and a dialog box will appear.
a. Enter the name of the application.
b. External ID can be used to enter an internal tracking identifier such as a product SKU or billing trackingcode (optional).
c. Check the Subscription box if you want to report on the applications as a Subscription product(optional).
d. If the product does not install by version (for example Chrome) check the Version Not Requiredcheckbox. This allows “continuous update” products to be installed without tracking their versions.
7

e. Conversely, if a product supports multiple named versions (ex: Quickbooks) you need to check this boxso that you can install multiple versions and have VDS specific each available version in the list ofapplications that can be entitled for and end user.
f. Check “No User Desktop Icon” if you don’t want VDS to provision a desktop icon for this product. Thisis used for “backend” products like SQL Server since end users don’t have an application to access.
g. “App Must be Associated” enforces the need for an associated app to be installed. For example, aclient server application may require SQL Server or mySQL to be installed as well.
h. Checking the License Required box indicates that VDS should request a license file to be uploaded foran installation of this application before it sets the application status to active. This step is performed onthe Application detail page of VDS.
i. Visible to All – application entitlement can be limited to specific subpartners in a multi-channelhierarchy. For evaluation purposes, click the Check Box so that all users can see it in their availableapplication list.
Add the application to the Workspace
To start the deployment process you’ll add the app to the workspace.
To do this, follow these steps
1. Click Workspaces
2. Scroll down to Apps
3. Click Add
4. Check box the application(s), enter required information, click Add Application, click Add Apps.
Manually install the application
Once the application has been added to the Workspace you’ll need to get that application installed on allsession hosts. This can be done manually and/or it can be automated.
To manually install applications on session hosts, follow these steps
1. Navigate to Service Board.
2. Click on the Service Board Task.
3. Click on the Server Name(s) to connect as a local admin.
4. Install the app(s), confirm the shortcut to this app is found in the Start Menu path.
a. For Server 2016 and Windows 10: C:\ProgramData\Microsoft\Windows\Start Menu\Programs.
5. Go back to the Service Board Task, click Browse and choose either the shortcut or a folder containingshortcuts.
6. Whichever you select is what will be displayed on the end user desktop when assigned the app.
7. Folders are great when an app is actually multiple applications. e.g “Microsoft Office” is easier to deploy asa folder with each app as a shortcut inside the folder.
8. Click Complete Installation.
9. If required, open the created Icon Add Service Board Task and confirm the icon has been added.
8

Assign applications to users
Application entitlement is handled by VDS and application can be assigned to users in three ways
Assign Applications to Users
1. Navigate to the User Detail page.
2. Navigate to the Applications section.
3. Check the box next to all applications required by this user.
Assign users to an application
1. Navigate to the Applications section on the Workspace Detail page.
2. Click on the name of the application.
3. Check the box next to the users the application.
Assign applications and users to user groups
1. Navigate to the Users and Groups Detail.
2. Add a new group or edit an existing group.
3. Assign user(s) and application(s) to the group.
Reset User Password
Reset user password steps
1. Navigate to the Used Detail page in VDS
2. Find the Password Section, enter the new PW twice and click
9
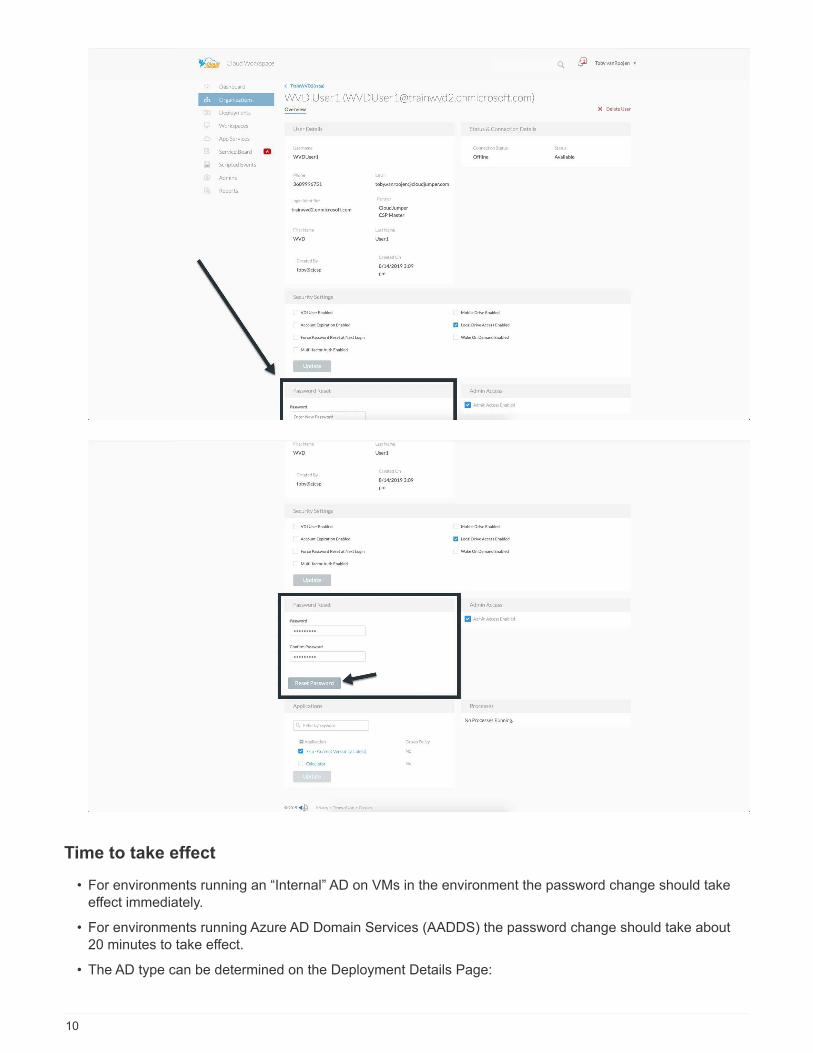
Time to take effect
• For environments running an “Internal” AD on VMs in the environment the password change should takeeffect immediately.
• For environments running Azure AD Domain Services (AADDS) the password change should take about20 minutes to take effect.
• The AD type can be determined on the Deployment Details Page:
10

Self service password reset (SSRP)
The NetApp VDS Windows client and the NetApp VDS web client will provide a prompt for users that enter anincorrect password when logging into a v5.2 (or later) virtual desktop deployment. In the event that the userhas locked their account, this process will unlock a user’s account as well.
Note: users must have already entered a mobile phone number or an email address for this process to work.
SSPR is supported with:
• NetApp VDS Window Client
• NetApp VDS Web Client
In this set of instructions, you will walk through the process of using SSPR as a simple means to enable usersto reset their passwords and unlock their accounts.
NetApp VDS Windows client
1. As an end user, click the Forgot Password link to continue.
11

2. Select whether to receive your code via your mobile phone or via email.
12

3. If an end user has only provided one of those contact methods, that will be the only method displayed.
13

4. After this step, users will be presented with a Code field where they should enter the numeric valuereceived either on their mobile device or in their inbox (depending which was selected). Enter that codefollowed by the new password and click Reset to proceed.
14

5. Users will see a prompt informing them that their password reset has been completed successfully – clickDone to proceed to complete the logon process.
If your deployment is using Azure Active Directory Domain Services, there is a Microsoft-defined password sync period – every 20 minutes. Again, this is controlled by Microsoft andcannot be changed. With this in mind, VDS displays that the user should wait for up to 20minutes for their new password to take effect. If your deployment is not using Azure ActiveDirectory Domain Services, the user will be able to log in again in seconds.
15

HTML5 portal
1. If the user fails to enter the correct password when attempting to login through the HTML5, they will now bepresented with an option to reset the password:
16

2. After clicking on the option to reset their password, they will be presented with their reset options:
3. The ‘Request’ button will send a generated code to the option selected (in this case the user’s email). Thecode is valid for 15 minutes.
17

4. The password has now been reset! It is important to remember that Windows Active Directory will oftenneed a moment to propagate the change so if the new password does not work immediately, just wait a fewminutes and try again. This is particularly relevant for users residing in an Azure Active Directory DomainServices deployment, where a password reset could take up to 20 minutes to propagate.
Enabling self service password reset (SSPR) for users
To use Self Service Password Reset (SSPR), administrators must first enter a mobile phone number and/or anemail account for an end user There are two ways to enter a mobile number and email addresses for a virtualdesktop user as detailed below.
In this set of instructions, you will walk through the process of configuring SSPR as a simple means for endusers to reset their passwords.
Bulk importing users via VDS
Start by navigating to the Workspaces module, then Users & Groups and then clicking Add/Import.
You can enter these values for users when creating them one by one:
18
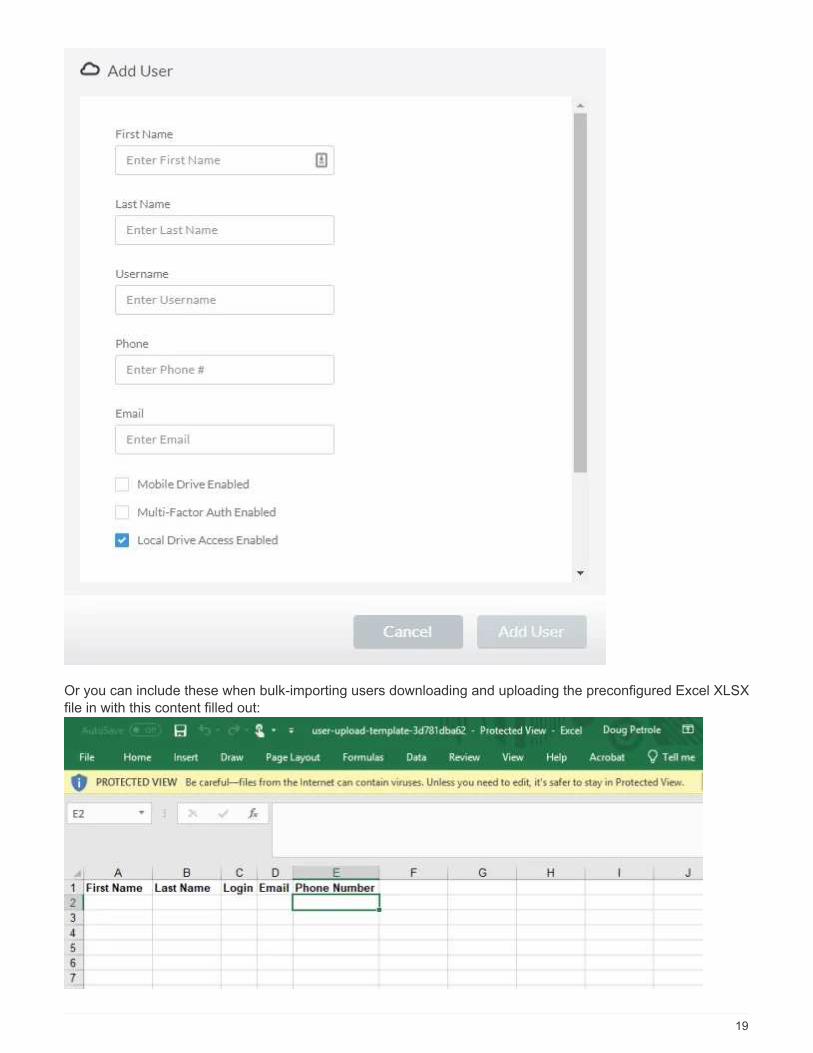
Or you can include these when bulk-importing users downloading and uploading the preconfigured Excel XLSXfile in with this content filled out:
19

Supplying the data via the VDS API
NetApp VDS API – specifically this call https://api.cloudworkspace.com/5.4/swagger/ui/index#!/User/User_PutUser – provides the ability to update this information.
Updating existing user phone
Update the users' phone number on the User Detail Overview page in VDS.
Using other consoles
Note: you currently cannot provide a phone number for a user via the Azure Console, Partner Center or fromthe Office 365 Admin console.
Customize SSPR sending address
NetApp VDS can be configured to send the confirmation email from a custom address. This is a serviceprovided to our service provider partners who wish for their end users to receive the reset password email tobe sent from their own customized email domain.
This customization requires some additional steps to verify the sending address. To start this process, pleaseopen a support case with VDS support requesting a custom "Self Service Password Reset Source Address".Please define the following:
• Your partner code (this can be found by clicking on settings under the upper-right down arrow menu. Seescreenshot below)
20

• Desired "from" address (which must be valid)
• To which clients the setting should apply (or all)
Opening a support case can be done by emailing: [email protected]
Once received, VDS support will work to validate the address with our SMTP service and activate this setting.Ideally you’ll have the ability to update public DNS records on the source address domain to maximize emaildeliverability.
Password complexity
VDS can be configured to enforce password complexity. The setting for this is on the Workspace Detail Page inthe Cloud Workspace Settings section.
21

Password complexity: Off
Policy Guideline
Minimum Password Length 8 characters
Maximum Password Age 110 days
Minimum Password Age 0 days
Enforce Password History 24 passwords remembered
Password Lock Automatically lockout will occur after 5 incorrect entries
Lock Duration 30 minutes
Password complexity: On
Policy Guideline
Minimum Password Length 8 charactersNot contain the user’s account name or parts of the user’s full name thatexceed two consecutive charactersContain characters from three of the following four categories:English uppercase characters (A through Z)English lowercase characters (a through z)Base 10 digits (0 through 9)Non-alphabetic characters (for example, !, $, #, %)Complexity requirements are enforced when passwords are changed orcreated.
Maximum Password Age 110 days
22

Policy Guideline
Minimum Password Age 0 days
Enforce Password History 24 passwords remembered
Password Lock Automatically lock will occur after 5 incorrect entries
Lock Duration Remains locked until administrator unlocks
Multi-Factor Authentication (MFA)
Overview
NetApp Virtual Desktop Service (VDS) includes an SMS/Email based MFA service at no additional charge.This service is independent of any other services (e.g. Azure Conditional Access) and can be used to secureadministrator logins to VDS and user logins to virtual desktops.
MFA basics
• VDS MFA can be assigned to admin users, individual end users or applied to all end users
• VDS MFA can send SMS or Email notifications
• VDS MFA has a self-service initial setup and reset function
Guide scope
This guide walks you thru the setup of MFA along with an illustration of the end user experience
This guide covers the following subjects:
1. Enabling MFA for Individual Users
2. Requiring MFA for All Users
3. Enabling MFA for Individual Administrators
4. End User Initial Setup
Enabling MFA for individual users
MFA can be enabled for individual users on the user detail page by clicking Multi-factor Auth Enabled
Workspaces > Workspace Name > Users & Groups > User Name > Multi-factor Auth Enabled > Update
MFA can also be assigned to all users, if this setting is in place, the checkbox will be checked and (via Client
Settings) will be appended to the checkbox label.
Requiring MFA for all users
MFA can be enabled and enforced across all users on the workspace detail page by clicking MFA for All Users
Enabled
Workspaces > Workspace Name > MFA for All Users Enabled >Update
23

Enabling MFA for individual administrators
MFA is also available for administrator accounts accessing the VDS portal. This can be enabled peradministrator on the admin detail page.Admins > Admin Name > Multi-Factor Auth Required > Update
Initial setup
On the first login after enabling MFA, the user or admin will be prompted to enter an email address or mobilephone number. They’ll receive a confirmation code to enter and confirm successful enrollment.
24

Copyright Information
Copyright © 2022 NetApp, Inc. All rights reserved. Printed in the U.S. No part of this documentcovered by copyright may be reproduced in any form or by any means-graphic, electronic, ormechanical, including photocopying, recording, taping, or storage in an electronic retrieval system-without prior written permission of the copyright owner.
Software derived from copyrighted NetApp material is subject to the following license and disclaimer:
THIS SOFTWARE IS PROVIDED BY NETAPP “AS IS” AND WITHOUT ANY EXPRESS OR IMPLIEDWARRANTIES, INCLUDING, BUT NOT LIMITED TO, THE IMPLIED WARRANTIES OFMERCHANTABILITY AND FITNESS FOR A PARTICULAR PURPOSE, WHICH ARE HEREBYDISCLAIMED. IN NO EVENT SHALL NETAPP BE LIABLE FOR ANY DIRECT, INDIRECT,INCIDENTAL, SPECIAL, EXEMPLARY, OR CONSEQUENTIAL DAMAGES (INCLUDING, BUT NOTLIMITED TO, PROCUREMENT OF SUBSTITUTE GOODS OR SERVICES; LOSS OF USE, DATA, ORPROFITS; OR BUSINESS INTERRUPTION) HOWEVER CAUSED AND ON ANY THEORY OFLIABILITY, WHETHER IN CONTRACT, STRICT LIABILITY, OR TORT (INCLUDING NEGLIGENCE OROTHERWISE) ARISING IN ANY WAY OUT OF THE USE OF THIS SOFTWARE, EVEN IF ADVISED OFTHE POSSIBILITY OF SUCH DAMAGE.
NetApp reserves the right to change any products described herein at any time, and without notice.NetApp assumes no responsibility or liability arising from the use of products described herein,except as expressly agreed to in writing by NetApp. The use or purchase of this product does notconvey a license under any patent rights, trademark rights, or any other intellectual propertyrights of NetApp.
The product described in this manual may be protected by one or more U.S. patents,foreign patents, or pending applications.
RESTRICTED RIGHTS LEGEND: Use, duplication, or disclosure by the government is subject torestrictions as set forth in subparagraph (c)(1)(ii) of the Rights in Technical Data andComputer Software clause at DFARS 252.277-7103 (October 1988) and FAR 52-227-19 (June 1987).
Trademark Information
NETAPP, the NETAPP logo, and the marks listed at http://www.netapp.com/TM are trademarks ofNetApp, Inc. Other company and product names may be trademarks of their respective owners.
25