use of ophthalmoscopes - kingston general hospital · a guide to the use of ophthalmoscopes in the...
TRANSCRIPT

A Guide to the Use of Ophthalmoscopes in the Eye Examination
Guide d’utilisation des ophtalmoscopespour l’examen de l’oeil
Hinweise zur Verwendung des Ophthalmoskopes bei der Augenuntersuchung
Una guía para el uso de los oftalmoscopios en el examen ocular
Una guida all’uso degli oftalmoscopi nell’esamedell’occhio
English 1Français 8Deutsch 16Español 24Italiano 32Pathologies 40
• Ophth Broch ForeignWorking.2 4/26/99 1:02 PM Page 1

The OphthalmoscopeTransparency of the cornea, lens and vitreous humorpermits the physician to directly view arteries, veins, opticnerve and the retina.
Direct observation of the structures of the fundus through anophthalmoscope may show disease of the eye itself or mayreveal abnormalities indicative of disease elsewhere in thebody. Among the most important of these are vascularchanges due to diabetes or hypertension and swelling of theoptic nerve head due to papilledema or optic neuritis. In thissense, the eye serves as a window through which manyvaluable clinical evaluations may be made.
When a preliminary diagnosis of an imminently dangerouseye condition, such as acute glaucoma or retinaldetachment, is made by the examiner, prompt referral to anophthalmologist may prevent irreversible damage. Or, whendistressing but less urgent conditions, such as visualimpairment due to cataract or vitreous floater arerecognized, the patient can be reassured and referred.
A. Front surface mirror
B. Crossed linear polarizing/red-free filter switch
C. Aperture selection disc
D. On/Off rheostat control
E. Rubber brow rest
F. Lens selection disc
G. Illuminated lens indicator
Acknowledgment
We wish to express our sincere appreciation to the Scheie Eye Institute andDr. Steven Koenig, Dr. Ralph Eagle, Dr. Ken Spitzer and John Griffin for theircontribution to this booklet.
A
BC
D
E
F
G
• Ophth Broch ForeignWorking.2 4/26/99 1:02 PM Page 2
1
Standard apertures
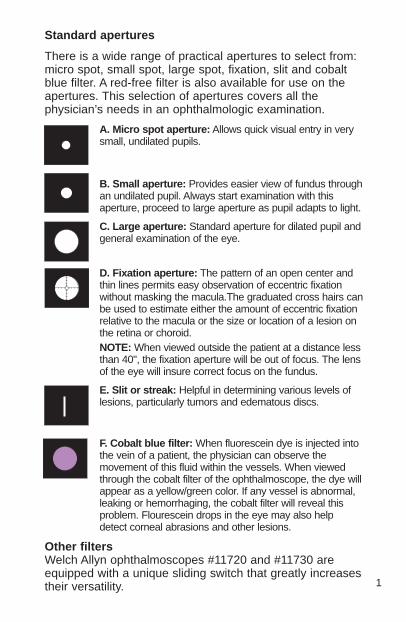
There is a wide range of practical apertures to select from:micro spot, small spot, large spot, fixation, slit and cobaltblue filter. A red-free filter is also available for use on theapertures. This selection of apertures covers all thephysician’s needs in an ophthalmologic examination.
A. Micro spot aperture: Allows quick visual entry in verysmall, undilated pupils.
B. Small aperture: Provides easier view of fundus throughan undilated pupil. Always start examination with thisaperture, proceed to large aperture as pupil adapts to light.
C. Large aperture: Standard aperture for dilated pupil andgeneral examination of the eye.
D. Fixation aperture: The pattern of an open center andthin lines permits easy observation of eccentric fixationwithout masking the macula.The graduated cross hairs canbe used to estimate either the amount of eccentric fixationrelative to the macula or the size or location of a lesion onthe retina or choroid.NOTE: When viewed outside the patient at a distance lessthan 40", the fixation aperture will be out of focus. The lensof the eye will insure correct focus on the fundus.
E. Slit or streak: Helpful in determining various levels oflesions, particularly tumors and edematous discs.
F. Cobalt blue filter: When fluorescein dye is injected intothe vein of a patient, the physician can observe themovement of this fluid within the vessels. When viewedthrough the cobalt filter of the ophthalmoscope, the dye willappear as a yellow/green color. If any vessel is abnormal,leaking or hemorrhaging, the cobalt filter will reveal thisproblem. Flourescein drops in the eye may also helpdetect corneal abrasions and other lesions.
Other filtersWelch Allyn ophthalmoscopes #11720 and #11730 areequipped with a unique sliding switch that greatly increasestheir versatility.
• Ophth Broch ForeignWorking.2 4/26/99 1:02 PM Page 1

Red-free filter: When the switch is positioned to the left (whilefacing the instrument front) it will be beneath a green dot and thered-free filter will be in place. This can be used in conjunction withany aperture. The red-free filter excludes red rays from theexamination field; this is superior to ordinary light in viewing slightalterations in vessels, minute retinal hemorrhages, ill-definedexudates and obscure changes in the macula. The nerve fibersbecome visible and the observer may note the disappearance ofsuch fibers, as in optic nerve atrophy. The background appears gray,the disc appears white, the macula appears yellow, the fundus reflexis intense and the vessels appear almost black. This filter is alsoused to help distinguish veins from arteries...veins stay relativelyblue, but oxygenated arterial blood makes arteries appear blacker.This makes differentiation easier for the examiner.
Crossed linear polarizing filter: When the switch is positioned tothe right (while facing the instrument front) it will be beneath a whilecircle with crosshairs inside. The crossed linear polarizing filter willbe in place. This filter is used to eliminate corneal glare andreflection and can be used with any aperture. For more informationon this filter turn to page 9.
Additional uses for the ophthalmoscope
In addition to examination of the fundus, theophthalmoscope is a useful diagnostic aid in studying otherocular structures. The light beam can be used to illuminatethe cornea and the iris for detecting foreign bodies in thecornea and irregularities of the pupil. By placing the +15.00 lens in the scope andlooking at the pupil as in fundus examination [2 inches (5cm) distance from patient], the physician may verify doubtful pupillary action.
The practitioner can also easily detect lens opacities bylooking at the pupil through the +6 lens setting at a distanceof 6 inches (15cm) from the patient. In the same manner,vitreous opacities can be detected by having the patient lookup and down, to the right and to the left. Any vitreousopacities will be seen moving across the pupillary area asthe eye changes position or comes back to the primaryposition.
2
• Ophth Broch ForeignWorking.2 4/26/99 1:02 PM Page 2

3
The Eye
With the ophthalmoscope 2 inches (5cm) in front of the eye,the lenses in the rotating wheel produce clear vision atpoints indicated in the diagrammatic eye.
The hyperopic or far-sighted eye requires more “plus” spherefor clear focus and the myopic or near-sighted eye requires “minus” sphere for clear focus.
VITREOUS HUMORRETINAOUTSIDE
LENS
INSIDELENS
ANTERIORCORNEA
• Ophth Broch ForeignWorking.2 4/26/99 1:02 PM Page 3

A. MaculaB. Vitreous humor C. Sclera D. ChoroidE. RetinaF. Ora SerrataG. Canal of SchlemmH. Anterior chamberI. Iris
4
J. CorneaK. Ciliary BodyL. Zonule (Suspensory Ligament)M. ConjunctivaN. LensO. Hyaloid canalP. Central retinal veinQ. Optic nerveR. Central retinal artery
• Ophth Broch ForeignWorking.2 4/26/99 1:02 PM Page 4

5
How to Conduct anOphthalmologic ExaminationPosition the ophthalmoscopeabout 6 inches (15cm) in frontand 25° to the right side ofthe patient. (Step 5)
In order to conduct asuccessful examinationof the fundus, theexamining room shouldbe either semi-darkenedor completely darkened.It is preferable to dilatethe pupil when there isno pathologic contrain-dication, but muchinformation can beobtained through theundilated pupil.
The following steps will help the physician obtain satisfactoryresults:
1. For examination of the right eye, sit or stand at thepatient’s right side.
2. Select “0” on the illuminated lens dial of theophthalmoscope and start with small aperture.
3. Take the ophthalmoscope and start in the right hand andhold it vertically in front of your own right eye with the lightbeam directed toward the patient and place your rightindex finger on the edge of the lens dial so that you will beable to change lenses easily if necessary.
4. Dim room lights. Instruct the patient to look straight aheadat a distant object.
5. Position the ophthalmoscope about 6 inches (15cm) infront and slightly to the right (25°) of the patient and directthe light beam into the pupil. A red “reflex” should appearas you look through the pupil.
• Ophth Broch ForeignWorking.2 4/26/99 1:02 PM Page 5

6
6. Rest the left hand on the patient’s forehead and hold theupper lid of the eye near the eyelashes with the thumb.While the patient holds his fixation on the specified object,keep the “reflex” in view and slowly move toward thepatient. The optic disc should come into view when you areabout 11/2 to 2 inches (3-5cm) from the patient. If it is not focused clearly, rotate lenses into the aperturewith your index finger until the optic disc is as clearly visibleas possible. The hyperopic, or far-sighted, eye requires more “plus” (black numbers)sphere for clear focus of the fundus; the myopic, or near-sighted, eye requires “minus” (red numbers) sphere forclear focus.
7. Now examine thedisc for clarity ofoutline, color,elevation andcondition of thevessels. Followeach vessel as farto the periphery asyou can. To locatethe macula, focuson the disc, thenmove the lightapproximately 2disc diameterstemporally. Youmay also have thepatient look at thelight of the ophthal-moscope, which willautomatically placethe macula in fullview. Examine forabnormalities in themacula area. The
red-free filter facilitates viewing of the center of the macula,or the fovea.
• Ophth Broch ForeignWorking.2 4/26/99 1:02 PM Page 6

8. To examine the extreme periphery, instruct the patient to:a) look up for examination of the superior retinab) look down for examination of the inferior retinac) look temporally for examination of the
temporal retinad) look nasally for examination of the nasal retina. This routine will reveal almost any abnormality that occurs in the fundus.
9. To examine the left eye, repeat the procedure outlinedabove except that you hold the ophthalmoscope in theleft hand, stand at the patient’s left side and use your lefteye.
CAUTION:
Before actuating the red-free filter/crossed linear polarizingfilter slide switch, pull the instrument away from the patient’sface to prevent contact with finger or switch.
Examine the disc for clarity of outline, color, elevation and condition ofthe vessels. (step 7)
Overcoming corneal reflection
One of the most troublesome barriers to a good view of the retina is the light reflected back into theexaminer’s eye by the patient’s cornea — a condition knowas corneal reflection.
1. On the ophthalmoscope shown in this book, the crossedlinear polarizing filter may be used. This filter reduces thecorneal reflection by 99%. To engage, simply move theswitch on the front of the instrument to the positionunderneath the white crosshairs. It is recommended thatthe crossed linear polarizing filter be used when cornealreflection is present.
2. Use the small spot aperture. However, this reduces thearea of the retina illuminated.
3. Direct the light beam toward the edge of the pupil rather than directly through its center. Thistechnique can be perfected with practice.
7
• Ophth Broch ForeignWorking.2 4/26/99 1:02 PM Page 7

8
L’ophtalmoscopeLa transparence de la cornée, du cristallin et de l’humeurvitrée permet au praticien d’examiner directement lesartères, les veines, le nerf optique et la rétine.
L’observation directe des structures du fond de l’œil àtravers un ophtalmoscope peut révéler soit des troubles del’œil même, soit des anomalies caractéristiques de troublesprésents dans d’autres régions du corps. Parmi les plusimportants de ces troubles, mentionnons les altérationsvasculaires dues au diabète ou à l’hypertension et latuméfaction de la papille optique due à l’œdème papillaireou à la névrite optique. En ce sens, l’œil est comme unefenêtre qui permet d’effectuer de nombreuses évaluationscliniques d’une grande utilité.
Le praticien qui effectue un diagnostic préliminaire d’uneaffection grave de l’œil, par exemple un glaucome aigu ouun décollement de la rétine, peut éviter des dommagesirréversibles en adressant rapidement son patient à unophtalmologiste. De même, dans des cas graves maismoins urgents, par exemple une déficience visuelle due àune cataracte ou à un corps flottant du vitré, il peut rassurerle patient et l’adresser à un spécialiste.
A. Miroir de surface avant
B. Sélecteur de filtre polarisant à champs linéaires croisés/filtre sans rayons rouges
C. Disque de sélection d’ouverture
D. Interrupteur marche-arrêt à rhéostat
E. Appuie-front en caoutchouc
F. Disque de sélection de lentille
G. Indicateur de lentille lumineux
Remerciements
Nous souhaitons exprimer notre sincère appréciation au Scheie Eye Institute,à Dr Steven Koenig, Dr Ralph Eagle, Dr Ken Spitzer ainsi qu’à John Griffinpour leur contribution à cette brochure.
A
BC
D
E
F
G
• Ophth Broch ForeignWorking.2 4/26/99 1:02 PM Page 8

Ouvertures standard
Un grand choix d’ouvertures est offert : micro, petite, grande, àfixation, à fente et à filtre au bleu de cobalt. Un filtre sans rayonsrouges peut également être utilisé sur les ouvertures. Lesouvertures proposées couvrent tous les besoins du praticienpendant l’examen ophtalmologique.
A. Micro-ouverture : Permet une pénétration rapide dans unepupille très petite et non dilatée.
B. Petite ouverture : Facilite l’examen du fond de l’œil dans unepupille non dilatée. Toujours utiliser cette ouverture pourcommencer l’examen, puis passer à une ouverture plus grande àmesure que la pupille s’adapte à la lumière.
C. Grande ouverture : L’ouverture standard pour pupille dilatée etpour l’examen général de l’œil.
D. Ouverture de fixation : Le centre ouvert et les réticulesfacilitent l’examen de la fixation excentrique sans masquer lamacula. Les réticules gradués permettent de mesurer soit lafixation excentrique par rapport à la macula, soit la taille oul’emplacement d’une lésion de la rétine ou de la choroïde.REMARQUE : Lorsqu’on l’observe à une distance de moins de1 m (40 po) du patient, l’ouverture de fixation est floue. Le cristallinde l’œil assure la convergence sur le fond de l’œil.
E. Ouverture à fente ou à strie : Elle sert à déterminer différentsdegrés de lésions, en particulier les tumeurs et les œdèmespapillaires.
F. Filtre au cobalt : Lorsqu’un colorant fluorescent est injecté dans laveine d’un patient, le praticien peut observer le déplacement de celiquide dans les vaisseaux. Lorsque le colorant est observé à traversle filtre au cobalt de l’ophtalmoscope, sa couleur est d’un jauneverdâtre. Si un vaisseau sanguin présente une anomalie, une fuite ouune hémorragie, le filtre au cobalt révèle ce problème. L’administrationde gouttes fluorescentes dans l’œil peut également permettre dedétecter les abrasions de la cornée et d’autres lésions.
Autres filtresLes ophtalmoscopes Welch Allyn n° 11720 et 11730 sont munisd’un sélecteur coulissant exclusif qui accroît considérablement leurpolyvalence.
9
• Ophth Broch ForeignWorking.2 4/26/99 1:02 PM Page 9

Filtre sans rayons rouges : Lorsqu’on place le sélecteur à gauche(en faisant face à l’avant de l’instrument), il est situé au-dessous d’unpoint vert ; le filtre sans rayons rouges est alors en place. Ce filtre peutêtre utilisé avec n’importe quelle ouverture. Il exclut les rayons rougesdu champ d’examen, ce qui assure des conditions supérieures à lalumière ordinaire pour observer les légères altérations des vaisseaux,de minuscules hémorragies rétiniennes, les exsudats mal définis et lesmodifications peu visibles de la macula. Les fibres nerveusesdeviennent apparentes et l’observateur peut donc remarquer leurdisparition, notamment dans un cas d’atrophie du nerf optique. Le fondparaît gris, la papille blanche, la macula jaune, le réflexe du fond del’œil est intense et les vaisseaux semblent presque noirs. Ce filtrepermet également de distinguer les veines des artères : les veinesrestent relativement bleues, mais le sang artériel oxygéné rend lesartères plus noires, ce qui facilite la différenciation.
Filtre polarisant à champs linéaires croisés : Lorsqu’on place lesélecteur à droite (en faisant face à l’avant de l’instrument), il estsitué au-dessous d’un cercle blanc contenant des réticules ; le filtrepolarisant est alors en place. Ce filtre sert à prévenir l’éblouissementet la réflexion cornéenne et peut être utilisé avec n’importe quelleouverture. Voir à la page 9 les détails concernant ce filtre.
Autres emplois de l’ophtalmoscope
En plus de servir à l’examen du fond de l’œil, l’ophtalmoscope estun instrument fort utile pour l’étude diagnostique d’autres structuresoculaires. Son faisceau lumineux permet d’éclairer la cornée et l’irisafin de détecter la présence de corps étrangers dans la cornée etles irrégularités de la pupille. En sélectionnant la lentille de + 15,00et en observant la pupille comme lors de l’examen du fond de l’œil[à 5 cm (2 po) du patient], le praticien est à même d’observer lesréactions anormales de la pupille.
Il peut aussi facilement détecter les opacités du cristallin en se plaçantà 15 cm (6 po) du patient et en examinant la pupille avec la lentille de+ 6. De même, il détectera les opacités du vitré en demandant aupatient de regarder en haut, en bas, à droite et à gauche. Il observerale déplacement des opacités du vitré dans la région de la pupille àmesure que l’œil bouge ou revient à sa position initiale.
10
• Ophth Broch ForeignWorking.2 4/26/99 1:03 PM Page 10

L’œil
Lorsque l’ophtalmoscope est à 5 cm (2 po) de l’œil, les lentilles dusélecteur rotatif permettent de voir clairement les points indiqués surle schéma de l’œil.
L’œil hypermétrope ou presbyte requiert des lentilles « positives »pour une pour une mise au point claire tandis que l’œil myoperequiert des lentilles « négatives ».
11
HUMEUR VITRÉERÉTINECRISTALLIN
EXTÉRIEUR
CRISTALLININTÉRIEUR
CORNÉEANTÉRIEURE
• Ophth Broch ForeignWorking.2 4/26/99 1:03 PM Page 11

A. MaculaB. Humeur vitréeC. SclérotiqueD. ChoroïdeE. RétineF. Ora serrataG. Canal de SchlemmH. Chambre antérieureI. Iris
J. CornéeK. Corps ciliaireL. Zonule (ligament suspenseur)M. ConjonctiveN. CristallinO. Canal hyaloïdienP. Veine rétinienne centrale Q. Nerf optiqueR. Artère rétinienne centrale
12
• Ophth Broch ForeignWorking.2 4/26/99 1:03 PM Page 12
Comment effectuer un examen ophtalmoscopique
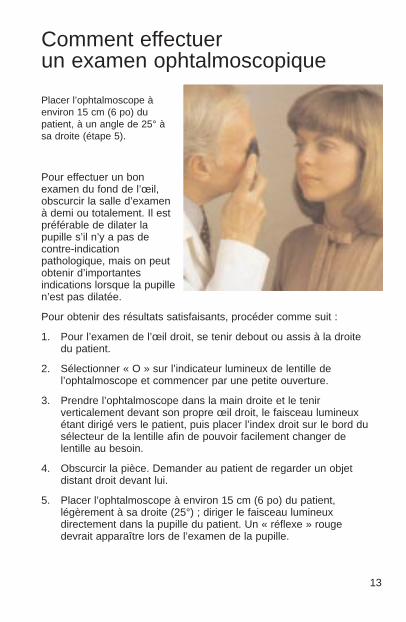
Placer l’ophtalmoscope àenviron 15 cm (6 po) dupatient, à un angle de 25° àsa droite (étape 5).
Pour effectuer un bonexamen du fond de l’œil,obscurcir la salle d’examenà demi ou totalement. Il estpréférable de dilater lapupille s’il n’y a pas decontre-indicationpathologique, mais on peutobtenir d’importantesindications lorsque la pupillen’est pas dilatée.
Pour obtenir des résultats satisfaisants, procéder comme suit :
1. Pour l’examen de l’œil droit, se tenir debout ou assis à la droitedu patient.
2. Sélectionner « O » sur l’indicateur lumineux de lentille del’ophtalmoscope et commencer par une petite ouverture.
3. Prendre l’ophtalmoscope dans la main droite et le tenirverticalement devant son propre œil droit, le faisceau lumineuxétant dirigé vers le patient, puis placer l’index droit sur le bord dusélecteur de la lentille afin de pouvoir facilement changer delentille au besoin.
4. Obscurcir la pièce. Demander au patient de regarder un objetdistant droit devant lui.
5. Placer l’ophtalmoscope à environ 15 cm (6 po) du patient,légèrement à sa droite (25°) ; diriger le faisceau lumineuxdirectement dans la pupille du patient. Un « réflexe » rougedevrait apparaître lors de l’examen de la pupille.
13
• Ophth Broch ForeignWorking.2 4/26/99 1:03 PM Page 13

6. Poser la main gauche sur le front du patient et tenir avec le poucesa paupière supérieure, à proximité des cils. Pendant que lepatient fixe l’objet, garder le « réflexe » en vue et s’approcherlentement du patient. La papille optique devrait lorsqu’on se trouveà une distance d’environ 3 à 5 cm (11⁄2- 2 po) du patient. Si la miseau point n’est pas nette, faire tourner à l’aide de l’index les lentillesdans l’ouverture jusqu’à ce que la papille soit aussi visible quepossible. L’œil hypermétrope ou presbyte nécessite des lentilles« positives » (chiffres noirs) pour une mise au point claire sur lefond de l’œil, tandis que l’œil myope nécessite des lentilles «négatives » (chiffres rouges).
7. Examiner la clarté du contour, la couleur et l’élévation de la papilleainsi que l’état des vaisseaux. Suivre chaque vaisseau aussi loin
que possible vers lapériphérie. Pourrepérer la macula,fixer la papille, puisdéplacer le faisceaulumineux d’environdeux fois le diamètrede la papille endirection de la tempe ;ou encore, demanderau patient de regarderla lumière del’ophtalmoscope, cequi feraautomatiquementapparaître la maculaen pleine vue.Examiner la région dela macula pour décelerdes anomalies. Lefiltre sans rayonsrouges facilitel’examen du centre dela macula, ou fovea.
14
• Ophth Broch ForeignWorking.2 4/26/99 1:03 PM Page 14

8. Pour examiner la périphérie, demander au patient :a) de regarder en haut pour l’examen de la rétine supérieureb) de regarder en bas pour l’examen de la rétine inférieurec) de regarder de côté pour l’examen de la rétine temporaled) de regarder son nez pour l’examen de la rétine nasale.Ce procédé révèle pratiquement toutes les anomalies du fondde l’œil.
9. Pour examiner l’œil gauche, répéter le procédé ci-dessus, maisen tenant l’ophtalmoscope de la main gauche, en se tenantdebout à la gauche du patient et en regardant de l’œil gauche.
ATTENTION :
Avant d’actionner le sélecteur du filtre sans rayons rouges et dufiltre polarisant à champs linéaires croisés, éloigner l’instrument du visage du patient pour éviter de le toucher avec le doigt ou le sélecteur.
Comment neutraliser la réflexion cornéenne
La lumière réfléchie par la cornée du patient dans l’œil du praticien– la réflexion cornéenne – est l’un des problèmes qui gênent le plusl’examen de la rétine.
1. Le filtre polarisant à champs linéaires croisés peut être utiliséavec l’ophtalmoscope décrit dans cette brochure. Ce filtre réduit de 99 % la réflexion cornéenne. Pour le mettre en place, amener simplement le sélecteur à l’avant de l’instru-ment, sous les réticules blancs. Il est recommandé d’utiliser le filtre polarisant à champs linéaires croisés s’il y a réflexion cornéenne.
2. Utiliser la petite ouverture. Elle réduit toutefois la surfaceilluminée de la rétine.
3. Diriger le faisceau lumineux vers le bord de la pupille plutôt quedirectement au centre. Cette technique peut être perfectionnéepar la pratique.
15
• Ophth Broch ForeignWorking.2 4/26/99 1:03 PM Page 15
16
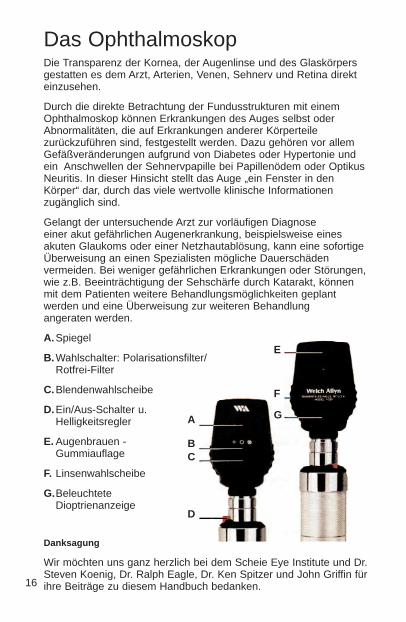
Das OphthalmoskopDie Transparenz der Kornea, der Augenlinse und des Glaskörpersgestatten es dem Arzt, Arterien, Venen, Sehnerv und Retina direkteinzusehen.
Durch die direkte Betrachtung der Fundusstrukturen mit einemOphthalmoskop können Erkrankungen des Auges selbst oderAbnormalitäten, die auf Erkrankungen anderer Körperteilezurückzuführen sind, festgestellt werden. Dazu gehören vor allemGefäßveränderungen aufgrund von Diabetes oder Hypertonie undein Anschwellen der Sehnervpapille bei Papillenödem oder OptikusNeuritis. In dieser Hinsicht stellt das Auge „ein Fenster in denKörper“ dar, durch das viele wertvolle klinische Informationenzugänglich sind.
Gelangt der untersuchende Arzt zur vorläufigen Diagnose einer akut gefährlichen Augenerkrankung, beispielsweise einesakuten Glaukoms oder einer Netzhautablösung, kann eine sofortigeÜberweisung an einen Spezialisten mögliche Dauerschädenvermeiden. Bei weniger gefährlichen Erkrankungen oder Störungen,wie z.B. Beeinträchtigung der Sehschärfe durch Katarakt, könnenmit dem Patienten weitere Behandlungsmöglichkeiten geplantwerden und eine Überweisung zur weiteren Behandlung angeraten werden.
A. Spiegel
B. Wahlschalter: Polarisationsfilter/ Rotfrei-Filter
C.Blendenwahlscheibe
D.Ein/Aus-Schalter u.Helligkeitsregler
E. Augenbrauen -Gummiauflage
F. Linsenwahlscheibe
G.BeleuchteteDioptrienanzeige
Danksagung
Wir möchten uns ganz herzlich bei dem Scheie Eye Institute und Dr.Steven Koenig, Dr. Ralph Eagle, Dr. Ken Spitzer und John Griffin fürihre Beiträge zu diesem Handbuch bedanken.
A
BC
D
E
F
G
• Ophth Broch ForeignWorking.2 4/26/99 1:03 PM Page 16

Standardblenden
Es steht eine Vielzahl von Blenden zur Verfügung:Micro-Spot, Kleine Blende, Große Blende, Fixationsblende,Spaltblende und Kobalt-Filter. Ein Rotfrei-Filter kann ebenfalls mit denBlenden kombiniert werden. Diese Auswahl an Blenden erfülltsämtliche Anforderungen der Ärzte in bezug auf ophthalmologischeUntersuchungen.
A. Micro-Spot Blende: Erlaubt Anwendungen bei sehr kleiner,nichtdilatierter Pupille.
B. Kleine Blende: Bietet eine leichtere Sicht auf den Fundus durchnichtdilatierte Pupillen. Die Untersuchung stets mit dieser Blendebeginnen. Sobald sich die Pupille an das Licht angepaßt hat, miteiner größeren Blende fortfahren.
C. Große Blende: Standardblende für dilatierte Pupillen und zurallgemeinen Augenuntersuchung.
D. Fixationsblende: Das dünne Fadenkreuz mit einem offenenKreis im Zentrum ermöglicht eine einfache Untersuchung beiexzentrischer Fixierung, ohne die Macula zu verdecken. Mit Hilfedes skalierten Fadenkreuzes kann das Ausmaß der exzentrischenFixierung relativ zur Macula abgeschätzt oder die Größe und derOrt einer Netzhaut- bzw. Aderhautläsion bestimmt werden.
HINWEIS: Die Fixierung ist unscharf, wenn man im Abstand vonweniger als 100 cm außerhalb des Patientenauges durch siehindurch sieht. Erst die Augenlinse gewährleistet eine korrekteFokusierung auf den Fundus.
E. Spaltblende: Nützlich zur Bestimmung vonNiveauunterschieden bei verschiedenen Läsionsgraden,insbesondere bei Tumoren und Papillenödemen.
F. Kobalt-Filter: Nach Injektion einer Fluoreszeinlösung in dieVene des Patienten kann der Arzt die Verteilung diesesFarbstoffes in den Gefäßen beobachten. Durch den Kobalt-Filterdes Ophthalmoskops betrachtet, erscheint der Farbstoffgelb/grün. Somit können mit Hilfe des Kobalt-FiltersGefäßprobleme, z.B. Gefäßblutungen oder eine erhöhteGefäßwandddurchlässigkeit, erkannt werden. Durch Einträufelnvon Fluoreszeinlösung in das Auge sind Hornhauterosionen undander Läsionen ebenfalls erkennbar.
Weitere FilterDie Welch Allyn Ophthalmoskope Nr. 11720 und 11730 sind miteiner zusätzlichen Blendenvorschaltung ausgerüstet, die ihreVielseitigkeit noch enorm erhöht.
17
• Ophth Broch ForeignWorking.2 4/26/99 1:03 PM Page 17

Rotfrei-Filter: Steht der Schalter in der linken Position (von derPatientenseite aus gesehen) unter einem grünen Punkt, so ist derRotfrei-Filter eingeschaltet. Dieser Filter kann nun mit einer beliebigenBlende kombiniert werden. Dies ist gegenüber einer Untersuchung mitWeißlicht von Vorteil, da kleine Gefäßveränderungen, winzigeNetzhautblutungen, diffuse Exsudate und ungewöhnlicheVeränderungen in der Macula leichter festzustellen sind. DieNervenfasern werden sichtbar, und der Arzt kann beispielsweise beiSehnervatrophie auf mögliche Auflösungserscheinungen prüfen. DerHintergrund erscheint grau, die Papille weiß, die Macula gelb, derFundusreflex ist intensiv, und die Gefäße erscheinen nahezu schwarz.Dieser Filter dient auch zur Untersscheidung von Venen und Arterien.Die Venen erscheinen bläulich , die Arterien jedoch schwärzeraufgrund ihres sauerstoffreichen Blutes. Eine Differenzierung ist daherfür den Arzt relativ einfach.
Polarisationsfilter: Befindet sich der Schalter in der rechtenPosition (von der Patientenseite aus gesehen) unter einem weißenKreis mit einem Fadenkreuz, so ist der lineareKreuzpolarisationsfilter vorgeschaltet. Dieser Filter beseitigtstörende Reflexionen der Kornea und kann wieder mit jeder Blendekombiniert werden. Nähere Informationen zu diesem Filter findenSie auf Seite 9.
Weitere Verwendungsmöglichkeiten für dasOphthalmoskop
Neben der Betrachtung des Fundus erweist sich dasOphthalmoskop auch bei der Untersuchung andererAugenstrukturen als ein wichtiges diagnostisches Instrument. DerLichtstrahl kann zur Beleuchtung der Kornea und der Iris dienen, umFremdkörper oder andere Unregelmäßigkeiten festzustellen. Mit der+15 Linse kann der Arzt durch Beobachten der Pupille wie bei einerFundusuntersuchung (in 5 cm Abstand vom Patienten) verdächtigenPupillenbewegungen nachgehen.
Ferner kann der Arzt auch leicht Linsentrübungen erkennen, indemer durch die +6 Linse in einem Abstand von 15 cm vom Patientenauf die Pupille schaut. Auf dieselbe Art und Weise könnenGlaskörpertrübungen untersucht werden. Der Patient muß hierzunach oben, unten, rechts und links schauen. Im Verlauf dieserBewegungen wandern Glaskörpertrübungen über denPupillenbereich hinweg, wenn das Auge seine Position ändert.
18
• Ophth Broch ForeignWorking.2 4/26/99 1:03 PM Page 18

Das Auge
Bei einem Abstand des Ophthalmoskops von 5 cm vor dem Augesind über die entsprechenden Linsen in der Linsenwahlscheibe vonden in obigem Diagramm angezeigten Augenbereichen scharfeDarstellungen möglich.
Bei Weitsichtigkeit (Hyperopie) sind für eine scharfe DarstellungLinsen mit positiven Werten und bei Kurzsichtigkeit (Myopie) Linsenmit negativen Werten erforderlich.
19
GLASKÖRPERRETINAÄUSSERER
LINSENBEREICH
INNERERLINSENBEREICH
VORDERERKORNEABEREICH
• Ophth Broch ForeignWorking.2 4/26/99 1:03 PM Page 19

A. Macula
B. Glaskörper
C. Lederhaut (Sklera)
D. Aderhaut (Choroidea)
E. Netzhaut (Retina)
F. Ora Serrata
G. Schlemm´scher Kanal
H. Vordere Augenkammer
I. Iris
J. KorneaK. ZiliarkörperL. Zonula FasernM. Bindehaut (Konjunktiva)N. LinseO. Canalis hyaloideusP. Zentrale RetinaveneQ. SehnervR. Zentrale Retinaarterie
20
• Ophth Broch ForeignWorking.2 4/26/99 1:03 PM Page 20

Durchführung einerophthalmologischen Untersuchung
Das Ophthalmoskop etwa 15cm vor und 25° rechts vomPatienten ausrichten (sieheSchritt 5).
Für eine erfolgreicheUntersuchung des Fundussollte dasBehandlungszimmer nurschwach beleuchtet oderganz abgedunkelt sein.Liegen keineKontraindikationen vor,werden die Pupillenerweitert, jedoch sind auchbei nicht erweitertenPupillen viele wertvolleInformationen erhältlich.Für eine erfolgreiche Untersuchung wirdfolgende Vorgehensweise empfohlen:
1. Zur Untersuchung des rechten Auges rechts neben demPatienten stehen oder sitzen.
2. Wählen Sie “0” auf der beleuchteten Dioptrienwahlscheibe desOphthalmoskops, und beginnen Sie mit der Kleinen Blende.
3. Nehmen Sie das Ophthalmoskop in die rechte Hand. Halten Siees senkrecht vor Ihr eigenes rechtes Auge, wobei der Lichtstrahlauf den Patienten gerichtet ist. Legen Sie Ihren rechtenZeigefinger auf den Rand der Linsenwahlscheibe, damit Sie dieLinsen während der Untersuchung bei Bedarf leicht wechselnkönnen.
4. Dämpfen Sie das Licht im Zimmer. Bitten Sie den Patienten,gerade auf ein entferntes Objekt zu blicken.
5. Halten Sie das Ophthalmoskop etwa 15 cm vom Patientenentfernt in einem Winkel von 25° nach rechts zum Patienten aufdie Pupille. Bei Durchsicht durch die Pupille sehen Sie einenorangeroten Fundusreflex aufleuchten.
21
• Ophth Broch ForeignWorking.2 4/26/99 1:03 PM Page 21
6. Sich dem Auge des Patienten auf ca. 5 cm nähern. Dabei kann dielinke Hand auf dem Kopf ruhen und der linke Daumen das Oberlidhochhalten. Während der Patient den Blick weiter auf das entfernteObjekt fixiert, behalten Sie den „Reflex“ im Auge und bewegen sichlangsam auf den Patienten zu. Im Abstand von ca. 3 - 5 cm vomPatienten sollte die Papille ins Blickfeld kommen. Falls keinscharfes Bild entsteht, muß an der Linsenwahlscheibenachfokussiert werden, bis die Papille möglichst klar zu sehen ist.Das hyperope (weitsichtige) Auge erfordert Vorschaltung vonPluslinsen, das myope (kurzsichtige) Auge Minuslinsen zurFokussierung.
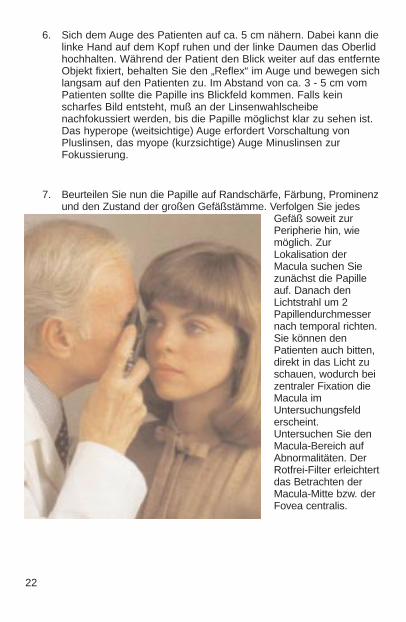
7. Beurteilen Sie nun die Papille auf Randschärfe, Färbung, Prominenzund den Zustand der großen Gefäßstämme. Verfolgen Sie jedes
Gefäß soweit zurPeripherie hin, wiemöglich. ZurLokalisation derMacula suchen Siezunächst die Papilleauf. Danach denLichtstrahl um 2Papillendurchmessernach temporal richten.Sie können denPatienten auch bitten,direkt in das Licht zuschauen, wodurch beizentraler Fixation dieMacula imUntersuchungsfelderscheint.Untersuchen Sie denMacula-Bereich aufAbnormalitäten. DerRotfrei-Filter erleichtertdas Betrachten derMacula-Mitte bzw. derFovea centralis.
22
• Ophth Broch ForeignWorking.2 4/26/99 1:03 PM Page 22

8. Zur Untersuchung der Peripherie der Netzhaut fordern Sie denPatienten auf:
a) nach oben zu sehen für die Untersuchung der oberen Retina
b) nach unten zu sehen für die Untersuchung der unterenRetina
c) auf die Seite zu sehen für die Untersuchung der temporalenRetina
d) zur Nase zu sehen für die Untersuchung der nasalen Retina.
Dieses Vorgehen gewährleistet, daß nahezu alle eventuellvorhandenen Veränderungen im Fundus erkannt werden.
9. Zur Untersuchung des linken Auges oben beschriebeneVorgehensweise wiederholen. Das Ophthalmoskop wird nun inder linken Hand gehalten und der Untersucher befindet sichlinks vom Patienten.
VORSICHT:
Vor der Betätigung des Zusatzschalters Rotfrei-Filter/Polarisationsfilter, das Instrument vom Gesicht des Patienten wegbewegen, damit das Patientenauge nicht vom Schalter oder Fingerberührt wird.
Hornhautreflexionen
Ein oft beobachtetes Problem bei der Retinauntersuchung ist dasvon der Hornhaut des Patienten in das Auge des Arztes reflektierteLicht (Cornea Reflexion).
1. Bei dem in dieser Broschüre beschriebenen Ophthalmoskopkann nun der Polarisationsfilter eingesetzt werden. Er reduziertdie korneale Reflexion um 99%. Dazu einfach den Schaltervorne am Instrument in die Position unterhalb des weißenFadenkreuzes stellen. Es empfiehlt sich, den Polarisationsfilterstets zu verwenden, wenn korneale Reflexion vorliegt.
2. Verwenden Sie die Kleine Blende, obwohl sich hiermit derbeleuchtete Bereich der Retina verkleinert.
3. Richten Sie den Lichtstrahl auf den Rand der Pupille anstattdirekt auf ihre Mitte. Diese Technik kann mit etwas Übungperfektioniert werden.
23
• Ophth Broch ForeignWorking.2 4/26/99 1:03 PM Page 23

24
El oftalmoscopioLa transparencia de la córnea, el cristalino y el humor vítreopermiten al médico ver directamente las arterias, las venas,el nervio óptico y la retina.
La observación directa de las estructuras del fondomediante un oftalmoscopio puede mostrar enfermedadesdel ojo mismo o puede revelar anormalidades indicadorasde enfermedades en otras partes del cuerpo. Entre las másimportantes de éstas se hallan los cambios vascularesdebido a la diabetes o la hipertensión e inflamación de lacabeza del nervio óptico debido a papiledema o neuritisóptica. En este sentido, el ojo sirve como una ventana através de la cual se pueden realizar muchas evaluacionesclínicas valiosas.
Cuando el examinador realiza un diagnóstico preliminar deuna enfermedad ocular inminentemente peligrosa, comoglaucoma agudo o desprendimiento de la retina, unainmediata referencia a un oftalmólogo puede evitar dañosirreversibles. O bien, cuando se reconocen trastornospreocupantes aunque no tan urgentes, como elimpedimento visual debido a cataratas o flotador vítreo, sepuede tranquilizar al paciente yrecomendarle visitar un especialista.
A. Espejo de la superficie frontal
B. Interruptor del filtro polarizante linealcruzado/sin rojo
C. Disco de selección de laapertura
D. Control deencendido/apagado delreóstato
E. Apoyo de goma para la ceja
F. Disco de selección de lentes
G. Indicador de lentesiluminado
AgradecimientoDeseamos expresar nuestro sincero agradecimiento al Scheie Eye Institute ya los Dres. Steven Koenig, Ralph Eagle, Ken Spitzer y John Griffin por suscontribuciones a este/estos folleto/s.
A
BC
D
E
F
G
• Ophth Broch ForeignWorking.2 4/26/99 1:03 PM Page 24

Aperturas estándar
Existe una amplia gama de aperturas prácticas de dónde seleccionar:micropunto, punto pequeño, punto grande, fijación, ranura y filtro azulcobalto. También se encuentra disponible un filtro sin rojo para utilizaren las aperturas. Esta selección de aperturas cubre todas lasnecesidades del médico en un examen oftalmológico.
A. Apertura de micropunto: Permite una entrada visual rápida enpupilas muy pequeñas y no dilatadas.
B. Apertura pequeña: Facilita la visión del fondo a través de unapupila sin dilatar. Siempre inicie el examen con esta apertura,continúe con aperturas más grandes a medida que las pupilas seadaptan a la luz.
C. Apertura grande: Apertura estándar para pupila dilatada yexamen general del ojo.
D. Apertura de fijación: El patrón de un centro abierto y líneasdelgadas permite la observación fácil de fijación excéntrica sinocultar la mácula. El retículo graduado puede utilizarse paraestimar ya sea la cantidad de fijación excéntrica relativa a lamácula o el tamaño de una lesión en la retina o coroides.NOTA: Cuando se observa desde fuera del paciente a unadistancia de menos de 102 cm (40"), la apertura de fijación estaráfuera de foco. El cristalino del ojo asegura el enfoque correcto en elfondo.
E. Ranura o franja: Ayuda en la determinación de varios nivelesde lesiones, en particular tumores y discos edematosos.
F. Filtro azul cobalto: Cuando se inyecta tintura de fluoresceína enla vena de un paciente, el médico puede observar el movimiento deeste líquido dentro de los vasos sanguíneos. Cuando se ve a travésdel filtro de cobalto del oftalmoscopio, la tintura aparece de un coloramarillo/verdoso. Si se observa un vaso sanguíneo anormal, conpérdidas o hemorragia, el filtro de cobalto revelará este problema. Lasgotas de fluoresceína en el ojo también pueden ayudar a detectarabrasiones de la córnea y otras lesiones.
Otros filtrosLos oftalmoscopios No. 11720 y No. 11730 de Welch Allyn estánequipados con un interruptor deslizante único que aumenta engran medida su versatilidad.
25
• Ophth Broch ForeignWorking.2 4/26/99 1:03 PM Page 25
Filtro sin rojo: Cuando el interruptor está ubicado hacia la izquierda(mirando la parte frontal del instrumento) estará debajo de un puntoverde y el filtro sin rojo estará en su lugar. Esto se puede utilizar enconjunto con cualquier apertura. El filtro sin rojo excluye los rayos rojosdel campo de examen; esto es muy superior que la luz corriente paraver las pequeñas alteraciones en los vasos sanguíneos, minúsculashemorragias retinales, exudaciones que definen enfermedades ycambios difíciles de ver en la mácula. Las fibras nerviosas se hacenvisibles y el observador puede notar la desaparición de dichas fibras,como en la atrofia del nervio óptico. El fondo aparece gris, el discoaparece blanco, la mácula aparece amarilla, el reflejo del fondo esintenso, viéndose los vasos sanguíneos casi negros. Este filtrotambién se utiliza para distinguir venas de arterias... las venaspermanecen relativamente azules, pero la sangre arterial oxigenadahace que las arterias se vean más negras. Esto facilita ladiferenciación para el examinador.
Filtro polarizante lineal cruzado: Cuando el interruptor estáubicado hacia la derecha (mirando el instrumento desde el frente)estará debajo de un círculo blanco con un retículo en el interior. Elfiltro polarizante lineal cruzado estará en su lugar. Este filtro seutiliza para eliminar el destello y reflejo de la córnea y puedeutilizarse con cualquier apertura. Consulte la página 9 para mayorinformación acerca de este filtro.
Usos adicionales del oftalmoscopio
Además del examen del fondo, el oftalmoscopio es un instrumento dediagnostico útil en el estudio de otras estructuras oculares. El haz deluz puede utilizarse para iluminar la córnea y el iris, para detectarcuerpos extraños en la córnea e irregularidades de la pupila.Colocando la lente +15.00 en el oftalmoscopio y mirando a la pupilacomo en el examen de fondo [a 5 cm de distancia desde el paciente (2pulgadas)], el médico puede verificar la acción pupilar dudosa.
El especialista también puede detectar fácilmente la opacidad delcristalino mirando a la pupila a través del lente +6 a una distancia de15 cm (6 pulgadas) del paciente. De la misma manera, se puedendetectar las opacidades vítreas haciendo que el paciente mire haciaarriba y hacia abajo, hacia la derecha y hacia la izquierda. Cualquieropacidad vítrea se verá moviéndose a través del área pupilar amedida que el ojo cambie de posición o vuelva a la posición primaria.
26
• Ophth Broch ForeignWorking.2 4/26/99 1:03 PM Page 26

El ojo
Con el oftalmoscopio a 5 cm (2 pulgadas) de la parte frontal del ojo,las lentes de la rueda giratoria producen una visión clara en lospuntos indicados en el diagrama del ojo.
El ojo hiperópico o hipermetrópico requiere mayor esfera “más” paraun enfoque nítido y el ojo miope requiere esfera “menos” para unenfoque nítido.
27
HUMOR VÍTREORETINACRISTALINO
EXTERIOR
CRISTALINOINTERIOR
CORNEAFRONTAL
• Ophth Broch ForeignWorking.2 4/26/99 1:03 PM Page 27

A. MáculaB. Humor vítreoC. EscleróticaD. CoroidesE. RetinaF. Ora serrataG. Canal de SchlemmH. Cámara anteriorI. Iris
J. CórneaK. Cuerpo ciliarL. Zónula (ligamento suspensor)M. ConjuntivaN. CristalinoO. Canal HialoideoP. Vena retinal centralQ. Nervio ópticoR. Arteria retinal central
28
• Ophth Broch ForeignWorking.2 4/26/99 1:03 PM Page 28

Cómo realizar un examen oftalmológico
Coloque el oftalmoscopio aunos 15 cm (6 pulgadas) alfrente y 25° hacia la derechadel paciente (Paso 5).
A fin de efectuar un examensatisfactorio del fondo, lasala de examen debe estarsemioscura o completamenteoscura. Es preferible dilatarla pupila cuando no hayauna contraindicaciónpatológica, pero puedeobtenerse muchainformación sin dilatar lapupila.Los pasos siguientesayudarán al médico aobtener resultadossatisfactorios:
1. Para examinar el ojo derecho, siéntese o párese del ladoderecho del paciente.
2. Seleccione “0” en el selector iluminado de la lente deloftalmoscopio y comience con una apertura pequeña.
3. Tome el oftalmoscopio y comience en el lado derecho ysosténgalo verticalmente frente a su propio ojo derecho con elhaz de luz dirigido hacia el paciente y coloque su dedo índicederecho en el borde del selector de la lente para que puedacambiar las lentes fácilmente si fuera necesario.
4. Atenúe las luces de la sala. Indique al paciente que mire derechohacia adelante a un objeto distante.
5. Coloque el oftalmoscopio unos 15 cm (6 pulgadas) delante yligeramente hacia la derecha (25°) del paciente y dirija el haz deluz dentro de la pupila. Debe aparecer un “reflejo” rojo al mirar através de la pupila.
29
• Ophth Broch ForeignWorking.2 4/26/99 1:03 PM Page 29

6. Apoye la mano izquierda sobre la frente del paciente y sostenga elpárpado superior del ojo cerca de las pestañas con el pulgar.Mientras el paciente sostiene fija su mirada en el objetoespecificado, mantenga el “reflejo” a la vista y lentamentemuévase hacia el paciente. El disco óptico debe verse ahoracuando esté a unos 3-5 cm (1,5 a 2 pulgadas) del paciente. Si noestá enfocado claramente, gire los lentes dentro de la apertura consu dedo índice hasta que el disco óptico esté lo más claramentevisible que se pueda. El ojo hiperópico o hipermetrópico, requierela esfera “más” (números negros) para enfocar claramente elfondo; el ojo miope requiere la esfera “menos” (números rojos)para obtener un enfoque claro.
7. Ahora examine el disco para ver la claridad del contorno, el color, laelevación y el estado de los vasos. Siga cada vaso hacia la periferia
tanto como le seaposible. Para localizarla mácula, enfoque enel disco, luego muevala luzaproximadamente 2diámetros del disco endirección temporal.También puede pedirleal paciente que mirehacia la luz deloftalmoscopio, lo quecolocaráautomáticamente lamácula en plena vista.Examine en busca deanormalidades en elárea de la mácula. Elfiltro sin rojo facilita verel centro de la mácula,o la fóvea.
30
• Ophth Broch ForeignWorking.2 4/26/99 1:03 PM Page 30

8. Para examinar la periferia extrema pida al paciente que:a) mire hacia arriba para examinar la retina superiorb) mire hacia abajo para examinar la retina inferiorc) mire en dirección temporal para examinar la retina temporald) mire en dirección nasal para examinar la retina nasalEsta rutina revelará casi cualquier anormalidad que ocurra en elfondo.
9. Para examinar el ojo izquierdo, repita el procedimiento descritoanteriormente con la salvedad de que se sostiene eloftalmoscopio con la mano izquierda, parado al lado izquierdodel paciente y usando su ojo izquierdo.
PRECAUCIÓN:
Antes de activar el interruptor deslizante de filtro sin rojo/filtropolarizante lineal cruzado, retire el instrumento del rostro delpaciente para evitar el contacto con el dedo o interruptor.
Cómo superar el reflejo de la córnea
Una de las barreras más problemáticas para la buena visión de laretina es la luz que se refleja de regreso hacia el ojo delexaminador por la córnea del paciente – una condición conocidacomo reflejo de la córnea.
1. En el oftalmoscopio mostrado en este libro, puede utilizarse elfiltro polarizante lineal cruzado. Este filtro reduce el reflejo de lacórnea en un 99%. Para usarlo, sencillamente mueva elinterruptor en la parte delantera del instrumento a la posicióndebajo del retículo blanco. Se recomienda el uso del filtropolarizante lineal cruzado cuando exista el reflejo de la córnea.
2. Use la apertura de punto pequeño. No obstante, esto reduce elárea iluminada de la retina.
3. Dirija el haz de luz hacia el borde de la pupila antes que hacerlodirectamente a través del centro. Esta técnica puedeperfeccionarse con la práctica.
31
• Ophth Broch ForeignWorking.2 4/26/99 1:03 PM Page 31

L’oftalmoscopioLa trasparenza della cornea del cristallino e dell’humorvitreo, permette di vedere direttamente le arterie le vene, ilnervo ottico e la retina.
L’osservazione diretta delle strutture del fondo attraverso unoftalmoscopio può evidenziare non solo malattie sellostesso occhio, ma anche rivelare alcune anormalitàindicative di patologie di altre parti dell’organismo. Tra le piùimportanti, sono le modificazioni vascolari da diabete oipertensione ed il rigonfiamento delle terminazioni del nervoottico dovuto a edema papillare o a neurite ottica. In questosenso l’occhio diventa una “finestra” attraverso la quale sipossono fare molte preziose valutazioni cliniche.
Quando l’esaminatore fa una diagnosi preliminare di unrischio imminente come un glaucoma acuto od un distaccodi retina, un rapido rinvio all’oculista può prevenire un dannoirreversibile. Così come, quando vengono riconosciutesituazioni pericolose ma meno urgenti, come una riduzionedella capacità visiva dovuta a cataratta o fluttuazione delvitreo, il paziente può essere rassicurato ed indirizzato aduna visita specialistica.
A. Superficie frontale dello specchio
B. Selettore del filtro di polarizzazione lineareincrociata o filtro rosso privo
C. Disco di selezione delleaperture
D. Pulsante accensione e controllo reostato
E. Poggiafronte in gomma
F. Disco di selezione delle lenti
G. Indicatore lente in uso, illuminato
Riconoscimenti
Desideriamo esprimere la nostra sincera gratitudine allo Sheie Eye Institute eal Dott. Steven Koening, al Dott. Ralph Eagle, al Dott. Ken Spitzer e a JohnGriffin per il prezioso apporto alla stesura di questo manualetto.32
A
BC
D
E
F
G
• Ophth Broch ForeignWorking.2 4/26/99 1:03 PM Page 32
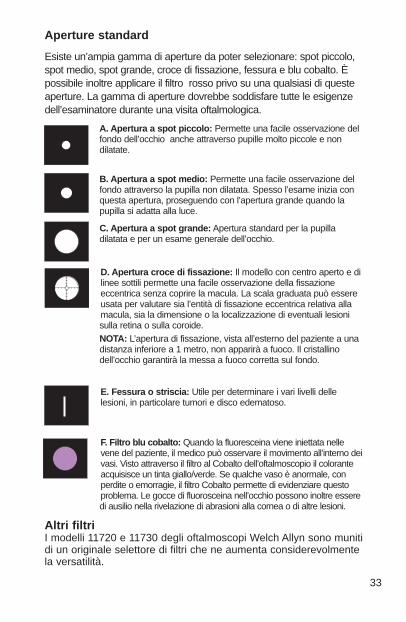
Aperture standard
Esiste un’ampia gamma di aperture da poter selezionare: spot piccolo,spot medio, spot grande, croce di fissazione, fessura e blu cobalto. Èpossibile inoltre applicare il filtro rosso privo su una qualsiasi di questeaperture. La gamma di aperture dovrebbe soddisfare tutte le esigenzedell’esaminatore durante una visita oftalmologica.
A. Apertura a spot piccolo: Permette una facile osservazione delfondo dell’occhio anche attraverso pupille molto piccole e nondilatate.
B. Apertura a spot medio: Permette una facile osservazione delfondo attraverso la pupilla non dilatata. Spesso l’esame inizia conquesta apertura, proseguendo con l’apertura grande quando lapupilla si adatta alla luce.
C. Apertura a spot grande: Apertura standard per la pupilladilatata e per un esame generale dell’occhio.
D. Apertura croce di fissazione: Il modello con centro aperto e dilinee sottili permette una facile osservazione della fissazioneeccentrica senza coprire la macula. La scala graduata può essereusata per valutare sia l’entità di fissazione eccentrica relativa allamacula, sia la dimensione o la localizzazione di eventuali lesionisulla retina o sulla coroide.NOTA: L’apertura di fissazione, vista all’esterno del paziente a unadistanza inferiore a 1 metro, non apparirà a fuoco. Il cristallinodell’occhio garantirà la messa a fuoco corretta sul fondo.
E. Fessura o striscia: Utile per determinare i vari livelli dellelesioni, in particolare tumori e disco edematoso.
F. Filtro blu cobalto: Quando la fluoresceina viene iniettata nellevene del paziente, il medico può osservare il movimento all’interno deivasi. Visto attraverso il filtro al Cobalto dell’oftalmoscopio il coloranteacquisisce un tinta giallo/verde. Se qualche vaso è anormale, conperdite o emorragie, il filtro Cobalto permette di evidenziare questoproblema. Le gocce di fluorosceina nell’occhio possono inoltre esseredi ausilio nella rivelazione di abrasioni alla cornea o di altre lesioni.
Altri filtriI modelli 11720 e 11730 degli oftalmoscopi Welch Allyn sono munitidi un originale selettore di filtri che ne aumenta considerevolmentela versatilità.
33
• Ophth Broch ForeignWorking.2 4/26/99 1:03 PM Page 33

Filtro rosso privo: Quando l’interruttore si trova spostato a sinistraosservando la parte anteriore dello strumento, questo apparirà incorrispondenza di un punto verde, a indicare che il filtro rosso privo èin posizione. Questa impostazione può essere usata unitamente a unaqualsiasi apertura, dato che detto filtro esclude le radiazioni rosse dalcampo in esame. Ciò fornisce risultati migliori di quelli con la luceordinaria nelle osservazioni di lievi alterazioni del sistema vascolarecome piccole emorragie retiniche, essudati mal definiti e variazioni dioscurità della macula. Le fibre nervose diventano visibili e l’osservatorepuò notare la loro scomparsa, come nel caso di atrofia del nervoottico. La parte sottostante appare grigia, il disco bianco, la macula sicolora in giallo, il riflesso del fondo diventa intenso ed i vasi appaionoquasi neri. Questa apertura può essere usata anche per distinguere levene dalle arterie: mentre le vene sono relativamente blu, le arteriediventano più scure per il maggior contenuto di ossigeno e questorende più facile la loro differenziazione.
Filtro di polarizzazione lineare incrociata: Quando l’interruttore sitrova spostato a destra osservando la parte anteriore dellostrumento, questo apparirà in corrispondenza di un punto biancocon mirini graduati, a indicare che il filtro è in posizione. Questo filtroè utile perché elimina i bagliori e i riflessi della cornea e può essereusato con una qualsiasi apertura. Per ulteriori informazioni suquesto filtro, andare a pagina 9.
Altri usi dell’oftalmoscopio
Oltre all’esame del fondo, l’oftalmoscopio risulta utile comestrumento diagnostico nello studio di altre strutture oculari. Con ilfascio di luce si possono illuminare cornea e iride per rivelare lapresenza di corpi estranei e irregolarità della pupilla. Fissando lalente + 15 dell’oftalmoscopio e guardando la pupilla comenell’esame del fondo(5 cm di distanza dal paziente) il medico puòverificare con sicurezza l’attività pupillare.
Inoltre è possibile evidenziare facilmente opacità del cristallinoosservando la pupilla con una lente +6 mettendosi a una distanza di15 cm dal paziente. Nello stesso modo possono essere scoperteopacità del vitreo facendo guardare il paziente in alto ed in basso, adestra e a sinistra. Eventuali opacità del vitreo si vedranno muoversiattraverso l’area pupillare, nel momento in cui l’occhio cambiaposizione o ritorna in posizione originaria.
34
• Ophth Broch ForeignWorking.2 4/26/99 1:03 PM Page 34

L’occhio
Mentre si tiene l’oftalmoscopio a 5 cm dall’occhio, le lenti presentinella ruota di selezione permettono una chiara visione dei puntiindicati nel diagramma dell’occhio.
L’occhio presbite, o che vede da lontano, richiede una maggiorecurvatura per la messa a fuoco, l’occhio miope, o che vede davicino, richiede una minore curvatura.
35
HUMOR VITREORETINAESTERNO DEL
CRISTALLINO
INTERNO DELCRISTALLINO
CORNEAANTERIORE
• Ophth Broch ForeignWorking.2 4/26/99 1:04 PM Page 35

A. MaculaB. Humor vitreoC. ScleraD. CoroideE. RetinaF. Ora serrataG. Canale di SchlemmH. Camera anterioreI. Iride
J. CorneaK. Corpo ciliareL. Zonula (legamento sospensorio)M. CongiuntivaN. CristallinoO. Canale ialoideP. Vena retinica centraleQ. Nervo otticoR. Arteria retinica centrale
36
• Ophth Broch ForeignWorking.2 4/26/99 1:04 PM Page 36

Conduzione di un esame oftalmologico
Posizione dell’oftalmoscopio acirca 15 cm ed a 25° sullaparte destra del paziente(Punto 5).
Al fine di fare un buonesame del fondo, il localedovrebbe essere semi buioo completamente oscurato.È preferibile dilatare lapupilla quando nonsussistonocontroindicazioni, anche sepossiamo ottenerecomunque attraverso lapupilla non dilatata.
I seguenti punti possono aiutare il medico nell’ottenimento di risultatisoddisfacenti:
1. Per l’esame dell’occhio destro, sedere o restare in piedi al latodestro del paziente.
2. Selezionare “0” sul disco della lente illuminata e impostareun’apertura piccola sull’oftalmoscopio.
3. Tenere l’oftalmoscopio nella mano destra in posizione verticaledavanti al proprio occhio destro con il fascio di luce rivolto verso ilpaziente; appoggiare l’indice destro sul disco delle lenti in mododa poterle cambiare facilmente, se necessario.
4. Abbassare le luci della stanza e invitare il paziente a guardare,diritto davanti a sé ad un oggetto distante.
5. Posizionare l’oftalmoscopio a circa 15 cm di fronte al paziente eleggermente spostato sulla destra (25°) e dirigere il fascio di lucedentro la pupilla. Un riflesso rosso dovrebbe apparire mentre siguarda attraverso la pupilla.
37
• Ophth Broch ForeignWorking.2 4/26/99 1:04 PM Page 37

38
6. Tenere la mano sinistra sulla fronte del paziente e sollevare con ilpollice la parte superiore della palpebra vicino alle sopracciglia.Mentre il paziente continua a fissare uno specifico oggetto,osservare il riflesso e lentamente avvicinarsi al paziente. Il discoottico dovrebbe apparire quando si è a una distanza di 3-5 cm dalpaziente. Se non si ottiene una precisa messa a fuoco, ruotare lelenti mantenendo la stessa apertura fino a che il disco ottico nonappaia nella maniera più chiara possibile. L’occhio presbite, o chenon vede da lontano, richiede una maggiore curvatura per la messaa fuoco del fondo (numeri neri); l’occhio miope, o che vede davicino, richiede una minore curvatura (numeri rossi).
7. Adesso esaminare il disco per la chiarezza dei contorni, il colore e lacondizione dei vasi. Seguire ogni vaso verso la periferia fino
a quando è possibile.Per individuare lamacula, mettere afuoco il disco, quindispostare la luce indirezione temporale di circa 2 diametri deldisco. Chiedereeventualmente alpaziente di fissare laluce dell’oftalmoscopioonde portareautomaticamente la macula in pienocampo visivo.Esaminare eventualianomalie dell’areadella macula. Il filtrorosso privo agevola la visualizzazione delcentro della macula odella fovea.
• Ophth Broch ForeignWorking.2 4/26/99 1:04 PM Page 38

8. Per esaminare le zone periferiche estreme, invitare il paziente a:a) guardare in alto per esaminare la retina superiore;b) guardare in basso per esaminare la retina inferiore;c) guardare in direzione delle tempie per esaminare la retina
temporale;d) guardare in direzione del naso per esaminare la retina
nasale.Questa prassi rivela pressoché tutte le anomalie che possonoriguardare il fondo.
9. Per esaminare l’occhio sinistro, ripetere la procedura descritta inprecedenza con l’unica differenza di tenere l’oftalmoscopio conla mano sinistra, disponendosi a sinistra del paziente enaturalmente usando il proprio occhio sinistro.
ATTENZIONE:
Prima di attivare il filtro rosso privo o di polarizzazione lineareincrociata, allontanare lo strumento dal volto del paziente perprevenire il contatto con le dita o con l’interruttore.
Correzione della luce riflessa dalla cornea
Una delle barriere più problematiche ad una buona visione dellaretina è la luce riflessa dalla cornea del paziente nell’occhiodell’esaminatore, situazione questa nota con il nome di riflessocorneale. Esistono tre possibilità per minimizzare questo disturbo:
1. L’oftalmoscopio descritto in questo documento prevede l’uso delfiltro di polarizzazione lineare incrociata, che riduce il riflessocorneale del 99%. Per attivarlo, portare l’interruttore posto sullaparte anteriore dello strumento nella posizione corrispondente alpunto bianco con i mirini graduati. Si consiglia l’uso di questofiltro solo quando si abbia riflesso corneale.
2. Utilizzare l’apertura a spot piccolo, sebbene questa riduca l’areadi retina illuminata.
3. Dirigere il fascio di luce verso il bordo della pupilla anzichédirettamente al suo centro. Questa tecnica potrà essereperfezionata con la pratica.
39
• Ophth Broch ForeignWorking.2 4/26/99 1:04 PM Page 39

Common Pathology of the EyeHäufige pathologische Befunde am Augenhintergrund/Pathologie courante de l’œil/Patologías comunes del ojo/Patologie comuni dell’occhio
Normal fundusDisc: Outline clear; physiological cup is pale area centrallyRetina: Normal red/orange color, macula is dark avascular area temporallyVessels: Arterial — venous ratio 2 to 3; the arteries appear a bright red, the
veins a slightly purplish color
Fond de l’œil normalPapille : Contour clair ; l’excavation de la papille est la zone pâle au centreRétine : Couleur rouge orangé normale, la macula est la zone sombre non
vasculariséeVaisseaux : On trouve deux artères pour trois veines ; les artères sont d’un
rouge vif et les veines, légèrement violacées
Normaler FundusPapille: Klarer Umriß; der helle Bereich zentral ist die physiolog.
Excavation der PapilleRetina: Rot / orangefarben, die Macula ist der dunkle avaskuläre Bereich
temporalGefäße: Verhältnis der Gefäßdicke Arterien: Venen = 2:3; Arterien
erscheinen hellrot, Venen eher violett rot
Fondo normalDisco: Contorno claro; área de copa fisiológica pálida en el centro.Retina: Color normal rojo/anaranjado, mácula oscura, área avascular en
dirección temporal.Vasos: Arteriales – relación venosa 2 a 3; las arterias se ven de color rojo
brillante, las venas de un color ligeramente morado.40
• Ophth Broch ForeignWorking.2 4/26/99 1:04 PM Page 40

Fondo normaleDisco: Contorno nitido, la coppa fisiologica è un’area pallida verso il centro.Retina: Normale se di colore rosso/arancio; la macula corrisponde all’area
avascolare scura nella zona temporale.Vasi: Rapporto arterie/vene di 2 a 3; le arterie appaiono di un rosso
brillante, le vene di colore leggermente purpureo.
Hypertensive retinopathy (advanced malignant)Disc: Elevated, edematous disc; blurred disc marginsRetina: Prominent flame hemorrhages surrounding vessels near disc borderVessels: Attenuated retinal arterioles
Rétinopathie hypertensive (tumeur maligne avancée)Papille : Papille surélevée et œdémateuse au bord flouRétine : Hémorragies manifestes en flammèches autour des vaisseaux situés
près du bord de la papille Vaisseaux : Artérioles rétiniennes rétrécies
Retinopathie hypertensiva (fortgeschritten)Papille: Prominent, ödematöse Papille; unscharfe RänderRetina: Steifige peripapilläre Blutungen Gefäße: Enggestellte Arterien
Retinopatía hipertensora (maligna avanzada)Disco: Disco elevado, edematoso; márgenes borrosos del disco.Retina: Hemorragias como llamas prominentes rodeadas de vasos cerca del
borde del disco.Vasos: Arteriolas retinales atenuadas.
Retinopatia ipertensiva (stadio maligno avanzato)Disco: Disco edematoso e sollevato; margini confusi.Retina: Premineneti aree emorragiche intorno ai vasi e sui bordi del disco.Vasi: Arteriole retiniche ridotte. 41
• Ophth Broch ForeignWorking.2 4/26/99 1:04 PM Page 41

42
Proliferative diabetic retinopathyDisc: Net of new vessels growing on disc surfaceRetina: Numerous hemorrhages, new vessels at superior disc marginVessels: Dilated retinal veins
Rétinopathie diabétique proliférantePapille : Apparition d’un réseau de nouveaux vaisseaux à la surface de la
papilleRétine : Nombreuses hémorragies, nouveaux vaisseaux sur le bord
supérieur de la papilleVaisseaux : Veines rétiniennes dilatées
Proliferative diabetische RetinopathiePapille: Netz neuer Gefäße auf der PapillenoberflächeRetina: Zahlreiche Blutungen, neue Gefäße am oberen PapillenrandGefäße: Erweiterte Venen
Retinopatía diabética proliferativaDisco: Red de nuevos vasos que crecen en la superficie del disco.Retina: Numerosas hemorragias, nuevos vasos en el margen superior del
disco.Vasos: Venas retinales dilatadas.
Retinopatia diabetica proliferativaDisco: Rete di nuovi vasi che si sviluppa sulla superficie del disco.Retina: Numerose emorragie, nuovi vasi sul margine superiore del disco.Vasi: Vene retiniche dilatate.
• Ophth Broch ForeignWorking.2 4/26/99 1:04 PM Page 42

43
PapilledemaDisc: Elevated, edematous disc, blurred disc margins; vessels engorgedRetina: Flame retinal hemorrhage close to discVessels: Engorged tortuous veins
Œdème papillairePapille : Papille surélevée et œdémateuse au bord flou ; vaisseaux engorgésRétine : Hémorragie rétinienne en flammèches près de la papilleVaisseaux : Veines sinueuses et engorgées
PapillenödemPapille: Prominent, ödematöse Papille; unscharfe Ränder, Gefäße zur Papille
aufsteigendRetina: Rote Netzhautblutungen nahe dem DiskusGefäße: Erweiterte Venen, vermehrt geschlängelter Verlauf
PapiledemaDisco: Disco elevado, edematoso, márgenes borrosos; vasos
congestionados.Retina: Hemorragia retinal como llama cerca del disco.Vasos: Venas tortuosas congestionadas.
Edema della pupillaDisco: Disco edematoso e sollevato; margini confusi; vasi ostruiti.Retina: Emorragie retiniche a fiamma vicino al disco.Vasi: Vene ostruite e tortuose.
• Ophth Broch ForeignWorking.2 4/26/99 1:04 PM Page 43

44
Benign choroidal nevusRetina: Slate gray, flat lesion under retina; several drusen overlying nevusVessels: Normal
Naevus choroïdien béninRétine : Lésion plate de couleur gris ardoise sous la rétine ; plusieurs corps
colloïdes sus-jacentsVaisseaux : Normaux
Gutartiger Choroid-NävusRetina: Schiefergrau, flache Läsion unter der Retina; mehrere Drusen über
dem NävusGefäße: NormalNevo coroidal benignoRetina: Lesión gris pizarra, plana, bajo la retina; varias inflamaciones sobre el
nevo.Vasos: Normales.
Nevo coroideo benignoRetina: Lesione piatta sotto la retina grigio ardesia; diverse dispersioni di luce
sopra il nevo.Vasi: Normali.
• Ophth Broch ForeignWorking.2 4/26/99 1:04 PM Page 44

45
Retinal detachmentDisc: NormalRetina: Gray elevation in temporal area with folds in detached sectionVessels: Tortuous and elevated over detached retina
Décollement de la rétinePapille : NormaleRétine : Soulèvement de couleur grise dans la région temporale avec replis
dans la section décolléeVaisseaux : Sinueux et surélevés sur la rétine décollée
NetzhautablösungPapille: NormalRetina: Temporal grau erhabene Ablösung mit Falten im abgelösten BereichGefäße: Vermehrt geschlängelt im abgelösten NetzhautbereichDesprendimiento de la retinaDisco: Normal.Retina: Elevación gris en el área temporal con pliegues en la sección
desprendida.Vasos: Tortuosos y elevados sobre la retina s desprendida.
Distacco della retinaDisco: Normale.Retina: Elevazione grigia nell’area temporale con pieghe nella sezione
distaccata.Vasi: Tortuosi e sollevati sopra la retina distaccata.
• Ophth Broch ForeignWorking.2 4/26/99 1:04 PM Page 45

Welch Allyn, Inc.4341 State Street Road
P.O. Box 220Skaneateles Falls, NY 13153-0220
U.S.A.Phone: (800) 535-6663 FAX: (315) 685-3361
(315) 685-4560
PM117072-01 Rev. B Printed in U.S.A.
• Ophth Broch ForeignWorking.2 4/26/99 1:04 PM Page 46