us water systems pulsar bodyguard whole house … · owners manual 390-pwfms1-a, 390-pwfms1-b,...
TRANSCRIPT

Visit us online at
www.uswatersystems.com
REVISION # 1.3 REVISION DATE May 24, 2018
US Water Systems Corporate Office 1209 Country Club Road Indianapolis, IN 46234 1-800-608-8792 [email protected]
Owners Manual 390-PWFMS1-A, 390-PWFMS1-B, 390-PWFMS1-C
US Water Systems Pulsar Bodyguard Whole House Chemical Removal Filter

2
Unpacking/Inspection………………………………………………………………………………..………...2 Safety Guide…………………………………………………………………………..………………………..2 System Overview……………………………………………………………………………………………….3 System Dimensions………………………………….….………………...…………………………….…….4 Pulsar Magna Filter Specification and Operation…………………...……….……………..………………6 Bodyguard Equipment Introduction……………………………….………………………………………….8 Pulsar Magna Filter Installation Instruction………………………..………..…...…………..………………9 Pulsar Magna Filter Startup Instructions………………………………………..…………..……………...13 Bodyguard Tank Installation………………………………………………………………………………….14 Bodyguard Tank Startup……………………………………………………………………………………...18 Pulsar Magna Filter Cartridge Replacement Instructions……………………………..………….……….19 Pulsar Bodyguard Warranty Information………………………………….…………...………..…………..22
Safety Guide
Be sure to check the entire system for any shipping damage or parts loss. Also note damage to the shipping cartons. Contact US Water Systems at 1-800-608-8792 to report any shipping damage within 24 hours of de-livery. Claims made after 24 hours may not be honored. Small parts, needed to install the system, are in a parts bags. To avoid loss of the small parts, keep them in the parts bag until you are ready to use them.
Unpacking / Inspection
Check and comply with your provincial / state and local codes. You must follow these guidelines.
Use care when handling the filter system. Do not turn upside down, drop, drag or set on sharp protru-sions.
WARNING: This system does not remove biolog-ical contaminants. US Water Systems recommends that bacteria levels be checked periodically to en-sure there is no bacteria present. Coliform and E.coli most importantly.
Table of Contents

3
Ma
gn
a F
ilte
r
Pu
lsar
Bo
dyg
uard
Sy
ste
m

4
System Dimensions

5
Pulsar Bodyguard systems are complete, self-contained, loaded with media and ready to use. A simple inlet and outlet connection is all that is required for installation. Please review operating pressures, temperatures and water chemistry limitations to ensure compatibility.
Specifications
Inlet/Outlet Connection 1” NPT
Temperature 40° - 110°F
Water Pressure 15 min, 100 max (PSI)
Dimensions (nominal - inches)
PWFMS2-A PWFMS2-B PWFMS2-C
A 55.0 61.0 61.0
B 52.5 58.5 58.5
C 9.0 10.0 13.0
D 2.5 2.5 2.5
E 3.0 3.0 3.0
System Dimensions
6
Magna Benefits
Magna Seal - It has a positive “o-ring seal” unlike traditional “flat top” filters
Magna Media – A 10” filter has 18 square feet of pleated polyester commercial grade me-dia, and a 20” filter has 36 square feet of pleated polyester commercial grade media – com-pare that to other brand pleated filters which have 30-50% less.
Magna Contaminant Capacity – Traps 12 times sediment depth filters, 8 times string wound filters, 2 times other pleated sediment filters.
Magna Clear Sump – Enables you to see when the filter is getting dirty.
Magna Made in USA – Nothing made outside of the U.S. and conforms to NSF/ANSI 61 Certified by WQA
Magna is a Latin word which means “ great,” and that is the true and accurate meaning of the Pulsar Magna Filter. The Magna Filter comes in two sizes: 4.5” x 10” for homes up to 3 bathrooms and 4.5” x 20” for homes with more than 3 bathrooms. This is a true commercial-grade filter.
Features Cartridge has 222 double o-ring seal for a positive barrier System conforms to NSF/ANSI 61 Certified by WQA Low pressure drop - typically < 3 PSID (clean)
Specifications
Micron Rating: 5 Microns
Media: Pleated Polyester
Peak Flow:
4.5” x 10” - 12 GPM
4.5” x 20” – 25 GPM
Maximum Pressure: 100 PSID
Pipe Size: 1” MNPT
Pulsar Magna Filter Specifications and Operation

7
Maintenance The Magna Pre-filter can be installed for up to a year. The Magna filter should be changed an-nually or sooner depending on the water usage or water conditions.
Pretreatment Guidelines Turbidity < 3 NTU pH 5-9.5 Iron < .3 ppm Manganese < .05 ppm This systems’ performance is dependent upon the incoming water quality and factors such as iron, sulfur and manganese need to be addressed ahead of the Pulsar Magna Pre-Filter. Life expectancy of the filter varies with the water supply, but many users experience filter change intervals in excess of a year when coupled with proper pre-treatment
Where to Install The Magna Pre-filter should be installed as the first line of treatment in the Pulsar system. In cases where there is extreme sediment levels in the water, it may be beneficial to install a backwashing sediment filter before the Magna Pre-filter. Water feeds with iron and other pre-cipitants may cause premature failure. If there are known extreme contaminant levels, those contaminants should be removed first. For installation questions please call 1-800-698-8792. WARNING! The Pulsar filtration system should not be installed in direct sunlight. The heat and UV light may cause the material to disfigure. Due to the transparency of the filter housing, photosynthesis may occur and cause algae to form on the outside of the filter and on the inner filter housing wall. Make sure the system is sheltered from the sun. WARNING: If extreme contaminant levels are present in the feed water, iron removal and sediment control should be installed prior to the Pulsar Magna.
Pulsar Magna Filter Specifications and Operation

8
Bodyguard Equipment Introduction
Pulsar Bodyguard™ Premium Whole House Chemical Removal Filter
The Pulsar BodyGuard is a non-electric carbon filter that removes chlorine, chloramines, chemicals, pesticides and a multitude of other contaminants through Prolonged Contact to de-liver the way nature intended it, using all NSF & WQA Certified Components.
The BodyGuard delivers clean, great-tasting water from every tap in your home by removing chlorine, chloramines and other chemicals in your tap water. The Pulsar BodyGuard removes the highest percentage of most contaminants of any filtration system on the market, due to the large amount of carbon that it contains. In many cases, the BodyGuard has 2 or 3 times the amount of carbon as our competitors*. It also reduces or removes other harmful contaminants including the following:
Chemicals Chlorine Chloramines Dioxin Heavy Metals
Herbicides Odors Pesticides Pharmaceuticals Tastes
TCE THM VOC’s … and many others
Benefits
The system reduces or removes chlorine and other chemicals
Unlike ordinary carbon filters it also removes or reduces chloramine
Delivers great-tasting water from every tap in your house
Softer skin and hair – You will see the difference after one shower
Great tasting beverages, coffee and tea
Eliminates Bad Tastes
Eliminates Foul Odors
Treats up to 1,000,000 Gallons or 5 Years
Extremely User Friendly
Easy to Install
Wastes No Water
Uses No electricity
Lifetime Warranty on all Parts
5-Year Performance Warranty
90-Day Satisfaction Guarantee Includes bypass valve and 1” MIP connection fittings. Installation kit is available.

9
1. Install the Pulsar Magna system in the desired location in the water treatment system. Typi-cally this will be the first component in the line of treatment. The cap are marked “Cartridge INLET” (Bag Outlet) and “Cartridge OUTLET” (Bag INLET) on the top of the housing. We will be using the Cartridge inlet and outlet configuration.
2. Mount the housing to the bracket using the supplied screws, orienting the housing to match the applications desired flow direction.
Pulsar Filter Installation Instructions

10
3. Install the supplied 1 1/2” x 1” reducing nipples in the housing. Be sure to use Teflon tape on the fittings. Tighten them with channels locks. If flex pipes with rubber gaskets are used there is no need to Teflon tape the outer fittings. If a normal plumbing fitting is used then be sure to Teflon tape the outer fitting.
4. Mount the Pulsar filter to the wall using the necessary fasteners for the wall type. Mark the
hole locations on the wall using a marker or pencil while holding the filter housing level. If this is to be mounted to a studded wall, a mounting board can be used. A shelf board or plywood can be mounted to the studs, then the filter housing can be screwed to the ply-wood or shelf board. (Shelf board pictured below).
Pulsar Filter Installation Instructions

11
5. Shut off the water and release the water pressure at the lowest sing or spigot. Cut the pipe and connect it to the filter. Connect the inlet plumbing to the inlet on the filter housing (Bag outlet, cartridge inlet). Tighten with channel locks.
6. Connect the outlet plumbing to the outlet on the filter housing (Bag inlet, cartridge outlet).
Tighten with channel locks. NOTE: The connections above are made using the installation kits used with the US Water Systems Modular Filtration System. These flex pipes have a rubber gasket and do not require Teflon tape. If pipe fittings are used be sure to use Teflon tape on the threads prior to installing the fitting on the filter housing. If copper pipe and fittings are being used make sure all solder joints within 12-15” of the filter housing are completed and the pipe is cool, prior to connecting it to the housing fittings.
Pulsar Filter Installation Instructions

12
1. Remove the sump from the filter housing and install the filter. A very small amount of sili-cone grease or water can be used to lubricate the O-rings on the filter. The filter housing cap has a couple that will accept the o-ringed nipple on top of the filter. Install the filter so the nipple on the top is fully seated in the filter housing cap.
2. Lubricate the O-ring on the filter housing sump and install it. Tighten the filter sump hand tight. That should be adequate. Do not use abrasive tools to tighten the housing or dam-age may occur.
Pulsar Filter Installation Instructions

13
1. Make sure that the distributor tube (shipped inside the tank) is centered in the indent in the bottom of the tank (use a flashlight if necessary).
2. The distributor tube should be even with the top of the tank. There is an o-ring inside the tank head
that seals around the distributor.
3. Cover the distributor tube opening with a cap or piece of tape. Duct tape works exceptionally well for this.
NOTE: IT IS IMPERATIVE THAT NO MEDIA (carbon) BE ALLOWED INSIDE THE DISTRIBUTOR TUBE. CARBON SHOULD NOT BE ALLOWED TO ENTER THE DISTRIBUTOR UNDER NO CIR-CUMSTANCES.
4. Add the gravel & carbon. 5. Place the included funnel inside the tank opening securely. It is easiest to
do this if there are two people (one to hold the funnel and one to pour the media), but one person can do it, especially if you secure the funnel to the tank with duct tape, being careful not to spill the media.
6. A mask or a cloth should be worn over the nose and mouth as the carbon fines can cause irritation to the nose if breathed in. However, the carbon is in no way toxic.
7. Pour all included gravel in the tank first followed by the all the carbon.
Bodyguard Tank Installation

14
The tank should now be filled approximately 70-80%. US Water does not send extra media. 8. Be sure to remove the tape and wipe the top of the tank and distributor tube with a clean cloth. 9. Fill the tank with water until it is approx. 4” from the top. Be sure to let the carbon soak for a mini-
mum of 2 hrs. 10. Lubricate the o-rings on the head with food grade silicone lubricant*. (part #995-1014081, not includ-
ed) Make sure that the upper basket (Figure B) is securely attached to the tank head. [* If food grade silicone is not available, use corn or vegetable oil.]
11. Install the head back on the tank and tighten hand tight. Do not use tools to tighten the head or
damage may occur. ****NEVER USE A PETROLEUM BASED LUBRICANT OR VASOLINE****
12. Install the bypass on the tank head. Lubricate the O-rings on the bypass and hand tighten the nuts.
Bodyguard Tank Installation

15
13. Assemble the tank connectors using the locking clip and the O-ring. 14. Make sure the O-ring isn’t twisted then lubricate it with silicone grease or corn oil. Hand tighten the
nuts on the bypass. NOTE: It is normal for the bypass and connectors to move/float when the nuts are tightened.
This is an intentional design feature intended to allow flexibility with the connections and possible tank deflection. These connections will be tight once the water is on and pres-sure is applied.
Bodyguard Tank Installation

16
1. Place the Pulsar Bodyguard tanks in the desired location on a flat level surface. 2. Make sure the tank head is tightened securely by hand tightening—Do Not Use a Wrench.
Hand-tight is recommended. 3. Connect the inlet piping from the Magna filter to the DOWNFLOW inlet on the Pulsar
Bodyguard carbon tank.
4. Connect the outlet of the Pulsar Bodyguard carbon tank (marked upflow inlet) to the next piece of equipment in the treatment system or to the plumbing distribution system.
5. Keep the Pulsar Bodyguard tank in the bypass position until startup.
6. Proceed to the Start-up.
Bodyguard Tank Installation
17
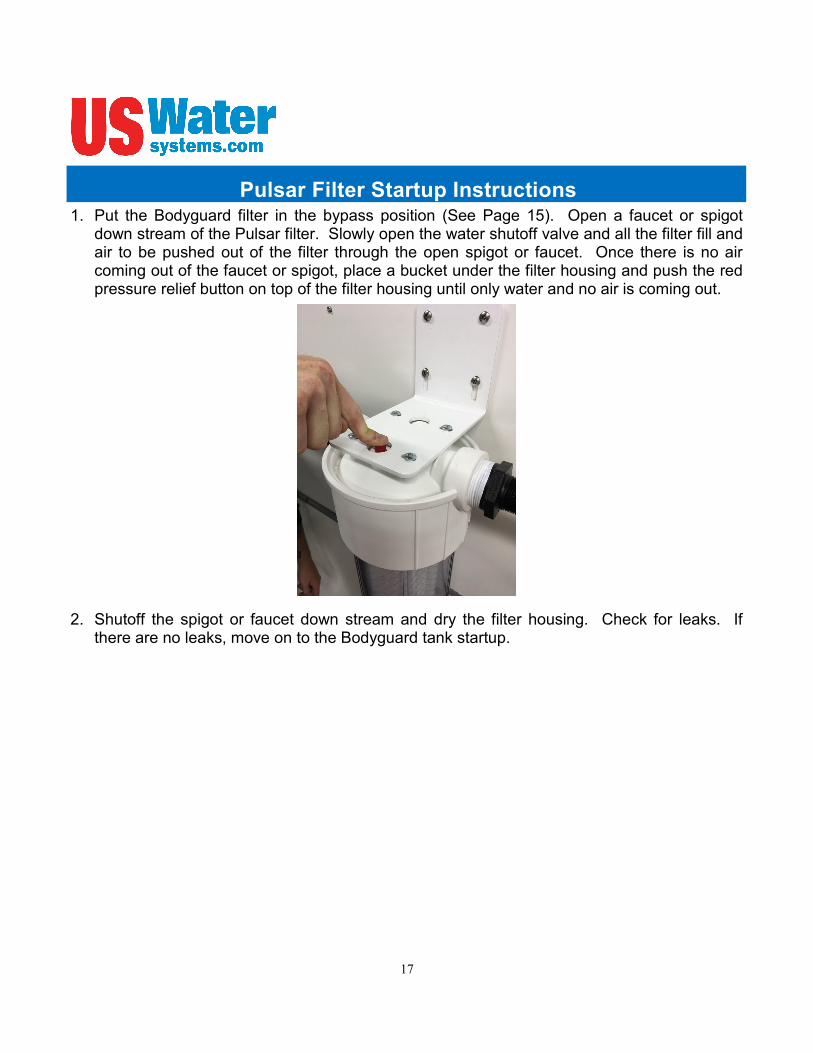
1. Put the Bodyguard filter in the bypass position (See Page 15). Open a faucet or spigot down stream of the Pulsar filter. Slowly open the water shutoff valve and all the filter fill and air to be pushed out of the filter through the open spigot or faucet. Once there is no air coming out of the faucet or spigot, place a bucket under the filter housing and push the red pressure relief button on top of the filter housing until only water and no air is coming out.
2. Shutoff the spigot or faucet down stream and dry the filter housing. Check for leaks. If
there are no leaks, move on to the Bodyguard tank startup.
Pulsar Filter Startup Instructions

18
1. Slowly open the Carbon Tank Bypass inlet valve on the Bodyguard tank. Allow the tank to fill with water until all the air is purged. Open a spigot or faucet downstream of the Bodyguard fil-ter. Slowly open the Bodyguard tank bypass outlet valve. Then, flush the carbon tank for 15-20 minutes or until water runs clear. If you see any carbon (other than the “black tinted color”), immediately bypass the system. If pieces of carbon are coming out of the carbon tank there could be an internal problem. Small fines (specs) or tinted water is normal.
NOTE: A white Styrofoam or plastic cup can be used to observe the water color. This helps
determine when the carbon is flushed. 2. Close the spigot or faucet and check for leaks. Repair as needed. 3. The Pulsar Bodyguard System is now ready for service.
Bodyguard Filter Start Up
WARNING: FLUSH THE BODY GUARD TANK BEFORE INSTALLING ANY
DOWNSTREAM FILTER CARTRIDGE IN THE SYSTEM.

19
1. Shutoff the water supply. 2. Open a faucet of spigot closest to the filter housing and allow all the water to empty from
the plumbing system. 3. Push the red button on the top of the filter housing to release the remaining water pressure. 4. Remove the sump by turning it counterclockwise. WARNING! If the pressure is not released, the filter sump will be very difficult to get loose. It is imperative that the water pressure is released prior to attempting to remove the filter sump. 5. Remove the sump by spinning it counterclockwise until the sump is completely removed.
Pulsar Filter Cartridge Replacement Instructions
20
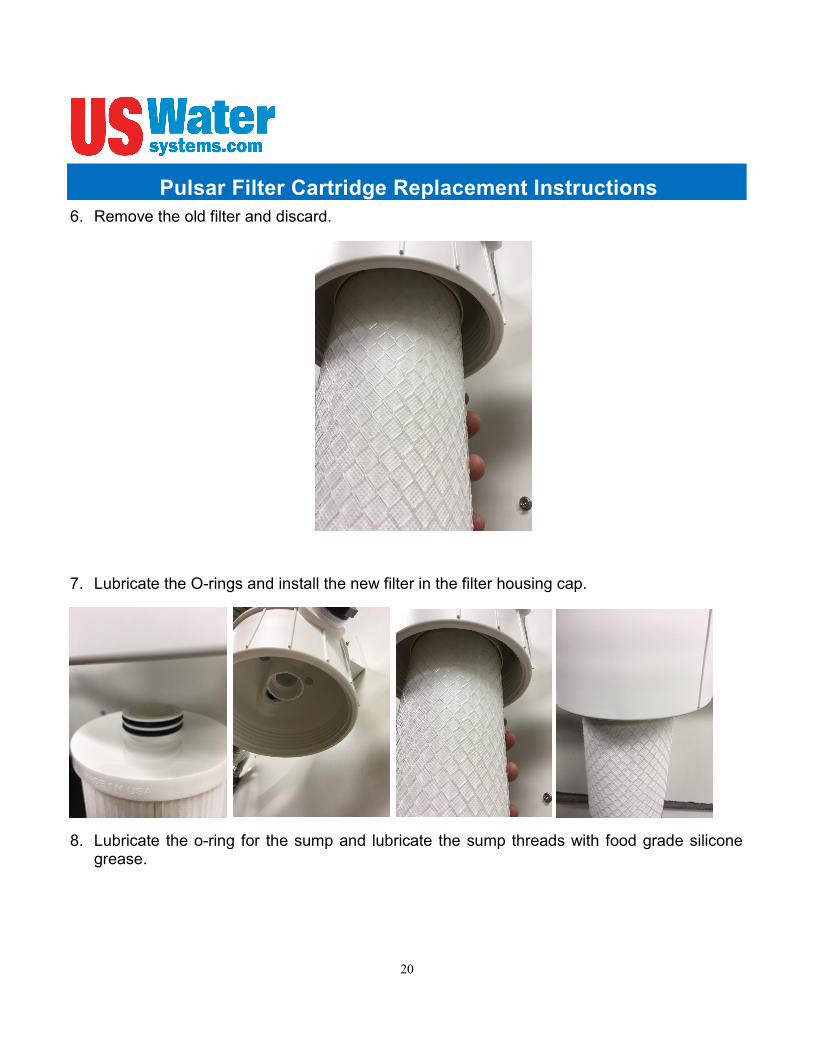
6. Remove the old filter and discard. 7. Lubricate the O-rings and install the new filter in the filter housing cap.
8. Lubricate the o-ring for the sump and lubricate the sump threads with food grade silicone grease.
Pulsar Filter Cartridge Replacement Instructions

21
9. Install the filter sump in the filter cap by turning it clockwise until it is hand tight. NOTE: The housing should spin tight fairly easily. If not, add more lubrication to the sump threads. This will aid with removing the sump when the filter needs to be replaced again. 10. Turn on the water supply and open a spigot downstream of the Pulsar filter to release the
air. 11. Once the air has been released, push the red button on top of the filter housing to release
any additional air in the filter housing. 12. Check the housing for leaks and repair as necessary.
Pulsar Filter Cartridge Replacement Instructions

22
GENERAL PROVISIONS This warranty does not apply to any commercial or industrial installations or to any part of the water conditioner which has been subjected to misuse, neglect, alteration or accident; or to any damage caused by fire, flood, freezing, Acts of God, or any other casualty, or if the original serial numbers have been removed.
These warranties are in lieu of all other warranties expressed. or implied, and we do not authorize any person to assume for us any other obligation on the sale of this
water conditioner. No responsibility is assumed for delays
or failure to meet these warranties caused by strike, government regulations or other circumstances beyond the control of US WATER SYSTEMS, INC..
TO OBTAIN WARRANTY SERVICE, CALL OR WRITE: US WATER SYSTEMS, INC. 1209 COUNTRY CLUB ROAD INDIANAPOLIS, IN 46234 (800) 608-USWA.
ANY IMPLIED WARRANTIES OF FITNESS OR MERCHANTABILITY ARE LIMITED TO THE TERMS OF THIS EXPRESSED WARRANTY AND THERE ARE NO WARRANTIES WHICH EXTEND BEYOND THOSE HEREIN. US WATER SHALL NOT BE LIABLE FOR ANY INCIDENTIAL OR CONSEQUENTIAL DAMAGES.
SOME STATES DO NOT ALLOW THE EXCLUSION OR LIMITATIONS OF INCIDENTAL OR CONSEQUENTIAL DAMAGES SO THE ABOVE LIMITATION MAY NOT APPLY TO YOU. THIS WARRANTY GIVES YOU SPECIFIC LEGAL RIGHTS, AND YOU MAY ALSO HAVE OTHER RIGHTS WHICH VARY FROM STATE TO STATE.
THIS WARRANTY MAY BE TRANSFRRED TO A SUBSEQUENT OWNER WITH WRITTEN APPROVAL OF US WATER AND PAYMENT OF STANDARD TRANSFER FEE.
For the lifetime of the original purchaser, at the original residential place of installation of this Pulsar Water Conditioning System, US WATER SYSTEMS, INC. warrants the following:
LIFETIME COVERAGE
Tank and Tank Head
We warrant that for the lifetime of the system from the date of purchase, we will replace the tank or tank head assembly at no charge to you except for transportation and standard labor charges. Damages due to environmental issues or improper installation are not covered.
Filter Housing
We warrant that for the lifetime of the system from the date of purchase, we will replace the filter housing at no charge to you except for transportation and standard labor charges. Damages due to environmental issues or improper installation are not covered.
Warranty