university of arkansas libraries arcgis desktop … of arkansas libraries arcgis desktop tutorial (...
TRANSCRIPT

University of Arkansas Libraries ArcGIS Desktop Tutorial
(http://libinfo.uark.edu/gis/tutorial.asp) Section 4
Page 1
Section 4: Preparing Data for Analysis
When a user acquires a particular data set of interest, it is rarely in the exact form that is needed during analysis. This tutorial describes how to change the data to make it more appropriate to the scope of the project. Data can be prepared using ArcToolbox accessible through either ArcCatalog or ArcMap for the purposes of this tutorial we have chosen to use ArcMap to interface with ArcToolbox.
Selecting Features:
It is often the case that we are only interested in a particular feature or features of an acquired data set and that the others are unnecessary to our purposes. We can extract only those features we need by selecting them and saving them in a new output feature class.
To select a feature of interest, the user must click the ArcToolbox Analysis Tools menu followed by Extract and then Select.

University of ArkansasArcGIS Desktop
(http://libinfo.uark.edu/gis/tutorial.asp)
Libraries Tutorial
Section 4 Page 2

University of Arkansas Libraries ArcGIS Desktop Tutorial
(http://libinfo.uark.edu/gis/tutorial.asp) Section 4
Page 3
The Select tool dialog box opens.
In the Select tool dialog box, you may select the Input Features from the drop‐down menu or browse to the feature. After specifying a name and location for the Output Feature Class move next to the Expression option. If you are not familiar or don't know the fields with which to structure an expression use the Query Builder accessible through the SQL button. From the list of fields, operators, and unique values put together an SQL query statement to select which features you want. Once the statement has been formulated, the OK button on the Query Builder should be clicked. Then the OK button on the Select dialog box. The output is automatically added to the map display. If the user wishes to learn more about the dissolve operation, the Help button should be selected.

University of ArkansasArcGIS Desktop
Libraries Tutorial
(http://libinfo.uark.edu/gis/tutorial.asp) Section 4
Page 4
Remove the layer that you are no longer in need of by performing a right mouse click and selecting Remove from the pop‐up menu.

University of ArkansasArcGIS Desktop
(http://libinfo.uark.edu/gis/tutorial.asp)
Libraries Tutorial
Section 4 Page 5

University of Arkansas Libraries ArcGIS Desktop Tutorial
(http://libinfo.uark.edu/gis/tutorial.asp) Section 4
Page 6
Clipping Features:
Sometimes the acquired data sets cover a greater area than the user is interested in. The data set can be clipped to the area of interest by using features in one layer to clip the features in another layer.
To clip one layer based on another, the user must us Clip found in the Extract portion of Analysis Tools in ArcToolbox.
Here the msa features outside the arkansas feature are not needed are therefore considered the Input Features. The arkansas features are the Clip Features or the polygon clip layer. A output shapefile or feature class should be selected, and the Finish button should be clicked. The clipped layer will appear in the ArcMap display.

University of ArkansasArcGIS Desktop
Libraries Tutorial
(http://libinfo.uark.edu/gis/tutorial.asp) Section 4
Page 7
To find out more about the Clip operation, the Help button can be clicked.
In the following example a state of Arkansas polygon was used to clip a Metropolitan Statistical Area layer. The resulting layer is a clipped msa layer that only shows the Metropolitan Statistical Areas in Arkansas.

University of ArkansasArcGIS Desktop
(http://libinfo.uark.edu/gis/tutorial.asp)
Libraries Tutorial
Section 4 Page 8

University of ArkansasArcGIS Desktop
(http://libinfo.uark.edu/gis/tutorial.asp)
Libraries Tutorial
Section 4 Page 9

University of Arkansas Libraries ArcGIS Desktop Tutorial
(http://libinfo.uark.edu/gis/tutorial.asp) Section 4 Page 10
Dissolving Features:
Dissolve is another tool used to trim away unnecessary detail that is not relevant to the scope of the project. Data can be simplified by dissolving several features in a layer into one.
To dissolve multiple features into one, the user must click the ArcToolbox Data Management Tools menu followed by Generalization and then Dissolve.

University of ArkansasArcGIS Desktop
(http://libinfo.uark.edu/gis/tutorial.asp)
Libraries Tutorial
Section 4 Page 11
University of Arkansas Libraries ArcGIS Desktop Tutorial
(http://libinfo.uark.edu/gis/tutorial.asp) Section 4 Page 12
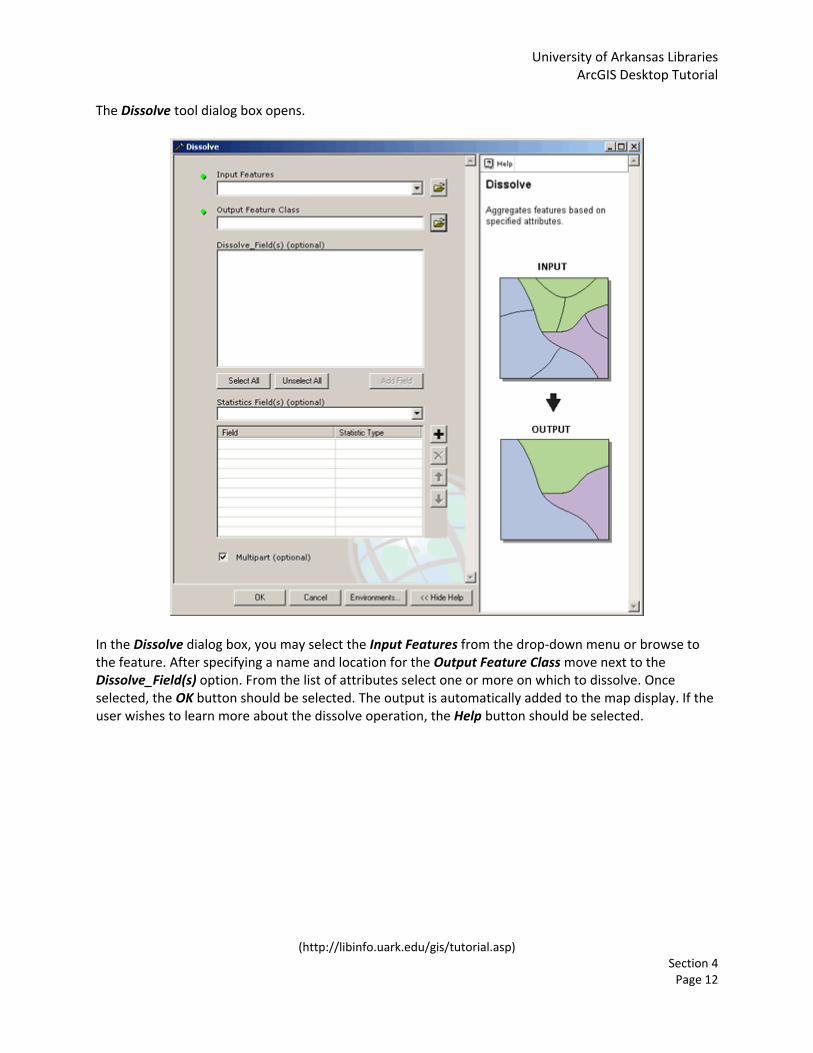
The Dissolve tool dialog box opens.
In the Dissolve dialog box, you may select the Input Features from the drop‐down menu or browse to the feature. After specifying a name and location for the Output Feature Class move next to the Dissolve_Field(s) option. From the list of attributes select one or more on which to dissolve. Once selected, the OK button should be selected. The output is automatically added to the map display. If the user wishes to learn more about the dissolve operation, the Help button should be selected.

University of ArkansasArcGIS Desktop
Libraries Tutorial
(http://libinfo.uark.edu/gis/tutorial.asp) Section 4 Page 13
In the following example, boundaries separating adjoining Arkansas' MSAs (Metropolitan Statistical Area) were dissolved so that there would be no distinction between individual MSAs.

University of ArkansasArcGIS Desktop
(http://libinfo.uark.edu/gis/tutorial.asp)
Libraries Tutorial
Section 4 Page 14

University of Arkansas Libraries ArcGIS Desktop Tutorial
(http://libinfo.uark.edu/gis/tutorial.asp) Section 4 Page 15
Exporting Data:
Using ArcMap, a user is capable of exporting a new data set from an existing one that contains selected features. As mentioned in the section three tutorial, once features have been selected the user can choose to create an ArcMap layer of only the selected features within a dataset. This is valuable for quick manipulation of datasets.
However, if the user wishes to use this new layer within other ArcGIS™ applications, the selected features should actually be EXPORTED as a real dataset, instead of a layer that will only exist in ArcMap.
Selected features within a dataset can be exported by right‐clicking on the data layer in the table of contents that contain the selected features the user wishes to export. Next, the user must point to the Data menu, and click Export Data. The Export Data Dialog Box appears.
The Export drop‐down list is set to the Selected Features option. This is the correct option if the user wishes to export the selected features within an existing data set. The other options allow the user to export all features or all features within the view extent. Once the correct export option is chosen, the user must specify whether the new data set should have the same Coordinate System as the layer's source data, or the same Coordinate Systems as the data frame. Next, an output file path and name should be chosen, and the OK button should be clicked.
Once the user clicks the OK button, ArcMap exports the features to a new feature class and prompts the user to add the exported data to the ArcMap display.
Projecting Data for Display in ArcMap:
A data layer's coordinate system information can be found by viewing its spatial metadata. When data sets have the same coordinate system they are correctly positioned with respect to each other in the data frame. If a data set is added to an ArcMap display that has a different coordinate system from those layers that have already been added to the data frame, ArcMap automatically changes its display so that it matches the existing layers. This change is only temporary and only exists within a particular data frame. The underlying coordinate system information DOES NOT change.

University of Arkansas Libraries ArcGIS Desktop Tutorial
(http://libinfo.uark.edu/gis/tutorial.asp) Section 4 Page 16
Projecting and Defining the Coordinate System or Spatial Reference:
Though one of the principal features of ArcGIS Desktop is the ability to change a dataset, feature class, or raster file's projection "on the fly" for display and analysis purposes, if the user acquires data sets with different coordinate systems or projections, the user may wish to change them so that they all match. A user can project data to a new data set using ArcToolbox™ Project for features and Project Raster for raster files, or the user can define or change the projection and coordinate system of a data set using Define Projection.
To project or define a projection or project data, the user must click the plus sign next to Data Management Tools, followed by a click on the plus sign next to Projections and Transformations.

University of ArkansasArcGIS Desktop
(http://libinfo.uark.edu/gis/tutorial.asp)
Libraries Tutorial
Section 4 Page 17

University of Arkansas Libraries ArcGIS Desktop Tutorial
(http://libinfo.uark.edu/gis/tutorial.asp) Section 4 Page 18
Project and Project Raster reproject input data and saves it as a new data set. Project allows the user to define or project feature classes and geodatabases. Project Raster allows the user to define or project coverages, grids, or TINs. The Define Projection tool applys coordinate system information to data sets and feature classes.
For example, if the user wishes to project a feature class the Project tool (shapefiles, geodatabases) should be opened by double‐clicking on the option in ArcToolbox. Once the Project dialog box opens, the user must select the data set to define. This can be done by clicking the folder icon and navigating to the shapefile or geodatabase of interest.
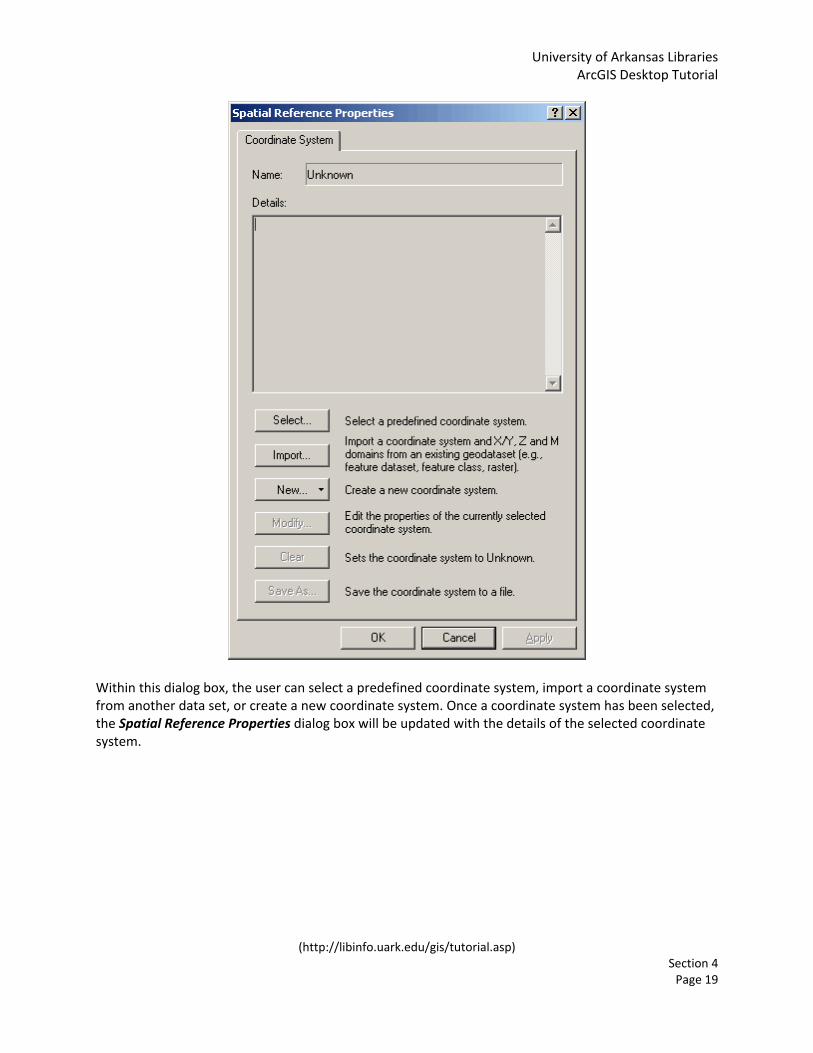
Once the data set name has been added to the dialog, the Output Coordinate System must be selected. To select a coordinate system click on the Spatial Reference Properties button highlighted by the red circle in the graphic above. The Spatial Reference Properties dialog box appears.
University of Arkansas Libraries ArcGIS Desktop Tutorial
(http://libinfo.uark.edu/gis/tutorial.asp) Section 4 Page 19
Within this dialog box, the user can select a predefined coordinate system, import a coordinate system from another data set, or create a new coordinate system. Once a coordinate system has been selected, the Spatial Reference Properties dialog box will be updated with the details of the selected coordinate system.

University of Arkansas Libraries ArcGIS Desktop Tutorial
(http://libinfo.uark.edu/gis/tutorial.asp) Section 4 Page 20
When the user clicks OK, the Output Coordinate System name appears in the Project dialog box.

University of ArkansasArcGIS Desktop
Libraries Tutorial
(http://libinfo.uark.edu/gis/tutorial.asp) Section 4 Page 21
Clicking OK produces a new data set with a different coordinate system. The new data set is automatically added to the list of layers. Though the new data set is a different coordinate system than the other layers it has been reprojected on the fly to match the other layers on screen.