universal cmdb integration guide (using ... · servicemanager software version: service manager...
TRANSCRIPT

Service ManagerSoftware Version: Service Manager 9.41 or later; UCMDB CP26 or later For the supported Windows® and UNIX® operating systems
ServiceManagerEnhancedAdapter9.41 User Guide
Document Release Date: February 2018 Software Release Date: February 2018
Legal Notices
WarrantyThe only warranties for Seattle SpinCo, Inc and its subsidiaries (“Seattle”) products and services are set forth in the express warranty statements accompanying such productsand services. Nothing herein should be construed as constituting an additional warranty. Seattle shall not be liable for technical or editorial errors or omissions containedherein.
The information contained herein is subject to change without notice.
Restricted Rights LegendConfidential computer software. Except as specifically indicated, valid license from Seattle required for possession, use or copying. Consistent with FAR 12.211 and 12.212,Commercial Computer Software, Computer Software Documentation, and Technical Data for Commercial Items are licensed to the U.S. Government under vendor'sstandard commercial license.
Copyright Notice© 2011 - 2018 Micro Focus or one of its affiliates.
Trademark NoticesAdobe® is a trademark of Adobe Systems Incorporated.
Microsoft® andWindows® are U.S. registered trademarks of Microsoft Corporation.
Oracle and Java are registered trademarks of Oracle and/or its affiliates.
Linux® is the registered trademark of Linus Torvalds in the U.S. and other countries.
DisclaimerCertain versions of software and/or documents (“Material”) accessible heremay contain branding from Hewlett-Packard Company (now HP Inc.) and Hewlett PackardEnterprise Company. As of September 1, 2017, theMaterial is now offered by Micro Focus, a separately owned and operated company. Any reference to the HP and HewlettPackard Enterprise/HPEmarks is historical in nature, and the HP and Hewlett Packard Enterprise/HPEmarks are the property of their respective owners.
Documentation UpdatesTo check for recent updates or to verify that you are using themost recent edition of a document, go to: https://softwaresupport.softwaregrp.com.
This site requires that you register for a Software Passport and to sign in. To register for a Software Passport ID, click Register for Software Passport on theMicro FocusSupport website at https://softwaresupport.softwaregrp.com.
You will also receive updated or new editions if you subscribe to the appropriate product support service. Contact your Micro Focus sales representative for details.
SupportVisit theMicro Focus Support site at: https://softwaresupport.softwaregrp.com.
This website provides contact information and details about the products, services, and support that Micro Focus offers.
Micro Focus online support provides customer self-solve capabilities. It provides a fast and efficient way to access interactive technical support tools needed tomanage yourbusiness. As a valued support customer, you can benefit by using the support website to:l Search for knowledge documents of interestl Submit and track support cases and enhancement requestsl Download software patchesl Manage support contractsl Look up support contactsl Review information about available servicesl Enter into discussions with other software customersl Research and register for software training
Most of the support areas require that you register as a Software Passport user and to sign in. Many also require a support contract. To register for a Software Passport ID,click Register for Software Passport on theMicro Focus Support website at https://softwaresupport.softwaregrp.com.
To findmore information about access levels, go to: https://softwaresupport.softwaregrp.com/web/softwaresupport/access-levels.
Integration Catalog accesses theMicro Focus Integration Catalog website. This site enables you to exploreMicro Focus Product Solutions tomeet your business needs,includes a full list of Integrations betweenMicro Focus Products, as well as a listing of ITIL Processes. The URL for this website ishttps://softwaresupport.softwaregrp.com/km/KM01702731.
ServiceManagerEnhancedAdapter9.41 User Guide
Micro Focus Service Manager (Service Manager 9.41 or later; UCMDB CP26 or later) Page 2 of 227
ContentsUsing the ServiceManagerEnhancedAdapter9.41 Adapter 10Chapter 1: Introduction 11
Who Should Read the SM-UCMDB Integration Documentation 11Purpose of the Integration 12
Supported Use Cases 12Enabling ITIL Processes 13Managing Planned Changes 14Managing Unplanned Changes 14Retrieving Service Manager Record Information 14Retrieving the Actual State of UCMDB CIs 15Accessing SM CI information in UCMDB 16How to View the Change History of the Primary CI of a ProblemRecord 16Support of Automated Service Modeling (ASM) 16Centralized CI Visualization and Impact Analysis 17
Tailor Service Manager Hybrid 17CI Visualization 19Impact Analysis 20
Core Features 21Push 21Federation 22Population 22
How CI information is Synchronized Between UCMDB and ServiceManager 22
CI Display Name Field in Service Manager 23CI Information Usage 23High-Level Components of the Integration 24Relationships Between Integration Components 25What Information is Stored in UCMDB 25What Information is Stored in Service Manager 25
Discovery Event Manager 26Discovery Event Manager managed fields 26
Add a managed field in Discovery Event Manager 27
ServiceManagerEnhancedAdapter9.41 User Guide
Micro Focus Service Manager (Service Manager 9.41 or later; UCMDB CP26 or later) Page 3 of 227

View, modify, or delete a managed field in Discovery Event Manager 28Discovery Event Manager rules 29
Discovery Event Manager rule options 29Add a rule in Discovery Event Manager 31View or modify rules in Discovery Event Manager 32Delete a set of rules in Discovery Event Manager 32
Add a configuration item in Discovery Event Manager 33View, modify, or delete a configuration item in Discovery Event Manager34Customize changes in Discovery Event Manager 34Customize incidents in Discovery Event Manager 35Discovery Event Manager change open process 36
Chapter 2: How to Upgrade Your Integration 37Task 1: Close All SM Unplanned Changes and Incidents Created for CIModifications 38Task 2: Upgrade Service Manager 38(Optional) Task 3: Copy Data to the joinnode Table 38Task 4: Update the DEM Rules in Service Manager 39Task 5: Enable the RESTful APIs for Custom CI Types in Service Manager39Task 6: Upgrade UCMDB 42Task 7: Update the Configurations for Custom CI Types in UCMDB 43
Step 1. Convert the mapping scripts from XSLT to XML and Groovy. 43Step 2. Update the configuration files. 48Step 3. Enable Push, Population and Federation for CI types. 49
Task 8: Upgrade Field Mapping 49Task 9: Reconfigure an Integration Point 52Task 10: Run a Full Push to Resynchronize CI Names 52Task 11: Restore the DEM Rules in Service Manager 53
Chapter 3: Integration Setup 54Integration Requirements 54
Supported Product Versions 54Setting up Required Components 55Deploying an Appropriate Adapter 55
Integration Setup Overview 56Service Manager Setup 56
How to Create an Integration User Account 57How to Add UCMDB and UCMDB Browser Connection Information 58
ServiceManagerEnhancedAdapter9.41 User Guide
Micro Focus Service Manager (Service Manager 9.41 or later; UCMDB CP26 or later) Page 4 of 227

Universal CMDB Setup 62How to Create an Integration Point in UCMDB 62
Populating UCMDB with Service Manager CI Data 65How to Define Population Jobs in UCMDB 66View Service Manager CI Data in UCMDB 68How to Schedule CI Population Jobs 68
Pushing UCMDB CI Data to Service Manager 69How to Define Data Push Jobs in UCMDB 69How to Schedule Data Push Jobs 71
Data Push Error Handling 73How to View UCMDB CI Data in Service Manager 73How to View the Change History of the Primary CI of a Problem Record 74
Federating Service Manager Ticket Data to UCMDB 75Federation Queries 75Examples of Using Federation 75
Example 1: Federate All SM Incident Tickets 76Example 2: Federate SM Incident Records that Affect a UCMDBBusiness Service CI 80Example 3: Federate Incident, Change, and Problem Record Datafrom Service Manager for UCMDB CIs 87Example 4: Retrieve Service Manager Records Related to a UCMDBCI 90
Chapter 4: Multi-Tenancy (Multi-Company) Setup 93Multi-Tenancy (Multi-Company) Support 93
Implementing Multi-Tenancy in the UCMDB-SM Integration 94Mandanten SM Security Layer 94What Multi-Tenant Information is Stored in UCMDB 94What Multi-Tenant Information is Stored in Service Manager 95Synchronization of Company Records 95
UCMDB Customer ID 97UCMDB User ID and Password 97Company Code 98CI Reconciliation Rules 98Company Information Pushed to CI and CI Relationship Records 98Company Information Replicated to Incident Records 99Schedule Records 99
Tenant-Specific Discovery Event Manager (DEM) Rules 99
ServiceManagerEnhancedAdapter9.41 User Guide
Micro Focus Service Manager (Service Manager 9.41 or later; UCMDB CP26 or later) Page 5 of 227

Multi-Tenancy Use Cases 100Multi-Tenancy Requirements 101Setting up the Multi-Tenancy Integration in UCMDB 101
How to Install a Separate Data Flow Probe for Each Tenant 102How to Start Tenant-Specific Data Flow Probes 103How to Configure IP Ranges for Tenant-Specific Data Flow Probes 104
Setting up the Multi-Tenancy Integration in Service Manager 104How to Start the Schedule Process 105How to Configure the Service Manager System Information Recordand Integration Manager 106How to Add Tenant-Specific UCMDB User ID and Password Values 107How to Add UCMDB Customer ID values to Existing Companies 108How to Synchronize Existing Companies from Service Manager toUCMDB 109How to View Whether Company Information Is in UCMDB 109How to Resynchronize an Existing Company with UCMDB 110How to Inactivate a Synchronized Company 111How to Reactivate an Inactive Company 111How to Add Tenant-Specific DEM Rules 112
Chapter 5: Standards and Best Practices 113UCMDB-SM Configuration Best Practices 113
Centralized CI Type Management 113Visual Mapping Tool 114
Bi-Directional Data Synchronization Recommendations 115Push Scheduling Recommendations 116Push in Clustered Environments 118
Dedicated Web Services 118Step-by-Step Cluster Configuration Process 118
How to Configure Web Clients 118How to Configure the Debugnode 119
Connecting to Multiple SM Processes 120Initial Load Configurations 120
Push Performance in a Single-Threaded Environment 121Implementing Multi-Threading 121Push Performance in Multi-Threaded Environments 123Push Performance in Multiple SM Processes Environments 123
ServiceManagerEnhancedAdapter9.41 User Guide
Micro Focus Service Manager (Service Manager 9.41 or later; UCMDB CP26 or later) Page 6 of 227

How to Set up SM DEM Rules for Initial Loads 124How to Configure Differential or Delta Load DEM Rules 125Fault Detection and Recovery for Push 125How to Enable Lightweight Single Sign-On (LW-SSO) Configuration 126
Frequently Asked Questions 126When Is a New CI Created in Service Manager? 127Can I Analyze the Reason for a CI Deletion in SM? 127How Do I Monitor Relationship Changes Between UCMDB and SM? 128What Kinds of Relationships are Pushed from UCMDB to SM? 128What is a Root CI Node? 129What Is a Root Relationship? 129What is the “Virtual-Compound” Relationship Type Used in a UCMDB-SM Integration Query? 129When Do I Need the Population Feature? 130Can I Populate Physically Deleted CIs from SM to UCMDB? 130How Do I Keep the Outage Dependency Setting of a CI Relationship inSM? 130How Do I Create an XML Configuration File? 132How Do I Use the Load Fields Button to Add Multiple Managed Fields?133What Is the Purpose of the <container> Element in the PopulationConfiguration File (smPopConf.xml)? 134Can I Populate Sub-Item Deletions? 135What Happens if a Population Job Failed or Completed? 135
Chapter 6: Tailoring the Integration 136Integration Architecture 136
Integration Class Model 136Integration Queries 136
Queries for Push 137Queries for Actual State 139Queries for Federation 140Queries for Population 140Query Requirements 142
Service Manager Web Services 142Managed Fields 142
Service Manager Reconciliation Rules 147Performance Implications 147Dependence on DEM Rules 148
ServiceManagerEnhancedAdapter9.41 User Guide
Micro Focus Service Manager (Service Manager 9.41 or later; UCMDB CP26 or later) Page 7 of 227
Service Manager Discovery Event Manager Rules 148Change the Conditions Under Which a DEM Rule Runs 148Change the Action the DEM Rule Takes 149Create Custom JavaScript to Open Change or Incident Records 149
Default values to create a new CI 149Default values to create a new change 150Default values to create a new incident 150
Integration Tailoring Options 151How to Enable ASM Support 151How to Update the Integration Adapter Configuration File(sm.properties) 152How to Add DEM Reconciliation Rules 156How to Add Discovery Event Manager Rules 158
DEM Rules 159Action if matching record does not exist 159Action if record exists but unexpected data discovered 160Action if record is to be deleted 160
CI Attributes Displayed in Change and Incident Records 161Searching for Change and Incident Records Opened by theIntegration 161
How to Add a CI Relationship Type to the Integration for Data Push 162How to Create a Query to Push a Relationship Type 162How to Map a Relationship Type Query to the Service ManagerWeb Service Object 165How to Create an XML Configuration File for a Relationship Type 166
How to Add a CI Attribute to the Integration for Data Push 168How to Add the CI Attribute to the UCMDB Class Model 168How to Add a CI Attribute to the Query Layout 170How to Add a Web Service Field for the Service Manager CI Type 171
Add a Simple Attribute to the SM CI Type 172Add an Array of Structure or Structure to the CI Type 175
How to Map the CI Attribute to a Service Manager Web ServiceField 180
How to Add a CI Type to the Integration for Data Push 182How to Add the CI Type to the UCMDB Class Model 183How to Create a Query to Synchronize the CI Type 185How to Add the CI Type’s Attributes to the Query Layout 189
ServiceManagerEnhancedAdapter9.41 User Guide
Micro Focus Service Manager (Service Manager 9.41 or later; UCMDB CP26 or later) Page 8 of 227

How to Add the CI Type to Service Manager 191How to Map the CI Type’s Attributes to Web Service Fields 193
How to Add a Custom Query to an Integration Job 197How to Add a CI Type, Attribute or Relationship Type to the Integrationfor Population 198How to Enable or Disable UCMDB ID Pushback for a CI Type 198How to Add an Attribute of a Supported CI Type for Federation 200
Chapter 7: Troubleshooting 207Troubleshooting Data Push Issues 207
How to Check the Error Message of a Failed Push Job 208How to Check the Error Messages of Failed CIs or Relationships in aPush Job 210How to Check the Push Log File 210Typical Push Errors and Solutions 212
Query not Configured in smPushConf.xml 212Mapping File not Well Formed 214
Troubleshooting Population Issues 216How to Check the Error Message of a Failed Population Job 217How to Check the Population Log File 217Typical Population Error Messages and Solutions 218
No TQL Query Configured in smPopConf.xml 218Nonexistent Mapping File Name Defined for a TQL Query insmPopConf.xml 221
Troubleshooting Federation Issues 222How to Check the Error Message of a Failed Federation Request 222Typical Federation Error Messages and Solutions 223
Mapping File for the Federation TQL Query Is not Well Formed 223Send documentation feedback 227
ServiceManagerEnhancedAdapter9.41 User Guide
Micro Focus Service Manager (Service Manager 9.41 or later; UCMDB CP26 or later) Page 9 of 227

Using theServiceManagerEnhancedAdapter9.41AdapterThis document describes how to implement an integration between ServiceManager and UCMDB byusing the ServiceManagerEnhancedAdapter9.41 adapter.
For information about using the ServiceManagerAdapter9.41 adapter, see theServiceManagerAdapter9.41 User Guide.
ServiceManagerEnhancedAdapter9.41 User GuideUsing the ServiceManagerEnhancedAdapter9.41 Adapter
Micro Focus Service Manager (Service Manager 9.41 or later; UCMDB CP26 or later) Page 10 of 227
Chapter 1: IntroductionThis chapter provides an overview of the Universal CMDB (UCMDB) - ServiceManager (SM)integration (also referred to as the Universal CMDB (UCMDB) integration or UCMDB-SM integration inthe ServiceManager documentation).
Who Should Read the SM-UCMDB Integration Documentation 11
Purpose of the Integration 12
Supported Use Cases 12
Core Features 21
How CI information is Synchronized Between UCMDB and ServiceManager 22
CI Display Name Field in ServiceManager 23
CI Information Usage 23
High-Level Components of the Integration 24
Relationships Between Integration Components 25
What Information is Stored in UCMDB 25
What Information is Stored in ServiceManager 25
Discovery Event Manager 26
Discovery Event Manager managed fields 26
Discovery Event Manager rules 29
Add a configuration item in Discovery Event Manager 33
View, modify, or delete a configuration item in Discovery Event Manager 34
Customize changes in Discovery Event Manager 34
Customize incidents in Discovery Event Manager 35
Discovery Event Manager change open process 36
Who Should Read the SM-UCMDB IntegrationDocumentationThe documentation is intended for a system implementer or system administrator who will beestablishing andmaintaining a connection between the UCMDB and ServiceManager systems. Thedocumentation assumes that you have administrative access to both systems.
Service Manager (Service Manager 9.41 or later; UCMDB CP26 or later) Page 11 of 227
Purpose of the IntegrationAn integration between Universal CMDB (UCMDB) and ServiceManager enables you to shareinformation about the actual state of a configuration item (CI) between your UCMDB system and aServiceManager system. CIs commonly include IT services, hardware and software. Any organizationthat wants to implement the best practices ConfigurationManagement and ChangeManagement ITILprocesses can use this integration to verify that CIs actually have the attribute values the organizationhas agreed to support.
You can use this integration to automate the creation of ServiceManager change or incident records toupdate or roll back CIs that have unexpected attribute values. ServiceManager allows you toprogrammatically define what actions you want to take whenever a CI’s actual state does not matchthe expected state as defined in the CI record.
The integration offers several different ways for users to view CI actual state information:
l By default, the integration automatically updates themanaged fields of ServiceManager CI recordsas part of the regular UCMDB synchronization schedule. You can choose the option to configurethe integration to automatically create change or incident records instead.
l A ServiceManager user can view the current actual state of a CI by looking at the Actual Statesection in the CI record. When you open the Actual State section, ServiceManager makes a webservices request to UCMDB and displays all CI attributes the request returns. ServiceManageronly makes the web service call when you open this section.
l A ServiceManager user can use theView in UCMDB option to log in to the UCMDB system andview the current CI attributes from UCMDB. The ServiceManager user must have a valid UCMDBuser name and password to log in to the UCMDB system.
Supported Use CasesThis section describes use cases that are supported by the UCMDB-SM integration. The supporteduse cases provide the core business processes that are enabled by the UCMDB-SM integration.
The followingmain business use cases are supported by the UCMDB-SM integration:
l Planned Change: A change created in ServiceManager (SM) through the formal SM changeprocess.
l Unplanned Change: A change or incident that occurred in SM and does not conform to the formalSM change process.
ServiceManagerEnhancedAdapter9.41 User GuideChapter 1: Introduction
Micro Focus Service Manager (Service Manager 9.41 or later; UCMDB CP26 or later) Page 12 of 227
l Retrieving SM Incident, Change, and Problem record information: The ability to view SM Incident,Change and Problem record information in UCMDB.
l Actual State: The ability for SM users to view the actual state of UCMDB CIs.
l View CIs in UCMDB: The ability for SM users to view SM CI information in UCMDB or in UCMDBBrowser.
l Primary CI History in UCMDB: The ability for SM users to view UCMDB change history of theprimary CI of a Problem record in SM for root cause investigation.
l Support of Automated ServiceModeling (ASM) in UCMDB Browser: The ability that enables theintegration to push consumer-provider relationships that are automatically discovered by ASM toSM, and enables SM users to access the ASM functionality of UCMDB Browser.
l Centralized VI visualization and impact analysis: The ability for SM users to access, directly fromthe SM user interface, the CI Visualization and Impact Analysis functionalities of UCMDB Browser.
All of the use cases provide important capabilities that enable the user to perform ITIL (IT InfrastructureLibrary) processes. The ITIL processes refer to a set of best practices that define and outline howorganizations shouldmanage their IT.
Enabling ITIL Processes
By activating CI push from UCMDB to SM the user facilitates ITIL processes such as Incident,Problem and ChangeManagement in SM.
SM utilizes the data pushed from UCMDB in the followingmodules:
l Incident Management: the Service Desk operator (SD Agent) selects the “Service” and the“Affected CI” for the specific Incident record.
l ProblemManagement: the SD agent selects the “Service” and the “Primary CI” for the specificProblem record.
l ChangeManagement: the SD agent selects the “Service” and the “Affected CI(s)” for the specificChange record.
In each of the previously mentioned ITIL processes, SM utilizes CI information for Service, AffectedCIs and Primary CIs that all originate in UCMDB.
ServiceManagerEnhancedAdapter9.41 User GuideChapter 1: Introduction
Micro Focus Service Manager (Service Manager 9.41 or later; UCMDB CP26 or later) Page 13 of 227

Managing Planned Changes
The purpose of the “Planned Change” use case is to provide IT organizations a formal process by whichchanges to the IT infrastructure are introduced after thorough review and analysis. This is performedaccording to the “ChangeManagement” process defined in ITIL v3.
A “Planned Change” is initiated by the SM user through the formal “ChangeManagement” processmodule in SM. This is followed by the actual change implementation.
The actual changes are discovered by a discovery tool such as DDMA, and then updated in UCMDBand the relevant modifications are pushed to SM. Once the user has validated the change, the usercloses the relevant planned change in SM.
Managing Unplanned Changes
The purpose of the “Unplanned Change” use case is to provide IT organizations a formal process bywhich all changes that occur to the IT infrastructure are both logged and conventionalized through theorganizations formal approval process.
An “Unplanned Change” is a change that is recognized by a Discovery tool such as DDMA. Thechange is first updated and visible in UCMDB and then the data is pushed to SM. SM recognizes thechange and as a result an “Incident” or “Change” record is generated.
These Changes are seen also in the SM “Pending Changes” section in the Configuration Item form,once approved they aremoved to the SM “Historic Changes” section.
Retrieving Service Manager Record Information
Retrieving record information from within UCMDB provides all Software applications users with accessto this information by using UCMDB's federation capabilities and supporting APIs. These applicationsinclude Asset Manager (AM), Operations Orchestration (OO), and so on.
SM record data is accessed from within UCMDB using UCMDB federation capabilities. SM recorddata includes Incident, Problem and Change records as well as a key set of their attributes.
UCMDB enables users to create reports or views that combine the federated record data from SMwithCI information from UCMDB.
ServiceManagerEnhancedAdapter9.41 User GuideChapter 1: Introduction
Micro Focus Service Manager (Service Manager 9.41 or later; UCMDB CP26 or later) Page 14 of 227

Retrieving the Actual State of UCMDB CIs
By default, ServiceManager only stores and displays the expected or managed state of CIs. Theinformation ServiceManager displays in the ConfigurationManagement form is essentially thedefinitive list of attributes that the CI should have. However, the actual state of the CI may differ fromthe expected state.
The purpose of “Actual State” is to enable SM users insight into CIs’ current state as detected by“Discovery Tools” and populated in UCMDB. This state provides up-to-date information that may varyfrom the information displayed in SM both in content and in scope.
The “Actual State” of the CI is displayed in SM in order to enable the user to validate the current state ofthe CI that resides in UCMDB or in another data repository.
SM users retrieve the Actual State of CIs from UCMDB or additional data sources by viewing the CI'sActual State section in the SM Configuration Item form.
To view the actual state of the CI, youmust first create an integration to an Universal CMDB server.The Universal CMDB server periodically discovers the actual state of CIs and records the actual statein the ConfigurationManagement database. ServiceManager accesses the actual state information byusing aWeb services connection. ServiceManager sends the CI ID to the Universal CMDB server andreceives a full list of the attributes for that CI. ServiceManager displays the CI attributes in the ActualState section of the ConfigurationManagement form.
If a ServiceManager CI does not have amatching CI in the Universal CMDB server, ServiceManagerdoes not display the Actual State section. For example, youmay track office furnishing CIs in ServiceManager that cannot be discovered and tracked in Universal CMDB.
To retrieve the actual state of a configuration item in ServiceManager, follow these steps:
1. Click Configuration Management > Resources > Search CIs.
2. Use search or advanced search to find one or more records.
3. Select the CI with the actual state that you want to see.
4. From the CI detail form, open theActual State section. ServiceManager displays the actual stateof the CI, as well as its UCMDB Id value.
Note: TheActual State section is visible only if your system has an active integration to anUniversal CMDB server and the CI has amatching entry in the ConfigurationManagementdatabase. ServiceManager does not display theActual State section if there is nomatchingCI in the Universal CMDB server.
ServiceManagerEnhancedAdapter9.41 User GuideChapter 1: Introduction
Micro Focus Service Manager (Service Manager 9.41 or later; UCMDB CP26 or later) Page 15 of 227

Accessing SM CI information in UCMDB
When integrated with UCMDB and UCMDB Browser, ServiceManager (SM) enables SM users toview CI information in UCMDB or UCMDB Browser.
When integrated with UCMDB, ServiceManager displays aView in UCMDB button in a CI record thatalso exists in UCMDB. If ServiceManager is also integrated with UCMDB Browser, aView inUCMDB Browser button is displayed instead.
If you click either button, you are prompted to enter a UCMDB user name and password to openUCMDB or UCMDB Browser in the context of the current CI.
How to View the Change History of the Primary CI of a
Problem Record
When integrated with UCMDB Browser, ServiceManager displays aPrimary CI History in UCMDBsection in a problem record whose primary CI is synchronized from UCMDB. You can view the CIchanges on that primary CI for root cause investigation.
For information about how to enable an integration with UCMDB Browser, see "How to Add UCMDBandUCMDB Browser Connection Information" on page 58.
To view the primary CI change history, follow these steps:
1. Log in to ServiceManager.
2. Navigate toProblem Management, and perform a search to open a problem record whosePrimary CI is synchronized from UCMDB.
3. Click thePrimary CI History in UCMDB tab.
Support of Automated Service Modeling (ASM)
Service Discovery in UCMDB Browser enables you to configure and run activities to discover yourbusiness services and applications. The discovery process starts from aCI that represents the URL ofa specified service, and continues only with other CIs that can potentially be related to the service. Thisfunctionality is also referred to as Automated ServiceModeling (ASM).
Note: ASM is supported only for UCMDB 10.20 or later.
ServiceManagerEnhancedAdapter9.41 User GuideChapter 1: Introduction
Micro Focus Service Manager (Service Manager 9.41 or later; UCMDB CP26 or later) Page 16 of 227

Starting with ServiceManager version 9.41, the ServiceManager adapters support data push ofconsumer-provider relationships that are discovered by ASM. The adapters provide an ASM TQL queryfor push.
Note: Only consumer-provider relationships directly pointing from a Business Element CI to aRunning Software CI can be pushed. Consumer-provider relationships between a BusinessElement CI and a Cluster CI cannot be pushed.
Additionally, ServiceManager can integrate with ASM so that SM users can access ASM in thecontext of an affected service in SM. This ability enables SM users to see the tree structure of aservice CI and facilitates servicemodeling in SM.
Note: To enable ASM support, you still need tomanually tailor related forms in ServiceManager.For more information, see theHow to Enable ASM Support topic.
Centralized CI Visualization and Impact Analysis
Once ServiceManager is integrated with UCMDB and UCMDB Browser, ServiceManager users canaccess UCMDB Browser directly from within ServiceManager to visualize CI relationships andsimulate the impact in the context of an affected service or configuration item (CI) in ServiceManager.
If light-weight single sign-on (LW-SSO) is not enabled for the integration, ServiceManager users areprompted with UCMDB Browser login page; however, the integration provides aUse a dedicated useraccount option, which enables you to configure a dedicated UCMDB Browser user account so thatusers bypass UCMDB Browser login page.
Additionally, UCMDB Browser CI visualization and impact graphs are displayed according to the user'sSM login language, which is English by default.
Important: To view UCMDB Browser CI visualization and impact graphs embedded in ServiceManager, users are recommended to use the latest Firefox or Chrome. This is because InternetExplorer 11 consumes toomany resources and thereforemay cause performance issues.
Tailor Service Manager Hybrid
If you are running ServiceManager in hybrid mode (for example, you have upgraded to ServiceManager Hybrid from an earlier version), you need to tailor your system before users can access theRun Impact Analysis functionality from the Changemodule (Change and Change Task).
ServiceManagerEnhancedAdapter9.41 User GuideChapter 1: Introduction
Micro Focus Service Manager (Service Manager 9.41 or later; UCMDB CP26 or later) Page 17 of 227

Note: For the Interaction and Configurationmodules, no tailoring is required.
To do this, follow these steps:
1. Log in to ServiceManager as a system administrator.
2. Update the cm.view.display Display Screen.
a. Enter ds in the command line, and press Enter.
b. In the Screen ID field, enter cm.view.display. Click Search. The record opens.
c. Click Main > Initializations.
d. Append the following line to the end of the script:
$showimpactbutton=jscall("uCMDBBrowserUrl.showImpact")
e. Save the record.
3. Add theRun Impact Analysis display option to the cm.view.display view.
a. Enter do in the command line, and press Enter.
b. In theUnique ID field, enter change.view_run.impact. Click Search. The display optionrecord is displayed.
c. In theScreen ID field, change the value to cm.view.display.
d. In theUnique ID field, change the value to cm.view.display_run.impact.
e. In theGUI option field, change the value from 405 to a different value if GUI option 405 isalready used in your system.
f. Click Add to add the new record.
4. Add aRun Impact Analysis button to the Change and Change Task formats.
Perform the steps for both formats:
a. Enter fd in the command line, and press Enter.
b. In the Form field, enter the name of the format.
c. Add aRun Impact Analysis button next to theService field, and specify the followingproperties for the button:
l Visible: checked
l Visible Condition: [$showimpactbutton]=true
l Input: $affected.item
l Button ID: This should be same as theGUI option value of the display option that you
ServiceManagerEnhancedAdapter9.41 User GuideChapter 1: Introduction
Micro Focus Service Manager (Service Manager 9.41 or later; UCMDB CP26 or later) Page 18 of 227

added previously. For example, 405.
l Image File: impact
l Enabled: checked
l Balloon Help: Run Impact Analysis.
5. Log off and log back in to ServiceManager to check that theRun Impact Analysis button isworking in the Change and Change Task formats.
CI Visualization
Only if anSMtoUCMDB integration instance is enabled in ServiceManager (Tailoring > IntegrationManager) and theShow UCMDB Browser CI Visualization widget option is enabled, ServiceManager uses the Get Related widget from UCMDB Browser to visualize CI relationships. Thisenables users to use the sameCI visualization on both product sides. For more information about theGet Related widget in UCMDB Browser, see UCMDB Browser Help Center (version 4.10 or later).
l For CIs that are not synchronized to UCMDB, for example, non-discoverable CIs, to show CIvisualization using the embeddedGet Related UCMDB Browser widget, it is recommended toset up an appropriate TQL script in UCMDB and then synchronize this kind of CIs to UCMDB.
l If there is noSMtoUCMDB integration instance enabled or theShow UCMDB Browser CIVisualization widget option is disabled in the integration instance, ServiceManager uses itsownCI visualization.
ServiceManager users can access UCMDB Browser Get Related widget as described in the followingtable.
Module How to access
Incident 1. Open an incident record.
2. Click the Smart Indicator icon for the following fields:o Primary Affected Serviceo Affected CI
3. On the Context Details form, click Visualize CI.
Interaction 1. Open an interaction record.
2. Click the Smart Indicator icon for theAffected Service field.
3. On the Context Details form, click Visualize CI.
Configuration 1. Open a configuration item record.
2. Click theRelationship Graph tab, or click More > Visualize CI.
ServiceManagerEnhancedAdapter9.41 User GuideChapter 1: Introduction
Micro Focus Service Manager (Service Manager 9.41 or later; UCMDB CP26 or later) Page 19 of 227

Module How to access
Change or ChangeTask
1. Open a Change or Change Task record.
2. Click More > Visualize CI.
3. Select the affected service or an affected CI of the change record, andthen click Finish.
Impact Analysis
If anSMtoUCMDB integration instance is enabled in ServiceManager (Tailoring > IntegrationManager) and theShow UCMDB Browser Impact widget option is enabled, ServiceManager userscan access the Impact Simulation widget of UCMDB Browser, as described in the following table. Payattention to the following:
l The Impact Simulation widget uses a default impact severity that is defined in theSMtoUCMDBintegration instance. The out-of-box value is Critical. For more information, see "How to AddUCMDB andUCMDB Browser Connection Information" on page 58.
l UCMDB Browser uses blue lines and black lines to indicate different types of relationships. Formore information, refer to theServiceModeling section in theUniversal CMDB Browser HelpCenter.
Note: If there is noSMtoUCMDB integration instance enabled or if theShow UCMDB BrowserImpact widget option is disabled in the integration instance, theVisualize Impact button andRun Impact Analysis icon andmenu option described in the following table are not displayed.
Module How to access
Incident 1. Open an incident record.
2. Click the Smart Indicator icon for the following fields:o Primary Affected Serviceo Affected CI
3. On the Context Details form, click Visualize Impact .
Interaction 1. Open an interaction record.
2. Click the Smart Indicator icon for theAffected Service field.
3. On the Context Details form, click Visualize Impact.
Change orChangeTask
1. Open a Change or Change Task record.
2. Click theRun Impact Analysis icon for theService field or click More > RunImpact Analysis.
ServiceManagerEnhancedAdapter9.41 User GuideChapter 1: Introduction
Micro Focus Service Manager (Service Manager 9.41 or later; UCMDB CP26 or later) Page 20 of 227
Module How to access
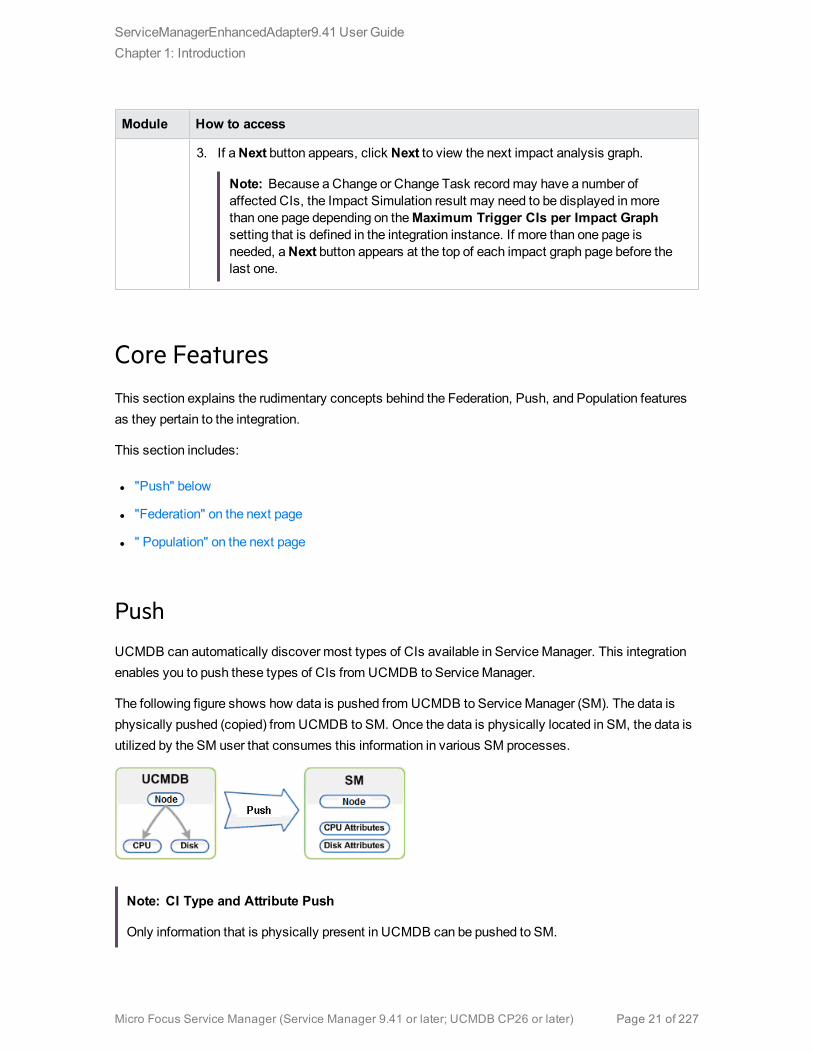
3. If aNext button appears, click Next to view the next impact analysis graph.
Note: Because a Change or Change Task recordmay have a number ofaffected CIs, the Impact Simulation result may need to be displayed inmorethan one page depending on theMaximum Trigger CIs per Impact Graphsetting that is defined in the integration instance. If more than one page isneeded, aNext button appears at the top of each impact graph page before thelast one.
Core FeaturesThis section explains the rudimentary concepts behind the Federation, Push, and Population featuresas they pertain to the integration.
This section includes:
l "Push" below
l "Federation" on the next page
l " Population" on the next page
Push
UCMDB can automatically discover most types of CIs available in ServiceManager. This integrationenables you to push these types of CIs from UCMDB to ServiceManager.
The following figure shows how data is pushed from UCMDB to ServiceManager (SM). The data isphysically pushed (copied) from UCMDB to SM. Once the data is physically located in SM, the data isutilized by the SM user that consumes this information in various SM processes.
Note: CI Type and Attribute Push
Only information that is physically present in UCMDB can be pushed to SM.
ServiceManagerEnhancedAdapter9.41 User GuideChapter 1: Introduction
Micro Focus Service Manager (Service Manager 9.41 or later; UCMDB CP26 or later) Page 21 of 227

Federation
With the federation feature, UCMDB pulls various ticket information (for example, Incident, Problem,Change, and Change Task ticket information) from SM. This enables users to see ticket information inUCMDB as ticket CIs that are connected to the relevant Nodes.
Note: Change Task federation is supported only when the ServiceManagerEnhancedAdapter9.41is used.
When data is federated (reflected or mirrored) from SM to UCMDB, the data is not physically present inUCMDB, instead it is passed over to UCMDB throughWeb Services.
Population
You can also use this integration to populate those types of CIs that UCMDB cannot automaticallydiscover or CIs that have been created in ServiceManager before you have a UCMDB systemdeployed.
Population is the reverse of Push. The following figure shows how data is populated from SM toUCMDB. One SM CI record with multiple attributes is transferred to UCMDB as multiple CI records.
How CI information is Synchronized BetweenUCMDB and Service ManagerThis section explains how CI information is transferred between the UCMDB and ServiceManagersystems.
This section includes:
l "CI Information Usage" on the next page
l "High-Level Components of the Integration" on page 24
ServiceManagerEnhancedAdapter9.41 User GuideChapter 1: Introduction
Micro Focus Service Manager (Service Manager 9.41 or later; UCMDB CP26 or later) Page 22 of 227

l "Relationships Between Integration Components" on page 25
l "What Information is Stored in UCMDB" on page 25
l "What Information is Stored in ServiceManager" on page 25
CI Display Name Field in Service ManagerPrior to version 9.41, ServiceManager used the CI Identifier field (logical.name field in the device table)to store Configuration Item (CI) names, and used the CI Name field (id field in the device table) to storeCI identification numbers. When CIs were pushed from UCMDB to ServiceManager, their names inUCMDB were synchronized to the logical.name field in ServiceManager, and duplicate CI names wererenamed because logical.name values must be unique in ServiceManager.
Starting with version 9.41, ServiceManager uses the logical.name field to store CI identificationnumbers, and a new field namedDisplay Name (display.name in the device table) to store CI names.The original CI Name field (id field in the device table) is removed from the CI form (but still kept in thedbdict). CI display names must follow these rules:
l Duplicate Display Names are always allowed for CIs that are created from UCMDB.
l Duplicate Display Names are not allowed for CIs that are created from ServiceManager, unlessthey belong to different CI types.
Note: Because ServiceManager 9.41 or later allows duplicate CI names (as long as the CIsbelong to different CI types), the automatic CI renamingmechanism is removed since ServiceManager 9.41. After upgrading to ServiceManager 9.41 or later, if you still need to push CI data tothe CI Identifier (logical.name) field in ServiceManager, you need to enable logical.name supportfirst andmake sure that each value to be pushed is unique. Otherwise, ServiceManager cannotcreate the CIs.
CI Information UsageWhen referring to the concept of CI information it is important to make the distinction between aUCMDB CI and a ServiceManager (SM) CI. The UCMDB model represents a topology that contains anumber of CI types and relationships.
The UCMDB topology can be represented in ServiceManager as a single entity. Multiple CIs fromUCMDB and their attributes aremerged into a single record in SM and the relevant UCMDB attributesaremapped to their appropriate counterparts in the SM record.
ServiceManagerEnhancedAdapter9.41 User GuideChapter 1: Introduction
Micro Focus Service Manager (Service Manager 9.41 or later; UCMDB CP26 or later) Page 23 of 227

The above figure shows the correlation between the UCMDB topological model and its representationof the Computer Instance together with its parallel representation in SM. The SM computer CI containsall of the UCMDB information that is passed through the integration.
In the push flow, in the UCMDB topological view several CIs such as Node, IP, Interface, Location,File System, CPU, Disk Device and their Relationships are converted into a single SM computerrecord with the IP, MAC Address and Location, File System, CPU and Disk Device attributes.
In the population flow, the conversion is reversed.
High-Level Components of the IntegrationThe following diagram shows the high-level components of the UCMDB integration, and illustrates theinteractions between UCMDB and ServiceManager.
ServiceManagerEnhancedAdapter9.41 User GuideChapter 1: Introduction
Micro Focus Service Manager (Service Manager 9.41 or later; UCMDB CP26 or later) Page 24 of 227

Relationships Between Integration ComponentsThe following figure illustrates the relationships between the ServiceManager Adapter components inUCMDB and the associated components in ServiceManager.
The ServiceManager Adapter includes configuration files, which are used tomapUCMDB entities totheir counterparts in ServiceManager during data push, as well as map ServiceManager CIs toUCMDB entities during population.
The configuration files utilize UCMDB queries that define a superset of data relevant for the integration.
What Information is Stored in UCMDBYour UCMDB system stores the actual state of CIs and CI relationships as CI attributes. Typically,UCMDB uses one or more integrations and discovery mechanisms (feeders) to automatically detect CIattribute values. The UCMDB-SM integration only uses a subset of the CI attributes available in aUCMDB system.
What Information is Stored in Service ManagerYour ServiceManager system stores themanaged or expected state of CIs and CI relationships asattribute values in a CI record. To be part of the integration, a CI attribute in your UCMDB systemmustmap to amanaged field in the ServiceManager CI record. You can add, remove, or update the
ServiceManagerEnhancedAdapter9.41 User GuideChapter 1: Introduction
Micro Focus Service Manager (Service Manager 9.41 or later; UCMDB CP26 or later) Page 25 of 227
managed fields that are part of the integration by tailoring the ServiceManager web services thatmanage the integration.
ServiceManager runs according to a set of rules that define what actions you want the system to takewhenever a CI’s actual state does not match the expected state as defined in the CI record. You definethese rules from the Discovery Event Manager (DEM) in ServiceManager where you can do thefollowing:
l Automatically update a CI record tomatch the attribute values listed in the actual state (This is thedefault behavior)
l Automatically create a change record to review the differences between the actual state and themanaged state
l Automatically create an incident record to review the differences between the actual state and themanaged state
Discovery Event ManagerThe Discovery Event Manager tool provides you with information about configuration items (CIs) in useby your organization. Discovery Event Manager collects data from associatedWeb services, such astheMicro Focus Universal ConfigurationManagement Database (UCMDB) for enterprise ITorganizations. UCMDB captures, documents, and stores information about CIs, servicedependencies, and relationships that support business services. The Discovery Event Manager tooltakes the information captured by UCMDB and compares the actual state of each incoming CI record(both existing and new) to themanaged field state of the CI record in ServiceManager.
If the actual state of an incoming UCMDB CI record differs from themanaged field state of the CIrecord in ServiceManager, the Discovery Event Manager tool works with ConfigurationManagementand ChangeManagement to perform any required changes to the incoming CI record according to therules you have set in the Discovery Event Manager tool.
Discovery Event Manager managed fieldsManaged fields are key fields in the ServiceManager configuration item (CI) record types that theDiscovery Event Manager tool uses to validate the incoming CI records fromWeb services. By default,the fields of the incoming CI records shouldmatch the key fields in the ServiceManager CI records.
If Discovery Event Manager discovers any discrepancies between the actual state of the incoming CIrecord fields and the ServiceManager managed fields, these discrepancies are handled by Change
ServiceManagerEnhancedAdapter9.41 User GuideChapter 1: Introduction
Micro Focus Service Manager (Service Manager 9.41 or later; UCMDB CP26 or later) Page 26 of 227
Management by default. Rules define what to do with a CI record tomake it compliant with the CIrecord types in ServiceManager.
Add a managed field in Discovery Event Manager
Managed fields are key fields in ServiceManager configuration item (CI) record types. They areimportant to helping the Discovery Event Manager tool to discover differences between the data in theincoming CI records fromWeb services versus what ServiceManager is expecting to receive in thoserecords. If the incoming records do not match themanaged key fields in ServiceManager, the rules setin the Discovery Event Manager tool determine what will happen to those incoming CI records.
For example: If the joinbizservice table has three fields in theManaged Fields tab in Discovery EventManager and some of the expected information is different or missing from any of those fields, theDiscovery Event Manager tool will deal with that incoming CI record that is not compliant with theServiceManager managed fields for that CI record type.
If you determine that a necessary field is not included in the existing discovery process, you can add amanaged field to the applicable table using the settings on theManaged Fields tab.
Note: If a managed field does not exist in an incoming CI record, the Discovery Event Managertool is not able to find discrepancies based on that field.
Tip: The following steps describe how tomanually add amanaged field. If you want toautomatically addmultiple or all fields from a table as managed fields, you can click the LoadFields button on theManaged Fields tab.
To add amanaged field:
1. Click Tailoring >Web Services > Discovered Event Manager Rules. The Discovery EventManager rules form is displayed.
2. Click Search to retrieve a list of CI ID types.
3. Select the ID type for the fields you want to view, and then select theManaged Fields tab. Youcan see which fields are beingmanaged for this CI type.
4. To select a new field you want managed, do the following:a. Select the drop-down arrow in the next blank Field Name field. You will see the list of fields
related to this CI type.
b. Select the field you want to add to theManaged Fields tab for this CI type.
ServiceManagerEnhancedAdapter9.41 User GuideChapter 1: Introduction
Micro Focus Service Manager (Service Manager 9.41 or later; UCMDB CP26 or later) Page 27 of 227

c. For a field that is part of an array of structures, choose aStructure and specify the field'sIndex value. For example, the CI type computer contains array elements, such as ports,printers, and scanners. Choose an array element within the structure, and then choose thecorresponding index number.
d. Click Save.
5. Repeat this process to add amanaged field for another ID type.
6. Click OK.
View, modify, or delete a managed field in Discovery
Event Manager
Applies to User Roles:
System Administrator
Managed fields are important to ensuring that the Discovery Event Manager tool can process incomingconfiguration item (CI) data fromWeb services. When the inventory of your organization changes, youcan add or update the CI types based on your new inventory requirements. You can also review themanaged fields for existing CI types to determine if the necessary fields exist and add, modify, ordelete managed fields.
Warning: If you are deleting a field, make sure you select the field you want to delete. If you delete thewrong field, youmust add the field back into theManaged Fields tab.
To view, modify, or delete amanaged field:
1. Click Tailoring >Web Services > Discovered Event Manager Rules. The Discovery EventManager form is displayed.
2. Click Search to retrieve a list of CI ID types.
3. Select the ID type for the fields you want to view, and then select theManaged Fields tab. A listof managed fields for the selected CI type is displayed.
4. Select the field you want to edit or delete.o Make any necessary changes.
o Click Delete to delete a field that is no longer valid.
o Click Save.
5. Click OK.
ServiceManagerEnhancedAdapter9.41 User GuideChapter 1: Introduction
Micro Focus Service Manager (Service Manager 9.41 or later; UCMDB CP26 or later) Page 28 of 227

Discovery Event Manager rulesDiscovery Event Manager processing is governed by rules that define what actions Discovery EventManager will perform when the actual state of an incoming configuration item (CI) record differs fromthemanaged state of a CI record in ServiceManager.
During initial configuration of Discovery Event Manager, you start with a basic set of rules for ChangeManagement. You can refine those rules as necessary. Each rule identifies a series of checks thatDiscovery Event Manager processes whenever a CI record is received fromWeb services. Dependingon the rule, Discovery Event Manager may add or delete the record, open a change, log the information,or update the record's status.
ServiceManager opens a change or incident based on the settings defined in the populateChange orpopulateIncident function in the discoveryEvent ScriptLibrary record. You can override the defaultsettings by writing a custom JavaScript on theChange Customization or Incident Customizationtab.
Discovery Event Manager rule options
Rules help to automate the process of managing incoming configuration item (CI) records. When youhave rules set up, you canmanage whether a record is added, updated, or deleted to the CI records inServiceManager. The Discovery Event Manager tool checks the incoming CI records and determineswhat to do when the actual state of the CI records does not match themanaged state of the CI recordsin ServiceManager. When Discovery Event Manager finds the rule that applies to an incoming CIrecord type, the server checks the rule, and then updates the record according to the rules you have setup.
Example: If a user's machine has 4GB of RAM added and the Discovery Event Manager tooldiscovers that the actual state of the CI record does not match the ServiceManager managed state forthat CI record type, the Discovery Event Manager tool opens an unplanned change. This then gives theChangeManager the opportunity to review the CI record and determine what tasks to complete.
Actions are required in the following cases:
l Records that do not exist.
l Records that contain unexpected data.
l Records aremarked for deletion.
The following options are available when configuring rules tomeet your business needs:
ServiceManagerEnhancedAdapter9.41 User GuideChapter 1: Introduction
Micro Focus Service Manager (Service Manager 9.41 or later; UCMDB CP26 or later) Page 29 of 227
l Action if matching record does not exist: If a CI record does not exist in ServiceManager.o Add the record: (Default) When the information received fromWeb services through Discovery
Event Manager does not bring up amatching record in ServiceManager, add the record.
o Add the record, and set dependency as true: This option is available only for synchronizationof CI relationship data. ServiceManager will add the CI relationship record and enable outagedependency for the record by checking its Outage Dependency check box and setting itsnumber of dependent downstream CIs to 1.
o Open an Incident:Open an incident to investigate a new CI record that currently does not existin ServiceManager to determine if it is compliant with ServiceManager.
o Open a Change:Open an unplanned change to review the new CI record, because it currentlydoes not exist in ServiceManager. This change gives the ServiceManager Administrator anopportunity to deny the ChangeManagement request and back it out by using the changemanagement process or to accept the actual state of the new CI record and assign tasksaccordingly.
l Action if record exists but unexpected data discovered:Changes to the information in anexisting CI record raise a flag for the Discovery Event Manager tool. Some of the information is notpart of themanaged state in ServiceManager. The unexpected data in the CI recordmust be loggedor reviewed.o Open a Change: (Default) Open an unplanned change to review the actual state of the CI
record. This change gives the ServiceManager Administrator an opportunity to deny the ChangeManagement request and back it out by using the changemanagement process, or to accept theactual state of the existing CI record and assign tasks accordingly.
o Log Results and update record: Log the results of the actual state of the CI record, and thenupdate the record.
o Open an Incident:Open an Incident to investigate the actual state of a CI record and determinewhat actions must be performed or initiated to bring the record into compliance with ServiceManager.
l Action if record is to be deleted: If an external event specifies that the record needs to bedeleted.o Delete record: (Default for CI relationship records) This option is available for synchronization
of both CI and CI relationship records. ServiceManagerautomatically deletes the record.
o Open an Incident: This option is available only for synchronization of CI relationship records.ServiceManager opens an incident to investigate the deleted record and determines whichactions must be performed or initiated to bring the record into compliance with ServiceManager.
o Open a Change: This option is available only for synchronization of CI relationship records.ServiceManager opens an unplanned change to review the deleted record. The change allows
ServiceManagerEnhancedAdapter9.41 User GuideChapter 1: Introduction
Micro Focus Service Manager (Service Manager 9.41 or later; UCMDB CP26 or later) Page 30 of 227
someone to investigate whether the deleted record is compliant with your business practices. Ifthe record is compliant, the change can be approved. If the record is not compliant, then thechange can be denied and the record added back to the system.
o Update record to the selected status: (Default) This option is available only forsynchronization of CI records. ServiceManager updates the status of the CI record to a valueselected from the drop-down list (for example, Retired/Consumed), instead of deleting therecord permanently.
o Open an Incident to update record to the selected status: This option is available only forsynchronization of CI records. ServiceManager opens an incident to update the record’s statusto a value selected from the drop-down list (for example,Retired/Consumed). Once the incidenthas been closed, ServiceManager automatically updates the CI record to the selected status.
o Open a Change to update record to the selected status: This option is available only forsynchronization of CI records. ServiceManager opens an unplanned change to update the CIrecord’s status to a value selected from the drop-down list (for example, Retired/Consumed).The change allows someone to investigate whether the requested status change is compliantwith your business practices. Once the change has been approved and closed, ServiceManagerautomatically changes the CI record to the selected status. If the change has been denied,ServiceManager makes no changes to the CI record.
Add a rule in Discovery Event Manager
Applies to User Roles:
System Administrator
Rules are the core of Discovery Event Manager processing. Based on your organization'srequirements, you can refine the basic set of rules that are configured with the Discovery EventManager tool by adding rules.
To add a rule:
1. Click Tailoring >Web Services > Discovered Event Manager Rules. The Discovery EventManager form opens.
2. Click New. The new rule form opens.
3. Enter the new rule name.
4. Select a table to be associated with the rule from the Table Name list, and then click Next.
5. Enter the condition for the rule. The rule is added to the records table.
ServiceManagerEnhancedAdapter9.41 User GuideChapter 1: Introduction
Micro Focus Service Manager (Service Manager 9.41 or later; UCMDB CP26 or later) Page 31 of 227

6. Click Save.
7. Click OK.
View or modify rules in Discovery Event Manager
Applies to User Roles:
System Administrator
Rules help you to automate the change control process, so that incoming configuration item (CI)records can be updated to comply with the CI record fields in ServiceManager. As you reevaluate yourorganization's requirements, youmay view the rules that are set up andmake changes as you see fit.
To view ormodify existing rules:
1. Click Tailoring >Web Services > Discovered Event Manager Rules. The Discovery EventManager form opens.
2. Click Search to retrieve a list of CI ID types.
3. Select the ID type for the rules you want to view.
4. Select theRules tab. The existing rules settings for the selected CI type are displayed.
5. If you want to edit the rule, do the following:o Make the necessary changes. For example, if you choose to select a different action step for
records that do not exist, make your change.
o Click Save.
6. Click OK.
Delete a set of rules in Discovery Event Manager
Applies to User Roles:
System Administrator
Rules help to automate the change control process, so that incoming configuration item (CI) recordscan be updated to comply with the CI record fields in ServiceManager. As you reevaluate yourorganization's requirements, youmay realize that the existing rules settings for a CI type are no longervalid. You can delete the existing rules settings to replace them with a new set of rules.
ServiceManagerEnhancedAdapter9.41 User GuideChapter 1: Introduction
Micro Focus Service Manager (Service Manager 9.41 or later; UCMDB CP26 or later) Page 32 of 227

Warning: Make sure you are deleting the rules for the CI ID type you want deleted. If you delete thewrong set of rules by mistake, you will have to add the CI ID type and set up the rules for each actionthat needs to be taken.
To delete a set of rules:
1. Click Tailoring >Web Services > Discovered Event Manager Rules. The Discovery EventManager form opens.
2. Click Search to retrieve a list of CI ID types.
3. Select the CI ID type, and then select theRules tab. Existing rules settings for the selected CItype are displayed.
4. After you determine that you want to delete the rules for this CI type, click Delete.
5. Click OK.
Add a configuration item in Discovery Event
ManagerApplies to User Roles:
System Administrator
As inventory changes within your organization, you will need to add new configuration item (CI) types,or possibly update or delete others, to keep your inventory records up-to-date for the Discovery EventManager tool. You canmanage the CI types in the CI record type table.
To add a configuration item in Discovery Event Manager:
1. Click Tailoring >Web Services > Discovered Event Manager Rules. The Discovery EventManager form opens.
2. Click New.
3. Enter the name of the new CI record type.
4. Select a table from the table list, and then click Next.
5. Enter the Condition for the CI record type. The CI record type is added to the records table.
o The conditionmust ensure that only one rule is applied when the web service request isprocessed.
ServiceManagerEnhancedAdapter9.41 User GuideChapter 1: Introduction
Micro Focus Service Manager (Service Manager 9.41 or later; UCMDB CP26 or later) Page 33 of 227
o An empty condition evaluates to true by default.
6. Click Save.
7. Click OK.
View, modify, or delete a configuration item in
Discovery Event ManagerApplies to User Roles:
System Administrator
As inventory changes within your organization, you will need to add, update, or delete configurationitem (CI) types to keep your inventory records up-to-date for the Discovery Event Manager tool. Youcanmanage the CI types in the CI record type table.
To view, modify, or delete a configuration item in Discovery Event Manager:
Warning: If you are deleting a CI record type, make sure you select the CI record type you want todelete. If you delete the wrong record type, youmust add the record back into the CI Record ID table.
1. Click Tailoring >Web Services > Discovered Event Manager Rules. The Discovery EventManager form opens.
2. Click Search to retrieve a list of CI ID types.
3. Select the ID type you want to view, and then click Previous orNext to scroll through the list ofrecords.
4. Select theRules tab to view the rules that are set for the selected CI type.
5. Select the record you want to change andmake any necessary changes.
6. Select the ID type you want to delete, and then click Delete.
7. Click Save.
8. Click OK.
Customize changes in Discovery Event ManagerApplies to User Roles:
ServiceManagerEnhancedAdapter9.41 User GuideChapter 1: Introduction
Micro Focus Service Manager (Service Manager 9.41 or later; UCMDB CP26 or later) Page 34 of 227

System Administrator
If your best practice is to have an incoming configuration item (CI) record that is not compliant with themanaged state of that CI record in ServiceManager go through the changemanagement process, youcan customize how you want the Discovery Event Manager tool to process those incoming CI records.
To customize the way changes are handled within Discovery Event Manager:
1. Click Tailoring >Web Services > Discovered Event Manager Rules. The Discovery EventManager form opens.
2. Click Search to retrieve a list of Configuration Item (CI) ID types.
3. Select the ID type for the customization you want to make, and then select theChangeCustomization tab.
4. Enter the customized script you want to override the default values set by the discoveryEventScriptLibrary record (the change recordmay be referenced as "change").
5. Click Save.
6. Click OK.
Customize incidents in Discovery Event ManagerApplies to User Roles:
System Administrator
If your best practice is to have an incident logged against an incoming configuration item (CI) recordthat is not compliant with themanaged state of a CI record in ServiceManager, you can customize therules you set for automatically opening an incident record.
To customize the JavaScript for opening an incident record:
1. Click Tailoring >Web Services > Discovered Event Manager Rules. The Discovery EventManager form opens.
2. Click Search to retrieve a list of Configuration Item (CI) ID types.
3. Select the ID type for the customization you want to make to incidents, and then select theIncident Customization tab.
4. Enter the customized script you have created to override the default values set by thediscoveryEventScriptLibrary record (the incident recordmay be referenced as "incident").
ServiceManagerEnhancedAdapter9.41 User GuideChapter 1: Introduction
Micro Focus Service Manager (Service Manager 9.41 or later; UCMDB CP26 or later) Page 35 of 227

5. Click Save.
6. Click OK.
Discovery Event Manager change open processYou can use the Discovery Event Manager tool to automate the change open process. When a changeis needed to address issues for review or tasks to be performed, the change open process begins. Thechange goes through phases that drive the unplanned change through the necessary tasks to updatethemanaged fields of a CI or to determine if the change is necessary or desired.
The change phases are as follows:
Discovery Assessment phase: Assess whether or not an unplanned change is allowed. Commentscan be added and updated in this phase, as needed. The CCB Approver must confirm that the changeis desired.
l If the change is approved, update themanaged field and close the change.
l If the change is denied, move it to the Discovery Backout phase to undo the change.
Discovery Backout phase: Back out a change after determining that the change is not necessary ordesired. Comments can be added and updated in this phase, as needed, including updates tomodifieddata. If the backout of the change is complete, move it to the Discovery Verification phase.
l If the denied change is verified, close the change.
l If the denied change is not verified, return to the Discovery Backout phase.
Discovery Implementation phase: The change requires further consideration before it is closed.
l If the backout of the change fails verification, return to the Discovery Implementation phase forfurther consideration.
l If verification of the change succeeds, close the change.
Discovery Verification phase: Verify that the change is successfully implemented.
l If verification of the change fails, return to the Discovery Implementation phase.
l If verification of the change succeeds, close the change.
ServiceManagerEnhancedAdapter9.41 User GuideChapter 1: Introduction
Micro Focus Service Manager (Service Manager 9.41 or later; UCMDB CP26 or later) Page 36 of 227

Chapter 2: How to Upgrade YourIntegrationThis chapter describes the upgrade steps required to use the ServiceManagerEnhancedAdapter9.41adapter with ServiceManager, including steps to adapt the integration to the logical name solutionintroduced in ServiceManager 9.41 and steps tomigrate from an XSLT-based adapter to a genericadapter.
The logical name solution contains significant CI related code changes. For example, prior to version9.41, ServiceManager used the logical.name field in the device table to store CI names. Thelogical.name field must be unique in the ServiceManager system, but UCMDB allows duplicate CInames. As a result, CIs may have to be renamedwhen they are pushed from UCMDB to ServiceManager. Starting with version 9.41, ServiceManager stores CI names in the display.name field in thedevice table, and stores unique CI identification numbers in the logical.name field. The display.namefield allows duplicate values if they are pushed from UCMDB, and requires unique values for CIs thatare created from ServiceManager (unless they are not of the sameCI type).
Before you proceed to the upgrade steps described in this chapter, make sure you have a goodunderstanding of the logical name solution and its impact on the SM-UCMDB integration. For details,see theServiceManger Logical Name Solutionwhite paper.
Perform the following tasks to upgrade your integration to use theServiceManagerEnhancedAdapter9.41 adapter.
Task 1: Close All SM Unplanned Changes and Incidents Created for CI Modifications 38
Task 2: Upgrade ServiceManager 38
(Optional) Task 3: Copy Data to the joinnode Table 38
Task 4: Update the DEMRules in ServiceManager 39
Task 5: Enable the RESTful APIs for Custom CI Types in ServiceManager 39
Task 6: Upgrade UCMDB 42
Task 7: Update the Configurations for Custom CI Types in UCMDB 43
Task 8: Upgrade Field Mapping 49
Task 9: Reconfigure an Integration Point 52
Task 10: Run a Full Push to Resynchronize CI Names 52
Task 11: Restore the DEMRules in ServiceManager 53
Service Manager (Service Manager 9.41 or later; UCMDB CP26 or later) Page 37 of 227

Task 1: Close All SM Unplanned Changes andIncidents Created for CI ModificationsBefore you upgrade to ServiceManager (SM) 9.41 or later, close all unplanned change and incidentrecords that were created due to CI modifications. After upgrading to version 9.41 or later, you will run afull data push to resynchronize CI names from UCMDB to the display.name field in the ServiceManager device table.
Task 2: Upgrade Service ManagerIf you want to use the ServiceManagerAdapter9.41 adapter for the integration, youmust upgradeServiceManager to version 9.41 or later, which uses display.name instead of logical.name for fieldmapping between UCMDB and ServiceManager.
Note: The upgrade includes the SM server, Windows and web clients, applications, ServiceRequest Catalog (SRC), andMobility client. If you upgrade only the server and clients and yourapplications version is still earlier than 9.41, you can only use an old adapter rather than any of theServiceManager 9.41 adapters.
For information about how to upgrade ServiceManager, see theServiceManager UpgradeDocumentation.
(Optional) Task 3: Copy Data to the joinnodeTableStarting with version 9.32, ServiceManager uses the joinnode table to replace themainframe,networkcomponents, storage, and computer tables. If you are upgrading from ServiceManager 9.31or earlier and want to migrate to the joinnode-based datamappings, you need to copy data to thejoinnode table.
Note: If you want to use the original tables instead of joinnode, this task is not needed. Instead,you need tomodify the datamappings of your ServiceManager adapter in UCMDB.
To copy your data to the joinnode table, follow these steps:
1. Log in to ServiceManager as a system administrator.
2. Open DatabaseManager
3. Enter cidatacopy in the Table field, and then click Search. The Copy CI Type Data form opens.
ServiceManagerEnhancedAdapter9.41 User GuideChapter 2: How to Upgrade Your Integration
Micro Focus Service Manager (Service Manager 9.41 or later; UCMDB CP26 or later) Page 38 of 227
4. Click Search. A list of records is displayed: joincomputer, joinmainframe,joinnetworkcomponents, and joinstorage.
5. Select each record from the list, update or add source/target fields as needed, and click theCopyData button. One of the followingmessages is displayed:o A message that resembles “<XXX> records were successfully copied, and <YYY> records
were ignored within xxx ms”, where XXX and YYY represent the numbers of records copiedand ignored, respectively.
o “Configuration validation failed, and no records were copied. Please check your SourceFields/Target Fields settings and run Copy Data again.”
6. If the error message is displayed, correct your Source Fields/Target Fields settings, and clickCopy Data again until all of your records have been successfully processed.
Task 4: Update the DEM Rules in ServiceManagerServiceManager 9.41 or later uses an updated CI form, so youmay want to correct the CI names in thelogical.name field that have been renamed, and update the CI Display Name (display.name) fieldvalues in ServiceManager by using the new field mapping.
To do this, you need to run a full data push to resynchronize the CIs to ServiceManager. Before doingso, youmust update the DEM rules to prevent unwanted Change or Incident records from being createddue to the CI name changes.
1. Log in to ServiceManager as a System Administrator.
2. Navigate to Tailoring >Web Services > Discovered Event Manager Rules.
3. Click Search.
4. For each DEM rule record, select Log Results and update record forAction if record existsbut unexpected data discovered.
Task 5: Enable the RESTful APIs for Custom CITypes in Service ManagerIf your existing UCMDB-SM integration environment uses any custom CI types, you need to updatethe External Access Definition of each custom CI type in ServiceManager to enable its RESTful APIfor using a generic adapter. A ServiceManager generic adapter requires the ucmdbIntegration RESTfulAPIs to work.
ServiceManagerEnhancedAdapter9.41 User GuideChapter 2: How to Upgrade Your Integration
Micro Focus Service Manager (Service Manager 9.41 or later; UCMDB CP26 or later) Page 39 of 227
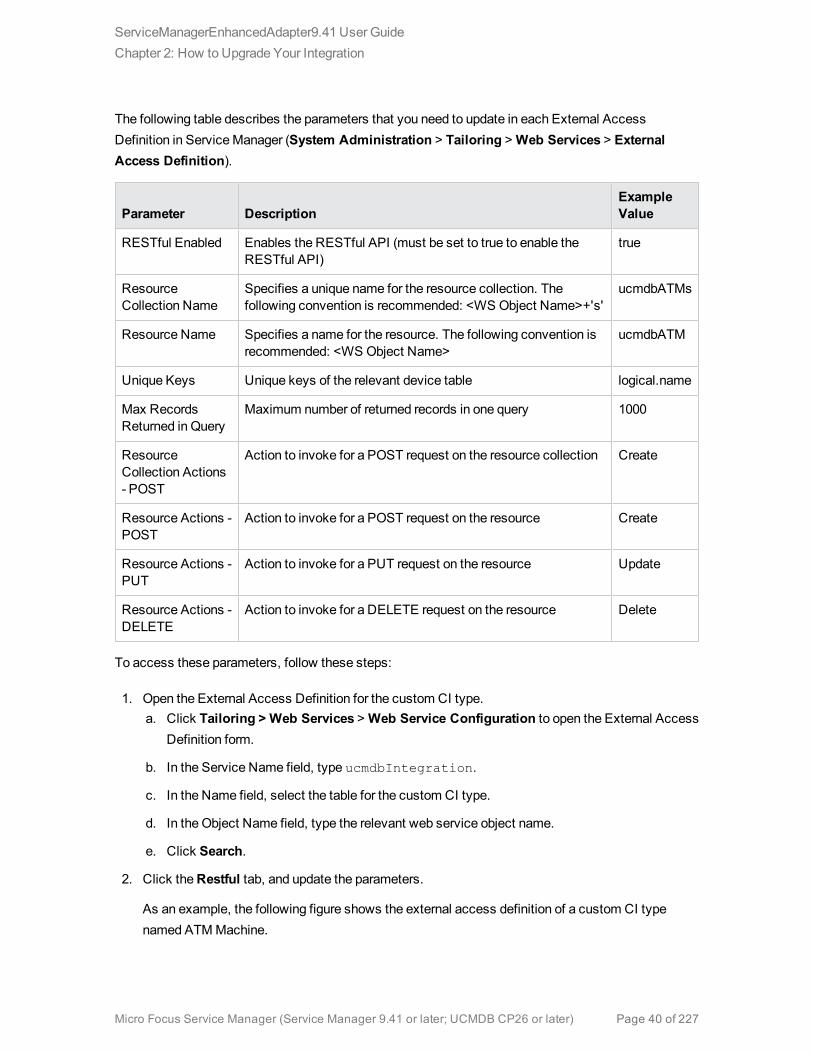
The following table describes the parameters that you need to update in each External AccessDefinition in ServiceManager (System Administration > Tailoring >Web Services > ExternalAccess Definition).
Parameter DescriptionExampleValue
RESTful Enabled Enables the RESTful API (must be set to true to enable theRESTful API)
true
ResourceCollection Name
Specifies a unique name for the resource collection. Thefollowing convention is recommended: <WS Object Name>+'s'
ucmdbATMs
Resource Name Specifies a name for the resource. The following convention isrecommended: <WS Object Name>
ucmdbATM
Unique Keys Unique keys of the relevant device table logical.name
Max RecordsReturned in Query
Maximum number of returned records in one query 1000
ResourceCollection Actions- POST
Action to invoke for a POST request on the resource collection Create
Resource Actions -POST
Action to invoke for a POST request on the resource Create
Resource Actions -PUT
Action to invoke for a PUT request on the resource Update
Resource Actions -DELETE
Action to invoke for a DELETE request on the resource Delete
To access these parameters, follow these steps:
1. Open the External Access Definition for the custom CI type.a. Click Tailoring > Web Services >Web Service Configuration to open the External Access
Definition form.
b. In the Service Name field, type ucmdbIntegration.
c. In the Name field, select the table for the custom CI type.
d. In the Object Name field, type the relevant web service object name.
e. Click Search.
2. Click theRestful tab, and update the parameters.
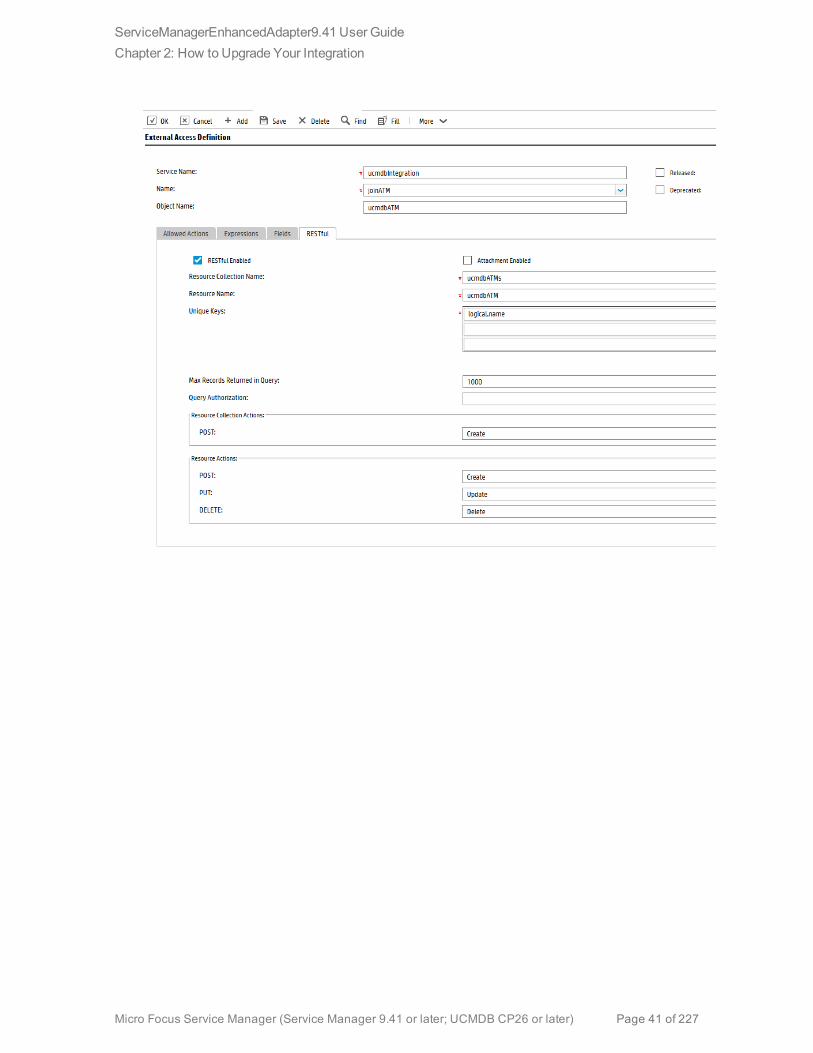
As an example, the following figure shows the external access definition of a custom CI typenamed ATMMachine.
ServiceManagerEnhancedAdapter9.41 User GuideChapter 2: How to Upgrade Your Integration
Micro Focus Service Manager (Service Manager 9.41 or later; UCMDB CP26 or later) Page 40 of 227
ServiceManagerEnhancedAdapter9.41 User GuideChapter 2: How to Upgrade Your Integration
Micro Focus Service Manager (Service Manager 9.41 or later; UCMDB CP26 or later) Page 41 of 227

Task 6: Upgrade UCMDBServiceManager 9.41 or later can work with XSLT-based adapters and generic adapters specificallydesigned for ServiceManager 9.41 or later:
l ServiceManagerAdapter9.41 for UCMDB 10.01, 10.11, 10.20, 10.21, or 10.30
Note: These are four XSLT-based adapters, one for each of the UCMDB versions.
l ServiceManagerEnhancedAdapter9.41 for UCMDB 10.20, 10.21, or 10.30
Note: These are two generic adapters based on the UCMDB generic framework, one for eachof UCMDB 10.20 and 10.21.
For more information, see "Integration Requirements" on page 54.
ServiceManagerEnhancedAdapter9.41 User GuideChapter 2: How to Upgrade Your Integration
Micro Focus Service Manager (Service Manager 9.41 or later; UCMDB CP26 or later) Page 42 of 227

Task 7: Update the Configurations for CustomCI Types in UCMDBThe configurations for all out-of-the-box CI types in UCMDB 10.20 are already based on the ServiceManager EnhancedGeneric Adapter. However, you still need to perform the following steps tomanually update the configurations for your custom CI types in UCMDB.
Step 1. Convert the mapping scripts from XSLT to
XML and Groovy.The old ServiceManager adapters use XSLT scripts for field mapping between UCMDB and SM. Mostof themapping scripts were developed for the four typical mapping scenarios described in the followingtable.
Scenario Notes
One to One fieldmapping
l One field in one side is mapped to one field in the other side
l The value is synchronized between UCMDB and SM directly (withoutvalue conversion)
One toMany fieldmapping
l One field in one side is mapped tomany fields in the other side
l The value of the one field is calculated based on the values of many fields
Many toMany fieldmapping
l Multiple fields are defined as a child CI type of the relevant CI type
l A single record has multiple child instances
Value Conversion l The value of one field is converted to another value based on a specificalgorithm
l Value conversion can happen on all kinds of field mappings (one to one,one tomany, andmany tomany)
The ServiceManager EnhancedGeneric Adapter uses XML andGroovy mapping scripts. Oldmappingscripts for the out-of-the-box CI types have been converted to XML andGroovy by default. However,you still need to convert your existing custom scripts to XML andGroovy.
To convert a custommapping script, you need to identify its mapping scenario (One to One, One toMany, Many toMany, or Value Conversion) first; then you can convert the script by referring to thefollowing sample scripts for your specific scenario.
Tip: In all mapping scenarios, you can use the Visual Mapping tool to generate an XML script
ServiceManagerEnhancedAdapter9.41 User GuideChapter 2: How to Upgrade Your Integration
Micro Focus Service Manager (Service Manager 9.41 or later; UCMDB CP26 or later) Page 43 of 227

skeleton. Compared with the use of an old XSLT adapter, this is much easier as you can drag anddrop themapped fields to generate the script instead of writing every code line from scratch. Fordetails about how to use XML andGroovy scripts in the UCMDB integration framework, see theMicro Focus Universal CMDB 10.20 Developer ReferenceGuide.
Tip: The ServiceManager EnhancedGeneric Adapter has four out-of-the-box Groovy scripts,which you can use as a reference:
l SMUtils.groovy: defines commonmethods used for push, population, and federation.
l SMPushFunctions.groovy: defines themethods used in the out-of-the-box pushmappingscripts.
l SMPopulateFunctions.groovy: defines themethods used in the out-of-the-box populationmapping scripts.
l SMFederationFunctions.groovy: defines themethods used in the out-of-the-box federationmapping scripts.
Additionally, the SMFederationConverter.groovy script defines value conversions for federation.
Field mappingmust use the correct data type for each attribute. It is convenient to determine the datatype for an attribute by using the Visual Mapping tool. The following figure illustrates the data type forthe CIIdentifier attribute. You can either find the data type from the External Class Model Attributespane or simply drag and drop the attribute from that pane to the Visual Mapping area to automaticallyget the correct data type.
ServiceManagerEnhancedAdapter9.41 User GuideChapter 2: How to Upgrade Your Integration
Micro Focus Service Manager (Service Manager 9.41 or later; UCMDB CP26 or later) Page 44 of 227

One to One Field Mapping
Sample Script in XSLT:
<Type>computer</Type>
Or
<UCMDBId><xsl:value-of select="@id"/></UCMDBId>
Or
<xsl:for-each select="@display_label"><DisplayName><xsl:value-of select="."/></DisplayName>
</xsl:for-each>
Sample Script in XML (Groovy is not required in this scenario):
<target_mapping datatype="STRING" name="DisplayName" value="Root['display_label']"/>
Where: The datatype must be the correct data type defined in ServiceManager for the attribute. Youcan find the data type from the Visual Mapping tool interface.
One to Many Field Mapping
Sample Script in XSLT:
<xsl:variable name="prefix" select="'Value>'"/><xsl:variable name="suffix" select="'</Value'"/><Subtype>
<xsl:choose><xsl:when test="contains(@node_role,concat
($prefix,'desktop',$suffix))">Desktop</xsl:when><xsl:when test="@os_family"><xsl:value-of select="@os_family"/></xsl:when><xsl:otherwise>Server</xsl:otherwise></xsl:choose>
</Subtype>
Sample Script in XML:
<target_mapping datatype="STRING" name="Subtype" value="SMPushFunctions.getSubType('computer',Root['node_role'],Root['os_family'])"/>
Sample Script in Groovy:
Youmust develop a groovy function to implement themapping logic. Usually the relevant fields in thecounterpart system will be used as the parameters of the Groovy function.
ServiceManagerEnhancedAdapter9.41 User GuideChapter 2: How to Upgrade Your Integration
Micro Focus Service Manager (Service Manager 9.41 or later; UCMDB CP26 or later) Page 45 of 227
Many to Many Field Mapping
Sample Script in XSLT:
<xsl:for-each select="cpus"><cpu>
<xsl:for-each select="cpu"><cpu>
<CpuID><xsl:value-of select="@cpu_id"/></CpuID><CpuName><xsl:value-of select="@name"/></CpuName><CpuClockSpeed>
<xsl:value-of select="@cpu_clock_speed"/></CpuClockSpeed>
</cpu></xsl:for-each>
</cpu></xsl:for-each>
Sample Script in XML:
<for-each-source-entity count-index="i" source-entities="Root.Cpu"><target_entity name="cpu">
<target_mapping datatype="STRING" name="CpuID" value="Root.Cpu[i]['cpu_id']"/>
<target_mapping datatype="STRING" name="CpuName" value="Root.Cpu[i]['name']"/>
<target_mapping datatype="STRING" name="CpuClockSpeed" value="Root.Cpu[i]['cpu_clock_speed']"/>
</target_entity></for-each-source-entity>
Where: <source-entities> (Root Cpu) comes from the local TQL query structure, while <target_entityname> (cpu) comes from the <cpu> tag in the XSLT file.
Note: Groovy scripts are not required for this scenario.
Value Conversion
Sample Script in XSLT:
<xsl:if test="@customer_id"><xsl:variable name="ucmdbCustomerId" select="@customer_id"/><xsl:variable name="tenantMappingEntry" select="document('SM_MT_
mapping.xml')/list['TenantMapping']/entry[@ucmdb=$ucmdbCustomerId]"/><xsl:choose>
<xsl:when test="$tenantMappingEntry"><CustomerId><xsl:value-of
select="$tenantMappingEntry/@sm"/></CustomerId></xsl:when>
ServiceManagerEnhancedAdapter9.41 User GuideChapter 2: How to Upgrade Your Integration
Micro Focus Service Manager (Service Manager 9.41 or later; UCMDB CP26 or later) Page 46 of 227
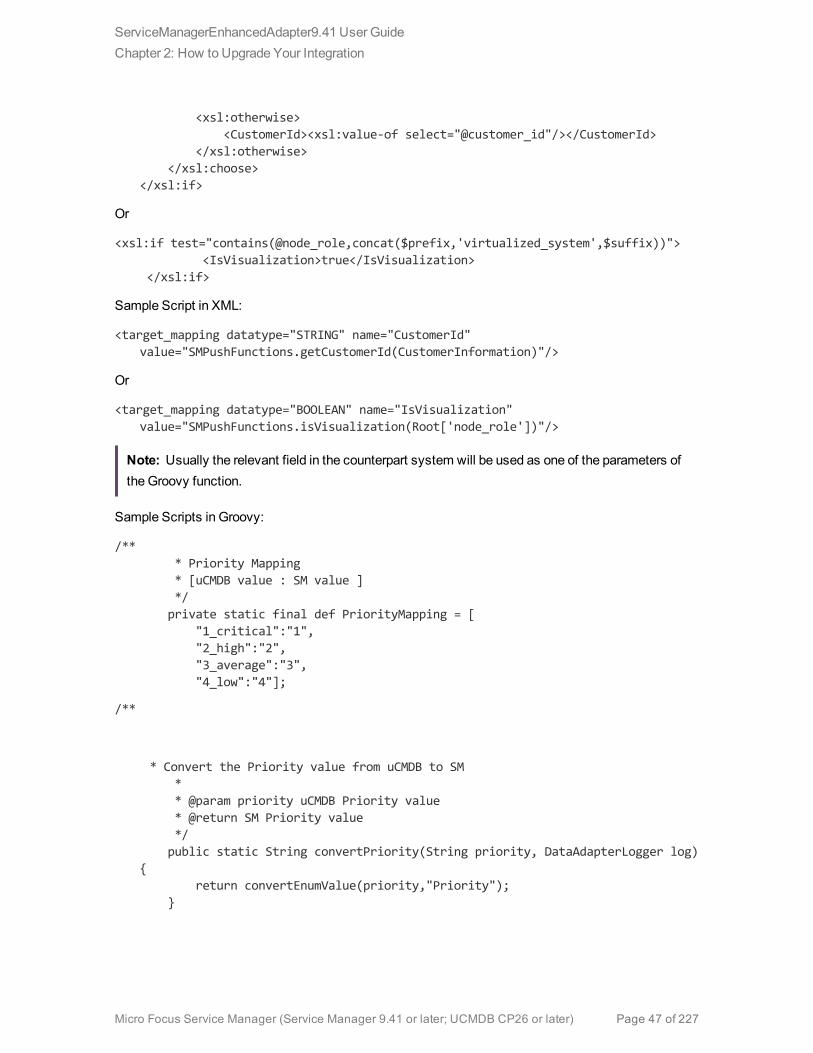
<xsl:otherwise><CustomerId><xsl:value-of select="@customer_id"/></CustomerId>
</xsl:otherwise></xsl:choose>
</xsl:if>
Or
<xsl:if test="contains(@node_role,concat($prefix,'virtualized_system',$suffix))"><IsVisualization>true</IsVisualization>
</xsl:if>
Sample Script in XML:
<target_mapping datatype="STRING" name="CustomerId"value="SMPushFunctions.getCustomerId(CustomerInformation)"/>
Or
<target_mapping datatype="BOOLEAN" name="IsVisualization"value="SMPushFunctions.isVisualization(Root['node_role'])"/>
Note: Usually the relevant field in the counterpart system will be used as one of the parameters ofthe Groovy function.
Sample Scripts in Groovy:
/*** Priority Mapping* [uCMDB value : SM value ]*/private static final def PriorityMapping = [
"1_critical":"1","2_high":"2","3_average":"3","4_low":"4"];
/**
* Convert the Priority value from uCMDB to SM** @param priority uCMDB Priority value* @return SM Priority value*/public static String convertPriority(String priority, DataAdapterLogger log)
{return convertEnumValue(priority,"Priority");
}
ServiceManagerEnhancedAdapter9.41 User GuideChapter 2: How to Upgrade Your Integration
Micro Focus Service Manager (Service Manager 9.41 or later; UCMDB CP26 or later) Page 47 of 227

Step 2. Update the configuration files.Update the files as described in the following table.
File Description
icon.properties This configuration file defines the UCMDB icons that will be displayed in themapping tool for ServiceManager CI Types. If you have defined any custom CItypes in SM, you can update this configuration file to assign them appropriateicons.
For more information, see theUniversal CMDB Data Flow Management Guide.
sm.properties This is the integration adapter configuration file. If you havemodified the out-of-the-box settings in your old sm.properties file (for example, the number ofconcurrent threads), you need to update this configuration file accordingly forthose options that are still valid in the ServiceManager EnhancedGenericAdapter.
For more information, see "How to Update the Integration Adapter ConfigurationFile (sm.properties)" on page 152.
smFedConf.xml This configuration file is used for federation and is introduced by the ServiceManager EnhancedGeneric Adapter. If you have any custom logic for thefederation feature, such as custom fields for federation CIs, you need to updatethis configuration file.
For more information, see "Troubleshooting Federation Issues" on page 222.
smPopConf.xml This configuration file is used for population and replaces the oldsmPopConfFile.xml configuration file. If you have any custom logic for thepopulation feature, such as custom query conditions, you need to update thisconfiguration file.
For more information, see the following topics:
"What Is the Purpose of the <container> Element in the Population ConfigurationFile (smPopConf.xml)?" on page 134
"No TQLQuery Configured in smPopConf.xml " on page 218
smPushConf.xml This configuration file is used for relationship data push and replaces the oldsmSyncConfFile.xml configuration file.
For more information about this file, see the following topics:
"How toMap a Relationship TypeQuery to the ServiceManagerWeb ServiceObject" on page 165
"Query not Configured in smPushConf.xml" on page 212
ServiceManagerEnhancedAdapter9.41 User GuideChapter 2: How to Upgrade Your Integration
Micro Focus Service Manager (Service Manager 9.41 or later; UCMDB CP26 or later) Page 48 of 227
Step 3. Enable Push, Population and Federation for
CI types.Once you have completed the tasks described above, youmust edit your integration point to add Pushand Population jobs for the CI types, as well as enable Federation for supported CI types. For details,see the following topics:
"How to Create an Integration Point in UCMDB" on page 62
"How to Define Data Push Jobs in UCMDB" on page 69
"How to Define Population Jobs in UCMDB" on page 66
"How to Add an Attribute of a Supported CI Type for Federation" on page 200
Task 8: Upgrade Field MappingThe out-of-box mapping files in the ServiceManager 9.41 adapters are already updated to align with thelogical name solution. You need tomake similar updates to your own field mapping.
Note: In ServiceManager 9.41 or later, the original CI Name field (the id field in the device table)is removed from the Configuration Item detail form.
Upgrading the field mappings includes the following steps.
Step 1. Upgrade your data push field mapping
To update your CI pushmapping files, follow these steps:
1. Switch themapping field from CIIdentifier to DisplayName.
For example, from
<target_mapping name="CIIdentifier" datatype="STRING" value="Root['display_label']"/>
to:
<target_mapping name="DisplayName" datatype="STRING" value="Root['display_label']"/>
2. (Optional) Simplify the business logic for DisplayName.
ServiceManagerEnhancedAdapter9.41 User GuideChapter 2: How to Upgrade Your Integration
Micro Focus Service Manager (Service Manager 9.41 or later; UCMDB CP26 or later) Page 49 of 227

If you have customized the original CIIdentifier field values to appendmore fields so that they areunique and not renamed by ServiceManager, you can remove such business logic. This isbecause the DisplayName field in ServiceManager now supports duplicate values.
Step 2. Upgrade your population field mapping
You need tomake the following changes to your population field mapping files:
1. Change “CIIdentifier” to “DisplayName”.
2. Change “CIName” to “CIIdentifier”.
3. Make sure that the global.id field is included in themapping files. For example:
<target_mapping datatype="STRING" name="global_id" value="bizservice['UCMDBId']"/>
For the Relationship and Running Software populationmapping files, perform the following additionalsteps:
1. Remove all upstream and downstream “name”mapping entries from all relationship populationmapping files. The following are two example "name" mapping entries:
<target_mapping name="name" datatype="STRING" value="cirelationship1to1['upstreamci.logical.name']"/>
<target_mapping name="name" datatype="STRING" value="cirelationship1to1['downstreamci.logical.name']"/>
2. Remove the “name”mapping entry (the entry in bold) from the container node in the runningsoftware populationmapping file.
<for-each-source-entity count-index="i" source-entities="runningsoftware.computer">
<target_entity name="Node">
<target_mapping name="name" datatype="STRING"value="runningsoftware.computer[i]['CIIdentifier']"/>
<target_mapping name="global_id" datatype="STRING"value="runningsoftware.computer[i]['UCMDBId']"/>
</target_entity>
</for-each-source-entity>
Step 3. Upgrade your federation configuration files
Make the following updates to your federation configuration files:
ServiceManagerEnhancedAdapter9.41 User GuideChapter 2: How to Upgrade Your Integration
Micro Focus Service Manager (Service Manager 9.41 or later; UCMDB CP26 or later) Page 50 of 227
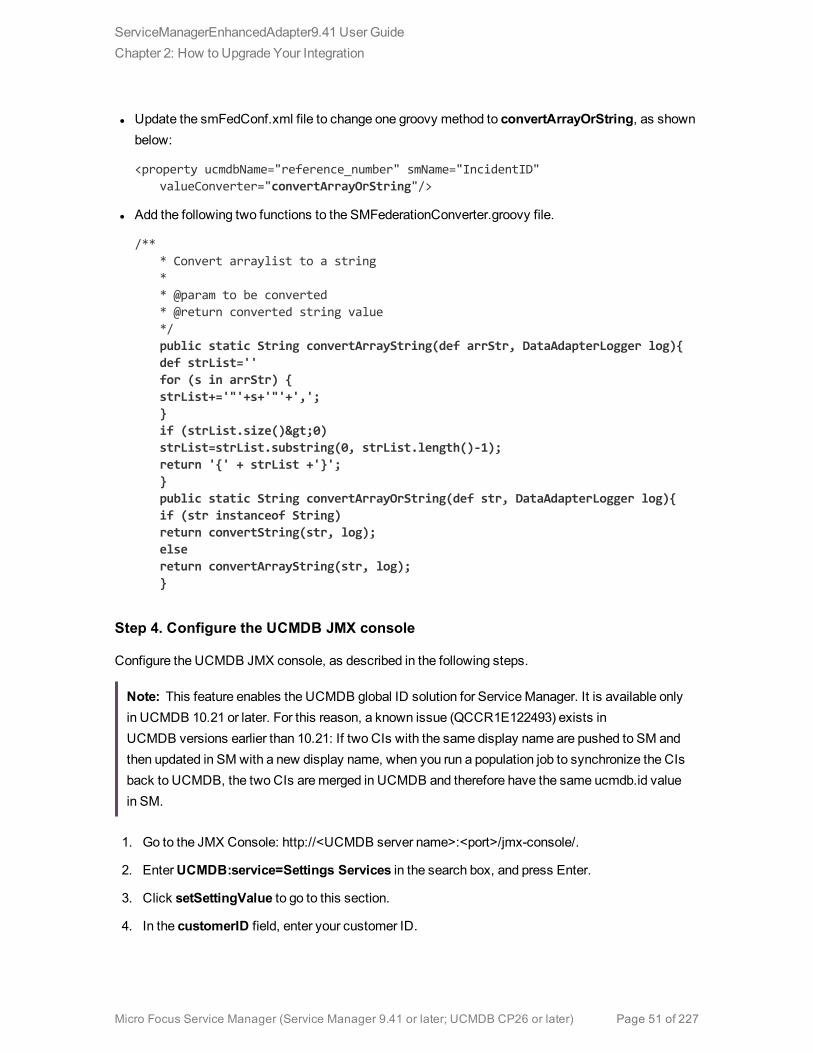
l Update the smFedConf.xml file to change one groovy method to convertArrayOrString, as shownbelow:
<property ucmdbName="reference_number" smName="IncidentID"valueConverter="convertArrayOrString"/>
l Add the following two functions to the SMFederationConverter.groovy file.
/*** Convert arraylist to a string** @param to be converted* @return converted string value*/public static String convertArrayString(def arrStr, DataAdapterLogger log){def strList=''for (s in arrStr) {strList+='"'+s+'"'+',';}if (strList.size()>0)strList=strList.substring(0, strList.length()-1);return '{' + strList +'}';}public static String convertArrayOrString(def str, DataAdapterLogger log){if (str instanceof String)return convertString(str, log);elsereturn convertArrayString(str, log);}
Step 4. Configure the UCMDB JMX console
Configure the UCMDB JMX console, as described in the following steps.
Note: This feature enables the UCMDB global ID solution for ServiceManager. It is available onlyin UCMDB 10.21 or later. For this reason, a known issue (QCCR1E122493) exists inUCMDB versions earlier than 10.21: If two CIs with the same display name are pushed to SM andthen updated in SM with a new display name, when you run a population job to synchronize the CIsback to UCMDB, the two CIs aremerged in UCMDB and therefore have the same ucmdb.id valuein SM.
1. Go to the JMX Console: http://<UCMDB server name>:<port>/jmx-console/.
2. EnterUCMDB:service=Settings Services in the search box, and press Enter.
3. Click setSettingValue to go to this section.
4. In the customerID field, enter your customer ID.
ServiceManagerEnhancedAdapter9.41 User GuideChapter 2: How to Upgrade Your Integration
Micro Focus Service Manager (Service Manager 9.41 or later; UCMDB CP26 or later) Page 51 of 227

5. In the name field, enter reconciliation.match.attributes.
6. In the value field, enter global_id.
7. Click Invoke.
If the configuration is successfully completed, the followingmessage is displayed:
Setting [reconciliation.match.attributes] value changed successfully to[global_id]
Task 9: Reconfigure an Integration PointYou need to set up an integration point to use the ServiceManagerEnhancedAdapter9.41 adapter, andactivate the integration point. For details, see "How to Create an Integration Point in UCMDB" onpage 62.
Once this adapter is successfully enabled, you should be able to open one of the out-of-box mappingfiles in the Visual Mapping tool interface without any problems. For details on how to use the VisualMapping tool, refer to theUniversal CMDB Data Flow Management Guide.
Task 10: Run a Full Push to ResynchronizeCI NamesDue to the logical name solution that was introduced in ServiceManager 9.41, once you have upgradedto ServiceManager 9.41 or later, youmust run a full data push to resynchronize CI names to the CIdisplay name field in ServiceManager. When performing this step, you need to use the new integrationpoint that you reconfigured.
To resynchronize CIs, follow these steps:
1. Run a Full Push in UCMDB.
2. Check the CI data in ServiceManager.a. Perform a search to find the CIs.
b. Verify that the Display Name field values of the CIs have been updated correctly.
Note: The display names of Retired CIs are not updated, because they are alreadyremoved from UCMDB.
ServiceManagerEnhancedAdapter9.41 User GuideChapter 2: How to Upgrade Your Integration
Micro Focus Service Manager (Service Manager 9.41 or later; UCMDB CP26 or later) Page 52 of 227

Task 11: Restore the DEM Rules in ServiceManagerAfter you have run a full data push to resynchronize CI names to ServiceManager, youmust restorethe DEM rules to their original state so that they can function as usual.
To restore the DEM rules, follow these steps:
1. Log in to ServiceManager as a System Administrator.
2. Navigate to Tailoring >Web Services > Discovered Event Manager Rules.
3. Click Search.
4. In each DEM rule, forAction if record exists but unexpected data discovered, restore thesetting to the original value (for example, Open a Change orOpen an Incident).
ServiceManagerEnhancedAdapter9.41 User GuideChapter 2: How to Upgrade Your Integration
Micro Focus Service Manager (Service Manager 9.41 or later; UCMDB CP26 or later) Page 53 of 227

Chapter 3: Integration SetupBefore implementing the integration in your production environment, you can set up the integration in atest environment using the out-of-the-box integration configurations. This chapter describes the basicintegration setup tasks without any tailoring or multi-tenancy configurations.
Integration Requirements 54
Integration SetupOverview 56
ServiceManager Setup 56
Universal CMDB Setup 62
Populating UCMDB with ServiceManager CI Data 65
Pushing UCMDB CI Data to ServiceManager 69
Federating ServiceManager Ticket Data to UCMDB 75
Tip: Before you proceed to implementing the integration in your production environment, you canrefer to the following chapters for further information:
l "Multi-Tenancy (Multi-Company) Setup" on page 93, which describes how you set up theintegration in multi-tenancy mode.
l "Standards and Best Practices" on page 113, which describes best practices for implementingthe integration and also provides Frequently-Asked-Questions information.
l "Tailoring the Integration" on page 136, which describes how you can tailor the integration tobetter suit your business needs.
l "Troubleshooting" on page 207, which provides information on troubleshooting data push andpopulation issues.
Integration RequirementsThis section describes the integration requirements when using theServiceManagerEnhancedAdapter9.41 adapter.
Supported Product VersionsThe supported product versions for using this adapter are listed in the following table.
Micro Focus Service Manager (Service Manager 9.41 or later; UCMDB CP26 or later) Page 54 of 227

Product Versions Notes
ServiceManager 9.41 or laterTo support the embedding ofUCMDB Browser's CIVisualization and ImpactVisualization widgets in ServiceManager, the following productversions are required:
l ServiceManager 9.50 orlater
l UCMDB Browser 4.10 orlater
UCMDB 10.20 or later
UCMDB Browser Compatible versions forUCMDB
Setting up Required ComponentsYoumust set up the following required components to establish an integration between UCMDB andServiceManager.
l Universal CMDB installationAdd a UCMDB Probe for the population feature if you do not already have one.
l ServiceManager installationAdd the UCMDB URL to the SMtoUCMDB integration instance in ServiceManager IntegrationManager.
l Network connection between the Universal CMDB and ServiceManager systems.
For instructions on installing and configuring your systems, see the UCMDB and ServiceManagerdocumentation.
Deploying an Appropriate AdapterTo use a ServiceManager 9.41 adapter, all of your ServiceManager server, clients, and applicationsmust be version 9.41 or later. You need to verify your ServiceManager applications version and thenfind the correct adapter.
To to this, follow these steps:
ServiceManagerEnhancedAdapter9.41 User GuideIntegration Requirements
Micro Focus Service Manager (Service Manager 9.41 or later; UCMDB CP26 or later) Page 55 of 227

1. Log in to ServiceManager as a system administrator.
2. Enter db in the command line, and press Enter.
3. Enter scversion in the Table field, and then click Search.
4. Click Search again.
5. Check the Application Version value that is displayed.
6. If your applications version is earlier than 9.41, use the ServiceManagerAdapter9.41 adapter.
7. If you are running ServiceManager applications 9.41 or later, use theServiceManagerEnhancedAdapter9.41 adapter.
Integration Setup OverviewThe integration requires setup on both the UCMDB and ServiceManager systems.
This task includes the following steps:
1. Set up the ServiceManager system.See "ServiceManager Setup" below.
2. Set up the UCMDB system.See "Universal CMDB Setup" on page 62.
3. Run the UCMDB population jobs to synchronize CIs to UCMDB.See "Populating UCMDB with ServiceManager CI Data" on page 65.
4. Run the UCMDB data push jobs to transfer CIs to ServiceManager.See "Populating UCMDB with ServiceManager CI Data" on page 65.
Service Manager SetupYoumust complete the following tasks from your ServiceManager system to support the integration.
1. Create a dedicated integration user account in ServiceManager.See "How to Create an Integration User Account" on the next page.
2. Add the UCMDB connection information to theSMtoUCMDB integration instance configured inIntegrationManager.See "How to Add UCMDB andUCMDB Browser Connection Information" on page 58.
ServiceManagerEnhancedAdapter9.41 User GuideIntegration SetupOverview
Micro Focus Service Manager (Service Manager 9.41 or later; UCMDB CP26 or later) Page 56 of 227
How to Create an Integration User AccountThis integration requires an administrator user account for UCMDB to connect to ServiceManager. Theuser account must already exist in both UCMDB and ServiceManager.
Note: The ServiceManager EnhancedGeneric Adapter requires the ServiceManagerucmdbIntegration RESTful APIs to work. For this reason, the integration user account must havetheRESTful API capability word in ServiceManager.
To create a dedicated integration user account in ServiceManager:
1. Log in to ServiceManager as a system administrator.
2. Type contacts in the ServiceManager command line, and press ENTER.
3. Create a new contact record for the integration user account.a. In the Contact Name field, type a name. For example, UCMDBIntUser.
b. Click Add, and thenOK.
4. Type operator in the ServiceManager command line, and press ENTER.
5. In the Login Name field, type the username of an existing system administrator account, and clickSearch.The system administrator account is displayed.
6. Create a new user account based on the existing one.a. Change the Login Name to the integration account name that you want (for example, ucmdb).
b. Type a Full Name. For example, UCMDB.
c. In the Contact ID field, click the Fill icon and select the contact record that you have justcreated.
d. Click Add.
e. Select theSecurity tab, and change the password.
f. Select theStartup tab, and add theRESTful API capability word for the operator.
g. Click OK.
The integration user account is created. Later you will need to add this user account(username/password) in UCMDB, and then specify this user account in the Credentials ID field whencreating an integration point in UCMDB. See "How to Create an Integration Point in UCMDB" onpage 62.
ServiceManagerEnhancedAdapter9.41 User GuideServiceManager Setup
Micro Focus Service Manager (Service Manager 9.41 or later; UCMDB CP26 or later) Page 57 of 227
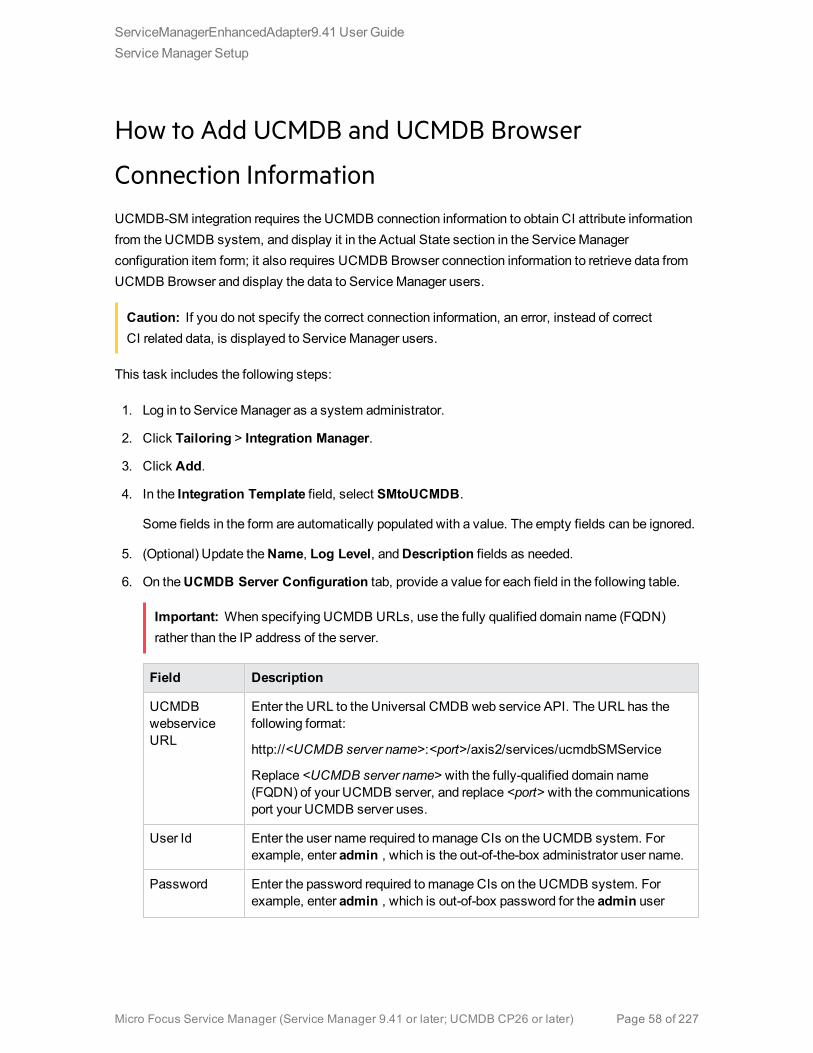
How to Add UCMDB and UCMDB Browser
Connection InformationUCMDB-SM integration requires the UCMDB connection information to obtain CI attribute informationfrom the UCMDB system, and display it in the Actual State section in the ServiceManagerconfiguration item form; it also requires UCMDB Browser connection information to retrieve data fromUCMDB Browser and display the data to ServiceManager users.
Caution: If you do not specify the correct connection information, an error, instead of correctCI related data, is displayed to ServiceManager users.
This task includes the following steps:
1. Log in to ServiceManager as a system administrator.
2. Click Tailoring > Integration Manager.
3. Click Add.
4. In the Integration Template field, select SMtoUCMDB.
Some fields in the form are automatically populated with a value. The empty fields can be ignored.
5. (Optional) Update theName, Log Level, andDescription fields as needed.
6. On theUCMDB Server Configuration tab, provide a value for each field in the following table.
Important: When specifying UCMDB URLs, use the fully qualified domain name (FQDN)rather than the IP address of the server.
Field Description
UCMDBwebserviceURL
Enter the URL to the Universal CMDB web service API. The URL has thefollowing format:
http://<UCMDB server name>:<port>/axis2/services/ucmdbSMService
Replace <UCMDB server name> with the fully-qualified domain name(FQDN) of your UCMDB server, and replace <port> with the communicationsport your UCMDB server uses.
User Id Enter the user name required tomanage CIs on the UCMDB system. Forexample, enter admin , which is the out-of-the-box administrator user name.
Password Enter the password required tomanage CIs on the UCMDB system. Forexample, enter admin , which is out-of-box password for the admin user
ServiceManagerEnhancedAdapter9.41 User GuideServiceManager Setup
Micro Focus Service Manager (Service Manager 9.41 or later; UCMDB CP26 or later) Page 58 of 227
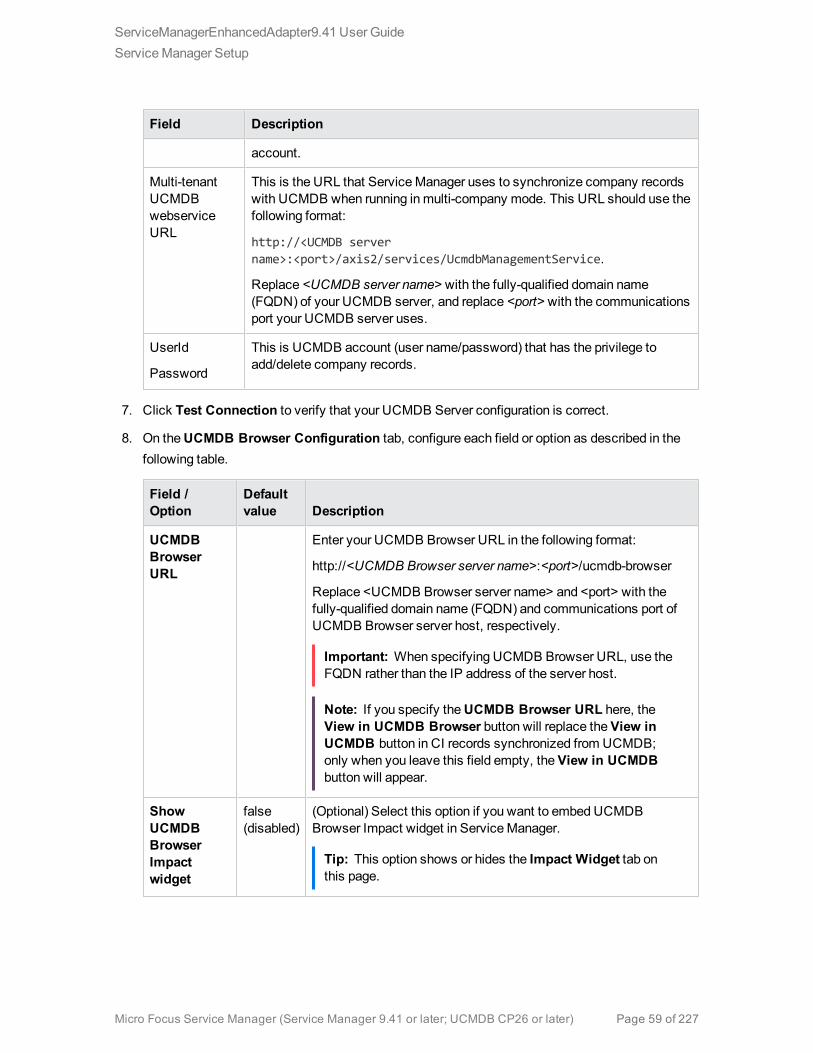
Field Description
account.
Multi-tenantUCMDBwebserviceURL
This is the URL that ServiceManager uses to synchronize company recordswith UCMDB when running in multi-company mode. This URL should use thefollowing format:
http://<UCMDB servername>:<port>/axis2/services/UcmdbManagementService.
Replace <UCMDB server name> with the fully-qualified domain name(FQDN) of your UCMDB server, and replace <port> with the communicationsport your UCMDB server uses.
UserId
Password
This is UCMDB account (user name/password) that has the privilege toadd/delete company records.
7. Click Test Connection to verify that your UCMDB Server configuration is correct.
8. On theUCMDB Browser Configuration tab, configure each field or option as described in thefollowing table.
Field /Option
Defaultvalue Description
UCMDBBrowserURL
Enter your UCMDB Browser URL in the following format:
http://<UCMDB Browser server name>:<port>/ucmdb-browser
Replace <UCMDB Browser server name> and <port> with thefully-qualified domain name (FQDN) and communications port ofUCMDB Browser server host, respectively.
Important: When specifying UCMDB Browser URL, use theFQDN rather than the IP address of the server host.
Note: If you specify theUCMDB Browser URL here, theView in UCMDB Browser button will replace theView inUCMDB button in CI records synchronized from UCMDB;only when you leave this field empty, theView in UCMDBbutton will appear.
ShowUCMDBBrowserImpactwidget
false(disabled)
(Optional) Select this option if you want to embed UCMDBBrowser Impact widget in ServiceManager.
Tip: This option shows or hides the Impact Widget tab onthis page.
ServiceManagerEnhancedAdapter9.41 User GuideServiceManager Setup
Micro Focus Service Manager (Service Manager 9.41 or later; UCMDB CP26 or later) Page 59 of 227

Field /Option
Defaultvalue Description
ShowUCMDBBrowser CIVisualizationwidget
false(disabled)
(Optional) Select this option if you want to embed UCMDBBrowser CI Visualization widget in ServiceManager.
Tip: This option shows or hides theCI Visualization Widgettab on this page.
Use adedicateduser account
false(disabled)
(Optional) Select this option if LW-SSO is not enabled for theintegration and you want to configure a dedicatedUCMDB Browser user account for users to view UCMDB Browserdata from ServiceManager.
This option enables users to access UCMDB Browser datadirectly from the ServiceManager user interface without the needto enter a user name and password, and is therefore useful whenLW-SSO is not enabled for the integration.
For example, this dedicated user account is used when users viewan embedded UCMDB Browser widget (such as CI Visualizationand Impact Simulation) from a ServiceManager record or whenusers click theView in UCMDB Browser button from aCI recordin ServiceManager.
Note: This option takes effect only when LW-SSO is notenabled for the integration. If you have enabled both LW-SSOand this option for the integration, LW-SSO is used.
Tip: This option shows or hides theDedicated User tab onthis page.
ImpactWidget tab >MaximumTrigger CIsper ImpactGraph
100 This is themaximum number of CIs that ServiceManager isallowed to send to UCMDB Browser as trigger CIs when runningimpact simulation. For example, if the number of affected serviceand CIs of a Change record exceeds this value, when users clickRun Impact Analysis for the Change record, the impact analysisresult is displayed onmultiple pages, each of which except the lastone contains aNext button on the top. Users can click Next toview the next impact simulation graph.
Caution: The value of this field must not be greater than 100.
ImpactWidget tab >ImpactBundle
This is a rule bundle that is defined in UCMDB Server and will beused for impact analysis.
If you leave this field blank, the List of impact rule bundlessetting in UCMDB will be used. To access this setting in UCMDB,
ServiceManagerEnhancedAdapter9.41 User GuideServiceManager Setup
Micro Focus Service Manager (Service Manager 9.41 or later; UCMDB CP26 or later) Page 60 of 227
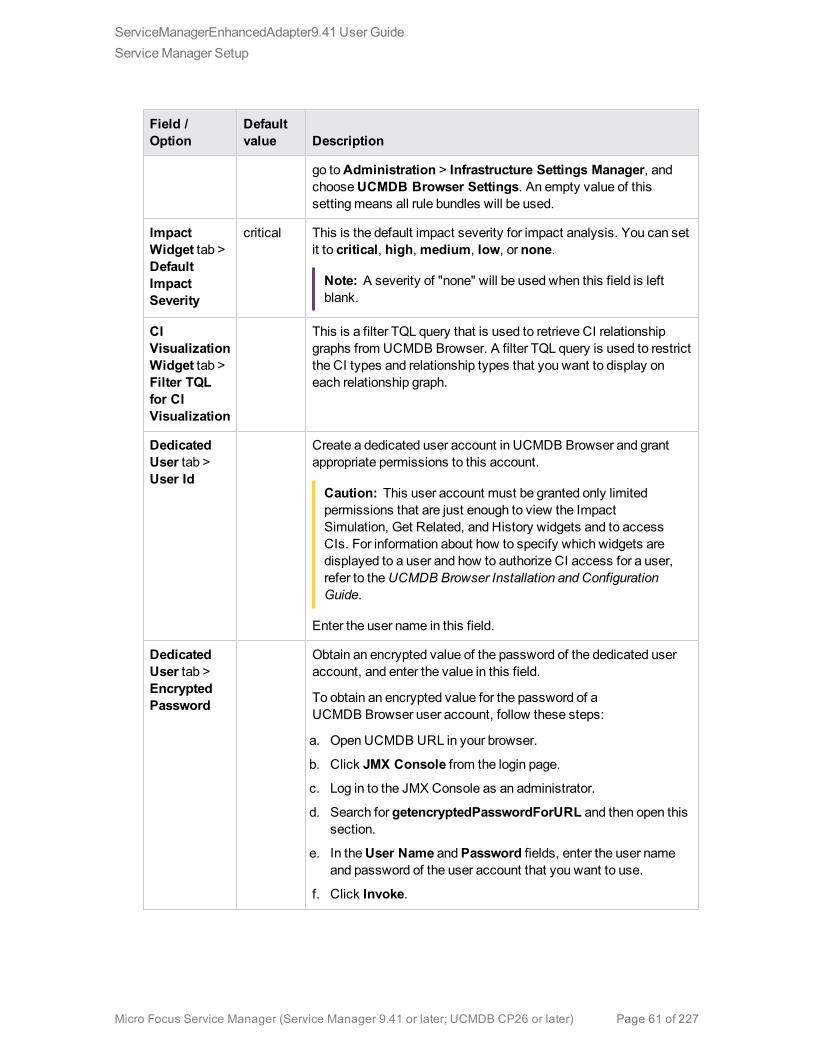
Field /Option
Defaultvalue Description
go toAdministration > Infrastructure Settings Manager, andchooseUCMDB Browser Settings. An empty value of thissettingmeans all rule bundles will be used.
ImpactWidget tab >DefaultImpactSeverity
critical This is the default impact severity for impact analysis. You can setit to critical, high,medium, low, or none.
Note: A severity of "none" will be used when this field is leftblank.
CIVisualizationWidget tab >Filter TQLfor CIVisualization
This is a filter TQL query that is used to retrieve CI relationshipgraphs from UCMDB Browser. A filter TQL query is used to restrictthe CI types and relationship types that you want to display oneach relationship graph.
DedicatedUser tab >User Id
Create a dedicated user account in UCMDB Browser and grantappropriate permissions to this account.
Caution: This user account must be granted only limitedpermissions that are just enough to view the ImpactSimulation, Get Related, and History widgets and to accessCIs. For information about how to specify which widgets aredisplayed to a user and how to authorize CI access for a user,refer to theUCMDB Browser Installation and ConfigurationGuide.
Enter the user name in this field.
DedicatedUser tab >EncryptedPassword
Obtain an encrypted value of the password of the dedicated useraccount, and enter the value in this field.
To obtain an encrypted value for the password of aUCMDB Browser user account, follow these steps:
a. Open UCMDB URL in your browser.
b. Click JMX Console from the login page.
c. Log in to the JMX Console as an administrator.
d. Search for getencryptedPasswordForURL and then open thissection.
e. In theUser Name andPassword fields, enter the user nameand password of the user account that you want to use.
f. Click Invoke.
ServiceManagerEnhancedAdapter9.41 User GuideServiceManager Setup
Micro Focus Service Manager (Service Manager 9.41 or later; UCMDB CP26 or later) Page 61 of 227

Field /Option
Defaultvalue Description
An encrypted value of the password is returned.
9. Click Finish.
ServiceManager creates an SMtoUCMDB integration instance.
10. Go to Integration Manager, and then click the SMtoUCMDB integration instance.
11. Click Next until the Initialize link becomes active, and then click the link.
Note: This step creates records in the cirelationship1to1 table so that CI relationships canbe properly populated to UCMDB.
12. Click Finish to go back to IntegrationManager, select the SMtoUCMDB integration instance, andthen click Enable to enable the integration instance.
Universal CMDB SetupYoumust complete the following task from your UCMDB system to support the integration:
Create an integration point between UCMDB and ServiceManager. See "How to Create an IntegrationPoint in UCMDB" below.
How to Create an Integration Point in UCMDBA default UCMDB installation already includes the ServiceManagerEnhancedAdapter9.41 package. Touse the integration package, youmust create an integration point that lists the connection properties forthe integration.
Caution: For data population, this integration supports the use of only one probe for your ServiceManager system. Do not run population jobs on different probes by setting upmultiple integrationpoints with different probes for your ServiceManager system. Only one probe is allowed for oneServiceManager system.
To create an integration point, follow these steps:
ServiceManagerEnhancedAdapter9.41 User GuideUniversal CMDB Setup
Micro Focus Service Manager (Service Manager 9.41 or later; UCMDB CP26 or later) Page 62 of 227
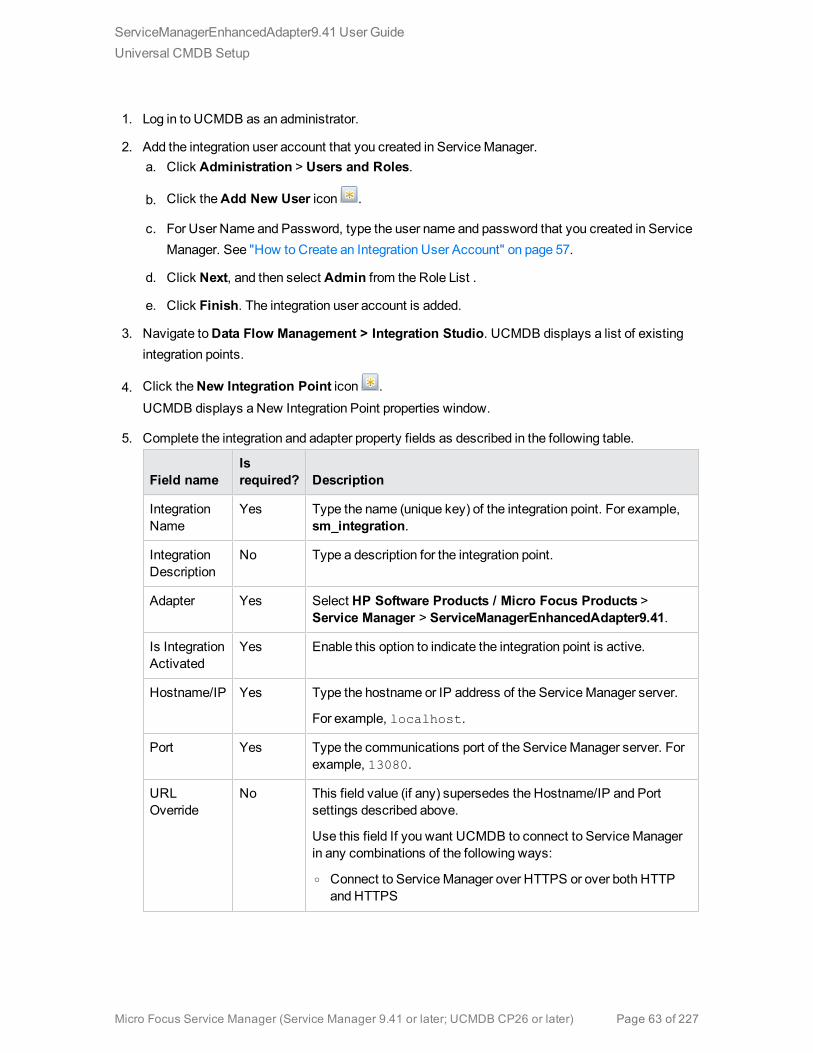
1. Log in to UCMDB as an administrator.
2. Add the integration user account that you created in ServiceManager.a. Click Administration > Users and Roles.
b. Click theAdd New User icon .
c. For User Name and Password, type the user name and password that you created in ServiceManager. See "How to Create an Integration User Account" on page 57.
d. Click Next, and then select Admin from the Role List .
e. Click Finish. The integration user account is added.
3. Navigate toData Flow Management > Integration Studio. UCMDB displays a list of existingintegration points.
4. Click theNew Integration Point icon .UCMDB displays a New Integration Point properties window.
5. Complete the integration and adapter property fields as described in the following table.
Field nameIsrequired? Description
IntegrationName
Yes Type the name (unique key) of the integration point. For example,sm_integration.
IntegrationDescription
No Type a description for the integration point.
Adapter Yes Select HP Software Products / Micro Focus Products >Service Manager > ServiceManagerEnhancedAdapter9.41.
Is IntegrationActivated
Yes Enable this option to indicate the integration point is active.
Hostname/IP Yes Type the hostname or IP address of the ServiceManager server.
For example, localhost.
Port Yes Type the communications port of the ServiceManager server. Forexample, 13080.
URLOverride
No This field value (if any) supersedes the Hostname/IP and Portsettings described above.
Use this field If you want UCMDB to connect to ServiceManagerin any combinations of the following ways:
o Connect to ServiceManager over HTTPS or over both HTTPand HTTPS
ServiceManagerEnhancedAdapter9.41 User GuideUniversal CMDB Setup
Micro Focus Service Manager (Service Manager 9.41 or later; UCMDB CP26 or later) Page 63 of 227

Field nameIsrequired? Description
o Connect to multiple ServiceManager server nodes (horizontallyscaled environment)
o Connect to one single ServiceManager server node throughmultiple ports (vertically scaled environment)
For more information, see "Push in Clustered Environments" onpage 118.
Type one or more ServiceManager web services URLs (separatedby a semicolon) in this field.
Each URLmust use this format:
http(s)://<hostname>:<port>/SM/9/rest
The following are two example values of this field:
o https://localhost:13443/SM/9/rest
o http://localhost:13080/SM/9/rest;https://localhost:13443/SM/9/rest;http://smfpe04:13080/SM/9/rest
CredentialsID
Yes Click Generic Protocol, click theAdd icon to add the integrationuser account that you created, and then select it. This accountmust exist in both ServiceManager and UCMDB. See "How toCreate an Integration User Account" on page 57.
Data FlowProbe
Yes Select the name of the Data Flow Probe used to run populationjobs. You should have already added the data flow probe for theintegration after installing UCMDB. See "IntegrationRequirements" on page 54.
6. Click Test Connection to make sure that a successful connection has been established.
7. Click OK.The integration point is created and its details are displayed.
8. Click the Federation tab, and complete the following configuration.a. In Supported and Selected CI Types, select the following CI types as needed from
ItProcessRecord:i. Incident
ii. Problem
iii. Request for Change
ServiceManagerEnhancedAdapter9.41 User GuideUniversal CMDB Setup
Micro Focus Service Manager (Service Manager 9.41 or later; UCMDB CP26 or later) Page 64 of 227
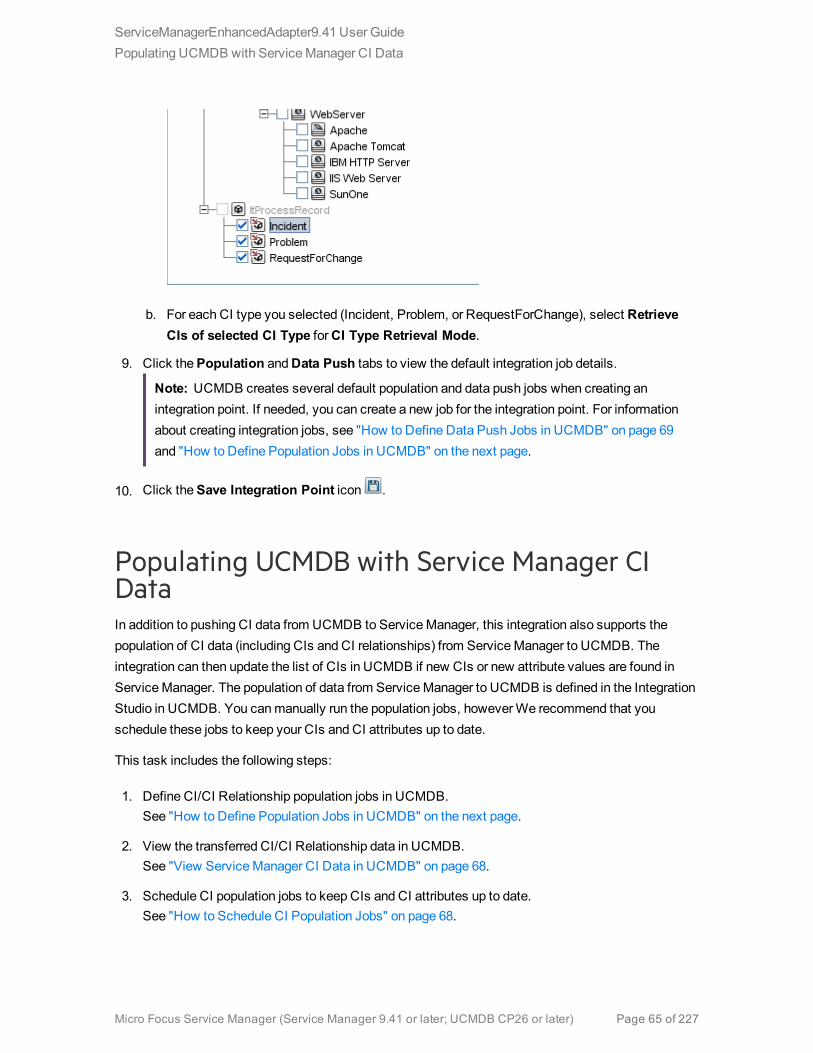
b. For each CI type you selected (Incident, Problem, or RequestForChange), select RetrieveCIs of selected CI Type forCI Type Retrieval Mode.
9. Click thePopulation andData Push tabs to view the default integration job details.
Note: UCMDB creates several default population and data push jobs when creating anintegration point. If needed, you can create a new job for the integration point. For informationabout creating integration jobs, see "How to Define Data Push Jobs in UCMDB" on page 69and "How to Define Population Jobs in UCMDB" on the next page.
10. Click theSave Integration Point icon .
Populating UCMDB with Service Manager CIDataIn addition to pushing CI data from UCMDB to ServiceManager, this integration also supports thepopulation of CI data (including CIs and CI relationships) from ServiceManager to UCMDB. Theintegration can then update the list of CIs in UCMDB if new CIs or new attribute values are found inServiceManager. The population of data from ServiceManager to UCMDB is defined in the IntegrationStudio in UCMDB. You canmanually run the population jobs, howeverWe recommend that youschedule these jobs to keep your CIs and CI attributes up to date.
This task includes the following steps:
1. Define CI/CI Relationship population jobs in UCMDB.See "How to Define Population Jobs in UCMDB" on the next page.
2. View the transferred CI/CI Relationship data in UCMDB.See "View ServiceManager CI Data in UCMDB" on page 68.
3. Schedule CI population jobs to keep CIs and CI attributes up to date.See "How to Schedule CI Population Jobs" on page 68.
ServiceManagerEnhancedAdapter9.41 User GuidePopulating UCMDB with ServiceManager CI Data
Micro Focus Service Manager (Service Manager 9.41 or later; UCMDB CP26 or later) Page 65 of 227

How to Define Population Jobs in UCMDBA CI or relationship population job copies certain types of CIs or relationships from ServiceManager toUCMDB.
To define a CI or CI relationship population job, follow these steps:
1. Log in to UCMDB as an administrator.
2. Navigate toData Flow Management > Integration Studio. UCMDB displays a list of existingintegration points.
3. Open the integration point that you created for ServiceManager.
4. Click thePopulation tab, and add a new job as follows.
Note: UCMDB creates several default population and data push jobs when creating anintegration point. The following table lists the default population jobs and their queries. Ifneeded, you can create, update or remove queries for each job.
Integration Job Queries for CI / CI relationship population
SMConfigurationItem Populationjob
Out-of-the-box, the following queries are available for this job, whichpopulates UCMDB with CI records from ServiceManager:
o SM Business Service Population 2.0: Populates UCMDB with CIsof the bizservice type.
o SM RunningSoftware Population 2.0: Populates UCMDB with CIsof the RunningSoftware type.
o SM Computer Population: Populates UCMDB with CIs of thecomputer type.
o SM CLIP Down Time Population 2.0: Populates UCMDB with CIsof the planned outage type.
SM RelationsPopulation job
Out-of-the-box, the following queries are defined for this job, whichpopulates UCMDB with CI Relationship records from ServiceManager:
o SM Biz To Biz With Containment 2.0: Populates UCMDB with CIrelationships in which a bizservice CI contains another.
o SM Biz To Biz With Usage 2.0: Populates UCMDB with CIrelationships in which a bizservice CI uses another.
o SM Biz To Computer With Containment 2.0: Populates UCMDBwith CI relationships in which a bizservice CI contains a computer CI.
o SM Biz To Computer With Usage 2.0: Populates UCMDB with CI
Queries for CI / CI relationship population
ServiceManagerEnhancedAdapter9.41 User GuidePopulating UCMDB with ServiceManager CI Data
Micro Focus Service Manager (Service Manager 9.41 or later; UCMDB CP26 or later) Page 66 of 227

Integration Job Queries for CI / CI relationship population
relationships in which a bizservice CI uses a computer CI.
o SM Computer To Computer With Connects 2.0: PopulatesUCMDB with CI relationships in which a computer CI connects toanother.
o SM Biz To Software With Containment 2.0: Populates UCMDBwith CI relationships in which a bizservice CI contains a software CI.
o SM Biz To Software With Usage 2.0: Populates UCMDB with CIrelationships in which a bizservice CI uses a software CI.
o SM Computer Composition Software 2.0: Populates UCMDB withCI relationships in which a computer CI connects to a software CI.
o SM CI Connection Down Time CI 2.0: Populates UCMDB with CIrelationships in which a CI connects to a down time CI.
Queries for CI / CI relationship population, continued
a. Click theNew Integration Job icon .
b. Type a Name for the integration job. For example, CI_Population_Job1.
c. Click theAdd Query icon to add existing queries to the job (see the table above).
d. Select theAllow Integration Job to delete removed data check box for the query.
e. Click OK to save the job.
5. Run the jobmanually to see if the integration job works properly.
a. To populate UCMDB with all relevant data for the job, click the icon.
b. To populate UCMDB with only CI data changes since the job last ran, click the icon.
6. Wait for the job to complete, and click theRefresh iconmultiple times as needed until the job iscompleted.
Note: When the job is completed, the job status becomes one of the following: Succeeded,Passed with failures, or Failed.
7. Click theStatistics tab to view the results. If the job failed, click theQuery Status tab and JobErrors tab for more information. For details, see "Troubleshooting Population Issues" onpage 216.
8. Click OK.
If the job is completed successfully, you can view the transferred CI data in UCMDB and schedule thejob so that it can run automatically.
ServiceManagerEnhancedAdapter9.41 User GuidePopulating UCMDB with ServiceManager CI Data
Micro Focus Service Manager (Service Manager 9.41 or later; UCMDB CP26 or later) Page 67 of 227

View Service Manager CI Data in UCMDBAfter a population job is successfully completed, you can search for the ServiceManager CI records inUCMDB, and verify that their attributes are correctly populated.
The ServiceManagerDisplay Name field is populated to theName field on the Configuration ItemProperties pane in UCMDB.
Note: To see the entire attributemappings of a CI type, you can open its population XML file (forexample, SM Business Service Population.xml), where the UCMDB attribute field names andthemapped ServiceManager web service field caption names are defined. For more information,see "Tailoring the Integration" on page 136.
How to Schedule CI Population JobsYou can schedule CI population jobs tomatch the discovery/maintenance schedule of your ServiceManager feeders. For example, if your ServiceManager feeders send CI data updates on a dailyschedule, then the population jobs must also run on a daily schedule. By using amatching scheduleyou can ensure that your UCMDB system always has themost current CI data.
This task includes the following steps:
1. Log in to UCMDB as an administrator.
2. Navigate toData Flow Management > Integration Studio. UCMDB displays a list of integrationpoints.
3. Open the integration point for ServiceManager.
4. Click thePopulation tab, and select a population job from the list.
5. Click theEdit Integration Job icon.
6. Select theScheduler enabled option.
7. Select the scheduling options that you want to use. For example, select Repeat every: Day andEnds: Never.
8. Select a Time Zone.
9. Click OK.
ServiceManagerEnhancedAdapter9.41 User GuidePopulating UCMDB with ServiceManager CI Data
Micro Focus Service Manager (Service Manager 9.41 or later; UCMDB CP26 or later) Page 68 of 227
Pushing UCMDB CI Data to Service ManagerThe integration requires a one-time transfer of CIs from UCMDB to ServiceManager to populate theServiceManager system with CIs. The integration will then update the list of CIs in ServiceManagerwhen UCMDB discovers new CIs or new attribute values. The integration accomplishes the push of CIdata using data push jobs in the UCMDB system. We recommend that you schedule these jobs tokeep your CIs and CI attributes up to date.
This task includes the following steps:
1. Define CI/CI Relationship data push jobs.See "How to Define Data Push Jobs in UCMDB" below.
2. View the CI/CI Relationship data pushed from UCMDB.See "How to View UCMDB CI Data in ServiceManager" on page 73.
3. Schedule data push jobs to keep CI/CI Relationship data up to date.See "How to Schedule Data Push Jobs" on page 71.
How to Define Data Push Jobs in UCMDBData push jobs copy CI or CI Relationship records from your UCMDB system to your ServiceManagersystem.
To define a CI or CI relationship push job, follow these steps:
1. Log in to UCMDB as an administrator.
2. Navigate to Data Flow Management > Integration Studio. UCMDB displays a list of existingintegration points.
3. Select the Integration Point that you created for ServiceManager. For example, sm_integration.
4. Click theData Push tab.
5. Follow these steps to add a new data push job:
a. Click theNew Integration Job icon .
Note: UCMDB creates a default data push job when creating an integration point. Thefollowing table lists the default data push job and its queries. If needed, you can create,update, or remove queries for the push job. To access these out-of-the-box queries for push,go toModeling >Modeling Studio > Resources, select Queries for Resource Type, andthen navigate toRoot > Integration > Service Manager > Push. For information about
ServiceManagerEnhancedAdapter9.41 User GuidePushing UCMDB CI Data to ServiceManager
Micro Focus Service Manager (Service Manager 9.41 or later; UCMDB CP26 or later) Page 69 of 227
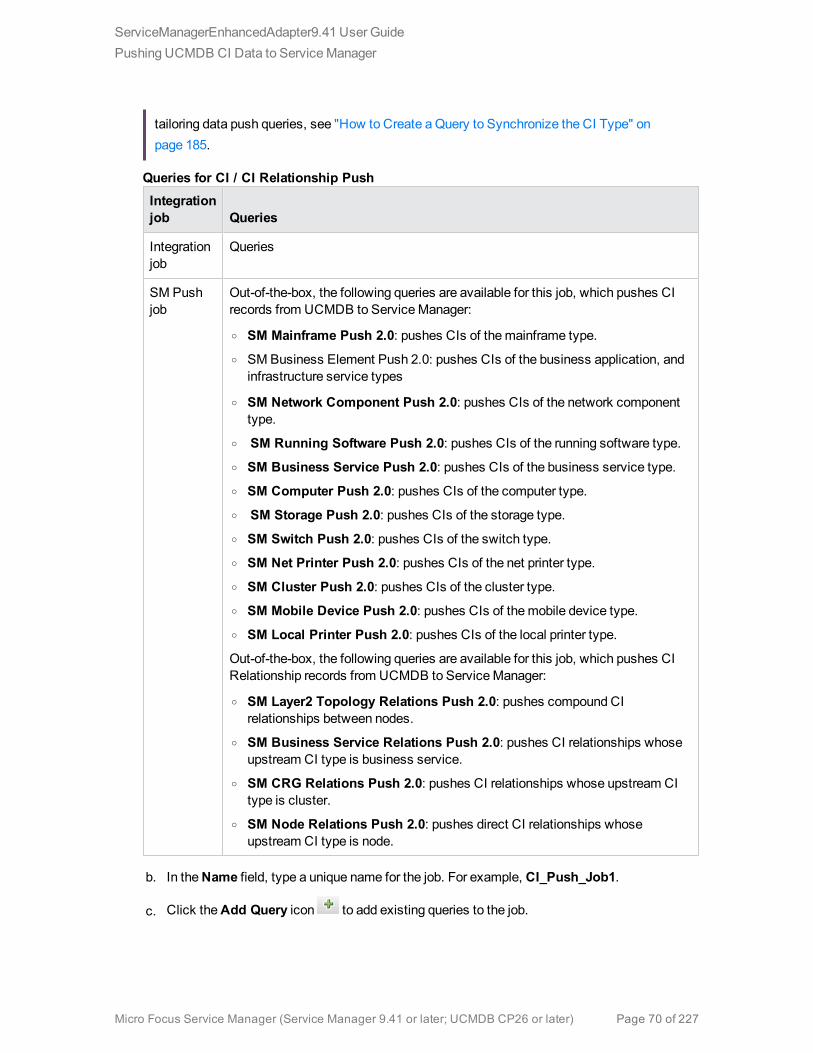
tailoring data push queries, see "How to Create aQuery to Synchronize the CI Type" onpage 185.
Integrationjob Queries
Integrationjob
Queries
SM Pushjob
Out-of-the-box, the following queries are available for this job, which pushes CIrecords from UCMDB to ServiceManager:
o SM Mainframe Push 2.0: pushes CIs of themainframe type.o SM Business Element Push 2.0: pushes CIs of the business application, and
infrastructure service types
o SM Network Component Push 2.0: pushes CIs of the network componenttype.
o SM Running Software Push 2.0: pushes CIs of the running software type.o SM Business Service Push 2.0: pushes CIs of the business service type.o SM Computer Push 2.0: pushes CIs of the computer type.o SM Storage Push 2.0: pushes CIs of the storage type.o SM Switch Push 2.0: pushes CIs of the switch type.o SM Net Printer Push 2.0: pushes CIs of the net printer type.o SM Cluster Push 2.0: pushes CIs of the cluster type.o SM Mobile Device Push 2.0: pushes CIs of themobile device type.o SM Local Printer Push 2.0: pushes CIs of the local printer type.
Out-of-the-box, the following queries are available for this job, which pushes CIRelationship records from UCMDB to ServiceManager:
o SM Layer2 Topology Relations Push 2.0: pushes compound CIrelationships between nodes.
o SM Business Service Relations Push 2.0: pushes CI relationships whoseupstream CI type is business service.
o SM CRG Relations Push 2.0: pushes CI relationships whose upstream CItype is cluster.
o SM Node Relations Push 2.0: pushes direct CI relationships whoseupstream CI type is node.
Queries for CI / CI Relationship Push
b. In theName field, type a unique name for the job. For example, CI_Push_Job1.
c. Click theAdd Query icon to add existing queries to the job.
ServiceManagerEnhancedAdapter9.41 User GuidePushing UCMDB CI Data to ServiceManager
Micro Focus Service Manager (Service Manager 9.41 or later; UCMDB CP26 or later) Page 70 of 227
d. Select theAllow Integration Job to delete removed data option for each query.
e. Click OK to save the job.
6. Run the jobmanually to verify that the integration job works properly.
Caution: If you have a huge amount of CI data in your UCMDB system, and this is your firsttime to push CI /CI Relationship data to ServiceManager, it is recommended to select the“Add the record” option instead of “Open a change” or “Open an incident” for “Action ifmatching record does not exist” in each Discovery Event Manager Rules definition. Failure todo somay cause unnecessary performance problems. For details, see "How to AddDiscovery Event Manager Rules" on page 158.
a. To push all relevant data for the job, click the icon.
b. To push only data that was changed since the job last ran, click the icon.
Tip: You can stop a running push job by pressing theStops the selected job icon .
7. Wait for the job to complete, and click theRefresh iconmultiple times as needed until the job iscompleted.
Note: When the job is completed, the job status becomes one of the following depending onthe results: Completed successfully, Completed, or Failed.
8. Click theStatistics tab to view the results; if any errors occur click theQuery Status tab and JobErrors tab for more information. For details, see "Troubleshooting Data Push Issues" onpage 207.
9. Click OK.
If the job is completed successfully, you can view the UCMDB CI data in ServiceManager, andschedule the job so that it can run automatically.
How to Schedule Data Push JobsIt is a best practice to schedule the data push jobs tomatch the discovery schedule of your ServiceManager feeders. For example, if your ServiceManager feeders send CI data updates on a dailyschedule, the data push jobs must also run on a daily schedule. By using amatching schedule you canensure that your ServiceManager system always has themost current CI data.
UCMDB allows you to schedule updates directly from a data push job. This task includes the followingsteps:
ServiceManagerEnhancedAdapter9.41 User GuidePushing UCMDB CI Data to ServiceManager
Micro Focus Service Manager (Service Manager 9.41 or later; UCMDB CP26 or later) Page 71 of 227
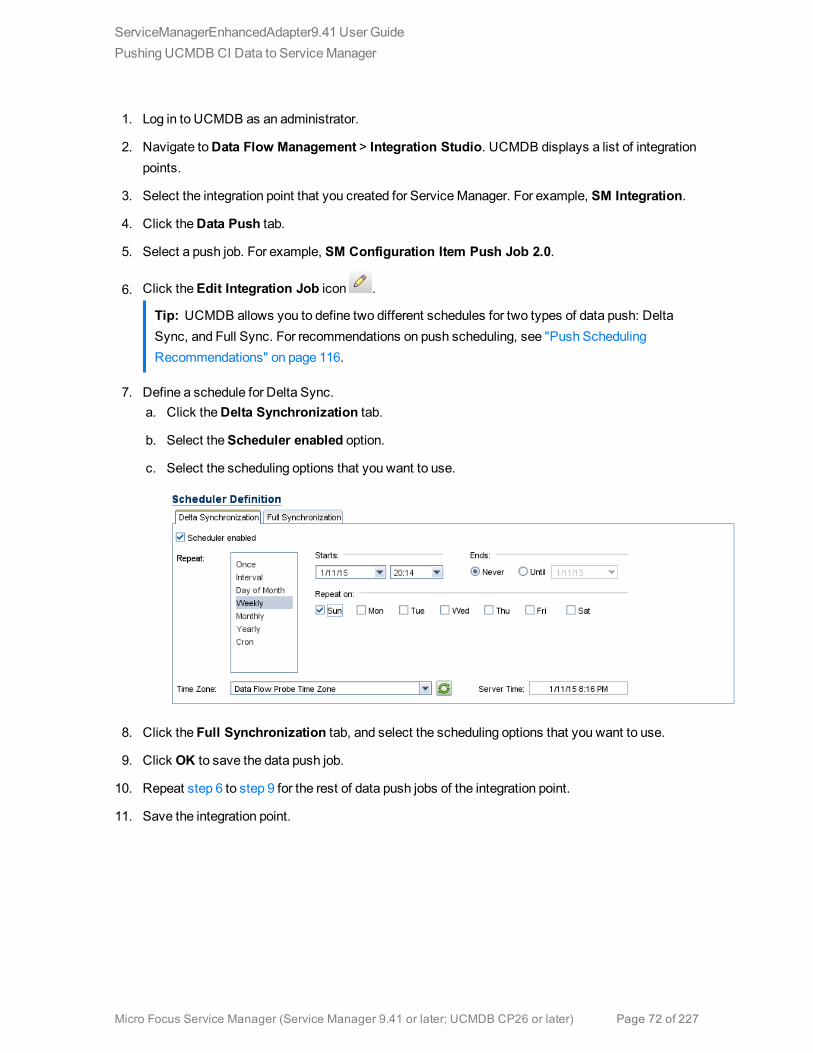
1. Log in to UCMDB as an administrator.
2. Navigate toData Flow Management > Integration Studio. UCMDB displays a list of integrationpoints.
3. Select the integration point that you created for ServiceManager. For example, SM Integration.
4. Click theData Push tab.
5. Select a push job. For example, SM Configuration Item Push Job 2.0.
6. Click theEdit Integration Job icon .
Tip: UCMDB allows you to define two different schedules for two types of data push: DeltaSync, and Full Sync. For recommendations on push scheduling, see "Push SchedulingRecommendations" on page 116.
7. Define a schedule for Delta Sync.a. Click theDelta Synchronization tab.
b. Select theScheduler enabled option.
c. Select the scheduling options that you want to use.
8. Click the Full Synchronization tab, and select the scheduling options that you want to use.
9. Click OK to save the data push job.
10. Repeat step 6 to step 9 for the rest of data push jobs of the integration point.
11. Save the integration point.
ServiceManagerEnhancedAdapter9.41 User GuidePushing UCMDB CI Data to ServiceManager
Micro Focus Service Manager (Service Manager 9.41 or later; UCMDB CP26 or later) Page 72 of 227
Data Push Error Handling
When a scheduled data push job in UCMDB is running, someCI datamay fail to be pushed due to anerror. When this happens, the order of pushing failed CIs is as follows:
1. UCMDB runs the job at one point and fails to push some data (CIs).
2. The ServiceManager (SM) adapter calls a UCMDB API tomark these CIs as failed.
3. UCMDB runs this job again at another point.
4. UCMDB picks up the failed CIs and sends them to the SM adapter first, and then sends new CIsto the SM adapter.
5. The SM adapter pushes all of the CIs from UCMDB to SM.
How to View UCMDB CI Data in Service ManagerAfter a push job is successfully completed, you can search for and verify the pushed CI/CI relationshipdata in ServiceManager.
CI records pushed from UCMDB contains aView in UCMDB orView in UCMDB Browser button,which enables you to access UCMDB or UCMDB Browser to view the CI information.
Note:l If you specified the UCMDB Browser URL in the System Information Record in SM, theViewin UCMDB Browser button is displayed; otherwise theView in UCMDB button is displayed.
l The UCMDB Browser is a lightweight UI designed for simple access to UCMDB configurationinformation. This is a tool for searching, locating and consuming configuration related data. It isan optional add-on to UCMDB. For more information, refer to the UCMDB Browserdocumentation.
To view UCMDB CI data in ServiceManager:
1. Log in to ServiceManager as a system administrator.
2. Navigate toConfiguration Management > Search CIs.
3. Open a CI record pushed from UCMDB.
ServiceManagerEnhancedAdapter9.41 User GuidePushing UCMDB CI Data to ServiceManager
Micro Focus Service Manager (Service Manager 9.41 or later; UCMDB CP26 or later) Page 73 of 227

4. If theView in UCMDB button is available, view the CI record in UCMDB.a. Click theView in UCMDB button. The UCMDB login screen opens.
b. Type a UCMDB username and password to log in.
The CI record opens in UCMDB. You can view its properties.
Note: You can enable Lightweight Single Sign-On (LW-SSO) for the integration so thatServiceManager web client users can bypass the UCMDB login screen. For details, see"How to Enable Lightweight Single Sign-On (LW-SSO) Configuration" on page 126.
5. If theView in UCMDB Browser button is available, view the CI record in the UCMDB Browser.a. Click theView in UCMDB Browser button. The UCMDB Browser login screen opens.
b. Type a UCMDB Browser username and password to log in. The CI record opens in theUCMDB Browser. You can view its properties and other information.
6. Open theActual State section.ServiceManager sends a web services request to UCMDB and displays all CI attributes that therequest returns.
Note: The web services request uses the UCMDB webservice URL and account (forexample, admin/admin) defined in theSMtoUCMDB integration instance in ServiceManager.See "How to Add UCMDB andUCMDB Browser Connection Information" on page 58.
How to View the Change History of the Primary CI of
a Problem RecordWhen integrated with UCMDB Browser, ServiceManager displays aPrimary CI History in UCMDBsection in a problem record whose primary CI is synchronized from UCMDB. You can view the CIchanges on that primary CI for root cause investigation.
For information about how to enable an integration with UCMDB Browser, see "How to Add UCMDBandUCMDB Browser Connection Information" on page 58.
To view the primary CI change history, follow these steps:
1. Log in to ServiceManager.
2. Navigate toProblem Management, and perform a search to open a problem record whosePrimary CI is synchronized from UCMDB.
3. Click thePrimary CI History in UCMDB tab.
ServiceManagerEnhancedAdapter9.41 User GuidePushing UCMDB CI Data to ServiceManager
Micro Focus Service Manager (Service Manager 9.41 or later; UCMDB CP26 or later) Page 74 of 227

Federating Service Manager Ticket Data toUCMDBFederation does not physically copy data from ServiceManager (SM) to UCMDB; it only retrieves SMdata for displaying in UCMDB. Out-of-the-box, the UCMDB-SM integration supports federation for thefollowing external CI types in UCMDB: Incident, Problem, RequestForChange, and ChangeTask. Ifyou have enabled these CI types for federation when creating your integration point, in UCMDB youcan retrieve Incident, Problem, Change, and Change Task record data from SM.
Out-of-the-box, each of the CI types (Incident, Problem, Change, and Change Task) supportsfederation of a subset of their attributes in ServiceManager; however, the integration can federatemoreattributes if tailored as such.
This section includes:
l "Federation Queries" below
l "Examples of Using Federation" below
l "How to Add an Attribute of a Supported CI Type for Federation" on page 200
Federation QueriesFederation uses queries to determine what data to retrieve from ServiceManager. To retrieve specificticket data from ServiceManager, you need to create a TQL query first.
The ServiceManagerEnhancedGenericAdapter9-x provides a bunch of sample federation queries,which you can use as a reference. They are available from the following path in UCMDB:Modeling >Modeling Studio > Resources > Integration > Service Manager > Federation.
Examples of Using FederationYou can use the federation feature in many different ways. The following are only examples of using thefeature:
l "Example 1: Federate All SM Incident Tickets" on the next page
l "Example 2: Federate SM Incident Records that Affect a UCMDB Business Service CI" on page 80
l "Example 3: Federate Incident, Change, and Problem Record Data from ServiceManager for
ServiceManagerEnhancedAdapter9.41 User GuideFederating ServiceManager Ticket Data to UCMDB
Micro Focus Service Manager (Service Manager 9.41 or later; UCMDB CP26 or later) Page 75 of 227

UCMDB CIs" on page 87
l "Example 4: Retrieve ServiceManager Records Related to a UCMDB CI" on page 90
Example 1: Federate All SM Incident Tickets
This example illustrates how you retrieve information of all Incident records that exist in ServiceManager.
1. Log in to UCMDB as an administrator.
2. Navigate toModeling >Modeling Studio > Resources.
3. For Resource Type, select Queries from the list.
4. Click New > Query.
5. On theCI Types tab, navigate to ItProcessRecord > Incident, and drag it to the query pane onthe right side.
ServiceManagerEnhancedAdapter9.41 User GuideFederating ServiceManager Ticket Data to UCMDB
Micro Focus Service Manager (Service Manager 9.41 or later; UCMDB CP26 or later) Page 76 of 227

6. Specify ServiceManager as the data source for the Incident query node.a. Select the Incident query node, click theData Sources tab on the lower right pane, and then
click Edit.
b. Select theSelect integration points option, and then select your integration point name (forexample, sm_integration). Click OK.
7. Click theSave icon , and then type a query name and select a location in which to save the
query (for example, select theRoot folder).
8. Select the Incident query node, and then click theCalculate Query Result Count icon .UCMDB returns the query result count. For example, the following figure shows that there are atotal of 116 Incident records in ServiceManager.
ServiceManagerEnhancedAdapter9.41 User GuideFederating ServiceManager Ticket Data to UCMDB
Micro Focus Service Manager (Service Manager 9.41 or later; UCMDB CP26 or later) Page 77 of 227

9. Right-click the Incident query node, and select Show Element Instances. UCMDB displays a listof all Incident records that exist in ServiceManager.
ServiceManagerEnhancedAdapter9.41 User GuideFederating ServiceManager Ticket Data to UCMDB
Micro Focus Service Manager (Service Manager 9.41 or later; UCMDB CP26 or later) Page 78 of 227

10. Select an Incident record from the list, and click theProperties icon to view its details.
ServiceManagerEnhancedAdapter9.41 User GuideFederating ServiceManager Ticket Data to UCMDB
Micro Focus Service Manager (Service Manager 9.41 or later; UCMDB CP26 or later) Page 79 of 227

Example 2: Federate SM Incident Records that Affect a
UCMDB Business Service CI
The following example illustrates how to federate a list of ServiceManager Incident records whoseAffected Service or Affected CI field contains a UCMDB Business Service CI.
In this example, IM10005 in SM has an affected service named bizservice1, which was pushed fromUCMDB.
1. Log in to UCMDB as an administrator.
2. Navigate toModeling >Modeling Studio > Resources.
3. For Resource Type, select Queries from the list.
4. Click New > Query.
5. On theCI Type tab, navigate toConfigurationItem > BusinessElement > Service >BusinessService, and drag it to the query pane on the right side.
6. Navigate to ItProcessRecord > Incident, and drag the icon to the query pane.
ServiceManagerEnhancedAdapter9.41 User GuideFederating ServiceManager Ticket Data to UCMDB
Micro Focus Service Manager (Service Manager 9.41 or later; UCMDB CP26 or later) Page 80 of 227

7. Click theCreate Relationship icon .
8. Select the Incident query node, and drag the arrow from this node to the BusinessService node tocreate a regular relationship between the nodes.a. Select Regular Relationship, and click OK.
b. SelectMembership, and optionally enter a relationship name (for example,Membership).
ServiceManagerEnhancedAdapter9.41 User GuideFederating ServiceManager Ticket Data to UCMDB
Micro Focus Service Manager (Service Manager 9.41 or later; UCMDB CP26 or later) Page 81 of 227
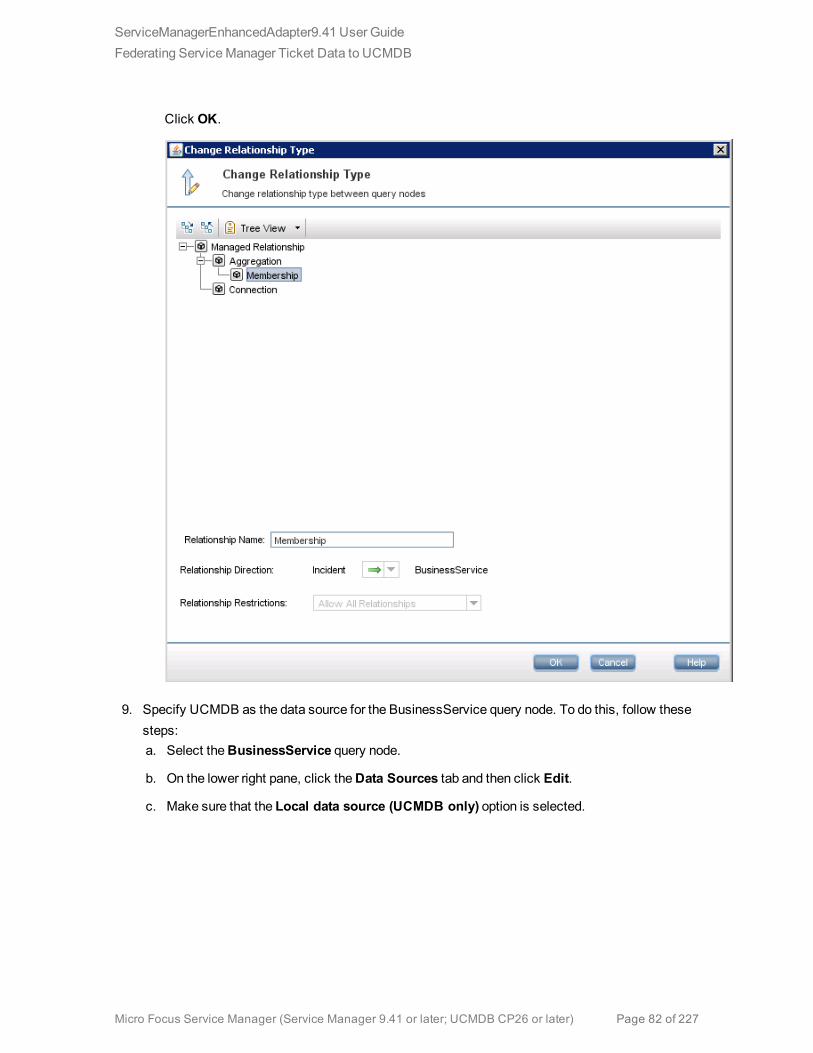
Click OK.
9. Specify UCMDB as the data source for the BusinessService query node. To do this, follow thesesteps:a. Select theBusinessService query node.
b. On the lower right pane, click theData Sources tab and then click Edit.
c. Make sure that the Local data source (UCMDB only) option is selected.
ServiceManagerEnhancedAdapter9.41 User GuideFederating ServiceManager Ticket Data to UCMDB
Micro Focus Service Manager (Service Manager 9.41 or later; UCMDB CP26 or later) Page 82 of 227
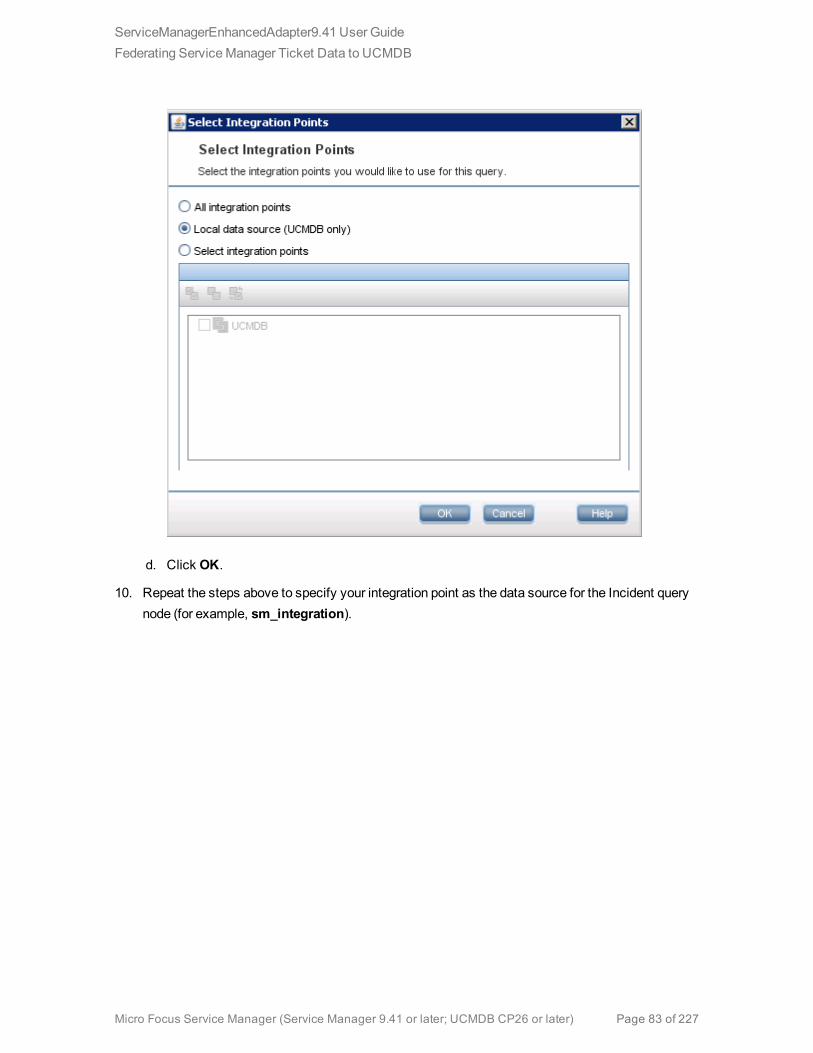
d. Click OK.
10. Repeat the steps above to specify your integration point as the data source for the Incident querynode (for example, sm_integration).
ServiceManagerEnhancedAdapter9.41 User GuideFederating ServiceManager Ticket Data to UCMDB
Micro Focus Service Manager (Service Manager 9.41 or later; UCMDB CP26 or later) Page 83 of 227

11. Click theCalculate Query Result Count icon . The number of SM Incidents and the number
of their affected UCMDB Business Service CIs are displayed.
ServiceManagerEnhancedAdapter9.41 User GuideFederating ServiceManager Ticket Data to UCMDB
Micro Focus Service Manager (Service Manager 9.41 or later; UCMDB CP26 or later) Page 84 of 227

12. Click thePreview icon to view the query results .
ServiceManagerEnhancedAdapter9.41 User GuideFederating ServiceManager Ticket Data to UCMDB
Micro Focus Service Manager (Service Manager 9.41 or later; UCMDB CP26 or later) Page 85 of 227

13. Select each SM Incident record from either the CI Selector pane or the query pane, and click the
Properties icon to view its details .
ServiceManagerEnhancedAdapter9.41 User GuideFederating ServiceManager Ticket Data to UCMDB
Micro Focus Service Manager (Service Manager 9.41 or later; UCMDB CP26 or later) Page 86 of 227
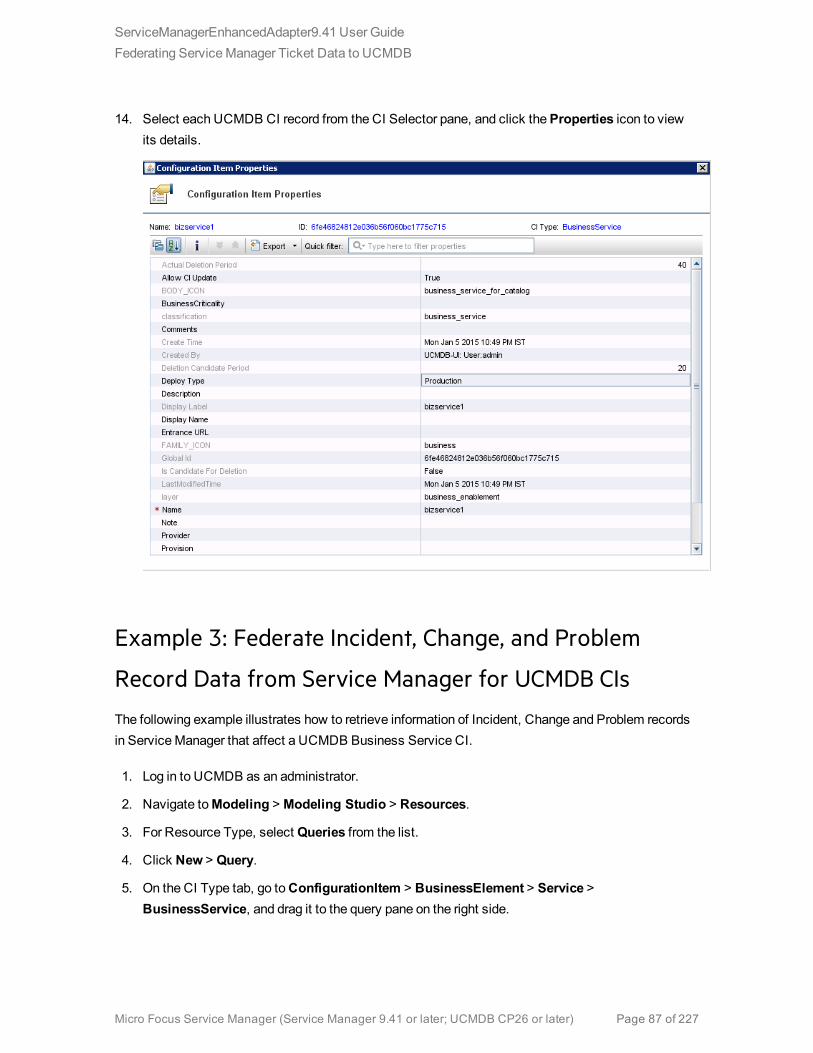
14. Select each UCMDB CI record from the CI Selector pane, and click theProperties icon to viewits details.
Example 3: Federate Incident, Change, and Problem
Record Data from Service Manager for UCMDB CIs
The following example illustrates how to retrieve information of Incident, Change and Problem recordsin ServiceManager that affect a UCMDB Business Service CI.
1. Log in to UCMDB as an administrator.
2. Navigate toModeling >Modeling Studio > Resources.
3. For Resource Type, select Queries from the list.
4. Click New > Query.
5. On the CI Type tab, go toConfigurationItem > BusinessElement > Service >BusinessService, and drag it to the query pane on the right side.
ServiceManagerEnhancedAdapter9.41 User GuideFederating ServiceManager Ticket Data to UCMDB
Micro Focus Service Manager (Service Manager 9.41 or later; UCMDB CP26 or later) Page 87 of 227
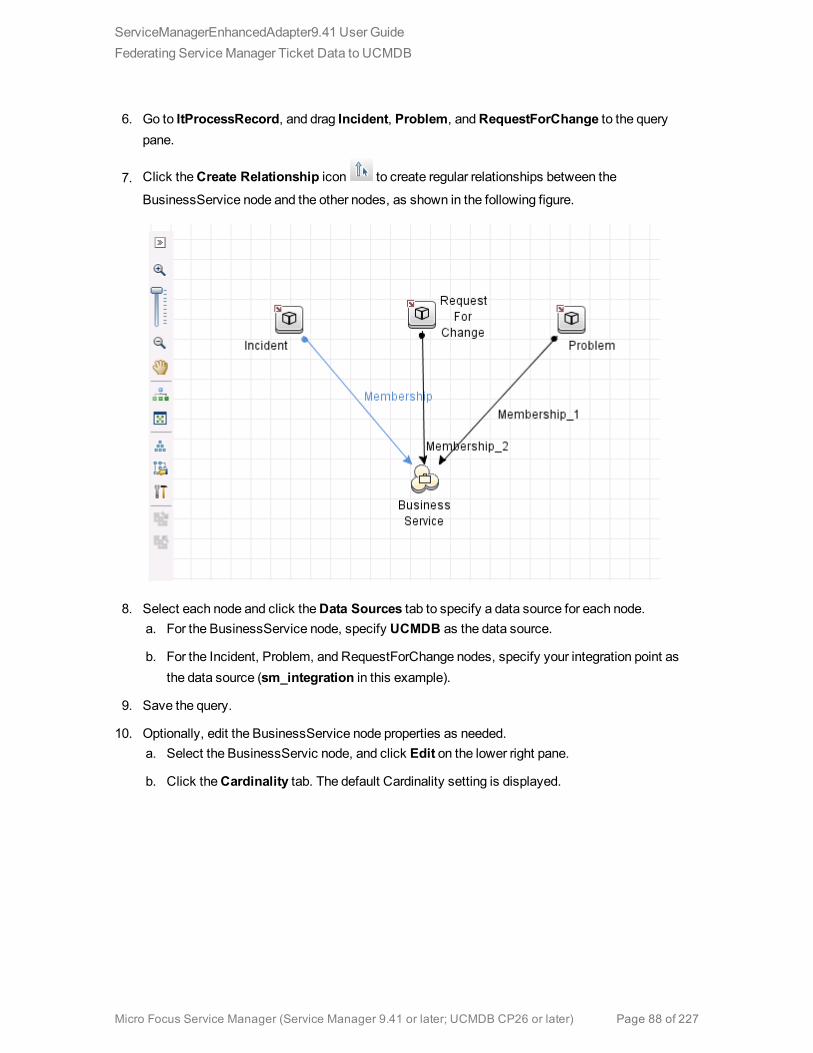
6. Go to ItProcessRecord, and drag Incident, Problem, andRequestForChange to the querypane.
7. Click theCreate Relationship icon to create regular relationships between the
BusinessService node and the other nodes, as shown in the following figure.
8. Select each node and click theData Sources tab to specify a data source for each node.a. For the BusinessService node, specify UCMDB as the data source.
b. For the Incident, Problem, and RequestForChange nodes, specify your integration point asthe data source (sm_integration in this example).
9. Save the query.
10. Optionally, edit the BusinessService node properties as needed.a. Select the BusinessServic node, and click Edit on the lower right pane.
b. Click theCardinality tab. The default Cardinality setting is displayed.
ServiceManagerEnhancedAdapter9.41 User GuideFederating ServiceManager Ticket Data to UCMDB
Micro Focus Service Manager (Service Manager 9.41 or later; UCMDB CP26 or later) Page 88 of 227

c. If you wish, change either or both of theAND operators toOR. This will change the filtercriteria and therefore the query results.
11. Click thePreview icon to view the query results.
ServiceManagerEnhancedAdapter9.41 User GuideFederating ServiceManager Ticket Data to UCMDB
Micro Focus Service Manager (Service Manager 9.41 or later; UCMDB CP26 or later) Page 89 of 227

12. Select each SM Incident record from either the CI Selector pane or the query pane, and click the
Properties icon to view its details.
13. Select each UCMDB CI record from either the CI Selector pane or the query pane, and on theRelated CIs tab click Show Related CIs to view its related CIs in both SM andUCMDB.
Example 4: Retrieve Service Manager Records Related to
a UCMDB CI
The following example illustrates how to retrieve ServiceManager records related to a UCMDB CI byusing the Get Related CIs functionality.
1. Log in to UCMDB as an administrator.
2. Navigate toModeling > IT Universe Manager.
3. On theSearch CIs tab, search for a UCMDB CI that has related records in ServiceManager. Forexample, enter bizservice1 in the CI Name field, click Search, and then double-click the CI toopen it.
4. If the Get Related CIs pane is not displayed, click theShow Get Related CIs pane icon .
ServiceManagerEnhancedAdapter9.41 User GuideFederating ServiceManager Ticket Data to UCMDB
Micro Focus Service Manager (Service Manager 9.41 or later; UCMDB CP26 or later) Page 90 of 227

5. Click theSelect target Integration Points for related CIs icon .
6. Select theSelect integration points option, and then select bothUCMDB and your integrationpoint. Click OK.
7. Click Show Related CIs. The CI’s related SM records and UCMDB CIs are displayed.
ServiceManagerEnhancedAdapter9.41 User GuideFederating ServiceManager Ticket Data to UCMDB
Micro Focus Service Manager (Service Manager 9.41 or later; UCMDB CP26 or later) Page 91 of 227
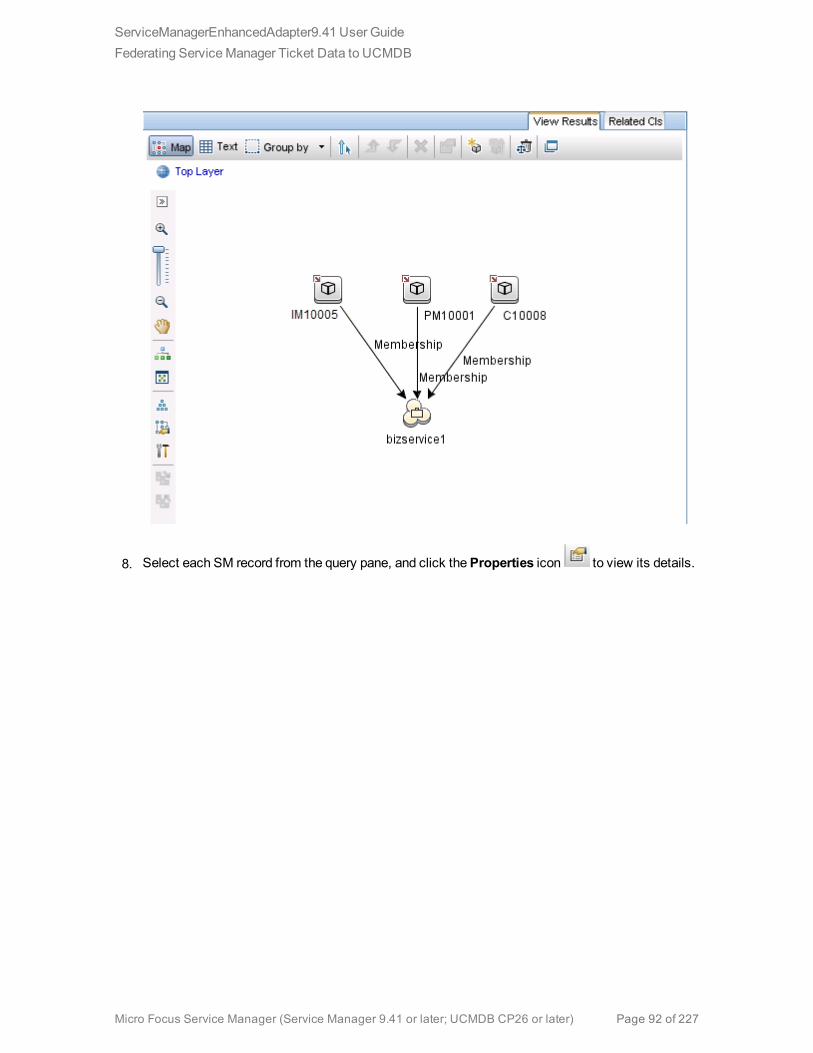
8. Select each SM record from the query pane, and click theProperties icon to view its details.
ServiceManagerEnhancedAdapter9.41 User GuideFederating ServiceManager Ticket Data to UCMDB
Micro Focus Service Manager (Service Manager 9.41 or later; UCMDB CP26 or later) Page 92 of 227
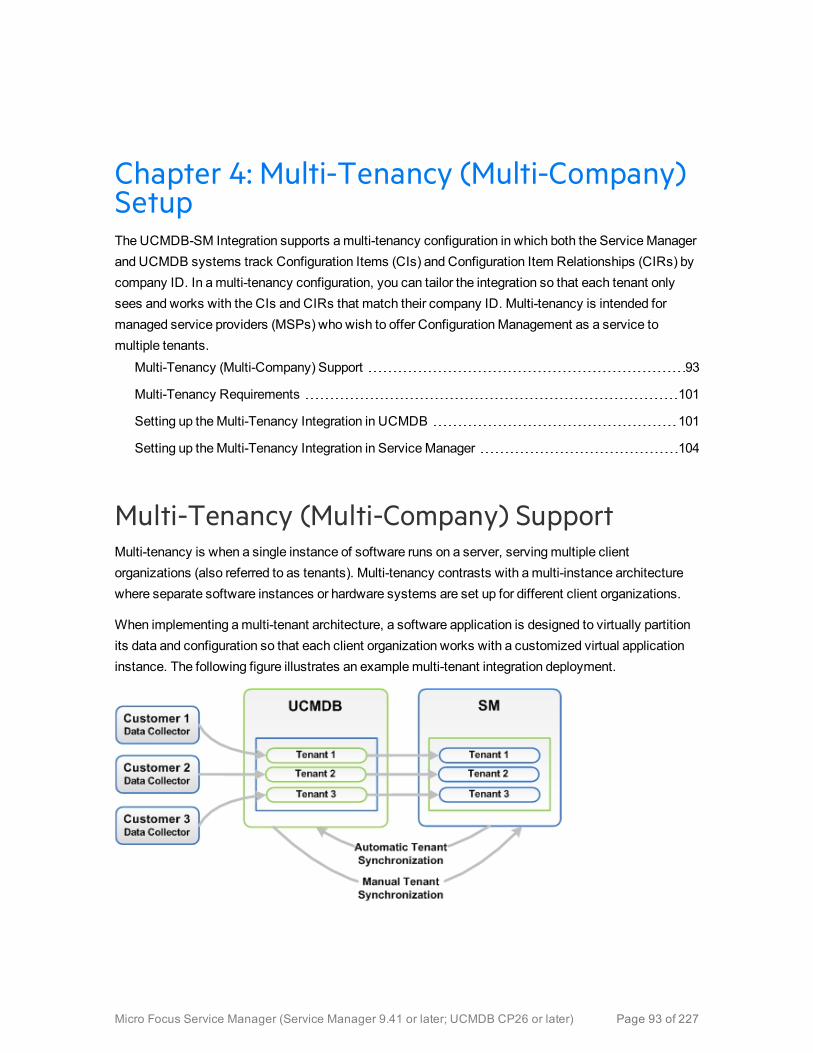
Chapter 4: Multi-Tenancy (Multi-Company)SetupThe UCMDB-SM Integration supports amulti-tenancy configuration in which both the ServiceManagerand UCMDB systems track Configuration Items (CIs) and Configuration Item Relationships (CIRs) bycompany ID. In amulti-tenancy configuration, you can tailor the integration so that each tenant onlysees and works with the CIs and CIRs that match their company ID. Multi-tenancy is intended formanaged service providers (MSPs) who wish to offer ConfigurationManagement as a service tomultiple tenants.
Multi-Tenancy (Multi-Company) Support 93
Multi-Tenancy Requirements 101
Setting up theMulti-Tenancy Integration in UCMDB 101
Setting up theMulti-Tenancy Integration in ServiceManager 104
Multi-Tenancy (Multi-Company) SupportMulti-tenancy is when a single instance of software runs on a server, servingmultiple clientorganizations (also referred to as tenants). Multi-tenancy contrasts with amulti-instance architecturewhere separate software instances or hardware systems are set up for different client organizations.
When implementing amulti-tenant architecture, a software application is designed to virtually partitionits data and configuration so that each client organization works with a customized virtual applicationinstance. The following figure illustrates an examplemulti-tenant integration deployment.
Micro Focus Service Manager (Service Manager 9.41 or later; UCMDB CP26 or later) Page 93 of 227
Every tenant configured in UCMDB works with the relevant tenant in SM. If UCMDB did not configuretenants, the tenant configurationmust be activated in order to transfer the configuration from SM toUCMDB automatically. This function is performed once only by the system administrator.
In the event that UCMDB tenant configuration already exists and the SM configuration does not exist,SM tenants must bemanually configured according to the UCMDB configuration.
Implementing Multi-Tenancy in the UCMDB-SM
IntegrationSM stores the company records that describe each tenant in themulti-tenant configuration. TheServiceManager system is the definitive source for company records and pushes all new company IDsto the UCMDB system creating the equivalent entity in UCMDB.
SM tracks the company ID of each CI and relationship in amulti-tenant configuration. CI records inheritthe company ID of the UCMDB feeder that discovered them. Relationship records inherit the companyID of the parent CI in the relationship.
Mandanten SM Security LayerMandanten is an SM software layer that is used to filter the customer ID from the CI information. SMuses theMandanten to ensure that operators only see CI and relationship records where the CI'scompany ID matches the operator's company ID. If the view is restricted with Mandanten, then ServiceManager also restricts the view to all other related records such as change requests and incidents.
What Multi-Tenant Information is Stored in UCMDBYour UCMDB system stores a company ID attribute for each CI and CIR. The company ID determineswhat adapter and synchronization schedule your UCMDB system uses to update CI data. Each CI andrelationship record can only have one company ID. The UCMDB system obtains a company ID fromthe ServiceManager system.
If more than one tenant (company) shares the sameCI, each tenant has their own unique CI recorddescribing the CI. In effect, the UCMDB system creates multiple CI records to track onemanagedasset. Each tenant’s CI record is unique to that tenant and lists the company's unique company ID.
ServiceManagerEnhancedAdapter9.41 User GuideMulti-Tenancy (Multi-Company) Support
Micro Focus Service Manager (Service Manager 9.41 or later; UCMDB CP26 or later) Page 94 of 227
What Multi-Tenant Information is Stored in Service
ManagerYour ServiceManager stores the company records that describe each tenant in themulti-tenantconfiguration. The ServiceManager system is the definitive source of company IDs and pushes newand updated information to your UCMDB system.
ServiceManager tracks the company ID of each CI and relationship in amulti-tenant configuration. CIrecords inherit the company ID of the UCMDB feeder that discovered them. Relationship recordsinherit the company ID of the parent CI in the relationship.
In a best practices implementation, ServiceManager uses Mandanten to ensure that operators onlysee CI and relationship records where the CI’s company ID matches the operator’s company ID. If yourestrict the view with Mandanten, then ServiceManager also restricts the view to all other relatedrecords such as change requests and incidents.
Synchronization of Company RecordsIf your systemmeets all the conditions for multi-tenancy support, ServiceManager creates a schedulerecord to push the company ID of the company record to your UCMDB system. ServiceManager usesthe following rules to determine whether to push the company ID to your UCMDB system.
Conditions
Tenantinformationsynchronized?
Schedule record createdand action taken inUCMDB
l UCMDB-SM integration enabled
l Multi-company mode enabled in ServiceManager
l You create a new company record in ServiceManager
Yes Synch Company withUCMDB - <UCMDBCompany ID>
l Add new company ID
l UCMDB-SM integration enabled
l You update an existing company record thathas not been synchronized with UCMDB
l Multi-company mode enabled in ServiceManager
Yes Synch Company withUCMDB - <UCMDBCompany ID>
l Add new company ID
l UCMDB-SM integration enabled Yes Inactivate Company with
Conditions where Service Manager synchronizes company ID with UCMDB
ServiceManagerEnhancedAdapter9.41 User GuideMulti-Tenancy (Multi-Company) Support
Micro Focus Service Manager (Service Manager 9.41 or later; UCMDB CP26 or later) Page 95 of 227
Conditions
Tenantinformationsynchronized?
Schedule record createdand action taken inUCMDB
l Multi-company mode enabled in ServiceManager
l You disable the option to show a company inmulti-company lists on a companysynchronized with UCMDB
UCMDB - <UCMDBCompany ID>
l Inactivate existingcompany ID
l UCMDB-SM integration enabled
l Multi-company mode enabled in ServiceManager
l You select the option to resynchronize withUCMDB on an existing company record
Yes Synch Company withUCMDB - <UCMDBCompany ID>
l Add new company ID
l UCMDB-SM integration enabled
l Multi-company mode enabled in ServiceManager
l You enable the option to show a company inmulti-company lists for an inactivated company
Yes Synch Company withUCMDB - <UCMDBCompany ID>
l Reactivate company ID
l UCMDB-SM integration disabled
l Multi-company mode enabled in ServiceManager
l You update an existing company record thathas already been synchronized with UCMDB
No None
l UCMDB-SM integration disabled
l Multi-company mode enabled in ServiceManager
l You create a new company record in ServiceManager
No None
l UCMDB-SM integration enabled
l Multi-company mode enabled in ServiceManager
l You disable the option to show a company inmulti-company lists on a company notsynchronized with UCMDB
No None
l UCMDB-SM integration enabled
l Multi-company mode disabled in ServiceManager
No None
Conditions where Service Manager synchronizes company ID with UCMDB, continued
ServiceManagerEnhancedAdapter9.41 User GuideMulti-Tenancy (Multi-Company) Support
Micro Focus Service Manager (Service Manager 9.41 or later; UCMDB CP26 or later) Page 96 of 227
Conditions
Tenantinformationsynchronized?
Schedule record createdand action taken inUCMDB
l You create a new company record in ServiceManager
Conditions where Service Manager synchronizes company ID with UCMDB, continued
UCMDB Customer ID
When you enable themulti-tenancy integration, ServiceManager displays a new field in each companyrecord called UCMDB Customer ID. In order to synchronize a company record with UCMDB, youmustfirst provide a value for this field. After you provide a UCMDB Customer ID value this field becomesread-only. You cannot change a company's UCMDB Customer ID after you set it.
This field only accepts numeric data up to ten characters long. ServiceManager requires the field valueto be a unique positive whole number. You cannot enter duplicate values or use decimals, negativenumbers, or zero.
Your UCMDB system automatically uses the UCMDB customer ID of 1 when running in single tenantmode. You can reuse this default value in your multi-tenant implementation by assigning a ServiceManager company to have this UCMDB customer ID value. Out-of-the-box, no ServiceManagercompany has the UCMDB customer ID of 1.
UCMDB User ID and Password
When you enable themulti-tenancy integration, ServiceManager displays two new fields in eachcompany record called UCMDB UserId and UCMDB Password. These fields allow you to specify theconnection information you want ServiceManager to use when requesting information for the ActualState section. Any user name and password you enter in these fields must be valid for your UCMDBsystem.
The user name and password you provide in the Company Information record takes precedence overthe user name and password you provide in the System Information record. This allows managedservice providers to control access to the UCMDB system on a tenant-by-tenant basis. If you do notprovide a company-specific UCMDB user name and password, ServiceManager uses the credentialsyou provided in the System Information record.
ServiceManagerEnhancedAdapter9.41 User GuideMulti-Tenancy (Multi-Company) Support
Micro Focus Service Manager (Service Manager 9.41 or later; UCMDB CP26 or later) Page 97 of 227
Company Code
Themulti-tenancy integration requires that each company record has a unique Company Code(company field) value. Since Company Code is a required field, your existing company records shouldalready have Company Code values. However you should ensure that each company record has aunique Company Code value.
When using ServiceManager EnhancedGeneric Adapter for UCMDB-SM integration, youmust defineyour company codes in the ServiceManagerEnhancedAdapter9.41/mappings/scripts/SMUtils.groovyfile using the following format (where a comma is used to separatemapping entries):
["<UCMDB Company 1 Code>":"<SMCompany 1 Code>", "<UCMDB Company 2 Code>":"<SMCompany 2 Code>"]
For example: ["1":"microfocus", "2":"sap"]
Caution: You should not change the Company Code value after you have enabled themulti-tenancy integration because this will cause your ServiceManager data to become out of synch.
CI Reconciliation Rules
CIs that are pushed from UCMDB are identified only by their global.id value in UCMDB. By default,only the ucmdb.id field in the device table is used in CI reconciliation (the company.id field is not used).
You can add reconciliation rules manually through Tailoring >Web Services > DEM ReconciliationRules. For details, see "How to Add DEMReconciliation Rules" on page 156.
Company Information Pushed to CI and CI Relationship
Records
When you enable themulti-tenancy integration, ServiceManager inserts the SM Company Code valuein CI and relationship records during data push. ServiceManager uses the UCMDB Customer ID tolook up thematching SM Company Code value.
ServiceManagerEnhancedAdapter9.41 User GuideMulti-Tenancy (Multi-Company) Support
Micro Focus Service Manager (Service Manager 9.41 or later; UCMDB CP26 or later) Page 98 of 227

Company Information Replicated to Incident Records
When you enable themulti-tenancy integration and select the option to create incidents when UCMDBdiscovers new, updated, or deleted CIs, ServiceManager inserts the SM Company Code value in theincident record during replication. ServiceManager uses the UCMDB Customer ID to look up thematching SM Company Code value.
Schedule Records
ServiceManager uses the problem schedule process tomanage the synchronization of company IDsto your UCMDB system. You canmanually enable the problem schedule process from the SystemStatus form.
When the synchronization criteria aremet as described in Table "Conditions where ServiceManagersynchronizes company ID with UCMDB" on page 95, ServiceManager creates a “Synch Companywith UCMDB - <UCMDB Company ID>” schedule record (for example, “Synch Company withUCMDB - 1234567890”). If you inactivate a company, ServiceManager creates an “InactivateCompany with UCMDB - <UCMDB Company ID>” schedule record (for example, “InactivateCompany with UCMDB - 1234567890”). The problem schedule process processes the new schedulerecord on the next background process iteration.
If your ServiceManager system cannot connect to your UCMDB system for some reason, it willreschedule the company synchronization at the next scheduled interval (the out-of-the-box interval is 5minutes). The problem schedule process updates the schedule record with the status rescheduled. Ifthe ServiceManager system receives any other error message while connecting to the UCMDBsystem, it updates the schedule record with the status “application failed due to error - check msglog forpossible messages.”
Tenant-Specific Discovery Event Manager (DEM)
RulesYou can implement the condition field function in order to create SM DEM rules that are specific to aparticular tenant in amulti-tenancy UCMDB-SM integration.
Tenant rules vary according to SM tenant configuration requirements, for each record information typepushed from UCMDB to SM different tenants can configure different DEM tenant rules.
ServiceManagerEnhancedAdapter9.41 User GuideMulti-Tenancy (Multi-Company) Support
Micro Focus Service Manager (Service Manager 9.41 or later; UCMDB CP26 or later) Page 99 of 227
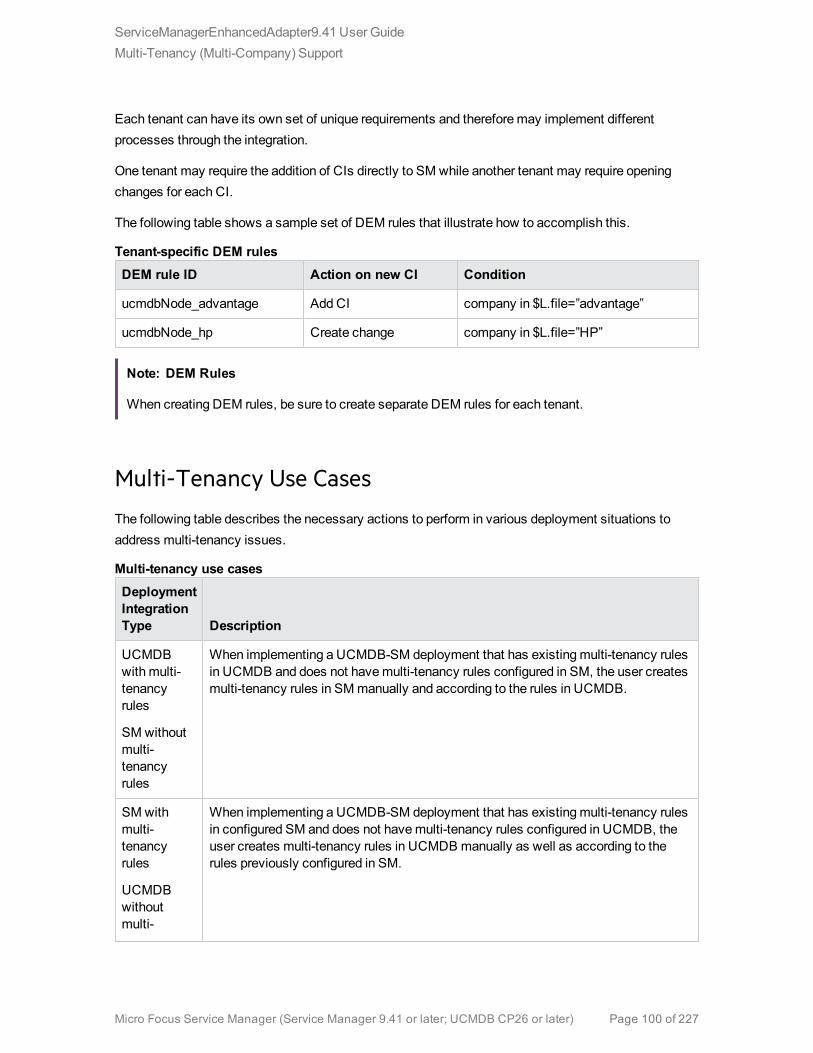
Each tenant can have its own set of unique requirements and thereforemay implement differentprocesses through the integration.
One tenant may require the addition of CIs directly to SM while another tenant may require openingchanges for each CI.
The following table shows a sample set of DEM rules that illustrate how to accomplish this.
DEM rule ID Action on new CI Condition
ucmdbNode_advantage Add CI company in $L.file=”advantage”
ucmdbNode_hp Create change company in $L.file=”HP”
Tenant-specific DEM rules
Note: DEM Rules
When creating DEM rules, be sure to create separate DEM rules for each tenant.
Multi-Tenancy Use Cases
The following table describes the necessary actions to perform in various deployment situations toaddress multi-tenancy issues.
DeploymentIntegrationType Description
UCMDBwithmulti-tenancyrules
SM withoutmulti-tenancyrules
When implementing a UCMDB-SM deployment that has existingmulti-tenancy rulesin UCMDB and does not havemulti-tenancy rules configured in SM, the user createsmulti-tenancy rules in SMmanually and according to the rules in UCMDB.
SM withmulti-tenancyrules
UCMDBwithoutmulti-
When implementing a UCMDB-SM deployment that has existingmulti-tenancy rulesin configured SM and does not havemulti-tenancy rules configured in UCMDB, theuser creates multi-tenancy rules in UCMDB manually as well as according to therules previously configured in SM.
Multi-tenancy use cases
ServiceManagerEnhancedAdapter9.41 User GuideMulti-Tenancy (Multi-Company) Support
Micro Focus Service Manager (Service Manager 9.41 or later; UCMDB CP26 or later) Page 100 of 227

DeploymentIntegrationType Description
tenancyrules
UCMDBwithoutmulti-tenancyrules
SM withoutmulti-tenancyrules
When implementing a UCMDB-SM deployment that does not havemulti-tenancyrules configured in UCMDB or in SM, the user configures the rules in SM.
During the configuration process using the SMmulti-tenancy wizard the user cancreate corresponding tenancy configuration in UCMDB. By creating correspondingtenancy configurations in SM the user also creates a corresponding tenant inUCMDB.
Multi-tenancy use cases, continued
Multi-Tenancy RequirementsYour systemmust meet the following requirements in order for the integration to support multi-tenancy.
l Integration enabled between UCMDB and ServiceManager
l Multi-company mode enabled on the ServiceManager system
l Problem schedule process running on the ServiceManager system
For additional information about themulti-tenancy integration, you can visit theMicro Focus SoftwareSupport Online web site or refer to the ServiceManager help.
Setting up the Multi-Tenancy Integration inUCMDBYou need to perform the following tasks in UCMDB to set up themulti-tenancy integration.
1. Install a separate data flow probe for each tenant the integration will support.See "How to Install a Separate Data Flow Probe for Each Tenant" on the next page.
2. Start tenant-specific data flow probes.See "How to Start Tenant-Specific Data Flow Probes" on page 103.
ServiceManagerEnhancedAdapter9.41 User GuideMulti-Tenancy Requirements
Micro Focus Service Manager (Service Manager 9.41 or later; UCMDB CP26 or later) Page 101 of 227
3. Configure IP address ranges for tenant-specific data flow probes.See "How to Configure IP Ranges for Tenant-Specific Data Flow Probes" on page 104.
Caution: Multi-tenancy is not supported for population when the integration uses the ServiceManager EnhancedGeneric Adapter.
How to Install a Separate Data Flow Probe for Each
TenantIf you plan to support a multi-tenant configuration, youmust install a separate data probe for eachtenant. Out-of-the-box, the UCMDB installer only installs one data flow probe and service.
To install additional data flow probes and start them from your operating system command prompt:
1. Log in to the host of your UCMDB system as an administrator.
2. Insert the Universal CMDB SetupWindows DVD into the system disc drive.
3. Start the Data Flow Probe installer (HPUCMDB_DataFlowProbe_x.xx.exe).
4. Follow the on-screen instructions to complete the wizard, but use the following values for eachdata flow probe you wish to install.a. Type a unique path for each installation folder.
b. Use the sameUCMDB application server address for each data flow probe.
c. Type a valid data flow probe address.
d. Type a unique name for each data flow probe identifier.
e. Create a unique customer Data Flow Probe domain for each probe (Clear the Use DefaultCMDB Domain option).
f. Use the same probe gateway and probemanager settings for each probe (for example, usecombined or separate processes).
See theUniversal CMDB Deployment Guide for complete installation instructions.
5. Repeat step 3 and step 4 for each data flow probe you wish to install.
6. Open the probe’s DiscoveryProbe.properties file in a text editor. By default, this file is locatedin the following folder:<UCMDB installation folder>\<data flow probe installation folder>\conf
For example, C:\UCMDB\DataFlowProbe\conf.
ServiceManagerEnhancedAdapter9.41 User GuideSetting up theMulti-Tenancy Integration in UCMDB
Micro Focus Service Manager (Service Manager 9.41 or later; UCMDB CP26 or later) Page 102 of 227
Note: The <data flow probe installation folder> must be unique for each tenant.
7. Edit the following properties in the configuration file.
Property Value
serverName Verify the name of the UCMDB server
customerId Type the customer ID for the tenant this data flow probesupports
appilog.collectors.probe.name Verify the probe name is unique such as server + tenantID
applilog.collectors.domain Verify the domain name of the data flow probe
appilog.collectors.local.ip Verify the data flow probe gateway name
appilog.collectors.probe.ip Verify the data flow probemanager name
appilog.collectors.rmi.port Type a unique port for each probe
appilog.collectors.rmi.gw.port Type a unique port for each probe
appilog.collectors.probe.html.port Type a unique port for each probe
appilog.collectors.local.html.port Type a unique port for each probe
appilog.collectors.ProbeUseSpecific
RMIPortFrom
Type a unique port for each probe or type 0 to have thesystem automatically select it
appilog.collectors.bigBrother.port Type a unique port for each probe
Discovery Probe properties set for each tenant
8. Save the configuration file.
9. Repeat step 6 to step 8 for the data flow probe of each tenant.
How to Start Tenant-Specific Data Flow ProbesTo start tenant-specific data flow probes:
1. Open theOS command prompt and navigate to the probe’s bin folder. For example,C:\UCMDB\DataFlowProbe1\bin.
2. Type gateway console.
3. Repeat step 1 to step 2 for each data flow probe you want to start.
ServiceManagerEnhancedAdapter9.41 User GuideSetting up theMulti-Tenancy Integration in UCMDB
Micro Focus Service Manager (Service Manager 9.41 or later; UCMDB CP26 or later) Page 103 of 227

How to Configure IP Ranges for Tenant-Specific
Data Flow ProbesTo configure IP ranges for tenant-specific data flow probes:
1. Log in to UCMDB as an administrator using the company ID of the tenant whose data flow probeyou want to configure.
2. Navigate toData Flow Management > Data Flow Probe Setup.
3. Expand the data flow probe domain containing the probe you want to start. For example,Customer2.
4. Expand the Probe node and select the data flow probe you want to start. For example,Probe2Customer2.
5. Click theAdd IP range icon .
6. Type an IP range you want the Data Flow Probe to scan. Optionally, add any IP ranges you wantto exclude.
7. Click OK to save the IP range.
8. Repeat step 1 to step 7 for each data flow probe you want to configure.
Setting up the Multi-Tenancy Integration inService ManagerYou need to perform the following tasks in ServiceManager to set up themulti-tenancy integration.
Multi-tenancy support is an optional feature of the integration intended for Managed Service Providers(MSPs) who want to offer ConfigurationManagement as a service to their tenants. In amulti-tenancyconfiguration, each CI and CIR record has a corresponding company ID. Out-of-the-box, ServiceManager allows all operators to view CI data regardless of the company ID. If you wish to restrictaccess to CI data by company ID, youmust enableMandanten and use the company ID field as a
ServiceManagerEnhancedAdapter9.41 User GuideSetting up theMulti-Tenancy Integration in ServiceManager
Micro Focus Service Manager (Service Manager 9.41 or later; UCMDB CP26 or later) Page 104 of 227

restricting query. See the ServiceManager help for more information about multi-company mode andMandanten.
Youmust complete the following tasks from your ServiceManager system to enablemulti-tenancysupport for the integration.
1. Start the process schedule.See "How to Start the Schedule Process " below.
2. Configure the ServiceManager System Information Record and IntegrationManager.See "How to Configure the ServiceManager System Information Record and IntegrationManager" on the next page.
3. Add tenant-specific UCMDB ID and password values to company records (optional).See "How to Add Tenant-Specific UCMDB User ID and Password Values" on page 107.
4. Add UCMDB Customer ID values to existing company records.See "How to Add UCMDB Customer ID values to Existing Companies" on page 108.
5. Synchronize existing company records with UCMDB.See "How to Synchronize Existing Companies from ServiceManager to UCMDB" on page 109.
6. Verify that ServiceManager synchronized company records with UCMDB (optional).See "How to View Whether Company Information Is in UCMDB" on page 109.
7. Resynchronize existing company records with UCMDB (as needed).See "How to Resynchronize an Existing Company with UCMDB" on page 110.
8. Inactivate company records you do not want to be part of the integration (as needed).See "How to Inactivate a Synchronized Company" on page 111.
9. Reactivate inactive company records you want to be part of the integration (as needed).See "How to Reactivate an Inactive Company" on page 111
10. Add tenant-specific DEM rules.See "How to Add Tenant-Specific DEM Rules" on page 112.
How to Start the Schedule ProcessThis integration needs the problem schedule process in order to synchronize company records fromServiceManager to UCMDB. Make sure that the process is started before you synchronize companyrecords.
To start the problem schedule process:
ServiceManagerEnhancedAdapter9.41 User GuideSetting up theMulti-Tenancy Integration in ServiceManager
Micro Focus Service Manager (Service Manager 9.41 or later; UCMDB CP26 or later) Page 105 of 227

1. Log in to ServiceManager as a system administrator.
2. From the System Navigator, click System Status.A list of the currently started schedules is displayed.
3. Click theRefresh Display button to refresh the list.
4. If the problem schedule process is not in the list, perform the following steps:a. Click theStart Scheduler button.
b. Double-click the problem schedule process.
A message is displayed, indicating that the problem schedule process is started.
How to Configure the Service Manager System
Information Record and Integration ManagerTo enable the integration to support multi-tenancy, youmust provide additional information in theServiceManager System Information Record.
To provide additional information in the ServiceManager System Information Record, follow thesesteps:
1. Log in to ServiceManager as a system administrator.
2. Navigate toSystem Administration > Base System Configuration >Miscellaneous >System Information Record.
3. Click theGeneral tab.
4. Enable theRun in Multi-Company Mode option and then click Save.
ServiceManager displays themessage: Information record updated.
5. Click Tailoring > Integration Manager.
6. Click Add.
7. In the Integration Template field, select SMtoUCMDB.
Some fields in the form are automatically populated with a value. The empty fields can be ignored.
8. (Optional) Update theName, Log Level, andDescription fields as needed.
9. Configure the following fields on theUCMDB Server Configuration tab.a. In theUCMDB web service URL field, type the URL to the synchronize CIs web service
API. The URL has the following format:
ServiceManagerEnhancedAdapter9.41 User GuideSetting up theMulti-Tenancy Integration in ServiceManager
Micro Focus Service Manager (Service Manager 9.41 or later; UCMDB CP26 or later) Page 106 of 227
http://<UCMDB server name>:<port>/axis2/services/ucmdbSMService
Replace <UCMDB server name>with the host name of your UCMDB server, and replace<port>with the communications port your UCMDB server uses.
b. In theUser Id andPassword fields, type the user credentials required tomanage CIs on theUCMDB system. For example, the out-of-the-box administrator credentials areadmin/admin.
c. In theMulti-tenant web service URL field, type the URL to the synchronize company IDs webservice API. The URL has the following format:http://<UCMDB server name>:<port>/axis2/services/UcmdbManagementService
Replace <UCMDB server name>with the host name of your UCMDB server, and replace<port>with the communications port your UCMDB server uses.
d. Type the user name and password required to synchronize company IDs on the UCMDBsystem. For example, the out-of-the-box system administrator credentials for UCMDB 9.x aresysadmin/sysadmin.
10. Click Finish.
11. Log out of the ServiceManager system, and log in again with an administrator account.
12. Click System Status > Display Options > All Tasks.
13. Type k in the Command field next to the problem schedule process and click ExecuteCommands. Wait a few minutes for the problem schedule process to close.
14. Click Start Scheduler.
15. Double-click the problem schedule process. The system now supports multi-tenancy forUCMDB.
How to Add Tenant-Specific UCMDB User ID and
Password ValuesYou can provide a tenant-specific UCMDB user name and password for ServiceManager to use whenrequesting information for the Actual State section. If you provide no credentials, ServiceManageruses the credentials in the System Information Record for all tenants.
Note: Any credentials you provide in the company record take precedence over credentials youprovide in the System Information Record. The UCMDB UserId and UCMDB Password fields areavailable only when you have enabled themulti-tenancy integration.
ServiceManagerEnhancedAdapter9.41 User GuideSetting up theMulti-Tenancy Integration in ServiceManager
Micro Focus Service Manager (Service Manager 9.41 or later; UCMDB CP26 or later) Page 107 of 227
To add tenant-specific UCMDB user name and password:
1. Log in to ServiceManager as a system administrator.
2. Navigate toSystem Administration > Base System Configuration > Companies.
3. Type the search criteria you want to use to find company records. For example, leave the searchform blank to search all company records.
4. Click Search.
5. Type the user name you want this company to use to connect to UCMDB in the UCMDB UserIdfield.
6. Type the password for the UCMDB user name in the UCMDB Password field.
7. Click Save.
8. Repeat step 3 through step 7 for each company for which you want to provide credentials.
How to Add UCMDB Customer ID values to Existing
CompaniesYou can use the following steps to add a UCMDB Customer ID value to your existing ServiceManagercompany records.
1. Log in to ServiceManager as a system administrator.
2. Navigate toSystem Administration > Base System Configuration > Companies.
3. Type the search criteria you want to use to find company records. For example, leave the searchform blank to search all company records.
4. Click Search.
5. Type a numeric value in the UCMDB Customer ID field for this company.
6. Click Save.
7. ServiceManager prompts to confirm that you want to synchronize the record with UCMDB. ClickYes if you want to synchronize the company now, or click No if you want synchronize thecompany later.
8. Click Next to go to the next company in the record list.
9. Repeat step 5 through step 8 for each company in the record list.
ServiceManagerEnhancedAdapter9.41 User GuideSetting up theMulti-Tenancy Integration in ServiceManager
Micro Focus Service Manager (Service Manager 9.41 or later; UCMDB CP26 or later) Page 108 of 227

How to Synchronize Existing Companies from
Service Manager to UCMDBYour ServiceManager systemmay already contain company records that you want to use with themulti-tenancy integration.
If you update any field in a company record that has not yet been synchronized to UCMDB, ServiceManager prompts whether you want to synchronize the company to UCMDB.
Note: ServiceManager will not prompt you to synchronize the company record if you havedisabled the option to show the company inmulti-company lists, or if there is a pending schedulerecord associated with the company. See "How to Inactivate a Synchronized Company" onpage 111 for more information.
This task includes the following steps:
1. Log in to ServiceManager as a system administrator.
2. Navigate toSystem Administration > Base System Configuration > Companies.
3. Type the search criteria you want to use to find company records. For example, leave the searchform blank to search all company records.
4. Click Search.
5. Select a company record to update.
6. Update the company record.
7. Click Save. ServiceManager prompts you to confirm that you want to synchronize the record withUCMDB.
Note: ServiceManager saves the company record regardless of your synchronizationchoice.
How to ViewWhether Company Information Is in
UCMDBWhen you enable themulti-tenancy integration, ServiceManager displays a read-only field in eachcompany record that indicates whether or not the UCMDB Customer ID has been synchronized withyour UCMDB system.
ServiceManagerEnhancedAdapter9.41 User GuideSetting up theMulti-Tenancy Integration in ServiceManager
Micro Focus Service Manager (Service Manager 9.41 or later; UCMDB CP26 or later) Page 109 of 227
Note: The UCMDB Customer ID field is visible only when you enable themulti-tenant UCMDBintegration.
To view whether company information is in UCMDB:
1. Log in to ServiceManager as a system administrator.
2. Navigate toSystem Administration > Base System Configuration > Companies.
3. Type the search criteria you want to use to find company records. For example, leave the searchform blank to search all company records.
4. Click Search.
5. Review the status of theSynched with UCMDB field.If the check box is checked, then ServiceManager has already synchronized the company ID withyour UCMDB system. If the check box is unchecked, then ServiceManager has yet to add thiscompany to your UCMDB system.
Note: Formore information about synchronization failures, see "Schedule Records" onpage 99.
How to Resynchronize an Existing Company with
UCMDBServiceManager provides you ameans to resynchronize company records with your UCMDB systemin case you lose UCMDB data for some reason. For example, youmight intentionally remove UCMDBdata during integration testing, or youmight need to recover data after a disaster. You can force ServiceManager to synchronize companies with your UCMDB system with the Re-synch with UCMDB option.
To resynchronize an existing company with UCMDB:
1. Log in to ServiceManager as a system administrator.
2. Navigate toSystem Administration > Base System Configuration > Companies.
3. Type the search criteria you want to use to find company records. For example, leave the searchform blank to search all company records.
4. Click Search.
5. Select a company record to synchronize.
6. Click theRe-synch button next to theSynched with UCMDB check box.
ServiceManagerEnhancedAdapter9.41 User GuideSetting up theMulti-Tenancy Integration in ServiceManager
Micro Focus Service Manager (Service Manager 9.41 or later; UCMDB CP26 or later) Page 110 of 227

Note: TheRe-synch button is available only from company records that have already beensynchronized with UCMDB and have theSynched with UCMDB check box checked. If yourUCMDB system already has a company with this ID value, it will ignore the resynchronizationrequest. ServiceManager will also ignore a resynchronization request if there is an existingschedule record to resynchronize the company with UCMDB. In this case, it displays themessage “A schedule record has already been added to re-synch this company withUCMDB.”
How to Inactivate a Synchronized CompanyAfter you have synchronized a company record with UCMDB you can no longer delete the record.Instead, you can inactivate a company record, which causes the UCMDB system to cease all furtherCI updates for the company. Any existing CI data for the company remains in the UCMDB systemassociated with the inactive UCMDB Customer ID, but both the company and any associated CIs willno longer be visible from the UCMDB system.
To inactivate a synchronized company:
1. Log in to ServiceManager as a system administrator.
2. Navigate toSystem Administration > Base System Configuration > Companies.
3. Type the search criteria you want to use to find company records. For example, leave the searchform blank to search all company records.
4. Click Search.
5. Select a company record to inactivate.
6. Select No from Show Company in Multi-Company Lists.
7. Click Save.
8. If this company was previously synchronized with UCMDB, ServiceManager prompts you toconfirm the inactivation.
9. Click Yes to confirm the inactivation orNo to cancel your changes.
How to Reactivate an Inactive CompanyYou can reactivate any inactive companies on your ServiceManager system to include them in themulti-tenancy integration. Youmust also synchronize the company with UCMDB for UCMDB to
ServiceManagerEnhancedAdapter9.41 User GuideSetting up theMulti-Tenancy Integration in ServiceManager
Micro Focus Service Manager (Service Manager 9.41 or later; UCMDB CP26 or later) Page 111 of 227
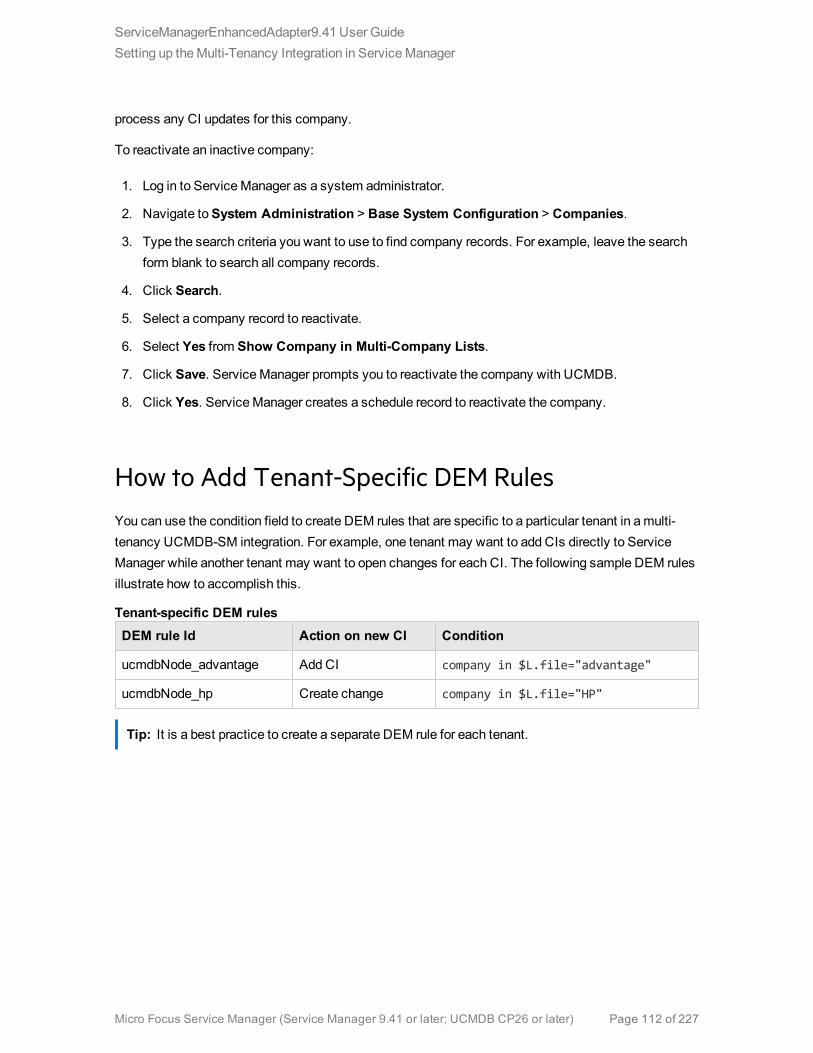
process any CI updates for this company.
To reactivate an inactive company:
1. Log in to ServiceManager as a system administrator.
2. Navigate toSystem Administration > Base System Configuration > Companies.
3. Type the search criteria you want to use to find company records. For example, leave the searchform blank to search all company records.
4. Click Search.
5. Select a company record to reactivate.
6. Select Yes from Show Company in Multi-Company Lists.
7. Click Save. ServiceManager prompts you to reactivate the company with UCMDB.
8. Click Yes. ServiceManager creates a schedule record to reactivate the company.
How to Add Tenant-Specific DEM RulesYou can use the condition field to create DEM rules that are specific to a particular tenant in amulti-tenancy UCMDB-SM integration. For example, one tenant may want to add CIs directly to ServiceManager while another tenant may want to open changes for each CI. The following sample DEM rulesillustrate how to accomplish this.
DEM rule Id Action on new CI Condition
ucmdbNode_advantage Add CI company in $L.file="advantage"
ucmdbNode_hp Create change company in $L.file="HP"
Tenant-specific DEM rules
Tip: It is a best practice to create a separate DEM rule for each tenant.
ServiceManagerEnhancedAdapter9.41 User GuideSetting up theMulti-Tenancy Integration in ServiceManager
Micro Focus Service Manager (Service Manager 9.41 or later; UCMDB CP26 or later) Page 112 of 227

Chapter 5: Standards and Best PracticesThis chapter provides best practices for using the integration.
UCMDB-SM Configuration Best Practices 113
Frequently AskedQuestions 126
UCMDB-SM Configuration Best PracticesThis section provides best practices and recommendations for successfully implementing thisintegration in various environments. This section provides you with valuable understandings andtechniques that will enhance the UCMDB-SM integration as well as solve common problems byproviding solutions and workarounds to these issues. These practices and recommendations may varyslightly according to each implementation, as the specific system requirements and settings alter persystem environment.
This section includes:
l "Bi-Directional Data Synchronization Recommendations" on page 115
l "Push Scheduling Recommendations" on page 116
l "Push in Clustered Environments" on page 118
l "Initial Load Configurations" on page 120
l "How to Configure Differential or Delta Load DEMRules" on page 125
l "Fault Detection and Recovery for Push" on page 125
l "How to Enable Lightweight Single Sign-On (LW-SSO) Configuration" on page 126
Centralized CI Type ManagementThe ServiceManager EnhancedGeneric Adapter allows centralized CI typemanagement. CentralizedCI typemanagement enables you tomanage CI types from UCMDB without the need to domuchtailoring work on the ServiceManager (SM) side. You can then synchronize CIs from UCMDB toSM through data push.
Micro Focus Service Manager (Service Manager 9.41 or later; UCMDB CP26 or later) Page 113 of 227

Managing Out-Of-the-Box CI Types
ServiceManager and UCMDB provide out-of-the-box CI types, as well as mapping files for them. Tomodify an out-of-the-box CI type (for example, adding new attributes according to your businessneeds), you only need to open the Visual Mapping tool, manually add new attributes to this CI type, andthen apply the update without leaving UCMDB. The new attribute will be automatically added to therelevant web service object on the SM side.
Managing New Custom CI Types
To add a new CI type according to your business needs, you only need to add a new CI type and createa TQL query in UCMDB, and then create amatching SM CI type by using the Visual Mapping Toolwithout the need to leave UCMDB.
When you create a new SM CI type in the UCMDB Visual Mapping Tool interface, all relevant SMobjects (DBDICT, JoinDef, Web Service API, DEM Rule, and so on) for the new CI type areautomatically created on the SM side, except the format and icon (the new CI type uses theconfigurationItem format by default).
Note: The population feature enables you to synchronize CIs from SM to UCMDB. Forinformation about the circumstances under which you need to use the population feature, see"When Do I Need the Population Feature?" on page 130.
Visual Mapping Tool
The UCMDB generic adapter framework comes with a Visual Mapping tool, which provides a graphicuser interface for you to configure value and field mappings for complex data push or populationconfigurations.
The following table describes the panes of this graphic user interface.
Pane Description
Local Query Displays a hierarchical tree structure of the local TQL query in the CMDB.
Local QueryAttributes
This is the Attributes pane for the Local Query pane. It displays attributes of a localintegration TQL query.
VisualMapping
Allows you to establishmapping for items you select from the Local Query pane andthe External Class Model pane through a drag and drop.
XML Editor Allows to you edit XML mapping files in a text editor.
ServiceManagerEnhancedAdapter9.41 User GuideUCMDB-SM Configuration Best Practices
Micro Focus Service Manager (Service Manager 9.41 or later; UCMDB CP26 or later) Page 114 of 227

Pane Description
ExternalClass Model
Displays a hierarchical tree structure of the external class model. For the UCMDB-SM integration, this pane displays supported CI types from the ServiceManager(SM) side.
ExternalClass ModelAttributes
The Attributes pane for the External Class Model pane displays attributes of anexternal class model. For the UCMDB-SM integration, this pane displays attributesfrom the SM side.
Bi-Directional Data Synchronization
RecommendationsUCMDB-SM integration supports bi-directional data synchronization between UCMDB and ServiceManager (SM). We recommend that you follow the following best practices to avoid unnecessaryproblems due to improper use of the data push and population features:
l For CIs/CI Relationships that UCMDB can automatically discover, use UCMDB as the datasource. Do not make changes to them in ServiceManager; instead, always let UCMDB discovertheir changes and push the changes to SM.
l For CIs/CI Relationships that UCMDB cannot automatically discover, use SM as the data source.Do not make changes to them in UCMDB; instead, always make changes to them in SM andpopulate the changes to UCMDB.
l For CIs/CI Relationships that are already created in SM and UCMDB can automatically discover,run a one-time population to synchronize them to UCMDB, and then use UCMDB as their datasource.
Caution: Problems like the followingmay occur if you do not follow these best practices:
Problem 1:
[Population Adapter] After CIs/CI Relationships are pushed from UCMDB, if you directly makechanges in SM to these records without ever populating them back to UCMDB first, the changesmay not be populated to UCMDB.
Workaround:
Changing these UCMDB records in SM is not recommended; however if you need to do so youcan do the following to solve this issue: After the records are pushed to SM, populate them back to
ServiceManagerEnhancedAdapter9.41 User GuideUCMDB-SM Configuration Best Practices
Micro Focus Service Manager (Service Manager 9.41 or later; UCMDB CP26 or later) Page 115 of 227
UCMDB first beforemaking any changes to them in SM. This way the changes can then bepopulated to UCMDB.
Problem 2:
[Population Adapter] After a Composition relationship between a Node CI (node 1) and RunningSoftware CI is pushed to SM, if you change the upstream CI of the relationship from node 1 tonode 2 in SM and then run a change population to populate this change, the Running Software CIwill be removed in UCMDB.
Workaround:
It is recommended that you remove the running software in UCMDB and create a new one insteadof directly replacing the container of the running software in SM. If you cannot avoid doing so, dothe following:
After you change the upstream CI of the relationship from node 1 to node 2, do not directly run thechange population. Follow these steps to avoid this issue:
1. Update the Running Software CI in SM (or simply save it to mark it as updated).
2. Run a Running Software CI change population. This will create a new Compositionrelationship between node 2 and this Running Software CI.
3. Run a delta population to synchronize the relationship change to UCMDB. The relationshipbetween node 1 and the Running Software CI will be removed, and the new relationshipcreated in step 2 will remain.
If you have run a delta population after changing the upstream CI of the relationship from node 1 tonode 2, and as a result the Running Software CI has been removed in UCMDB, follow these stepsto solve this issue:
1. Update the Running Software CI in SM (or simply save it to mark it as updated).
2. Run a Running Software CI change population. This will create the Running Software CI, anda new Composition relationship between node 2 and this Running Software CI.
Push Scheduling RecommendationsPush jobs are run using twomainmethods, the first of which is manually executing the push job and thesecond is scheduling the push job.
All push jobs can potentially produce a strain on the UCMDB and SM systems; We recommend thatyou adhere to the following guidelines.
ServiceManagerEnhancedAdapter9.41 User GuideUCMDB-SM Configuration Best Practices
Micro Focus Service Manager (Service Manager 9.41 or later; UCMDB CP26 or later) Page 116 of 227

Scheduler time frames
It is important for you to understand the function of the Scheduler “time frame” concept. Running pushjobs creates an increase in system activity andmay affect application responsiveness. In order toenable users to effectively interact with applications We recommend the following guidelines:
In order to reduce system strain, schedule the UCMDB to SM push to run at non-peak usage hours,preferably when system usage is at aminimum.
Scheduler frequency
It is important to be aware of the business requirements when configuring the schedule frequency. Thescheduler frequency depends on infrastructure environment changes that must be synchronizedbetween UCMDB and SM.
Define the scheduling frequency based on the business requirements for consuming up-to-date CIinformation. Most implementations require a daily update. When scheduling small IT systems that areprone to frequent changes, the scheduling frequency may need to be increased.
Push Job dependencies
UCMDB Push Jobs do not support dependencies between each other. Each “Push Job” is considereda separate task and users cannot define job dependencies. For example, that one job is dependent onanother or upon completion before the next job is run.
It is important that both CI queries and their dependent Relationship queries exist in the same Job inorder to avoid relationships not being pushed to ServiceManager. You can change the position of eachquery in the list to define an appropriate execution sequence. See the following figure for an example.
ServiceManagerEnhancedAdapter9.41 User GuideUCMDB-SM Configuration Best Practices
Micro Focus Service Manager (Service Manager 9.41 or later; UCMDB CP26 or later) Page 117 of 227
Push in Clustered EnvironmentsA clustered SM environment is comprised of multiple servlets running in parallel with a load balancerthat dispatches user requests to any available servlet. Youmust configure the UCMDB-SM integrationto point to a specific servlet and not to the SM loadBalancer. In order to perform this, youmust firstcreate a dedicated web service listener.
This section includes:
l "DedicatedWeb Services" below
l "Step-by-Step Cluster Configuration Process" below
l "Connecting toMultiple SM Processes" on page 120
Dedicated Web Services
A ServiceManager system configured for vertical or horizontal scaling uses a load balancer to redirectclient connection requests to an available SM process. However, most Web Services clients cannothandle a redirect request and will fail if they use the SM load balancer as the endpoint URL.
We recommend creating one or more SM processes dedicated toWeb Services requests. The usermust configure the relevant external web service clients to connect directly to the dedicated ServiceManager processes.
Step-by-Step Cluster Configuration Process
This section describes the steps to configure a cluster environment for the integration.
How to Configure Web Clients
To configure the relevant external web clients:
1. Stop the ServiceManager service.
2. Open the sm.cfg file, and create a dedicated SM process to listen forWeb Services requestsusing the -debugnode parameter.The following entries create a dedicated process listening on ports 13085 and 13445.
ServiceManagerEnhancedAdapter9.41 User GuideUCMDB-SM Configuration Best Practices
Micro Focus Service Manager (Service Manager 9.41 or later; UCMDB CP26 or later) Page 118 of 227
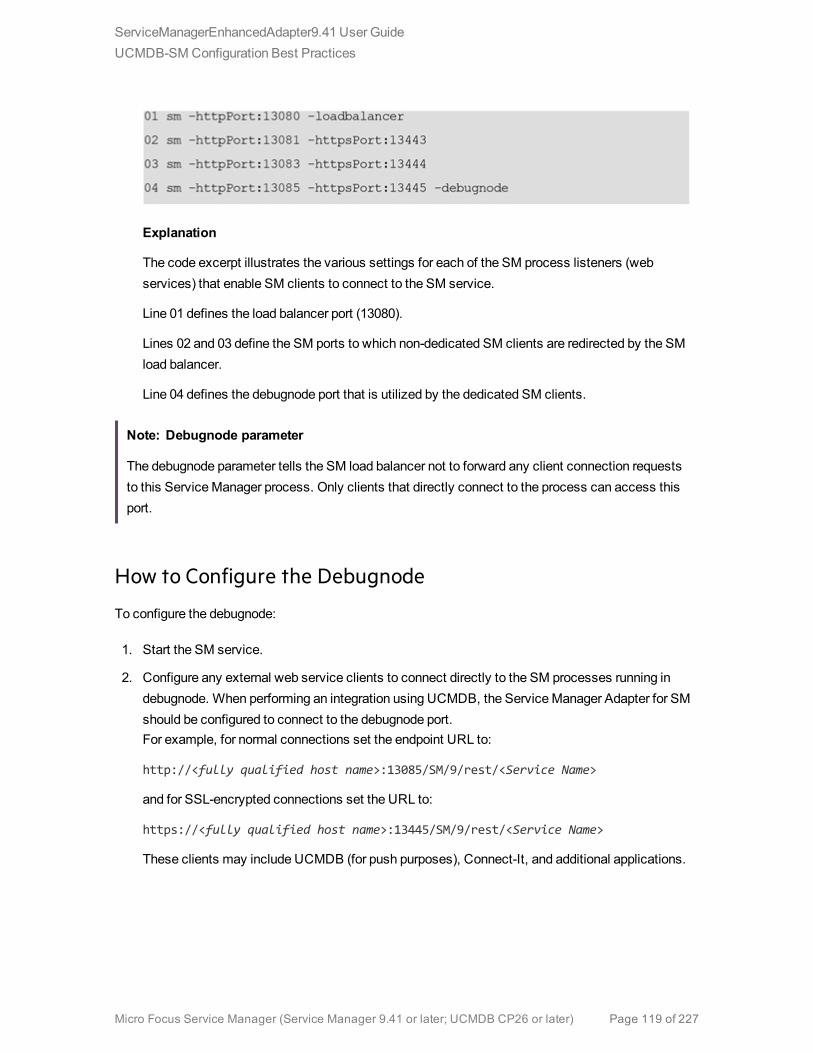
Explanation
The code excerpt illustrates the various settings for each of the SM process listeners (webservices) that enable SM clients to connect to the SM service.
Line 01 defines the load balancer port (13080).
Lines 02 and 03 define the SM ports to which non-dedicated SM clients are redirected by the SMload balancer.
Line 04 defines the debugnode port that is utilized by the dedicated SM clients.
Note: Debugnode parameter
The debugnode parameter tells the SM load balancer not to forward any client connection requeststo this ServiceManager process. Only clients that directly connect to the process can access thisport.
How to Configure the Debugnode
To configure the debugnode:
1. Start the SM service.
2. Configure any external web service clients to connect directly to the SM processes running indebugnode. When performing an integration using UCMDB, the ServiceManager Adapter for SMshould be configured to connect to the debugnode port.For example, for normal connections set the endpoint URL to:
http://<fully qualified host name>:13085/SM/9/rest/<Service Name>
and for SSL-encrypted connections set the URL to:
https://<fully qualified host name>:13445/SM/9/rest/<Service Name>
These clients may include UCMDB (for push purposes), Connect-It, and additional applications.
ServiceManagerEnhancedAdapter9.41 User GuideUCMDB-SM Configuration Best Practices
Micro Focus Service Manager (Service Manager 9.41 or later; UCMDB CP26 or later) Page 119 of 227
Connecting to Multiple SM Processes
If you want to improve performance, you can connect to multiple ServiceManager processes. Theintegration supports both ServiceManager vertical and horizontal load balancer environments.
You can createmore than one SM process that is dedicated toWeb Services requests, and configuretheURL Override field of the integration point with the dedicated SM processes. This field value (ifany) overrides the Hostname/IP and Port settings.
The following is an example value of this field, which connects two SM processes:
http://<fully qualified host name1>:13080/SM/9/rest;http://<fully qualified hostname2>:13082/SM/9/rest
Initial Load ConfigurationsBefore the configuration process can begin, youmust first assess the amount of CI and relationshipdata to be transferred from UCMDB to SM and ascertain the iteration process that is required based onthe volume.
Youmust first assess whether or not all of the data can be pushed in a single iteration. This isascertained by the amount of data that is included in the push queries and the amount of time you haveto push this data.
This section includes:
l "Push Performance in a Single-Threaded Environment" on the next page
l "ImplementingMulti-Threading" on the next page
l "Push Performance inMulti-Threaded Environments" on page 123
l "Push Performance inMultiple SM Processes Environments" on page 123
l "How to Set up SM DEMRules for Initial Loads" on page 124
Note: The performance data presented in this document is based on tests that were performed atMicro Focus and is provided for reference only. The integration performancemay significantlydiffer in your environment depending on your hardware configuration.
ServiceManagerEnhancedAdapter9.41 User GuideUCMDB-SM Configuration Best Practices
Micro Focus Service Manager (Service Manager 9.41 or later; UCMDB CP26 or later) Page 120 of 227

Push Performance in a Single-Threaded Environment
The Push of 22,500 UCMDB root CIs (roots in queries) and/or Relationships in a single-threadedenvironment takes about an hour and is performed in a linear fashion. See the following table.
Number of root CIs/CI Relationships Pushedper Hour Multi-Threading Settings in sm.properties
22,500 number.of.concurent.sending.threads=1
min.objects.for.concurent.sending=50
number.of.chunks.per.thread=3
recommended.min.cis.per.chunk=50
Performance data in a single-threaded environment
To view or edit the sm.properties file in UCMDB, navigate toData Flow Management > AdapterManagement > ServiceManagerEnhancedAdapter9.41 > Configuration Files > sm.properties.
Number of Root CIs and Relationships/22,500
The push time (in hours) in any given environment is calculated as follows:
If the push of a single planned query has the potential of breaching the permitted time frame, the datamust be divided into several queries. Each query must be pushed individually.
This query division is performed by creating several queries, each with different node conditions thatenable data filtering. Once all queries are pushed for the first time, the Initial Load process is complete.
Note: When applying node conditions to the various ServiceManager queries, youmust makesure that all of the information is included in the queries, so that all relevant data is copied toServiceManager.
Implementing Multi-Threading
In order to improve performance, the ServiceManager adapter utilizes multiple threads for the push ofCI and Relationship data to SM. The following section explains these settings and how to configurethem for maximum performance.
Themulti-threading configuration is defined in the sm.properties file on the UCMDB server. To view oredit the file in UCMDB, navigate toData Flow Management > Adapter Management >ServiceManagerEnhancedAdapter9.41 > Configuration Files > sm.properties.
The following are examplemulti-threading definitions in the sm.properties file:
ServiceManagerEnhancedAdapter9.41 User GuideUCMDB-SM Configuration Best Practices
Micro Focus Service Manager (Service Manager 9.41 or later; UCMDB CP26 or later) Page 121 of 227

01 number.of.concurrent.sending.threads=6
02 min.objects.for.concurrent.sending=50
03 number.of.chunks.per.thread=3
04 recommended.min.cis.per.chunk=50
Explanation
The code excerpt illustrates the relevant multi threading settings on the UCMDB server.
l Line 01 defines the number of parallel threads UCMDB will open to SM for CI push. Setting thisparameter to 1 disables multi-threading, while a values of 2 or higher enables multi-threading.
l Line 02 defines theminimum number of SM objects needed to usemultiple threads as opposed to asingle thread.
l Line 03 defines the number of chunks per thread. This numbermultiplied by the number of threadsgives you the total number of CI data chunks.
l Line 04 defines the recommendedminimum number of CIs per CI data chunk.
The total number of chunks = number.of.chunks.per.thread * number.of.concurrent.sending.threads
The integration implements a queuemechanism as follows:
The data passed from UCMDB to SM is divided into equal chunks, and these chunks are placed in aqueue.
Each available thread pulls the next chunk from the queue until all threads are available. Once thisprocess has completed, the push is complete.
Themechanism is designed tominimize idle time of each thread. As each thread processes its chunkin parallel, some threads may finish before others and it is inefficient for them to wait for each other.
Caution: Defining too many threads
It is ineffective to over-increase the number of threads as this causes the SM server to overload. Inenterprise environments where the SM server processing the push data is very robust the numberof threads can be increased to 10 and in some cases even 20; however, youmust take intoaccount that increasing the number of threads raises CPU usage on the SM server during push,whichmay reduce application performance.
ServiceManagerEnhancedAdapter9.41 User GuideUCMDB-SM Configuration Best Practices
Micro Focus Service Manager (Service Manager 9.41 or later; UCMDB CP26 or later) Page 122 of 227

Push Performance in Multi-Threaded Environments
The push of 60,000 UCMDB root CIs (roots in queries) and/or Relationships in an out-of-the-box multi-threaded environment takes about an hour and is performed in a linear fashion. See the following table.
Number of Root CIs/Relationships Pushedper Hour
Multi-Threading Settings in sm.properties(Default)
60,000 number.of.concurrent.sending.threads=6
min.objects.for.concurrent.sending=50
number.of.chunks.per.thread=3
recommended.min.cis.per.chunk=50
Performance Data in an Out-Of-The-Box Multi-Threaded Environment
The push time (in hours) in any given environment is calculated as follows:
Number of Root CIs and Relationships/60,000
Push Performance in Multiple SM Processes
Environments
The Push of 190,000 UCMDB root CIs (roots in queries) and/or Relationships in amulti-threadedenvironment with multiple SM processes takes about an hour and is performed in a linear fashion. Seethe following table:
Number of rootCIs/Relationshipspushed per hour SM processes
Multi-threading settings in sm.properties(default)
160,000 2 server hosts, witheach host running 4processes
number.of.concurrent.sending.threads=60
min.objects.for.concurrent.sending=50
number.of.chunks.per.thread=3
recommended.min.cis.per.chunk=50
Data Push Chunk Size = 4000 (in IntegrationSettings in UCMDB)
Performance data in a multiple SM processes environment
Formore information about definingmultiple SM processes for the integration, see "How to Create anIntegration Point in UCMDB" on page 62.
The push time (in hours) in any given environment is calculated as follows:
ServiceManagerEnhancedAdapter9.41 User GuideUCMDB-SM Configuration Best Practices
Micro Focus Service Manager (Service Manager 9.41 or later; UCMDB CP26 or later) Page 123 of 227

Number of Root CIs and Relationships/160,000
How to Set up SM DEM Rules for Initial Loads
SMDiscovered Event Manager Rules (DEM Rules) enable the user to define the appropriate action totake for each event type that is reported to SM.
Each CI and relationship record pushed from UCMDB to SM is analyzed against the existing SMrecords and open Change requests. SM rules define the appropriate action to be taken for each type ofCI data update that is sent to SM.
To view or update the SM Discovered Event Manager Rules:
1. Log in to ServiceManager as a system administrator.
2. Navigate to Tailoring >Web Services > Discovered Event Manager Rules.
3. Press ENTER or click theSearch button.A list of all the Discovered Event Manager Rules is displayed. Each rule is usually linked to a CIType or a subset of CIs of the same type.
4. Click the individual CI Discovered Event Manager Rule to view its details.
To set up DEMRules for initial loads:
Tip: When performing an Initial Loadwe recommend setting the SM Discovered Event ManagerRules to add newly reported CIs as described below. This minimizes the “noise” of an Initial Load,which could potentially create tens of thousands of Changes or Incidents.
For each of the Discovered Event Manager Rules, perform the following steps:
1. Select the relevant Discovered Event Manager Rule.
2. Go to theAction if matching record does not exist section, select theAdd the record option.
3. In theAction if record does not exist but unexpected data discovered section, select theLog Results and Update Record option.
4. In theAction if record is to be deleted section, select theDelete Record option.
5. Save the Discovered Event Manager Rule record.
ServiceManagerEnhancedAdapter9.41 User GuideUCMDB-SM Configuration Best Practices
Micro Focus Service Manager (Service Manager 9.41 or later; UCMDB CP26 or later) Page 124 of 227
How to Configure Differential or Delta Load DEM
Rules
Tip: Once the “Initial Load” or “Data Load” of the CI data is completedwe recommend applyingDifferential or Delta Load settings. These settings apply to all data loaded from UCMDB to SM.
These loads send only updates regardingmodifications discovered in the IT infrastructure fromUCMDB to SM.
To set up the SM DEMRules for Differential or Delta Loads:
1. Log in to ServiceManager as a system administrator.
2. Navigate to Tailoring >Web Services > Discovered Event Manager Rules.
3. Press Enter or click theSearch button.A list of all the Discovered Event Manager Rules in SM is displayed.
4. For each of the Discovered Event Manager Rules, perform the following steps:a. Select the relevant Discovered Event Manager Rule.
b. In theAction if matching record does not exist section, select the appropriate actionrequired for each newly detected CI. If uncertain, select theAdd the record option.
c. In theAction if record does exist but unexpected data discovered section, select theappropriate action for each CI that was modified, resulting in an unexpected or incorrect result.The recommended best practice is to select theOpen a Change option.
d. In theAction if record is to be deleted section, select the appropriate action required foreach CI that was removed. The recommended best practice is to select theDelete Recordoption for CI Relationships, and select theUpdate record to the selected status option forCIs.
e. Save the Discovered Event Manager Rule record.
Fault Detection and Recovery for PushUniversal CMDB has provided a fault detection and recovery mechanism since version 9.05: individualCI failures no longer cause the entire push to fail, and you can review all failed CIs in the UniversalCMDB studio and then re-push them.
ServiceManagerEnhancedAdapter9.41 User GuideUCMDB-SM Configuration Best Practices
Micro Focus Service Manager (Service Manager 9.41 or later; UCMDB CP26 or later) Page 125 of 227
How to Enable Lightweight Single Sign-On (LW-
SSO) ConfigurationYou can enable LW-SSO for the integration so that users can directly view UCMDB CI records fromthe ServiceManager web client by clicking theView in UCMDB button, without providing a UCMDBusername and password.
Note: LW-SSO is not supported for the ServiceManagerWindows client.
To enable LW-SSO for the integration:
1. For each ServiceManager user account that needs LW-SSO, create a user account in UCMDBwith the same username. The passwords in the two systems can be different.
2. Enable LW-SSO in the ServiceManagerWeb tier. For details, see theConfigure LW-SSO in theServiceManagerWeb tier topic in the ServiceManager help.
3. Enable LW-SSO in UCMDB. For details, see theUniversal CMDB Deployment Guide.
Frequently Asked QuestionsThis section provides answers to frequently asked questions about the UCMDB-SM integration.
This section includes:
l "When Is a New CI Created in ServiceManager? " on the next page
l "Can I Analyze the Reason for a CI Deletion in SM?" on the next page
l "How Do I Monitor Relationship Changes Between UCMDB and SM?" on page 128
l "What Kinds of Relationships are Pushed from UCMDB to SM?" on page 128
l "What is a Root CI Node?" on page 129
l "What Is a Root Relationship?" on page 129
l "What is the “Virtual-Compound” Relationship Type Used in a UCMDB-SM Integration Query?" onpage 129
l "When Do I Need the Population Feature?" on page 130
l "Can I Populate Physically Deleted CIs from SM to UCMDB?" on page 130
l "How Do I Keep theOutage Dependency Setting of a CI Relationship in SM?" on page 130
l "How Do I Create an XMLConfiguration File?" on page 132
ServiceManagerEnhancedAdapter9.41 User GuideFrequently AskedQuestions
Micro Focus Service Manager (Service Manager 9.41 or later; UCMDB CP26 or later) Page 126 of 227

l "How Do I Use the Load Fields Button to AddMultiple Managed Fields?" on page 133
l "What Is the Purpose of the <container> Element in the Population Configuration File(smPopConf.xml)?" on page 134
l "Can I Populate Sub-Item Deletions?" on page 135
l "What Happens if a Population Job Failed or Completed?" on page 135
When Is a New CI Created in Service Manager?CIs are created in SM under the following circumstances:
l A CI is manually added to SM through the ConfigurationManagement module or the Requestmodule.
l UCMDB reports a newly discovered CI according to the following:o When a new CI is reported and the Discovered Event Manager Rules are set to Add the
Record.
o When a new CI is reported, the Discovered Event Manager Rules are set toOpen an Incidentand the Incident has been closed.
o When a new CI is reported, the Discovered Event Manager Rules are set toOpen a Changeand the Change has been verified.
Can I Analyze the Reason for a CI Deletion in SM?No.
SM opens a change request on the deleted CI and includes the following information:
“Delete event for CI “CI Name” triggered by discovery”.
Workaround
An SM change request does not contain a description of the reason for deletion, however it is possibleto extract specific information about CI deletions from the UCMDB History Database. UCMDB dataprovides information about the user or the discovery pattern that initiated the CI deletion.
ServiceManagerEnhancedAdapter9.41 User GuideFrequently AskedQuestions
Micro Focus Service Manager (Service Manager 9.41 or later; UCMDB CP26 or later) Page 127 of 227

How Do I Monitor Relationship Changes Between
UCMDB and SM?To understand the relationship change in SM, a distinctionmust bemade between the various types ofRelationship Changes:
l The second endpoint of the relationship has Changed, so instead of CI X being linked to CI Ythrough a relationship, now CI X is related to CI Z.
l An attribute of the relationship has changed.
The first type of Relationship change is supported by the UCMDB-SM integration, therefore, such“Relationship Changes” can either invoke CI relationship updates, or perform the creation of Incidentsor Changes, which are then reviewed andmonitored.
The second is also supported, but it is not covered out-of-the-box; you can configure the UniversalCMDB query to expose such attributes of the relationship, and configure the ServiceManagerWSDLto expose themapped field, and then configure the adapter mapping configuration in the XML andGroovy. However such a Relationship Attribute Change cannot perform the creation of Incidents orChanges, and only supports invoking CI relationship updates directly.
What Kinds of Relationships are Pushed from
UCMDB to SM?Any kinds of relationships are pushed from UCMDB to SM under the following conditions:
l The relationship appears in a PushQuery located in theService Manager > Push folder in theUCMDB Query Manager.
l The relationship is namedRoot in the PushQuery.
l The relationship is mapped to an appropriate target in SM in the UCMDB configuration files (XMLandGroovy files).
The out-of-the-box relationships that are pushed from UCMDB to SM are relationships between twoCIs such as:
l Between Business Services and Applications;
l Between Business Service and Host;
ServiceManagerEnhancedAdapter9.41 User GuideFrequently AskedQuestions
Micro Focus Service Manager (Service Manager 9.41 or later; UCMDB CP26 or later) Page 128 of 227
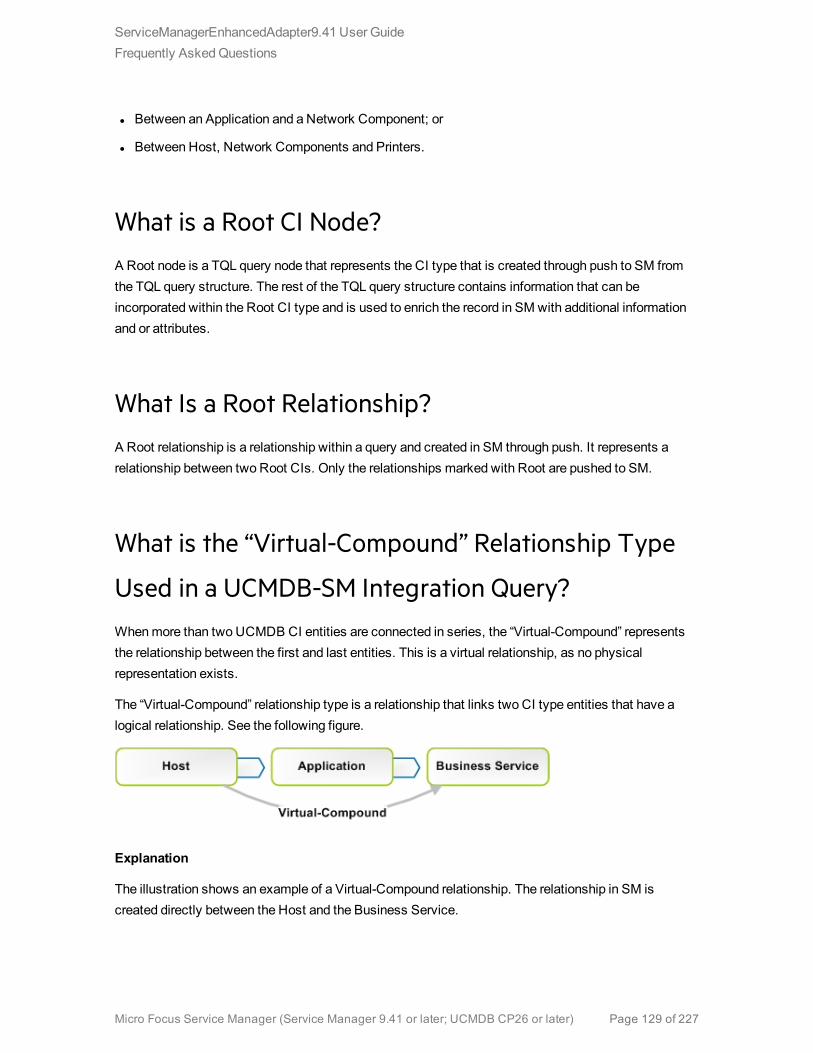
l Between an Application and a Network Component; or
l Between Host, Network Components and Printers.
What is a Root CI Node?A Root node is a TQL query node that represents the CI type that is created through push to SM fromthe TQL query structure. The rest of the TQL query structure contains information that can beincorporated within the Root CI type and is used to enrich the record in SM with additional informationand or attributes.
What Is a Root Relationship?A Root relationship is a relationship within a query and created in SM through push. It represents arelationship between two Root CIs. Only the relationships marked with Root are pushed to SM.
What is the “Virtual-Compound” Relationship Type
Used in a UCMDB-SM Integration Query?Whenmore than two UCMDB CI entities are connected in series, the “Virtual-Compound” representsthe relationship between the first and last entities. This is a virtual relationship, as no physicalrepresentation exists.
The “Virtual-Compound” relationship type is a relationship that links two CI type entities that have alogical relationship. See the following figure.
Explanation
The illustration shows an example of a Virtual-Compound relationship. The relationship in SM iscreated directly between the Host and the Business Service.
ServiceManagerEnhancedAdapter9.41 User GuideFrequently AskedQuestions
Micro Focus Service Manager (Service Manager 9.41 or later; UCMDB CP26 or later) Page 129 of 227

When Do I Need the Population Feature?You need the population feature under any of the following circumstances:
l You have donemodeling in SM, especially when you are in the planning and design phases, andyou want your models to be reflected in UCMDB;
l Youwant to implement the UCMDB-SM integration, however you have already invested in your SMCMDB and do not want to lose that investment;
l Youwant to continue tomaintain some parts of the SM CMDB while maturing yourUCMDB/Discovery implementation.
Can I Populate Physically Deleted CIs from SM to
UCMDB?No.
Physical deletions of CIs are allowed in SM, but SM cannot get such “deletion changes” and thepopulation feature will not synchronize such changes to UCMDB.
Physical deletions of CIs can be considered as exceptions, which occur only after you create CIs bymistake. Normally, you delete a CI by setting its status to something likeRetired/Consumed. If suchCIs have been populated to UCMDB, it is your responsibility to remove themmanually from UCMDB.
How Do I Keep the Outage Dependency Setting of a
CI Relationship in SM?Out-of-the-box, CI relationships that are pushed from UCMDB to SM do not have outage dependencyinformation by default. If you need such information, you can set the DEM rule of the CI RelationshipWSDL as follows:
1. Log in to ServiceManager as a system administrator.
2. Navigate to Tailoring >Web Services > Discovered Event Manager Rules.
3. Open the ucmdbRelationship record.
ServiceManagerEnhancedAdapter9.41 User GuideFrequently AskedQuestions
Micro Focus Service Manager (Service Manager 9.41 or later; UCMDB CP26 or later) Page 130 of 227
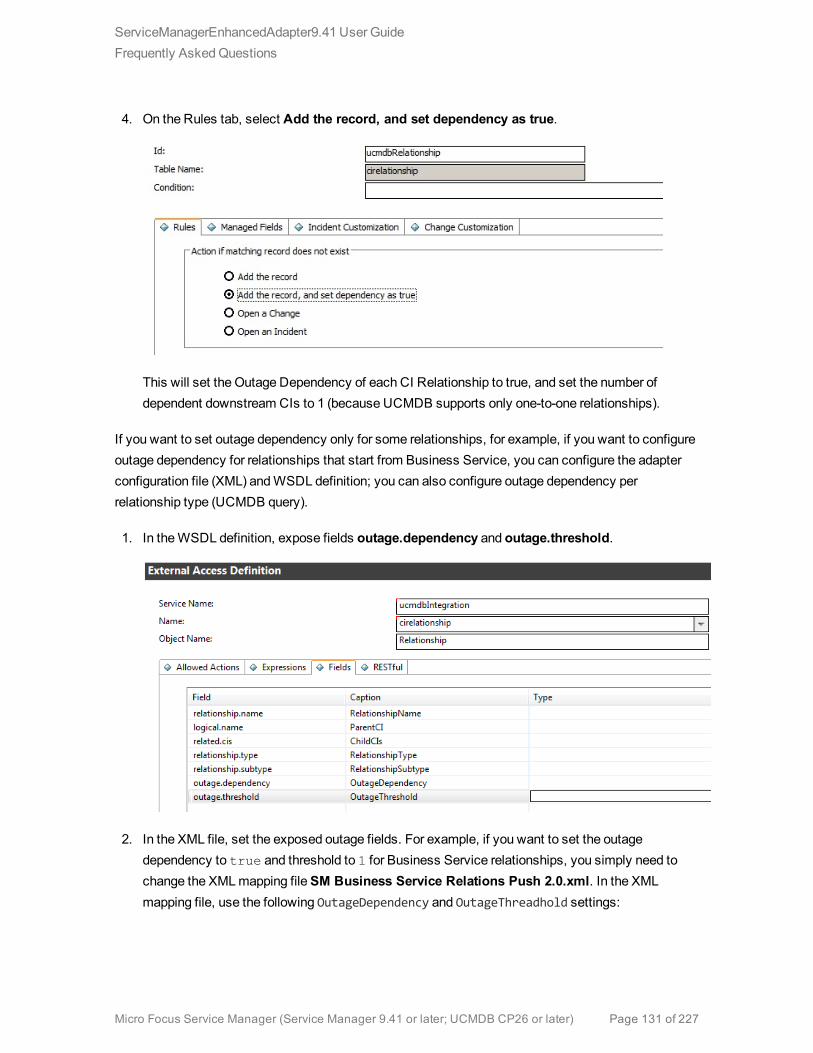
4. On the Rules tab, select Add the record, and set dependency as true.
This will set the Outage Dependency of each CI Relationship to true, and set the number ofdependent downstream CIs to 1 (because UCMDB supports only one-to-one relationships).
If you want to set outage dependency only for some relationships, for example, if you want to configureoutage dependency for relationships that start from Business Service, you can configure the adapterconfiguration file (XML) andWSDL definition; you can also configure outage dependency perrelationship type (UCMDB query).
1. In theWSDL definition, expose fields outage.dependency and outage.threshold.
2. In the XML file, set the exposed outage fields. For example, if you want to set the outagedependency to true and threshold to 1 for Business Service relationships, you simply need tochange the XMLmapping fileSM Business Service Relations Push 2.0.xml. In the XMLmapping file, use the following OutageDependency and OutageThreadhold settings:
ServiceManagerEnhancedAdapter9.41 User GuideFrequently AskedQuestions
Micro Focus Service Manager (Service Manager 9.41 or later; UCMDB CP26 or later) Page 131 of 227

<?xml version="1.0" encoding="UTF-8" standalone="yes"?><integration>
<info><source name="UCMDB" vendor="HP" version="10.20"/><target name="SM" vendor="HP" version="9.40"/>
</info><import>
<scriptFile path="mappings.scripts.SMPushFunctions"/></import><target_entities>
<source_instance root-element-name="Root_directly" query-name="EA_SMBusiness Service Relations Push">
<target_entity name="Relationship"><target_mapping datatype="STRING" name="RelationshipType"
value="SMPushFunctions.getDisplayName(Root_directly['element_type'],ClassModel)"/>
<target_mapping datatype="STRING" name="ParentCI"value="SMPushFunctions.getEndId(OutputCI.getExternalId().getEnd1Id())"/>
<target_mapping datatype="STRING_LIST" name="ChildCIs"value="[SMPushFunctions.getEndId(OutputCI.getExternalId().getEnd2Id())]"/>
<target_mapping datatype="BOOLEAN" name="OutageDependency"value="true"/>
<target_mapping datatype="NUMBER" name="OutageThreadhold"value="1"/>
</target_entity></source_instance>
</target_entities></integration>
How Do I Create an XML Configuration File?You create an XML configuration file in Adapter Management. You can copy the content of an existingXML configuration file to the new file and thenmake necessary edits.
To create an XML configuration file:
1. Log in to UCMDB as an administrator.
2. Navigate toData Flow Management > Adapter Management.ServiceManagerEnhancedAdapter9.41 > Configuration Files.
3. Click theCreate new resource icon .
4. Select New Configuration File.
ServiceManagerEnhancedAdapter9.41 User GuideFrequently AskedQuestions
Micro Focus Service Manager (Service Manager 9.41 or later; UCMDB CP26 or later) Page 132 of 227
5. Enter a name for the file. The file name should use this format: <AdapterID>/mappings/<SynchType>/<filename>. For example:ServiceManagerEnhancedAdapter9.41/mappings/push/SM Computer Push
2.0.xml.
6. Click OK. A message is displayed, asking if you want to open the file in the Visual Mapping tooleditor.
7. Click Yes orNo to continue.UCMDB creates the new XML configuration file in the Configuration Files folder of the adapter.
8. Copy the content of an existing XML configuration file to the new file.
9. Make necessary edits to the new file.
Caution: Invalid XML
When removing XML elements from an XML file, keep inmind that the remaining elements mustconstitute a valid XML file, which will be used to translate the UCMDB Query Definition.
How Do I Use the Load Fields Button to Add
Multiple Managed Fields?ServiceManager stores a list of managed fields in the ucmdbIntegration web service, which consistsof a number of web services objects. You can addmoremanaged fields to DEMRules so that ServiceManager canmonitor changes inmore CI attributes in UCMDB and trigger the actions defined inrelevant DEM Rules.
You canmanually addmanaged fields that are exposed in associatedWSDL definitions to DEMRules;however, you can use the Load Fields button to automatically (and therefore correctly) addmanagedfields to DEMRules.
1. Click theManaged Fields tab of the DEMRule.
2. Click the Load Fields button.
3. If the table (in the Table Name field) of the DEM rule record has only oneWSDL definitionassociated to it, all fields exposed in theWSDL definition are immediately added to theManagedFields list.A message is displayed: <XX> new fields loaded.
ServiceManagerEnhancedAdapter9.41 User GuideFrequently AskedQuestions
Micro Focus Service Manager (Service Manager 9.41 or later; UCMDB CP26 or later) Page 133 of 227

4. If the table has more than oneWSDL definition associated to it, theManaged Fields Importingwizard opens, and a list of WSDL definitions (ucmdbIntegration web service objects) is displayed.a. Select one or more objects, and click Next. All new fields that can be added from the selected
web service objects are displayed.
b. If you want to add all of the fields, click Finish; if you want to ignore some of them, changetheir Action value from Add to Ignore, and then click Finish.A message is displayed: <XX> new fields loaded.
5. Save the DEMRule record.
What Is the Purpose of the <container> Element in
the Population Configuration File (smPopConf.xml)?Out-of-the-box, the smPopConf.xml file has a container element.
<tql name="SM RunningSoftware Population 2.0" citype="running_software"><request type="Retrieve" dataType="ci"resourceCollectionName="ucmdbRunningSoftwares"resourceName="ucmdbRunningSoftware"basicQueryCondition="type="runningsoftware""fullQueryCondition="istatus~="Retired/Consumed""changedCreationQueryCondition="created.by.date>'{fromDate}' and
istatus~="Retired/Consumed""changedUpdateQueryCondition="created.by.date<='{fromDate}' and
devicemodtime>'{fromDate}' and istatus~="Retired/Consumed""changedDeletionQueryCondition="devicemodtime>'{fromDate}' and
istatus="Retired/Consumed""/><container tql="SM Computer Population 2.0"keyFields="CIIdentifier"linkTql="SM Computer Composition Software 2.0"linkRetrieveCondition="downstreamci.logical.name="$$$" and
upstreamci.type="computer" anddownstreamci.type="runningsoftware" andrelationship.subtype="Composition""
linkRetrieveConditionKey="CIIdentifier"linkValueFields="upstreamci.logical.name"/>
</tql>
l In UCMDB, RunningSoftware CIs must exist together with a Root Container (Node); however,ServiceManager allows RunningSoftware CIs without a Node.
ServiceManagerEnhancedAdapter9.41 User GuideFrequently AskedQuestions
Micro Focus Service Manager (Service Manager 9.41 or later; UCMDB CP26 or later) Page 134 of 227

l The integration adapter synchronizes CIs and Relationships separately; when populating aRunningSoftware CI, the integration has no chance to check if a relationship exists between the CIand a Node.
With the <container> element, the integration populates RunningSoftware CIs together with acontainer.
Can I Populate Sub-Item Deletions?Yes.
ServiceManager and UCMDB store CI information in different data structures, and therefore one SMCI may be synchronized to UCMDB as several CIs. For example, during population, an SM computerCI record is synchronized to a Node CI in UCMDB, and the computer CI’s attributes to CIs such as IP,Interface, Location, etc (which are referred to as sub-items of the Node CI.). In this case, the Node CIis the root CI.
The integration allows you to populate sub-item deletions to UCMDB. For example, if you delete the IPAddress attribute value of a computer, the corresponding IP CI record in UCMDB will be deleted too.
What Happens if a Population Job Failed or
Completed?When a population job failed
The failure prevents the remaining population tasks from running. The next job run will start from thelast Success time. If pagination occurs (that is, the tasks are divided intomultiple pages), the tasks willrun again and again within the first page from the last “Success” time (once the end of the first page isreached, no new tasks will be executed).
When a population job completed
When the status of a job is "completed" (but not "completed successfully"), warnings occurred. Awarning does not prevent the remaining population tasks from running. The next job run will run all tasksagain starting from the last Success time. If pagination occurs (the tasks are divided intomultiplepages), the tasks on all pages will be re-run (including those that successfully completed last time).
ServiceManagerEnhancedAdapter9.41 User GuideFrequently AskedQuestions
Micro Focus Service Manager (Service Manager 9.41 or later; UCMDB CP26 or later) Page 135 of 227

Chapter 6: Tailoring the IntegrationYou can tailor the UCMDB-SM integration tomeet your business needs by adding or removingmanaged CI types, attributes, and relationship types. This chapter describes the integrationarchitecture and tailoring options for data push, population, and federation.
Integration Architecture 136
Integration Tailoring Options 151
Integration ArchitectureBefore you tailor the integration, you should understand how the following components of the out-of-the-box integration work.
l "Integration Class Model" below
l "Integration Queries" below
l "ServiceManagerWeb Services" on page 142
l "ServiceManager Reconciliation Rules" on page 147
l "ServiceManager Discovery Event Manager Rules" on page 148
Integration Class ModelUCMDB 9.x or later no longer uses a private class model of CI types tomanage integration CIs, aswas required in prior versions. Instead, the integration uses the standard UCMDB managed objectsandmaps them to ServiceManager CI types and attributes with queries and transformation files.
Integration QueriesThis section describes out-of-the-box queries used for data push, Actual State, and population.
l "Queries for Push" on the next page
l "Queries for Actual State" on page 139
Micro Focus Service Manager (Service Manager 9.41 or later; UCMDB CP26 or later) Page 136 of 227
l "Queries for Population" on page 140
l "Query Requirements" on page 142
Queries for Push
For the push feature, the integration uses a collection of queries to gather CI attribute information fromUniversal CMDB and send it to the ServiceManager system.
To access the out-of-the-box data push queries, navigate toModeling >Modeling Studio, selectQueries for Resource Type, and then navigate to theRoot > Integration > Service Manager > Pushfolder.
If you want to change what CI types, Relationship types or attributes are part of the integration, youmust also edit the integration queries to support your updated CI types, CI Relationship types andattributes.
Note: The ServiceManager EnhancedGeneric Adapter has been introduced since UCMDBversion 10.20. This adapter can coexist with an old XSLT adapter. In order to distinguish itsqueries from those of an XSLT adapter, all queries of the enhanced adapter are suffixed with 2.0.
Query name Description
SM LocalPrinter Push2.0
This query gathers CI attributes from printer CIs. It also gathers related CIattributes from the Node CI type.
SM Net PrinterPush 2.0
This query gathers CI attributes from Node CI types whose NodeRole contains“printer.”
It also gathers related CI attributes from the following CI types through containersand links: IPAddress, Interface, CPU, FileSystem, DiskDevice, and Location.
SMMainframePush 2.0
This query gathers CI attributes from the following Node CI types: MainframeLogical Partition, andMainframeCPC.
It also gathers related CI attributes from the following CI types through containersand links: IPAddress, Interface, CPU, FileSystem, DiskDevice, and Location.
SMMobileDevice Push2.0
This query gathers CI attributes from Node CI types whose NodeRole contains“pda_handheld.”
It also gathers related CI attributes from the following CI types through containersand links: IPAddress, Interface, CPU, FileSystem, DiskDevice, and Location.
SM NetworkComponentPush 2.0
This query gathers CI attributes from Node CI types whose NodeRole containsrouter, adsl_modem, appletalk_gateway, bandwith_manager, cable_model, csu_
ServiceManagerEnhancedAdapter9.41 User GuideIntegration Architecture
Micro Focus Service Manager (Service Manager 9.41 or later; UCMDB CP26 or later) Page 137 of 227
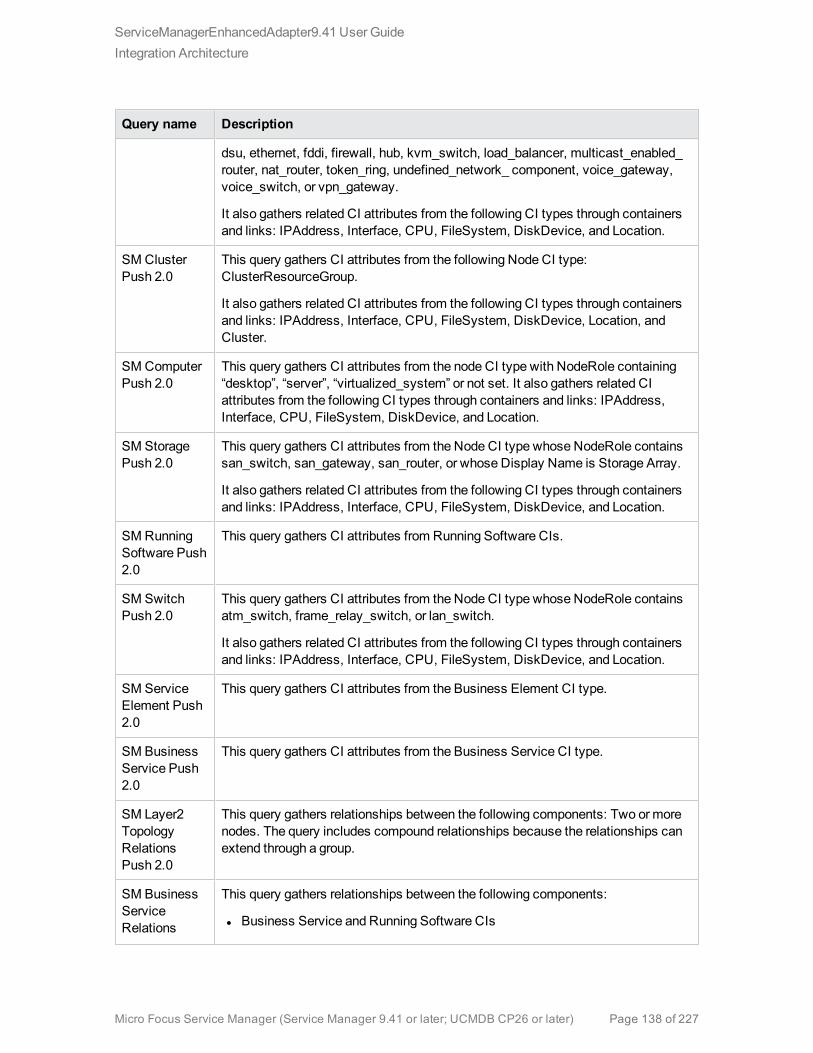
Query name Description
dsu, ethernet, fddi, firewall, hub, kvm_switch, load_balancer, multicast_enabled_router, nat_router, token_ring, undefined_network_ component, voice_gateway,voice_switch, or vpn_gateway.
It also gathers related CI attributes from the following CI types through containersand links: IPAddress, Interface, CPU, FileSystem, DiskDevice, and Location.
SM ClusterPush 2.0
This query gathers CI attributes from the following Node CI type:ClusterResourceGroup.
It also gathers related CI attributes from the following CI types through containersand links: IPAddress, Interface, CPU, FileSystem, DiskDevice, Location, andCluster.
SM ComputerPush 2.0
This query gathers CI attributes from the node CI type with NodeRole containing“desktop”, “server”, “virtualized_system” or not set. It also gathers related CIattributes from the following CI types through containers and links: IPAddress,Interface, CPU, FileSystem, DiskDevice, and Location.
SM StoragePush 2.0
This query gathers CI attributes from the Node CI type whose NodeRole containssan_switch, san_gateway, san_router, or whose Display Name is Storage Array.
It also gathers related CI attributes from the following CI types through containersand links: IPAddress, Interface, CPU, FileSystem, DiskDevice, and Location.
SM RunningSoftware Push2.0
This query gathers CI attributes from Running Software CIs.
SM SwitchPush 2.0
This query gathers CI attributes from the Node CI type whose NodeRole containsatm_switch, frame_relay_switch, or lan_switch.
It also gathers related CI attributes from the following CI types through containersand links: IPAddress, Interface, CPU, FileSystem, DiskDevice, and Location.
SM ServiceElement Push2.0
This query gathers CI attributes from the Business Element CI type.
SM BusinessService Push2.0
This query gathers CI attributes from the Business Service CI type.
SM Layer2TopologyRelationsPush 2.0
This query gathers relationships between the following components: Two ormorenodes. The query includes compound relationships because the relationships canextend through a group.
SM BusinessServiceRelations
This query gathers relationships between the following components:
l Business Service and Running Software CIs
ServiceManagerEnhancedAdapter9.41 User GuideIntegration Architecture
Micro Focus Service Manager (Service Manager 9.41 or later; UCMDB CP26 or later) Page 138 of 227

Query name Description
Push 2.0 l Business Service and Node CIs
l Two ormore Business Services
The query includes compound relationships because the relationships can extendthrough a group.
SM CRGRelationsPush 2.0
This query gathers relationships between the following components: Node andCluster Resource Group CIs.
The query includes compound relationships because the relationships can extendthrough a group.
SM NodeRelationsPush 2.0
This query gathers relationships between the following components:
l Node and Printer CIs
l Node and RunningSoftware CIs
The root class of the relationship is composition.
SMASM RelationsPush 2.0
This query gathers ASM discovered consumer-provider relationships that pointfrom a Business Element CI to a Running Software CI.
Note: This query does not support consumer-provider relationships between aBusiness Element CI and a Cluster CI.
Note: Towork correctly, this query requires the ASM Enhanced package tobe deployed in UCMDB. This package is already included in UCMDB ContentPack (CP) 17.
Queries for Actual State
Out-of-the-box, the queries in the following table are used for retrieving CI information from UCMDB tothe Actual State section of the ServiceManager Configuration Item (CI) form. ServiceManagerretrieves CI Actual State information by calling a UCMDB web service that retrieves CI data accordingto these queries.
The queries are located in the Integration > SM Query folder in the UCMDB Modeling Studio.
Query name Description
localPrinterExtendedData This query gathers real-time extended information from Printer CIsin UCMDB.
applicationExtendedData This query gathers real-time extended information fromRunningSoftware CIs in UCMDB.
ServiceManagerEnhancedAdapter9.41 User GuideIntegration Architecture
Micro Focus Service Manager (Service Manager 9.41 or later; UCMDB CP26 or later) Page 139 of 227
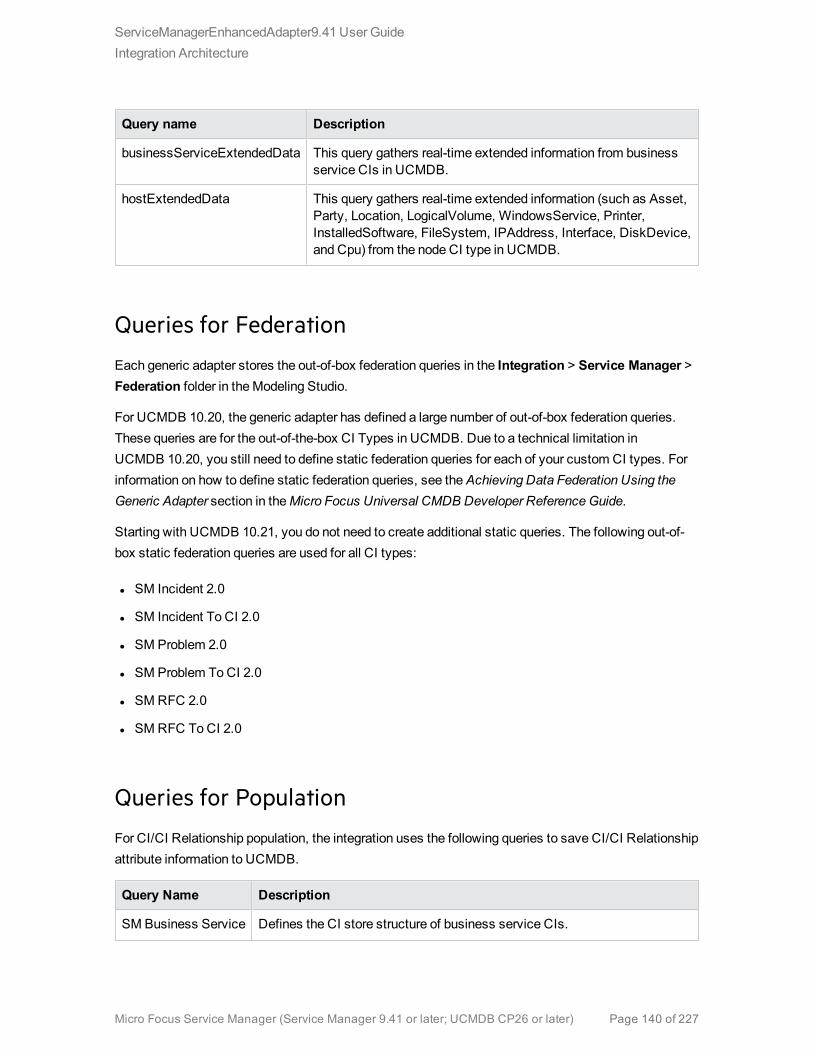
Query name Description
businessServiceExtendedData This query gathers real-time extended information from businessservice CIs in UCMDB.
hostExtendedData This query gathers real-time extended information (such as Asset,Party, Location, LogicalVolume, WindowsService, Printer,InstalledSoftware, FileSystem, IPAddress, Interface, DiskDevice,and Cpu) from the node CI type in UCMDB.
Queries for Federation
Each generic adapter stores the out-of-box federation queries in the Integration > Service Manager >Federation folder in theModeling Studio.
For UCMDB 10.20, the generic adapter has defined a large number of out-of-box federation queries.These queries are for the out-of-the-box CI Types in UCMDB. Due to a technical limitation inUCMDB 10.20, you still need to define static federation queries for each of your custom CI types. Forinformation on how to define static federation queries, see theAchieving Data Federation Using theGeneric Adapter section in theMicro Focus Universal CMDB Developer ReferenceGuide.
Starting with UCMDB 10.21, you do not need to create additional static queries. The following out-of-box static federation queries are used for all CI types:
l SM Incident 2.0
l SM Incident To CI 2.0
l SM Problem 2.0
l SM Problem ToCI 2.0
l SMRFC 2.0
l SMRFC ToCI 2.0
Queries for Population
For CI/CI Relationship population, the integration uses the following queries to save CI/CI Relationshipattribute information to UCMDB.
Query Name Description
SM Business Service Defines the CI store structure of business service CIs.
ServiceManagerEnhancedAdapter9.41 User GuideIntegration Architecture
Micro Focus Service Manager (Service Manager 9.41 or later; UCMDB CP26 or later) Page 140 of 227

Query Name Description
Population 2.0
SM BusinessApplicationPopulation 2.0
Defines the CI store structure of Application Service CIs.
SMInfrastructure ServicePopulation 2.0
Defines the CI store structure of Infrastructure Service CIs.
SM RunningSoftware Population2.0
Defines the CI store structure of running software CIs.
SM ComputerPopulation 2.0
Defines the CI store structure of computer CIs.
SM CLIP Down TimePopulation 2.0
Defines the CI store structure of ScheduledDowntime CIs.
SM Biz ContainmentBiz 2.0
This query defines the CI store structure of CI relationships in which abizservice CI contains another.
SM Biz Usage Biz2.0
Defines the CI store structure of CI relationships in which a bizservice CIuses another.
SM Biz ContainmentComputer 2.0
This query defines the CI store structure of CI relationships in which abizservice CI contains a computer CI.
SM Biz ContainmentSoftware 2.0
Defines the CI store structure of CI relationships in which a bizservice CIcontains a RunningSoftware CI.
SM Biz UsageComputer 2.0
Defines the CI store structure of CI relationships in which a bizservice CIuses a computer CI.
SM Biz UsageSoftware 2.0
Defines the CI store structure of CI relationships in which a bizservice CIuses a RunningSoftware CI.
SM ComputerConnects Computer2.0
Defines the CI store structure of CI relationships in which a computer CIconnects to another.
SM ComputerCompositionSoftware 2.0
Defines the CI store structure of CI relationships in which aRunningSoftware CI is contained within a computer CI and theRunningSoftware CI cannot exist without the container.
SM CI ConnectionDown TimeCI 2.0
Defines the CI store structure of CI relationships in which aScheduledDowntime CI connects to an affected CI.
ServiceManagerEnhancedAdapter9.41 User GuideIntegration Architecture
Micro Focus Service Manager (Service Manager 9.41 or later; UCMDB CP26 or later) Page 141 of 227

Query Requirements
The integration requires that any custom queries you createmeet certain formatting conditions. Anyqueries that you want to include in the integrationmust meet these conditions:
l To query CIs, a query must contain one CI type labeled Root. The Root node is themain CI thatUCMDB synchronizes. All other CIs are contained CIs of the Root CI.
l To query relationships, a query must contain one or more relationships labeled Root.
l A query must contain only the Root CI and CIs that are directly connected to it. The Root CI isalways the top node of the query hierarchy.
l A query layout cannot have cycles.
l If a query synchronizing relationships has cardinality, it must be cardinality 1...*. Additionalcardinality entries must have anOR condition between them.
l If you want the integration to only synchronize specific CIs, youmust configure the condition on thequery to filter such CIs.
Service Manager Web ServicesServiceManager uses web services messages to get and receive CI information from your UCMDBsystem. Out-of-the-box, UCMDB sends more CI attribute information than the ServiceManagersystem actually manages. ServiceManager users can view all of the CI attribute information theUCMDB system sends from the Actual State section of the CI record.
ServiceManager publishes several web services for use by the UCMDB-SM integration. The UCMDBsystem uses the web services tomapUCMDB CI types and CI attributes to web services objects thatthe ServiceManager system recognizes. You can add UCMDB CI types or CI attributes that you wantServiceManager to manage by using the Visual Mapping tool, and the tool will automatically updateone or more of these web services to define web service objects.
Managed Fields
Note: Managed fields are used only for the data push feature.
A ServiceManager managed field is a field where the system compares the CI attribute value in theincoming UCMDB web services message to the value in a ServiceManager CI record. If the values inthe web services message do not match those in the CI record, ServiceManager runs a Discovery
ServiceManagerEnhancedAdapter9.41 User GuideIntegration Architecture
Micro Focus Service Manager (Service Manager 9.41 or later; UCMDB CP26 or later) Page 142 of 227

Event Manager (DEM) rule to determine what action to take. The DEM rule determines which of thefields that are published as web services objects are fields managed by the integration. Only valuechanges inmanaged fields trigger the DEM rule.
The ucmdbIntegration web service consists of a set of web services objects, each of which defines alist of web service fields. Out-of-the-box, the integration uses only part of them (see theMappingsbetween ServiceManager web service objects, tables, and DEM rules table), some of them (along withtheir relevant DEM Rules) are deprecated and removed (see the Deprecated ucmdbIntegration webservice objects for data push table), and some are used for population or federation (see theucmdbIntegration web service objects used for population or federation table).
This web service object Publishes fields from this table And uses this DEM rule ID
Relationship cirelationship ucmdbRelationship
ucmdbRunningSoftware device ucmdbRunningSoftware
ucmdbBusinessService joinbizservice ucmdbBusinessService
ucmdbNode joinnode ucmdbNode
Mappings between Service Manager web service objects, tables, and DEM rules
This web service object Publishes fields from this table Replaced with (object)
ucmdbApplication device ucmdbRunningSoftware
ucmdbComputer ucmdbComputer ucmdbNode
ucmdbNetwork joinnetworkcomponents ucmdbNode
ucmdbPrinter joinofficeelectronics ucmdbNode
Deprecated ucmdbIntegration web service objects for data push
This web serviceobject
Publishes fields from thistable
And is usedfor
Requires a DEMRule?
cirelationship1to1 cirelationship1to1 Population No
ucmdbIDPushBack device Population No
UcmdbChange cm3r Federation No
UcmdbChangeTask cm3t Federation No
UcmdbIncident probsummary Federation No
UcmdbProblem rootcause Federation No
ucmdbIntegration web service objects used for population or federation
The following sections list the fields published as web services objects used for data push (see theMappings between ServiceManager web service objects, tables, and DEM rules table) and indicate
ServiceManagerEnhancedAdapter9.41 User GuideIntegration Architecture
Micro Focus Service Manager (Service Manager 9.41 or later; UCMDB CP26 or later) Page 143 of 227
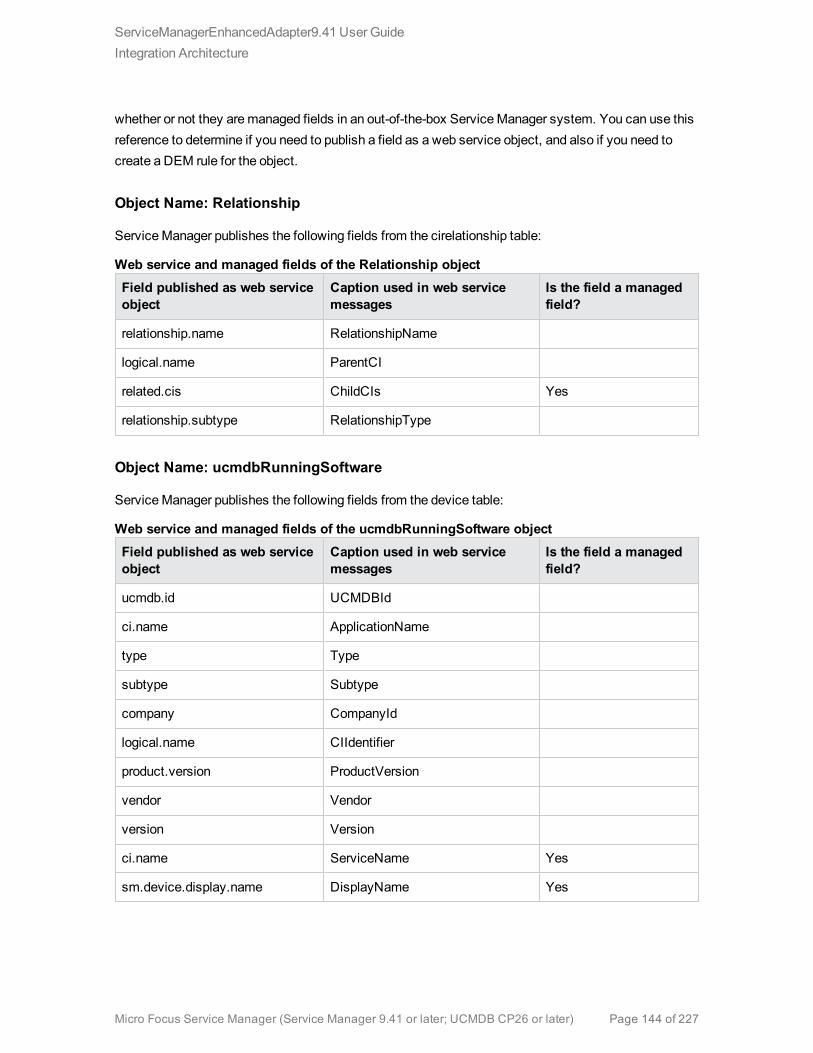
whether or not they aremanaged fields in an out-of-the-box ServiceManager system. You can use thisreference to determine if you need to publish a field as a web service object, and also if you need tocreate a DEM rule for the object.
Object Name: Relationship
ServiceManager publishes the following fields from the cirelationship table:
Field published as web serviceobject
Caption used in web servicemessages
Is the field a managedfield?
relationship.name RelationshipName
logical.name ParentCI
related.cis ChildCIs Yes
relationship.subtype RelationshipType
Web service and managed fields of the Relationship object
Object Name: ucmdbRunningSoftware
ServiceManager publishes the following fields from the device table:
Field published as web serviceobject
Caption used in web servicemessages
Is the field a managedfield?
ucmdb.id UCMDBId
ci.name ApplicationName
type Type
subtype Subtype
company CompanyId
logical.name CIIdentifier
product.version ProductVersion
vendor Vendor
version Version
ci.name ServiceName Yes
sm.device.display.name DisplayName Yes
Web service and managed fields of the ucmdbRunningSoftware object
ServiceManagerEnhancedAdapter9.41 User GuideIntegration Architecture
Micro Focus Service Manager (Service Manager 9.41 or later; UCMDB CP26 or later) Page 144 of 227
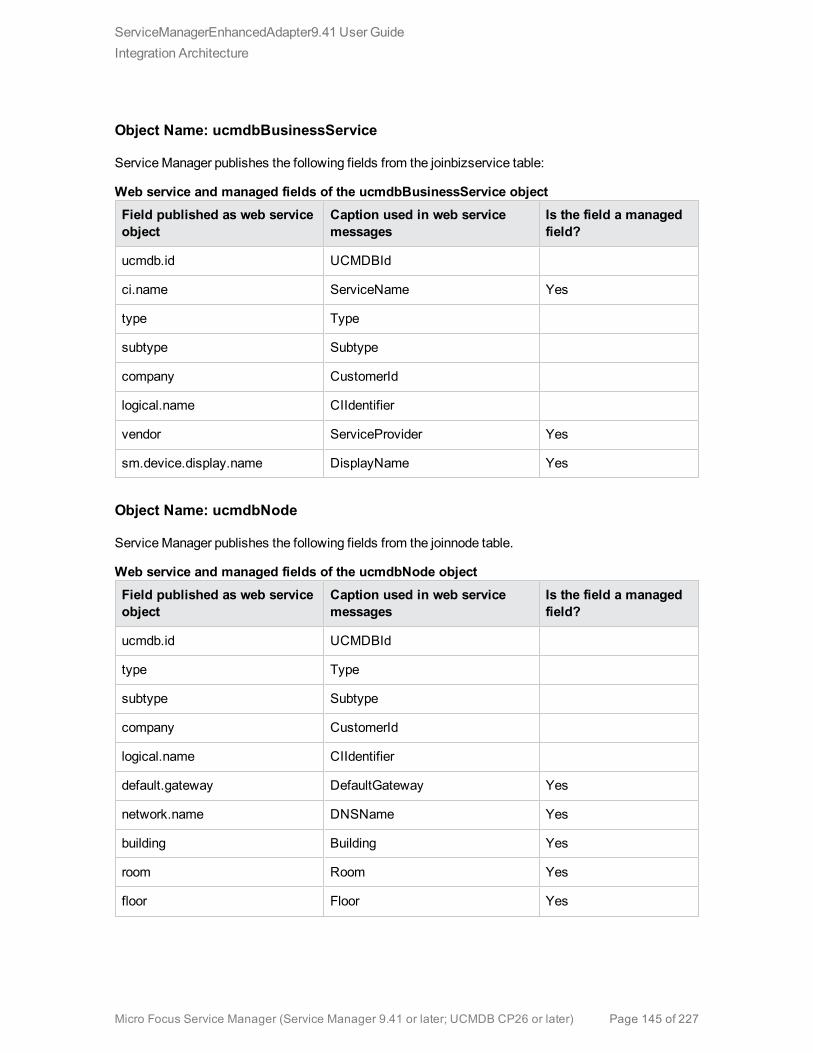
Object Name: ucmdbBusinessService
ServiceManager publishes the following fields from the joinbizservice table:
Field published as web serviceobject
Caption used in web servicemessages
Is the field a managedfield?
ucmdb.id UCMDBId
ci.name ServiceName Yes
type Type
subtype Subtype
company CustomerId
logical.name CIIdentifier
vendor ServiceProvider Yes
sm.device.display.name DisplayName Yes
Web service and managed fields of the ucmdbBusinessService object
Object Name: ucmdbNode
ServiceManager publishes the following fields from the joinnode table.
Field published as web serviceobject
Caption used in web servicemessages
Is the field a managedfield?
ucmdb.id UCMDBId
type Type
subtype Subtype
company CustomerId
logical.name CIIdentifier
default.gateway DefaultGateway Yes
network.name DNSName Yes
building Building Yes
room Room Yes
floor Floor Yes
Web service and managed fields of the ucmdbNode object
ServiceManagerEnhancedAdapter9.41 User GuideIntegration Architecture
Micro Focus Service Manager (Service Manager 9.41 or later; UCMDB CP26 or later) Page 145 of 227

Field published as web serviceobject
Caption used in web servicemessages
Is the field a managedfield?
location Location
addlIPAddr[addlIPAddress] AddlIPAddress Yes
addlIPAddr[addlSubnet] AddlSubnet Yes
addlMacAddress AddlMacAddress Yes
bios.id BIOSId Yes
operating.system OS Yes
os.version OSVersion Yes
physical.mem.total PhysicalMemory Yes
serial.no. SerialNo
vendor Vendor
cpu[cpu.id] CpuID
cpu[cpu.name] CpuName
cpu[cpu.clock.speed] CpuClockSpeed
file.system[mount.point] MountPoint
file.system[disk.type] DiskType
file.system[file.system.type] FilesystemType
file.system[disk.size] DiskSize
asset.tag AssetTag
machine.name HostName Yes
disk.device[model.name] ModelName
disk.device[disk.vendor] DiskVendor
disk.device[disk.name] DiskName
sm.device.display.name DisplayName Yes
isVisualization IsVisualization
istatus AssetStatus
Web service and managed fields of the ucmdbNode object, continued
ServiceManagerEnhancedAdapter9.41 User GuideIntegration Architecture
Micro Focus Service Manager (Service Manager 9.41 or later; UCMDB CP26 or later) Page 146 of 227

Service Manager Reconciliation RulesServiceManager reconciliation rules allow the integration to identify CI records in your ServiceManager system that match CIs in your UCMDB system. ServiceManager attempts to reconcile CIrecords with every push of CI attributes from your UCMDB system. The integration uses the followingworkflow tomatch UCMDB CIs with ServiceManager CIs.
1. The UCMDB system sends a web servicemessage containing the latest CI attribute data toServiceManager.
2. ServiceManager scans the web servicemessage for the CI ucmdb.id value.
Note: The ucmdb.id field is displayed in the Actual State Section of the CI form, with a labelof Ucmdb ID.
3. ServiceManager searches for an existing CI record that has the same ucmdb.id value.
4. If ServiceManager finds a CI that has the ucmdb.id value, no reconciliation is needed. ServiceManager compares the UCMDB CI attributes to the ServiceManager managed fields and runs theappropriate Discovery Event Manager (DEM) rules as needed to update the CI record in ServiceManager.
5. If ServiceManager cannot find a CI that has the ucmdb.id value, it searches for a DEMreconciliation rule record that is defined for the CI type.
6. If no DEM reconciliation rule record is found, ServiceManager creates the CI record according tothe appropriate DEM rules.
7. If a DEM reconciliation rule record is found, ServiceManager evaluates the rules and appends(ucmdb.id=NULL or ucmdb.id~=NULL and istatus=”XXXXXX”) to the reconciliation rules in thebackend, where the istatus value is retrieved from the DEM rule for deletion (for example,Retired/Consumed). If no istatus value is found in the DEM rule, ServiceManager only appendsucmdb.id=NULL to the reconciliation rules in the backend.
8. If nomatching CI record is found by the reconciliation rules, ServiceManager creates the CIrecord according to the appropriate DEM rules.
9. If a matching CI record is found by the reconciliation rules, ServiceManager updates the CI recordaccording to the appropriate DEM rules
Performance Implications
Because ServiceManager attempts to reconcile CIs with every push, the number of reconciliationfields you have will affect the integration’s performance. Themore reconciliation rules you have, the
ServiceManagerEnhancedAdapter9.41 User GuideIntegration Architecture
Micro Focus Service Manager (Service Manager 9.41 or later; UCMDB CP26 or later) Page 147 of 227
more searches ServiceManager must perform tomatch CIs. To improve the performance ofreconciliation searches, you should choose reconciliation fields that are unique keys of the underlyingServiceManager table. For example, if you want to reconcile CI records in the device table, use thelogical.name field as a reconciliation field because it is a unique key. For information about how tocreate a reconciliation rule, see "How to Add DEMReconciliation Rules" on page 156.
Dependence on DEM Rules
ServiceManager uses theAction if matching record does not existDEM rule whenever it cannotreconcile CIs. Youmust review the DEM settings and decide if they meet your business standardsprior to the initial push of CIs from UCMDB to ServiceManager. For example, you can have ServiceManager create a change request for every CI in the initial CI push by selecting theOpen a Changeoption.
Service Manager Discovery Event Manager RulesYou only need to create Discovery Event Manager (DEM) rules if you want to accomplish any of thefollowing custom actions:
l "Change the Conditions UnderWhich a DEMRule Runs" below
l "Change the Action the DEMRule Takes" on the next page
l "Create Custom JavaScript to Open Change or Incident Records" on the next page
Change the Conditions Under Which a DEM Rule Runs
ServiceManager will run a DEM rule only if the condition field evaluates to true. Out-of-the-box, noDEM rule has a condition statement that restricts when the rule runs, and all the integration DEM ruleswill always run by default.
You can update a DEM rule's condition statements if you want to restrict when ServiceManager runsyour DEM rules. For example, adding the following condition to the ucmdbNode DEM rule restricts therule to desktop CIs.
subtype in $L.file="Desktop"
You can also use the condition field to createmultiple DEM rules that apply to the same table name.For example, the following DEM rules both apply to the joinnode table.
ServiceManagerEnhancedAdapter9.41 User GuideIntegration Architecture
Micro Focus Service Manager (Service Manager 9.41 or later; UCMDB CP26 or later) Page 148 of 227

DEM rule Id Table Name Condition
ucmdbNode joinnode subtype in $L.file~="Desktop"
ucmdbDesktop joinnode subtype in $L.file="Desktop"
DEM rules using different conditions to affect the same table
Typically, you will only need to add conditions if your business processes require the integration to takedifferent actions with certain CI types or SLAs.
Change the Action the DEM Rule Takes
Out-of-the-box, the integration DEM rules take the following actions:
l Add a CI record when the UCMDB data does not match an existing ServiceManager CI record
l Open a Change or log results and update a CI record when the UCMDB CI attribute data does notmatch the CI attribute data in the ServiceManager CI record
l Delete a CI record when the UCMDB data specifies that the CI has been deleted
You can change the integration DEM rules tomeet your business processes. For example, you coulduse the ucmdbNode DEM rule to open a change when the integration finds a non-desktop CI withunexpected data, and use the ucmdbDesktop DEM rule to log results and update the record when theintegration finds a desktop CI with unexpected data.
Caution: If you want to use the ChangeManagement verification and ChangeManagementvalidation features of the integration, your DEM rules must use theOpen a Change option for the“Action if record exists but unexpected data discovered” event.
Create Custom JavaScript to Open Change or Incident
Records
ServiceManager uses the discoveryEvent JavaScript to create CI names and to set the values ofrequired fields when opening change or incident records. Out-of-the-box, the script uses the followingdefault values.
Default values to create a new CI
You can update the createCIName and populateNewCI functions to set the following CI values.
ServiceManagerEnhancedAdapter9.41 User GuideIntegration Architecture
Micro Focus Service Manager (Service Manager 9.41 or later; UCMDB CP26 or later) Page 149 of 227

CI attribute Default value defined in discoveryEvent
record.logical_name System generated ID number
record.assignment AUTO
record.istatus Installed
record.os_name Value in record.operating_system
Default values used to create a new CI
Default values to create a new change
You can update the populateChange function to set the following change values.
CI attribute Default value defined in discoveryEvent
change.category Unplanned Change
change.reason Value in reason
change.initial_impact 3
change.severity 3
change.coordinator Change.Coordinator
change.requested_by discovery
change.status initial
Default values used to create a new change
Default values to create a new incident
You can update the populateIncident function to set the following incident values.
CI attribute Default value defined in discoveryEvent
incident.category incident
incident.subcategory hardware
incident.product_type missing or stolen
incident.assignment Hardware
incident.initial_impact 3
Default values used to create a new incident
ServiceManagerEnhancedAdapter9.41 User GuideIntegration Architecture
Micro Focus Service Manager (Service Manager 9.41 or later; UCMDB CP26 or later) Page 150 of 227
CI attribute Default value defined in discoveryEvent
incident.severity 3
incident.logical_name Value of id
incident.site_cateogry C
incident.contact_name ANALYST, INCIDENT
incident.affected_item MyDevices
Default values used to create a new incident, continued
Integration Tailoring OptionsThe integration offers the following tailoring options:
How to Enable ASM Support 151
How to Update the Integration Adapter Configuration File (sm.properties) 152
How to Add DEMReconciliation Rules 156
How to Add Discovery Event Manager Rules 158
How to Add a CI Relationship Type to the Integration for Data Push 162
How to Add a CI Attribute to the Integration for Data Push 168
How to Add a CI Type to the Integration for Data Push 182
How to Add a Custom Query to an Integration Job 197
How to Add a CI Type, Attribute or Relationship Type to the Integration for Population 198
How to Enable or Disable UCMDB ID Pushback for a CI Type 198
How to Add an Attribute of a Supported CI Type for Federation 200
How to Enable ASM SupportAs of version 9.41, ServiceManager supports the Automated ServiceModeling (ASM) functionality inthe UCMDB Browser.
ASM can automatically discover Service CIs and the consumer-provider relationships between thecomponents of services. The Service Discovery process builds dependency graphs from theconsumer-provider components that make up a service.
Note: ASM is supported only for UCMDB 10.20 or later. To use ASM, the ASM Enhanced
ServiceManagerEnhancedAdapter9.41 User GuideIntegration Tailoring Options
Micro Focus Service Manager (Service Manager 9.41 or later; UCMDB CP26 or later) Page 151 of 227
packagemust be deployed in UCMDB.
You can tailor ServiceManager to integrate with Automated ServiceModeling (ASM) of theUCMDB Browser. See the following instructions.
How to integrate with ASM
ASM enables ServiceManager users to view the accurate service trees that are discovered byASM and facilitates servicemodeling in ServiceManager.
For example, to integrate the ServiceManager ChangeManagement module with ASM, you can add acontrol that calls the us.launch.external RAD application by passing the following URL:
http://[UCMDB browser server name]:[port]/ucmdb_browser.jsp?username=<username>&password=<password>&server=Default%20Client&locale=en#view=[Service Name];tab=service-modeling
Where:
l [UCMDB browser server name], [port], [username] and [password] are the UCMDB server hostname, communications port, integration account user name and password, respectively. Theseparameters are configured in the UCMDB integration section in the System Information Record.
l [Service Name] is the display name of current service CI.
How to Update the Integration Adapter
Configuration File (sm.properties)The integration uses a properties file (sm.properties) as a configuration file of the adapter. Out-of-the-box, this file has been set up based on best practices, so usually you can keep the default parametervalues. Optionally, you can update the parameter values to better suit your needs.
To update the sm.properties file:
1. Log in to UCMDB as an administrator.
2. Navigate toData Flow Management > Adapter Management >ServiceManagerEnhancedAdapter9.41 > Configuration Files.
3. Click the properties configuration file: sm.properties.
4. Update the parameter values as needed. For a list of the parameters, see the following table.
ServiceManagerEnhancedAdapter9.41 User GuideIntegration Tailoring Options
Micro Focus Service Manager (Service Manager 9.41 or later; UCMDB CP26 or later) Page 152 of 227

Parameter Default value Comment
timeout.minutes 10 The integration connection timeoutvalue (in minutes)
number.of.concurrent.sending.threads
6 The number of concurrent threads usedfor the data push feature
o 1: Disabled
o 2 or higher: Enabled
Note: If you are connecting tomultiple ServiceManagerinstances to improve the CI datapush performance (see the URLOverride configuration in "How toCreate an Integration Point inUCMDB" on page 62), you arerecommended to increase thisvalue for optimized performance.For example, set it to 12 if you areconnecting to two ServiceManagerinstances.
min.objects.for.concurrent.sending
50 Theminimum number of ServiceManager objects that is required to useconcurrent sending instead of singlethread sending
Note: It is used for the pushfeature.
number.of.chunks.per.thread 3 The number of chunks per thread usedfor the push feature
Total of number of chunks =number.of.chunks.per.thread *number.of.concurrent.sending.threads
recommended.min.cis.per.chunk 50 Theminimum allowed number of CIsper CI data chunk. This value is used tomitigate the risk of making your datachunks too small.
For example, suppose your systemuses the following settings:
o number.of.chunks.per.thread=3
Parameters in the sm.properties file
ServiceManagerEnhancedAdapter9.41 User GuideIntegration Tailoring Options
Micro Focus Service Manager (Service Manager 9.41 or later; UCMDB CP26 or later) Page 153 of 227
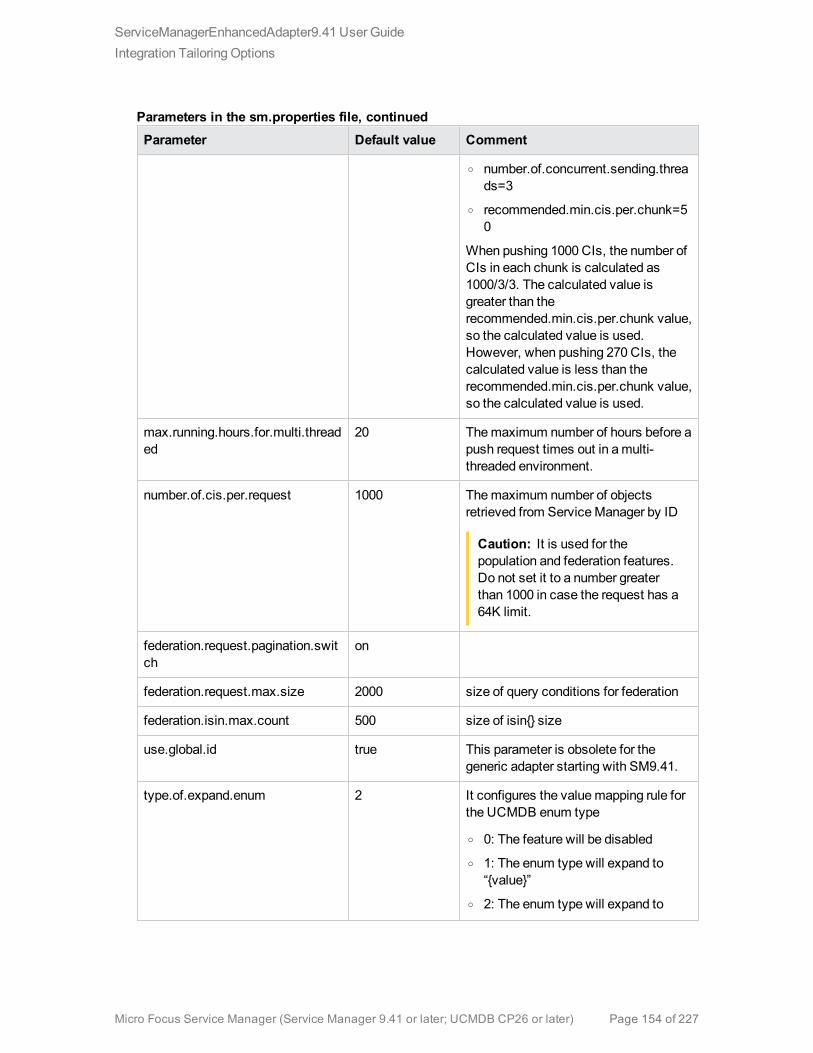
Parameter Default value Comment
o number.of.concurrent.sending.threads=3
o recommended.min.cis.per.chunk=50
When pushing 1000 CIs, the number ofCIs in each chunk is calculated as1000/3/3. The calculated value isgreater than therecommended.min.cis.per.chunk value,so the calculated value is used.However, when pushing 270 CIs, thecalculated value is less than therecommended.min.cis.per.chunk value,so the calculated value is used.
max.running.hours.for.multi.threaded
20 Themaximum number of hours before apush request times out in amulti-threaded environment.
number.of.cis.per.request 1000 Themaximum number of objectsretrieved from ServiceManager by ID
Caution: It is used for thepopulation and federation features.Do not set it to a number greaterthan 1000 in case the request has a64K limit.
federation.request.pagination.switch
on
federation.request.max.size 2000 size of query conditions for federation
federation.isin.max.count 500 size of isin{} size
use.global.id true This parameter is obsolete for thegeneric adapter starting with SM9.41.
type.of.expand.enum 2 It configures the valuemapping rule forthe UCMDB enum type
o 0: The feature will be disabled
o 1: The enum type will expand to“{value}”
o 2: The enum type will expand to
Parameters in the sm.properties file, continued
ServiceManagerEnhancedAdapter9.41 User GuideIntegration Tailoring Options
Micro Focus Service Manager (Service Manager 9.41 or later; UCMDB CP26 or later) Page 154 of 227
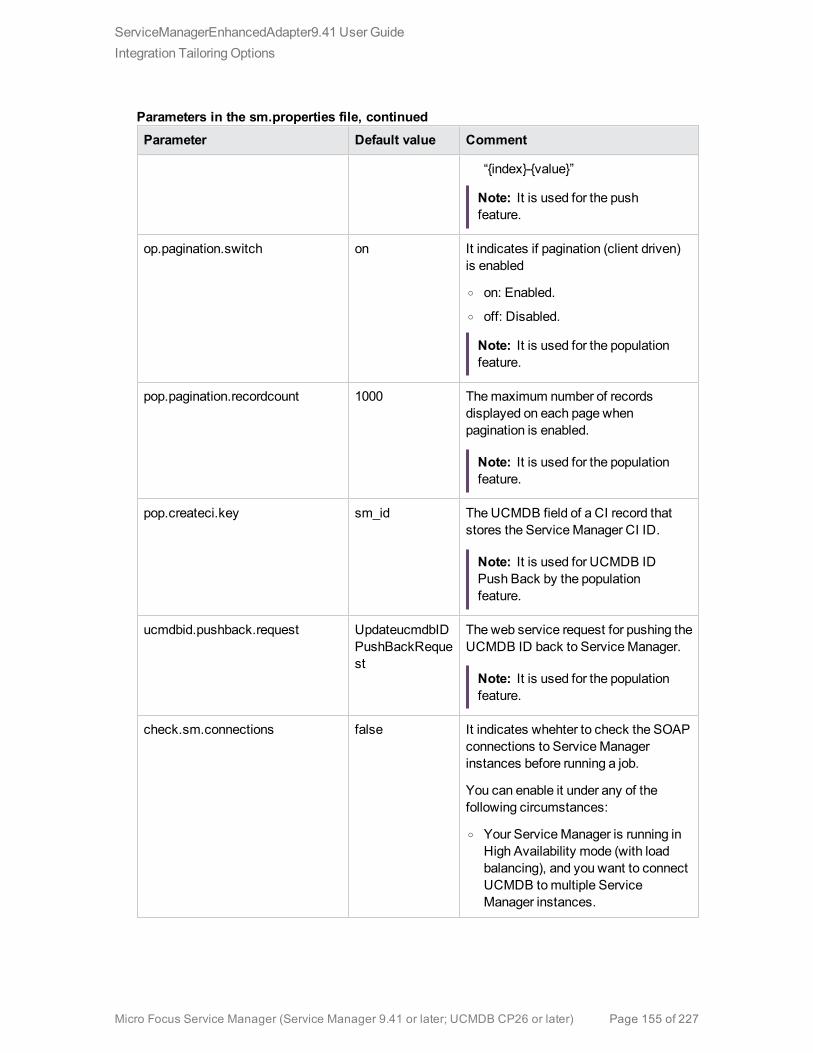
Parameter Default value Comment
“{index}-{value}”
Note: It is used for the pushfeature.
op.pagination.switch on It indicates if pagination (client driven)is enabled
o on: Enabled.
o off: Disabled.
Note: It is used for the populationfeature.
pop.pagination.recordcount 1000 Themaximum number of recordsdisplayed on each page whenpagination is enabled.
Note: It is used for the populationfeature.
pop.createci.key sm_id The UCMDB field of a CI record thatstores the ServiceManager CI ID.
Note: It is used for UCMDB IDPush Back by the populationfeature.
ucmdbid.pushback.request UpdateucmdbIDPushBackRequest
The web service request for pushing theUCMDB ID back to ServiceManager.
Note: It is used for the populationfeature.
check.sm.connections false It indicates whehter to check the SOAPconnections to ServiceManagerinstances before running a job.
You can enable it under any of thefollowing circumstances:
o Your ServiceManager is running inHigh Availability mode (with loadbalancing), and you want to connectUCMDB tomultiple ServiceManager instances.
Parameters in the sm.properties file, continued
ServiceManagerEnhancedAdapter9.41 User GuideIntegration Tailoring Options
Micro Focus Service Manager (Service Manager 9.41 or later; UCMDB CP26 or later) Page 155 of 227

Parameter Default value Comment
o Youwant UCMDB to not run a jobwhen no integration connections areavailable, rather than run the job andthen report a failure.
Parameters in the sm.properties file, continued
How to Add DEM Reconciliation RulesIt is possible that your ServiceManager system already contains CI records that match CIs in yourUCMDB system. Rather than add duplicate CI records to your ServiceManager system, you canconfigure ServiceManager to reconcile CI records between the two systems based on specifiedDiscovery Event Manager (DEM) reconciliation rules.
A DEM reconciliation rule record enables you to specify what ServiceManager queries you want to useto determine whether an existing CI recordmatches a CI in a UCMDB system. An administratortypically specifies reconciliation rules prior to starting the integration to the UCMDB system so thatServiceManager will not create duplicate CI records.
When performing CI reconciliation between ServiceManager and UCMDB, ServiceManager uses theucmdb.id field to query the device table or a join table to determine whether an Update or Createoperation is needed. The reconciliation process is as follows:
1. The UCMDB system sends a web servicemessage containing the latest CI attribute data toServiceManager.
2. ServiceManager scans the web servicemessage for the CI ucmdb.id value.
Note: The ucmdb.id field is displayed in the Actual State Section of the CI form, with a labelof Ucmdb ID.
3. ServiceManager searches for an existing CI record that has the same ucmdb.id value.
4. If ServiceManager finds a CI that has the ucmdb.id value, no reconciliation is needed. ServiceManager compares the UCMDB CI attributes to the ServiceManager managed fields and runs theappropriate Discovery Event Manager (DEM) rules as needed to update the CI record in ServiceManager.
5. If ServiceManager cannot find a CI that has the ucmdb.id value, it searches for a DEMreconciliation rule record that is defined for the CI type.
6. If no DEM reconciliation rule record is found, ServiceManager creates the CI record according tothe appropriate DEM rules.
ServiceManagerEnhancedAdapter9.41 User GuideIntegration Tailoring Options
Micro Focus Service Manager (Service Manager 9.41 or later; UCMDB CP26 or later) Page 156 of 227

7. If a DEM reconciliation rule record is found, ServiceManager evaluates the rules and appends(ucmdb.id=NULL or ucmdb.id~=NULL and istatus=”XXXXXX”) to the reconciliation rules in thebackend. The istatus value is retrieved from the DEM rule for deletion (for example,Retired/Consumed). If no istatus value is found in the DEM rule, ServiceManager only appendsucmdb.id=NULL to the reconciliation rules in the backend.
8. If nomatching CI record is found by the reconciliation rules, ServiceManager creates the CIrecord according to the appropriate DEM rules.
9. If a matching CI record is found by the reconciliation rules, ServiceManager updates the CI recordaccording to the appropriate DEM rules
Multi-company mode
By default, ServiceManager uses only the ucmdb.id field for CI reconciliation and the company.id fieldis not used. You canmanually add DEM reconciliation rules.
Using join tables for reconciliation
When setting reconciliation rules, if the CI type you are reconciling has a joindef definition (as defined inthe devtype table), use the join table name instead of the device table. For example, if you want toreconcile computer CIs, use the joinnode table instead of the device table.
Sequence of reconciliation
By default, ServiceManager executes the reconciliation rules in their listed order. To change the orderin which ServiceManager reconciles CIs, you can add a numeric value to theSequence field.
Steps to add a DEM reconciliation rule record
To create a DEM reconciliation rule record, follow these steps:
1. Click Tailoring >Web Services > DEM Reconciliation Rules.
ServiceManager displays the DEMReconcile Record form.
2. In the Table field, select a ServiceManager table against which you want to run reconciliationqueries.
Note: Only tables that are specified in CI type records are displayed in the drop-down list.You can create only one DEM reconciliation record for one table.
3. Click New.
4. Enter expressions in theExpression column, and then enter a sequence number for each
ServiceManagerEnhancedAdapter9.41 User GuideIntegration Tailoring Options
Micro Focus Service Manager (Service Manager 9.41 or later; UCMDB CP26 or later) Page 157 of 227
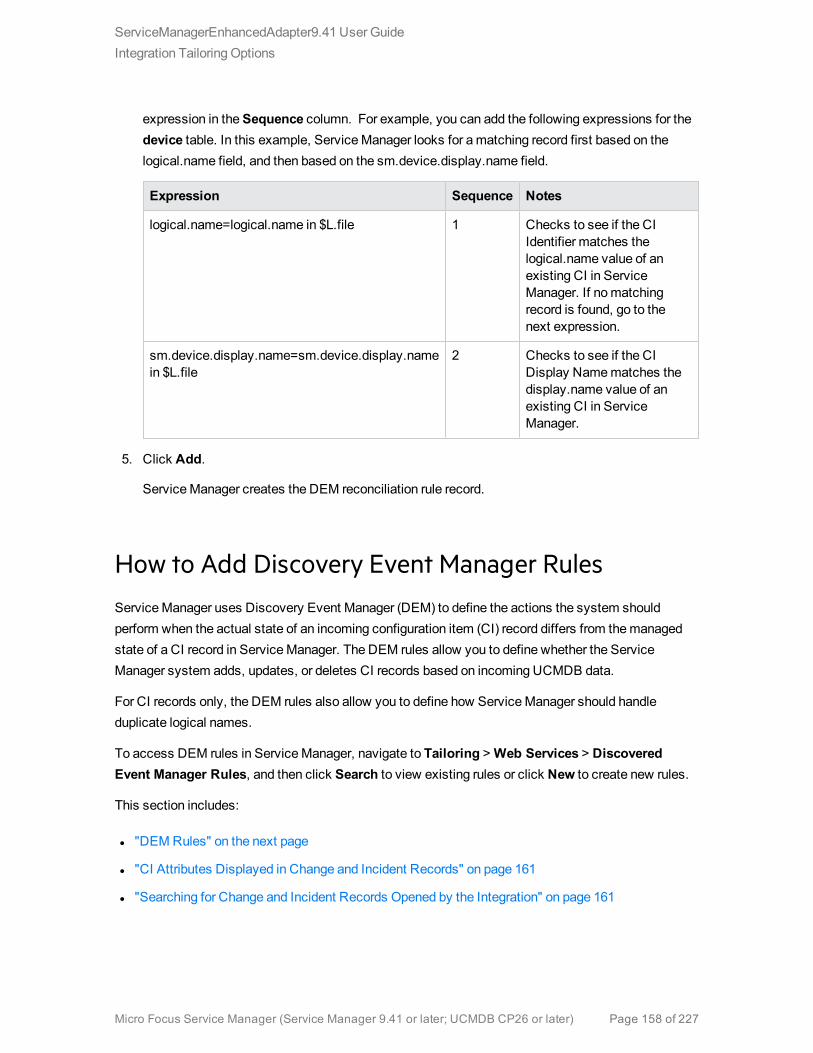
expression in theSequence column. For example, you can add the following expressions for thedevice table. In this example, ServiceManager looks for amatching record first based on thelogical.name field, and then based on the sm.device.display.name field.
Expression Sequence Notes
logical.name=logical.name in $L.file 1 Checks to see if the CIIdentifier matches thelogical.name value of anexisting CI in ServiceManager. If nomatchingrecord is found, go to thenext expression.
sm.device.display.name=sm.device.display.namein $L.file
2 Checks to see if the CIDisplay Namematches thedisplay.name value of anexisting CI in ServiceManager.
5. Click Add.
ServiceManager creates the DEM reconciliation rule record.
How to Add Discovery Event Manager RulesServiceManager uses Discovery Event Manager (DEM) to define the actions the system shouldperform when the actual state of an incoming configuration item (CI) record differs from themanagedstate of a CI record in ServiceManager. The DEM rules allow you to define whether the ServiceManager system adds, updates, or deletes CI records based on incoming UCMDB data.
For CI records only, the DEM rules also allow you to define how ServiceManager should handleduplicate logical names.
To access DEM rules in ServiceManager, navigate to Tailoring >Web Services > DiscoveredEvent Manager Rules, and then click Search to view existing rules or click New to create new rules.
This section includes:
l "DEM Rules" on the next page
l "CI Attributes Displayed in Change and Incident Records" on page 161
l "Searching for Change and Incident Records Opened by the Integration" on page 161
ServiceManagerEnhancedAdapter9.41 User GuideIntegration Tailoring Options
Micro Focus Service Manager (Service Manager 9.41 or later; UCMDB CP26 or later) Page 158 of 227

DEM Rules
ServiceManager offers the following rules options:
Action if matching record does not exist
This is the action you want ServiceManager to take if it cannot find amatching CI record.
l Add the record:(Default) ServiceManager will add a CI record when it cannot find amatchingrecord. See "How to Add DEMReconciliation Rules" on page 156 to define what fields ServiceManager uses tomatch CI records.
l Add the record, and set dependency as true: This option is available only for synchronization ofCI relationship data. ServiceManager adds the CI relationship record and enables outagedependency for the record by doing the following:o Checks the Outage Dependency check box;
o Sets the number of dependent downstream CIs to 1. This is because UCMDB only supportsone-to-one CI relationships.
l Open an Incident:ServiceManager opens an incident for someone to review the new CI record.The incident enables someone to investigate whether the new CI record is compliant with yourbusiness practices.
ServiceManagerEnhancedAdapter9.41 User GuideIntegration Tailoring Options
Micro Focus Service Manager (Service Manager 9.41 or later; UCMDB CP26 or later) Page 159 of 227
l Open a Change:ServiceManager opens an unplanned change for someone to review the new CIrecord. The change allows you to investigate whether the new CI record is compliant with yourbusiness practices. If the CI record is compliant, the change can be approved. If the CI record is notcompliant, then the change can be denied and the CI record removed. The change record lists boththe current and proposed attribute values.
Action if record exists but unexpected data discovered
This is the action you want ServiceManager to perform if it does not find amatching CI attribute value.
l Open a Change: (Default) ServiceManager opens an unplanned change to review the actual stateof the CI record. The change allows someone to investigate whether the new attribute value iscompliant with your business practices. If the value is compliant, the change can be approved. Ifthe value is not compliant, then the change can be denied and the CI attribute value reverted to itsmanaged state.
l Log Results and update record:ServiceManager logs the results of the actual state of the CIrecord, and then updates the CI record.
l Open an Incident:ServiceManager opens an Incident to investigate the actual state of a CI recordand determines what actions must be performed or initiated to bring the record into compliance withServiceManager.
Action if record is to be deleted
This is the action you want ServiceManager to perform if an external event specifies that the recordneeds to be deleted.
l Delete record: (Default for CI Relationship records) This option is available for synchronization ofboth CI and CI Relationship records. ServiceManager automatically deletes the CI/CI Relationshiprecord.
l Open an Incident: This option is available only for synchronization of CI Relationship records.ServiceManager opens an incident to investigate the deleted record and determines which actionsmust be performed or initiated to bring the record into compliance with ServiceManager.
l Open a Change: This option is available only for synchronization of CI Relationship records.ServiceManager opens an unplanned change to review the deleted record. The change allowssomeone to investigate whether the deleted record is compliant with your business practices. If therecord is compliant, the change can be approved. If the record is not compliant, then the change canbe denied and the record added back to the system.
ServiceManagerEnhancedAdapter9.41 User GuideIntegration Tailoring Options
Micro Focus Service Manager (Service Manager 9.41 or later; UCMDB CP26 or later) Page 160 of 227
l Update record to the selected status: (Default for CI records) This option is available only forsynchronization of CI records. ServiceManager updates the status of the CI record to a valueselected from the drop-down list (for example, Retired/Consumed), rather than deletes the recordpermanently.
Note: Values available from the drop-down list are defined in the ICM Status global list.
l Open a Change to update record to the selected status: This option is available only forsynchronization of CI records. ServiceManager opens an unplanned change to update the CIrecord’s status to a value selected from the drop-down list (for example, Retired/Consumed). Thechange allows someone to investigate whether the requested status change is compliant with yourbusiness practices. Once the change has been approved and closed, ServiceManagerautomatically changes the CI record to the selected status. If the change has been denied, ServiceManager makes no changes to the CI record.
l Open an Incident to update record to the selected status: This option is available only forsynchronization of CI records. ServiceManager opens an incident to update the record’s status to avalue selected from the drop-down list (for example, Retired/Consumed). Once the incident hasbeen closed, ServiceManager automatically updates the CI record to the selected status.
CI Attributes Displayed in Change and Incident Records
ServiceManager displays a Change Details section on the corresponding change or a CMDB Changessection on the corresponding incident when you configure DEM to open either change records orincident records when it discovers CI attribute changes through the UCMDB-SM integration. ServiceManager only displays a tab for CI attributes when the UCMDB-SM integration is enabled and you havedefined a rule in the Discovery Event Manager to create a change or incident record when a CI isadded, updated, or deleted.
Both the Change Details and CMDB Changes sections display the current CI attribute valuesalongside the actual attribute values discovered by UCMDB. You can use this information to approveor deny a change or escalate an incident to the proper assignment group.
Searching for Change and Incident Records Opened by
the Integration
You can use the following search criteria to find change and incident records opened by the UCMDB-SM integration.
ServiceManagerEnhancedAdapter9.41 User GuideIntegration Tailoring Options
Micro Focus Service Manager (Service Manager 9.41 or later; UCMDB CP26 or later) Page 161 of 227
Record type Search option available
Change Search for records with the category unplanned change.
Incident Search for records using theGenerated by UCMDB Integration option.
Search options available for change and incident records
How to Add a CI Relationship Type to the
Integration for Data PushOnce you have added a new CI type to the integration and have created relationships between it andother CI types in UCMDB, for each of these relationship types you need to perform the following tasksso that UCMDB can push each type of relationships to ServiceManager.
As an example, the following steps illustrate how you add a relationship type namedOwnership(between theCost andCostCategoryCI types) to the integration for data push.
Note: These steps assume that you have already added theCost andCostCategoryCI types tothe integration.
1. Create a query to push the relationship type.See "How to Create aQuery to Push a Relationship Type" below.
2. Map the relationship query to a ServiceManager web service object.See "How toMap a Relationship TypeQuery to the ServiceManagerWeb Service Object" onpage 165.
3. Create an XML configuration file for the new relationship type.
See "How to Create an XMLConfiguration File for a Relationship Type" on page 166.
How to Create a Query to Push a Relationship Type
Once you have created a relationship between two CI types, youmust create a query to push therelationship to ServiceManager.
Note: Any query you createmust conform to the "Query Requirements" on page 142.
To create a new query calledCost CostCategory Ownership Relations for Ownership relationshipsbetween the Cost and CostCategory CI types:
ServiceManagerEnhancedAdapter9.41 User GuideIntegration Tailoring Options
Micro Focus Service Manager (Service Manager 9.41 or later; UCMDB CP26 or later) Page 162 of 227
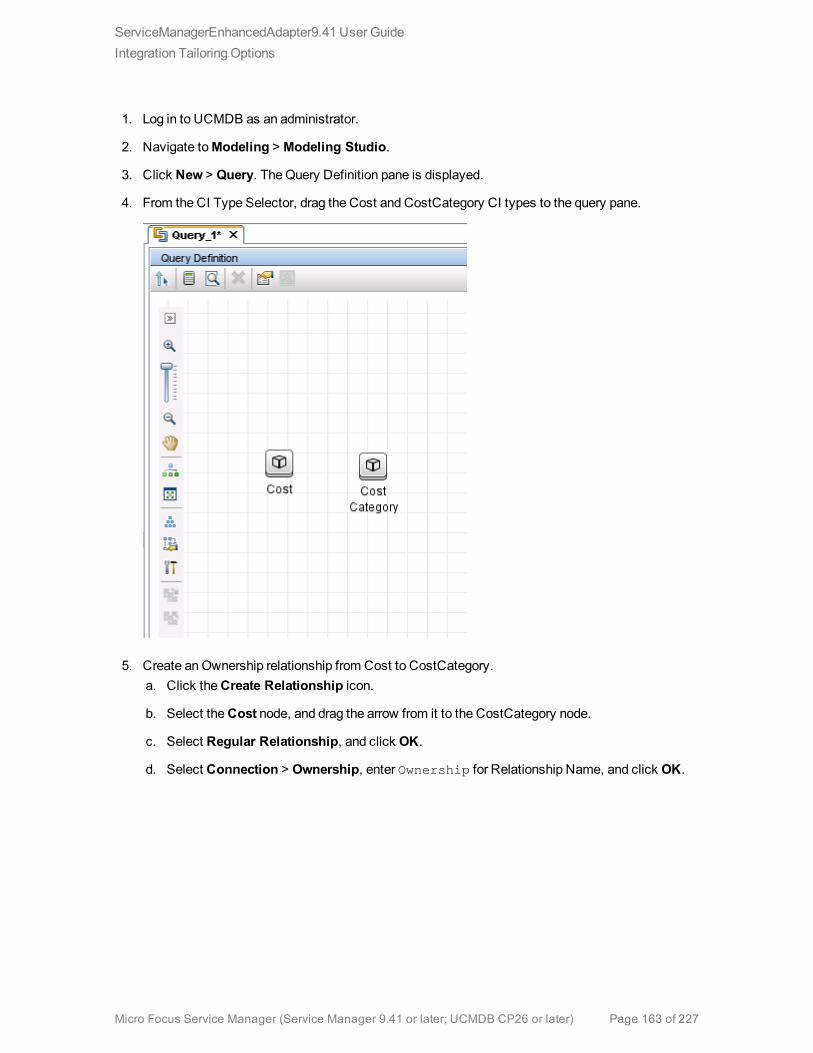
1. Log in to UCMDB as an administrator.
2. Navigate toModeling >Modeling Studio.
3. Click New > Query. TheQuery Definition pane is displayed.
4. From the CI Type Selector, drag the Cost and CostCategory CI types to the query pane.
5. Create anOwnership relationship from Cost to CostCategory.a. Click theCreate Relationship icon.
b. Select theCost node, and drag the arrow from it to the CostCategory node.
c. Select Regular Relationship, and click OK.
d. Select Connection > Ownership, enter Ownership for Relationship Name, and click OK.
ServiceManagerEnhancedAdapter9.41 User GuideIntegration Tailoring Options
Micro Focus Service Manager (Service Manager 9.41 or later; UCMDB CP26 or later) Page 163 of 227
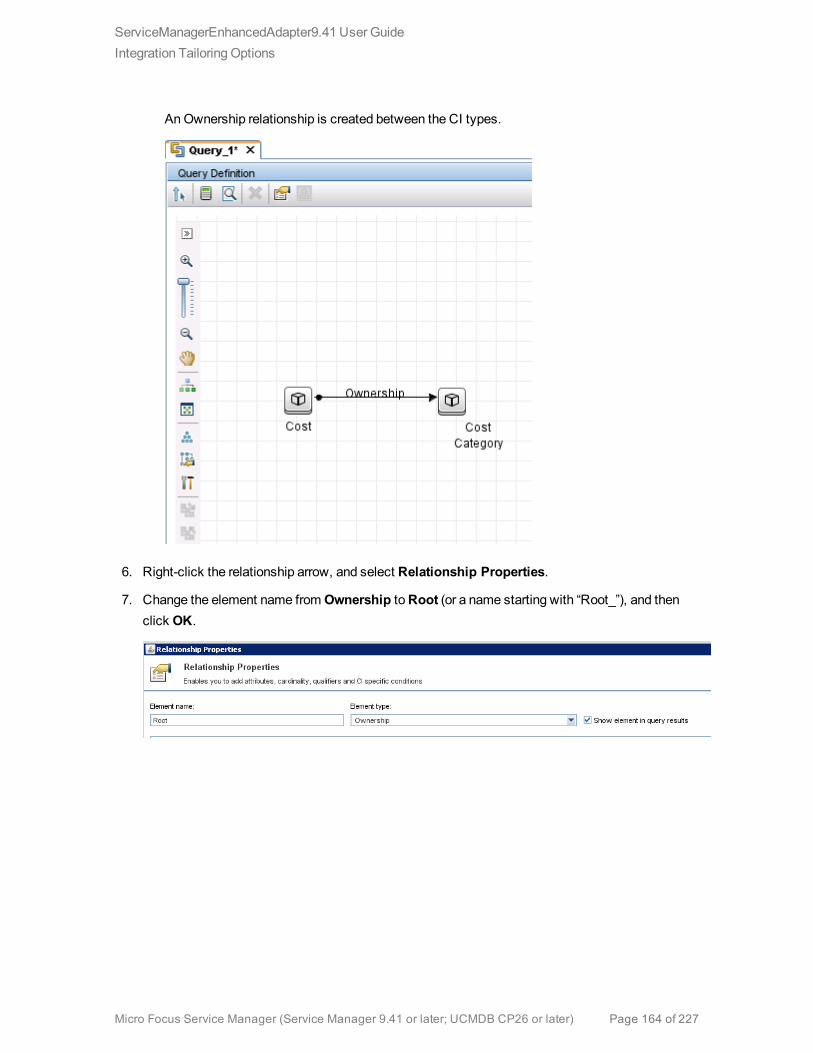
AnOwnership relationship is created between the CI types.
6. Right-click the relationship arrow, and select Relationship Properties.
7. Change the element name fromOwnership toRoot (or a name starting with “Root_”), and thenclick OK.
ServiceManagerEnhancedAdapter9.41 User GuideIntegration Tailoring Options
Micro Focus Service Manager (Service Manager 9.41 or later; UCMDB CP26 or later) Page 164 of 227

8. Click theSave icon, and save the query as described in the following.a. Enter a query name. For example, Cost CostCategory Ownership Relations
Push.
b. Select the Integration > Service Manager > Push folder.
c. Click OK.
The query is now created. You are ready to add this query to the push configuration file(smPushConf.xml).
How to Map a Relationship Type Query to the Service
Manager Web Service Object
Once you have created a query for a relationship type, you need tomap the query to the Relationshipweb service object in ServiceManager as described in the following steps.
1. Navigate toData Flow Management > Adapter Management >ServiceManagerEnhancedAdapter9.41 > Configuration Files.
ServiceManagerEnhancedAdapter9.41 User GuideIntegration Tailoring Options
Micro Focus Service Manager (Service Manager 9.41 or later; UCMDB CP26 or later) Page 165 of 227
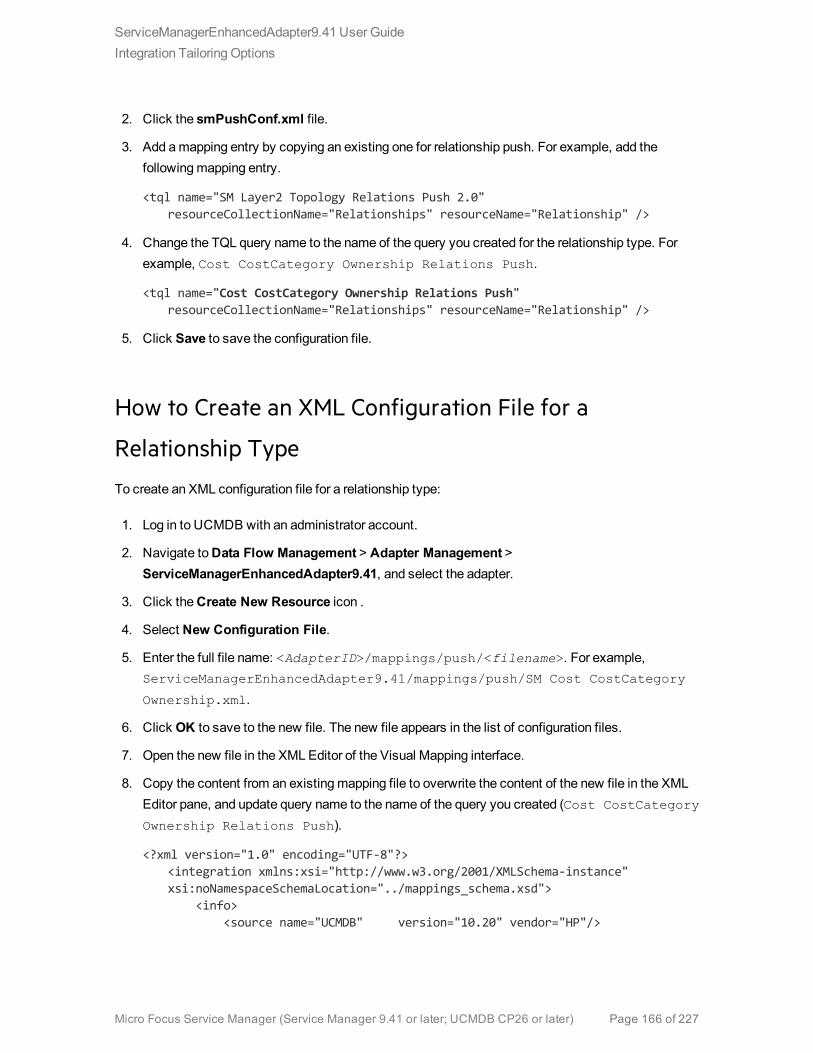
2. Click the smPushConf.xml file.
3. Add amapping entry by copying an existing one for relationship push. For example, add thefollowingmapping entry.
<tql name="SM Layer2 Topology Relations Push 2.0"resourceCollectionName="Relationships" resourceName="Relationship" />
4. Change the TQL query name to the name of the query you created for the relationship type. Forexample, Cost CostCategory Ownership Relations Push.
<tql name="Cost CostCategory Ownership Relations Push"resourceCollectionName="Relationships" resourceName="Relationship" />
5. Click Save to save the configuration file.
How to Create an XML Configuration File for a
Relationship Type
To create an XML configuration file for a relationship type:
1. Log in to UCMDB with an administrator account.
2. Navigate toData Flow Management > Adapter Management >ServiceManagerEnhancedAdapter9.41, and select the adapter.
3. Click theCreate New Resource icon .
4. Select New Configuration File.
5. Enter the full file name: <AdapterID>/mappings/push/<filename>. For example,ServiceManagerEnhancedAdapter9.41/mappings/push/SM Cost CostCategory
Ownership.xml.
6. Click OK to save to the new file. The new file appears in the list of configuration files.
7. Open the new file in the XML Editor of the Visual Mapping interface.
8. Copy the content from an existingmapping file to overwrite the content of the new file in the XMLEditor pane, and update query name to the name of the query you created (Cost CostCategory
Ownership Relations Push).
<?xml version="1.0" encoding="UTF-8"?><integration xmlns:xsi="http://www.w3.org/2001/XMLSchema-instance"xsi:noNamespaceSchemaLocation="../mappings_schema.xsd">
<info><source name="UCMDB" version="10.20" vendor="HP"/>
ServiceManagerEnhancedAdapter9.41 User GuideIntegration Tailoring Options
Micro Focus Service Manager (Service Manager 9.41 or later; UCMDB CP26 or later) Page 166 of 227
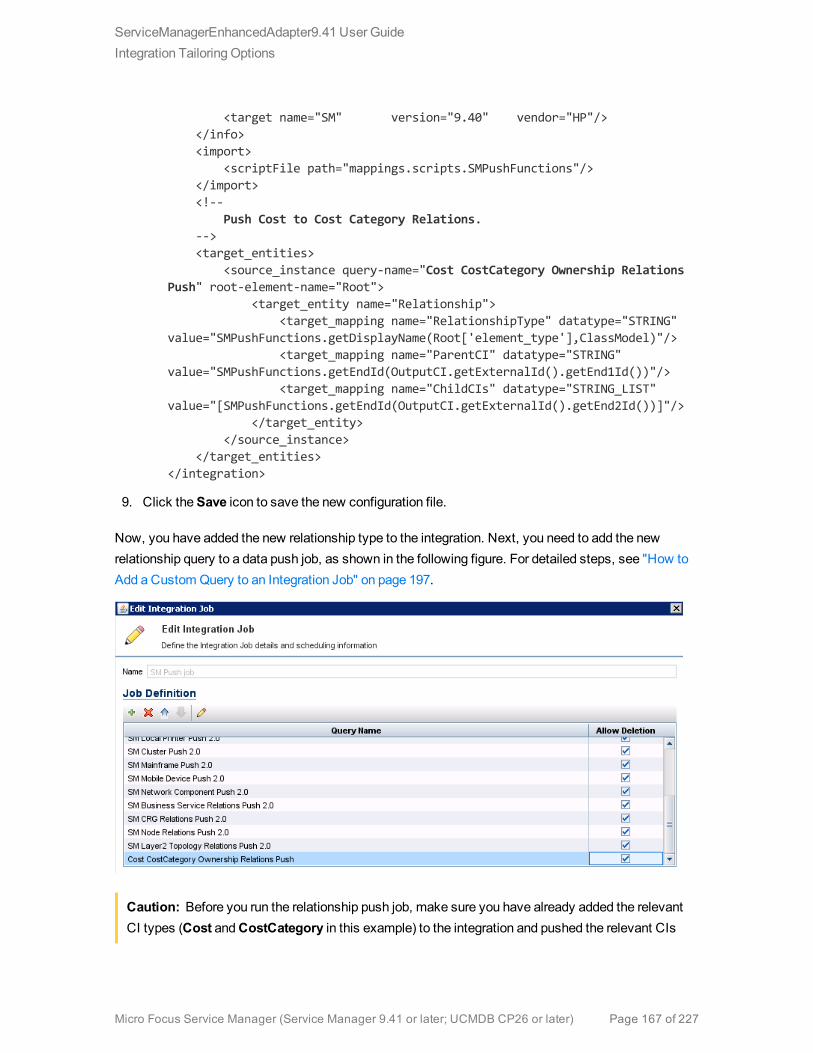
<target name="SM" version="9.40" vendor="HP"/></info><import>
<scriptFile path="mappings.scripts.SMPushFunctions"/></import><!--
Push Cost to Cost Category Relations.--><target_entities>
<source_instance query-name="Cost CostCategory Ownership RelationsPush" root-element-name="Root">
<target_entity name="Relationship"><target_mapping name="RelationshipType" datatype="STRING"
value="SMPushFunctions.getDisplayName(Root['element_type'],ClassModel)"/><target_mapping name="ParentCI" datatype="STRING"
value="SMPushFunctions.getEndId(OutputCI.getExternalId().getEnd1Id())"/><target_mapping name="ChildCIs" datatype="STRING_LIST"
value="[SMPushFunctions.getEndId(OutputCI.getExternalId().getEnd2Id())]"/></target_entity>
</source_instance></target_entities>
</integration>
9. Click theSave icon to save the new configuration file.
Now, you have added the new relationship type to the integration. Next, you need to add the newrelationship query to a data push job, as shown in the following figure. For detailed steps, see "How toAdd a Custom Query to an Integration Job" on page 197.
Caution: Before you run the relationship push job, make sure you have already added the relevantCI types (Cost andCostCategory in this example) to the integration and pushed the relevant CIs
ServiceManagerEnhancedAdapter9.41 User GuideIntegration Tailoring Options
Micro Focus Service Manager (Service Manager 9.41 or later; UCMDB CP26 or later) Page 167 of 227

to ServiceManager.
How to Add a CI Attribute to the Integration for Data
PushYou can use the following steps to add a CI attribute to the integration.
1. Does the CI attribute already exist in the UCMDB class model?Yes. Go to Step 3.
No. Go to Step 2.
2. Add the CI attribute to the UCMDB class model.See "How to Add the CI Attribute to the UCMDB Class Model" below.
3. Add the CI attribute to the query layout.See "How to Add a CI Attribute to the Query Layout" on page 170.
4. Add a web service field for the ServiceManager CI type.See "How to Add aWeb Service Field for the ServiceManager CI Type" on page 171.
5. Map the CI attribute to the ServiceManager web service field.
See "How toMap the CI Attribute to a ServiceManagerWeb Service Field" on page 180.
How to Add the CI Attribute to the UCMDB Class Model
The integration only uses a subset of the CI attributes available from your UCMDB system. Out-of-the-box, the integration consists of CI attributes that are typically managed from a ServiceManagersystem such as host name and host DNS name. Before creating a new UCMDB CI attribute, youshould determine if there are any existing CI attributes in your UCMDB system that provide the datayou want. In most cases, there is an existing attribute tracking the data that you want to add to theintegration. For example, the Node CI type contains many attributes that you can add to the integration.
ServiceManagerEnhancedAdapter9.41 User GuideIntegration Tailoring Options
Micro Focus Service Manager (Service Manager 9.41 or later; UCMDB CP26 or later) Page 168 of 227
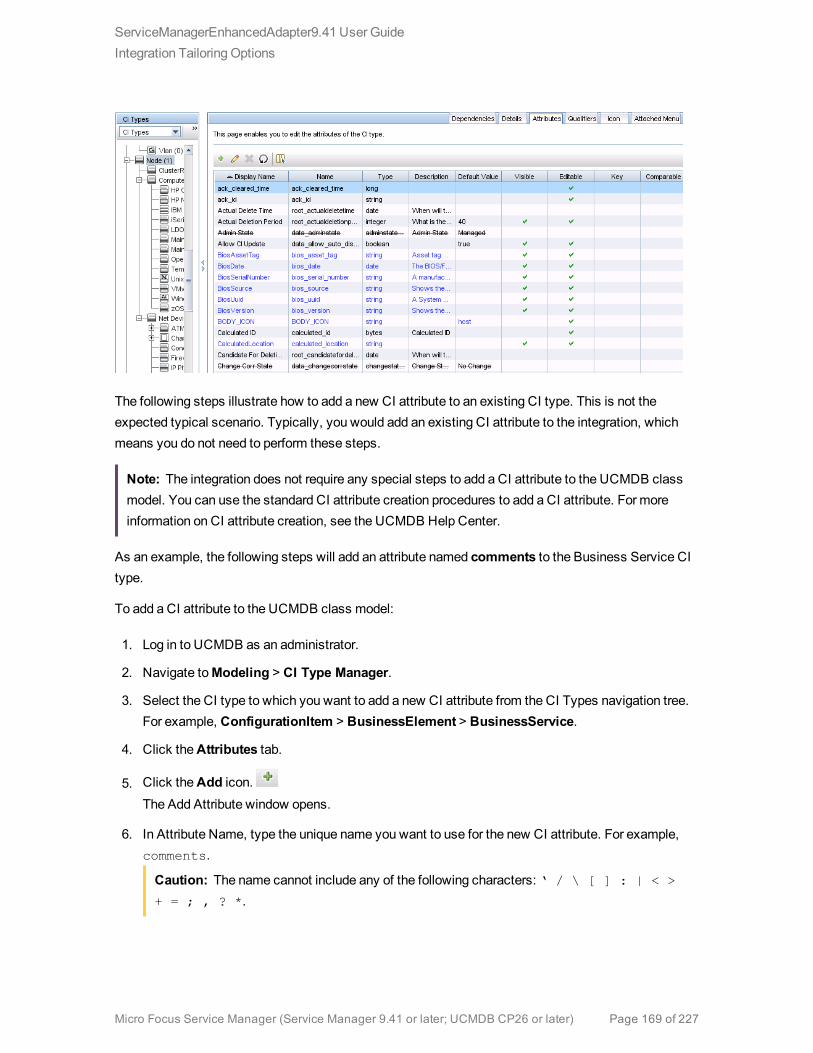
The following steps illustrate how to add a new CI attribute to an existing CI type. This is not theexpected typical scenario. Typically, you would add an existing CI attribute to the integration, whichmeans you do not need to perform these steps.
Note: The integration does not require any special steps to add a CI attribute to the UCMDB classmodel. You can use the standard CI attribute creation procedures to add a CI attribute. For moreinformation on CI attribute creation, see the UCMDB Help Center.
As an example, the following steps will add an attribute named comments to the Business Service CItype.
To add a CI attribute to the UCMDB class model:
1. Log in to UCMDB as an administrator.
2. Navigate toModeling > CI Type Manager.
3. Select the CI type to which you want to add a new CI attribute from the CI Types navigation tree.For example, ConfigurationItem > BusinessElement > BusinessService.
4. Click theAttributes tab.
5. Click theAdd icon.The Add Attribute window opens.
6. In Attribute Name, type the unique name you want to use for the new CI attribute. For example,comments.
Caution: The name cannot include any of the following characters: ‘ / \ [ ] : | < >
+ = ; , ? *.
ServiceManagerEnhancedAdapter9.41 User GuideIntegration Tailoring Options
Micro Focus Service Manager (Service Manager 9.41 or later; UCMDB CP26 or later) Page 169 of 227
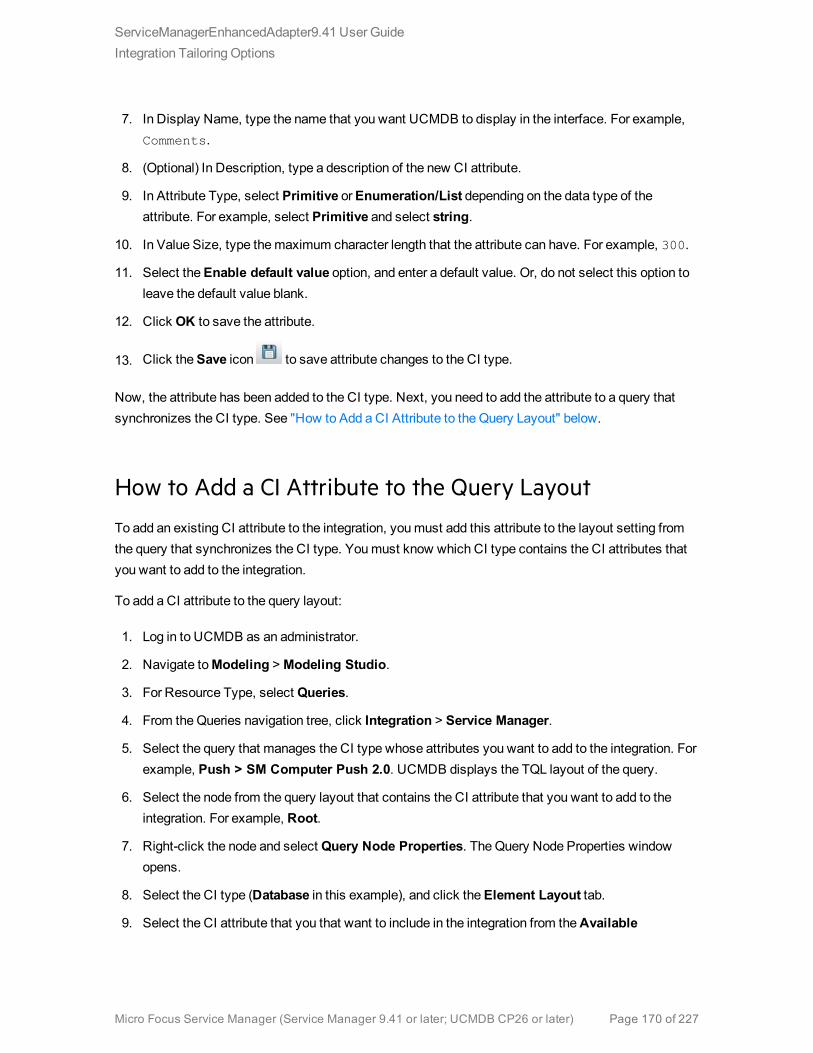
7. In Display Name, type the name that you want UCMDB to display in the interface. For example,Comments.
8. (Optional) In Description, type a description of the new CI attribute.
9. In Attribute Type, select Primitive orEnumeration/List depending on the data type of theattribute. For example, select Primitive and select string.
10. In Value Size, type themaximum character length that the attribute can have. For example, 300.
11. Select theEnable default value option, and enter a default value. Or, do not select this option toleave the default value blank.
12. Click OK to save the attribute.
13. Click theSave icon to save attribute changes to the CI type.
Now, the attribute has been added to the CI type. Next, you need to add the attribute to a query thatsynchronizes the CI type. See "How to Add a CI Attribute to the Query Layout" below.
How to Add a CI Attribute to the Query Layout
To add an existing CI attribute to the integration, youmust add this attribute to the layout setting fromthe query that synchronizes the CI type. Youmust know which CI type contains the CI attributes thatyou want to add to the integration.
To add a CI attribute to the query layout:
1. Log in to UCMDB as an administrator.
2. Navigate toModeling >Modeling Studio.
3. For Resource Type, select Queries.
4. From theQueries navigation tree, click Integration > Service Manager.
5. Select the query that manages the CI type whose attributes you want to add to the integration. Forexample, Push > SM Computer Push 2.0. UCMDB displays the TQL layout of the query.
6. Select the node from the query layout that contains the CI attribute that you want to add to theintegration. For example, Root.
7. Right-click the node and select Query Node Properties. TheQuery Node Properties windowopens.
8. Select the CI type (Database in this example), and click theElement Layout tab.
9. Select the CI attribute that you that want to include in the integration from theAvailable
ServiceManagerEnhancedAdapter9.41 User GuideIntegration Tailoring Options
Micro Focus Service Manager (Service Manager 9.41 or later; UCMDB CP26 or later) Page 170 of 227

Attributes list, and click theAdd icon to add it toSpecific Attributes list. For example,Comments.
10. Click OK to save the node properties.
11. Click theSave icon to save the query.
Now, the CI attribute has been added to the relevant query layout. Next, you need to add a ServiceManager web service field that will bemapped to this UCMDB CI attribute.
How to Add a Web Service Field for the Service Manager
CI Type
The integration uses only a subset of the CI attributes available from your ServiceManager (SM)system. CI attributes must bemapped between UCMDB and SM. Before creating a new SMCIattribute that will bemapped to the UCMDB CI attribute you added previously, youmust determine ifthere are any existing CI attributes in your ServiceManager system that provide the data you want. Inmost cases, there is an existing attribute tracking the data that you want to add to the integration. Forexample, the Computer CI type contains many attributes that you can add to the integration.
ServiceManagerEnhancedAdapter9.41 User GuideIntegration Tailoring Options
Micro Focus Service Manager (Service Manager 9.41 or later; UCMDB CP26 or later) Page 171 of 227

If you decide to use an existing attribute instead of creating a new one, you can directly modify the webservice definition in ServiceManager to expose that attribute, and thenmap this SM attribute to theUCMDB attribute by using the UCMDB Visual Mapping tool (see "How toMap the CI Attribute to aServiceManagerWeb Service Field" on page 180).
If you decide to add a new attribute, follow the steps below. The steps vary depending on the data typeof the attribute: simple (string, for example), or complex (array of structure or structure).
Add a Simple Attribute to the SM CI Type
As an example, the following steps illustrate how to add a simple attribute (comments) to an existingCI type (Business Service).
1. Log in to UCMDB as a system administrator.
2. Click Data Flow Management > Adapter Management, and then select
ServiceManagerEnhancedAdapter9.41 User GuideIntegration Tailoring Options
Micro Focus Service Manager (Service Manager 9.41 or later; UCMDB CP26 or later) Page 172 of 227

ServiceManagerEnhancedAdapter 9-x to open the corresponding XMLmapping file (SMBusiness Service 2.0.xml in this example) with the Visual Mapping tool editor.
3. On the External Class Model pane, select the CI type (bizservice).
4. On the left-side Attributes pane (which displays the fields that are retrieved from the ServiceManager web service object for the Business Service CI type), click theAdd New Attribute toSelected External Node icon.
5. Type a name and display label for the new attribute, and click OK.
Caution: If the you enter a name that duplicates or is part of an existing field name in theattribute table of the ServiceManager CI type or in the device table, an error will occurindicating the attribute could not be created.
ServiceManagerEnhancedAdapter9.41 User GuideIntegration Tailoring Options
Micro Focus Service Manager (Service Manager 9.41 or later; UCMDB CP26 or later) Page 173 of 227

6. Click OK again to confirm the attribute creation.
The new attribute (mycomments) appears in the ServiceManager attribute list.
At the same time, UCMDB invokes the ServiceManagerWeb Service API to add the newattribute, expose it in theWeb Service API and set it as amanaged field. You can open the web
ServiceManagerEnhancedAdapter9.41 User GuideIntegration Tailoring Options
Micro Focus Service Manager (Service Manager 9.41 or later; UCMDB CP26 or later) Page 174 of 227
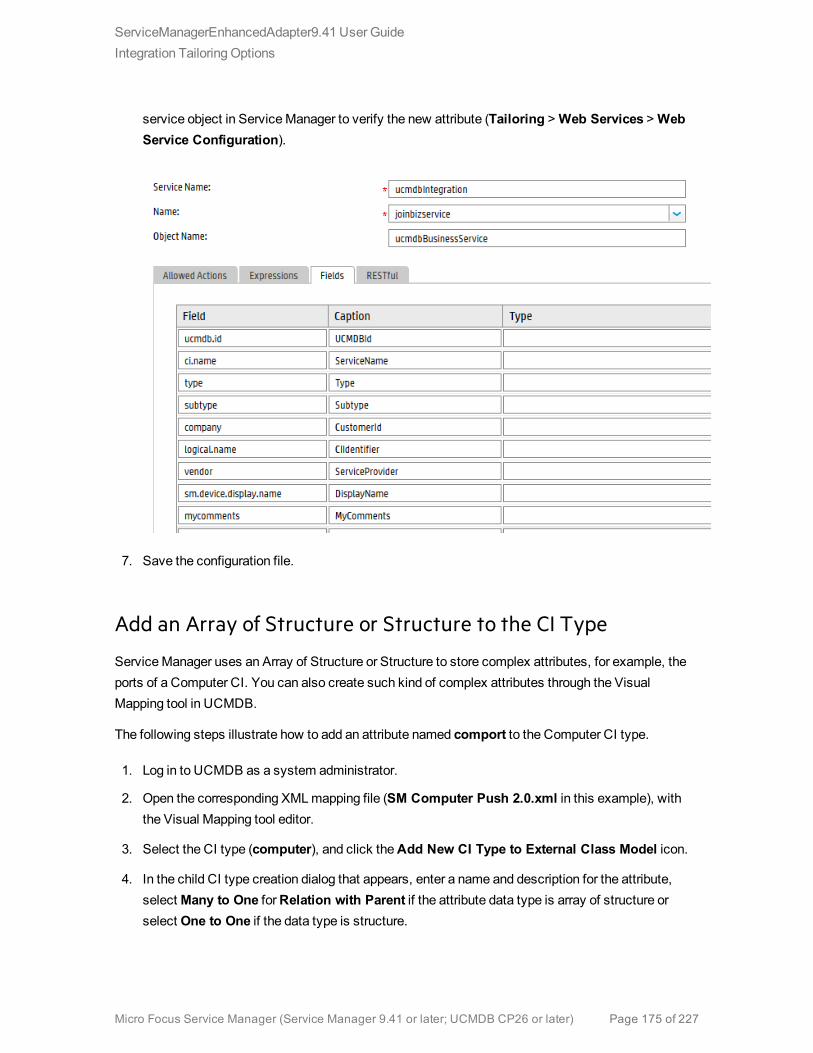
service object in ServiceManager to verify the new attribute (Tailoring >Web Services >WebService Configuration).
7. Save the configuration file.
Add an Array of Structure or Structure to the CI Type
ServiceManager uses an Array of Structure or Structure to store complex attributes, for example, theports of a Computer CI. You can also create such kind of complex attributes through the VisualMapping tool in UCMDB.
The following steps illustrate how to add an attribute named comport to the Computer CI type.
1. Log in to UCMDB as a system administrator.
2. Open the corresponding XMLmapping file (SM Computer Push 2.0.xml in this example), withthe Visual Mapping tool editor.
3. Select the CI type (computer), and click theAdd New CI Type to External Class Model icon.
4. In the child CI type creation dialog that appears, enter a name and description for the attribute,selectMany to One forRelation with Parent if the attribute data type is array of structure orselect One to One if the data type is structure.
ServiceManagerEnhancedAdapter9.41 User GuideIntegration Tailoring Options
Micro Focus Service Manager (Service Manager 9.41 or later; UCMDB CP26 or later) Page 175 of 227
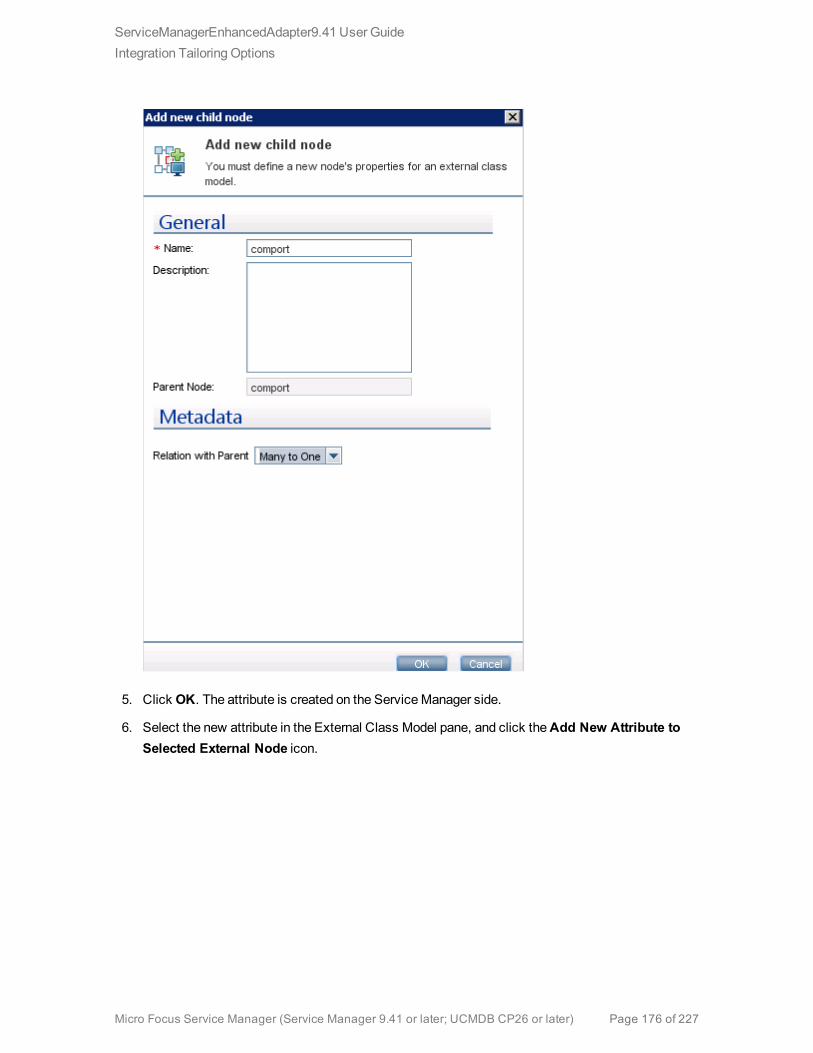
5. Click OK. The attribute is created on the ServiceManager side.
6. Select the new attribute in the External Class Model pane, and click theAdd New Attribute toSelected External Node icon.
ServiceManagerEnhancedAdapter9.41 User GuideIntegration Tailoring Options
Micro Focus Service Manager (Service Manager 9.41 or later; UCMDB CP26 or later) Page 176 of 227

7. Add a field (httpPort) to the array of structure, and click OK. Click OK again to confirm theattribute creation.
ServiceManagerEnhancedAdapter9.41 User GuideIntegration Tailoring Options
Micro Focus Service Manager (Service Manager 9.41 or later; UCMDB CP26 or later) Page 177 of 227
8. Repeat the previous two steps to addmore fields to the array of structure as needed.
ServiceManagerEnhancedAdapter9.41 User GuideIntegration Tailoring Options
Micro Focus Service Manager (Service Manager 9.41 or later; UCMDB CP26 or later) Page 178 of 227
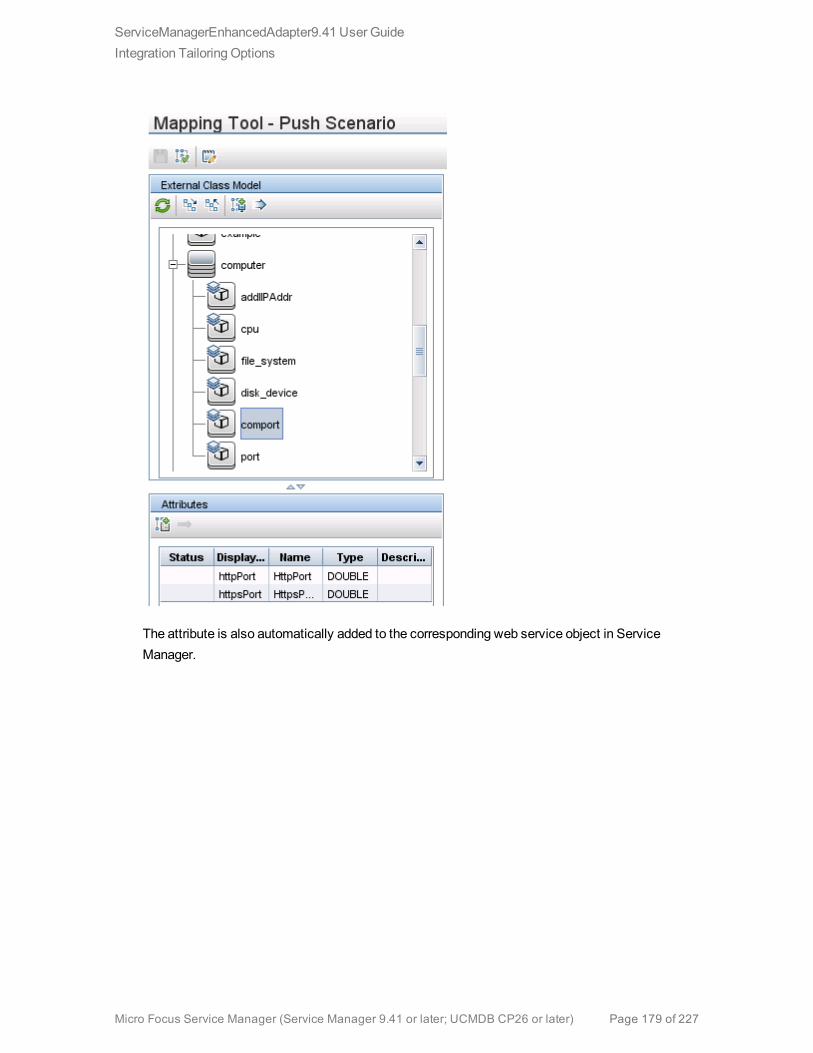
The attribute is also automatically added to the corresponding web service object in ServiceManager.
ServiceManagerEnhancedAdapter9.41 User GuideIntegration Tailoring Options
Micro Focus Service Manager (Service Manager 9.41 or later; UCMDB CP26 or later) Page 179 of 227
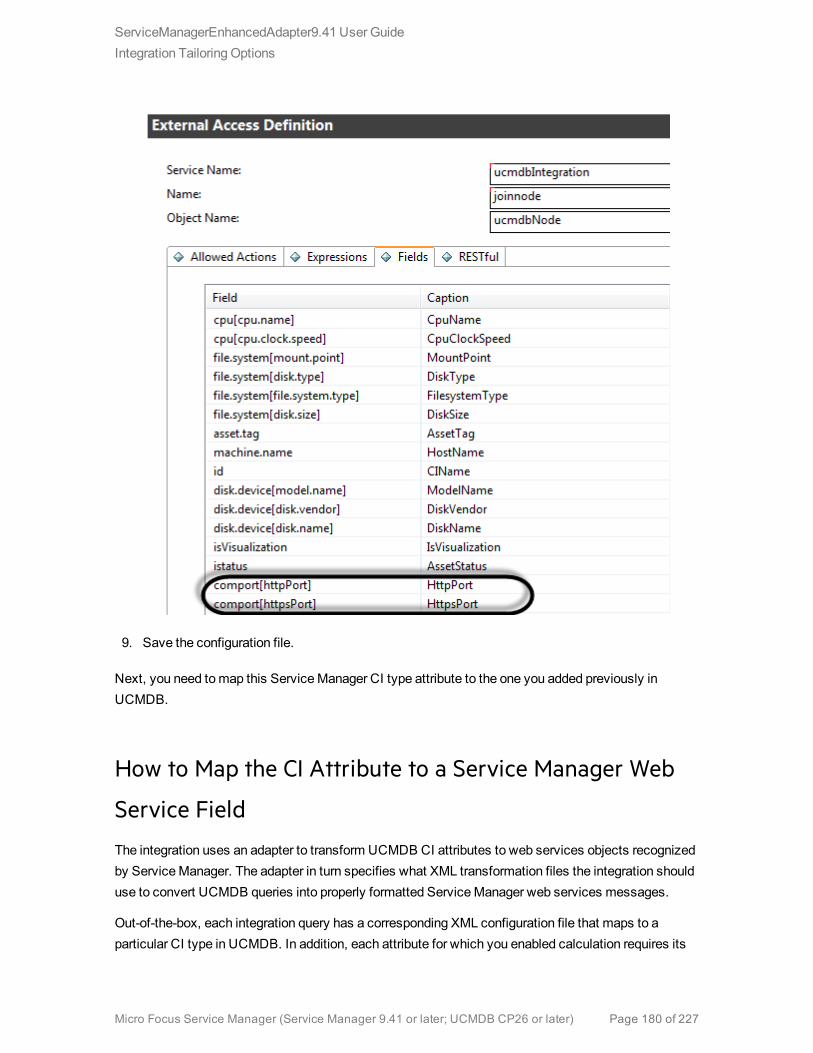
9. Save the configuration file.
Next, you need tomap this ServiceManager CI type attribute to the one you added previously inUCMDB.
How to Map the CI Attribute to a Service Manager Web
Service Field
The integration uses an adapter to transform UCMDB CI attributes to web services objects recognizedby ServiceManager. The adapter in turn specifies what XML transformation files the integration shoulduse to convert UCMDB queries into properly formatted ServiceManager web services messages.
Out-of-the-box, each integration query has a corresponding XML configuration file that maps to aparticular CI type in UCMDB. In addition, each attribute for which you enabled calculation requires its
ServiceManagerEnhancedAdapter9.41 User GuideIntegration Tailoring Options
Micro Focus Service Manager (Service Manager 9.41 or later; UCMDB CP26 or later) Page 180 of 227

own entry in the XML configuration file. Without an XML transformation entry, ServiceManager cannotreceive any CI attribute updates from your UCMDB system.
If you want to add a new attribute to the integration, youmust edit the XML configuration file for theparent CI type and add an entry for the CI attribute. For information about which CI types each querymanages, see "Queries for Push" on page 137.
The following steps illustrate how tomapUCMDB CI attributeComments (which you addedpreviously) to theMyCommentsServiceManager attribute (which you created in the previous step).
Tomap a UCMDB CI attribute to an SM CI attribute:
1. Log in to UCMDB as an administrator.
2. Navigate toData Flow Management > Adapter Management >ServiceManagerEnhancedAdapter9.41 > Configuration Files.
3. Double-click the XML configuration file that manages the parent CI type of your CI attribute. Forexample, openSM Business Service Push 2.0.xml to add an attribute to theSM BusinessService Push 2.0 query.
4. Select the relevant CI type in the External Class Model pane (bizservice in this example), anddrag and drop the attribute (mycomments) from the left-side Attributes pane into the VisualMapping pane.
5. Select the relevant Node in the Local Query panel (Root in this example), and drag and drop theattribute (comments in this case) into themapping entry that you created in the previous step.
ServiceManagerEnhancedAdapter9.41 User GuideIntegration Tailoring Options
Micro Focus Service Manager (Service Manager 9.41 or later; UCMDB CP26 or later) Page 181 of 227

6. Save the XML configuration file. TheComments attribute in UCMDB is now mapped to theMyComments attribute in ServiceManager.
Note: When you create or edit and then save a configuration file in Adapter Management,UCMDB automatically restarts the adapter with the new configuration file.
How to Add a CI Type to the Integration for Data
PushYou can use the following steps to add a CI type to the integration.
1. Does the CI type already exist in the UCMDB class model?Yes. Go to Step 3.
No. Go to Step 2.
2. Add the CI type to the UCMDB class model.See "How to Add the CI Type to the UCMDB Class Model" on the next page.
3. Create a query to synchronize the CI type.See "How to Create aQuery to Synchronize the CI Type" on page 185.
ServiceManagerEnhancedAdapter9.41 User GuideIntegration Tailoring Options
Micro Focus Service Manager (Service Manager 9.41 or later; UCMDB CP26 or later) Page 182 of 227
4. Add the CI type’s attributes to the query layout.See "How to Add the CI Type’s Attributes to the Query Layout" on page 189.
5. Add the CI type to ServiceManagerServiceManager.See "How to Add the CI Type to ServiceManager" on page 191.
6. Map the CI type’s attributes to web service fields.See "How toMap the CI Type’s Attributes toWeb Service Fields" on page 193.
7. Add custom queries to integration data push jobs.See "How to Add a Custom Query to an Integration Job" on page 197.
How to Add the CI Type to the UCMDB Class Model
Before creating a new UCMDB CI type, you should determine if there are any existing CI types in yourUCMDB system that provide the CI attributes you want. In most cases, you can create links to one ormore existing CI types to create a new logical CI type for use by the integration.
The following steps illustrate how to create a new CI type called SM RDBMS based on an existing CItype called database.
Note: The integration does not require any special steps to add a CI type to the UCMDB classmodel. You can use the standard CI type creation procedures to add a CI type. For moreinformation on CI type creation, see the UCMDB Help Center.
To add a CI type to the UCMDB class model:
1. Log in to UCMDB as an administrator.
2. Navigate toModeling > CI Type Manager.
3. Select the base CI type you want to use for your new CI type from the CI Types navigation tree:Managed Object > ConfigurationItem > Infrastructure Element > Running Software >Database.
4. Click theNew icon .The Create Configuration Item Type window opens.
5. In Name, type the unique name you want to use for the new CI type. For example, sm_rdbms.
Caution: The name cannot include any of the following characters: ‘ / \ [ ] : | < >
+ = ; , ? *.
6. In Display Name, type the name you want UCMDB to display in the interface. For example, SMRDBMS.
ServiceManagerEnhancedAdapter9.41 User GuideIntegration Tailoring Options
Micro Focus Service Manager (Service Manager 9.41 or later; UCMDB CP26 or later) Page 183 of 227

7. In Description, type a description of the new CI type. This is an optional field. For example, Hostsrunning relational databases.
8. In Base CI Type, verify that the proper base CI type is selected. Your new CI type will inherit theattributes of the base CI type you select here. For example, Database.
9. Click Next. The wizard displays a list of CI attributes from the base CI type.
10. Add, edit, or remove CI attributes as needed for the new CI type. For example, accept the defaultattributes inherited from Database.
11. Click Next. The wizard displays a list of qualifiers from the base CI type.
12. Add or remove qualifiers as needed for the new CI type. For example, accept the default qualifiers.
13. Click Next. The wizard displays a list of icons associated with the CI type.
14. Select the icons associated with this CI type. For example, accept the default abstract class icon.
15. Click Next to add any menu item properties or label definitions as needed. For example, acceptthe default settings from the base CI type.
16. Click Finish to create the CI type.
17. Select your new CI type from the tree. For example, SM RDBMS.
ServiceManagerEnhancedAdapter9.41 User GuideIntegration Tailoring Options
Micro Focus Service Manager (Service Manager 9.41 or later; UCMDB CP26 or later) Page 184 of 227
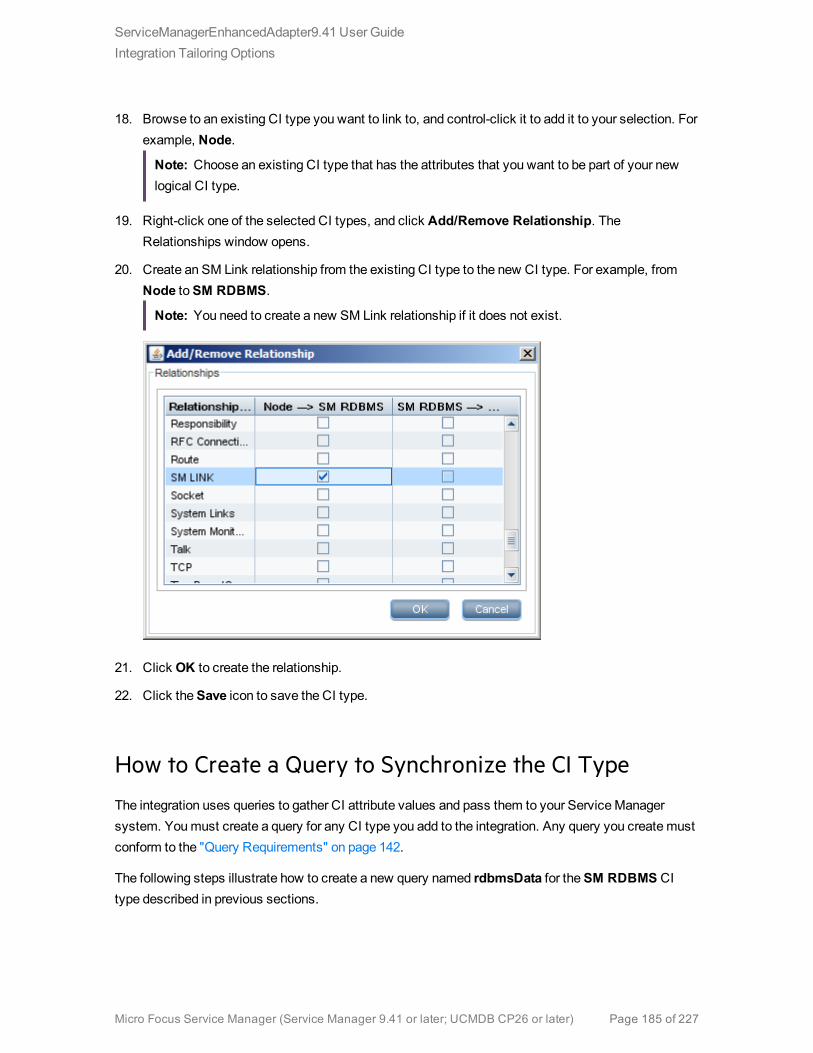
18. Browse to an existing CI type you want to link to, and control-click it to add it to your selection. Forexample, Node.
Note: Choose an existing CI type that has the attributes that you want to be part of your newlogical CI type.
19. Right-click one of the selected CI types, and click Add/Remove Relationship. TheRelationships window opens.
20. Create an SM Link relationship from the existing CI type to the new CI type. For example, fromNode toSM RDBMS.
Note: You need to create a new SM Link relationship if it does not exist.
21. Click OK to create the relationship.
22. Click theSave icon to save the CI type.
How to Create a Query to Synchronize the CI Type
The integration uses queries to gather CI attribute values and pass them to your ServiceManagersystem. Youmust create a query for any CI type you add to the integration. Any query you createmustconform to the "Query Requirements" on page 142.
The following steps illustrate how to create a new query named rdbmsData for theSM RDBMS CItype described in previous sections.
ServiceManagerEnhancedAdapter9.41 User GuideIntegration Tailoring Options
Micro Focus Service Manager (Service Manager 9.41 or later; UCMDB CP26 or later) Page 185 of 227

1. Log in to UCMDB as an administrator.
2. Navigate toModeling >Modeling Studio.
3. From theQueries navigation tree, click Integration > Service Manager.
4. Right-click Service Manager, and select theNew > Query.TheQuery Definition window opens.
5. Find the CI type that will be the root node of your query from the CI Type Selector. This CI type istypically the one that provides themost attributes for the CI. For example,Managed Object >ConfigurationItem > InfrastructureElement > RunningSoftware > Database > SM RDBMS.
6. Drag the root CI type from the CI Type Selector and drop it into the empty Editing pane. UCMDBdisplays the icon of the CI type.
7. Right-click the CI type icon, and select Query Node Properties. The Node Properties windowopens.
8. Change the Element Name toRoot.
9. Click OK to save the node properties.
ServiceManagerEnhancedAdapter9.41 User GuideIntegration Tailoring Options
Micro Focus Service Manager (Service Manager 9.41 or later; UCMDB CP26 or later) Page 186 of 227

10. Find any additional CI types you want to add to the query from the CI Type Selector. These CItypes typically provide additional CI attributes. For example,Managed Object >ConfigurationItem > Infrastructure Element > Node.
11. Drag the additional CI type from the CI Type Selector and drop it into the Query Definition pane.UCMDB displays the icon of the additional CI type.
ServiceManagerEnhancedAdapter9.41 User GuideIntegration Tailoring Options
Micro Focus Service Manager (Service Manager 9.41 or later; UCMDB CP26 or later) Page 187 of 227
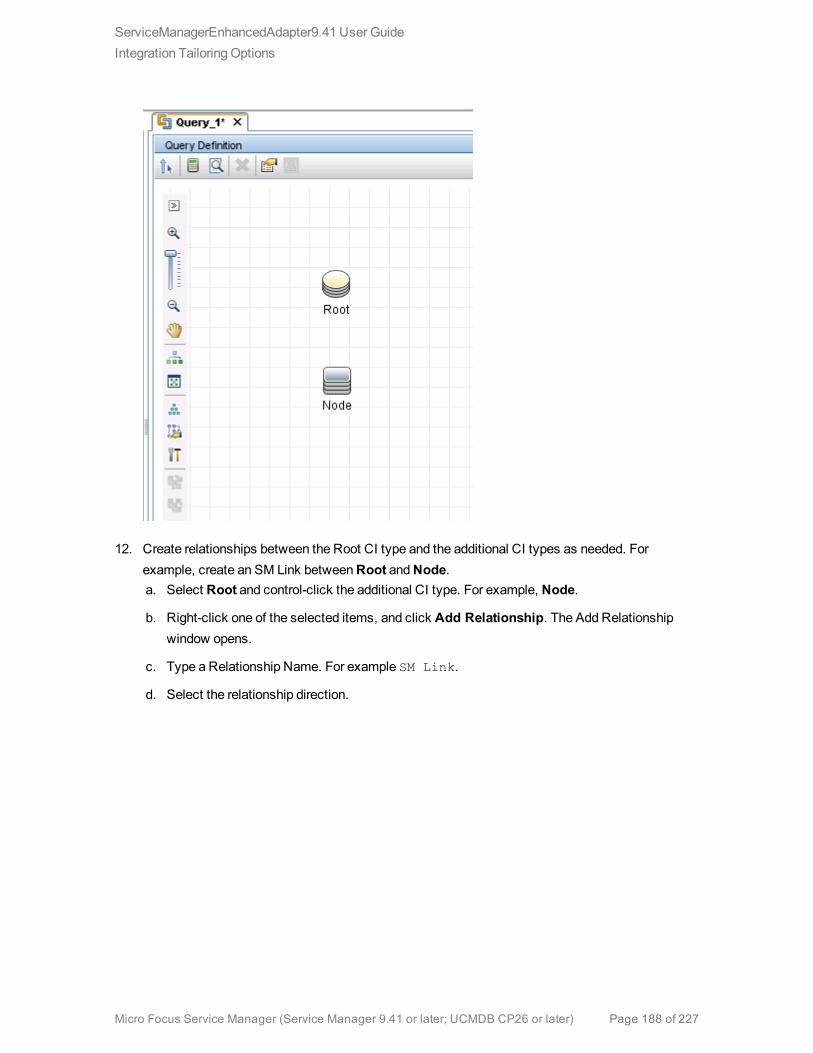
12. Create relationships between the Root CI type and the additional CI types as needed. Forexample, create an SM Link betweenRoot andNode.a. Select Root and control-click the additional CI type. For example, Node.
b. Right-click one of the selected items, and click Add Relationship. The Add Relationshipwindow opens.
c. Type a Relationship Name. For example SM Link.
d. Select the relationship direction.
ServiceManagerEnhancedAdapter9.41 User GuideIntegration Tailoring Options
Micro Focus Service Manager (Service Manager 9.41 or later; UCMDB CP26 or later) Page 188 of 227

e. Click OK to add the relationship.
13. Repeat step 10 to step 12 for each additional CI type you want to add to the query. For example,SM RDBMS does not need any additional CI types.
14. Click theSave icon to save the query.a. In Query Name, type the unique name you want to use for the new query. For example,
rdbmsData.
b. In the folder tree, select the folder in which you want to save the query. For example, Root >Integration > Service Manager > Push.
c. Click OK. UCMDB adds your new query to the query list.
How to Add the CI Type’s Attributes to the Query Layout
To add a CI attribute to the integration, youmust enable the calculation layout setting from the querythat synchronizes the CI type. Because youmust enable calculation for each attribute you want to addto the integration, you should be familiar with the integration CI types and their attributes.
The following steps illustrate how to enable calculation for attributes of theSM RDBMS CI typedescribed in previous sections.
ServiceManagerEnhancedAdapter9.41 User GuideIntegration Tailoring Options
Micro Focus Service Manager (Service Manager 9.41 or later; UCMDB CP26 or later) Page 189 of 227

To add a CI type’s attributes to the query layout:
1. Log in to UCMDB as an administrator.
2. Navigate toModeling >Modeling Studio.
3. From theQueries navigation tree, click Integration > Service Manager.
4. Double-click the query that manages the CI type whose attributes you want to add to theintegration. For example, rdbmsData. UCMDB displays the TQL layout of the query.
5. Right-click theRoot node from the query layout, and then select Query Node Properties. TheQuery Node Properties window opens.
Caution: Your integration query must contain a node calledRoot. See "QueryRequirements" on page 142 for more information.
6. Click theElement Layout tab, and select theSelect attributes for layout option.
7. Select Specific Attributes from theAttributes condition list, and from the Available Attributeslist select the attributes you want andmove them to the Specific Attributes list. For example, addtheProduct Name, Application Version Description, The Database Instance Name, andPort attributes.
8. Click OK to save the query node properties.
9. Select any additional node that contains the attributes you want to add to the integration. Forexample, Node.
10. Repeat step 4 through step8 for each additional node.
ServiceManagerEnhancedAdapter9.41 User GuideIntegration Tailoring Options
Micro Focus Service Manager (Service Manager 9.41 or later; UCMDB CP26 or later) Page 190 of 227

11. Click OK to save the query node properties.
12. Repeat step 9 to step 13 for each additional node that contains the attributes you want to add tothe integration.
13. Click theSave icon to save the query .
How to Add the CI Type to Service Manager
Before creating a new ServiceManager CI type, you should determine if there are any existing CI typesin your ServiceManager system that provide the CI attributes you want. In most cases, you can reusethe existing CI types for the integration.
You can add a new CI type to ServiceManager by using the Visual Mapping tool in UCMDB, whichmeans you do not have to log out of UCMDB and then log in to ServiceManager.
The following steps illustrate how to create a new CI type calledRDBMS.
Note: This example is provided only as an illustration of the steps. The best practice is to reusethe existing ServiceManager CI typeRunningSoftware to map with UCMDB CI typeSMRDBMS.
1. Log in to UCMDB as an administrator.
2. Open an existing XMLmapping file (SM Computer Push 2.0.xml, for example) with the VisualMapping tool editor.
3. Select the Root node in the External Class Model panel, and click theAdd New CI Type toExternal Class Model icon.
4. Enter parameter values as follows.
Name: rdbms
Description: CI type for RDBMS
table: smrdbms
subtype: Oracle, SQL Server
ServiceManagerEnhancedAdapter9.41 User GuideIntegration Tailoring Options
Micro Focus Service Manager (Service Manager 9.41 or later; UCMDB CP26 or later) Page 191 of 227

5. Click OK.
6. Click OK again to confirm the CI type creation. The CI type is automatically created in ServiceManager, as shown in the following figure.
ServiceManagerEnhancedAdapter9.41 User GuideIntegration Tailoring Options
Micro Focus Service Manager (Service Manager 9.41 or later; UCMDB CP26 or later) Page 192 of 227

What happens on the Service Manager (SM) side?
All relevant SM objects (DBDICT, JoinDef, Web Service API, DEM Rule, and so on) for the newCI type are automatically created on the SM side, except the format. The new CI type will useconfigurationItem as the default format.
If you want to use custom formats in SM for the new CI type, you have to create themmanually.You can create the formats in Forms Designer based on existing view forms and bulk updateforms. To access Forms Designer in ServiceManager, type fd in the command line or navigate toTailoring > Forms Designer. For more information about creating forms in ServiceManager, seethe ServiceManager online help and the Tailoring Best Practices Guide.
How to Map the CI Type’s Attributes to Web Service
Fields
The integration uses the ServiceManager Adapter to transform UCMDB CI attributes to web servicesobjects recognized by ServiceManager. The ServiceManager Adapter uses XML configuration files toconvert UCMDB queries into a properly formatted ServiceManager web services messages. Out-of-the-box, each integration query has a corresponding XML configuration file. In addition, each attributeyou enable for synchronization from advanced layout settings requires its own entry in the XMLconfiguration file.
ServiceManagerEnhancedAdapter9.41 User GuideIntegration Tailoring Options
Micro Focus Service Manager (Service Manager 9.41 or later; UCMDB CP26 or later) Page 193 of 227
If you want to add a CI type to the integration, youmust create amatching XML configuration file thatdefines how the ServiceManager Adapter transforms each CI type into a ServiceManager web serviceobject. See "Integration Queries" on page 136 for information about the CI types each query manages.
The following steps illustrate how to create an XML configuration file for the rdbmsData querydescribed in previous sections.
Tomap a CI type’s attributes to web service fields:
1. Log in to UCMDB with an administrator account.
2. Navigate toData Flow Management > Adapter Management >ServiceManagerEnhancedAdapter9.41, and select the adapter.
3. Click theCreate New Resource icon .
4. Select New Configuration File.
5. Enter the full file name: <AdapterID>/mappings/push/<filename>. For example,ServiceManagerEnhancedAdapter9.41/mappings/push/SM RDBMS Push.xml.
6. Click OK. Themapping file is created.
7. Double-click the new mapping file to open it with the Visual Mapping tool editor.
8. In the Local Query pane, click theAdd TQL Queries icon to add the rdbmsData query.
ServiceManagerEnhancedAdapter9.41 User GuideIntegration Tailoring Options
Micro Focus Service Manager (Service Manager 9.41 or later; UCMDB CP26 or later) Page 194 of 227

9. Click OK.
ServiceManagerEnhancedAdapter9.41 User GuideIntegration Tailoring Options
Micro Focus Service Manager (Service Manager 9.41 or later; UCMDB CP26 or later) Page 195 of 227
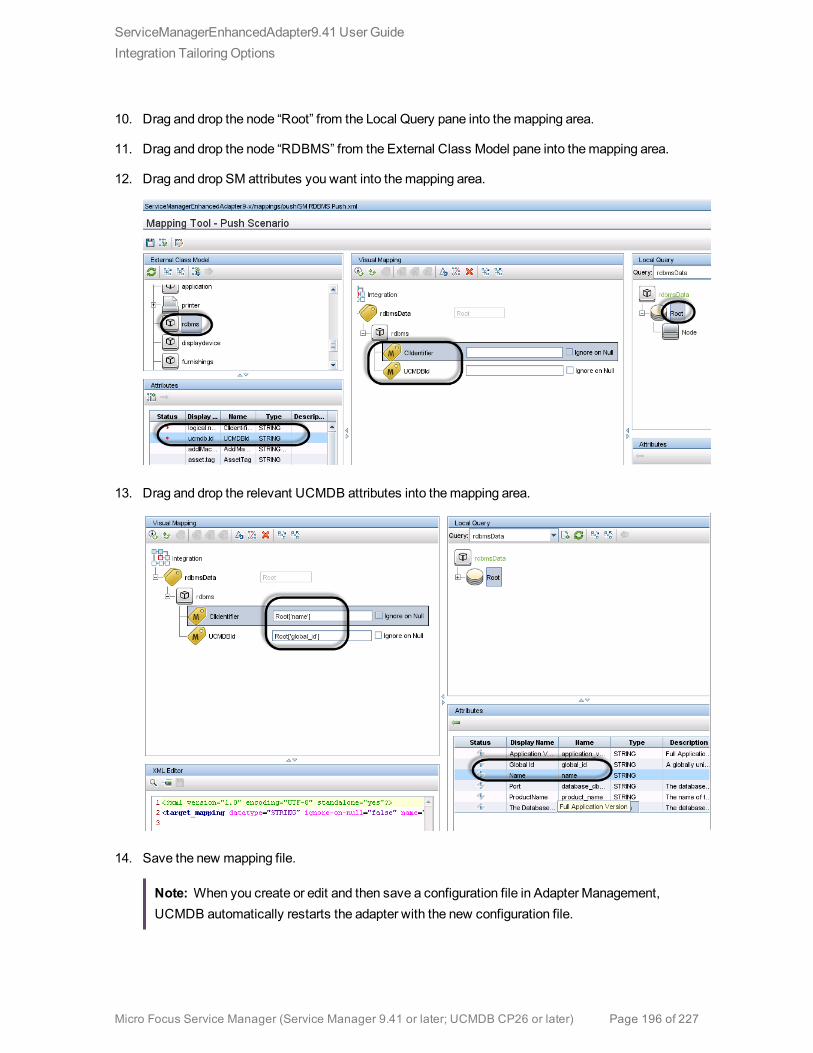
10. Drag and drop the node “Root” from the Local Query pane into themapping area.
11. Drag and drop the node “RDBMS” from the External Class Model pane into themapping area.
12. Drag and drop SM attributes you want into themapping area.
13. Drag and drop the relevant UCMDB attributes into themapping area.
14. Save the new mapping file.
Note: When you create or edit and then save a configuration file in Adapter Management,UCMDB automatically restarts the adapter with the new configuration file.
ServiceManagerEnhancedAdapter9.41 User GuideIntegration Tailoring Options
Micro Focus Service Manager (Service Manager 9.41 or later; UCMDB CP26 or later) Page 196 of 227

Using Groovy scripts in XML Configuration Files
The ServiceManager EnhancedGeneric Adapter uses XML andGroovy mapping scripts for four fieldmapping scenarios: One to One, One toMany, Many toMany, and Value Conversion. Groovy scriptshave to be used for complex scenarios. For more information, see "Task 7: Update the Configurationsfor Custom CI Types in UCMDB" on page 43.
How to Add a Custom Query to an Integration JobIn order for the integration to synchronize your custom CI types, attributes, and relationships betweenyour ServiceManager and UCMDB systems, youmust add your custom queries to a data push orpopulation job.
The following steps illustrate how to add an custom query named rdbmsData, which you createdpreviously (see "How to Create aQuery to Synchronize the CI Type" on page 185), to a data push job.The steps for adding a population query to a population job are similar.
To add a custom query to a data push or population job:
1. Log in to UCMDB as an administrator.
2. Navigate toData Flow Management > Integration Studio.
3. Click the name of your ServiceManager integration point. For example, sm_integration.
4. Click theData Push tab.
Note: To add a query to a population job, click thePopulation tab instead.
5. Click the name of the integration job. For example, SM Configuration Item Push job.
6. Click theEdit icon .
7. Click theAdd icon.
8. Click Integration > Service Manager > Push > rdbmsData.
Note: For population, navigate to Integration > Service Manager > Population, and clickthe population query instead.
9. Click OK to add the custom query.
10. Enable theAllow Deletion option for the query to allow the integration job to delete removed data.
11. Click OK to close the Update Job Definition window.
ServiceManagerEnhancedAdapter9.41 User GuideIntegration Tailoring Options
Micro Focus Service Manager (Service Manager 9.41 or later; UCMDB CP26 or later) Page 197 of 227
How to Add a CI Type, Attribute or Relationship
Type to the Integration for PopulationAll out-of-the-box mapping files for Population can be found by navigating toData Flow Management> Adapter Management > ServiceManagerEnhancedAdapter9.41 >ServiceManagerEnhancedAdapter9.41/mappings/population/<Name of Mapping File>.
With the Visual Mapping tool, you can add a CI Type, CI attribute, or relationship to the integration forPopulation by following similar steps to those for data push. Additionally, you also need to add yourpopulation queries to a population job. Refer to the following steps for data push:
"How to Add a CI Attribute to the Integration for Data Push" on page 168
"How to Add a CI Type to the Integration for Data Push" on page 182
"How to Add a CI Relationship Type to the Integration for Data Push" on page 162
"How to Add a Custom Query to an Integration Job" on the previous page
How to Enable or Disable UCMDB ID Pushback for a
CI TypeWhen a new CI is created in UCMDB, a UCMDB ID value is assigned to the CI. When CIs aresynchronized from ServiceManager (SM) to UCMDB through population, the UCMDB ID Pushbackfeature can push their UCMDB ID values back to SM. The UCMDB ID field is then used as a flag toindicate if a CI has already been synchronized to UCMDB through population.
There are also cases when you do not want to enable the UCMDB ID pushback feature. For example,the scheduled_downtime CI type in UCMDB does not physically exist in SM. Instead, the integrationretrieves Scheduled Downtime information from several entities in SM and then synchronizes theinformation to scheduled_downtime CIs in UCMDB. For this reason, the UCMDB ID Pushback featureis disabled by default for scheduled_downtime CIs; otherwise a pushback error will occur duringpopulation.
To enable UCMDB ID pushback for a CI type, follow these steps:
1. Add the following entries to your population configuration file for the CI type (for example,MyBusiness Service Population.xml).
ServiceManagerEnhancedAdapter9.41 User GuideIntegration Tailoring Options
Micro Focus Service Manager (Service Manager 9.41 or later; UCMDB CP26 or later) Page 198 of 227

<target_mapping name="sm_id" datatype="STRING" value="bizservice['CIName']"/>
<target_mapping name="global_id" datatype="STRING" value="bizservice['UCMDBId']"/>
Note: In this example, bizservice is the CI Type display name defined in ServiceManagerand also the external class model name displayed in the UCMDB Visual Mapping interface,as shown in the following figures.
2. Save the XML configuration file.
3. Open the smPopConf.xml file, andmake sure that the UCMDB ID Pushback setting for theCI type is either not present or is set to true:
<pushback>
ServiceManagerEnhancedAdapter9.41 User GuideIntegration Tailoring Options
Micro Focus Service Manager (Service Manager 9.41 or later; UCMDB CP26 or later) Page 199 of 227

<type name="business_service" enable="true"/>
</pushback>
Where: <type name> is the name of the CI type in UCMDB.
To disable UCMDB ID Pushback feature for a CI type, follow these steps:
1. Open the smPopConf.xml file.
2. In the <pushback> section, insert one line for the CI type:
<config><pushback>
<type name="scheduled_downtime" enable="false"/><type name="business_service" enable="false"/>
</pushback><mapping>
<tql name="SM Business Service Population 2.0">...</tql>…
</mapping></config>
How to Add an Attribute of a Supported CI Type for
FederationOut-of-the-box, the integration supports federation for three external CI types in UCMDB: Incident,Problem, and RequestForChange. For each of the supported CI types, there is a list of attributes inUCMDB that you canmap to ServiceManager web service objects for federation. The following figureshows the out-of-the-box UCMDB CI attributes available for the Incident CI type.
ServiceManagerEnhancedAdapter9.41 User GuideIntegration Tailoring Options
Micro Focus Service Manager (Service Manager 9.41 or later; UCMDB CP26 or later) Page 200 of 227

For example, to add an SM Incident attribute for federation, you need to expose the field in the SMUcmdbIncident web service object and thenmap it to an appropriate UCMDB attribute (if one does notalready exist, you need to create it in UCMDB first).
The following figure shows the fields that are exposed in the UcmdbIncidentweb service object inServiceManager.
ServiceManagerEnhancedAdapter9.41 User GuideIntegration Tailoring Options
Micro Focus Service Manager (Service Manager 9.41 or later; UCMDB CP26 or later) Page 201 of 227
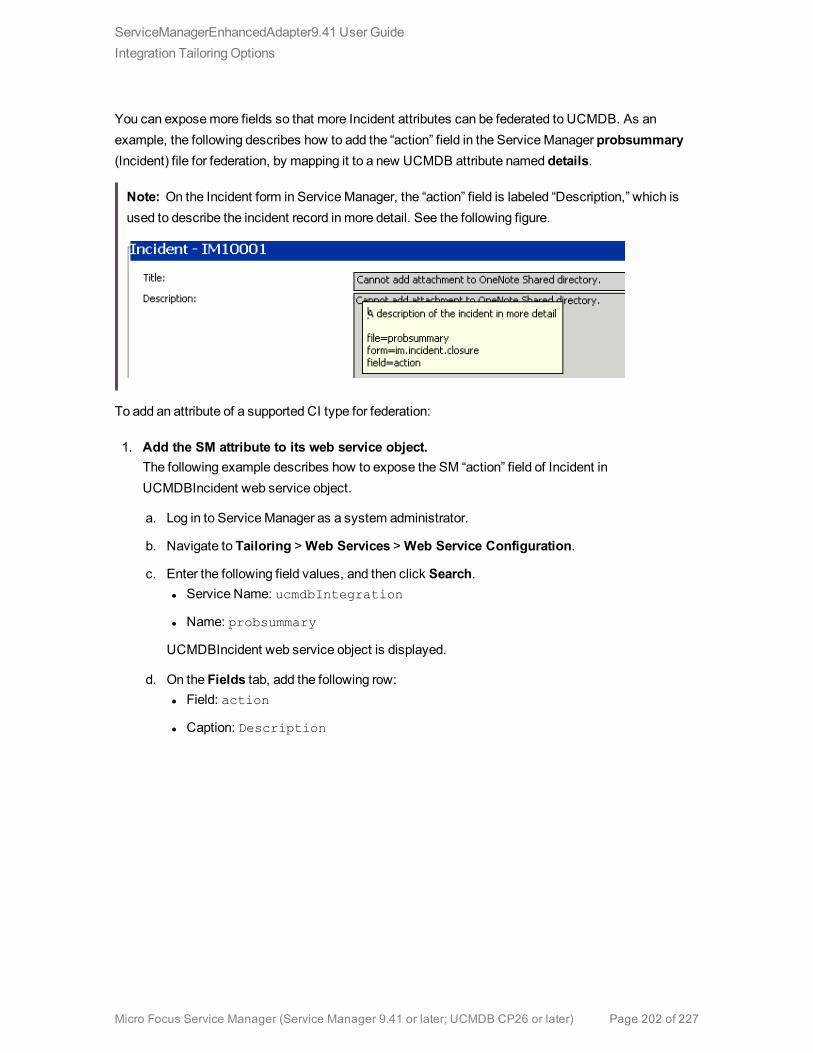
You can exposemore fields so that more Incident attributes can be federated to UCMDB. As anexample, the following describes how to add the “action” field in the ServiceManager probsummary(Incident) file for federation, by mapping it to a new UCMDB attribute named details.
Note: On the Incident form in ServiceManager, the “action” field is labeled “Description,” which isused to describe the incident record in more detail. See the following figure.
To add an attribute of a supported CI type for federation:
1. Add the SM attribute to its web service object.The following example describes how to expose the SM “action” field of Incident inUCMDBIncident web service object.
a. Log in to ServiceManager as a system administrator.
b. Navigate to Tailoring >Web Services >Web Service Configuration.
c. Enter the following field values, and then click Search.l Service Name: ucmdbIntegration
l Name: probsummary
UCMDBIncident web service object is displayed.
d. On the Fields tab, add the following row:l Field: action
l Caption: Description
ServiceManagerEnhancedAdapter9.41 User GuideIntegration Tailoring Options
Micro Focus Service Manager (Service Manager 9.41 or later; UCMDB CP26 or later) Page 202 of 227
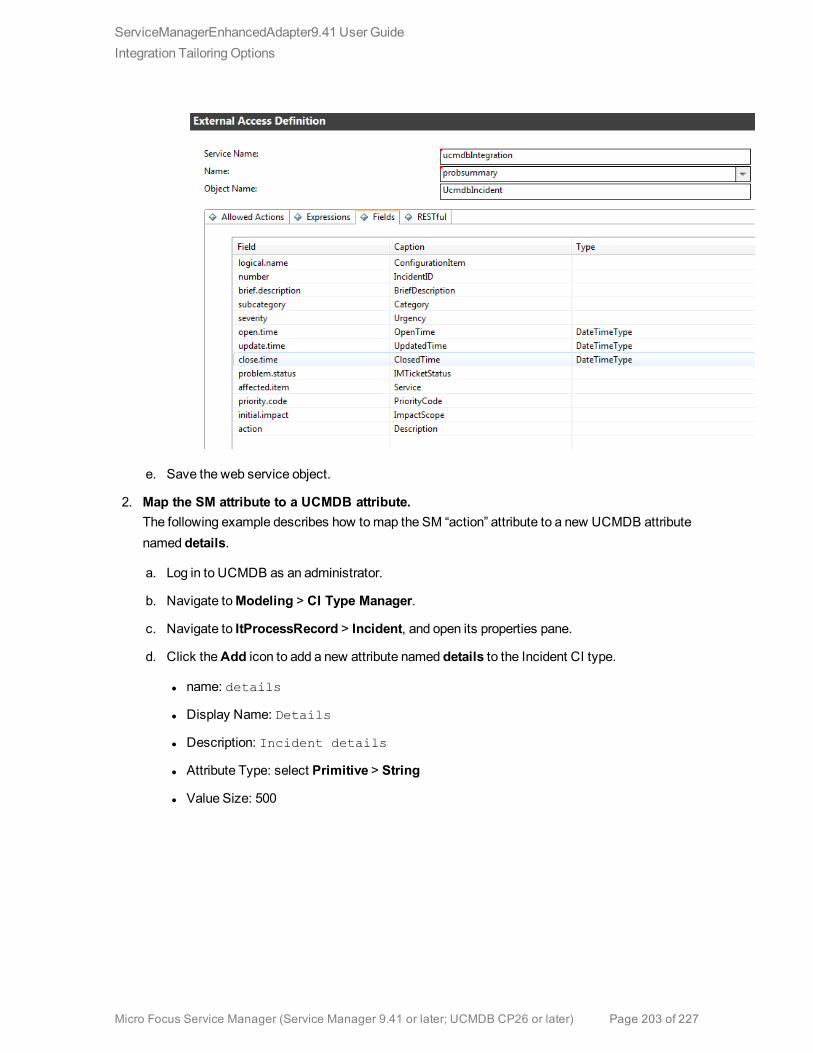
e. Save the web service object.
2. Map the SM attribute to a UCMDB attribute.The following example describes how tomap the SM “action” attribute to a new UCMDB attributenamed details.
a. Log in to UCMDB as an administrator.
b. Navigate toModeling > CI Type Manager.
c. Navigate to ItProcessRecord > Incident, and open its properties pane.
d. Click theAdd icon to add a new attribute named details to the Incident CI type.
l name: details
l Display Name: Details
l Description: Incident details
l Attribute Type: select Primitive > String
l Value Size: 500
ServiceManagerEnhancedAdapter9.41 User GuideIntegration Tailoring Options
Micro Focus Service Manager (Service Manager 9.41 or later; UCMDB CP26 or later) Page 203 of 227

e. Save the Incident CI type record.
f. Navigate toData Flow Management > Adapter Management >ServiceManagerEnhancedAdapter9.41 > Configuration Files.
g. Edit the relevant federationmapping file(ServiceManagerEnhancedAdapter9.41/mappings/federation/SM Incident 2.0.xml) toadd amapping entry for the new attribute.
<target_entities><source_instance query-name="SM Incident 2.0" root-element-
name="ucmdbIncident"><target_entity name="incident">
<target_mapping name="reference_number"datatype="STRING" value="ucmdbIncident['IncidentID']"/>
<target_mapping name="name"datatype="STRING" value="ucmdbIncident['BriefDescription']"/>
<target_mapping name="priority"datatype="STRING" value="SMFederationFunctions.getEnumValue(ucmdbIncident['PriorityCode'],'Priority')"/>
ServiceManagerEnhancedAdapter9.41 User GuideIntegration Tailoring Options
Micro Focus Service Manager (Service Manager 9.41 or later; UCMDB CP26 or later) Page 204 of 227
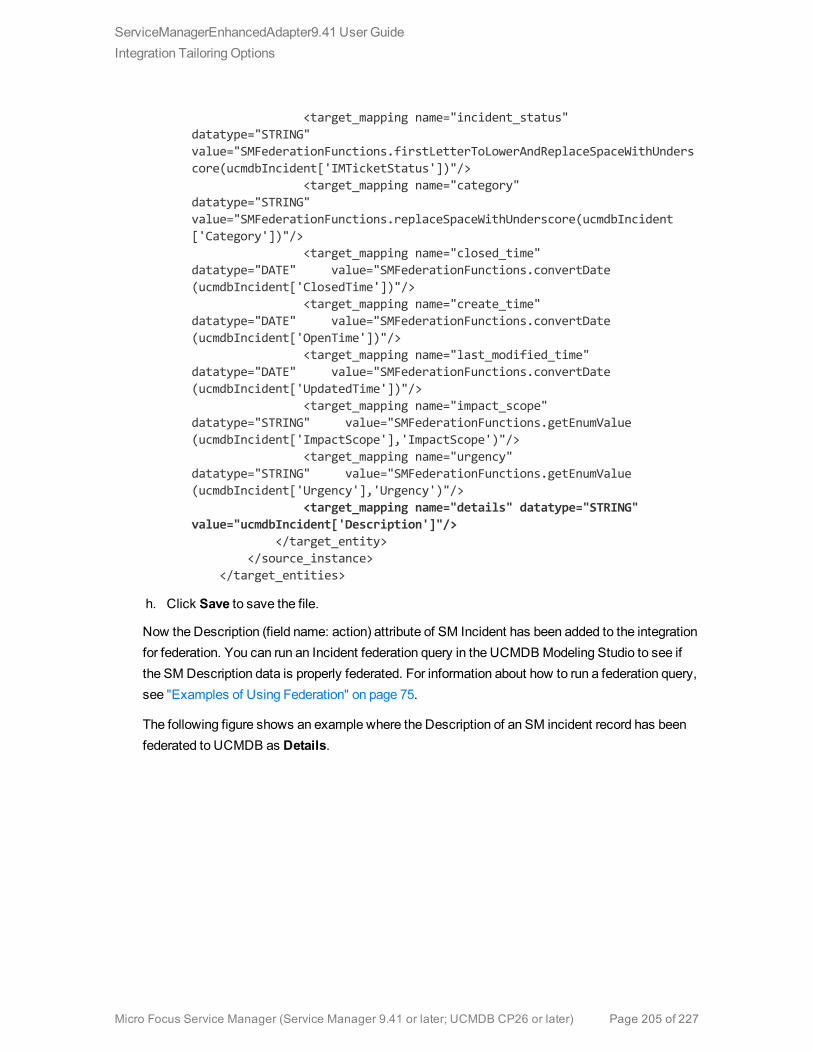
<target_mapping name="incident_status"datatype="STRING"value="SMFederationFunctions.firstLetterToLowerAndReplaceSpaceWithUnderscore(ucmdbIncident['IMTicketStatus'])"/>
<target_mapping name="category"datatype="STRING"value="SMFederationFunctions.replaceSpaceWithUnderscore(ucmdbIncident['Category'])"/>
<target_mapping name="closed_time"datatype="DATE" value="SMFederationFunctions.convertDate(ucmdbIncident['ClosedTime'])"/>
<target_mapping name="create_time"datatype="DATE" value="SMFederationFunctions.convertDate(ucmdbIncident['OpenTime'])"/>
<target_mapping name="last_modified_time"datatype="DATE" value="SMFederationFunctions.convertDate(ucmdbIncident['UpdatedTime'])"/>
<target_mapping name="impact_scope"datatype="STRING" value="SMFederationFunctions.getEnumValue(ucmdbIncident['ImpactScope'],'ImpactScope')"/>
<target_mapping name="urgency"datatype="STRING" value="SMFederationFunctions.getEnumValue(ucmdbIncident['Urgency'],'Urgency')"/>
<target_mapping name="details" datatype="STRING"value="ucmdbIncident['Description']"/>
</target_entity></source_instance>
</target_entities>
h. Click Save to save the file.
Now the Description (field name: action) attribute of SM Incident has been added to the integrationfor federation. You can run an Incident federation query in the UCMDB Modeling Studio to see ifthe SM Description data is properly federated. For information about how to run a federation query,see "Examples of Using Federation" on page 75.
The following figure shows an example where the Description of an SM incident record has beenfederated to UCMDB as Details.
ServiceManagerEnhancedAdapter9.41 User GuideIntegration Tailoring Options
Micro Focus Service Manager (Service Manager 9.41 or later; UCMDB CP26 or later) Page 205 of 227
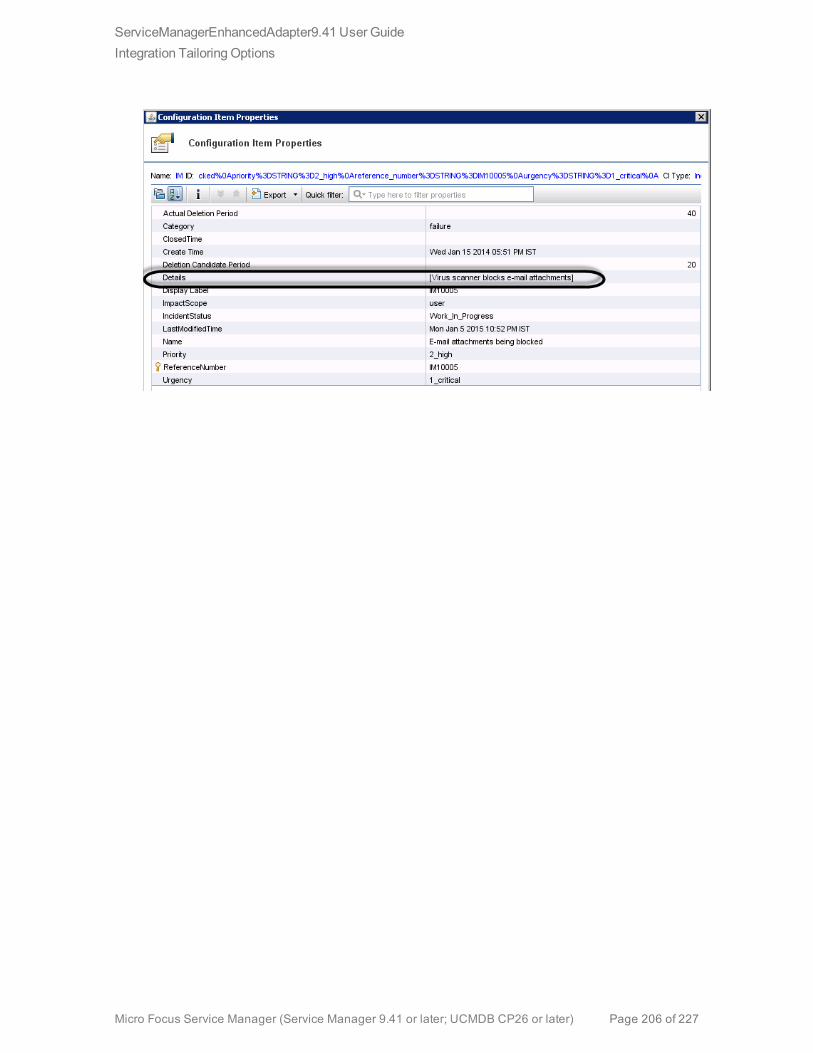
ServiceManagerEnhancedAdapter9.41 User GuideIntegration Tailoring Options
Micro Focus Service Manager (Service Manager 9.41 or later; UCMDB CP26 or later) Page 206 of 227
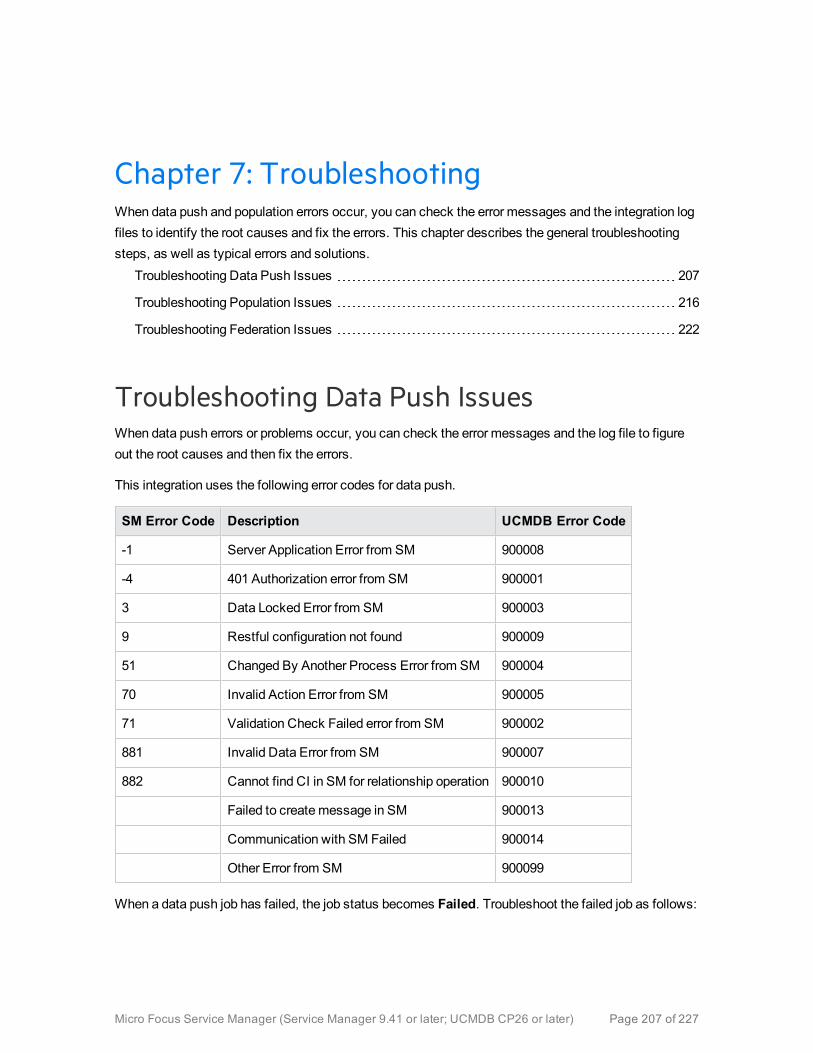
Chapter 7: TroubleshootingWhen data push and population errors occur, you can check the error messages and the integration logfiles to identify the root causes and fix the errors. This chapter describes the general troubleshootingsteps, as well as typical errors and solutions.
Troubleshooting Data Push Issues 207
Troubleshooting Population Issues 216
Troubleshooting Federation Issues 222
Troubleshooting Data Push IssuesWhen data push errors or problems occur, you can check the error messages and the log file to figureout the root causes and then fix the errors.
This integration uses the following error codes for data push.
SM Error Code Description UCMDB Error Code
-1 Server Application Error from SM 900008
-4 401 Authorization error from SM 900001
3 Data Locked Error from SM 900003
9 Restful configuration not found 900009
51 Changed By Another Process Error from SM 900004
70 Invalid Action Error from SM 900005
71 Validation Check Failed error from SM 900002
881 Invalid Data Error from SM 900007
882 Cannot find CI in SM for relationship operation 900010
Failed to createmessage in SM 900013
Communication with SM Failed 900014
Other Error from SM 900099
When a data push job has failed, the job status becomes Failed. Troubleshoot the failed job as follows:
Micro Focus Service Manager (Service Manager 9.41 or later; UCMDB CP26 or later) Page 207 of 227

l Check the error messages of the failed job in the Universal CMDB studio.See "How to Check the Error Message of a Failed Push Job" below.
l Check the log file for more details.See "How to Check the Push Log File" on page 210.
When a data push job was completed with failures of partial records, the job status becomesCompleted. Troubleshoot the failed records as follows:
l Check the error messages of failed CIs in the Universal CMDB studio.See "How to Check the Error Messages of Failed CIs or Relationships in a Push Job" on page 210.
l Check the log file for more details.See "How to Check the Push Log File" on page 210.
How to Check the Error Message of a Failed Push
JobTo check the error message of a failed job:
1. Log in to UCMDB as an administrator.
2. Navigate toData Flow Management > Integration Studio.
3. Select the integration point for this integration from Integration Point list.
4. Click theData Push tab.
5. Select the job from Integration Jobs.
6. Click the Job Errors sub-tab, and double-click the Severity of amessage from the list.A popup window displays the detailed error message of this failed job. The following is an excerptof a sample error message indicating that nomapping configuration was found for the push TQLquery.
java.lang.RuntimeException: No mapping is found for TQL: "SM Business ServicePush 2.0", or Cannot retrieve the mapping from SM side by QueryNodeName[bizservice", please configure in smPushConf.xml or SM configuration
atcom.mercury.topaz.fcmdb.adapters.serviceDeskAdapter.push.SmGenericPusher.push(SmGenericPusher.java:119)
... 35 more--- End of probe-side exception ---
at
ServiceManagerEnhancedAdapter9.41 User GuideTroubleshooting Data Push Issues
Micro Focus Service Manager (Service Manager 9.41 or later; UCMDB CP26 or later) Page 208 of 227

com.hp.ucmdb.discovery.probe.agents.probemgr.adhoctasks.AdHocProbeRequestOperation.convertThrowableToStringSafeException(AdHocProbeRequestOperation.java:86)
atcom.hp.ucmdb.discovery.probe.agents.probemgr.adhoctasks.AdHocProbeRequestOperation.performAction(AdHocProbeRequestOperation.java:77)
atcom.hp.ucmdb.discovery.probe.agents.probemgr.taskdispatcher.AdHocTaskDispatcher.dispatchTask(AdHocTaskDispatcher.java:70)
at sun.reflect.GeneratedMethodAccessor59.invoke(Unknown Source)at sun.reflect.DelegatingMethodAccessorImpl.invoke
(DelegatingMethodAccessorImpl.java:43)at java.lang.reflect.Method.invoke(Method.java:601)at com.sun.jmx.mbeanserver.StandardMBeanIntrospector.invokeM2
(StandardMBeanIntrospector.java:111)at com.sun.jmx.mbeanserver.StandardMBeanIntrospector.invokeM2
(StandardMBeanIntrospector.java:45)at com.sun.jmx.mbeanserver.MBeanIntrospector.invokeM
(MBeanIntrospector.java:235)at com.sun.jmx.mbeanserver.PerInterface.invoke(PerInterface.java:138)at com.sun.jmx.mbeanserver.MBeanSupport.invoke(MBeanSupport.java:252)at javax.management.StandardMBean.invoke(StandardMBean.java:405)at com.sun.jmx.interceptor.DefaultMBeanServerInterceptor.invoke
(DefaultMBeanServerInterceptor.java:819)at com.sun.jmx.mbeanserver.JmxMBeanServer.invoke(JmxMBeanServer.java:792)at javax.management.MBeanServerInvocationHandler.invoke
(MBeanServerInvocationHandler.java:305)at org.springframework.jmx.access.MBeanClientInterceptor.doInvoke
(MBeanClientInterceptor.java:405)at org.springframework.jmx.access.MBeanClientInterceptor.invoke
(MBeanClientInterceptor.java:353)at org.springframework.aop.framework.ReflectiveMethodInvocation.proceed
(ReflectiveMethodInvocation.java:172)at org.springframework.aop.framework.JdkDynamicAopProxy.invoke
(JdkDynamicAopProxy.java:202)at com.sun.proxy.$Proxy57.dispatchTask(Unknown Source)at
com.hp.ucmdb.discovery.probe.agents.probegw.managementtasks.adhoctasks.AdhocThread.run(AdhocThread.java:54)
... 3 more
ServiceManagerEnhancedAdapter9.41 User GuideTroubleshooting Data Push Issues
Micro Focus Service Manager (Service Manager 9.41 or later; UCMDB CP26 or later) Page 209 of 227

How to Check the Error Messages of Failed CIs or
Relationships in a Push JobWhen a data push job is completed with failures of partial records, in the Universal CMDB studio, youcan check the detail error message for each failed record.
To check the error messages of failed records in a data push job:
1. Log in to UCMDB as an administrator.
2. Navigate toData Flow Management > Integration Studio.
3. Select the integration point for this integration from Integration Point list.
4. Click theData Push tab.
5. Select the job from Integration Jobs.
6. Click theQuery Status sub-tab.
7. Double-click a query with failures. The Error Message and CI Count for each failed CI Type aredisplayed.
8. Double-click an error message. A list of failed records is displayed.
9. Double-click a failed record.The detailed error message of the record is displayed.
How to Check the Push Log FileYou need to set the Development adapter log level to DEBUG or TRACE, so that you can check thepush result tree nodes of UCMDB, and then sendmessages to and receivemessages from ServiceManager. Alternatively, you can set the log level to TRACE so as to check the conversion period basedon amapping file.
Note: To troubleshoot push, population, and federation issues, you need to set the Development
ServiceManagerEnhancedAdapter9.41 User GuideTroubleshooting Data Push Issues
Micro Focus Service Manager (Service Manager 9.41 or later; UCMDB CP26 or later) Page 210 of 227
adapter log level to DEBUG or TRACE in the fcmdb.properties and fcmdb.push.propertiesfiles, which are located in the \conf\log folder of your Data Flow Probe or Integration Serviceinstallation. Additionally, you can view push, population and federation log information in thefcmdb.push.all.log file, which is located in the \runtime\log folder of your Data Flow Probe orIntegration Service installation. Your Data Flow Probe or Integration Servicemay be installed onthe same host as your UCMDB Server or on a separate host.
To set the Development adapter log level to DEBUG or TRACE:
1. Log in as an administrator to the host on which your UCMDB Data Flow Probe or IntegrationService is installed.
2. Navigate to the <UCMDB installation folder>\DataFlowProbe\conf\log folder or the <UCMDBinstallation folder\UCMDBServer\integrations\conf\log. For example:
C:\UCMDB\DataFlowProbe\conf\log\
Or C:\UCMDB\UCMDBServer\integrations\conf\log
3. Open the fcmdb.properties file in a text editor, and change the log level to DEBUG or TRACE. Forexample:
#loglevel can be any of TRACE DEBUG INFO WARN ERROR FATALloglevel=DEBUGdef.file.max.size=5000KBdef.files.backup.count=10msg.layout=%d %-5p [%t] - %m%n
4. Open the fcmdb.push.properties files in a text editor, and change the log4j log level to DEBUG orTRACE. For example:
### UCMDB log4j Propertieslog.file.path=log/${log.folder.path.output}#loglevel can be any of TRACE DEBUG INFO WARN ERROR FATALloglevel=DEBUGdef.file.max.size=5000KBdef.files.backup.count=10msg.layout=%d %-5p [%t] - %m%n
5. Save the files.
To check the push log file:
1. Log in as an administrator to the host on which your UCMDB Data Flow Probe or IntegrationService is installed.
2. Navigate to the <UCMDB installation folder>\DataFlowProbe\runtime\log folder or the <UCMDB
ServiceManagerEnhancedAdapter9.41 User GuideTroubleshooting Data Push Issues
Micro Focus Service Manager (Service Manager 9.41 or later; UCMDB CP26 or later) Page 211 of 227
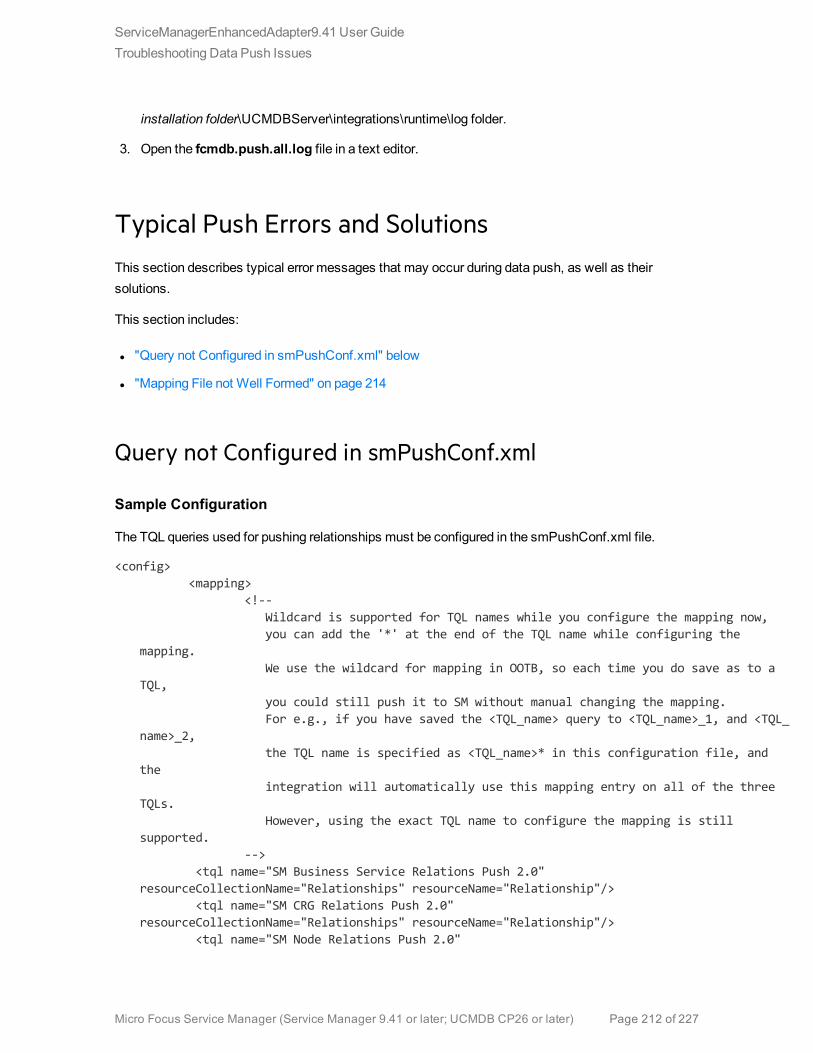
installation folder\UCMDBServer\integrations\runtime\log folder.
3. Open the fcmdb.push.all.log file in a text editor.
Typical Push Errors and SolutionsThis section describes typical error messages that may occur during data push, as well as theirsolutions.
This section includes:
l "Query not Configured in smPushConf.xml" below
l "Mapping File not Well Formed" on page 214
Query not Configured in smPushConf.xml
Sample Configuration
The TQL queries used for pushing relationships must be configured in the smPushConf.xml file.
<config><mapping>
<!--Wildcard is supported for TQL names while you configure the mapping now,you can add the '*' at the end of the TQL name while configuring the
mapping.We use the wildcard for mapping in OOTB, so each time you do save as to a
TQL,you could still push it to SM without manual changing the mapping.For e.g., if you have saved the <TQL_name> query to <TQL_name>_1, and <TQL_
name>_2,the TQL name is specified as <TQL_name>* in this configuration file, and
theintegration will automatically use this mapping entry on all of the three
TQLs.However, using the exact TQL name to configure the mapping is still
supported.-->
<tql name="SM Business Service Relations Push 2.0"resourceCollectionName="Relationships" resourceName="Relationship"/>
<tql name="SM CRG Relations Push 2.0"resourceCollectionName="Relationships" resourceName="Relationship"/>
<tql name="SM Node Relations Push 2.0"
ServiceManagerEnhancedAdapter9.41 User GuideTroubleshooting Data Push Issues
Micro Focus Service Manager (Service Manager 9.41 or later; UCMDB CP26 or later) Page 212 of 227
resourceCollectionName="Relationships" resourceName="Relationship"/><tql name="SM Layer2 Topology Relations Push 2.0"
resourceCollectionName="Relationships" resourceName="Relationship"/></mapping>
</config>
Error Message
The push job fails with a “Failed” status. From both the log file and the detail error message of the failedjob in the Universal CMDB studio (see "How to Check the Error Message of a Failed Push Job" onpage 208), you receive an error like the following:
java.lang.RuntimeException: No mapping is found for TQL: "SM Business Service Push2.0", or Cannot retrieve the mapping from SM side by QueryNodeName [bizservice",please configure in smPushConf.xml or SM configuration
atcom.mercury.topaz.fcmdb.adapters.serviceDeskAdapter.push.SmGenericPusher.push(SmGenericPusher.java:119)
... 35 more--- End of probe-side exception ---
atcom.hp.ucmdb.discovery.probe.agents.probemgr.adhoctasks.AdHocProbeRequestOperation.convertThrowableToStringSafeException(AdHocProbeRequestOperation.java:86)
atcom.hp.ucmdb.discovery.probe.agents.probemgr.adhoctasks.AdHocProbeRequestOperation.performAction(AdHocProbeRequestOperation.java:77)
atcom.hp.ucmdb.discovery.probe.agents.probemgr.taskdispatcher.AdHocTaskDispatcher.dispatchTask(AdHocTaskDispatcher.java:70)
at sun.reflect.GeneratedMethodAccessor59.invoke(Unknown Source)at sun.reflect.DelegatingMethodAccessorImpl.invoke
(DelegatingMethodAccessorImpl.java:43)at java.lang.reflect.Method.invoke(Method.java:601)at com.sun.jmx.mbeanserver.StandardMBeanIntrospector.invokeM2
(StandardMBeanIntrospector.java:111)at com.sun.jmx.mbeanserver.StandardMBeanIntrospector.invokeM2
(StandardMBeanIntrospector.java:45)at com.sun.jmx.mbeanserver.MBeanIntrospector.invokeM
(MBeanIntrospector.java:235)at com.sun.jmx.mbeanserver.PerInterface.invoke(PerInterface.java:138)at com.sun.jmx.mbeanserver.MBeanSupport.invoke(MBeanSupport.java:252)at javax.management.StandardMBean.invoke(StandardMBean.java:405)at com.sun.jmx.interceptor.DefaultMBeanServerInterceptor.invoke
(DefaultMBeanServerInterceptor.java:819)at com.sun.jmx.mbeanserver.JmxMBeanServer.invoke(JmxMBeanServer.java:792)at javax.management.MBeanServerInvocationHandler.invoke
(MBeanServerInvocationHandler.java:305)at org.springframework.jmx.access.MBeanClientInterceptor.doInvoke
ServiceManagerEnhancedAdapter9.41 User GuideTroubleshooting Data Push Issues
Micro Focus Service Manager (Service Manager 9.41 or later; UCMDB CP26 or later) Page 213 of 227

(MBeanClientInterceptor.java:405)at org.springframework.jmx.access.MBeanClientInterceptor.invoke
(MBeanClientInterceptor.java:353)at org.springframework.aop.framework.ReflectiveMethodInvocation.proceed
(ReflectiveMethodInvocation.java:172)at org.springframework.aop.framework.JdkDynamicAopProxy.invoke
(JdkDynamicAopProxy.java:202)at com.sun.proxy.$Proxy57.dispatchTask(Unknown Source)at
com.hp.ucmdb.discovery.probe.agents.probegw.managementtasks.adhoctasks.AdhocThread.run(AdhocThread.java:54)
... 3 more
Solution
Search for text string No mapping is found for TQL to find the name of the query that is not yetconfigured, and then add amapping entry for the query in the smPushConf.xml file.
Mapping File not Well Formed
Sample Configuration
The "target_entity name" should be bizservice (which is the CI type display name defined in ServiceManager, and also the external class model name displayed in the UCMDB Visual Mapping toolinterface); however you have configured a wrong name businessservice.
<?xml version="1.0" encoding="UTF-8"?><integration xmlns:xsi="http://www.w3.org/2001/XMLSchema-instance"xsi:noNamespaceSchemaLocation="../mappings_schema.xsd">
<info><source name="UCMDB" version="10.20" vendor="HP"/><target name="SM" version="9.40" vendor="HP"/>
</info><import>
<scriptFile path="mappings.scripts.SMPushFunctions"/></import><!--
Push uCMDB CIT to SM Business Service.--><target_entities>
<source_instance query-name="SM Business Service Push 2.0" root-element-name="Root" >
<target_entity name="businessservice"><target_mapping name="UCMDBId" datatype="STRING" value="Root
['global_id']"/><target_mapping name="CustomerId" datatype="STRING"
ServiceManagerEnhancedAdapter9.41 User GuideTroubleshooting Data Push Issues
Micro Focus Service Manager (Service Manager 9.41 or later; UCMDB CP26 or later) Page 214 of 227
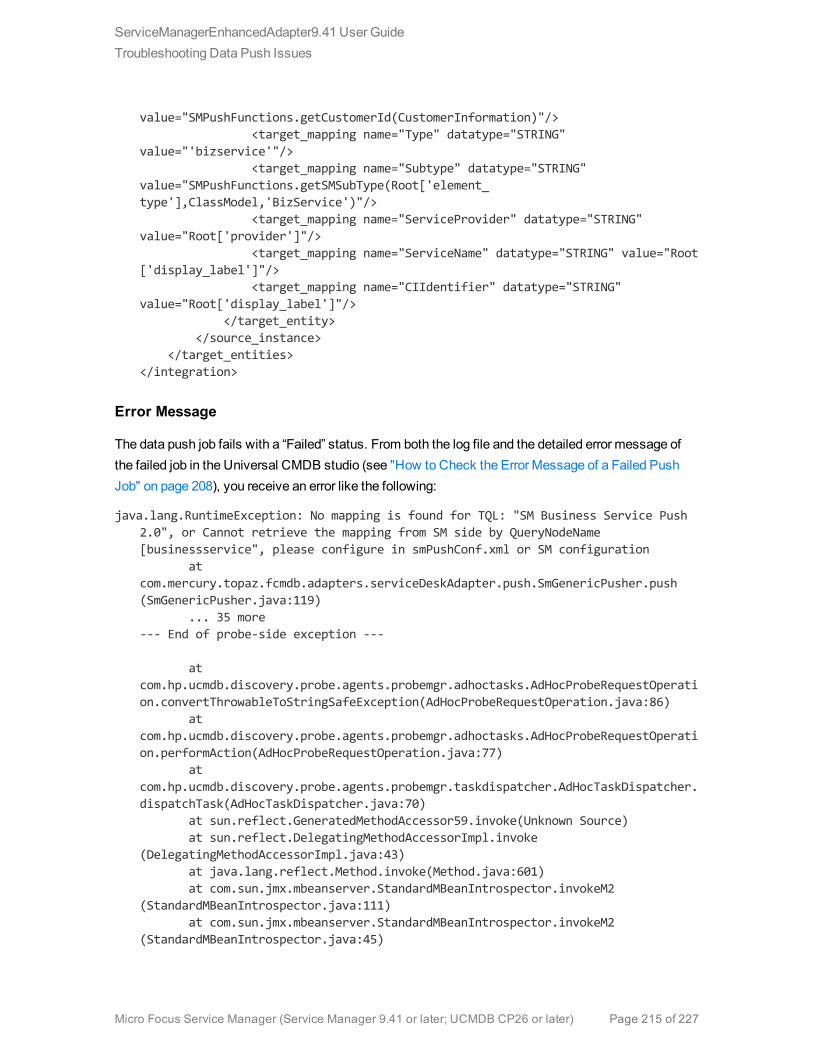
value="SMPushFunctions.getCustomerId(CustomerInformation)"/><target_mapping name="Type" datatype="STRING"
value="'bizservice'"/><target_mapping name="Subtype" datatype="STRING"
value="SMPushFunctions.getSMSubType(Root['element_type'],ClassModel,'BizService')"/>
<target_mapping name="ServiceProvider" datatype="STRING"value="Root['provider']"/>
<target_mapping name="ServiceName" datatype="STRING" value="Root['display_label']"/>
<target_mapping name="CIIdentifier" datatype="STRING"value="Root['display_label']"/>
</target_entity></source_instance>
</target_entities></integration>
Error Message
The data push job fails with a “Failed” status. From both the log file and the detailed error message ofthe failed job in the Universal CMDB studio (see "How to Check the Error Message of a Failed PushJob" on page 208), you receive an error like the following:
java.lang.RuntimeException: No mapping is found for TQL: "SM Business Service Push2.0", or Cannot retrieve the mapping from SM side by QueryNodeName[businessservice", please configure in smPushConf.xml or SM configuration
atcom.mercury.topaz.fcmdb.adapters.serviceDeskAdapter.push.SmGenericPusher.push(SmGenericPusher.java:119)
... 35 more--- End of probe-side exception ---
atcom.hp.ucmdb.discovery.probe.agents.probemgr.adhoctasks.AdHocProbeRequestOperation.convertThrowableToStringSafeException(AdHocProbeRequestOperation.java:86)
atcom.hp.ucmdb.discovery.probe.agents.probemgr.adhoctasks.AdHocProbeRequestOperation.performAction(AdHocProbeRequestOperation.java:77)
atcom.hp.ucmdb.discovery.probe.agents.probemgr.taskdispatcher.AdHocTaskDispatcher.dispatchTask(AdHocTaskDispatcher.java:70)
at sun.reflect.GeneratedMethodAccessor59.invoke(Unknown Source)at sun.reflect.DelegatingMethodAccessorImpl.invoke
(DelegatingMethodAccessorImpl.java:43)at java.lang.reflect.Method.invoke(Method.java:601)at com.sun.jmx.mbeanserver.StandardMBeanIntrospector.invokeM2
(StandardMBeanIntrospector.java:111)at com.sun.jmx.mbeanserver.StandardMBeanIntrospector.invokeM2
(StandardMBeanIntrospector.java:45)
ServiceManagerEnhancedAdapter9.41 User GuideTroubleshooting Data Push Issues
Micro Focus Service Manager (Service Manager 9.41 or later; UCMDB CP26 or later) Page 215 of 227
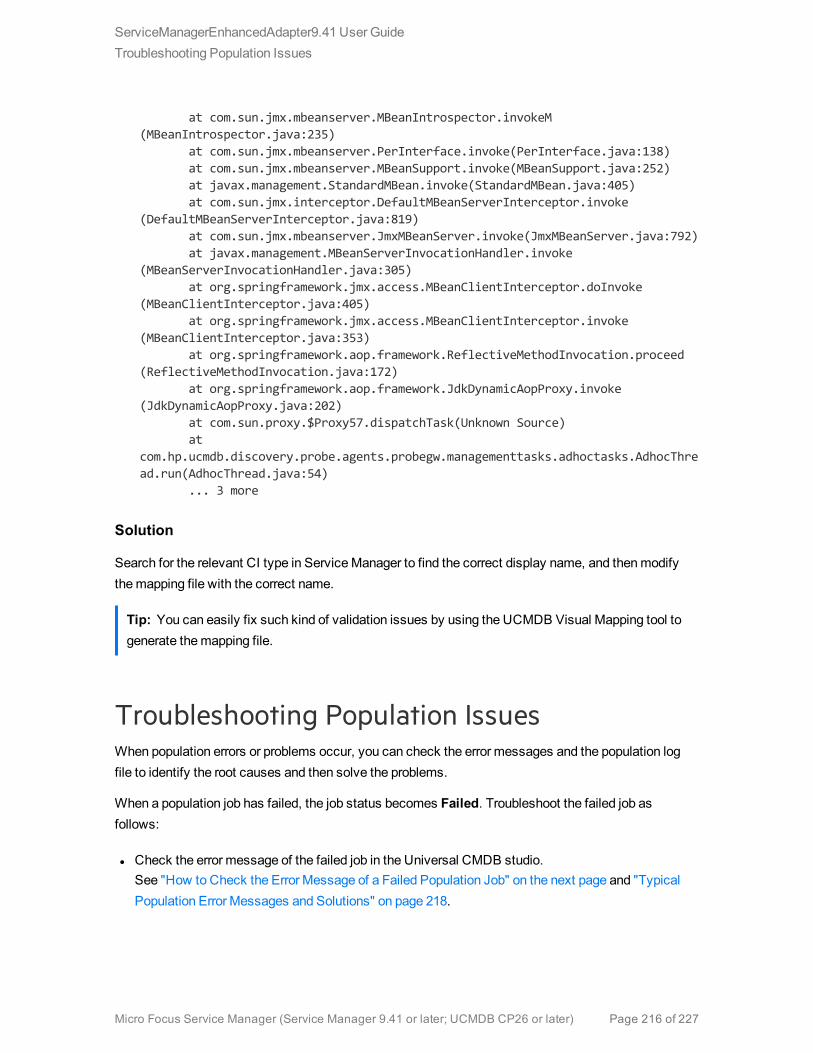
at com.sun.jmx.mbeanserver.MBeanIntrospector.invokeM(MBeanIntrospector.java:235)
at com.sun.jmx.mbeanserver.PerInterface.invoke(PerInterface.java:138)at com.sun.jmx.mbeanserver.MBeanSupport.invoke(MBeanSupport.java:252)at javax.management.StandardMBean.invoke(StandardMBean.java:405)at com.sun.jmx.interceptor.DefaultMBeanServerInterceptor.invoke
(DefaultMBeanServerInterceptor.java:819)at com.sun.jmx.mbeanserver.JmxMBeanServer.invoke(JmxMBeanServer.java:792)at javax.management.MBeanServerInvocationHandler.invoke
(MBeanServerInvocationHandler.java:305)at org.springframework.jmx.access.MBeanClientInterceptor.doInvoke
(MBeanClientInterceptor.java:405)at org.springframework.jmx.access.MBeanClientInterceptor.invoke
(MBeanClientInterceptor.java:353)at org.springframework.aop.framework.ReflectiveMethodInvocation.proceed
(ReflectiveMethodInvocation.java:172)at org.springframework.aop.framework.JdkDynamicAopProxy.invoke
(JdkDynamicAopProxy.java:202)at com.sun.proxy.$Proxy57.dispatchTask(Unknown Source)at
com.hp.ucmdb.discovery.probe.agents.probegw.managementtasks.adhoctasks.AdhocThread.run(AdhocThread.java:54)
... 3 more
Solution
Search for the relevant CI type in ServiceManager to find the correct display name, and thenmodifythemapping file with the correct name.
Tip: You can easily fix such kind of validation issues by using the UCMDB Visual Mapping tool togenerate themapping file.
Troubleshooting Population IssuesWhen population errors or problems occur, you can check the error messages and the population logfile to identify the root causes and then solve the problems.
When a population job has failed, the job status becomes Failed. Troubleshoot the failed job asfollows:
l Check the error message of the failed job in the Universal CMDB studio.See "How to Check the Error Message of a Failed Population Job" on the next page and "TypicalPopulation Error Messages and Solutions" on page 218.
ServiceManagerEnhancedAdapter9.41 User GuideTroubleshooting Population Issues
Micro Focus Service Manager (Service Manager 9.41 or later; UCMDB CP26 or later) Page 216 of 227
l Check the log file for more details.See "How to Check the Population Log File" below.
How to Check the Error Message of a Failed
Population JobWhile a population job fails, you can check the detailed error messages in the Universal CMDB studio.
To check the error message of a failed population job:
1. Log in to UCMDB as an administrator.
2. Navigate toData Flow Management > Integration Studio.
3. Select the integration point for this integration.
4. Click thePopulation tab.
5. Select the failed job from Integration Jobs, and click the Job Errors subtab.
6. Double-click an error message from the list.A pop-up window opens to display the error details.
How to Check the Population Log FileYou can set the Development adapter log level to DEBUG so that you can check the population resulttree nodes of UCMDB, and sendmessages to and receivemessages from ServiceManager.Alternatively, you can set the log level to TRACE so as to check the conversion period based on amapping file.
Note: To troubleshoot push, population, and federation issues, you need to set the Developmentadapter log level to DEBUG or TRACE in the fcmdb.properties and fcmdb.push.propertiesfiles, which are located in the \conf\log folder of your Data Flow Probe or Integration Serviceinstallation. Additionally, you can view push, population and federation log information in thefcmdb.push.all.log file, which is located in the \runtime\log folder of your Data Flow Probe orIntegration Service installation. Your Data Flow Probe or Integration Servicemay be installed onthe same host as your UCMDB Server or on a separate host.
To set the Development adapter log level and view the population log file, follow the steps described in"How to Check the Push Log File" on page 210.
ServiceManagerEnhancedAdapter9.41 User GuideTroubleshooting Population Issues
Micro Focus Service Manager (Service Manager 9.41 or later; UCMDB CP26 or later) Page 217 of 227

Typical Population Error Messages and SolutionsThe following describes typical error messages that may occur during population, and their solutions.
This section includes:
l "No TQLQuery Configured in smPopConf.xml " below
l "Nonexistent Mapping File NameDefined for a TQLQuery in smPopConf.xml" on page 221
No TQL Query Configured in smPopConf.xml
Error Message
If you have not yet added a TQL query to your job, you cannot select this query from the list while youcreate or update your job.
If you have already added this TQL query to your job, but forgot to add the configuration for this query insmPopConf.xml, you will get a “Failed” status while you run this population job. In addition, in theUniversal CMDB studio, you will get an error message like the following (see "How to Check the ErrorMessage of a Failed Population Job" on the previous page).
running population. Destination ID: sm, Failed during query: SM BusinessApplication Population 2.0, all queries: [SM Business Application Population2.0, SM Business Service Population 2.0], finished queries: [].ERROR: com.mercury.topaz.cmdb.shared.base.CmdbException: [ErrorCode [802]General Integration Error{sm}]appilog.framework.shared.manage.impl.MamResponseException: [ErrorCode [802]General Integration Error{sm}]CMDB Operation Internal Error: classcom.mercury.topaz.cmdb.shared.fcmdb.dataAccess.exception.AdapterAccessGeneralException : Unsupported Query [SM Business Application Population 2.0], onlypopulation TQL is supported : operation Data Access Adapter Query: RetrieveChanged Data
atcom.mercury.topaz.cmdb.shared.manage.operation.impl.AbstractCommonOperation.execute(AbstractCommonOperation.java:160)
atcom.hp.ucmdb.dataAccess.manager.DataAccessAdapterManagerProbeImpl.executeOperation(DataAccessAdapterManagerProbeImpl.java:50)
atcom.hp.ucmdb.discovery.probe.agents.probemgr.adapters.DataAccessAdaptersFacade.invokeOperation(DataAccessAdaptersFacade.java:406)
at
ServiceManagerEnhancedAdapter9.41 User GuideTroubleshooting Population Issues
Micro Focus Service Manager (Service Manager 9.41 or later; UCMDB CP26 or later) Page 218 of 227
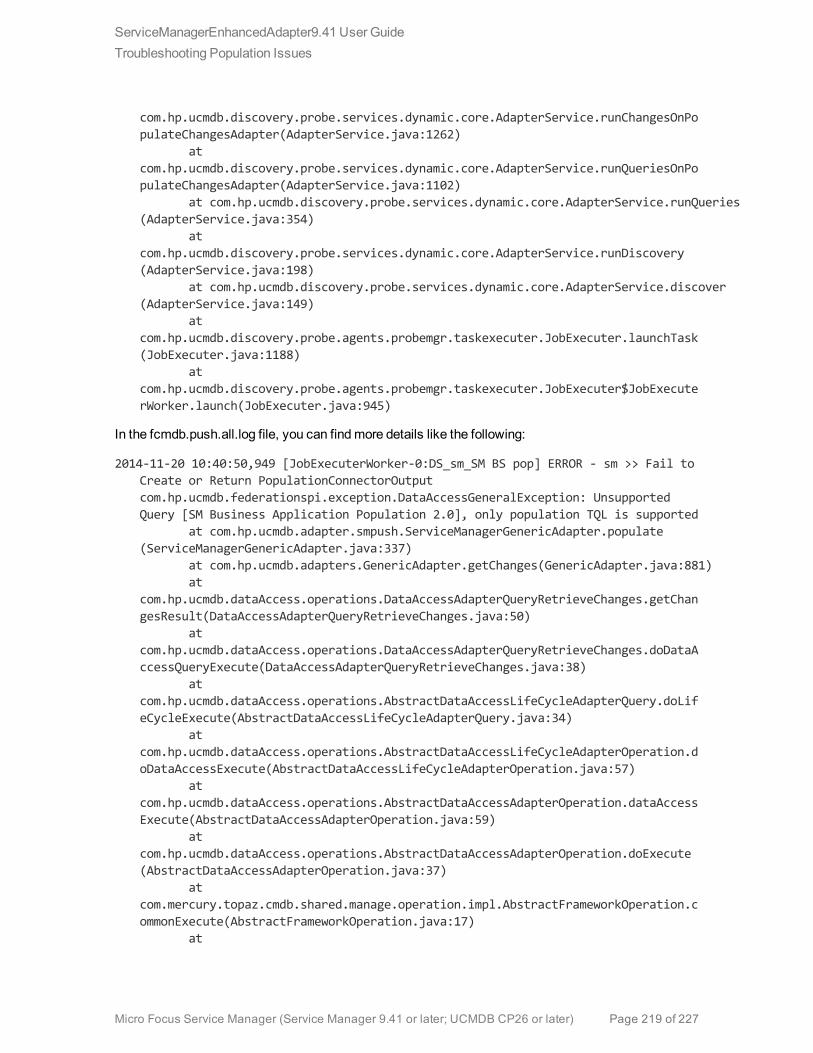
com.hp.ucmdb.discovery.probe.services.dynamic.core.AdapterService.runChangesOnPopulateChangesAdapter(AdapterService.java:1262)
atcom.hp.ucmdb.discovery.probe.services.dynamic.core.AdapterService.runQueriesOnPopulateChangesAdapter(AdapterService.java:1102)
at com.hp.ucmdb.discovery.probe.services.dynamic.core.AdapterService.runQueries(AdapterService.java:354)
atcom.hp.ucmdb.discovery.probe.services.dynamic.core.AdapterService.runDiscovery(AdapterService.java:198)
at com.hp.ucmdb.discovery.probe.services.dynamic.core.AdapterService.discover(AdapterService.java:149)
atcom.hp.ucmdb.discovery.probe.agents.probemgr.taskexecuter.JobExecuter.launchTask(JobExecuter.java:1188)
atcom.hp.ucmdb.discovery.probe.agents.probemgr.taskexecuter.JobExecuter$JobExecuterWorker.launch(JobExecuter.java:945)
In the fcmdb.push.all.log file, you can findmore details like the following:
2014-11-20 10:40:50,949 [JobExecuterWorker-0:DS_sm_SM BS pop] ERROR - sm >> Fail toCreate or Return PopulationConnectorOutputcom.hp.ucmdb.federationspi.exception.DataAccessGeneralException: UnsupportedQuery [SM Business Application Population 2.0], only population TQL is supported
at com.hp.ucmdb.adapter.smpush.ServiceManagerGenericAdapter.populate(ServiceManagerGenericAdapter.java:337)
at com.hp.ucmdb.adapters.GenericAdapter.getChanges(GenericAdapter.java:881)at
com.hp.ucmdb.dataAccess.operations.DataAccessAdapterQueryRetrieveChanges.getChangesResult(DataAccessAdapterQueryRetrieveChanges.java:50)
atcom.hp.ucmdb.dataAccess.operations.DataAccessAdapterQueryRetrieveChanges.doDataAccessQueryExecute(DataAccessAdapterQueryRetrieveChanges.java:38)
atcom.hp.ucmdb.dataAccess.operations.AbstractDataAccessLifeCycleAdapterQuery.doLifeCycleExecute(AbstractDataAccessLifeCycleAdapterQuery.java:34)
atcom.hp.ucmdb.dataAccess.operations.AbstractDataAccessLifeCycleAdapterOperation.doDataAccessExecute(AbstractDataAccessLifeCycleAdapterOperation.java:57)
atcom.hp.ucmdb.dataAccess.operations.AbstractDataAccessAdapterOperation.dataAccessExecute(AbstractDataAccessAdapterOperation.java:59)
atcom.hp.ucmdb.dataAccess.operations.AbstractDataAccessAdapterOperation.doExecute(AbstractDataAccessAdapterOperation.java:37)
atcom.mercury.topaz.cmdb.shared.manage.operation.impl.AbstractFrameworkOperation.commonExecute(AbstractFrameworkOperation.java:17)
at
ServiceManagerEnhancedAdapter9.41 User GuideTroubleshooting Population Issues
Micro Focus Service Manager (Service Manager 9.41 or later; UCMDB CP26 or later) Page 219 of 227

com.mercury.topaz.cmdb.shared.manage.operation.impl.AbstractCommonOperation$OperationExecuteFlowTrackingCommand.execute(AbstractCommonOperation.java:87)
atcom.mercury.topaz.cmdb.shared.manage.operation.impl.AbstractCommonOperation$OperationExecuteFlowTrackingCommand.execute(AbstractCommonOperation.java:60)
at com.mercury.topaz.cmdb.shared.manage.flowmanagement.api.FlowManager.execute(FlowManager.java:227)
atcom.mercury.topaz.cmdb.shared.manage.operation.flow.OperationInFlowDefaultExecutor.execute(OperationInFlowDefaultExecutor.java:23)
atcom.mercury.topaz.cmdb.shared.manage.operation.impl.AbstractCommonOperation.execute(AbstractCommonOperation.java:158)
atcom.hp.ucmdb.dataAccess.manager.DataAccessAdapterManagerProbeImpl.executeOperation(DataAccessAdapterManagerProbeImpl.java:50)
atcom.hp.ucmdb.discovery.probe.agents.probemgr.adapters.DataAccessAdaptersFacade.invokeOperation(DataAccessAdaptersFacade.java:406)
atcom.hp.ucmdb.discovery.probe.services.dynamic.core.AdapterService.runChangesOnPopulateChangesAdapter(AdapterService.java:1262)
atcom.hp.ucmdb.discovery.probe.services.dynamic.core.AdapterService.runQueriesOnPopulateChangesAdapter(AdapterService.java:1102)
at com.hp.ucmdb.discovery.probe.services.dynamic.core.AdapterService.runQueries(AdapterService.java:354)
atcom.hp.ucmdb.discovery.probe.services.dynamic.core.AdapterService.runDiscovery(AdapterService.java:198)
at com.hp.ucmdb.discovery.probe.services.dynamic.core.AdapterService.discover(AdapterService.java:149)
atcom.hp.ucmdb.discovery.probe.agents.probemgr.taskexecuter.JobExecuter.launchTask(JobExecuter.java:1188)
atcom.hp.ucmdb.discovery.probe.agents.probemgr.taskexecuter.JobExecuter$JobExecuterWorker.launch(JobExecuter.java:945)
atcom.hp.ucmdb.discovery.probe.agents.probemgr.taskexecuter.JobExecuter$JobExecuterWorker.executeTask(JobExecuter.java:867)
atcom.hp.ucmdb.discovery.probe.agents.probemgr.taskexecuter.JobExecuter$JobExecuterWorker.run(JobExecuter.java:728)
Solution
Search for text string “Unsupported Query by this adapter” to find out the TQL query name that has notyet been configured, and then configure it in the smPopConf.xml file.
ServiceManagerEnhancedAdapter9.41 User GuideTroubleshooting Population Issues
Micro Focus Service Manager (Service Manager 9.41 or later; UCMDB CP26 or later) Page 220 of 227
Nonexistent Mapping File Name Defined for a TQL
Query in smPopConf.xml
Error Message
Youwill get a “Failed” status while you run the population job. In addition, from the Universal CMDBstudio, you will get an error message like the following:
running population. Destination ID: sm, Failed during query: SM Business ServicePopulation 2.0, all queries: [SM Business Application Population 2.0, SMBusiness Service Population 2.0], finished queries: [SM Business ApplicationPopulation 2.0].ERROR: com.mercury.topaz.cmdb.shared.base.CmdbException: [ErrorCode [802]General Integration Error{sm}]appilog.framework.shared.manage.impl.MamResponseException: [ErrorCode [802]General Integration Error{sm}]CMDB Operation Internal Error: classcom.mercury.topaz.cmdb.shared.fcmdb.dataAccess.exception.AdapterAccessGeneralException : Query Definition [SM Business Service Population 2.0] has no matchingmapping. Make sure the mapping exist exists under folder 'mapping' and containsthe exact query name and root name. Available mappings:[QueryRoot{queryName='SM Business Application Population 2.0',rootName='bizservice'}] : operation Data Access Adapter Query: Retrieve ChangedData
atcom.mercury.topaz.cmdb.shared.manage.operation.impl.AbstractCommonOperation.execute(AbstractCommonOperation.java:160)
atcom.hp.ucmdb.dataAccess.manager.DataAccessAdapterManagerProbeImpl.executeOperation(DataAccessAdapterManagerProbeImpl.java:50)
atcom.hp.ucmdb.discovery.probe.agents.probemgr.adapters.DataAccessAdaptersFacade.invokeOperation(DataAccessAdaptersFacade.java:406)
atcom.hp.ucmdb.discovery.probe.services.dynamic.core.AdapterService.runChangesOnPopulateChangesAdapter(AdapterService.java:1262)
atcom.hp.ucmdb.discovery.probe.services.dynamic.core.AdapterService.runQueriesOnPopulateChangesAdapter(AdapterService.java:1102)
at com.hp.ucmdb.discovery.probe.services.dynamic.core.AdapterService.runQueries(AdapterService.java:354)
atcom.hp.ucmdb.discovery.probe.services.dynamic.core.AdapterService.runDiscovery(AdapterService.java:198)
at com.hp.ucmdb.discovery.probe.services.dynamic.core.AdapterService.discover(AdapterService.java:149)
ServiceManagerEnhancedAdapter9.41 User GuideTroubleshooting Population Issues
Micro Focus Service Manager (Service Manager 9.41 or later; UCMDB CP26 or later) Page 221 of 227

atcom.hp.ucmdb.discovery.probe.agents.probemgr.taskexecuter.JobExecuter.launchTask(JobExecuter.java:1188)
atcom.hp.ucmdb.discovery.probe.agents.probemgr.taskexecuter.JobExecuter$JobExecuterWorker.launch(JobExecuter.java:945)
atcom.hp.ucmdb.discovery.probe.agents.probemgr.taskexecuter.JobExecuter$JobExecuterWorker.executeTask(JobExecuter.java:867)
atcom.hp.ucmdb.discovery.probe.agents.probemgr.taskexecuter.JobExecuter$JobExecuterWorker.run(JobExecuter.java:728)
Solution
Search for text “has nomatchingmapping” to find out the missingmapping file name, and then add themapping file to the adapter package.
Troubleshooting Federation IssuesWhen a federation error occurs, you can check the error message in the federation log file to identify theroot cause and then solve the problem.
For more information, see the following:
"How to Check the Error Message of a Failed Federation Request" below
"Typical Federation Error Messages and Solutions" on the next page
How to Check the Error Message of a Failed
Federation RequestWhen a federation query fails, a pop-up window similar to the following appears in the UCMDB studio.
ServiceManagerEnhancedAdapter9.41 User GuideTroubleshooting Federation Issues
Micro Focus Service Manager (Service Manager 9.41 or later; UCMDB CP26 or later) Page 222 of 227

Note: To troubleshoot push, population, and federation issues, you need to set the Developmentadapter log level to DEBUG or TRACE in the fcmdb.properties and fcmdb.push.propertiesfiles, which are located in the \conf\log folder of your Data Flow Probe or Integration Serviceinstallation. Additionally, you can view push, population and federation log information in thefcmdb.push.all.log file, which is located in the \runtime\log folder of your Data Flow Probe orIntegration Service installation. Your Data Flow Probe or Integration Servicemay be installed onthe same host as your UCMDB Server or on a separate host.
To set the Development adapter log level and view the detailed error message of a failed federationquery, follow the steps described in "How to Check the Push Log File" on page 210.
Typical Federation Error Messages and SolutionsThe following error may occur during federation:
"Mapping File for the Federation TQLQuery Is not Well Formed" below
Mapping File for the Federation TQL Query Is not Well
Formed
Error Message
There are cases where themapping file for a federation TQL query is not well formed. For example,target_mapping_name “priority” in the following example federationmapping file specifies a wrongGroovy function name (SMFederationFunctions.getEnumValue1):
<?xml version="1.0" encoding="UTF-8"?><integration xmlns:xsi="http://www.w3.org/2001/XMLSchema-instance"xsi:noNamespaceSchemaLocation="../mappings_schema.xsd">
<info><source name="SM" version="9.40" vendor="HP"/><target name="UCMDB" version="10.20" vendor="HP"/>
</info><import>
<scriptFile path="mappings.scripts.SMFederationFunctions"/></import><target_entities>
<source_instance query-name="SM Incident 2.0" root-element-name="ucmdbIncident">
<target_entity name="incident">
ServiceManagerEnhancedAdapter9.41 User GuideTroubleshooting Federation Issues
Micro Focus Service Manager (Service Manager 9.41 or later; UCMDB CP26 or later) Page 223 of 227

<target_mapping name="reference_number" datatype="STRING"value="ucmdbIncident['IncidentID']"/>
<target_mapping name="name" datatype="STRING"value="ucmdbIncident['BriefDescription']"/>
<target_mapping name="priority" datatype="STRING"value="SMFederationFunctions.getEnumValue1(ucmdbIncident['PriorityCode'],'Priority')"/>
<target_mapping name="incident_status" datatype="STRING"value="SMFederationFunctions.firstLetterToLowerAndReplaceSpaceWithUnderscore
(ucmdbIncident['IMTicketStatus'])"/><target_mapping name="category" datatype="STRING"
value="SMFederationFunctions.replaceSpaceWithUnderscore(ucmdbIncident['Category'])"/>
<target_mapping name="closed_time" datatype="DATE"value="SMFederationFunctions.convertDate(ucmdbIncident['ClosedTime'])"/>
<target_mapping name="create_time" datatype="DATE"value="SMFederationFunctions.convertDate(ucmdbIncident['OpenTime'])"/>
<target_mapping name="last_modified_time" datatype="DATE"value="SMFederationFunctions.convertDate(ucmdbIncident['UpdatedTime'])"/>
<target_mapping name="impact_scope" datatype="STRING"value="SMFederationFunctions.getEnumValue(ucmdbIncident['ImpactScope'],'ImpactScope')"/>
<target_mapping name="urgency" datatype="STRING"value="SMFederationFunctions.getEnumValue(ucmdbIncident
['Urgency'],'Urgency')"/></target_entity>
</source_instance></target_entities>
</integration>
When you try to federate incidents, no records are retrieved from ServiceManager. If you check thefcmdb.push.all.log file, you can find a detailed error message that resembles the following for thefederation query:
2014-11-20 14:09:58,670 [AdHoc:AD_HOC_TASK_PATTERN_ID-66-1416463796366] ERROR - >>Failed executing value [SMFederationFunctions.getEnumValue1(ucmdbIncident['PriorityCode'],'Priority')] of mapping <target_mapping name="priority"><target_ci_type name="incident"> , Root cmdbId [null]groovy.lang.MissingMethodException: No signature of method: staticmappings.scripts.SMFederationFunctions.getEnumValue1() is applicable forargument types: (java.lang.String, java.lang.String) values: [1, Priority]Possible solutions: getEnumValue(java.lang.String, java.lang.String)
at groovy.lang.MetaClassImpl.invokeStaticMissingMethod(MetaClassImpl.java:1359)at groovy.lang.MetaClassImpl.invokeStaticMethod(MetaClassImpl.java:1345)at org.codehaus.groovy.runtime.callsite.StaticMetaClassSite.call
(StaticMetaClassSite.java:50)at org.codehaus.groovy.runtime.callsite.CallSiteArray.defaultCall
(CallSiteArray.java:42)at org.codehaus.groovy.runtime.callsite.AbstractCallSite.call
(AbstractCallSite.java:108)
ServiceManagerEnhancedAdapter9.41 User GuideTroubleshooting Federation Issues
Micro Focus Service Manager (Service Manager 9.41 or later; UCMDB CP26 or later) Page 224 of 227

at org.codehaus.groovy.runtime.callsite.AbstractCallSite.call(AbstractCallSite.java:120)
at Mapping_4a8761e7adc009e8a7d268c2f1349ab4.run(Mapping_4a8761e7adc009e8a7d268c2f1349ab4.groovy:1)
atcom.hp.ucmdb.adapters.instance.mapping.AbstractResultTreeNodeMapper.calculateProperties(AbstractResultTreeNodeMapper.java:231)
atcom.hp.ucmdb.adapters.instance.mapping.AbstractResultTreeNodeMapper.processTargetEntity(AbstractResultTreeNodeMapper.java:301)
at com.hp.ucmdb.adapters.instance.mapping.RtnToRtnMapper.processTargetEntities(RtnToRtnMapper.java:214)
atcom.hp.ucmdb.adapters.instance.mapping.RtnToRtnMapper.processSourceInstanceWrapper(RtnToRtnMapper.java:101)
at com.hp.ucmdb.adapters.instance.mapping.RtnToRtnMapper.buildResultTreeNode(RtnToRtnMapper.java:76)
atcom.hp.ucmdb.adapters.GenericAdapter$PopulationFederationChunkProcessor.invoke(GenericAdapter.java:1213)
at com.hp.ucmdb.adapters.GenericAdapter.getDataResult(GenericAdapter.java:743)at
com.hp.ucmdb.discovery.probe.processor.FederationTopologyGetDataResultProbeRequestProcessor.processRequest(FederationTopologyGetDataResultProbeRequestProcessor.java:40)
atcom.hp.ucmdb.discovery.probe.processor.FederationTopologyGetDataResultProbeRequestProcessor.processRequest(FederationTopologyGetDataResultProbeRequestProcessor.java:26)
at com.hp.ucmdb.discovery.probe.processor.AbstractProbeProcessor.process(AbstractProbeProcessor.java:56)
at com.hp.ucmdb.discovery.probe.processor.AbstractProbeProcessor.process(AbstractProbeProcessor.java:19)
atcom.hp.ucmdb.discovery.probe.agents.probemgr.adhoctasks.AdHocProbeRequestOperation.performAction(AdHocProbeRequestOperation.java:63)
atcom.hp.ucmdb.discovery.probe.agents.probemgr.taskdispatcher.AdHocTaskDispatcher.dispatchTask(AdHocTaskDispatcher.java:70)
at sun.reflect.GeneratedMethodAccessor75.invoke(Unknown Source)at sun.reflect.DelegatingMethodAccessorImpl.invoke
(DelegatingMethodAccessorImpl.java:43)at java.lang.reflect.Method.invoke(Method.java:601)at com.sun.jmx.mbeanserver.StandardMBeanIntrospector.invokeM2
(StandardMBeanIntrospector.java:111)at com.sun.jmx.mbeanserver.StandardMBeanIntrospector.invokeM2
(StandardMBeanIntrospector.java:45)at com.sun.jmx.mbeanserver.MBeanIntrospector.invokeM
(MBeanIntrospector.java:235)
ServiceManagerEnhancedAdapter9.41 User GuideTroubleshooting Federation Issues
Micro Focus Service Manager (Service Manager 9.41 or later; UCMDB CP26 or later) Page 225 of 227
at com.sun.jmx.mbeanserver.PerInterface.invoke(PerInterface.java:138)at com.sun.jmx.mbeanserver.MBeanSupport.invoke(MBeanSupport.java:252)at javax.management.StandardMBean.invoke(StandardMBean.java:405)at com.sun.jmx.interceptor.DefaultMBeanServerInterceptor.invoke
(DefaultMBeanServerInterceptor.java:819)at com.sun.jmx.mbeanserver.JmxMBeanServer.invoke(JmxMBeanServer.java:792)at javax.management.MBeanServerInvocationHandler.invoke
(MBeanServerInvocationHandler.java:305)at org.springframework.jmx.access.MBeanClientInterceptor.doInvoke
(MBeanClientInterceptor.java:405)at org.springframework.jmx.access.MBeanClientInterceptor.invoke
(MBeanClientInterceptor.java:353)at org.springframework.aop.framework.ReflectiveMethodInvocation.proceed
(ReflectiveMethodInvocation.java:172)at org.springframework.aop.framework.JdkDynamicAopProxy.invoke
(JdkDynamicAopProxy.java:202)at com.sun.proxy.$Proxy51.dispatchTask(Unknown Source)at
com.hp.ucmdb.discovery.probe.agents.probegw.managementtasks.adhoctasks.AdhocThread.run(AdhocThread.java:54)
at org.eclipse.jetty.util.thread.QueuedThreadPool.runJob(QueuedThreadPool.java:599)
at org.eclipse.jetty.util.thread.QueuedThreadPool$3.run(QueuedThreadPool.java:534)
at java.lang.Thread.run(Thread.java:722)
Solution
Search for word "Exception" in the fcmdb.push.all.log file to find the wrongmethod name, and thencorrect it in the corresponding federationmapping file.
ServiceManagerEnhancedAdapter9.41 User GuideTroubleshooting Federation Issues
Micro Focus Service Manager (Service Manager 9.41 or later; UCMDB CP26 or later) Page 226 of 227
Send documentation feedbackIf you have comments about this document, you can contact the documentation team by email. If anemail client is configured on this system, click the link above and an email window opens with thefollowing information in the subject line:
Feedback on ServiceManagerEnhancedAdapter9.41 User Guide (Service Manager ServiceManager 9.41 or later; UCMDB CP26 or later)
Just add your feedback to the email and click send.
If no email client is available, copy the information above to a new message in a webmail client, andsend your feedback to [email protected].
We appreciate your feedback!
Service Manager (Service Manager 9.41 or later; UCMDB CP26 or later) Page 227 of 227