unit 8 grade 9 applied plane geometry - · pdf filetips4rm: grade 9 applied – unit 8:...
TRANSCRIPT

TIPS4RM: Grade 9 Applied – Unit 8: Plane Geometry 1
Unit 8 Grade 9 Applied Plane Geometry Lesson Outline *Note: This unit could stand alone and be placed anywhere in the course.
BIG PICTURE
Students will: • investigate properties of geometric objects using dynamic geometry software and manipulatives; • illustrate and explain the relationship between angles formed by parallel lines cut by a transversal and interior and
exterior angles of triangles and quadrilaterals; • determine some properties of sides and diagonals of quadrilaterals.
Note: Students may have a very broad range of experience with using The Geometer’s Sketchpad®4. Skills can be taught as they are needed for each lesson, or alternatively, Introduction to The Geometer’s Sketchpad®4 file (included in Day 2) could be used at the beginning of the unit.
Day Lesson Title Math Learning Goals Expectations 1 It’s a Parallel World • Describe the properties and relationships of the angles formed by
parallel lines cut by a transversal. MG3.01, MG3.02
CGE 5a, 5c 2 Plane Geometry –
Introduction (Part 1) GSP®4 files: Plane Geometry, Introduction to Geometer’s Sketchpad
• Review angles, triangles, and parallel lines through exploration. • Build skills required for future use of The Geometer’s
Sketchpad®4 (GSP®4).
MG3.01, MG3.02
CGE 5a, 5e
3 Plane Geometry – Introduction (Part 2)
• Explore geometrical concepts (angles, triangles, parallel lines). • Build skills required for future use of GSP®4.
MG3.01, MG3.02
CGE 4b, 5b 4 What’s So Special?
(Part 1) GSP®4 file: What’s So Special?
• Build investigation skills by exploring geometric concepts, using GSP®4.
• Develop communication skills and geometric vocabulary.
MG3.01, MG3.02
CGE 2a, 5a
5 What’s So Special? (Part 2)
• Build investigation skills by exploring geometric concepts, using GSP®4.
• Develop communication skills and geometric vocabulary.
MG3.01, MG3.02
CGE 5a, 5b
6 Interior and Exterior Angles of Triangles and Quadrilaterals GSP®4 files: Tutorial GSP, Sum of the Exterior Angles of a Triangle, Sum of the Interior Angles of a Polygon
• Investigate the sum of the interior and exterior angles of triangles and quadrilaterals using GSP®4 and demonstration.
• Develop skills with GSP®4 in preparation for summative assessments.
MG3.01, LR1.03, LR4.04
CGE 2a, 3c
7 Using the Properties: Connecting Algebra to Geometry
• Practise solving problems using the geometry explored in previous lessons.
• Make connections to solving equations.
MG3.01, MG3.02, NA2.07, LR2.02, LR4.04
CGE 4b, 5a 8 Freaky Folds • Use paper folding to illustrate geometric properties. MG3.03
CGE 3c, 4b, 5g 9 Instructional Jazz
10 Instructional Jazz 11 Assessment presentation and/or test

TIPS4RM: Grade 9 Applied – Unit 8: Plane Geometry 2
Unit 8: Day 1: It’s a Parallel World Grade 9 Applied
75 min
Math Learning Goals • Describe the properties and relationships of the angles formed by parallel lines
cut by a transversal.
Materials • BLM 8.1.1, 8.1.2 • washable
markers • stickers • butterfly
fasteners • protractors • electronic
presentation • overheads or
pictures of everyday examples of parallel lines
• scissors • Acetate copies of
BLM 8.1.1, 1 /pair
Assessment Opportunities
Minds On ... Small Groups Brainstorm/Pass the Paper In groups, students pass one piece of paper and write examples of everyday objects or situations that can be modelled using parallel lines. Examples could include fencing, ironing board top with the floor, any rectangular shape, railway tracks, etc. Record verbal responses from the groups, asking clarifying questions with respect to where the parallelism is. As a class, define parallel lines.
Have pictures, overheads, or an electronic presentation for followup to reinforce the possibilities. Teachers can differentiate for students by helping them select an appropriate tool. Students must understand that equal corresponding or alternate angles only occur with parallel lines.
Action! Pairs Guided Exploration Provide each pair with an acetate copy of BLM 8.1.1, washable markers, a protractor, and some stickers. Cut the acetate in half, and poke a hole through each piece on the dot. Fasten the pieces of acetate with butterfly fasteners through the dots. Explain that the images on the acetates should be superimposed and rotated to create parallel lines. Students explore, record, and justify any angle relationships they observe on BLM 8.1.2. Students can use any of the tools (e.g., stickers, markers, protractors) to determine angle relationships.
Selecting Tools and Computation Strategies/Observation/Checklist: Circulate and observe the students as they choose their tools and strategies and as they investigate.
Consolidate Debrief
Whole Class Summarizing Record and consolidate the relationships established by student groups. Establish that the transversal is an essential condition for angles with parallel lines. Ensure that students recognize all the possible variations of each relationship, i.e., alternate (Z), corresponding (F), co-interior (C). Students make summarizing notes.
Application Concept Practice
Home Activity or Further Classroom Consolidation Identify the types of angles found in the examples used in Minds On. Justify your answers. Complete the practice questions.
Provide appropriate practice questions for students.

TIPS4RM: Grade 9 Applied – Unit 8: Plane Geometry 3
8.1.1: Parallel Lines Exploration
Line 2
Line 1
TIPS4RM: Grade 9 Applied – Unit 8: Plane Geometry 4
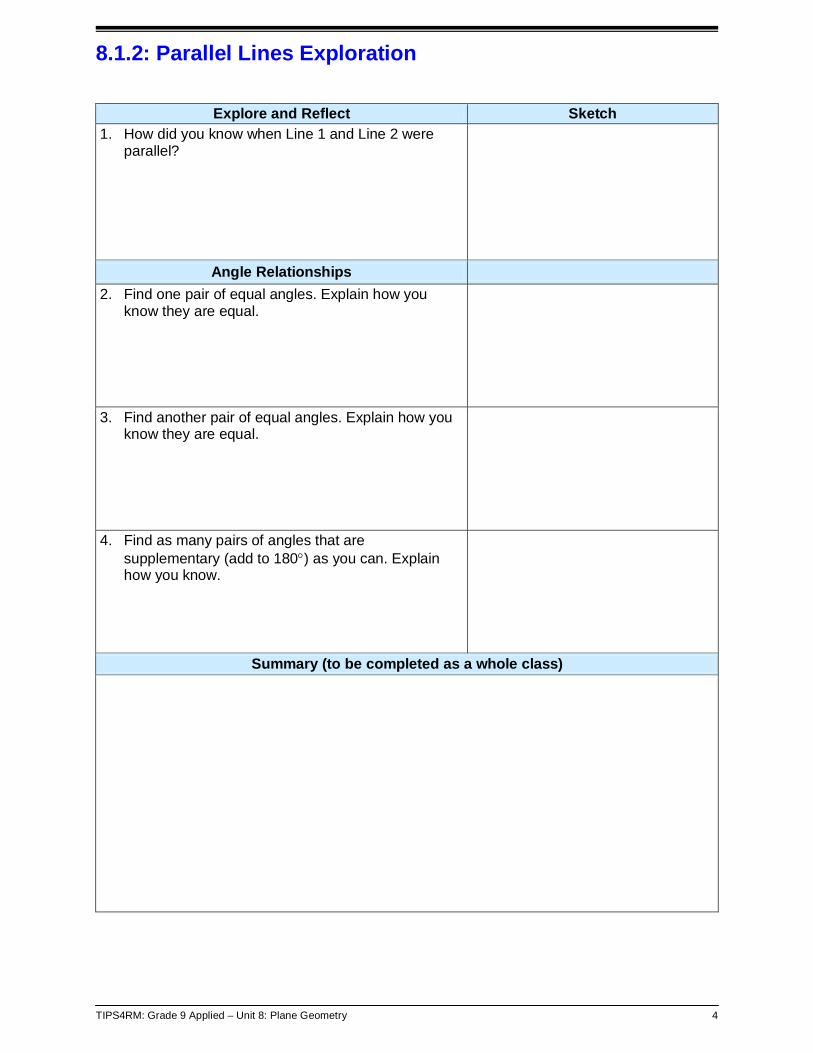
8.1.2: Parallel Lines Exploration
Explore and Reflect Sketch 1. How did you know when Line 1 and Line 2 were
parallel?
Angle Relationships 2. Find one pair of equal angles. Explain how you
know they are equal.
3. Find another pair of equal angles. Explain how you know they are equal.
4. Find as many pairs of angles that are supplementary (add to 180°) as you can. Explain how you know.
Summary (to be completed as a whole class)

TIPS4RM: Grade 9 Applied – Unit 8: Plane Geometry 5
Unit 8: Day 2: Plane Geometry – Introduction (Part 1) Grade 9 Applied
75 min
Math Learning Goals • Review angles, triangles, and parallel lines through exploration. • Build skills required for future use of The Geometer’s Sketchpad®4 (GSP).
Materials • BLM 8.2.1,
8.2.2, 8.2.3 • BLM 8.2.4
(Teacher) • chart paper • Computer with
data projector • Computer with
Geometers Sketchpad 4, 1/ pair
Assessment Opportunities
Minds On ... Small Groups Brainstorm
Curriculum Expectations/Observation/Mental Note: Circulate while students are working to assess prior learning diagnostically.
For the Graffiti activity, post sheets of chart paper with the following topic titles: Triangles, Quadrilaterals, Polygons, Angles, Lines/Line Segments/Rays. Instruct groups to record prior learning on one of the concept sheets. Students might draw sketches, write definitions, state properties, etc. Groups rotate so that each group visits each topic sheet and adds information. Whole Group Demonstration Demonstrate how to navigate through the GSP®4 file Plane Geometry using the How Do I...? feature and the GSP®4 Notes Booklet (BLM 8.2.2). Students may refer to these notes throughout the unit.
Intro GSP.gsp
Plane Geometry.gsp As an introductory activity, ask students to search the web to discover the meaning of the word geometry. Word Wall See BLM 8.2.4 The GSP®4 file Plane Geometry also has a “How to” button on each page with information that students may copy onto BLM 8.2.2.
Action! Pairs Guided Exploration Students use the GSP®4 file Plane Geometry and BLM 8.2.1 to review geometric concepts from Grades 7/8 and to build skills required for future activities with The Geometer’s Sketchpad®4. Student roles: Driver (runs the mouse), Recorder (takes notes for the pair). Students exchange roles part way through the activity. Provide feedback to student responses.
Learning Skills/Work Habits/Observation/Rating Scale: Circulate to assess how individual students stay on task and in role to complete the investigations.
Consolidate Debrief
Whole Class Discussion Discuss what has been accomplished to date. Ask students to bring an optical illusion for Day 3.
Reflection Concept Practice
Home Activity or Further Classroom Consolidation Make a title page for this unit. Complete practice questions using the theorems. Complete worksheet 8.2.3.
Provide appropriate practice questions.

TIPS4RM: Grade 9 Applied – Unit 8: Plane Geometry 6
8.2.1: Plane Geometry Record Sheet Use this page to record your observations and conclusions from the Plane Geometry GSP®4 file. Determine the unknown angle in the right column. Give reasons for your answer.

TIPS4RM: Grade 9 Applied – Unit 8: Plane Geometry 7
8.2.1: Plane Geometry Record Sheet (continued)
TIPS4RM: Grade 9 Applied – Unit 8: Plane Geometry 8
8.2.1: Plane Geometry Record Sheet (continued)

TIPS4RM: Grade 9 Applied – Unit 8: Plane Geometry 9
8.2.2: GSP® Notes Booklet
How do I …? Geometer’s Sketchpad Version 4
Instruction Booklet Created by:
__________________________

TIPS4RM: Grade 9 Applied – Unit 8: Plane Geometry 10
8.2.2: GSP® Notes Booklet (continued)

TIPS4RM: Grade 9 Applied – Unit 8: Plane Geometry 11
8.2.3: Theorems Practice Sheet Define each principle and determine the unknown angles. 1. Supplementary Angles
x 85° 2. Complementary Angles
m30°
3. Opposite Angle Theorem
r 70°
4. The Interior Angles of a Triangle
q
50° 55°
x ==
m ==
r ==
q ==

TIPS4RM: Grade 9 Applied – Unit 8: Plane Geometry 12
8.2.3: Theorems Practice Sheet (continued) 5. Isosceles Triangle Theorem
a75° 6. Equilateral Triangles
7. Exterior Angle Theorem
b45°
60°
a ==
x ==
b ==
x°

TIPS4RM: Grade 9 Applied – Unit 8: Plane Geometry 13
8.2.3: Theorems Practice Sheet (continued) 8. Parallel Lines
a) Corresponding Angles
m
68°
b) Alternate Angles
w83°
c) Co-interior Angles
x
72°
m =
w =
x ==

TIPS4RM: Grade 9 Applied – Unit 8: Plane Geometry 14
8.2.4: Word Wall List (Teacher)
acute angle obtuse triangle
acute triangle octagon
adjacent angles opposite angle
alternate angles parallelogram
bisector pentagon
circle perpendicular
co-interior angles perpendicular bisector
complementary angles point
congruent polygon
corresponding angles quadrilateral
diagonal radius
diameter ray
equilateral triangle rectangle
exterior angle reflex angle
hexagon rhombus
interior angle right angle
isosceles triangle right angle triangle
kite scalene triangle
line side
line segment similar figures
midpoint supplementary angles
obtuse angle transversal

TIPS4RM: Grade 9 Applied – Unit 8: Plane Geometry 15
Introduction to the Geometer’s Sketchpad (GSP®4 file) Intro GSP.gsp
When you are finished, click on the Link button to go to Page 2.
Try experimenting with these tools by constructingvarious objects on the right of the screen.
The four tools for constructing objectsare at the left of the screen.1) Point Tool (dot)2) Compass Tool (circle)3) Segment Tool (line segment)4) Text Tool (letter A)
Geometer's Sketchpad allows us toconstruct, measure, and animate and movegeometric objects easily.
Introduction to Geometer's Sketchpad.
Link to Page 2 Click on the Link button to go to Page 3
By highlighting an object you can also Hide the objectfrom the Display tab. This does not delete it, but hides itfrom view.
Another way to show or hide the label is tohighlight the object, then from the Display tab,choose Show/Hide Label.
To hide a label, click on the object, choose the Displaytab then choose Hide Label.
A point and a line segment are drawn at right. To label them click on the Text Tool (letter A)then click on the point or the line segment.
Labeling Objects.
Link to Page 3
Constructions.
To construct the midpoint of CD, click on the linesegment then, from the Construct menu, chooseMidpoint.
To construct a line parallel to FG highlight point Eand segment FG Then, from the Construct menu,choose Parallel Line.
To construct a line perpendicular to FG, highlight point E andsegment FG Then, from the Construct menu, choosePerpendicular Line.
To construct a line segment between points A and B,click on the points then, from the Construct menu,choose Segment
Click on the Link button to go to Page 4Link to Page 4
BA
E
GF
DC
Click on the Link button to go to Page 5
To construct the angle bisector of ABC, click on thepoints ABC (order is important) then, from theConstruct Menu, choose Angle Bisector.
Constructions 2
To construct the interior of DEF , click on thepoints DEF. Then, from the Construct Menu,choose Triangle Interior.
You can change the color of the interior byhighlighting it then, from the Display Menu, chooseColor.
Link to Page 5
F
D
E
CB
A
Click on the Link button to go to Page 6
To change the precision of the measurements, go tothe Edit tab and choose Preferences.
∠CDE is drawn at right. To measure the angle,click on points CDE (order is important) then go tothe Measure menu and choose Angle.
Be sure that only the line segement is highlighted. Tode-highlight an object click anywhere on the screen.
Measuring Objects (segments and angles).
A line segment is drawn at right. To measure thelength of the line segment, click on it then go to theMeasure menu above and choose Length.
Link to Page 6
A B
C
D E
Highlight the interior of the triangle then, from theMeasure Menu, choose Perimeter
Practice: Determine the area andperimeter of parallelogram DEFG.
Highlight the interior of the triangle then, from theMeasure Menu, choose Area.
Construct the interior of ABC (click on pointsABC then choose Triangle Interior from theConstruct Menu).
Measuring Objects (perimeter and area)
Click on the Link button to go to Page 7Link to Page 7
E
B
A
C
G F
D
TIPS4RM: Grade 9 Applied – Unit 8: Plane Geometry 16
Introduction to the Geometer’s Sketchpad (GSP®4 file) (continued)
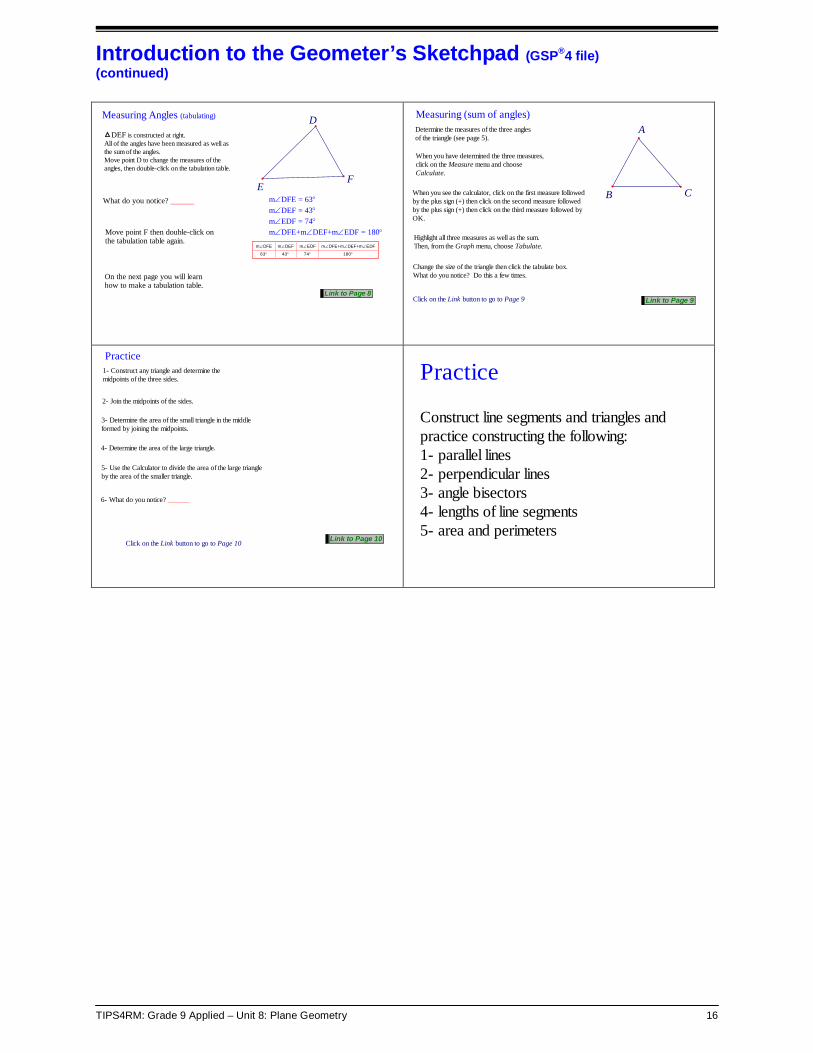
m∠DFE m∠DEF m∠EDF m∠DFE+m∠DEF+m∠EDF
63° 43° 74° 180°
On the next page you will learnhow to make a tabulation table.
Move point F then double-click onthe tabulation table again.
What do you notice? ______
Measuring Angles (tabulating)
DEF is constructed at right.All of the angles have been measured as well asthe sum of the angles.Move point D to change the measures of theangles, then double-click on the tabulation table.
m∠DFE+m∠DEF+m∠EDF = 180°m∠EDF = 74°m∠DEF = 43°m∠DFE = 63°
Link to Page 8
F
D
E
Change the size of the triangle then click the tabulate box. What do you notice? Do this a few times.
Highlight all three measures as well as the sum.Then, from the Graph menu, choose Tabulate.
When you see the calculator, click on the first measure followedby the plus sign (+) then click on the second measure followedby the plus sign (+) then click on the third measure followed byOK.
When you have determined the three measures,click on the Measure menu and chooseCalculate.
Click on the Link button to go to Page 9
Measuring (sum of angles)Determine the measures of the three anglesof the triangle (see page 5).
Link to Page 9
C
A
B
Click on the Link button to go to Page 10
6- What do you notice? ______
5- Use the Calculator to divide the area of the large triangleby the area of the smaller triangle.
4- Determine the area of the large triangle.
3- Determine the area of the small triangle in the middleformed by joining the midpoints.
2- Join the midpoints of the sides.
1- Construct any triangle and determine themidpoints of the three sides.
Practice
Link to Page 10
Construct line segments and triangles andpractice constructing the following:1- parallel lines2- perpendicular lines3- angle bisectors4- lengths of line segments5- area and perimeters
Practice
TIPS4RM: Grade 9 Applied – Unit 8: Plane Geometry 17
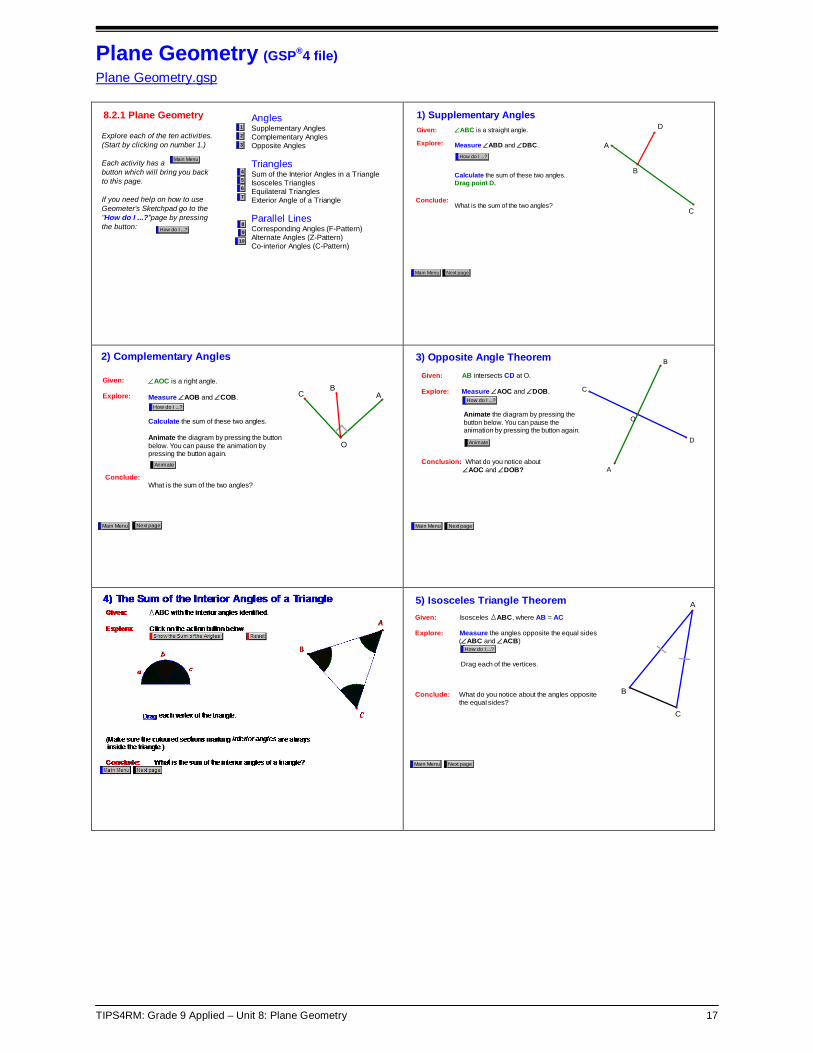
Plane Geometry (GSP®4 file) Plane Geometry.gsp
8.2.1 Plane Geometry Angles Supplementary AnglesComplementary AnglesOpposite Angles
Triangles Sum of the Interior Angles in a Triangle Isosceles Triangles Equilateral TrianglesExterior Angle of a Triangle
Parallel Lines Corresponding Angles (F-Pattern)Alternate Angles (Z-Pattern)Co-interior Angles (C-Pattern)
Explore each of the ten activities.(Start by clicking on number 1.)
Each activity has a button which will bring you backto this page.
If you need help on how to useGeometer's Sketchpad go to the"How do I ...?"page by pressingthe button:
Main Menu
10
98
7
654
3
2
1
How do I ...?
Explore:
Conclude:
Given: ∠ABC is a straight angle.
Measure ∠ABD and ∠DBC.
Calculate the sum of these two angles. Drag point D.
What is the sum of the two angles?
1) Supplementary Angles
Next pageMain Menu
How do I ...?
A
C
D
B
Given:
Explore:
Conclude:
∠AOC is a right angle.
Measure ∠AOB and ∠COB.
Calculate the sum of these two angles.
Animate the diagram by pressing the buttonbelow. You can pause the animation bypressing the button again.
What is the sum of the two angles?
2) Complementary Angles
Animate
Next pageMain Menu
How do I ...?
O
ACB
Animate the diagram by pressing thebutton below. You can pause theanimation by pressing the button again.
Given: AB intersects CD at O.
Explore: Measure ∠AOC and ∠DOB.
Conclusion: What do you notice about ∠AOC and ∠DOB?
3) Opposite Angle Theorem
Next pageMain Menu
How do I ...?
Animate
A
C
O
D
B
Given: Isosceles ABC, where AB = AC
Explore: Measure the angles opposite the equal sides (∠ABC and ∠ACB)
Drag each of the vertices.
Conclude: What do you notice about the angles opposite the equal sides?
5) Isosceles Triangle Theorem
Next pageMain Menu
How do I ...?
A
B
C

TIPS4RM: Grade 9 Applied – Unit 8: Plane Geometry 18
Plane Geometry (GSP®4 file) (continued)
Given: ABC, where AB = AC = BC
Explore: Measure each of the interior angles then drag point C.
Conclude: What do you notice about each of the interior angles?
6) Equilateral Triangles
Next pageMain Menu
How do I ...?
B
A
C
Given: ABC and exterior angle ∠ABD.
Explore: Measure the non-adjacent angles∠ACB & ∠CAB.
Calculate the sum of these two angles. Measure the exterior angle ∠ABD.
Drag point A.
Conclude: What do you notice about the sum of the two non-adjacent angles, ∠ACB & ∠CAB, inside the triangle and the exterior angle, ∠ABD?
7) Exterior Angle Theorem
Next PageMain Menu
How do I ...?
A
C
D
B
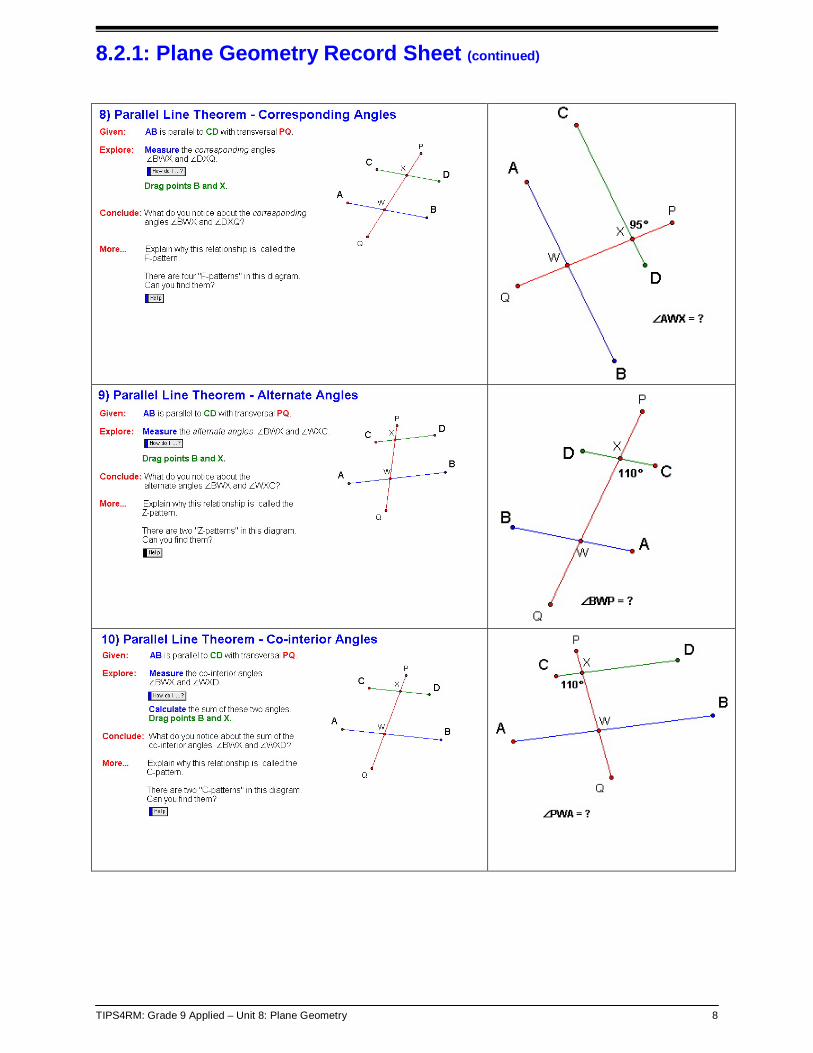
Given: AB is parallel to CD with transversal PQ.
Explore: Measure the corresponding angles ∠BWX and ∠DXP.
Drag points B and X.
Conclude: What do you notice about the corresponding angles ∠BWX and ∠DXP?
More... Explain why this relationship is called the F-pattern.
There are four "F-patterns" in this diagram. Can you find them?
8) Parallel Line Theorem - Corresponding Angles Reset
Help
How do I ...?
Next pageMain Menu
A
B
CD
W
X
P
Q
Given: AB is parallel to CD with transversal PQ.
Explore: Measure the alternate angles ∠BWX and ∠WXC.
Drag points B and X.
Conclude: What do you notice about the alternate angles ∠BWX and ∠WXC?
More... Explain why this relationship is called the Z-pattern.
There are two "Z-patterns" in this diagram. Can you find them?
9) Parallel Line Theorem - Alternate Angles Reset Z Pattern
Help
Next page
How do I ...?
Main Menu
C
BA
D
W
X
P
Q
Given: AB is parallel to CD with transversal PQ.
Explore: Measure the co-interior angles ∠BWX and ∠WXD.
Calculate the sum of these two angles. Drag points B and X.
Conclude: What do you notice about the sum of the co-interior angles ∠BWX and ∠WXD?
More... Explain why this relationship is called the C-pattern.
There are two "C-patterns" in this diagram. Can you find them?
10) Parallel Line Theorem - Co-interior AnglesReset C Pattern
Help
How do I ...?
Main Menu
AB
CDX
W
Q
P
Angle Measures in ABC
m∠BCA = 76°
m∠ABC = 43°
m∠CAB = 62°
...measure the length of a side?
To measure side CB:1. Deselect.2. Select the two endpoints (C and B).3. Under Measure choose Distance.
...measure an angle?
To measure ∠ABC:1. Deselect.2. Select point A, then B, then C. Order is important! The second point chosen is the vertex.3. Under Measure choose Angle..
How do I ...?
... make a calculation?
... create a table?
... measure an area or perimeter?
... construct a polygon interior
...measure an angle or side?
Main Menu
C
AB

TIPS4RM: Grade 9 Applied – Unit 8: Plane Geometry 19
Unit 8: Day 3: Plane Geometry – Introduction (Part 2) Grade 9 Applied
75 min
Math Learning Goals • Explore geometrical concepts (angles, triangles, parallel lines). • Build skills required for future use of The Geometer’s Sketchpad®4 (GSP).
Materials • computer/pair • BLM 8.2.1
Assessment Opportunities
Minds On ... Pairs Discussion Students post their optical illusions and find concrete examples in the classroom of the geometric concepts that they explored yesterday. (For example, swing the door and ask what type of angles does the door create with the wall?) Whole Group Discussion Review some of the concepts from the last lesson and ask students to share their concrete examples. Discuss some of the problems you observed with the students’ use of GSP®4 and BLM 8.2.2 GSP®4 Notes Booklet (see Day 2). As a class make up acronyms for some of the theorems e.g., students may suggest OAT for the Opposite Angles Theorem. In later lessons students may use the acronyms when asked to give reasons for their answers. Discuss the idea of a theorem and the need to confirm your hypothesis with measurement.
Acronyms are good time savers when students are asked to give reasons for their answers. Students should use full terminology in work handed in. They could write acronyms on their practice sheet (BLM 8.2.3). Examining the theorem with GSP®4 provides convincing evidence that the theorem always works. Encourage students to record GSP®4 instructions on BLM 8.2.2 GSP®4 Notes Booklet for future reference. Consider using the Word Wall list for a charade word game as a vocabulary review.
Action! Pairs Guided Exploration
Learning Skills/Work Habits/Checklist/Rating Scale: Circulate to check homework and see unit title page while students are working.
Students use the GSP®4 file Plane Geometry and BLM 8.2.1 to complete the review of geometric concepts from Grades 7/8 and to build skills required for future activities with Geometer’s Sketchpad. As well, they should work on completing BLM 8.2.2 GSP®4 Notes Booklet. Student roles: Driver, Recorder. Students exchange roles part way through the activity. Provide feedback to student responses during circulation. (Students can check their answers by using the GSP®4 sketch.)
Consolidate Debrief
Whole Class Discussion Using the Graffiti sheets from Day 2, students determine if anything needs to be added/changed/deleted on the topic sheets, based on what they learned during the computer exploration. Students provide more concrete illustrations of the concepts, using objects in the classroom, e.g., pages in a book, ceiling/floor tiles. As a class, continue to make up acronyms for the theorems, e.g., students may suggest OAT for the Opposite Angles Theorem. Students record them on the Word Wall and/or in their notes. In later lessons students may use the acronyms when asked to give reasons for their answers.
Reflection Concept Practice
Home Activity or Further Classroom Consolidation Ask students to bring an optical illusion to the next day’s class if they haven’t already. Continue working on the title page for this unit, if necessary. Complete practise questions using the theorems.
Provide appropriate practice questions.

TIPS4RM: Grade 9 Applied – Unit 8: Plane Geometry 20
Unit 8: Day 4: What’s So Special? (Part 1) Grade 9 Applied
75 min
Math Learning Goals • Build investigation skills by exploring geometric concepts, using GSP®4. • Develop communication skills and geometric vocabulary.
Materials • BLM 8.4.1, 8.4.2 • data projector
Assessment Opportunities
Minds On ... Whole Class Demonstration Students post their optical illusions. Display the GSP®4 file What’s So Special? using a data projector. After each demonstration, invite students to share their observations. • Discuss the two optical illusions on the first sketch. Students will see different
things when they look at geometric diagrams. • Click the first two demonstration buttons. Emphasize the importance of
discussing and recording observations so students can learn from each other. Use the posted optical illusions to reinforce messages.
• Click the Demonstration 3 button. Discuss the hidden geometry in the constructed equilateral triangle. (Students may respond that some sketches are special because some things always remain true in any drag test.)
• Click the Demonstration 4 button and drag the points to demonstrate how to collect evidence that shows that two quantities are proportional. Show students how to measure the areas of both circles and how to determine the ratio of the areas by using the Calculate command under the Measure menu.
• Use the first activity (Special Triangles) to demonstrate how to look for something special in a sketch. Explore the first two triangles. Demonstrate how to use “tabulate” to collect evidence that supports an hypothesis, e.g., for the second triangle collect at least three table entries that show that angle LKM has a measure of 90 degrees.
• Review the process by using BLM 8.4.1 and 8.4.2, and suggest that students use them as guides for GSP®4 explorations.
Special.gsp When students identify a property they should consider: Is it always true? Have I provided evidence to support my answers? Emphasize that students should look for special properties and measure to show the special feature.
Action! Pairs Investigation Students work on triangle ABC and KLM of Investigation 1 in the GSP®4 file What’s So Special? Circulate and assist groups who are experiencing difficulties.
Consolidate Debrief
Whole Class Discussion Using the demonstration, discuss what is so special about the triangle. Discuss what must be measured to show the special feature.
Curriculum Expectations/Quiz/Marking Key: Create a quiz that is based on material from Days 1–3.
Application Home Activity or Further Classroom Consolidation Find or create a logo that has a geometric design. Describe the design so someone else has a clear picture of it.

TIPS4RM: Grade 9 Applied – Unit 8: Plane Geometry 21
8.4.1: “What’s So Special?” Guide Sheet Explore! Drag each vertex in the figure. As you drag vertices, look for some of the following: • measurements that always seem to be equal to each other • measurements that never seem to change • measurements that might have a constant ratio (proportional) • lines that always seem to be parallel or perpendicular • line segments that always seem to be bisected • figures that always seem to be congruent • objects that don’t seem to be connected, yet they move together when something is
dragged Make an Hypothesis Decide which measurements you need to test your hypothesis. Drag each vertex again while you pay close attention to the way the object moves and to the way the measurements change. Test Your Hypothesis Collect and record evidence to test your hypothesis.
What can you measure? • angles • lengths • areas • perimeters • slopes • •
What can you calculate? • sums • ratios • formulas • • • •
TIPS4RM: Grade 9 Applied – Unit 8: Plane Geometry 22
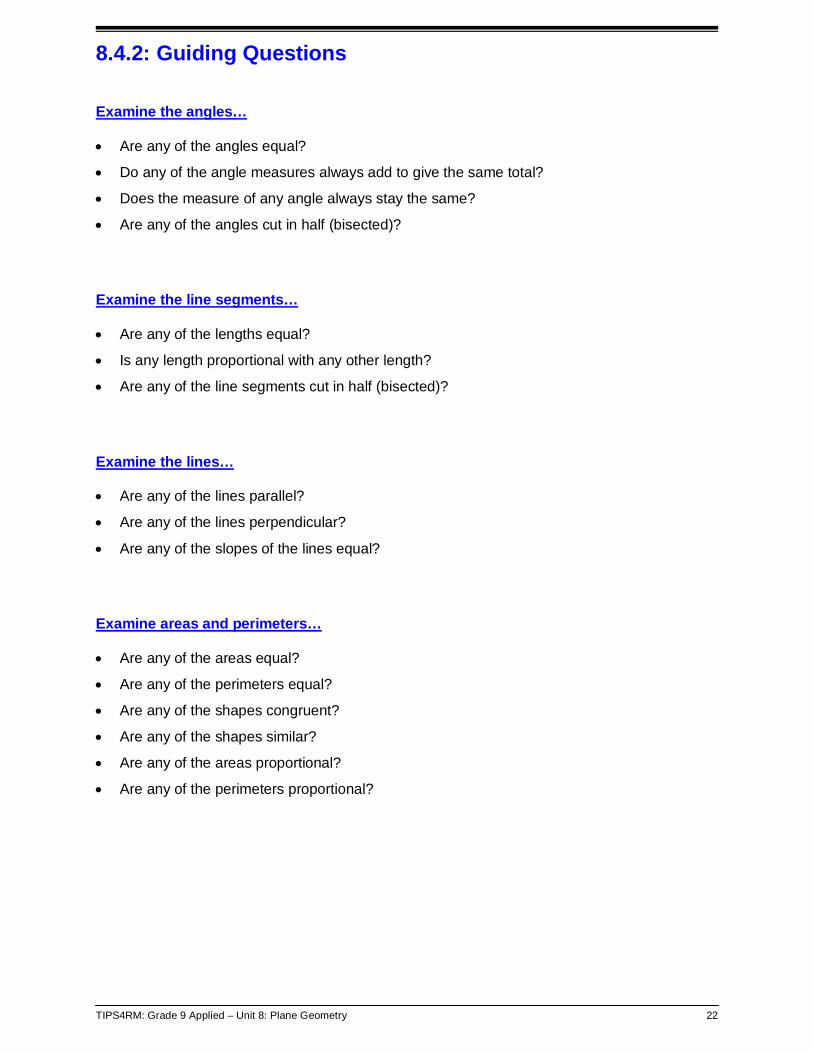
8.4.2: Guiding Questions Examine the angles…
• Are any of the angles equal?
• Do any of the angle measures always add to give the same total?
• Does the measure of any angle always stay the same?
• Are any of the angles cut in half (bisected)?
Examine the line segments…
• Are any of the lengths equal?
• Is any length proportional with any other length?
• Are any of the line segments cut in half (bisected)?
Examine the lines…
• Are any of the lines parallel?
• Are any of the lines perpendicular?
• Are any of the slopes of the lines equal?
Examine areas and perimeters…
• Are any of the areas equal?
• Are any of the perimeters equal?
• Are any of the shapes congruent?
• Are any of the shapes similar?
• Are any of the areas proportional?
• Are any of the perimeters proportional?
TIPS4RM: Grade 9 Applied – Unit 8: Plane Geometry 23
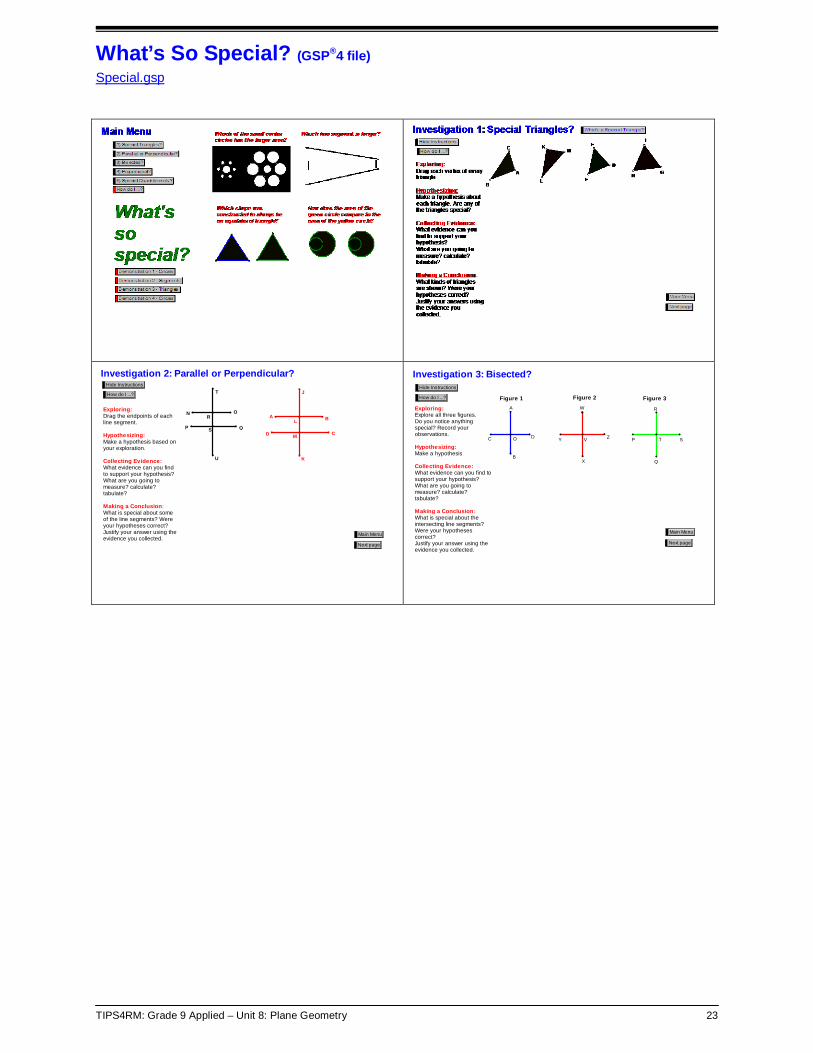
What’s So Special? (GSP®4 file) Special.gsp
Exploring: Drag the endpoints of eachline segment.
Hypothesizing: Make a hypothesis based onyour exploration.
Collecting Evidence: What evidence can you findto support your hypothesis? What are you going tomeasure? calculate?tabulate?
Making a Conclusion: What is special about someof the line segments? Wereyour hypotheses correct? Justify your answer using theevidence you collected.
Investigation 2: Parallel or Perpendicular?
Main Menu
Next page
Hide Instructions
How do I ...?
MS
LA B
C
J
K
N O
P Q
R
D
T
U
Figure 3
Exploring: Explore all three figures.Do you notice anythingspecial? Record yourobservations.
Hypothesizing: Make a hypothesis
Collecting Evidence: What evidence can you find tosupport your hypothesis? What are you going tomeasure? calculate?tabulate?
Making a Conclusion: What is special about theintersecting line segments? Were your hypothesescorrect? Justify your answer using theevidence you collected.
Investigation 3: Bisected?
Figure 2Figure 1
Main Menu
Next page
Hide Instructions
How do I ...?
STV
W
O Y
X
Z
A
B
DC
R
Q
P
TIPS4RM: Grade 9 Applied – Unit 8: Plane Geometry 24
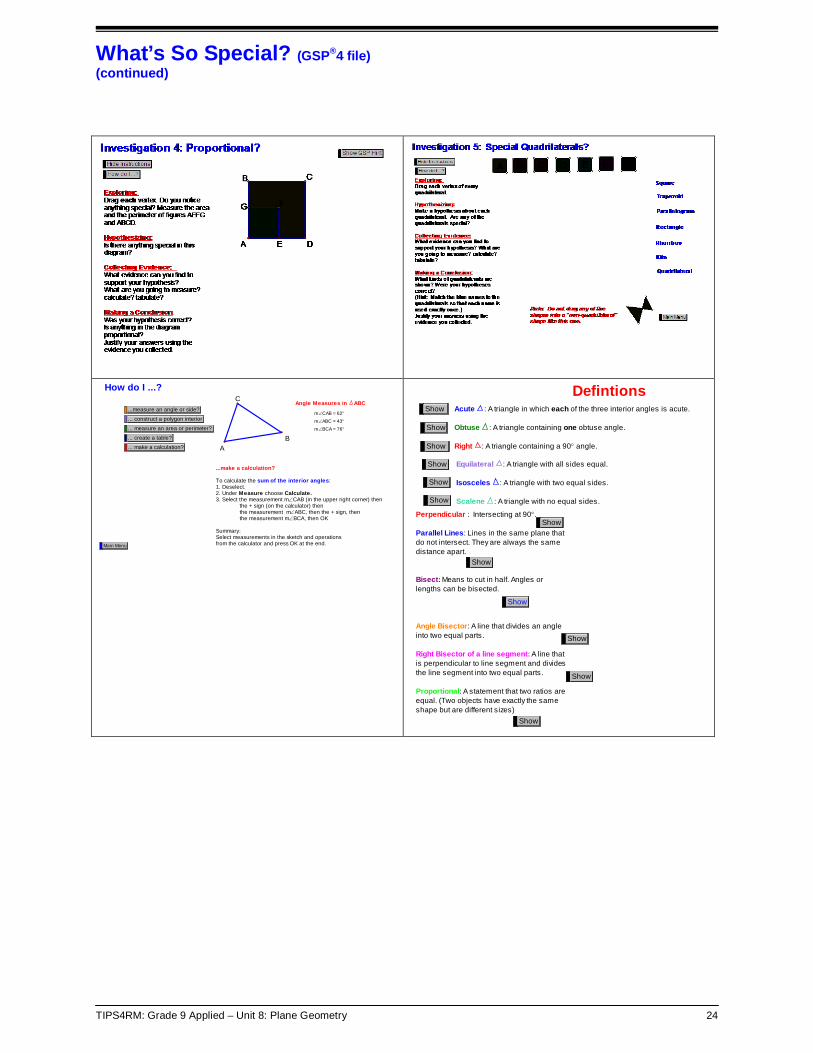
What’s So Special? (GSP®4 file) (continued)
Angle Measures in ABC
m∠BCA = 76°
m∠ABC = 43°
m∠CAB = 62°
...make a calculation?
To calculate the sum of the interior angles:1. Deselect.2. Under Measure choose Calculate.3. Select the measurement m∠CAB (in the upper right corner) then the + sign (on the calculator) then the measurement m∠ABC, then the + sign, then the measurement m∠BCA, then OK
Summary: Select measurements in the sketch and operationsfrom the calculator and press OK at the end.
How do I ...?
... make a calculation?
... create a table?
... measure an area or perimeter?
... construct a polygon interior
...measure an angle or side?
Main Menu
C
AB
DefintionsAcute : A triangle in which each of the three interior angles is acute.
Obtuse : A triangle containing one obtuse angle.
Right : A triangle containing a 90° angle.
Perpendicular : Intersecting at 90°.
Parallel Lines: Lines in the same plane thatdo not intersect. They are always the samedistance apart.
Bisect: Means to cut in half. Angles orlengths can be bisected.
Angle Bisector: A line that divides an angleinto two equal parts.
Right Bisector of a line segment: A line thatis perpendicular to line segment and dividesthe line segment into two equal parts.
Proportional: A statement that two ratios areequal. (Two objects have exactly the sameshape but are different sizes)
Equilateral : A triangle with all sides equal.
Isosceles : A triangle with two equal sides.
Scalene : A triangle with no equal sides.
Show
Show
Show
Show
Show
Show
Show
Show
Show
Show
Show
Show

TIPS4RM: Grade 9 Applied – Unit 8: Plane Geometry 25
Unit 8: Day 5: What’s So Special? (Part 2) Grade 9 Applied
75 min
Math Learning Goals • Build investigation skills by exploring geometric concepts, using GSP®4. • Develop communication skills and geometric vocabulary.
Materials • BLM 8.5.1 • Examples of
logos with geometric designs
• Computer with Geometers Sketchpad 4, 1/ pair
Assessment Opportunities
Minds On ... Small Groups Brainstorm Students form small groups and challenge each other to sketch the logo that they describe from the Home Activity assignment. Students brainstorm how to create an effective description. Whole Class Discussion Demonstrate the two triangles from Day 4. Emphasize that there is very little that is always special about triangle ABC. (It will always have three sides and three angles). Emphasize that triangle KLM always has a right angle at K. Explore the other triangles in the sketch to determine what is special.
Have available some examples of logos with geometric designs.
Action! Pairs Investigation Students investigate geometric relationships using sketches in the GSP®4 file, What’s So Special? (See Day 4.) Assign one investigation to each pair for reporting purposes during Consolidate/Debrief. Pairs may have time to do more than one of the investigations.
Learning Skills (Teamwork)/Observation/Rating Scale: Circulate to assess how students contribute to the group to complete the activity.
Consolidate Debrief
Pairs Presentation For each of the four activities choose pairs of students to present their work to the class. Whole Class Discussion Debrief the presentations to help students understand how GSP®4 shows geometric principles. Ask such questions as: • How does The Geometer’s Sketchpad®4 help to collect evidence? • How much evidence is needed to convince you that something is always true?
Application Home Activity or Further Classroom Consolidation Complete worksheet 8.5.1 Learn the Lingo.
TIPS4RM: Grade 9 Applied – Unit 8: Plane Geometry 26
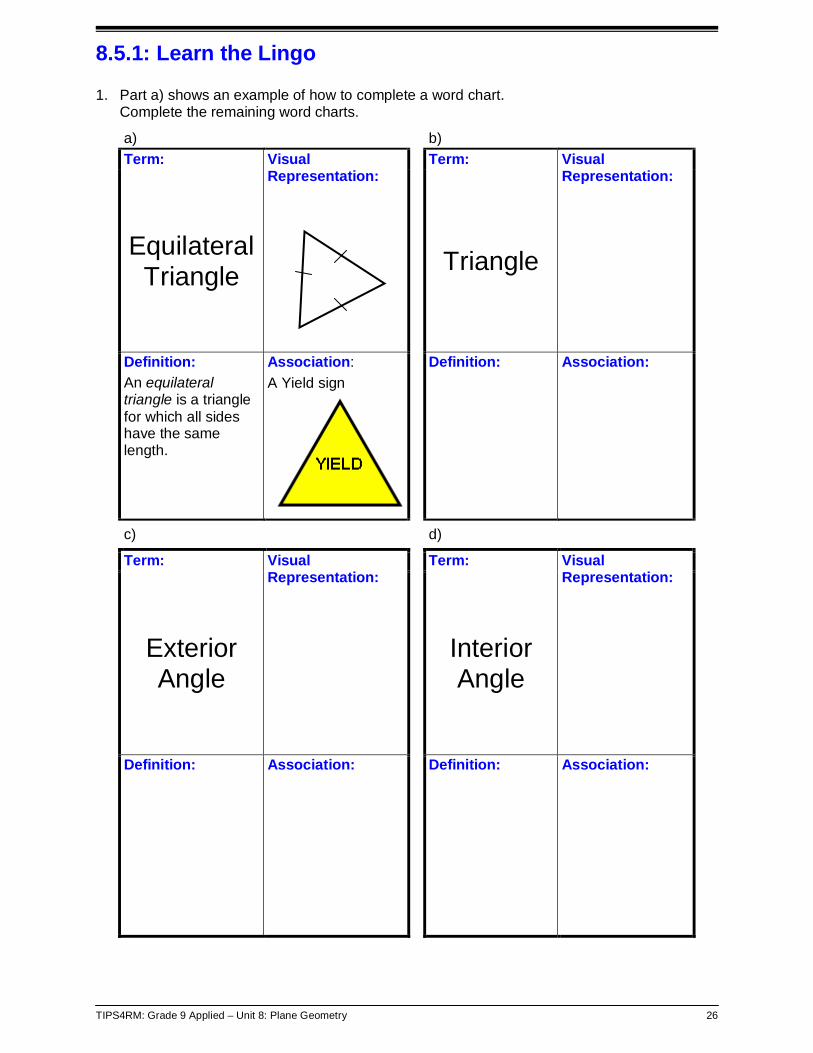
8.5.1: Learn the Lingo 1. Part a) shows an example of how to complete a word chart.
Complete the remaining word charts.
a) b) Term: Visual
Representation: Term: Visual
Representation:
Equilateral Triangle Triangle
Definition: An equilateral triangle is a triangle for which all sides have the same length.
Association: A Yield sign
Definition: Association:
c) d)
Term: Visual Representation:
Term: Visual Representation:
Exterior Angle
Interior Angle
Definition: Association: Definition: Association:

TIPS4RM: Grade 9 Applied – Unit 8: Plane Geometry 27
8.5.1: Learn the Lingo (continued)
e) f) Term: Visual
Representation: Term: Visual
Representation:
Parallel Lines Transversal
Definition: Association: Definition: Association:
g) h)
Term: Visual Representation:
Term: Visual Representation:
Perpendicular Bisector
Diagonal
Definition: Association: Definition: Association:

TIPS4RM: Grade 9 Applied – Unit 8: Plane Geometry 28
8.5.1: Learn the Lingo (continued) 2. Determine the unknown angle. Give reasons for your answer.
a)
∠AB = AC = BC
ACB = ________
b)
∠DEG = ____
c)
d)
∠∠∠
oCOD = 64FOE = ___COF = ___
e)
f)
∠∠∠
oBOC = 43COE = ____EOD = ____
g)
∠
∠∠
o
o
VRW = 42RT = RU
SRT = 19RSZ =
h)
∠∠
o
WX = WYYWX = 118WXZ = _____
i) Create your own question!
TIPS4RM: Grade 9 Applied – Unit 8: Plane Geometry 29
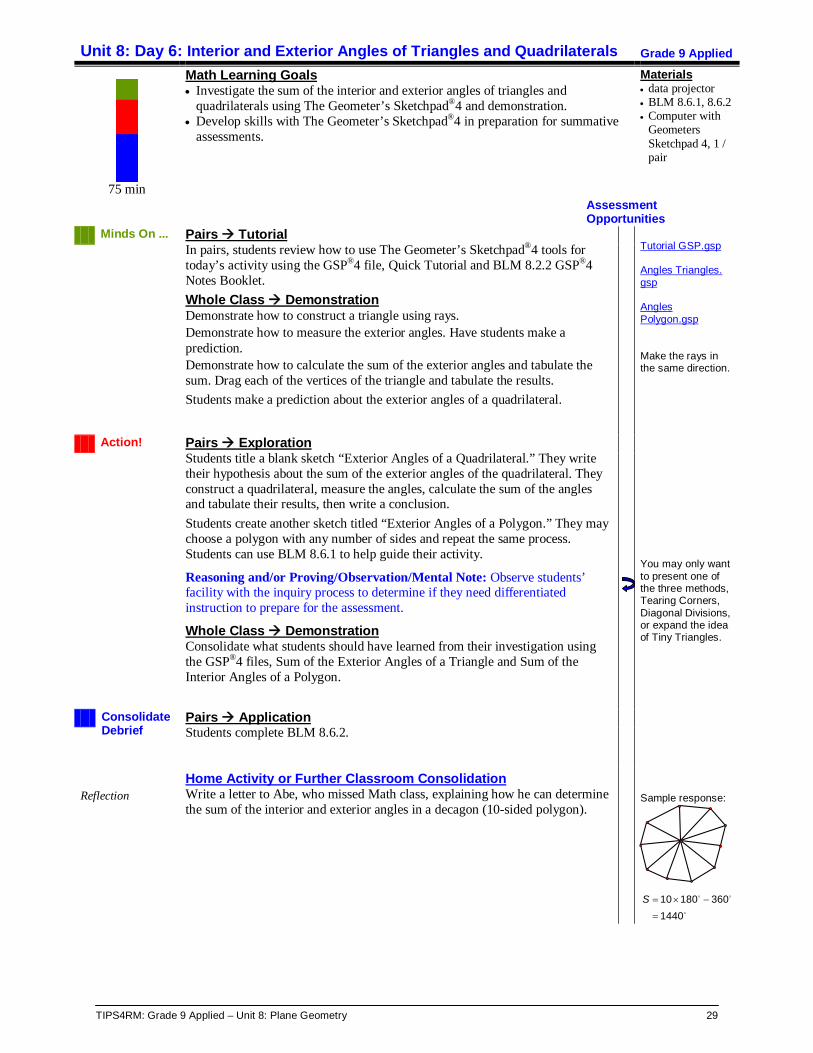
Unit 8: Day 6: Interior and Exterior Angles of Triangles and Quadrilaterals Grade 9 Applied
75 min
Math Learning Goals • Investigate the sum of the interior and exterior angles of triangles and
quadrilaterals using The Geometer’s Sketchpad®4 and demonstration. • Develop skills with The Geometer’s Sketchpad®4 in preparation for summative
assessments.
Materials • data projector • BLM 8.6.1, 8.6.2 • Computer with
Geometers Sketchpad 4, 1 / pair
Assessment Opportunities
Minds On ... Pairs Tutorial In pairs, students review how to use The Geometer’s Sketchpad®4 tools for today’s activity using the GSP®4 file, Quick Tutorial and BLM 8.2.2 GSP®4 Notes Booklet. Whole Class Demonstration Demonstrate how to construct a triangle using rays. Demonstrate how to measure the exterior angles. Have students make a prediction. Demonstrate how to calculate the sum of the exterior angles and tabulate the sum. Drag each of the vertices of the triangle and tabulate the results. Students make a prediction about the exterior angles of a quadrilateral.
Tutorial GSP.gsp Angles Triangles. gsp Angles Polygon.gsp Make the rays in the same direction. You may only want to present one of the three methods, Tearing Corners, Diagonal Divisions, or expand the idea of Tiny Triangles.
Action! Pairs Exploration Students title a blank sketch “Exterior Angles of a Quadrilateral.” They write their hypothesis about the sum of the exterior angles of the quadrilateral. They construct a quadrilateral, measure the angles, calculate the sum of the angles and tabulate their results, then write a conclusion. Students create another sketch titled “Exterior Angles of a Polygon.” They may choose a polygon with any number of sides and repeat the same process. Students can use BLM 8.6.1 to help guide their activity.
Reasoning and/or Proving/Observation/Mental Note: Observe students’ facility with the inquiry process to determine if they need differentiated instruction to prepare for the assessment.
Whole Class Demonstration Consolidate what students should have learned from their investigation using the GSP®4 files, Sum of the Exterior Angles of a Triangle and Sum of the Interior Angles of a Polygon.
Consolidate Debrief
Pairs Application Students complete BLM 8.6.2.
Reflection Home Activity or Further Classroom Consolidation Write a letter to Abe, who missed Math class, explaining how he can determine the sum of the interior and exterior angles in a decagon (10-sided polygon).
Sample response: S 10 180 360
1440= × −
=

TIPS4RM: Grade 9 Applied – Unit 8: Plane Geometry 30
8.6.1: Exterior and Interior Angles of a Polygon Part A – Exterior Angles of a Triangle Follow the instructions carefully to make the diagram shown. • Plot point A and draw a ray. • Drag point B along the ray AB
and then draw a ray from B. • Select points C and A (order is
important) then use the construct menu to construct ray CA.
• Construct points D, E, and F on rays AB, BC, and CA respectively.
• Drag test your construction. Hypothesis I think that the sum of the exterior angles of a triangle is ________ because Conclusion Form a conclusion based on your evidence. Refer to your hypothesis. Part B – Exterior Angles of a Quadrilateral Use the steps from Part A to construct and explore the sum of the exterior angles of a quadrilateral. Part C – Exterior Angles of Any Polygon Compare the conclusions you reached in Part A and Part B. Test your hypothesis about the sum of the exterior angles of a polygon by constructing and measuring the angles of another polygon (pentagon, hexagon, etc.). Record your information and write your final conclusion about the sum of the exterior angles of any polygon.
C
A
B
D
E
F
C
A
BD
E
FG
H

TIPS4RM: Grade 9 Applied – Unit 8: Plane Geometry 31
8.6.2: Interior Angle Sums 1. Complete the chart.
Diagram Number of sides
Sum of interior angles Understanding
3 180°
The sum of the angles in any triangle is 180o.
4
5
n
2. a) Determine the sum of the interior angles in a polygon with 15 sides. Show your work. b) Determine the number of sides in a polygon if the sum of the interior angles is 5400°.
Show your work.
TIPS4RM: Grade 9 Applied – Unit 8: Plane Geometry 32
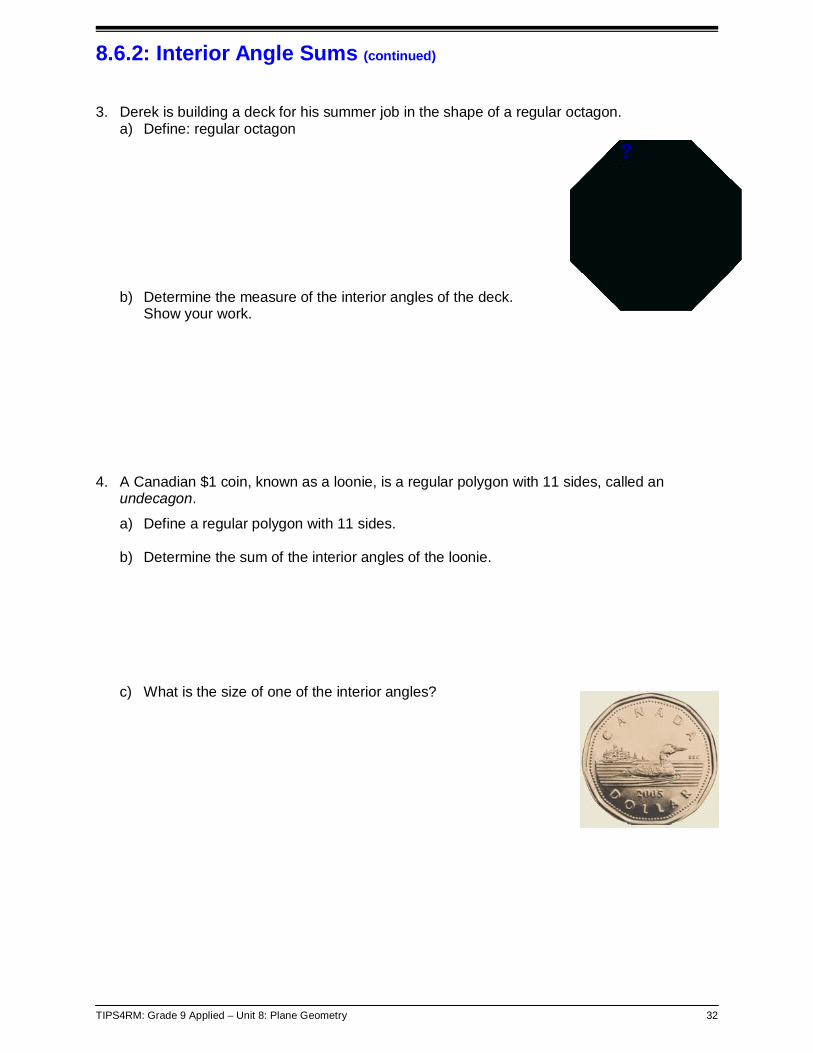
8.6.2: Interior Angle Sums (continued) 3. Derek is building a deck for his summer job in the shape of a regular octagon. a) Define: regular octagon b) Determine the measure of the interior angles of the deck.
Show your work. 4. A Canadian $1 coin, known as a loonie, is a regular polygon with 11 sides, called an
undecagon.
a) Define a regular polygon with 11 sides. b) Determine the sum of the interior angles of the loonie. c) What is the size of one of the interior angles?
TIPS4RM: Grade 9 Applied – Unit 8: Plane Geometry 33
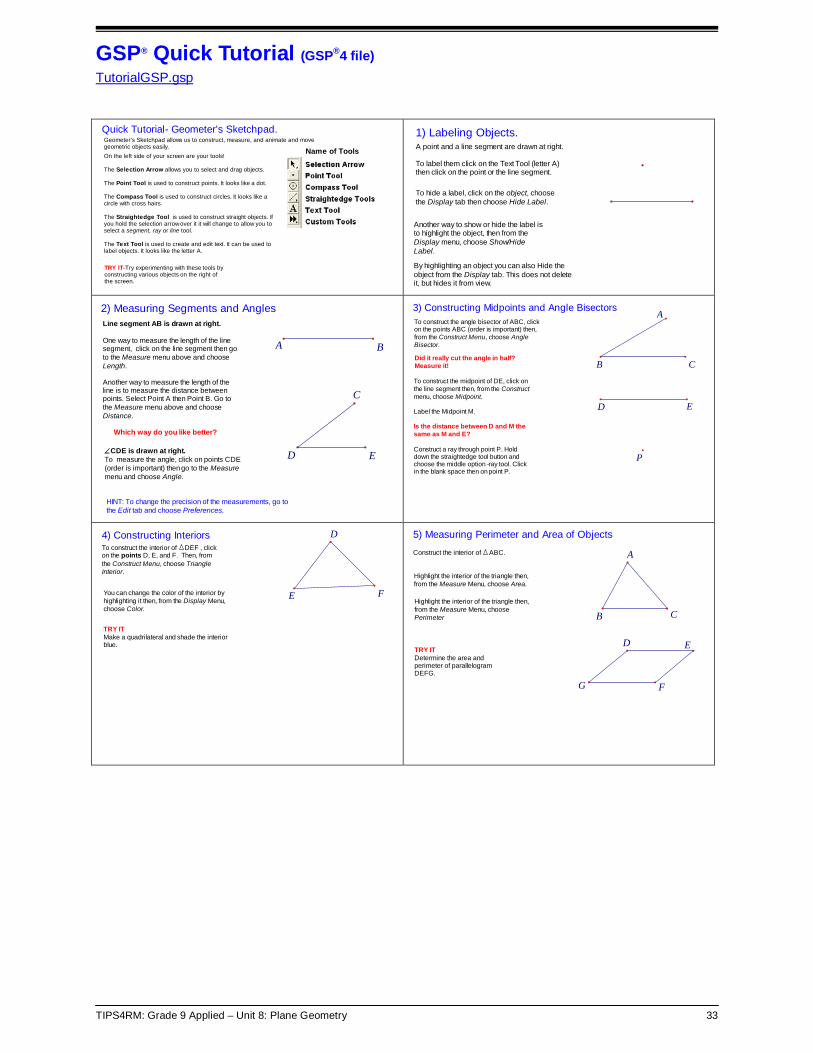
GSP® Quick Tutorial (GSP®4 file) TutorialGSP.gsp
Name of Tools
TRY IT-Try experimenting with these tools byconstructing various objects on the right ofthe screen.
On the left side of your screen are your tools!
The Selection Arrow allows you to select and drag objects.
The Point Tool is used to construct points. It looks like a dot.
The Compass Tool is used to construct circles. It looks like acircle with cross hairs.
The Straightedge Tool is used to construct straight objects. Ifyou hold the selection arrow over it it will change to allow you toselect a segment, ray or line tool.
The Text Tool is used to create and edit text. It can be used tolabel objects. It looks like the letter A.
Geometer's Sketchpad allows us to construct, measure, and animate and movegeometric objects easily.
Quick Tutorial- Geometer's Sketchpad.
By highlighting an object you can also Hide theobject from the Display tab. This does not deleteit, but hides it from view.
Another way to show or hide the label isto highlight the object, then from theDisplay menu, choose Show/HideLabel.
To hide a label, click on the object, choosethe Display tab then choose Hide Label.
A point and a line segment are drawn at right.
To label them click on the Text Tool (letter A)then click on the point or the line segment.
1) Labeling Objects.
HINT: To change the precision of the measurements, go tothe Edit tab and choose Preferences.
∠CDE is drawn at right. To measure the angle, click on points CDE(order is important) then go to the Measuremenu and choose Angle.
2) Measuring Segments and AnglesLine segment AB is drawn at right.
One way to measure the length of the linesegment, click on the line segment then goto the Measure menu above and chooseLength.
Another way to measure the length of theline is to measure the distance betweenpoints. Select Point A then Point B. Go tothe Measure menu above and chooseDistance.
Which way do you like better?
A B
C
D E
Did it really cut the angle in half?Measure it!
To construct the angle bisector of ABC, clickon the points ABC (order is important) then,from the Construct Menu, choose AngleBisector.
3) Constructing Midpoints and Angle Bisectors
To construct the midpoint of DE, click onthe line segment then, from the Constructmenu, choose Midpoint.
Label the Midpoint M.
Is the distance between D and M thesame as M and E?
Construct a ray through point P. Holddown the straightedge tool button andchoose the middle option -ray tool. Clickin the blank space then on point P.
ED
A
B C
P
TRY ITMake a quadrilateral and shade the interiorblue.
4) Constructing InteriorsTo construct the interior of DEF , clickon the points D, E, and F. Then, fromthe Construct Menu, choose TriangleInterior.
You can change the color of the interior byhighlighting it then, from the Display Menu,choose Color.
F
D
E
Highlight the interior of the triangle then,from the Measure Menu, choosePerimeter
TRY ITDetermine the area andperimeter of parallelogramDEFG.
Highlight the interior of the triangle then,from the Measure Menu, choose Area.
Construct the interior of ABC.
5) Measuring Perimeter and Area of Objects
E
B
A
C
G F
D

TIPS4RM: Grade 9 Applied – Unit 8: Plane Geometry 34
GSP® Quick Tutorial (GSP®4 file) (continued)
Change the size of the triangle then doubleclick thetabulate box. What do you notice? Do this a few times.
Highlight all three measures as well as the sum.Then, from the Graph menu, choose Tabulate.
When you see the calculator, click on the first measure(m∠ABC) followed by the plus sign (+) then click on thesecond measure followed by the plus sign (+) then clickon the third measure followed by OK.
When you have determined the threemeasures, click on the Measure menuand choose Calculate.
6) Measuring the sum of anglesDetermine the measures of the threeangles of the triangle ∠ABC, ∠ACB and ∠CBA
C
A
B
Test to see if they are perpendicular.
Test to see if they are parallel bydragging point C.
7) Constructing Parallel and Perpendicular Lines
To construct a line perpendicular to FG through E.Highlight point E and segment FG then, from theConstruct menu, choose Perpendicular Line.
To construct a line parallel to BC throughA. Highlight point A and segment BCThen, from the Construct menu, chooseParallel Line. B C
A
E
G
F
7- Tabulate your measurements.
8- What do you notice? ______
6- Use the Calculator to divide the area of the large triangle by thearea of the smaller triangle.
5- Determine the area of the large triangle.
4- Determine the area of the small triangle in the middle formed byjoining the midpoints.
3- Join the midpoints of the sides.
1- Construct any triangle. Label it ABC.
2- Determine the midpoints of the three sides. Label them P, Q and R.
8) Practice
9) Picture Practice Make a picture that includes construction of the following: 1- parallel lines
2- perpendicular lines
3- angle bisectors
4- lengths of the line segments
5- area and perimeters

TIPS4RM: Grade 9 Applied – Unit 8: Plane Geometry 35
Sum of the Exterior Angles of a Triangle (GSP®4 file) Angles Triangle.gsp

TIPS4RM: Grade 9 Applied – Unit 8: Plane Geometry 36
Sum of the Exterior Angles of a Triangle (GSP®4 file) (continued)
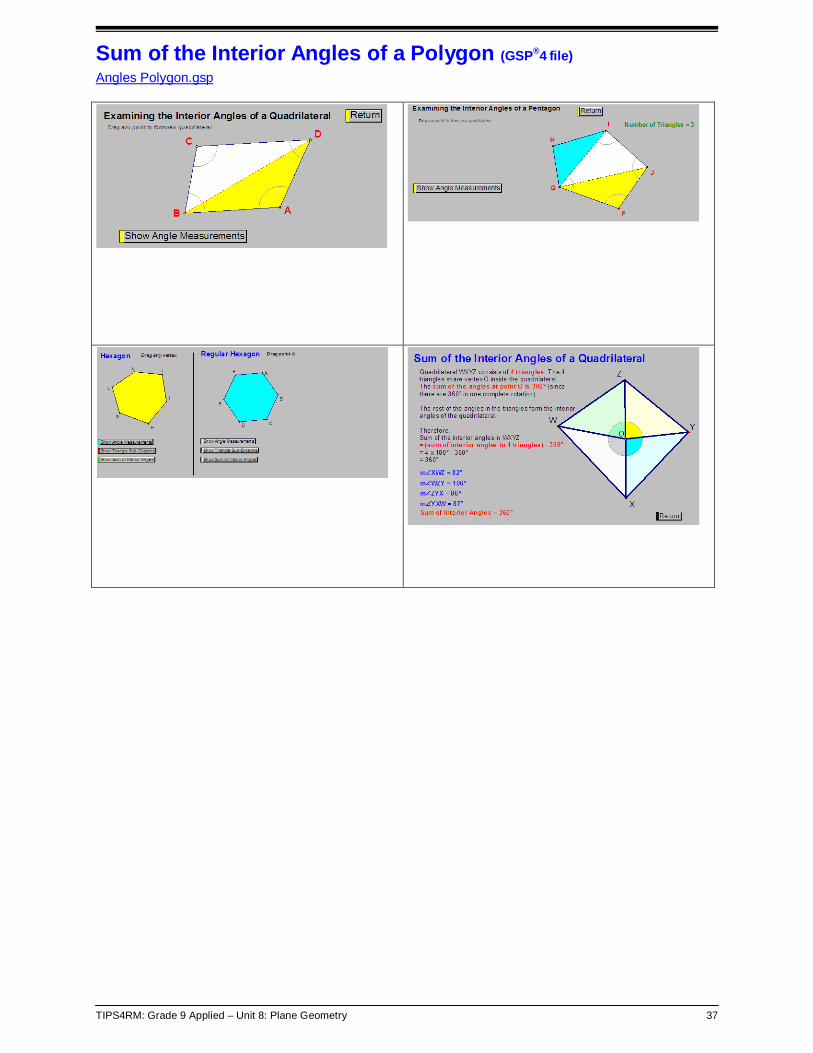
This investigation uses the fact that any polygon can bedivided into triangles by connecting a center point to twoof the vertices. It also uses the idea of subtracting onecomplete rotation.
These investigations use the fact that any polygoncan be divided into triangles by drawingdiagonals. It can also be used to explore thepattern of the sum of the angles and number ofsides.
These two investigations simulate tearing off thecorners of the polygon and joining them.
Hexagon vs. Regular Hexagon
Quadrilateral
PentagonQuadrilateralSummary
QuadrilateralTriangle
Sum of the Interior Angles of a Polygon
Tiny Triangles
Diagonal Divisions
Tearing Corners
7
6
5
4
3
2
1
TIPS4RM: Grade 9 Applied – Unit 8: Plane Geometry 37
Sum of the Interior Angles of a Polygon (GSP®4 file) Angles Polygon.gsp
TIPS4RM: Grade 9 Applied – Unit 8: Plane Geometry 38
Unit 8: Day 7: Using the Properties: Connecting Algebra to Geometry Grade 9 Applied
75 min
Math Learning Goals • Practise solving problems using the geometry explored in previous lessons. • Make connections to solving equations.
Materials • BLM 8.7.1
(Teacher) • BLM 8.7.2 • envelopes • Smart Ideas
software • BLM 8.7.1 cut
into strips and placed in an envelope and computers with Smart Ideas software
Assessment Opportunities
Minds On ... Pairs Equation Game Use BLM 8.7.1 Equation Strips. Cut each solution into strips and place in an envelope. Pairs of students solve the equations by correctly ordering the strips. Whole Class Discussion Review the concept that solving an equation means finding the value of the variable that makes the statement true, i.e., so that the expression on the left side of the equal sign balances the expression on the right side of the equal sign.
Extension: Some students are ready to solve equations with variables on both sides. Challenge these students to create new Equation Strips. Some students will need more instruction on solving simple equations. This lesson provides an opportunity to differentiate instruction based on student readiness.
Action! Small Groups Discussion Students scan BLM 8.7.2 Connecting Algebra to Geometry and determine three clarifying questions to help them understand the task. As a class, discuss the clarifying questions. Pairs Practice Students complete BLM 8.7.2.
Learning Skills (Teamwork)/Observation/Mental Note: Continuously check as pairs work. Check one pair’s work (this first pair becomes the expert pair on a question) and refer other pairs to the first pair for a correct solution.
Consolidate Debrief
Whole Class Concept Map Use Smart Ideas software to create a concept map with various titles, for example, Angle Theorems. Brainstorm a list of theorems. Review the list and categorize the theorems, e.g. triangle angle theorems. Discuss the categories and display the concept map.

TIPS4RM: Grade 9 Applied – Unit 8: Plane Geometry 39
Application Home Activity or Further Classroom Consolidation Create five quiz questions, write solutions, and check them for accuracy.
These quiz questions could be exchanged with a partner for review or form part of a review package for the class.

TIPS4RM: Grade 9 Applied – Unit 8: Plane Geometry 40
8.7.1: Equation Strips
1.
a a2 90+ =
a3 90=
a3 903 3
=
a 30=
2.
b2 40 70= +
b2 110=
b2 1102 2
=
b 55=

TIPS4RM: Grade 9 Applied – Unit 8: Plane Geometry 41
8.7.1: Equation Strips (continued) 3.
b x2 3 100+ =
x5 100=
x5 1005 5
=
x 20=
4.
c4 50 170+ =
c4 50 50 170 50+ − = −
c4 120=
c4 1204 4
=
c 30=
TIPS4RM: Grade 9 Applied – Unit 8: Plane Geometry 42
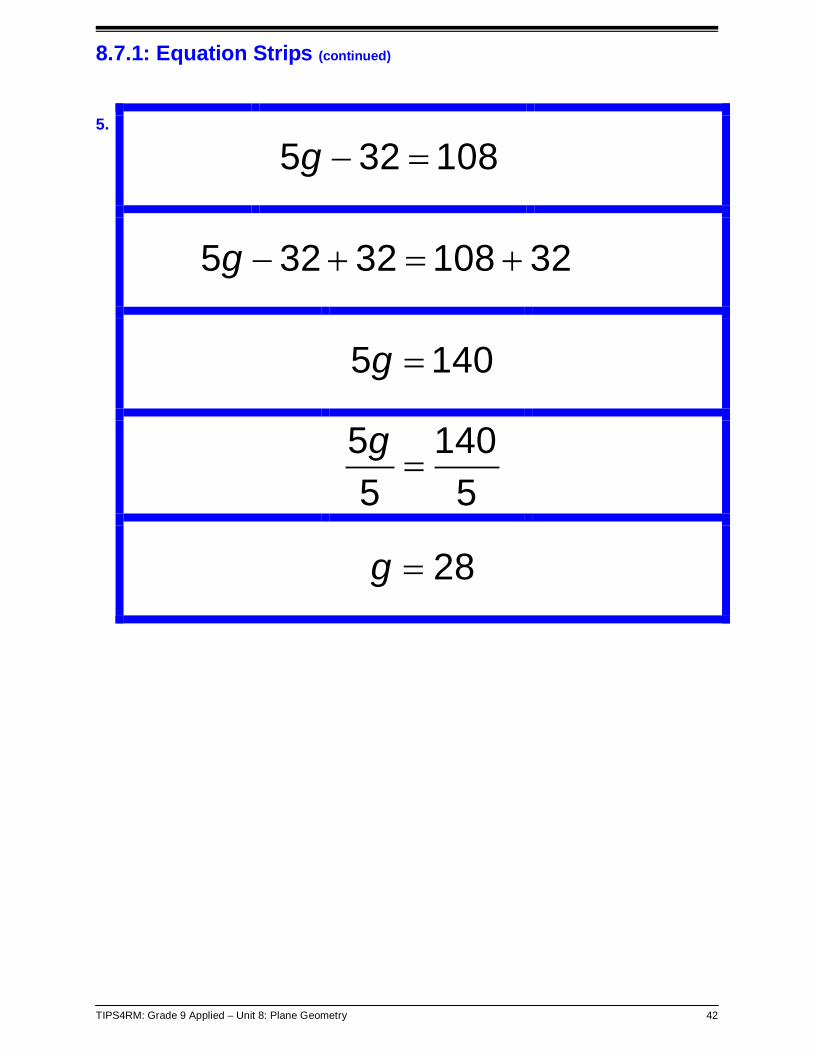
8.7.1: Equation Strips (continued)
5.
g5 32 108− =
5 32 32 108 32g − + = +
g5 140=
g5 1405 5
=
g 28=
TIPS4RM: Grade 9 Applied – Unit 8: Plane Geometry 43
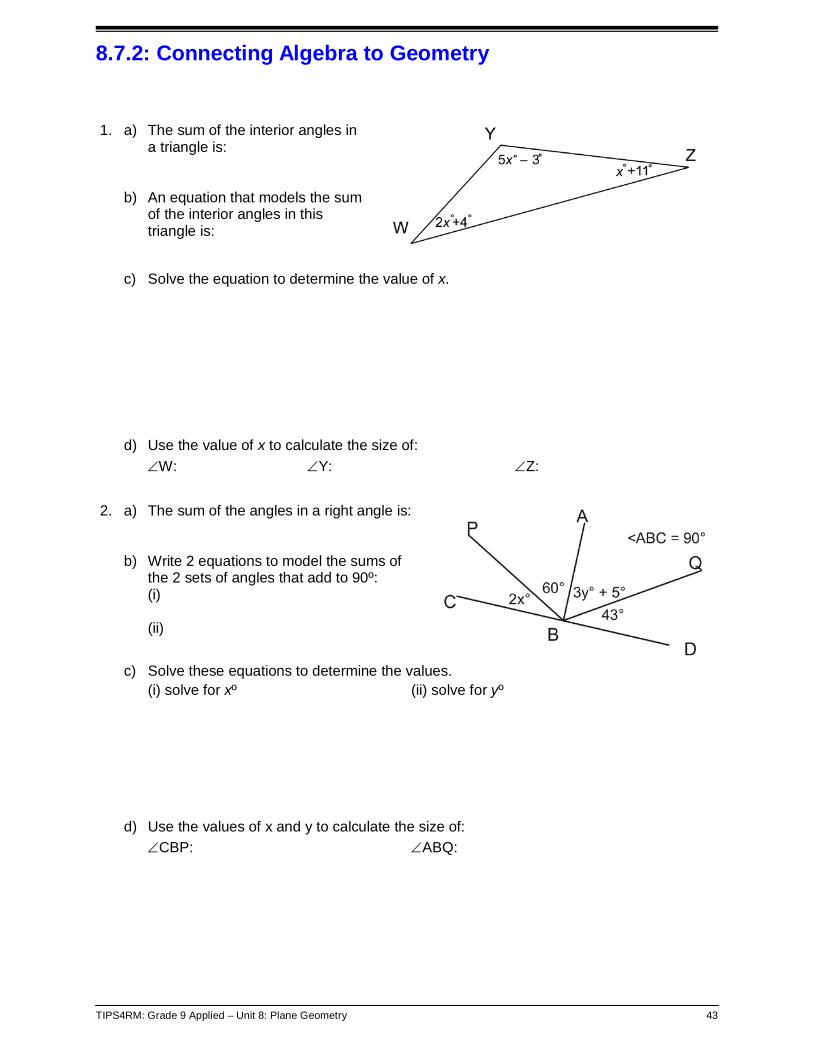
8.7.2: Connecting Algebra to Geometry 1. a) The sum of the interior angles in
a triangle is: b) An equation that models the sum
of the interior angles in this triangle is:
c) Solve the equation to determine the value of x.
d) Use the value of x to calculate the size of: ∠W: ∠Y: ∠Z:
2. a) The sum of the angles in a right angle is: b) Write 2 equations to model the sums of
the 2 sets of angles that add to 90º: (i) (ii)
c) Solve these equations to determine the values. (i) solve for xº (ii) solve for yº
d) Use the values of x and y to calculate the size of: ∠CBP: ∠ABQ:

TIPS4RM: Grade 9 Applied – Unit 8: Plane Geometry 44
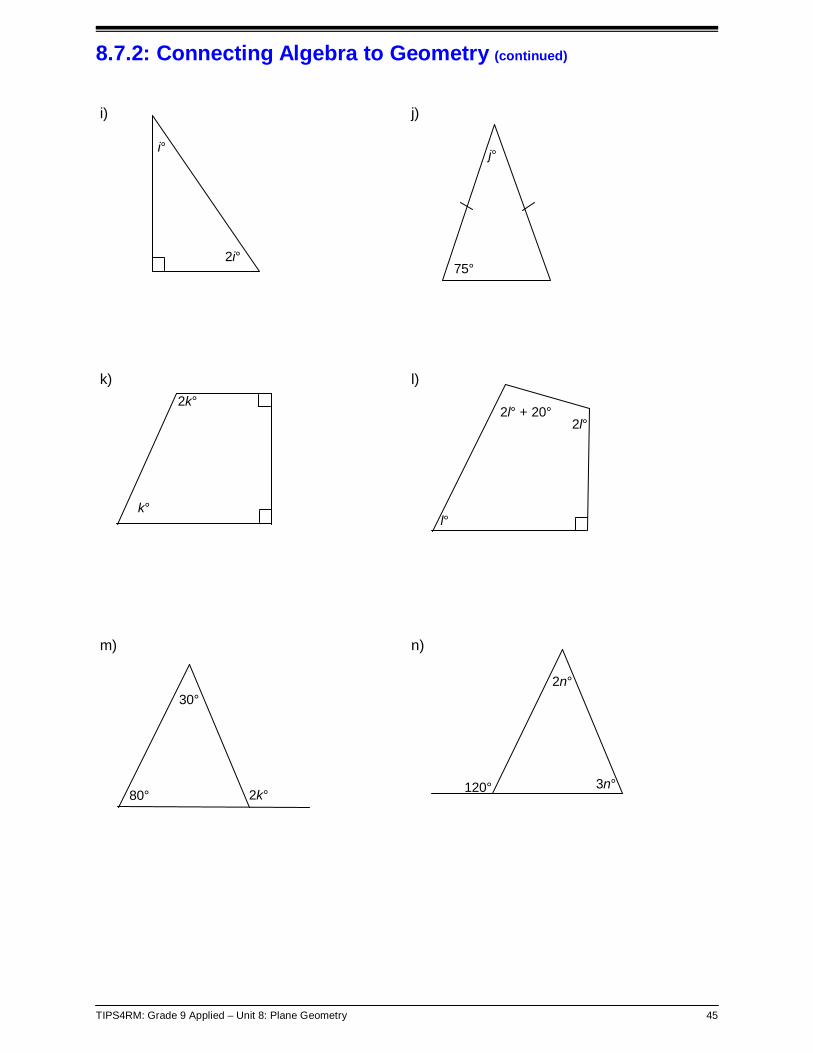
8.7.2: Connecting Algebra to Geometry (continued) 3. Write an equation and solve for the unknown. State the theorem used to make the equation.
a)
b)
c)
d)
e)
f)
g)
h)
TIPS4RM: Grade 9 Applied – Unit 8: Plane Geometry 45
8.7.2: Connecting Algebra to Geometry (continued) i) j)
k) l)
m) n)
75°
j°
k°
2k°
l°
2l° + 20° 2l°
80°
30°
2k° 120° 3n°
2n°
i°
2i°

TIPS4RM: Grade 9 Applied – Unit 8: Plane Geometry 46
Unit 8: Day 8: Freaky Folds Grade 9 Applied
75 min
Math Learning Goals • Use paper folding to illustrate geometric properties.
Materials • origami paper • scissors • BLM 8.8.1
(Teacher)
Assessment Opportunities
Minds On ... Whole Class Demonstration Introduce origami to the class as the art of paper folding. Give each student an origami or square piece of paper. Demonstrate how to fold the paper to form a paper drinking cup (use an overhead of BLM 8.8.1). Students perform the same folds. Students then unfold their paper cup. Discuss the kinds of geometry they see in the folds. For example: • triangle EFB, triangle BFG, triangle DHI, triangle DIJ are congruent and
isosceles • triangle HCG and triangle JAE are right isosceles triangles • EF is parallel to IH • JI is parallel to FG • JE || DB || GH
Visit: www.tammyyee.com/origami.html. This website is designed for young children but provides a good selection of appropriate origami patterns. For example: • fish • iris (a bit tricky) • cat (easy!) • dragon fortune
teller
Action! Pairs Investigation Students make two of the same item – leave one folded and the second one unfolded. They tape their unfolded one onto another piece of paper and label all the geometry in preparation for their presentation. Ask students to make measurements to provide evidence that they have correctly identified the geometry.
Consolidate Debrief
Pairs Presentation Students present to the class their origami figure and explain the geometry they found in the unfolded shape.
Communicating/Presentation/Rubric: Assess students on their use of appropriate terminology and the clarity of their justifications as they make their presentations.
Differentiated Reflection Reasoning and Proving
Home Activity or Further Classroom Consolidation Look in newspapers, magazines, or on the Internet for a logo that has some geometric properties. Paste a picture of your logo on a piece of paper and identify and describe the geometry in the logo. Submit your work for assessment.

TIPS4RM: Grade 9 Applied – Unit 8: Plane Geometry 47
8.8.1: Origami Paper Cup (Teacher)
1. Cut out the pattern and fold the square paper in half (lines facing out). 2. Fold right on the dotted line towards you, fold left outwards from you. 3. Tuck the top triangle inside the paper, one on each side paper.
I G
H
J
D C
A B E
F