unit 6) modeling the design of mechanical, electrical, and...
TRANSCRIPT

Unit 6) Modeling the Design of Mechanical, Electrical, and Plumbing Systems for Sustainability Exercise: Energy Analysis Packages This unit has 3 standalone exercises. Each of the exercises outlines how to perform a distinct type of energy analysis on a building. As stated in the introduction, there are more than 350 different energy analysis software packages. This workbook unit demonstrates how to use three of those packages that work directly with the building information model produced by Revit® MEP software. In Exercise 6A, you use the Heating and Cooling Loads tool built into Revit MEP software. In Exercise 6B, you use IES <VE>™ toolkits to analyze building energy usage. Finally, in Exercise 6B, you learn how to create a gbXML™ file, and also how to perform an analysis using Green Building Studio™ tools.
The Analytical Model One concept common to all three packages is the analytical model. The analytical model is a simplified version of the building information model created by the analysis software specifically for its calculations. In Revit MEP software, you use walls, doors, floors, and roofs to create a model of the building. The analytical model is much more limited in scope. It contains only those surfaces and objects that hold parameters directly relevant to the energy loading analysis. This process is not unlike the radiosity rendering process, which creates a separate internal model to process light bouncing from surface to surface within the building. Rather than attempting to understand all of the different software object classes from different software packages (for example, a wall in Revit MEP software is not the same as an AutoCAD® Architecture wall), you simply create a model specifically for the analysis software. For IES <VE>, the process of creating the analytical model is built into the analysis tools. For Green Building Studio, you export the model created using Revit MEP as a gbXML file, or green building xml file. In most cases, the analysis package produces more accurate results if you optimize the Revit model to make conversion to the analytical model easier for the translating software. What might make sense to an architect (room stops at ceiling) might not make sense for energy analysis (room stops at underside of floor above because an acoustical ceiling does not necessarily provide any real barrier to the air flow through a room. If you are working at a conceptual level or early schematic design level, when the fenestration changes frequently, or you are studying the effects of a particular solar light shelf, you may only be concerned with differences in design options rather than with the final heating and cooling load numbers. When you are more concerned with a percentage change rather than an end total, the validity of rooms may be a non-issue. However, if you wish to get more accuracy, you will need to verify a few things about the rooms prior to running the heating and cooling load calculations.
building_performance_analysis_using_revit.pdf The compressed file for this unit also contains the PDF file building_performance_analysis_using_revit.pdf. This document outlines the differences between the Revit model and the analytical model, and gives some advice on how to optimize the Revit model for the most accurate analysis results.
Exercise 6A, B and C Prerequisite: Modifying the Revit Model for Analysis Tools Analysis type: Software required:
Starting Point Dataset:
N/A
Revit® Architecture 2008 or Revit® MEP 2008 There are no datasets for this prerequisite exercise, However there is the document referenced building_performance_analysis_using_revit.pdf in the zip file for Unit 6.

1 Review building_performance_analysis_using_revit.pdf This paper shows you how to leverage the Revit software platform to carry out Building Performance Analysis using two methods: the IES <VE> Direct Link found in Revit MEP software, or the gbXML exports in Revit Architecture software. It also discusses the elements of the model (walls, doors, floors, rooms) and how they relate to and create the analytical model that serves as the true source of the calculations for the heating/cooling analysis. Of particular importance is the nature of rooms and how they are bounded within the Revit physical model. This PDF document is included in the same compressed file as this exercise and the Unit 6 datasets.
2 Verify the Validity of the Rooms in the Model Using Review Warnings
The original Warning Warning as seen with Review Warnings
2a Review the Warning Messages in Your Revit Project As you build the model, you sometimes receive Warnings when you add walls, room separation lines, and room objects. If you ignore these messages when they pop up, you can easily access them later. Simply click Tools menu > Review Warnings. Using this function, you can access all of the warnings that you previously ignored, including warnings about overlapping room volumes or duplicate rooms. To open a dialog box that illustrates each conflict, select a warning from the list and then click Show.

3 Visually Review Spaces
2b Reviewing Space Extents Using a Tiled Plan and Section View
Open a plan view and create a section through your building. To arrange these views side-by-side so that you can work in either view simultaneously, click Window menu > Tile. In the section view, use Visibility Graphics Override to turn on the Room’s Interior Fill and Reference and make them visible. Check to see that the upper floor rooms extend through the roof, and that the rooms do not overlap each other.

Exercise 6A) Revit MEP Heating and Cooling Loads Analysis type: Software required:
Starting Point Dataset:
Tabular analysis report
Revit® MEP 2008. It does not require the IES <VE> plug-ins.
Unit 6A_i_Start.rvt
Heating and cooling loads are the primary operating energy costs. The Heating and Cooling Load tool of Revit MEP 2008 software enables you to quickly generate numerical feedback while studying different design permutations. The exercise for this unit outlines how to run a heating and cooling load report using Revit MEP 2008 software. This exercise consists of the following tasks: • Exercise 6A, B, and C Prerequisite: Modifying the Revit Model for Analysis Tools; Verify the Validity of the Rooms in the Model. • Entering room data on occupants and use (optional). • Generating a report using the Heating and Cooling Loads tool in Revit MEP software.
1 Exercise 6A, B, and C Prerequisite: Modifying the Revit Model for Analysis Tools Prepare the model for analysis.
2 Run the calculation to generate a Report
Open the prepared model. On the Mechanical Design Bar, click Heating and Cooling Loads. Set Building Type and Building Service. The Revit
project location parameter automatically enters Place and Location. On the Rooms tab, assign a room type to each room. Click Calculate.

3 Revit MEP then generates the Load report and makes it accessible in the Project Browser under Schedules.
Exercise Complete.


Exercise 6B) IES <VE> Heating and Cooling Loads Analysis type: Software required:
Starting Point Dataset:
External Analysis
Tabular analysis report
Revit® MEP 2008. It also uses the IES <VE> toolkit*
Unit 6B_i_Start.rvt
* For more information on the IES<VE> analysis software, please refer to the “Getting Started Guide.doc.” Heating and cooling loads are the largest factors affecting operating energy costs. Using the Heating and Cooling Load function in Revit MEP 2008, you can quickly generate numerical feedback reports while studying different design permutations. This exercise consists of the following tasks: • Exercise 6A, B, and C Prerequisite: Modifying the Revit Model for Analysis Tools; Verifying the Validity of the Rooms in the Model. • Entering room data on occupants and use (optional). • Generating an IES <VE> model using Revit MEP software Heating and Cooling Loads tool. • Running the analysis in IES <VE>.
1 Exercise 6A, B, and C Prerequisite: Modifying the Revit Model for Analysis Tools Prepare a model for analysis. Use dataset Unit 6B_i_Start.rvt or your own project.
2 Launch the Heating and Cooling Loads Tool and Review the Rooms in the Model

Use Revit MEP 2008 software to open the model you prepared in the previous step. On the Mechanical Design Bar, click Heating and Cooling Loads. Enter Building Type and Building Service. The Revit project location parameter automatically enters Place and Location. On the Rooms tab, assign a room type to each room.
3 Create the IES <VE> Model
In the Heating and Cooling Loads dialog box, click Create a New IES <VE> Model. Click OK. Revit MEP then generates the model and launches IES <VE>.
4 Run ASHRAE Loads Analysis and ApacheSim: Dynamic Thermal.

The IES <VE> toolkits ASHRAE Heating Loads report ApacheSim report
To generate a tabular report, which you can save as an HTML file, click ASHRAE Loads. To create the building simulation report, click ApacheSim: Dynamic Thermal. When you finish reviewing the results, click Close.
Exercise Complete.

Exercise 6C) Green Building Studio Analysis Analysis type: Software required:
Starting Point Dataset:
Tabular analysis report
Revit® MEP 2008 or Revit® Architecture 2008. It also uses the Green Building Studio plug-in for Revit.
Unit 6C_i_Start.rvt (adapted from Convention Center Extensions.rvt)
Heating and cooling loads are the largest factors affecting operating energy costs. Using the Heating and Cooling Load function in Revit MEP 2008, you can quickly generate numerical feedback reports while studying different design permutations. This exercise consists of the following tasks: • Installing the Green Building Studio plug-in. • Exporting the model to green building xml (gbXML). • Loading the project to Green Building Studio using the plug-in.
1 Exercise 6A, B and C Prerequisite: Modifying the Revit Model for Analysis Tools Again, prepare the model for analysis. This step is equally valuable when exporting data to gbXML format.
2 Verify Installation of Green Building Studio and Parallel Graphics VRML Internet Plug-ins
The plug in is available from the Green Building Studio web site. Even if the Green Building Studio plug-in is installed, you will still need to establish an account at the Green Building Studio web site: http://www.greenbuildingstudio.com.
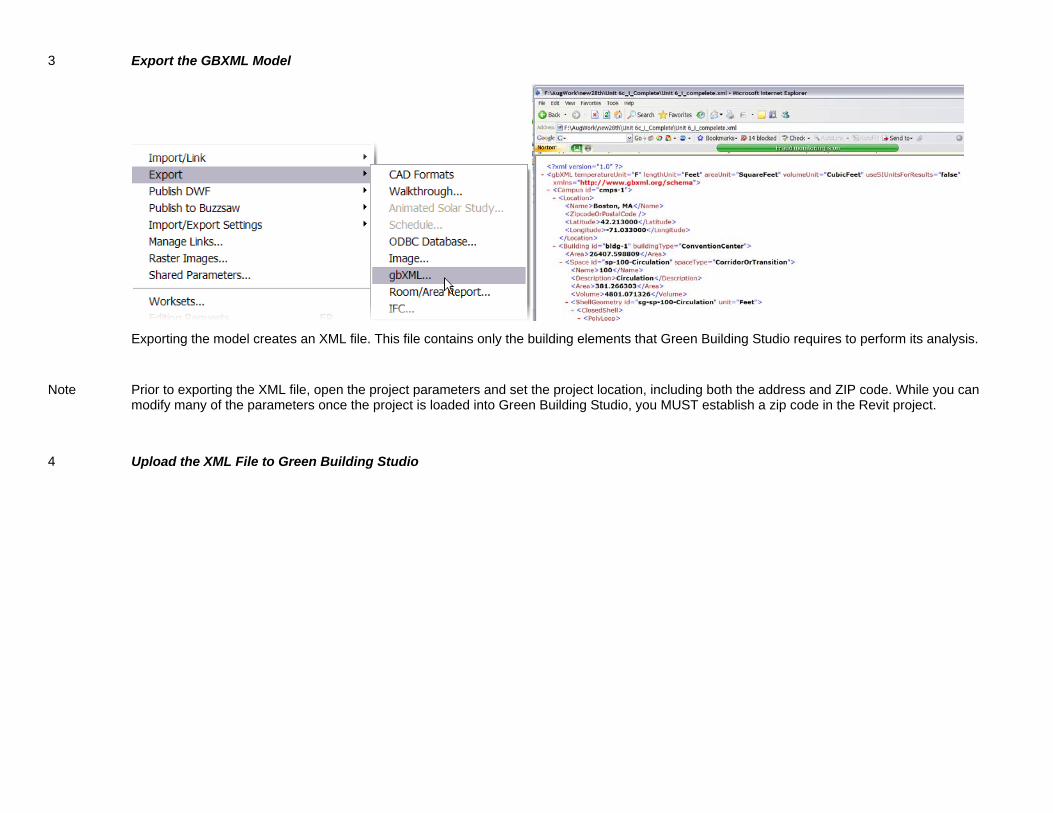
3 Export the GBXML Model
Exporting the model creates an XML file. This file contains only the building elements that Green Building Studio requires to perform its analysis.
Note Prior to exporting the XML file, open the project parameters and set the project location, including both the address and ZIP code. While you can modify many of the parameters once the project is loaded into Green Building Studio, you MUST establish a zip code in the Revit project.
4 Upload the XML File to Green Building Studio

Launch the Green Building Studio Client. Under Add New Run, click Select gbXML File. Select the XML file you generated in Revit MEP. You may have to create a project before you can upload the gbXML file. To do so, first log in to the Green Building Studio site. To create a new project, click Projects.

5 Review the Analysis
To study the design alternatives, access the alternatives icon on the individual project page.
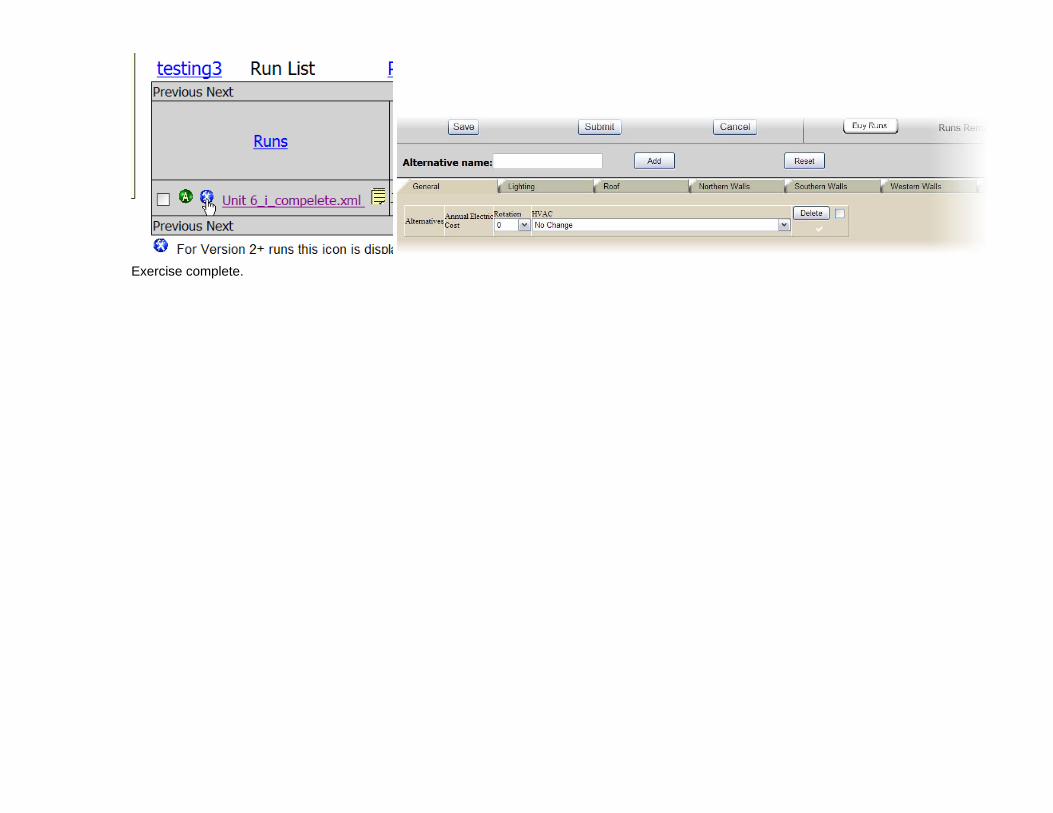
Exercise complete.