unit 3: using explanations as a teaching strategy: life · pdf fileteacher education through...
TRANSCRIPT
Teacher Education through School-based Support in Indiawww.TESS-India.edu.in
Using explanations as a teaching strategy: life processes
Unit 3:
Elementary Science
http://creativecommons.org/licenses/
The TESS-India project (Teacher Education through School-based Support) aims to improve the classroom practices of elementary and secondary teachers in India through student-centred and activity-based approaches. This has been realised through 105 teacher development units (TDUs) available online and downloaded in printed form. Teachers are encouraged to read the whole TDU and try out the activities in their classroom in order to maximise their learning and enhance their practice. The TDUs are written in a supportive manner, with a narrative that helps to establish the context and principles that underpin the activities. The activities are written for the teacher rather than the student, acting as a companion to textbooks. TESS-India TDUs were co-written by Indian authors and UK subject leads to address Indian curriculum and pedagogic targets and contexts. Originally written in English, the TDUs have then been localised to ensure that they have relevance and resonance in each participating Indian state’s context. TESS-India is led by The Open University and funded by UKAID from the Department for International Development. Version 1.0 Except for third party materials and otherwise stated, this content is made available under a Creative Commons Attribution-ShareAlike licence: http://creativecommons.org/licenses/by-sa/3.0/
ContentsIntroduction 1
Learning outcomes 2
1 What makes an explanation good? 3
2 Identifying different learning styles 4
3 Engaging different learning styles through lessonplanning 9
4 Taking learning outside 11
5 Summary 12
6 Resources 13
Resource 1: Lesson plan A 13Resource 2: Further reading 16
7 Related units 17
References 18
Acknowledgements 19

IntroductionExplanations are integral to the learning process and can be used as aneffective elementary science teaching strategy when combined withopportunities for student activity.
Effective explanations involve the following:
. the use of clear language
. good teacher subject knowledge delivered in simplified chunks
. an awareness of what your students already know
. the use of memorable examples
. ongoing questioning to check understanding
. actively engaging all your students.
People process information in different ways. Visual learners have apreference for reading words and looking at diagrams and images; auditorylearners have a preference for listening; tactile or kinaesthetic learners have apreference for touch and movement. Small modifications to yourexplanations can address each of these learning styles, thereby improving theeducational experience of all your students.
By focusing on ways of explaining aspects of life processes, this unit willhelp you deliver information more effectively, which will in turn have apositive impact on all the students in your class.
Pause for thought
What do you consider to be an engaging teacher explanation?
Think about an effective lesson that you have delivered. What made it
so effective?
1
Introduction
Learning outcomesAfter studying this unit, you should be able to:
. explore ways of delivering scientific explanations that engage all thestudents in your class
. understand what is meant by visual, auditory and tactile learning, andconsider how this can be applied to your own teaching.
TDU 3 Using explanations as a teaching strategy: life processes
2
1 What makes an explanationgood?As a teacher, you will be required to provide scientific explanations thatengage all of your students. Activity 1 encourages you to start thinkingabout how to give engaging explanations that appeal to students withdifferent styles of learning.
Activity 1: Giving a clear explanation
Imagine that you are going to explain to your students how a muscle in
your arm works. Make brief notes using the five headings below to help
organise your ideas.
1 What is the core information that my students need to know about
this topic?
2 What do they already know?
3 What scientific vocabulary needs to be used? Does this need to
be explained too?
4 How will I make the explanation memorable and engaging?
5 What questions will I ask to check my students’ understanding?
Making brief notes before you deliver a scientific explanation can make
it much more relevant and interesting to your students.
3
1 What makes an explanation good?
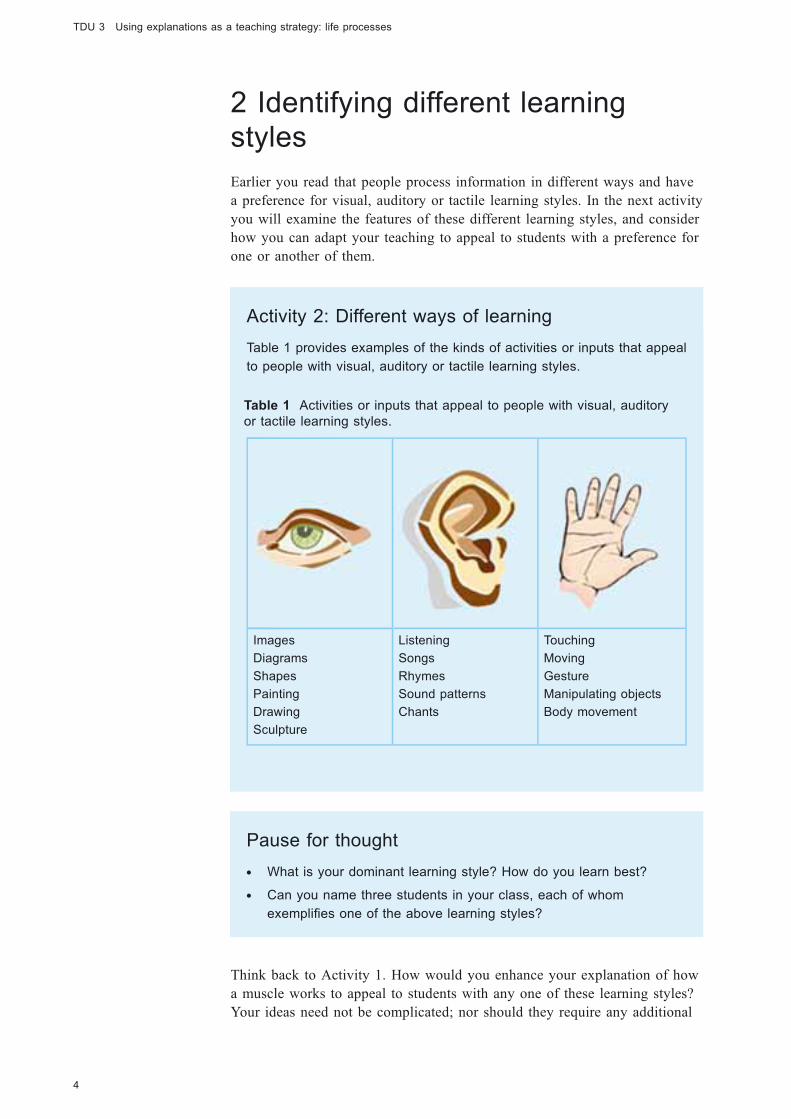
2 Identifying different learningstylesEarlier you read that people process information in different ways and havea preference for visual, auditory or tactile learning styles. In the next activityyou will examine the features of these different learning styles, and considerhow you can adapt your teaching to appeal to students with a preference forone or another of them.
Activity 2: Different ways of learning
Table 1 provides examples of the kinds of activities or inputs that appeal
to people with visual, auditory or tactile learning styles.
Table 1 Activities or inputs that appeal to people with visual, auditoryor tactile learning styles.
Images
Diagrams
Shapes
Painting
Drawing
Sculpture
Listening
Songs
Rhymes
Sound patterns
Chants
Touching
Moving
Gesture
Manipulating objects
Body movement
Pause for thought
. What is your dominant learning style? How do you learn best?
. Can you name three students in your class, each of whom
exemplifies one of the above learning styles?
Think back to Activity 1. How would you enhance your explanation of howa muscle works to appeal to students with any one of these learning styles?Your ideas need not be complicated; nor should they require any additional
TDU 3 Using explanations as a teaching strategy: life processes
4
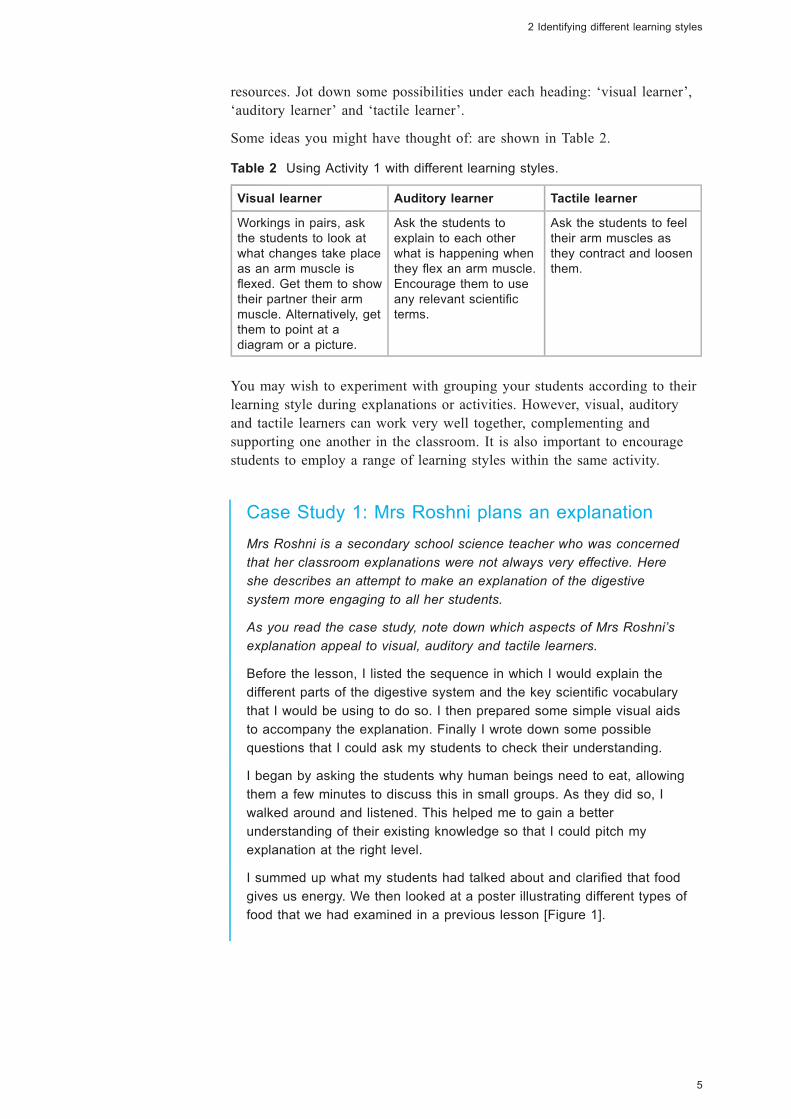
resources. Jot down some possibilities under each heading: ‘visual learner’,‘auditory learner’ and ‘tactile learner’.
Some ideas you might have thought of: are shown in Table 2.
Table 2 Using Activity 1 with different learning styles.
Visual learner Auditory learner Tactile learner
Workings in pairs, askthe students to look atwhat changes take placeas an arm muscle isflexed. Get them to showtheir partner their armmuscle. Alternatively, getthem to point at adiagram or a picture.
Ask the students toexplain to each otherwhat is happening whenthey flex an arm muscle.Encourage them to useany relevant scientificterms.
Ask the students to feeltheir arm muscles asthey contract and loosenthem.
You may wish to experiment with grouping your students according to theirlearning style during explanations or activities. However, visual, auditoryand tactile learners can work very well together, complementing andsupporting one another in the classroom. It is also important to encouragestudents to employ a range of learning styles within the same activity.
Case Study 1: Mrs Roshni plans an explanation
Mrs Roshni is a secondary school science teacher who was concerned
that her classroom explanations were not always very effective. Here
she describes an attempt to make an explanation of the digestive
system more engaging to all her students.
As you read the case study, note down which aspects of Mrs Roshni’s
explanation appeal to visual, auditory and tactile learners.
Before the lesson, I listed the sequence in which I would explain the
different parts of the digestive system and the key scientific vocabulary
that I would be using to do so. I then prepared some simple visual aids
to accompany the explanation. Finally I wrote down some possible
questions that I could ask my students to check their understanding.
I began by asking the students why human beings need to eat, allowing
them a few minutes to discuss this in small groups. As they did so, I
walked around and listened. This helped me to gain a better
understanding of their existing knowledge so that I could pitch my
explanation at the right level.
I summed up what my students had talked about and clarified that food
gives us energy. We then looked at a poster illustrating different types of
food that we had examined in a previous lesson [Figure 1].
5
2 Identifying different learning styles

Figure 1 A poster showing different types of food.
I held up a bowl of rice and ask the students to think about how the rice
gives us energy.
Using a diagram of the human digestive system, I explained about the
passage of food through the alimentary canal, from one end to the
other. As I did so, I asked the students the questions I had prepared
earlier, such as ‘What happens to the food in our mouths? Why do we
have teeth? What is the role of the tongue? How does saliva help with
digestion?’. Based on my students’ responses, I built up an explanation
of the digestive process, with reference to the mouth, stomach, liver, gall
bladder, pancreas, the small and the large intestine, the rectum and the
anus.
I explained that food is broken down into simpler components during
this process, leading to its absorption into the bloodstream, which, in
turn, gives us energy.
I used a bicycle tyre and a small ball of clay to demonstrate how the
squeezing of muscles help to move food through the digestive system.
I then distributed copies of a diagram of the digestive system and asked
my students to label its different parts.
I ended the lesson with quiz on the key stages of digestion to assess
what my students had understood and to check whether there were any
gaps in their understanding.
I sensed that my students enjoyed sharing their ideas with each other at
the start of the lesson. By questioning them at intervals, I was able to
adapt my explanation in response to their needs. The use of visual aids,
such as diagrams, provided a valuable complement to the spoken
TDU 3 Using explanations as a teaching strategy: life processes
6

elements of the lesson. Similarly, the demonstration involving the bicycle
tyre and ball of clay gave my students a memorable impression of how
food moves through the body.
Pause for thought
How did Mrs Roshni motivate and engage her students during her
explanation?
What elements of her lesson did you particularly like?
Note down three ways you could you adapt her lesson to accommodate
the different ways students learn.
Here are some ideas:
. Inviting the students to squeeze the clay through the ‘digestive
system’.
. Asking students to stick pre-written labels onto the different parts of
the digestive system diagram.
. Encouraging students to point to or feel where particular organs are
in their own body as you point to the diagram.
. Getting students to work in groups, with one lying down and the
others using written labels to indicate where their classmate’s organs
are.
. Inviting students to sequence simple pictures of food moving through
the digestive tract from start to finish.
Comprehensive and continuous evaluation (CCE)
Reversing the role of your students – so that they become ‘the teacher’
– gives them the opportunity to explain a scientific concept or process to
their peers. Students can often explain things extremely skilfully and
imaginatively. However, they can only explain things effectively if they
have fully understood the concept or process themselves. Providing
students with opportunities to explain things to each other therefore has
the additional benefit of enabling you to make ongoing assessments of
their scientific understanding. A simple tick list can help you keep track
of this.
You may wish to encourage your students to use drawings, diagrams
and flow charts to support their explanations.
Some possible questions that you could ask your students to assess
their understanding of life processes through peer explanations are
shown in Table 3. You may be able to think of others relating to different
scientific fields.
7
2 Identifying different learning styles
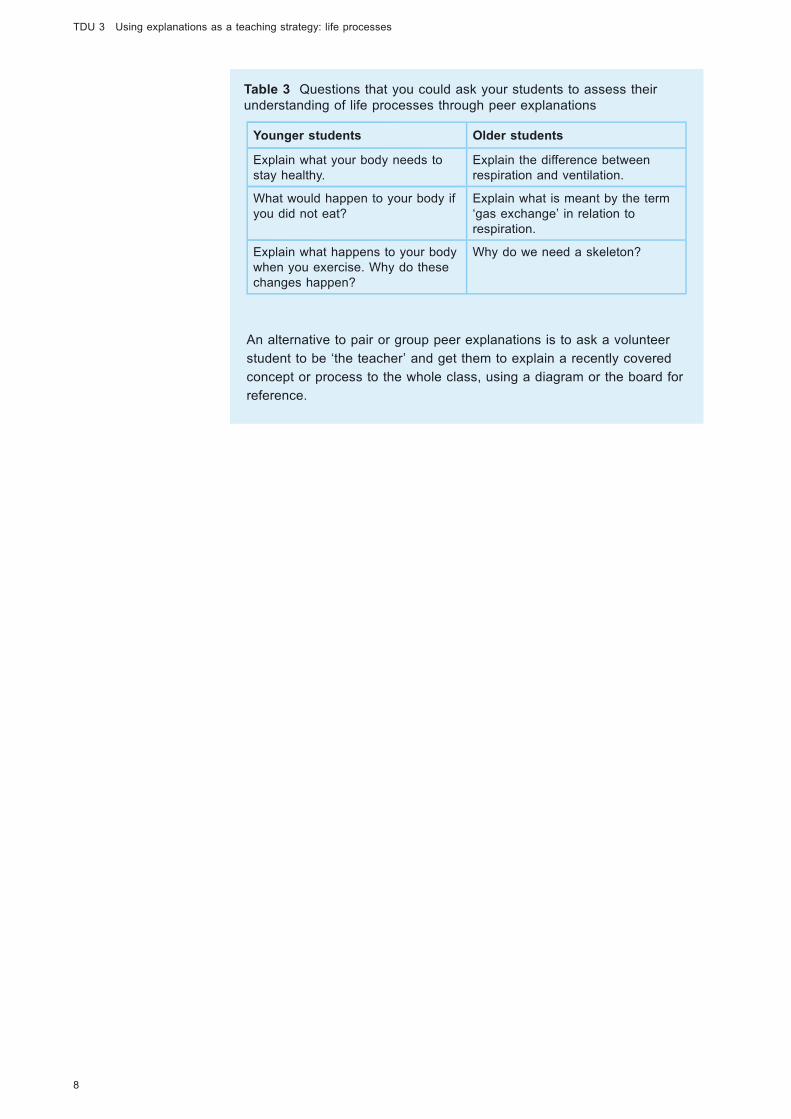
Table 3 Questions that you could ask your students to assess theirunderstanding of life processes through peer explanations
Younger students Older students
Explain what your body needs tostay healthy.
Explain the difference betweenrespiration and ventilation.
What would happen to your body ifyou did not eat?
Explain what is meant by the term‘gas exchange’ in relation torespiration.
Explain what happens to your bodywhen you exercise. Why do thesechanges happen?
Why do we need a skeleton?
An alternative to pair or group peer explanations is to ask a volunteer
student to be ‘the teacher’ and get them to explain a recently covered
concept or process to the whole class, using a diagram or the board for
reference.
TDU 3 Using explanations as a teaching strategy: life processes
8

3 Engaging different learning stylesthrough lesson planning
Activity 3: Improving your lesson planning
Lesson plan A
Read through lesson plan A on plant life cycles. Taking into
consideration what you have learned in this unit so far, list the ways you
would improve the teacher explanation in this lesson plan. What kinds of
changes should you make to actively engage your students? Remember
that small changes can have a big impact on the way that your students
engage with your explanations.
An elementary teacher recently changed the lesson plan on plant life
cycles and used it with her class (see italic text in lesson plan B below).
What small changes did she make to her explanation and what impact
do you think these would have on the students in her class?
Lesson plan B
Review the last lesson. Draw a diagram of the internal parts of a flower
[Figure 2]. Ask the students to work in pairs and tell their partner the
names of the internal plant parts. Ask for volunteers to pick up a label
and place it onto the correct part of the diagram on the board. Check
that the rest of the class agrees.
Figure 2 Internal parts of the flower.
Show students four pictures that represent parts of a plant’s life cycle.
Ask them to discuss the order of the pictures in groups of four. Students
can then use paper and pens to draw the pictures in the order they think
is correct. Ask one or two groups to say the order they think the pictures
should go in. Tell students that the life of a plant starts when the seed
lands on soil, the seed then germinates growing a root followed by a
shoot. At this point, it starts to photosynthesise and grows into a small
plant. The plant continues to grow and develops a flower. The flower is
pollinated by a bee. The pollen fertilises an ovum/egg in the ovary. The
9
3 Engaging different learning styles through lesson planning

flower dies and a seed head forms. The seeds are dispersed in the
wind. Then the life cycle then begins again. Finally, ask for a volunteer
to place the pictures of a plant life cycle in the right order on the board
[Figure 3].
Figure 3 Plant life cycle.
In pairs, ask students to write the definition of germination, pollination,
fertilisation and seed dispersal on strips of paper. These can then be
used for a classroom display.
Comprehensive and continuous evaluation (CCE)
Creating a wall of scientific vocabulary will provide your students with
another opportunity to explain and establish their knowledge.
Arrange your students in pairs or small groups. Hand out cards with
individual words on that relate to your current topic area in elementary
science. Ask your students to take turns to explain what the word on the
card means to their partner or the others in their group. They then agree
on a definition together and write it out underneath the word. Listening
to your students’ definitions will give you an indication of their
understanding and knowledge. The words and their definitions can then
be displayed and referred to as the topic progresses.
TDU 3 Using explanations as a teaching strategy: life processes
10

4 Taking learning outsideUsing the outdoor space around your school provides opportunities for moreactive and engaging explanations. These are particularly appealing to thosewith a predominantly tactile learning style. An outdoor space with flowerscan enable students to observe germination, pollination, fertilisation and seeddispersal first hand. If your school has limited outdoor space, you couldarrange for your students to plant seeds in small pots before embarking onthe study of plant life cycles.
The outdoor space also lends itself very well to reinforcing classroomexplanations. One possibility for making learning more active is to make ascience treasure hunt. This involves writing out questions and answers onseparate strips of paper. Arrange your students in small groups, giving themeach a different question. They then have to look for the appropriate answeramong those you have hidden outside. Alternatives to this game are to hidethe questions and give students the answers instead, or to hide both thequestions and the answers, so that students have to find pairs that match.
The example treasure hunt questions and answers in Table 4 can be used toassess your students’ understanding of plant parts and their functions. Whatother topics lend themselves well to this activity?
Table 4 Example treasure hunt questions and answers.
What collect sunlight to help the plant to grow? Leaves
Where are the seeds produced in the plant? Bud
What contains the seeds, ready to be dispersed? Roots
What will grow into a full flower? Fruit
What act as landing platform for insects? The colour andscent helps attract the insects.
Stem
What take water and nutrients from the soil? Flower
What carries water and nutrients around the plant? Petals
Pause for thought
In what ways do you plan to enhance your explanations to ensure that
they engage all of your students?
What kinds of things can you invite your students to explain to each
other?
What are the benefits of active rather than passive ways of reinforcing
explanations? How could using your school’s outdoor areas support
learning in science?
11
4 Taking learning outside

5 SummaryIn this unit you have considered small ways in which you can improve theexplanations that you give to your students to ensure that they are motivatedand challenged. You will have thought about the different ways that peopleprocess information and how you can appeal to the visual, auditory andtactile learners in your class. By reflecting on a case study and two versionsof a lesson plan, you will have identified ways to improve teacherexplanations so that all of your students feel motivated and challenged.
You have also considered the value of asking students to explain scientificconcepts and processes to their peers.
To conclude this unit, note down five tips for improving teacher explanationsin elementary science. Which of them do you intend to adopt with yourstudents?
TDU 3 Using explanations as a teaching strategy: life processes
12

6 ResourcesResource 1: Lesson plan A
Lesson plan A – for use with Section 3, ‘Engaging different learning stylesthrough lesson planning’.
13
6 Resources

TDU 3 Using explanations as a teaching strategy: life processes
14
Top
ic /
Ob
ject
ive
s M
ain
Tea
chin
g (T
each
er e
xpla
nat
ion
)
Ind
epen
den
t /
Gro
up
act
ivit
y
Elem
enta
ry S
cie
nce
: Pla
nt
life
cycl
e O
bje
ctiv
es:
U
nd
erst
and
th
e lif
e cy
cle
of
flo
wer
ing
pla
nts
. Id
enti
fy a
nd
nam
e p
arts
of
a p
lan
t
(rel
ates
to
pre
vio
us
less
on
).
Ou
tco
me
s:
Can
stu
den
ts d
isti
ngu
ish
bet
wee
n p
olle
n
dis
per
sal a
nd
see
d d
isp
ersa
l?
C
an s
tud
ents
co
rre
ctly
ord
er t
he
step
s in
th
e lif
e cy
cle
of
a p
lan
t?
Can
stu
den
ts id
enti
fy a
nd
nam
e p
arts
of
a p
lan
t (r
elat
es t
o p
revi
ou
s le
sso
n)?
Ne
w v
oca
bu
lary
V
oca
bu
lary
fro
m
pre
vio
us
less
on
po
llin
atio
n
germ
inat
ion
fe
rtili
zati
on
se
ed d
isp
ersa
l p
ho
tosy
nth
esis
e
anth
er
fila
me
nt
p
etal
st
ame
n
sep
al
ped
un
cle
re
cep
tacl
e
ovu
le
ova
ry
styl
e
stig
ma
ca
rpel
Rev
iew
last
less
on
. Dra
w a
dia
gram
of
the
inte
rnal
par
ts
of
a fl
ow
er (
see
p2
). A
sk s
tud
ents
to
say
wh
at t
he
inte
rnal
par
ts o
f a
pla
nt
are
cal
led
, in
clu
din
g th
e m
ale
and
fem
ale
par
ts. W
rite
th
ese
lab
els
on
th
e b
oar
d.
Dra
w a
dia
gram
of
a p
lan
t lif
e cy
cle
an
d e
xpla
in w
hat
h
app
ens
at e
ach
sta
ge o
f th
e p
roce
ss (
see
bel
ow
).
Exp
lain
an
d w
rite
th
e d
efin
itio
n o
f ge
rmin
atio
n,
po
llin
atio
n, f
erti
lisat
ion
an
d s
eed
dis
per
sal a
s th
e
stu
den
ts a
re t
old
ab
ou
t th
e lif
e cy
cle
. Tel
l stu
den
ts a
life
o
f a
pla
nt
star
ts w
her
e th
e se
ed la
nd
s o
n s
oil.
Th
e se
ed
then
ger
min
ates
an
d g
row
s a
sho
ot.
At
this
po
int,
it
star
ts t
o p
ho
tosy
nth
esis
e a
nd
gro
ws
into
a s
mal
l pla
nt.
Th
e p
lan
t co
nti
nu
es
to g
row
an
d d
evel
op
s a
flo
wer
. Th
e fl
ow
er is
po
llin
ated
by
a b
ee, t
he
po
llen
fer
tilis
es a
n
ovu
m (
egg)
in t
he
ova
ry. T
he
flo
wer
die
s an
d a
see
d h
ead
fo
rms.
Th
e se
ed
s ar
e d
isp
erse
d in
th
e w
ind
. Th
e lif
e cy
cle
then
beg
ins
agai
n.
Stu
den
ts w
ill d
raw
a li
fe c
ycle
of
a p
lan
t in
thei
r sc
ien
ce b
oo
ks, l
abel
ling
and
exp
lain
ing
each
par
t o
f th
e p
roce
ss.
Ass
ess
men
t:
Can
stu
den
ts id
enti
fy a
nd
nam
e p
arts
of
a
pla
nt?
(re
late
s to
pre
vio
us
less
on
)
Can
stu
den
ts c
orr
ect
ly o
rder
th
e st
eps
in t
he
life
cycl
e o
f a
pla
nt?
C
an t
he
stu
den
ts e
xpla
in e
ach
par
t o
f th
e p
roce
ss?
C
an t
hey
use
th
e w
ord
s p
olli
nat
ion
, ge
rmin
atio
n, f
erti
lisat
ion
an
d s
eed
dis
per
sal
corr
ect
ly?

6 Resources
15
A d
iagr
am o
f th
e in
tern
al p
arts
of
a fl
ow
er.
Resource 2: Further reading
You may find this book useful to help you with your teaching:
. Sam Plants a Sunflower by Kate Petty and Axel Scheffler.
If you are interested in the topic of human digestion, you may find thefollowing online resources useful as background information:
. ‘Nutrition in animals’ (National Council of Educational Research andTraining, 2011)
. ‘The digestive system and how it works’ (National Digestive DiseasesInformation Clearinghouse, 2008)
. ‘Learn human body – digestive system’ (APPUSERIES, 2010 )
If you are interested in the topic of human respiration, you may find thefollowing online resources useful as background information:
. ‘Respiration in organisms’ (National Council of Educational Researchand Training, 2011)
. Animation of a diaphragm exhaling and inhaling (WikimediaCommons, 2008)
. ‘Learn human body – respiratory system’ (APPUSERIES, 2012)
. ‘Respiratory system: oxygen delivery system’ (The Franklin Institute,undated
If you are interested in the topic of sexual reproduction in plants, you mayfind the following online:
. ‘Reproduction in plants’ (National Council of Educational Research andTraining, 2011)
. ‘Reproduction in plants’ (Schultz, undated)
. ‘Sexual reproduction in flower plants’ (paralleleducation, 2012)
TDU 3 Using explanations as a teaching strategy: life processes
16

7 Related unitsGiving clear explanations will be an integral part of everyday elementaryscience teaching and therefore is related to most other TDUs.
. TDU 1, Sound: eliciting prior knowledge through brainstorming: Termslike ‘amplitude’ and ‘frequency’, and the mechanism of sound productionby human beings using the voice box and the inner structure of the ear,lend themselves to interactive classroom explanations. You can engageyour students in simple activities such as touching someone’s body as itproduces sound to feel the associated vibration, striking the edge of ametal cup containing water and noting the different sounds produced withvarying levels of water, and other such activities.
. TDU 10, The environment: creative ways to introduce new topics:Aspects such as ground water, recharging of ground water, the watertable, depletion of the water table, the distribution of water and watermanagement need to be explained, because students cannot directlyobserve or investigate them. The explanation may be initiated withexamples of Indian states facing ground water depletion. You maydiscuss the reasons for this, its impact and any possible remedialmeasures available. You may show them related newspaper clippings andread out such news. You may also ask students whether they faceproblems regarding drinking water and discuss the water conservationmeasures adopted in their community.
17
7 Related units
ReferencesAPPUSERIES [YouTube user] (2010) ‘Learn human body – digestive system’(online), YouTube, 11 June. Available from: http://www.youtube.com/watch?v=_EtTWXQ5BiA (accessed 26 November 2013).
APPUSERIES [YouTube user] (2012) ‘Learn human body – respiratory system’(online), YouTube, 7 March. Available from: http://www.youtube.com/watch?v=VseZ4fvJxu0 (accessed 26 November 2013).
The Franklin Institute (undated) ‘Respiratory system: oxygen delivery system’(online). Available from: http://www.fi.edu/learn/heart/systems/respiration.html (accessed 26 November 2013).
National Council of Educational Research and Training (2011) Science Textbookfor Class VII. New Delhi: NCERT. Available from: http://ncert.nic.in/ncerts/textbook/textbook.htm?gesc1=2-18 (accessed 26 November 2013).
National Digestive Diseases Information Clearinghouse (2008) ‘Your digestivesystem and how it works’ (online), National Institute of Diabetes and Digestiveand Kidney Diseases, US Department of Health and Human Services, April.Available from: http://digestive.niddk.nih.gov/ddiseases/pubs/yrdd/(accessed 26 November 2013).
paralleleducation [YouTube user] (2012) ‘Sexual reproduction in flower plants |fertilization’ (online), YouTube, 9 April. Available from: http://www.youtube.com/watch?v=X7zW5W6XGeg (accessed 26 November 2013).
Schultz, S.T. (undated) ‘Reproduction in plants’ (online), Biology Encyclopedia.Available from: http://www.biologyreference.com/Re-Se/Reproduction-in-Plants.html#b (accessed 26 November 2013).
Wikimedia Commons (2008) ‘File:Diaphragmatic_breathing.gif’ (online), 10September. Available from: http://commons.wikimedia.org/wiki/File:Diaphragmatic_breathing.gif (accessed 26 November 2013).
TDU 3 Using explanations as a teaching strategy: life processes
18

AcknowledgementsThe content of this teacher development unit was developed collaborativelyand incrementally by the following educators and academics from India andThe Open University (UK) who discussed various drafts, including thefeedback from Indian and UK critical readers: Sutapa Bose, Jane Devereuxand Christine James.
Except for third party materials and otherwise stated, this content is madeavailable under a Creative Commons Attribution-ShareAlike licence:http://creativecommons.org/licenses/by-sa/3.0/
The material acknowledged below is Proprietary and used under licence (notsubject to Creative Commons Licence). Grateful acknowledgement is madeto the following sources for permission to reproduce material in this unit:
Figure 1: photograph taken by Jane Devereux.
Figure 2: http://en.wikipedia.org/wiki/File:Mature_flower_diagram.svg(public domain).
CCE logo: http://cbse.nic.in/.
Other illustrations: clip art used with permission from Microsoft.
Every effort has been made to contact copyright owners. If any have beeninadvertently overlooked, the publishers will be pleased to make thenecessary arrangements at the first opportunity.
19
Acknowledgements