unifier business processes user guide · 2020-04-08 · oracle primavera unifier business processes...
TRANSCRIPT
Oracle Primavera Unifier Business Processes User Guide
Version 20 April 2020

3
Contents
Working with Unifier Business Processes ....................................................................................... 11
Unifier Business Processes ................................................................................................................. 13
Workflow Versus Non-Workflow ................................................................................................ 15
Business Process Types............................................................................................................. 15Cost ..................................................................................................................................... 15
Document ........................................................................................................................... 16
Line Item ............................................................................................................................. 17
Project/Shell Creation ........................................................................................................ 18
Request for Bid (RFB) ......................................................................................................... 19
Resource ............................................................................................................................. 19
Simple ................................................................................................................................. 19
Text ...................................................................................................................................... 19
Business Process Editor ............................................................................................................ 20
Business Process Dates and Calendars ................................................................................... 21
Business Process Forms ............................................................................................................ 21Parts of the Form ................................................................................................................ 23
Auto-sequencing and Unique Values in Fields .................................................................. 26
Pickers ................................................................................................................................ 27
CBS Picker .......................................................................................................................... 33
WBS Picker ......................................................................................................................... 33
User Picker and Group Picker ............................................................................................ 35
Shell Data Picker ................................................................................................................ 38
About Workflows ......................................................................................................................... 39
Auto-Populating Fields in a BP Record ...................................................................................... 40
Reverse Auto-Populating (RAP) Fields in a BP Record ............................................................. 40
Viewing Notifications (CC'd Tasks) ............................................................................................ 42
Accessing a BP Record from an External System .................................................................... 43
Business Processes in Company Logs and Logs Nodes .......................................................... 44
Creating a Business Process (BP) Record ................................................................................ 48Manually Creating a New BP Record from a BP Log (Standard View) ............................. 49
Manually Creating a New BP Record from the Master Log (Standard View) .................. 50
Manually Creating a New BP Record from the Tasks Log (Standard View) .................... 51
Creating a BP Record by Copying an Existing BP Record (Standard View) ..................... 52
Copying a BP Record in Master Log (Standard View) ....................................................... 53
Visibility of Properties tabs in BPs ..................................................................................... 54
Auto-Creating BP Records .................................................................................................. 54
Auto-Create a BP Record from a Workflow Step (S-Step) ................................................ 55
Auto-Create a BP Record, or Line Item, Based on Conditions or Frequency .................. 55
Bypassing the Initiation Step (I-Step) ................................................................................ 57
Auto-Create a BP Record via a Template .......................................................................... 59
Examples of Auto-Creation ................................................................................................. 59
Unifier Business Processes User Guide
4
Rules for Checking Conditions for Auto-Creation ............................................................. 60
Rule 1 .................................................................................................................................. 60
Rule 2 .................................................................................................................................. 61
Rule 3 .................................................................................................................................. 61
Auto-Creation In Operation ................................................................................................ 61
Change Commit .................................................................................................................. 61
Attachments........................................................................................................................ 62
Schedule BP Auto-Creation Dynamically ........................................................................... 64
Stop Auto-Creation ............................................................................................................. 65
Create a BP Record, or Line Item, with Manual Auto-Creation ........................................ 65
Create a BP Record in Document Manager ...................................................................... 65
Create a BP Record from a Template ................................................................................ 67
Create BP Templates and Schedule BP Creation ............................................................. 71
Create a BP Template ........................................................................................................ 72
Change the Template Satus (Draft and Complete) .......................................................... 73
Schedule Automatic BP Record creation Based on a Template ...................................... 74
Edit, or Delete, a BP Template ........................................................................................... 76
Edit, or Cancel a BP Schedule ........................................................................................... 76
Failed Scheduled BP Record Creation .............................................................................. 76
Using CSV and Restful Services ........................................................................................ 77
Working with Permissions (Non-Workflow BPs) ....................................................................... 78
Filling Out a Business Process Form ......................................................................................... 78
Saving a Draft of a Workflow Business Process ....................................................................... 79
Accessing Custom Business Process Help PDF File ................................................................ 80
Adding and Managing Line Items .............................................................................................. 80Add Line Items Using a Line-Item Entry Form ................................................................... 81
Edit or Remove Line Items ................................................................................................. 82
Add and Manage Summary Line Items ............................................................................. 84
Filtering the Line Item List ................................................................................................. 84
Copy a Line Item from the Same Form ............................................................................. 86
Copy and Consolidate Line Items from Different Business Process Forms .................... 86
Restricting Line Items by Using Copy with Conditions Option (Standard View) ...................... 89
Adding and Managing Line Items Using the Grid View Feature .............................................. 90Add line items using the Grid ............................................................................................. 92
Link line items to other business process records ........................................................... 93
Edit line items using the Grid ............................................................................................. 94
Insert a row into the grid .................................................................................................... 95
Manually create a business process from the Grid .......................................................... 96
Copy a line item on the Grid .............................................................................................. 96
Adding and Managing General Comments ............................................................................... 96
Add comments to a business process form ..................................................................... 97
Add comments to a document type business process .................................................... 98
View comments .................................................................................................................. 98
Edit or delete comments .................................................................................................... 98
Hide comments .................................................................................................................. 99
Add comments to an attached document ........................................................................ 99
Contents
5
Using or Viewing a Query-Based Tab ....................................................................................... 100
QBDE Evaluation Upon Creating Record From Query-Based Tab ......................................... 101
Working with File Attachments and Markups ......................................................................... 102
Attach Files to General Comments Section of a Business Process............................... 103
Attach Files to a Document-type BP from My Computer ................................................ 103
Attach Files to a Document-type BP from Unifier Folder ................................................ 104
Attach Files to Document-Type Business Process Forms .............................................. 105
Attach Drawing and Reference Files to a Business Process ......................................... 107
Add Markups to a Business Process Attachment .......................................................... 107
Including Stamps in Documents...................................................................................... 109
View Attachments in a Business Process ....................................................................... 109
Download Attachments in a Business Process .............................................................. 110
Revising and Reviewing Attachments in a Business Process ........................................ 110
Publish Attachments or Revised Attachments in a Business Process .......................... 112
View Graphic Markups in a Business Process Attachment ........................................... 112
Remove Attachments from a Business Process ............................................................. 113
Using User-Defined Stamps ............................................................................................. 113
Comparing File Attachments ........................................................................................... 114
Republishing DM Document from BP Record ................................................................. 115
Linking Business Process Records ......................................................................................... 118
Link a business process record ....................................................................................... 119
Manage linked records .................................................................................................... 120
Linking Mailbox Messages to a Record .................................................................................. 121
About permissions ............................................................................................................ 121
Attach an existing Mailbox message ............................................................................... 121
Create and attach a new Mailbox message .................................................................... 122
Manage linked Mailbox .................................................................................................... 122
Reply to or forward a linked Mailbox message ............................................................... 122
View the list of linked BPs from a Mailbox message ...................................................... 122
Send and Manage Linked Mailbox from RFB Forms ...................................................... 123
Attaching External Emails from the Project or Shell Mailbox to a Record ............................ 123
Sending Attachments for E-Signature ..................................................................................... 125
Adding or Viewing a Map (Geocoding) .................................................................................... 126
Adding an Image ....................................................................................................................... 127
Scanning for Viruses (Cloud Deployments) ............................................................................ 128
Adding a Hyperlink ................................................................................................................... 131
Viewing Referencing Records .................................................................................................. 132
View a list of referencing records .................................................................................... 133
What you can do on the Reference Graph window: ....................................................... 133
What you can do on the Reference and Linked Records window ................................. 146
Spell-Checking a Form ............................................................................................................. 151
Participating in a Workflow ...................................................................................................... 151
Completion Policies and Resolving Actions .................................................................... 152
Statuses ............................................................................................................................ 153
Working with Tasks .......................................................................................................... 155
Unifier Business Processes User Guide
6
Taking Action on your Task (Standard View) ................................................................... 155
Taking Action on Multiple Tasks at the Same Time (Standard View) ............................ 156
Accepting your Tasks (Standard View) ............................................................................ 158
Undoing Accepting your Tasks (Standard View) ............................................................. 160
Declining a Task (Standard View) .................................................................................... 161
Completing a Business Process Form ............................................................................. 161
Assigning Users for the Next Step or Sending a Copy (Standard View) ......................... 162
Modifying Step Due Date ................................................................................................. 163
Adding Additional Assignee or Sending Additional Copy (Standard View) .................... 164
Adding or Viewing Task Notes (Classic View Only) ......................................................... 165
Completing Tasks via Email ............................................................................................. 165
About Email Notifications for Business Processes ................................................................ 168Email Notifications for Workflow Business Processes ................................................... 169
Email Notifications for Non-Workflow Business Processes ........................................... 170
Participating in a Discussion Group (Classic View only) ........................................................ 171Initiating a discussion group (Classic View only) ............................................................ 171
Closing a discussion group (Classic View only) ............................................................... 172
Participating in a discussion group (Classic View only) .................................................. 172
Copying and Consolidating Comments and Markups ............................................................ 173Copy or consolidate text comments ................................................................................ 173
Copy or consolidate graphic markups ............................................................................. 175
Track a Step Through the Workflow ................................................................................ 176
Managing Business Process Records ..................................................................................... 178Transferring Ownership - Business Process Records ..................................................... 178
Granting Business Process Record Permissions ............................................................ 178
Editing Business Process Records .................................................................................. 179
Editing a BP Record for Editors ....................................................................................... 180
Editing a BP Record from Master Log - Business Processes Node (Standard View) .... 180
Editing Multiple BP Records (Bulk Edit) (Standard View) ............................................... 181
Editing Multiple BP Records (Bulk Edit) from Master Log - Business Process Node (Standard View) .................................................................................................................................. 183
Auditing Business Processes ........................................................................................... 185
Printing and Distributing BP Forms ......................................................................................... 186
Print a BP Form in Different Formats .............................................................................. 186
Custom Format Print Options For BPs............................................................................. 189
Print Using a Custom Layout ............................................................................................ 190
Send a PDF copy of a BP form via Mailbox ..................................................................... 191
Auto-Populating BP Data Picker on BP Auto-Creation............................................................ 192
Updates on Document Attributes for Business Processes .................................................... 193
Unifier Business Processes with Special Behaviors......................................................................... 195
Schedule of Values (SOV) Sheets and Business Processes .................................................. 195
Payment Application Business Processes .............................................................................. 197Payment Application Tasks and Performing Multiple Actions-Bulk Action (Standard View) ........................................................................................................................................... 197
Payment Application BP and Multiple Payments ............................................................ 198
Payment Application BP and Negative Change Commits (Standard View) ................... 199
Contents
7
Enter Payment Application Line Item Information .......................................................... 200
View Payment Application Line Item History ................................................................... 203
Export line item history..................................................................................................... 204
Save payment application in draft mode ........................................................................ 204
Draft mode and SOV synchronization ............................................................................. 204
View the Schedule of Values (SOV) Sheet ....................................................................... 205
Importing, Exporting, and Integration .............................................................................. 207
Import new payment application records ....................................................................... 207
Import payment application line items into a BP ........................................................... 208
Payment Application Grid Column Total .......................................................................... 210
General Spends Business Processes ..................................................................................... 211Import new general spends records ................................................................................ 211
Import general spends line items into a business process ........................................... 213
Lump Sum and Unit Cost ................................................................................................. 214
CSV Integration ................................................................................................................. 219
Change Commit Business Processes ..................................................................................... 221Import new change commit records ................................................................................ 221
Import change commit line items into a BP .................................................................... 222
SOV Summary Payment Applications Sheets and Business Processes ............................... 223Adding Values to a Summary Payment Applications SOV Sheet ................................... 225
Summary Payment Applications SOV Sheet window ...................................................... 225
Grid Support in Base Commit and Change Commit ....................................................... 226
Grid Support for Base Commit ......................................................................................... 226
Grid Support for Change Commit .................................................................................... 238
Summary Payment Application Grid Column Total ......................................................... 243
SOV Summary Payment Application Business Process (Standard View) ............................. 244
Overpayment in Summary Payment Applications SOV .......................................................... 246
Totaling Cost Breakdown Values ............................................................................................. 246
Totaling Cost Breakdown to the Line Item ...................................................................... 246
Totaling Line Item in Payment Application ...................................................................... 248
Totaling Line Item in Summary Payment Application ..................................................... 248
Line Item and Sum of Costed Line .................................................................................. 248
Summary Line Item .......................................................................................................... 249
Summary Row Totals ........................................................................................................ 251
Summary Total.................................................................................................................. 251
Line Item Total .................................................................................................................. 253
Request for Bid (RFB) Business Processes ............................................................................ 255
Language, Time Zone, and Date Format for Vendors BP ............................................... 257
Working with RFBs ........................................................................................................... 257
Sending the Bid Request for Internal Review and Approval .......................................... 258
Starting the Bidding Process ........................................................................................... 259
Filtering Bidders ............................................................................................................... 260
Public Bidding ................................................................................................................... 260
Private or Non-Public Bidding .......................................................................................... 262
Bidders and Passwords.................................................................................................... 266
Comparing the Bids .......................................................................................................... 267
Unifier Business Processes User Guide
8
Bid Comparison Options .................................................................................................. 267
Select Winning Bid ........................................................................................................... 268
Auto-create Contract ........................................................................................................ 270
What the Vendor Does ..................................................................................................... 271
Changing Vendor Email Address ..................................................................................... 275
Lease Business Processes ...................................................................................................... 276
Lease business process terminology .............................................................................. 277
Lease business process use cases ................................................................................. 277
Various Payment Terms for the same lease ................................................................... 278
Different payment allocations for multiple tenants........................................................ 278
Semi-annual lease terms with proration ......................................................................... 278
Handling rent pre-payments ............................................................................................ 278
Straight lining with quarterly payments .......................................................................... 278
Straight Lining with monthly payments ........................................................................... 279
Lease term of 20 years with escalation .......................................................................... 279
Escalation Based on Index Rate ...................................................................................... 279
Create and manage Lease business processes ............................................................. 279
Create and use an allocation template ........................................................................... 280
View or export payment schedule ................................................................................... 281
Auto-create an invoice or payment request from a Lease business process ............... 282
Take a snapshot of a Lease ............................................................................................. 282
Calculating Net Present Value (NPV) ............................................................................... 283
Reservation Business Process ................................................................................................ 285Using a Reservation Business Process ........................................................................... 286
Using the Schedules Feature ........................................................................................... 288
Making a Recurring Reservation ..................................................................................... 290
Auto-Creating Another Business Process From the Reservation ................................... 292
How the data pickers work on a Reservation business process ................................... 293
Using Quick Calendar Entry on a Business Process ....................................................... 294
Canceling a reservation ................................................................................................... 296
Business Processes with Redesigned User Interface ...................................................................... 299
Business Process Types with Redesigned UI ......................................................................... 300
Cost ................................................................................................................................... 300
Document ......................................................................................................................... 301
Line Item ........................................................................................................................... 301
Project/Shell Creation ...................................................................................................... 301
Text .................................................................................................................................... 301
Creation Step ............................................................................................................................ 301
Update Step .............................................................................................................................. 304
View Step .................................................................................................................................. 304
Completing a BP Record Form ................................................................................................ 305
Editing Values on a BP Record Form ............................................................................... 306
Supported Data Pickers ................................................................................................... 308
Adding and Managing Line Items ............................................................................................ 309
Adding Line Items ............................................................................................................. 309
Editing and Deleting Line Items ....................................................................................... 309
Contents
9
Copy Line Items ................................................................................................................ 310
Line Item Consolidation ................................................................................................... 310
Grouping Line Items ......................................................................................................... 313
Removing Line Item Attachments ................................................................................... 315
Working with Attachments ....................................................................................................... 316Viewing Attachments Associated with a BP Record ....................................................... 316
Adding Attachments ......................................................................................................... 318
Adding Attachments from Document Manager .............................................................. 318
Opening an Attachment ................................................................................................... 318
Reviewing an Attachment ................................................................................................ 319
Revising an Attachment ................................................................................................... 319
Downloading an Attachment ........................................................................................... 319
Deleting an Attachment ................................................................................................... 319
Adding and Managing Linked Records ................................................................................... 320
Viewing Reference Records ..................................................................................................... 320
Using the Reference Graph .............................................................................................. 321
Working with General Comments ............................................................................................ 322Adding General Comments .............................................................................................. 323
Editing and Deleting General Comments ........................................................................ 324
Viewing Comments ........................................................................................................... 325
Working with Linked Mail ......................................................................................................... 325
Composing Linked Mails .................................................................................................. 325
Adding from Project Mailbox ............................................................................................ 326
Working with Query-Based Tabs .............................................................................................. 326Using Query-Based Tab Logs ........................................................................................... 327
Working with Quick Calendar Entry ......................................................................................... 327Other Calendar Features .................................................................................................. 330
Document-Type Business Process Forms (Without Folder Structure) .................................. 331
Adding Attachment to the Line Item ................................................................................ 332
Importing Attachments (Without Folder Structure) ........................................................ 334
Document-Type Business Process Forms (With Folder Structure) ....................................... 334
Adding Attachment to the Line Item ................................................................................ 335
Importing Attachments (With Folder Structure) .............................................................. 337
Copying Folder (Standard View) ....................................................................................... 337
Request for Bid (RFB) Type Business Process Form (Private)............................................... 337
Inviting to RFB .................................................................................................................. 340
Audit Log in Requestor BP (Private Bid and Public Bid) ................................................. 341
User Picker and Group Picker .................................................................................................. 341
View User Profile....................................................................................................................... 342
Cost-Type Business Processes ................................................................................................ 342
Base Commit Summary Payment Application SOV Type ................................................ 342
Change Commit Summary Payment Application SOV Type ........................................... 346
Text-Type Business Process .................................................................................................... 349
Simple-Type Business Process ................................................................................................ 350
Preventive Maintenance Business Process ........................................................................... 350
Unifier Business Processes User Guide
10
Unifier Business Process Forms, Managers Attributes, and Shell Dashboards - User Interface .. 353
Classic View User Interface Features Not Supported in Standard View ............................... 354
Classic View and Standard View Labels ................................................................................. 357
Classic View and Standard View Tabs, Menus, and Actions ................................................. 362
Classic View and Standard View Functions ............................................................................ 364
Copyright ....................................................................................................................................... 378
11
Working with Unifier Business Processes
The following explains how to work with Unifier business processes.
Within our documentation, some content might be specific for cloud deployments while other content is relevant for on-premises deployments. Any content that applies to only one of these deployments is labeled accordingly.
In This Section
Unifier Business Processes ..................................................................................... 13 Unifier Business Processes with Special Behaviors .............................................. 195 Business Processes with Redesigned User Interface ............................................ 299 Unifier Business Process Forms, Managers Attributes, and Shell Dashboards - User Interface ................................................................................................................ 353

13
Unifier Business Processes
Unifier transactions and collaboration are driven by business processes. Information is entered and stored in Unifier using electronic Business Process (BP) forms.
Each time you fill out a BP form, you are creating a new record in Unifier. These forms may be routed to project or shell team members or other Unifier users via workflows.
Non-workflow business processes will simply be stored as records.
BP records are stored in logs, which are accessible in the Navigator. You can think of these logs as filing cabinets, with each drawer storing a different type of BP.
The information that you enter into BP form fields may be used throughout Unifier. Each field corresponds to a Data Element (DE) that can be identified, reported upon, and tracked; some data element values may be rolled up to sheets such as a cost sheet or resource sheet.
The look and feel of a field (Data Element) is determined by the Data Definition (DD) on which the Data Element is based. The Data Definition determines whether the field is a text-entry field, a drop-down list of options, a checkbox that you can select, a picker that is used to select an existing Unifier record, etc.
BPs can be associated with specific Project or Shell (Project/Shell-level BP), or they can be applicable for the entire Company (company-level BP) and not to be specific to a Project/Shell. The Administrator (Project/Shell or Company) determines which forms are to be used and how the workflows operate.
Business Process forms are designed in uDesigner.
For information about internationalization and CSV files refer to Unifier General User Guide.
Unifier Business Processes User Guide
14
In This Section
Workflow Versus Non-Workflow .............................................................................. 15 Business Process Types ......................................................................................... 15 Business Process Editor .......................................................................................... 20 Business Process Dates and Calendars .................................................................. 21 Business Process Forms ......................................................................................... 21 About Workflows ..................................................................................................... 39 Auto-Populating Fields in a BP Record .................................................................... 40 Reverse Auto-Populating (RAP) Fields in a BP Record ........................................... 40 Viewing Notifications (CC'd Tasks) .......................................................................... 42 Accessing a BP Record from an External System ................................................... 43 Business Processes in Company Logs and Logs Nodes ......................................... 44 Creating a Business Process (BP) Record .............................................................. 48 Working with Permissions (Non-Workflow BPs) ...................................................... 78 Filling Out a Business Process Form ....................................................................... 78 Saving a Draft of a Workflow Business Process ...................................................... 79 Accessing Custom Business Process Help PDF File ............................................... 80 Adding and Managing Line Items ............................................................................ 80 Restricting Line Items by Using Copy with Conditions Option (Standard View) ....... 89 Adding and Managing Line Items Using the Grid View Feature ............................... 90 Adding and Managing General Comments .............................................................. 96 Using or Viewing a Query-Based Tab .................................................................... 100 QBDE Evaluation Upon Creating Record From Query-Based Tab ........................ 101 Working with File Attachments and Markups ......................................................... 102 Linking Business Process Records ....................................................................... 118 Linking Mailbox Messages to a Record ................................................................. 121 Attaching External Emails from the Project or Shell Mailbox to a Record .............. 123 Sending Attachments for E-Signature .................................................................... 125 Adding or Viewing a Map (Geocoding) .................................................................. 126 Adding an Image ................................................................................................... 127 Scanning for Viruses (Cloud Deployments) ........................................................... 128 Adding a Hyperlink ................................................................................................ 131 Viewing Referencing Records ............................................................................... 132 Spell-Checking a Form .......................................................................................... 151 Participating in a Workflow .................................................................................... 151 About Email Notifications for Business Processes ................................................. 168 Participating in a Discussion Group (Classic View only) ........................................ 171 Copying and Consolidating Comments and Markups ............................................ 173 Managing Business Process Records ................................................................... 178 Printing and Distributing BP Forms ........................................................................ 186 Auto-Populating BP Data Picker on BP Auto-Creation .......................................... 192 Updates on Document Attributes for Business Processes ..................................... 193
Working with Unifier Business Processes
15
Workflow Versus Non-Workflow
Business processes can be designed with or without workflows. A workflow specifies how a business process should proceed, from start to finish. Workflows define how records are routed and govern the behavior of each step in the business process. Each step uses the forms that were designed for it in uDesigner.
Most business processes will include a workflow or workflows; however, some business processes have a single purpose of storing data. These business processes are called non-workflow BPs. An example of a non-workflow BP is one or more forms that record contact and other general information about a company.
Business Process Types
Different business needs require different types of business processes. In uDesigner, many different types of business processes are available that perform various functions within Unifier.
The business process forms can be of the following types:
Cost
Document
Line Item
Project/Shell Creation
Request for Bid (RFB)
Resource
Simple
Text
The following explains each type.
Cost
The Cost type business process form enables you to track and manage cost information and interact with the Project/Shell cost sheet. Examples include base contracts or purchase orders, change orders, budget change requests, invoices, fund appropriations, and leases.
Additional cost-related functionality includes schedule of values (SOV) and payment applications.
In any change order (including change orders with Unit Cost-type Contract when the Unit Cost Contract option is selected), when you select a reference SOV, for selecting an SOV line item, Unifier uses the value of the Item Unit Cost field from the referenced SOV and makes the field read-only.
The Cost type business process form has several sub-types that are used to perform specific cost-type functions in Unifier. The cost business process subtypes are:
Commit at company level (also known as Blanket Purchase Order)
This sub-type allows tracking and control of costs at the company level above the CBS level.
Unifier Business Processes User Guide
16
It is independent of a budget or cost sheet, and it is used for tracking non-CBS expenses across projects or shells.
Project/Shell level Commit at company level sub-type can be set up to reference a company commit.
Example of Blanket Purchase Order
A Blanket Purchase Order is a type of purchase order that the customer makes with its supplier. A Blanket Purchase Order contains multiple delivery dates over a period of time (often negotiated) to take advantage of predetermined pricing. It is usually used when there is a recurring need for expendable goods.
Line items with CBS code
This sub-type relates to the Project/Shell cost sheet, directly.
The business processes that use a CBS picker to reference CBS codes must use the Line items with CBS code sub-type.
These business process transactions can directly affect the budget. Examples include Base Commits, Change Commits, General Spends, and Payment Applications.
Line items with fund code
This sub-type is used for fund appropriation at the Project/Shell level.
Business processes can be created to automatically allocate or consume funding source funds, which are chosen using a Fund picker. These transactions are for fund management and do not necessarily affect the budget. Transactions on Line items with fund code sub-type roll up to the Fund Manager.
Line items with both CBS and fund code
This sub-type is used during fund appropriation at the CBS level. These transactions are for fund management and do not necessarily affect the budget. Transactions on Line items with both CBS and fund code sub-type roll up to the Fund Manager and Cost Manager.
Line Items with Both CBS and WBS Codes
This sub-type is used to roll up transaction data to the EVM-WBS Sheet and Cost Manager.
Line items with company accounts code
This is a company-level business process that can be used to roll up transaction data to the company accounts sheet.
Line items with asset code
This is a company-level business process that can be used to roll up transaction data to asset sheets.
Line items with multiple codes
This sub-type is for business processes that can be used with a generic (non-CBS) cost manager.
Document
The Document type business process form can be used as an "envelope" to package a set of files, such as spreadsheets, drawings, and design documentation that flow from one group to another.

Working with Unifier Business Processes
17
The Advanced functionality allows documents to be attached to the form as line items, with line item status control. This allows the ability to change the status (for example, approve or reject) for each attached document. Examples are submittals and transmittals.
The following are the sub-types of Document type business process form:
With folder structure
Both documents and folders can be uploaded to the business process. The folder navigator in the lower left of the form displays the folder structure.
Without folder structure
The folder structure will be ignored, and documents are attached in a flat list. The contents of selected folders and sub-folders are attached.
Line Item
The Line Item type business process form can:
Lend itself well to business processes that involve miscellaneous information that you want to document for a company or project, for example, a vendor contact list.
Be useful for project-specific information that only needs to be documented on a single form, such as the overall project scope, or meeting minutes.
The Line Item type business process form is also useful for collecting data that other (more restricted) types of business processes cannot collect. For example, while a Simple type business process form can be used to collect basic vendor information, a company-level Line Item type business process form can collect additional vendor information, such as multiple business addresses.
At the project level, you can use a Line Item type business process form to filter large numbers of company records into smaller lists of records that are more appropriate for a specific project.
The Line Item type business process form uses a separate detail form to enter line items, which then appear on a line item list at the bottom of the form.
For short line items, Unifier users can enter information directly into the line item list using a "grid view" of the list.
You can design the Line Item type business process form to accommodate line item status, so you can control modifications to individual line items based on their status.
The following are the sub-types of the Line Item type business process form:
Generic
Use the Generic sub-type for all Line Item type business process forms unless you want to filter the business process records.
To filter BP records, use the sub-type explained below.
Line items to filter business process records
Use the Line items to filter business process records sub-type to filter company records into smaller lists of records for your projects.
Unifier Business Processes User Guide
18
This sub-type is particularly suited for selecting specific vendors from a company’s master vendor list (vendor master list) to create a sub-set of the master list that contains vendors who are appropriate for a particular project.
Used for this purpose, this sub-type can be linked (as a reference process) to an RFB to supply a project-specific vendor list for bid invitations.
Unifier allows your company to only designate one "Vendors" business process as the RFB master vendor list.
Preventive Maintenance (If the module is available)
Use the Preventive Maintenance sub-type to maintain assets proactively and on a regular basis, even when no issue has been reported on the asset.
The Preventive sub-type has the following classifications:
Asset
Asset Template
PM Book
PM Book Template
Meter Reading
These classifications are available for selection from the Classification drop-down list, once you select Preventive Maintenance.
Note: A Company can have more than one business of a particular sub-type, for example, two or more Asset BPs, two or more Asset Template BPs, and so forth).
Project/Shell Creation
The Project/Shell Creation type business process form enables you to create new standard projects and shells from the upper form of the business process or from line items.
The data necessary to create projects/shells is provided by this business process.
In addition to creating a new shell, this type of business process form can also be designed so that you can choose the managers and employees who should be automatically assigned to the shell when it is created.
This type of business process form enables your to create projects and shells using the templates that have been designed in Unifier.
Project/Shell Creation type business process form can also work with the Planning Manager by automatically linking new projects/shells with planning items. That is to say, instead of linking a planning item to a project in the Planning Manager, the Project/Shell Creation type business process form can be designed to automatically create the link (when the project/shell is created) and roll up data to the Planning Sheet from the business processes in that project/shell.
If integration was defined in the business process, Unifier can export/import a CSV template for the Simple type business process form.
Working with Unifier Business Processes
19
Request for Bid (RFB)
The Request for Bid (RFB) type business process form allows companies to invite project- or shell-related bids from different vendors.
There is a business process form for requestors.
Unifier user requesting the bids.
There is a business process form for bidders.
Bidders do not need to be existing Unifier users and are provided with a simple interface that does not require special training to use.
See Request for Bid (RFB) Business Processes (on page 255) for more information.
Resource
The Resource type business process form works with the Resource Manager.
There are two subtypes of the Resource type business process form:
Resource booking
This is a project-level business process.
In the upper form, you pick a date range to book resources.
The line item list displays a summary of booking rows.
You can one resource booking BP per project.
Time sheet
The time sheet business process can be designed to roll up hours and costs from the time sheet to cost sheets.
There is one per company, but there can be multiple schemas.
Simple
The Simple type business process form consists of an upper form only (like a line-item-type BP without the line items). It is used to add company or project or shell information that does not require line items.
The Simple type business process form can be a:
Company-level, non-workflow, single record.
Company-level, non-workflow, multi record.
Project-level, non-workflow or workflow, multi-record.
Shell-level, non-workflow or workflow, multi-record.
An example of the Simple type business process form is a project information form to capture basic reference information.
Text
The content of the Text type business process form is typically a text comment in the lower portion of the form.
Unifier Business Processes User Guide
20
Examples of text type BPs include:
RFIs (Request for Information).
Action items, which track issue resolution.
Business Process Editor
The Editor designation allows someone other than the assignee to edit the business process record. Editors can be added to the following workflow, or non-workflow, business process types:
Line Item
Cost (all types, including Lease and Line Item with Multiple Codes)
Document
Simple
RFB
Text
If you are designated as an Editor on a business process, it means that you are a user, or member of a group, who can open and edit a business process record without being granted explicit record-level permission.
If you are an Editor on a business process, you can open and edit any record that you can see listed in the business processes log, per your view access permission (View User Records, View Company Records, or View All Records).
Note: You must have at least one of the above permissions to be able to view the record in the log to access it to edit.
The editors cannot edit a Workflow Business Process record until the task assignee accepts the task and saves the draft.
Edits performed by editors are not audited.
Edits performed on the end step of a Workflow Business Process affect the record directly because no draft exists.
If there are multiple editors, the last Editor, who saves changes/edits, overwrites all other changes/edits.
If multiple editors and the assignee are editing the business process record at the same time, the data saved by the last edit overwrites all previous edits.
Example
If User 1 changes an amount field from 15,000 to 23,000 and saves the change, and User 2 changes an address field, but does not change the amount field on her copy of the form, when User 2 saves her change, Unifier will commit User 2’s edits and overwrite User 1's changes. In this scenario, the amount field value will be 15,000.
For information about responding to your tasks, see Working with Tasks (on page 155) and Completing Tasks via Email (on page 165).
Working with Unifier Business Processes
21
Business Process Dates and Calendars
Unifier supports multiple calendars, enabling the Administrator to create a library of calendars that can be selected for use at the Company or project/shell levels. The multiple calendars enable you to have calendars to support varying work schedules (depending on locality) and to account for holidays and other non‐working days. For example, some countries in the Middle East have weekends that are other than Saturday and Sunday.
Calendars affect the calculation of both business process workflow due dates and task due dates, and formula calculations. When the calendar changes for the Company, or for the project/shell, any subsequent computation of dates will use the new or changed calendar. Dates are not affected for records that are in process. The Date Picker and the Date Only Picker will show the changed calendar.
Business Process Forms
The electronic forms in Unifier are consistent throughout Unifier, with a similar look and feel. When you send a workflow business process form to the next step, the assignee receives a task.
When you first open a task, it appears in "view" mode. On the "view" version of this form, you can do the following:
Accept the task
Decline the task
Print the form
Terminate the record
Send Mailbox
Transfer ownership of the record
Add an assignee to the current step
Copy users to the current step
Audit the progress of the record
Add a comment, if you have permission
If you accept the task, the form becomes editable. On the editable, or "action," version of this form, you can do the following:
Undo task acceptance, which allows someone else to accept the task.
Decline the task, which takes you out of the list of assignees.
Select the step’s next action.
Add or edit form content
Save a draft of the record
Terminate the record
Transfer ownership of the record
Display the view form of the business process
Audit the progress of the record
Spell check the record content
Add attachments, line items, etc.
Unifier Business Processes User Guide
22
Send the form to the next step
The electronic form appears similar to a paper form—you complete the form by typing information directly into the form fields or choosing options through drop-down lists, pickers, or checkboxes.
Note: The section labels are determined in uDesigner and may vary. The basic form functionality remains the same.
If a data element in a BP form contains a tooltip (associated in the design, in uDesigner), then at runtime a question mark (?) symbol appears next to that field.
When you click on the Tooltip option, the Tooltip window opens which displays the following information in columns:
Data Element: The name of the data element.
Form Label: The label for the data element.
Tooltip: The description of the tooltip.
The toolbar of the Tooltip window has the following options:
Open
Find
Update from Data Element Properties
When you open the Tooltip window from the Upper Forms, all unique data elements from across all of the Action and View forms are displayed.
Note: If a data element exists in multiple forms, the data element will appear on this window once, only.
The data elements can be read-only or editable.
When you open the Tooltip window from the Detail Form, the data elements from across all of the line item detail forms are displayed.
When you open the Tooltip window from the Attribute form, the data elements present in the Attribute form are displayed.
When you click the Update from Data Element Properties, the Update tooltip Descriptionwindow opens which contains the following information in columns:
Data Element
Form Label
You can select multiple items from the list.
The list of data elements are filtered based on the data elements available in the Tooltip window. You can select one or multiple fields and click Update. When you click Update, Unifier processes the changes and updates the tooltip contents.
Existing Designs
If a design existed prior to including the tooltip option, and you decide to use the tooltip feature at runtime, then you must perform the following:
Working with Unifier Business Processes
23
Enter the tooltip in the Data Element properties.
In uDesigner, in the tooltip window, click on the Update from Data Element Propertiesoption to get the updated tooltip from the data element properties.
Deploy the design to see the tooltip at runtime.
Alternatively, you can open the data element in the tooltip of the design and manually enter the tooltip and then redeploy the design.
Parts of the Form
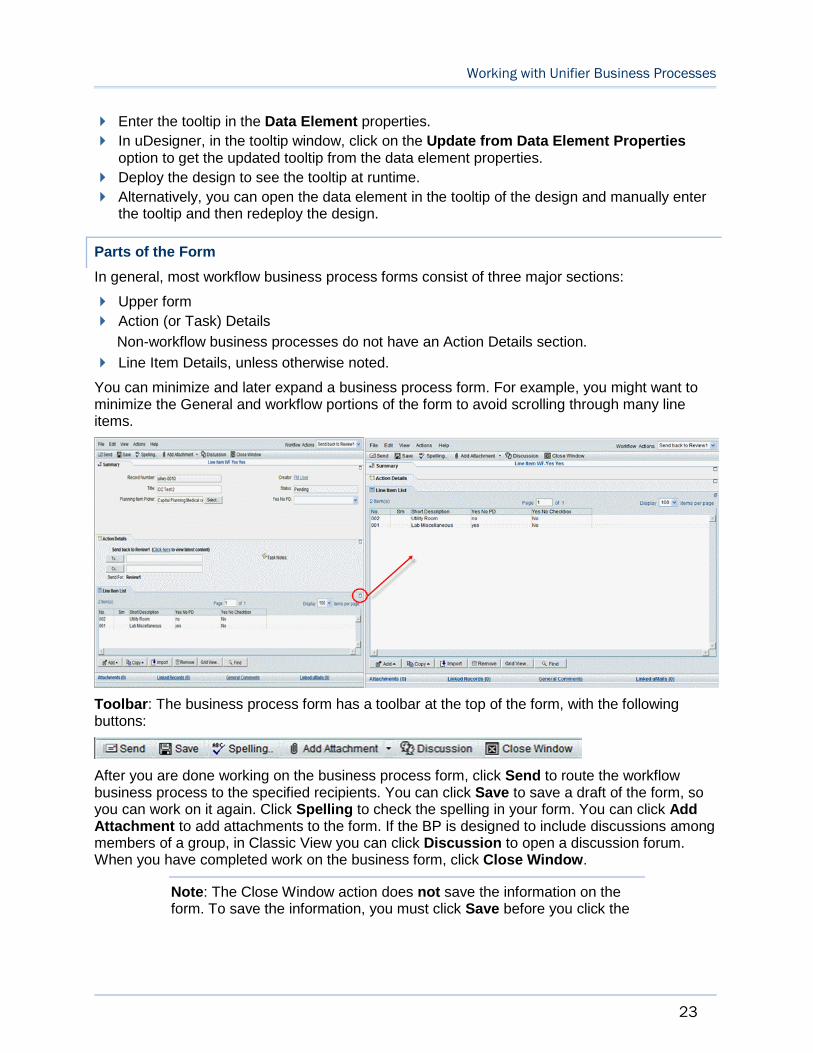
In general, most workflow business process forms consist of three major sections:
Upper form
Action (or Task) Details
Non-workflow business processes do not have an Action Details section.
Line Item Details, unless otherwise noted.
You can minimize and later expand a business process form. For example, you might want to minimize the General and workflow portions of the form to avoid scrolling through many line items.
Toolbar: The business process form has a toolbar at the top of the form, with the following buttons:
After you are done working on the business process form, click Send to route the workflow business process to the specified recipients. You can click Save to save a draft of the form, so you can work on it again. Click Spelling to check the spelling in your form. You can click Add Attachment to add attachments to the form. If the BP is designed to include discussions among members of a group, in Classic View you can click Discussion to open a discussion forum. When you have completed work on the business form, click Close Window.
Note: The Close Window action does not save the information on the form. To save the information, you must click Save before you click the
Unifier Business Processes User Guide
24
Close Window button.
Collapse by Default Option in Business Process Forms
In the Block Properties window of a BP form, there is a new checkbox called Collapse by Default. If the checkbox is checked, the block is collapsed by default. If the checkbox is unchecked, the block is expanded by default.
With the Collapse by Default option, you can avoid scrolling through irrelevant information.
The Block Properties are searched during the rendering of a BP form to determine whether a block is collapsed or expanded at runtime.
Collapse by Default is applicable to Upper forms and Detail forms related to Line Item BPs. This option is also applicable to places where a preview of a BP form is displayed, such as a variety of logs, Query-Based Tabs, and Reference records among others.
Note: If you change the default behavior by performing the opposite action at runtime, the default expand or collapse option is displayed when the page is reloaded.
Additional Elements of the Form
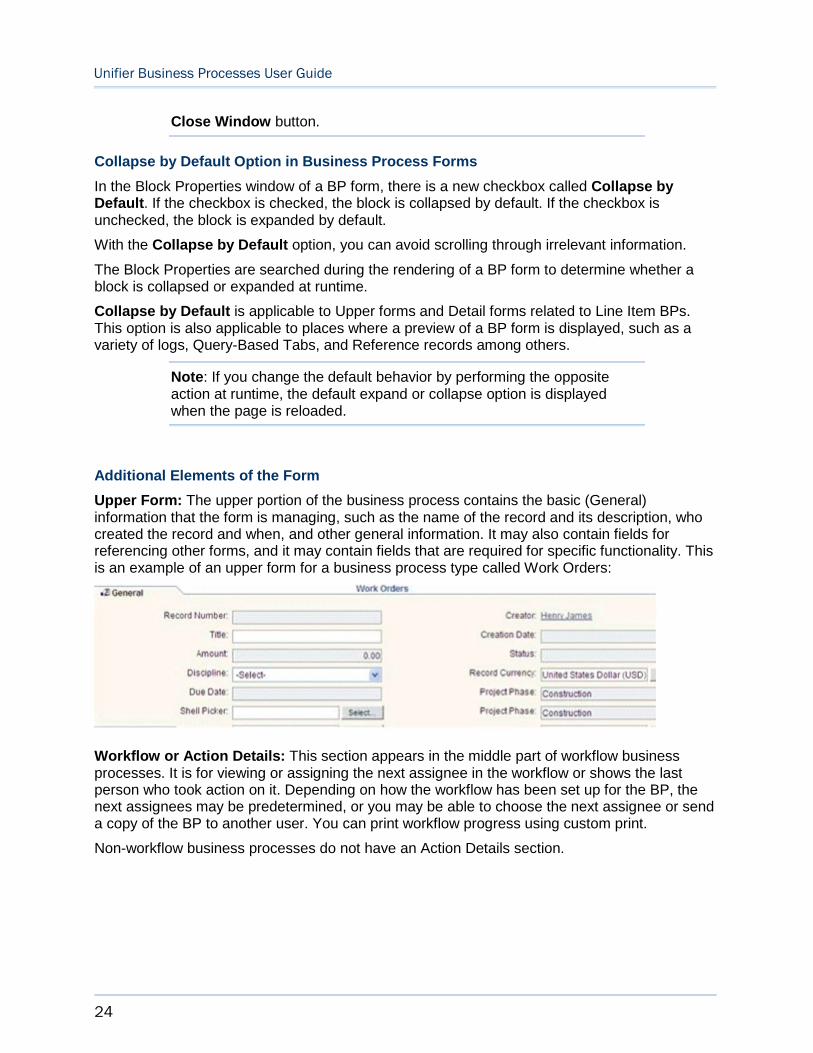
Upper Form: The upper portion of the business process contains the basic (General) information that the form is managing, such as the name of the record and its description, who created the record and when, and other general information. It may also contain fields for referencing other forms, and it may contain fields that are required for specific functionality. This is an example of an upper form for a business process type called Work Orders:
Workflow or Action Details: This section appears in the middle part of workflow business processes. It is for viewing or assigning the next assignee in the workflow or shows the last person who took action on it. Depending on how the workflow has been set up for the BP, the next assignees may be predetermined, or you may be able to choose the next assignee or send a copy of the BP to another user. You can print workflow progress using custom print.
Non-workflow business processes do not have an Action Details section.
Working with Unifier Business Processes
25
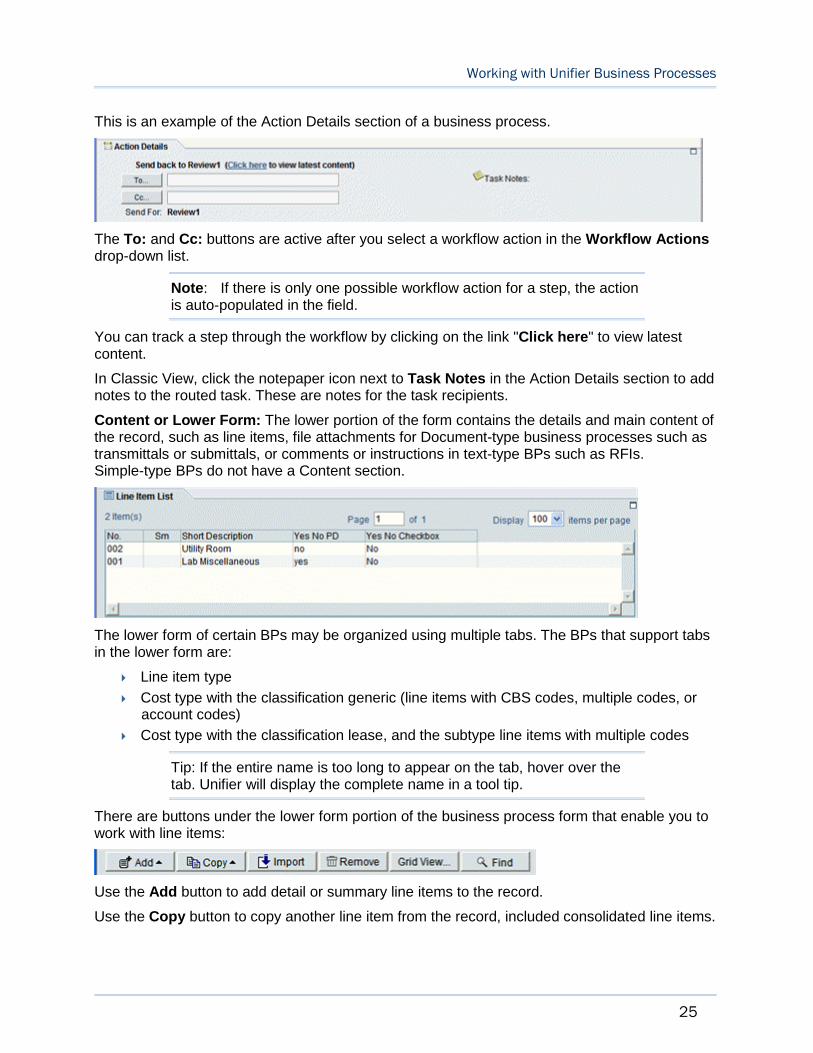
This is an example of the Action Details section of a business process.
The To: and Cc: buttons are active after you select a workflow action in the Workflow Actionsdrop-down list.
Note: If there is only one possible workflow action for a step, the action is auto-populated in the field.
You can track a step through the workflow by clicking on the link "Click here" to view latest content.
In Classic View, click the notepaper icon next to Task Notes in the Action Details section to add notes to the routed task. These are notes for the task recipients.
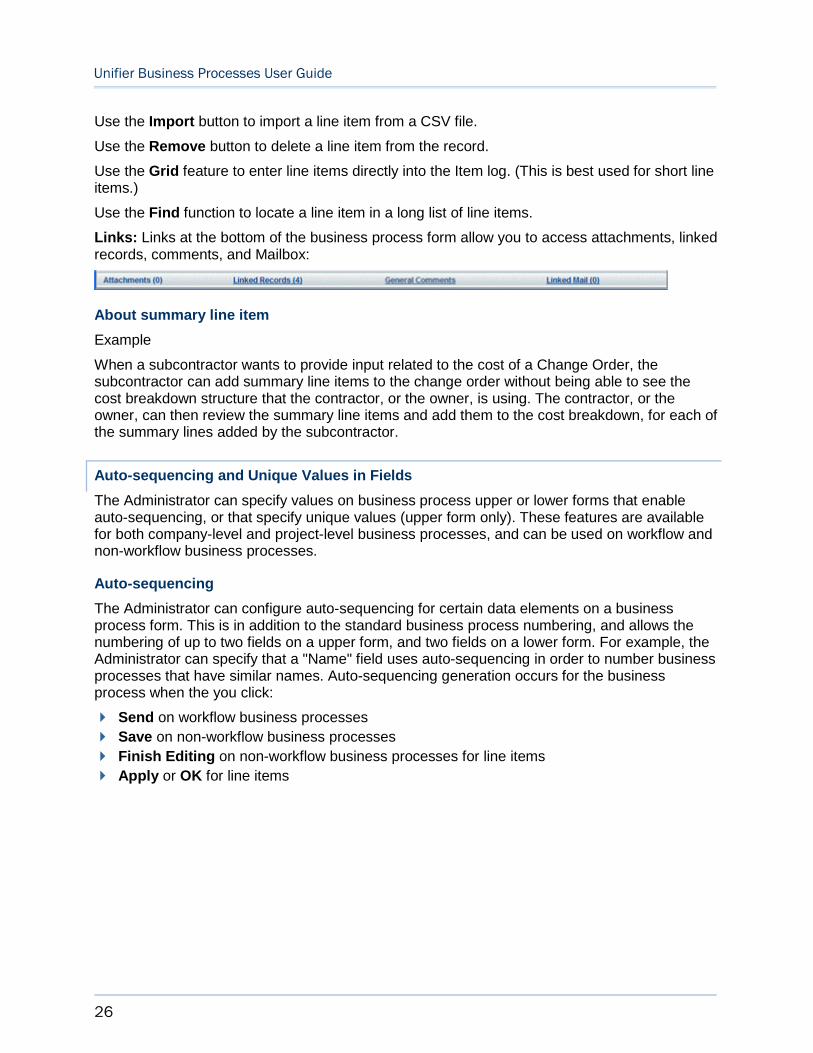
Content or Lower Form: The lower portion of the form contains the details and main content of the record, such as line items, file attachments for Document-type business processes such as transmittals or submittals, or comments or instructions in text-type BPs such as RFIs. Simple-type BPs do not have a Content section.
The lower form of certain BPs may be organized using multiple tabs. The BPs that support tabs in the lower form are:
Line item type
Cost type with the classification generic (line items with CBS codes, multiple codes, or account codes)
Cost type with the classification lease, and the subtype line items with multiple codes
Tip: If the entire name is too long to appear on the tab, hover over the tab. Unifier will display the complete name in a tool tip.
There are buttons under the lower form portion of the business process form that enable you to work with line items:
Use the Add button to add detail or summary line items to the record.
Use the Copy button to copy another line item from the record, included consolidated line items.
Unifier Business Processes User Guide
26
Use the Import button to import a line item from a CSV file.
Use the Remove button to delete a line item from the record.
Use the Grid feature to enter line items directly into the Item log. (This is best used for short line items.)
Use the Find function to locate a line item in a long list of line items.
Links: Links at the bottom of the business process form allow you to access attachments, linked records, comments, and Mailbox:
About summary line item
Example
When a subcontractor wants to provide input related to the cost of a Change Order, the subcontractor can add summary line items to the change order without being able to see the cost breakdown structure that the contractor, or the owner, is using. The contractor, or the owner, can then review the summary line items and add them to the cost breakdown, for each of the summary lines added by the subcontractor.
Auto-sequencing and Unique Values in Fields
The Administrator can specify values on business process upper or lower forms that enable auto-sequencing, or that specify unique values (upper form only). These features are available for both company-level and project-level business processes, and can be used on workflow and non-workflow business processes.
Auto-sequencing
The Administrator can configure auto-sequencing for certain data elements on a business process form. This is in addition to the standard business process numbering, and allows the numbering of up to two fields on a upper form, and two fields on a lower form. For example, the Administrator can specify that a "Name" field uses auto-sequencing in order to number business processes that have similar names. Auto-sequencing generation occurs for the business process when the you click:
Send on workflow business processes
Save on non-workflow business processes
Finish Editing on non-workflow business processes for line items
Apply or OK for line items
Working with Unifier Business Processes
27
Note: Fields configured for auto-sequencing are not available for Bulk Edit, since the values for these fields are system-generated.
Unique values
The Administrator can configure unique value validation on data elements on business process upper forms. For example, if a business process has a field called Invoice, and should enforce that each invoice number is a unique string, this field can be configured to validate for a unique value. If you attempt to enter a string that is not unique (has been entered on another business process), you will get a warning message that an alternate value must be entered. Unique value validation occurs for the business process when the you click:
Send on workflow business processes
Save on non-workflow business processes
Finish Editing on non-workflow business processes for line items
Note: If you use Bulk Edit to update multiple records, and attempt to update a field that has value uniqueness configured, only the first record will update (and is therefore unique).
Pickers
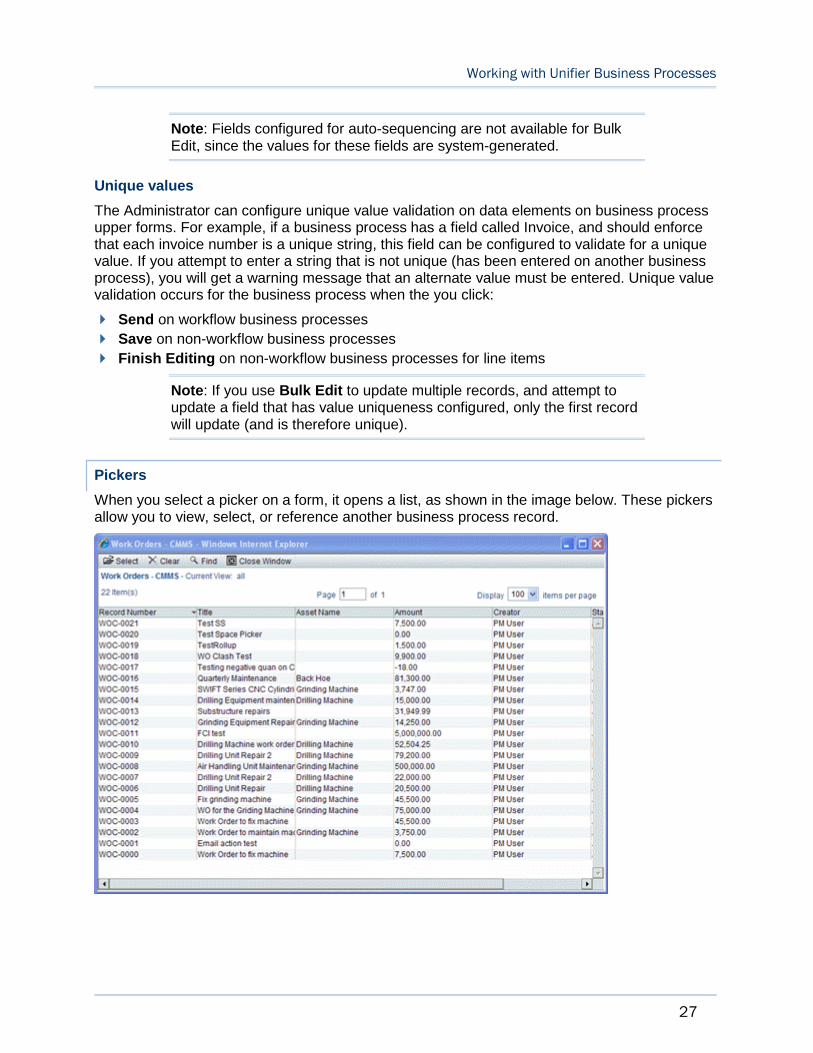
When you select a picker on a form, it opens a list, as shown in the image below. These pickers allow you to view, select, or reference another business process record.
Unifier Business Processes User Guide
28
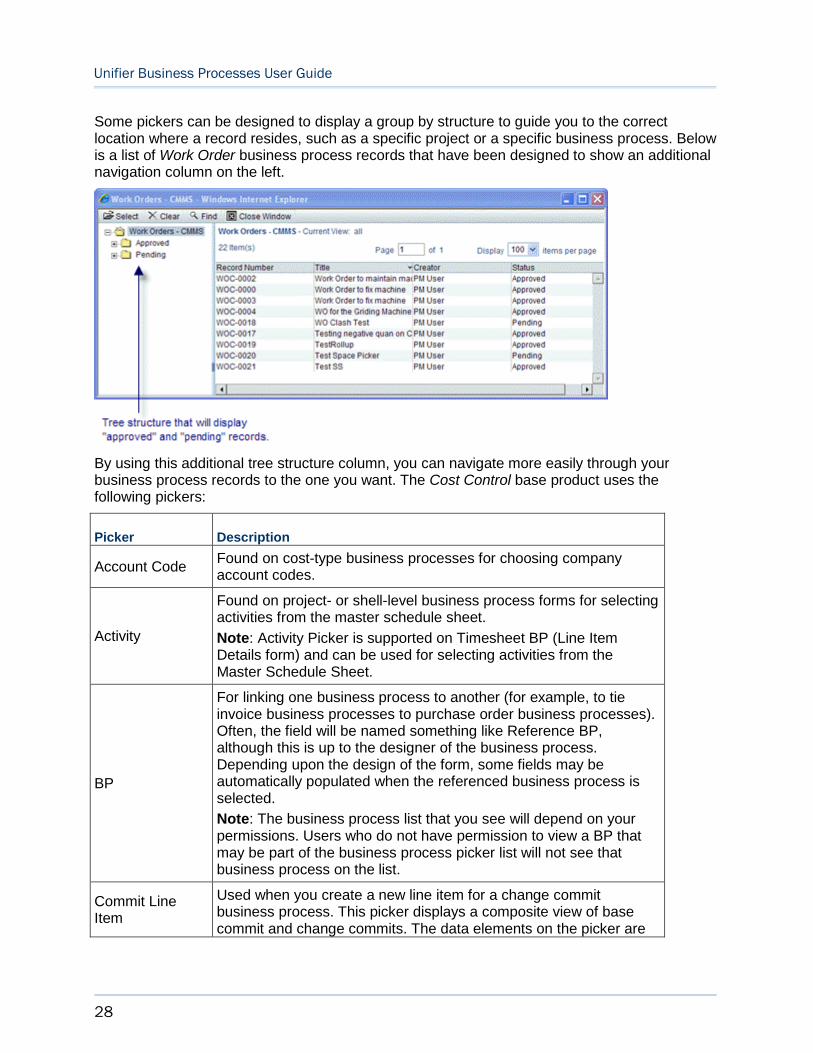
Some pickers can be designed to display a group by structure to guide you to the correct location where a record resides, such as a specific project or a specific business process. Below is a list of Work Order business process records that have been designed to show an additional navigation column on the left.
By using this additional tree structure column, you can navigate more easily through your business process records to the one you want. The Cost Control base product uses the following pickers:
Picker Description
Account Code Found on cost-type business processes for choosing company account codes.
Activity
Found on project- or shell-level business process forms for selecting activities from the master schedule sheet.
Note: Activity Picker is supported on Timesheet BP (Line Item Details form) and can be used for selecting activities from the Master Schedule Sheet.
BP
For linking one business process to another (for example, to tie invoice business processes to purchase order business processes). Often, the field will be named something like Reference BP, although this is up to the designer of the business process. Depending upon the design of the form, some fields may be automatically populated when the referenced business process is selected.
Note: The business process list that you see will depend on your permissions. Users who do not have permission to view a BP that may be part of the business process picker list will not see that business process on the list.
Commit Line Item
Used when you create a new line item for a change commit business process. This picker displays a composite view of base commit and change commits. The data elements on the picker are
Working with Unifier Business Processes
29
reference, description, and CBS code.
Currency
For selecting a currency on a cost-type business process. If no currency is chosen by the creator of the record, the default is the project or shell currency. If there isn't a Currency picker is on the form, the currency defaults to the project or shell currency.
Date
Displays an interactive calendar from which the date can be chosen. For some business processes, dates in Date pickers can be set in uDesigner to automatically default. For example, this defaulting can be useful in the case of entering a delivery date and having the date default to today’s date rather than have to use the Date picker to get a date.
Date Only
Displays an interactive calendar from which the date can be chosen. This picker allows you to select a date from the picker, or enter a date into the field. This picker allows you to choose the date only, with no associated time or time zone. For example, you would not need time and time zone for a date like an equipment purchase date. Also, for some business processes, dates in Date Only pickers can be set in uDesigner to automatically populate the server date. For example, this defaulting can be useful in the case of completing an equipment purchase and having the date default to today’s date rather than have to use the Date picker to get a date.
Fund On Cost business processes, for selecting which fund (from the company funding sheet) the business process will allocate funds to or consume funds from.
Location For selecting a shell.
Planning Item For selecting a planning item at the company level.
Project
For selecting a company-sponsored project. You can use this picker to auto-populate project data elements on other BP fields. The picker is designed to show Active, Inactive, View-Only, and On-Hold projects.
Unifier Business Processes User Guide
30
Project Template For selecting a template to use to auto-create a project.
Resource
On time sheet, booking, or assignment business process, for selecting the resource to report on or assign. This picker always opens in Find mode and requires you to enter at least one search criteria, such as a name or a skill, to narrow the field of names to choose from. For time sheet business processes, use this picker to select the personnel to report time on. At runtime in Unifier, the picker will default to read-only mode and show the current user’s name, as Unifier assumes the user will be reporting his or her own time. However, depending on permissions, the picker can be editable to allow others, such as project managers, to complete time sheets on behalf of other workers.
Role
On time sheet, booking, or assignment business processes or for resource allocation sheets. It allows you to choose the roll to report on or assign. On time sheet business processes at the project level, it will filter out those roles that have already been booked for other projects
Shell For selecting a company-sponsored shell to auto-populate shell data elements on other business process fields. The picker is designed to show Active, Inactive, View-Only, and On-Hold shells.
Shell Template For selecting the template that should be used by a business process to auto-create a shell. The picker will show you a list of active templates that have been created for the shell.
User/Group For selecting project/shell users (members of a project team) or company users (all users defined within a company). See more information under User Picker and Group Picker (on page 35).
CBS On Cost-type business processes, project/shell cost sheets, and on schedule activity forms, for selecting CBS codes.
Working with Unifier Business Processes
31
Week On Resource or Time Sheet business processes for selecting a specific week for reporting.
Work Package On Cost-type business processes, for selecting a work package for a Cost Sheet. This picker is populated with the work packages that have been created.
The following lists all the pickers:
Account Code picker
Activity Picker
Asset Picker
Bid Picker
BP Picker
BP Line Item Picker
CBS Picker
CBS Code Picker
CM0 Picker
CMx (code and Record based) Picker
CMx (Code based) Picker
Comment Line Item Picker
Company Picker
Configurable Manager [Name] Picker
Cost Attribute Picker
Currency Picker
Data Picker
Date Picker
Date Only Picker
Fund Picker
Generic Cost Code Picker
Group Name Picker
Hyperlink Picker
Image Picker
Level Picker
Location Picker
Planning Item Picker/Planning Line Item Picker
Planning Period Picker
Program Picker
Project Picker
Unifier Business Processes User Guide
32
Project Template Picker
Resource Picker
Role Picker
Role Data Picker
Seasonal Date Picker
Shell Picker
Shell Template Picker
Shell Data Picker
Single User Picker
Space Picker
User Picker
User Data Picker
Week Picker
Work Package Picker
For the following details, for each picker, refer to the Unifier Reference Guide:
Data Element Name
Label that will Appear on the Form
Available for Forms on Mobile Device
What it Does
At run-time, when a record is selected for a BP Data picker, all the line items for referenced BP Line Item Data Picker that meet the query conditions defined on the Line Item Data Picker are displayed.
In the Action form, a data line item picker can be designed to be either editable or read-only. At runtime based on the design of the action form, the data picker is either editable or read-only:
Editable: A line item from a data line item picker.
Read-only: A disabled text box without select icon.
In the View form, a Line item data picker can be designed to be read-only.
Read-Only: A disabled text box without select icon.
If picker is read-only, the display element of the selected line item in previous step is displayed. if no line item is picked, or the display element does not have value then picker shows empty text box and is disabled.
Click the picker icon for BP Line Item Data Picker to view the detail forms of the source BP displayed as different line items.
Note: The tabs that are set as visible in picker configuration are shown.
All the source line items within each tab that satisfy the query conditions are displayed.
The Toolbar options are:
Lineitem: This is a drop down that shows tabs from source BP. Tabs that are hidden in picker configuration will not be shown.
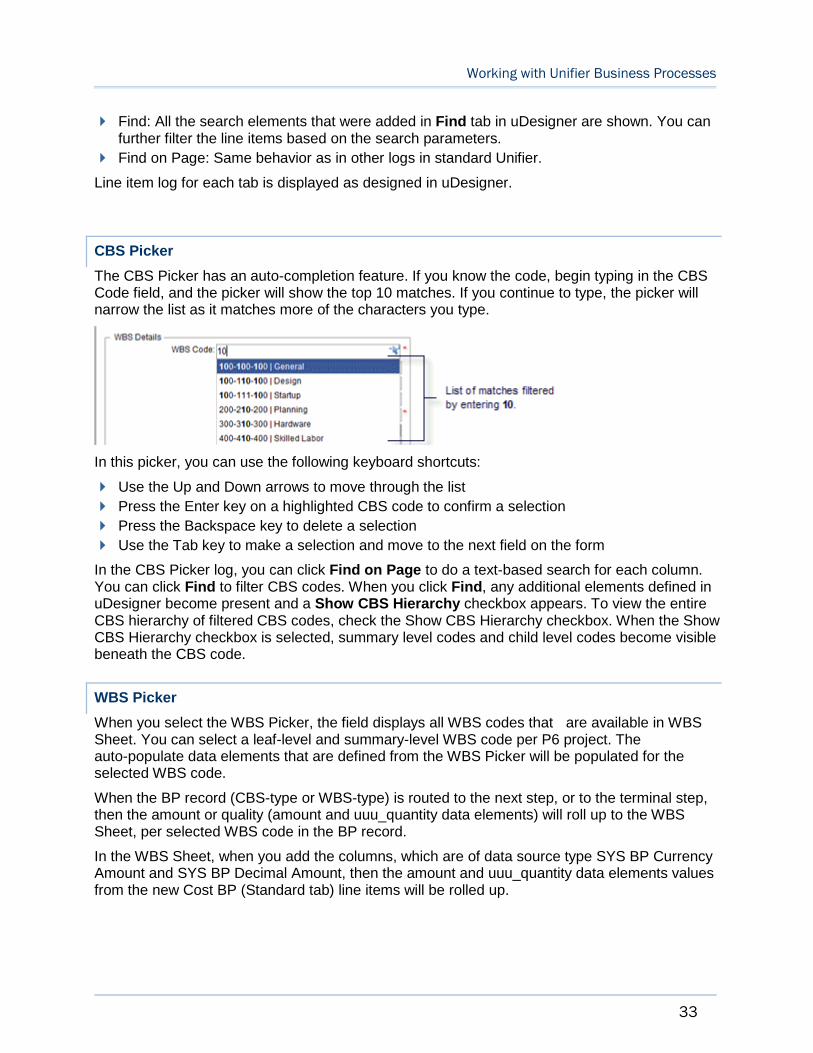
Working with Unifier Business Processes
33
Find: All the search elements that were added in Find tab in uDesigner are shown. You can further filter the line items based on the search parameters.
Find on Page: Same behavior as in other logs in standard Unifier.
Line item log for each tab is displayed as designed in uDesigner.
CBS Picker
The CBS Picker has an auto-completion feature. If you know the code, begin typing in the CBS Code field, and the picker will show the top 10 matches. If you continue to type, the picker will narrow the list as it matches more of the characters you type.
In this picker, you can use the following keyboard shortcuts:
Use the Up and Down arrows to move through the list
Press the Enter key on a highlighted CBS code to confirm a selection
Press the Backspace key to delete a selection
Use the Tab key to make a selection and move to the next field on the form
In the CBS Picker log, you can click Find on Page to do a text-based search for each column. You can click Find to filter CBS codes. When you click Find, any additional elements defined in uDesigner become present and a Show CBS Hierarchy checkbox appears. To view the entire CBS hierarchy of filtered CBS codes, check the Show CBS Hierarchy checkbox. When the Show CBS Hierarchy checkbox is selected, summary level codes and child level codes become visible beneath the CBS code.
WBS Picker
When you select the WBS Picker, the field displays all WBS codes that are available in WBS Sheet. You can select a leaf-level and summary-level WBS code per P6 project. The auto-populate data elements that are defined from the WBS Picker will be populated for the selected WBS code.
When the BP record (CBS-type or WBS-type) is routed to the next step, or to the terminal step, then the amount or quality (amount and uuu_quantity data elements) will roll up to the WBS Sheet, per selected WBS code in the BP record.
In the WBS Sheet, when you add the columns, which are of data source type SYS BP Currency Amount and SYS BP Decimal Amount, then the amount and uuu_quantity data elements values from the new Cost BP (Standard tab) line items will be rolled up.
Unifier Business Processes User Guide
34
When the BP record (CBS-type or WBS-type) is created and routed to the next step by way of CSV import, SOAP Services, and RESTFUL Services, then the pertinent roll up will take place. Refer to the Integration Interface User Guide for more details.
Bulk Edit
When you bulk edit multiple BP records (CBS-type or WBS-type) and change the status, the corresponding amount and quantity will roll up.
Note: You can use bulk edit to update all other data elements in the action forms.
Bulk Action
You can route multiple records at a time by going to the Task log and selecting one of the following options:
Bulk Action with Preview
Bulk Action without Preview
You can route the BP records (CBS-type or WBS-type) to the next step by using bulk action and roll up will occur if the BP status is added as a column in the WBS Sheet.
For the current workflow BPs, you can route the BP record through email. When routing the BP record through email to the next step, or terminal status, the corresponding amount and quantity data elements are rolled up to the WBS Sheet, in the same way the same line item rolls up to the Cost Sheet for the corresponding CBS Code.
The new BP records (CBS-type or WBS-type), are available to be used for User-Defined Reports (UDRs), similar to other BPs.
In a project:
If the WBS has not been created yet, then Unifier does not allow the creation of a new BP record (CBS-type or WBS-type).
When a BP record (CBS-type or WBS-type) is terminated, then the data rolls back from both Cost Sheet and WBS Sheet.
You cannot delete a WBS code that has line item data and is removed from P6.
If the Cost Sheet is not locked, then Unifier does not allow you to route the new BP record (CBS-type or WBS-type) to next step.
When you create a new BP record (CBS-type or WBS-type), the main form of the record appears and each line item appears as a tab (Create New CBS/WBS BP window). The following explains this form in details.
The form is split into two panes. The left-hand pane contains the upper form and contains tabs that contain line item details:
General tab
Standard tab
Payments tab
Schedules tab
The right-hand pane contains th following tab:
Working with Unifier Business Processes
35
Attachments tab
To add attachments by way of browsing or Document Manager (if the uDesigner option is selected).
General Comments tab
To add general comments (if the uDesigner option is selected).
Linked Records tab
To include a link to additional records, similar to other BPs.
Linked Mail tab
To include a link to emails.
The menu option (the three horizontal lines icon) enables you to conduct the following:
Auto-create
To use if there are any BP creators on the form, where user can define scheduled auto-creation.
Export Line Item Template
To use the CSV template to import the line items, in bulk.
Reload
Help
Close
User Picker and Group Picker
Most pickers operate in the same way. However, the User/Group Picker has several features that other pickers do not.

Unifier Business Processes User Guide
36
Note: If a User Administration design has been imported, the content of the User/Group picker (in User view) can vary. The Find window and sort order can also vary depending on the optional design created in uDesigner.
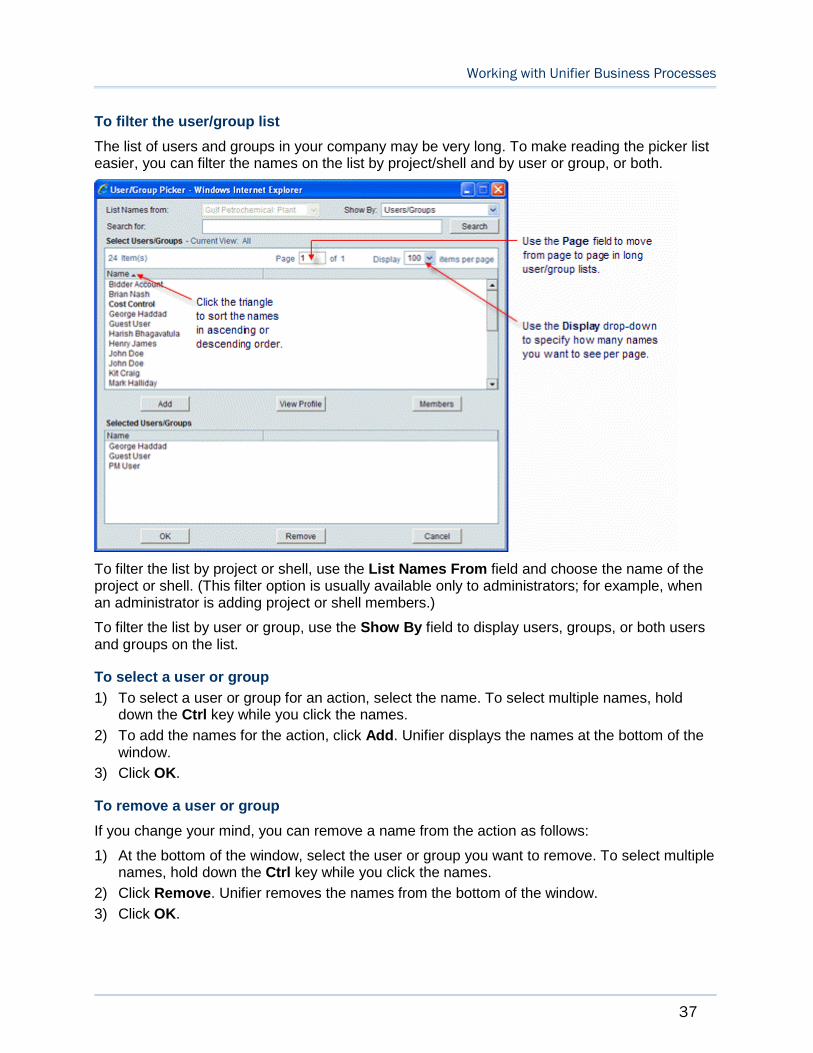
Working with Unifier Business Processes
37
To filter the user/group list
The list of users and groups in your company may be very long. To make reading the picker list easier, you can filter the names on the list by project/shell and by user or group, or both.
To filter the list by project or shell, use the List Names From field and choose the name of the project or shell. (This filter option is usually available only to administrators; for example, when an administrator is adding project or shell members.)
To filter the list by user or group, use the Show By field to display users, groups, or both users and groups on the list.
To select a user or group
1) To select a user or group for an action, select the name. To select multiple names, hold down the Ctrl key while you click the names.
2) To add the names for the action, click Add. Unifier displays the names at the bottom of the window.
3) Click OK.
To remove a user or group
If you change your mind, you can remove a name from the action as follows:
1) At the bottom of the window, select the user or group you want to remove. To select multiple names, hold down the Ctrl key while you click the names.
2) Click Remove. Unifier removes the names from the bottom of the window.
3) Click OK.
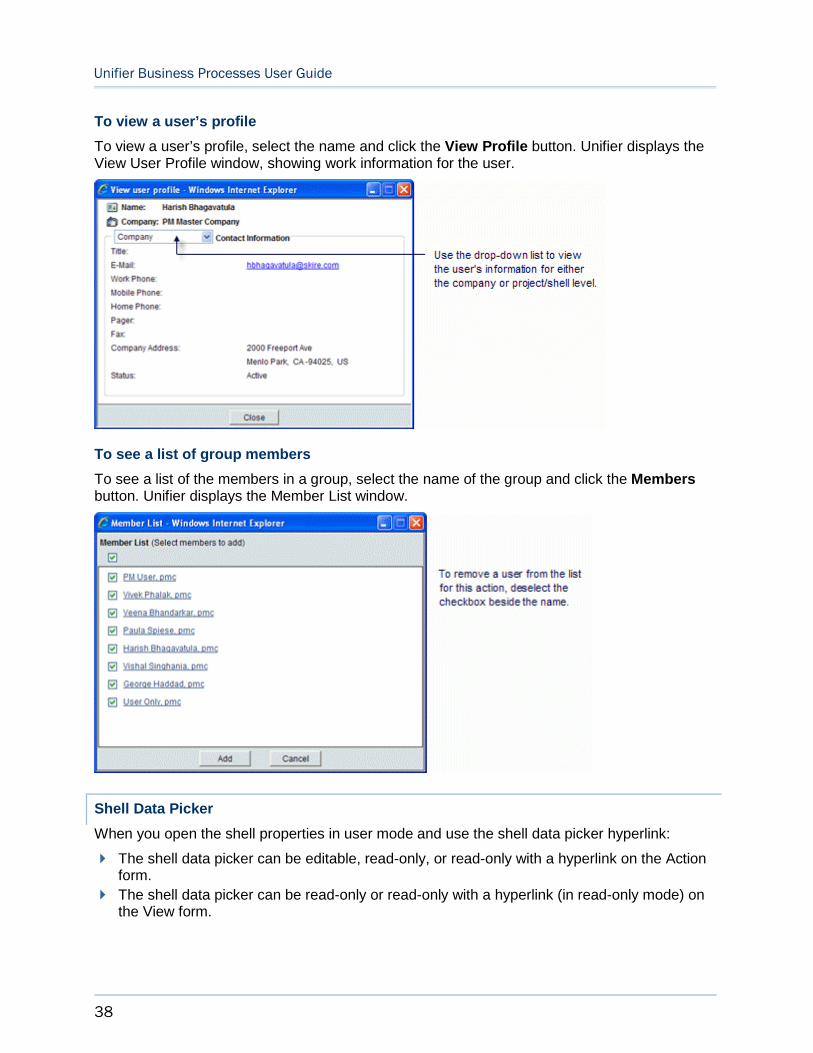
Unifier Business Processes User Guide
38
To view a user’s profile
To view a user’s profile, select the name and click the View Profile button. Unifier displays the View User Profile window, showing work information for the user.
To see a list of group members
To see a list of the members in a group, select the name of the group and click the Membersbutton. Unifier displays the Member List window.
Shell Data Picker
When you open the shell properties in user mode and use the shell data picker hyperlink:
The shell data picker can be editable, read-only, or read-only with a hyperlink on the Action form.
The shell data picker can be read-only or read-only with a hyperlink (in read-only mode) on the View form.
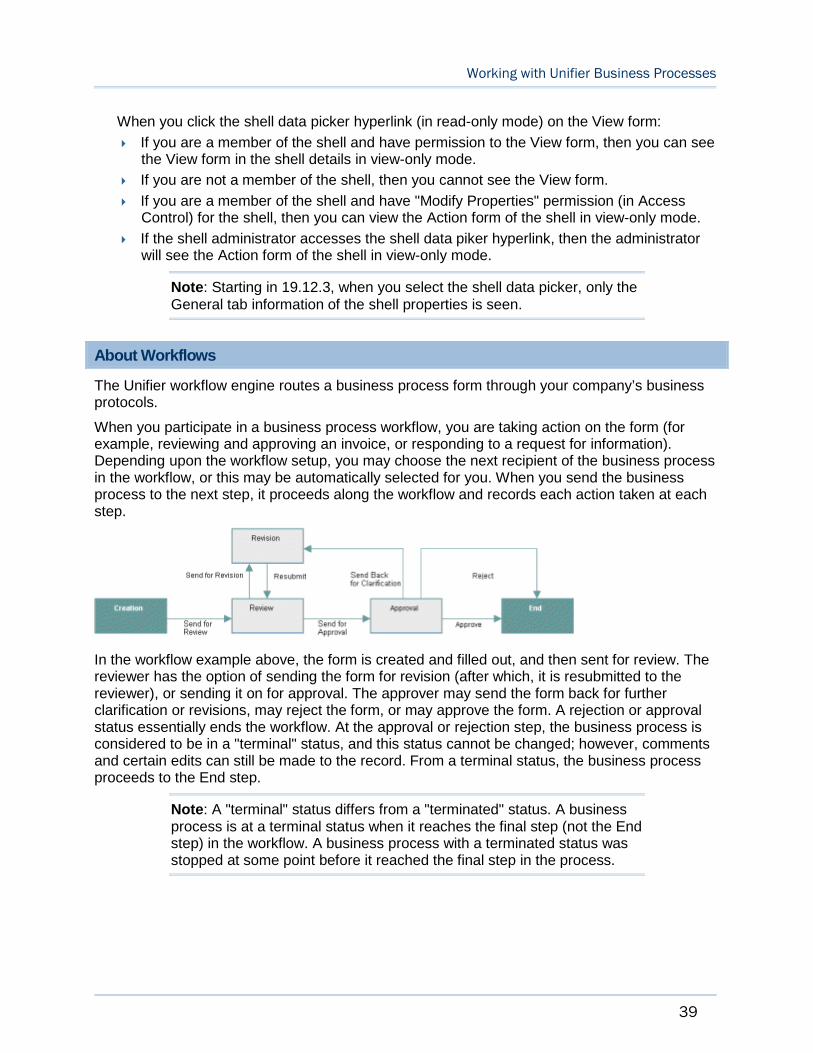
Working with Unifier Business Processes
39
When you click the shell data picker hyperlink (in read-only mode) on the View form:
If you are a member of the shell and have permission to the View form, then you can see the View form in the shell details in view-only mode.
If you are not a member of the shell, then you cannot see the View form.
If you are a member of the shell and have "Modify Properties" permission (in Access Control) for the shell, then you can view the Action form of the shell in view-only mode.
If the shell administrator accesses the shell data piker hyperlink, then the administrator will see the Action form of the shell in view-only mode.
Note: Starting in 19.12.3, when you select the shell data picker, only the General tab information of the shell properties is seen.
About Workflows
The Unifier workflow engine routes a business process form through your company’s business protocols.
When you participate in a business process workflow, you are taking action on the form (for example, reviewing and approving an invoice, or responding to a request for information). Depending upon the workflow setup, you may choose the next recipient of the business process in the workflow, or this may be automatically selected for you. When you send the business process to the next step, it proceeds along the workflow and records each action taken at each step.
In the workflow example above, the form is created and filled out, and then sent for review. The reviewer has the option of sending the form for revision (after which, it is resubmitted to the reviewer), or sending it on for approval. The approver may send the form back for further clarification or revisions, may reject the form, or may approve the form. A rejection or approval status essentially ends the workflow. At the approval or rejection step, the business process is considered to be in a "terminal" status, and this status cannot be changed; however, comments and certain edits can still be made to the record. From a terminal status, the business process proceeds to the End step.
Note: A "terminal" status differs from a "terminated" status. A business process is at a terminal status when it reaches the final step (not the End step) in the workflow. A business process with a terminated status was stopped at some point before it reached the final step in the process.
Unifier Business Processes User Guide
40
Auto-Populating Fields in a BP Record
Using uDesigner auto-population feature, you can automatically populate fields on a form or line item at the time the form/line item is created. Auto-population can occur on business processes that are in the same shell, or across shells. Using auto-population means that you do not have to enter data in every field in a form. For example, this feature could automatically fill in a "Plant Location" field from an attribute form.
For another example, the date field on a time sheet could be set up to default to the server date and time so that you do not need to use a date picker. Or, a field could be set up to automatically display a title or other text that you would normally need to fill in on a frequent basis.
In addition, auto-population can be used with the Unifier portal. When a user logs into the portal to submit a form, such as a work order, the user’s information, such as his/her location and department, can be automatically populated on the work order. Or, when an employee "move" request is created, the current location of the employee can be auto-populated onto the move request form.
Fields on a form can be auto-populated from the following sources:
Fields on an attribute form for managers (except a code-based configurable manager)
Fields on another business process form or line item
Fields on a user attribute form (via a user data picker)
Shell attribute forms
Fields from an upper form (to fields on a detail form)
Fields on single-record BPs at the company, shell, or standard project level
Fields on an SOV (for a payment application BP)
Fields from document properties of a line item attachment
The total value from a line-item numeric field (can populate a field on an upper form; becomes a read-only field)
A constant value that was specified for a field when the form was created in uDesigner
Reverse Auto-Populating (RAP) Fields in a BP Record
Some data elements on forms can be updated using "reverse auto-population." These data elements are specified in uDesigner when the form is designed. Reverse auto-population means that some values can be automatically updated when other values are modified in a business process form.
Notes:
The data fields in a business process form can be updated through reverse auto-population, including those in the behavior set of a DDS.
Reverse auto-population does not occur for projects and shells with View-Only or Inactive status.
Reverse auto-population is not supported for single-record business processes, except in the case of BPs existing under child shells,
Working with Unifier Business Processes
41
which can reverse auto-populate to single-record BPs under any parent shell in the shell hierarchy.
Unifier does not allow Reverse Auto-Population (RAP) for any data pickers that use the BP Line Item selectors. None of data picker data elements (including the user data picker data element) can have "Reference BP Line Item Selectors," when defining Reverse Auto-Population (RAP). Other data elements can have "Reference BP Line Item Selectors," when defining RAP.
Reverse Auto-Population in Auto-Created Business Processes
A business process can be designed to update the record or line item that auto-created it. For example, a Meeting Minutes business process auto-creates Action Items business processes from line items. If you update the Meeting Minutes business process line item, the Action Item business process can be updated via reverse auto-population.
In another case, if a business process auto-creates a new line item for an existing record, that line item can be updated with information from subsequent steps in the workflow.
Business cases that might use reverse auto-population:
A work order could reference the line items on a preventive maintenance type business process. Certain updates in the work order could be reverse auto-populated onto the line items of the preventive maintenance type business process.
Changes to the detail form in a business process under a child shell could result in changes to the upper form of a single record non-workflow business process under any parent shell in the shell hierarchy.
Lease payment requests could be auto-created from a lease business process. An approved payment request could reverse auto-populate the lease BP’s line item status to "approved."
A move order business process could reference an asset record. Updates on the move order could be reverse auto-populated onto the asset record.
An office move order business process could reference a user attribute form. Once the move is complete, the user’s new location could be updated on the attribute form. (This kind of reverse auto-population is normally triggered when you choose a user from a data picker, rather than when a business process is auto-created.)
Reverse Auto-Populate Status of non-Workflow BP
The Status DE on a non-Workflow Business Process can be Reverse Auto-Populated (RAP) from another non-Workflow or Workflow Business Process.
Example
A non-Workflow Asset Business Process (BP) (a non-workflow BP) record is in an "In_Service" status. Another Business Process goes through approvals to shut down that Asset. As a result, the Asset BP status changes to "Inactive."
The following explains the function of the Data Element (DE) of Data Definition (DD) = "Record Status Pulldown" at runtime:
Unifier Business Processes User Guide
42
If the DE is set to Reverse Auto-Population on a BP form and a default value has been defined, then the BP form renders the DE to display the default value. You can chang the default value.
If the DE is not set to Reverse Auto-Population on a BP form, then the BP form renders a read-only value because the BP form does not have a configured RAP, in which a dataset has been defined for the DE.
Example
BP Form 1 is configured for RAP and two DDs (DD = "Record Status Pulldown") have been set in uDesigner as A and B. The BP Form 1, will render the DE as Editable, Required, or Read-Only as defined in uDesigner. If the DE is designated as "Editable," then you can select A or B.
BP Form 2 is not configured for RAP in uDesigner, so the BP Form 2 renders the DE as read-only, irrespective of the settings in uDesigner. The DE value is the one that you have selected for BP Form B.
BP Form 3 is configured for RAP and two DDs (DD = "Record Status Pulldown") have been set in uDesigner as C and D. The BP Form 3, will render the DE as Editable, Required, or Read-Only as defined in uDesigner. As a result, the value from BP Form 1 is deleted. If the DE is designated as "Editable," then you can select C or D.
BP Form 4 is configured for RAP and two DDs (DD = "Record Status Pulldown") have been set in uDesigner as D and E. The BP Form 4 will render the DE as Read-Only as defined in uDesigner. If you select C in BP Form 3, then the value is deleted. If you select D in BP Form 3, then the value will be retained. If the DE is designated as "Editable," then you can select D or E.
If RAP is configured such that the destination is a non-Workflow BP, and the destination record is in finished or edited state, then the RAP first brings the record to an "Edit" state and then back to finished or edited state (rollback).
Reverse Auto-Populate Status of non-Workflow BP Errors
The RAP will fail if an invalid Status has been defined in the dataset value during RAP configuration of a destination non-Workflow BP (RAP to "Status" has failed becuse an invalid value was detected in the source element). The system logs this error, and you can send this error message to the user who has been designated to receive source BP error notifications in the Business Process Setup window > "Send error notification to."
Viewing Notifications (CC'd Tasks)
If someone copies you (cc) on a task, it is not a task for you, but it is for your information only and called a message. These business process record copies are listed in your Notifications log. You will usually be notified by email when you have a new a message. If you receive an email notification, click on the hyperlink at the bottom of the email. You will be directed to the Unifier Sign In screen and, once you log in, to the project or shell or company Notifications log.
Working with Unifier Business Processes
43
Note: Notifications for View-Only projects or shells are listed in the Notifications log, but you cannot add general comments to these messages.
Notifications are view-only snapshots of the form at a particular step and remain available for viewing until the BP is sent to the next step. Notifications received for an end-step will remain available in the log.
To view your messages from:
Home page > Home node > click the Messages link listed under Items Requiring Your Attention.
Home page > Notifications.
Project/Shell tab > User mode > Notifications.
Accessing a BP Record from an External System
Unifier provides a data element for business processes that can display a URL for access to Unifier from an external system. If the business process contains this URL field, you can open a view-only copy of the record from that external system.
For example, you might have notifications from Unifier that are sent to email programs, such as Microsoft Outlook or Yahoo Mail, outside of Unifier. From that email program, you could open a view-only copy of the business process.
Or, you might have an approval process that resides outside of Unifier. At a certain point in the workflow, the business process record data could be sent from Unifier to that external approval process. From that external system, you could open a view-only copy of the business process record.
Note: If this business process created records before this URL field was added to the form, those records will not show data in the URL field. Only new records will show data in the URL field. Any business process designed to be opened from an external system must be available in the Master Log - Business Processes node.
To open a business process from an external system
You must be an active member of the project, shell, or sub-shell, and have at least view permission to the Master Log - Business Processes node that lists/contains the business process record you want to view.
Use the URL to access Unifier. This URL will open the Unifier sign in window. Once you are signed in, Unifier will display the business process record in view-only mode.
Note: If Unifier has been configured to sign in users using single sign-on (SSO), the Sign In window will not appear.
Depending on what permissions you have, you can take the following actions from this view-only copy of the record:
Unifier Business Processes User Guide
44
Terminate the business process
Print the business process
Send Mailbox
Transfer ownership
View reference records
View the audit log
View record attachments, general comments, linked records, and linked Mailbox
Click line item tabs and open the line items in grid view
Use the Find feature to locate line items
Use any hyperlinked field, such as a picker, an image, or a URL, or the workflow progress link
View the assignees and cc’d users on the step
Business Processes in Company Logs and Logs Nodes
The Company Logs node is in Company Workspace, and the Logs node can be accessed in a project or shell. You can use the Company Logs node and the Logs node to access the business processes which you have permission for.
To access the business processes in Company Logs node:
1) Go to your Company Workspace (User mode).
2) Click Company Logs node to expand and see the business processes.
To access the business processes in Logs node:
1) Go to your project or shell (User mode).
2) Click Logs node to expand and see the business processes.
The following explains the log elements in both Company Logs and Logs nodes. The log in each node is divided into two panes, left and right.
The toolbar options and columns on the left-pane are:
Create To create a new record and subsequently add attachments, add comments, and include link to other records.
Actions To perform the following actions:
Import
Export CSV Template
Create From Template
Bulk Edit
Transfer Ownership
Terminate Record
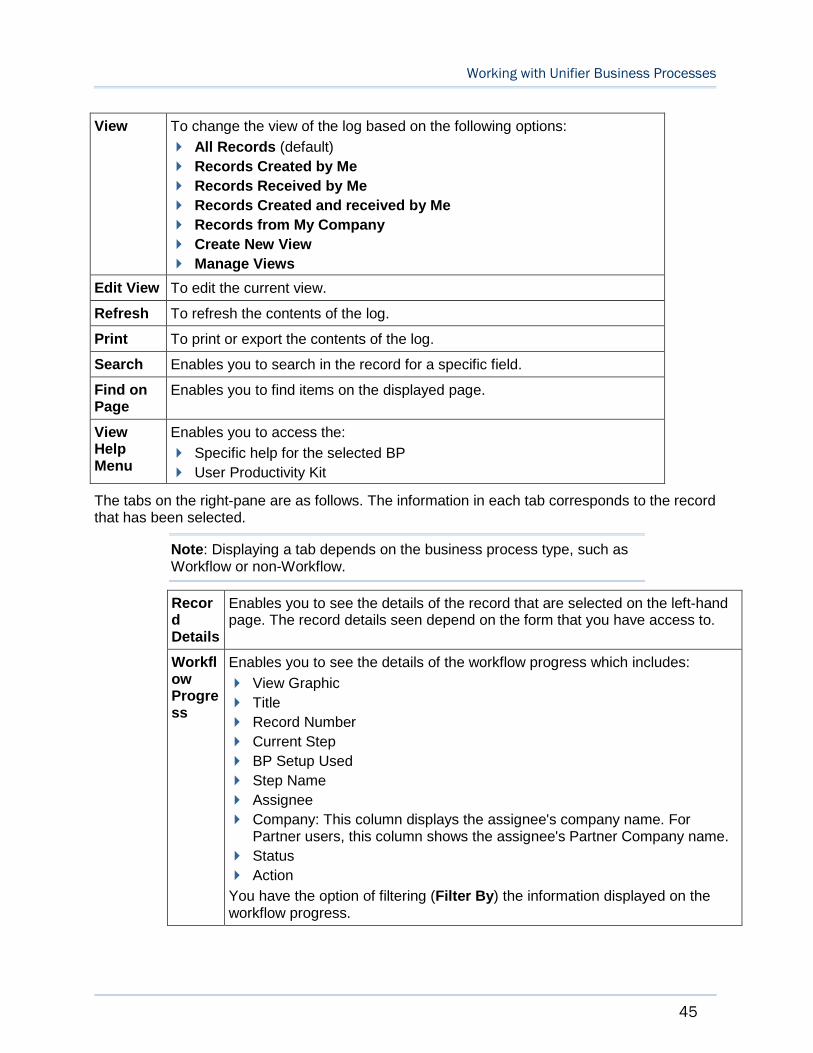
Working with Unifier Business Processes
45
View To change the view of the log based on the following options:
All Records (default)
Records Created by Me
Records Received by Me
Records Created and received by Me
Records from My Company
Create New View
Manage Views
Edit View To edit the current view.
Refresh To refresh the contents of the log.
Print To print or export the contents of the log.
Search Enables you to search in the record for a specific field.
Find on Page
Enables you to find items on the displayed page.
View Help Menu
Enables you to access the:
Specific help for the selected BP
User Productivity Kit
The tabs on the right-pane are as follows. The information in each tab corresponds to the record that has been selected.
Note: Displaying a tab depends on the business process type, such as Workflow or non-Workflow.
Record Details
Enables you to see the details of the record that are selected on the left-hand page. The record details seen depend on the form that you have access to.
Workflow Progress
Enables you to see the details of the workflow progress which includes:
View Graphic
Title
Record Number
Current Step
BP Setup Used
Step Name
Assignee
Company: This column displays the assignee's company name. For Partner users, this column shows the assignee's Partner Company name.
Status
Action
You have the option of filtering (Filter By) the information displayed on the workflow progress.
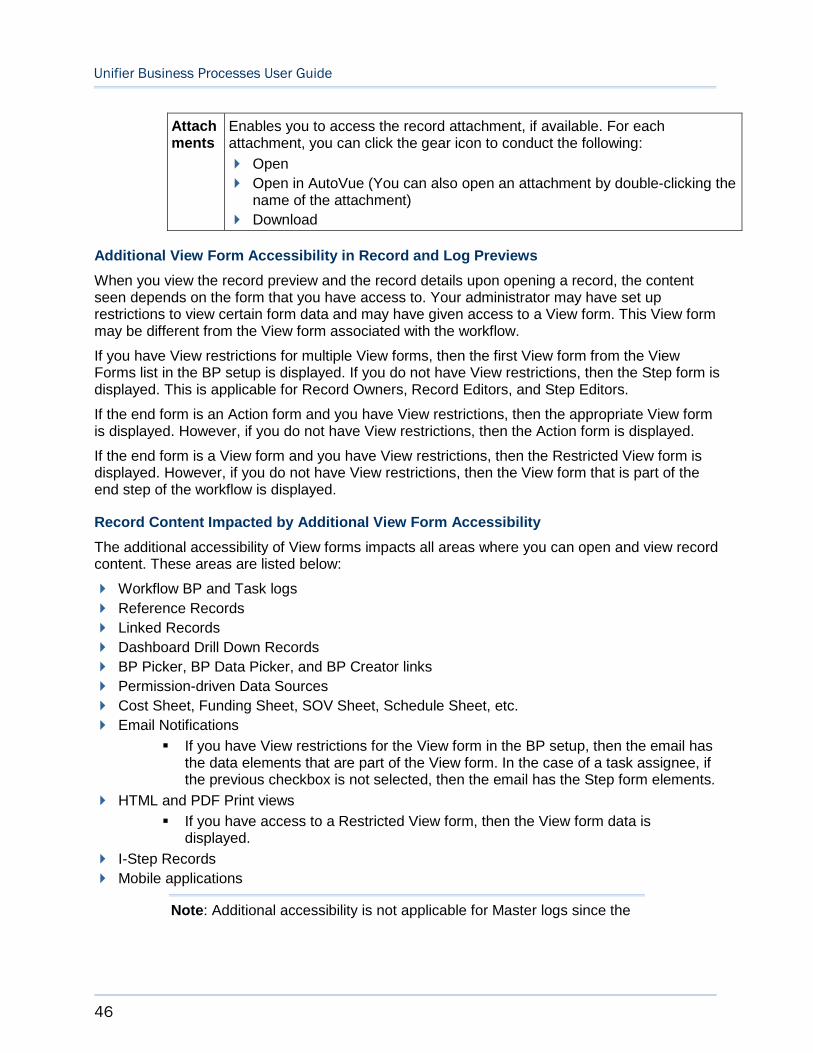
Unifier Business Processes User Guide
46
Attachments
Enables you to access the record attachment, if available. For each attachment, you can click the gear icon to conduct the following:
Open
Open in AutoVue (You can also open an attachment by double-clicking the name of the attachment)
Download
Additional View Form Accessibility in Record and Log Previews
When you view the record preview and the record details upon opening a record, the content seen depends on the form that you have access to. Your administrator may have set up restrictions to view certain form data and may have given access to a View form. This View form may be different from the View form associated with the workflow.
If you have View restrictions for multiple View forms, then the first View form from the View Forms list in the BP setup is displayed. If you do not have View restrictions, then the Step form is displayed. This is applicable for Record Owners, Record Editors, and Step Editors.
If the end form is an Action form and you have View restrictions, then the appropriate View form is displayed. However, if you do not have View restrictions, then the Action form is displayed.
If the end form is a View form and you have View restrictions, then the Restricted View form is displayed. However, if you do not have View restrictions, then the View form that is part of the end step of the workflow is displayed.
Record Content Impacted by Additional View Form Accessibility
The additional accessibility of View forms impacts all areas where you can open and view record content. These areas are listed below:
Workflow BP and Task logs
Reference Records
Linked Records
Dashboard Drill Down Records
BP Picker, BP Data Picker, and BP Creator links
Permission-driven Data Sources
Cost Sheet, Funding Sheet, SOV Sheet, Schedule Sheet, etc.
Email Notifications
If you have View restrictions for the View form in the BP setup, then the email has the data elements that are part of the View form. In the case of a task assignee, if the previous checkbox is not selected, then the email has the Step form elements.
HTML and PDF Print views
If you have access to a Restricted View form, then the View form data is displayed.
I-Step Records
Mobile applications
Note: Additional accessibility is not applicable for Master logs since the
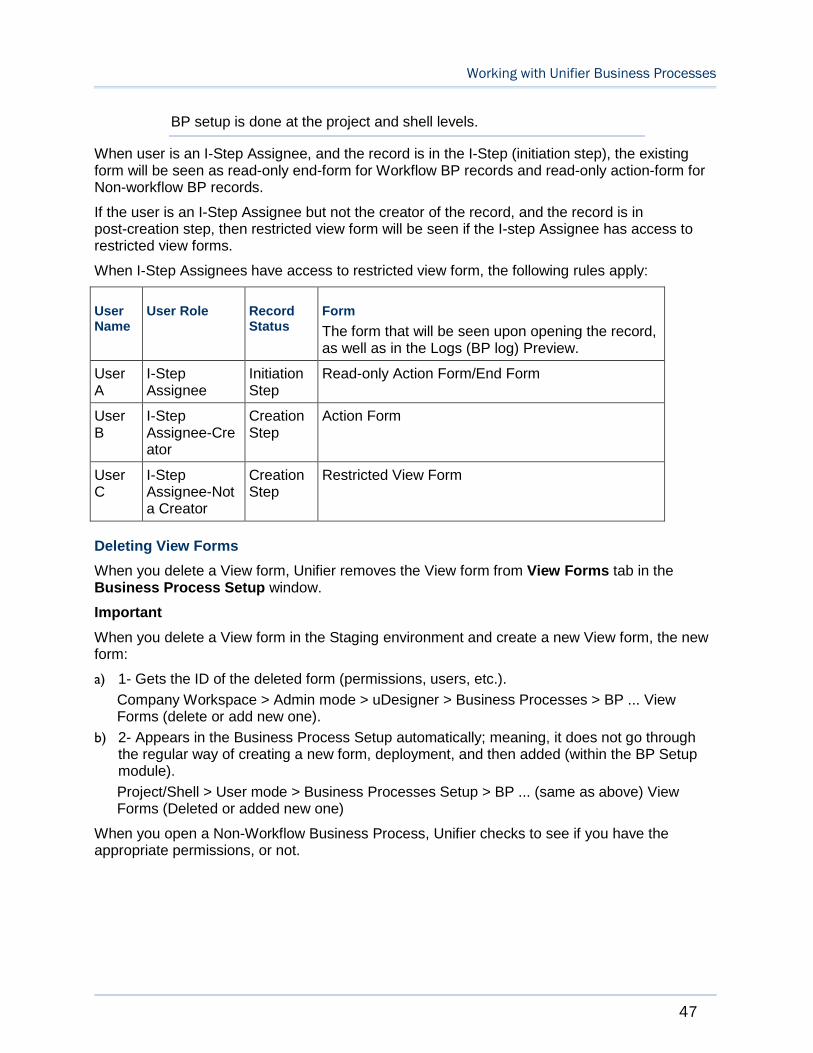
Working with Unifier Business Processes
47
BP setup is done at the project and shell levels.
When user is an I-Step Assignee, and the record is in the I-Step (initiation step), the existing form will be seen as read-only end-form for Workflow BP records and read-only action-form for Non-workflow BP records.
If the user is an I-Step Assignee but not the creator of the record, and the record is in post-creation step, then restricted view form will be seen if the I-step Assignee has access to restricted view forms.
When I-Step Assignees have access to restricted view form, the following rules apply:
User Name
User Role Record Status
Form
The form that will be seen upon opening the record, as well as in the Logs (BP log) Preview.
User A
I-Step Assignee
Initiation Step
Read-only Action Form/End Form
User B
I-Step Assignee-Creator
Creation Step
Action Form
User C
I-Step Assignee-Not a Creator
Creation Step
Restricted View Form
Deleting View Forms
When you delete a View form, Unifier removes the View form from View Forms tab in the Business Process Setup window.
Important
When you delete a View form in the Staging environment and create a new View form, the new form:
a) 1- Gets the ID of the deleted form (permissions, users, etc.).
Company Workspace > Admin mode > uDesigner > Business Processes > BP ... View Forms (delete or add new one).
b) 2- Appears in the Business Process Setup automatically; meaning, it does not go through the regular way of creating a new form, deployment, and then added (within the BP Setup module).
Project/Shell > User mode > Business Processes Setup > BP ... (same as above) View Forms (Deleted or added new one)
When you open a Non-Workflow Business Process, Unifier checks to see if you have the appropriate permissions, or not.
Unifier Business Processes User Guide
48
Note: There are no changes to the Permissions tab in a Non-Workflow Business Process log and Access Control.
To be able to view Non-Workflow Business Process records, you must have the following permissions:
Navigation-level access (left-hand Navigator) to view the Non-Workflow Business Process record.
View All Records
View Company Records
View User Records
At the Non-Workflow Business Process log level, you must have at least the "View" permission in order to view the record content.
The Views setting of the Permission Settings block (View Forms tab) of a Non-Workflow Business Process sets the visibility of the data (including tabs) when you open the record.
Creating a Business Process (BP) Record
You can create a business process (BP) record and access that record from any of the business process logs (Company Logs in Company Workspace or Logs in a project or shell).
Note: You must have the proper permissions to create a new BP record.
Important information
Once a workflow record is created by using any workflow schema (unique combination of Setup Name + Workflow Name), the workflow record continues to reference the workflow schema even if the Status of the workflow schema has been set to Inactive.
This condition includes workflow records that are in the following statuses:
Draft
Initiation Step (I-Step)
Also, this condition includes any workflow record at any other step in the workflow.
If there is an Active BP Template, then the Template continues to create records referencing the Inactive workflow schema. For instructions on creating a template, see Create BP Templates and Schedule BP Creation.
A new BP record can be created in the following ways:
Manually create a new BP record, starting with a blank form.
Copy an existing BP record in the same log. The fields will be populated with the original record entries, which can be edited as necessary.
Create a BP record from a template.
Auto-create a BP record from another record at a specified step (S-Step) in a workflow.
Auto-create a BP record when certain conditions are met or at a specified frequency.
Create a BP record from the Master Log - Business Processes node.
Working with Unifier Business Processes
49
Create a BP record from within the Document Manager, selecting the documents or folders to include as attachments.
Auto-create a BP record using the Scope Management feature of the Schedule Manager.
Before you begin
Be sure that you have the proper permission settings. All Unifier functions are controlled by fully configurable permission settings, including creating business processes. Contact your project or shell or company administrator regarding permission settings.
A business process (form and workflow) must be imported, configured, and set up by an administrator before it can be used.
You cannot create records of other business processes in a business process log (except in the Tasks log and Master Log - Business Processes node).
For a Workflow Business Process, when you create a new record, if the next step is match step Creation (per workflow setup), then the To list will be populated with the user who has signed in.
Manually Creating a New BP Record from a BP Log (Standard View)
The following is a general procedure that can be used to create a new BP record from any BP log (Company and/or Project/Shell -- Company Logs and/or Logs).
To create a new BP record from Company BP log:
1) Go to Company Workspace and switch to User mode.
2) From the left-hand Navigator, click the Company Logs node to expand.
3) Click to select a BP and open the BP log.
4) Click the Create icon to open the New Record window. The value for Business Process Origin is read-only and set to Company Workspace.
The Create option is not available if you do not have the permission to create a record.
You can no longer create records of other business processes in a business process log (except in the Tasks log and Master Log - Business Processes node).
Example
You cannot create a Meeting Minutes business process record in an Action Items business process log.
5) For the Select Business Process field, click the drop-down list and select a BP.
The New Record window, for a BP, has a Select Workflow field which displays value if:
The BP is a non-Workflow BP.
There is only one Workflow schema available that you can choose.
6) When finished, click Create.
To create a new BP record from Project/Shell BP log:
1) Go to your Project/Shell and switch to User mode.
2) From the left-hand Navigator, click the Logs node to expand.
3) Click to select a BP and open the BP log.
4) Click the Create icon to open the New Record window. The value for Business Process Origin is read-only and set to Company Workspace.
Unifier Business Processes User Guide
50
The Create option is not available if you do not have the permission to create a record.
You can no longer create records of other business processes in a business process log (except in the Tasks log and Master Log - Business Processes node).
Example
You cannot create a Meeting Minutes business process record in an Action Items business process log.
5) For the Select Business Process field, click the drop-down list and select a BP.
The New Record window, for a BP, has a Select Workflow field which displays value if:
The BP is a non-Workflow BP.
There is only one Workflow schema available that you can choose.
6) When finished, click Create.
Manually Creating a New BP Record from the Master Log (Standard View)
If you have permission to create BP records, then you can go to the master log (Home > Master Log - Business Processes node).
Note: The name of the Master Log - Business Processes node can be customized.
Auto-population and reverse auto-population are supported for BP records that are created or edited in the master log, also.
Note: The default elements and fields (log layout, view, search, etc.) that are defined in the Standard Log, in uDesigner, determine the Standard user interface elements and fields of all logs.
The following BP records actions and functions are not supported in the master log:
Import template
Export template
Permissions
There are specific conditions for creating workflow BP records and non-workflow BP records in the master log.
Creation conditions for workflow BP records:
The BP must have an Active setup in the selected Project/Shell
If no active setups exist for the BP, the system will notify you.
The selected Project/Shell controls the list of enabled workflow setups
You must be an assignee on the Create step of the BP, within the selected Project/Shell
If you save a BP record (during its creation) instead of sending it, the system lists the BP record drafts folder (Home > Drafts) and not the master log.
After you create a BP record, the system lists the BP record in both the:
Project/Shell BP log (Project/Shell > User mode > Logs)
Master log (master log (Home > Master Log - Business Processes node)
Working with Unifier Business Processes
51
Creation conditions for non-workflow BP records:
The BP must have an Active setup in the selected Project/Shell
If no active setups exist for the BP, the system will notify you.
You must be on the Creator list, for the BP, in the selected Project/Shell
After you create a BP record, the system lists the BP record in both the:
Project/Shell BP log (Project/Shell > User mode > Logs)
Master log (master log (Home > Master Log - Business Processes node)
To create a BP record from the master log:
1) Go to Home page and from the left-hand Navigator, click the Master Log - Business Processes node to expand.
2) Click to select a BP and open the BP log.
3) Click the Create icon to open the New Record window.
4) Select a value for the Business Process Origin field. You can select a BP from Shells or Standard Projects.
The Details icon ( ), next to the Select Business Process Origin field drop-down list in the New Record window, enables you to see a list of available options under Shells or Standard Projects. The list on the left-hand pane is displayed according to your permissions. After you select an entry from the list and click Select, your selected option becomes the value of the Select Business Process Origin field of the New Recordwindow.
The Select Business Process field displays the BP that you have selected to create a new record for.
The New Record window, for a BP, has a Select Workflow field which displays value if:
The BP is a non-Workflow BP.
There is only one Workflow schema available that you can choose.
5) When finished, click Create.
Manually Creating a New BP Record from the Tasks Log (Standard View)
1) Go to the Home page and click the Tasks node.
2) From the Tasks log click the Create icon to open the New Record window.
When you create a BP record, you generate tasks for assignees on the next step, and the tasks appear in the assignees' logs.
The BP record appears in the BP log, including the status, as the BP record moves through the workflow.
The Create option is not available if you do not have the permission to create a record.
You create records of other business processes in the Tasks log and Master Log - Business Processes node, only.
You cannot create records of other business processes in business process log (Company Logs node and Logs node).
Unifier Business Processes User Guide
52
Example
You cannot create a Meeting Minutes business process record in an Action Itemsbusiness process log.
3) Select a value for the Business Process Origin field. You can select a BP from Company Workspace, Shells, or Standard Projects.
The Details icon ( ) (Tasks log only), next to the Select Business Process Origin field drop-down list in the New Record window, enables you to see a list of available options under Shells or Standard Projects.
The list on the left-hand pane is displayed according to your permissions.
Select the option from the left-had pane, then select an entry from the list (on the right-had pane), and click Select. The list of business process names includes those business processes that you have the "Create" permission for.
Your selected option becomes the value of the Select Business Process Origin field of the New Record window.
If applicable and if you have the "Create" permission, select a workflow (Select Workflow).
4) In the Select Business Process field, click the drop-down list and select a BP that you want to create a new record for.
The New Record window, for a BP, has a Select Workflow field which displays value if:
The BP is a non-Workflow BP.
There is only one Workflow schema available that you can choose.
5) When finished, click Create. The BP record is now created in the appropriate log.
Creating a BP Record by Copying an Existing BP Record (Standard View)
You can copy an existing business process record to create another business process record of the same type.
The original data in all data entry fields, including line items (if applicable), will be copied. For most business processes, you will have the option to copy attachments to the new form. Other attached information, such as general comments, linked records, and linked Mailbox, will not be copied.
The copied record will reflect the data found in the original record. Auto-populated fields will not be refreshed or recalculated.
For non-workflow BPs, copying a record results in creation of a record and not creation of a draft.
In addition, you can restrict the line items to be copied and specify other copy options by using the Copy with Conditions copy option. The Copy with Conditions enables you to:
Copy specific (rather than all) line items
Include or exclude attachments
Retain or remove references to records auto-created from an upper form
Retain or remove references to records auto-created from line items (from all tabs)
Include linked records
The above options are not available for Payment Applications.
Working with Unifier Business Processes
53
Business processes that have been auto-created and are currently in the Initiation step (prior to the Create step in the workflow) cannot be copied. You cannot copy these business processes until the record has been sent or is in a "finish edit" status.
To create a new BP record by copying another BP record in Company BP log:
1) Go to Company Workspace and switch to User mode.
2) From the left-hand Navigator, click the Company Logs node to expand.
3) Click to select a BP and open the BP log.
4) Click the gear icon ( ) next to the record that you want to copy and click Copy.
5) Follow the prompts to complete copying your record for use.
To create a new BP record by copying another BP record in Project/Shell BP log:
1) Go to your project/shell and switch to User mode.
2) From the left-hand Navigator, click the Logs node to expand.
3) Click to select a BP and open the BP log.
4) Click the gear icon ( ) next to the record that you want to copy and click to select one of the following option:
Copy with Attachments
Copy without Attachments
5) Follow the prompts to complete copying your record for use.
Note: You cannot create a new BP record by copying another BP record in Tasks log (Home > Tasks node).
Reset on Copy of Record
A reset works on Workflow business process records, only.
If the Action form associated with the "Creation Step" of record has data elements that have "Reset" property, then after copy the system resets the values of these fields.
If the reset is done on an element that has a data set of value/label pairs, and if there is a default value specified, then the default value is displayed.
For fields with Data Picker as auto-population source, if the value of the Data Picker (as auto-population source) has been reset, then the system resets the value of the field. This means that the auto-population of the form fields from a Data Picker will change if the Data Picker value is reset.
After a reset is done, any formula that depended on the Reset field will be re-evaluated.
If a default value has been specified for a Data Element with Reset property, then this default value will be seen in the Upper Forms after the Reset operation has been performed. This will be applicable to Upper Forms, only. Reset will not work for Line items since the system will treat a reset operation as though the user has edited the record and saved it as a draft.
Copying a BP Record in Master Log (Standard View)
To create a new BP record by copying another BP record in master log (Master Log - Business Processes node):

Unifier Business Processes User Guide
54
Note: The name of the Master Log - Business Processes node can be customized.
1) Go to Home page and from the left-hand Navigator, click the Master Log - Business Processes node to expand.
2) Click to select a BP and open the BP log.
3) Click the gear icon ( ) next to the record that you want to copy and click to select one of the following option:
Copy with Attachments
Copy without Attachments
Copy with Conditions
4) Follow the prompts to complete copying your record for use.
Note: You cannot create a new BP record by copying another BP record in Tasks log (Home > Tasks node).
See Restricting Line Items by Using Copy with Conditions Option (Standard View) (on page 89) for more details.
Visibility of Properties tabs in BPs
In a company, a shell, or a project (Master Log, Company Logs, Single-Record BP Log, Portal BP Log, and Logs nodes), when you open a business process, or any user-defined BP, and select a record, the log window displays the properties pane with a series of applicable tabs (record properties tabs) such as Record Details tab, Notifications tab, Record Properties tab, Attachments tab, Permissions tab, and so forth.
The visibility of these tabs is based on restrictions made within the BP setup. This rule also applies to the following nodes:
Drafts
Tasks
For the Attachments tab, if you have restrictions to download, you will be able to only view or access the attachment, and you cannot download or save the attachment to a local system.
Auto-Creating BP Records
There are three ways of auto-creation:
Spawning a record at a particular point in a workflow (S-Step)
Auto-creating a record or line item when it reaches a particular condition or frequency (I-Step)
Using a template that is scheduled to auto-create records
For auto-creating BP records in S-Step or I-Step, the following rules apply:
Working with Unifier Business Processes
55
Reset on Creation Step
If the Action form associated with the Creation Step has Data Elements (DEs) that have Reset property, then post auto-creation the values of these fields will be reset.
Regardless of whether the auto-created record is in I-Step or not, the values must get reset.
Fields with auto-population source, "Data Picker" whose value has been set as reset must get reset.
After a reset is done, any formula-dependent field, in the reset field, will be re-evaluated.
Reset will work for Workflow BPs only (This is an existing limitation).
If a default value in the reset field has been specified for a DE that has reset property, then this default value will be seen in the Upper Forms after the Reset operation has been performed post auto creation. This will be applicable to Upper Forms only.
Reset will not work for Line items since system will treat a reset operation as though the user has edited the record and saved it as a draft.
Auto-Create a BP Record from a Workflow Step (S-Step)
You can use uDesigner to design a business process form that automatically creates a new Unifier BP record, after reaching a designated status in a workflow (for example, approved).
The user who owns the original record becomes the owner of the auto-created record. After being created, the new record is sent automatically to the next step in the workflow if it is a workflow business process. Non-workflow business process records will reside in the log.
Note: Business processes are not auto-created in projects or shells that have the View-Only or Inactive status.
The original record can be set up to automatically populate upper form (header) information on the new record, provided the data elements of the upper form fields are the same on both records. That is, for example, if a Description field using the same data element appears on both records, the text in the original record can be entered automatically into the new record.
Auto-Create a BP Record, or Line Item, Based on Conditions or Frequency
You can use uDesigner to design a form that automatically creates a new record, line item, or planning item if certain criteria are met. The criteria can be:
A condition, such as a dollar amount.
A frequency, such as a daily or weekly time frame.
Only for a record
Line items cannot be created with a frequency trigger.
Both a condition and a frequency.
When the business process, planning item, or line item reaches the condition or frequency trigger(s), the form will automatically create a new record and send it to an Initiation step (I Step). These forms contain a Creator field to activate the auto-creation, either automatically, or manually. If you have Modify Ownership permission on the source record, you can auto-create new records or line items. You can also override conditional auto-creation and immediately invoke the auto-creation manually if necessary.
Unifier Business Processes User Guide
56
Note: If the line items have been grouped (as part of the administrator's business process setup), you can manually invoke the auto-creation; however, only those line items in a status of "pending creation" will be grouped.
Bypassing the I Step
During business process setup in Unifier, the administrator can set up the auto-created workflow business process to skip the initiation step and send the record directly into the workflow, where it normally arrives at the first step after the Create step (or the first step in a conditional routing). For a workflow business process, the administrator specifies the schema, the step in the workflow that the record should use as its first step, the workflow duration, and the name of the person or group who will be the owner of the auto-created record. When the record is created, data will roll up to manager sheets at the appropriate status; however, if Unifier encounters errors or invalid data, the record will remain at the Create step, and roll-ups will not occur until the user resolves the errors.
For a non-workflow business process, the administrator can set up an auto-created record to skip the initiation step. In this case, Unifier creates the non-workflow business process record and lists it in users' logs in either:
Edit mode. When the record is in edit mode, you can see the Finish Editing button.
Read-only mode. When the record is in read-only mode, you can see the Edit button.
If it appears in edit mode, the user will have to open the record and add or correct information on the form. If it appears in read-only mode, the record is considered complete, and data will roll up to manager sheets.
Note: Business processes are not auto-created in projects or shells that have the view-only or inactive status.
Your administrator sets up the auto-creation by specifying:
The name of the person or group who will be the owner of the auto-created record.
(For workflow business processes) The workflow schema to use.
(For workflow BPs) Which step in the workflow the record should use as its first step
(For workflow BPs) The workflow duration
The criteria that will trigger the auto-creation
Whether or not attachments to the record or line item will be included when the record is auto-created
Whether or not records that were linked to the creating record should also be linked to the newly created record, or to the new line item
Whether or not the I Step should be bypassed when Unifier auto-creates a new record
Whether or not the line items from line item tabs should be grouped
Delete Error Lines
Working with Unifier Business Processes
57
The Delete Error Lines option appears in the Errors and Warnings window when you finish editing (or send) a BP when the BP line items are failing validation errors (such as required field check, etc.). The Delete Error Lines option enables you to delete the faulty BP line items and route the BP record to the next step, if the BP line items are not needed.
Note: Once you delete the faulty BP line items, Unifier removes them permanently without providing an option to access them.
If line item auto-creation fails
If the line-item creation is auto-created with a condition-based query (that is, not manually), Unifier will send an email notification to the business process owner. The email will contain location information so that the recipient can see where the auto-creation originated and where it failed. Following are conditions under which line item creation can fail:
The To field is empty. This is possible if the assignee becomes inactive after the schedule is created or if a group is empty.
The CBS code is invalid, which can happen if the CBS code becomes inactive after selecting in the template.
The rules engine validation fails.
For payment applications, the associated SOV is locked, either by the payment application record in routing, or by a change commit with a negative line item value. See Payment Application Business Processes (on page 197) for details.
Note: If the destination business process does not exist or has not been imported into Unifier, the location specified in the email notification might be non-existent or incorrect.
Bypassing the Initiation Step (I-Step)
During the Business Process (BP) setup in Unifier, the administrator can set up the auto-created workflow BP to skip the Initiation step and send the record directly into the workflow, where it normally arrives at the first step after the Create step (or the first step in a conditional routing).
Workflow BP
For a workflow BP, the administrator specifies the workflow schema to use, the step in the workflow that the record should use as its first step, the workflow duration, and the name of the person or group who will be the owner of the auto-created record. When the record is created, data will roll up to any applicable manager sheets (e.g., the cost sheet) at the appropriate status; however, if Unifier encounters errors or invalid data, the record will remain at the Create step, and roll-ups will not occur until the user resolves the errors.
Non-workflow BP
For a non-workflow BP, the administrator can set up an auto-created record to skip the initiation step. In this case, the non-workflow BP will be created and will appear in the users' BP logs in either an "edit" or "finish edit" mode. If it appears in an "edit" mode, the user will have to open the record and add or correct information on the form. If it appears in a "finish edit" mode, the record is considered complete, and data will roll up to any applicable manager sheets.
Unifier Business Processes User Guide
58
Additional information about bypassing the I-Step
In the following scenarios, If the auto-creation of a change commit BP is set to "Bypass I-Step," the auto-created record will remain in I-Step and the element "refid" will remain blank:
If the source BP form has no BP Data Picker, or BP Picker, pointing to the Change Commit "refid" Base Commit BP.
If the source BP form has more than one BP Data Picker, or BP Picker, that satisfy the conditions needed to populate "refid" (map to the Change Commit "refid" Base Commit BP).
If the conditions on "refid" picker are not satisfied by the value from the source BP, for example, the "refid" picker allows an "Approved" Base Commit, only, but the source BP sends a "Pending" record.
If the value from the source BP that is mapped to the "refid" element is set as: <null>.
When copying the Line Items form a source to the destination record:
The source Detail form does not contains the element: uuu_sovlinum
The destination Change Commit Detail tab contains the element: uuu_sovlinum
Note: In this scenario, the Line Items will be copied from the source to destination, and the uuu_sovlinum field will be set as blank. All other fields will be mapped from source to destination Detail form.
In the above scenarios, since the "refid" is blank, no Line Items will get copied into the "Standard" tab of the auto-created Change Commit record.
Note: If any other tab in the "Change Commit" is configured to copy Line Items from the source, those Line Items will be copied.
You will be able to auto-create a "Change Commit" type BP from any type of BP Upper or Detail forms.
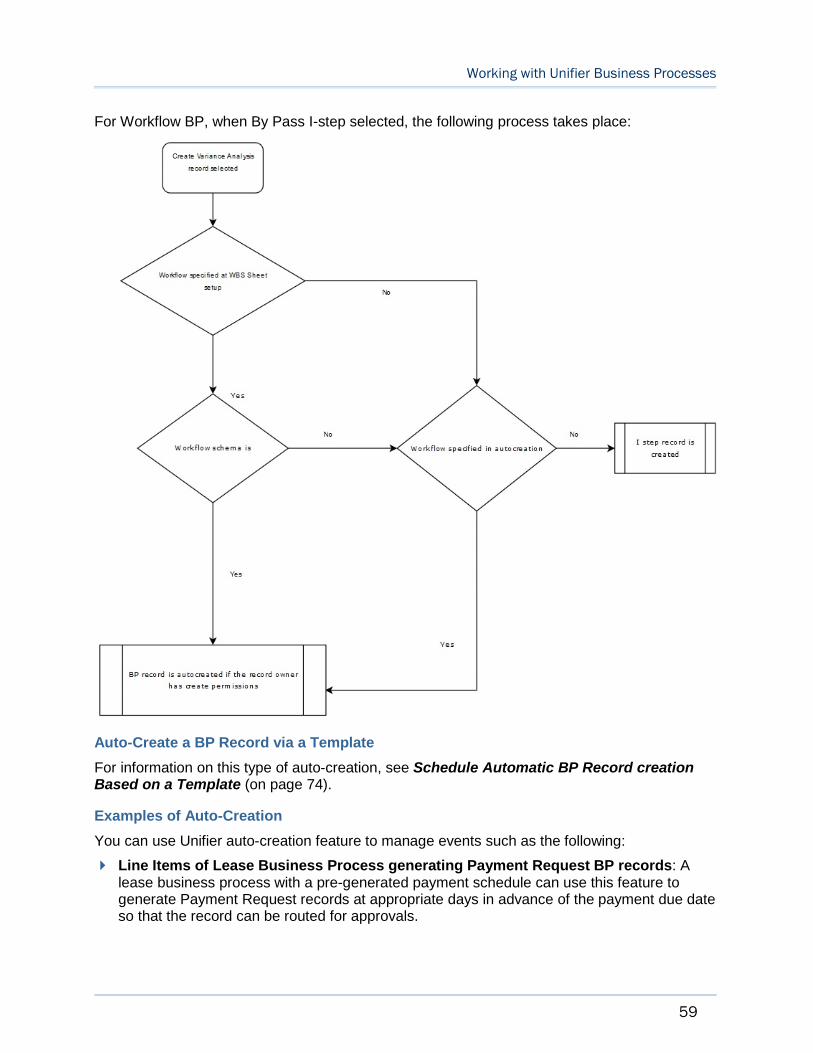
Working with Unifier Business Processes
59
For Workflow BP, when By Pass I-step selected, the following process takes place:
Auto-Create a BP Record via a Template
For information on this type of auto-creation, see Schedule Automatic BP Record creation Based on a Template (on page 74).
Examples of Auto-Creation
You can use Unifier auto-creation feature to manage events such as the following:
Line Items of Lease Business Process generating Payment Request BP records: A lease business process with a pre-generated payment schedule can use this feature to generate Payment Request records at appropriate days in advance of the payment due date so that the record can be routed for approvals.
Unifier Business Processes User Guide
60
Preventive Maintenance BP line items generating Work Order BP records: A Preventive Maintenance type business process (Preventive Maintenance Book) can be set up to create Work Orders for assets at periodic intervals depending on the service needs of the asset.
Create Action Items from Meeting Minutes: Auto-creation feature can be used to create and assign tasks to different people creating a fully automated flow for routing of action items from meeting minutes records that have lines items. For example, each line item Action Item could auto-create a separate Action Item records from the meeting minutes record.
Create a planning item from a business process: You can create a planning item from a business process when the business process, with its details (such as expense estimates, owners, etc.) has been approved.
Add a new line item to an existing record: You can add a line item to an existing business process. For example, a submittal registry record could contain line items that auto-create separate submittal business process forms for each contractor on a project. In the course of work, you might realize that the original submittal registry record is missing a submittal for an architectural drawing. You could submit a new submittal business process form that would add the missing architectural drawing submittal to the original registry record.
For Line Item Creation
You cannot create a line item on a record that is at a terminal or terminated status.
If you create a line item on a non-workflow cost type business process, the cost amount(s) will roll up to the Cost Sheet.
If you create a line item on a workflow cost type business process, the cost amount(s) will not roll up to the Cost Sheet.
Rules for Checking Conditions for Auto-Creation
There are rules that govern when Unifier scheduler checks the conditions for auto-creation, and then if the conditions are met, auto-creates the BP.
Rule 1
The Company Administrator selected the Enable Auto creation checkbox for BP Creator when the auto-creation was set up in Unifier.
If the Enable Auto creation checkbox is checked, it implies system based auto-creation, and the BP Creator Select button is not displayed in User Mode.
For non-workflow BPs: The condition check occurs on Finish Edit. If condition met, creates record and shows the link for the auto-created BP. If no condition is specified auto-creates records and shows the link for the auto-created BP.
For workflow BPs: The condition check occurs on Send. If end step reached and Action Form is used on End Step, the condition check occurs on Save instead of Send. If condition met, creates record and shows the link for the auto-created BP. If no condition specified blindly creates records and shows the link for the auto-created BP.
If the Enable Auto creation checkbox is not checked, it implies manual creation.
For non-workflow BPs: The condition check does not occur on Finish Edit.
For workflow BPs: The condition check does not occur on Send.
Working with Unifier Business Processes
61
BP Creator- Select button shown in User Mode so that the user can create the business process manually. If clicked, creates BP record without checking any condition, and creates record and shows the link.
Rule 2
Date Trigger Condition check: Are checks on the specified Date Data Element. Setting this up implies that condition checks are done on a date instead of Finish Edit/Send in case of Non workflow and Workflow respectively provided a link does not already exist next to BP creator element. If a link already exists, it will not create any new records for that BP Creator element in the chosen line item of the record.
Rule 3
Trigger Condition check based on frequency (Periodic): Are checks on frequency for BP Creator elements with Enable Auto creator checked. If specified, these are the only time condition checks are done. This overrides any other checks for date. This is the only method to create multiple records even if a link already exists and a record has already been creator for this BP Creator element. The link created using this will always point to last auto-created record.
Auto-Creation In Operation
Upon auto-creation, the following are not copied to the auto-created Business Process (BP) from the source BP:
Line item status
Creator fields
Hidden tab data
These elements are copied from the source BP to the auto-created BP on certain conditions:
BP Pickers are not copied if the auto-creation occurs from a Project (Standard) to a Shell and the BP Picker location is not defined or is no longer valid
Configurable Manager codes and CBS codes are copied from the source business process to the auto-created business process if the codes are available in the destination shell.
User/Group Picker values are copied only if they are available in the destination shell.
Transaction currency field is copied if that currency is available in the destination shell.
Change Commit
If you configure a BP Creator field to auto-create a "Change Commit," during the runtime the field will behave the same way as any other BP Creator field. Also:
A "Change Commit" type BP always holds a required BP Picker element (refid) on the BP Upper form. In uDesigner, this BP Picker is configured to point to Base Commit BP.
During the auto-creation of a "Change Commit," the required BP Picker element (refid) on the BP Upper form gets populated with the value of the same BP Data Picker, or BP Picker (the source BP). This value:
Resides on the same form as the BP Creator, and
Points to the same Base Commit type BP as the BP Picker element (refid) is configured to point to in uDesigner.
Unifier Business Processes User Guide
62
Attachments
Including attachment in the Auto Creation tab of the BP setup enables the copying of attachments from both the upper and detail forms.
When a record is auto-created and receives Line Items from a reference record during the auto-creation, the Line Item attachments transfer from the source reference record.
If the option of including attachment in a BP setup BP creator configuration is checked, then the source Line Items from a "Referenced" picker will be copied into auto-created record with attachments. This applies to BP creators on upper as well as detail form.
In case when an attachment existing in the Line Items of the Source BP record needs to get copied over to the upper form of the destination BP record, the project administrator can specify the levels for the transfer of attachments; Upper form to Upper Form, Line Item to Upper Form, and so forth.
Example
An operations manual (existing as an attachment) in the Line Items of the Source BP of PM Book has to be seen as an Upper form attachment on the auto created BP record of the Work Order.
The following provides more details:
The Business Process Setup window enables you administrator to provide additional levels of granularity for copying attachments when auto-creations are happening from Record to Record and Line Item to Record methods of Auto creation.
Record to Record
This is the option seen in the Creation Method field "Record Auto Creation: Upper Configuration" in uDesigner > BP > Auto Creation Process > Upper. This option is pre-populated by the system based on where the BP Creator is located. If the BP creator is located in the upper form of the BP, then this option will be seen in the above mentioned field.
Line Item to Record
This is the option seen in the Creation Method field "Record Auto Creation: Detail Configuration" in uDesigner > BP > Auto Creation Process > Detail. This option is pre-populated by the system based on where the BP Creator is located. If the BP creator is located in the detail form of the BP, then this option will be seen in the above mentioned field.
The Auto Creation tab (in the Business Process Setup window) provides the following attachment options:
Include Upper Form Attachments
Include Detail Form Attachments
Copy Line Item Attachments to Upper Form of the Record
Copy Line Item Attachments to Line Items of the Record
Bypass Initiation Step during auto creation
Copy Linked Records
The following explains the results of the selections:
Working with Unifier Business Processes
63
When the Include Upper Form Attachments option is selected, and the source is a Line Item BP, the attachments from the Upper Form of the source record are copied over to the Upper Form of the auto-created record.
If the destination is a Line Item BP, then:
The line items may get created but no attachments from the line items will get copied over.
If the destination is a Simple BP, then:
No attachments from the line items will get copied over to the Upper Form.
When the Include Detail Form Attachments option is selected, and the source is a Line Item BP, the Copy Line Item Attachments to Upper Form of the Record option will be selected by default.
Note: The Copy Line Item Attachments to Upper Form of the Recordoption will be selected by default to inform you that since the destination is a Simple BP, checking the option of Include Detail Form Attachments will always add the line item attachments to the Upper Form of the Simple BP.
If the destination is a Line Item BP, then:
The attachments from the line items of the source record are copied over to the Upper Form of the auto-created record. If the Upper Form of the source BP record has attachments, the attachments will not get copied over.
The line items may get created and any attachments from the source line items will get copied over as Upper Form attachments. The line items from the source may be seen in the auto-created record; however, the line items will not have any attachments.
If the destination is a Simple BP, then:
The attachments from the line items of the source record are copied over to the Upper Form of the auto-created record. If the Upper Form of the source BP record has attachments, the attachments will not get copied over.
When the Include Detail Form Attachments option is selected, and the source is a Line Item BP, the Copy Line Item Attachments to Upper Form of the Record option will be selected by default. The attachments from the line items of the source record are copied over to the line items of the auto-created record. If the design of the source BP does not have any tab mapping then the line items will not get created, and the line item attachments will not get copied over.
If the destination is a Line Item BP, then:
The line items created in the destination record will have attachments from the corresponding line items of the source record.
If the destination is a Simple BP, then:
The option will not be available.
When the Include Upper Form Attachments and the Include Detail Form Attachmentsoptions are selected, and the source is a Line Item BP, the Copy Line Item Attachments to Upper Form of the Record option will be selected by default.
For Line Item BPs and Simple BPs:
Unifier Business Processes User Guide
64
The Upper Form attachments from the source record and the line item attachments from the line items are copied over as an Upper Form record attachments in the destination record.
When the Include Upper Form Attachments and the Include Detail Form Attachmentsoptions are selected, and the source is a Line Item BP, the Copy Line Item Attachments to Upper Form of the Record option will be selected by default.
For Line Item BPs:
The Upper Form attachments from the source record are copied over as an Upper Form record attachments in the destination record. The Line Item BP attachments, from the line items of the source record, will are over as line item attachments, if the design permits the creation of line items.
When the Include Upper Form Attachments is selected, the source is a Simple BP, the Copy Line Item Attachments to Upper Form of the Record option is selected (disabled by the system), and the Copy Line Item Attachments to Line Items of the Record option is disabled by the system:
If the source is a Simple BP:
The only option that is available is the Include Upper Form Attachments.
If the source is a Simple BP and the destination is either a Simple BP or a Line Item BP:
The Upper Form attachments from the source record of the Simple BP is copied over as Upper Form attachments in the destination record.
Schedule BP Auto-Creation Dynamically
Auto-created business processes can be scheduled for creation from setups created by an administrator, or you can create them dynamically.
To create new business process records using auto-creation
1) Navigate to a business process log and open the source BP record to use for auto-creation.
2) Choose File > Auto-create.
3) Select the Enable Scheduled Runs checkbox.
4) Under Frequency, choose how often you want the auto-creation to occur: Daily, Weekly, Monthly, or Yearly.
5) Under Range of Recurrence, specify the date range during which the auto-creation should occur.
6) Click OK.
After the new record is auto-created, there is a link in the source record to the newly created record. Click this link to access the auto-created record. The link always accesses the last record created by the auto-creation.
Once you create a new workflow record, Unifier sends it to the assignees as an initiation task (I Step) that will appear on their Tasks log and the Business Process (BP) log to which the record belongs. If a new record is sent as an initiation task, users must accept the task to manually launch the record.
Working with Unifier Business Processes
65
Once you create a new non-workflow record, Unifier sends it to the designated creators as an initiation task (I Step) that will appear on their Tasks log and the BP log to which the record belongs. Users must accept the task to view the record.
Note: If your administrator has set up these business processes to bypass the I Step, the new records will appear in Unifier at different workflow steps, or in different statuses. For information about this, see Bypassing the Initiation Step (I-Step) (on page 57).
Stop Auto-Creation
To stop the creation of new auto-created business process records:
1) Navigate to a business process log and select the source record or records to use for auto-creation.
2) Choose File > Auto-create.
3) De-select the Enable Scheduled Auto creation checkbox.
4) Click OK.
Create a BP Record, or Line Item, with Manual Auto-Creation
Note that, for line item creation, you cannot add a line item to a record in a terminal or terminated status.
To create a new business process record or line item with manual auto-creation
1) Open the record that will auto-create the new record or line item.
2) Click the Create button next to the creator field.
The field will display the words "Pending Creation."
Unifier immediately auto-creates the destination record or line item. The new, auto-created record or line item will show a link to the source record that created it. You can click this link to view the source record.
If you manually auto-create a line item, Unifier will validate the creation and tell you immediately if there are errors that caused the auto-creation to fail.
The Reset button
When you manually auto-create a new record or line item, the button beside the creator field changes from Create to Reset. You can use this Reset button to break the link from this (the source) record to the new record/line item so that you can auto-create another record or line item manually. When you click the Reset button, it changes back to a Create button.
Create a BP Record in Document Manager
If you have permission to access the Document Manager node (<project/shell> > User mode > Document Manager), then you can create a business process directly from the Documents sub-node.
You can create a BP record from the Document Manager node by:
Unifier Business Processes User Guide
66
Selecting the files/folders that have to be attached to the BP record.
Not selecting the files/folders that have to be attached to the BP record.
The following explains how to create a BP record from Document Manager node without selecting the files/folders that have to be attached to the BP record.
In Classic View
1) Click Documents sub-node (<project/shell> > User mode > Document Manager> Documents) to open the log.
2) From the left-hand pane of the log click to select the appropriate documents or folders to which you want to attach the business process.
3) Click the New down-arrow to open the menu.
4) Click to select the business process type and open the Create New <business process type> window.
To learn how to launch a BP from the Document Manager refer to Unifier Managers User Guide.
In Standard View
1) Click Documents sub-node (<project/shell> > User mode > Document Manager> Documents) to open the log.
2) In the Documents log page, click Create ( ) drop-down menu.
3) Click Business Process. to open the New Record window.
4) Click the drop-down arrow in the field under Select Business Process.
5) Select the business process type.
6) Click Create.
Note: The format of the business process form changes depending on the availability of the standard forms (new user interface) option.
The name of the project/shell (for the Documentation Manager in which the business process is being created) appears under Business Process Origin.
The drop-down arrow in the field under Select Business Process lists business processes that you have permission to access.
Once you select a business process:
For single workflow setup for the business process, the workflow name appears under Select Workflow.
For multiple workflows setups for the business processes, the drop-down arrow in field under Select Workflow enables you to select a workflow setup for the newly created business process record, from a list of applicable workflow setups.
Note: The list of workflow setups appearing in the drop-down list depends on whether you (user) have been designated as an assignee, in the creation step, or not.
Standard forms (new user interface)
Working with Unifier Business Processes
67
In the Standard View, only the following business process types support the standard forms (new user interface) format:
Line Item type Business Processes
Simple type Business Processes
From the top right-hand corner of the application, before User control panel which displays your
name, click the standard forms (new user interface) icon ( ) to turn the option on ( ).
See Business Processes with Redesigned User Interface (on page 299) for details about the new user interface of standard forms.
If you create a business process that has the standard forms (new user interface) format, and selected files/folders when creating, then Unifier adds the files/folders as attachments for the business process record that you have just created.
If you select one file, or multiple files, then the file, or files, will be included in the attachment tab.
If you select one folder, or multiple folders, then the folder, or folders, then:
For Document Manager business processes that do not support folder structure, Unifier displays an alert message and the documents from selected folders and sub-folders are attached without the folder structure.
For Document Manager business processes that support folder structure, Unifier displays the folder structure.
Create a BP Record from a Template
If you have created a business process template for a BP, you can manually create BP records by copying the template. For instructions on creating BP templates and scheduling BP creation,, see Create BP Templates and Schedule BP Creation (on page 71).
Creating a BP record from a template is similar to copying an existing BP record. Any values in any of the form fields on the template (either manually entered or auto-populated) will be copied to the new record. Line items, file attachments, and attachments to line items will also be copied. Other attached information, such as general comments, linked records, and linked Mailbox, will not be copied to the new form.
To create a business process record from a business process template
1) Open a business process log.
2) In the log, click the Actions and select one of the two options (available for all Workflow type BPs, only) that enable you to create BPs by way of BP templates:
a. Create From Template...
b. Create From Template...(New UI)
If you click Create From Template...
1) The [BP name]: Template List window opens, which displays the list of templates created for the selected BP.
2) Select a template from the list and click Open. The BP form opens. Data is populated based on the template. You can modify the data or enter additional data.
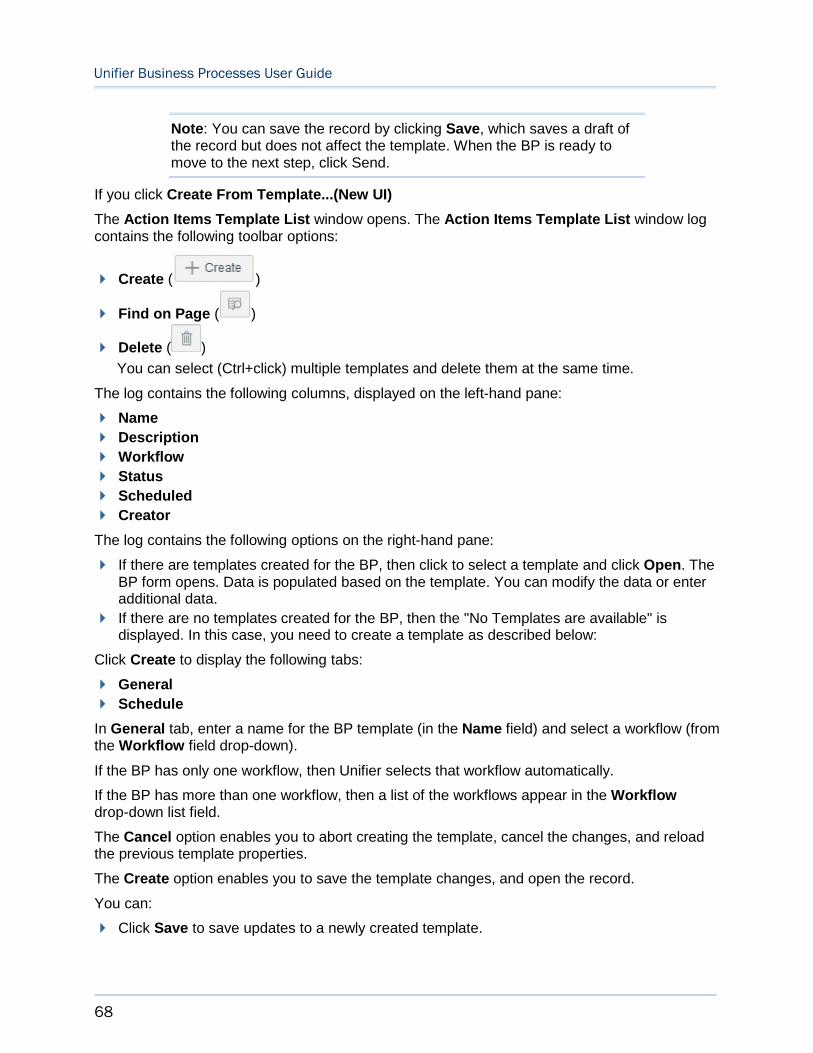
Unifier Business Processes User Guide
68
Note: You can save the record by clicking Save, which saves a draft of the record but does not affect the template. When the BP is ready to move to the next step, click Send.
If you click Create From Template...(New UI)
The Action Items Template List window opens. The Action Items Template List window log contains the following toolbar options:
Create ( )
Find on Page ( )
Delete ( )
You can select (Ctrl+click) multiple templates and delete them at the same time.
The log contains the following columns, displayed on the left-hand pane:
Name
Description
Workflow
Status
Scheduled
Creator
The log contains the following options on the right-hand pane:
If there are templates created for the BP, then click to select a template and click Open. The BP form opens. Data is populated based on the template. You can modify the data or enter additional data.
If there are no templates created for the BP, then the "No Templates are available" is displayed. In this case, you need to create a template as described below:
Click Create to display the following tabs:
General
Schedule
In General tab, enter a name for the BP template (in the Name field) and select a workflow (from the Workflow field drop-down).
If the BP has only one workflow, then Unifier selects that workflow automatically.
If the BP has more than one workflow, then a list of the workflows appear in the Workflowdrop-down list field.
The Cancel option enables you to abort creating the template, cancel the changes, and reload the previous template properties.
The Create option enables you to save the template changes, and open the record.
You can:
Click Save to save updates to a newly created template.

Working with Unifier Business Processes
69
Double-click on a template to open it for viewing.
Simple type Business Processes
Unifier enables the Refresh auto-populated and calculated fields on record creation checkbox option if you use the Create From Template... option to create a new template.
Unifier does not enable the Refresh auto-populated and calculated fields on record creation checkbox option if you use the Create From Template...(New UI) option to create a new template.
Use the Schedule tab to schedule a run. A template can be set for scheduled run if it is marked as Complete (under Status), only. The fields in the Schedule tab are disabled until the time that the template is marked as Complete. The following options are available in the Schedule tab:
Schedule
Enable scheduled record creation
Note: You can schedule auto-creation of records when the template marked as Complete (under Status).
Frequency
Daily
Weekly, end of day
Monthly
Yearly
Range of Recurrence
No end date
End by
Additional Information
Auto-email creator if scheduled creation fails
When the template is in Complete status, and user is setting up the schedule, the Schedule tab shows the following options:
Cancel
Save
When the template is in Draft status, after the Creation step, the Schedule tab shows the following options:
Cancel
Save
Under other conditions the following two options are not available:
Cancel
Save
By default the very first template is selected, and the details for the first template are displayed on the right-hand pane.
Unifier Business Processes User Guide
70
In the creation step, no template will be highlighted on the left-hand pane. After you save, the template is added to the template list, highlighted on the left-hand pane, and the details are displayed on the right-hand pane.
Templates with Draft status
Note: The options described below are displayed based on BP type and the availability of the new user interface. The final template format is adjusted accordingly. All templates created by using the new user interface will keep the new format in the event of a subsequent edits.
When you open a template that is in draft status, Unifier displays the following toolbar options on the top right-hand section:
Complete
Save
Menu Options icon ( )
Auto-create
Export Line Item Template
Print (HTML and PDF)
Reload
[BP name] Help
Close
When you finish drafting and click Complete, Unifier displays the Workflow [BP name] Details window. In this window, you can enter all the workflow information and click Save when finished. When you click Save, the toolbar options change to:
Edit
View Workflow
Send
Menu Options icon ( )
Templates with Complete status
Note: The options described below are displayed based on BP type and the availability of the new user interface. The final template format is adjusted accordingly. All templates created by using the new user interface will keep the new format in the event of a subsequent edits.
When the template status is marked as Complete, the template turns into read-only mode. If you decide to edit a template marked as Complete, you can open the template and click Edit. This action changes the status of the template to Draft. In this case, Unifier checks to see if there is any scheduled auto-creation for the template.
If a schedule is detected, Unifier displays a confirmation dialog box. If you click Yes, Unifier changes the template status to Draft and stops the scheduled auto-creation for the template; however, Unifier retains the previously entered scheduled runs information.
Template log and the gear icon ( )
Working with Unifier Business Processes
71
The options available for gear icon are context sensitive, based on the status of the template. The following gear icon options are displayed when the template is in Draft status:
Open
Create Record
Delete
The following gear icon options are displayed when the template is in Complete status:
Open
Create Record
Delete
The following gear icon options are displayed when multiple templates, regardless of status, are selected:
Delete
Creating a record from a template with Complete status
When you select a completed template and click Create Record, Unifier opens the Create New [BP name] and Workflow [BP name] Details window simultaneously. The fields in Workflow [BP name] Details window is populated with the workflow information that was stored at the time of drafting and subsequent completing of the template. The toolbar options change to:
Send
The Create Record option replaces the Send option in the new user interface window.
Save
Menu Options icon ( )
If you click Cancel in the Workflow [BP name] Details window to work in the Create New [BP name] window in order to make necessary changes, or to review the record information, you must click Send to route the record to the next step. In these two scenarios:
The Workflow [BP name] Details window opens, but the fields will not be populated with the workflow information that was stored at the time of drafting and subsequent completing of the template.
You must re-enter the workflow details as Unifier treats this instance as a one-time creation.
Create BP Templates and Schedule BP Creation
You can create templates for project- or shell-level and company-level workflow business processes. This allows:
Easy creation of records for business processes that you use often or are recurring (for example, lease renewals or time sheets)
Scheduling automatic creation of recurring BP records
This section discusses how to:
Create and edit business process templates
Schedule automatic business process record creation from the template

Unifier Business Processes User Guide
72
Note: When you create BP records from a BP template, any values in any of the form fields on the template (either manually entered or auto-populated) will be copied to the new record. Line items, file attachments, and attachments to line items will also be copied. Other attached information, such as general comments, linked records, and linked Mailbox, will not be copied to the new form.
Create a BP Template
You can create a template for any business process for which you have at least "view user records" permission.
Note: Since draft option is not available for non-workflow business process records, and draft option is essential in storing a business record template, you can only create a template for a workflow business process record.
To create a template
1) In User Mode, open to the log containing the business process for which you want to create the template.
2) In the Navigator, select the business process.
3) Click the File menu and choose Template. The Template List window for that business process opens. The window displays any templates that have been created for the selected BP.
4) Click the New button. The Properties window opens.
5) Use the information in the table below to fill in the General tab.
Note: Although the Schedule tab is visible, it is disabled until you have changed the status to Complete. At this point, you can use this template to manually create BP records; however, if you want to schedule automatic creation, you must first change the template status to Complete.
6) Click OK.
Unifier adds the template to the Template List with a status of Draft and opens the form as it would in the create step of the workflow. This form will be used as the template.
7) Enter any information into the template form that you want to include in the records that you create from it.
8) You can add line items as needed. You can also add file attachments, which will be attached when a record is created from the template. This includes attachments to the record itself and attachments to line items.
You can also add linked records, linked Mailbox, and general comments to the template, but these will not be included in the records created from this template.
9) Click the Save button at the top of the form.
Working with Unifier Business Processes
73
Unifier saves the template in Draft mode, and the window remains open. You can use the template at this point to manually create BP records; however, if you want to schedule automatic creation, you must first change the template status to Complete (see the following procedure).
In this field: Do this:
Name Enter a name for the new template.
Description Enter a description of what this template is used for.
Workflow Select the workflow that should be used for the BPs that will use this template.
Refresh auto-populated and calculated fields on record creation
(This option will appear for simple type business processes only) Select this check box if the values in the fields that are auto-populated and calculated should be refreshed whenever a record is created from this template. If this simple type BP contains fields that are being auto-populated from the attribute form of the current or any parent shell in the hierarchy, or from a single-record business process in any parent shell in the hierarchy, you can refresh these values so that this new record contains the latest data.
Copy Linked Records
Select the check box if you want to copy any linked records whenever a record is created from this template.
Change the Template Satus (Draft and Complete)
Each template will either be in Draft mode or Complete mode. You can change the status of a template between the two statuses at any time. The template status controls whether a BP creation schedule can be defined.
If the template status is Draft, the template can be edited and used to manually create BP records. Required fields and assignee information can be left blank. Scheduled record creation cannot be performed.
If the template status is Complete, the Schedule tab of the Properties window is activated and can be used to define and schedule automatic record creation. The form is no longer editable (unless changed back to Draft). Required fields and assignee information must be completed before the status can be changed to Complete.
To change the status of a business process template to Complete
1) In User Mode, navigate to the log of the business process for which to edit the template. Click the File menu and choose Template. The Template List window opens.
2) Select a template and click Open. The template form opens.
3) Complete the BP form:
Complete all required fields.
Unifier Business Processes User Guide
74
Be sure the rest of the template form is filled out appropriately, including line items and attachments, if applicable. Remember that if you will be scheduling automatic record creation from this template, the information that you enter here will used for the creation step and sent to the first step in the workflow.
Select a workflow action (for the first step in the workflow).
Complete the assignees information (To field) as necessary.
4) Click the File menu and choose Template Status > Complete. A validation check will verify the following:
All required fields have valid data (and all other information on the form is valid).
The workflow action has been selected.
The Action Details/Assignees section To field is populated with valid users or groups, based on the BP setup.
When the status is Complete, the template form becomes view-only. If you have defined a record creation schedule in the Schedule tab, the schedule will be activated.
To change the status of a business process template to Draft
1) Open the template form.
2) Click the File menu and choose Template Status > Draft.
3) At the confirmation window, click Yes.
In Draft mode, the template form becomes editable. Scheduled record creation is disabled until you change the status back to Complete.
Schedule Automatic BP Record creation Based on a Template
You can schedule automatic BP record creation runs that are based on a BP template. The templates must have a status of Complete before you can define and activate the schedule.
For information on manual creation from a BP template, see Create a BP Record from a Template (on page 67).
Note: Business process creation cannot be scheduled from a template in projects or shells that have the View -Only or Inactive status.
To define a BP creation schedule
1) In User Mode, navigate to the log of the business process for which to edit the template.
2) Click the File menu and choose Template. The Template List window opens.
3) Select a template and click Properties. The Properties window opens.
4) Click the Schedule tab.
5) Complete the Schedule tab as described in the following section.
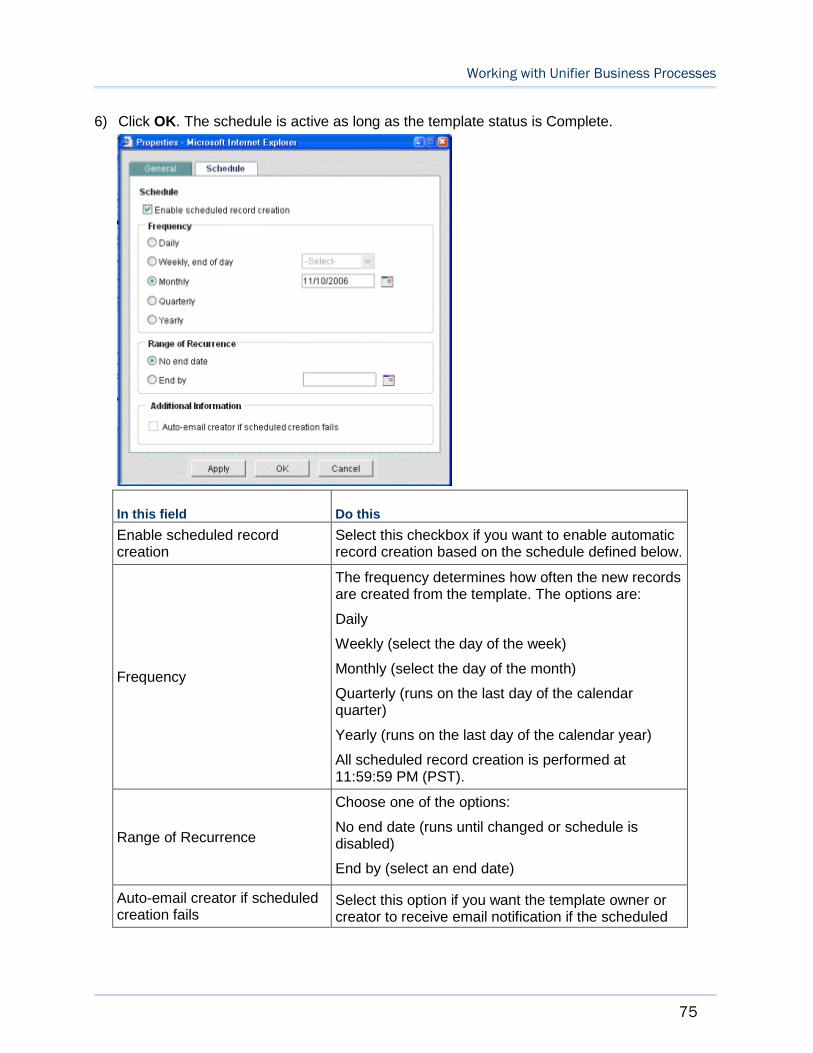
Working with Unifier Business Processes
75
6) Click OK. The schedule is active as long as the template status is Complete.
In this field Do this
Enable scheduled record creation
Select this checkbox if you want to enable automatic record creation based on the schedule defined below.
Frequency
The frequency determines how often the new records are created from the template. The options are:
Daily
Weekly (select the day of the week)
Monthly (select the day of the month)
Quarterly (runs on the last day of the calendar quarter)
Yearly (runs on the last day of the calendar year)
All scheduled record creation is performed at 11:59:59 PM (PST).
Range of Recurrence
Choose one of the options:
No end date (runs until changed or schedule is disabled)
End by (select an end date)
Auto-email creator if scheduled creation fails
Select this option if you want the template owner or creator to receive email notification if the scheduled
Unifier Business Processes User Guide
76
creation fails. The email will contain location information so that the recipient can see where the auto-creation originated, and where it failed.
Edit, or Delete, a BP Template
Users with view permission to a business process log will be able to view any associated templates. The template form and properties can be edited by the owner or creator and by users with Modify Record Ownership.
Only the owner or creator of a template can delete it.
To edit a template
1) In User Mode, navigate to the log of the business process for which to edit the template. Click the File menu and choose Template. The Template List window opens.
2) Select a template and click Open. The template form opens.
3) The fields, line items, file attachments, and other data are editable. You cannot change the workflow once the template has been created.
To delete a template
In the Template List window, select the template and click the Delete button. Click Yes to confirm.
Edit, or Cancel a BP Schedule
To edit a business process schedule
You can edit the schedule information in the Schedule tab at any time. The Schedule tab is active only when the BP status is Complete. After saving changes, the new schedule will be activated immediately.
To pause or cancel scheduled business process creation
Do one of the following to deactivate scheduled BP creation:
Open the Properties window, and choose the Schedule tab. Deselect the Enable scheduled record creation checkbox. To reactivate the schedule, select the checkbox.
Open the template form and change the status to Draft (from the File menu, choose Template Status > Draft). As long as the template remains in Draft mode, the BP schedule will be inactive. You can still manually create BP records from a draft template. To reactivate the schedule, change the status back to Complete.
Failed Scheduled BP Record Creation
If a scheduled BP creation fails, email notification will be sent to the template owner (as long as the checkbox enabling the notification has been selected on the Schedule tab of the template Properties window). The email will contain location information so that the recipient can see where the auto-creation originated and where it failed. Following are conditions under which scheduled record creation can fail:
Working with Unifier Business Processes
77
The To field is empty. This is possible if the assignee user becomes inactive after the schedule is created or if a group is empty.
CBS code is invalid, which can happen if the CBS code becomes inactive after selecting in the template.
If the rules engine validation fails.
For payment applications, if the associated SOV is locked either by the payment application record in routing, or by a change commit with a negative line item value. See Payment Application Business Processes (on page 197) for details.
Note: If the destination business process does not exist or has not been imported into Unifier, the location specified in the email notification might be non-existent or incorrect.
Using CSV and Restful Services
You can use CSV and Restful Services to create a BP Record or Line Item with Line Item Data Picker. When you export your CSV template, the Line Item Data Pikcer are shown and the direction is set as an input or both, in the Integration tab in uDesigner.
When you create a record or line items using a csv import:
If the CSV input request has Line item Data Picker values, then the following validations need to be done:
The associated data picker has a record selected. If a record is not selected, then Unifier displays the message: <value> is invalid value for Line item Data Picker <DE name>.
The record selected verifies that the line item belongs to the selected record. If not verified, then Unifier displays the message: <value> is invalid value for Line item Data Picker <DE name>.
The line item exists. If it does, then Unifier executes the query conditions defined for the Line Item Data Picker. If it does not, then Unifier displays the message: <value> is invalid value for Line item Data Picker <DE name>.
Similarly, all the following Restful Services support Line Item Data Pickers. The validations are the same validations for users who try to create record using CSV import.
Get BP Record List
Get BP Record
Get BP Record with attachments
Create BP Record
Create BP Record with lineitems
Update BP Record
Unifier Business Processes User Guide
78
Working with Permissions (Non-Workflow BPs)
To grant permission to a non-workflow business process record
1) Create a BP record in the Company Data Manager, Company General, or project or shell General log.
2) Select one or more BP records and click Actions > Permissions. You can also click the gear icon and click Permissions to assign permissions to only one BP Record. The Permissions window opens.
3) In the Permissions table, type the user or group name in the Add box and select the user or group to grant access.
4) By default, each listed user or group will be granted View permission, allowing them to open the BP Record. To grant additional permissions, select the checkboxes that correspond to the user or group:
All: User will have View, Edit, and Modify Permission.
Modify Permissions: Allows user to control the BP record's permission settings.
Edit Data: User can import BP record information, save a snapshot, edit BP record properties, and add columns.
View: User can view the BP record.
5) Click Save.
6) When editing one record at a time, click the left arrow to view the previous BP record or the right arrow to view the next BP record.
7) After exiting the Permissions window, the Permissions tab will be refreshed with the updated information.
You can Remove user or group permission by clicking the trash-can icon in the Removecolumn.
Filling Out a Business Process Form
To fill out a Business Process (BP) form:
1) Complete the Upper form. Fields marked with a red asterisk (*) require an entry.
2) Add line items, if applicable.
If this is a cost or line item-type BP add line items as necessary.
If this is a Document-type BP, attach any documents to the form.
3) Add additional information, if applicable.
General comments.
Attachments to General comments.
In Classic View, Task Notes, which are impermanent record notes that are available only on the next step, and only on the View form.
4) When you have completed the form, do one of the following:
If this is a non-workflow BP:
Working with Unifier Business Processes
79
a. Click Save to save your changes. Saving the form creates a permanent record.
b. Click Finish Editing to render the record in view-only mode.
Unifier uses statuses to track the state of a business process record and any line items it may contain. For example, a Pending status generally means people are still working with the record, while a Closed status suggests the record is completed. Records in Closed status are typically marked as Terminal, meaning the record has reached a point where no further input is either required or desired. You can still access a non-workflow record in a terminal status as long as the record is in Edit mode. However, if you click Finish Editing when the record is in a terminal status the record becomes permanently read-only and un-editable.
If this is a workflow BP:
a. When you have completed the form, select an action from the Workflow Actionsdrop-down list. Action selections depend on the BP design, for example, if this is a review step, an action that you may be able to select is "Approve Budget Approval." Selecting a Workflow Action activates Action Details. If there is only one possible workflow action for a step, the action is auto-populated in the field.
b. In Action Details, designate assignees for the next step; that is, the users and groups who will receive the record as a task on the next step in the workflow. If the next step is the End step, then the To field will be preassigned.
c. Click the Send button. At the Creation step, sending the form to the next step in the workflow creates a permanent record.
If the workflow is not yet complete, the form will be forwarded to the next step in the workflow.
If the workflow is complete (that is, your task was the last step of the workflow), the record will appear as complete in the business process log.
Use the Workflow Progress hyperlink, in the Action Details section of a Workflow BP, to open the Workflow Progress window and view the workflow progress status.
When you accept the task, the form becomes editable. On the editable, or "action," version of a form (belonging to an accepted task), you can see the view form of the business process (Task Details). In the view form, you are able to view the Workflow progress status by clicking on the Workflow Progress hyperlink. This option is available for Workflow records of both company-level and Project-level BPs.
Saving a Draft of a Workflow Business Process
At any time while filling out a business process form (whether creating a new one or responding to a task), you can save your work as a draft and return to it later. The record remains in your Drafts log until you send it. In addition, if you initiate a discussion group in Classic View, the record remains in your Drafts log (the log displays a Yes in the Discussion column) until the discussion group ends.
Unifier Business Processes User Guide
80
Note: Saving a draft is only applicable to Workflow type of BP records. For non-workflow type of BPs, saving a record results in creation of a record and not a draft.
To save a draft copy of the workflow business process form
From the File menu of an open business record, click Save. A draft copy of the form with your edits so far is saved in your Drafts log.
To view your drafts
Navigate to the Drafts log by doing one of the following:
In the Navigator, click Drafts directly under the Home node. The Drafts log lists all draft business processes.
In the Navigator go to your project or the Company Workspace and navigate to Drafts.
Notes:
Drafts for View-Only and Inactive projects or shells are not listed in the Drafts log.
Unifier displays the Tasks, Notifications, and Drafts nodes, in the respective Company Workspace and Project/Shell, based on the deployment of your user mode navigators.
To open a draft
Select a record from the Drafts log and click Open.
To delete a draft
Select the record from the Drafts log and click Delete. The draft form will be permanently deleted. A draft is automatically deleted from the log after the record has been sent or otherwise completed, or the discussion group ends.
Accessing Custom Business Process Help PDF File
Your company or your Project/Shell administrator may provide a custom Help file to give you information about a specific business process. This file is provided as a PDF file, which can be read with Adobe Reader. If a custom help file is available, it will be listed under the Help menu for the business process log or form.
Adding and Managing Line Items
Detailed information, such as transactions, can be entered as line items on Cost BPs and Line Item BPs, as well as on Document-type BPs, if they have been designed to accommodate documents that are attached as line items.
Working with Unifier Business Processes
81
You can edit or delete line items on a BP form as long as the form is still editable; that is, before it reaches its terminal status (for example, approved). If you add a new line item in any step (other than the creation step), you can modify the line item until the BP is sent to the next step. The line item status will always default to the default line item status specified in the design. Users with permission can change the status if modification to the line item status is allowed in that step.
Note: Document and Line Item BPs can be designed to include line item status control, which allows users to choose a status for individual line items and control whether they can be modified.
If designed in uDesigner, there may be multiple tabs in the line item area of your BP form. Click these tabs to access the various line items.
You can enter line items using either a line-item entry form, or the Grid feature. Line item entryforms open in a separate window, which you must fill in and click OK to insert into the Item log at the bottom of the form. With the Grid feature, you can enter information directly into the Item log, but it is best used for short line items.
You can access the attachments in Workflow task emails under General comments section in the Document type BP.
Note: The Enable response via email option must be selected.
Add Line Items Using a Line-Item Entry Form
You can add either a Detail Line Item, or a Summary Line Item.
To add a line item
1) On the business process form, click the Add button.
If the business process does not use summary line items, Unifier opens the Line Item window.
If the business process uses summary line items, choose Detail Line Item or Summary Line Item, as appropriate. Unifier opens the Line Item window.
2) Fill in the line item fields.
If you select the Detail Line Item for the following types of BPs:
RFB
Line Item
Document
Cost
The Detail Line Item window allows you to perform the following actions:
Example
Your Project > Logs > Create > Add > Detail Line Item > Save & Close/Save & Add New/Cancel
Save & Close
Unifier Business Processes User Guide
82
To save the information that you have entered and close the window.
Save & Add New
To save information that you have entered and refresh the window in order to add another line item.
Cancel
To discard changes that you have made and close the window.
If you select the Summary Line Item, click Save.
Example
Your Project > Logs > Create > Add > Summary Line Item > Save
For information about adding documents to Document type business processes with line items, see Attach Files to Document-Type Business Process Forms (on page 105).
Edit or Remove Line Items
To edit a line item
As long as the BP form is still a draft, you can edit a line item at any time by selecting it and clicking Open.
If you open an existing Line Item form for the following types of BPs:
RFB
Line Item
Document
Cost
Fund
Then, you can click the following options from the Line Item window:
<< (previous)
To go to the previous Line Item record.
This option is disabled if you open the first Line Item record.
Note: If you modify the values in the Line Item and click next/previous, the system saves the values that you have entered.
>> (next)
To go to the next Line Item record.
This option is disabled if you open the first Line Item record.
Note: If you modify the values in the Line Item and click next/previous, the system saves the values that you have entered.
Save & Close
To save the values that you have entered in the Line Item and close the window.
Cancel
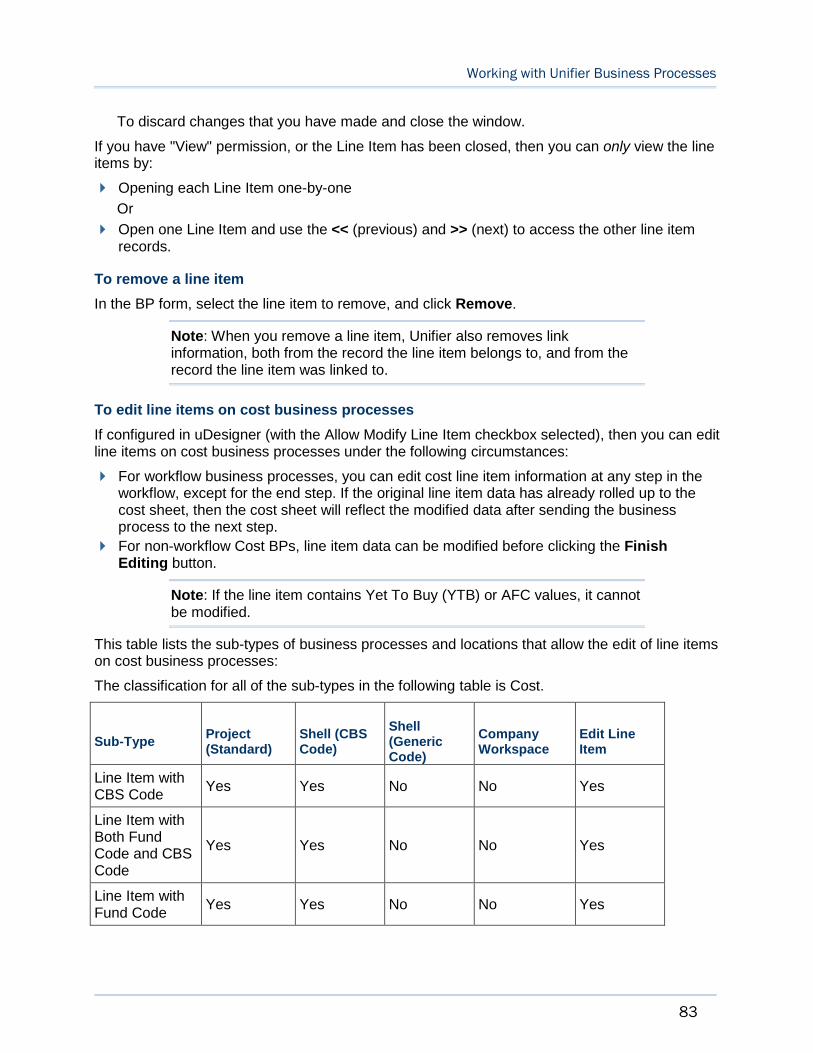
Working with Unifier Business Processes
83
To discard changes that you have made and close the window.
If you have "View" permission, or the Line Item has been closed, then you can only view the line items by:
Opening each Line Item one-by-one
Or
Open one Line Item and use the << (previous) and >> (next) to access the other line item records.
To remove a line item
In the BP form, select the line item to remove, and click Remove.
Note: When you remove a line item, Unifier also removes link information, both from the record the line item belongs to, and from the record the line item was linked to.
To edit line items on cost business processes
If configured in uDesigner (with the Allow Modify Line Item checkbox selected), then you can edit line items on cost business processes under the following circumstances:
For workflow business processes, you can edit cost line item information at any step in the workflow, except for the end step. If the original line item data has already rolled up to the cost sheet, then the cost sheet will reflect the modified data after sending the business process to the next step.
For non-workflow Cost BPs, line item data can be modified before clicking the Finish Editing button.
Note: If the line item contains Yet To Buy (YTB) or AFC values, it cannot be modified.
This table lists the sub-types of business processes and locations that allow the edit of line items on cost business processes:
The classification for all of the sub-types in the following table is Cost.
Sub-Type Project (Standard)
Shell (CBS Code)
Shell (Generic Code)
Company Workspace
Edit Line Item
Line Item with CBS Code
Yes Yes No No Yes
Line Item with Both Fund Code and CBS Code
Yes Yes No No Yes
Line Item with Fund Code
Yes Yes No No Yes
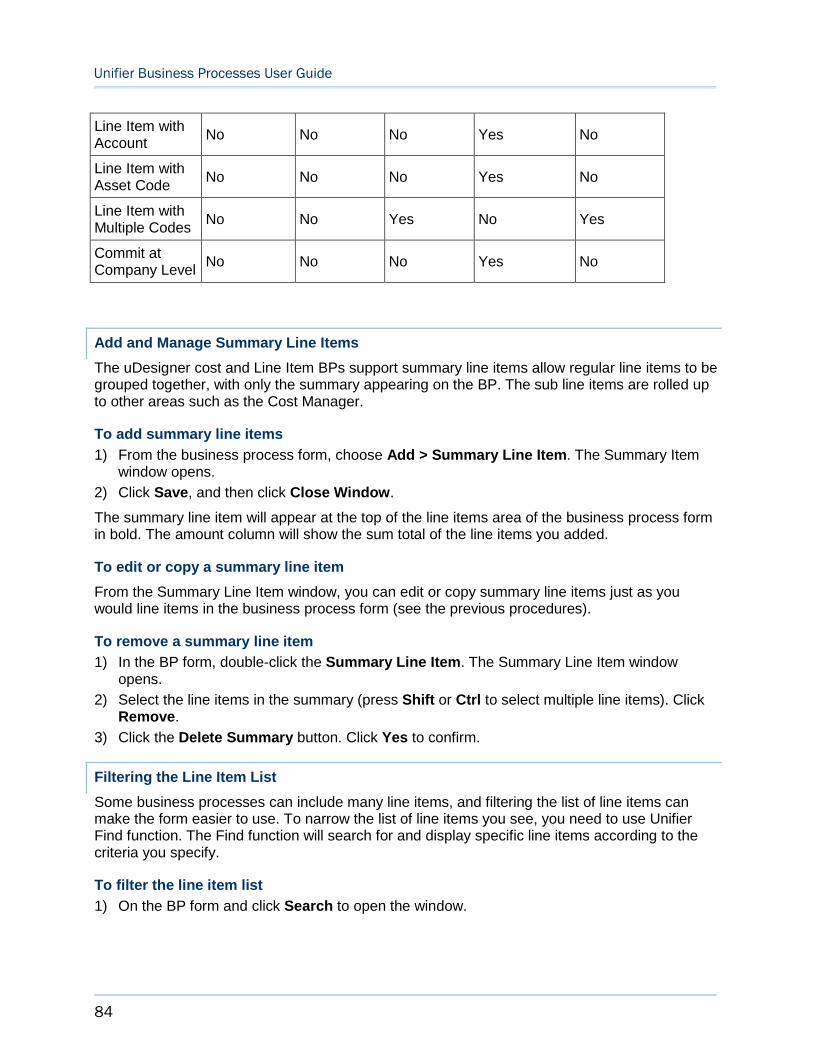
Unifier Business Processes User Guide
84
Line Item with Account
No No No Yes No
Line Item with Asset Code
No No No Yes No
Line Item with Multiple Codes
No No Yes No Yes
Commit at Company Level
No No No Yes No
Add and Manage Summary Line Items
The uDesigner cost and Line Item BPs support summary line items allow regular line items to be grouped together, with only the summary appearing on the BP. The sub line items are rolled up to other areas such as the Cost Manager.
To add summary line items
1) From the business process form, choose Add > Summary Line Item. The Summary Item window opens.
2) Click Save, and then click Close Window.
The summary line item will appear at the top of the line items area of the business process form in bold. The amount column will show the sum total of the line items you added.
To edit or copy a summary line item
From the Summary Line Item window, you can edit or copy summary line items just as you would line items in the business process form (see the previous procedures).
To remove a summary line item
1) In the BP form, double-click the Summary Line Item. The Summary Line Item window opens.
2) Select the line items in the summary (press Shift or Ctrl to select multiple line items). Click Remove.
3) Click the Delete Summary button. Click Yes to confirm.
Filtering the Line Item List
Some business processes can include many line items, and filtering the list of line items can make the form easier to use. To narrow the list of line items you see, you need to use Unifier Find function. The Find function will search for and display specific line items according to the criteria you specify.
To filter the line item list
1) On the BP form and click Search to open the window.
Working with Unifier Business Processes
85
The window shows fields from the line item list, which you can use to narrow the list of line items you see.
Each field shows an operator, such as "contains" or "equals," which you can use to specify more precisely which line items you want to see on the list.
You can narrow the list of line items to show only certain class levels or cost categories.
2) To specify search criteria, first choose the operator you want to use on the field, such as "equals," "does not contain," or "is empty".
3) Enter the value the field should contain, or click the Select button and select the value from the list that appears.
4) Click Search (or press Enter).
Unifier displays all the line items that met the search criteria you entered.
If you choose to, you can cancel the filtering action by clicking [Cancel Filter] or the x icon in the upper-right corner of the Find window. Unifier will restore the list of line items to its unfiltered state.
To display the filtered Total Amount
For Cost-type and Line Item-type business process that display the total amount for line items (in the Total Amount field), you can select to see the total amount for the filtered line items by selecting the Show Filtered Total Amount option when creating your filter. This selection enables you to see the sum of the amounts for all individual line items in your filter list.
Note: If you do not select the Show Filtered Total Amount option when creating your filter, then the value in the Total Amount field displays the total amount for all line items and not the total amount for filtered line items.
If you have multiple tabs, you have the option of selecting the Show Filtered Total Amountoption when creating your filter for each tab independently.
The total amount displayed at the bottom of the screen enables you to select:
Total Amount
Filtered Total Amount
Total Amount is defined as: Sum of the "Amount" field from across all the line items.
Filtered Total Amount is defined as: Sum of the "Amount" field from the line items which are the result of the Search criteria.
When a Search is active, then the option that you select from the drop-down will be the "Filtered Total Amount."
When the Search is canceled, then the system will default the option back to Total Amount. At any given point of time, you will be able to toggle between the two options.
Example
Filtered Total Amount
Line # Spend Category Amount
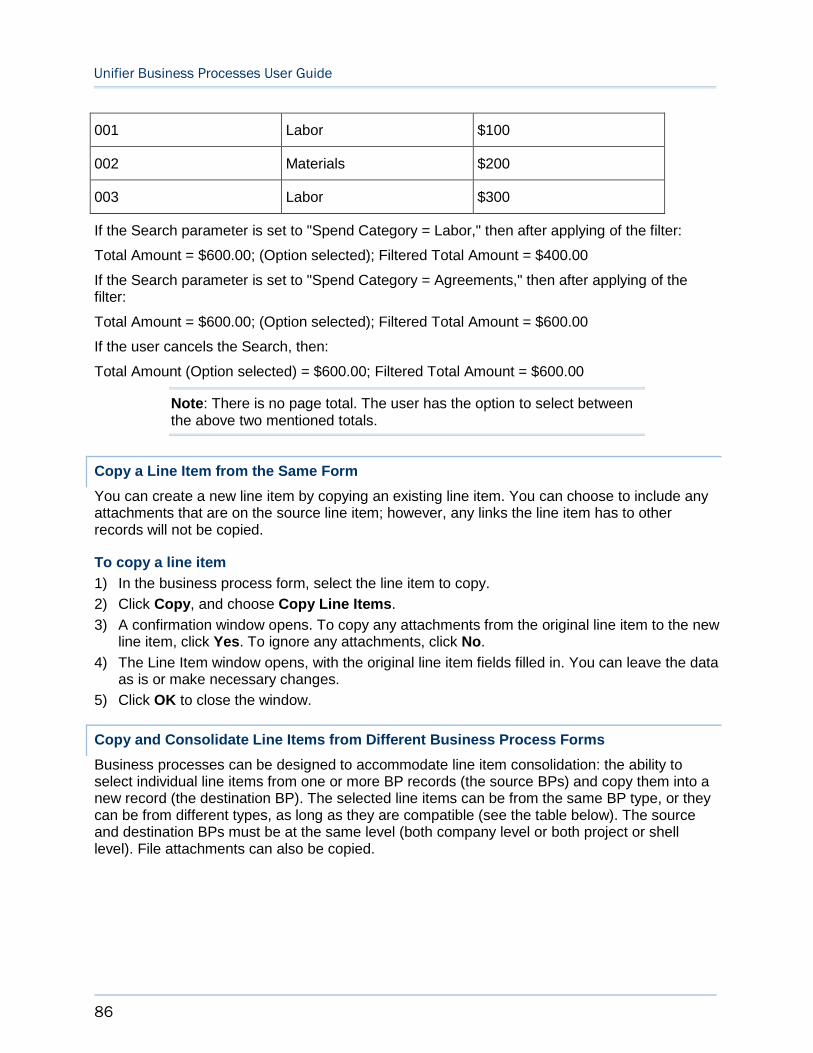
Unifier Business Processes User Guide
86
001 Labor $100
002 Materials $200
003 Labor $300
If the Search parameter is set to "Spend Category = Labor," then after applying of the filter:
Total Amount = $600.00; (Option selected); Filtered Total Amount = $400.00
If the Search parameter is set to "Spend Category = Agreements," then after applying of the filter:
Total Amount = $600.00; (Option selected); Filtered Total Amount = $600.00
If the user cancels the Search, then:
Total Amount (Option selected) = $600.00; Filtered Total Amount = $600.00
Note: There is no page total. The user has the option to select between the above two mentioned totals.
Copy a Line Item from the Same Form
You can create a new line item by copying an existing line item. You can choose to include any attachments that are on the source line item; however, any links the line item has to other records will not be copied.
To copy a line item
1) In the business process form, select the line item to copy.
2) Click Copy, and choose Copy Line Items.
3) A confirmation window opens. To copy any attachments from the original line item to the new line item, click Yes. To ignore any attachments, click No.
4) The Line Item window opens, with the original line item fields filled in. You can leave the data as is or make necessary changes.
5) Click OK to close the window.
Copy and Consolidate Line Items from Different Business Process Forms
Business processes can be designed to accommodate line item consolidation: the ability to select individual line items from one or more BP records (the source BPs) and copy them into a new record (the destination BP). The selected line items can be from the same BP type, or they can be from different types, as long as they are compatible (see the table below). The source and destination BPs must be at the same level (both company level or both project or shell level). File attachments can also be copied.
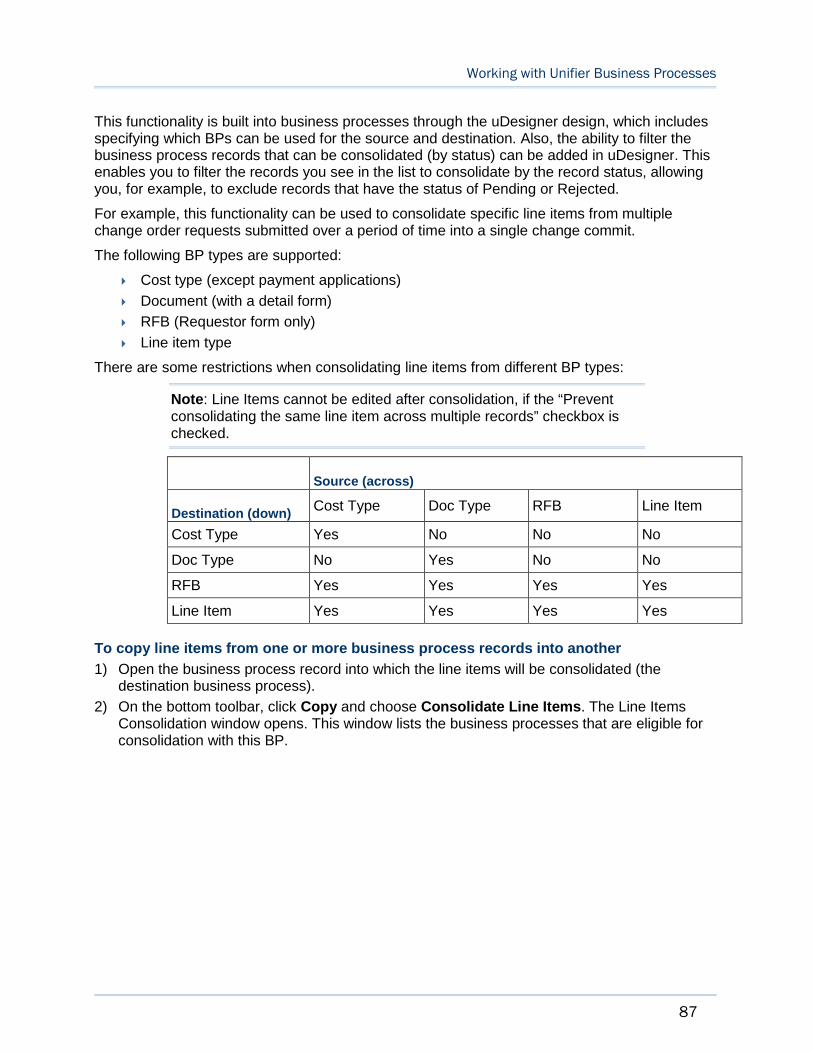
Working with Unifier Business Processes
87
This functionality is built into business processes through the uDesigner design, which includes specifying which BPs can be used for the source and destination. Also, the ability to filter the business process records that can be consolidated (by status) can be added in uDesigner. This enables you to filter the records you see in the list to consolidate by the record status, allowing you, for example, to exclude records that have the status of Pending or Rejected.
For example, this functionality can be used to consolidate specific line items from multiple change order requests submitted over a period of time into a single change commit.
The following BP types are supported:
Cost type (except payment applications)
Document (with a detail form)
RFB (Requestor form only)
Line item type
There are some restrictions when consolidating line items from different BP types:
Note: Line Items cannot be edited after consolidation, if the “Prevent consolidating the same line item across multiple records” checkbox is checked.
Source (across)
Destination (down) Cost Type Doc Type RFB Line Item
Cost Type Yes No No No
Doc Type No Yes No No
RFB Yes Yes Yes Yes
Line Item Yes Yes Yes Yes
To copy line items from one or more business process records into another
1) Open the business process record into which the line items will be consolidated (the destination business process).
2) On the bottom toolbar, click Copy and choose Consolidate Line Items. The Line Items Consolidation window opens. This window lists the business processes that are eligible for consolidation with this BP.
Unifier Business Processes User Guide
88
Note: This window will not appear if there is only one eligible business process. Instead, a list window opens, displaying a list of the eligible records from that business process. Continue with step 4.
For Shells:
If you are consolidating line items from a business process in a shell, the window will display a Choose Location field. Use this field to specify which shell the business process resides in. (View-only shells are not usable with this feature.)
For Data Pickers:
If the source BP includes a data picker on the form, it might be set up to present the list of records in a hierarchy. If this is the case, Unifier will ignore the Choose Location field.
3) Select the source business process and click OK. A list window opens, displaying a list of eligible records from that business process.
4) Select a record from the list. To search for a particular record, click Find.
5) To copy specific line items from the selected record:
Click the Select Line Items button. The BP Line Item(s) window opens, displaying the line items for that record.
Select one or more line items and click Copy.
Choose With Attachments to include any file attachments that may be present on the line item to be copied, or choose Without Attachments to ignore attachments.
6) To copy all line items from the selected record:
Click All Line Items.
Choose With Attachments to include any file attachments that may be present on the line item to be copied, or choose Without Attachments to ignore attachments.
Note: If there are multiple tabs on the record you selected, Unifier will prompt you to select the tab you want to copy the line items from.
7) Close this window by clicking the Close Window button.
Unifier copies the line items to the consolidated business process record.
Note the following:
Once you copy a line item for consolidation, that line item will no longer be available for other consolidations—unless the BP design specifies that, once the consolidated BP reaches a certain status, the line items from the source BP(s) will be available again. For example, if a Change Order with consolidated line items reaches a "rejected" status, then all the consolidated line items will be available so you can consolidate them again in another Change Order. In addition, line items will be available again for consolidation if the consolidated business process record reaches a terminal status, or if the line item is deleted in the originating (source) business process or is terminated.
You can consolidate the line items of the Standard tab of a Document-type business process into the line items of the Standard tab of another Document-type business process, only.
Working with Unifier Business Processes
89
Be aware that line items on a draft business process are also unavailable for consolidation. If the consolidated line item business process has not been saved or sent to the next step in a workflow, Unifier considers it to be in draft mode and will lock the line item for any other consolidation. To unlock the line item, you must delete the draft BP.
If the consolidation setup was designed so in uDesigner, the line item in the consolidated BP can be automatically updated whenever the source line item changes (as long as the consolidated record has not reached a terminal status). For example, pickers that are auto-populated will be updated, formulas will be re-calculated, roll-ups will be updated, attachments will be modified or removed, reverse auto-population will be performed. However, if any new attachments are added to the source line item, these will not be added to the line item on the consolidated BP. If uuu_li_consolidated (Field Label: Consolidated) is a part of the detail form design of the consolidation source BP record, then the Data Element (DE) will be set to "yes," if the line item has been consolidated.
If there is a BP Line Item picker on the source and destination detail forms, the BP Line Item picker data will be ignored (will not be copied) while copying line items.
BP picker information can exist on source and destination detail forms. Data will be copied only if the underlying BP picker reference is the same on both the source and destination. If the reference is not the same, data will not be copied. For example, a destination BP has a BP picker on the detail form that references a vendor BP. To populate data via this BP picker, the source BP must have a BP picker that is the same vendor BP. If it is not, the vendor data cannot be copied.
A Commit Line Item picker on the detail form of a change order business process will allow you to select a line item from SOV (contract + change orders). A Commit Line Item picker always works in conjunction with a Reference Commit picker on the upper form. The Reference Commit picker on the source and destination should refer to the same base contract.
If the destination line item form and the source line item form both contain a data element that is designed to be auto-populated from another source, the auto-populate will be ignored during consolidation. The copied line item data will take precedence over auto-populated data in the destination BP
Restricting Line Items by Using Copy with Conditions Option (Standard View)
You can use the Copy with Conditions option (from the gear icon ( ) next to the record) to copy a specific line item, rather than copying all line items. You can use this option to also:
Include, or exclude attachments
Include linked records
Retain or remove references to auto-created records or line items
These copy options are set up by your administrator and will appear in a list that you can choose from.
If no copy options have been created, then the Copy with Conditions sub-menu option will be disabled.
To restrict line items using the Copy with Conditions option:
Note: The following is applicable to Company, Project/Shell, and master
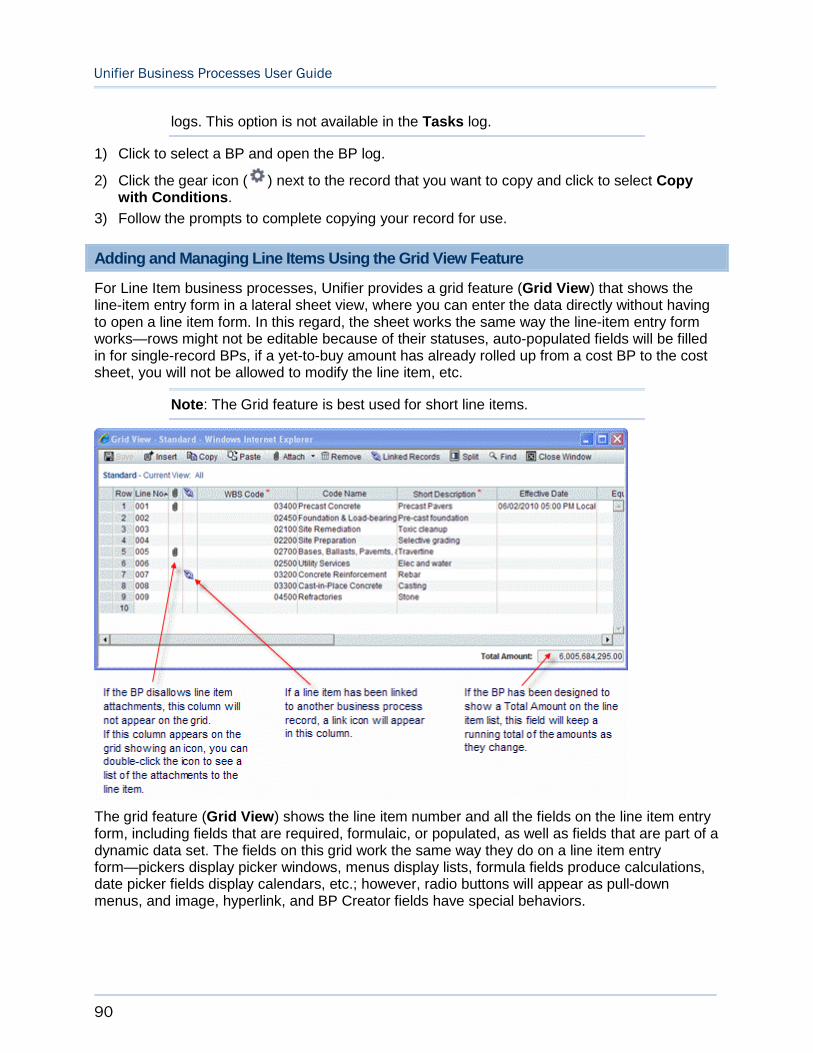
Unifier Business Processes User Guide
90
logs. This option is not available in the Tasks log.
1) Click to select a BP and open the BP log.
2) Click the gear icon ( ) next to the record that you want to copy and click to select Copy with Conditions.
3) Follow the prompts to complete copying your record for use.
Adding and Managing Line Items Using the Grid View Feature
For Line Item business processes, Unifier provides a grid feature (Grid View) that shows the line-item entry form in a lateral sheet view, where you can enter the data directly without having to open a line item form. In this regard, the sheet works the same way the line-item entry form works—rows might not be editable because of their statuses, auto-populated fields will be filled in for single-record BPs, if a yet-to-buy amount has already rolled up from a cost BP to the cost sheet, you will not be allowed to modify the line item, etc.
Note: The Grid feature is best used for short line items.
The grid feature (Grid View) shows the line item number and all the fields on the line item entry form, including fields that are required, formulaic, or populated, as well as fields that are part of a dynamic data set. The fields on this grid work the same way they do on a line item entry form—pickers display picker windows, menus display lists, formula fields produce calculations, date picker fields display calendars, etc.; however, radio buttons will appear as pull-down menus, and image, hyperlink, and BP Creator fields have special behaviors.
Working with Unifier Business Processes
91
You can resize the columns by dragging, and sort the data by column (except for Row and image fields). You can use the Tab and arrow keys to move from field to field and open them. For business processes that include many line items, you can use the Find function to filter the list to display only certain line items.
The grid feature (Grid View) is not available on:
RFB bidder forms
Line Item with CBS Code BPs (Transfer classification)
Standard tab of Payment Application Line Item with CBS Code BPs
Line Item with Asset Code BPs
Line Item with Multiple Codes BPs (Transfer and Lease classifications)
Simple type BPs
Text type BPs
Document type BPs
Resource Booking type BPs for project/shell
Project/Shell Creation BPs (Simple sub-type)
What is not available on the grid:
Summary row functions: Summary line items do not appear on the grid and cannot be created on the grid. In addition, line items within the summary do not appear.
Transaction currencies
Line item consolidation
Import function
Behavior Set DEs in the Grid Feature
Since fields displayed in the grid feature (Grid View) can come from DDS, the behavior set DEs can be seen in the grid. If you select Disabled and Clear for a behavior set that is present on the grid, then the updated value is displayed in the grid. This value is either populated with a value or left blank.
Last One to Save Over-Writes Other Edits (Except for Deleted Rows)
The Grid feature can be used simultaneously by multiple users. To accommodate multiple editors using the grid simultaneously, the commit order of saved edits is on a line-by-line basis, not on the entire grid view. If two users are editing the same line item, but different fields, at the same time, the edits made by the last user to save that line item are the edits Unifier will commit to the record.
For example, if User 1 changes an amount field from 15,000 to 23,000 and saves the change, and User 2 changes a different field, but does not touch the amount field, when User 2 saves the grid, Unifier will commit User 2’s edits; and the amount field will show 15,000 rather than 23,000.
The order of saved edits is particularly important for deleted rows on the grid. Once a row is deleted, it cannot be reinstated with a later edit. For example, if User 1 deletes a row and saves the grid view, and User 2 changes the amount field in that row from 15,000 to 23,000 and saves the grid view, the row will not be reinstated with the new amount of 23,000.
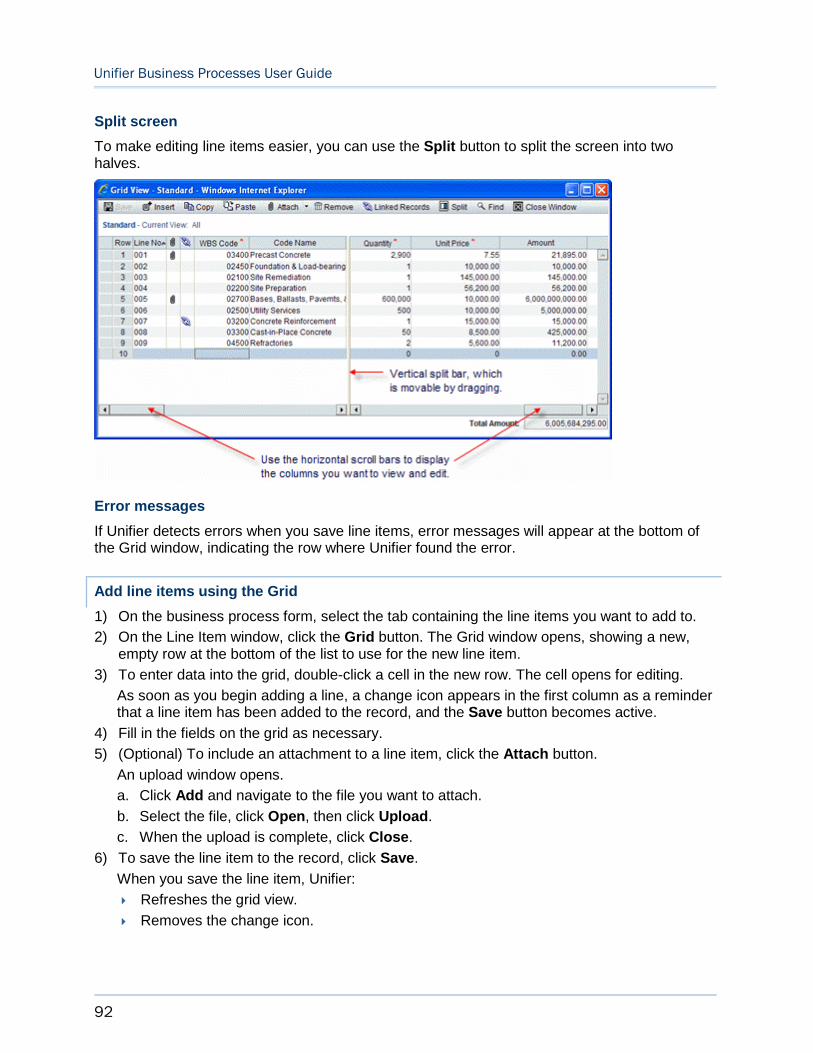
Unifier Business Processes User Guide
92
Split screen
To make editing line items easier, you can use the Split button to split the screen into two halves.
Error messages
If Unifier detects errors when you save line items, error messages will appear at the bottom of the Grid window, indicating the row where Unifier found the error.
Add line items using the Grid
1) On the business process form, select the tab containing the line items you want to add to.
2) On the Line Item window, click the Grid button. The Grid window opens, showing a new, empty row at the bottom of the list to use for the new line item.
3) To enter data into the grid, double-click a cell in the new row. The cell opens for editing.
As soon as you begin adding a line, a change icon appears in the first column as a reminder that a line item has been added to the record, and the Save button becomes active.
4) Fill in the fields on the grid as necessary.
5) (Optional) To include an attachment to a line item, click the Attach button.
An upload window opens.
a. Click Add and navigate to the file you want to attach.
b. Select the file, click Open, then click Upload.
c. When the upload is complete, click Close.
6) To save the line item to the record, click Save.
When you save the line item, Unifier:
Refreshes the grid view.
Removes the change icon.
Working with Unifier Business Processes
93
Adds the line item to the list.
Inserts a blank line at the bottom of the list for another new line item.
Updates the line items on the business process form.
Updates summary if configured in uDesigner to do so.
Line item summaries, for totals and summary averages, update in real time.
7) To add additional line items, repeat steps 3 through 6.
Link line items to other business process records
Once you have entered a line item onto the grid and clicked the Save button, you can link the line item to a business process record.
To link a line item to a BP record
1) On the BP form, select the tab containing the line item you want to link to a record.
2) On the Line Item window, click the Grid button. The Grid window opens.
3) Select the line item you want to link and click the Linked Records button. The Links window opens.
4) Do one of the following:
If you are linking to a record from the same business process log, click the Attach button.
If you want to link to a record from another business process log, click the arrow next to the Attach button, and then choose the log where that business process record resides.
5) From the resulting list of BP records, select the record(s) to link to the line item and click Attach.
When you link a business process record, the Links window shows the Current View for all records and provides the following details:
Direction
Type
The contents of the Type column indicates whether the linked record has been associated automatically (by way of Line Item Consolidation), or manually (by way of manual linking).
Record Number
Record Title
Record Location
- If the BP is a company-level BP, then the Record Location shows the Company Workspace tab name.
- If the BP is a Project-level BP, then the Record Location shows the Project name.
- If the BP is a Shell-level BP, then the Record Location shows the Shell location.
Unifier Business Processes User Guide
94
Notes:
You cannot remove the link Type: Line Item Consolidation.
If there are multiple line items consolidated from the same BP record, then the BP record will be seen as a linked record for that many line items.
If the line item with the link Type: Line Item Consolidation moves to the status, "Previously consolidated lines are available when terminal status equals" in uDesigner, or is terminated, then the link will be automatically removed.
If using a Detail form, click Linked Records, at the bottom right-hand corner of the Detail form. You do not need to save the line item in order to link a record.
6. Click Close Window to close the Links window.
Edit line items using the Grid
To edit line items using the line item grid
1) On the BP form, select the tab containing the line items you want to edit.
2) Click the Grid button.
3) On the Grid, double-click the cell you want to edit. The cell opens for editing.
As soon as you begin editing, a red change icon appears in the first column as a reminder that the line item has been modified, and the Save button becomes active.
4) Click Save.
When you save the line item, Unifier refreshes the grid view, removes the change icon, and updates the line items on the BP form.
5) To edit additional line items, repeat steps 1 and 2.
6) When you have finished, click the Close Window button.
Notes:
When editing the element of Dynamic Data Set, use the drop-down list to select the values or labels.
When editing the element of Multi-line Text Data Element (DE)/field, use the text box to conduct your in-line editing. You can change the width of the box, but the height of the box is set according to the DE properties (i.e., Number of lines).
To edit an image field on a line item grid
An image field on the grid displays only an image icon; however, you can see a thumbnail of the image if you double-click on the icon. If you want to change or remove the image, double-click the cell anywhere but on the icon. Unifier displays a menu, from which you can choose to upload a different image, or remove the image.
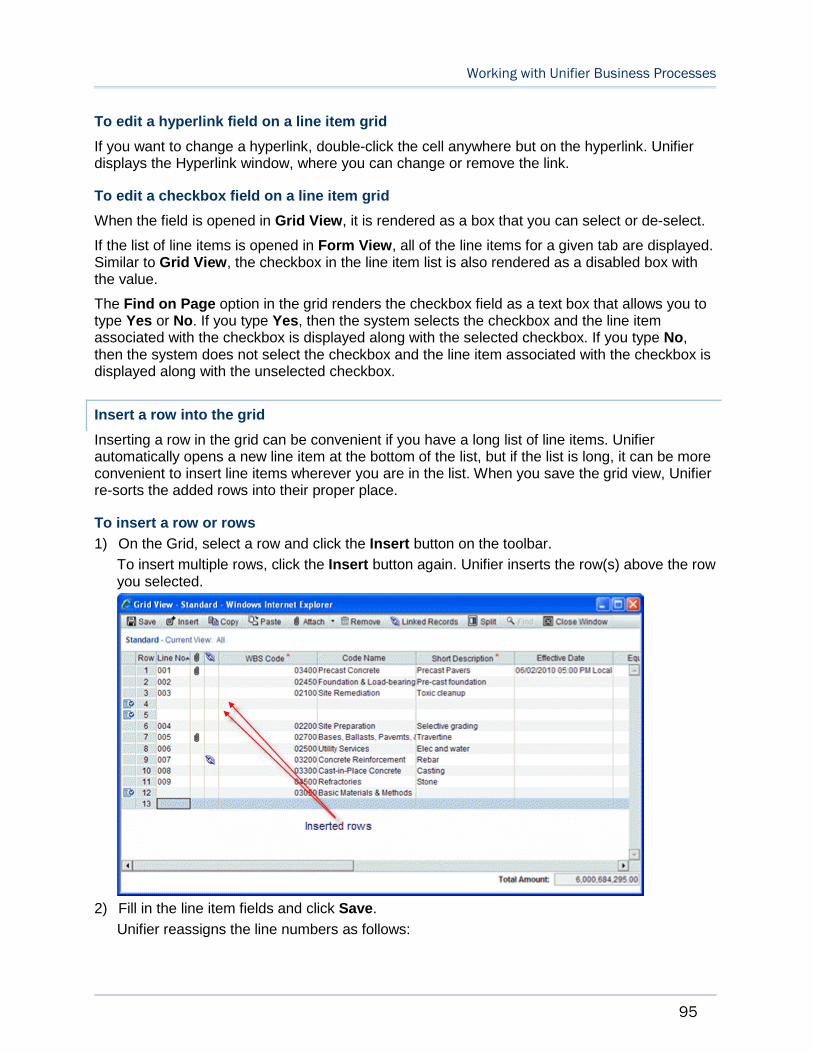
Working with Unifier Business Processes
95
To edit a hyperlink field on a line item grid
If you want to change a hyperlink, double-click the cell anywhere but on the hyperlink. Unifier displays the Hyperlink window, where you can change or remove the link.
To edit a checkbox field on a line item grid
When the field is opened in Grid View, it is rendered as a box that you can select or de-select.
If the list of line items is opened in Form View, all of the line items for a given tab are displayed. Similar to Grid View, the checkbox in the line item list is also rendered as a disabled box with the value.
The Find on Page option in the grid renders the checkbox field as a text box that allows you to type Yes or No. If you type Yes, then the system selects the checkbox and the line item associated with the checkbox is displayed along with the selected checkbox. If you type No, then the system does not select the checkbox and the line item associated with the checkbox is displayed along with the unselected checkbox.
Insert a row into the grid
Inserting a row in the grid can be convenient if you have a long list of line items. Unifier automatically opens a new line item at the bottom of the list, but if the list is long, it can be more convenient to insert line items wherever you are in the list. When you save the grid view, Unifier re-sorts the added rows into their proper place.
To insert a row or rows
1) On the Grid, select a row and click the Insert button on the toolbar.
To insert multiple rows, click the Insert button again. Unifier inserts the row(s) above the row you selected.
2) Fill in the line item fields and click Save.
Unifier reassigns the line numbers as follows:
Unifier Business Processes User Guide
96
If any rows have been deleted during an edit, the line numbers are reused so that the line numbering remains continuous. (Exception:If the amount on a CBS line item has been rolled up to the cost sheet, the line number will not be reused.)
After deleted line numbers have been reused, any new line items are assigned numbers in ascending or descending order, depending on how the sort order was specified when the Item log was created.
Manually create a business process from the Grid
A BP Creator field configured for automatic creation mode will appear as a read-only field on the grid. But if the field is configured for manual creation, you can set up the business process creation from the Grid. The new business process will be created when you finish editing the form, or send the form on to the next step in the workflow.
To manually create a business process from the Grid
1) Double-click the BP Creator field.
The field will display the words "Pending Creation."
1) Click Close Window to close the Grid and return to the form.
2) On the form, click Finished Editing (if this is a non-workflow BP), or Send to send the BP form on to the next step in the workflow.
Unifier creates the new business process. After the business process has been created, this field will show a hyperlink to the new business process.
To prevent a business process from being created
1) Double-click the BP Creator field.
The field will display the words "Pending Creation."
2) Double-click the BP Creator field again.
Unifier clears the text from the field, and will not create the business process.
Copy a line item on the Grid
1) On the form, select the tab containing the line item you want to copy.
2) On the Line Item window, click the Grid button. The Grid window opens
3) Select the line item (or items, using the Ctrl key) you want to copy and click the Copybutton.
4) Select a line and click the Paste button. Unifier pastes the copied line item(s) into the row(s) above the selected line, giving it (or them) a line item number of 0.
5) Click Save. Unifier renumbers the line item(s) with the next incremental number(s), and updates the line items on the form.
Adding and Managing General Comments
Business processes provide a general comments section that allows you to add text comments that are like notes that accompany the business process but do not become part of it.
Depending upon the workflow setup and your permission settings:
Working with Unifier Business Processes
97
You can hide or delete comments.
You can attach supporting documents to your comments, which do not become part of the attachments of the BP itself, or mark up attached documents. See Working with File Attachments and Markups (on page 102).
You can initiate a discussion group to help you draft your comments or markups (Classic View only). See Participating in a Discussion Group (Classic View only) (on page 171).
You can add general comments if you are a task assignee or if you have been copied (cc'd) on the business process.
You can add comments to a business process at the End step, and also at any status in a workflow, including Terminated (which means the business process was stopped at some point in the workflow). To add comments at those points in a workflow, you must have the Add General Comments permission.
Note: Some users, such as project managers, may have an additional permission that allows them to add general comments to any form (workflow or non-workflow) that they can view, without accepting the task.
Add comments to a business process form
When you add a new comment to a business process form, it remains as a draft until you send the form to the next step in the workflow. Draft comments remain editable until you send the form. After that, they cannot be modified.
To add general comments to the business process form
1) At the bottom of the business process form, click the General Comments link. The General Comments window opens.
Note: If any comments already exist on this business process, they will be listed in the Comments section of the window.
2) Click Add. The Edit General Comment window opens.
3) Type your comments in the text box. You may spell-check by clicking the Spelling button.
4) To add files to the comment, click Attach.
My Computer: Attach the file from your local system. The procedure is the same as for uploading files to the Document Manager.
Primavera Unifier Folder: Attach documents from the Document Manager. The window opens displaying the project or shell documents files and folders. Select the files and folders to attach and click OK. Folders are not attached. Instead, the contents of selected folders are attached in a flat list. Documents with duplicate file names will not attach.
5) To copy information in a previous draft comment, click the Copy From button. See Copying and Consolidating Comments and Markups (on page 173) for more information.
6) Click OK to save the comment and close the Edit General Comment window.
Note: The Text Comments box does not recognize formatting, including
Unifier Business Processes User Guide
98
line breaks. Even if you press the Enter key to make a new line in the Edit General Comment window, the final comment will not reflect the new line.
7) Click Close Window to save your comments and return to the business process form.
An icon will appear at the bottom of the form next to the General Comments link.
Add comments to a document type business process
To add comments to an attached document on a document type business process
1) Select the document from the document list at the bottom of the form.
2) Click the Comments button.
3) Click Add to add the comment. Enter the text comment. Click the Spelling button to spell-check the comment.
4) You can also add a graphic markup to the document or attach a file to the comment.
5) Click OK.
Note: If the document type BP has been designed to use line item status, and a specified status has already been reached (e.g., approved), the line item may no longer be editable, and you may not be able to add comments to it.
View comments
If a BP form has comments added, a Comments icon will display next to the General Comments link.
To view comments on a business process form
Click the General Comments link at the bottom of the BP form. The General Comments window opens displaying previous comments. You can collapse or expand individual comments by clicking the arrow in the upper left corner of each comment.
Edit or delete comments
When you add a new comment to a BP form, it remains as a draft until you send the form to the next step in the workflow. Draft comments remain editable until you send the form. After that, they cannot be modified. (You can only modify your own comments, and only if you have not yet sent the BP to the next step in the workflow after creating the comments.)
Comments can be deleted after being sent only if the BP workflow has been set up to allow deleting of comments.
To edit a comment
From the General Comments window, select the comment to edit and click Modify from the toolbar. The Edit General Comment window opens. Make the necessary edits. Comments are editable until you click Send (workflow BP) or Finished Editing (non-workflow BP).
Working with Unifier Business Processes
99
To delete a comment
From the General Comments window, select the comment to delete and click the Removebutton. Draft comments can be edited before sending a BP. You must have proper permissions to delete final comments.
Hide comments
You can hide comments that you do not want to be generally viewed on workflow business processes. If you have permissions, you can view previously hidden comments. Other users will not be able to see the hidden comments unless they have the View Hidden Comments permission set, and using that permission, can also unhide the hidden comments. As the creator of the comment, you can view your own hidden comments, whether or not you have the View Hidden Comments permission (until the comments are published).
Note: Hidden comments are never included in the PDF attached to emails, regardless of a user's view permissions.
To hide or unhide comments
1) From the Comments window, select the comment to hide and click the Hide Commentsbutton at the bottom of the window. The color of the hidden comment title bar lightens, and the Hidden Comment column will display Yes.
2) To unhide the comment, select it and click Unhide Comments.
Note: Due the nature of end steps, you cannot hide or delete comments on the end step of the workflow, even if the end step is an action (editable) form.
Add comments to an attached document
For Document-type BPs (such as transmittals or submittals), you can add comments directly to an attached document.
You can access the attachments in Workflow task emails under General comments section in the Document type BP.
Note: The Enable response via email option must be selected.
To add comments to an attached document
1) Select an attached document in the Attachments portion of the Document-type BP.
2) Click the Comments button on the toolbar. The File Comments window opens.
3) Click Add. The Edit General Comment window opens.
4) Type your comments in the text box. You may spell check by clicking the Spelling button.
5) You can hide comments on the attachments of workflow business processes by selecting the Hide Comment checkbox. See Hide comments (on page 99) for details on working with hidden comments.
6) Click OK.
Unifier Business Processes User Guide
100
To attach files to comments
To add files to the comment, click Attach and choose:
My Computer: Attach the file from your local system. The procedure is the same as for uploading files to the Document Manager.
Primavera Unifier Folder: Attach documents from the Document Manager. The window opens displaying the project or shell documents files and folders. Select the files and folders to attach and click OK. Folders are not attached. Instead, the contents of selected folders are attached in a flat list. Documents with duplicate file names will not attach.
Note: The attachment sources (My Computer and Primavera Unifier Folder) that are available depend on the BP design. Both choices may not be available for a given BP.
For additional information, see Working with File Attachments and Markups (on page 102).
Using or Viewing a Query-Based Tab
To use or view a Query-Based Tab (QBT):
1) Navigate to the parent Business Process log in your Project/Shell.
2) Open a record to view the QBT.
Note: The source Business Process/Space/Level of the QBT must be active in order for the tab to display.
3) Click New or Copy to create a record. The new record will display if query conditions are met.
As a pre-process to defining the Query tab in the business process (applicable for Line Item, Cost, and Document-type business processes), you need to use a reference picker in one of the upper forms of the business process, Space, or Level from where you want to create the Query tab. For defining a Query tab, click on the Query Tabs link in uDesigner, click New, and select a business process, Space, or Level. The system allows you to create a maximum of 8 tabs in uDesigner, including the QBT.
Query-based tab enables the user to:
View a filtered list of business process records associated with the parent business process.
Once the QBT in a business process is correctly configured and deployed, the QBT appears in the business process (User mode) for which the QBT has been configured.
Create a new business process from the QBT in the same Project/Shell, where the parent business process resides.
Users can create new business process records from the QBT provided that the users have permission to create business process records for the Project/Shell that contains the business process.
Copy a business process in the same location as the parent business process.
Users can copy a business process either with or without attachments. In addition, a user can copy any of the records, in the QBT, and create a new business process record.
Working with Unifier Business Processes
101
Note: Users can copy one record at a time.
When the user copies a business process record in order to create a new business process, the new business process record contains all the information present in the copied/based business process record.. So, in case of business records with attachments, the user has the option of including or excluding (copying or not copying) the attachments when copying a business process record.
Search for business process records based on user-entered criteria.
Users can find any record from the list of records included in the QBT.
Note: The fields available for the Find feature must be defined in the uDesigner for the business process.
Format of the Currency for Query-Based Data Element (QBDE)
When the values for the query conditions are set, you can see the QBDE values according to the values that had been setup in the Modify Data Element window (selecting, or deselecting, the Hide Currency Symbol in Cost type Business Process option). Go to your project (User mode) and click the item.
When you open the record, you will see the same QBDE value, in the new user interface. You can print the record. In the Classic View, the Upper Form contains the values, accordingly.
Administrator
Go to Company Workspace (Admin mode) > Configuration > Business Process.
Click on a BP to open the Configuration window.
Click the Query tab.
Under the Query Conditions block, click the query element name, and click Modify.
Define the values under the Definition and Condition blocks and deploy.
Creating a Record from the Query-Based Tab
When creating a record from its own BP log, the “SYS Numeric Query Based” Data Definition is updated when the user picks a reference process.
When creating a record from the Query Based tab of another BP (that auto-populates data to the record being created), the “SYS Numeric Query Based” Data Definition is not updated, unless the user:
- Manually changes the value.
- Uses a triggering element.
You cannot create a company-level business process record within a project, from a Query-Based tab.
QBDE Evaluation Upon Creating Record From Query-Based Tab
When creating a new record from a Query-Based Tab (QBT), if the trigger element gets populated, then the Query-Based Data Element (QBDE) will be evaluated.
Unifier Business Processes User Guide
102
When you create a Change Order record from a QBT (on Base Commit), the reference commit is populated and QBDE will be evaluated, if the reference commit is selected as the trigger element.
Whenever a reference picker is selected as the trigger element, and the reference picker is updated by means of record creation from the QBT, then the QBDE is evaluated.
Unifier:
a) Calculates any formula elements that are based on QBDEs.
b) Auto-populates the auto-populate element that is based on QBDE in the Line Item tab.
c) Triggers any form validations (based on QBDE), when routing the record or saving line item.
When you create a record by way of copy in the QBT (with attachments or without attachments), Unifier evaluates the QBDEs, if the reference picker is selected as the trigger element, Unifier updates the reference picker. Unifier calculates any formula elements that are based on QBDEs and triggers form validation based on QBDEs.
Working with File Attachments and Markups
You can attach files to be routed with a business process (BP) form. These attachments can be documents that are sent within a Document-type BP, such as a transmittal, or they may be supporting documents that are attached to a BP record of any type in the General Commentssection of the BP.
Note: You cannot upload and attach two documents with the same name to a BP record. If you are using a Document-type BP (such as a submittal or transmittal), and you are using a folder structure, then you can have two documents with the same name in different folders (as you would on a local machine or network drive).
You can access the attachments in Workflow task emails under General comments section in the Document-type BP.
By default, files attached to business processes are placed in the Unpublished Documentsfolder in the Document Manager. A Publish Path data element can be designed in business processes in uDesigner to specify the automatic publishing of documents to a specified path and override the default.
Refer to Unifier Managers User Guide for details about automatic publishing of documents.
If you are uploading drawing files, see Attach Drawing and Reference Files to a Business Process (on page 107) for handling drawing file attachments.
You may also initiate a discussion group in Classic View to help you draft your comments or markups. See Participating in a Discussion Group (Classic View only) (on page 171).
Note: For security, the Company Administrators can specify the list and size of files that can be uploaded to the Company Properties page, by users and per company policy. Contact your Company Administrator for more information.
Working with Unifier Business Processes
103
Attach Files to General Comments Section of a Business Process
The General Comments option allows you to enter your comments and attach documents, or files, that can provide more information about a BP record.
Note: The General Comments option cannot be used for updating any BP record.
To use the General Comments option to enter your comment and attach files, or documents:
1) Go to Unifier > User mode > Project/Shell and open the BP record.
A Business Process (BP) record could be in a folder such as Project Delivery, Cost Manager, Cost Controls, and so forth, in the right-hand Navigator.
2) From the bottom of the BP record, click General Comments to open the General Comments window.
3) In the General Comments window click Add to open the Edit General Comment window.
4) Enter your comments in the Text Comment box and select the Hidden Comment option, if you prefer.
5) Click Attach and select one of the following options:
a. My Computer (local system)
b. Unifier Folder (Document Management)
Note: The attachment sources (My Computer and Unifier Folder) are available based on the BP design and both of these two options may not be available for a given BP.
The following explains these options in details.
Attaching files to a Document-type business process from My Computer
Attaching files to a Document-type business process from Unifier Folder
Attach Files to a Document-type BP from My Computer
This option allows you to attach files, from your computer or your local system onto a Document-type Business Process record.
There are multiple ways in which files can be uploaded to a Document Type BP depending upon your use case.
You can upload files to a Document-type BP, based on your use-case, as follows:
If one file (attachment) needs to be added to a single line item, then click Add > Attachment > Add Attachment > My Computer, select the file that you wish to upload, and click Open.
If multiple files (attachments) need to be uploaded simultaneously, click Import and select Import Attachments. In the File Upload window, click Browse, select the files that you want to upload, and click Open. Once all the files are available in the File Upload window, click Upload. This will upload all the files as Line Items into your Business Process Record.
Unifier Business Processes User Guide
104
If you need to upload multiple files (attachments) simultaneously, and in addition to the files you also wish to provide more details about the line item, then click Import and select Import Line Items to open the CSV import wizard. You can use the CSV import file to specify the files (attachments) that are required for the line items and then import the line items as well as the files (attachments).
Note: The system does not attach folders. If you select a folder, the system attaches the contents of the selected folder, in a flat list.
By default, files attached to a business process are placed in the Unpublished Documentsfolder in the Document Management node (Project/Shell > User mode > Document Management > Unpublished Documents).
A Publish Path data element can be designed in uDesigner (Business Processes) to specify the automatic publishing of documents to a specified path and override the default. Refer to Unifier Managers User Guide for details about automatic publishing of documents.
Attach Files to a Document-type BP from Unifier Folder
This option allows you to attach files, from the Document Management (Documents folder).
When you select this option, the Select Files window opens, which displays all the folders of the Project/Shell documents (Current Phase > Documents > Project Documents). If Line Items, then select Attachment > Add Attachment > Unifier Folder.
From the Current Phase (right-hand pane) select the appropriate folder to see the contents in the right-hand pane.
Selecting Current Phase enables you to view the folders and documents associated with the current phase.
Selecting All Phases enables you to view all folders and documents in the Document Management, regardless of the phase.
If you want to include the comments that are attached to the documents, select the Copy Comments checkbox.
From the right-hand pane, click to select a folder, and then click OK to attach the files in the folder. The attached files appear in the lower portion of the window. If the BP has line items and you select a folder or multiple documents, the system adds each document to a separate line item.
Notes:
Folders are not attached. Instead, the contents of a selected folder are attached in a flat list.
The system does not allow attaching files with duplicate file names.
By default, files attached to a business process are placed in the Unpublished Documentsfolder in the Document Management node (Project/Shell > User mode > Document Management > Unpublished Documents).
A Publish Path data element can be designed in uDesigner (Business Processes) to specify the automatic publishing of documents to a specified path and override the default. Refer to Unifier Managers User Guide for details about automatic publishing of documents.

Working with Unifier Business Processes
105
Attach Files to Document-Type Business Process Forms
Document-type business processes, such as Transmittals or Submittals, can be used for routing documents such as specifications or drawings for review.
Note: Comments and graphic markups can be added to individual files, and the document list is easily accessible from the BP form.
Document-type BPs can be designed such that files can be added to individual line items. This feature allows you to assign line-item status to individual documents. If the status of the line item (and therefore, the associated document) reaches a specified status, for example, Approved, then the BP can be set up so that the line item is no longer editable. At this point, attachments and comments to that line item are no longer allowed.
There are two subtypes of Document-type BPs:
Document-type BPs with folder structure
A Document-type BPs with folder structure maintains the folder structure of the attached documents and folders, and the folder structure is displayed in the left-hand pane of the lower portion of the form.
For Document-type BPs with folder structure, the designer can specify that a configured folder path be appended to the folder structure. This appended path is based on the path configured in the uuu_dm_publish_path data element on the business process form, and the selection of the Append Line Items Folder Structure to AutoPublish Path option, which is documented in the Unifier uDesigner User Guide (Starting an Upper Form).
Document-type BPs without folder structure
A Document-type BPs without folder structure does not maintain the folder structure of the attached documents and folders, and the files (within the attached folders and sub-folders) are listed in a flat list.
To attach files to a Document-type BP:
1) Go to Unifier > User mode > Project/Shell and open the BP record.
Note: A Business Process (BP) record could be in a folder such as Project Delivery, Cost Manager, Cost Controls, and so forth, in the right-hand Navigator.
2) Go to the Line Item tab <tab name> (the very last tab) and click Add to open the Line Itemwindow.
3) In the Line Item window click Attachments, click Add Attachments, and select one of the following options:
a. My Computer (local system)
Or
b. Unifier Folder (Document Management)
Note: The attachment sources (My Computer and Unifier Folder) are available based on the BP design and both of these two options may not
Unifier Business Processes User Guide
106
be available for a given BP.
The following explains each option in details.
Attaching files to a Document-type business process from My Computer
This option allows you to attach files, from your computer or your local system.
When you click Add Attachments and select My Computer, the File Upload window opens.
Select the document that you want to attach.
Note: You cannot select a folder.
After you select the file, click Open in the File Upload window. The Line Item window opens.
Enter the information in the fields listed under General and click OK.
Once you attach your files, you can see the files listed in the Line Item window, the Line Itemtab <tab name> (the very last tab). The Line Item tab <tab name> (the very last tab) has two panes. The pane on the left displays the Attachment folder which contains the files that you have attached. The pane on the right displays all attached files.
When you upload a file from My Computer as an attachment, in order to be able to enter file-related values for that attachment, the Detail Form design of Document Type with Folder Structure BP (Advanced Document Type BP), must have the following fields:
uuu_title
uuu_revision_no
uuu_issue_date
Note: When attaching files from the Document Manager, some fields on the line item may auto-populate with data from the document or folder Properties window. Document-type BPs can be designed to auto-populate certain data elements on the detail form with data from matching data elements on the document attribute form.
By default, files attached to a business process are placed in the Unpublished Documentsfolder in the Document Management node (Project/Shell > User mode > Document Management > Unpublished Documents).
A Publish Path data element can be designed in business processes in uDesigner to specify the automatic publishing of documents (Automatic Publishing to a Specified Path) to a specified path and override the default. Refer to Unifier Managers User Guide for details about automatic publishing of documents.
Attaching files to a Document-type business process from Unifier Folder
This option allows you to attach files, from the Document Management (Documents folder).
When you select this option, the Select Files window opens, which displays all the folders of the Project/Shell documents (Current Phase > Documents > Project Documents).
If the Document-type BP has line items, click Add and select Import Line Item w/Attachments > Unifier Folder.

Working with Unifier Business Processes
107
If the Document-type BP does not have line items, click Add Attachments and select Unifier Folder.
From the Current Phase (right-hand pane) select the appropriate folder to see the contents in the right-hand pane.
The Current Phase section enables you to view folders and documents associated with the current phase
The All Phases section enables you to view all folders and documents in the Document Management, regardless of the phase.
If you want to include the comments that may be attached to the documents, select the Copy Comments checkbox.
From the right-hand pane, click to select a folder and click OK to attach the files in the folder.
The attached files appear in the lower portion of the window. If the BP has line items and you select a folder or multiple documents, each document will be added in a separate line item.
Notes:
Folders are not attached. Instead, the contents of a selected folder are attached in a flat list.
The system does not allow attaching files with duplicate file names.
By default, files attached to a business process are placed in the Unpublished Documentsfolder in the Document Management node (Project/Shell > User mode > Document Management > Unpublished Documents).
A Publish Path data element can be designed in business processes in uDesigner to specify the automatic publishing of documents to a specified path and override the default. Refer to Unifier Managers User Guide for details about automatic publishing of documents.
Attach Drawing and Reference Files to a Business Process
Drawing files attached to Document-type business processes may be accompanied by multiple reference files, which may need to be resolved when attaching a drawing file.
Add Markups to a Business Process Attachment
You can add markups, such as circles or other graphical elements as well as text, to a document, which display directly on the document, but do not alter the document itself. Markups are layered on top of a file, as if the markups had been done on an acetate sheet that had been placed on top of the file. Each user who adds a markup is adding a new layer to the file.
To add a markup to an attachment on a business process using the Unifier Default viewer, see topic Revising and Reviewing Attachments in a Business Process (on page 110) .
To add a markup to an attachment on a business processes using AutoVue:
1) Do one of the following:
For non-Document-type BPs, click the Attachments link. In the Attachments window, select the document and click the Comments button.
Unifier Business Processes User Guide
108
For document type BPs, select the document in the lower portion of the Document-type business process and click the Comments button. The File Comments window opens. If you have added any previous comments since the last time the business process was sent, they will be listed in the Draft Comments portion of the window.
2) Click the Add button. The Edit File Comment window opens.
3) Click the Graphic Markup button. The AutoVue Professional viewer window opens displaying the document content. The window opens initially in View mode.
4) In the viewer window, click the NewMarkup tool or select File > New Markup.
If there are existing markups, the Markup Files window opens. Each saved markup session is listed in the window. Select the checkbox by the markups to view and click OK.
The viewer switches to Markup mode, and the markup tools become available.
5) Add graphic markups to the drawing as necessary, using the tools on the horizontal toolbar.
Note: Each markup shape is a separate entity. The navigation pane on the left shows the Bookmarks tab and Markup Tree tab. The Markup Tree tab shows the markups. Click an entity to select it.
6) Click the Save button or select File > Save to save your markups. Enter a name for the markup and click OK.
Note: Markups are saved as a single layer and are no longer editable once you close the window. Each markup is listed by name in the Markup Tree tab as a separate layer. To add another markup layer, click the New button.
7) When you have completed your markups, close the viewer window to return to the Edit File Comment window.
Note: At this point, the comment is still in Draft mode. You can add additional markups or file attachments if desired. You must enter some text in the Text Comment box to save it.
8) Click OK to save and exit the Edit File Comment window.
9) Close the File Comments window.
Viewing and Adding New Markups in AutoVue
In addition to adding markups to a BP attachment, you can add and view old markups simultaneously. With this functionality, multiple members can add various markups across shared files throughout the life cycle of a design document.
When you select AutoVue Review in the Gear options of the Attachments tab, a View All Markups option is available in the File Viewer of the Comments section. If you select View All Markups, the document is displayed in View-Only mode.
You can also choose the markups that are displayed by selecting the checkbox next to each markup. After selecting OK, all the chosen markups are displayed.
Working with Unifier Business Processes
109
Including Stamps in Documents
After you include markups on a document that you have reviewed, you can follow these instruction to include a stamp in order to indicate the validity of your comments. To learn who to import stamps from AutoVue to Unifier, Refer to the Using User-Defined Stamps (on page 113) in the Unifier User Guide.
To include a stamp in a document:
1) Open the comments for your document.
2) You can do this from the comments window, or from the BP attachment viewer.
3) Add your comment.
4) Click the markup icon to add markup.
5) Click the stamp icon, on the AutoVue window.
6) Select a stamp that you want to include in your document. The system places the stamp on your document.
To update the value for any of the editable attributes, or fields, in your stamp:
1) Open the stamp properties (double-click on the stamp).
2) Make changes and save.
After you are done with updating or changing your markup, ensure that you save (Save Markup) your markup on AutoVue Stamp.
When you post your comment, the system saves your stamp (as a markup), along with your comment, on you document.
View Attachments in a Business Process
To view attached files in all BPs (except Document-type BP)
1) Do one of the following:
If the file is attached to the comments on a BP form, click the General Comments link. Open the comment with the attachment, and then click the Attachments link at the bottom of the Edit General Comment window to open Attachments window.
If the file is attached directly to the BP form, click the Attachments link at the bottom of the form to open Attachments window.
2) When the Attachments window opens, select a file and click View. The file opens in the viewer selected in your user preferences.
Unifier Business Processes User Guide
110
Note: If the file is a drawing file with references, you can select the file in the Attachments window and click Reference Records to open the Reference Record window.
To view attached files in Document-type BPs with line items
Double-click the document from the list at the bottom of the form. The Line Item window opens. Double-click the document to open.
Refer to Unifier Managers User Guide (Document Manager) for information about downloading AutoVue Client Certificate and launching AutoVue Web Start Client.
Download Attachments in a Business Process
Do one of the following:
For non-Document-type BPs, in the Attachments window, select the file to be downloaded and click Download.
For Document-type Line Item BPs, select the document to be downloaded and click Download.
Revising and Reviewing Attachments in a Business Process
You can revise/edit documents that are attached to any BP record, or Line Item.
Note: Revising a document replaces the existing file (with the same name) in BP record, or Line Item.
Revising attachments in all BPs (except Document-type BP)
1) Go to the Attachments window.
2) Select the file to be revised and click Revise.
3) Revise your document and save.
4) From the Advanced Options section, select your preferences.
5) Click Upload.
You can click View Revisions to see a list of revised documents. All revised documents are available for download.
If the name of a file that you attach to a BP record, or Line Item, matches the name of a file that exists in the BP record, or Line Item, Unifier allows you to automatically revise the existing file (Revise automatically if file with same name exists) with the newly attached file.
Note: If the terminal status of a BP record has been reached, then the system disables the document revision option.
Revising attachments in a Document-type BP
1) Go to the document Detail tab and click the Revise drop-down list and select Revise.
2) Click the Revise drop-down list and select View Revisions to view your revisions.

Working with Unifier Business Processes
111
Reviewing attachments in a Business Process Record
If you have a BP record that has several attachments (documents) attached to the BP record, as well as Line Items, then you can review all the attached files in one place.
To review, select the attached document that you want to review, enter your comments, and save the document back in the BP. The details are as follows:
1) Open the BP record that has attachments.
2) Click Review > Review (or File > Review > Review) to open attachments in the default Unifier viewer. To open attachments in AutoVue, click Review > AutoVue Review (or File > Review> AutoVue Review).
The Review option is available for an Action Form as well as a View Form. The option AutoVue Review is displayed only if your Unifier server is configured to use AutoVue.
3) Click to select the attachment that you want. The attachments and comments are displayed in the BP Attachment Viewer.
4) Review the comments posted by others.
5) Enter your comments and post your comments on the document.
Using the Unifier Default Viewer:
a. Click the Comments icon.
b. Click the Annotation icon to display the annotation toolbar.
c. Use the annotation toolbar to markup your document.
d. Enter your comments and click Post.
e. To add attachments to your comments, click the Attachment icon.
Using AutoVue:
f. Click the Markup icon in the Comments and Revision window.
g. Use the markup toolbar displayed in the Document window to markup up your document.
h. Enter your comments in the Comments and Revisions window and click Post.
i. To add attachments to your comments, click the Attachment icon .
Notes:
You can add comments in one document and then move on to the next document.
All comments are displayed in both viewers regardless of which viewer the comments were added in. Markups are visible only in the viewer they were made in.
You can consolidate attachments and multiple comments (and their respective mark ups). This option is available if you are viewing the file in AutoVue.
You can use the existing, default, and imported stamps to stamp the documents that you have revised.
6) Click Finish to complete your document revision.
Unifier Business Processes User Guide
112
Additional information about the Review screen
If a BP record has reached the terminal status, (Terminal Status or Terminated Status), the Review window opens in Read-Only mode.
If a hidden tab, on a BP record, contains attachments, then the review screen does not display those attachments.
The attachments present on Query-based tab (QBT), on a BP record, contains attachments, then the review screen does not display those attachments.
The Review screen does not display the line times for Cost BP Records of Summary Payment Application (SPA) Schedule of Values (SOV) type. For this type of BP, you can include comments in the General Comments field.
The Review screen lists all document revisions for each revised document.
The Review window lists all the BP Record-level and Line Item-level attachments grouped first by BP Record attachments and then by Line Item attachments, according to the tab order.
When you select a file in the Review screen, the system displays the files content in the AutoVue section of the screen. If you click the comment icon, the system opens the comments window.
Publish Attachments or Revised Attachments in a Business Process
By default, documents attached to BP record, or Line Item are published in the Unpublished Documents folder. For Document-type BP record, or Line Item, with Folder Structure, the Company Administrator can specify that a configured folder path be appended to the folder structure. Refer to Unifier Reference Guide for details.
Unifier publishes to the Document Manager:
Documents attached to the BP record.
Documents attached to the Line Item of the BP record.
Note: Comments related to a document attached to the BP record and/or its Line Item are not carried over to the Document Manager when published.
You can set the auto-publishing process by including the uuu_dm_publish_path Data Element in the BP record, or Line Item. Alternatively, you can go the unpublished documents, select your file, and click Publish.
View Graphic Markups in a Business Process Attachment
To view graphic markups:
1) From the BP Attachment Viewer, locate the comments pane. Markups are associated with a specific comment.
2) Click the View link next to a comment to view the markup.
Note: All comments are displayed in both viewers regardless of which
Working with Unifier Business Processes
113
viewer the comments were added in. Markups are visible only in the viewer they were made in.
Remove Attachments from a Business Process
Removing attachments from a BP
Do one of the following:
For non-Document-type BPs, in the Attachments window, select the file to be deleted, and then click Remove.
For Document-type Line Item BPs, select the document in the bottom of the form, and then click Remove.
Removing attachments from a Document-type BP
To remove attachments from a Document-type BP, you can remove the entire line item, or you can leave the line item intact and remove the attachment from it.
Note: If the Document-type BP has been designed to use line item status, and the specified status has already been reached (e.g., approved), the line item may no longer be editable.
To remove attachments from a Document-type business process (remove line item)
1) From the Document-type BP form, select the line item to be removed.
2) Click the Remove button.
3) Click Yes to confirm. The line item and attachment are removed.
To remove attachments from a Document-type business process (remove attachment from the line item)
1) From the Document-type BP form, double-click the line item to be removed. The detail line item window opens.
2) Click the Remove Attachment button.
3) Click Yes to confirm. The attachment is removed from the line item.
Note: All fields that had been auto-populated when the file was originally attached (for example, name, issue date, revision number, etc.) will be cleared.
Since Name is a required field, you must give the line item a new name before closing the line item detail window. If you close the line item detail window before entering a new name, the name of the file that has been removed will remain in the field.
Using User-Defined Stamps
In addition to the default stamps, you can use the Stamps module (Company Workspace > Admin mode > Configuration > Stamps) to import the stamps into Unifier for use.
Unifier Business Processes User Guide
114
Your custom-stamps can include Data Elements (DEs) which are used on Business Process (BP) and/or Document Management Attribute form (File Properties).
When you add markups on Comments in Unifier, you can include stamps onto the documents as Markups, also.
When creating your custom stamp, you can include the DEs that you want to be enabled to read data from Unifier. You must mark the included attributes with properties of "Read" or "Read-Once" in Stamp properties, and ensure that the attributes names match the DE name in Unifier, exactly.
To import your custom-stamp into Unifier go to: Company Workspace > Admin mode > Configuration > Stamps > Import and follow the prompts in the Import Stamps wizard. The Import Stamps wizard contains information about the stamp name, background image, size, and status. The system lists all referred files, and their images, for you to upload. Once you upload all the needed files, you can click Import to import the stamp files and their background images.
Note: If a stamp file exists in Unifier already, Unifier will not let the user to import the file again.
On the Stamps screen you can use the gear icon to delete an existing stamp.
Note: Before including an attribute onto a stamp, which needs to read data from Unifier Data Elements, you must include the DE into the DE section of the stamp. (Click on the DE button in the stamp, on the Stamps screen, search for the DE, and then include the DE in the selected DE section.
The following Attribute properties from the Stamp are currently supported in Unifier:
Read
If you assign Read as the property of an attribute, then AutoVue reads the value from the Document DMS properties in Unifier. The stamp reads the value from the DMS properties every time the stamp is opened.
Read Once
If you assign Read Once as the property of an attribute, then AutoVue reads the value from the Document DMS properties in Unifier. The stamp reads the value from the DMS properties only for the first time (when the stamp is put onto the document).
Hidden
If you assign Hidden as the property of an attribute, then the system does not display the attribute value onto the stamp but stores the value onto the stamp.
Edit
If you assign Edit as the property of an attribute, then you will be able to edit the property value on the stamp (double-click the stamp or use the properties of the stamp).
Comparing File Attachments
Unifier allows you to compare different revisions of a file that is attached to a:
Working with Unifier Business Processes
115
Business Process (BP) record.
BP Line Item.
Document in Document Manager.
To compare different revisions of a file, or document, that is attached to BP record and BP Line Item:
1) Open the BP that has attachments.
2) Click Review to open the BP Attachment Viewer window.
3) Click to select an attachment.
4) Click Analysis and select Compare.
5) Select the revision that you want to compare the current version with.
6) Follow the prompts and click Finish when done.
To compare different revisions of a file, or document, in Document Manager:
1) Go to Document Manager and open the folder.
2) Click to select a file that has revisions and click Open to open the View File window.
3) Click Analysis and select Compare.
4) Select the revision that you want to compare the current version with.
5) Follow the prompts and click Finish when done.
Unifier also allows you to compare any Unifier file with a file on your local system.
1) Open the BP that has attachments.
2) Click Review to open the BP Attachment Viewer window.
3) Click to select an attachment.
4) Click Analysis and select Compare.
5) Deselect the checkbox for revisions.
6) Click Browse to select the file from your local system.
7) Follow the prompts and click Finish when done.
To compare file, or document, in Document Manager with a file on your local system:
1) Go to Document Manager and open the folder.
2) Click to select a file that has revisions and click Open to open the View File window.
3) Click Analysis and select Compare.
4) Deselect the checkbox for selecting revisions.
5) Click Browse to select the file from your local system.
6) Follow the prompts and click Finish when done.
Republishing DM Document from BP Record
When a BP type enables you to select Republish if Publish Path is different from current location (Move or Copy), then:
Note: This option is not available for the Text-type BPs (since these types of BPs do not support attachments) and RFB BPs bidder upper
Unifier Business Processes User Guide
116
action form.
You can change the Publish option (in the Attachments tab) in the BP record in any attachment that you add from the Document Manage (DM).
When you select the Publish option, then you can move, or copy, the attachment to a location (publish path as captured in the uuu_dm_publish_path).
If the uuu_dm_publish_path is the same as the current location of the file in DM, then the file in DM stays as is, and there will be no revision or republish.
If the uuu_dm_publish_path is different from the current location of file in DM, then:
If the Move option has been selected (in uDesigner), then the file (with all its revisions) can be moved from the original DM location to the new uuu_dm_publish_path. This type of move is the same as a manual move of a file from one location to another location in DM, and it is captured in the Audit Log. Furthermore, the BP record assignee (the user who initiated the move action) is also captured in the Audit Log.
If the BP step assignee does not have Add Folder or Add Documents permission, then if the BP step assignee:
Selects Send or Finish Editing, Unifier displays the following alert:
The following attachment(s) cannot be moved to <label of DE uuu_dm_publish_path> as you do not have permissions:
<File 1 Name>
<File 2 Name>
...
Do you want to proceed?
If the answer is Yes, the record is sent to the next step or finish edit without moving the file.
If the answer is No, the record is not moved to next step or finish edit, and the record stays at the current step giving the BP step assignee a chance to change the publish path or take other action.
Note: If the source file is locked or checked out, then the source file remains in the same state, at the destination after the move.
If the Copy option has been selected (in uDesigner), then the latest revision of the file (from the original DM location) is copied into the uuu_dm_publish_path. The new copied file, at a new DM location, is linked to the BP record. The original file (with all its revisions) remains in the original DM location, as is, and it is not linked to the BP record.
If the BP step assignee does not have Add Folder or Add Documents permission, then if the BP step assignee:
Selects Send or Finish Editing, Unifier displays the following alert:
The following attachment(s) cannot be copied to <label of DE uuu_dm_publish_path> as you do not have permissions:
<File 1 Name>
<File 2 Name>
Working with Unifier Business Processes
117
...
Do you want to copy these attachment(s) to Unpublished Documents?
If the answer is Cancel, then the record stays at the current step.
If the answer is Skip, then the file (or files) will not be copied and stay as is. The original file shows as an attachment and linked to the BP record. The record can be moved to the next step or finish edit.
If the answer is Copy, then the file (or files) will be copied to the Unpublished Documents for the project/shell. This new file in the Unpublished Documents is linked to the BP record. The original file stays as is, and it is not linked to the BP record. The record can be moved to the next step or finish edit.
For both the Move and Copy option, if the destination location already has a file with the same name as the file that is being moved or copied, then the existing file will be revised with the new file from the BP. And if:
The same name file in the destination is already checked out, then Unifier revises the checked out file with new file from BP and leaves this new file as checked out in the new location.
The same name file in destination is locked, then Unifier revises the locked file and the newly revised file will be locked (same as if a user revises a locked DM file attached to a BP record).
The source file is in a checked out, or locked state, and at the destination the same name file is also checked out or locked, then the destination file state remains (the final file at destination location shows as locked or checked out based on its previous state in same location). In these scenarios (when destination location has a file with same name), the permission to revise the destination file has to be selected.
If the user has the permission:
In the case of move, the source file revises the destination file with all its revisions. As a result, if source file has two revisions, and the destination file has three revisions, then the final file in destination location after the move will have five revisions (two revisions from source file added on top of the three revisions in destination file).
In the case of copy, only the latest revision of the source file revises the destination file.
If the user does not have the permission:
In the case of move, if Send or Finish Editing is selected, then Unifier displays the following alert:
The following attachment(s) cannot be moved to <label of DE uuu_dm_publish_path> as you do not have permissions:
<File 1 Name>
<File 2 Name>
...
Do you want to proceed?
In the case of Copy, if Send or Finish Editing is selected, then Unifier displays the following alert:
The following attachment(s) cannot be copied to <label of DE uuu_dm_publish_path> as you do not have permissions:
Unifier Business Processes User Guide
118
<File 1 Name>
<File 2 Name>
...
Do you want to copy these attachment(s) to Unpublished Documents?
If the uuu_dm_publish_path is blank, then:
If the republish option as Move is selected, then the file stays at the original location, and the file will not be moved to Unpublished documents.
If the republish option as Copy is selected, then the latest revision of that file is copied into the Unpublished Documents.
Note: The above scenarios apply to both Upper Forms and Detail form attachments of a BP record.
When a BP record moves from one step to the next (in uDesigner the Publish Path is different from current location option is selected):
If the next step form has the option Publish Path is different from current location checked, in uDesigner, then the same process occurs (as stated above). If the you select Publish for an already published attachment again, then that attachment will be published to the uuu_dm_publish_path again.
Note: This is the same as When the destination already has a file with same name as the one being published is triggered (as stated above).
If the next step form does not have the option Publish Path is different from current location checked, in uDesigner, then the same process occurs as for attachments from DM on a BP record.
Note: If you add any attachment to the BP record from the DM, the attachment moves into the Published Attachments group, on the log. If you add an attachment from a local area, then the attachment moves into the Unpublished Attachments group. As the unpublished attachments get published to the DM (upon Finish Editing or routing the record to next step), those attachments move into the Published group.
Linking Business Process Records
You can create a link from one business process to another, or from a line item to a business process. Other users will be able to click on the link and view the referenced business process. Linked records are added and viewed from the Linked Records link at the bottom of the BP form. If records have been linked, the number of records will appear next to the Linked Records link.
Note: This option is available only in BPs that have been designed to accommodate linked records. A user's ability to view a linked BP record is based on the user's permissions. If users cannot see the record in the log, they cannot see it in the link.
Working with Unifier Business Processes
119
Link a business process record
To link a business process record to another business process:
1) At the bottom of the BP form, click the Linked Records link. The Links window opens.
2) Do one of the following:
If you are linking to a record from the same business process log, click the Attach button.
If you want to link to a record from another business process log, click the arrow next to the Attach button, and then choose the log where that business process record resides.
3) From the resulting list of BP records, select the record(s) to link to the open business process form and click Attach.
4) Click Close Window to close the Links window.
To link a line item to a business process record:
1) Open the business process that contains the line item you want to link.
2) Open the line item.
3) At the bottom of the line item detail form, click the Linked Records link. The Links window opens.
4) Do one of the following:
If you are linking to a record from the same business process log, click the Attach button.
If you want to link to a record from another business process log, click the arrow next to the Attach button, and then choose the log where that business process record resides.
5) From the resulting list of BP records, select the record(s) to link to the open business process form and click Attach.
To link a line item from a business process record to another business process record by way of consolidation, use the Copy option, select Copy Consolidated Line Items, and create a line item.
Note: The "Prevent consolidating the same line item across multiple records" option must be selected in uDesigner to prevent the Primavera Unifier user from consolidating line items that have already been consolidated. If this option is selected, the line Items cannot be edited, later. Primavera Unifier ensures that the line items can be consolidated only once, across all the business.
When you link a business process record, using any of the methods explained above, the Links window shows the Current View for all records and provide the following details:
Direction
Type
The contents of the Type column indicates whether the linked record has been associated automatically (by way of Line Item Consolidation), or manually (by way of manual linking).
Record Number
Record Title
Record Location
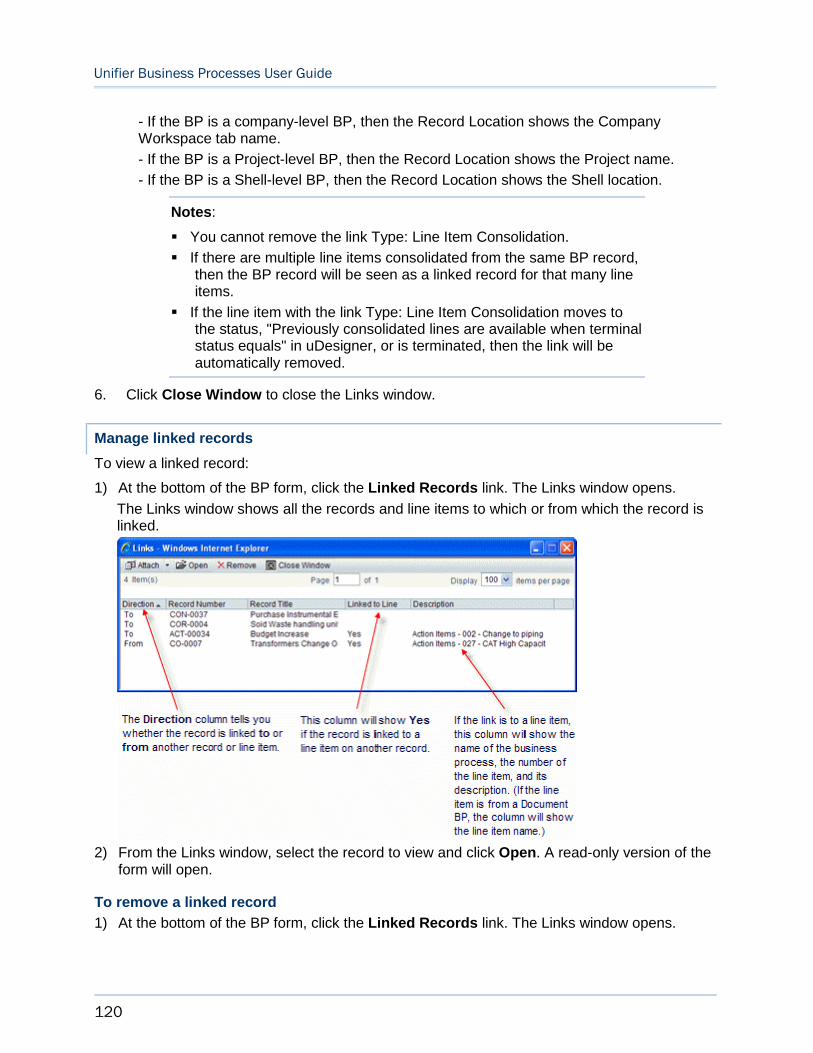
Unifier Business Processes User Guide
120
- If the BP is a company-level BP, then the Record Location shows the Company Workspace tab name.
- If the BP is a Project-level BP, then the Record Location shows the Project name.
- If the BP is a Shell-level BP, then the Record Location shows the Shell location.
Notes:
You cannot remove the link Type: Line Item Consolidation.
If there are multiple line items consolidated from the same BP record, then the BP record will be seen as a linked record for that many line items.
If the line item with the link Type: Line Item Consolidation moves to the status, "Previously consolidated lines are available when terminal status equals" in uDesigner, or is terminated, then the link will be automatically removed.
6. Click Close Window to close the Links window.
Manage linked records
To view a linked record:
1) At the bottom of the BP form, click the Linked Records link. The Links window opens.
The Links window shows all the records and line items to which or from which the record is linked.
2) From the Links window, select the record to view and click Open. A read-only version of the form will open.
To remove a linked record
1) At the bottom of the BP form, click the Linked Records link. The Links window opens.
Working with Unifier Business Processes
121
2) From the Links window, select the record link to remove and click Remove.
Note: From this window, you cannot delete a record with a From direction. To delete the record, you must open that record, click the Linked Records link and remove it from the Links window.
Linking Mailbox Messages to a Record
You can attach Mailbox messages directly to a BP record. On any action form in the workflow, users can click on the link and view the referenced Mailbox. Attached Mailbox are added and viewed from the Linked Mail link at the bottom of the BP form. This link will show the number of emails, both Mailbox and external emails, that have been attached to the record. A single email message can be attached to more than one BP record.
Note: This option is available only in BPs that have been set up to accommodate linked Mailbox messages.
About permissions
The Mailbox messages that users have access to (whether linking a Mailbox message or viewing a message linked to the business process by someone else) will depend on their Mailbox permissions. By default, users can see linked Mailbox that reside in their personal Inbox and Sent boxes (either they have sent the Mailbox or were a recipient). A user who has permission can view the Project Mailbox folder that contains messages sent and received by other project members. For example, users with Project Mailbox view permission can see all Mailbox generated within a project.
Note: There are special conditions for linking Mailbox in the Request for Bid functionality. See Send and Manage Linked Mailbox from RFB Forms (on page 123) for more information.
Attach an existing Mailbox message
You can attach new or existing Mailbox messages to a BP record. A single Mailbox message can be attached to one or multiple BPs.
To attach an existing Mailbox message to a BP
1) At the bottom of the BP form, click the Linked Mail link. The Linked Mail window opens.
2) Click the Add button and choose My Mailbox. The My Mailbox window opens, displaying the list of available Mailbox messages.
3) From the list, select the Mailbox to link to the open BP form and click Attach.
4) Click Close Window to close the Linked Mailbox window.

Unifier Business Processes User Guide
122
Create and attach a new Mailbox message
You can create and send a Mailbox message from the BP record. You must send the Mailbox before sending the BP to automatically attach it to the BP record. The Mailbox message will be stored in your current project or shell Mailbox Sent folder, in the Project Mailbox folder, and the Inbox of recipients. In addition, if you reply to or forward the message, the reply and forwarded copies will also automatically be linked to the BP record.
Note: If you create a new Mailbox message and save it without sending, it will remain in your Mailbox Draft log in the current project or shell. You can later access this draft Mailbox and send it, but it will not be automatically linked to the BP record from which you originally created it. To link it, send the message first, and then attach it as you normally would an existing Mailbox message.
If a recipient replies to or forwards the linked Mailbox message, the reply or forwarded message will also be automatically linked to the BP.
To create and attach a new Mailbox message to a business process
1) At the bottom of the BP form, click the Linked Mail link. The Linked Mail window opens.
2) Click New. A Mailbox message window opens.
3) Complete the Mailbox message window as normal, and click Send to send the message.
Once the BP record is sent, the Mailbox message and any subsequent replies to that message by other users will be automatically attached to the BP record.
Manage linked Mailbox
You can view or remove linked Mailbox messages.
To view linked Mailbox messages
From the Linked Mail window, click on the gear icon, then click Open or double click on the email. The Message window opens.
To remove a linked Mailbox message
From the Linked Mail window, click on the gear icon, then click Delete.
Reply to or forward a linked Mailbox message
If you receive a Mailbox message with a link in the upper portion of the window, that Mailbox message is linked to one or more BP records. If you click Reply, Reply All, or Forward and then send your response, the reply or forwarded message will also automatically be linked to the BP record.
View the list of linked BPs from a Mailbox message
To view linked BP records from a Mailbox message:
1) Open the business process record.
Working with Unifier Business Processes
123
2) Click the Linked Mail button. The Linked Mail window opens, showing the emails that are attached to the record.
3) Select the email you want to view, and use the gear icon to click Open or double click on the email. Unifier opens the email.
4) Below the Subject line is an information icon with the following caption:
This Mailbox and any future replies are linked to business process records.
5) Click the business process records link. Unifier opens the Linked Business Process Records window, which shows a list of all business process records to which this email is attached.
You can select a business process record from the list to view its record details in the right pane.
Send and Manage Linked Mailbox from RFB Forms
The Request for Bid (RFB) Business Processes (on page 255) have special linked Mailbox functionality. For RFB business processes, the creator of the RFB form will be allowed to correspond with internal users or with RFB bidders.
To send a Mailbox message from an RFB form
1) Open the RFB BP form and click the Linked Mail link in the lower-right corner of the form. The Linked Mail window opens.
2) Click New and select one of the following:
To Internal: The Message window opens. The selection list for To, Cc, and Bcc includes your Unifier project or shell team, as in other Mailbox messages.
To Bidder: The Message window opens. The selection list for To, Cc, and Bcc is generated from the list of invited bidders (selected from the Master Vendor BP/Vendor Master BP and invited to submit a bid during the creation of the RFB record).
Note: You will not be able to save a draft copy of the Mailbox from this selection.
Bidders will be allowed to view and access Mailbox once they are signed in Unifier using a special sign in.
Bidders can also create and add Mailbox messages from the RFB form. The To field is auto-populated with the requestor name. The Cc and Bcc buttons are not available; however, bidders can fill in external Cc and Bcc fields with external email addresses. When bidders reply or forward Mailbox messages, these will be linked with the record.
Bidders will not be able to create any new Mailbox after the bid due date.
Attaching External Emails from the Project or Shell Mailbox to a Record
Unifier collects all external emails it receives for a project or shell in a dedicated mailbox. You can attach these external emails directly to a business process record. Other users can view the email from a link on the record. A single email can be attached to more than one business process record.

Unifier Business Processes User Guide
124
External emails that have been blind copied (Bcc’d) are not collected by the Mailbox.
To attach an external email to a record
1) Open the business process record to which you want to attach the email.
2) Click the Linked Mail link at the bottom of the form. The Linked Mail window opens.
3) Click Add and choose Mailbox or Project Mailbox. The Add from Mailbox or Add from Project Mailbox window opens, showing a list of the external emails that have been received for the project or shell.
4) Select the emails you want to attach to the record, and click the right arrow button.
Unifier adds the email to the Linked Mail window.
5) Click done.
To open an external email attached to a record
1) Open the business process record.
2) Click the Linked Mail link at the bottom of the form. The Linked Mail window opens, showing the emails that are attached to the record.
3) Select the email you want to view, and use the gear icon to click Open. Unifier opens the email.
From this email window, you can:
Reply to the sender
Forward the email to others in the project or shell
Flag the email for follow-up
Clear a Flag from the email
Delete the email
Print the email
Note: You must have permissions to view, reply to, or delete external emails.
To view linked BP records from a Mailbox message:
1) Open the business process record.
2) Click the Linked Mail button. The Linked Mail window opens, showing the emails that are attached to the record.
3) Select the email you want to view, and use the gear icon to click Open or double click on the email. Unifier opens the email.
4) Below the Subject line is an information icon with the following caption:
This Mailbox and any future replies are linked to business process records.
5) Click the business process records link. Unifier opens the Linked Business Process Records window, which shows a list of all business process records to which this email is attached.
You can select a business process record from the list to view its record details in the right pane.
Working with Unifier Business Processes
125
Sending Attachments for E-Signature
If you have configured and activated Company Properties > E-Signatures tab with details about the entity that provides electronic signature technology (DocuSign or AdobeSign), then when you access your BP record Upper Form or Detail Form and open the properties window, you can use the Attachments tab to send the attachment for signature.
The toolbar options for the Attachments tab are:
Attach
Browse
Document Manager
Custom Print
Review
When you expand the Attachments tab for BP Upper form, or detail form, if a file has E-Signature requests associated with it, the right-hand pane displays the E-Sign Log tab, next to the preview tab.
Business Process records
In the Attachments tab for BP Upper form, or detail form:
If you select multiple attachments that their E-Signature process has not yet been started, or it is complete, then Unifier enables the option Send for E-signature.
If the E-Signature process of any of the selected attachments is ongoing, then Unifier disables the option Send for E-signature.
If you select multiple attachments such that their E-Signature process for at least one of them is In-Progress, then when you right-click, you have the option Recall E-Sign Request. If you select recall, then for each selected attachment with E-Signature status = In-Progress:
The E-Signature request sent out to each signee who has not yet completed the E-Signature request (Status = In-Progress) is set to recalled, and the E-Signature Status in the E-Sign Log is set as recalled.
The E-Signature Status column in the Attachments tab is set as recalled.
The E-Signature status in the E-Signatures node for each signee who has not yet completed the E-Sign task is set as recalled.
In the Attachments Review tab:
The E-Signature status in the Review window is set as recalled.
For each selected attachment with E-Signature status as complete, or not started, Unifier ignores the recall request.
The Review window (similar to the Attachments tab for BP Upper form, or detail form) displays the Send for E-Signature and Recall E-Sign Request actions by way of the:
Gear icon
Right-click
The right-click options will be visible based on the E-Sign Status of selected attachments. Use the right-click options to send, or recall, multiple attachments for E-signatures. The Recall E-Sign Request option is available only to the:
Unifier Business Processes User Guide
126
E-Signature request sender
Document Owner
Note: Other users will not be able to view or take action even if all other conditions are met.
E-Signature Log (Declining an E-Signature)
If a signee declines an E-signature request, then the E-Signature log captures the E-Signature status as Declined. When the E-Signature Status = Declined, then the tooltip (triggered by placing the pointer on the status), or the gear icon options, displays the reason for decline.
E-Signature Node (E-Signature request)
When you select an E-Signature request from the E-Signatures node, you can see the E-Sign log in the right-hand pane (E-Sign Log). This contains the message which was sent out a the time of sending the E-Signature request and a log of all signature requests’ statuses. When you expand the Attachments tab for BP Upper form, or detail form, if a file has E-Signature requests associated with it, the right-hand pane displays the E-Sign Log tab, next to the preview tab.
Publish from BP to DM
If you attach a file in the DM to a BP record and send it for E-Signature from the BP record, then the revised (signed) file will be published back into the DM at the same location from where the original file was attached. This is irrespective of the publish path on the BP record.
The ability to re-publish DM Document from a BP record allows you to choose to republish (move or copy) a revised DM attachment, if this option is selected in uDesigner then the signed file will be published using the Publish Path.
Adding or Viewing a Map (Geocoding)
If the functionality is configured in uDesigner for a business process, you can add an interactive map to a record. The location will be based on a property address, and/or longitude and latitude (Geocoding). You can add or view maps from the upper form of these business process types:
Line item
Simple
Text
Document
Cost (classification generic)
Maps are supported on company, project, and shell-level BPs. You can also search for a map by an address or longitude or latitude.
To add a map to a business process
1) Click the globe icon next to the Latitude and Longitude fields. The Latitude/Longitude picker window displays with a map that you can manipulate as needed.
2) Do one of the following:
Working with Unifier Business Processes
127
Enter the address of the property to compute the latitude and longitude, and click the Map It button.
Enter the numbers for latitude and longitude in degrees, or in degrees, minutes, and seconds, and click the Map It button.
Click on the map to compute latitude and longitude. A map pin displays the location of your click.
3) Click OK when finished computing latitude and longitude. Latitude and longitude are populated in the corresponding fields on the BP in decimal degrees.
4) If you click the globe icon again, the latitude and longitude values are displayed in the Latitude Longitude picker window and are retained there until you calculate a new latitude and longitude. A map pin on the map indicates the location of the property represented by the current latitude and longitude displayed in the picker.
To view maps from the business process log
1) Navigate to a business process log.
2) Select one or more records.
3) Click View Map. A map opens displaying the various locations that are mapped, indicated by map pins. If the locations indicated on the map are far apart, the map zooms to the closest location.
4) Click a map pin for location details.
5) Click Close to close the map.
Note: If multiple records are selected that have the same latitude and longitude, the map will show only one pin marker.
To view a map for a specific business process record
1) Navigate to a BP record and click View Map. If the BP has latitude and longitude address details, a map opens displaying the property location, indicated by a map pin.
2) Click the map pin for location details.
3) Click Close to close the map.
Adding an Image
In many forms, you can add an image to your project or shell. For example, you can add an image that shows progress on the project or shell information record, pictures of assets related to a specific asset record, or a photo of an employee in the Resource Manager. You can add images to attribute forms in shells, project or shells, companies, and business processes.
If the Image picker functionality has been added to your project or shell in uDesigner, forms with the functionality display the image name and a virtual box that will hold the uploaded image.
Unifier Business Processes User Guide
128
Note: The image name is based on the data element name provided in uDesigner.
To add an image
1) Click Upload Images in the toolbar at the top of the form.
2) Browse for the image to upload and click OK.
Valid image file types are:
.jpg
.jpeg
.gif
.png
.tif
You can change the image by replacing it with another uploaded image. Images appear on the HTML or PDF formats of printed forms. They appear in print preview as well. The Image picker can be added to all forms except for those in the Cost Manager, Generic Cost Manager, Schedule Manager, and the Document Manager.
Note: The image appears online in Unifier, but it is not available for printing. Also, images do not appear in UDRs or email notifications.
Scanning for Viruses (Cloud Deployments)
Unifier scans all files that are uploaded into Unifier, for viruses.
This includes all types of files in:
Document Manager
BP Record attachments
Shell image
CSV import files
Example
When an Administrator uploads a single file (shell image) to the shell details page, the system scans the file for viruses and other threats.
When a threat is detected, Unifier sends notification to uploader & blocks the download of infected file.
When the virus scanner is configured, the files will be scanned offline and not during the operation (real time). That is to state, the scan is performed after the upload of files and not at the time of uploading the files.
Working with Unifier Business Processes
129
The following flowchart shows an overview of the end-to-end process, from the uploading of files to the scanning result:
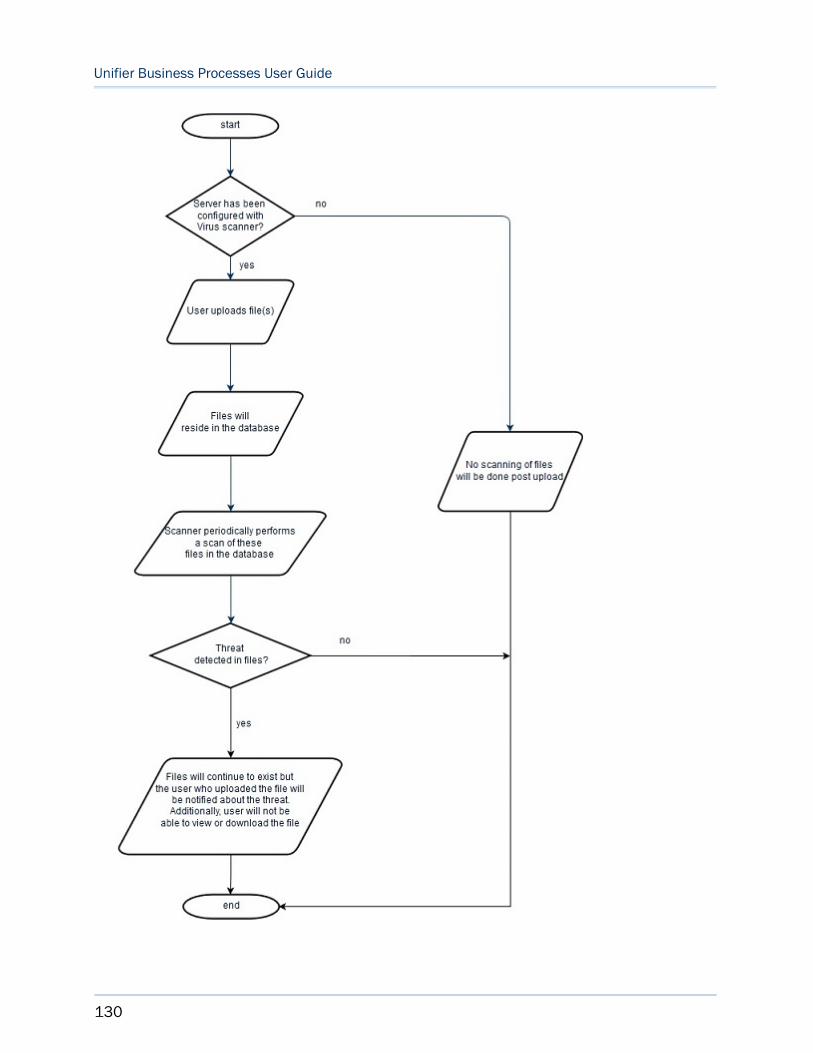
Unifier Business Processes User Guide
130
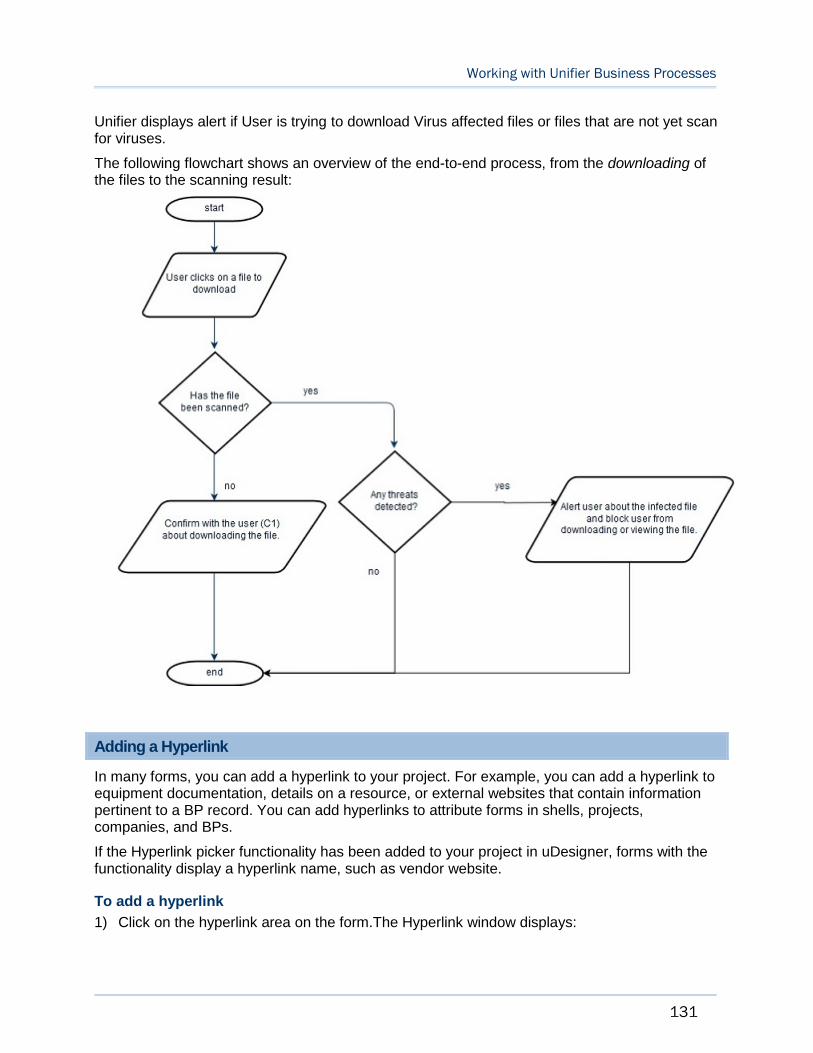
Working with Unifier Business Processes
131
Unifier displays alert if User is trying to download Virus affected files or files that are not yet scan for viruses.
The following flowchart shows an overview of the end-to-end process, from the downloading of the files to the scanning result:
Adding a Hyperlink
In many forms, you can add a hyperlink to your project. For example, you can add a hyperlink to equipment documentation, details on a resource, or external websites that contain information pertinent to a BP record. You can add hyperlinks to attribute forms in shells, projects, companies, and BPs.
If the Hyperlink picker functionality has been added to your project in uDesigner, forms with the functionality display a hyperlink name, such as vendor website.
To add a hyperlink
1) Click on the hyperlink area on the form.The Hyperlink window displays:

Unifier Business Processes User Guide
132
2) Enter the hyperlink name and the URL. Only the URL is mandatory. If you enter the name and the URL, the hyperlink displays as the name you entered. If you enter the URL only, the hyperlink displays as the URL. The protocols HTTP and HTTPS are the only protocols allowed. FTP is not supported for hyperlink creation on forms.
Note: The URL should not reference the same domain that Unifier is using for operation. If you attempt to use the same domain, a warning message will result.
3) Click OK.
To reset a hyperlink
1) Click on the hyperlink area on the form. The Hyperlink window displays.
2) In the Hyperlink window, click Clear. This will remove the existing hyperlink.
3) Enter a new hyperlink name and URL.
4) Click OK.
Viewing Referencing Records
For any business process with referencing records, Unifier can show you a Reference Records window that displays a graph and a list of the records that the record you are viewing refers to, as well as those records that refer to the record you are viewing. (To see the records, you must have view permissions.)
For example, you might want to view all the change orders that refer to a particular purchase order. For other examples, you could view:
All the invoices that a commit business process refers to so that you can reconcile all the invoices against the purchase order
All the change order requests that are referred to by a specific change commit business process in order to track the progress of a construction project
All the lease payment requests that refer to a Master Lease, in order to view and reconcile all payment records for a lease
All the base commits that are referred to by a vendor record in order to review payment progress
All the work order BPs refer to a Preventive Maintenance type BP in order to view all the work orders for a Preventive Maintenance Book.
Business process records can reference other records and be referenced to using the following Unifier features:
A BP picker on a business process record, including line items
A BP line item picker on a business process record
Auto-creation of a record through the workflow (S-Step)
Auto-creation of a record through meeting specific criteria set up by your administrator
A data picker
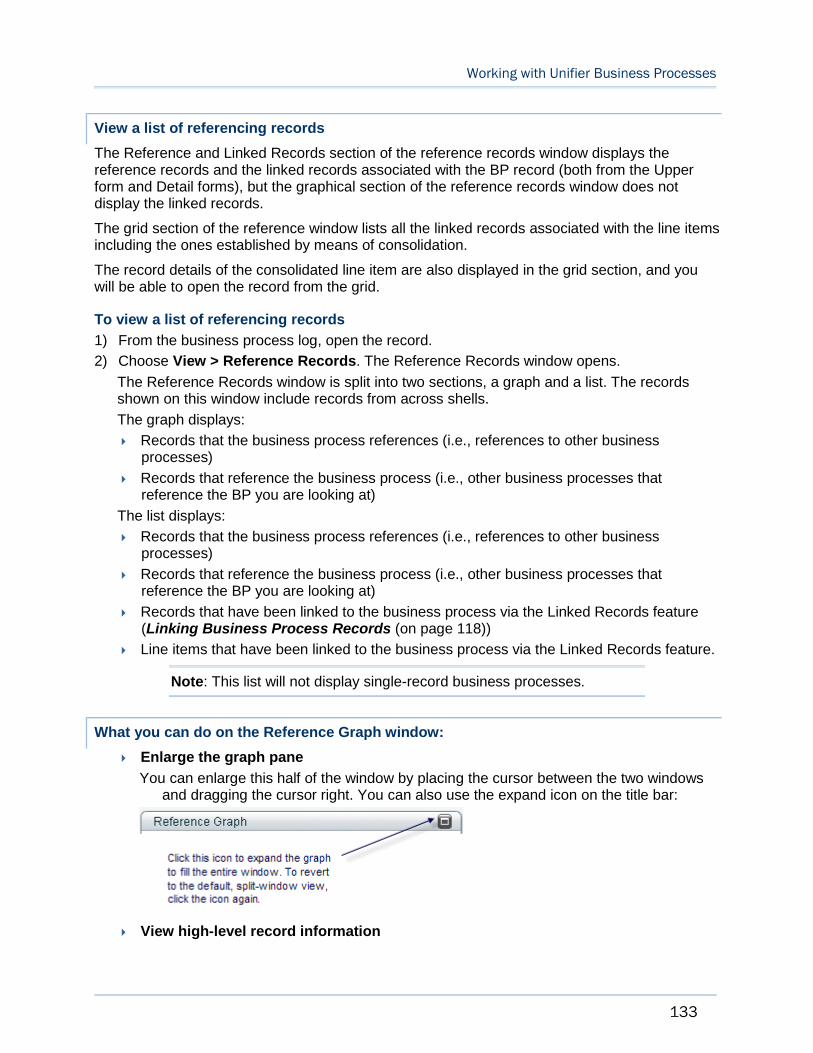
Working with Unifier Business Processes
133
View a list of referencing records
The Reference and Linked Records section of the reference records window displays the reference records and the linked records associated with the BP record (both from the Upper form and Detail forms), but the graphical section of the reference records window does not display the linked records.
The grid section of the reference window lists all the linked records associated with the line items including the ones established by means of consolidation.
The record details of the consolidated line item are also displayed in the grid section, and you will be able to open the record from the grid.
To view a list of referencing records
1) From the business process log, open the record.
2) Choose View > Reference Records. The Reference Records window opens.
The Reference Records window is split into two sections, a graph and a list. The records shown on this window include records from across shells.
The graph displays:
Records that the business process references (i.e., references to other business processes)
Records that reference the business process (i.e., other business processes that reference the BP you are looking at)
The list displays:
Records that the business process references (i.e., references to other business processes)
Records that reference the business process (i.e., other business processes that reference the BP you are looking at)
Records that have been linked to the business process via the Linked Records feature (Linking Business Process Records (on page 118))
Line items that have been linked to the business process via the Linked Records feature.
Note: This list will not display single-record business processes.
What you can do on the Reference Graph window:
Enlarge the graph pane
You can enlarge this half of the window by placing the cursor between the two windows and dragging the cursor right. You can also use the expand icon on the title bar:
View high-level record information

Unifier Business Processes User Guide
134
When you first open the graph, it displays a total of five levels:
Two levels "up" (that is, two record levels that refer to the original record)
Two levels "down" (that is, two record levels that the original record refers to)
The graph does not indicate the direction of the up or down levels; only that the records are connected.
Expand the graph
You can expand the graph display in two ways:
By individual record
Using the Expand button
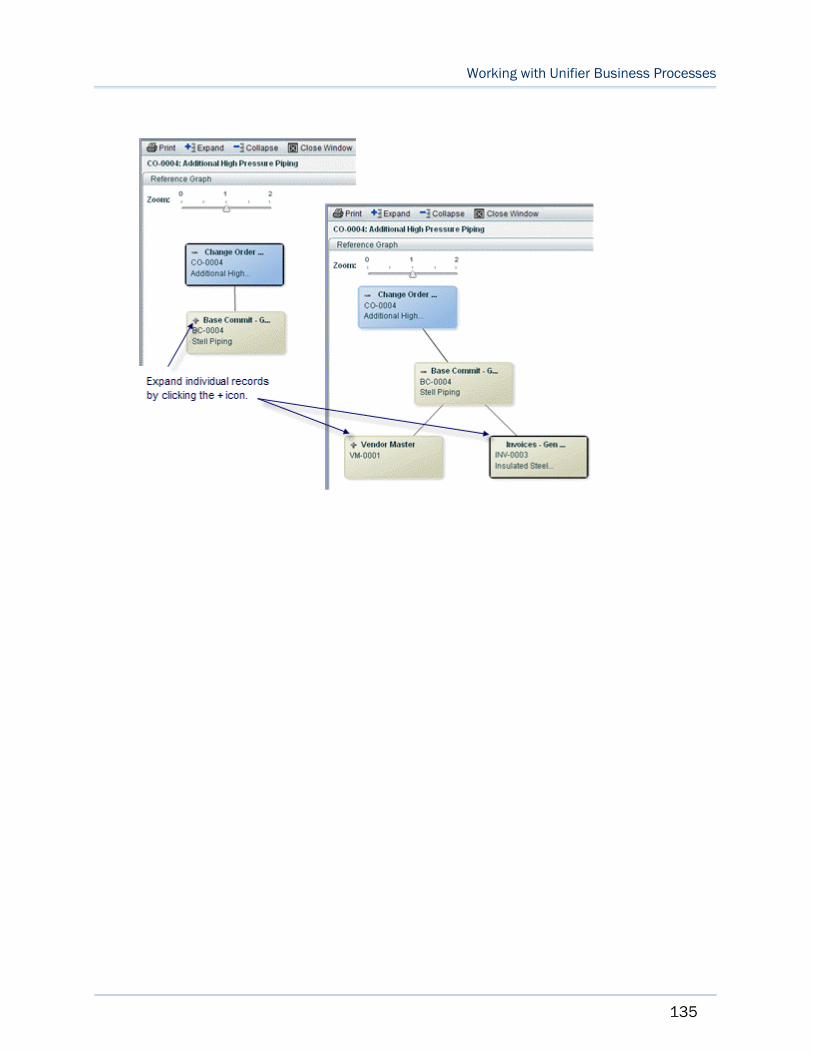
Working with Unifier Business Processes
135
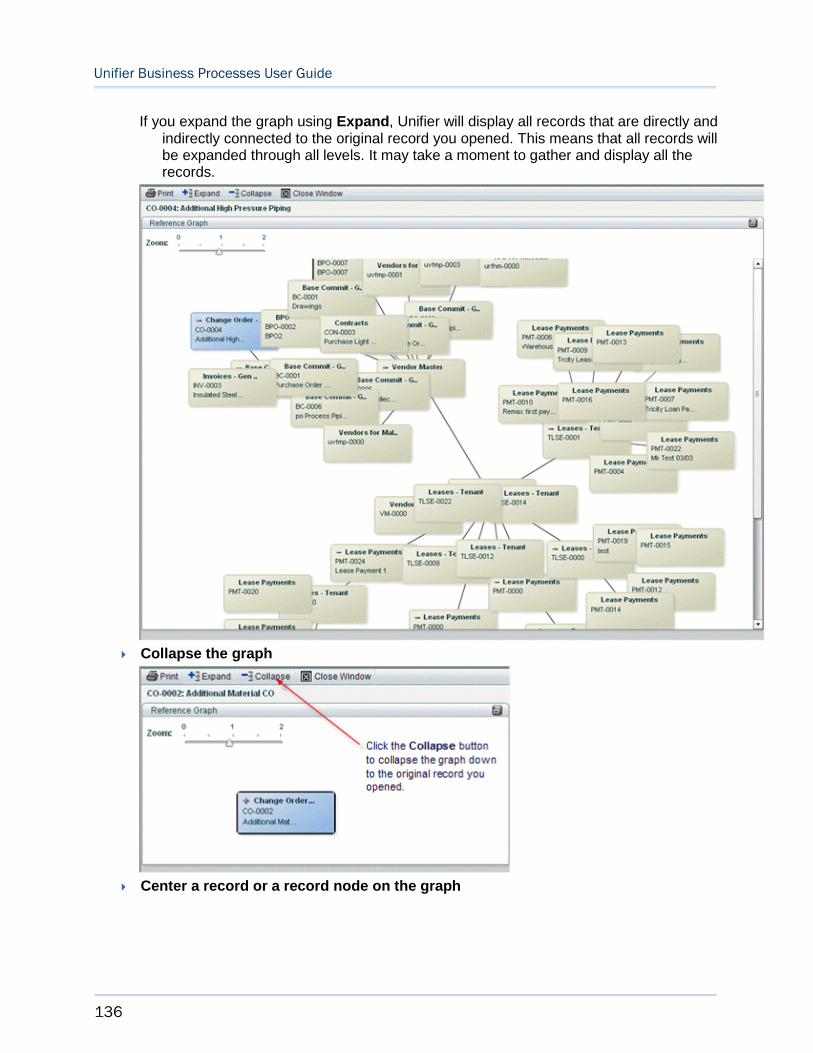
Unifier Business Processes User Guide
136
If you expand the graph using Expand, Unifier will display all records that are directly and indirectly connected to the original record you opened. This means that all records will be expanded through all levels. It may take a moment to gather and display all the records.
Collapse the graph
Center a record or a record node on the graph
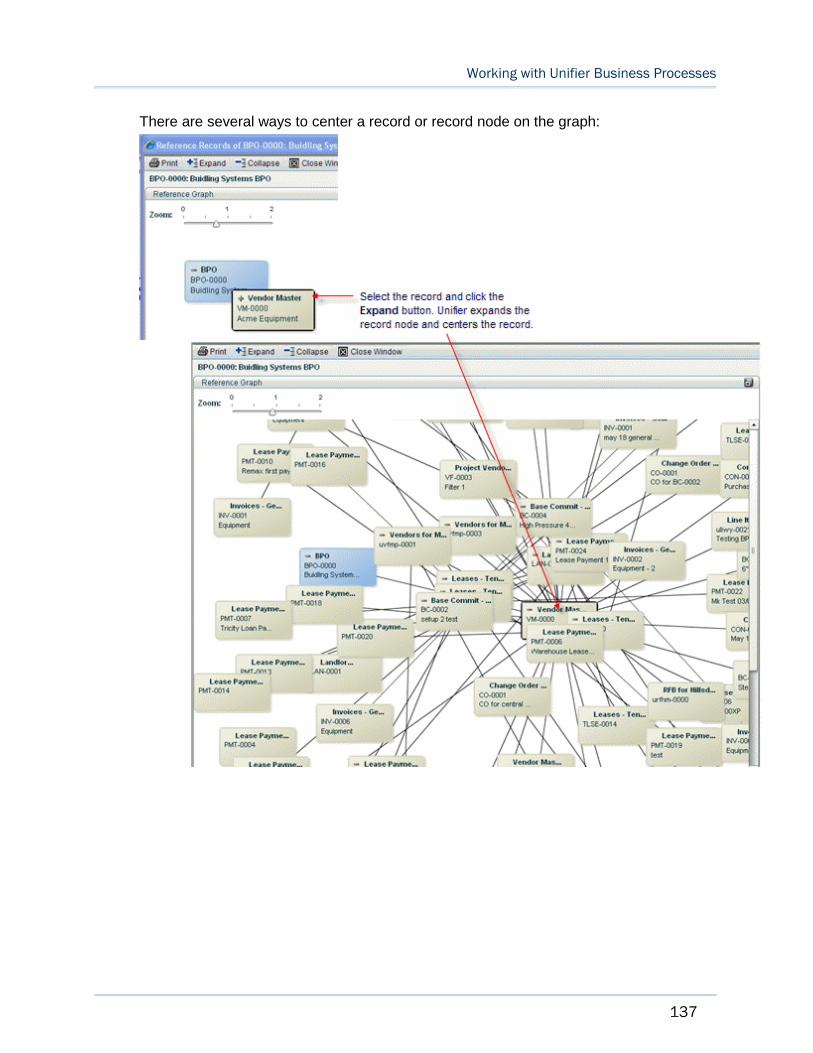
Working with Unifier Business Processes
137
There are several ways to center a record or record node on the graph:
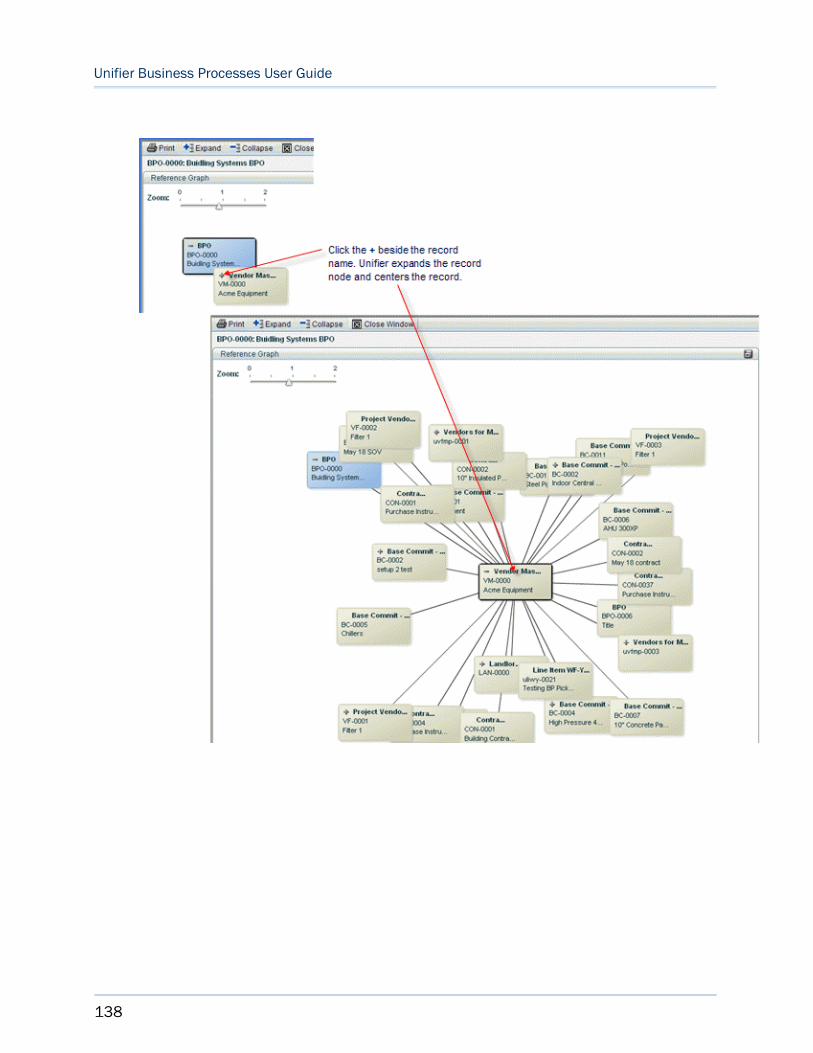
Unifier Business Processes User Guide
138

Working with Unifier Business Processes
139

Unifier Business Processes User Guide
140
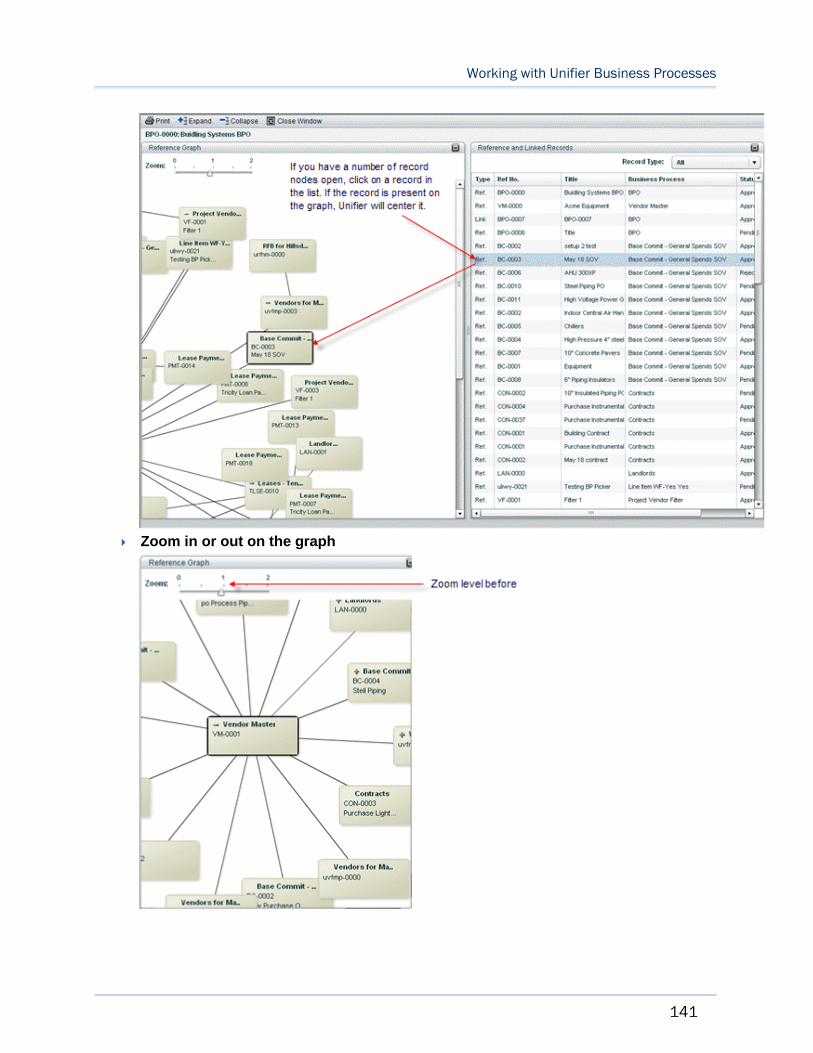
Working with Unifier Business Processes
141
Zoom in or out on the graph
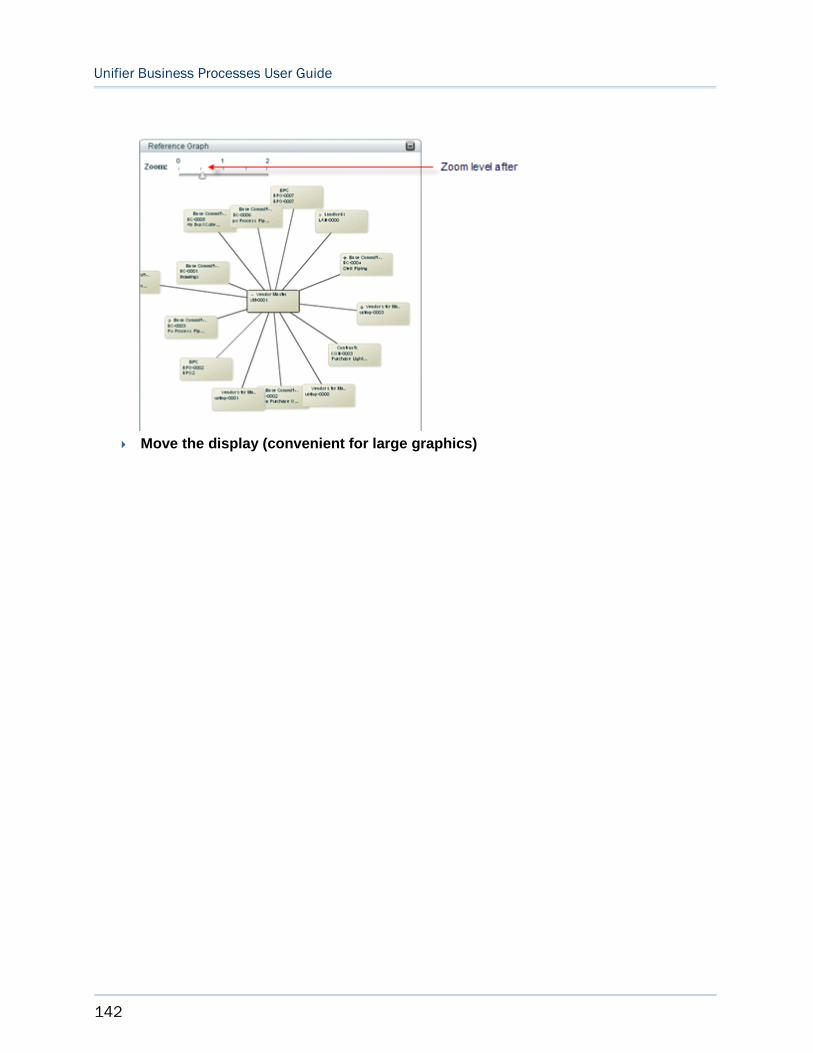
Unifier Business Processes User Guide
142
Move the display (convenient for large graphics)
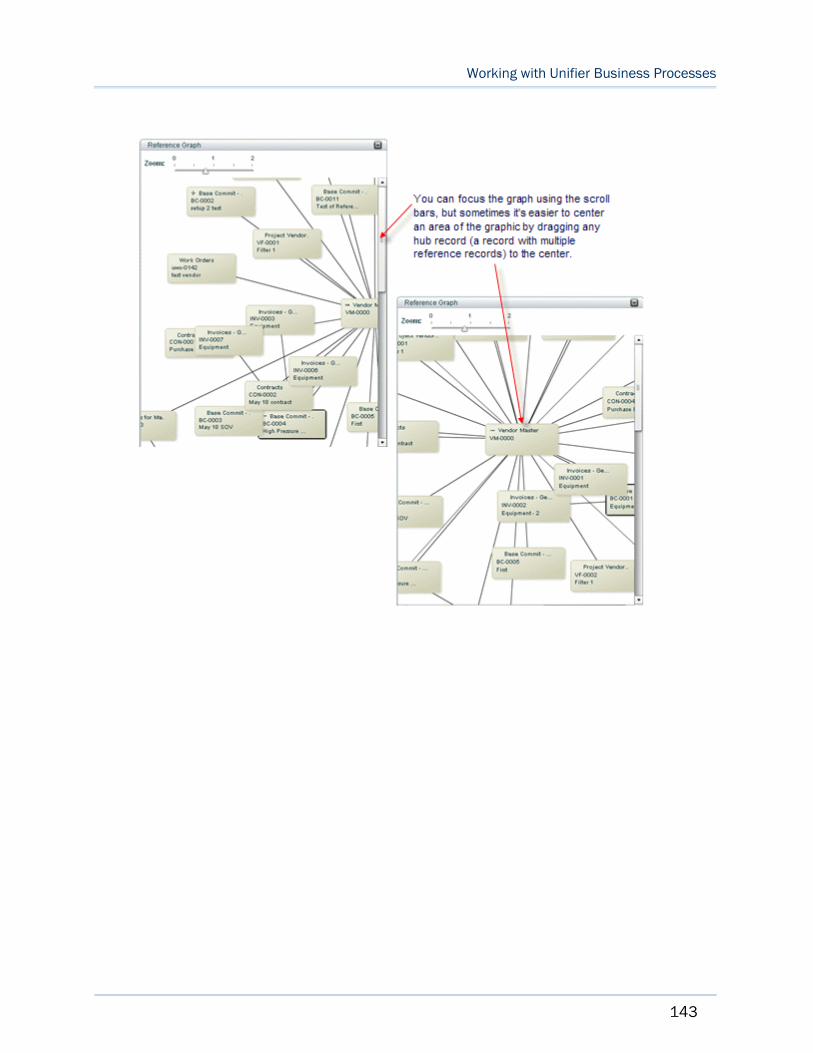
Working with Unifier Business Processes
143
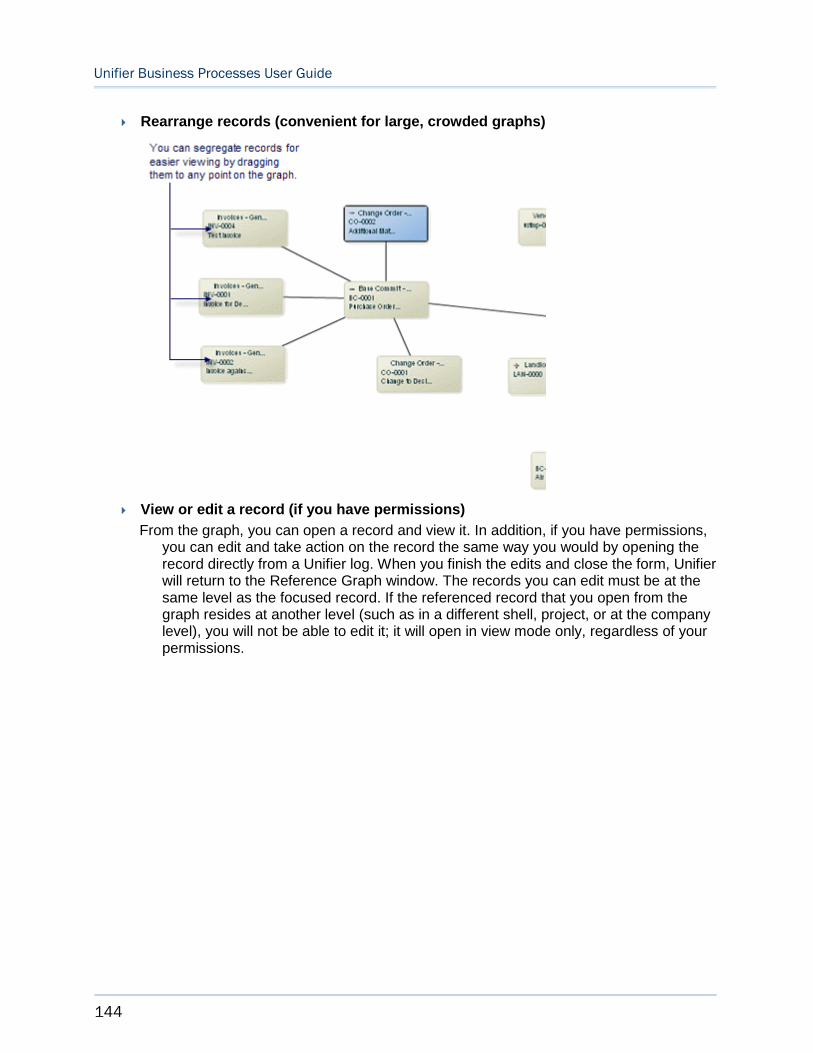
Unifier Business Processes User Guide
144
Rearrange records (convenient for large, crowded graphs)
View or edit a record (if you have permissions)
From the graph, you can open a record and view it. In addition, if you have permissions, you can edit and take action on the record the same way you would by opening the record directly from a Unifier log. When you finish the edits and close the form, Unifier will return to the Reference Graph window. The records you can edit must be at the same level as the focused record. If the referenced record that you open from the graph resides at another level (such as in a different shell, project, or at the company level), you will not be able to edit it; it will open in view mode only, regardless of your permissions.
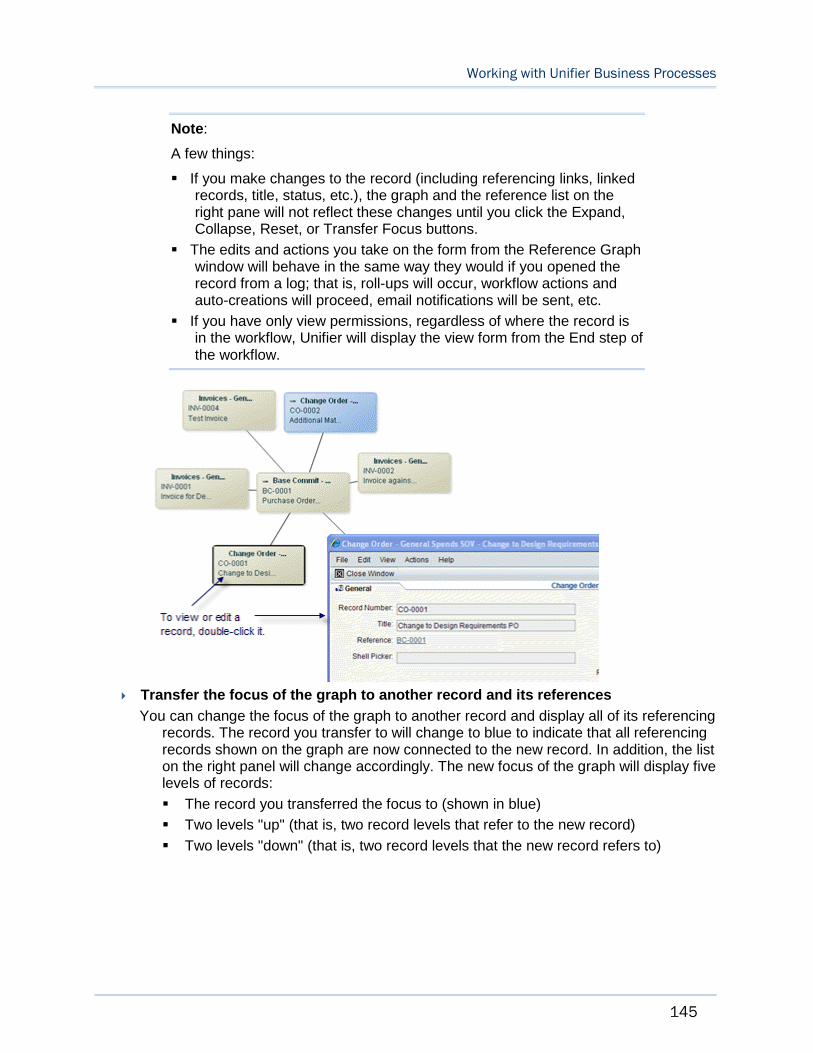
Working with Unifier Business Processes
145
Note:
A few things:
If you make changes to the record (including referencing links, linked records, title, status, etc.), the graph and the reference list on the right pane will not reflect these changes until you click the Expand, Collapse, Reset, or Transfer Focus buttons.
The edits and actions you take on the form from the Reference Graph window will behave in the same way they would if you opened the record from a log; that is, roll-ups will occur, workflow actions and auto-creations will proceed, email notifications will be sent, etc.
If you have only view permissions, regardless of where the record is in the workflow, Unifier will display the view form from the End step of the workflow.
Transfer the focus of the graph to another record and its references
You can change the focus of the graph to another record and display all of its referencing records. The record you transfer to will change to blue to indicate that all referencing records shown on the graph are now connected to the new record. In addition, the list on the right panel will change accordingly. The new focus of the graph will display five levels of records:
The record you transferred the focus to (shown in blue)
Two levels "up" (that is, two record levels that refer to the new record)
Two levels "down" (that is, two record levels that the new record refers to)
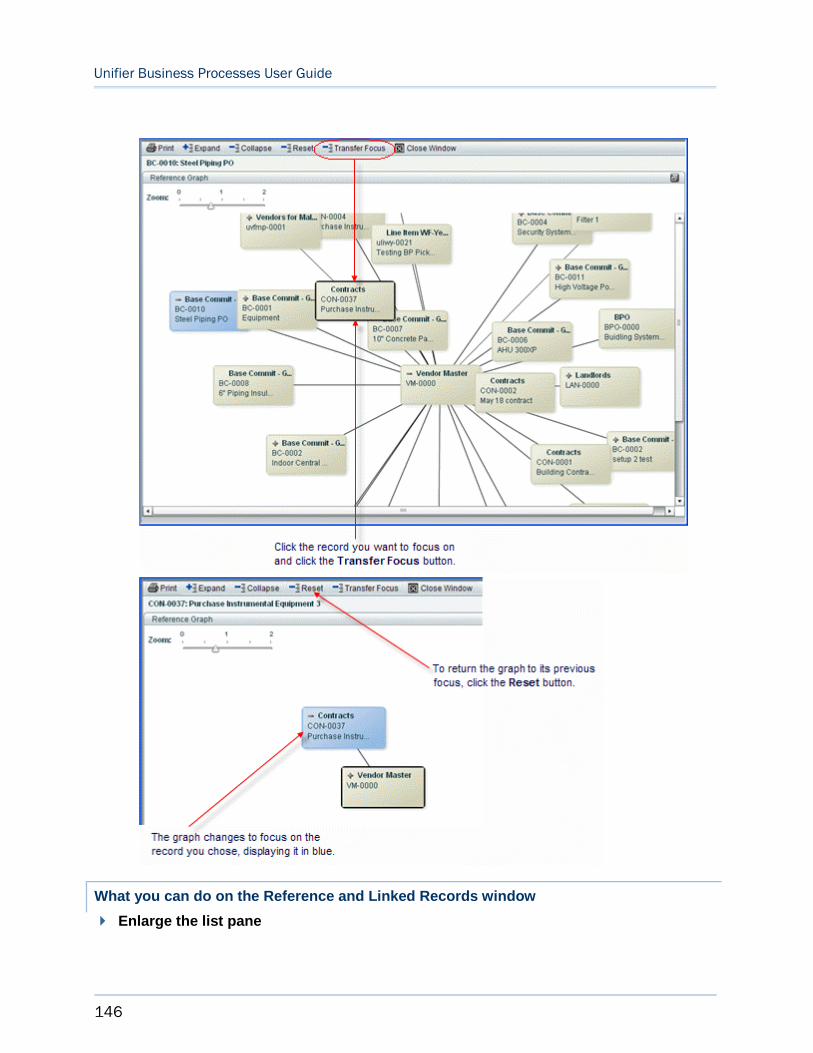
Unifier Business Processes User Guide
146
What you can do on the Reference and Linked Records window
Enlarge the list pane
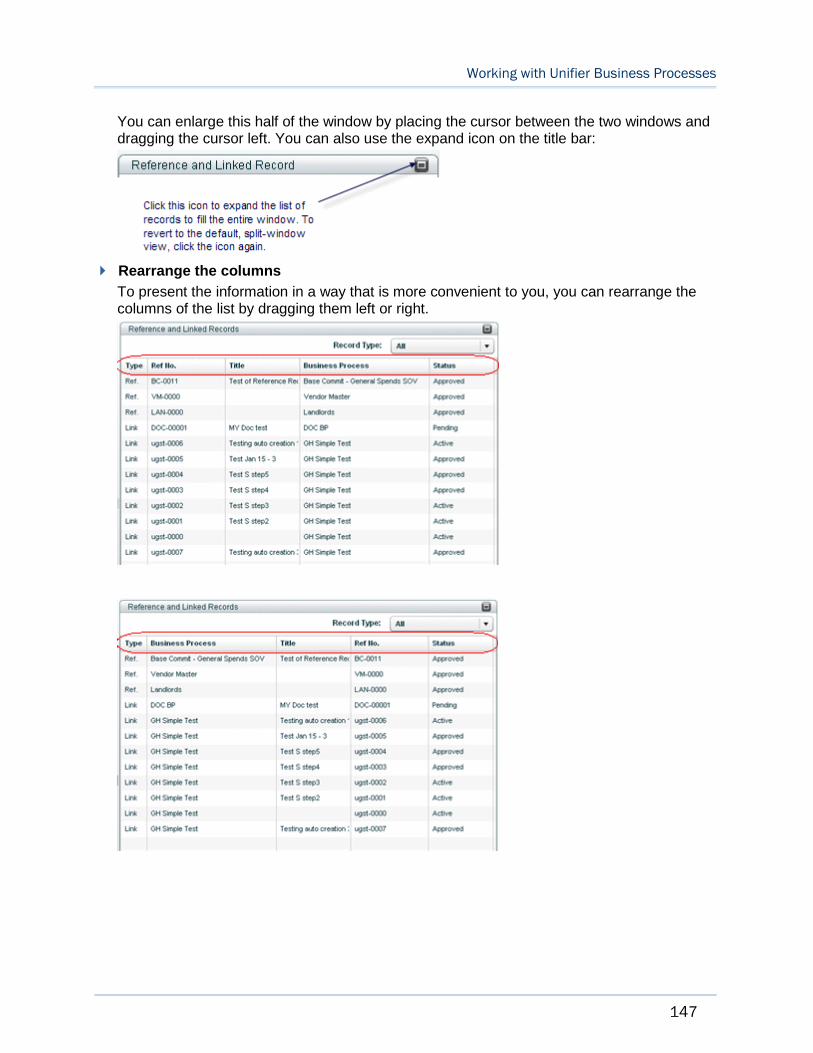
Working with Unifier Business Processes
147
You can enlarge this half of the window by placing the cursor between the two windows and dragging the cursor left. You can also use the expand icon on the title bar:
Rearrange the columns
To present the information in a way that is more convenient to you, you can rearrange the columns of the list by dragging them left or right.
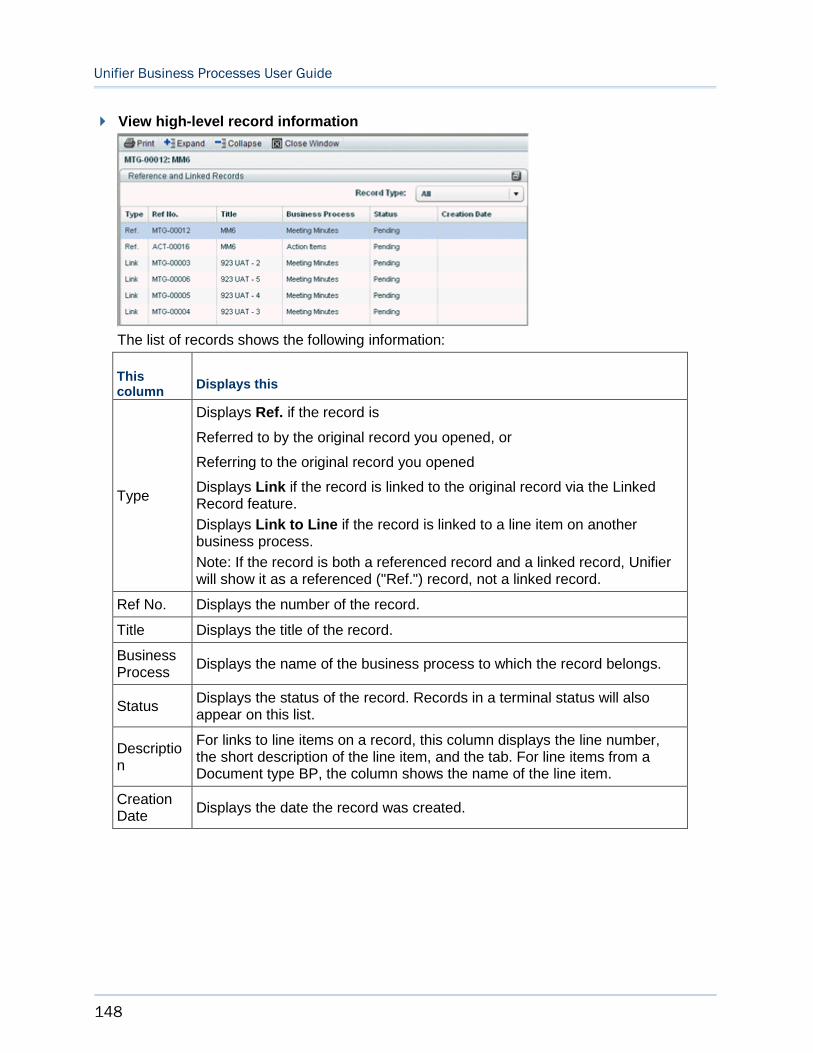
Unifier Business Processes User Guide
148
View high-level record information
The list of records shows the following information:
This column
Displays this
Type
Displays Ref. if the record is
Referred to by the original record you opened, or
Referring to the original record you opened
Displays Link if the record is linked to the original record via the Linked Record feature.
Displays Link to Line if the record is linked to a line item on another business process.
Note: If the record is both a referenced record and a linked record, Unifier will show it as a referenced ("Ref.") record, not a linked record.
Ref No. Displays the number of the record.
Title Displays the title of the record.
Business Process
Displays the name of the business process to which the record belongs.
Status Displays the status of the record. Records in a terminal status will also appear on this list.
Description
For links to line items on a record, this column displays the line number, the short description of the line item, and the tab. For line items from a Document type BP, the column shows the name of the line item.
Creation Date
Displays the date the record was created.
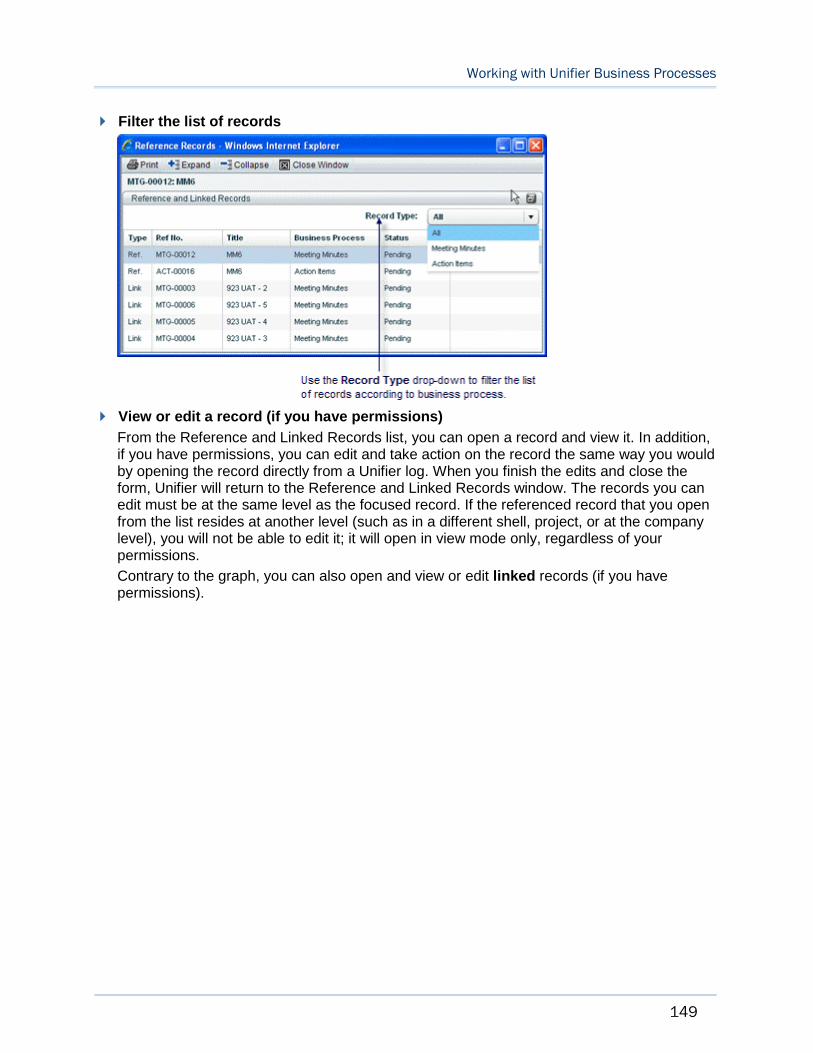
Working with Unifier Business Processes
149
Filter the list of records
View or edit a record (if you have permissions)
From the Reference and Linked Records list, you can open a record and view it. In addition, if you have permissions, you can edit and take action on the record the same way you would by opening the record directly from a Unifier log. When you finish the edits and close the form, Unifier will return to the Reference and Linked Records window. The records you can edit must be at the same level as the focused record. If the referenced record that you open from the list resides at another level (such as in a different shell, project, or at the company level), you will not be able to edit it; it will open in view mode only, regardless of your permissions.
Contrary to the graph, you can also open and view or edit linked records (if you have permissions).
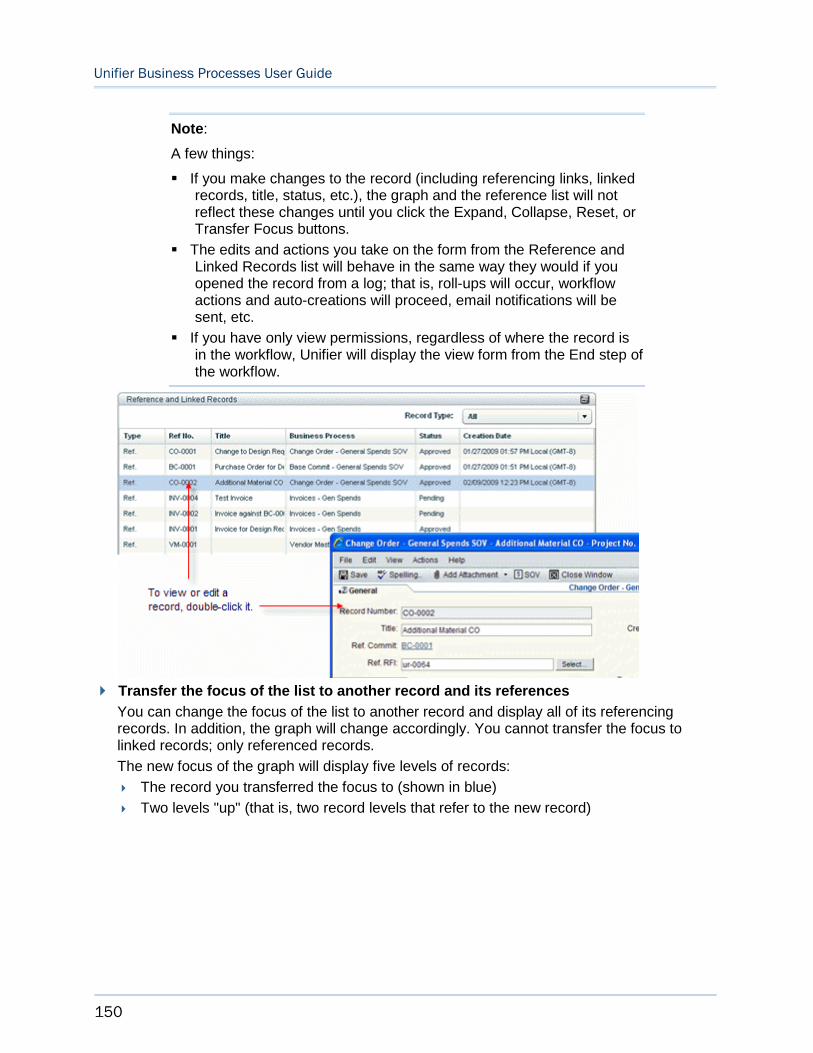
Unifier Business Processes User Guide
150
Note:
A few things:
If you make changes to the record (including referencing links, linked records, title, status, etc.), the graph and the reference list will not reflect these changes until you click the Expand, Collapse, Reset, or Transfer Focus buttons.
The edits and actions you take on the form from the Reference and Linked Records list will behave in the same way they would if you opened the record from a log; that is, roll-ups will occur, workflow actions and auto-creations will proceed, email notifications will be sent, etc.
If you have only view permissions, regardless of where the record is in the workflow, Unifier will display the view form from the End step of the workflow.
Transfer the focus of the list to another record and its references
You can change the focus of the list to another record and display all of its referencing records. In addition, the graph will change accordingly. You cannot transfer the focus to linked records; only referenced records.
The new focus of the graph will display five levels of records:
The record you transferred the focus to (shown in blue)
Two levels "up" (that is, two record levels that refer to the new record)
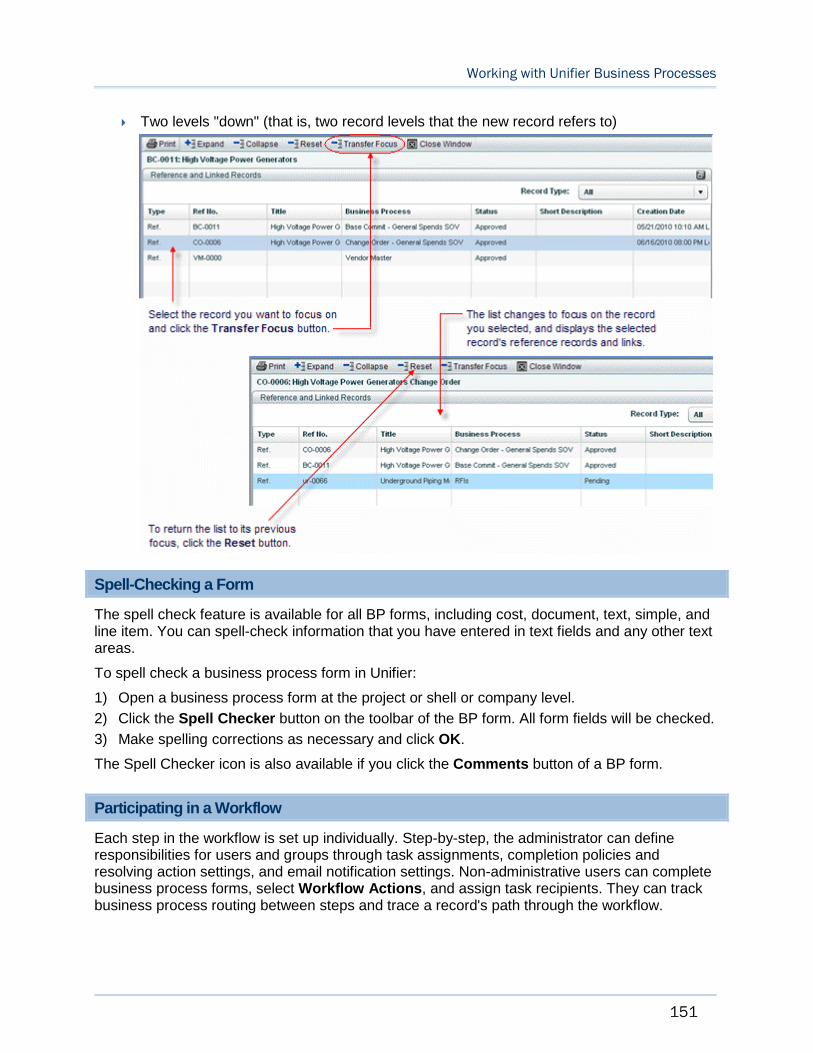
Working with Unifier Business Processes
151
Two levels "down" (that is, two record levels that the new record refers to)
Spell-Checking a Form
The spell check feature is available for all BP forms, including cost, document, text, simple, and line item. You can spell-check information that you have entered in text fields and any other text areas.
To spell check a business process form in Unifier:
1) Open a business process form at the project or shell or company level.
2) Click the Spell Checker button on the toolbar of the BP form. All form fields will be checked.
3) Make spelling corrections as necessary and click OK.
The Spell Checker icon is also available if you click the Comments button of a BP form.
Participating in a Workflow
Each step in the workflow is set up individually. Step-by-step, the administrator can define responsibilities for users and groups through task assignments, completion policies and resolving action settings, and email notification settings. Non-administrative users can complete business process forms, select Workflow Actions, and assign task recipients. They can track business process routing between steps and trace a record's path through the workflow.
Unifier Business Processes User Guide
152
Completion Policies and Resolving Actions
Your administrator sets a "completion policy" on each step in a workflow. This policy determines when the step is complete and where the step proceeds from there. A step can be complete under the conditions listed below.
Single completion policy: Any single user can accept a task and complete it, and the record will move forward to the next step.
All-majority completion policy: All assignees to the task have responded to it and a majority has agreed on the action that moves the record forward to the next step. If there is no clear majority on the action, Unifier will use a resolving action to determine how the record moves forward.
All-consensus completion policy: All assignees to the task have responded to it and all assignees have agreed on the action that moves the record forward to the next step. If there is no consensus on the action, Unifier will use a resolving action to determine how the record moves forward.
A resolving action moves the step to either a following step, a previous step, or a conditional step that essentially "re-addresses" or "revisits" the task. This step must be completed before the workflow can continue. The assignees on this resolving action step can include the original task assignees and can also include new assignees.
If there is only one action in the Workflow Actions drop-down list, then Unifier defaults the selection. As a result, Unifier updates the To and CC fields with the relevant users and groups. When you click Send, if the list of users changes based on either an assignee filter in the workflow setup or via conditional routing, then Unifier displays a window informing you that the list of users will change. Once the list of users is changed, then you must click Send again. The list of assignees changes to reflect the change in the next step and will be displayed when you save the workflow BP record.
Note: Clicking Send will not route the BP record if the conditional routing is not resolved.
If the Admin sets up the Business Process policy, then you have the ability to choose that a step be completed without all assignees having to act on it, if the result can be determined without the assignee action. This is to prevent unnecessarily wait for all users to take action on the record before moving it to next step.
If the Admin sets the Completion Policy for a step in a business process workflow setup as "All - Majority" and checks the option "Advance workflow when next step is determined," then during runtime, when a record for this business process reaches this step, as soon as majority of the step assignees take the same action at this step, the step will be completed and the workflow moves to the selected step.
Note: One or more assignees on the step could choose to decline acting on their tasks. In this case, the majority count is determined by dismissing the count of users who declined the task.
Example
Working with Unifier Business Processes
153
There are four assignees on a step. Two of the assignees take the same action. The third assignee declines the task. As soon as the third assignee declines, since the majority (two of the assignees) have taken the same action, the record will move to the next selected step.
In addition, the "Workflow Progress" tab (in the BP log and within the BP record) gets updated correctly (with the correct "Status" and "Action") for all of the users who took action on the step. For all users who did not act on the step:
The "Status" gets updated as: Closed.
The "Action" remains blank.
If the Admin sets the Completion Policy for a step in a business process workflow setup as "All - Consensus," and checks the option "Advance workflow when next step is determined," then during runtime:
When a record for this business process reaches this step, and:
As soon as one assignee on the step takes the "Resolving action" as chosen in the BP setup in the Admin mode, or
As soon as two assignees on the step take two different actions on the step
Then, this step will be completed, and the workflow moves to the "Resolving action" step; otherwise, if all of the assignees take the same action (which might be different from the resolving action), then the record moves to the step, as chosen by the assignees.
The "Workflow Progress" tab (in the BP log and within the BP record) gets updated correctly (with the correct "Status" and "Action") for all of the users who took action on the step. For all users who did not act on the step:
The "Status" gets updated as: Closed.
The "Action" remains blank.
For both options "All - Majority" and "All - Consensus" completion policies, if an assignee accepts the task and has been working on a draft record, and while the assignee has been working on a draft record a majority or consensus has been reached, then the draft will be deleted, and the record moves to the next step.
Note: In case the assignee has who has worked on the draft had added new line items, or edited existing line items, the changes will be retained when the record moves to the next step.
Statuses
The statuses you see on this window are internal to Unifier and are used only to display the status of the workflow step relative to the completion policy. These statuses are:
Status Description
Not Started
The assignee has not accepted the task.
In Progress
The assignee has accepted the task.
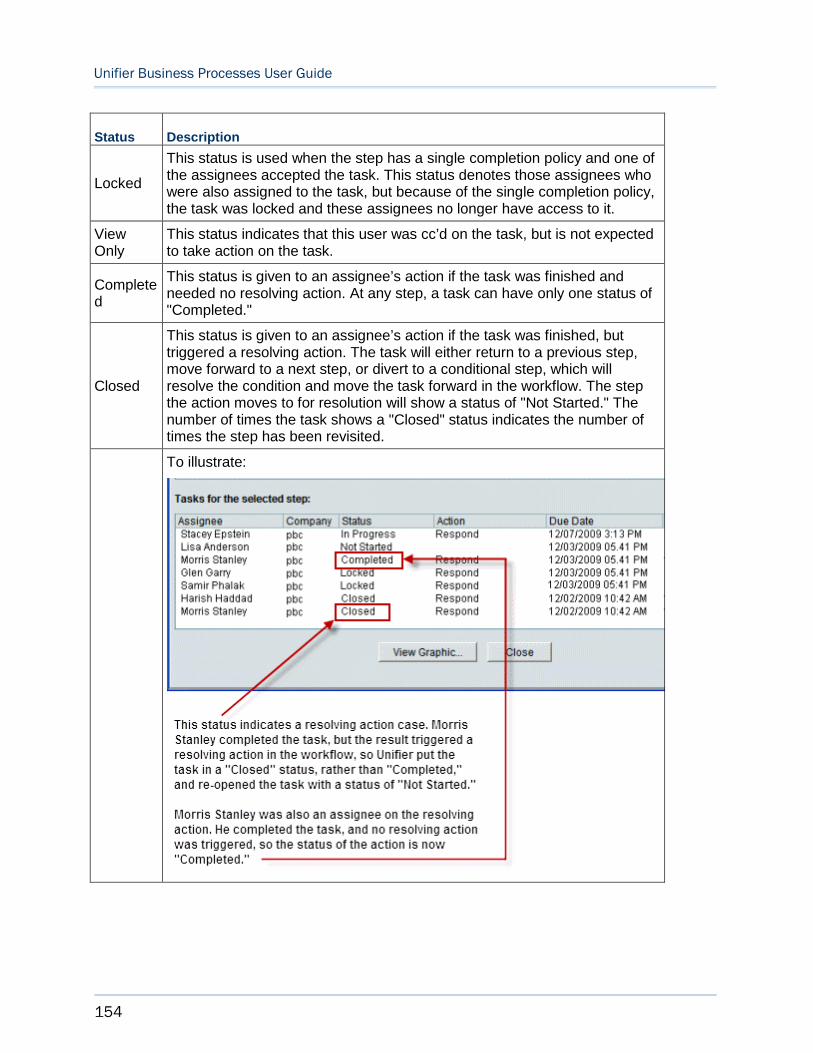
Unifier Business Processes User Guide
154
Status Description
Locked
This status is used when the step has a single completion policy and one of the assignees accepted the task. This status denotes those assignees who were also assigned to the task, but because of the single completion policy, the task was locked and these assignees no longer have access to it.
View Only
This status indicates that this user was cc’d on the task, but is not expected to take action on the task.
Completed
This status is given to an assignee’s action if the task was finished and needed no resolving action. At any step, a task can have only one status of "Completed."
Closed
This status is given to an assignee’s action if the task was finished, but triggered a resolving action. The task will either return to a previous step, move forward to a next step, or divert to a conditional step, which will resolve the condition and move the task forward in the workflow. The step the action moves to for resolution will show a status of "Not Started." The number of times the task shows a "Closed" status indicates the number of times the step has been revisited.
To illustrate:
Working with Unifier Business Processes
155
Working with Tasks
Unifier helps you to collaborate with your fellow team members through business processes. Your tasks are business processes that are in process and with which you are involved. When you are part of a business process workflow, or, in Classic View, have been invited to participate in a discussion group within a business process, you are assigned a task.
After you create and send a workflow business process, Unifier creates a task for each of the assignees in the next step in the workflow, and sends a message to each user that has been Cc'd.
In general, your are assigned a task under the following conditions:
You are part of a BP workflow, and you are requested, or required, to take some sort of action.
You have been invited to join a discussion group in Classic View by another user who is requesting assistance with drafting comments or markups on a BP. These are indicated as being sent for "Discussion" in the task.
The following tasks are not listed in your Tasks log:
Tasks for view-only.
Tasks for inactive Projects/Shells.
If you are designated as an assignee on a task, you will receive an email notification, and the task will appear in your Tasks log.
After you create and send a workflow business process, Unifier creates a task for each of the assignees in the next step in the workflow, and sends a message to each user that has been Cc'd.
Taking Action on your Task (Standard View)
To take action on your task, you can use the following sub-options of the Actions option:
Action with Preview
Action without Preview
For Action with Preview:
1) Go to your Tasks log and ctrl+click the tasks that you want to modify.
2) Click Actions drop-down list and click to select Action Preview.
Unifier opens the record that you have selected in a separate window.
3) Modify the record.
4) Click Save.
5) Click Close Window.
If your tasks have been accepted, then the Action with Preview option will not be available.
For Action without Preview:
1) Go to your Tasks log and ctrl+click the tasks that you want to modify.
2) Click Actions drop-down list and click to select Action without Preview to open the Action Without Preview window.
Unifier Business Processes User Guide
156
The Action Without Preview window is divided into two panes:
Use the left-hand pane to edit the Upper Form of your business process and perform workflow action (Workflow Actions).
Use the Workflow Actions to send records to the next step in the workflow, after completing the task, and assign record status such as pending, in-review, and so forth.
Unifier automatically selects the checkbox under the Update column when you type into or modify a field. You can deselect it if you do not want to modify the field at this time.
Unifier updates the field values if you click to select the checkbox under the Update column of that field.
- If you change the value of a field and click to select the checkbox under the Update column of that field, then Unifier will update the value of that field.
- If you erase the value of a field (blank) and click to select the checkbox under the Update column of that field, then Unifier erases the pre-existing value of that field.
Use the right-hand pane to preview the status of the task (Action Status).
The Action Status indicates whether your update was a success or not (using a green check-mark symbol or a red x symbol, respectively), and a message explaining why an update has failed.
You can use Action without Preview to create multiple shells using the Project/Shell Creation business process. The Action without Preview functionality in the Tasks log supports data elements such as Shell Location and Shell Template pickers (existing in the Upper Form) that are required for shell creation.
3) When finished, click Close. Unifier will update the tasks.
For more information about editing business process records see Editing Business Process Records (on page 179).
Taking Action on Multiple Tasks at the Same Time (Standard View)
Use the Actions option to take similar actions for multiple tasks.
You can select multiple tasks (ctrl+click), click Actions drop-down list, and perform the following actions:
Accept
Undo Accept
Hide
Unhide All
You can use the following options to modify multiple records:
Action with Preview
To open multiple records one record at a time. and modify the contents.
Note: The records must belong to the same business process, and the same step.
Action without Preview
To open multiple records in Action Without Preview window and modify the contents.
Working with Unifier Business Processes
157
Notes:
- The records do not need to belong to the same business process, and the same step.
- When tasks are updated through the Action without Preview option (in the Tasks log), the values of the Data Elements (DEs) that have Reset property will not be reset.
The following provides more details about modification of multiple records.
Taking similar actions for multiple tasks that belong to the same business process, and the same step
1) Go to your Tasks log and ctrl+click the tasks that you want to modify.
2) Click Actions drop-down list and click to select Action without Preview to open the Action Without Preview window.
The Action Without Preview window is divided into two panes:
Use the left-hand pane to edit the Upper Form of your business process and perform workflow action (Workflow Actions).
Use the Workflow Actions to send records to the next step in the workflow, after completing the task, and assign record status such as pending, in-review, and so forth.
Unifier displays Master DE, value set DE, and the behavior set DEs (Required, Disabled, Disabled and Clear). If the data element is disabled, it is based on the Master DE and value set DE in the DDS configuration.
Notes:
The elements of a DDS, especially behavior set DEs, play a role on many of these actions. This is due to Bulk Update honoring any change brought on by a behavior set DE. For example, if the fields become Disabled and Clear based on the values selected in the Master Data Element, the fields become disabled with no values.
When you select Disabled and Clear, other formula fields are re-evaluated.
A similar reaction occurs when updating records, as the Update checkbox also becomes disabled.
Unifier automatically selects the checkbox under the Update column when you type into or modify a field. You can deselect it if you do not want to modify the field at this time.
Unifier updates the field values if you click to select the checkbox under the Update column of that field.
- If you change the value of a field and click to select the checkbox under the Update column of that field, then Unifier will update the value of that field.
- If you erase the value of a field (blank) and click to select the checkbox under the Update column of that field, then Unifier erases the pre-existing value of that field.
Use the right-hand pane to preview the status of the task (Action Status).
When working with multiple tasks, you (the assignee) can select multiple records of the same business process and same step and perform the action in one place.
Unifier Business Processes User Guide
158
The Action Status indicates whether your update was a success or not (using a green check-mark symbol or a red x symbol, respectively), and a message explaining why an update has failed.
3) When finished, click Close. Unifier will update the tasks.
Taking similar actions for multiple tasks that do not belong to the same business process, and the same step
The Action without Preview is not available for tasks that do not belong to the same business process, and the same step.
1) Go to your Tasks log and ctrl+click the tasks that you want to modify.
2) Click Actions drop-down list and click to select Action Preview.
Unifier opens each record that you have selected in a separate window.
3) Modify the record.
4) Click Save.
5) Click Close Window. Unifier opens the window of the next record.
6) Continue modifying the records, Save, and click Close Window until finished.
If your tasks have been accepted, then the Action with Preview option will not be available.
Additional information about taking actions for multiple records
You can update a maximum of 200 records using Workflow update (Action Without Preview window > Workflow Actions).
Only the Upper Form is modified during Workflow update (Action Without Preview window > Workflow Actions).
The Workflow update (Action Without Preview window > Workflow Actions) is not supported on tasks that are on the Initiation step.
When you send the record to the next step, Unifier performs validation for the required fields.
At the company-level and project-level, when you are taking action on multiple tasks, you must have Allow Bulk Edit permission for each task.
For bulk update, the fields are from both Upper Form and Details forms (drawn from integration templates in uDesigner). Some business processes do not support integration. As a result, you cannot take multiple actions on these business processes because integration is used in multiple action.
For more information about editing multiple business process records, see Editing Business Process Records (on page 179).
Accepting your Tasks (Standard View)
You must accept a task in order to complete it.
Oracle recommends that you accept a task from the Home page: Home page > Tasks. You can also accept a task from the specific business process log, provided you have permission to the log (Company Workspace and Project/Shell). See Accepting your Tasks (Standard View) (on page 158) for details on how to access the Tasks node in the Company Workspace or Project/Shell.
Working with Unifier Business Processes
159
Note: If the Project/Shell in which a business process resides becomes View-Only, any in-process records will be placed on the View form of the current step of the workflow. If the project or shell is re-activated, the business processes will revert to the Action form.
To accept a task from the Home page:
1) Go to Home page and click the Tasks node.
2) Hover over the record and click the gear icon ( ).
3) Click Accept.
Alternatively, you can also click Actions and then click Accept. or use the Task Status (the check-mark icon).
To accept a task from the specific business process log (Company Workspace and Project/Shell):
1) Go to your business process and open the log from the Tasks node.
2) Hover over the record and click the gear icon ( ).
3) click Accept.
Alternatively, you can also click Actions and then click Accept. or use the Task Status (the check-mark icon).
To accept multiple tasks (of the same BP and same workflow schema):
1) Go to Home page, or your business process, and open the log from the Tasks node.
2) Ctrl-click to select the necessary tasks.
3) Click Actions and then click Accept.
Every task you complete will be deleted from the Tasks log (Tasks node). Those you do not complete will remain on your Tasks log.
Additional information about accepting your tasks
Task Notifications
If the task belongs to the Create step of a workflow, you will receive a message confirming that the record was (or was not) created successfully.
If you open a task from a project/shell that is on-hold, Unifier will notify you and delete the task from the log.
Initiation Step
In general, if a business process has been auto-created and sent to an Initiation Step, you will usually need to select a workflow schema to launch the business process into the workflow. When you accept the task, Unifier displays a Select Workflow window, where you must choose the workflow schema this business process should use. See Creating a Business Process (BP) Record (on page 48) for more information.
Unifier does not display the Select Workflow window if:
The BP is a non-workflow business process.
There is only one workflow schema you can choose for this business process.
Unifier Business Processes User Guide
160
Undoing Accepting your Tasks (Standard View)
If you change your mind after accepting a task, you can use the Undo Accept option, if:
You are the last person on the task distribution list and everyone else has declined the task.
You are the only task recipient.
The Undo Accept option restores the business process form, and data, back to the state it was in just prior to accepting the task, even if you have made some modifications to it. This applies only to additions or changes made between accepting the task and selecting Undo Accept.
Note: The Undo Accept is not available for Initiation Steps.
The Undo Accept will roll back the following to their previous state:
Changes to Upper Form fields
Auto-populated fields
Changes to the action details (To and Cc fields)
Any new additions of the following are removed:
Summary, detail, or imported line items
Comments
File attachments
Linked records
These changes are not rolled back:
Changes made to existing line items.
Anything that is deleted, such as attachments, linked records, linked Mailbox, and line items, cannot be restored. The exception is upper form fields, which will be restored to their previous state.
Transfer ownership.
Mailbox messages sent through linked Mailbox.
Discussion group activity.
To undo an accepted task from the Home page:
1) Go to Home page and click the Tasks node.
2) Hover over the record and click the gear icon ( ).
3) click Undo Accept.
Alternatively, you can also click Actions and then click Undo Accept. or use the Task Status (the check-mark icon).
To undo an accepted task from the specific business process log (Company Workspace and Project/Shell):
1) Go to your business process and open the log from the Tasks node.
2) Hover over the record and click the gear icon ( ).
3) click Undo Accept.

Working with Unifier Business Processes
161
Alternatively, you can also click Actions and then click Undo Accept. or use the Task Status (the check-mark icon).
To accept multiple tasks (of the same BP and same workflow schema):
1) Go to Home page, or your business process, and open the log from the Tasks node.
2) Ctrl-click to select the necessary tasks.
3) Click Actions and then click Undo Accept.
Declining a Task (Standard View)
Sometimes you have the option of declining a task. If you are the only person assigned to a step in the workflow, or if the creator of the workflow has not granted permission to decline a task, this is not an option.
To decline a task from the Home page:
1) Go to Home page and click the Tasks node.
2) Hover over the record and click the gear icon ( ).
3) Click Decline.
To decline a task from the specific business process log (Company Workspace and Project/Shell):
1) Go to your business process and open the log from the Tasks node.
2) Hover over the record and click the gear icon ( ).
3) Click Decline.
Note: You cannot decline multiple tasks.
Completing a Business Process Form
To complete a business process form
1) Review the form carefully. If you have the proper permissions, you can perform the following functions, as long as the business process is set up for them or is of the proper type to accommodate them.
Make changes or additions in editable fields of the business process.
Add, edit, or remove line items or summary line items (see Adding and Managing Line Items (on page 80)).
Add or view file attachments (see Working with File Attachments and Markups (on page 102)).
View or add general comments (see Adding and Managing General Comments (on page 96)).
Add or review graphic markups to an attached document (see Add Markups to a Business Process Attachment (on page 107)).
Provide a link to another completed BP form. Other participants will be able to click on the link and view the referenced BP form (see Linking Business Process Records (on page 118)).
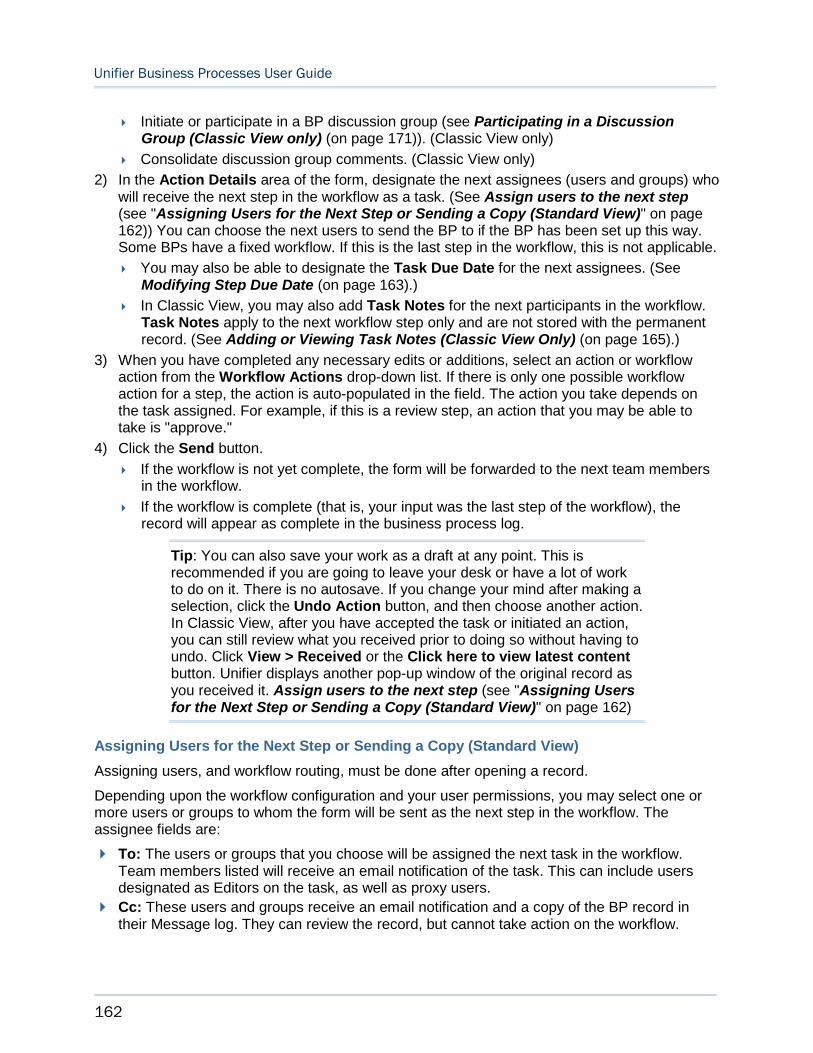
Unifier Business Processes User Guide
162
Initiate or participate in a BP discussion group (see Participating in a Discussion Group (Classic View only) (on page 171)). (Classic View only)
Consolidate discussion group comments. (Classic View only)
2) In the Action Details area of the form, designate the next assignees (users and groups) who will receive the next step in the workflow as a task. (See Assign users to the next step(see "Assigning Users for the Next Step or Sending a Copy (Standard View)" on page 162)) You can choose the next users to send the BP to if the BP has been set up this way. Some BPs have a fixed workflow. If this is the last step in the workflow, this is not applicable.
You may also be able to designate the Task Due Date for the next assignees. (See Modifying Step Due Date (on page 163).)
In Classic View, you may also add Task Notes for the next participants in the workflow. Task Notes apply to the next workflow step only and are not stored with the permanent record. (See Adding or Viewing Task Notes (Classic View Only) (on page 165).)
3) When you have completed any necessary edits or additions, select an action or workflow action from the Workflow Actions drop-down list. If there is only one possible workflow action for a step, the action is auto-populated in the field. The action you take depends on the task assigned. For example, if this is a review step, an action that you may be able to take is "approve."
4) Click the Send button.
If the workflow is not yet complete, the form will be forwarded to the next team members in the workflow.
If the workflow is complete (that is, your input was the last step of the workflow), the record will appear as complete in the business process log.
Tip: You can also save your work as a draft at any point. This is recommended if you are going to leave your desk or have a lot of work to do on it. There is no autosave. If you change your mind after making a selection, click the Undo Action button, and then choose another action. In Classic View, after you have accepted the task or initiated an action, you can still review what you received prior to doing so without having to undo. Click View > Received or the Click here to view latest contentbutton. Unifier displays another pop-up window of the original record as you received it. Assign users to the next step (see "Assigning Users for the Next Step or Sending a Copy (Standard View)" on page 162)
Assigning Users for the Next Step or Sending a Copy (Standard View)
Assigning users, and workflow routing, must be done after opening a record.
Depending upon the workflow configuration and your user permissions, you may select one or more users or groups to whom the form will be sent as the next step in the workflow. The assignee fields are:
To: The users or groups that you choose will be assigned the next task in the workflow. Team members listed will receive an email notification of the task. This can include users designated as Editors on the task, as well as proxy users.
Cc: These users and groups receive an email notification and a copy of the BP record in their Message log. They can review the record, but cannot take action on the workflow.
Working with Unifier Business Processes
163
Depending on the workflow setup, you may also be able to set the due date for the next step.
Assigning Users for the Next Step
You can assign a user for the next step from the tasks log (Task node in Home page, Company Workspace, and Project/Shell).
1) Go to your business process and open the log.
2) Click to select the record, click the gear icon ( ), and click Open.
3) In the Assignee portion of the BP form, click the To button. The User/Group picker window opens (to learn how to search and use the picker refer to Unifier General User Guide).
4) Follow the assign team members procedure to select users or groups.
5) Click OK.
When the business process form is sent, each member will receive an email message regarding their task assignment and a copy of the BP form in their Tasks log.
Sending a Copy of the Business Process Form
If you need to send a copy of a business process form to another user:
1) Go to your business process and open the log.
2) Click to select the record , click the gear icon ( ), and click Open.
3) In the Assignee portion of the BP form, click the Cc button. The User/Group picker opens (to learn how to use the picker, see Searching Pickers).
4) Follow the assign team members procedure to select users or groups.
5) Click OK.
The selected users or groups appear in the Cc field on the form.
When the business process form is sent, each member will receive an email message and a copy of the BP form in their Notifications log.
Note: The BP form may be set up to have pre-assigned Cc users. In this case, if the Cc button is enabled, you can add additional Cc users. If not, the BP is not set up to allow additional Cc users. You cannot remove pre-assigned Cc users.
Modifying Step Due Date
If the step duration and workflow override are enabled on the business process, you can also set the task due date for the next step.
To change the task due date
1) Click the Calendar icon next to the To field. The Task Due Dates window opens.
2) Choose one of the following options:
Set all task due dates as: Lets you set the same due date for all assignees.
Set individual task due dates: Allows you to assign different due dates for each assignee one at a time.
Unifier Business Processes User Guide
164
3) Click the Calendar icon corresponding to the option you chose. For the second option, click the Calendar icon next to each user’s name on the list. The Date picker opens.
4) Select the month and year, and then click the date you want to select.
Note: The workflow engine uses the company workday calendar. Grayed-out dates are those that have been set as non-working days (for example, weekends and holidays) by your company administrator. You cannot select non-working days for a task due date.
Adding Additional Assignee or Sending Additional Copy (Standard View)
The current step assignee can add assignees to the next step in the workflow. This is useful if you want to send a copy of the record or add another assignee before you take action on it.
You can add additional assignees or copy users if:
You have not yet accepted the task, and the form is still in view form. If you have already accepted the task, you can reverse the action by clicking the menu icon (three horizontal lines) and selecting Undo Accept.
The business process workflow has been set up to allow adding assignees or allowing to Cc.
Adding Additional Assignee
You can add additional assignees or copy users from the tasks log (Tasks node of Home page, Company Workspace, and Project/Shell).
Note: Adding additional assignees must be done after opening a record.
To add an additional assignee to a task:
1) Go to your business process and open the log.
2) Click to select the record , click the gear icon ( ), and click Open.
3) Click the Edit menu and choose Add Assignees to Current Step. The User/Group picker window opens (to learn how to search and use the picker refer to Unifier General User Guide). The list displays the list of users or groups that can be assigned, according to the business process setup.
4) Follow the assign team members procedure to select users or groups.
5) Click OK.
The user or group will be added to the list of assignees. The record will appear in each new user's Tasks log and applicable business process log, and users will receive an email informing them of the task, depending on their email subscription preferences.
Sending Additional Copy of Business Process Form
To send a copy of a business process to additional users:
1) Go to your business process and open the log.
2) Click to select the record , click the gear icon ( ), and click Open.
Working with Unifier Business Processes
165
3) Click the Edit menu and choose Copy Users to Current Step. The User/Group picker window opens (to learn how to use the picker, see Searching Pickers). The list displays the list of users or groups that can be copied according to the business process setup.
4) Follow the assign team members procedure to select users or groups.
5) Click OK.
The user or group will be copied. This means that the record will appear in each new user’s Notifications log and applicable business process log, and the users will receive an email informing them of the copy, depending on their email subscription preferences.
Adding or Viewing Task Notes (Classic View Only)
Notes that are specific to a task can be added to a business process form. They are temporary notes that can be used as comments or specific instructions to the next user in the workflow. Task notes are not forwarded throughout the workflow and are not archived. You can think of them as sticky notes that stay with the form for one step in the workflow only.
A task note only applies to the current task. If you are part of the current task and a task note is present, be sure to take notice. The task note will not be included in the rest of the workflow. If a task note is present, a "(1)" will display by the Task Notes field in the Action Details section of the business process.
To add task notes to a business process
In the Action Details section of the business process, click the Task Notes icon. The Add Notes window opens. Enter the text for the task note and click OK.
To view task notes
If a task note is present, click the (1) next to the Task Notes icon in the Action Details section of the business process. The Notes window opens displaying the note and the user who created it.
When you accept a task, the business process form becomes editable and the Task Notes field will clear. If you want to review a task note but have already accepted the task, you can click the View menu and choose Received or click the link Click here to view latest content in the Action Details section. Another window opens displaying the record as you received it, with the task note intact.
Completing Tasks via Email
You may receive BP-related email notifications that contain hyperlinks that represent actions in a BP workflow.
Unifier Business Processes User Guide
166
Actions you can take via email are shown as hyperlinks and represent actions you can take in a workflow step. When you click the hyperlink, an email reply is generated. Your reply text becomes a general comment in the BP record, except in the case of Document Type business processes; reply text is not attached for those business processes. Assignees need to be pre-assigned on the workflow steps for the email workflow action to occur. Attachments can be included in the workflow action replies if the BP is set up to include them. Email clients supported for workflow actions via email include HTML and text. If you are using a text client for your email, the possible actions are listed, but are static text (not hyperlinks). In that case, you can reply to the email manually and provide the appropriate To, Subject, and body text. Your subject should be the name of the action you want to take as shown in the email notification.
Your subject should be the name of the action you want to take as shown in the email notification.
Tasks that are assigned to you are listed in your Tasks logs. The Tasks logs display business process-related tasks in which you are being requested to participate. Refer to Unifier General User Guide for details about the Tasks log.
The following tasks may appear in your Tasks logs:
You are part of a business process workflow and are requested or required to take some sort of action.
You have been invited to join a discussion group by another user who is requesting assistance with drafting comments or markups on a BP (Classic View only). These are indicated as being sent for "Discussion" in the Tasks log.
You are designated as the Initiation step assignee for an auto-created business process.
Validation for email task flow actions are as follows:
Email address must match that of the assignee
Valid Notification ID/Password (NID)
Active (Unifier) User
BP record has not moved or been terminated
Record has not already met completion policy
Assignees must be Preassigned at the destination step
To respond to a workflow task directly from email
1) Open the email notification.
If Response via email has been enabled in the business process design, the email includes action links. The email message also displays data from the business process form.
2) To take action, review the email, then click an action link. In an email program such as Outlook, this will create a response email.
Working with Unifier Business Processes
167
Note: (1) Do not change the subject line of the email. Changing the subject line text will cause the email response to fail. (2) If you are using a text client for your email, you can open a new email message, copy the subject line of the notification, and paste it into the subject line of the response email.
3) You can add text to the body of the email. This will create a General Comment on the business process record.
Note: Email response text is not saved as General Comments for Document Type business processes.
4) You can add file attachments to your email response.
If the business process has been set up to accept attachments, they will be added to the record in Unifier. If the business process does not allow attachments, then attachments you add to the email response will be ignored. If a file already exists on the record with the same name as the file you are trying to send, then your attachment will be ignored.
5) Send the email, which will send the action to Unifier.
For all Workflow Business Processes where the steps are enabled for “Enable Response via email,” the following Workflow processes are completed when you perform, or approve, a task via email:
Capture of Workflow progress elements in the form:
Taken By
Action Name
Taken On
Formula calculations on the form:
When record progresses to the next step, the system evaluates the formulas on the form that are associated to the Workflow.
Form level validations:
Form-level validations are applied. If any errors, it will not advance the Workflow to the next step.
Additional form processing:
Auto population (sum of line items)
Dynamic Data Set (DDS) check: The system performs DDS checks prior to routing the record to the next step when action is taken through Email.
Note: If the step where the action is being performed has a DDS behavior set field which is required, and that field is empty, then the record will not progress to the next step.
Reset Form: Data Elements (DEs) in the form that have the Data Entry as Reset are processed when the record is progressed to the next step via email action.
Unifier Business Processes User Guide
168
Auto-Population for Behavior Set DEs
The data fields in a business process form can be updated through auto-population, including those in a behavior set of a DDS. Auto-population can occur during the creation of a form or during the selection of a picker value within a form. If the value of a Master Data Element clears a previously entered value of a behavior set data element and disables it, then any fields auto-populated from the behavior set data element are re-evaluated.
Similarly, any formulas dependent on the behavior set data element are re-evaluated. For example, in an Upper or Detail form, when a behavior set DE changes, the auto-population fields do not change. In the case of selecting a picker value, when the value of a picker changes, the auto-population fields do change.
Additional Processing
Query and Summary DEs:
Query and summary-based DEs, in the subsequent forms of the Workflow, are populated correctly when the record is progressed to the next step via email action.
Other post processing logic:
Reverse auto population
Roll-up to Cost sheet
Roll-ups to other sheets
Auto Creation – S Step
Auto Creation – I Step and so forth
About Email Notifications for Business Processes
Email notifications are designed in uDesigner and set up by the Primavera Unifier Administrator. To initiate this feature for yourself, you need to set up an option in your user preferences that specifies that you wish to receive these notifications.
Refer to Unifier General User Guide for information about selecting email subscription options.
Once you make this specification, you will be notified whenever a business process to which you have been assigned is created, modified, or closed.
In addition, if you are creating or editing a business process that has been set up for email notifications, you can notify additional users or groups at your discretion.
Users who receive email notification (based on events triggered) will see the data elements based on email notification elements setup in uDesigner which is across all view forms for Workflow BPs. For Non-workflow BPs, the email notification received will show all the data elements based on email notification elements setup across all upper forms in uDesigner.

Working with Unifier Business Processes
169
Email Notifications for Workflow Business Processes
You may be notified by email when you have a new task, if you are late responding to an assigned task, if you have been requested to join a business process discussion group (Classic View only), you are an editor on the task (in which case, you receive notification each time a draft is created), or if you were the creator of the business process and someone has taken action on their task.
Depending on your company Unifier email notification setup and your own user preferences, you may receive such emails one at a time as the task is generated, or you may receive one daily email digest summarizing all of the day’s email notifications (including non-business process related notifications).
Note: Email notifications can be configured in your user preferences.
If you receive an email notification
You may receive BP-related email notifications for the following:
You have a new task. A task can be generated if you need to take action on a BP workflow step, or if you have been requested to be part of a BP discussion group. Click on the hyperlink at the bottom of the email. When you click the link, you will be directed to the Unifier sign in screen. Once you sign in, Unifier will display the record, where you can complete the form and send it to the next step.
You are late responding to an assigned task. The actions you can take are similar to when you have a new task.
You are the owner or creator of the BP and someone has taken action on their task. This is a notification only and no action is required.
You are an Editor on a task (you receive notification each time a draft is created).
You are designated as an active proxy user, and the user you are acting for has received a task.
A BP workflow has been completed. This is a notification only and no action is required.
You have to take action during a BP workflow.
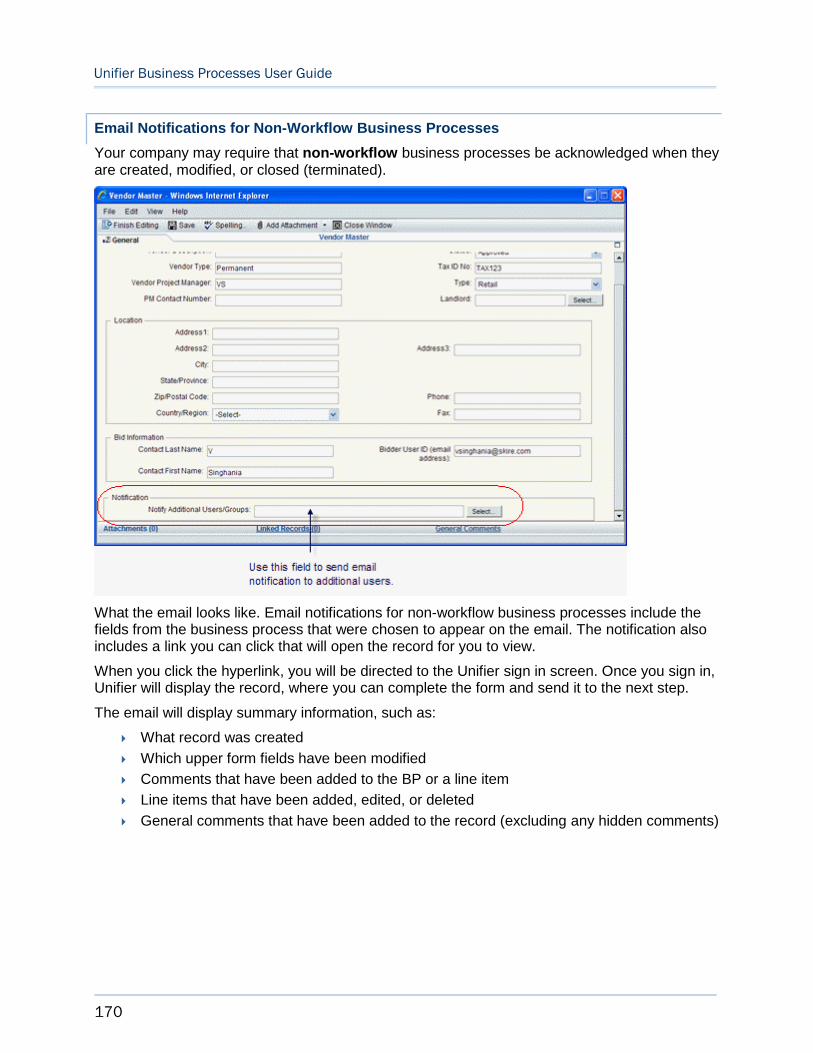
Unifier Business Processes User Guide
170
Email Notifications for Non-Workflow Business Processes
Your company may require that non-workflow business processes be acknowledged when they are created, modified, or closed (terminated).
What the email looks like. Email notifications for non-workflow business processes include the fields from the business process that were chosen to appear on the email. The notification also includes a link you can click that will open the record for you to view.
When you click the hyperlink, you will be directed to the Unifier sign in screen. Once you sign in, Unifier will display the record, where you can complete the form and send it to the next step.
The email will display summary information, such as:
What record was created
Which upper form fields have been modified
Comments that have been added to the BP or a line item
Line items that have been added, edited, or deleted
General comments that have been added to the record (excluding any hidden comments)
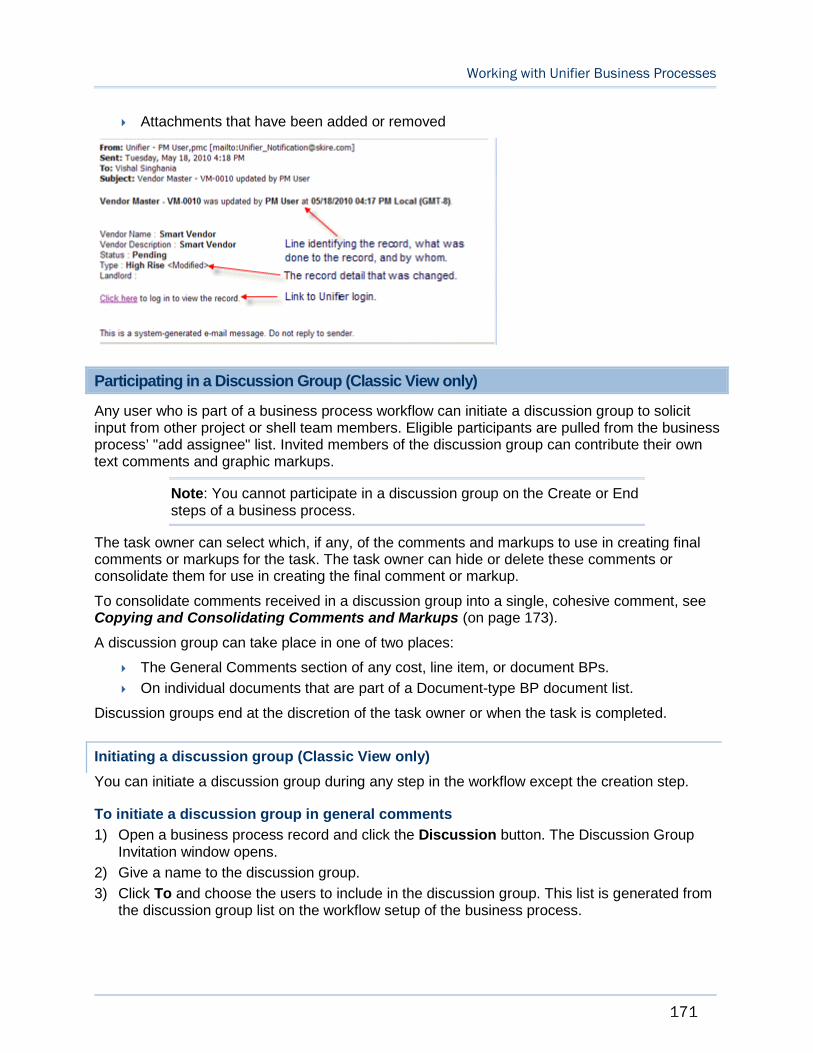
Working with Unifier Business Processes
171
Attachments that have been added or removed
Participating in a Discussion Group (Classic View only)
Any user who is part of a business process workflow can initiate a discussion group to solicit input from other project or shell team members. Eligible participants are pulled from the business process’ "add assignee" list. Invited members of the discussion group can contribute their own text comments and graphic markups.
Note: You cannot participate in a discussion group on the Create or End steps of a business process.
The task owner can select which, if any, of the comments and markups to use in creating final comments or markups for the task. The task owner can hide or delete these comments or consolidate them for use in creating the final comment or markup.
To consolidate comments received in a discussion group into a single, cohesive comment, see Copying and Consolidating Comments and Markups (on page 173).
A discussion group can take place in one of two places:
The General Comments section of any cost, line item, or document BPs.
On individual documents that are part of a Document-type BP document list.
Discussion groups end at the discretion of the task owner or when the task is completed.
Initiating a discussion group (Classic View only)
You can initiate a discussion group during any step in the workflow except the creation step.
To initiate a discussion group in general comments
1) Open a business process record and click the Discussion button. The Discussion Group Invitation window opens.
2) Give a name to the discussion group.
3) Click To and choose the users to include in the discussion group. This list is generated from the discussion group list on the workflow setup of the business process.
Unifier Business Processes User Guide
172
Note: To include users who are not part of the original business process workflow, you must first add them to the discussion group list. The workflow must be set up to allow this, and you must have the proper permissions.
4) In the Discussion Notes text field, write a description of the assistance or input you are asking for from the participating members of the discussion group.
5) Click Send.
The receivers get a task in their Tasks log and an email message. The subject of the email will show the record number of the business process and the phrase "is sent to you for discussion." When the receiver opens the form, only the comments section is editable.
When users respond to a discussion group, the discussion group owner is notified by email.
To initiate a discussion group on a particular document in a Document-type business process
Open the Document-type business process record. Select the document from the document list on the form. Click the Discussion button and follow the procedure to initiate a discussion group.
Closing a discussion group (Classic View only)
When a discussion group is closed, all invited participants will receive an email notification.
To close a discussion group
The initiator can close the discussion group at any time by clicking Close. This will remove the task from each receiver’s task log, regardless of whether they have completed it.
Discussion groups are closed automatically when the task in which the discussion group had been initiated is completed, regardless of the status of the discussion group comments.
Participating in a discussion group (Classic View only)
If you are invited to join a discussion group, a new task will appear in your Tasks log, and you will receive an email message. The Sent for column of the Tasks log will indicate "discussion," distinguishing it from workflow-related tasks.
To participate in a discussion group in comments
1) From the Tasks log, select the discussion group business process and click Open. The form will be view-only, except for the comments area.
Note: Pay particular attention to the Discussion Notes area of the Action Details portion of the form. This is where the owner of the discussion group will add information regarding what input is needed.
2) Click General Comments. Add text comments.
Working with Unifier Business Processes
173
To participate in a discussion group on a Document-type business process
1) From the Tasks log, select the discussion group business process and click Open. The business process form will be view-only, except for the comments and document list.
Note: Pay particular attention to the Discussion Notes area of the Action Details portion of the form. This is where the owner of the discussion group will add information regarding what input is needed and the documents that need review.
2) Select the document to comment on and click Comments. Add text comments and graphic markups.
Copying and Consolidating Comments and Markups
These procedures are useful for consolidating comments and markups received during a discussion group (Classic View only), but can also be used anytime you want to copy or consolidate comments or markups on a BP attachment.
When you copy and consolidate comments, all attachments to comments will display as attachments to the consolidated comment. All graphical markups will also be copied and included in the new consolidated comment in a separate, editable markup layer.
You can also consolidate graphic markups made to documents that are attached directly to the BP form (that is, documents attached in the lower portion of a Document-type BP, or documents attached directly to the BP form).
You can copy and consolidate text comments in general comments, but not graphic markups to file attachments added to a general comment. The following table summarizes:
BP Feature Consolidate Text Comments Consolidate Graphic Markups
Documents attached to Document-type BPs
Can copy and consolidate comments made directly to attached documents
Can copy and consolidate graphic markups on attached documents
File attachments: all BP types
Can copy and consolidate comments made to files attached directly to BPs (listed in the Attachments link)
Can copy and consolidate markups made to files attached directly to BPs (listed in the Attachments link)
General comments Can copy and consolidate general comments
Cannot copy or consolidate markups on files attached to a general comment.
Copy or consolidate text comments
You can copy one or more existing comments to use in formulating your own comment. Copied comments also include any attached files and graphic markups.
Unifier Business Processes User Guide
174
When used in conjunction with the discussion group function (Classic View only), this can be used to consolidate the comments you receive from the group and create a single, cohesive comment. Because discussion group comments remain draft until the BP is sent to the next workflow step, the task owner can choose to delete or include the other draft comments.
You can also copy and consolidate comments made to documents attached directly to a BP. This allows you to consolidate several comments made by multiple users into a single comment by copying the existing comments into a new one and editing as necessary.
Note: The option to consolidate review comments is available only in AutoVue.
To copy general comments
1) On the BP form, click the General Comments link. The General Comments window opens.
2) Click Add (or Modify to modify an existing comment). The Edit General Comment window opens.
3) Click the Copy From button. The Copy General Comments window opens, displaying the list of existing comments.
4) Click the selection box next to each of the comments you want to copy into your comments and click OK. Any additional file attachments or markups associated with each comment are also copied to the new comment.
5) Make edits as necessary and click OK.
To copy and consolidate text comments on a BP attachment
1) Do one of the following:
Click the Attachments link at the bottom of the BP form. The Attachments window opens. Select the file and click the Comments button.
For Document-type BPs, in the document list in the lower portion of the Document-type BP, select the file to mark up and click the Comments button.
The File Comments window opens.
2) Click the Add button. The Edit File Comment window opens.
3) Click the Copy From button. The Copy General Comments window opens, displaying the list of existing comments.
4) Click the selection box next to each of the comments that you want to copy into your comments and click OK. The comments are copied into the new comment and are listed in the Text Comment box of the Edit File Comment window. Any additional file attachments or markups associated with each comment are also copied to the new comment.
5) In the Edit File Comment window, make any necessary edits to consolidate the text comments.
Note: At this point, you can also consolidate graphic markups before saving the newly consolidated comment by clicking the Consolidate link next to Graphic Markup.
6) When you are done consolidating comments and markups, click OK to save and exit the Edit File Comment window.

Working with Unifier Business Processes
175
To consolidate discussion group comments on a business process or document
1) Use the copy text comments procedure to copy any of the draft comments that you received from the discussion group that you initiated.
2) Click the selection box next to the text comments that you want to include in your new comment and click OK. The text comments and any graphic markups will be copied in to your new comment.
3) Edit as necessary and click OK.
4) You may select any of the draft comments and click Remove if you do not want to include them in the BP record.
Copy or consolidate graphic markups
You can copy and consolidate graphic markups made on document attachments to BPs.
Note: The option to consolidate review comments is available only in AutoVue.
To copy and consolidate graphic markups on a BP attachment
The business process must have been sent. You cannot consolidate draft comments.
1) Do one of the following:
Click the Attachments link at the bottom of the BP form. The Attachments window opens. Select the file and click the Comments button.
For Document-type BPs, in the document list in the lower portion of the Document-type BP, select the file to mark up and click the Comments button.
The File Comments window opens.
2) Click the Add button. The Edit File Comment window opens.
3) Click the Copy From button. The Copy General Comments window opens, displaying the list of existing comments.
4) Click the selection box next to each of the comments that you want to copy into your comments and click OK. The comments are copied into the new comment and are listed in the Text Comment box of the Edit File Comment window. Any additional file attachments or markups associated with each comment are also copied to the new comment.
5) In the Edit File Comment window, make any necessary edits to consolidate the text comments. Note that the link next to Graphic Markup at the bottom of the Edit File Comment window changes to "Consolidate."
6) Click the Consolidate link. The document opens in for viewing in the AutoVue viewer.
7) In the viewer window, click the Open Markup(s) tool or select File > Open. The Markup Files window opens, displaying the list of existing markups.
8) Select the markups to be copied and click OK. The selected markups will display in layers on the document.
9) Click the File menu and choose Consolidate. The Consolidate Markups window opens.
10) Do the following to create a new consolidated markup layer:
Enter a name for the new consolidated markup.
Unifier Business Processes User Guide
176
Select the checkbox next to the markup layers to include, or click the Select All button to select all markup layers.
Select the Open as active markup and hide the others checkbox.
Click OK.
The markup elements from the selected layers will be copied into the new consolidated layer. These elements are editable. You can select, modify, or delete individual elements, or add new markups as necessary.
11) Click the Save button or select File > Save to save the new consolidated markup layer. If you want to add another markup layer, click the New Markup button and add markups as necessary.
12) Close the AutoVue viewer window.
13) In the Edit File Comment window, click OK to save the consolidated markups and text comments. Close the File Comments window.
Track a Step Through the Workflow
There are times when you might need to examine a record’s workflow in detail to see the progression of a step or task through each assignee’s actions. You can track a step in this way using a single window, which is available from the business process form.
To track the progress of a workflow step
1) From the log node in the Navigator, select the business process.
2) On the right pane, double-click the record you want to track. Unifier displays the BP record window.
If the record is open or pending, click the Task Status link in the Task Details section of the form.
If the record is closed, click the link to view the process details in the Task Detailssection of the form.
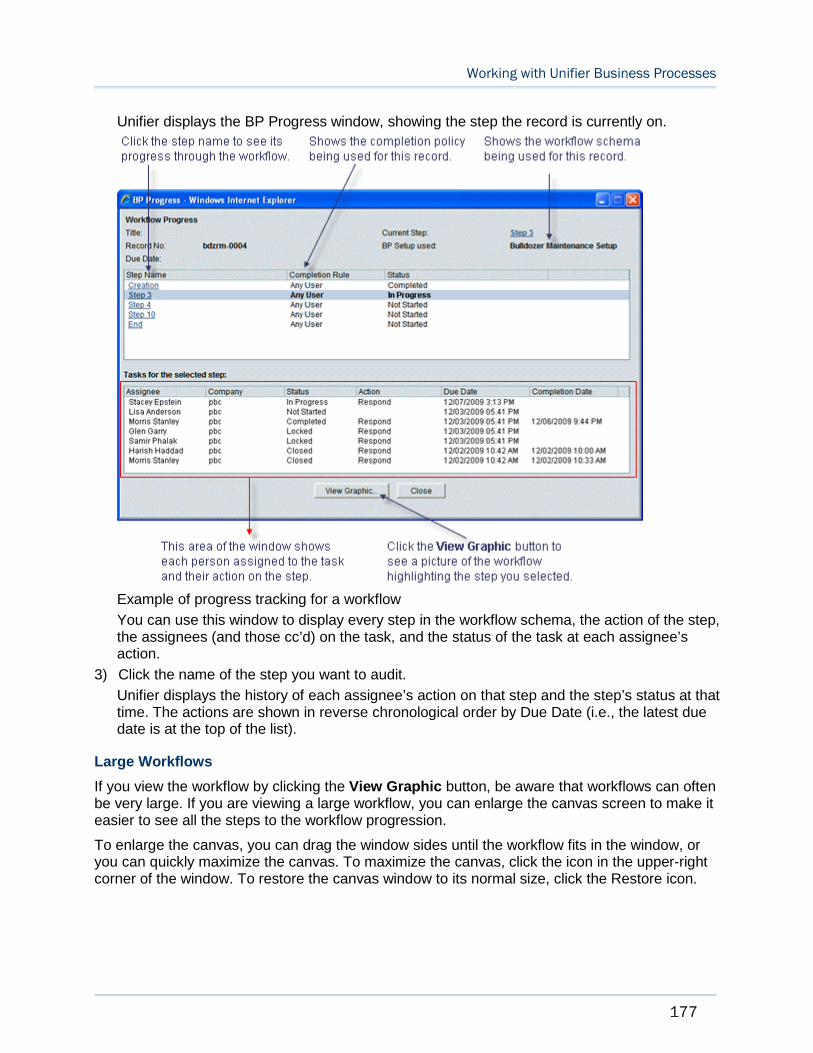
Working with Unifier Business Processes
177
Unifier displays the BP Progress window, showing the step the record is currently on.
Example of progress tracking for a workflow
You can use this window to display every step in the workflow schema, the action of the step, the assignees (and those cc’d) on the task, and the status of the task at each assignee’s action.
3) Click the name of the step you want to audit.
Unifier displays the history of each assignee’s action on that step and the step’s status at that time. The actions are shown in reverse chronological order by Due Date (i.e., the latest due date is at the top of the list).
Large Workflows
If you view the workflow by clicking the View Graphic button, be aware that workflows can often be very large. If you are viewing a large workflow, you can enlarge the canvas screen to make it easier to see all the steps to the workflow progression.
To enlarge the canvas, you can drag the window sides until the workflow fits in the window, or you can quickly maximize the canvas. To maximize the canvas, click the icon in the upper-right corner of the window. To restore the canvas window to its normal size, click the Restore icon.
Unifier Business Processes User Guide
178
Managing Business Process Records
The following topics describe how to manage business process records.
Transferring Ownership - Business Process Records
If you are a BP record owner or creator, you can transfer ownership at any time in the workflow process, other than the creation step, or after its termination step. The new owner will have all privileges of a BP owner, and the originator name on the BP form and the log will show the new owner.
To transfer ownership
Open a BP record. From the Edit menu, click Transfer Ownership. Choose the user from the User/Group picker and click OK. The selected user becomes the BP’s new owner. You can also transfer a record from the BP log, Actions > Transfer Ownership. If you have enabled to view
forms in the redesigned user interface, the option to transfer ownership is under Menu > Transfer Ownership.
Granting Business Process Record Permissions
To grant permission to a non-workflow business process record
1) Create a BP record in the Company Data Manager, Company General, or project or shell General log.
2) Select one or more BP records and click Actions > Permissions. You can also click the gear icon and click Permissions to assign permissions to only one BP Record. The Permissions window opens.
3) In the Permissions table, type the user or group name in the Add box and select the user or group to grant access.
4) By default, each listed user or group will be granted View permission, allowing them to open the BP Record. To grant additional permissions, select the checkboxes that correspond to the user or group:
All: User will have View, Edit, and Modify Permission.
Modify Permissions: Allows user to control the BP record's permission settings.
Edit Data: User can import BP record information, save a snapshot, edit BP record properties, and add columns.
View: User can view the BP record.
5) Click Save, or click Save & Next to go to the next worksheet.
You can Remove user or group permission by clicking the trash-can icon in the Removecolumn.
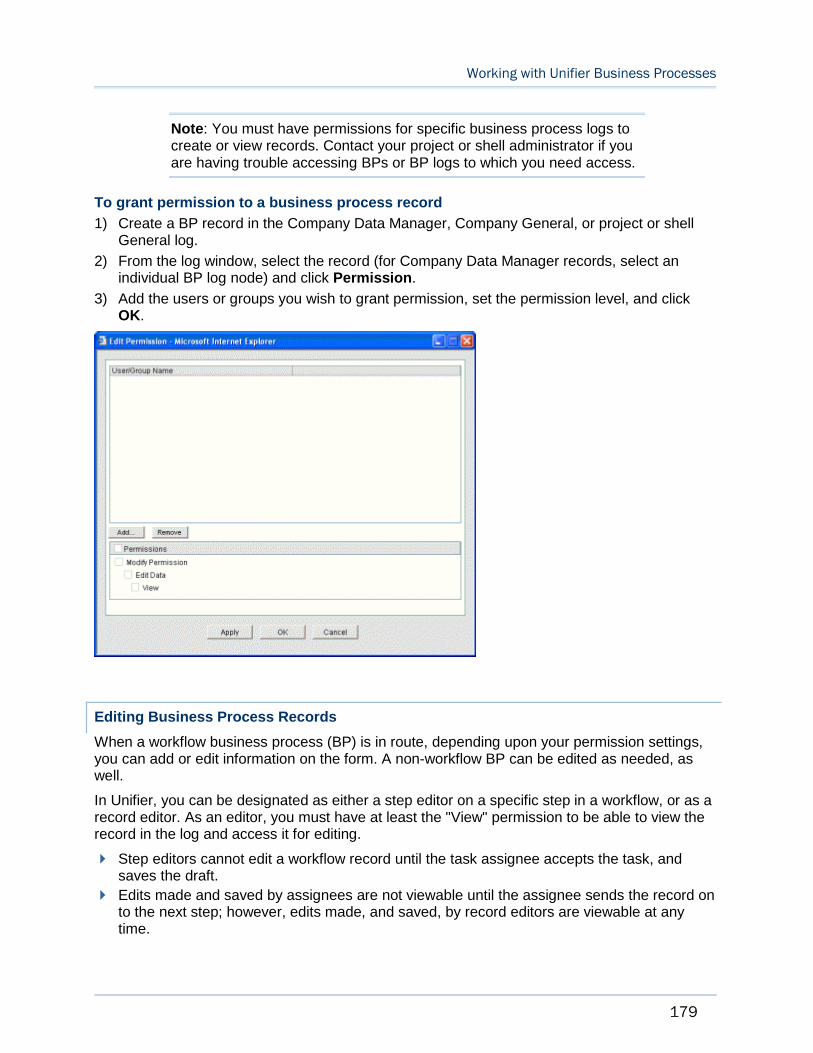
Working with Unifier Business Processes
179
Note: You must have permissions for specific business process logs to create or view records. Contact your project or shell administrator if you are having trouble accessing BPs or BP logs to which you need access.
To grant permission to a business process record
1) Create a BP record in the Company Data Manager, Company General, or project or shell General log.
2) From the log window, select the record (for Company Data Manager records, select an individual BP log node) and click Permission.
3) Add the users or groups you wish to grant permission, set the permission level, and click OK.
Editing Business Process Records
When a workflow business process (BP) is in route, depending upon your permission settings, you can add or edit information on the form. A non-workflow BP can be edited as needed, as well.
In Unifier, you can be designated as either a step editor on a specific step in a workflow, or as a record editor. As an editor, you must have at least the "View" permission to be able to view the record in the log and access it for editing.
Step editors cannot edit a workflow record until the task assignee accepts the task, and saves the draft.
Edits made and saved by assignees are not viewable until the assignee sends the record on to the next step; however, edits made, and saved, by record editors are viewable at any time.
Unifier Business Processes User Guide
180
Edits performed on the end step of a workflow BP affect the record directly, as no draft exists.
For details about editing your tasks records, see Taking Action on your Task (Working with Tasks (on page 155)).
Editing a BP Record for Editors
In Unifier, you can be designated as either an Editor on a specific step in a workflow, or as a Record Editor. As an Editor, you must have at least view permission to be able to view the record in the log and access it for editing.
Notes:
Step editors cannot edit a workflow record until the task assignee accepts the task, and saves the draft.
Edits made and saved by assignees are not viewable until the assignee sends the record on to the next step. However, edits made and saved by record editors are viewable at any time.
Edits performed by editors are not audited; however, changes made by record editors are audited.
Edits performed on the end step of a workflow business process affect the record directly, as no draft exists.
Concurrent editors in a business process
While a workflow BP is on a step, or a non-workflow BP is in Edit mode, Unifier saves edits to fields, but does not commit the changes. For example, if editor one revises fields 1 to 5 and then saves the record, and editor two revises fields 6 to 10 and saves, the record retains all 10 edits. However, if editor two revises field 4, and saves the record after editor one saved the record, then the data from editor two over-writes editor one's revision.
To edit a non-workflow BP that is already complete, click to open the BP and click Edit.
Note: If the BP is in a terminal status and you click Finish Editing, Unifier disables the Edit button and the form can never be edited again.
You can edit a workflow BP during the workflow process.
Note: If a view form is used on a terminal step, further editing is not possible.
Editing a BP Record from Master Log - Business Processes Node (Standard View)
You can edit a Project/Shell BP record from the master log (Master Log - Business Processesnode), provided that you:
Note: The name of the Master Log - Business Processes node can be customized.
Are an active member of the project, shell, or sub-shell
Working with Unifier Business Processes
181
Have the appropriate permissions in the associated project or shell.
When you open a BP record from the master log, the record will open in either Edit or View mode, depending on the user permissions associated with that record in the Project/Shell.
For editing workflow BP records:
After you open a BP record from the master log, the Project/Shell permissions are in effect.
You can accept a task and take action on the workflow BP record by opening the BP record from the master log, if you are the assignee on the current workflow-step in the BP. If not, the BP record is opened in View mode only.
You can add general comments, if you are a cc user on a particular step.
You can add general comments provided that the current step has general comments option enabled.
If you are not an assignee on a particular step, you must have Bulk Edit permission on the BP record, in the master log, in order to be able to edit data elements on the record.
For editing non-workflow Bp records:
If you have Edit Data permissions for a non-workflow BP record, then you can open the record from the master log and proceed to edit the BP record.
If you are an Editor of a non-workflow BP record, then you can open the record from the master log and proceed to edit the BP record.
To edit a BP record from the master log
1) Go to Home page.
2) Click Master Log - Business Processes node.
3) Click to select the BP record that you want to edit.
4) Click the gear icon ( ) and select Open to open the BP record.
5) When finished editing, click Save.
Editing Multiple BP Records (Bulk Edit) (Standard View)
If you have a large number of projects or shells with several business processes in the same state, you can edit/modify (update) multiple BP records (bulk edit) at once.
In order to be able to edit/modify multiple BP (bulk edit) records through integration:
An interface must have been defined in uDesigner.
You must have permission to perform bulk edit (Allow Bulk Edit).
Note: You can update a maximum of 200 records using bulk workflow update.
You can edit/modify multiple BP records, both the workflow and non-workflow, at the following levels:
Project
Shell
Company
Unifier Business Processes User Guide
182
You can edit/modify multiple BP records (bulk edit), both the workflow and non-workflow, from the following nodes:
Company Logs
Project/Shell Logs
To edit/modify multiple BP records (bulk edit), both the workflow and non-workflow, from the Company Logs node
1) Go to Company Workspace and switch to User mode ( ).
2) From the left-hand Navigator, click Company Logs node to expand.
3) Click the desired BP to open the BP log.
4) From the log, ctrl+click to select the BP records that you want to edit.
5) Click Actions and click Bulk Edit to open the Bulk Edit window.
The window is divided into two panes. Use the left-hand pane to edit the Upper Form of your business process.
Unifier automatically selects the Update checkbox when you type into or modify a field. You can deselect it if you do not want to modify the field at this time.
Use the right-hand pane (Action Status) to preview the status of each record.
6) When finished, click Close.
To edit/modify multiple BP records (bulk edit), both the workflow and non-workflow, from the Project/Shell Logs node
1) Go to your Project/Shell and switch to User mode ( ).
2) From the left-hand Navigator, click Logs node to expand.
3) Click the desired BP to open the log.
4) From the right-hand pane, log, ctrl+click to select the BP records that you want to edit.
5) Click the desired BP to open the BP log.
6) From the log, ctrl+click to select the BP records that you want to edit.
7) Click Actions and click Bulk Edit to open the Bulk Edit window.
The window is divided into two panes. Use the left-hand pane to edit the Upper Form of your business process.
Unifier automatically selects the Update checkbox when you type into or modify a field. You can deselect the Update checkbox if you do not want to modify the field at this time.
Use the right-hand pane (Action Status) to preview the status of each record.
8) When finished, click Close.
Additional information about editing/modifying multiple BP records (bulk edit)
The Bulk Edit option (for multiple BP records) enables you to edit the fields from the Action Form (Upper Form) of the current step in the workflow.
You cannot use the Bulk Edit option for multiple BP records to edit:
Fields in a dynamic data set
Fields from line items
Working with Unifier Business Processes
183
System-defined fields, such as record number, status, or due date
The Bulk Edit option for multiple BP records is not available for the following BPs:
Resource Booking BP
Timesheet BP
Single-record BP
Fields that are configured for auto-sequencing are not available for bulk edit since the values for these fields are system-generated.
You cannot use the Bulk Edit option for single, or multiple, BP records to update a field that has value uniqueness configured.
You can update a maximum of 200 records using Workflow update (Action Without Previewwindow > Workflow Actions).
Only the Upper Form is modified during Workflow update (Action Without Preview window > Workflow Actions).
The Workflow update (Action Without Preview window > Workflow Actions) is not supported on tasks that are on the Initiation step.
When you send the record to the next step, Unifier performs validation for the required fields.
At the company-level and project-level, when you are taking action on multiple tasks, you must have Allow Bulk Edit permission for each task.
For bulk update, the fields are from both Upper Form and Details forms (drawn from integration templates in uDesigner). Some business processes do not support integration. As a result, you cannot take multiple actions on these business processes because integration is used in multiple action.
Unifier does not allow Bulk edit of Data Picker based on a query.
Editing Multiple BP Records (Bulk Edit) from Master Log - Business Process Node (Standard View)
If you have the Allow Bulk Edit permission, you can select one or more business process records from a master log (Master Log - Business Processes node) and perform bulk edits on those selected records.
Note: The name of the Master Log - Business Processes node can be customized.
You can select records across projects or shells to perform bulk edit.
The following Data Definitions cannot be modified using Bulk Edit in a Master Log:
You cannot modify the following data definitions when using the Bulk Edit option from a master log.
Image Picker
Program Picker
Company Picker
Group Name Picker
Unifier Business Processes User Guide
184
User Picker
Project Picker
BP Creator
To edit multiple BP records (bulk edit) from the master log (availability based on permission)
1) Go to Home page.
2) Click Master Log - Business Processes node.
3) Click to select the BP record that you want to edit.
4) From the right-hand pane, log, ctrl+click to select the BP records that you want to edit.
5) Click Actions and click Bulk Edit to open the Bulk Edit window.
The window is divided into two panes. Use the left-hand pane to edit the Upper Form of your business process.
Unifier automatically selects the Update checkbox when you type into or modify a field. You can deselect it if you do not want to modify the field at this time.
Use the right-hand pane (Action Status) to preview the status of each record.
6) When finished, click Close.
7) Proceed with your edits, save, and close the window.
Additional information about editing/modifying multiple BP records (bulk edit)
The Bulk Edit option (for multiple BP records) enables you to edit the fields from the Action Form (Upper Form) of the current step in the workflow.
You cannot use the Bulk Edit option for multiple BP records to edit:
Fields in a dynamic data set
Fields from line items
System-defined fields, such as record number, status, or due date
The Bulk Edit option for multiple BP records is not available for the following BPs:
Resource Booking BP
Timesheet BP
Single-record BP
Fields that are configured for auto-sequencing are not available for bulk edit since the values for these fields are system-generated.
You cannot use the Bulk Edit option for single, or multiple, BP records to update a field that has value uniqueness configured.
You can update a maximum of 200 records using Workflow update (Action Without Previewwindow > Workflow Actions).
Only the Upper Form is modified during Workflow update (Action Without Preview window > Workflow Actions).
The Workflow update (Action Without Preview window > Workflow Actions) is not supported on tasks that are on the Initiation step.

Working with Unifier Business Processes
185
When you send the record to the next step, Unifier performs validation for the required fields.
At the company-level and project-level, when you are taking action on multiple tasks, you must have Allow Bulk Edit permission for each task.
For bulk update, the fields are from both Upper Form and Details forms (drawn from integration templates in uDesigner). Some business processes do not support integration. As a result, you cannot take multiple actions on these business processes because integration is used in multiple action.
Auditing Business Processes
The business process (BP) Audit Log tab lists the actions that have been taken on a specific BP record. The following table describes the events that are, or are not, captured in the Audit Log tab.
Note: Unless note otherwise, the following information applies to both workflow and non-workflow BPs.
The following events are captured in the BP Audit Log:
Workflow steps
When and to whom (To and Cc) each step was sent (workflow BPs)
Record creation date (non-workflow BPs)
General comments
File comments
Linked Mailbox
Linked records
Discussion group: start and end (Classic View only)
Add or manage Document-type BP folders: new, remove, rename, move
Add, remove, open, view,or download file attachments
Decline task
Transfer ownership
Add, modify, or delete a line item: detail or summary
File attachments to existing line items
Copied (cc) user views the record
Updates performed on any part of the BP using the Reverse Auto-Population feature
Record print
The entries include:
Printing from BP record
Single & Bulk Printing from the BP log
Single & Bulk Printing from the Task log
The log entries are:
Event - Print > <Print Type>
Action - Run Print
User Name - User who executed the print
Unifier Business Processes User Guide
186
The print type can be PDF, HTM or Custom. In case of custom print, the format in Event will be Print > Custom > <Template : Format>
Disabled and Clear
The Audit Log captures the number of clearing and disabling of data fields, based on the Disabled and Clear behavior set option in a DDS.
The following events are not captured in the BP Audit Log:
Actions undertaken at the creation step
Accept task
Undo accept task
Add assignees or copy users between steps
Printing and Distributing BP Forms
At times, you may need to print copies of a Business Process form, such as an invoice or a purchase order. You can save a copy of the form as a PDF file and print or email the file, print an HTML view, or print from a Word file if a custom print layout has been created for the form.
Notes:
You can print a form that is in view mode or in edit mode.
The print output is based on your permissions to certain data in Unifier. If you cannot see the hidden comments in a particular step within a Workflow, then the hidden details will not be printed and will not be visible in the Custom Print.
Print a BP Form in Different Formats
When printing business process forms from PDF or HTML format, you can choose to include not only the information on the form itself, but also associated information such as general comments and information about file attachments. The print options are:
Upper form data
Workflow progress information (for business processes with a workflow)
Line item list
Line item data
General comments made to the record
Information about file attachments on the record or line items
Comments made to file attachments
Note: Some fonts may not be supported. Ensure that you adjust your language settings correctly (go to region format tab and review changing language topics in the Help) in cases of printing a BP form or attaching a pdf version of a BP form to an email when a workflow is routed.
If custom print layouts have been created for the business process, the form will print according to the layout that you select.

Working with Unifier Business Processes
187
Note: For PDF and HTML layouts, the ability to print hidden comments will respect permissions: if you can see hidden comments, you can print them. In custom print, hidden comments are not printed.
To preview and print a business process form:
Note: Workflow Progress section in Print options is driven by permissions. If you can see workflow progress, you can print the workflow progress.
1) Open the BP record that you want to print.
2) From the File menu, choose Print Preview, then choose one of the following:
HTML to view the form in the browser which can then be printed.
PDF to open the form in Adobe Reader, which can be saved or emailed as a PDF file, or printed process, you are asked to save the changes to the form.
Custom to select the BI Publisher, Microsoft Word, and PDF custom print templates from the same place as the current custom prints (Custom Format Print selection window).
Note: Even if you have not made any edits, you may be asked to save changes. This can occur if the form includes fields that are auto-populated or automatically updated, as these automatic functions are considered to be changes.
3) The Print Options window opens.
This window displays the business process record information that can be printed; see the table below. Select the checkboxes for the information that you want to print. Only those options that are applicable to that business process design will appear on the Print Options window. For example, line items options are available for business process types that support line items, the Task Details option appears only for workflow business processes.
4) To select all the checkboxes, click the Select All checkbox. To deselect all, uncheck the Select All checkbox.
Selecting or deselecting this checkbox will have no affect on any Workflow Progress options you choose.
5) Click OK. The preview form opens in an HTML or PDF (Adobe Acrobat or Reader) window, from which you can print.
If you chose PDF, you can save a copy by clicking the Save a Copy button, or print. To print from HTML format, click on the Print icon in the upper right corner.
Print option What it prints
Upper Form Selected by default. This prints the information entered on the upper form.
Workflow Progress
Prints a log of the steps in a workflow, showing the step name, the assignee(s) on the step, the action that was taken on the step and the completion date. You have additional print options:
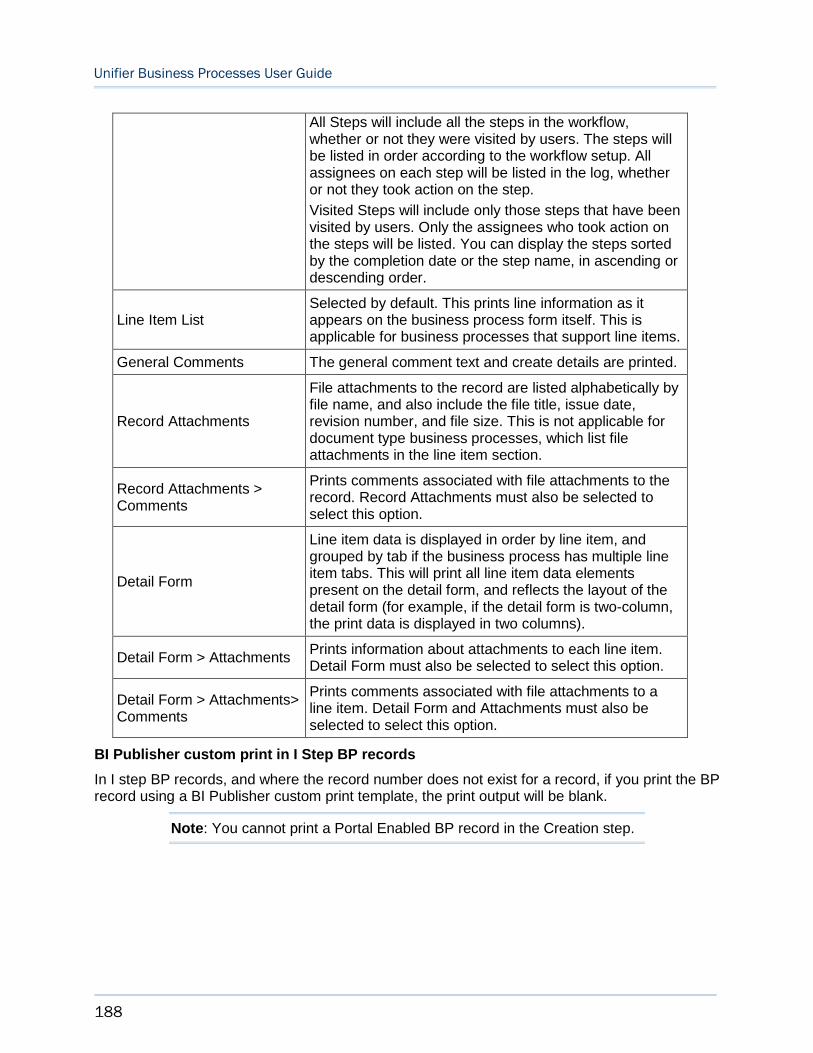
Unifier Business Processes User Guide
188
All Steps will include all the steps in the workflow, whether or not they were visited by users. The steps will be listed in order according to the workflow setup. All assignees on each step will be listed in the log, whether or not they took action on the step.
Visited Steps will include only those steps that have been visited by users. Only the assignees who took action on the steps will be listed. You can display the steps sorted by the completion date or the step name, in ascending or descending order.
Line Item List Selected by default. This prints line information as it appears on the business process form itself. This is applicable for business processes that support line items.
General Comments The general comment text and create details are printed.
Record Attachments
File attachments to the record are listed alphabetically by file name, and also include the file title, issue date, revision number, and file size. This is not applicable for document type business processes, which list file attachments in the line item section.
Record Attachments > Comments
Prints comments associated with file attachments to the record. Record Attachments must also be selected to select this option.
Detail Form
Line item data is displayed in order by line item, and grouped by tab if the business process has multiple line item tabs. This will print all line item data elements present on the detail form, and reflects the layout of the detail form (for example, if the detail form is two-column, the print data is displayed in two columns).
Detail Form > Attachments Prints information about attachments to each line item. Detail Form must also be selected to select this option.
Detail Form > Attachments> Comments
Prints comments associated with file attachments to a line item. Detail Form and Attachments must also be selected to select this option.
BI Publisher custom print in I Step BP records
In I step BP records, and where the record number does not exist for a record, if you print the BP record using a BI Publisher custom print template, the print output will be blank.
Note: You cannot print a Portal Enabled BP record in the Creation step.

Working with Unifier Business Processes
189
Custom Format Print Options For BPs
Custom Format Print Window for a non-Workflow BP
The Custom Format Print window, for a non-Workflow BP, has two sections:
Select a custom print template
Select a template and format to print
Both sections facilitate custom print template and format selections.
Select a custom print template
Lists all the custom print templates existing for the non-workflow BP, including the custom print templates created in the Custom Templates node and the custom print templates created in the configuration of the non-workflow BP. For example, the list may include BI Publisher custom print templates, Word, and PDF custom print templates.
If there are multiple custom print templates for the same non-workflow BP, all the published templates are listed in this section.
The "Select a template and format to print" is populated by the selection made in the "Select a custom print template" section.
Select a template and format to print
If you select a BI Publisher custom print, then you can select the desired template and format from the drop-down lists.
Template drop-down displays all the available templates for the selected format.
Format drop-down displays the available formats for the selected template.
If the custom print template was created using PDF or Word, then the "Select a template and format to print" is disabled.
Default template and format (non-Workflow)
If a BI Publisher print template is selected, then the default values in the drop-down lists are set based on the default in the custom print template.
When a BI Publisher print template is selected in the "Select a custom print template" section, the template and format are populated based on the default value selected at the time of designing the print template.
Custom Format Print Window for a Workflow BP
If there is only one custom print template, and it happens to be a BI Publisher template, then the print template is selected in the “Select a custom print template” section, and the template and format are populated based on the default value selected at the time of designing the print template.
The Custom Format Print window has three sections for a Workflow BP.
Select a custom print template
Select a template and format to print
Select options for Workflow Progress
Unifier Business Processes User Guide
190
By default, when the Custom Format Print window is launched, all three sections are enabled and the first template is selected. The options seen in the subsequent sections are based on the selection made in the "Select a custom print template" section.
You are able to select options for workflow progress in the 'Select options for Workflow Progress" section of the Custom Format Print window for PDF and Word templates, which are created at the time of configuring the non-workflow BP.
If the selected custom print template is of a BI Publisher type, then the “Select options for Workflow Progress” section is disabled. This is because the custom print template designers can always use the system provided Workflow views to include workflow-related information in the template.
Default template and format (Workflow)
When a BI Publisher print template is selected in the "Select a custom print template" section, the "Select a template and format to print" section is populated based on the default value selected at the time of designing the print template.
If there is only one custom print template, and it is a BI Publisher template, then the print template is selected in the “Select a custom print template” section, and the template and format is populated based on the default value selected at the time of designing the print template.
Note: If you custom print a draft business process record, the modified record values will not be displayed in the in the Output of the BI Publisher print.
Custom Format Print Window for Shells
In addition to editing shells that you have permissions for, you can view all Custom Print Templates and define them at the shell level. Once you navigate to your system logs, you must select a BP. After you choose an item from the list of available items in the BP, click the Settings icon and select the Print – Custom option.
When you select Print – Custom, a new window is displayed where you can choose a Custom Print Template from the dropdown. Upon choosing one of the available Custom Print Templates, select Print.
Note: If you copy a shell that has an existing setup and the BPSetupmodule is selected, then the Custom Print Templates are also copied.
Print Using a Custom Layout
Custom printing can be used with templates created in BI Publisher, Microsoft Word, and PDF format. Depending upon the template used for custom print, you can print the upper form, the current workflow step, comments and attachments of the record. The template may also allow printing of specific line items in their tabs. The printed output will list the name of the tab with the line items following on separate lines.
To print a BP form with a custom print layout:
Working with Unifier Business Processes
191
1) Open the business process record that you want to print.
2) From the File menu, choose Print Preview, then choose Custom to select the BI Publisher, Microsoft Word, or PDF custom print templates from the same place as the current custom prints (Custom Format Print selection window).
If you are editing the business process, you are asked to save the changes to the form.
Note: Even if you have not made any edits, you may be asked to save changes. This can occur if the form includes fields that are auto-populated or automatically updated, as these automatic functions are considered to be changes.
3) Select a template and format.
4) Select Workflow progress options. Refer to Unifier Managers User Guide (Printing a Configurable Manager Form) for details on non-Workflow progress options.
Workflow progress prints a log of the steps in a workflow, showing the:
Step name
Assignee: on the step
Company: the assignee company
Status: of the step
Action: on the step
You have additional print options:
All Steps will include all the steps in the workflow, whether or not they were visited by users. The steps will be listed in order according to the workflow setup. All assignees on each step will be listed in the log, whether or not they took action on the step.
Visited Steps will include only those steps that have been visited by users. Only the assignees who took action on the steps will be listed. You can print the selected steps (including the current workflow step) sorted by completion date or step name, in ascending or descending order.
5) Click OK. The File Download window opens.
6) Choose to Open or Save the file.
7) Print the file.
Send a PDF copy of a BP form via Mailbox
You can create and send a PDF copy of a business process record directly from Mailbox.
To send a PDF copy of a BP form using Mailbox
1) Open the business process form in View mode.
2) From the File menu, click Send Mailbox. The Mailbox window opens. A PDF copy of the form is automatically attached.
3) Complete the Mailbox form and send.

Unifier Business Processes User Guide
192
Auto-Populating BP Data Picker on BP Auto-Creation
When a source business process (BP) record has a BP creator that auto-creates another BP record that has a BP Data Picker referencing the source BP record, the BP Data Picker values will be auto-populated referencing the source BP record, even when the source BP record is in a different shell.
The auto-creation of the destination BP records (from source BP record) can be either of the type:
Record to Record or
Line-item to Record
Both types support the BP Data Picker in destination record that will be auto-populated.
Note: Unifier ignores the queries that have been defined for the BP Data Picker.
The source BP record in a Project/Shell can auto-create another BP record in the same Project/Shell
As a result, when the source BP (BP A) record and the auto-created BP (BP B) record reside in the same Project/Shell, then the BP Data Picker in the auto-created BP (BP B) record is auto-populated with reference to the source BP (BP A) record, similar to all BP Pickers.
The source BP record in a Project/Shell can auto-create another BP record in different Projects/Shells
As a result, when the source BP (BP A) record and the auto-created BP (BP B) record reside in different Projects/Shells, then the BP Data Picker in the auto-created BP (BP B) record is auto-populated with reference to the source BP (BP A) record.
Auto-Populating BP Line Item Data Picker on BP Auto-Creation
When a record is auto-created from a line item:
If the created record has a BP Data Picker, it will be populated with a reference to the source record. If the upper form also has the BP Line Item Data Picker, it will be populated with a reference back to the line item on the source record.
If the created record has a BP Data Picker on the detail form, the line items copied from the source will have the picker populated with a reference to the source record. If the detail line also has BP Line Item Data Picker, it will be updated with a reference to the detail line. You can auto-populate and reverse auto-populate back to the source upper or detail form.
BP Line item Data Picker displays the line item based on query conditions that are evaluated similar to Data Picker in the auto-created record.
When a record is auto-created from another record upper form:
If the created record has a BP Data Picker, it is populated with a reference to the source record and any Line Item Data Picker on record is empty.

Working with Unifier Business Processes
193
If the created record has a BP Data Picker on the detail form, the Line Items copied from the source will have the picker populated with a reference to the source record. If the detail line also has BP Line Item Data Picker, it will be updated with a reference to the detail line. The design can then auto-populate and reverse auto-populate back to the source upper or detail form.
BP Line Item Data Picker displays the Line Item based on query conditions that are evaluated similar to Data Picker in the auto-created record.
When a line item is auto-created from source BP line item:
If the source record has a BP Line Item Data Picker, it is populated with a reference to the auto-created line item, provided BP Data pickers refer to the source record.
Auto-population and Reverse Auto-Population of data elements, based on BP Line Item Data Picker, is supported. A Reverse Auto-Population can be done from both the Upper and Detail forms.
When you select a Line Item Data Picker without selecting a BP Data Picker, Unifier displays a picker window without line items.
When you change the selection in a BP Data picker, if there is already a line item selected, then Unifier displays the message: You cannot change a BP Data picker that has line item(s) associated with it.
Upon copying a record, the selected values for a BP Line Item Data Picker will be copied from the source record.
Upon auto-creation of the record or line item, the value for the BP Line Item Data Picker (on the destination record or line item) is retained from the source. The value of the BP Data Picker is also retained on the destination from the source.
A data element that is based on a Line Item Data Picker data definition is supported as part of HTML or PDF prints. The Display Element value is printed as part of HTML or PDF prints.
A Line Item Data Picker element is available as part of Custom Print schema so that you can use it on Custom print XML file. At runtime the Display Element value will be printed.
Updates on Document Attributes for Business Processes
When a document gets published to the Document Manager (DM), the document attributes get updated by matching DEs from the BP record. If the matching DEs on the source record get updated during the life of the record, then the corresponding DM attributes can get updated, if it has been configured in uDesigner to do so.
If the option of Update attributes for already published documents is checked on a BP Upper Form at a given step (in uDesigner), then the attributes of all record and line item published attachments will be updated according to the matching DEs between the record and the DM attribute form. Also:
If the uDesigner option (Update attributes for already published documents) is checked at multiple steps, the DM attributes gets updated at each such step.
For a Workflow type BP:

Unifier Business Processes User Guide
194
If the uDesigner option (Update attributes for already published documents) is checked on current step, the DM attributes get updated as the record is routed to next step.
If the user causing the record to move to next step does not have Modify Properties permission on a document, the DM attributes get updated, if the uDesigner option (Update attributes for already published documents) is checked.
If the end step has an edit form, then the DM attributes get updated at each save of the record, if the uDesigner option (Update attributes for already published documents) is checked.
For a non-Workflow type BP:
The attributes get updated when the record is Finish Edited, if the uDesigner option (Update attributes for already published documents) is checked.
If the user who edits the record does not have Modify Properties permission on a document, the DM attributes get updated, if the uDesigner option (Update attributes for already published documents) is checked.
For both Workflow and non-Workflow type BPs:
If the attribute on DM form is set to Formula or Auto-populate with a Constant Value, the attributes get updated from the BP if there are matching DEs with the BP form; however, when you manually open the Properties, and click OK, the Formula or Auto-populate with a Constant Value on the DE gets recalculated and repopulated.
If a BP record is created by attaching file(s) from the DM directly, and the uDesigner option (Update attributes for already published documents) is checked, then the files are treated as a published document(s) and their attributes get updated as the record progresses in workflow, or the record is Finish Edited.
Note: If the uDesigner (Update attributes for already published documents) is not checked, then there will be no update of DM attributes as a record progresses in workflow, or the record is Finish Edited.
195
Unifier Business Processes with Special Behaviors
Some business processes have special features and behaviors that make them operate differently from most business processes in Unifier. These business processes and their features are described in this section.
For information about internationalization and CSV files refer to Unifier General User Guide.
In This Section
Schedule of Values (SOV) Sheets and Business Processes ................................. 195 Payment Application Business Processes ............................................................. 197 General Spends Business Processes .................................................................... 211 Change Commit Business Processes .................................................................... 221 SOV Summary Payment Applications Sheets and Business Processes ................ 223 SOV Summary Payment Application Business Process (Standard View) .............. 244 Overpayment in Summary Payment Applications SOV.......................................... 246 Totaling Cost Breakdown Values ........................................................................... 246 Request for Bid (RFB) Business Processes .......................................................... 255 Lease Business Processes ................................................................................... 276 Reservation Business Process .............................................................................. 285
Schedule of Values (SOV) Sheets and Business Processes
This section discusses how to manage BP records, including searching for existing BPs, transferring ownership, viewing BP properties, and viewing Schedule of Values (SOV) or funding information from within a Cost type BP.
View an SOV sheet from the BP form
Commit (contract) or spend (invoice) BPs can be set up to automatically create a Schedule of Values (SOV) sheet. These transactions can be easily accessed directly from the BP form. The BP form remains active.
If the BP has been set up to automatically create an SOV sheet, once the SOV sheet has been created, an SOV button appears at the top of the BP form.
For more information about Schedule of Values (SOV) sheets refer to Unifier Managers User Guide (Unifier Cost Manager, About Schedule of Values (SOV)).
To view the SOV sheet created from the Cost type BP:
1) Wait for the BP to reach terminal status.
2) Click the SOV button to open the SOV sheet that corresponds to the transaction.
3) Close the SOV sheet to return to the BP form.

Unifier Business Processes User Guide
196
Create SOV breakdowns
You can add SOV breakdowns from this view. Breakdowns are only in use in the SOV sheet, not the cost sheet. If another transaction exists for the CBS code, you will not be able to do a breakdown.
To add CBS code breakdowns that can be used to create invoices:
1) Open the SOV sheet by clicking the SOV button.
2) Click on a listed CBS code from the sheet. The CBS Detail window opens.
For more information about adding CBS breakdowns refer to Unifier Managers User Guide(Unifier Cost Manager, Adding Breakdowns to SOV sheet by Importing).
View, or edit, fund transaction details from the BP form
Commit (contract) or spend (invoice) BPs can be set up to consume or appropriate funds in the project/shell funding sheet or commitment funding sheet. These transactions can be easily accessed directly from the BP form.
If the BP form has been set up for funding (and is in the appropriate step, and you have funding permissions), a Funding button will appear at the top of the BP form. This allows you to perform a fund assignment while routing and approving a BP, such as a payment. Access to this button and fund information is dependent upon your Fund Manager permissions.
Refer to Unifier Managers User Guide (Unifier Cost Manager, About business processes enabled for commitment funding).
Refer to Unifier Managers User Guide (Unifier Cost Manager, About business processes enabled for funding).
Composite view of Base Commits and Change Commits
You can view a composite view of both Base Commits and Change commits. The SOV sheet is used as a composite view, and the SOV sheet will be the composite of the PO and all added lines from Change commits.
To support the line-item mode, the SOV sheet has a column called Ref that represents line item numbers.
There are other fixed columns, and the columns will be dependent on the mode.
Line item mode:
The Ref column represents the line item numbers for both Commits and Change Commits.
The Description column shows the short description of the line item from the Commit.
CBS mode:
The Ref column does not have any data. The breakdown items do not include a ref number. The column width is four characters.
Note: For Base Commits Business Processes (BPs) with SOV type of "Summary Payment Applications," a special behavior line item has been provided to allow you to add further cost distribution details to the line items. This option is accessible in the Standard detail tab of the

Working with Unifier Business Processes
197
properties window and contains two options: Lump Sum and Cost Unit. Click Add and select the appropriate option.
To view funding details from the Cost type BP:
1) Wait for the BP to reach terminal status.
2) Click the Funding button to open the Cell Detail window.
3) Review the details of the transaction.
Note: This is the same window that you would see if you clicked on the link corresponding to this transaction on the project or shell funding sheet.
To reassign funding, click the Reassign Funds button. Refer to Unifier Managers User Guide(Unifier Cost Manager, About business processes enabled for funding).
Payment Application Business Processes
A Payment Application BP enables you to track the payment information using the standard payment application method such as tracking retainage, stored and materials. Each Payment Application BP record references a particular Base Commits record. The line items on the Payment Application BP will reflect the line items on the Base commits as well as any associated Change Commits.
Payment Application BPs, and associated Base Commits and Change Commits, are designed in uDesigner. For more information, refer to the Unifier uDesigner User Guide. Your Company Administrator can include or remove SOV restrictions when setting up a Base Commit BP, or a negative Change Commit (negative change order) BP.
Payment Application Tasks and Performing Multiple Actions-Bulk Action (Standard View)
The Tasks node of the Payment Application enables you to perform bulk action on Payment Application records, when Unifier detects multiple payments, or negative change orders.
When you select multiple Payment Application BP records (or Summary Payment Application BP records) and perform a workflow action (bulk action), then Unifier (based on the "remove SOV restrictions" selection on the Commit BP) updates all the records that you selected, and:
If you select the Action with Preview option (Tasks node > Actions), then Unifier displays messages related to payment applications and negative change commits, when applicable.
If you select the Action without Preview option (Tasks node > Actions), then Unifier does not display messages related to payment applications and negative change commits, when applicable.
For non-Workflow BP records, when the "Status" is updated through Bulk Edit, Unifier does not display messages related to payment applications and negative change commits.
When the BP records are progressed from email notifications (when you perform a workflow action through email notifications), Unifier does not display messages related to payment applications and negative change commits.
Unifier Business Processes User Guide
198
Payment Application BP and Multiple Payments
If the Remove SOV restrictions option is selected in the Business Process Setup window (General tab), then multiple Payment Application type BPs can be configured for a Project/Shell and multiple Payment Application BP records can be routed, at any time, for a commit.
Note: You can go to the Base Commit Setup section for setting information.
Example
First, the user creates the contract record CON-001 and sends the contact to a step that creates Schedule of Values.
Then, the user creates a Payment Application BP record PA-001 and sends the BP record to the next step for approval. At this point the BP record is in progress (in-flight).
Then, the user creates a second Payment Application BP record PA-002 and sends the BP record to the next step for approval.
Then, the user tries to create a second Payment Application BP record for the same Contract CON-001.
An Alerts icon ( ) is displayed and when the user clicks the icon, information about pending payments and negative change orders is presented.
Unifier does not block the creation of the second Payment Application BP record PA-002, but informs the user that a Payment Application BP record is pending on the contact.
If the Remove SOV restrictions option is deselected in the Business Process Setup window (General tab), then only one Payment Application type BP can be configured for a Project/Shell and only one Payment Application BP record can be routed, at any time, for a commit.
After a Payment Application has reached the terminal step, if you open an in progress (in-flight) BP record, Unifier notifies you that the SOV has been refreshed.
After the system refreshes, Unifier retrieves the latest information, from the SOV. At run time, whenever you open a draft, or an in-flight, payment record and accept the SOV merge alert the data element (which has the "Do not get latest SOV values when merging" checked in uDesigner) will not get refreshed with the latest updated values from SOV.
Before SOV merge, payment grid for data element 'Unit price/gallon' which has 'Do not get latest SOV values when merging' checked.
All the fields populated from the SOV will be updated based on the latest SOV.
All formula fields, in the Payment Application Detail Form, defined using fields from SOV, will be re-evaluated.
Example
There are two Payment Applications P1 and P2. P1 has reached the terminal step. P2 is in progress (in-flight).
User has not yet accepted the task. Upon accepting the task, the system will refresh the SOV and inform user with an alert.

Working with Unifier Business Processes
199
When the user changes to Payment Application BP, an alert icon appears on the window. Click the Alerts icon ( ) to see any pending payments, and negative change orders, associated with the selected reference commit. The Alerts icon is available for both Workflow and non-Workflow BPs and might appear after a selection for the contract record is made.
User has accepted the task, and SOV has changed because of another payment. When user open this record, system will perform an SOV merge, and inform user with an alert.
If the user has left P2 open, and P1 has reached terminal status and P1 has impacted the SOV used in P2, then when the record P2 is sent to the next step, system will refresh the SOV and throw an alert to the user stating that the SOV has changed.
Payment Application BP and Negative Change Commits (Standard View)
If the Remove SOV restrictions option is selected in the Business Process Setup window of the Base Commit (General tab), then multiple Payment Application type BPs and Negative Change Commits can be configured for a Project/Shell.
At the time of creating the Payment Application record, upon selecting the reference commit, the system will check for any existing negative change orders for the selected reference commit. Unifier displays a message if there any negative change orders.
After the record has been created, subsequently, when you open Payment Application record, the system checks to see if there are any pending payments, or negative change orders. If detected, Unifier displays a message.
Payment Grid which has negative line items
When you open the Payment Application grid, the line items which will be modified because of a pending Negative Change order will have an yellow alert in the Scheduled Value cell. You can click on the cell to view the details of the Change Order. The details include the BP name, BP record number, Line Number, and the Amount fields.
Line items from negative Change orders which are in draft status will not be seen in the Payment Application grid, but if a line item has been modified or removed from an existing record which is in draft status, the line item from negative change order can be seen in the Payment Application grid.
In case of Summary Payment Application, the alert will be seen in the Summary line, if the summary line item amount is negative. Similar alert will be seen if the costed line item is negative.
The sort order in the window begins by Business Process, then by Record Number, then by Line Number, and finally by Costed Line Number.
Creating negative change orders when the Payment Application is in progress (in-flight)
Example
First, the user creates the contract record CON-001 and sends the contact to a step that creates Schedule of Values.
Then, the user creates a Payment Application BP record PA-001 and sends the BP record to the next step for approval. At this point the BP record is in progress (in-flight).
Unifier Business Processes User Guide
200
Then, the user creates a Change Order (Change Commit) BP record to modify the committed line with a line item with a negative amount (a Negative Change Order CC-001) and sends it to the next step for approval.
The creation is successful.
Creating multiple negative change orders
Note: The following is applicable to Change Orders (Change Commits) that point to the Base Commit that does not have any SOV restrictions.
Example
First, the user creates the contract record CON-001 and sends the contact to a step that creates Schedule of Values.
Then, the user creates a Change Order (Change Commit) BP record to modify the committed line with a line item with negative amount (a Negative Change Order CC-001) and sends it to the next step for approval.
Then, the user creates another Negative Change Order for the same contract record CON-001.
The creation is successful.
Enter Payment Application Line Item Information
Line items on payment applications have special functionality. Payment application line items are created automatically from the line items on the associated base commit and any change commits. The columns that appear on the grid (including formula columns) are part of the business process detail form design.
To enter line item information on a payment application
1) In the Standard tab of the payment application business process form, click Add. This displays all the SOV lines with the selected Base Commit BP record in the upper form.
Note: Depending upon the design of the BPs, some fields may be auto-populated with data from the base commit and change commit. For a field to auto-populate, the same data element must be used on the base commit, change commit, and payment application. Line items appear from the base commit and any change commits based on the statuses of those business processes, as designed in uDesigner.
2) Enter details for the line items that must be paid. You can enter values in any editable field on the grid.
3) The grid is locked after the first five columns. To lock another column while viewing or editing data, you can drag the column from the unlocked part of the sheet into the locked part of the sheet. This layout will not be saved into the database.
4) When you have completed editing the Line Items window, click Save.
1. When the form is saved, lines that have payments are added to the grid.
Working with Unifier Business Processes
201
2. If a payment must be made in a subsequent step, click on Add again to re-invoke the SOV lines screen. All lines become visible and any lines that were previously added open up in edit mode.
A pen icon appears in the second column to indicate which rows have been modified. When a payment has been added and saved, the pen icon turns green. When the row is still being edited, the pen icon is yellow.
To Remove an SOV line that you added to the grid, click the trash-can button on the toolbar.
Errors
The first column of the payment applications grid is marked by an (x) icon and indicates errors within edited line items. An (x) icon appears in this column when rows have errors. To view errors in the log, click Check Errors or click on the (x) icon.
Payment Status
The second column of the payment applications grid is marked by a pen icon and indicates payment status. A pen icon appears in this column to indicate which rows have been modified. When a payment has been added and saved, the pen icon turns green. When the row is still being edited, the pen icon is yellow.
To undo line item changes without closing the Line Items window
In the Line Items window, click the Cancel button. Any line item information that you have entered or changed will be cleared, and the fields will revert back to their original values.
SOV type Payment Application and SOV line items type Individual commit line items
Note: The following applies when the "Update Auto-populate on payment application" option (in Options tab) is selected for a Change Order BP, in uDesigner.
When you create a new Payment Applications in your project (Payment Applications node), in the Line Items tab of the Create New Payment Applications window:
a) The Description column and the Spend Category column are set to auto-populate from the Base Commit and receive the latest updated values from the Change Order that references this SOV line items.
b) The Change Order then routes the record to the terminal status.
c) The Description column and the Spend Category column are set to auto-populate from the Base Commit and receive the latest updated values from the Change Order that references this SOV line items.
When the auto-populated data elements are updated in referenced SOV line items (in the Change Order) and route to approved step, creating a new payment record elements that are set to auto-populate from Base Commit will be updated with the latest values from the Change Order. The new payment record elements will always get the values from the latest Change Order whenever these values are updated in the payment record. Upon routing the payment record to terminal status, it will further update the values in SOV line items.
Unifier Business Processes User Guide
202
Pending SOV type Payment Application, or SOV type Summary Payment Application, and SOV line items type Individual commit line items
Note: In the payment record, the values are auto-populated from the Base Commit if the "Update Auto-populate on payment application" option (in Options tab) is not selected for a Change Order BP, in uDesigner.
For a pending payment record, in the Line Items tab of the Payment Applications window:
a) The Description column and the Spend Category column are set to auto-populate from the Base Commit and receive the latest updated values from the Change Order that references this SOV line items.
b) The Change Order then routes the record to the terminal status.
c) The Description column and the Spend Category column are set to auto-populate from the Base Commit and receive the latest updated values from the Change Order that references this SOV line items.
When the auto-populated data elements are updated in referenced SOV line items (in the Change Order) and route to approved step, the pending payment (after opening and accepting the task) will receive an SOV alert, if there is an SOV merge. When you click OK, the auto-populate data elements (from Base Commit) are updated with the latest Change Order in the grid, along with the latest SOV line items values.
If you open a pending payment which is in accepted state and navigate to the payment grid, then all of the existing payment lines will receive the latest values for the auto-populated data elements from the latest Change Order.
Summary Payment Applications behavior for Variable Unit Cost Lines
For the Variable Unit Cost line items, the Quantity this Period column is editable for both the summary and costed lines. You can enter quantity at the summary and push that quantity to the costed lines.
The Requested this Period amount will be calculated based on the Unit Price and Quantity this Period for each costed line. In the summary line item, the Amount this Period is populated with the sum of costed lines - unit price * Quantity this Period, and the request this period will be calculated accordingly.
In the Payment Applications for the Variable Unit Cost line items, the Amount this Period for the summary line will be calculated as sum of each costed line (uuu_unit_price * quantity this period), if "Total the cost breakdown values to line item" is in the design. The Amount this Period will be read-only for both the summary and the costed lines.
Amount this Period (uuu_spa_amt_tp)
This uuu_field DE will be calculated by the system in the summary line if you enter Qunatity this Period in the costed lines. The calculation of this field in summary line will be: uuu_spa_amt_tp = sum of each costed line (uuu_unit_price * quantity this period). In the design,the "Total the cost breakdown values to line item" must be selected. For costed lines, the uuu_spa_amt_tp DE value will always zero (0).
Working with Unifier Business Processes
203
The same applies when you import the payment line items for Variable Unit Cost line items, using CSV or Restful services. The Amount this Period in summary line will always be the sum of each costed line (uuu_unit_price * quantity this period). For the costed line items, the uuu_spa_amt_tp DE value will be zero (0).
The Requested this Period will be calculated based on the user-defined formula, for both the summary and the costed line items, and % Complete to Date (for the summary and the costed line items) is calculated based on the existing formula as: % complete to date = (uuu_spa_prev_amt + (uuu_spa_qty_tp * uuu_unit_price) + uuu_spa_amt_tp + uuu_spa_other_tp + uuu_pa_mat_stored) / scheduled_value.
Note: The Percent Complete to Date field is read-only for the summary Variable Unit Cost line item.
Percentage Complete to Date
In the Create New Payment application with Summary grid, you can edit the value of the Percentage Complete to Date for the variable unit cost line items, when the Apply line item value of Percentage Complete to Date to costed lines check box is selected--and can push percentage down to the costed lines).
Note: In the Create New Payment application with Summary grid, the value of the Percentage Complete to Date for the variable unit cost line items is read-only if the Apply line item value of Percentage Complete to Date to costed lines check box is selected.
In the Create New Payment application with Summary grid, based on the value of the Percentage Complete to Date for the variable unit cost line items, the value of the Quantity this Period will get calculated for costed lines, and the value of the Amount this Period will be calculated for summary line.
View Payment Application Line Item History
When payment application records in view mode, a Line Item History button becomes available. This provides a snapshot view of the line item grid as of the last entry.
Note: View mode refers to the non-editable version of the form. For example, for workflow BPs, this is before clicking the Accept Taskbutton or after the form has gone through all the workflow steps and is complete. For non-workflow BPs, this is after editing has been completed.
To access line item history
1) Open a payment application record from the log. Be sure the record is in view mode.
2) Click the Line Item History button. The Line Items window opens, displaying the payment application line item grid, as view-only, with data entered to date.
3) You can optionally split the grid so that the cost codes or other columns are always in view on the left, allowing you to scroll through other columns to view data on the right.
a. To split the grid, click the Split button.
Unifier Business Processes User Guide
204
b. You can click the Freeze button to make the left side of the vertical bar unmovable.
c. To unfreeze the left side, click the Freeze button again. To remove the split, click the Split button again.
4) Click the Close button to close the window.
By default, the first 100 line items are displayed on the page. If your payment application BP has more than 100 line items, you can scroll through the other pages, or you can choose to display up to 500 line items on the same page. Displaying more than 100 line items on the page may take several seconds to load.
Export line item history
You can export the line item history of a payment application record to a CSV file.
To export payment application line item history information
1) Open a payment application record from the log. Be sure the record is in view mode.
2) Click the Line Item History button. The Line Items window opens.
3) Click the Export button. A confirmation window opens. If there are many line items, the operation can take more than 20 seconds.
4) Click Yes on the confirmation window. The File Download window opens.
5) Click Save and specify the file name and location to which to save a copy of the CSV (export) file.
Save payment application in draft mode
You can save a payment application record in draft mode by clicking the Save button from the toolbar.
When you open the draft again to send, the system will check to see if there is any modification done by other users. If the system identifies that there is modification to your payment application, you will be asked to accept new changes before proceeding.
Draft mode and SOV synchronization
If you create a payment application record and save it in Draft mode, and your SOV changes before you route the draft payment application, an error can result when you attempt to route the record. The error Line Items must be validated before proceeding can result if the SOV has changed while your payment application is in Draft mode.
To fix payment application BPs that are affected by changes to the SOV
1) Open the draft payment application record.
2) Click the Add button and click Detail Line Item to open the line item entry grid. Line items that are affected by SOV changes are indicated with check marks.
3) Click OK. The line items are validated against the SOV.

Working with Unifier Business Processes
205
View the Schedule of Values (SOV) Sheet
The Schedule of Values (SOV) for Payment Application functionality provides a way to assemble information from the Base commits and Change commits (Commit), as well as the payment history, in an SOV sheet. You can open the SOV sheet either from the Schedule of Values (SOV) log, or from within a payment application record (the record must be in an editable mode).
When the base commit record is created and reaches a specified terminal status (for example, Approved), the SOV sheet is automatically created, and line items display as rows. As change commits are created and approved (or other specified status), they are added automatically to the SOV sheet. As payment records are created, these also will affect the SOV.
Data that is displayed on the SOV sheet will depend on the columns that have been added to the SOV structure.
The SOV displays the source information from the base commit any change commits. The source for each line can be one or more lines from one or more records.
Depending on the design of the associated business processes, the SOV may list each line entry for the base commit and all change commits as separate line items, or it may group entries with the same CBS code and display the total.
When you are working with the SOV sheets, in a Project/Shell, you can enter the item number (Item # field) for each of the SOV lines:
Unifier stores the SOV sheet based on the Item # column.
When line items roll up to the SOV sheet from the Base Commit and Change Commit BP records, then the system generates the values in the Item # field.
The Item # for each SOV sheet starts with 000010 and this value is incremented by 10. So, if there are 2 lines coming from the Base Commit, then the values seen are: 000010 and 000020.
Although the system generates these numbers, you can edit the numbers. This enables you to reorder the SOV lines. To edit the values, double-click on the field. Entries to this field must be Numeric. No alphanumeric fields are allowed. Similarly, no other characters such as punctuation marks, non ISO characters, -ve sign etc. are permitted. For the summary lines, you cannot enter dot "." character. Dots are reserved for costed lines.
If you edit an existing value, for example 000030, and enter 27, then the value seen in the field will be 000027. The leading zeros are added by the system in order to align and help sort all the values in the column.
The values entered should be in the range of 000000 to 999999.
The subsequent lines coming from the Change Commit (CC )records (with reference to the above mentioned Base Commit (BC) record) can be seen in the SOV sheet with increments of 10.
If you make any changes to the Item # field, click Apply to save the values in the column and to change the Sort order of the rows. The new sort order is maintained in the database and next time when you open the SOV sheet the sort order is displayed in the SOV sheet be based on the last saved view.
For Payment Applications SOV and Summary Payment Applications SOV, the structure is copied from the line item grid structure of the Payment Application BP.
Unifier Business Processes User Guide
206
When a Payment Application BP references a Base Commits of the Summary Payment Applications SOV, the line items of the Payment Application BP will reflect the line items of the Base Commits as well as any associated Change Commits.
In a Payment Application BP referring to the commits and the Summary Payment Applications SOV type, depending on the BP setup, you can:
Include only one Payment Application record, or
Include multiple Payment Application records
See Payment Application Business Processes (on page 197) for details.
To open the Line Item window of a Payment Application BP form, click Add. The window displays a list of line items from the Base Commits (and any Chance Commits), and the values are populated if auto-population (from Base Commits and Change Commits) has been defined.
To view the associated SOV sheet
1) In the Navigator, click Cost Manager > Schedule of Values > Payment Applications. The Schedule of Values: Payment Applications log opens. The SOVs are listed by their associated base comment record numbers and descriptions (SOV Base Record and SOV Description).
2) Select an SOV and click Open (or double-click the record). The Schedule of Values sheet for the base commit associated with the payment application opens.
3) You can optionally split the grid so that the cost codes or other columns are always in view on the left, allowing you to scroll through other columns to view data on the right.
a. To split the grid, click the Split button.
b. You can click the Freeze button to make the left side of the vertical bar unmovable.
c. To unfreeze the left side, click the Freeze button again. To remove the split, click the Split button again
4) To view source information from the base commit and/or change commits, locate the Scheduled Value column.
Note: This assumes that a column has been added to the SOV that is associated with the datasource "Scheduled Value." The column name may vary. Click the link in a cell. The Cell Details window opens, displaying the source of the line item information -- the commit record(s) with a line item entry for that CBS code.
5) Click Scheduled Value link (the column header) to open the View Column window and review the source information (Name, Data Source, Date Format, and Display Mode).
6) Click the Close button to close the window.
To view the associated SOV sheet from within the payment application BP
1) In the Navigator, click Logs > Payment Applications.
2) Select a Payment Application record and click Open (or double-click the record). The Payment Application form opens.
3) Click the SOV button from the record toolbar to open the Schedule of Values window for the Application BP record that you selected.
Working with Unifier Business Processes
207
Note: Ensure that the form is not in a view-only mode.
4) Click the Close button to close the window.
Importing, Exporting, and Integration
You can use CSV import to create new Payment Application Business Processes, or to add SOV line items to an existing Business Process.
You can export payment application CSV templates at the log level (for header and line item templates) and at the record level (for line item templates). You can then modify the templates and import them to create new records (at the log level) or to add line items to an existing record (at the record level).
An integration interface must be defined to support CSV import. If you find that you cannot perform the file import, see your Administrator. Also, new records can be created and line items added using integration through Web Services. Integration through Web Services must be coordinated with an Oracle Primavera representative.
Multiple Payment Applications and negative change orders (Change Commits) and CSV import and Web Services
Previously, Unifier only allowed one Payment Applications, or negative Change Commit record, per SOV. You can now create multiple Payment Applications, or negative Change Commit records, against the SOV in Unifier. You can also create these types of records through CSV import and Web Services.
Note: You can create only one record for each import.
Import new payment application records
You can export a CSV template that includes the upper form and detail form fields as columns. These fields include the header fields from the upper form and the line item SOV fields from the detail form, including the detail line item fields defined in Integration. The Reference Number field is exported as a column for payment application business processes that use individual line items. The Reference number field is not exported as a column for payment application business processes that use Group by CBS.
You can then modify the exported CSV template and import it to create the upper form header and the detail form line items for the new business process.
To export a copy of the payment application business process template
1) Navigate to the payment application business process log.
2) Choose File > Export Template > CSV.
3) Click Open to open the file in Excel, or click Save to save the file to your local drive. The template exports with no data in it, and contains only the column headings.
Unifier Business Processes User Guide
208
To modify the exported payment application business process template
1) Open the exported CSV file in Microsoft Excel.
2) Enter the business process information into the spreadsheet. Each upper form header record must begin with an "H". Each line item must begin with a "D". For multiple tabs, you must enter appropriate tab name in the Tab Name column.
3) Enter data into the required fields, as well as non-required fields as needed.
Notes:
Data for formula-based columns is ignored.
If auto-populated data is provided, the system will import the value, and will not override the imported values except for fields auto-populated by Base Commit, Change Commit, or Unit Cost Control.
Any line items with the Amount equal to zero will not be imported.
SOV locking is enforced
Use to add new business process records only; not to modify existing business processes.
You might find that you have to change some of the cells in the CSV file to Text type in order for data to import correctly. For example, if you have a CBS code of 1-1, Microsoft Excel can interpret this entry as a month-day combination and reformat it to Jan-1. In this case, your data import will fail because this data is now an invalid CBS code.
If the Integration design for the business process includes a Description field for line items, and the associated SOV sheet also contains a Description field, the description from the SOV sheet is imported, and the line item description is not imported.
To import the payment application business process template
1) Navigate to the payment application business process log.
2) Choose File > Import.
3) Browse to select the file to import.
4) Click OK. The new business processes are listed in the log.
If there are any import errors, you can open the CSV file to view and correct the error. No records are imported if any rows contain an import error.
Import payment application line items into a BP
You can export a template that includes the detail form fields as columns for a specific business process. These fields include the SOV data and detail line item fields defined in Integration. The Reference Number field is exported as a column for payment application business processes that use individual line items. The Reference number field is not exported as a column for payment application business processes that use Group by CBS. If multiple tabs are designed for the line items in the business process, the tab columns are included in the export. All of the data on the Standard tab is exported; no data on the other tabs is exported.
Working with Unifier Business Processes
209
You can then modify the exported template and import it to create new line items for the business process. The exported template contains SOV record information.
Notes:
The Payment Application of Summary Payment Application SOV type supports Record, Line Item, and Cost Allocation creation through CSV integration.
If the payment line items have already been added in the Standard tab, then importing of the line items through CSV is not permitted.
To export the payment application line item template
If multiple tabs are designed for the line items in the business process, only the data in the Standard tab is exported. For the other tabs, the tab name is included in the exported data for reference, but no data in these tabs is exported.
1) Navigate to the payment application business process log.
2) Click New to create a new business process.
3) Select a Reference Base Commit for the business process. If you do not select a Reference Base Commit, the exported template will not contain data. Data from all columns in the Reference Base Commit is exported.
4) Choose File > Export Line Item Template.
5) Click Open to open the file in Microsoft Excel, or click Save to save the file to your local drive. The template exports with SOV line item data in it, based on the selected Reference Base Commit.
To modify the payment application line item template
1) Open the exported CSV file in Microsoft Excel. The SOV line items are listed.
2) Enter the line item information into the spreadsheet. Each line must begin with a "D". For multiple tabs, you must enter appropriate tab name in the Tab Name column.
3) Enter data into the required fields, as well as non-required fields as needed.
Notes:
Data for formula-based columns is ignored.
If auto-populated data is provided, the system will import the value, and will not
override the imported values except for fields auto-populated by Base Commit, Change Commit, or Unit Cost Control.
Any line items with the Amount equal to zero will not be imported.
SOV locking is enforced
Any line items that you import will replace the existing line items in the business process.
Use to add new lines only, not to modify existing lines
You might find that you have to change some of the cells in the CSV file to Text type in order for data to import correctly. For example, if
Unifier Business Processes User Guide
210
you have a CBS code of 1-1, Microsoft Excel can interpret this entry as a month-day combination and reformat it to Jan-1. In this case, your data import will fail because this data is now an invalid CBS code.
If the Integration design for the business process includes a Description field for line items, and the associated SOV sheet also contains a Description field, the description from the SOV sheet is imported, and the line item description is not imported.
To import the payment application line item template
Note: Line items you import will replace any existing line items.
1) Navigate to the Payment Application business process log.
2) Select a business process and click Open.
3) Click the Import button. The imported line items replace any existing line items.
If there are any import errors, you can open the CSV file to view and correct the error. No line items are imported if any row contains an import error.
You can add line items with 0 (zero) value in the CSV template. In such scenario, after you import your CSV template to our BP record, the BP record will have your added line items with 0 (zero) value.
Example
You import a CSV template that has the following three line items to your BP record:
1-Amount = 1000
2-Amount = 0
3-Amount = 0
Once the import is complete, all three line items will be added to your BP record.
Payment Application Grid Column Total
The following information is related to BP run-time for the Payment Applications and Summary Payments Applications Business Processes (Standard tab), only.
For Payment Applications and Summary Payments Applications Business Processes, based on the options set for the Total property for the Data Elements (DEs) in uDesigner, when you add or modify the grid, the Total row displayed shows the following values:
Blank
Unifier displays the value as empty in the Total Column (that particular DE column).
Sum of All Rows
Unifier displays the value as "Sum of All Rows" in the Total Column.
Use Formula Definition
Unifier displays the value as "Formula Defined" in the Total Column. In other words, Unifier calculates the formula by using the values from the Total row for the respective DEs.
If the formula was reset to Manual, then Unifier resets the Total to "Sum of All Rows."
Working with Unifier Business Processes
211
Unifier calculated the Total, for DEs with predefined formula, as follows:
%Complete to Date (uuu_spa_per_comp)
Custom formula
Based on the property selected in uDesigner.
System-defined formula
Based on the property selected in uDesigner.
Amount This period (uuu_spa_amt_tp)
Based on the property selected in uDesigner. (Either Blank or Sum of All Rows)
General Spends Business Processes
General spends business processes enable you to invoice at the CBS or breakdown level, supporting multiple invoices per SOV. These business processes do not calculate retainage or stored materials. General spends business processes are designed in uDesigner. For more information, refer to the Unifier uDesigner User Guide or Unifier Help.
You can use CSV import to create new general spends business processes or to add SOV line items to existing business processes. You can export general spends business process templates at the log level (for header and line item templates, with no data exported) and at the record level (for line item templates with SOV line item data exported). You can modify the templates and import them to create new records (at the log level) or to add line items to an existing record (at the record level).
An Integration interface must be defined to support CSV import. If you find that you cannot perform the file import, see your Administrator.
Also, new records can be created and line items added using Integration through Web Services. Integration through Web Services must be coordinated with an Oracle Primavera representative.
Import new general spends records
You can export a CSV template that includes the upper form and detail form fields as columns. These fields include the header fields from the upper form and the line item SOV fields from the detail form, including the detail line item fields defined in Integration. These fields are always exported in the template as well:
Reference Number
Description
CBS Code
Breakdown
You can then modify the exported template and import it to create a the upper form header information and the detail form line items for the new business process.
To export a copy of the general spends business process template
1) Navigate to the General Spends business process log.
2) Choose File > Export Template > CSV.
Unifier Business Processes User Guide
212
3) Click Open to open the file in Excel, or click Save to save the file to your local drive. The template exports with no data in it, and contains only the column headings.
To modify the exported general spends business process template
1) Open the CSV file in Microsoft Excel.
2) Enter the business process information into the spreadsheet. Each upper form header record must begin with an "H". Each line item must begin with a "D". Add a new "D" line for each line item in the business process. For multiple tabs, you must enter appropriate tab name in the Tab Name column.
3) Ensure that you enter the required values for the Amount, CBS Code, and Short Description columns.
Notes:
Data for formula-based columns is ignored.
If auto-populated data is provided, the system will import the value, and will not override the imported values except for fields auto-populated by Base Commit, Change Commit, or Unit Cost Control.
Any line items with the Amount equal to zero will not be imported.
Use to add new business process records only, not to modify existing business processes.
You might find that you have to change some of the cells in the CSV file to Text type in order for data to import correctly. For example, if you have a CBS code of 1-1, Microsoft Excel can interpret this entry as a month-day combination and reformat it to Jan-1. In this case, your data import will fail because this data is now an invalid CBS code.
If the Integration design for the business process includes a Description field for line items, and the associated SOV sheet also contains a Description field, the description from the SOV sheet is imported, and the line item description is not imported.
To import the general spends business process template
1) Navigate to the General Spends business process log.
2) Choose File > Import.
3) Browse to select the file to import.
4) Click OK. If the import is successful, you receive the message Record Creation is in Progress. When the record is created, it is listed in the log.
If there are any import errors, you can open the CSV file to view and correct the errors. No records are imported if any row in the CSV file contains an import error.
Working with Unifier Business Processes
213
Import general spends line items into a business process
You can export a template that includes the detail form fields as columns for a specific business process. These fields include the detail line item columns defined in Integration. These fields are always exported in the template as well:
Reference Number
Description
CBS Code
Breakdown
You can then modify the amounts on the exported template and import it to create new line items for the business process. The exported template contains SOV record information.
To export the general spends line item template
If multiple tabs are designed for the line items in the business process, only the data in the Standard tab is exported. For the other tabs, the tab name is included in the exported data for reference, but no data in these tabs is exported. Data from all columns in the Reference Base Commit is exported.
1) Navigate to the General Spends business process log.
2) Click New to create a new business process.
3) Select a Reference Base Commit for the business process. If you do not select a Reference Base Commit, the exported template will not contain data.
4) Choose File > Export Line Item Template.
5) Click Open to open the file in Microsoft Excel, or click Save to save the file to your local drive. The template exports with SOV data in it, based on the selected Reference Base Commit. No business process line item data is exported.
To modify the general spends line item template
1) Open the CSV file in Microsoft Excel. The SOV line item data is shown.
2) Enter the line item information into the spreadsheet. Each line item must begin with a "D". For multiple tabs, you must enter appropriate tab name in the Tab Name column.
3) Enter required values for the Amount, CBS Code, and Short Description columns.
Notes:
Data for formula-based columns is ignored.
If auto-populated data is provided, the system will import the value, and will not override the imported values except for fields auto-populated by Base Commit, Change Commit, or Unit Cost Control.
Any line items with the Amount equal to zero will not be imported.
Use the import to add new line items only, not to modify existing line items.
Any line items you import will be added after any existing line items.
You might find that you have to change some of the cells in the CSV
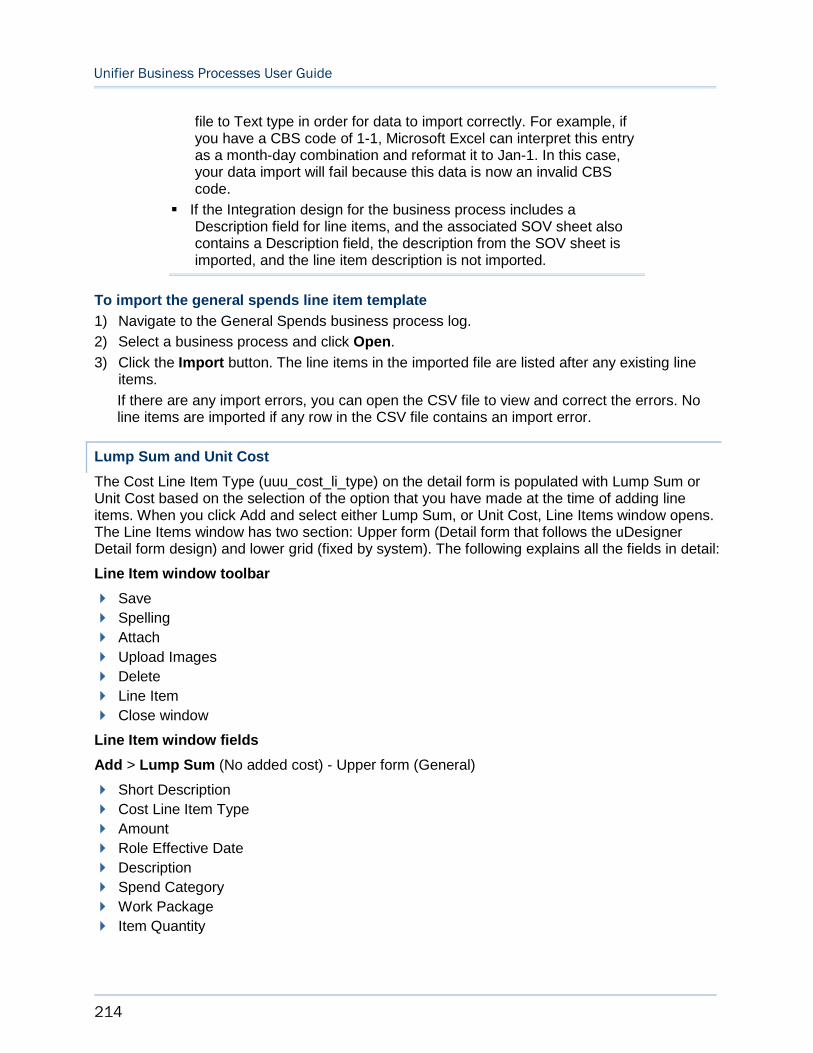
Unifier Business Processes User Guide
214
file to Text type in order for data to import correctly. For example, if you have a CBS code of 1-1, Microsoft Excel can interpret this entry as a month-day combination and reformat it to Jan-1. In this case, your data import will fail because this data is now an invalid CBS code.
If the Integration design for the business process includes a Description field for line items, and the associated SOV sheet also contains a Description field, the description from the SOV sheet is imported, and the line item description is not imported.
To import the general spends line item template
1) Navigate to the General Spends business process log.
2) Select a business process and click Open.
3) Click the Import button. The line items in the imported file are listed after any existing line items.
If there are any import errors, you can open the CSV file to view and correct the errors. No line items are imported if any row in the CSV file contains an import error.
Lump Sum and Unit Cost
The Cost Line Item Type (uuu_cost_li_type) on the detail form is populated with Lump Sum or Unit Cost based on the selection of the option that you have made at the time of adding line items. When you click Add and select either Lump Sum, or Unit Cost, Line Items window opens. The Line Items window has two section: Upper form (Detail form that follows the uDesigner Detail form design) and lower grid (fixed by system). The following explains all the fields in detail:
Line Item window toolbar
Save
Spelling
Attach
Upload Images
Delete
Line Item
Close window
Line Item window fields
Add > Lump Sum (No added cost) - Upper form (General)
Short Description
Cost Line Item Type
Amount
Role Effective Date
Description
Spend Category
Work Package
Item Quantity
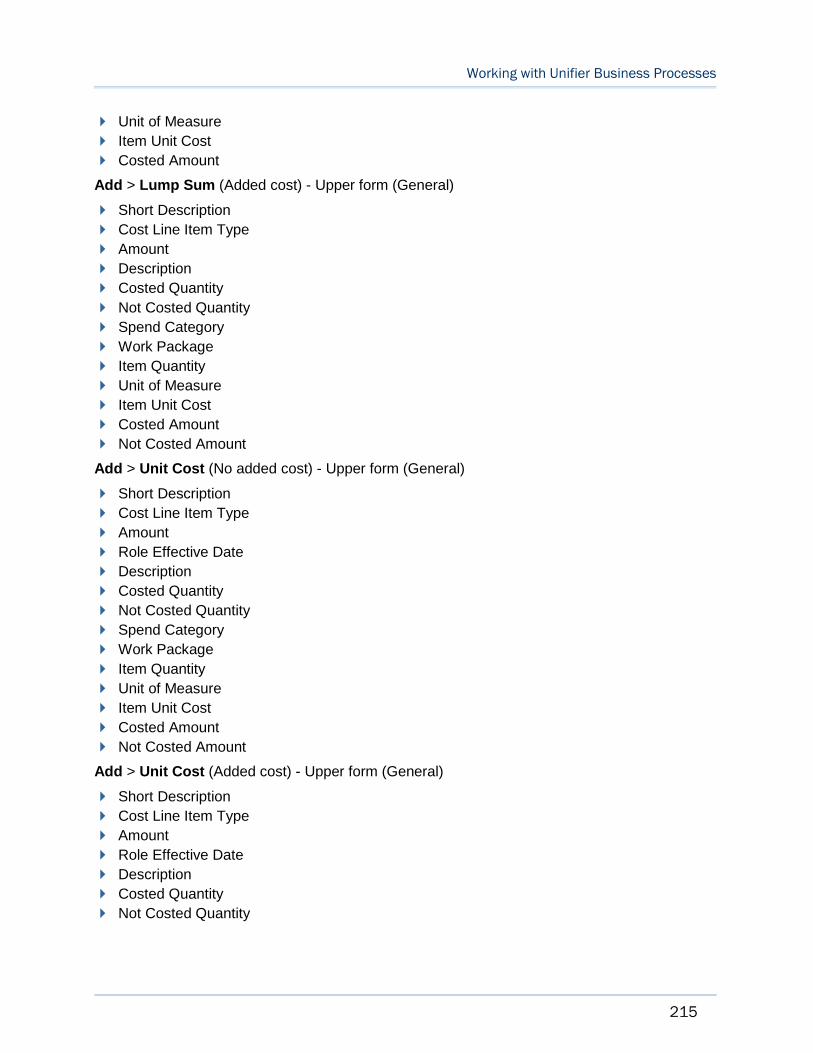
Working with Unifier Business Processes
215
Unit of Measure
Item Unit Cost
Costed Amount
Add > Lump Sum (Added cost) - Upper form (General)
Short Description
Cost Line Item Type
Amount
Description
Costed Quantity
Not Costed Quantity
Spend Category
Work Package
Item Quantity
Unit of Measure
Item Unit Cost
Costed Amount
Not Costed Amount
Add > Unit Cost (No added cost) - Upper form (General)
Short Description
Cost Line Item Type
Amount
Role Effective Date
Description
Costed Quantity
Not Costed Quantity
Spend Category
Work Package
Item Quantity
Unit of Measure
Item Unit Cost
Costed Amount
Not Costed Amount
Add > Unit Cost (Added cost) - Upper form (General)
Short Description
Cost Line Item Type
Amount
Role Effective Date
Description
Costed Quantity
Not Costed Quantity
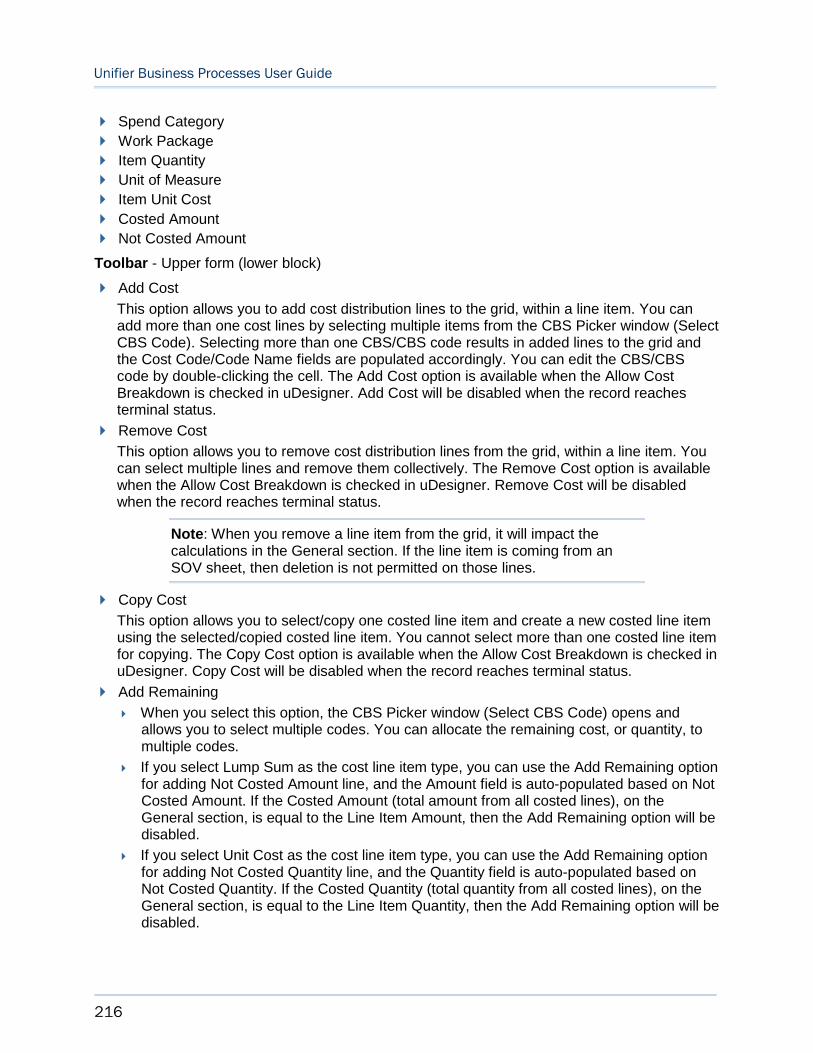
Unifier Business Processes User Guide
216
Spend Category
Work Package
Item Quantity
Unit of Measure
Item Unit Cost
Costed Amount
Not Costed Amount
Toolbar - Upper form (lower block)
Add Cost
This option allows you to add cost distribution lines to the grid, within a line item. You can add more than one cost lines by selecting multiple items from the CBS Picker window (Select CBS Code). Selecting more than one CBS/CBS code results in added lines to the grid and the Cost Code/Code Name fields are populated accordingly. You can edit the CBS/CBS code by double-clicking the cell. The Add Cost option is available when the Allow Cost Breakdown is checked in uDesigner. Add Cost will be disabled when the record reaches terminal status.
Remove Cost
This option allows you to remove cost distribution lines from the grid, within a line item. You can select multiple lines and remove them collectively. The Remove Cost option is available when the Allow Cost Breakdown is checked in uDesigner. Remove Cost will be disabled when the record reaches terminal status.
Note: When you remove a line item from the grid, it will impact the calculations in the General section. If the line item is coming from an SOV sheet, then deletion is not permitted on those lines.
Copy Cost
This option allows you to select/copy one costed line item and create a new costed line item using the selected/copied costed line item. You cannot select more than one costed line item for copying. The Copy Cost option is available when the Allow Cost Breakdown is checked in uDesigner. Copy Cost will be disabled when the record reaches terminal status.
Add Remaining
When you select this option, the CBS Picker window (Select CBS Code) opens and allows you to select multiple codes. You can allocate the remaining cost, or quantity, to multiple codes.
If you select Lump Sum as the cost line item type, you can use the Add Remaining option for adding Not Costed Amount line, and the Amount field is auto-populated based on Not Costed Amount. If the Costed Amount (total amount from all costed lines), on the General section, is equal to the Line Item Amount, then the Add Remaining option will be disabled.
If you select Unit Cost as the cost line item type, you can use the Add Remaining option for adding Not Costed Quantity line, and the Quantity field is auto-populated based on Not Costed Quantity. If the Costed Quantity (total quantity from all costed lines), on the General section, is equal to the Line Item Quantity, then the Add Remaining option will be disabled.
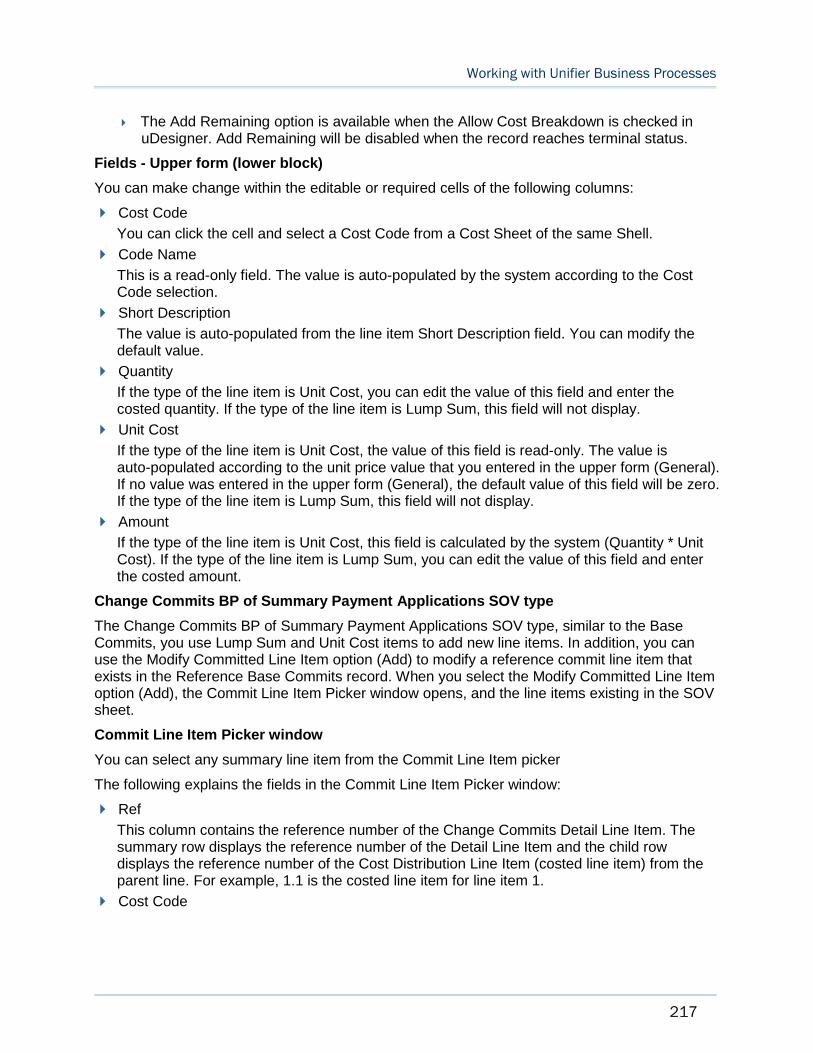
Working with Unifier Business Processes
217
The Add Remaining option is available when the Allow Cost Breakdown is checked in uDesigner. Add Remaining will be disabled when the record reaches terminal status.
Fields - Upper form (lower block)
You can make change within the editable or required cells of the following columns:
Cost Code
You can click the cell and select a Cost Code from a Cost Sheet of the same Shell.
Code Name
This is a read-only field. The value is auto-populated by the system according to the Cost Code selection.
Short Description
The value is auto-populated from the line item Short Description field. You can modify the default value.
Quantity
If the type of the line item is Unit Cost, you can edit the value of this field and enter the costed quantity. If the type of the line item is Lump Sum, this field will not display.
Unit Cost
If the type of the line item is Unit Cost, the value of this field is read-only. The value is auto-populated according to the unit price value that you entered in the upper form (General). If no value was entered in the upper form (General), the default value of this field will be zero. If the type of the line item is Lump Sum, this field will not display.
Amount
If the type of the line item is Unit Cost, this field is calculated by the system (Quantity * Unit Cost). If the type of the line item is Lump Sum, you can edit the value of this field and enter the costed amount.
Change Commits BP of Summary Payment Applications SOV type
The Change Commits BP of Summary Payment Applications SOV type, similar to the Base Commits, you use Lump Sum and Unit Cost items to add new line items. In addition, you can use the Modify Committed Line Item option (Add) to modify a reference commit line item that exists in the Reference Base Commits record. When you select the Modify Committed Line Item option (Add), the Commit Line Item Picker window opens, and the line items existing in the SOV sheet.
Commit Line Item Picker window
You can select any summary line item from the Commit Line Item picker
The following explains the fields in the Commit Line Item Picker window:
Ref
This column contains the reference number of the Change Commits Detail Line Item. The summary row displays the reference number of the Detail Line Item and the child row displays the reference number of the Cost Distribution Line Item (costed line item) from the parent line. For example, 1.1 is the costed line item for line item 1.
Cost Code
Unifier Business Processes User Guide
218
This column contains the CBS Code associated with each distribution line. For summary rows (parent), the value for this column is blank.
Code Name
This column contains the CBS Code associated with the code. For summary rows, the value for this column is blank.
Cost Type
This column contains the Cost Line Item type for the Summary rows. For child rows, the value for this column is blank.
Description
This column contains the contents of the Short Description (short_desc) field in the Detail Line item. For summary rows (parent), this column contains the Short Description of the Line Item. For distribution rows, this column shows the Short Description of each costed line item, and based on the user input, the value might, or might not be, the same as the Short Description of the Line Item.
Note: The names of the columns are based on the Summary Payment Applications SOV sheet structure.
Cost Distribution Grid log columns
Cost Code
This field is both editable and required. You can click the cell and select a Cost Code from a Cost Sheet of the same Shell. Similar to the Line Items, you can enter a Cost Code and the same Cost Code will be available to select. You cannot change the Cost Code for exisiting Line Items coming from SOV.
Code Name
This field is read-only and the value is auto-populated by the system according to the Cost Code that you have selected
Short Description
This field is editable and the default value is auto-populated according to the Short Description (short_dec) field.
Current Quantity
This field is read-only and the value is auto-populated by the system if you have selected Modify Reference Commit option, and the Cost Line Item type (uuu_cost_li_type) of the selected Commit Line Item is Unit Cost.
Note: If the conditions are not met, then the system auto-populates the value as "Quantity," from the source commit distribution line item.
Current Scheduled Value
This field is read-only and the value is auto-populated by the system (regardless of the Cost Line Item type (uuu_cost_li_type). The value of this field can be updated when modifying an existing line is from an SOV sheet.
Change Quantity
Working with Unifier Business Processes
219
This field is read-only if the Cost Line Item type (uuu_cost_li_type) of the selected Commit Line Item is Lump Sum. If the Cost Line Item type (uuu_cost_li_type) of the selected Commit Line Item is Unit Cost, then you can edit this field and enter the costed quantity.
Change Amount
If the Cost Line Item type (uuu_cost_li_type) of the selected Commit Line Item is Lump Sum, then you can edit this field and enter the costed amount. If the Cost Line Item type (uuu_cost_li_type) of the selected Commit Line Item is Unit Cost, then the value of this field is calculated by the system as: Change Quantity * Unit Cost.
New Schedule Value
This is a read-only field and the value is auto-populated by the system when modifying an existing line is from an SOV sheet. The value of this field is calculated by the system as: Current Scheduled Value + Change Amount.
CSV Integration
You can use a Comma Separated Values (CSV) file to save Cost Allocation data for Base Commit and Change Commit of Summary Payment Application SOV type.
The Payment Application of Summary Payment Application SOV type supports Record, Line Item, and Cost Allocation creation through CSV integration.
If the payment line items have already been added in the Standard tab, then importing of the line items through CSV is not permitted.
The "CA" (Cost Allocation) row, in the CSV file, includes the following information about Cost Allocation.
Cost Code
Short Description
Quantity
Amount
Note: Ensure that all Costed Line Item details are entered in the "CA" row.
Multiple Cost Allocation Line Items can be added to the CSV file by way of multiple CA rows.
If your CSV template contains Cost Allocation details, but the design does not permit entering the Cost breakdown information (i.e., the option of Allow Cost Breakdown is unchecked), then importing the CSV file will fail and you will receive an error message.
Creating Lump Sum and entering Unit Cost details
The "D" row, in the CSV file, includes the information about Summary Line Item. If the Cost Line Item type is Unit Cost type, then you must enter the Unit Cost in the D row.
Based on the Cost Line Item type specified in the "D" row, the system will check for the presence of required fields for the specified Cost Line Item type.
Change Commit: Adding Line Items to modify committed lines
Unifier Business Processes User Guide
220
The CSV template contains a "Reference" field that you can use for adding lines that have already been committed from a reference commit. The system uses the value in the "Reference" field to select a specific row in the committed lines (SOV).
Note: The availability of the "Reference” field depends on the design set in uDesigner. If this field is not present in the Detail Form integration interface, then modification of committed lines cannot take place.
The Costed Line Item of the Summary Line Item that needs to be updated will be identified by the value in the "Reference" field and the Cost Code. The "Reference" column label is the label set for "sovlinum" and will appear after the CA column.
After the record creation, all the Costed Line Items belonging to the selected Line Item ( Summary Line Item and child Line Item) will be added to the record.
Payment Application
For Payment Application of Summary Payment Application (SPA) SOV type, the "CA" row will have the columns similar to the details row.
Unit Cost
The following additional informational texts are displayed in the exported CSV template:
Cost Code
Short Description
Quantity
Unit Cost
Amount
Enter the unit cost value either at "D" or "CA" row but not in both rows. Variable
You can enter the uniti cost value either in the "D" row or in the "CA" row but not both. You can create the variable unit cost lines by entering the unit cost in the "CA" row.
Importing the Lump Sum or Unit Cost line items remains as is. The Unit Cost, in the "CA" row is ignored even if the Unit Cost column is seen in the "CA" row, and the cost line item type selected is Lump Sum or Unit Cost.
When importing the line items for Lump Sum and Fixed Unit Cost line items, if the "CA" row has values (based on the cost line item type mentioned in "D" row) Unifier will check the presence of teh required fields.
You can create both the Base Commit and the Change Commit records with the variable unit cost line items. The "CA" row is populated with the variable rates for the Unit Cost column.
In the "D" row (Summary), if the uuu_li_cost_type value is entered as "Variable Unit Cost," and you enter the unit cost for the "CA" rows, then the variable unit cost line items will be created with uuu_li_cost_type, as the "Unit Cost."
If you enter the unit cost value and select cost line item type as "Variable Unit Cost" at summary row "D," you will see the message: Unit Cost is not allowed on summary line for variable unit cost lines.
If the design does not permit cost breakdown (Allow Cost Breakdown is unchecked), and if the CSV Template has cost allocation details, then you will see the message: Business Process design does not allow cost allocation.
Working with Unifier Business Processes
221
Change Commit Business Processes
Change commit business processes enable you to change the value of a base commit and to also update the SOV created by the contract. This business process is also known as a change order. Change commit business processes are designed in uDesigner. For more information, refer to the Unifier uDesigner User Guide.
You can use CSV import to create new change commit business processes or to add SOV line items for an existing business process. You can export change commit business process templates at the log level (for header and line item templates with no data exported) and at the record level (for line item templates with SOV data exported). You can then modify the templates and import them to create new records (at the log level) or to add line items to an existing record (at the record level).
An Integration interface must be defined to support CSV import. If you find that you cannot import the file see your Administrator.
Also, new records can be created and line items added using Integration through Web Services. Integration through Web Services must be coordinated with Primavera Unifier Consulting Services.
Import new change commit records
You can export a CSV template that includes the upper form and detail form fields as columns. These fields include the header fields from the upper form and the line item SOV fields from the detail form, including the detail line item fields defined in Integration.
You can modify the exported CSV template and import it to create a the upper form header information and the detail line items for the new business process.
To export a copy of the change commit business process template
1) Navigate to the change commit business process log.
2) Choose File > Export Template > CSV.
3) Click Open to open the file in Excel, click Save to save the file to your local drive. The template exports with no data in it, and contains only the column headings.
To modify the exported change commit business process template
1) Open the exported CSV file in Microsoft Excel.
2) Enter the business process information into the spreadsheet. Each upper form header record must begin with an "H". Each line item must begin with a "D". For multiple tabs, you must enter appropriate tab name in the Tab Name column.
3) Enter data into the required fields, as well as non-required fields as needed.
Unifier Business Processes User Guide
222
Notes:
Data for formula-based columns is ignored.
If auto-populated data is provided, the system will import the value, and will not override the imported values except for fields auto-populated by Base Commit, Change Commit, or Unit Cost Control.
Any line items with the Amount equal to zero will not be imported.
Use to add new business process records only; not to modify existing business processes.
All data created through the CSV import is rolled up to the cost sheet
You might find that you have to change some of the cells in the CSV file to Text type in order for data to import correctly. For example, if you have a CBS code of 1-1, Microsoft Excel can interpret this entry as a month‐day combination and reformat it to Jan-1. In this case, your data import will fail because this data is now an invalid CBS code.
To import the change commit business process template
1) Navigate to the change commit business process log.
2) Choose File > Import.
3) Browse to select the file to import.
4) Click OK. The new business processes are listed in the log.
If there are any import errors, you can open the CSV file to view and correct the error. No records are imported if any row contains an import error.
Import change commit line items into a BP
You can export a template that includes the detail form fields as columns for a specific business process. These fields include the detail form line item fields defined in Integration.
You can then modify the exported template and import it to create new line items for the business process. The exported template contains SOV record information.
To export the change commit line item template
If multiple tabs are designed for the line items in the business process, only the data in the Standard tab is exported. For the other tabs, the tab name is included in the exported data for reference, but no data in these tabs is exported. Data from all columns in the Reference Base Commit is exported.
1) Navigate to the change commit business process log.
2) Click New to create a new business process.
3) Select a Reference Base Commit for the business process.
4) Choose File > Export Line Item Template.
Working with Unifier Business Processes
223
5) Click Open to open the file in Microsoft Excel, or click Save to save the file to your local drive. The template exports with SOV data in it, based on the selected Reference Base Commit. No business process line item data is exported.
To modify the change commit line item template
1) Open the exported CSV file in Microsoft Excel. The SOV line items are listed.
2) Enter the line item information into the spreadsheet. Each line must begin with a "D". For multiple tabs, you must enter appropriate tab name in the Tab Name column.
3) Enter data into the required fields, as well as non-required fields as needed.
Notes:
Data for formula-based columns is ignored.
If auto-populated data is provided, the system will import the value, and will not override the imported values except for fields auto-populated by Base Commit, Change Commit, or Unit Cost Control.
Any line items with the Amount equal to zero will not be imported.
Ensure that you are importing the records you want to import. Any line items that you import will be added after any existing line items.
Use to add new lines only, not to modify existing lines
All data created through the CSV import is rolled up to the cost sheet
You might find that you have to change some of the cells in the CSV file to Text type in order for data to import correctly. For example, if you have a CBS code of 1-1, Microsoft Excel can interpret this entry as a month-day combination and reformat it to Jan-1. In this case, your data import will fail because this data is now an invalid CBS code.
To import the change commit line item template
1) Navigate to the change commit business process log.
2) Select a business process and click Open.
3) Click the Import button. The line items in the imported file are listed after any existing line items.
If there are any import errors, you can open the CSV file to view and correct the error. No line items are imported if any row contains an import error.
SOV Summary Payment Applications Sheets and Business Processes
The Summary Payment Applications Schedule of Values (Summary Payment Applications SOV) allows users to allocate cost to line items based on the line item type (Lump Sum or Unit Cost). Use the Summary Payment Applications SOV type in association with Commit and SpendsBusiness Processes (BPs) that are designed for Summary Payment Applications SOV (SPA SOV) type.
Unifier Business Processes User Guide
224
For a given Project/Shell, there can be multiple Payment Application Business Processes of Summary Payment Applications SOV Type.
For Base Commits Business Processes (BPs) with SOV type of "Summary Payment Applications," a special behavior line item has been provided to allow you to add further cost distribution details to the line items.
Note: Cost allocation/distribution can be done only for line items that are in the Standard tab of the Base Commits and Change Commits BPs of SPA SOV type.
The Standard detail tab of the properties window contains two options:
Lump Sum
Cost Unit
Click Add and select the appropriate option. For more information, see the topic "Cost Distribution Grid log columns," below.
The Summary Payment Applications sub-node will be available under the Schedule of Values node only if a Base Commits or Change Commits of SOV type Summary Payment Applications is deployed in uDesigner.
The Grid functionality is not supported for the Base Commits BP with SOV type of "Summary Payment Applications."
When a Base Commits BP with SOV type of "Summary Payment Applications" is configured to auto-populate Data Elements on a Payment Application with values from the Base Commits, the runtime auto-populate occurs for the:
Summary lines
Costed lines
The Audit log, at the record level, captures the Line Item as well as the Costed Line Item changes (taking place through Web Services) for both Base Commits and Change Commits BPs with SOV type of "Summary Payment Applications." In this case the Event field of the Audit Log for the BP displays "Line Items: Costed Line Item." In other words, any updates that are made to the Costed Line Items, through Update calls, will have the Event as “Costed Line Item” for Costed Line Item changes.
Grid functionality is not supported for Change Commits BPs with SOV type of "Summary Payment Applications."
Summary Payment Applications SOV sheet is created when the Base Commits BP reaches the terminal step as set in uDesigner.
Note: If a BP has been set up in uDesigner to automatically create a Summary Payment Applications SOV sheet upon the end step, the following procedures are not applicable.
Working with Unifier Business Processes
225
Adding Values to a Summary Payment Applications SOV Sheet
To create a Summary Payment Applications SOV sheet, manually, begin by allocating cost to line items based on the line item type (Lump Sum or Unit Cost).
To allocate cost to line items based on the line item type (Lump Sum or Unit Cost), follow these steps.
1) Open the Project/Shell, switch to User mode, and click Cost Manager > Schedule of Values in the left Navigator.
2) Click to expand the Summary Payment Applications node.
3) Select a Base Commit BP (SOV Base Record) that you want to allocate cost to.
4) In the left-hand Navigator pane, go to Logs node and click to expand.
5) Select the Base Commit BP that you want to allocate and click to open the log window.
6) Click to select a record and from the toolbar click Open to open the Base Commit BP form. The Base Commit BP must be Approved before you can allocate.
7) Click Edit from the toolbar and change the Status to Approved.
8) Add cost by clicking the Add button, located at the lower left-hand corner of the window, and selecting your cost option (Lump Sum or Unit Cost).
9) Ensure that the Line Item fields have correct values (Add Cost, Remove Cost, etc.) and when finished click Close Window.
10) Click Finish Editing from the toolbar and wait for the process to complete.
11) Go to the Base Commit BP under the Summary Payment Applications node.
12) Find the SOV Base Record that you have added, select the record, and click Open.
13) Inspect the fields to ensure that the record has been added.
Note: Some of the column headings are links. If you click on these types of column headings, you can view more details about the column.
14) When finished, click Close Window.
Summary Payment Applications SOV Sheet window
Use the toolbar to expand, collapse, find, split the screen, and export records.
Note: You can use the menu bar options as an alternative and perform the same operations.
Expand
Allows you to view the Summary and the associated child rows.
Collapse
Allows you to view only the Summary rows. This will be the default view.
Find
Allows you to search the Summary Payment Applications SOV sheet for specific line items. Find will be based on the columns and will have fields of Column, Value, and Search.
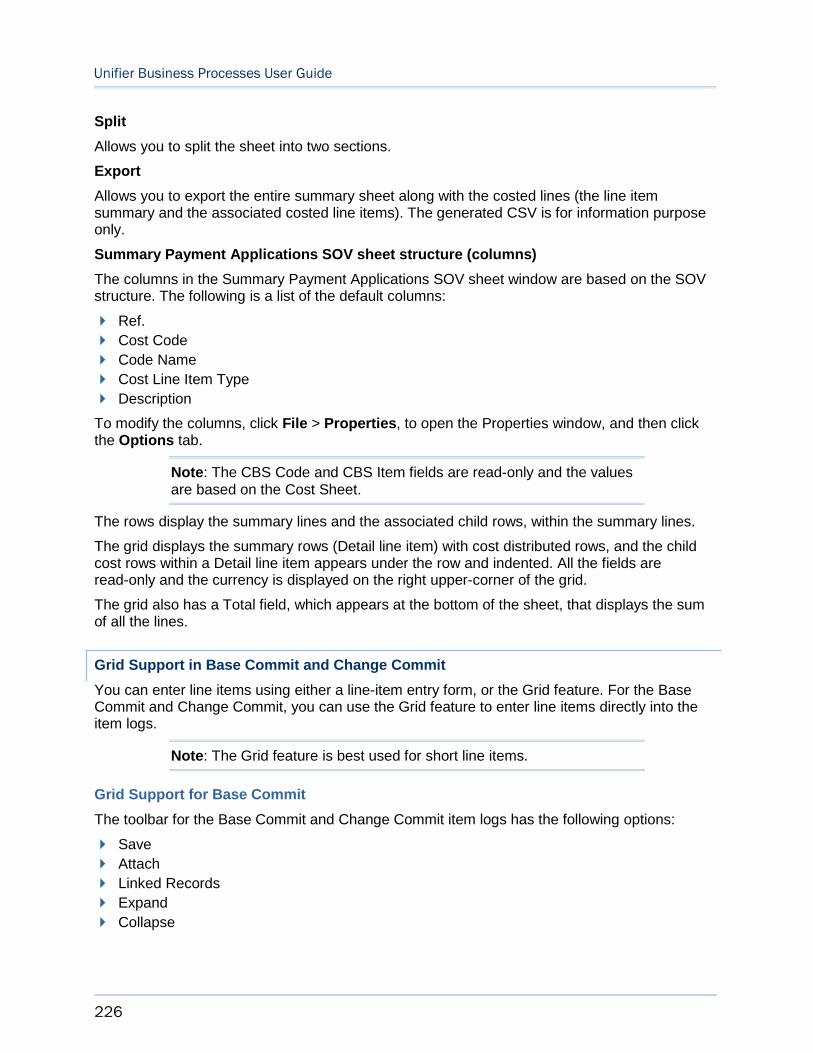
Unifier Business Processes User Guide
226
Split
Allows you to split the sheet into two sections.
Export
Allows you to export the entire summary sheet along with the costed lines (the line item summary and the associated costed line items). The generated CSV is for information purpose only.
Summary Payment Applications SOV sheet structure (columns)
The columns in the Summary Payment Applications SOV sheet window are based on the SOV structure. The following is a list of the default columns:
Ref.
Cost Code
Code Name
Cost Line Item Type
Description
To modify the columns, click File > Properties, to open the Properties window, and then click the Options tab.
Note: The CBS Code and CBS Item fields are read-only and the values are based on the Cost Sheet.
The rows display the summary lines and the associated child rows, within the summary lines.
The grid displays the summary rows (Detail line item) with cost distributed rows, and the child cost rows within a Detail line item appears under the row and indented. All the fields are read-only and the currency is displayed on the right upper-corner of the grid.
The grid also has a Total field, which appears at the bottom of the sheet, that displays the sum of all the lines.
Grid Support in Base Commit and Change Commit
You can enter line items using either a line-item entry form, or the Grid feature. For the Base Commit and Change Commit, you can use the Grid feature to enter line items directly into the item logs.
Note: The Grid feature is best used for short line items.
Grid Support for Base Commit
The toolbar for the Base Commit and Change Commit item logs has the following options:
Save
Attach
Linked Records
Expand
Collapse
Working with Unifier Business Processes
227
Split
Find
Close Window
Additional Grid Toolbar Options
Upon selecting the Line Items tab of a Business Process record, the Form View is displayed by default. In Form View, the view options are displayed in the toolbar alongside options like Refresh, Print, Search, and Find on Page.
The Line Item list, along with line item Details, Attachments, and Linked Records, is displayed in the right-hand pane.
You can switch to Grid View by selecting the Grid View option in the toolbar. In Grid view, the view options are displayed in the toolbar alongside Refresh, Print, Find on Page, and Expand/Collapse. When a row or cell in the grid is edited, additional toolbar options are available, including: Add, Cancel, Error Check, Save, Print, and Find on Page.
Note: In the Grid view of Line Item tabs, the additional options are applicable to Pending records. Only the Refresh, Print, Find on Page, and Expand/Collapse options are applicable to Approved records and Terminated records.
Other Elements of Line Items and the Grid
The options of Attach and Linked Records are available for Line Items, only. If you attempt to add attachments or linked records to a Costed line, an error message is displayed. If a Costed Line Item (Cost allocated Line Item which belongs to a Summary Line Item) is selected, then these options are not available.
Before adding attachments or linked records to a line item, you must save the line item.
If a Costed Line Item and a Summary Line Item are selected, then you can upload the attachments, or link records, to the Summary Line Item.
If multiple Summary Line Items are selected, and you click Attach, or Linked Records, the system notifies you then an alert will be seen informing user that only one record needs to be selected (this is existing elsewhere in the grid).
The search parameters, in the Find option, are based on the design of the Line Item list, prepared in uDesigner.
Note: The search parameters are not for the Costed Line Items.
Any time a search is executed, the Line Item that matches the search parameter is found. In addition to the parent Line Item, the Costed Line Items belonging to that Line Item will be found.
The Grid rows can be expanded.
The Grid columns contain the Cost Allocation columns, and the fields designed in the Detail Form, in uDesigner.
The sorting order is based on the order set in uDesigner. Line items are sorted first, followed by Costed lines.
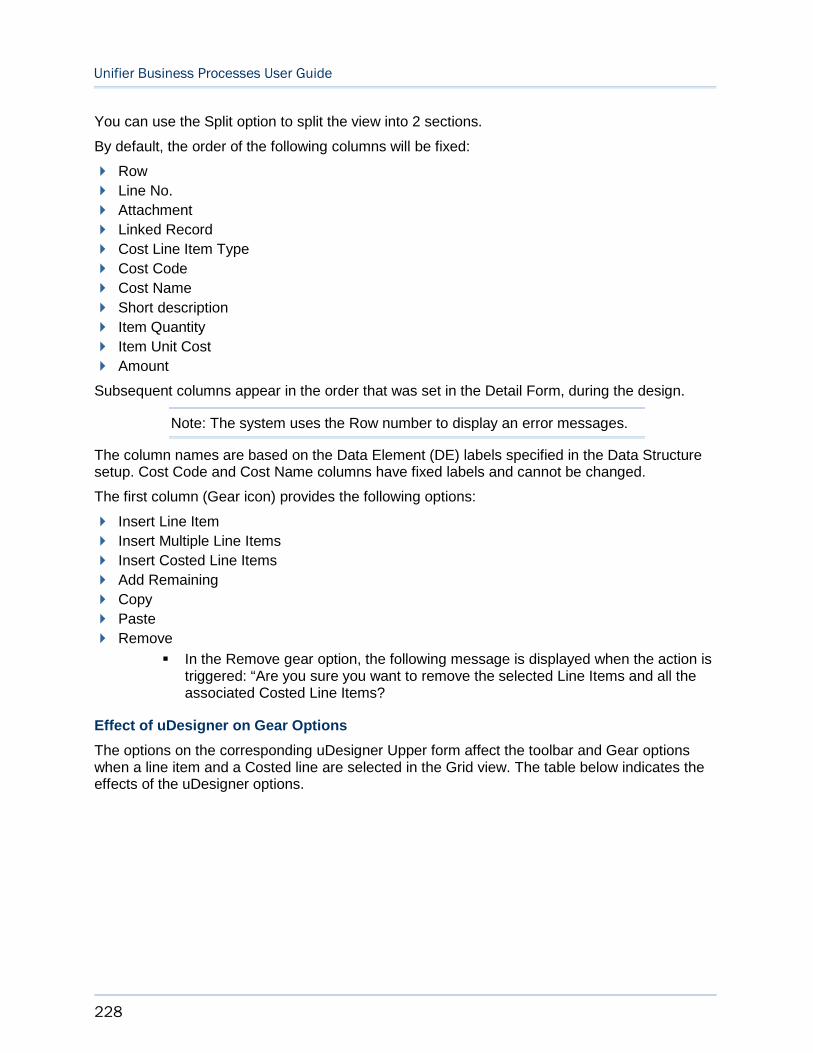
Unifier Business Processes User Guide
228
You can use the Split option to split the view into 2 sections.
By default, the order of the following columns will be fixed:
Row
Line No.
Attachment
Linked Record
Cost Line Item Type
Cost Code
Cost Name
Short description
Item Quantity
Item Unit Cost
Amount
Subsequent columns appear in the order that was set in the Detail Form, during the design.
Note: The system uses the Row number to display an error messages.
The column names are based on the Data Element (DE) labels specified in the Data Structure setup. Cost Code and Cost Name columns have fixed labels and cannot be changed.
The first column (Gear icon) provides the following options:
Insert Line Item
Insert Multiple Line Items
Insert Costed Line Items
Add Remaining
Copy
Paste
Remove
In the Remove gear option, the following message is displayed when the action is triggered: “Are you sure you want to remove the selected Line Items and all the associated Costed Line Items?
Effect of uDesigner on Gear Options
The options on the corresponding uDesigner Upper form affect the toolbar and Gear options when a line item and a Costed line are selected in the Grid view. The table below indicates the effects of the uDesigner options.
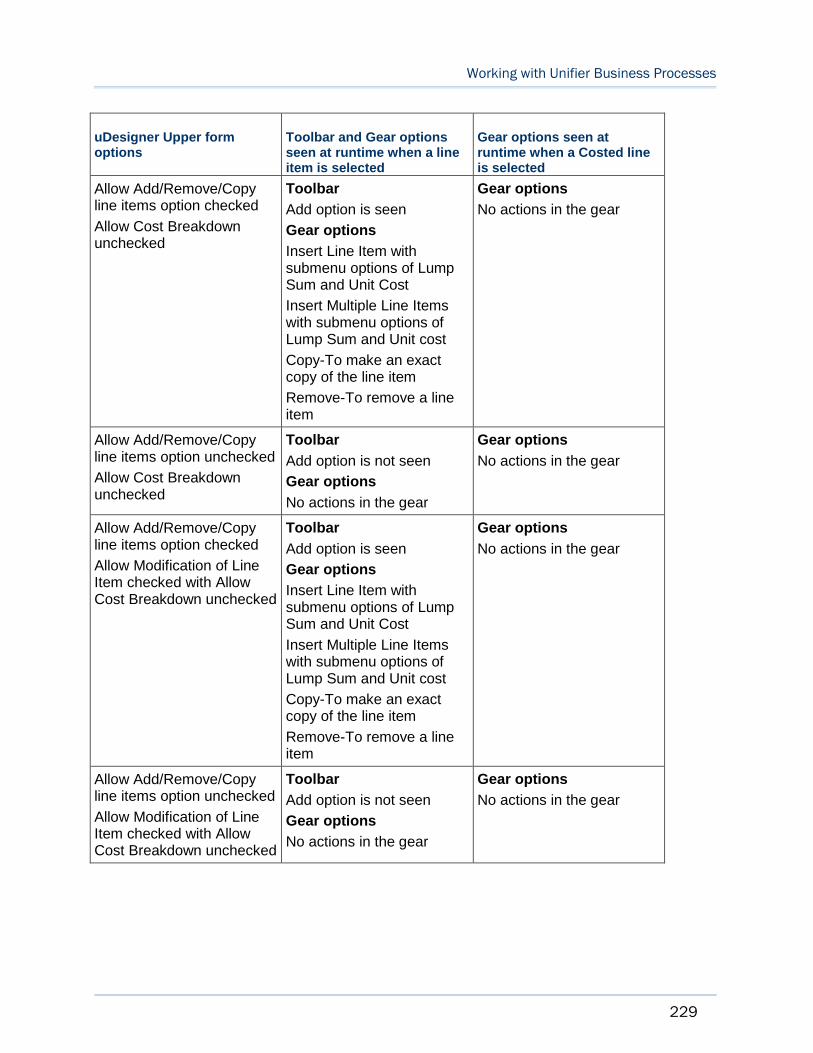
Working with Unifier Business Processes
229
uDesigner Upper form options
Toolbar and Gear options seen at runtime when a line item is selected
Gear options seen at runtime when a Costed line is selected
Allow Add/Remove/Copy line items option checked
Allow Cost Breakdown unchecked
Toolbar
Add option is seen
Gear options
Insert Line Item with submenu options of Lump Sum and Unit Cost
Insert Multiple Line Items with submenu options of Lump Sum and Unit cost
Copy-To make an exact copy of the line item
Remove-To remove a line item
Gear options
No actions in the gear
Allow Add/Remove/Copy line items option unchecked
Allow Cost Breakdown unchecked
Toolbar
Add option is not seen
Gear options
No actions in the gear
Gear options
No actions in the gear
Allow Add/Remove/Copy line items option checked
Allow Modification of Line Item checked with Allow Cost Breakdown unchecked
Toolbar
Add option is seen
Gear options
Insert Line Item with submenu options of Lump Sum and Unit Cost
Insert Multiple Line Items with submenu options of Lump Sum and Unit cost
Copy-To make an exact copy of the line item
Remove-To remove a line item
Gear options
No actions in the gear
Allow Add/Remove/Copy line items option unchecked
Allow Modification of Line Item checked with Allow Cost Breakdown unchecked
Toolbar
Add option is not seen
Gear options
No actions in the gear
Gear options
No actions in the gear

Unifier Business Processes User Guide
230
Allow Add/Remove/Copy line items option unchecked
Allow Cost Breakdown checked
Toolbar
Add option is not seen
Gear options
Insert Costed Line Items-To add cost break down to a line item
Add Remaining-To add a costed line which will have the Amount field=Non-Costed Amount – Costed Amount. This option will not be seen when the Costed Amount=Amount in the Costed lines
Copy-To make an exact copy of the line item
Remove-To remove a line item and its costed lines
Gear options
Insert Costed Line Items-To add cost break down to a line item
Copy-To make an exact copy of the line item
Remove-To remove line items
Allow Add/Remove/Copy line items option checked
Allow Cost Breakdown checked
Toolbar
Add option is seen
Gear options
Insert Line Item with submenu options of Lump Sum and Unit Cost
Insert Multiple Line Items with submenu options of Lump Sum and Unit cost
Insert Costed Line Items-To add cost break down to a line item
Add Remaining-To add a costed line which will have the Amount field=Non-Costed Amount – Costed Amount. This option will not be seen when the Costed Amount=Amount in the Costed lines
Copy-To make an exact copy of the line item
Remove-To remove a line item and its costed lines
Gear options
Insert Costed Line Items-To add cost break down to a line item
Copy-To make an exact copy of the line item
Remove-To remove line items
Working with Unifier Business Processes
231
Line Items in the Grid
When the Grid is launched for the very first time and no Line Items exist for the BP record:
A blank line (first line) is displayed in the Grid, by default, and the blank line is treated as a Summary Line Item.The uuu_cost_li_type field will be set as “Lump Sum” for the Summary Line Items.
Note: The uuu_cost_li_type field cannot be blank. It can either be set as "Lump Sum" or "Unit Cost."
If you click the Gear icon (in the first column) in the first line, these options will be available, only:
Insert Line Item
Insert Multiple Line Items
All other options are disabled.
You can change the default value set in the uuu_cost_li_type field to "Unit Cost." The value specified in this field governs whether the other fields can be edited, or not.
When a new Line Item is inserted, the new Line Item will be a Summary Line Item.
You can add the Summary Line Item by selecting the “Insert Line Item…” option, using the Gear icon, also. The “Insert Line Item…” option enables you to add on Line Item, only.
You can add multiple Summary Line Items by selecting the “Insert Multiple Line Items…” option.
If you insert a new row, based on key actions (tab, enter), then the inserted new row type will be the same as the previous row.
The line number (1, 2, 3, 4, and so forth) are generated after you click Save.
The "Add Remaining" option is enabled for all Summary Line Items as long as the:
"Total Amount" from the Costed Line Items is not = Line Item Amount, in case of Lump Sum
"Quantity" from the Costed Line Items is not = Line Item Quantity, in case of Unit Cost
When you select the “Insert Multiple Line Items…” option, the Insert Multiple Line Items window appears which allows you to determine the number of Line Items that you want to add.
The total amount row (at the bottom of the Grid) displays the Total Line Item Amount of all the Summary Line Item rows.
Note: The added Line Items are all Summary Line Items and will be populated with Lump Sum as the Cost Line Item Type.
Gear Options for Summary Line Item
The following explains the functions of the Gear options when you select the Summary Line Item and click the Gear icon (in the first column).
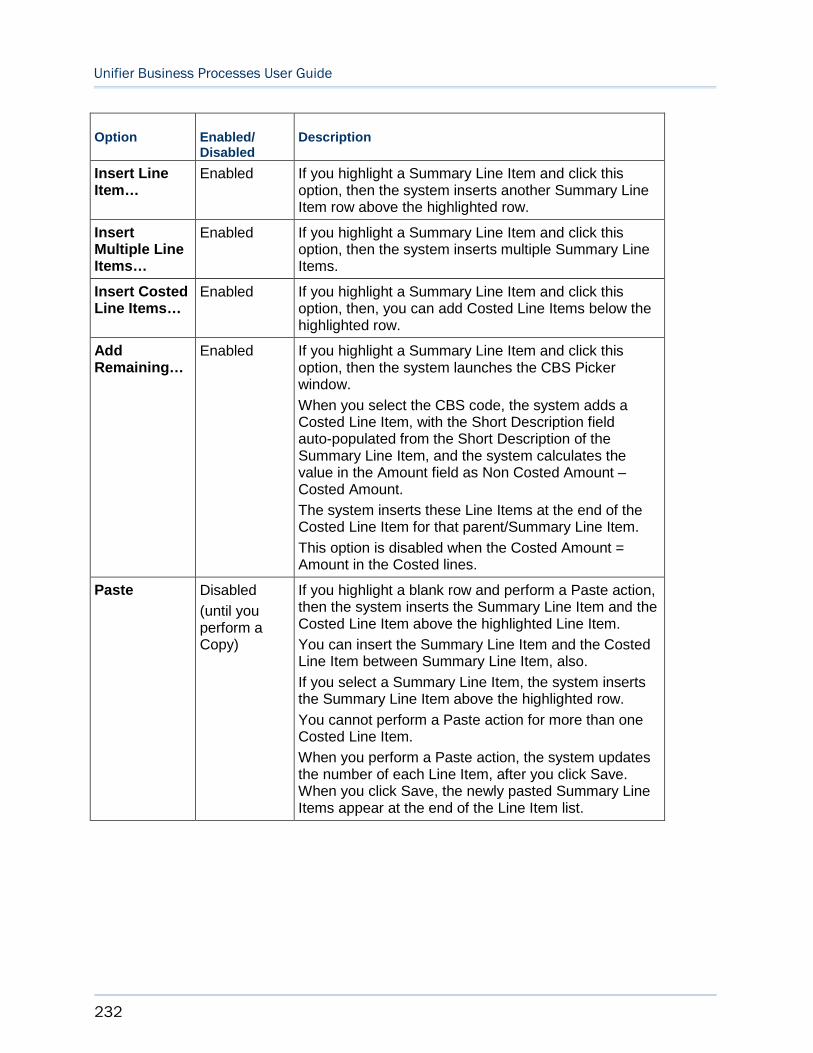
Unifier Business Processes User Guide
232
Option Enabled/ Disabled
Description
Insert Line Item…
Enabled If you highlight a Summary Line Item and click this option, then the system inserts another Summary Line Item row above the highlighted row.
Insert Multiple Line Items…
Enabled If you highlight a Summary Line Item and click this option, then the system inserts multiple Summary Line Items.
Insert Costed Line Items…
Enabled If you highlight a Summary Line Item and click this option, then, you can add Costed Line Items below the highlighted row.
Add Remaining…
Enabled If you highlight a Summary Line Item and click this option, then the system launches the CBS Picker window.
When you select the CBS code, the system adds a Costed Line Item, with the Short Description field auto-populated from the Short Description of the Summary Line Item, and the system calculates the value in the Amount field as Non Costed Amount – Costed Amount.
The system inserts these Line Items at the end of the Costed Line Item for that parent/Summary Line Item.
This option is disabled when the Costed Amount = Amount in the Costed lines.
Paste Disabled
(until you perform a Copy)
If you highlight a blank row and perform a Paste action, then the system inserts the Summary Line Item and the Costed Line Item above the highlighted Line Item.
You can insert the Summary Line Item and the Costed Line Item between Summary Line Item, also.
If you select a Summary Line Item, the system inserts the Summary Line Item above the highlighted row.
You cannot perform a Paste action for more than one Costed Line Item.
When you perform a Paste action, the system updates the number of each Line Item, after you click Save. When you click Save, the newly pasted Summary Line Items appear at the end of the Line Item list.

Working with Unifier Business Processes
233
Option Enabled/ Disabled
Description
Copy Enabled If you highlight a Summary Line Item and click this option, then you copy the Summary Line Item and the associated Costed Line Items.
If you highlight a Summary Line Item and a Costed Line Item, from a set of Costed Line Items, and click the Gear icon > Copy, then the Summary Line Item and all the associated Costed Line Items are copied.
Example
Line 1 has 1.1, 1.2, and 1.3.
You select Line 1 and click copy.
When you paste, the system inserts Line 1 along with 1.1, 1.2, and 1.3 in the Grid.
Remove Enabled If you highlight a Summary Line Item and click this option, then the Summary Line Item and all the associated Costed Line Items are removed.
Adding Line Items in Grid View
Upon selecting the Line Items tab of the record, you can add a Lump Sum item or a Unit Cost item using the Add dropdown.
Fields seen in the grid are based on the detail form design. The editable field cells are bolded while the read-only field cells are italicized. Row numbers for the line items are generated upon saving the grid.
Adding Multiple Line Items in the Grid
After selecting to add multiple line items, a dialog box is displayed where you can specify the number of added line items. When adding these line items, the total number of rows displayed depends on the number indicated in the dialog box.
The Cost Line Item Type for each line item is populated based on the selected sub-menu option.
Modifying Cost Line Item Types
When an alert window is displayed regarding a change of value for uuu_cost_li_type, the rules are applied as listed below:
If the line item has not been saved and the line item remains in entry mode, no error message is displayed.
If the summary line item has been saved, a confirmation message is displayed.
This indicates that the field values for the Cost Line Item Type are reset.
If the summary line item has Costed lines, a confirmation message is displayed.
This indicates that the field values for both the line item and Costed line are reset.
If you select, “Yes” in the alert window, system fields dependent on uuu_cost_li_type are reset for both the line item and Costed line.
Unifier Business Processes User Guide
234
Note: If “Allow Cost Breakdown” is unchecked in uDesigner and Costed lines exist as part of a previous step, then changing uuu_cost_li_type modifies the Costed lines. This is applicable for Workflow Business Processes.
Handling Errors in the Grid
The handling of errors in this updated grid is similar to other grids. All required field validation errors are displayed with a red circle in their respective fields.
When you select Save or Error Check, form and system-level validations are performed. If any rows on the grid contain errors, the Error Indicator column displays an error.
System-defined Fields for the Summary Line Item
The following explains the function of the system-defined fields in the Summary Line Item.
Columns
The first 10 columns will be fixed as Line No., attachment, link records, uuu_cost_li_type field, Cost Code, Cost Name, Short Description, Item Quantity, Item Unit Cost and Amount.
Remaining columns will be as per the detail form design in uDesigner.
uuu_cost_li_type
The uuu_cost_li_type will be a drop down and will have the values of Lump Sum and Unit Cost.
This field is a required field and should be marked with an asterisk. This field cannot be blank and by default will be set as Lump Sum.
The drop-down will have the values of Lump Sum and Unit Cost.
The editing of remaining fields in the grid will be dynamic in nature.
Meaning the uuu_cost_li_type will drive the editable and non-editable fields in the grid.
Note: Once the selection has been made, this value should be grayed out post shift of focus. This will be important since this field drives the behavior of other fields.
If the option selected is Lump Sum then:
uuu_quantity: Disabled (Any auto population and formula definition on this field will not be honored when the LI type is lump sum.)
uuu_unit_price: Disabled (Any auto population and formula definition on this field will not be honored when the LI type is lump sum.)
amount: Required.
Manual or Formula destination. User must type in the amount value. This DE could also be set as formula in uDesigner. Runtime should honor the formula calculation.
If the option selected is Unit Cost then:
uuu_quantity: Required.
Manual or Formula destination. User must type in the Quantity value. This DE could also be set as formula in uDesigner. Runtime should honor the formula calculation.
Working with Unifier Business Processes
235
uuu_unit_price: Required
Manual or Formula destination. User must type in the unit cost value. This DE could also be set as formula in uDesigner. Runtime should honor the formula calculation.
amount: Read-only, populated by formula as configured by user in uDesigner. At runtime this field should always be calculated as uuu_quantity*uuu_unit_price
If the detail form design does not have the uuu_quantity and uuu_unit_price fields but user selects the Unit Cost option for uuu_cost_li_type then upon shift of focus, an error should be thrown alerting the user that the fields are missing. (Use existing alert currently being thrown when user clicks unit cost option in the classic line item Unit Cost option).
Other System Elements in the Grid
uuu_costed_amt
Always read-only. This DE should show value as sum of ‘Amount’ from all costed lines.
(Note that when uuu_cost_li_type = Lump Sum, amount will be entered by user in the cost allocation window. When uuu_cost_li_type = Unit Cost, amount will be calculated in the grid by system as Unit Cost*Quantity. Either case, uuu_costed_amt in the summary line item will be calculated as sum of ‘amount’ from all costed lines.)
This field will be displayed only at the summary line item level in the grid.
uuu_not_costed_amt
Always read-only, this DE should show value = (amount – uuu_costed_amount)
This field will be displayed only at the summary line item level in the grid.
uuu_costed_qty
Always read-only. This DE should show value as sum of ‘Quantity’ from all distributed cost child lines.
(Note that when uuu_costed_li_type = Lump Sum, this will be zero. When uuu_cost_li_type = Unit Cost, Quantity will be entered by user in the Cost Allocation window. Either case, uuu_costed_qty in the summary line item should calculate as sum of ‘Quantity’ from all costed lines.)
This field will be displayed only at the summary line item level in the grid.
uuu_not_costed_qty
Always read-only, this DE should show value = (uuu_quantity – uuu_costed_quantity). Note that when uuu_cost_li_type = Lump Sum, this will calculate as zero.
This field will be displayed only at the summary line item level in the grid.
All other fields designed in the Detail form
User defined fields will be editable in the summary line item and not in the costed lines.
Costed Line Items in the Grid
The option of “Insert Costed Line Items…” allows you to add Costed Line Items for a Line Item. Clicking this option will launch the CBS Picker window. Multiple CBS Codes can be selected.
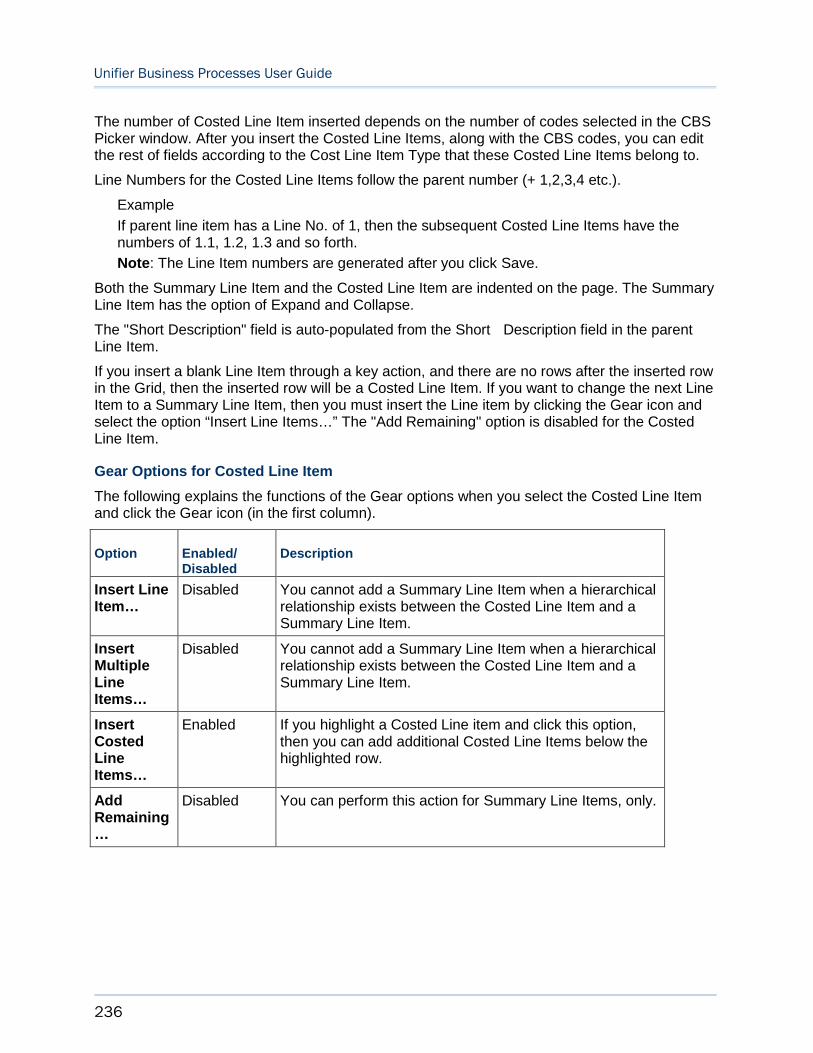
Unifier Business Processes User Guide
236
The number of Costed Line Item inserted depends on the number of codes selected in the CBS Picker window. After you insert the Costed Line Items, along with the CBS codes, you can edit the rest of fields according to the Cost Line Item Type that these Costed Line Items belong to.
Line Numbers for the Costed Line Items follow the parent number (+ 1,2,3,4 etc.).
Example
If parent line item has a Line No. of 1, then the subsequent Costed Line Items have the numbers of 1.1, 1.2, 1.3 and so forth.
Note: The Line Item numbers are generated after you click Save.
Both the Summary Line Item and the Costed Line Item are indented on the page. The Summary Line Item has the option of Expand and Collapse.
The "Short Description" field is auto-populated from the Short Description field in the parent Line Item.
If you insert a blank Line Item through a key action, and there are no rows after the inserted row in the Grid, then the inserted row will be a Costed Line Item. If you want to change the next Line Item to a Summary Line Item, then you must insert the Line item by clicking the Gear icon and select the option “Insert Line Items…” The "Add Remaining" option is disabled for the Costed Line Item.
Gear Options for Costed Line Item
The following explains the functions of the Gear options when you select the Costed Line Item and click the Gear icon (in the first column).
Option Enabled/ Disabled
Description
Insert Line Item…
Disabled You cannot add a Summary Line Item when a hierarchical relationship exists between the Costed Line Item and a Summary Line Item.
Insert Multiple Line Items…
Disabled You cannot add a Summary Line Item when a hierarchical relationship exists between the Costed Line Item and a Summary Line Item.
Insert Costed Line Items…
Enabled If you highlight a Costed Line item and click this option, then you can add additional Costed Line Items below the highlighted row.
Add Remaining…
Disabled You can perform this action for Summary Line Items, only.
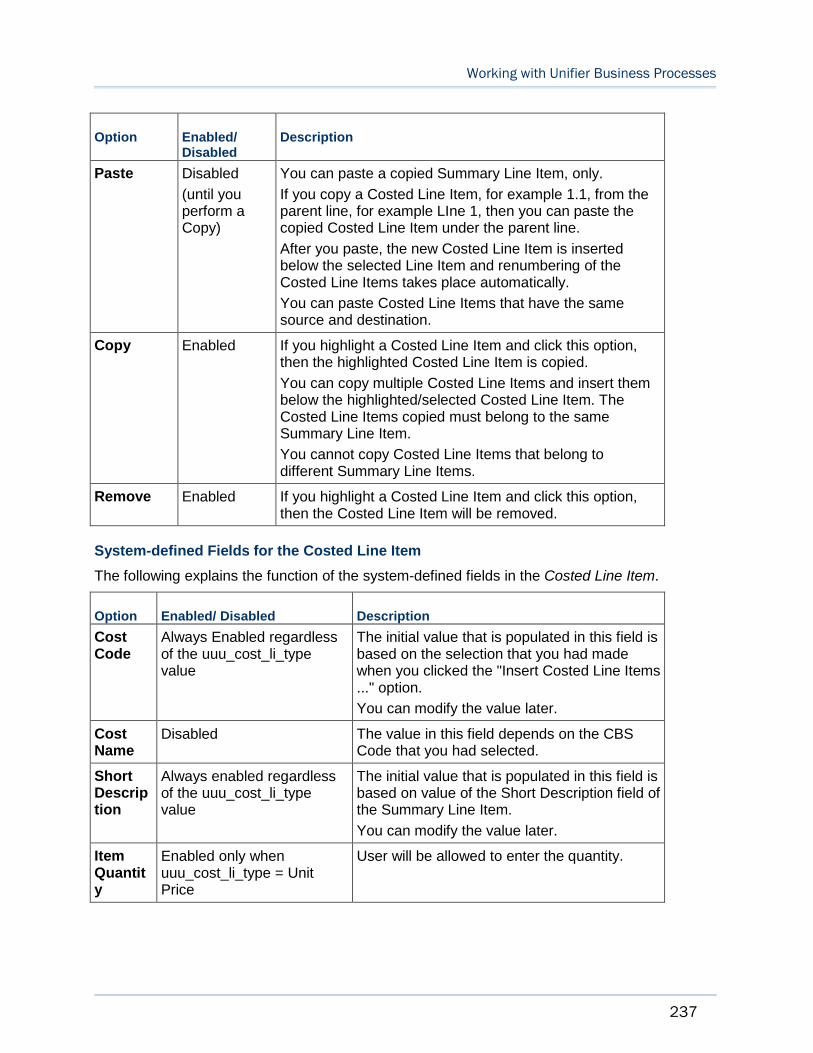
Working with Unifier Business Processes
237
Option Enabled/ Disabled
Description
Paste Disabled
(until you perform a Copy)
You can paste a copied Summary Line Item, only.
If you copy a Costed Line Item, for example 1.1, from the parent line, for example LIne 1, then you can paste the copied Costed Line Item under the parent line.
After you paste, the new Costed Line Item is inserted below the selected Line Item and renumbering of the Costed Line Items takes place automatically.
You can paste Costed Line Items that have the same source and destination.
Copy Enabled If you highlight a Costed Line Item and click this option, then the highlighted Costed Line Item is copied.
You can copy multiple Costed Line Items and insert them below the highlighted/selected Costed Line Item. The Costed Line Items copied must belong to the same Summary Line Item.
You cannot copy Costed Line Items that belong to different Summary Line Items.
Remove Enabled If you highlight a Costed Line Item and click this option, then the Costed Line Item will be removed.
System-defined Fields for the Costed Line Item
The following explains the function of the system-defined fields in the Costed Line Item.
Option Enabled/ Disabled Description
Cost Code
Always Enabled regardless of the uuu_cost_li_type value
The initial value that is populated in this field is based on the selection that you had made when you clicked the "Insert Costed Line Items ..." option.
You can modify the value later.
Cost Name
Disabled The value in this field depends on the CBS Code that you had selected.
Short Description
Always enabled regardless of the uuu_cost_li_type value
The initial value that is populated in this field is based on value of the Short Description field of the Summary Line Item.
You can modify the value later.
Item Quantity
Enabled only when uuu_cost_li_type = Unit Price
User will be allowed to enter the quantity.
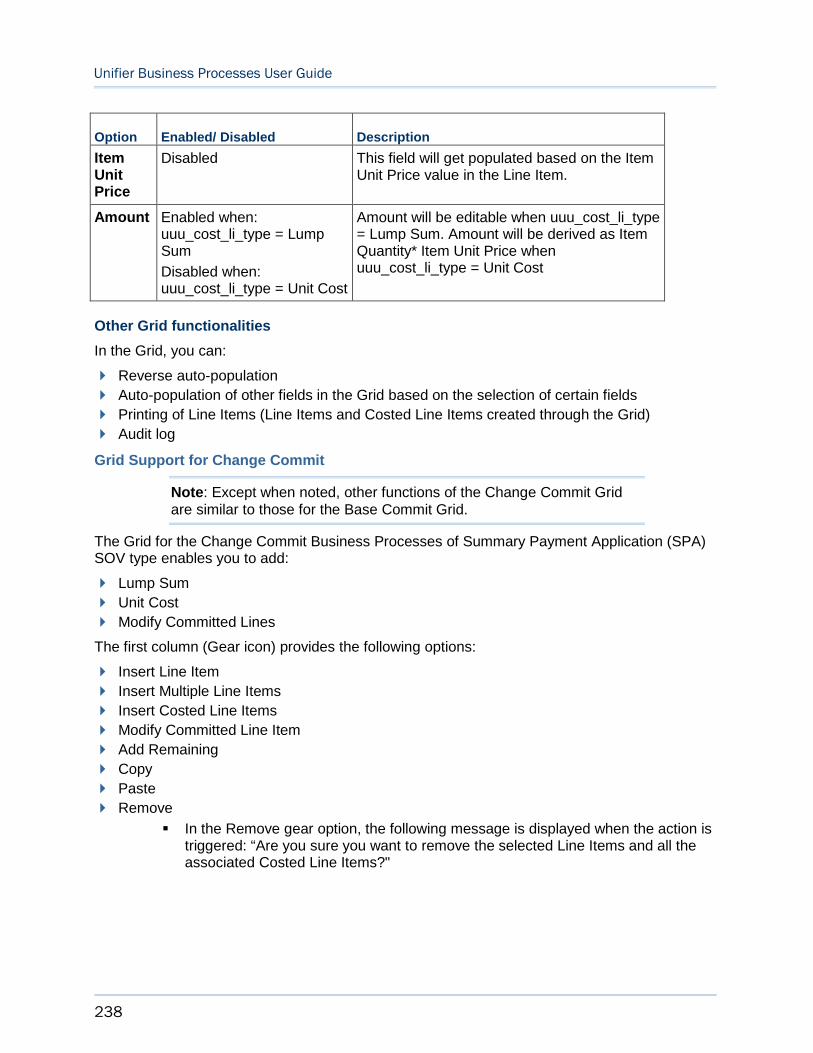
Unifier Business Processes User Guide
238
Option Enabled/ Disabled Description
Item Unit Price
Disabled This field will get populated based on the Item Unit Price value in the Line Item.
Amount Enabled when: uuu_cost_li_type = Lump Sum
Disabled when: uuu_cost_li_type = Unit Cost
Amount will be editable when uuu_cost_li_type = Lump Sum. Amount will be derived as Item Quantity* Item Unit Price when uuu_cost_li_type = Unit Cost
Other Grid functionalities
In the Grid, you can:
Reverse auto-population
Auto-population of other fields in the Grid based on the selection of certain fields
Printing of Line Items (Line Items and Costed Line Items created through the Grid)
Audit log
Grid Support for Change Commit
Note: Except when noted, other functions of the Change Commit Grid are similar to those for the Base Commit Grid.
The Grid for the Change Commit Business Processes of Summary Payment Application (SPA) SOV type enables you to add:
Lump Sum
Unit Cost
Modify Committed Lines
The first column (Gear icon) provides the following options:
Insert Line Item
Insert Multiple Line Items
Insert Costed Line Items
Modify Committed Line Item
Add Remaining
Copy
Paste
Remove
In the Remove gear option, the following message is displayed when the action is triggered: “Are you sure you want to remove the selected Line Items and all the associated Costed Line Items?"
Working with Unifier Business Processes
239
Note: The "Modify Committed Line Item ..." option will be disabled when you select a Costed Line Item.
When you click the "Modify Committed Line Item ..." option, the Commit Line Picker window opens. Follow the prompts to select a Commit Line Item from SOV to insert in the Grid.
The columns in the Change Commit grid are similar to the Base Commit grid. Alongside Item Quantity, Item Unit Cost, and Amount are the following new columns:
Error Indicator
Attachment
Linked Record
Cost Line Item Type
Cost Name
Short Description
Current Quantity
Current Scheduled Value
New Scheduled Value
The remainder of the columns display based on the form design established in uDesigner.
Total Amount Row
Similar to a Base Commit grid, a total amount row (at the bottom of the Grid) displays the Total Line Item Amount of all the Summary Line Item rows.
Form Validations
All form level validations at the system and user-defined levels are done once the Save option is selected in the toolbar.
For Lump Sum validations, the Costed Amount must be the same as the Line Item Amount for the Cost Line Item Type.
For Unit Cost validations, the Costed Quantity must be the same as the Line Item Quantity for the Cost Line Item Type.
Selecting and Modifying Line Items
You can use the "Item Quantity" and "Amount" to enter "Change Quantity" and "Change Amount" when modifying the Committed Line Items.
When you select "Modify Committed Line Item ..." option, the Committed Line Item Picker window opens to allow you to select the Line Item that you want to modify. The behavior of a line item selection is similar to the one seen when line items are added through selecting the Modify Committed Line option in Form View. You can select any Summary Line Item, from this window. Once you select the Line Item, the following occurs:
The uuu_cost_li_type and uuu_unit_price fields, when Cost LI type = Unit Cost, are copied from the reference Commit Line Item and transferred into the Change Commit Line Item as read-only fields.
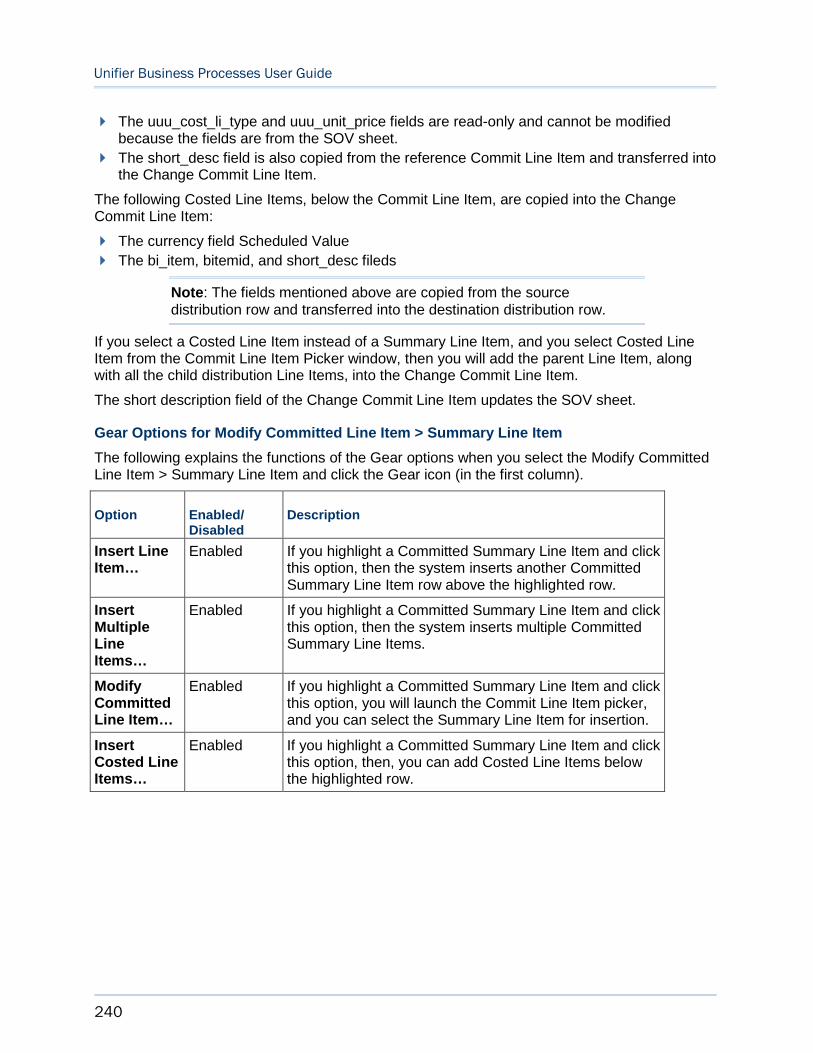
Unifier Business Processes User Guide
240
The uuu_cost_li_type and uuu_unit_price fields are read-only and cannot be modified because the fields are from the SOV sheet.
The short_desc field is also copied from the reference Commit Line Item and transferred into the Change Commit Line Item.
The following Costed Line Items, below the Commit Line Item, are copied into the Change Commit Line Item:
The currency field Scheduled Value
The bi_item, bitemid, and short_desc fileds
Note: The fields mentioned above are copied from the source distribution row and transferred into the destination distribution row.
If you select a Costed Line Item instead of a Summary Line Item, and you select Costed Line Item from the Commit Line Item Picker window, then you will add the parent Line Item, along with all the child distribution Line Items, into the Change Commit Line Item.
The short description field of the Change Commit Line Item updates the SOV sheet.
Gear Options for Modify Committed Line Item > Summary Line Item
The following explains the functions of the Gear options when you select the Modify Committed Line Item > Summary Line Item and click the Gear icon (in the first column).
Option Enabled/ Disabled
Description
Insert Line Item…
Enabled If you highlight a Committed Summary Line Item and click this option, then the system inserts another Committed Summary Line Item row above the highlighted row.
Insert Multiple Line Items…
Enabled If you highlight a Committed Summary Line Item and click this option, then the system inserts multiple Committed Summary Line Items.
Modify Committed Line Item…
Enabled If you highlight a Committed Summary Line Item and click this option, you will launch the Commit Line Item picker, and you can select the Summary Line Item for insertion.
Insert Costed Line Items…
Enabled If you highlight a Committed Summary Line Item and click this option, then, you can add Costed Line Items below the highlighted row.
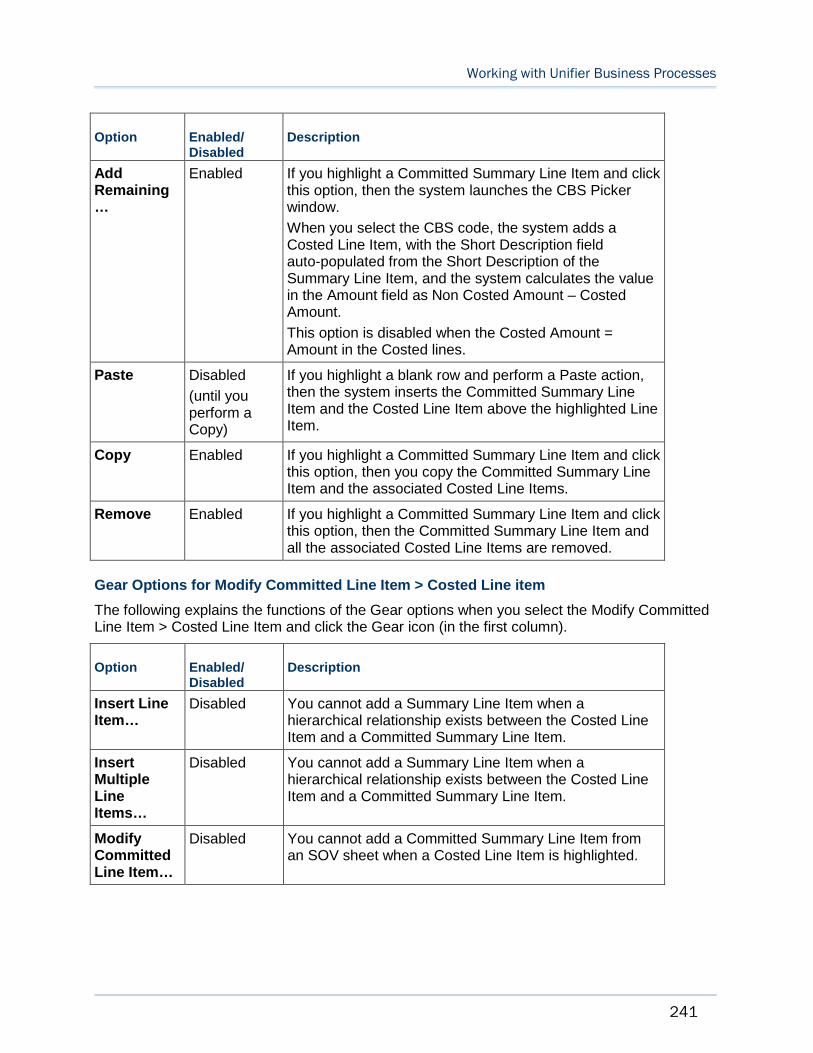
Working with Unifier Business Processes
241
Option Enabled/ Disabled
Description
Add Remaining…
Enabled If you highlight a Committed Summary Line Item and click this option, then the system launches the CBS Picker window.
When you select the CBS code, the system adds a Costed Line Item, with the Short Description field auto-populated from the Short Description of the Summary Line Item, and the system calculates the value in the Amount field as Non Costed Amount – Costed Amount.
This option is disabled when the Costed Amount = Amount in the Costed lines.
Paste Disabled
(until you perform a Copy)
If you highlight a blank row and perform a Paste action, then the system inserts the Committed Summary Line Item and the Costed Line Item above the highlighted Line Item.
Copy Enabled If you highlight a Committed Summary Line Item and click this option, then you copy the Committed Summary Line Item and the associated Costed Line Items.
Remove Enabled If you highlight a Committed Summary Line Item and click this option, then the Committed Summary Line Item and all the associated Costed Line Items are removed.
Gear Options for Modify Committed Line Item > Costed Line item
The following explains the functions of the Gear options when you select the Modify Committed Line Item > Costed Line Item and click the Gear icon (in the first column).
Option Enabled/ Disabled
Description
Insert Line Item…
Disabled You cannot add a Summary Line Item when a hierarchical relationship exists between the Costed Line Item and a Committed Summary Line Item.
Insert Multiple Line Items…
Disabled You cannot add a Summary Line Item when a hierarchical relationship exists between the Costed Line Item and a Committed Summary Line Item.
Modify Committed Line Item…
Disabled You cannot add a Committed Summary Line Item from an SOV sheet when a Costed Line Item is highlighted.
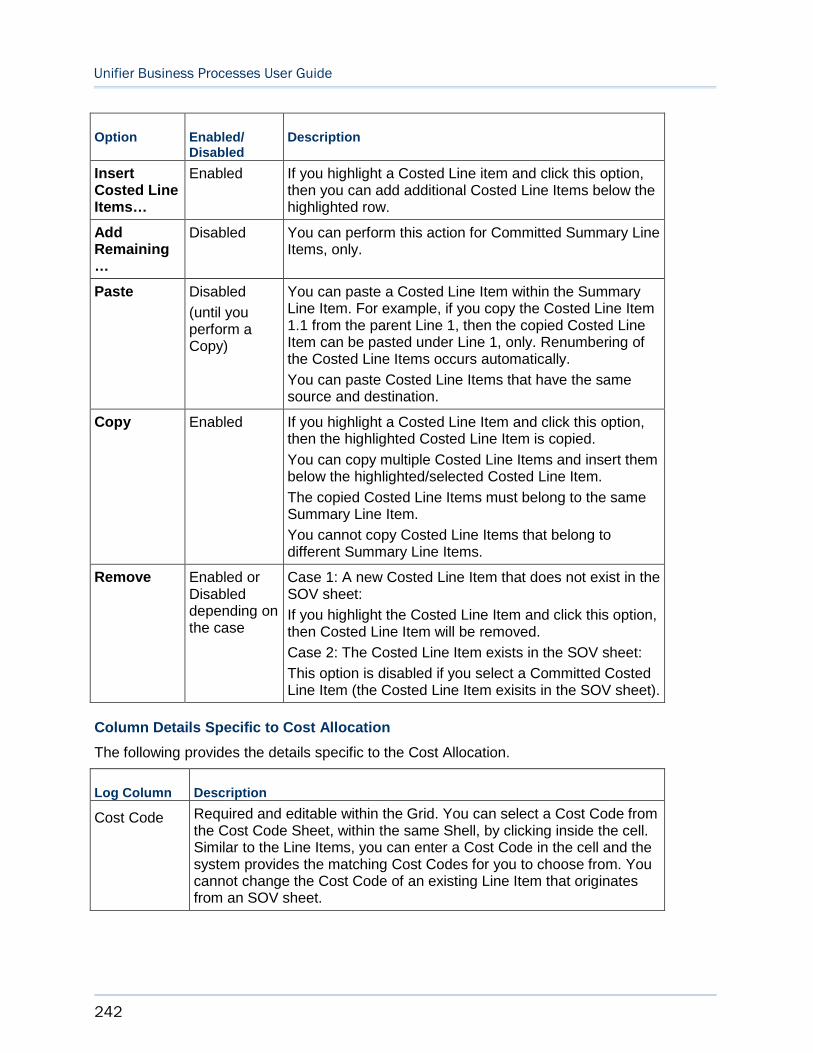
Unifier Business Processes User Guide
242
Option Enabled/ Disabled
Description
Insert Costed Line Items…
Enabled If you highlight a Costed Line item and click this option, then you can add additional Costed Line Items below the highlighted row.
Add Remaining…
Disabled You can perform this action for Committed Summary Line Items, only.
Paste Disabled
(until you perform a Copy)
You can paste a Costed Line Item within the Summary Line Item. For example, if you copy the Costed Line Item 1.1 from the parent Line 1, then the copied Costed Line Item can be pasted under Line 1, only. Renumbering of the Costed Line Items occurs automatically.
You can paste Costed Line Items that have the same source and destination.
Copy Enabled If you highlight a Costed Line Item and click this option, then the highlighted Costed Line Item is copied.
You can copy multiple Costed Line Items and insert them below the highlighted/selected Costed Line Item.
The copied Costed Line Items must belong to the same Summary Line Item.
You cannot copy Costed Line Items that belong to different Summary Line Items.
Remove Enabled or Disabled depending on the case
Case 1: A new Costed Line Item that does not exist in the SOV sheet:
If you highlight the Costed Line Item and click this option, then Costed Line Item will be removed.
Case 2: The Costed Line Item exists in the SOV sheet:
This option is disabled if you select a Committed Costed Line Item (the Costed Line Item exisits in the SOV sheet).
Column Details Specific to Cost Allocation
The following provides the details specific to the Cost Allocation.
Log Column Description
Cost Code Required and editable within the Grid. You can select a Cost Code from the Cost Code Sheet, within the same Shell, by clicking inside the cell. Similar to the Line Items, you can enter a Cost Code in the cell and the system provides the matching Cost Codes for you to choose from. You cannot change the Cost Code of an existing Line Item that originates from an SOV sheet.
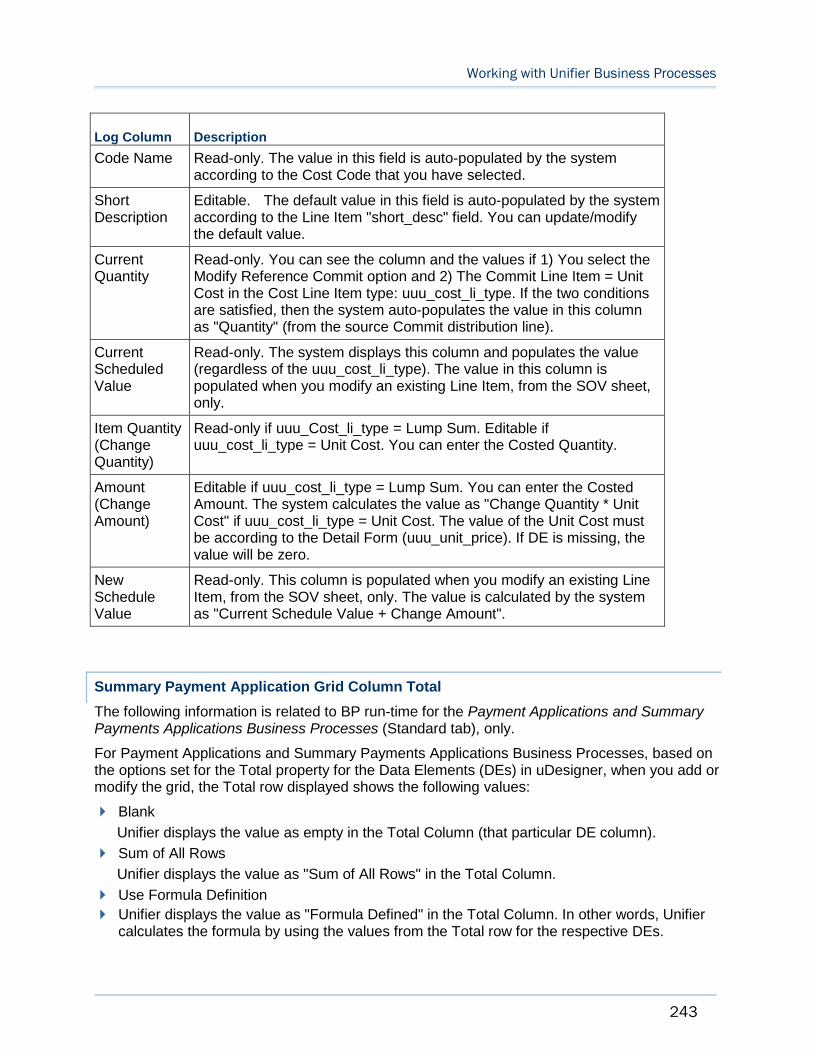
Working with Unifier Business Processes
243
Log Column Description
Code Name Read-only. The value in this field is auto-populated by the system according to the Cost Code that you have selected.
Short Description
Editable. The default value in this field is auto-populated by the system according to the Line Item "short_desc" field. You can update/modify the default value.
Current Quantity
Read-only. You can see the column and the values if 1) You select the Modify Reference Commit option and 2) The Commit Line Item = Unit Cost in the Cost Line Item type: uuu_cost_li_type. If the two conditions are satisfied, then the system auto-populates the value in this column as "Quantity" (from the source Commit distribution line).
Current Scheduled Value
Read-only. The system displays this column and populates the value (regardless of the uuu_cost_li_type). The value in this column is populated when you modify an existing Line Item, from the SOV sheet, only.
Item Quantity (Change Quantity)
Read-only if uuu_Cost_li_type = Lump Sum. Editable if uuu_cost_li_type = Unit Cost. You can enter the Costed Quantity.
Amount (Change Amount)
Editable if uuu_cost_li_type = Lump Sum. You can enter the Costed Amount. The system calculates the value as "Change Quantity * Unit Cost" if uuu_cost_li_type = Unit Cost. The value of the Unit Cost must be according to the Detail Form (uuu_unit_price). If DE is missing, the value will be zero.
New Schedule Value
Read-only. This column is populated when you modify an existing Line Item, from the SOV sheet, only. The value is calculated by the system as "Current Schedule Value + Change Amount".
Summary Payment Application Grid Column Total
The following information is related to BP run-time for the Payment Applications and Summary Payments Applications Business Processes (Standard tab), only.
For Payment Applications and Summary Payments Applications Business Processes, based on the options set for the Total property for the Data Elements (DEs) in uDesigner, when you add or modify the grid, the Total row displayed shows the following values:
Blank
Unifier displays the value as empty in the Total Column (that particular DE column).
Sum of All Rows
Unifier displays the value as "Sum of All Rows" in the Total Column.
Use Formula Definition
Unifier displays the value as "Formula Defined" in the Total Column. In other words, Unifier calculates the formula by using the values from the Total row for the respective DEs.
Unifier Business Processes User Guide
244
If the formula was reset to Manual, then Unifier resets the Total to "Sum of All Rows."
Unifier calculated the Total, for DEs with predefined formula, as follows:
%Complete to Date (uuu_spa_per_comp)
Custom formula
Based on the property selected in uDesigner.
System-defined formula
Based on the property selected in uDesigner.
Amount This period (uuu_spa_amt_tp)
Based on the property selected in uDesigner. (Either Blank or Sum of All Rows)
SOV Summary Payment Application Business Process (Standard View)
View Mode
In View Mode, you can use the toolbar to Reload, Print, Find, Collapse, and Expand.
Add
Allows you to add lines. When you click Add, a confirmation dialog will be displayed. After lines have been added, the Add button will be hidden.
Note: After lines have been added manually, the payment lines cannot be added through CSV import.
Import
Allows you to import lines. After lines have been added, the Import button will be hidden.
Reload
Allows you to reload line items.
Allows you to print or export the entire summary sheet along with the costed lines (the line item summary and the associated costed line items). The sheet can be exported to CSV or EXcel. The generated CSV or Excel sheet is for information purpose only.
Find on Page
Allows you to search the Summary Payment Applications SOV for specific line items.
Collapse
Allows you to view only the Summary rows.
Expand
Allows you to view the Summary and the associated child rows. This will be the default view.
Summary Payment Applications SOV structure (columns)
The grid columns seen in the classic payment application will be as per the detail form design specified in uDesigner.
Working with Unifier Business Processes
245
The grid also has a Total field, which appears at the bottom of the sheet, that displays the sum of all the lines.
Edit Mode
In Edit Mode, you can use the toolbar to Cancel, Error Check, Save, Find, Collapse, and Expand. Additionally, a checkbox option of "Apply line item value of Percentage Complete to Date to Costed Lines" will be visible on the right.
Cancel
Allows you to exit Edit Mode.
Error Check
Allows you to check the sheet for errors.
Save
Allows you to save any changes made to the sheet in Edit Mode.
Collapse
Allows you to view only the Summary rows.
Expand
Allows you to view the Summary and the associated child rows. This will be the default view.S
Locking of the Grid
In View and Edit mode, the system will automatically lock the grid after the first 5 columns. To lock another column while viewing or editing data, you can drag the column from the unlocked part of the sheet into the locked part of the sheet. This layout will not be saved into the database.
Total Mismatch Indicator
When the line item field value does not match the sum of costed line values, the line item cell displays a small red triangle to indicate that the totals do not match. When you click the small triangle, the system displays an information text and informs you of the differences. This is applicable only for the line item.
Multiple Payment Applications
If SOV restrictions are removed and multiple Payment Applications are detected, an Alerts icon will be displayed in the upper right corner of the window. When you hover over the icon, information about pending payments is presented.
Negative Change Orders
When the Payment Application grid is opened, the line items that will be modified because of a pending Negative Change order will have an Alerts icon in the Scheduled Value cell. You can click on the cell to view the details of the Change order. The Pending Change Orders with negative amounts screen will be displayed. The screen will include columns for the Business Process name, Record Number, Line Number, and Amount.
Unifier Business Processes User Guide
246
Overpayment in Summary Payment Applications SOV
The Data Element (DE) uuu_spa_per_comp (Percentage Complete to Date) is mandatory on the detail form of a Summary Payment Applications type Payment Application business process.
You can enter values in the detail form (grid) (for uuu_spa_per_comp (Percentage Complete to Date)) that is above 100 percent.
In the Summary Payment Application SOV structure, you can add a column with Datasource = Commits Remaining Balance.
If the Commits Remaining Balance column has not been added to the SOV structure, you will have the ability to overpay (assign a payment amount that exceeds the remaining balance and the uuu_spa_per_comp value exceeds 100%).
If the Commits Remaining Balance column has been added to the SOV structure, you will not have the ability to overpay (you will not be allowed to assign a payment amount that exceeds the remaining balance or to make the uuu_spa_per_comp greater than 100), and Unifier displays a detailed message notifying you that the payment amount exceeds the remaining reference commit balance.
Totaling Cost Breakdown Values
This section explains the following topics:
Note: The following applies when the "Total the Cost Breakdown values to the line item" option is checked in the form. Go to uDesigner node > Payment Applications > Upper Forms > Properties > General tab > Line Items block.
Totaling Cost Breakdown to the Line Item
Totaling cost breakdown values to the line item
Totaling Line Item in Payment Application
Totaling the line in the Payment grid of Payment Application
Totaling Line Item in Summary Payment Application
Totaling the line in the Payment grid of the Summary Payment Application
Line Item and Sum of Costed Line
When the line item field value does not match the sum of costed line values
Summary Line item
Summary Row Totals
Summary total
Line item total
Totaling Cost Breakdown to the Line Item
The totaling cost breakdown to the line item can be done for:
Line items with editable numeric data element columns (line item and costed lines)
Working with Unifier Business Processes
247
Line items with editable numeric data element columns (line item and costed lines)
Line items with cells that are based on formula
Line items with cells that are percentages
The following explains each option.
Line items with editable numeric data element columns (line item and costed lines)
You can see the sum of all the costed line item values after entering the pertinent values in the editable fields (line item and costed lines). That is to say, when you enter values in the costed line items, the system sums up those values and displays the resulting value in the corresponding cell of the line item.
Example
Contracts with Cost Break down
Enter the costed line item information in the “Other Amount this Period” field. Once you click elsewhere, the system displays the sum total of the costed line item values in the "Other Amount this Period" field of the line item.
Line items with editable numeric data element columns (line item and costed lines)
If the fields are read-only, then there are not summations.
Line items with cells that are based on formula
When the line item cell has a formula definition, then the sum (roll up) for the cell in the line item is not generated from the costed line items. The calculation for this cell is based on the line item values.
Example
"Completed and Stored to Date" is a formula field = Total Previous Payments <uuu_spa_prev_amt> + Requested this Period <spz_total_tp> + Stored Materials Amount <uuu_spa_mat_stored>. As a result, the cell value for "Completed and Stored to Date" in the line item = Total Previous Payments <uuu_spa_prev_amt> + Requested this Period <spz_total_tp> + Stored Materials Amount <uuu_spa_mat_stored>.
During runtime, the system Data Element (DE) uuu_spa_prev_amt, on a Summary Payment Applications detail form, is calculated by the system as the sum of following (from SOV):
The uuu_spa_prev_amt, and
The data element selected in udesigner option "Total Previous Payments = Total Previous Payments + ..."
By default, uDesigner selects the "Amount" field from the system detail form in this option and the formula for uuu_spa_prev_amt equals the sum of:
The uuu_spa_prev_amt from SOV, and
The amount from the SOV.
If the user selects some other option in uDesigner, for example, the data element "Amount Requested this Period," then the formula for this field would become:
The uuu_spa_prev_amt from SOV, and
The amount Requested This Period from SOV
Unifier Business Processes User Guide
248
Line items with cells that are percentages
System-defined uuu fields, and user-defined custom formula fields, which are treated as percentages field and set as formulas, do not sum up the values from the costed lines to the line item.
Totaling Line Item in Payment Application
The Total row, at the bottom of grid, displays the total for payment lines (costed line items) when the values are:
Manually entered
Formula based
Percentages
In the total Row, all the numeric columns display the total of the Summary Line items.
Totaling Line Item in Summary Payment Application
In the Total Row, the manual data element columns display the total of the Summary line item values.
The calculation in the Total Row is applicable for both Payment Application and Summary Payment Application.
Line Item and Sum of Costed Line
When the line item field value does not match the sum of costed line values:
For fields that are editable, the line item cell displays a small triangle to indicate that the totals do not match.
Note: The small triangle is displayed based on the selection that has been made in the Upper Form option "Costed line item total must be equal to the line item total". If the checkbox for Costed line item total must be equal to the line item total is unchecked, then the red triangle does not display. If the checkbox for Costed line item total must be equal to the line item total is checked, then the Data Element is configured in uDesigner to show the Summary Total as Sum of All Rows (there is a total mismatch), and the red triangle is displayed.
When the user clicks the small triangle, the system displays an information text and informs the user about the differences. This is applicable only for the line item.
Note: The alert is not displayed for uuu_spa_per_comp field since the field values of costed lines and summary lines will always have a discrepancy.

Working with Unifier Business Processes
249
Summary Line Item
The (Summary) Line item row is grey when the line is not editable.
The (Summary) Line item row is editable if the row is displayed:
In bold font.
With thick borders.
To be able to modify Line Items, you must select the "Allow Modification of Line Items" option in the Creation step.
You can define whether you want the value of the Data Element (DE) uuu_spa_per_comp(from summary row) to apply to all costed lines (in a summary Payment Application grid) automatically, or not. This enables you to avoid filling each costed line value manually and have a better user experience.
If the Allow viewing of Costed line items and Allow Modification of line item options are selected (checked) in the Upper Form of a Payment Application type BP (which references a Base Commit of SOV Type = Summary Payment Applications) in uDesigner, then the runtime SPA grid provides a checkbox option labeled Apply line item value of <label of DE uuu_spa_per_comp> to costed lines (at the top right-hand corner of the grid) to enable you to apply the line item value to costed lines.
When you select checkbox option labeled Apply line item value of <label of DE uuu_spa_per_comp> to costed lines, Unifier copies the value of the data element uuu_spa_per_comp (from the summary lines) into the corresponding costed lines. The subsequent impact on fields uuu_spa_amt_tp / uuu_spa_qty_tp in the costed lines is similar to just as if you made a manual edit of uuu_spa_per_comp in the costed lines to trigger the update of these fields.
To proceed, click to select the Apply line item value of <label of DE uuu_spa_per_comp> to costed lines option (at the top right-hand corner of the detail form).
This selection impacts only those lines that are edited after checking the box, and the existing, or edited, lines will remain as they were.
The following scenarios explain the behavior, when you edit a line item, or costed rows, after checking the box.
Scenario 1
Scenario 1-a: The uuu_spa_per_comp is editable and the Apply line item value of 'Percentage Complete to Date' to costed lines options is selected (checked) when the user enters a value for field uuu_spa_per_com in the summary row:
a) The corresponding uuu_spa_amt_tp or uuu_spa_qty_tp (depending on whether it is a Lump sum or Unit Cost type line item) in the summary row should get back-calculated as per the new value of uuu_spa_per_com.
b) All child costed lines should get auto-populated with the same value as the summary cell for uuu_spa_per_com.
c) The fields uuu_spa_amt_tp or uuu_spa_qty_tp for all costed lines get back-calculated according to the newly populated value of uuu_spa_per_com.
Unifier Business Processes User Guide
250
In this case, Unifier stops at back-calculating the costed row values for uuu_spa_amt_tp or uuu_spa_qty_tp and does not roll the values into the line item value again (even if the option Total the Cost Breakdown values to the line item is checked). Here, if the back-calculated values of uuu_spa_amt_tp or uuu_spa_qty_tp total to a penny off from the line item cell value, Unifier adjusts that penny in the last costed line.
Scenario 1-b: The uuu_spa_per_comp is editable and the Apply line item value of 'Percentage Complete to Date' to costed lines options is selected (checked) when the user enters a value in the summary cell for fields uuu_spa_amt_tp or uuu_spa_qty_tp, depending whether it is a Lump sum or Unit Cost type line item:
a) The summary row field uuu_spa_per_com is calculated by the system.
b) At the same time, all child costed lines get auto-populated with the same value as the summary cell for uuu_spa_per_com.
c) The fields uuu_spa_amt_tp or uuu_spa_qty_tp (depending on whether it is a Lump sumor Unit Cost type line item) for all costed lines get back-calculated according to the newly populated value of uuu_spa_per_com.
In this case, Unifier stops at back-calculating the costed row values for uuu_spa_amt_tp or uuu_spa_qty_tp and does not roll the values into the line item value again (even if the option Total the Cost Breakdown values to the line item is checked). Here, if the back-calculated values of uuu_spa_amt_tp or uuu_spa_qty_tp total to a penny off from the line item cell value, Unifier adjusts that penny in the last costed line.
Scenario 1-c: The uuu_spa_per_comp is editable and the Apply line item value of 'Percentage Complete to Date' to costed lines options is selected (checked) when the user enters a value in the summary cell for a field that impacts calculation of uuu_spa_per_comp(such as uuu_spa_mat_stored or uuu_spa_other_tp):
a) The summary row field uuu_spa_per_com get calculated by the system.
b) At the same time, all child costed lines get auto-populated with the same value as the summary cell for uuu_spa_per_com.
c) The fields uuu_spa_amt_tp or uuu_spa_qty_tp (depending on whether it is a Lump sumor Unit Cost type line item) for all costed lines get back-calculated according to the newly populated value of uuu_spa_per_com.
In this case, Unifier stops at back-calculating the costed row values for uuu_spa_amt_tp or uuu_spa_qty_tp and does not roll the values into the line item value again (even if the option Total the Cost Breakdown values to the line item is checked). Here, if the back-calculated values of uuu_spa_amt_tp or uuu_spa_qty_tp total to a penny off from the line item cell value, Unifier adjusts that penny in the last costed line.
Scenario 2
In this scenario, the uuu_spa_per_comp field is read-only, but any of the other fields that impact its calculation (uuu_spa_amt_tp, uuu_spa_qty_tp, uuu_spa_mat_stored, or uuu_spa_other_tp) are editable, and the option Apply line item value of <label of DE uuu_spa_per_com> to costed lines is checked. In such scenario:
Scenario 2-a: If the user modifies the summary cell value for any of the editable fields, the behavior will be similar to Scenario 1-b and Scenario 1-c, above.
Working with Unifier Business Processes
251
Scenario 2-b: If the user modifies the costed row value for any of the editable fields (existing functionality), then the corresponding costed row value of uuu_spa_per_com gets calculated by system. This does not result in roll up, or impact, the summary cell value of uuu_spa_per_com, even if the option Total the Cost Breakdown values to the line item is checked.
You can select (check) the Apply line item value of <label of DE uuu_spa_per_com> to costed lines option and the proceed to deselect (uncheck) it. Deselecting the option does not revert any of the changes that you had made when the option was selected, but it impacts the future operation and the subsequent summary value changes for uuu_spa_per_com will not automatically copy into the costed lines.
If you make manual changes (after deselecting the option), then select the option again:
The manual changes that you had made remain as they were.
The roll-down behavior from summary to costed rows occurs for all of the subsequent summary row changes.
If you select (check) the Apply line item value of <label of DE uuu_spa_per_com> to costed lines option, the system allows you to only push the values down from the line items to the costed row (for uuu_spa_per_com).
Even if the option Total the Cost Breakdown values to the line item is selected in uDesigner, the system does not allow roll-up from the costed rows to line item for the following Data Elements:
uuu_spa_per_com
uuu_spa_amt_tp
uuu_spa_qty_tp
Summary Row Totals
The costed lines can be defined to rollup to their summary line items as "Sum of all rows" by using the form option "Total the Cost Breakdown values to the line item" in uDesigner (for a Payment Application BP which has reference to a Contract type BP of SOV Type: "Summary Payment Applications").
Similar to the "Totals: for fields on a Summary Payment Application detail form, you can define:
The fields from costed lines sum up to the summary line item.
The fields from costed lines do no sum up to the summary line item.
The values in summary line item fields populate as defined in uDesigner (Manual, Formula, or Auto-populate).
The following sub-sections provide details about when the option Total the Cost Breakdown values to the line item is checked (Summary Row Totals), or is not checked (Line Item Total), in uDesigner.
Summary Total
During runtime, if the uDesigner upper form option "Total the Cost Breakdown values to the line item" is checked, then the Summary row values in Payment Applications grid displays per "Summary Total' option, selected by the user in detail form. The following table "Summary Total" provides details:
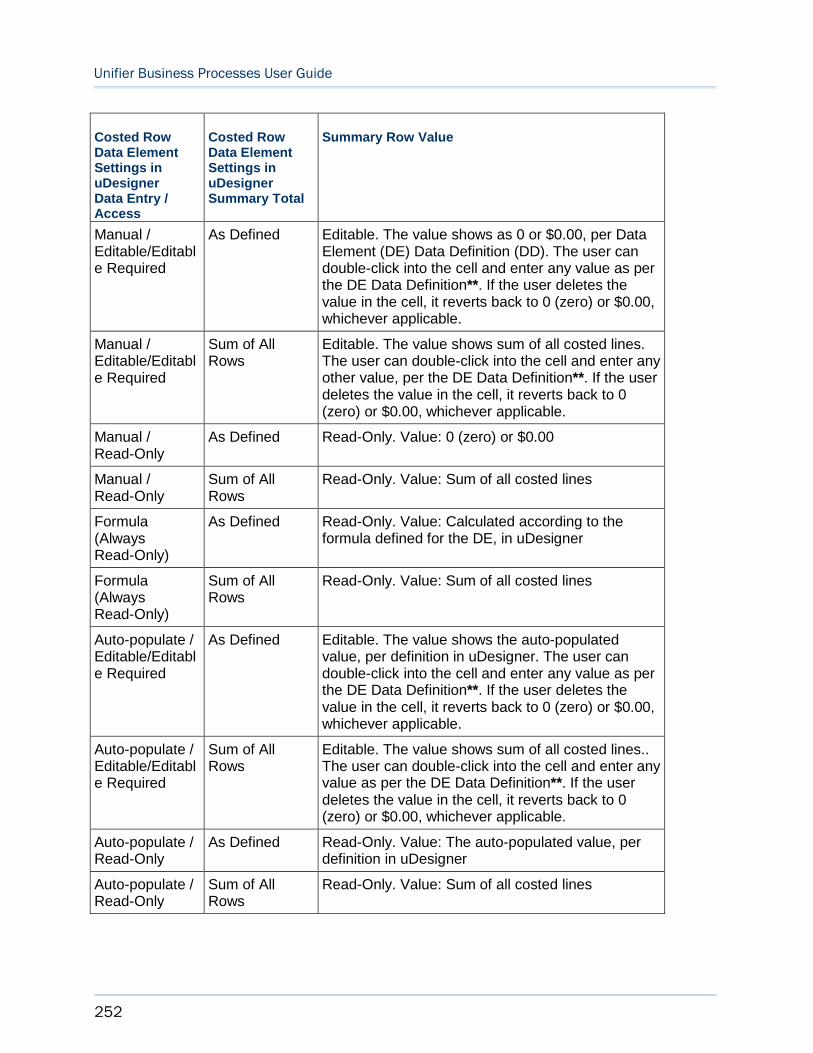
Unifier Business Processes User Guide
252
Costed Row Data Element Settings in uDesigner Data Entry / Access
Costed Row Data Element Settings in uDesigner Summary Total
Summary Row Value
Manual / Editable/Editable Required
As Defined Editable. The value shows as 0 or $0.00, per Data Element (DE) Data Definition (DD). The user can double-click into the cell and enter any value as per the DE Data Definition**. If the user deletes the value in the cell, it reverts back to 0 (zero) or $0.00, whichever applicable.
Manual / Editable/Editable Required
Sum of All Rows
Editable. The value shows sum of all costed lines. The user can double-click into the cell and enter any other value, per the DE Data Definition**. If the user deletes the value in the cell, it reverts back to 0 (zero) or $0.00, whichever applicable.
Manual / Read-Only
As Defined Read-Only. Value: 0 (zero) or $0.00
Manual / Read-Only
Sum of All Rows
Read-Only. Value: Sum of all costed lines
Formula (Always Read-Only)
As Defined Read-Only. Value: Calculated according to the formula defined for the DE, in uDesigner
Formula (Always Read-Only)
Sum of All Rows
Read-Only. Value: Sum of all costed lines
Auto-populate / Editable/Editable Required
As Defined Editable. The value shows the auto-populated value, per definition in uDesigner. The user can double-click into the cell and enter any value as per the DE Data Definition**. If the user deletes the value in the cell, it reverts back to 0 (zero) or $0.00, whichever applicable.
Auto-populate / Editable/Editable Required
Sum of All Rows
Editable. The value shows sum of all costed lines.. The user can double-click into the cell and enter any value as per the DE Data Definition**. If the user deletes the value in the cell, it reverts back to 0 (zero) or $0.00, whichever applicable.
Auto-populate / Read-Only
As Defined Read-Only. Value: The auto-populated value, per definition in uDesigner
Auto-populate / Read-Only
Sum of All Rows
Read-Only. Value: Sum of all costed lines
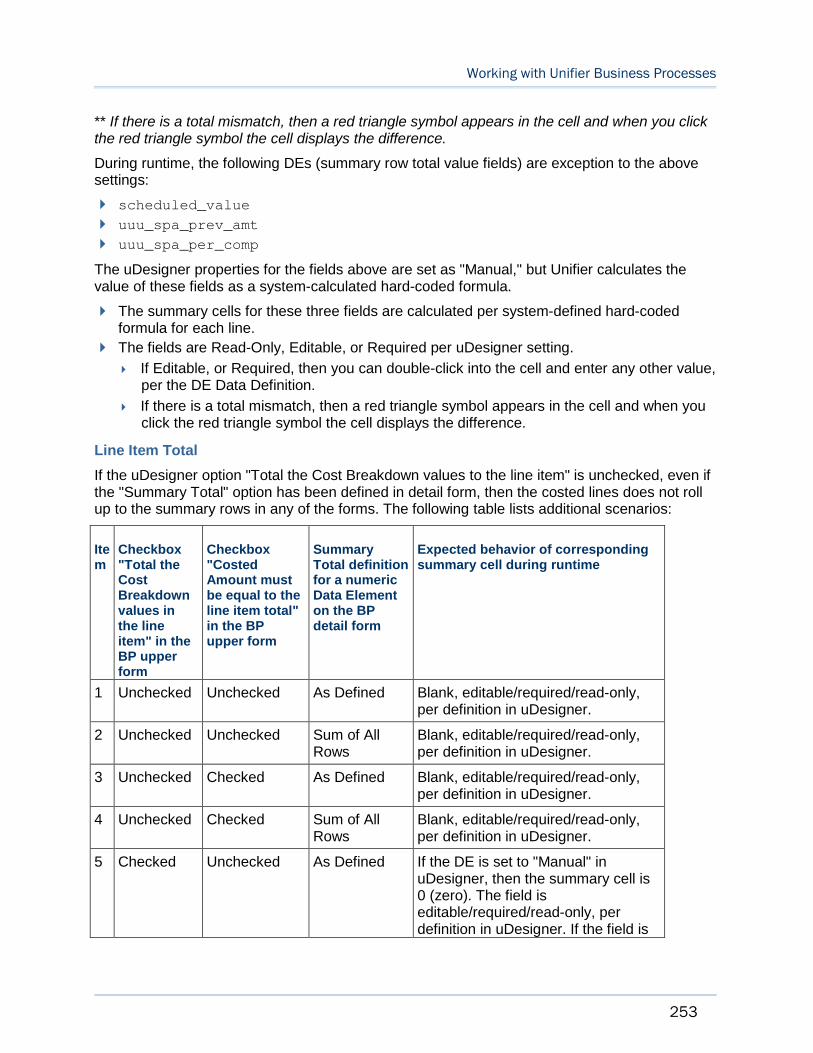
Working with Unifier Business Processes
253
** If there is a total mismatch, then a red triangle symbol appears in the cell and when you click the red triangle symbol the cell displays the difference.
During runtime, the following DEs (summary row total value fields) are exception to the above settings:
scheduled_value
uuu_spa_prev_amt
uuu_spa_per_comp
The uDesigner properties for the fields above are set as "Manual," but Unifier calculates the value of these fields as a system-calculated hard-coded formula.
The summary cells for these three fields are calculated per system-defined hard-coded formula for each line.
The fields are Read-Only, Editable, or Required per uDesigner setting.
If Editable, or Required, then you can double-click into the cell and enter any other value, per the DE Data Definition.
If there is a total mismatch, then a red triangle symbol appears in the cell and when you click the red triangle symbol the cell displays the difference.
Line Item Total
If the uDesigner option "Total the Cost Breakdown values to the line item" is unchecked, even if the "Summary Total" option has been defined in detail form, then the costed lines does not roll up to the summary rows in any of the forms. The following table lists additional scenarios:
Item
Checkbox "Total the Cost Breakdown values in the line item" in the BP upper form
Checkbox "Costed Amount must be equal to the line item total" in the BP upper form
Summary Total definition for a numeric Data Element on the BP detail form
Expected behavior of corresponding summary cell during runtime
1 Unchecked Unchecked As Defined Blank, editable/required/read-only, per definition in uDesigner.
2 Unchecked Unchecked Sum of All Rows
Blank, editable/required/read-only, per definition in uDesigner.
3 Unchecked Checked As Defined Blank, editable/required/read-only, per definition in uDesigner.
4 Unchecked Checked Sum of All Rows
Blank, editable/required/read-only, per definition in uDesigner.
5 Checked Unchecked As Defined If the DE is set to "Manual" in uDesigner, then the summary cell is 0 (zero). The field is editable/required/read-only, per definition in uDesigner. If the field is
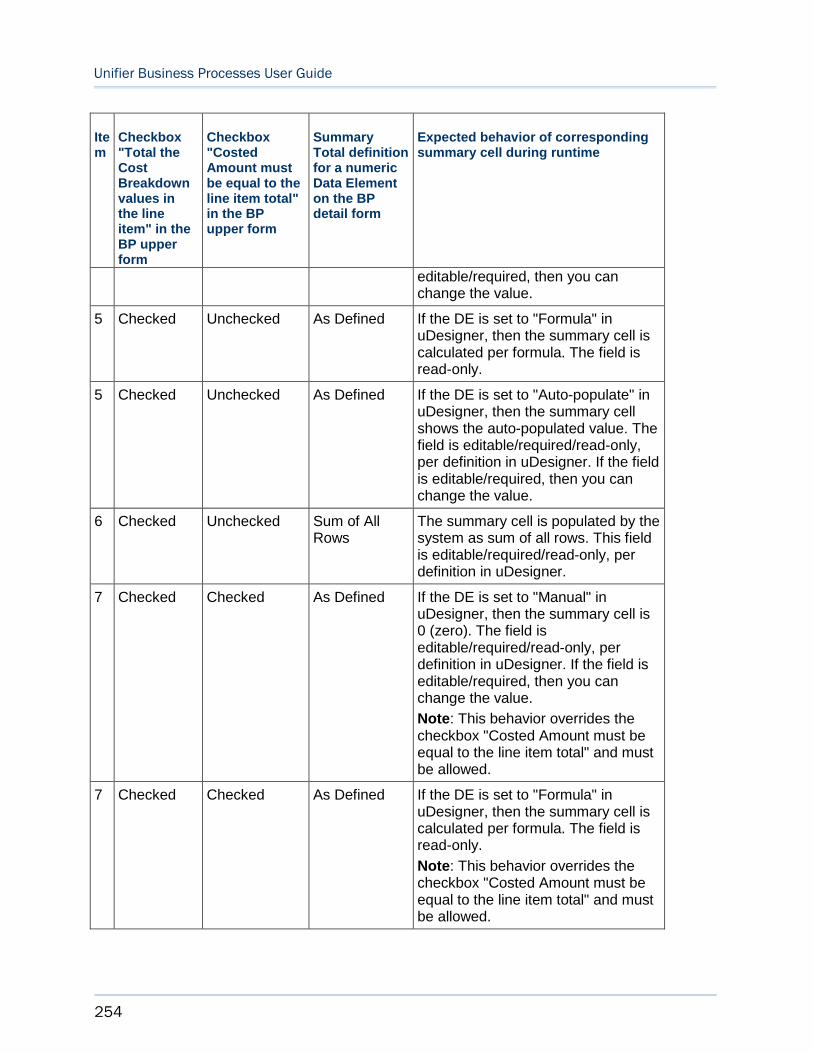
Unifier Business Processes User Guide
254
Item
Checkbox "Total the Cost Breakdown values in the line item" in the BP upper form
Checkbox "Costed Amount must be equal to the line item total" in the BP upper form
Summary Total definition for a numeric Data Element on the BP detail form
Expected behavior of corresponding summary cell during runtime
editable/required, then you can change the value.
5 Checked Unchecked As Defined If the DE is set to "Formula" in uDesigner, then the summary cell is calculated per formula. The field is read-only.
5 Checked Unchecked As Defined If the DE is set to "Auto-populate" in uDesigner, then the summary cell shows the auto-populated value. The field is editable/required/read-only, per definition in uDesigner. If the field is editable/required, then you can change the value.
6 Checked Unchecked Sum of All Rows
The summary cell is populated by the system as sum of all rows. This field is editable/required/read-only, per definition in uDesigner.
7 Checked Checked As Defined If the DE is set to "Manual" in uDesigner, then the summary cell is 0 (zero). The field is editable/required/read-only, per definition in uDesigner. If the field is editable/required, then you can change the value.
Note: This behavior overrides the checkbox "Costed Amount must be equal to the line item total" and must be allowed.
7 Checked Checked As Defined If the DE is set to "Formula" in uDesigner, then the summary cell is calculated per formula. The field is read-only.
Note: This behavior overrides the checkbox "Costed Amount must be equal to the line item total" and must be allowed.
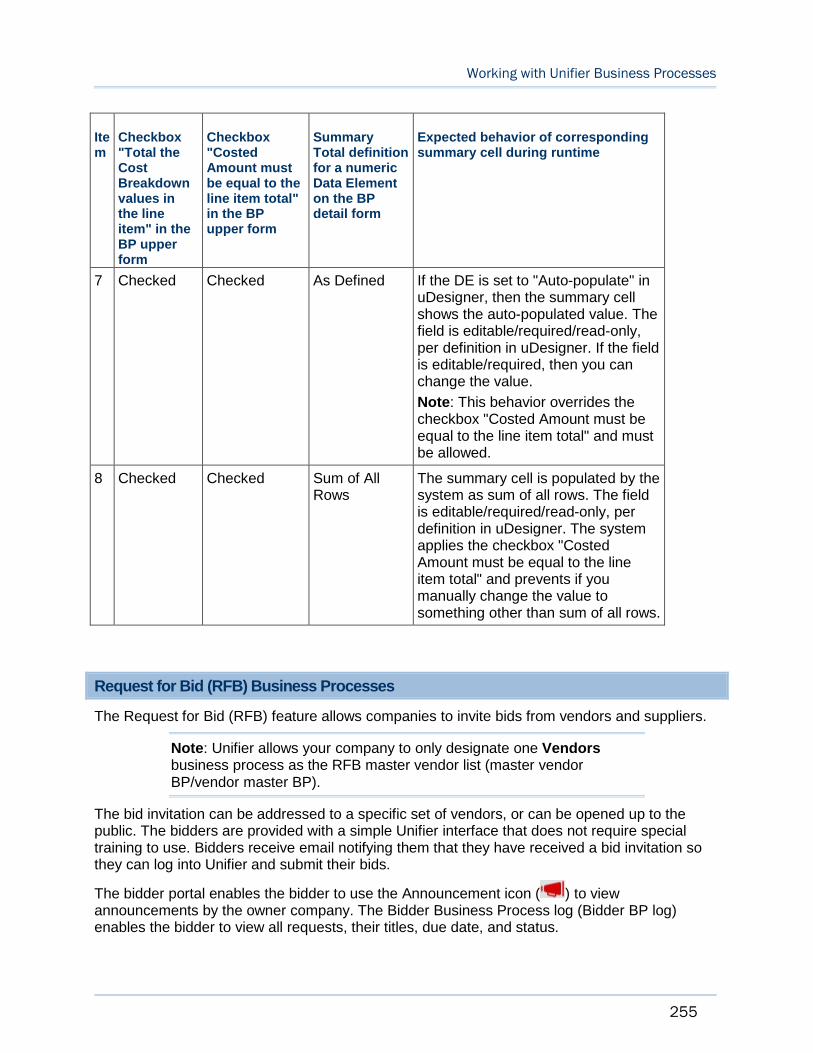
Working with Unifier Business Processes
255
Item
Checkbox "Total the Cost Breakdown values in the line item" in the BP upper form
Checkbox "Costed Amount must be equal to the line item total" in the BP upper form
Summary Total definition for a numeric Data Element on the BP detail form
Expected behavior of corresponding summary cell during runtime
7 Checked Checked As Defined If the DE is set to "Auto-populate" in uDesigner, then the summary cell shows the auto-populated value. The field is editable/required/read-only, per definition in uDesigner. If the field is editable/required, then you can change the value.
Note: This behavior overrides the checkbox "Costed Amount must be equal to the line item total" and must be allowed.
8 Checked Checked Sum of All Rows
The summary cell is populated by the system as sum of all rows. The field is editable/required/read-only, per definition in uDesigner. The system applies the checkbox "Costed Amount must be equal to the line item total" and prevents if you manually change the value to something other than sum of all rows.
Request for Bid (RFB) Business Processes
The Request for Bid (RFB) feature allows companies to invite bids from vendors and suppliers.
Note: Unifier allows your company to only designate one Vendors business process as the RFB master vendor list (master vendor BP/vendor master BP).
The bid invitation can be addressed to a specific set of vendors, or can be opened up to the public. The bidders are provided with a simple Unifier interface that does not require special training to use. Bidders receive email notifying them that they have received a bid invitation so they can log into Unifier and submit their bids.
The bidder portal enables the bidder to use the Announcement icon ( ) to view announcements by the owner company. The Bidder Business Process log (Bidder BP log) enables the bidder to view all requests, their titles, due date, and status.
Unifier Business Processes User Guide
256
The Bidder BP log has the following options:
View
Active
All
Refresh: To refresh the log items.
Print: To print the log contents.
Search
Status with values of All, Open and Closed
Search parameters based on Bidder log set in uDesigner
Find on Page: To find content on the visible page.
Help: To view help options.
The gear icon ( ), in front of each record, is context sensitive and provides the following conditions and corresponding options:
Condition Options
Bid has been received and no submissions have been made
Open - Opens the requestor's form
Create - Will open the bid form
Bid has been submitted Open - Opens the requestor's form
View Submission
Withdraw Submission - Confirmation asking user to confirm action. After a successful withdrawal, an alert will be seen
Note: After a bid has been withdrawn, options seen will be: Open
Bid has been closed View Submission - This will open the submitted bid
Double clicking the record will open the submitted bid form.
The preview pane, on the right-hand side, contains:
The form content, based on the current state of the record.
If the bid is active (just received a RFB or submitted a bid), then the requestor form is displayed.
If the bid is closed, then the content of the submitted bid is displayed.
The Attachments tab is displayed.
The Mailbox provides a preview of a selected email, in the right- hand pane. The Mailbox has Inbox and Sent Items. The Inbox enables bidders to view all the mails received from Unifier.
The RFB type BP supports the Grid feature when the RFB design (developed in uDesigner) includes the subtype: Line Item with CBS Code. The Grid feature is available both in the Requestor and Bidder sides, within the Line Item tab.
Working with Unifier Business Processes
257
Language, Time Zone, and Date Format for Vendors BP
While creating a Vendors BP, you have an option to set the language, date format, and time zone specific to your bidders:
Note: The languages listed are the active languages selected in the Configuration - Internationalization log window, by the administrator.
Contact Language:
Date Format:
Time Zone:
Note: The DEs mentioned above must be included in the RFB master vendor list BP (master vendor BP/vendor master BP) in uDesigner in order to be selected by the user in runtime.
The notifications follow the preferences of the user who has been specified in Bid Management Account field (Company Workplace > Admin mode > click Open from left-hand > Bid Management Account), who is designated as the manager for all bidders, or the company bid contact.
Selecting the above options enables the bidder to receive email notifications (also Unifier Bidder Portal web page content and Bidder forms) in the bidder's language, date format, and time zone.
If the above options are not available, or not selected, then the bidder receives email notifications (also Unifier Bidder Portal web page content and Bidder forms) following the user preferences whose name is indicated in the Bid Management Account field.
Note: If the RFB master vendor list BP (master vendor BP/vendor master BP) includes Date Format data element but no value is selected, the system displays a default date format (e.g., MM/DD/YYYY HH:MM AM). The Company Administrator has to set the respective bidder’s date format in the RFB master vendor list BP.
Unlike a standard Unifier user, a bidder user cannot change the preferences in the bidder portal. When this option is clicked, the Preferences set forth in Vendor information record (for the vendor) will be seen in view only mode.
Working with RFBs
The RFB business process has a reference process to a vendor list business process, which contains the pool of vendors to whom the RFB will be sent. This vendor reference process will populate the upper fields of the RFB at runtime. Unifier automatically launches this reference process, when the RFB is activated.
Once the RFB Business Process is active in Unifier, the bid procedure runs as follows:
You (the person who starts the bidding process and sends the invite):
1) Start the bid procedure by opening the RFB, filling in the form, and sending it for internal review (if necessary).
Unifier Business Processes User Guide
258
2) When the internal review is complete, you:
a. Assemble the bid package and prepare the bid invitation for distribution.
b. Send out the bid invitations, along with a user name and password so that the vendors can log into Unifier and submit their bids.
Once the bid invitations have been sent, you must wait, then, for the bid due date to pass.
The vendors:
1) When the vendors receive the bid invitation, they log into Unifier and open the bid request.
2) (Optional) The vendors can request clarification of any questions or issues before submitting the bid. (The vendors can use the Mailbox link on the bid request for this purpose.)
3) The vendors then submit their bids.
You (the person who started the bidding process and sent the invite):
1) When the due date for all bids is reached, you tabulate the bids for comparison.
2) Open discussions about the bids, if necessary.
3) Award the bid to a vendor and automatically generate a contract copying relevant details from bid record into the contract.
4) Select a winning bid, after discussions with the members of your team.
In Unifier, you can create a contract from the winning bid (the bid that was selected from multiple bids) automatically, and the contract that is generated automatically will have a copy of the data from the winning bid (terms and negotiating amounts), if any.
See Select Winning Bid and Auto-create Contract sections for details.
Active bids in Bidder log
When you open the Attachments tab, the following blocks and sub-blocks will be present, depending on the bid status:
Unpublished Attachments
Addendums
Published Attachments
Original Attachments
All of the active bids can receive additional attachments, from the requestor. When the bidder opens or views the bidding in the log, the new or additional attachments will be shown under the Addendums block.
When a bid receives a new attachment, as addendums, then Unifier sends a new email to all of the bidders. Unifier sends a similar email when an existing bid attachment is removed.
Sending the Bid Request for Internal Review and Approval
For most companies, an internal review is necessary for the purpose of verifying the scope of the project as well as other issues such as terms and conditions, architectural drawings, and structural materials.
To send the Bid Request for internal review and approval:
1) Navigate to the RFB log and click New. The RFB BP form opens.

Working with Unifier Business Processes
259
2) Complete the form, then use the Workflow Actions drop-down list to send the RFB into the workflow.
Once the approval request reaches the middle of the workflow, you receive the completed BP as a task in your Tasks log. When you open the form this time, you should see an Invite button on the toolbar, with which you can start the bidding process.
After the bid request is approved, you can start the bidding process.
Starting the Bidding Process
After the RFB has completed the internal review and approval, you can start the bidding process.
To start the bidding process:
1) Go to your Project > User mode > Logs > Requests for Bid.
2) Open the bid that you want to send.
3) Click Invite to open Invitations window.
If this is the first time you are sending an invitation, click Add to open the Vendors window, select a vendor BP and click Attach. A list of vendors in the selected Vendor BP is now available in the Invitations block. See the Public Bidding (on page 260) and Private or Non-Public Bidding (on page 262) for more details about the options in the Invitation block.
4) Select a vendor from the Invitations window and follow one of the instructions below:
If Unifier is not integrated with Oracle Identity Manager (OIM), and you are sending invitation for the first time, open the RFB and click Send Invitation. Unifier sends two emails:
An invitation email (contains the Bid Access UR)
A credential email (contains the username and password).
In this case, if a vendor who has already received an invitation loses password and request to receive another password, open the RFB, click Send Password to send a credential email (contains the username and new password). Oracle recommends that the bidders change the password at the very first log in, and then sign in to Unifier using the newly set password.
If Unifier is integrated with OIM, and you are sending invitation for the first time, open the RFB, click Send Invitation. OIM sends one email:
A credential email (contains the username and password). There might be a delay receiving a credential email from OIM based on the bidder reconciliation job interval set in OIM.
If a bidder accesses Unifier through OIM, the bidder cannot change password in Unifier. Changing password can be done only in Unifier when it is not accessed through OIM. Oracle recommends that the bidders change the password at the very first log in, and then sign in to Unifier using the newly set password.
The following provides additional information regarding the bidding process:
If you need, you can click Modify to modify the bidding end date.
The list of vendors you use to distribute the bid invitations can include your company’s entire list of vendors or a list of "approved vendors" specific for the project you are working on.
Unifier Business Processes User Guide
260
Your administrator can design a business process that filters the master list of vendors into a sub-set of this list for your project. If such a sub-set of the vendor list has been created for your project, this is the list of vendors you will see in the Bidders window, unless this is a public bid. For public bids, the filtered vendor list will be ignored.
To see the approved list of vendors with more information, go to your project Logs node in the Navigator and click on the business process that created the vendor list for your project. Unifier will display the list of records in that business process. To see the approved list, click the Filtered Referenced Records button on the toolbar.
Note: Once you have sent out all the bid invitations, Unifier freezes the RFB until the bid due date passes. After the due date passes, you can compare the bids.
Filtering Bidders
During the BP run-time, the list of available bidders depends on the options set in uDesigner.
When you do not select set additional filter for a bidder in the RFB BP, and you are in a Shell, then:
If a Line Item type BP of sub-type, "Line item to filter Company BP record" exists and the option of, "Use Master Vendor list filtered at Project level is checked, then the list of vendors will be filtered based on this existing functionality.
When you select set additional filter for bidder in the RFB BP and you are in a Shell, then:
A filtered list of potential bidders is listed which includes all those bidders referenced by the BP Data Picker and the system ignores the Line Item type BP of sub-type, "Line item to filter Company BP record."
The BP Data Picker:
Does not need to be populated in the RFB form.
Value will always be ignored and the system uses the query conditions on the Data Picker to filter the list of vendors.
If no query conditions are defined for the BP Data Picker, then you will see the list of all vendors.
In the uDesigner, you can place the BP Data Picker, in the RFB BP, in a hidden block. If the BP Data Picker is placed in the hidden block, then you can filter the list of vendors through the defined query conditions.
Public Bidding
For public bidding, invitations are sent to the Vendors that you have selected from the Vendors business process (a company-level BP). The Vendors BPs can be found in Company Logs > User mode > Vendors BP.
The option for public bidding is set in uDesigner: Company Workspace > Admin mode > uDesigner; Selected RFB Business Process > Open > General > Options tab: Allow public bidding (no pre-defined bidders).

Working with Unifier Business Processes
261
Public Bids: Requestor BP - Invite form
When you select the Invite option (from the menu icon), after the BP has been opened for public bidding, the Invite overlay page opens. The following blocks are displayed on the Invite overlay page:
General
This block has the following fields:
Title
Requester Name
Phone
Due Date
Invitation
This block has the following toolbar options:
Add
To add invitee.
Send
To send password.
This block has the following columns:
First Name
Last Name
Company
User Id
Sent Date
The Invite overlay page has the following tabs (right-hand pane):
Attachments
Go to this tab to add additional attachments through using the Browse or Document Manager options, similar to the Private or Non-Public Bidding (on page 262).
All of the attachments that have been added, from this form, are shown in the Addendums as well as the Attachments tab of the Requestor form (Request for Bid), similar to the Private or Non-Public Bidding (on page 262).
In the Requestor form (Request for Bid), Attachments tab, you can see the attachments that have been added from the Invite form.
The new column, Addendums, can be seen under the Attachments tab in the BP log of the RFB records. The additional attachments, added from the Invite form and sent to bidders, are also shown under the Attachments tab in the BP log, but they will be listed as Addendums.
The requestor can make changes to the attachments. Changes made to the Attachments tab, before an invitation is sent out to the invitees, will be audited (Requests for Bid > Request for Bid tab > Audit Log tab).
Go to this tab to send email to the vendors, when the bidding is open (Send > Mail).
Unifier Business Processes User Guide
262
The emails that have been sent to the bidders are shown in the Mail tab, similar to the Private or Non-Public Bidding (on page 262).
Private or Non-Public Bidding
For private non-public bidding, where you want to select who is invited to bid, the "Allow public bidding (no pre-defined bidders)" option is deselected in uDesigner.
In the Invitations window, click Add, select vendors, and click Invite to send the invitation to the Vendors. See the "Additional Information about starting a bidding process" section below for details.
Private Bids: Requestor BP - Invite form
In an RFB, the Requestor can send an email to the bid-invitees from the Linked Mail tab. The Requestor is also able to send emails from the Invite form. The Invite form enables the Requestor to add attachments while the bid is open.
Note: On the Attachment tab, the attachments must be identified as being added as addendums. So when the Bidder opens the bid (or views the bid) from the log, the newly added attachments are shown as addendums for the open bids.
When you select the Invite option (from the menu icon), the Invite overlay page opens. On the left-hand pane, the following blocks are displayed:
General block
The requestor information is displayed in the General block. This block contains the following fields:
Title
Requestor Name
Phone
Due Date
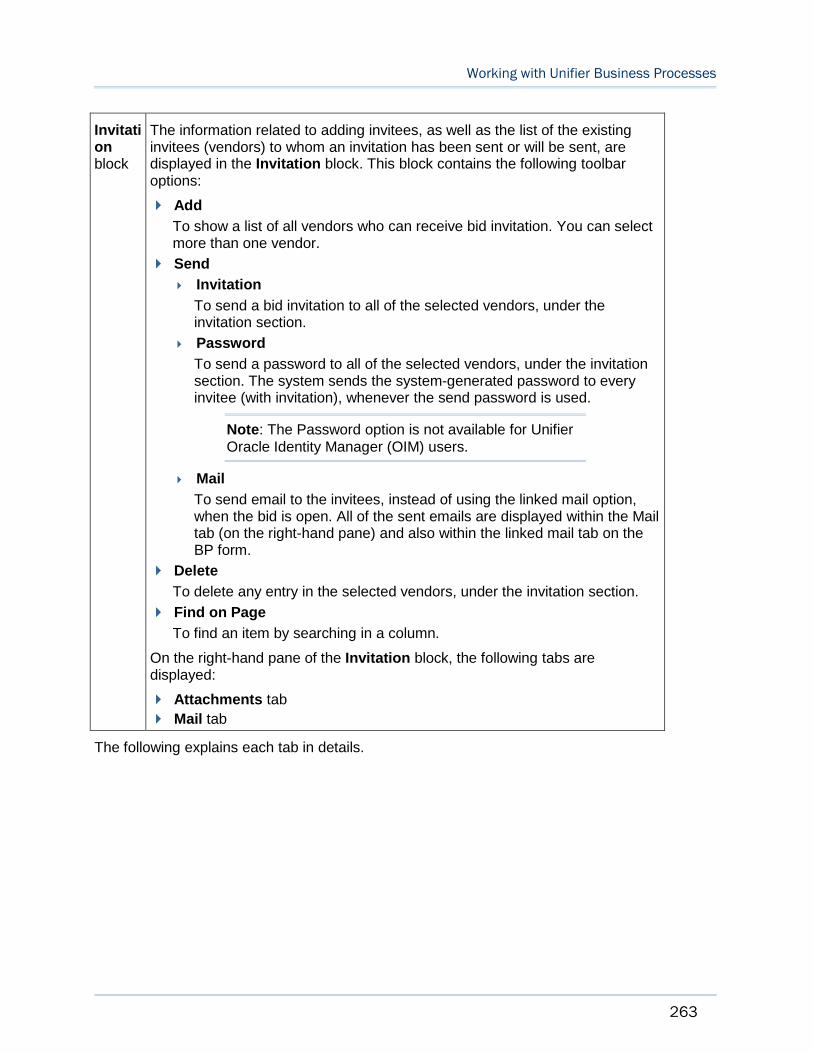
Working with Unifier Business Processes
263
Invitation block
The information related to adding invitees, as well as the list of the existing invitees (vendors) to whom an invitation has been sent or will be sent, are displayed in the Invitation block. This block contains the following toolbar options:
Add
To show a list of all vendors who can receive bid invitation. You can select more than one vendor.
Send
Invitation
To send a bid invitation to all of the selected vendors, under the invitation section.
Password
To send a password to all of the selected vendors, under the invitation section. The system sends the system-generated password to every invitee (with invitation), whenever the send password is used.
Note: The Password option is not available for Unifier Oracle Identity Manager (OIM) users.
To send email to the invitees, instead of using the linked mail option, when the bid is open. All of the sent emails are displayed within the Mail tab (on the right-hand pane) and also within the linked mail tab on the BP form.
Delete
To delete any entry in the selected vendors, under the invitation section.
Find on Page
To find an item by searching in a column.
On the right-hand pane of the Invitation block, the following tabs are displayed:
Attachments tab
Mail tab
The following explains each tab in details.
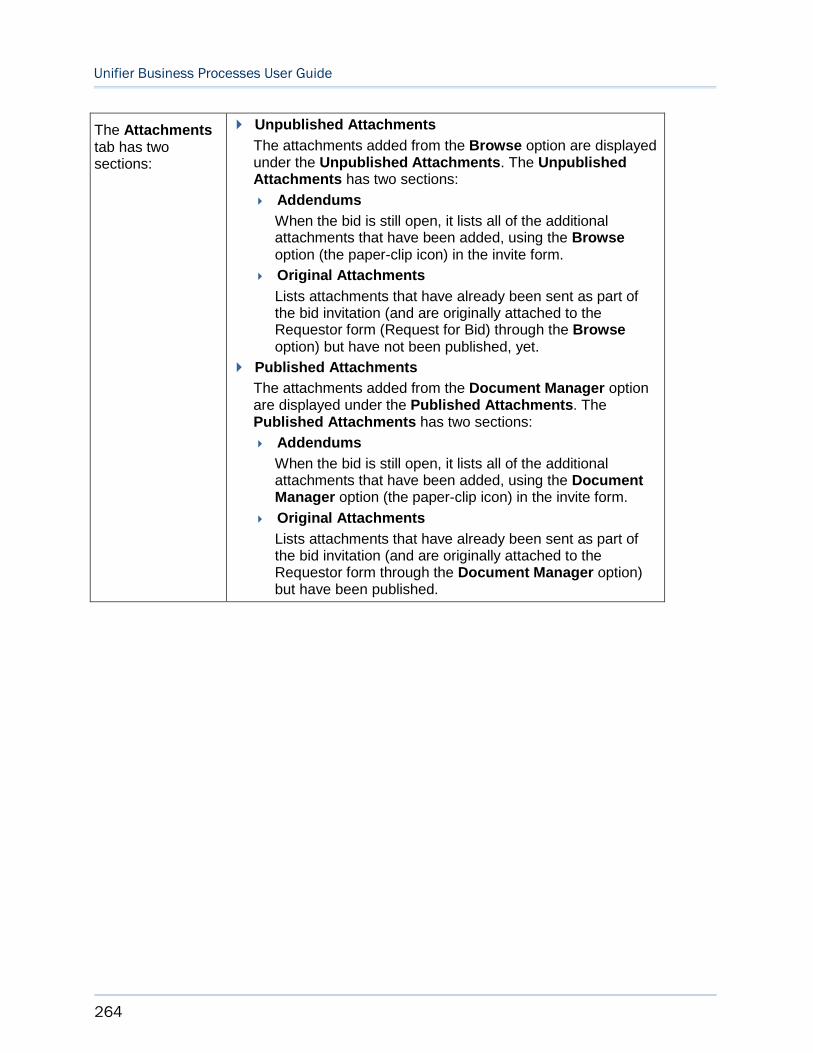
Unifier Business Processes User Guide
264
The Attachments tab has two sections:
Unpublished Attachments
The attachments added from the Browse option are displayed under the Unpublished Attachments. The Unpublished Attachments has two sections:
Addendums
When the bid is still open, it lists all of the additional attachments that have been added, using the Browse option (the paper-clip icon) in the invite form.
Original Attachments
Lists attachments that have already been sent as part of the bid invitation (and are originally attached to the Requestor form (Request for Bid) through the Browseoption) but have not been published, yet.
Published Attachments
The attachments added from the Document Manager option are displayed under the Published Attachments. The Published Attachments has two sections:
Addendums
When the bid is still open, it lists all of the additional attachments that have been added, using the Document Manager option (the paper-clip icon) in the invite form.
Original Attachments
Lists attachments that have already been sent as part of the bid invitation (and are originally attached to the Requestor form through the Document Manager option) but have been published.
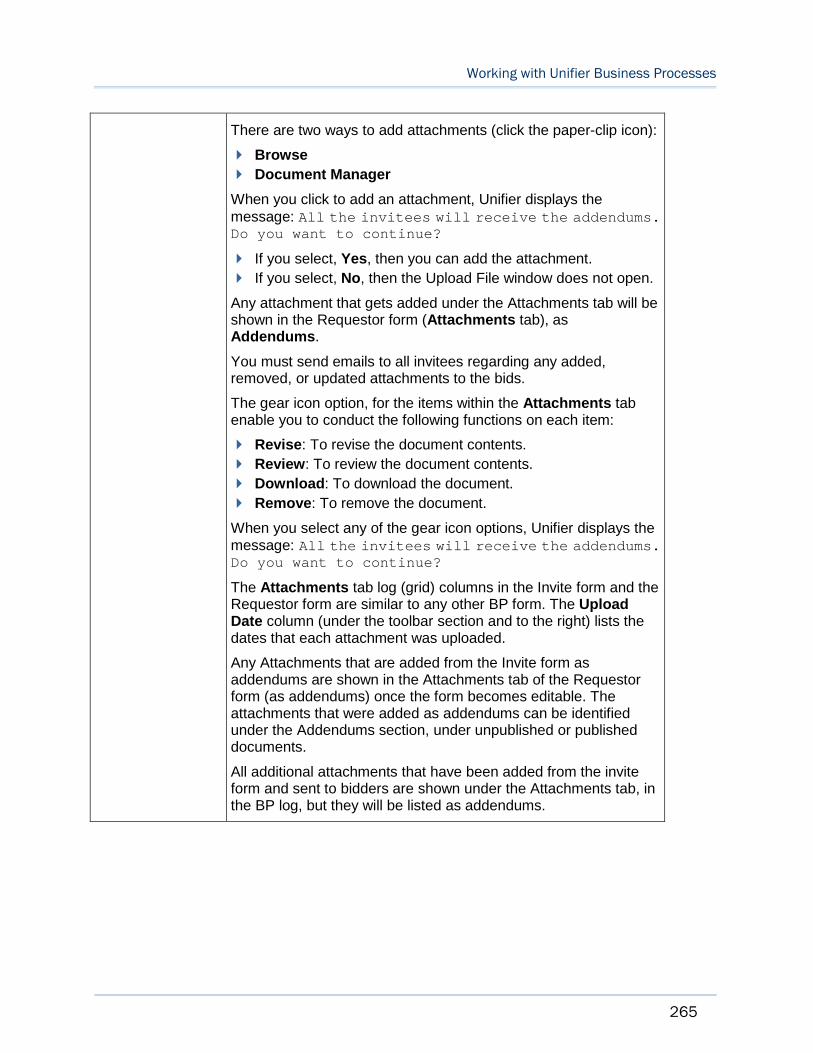
Working with Unifier Business Processes
265
There are two ways to add attachments (click the paper-clip icon):
Browse
Document Manager
When you click to add an attachment, Unifier displays the message: All the invitees will receive the addendums. Do you want to continue?
If you select, Yes, then you can add the attachment.
If you select, No, then the Upload File window does not open.
Any attachment that gets added under the Attachments tab will be shown in the Requestor form (Attachments tab), as Addendums.
You must send emails to all invitees regarding any added, removed, or updated attachments to the bids.
The gear icon option, for the items within the Attachments tab enable you to conduct the following functions on each item:
Revise: To revise the document contents.
Review: To review the document contents.
Download: To download the document.
Remove: To remove the document.
When you select any of the gear icon options, Unifier displays the message: All the invitees will receive the addendums. Do you want to continue?
The Attachments tab log (grid) columns in the Invite form and the Requestor form are similar to any other BP form. The Upload Date column (under the toolbar section and to the right) lists the dates that each attachment was uploaded.
Any Attachments that are added from the Invite form as addendums are shown in the Attachments tab of the Requestor form (as addendums) once the form becomes editable. The attachments that were added as addendums can be identified under the Addendums section, under unpublished or published documents.
All additional attachments that have been added from the invite form and sent to bidders are shown under the Attachments tab, in the BP log, but they will be listed as addendums.
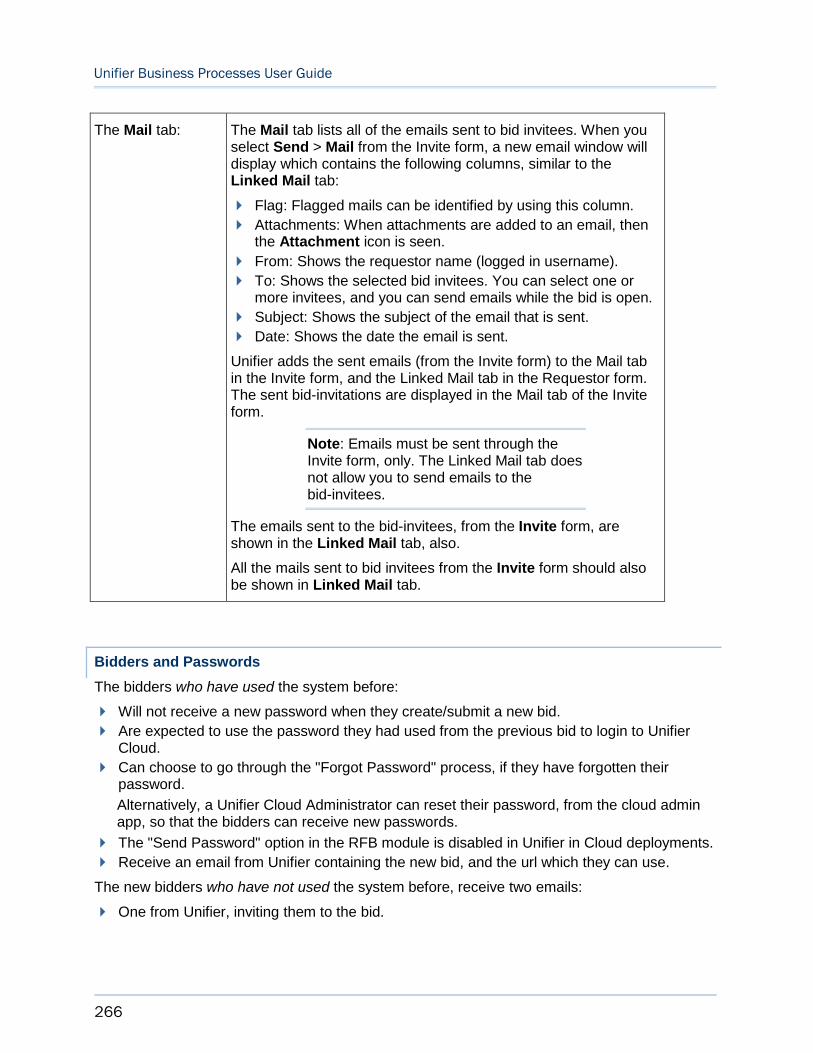
Unifier Business Processes User Guide
266
The Mail tab: The Mail tab lists all of the emails sent to bid invitees. When you select Send > Mail from the Invite form, a new email window will display which contains the following columns, similar to the Linked Mail tab:
Flag: Flagged mails can be identified by using this column.
Attachments: When attachments are added to an email, then the Attachment icon is seen.
From: Shows the requestor name (logged in username).
To: Shows the selected bid invitees. You can select one or more invitees, and you can send emails while the bid is open.
Subject: Shows the subject of the email that is sent.
Date: Shows the date the email is sent.
Unifier adds the sent emails (from the Invite form) to the Mail tab in the Invite form, and the Linked Mail tab in the Requestor form. The sent bid-invitations are displayed in the Mail tab of the Invite form.
Note: Emails must be sent through the Invite form, only. The Linked Mail tab does not allow you to send emails to the bid-invitees.
The emails sent to the bid-invitees, from the Invite form, are shown in the Linked Mail tab, also.
All the mails sent to bid invitees from the Invite form should also be shown in Linked Mail tab.
Bidders and Passwords
The bidders who have used the system before:
Will not receive a new password when they create/submit a new bid.
Are expected to use the password they had used from the previous bid to login to Unifier Cloud.
Can choose to go through the "Forgot Password" process, if they have forgotten their password.
Alternatively, a Unifier Cloud Administrator can reset their password, from the cloud admin app, so that the bidders can receive new passwords.
The "Send Password" option in the RFB module is disabled in Unifier in Cloud deployments.
Receive an email from Unifier containing the new bid, and the url which they can use.
The new bidders who have not used the system before, receive two emails:
One from Unifier, inviting them to the bid.
Working with Unifier Business Processes
267
One from OIM, containing instructions on how to login to Unifier Cloud. This email contains a system-generated password.
Comparing the Bids
Once the bidding process ends (after the bid due date has passed), you can open a bid tabulation to compare the bids you received. A default bid tabulation sheet is available in Unifier, or your company may have a custom-designed bid tabulation sheet.
To compare bids
1) Open the Request for Bid (RFB) record. The toolbar displays a Show button.
2) Click Show. The Show window opens, listing the bids you received.
Once the bid is closed, upon selecting the bid, you can only view the information of the invitation that was sent, along with the bids that have been received. The information within the Invitation tab is read-only, and you (requestor) can only view the information about the bid-invitees, the addendums sent, and the emails sent to the invitees.
3) From the list, select the vendors you want to compare and click Compare.
Unifier tabulates the bids from the vendors you selected and displays a Compare sheet. This sheet will look different, depending on whether you are using the default comparison sheet supplied by Unifier, or a custom-designed comparison sheet created by your company.
The default bid comparison sheet shows the bid amounts for each line item for which the vendor submitted a bid.
The custom-designed bid comparison sheet shows the following:
General bid information from each vendor who submitted a bid.
Each line item from the RFB that the vendor has bid on. If the vendor adds line items of their own to the bid, these line items will appear on the sheet as well.
Bid Comparison Options
On the custom bid comparison sheet window, you have the following options:
Use this button: To:
Save Save the data you entered or modified on the sheet. (This will not affect the bidder’s data.)
Split Split the screen so you can easily compare vendors by column.
Find
Find specific data on the sheet. When you click Find, a window opens where you can specify the vendor (column) and the value you want to locate. Unifier will search the line items in that column and highlight the value, if it finds it.
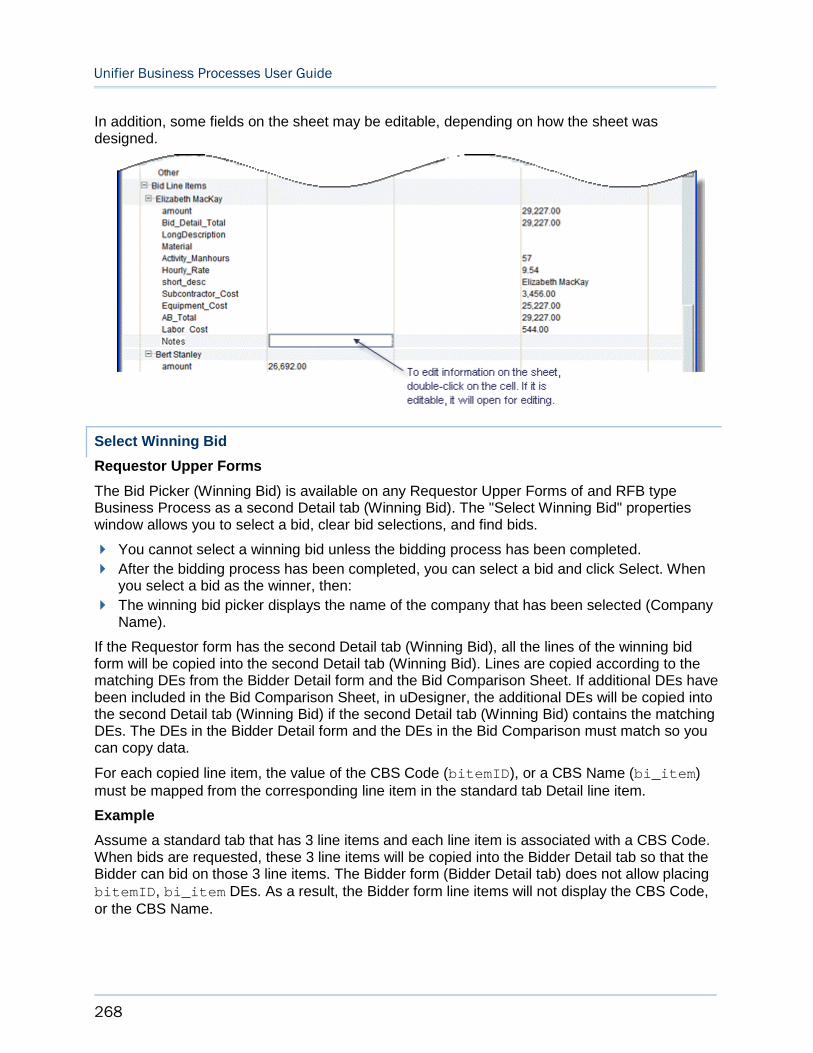
Unifier Business Processes User Guide
268
In addition, some fields on the sheet may be editable, depending on how the sheet was designed.
Select Winning Bid
Requestor Upper Forms
The Bid Picker (Winning Bid) is available on any Requestor Upper Forms of and RFB type Business Process as a second Detail tab (Winning Bid). The "Select Winning Bid" properties window allows you to select a bid, clear bid selections, and find bids.
You cannot select a winning bid unless the bidding process has been completed.
After the bidding process has been completed, you can select a bid and click Select. When you select a bid as the winner, then:
The winning bid picker displays the name of the company that has been selected (Company Name).
If the Requestor form has the second Detail tab (Winning Bid), all the lines of the winning bid form will be copied into the second Detail tab (Winning Bid). Lines are copied according to the matching DEs from the Bidder Detail form and the Bid Comparison Sheet. If additional DEs have been included in the Bid Comparison Sheet, in uDesigner, the additional DEs will be copied into the second Detail tab (Winning Bid) if the second Detail tab (Winning Bid) contains the matching DEs. The DEs in the Bidder Detail form and the DEs in the Bid Comparison must match so you can copy data.
For each copied line item, the value of the CBS Code (bitemID), or a CBS Name (bi_item) must be mapped from the corresponding line item in the standard tab Detail line item.
Example
Assume a standard tab that has 3 line items and each line item is associated with a CBS Code. When bids are requested, these 3 line items will be copied into the Bidder Detail tab so that the Bidder can bid on those 3 line items. The Bidder form (Bidder Detail tab) does not allow placing bitemID, bi_item DEs. As a result, the Bidder form line items will not display the CBS Code, or the CBS Name.
Working with Unifier Business Processes
269
When Bidder A adds 2 more line items to the Bidder form before submitting the bid. After all bids have been submitted, the Bid Comparison Sheet column for Bidder A shows 5 line items (3 line items from the Requestor standard tab, and the 2 line items that have been added by Bidder A, manually).
If Bidder A is selected as winner, and the requestor adds more line items such as the negotiated amount, price, quantity, and so forth, then the Bid Comparison Sheet, for the winner (Bidder A) will have more information than originally included by Bidder A, when Bidder A submitted the bid.
Note: The additional line items that the requestor has added must be captured in the "Bid Comparison Sheet" by the requestor by way of adding corresponding DEs in uDesigner (uDesigner > RFB Business Process > Bid Comparison Sheet > Detail).
All line items, within the second Detail tab (Winning Bid) must be valid before an RFB record can be successfully routed to next step. If you change the value of a "Winning Bid" picker on the Requestor Upper form, the existing line items in the tab (<winning bid tab name>) will be removed and the system sends a confirmation request. If you confirm the change, the Winning Bid selector displays the new value and all the line items from the second Detail tab (Winning Bid) will be deleted.
If you use the Clear option in the winning bid selector window, the existing line items in the tab (<winning bid tab name>) will be removed and the system sends a confirmation request. If you confirm the change, the confirmation window and the winning bid selector window will close, the winning bid selector value will be cleared, and all line items from second Detail tab (Winning Bid) will be deleted, including line items add manually.
Unifier saves the following information to the database, each time you make a winning bid selection:
Winning Bid picker value
Winning Bid Detail tab line items
Any DEs on Requestor Upper form which are set to auto-populate from winning bid picker
As a result, if you select a winning bid and perform an Undo Accept Task, then:
Winning bid will stay as selected
Winning bid tab Detail line items will persist and not revert back
Fields that receive AP from winning bid will be persisted and will not revert back
Other DEs will be reverted back as per existing functionality
Note: If the winning bid picker is blank, but the Winning Bid Detail tab has line items that have been manually added, then the manually added line item will be removed when you perform an Undo Accept Task.
If you close a form window without saving the form:
Winning bid Picker, auto-populated fields, and the winning bid Detail tab line items will still be saved as records
Other fields will not be saved (as per existing functionality)
To clear the winning bid related information, you can do one of the following:
Unifier Business Processes User Guide
270
Clear, or reselect, the winning bid Detail tab to its previous value before performing Undo Accept Task
or
If you performed Undo Accept Task, then click Accept Task, and reselect, or deselect the winning bid picker.
If there are more than one assignees on a step:
When user 2 tries to select the winning bid, if user 1 has already done a selection, then user 2 will receive an alert notifying user 2 that some of the line items have already been saved to the winning bid tab (<winning bid tab name>) and the action taken by user 2 will remove all those lines and recreate lines as per new information in the DE (<label of DE uuu_rfb_winning_bid>) selection.
New line items will be created in the winning bid Detail tab as per user 2’s response.
The special runtime behavior of the winning bid Detail tab is connected to the winning bid selector DE (uuu_rfb_winning_bid). You can select not to place the winning bid selector DE (uuu_rfb_winning_bid) on the form and still use the winning bid Detail tab by naming it something else. The winning bid Detail tab will behave like any other non-standard detail tab in such a scenario.
Also, similar to other Detail tabs in Business Processes, you have the ability to delete line items from the winning bid Detail tab if it is configured so in uDesigner.
Additional information about selecting winning bid
To keep winning bid details hidden from the bidder, if a user signs in as a "Bidder," the requestor Winning Bid Detail tab will remain hidden.
If you select a bid using the winning bid selector on RFB Upper form, the winning bid will be highlighted in the following window:
Select Winning Bid: By way of displaying the selected bid in bold typeface.
Show: By way of displaying the "Winning Bid" column.
Compare: By way of displaying the selected bid in bold typeface.
Note: The DE of DD = Bid Picker will not be available for bulk editing or bulk action.
When you copy an RFB record to create a new RFB record, note that:
Not all the line items in the winning bid Detail tab are going to be copied.
The picker "Winner Bid" will not be copied.
DEs will be copied, similar to the standard copy behavior for records in Unifier.
Auto-create Contract
When an additional Detail tab (for the Requestor section of all RFB type Business Process forms) is available, you can use the second Detail tab (non-standard tab) to record the lines of the winning bid, as the user copies the data from the Bid Comparison Sheet.
Working with Unifier Business Processes
271
In general, the Bid Comparison Sheet, for a preferred bidder, contains more information than the information submitted by the bidder.
The second Detail tab is similar to that of any other non-standard Detail tab on any other Cost-type BP which allows multiple tabs.
To be able to use this feature, the following conditions must exist:
The "uuu_rfb_winning_bid" data element must be included in the RFB requestor form.
At least one bidding process must be completed.
Once these conditions are met, then you can select the winning bid.
The Result window displays all of the completed biddings. You can select one bid as the winning bid and after selecting that bid the system copies all the lines of the winning bid onto the Winning Bid tab.
The system copies the lines base on the matching data elements available on the:
Bidder detail form
Bid Comparison Sheet
The destination record is created by auto-creation and selecting a Winning Bid is not a must for successful auto-creation.
The BP Creator is available after all the mapping to the second Detail tab (Winning Bid) is complete. If the BP Creator is configured to auto-create a CBS Cost type Business Process, but the source Bidder Detail form did not contain a CBS picker (bitemid), the auto-creation will fail. To correct this error, you must correct the data (for example, selecting the CBS code before routing it to the next step), manually.
Note: The value of bitemid cannot be copied over when a record is auto-created from a Summary Base Commit to a non-Summary Base Commit.
What the Vendor Does
Use the instructions in this section to familiarize vendors with the Unifier interface so they can submit bids.
Note: If a bidder accesses Unifier through Oracle Identity Manager (OIM), the bidder cannot change password in Unifier. Changing password can be done only in Unifier when it is not accessed through OIM.
When a bidder is invited to bid for the first time, the system sends two emails simultaneously:
Invitation email, which contains the Bid Access URL.
Credential email, which contains the username and system-generated password.
Unifier Business Processes User Guide
272
Note: Oracle recommends that the bidders change the password at the very first log in, and then sign in to Unifier using the newly set password.
About the Bid Due Date Time
Be aware that the due date and time for the bid reflect the time of the server on which Unifier is running. (Unifier servers operate on Pacific Standard Time.)
To sign in to Unifier
If you received a bid invitation, you should also have received an email containing a link to Unifier, a user name, and a password.
1) Open the bid invitation and click the link provided.
2) At the login screen, enter the user name and password provided in the email.
The Primavera Unifier home screen opens.
To submit a bid
1) In the left Navigator, click Request for Bid/Bids (or Request for Bid Private/Bids if you have been invited for a private bid). A bid log appears on the right pane showing a list of open bids you have been invited to submit.
By default , Unifier displays only open bids. If you want to see all the bids you have been invited to submit, use the View menu on the right corner of the tool bar. Click the arrow and choose All Bids from the list. Unifier will display all your bids, past and present.
2) On the right pane, double-click the name of the RFB you have received (or click the View button). The Request for Bid form opens.
Before you submit the bid, you can communicate with the requestor about any questions or issues that need clarification. The Request for Bid form provides a link to Unifier Mailbox feature. To send a communication:
1. Click the Linked Mail link in the lower-right corner of the window. A Linked Mail window opens, showing a chronological list of any existing communications.
2. Click New. An email-type form opens, where you can send a communication to the requestor.
3) Click the Create button in the upper-left corner of the screen. The request for bid form opens for editing.
4) Fill in the upper form fields that are required.
5) Click the Add button in the lower-left corner and choose Detail Line Item. The Request for Bid Line Item window opens.
6) Fill in the fields on this form and click OK.
The line item detail you entered appears on the tab at the bottom of the screen.
7) (Optional) To add an attachment to the bid, click Add Attachment in the toolbar. A file upload window opens.
a. Click the Add button. A window opens showing the directory tree of files on your machine.
b. Navigate to the file you want to attach and select it. Then click Open. The file name appears in the Upload List field.
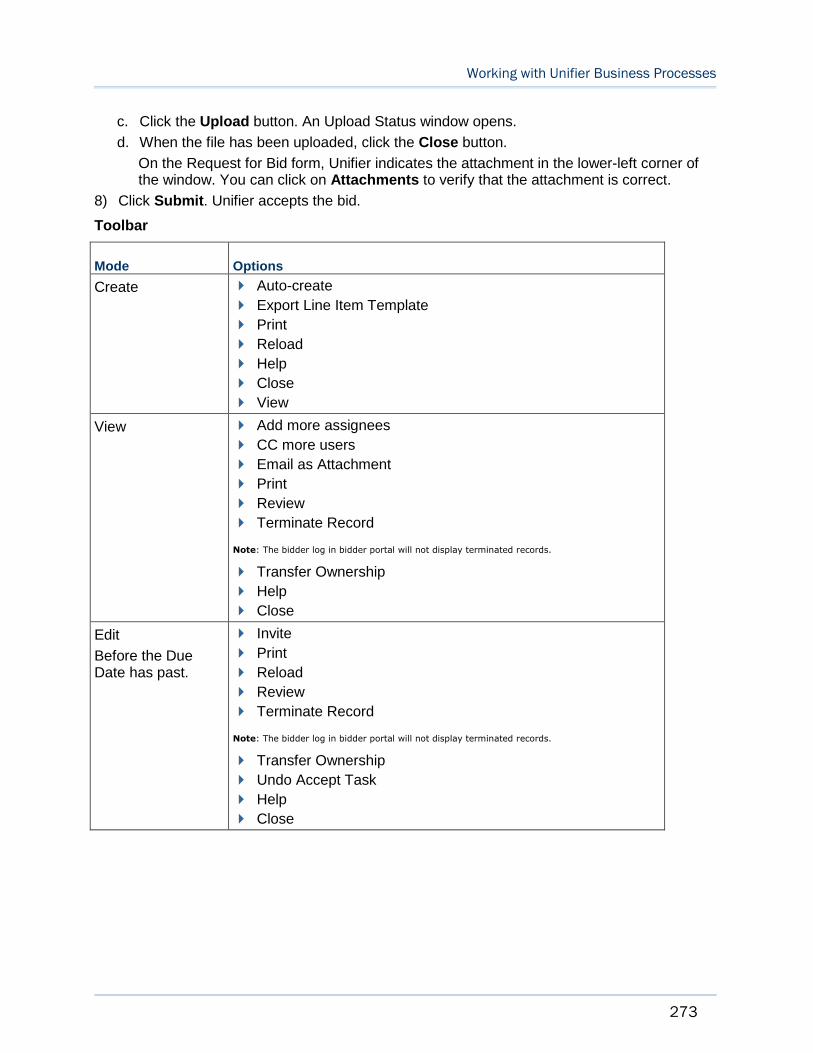
Working with Unifier Business Processes
273
c. Click the Upload button. An Upload Status window opens.
d. When the file has been uploaded, click the Close button.
On the Request for Bid form, Unifier indicates the attachment in the lower-left corner of the window. You can click on Attachments to verify that the attachment is correct.
8) Click Submit. Unifier accepts the bid.
Toolbar
Mode Options
Create Auto-create
Export Line Item Template
Reload
Help
Close
View
View Add more assignees
CC more users
Email as Attachment
Review
Terminate Record
Note: The bidder log in bidder portal will not display terminated records.
Transfer Ownership
Help
Close
Edit
Before the Due Date has past.
Invite
Reload
Review
Terminate Record
Note: The bidder log in bidder portal will not display terminated records.
Transfer Ownership
Undo Accept Task
Help
Close
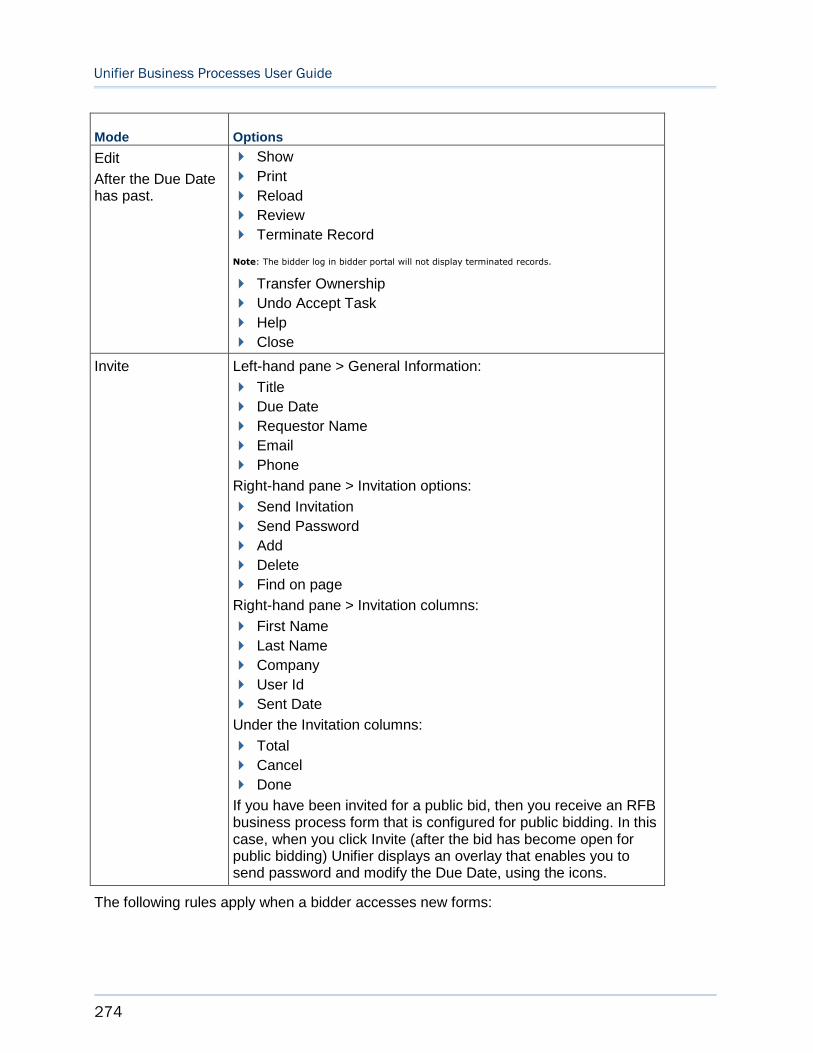
Unifier Business Processes User Guide
274
Mode Options
Edit
After the Due Date has past.
Show
Reload
Review
Terminate Record
Note: The bidder log in bidder portal will not display terminated records.
Transfer Ownership
Undo Accept Task
Help
Close
Invite Left-hand pane > General Information:
Title
Due Date
Requestor Name
Phone
Right-hand pane > Invitation options:
Send Invitation
Send Password
Add
Delete
Find on page
Right-hand pane > Invitation columns:
First Name
Last Name
Company
User Id
Sent Date
Under the Invitation columns:
Total
Cancel
Done
If you have been invited for a public bid, then you receive an RFB business process form that is configured for public bidding. In this case, when you click Invite (after the bid has become open for public bidding) Unifier displays an overlay that enables you to send password and modify the Due Date, using the icons.
The following rules apply when a bidder accesses new forms:
Working with Unifier Business Processes
275
If the Requestor has created the bid request in Classic view, then the bidder will be able to perform all subsequent actions (such as View the request/Create Bids in Classic view).
If the Requestor has created the bid request in Standard view, then the bidder will be able to perform all subsequent actions (such as View the request/Create Bids in Standard view).
Once the bid is submitted, and the due date is crossed, Unifier opens the RFB form in Standard view.
To withdraw a bid
1) Sign in to Unifier.
2) In the left Navigator, click Request for Bid/Bids (or Request for Bid Private/Bids, if you were invited for a private bid). A bid log appears on the right pane.
3) On the right pane, double-click the name of the RFB you received. The Request for Bid form opens.
4) Click the Create button in the upper-left corner of the window. The request for bid form opens for editing.
5) Click the Withdraw button in the upper-left corner of the window.
To view or print the bid after submitting it
1) Sign in to Unifier.
2) In the left Navigator, click Request for Bid/Bids (or Request for Bid Private/Bids, if you were invited for a private bid). A bid log appears on the right pane.
3) In the log, select the bid record that you want to view or print.
4) Click the View button. The bid form that you submitted opens for viewing.
5) (Optional) Print the bid form from the File menu. Choose either:
Print Preview > HTML Format: The print view of the form will open in the browser. Landscape orientation usually provides best results for HTML format. To print the bid, click the print icon in the upper-right corner of the window.
Print Preview > PDF Format: Opens the form in Acrobat Reader. Print the bid using the File menu in Acrobat.
Changing Vendor Email Address
You can change the bidder email in the RFB Vendors BP > Line Item Type Vendor > Bidder Email.
If you accept the change (click Finish Editing or Save > Yes), then the system updates the vendor record, with the new email address.
If Unifier is not integrated with Oracle Identity Manager (OIM), then:
If there are active bids for the vendor, then the system sends an email to the vendor with their username and password.
If there are no active bids, then the system changes the email address, but the system does not send an email to the vendor.
Unifier Business Processes User Guide
276
Note: Unifier deactivates the old email address.
If you do not accept the change (click Finish > No), then the system reverts back to the original email address.
If Unifier is integrated with OIM, then the system does not send a notification/email if you update the vendor email address, regardless of the status of the bid (active/inactive).
If Unifier is integrated with OIM, and a new account has been established for a vendor, then OIM sends a notification/email if you change the vendor email address. The notification/email contains the new sign-in information.
To change the vendor email address through integration, Reverse Auto-population (RAP), or Bulk Edit
If Unifier is integrated with OIM, then:
If you update the vendor's email address on the vendor record by way of integration, Reverse Auto-population (RAP), or Bulk Edit, then the system updates the record with the new email address and creates a new account in OIM, automatically. The OIM sends a notification/email that includes the sign-in information (username and password) to the vendor's new email address from OIM.
If Unifier is not integrated with OIM, then:
If you update the vendor's email address on the vendor record by way of integration, Reverse Auto-population (RAP), or Bulk Edit, then the system updates the record with the new email address and sends an email to the vendor, if the bids are active.
Note: The system does not send an email to the vendor if the bids are inactive.
Lease Business Processes
Lease business processes are a Cost type business process. You can use the Lease business process at the project or shell level to set up and manage real estate leases and view the expected Payment Schedule (regular as well as straight line) using the lease data from the business process. You can set up a Lease business process if you are the landlord (lessor), or if you are the tenant (lessee). You can use it for new leases you have just contracted, or existing leases. The Lease business process allows you to track incoming or outgoing payments, and you can use the Generic Cost Manager to roll up the amounts.
Lease business processes are typically used to auto-create invoices (if you are the landlord) or payment requests (if you are the lessee). These auto-created business processes are designed and set up by your administrator. For more information, see Auto-create an invoice or payment request from a Lease business process (on page 282).
Lease business processes can be workflow or non-workflow cost business processes. If they are workflow business processes, you can route them like other workflow business processes in Unifier.
Working with Unifier Business Processes
277
Note: Lease business processes cannot be defined at the Company level, and do not support CBS functions.
Leases can be designed with fields that you can use in line items to perform lease data calculations. These calculations generate lease payment schedules. For example, you could add lines items for rent, cost of maintenance, or taxes to a lease. The data in these line items is data that you enter, or data that is populated based on calculations.
On Leases, you can:
View expected payments for the lifetime of the lease using the Regular Payment Schedule and Straight Line Schedule reports
Disable the auto-creation of related BPs, or re-enable these auto-created BPs as needed
Create Payment Schedules (regular and straight line)
Create snapshots of the lease for historical purposes
In addition to typical behavior, the Lease business process supports:
Consolidation from other Cost BPs
Snapshot creation
Auto-creation
Auto generation of Regular and Straight Line Payment schedules
Integration methods for creating upper form as well as line items of all tabs
Multiple tabs for line items (up to 8 tabs)
An allocation template to divide lease payments into different amounts for multiple tenants in a building.
Lease business process terminology
Lease: An agreement whereby the owner of real property (the landlord or lessor) gives the right of possession to another (the tenant or lessee) for a specified period of time (the terms of the lease) and for a specified consideration (the rent or lease payments).
Straight line: The straight-line method implies that the cash flows in the form of fixed lease payments over the lease term are aggregated and divided by the lease term to arrive at the monthly income or expense. This results in an equal impact in the income statement in each reporting period irrespective of the fact that cash flows differ.
Escalation: A clause in a lease which provides for the rent to be increased to reflect changes in expenses paid by the landlord such as real estate taxes, or operating costs. An escalation can be accomplished by several means such as fixed periodic increases, increases tied to the Consumer Price Index, or adjustments based on changes in expenses paid by the landlord in relation to a dollar or base year reference.
In addition to the terminology above, you can find more information about the special fields that can be used on Lease business processes in the Unifier Reference Guide.
Lease business process use cases
The following are examples of how you can the Lease BP to manage leases.
Unifier Business Processes User Guide
278
Various Payment Terms for the same lease
You execute a lease on December 1, 2003 with a commencement date of April 1, 2004 and a termination date of March 28, 2005.
Payment Term 1: A term of $4,000 per month for rent begins on April 1, 2004 and ends on March 28, 2005. The due day is 1.
Payment Term 2: A term of $300 per month for common area maintenance (CAM) starts on April 1, 2004 and ends on March 28, 2005. The due day is 1.
Payment Term 3: A semi-annual term of $500 for taxes begins on September 1, 2004 and ends on March 28, 2005. The due day is 1.
Different payment allocations for multiple tenants
For accounting purposes, the rent for a building is to be charged back to departments, based on each department’s space usage. The Marketing Department uses 60% of the space and IT uses 40% of the space. If the total rent for the building is $5000 per month, then Marketing would be charged $3000 and IT would be charged $2000 per month.
Semi-annual lease terms with proration
The lease term start date is February 15, 2002, the end date is January 1, 2003. The frequency is semi-annual, and the amount is $1,000 per term. The Proration Rule accounts for the date difference in days, with the end date included.
Handling rent pre-payments
The lease term start date is January 1, 2003, the end date is June 30, 2003. The frequency is monthly, and the amount is $6,000 per month. The due day is 1. The pre-payments are the first and last month’s rent.
Straight lining with quarterly payments
The lease begins mid-month on 15 January, 2002 and ends mid-month on 14 January, 2003.
Rent for the first quarter is $100
Rent for the second quarter is $200
Rent for the third quarter is $300
Rent for the fourth quarter is $400
Rent for the fifth quarter is $500
The rent abatement of $10 is given only in the first month. The rent is scheduled to be paid in full at the beginning of each month.
Note: Information about Straight-line Payment Adjustments: Straight-line payments can be modified if the business process design includes special data elements (fields). These fields can override the start and end dates of a lease, add or subtract days from the lease term, or add or subtract specific dollar amounts to the lease amount.These adjustment fields do not change the line item dates or amounts. Unifier takes these adjustments into consideration when it calculates the straight-line payments after you click Save or Finish Editing. When you open the form
Working with Unifier Business Processes
279
in view mode, you will see the adjustments reflected on the Payment Schedule you open from the Payment Schedule button on the toolbar.
Straight Lining with monthly payments
The terms are a 12-month lease, with the first month rent-free. The rent is $1000 per month. Real estate rules (FASB 13) require that this rent be normalized (or straight-lined) across the entire lease term.
Lease term of 20 years with escalation
The base, or primary, lease term is 20 years. During the base lease term, the monthly lease payment is $10,000 for the first 10 years and $12,000 for the next 10 years.
Note: Payment Schedule calculations for Lease base frequencies and Escalation frequencies will differ slightly depending on the frequency used. For example, a 10 year lease escalating each year will differ slightly from a lease escalating every 52 weeks (as opposed to a lease escalating every 365 days). Over a 10 year period, if the lease calculation is done in days, there can be years with more than 365 days. Also, if the calculation done in weeks, 52 weeks might be a day or two short of a full year depending on the year used.
Escalation Based on Index Rate
Set lease payments to increase based on the Consumer Price Index of a country. This escalation method allows lessors to increase the rent by aligning it with inflation and without going into an agreement using a pre-determined % escalation. On the Lease Business Process, you can specify the index rate to use, the payment schedules are updated whenever the index rate is changed.
Create and manage Lease business processes
To create a Lease business process record
1) Navigate to the Lease business process log.
2) In the Lease BP log, click New. The Lease form opens.
3) Complete the Lease business process record. Add the basic lease information to the upper form, including the lease name, number, class of lease, and other details. Add the routing information for the workflow if the BP is a workflow BP.
4) On the detail form, add the payment terms in the Payment Setup tab. Click the Add button to add a line item for each aspect of the lease for which you want to create a payment schedule. For example, you can add individual line items for rent, maintenance costs, and taxes.
5) Click Save.
Unifier Business Processes User Guide
280
To edit a line item
As long as the Lease BP form is still a Draft, you can edit a line item at any time. Open the grid by clicking the Add button. The Line Items window opens. Enter the payment general setup, payment trigger dates setup, straight line settings, payment escalation setup, and the cost account setup. Make changes and click OK.
To remove a line item
In the Lease BP form, select the line item to remove and click the Remove button.
If you have created an allocation template, you can link the record to it. See Create and use an allocation template (on page 280).
Create and use an allocation template
If the rent you charge (or pay) should be pro-rated for different tenants in a building, you can create an allocation template and assign it to a Lease BP. The template will designate a breakdown of the costs for each tenant and Unifier will use this breakdown to create the payment calculations.
For example, for accounting purposes, the rent for a building is to be charged back to departments, based on each department’s space usage. The Marketing Department uses 60% of the space and IT uses 40% of the space. If the total rent for the building is $5000 per month, then Marketing would be charged $3000 and IT would be charged $2000 per month.
To create an allocation template
1) Open the Lease BP you want to create the template for.
2) Click the Allocation button. The Allocation Templates window opens.
3) Click the New button. The Add/Edit Allocation Details window opens.
4) Use the information in the first table below to complete the top three fields in this window.
5) Click the Add button. Unifier enters a row number and opens an editable text box in the Description field.
6) Use the information in the second table below to add rows to the allocation template.
7) To add more rows to the allocation template, repeat steps 5 and 6.
8) Click OK.
In this field: Do this:
Allocation Name
Enter a name for the allocation template. This name will appear on the list of allocation templates you can select for the record or line item you create.
Payment Type
Click the arrow and select the payment type that should be used for the allocations.
Allocation Type
Select the type of allocation to use for the pro-ration.
Percent will pro-rate the lease according to the percentage you specify (see Allocation Value).
Fixed will allocate a fixed cost to each tenant.
Working with Unifier Business Processes
281
Area will pro-rate the lease according to the square footage each tenant occupies (see Allocation Value).
In this field: Do this:
Description Enter a name to identify the allocation, such as "Sales Dept" or "Uptown Restaurant".
Allocation Value
Enter the value of the Allocation Type.
For Percent, enter the percentage of the lease that should be paid by the tenant. If you specify percent, the values in all these fields must add up to 100%.
For Fixed, enter the lease amount that should be paid by the tenant.
For Area, enter the square footage for which the tenant is paying.
Cost Code From the picker that opens, select the cost code for the allocation.
To link an allocation template to a lease business process
1) Open the Lease business process record to which you want to link the template.
2) Click the Allocation button. The Allocation Templates window opens.
3) Select the template you want and click Open.
View or export payment schedule
The Lease BP creates the Regular Payment Schedule and the Straight Line Schedule to allow you to view your future lease payments.
The lease payment schedule is generated automatically after you add or change a line item for the Lease BP. The schedule is time stamped, and is overwritten each time you add or modify a line item. You can capture a particular schedule by exporting it to a PDF file.
To view or export payment schedule
1) Open a Lease BP record from the log.
2) On the toolbar, click the Payment Schedules button and choose Regular or Straight Line. The payment schedule window opens.
The schedule shows currency amounts to two decimal places (e.g., $3120.33).
The Regular Payment Schedule lists the lease payments as calculated using Frequency, Start Date, and End Date.
The Straight Line Schedule lists the lease payments averaged over all of the line items of the payment terms for the lease over the life of the lease. You can specify which line items that you want to include in the Straight Line Schedule by clicking the Straight Line radio button on the detail form of each line item to Yes for each item you want listed in the schedule.
3) Click the Export button to save all of the schedule rows or selected rows to a PDF file. Click Save to create the PDF file of the schedule.
4) Click the Close Window button when you are done viewing the schedule.
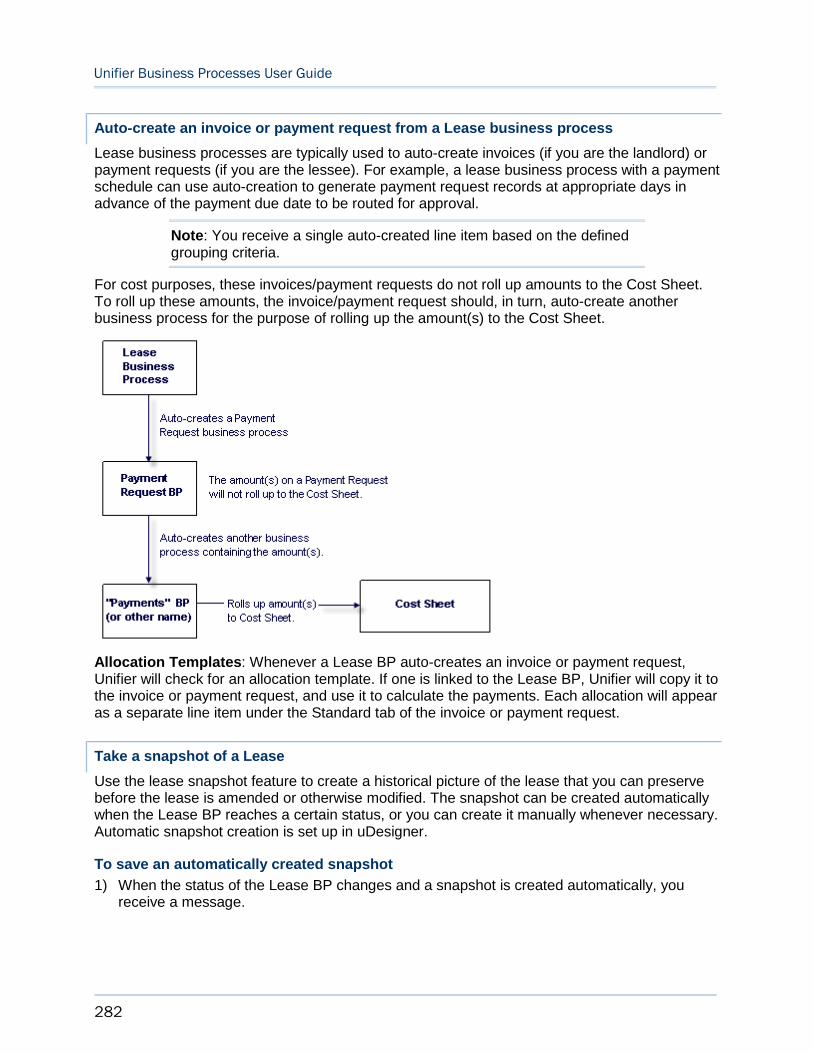
Unifier Business Processes User Guide
282
Auto-create an invoice or payment request from a Lease business process
Lease business processes are typically used to auto-create invoices (if you are the landlord) or payment requests (if you are the lessee). For example, a lease business process with a payment schedule can use auto-creation to generate payment request records at appropriate days in advance of the payment due date to be routed for approval.
Note: You receive a single auto-created line item based on the defined grouping criteria.
For cost purposes, these invoices/payment requests do not roll up amounts to the Cost Sheet. To roll up these amounts, the invoice/payment request should, in turn, auto-create another business process for the purpose of rolling up the amount(s) to the Cost Sheet.
Allocation Templates: Whenever a Lease BP auto-creates an invoice or payment request, Unifier will check for an allocation template. If one is linked to the Lease BP, Unifier will copy it to the invoice or payment request, and use it to calculate the payments. Each allocation will appear as a separate line item under the Standard tab of the invoice or payment request.
Take a snapshot of a Lease
Use the lease snapshot feature to create a historical picture of the lease that you can preserve before the lease is amended or otherwise modified. The snapshot can be created automatically when the Lease BP reaches a certain status, or you can create it manually whenever necessary. Automatic snapshot creation is set up in uDesigner.
To save an automatically created snapshot
1) When the status of the Lease BP changes and a snapshot is created automatically, you receive a message.

Working with Unifier Business Processes
283
Enter a title for the snapshot (if you want to overwrite the default title), and an optional description.
2) Click OK. The snapshot is saved in Unifier.
To create a snapshot manually
1) While in the Lease BP, choose File > Create Snapshot.
2) Enter a title for the snapshot (if you want to overwrite the default title), and an optional description.
3) Click OK. The snapshot is saved in Unifier.
To view and manage snapshots
1) While in the Lease BP, choose View > Snapshots. The Snapshots window opens.
The snapshots are listed in the window. Manually created snapshots display Yes under the User Created column; system created snapshots display No.
2) To save the snapshot as a PDF file, select a snapshot from the list and click Open.
Unifier displays the PDF file, which shows all the fields from the detail forms for all the tabs on the business process.
3) To view snapshot properties and change the title or description of the snapshot, select a snapshot from the list and click Properties.
4) To delete a snapshot, select a snapshot from the list and click Delete.
5) Click Close when you a done viewing snapshots.
Calculating Net Present Value (NPV)
If you the data elements corresponding to the Net Present Value (NPV) are included in Lease BP design, then the following information will be available:
Annual discount rate
NPV Amount
Comments
Detail Form
Detail Form
The NPV amount for each payment setup will be calculated individually using the discount rate present on the respective setup.
The calculated amount will then be populated into the NPV present on each payment setup respectively.
Detail Form
Upper Form
The NPV amount for each payment setup will be calculated individually using the discount rate present on the respective payment setup.
The summarized NPV amount will be populated on the upper form.
Upper Form
Detail Form
The NPV amount for each payment setup will be calculated using the discount rate present on upper form.
The calculated amount will then be populated into the NPV present on each payment setup respectively.

Unifier Business Processes User Guide
284
Upper Form
Upper Form
The NPV amount for each payment setup will be calculated using the discount rate present on the upper form and the summarized amount will be populated on the upper form.
Upper Form, Detail Form
Upper Form
The NPV amount for each payment setup will be calculated using the discount rate present on the each setup.
If the rate is not present on the payment setup then we will use the rate present on the upper form.
The summarized amount will then be populated on the upper form.
Upper Form, Detail Form
Detail Form
The NPV amount for each payment setup will be calculated using the discount rate present on the payment setup.
If the rate is not present on the payment setup then we will use the rate present on the upper form.
Calculated NPV amount for each payment setup will be populated in the respective form.
Detail Form
Upper Form, Detail Form
The NPV amount for each payment setup will be calculated individually using the discount rate present on the payment setup.
The NPV for each payment setup will be populated in the respective form. Also, the summarized amount will populated in the upper form.
Upper Form
Upper Form, Detail Form
The NPV amount for each payment setup will be calculated using the discount rate present on the upper form.
The NPV for each payment setup will be populated in the respective form.
Also, the summarized amount will populated in the upper form.
If you have added the following data elements, then you will be able to calculate the Net Present Value (NPV):
Annual discount rate
NPV Amount
Include in Net Present Value
The NPV calculation will be triggered after the following events:
Finish editing
Index rate change (at the end of the day)
Index rate change through user interface (UI) or Integration.
Reverse Auto-population of the base lease record.
After you finish editing, the system refreshes values in the Regular Line Schedule and Straight Line Schedules.
For a Workflow BP, the system calculates the NPV value when Payment Schedule is refreshed. This feature applies to the Line Item updates, as well.

Working with Unifier Business Processes
285
The system checks changes in the following values, daily:
Index rate
Payment schedules
Discount rate
If there are any changes in the values of the fields above, then the system triggers NPV recalculation based on the updated values.
Reservation Business Process
Some objects in Unifier can be reserved for use. For example, in the Asset Manager, you could reserve a piece of equipment that needs to be used at a project site for three weeks.
In Unifier, you can reserve the following objects:
Assets
Document Manager records
Configurable manager objects
The object of a line item or simple type business processes (both workflow and non-workflow)
When these objects (assets, shells, spaces, etc.) are designed, they can be "calendar enabled," which means that the business process form for these objects will show a calendar option, and the object will be available for reservation.
In conjunction with these calendar-enabled objects, Unifier provides a reservation type business process which you can use to reserve these objects. A reservation BP is considered a type of cost BP in that it integrates with the Cost Manager to use cost codes at the company and project/shell level.
There are two ways to make a reservation:
1) Using a reservation business process
By using a reservation business process (that has been designed and configured for your use), you can specify the date and time of the reservation. Depending on its design, this business process can also:
Display availability and identify scheduling conflicts
Denote the reservation as "tentative" or "confirmed"
Gather cost information
Specify additional details, such as the number of attendees, A/V requirements, food catering, etc.
Show the reservation as a recurring event.
Trigger another business process, such as a work order.
2) Using a quick calendar
By using the quick calendar option that is available on any business process (that was designed to be calendar-enabled), you can open the calendar and enter the parameters for your reservation.
Unifier Business Processes User Guide
286
Note: For an asset in the Asset Manager, the quick calendar is the only way you can reserve an asset; you cannot use the reservation business process.
Using a Reservation Business Process
The reservation business process is similar to any other business process. You need to fill in the upper form fields as necessary, and add line items for detail information about the reservation.
The upper form of the reservation business process should include From Date and To Datefields which you need to complete, and should also include one or more data pickers, where you choose the object or objects that you want to reserve. In the example above, the room and projector fields are the data pickers from which you can select multiple objects to reserve for this event.
The reservation business process can be designed to include additional information about this reservation, such as food catering for the event.
The reservation business process has two special features:
Schedules
Enables you to open the Schedules window and view the reservation schedule for the objects you are reserving with this reservation BP.
Is useful for comparing the availability of multiple objects being booked for the same event, and to resolve conflicts or identify openings in the schedule.
Recurrence
Enables you to specify how often this reservation should be created. When you use this options, Unifier continues to automatically reserve the object according to the specifications you select with this feature.
The following describes the reservation business process log (Standard View):
From your project, go to your reservation BP and click to open the reservation BP log. On the left-hand pane, a set of toolbar options and a list of records, if available, are displayed. On the right-hand pane, the following tabs explain more information about each item on the list:
Record Details tab
Workflow Progress tab
Attachments tab
The following explains the toolbar options of the reservation BP log:
Create Enables you to create a new reservation BP. From the Requester Informationblock, you can click the Space data picker field to open the Usable Space Reservation window which contains a calendar that enables you to determine the duration of the reservation.
Working with Unifier Business Processes
287
Actions
Enables you to conduct the following on a selected record, or multiple records:
Import
Export CSV Template
Create From Template
Bulk Edit
Transfer Ownership
Terminate Record
View The View data picker enables you to arrange the list of records listed, as follows:
Records Created by Me
Records Received by Me
Records Created and Received by Me
Records from My Company
In addition, the View data picker enables you to:
Create New View
Manage Views
Edit View
To edit, or customize, the view of the log.
Refresh
To refresh the data displayed on the log.
Print To print a record.
Search
To search for a record.
Find on Page
To find a record based on a column heading.
Help To access documentation.
The following explains the columns on the reservation BP log:
Record Duration Status (Calendar icon)
Attachments (Paper clip icon)
Record Number
Reservation name
Space
From Date
To Date

Unifier Business Processes User Guide
288
Amount
Status
Creation Date
Creator
For each item on the list, the gear icon option enables you to perform the following:
Open
Copy with Attachments
Copy without Attachments
Transfer Ownership
Terminate Record
Using the Schedules Feature
The Schedules feature is most useful for resolving scheduling conflicts.
Classic View
On the Schedules window, you can see if the object(s) you choose are available, or if there is a conflict in the date or time frame. The Schedules window is particularly useful if you have multiple objects you need to reserve for an event, such as a room, projector, special lighting, podium, and a microphone. For this number of objects, it can be difficult to find a date and time when all are available. You could look at their availability separately, when you choose them from the picker on the form, but this is time-consuming. By using the Schedules feature, you can find a day and time slot that will accommodate all the objects and reserve all of them at once.
The reservation business process includes a Schedules button in the toolbar. Once you have picked the objects to reserve (such as a room and a projector), you can use this button to view a schedule that includes the room and projector you chose. For these objects, the schedule might look like this:
Working with Unifier Business Processes
289
This example shows the room and projector you chose and the timeframe you specified in the From Date and To Date fields on the form (green and red lines).
In the example above, the room is available, but the projector is not. The schedule shows, in blue, that the projector has already been reserved for that time slot. However, the schedule also shows that both the room and the projector are available at other hours on that day. By dragging the green and red lines, you can move the reservation for both the room and projector to, say, 10:00 to 11:00. Unifier will change the Reservation From/To fields at the bottom of the window to reflect your change. When you click the Update button at the top of the window, Unifier will reserve the room and projector and will update the Reservation record with the new time.
Standard View
When you open a reservation BP record, the BP record page that opens contains the following menu options (on the top right-hand corner):
Send Enables you to send the BP to the next step.
Save Enables you to save any changes that you have made.
Menu Options drop-down (the three horizontal line icon)
Enables you to complete, set up, or access any of the following operations:
Cancel Reservation
Export Line Item Template
HTML
Custom
Recurrence
Reload
Review
Review
AutoVue Review
Schedules (See below for more details)
Transfer Ownerships
Undo Accept Task
Help
Close
When you open a reservation BP record, the BP record page that opens contains the following tabs:
<BP name> Reservation Details tab
This tab enables you to see the details of the BP and access the following tabs for the record that you had selected:
Attachments
Comments
Unifier Business Processes User Guide
290
Linked Records
Lined Mail
Workflow Progress
Audit Log
Reference Records
Reservation Charges tab
This tab enables you to view and work with all the charges related to your selected record.
When open a record and click Schedules (the Menu Options drop-down (the three horizontal line icon) > Schedules), a new window opens which contains the following tabs:
Schedule
This tab enables you to set the schedule for the reservation. You can see and set the reservation period and see any conflicts.
Recurrence
This tab enables you to set the frequency and range of the reservation. See the next topic for more details.
Making a Recurring Reservation
The reservation business process includes a "recurrence" feature, where you can specify how often this reservation should be created. Unifier will continue to automatically reserve the object according to the specifications you select with this feature.
To make a recurring reservation (Classic View)
1) On the reservation business form, click the Recurrence button in the toolbar. Unifier opens the Recurrence window.
2) Use the information in the following table to complete the fields in the Recurrence window.
Unifier will continue to automatically reserve the object according to the specifications you select in this window. See the table below.
3) Click OK.
In this field: Do this:
Start This field shows the starting time you entered on the upper form of the reservation form. This field is editable, and your change will appear on the reservation form.
End This field shows the ending time you entered on the upper form of the reservation form. This field is editable, and your change will appear on the reservation form.
Frequency Select how often this reservation should be made.
Range of Recurrence
Specify when the recurring reservation should end.
The Start On field shows the starting time you entered on the upper form of the reservation form. This field is editable, and your change will appear on the reservation form.
No end date Select this if the recurring reservation should be

Working with Unifier Business Processes
291
made for the indefinite future. (Unifier will assume an end date 10 years from the current date.)
End After Occurrences Select this if the recurring reservation should stop after a specific number of recurrences, and enter that number in the text box. (The maximum number is 1000.)
End by Select this if the recurring reservation should stop at a specific date, and enter that date in the text box.
To make a recurring reservation (Standard View)
When open a record and click Schedules (the Menu Options drop-down (the three horizontal line icon) > Schedules), a new window opens which contains the following tabs:
Schedule
This tab enables you to set the schedule for the reservation. You can see and set the reservation period and see any conflicts.
Recurrence
This tab enables you to set the frequency and range of the reservation. See the next topic for more details.
Recurrence Daily
In the Recurrence tab, when the "Recurrence On" checkbox is checked, the Frequency and Range of Recurrence sections will be displayed.
In case the checkbox is unchecked, the two sections are not displayed.
In case of an existing recurrence, if the checkbox is unchecked, all recurrences will be removed when you click Save. The interaction is the same as that occurs on clicking on 'Remove Recurrence' button in existing screen.
Recurrence Weekly
In case of an existing recurrence, if the checkbox is unchecked, and then it is checked again (without clicking on Save), the values present for the frequency and range of recurrence sections will remain the same, as before.
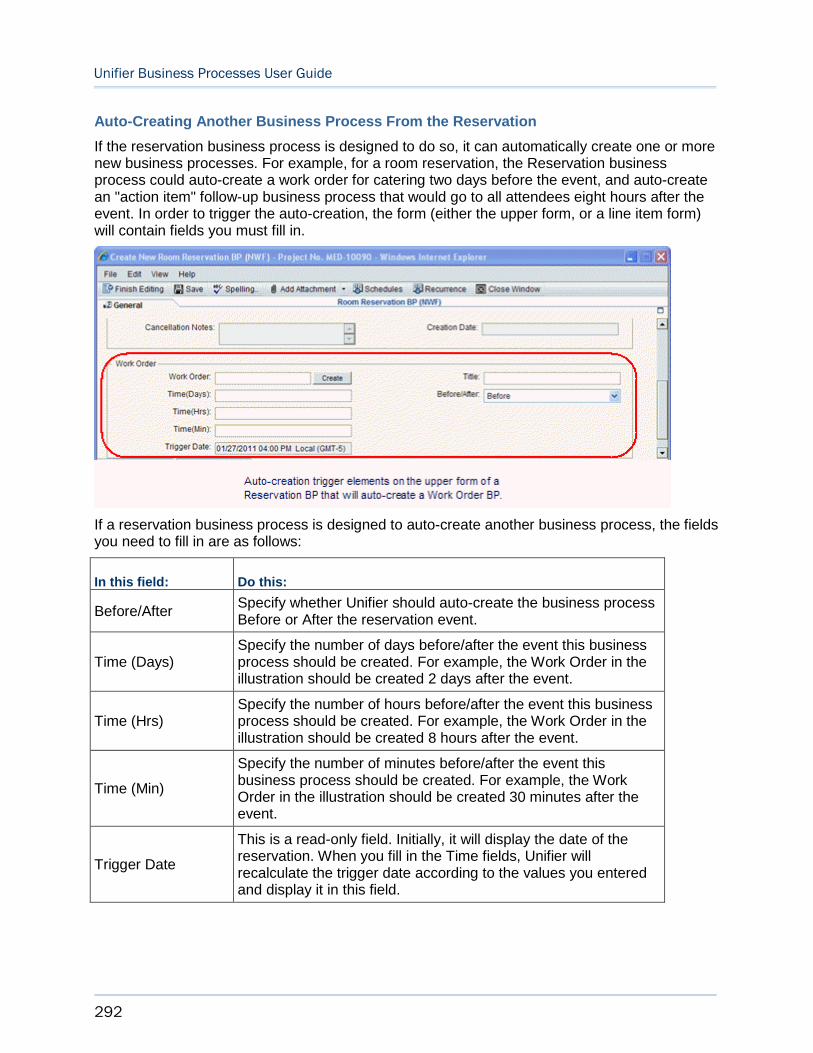
Unifier Business Processes User Guide
292
Auto-Creating Another Business Process From the Reservation
If the reservation business process is designed to do so, it can automatically create one or more new business processes. For example, for a room reservation, the Reservation business process could auto-create a work order for catering two days before the event, and auto-create an "action item" follow-up business process that would go to all attendees eight hours after the event. In order to trigger the auto-creation, the form (either the upper form, or a line item form) will contain fields you must fill in.
If a reservation business process is designed to auto-create another business process, the fields you need to fill in are as follows:
In this field: Do this:
Before/After Specify whether Unifier should auto-create the business process Before or After the reservation event.
Time (Days) Specify the number of days before/after the event this business process should be created. For example, the Work Order in the illustration should be created 2 days after the event.
Time (Hrs) Specify the number of hours before/after the event this business process should be created. For example, the Work Order in the illustration should be created 8 hours after the event.
Time (Min)
Specify the number of minutes before/after the event this business process should be created. For example, the Work Order in the illustration should be created 30 minutes after the event.
Trigger Date
This is a read-only field. Initially, it will display the date of the reservation. When you fill in the Time fields, Unifier will recalculate the trigger date according to the values you entered and display it in this field.
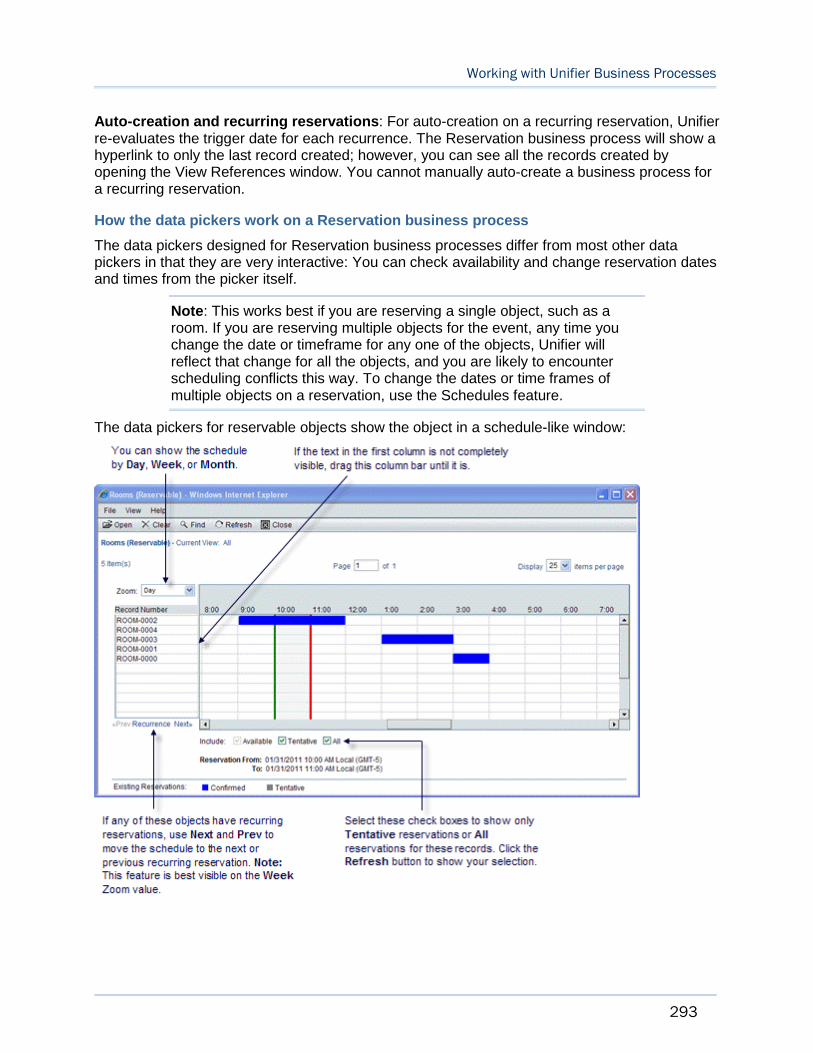
Working with Unifier Business Processes
293
Auto-creation and recurring reservations: For auto-creation on a recurring reservation, Unifier re-evaluates the trigger date for each recurrence. The Reservation business process will show a hyperlink to only the last record created; however, you can see all the records created by opening the View References window. You cannot manually auto-create a business process for a recurring reservation.
How the data pickers work on a Reservation business process
The data pickers designed for Reservation business processes differ from most other data pickers in that they are very interactive: You can check availability and change reservation dates and times from the picker itself.
Note: This works best if you are reserving a single object, such as a room. If you are reserving multiple objects for the event, any time you change the date or timeframe for any one of the objects, Unifier will reflect that change for all the objects, and you are likely to encounter scheduling conflicts this way. To change the dates or time frames of multiple objects on a reservation, use the Schedules feature.
The data pickers for reservable objects show the object in a schedule-like window:
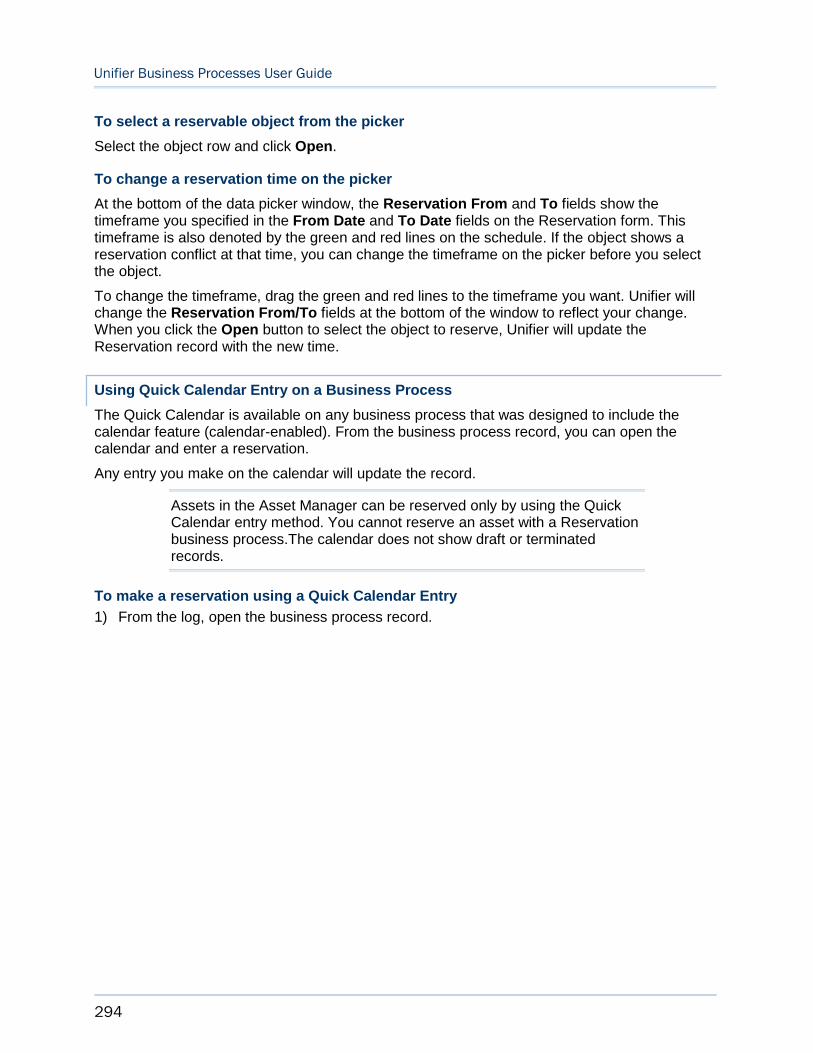
Unifier Business Processes User Guide
294
To select a reservable object from the picker
Select the object row and click Open.
To change a reservation time on the picker
At the bottom of the data picker window, the Reservation From and To fields show the timeframe you specified in the From Date and To Date fields on the Reservation form. This timeframe is also denoted by the green and red lines on the schedule. If the object shows a reservation conflict at that time, you can change the timeframe on the picker before you select the object.
To change the timeframe, drag the green and red lines to the timeframe you want. Unifier will change the Reservation From/To fields at the bottom of the window to reflect your change. When you click the Open button to select the object to reserve, Unifier will update the Reservation record with the new time.
Using Quick Calendar Entry on a Business Process
The Quick Calendar is available on any business process that was designed to include the calendar feature (calendar-enabled). From the business process record, you can open the calendar and enter a reservation.
Any entry you make on the calendar will update the record.
Assets in the Asset Manager can be reserved only by using the Quick Calendar entry method. You cannot reserve an asset with a Reservation business process.The calendar does not show draft or terminated records.
To make a reservation using a Quick Calendar Entry
1) From the log, open the business process record.
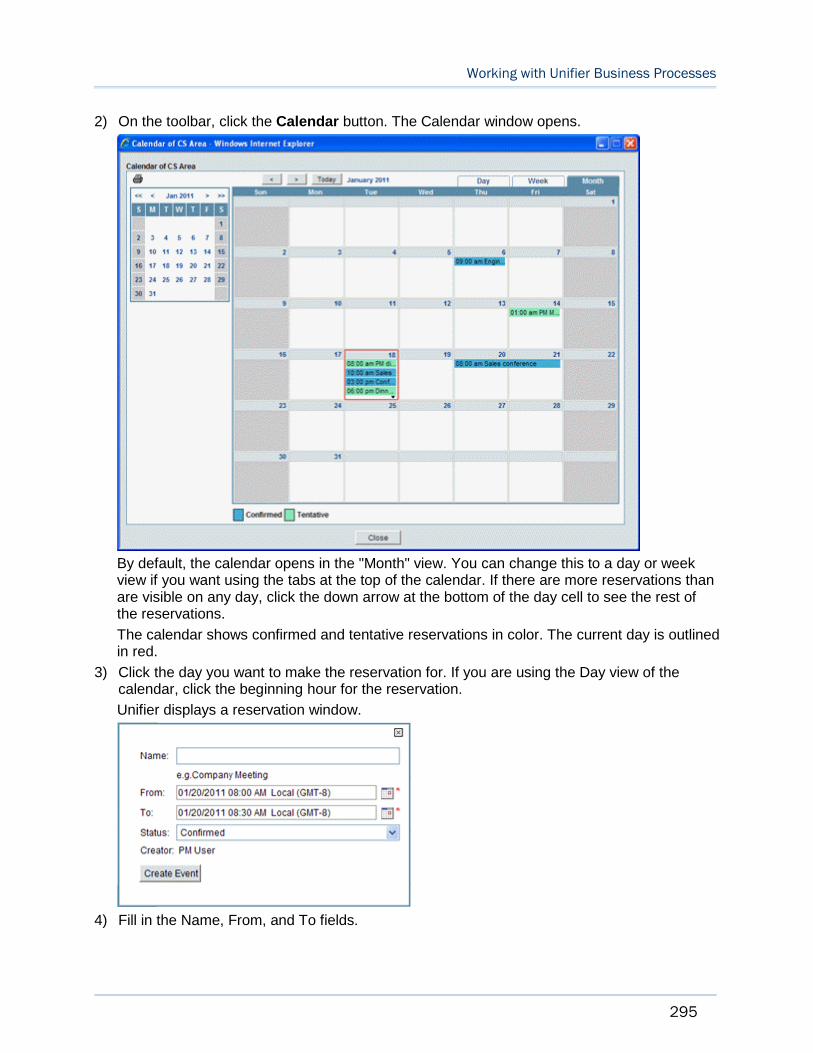
Working with Unifier Business Processes
295
2) On the toolbar, click the Calendar button. The Calendar window opens.
By default, the calendar opens in the "Month" view. You can change this to a day or week view if you want using the tabs at the top of the calendar. If there are more reservations than are visible on any day, click the down arrow at the bottom of the day cell to see the rest of the reservations.
The calendar shows confirmed and tentative reservations in color. The current day is outlined in red.
3) Click the day you want to make the reservation for. If you are using the Day view of the calendar, click the beginning hour for the reservation.
Unifier displays a reservation window.
4) Fill in the Name, From, and To fields.
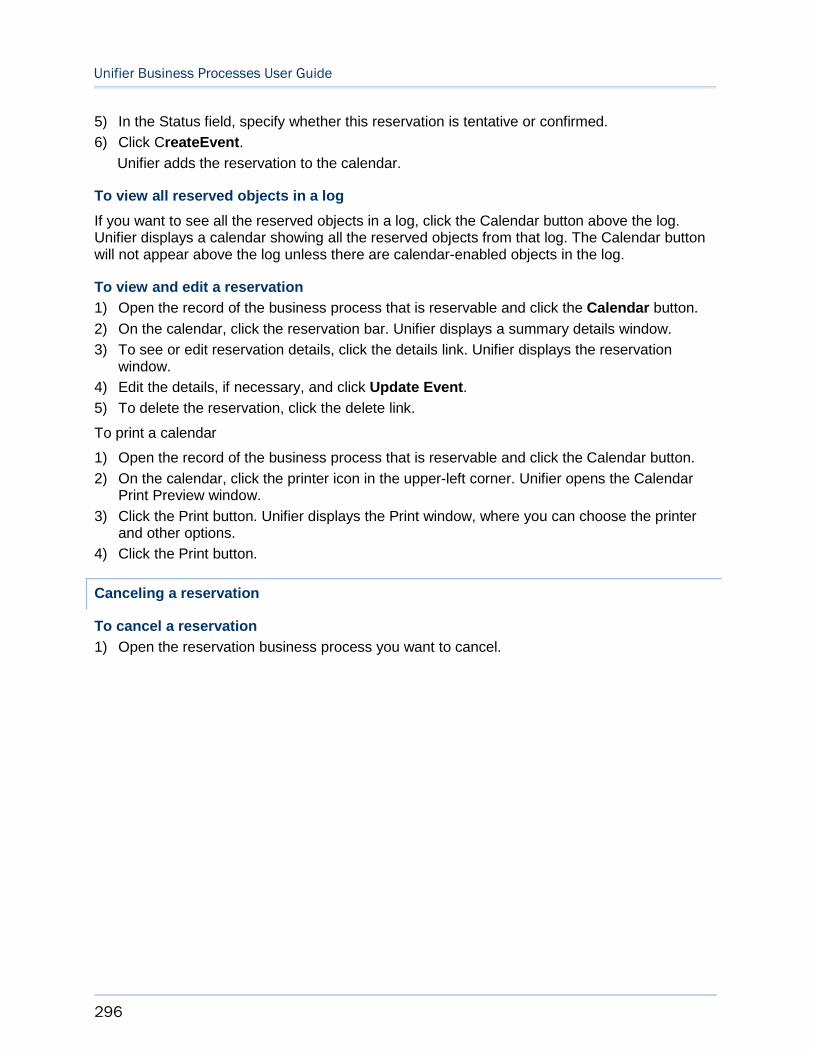
Unifier Business Processes User Guide
296
5) In the Status field, specify whether this reservation is tentative or confirmed.
6) Click CreateEvent.
Unifier adds the reservation to the calendar.
To view all reserved objects in a log
If you want to see all the reserved objects in a log, click the Calendar button above the log. Unifier displays a calendar showing all the reserved objects from that log. The Calendar button will not appear above the log unless there are calendar-enabled objects in the log.
To view and edit a reservation
1) Open the record of the business process that is reservable and click the Calendar button.
2) On the calendar, click the reservation bar. Unifier displays a summary details window.
3) To see or edit reservation details, click the details link. Unifier displays the reservation window.
4) Edit the details, if necessary, and click Update Event.
5) To delete the reservation, click the delete link.
To print a calendar
1) Open the record of the business process that is reservable and click the Calendar button.
2) On the calendar, click the printer icon in the upper-left corner. Unifier opens the Calendar Print Preview window.
3) Click the Print button. Unifier displays the Print window, where you can choose the printer and other options.
4) Click the Print button.
Canceling a reservation
To cancel a reservation
1) Open the reservation business process you want to cancel.

Working with Unifier Business Processes
297
2) From the File menu, choose Cancel Reservation. Unifier displays a Cancel Reservation window.
On this window, Unifier tells you exactly what will be removed from the calendars, and provides an area for notes on the cancelation. It shows:
Any business processes this reservation auto-creates. These will also be canceled.
All the objects associated with this reservation that will be canceled. In the example above, the room is being canceled as well as the projector that was reserved for the room.
3) In the Cancelation Notes area, enter any notes you wish regarding the cancelation.
4) Click OK.


299
Business Processes with Redesigned User Interface
The redesigned Business Process user interface allows you to:
View, edit, and manage all relevant details within a single form.
Access record details with limited popup and clicks.
See only relevant, context-sensitive menu and toolbar functions.
Use the enhanced form layout to navigate, expand, and collapse field blocks.
Create, enter, and update record data and line items in one place.
Navigate easily between tabs to complete the main and line item forms.
Add and view attachments in one place.
Route workflows with minimized alerts and errors.
Use enhanced field interaction in text boxes, pickers and data pickers.
To use the redesigned user interface to view BP records, from the top toolbar click . To turn
off the redesigned interface, click .
For information about internationalization and CSV files refer to Unifier General User Guide.
In This Section
Business Process Types with Redesigned UI ........................................................ 300 Creation Step ........................................................................................................ 301 Update Step .......................................................................................................... 304 View Step .............................................................................................................. 304 Completing a BP Record Form .............................................................................. 305 Adding and Managing Line Items .......................................................................... 309 Working with Attachments ..................................................................................... 316 Adding and Managing Linked Records .................................................................. 320 Viewing Reference Records .................................................................................. 320 Working with General Comments .......................................................................... 322 Working with Linked Mail ....................................................................................... 325 Working with Query-Based Tabs ........................................................................... 326 Working with Quick Calendar Entry ....................................................................... 327 Document-Type Business Process Forms (Without Folder Structure) ................... 331 Document-Type Business Process Forms (With Folder Structure) ........................ 334 Request for Bid (RFB) Type Business Process Form (Private) .............................. 337 User Picker and Group Picker ............................................................................... 341 View User Profile ................................................................................................... 342 Cost-Type Business Processes ............................................................................. 342 Text-Type Business Process ................................................................................. 349 Simple-Type Business Process ............................................................................. 350 Preventive Maintenance Business Process ........................................................... 350
Unifier Business Processes User Guide
300
Business Process Types with Redesigned UI
Different business needs require different types of business processes. In uDesigner, many different types of business processes are available that perform various functions within Unifier.
The business process forms of the following types have redesigned UI:
Cost
Line Items with CBS codes
Line Items with Fund codes
Line Items with CBS and Fund codes
Commit at Company Level
Line Items with Company Accounts Code (except Reservation)
Line Items with Multiple Codes (except Reservation)
Document
Document with Folder
Line Item
Line Item (Generic)
Project/Shell Creation
Project/Shell Creation (Simple and Line Item)
Base Commit and Change Commit (SPA)
Text
The following explains each type.
See Business Process Types (on page 15) for details.
Cost
The following Cost-type BPs have redesigned UI:
Line Items with CBS codes
Generic
Transfer
Base Commit
SOV
General Spends
SPA
Change Commit
SOV
General Spends
SPA
General Spends
Line Items with Fund codes
Generic
Working with Unifier Business Processes
301
Transfer
Line Items with CBS and Fund codes
Generic
Transfer
Line Items with Both CBS and WBS Codes
Generic
Commit at Company Level
Line Items with Company Accounts Code (except Reservation)
Line Items with Multiple Codes (except Reservation)
Lease
Base Commit and Change Commit of Summary Payment Application SOV type
Document
The following Document-type BPs have redesigned UI:
Document with Folder BP
Line Item
The following Line Item-type BPs have redesigned UI:
Line Item (Generic)
This includes Generic Line Item BPs that have either one of the options indicated in the Cost-type BPs checked.
Use this process as RFB Master Vendor List or Enable Calendar.
Preventive Maintenance
Project/Shell Creation
The following Project/Shell-type BPs have redesigned UI:
Simple
Line Item
Text
The content of the Text-type business process form is typically a text comment in the lower portion of the form.
Creation Step
The create BP record form opens as a pop up window. The top part of the form contains tabs (main form and line item tabs), and toolbar options. The main form is displayed as the first tab and each line item tab appears as subsequent tabs.The left pane displays the record details and line item details. The right pane displays additional tabs associated with the main form or line
items. You can resize the left and right panes using the Resize icon.
Unifier Business Processes User Guide
302
Main form:
This top portion of the business process form contains information about the BP record, such as the name of the record, description, who created the record and when, and other general information. Additional informational blocks defined in uDesigner by your administrator are also displayed. You can collapse and expand these blocks.
Toolbar Option
Description
Save To save a draft of the form. You can view your drafts under Home > Drafts. This option is displayed only for workflow BPs.
Send To route a workflow business process to the specified recipients. This option is displayed only for workflow BPs.
Submit Use Submit when you have finished editing a record. Displayed on all Non Workflow BPs when in Edit Mode.
Menu The options you see under this menu are based on the BP design.
Auto-Create: Displayed on any BP that can auto create other BPs.
Print HTML, PDF and Custom: Displayed on all BPs. You cannot print draft records.
Export Line item template: Displayed on any BP that has detail form integration interface defined.
Reload: Displayed on all BPs. This option will reload the page.
Help: BP specific help option.Your company or project/Shell administrator may provide a custom Help file to give you information about a specific business process. If a custom help file is available, it will be listed under the Help menu for the business process log or form.
Close: Close the record.
The right pane displays the following tabs associated with the main form: Attachments, Comments, linked Records, and Linked Mail. For Portal BPs, Attachments and Comments tabs are displayed.

Working with Unifier Business Processes
303
Notes:
If the Attachments tab of the business process form contains any attachments, then an Attachment indicator is displayed. If the tab contains no attachments, then the right pane is refreshed and the indicator is no longer displayed.
If the Comments tab of the business process form contains any comments, then a Comment indicator is displayed. If the tab contains no comments, then the right pane is refreshed and the indicator is no longer displayed.
Line Item form:
Line item tabs are displayed after the main form tab. All line items are displayed on the left pane, and the right pane displays the details form associated with the selected line item. The right pane contains the Details form, Attachments, and Linked Records. The Attachments tab is displayed only if the line item form supports the addition of attachments. Query based tabs will
not be seen in the Creation step. The gear menu displays next to each line item on the left pane and contains all available actions you can perform on the line item. The following options
are displayed on the gear menu: Copy, Copy With Attachments(Option seen only if attachments exist), Add to Group, and Remove. The Copy, Add to Group, and Remove options are displayed only if it is specified in the form design.
Toolbar Options Description
Add To add new line items. The Add button will be seen only if the form design allows for line item additions.
The following actions will be seen:
Import
Consolidate Line Items
Refresh Refreshes the line items. All unsaved manual edits will be lost.
PrintPrints the list view. You can choose from: Print, Export to CSV, Export to Excel.
Search Enables users to search for specific line items across all pages.
Find on PageEnables users to type in find parameters to quickly search line items matching the criteria.
Collapse All Groups
Expand All Groups
To expand or collapse line items groups. These icons are displayed only when line item groups are present.
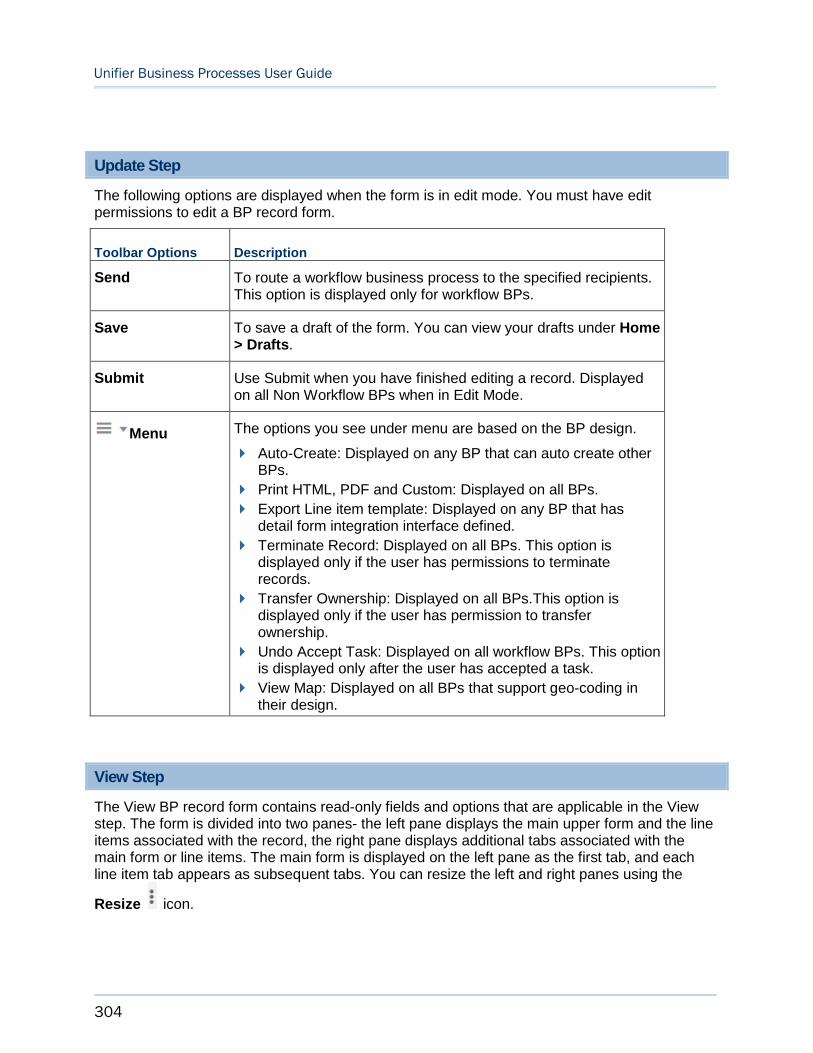
Unifier Business Processes User Guide
304
Update Step
The following options are displayed when the form is in edit mode. You must have edit permissions to edit a BP record form.
Toolbar Options Description
Send To route a workflow business process to the specified recipients. This option is displayed only for workflow BPs.
Save To save a draft of the form. You can view your drafts under Home > Drafts.
Submit Use Submit when you have finished editing a record. Displayed on all Non Workflow BPs when in Edit Mode.
Menu The options you see under menu are based on the BP design.
Auto-Create: Displayed on any BP that can auto create other BPs.
Print HTML, PDF and Custom: Displayed on all BPs.
Export Line item template: Displayed on any BP that has detail form integration interface defined.
Terminate Record: Displayed on all BPs. This option is displayed only if the user has permissions to terminate records.
Transfer Ownership: Displayed on all BPs.This option is displayed only if the user has permission to transfer ownership.
Undo Accept Task: Displayed on all workflow BPs. This option is displayed only after the user has accepted a task.
View Map: Displayed on all BPs that support geo-coding in their design.
View Step
The View BP record form contains read-only fields and options that are applicable in the View step. The form is divided into two panes- the left pane displays the main upper form and the line items associated with the record, the right pane displays additional tabs associated with the main form or line items. The main form is displayed on the left pane as the first tab, and each line item tab appears as subsequent tabs. You can resize the left and right panes using the
Resize icon.
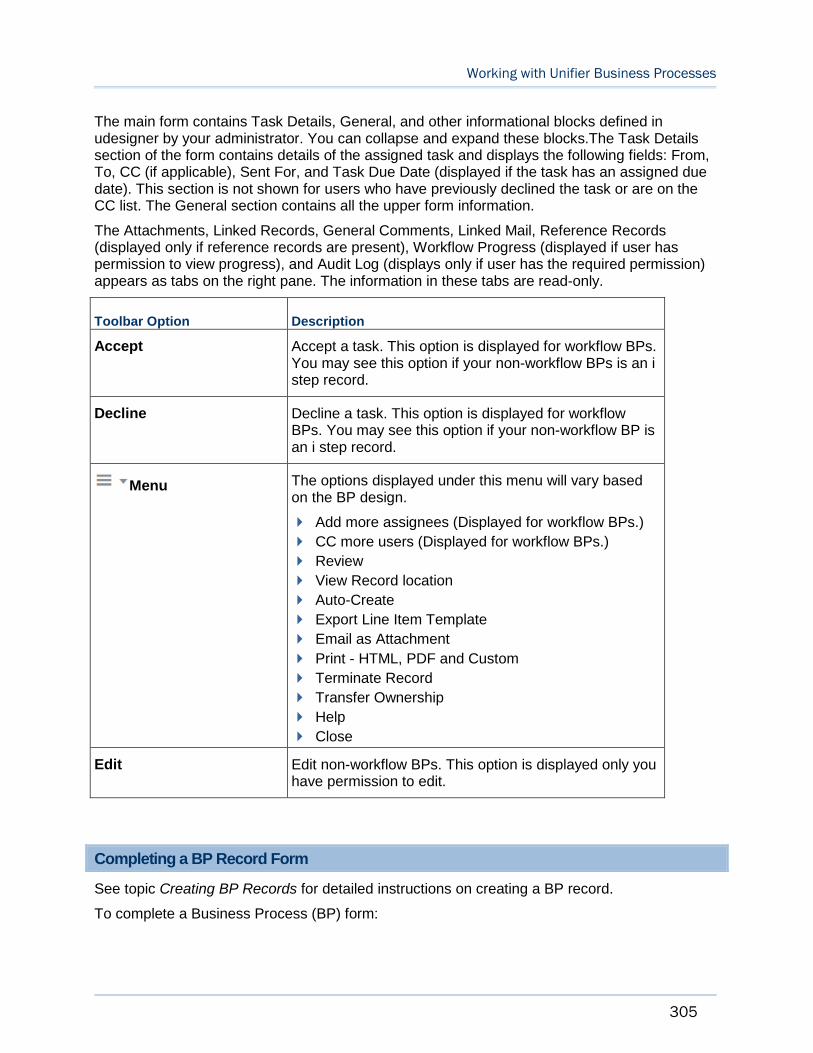
Working with Unifier Business Processes
305
The main form contains Task Details, General, and other informational blocks defined in udesigner by your administrator. You can collapse and expand these blocks.The Task Details section of the form contains details of the assigned task and displays the following fields: From, To, CC (if applicable), Sent For, and Task Due Date (displayed if the task has an assigned due date). This section is not shown for users who have previously declined the task or are on the CC list. The General section contains all the upper form information.
The Attachments, Linked Records, General Comments, Linked Mail, Reference Records (displayed only if reference records are present), Workflow Progress (displayed if user has permission to view progress), and Audit Log (displays only if user has the required permission) appears as tabs on the right pane. The information in these tabs are read-only.
Toolbar Option Description
Accept Accept a task. This option is displayed for workflow BPs. You may see this option if your non-workflow BPs is an i step record.
Decline Decline a task. This option is displayed for workflow BPs. You may see this option if your non-workflow BP is an i step record.
Menu The options displayed under this menu will vary based on the BP design.
Add more assignees (Displayed for workflow BPs.)
CC more users (Displayed for workflow BPs.)
Review
View Record location
Auto-Create
Export Line Item Template
Email as Attachment
Print - HTML, PDF and Custom
Terminate Record
Transfer Ownership
Help
Close
Edit Edit non-workflow BPs. This option is displayed only you have permission to edit.
Completing a BP Record Form
See topic Creating BP Records for detailed instructions on creating a BP record.
To complete a Business Process (BP) form:
Unifier Business Processes User Guide
306
1) Complete the Main form. Fields marked with a red asterisk (*) require an entry.
2) Add line items, if applicable.
If this is a cost or line item-type BP add line items as necessary.
If this is a Document-type BP, attach any documents to the form.
3) Add additional information, if applicable.
General comments.
Attachments to General comments.
4) When you have completed the form, do one of the following:
If this is a non-workflow BP:
a. Click Save to save your changes. Saving the form creates a permanent record.
b. Click Submit to finalize the record. The record will be displayed in view-only mode.
Unifier uses statuses to track the state of a business process record and any line items it may contain. For example, a Pending status generally means people are still working with the record, while a Closed status suggests the record is completed. Records in Closed status are typically marked as Terminal, meaning the record has reached a point where no further input is either required or desired. You can still access a non-workflow record in a terminal status as long as the record is in Edit mode. However, if you click Submit when the record is in a terminal status the record becomes permanently read-only and un-editable.
If this is a workflow BP:
a. When you have completed the form, click Send. The Workflow Action Details form is displayed.
b. From the Workflow Actions drop-down , select a workflow action. If there is only one possible action name, then this step is pre-populated.
c. The Send For field displays the Step name. The step name is populated based on the selected Action name, and is a read-only field.
d. The To field displays the possible list of assignees for the workflow step. Use the User/Group picker to select an assignee, if not already preassigned.
e. The CC field displays only if the workflow step allows CC users. Use the User/Group picker to select users who will receive notification on the BP record form. This field might be pre-populated based on the step setup.
f. If the selected step has a due date, the details of the due date are displayed. If not already preassigned, you can choose from one of the following options:
Set all task due dates as: Lets you set the same due date for all assignees.
Set individual task due dates: Allows you to assign different due dates for each assignee one at a time.
Click the Calendar icon corresponding to the option you chose. The Date picker opens. Select the month and year, and then click the date you want to select.
g. Click Send.
Editing Values on a BP Record Form
The following table describes the values:
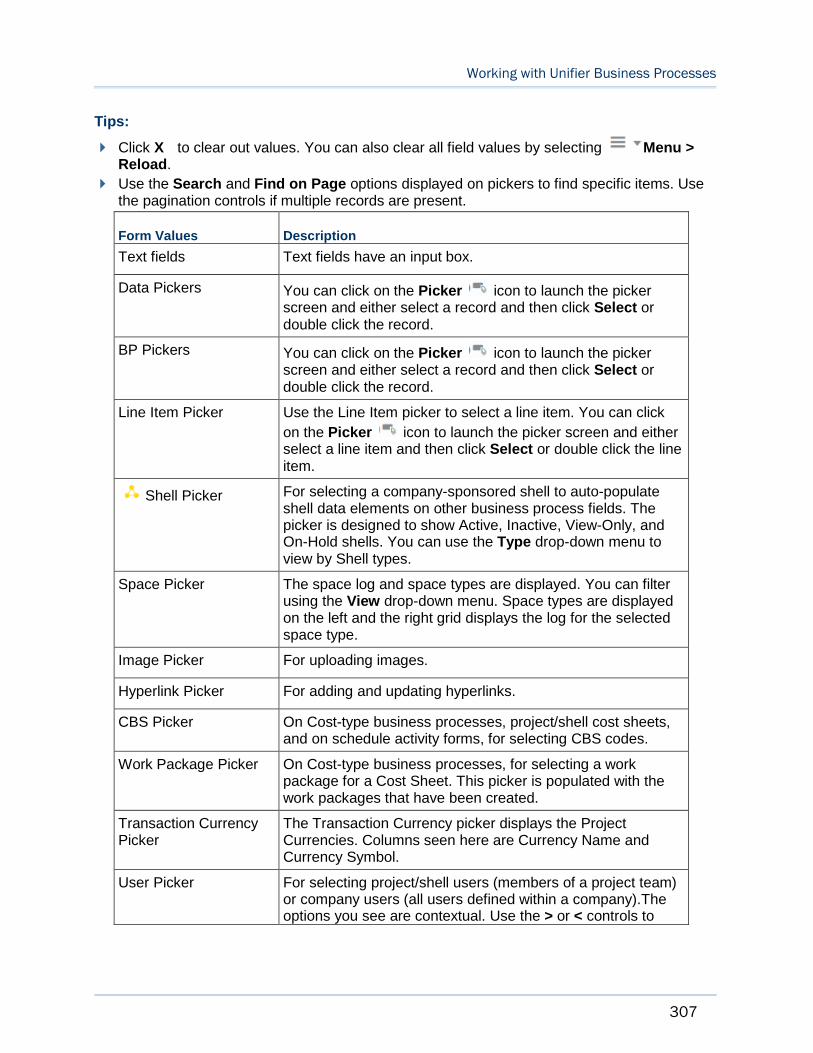
Working with Unifier Business Processes
307
Tips:
Click X to clear out values. You can also clear all field values by selecting Menu >Reload.
Use the Search and Find on Page options displayed on pickers to find specific items. Use the pagination controls if multiple records are present.
Form Values Description
Text fields Text fields have an input box.
Data Pickers You can click on the Picker icon to launch the picker screen and either select a record and then click Select or double click the record.
BP Pickers You can click on the Picker icon to launch the picker screen and either select a record and then click Select or double click the record.
Line Item Picker Use the Line Item picker to select a line item. You can click
on the Picker icon to launch the picker screen and either select a line item and then click Select or double click the line item.
Shell Picker For selecting a company-sponsored shell to auto-populate shell data elements on other business process fields. The picker is designed to show Active, Inactive, View-Only, and On-Hold shells. You can use the Type drop-down menu to view by Shell types.
Space Picker The space log and space types are displayed. You can filter using the View drop-down menu. Space types are displayed on the left and the right grid displays the log for the selected space type.
Image Picker For uploading images.
Hyperlink Picker For adding and updating hyperlinks.
CBS Picker On Cost-type business processes, project/shell cost sheets, and on schedule activity forms, for selecting CBS codes.
Work Package Picker On Cost-type business processes, for selecting a work package for a Cost Sheet. This picker is populated with the work packages that have been created.
Transaction Currency Picker
The Transaction Currency picker displays the Project Currencies. Columns seen here are Currency Name and Currency Symbol.
User Picker For selecting project/shell users (members of a project team) or company users (all users defined within a company).The options you see are contextual. Use the > or < controls to
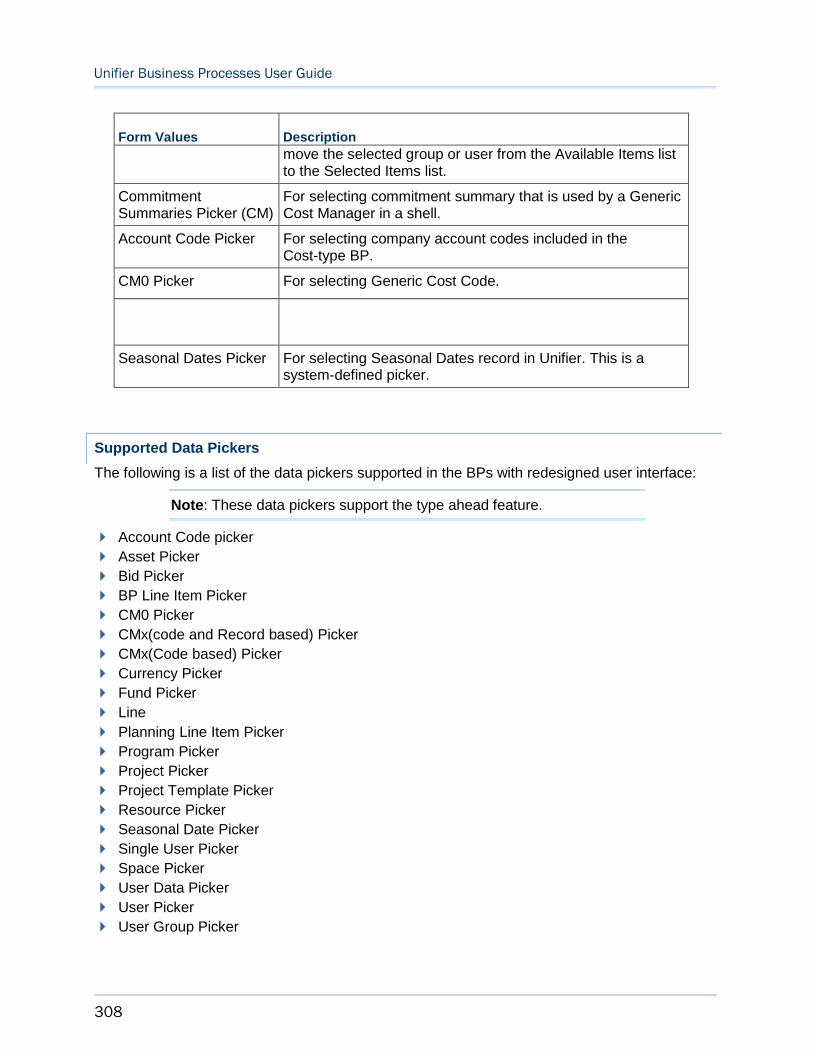
Unifier Business Processes User Guide
308
Form Values Description
move the selected group or user from the Available Items list to the Selected Items list.
Commitment Summaries Picker (CM)
For selecting commitment summary that is used by a Generic Cost Manager in a shell.
Account Code Picker For selecting company account codes included in the Cost-type BP.
CM0 Picker For selecting Generic Cost Code.
Seasonal Dates Picker For selecting Seasonal Dates record in Unifier. This is a system-defined picker.
Supported Data Pickers
The following is a list of the data pickers supported in the BPs with redesigned user interface:
Note: These data pickers support the type ahead feature.
Account Code picker
Asset Picker
Bid Picker
BP Line Item Picker
CM0 Picker
CMx(code and Record based) Picker
CMx(Code based) Picker
Currency Picker
Fund Picker
Line
Planning Line Item Picker
Program Picker
Project Picker
Project Template Picker
Resource Picker
Seasonal Date Picker
Single User Picker
Space Picker
User Data Picker
User Picker
User Group Picker
Working with Unifier Business Processes
309
Work Package Picker
Adding and Managing Line Items
Detailed information, such as transactions, can be entered as line items on BP records, if they have been designed to accommodate documents that are attached as line items.
You can edit or delete line items on a BP form as long as the form is still editable; that is, before it reaches its terminal status (for example, approved). If you add a new line item in any step (other than the creation step), you can modify the line item until the BP is sent to the next step. The line item status will always default to the default line item status specified in the design. Users with permission can change the status if modification to the line item status is allowed in that step.
You can add attachments and comments to line items. In addition, you can filter, copy, and consolidate line items.
Note: Document and Line Item BPs can be designed to include line item status control, which allows users to choose a status for individual line items and control whether they can be modified.
Adding Line Items
To add a line item:
1) Select a line item tab and click Add. The right pane displays the Line Item Details.
2) Complete the Line Item Details section. You can expand and collapse these information blocks.
3) If your line item supports attachments, you can add attachments. The Attachments and Linked Records tabs are seen only after you save the line item. For more information, see topic Adding Attachments.
4) When done, select from one of the following options:
Save & Close: To save the information that you have entered and close the window.
Save & Add New: To save information that you have entered and refresh the window in order to add another line item.
Cancel: To discard changes that you have made and close the window.
Editing and Deleting Line Items
You can edit the line items on a BP record only if the design permits modification of line items and if the record has not reached the terminal step.
Unifier Business Processes User Guide
310
Note: If the line item contains Yet To Buy (YTB) or AFC values, it cannot be modified.
To edit line items:
1) Select the line item tab.
2) From the left pane, select a line item. The line item details are displayed on the right pane.
3) Update the line items.
4) When done, select from one of the following options:
Save & Close: To save the information that you have entered and close the window.
Save & Add New: To save information that you have entered and refresh the window in order to add another line item.
Cancel: To discard changes that you have made and close the window.
To delete line items:
1) Select the line item tab.
2) From the left pane, select a line item.
3) From the gear menu, select Remove.
Note: When a line item is removed, Unifier removes link information, both from the record the line item belongs to, and from the record the line item item was linked to.
Copy Line Items
You can create a new line item by copying an existing line item. You can choose to include any attachments that are on the source line item; however, any links the line item has to other records will not be copied.
To copy line items from the same form:
1) In a business process form, select a line item tab.
2) Select a line item to copy and select > Copy.
3) From the Line Item Details tab on the right pane, complete all the required fields.
4) Click Save.
Line Item Consolidation
Business processes can be designed to accommodate line item consolidation: the ability to select individual line items from one or more BP records (the source BPs) and copy them into a new record (the destination BP). The selected line items can be from the same BP type, or they can be from different types, as long as they are compatible. The source and destination BPs must be at the same level (both company level or both project or shell level). File attachments can also be copied. For example, this functionality can be used to consolidate specific line items from multiple change order requests submitted over a period of time into a single change commit.
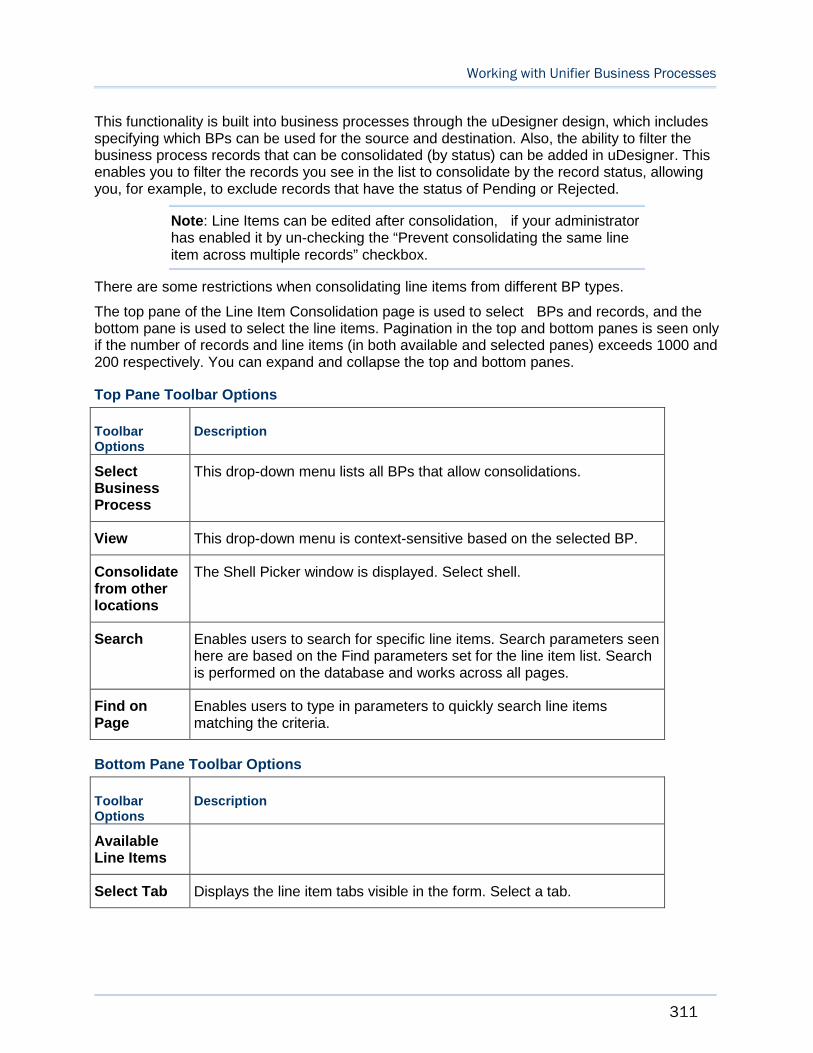
Working with Unifier Business Processes
311
This functionality is built into business processes through the uDesigner design, which includes specifying which BPs can be used for the source and destination. Also, the ability to filter the business process records that can be consolidated (by status) can be added in uDesigner. This enables you to filter the records you see in the list to consolidate by the record status, allowing you, for example, to exclude records that have the status of Pending or Rejected.
Note: Line Items can be edited after consolidation, if your administrator has enabled it by un-checking the “Prevent consolidating the same line item across multiple records” checkbox.
There are some restrictions when consolidating line items from different BP types.
The top pane of the Line Item Consolidation page is used to select BPs and records, and the bottom pane is used to select the line items. Pagination in the top and bottom panes is seen only if the number of records and line items (in both available and selected panes) exceeds 1000 and 200 respectively. You can expand and collapse the top and bottom panes.
Top Pane Toolbar Options
Toolbar Options
Description
Select Business Process
This drop-down menu lists all BPs that allow consolidations.
View This drop-down menu is context-sensitive based on the selected BP.
Consolidate from other locations
The Shell Picker window is displayed. Select shell.
Search Enables users to search for specific line items. Search parameters seen here are based on the Find parameters set for the line item list. Search is performed on the database and works across all pages.
Find on Page
Enables users to type in parameters to quickly search line items matching the criteria.
Bottom Pane Toolbar Options
Toolbar Options
Description
Available Line Items
Select Tab Displays the line item tabs visible in the form. Select a tab.
Unifier Business Processes User Guide
312
Group By Group line items by column header. This drop-down menu lists all log columns for the selected log view of the BP. By default the <record_no label>is selected.
Search Enables users to do search for specific line items. Search parameters seen here will be based on the Find parameters set for the line item list. Search criteria defined in uDesigner for each tab's log layout will appear as search parameters. Search will be a database search and will work across all the pages.
Find on Page
Enables users to type in find parameters to quickly search line items matching the criteria.
Include Attachments
This option will be checked by default. When this option is checked, attachments if any existing in the line items will get copied over.
To consolidate line items:
1) Select a line item tab.
2) From the Actions menu, select Consolidate Line Items.
3) From the Select Business Process drop-down top menu, select a BP.
4) Select a BP record.
5) From the Available Line Item List pane, select the line item tab.
6) Select the line items and click the arrows to move it to the Selected line Items pane.
7) Click Done.
Additional Information:
If you open a record from the shell and try to consolidate line items, you will see the shell picker (BP location picker).
If you open a record from a project, when you try to consolidate line items, you will not be able to see the BP location picker.
If you are opening the record at the company level, when you try to consolidate line items, you will not be able to see the BP location picker.
If data picker is configured for a BP in uDesigner, line item consolidation displays records across all shells or projects. This is applicable for source BP, either associated with a standard project or a shell.
If there is a source BP that is associated with a data picker, then Unifier hides the shell location picker.
If the records are displayed based on data picker configuration for a shell, then the “Records from <Shell Name>” label changes to “Records from All Locations” label.
You can consolidate lineitems that have Line Item Data Pickers. While copying, the system executes query condition defined for the Line Item Data Picker under destination business process configuration.
If the query condition does not return the value that is getting copied, then the Line Item Data Picker value will not be copied over.

Working with Unifier Business Processes
313
If the query conditions are met. then only teh Line Item Data Picker value will be copied in to destination line item and any other auto-population based on this picker will be populated.
If in the destination BP Line Item Data Picker the tab is hidden, and you are copying line items from another BP record where the Line Item Data Picker has that tab lineitem selected, then the line item will be copied with out the picker value.
The Line Item Data Picker value from the source line items cannot be copied in to destination if in destination teh record BP Data Picker has different record or no record selected.
Grouping Line Items
If your BP design allows adding or copying of line items, you can also choose to group line items into meaningful categories. You can select one or more line items to add to a group and each group displays the line items under it. The groups are displayed in alphabetical order, and the line items that are not part of a group are displayed under the group Not Grouped. You can change the name of the groups and move line items between groups. When a record or line items are copied, the groups are also copied.
Note: The Manage Groups option is available for Line Item and Cost BP types. The Manage Groups option is not available for SOV type BP (Summary Payment Applications).
To create a group
1) After the line items are created, open a business process record, and select a line item tab (for example, Line Item List tab).
2) Select one or more line items.
3) Click the Actions drop-down menu and select Manage Groups to open the Manage Groups window.
4) In the Manage Groups window, click the plus icon ( ) to create a new group on a new row.
5) Enter a name, and description, for the new group.
6) Select one of the following options:
Cancel: If you make any changes to the groups and click Cancel, the window closes without any changes saved.
Save: If you make changes and click Save, your changes will be saved, but the Manage Groups window will still be available to make more changes.
Save & Close: If you make changes and click Save & Close, your changes will be saved, and the Manage Groups window closes.
To edit group property
1) From the line item tab, select a group by hovering over the group name.
2) From the gear menu, select Edit Group Properties.
3) Change the name or description of the group, and select Save.
You cannot change the properties of the default group Not Grouped.
Unifier Business Processes User Guide
314
To add line items to a group
1) Open a business process record, and select a line item tab.
2) Select one or more line items. In order to select multiple line items, you have to click Cancel or Save.
3) From the gear menu, select Add to Group and select a group.
The group line item will appear at the top of the line items area of the business process form in bold. The amount column will show the sum total of the line items you added. If a line item has been copied and the copy source is already in a group, then the new copied line item will be in the same group.
To remove line items added to a group
Select a line item and from the gear menu, select Add to Group and select Not Grouped. You can also choose to move line items to other groups.
To manage groups
From the toolbar, select Actions > Manage Groups to open the Manage Groups window and display all of the existing groups, excluding the Not Grouped items. The sorting order is ascending, by default.
The Manage Groups option is available for Line Item type BP and Cost type BP (excluding the SPA type BP), only. When there is a flat list of line items in line item log, the Manage Groupsoption is not available. The Manage Groups option is available when there is at least one group available to select.
In the Manage Groups window, you can delete existing groups, also (click a row and click the
trash-can icon). You can select multiple groups, right-click (or click the gear menu), and select Remove, to move the groups to the Not Grouped items.
The groups are sorted in alphabetical order. The sort order of the line items within the group will be governed by the Line Item List Sort as set in uDesigner.
To expand or Collapse Groups
From the line items tab, select the Collapse all Groups or Expand all Groups icons.
To create line item groups by using CSV
You can group line items by CSV import.
Unifier inserts an additional column in the CSV file, Tab Name, D row. The cell under the Group Name column contains the line item group name. It is optional to enter a value. The column is provided to allow you to assign line items to the groups, at the time of creation.
When you import a line item, if the group name that you enter in the template already exists in the record, then Unifier adds a line to the group.
If the CSV template has multiple line items, and if few lines have Group Name value and others do not, then the ones with the empty Group Name will be in the "Not Grouped" group at runtime.
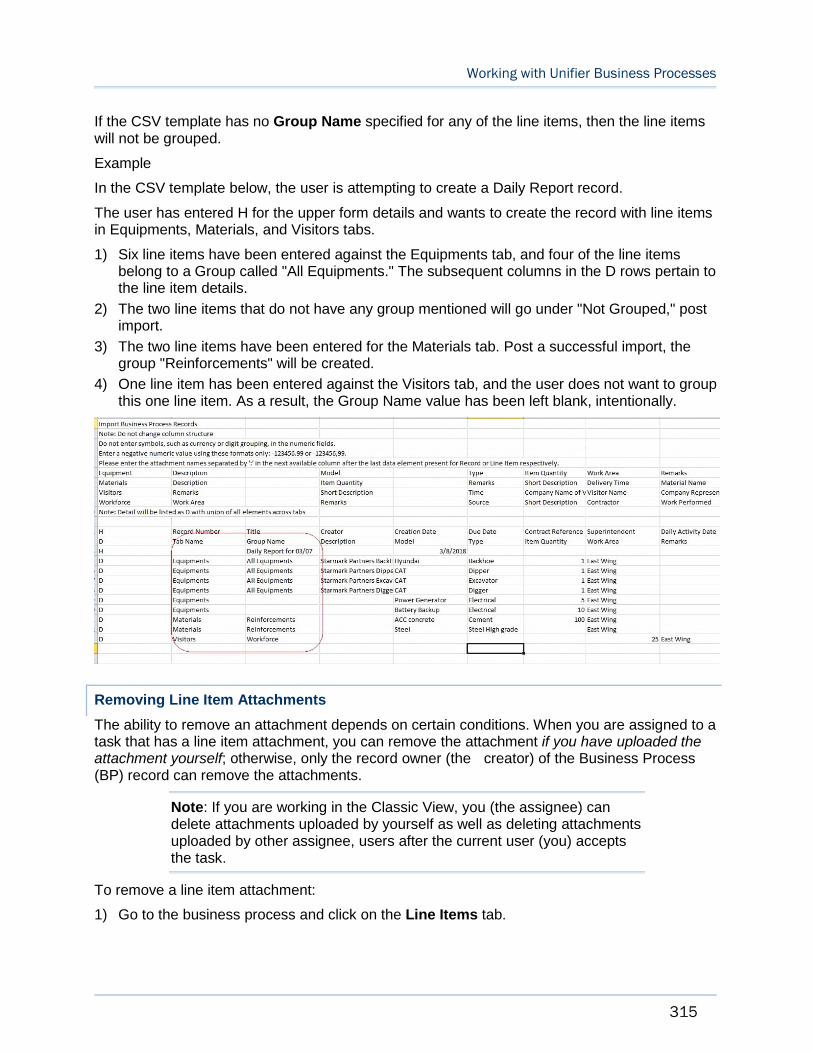
Working with Unifier Business Processes
315
If the CSV template has no Group Name specified for any of the line items, then the line items will not be grouped.
Example
In the CSV template below, the user is attempting to create a Daily Report record.
The user has entered H for the upper form details and wants to create the record with line items in Equipments, Materials, and Visitors tabs.
1) Six line items have been entered against the Equipments tab, and four of the line items belong to a Group called "All Equipments." The subsequent columns in the D rows pertain to the line item details.
2) The two line items that do not have any group mentioned will go under "Not Grouped," post import.
3) The two line items have been entered for the Materials tab. Post a successful import, the group "Reinforcements" will be created.
4) One line item has been entered against the Visitors tab, and the user does not want to group this one line item. As a result, the Group Name value has been left blank, intentionally.
Removing Line Item Attachments
The ability to remove an attachment depends on certain conditions. When you are assigned to a task that has a line item attachment, you can remove the attachment if you have uploaded the attachment yourself; otherwise, only the record owner (the creator) of the Business Process (BP) record can remove the attachments.
Note: If you are working in the Classic View, you (the assignee) can delete attachments uploaded by yourself as well as deleting attachments uploaded by other assignee, users after the current user (you) accepts the task.
To remove a line item attachment:
1) Go to the business process and click on the Line Items tab.
Unifier Business Processes User Guide
316
2) Click to select a line item from the log.
3) On the right-hand pane, click the Attachments tab.
4) Click the gear icon to open the menu and click Remove ( > Remove).
Working with Attachments
You can attach files to be routed with a business process (BP) form. These attachments may be supporting documents that are attached to a BP record. You can also include attachments to the Comments section of the BP.
By default, files attached to business processes are placed in the Unpublished Documentsfolder in the Document Manager. A Publish Path data element can be designed in business processes in uDesigner to specify the automatic publishing of documents to a specified path and override the default. Refer to Unifier Managers User Guide for details about automatic publishing of documents.
If you are uploading drawing files, see Attach Drawing and Reference Files to a Business Process (on page 107) for handling drawing file attachments.
Notes:
You cannot upload and attach two documents with the same name to a BP record.
For security, the Company Administrators can specify the list and size of files that can be uploaded to the Company Properties page, by users and per company policy. Contact your Company Administrator for more information.
Viewing Attachments Associated with a BP Record
To view attachments:
1) Open a business process record.
2) Select the Attachments tab from the right pane. A list of attachments is displayed on the right pane.
3) To view the Revisions and the References tabs, maximize the right pane. The References tab is displayed only if there are references to drawing file attachments.
4) When you maximize the Attachment tab, the system selects the first file in the grid, by default, and a preview of the file is displayed on the right-hand side of the window.
The Previous and Next page buttons allow you to navigate between multiple pages.
The Revisions tab, located under the Attachments tab grid, allows you to access the previous version of the file that you have selected, if available.
The preview screen displays the following file types:
Image
Working with Unifier Business Processes
317
The audio and video files cannot be previewed. You cannot preview DLL and SWF files, but you can open them in AutoVue or download the attachment.
Document Review
When you click and select a document, use the gear icon ( ) to perform the following operations:
Review
Open in AutoVue (You can also open an attachment by double-clicking the name of the attachment)
Download
Revise
Remove
If you click Review, the Document Review window opens. This window has the following sections:
Attachment grid
File viewer
Use the File viewer to perform the following operations, using the icons on top:
Maximize
To expand the viewer.
Download
To download a raw file.
Zoom
Rotate
To rotate the attached graphic.
Rotation happens clockwise, by 90 degrees.
Context-sensitive Cancel and Save options are made available when the system detects rotation. The Save option enables you to save the rotational changes, and the Cancel option enables you to reset the image back to its original state.
Rotation will not be permitted after the first annotation is completed.
Comments
To open the Comments pane.
The Comments pane enables you to insert your comments and annotate the file.
Click the pin icon to see the annotation options (Brush, Pin, Square, Circle, and colors palette).
You can remove your annotation by using the Clear option, when adding a new comment. Once you post an annotation, you cannot remove or update it.
In annotation addition mode, you can mark up multiple areas and enter a comment. You can create more than one annotation per comment. To view annotations, hover over the pin icon and select View Annotations. You can also add multiple markups or annotations to a comment. Use the pin icon to open the annotations options and add markups one after the other. After you post the comment, the markups will be associated with that comment.
Unifier Business Processes User Guide
318
You can edit or delete a comment by selecting the comment block, right-click, and select Edit or Remove options.
When you select Edit, you can edit the comments and annotations.
The Remove option removes the comment and associated annotations.
Adding Attachments
To add attachments to the main form of a business process record:
1) Open a business process record.
2) Select the Attachments tab from the right pane.
3) To select a file from your computer, select Attachment > Browse.
a. Drop and drag files from you computer, or click Browse and navigate to your file.
b. Select if you want to include reference files and if you want to revise the file automatically if a file with the same name exists.
c. Click Upload.
4) To select a file from Document Manager, select Attachment > Document Manager.
a. Select a file. You can select the Find on Page icon to help you find a file. You can expand and collapse the document structure to easily navigate to your file.
b. Select the Copy Comments checkbox to copy the comments that are associated with the file you are attaching.
c. Click Select.
The Publish checkbox is disabled for documents that have been added from the Document Manager. For files attached from your local system, the Publish column is automatically checked, you can choose to un-check it.
If the Attachments tab of the business process form contains any attachments, then an Attachment indicator is displayed. If the tab contains no attachments, then the right pane is refreshed and the indicator is no longer displayed.
Adding Attachments from Document Manager
You can use the Search option (Document Manager picker > Select Files) to find documents that you want to add to the Business Process record, from Document Manager (DM).
Opening an Attachment
To open an attachment:
1) Select the Attachments tab from the right pane. A list of attachments are displayed on the right pane. File revisions are displayed under the Revisions tab only if the file has revisions. The References tab is displayed only if there are references to drawing file attachments.
2) Select an attachment and select > Open in AutoVue. Or, double-click the name of the attachment.

Working with Unifier Business Processes
319
For more information on adding annotations and markups, see topic Add Markups to a Business Process Attachment.
Reviewing an Attachment
When reviewing a document, you can do the following when editing a document or adding comments:
Undo your changes (use the toolbar option or Ctrl+z)
Redo your changes (use the toolbar option or Ctrl+y)
You can only make changes in comments that are in draft status. You cannot make changes on existing comments.
Revising an Attachment
To revise an attachment:
1) Open a business process record.
2) Select the Attachments tab from the right pane.
3) Select an attachment and select > Revise.
4) Select the file you want to revise and click > Browse.
5) Select the revised file to upload, and click Open.
6) Click Upload.
To see a list of revised documents, maximize the Attachments tab on the right pane.
If the name of a file that you attach to a BP record, or Line Item, matches the name of a file that exists in the BP record, or Line Item, Unifier allows you to automatically revise the existing file (Revise automatically if file with same name exists) with the newly attached file.
Note: If the terminal status of a BP record has been reached, then the system disables the document revision option.
Downloading an Attachment
To download an attachment:
1) Open a business process record.
2) Select the Attachments tab from the right pane.
3) Select an attachment and select > Download.
Deleting an Attachment
To delete an attachment:
1) Open a business process record.
Unifier Business Processes User Guide
320
2) Select the Attachments tab from the right pane.
3) Select an attachment and select > Remove.
Adding and Managing Linked Records
To add linked records to the main form or line item tab:
1) Open a BP record. If you are adding a linked record to a line item tab, select the line item tab and select a line item.
2) Select the Linked Records tab on the right pane.
3) Click Add . The Add Records page is displayed.
4) From the Select Business Process drop-down menu, select a business process. You can use the View drop-down menu or Find on Page options to filter the list of available records.
5) Select records and use the arrows to move it to the Selected Records pane.
6) Click Done.
To open the linked record:
1) Open a BP record. If you are opening a linked record associated with a line item, select a line item tab and select the line item.
2) Select the Linked Records tab on the right pane. All the associated linked records are displayed.
3) Select a linked record and and select > Open.
To remove a linked record:
1) Open a BP record. If you are deleting a linked record associated with a line item, select a line item tab and select the line item.
2) Select the Linked Records tab on the right pane. All the associated linked records are displayed.
3) Select a linked record and and select > Delete.
Viewing Reference Records
The Reference Records tab is visible only after a record has been created. This tab displays the reference records and linked records associated with a BP record. The linked records associated with the line items, including the ones established by means of consolidation, are also displayed.
In the Reference Records log, reference records are represented with this icon and linked records are represented with this icon if it is linked to the record, and this icon if linked to a line item. You can open a record by clicking on the record name. When the tab is maximized, the record information is seen on the right pane.
To view a list of referencing records
1) From the business process log, open the record.
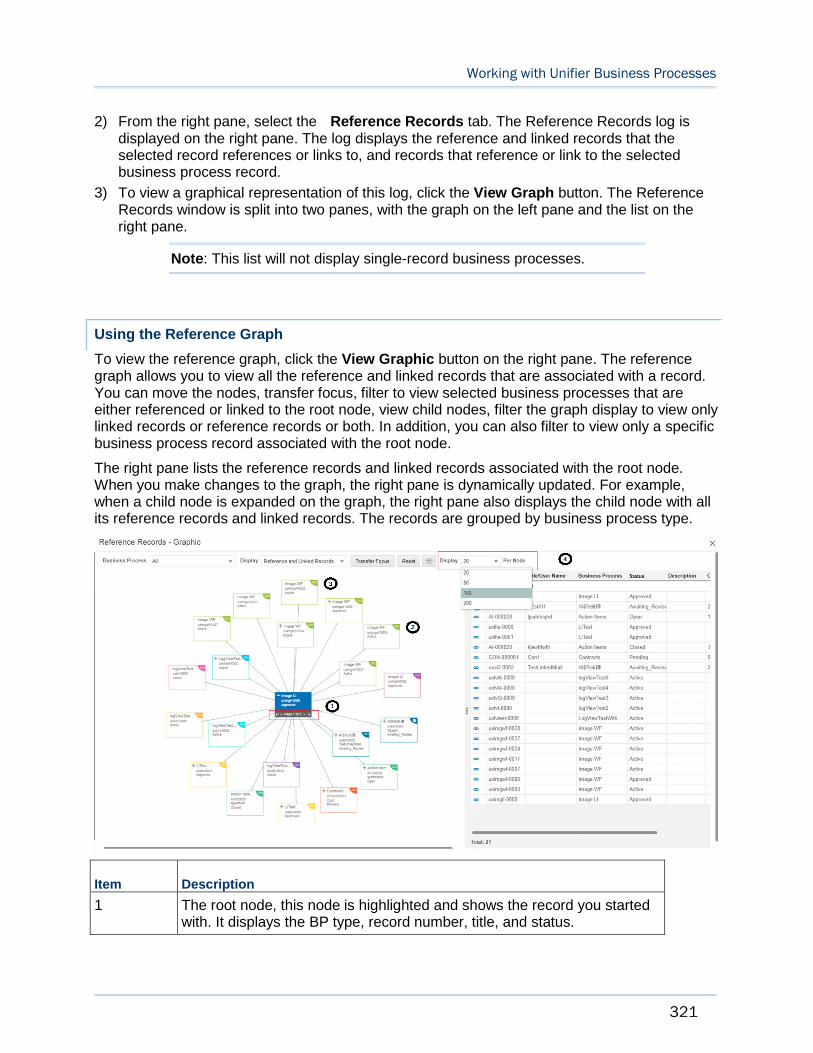
Working with Unifier Business Processes
321
2) From the right pane, select the Reference Records tab. The Reference Records log is displayed on the right pane. The log displays the reference and linked records that the selected record references or links to, and records that reference or link to the selected business process record.
3) To view a graphical representation of this log, click the View Graph button. The Reference Records window is split into two panes, with the graph on the left pane and the list on the right pane.
Note: This list will not display single-record business processes.
Using the Reference Graph
To view the reference graph, click the View Graphic button on the right pane. The reference graph allows you to view all the reference and linked records that are associated with a record. You can move the nodes, transfer focus, filter to view selected business processes that are either referenced or linked to the root node, view child nodes, filter the graph display to view only linked records or reference records or both. In addition, you can also filter to view only a specific business process record associated with the root node.
The right pane lists the reference records and linked records associated with the root node. When you make changes to the graph, the right pane is dynamically updated. For example, when a child node is expanded on the graph, the right pane also displays the child node with all its reference records and linked records. The records are grouped by business process type.
Item Description
1 The root node, this node is highlighted and shows the record you started with. It displays the BP type, record number, title, and status.
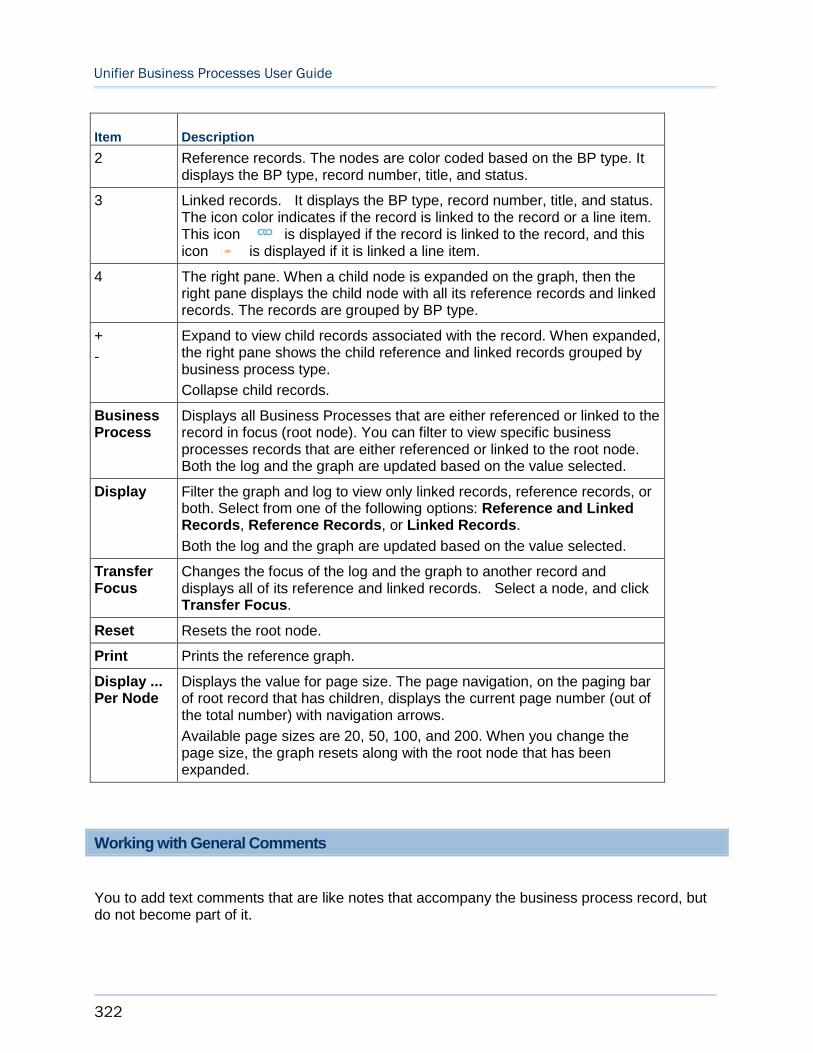
Unifier Business Processes User Guide
322
Item Description
2 Reference records. The nodes are color coded based on the BP type. It displays the BP type, record number, title, and status.
3 Linked records. It displays the BP type, record number, title, and status. The icon color indicates if the record is linked to the record or a line item. This icon is displayed if the record is linked to the record, and this icon is displayed if it is linked a line item.
4 The right pane. When a child node is expanded on the graph, then the right pane displays the child node with all its reference records and linked records. The records are grouped by BP type.
+
-
Expand to view child records associated with the record. When expanded, the right pane shows the child reference and linked records grouped by business process type.
Collapse child records.
Business Process
Displays all Business Processes that are either referenced or linked to the record in focus (root node). You can filter to view specific business processes records that are either referenced or linked to the root node. Both the log and the graph are updated based on the value selected.
Display Filter the graph and log to view only linked records, reference records, or both. Select from one of the following options: Reference and Linked Records, Reference Records, or Linked Records.
Both the log and the graph are updated based on the value selected.
Transfer Focus
Changes the focus of the log and the graph to another record and displays all of its reference and linked records. Select a node, and click Transfer Focus.
Reset Resets the root node.
Print Prints the reference graph.
Display ... Per Node
Displays the value for page size. The page navigation, on the paging bar of root record that has children, displays the current page number (out of the total number) with navigation arrows.
Available page sizes are 20, 50, 100, and 200. When you change the page size, the graph resets along with the root node that has been expanded.
Working with General Comments
You to add text comments that are like notes that accompany the business process record, but do not become part of it.

Working with Unifier Business Processes
323
Depending upon the workflow setup and your permission settings:
You can hide or delete comments.
You can attach supporting documents to your comments, which do not become part of the attachments of the BP itself, or mark up attached documents. See Working with File Attachments and Markups (on page 102).
You can add comments if you are a task assignee or if you have been copied (cc'd) on the business process.
You can add comments to a business process at the End step, and also at any status in a workflow, including Terminated (which means the business process was stopped at some point in the workflow). To add comments at those points in a workflow, you must have the Add General Comments permission.
Note: Some users, such as project managers, may have an additional permission that allows them to add general comments to any form (workflow or non-workflow) that they can view, without accepting the task.
Adding General Comments
When you add a new comment to a business process form, it remains as a draft until you send the form to the next step in the workflow. Comments are editable in the draft stage, you cannot modify the comment once it has been sent to the next step. Comments that are in draft mode
and editable have the Edit icon. By default comments you post are automatically hidden, you can uncheck the Hide box to make comments public. Private draft comments have the
following hidden icon next to them and when the records moves to the next step in the workflow, the hidden icon changes to red .
To add general comments to the business process form:
1) Open a business process record.
2) Select the main form (Record Details) tab.
3) From the right pane, select the Comments tab.
4) Click the Attachment button.
5) Enter your comments in the Comments box.
6) To add an attachment to a comment from your computer, click Attachment > Browse.
a. Drop and drag files from you computer, or click Browse and navigate to your file.
b. Select if you want to include reference files and if you want to revise the file automatically if a file with the same name exists.
c. Click Upload.
7) To add an attachment from Document Manager, click Attachment > Document Manager.
a. Select a file. You can select the Find on Page icon to help you find a file. You can expand and collapse the document structure to easily navigate to your file.
Unifier Business Processes User Guide
324
b. Click Select.
8) De-select the Hide checkbox to post a public comment.
9) Click Post.
Note: The Comments box does not recognize formatting, including line breaks. Even if you press the Enter key to make a new line in the Text Comments section, the final comment will not reflect the new line.
If the Comments tab of the business process form contains any comments, then a Commentindicator is displayed. If the tab contains no comments, then the right pane is refreshed and the indicator is no longer displayed.
Copying Comments
To copy your comments:
1) From the Comments tab, right-click on a comment and select Copy. A new comment row is created.
2) Use the Comments box to add or edit the comment.
3) To add attachments, click Attachment and select Browse or Document Manager.
4) Click Post.
Tips:
Click on an attachment to open it.
To download and attachment, select the arrow next to the attachment and select Download.
To delete an attachment, select the arrow next the attachment and select Delete.
Editing and Deleting General Comments
Comments on a business process record are displayed in the Comments tab.
When you add a new comment to a BP form, it remains as a draft until you send the form to the next step in the workflow. Comments are editable in the draft stage, you cannot modify the comment once it has been sent to the next step. Comments can be deleted after being sent, only if the BP workflow has been set up to allow deleting of comments.
To edit a comment
1) From the Comments tab, select a comment.
2) Right-click on a comment, and select Edit.
3) Update your comments.
4) Click Post.
To delete a comment
1) From the Comments tab, select a comment.
2) Right-click on a comment and select Remove.

Working with Unifier Business Processes
325
Viewing Comments
To view comments:
1) Open a business process record.
2) Select the Comments tab from the right pane. A list of comments are displayed on the right pane. The name of the user who posted the comment, the company name of the user, and the timestamp when the comment was added or updated are displayed. You can also view the attachments associated with the comment. When the tab is expanded, the left pane displays the grid and the right pane displays the content of the selected comment.
3) To filter the comments, use the Posted By drop-down menu to view comments by a specific user or by all users.
Working with Linked Mail
The Linked Mail tab enables you to link existing emails (Mailbox items), or compose new emails to a BP record. On any action form, you can view the referenced mail. Click the Add drop-down menu to view the following options:
Mailbox
To link mails from your Mailbox
Project Mailbox
To link mails from the Project Mailbox
New Mail
To compose emails and add attachments from your computer or Document Manager. After the mail is submitted, it gets linked to the record and displayed in the Linked Mail tab.
When the Linked Mail tab is maximized, the left section displays the grid, and the right displays the functions, content and attachments of the selected mail. If you are a participant in the email, you can see the action buttons: Reply, Reply all, and Forward, as well as the More drop-down menu which has options to Flag, Clear Flag, Print, and Delete. If you are not a participant in the mail, you can see the option to Print.
Opening or Deleting mail
To open a mail or delete a mail:
From the grid, click on the gear icon and select Open or Delete. Alternatively, you can double click on the mail, in the grid. When you select multiple mails, the only option available is Delete.
Viewing content of the linked record
To view the full content of the linked record, double-click on an entry in the grid.
Composing Linked Mails
To compose a new message to link to a BP record:
Unifier Business Processes User Guide
326
1) Select a BP record.
2) From the right-pane, select the Linked Mail tab.
3) Click and select New Mail.
4) Compose your message and click Send. The following additional options are displayed: Save, Delete, Attach, Flag, Clear Flag, Print, CC, and Bcc.
After the mail is sent, it will appear in the Linked Mail grid.
Adding from Project Mailbox
Project Mailbox option will be seen only if user has permissions to the Project Mailbox.
To link message from the Project Mailbox to a BP record:
1) Select a BP record.
2) From the right-pane, select the Linked Mail tab.
3) Click and select Project Mailbox. The Add from Project Mailbox page is displayed.
4) Use arrows to select the messages you want to link from the Available Items column to the Selected Items column.
5) Click Done.
Working with Query-Based Tabs
Query-based tab (QBT) enables the user to:
View a filtered list of business process records associated with the parent business process.
Once the QBT in a business process is correctly configured and deployed, the QBT appears in the business process for which the QBT has been configured.
Create a new business process from the QBT in the same Project/Shell, where the parent business process resides.
Users can create new business process records from the QBT provided that the users have permission to create business process records for the Project/Shell that contains the business process.
Copy a business process in the same location as the parent business process.
Users can copy a business process either with or without attachments. In addition, a user can copy any of the records in the QBT and create a new business process record. Note, only one record at a time can be copied.
When the user copies a business process record in order to create a new business process, the new business process record contains all the information present in the copied/based business process record. So, in case of business records with attachments, the user has the option of including or excluding (copying or not copying) the attachments when copying a business process record.
Search for business process records based on user-entered criteria.
Users can find any record from the list of records included in the QBT.
Notes
The fields available for the Find feature must be defined in the
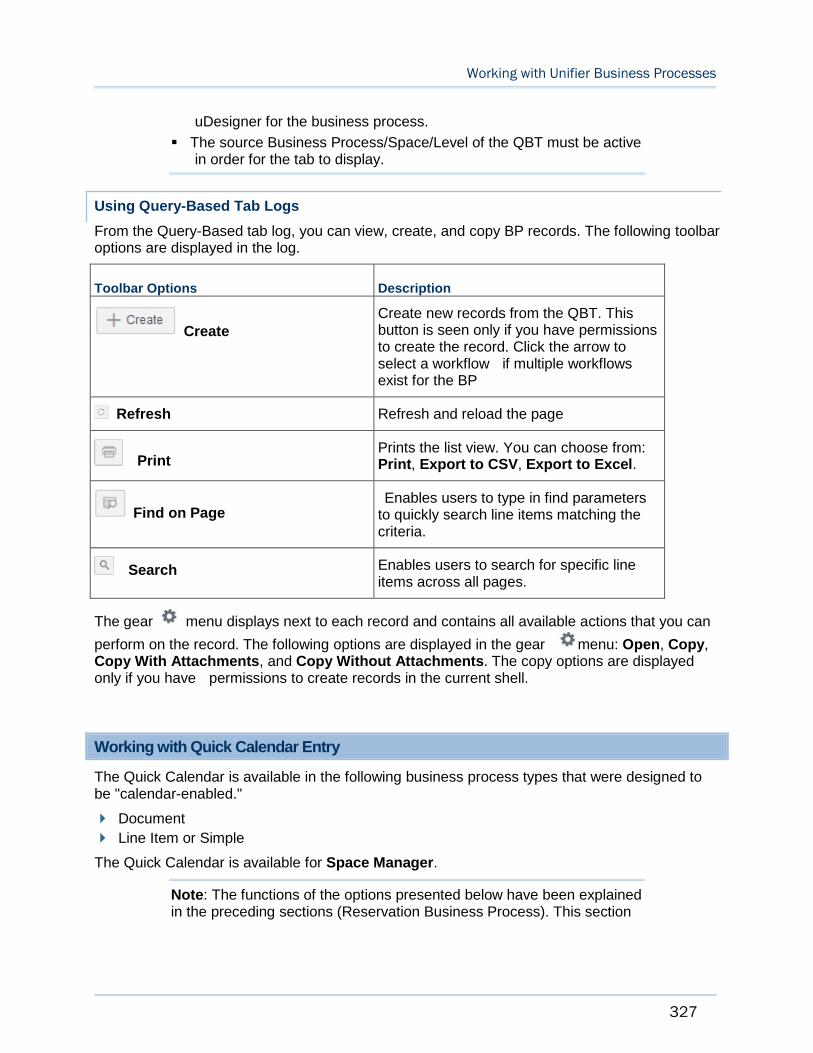
Working with Unifier Business Processes
327
uDesigner for the business process.
The source Business Process/Space/Level of the QBT must be active in order for the tab to display.
Using Query-Based Tab Logs
From the Query-Based tab log, you can view, create, and copy BP records. The following toolbar options are displayed in the log.
Toolbar Options Description
CreateCreate new records from the QBT. This button is seen only if you have permissions to create the record. Click the arrow to select a workflow if multiple workflows exist for the BP
Refresh Refresh and reload the page
PrintPrints the list view. You can choose from: Print, Export to CSV, Export to Excel.
Find on Page Enables users to type in find parameters to quickly search line items matching the criteria.
Search Enables users to search for specific line items across all pages.
The gear menu displays next to each record and contains all available actions that you can
perform on the record. The following options are displayed in the gear menu: Open, Copy, Copy With Attachments, and Copy Without Attachments. The copy options are displayed only if you have permissions to create records in the current shell.
Working with Quick Calendar Entry
The Quick Calendar is available in the following business process types that were designed to be "calendar-enabled."
Document
Line Item or Simple
The Quick Calendar is available for Space Manager.
Note: The functions of the options presented below have been explained in the preceding sections (Reservation Business Process). This section
Unifier Business Processes User Guide
328
explains new functions and procedural differences.
The following scenarios describe the details when you click the Calendar option.
Viewing a Calendar in View only mode from log for Month: Viewing details of an existing event
The default view of the Calendar is set to Month.
When you hover over a date, on which an event or reservation has been created, the tool-tip (Details) displays all event details such as:
Name (Event)
From (time)
To (time)
Status
Creator
When clicking on the Event, a Detail overlay is displayed with Name (time), From (time), To (Date), Status & Creator.
The Tentative events are marked with a gray bullet, and the Confirmed events are marked with a green bullet.
Create event in month view
When you click on a date, for which an event has not created, an overlay is displayed. In the Details overlay, you can enter values for:
Name (Event)
From (time)
To (time)
Status
Note: You must have permission to make Quick Calendar entries.
When you click the calendar symbol (next to From and To fields), the calendar opens and you can pick a date.
The Creator field is auto-populated with the name of the signed-in user.
When you click Done, the event details are saved, the overlay screen closes, and the saved event is displayed on the Calendar.
When you click Cancel, the event details will not be saved and the overlay screen closes.
Edit event in month view
When you double-click on a date cell, for an existing event, the Details overlay screen is displayed.
Click Delete to remove the event.
Click Edit to open an overlay screen and edit the event details.
Viewing a calendar in View only mode from log for Week (Viewing details of an existing event)
Upon hovering over a date, on which an event/reservation has been created, the date will be highlighted by en-circling it in Red color.
Working with Unifier Business Processes
329
When you hover over an Event, the date of the event is highlighted by en-circling it in Red color.
A tool-tip, Details, opens and displays the event details such as:
Name (Event)
From (time)
To (time)
Status
Creator
The Tentative events are highlighted in gray, and the Confirmed events are highlighted in green.
Create event in week view
When you click on a date, for which an event has not created, an overlay is displayed. In the Details overlay, you can enter values for:
Name (Event)
From (time)
To (time)
Status
Note: You must have permission to make Quick Calendar entries.
When you click on the calendar symbol (next to the From and To fields), the calendar opens and enables you to pick a date.
The Creator field is auto-populated with the name of the user who has signed in.
The To and From fields are auto-populated based on the time displayed.
When you click Done, the event details will be saved, and the saved event is displayed on the calendar.
When you click Cancel, the event details will not be saved.
Edit event in Week view
When you double-click on a date cell, for an existing event, the Details overlay screen is displayed.
Click Delete to remove the event.
Click Edit to open an overlay screen and edit the event details.
View mode for Day view
The events displayed for the day are marked with green highlight, in case the event is confirmed.
The events displayed for the day are marked with grey highlight, in case the event is tentative.
As a result, when you click an event, if the event status is confirmed, the event is marked with green highlight, and if the event status is tentative, the event is marked with grey highlight.
The event details for both cases above are displayed.
Unifier Business Processes User Guide
330
Create event in day view
When you click on a time cell in Day view, an overlay is displayed. In the Details overlay, you can enter values for:
Name (Event)
From (time)
To (time)
Status
Note: You must have permission to make Quick Calendar entries.
When you click on the calendar symbol (next to the From and To fields), the calendar opens and enables you to pick a date.
The Creator field is auto-populated with the name of the user who has signed in.
The To and From fields are auto-populated based on the time displayed.
When you click Done, the event details will be saved, and the saved event is displayed on the calendar.
When you click Cancel, the event details will not be saved.
Edit event in Day view
When you double-click on an event, for an existing event, the Details overlay screen is displayed.
Click Delete to remove the event.
Click Edit to open an overlay screen and edit the event details.
Other Calendar Features
Note: Other events, scheduled within the extended events, are displayed accordingly.
Display of Mini-Calendar
A mini-calendar is displayed besides the Quick Entry Calendar, to enable you to go through years and months irrespective of the selected view.
Display of Upcoming Events
A mini-calendar is displayed besides the Quick Entry Calendar, to enable you to go through years and months irrespective of the selected view. A list of 10 future upcoming events are displayed on calendar. For the current day, according to the current time, the future events are displayed. WRITER:
Example
If the event "Lunch Meeting" is scheduled for 2:00 PM to 3:00 PM, today, and the current time is 3:30 PM, then the "Lunch Meeting" even is not displayed in the upcoming event list.
Working with Unifier Business Processes
331
Document-Type Business Process Forms (Without Folder Structure)
A Document-type BP without folder structure does not maintain the folder structure of the attached documents and folders, and the files (within the attached folders and sub-folders) are listed in a flat list.
1) Go to you Project/Shell, User mode.
2) From the left-hand Navigator, click Logs and open a Document-type BP without folder structure.
3) Open a record. By default, the record properties window (General tab) opens.
Note: Document BP without attribute form is not supported in the new user interface.
The following explains each tab.
General tab.
On the top right-hand side of the record window, you can Accept or Decline, and use theMenu Options icon (three horizontal lines) to perform and access the following:
Add more assignees
Auto-create
CC more users
Email as Attachment
Print (HTML, PDF, Custom)
AutoVue Review
Terminate Record
Transfer Ownership
Help (record help and User Productivity Kit)
Close
On the left-hand pane you have the following options:
Record No.
Status
Title
Revision no.
Issue Date
BP Creator
Other fields
On the right-hand pane you have the following tabs:
Comments
Linked Records
Linked Mail
Workflow Progress
Audit Log
Unifier Business Processes User Guide
332
Reference Records
The Maximize icon is also available to expand the screen.
Line Items <line items> tab. The line items for Document-type BP are displayed according to the line item log designed in uDesigner.
On the top right-hand side of the record window, you can Accept or Decline, and use theMenu Options icon (three horizontal lines) to perform and access the following:
Add more assignees
Auto-create
CC more users
Email as Attachment
Print (HTML, PDF, Custom)
AutoVue Review
Terminate Record
Transfer Ownership
Help (record help and User Productivity Kit)
Close
On the left-hand pane you have the following toolbar options:
View Comments by
Download
Refresh
Search
Find on Page
The following columns are also displayed:
Name
Record Comments (callout icon)
Draft Comments (pen icon)
Line Item Status
Short Description
Other fields
On the right-hand pane you have the following tabs:
Line Item Details
Attachments
Linked Records
Refer to Unifier Managers User Guide for more details.
Adding Attachment to the Line Item
1) Go to you Project/Shell, User mode.
Working with Unifier Business Processes
333
2) From the left-hand Navigator, click Logs and open a Document-type BP without folder structure.
3) Open a record. The record General tab opens, by default.
4) Click the Line Items <line items> tab.
5) On the right-hand pane, click the Attachments tab.
Attachments tab
When you create a line item, Unifier allows you to use the paper-clip icon to attach a file to your record. Once you save the line item, the Attachment tab appears for the record.
The Attachment tab provides additional details about an attachment in the following columns:
Note: You can preview the file in the Attachment tab. Click the expand icon to expand the window and see the file preview.
Publish (select or deselect)
Name
Comments
Revised
Title
Pub. No.
Rev. No.
Issue Date
Size
In addition, if there is a revision to an attachment, the following columns are displayed in the Revisions block:
Publish (select or deselect)
Name
Comments
Ref.
Pub. No.
Upload Date
Size
Upload By
Rev. No.
Issue Date
Use the gear icon, next to the file to:
Note: After saving the line item, you must use the gear icon, next to the attachment (file), to remove the attachment. Use the trash can icon to remove your attachment prior to saving the line item.
Review
Unifier Business Processes User Guide
334
Open in AutoVue (You can also open an attachment by double-clicking the name of the attachment)
Download
Importing Attachments (Without Folder Structure)
You can create line items in a Document Type BP without folder structure record and import attachments into the line items (go to a Document Type BP without folders record, click Actions, and select Import Attachments). For any Workflow, or Non-Workflow, Document Type BP without folder structure record you must ensure that all the required fields have values.
Document-Type Business Process Forms (With Folder Structure)
A Document-type BPs with folder structure maintains the folder structure of the attached documents and folders, and the files (within the attached folders and sub-folders) are listed in a flat list.
1) Go to you Project/Shell, User mode.
2) From the left-hand Navigator, click Logs and open a Document-type BP without folder structure.
3) Open a record. By default, the record properties window (General tab) opens.
Note: Document BP without attribute form is not supported in the new user interface.
The following explains each tab.
General tab.
On the top right-hand side of the record window, you can Submit or Decline, and use theMenu Options icon (three horizontal lines) to perform and access the following:
Email as Attachment
Print (HTML, PDF, Custom)
AutoVue Review
Transfer Ownership
View Record Location
Help (record help and User Productivity Kit)
Close
On the left-hand pane you have the following options:
Record No.
Status
Publish Path
Issue Date
Other fields
On the right-hand pane you have the following tabs:
Working with Unifier Business Processes
335
Comments (use the paper clip icon to Browse uploaded files or go to Document Manager to select files)
Linked Records
Linked Mail
Reference Records
The Maximize icon is also available to expand the screen.
Line Items <line items> tab. The line items for Document-type BP are displayed according to the line item log designed in uDesigner.
On the top right-hand side of the record window, you can Submit or Decline, and use theMenu Options icon (three horizontal lines) to perform and access the following:
Email as Attachment
Print (HTML, PDF, Custom)
AutoVue Review
Transfer Ownership
View Record Location
Help (record help and User Productivity Kit)
Close
On the left-hand pane you have the following options:
View Comments by
Refresh
Search
Find on Page
Expand All Groups
The following columns are also displayed:
Name
Record Comments (callout icon)
Line Item Status
Issue Date
Other fields
On the right-hand pane you have the following tabs:
Folder Details
Refer to Unifier Managers User Guide for more details.
Adding Attachment to the Line Item
1) Go to you Project/Shell, User mode.
2) From the left-hand Navigator, click Logs and open a Document-type BP without folder structure.
3) Open a record. The record General tab opens, by default.
Unifier Business Processes User Guide
336
4) Click the Line Items <line items> tab.
5) On the right-hand pane, click the Attachments tab.
Attachments tab
When you create a line item, Unifier allows you to use the paper-clip icon to attach a file to your record. Once you save the line item, the Attachment tab appears for the record.
The Attachment tab provides additional details about an attachment in the following columns:
Note: You can preview the file in the Attachment tab. Click the expand icon to expand the window and see the file preview.
Publish (select or deselect)
Name
Comments
Revised
Title
Pub. No.
Rev. No.
Issue Date
Size
In addition, if there is a revision to an attachment, the following columns are displayed in the Revisions block:
Publish (select or deselect)
Name
Comments
Ref.
Pub. No.
Upload Date
Size
Upload By
Rev. No.
Issue Date
Use the gear icon, next to the file to:
Note: After saving the line item, you must use the gear icon, next to the attachment (file), to remove the attachment. Use the trash can icon to remove your attachment prior to saving the line item.
Review
Open in AutoVue (You can also open an attachment by double-clicking the name of the attachment)
Download
Working with Unifier Business Processes
337
Importing Attachments (With Folder Structure)
You can create line items in a Document Type BP with folder structure record and import attachments into the line items (go to a Document Type BP with folders record, open the folder, open the record, click Actions, and select Import Attachments). For any Workflow, or Non-Workflow, Document Type BP with folder structure record you must ensure that all the required fields have values.
Copying Folder (Standard View)
If you have permission to create folders in a Document-Type Business Process For (With Folder Structure), then you can see an additional option in the gear icon menu: Copy. The gear icon menu options will be:
Add Sub Folder
Move
Copy
Delete
Note: The above gear icon menu options apply to the customer-created folders only and not to the system-defined root folder, "Attachments."
Using the "Copy" option enables you to copy a folder into the same path where it currently exists. In this case, the name of the newly created folder will be: "Copy of <original folder name>."
Notes:
The bracket ">" symbol between the source folder and the destination folder has the hover over text: "Copy to."
The option "Copy" remains disabled until you select a destination folder.
When the copy action is complete for a folder, the original source folder continues to show as the selected folder in the grid.
Request for Bid (RFB) Type Business Process Form (Private)
If you have been invited for a private bid, then you receive an RFB business process form that is not configured for public bidding. In such case, the upper form and detail form contain the following elements:
1) Go to you Project/Shell, User mode.
2) From the left-hand Navigator, click Logs and open a RFB BP.
3) Open a record.
The record details screen opens with the following elements:
Send
Save
Menu Options
Unifier Business Processes User Guide
338
Tabs
General
Line Item
Winning bid
The Menu Options enables to do and access the following:
Show
To show the details of the received form (Winning Bid, First name, Last Name, Company, User Id) and supporting information.
Auto-create
To auto create scheduled runs.
To print the form (HTML, PDF, Custom)
Reload
To reload the information presented.
AutoVue Review
To preview an attachment.
Terminate Record
Transfer Ownership
Undo Accept Task
Help
To access the BP help and User Productivity Kit)
Close
Tabs (RFB Creation Form)
On the left-hand pane, the RFB Creation Form tab contains the following field blocks:
General
Details
Calculation
On the right-hand pane, the RFB Creation Form tab contains the following tabs:
Attachments
Comments
Linked Records
Linked Mail
Workflow Progress
Audit Log
Reference Records
Tabs (RFB Line Item List)
On the left-hand pane, the RFB Line Item List tab contains the following toolbar options:
Add
Actions
Working with Unifier Business Processes
339
Refresh
Search
Find on Page
On the left-hand pane, the RFB Line Item List tab contains the following columns:
No.
Sort
Attachments
Linked Records
WBS Code
Short Description
Qty
Unit Cost
Amount
Total Amount
On the right-hand pane, the RFB Line Item List tab contains the following tabs:
Line Item Details
Attachments
Linked Records
Tabs (Winning bid)
On the left-hand pane, the Winning bid tab contains the following toolbar options:
Add
Actions
Refresh
Search
Find on Page
On the left-hand pane, the Winning bid tab contains the following columns:
No.
Sort
Attachments
Linked Records
WBS Code
Short Description
Qty
Unit Cost
Amount
Total Amount
Unifier Business Processes User Guide
340
Inviting to RFB
For public bidding, invitations are sent to the Vendors that you have selected from the Vendors business process (a company-level BP). The Vendors BPs can be found in Company Logs > User mode > Vendors BP.
To start the bidding process:
1) Go to your Project > User mode > Logs > Requests for Bid.
2) Open the bid that you want to send.
3) From top right-hand section of the screen click the Menu Options (three horizontal bars) and click Invite.
The left-hand section includes the general information about the requestor and the bid.
To modify the date, click on the date icon, modify the date and click Done.
The right panel includes the list of invitees to whom the invitations have been either sent out or will be sent in future.
Toolbar options:
Send Invitations
Send Password
Add
To add vendors to invitees list.
Delete
Find on Page
The Done action will save the changes in the left section (General information).
The Cancel action will close the window.
When you click Add, a new full-screen window overlay appears (similar to BP Picker) which enables you to select the list of vendors (from the Master Vendor List BP) that you want to add to the invitees list.
Click Select to add the invitees to the invitation list and close the overlay window.
Click the Menu Options (three horizontal bars) and click Show to view the list of bids that have been received from the bidders.
The toolbar enables you to:
Send Password
Compare (opens the compare window)
Search
Find on Page
The gear icon, next to each item, enables you to open and send password.
When you click on a row and select it in the Received From window, Unifier displays the Upper Form preview of the Bidder BP Upper Form (in the Preview tab). You can open the record and view both the Upper Form and Detail Form of the Bidder BP form.
Working with Unifier Business Processes
341
The following lists the options available under the toolbar and Menu Options (three horizontal bars):
Create
View
Edit (before RFB Due Date is past) and Edit (after RFB Due Date is past)
For an RFB BP that is enabled for public bidding, if you click Invite after the BP is opened for public bidding, then Unifier displays an overlay screen that enables you to send password and modify due date. Modifying the due date in public bidding is similar to the same feature in private bidding.
Audit Log in Requestor BP (Private Bid and Public Bid)
Unifier audits all of the emails sent to the bidder (send password, send new password, revised attachments, and so forth) and makes the information available in the Audit Log tab of the Requestor BP record. The Audit Audit Log captures the following events when an email is sent to a the bidder:
Adding new addendums
Revising Addendums
Removing Addendums or original attachments
Password sent to invitees
In all of the above cases, the event name will be Bidding. Furthermore:
For adding addendums, the Action name will be "Send Addendum <Attachment name>."
For Revising addendums, the Action name will be "Send Revised Addendum <Attachment name>."
When addendums or original attachments are removed, the Action name will be "Removed Addendum <Attachment name>" or "Removed Original Attachment <Attachment name>."
When a password is sent to the invitees, the Audit Log Action name will be "Send Password."
Also, the attachment name is displayed in the Audit Log entry.
Note: The send password Audit Log changes are applicable to private bidding, only.
User Picker and Group Picker
With the introduction of profile picture, the User Picker, User Data Picker, and User and Group Picker include the profile picture, before the User name.
User Picker
This picker has the list of users. For users who have uploaded their profile picture, their picture will be displayed. If there are not pictures, then Unifier displays the initials of the user's first and last names.
User Data Picker
Unifier Business Processes User Guide
342
This picker has the list of users. For users who have uploaded their profile picture, their picture will be displayed. If there are not pictures, then Unifier displays the initials of the user's first and last names.
User Group Picker
This picker has Groups followed by Users. For users who have uploaded their profile picture, their picture will be displayed. If there are not pictures, then Unifier displays the initials of the user's first and last names.
View User Profile
The View User Profile window enables you to see the profile for multiple users who are assigned to, or cc'd in, workflow tasks.
The left section of the View User Profile window lists the users, and the right section displays the following for the user:
Basic Information
Additional Information
Cost-Type Business Processes
The following explain the Cost-type business processes with redesigned user interface.
Note: The Payment Application of Summary Payment Application SOV type supports Record, Line Item, and Cost Allocation creation through CSV integration.
Base Commit Summary Payment Application SOV Type
Create New Base Contract Summary Payment Application
Based on the upper form properties, designed in uDesigner, if the add, copy, and remove lineitems options are checked, then you can select Add and create a line item from the Standard tab, in the Create New Base Contract Summary Pay App window. The following options will be made available when you click Add:
Lump Sum
Enables you to create line items with lump sum amount defined at the summary line item and at the cost breakdown level.
When you select Lump Sum, the summary line item and cost breakdown creation are set. The amount data element in the summary line item will be editable and any formulas defined on the amount data element will be honored. The uuu_quantity and uuu_unit_price will be disabled. The cost line item type for this type of line item will be lump sum. For the lump sum cost breakdowns, the uuu_amount data element will be editable. You can add the cost breakdowns with the amounts when the "allow cost breakdown" is configured, in uDesigner.
Unit Cost
Working with Unifier Business Processes
343
Enables you to create line items with fixed unit rate defined at summary line item and cost breakdowns that were added. Unifier will use the same unit rate to calculate the line item amount.
When you select Unit Cost, the summary line item will have uuu_quantity and uuu_unit_price data elements as editable fields. The summary line item can be set as formula, in uDesigner. The Amount field will be read-only and always calculated based on the formula configured in uDesigner.
When adding cost break downs, you can enter the CBS Code, a short description, and the uuu_quantity data element. The uuu_unit_price, for each break own line, will be read-only and is populated with the value from summary line. The Amount field, for each cost breakdown, will be calculated based on the formula: quantity * unit price. The Cost Line Item Type will be displayed as Unit Cost in the line item.
Variable Unit Cost
Enables you to define a variable unit rate at cost breakdowns. The line item amount is calculated based on the variable unit rate.
When you select Variable Unit Cost, the summary line item will have the uuu_quantity and amount data elements editable, but the uuu_unit_price data element will be disabled and read-only. The Cost Line Item Type will be displayed as Variable Unit Cost in the line item. The following describes the data elements on the summary line item when the Variable Unit Cost is selected:
uuu_quantity
The uuu_quantity is an editable and required field. It can be set for either a manual or formula destination. The uuu_quantity DE can be set formula, or it can be set as auto-populate, in uDesigner. The auto-population or formula will work in user mode (at runtime).
uuu_unit_price
The uuu_unit_price is a disabled field. The formula or auto-populate design does not work for the Variable Unit Cost line item.
amount
The amount is an editable and required field. It can be set for either a manual or formula destination. The amount DE can be set as auto-populate, in uDesigner. The auto-population or formula will work in user mode (at runtime).
In the Variable Unit Cost, the data element uuu_costed_amount (in the upper section of the line item) will be calculated as sum of the amount (from all cost breakdowns). The uuu_non_costed amount will be calculated as (amount - uuu_costed_amount). The amount, in this case, is the line item amount. Similarly, the data element uuu_costed_quantity (in the line item) will be calculated as sum of quantity entered in all cost breakdown. In the uuu_non_costed_quantity DE, the data element uuu_costed_quantity, will be calculated as: uuu_quantity - uuu_costed_quantity.
Regardless of the Line Item type, the right-hand pane displays the Line Item and Cost Breakdown options.
Unifier Business Processes User Guide
344
Note: The availability of the Cost Breakdown options of Add Cost and Add Remaining is per uDesigner design. If the Business Process form does not permit cost breakdown, then these options will not be available.
Cancel
Save
Save & Add New
When you click the Save & Add New option, the Line Item type displayed will be based on the last cost line item type selected. As a result, if you click Add > Lump Sum and then save the Line Item and continue to click Save & Add New, then the new Line Item will be of Lump Sum type.
On the right-hand pane:
The Line Item option contains fields that have been designed in uDesigner, and the fields are similar to those in other Business Processes with the Standard user interface.
The Cost Breakdown option enables you to open a grid that contains fields related to the Cost Line Item type such as the number, cost code, etc.
Use the Add Cost and Add Remaining toolbar options to add your cost or the remainder of the cost.
The "Not Costed Amount" (for Lump Sum) and "Not Costed Quantity" (for Unit Cost) options are also available.
Cost Breakdown option (Adding costed lines)
When you click the plus (+) icon, Unifier launches the CBS picker, and you can select one or more codes and add the codes to the grid.
The gear icon is available when you select a single line item or multiple line items, and it allows you to copy or remove an item.
Note: You can copy multiple costed lines by selecting multiple line items, click the gear icon, and click Copy.
Errors
In case of errors in Line Items, Unifier displays a detailed report inline (Error Location and Description). Unifier displays all form level validation errors and required field errors at the record level error location.
In case of errors in Cost Breakdown, Unifier populates an error column that contains the error indication followed by a message.
Add Cost
In the Line Item Details tab, the Cost BreakDown tab, the add cost(+) option will be enabled if in the upper form properties the Allow Cost Breakdown option is selected in uDesigner.
When you select the add cost option, in the Cost BreakDown tab, the CBS picker will be shown so you can select a single or multiple CBS codes to add their breakdowns. In the cost breakdown line:
Cost Code and Code Name
Working with Unifier Business Processes
345
The Cost Code is editable and the default value will be populated from selected code in the CBS picker. You can double click and modify the cost code. The Code Name is read-only and populated by cost code selection.
Short Description
The Short Description should is editable. By default, the Short Description data element is populated from the value of the summary line item short_desc field. You can edit and modify the field.
uuu_unit_price and uuu_quantity
The uuu_unit_price and uuu_quantity DEs are editable and available for you to enter the values.
uuu_amount
The uuu_amount, in cost breakdown, will be calculated as uuu_unit_price * uuu_quantity.
Not Costed Quantity and Non Costed Amount
The Not Costed Quantity and Non Costed Amount will be calculated and displayed on the top of the costed lines.
Total Amount
The Total Amount for all costed lines is displayed.
uuu_costed_amount and uuu_costed_quantity
The uuu_costed_amount and uuu_costed_quantity, in the summary line item, will be calculated as the sum of amount and quantity from the costed lines.
Remove Cost
You can remove one or more cost breakdowns by using the Remove opion (gear icon). When the selected cost breakdowns are removed, the total amount of the costed lines will be updated. The uuu_non_costed_amount and uuu_non_costed_quantity will be recalculated accordingly.
Copy Cost
You can copy one or more cost breakdowns by using the Copy opion (gear icon). For copied costed lines, besides the CBS code, the quantity unit cost and the amount will be copied.
Adding Variable Unit Cost lines by using the grid
You can add Variable Unit Cost line items in the grid view. Click Insert Line Item and select the Variable Unit Cost option (similar to the form view). When you click the Insert Line Item, the following options will be available, based on the form properties
Lump Sum
Unit Cost
Variable Unit Cost
The Cost Line Item Type is set as "Variable Unit Cost" in the line item, when the Variable Unit Cost option is selected.
Unifier Business Processes User Guide
346
The behavior of data elements uuu_quantity, uuu_unit_price and amount in the Variable Unit Cost lines will be similar to the cost lines created from the form view. The uuu_unit_price DE, in the cost breakdowns, will be editable, and you can specify the variable rates for each costed line. The amount for each cost breakdown will be calculated based on the unit rate specified. Accordingly, both the uuu_costed_amount DE and uuu_noncosted_amount DE will be calculated.
In unit cost lines, the uuu_unit_price DE will be editable only on the summary line and read-only in cost breakdowns.
Once the base contract record which has the line items of both fixed and variable unit cost reaches the terminal step, the SOV will be created. The variable unit rates provided in the cost breakdowns will be rolled up to SOV along with quantity and amount.
Change Commit Summary Payment Application SOV Type
Create New Change Order with Summary Payment Application
Based on the upper form properties, designed in uDesigner, if the add, copy, and remove lineitems options are checked, then you can select Add and create a line item from the Standard tab, in the Create New Change Order with Summary Pay App business process window. The following options will be made available when you click Add and when a referenced Base Commit has "Allow Variable Unit Cost in Cost Breakdown" is selected in uDesigner:
Lump Sum
Unit Cost
Variable Unit Cost
Modify Committed Line Item
The cost breakdown of Lump Sum and Unit Cost is similar to the Base Commit Summary Payment Application SOV type BP (cost), explained in the previous section.
The summary and costed line item behavior for the first three options selected will be similar to Base Commit Summary Payment Application SOV type Business Process records with checkbox checked in uDesigner.
For the Variable Unit Cost line items, you are allowed to enter the uuu_unit_price for each cost breakdown. The amount will be calculated based on the unit rate and the quantity entered. The summary line item will have the uuu_unit_price disabled.
When you select the Modify Committed Line Item option, the Commit Line Item Pickerwindow will be displayed. This window enables you to select and modify any line item from the picker. The cost line item type for the unit cost lines will be the Unit Cost; whereas, for the variable unit cost lines, the cost line item type will be the Variable Unit Cost.
When you click Save & Add New option, Unifier displays the Line Item type based on the last cost line item type that was selected. As a result, if you click Add > Lump Sum and then saved the Line Item and continue to click Save & Add new, then the new Line Item will be of Lump Sum type.
When you click Modify Committed Line Item option, and then click Save & Add new, Unifier launches the SOV picker.
Working with Unifier Business Processes
347
Commit Line Item Picker
Note: The fields displayed vary based on the line item selected from the Commit Line Item Picker
The Cost Break down field, when you select a committed line:
Committed line = Lump Sum, then the field seen will be "Not Costed Amount."
Committed line = Unit Cost, then the field seen will be "Not Costed Quantity."
The grid columns are always dependent on line item creation.
Note: Grouping of line items through CSV is not supported for SPA BPs.
When you select the line item of type "Variable Unit Cost," the data element uuu_cost_li_type is copied over from the reference commit line item into the Change Commit line item and will be set as read-only.
The uuu_quantity and amount data elements, in the summary line item are editable. The uuu_unit price DE will be disabled for the summary line item.
If the selected line item has variable unit rates at costed lines, then an additional column (uuu_unit_price) will be seen in cost breakdowns that is copied over from the SOV.
The following columns will be in cost breakdowns in the Commit Line Item Picker, for the costed lines that are copied from SOV:
Cost Code
The Cost Code is a read-only field, and the value gets populated from the Commit Line Item Picker (for the SOV referenced lines). For the new costed lines, the Cost Code field can be edited, and it can pick from the CBS picker.
Code Name
The Code Name is a read-only field, and the value gets populated from the Cost Code selection.
Short Description
The Short Description is an editable field. By default, the value for this data element gets populated from the summary line item short_desc field.
Current Quantity
The Current Quantity column is read-only, and the value for the existing lines will be copied from the selected commit record. For the new costed lines that are added, this column will be empty and read-only.
Unit Cost
The Unit Cost column is read-only, and it displays the uuu_unit_price value that is coming from the selected commit record. For new costed lines added, this column will be empty and editable.
Current Scheduled Value:
The Current Scheduled Value column is read-only, and it gets populated with the scheduled value from the SOV for the existing costed lines. For the new costed lines, this column will be 0 and will be read-only.
Unifier Business Processes User Guide
348
Change Quantity
The Change Quantity column is editable and you can enter the values for existing and new costed lines.
Change Amount
The Change Amount column is read-only, and the value is populated based on the calculation: Change Quantity * Current Unit Cost.
New Scheduled Value:
The New Scheduled Value column is read-only, and the value gets calculated as: Current Scheduled Value + Change Amount.
In the Commit Line Item Picker, you can:
Add new costed lines
Copy existing costed lines
Remove newly added costed lines
The In the Commit Line Item Picker toolbar options that are available in the Cost Breakdown tab (for the Commit Line Item) are:
Add Cost
When you select this option, the CBS picker is displayed so you can select single or multiple CBS codes in order to add the breakdowns. In the cost breakdown line, the following columns are displayed:
Cost Code
Editable field with value populated from the selected code, in the CBS picker. You can double-click the field and modity the value.
Code Name
Read-only field with value populated from the selected cost code.
Short Description
Editable field with value populated from the summary line item short_desc field.
Current Quantity
For the new costed lines added, the Current Quantity column value will be empty and read-only.
Unit Cost
For the new costed lines added, the Unit Cost column value will be empty and read-only.
Current Scheduled Value
For the new costed lines added, the Unit Cost column value will be 0 and cannot be edited.
Change Quantity
This column is editable and you can enter the values for new costed lines.
Change Amount
This column is read-only and the value is populated based on calculation: Change Quantity * Current Unit Cost.
New Scheduled Value
Working with Unifier Business Processes
349
This column is read-only and is calculated as: Current Scheduled Value + Change Amount.
The gear icon options available for the costed lines are as follows:
Note: You cannot remove the existing line items that are coming from the SOV.
Copy
If you select an existing line item and click Copy, then you will copy the costed line item. THe current scheduled value will not be copied. Only the unit cost and change quantity columns are editable. The new scheduled value will be calculated based on the: change amount + current scheduled value.
You can copy multiple costed line items at the same time. All these line items must belong to the same summary line item.
You cannot pick costed lines from different summary line items.
Remove
If you select a new costed line item, then by clicking this option you will remove the costed line item.
For the committed costed line item (line items coming from the SOV), the Remove option is not available.
Once the Change Commit record is routed to the terminal step, the SOV will be updated with both the modified quantity, and the new scheduled value, for costed lines that exists in the SOV .
The variable unit rates that are provided in the cost breakdowns will be rolled up to the SOV, along with the quantity and amount for new lines.
Text-Type Business Process
The content of the Text-type business process form is typically a text comment in the lower portion of the form.
You can view responses from other users who may have acted on the record at a given step while working on the record.
Note: The functions of the options presented below have been explained in the preceding sections. This section explains new functions and procedural differences.
A Text-type BP has a:
Upper Forms (main form)
Text Entry Form
Response List form
In edit mode, you can see the:
Upper Forms (main form) tab name: General
Text Entry Form tab name: Collaboration
When you click on the Collaboration tab, you can enter the response in the input box.
Unifier Business Processes User Guide
350
When you are viewing the form, Unifier displays the General tab and the Response tab. You can filter the responses, based on user, by clicking on the Posted By drop-down list. Each of the responses received will be placed in a separate block, and no actions are permitted on these blocks.
When you want to update a record, the following tabs are displayed:
Upper Forms (main form): General
Text Entry Form: Collaboration
Response List form: Response
Note: In edit mode, the Response List form: Response looks the same as the one seen in view mode.
Simple-Type Business Process
The Simple type business process form consists of an upper form only (like a line-item-type BP without the line items). It is used to add company or project or shell information that does not require line items. WRITER: This is
The Simple type business process form can be a:
Company-level, non-workflow, single record.
Company-level, non-workflow, multi record.
Project-level, non-workflow or workflow, multi-record.
Shell-level, non-workflow or workflow, multi-record.
An example of the Simple type business process form is a project information form to capture basic reference information.
Preventive Maintenance Business Process
Preventive Maintenance Business Process toolbar options:
Form View (default view)
Grid View
Add
Actions
Import
Consolidate Line Items
Reload
Export to CSV
Export to Excel
Search
Find on Page
Working with Unifier Business Processes
351
You can click the Gear icon to the left of each row in the grid or right click rows to see the following options:
Copy
Remove
Group line items
Additionally, you can select multiple rows and right click to see the following options:
Add line item below
Copy
Paste below
Remove
Group line items
Adding and Modifying Line Items
To add a line item to the grid, click Add. A blank row will be inserted and the following toolbar options will be visible:
Create
To add a new line item.
Search
Find on Page
Note: Any fields that have default values will display them.
After a line item is created, you can double click the cell to modify its content (if the form properties permit modifications).
Error Reporting
If any rows have an error, the red Error icon appears in the first column. You can click the Error icon to see an error message. Columns with required fields display red triangles in the upper-right corner.
Hyperlink Fields and Image Fields
When you double click a hyperlink field, the Hyperlink icon appears in the cell. When you click the Hyperlink icon, a box appears. Here, you can enter the Name and URL that appear in the cell.
When you double click an image field, the Upload icon appears in the cell. Clicking on the Upload icon gives you the options of Browse and Document Manager. When you click Browse, the File browser will open. When you click Document Manager, the image field from Document Manager will appear.

353
Unifier Business Process Forms, Managers Attributes, and Shell Dashboards - User Interface
The Oracle Primavera Unifier has been undergoing significant changes in the overall user interaction in the Business Process forms, various Logs, Cost Sheet, etc. These changes were focused on the user interface (UI) and few structural changes related to the user interaction. These changes have been rolled-out in early 2018, in phases. In November of 2019, the Classic View of the business process forms, managers attributes, and shell dashboards have been replaced with the Standard View (the new view). There are also other functional improvements as a result of the UI improvements such as type-ahead, auto-fill in pickers, tool-tips, etc. Those improvements have been covered in pertinent user documents.
The redesigned business process user interface allows you to:
View, edit, and manage all relevant details within a single form.
Access record details with limited pop-up and clicks.
See only relevant, context-sensitive menu, and toolbar functions.
Use the enhanced form layout to navigate, expand, and collapse field blocks.
Create, enter, and update record data and line items in one place.
Navigate easily between tabs to complete the main and line item forms.
Add and view attachments in one place.
Route workflows with minimized alerts and errors.
Use enhanced field interaction in text boxes, pickers and data pickers.
Note: This updated version does not impact the fundamental ways in which a business process, manager attributes, or shell dashboards are created in the new User Interface.
The following describes the business process types that are not supported in the new User Interface and will continue to be shown in Classic View:
Cost BP > Line Items with Asset Code
Resource > Resource Booking
Resource > Time Sheet
The following describes the business process types and sub-types that support the new UI:
Cost
Line Items with CBS codes
Line Items with Fund codes
Line Items with CBS and Fund codes
Commit at Company Level
Line Items with Company Accounts Code
Line Items with Multiple Codes
Document
With Folder Structure
Unifier Business Processes User Guide
354
Without Folder Structure
Line Item
Line Item (Generic)
Line item to filter Company Business Process Records
Preventive Maintenance
Simple
RFB
Generic
Line Items with CBS Codes
Line Items with Generic Cost manager
Project/Shell Creation
Project/Shell Creation - Simple
Project/Shell Creation - Line Item
Text
In This Section
Classic View User Interface Features Not Supported in Standard View ................. 354 Classic View and Standard View Labels ................................................................ 357 Classic View and Standard View Tabs, Menus, and Actions.................................. 362 Classic View and Standard View Functions ........................................................... 364
Classic View User Interface Features Not Supported in Standard View
The following features will not be supported in the Standard View of the business processes forms:
Discussion Groups in workflow business processes
Adding or Viewing of Task Notes
View Received Task option
Uploading images from the toolbar
Summary Items in business processes that support Summary line items
Spell-check feature in business process
The following explains each feature in details:
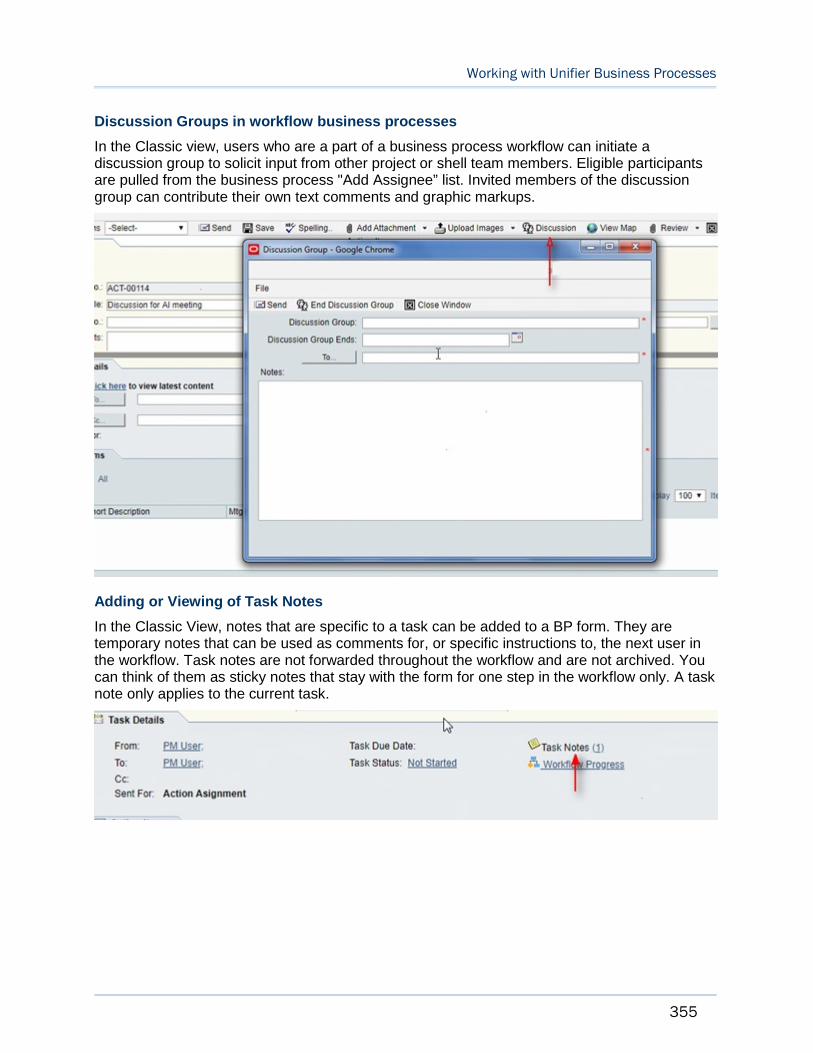
Working with Unifier Business Processes
355
Discussion Groups in workflow business processes
In the Classic view, users who are a part of a business process workflow can initiate a discussion group to solicit input from other project or shell team members. Eligible participants are pulled from the business process "Add Assignee” list. Invited members of the discussion group can contribute their own text comments and graphic markups.
Adding or Viewing of Task Notes
In the Classic View, notes that are specific to a task can be added to a BP form. They are temporary notes that can be used as comments for, or specific instructions to, the next user in the workflow. Task notes are not forwarded throughout the workflow and are not archived. You can think of them as sticky notes that stay with the form for one step in the workflow only. A task note only applies to the current task.
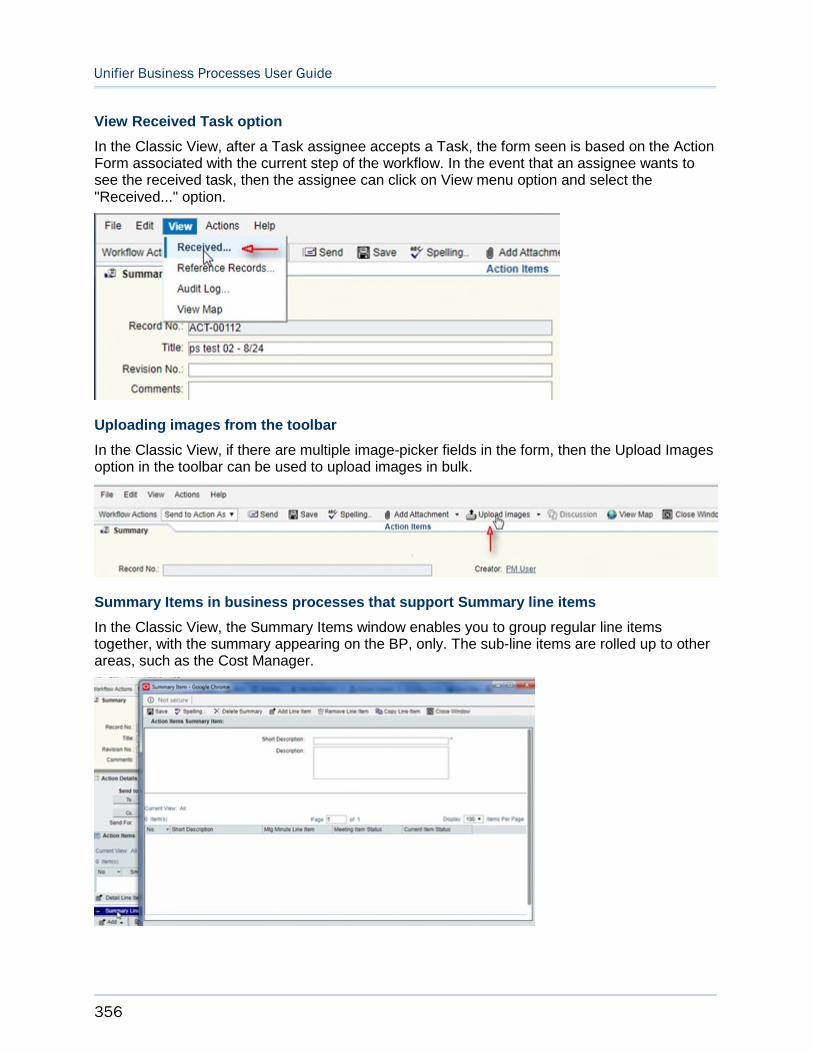
Unifier Business Processes User Guide
356
View Received Task option
In the Classic View, after a Task assignee accepts a Task, the form seen is based on the Action Form associated with the current step of the workflow. In the event that an assignee wants to see the received task, then the assignee can click on View menu option and select the "Received..." option.
Uploading images from the toolbar
In the Classic View, if there are multiple image-picker fields in the form, then the Upload Images option in the toolbar can be used to upload images in bulk.
Summary Items in business processes that support Summary line items
In the Classic View, the Summary Items window enables you to group regular line items together, with the summary appearing on the BP, only. The sub-line items are rolled up to other areas, such as the Cost Manager.
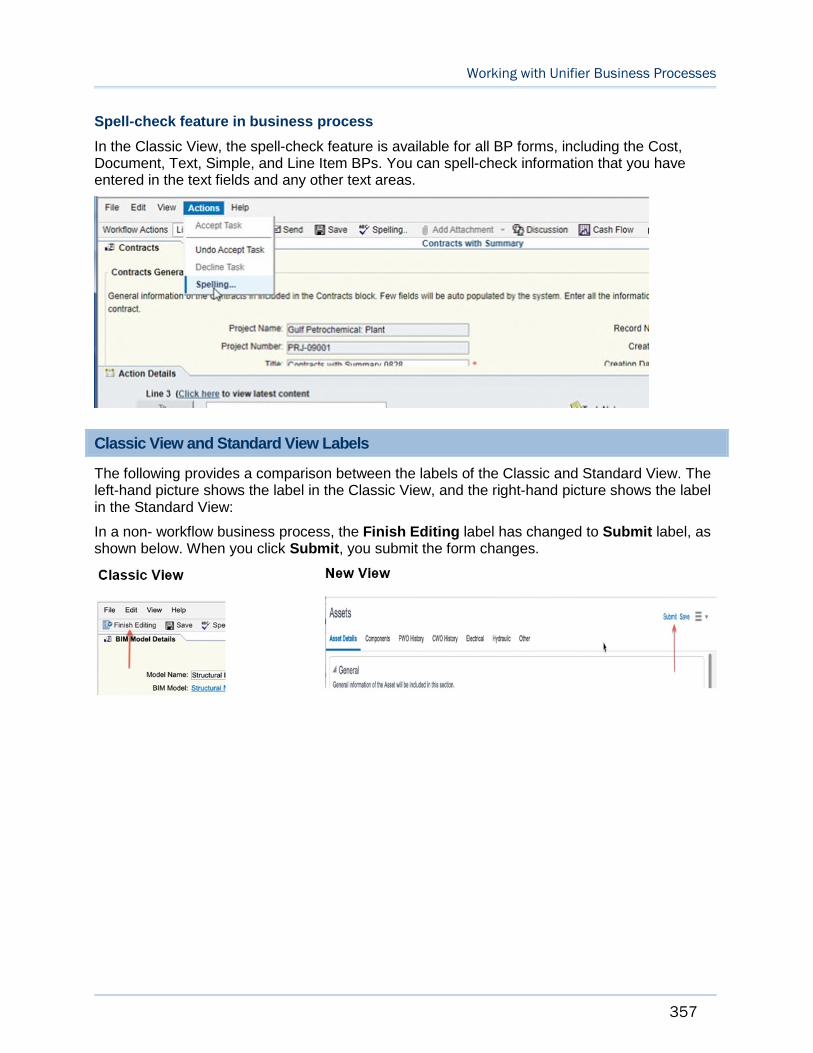
Working with Unifier Business Processes
357
Spell-check feature in business process
In the Classic View, the spell-check feature is available for all BP forms, including the Cost, Document, Text, Simple, and Line Item BPs. You can spell-check information that you have entered in the text fields and any other text areas.
Classic View and Standard View Labels
The following provides a comparison between the labels of the Classic and Standard View. The left-hand picture shows the label in the Classic View, and the right-hand picture shows the label in the Standard View:
In a non- workflow business process, the Finish Editing label has changed to Submit label, as shown below. When you click Submit, you submit the form changes.
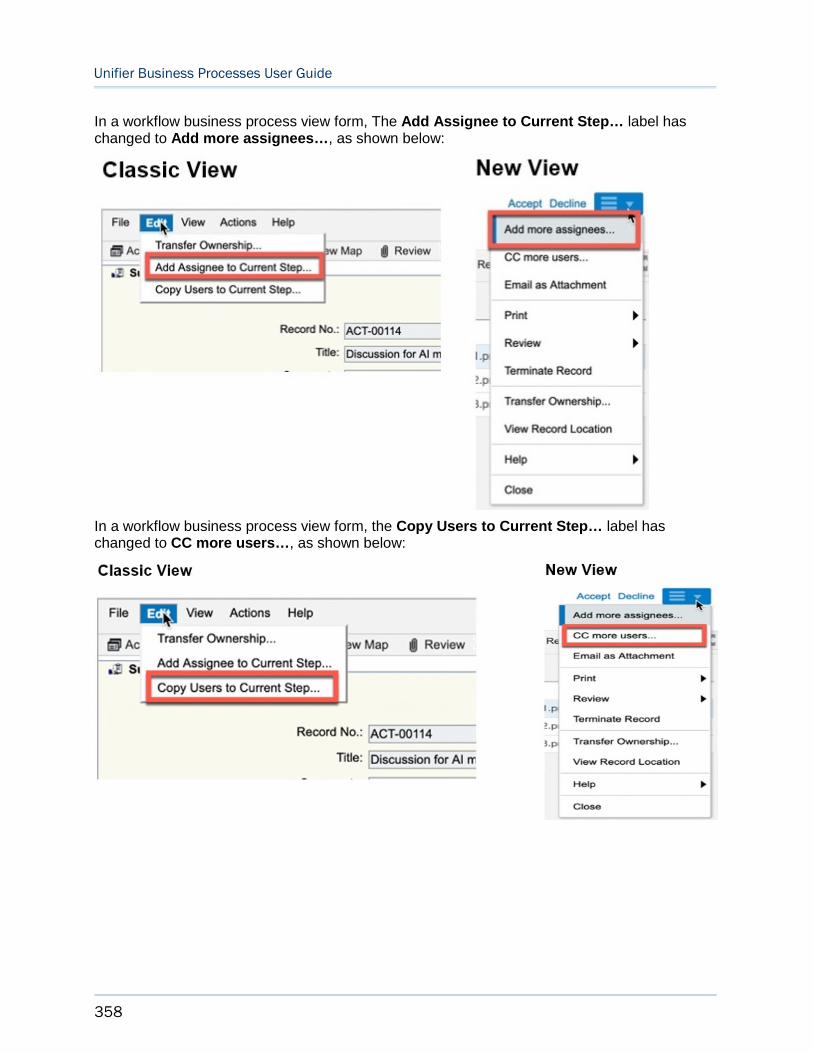
Unifier Business Processes User Guide
358
In a workflow business process view form, The Add Assignee to Current Step… label has changed to Add more assignees…, as shown below:
In a workflow business process view form, the Copy Users to Current Step… label has changed to CC more users…, as shown below:
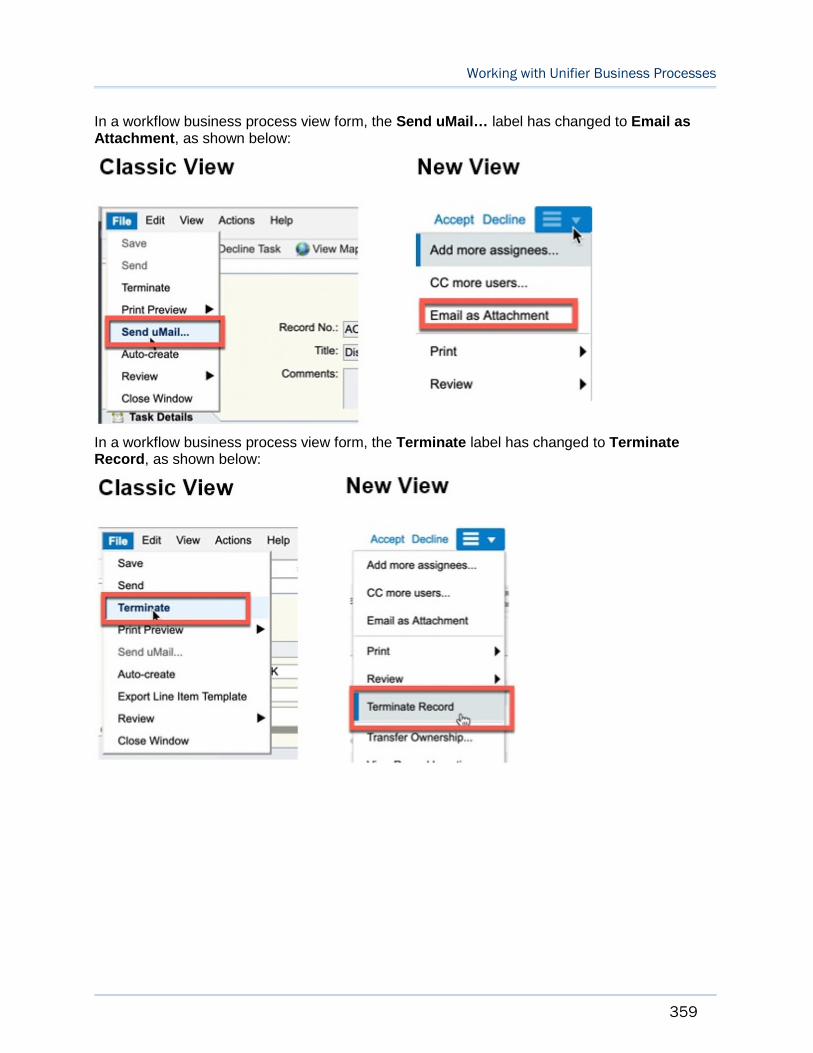
Working with Unifier Business Processes
359
In a workflow business process view form, the Send uMail… label has changed to Email as Attachment, as shown below:
In a workflow business process view form, the Terminate label has changed to Terminate Record, as shown below:
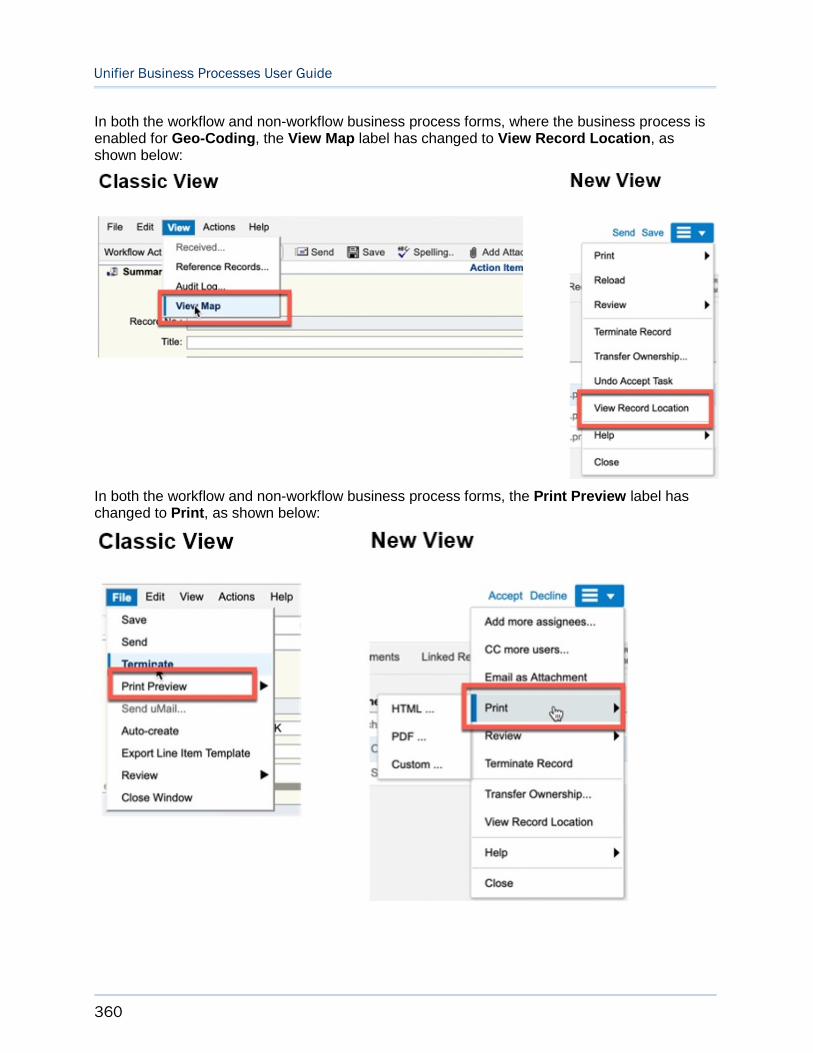
Unifier Business Processes User Guide
360
In both the workflow and non-workflow business process forms, where the business process is enabled for Geo-Coding, the View Map label has changed to View Record Location, as shown below:
In both the workflow and non-workflow business process forms, the Print Preview label has changed to Print, as shown below:
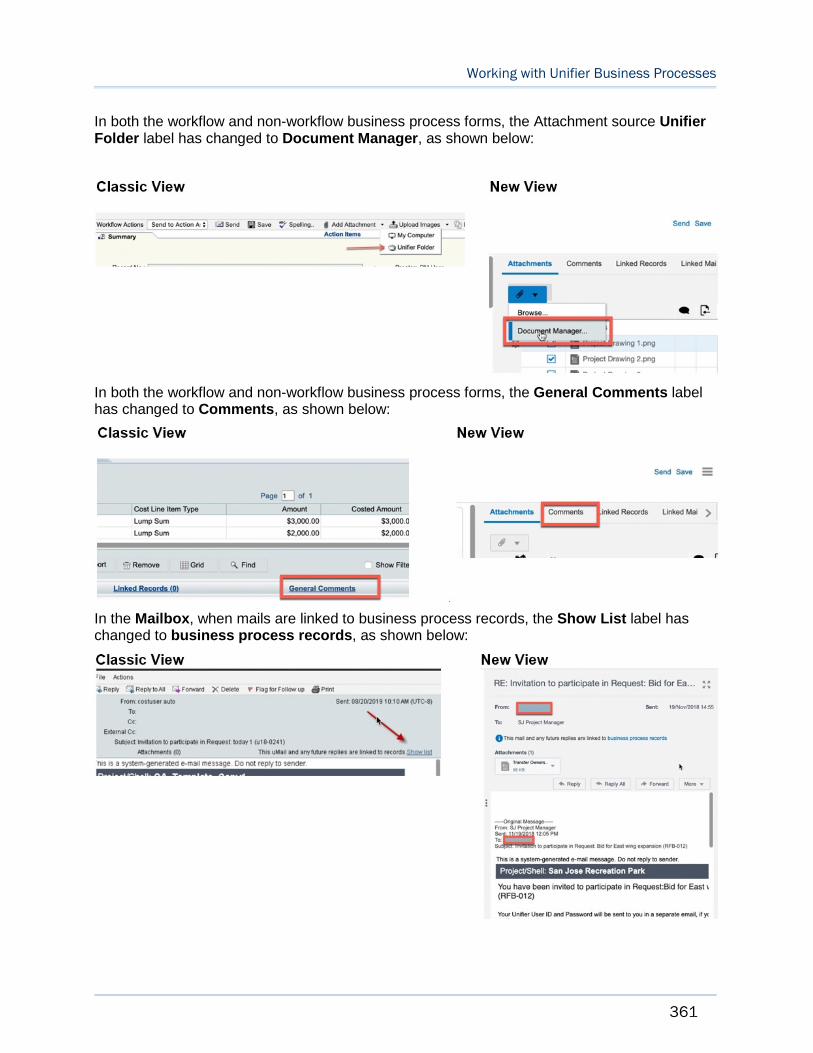
Working with Unifier Business Processes
361
In both the workflow and non-workflow business process forms, the Attachment source Unifier Folder label has changed to Document Manager, as shown below:
In both the workflow and non-workflow business process forms, the General Comments label has changed to Comments, as shown below:
In the Mailbox, when mails are linked to business process records, the Show List label has changed to business process records, as shown below:
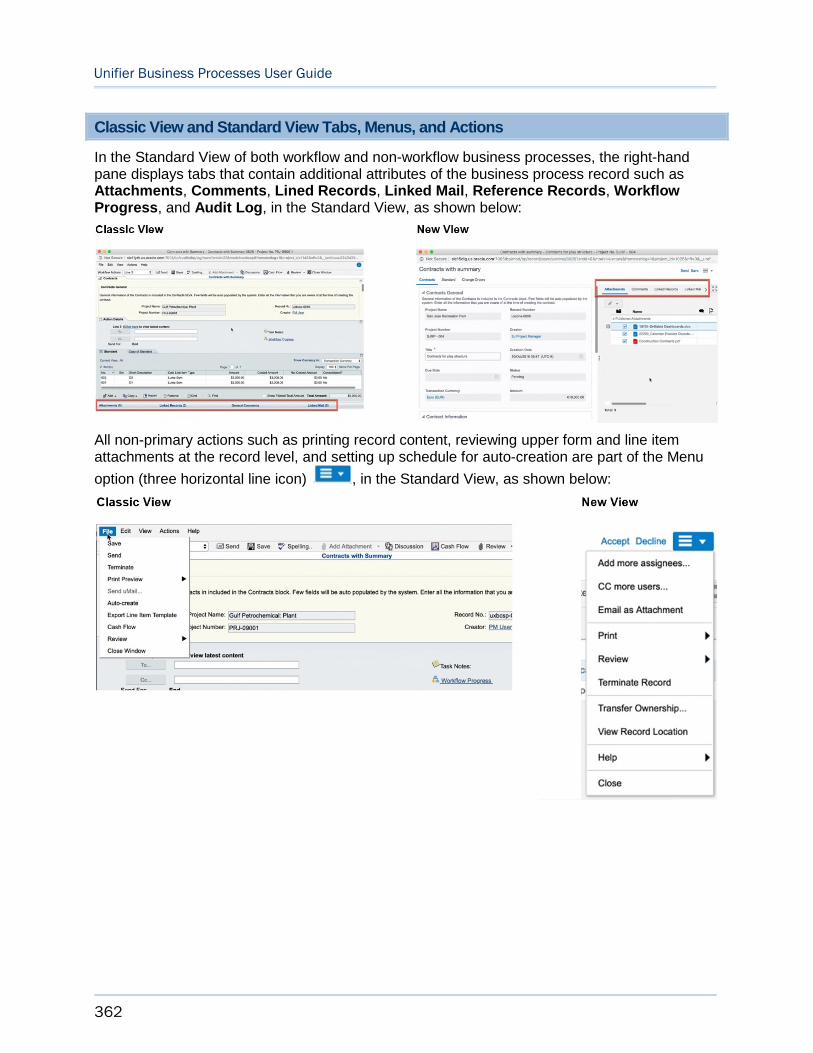
Unifier Business Processes User Guide
362
Classic View and Standard View Tabs, Menus, and Actions
In the Standard View of both workflow and non-workflow business processes, the right-hand pane displays tabs that contain additional attributes of the business process record such as Attachments, Comments, Lined Records, Linked Mail, Reference Records, Workflow Progress, and Audit Log, in the Standard View, as shown below:
All non-primary actions such as printing record content, reviewing upper form and line item attachments at the record level, and setting up schedule for auto-creation are part of the Menu
option (three horizontal line icon) , in the Standard View, as shown below:
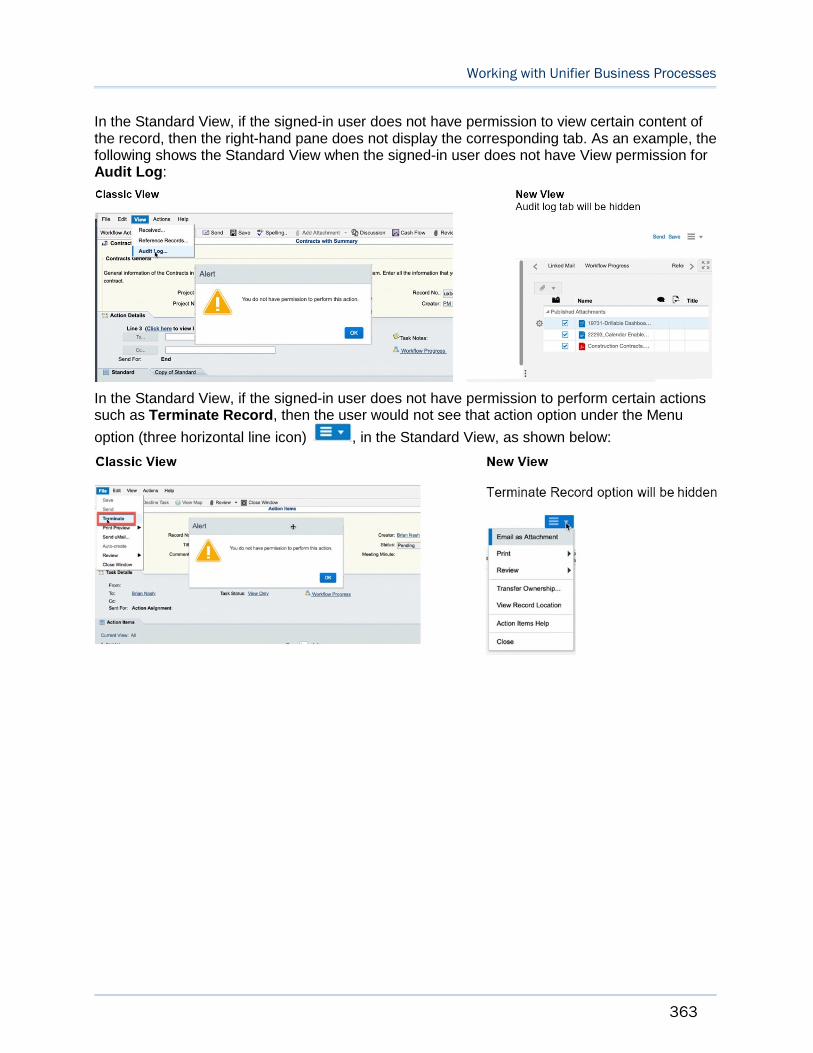
Working with Unifier Business Processes
363
In the Standard View, if the signed-in user does not have permission to view certain content of the record, then the right-hand pane does not display the corresponding tab. As an example, the following shows the Standard View when the signed-in user does not have View permission for Audit Log:
In the Standard View, if the signed-in user does not have permission to perform certain actions such as Terminate Record, then the user would not see that action option under the Menu
option (three horizontal line icon) , in the Standard View, as shown below:
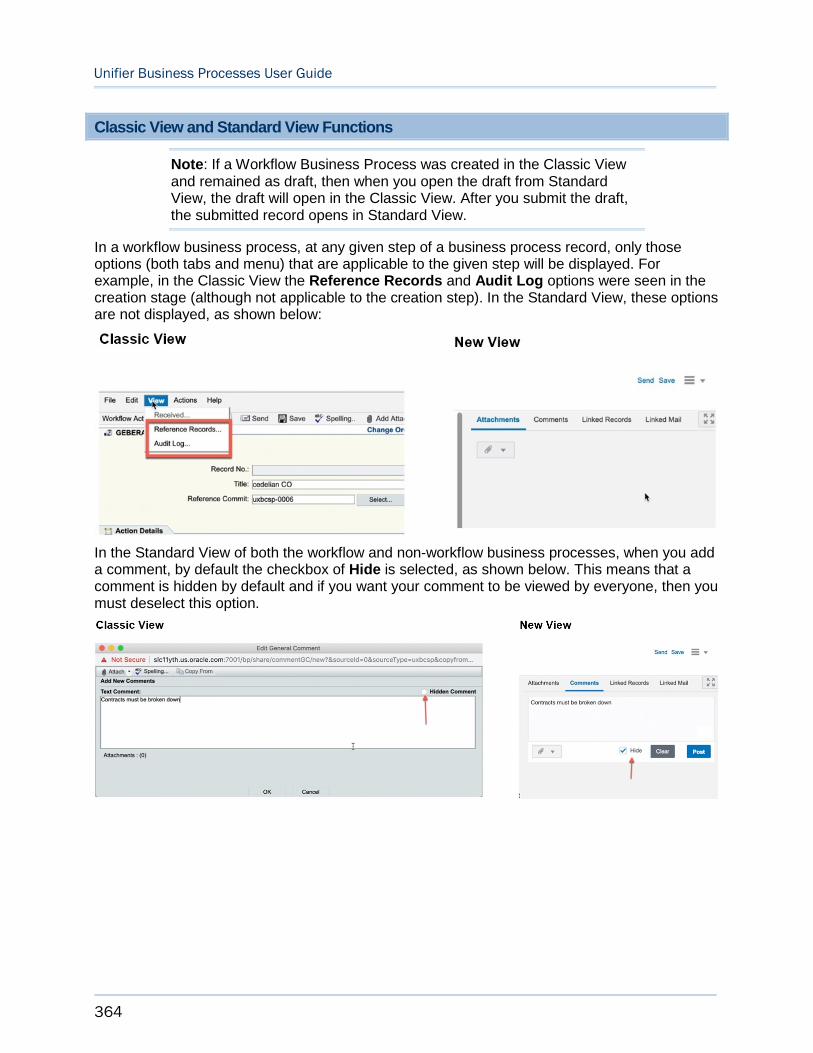
Unifier Business Processes User Guide
364
Classic View and Standard View Functions
Note: If a Workflow Business Process was created in the Classic View and remained as draft, then when you open the draft from Standard View, the draft will open in the Classic View. After you submit the draft, the submitted record opens in Standard View.
In a workflow business process, at any given step of a business process record, only those options (both tabs and menu) that are applicable to the given step will be displayed. For example, in the Classic View the Reference Records and Audit Log options were seen in the creation stage (although not applicable to the creation step). In the Standard View, these options are not displayed, as shown below:
In the Standard View of both the workflow and non-workflow business processes, when you add a comment, by default the checkbox of Hide is selected, as shown below. This means that a comment is hidden by default and if you want your comment to be viewed by everyone, then you must deselect this option.
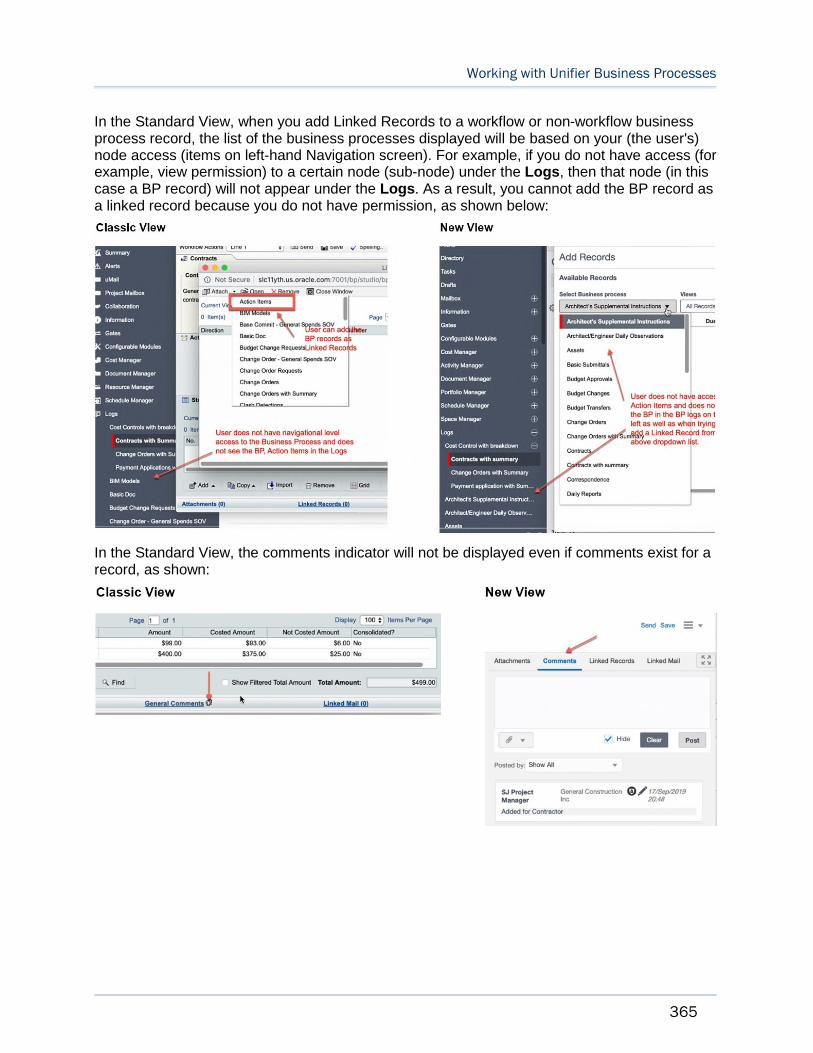
Working with Unifier Business Processes
365
In the Standard View, when you add Linked Records to a workflow or non-workflow business process record, the list of the business processes displayed will be based on your (the user's) node access (items on left-hand Navigation screen). For example, if you do not have access (for example, view permission) to a certain node (sub-node) under the Logs, then that node (in this case a BP record) will not appear under the Logs. As a result, you cannot add the BP record as a linked record because you do not have permission, as shown below:
In the Standard View, the comments indicator will not be displayed even if comments exist for a record, as shown:
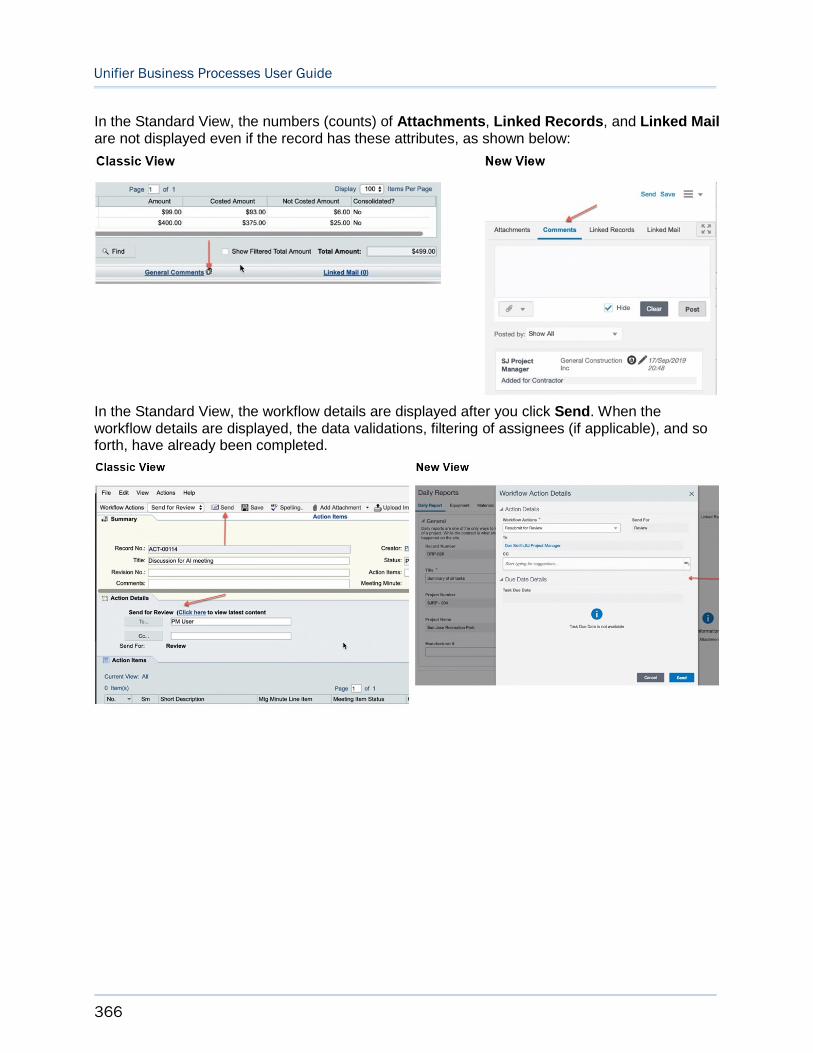
Unifier Business Processes User Guide
366
In the Standard View, the numbers (counts) of Attachments, Linked Records, and Linked Mailare not displayed even if the record has these attributes, as shown below:
In the Standard View, the workflow details are displayed after you click Send. When the workflow details are displayed, the data validations, filtering of assignees (if applicable), and so forth, have already been completed.
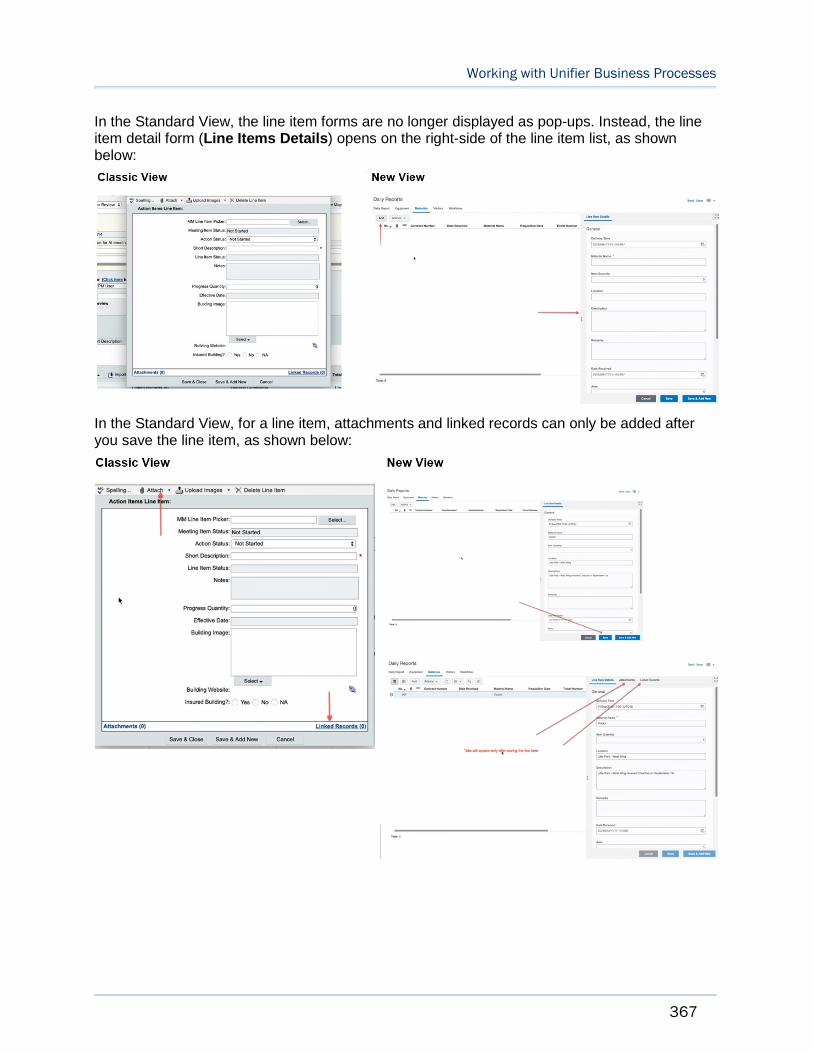
Working with Unifier Business Processes
367
In the Standard View, the line item forms are no longer displayed as pop-ups. Instead, the line item detail form (Line Items Details) opens on the right-side of the line item list, as shown below:
In the Standard View, for a line item, attachments and linked records can only be added after you save the line item, as shown below:

Unifier Business Processes User Guide
368
In the Standard View, for auto-created records (Auto Create BP) that are in Initiation Step, but the job is not yet complete, the accept and decline actions will not be displayed, as shown below:
In the Standard View, you cannot transfer ownership if the selected user is the record owner, as shown below:
In the Standard View, the form design is honored without any exceptions.
In the Classic View of Change Commit BP, if the Reference Commit field is marked as read-only, in the design (uDesigner), then in the Standard View the Reference Commit field will be rendered as a read-only data element, as shown below:
Note: Prior to this improvement, in the Classic View, this data element had an exception, wherein even if the field was marked as read-only, at
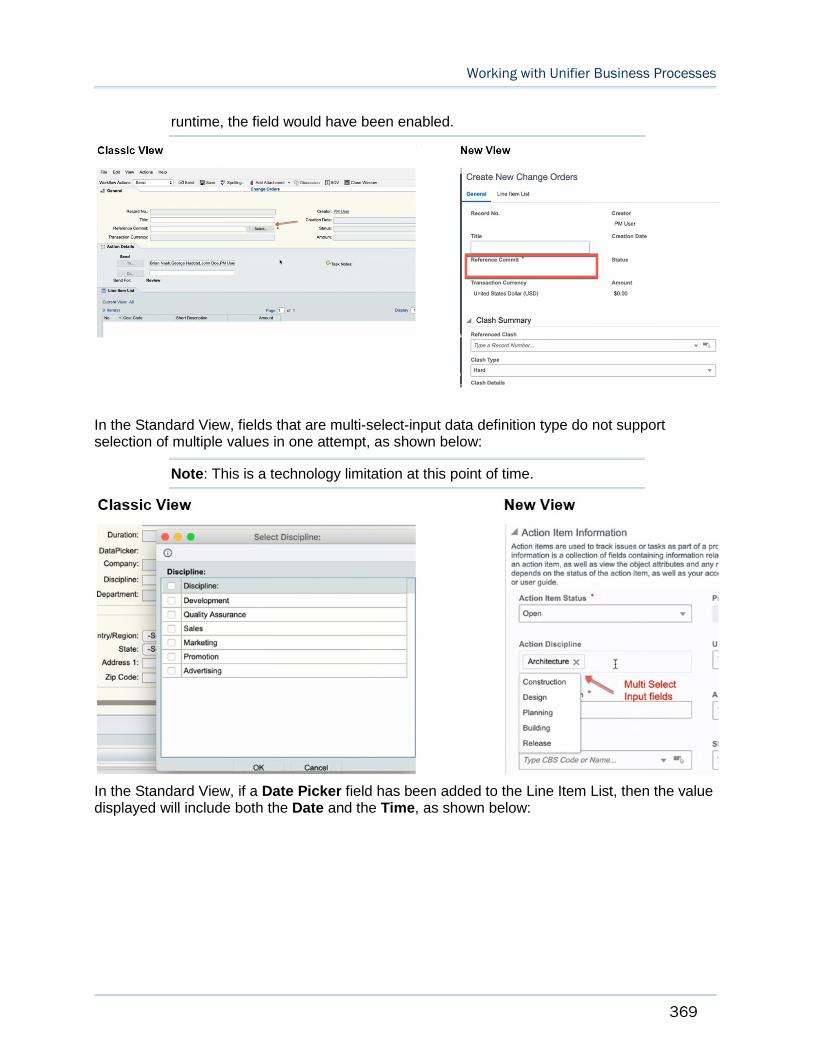
Working with Unifier Business Processes
369
runtime, the field would have been enabled.
In the Standard View, fields that are multi-select-input data definition type do not support selection of multiple values in one attempt, as shown below:
Note: This is a technology limitation at this point of time.
In the Standard View, if a Date Picker field has been added to the Line Item List, then the value displayed will include both the Date and the Time, as shown below:
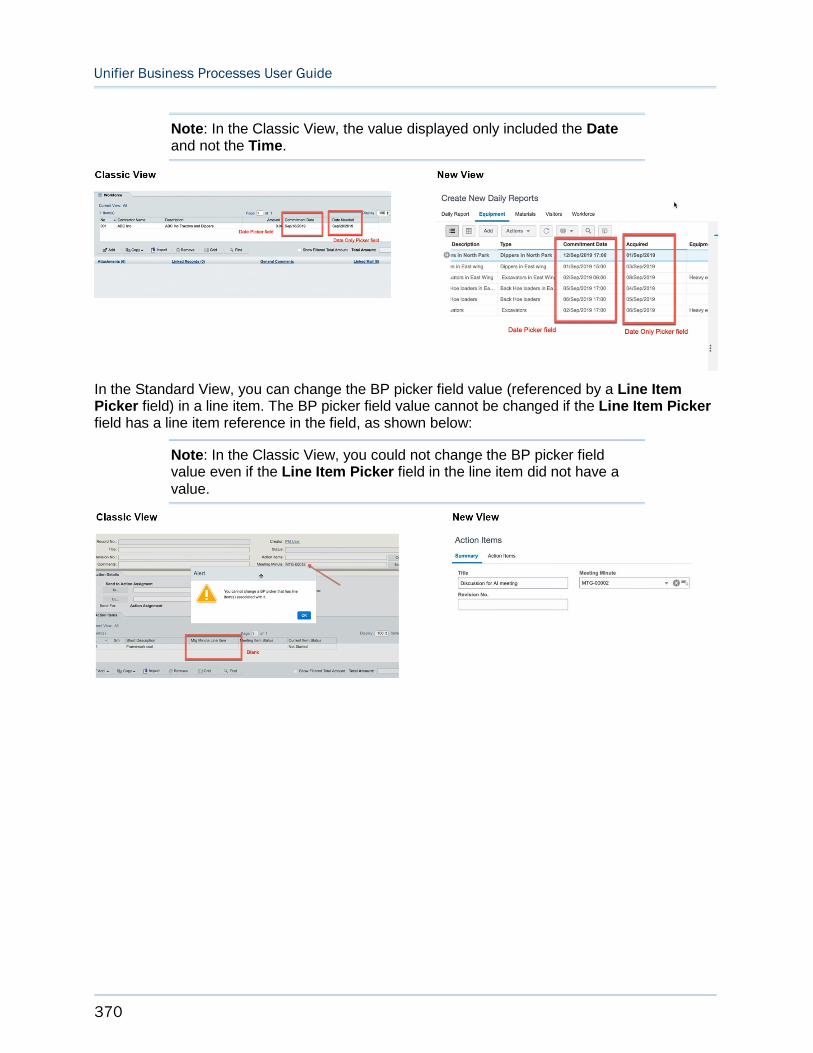
Unifier Business Processes User Guide
370
Note: In the Classic View, the value displayed only included the Date and not the Time.
In the Standard View, you can change the BP picker field value (referenced by a Line Item Picker field) in a line item. The BP picker field value cannot be changed if the Line Item Pickerfield has a line item reference in the field, as shown below:
Note: In the Classic View, you could not change the BP picker field value even if the Line Item Picker field in the line item did not have a value.
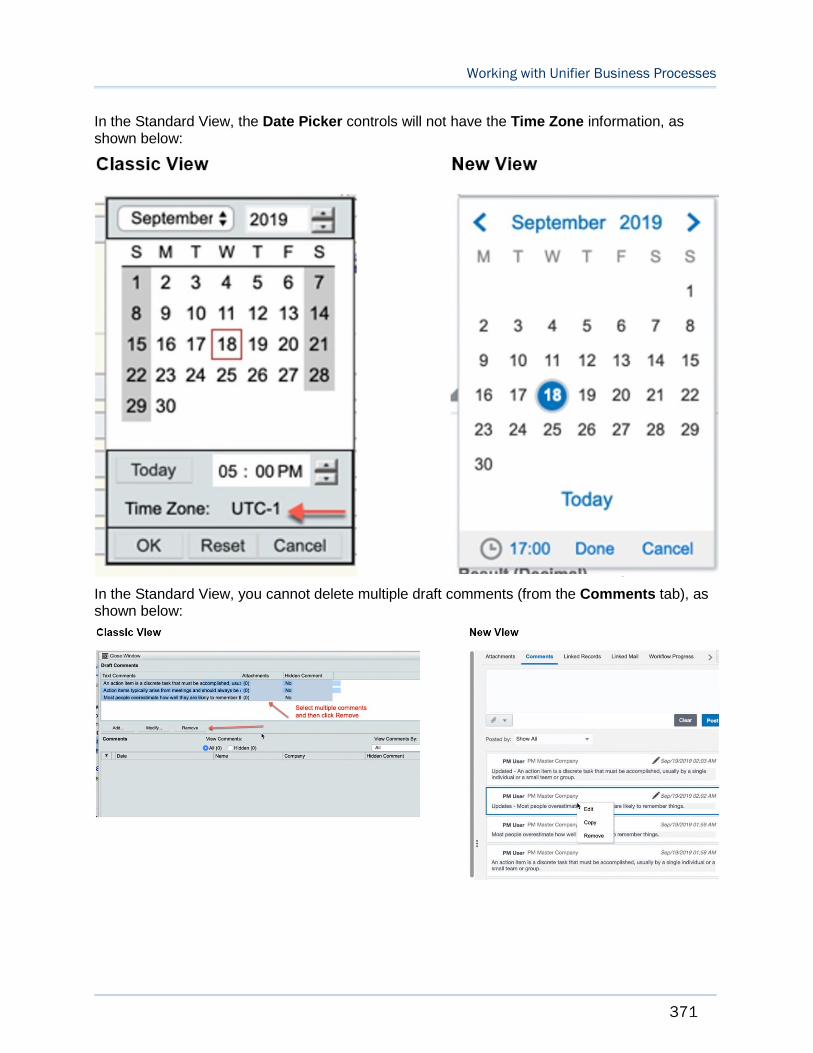
Working with Unifier Business Processes
371
In the Standard View, the Date Picker controls will not have the Time Zone information, as shown below:
In the Standard View, you cannot delete multiple draft comments (from the Comments tab), as shown below:
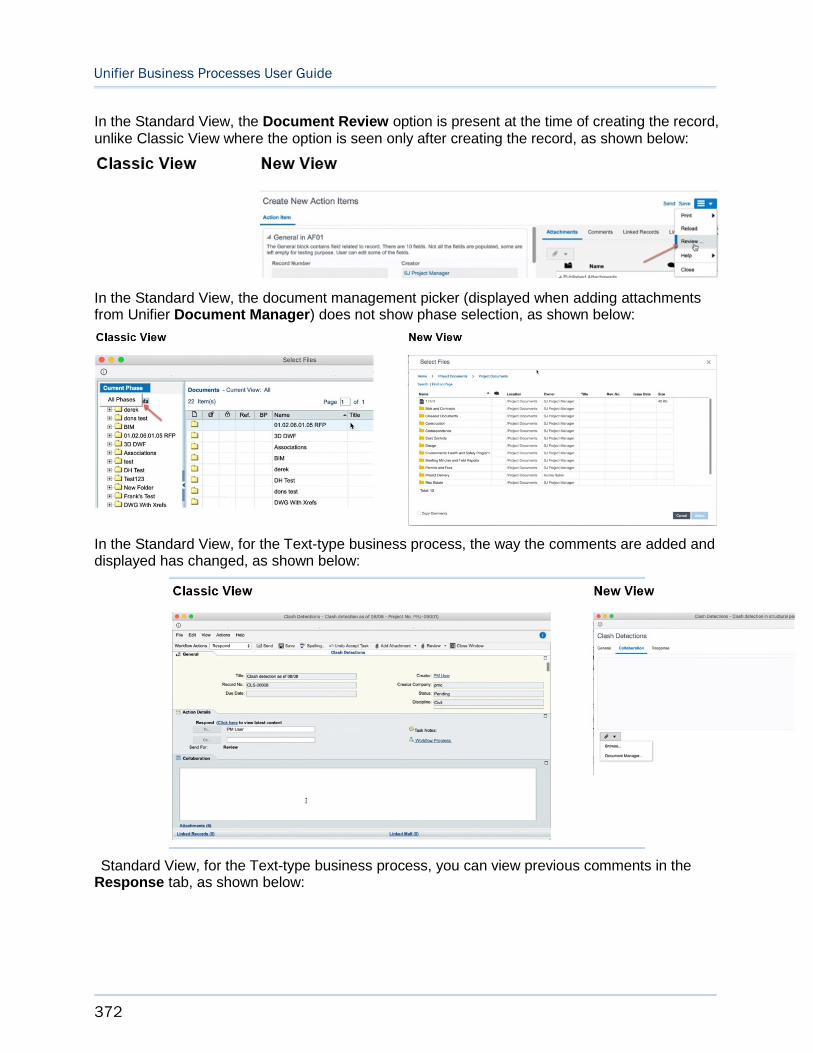
Unifier Business Processes User Guide
372
In the Standard View, the Document Review option is present at the time of creating the record, unlike Classic View where the option is seen only after creating the record, as shown below:
In the Standard View, the document management picker (displayed when adding attachments from Unifier Document Manager) does not show phase selection, as shown below:
In the Standard View, for the Text-type business process, the way the comments are added and displayed has changed, as shown below:
Standard View, for the Text-type business process, you can view previous comments in the Response tab, as shown below:

Working with Unifier Business Processes
373
In the
In the Standard View, for the Document-type business process, the steps to create folders and line items have changed, as shown below:
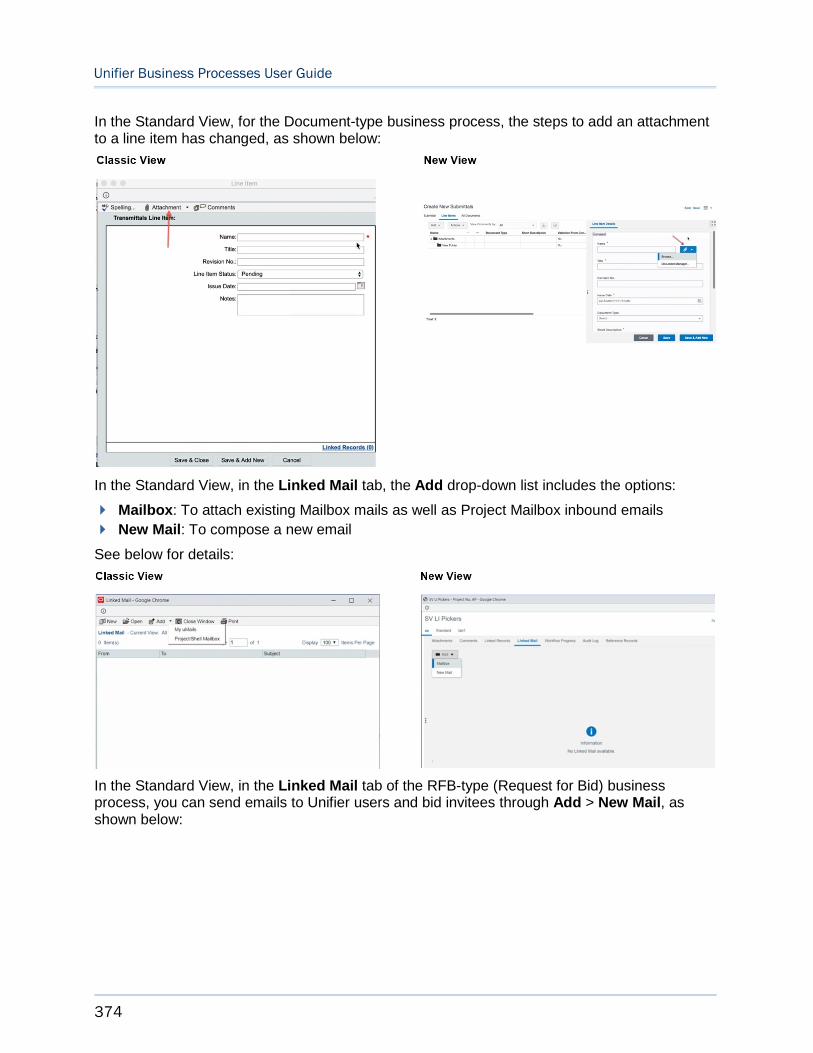
Unifier Business Processes User Guide
374
In the Standard View, for the Document-type business process, the steps to add an attachment to a line item has changed, as shown below:
In the Standard View, in the Linked Mail tab, the Add drop-down list includes the options:
Mailbox: To attach existing Mailbox mails as well as Project Mailbox inbound emails
New Mail: To compose a new email
See below for details:
In the Standard View, in the Linked Mail tab of the RFB-type (Request for Bid) business process, you can send emails to Unifier users and bid invitees through Add > New Mail, as shown below:
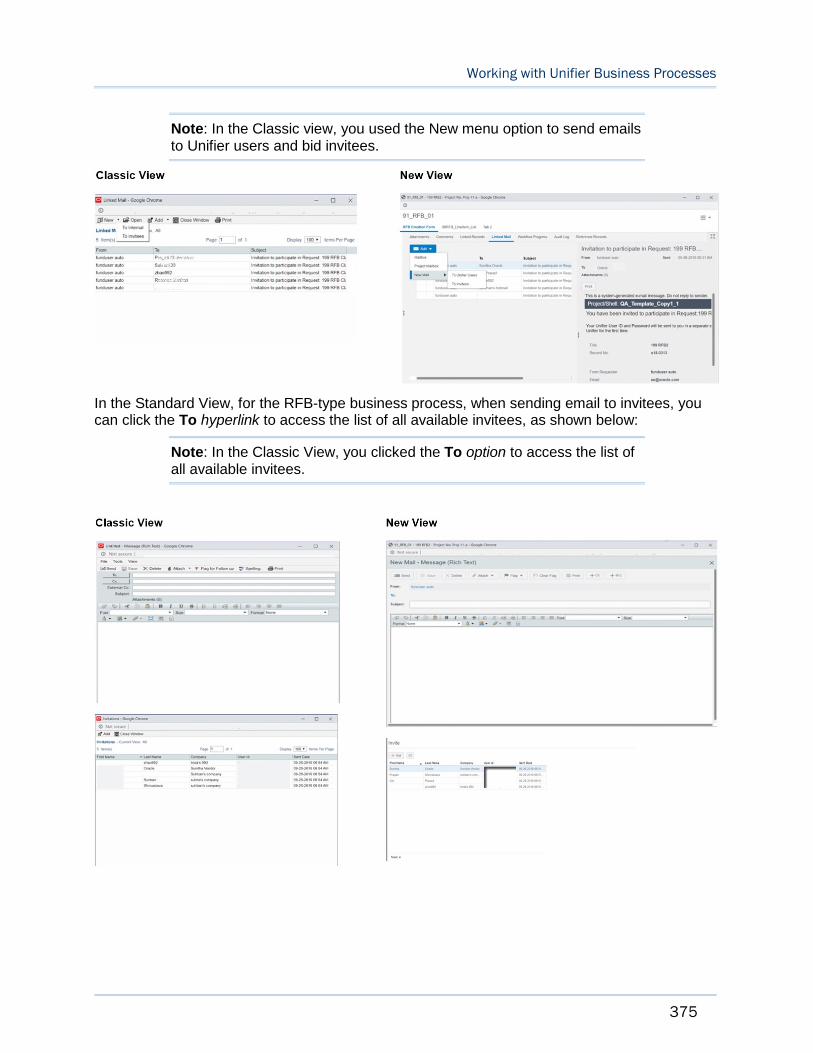
Working with Unifier Business Processes
375
Note: In the Classic view, you used the New menu option to send emails to Unifier users and bid invitees.
In the Standard View, for the RFB-type business process, when sending email to invitees, you can click the To hyperlink to access the list of all available invitees, as shown below:
Note: In the Classic View, you clicked the To option to access the list of all available invitees.
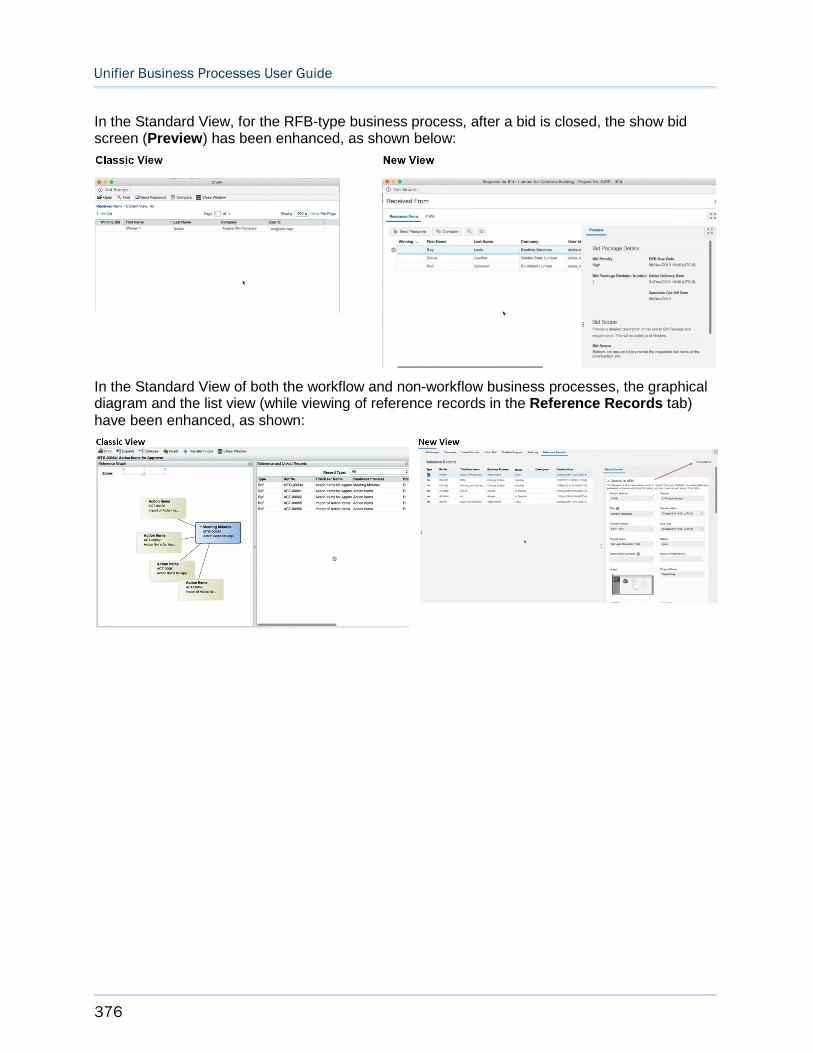
Unifier Business Processes User Guide
376
In the Standard View, for the RFB-type business process, after a bid is closed, the show bid screen (Preview) has been enhanced, as shown below:
In the Standard View of both the workflow and non-workflow business processes, the graphical diagram and the list view (while viewing of reference records in the Reference Records tab) have been enhanced, as shown:
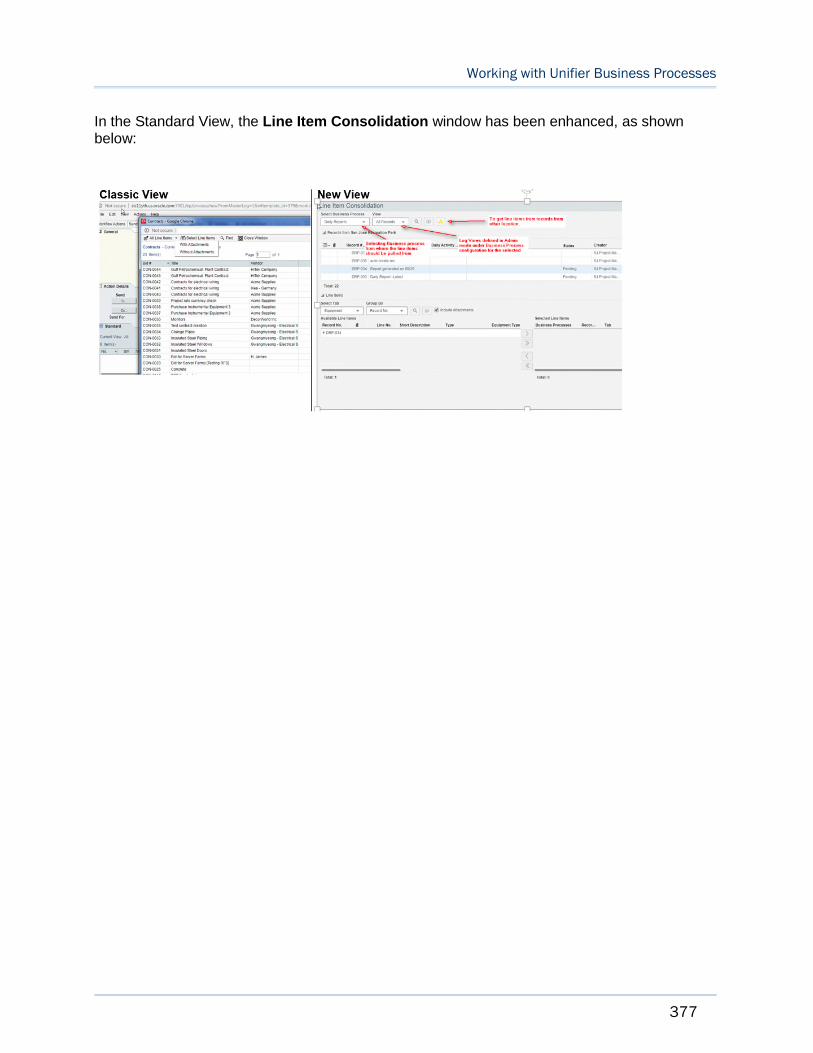
Working with Unifier Business Processes
377
In the Standard View, the Line Item Consolidation window has been enhanced, as shown below:
378
Oracle Primavera Unifier Business Processes User Guide
Copyright © 1998, 2020, Oracle and/or its affiliates. All rights reserved. Oracle and Java are registered trademarks of Oracle and/or its affiliates. Other names may be trademarks of their respective owners.
Intel and Intel Xeon are trademarks or registered trademarks of Intel Corporation. All SPARC trademarks are used under license and are trademarks or registered trademarks of SPARC International, Inc. AMD, Opteron, the AMD logo, and the AMD Opteron logo are trademarks or registered trademarks of Advanced Micro Devices. UNIX is a registered trademark of The Open Group.
This software and related documentation are provided under a license agreement containing restrictions on use and disclosure and are protected by intellectual property laws. Except as expressly permitted in your license agreement or allowed by law, you may not use, copy, reproduce, translate, broadcast, modify, license, transmit, distribute, exhibit, perform, publish or display any part, in any form, or by any means. Reverse engineering, disassembly, or decompilation of this software, unless required by law for interoperability, is prohibited.
The information contained herein is subject to change without notice and is not warranted to be error-free. If you find any errors, please report them to us in writing.
If this is software or related documentation that is delivered to the U.S. Government or anyone licensing it on behalf of the U.S. Government, the following notice is applicable:
U.S. GOVERNMENT END USERS: Oracle programs, including any operating system, integrated software, any programs installed on the hardware, and/or documentation, delivered to U.S. Government end users are "commercial computer software" pursuant to the applicable Federal Acquisition Regulation and agency-specific supplemental regulations. As such, use, duplication, disclosure, modification, and adaptation of the programs, including any operating system, integrated software, any programs installed on the hardware, and/or documentation, shall be subject to license terms and license restrictions applicable to the programs. No other rights are granted to the U.S. Government.
This software or hardware is developed for general use in a variety of information management applications. It is not developed or intended for use in any inherently dangerous applications, including applications that may create a risk of personal injury. If you use this software or hardware in dangerous applications, then you shall be responsible to take all appropriate failsafe, backup, redundancy, and other measures to ensure its safe use. Oracle Corporation and its affiliates disclaim any liability for any damages caused by use of this software or hardware in dangerous applications.
This software or hardware and documentation may provide access to or information on content, products and services from third-parties. Oracle Corporation and its affiliates are not responsible for and expressly disclaim all warranties of any kind with respect to third-party content, products, and services. Oracle Corporation and its affiliates will not be responsible for any loss, costs, or damages incurred due to your access to or use of third-party content, products, or services.
Copyright