un-weigh mobility trainer - baaz oil seals · un-weigh mobility trainer imi 3204, imi 3207 (general...
TRANSCRIPT

UNUN--WEIGH MOBILITY TRAINERWEIGH MOBILITY TRAINERIMI 3204, IMI 3207IMI 3204, IMI 3207
(General Information & Working Manual)(General Information & Working Manual)
1
INDIA MEDICO INSTRUMENTSS-46, Badli Industrial Estate Phase-1, Delhi 110042 (India)
Office : 2-3 Gurwalon Ki Dharamshala, Angoori Bagh, Delhi 110006
Email. : www.indiamedico.com

INTRODUCTIONINTRODUCTION
PARTIAL WEIGHT BEARING GAIT THERAPY AND BALANCE TRAINING (1)
The loss of the ability to ambulate can be one of the most debilitating aspects of manyNeurological and musculoskeletal disorders. Any of the three main components of locomotion- posture, balance and coordination - can be affected by a variety of neurological ormusculoskeletal pathologies resulting in the disruption of an individual’s ability to walkNormally. Partial Weight Bearing Gait Therapy (PWBGT) has shown great promise in helping awide Variety of impaired patients as they relearn walking function. It is an appropriate modalityto use whenever gait therapy is prescribed for patients who are unable to support their ownbody weight or lack the upper body strength to support themselves during assisted ambulation.In addition to aiding gait pattern regeneration, partial weight bearing therapy allows patients toperform cardiovascular workouts in conjunction with a treadmill, enhance balance and improveposture. Partial Weight Bearing Gait Therapy makes use of a patient suspension system, suchas the IMI Un-weighing Trainer, to reduce the amount of weight born by a patient and provideproper upright posture. The suspension system is used to remove a pre-determined portion ofthe weight load from the patient’s legs and redistribute it to the patient’s trunk and upper thighs,thus freeing up the arms and legs.
2India Medico Instruments

INTRODUCTIONINTRODUCTIONPARTIAL WEIGHT BEARING GAIT THERAPY AND BALANCE TRAINING (2)
With the patient supported by the suspension system, horizontal movement is provided bysetting the treadmill to a slow speed. The constant rate of movement provided by the treadmillprovides rhythmic input to reinforce coordinated, reciprocal movement of the legs. The therapistcan provide further assistance, especially with severely involved patients, by manually placingthe patient’s feet and/or assisting the patient in weight shifting. Once the patient begins to gain afeel for the proper coordinated movement pattern the Treadmill speed and/or the amount ofweight borne by the patient can be gradually increased to better simulate natural walkingconditions. The increase in weight bearing and treadmill speed also helps the patient to relearndynamic balance. Having achieved preset goals on the treadmill, the patient can be progressedto ambulating over ground with the aid of the suspension system. Ultimately, it is hoped thepatient will be able to ambulate over ground independently or with an assistive device. PWBGTherapy sessions typically last 30 minutes to an hour and are scheduled three to four times perweek. Each hour of the session can be divided into three or four periods of activity followed by arest period. Activity periods can be as short as three minutes with five minutes of rest but shouldnot exceed 15 minutes if the patient is supported or partially supported by the suspensionsystem. Each period should end at its predetermined time, especially if the patient’s gaitdeteriorates or the patient or therapist feels fatigued. Because the repetition of coordinatedwalking patterns is the most essential element to the success of this therapy, be sure to provideconsistent training without interruptions or breaks.
PARTIAL WEIGHT BEARING GAIT THERAPY AND BALANCE TRAINING (2)
With the patient supported by the suspension system, horizontal movement is provided bysetting the treadmill to a slow speed. The constant rate of movement provided by the treadmillprovides rhythmic input to reinforce coordinated, reciprocal movement of the legs. The therapistcan provide further assistance, especially with severely involved patients, by manually placingthe patient’s feet and/or assisting the patient in weight shifting. Once the patient begins to gain afeel for the proper coordinated movement pattern the Treadmill speed and/or the amount ofweight borne by the patient can be gradually increased to better simulate natural walkingconditions. The increase in weight bearing and treadmill speed also helps the patient to relearndynamic balance. Having achieved preset goals on the treadmill, the patient can be progressedto ambulating over ground with the aid of the suspension system. Ultimately, it is hoped thepatient will be able to ambulate over ground independently or with an assistive device. PWBGTherapy sessions typically last 30 minutes to an hour and are scheduled three to four times perweek. Each hour of the session can be divided into three or four periods of activity followed by arest period. Activity periods can be as short as three minutes with five minutes of rest but shouldnot exceed 15 minutes if the patient is supported or partially supported by the suspensionsystem. Each period should end at its predetermined time, especially if the patient’s gaitdeteriorates or the patient or therapist feels fatigued. Because the repetition of coordinatedwalking patterns is the most essential element to the success of this therapy, be sure to provideconsistent training without interruptions or breaks.
3India Medico Instruments

INTRODUCTIONINTRODUCTIONPARTIAL WEIGHT BEARING GAIT THERAPY AND BALANCE TRAINING (3)
Patients are evaluated over a Two-week period and are expected to make some gains in
their ability to coordinate movement during treadmill walking in this time frame. Continue the
program for Eight to 12 weeks if sufficient progress is demonstrated. Continue for up to an
additional Four weeks for cases showing slower improvement. For acute patients who show
little on no progress after the first Two weeks of therapy, time may be better spent on
different learning activities. The Un-weighing System can be used in the recovery of balance
and posture for patients with compromised posture or balance mechanisms. Toss the
patient a ball to catch or provide perturbation manually to challenge their balance. The
suspension system will prevent the patient from falling while providing proprioceptive cues.
The amount of support can be reduced as the patient progresses.
NOTE : Extreme caution should be taken to assure the stability of autonomic reflexes(in acute stages) as well as bone and muscle integrity (in chronic cases).
PARTIAL WEIGHT BEARING GAIT THERAPY AND BALANCE TRAINING (3)
Patients are evaluated over a Two-week period and are expected to make some gains in
their ability to coordinate movement during treadmill walking in this time frame. Continue the
program for Eight to 12 weeks if sufficient progress is demonstrated. Continue for up to an
additional Four weeks for cases showing slower improvement. For acute patients who show
little on no progress after the first Two weeks of therapy, time may be better spent on
different learning activities. The Un-weighing System can be used in the recovery of balance
and posture for patients with compromised posture or balance mechanisms. Toss the
patient a ball to catch or provide perturbation manually to challenge their balance. The
suspension system will prevent the patient from falling while providing proprioceptive cues.
The amount of support can be reduced as the patient progresses.
NOTE : Extreme caution should be taken to assure the stability of autonomic reflexes(in acute stages) as well as bone and muscle integrity (in chronic cases).
4India Medico Instruments

UNUN--WEIGH MOBIILITY TRAINERWEIGH MOBIILITY TRAINER IMI 3204IMI 3204
5India Medico Instruments

ASSEMBLING THE UNWEIGHING SYSTEMASSEMBLING THE UNWEIGHING SYSTEMNOTE : At least two people are required to complete the following procedure. Ensure that the Un-weighing
system will be assembled on a level surface. Ensure that there is enough room to move easilyaround the Un-weighing system frame during installation. After final assembly the Unit will be likethis drawing/photo. (see page 5)
Tools: Spanners & Screw Driver are provided with the unit for assembly.
1. Using a knife slice open the Bundles & open Boxes and remove the packing.
2. Support legs with wheels should be bolted to Base Frame (with matching Numbers & printed name facingyou) making it to look-like a Horseshoe.
3. Bolt the chrome-plated Support Pillar’s Base Plate on the top of Base Frame with positioning/adjustmentholes on the outer side.
4. Now slide down first Handle Bar bracket, second Steering Handle bracket & last Suspension Bracket(large one). The Locking Pins of Brackets should match with Holes in the Support Pillar.
5. Fix digital Panel on Suspension Bracket.
6. Fix with Straps UPS in SS tray provided on the Base Frame, the out-put sockets should face SupportPillar.
7. Insert patient support handles into the handrail receiving tubes so that they face in toward the center of theunit.
8. Snap a black finishing cap into each of the bolts fixed.
9. To attach the harness, open the harness attachment clips, attach the harness and snap the clips backtogether to secure.
NOTE : 1. Un-weighing System uses a special harness to support the patient. It is vital that the harness fitsproperly on the patient.
2. Never leave a patient unattended on this device. Check all cables, harnesses and fittings
before each use.
NOTE : At least two people are required to complete the following procedure. Ensure that the Un-weighingsystem will be assembled on a level surface. Ensure that there is enough room to move easilyaround the Un-weighing system frame during installation. After final assembly the Unit will be likethis drawing/photo. (see page 5)
Tools: Spanners & Screw Driver are provided with the unit for assembly.
1. Using a knife slice open the Bundles & open Boxes and remove the packing.
2. Support legs with wheels should be bolted to Base Frame (with matching Numbers & printed name facingyou) making it to look-like a Horseshoe.
3. Bolt the chrome-plated Support Pillar’s Base Plate on the top of Base Frame with positioning/adjustmentholes on the outer side.
4. Now slide down first Handle Bar bracket, second Steering Handle bracket & last Suspension Bracket(large one). The Locking Pins of Brackets should match with Holes in the Support Pillar.
5. Fix digital Panel on Suspension Bracket.
6. Fix with Straps UPS in SS tray provided on the Base Frame, the out-put sockets should face SupportPillar.
7. Insert patient support handles into the handrail receiving tubes so that they face in toward the center of theunit.
8. Snap a black finishing cap into each of the bolts fixed.
9. To attach the harness, open the harness attachment clips, attach the harness and snap the clips backtogether to secure.
NOTE : 1. Un-weighing System uses a special harness to support the patient. It is vital that the harness fitsproperly on the patient.
2. Never leave a patient unattended on this device. Check all cables, harnesses and fittings
before each use.
India Medico Instruments 6

BENEFITS OF DYNAMIC UNBENEFITS OF DYNAMIC UN--WEIGHING THERAPYWEIGHING THERAPY
Partial Weight-Bearing Therapy, also known as Un-weighing, is a concept of
rehabilitation that uses an external device to support a percentage of the patient’s body
weight, allowing them to perform a variety of therapeutic activities in an upright and safe
environment.
Typically used with Neurological Pathologies, the patient’s body weight is supported
between 20-40% to assist with developing proper gait patterns and improvements in
cardiovascular and muscular endurance with less physical demand.
The ability to initiate exercise early in the rehabilitation process can benefit the patient
by allowing development of neural pathways through muscular patterning.
Research has shown the benefits of Un-weighing to occur in a variety of physiological
ways.
7India Medico Instruments

PHYSIOLOGICAL BENEFITSPHYSIOLOGICAL BENEFITS
Symmetrical Loading of the Lower extremities - This assists with equal weightdistribution over the base of support. Equal weight distribution in turn provides the properbiomechanics to correct step length deficits and time distribution between limbs.
Reduction of Muscular Splinting - Parasympathetic tones typically associated withneurological pathologies can be reduced through partial-weight therapy.Minimizing parasympathetic stimuli helps to reduce muscular tension in turn allowingfor increased range of motion and focus on motor control exercises.
Reduction of Cardiovascular and Metabolic Demands - Relieving graded portions ofbody weight allow the patient to exercise with less stress to the cardiopulmonary system,this is beneficial for extremely deconditioned patients as it allows them to initiate exercisewithout increasing cardiopulmonary demand. VO2 levels are maintained better at 40% un-weighing than at 0%, the patient can then also exercise for a longer period of time. Thisapplication can be beneficial for cardiac and pulmonary rehabilitation, as well as obesepatients as exercise can be prolonged to enhance conditioning.
8
India Medico Instruments

OTHER BENEFITSOTHER BENEFITSAcute Injury and Post Surgical – Un-weighing can also provide a safe environment tostart acute therapy following injury or surgical procedures. This is especially true withpatients suffering from low back pain, whether it’s acute or chronic. Un-weighing providesan environment around the injured joint with reduced gravitational effects, this can becoupled with exercise to enhance joint stability. Vertical traction is accomplished to providepatient relief. This same approach can be taken with other orthopedic injuries. By usingthe Un-weighing System you can be assured that your patient is working in a dynamicenvironment unloaded to physician specifications. Since the weight of the patient issupported, there is increased safety for them and the clinician, should a fall occur.Balance Training - The Un-weighing System provides a safe environment during balancetraining. Securing your patient in the Un-weighing System will eliminate the risk for fallingduring balance training. The somatosensory input provided by the harness providesproprioceptive feedback in regards to location of the trunk over the base of support and willallow your patient to work with more confidence during rehabilitation.Digital Display of Un-weighing Load - The digital display incorporated on the Un-weighing System provides feedback in regards to the amount of weight being relievedfrom the patient. This is beneficial as it allows for consistency between treatments thusproviding a therapeutic environment to improved gait mechanics and neurologicalpatterning.
Acute Injury and Post Surgical – Un-weighing can also provide a safe environment tostart acute therapy following injury or surgical procedures. This is especially true withpatients suffering from low back pain, whether it’s acute or chronic. Un-weighing providesan environment around the injured joint with reduced gravitational effects, this can becoupled with exercise to enhance joint stability. Vertical traction is accomplished to providepatient relief. This same approach can be taken with other orthopedic injuries. By usingthe Un-weighing System you can be assured that your patient is working in a dynamicenvironment unloaded to physician specifications. Since the weight of the patient issupported, there is increased safety for them and the clinician, should a fall occur.Balance Training - The Un-weighing System provides a safe environment during balancetraining. Securing your patient in the Un-weighing System will eliminate the risk for fallingduring balance training. The somatosensory input provided by the harness providesproprioceptive feedback in regards to location of the trunk over the base of support and willallow your patient to work with more confidence during rehabilitation.Digital Display of Un-weighing Load - The digital display incorporated on the Un-weighing System provides feedback in regards to the amount of weight being relievedfrom the patient. This is beneficial as it allows for consistency between treatments thusproviding a therapeutic environment to improved gait mechanics and neurologicalpatterning.
9India Medico Instruments

POSITIONING THE UNPOSITIONING THE UN--WEIGHING SYSTEM FORWEIGHING SYSTEM FORUSE WITH TREADMILLUSE WITH TREADMILL
1. Roll the un-weighing system into
position so the display faces
toward the front or back of the
treadmill deck. The treadmill
control panel should be easily
accessible.
2. The patient should be placed in the
center of the treadmill belt and
closer to the front than the back.
3. Lock all four locking casters.
4. Adjust un-weighing as needed.
10India Medico Instruments

DETERMINATION OF BODY WEIGHTDETERMINATION OF BODY WEIGHTSUPPORTSUPPORT
1. Heel / Ground contact during ambulation is lost in patients when weight relief is
in excess of 40% body weight.
2. Chose a level of weight relief in which the patient achieved heel/ground contact
bilaterally for ten consecutive steps.
3. When determining body weight support, keep in mind the patient's pathology
level of involvement and comfort. A patient who is considerably challenged
may require a greater percentage of weight relief.
4. The digital panel shows the Total Body-weight of the Patient in Green window
and the Red window shows the Body weight being lifted.
11India Medico Instruments

USING THE SUPPORT HARNESSUSING THE SUPPORT HARNESS
1. Two Harnesses are supplied with the system. (Small harness for thin patients & Large for fatpatients)
2. To assure patient compliance and successful rehabilitation, the Support Harness must beproperly adjusted to provide a comfortable environment for your patients. There are Twoharnesses to accommodates a wide variety of patient sizes and shapes.
3. The Velcro straps are easily adjusted while the harness is on the patient and allow for quickremoval once therapy is completed.
4. The harnesses can accommodate patients with torso sizes measuring from 24" to 50".Follow the directions below to ensure a proper and safe fit.CAUTION: A snug fit is necessary to provide safe un-weighing and improved patient compliance. It is necessary to ensure that the straps do not lay over pressure points or where friction
may occur. These areas may include, but are not limited to, under arms, between legs, and at the edges
of the harness. For purposes of hygiene and comfort, it is recommended that the patient wear clothing
under the contact areas of the harness at all times.
12India Medico Instruments

PUTTING THE HARNESS ON THE PATIENTPUTTING THE HARNESS ON THE PATIENTNOTE: You can perform the following procedure with the patient in a supine, seated or standing position.NOTE: You can perform the following procedure with the patient in a supine, seated or standing position.
1. Undo the Buckle straps on the front of the harness. (The front of the harness is the side with thered button on the seat belt buckle).
2. Place the patient’s arms through the shoulder straps on each side of the harness.3. Place the middle torso strap over the iliac crest. Make necessary adjustments to the vest using
the Velcro straps in the front and back to provide an equal and snug fit.NOTE: The buckles should align up along the middle of the patient's body on both the
front and back.4. Place the leg straps between the legs and adjust fit to patient comfort.5. Ensure that the shoulder straps have been adjusted to equal length on both the right and left
side.6. Attach "O" rings to Cross-Bar hooks and check that the cross bar is now two to three inches
above the patient’s head. Readjust the length of the shoulder straps and ensure the strapsequally snug on both sides.
7. When the treatment session is completed, open the buckles release the patient. The harness isnow ready for the next patient.
CAUTION: The between leg straps must be used with the harness for heavy un-weighing load.The leg straps are as important for weight distribution as is the main body of the harness.The buckles should align with the middle of the patient’s body on both the front and back.
13India Medico Instruments

14
ANTERIOR VIEW POSTERIOR VIEW
India Medico InstrumentsFixing of Harness

15
POSTERIOR VIEW
LATERAL VIEW
India Medico Instruments
ANTERIOR VIEW
Fixing of Harness

ADJUSTING THE HARNESSHE HARNESS
1. Torso Straps : Adjust for the circumference of the patient’s chest.Placement : The middle torso strap should be placed over the iliac crest and equally
distributed between the right and left sides.Adjustment : Using the Velcro straps, secure the harness snugly around the patient’s torso.
The torso straps can be adjusted from the front or back of the harness.2. Between Leg Straps: Allows for weight distribution through the legs.
Adjustment : Using the Velcro strap, secure the harness snugly between the Legs.3. Shoulder Straps : Allow for harness height adjustment while patient is secured to the Un-
weighing System. Should the patient need additional support on one sidethe strap can be shortened to provide additional unilateral support.
Placement : Adjustment of the shoulder straps should allow the cross bar of the Un-weighing System to be positioned approximately two to three inches abovethe patient’s head before the un-weighing load is applied.
Adjustment : The shoulder straps can be lengthened or shortened using the end of the straplocated near the seat belt buckle. With Remote Switch adjust the Suspensionbracket with cross bar to patient height.
NOTE : Be aware of incontinence concerns. Use of the un-weighing harness can put pressureon the patient’s abdominal area, including the bladder. Should a harness becomesoiled, it can be hand-washed in a sanitizing detergent, then air-dried.
NOTE : Patient set-up should be conducted over the desired walking surface (i.e, treadmill orfloor) as moving from the floor to the treadmill will require the set up procedure berepeated.
16India Medico Instruments

ATTACHING A PATIENT TO THEATTACHING A PATIENT TO THEUNUN--WEIGHING SYSTEMWEIGHING SYSTEM
1. Turn “ON” the Load Monitor display on the Right side of the unit.2. Press “TARE” button, all the readings in Red & Green window gets “0”.3. Press “Peak” Hold button, Hold’s Red indicator will glow.4. Press “UP” button (Remote/Hand held switch) to lift up the Patient from
ground to have patient’s actual body weight in Kilograms.& it will be displayed in “GREEN” window.
5. Press “Store/Reset” button to store the actual body weight in memory.6. Press “Peak” Hold button, Hold’s Red indicator will goes OFF.7. Press “DOWN” button (Remote/Hand held switch) and Check the display to
see how much weight have been on the patient’s legs.Calculate the weight removed and press switch until the displayshows the desired level.
8. Ensure the patient is comfortable and that the vest is properly fitted.Be sure the shoulder straps do not rub against the patient’s ears.Make sure the bar does not hit the patient’s head.
The Un-weighing System is now ready for use.
17India Medico Instruments

FREE WHEELINGFREE WHEELING1. The Un-weighing System can be
used over the floor or with otherexercise devices.
2. Be aware of the adjustmentsrequired when moving from onedevice to another.
3. For example, when stepping downfrom a treadmill, the step-up heightof the treadmill must be taken intoaccount.
4. This is accomplished by PressingDOWN switch of remote switch andlowers the patient.
5. The opposite is true when goingfrom the floor to the treadmill.
6. When traveling across the floorthere is no need to spin the entireun-weighing system around whenthe patient runs out of floor space.Simply turn the patient and head inthe opposite direction.
1. The Un-weighing System can beused over the floor or with otherexercise devices.
2. Be aware of the adjustmentsrequired when moving from onedevice to another.
3. For example, when stepping downfrom a treadmill, the step-up heightof the treadmill must be taken intoaccount.
4. This is accomplished by PressingDOWN switch of remote switch andlowers the patient.
5. The opposite is true when goingfrom the floor to the treadmill.
6. When traveling across the floorthere is no need to spin the entireun-weighing system around whenthe patient runs out of floor space.Simply turn the patient and head inthe opposite direction.
18India Medico Instruments
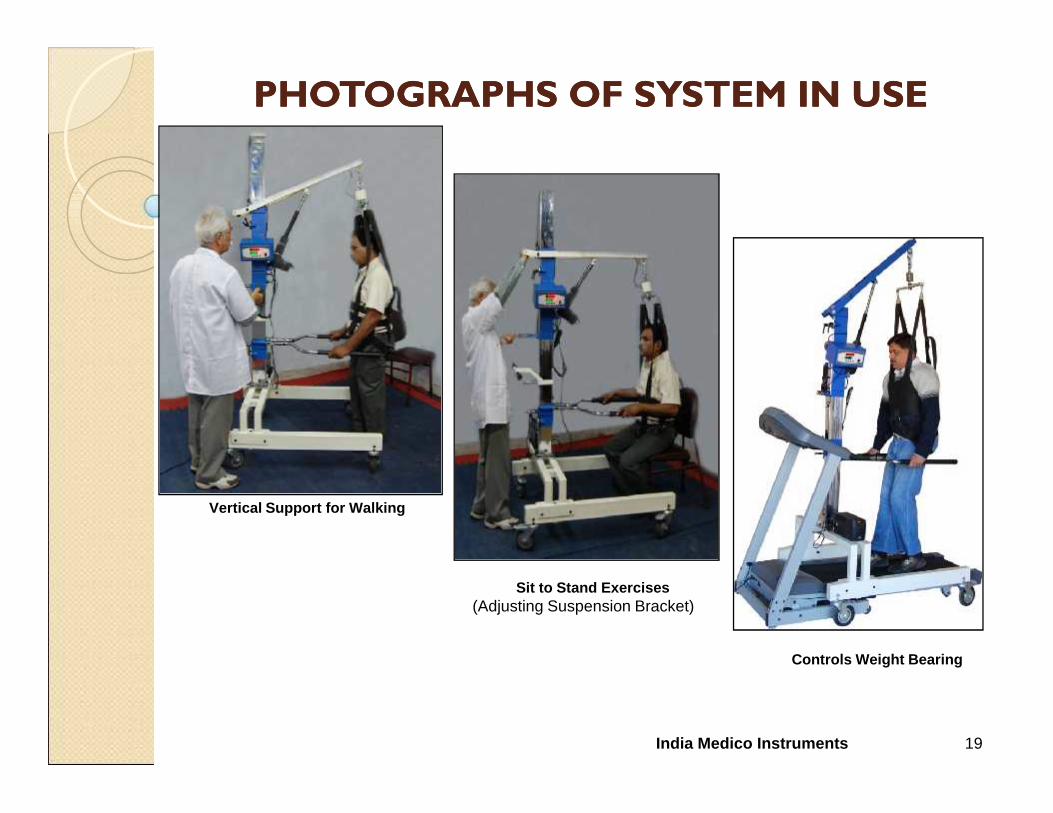
PHOTOGRAPHS OF SYSTEM IN USEPHOTOGRAPHS OF SYSTEM IN USE
19India Medico Instruments
Vertical Support for Walking
Controls Weight Bearing
Sit to Stand Exercises(Adjusting Suspension Bracket)

MAINTENANCE AND SAFETYMAINTENANCE AND SAFETYINSPECTIONINSPECTION
INSPECTION Although the IMI Un-weighing System is designed for trouble-free operation, simple daily and
monthly inspections should be made of the hooks & straps to assure patient safety. A more comprehensive inspection should be performed every six months to the lifting assembly
to ensure proper operation and safe applications.Cleaning
• As needed, wipe down the frame with a solution of warm water and mild detergent.• Hand-wash patient support vest in a sanitizing detergent & Air dry.
Dailya. Inspect the Harness Straps and Snap hooks.b. Use Remote Switch to Lift or Lower the Suspension Cross Bar to check its smooth working.c. Inspect Harness Spreader Bar and clips for signs of wear. Make sure to release clips and lock
them into place to ensure they are functioning properly.Monthly
a, Inspect the four casters for uneven wear. Ensure they are attached firmly to the Un-weighingSystem.
b, Check that the wheels lock and unlock properly.c, Inspect the upper pulley and suspension bracket adjusting rope for any signs of wear, which may
include fraying, cuts, or kinks in the rope.
20India Medico Instruments