ultrasonic fuel sensor - eddy · pdf fileultrasonic fuel sensor user guide for gvxxx-series...
TRANSCRIPT

Ultrasonic Fuel Sensor User Guide For GVXXX-Series Devices Application Notes: ACCEUF100UG001
Revision: 1.00

Ultrasonic Fuel Sensor User Guide
ACCEUF100UG001 - 1 -
Document Title Ultrasonic Fuel Sensor User Guide
Version 1.00
Date 2013-12-16
Status Release
Document Control ID ACCEUF100UG001
General Notes Queclink offers this information as a service to its customers, to support application and engineering efforts that use the products designed by Queclink. The information provided is based upon requirements specifically provided to Queclink by the customers. Queclink has not undertaken any independent search for additional relevant information, including any information that may be in the customer’s possession. Furthermore, system validation of this product designed by Queclink within a larger electronic system remains the responsibility of the customer or the customer’s system integrator. All specifications supplied herein are subject to change. Copyright This document contains proprietary technical information which is the property of Queclink Limited. The copying of this document, distribution to others, and communication of the contents thereof, are forbidden without express authority. Offenders are liable to the payment of damages. All rights are reserved in the event of a patent grant or registration of a utility model or design. All specification supplied herein are subject to change without notice at any time. Copyright © Queclink Wireless Solutions Co., Ltd. 2013
Queclink
Confidential

Ultrasonic Fuel Sensor User Guide
ACCEUF100UG001 - 2 -
Contents
Contents ............................................................................................................................................ 2 Table Index ........................................................................................................................................ 3 Figure Index ...................................................................................................................................... 4 0. Revision history ............................................................................................................................ 5 1. Introduction ................................................................................................................................... 6 2. Product Introduction ..................................................................................................................... 7
2.1. Product Parts List ................................................................................................................ 7 2.2. Technical Parameters .......................................................................................................... 8 2.3. Product Feature ................................................................................................................... 9
2.3.1. High Accuracy ........................................................................................................... 9 2.3.2. Better Long Term Stability ........................................................................................ 9 2.3.3. Easy Installation and Maintenance ............................................................................ 9 2.3.4. Environmentally Friendly .......................................................................................... 9 2.3.5. Reliability .................................................................................................................. 9
2.4. Advantage Over Other Fuel Sensors ................................................................................... 9 2.4.1. Capacitive Fuel Sensor .............................................................................................. 9 2.4.2. Resistive Fuel Sensor ................................................................................................ 9 2.4.3. Fuel Flow Meter ...................................................................................................... 10 2.4.4. Reed Switch Fuel Sensor ......................................................................................... 10 2.4.5. Fuel Float Sensor ..................................................................................................... 10
2.5. Applications ...................................................................................................................... 10 3. Principle Analysis ....................................................................................................................... 11
3.1. Principle ............................................................................................................................ 11 3.2. Obstacles in Fuel Tank ...................................................................................................... 11
4. Installation ................................................................................................................................... 12 4.1. Installation of Square Fuel Tank ........................................................................................ 12
4.1.1. Preparation ............................................................................................................... 12 4.1.2. Observe Fuel Tank Surface ...................................................................................... 12 4.1.3. Locate the Installation Area ..................................................................................... 13 4.1.4. Test .......................................................................................................................... 15 4.1.5. Finish the Installation .............................................................................................. 16
4.2. Installation of Round Fuel Tank ........................................................................................ 19 4.2.1. Observe Tank Surface .............................................................................................. 19 4.2.2. Locate the Installation Area ..................................................................................... 19 4.2.3. Test .......................................................................................................................... 20 4.2.4. Finish the Installation .............................................................................................. 20
5. System Connection ..................................................................................................................... 21 5.1. Wiring ................................................................................................................................ 21 5.2. Installation of the Control Box .......................................................................................... 22
6. Attention ..................................................................................................................................... 24 7. Appendix ..................................................................................................................................... 25
Queclink
Confidential

Ultrasonic Fuel Sensor User Guide
ACCEUF100UG001 - 3 -
Table Index
TABLE 1: TECHNICAL PARAMETERS ............................................................................................... 8 TABLE 2: TOOLS AND AUXILIARY MATERIALS ........................................................................... 12 TABLE 3: CONNECTION WITH GV300............................................................................................. 23 TABLE 4: RECORD FORM .................................................................................................................. 25
Queclink
Confidential

Ultrasonic Fuel Sensor User Guide
ACCEUF100UG001 - 4 -
Figure Index
FIGURE 1. ULTRASONIC FUEL SENSOR PARTS LIST ..................................................................... 7
FIGURE 2. PRINCIPLE DIAGRAM..................................................................................................... 11
FIGURE 3. OBSTACLES IN FUEL TANK ........................................................................................... 11
FIGURE 4. SURFACE OF SQUARE FUEL TANK .............................................................................. 12
FIGURE 5. LOCATIONS AND STRUCTURES OF OBSTACLES IN SQUARE FUEL TANK ......... 13
FIGURE 6. LOCATE THE INSTALLATION AREA ............................................................................ 14
FIGURE 7. FUEL DRAIN BOLT .......................................................................................................... 15
FIGURE 8. COUPLANT ....................................................................................................................... 15
FIGURE 9. FUEL LEVEL AND SIGNAL VALUE ............................................................................... 16
FIGURE 10. MARK THE LOCATION OF DETECTOR ..................................................................... 16
FIGURE 11. STAINLESS STEEL HOSE CLAMP ............................................................................... 17
FIGURE 12. GLUE WITHIN THE RED CIRCLE ................................................................................ 18
FIGURE 13. FINISH THE INSTALLATION ........................................................................................ 18
FIGURE 14. SURFACE OF ROUND FUEL TANK ............................................................................. 19
FIGURE 15. LOCATIONS AND STRUCTURES OF OBSTACLES IN ROUND FUEL TANK ......... 19
FIGURE 16. INSTALLATION AREA OF ROUND FUEL TANK ....................................................... 20
FIGURE 17. WIRING ............................................................................................................................ 21
FIGURE 18. INTERFACE DEFINITION OF CONTROL BOX........................................................... 22
FIGURE 19. CONNECTION WITH GV300 ......................................................................................... 22
FIGURE 20. CUT THE CLIP OF 4 PIN SERIAL PORT HARNESS .................................................... 23
Queclink
Confidential

Ultrasonic Fuel Sensor User Guide
ACCEUF100UG001 - 5 -
0. Revision History
Revision Date Author Description of change 0.01 2013-09-24 Pam Pan Initial 1.00 2013-12-16 Eagle Liu Review
Queclink
Confidential

Ultrasonic Fuel Sensor User Guide
ACCEUF100UG001 - 6 -
1. Introduction
This document is designed to introduce the ultrasonic fuel sensor and offer users instructions on how to install the fuel sensor correctly.
Queclink
Confidential

Ultrasonic Fuel Sensor User Guide
ACCEUF100UG001 - 7 -
2. Product Introduction
2.1. Product Parts List
The product is composed of one ultrasonic sensor detector and one signal control box.
Ultrasonic Sensor Detector Signal Control Box
Figure 1. Ultrasonic Fuel Sensor Parts List
Ultrasonic Detector Control Box
User Connector
Signal Extension Wire
Power Wire
Queclink
Confidential

Ultrasonic Fuel Sensor User Guide
ACCEUF100UG001 - 8 -
2.2. Technical Parameters
Table 1: Technical Parameters
Items Parameters
Operating Voltage 5-36V 50mA
Operating Temperature -40℃-80℃
Measurement Range 5cm-2m
Pressure Range -0.1MPa-32MPa
Level Accuracy 3mm
Level Measurement Accuracy Theoretical 0.1L / Practical 1L
Working Environment Moisture-proof (detector)
acid-resistant (detector)
anti-interference
flame retardant (detector)
anti-vibration (detector)
IP Rating IP66 (detector)
Output Interface
Interface Parameter Connection
Analog Output Output voltage range: 0.1-6.0V. Green: Voltage output
Black: Ground
RS232 Interface Baud rate: 19,200.
Automatically output fuel level (unit 0.1mm)
every 10 seconds
Yellow: TXD
Blue: RXD
Black: Ground
Queclink
Confidential

Ultrasonic Fuel Sensor User Guide
ACCEUF100UG001 - 9 -
2.3. Product Feature
2.3.1. High Accuracy
The measurement resolution of the fuel level is 0.2 mm and the level accuracy is 3 mm. The sensor automatically performs the temperature compensation in the range from -40℃ to 80℃. This ensures the measurement accuracy even when the environment temperature is extreme high or low.
2.3.2. Better Long Term Stability
The fuel sensor adopts the method of ultrasonic measurement, a non-contact measurement that is different from the current widely used direct contact method such as the fuel float sensor, fuel pressure sensor and magnetic fuel sensor, so as to avoid corrosion and pollution by the fuel and keep excellent long-term stability of the measurement.
2.3.3. Easy Installation and Maintenance
The sensor is installed at the bottom of the fuel tank, which requires no change to the original fuel tank measuring system and the fuel tank. This allows the original vehicle fuel gauge to work undisturbed and no warrant issue.
2.3.4. Environmentally Friendly
The non-contact measurement does not require making hole to the fuel tank or modifying the fuel tank and thus avoids the fuel contamination.
2.3.5. Reliability
It can work perfectly in harsh environments.
2.4. Advantage Over Other Fuel Sensors
2.4.1. Capacitive Fuel Sensor
This type of fuel sensor is susceptible to sticky grease stains and causes measurement error. It has potential risk of producing electrical spark. Drilling installation causes pollution and warranty issue.
2.4.2. Resistive Fuel Sensor
This type of fuel sensor uses mechanical method to measure fuel level. It is easy to get big measurement error and delay. It is vulnerable to corrosion and pollution because of long-term exposure to the fuel, which will lower the measurement accuracy. Drilling installation is used.
Queclink
Confidential

Ultrasonic Fuel Sensor User Guide
ACCEUF100UG001 - 10 -
2.4.3. Fuel Flow Meter
This type of fuel sensor is difficult to install as it has to truncate the original fuel pipe. It can measure the fuel consumption, but not the amount of refuelling, which makes it inconvenient for measurement and management.
2.4.4. Reed Switch Fuel Sensor
This type of fuel sensor has low accuracy and is very easy to be influenced by the measurement media and temperature fluctuation caused by power voltage. Its components are vulnerable to magnetization. The measurement result is greatly influenced by fluctuations in the fuel level and grease. It is impossible for field installation according to the height of the fuel tank.
2.4.5. Fuel Float Sensor
This type of fuel sensor can only be used for vague indication and cannot be used for fuel metering. It is vulnerable to grease stain, power supply, mechanical structure and lubrication, which will cause problem of stability to the output value.
2.5. Applications
The product applies to various types of vehicles including logistics vehicles, taxis, buses and passenger cars. It can measure the vehicle refuelling and fuel consumption and thus to prevent the fuel theft, avoid resource waste, improve operating efficiency, enhance the traffic safety, and strengthen the operation and management of fleets.
Queclink
Confidential

Ultrasonic Fuel Sensor User Guide
ACCEUF100UG001 - 11 -
3. Principle Analysis
This chapter mainly illustrates the principle of the ultrasonic fuel sensor and the common fuel sending units and partitions.
Figure 2. Principle Diagram
3.1. Principle
Liquid level in a container is measured by coupling the transducer to the bottom of the container using couplant. The transducer generates a short ultrasonic sound pulse which is transmitted through the container wall and into the liquid. The pulse travels up through the liquid until it reaches the surface where it is reflected and returns back through the liquid to be received by the transducer. The liquid level then could be calculated by the round-trip transit time and the sound velocity in the liquid. According to the principle, the depth of the liquid calculated in this method could be wrong if the ultrasonic wave is reflected before the due time when there are obstacles in the transmission path. Therefore, users should avoid obstacles that could hinder the transmission of ultrasonic wave such as common fuel sending units, supply tubes, return tubes and partitions inside the fuel tank.
3.2. Obstacles in Fuel Tank
Figure 3. Obstacles in Fuel Tank
Queclink
Confidential

Ultrasonic Fuel Sensor User Guide
ACCEUF100UG001 - 12 -
4. Installation
This chapter deals with the installation procedure of the square and round fuel tank.
4.1. Installation of Square Fuel Tank
4.1.1. Preparation
Fill up the fuel tank and park the vehicle on a horizontal surface, and prepare all the installation tools and auxiliary materials as shown below.
Table 2: Tools and Auxiliary Materials
Items Quantity Items Quantity
Ultrasonic Fuel Sensor 1 set Small Phillips Screwdriver 1 Couplant 1 bottle Large Phillips Screwdriver 1 LOCTITE 380 Glue 1 bottle Cable Tie Several 80# Sandpaper Several LED Digital Tube Display 1 Diagonal Cutting Pliers 1 Rag 1 piece Black Tape 1 Plastic Bottle with Water 1 bottle 12V Lithium Portable Power Supply
1 Disposable Mitten Several
L-Square 1 3m Line Tape 1 Chalk Several 304 Stainless Steel Hose Clamp Several Thread Sealant 1 bottle
4.1.2. Observe Fuel Tank Surface
Observe the locations of the obstacles such as the fuel sending unit, supply tube and return tube on the surface of the fuel tank.
Figure 4. Surface of Square Fuel Tank
Users can judge the locations and structures of the obstacles inside the fuel tank by observing them
Queclink
Confidential

Ultrasonic Fuel Sensor User Guide
ACCEUF100UG001 - 13 -
on the surface.
Supply/Return Tube
Dip Tube Fuel
Sending Unit
Supply / Return
Tube
Float Fuel
Sending Unit
Figure 5. Locations and Structures of Obstacles in Square Fuel Tank
4.1.3. Locate the Installation Area
According to the principle of the ultrasonic fuel sensor, the gauged liquid depth could be wrong if the ultrasonic wave is hindered by the obstacles such as supply or return tube and fuel sending unit. Therefore, the area covering the fuel sending unit and supply or return tube at the top of the fuel tank can not be used for installation. Meanwhile, the detector should be installed close to the center of the fuel tank in order to minimize the interference. As shown in Figure 6, select an area with 20CM X 20CM in the center of the fuel tank as the installation area after lining out the area not suitable for installation. The installation area can be bigger or smaller, depending on the actual situation of the fuel tank. If the obstacles are located right in the center of the fuel tank, please select an area near the center without obstacles to install the detector.
Queclink
Confidential

Ultrasonic Fuel Sensor User Guide
ACCEUF100UG001 - 14 -
Figure 6. Locate the Installation Area
Note: the installation area must avoid the possible area with fuel sediments, that is, the prominent surface of the fuel drain bolt. As shown below, the old detector on the left is a faulted one because of the fuel sediments.
Queclink
Confidential

Ultrasonic Fuel Sensor User Guide
ACCEUF100UG001 - 15 -
Figure 7. Fuel Drain Bolt
Please make sure that the installation area does not obstruct the installation of the stainless steel hose clamp.
4.1.4. Test
Draw an area at the bottom of the fuel tank corresponding to the area available to installation at the top. Wash this area by removing all the grease, dirt and sands on the surface and dry it with a rag. If the conditions allow it, please read the fuel level from the fuel gauge in the cab or observe the depth of the fuel by opening up the fuel tank cap. Otherwise, please knock at the side of the fuel tank with hand and assess the current depth of fuel by the sound. For example, there is still 45cm fuel in the tank with a height of 50cm, as the installation requires almost full capacity of fuel in the tank. Then as shown in Figure 8, please push the couplant onto the detector and stick the detector to the selected area to find the precise location for installation. During this process, please observe whether the reading in the LED digital tube display approximates 45cm, or 450, and the signal value is not bigger than 0.0.2.
Figure 8. Couplant
The difference between the fuel level (unit: mm) and the signal value is that the latter has decimal points as shown in Figure 9.
Queclink
Confidential

Ultrasonic Fuel Sensor User Guide
ACCEUF100UG001 - 16 -
Figure 9. Fuel Level and Signal Value
Note: Sometimes, the gauged liquid depth is 000mm and the signal strength is 000 when the vehicle is stationary. In this situation, fill the fuel to more than 80% of the full capacity and start the vehicle engine, if the correct depth can be obtained with the signal strength ranging from 1 to 2 by shaking the vehicle, then we can judge the location is suitable for installation. After finding the suitable installation location, a circle mark of the detector will be left on the couplant when taking off the detector gently in the vertical direction. Then draw a square frame tangent to the circle with the small Phillips screwdriver and mark the location of the detector as shown in Figure 10.
Figure 10. Mark the Location of Detector
4.1.5. Finish the Installation
Clean the couplant on the fuel tank and the detector with a rag. Remove the paint on the surface of the fuel tank within the square frame with the sand paper. Then clean the dirt and grease on the surface with a rag. Make sure the contact surface is clean. But don't remove the paint outside the square frame. Fasten the stainless steel hose clamp to the installation location and leave room for plastic cable ties
Queclink
Confidential

Ultrasonic Fuel Sensor User Guide
ACCEUF100UG001 - 17 -
used to fix the detector cable. Please refer to the following figures.
Figure 11. Stainless Steel Hose Clamp
After the detector and the installation surface become dry, put on the disposable plastic mitten and spread glue in the center of the detector. Don't put too much glue. As the sand paper may remove paint outside the square frame, protect this exposed area with glue on the detector (the glue will form a rust-proof film) by moving the detector fast and mildly on the exposed area. After ensuring that the exposed area is covered with glue and the liquid depth and signal value are reasonable, press the detector tightly to the location. (Please note that the hold-down groove on the back of the detector should be parallel with the section of the tank to ensure the successful installation of the stainless steel hose clamp.) Wait two minutes for preliminary curing of the glue. During this process, users can also quickly fine-tune the location based on the reading of the digital tube display (If necessary, an installation engineer can shake the vehicle by standing on the front of the vehicle.) to ensure the best signal strength before the glue solidifies. The glue only needs to cover the area within the red circle as shown in Figure 12. After the preliminary curing, reinforce the detector with the 304 stainless steel hose clamp and reinforce the thread with thread sealant, and fix the detector cable with plastic cable ties along the stainless hose clamp as shown in Figure 13.
Queclink
Confidential

Ultrasonic Fuel Sensor User Guide
ACCEUF100UG001 - 18 -
Figure 12. Glue within the Red Circle
Figure 13. Finish the Installation
Queclink
Confidential

Ultrasonic Fuel Sensor User Guide
ACCEUF100UG001 - 19 -
4.2. Installation of Round Fuel Tank
4.2.1. Observe Tank Surface
Observe the locations of obstacles such as the fuel sending unit, supply tube, and return tube.
Figure 14. Surface of Round Fuel Tank
Judge the structures and locations of obstacles inside the fuel tank based on the observation of those obstacles on the surface.
Figure 15. Locations and Structures of Obstacles in Round Fuel Tank
4.2.2. Locate the Installation Area
The installation area of the round fuel tank is different from that of the square one. Only the location of the tangent can reflect the true depth of the liquid. Therefore, the detector must be installed on the tangent section perpendicular to the liquid surface and avoid obstacles in order to ensure the precision and stability of gauged data. Locate the installation area as shown in Figure 16. The selection of the tangent location: spread water on the surface of the fuel tank and the water will flow along the surface to the lowest point to drop which is the tangent location perpendicular to the liquid surface.
Queclink
Confidential

Ultrasonic Fuel Sensor User Guide
ACCEUF100UG001 - 20 -
Figure 16. Installation Area of Round Fuel Tank
Please avoid selecting installation location that will hinder the installation of the stainless steel hose clamp.
4.2.3. Test
Refer to 4.1.4.
4.2.4. Finish the Installation
Refer to 4.1.5.
Queclink
Confidential
Ultrasonic Fuel Sensor User Guide
ACCEUF100UG001 - 21 -
5. System Connection
System connection includes correct wiring and installation of the signal control box.
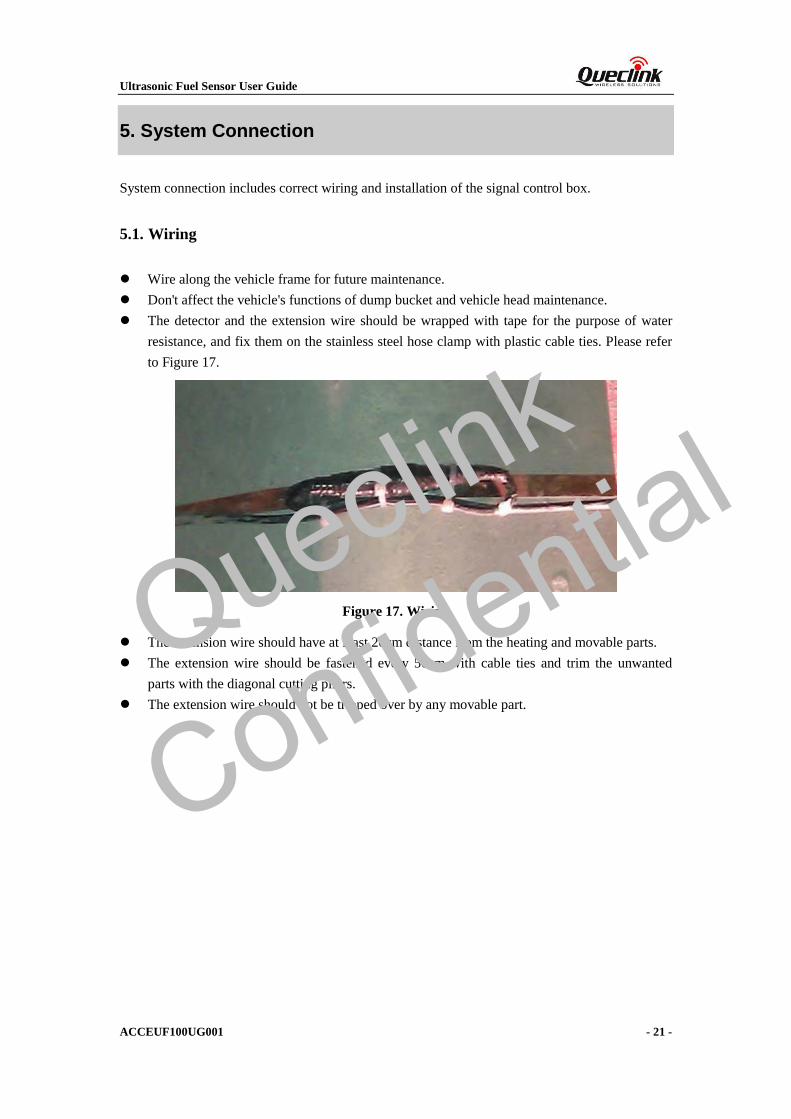
5.1. Wiring
Wire along the vehicle frame for future maintenance. Don't affect the vehicle's functions of dump bucket and vehicle head maintenance. The detector and the extension wire should be wrapped with tape for the purpose of water
resistance, and fix them on the stainless steel hose clamp with plastic cable ties. Please refer to Figure 17.
Figure 17. Wiring
The extension wire should have at least 20cm distance from the heating and movable parts. The extension wire should be fastened every 50cm with cable ties and trim the unwanted
parts with the diagonal cutting pliers. The extension wire should not be tripped over by any movable part.
Queclink
Confidential

Ultrasonic Fuel Sensor User Guide
ACCEUF100UG001 - 22 -
5.2. Installation of the Control Box
The control box should be fixed on the installation surface of the vehicle with Velcro. Install it on the horizontal surface and fasten it with cable ties. The interface definition of the control box is as follows.
Figure 18. Interface Definition of Control Box
Power interface: connect to the vehicle’s battery. GPS tracker interface: connect to GPS tracker device as shown in Figure 19. Ultrasonic interface: connect to the extension wire. Fix the control box on the vehicle with Velcro and fasten the three wire harnesses together. Meanwhile, fasten the unused harnesses together and fix them on the vehicle. The unused harnesses should not be left in chaos.
Figure 19. Connection with GV300
Queclink
Confidential

Ultrasonic Fuel Sensor User Guide
ACCEUF100UG001 - 23 -
Table 3: Connection with GV300
Fuel Sensor PIN Name Color Connect to GV300 Color Power Interface Positive Red PIN 11 PWR Red
Negative Black PIN 6 GND Black Tracker Interface
TX Yellow PIN 4 RXD Green or Pink RX Blue PIN 5 TXD Black and White Ground Black PIN 6 GND Black
For the sake of convenience of maintenance, users can cut the clip from the connector of the 4-PIN serial port harness as it is difficult to plug out. Please fasten together the cables with cable ties if the clip is cut off. The above one in Figure 20 is a serial port harness with clip cut.
Figure 20. Cut the Clip of 4-PIN Serial Port Harness
Queclink
Confidential

Ultrasonic Fuel Sensor User Guide
ACCEUF100UG001 - 24 -
6. Attention
Pay attention to your own safety during installation.
Connect cables to the positive and negative of batteries in the correct way. The power interface
should not contact other circuits and metal parts of vehicles. Don’t cut or connect circuits
arbitrarily in the vehicles.
Take some shock-absorbing measures when fixing the signal control box if possible.
After installation is completed, record the vehicle model, materials and shape of the fuel tank,
and installation location among others as reference for after-sales service. The record form is in
the appendix.
Queclink
Confidential

Ultrasonic Fuel Sensor User Guide
ACCEUF100UG001 - 25 -
7. Appendix
Table 4: Record Form
No. License Plate No.
Vehicle Brand
Vehicle Picture
Material of Fuel Tank
Fuel Tank Shape (Picture)
Fuel Tank Specifications
Installation Location (Picture)
1 2 3
Queclink
Confidential