uk akvasmart ccs feeding system maintenance manual
TRANSCRIPT

Page 1 of 44Maintenance manual Akvasmart CCS Feeding system Document no. DC10000635
MAINTENANCE MANUAL
Akvasmart CCS Feeding System
B 25.09.14 Approved (ECO-0000588) EBL IL/HMRev Date Issued Issued by Approved by
Document no.:
DC10000635 Documents part no.:
10001158 Project no.: 88072-01

Page 2 of 44Maintenance manual Akvasmart CCS Feeding system Document no. DC10000635
For a thorough introduction of Your AKVA product, we ask that
all users read this entire manual. If questions occur, contact us!
The information in this document is subject to change without
notice and should not be construed as a commitment by AKVA
group ASA.
AKVA group ASA assumes no responsibility for any errors
that may appear in this document.
In no event shall AKVA group ASA be liable for incidental or con-
sequential damages arising from use of this document or of the
software and hardware described in this document.
We reserve all rights in this document and in the information
contained therein. Reproduction, use or disclosure to third
parties without express authority is strictly forbidden.
Additional copies of this document may be obtained from
AKVA group ASA at its current charge.
© 2014 AKVA group ASA (NO)

Table of contents
1 Safety .......................................................................................................5
1.1 Safety symbols ............................................................................................5
1.2 General ......................................................................................................6
1.3 Emergency-stop ..........................................................................................7
1.4 Safety risk related to the feeding process .......................................................7
1.5 Risks during installation, use, maintenance and repair ......................................8
1.6 Risk associated with live electric parts ............................................................9
1.7 Risks associated with high surface temperature ...............................................9
2 Introduction.............................................................................................10
2.1 Contact information .................................................................................... 12
3 Information .............................................................................................13
4 Blowers ...................................................................................................16
4.1 Check and change air filter Robuschi blower .................................................. 16
4.2 Check and change air filter Kaeser blower ..................................................... 16
5 Dosers .....................................................................................................17
5.1 Gasket and rotor cleaning ........................................................................... 18
6 Selector ...................................................................................................27
6.1 Internal selector cleaning ........................................................................... 27
7 Feeding pipes ..........................................................................................28
7.1 Prevention instructions................................................................................ 29
8 Rotor spreader ........................................................................................30
8.1 Bearing cleaning ........................................................................................ 30
9 Main cabinet ............................................................................................31
9.1 Air filter .................................................................................................... 31
Page 3 of 44Maintenance manual Akvasmart CCS Feeding system Document no. DC10000635

10 Emergency stop ......................................................................................32
11 Cooler .....................................................................................................33
12 Maintenance intervals .............................................................................34
12.1 Expected equipment life time ....................................................................... 35
12.2 Check lists................................................................................................. 36
12.3 Daily maintenance ...................................................................................... 37
12.4 Weekly maintenance - first half year ............................................................. 38
12.5 Weekly maintenance - second half year ......................................................... 39
Appendix A - Index...........................................................................................40
Appendix B - Deviation form.............................................................................42
Appendix C - Notes ...........................................................................................43
Page 4 of 44Maintenance manual Akvasmart CCS Feeding system Document no. DC10000635
1 SafetySafety for the users of our equipment is top focus when AKVA
group ASA develop new products and product manuals.
We therefore strongly recommend that everyone that use the
equipment, all that perform any type of repairs, service or other
maintenance to the product, and all that work in areas where the
product is installed read this entire manual and at least this
safety chapter.
This recommendation is based on both personnel safety as well
as a desire to keep the products in order and avoid damages
risked if the safety instructions are not followed.
1.1 Safety symbols
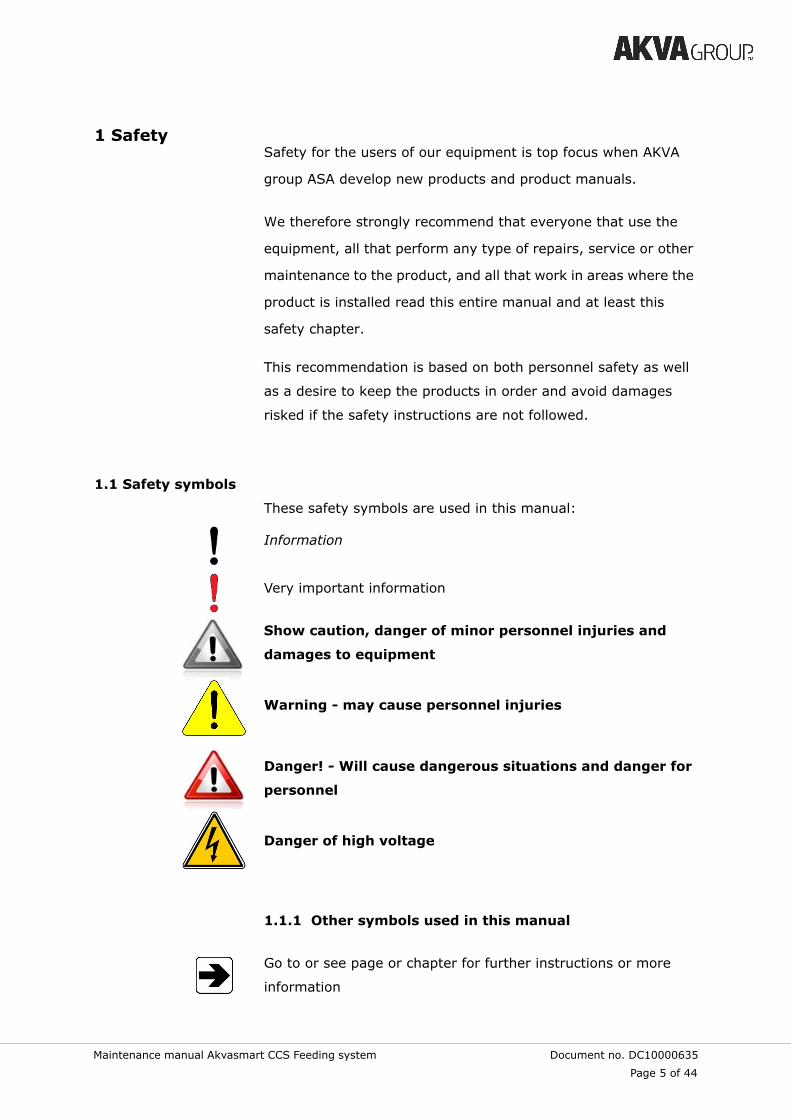
These safety symbols are used in this manual:
Information
Very important information
Show caution, danger of minor personnel injuries and
damages to equipment
Warning - may cause personnel injuries
Danger! - Will cause dangerous situations and danger for
personnel
Danger of high voltage
1.1.1 Other symbols used in this manual
Go to or see page or chapter for further instructions or more
information
Page 5 of 44
Maintenance manual Akvasmart CCS Feeding system Document no. DC10000635

1.2 General
The system must not be operated, and no work may be
performed on the system before the safety precautions
described in this manual have been read and understood.
This safety information covers functions that are involved in the
Akvasmart CCS feeding system maintenance. The information
does not cover how to design, install and operate a complete
system, nor does it cover all peripheral equipment, which can
influence the safety of the total system.
To protect personnel, the complete system has to be designed
and installed in accordance with the safety requirements set
forth in the standards and regulations of the country in which the
system is installed. The system users are responsible for
following these regulations, this is not AKVA group ASA’s
responsibility.
The Akvasmart CCS feeding system users have to ensure that
the applicable safety laws and regulations in the current country
are complied, and that the safety devices necessary to protect
people working with the system, have been designed and
installed correctly. People who work with the Akvasmart CCS
feeding systems must be familiar with the operation and
handling of the system, described in applicable documents.
Apart from the built-in safety functions, the system is supplied
with an interface for external safety device connections. Via this
interface, external emergency stop switches can be incorporated
into the system. Please refer to the emergency stop switches’
own installation manual for information on how to install this.
Safety procedures must be followed to prevent personnel
and equipment injuries
Page 6 of 44
Maintenance manual Akvasmart CCS Feeding system Document no. DC10000635

1.3 Emergency-stop
“A condition which overrides all other system controls, removes
drive power from the motors, stops all moving parts and removes
power from other dangerous functions controlled by the system.”
The emergency stop must be activated when any danger to
people or equipment occurs. A built in emergency stop button is
located at the front of the main control cabinet door.
Additional emergency stop buttons can be connected to the
safety chain by the user, as long as they fulfill the requirements
of “EN 418 Safety of Machinery, Emergency stop equipment,
functional aspects.”
Before restarting anything after an emergency stop, the
reason of the stop needs to be examined and repaired
1.4 Safety risk related to the feeding process
The system automatically starts feeding in accordance with an
user defined schedule. This schedule may be predetermined, or
it follows signals from for instance the Doppler pellet sensors.
Feed is transported from the silos to the cages using compressed
air, and the fish feed have a high speed when leaving the
transport pipe via the rotor spreader. Personnel must not be in
the area around the pipe outlet, unless the system main switch
has been turned off and secured in locked position, because of
the risk of injury related to flying feed pellets.
Covers on blowers, dosers and selectors must never be removed
during operating mode/feeding. The farm owner and the
operations manager are responsible for installing appropriate
warning signs regarding this risk prior to setting the system into
operation.
Page 7 of 44
Maintenance manual Akvasmart CCS Feeding system Document no. DC10000635

1.5 Risks during installation, use, maintenance and repair
To prevent injuries and damages during installation, use,
maintenance and repairs, the regulations applicable in the
country concerned, and the instructions from AKVA group ASA
(hereunder this manual), must be complied with.
Special attention must be paid to the following points:
- Electric shock may appear because of the static electricity
appearing between the pellets and the HDPE pipe
material. The electricity inside may cause severe shocks when
cutting the pipes endangering the life and health of the user.
Cutting should only be performed by qualified personnel
- The instructions in product specification manual, installation-,
maintenance- and repair manuals must always be followed
- The system supplier must ensure that all circuits delivered
with the safety functions are interlocked in accordance with
the applicable standards for that function
- Those who install the system must have the appropriate
training for the system in question, as well as for any safety
matters associated with it
- Emergency stop buttons must be positioned in easily
accessible places so that the system can be stopped quickly
- Those in charge of operations must make sure that safety
instructions are available for the installation in question.
Although troubleshooting may, on occasion, have to be
carried out while the power supply is turned on, the main
rule is that the system must be turned off and secured in
OFF position during installation, maintenance and repairs,
thus disconnecting all electric leads and disconnecting or
connection of units.
Page 8 of 44
Maintenance manual Akvasmart CCS Feeding system Document no. DC10000635

1.6 Risk associated with live electric parts
A danger of high voltage is associated with the following parts of
the system:
- The mains supply/mains switch of the main control cabinet
- The frequency inverters of the main control cabinet and the
selector valve
- The motors for driving the dosers and the selector valves
- The external voltage connected to the control cabinet mains
switch remains live even when the mains switch itself is
turned off.
1.7 Risks associated with high surface temperature
The outlet air of the blower can be hot when the system is
running. This means that the air transport pipes are very hot,
and these surfaces must not be touched without using protective
gloves, because touching presents a risk for personnel injury.
Care must therefore be taken to avoid touching these pipes
without protective gloves before they have cooled down. It is the
responsibility of the farm owner and the operations manager to
install proper warning signs regarding the hot surfaces, these
signs must be put up prior to any operation of the system.
The dosers’ motor and the selector valve motor can become
hot during system operation. This presents a risk for personnel
injury, and care must be taken to avoid touching these
components without protective gloves before they have cooled
down.
INFORMATION IN THIS SAFETY CHAPTER MUST NOT BE
REGARDED AS A WARRANTY FROM AKVA GROUP ASA.
THE FEEDING SYSTEM MAY CAUSE DAMAGE EVEN IF THE
SAFETY PROSEDURES ARE FOLLOWED
Page 9 of 44
Maintenance manual Akvasmart CCS Feeding system Document no. DC10000635

2 Introduction
This user manual is part of the equipment delivered with
Akvasmart CCS Feeding System. Preserve this manual for
as long as the equipment is being used, and make sure
that all changes done to the system and its equipment are
being noted in the back this manual.
Thank you for choosing AKVA group ASA as supplier for your
feeding system. Do not hesitate contacting us if you need more
information regarding use or maintenance for your product.
With four house brands, AKVA group ASA is a world leading
supplier of technical aquaculture equipment. Since 1980 we
have developed and produced fish farming equipment, both for
cages at sea and for land based hatcheries. AKVA represents an
industrial standard, which is presumed to be the turn key to the
future. Research, project management, fast deliveries and
customer follow-up have been in focus to ensure that we
deliver the best possible and most cost efficient equipment, and
thus contributing to preserve a sustainable aquaculture and a
positive development within the aquaculture industry.
We have a wide variety of products, for example: plastic and
steel cages, high pressure washers, net washers, boats, feed
barges, feeding systems, cameras, sensor systems, under water
lighting, software for fish farming and recycling systems.
We practice continuous product development to improve the
equipment’s safety, functions, manner of operation and working
reliability. This manual enables the operator to install and
maintain Akvasmart CCS Feeding system in a safe and
economically way.
Page 10 of 44Maintenance manual Akvasmart CCS Feeding system Document no. DC10000635

All of our feeding system products are developed according to
these European directives:
• EMC directive, 2004/108/EC• Low voltage directive, 2006/95/EC• Machinery directive, 2006/42/EC
All of our equipment is pre-installed, tested and delivered from
our own production department or from approved collaborators.
This means that our customers have total control of components
to choose from, grouping collocation, testing and deliveries.
Our production staff consists of people with great expertise and
enthusiasm to produce the best possible products for you.
Having our own production site gives you excellent service in
case something should go wrong, or if you are in need of any
assistance. We hold most of the parts for your equipment in
stock, and our service staff is available on the telephone or on
location in order to assist you if necessary.
This entire manual, and especially the safety chapter must be read and understood before commencing any work on the components of the Akvasmart CCS Feeding system
This manual must be read and understood, and maintenance
must be performed as described here to ensure reliable
operations.
Page 11 of 44Maintenance manual Akvasmart CCS Feeding system Document no. DC10000635

2.1 Contact information
AKVA group ASA - Bryne (Head Office)Nordlysveien 4PO. Box 271N-4340 Bryne, Norwaytel. +47 - 51 77 85 00fax. +47 - 51 77 85 01
Support Hardware and AKVAconnecttel. + 47 - 51 77 85 [email protected]
Support Fishtalk tel. +47 - 73 84 28 [email protected]
Page 12 of 44Maintenance manual Akvasmart CCS Feeding system Document no. DC10000635

3 Information
The central feed system concept was invented by AKVA in 1980
and Akvasmart CCS Feed System is today the most popular and
reliable feed system worldwide. The system is suitable for all
species feeding on pellets. It is now also fully integrated with
camera control, pellet- and environmental sensors, as well as
Fishtalk production control software. All feeding and
environmental data is stored in the Fishtalk database. This
unique integration allows for full overview and control of all
operational activities from farm site to top management level.
The Akvasmart CCS Feed System will feed the correct amount,
at the optimal rate, on time and every time. This powerful
system provides great opportunities to optimize the entire
feeding process.
AkvaControl is the leading edge feed system software, now part
of the Fishtalk software family. New functionality includes meal
planner, group feeding and adaptive feeding. Combined with
data from environmental sensors, this allows for efficient
analysis and benchmarking between farm sites.
The Akvasmart CCS Feed System is designed to handle more
than 40 feed lines running i parallel and more than 1000 cage/
tank units, centralized- or hopper feeders, all operated from one
PC, iPad or smartpone.
Akvasmart CCS is the perfect choice for feeding fish, designed to
fit the requirements from low capacity system such as CCS-32,
up to high capacity systems such as CCS-110.
The Akvasmart CCS Feed System is designed to fulfill all feeding
requirements, regardless of species or how you want to feed
your fish.
Page 13 of 44Maintenance manual Akvasmart CCS Feeding system Document no. DC10000635
The configuration of the system is based on the following
factors:
- Transport lengths
- Biomass
- Number of units (cages)
- Species
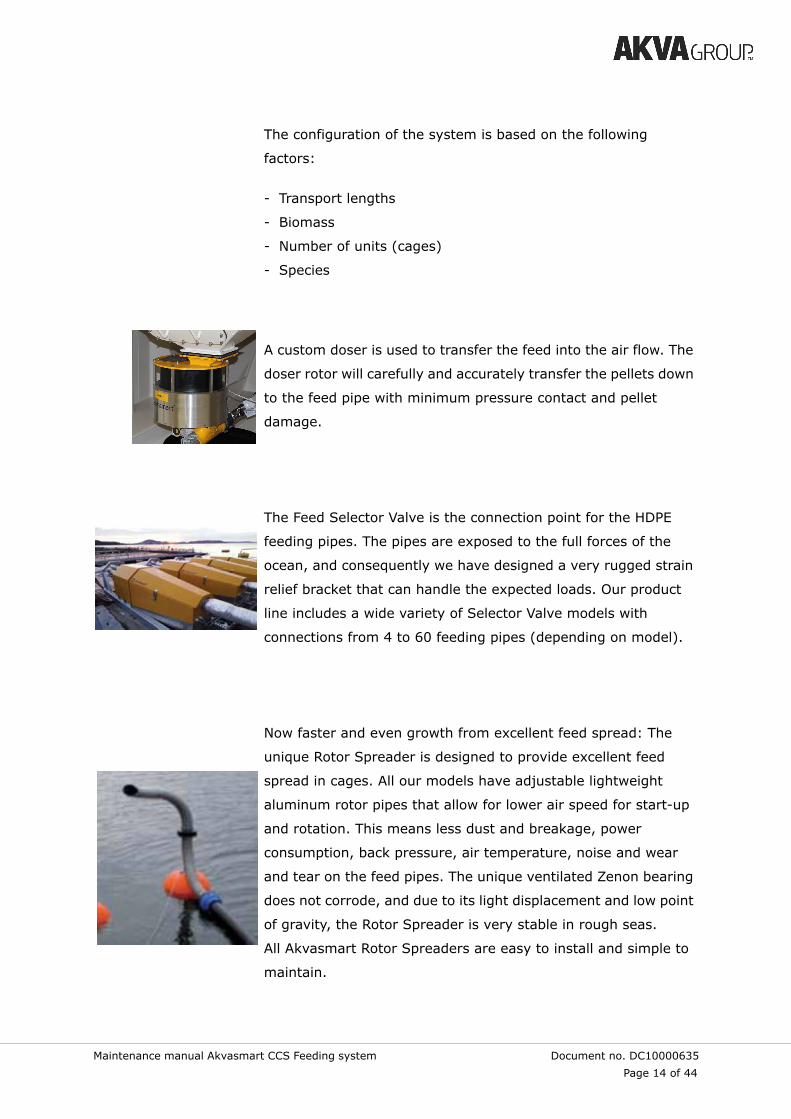
A custom doser is used to transfer the feed into the air flow. The
doser rotor will carefully and accurately transfer the pellets down
to the feed pipe with minimum pressure contact and pellet
damage.
The Feed Selector Valve is the connection point for the HDPE
feeding pipes. The pipes are exposed to the full forces of the
ocean, and consequently we have designed a very rugged strain
relief bracket that can handle the expected loads. Our product
line includes a wide variety of Selector Valve models with
connections from 4 to 60 feeding pipes (depending on model).
Now faster and even growth from excellent feed spread: The
unique Rotor Spreader is designed to provide excellent feed
spread in cages. All our models have adjustable lightweight
aluminum rotor pipes that allow for lower air speed for start-up
and rotation. This means less dust and breakage, power
consumption, back pressure, air temperature, noise and wear
and tear on the feed pipes. The unique ventilated Zenon bearing
does not corrode, and due to its light displacement and low point
of gravity, the Rotor Spreader is very stable in rough seas.
All Akvasmart Rotor Spreaders are easy to install and simple to
maintain.
Page 14 of 44Maintenance manual Akvasmart CCS Feeding system Document no. DC10000635

Akvasmart Air Control System is installed between the Air Cooler
and Feed Doser. Regulated air speed ensures optimal pellet flow,
significantly reducing the risk of blockage and breakage.
- if air speed is too low, the risk for pellet breakage increases
- if air speed is too high, dust and breakage increases
The system also monitors and logs air speed, back pressure and
temperature.
Smart Remote Controls provide new opportunities for the fish
farmer. The rugged Tablet PCs give you access to all the
functionality in AkvaControl and Fishtalk while away from the
control room. You can control the feed system, look at
environmental sensor readings and watch video from the feeding
cameras, only using the Remote Control.
Page 15 of 44Maintenance manual Akvasmart CCS Feeding system Document no. DC10000635

Page 16 of 44
Maintenance manual Akvasmart CCS Feeding system Document no. DC10000635
4 Blowers
When operating, this component gives a continuous air-flow to
the pipe-system, and thereby transports the feed through the
system in order to feed each unit in the system.
All maintenance parameters are found in the maintenance table
in chapter 12.
Remember to always turn the main switch off and secure
it in locked position before any work is done with the
blowers!
In the Akvasmart CCS Feed System, two different types of
blowers are used; the Robuschi and the Kaeser blower.
4.1 Check and change air filter Robuschi blower
No tools needed.
1 Turn off the main power switch and secure in off position to
make sure the blower will not start while working.
2 Open the filter box by unscrewing the black handle on top of
the filter box.
3 Pull out the air filter and replace it with a new one.
4 Put the lid back on, and tighten the black handle/screw by
hand.
5 Turn the main switch back on.
4.2 Check and change air filter Kaeser blower
Refer to Kaeser maintenance and repair instructions manual.

5 Dosers
These components distribute the feed in the feed system. The
feed amount is programmed for each unit by the software.
Remember to always turn the main switch off and secure
in locked position before any work is commenced with the
dosers
All maintenance parameters for dosers are visual controls and
cleaning, and is performed by the site personnel.
All maintenance parameters are found in chapter 12 in this
manual.
If a doser leaks air, the gaskets need to be taken out and
checked. Most of the time, a simple vacuuming and soap-wash is
enough to stop the air leakage, but if gaskets are broken, they
must be replaced. The rubber gaskets must be lubricated with a
thin layer of siliconc grease after cleaning. Remember to place
the gaskets back into the rotor in the same order as they were
originally placed.
If there are leakages in pipe couplings, these need to be
tightened or replaced. Loose couplings in the electro motor also
need to be tightened, repaired or replaced.
If electro motor couplings are loose, these must be tightened. If
they are broken and need to be changed, contact AKVA service
personnel.
If cleaning or replacing broken gaskets does not stop the air
leakage, if loose couplings are a repetitive problem, or if any
couplings must be replaced, contact AKVA service personnel.
Page 17 of 44Maintenance manual Akvasmart CCS Feeding system Document no. DC10000635

The dosers have to be disassembled in order to perform
necessary maintenance of gaskets and rotor. Each doser
require different disassembling methods, it is therefore
very important to follow the correct instructions for the
specific doser.
5.1 Gasket and rotor cleaning
In order to perform maintenance such as cleaning the rotor and
the doser gaskets, the doser needs to be disassembled. There
are different methods for disassembling the various dosers,
therefore; follow the instructions for your doser carefully.
It is very important to replace the gaskets into the rotor
in the same order they were originally assembled
The dosers’ lower half is very heavy, and weights up to
95kg. Always bear HSE in mind and protect both
personnel and equipment during this maintenance
operation. We recommend using a jack to lower and lift
the doser
Page 18 of 44Maintenance manual Akvasmart CCS Feeding system Document no. DC10000635

5.1.1 CF1000, CF1500 and CF4000
1 Turn off the main power switch and secure it in locked
position
2 This doser is disassembled still attached to the silo. If the silo
holds pellets, a silo hatch or a fitted metal plate has to be
inserted between the silo and the funnel to prevent the
pellets from falling out during maintenance. If the space is
tight, loosen the bolts attaching the funnel to the silo a little
bit
3 Release the pipe couplings and push them aside. Unlock and
remove the cover
4 Unscrew the six nuts underneath the base plate (red color)
5 Use a jack to carefully lower the bottom part of the doser
(with the rotor attached). Leave all the stretch bolts attached
to the middle- and base plate
6 Remove the rotor
7 Remove the inspection hatch and vacuum inside the feeder
unit through the inspection opening
8 Clean the base plate, the middle plate and the drain
Page 19 of 44Maintenance manual Akvasmart CCS Feeding system Document no. DC10000635

9 Remove the gaskets from the rotor only if necessary. Most
times, it will only be enough to vacuum the rotor
10 If the gaskets need to be cleaned or replaced, be sure to
remember their order in the rotor. It is important that these
are always placed correctly inside the rotor
11 Clean the gaskets with warm mild-degreasing soap-water.
The rubber gaskets need siliconc grease lubrication after
cleaning
12 If any of the gaskets are damaged, they need to be replaced
13 Reassemble the gaskets into the rotor and replace the rotor
on the base plate. If this is done the wrong way, all pellets
will be crushed inside the doser during the feeding process.
CORRECT: INCORRECT:
14 We recommend using the jack to lift the base plate back in
place. Make sure that the rotor is placed correctly. See
figures under and make sure the doser is replaced correctly.
The rotor and the feeder need to be assembled correctly
CF1000: CF4000:
Page 20 of 44Maintenance manual Akvasmart CCS Feeding system Document no. DC10000635

If the rotor is not placed correctly in the CF1000 and
CF4000 dosers, the pellets will be crushed between the
feeder and rotor arms. This does not concern the CF1500,
because it has both top and bottom gear
15 Reassemble bolts and nuts
16 Reattach the inspection hatch and clean the dosers outside
and clean the dosers surface
17 Turn the main power switch on.
Page 21 of 44Maintenance manual Akvasmart CCS Feeding system Document no. DC10000635

5.1.2 Varidoser CF 1500 MKII
1 Turn off the main power switch and secure it in locked
position
2 This doser is disassembled when it is still attached to the silo.
If the silo holds pellets, a silo hatch or a fitted metal plate
has to be inserted between the silo and the funnel to prevent
the pellets from falling out during maintenance. If the space
is tight, loosen the bolts attaching the funnel to the silo a
little bit
3 Unlock and remove the doser cover
4 Unscrew the 4 Unbraco bolts underneath the doser (red
color) and pull the shaft (green color) down
5 Remove the 2 distance bolts as shown in the picture by
unscrewing the appurtenant nuts underneath the base plate,
as well as the appurtenant bolts on the top plate
6 Loosen the other bolts that are attached under the base plate
just a bit
Page 22 of 44Maintenance manual Akvasmart CCS Feeding system Document no. DC10000635

7 Remove the rotor from the doser. Remove gaskets from the
rotor only when necessary. Most of the maintenance may be
done by vacuuming the rotor with the gaskets still inside
8 Remove the inspection hatch (blue color) and vacuum inside
the feeder unit through this opening
9 If the gaskets from the rotor need to be cleaned or replaced,
be sure to remember their order and places inside the rotor.
It is important that these always are in the same place inside
the rotor. If any of the gaskets are broken, they need to be
replaced
10 Clean the gaskets with warm mild-degreasing soap-water.
The rubber gaskets need siliconc grease lubrication after
cleaning
11 Vacuum and clean the rotor
12 Clean the base plate, the middle plate and the drain
13 If the gaskets have been taken out, reassemble them into
the rotor in the correct order, and place the rotor back into
the doser
14 Reassemble all bolts, nuts and the inspection hatch, and
clean the dosers outside
15 Replace and lock the cover and clean the dosers surface
16 Turn the main power switch back on.
Page 23 of 44Maintenance manual Akvasmart CCS Feeding system Document no. DC10000635

5.1.3 Doser CF4000 MKII
1 Turn off the main power switch and secure it in locked off
position
2 This doser is disassembled when it is still attached to the silo.
If the silo holds pellets, a silo hatch or a fitted metal plate
has to be inserted between the silo and the funnel to prevent
the pellets from falling out during maintenance.
If the space is tight, loosen the bolts attaching the funnel to
the silo a little bit
3 Release the pipe couplings and push them aside. Unlock and
remove the cover
4 Unscrew the 3 Unbraco bolts underneath the doser, and pull
the gear about 3cm (1.2 inches) downwards
5 Unscrew the bolts on the top gear and pull it upwards. Put for
instance a 4mm (0.16 inch) Unbraco-key in the holes in the
gear shaft to prevent the gear from falling down during the
work
Page 24 of 44Maintenance manual Akvasmart CCS Feeding system Document no. DC10000635

6 Loosen all of the 6 nuts underneath the base plate about 2-3
revolutions. Loosen the 2 nuts on the front side entirely and
remove them
7 Unscrew the 2 appurtenant bolts over the top plate and
remove the 2 front stretch bolts
8 Remove the rotor
9 Remove the inspection hatch. Vacuum inside the feeder unit,
through this opening
10 Clean the middle- and the base plate and the drain
11 Remove the gaskets from the rotor only when necessary.
Most of the maintenance can be done by vacuuming the rotor
with the gaskets still inside
12 If the gaskets from the rotor need to be cleaned or replaced,
be sure to remember their order and places inside the rotor.
It is important that these always are in the same place inside
the rotor. If any of the gaskets are broken, they need to be
replaced
13 Clean the gaskets with warm mild-degreasing soap-water.
The rubber gaskets need siliconc grease lubrication after
cleaning
Page 25 of 44Maintenance manual Akvasmart CCS Feeding system Document no. DC10000635
14 If any of the gaskets are broken, these must be replaced
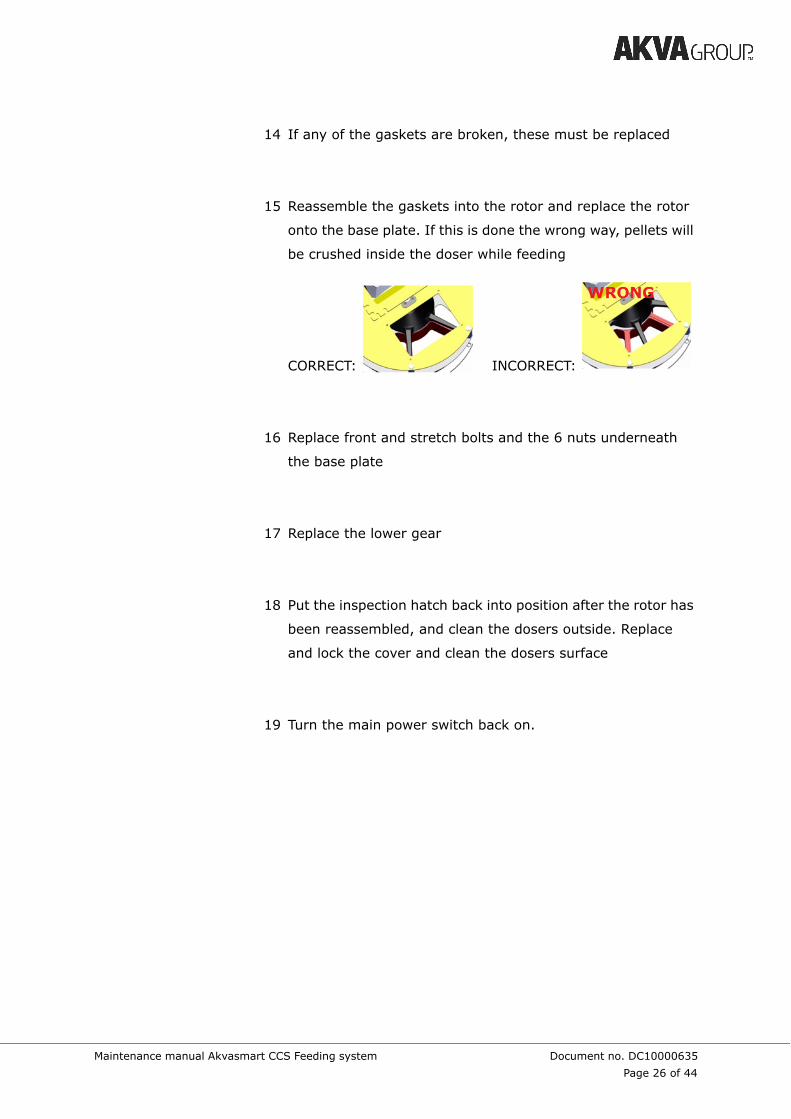
15 Reassemble the gaskets into the rotor and replace the rotor
onto the base plate. If this is done the wrong way, pellets will
be crushed inside the doser while feeding
CORRECT: INCORRECT:
16 Replace front and stretch bolts and the 6 nuts underneath
the base plate
17 Replace the lower gear
18 Put the inspection hatch back into position after the rotor has
been reassembled, and clean the dosers outside. Replace
and lock the cover and clean the dosers surface
19 Turn the main power switch back on.
Page 26 of 44Maintenance manual Akvasmart CCS Feeding system Document no. DC10000635

Page 27 of 44
Maintenance manual Akvasmart CCS Feeding system Document no. DC10000635
6 Selector
Remember to always turn the main power switch off and secure
in locked position before any work done with the selectors!
All of the visual maintenance parameters, as well as internal and
external cleaning is performed by the farm personnel.
If any irregularities are discovered during selector maintenance
or during use, do contact AKVA service personnel.
All maintenance parameters are found in chapter 12.
Always turn off the main power switch and secure it in
locked position before opening the selector cover!
6.1 Internal selector cleaning
1 Unlock the cover-lock (green color)
2 Remove the cover (yellow color)
3 Vacuum then clean with warm soap water
4 Rinse well with a normal water pressure hose (never use
high pressure washer here, this can destroy the electro
motor)
5 Also be careful not to get water on or into the control box
(red color) if this is installed
inside the selector. Cover it or
keep the water away from it
during the cleaning
6 Rinse out the selector drains
when necessary.

7 Feeding pipes
Whether only parts of the feeding pipes need to be repaired or
the entire pipe has to be replaced, it is very important to follow
these instructions and precautions:
Always turn off the main power switch and secure it in
locked position before commencing any work with the
feeding pipes
Electric shock may appear because of the static electricity
appearing between the pellets and the HDPE pipe
material. The electricity inside may cause severe shocks
when cutting the pipes endangering the life and health of
the user. Therefore, the instructions in chapter 7.1 must
be followed carefully
When only parts of a pipe needs to be repaired, cut off the
broken part according to given instructions, and splice the extra
pipe-length to the rest when necessary. Remember that the
feeding pipes need enough length that they can follow the
motions in the ocean at all weather conditions.
Always use adjusted pipe couplings for the pipe splicing.
Page 28 of 44
Maintenance manual Akvasmart CCS Feeding system Document no. DC10000635

7.1 PREVENTION INSTRUCTIONS
1 Safety equipment shall always be used while working with
the feeding pipes; this includes isolating gloves and isolating
foot wear. Avoid wet clothes, these may cause transient
overvoltage
2 Set up a voltage unloader (earthing/grounding):
a Remove insulation in minimum 2,5mm2 for proper
earthing (established earthing points)
b Put about 2m of the cable into the feeding pipe through
the selector opening
c Disconnect the feeding pipe from the selector
3 When adjusting or cutting broken pipe-parts, always make
sure that the cutter is earthed
4 Never work with assembling or reassembling of feeding pipes
by yourself, and remember to always wear approved safety-
garments when working near or on the sea.
From the user manual for cartwheels, center support stands and
feeding pipes, («Bruker og montasjeveiledning for hamsterhjul,
fuglenettflottør og fôrslanger»), rev A, 12.12.12.
Page 29 of 44
Maintenance manual Akvasmart CCS Feeding system Document no. DC10000635

Page 30 of 44
Maintenance manual Akvasmart CCS Feeding system Document no. DC10000635
8 Rotor spreader
Regular maintenance on the rotor spreader bearing is important
in order to maintain an even rotation during feeding. AKVA
group recommend bearing inspection minimum every sixth
month. Clean and change if required. See chapter 12.1 for
expected ball bearing operating time.
All maintenance parameters are found in the maintenance table
in chapter 12.2. Follow the instructions below in order to perform
the parameters correctly.
Contact the AKVA service department if you have any questions,
or if you want service personnel to execute this task for you.
Remember to always turn the main power switch off and
secure in locked position before any work done with the
rotor spreader
8.1 Bearing cleaning
1 Unscrew the 3 Unbraco bolts and remove the bearing. Clean
the bearing in warm, mild degreasing soap water
2 If the bearing is OK, put it back to its place. If it is not OK,
replace it with a new bearing
3 Reattach all 3 bolts before tightening. Then torque one by
one maximum 6Nm. If the torque is too tight the bearing
house will bend.

Page 31 of 44Maintenance manual Akvasmart CCS Feeding system Document no. DC10000635
9 Main cabinet
The main fuse box cabinet has to be closed at all times, except
when labor is preformed inside it. This is to prevent pellet-dust
and other particles from getting into the cabinet.
All maintenance parameters are found in the maintenance table
in chapter 12.
In older main cabinets, the main power switch is placed on the
door of the cabinet. It is therefore easy to access for switching it
off and on.
Newer cabinets have this switch mounted inside the
cabinet, and only instructed personnel are allowed to
open this cabinet.
Only instructed personnel have
access to the MKII cabinets
It is important to keep the access to the main cabinet free
and open, so that there is no problem opening it when-
ever it is necessary
9.1 Air filter
The air filter must be changed every three months and the air
filter house must be cleaned every time the filter is changed.

Page 32 of 44
Maintenance manual Akvasmart CCS Feeding system Document no. DC10000635
10 Emergency stop
The feed systems emergency stop button is placed on the main
cabinet. In case of any emergency that can damage equipment
or personnel, or if other irregularities should occur, the
emergency stop has to be activated.
This is done by pushing the button.
It is very important that the main cabinet, and then, also the
emergency stop button, is easy to get to. Nothing must be
placed in front of this cabinet.
Before the system is reset after an emergency stop, the cause of
the stop needs to be determined, examined and fixed.
To reactivate the emergency stop button, simply twist the
button either way.
Always keep access to main cabinet and emergency stop
button open and easy to reach
Page 33 of 44Maintenance manual Akvasmart CCS Feeding system Document no. DC10000635
11 Cooler
The cooling engines needs to be checked regularly according to
the maintenance plans in chapter 12. All these parameters may
be checked by the fish farmers and barge personnel.
If anything is wrong, broken or torn, contact AKVA service
personnel in order to repair or replace.
Further maintenance are visual controls.
Remember to always turn the main power switch off and
secure in locked position before any work done with the
cooling engines

12 Maintenance intervals
All components each have its own maintenance-button in the
iControl software. Use this to register all maintenance rendered
for the components and units.
Blowers, dosers and selectors have automatic hour-counters.
The users will have total control over when the blower oil was
changed the last time, and thereby know when the next change
must be performed. This simplifies ordering services, parts and
other equipment for the feed system.
AKVA group recommend that Akvasmart CCS Feeding System
service is performed by AKVA service personnel 2 times a year.
Visual maintenance is performed by the farm personnel and is
executed according to the check lists in chapter 12.3-12.5.
Non-visual maintenance:
- cleaning cooler radiator
- cleaning dosers, selectors and main cabinet
- change filter in main cabinet
- cleaning rotor spreader bearing
These tasks must always be performed by properly instructed
and trained personnel.
Page 34 of 44Maintenance manual Akvasmart CCS Feeding system Document no. DC10000635
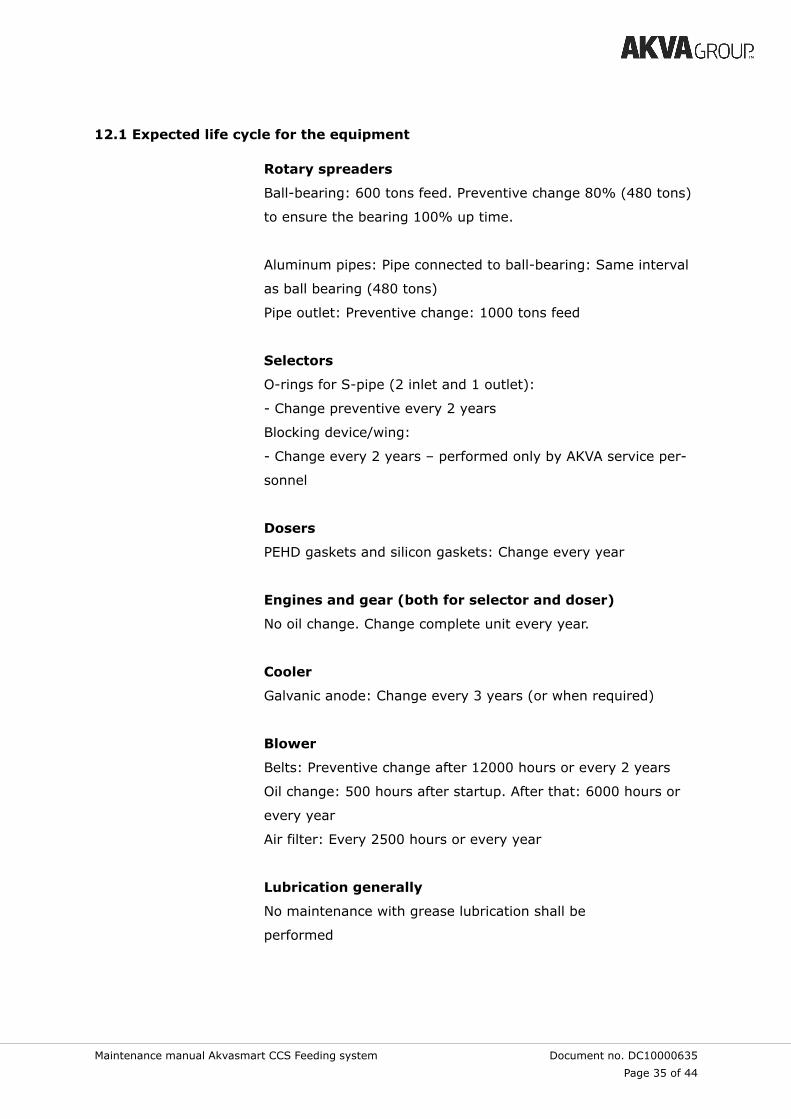
12.1 Expected life cycle for the equipment
Rotary spreaders
Ball-bearing: 600 tons feed. Preventive change 80% (480 tons)
to ensure the bearing 100% up time.
Aluminum pipes: Pipe connected to ball-bearing: Same interval
as ball bearing (480 tons)
Pipe outlet: Preventive change: 1000 tons feed
Selectors
O-rings for S-pipe (2 inlet and 1 outlet):
- Change preventive every 2 years
Blocking device/wing:
- Change every 2 years – performed only by AKVA service per-
sonnel
Dosers
PEHD gaskets and silicon gaskets: Change every year
Engines and gear (both for selector and doser)
No oil change. Change complete unit every year.
Cooler
Galvanic anode: Change every 3 years (or when required)
Blower
Belts: Preventive change after 12000 hours or every 2 years
Oil change: 500 hours after startup. After that: 6000 hours or
every year
Air filter: Every 2500 hours or every year
Lubrication generally
No maintenance with grease lubrication shall be
performed
Page 35 of 44Maintenance manual Akvasmart CCS Feeding system Document no. DC10000635

12.2 Check lists
In addition to iControl software, it is sensible to have a manual
list for maintenance registration. Make copies of the check-lists
on the following pages.
Go through the daily routine list every day (chapter 12.3).
Go through the weekly routine list one constant day a week
(chapter 12.4 and 12.5).
Sign inside the white check boxes when the task is performed.
Do not check the gray check boxes, only the white ones.
Fill in the number of the first week the feed system is
used, and fill the following first half year, then continue
on the second half year in order to achieve correct main-
tenance frequency.
Use these lists when recording maintenance in iControl.
Copy or print more copies of the check lists, especially the daily
routines. Put these in a binder and mark the last copy with a
post-it note marked “Last copy” or anything similar, so it is easy
to recognize the last copy and when it is time to make more.
Page 36 of 44Maintenance manual Akvasmart CCS Feeding system Document no. DC10000635

12.3 Daily maintenance
Fill in the week numbers to ensure correct maintenance intervals
Make copies of this maintenance plan before filling anything in
Blower, week______ Mon Tue Wed Thu Fri Sat Sun
Pressure
Temperature
Effect
Noise
Coolant flow
Filter vacuum
Cooler, week______ Mon Tue Wed Thu Fri Sat Sun
Radiator leakage
Cooler pipe leakage
Blower, week______ Mon Tue Wed Thu Fri Sat Sun
Pressure
Temperature
Effect
Noise
Coolant flow
Filter vacuum
Cooler, week_______ Mon Tue Wed Thu Fri Sat Sun
Radiator leakage
Cooler pipe leakage
Page 37 of 44Maintenance manual Akvasmart CCS Feeding system Document no. DC10000635

Page 38 of 44Maintenance manual Akvasmart CCS Feeding system Document no. DC10000635
12.4 Weekly maintenance - first 6 months
Fill in week numbers to ensure correct maintenance intervals
Make copies of this form before filling anything in
Page 39 of 44Maintenance manual Akvasmart CCS Feeding system Document no. DC10000635
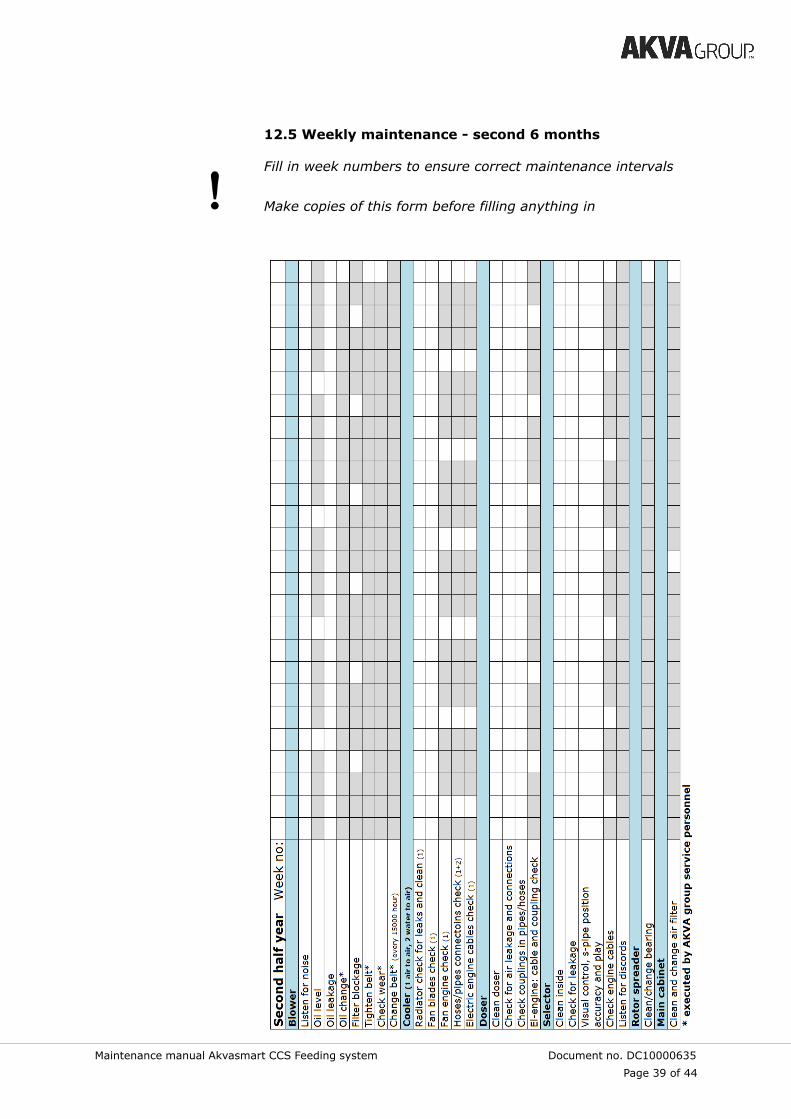
12.5 Weekly maintenance - second 6 months
Fill in week numbers to ensure correct maintenance intervals
Make copies of this form before filling anything in

Appendix A - Index
A
air control system 15
air leakage 17
air speed 14, 15
B
bearing 14, 30, 31
blower 7, 9, 16
C
camera control 13
check list 36
clean 14, 17-21, 23, 25-27, 30, 31, 34
control cabinet 7, 9
cooler 9, 15, 33, 34
cover 7, 19, 22-24, 26
D
damage 5, 8, 9, 20, 32
dosers 7, 9, 14, 17-24, 26, 34
E
electric shock 28
electro motor 17, 27
emergency stop 6, 7, 8, 11, 32
environmental sensors 13, 15
F
feeding pipes 14, 28, 29
feeding process 7, 13
filter 16, 18, 31, 34
funnel 19, 22, 24
G
gaskets 17, 18, 20, 23, 25, 26
gear 21, 24, 26
H
hatch 19, 21-26
high voltage 5, 9, 29
HME 18
hour-counters 34
I
information 5, 6, 9, 13
injuries 5-9
installation 6, 8
instructions 5, 8, 16, 18, 28-30
J
jack 18-20
L
leaks air 17
M
main cabinet 31, 32, 34
main switch 7, 16, 17, 19, 21-24, 26-28
maintenance 5, 6, 8, 16-19, 22, 24, 25, 27,
30, 31, 33, 34, 36
meal planner 13
P
pellet 7, 13, 15, 19-22, 24, 26, 28, 31
pipe couplings 17, 19, 24, 28
pipe splicing 16, 28
precautions 6, 28
prevention instructions 29
R
regulations 6, 8
remote control 15
repairs 5, 7, 8, 16, 17, 28, 33
Page 40 of 44Maintenance manual Akvasmart CCS Feeding system Document no. DC10000635
restart 7
rotor 18-21, 23, 25, 26
rotor spreader 7, 14, 30
S
safety 5-11, 29
selector 7, 9, 14, 27, 29, 34
service 5, 34
shaft 22, 24
siliconc grease lubrication 17, 20, 23, 25
silo 7, 19, 22, 24
site personnel 17
soap-wash 17, 20, 23, 25, 30
software 13, 17, 34, 36
species 13, 14
standards 6, 8, 10, 11
static electricity 28
stretch bolts 19, 25, 26
symbols 5
T
temperature 9, 11, 14, 15
transient overvoltage 29
troubleshooting 8
U
user 5, 7, 28, 34
V
vacuum 17, 19, 20, 23, 25, 27
visual control 17, 33
voltage unloader 29
W
warning signs 7, 9
warranty 9
Page 41 of 44Maintenance manual Akvasmart CCS Feeding system Document no. DC10000635

of 42
Page 42 of 44Maintenance manual Akvasmart CCS Feeding system Document no. DC10000635
Appendix B - Deviation form
Make copies of this deviation form before filling anything in.
Deviation control No.:
Unit: Producer: Prod.no.: Purchase year:
Deviation description:
Follow up proposition:
Date and signature, declarer:
Follow up directed:
Status:
New action for deviation no.:
Date and signature, follow up:
of 44
Appendix C - Notes
Page 43 of 44Maintenance manual Akvasmart CCS Feeding system Document no. DC10000635

of 44
Page 44 of 44Maintenance manual Akvasmart CCS Feeding system Document no. DC10000635