ug 253xxxxxx dci85 hd kd en - sagemcom.com · 1 dci85hd kd congratulations! this receiver is an...
TRANSCRIPT

User manual
RECEIVER
DCI85HD KD


1
DCI85HD KD
Congratulations!
This Receiver is an innovative product from the latest generation of Sagemcom digital TV receivers,dedicated to Digital Cable Television. It allows easy reception of digital programs, including thosebroadcast in High Definition.
Once you have connected your Receiver and performed the initial installation, you will be able to watchand enjoy all the cable TV and radio channels which are not scrambled and you are entitled to. You canupdate your Receiver if new functions or services become available.
The Sagemcom Receiver follows a continuous development strategy. Therefore, we reserve the right tomake changes and improvements to the product described in this user manual without any prior notice.
This product complies with EMC directive 89/336/EEC.
CE marking: The CE marking certifies that the product complies with the essential requirements of the Directive1999/5/EC concerning radio equipment and telecommunication equipment, and of Directives 2006/95/ECconcerning safety, 2004/108/EC concerning electromagnetic compatibility and ErP 2009/125/ECconcerning ecodesign requirements, defined by the European Parliament and Council to minimizeelectromagnetic interferences, ensure the safety of users and their equipment and protect their health,and minimize the impact of products on the environment.
The CE declaration of conformity can be viewed in the support section of the Sagemcom sitewww.sagemcom.com, or it can be obtained from the following address:
Sagemcom Broadband SAS - Customer relations department250 route de l'Empereur
92848 Rueil-Malmaison Cedex - FRANCE
Copyright © Sagemcom Broadband SASAll rights reservedSagemcom is a registered trademark.
This "HD TV" Television Receiver complies with the "HD TV" Minimum Requirements. The "HD TV" Logois a trademark of DIGITALEUROPE. HDMI, HDMI logo and High-Definition Multimedia Interface aretrademarks or registered trademarks of HDMI Licensing LLC.DTS is a registered trademark of Digital Theater Systems, Inc.Macrovision is a registered trademark of Rovi Corp.Manufactured under license from Dolby Laboratories. "Dolby" and the double-D symbol are registeredtrademarks of Dolby Laboratories Inc.
Macrovision Copyright noticeThis product incorporates copyright protection technology that is protected by U.S. patents and otherintellectual property rights. Use of this copyright protection technology must be authorized by RoviCorporation, and is intended for home and other limited viewing uses only unless otherwise authorized byRovi Corporation. Reverse engineering or diassembly is prohibited.

2
DCI85HD KD
Read this first!
For your safety and comfort, we urge you to carefully read the Safety recommendations on page 3before attempting use.
This document makes use of symbols designed to help the reader identify the information supplied:
Symbol Definition
CAUTION
Indicates important safety information.
Failure to respect these notes may lead to serious or even fatal injury. Read these notes carefully. You will find them in the Safety section of this manual.
WARNING
Indicates important safety information.
Failure to respect these notes may lead to minor to moderate injury, or damage to the apparatus or equipment. Read these notes carefully. You will find them in the Safety section of this manual.
ImportantIndicates points to be read with special attention when using the device, and explanations of probable reception issues. Read these explanations carefully.
NoteIndicates additional explanations about device functions, and instructions for resolving user errors.

3
DCI85HD KD
Safety recommendationsUse of the Receiver is subject to safety measures designed to protect users and their environment.
Where to put your Receiver?
In order to guarantee the correct operation of your Receiver, you must:
• place it indoors to protect it from lightning, rain, and sun rays,• place it in a dry and well ventilated area,• keep it away from heat sources such as radiators, candles, lamps,
etc.• protect it from dampness, place it on a flat surface from where it
will not fall off and children don`t have access to,• do not place anything on top of your Receiver (as it would restrict
ventilation): the ventilation slots located on the casing prevent your Receiver from overheating. If you place the Receiver in a compartment, leave a space of at least 10 cm on each side and 20 cm on the front and back of the Receiver,
• connect it directly to the mains with the provided cords, the socket must be near the Receiver and easy to access. The use of an extension cable (with multi-points) is not recommended.
Warnings and safety instructions
NEVER OPEN THE Receiver! YOU RISK GETTING AN ELECTRIC SHOCK.
• Use only the power cord supplied with the Receiver to connect it to the mains. Other practice may be dangerous.• Connect the Receiver to the mains in accordance with the installation instructions in this document and the indications mentioned on the identification label (voltage, current, frequency of electricity network).• As a precaution, in case of danger, the mains adapters act as a disconnecting mechanism for the 230V power supply. That is why it is imperative that you connect the Receiver to a power outlet located nearby and easily accessible.•The Receiver must be used within a temperature range of between 0 °C and 40 °C.
• You must imperatively connect the power cord to the Receiver before connecting the power cord to the power socket.
• To avoid short-circuits (fire or electrocution hazard), do not expose your Receiver to dampness. Do not place any object containing liquid (vase for example) on the appliance. The Receiver must not be splashed with liquid. If liquid is dropped, dripped onto the Receiver, unplug it immediately from the mains and consult your supplier.
• Take care not to allow liquids or metal objects to enter the Receiver through the ventilation slots.• Avoid reconnecting the Receiver after it has been subjected to large changes in temperature. • The Receiver must be disconnected from mains supply (from the power outlet or rear panel) before
any modification of connection between TV, VCR or antenna.• In the event of a storm, it is advisable to unplug the antenna. Even if the Receiver and the television
set are disconnected from the power supply, lightning can still damage them.• Only a personnel approved by the manufacturer can repair the Receiver. The non-observance of these
safety precautions can result in forfeiture of the guarantee.

4
DCI85HD KD
Batteries
Batteries are easily swallowed by young children. Do not allow young children to play with the remotecontrol.
To avoid damaging the remote control, only use identical batteries or batteries of equivalent type. Thebatteries provided are not rechargeable.
Interference
Do not place the Receiver near appliances that may cause electromagnetic interferences (for exampleloudspeakers). This could affect Receiver operation and distort the picture or sound.
Cleaning the Receiver
The outer casing of the Receiver can be cleaned with a soft and dry cloth. Do not use any type of abrasivepad, scouring powder or solvents, such as alcohol or turpentine, as they could damage the surface of theReceiver.

5
DCI85HD KD
EnvironmentPreservation of the environment is an essential concern of the manufacturer. The desire of themanufacturer is to operate systems observing the environment and consequently it has decided tointegrate environmental performances in the life cycle of its products, from manufacturing tocommissioning, use and elimination.
Meaning of logos present on the product or its packaging
The crossed-out dustbin sign stuck on the product or its accessories means that at the end of itslife, the product is subject to selective collection and must not be thrown away in unsortedhousehold waste.
The looped arrow sign means that the packaging may be recycled and must not be disposed ofwith household waste.
The green logo means that a financial contribution is paid to an approved national organisation toimprove packaging recovery and recycling infrastructures.
The logo with three arrows shown on the plastic parts means that they may be recycled and thatthey must not be disposed of with household waste.
Product recycling and disposal
To facilitate recycling, please respect the sorting rules set up locally for this kind of waste.
If your product contains batteries, they must be disposed of at appropriate collection points.
European regulations ask you to dispose of products belonging to the family of electrical and electronic
equipments ( ) selectively:
• At the collection points made available to you locally (drop-off centre, selective collection, etc.),• At sales points in the event of the purchase of similar equipment.
In this way you can participate in the re-use and upgrading of Electrical and Electronic Equipment Waste,which can have an effect on the environment and human health.
European Directive on Waste Electrical and Electronic Equipment (WEEE)
In the context of sustainable development, the reduction of wastes to be eliminated by reusing, recycling,composting and energy recovery is strongly advised.
In order to comply with this directive which is applicable to EEEs sold after 13/08/2005, your Receiver willbe taken back free of charge and recycled by the distributor of the EEE within the limits of the quantity andtypes of equipment bought from them. These appliances which contain substances potentially dangerousto human health and the environment will be recycled.

6
DCI85HD KD
Directive on the Restriction of use of certain hazardous substances in electronic equipment (ROHS)
Your Receiver along with the batteries supplied comply with the directive relating to the RoHS –dangerous materials such as lead, mercury or cadmium are not used. This avoids environmental hazardsand any risks to the health of personnel at the recycling centres. The batteries of the remote control canbe removed simply.
Note: When the batteries of the remote control are worn out, please dispose of them at a collection pointand not with household waste.
Electrical consumption of the Receiver
To reduce the consumption of your Receiver, you are recommended to place it in standby mode when notin use. We recommend you to turn off the Receiver or unplug it from the mains if you will not be using it fora prolonged period of time.

7
DCI85HD KD
Contents1. Product Overview ....................................9
1.1 Package contents ......................................... 9
1.2 Elements and functionalities: Front side of the device ............................................... 10
1.3 Elements and functionalities: Back side of the device ............................................... 10
1.4 Remote control ........................................... 11Batteries .............................................................11
2. Connections to the network and connecting additional devices ..............12
2.1 Connection to the cable network ................ 12RF Cable connection..........................................12
2.2 Connection to TV ........................................ 13Connection to High Definition TV with HDMI® port ........................................................13Connection to a standard definition TV with SCART connection .....................................13
2.3 Connection to the internet........................... 14Internet connection via wireless stick .................14Internet connection via network cable ................14
2.4 Connection to the VCR / DVD recorder ...... 14
2.5 Connection with a home cinema amplifier .. 15
2.6 Connection to a hi-fi unit ............................. 15
2.7 Powering On / Off the Receiver .................. 16
3. Initial installation ....................................17
3.1 Preparation: Device checks the device settings ....................................................... 17
3.2 Language settings ...................................... 17
3.3 The five steps of the installation wizard ...... 18Step 1: Channel search......................................18Step 2: Set up favorite channels ........................18Step 3: Setting up an internet connection ..........19Step 4: Select energy mode ...............................20Step 5: Summary................................................20
4. Basic functions ......................................21
4.1 Selecting a TV channel............................... 21Using P+/P- or 0-9..............................................21Program information bar.....................................21Using the channel list .........................................22Detailed program information .............................23
4.2 Volume settings .......................................... 23Volume ...............................................................23Mute ...................................................................24
4.3 Language settings for audio and subtitles and selection of option channels.................. 24Language for audio............................................ 24Language for subtitles ....................................... 24Selecting option channels.................................. 24
4.4 Teletext ....................................................... 25
4.5 Listen to radio.............................................. 25Selecting a radio channel .................................. 26Categories and other options in radio mode...... 26
5. Setting a timer ....................................... 27
5.1 Set timer...................................................... 27Set flags in program information bar.................. 27Set timer in electronic program guide (EPG) ..... 27Set timer in search results ................................. 28Delete timer ....................................................... 28
5.2 Set timer manually....................................... 28
5.3 Displaying and using timers ........................ 29
6. Electronic program guide (EPG), search function and Select Video (video library) ........................................ 31
6.1 Electronic Program Guide (EPG) ............... 31
6.2 Search ........................................................ 32Search by keyword ............................................ 32Search by category............................................ 33Search results.................................................... 34Local Search...................................................... 34
6.3 Select Video (online video library)............... 35Access to Select Video ...................................... 35Selection of videos............................................. 35
7. Settings ................................................. 37
7.1 System Update............................................ 37Software update................................................. 37Search for updated software.............................. 37Channel search.................................................. 38Delete additional channels................................. 39Search additional channels................................ 39Start a channel search....................................... 39Reset to factory default...................................... 40Update EPG....................................................... 40
7.2 System set-up ............................................. 41Language........................................................... 41Audio.................................................................. 41Picture................................................................ 43Energy settings .................................................. 45Internet............................................................... 46

8
DCI85HD KD
7.3 Protection of minors.................................... 50Change Parental Control PIN.............................50Change Adult PIN...............................................51PIN request when ordering Select Video ...........51PIN-protect timer ................................................52
7.4 Timer settings ............................................. 52Manual timer.......................................................52Timer extensions ................................................53
7.5 Favorites ..................................................... 53Add favorites ......................................................53Delete favorites ..................................................54Sort favorites ......................................................54
7.6 Service........................................................ 55Support by phone ...............................................55Service messages ..............................................55
7.7 System Check ............................................ 55Device Info .........................................................55Smartcard...........................................................56TV Signal............................................................56VOD Signal.........................................................56HDMI ..................................................................56TV picture ...........................................................56Audio ..................................................................56Network settings.................................................57Back channel......................................................57Test IP Connection.............................................57
7.8 Settings overview........................................ 58
8. Software update .....................................62
9. Universal remote control .......................63
9.1 Programing the universal remote control.... 63
9.2 Selection of the volume control................... 64
9.3 Reading out the 4-digit code....................... 64
9.4 Reset the universal remote control ............. 64
9.5 Brand Code List .......................................... 65
10. Troubleshooting .....................................74
11. Support ...................................................75
12. Explanation of terms .............................76
13. Specifications .........................................77

9
DCI85HD KD
1 Product OverviewYour Receiver is a digital receiver that lets you watch all the cable TV and radio channels which are notscrambled and you are entitled to.
1.1 Package contents
The package of your new device includes:
In addition, a smartcard from Kabel Deutschland is provided for the operation of the device.
Item Description
1 Receiver
2 Power cord
3 Remote control with 2 batteries (AAA)
4 HDMI lead for connection to the HDTV
5 Antenna cable to connect to the cable network
6 Quick installation guide
7 WLAN-Stick and cable
754
12
34
5
67
89
1011
1213
1415
1617
1819
2021
2223
2425
2627
2829
3031
3233
3435
3637
3839
4041
42
TV/Radio
Menü Suche
Aufnahmen
P
OK
Zurück
Info
Rec
Opt
1
42
3 67
85
90
321
6
10
DCI85HD KD
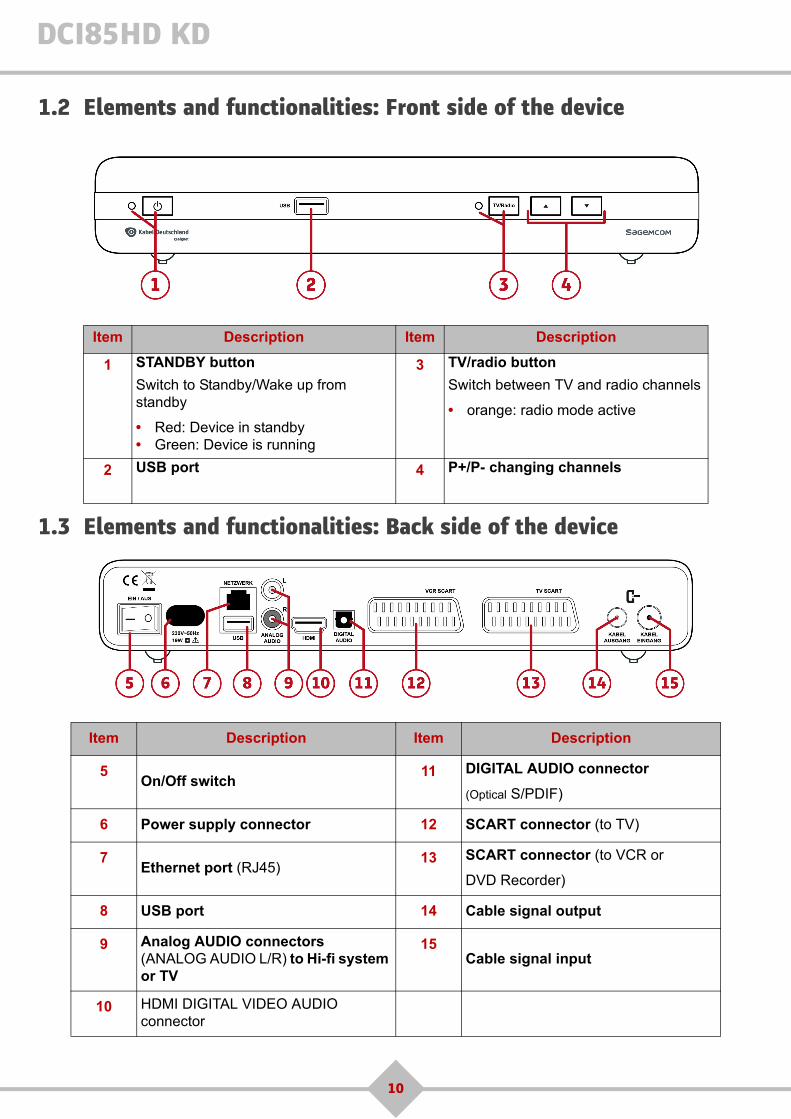
1.2 Elements and functionalities: Front side of the device
1.3 Elements and functionalities: Back side of the device
Item Description Item Description
1 STANDBY button 3 TV/radio button
Switch to Standby/Wake up from standby
• Red: Device in standby• Green: Device is running
Switch between TV and radio channels
• orange: radio mode active
2 USB port 4 P+/P- changing channels
Item Description Item Description
5On/Off switch
11 DIGITAL AUDIO connector
(Optical S/PDIF)
6 Power supply connector 12 SCART connector (to TV)
7Ethernet port (RJ45)
13 SCART connector (to VCR or
DVD Recorder)
8 USB port 14 Cable signal output
9 Analog AUDIO connectors (ANALOG AUDIO L/R) to Hi-fi system or TV
15Cable signal input
10 HDMI DIGITAL VIDEO AUDIO connector

11
DCI85HD KD
1.4 Remote control
Batteries
The remote control needs two batteries (AAA) to operate. The direction to insert the batteries is labeled inthe battery compartment. The batteries are not rechargeable.
Button Functions
1 TV: Switch to TV mode, if programed. In TV mode, you can control your TV with this remote (see chapter 9, Using the universal remote). The unit is in TV mode, the LED light flashes.
2 MENÜ: Open and close main menu
3 PROGRAMM: Show electronic program guide (EPG)
4 SELECT VIDEO: Open online video library Select Video (Video on Demand, VOD), internet connection necessary. This service is not yet available everywhere in Germany.
5 V+/V-: Adjust the volume
6 NAVIGATION: Browse menu, electronic program guide (EPG), program information bar and other functionalities
7 ZURÜCK: Return to the previous screen or mode
8 MUTE: Turn the sound on or off
9 REWIND: Rewind program or recorded program, switch to other day in electronic program guide (EPG)
10 REC: Timing a program or prepare a timer using the electronic program guide (EPG).
11 COLOR KEYS: Select options in the On Screen Display (OSD), menus and messages, that are displayed on the screen
12 0-9: Choose programs and options from the On Screen Display (OSD)
13 OPT: Displays options for the current program (Audio Language / Subtitle, option channels). Shows program information for prime time in electronic program guide (EPG)
14 STANDBY: Switch to Standby/Wake up from standby
15 TV/RADIO: Switch between TV and radio channels
16 EXIT: Close a screen or a mode, return to the last viewed program, switch from TV mode to Receiver mode
17 AUFNAHMEN: : Displays the timed program list
18 SUCHE: Starts a search for programs in electronic program guide (EPG), in online video library Select Video and recordings
19 P+/P-: Jump to next / previous channel, display next / previous page in electronic program guide (EPG), browse in multipage lists / references
20 OK: Show program information bar, confirm a selection
21 INFO: Show informations for current program, in electronic program guide (EPG) and program search
22 FAST FORWARD: Forward switch to other day in the electronic program guide (EPG)
23 PLAY/PAUSE: Play / pause a recorded program, switch to time-shifted mode
24 STOP: Stop a recording, stop playing a recorded program, stop the time shift mode and return to live TV program
25 TELETEXT: Show teletext pages, if available

12
DCI85HD KD
2 Connections to the network and connecting additional devicesCheck if the package is complete before installing the Receiver (see chapter 1.1, Package contents).
Make sure that the devices to be connected (Receiver, TV, VCR ...) are disconnected from the powersupply.
2.1 Connection to the cable network
To make sure that your Receiver can receive all the cable TV and radio channels which are not scrambledand you are entitled to, you must check first of all that your home is connected to cable network.
2.1.1 RF Cable connection
1. Connect the antenna cable input of the Receiver with the antenna socket (antenna cable provided).
2. Connect the antenna cable output of the Receiver with the antenna socket of the TV or VCR/DVDRecorder (antenna cable not provided).
ANALOGAUDIO
KABELEINGANG
KABELAUSGANG
VCR SCART
TV SCART
DIGITALAUDIO
HDMI
L
R
NETZWERK
USB
EIN / AUS
19W230V~50Hz
I O

13
DCI85HD KD
2.2 Connection to TV
2.2.1 Connection to High Definition TV with HDMI® port
In order to take advantage of high-definition television (HDTV), connect the HDMI® port on your digitalReceiver through the HDMI® cable (provided) to the HDMI ® port on your HD TV.
2.2.2 Connection to a standard definition TV with SCART connection
Connect the TV SCART connector on the Receiver through a SCART cable (not provided) with a freeSCART socket on your TV.
Note
If you have a TV with HDMI® port, please use only the HDMI® cable to connect the Receiver to TV.
ANALOGAUDIO
KABELEINGANG
KABELAUSGANG
VCR SCART
TV SCART
DIGITALAUDIO
HDMI
L
R
NETZWERK
USB
EIN / AUS
19W230V~50Hz
I O
ANALOGAUDIO
KABELEINGANG
KABELAUSGANG
VCR SCART
TV SCART
DIGITALAUDIO
HDMI
L
R
NETZWERK
USB
EIN / AUS
19W230V~50Hz
I O

14
DCI85HD KD
2.3 Connection to the internet
With an internet connection you have numerous other offers from Kabel Deutschland. To use them,connect your Receiver to the internet, either through the wireless stick or via a network cable (LAN cable).
2.3.1 Internet connection via wireless stick
Slide the WLAN-Stick into the USB port for the WLAN dongle below the Network connector(RJ45). If the Receiver is connected to the power supply after all devices were connected,the wireless stick automatically starts. You may be prompted to enter the necessary datalater.
2.3.2 Internet connection via network cable
If you wish to connect your Receiver to the internet using a network cable with RJ45connectors (LAN cable), plug in such a network cable (not provided) into the network port(RJ45) on the back of the Receiver. Plug the other end of the network cable to a freenetwork connection to your internet router. You may be prompted to enter the necessarydata later.
2.4 Connection to the VCR / DVD recorder
Connect the VCR SCART connector on the back of your Receiver with a free SCART socket on yourVCR-/DVD-Recorder (cable not provided).
Note
If your VCR / DVD recorder has more than one SCART socket, select the TV or EXT1 port.
NETZWERK
USB
NETZWERK
USB
ANALOGAUDIO
KABELEINGANG
KABELAUSGANG
VCR SCART
TV SCART
DIGITALAUDIO
HDMI
L
R
NETZWERK
USB
EIN / AUS
19W230V~50Hz
I O
TV
EXT
DIGITDIGITALALAUDIO
HDMIH

15
DCI85HD KD
2.5 Connection with a home cinema amplifier
Some programs are broadcast with DTS or DOLBY DIGITAL sound. To fully enjoy this high sound qualityit is recommended to connect your Receiver via the optical S / PDIF connection with a home cinemaamplifier.
Use an optical S / PDIF cable (not supplied) to connect the DIGITAL AUDIO port of the Receiver to theDIGITAL AUDIO port of the home cinema amplifier.
2.6 Connection to a hi-fi unit
To enjoy digital broadcasts in high sound quality and to listen to radio channels with switched off TV,connect the two analog AUDIO terminals (ANALOG AUDIO L / R) of the Receiver to the AUDIO terminalsof your hi-fi system (cable not provided). This is only possible if you do not use the two analog AUDIOterminals (ANALOG AUDIO L / R) of the Receiver for connecting a TV.
ANALOGAUDIO
KABELEINGANG
KABELAUSGANG
VCR SCART
TV SCART
DIGITALAUDIO
HDMI
L
R
NETZWERK
USB
EIN / AUS
19W230V~50Hz
I O
DHDMI
ANALOGAUDIO
KABELEINGANG
KABELAUSGANG
VCR SCART
TV SCART
DIGITALAUDIO
HDMI
L
R
NETZWERK
USB
EIN / AUS
19W230V~50Hz
I O

16
DCI85HD KD
2.7 Powering On / Off the Receiver
You have all the equipment (Receiver, TV, VCR) connected? Connect the Receiver to the power networkand turn it on. To turn on the Receiver proceed as follows:
1. Make sure that the power switch "On / Off" on the back of the Receiver is set to "Off" (position 0).
2. Now connect the power cord to the power connector of the Receiver.
3. Plug the power cord into a power outlet near the equipment so you can easily access it.
4. Press the "On / Off" button to switch the Receiver on (position I).
The initial installation of your Receiver will start automatically.
If you need to turn off the Receiver (for example, before a long period without using it), proceed asfollows:
1. Press the STANDBY button on the remote control or on the front of the Receiver to switch the Receiverto standby mode.
2. Press the "on / off" switch on the back of the Receiver to turn off the Receiver (position O).
3. Unplug the power cord from the socket.
ANALOGAUDIO
KABELEINGANG
KABELAUSGANG
VCR SCART
TV SCART
DIGITALAUDIO
HDMI
L
R
NETZWERK
USB
EIN / AUS
19W230V~50Hz
I O

17
DCI85HD KD
3 Initial installationIf the Receiver is plugged in and turned on for the first time, the installation wizard starts.
1. Turn on your TV. If your TV does not automatically recognize the connected and powered Receiver,select the AV source to your TV (HDMI ®, analog or SCART AUDIO / VIDEO connector), on which theTV is currently connected to the Receiver.
2. Open the cover of the smartcard reader on the front of theReceiver. Slide the smartcard into the card slot. Thesmartcard must be inserted with the chip facing down.
3.1 Preparation: Device checks the device settings
The following tests are performed by the installation wizard automatically. Your intervention is not requirednormally.
The Receiver searches for the cable signal. If no signal is detected, make sure that the antenna cable is
properly connected. If the test has been interrupted, press on your remote control to proceed with the
installation.
If the Receiver does not find a signal, contact the customer service of Kabel Deutschland.
The Receiver verifies that you have inserted the smartcard into the device. You received a smartcard fromKabel Deutschland, insert it into the smartcard reader. The smartcard must be inserted with the gold chip
facing down. If you do not have the smartcard at hand, press on the remote control to continue the
installation without smartcard. Until you use the smartcard, you can only use free channels.
The Receiver automatically searches the cable network for new and improved software for your Receiver.If new software is available, the Receiver downloads it and reboots.
3.2 Language settingsThe default language for the operation of your Receiver is
German. If you want to set a different language, press
on the remote control. You can choose between the languagesGerman, English, Turkish and Russian. Use the keys to select
a language and confirm your selection by pressing .
Note
The assignment of the button on your remote changes depending on
the steps you perform. During installation, the current function assignment of
the button always appears at the bottom right on your television
screen.

18
DCI85HD KD
3.3 The five steps of the installation wizardIn five steps, the installation wizard will guide you through the installation. Please follow the instructionson the screen carefully. If necessary, react with your remote control. Simply use the keys around the
button and then confirm your selection by pressing .
3.3.1 Step 1: Channel search
The Receiver automatically checks the cable for TV and radio channels and stores them in places 101 to999.
After the completion of the channel search, the total numberof TV and radio channels is displayed in the installation
screen. Exit the channel search by pressing .
3.3.2 Step 2: Set up favorite channels
The channel search normally finds several hundred channels.You can now set up your favorite channels and their place inthe list of favorite channels. Places 1 to 100 are reserved for
your favorites. To begin, press .
1. The list of TV channels is displayed. Now proceed by pressing the keys , or the P+ / P- button onyour remote control to browse through the channel list and select which channel you want to add to your
favorites list. If you want to add a channel to your favorites list, press while the yellow marker is on
the name of the channel. The selection is indicated by a green check mark next to the channel name.
2. If your list is complete, press on the remote control. A window appears in which you are prompted to
confirm your selection. By pressing you store your entire favorite list.
3. To change the order of the channels in your favorites list, move down with the arrow key to the entry
Rearrange. Your favorites are displayed. Do you want to move a channel in the favorites list, press
while the yellow marker is on the program‘s name. Now the program can be moved using the keys, .
4. To complete sorting, press the arrow button . Confirm the selected order of your favorites list by
pressing .
Note
If you do not want to create a list now, skip this menu. You can later press
on your remote to enter the main menu. Then select Settings first,
then Favorites (see chapter 7.5, Favorites). By choosing Add the list of TV channels is displayed. You can now create your favorites list as described. Without a favorites list the positions 1 to 100 remain unassigned.

19
DCI85HD KD
3.3.3 Step 3: Setting up an internet connection
If you are connected to the internet you can use the Kabel Deutschland’s online video store "SelectVideo". This service is not yet available everywhere in Germany. Furthermore, by using an internetconnection you can review previous searches, the list of your recorded programs and a list of yourfavorite channels.
On the TV screen you see how to connect the Receiver to the internet. Select how to connect to theinternet using the keys , on the remote control: via the provided wireless stick or via a network cable(LAN cable) (with network cable, continue with step 2).
If you do not want to connect the Receiver to the internet at the moment, use the arrow button and
on your remote control to select Proceed to step 4: Select Energy Save Mode.
1. If you want to connect via the WLAN-Stick, make sure thatthe WLAN-Stick is plugged into the USB port for WLAN-Stick under the network connector (RJ45) on the back of theReceiver and that the WLAN key is at hand. The wirelesskey is a string in the form of a password that protects accessto your wireless internet access from unauthorized thirdparties. The wireless key is usually found in thedocumentation of your wireless router, the wireless accesspoint to the internet. It is strongly discouraged to operate awireless internet access in Germany without protection by awireless key for reasons of data protection, data security and for legal liability.
Now select the yellow highlighted line Via the Kabel
Deutschland wireless LAN stick by pressing on your
remote to establish an encrypted connection betweenWLAN-Stick and wireless router using a WLAN key. You have additionally the option of selecting Continue withWPS using the arrow key on your remote control. WPSstands for Wi-Fi Protected set-up and is anothertechnology for establishing wireless connections, but withlower level safety.If wireless networks are in range, they are now displayed. Choose with the keys , on the remotecontrol, with which wireless network to connect the Receiver. When the name of the network is
highlighted in yellow, select this network pressing on your remote.
Now, an on-screen keyboard is displayed to type the WLAN key. The wireless key is usually between 8and 63 characters long and can consist of numbers, letters and special characters. Usually you haveto distinguish between lowercase and uppercase letters. To enter the WLAN key, move the yellowhighlight using the four keys , , , on your remote control to the first character of the Wi-Fi key,
and then press on your remote control. The character appears in the input line on the screen
keyboard. Enter all characters of the wireless key. Use the ABC field in the screen keyboard and press
on your remote to set the lowercase letters shown in the screen keyboard to uppercase if
necessary. Use the field !&? in on the on-screen keyboard and press on your remote to display
the special characters available. If the key is entered completely and correctly, finish the input via the
field Input ready on the on-screen keyboard and press on your remote control. Now, the Receiver
checks the network and internet connection. If the Receiver is connected to the internet, the messageThe internet connection has been set up appears. In addition, the LED light flashes on the wirelessstick.
I
O
EIN / AUS
23W230V~50Hz
L
ANALOGAUDIO
USBUSB
NETZWERK
HDMI
20
DCI85HD KD
2. If you choose to connect via a network cable (LAN cable), check if the network cable is connected tothe Receiver and to the router as shown in chapter 2.2.2, Connection to a standard definition TV
with SCART connection. Press and on your remote control to select Via a LAN cable. The
device will automatically establish an internet connection.
If the internet connection is lost, it can be established later pressing on your remote control
and selecting Settings (see chapter 7.2.5, Internet).
3.3.4 Step 4: Select energy mode
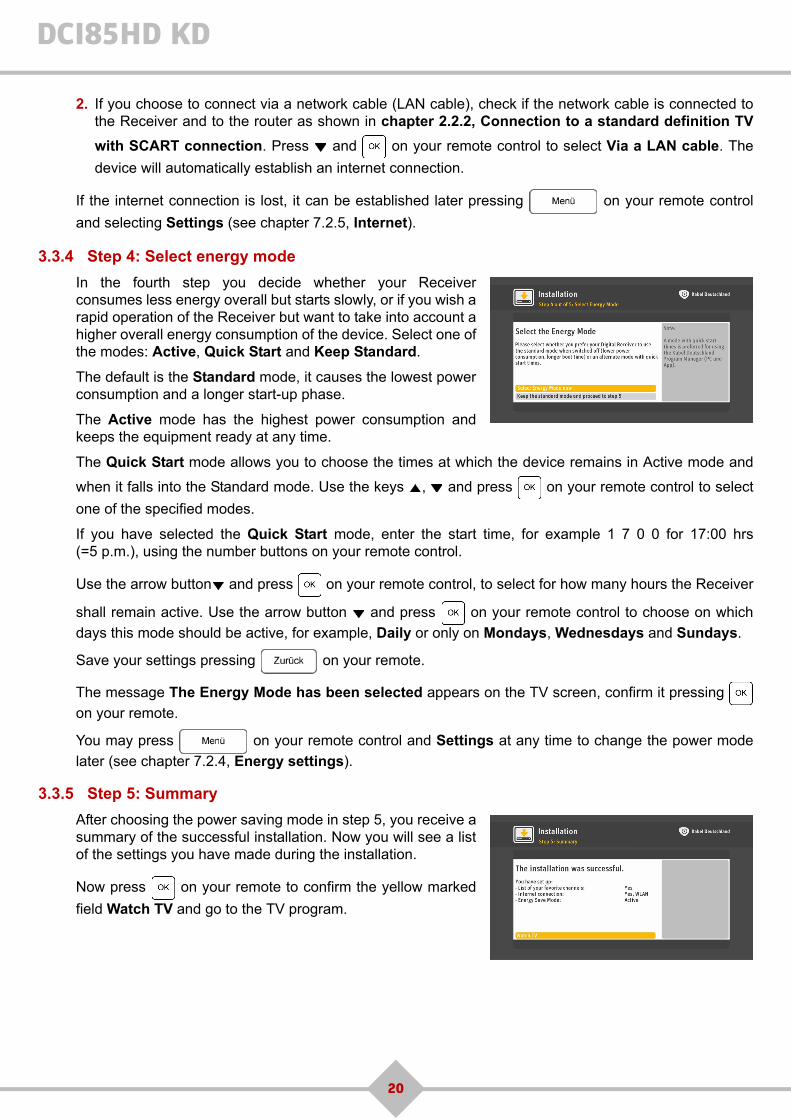
In the fourth step you decide whether your Receiverconsumes less energy overall but starts slowly, or if you wish arapid operation of the Receiver but want to take into account ahigher overall energy consumption of the device. Select one ofthe modes: Active, Quick Start and Keep Standard.
The default is the Standard mode, it causes the lowest powerconsumption and a longer start-up phase.
The Active mode has the highest power consumption andkeeps the equipment ready at any time.
The Quick Start mode allows you to choose the times at which the device remains in Active mode and
when it falls into the Standard mode. Use the keys , and press on your remote control to select
one of the specified modes.
If you have selected the Quick Start mode, enter the start time, for example 1 7 0 0 for 17:00 hrs(=5 p.m.), using the number buttons on your remote control.
Use the arrow button and press on your remote control, to select for how many hours the Receiver
shall remain active. Use the arrow button and press on your remote control to choose on which
days this mode should be active, for example, Daily or only on Mondays, Wednesdays and Sundays.
Save your settings pressing on your remote.
The message The Energy Mode has been selected appears on the TV screen, confirm it pressing
on your remote.
You may press on your remote control and Settings at any time to change the power mode
later (see chapter 7.2.4, Energy settings).
3.3.5 Step 5: Summary
After choosing the power saving mode in step 5, you receive asummary of the successful installation. Now you will see a listof the settings you have made during the installation.
Now press on your remote to confirm the yellow marked
field Watch TV and go to the TV program.

21
DCI85HD KD
4 Basic functions
4.1 Selecting a TV channel
4.1.1 Using P+/P- or 0-9
To change channels press the P+ or P- button on the remote control or enter the channel number directlyusing the numeric keys on the remote control. You can also switch to the last viewed channel using the
button .
4.1.2 Program information bar
Each time you change the channel, the program information bar appears on the TV screen. It can also be
displayed while watching a program by pressing or using the four keys , , , .
The program information bar shows you the current program and the program for the coming 2 hours at aglance.
Use the keys and to scroll through the information regarding the current program and upcoming
programs. You can display the time and the transparency of the information bar pressing on
your remote and Settings, System set-up, Picture, OSD Transparency (see chapter 7.2.3.6, OSDTransparency).
A Day of broadcast E Current and next program
B Channel number and name F Channel category
CTitle, start time and end time of the broadcast
G Choose category
D Elapsed time H Show options for this program
HGF
C D
B
A
E

22
DCI85HD KD
4.1.3 Using the channel list
During a program you can display the program information bar by pressing on your remote control or
using the four keys , , , .
Press or to display the channel list.
Press and to scroll through the channel list (I). The program information bar shows the broadcastdata for the selected channel (J).
To switch to a channel in the list, mark it with the buttons or , then press .
4.1.3.1 List of favorites
If you have favorite channels you watch frequently, you can add them to your TV favorites list in theprogram information bar: your favorites are listed first for faster selection (channels 1 to 100 depending onthe number of favorites). The main channel list follows, from channel number 101 to 999 depending onthe number of channels found in the cable network.
For more information about creating and managing favorites, see chapter 7.5, Favorites.
4.1.3.2 Categories
To allow easy access to channels in a particular category, proceed as follows: press the yellow button on
the remote control, select a category using the buttons or and press . The Channel list now
shows the first channel in the selected category.
JI

23
DCI85HD KD
4.1.4 Detailed program information
To view more information about a program, press . Depending on availability, a detailed description
of the program is displayed.
Use the keys P+ or P- to scroll through the information pages.
Depending on the mission, you can select different actions within the information page:
Use the buttons or to select an action and press to confirm.
To close the program information screen and move to the last viewed program, press or .
4.2 Volume settings
4.2.1 Volume
Adjust the volume using the volume buttons on your remote control. If you want to increase the volume,press +. If you want to decrease the volume, press -.
Action Description
Watch View the program.
Watch in HDWatch the channel in HD if you have an activation for the selectedchannel.
Timer Set the timer.
Channel to favorites Add the channel broadcasting the program to the Favorites.
Note
The following settings affect the sound that can be heard on TV, but not on the VCR SCART connector, on the analog AUDIO connector (ANALOG AUDIO L / R) for Hi-fi system and on the DIGITAL AUDIO port.

24
DCI85HD KD
4.2.2 Mute
If you want to mute the sound heard on the TV, use the button . Pressing again turns the
sound on again.
4.3 Language settings for audio and subtitles and selection of option channels
4.3.1 Language for audio
1. Press to display the options bar.
2. Select Audio language using or and press or .
3. Select the language using or and press .
4.3.2 Language for subtitles
1. Press to display the options bar.
2. Select Subtitle language using or and press
or .
3. Select the language using or and press .
4.3.3 Selecting option channels
1. Press to display the options bar.
2. Select Video subchannel using or and press
or .
3. Select the language using or and press .
Note
All changes are immediately reflected in the program that you are watching. The temporary adjustments will be lost if you switch to another channel.
For a permanent change of language or settings for subtitles, press
on your remote and select Settings, System set-up, Language
(see chapter 7.2.1, Language).

25
DCI85HD KD
4.4 Teletext
You can view teletext pages with additional information on television programs, if this service is suppliedby the channel.
Press to open the teletext page for the channel you are watching.
To make teletext pages appear transparent so that you can track the current program in the background,
press again.
To scroll through the teletext pages, either select a page using the number buttons on your remote controlor press the P+ or P- button on the remote control.
If the channel provides more screen options and services, select them using the color keys on the remotecontrol.
To change back to the program from the teletext pages press and .
4.5 Listen to radio
The radio mode offers the same features as the TV mode.
Press on your remote to switch between TV mode and radio mode. On the TV screen the
selected channel and the current program are displayed.
If you press or one of the keys , , , on the remote, the channel information is displayed as in
TV mode.
A Day of broadcast E Current and next program
B Channel number and name F Channel category
CTitle, start time and end time of the broadcast
G Choose category
D Elapsed time H Show options for this programn
HGF
C D
B
A
E

26
DCI85HD KD
4.5.1 Selecting a radio channel
Press P+ or P- on the remote control to change channels or enter a channel number using the numerickeys on the remote.
Use the keys , to scroll through information regarding current and upcoming program.
Press or to display the radio channel list. As in TV mode, you may create a list of favorites amongthe radio channels (see chapter 7.5, Favorites).
4.5.2 Categories and other options in radio mode
Each time you change the radio channel the program information bar appears. If you press the yellowbutton on your remote now, you can quickly reach the first channel of a particular category, for exampleNews where categories are available for the program.
Press to display detailed information about a program.
Press to see more options, if available for the current radio program.
27
DCI85HD KD
5 Setting a timerYour Receiver has the ability to set timers for favorite programs in order to notify you in time before thestart of the broadcast. The unit will automatically switch to that program before the program starts.
This feature is especially useful when you wish to record a video or DVD. Before recording a program onvideo or DVD make sure that:
• Your recorder is connected to the Receiver (see chapter 2.4, Connection to the VCR / DVDrecorder)
• Your recorder is adjusted for the same period for recording as the Receiver• The Receiver is not turned off at the time of the recording but turned on or in standby mode.
You can record TV and radio programs.
5.1 Set timer
A flag can be set for upcoming broadcasts (TV and radio). To set a flag for a program, you have tonavigate to the program information bar in the digital program guide or to the search results. Once youhave set a flag (see below), you can change the channel or put the Receiver into standby. Shortly beforethe scheduled broadcast a screen message is displayed that the Receiver will switch to the rememberedprogram.
By default, the Receiver switches to the respective program before the program begins. After the end ofthe program, the Receiver returns to the channel previously selected.
Note: If you want to record a flagged program on your VCR or DVD recorder, these devices must be set atthe scheduled time to record.
5.1.1 Set flags in program information bar
1. Press or one of the keys , , , to enter the program information bar.
2. Use , to browse to the program you wish to record. Press to set a timer for a program. The
program information window opens.
3. Use , to select Set timer and press . See chapter 4.1.2, Program information bar for more
information.
5.1.2 Set timer in electronic program guide (EPG)
1. Press to switch to the EPG.
2. Use , , , to navigate to the selected program in the EPG. Press to set a timer for a
program. The program information window opens.
3. Use , to select Set timer and press . See chapter 6.1, Electronic Program Guide (EPG) for
more information.

28
DCI85HD KD
5.1.3 Set timer in search results
1. Press to enter search, perform a search for keywords or categories as described
in chapter 6.2.
2. Use , , , to navigate to the selected program in the search results. Press to set a timer
for a program. The program information window opens.
3. Use , to select Set timer and press . See chapter 4.1.2, Program information bar for more
information.
• The selected program is marked in grey in the program information bar and in the EPG. • If the saved program overlaps with another saved program, you will be prompted to correct the
overlap.If a program is not approved for minors, the Receiver asks you to enter the Parental Control PIN toconfirm the timer.
5.1.4 Delete timer
1. In the program information bar, in the EPG or in search use the keys , , , to select a program.
2. Press . The program information window opens.
3. Use , to select Cancel timer and press .
5.2 Set timer manually
To set a timer for a program, the Receiver automatically retrieves the data required for the selectedprogram and stores it.
If too few details for the program are available, the Receiver offers to set the details of the recordingmanually.
Additionally, you can also prepare a timer manually for a period of your choice on a channel you select.
Press on your remote and use the keys , and to choose Settings, Timer, Set timer.
Now choose your settings:
1. Choose a channel. Use , to select Channel. In the list use , to select a channel and confirm

29
DCI85HD KD
your choice by pressing .
2. Select a date. Use , to select Date. Use the number keys of your remote to choose a date.
3. Enter the start and end time of the timer. Press , to select Start time. The marker automaticallyjumps to the line End time. Use the number buttons on your remote to insert the end time.
4. Select whether the recording should take place once or repeatedly. The marker jumps automatically to
the line Repeat. By default Once is set. To set an automatic repetition of the recording, press . Now
select how often you want the recording to take place:
• Once: once at the set time.• Daily: every day at the set time.• Mon-Fri only: every week day from Monday to Friday at the set time.• Weekly: at an interval of seven days from the date set for the set time.
5. Use , to select Save and press .
The manually prepared timers in the timer list will show a clock symbol. The manually prepared recurringtimers are stored in a folder that is named with the channel's name and date and time of the recording.
Manual programmings can always be changed via the menu Timer.
5.3 Displaying and using timers
Press on your remote to open Timer. Or press and use and on your remote to
select Timer.
For details concerning your timers and folders choose the referring line using the keys , and press . All
timers are shown in Timer.
In Timer first all folders for series are displayed, followed by the timers created manually and the timers for individual programs. For each line, the following properties are displayed:
Note
You can customise your timer settings to add extra time before and after your manual timers (see chapter 7.4.2, Timer extensions).

30
DCI85HD KD
• Folder or program name• Start date of timer• Time of broadcast• Channel name or number
Use the following icons to quickly realize which kind of timers are displayed:
To leave Timer press .
Symbol Description
The folder contains timers with repetition scheme: • A series whose future sequences are timed automatically.• Manual timers with repetition scheme.The folder contains timers without repetition scheme:• A series which is terminated.• A series with deleted timers.
The timer was prepared manually.
The folder was prepared manually.
PIN protected timers. To lock / unlock an item select it using the
keys , , press and select an action.

31
DCI85HD KD
6 Electronic program guide (EPG), search function and Select Video (video library)If you are looking for programs that interest you, press on your remote. Now you see thefollowing options:
• Program Guide: The electronic program guide (EPG) provides an overview of current and upcomingprograms.
• Search: Searches current and upcoming programs by genre and titles that you enter.
• Select Video: Access to the online video Select Video to download a film or broadcast on yourReceiver.
6.1 Electronic Program Guide (EPG)
The digital program guide, also known as EPG, offers a preview for most TV and radio channels. You canset a timer directly from the EPG, see chapter 5.1.2, Set timer in electronic program guide (EPG). TheEPG previews up to 7 days, depending on the channel.
Press on your remote control to open the EPG. Or press and select Program
Guide using the key and press on your remote control.
You can choose to view the digital program guide for the TV or the radio program. To switch between TV
and radio press on your remote.
AYou receive an information on the specific day that is displayed.
C
The period in which the programs are broadcasted. The current period is highlighted with a fine yellow timeline.
B
You receive an information on the specific channels that are displayed. If you select a channel, it is highlighted in yellow, the other channels are gray.
D
Here you can see the broadcasts of the respective channel (list on the left) for the relevant period (time axis above).
B
A
D
C

32
DCI85HD KD
For better orientation, the EPG marks the current time with a yellow timeline.
How to use the EPG:
• To select a program or a channel on the current page of the digital program guide press the keys , ,, on your remote. Looking for a specific channel and knowing the number of the channel in your
favorites? Then you can also enter this number directly using the number buttons on your remotecontrol.
• To browse the EPG, press P+ (one page forward) and P- (one page back) on your remote control.
• To move to the next day, press . To move to the previous day, press .
• To view details such as content or performer of a program, select the title of the program with one ofthe keys , , , on your remote. As soon as the title of the program appears in yellow, press
.
• Do you want to leave the digital program guide and watch the program that you selected using the
keys , , , on your remote? Press .
• Do you want to see programs shown in prime time on the same day from 8 pm? Press .
• Do you want a preview exclusively for a particular channel category (e.g. sports)? Simply press theyellow button on your remote control. Select a category using the keys , on your remote and
press .
• To set a timer for an upcoming program, select it by pressing the keys , , , and press .
For more information see chapter 5.1.2, Set timer in electronic program guide (EPG).
To exit the EPG press or on your remote.
6.2 Search
With the search function you can search for any keyword. For example actors, movie titles or differentkeywords but also by categories such as movies, series, entertainment, etc.
An internet connection is required for using all features within the search function. The results do not onlyinclude television broadcasts from the EPG but also the movies of online video library Select Video, ifavailable in your region.
Press on your remote to begin the search.
You can also press on your remote control and then use the four keys , , , to select
Search.
You are automatically in the keyword search.
6.2.1 Search by keyword
Enter a keyword on the on-screen keyboard:
• Select the characters using the four keys , , , and press for each character you want to
33
DCI85HD KD
select.
After entering the third letter, the search will start automatically and search results that contain the lettersyou type.
The list on the right contains results that include your keyword. In the list you find results from the currenttelevision program and from the film supply of Select Video.
By pressing on your remote you can now switch to the right window into search results. If you want
detailed information about this result, use the keys , to select the search result and press . If you
selected a movie title with the arrow keys press . The time of the broadcast is displayed now. If your
keyword is an actor name, films with this actor will now display, including broadcast date and channel.
To select a TV program or a rental video from the list press and follow the instructions on the screen
navigating with the four keys , , , and confirming with .
Possibly the list of results has multiple pages. If necessary, move to the next page using and return tothe last page pressing .
If you are in the keyword list, you may wish to refine your search. To do this, press to proceed to thesearch filters. The filters Search for keyword, Search for title only, Search for person only refine yoursearch. In this case, the search only displays results according to the chosen filter. Use to move fromthe list of filters back to the refined search results.
6.2.2 Search by category
In addition, you also have the opportunitiy to search by category such as programs in a particularcategory (eg, movie or sport).
1. Select Category using , and press or .
2. Select a category from the list using , and press or .
3. For some categories more input is needed. E.g. if you select Spielfilm as category, another list isdisplayed in which a subset should be selected, such as Action, Comedy, Krimi etc. Select a
subcategory from the list with the , keys and press .
4. If you want to refine your search, press to proceed to the search filters. Filters like Show all, ShowTV only refine your search. In this case only results according to the chosen filter are displayed. Select
a filter from the list with the , keys and press .
Note
You may enter numbers using on the on-screen keyboard as well as using the number buttons on your remote control.
Note
Possibly the list of categories has multiple pages. If necessary, move to the next page using P+ on your remote and return to the last page pressing P-.

34
DCI85HD KD
6.2.3 Search results
In the list of search results all matching programs are displayed with date, time and channel.
How to use the search results:
• Browse the list of results using , on your remote.
• To browse several pages of a results list press P+ (one page forward) and P- (one page back) on yourremote.
• To display details like content or actors select the title of the program using the keys , , , . Is the
title marked yellow, press .
• To set a timer for a current program or prepare a timer, select it using , , , and press as
soon as the title is marked yellow.
For more information on this feature, see chapter 5, Setting a timer.
To leave the search press or on your remote.
6.2.4 Local Search
If you have not established an internet connection you can use the local search. Press on your
remote to start the search. You can also press on your remote control and then use the four
keys , , , to select Search.
Press , select Search without internet connection and press .
6.2.4.1 Title/Actor
You can search for a program by entering the title or the actor name.
• On the Enter keyword tab, select at least three characters by using the four keys , , , and the OK button on the virtual keyboard.
• Select the List entry on-screen to move to the list of keywords matching to the entered title/actor. If there are no titles or actors listed, the list is disabled.
6.2.4.2 Categories
You can search for a program by category.
• Select Category and press OK or button.

35
DCI85HD KD
• For some categories more input is needed. E.g. if you select Spielfilm as category, another list is displayed in which a subset should be selected, such as Action, Comedy, Krimi etc.
• Press to view search results.
6.3 Select Video (online video library)
Select Video is a video-on-demand service (VOD). It offers videos on demand through the internet and inhigh diversity. You order and play rental videos via your Receiver, if it is connected to the internet.
6.3.1 Access to Select Video
Select Video is only available if the service is available in your region and you are entitled to. In addition,you have to connect the Receiver to the internet via your router in order to use all features of Select Video(see chapter 7.2.5, Internet).
6.3.2 Selection of videos
Press on your remote to enter the online video store. Alternatively press , select
Select Video using the key and press on your remote.
You will see a list of several categories such as Highlights, Specials, TV auf Abruf etc. Use the keys ,
to select a category and press .

36
DCI85HD KD
You will now see the available films or programs in this category. Use the arrow keys to select a movie or
a show. Select a film or a program using , . If the item is marked yellow, press . Follow the
instructions on the screen. Navigate using , , , and confirm your selection with .

37
DCI85HD KD
7 Settings
Press on your remote. Select Settings using the keys , . Press . Select one of the
following options using the keys , :
1. System update
2. System set-up
3. Parental control
4. Timer
5. Favorites
6. Service
7. System check
7.1 System Update
Using the settings in System update you can configure the software update feature, search for channels,add or remove channels, and reset the Receiver to factory default.
Press on your remote. Use the keys , to select Settings. Press . Select System
update with the keys , :
To return to the previous screen and save your changes, press or .
To exit the menu screen, press or .
7.1.1 Software update
You can choose two types of software updates, the two available options are Automatic and Manual.Manual is the default.
If Automatic is selected, the Receiver automatically updates its operating software at intervals when it isin standby mode. If Manual is selected, you will be prompted to perform the upgrade immediately when asoftware update is available, or wait until the Receiver is in standby mode or otherwise to refuse.
To change this setting:
1. Press on your remote. Use the keys , to
select Settings. Press .
2. Use the keys , to select System update. Press
or .3. Use the keys , to select Software update mode. Press
or .
4. Use the keys , to select how the software should be updated: Automatic or Manual.
5. Press to confirm the new setting.
More information on software updates can be found in see chapter 8, Software update.
7.1.2 Search for updated software
You can search for new operating software for your Receiver at any time. This feature is especially useful

38
DCI85HD KD
if you have previously rejected an update that you want to catch up now.
To start a search for new software:
1. Press on your remote. Use the keys , to
select Settings. Press .
2. Use the keys , to select System update. Press
or .3. Use the keys , to select Search for new software.
Press or .
4. The Receiver will search for new software. 5. If new software is available, use the keys , to select one of the following options: Download it now,
In Standby or Do not download. Press .
More information on software updates can be found in see chapter 8, Software update.
7.1.3 Channel search
Per default the Receiver automatically checks at intervals if new channels are available, and stores themwhen it is in standby mode.
You can choose two types of channel search, the two available options are Automatic and Manual.Automatic is the default.
If Automatic is selected, the Receiver automatically updates its channels list at intervals when it is instandby mode. As soon as an update of the channel list is available you will be prompted to perform theupdate immediately, to wait until the Receiver is in standby mode or otherwise to refuse, if Manual isselected.
To change the setting:
1. Press on your remote. Use the keys , to
select Settings. Press .
2. Use the keys , to select System update. Press
or .3. Use the keys , to select Channel scan mode. Press
or .
4. Use the keys , to select, how the channel list should be updated: Automatic or Manual.
5. Press to confirm the new setting.

39
DCI85HD KD
7.1.4 Delete additional channels
Use this feature to delete unwanted channels after performing a manual search (described in chapter7.1.5, Search additional channels).
1. Press on your remote. Use the keys , to
select Settings. Press .
2. Use the keys , to select System update. Press
or .3. Use the keys , to select Delete additional channels.
Press or .
4. Use the keys , to select channels to be deleted and mark them. The list of additional channels mayconsist of multiple pages. To browse through the pages of the list press P+ (forward) or Taste P- (back).
5. To undo the selection of a channel you selected press .
6. After selecting all channels to be deleted, press or .
7.1.5 Search additional channels
This menu lets you search for additional channels manually by typing a specific cable frequency. Cablefrequencies are available on the website of Kabel Deutschland or made available by your televisionchannel.
To start the search for additional channels:
1. Press on your remote. Use the keys , to
select Settings. Press .
2. Use the keys , to select System update. Press
or .3. Use the keys , to select Search for additional
channels. Press or .
4. Input a Frequency using the number keys of your remote. Press .
5. Use the keys , to select Search. Press .
6. The Receiver searches for TV and radio channels and displays the number of channels found. To
cancel the search press or .
7. Save the channels by pressing .
7.1.6 Start a channel search
Per default the Receiver automatically checks at intervals if new channels are available and saves themwhen it is in standby mode. You can start this search manually, if necessary. This feature is especiallyuseful if you have previously rejected an update that you want to catch up now.

40
DCI85HD KD
To start a channel search:
1. Press on your remote. Use the keys , to
select Settings. Press .
2. Use the keys , to select System update. Press
or .3. Use the keys , to select Automatic channel scan.
Press .
4. The Receiver will scan for new TV channels and radio channels and show the number of channels
found. You can stop the search by pressing or .
5. To save the channels press .
7.1.7 Reset to factory default
This menu lets you restore the factory settings of the Receiver.
1. Press on your remote. Use the keys , to
select Settings. Press .
2. Use the keys , to select System update. Press
or .
3. Use the keys , to select Factory reset. Press .
4. To cancel, use the keys , to select No. Press
or . To confirm, use the keys , to select Yes. Press .
5. After resetting to factory default, the installation screen of the Receiver is displayed. Set up the Receiveragain (see chapter 3, Initial installation).
7.1.8 Update EPG
You can update the electronic program guide if necessary.
To start the update:
1. Press on your remote. Use the keys , to
select Settings. Press .
2. Use the keys , to select System update. Press
or .3. Use the keys , to select Program Guide refresh. Press
.
The message Program Guide refresh in progress… isdisplayed.
Note
If you restore the factory settings, your favorites, settings and prepared timer are lost.

41
DCI85HD KD
7.2 System set-up
The System set-up menu allows you to change the settings for language, audio and picture, energy useas well as for the internet connection of the Receiver and to control the remote control app.
Press on your remote. Use the keys , to select Settings. Press . Use the keys ,
to select System set-up. Press .
To return to the previous screen to save your changes, press or .
To exit the menu screen, press or .
7.2.1 Language
Using this setting you can configure the language settings for the user interface and the subtitle of theprogram. Broadcasts are also shown in the selected menu language, if available. The automatic(permanent) subtitle display can be enabled or disabled here.
To open the language settings:
1. Press on your remote. Use the keys , to
select Settings. Press .
2. Use the keys , to select System set-up. Press
or .
3. Use the keys , to select Language. Press or .
7.2.1.1 Menu language
To set a default language for menus, sound and subtitles:
1. Use the keys , to select On Screen Language. Press
or .
2. Use the keys , to select a language.
3. Press to confirm.
7.2.1.2 Subtitles
To enable or disable automatic subtitle display:
1. Use the keys , to select Subtitles. Press or .
2. Use the keys , to select On (activate subtitles) or Off(disable subtitles).
3. Press to confirm.
7.2.2 Audio
This menu lets you configure the following audio settings:
• Audio Output: Set the most appropriate AUDIO connector for your devices: Mono or Stereo.
• Dolby Digital on HDMI / Dolby Digital on SPDIF: You can activate or deactivate automatic playbackof Dolby Digital at the HDMI connection for digital video / audio and the DIGITAL AUDIO jack (S /PDIF). In this case broadcasts are delivered in Dolby Digital if available. Refer to the manual of youraudio system, which settings your device requires.

42
DCI85HD KD
• For visually impaired: This audio is supplement with the sounds that aid to understand the action onthe screen.
To open the audio settings:
1. Press on your remote. Use the keys , to
select Settings. Press .
2. Use the keys , to select System set-up. Press
or .
3. Use the keys , to select Audio. Press or .
7.2.2.1 Audio output
To set the default settings for the audio output:
1. Use the keys , to select Audio output. Press or .
2. Select the desired audio output. Use the keys , to select Mono or Stereo.
3. Press to confirm.
7.2.2.2 Dolby Digital
To enable or disable Dolby Digital replay at the HDMI connection for digital video / audio and at theDIGITAL AUDIO connector (S / PDIF):
1. Use the keys , to select Dolby Digital on HDMI or Dolby Digital on SPDIF. Press or .
2. Use the keys , to select On (enable Dolby Digital) or Off (disable Dolby Digital).
3. Press to confirm.
7.2.2.3 For visually impaired
To enable or disable audio for visually impaired:
1. Use the keys , to select Audio. Press or .
2. Use the keys , to select On (enable audio for visually impaired) or Off (disable audio for visuallyimpaired).
3. Press to confirm.

43
DCI85HD KD
7.2.3 Picture
This menu lets you configure the following picture settings:
1. TV-SCART / VCR SCART
2. SCART Switching
3. HDMI Screen Resolution
4. Banner Timeout
5. OSD-Transparency
6. Start Channel
To open the image settings of the Receiver:
1. Press on your remote. Use the keys , to
select Settings. Press .
2. Use the keys , to select System set-up. Press
or .
3. Use the keys , to select Picture. Press or .
7.2.3.1 SCART settings for TV
Using this setting you can specify the most suitable video standard for TV output for the the TV connectedto the TV SCART connector.
1. Use the keys , to select TV SCART. Press or .
2. Set the video standard that is best suited for your TV. Referto the manual of your TV for all necessary information. Usethe keys , to select RGB, CVBS or S-Video.
3. Press to confirm.
7.2.3.2 SCART settings for video recorder or DVD recorder
This menu lets you adjust the video standard that is best suited for the VCR or DVD recorder connectedto the VCR SCART output.
1. Use the keys , to select VCR SCART. Press or .
2. Set the video standard that is best suited for your device.Refer to the manual of your video recorder or DVD recorderfor all necessary information. Use the keys , to selectCVBS or S-Video.
3. Press to confirm.

44
DCI85HD KD
7.2.3.3 Video aspect ratio for SCART
This menu lets you select whether the video aspect ratio (4:3 or 16:9) is also automatically displayed onthe TV SCART output.
1. Use the keys , to select SCART-switching. Press
or .2. Use the keys , to select Always 16:9 or Always 4:3.
3. Press to confirm.
7.2.3.4 HDMI video resolution
Using this setting you can specify the output resolution for HDTV.
1. Use the keys , to select HDMI screen resolution.
Press or .
2. Determine the output resolution of your HD TV. Use thekeys , to select 576p, 576i, 720p or 1080i. If you use astandard TV, leave the setting to 720p.
3. Press to confirm.
4. The Receiver will temporarily switch to the selectedresolution. If you do not want to save this setting, use the
keys , to select No, press and select a different setting. If you want to save this setting, use the
keys , to select Yes.
5. Press to confirm.
7.2.3.5 Display options for program information bar
Using this setting you can select how long the program information bar should be displayed on the TVscreen (for more information see chapter 4.1.2, Program information bar).
1. Use the keys , to select Banner timeout. Press
or .2. Use the keys , to select 5 sec or 10 sec.
3. Press to confirm.
7.2.3.6 OSD Transparency
Using this setting you can select how transparent menus andmessages in the so-called On-Screen Display (OSD) on the TV screen will be displayed.
1. Use the keys , to select OSD transparency. Press
or .2. Use the keys , to select None to disable OSD
transparency. Use the keys , to select 10%, 30% or50%, if you want to soften the image in the background tothe respective percentage.
3. Press to confirm.

45
DCI85HD KD
7.2.3.7 Startup channel
Select On, if the Receiver should always show the Kabel Deutschland channel on startup. Select Off, ifthe Receiver should always show the last viewed channel on startup.
1. Use the keys , to select Start channel. Press or .
2. Use the keys , to select Off, if the Receiver shouldalways show the last viewed channel on startup. Use thekeys , to select On, if the Receiver should always showthe Kabel Deutschland channel on startup.
3. Press to confirm.
7.2.4 Energy settings
In this menu you decide whether your Receiver consumes less energy overall, but starts slowly, or if youwish a rapid operation of the Receiver, but want to take into account a higher overall energy consumptionof the device. Select one of the modes: Standard, Energy Save Mode, Quick Start and Active. Thedefault is the Standard mode, it causes the lowest power consumption and a longer start-up phase.
To change this setting:
1. Press on your remote. Use the keys , to
select Settings. Press .
2. Use the keys , to select System set-up. Press
or .
3. Use the keys , to select Energy settings. Press
or .
4. Use the keys , to select Standard, Energy Save Mode, Quick Start or Active. Press . A
description of the different modes is displayed.
Standard: This mode helps you minimize your energy consumption. For this reason your Receiver takeslonger to start and switches off automatically if the remote control is not used. The duration until automaticswitch-off can be determined.
1. Use the keys , to select Standard.
2. Press two times.
3. Use the keys , to select the time in hours, until the device turns off automaticcally and press .
4. Use the key to select Confirm and press .
Energy Save Mode: In the Energy Save Mode your Receiver consumes little energy on standby. Incontrast to the standard mode the Receiver does not switch off automatically.
1. Use the keys , to select Energy Save Mode.
2. Press two times.
Quick start: In the quick start mode you can set on which days, at what time and for how long yourReceiver automatically turns on from standby mode to active mode. The Receiver switches to activemode for the duration you determined.
1. Use the keys , to select Quick start.
2. Press .
3. Enter a start time using the number keys of your remote, for example 1 7 0 0 for 17:00 hrs (=5 p.m.).

46
DCI85HD KD
4. Press and use the keys , to select, for how many hours the Receiver remains in the Active
mode. Press .
5. Use the keys , to select Days. Press .
6. Use the keys , to select the days, on which the device remains in the Active mode during the time
selected before. Press for every day you wish to select.
7. Press to save your settings.
8. Use the keys , to select Confirm and press .
Active: In the Active Mode your Receiver is always available and boots within seconds. In this mode thedevice has the highest power consumption.
1. Use the keys , to select Active.
2. Press two times.
7.2.5 Internet
With an internet connection additional offers from Kabel Deutschland are available. To use them, youneed to connect your Receiver to the internet, either through the wireless stick or via a network cable(LAN cable).
To set up an internet connection:
7.2.5.1 Setting up a wireless internet connection (Wi-fi)
1. Press on your remote. Use the keys , to select Settings. Press .
2. Use the keys , to select System set-up. Press or .
3. Use the keys , to select Internet. Press or .
4. Use the keys , to select Internet set-up. Press .
5. Use the keys , to select Via the Kabel Deutschland wireless LAN-Stick or Via a LAN-cable.
Press .
Using the Kabel Deutschland WLAN-Stick
1. Use the keys , to select Via the Kabel Deutschland wireless LAN-Stick. Press .
Note
Make sure that you have either the wireless stick connected via a USB port OR a LAN cable to the network port on the Receiver (see chapter 2.2, Connection to TV).
Note
If the network does not appear in the list, you must configure it manually (see section Setting up a wireless internet connection (Wi-fi) manually, page 47).

47
DCI85HD KD
2. Use the keys , to select Continue with security key for wireless LAN or Continue with WPS.
You have additionally the option of selecting WPS. WPS stands for Wi-Fi Protected set-up and is anothertechnology for establishing wireless connections, but with lower level safety.
Continue with wireless key
1. Use the keys , to select Continue with security key for wireless LAN. Press .
2. The device now searches for available wireless networks. Use the keys , to select the wireless
network you would like to connect to. Press .
3. Enter your wireless key.Now an on-screen keyboard is displayed to type the WLAN key. The wireless key is usually between 8and 63 characters long and can consist of numbers, letters and special characters. Usually you have todistinguish between lowercase and uppercase letters.To enter the WLAN key, move the yellow highlight using the four keys , , , on your remote
control to the first character of the Wi-Fi key, and then press on your remote control. The character
appears in the input line on the screen keyboard. Enter all characters of the wireless key. Use the ABC
field in the screen keyboard and press on your remote to set the lowercase letters shown in the
screen keyboard to uppercase if necessary. Use the field !&? in on the on-screen keyboard and press
on your remote to display the special characters available. If the key is entered completely and
correctly, finish the input via the field Input ready on the on-screen keyboard and press on your
remote control.
4. Now, the Receiver checks the network and internet connection. If the Receiver is connected to theinternet, the message The internet connection has been set up appears. In addition, the LED lightflashes on the wireless stick in the color orange.
Continue with WPS
1. Use the keys , to select Continue with WPS. Press .
2. The device detects the internet connection and sets it up automatically. Press .
Setting up a wireless internet connection (Wi-fi) manually
Use the manual configuration if your wireless network (Wi-fi) is not visible for security reasons, but allowsdevices to detect and register. To perform the manual configuration, keep the following information aboutthe network ready: SSID network name, wireless security type and wireless key.
1. Press on your remote. Use the keys , to select Settings. Press .
Note
The wireless key is a string in the form of a password that protects access to your wireless internet access from unauthorized third parties. The wireless key is usually found in the documentation of your wireless router, the wireless access point to the internet. It is strongly discouraged to operate a wireless internet access in Germany without protection by a wireless key for reasons of data protection, data security and for legal liability.
Note
For a WPS connection your router has to be prepared. The settings for a WPS connection have to be made in the software menu of your router. In addition, some routers ask for WPS activation on the router device itself.

48
DCI85HD KD
2. Use the keys , to select System set-up. Press or .
3. Use the keys , to select Internet. Press or .
4. Use the keys , to select Internet set-up. Press .
5. Use the keys , to select Via the Kabel Deutschland wireless LAN-Stick. Press .
6. The screen for the network selection is displayed. Press to configure a wireless network (Wi-
fi) that is not visible for security reasons.
7. Use the keys , to select SSID. Press .
8. Enter the name of the wireless network (also called SSID) on the on-screen keyboard. To enter the SSID, move the yellow highlight using the four keys , , , on your remote control to
the first character of the SSID, and then press on your remote control. The character appears in
the input line on the screen keyboard. Enter all characters of the wireless key. Use the ABC field in the
screen keyboard and press on your remote to set the lowercase letters shown in the screen
keyboard to uppercase if necessary. Use the field !&? in on the on-screen keyboard and press on
your remote to display the special characters available. If the key is entered completely and correctly,
finish the input via the field Input ready on the on-screen keyboard and press on your remote
control.
9. Select Security Type. Press . Select the type of security used on the network (unsecured, WEP,
WPA-PSK or WPA2-PSK) using the keys , . Press .
10.Select Security Key. Press .
Now an on-screen keyboard is displayed to type the WLAN key. The wireless key is usually between 8and 63 characters long and can consist of numbers, letters and special characters. Usually you have todistinguish between lowercase and uppercase letters.
To enter the WLAN key, move the yellow highlight using the four keys , , , on your remote control
to the first character of the Wi-Fi key, and then press on your remote control. The character appears
in the input line on the screen keyboard. Enter all characters of the wireless key. Use the ABC field in the
screen keyboard and press on your remote to set the lowercase letters shown in the screen keyboard
to uppercase if necessary. Use the field ! &? in on the on-screen keyboard and press on your remote
to display the special characters available. If the key is entered completely and correctly, finish the input
via the field Input ready on the on-screen keyboard and press on your remote control.
11.Use the keys , to select Save. Press .
Setting up an internet connection via network cable (LAN cable)
1. Press on your remote. Use the keys , to select Settings. Press .
2. Use the keys , to select System set-up. Press or .
3. Use the keys , to select Internet. Press or .
4. Use the keys , to select Internet set-up. Press .

49
DCI85HD KD
5. Use the keys , to select Via a LAN-cable. Press .
6. The device detects the internet connection and sets it up automatically. Press .
7.2.5.2 Show internet connection settings
With this menu you can view the internet settings of the device.
1. Press on your remote. Use the keys , to select Settings. Press .
2. Use the keys , to select System set-up. Press or .
3. Use the keys , to select Internet. Press or .
4. Use the keys , to select View settings. Now the settings of the internet connections are displayed.
7.2.5.3 Test internet connection
In this menu you can test your internet connection.
1. Press on your remote. Use the keys , to select Settings. Press .
2. Use the keys , to select System set-up. Press or .
3. Use the keys , to select Internet. Press or .
4. Use the keys , to select Test Connection. Press .
5. The Receiver tests the connection and displays the result on the TV screen.
7.2.5.4 Disable internet connection
With this menu you can turn off the internet connection.
1. Press on your remote. Use the keys , to select Settings. Press .
2. Use the keys , to select System set-up. Press or .
3. Use the keys , to select Internet. Press or .
4. Use the keys , to select Switch off. Press . A message is displayed: If you switch off now
you will lose all functions using the internet connection. Most important examples are Video-on-Demand (if available) and Keyword Search.
5. To turn off the connection press two times. To leave the connection turned on press .
7.2.5.5 Privacy
In this menu you can view the privacy information.
1. Press on your remote. Use the keys , to select Settings. Press .
2. Use the keys , to select System set-up. Press or .
3. Use the keys , to select Internet. Press or .
4. Use the keys , to select Data privacy. Press .
5. The privacy policy is displayed. Use P+ and P- to browse. Press to leave this menu.

50
DCI85HD KD
7.3 Protection of minors
With the Parental control menu you can change the PIN protection stored on your smartcard.
If you use the online video library Select Video, you can also:
• Change the Adult PIN
• Protect the purchase of Select Video with your Parental Control PIN
To return to the previous screen and save your changes, press or .
To exit the menu screen press or .
7.3.1 Change Parental Control PIN
The Parental Control PIN is used to block access to channels and broadcasts, which are not suitable forminors. If you switch to channels or programs that are subject to the protection of minors the Receiverasks you to enter the Parental Control PIN. The broadcast will be played back after the correct ParentalControl PIN has been entered.
Please note if you change the Parental Control PIN:
• The Parental Control PIN is a four digit code.
• You must first enter the current Parental Control PIN before changing.
• The current Parental Control PIN must match the PIN stored on the smartcard.
• The new Parental Control PIN must be different from the current PIN.
• The new Parental Control PIN must be different from the current Adult PIN, both must not be thesame.
• The new PIN must not consist of the same four digits.
• If you enter the wrong PIN three times, access is blocked for ten minutes.
To change the Parental Control PIN:
1. Press on your remote. Use the keys , to
select Settings. Press .
2. Use the keys , to select Parental control. Press or
.
3. Use the keys , to select Change PIN. Press or .
4. Enter the current four-digit Parental Control PIN using thenumber keys on the remote control.
5. Enter the new four-digit Parental Control PIN.6. Enter the new four-digit Parental Control PIN again, to protect against typos. If the first and second input
match, you will receive confirmation that the Parental Control PIN has been changed successfully.

51
DCI85HD KD
7.3.2 Change Adult PIN
The Adult PIN protects access to videos in the online video library Select Video, which are only suitablefor adults. You can only change the Adult PIN if you use Select Video. Please note that the Adult PIN isalways sent by mail and you may have to wait a few days until you can change the Adult PIN on yourdevice.
Please note if you change the Adult PIN:
• The Adult PIN is a four digit code.
• You must first enter the current Adult PIN before changing.
• The current Adult PIN must match the Adult PIN stored.
• The new Adult PIN must be different from the current Adult PIN.
• The new Adult PIN must be different from the current Parental Control PIN, both must not be thesame.
• The new Adult PIN must not consist of the same four digits.
• If you enter the wrong PIN three times, access is blocked for ten minutes.
1. Press on your remote. Use the keys , to
select Settings. Press .
2. Use the keys , to select Parental control. Press or
.
3. Use the keys , to select Change PIN-18. Press or
.4. Enter the current four-digit Adult PIN using the number keys on the remote control.5. Enter the new four-digit Adult PIN.6. Enter the new four-digit Adult PIN again, to protect against typos. If the first and second input match,
you will receive confirmation that the Adult PIN has been changed successfully.
7. Press to close the menu window.
7.3.3 PIN request when ordering Select Video
With this setting, you can protect the order of paid programs in the online video library Select Video byfirst entering the Parental Control PIN. If this is selected, the Receiver prompts you to enter the ParentalControl PIN as soon as you order a video in the online video library Select Video.
To set up PIN protection:
Note
This function can only be used when the online video library Select Video is available at your address and if you are unlocked for the online video library Select Video.
Note
This function can only be used when the online video library Select Video is available at your address and if you are unlocked for the online video library Select Video.

52
DCI85HD KD
1. Press on your remote. Use the keys , to
select Settings. Press .
2. Use the keys , to select Parental control. Press or
.
3. Use the keys , to select PIN VOD purchase. Press
or .4. Use the keys , to select On (PIN protection activated) or Off (PIN protection deactivated). If you
select On, a window opens. Enter the current Parental Control PIN. 5. To turn off the Parental Control PIN protection, use the keys , to select Off. A window opens. Enter
the current Parental Control PIN.
7.3.4 PIN-protect timer
With this setting, you can protect access to your timer with the Parental Control PIN.
1. Press on your remote. Use the keys , to select Settings. Press .
2. Use the keys , to select Parental control. Press or .
3. Use the keys , to select PIN for timer. Press or .
4. Use the keys , to select On (PIN protection activated) or Off (PIN protection deactivated). If youselect On, a window opens. Enter the current Parental Control PIN.
5. To turn off the Parental Control PIN protection, use the keys , to select Off. A window opens. Enterthe current Parental Control PIN.
7.4 Timer settings
The menu Timer lets you prepare timers manually.
To return to the previous screen and to save your changes, press or .
To exit the menu screen, press or .
7.4.1 Manual timer
This menu lets you program timers manually.
1. Press on your remote. Use the keys , to
select Settings. Press .
2. Use the keys , to select Timer. Press or .
3. Use the keys , to select Set timer. Press or .
4. Set the timer options.More information about timer functions can be found inchapter 5, Setting a timer.

53
DCI85HD KD
7.4.2 Timer extensions
In this menu you can set timer extensions that are automatically added to recordings from the EPG. Itallows you to set the Receiver in a way that the timer begins before the announced starting time and endsafter the announced end time.
You can program the following setttings:
1. Press on your remote. Use the keys , to
select Settings. Press .
2. Use the keys , to select Timer. Press or .
3. Use the keys , to select Guard time. Press or .
4. Press to confirm the new setting.
7.5 Favorites
7.5.1 Add favorites
You can create two separate lists of favorites: for TV channels and radio channels.
1. Press on your remote. Use the keys , to
select Settings. Press .
2. Use the keys , to select Favorites. Press or .
3. Use the keys , to select Add. Press or .
Depending on the selected mode (radio or television), the listof TV channels or radio channels is displayed.
4. Press to specify which type of favorites list you want to create: TV channels or radio channels.
5. Select the channels you want to add as favorites. Use the keys , to select them. Press for every
channel you want to add. Selected channels are now marked.
6. To cancel your selection, press . To browse the list, press P+ or P-.
7. Press or . A confirmation message is displayed.
8. Press to save your favorites list.
Note
In our example, the timer will start 1 minute before the start time and end 14 minutes after the end time of the broadcast. To choose the correct entries:
• For Start time enter the number of minutes using the number buttons on your remote control. Possible entries are all two-digit numbers from 00 to 99, e.g. 01.
• For End time enter the number of minutes using the number buttons on your remote control. Possible entries are all two-digit numbers from 00 to 99, e.g. 14.

54
DCI85HD KD
7.5.2 Delete favorites
1. Press on your remote. Use the keys , to
select Settings. Press .
2. Use the keys , to select Favorites. Press or .
3. Use the keys , to select Delete. Press or .
4. Press to select the type of list you want to edit: TV
or radio.
5. Select the channels you want to delete as favorites. Use the keys , to select them. Press for
every channel you want to delete. Selected channels are now marked.
6. To cancel your selection, press . To browse the list, press P+ or P-.
7. Press or . A confirmation message is displayed.
8. Press to save your changes.
7.5.3 Sort favorites
With this setting you may rearrange your list.
1. Press on your remote. Use the keys , to
select Settings. Press .
2. Use the keys , to select Favorites. Press or .
3. Use the keys , to select Rearrange. Press or .
4. .Press to select the type of list you want to edit: TV
or radio.5. Select the channels you want to move. Use the keys , to select them. 6. Use the keys , to move a channel by one position. Use the keys P+ and P- to move a channel by
ten positions. If a channel is in the right position, press .
7. Repeat the procedure for each channel you want to move.
8. Press or . A confirmation message is displayed.
9. Press to save your changes.
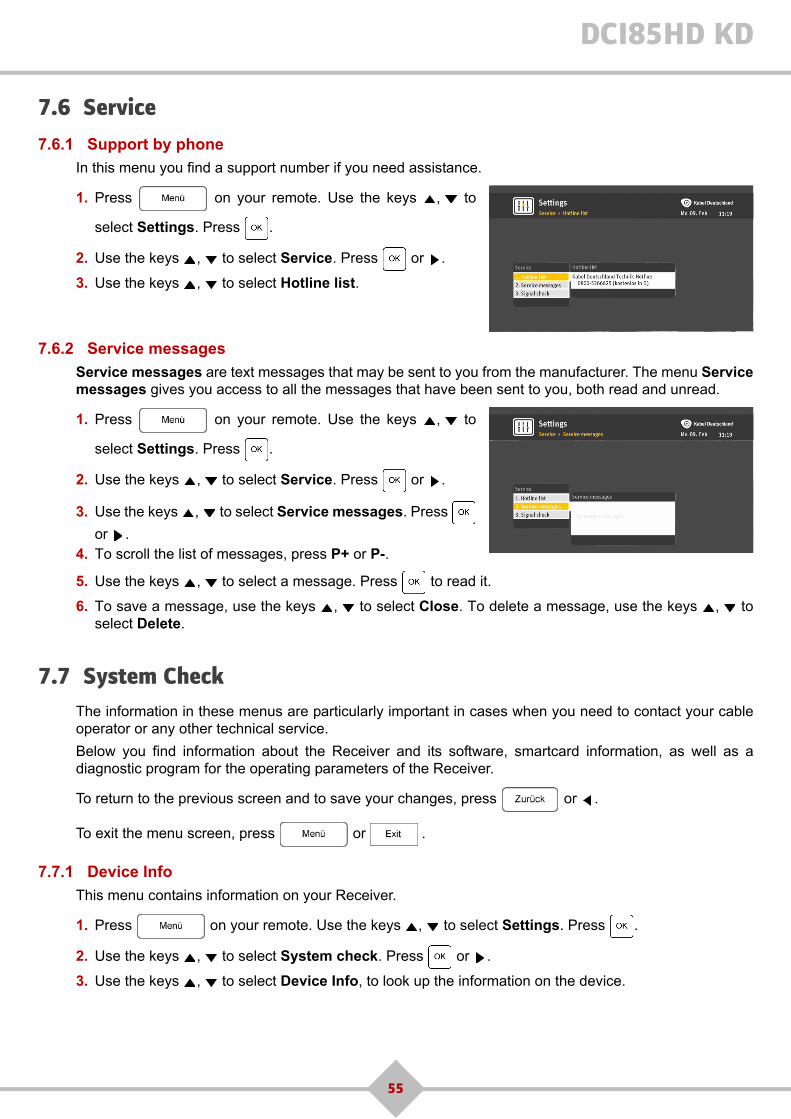
55
DCI85HD KD
7.6 Service
7.6.1 Support by phone
In this menu you find a support number if you need assistance.
1. Press on your remote. Use the keys , to
select Settings. Press .
2. Use the keys , to select Service. Press or .
3. Use the keys , to select Hotline list.
7.6.2 Service messages
Service messages are text messages that may be sent to you from the manufacturer. The menu Servicemessages gives you access to all the messages that have been sent to you, both read and unread.
1. Press on your remote. Use the keys , to
select Settings. Press .
2. Use the keys , to select Service. Press or .
3. Use the keys , to select Service messages. Press
or .4. To scroll the list of messages, press P+ or P-.
5. Use the keys , to select a message. Press to read it.
6. To save a message, use the keys , to select Close. To delete a message, use the keys , toselect Delete.
7.7 System Check
The information in these menus are particularly important in cases when you need to contact your cableoperator or any other technical service.
Below you find information about the Receiver and its software, smartcard information, as well as adiagnostic program for the operating parameters of the Receiver.
To return to the previous screen and to save your changes, press or .
To exit the menu screen, press or .
7.7.1 Device Info
This menu contains information on your Receiver.
1. Press on your remote. Use the keys , to select Settings. Press .
2. Use the keys , to select System check. Press or .
3. Use the keys , to select Device Info, to look up the information on the device.

56
DCI85HD KD
7.7.2 Smartcard
This menu contains information on your smartcard. To retrieve and display this information, the smartcardmust be inserted into the Receiver.
1. Press on your remote. Use the keys , to select Settings. Press .
2. Use the keys , to select System check. Press or .
3. Use the keys , to select Smartcard, to look up the information on the smartcard.
7.7.3 TV Signal
This menu contains information about your cable connection and provides an overview of the signalquality of cable frequencies.
1. Press on your remote. Use the keys , to select Settings. Press .
2. Use the keys , to select System check. Press or .
3. Use the keys , to select TV signal, to look up the information on the TV signal.The following network information is displayed:
• Last channel scan: Date of the last channel scan.
• TV/radio channels: Number of stored TV channels and radio channels.
• Tuner parameter: Displays the frequency and the modulation of the current channel for each tuner.
• Signal level: Displays the signal quality for each tuner to the current channel.
• BER: Displays the bit error rate of the current channel.
• Network info: Name of the cable network.
7.7.4 VOD Signal
With this setting you can check the video-on-demand (VOD) connection.
1. Press on your remote. Use the keys , to select Settings. Press .
2. Use the keys , to select System check. Press or .
3. Use the keys , to select VOD signal, to look up the information on the VOD Signal.
7.7.5 HDMI
This menu contains information about a HD-TV connected to the Receiver via HDMI cable.
1. Press on your remote. Use the keys , to select Settings. Press .
2. Use the keys , to select System check. Press or .
3. Use the keys , to select HDMI, to look up the information on HD-TV.
7.7.6 TV picture
This menu contains information about the current TV screen format and SCART equipment.
1. Press on your remote. Use the keys , to select Settings. Press .
2. Use the keys , to select System check. Press or .
3. Use the keys , to select TV picture, to look up the information about the TV screen format andSCART equipment.
7.7.7 Audio
This menu contains information about the audio settings.

57
DCI85HD KD
1. Press on your remote. Use the keys , to select Settings. Press .
2. Use the keys , to select System check. Press or .
3. Use the keys , to select Audio, to look up the information about the audio settings.
7.7.8 Network settings
This menu contains information about the internet connection via Wi-fi or network cable.
1. Press on your remote. Use the keys , to select Settings. Press .
2. Use the keys , to select System check. Press or .
3. Use the keys , to select LAN / WLAN, to look up the information about the internet and networksettings.
7.7.9 Back channel
With this setting, you can check the back channel connection.
1. Press on your remote. Use the keys , to select Settings. Press .
2. Use the keys , to select System check. Press or .
3. Use the keys , to select Back channel,to look up the information about the return channelconnection.
4. Press to check the return channel. Now details are displayed.
7.7.10 Test IP Connection
With this setting you can check the speed of your internet connection.
1. Press on your remote. Use the keys , to select Settings. Press .
2. Use the keys , to select System check. Press or .
3. Use the keys , to select Test IP connection, to look up the information about the speed of yourinternet connection.
4. . Press to check the speed of your internet connection. Now the speed of your internet connection
is displayed.

58
DCI85HD KD
7.8 Settings overview
The following table shows an overview of the Settings menu and the default settings of the Receiver:
• Default settings are bold.
• Grey cells show that the sub menu prompts for an action, for editing or shows data that can not bechanged.
• The asterisk (*) shows that the (sub) menu is only available when the Select Video service is enabledand if this service is available at your home port.
Menu Sub-menu(s) Default settings #
System update p. 37
Software update mode Automatic | Manual p. 37
Search for new software p. 37
Channel scan mode Automatic | Manual p. 38
Delete additional channels p. 39
Search for additional channels p. 39
Automatic channel scan p. 39
Factory reset p. 40
Program guide refresh p. 40
System set-up p. 41
Language p. 41
On-screen language Deutsch | English | Turkish | Russian
Subtitles On | Off
Audio p. 41
Audio output Mono | Stereo
Dolby Digital on HDMI On | Off
Dolby Digital on SPDIF On | Off
For visually impaired On | Off
Picture p. 43
TV SCART RGB | CVBS | S-Video
VCR SCART CVBS | S-Video
SCART switching Always 16/9 | Always 4/3
HDMI screen resolution1080i | 720p (if not detected on TV set) | 576p | 576i
Banner timeout 5 sec | 10 sec
OSD transparency None | 10% | 30% | 50%
Start channel On | Off

59
DCI85HD KD
Energy saving mode On | Off p. 45
Standard
Energy save mode
Quick start
Active
Internet (*) p. 46
Internet set-up
View settings
Test connection
Switch off
Data privacy
Parental control p. 50
Change Parental Control PIN
Change Adult PIN
PIN for VOD On | Off
Timer p. 52
Set timer
Guard time
Automatic | Manual
If set to Automatic:• Start guard time: 1 min. • End guard time: 14 min.
Favorites p. 53
Add
Delete
Rearrange
Service p. 55
Hotline list p. 55
Service messages p. 55
System check p. 55
Device Information p. 55
Menu Sub-menu(s) Default settings #

60
DCI85HD KD
Manufacturer
Model
Serial number
CA Serial number
Hardware version
Software version
Last SW update
Last SW update status
Provisioning code
Free space
Smartcard p. 56
Smartcard serial No.
Smartcard version
Smartcard status
Program data status
Program data version
Program guide update
Status program guide
CA project name
CAK version
Chip NUID
TV signal p. 56
Last channel scan
TV channels
radio channels
Tuner parameter
Signal level
BER
Network
VOD signal p. 56
HDMI p. 56
Menu Sub-menu(s) Default settings #

61
DCI85HD KD
HDMI screen resolution
HDMI status
HDCP status
TV manufacturer
TV model
TV picture p. 56
Selected channel
Picture mode
TV SCART
VCR SCART
SCART switching
Audio p. 56
On-screen language
Subtitles
Audio output
Dolby Digital on HDMI
Dolby Digital on SPDIF
For visually impaired
LAN / WLAN p. 57
WLAN / LAN IP address
Subnet mask
Default gateway
DNS server
LAN MAC address
Connection uptime
SSID
WLAN encryption
WLAN MAC address
Signal strength
Back channel p. 57
Test IP connection p. 57
Menu Sub-menu(s) Default settings #

62
DCI85HD KD
8 Software updateBy default, the Receiver is in manual mode. The Receiver automatically checks for new software in thecable network. If an software update is available you can directly start the update, postpone until nextstandybode or reject.
Using the menu Settings, System update, Search for new software you can start an automatic searchfor new Receiver software at any time (see chapter 7.1.1, Software update). If you change the updatesettings, the Receiver asks if you wish to perform the upgrade immediately, wait for the next switch tostandby mode or to reject it.
In manual mode, when a new software update is available an alert is displayed:
• To accept the update, use the keys , to select Yes (Upgrade now). Press .
The Receiver starts an update. You can use the Receiver only after successful completion of theupdate:
- The progress of the update is displayed in the status screen.
- After the update, the Receiver automatically switches back to the previously viewed program.
• To update in standby mode, use the keys , to select No (Wait for Standby). Press . The
Receiver will update the software next time it switches to standby mode.
• To reject the update, use the keys , to select No (Do not upgrade at all). Press . The
Receiver will not update the software.
Note
Please note, that you may not be able to use technical developments or additional services, if you reject a software update.

63
DCI85HD KD
9 Universal remote controlThe remote control is a universal model. You can program it to control your TV as well. The supporteddevices are listed in the Brand Code List.
After programing the remote use press to switch from Receiver mode to TV mode. The LED
flashes once in short interval. The LED also flashes after each command is transmitted to the TV.
These are the main controls for the direct control of your television:
• Standby/Wake up
• Volume up / down, mute
• Changing channels, keys P+ and P-
• Four arrow keys , , , ,
• Access to the TV menu, key
Press to return to Receiver mode.
9.1 Programing the universal remote control
Refer to the brand code list for the right four-digit code for your TV.
1. Turn on your TV.
2. Press and at the same time for at least 3 seconds, until the LED on the remote
flashes two times.
3. Enter the 4-digit code for your TV or the universal code. Make sure that not more than 10 seconds passbetween the entry of each number. After entering the first 3 digits the LED flashes one time in shortinterval. After the fourth digit the LED flashes 2 times short and then remains lit.
4. Press until your TV turns off.
5. Release the key.
6. Press for 3 seconds to confirm the code.
7. Press to use your TV.
If you do not see your TV in the code list, please enter the code "0000" in step 3 and keep pressed
until your TV turns off. The remote control now starts a search through all the available codes. Thisprocess may take some time.

64
DCI85HD KD
9.2 Selection of the volume control
When a TV code is programmed into the remote, the remote controls the volume of the TV also in
Receiver mode (instead of the Receiver's volume). To change, press and at the same time
for at least 3 seconds. The LED on your remote flashes 2 times.
To switch back to TV control mode, keep and pressed at the same time for at least 3
seconds. The LED on your remote flashes 2 times.
9.3 Reading out the 4-digit code
Using this method, you can read out the 4-digit code stored in the remote to control the TV.
1. Press the number key 1 and at the same time: The LED on your remote shows the first digit of
the code by flashing. E.g., if the first number is 9, the LED flashes 9 times. No flashing means 0 (zero).
2. Press the number key 2 and at the same time for the second digit of the code.
3. Press the number key 3 and at the same time for the third digit of the code.
4. Press the number key 4 and at the same time for the fourth digit of the code.
9.4 Reset the universal remote control
1. Press , and at the same time for at least 3 seconds. The LED on your remote
flashes 2 times.
2. All codes stored in the remote will be deleted. After restoring the factory settings on your remote, theLED flashes twice again.

65
DCI85HD KD
9.5 Brand Code List
TV BrandBrand code
TV code(s)
A.R. Systems 0583
Accent 0583 0064
Acec 0039
Acer 1366 1671, 2217, 1536, 1430
Acoustic Solutions 1694
Adcom 0652
Admiral 0120 0445, 0114, 0291
Advent 0903
AEG 06332123, 1399, 2048, 1064, 1583, 2193, 1582, 1190, 2266
Agef 0114
Aim 0064 0583
Aiwa 0728 0732, 1943, 1532
Akai 0388
0235, 0398, 0064, 0460, 0218, 1892, 1286, 1275, 1962, 2048, 2123, 1335, 0633, 0613, 1064, 0500, 0675, 0839, 0583, 0575, 0507, 0658, 0291, 0205, 0062, 0036, 0245, 0579, 0741, 0742
Akiba 0245 0064, 0583, 0321
Akura 1694 1672, 1797
Alkos 0062
Allorgan 0321
Allstar 0064 0583
Amoi 1556 2369
Amstrad 00360291, 0398, 0245, 0064, 0583, 0460, 1064, 0675, 2009, 1847
Anam National 0677
Andersson 1190 1612, 1176
Anglo 0036 0291
Anitech 0036 0291, 0064, 0583
Ansonic 03970064, 0583, 0036, 0695, 0438, 0274, 1464, 0039
AOC 1615 0652, 2138
Apollo 0500
Ardem 0513 0064, 0583
Arena 0064
Aristona 0583 0064, 0039
Art Mito 1612 1847
ASA 0132 0373, 0097, 0114
Asberg 0064 0583
Asora 0036
Astro 0667
Atec 1633
Atlantic 0064 0583
Atori 0036
Audiosonic 00640583, 0136, 0741, 0742, 0397, 0291, 0245, 0513, 2010
Audioton 0513 0397, 0291
Autovox 0114 0571, 0376, 0274
Avol 1847
Axxent 0036
B&D 1244
Baier 0903 1399, 2266
Bang & Olufsen 0592 0647, 0114, 1647
Barco 0579
Basic Line 0064 0695, 0583, 0036, 0245, 1064
Bauer 1642
Baur 05620222, 0539, 0064, 0583, 0581, 0218, 0388, 0571, 0376, 1532, 1037
Beaumark 0205
Beko 07410513, 0742, 0064, 0633, 1679, 2227, 1827, 0397, 0835
Bennett 0583 0064
BenQ 1589 1601
Beon 0064 0583, 0445
Best 0397 0448
Bestar 0064 0583, 0397
Black Diamond 1064 0583, 1190
Blackway 0245
Blaupunkt 05810222, 0562, 0218, 0227, 0354, 0197
Blue Media 1633
Blue Sky 0064
1064, 0741, 0514, 0695, 0742, 0835, 1390, 1341, 1943, 1270, 0652, 1679, 0651, 1936, 0583, 0245
Boman 1399
Bondstec 0274
Boots 0036
Bosch 0354
BPL 0064 0583
Brandt 06520136, 0223, 0314, 0362, 0498, 0370, 0587
Brandt Electronique
0314 0362
Brinkmann 0064 0583, 0695, 0546, 0445, 0513
Brother 0291
Bruns 0114 0513
BSR 0321 0579, 0388
BTC 0245
TV BrandBrand code
TV code(s)

66
DCI85HD KD
Bush 1064
1679, 0741, 1943, 0695, 1672, 0546, 1694, 0064, 0583, 1736, 1335, 0805, 0614, 1286, 2154, 0688, 1583, 0514, 1176, 1353
Canton 0245
Capsonic 0291
Carad 0637 0064, 0583, 0695, 1064
Carrefour 0097 0064, 0583
Cascade 0036 0064, 0583
Casio 0064 0583, 0376
CAT 1709 2182
Cathay 0064 0583
Centrum 1064
Centurion 0064 0583
Century 0114 0274
CGE 0101 0445, 0274, 0579, 0397
Cimline 0036 0262, 0245
Cinex 1583 0675
City 0036
Clarivox 0445 0064, 0583, 0097
Clatronic 13990633, 0245, 0064, 0583, 0741, 1704, 0036, 0398, 0675, 0397, 0274, 0291, 1190
Clayton 1064
Concorde 0036
Condor 00360397, 0438, 0445, 0064, 0274, 0291
Conia 1672
Conrac 0835
Conrad 0064 0583
Contec 0036 0038, 0291, 0064, 0583
Continental Edison
0136 0223, 0314, 0514
Cosmel 0036 0064, 0583
Crosley 0114 0274, 0101, 0579
Crown 0064
0513, 0633, 1064, 0742, 0514, 0235, 0445, 0397, 0741, 0036, 1679, 0695, 0448, 0680
CS Electronics 0245 0274
CTC 0274
Cybertron 0245
Cytronix 1325
D.Boss 1501 0064
Daewoo 0661
0688, 0526, 1936, 1822, 0064, 0651, 2302, 0741, 0583, 0036, 0907, 1334, 0903, 0892, 1639, 0245, 1164, 2064
Dainichi 0245
TV BrandBrand code
TV code(s)
Dantax 0397 0513, 0741, 0633, 0742
Daytek 1403
Daytron 0036 0064, 0583
de Graaf 0235 0575
Dell 1430
Denver 17041216, 2077, 0614, 2123, 2048, 1661, 1872, 2272, 0064, 2015, 1736, 1847
Desmet 0064 0583, 0036, 0114
Diamant 0064 0583
DiBoss 0064 0583, 1501
Digatron 0064 0583
Digihome 1694
Digiline 0064 0583, 0132, 0695
Digimate 0917
Digital Device 1633
Digitek 1736
Digivision 0388
DigiX 0907
DiK 0064 0583
Dixi 0036 0064, 0583, 0274, 0114
DMTECH 2028 1991
Domland 0421
Doric 0376
Dream Vision 1731 1781
DTS 0036
Dual 1064
2268, 0064, 1229, 0546, 0579, 1264, 1164, 0571, 0805, 0421, 1294, 0376, 0370, 1399, 1190, 0658, 1176, 2059, 0379
Dumont 0114 0097
Dunai 0571
Durabrand 0064 1464, 0583, 2015, 1679
D-Vision 2009 0064, 0583
Dynatron 0064 0583, 0039
e:max 1399 1558
Edison-Minerva 0514
Electrion 1612
Elekta 0036 0064, 0583, 0291
ELG 0064 0583
Elin 00640583, 0132, 0575, 0388, 0376, 0036
Elite 0245 0064, 0583
Elta 0036 0291
Emco 0274
Emerson 01140274, 1936, 0513, 0397, 0695, 0064, 0583, 0398, 0097, 0388, 0651
Emprex 1816
TV BrandBrand code
TV code(s)

67
DCI85HD KD
Epson 0858
Erres 0064 0583, 0039
ESC 0064 0583
Estèle 0579
Etron 0064 0583, 0036
Eurofeel 0291
EuroLine 0064 2077
Euroman 0291 0064, 0583, 0448, 0397
Europa 0064 0583
Europhon 0064 0583, 0274, 0579
Evesham 1694
Exquisit 0064 0583, 0274
Fast 1928
Fenner 0036
Finlux 1694
0064, 0583, 1583, 2009, 1612, 1398, 0132, 1275, 0373, 0741, 0835, 0658, 0519, 0507, 0500, 0445, 0579, 0742, 0097, 0114, 0438
Firstline 0064
0583, 0695, 0741, 0651, 0036, 1390, 1190, 1398, 1639, 1335, 0376, 0262, 0235, 0388, 1064, 0835, 0321, 0274, 0579, 1936, 0438, 0571
Fisher 02350397, 0114, 0388, 0579, 0571, 0376
Force 1176
Formenti 0064 0583, 0513, 0114, 0579
Formenti-Phoenix 0579
Fortress 0120 0114
Fraba 0064 0583, 0397
Friac 00360064, 0583, 0448, 0397, 0526, 0682, 0637
Frontech 0274 0291, 0376, 0036
Fujitsu 0036 0379, 0064, 0583, 0388
Fujitsu General 0036
Fujitsu Siemens 16931325, 0835, 2201, 1275, 1190, 1286
Funai 18441421, 1064, 1693, 1622, 0695, 0741, 0291, 0321
Future 0064 0583
Galaxi 0064 0583, 0388
Galaxis 0397 0064, 0445, 0583
Galeria 0036
GBC 0579 0036, 0245
GE 0370
GEC 0388 0376, 0064, 0583
Geloso 0274 0036, 0579
General Electric 0370 0314
General Technic 0036
TV BrandBrand code
TV code(s)
Genexxa 0245 0064, 0583, 0036
Gericom 12441633, 0892, 1325, 1233, 0907, 0835, 1748
Goldfunk 0695
GoldStar 00640583, 0274, 0388, 0741, 0633, 0036, 0136, 0742, 0397
Gooding 0514
Goodmans 1286 1275, 1822
Gorenje 0397 0448
GPM 0245
Graetz 0388 0398, 1190
Gran Prix 0675
Grundig 0222
1250, 0562, 0097, 1609, 0581, 0064, 0218, 0561, 2227, 1286, 1827, 0205, 0583, 1064, 1694, 0784, 1403, 0470, 1335, 2266, 2152, 0514, 2154, 1962, 1943, 0397, 0036, 0614, 0370
H&B 0835 2028
Haier 1642
Halifax 0291
Hanimex 0245
Hanns.G 1640
Hannspree 2054 2245, 1640, 1378, 2241
Hanseatic 0546
0064, 0661, 2028, 0526, 0688, 0652, 0421, 0741, 1991, 0835, 0388, 0513, 0583, 0036, 0571, 0321, 0114, 0376, 0397
Hantarex 0036 0064, 0583
Hantor 0064 0583
Harsper 0892
Harwa 1223 1534, 1296
Hauppauge 0064 0583
HB 1399
HCM 0036 0064, 0583, 0245, 0445, 0291
Hedzon 0583 0064
Hema 0036
Highline 0291 0064, 0583
Hisense 1390 2125, 2064, 1341
Hit 0114
Hitachi 1603
0508, 0605, 1799, 1064, 2234, 0526, 0771, 0064, 1072, 1511, 1221, 0252, 1508, 2241, 1881, 0388, 0661, 0746, 1190, 1612, 1176, 0824, 2154, 0507, 0904, 0519, 1164, 0575, 0376, 0500, 0911, 1694, 0579, 0223, 0370, 0136, 0132, 0205
Hitachi Fujian 0135 0252
TV BrandBrand code
TV code(s)

68
DCI85HD KD
HMV 0114
Höher 0741 1583, 0892, 1190
Hugoson 1693
Humax 1566 1322, 1848, 1562
Hyper 0036 0274
Hypersonic 0388
Hypson 00640583, 0741, 0742, 0291, 1064, 0695, 0513
Hyundai 13081495, 1179, 0903, 1559, 1403, 0892, 1321, 1501, 1583, 1633, 0805, 1639
Iberia 0064 0583
ICE 0398 0245, 0291, 0064, 0036
Ices 0245
Ict 0064 1164, 0583
IISonic 1403
Iiyama 0904 0917, 2281, 1244
Ikasu 1704
Imperial 04450579, 0274, 0101, 0223, 0397, 0064, 0376
Indiana 0064 0583
InFocus 1457 1233
Ingelen 0514 0637, 0741, 0388, 1464
Ingersoll 0036
Inno Hit 00360064, 0583, 0245, 0274, 1190, 1612
Innovation 0546 0064, 0583
Innowert 0892 1325
Interactive 00640583, 0039, 0114, 0539, 0354, 0388, 0397, 0136, 0438
Interbuy 0036 0064, 0291, 0274, 0539, 0583
Interfunk 00640583, 0039, 0114, 0539, 0354, 0388, 0397, 0136, 0376, 0274, 0227
Internal 0064 0583, 0651, 0526, 1936
Intervision 00640398, 0546, 0513, 0397, 0421, 0514, 0245, 0291, 0274, 0036, 0583
Isukai 0245 0064, 0583
ITC 0579
ITS 0064 0398, 0245, 0291, 0036, 0583
ITT 21520575, 0388, 0507, 0376, 0500, 0373, 0235, 0613, 0637
ITT Nokia 03880575, 0500, 0507, 0376, 0373, 0235, 0613, 0633, 0637, 0658
ITV 0291
Jean 1540
JEC 0062
JGC 1704 1736
Jubilee 0583
TV BrandBrand code
TV code(s)
JVC 06801845, 1680, 0398, 2145, 0633, 0758, 0120, 0245, 0677, 0445
Kapsch 0388
Karcher 06331583, 0448, 0805, 0064, 0637, 0741, 0397, 0583, 0291, 2152, 1335, 2009
Kathrein 0583 0064, 0907
Kawa 0398
Kendo 16121064, 0637, 0438, 1176, 0397, 0064, 1464, 0513, 0675, 0274, 0546, 0262, 1164
Kennedy 0579
Kiton 0583 0064, 0695
Kobra 1325
Kolster 0064 0583, 0376, 0274, 0245
Konka 00640583, 0398, 0741, 0445, 0245, 2056
Kontakt 0514
Korpel 0064 0583
Korting 0114 0448, 0397
Kotron 0291
Koyoda 0036
Kriesler 0039
Kuba 0376
Kuba Electronic 0376
Kyoshu 0445 0291
L&S Electronic 0892 0741
LaSAT 0513 0397
Lava 1501
Leader 0036
Lemair 0438
Lenco 00640036, 1822, 0583, 0614, 1064, 2010
Lentec 1558
Lesa 0274
Levis Austria 0064 0583
Lexsor 1223 1534
Leyco 0291 0064, 0583, 0321
LG 1450
2209, 0205, 1869, 0741, 1690, 1867, 0064, 1332, 1664, 1748, 0583, 1566, 0742, 0136, 0274, 0388, 0397, 0036
Liesenkötter 0064 0354, 0039, 0583
Lifetec 00640695, 1064, 1164, 0546, 2028, 0245, 0036, 0741, 0682, 1275, 1286, 0291
Loewe 05390660, 1911, 0817, 1863, 0114, 1817, 0682, 0397
TV BrandBrand code
TV code(s)

69
DCI85HD KD
Logik 00380398, 0907, 1244, 1064, 2056, 1672
Logix 0695 0546
Luma 0064 0438, 0583, 0036
Lumatron 0064 0583, 0388, 0291
Luxor 05070519, 0376, 0388, 0235, 0575, 0373, 0500, 1064, 0658
Madison 0064 0583
Magnavox 0064 0583
Magnum 0675 0741, 0064, 0742, 1316
Mandor 0291
Manesth 0064 0583, 0262, 0291, 0062, 0321
Manhattan 0064 0583, 0695, 1064, 0805
Maqma 1816 1633, 1325, 1729, 1736
Marantz 0064 0583, 1559
Mark 0064 0583, 0036, 0741, 0742
Master's 0526 0064
Masuda 0398
Matsui 1190
Matsushita 0677
Maxim 2009 1583
Medialine 1233 1991
Mediator 0064 0583, 0039
Medion 0835
1275, 0741, 1768, 0583, 1176, 1229, 1583, 0064, 0907, 1064, 1612, 1694, 0272, 1164, 1464, 0695, 1943, 2028, 0539, 1248, 1233
Megas 0637
MEI 1064 0064, 0583
Melectronic 0373
0064, 0539, 0136, 0370, 0274, 0222, 0688, 0741, 1679, 0314, 0583, 0651, 0661, 0388, 0218, 0132, 0036, 0507, 0519, 0438, 0376
Memorex 0036
Memphis 0036
Mercury 0064 0036, 0583
Metz 04741560, 0773, 0394, 0415, 1190, 0695, 0114, 0064, 0222, 0562, 0561, 0581, 0218
Micromaxx 13990741, 0064, 0695, 0835, 1064, 2028
Microstar 0835
Minato 0064 0583
Minerva 05141275, 0581, 0562, 0222, 0097, 0561, 0218, 0135
Minoka 0064 0583
Mirai 1693 2099, 1879
Mitsubishi 01350064, 0562, 0539, 1064, 0583, 0114, 0235
TV BrandBrand code
TV code(s)
Mivar 0397
Monaco 0036
Morgan's 0064 0583
MTC 0397 0376, 0539, 0388
MTlogic 1335
Multitec 06951064, 1583, 2009, 0064, 0583, 0513
Multitech 03760036, 0513, 0064, 0397, 0583, 0274, 0291, 0579
Musikland 0064 0245, 0274, 0583
Mx Onda 1672 1847
Myryad 0583 0064
NAD 0892
Naiko 0064 0633, 0583
Nakimura 0064 0583
NEC 21710197, 0272, 1731, 0036, 0064, 0038, 0526, 0688, 0732, 0731, 0680
Neckermann 0064
0218, 0397, 1532, 1037, 0561, 0376, 0114, 0274, 0438, 0539, 0227, 0581, 0583, 0579, 0354, 0445
NEI 0064 0583, 0398, 1064
Neon 1759
Neovia 1233 0892, 1991, 1398, 0903, 1403
Nesco 0274
Netway 2136
Neufunk 0064 0036, 0583, 0637, 0245, 0741
New Tech 0064 0036, 0583, 0370
Nikkai 1704
Nikkei 0741
Nobliko 0097
Nokia 05000507, 0388, 0613, 0575, 0658, 0633, 0376, 0373, 0235, 0519, 0637, 0136
Nordmende 1440
0136, 0587, 2358, 2356, 0314, 1316, 0498, 2359, 0223, 0741, 0362, 0370, 1612, 2034, 2028, 1694, 1286, 0064, 0222
Normerel 0064 0583
Novak 0039 0064, 0583
Novatronic 0064 0132, 0583
Novita 1612
Nurnberg 0388
Oceanic 03880321, 0235, 0500, 0575, 0507, 2028
Odeon 0291
Odys 2416 1822
Okano 0291 0036, 0397, 0064, 0583
Olidata 1403
TV BrandBrand code
TV code(s)

70
DCI85HD KD
Omega 0291
Onwa 0398 0245, 0460
Optoma 1781 1701
Orbit 0064 0583
Orion 2034
2032, 0470, 0741, 0262, 0682, 0064, 2135, 0321, 0583, 2027, 0907, 0382, 1943, 1223, 0571, 0291, 0038, 0036
Orline 0064 0245, 0583
Ormond 0695 1064, 0064, 0583
Osio 0064 0583
Oso 0245
Osume 0245 0064, 0583
OTIC 1672 2010
Otto Versand 1532
1037, 0120, 0539, 0064, 0583, 0274, 0036, 0370, 0546, 0579, 0218, 0388, 0262, 0136, 0321, 0253, 0561, 0562, 0222, 0571, 0376, 0581
Pacific 00640583, 1164, 1264, 0741, 1064, 0470, 1399
Palladium 0397
0438, 0376, 0682, 0741, 0546, 0064, 0445, 0218, 1532, 1164, 0561, 0227, 0581, 0354, 0114, 0274, 0579, 0583, 1037, 2009
Panama 0036 0291, 0064, 0583, 0274
Panasonic 06771663, 1677, 0253, 1337, 1362, 0575, 0394, 0388, 0064, 0561
Papouw 0064 0583
Pathe Cinema 0376 0579, 0397
Pathe Marconi 0136 0223
Pausa 0036
Perdio 0064 0583
Perfekt 0064 0583
Philco 01140101, 0445, 0274, 0579, 0397, 0064, 0583, 0546
Philips 0583
1533, 0064, 1771, 0666, 1894, 0632, 1610, 1522, 2042, 1273, 1482, 0039, 0799, 0581, 0036, 0388, 0227, 0114, 0370
Phocus 1335 0741, 1316, 1679, 1827
Phoenix 0064 0583, 0397, 0513, 0114, 0579
Phonola 0064 0583, 0039, 0114
Pioneer 14841287, 0706, 0193, 0787, 0064, 0388, 0136, 0513, 0539, 0397, 0370, 0314
Pionier 0397 0513
Plantron 0583 0291, 0036, 0064
TV BrandBrand code
TV code(s)
Playsonic 0741 0064, 0742, 1827, 1679
Polaroid 1768 2152, 1672, 1550, 1747
Policom 01360223, 0388, 0097, 0101, 0114, 0562
Poppy 0036
Portland 0651 1936
Powerpoint 0514 0064, 0583, 1797
Prandoni-Prince 0274 0388
Prima 0036 0291, 1296, 1534, 1223
Prinz 0571 0376, 0388
Profex 0036 0388
Profi 0036
Profilo 1583
Profitronic 0064 0583
Proline 00640583, 0652, 0661, 0438, 0039, 1403, 1540, 1064
Prosonic 06950741, 1759, 2117, 2272, 0064, 0583, 0397, 0398
Protech 00640583, 0036, 0274, 0376, 0291, 0445, 0695, 0579, 0513, 1064
Proview 1672
Provision 1064 1558, 0064, 0583, 0741, 1399
Pye 0064 0583, 0039, 0114, 0581, 0376
Pymi 0036
QONIX 1661
Quadral 0245
Quasar 0274 0892, 0036
Quelle 0064
1532, 1037, 0038, 0136, 0539, 0373, 0448, 0579, 0036, 0583, 0222, 0227, 0291, 1064, 0321, 0274, 0101, 0354, 0097, 0132, 0695, 0562, 0571, 0376, 0581, 0218, 0388
radiola 0064 0583, 0039
radiomarelli 0114 0274, 0064, 0583
radioShack 0064 0583
radiotone 06950675, 0064, 0036, 1064, 0397, 0445, 0291
Rank 0097
RBM 0097
Recor 0064 0583
Rectiligne 0064 0583
Red Star 1583
Rediffusion 0388 0575, 0373
Redstar 0064 0583
REEL Multimedia 1451
Reflex 0064 0583, 1064, 0695
Relisys 17681672, 0904, 1233, 1325, 1403, 1612, 1639, 0892, 0903
TV BrandBrand code
TV code(s)

71
DCI85HD KD
Revox 0064 0835, 0583, 0397
Rex 0438 0274, 0291
RFT 0291 0114, 0397, 0064, 0583, 0513
Ricoh 0064 0583
Roadstar 1064
0742, 0741, 0036, 0064, 1216, 1582, 1353, 0583, 0445, 0695, 1464, 0245, 0291, 1943
Robotron 0114
Rowa 0583 0291, 0036, 0614, 0064
Royal Lux 0448 0397, 0362
Rukopir 0583 0064
Saba 0652
0362, 0136, 0587, 0370, 0114, 0223, 0498, 0314, 1064, 0388, 0575, 0525, 1615, 0741, 0583
Sagem 0637 0857, 1340, 0645
SaiVOD 0064 0583, 0695, 1064
Salora 03760388, 0575, 0235, 0579, 0507, 2152, 1264, 0658, 1583, 0805, 1398, 1229
Salsa 0362
Samsung 2078
0839, 1485, 0645, 1339, 0614, 2164, 1276, 1657, 1705, 2121, 0671, 0583, 1262, 0064, 0036, 0793, 1659, 0397, 0546, 0291
Sansui 0064 0583, 0398, 1962
Santon 0036
Sanyo 0235
1235, 1674, 1612, 0036, 1694, 0571, 1676, 1064, 1675, 0135, 0197, 0731, 0397, 0038
Save 0064 0583
SBR 0064 0583, 0039
Schaub Lorenz 07412127, 1399, 0513, 0575, 0633, 1398, 0388, 1221, 0376, 2152, 1694, 1390
Schneider 0583
1164, 0064, 1064, 2155, 1644, 0695, 0546, 0379, 0039, 0571, 1501, 0376, 1395, 0274, 0741, 1399, 2009, 0421, 1264, 0398, 0388, 0245, 0370, 1943, 0097, 0675
Scott 1216 2010
Seaway 0661
SEG 1064
0695, 1190, 0064, 1176, 1936, 1464, 0651, 0579, 0583, 1928, 1612, 1694, 0036, 2088, 0514, 0661, 0291, 0245, 0376, 0274
SEI 01141532, 1037, 0579, 0571, 0376, 0321, 0064, 0583
TV BrandBrand code
TV code(s)
Sei-Sinudyne 03211532, 1037, 0579, 0571, 0064, 0583, 0114
Seleco 0438 0398, 0291, 0373
Sencora 0036
Sentra 0062 0245, 0036, 0376
Sharp 16860120, 1220, 1420, 1614, 2241, 1846, 1613, 0321, 0227, 0680
Shintoshi 0064 0583
Shivaki 0064 0583, 0470, 0205
Siarem 0579 0114
Siemens 02220581, 0218, 0562, 0227, 0354, 0064, 0561, 0583, 0388
Siera 0064 0583, 0039, 0614
Siesta 0397
Silva 0388 0675, 0064, 0583
Silva Schneider 1583 2193, 0675, 2152
Silver 0388 0742
Simz 1847
Singer 0036 0114, 0064, 0583, 0274, 0362
Sinudyne 13990114, 0262, 0321, 0579, 0388, 0633, 0571, 0376, 1532, 1037, 0064, 0583
Sky 15401640, 1633, 1772, 0688, 0892, 0907, 0205, 1531, 1642, 1403
Skymaster 0132
Sliding 0892 0907, 1399, 1395
Smaragd 0514
Soemtron 0892 1325
Sogo 1403
Solavox 0388 0575, 0064, 0583
Sonawa 0245
Soniko 0064 0583
Sonitron 0235 0397
Sonoko 0064 0583, 0036, 0291
Sontec 0064 0583, 0397, 0321, 0036
Sony 18521532, 1678, 1778, 1037, 0038, 1712, 0861, 0064, 0120, 0197, 0101
Sound & Vision 0245 0064, 0583
Soundwave 0064 0583, 0445, 0742
Standard 0064 0583, 1064, 0245, 0036
Starion 1064
Starlite 0036 0579, 0064, 0583, 0291
Starmedia 2136
Stenway 0245
Stern 0291 0438
Strato 0064 0583, 0291, 0036
Strong 0064 0583, 1190, 1176, 1064
TV BrandBrand code
TV code(s)

72
DCI85HD KD
Sungoo 2064
Sunic Line 0064 0583
Sunstar 0398 0064, 0583, 0036, 0291
Sunstech 2028 1991
Sunwood 0036 0064, 0583
SuperTech 0036 0064, 0583, 0245
Supra 0036
Susumu 0362 0245, 0314
Sutron 0036
Swedx 1633
Swissline 0274
Swisstec 1531
Sysline 0064 0583
T+A 0474
Tandberg 0394 0438, 0136, 0223, 0388
Tandy 0245 0274, 0120
Targa 0645 2272, 1398, 1294
Tatung 17471275, 0064, 0583, 1399, 1286, 1583, 1398, 0038
TCM 2028 1335, 0741, 1316, 0835
TEC 00360274, 0498, 0362, 0579, 0064, 0583, 0388
Tech Line 0064 0583, 0695, 1464, 1190
Tech Lux 1216
Technica 2009
TechniSat 1294 0667, 0064, 2182, 0583, 0682
Technisson 0741 1316, 1679
Technotrend 1729 2182, 1558
Techvision 1736 1558
Techwood 1190 1064, 1694
Teco 1340 2136, 1550
Tedelex 0633 0064, 0036, 0235, 0614, 0583
Teiron 0036
Telefunken 0289
0652, 0498, 0128, 0362, 0136, 0314, 0525, 0370, 0587, 0101, 0064, 0513, 0741, 1583, 0373, 0223
Telefusion 0064 0583
Telemeister 0064 0583
Telesonic 0064 0583
Telestar 2345 0064, 2117, 0583
Teletech 0064 0695, 1064, 0036, 0274
Teleton 0376
Televideon 0579
Teleview 0064 0583
Tensai 02450064, 0583, 0321, 0036, 0132, 0398, 0274, 0742, 1064
Tenson 0036
Tesla 0064
TV BrandBrand code
TV code(s)
Tevion 1275
1164, 0741, 0583, 1583, 1064, 2050, 0695, 0835, 1768, 0675, 2268, 1316, 1827, 2117, 1612, 0892, 1286, 0064
Texet 0036 0245
Thomson 06520587, 0314, 0370, 0362, 0498, 0136, 1615, 0223, 2155, 0064, 0376, 0579
Thorn 01350136, 0252, 0370, 0097, 0128, 0388, 1532, 1037, 0562, 0038, 0039
Thorn-Ferguson 0362 0062
Tokyo 0062
Topline 0695 1064
Toshiba 1535
0535, 0062, 0745, 1609, 0580, 1764, 1316, 0222, 1457, 1064, 0268, 1583, 1962, 0645, 0677, 1972, 1731, 0097, 1943, 0036, 0136
Towada 0376 0579
Toyoda 0036
Trakton 0291
Triad 0583 0245, 0036, 0064
Trio 1672
Tristar 0291 0245
TVTEXT 95 0583
Uher 0064 0583, 0445, 0513, 0397, 0507
Ultravox 0064 0114, 0274, 0579, 0583
Unic Line 0064 0583, 0500, 0376
United 16791847, 1797, 0583, 1943, 1064, 0614, 2009, 2227, 0741, 0064, 0742
Universum 1064
0064, 0373, 1190, 0695, 1464, 0500, 0438, 0132, 0507, 1264, 0036, 0388, 0291, 0354, 0562, 0097, 0519, 1928, 0579, 0038, 0539, 1176, 0658, 0397, 0274, 0645, 0571, 0581, 0445, 0448, 0197, 0136, 0101, 0227, 2201, 0376, 0222, 1532, 0321, 1037
Univox 0064 0583, 0114
V7 Videoseven 1244 1693, 2281, 0907, 1403, 1294
Vestel 10641190, 1612, 1694, 0064, 0695, 0579, 0583
Vexa 0036 0064, 0583
Videologic 0245
Videosat 0274
VideoSystem 0064 0583
Viewpia 0903
ViewSonic 1569 1615, 1540, 2136, 2138
TV BrandBrand code
TV code(s)

73
DCI85HD KD
Vision 0064 0583
Vistar 0388
Vortec 0064 0583
Voxson 0114 0064, 0583, 0445, 0205
Waltham 10640470, 0445, 0314, 0064, 0583, 0695, 0136
Watson 00641064, 0546, 0036, 0695, 1275, 1403, 1464, 0354, 0421, 0245
Watt radio 0571 0376, 0579, 0513
Wega 0064 0583, 0114
Wegavox 0036 0064, 0583
Welltech 1679
Weltblick 0064 0583
Weltstar 1064
Weston 0064 0583
White Westinghouse
0064 0583, 0651, 1936
Wilson 0583
Windy Sam 0583
World-of-Vision 09071759, 2028, 0917, 0892, 1316, 1325, 0904, 1633, 1244
Xomax 1797
Xoro 18162094, 1534, 2173, 1223, 1244, 1270, 2172
Xrypton 0064 0583
Yakumo 1640 2324
Yamaha 0677 0824, 1553, 1603
Yokan 0064 0583
Yoko 00640583, 0245, 0291, 0036, 0448, 0397, 0274
Yorx 0245
TV BrandBrand code
TV code(s)

74
DCI85HD KD
10 Troubleshooting
Problem Solution
The remote control does not work.
• Press to switch to Receiver mode.
• Point the remote towards the Receiver.• Check the batteries and check that the batteries are inserted
correctly.
The Receiver displays a black screen or an error message.
• Search for channels (see chapter 7.1.4, Delete additional channels).
The picture is frozen and / or blurred.• Check all connections, the antenna cable, and search for
channels again (see chapter 7.1.6, Start a channel search).
The Receiver cannot find any channels.
• Check the cable connection.• Check the antenna signal (see chapter 2, Connections to
the network and connecting additional devices).• Search for channels (see chapter 7.1.6, Start a channel
search).• Check with your cable company for more information about
your home connection.
The TV does not recognize the Receiver if he leaves the standby mode.
• "Check if your TV is connected to the TV SCART connector (see chapter 2, Connections to the network and connecting additional devices).
• "Select the SCART input on the TV, if necessary.
At some channels, no audio in Home Cinema mode is displayed.
• Check whether the Receiver is connected to a Home Cinema amplifier via optical SPDIF connector (see chapter 2, Connections to the network and connecting additional devices).
Black and white video at VCR output (during VCR / DVD recording).
• "Check that the mode selected for the VCR SCART output type is compatible with your VCR (see chapter 7.2.3, Picture).
All other problems.• Reset device to factory default (see chapter 7.1.7, Reset to
factory default).

75
DCI85HD KD
11SupportThis product has been designed with great care to ensure the best possible quality. In the unlikely caseyou have difficulties with the product and need advice or support, you can rely on the best possible help.
For technical problems with the product, you may contact Kabel Deutschland directly:
0800/ 52 666 25Mon - Sun 0:00 - 24:00(free of charge from Germany)

76
DCI85HD KD
12 Explanation of terms
Term Definition
BERBit Error RateThe bit error rate defines the transmission quality from the number ofincorrectly transmitted bits.
EPGElectronic Programme GuideDigital program guide, where you can view the programs, channels andsearch for content.
FSK
Voluntary self-regulation of the film industry (Freiwillige Selbstkontrolle derFilmwirtschaft)German organization that maintains a movie rating system, which draws onthe parental control feature. The Receiver's replays content with classificationG-16 or higher only if the parental protection PIN is entered.
Non entitled channels Channels that are saved in the channel list but can not be displayed becauseyou have no entitlement.
OSDOn Screen DisplayMenus and messages that are displayed on the screen.
Service Info Text message that is sent from the channel or cable operator. See chapter7.6.2, Service messages.
SmartcardElectronic smartcard to decrypt encrypted digital TV or radio broadcasts.Slide the smartcard with the chip facing downwards into the reader of theReceiver to view programs for which you are unlocked.
Start Channel Channel on which the Receiver systematically tunes to wherever theReceiver is switched on or woke up after standby.
Timeshift Mode Time-shift recording mode, which allows to stop and rewind currentbroadcasts and watch it again.
Video Subchannel Channels or programs that transfer more than one video channel at a timeand offer you the option of choosing from different video channels.
VOD
Video on Demand (Select Video)Interactive services for direct retrieval of a wide range of programs. To usethis service, the Receiver must be connected to the internet, Select Videomust be available in your region and you must be unlocked for this service.
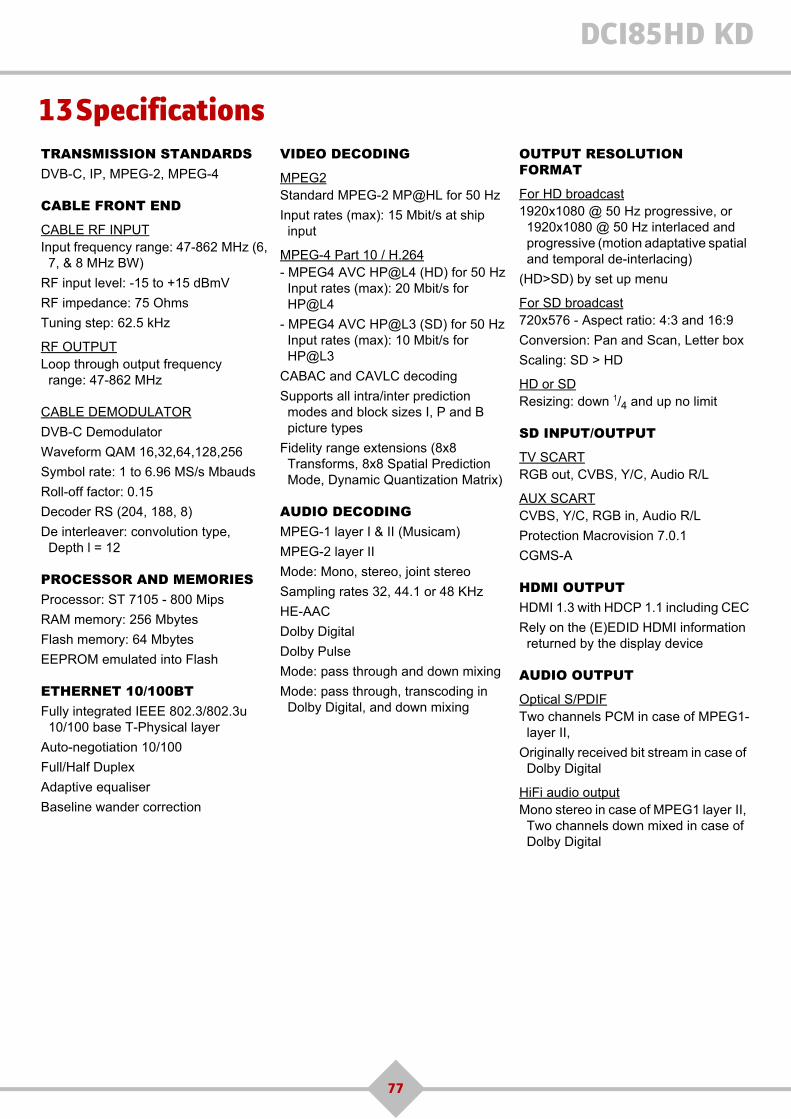
77
DCI85HD KD
13SpecificationsTRANSMISSION STANDARDSDVB-C, IP, MPEG-2, MPEG-4
CABLE FRONT END
CABLE RF INPUTInput frequency range: 47-862 MHz (6,
7, & 8 MHz BW)
RF input level: -15 to +15 dBmV
RF impedance: 75 Ohms
Tuning step: 62.5 kHz
RF OUTPUTLoop through output frequency
range: 47-862 MHz
CABLE DEMODULATOR
DVB-C Demodulator
Waveform QAM 16,32,64,128,256
Symbol rate: 1 to 6.96 MS/s Mbauds
Roll-off factor: 0.15
Decoder RS (204, 188, 8)
De interleaver: convolution type, Depth l = 12
PROCESSOR AND MEMORIESProcessor: ST 7105 - 800 Mips
RAM memory: 256 Mbytes
Flash memory: 64 Mbytes
EEPROM emulated into Flash
ETHERNET 10/100BTFully integrated IEEE 802.3/802.3u
10/100 base T-Physical layer
Auto-negotiation 10/100
Full/Half Duplex
Adaptive equaliser
Baseline wander correction
VIDEO DECODING
MPEG2Standard MPEG-2 MP@HL for 50 Hz
Input rates (max): 15 Mbit/s at ship input
MPEG-4 Part 10 / H.264- MPEG4 AVC HP@L4 (HD) for 50 Hz
Input rates (max): 20 Mbit/s for HP@L4
- MPEG4 AVC HP@L3 (SD) for 50 HzInput rates (max): 10 Mbit/s for HP@L3
CABAC and CAVLC decoding
Supports all intra/inter prediction modes and block sizes I, P and B picture types
Fidelity range extensions (8x8 Transforms, 8x8 Spatial Prediction Mode, Dynamic Quantization Matrix)
AUDIO DECODINGMPEG-1 layer I & II (Musicam)
MPEG-2 layer II
Mode: Mono, stereo, joint stereo
Sampling rates 32, 44.1 or 48 KHz
HE-AAC
Dolby Digital
Dolby Pulse
Mode: pass through and down mixing
Mode: pass through, transcoding in Dolby Digital, and down mixing
OUTPUT RESOLUTION FORMAT
For HD broadcast1920x1080 @ 50 Hz progressive, or
1920x1080 @ 50 Hz interlaced and progressive (motion adaptative spatial and temporal de-interlacing)
(HD>SD) by set up menu
For SD broadcast720x576 - Aspect ratio: 4:3 and 16:9
Conversion: Pan and Scan, Letter box
Scaling: SD > HD
HD or SDResizing: down 1/4 and up no limit
SD INPUT/OUTPUT
TV SCARTRGB out, CVBS, Y/C, Audio R/L
AUX SCARTCVBS, Y/C, RGB in, Audio R/L
Protection Macrovision 7.0.1
CGMS-A
HDMI OUTPUTHDMI 1.3 with HDCP 1.1 including CEC
Rely on the (E)EDID HDMI information returned by the display device
AUDIO OUTPUT
Optical S/PDIFTwo channels PCM in case of MPEG1-
layer II,
Originally received bit stream in case of Dolby Digital
HiFi audio outputMono stereo in case of MPEG1 layer II,
Two channels down mixed in case of Dolby Digital

78
DCI85HD KD
CONDITIONAL ACCESS1 x Smart card reader, ISO/IEC 7816
DATA PORT2 x USB 2.0 Host (High Speed)
1 x RJ45 (Ethernet 10/100 base T)
FRONT PANEL1 x Smart Card reader
1 x IR sensor: 36 kHz
4 x Buttons (Standby, P+, P-, TV/radio with LEDs)
1x USB 2.0 Host (High Speed)
REAR PANEL1 x IEC169-2 (female: RF In)
1 x IEC169-2 (male: RF Out)
2 x SCART (TV, AUX)
1 x HDMI
2 x RCA Stereo L/R
1 x Optical S/PDIF
1 x RJ45 (Ethernet 10/100 base T)
1x USB 2.0 Host (High Speed)
1 x Power On/Off switch
POWER SUPPLYMains supply voltage: 220-240 V
~50 Hz
Max. Power consumption: 25 W
Standby mode: < 1 W
PHYSICAL SPECIFICATIONS
Receiver:- Size (wxdxh): 310x175x41 mm
- Weight: ~0.780 Kg
- Operating temperature: 0°C to +40°C
- Storage temperature: -25°C to +65°C
ACCESSORIES1 x Power cord for internal AC/DC
(1.8 m)
1 x Remote control
2 x Alkaline 1.5 V batteries (AAA type)
1 x HDMI cable (2 m)
1 x RF cable (2 m)
1 x Quick Installation guide


Sagemcom Broadband SASHeadquarters: 250, route de l’Empereur
92848 Rueil-Malmaison Cedex - FRANCETel : +33 (0)1 57 61 10 00 - Fax : +33 (0)1 57 61 10 01
www.sagemcom.com
All r
ight
s re
serv
ed. T
he in
form
atio
n an
d sp
ecifi
catio
ns in
clud
ed a
re s
ubje
ct to
cha
nge
with
out p
rior n
otic
e. S
agem
com
Bro
adba
nd S
AS tr
ies
to e
nsur
e th
at a
ll in
form
atio
n in
this
doc
umen
t is
corr
ect,
but d
oes
not a
ccep
t lia
bilit
y fo
r err
or o
r om
issi
on.
Non
con
trac
tual
doc
umen
t. Al
l tra
dem
arks
are
regi
ster
ed b
y th
eir r
espe
ctiv
e ow
ners
. Sim
plifi
ed jo
int s
tock
com
pany
- C
apita
l 35
703
000
Euro
s -
518
250
360
RCS
NAN
TERR
E.