uc201205184c ee corevalve ® implantation best practices january 2013 innovating for life. these...
TRANSCRIPT

UC201205184c EE
CoreValve® ImplantationBest PracticesJanuary 2013
Innovating for life.
These best practices were created with detailed input, review and approval from Medtronic proctors.

AcademiaMedical Education
The information in this document is intended for educational purposes and is not meant as a substitute for Instructions for Use or product training. Practice may vary based on clinical judgmentINTERNATIONAL. CAUTION: For distribution only in markets where CoreValve® is approved. Not for distribution in U.S. or Japan. Medtronic, Inc. 2013. All Rights Reserved.
Valve Size
Aortic Annulus Measurements
Sinus of Valsalva Diameter
Native Leaflet to
SinutubularJunction Length
Ascending Aorta
Diameter*Diameter Perimeter Area Range
2318 mm – 20
mm56.5 mm –
62.8 mm254.5-314.2
mm≥ 25 mm ≥ 15mm ≤ 34 mm
2620 mm – 23
mm62.8 mm –
72.3 mm314.2-415.5
mm≥ 27 mm ≥ 15mm ≤ 40 mm
2923 mm – 27
mm72.3 mm –
84.8 mm415.5-572.6
mm≥ 29 mm ≥ 15mm ≤ 43 mm
3126 mm – 29
mm81.6 mm –
91.1 mm
530.9-660.5
mm≥ 29 mm ≥ 15mm ≤ 43 mm
*Ascending Aorta measurements are taken at 30 mm from the aortic annulus for the 23 mm device and at 40 mm from the aortic annulus for the 26, 29, and 31 mm devices.
Device and Patient Selection Measurements per MSCT

AcademiaMedical Education
The information in this document is intended for educational purposes and is not meant as a substitute for Instructions for Use or product training. Practice may vary based on clinical judgmentINTERNATIONAL. CAUTION: For distribution only in markets where CoreValve® is approved. Not for distribution in U.S. or Japan. Medtronic, Inc. 2013. All Rights Reserved.
TAVI Fundamentals
Standard steps to deployment:• Ensure accurate annulus measurement• Align annulus / catheter marker band• Target coaxial alignment of catheter and annulus (┴)• Properly shape and maintain control of guidewire to
ensure stable placement during deployment

AcademiaMedical Education
The information in this document is intended for educational purposes and is not meant as a substitute for Instructions for Use or product training. Practice may vary based on clinical judgmentINTERNATIONAL. CAUTION: For distribution only in markets where CoreValve® is approved. Not for distribution in U.S. or Japan. Medtronic, Inc. 2013. All Rights Reserved.
TAVI Fundamentals: Valve Sizing
• Ensure Accurate Annulus Measurement – Use a multi-modality
approach to calculate anatomical measurements (CT, Echo, and Angio), particularly in borderline cases
• CT is highly recommended and coronary angiography is required on all patients (see Recommended Sizing Methodology using MSCT presentation)
• CT may not be used alone, it must be used in conjunction with angiography
– Adhere to patient evaluation matrix when selecting valve size

AcademiaMedical Education
The information in this document is intended for educational purposes and is not meant as a substitute for Instructions for Use or product training. Practice may vary based on clinical judgmentINTERNATIONAL. CAUTION: For distribution only in markets where CoreValve® is approved. Not for distribution in U.S. or Japan. Medtronic, Inc. 2013. All Rights Reserved.
TAVI Fundamentals: Imaging Projection
• Proper imaging projection helps ensure a more accurate valve placement
• Identify the ideal annular viewing plane using contrast injections at various angiographic angles considering the following:– Alignment of three
annulus cusps in a common plane
– Radiopaque catheter marker band appearing as a straight line

AcademiaMedical Education
The information in this document is intended for educational purposes and is not meant as a substitute for Instructions for Use or product training. Practice may vary based on clinical judgmentINTERNATIONAL. CAUTION: For distribution only in markets where CoreValve® is approved. Not for distribution in U.S. or Japan. Medtronic, Inc. 2013. All Rights Reserved.
TAVI Fundamentals: Coaxial Alignment
• Target coaxial alignment of catheter and annulus– Adjust catheter and
guidewire tension to ensure valve is aligned within the annulus and perpendicular to the basal plane

AcademiaMedical Education
The information in this document is intended for educational purposes and is not meant as a substitute for Instructions for Use or product training. Practice may vary based on clinical judgmentINTERNATIONAL. CAUTION: For distribution only in markets where CoreValve® is approved. Not for distribution in U.S. or Japan. Medtronic, Inc. 2013. All Rights Reserved.
TAVI Fundamentals: Guidewire Management• Properly shape and maintain control
of guidewire to ensure stable placement during deployment– Pre-shape the guidewire to the
contours of the patient’s left ventricle
– Confirm proper placement within the ventricle with the transition point of the guidewire held above the apex and pointing away from the ventricle wall
– Maintain strict fluoroscopic surveillance of the guidewire in the left ventricle
• The position of the prosthesis can be regularly adjusted by a combination of pulling the catheter and pushing on the wire

AcademiaMedical Education
The information in this document is intended for educational purposes and is not meant as a substitute for Instructions for Use or product training. Practice may vary based on clinical judgmentINTERNATIONAL. CAUTION: For distribution only in markets where CoreValve® is approved. Not for distribution in U.S. or Japan. Medtronic, Inc. 2013. All Rights Reserved.
IMPLANTATION BEST PRACTICES
Medtronic CoreValve Transfemoral Procedure
These best practices were created with detailed input, review and approval from Medtronic proctors.

AcademiaMedical Education
The information in this document is intended for educational purposes and is not meant as a substitute for Instructions for Use or product training. Practice may vary based on clinical judgmentINTERNATIONAL. CAUTION: For distribution only in markets where CoreValve® is approved. Not for distribution in U.S. or Japan. Medtronic, Inc. 2013. All Rights Reserved.
1. Target implant depth is 4-6 mm2. Start deployment at target implant depth
31mm: Anticipate slight movement towards the ventricle during 1st 1/3 deployment and adjust starting depth &/or reposition before annular engagement accordingly
3. Consider fast pacing during deployment in patients with aortic regurgitation, hypertension, and/or large anatomies
4. Slow release during first 1/3 deployment and reposition if necessary until annular engagement
31mm: Very slow release during first 1/3 deployment and pause frequently to release radial force Check position (3 – 4 times) & reposition if necessary until annular engagement
5. Understand foreshortening as a potential contributor to tension in catheter during deployment
6. If present, release system tension just prior to final valve release from catheter by:Releasing tension on guidewireSlightly pushing on catheter to remove any tension placed on valve by catheter
Procedural Best Practices

AcademiaMedical Education
The information in this document is intended for educational purposes and is not meant as a substitute for Instructions for Use or product training. Practice may vary based on clinical judgmentINTERNATIONAL. CAUTION: For distribution only in markets where CoreValve® is approved. Not for distribution in U.S. or Japan. Medtronic, Inc. 2013. All Rights Reserved.
1. Target Implantation Depth
• Target implant depth is 4 - 6 mm (Marker Band 1 – 1.5)– Due to valve profile and native
annulus interaction, higher implantation provides greater radial interference. This consideration is especially important for larger anatomies
– Most implants should trend closer to 4 mm depth
4 mm6 mm

AcademiaMedical Education
The information in this document is intended for educational purposes and is not meant as a substitute for Instructions for Use or product training. Practice may vary based on clinical judgmentINTERNATIONAL. CAUTION: For distribution only in markets where CoreValve® is approved. Not for distribution in U.S. or Japan. Medtronic, Inc. 2013. All Rights Reserved.
2. Starting Deployment Depth
•Start deployment at intended final landing zone
•Anticipate slight movement towards the ventricle during 1st 1/3 deployment and adjust starting depth &/or reposition before annular engagement accordingly
Appreciate the tendency for larger anatomies to experience greater movement during deployment
Target Implant Depth
AcademiaMedical Education
The information in this document is intended for educational purposes and is not meant as a substitute for Instructions for Use or product training. Practice may vary based on clinical judgmentINTERNATIONAL. CAUTION: For distribution only in markets where CoreValve® is approved. Not for distribution in U.S. or Japan. Medtronic, Inc. 2013. All Rights Reserved.
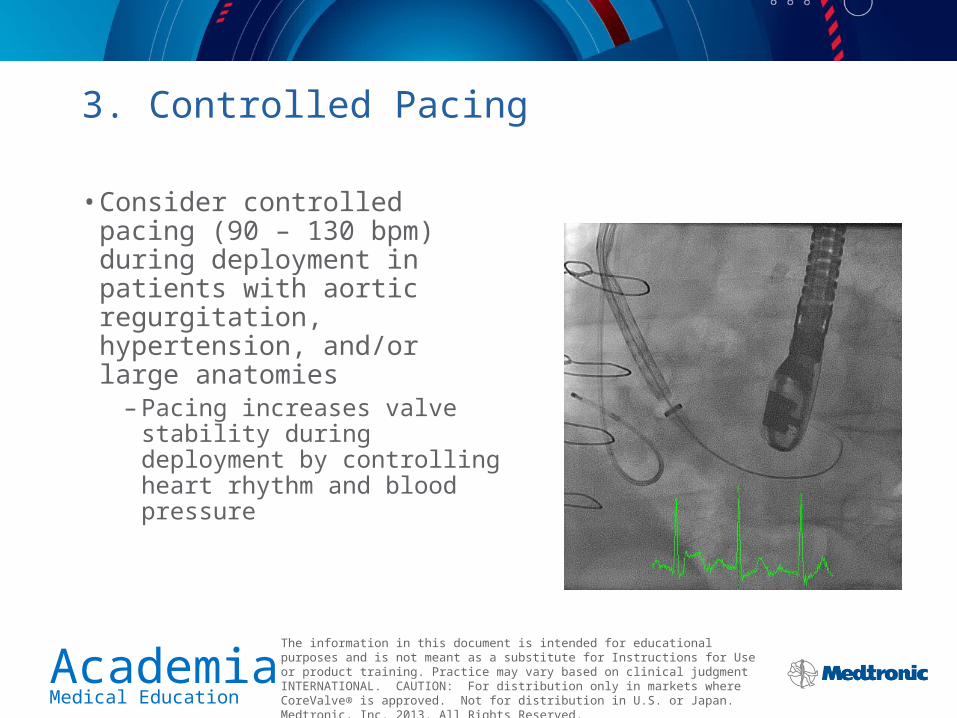
3. Controlled Pacing
•Consider controlled pacing (90 – 130 bpm) during deployment in patients with aortic regurgitation, hypertension, and/or large anatomies
– Pacing increases valve stability during deployment by controlling heart rhythm and blood pressure

AcademiaMedical Education
The information in this document is intended for educational purposes and is not meant as a substitute for Instructions for Use or product training. Practice may vary based on clinical judgmentINTERNATIONAL. CAUTION: For distribution only in markets where CoreValve® is approved. Not for distribution in U.S. or Japan. Medtronic, Inc. 2013. All Rights Reserved.
4. Slow Deployment for First 1/3
•Release the valve slowly during first 1/3 deployment and reposition if necessary until annular engagement
– Appreciate the tendency to experience greater valve movement in larger anatomies and adjust deployment pace and valve position accordingly

AcademiaMedical Education
The information in this document is intended for educational purposes and is not meant as a substitute for Instructions for Use or product training. Practice may vary based on clinical judgmentINTERNATIONAL. CAUTION: For distribution only in markets where CoreValve® is approved. Not for distribution in U.S. or Japan. Medtronic, Inc. 2013. All Rights Reserved.
5. Understand Foreshortening
•Understand foreshortening as a potential contributor to minor (~2 mm) valve antegrade movement during first 1/3 deployment, and tension in catheter during remainder of deployment
55.5 mm (26mm Frame)53.4 mm (29mm Frame)52.4 mm (31mm Frame)
23 mm Valve•Crimped Length: 55mm•Expanded Length: 45 mmNote: Measurements exclude loading tabs in calculation of length

AcademiaMedical Education
The information in this document is intended for educational purposes and is not meant as a substitute for Instructions for Use or product training. Practice may vary based on clinical judgmentINTERNATIONAL. CAUTION: For distribution only in markets where CoreValve® is approved. Not for distribution in U.S. or Japan. Medtronic, Inc. 2013. All Rights Reserved.
6. Release System Tension
• The position of catheter along inner curvature of aortic arch may indicate presence of tension in system
• Tension can create an antegrade (e.g. upward) force on valve during deployment
• If present, release system tension just prior to final valve release from catheter by:– Releasing tension on guidewire*– Slightly pushing on catheter to
remove any tension placed on valve by catheter
* Always ensure guidewire is located in an atraumatic position
System with Tension
System without Tension:
Catheter may be positioned along outer curvature (as shown) or in
middle of arch
Tension may contribute to an antegrade force during
deployment.
AcademiaMedical Education
The information in this document is intended for educational purposes and is not meant as a substitute for Instructions for Use or product training. Practice may vary based on clinical judgmentINTERNATIONAL. CAUTION: For distribution only in markets where CoreValve® is approved. Not for distribution in U.S. or Japan. Medtronic, Inc. 2013. All Rights Reserved.
PROCEDURAL IMPLANTATION BEST PRACTICES
Medtronic CoreValve
These best practices were created with detailed input, review and approval from Medtronic proctors.

AcademiaMedical Education
The information in this document is intended for educational purposes and is not meant as a substitute for Instructions for Use or product training. Practice may vary based on clinical judgmentINTERNATIONAL. CAUTION: For distribution only in markets where CoreValve® is approved. Not for distribution in U.S. or Japan. Medtronic, Inc. 2013. All Rights Reserved.
Other Procedural Considerations
Pre-Procedural Screening•Use TEE if TTE is technically difficult or adequate images
can not be obtained•For low-gradient stenosis, stress TEE needed as well as LV
angiogram for assessment of critically-low EF and definition of LV outflow track
• If transfemoral implantation could be impracticable, perform aortic root and left subclavian angiography with graduated pigtail for potential alternative access route assessment.

AcademiaMedical Education
The information in this document is intended for educational purposes and is not meant as a substitute for Instructions for Use or product training. Practice may vary based on clinical judgmentINTERNATIONAL. CAUTION: For distribution only in markets where CoreValve® is approved. Not for distribution in U.S. or Japan. Medtronic, Inc. 2013. All Rights Reserved.
Other Procedural Considerations
Sedation•During first five cases, general anesthesia is
recommended, unless contra-indicated• If patient is under general anesthetic then TEE should be
utilized • If conscious sedation is used then TTE should be on
stand-by

AcademiaMedical Education
The information in this document is intended for educational purposes and is not meant as a substitute for Instructions for Use or product training. Practice may vary based on clinical judgmentINTERNATIONAL. CAUTION: For distribution only in markets where CoreValve® is approved. Not for distribution in U.S. or Japan. Medtronic, Inc. 2013. All Rights Reserved.
Other Procedural Considerations
Temporary Pacemaker• First choice: implant temporary lead from femoral vein at beginning of
procedure - move to jugular vein at end of procedure• Second choice: implant temporary lead from jugular vein at beginning of
procedure - leave indwelling at end of procedure• Third choice: implant temporary lead from femoral vein at beginning of
procedure – leave indwelling in femoral vein at end of procedure • An operator that has experience with manipulating guide wires and
catheters inside the heart should position the PM in the RV• A balloon-tip temporary PM is highly recommended. The balloon should be
kept fully-inflated during positioning and semi-inflated for the rest of the procedure and postoperatively
• If an active-fixation PM lead is contemplated, it should be inserted by an experienced operator.
• For operation of the pacing generator during the procedure, identify one person that will be responsible for the PM settings and limit instructions for its operator to a single, designated operator

AcademiaMedical Education
The information in this document is intended for educational purposes and is not meant as a substitute for Instructions for Use or product training. Practice may vary based on clinical judgmentINTERNATIONAL. CAUTION: For distribution only in markets where CoreValve® is approved. Not for distribution in U.S. or Japan. Medtronic, Inc. 2013. All Rights Reserved.
Other Procedural Considerations
Puncture/Sheath• Transfemoral puncture should be a single-wall stick of the
common femoral artery • When percutaneous access is planned, arterial puncture should
be performed under fluoroscopic visualization using either a contra-lateral injection into the target vessel, or positioning of a catheter or guidewire into the target vessel from the contra-lateral artery
• Percutaneous closure devices may be used. However, a surgical cut-down is not discouraged. Site should use what they are comfortable with and maintain consistency
• Transfemoral introducer sheath priority is patient specific. Consider the resistance to kinking, the OD, and the hemostasis provided when selecting a sheath
• Non-iliofemoral introducer recommendation: Cook Check-Flo

AcademiaMedical Education
The information in this document is intended for educational purposes and is not meant as a substitute for Instructions for Use or product training. Practice may vary based on clinical judgmentINTERNATIONAL. CAUTION: For distribution only in markets where CoreValve® is approved. Not for distribution in U.S. or Japan. Medtronic, Inc. 2013. All Rights Reserved.
Other Procedural Considerations
Inter-Procedure Imaging• Ideal implant projections will be recommended by Clinical Analyst
contained in the Patient Assessment• Baseline aortography should be performed before insertion of 18
Fr introducer• Various angiographic projections are recommended to assure
correct expansion of the frame. This is especially important if the leaflets are heavily calcified
• When deploying the valve, proper image projections helps assure a more accurate valve placement. The preferred viewing plan for deployment is LAO
AcademiaMedical Education
The information in this document is intended for educational purposes and is not meant as a substitute for Instructions for Use or product training. Practice may vary based on clinical judgmentINTERNATIONAL. CAUTION: For distribution only in markets where CoreValve® is approved. Not for distribution in U.S. or Japan. Medtronic, Inc. 2013. All Rights Reserved.
Other Procedural ConsiderationsProcedural • Transfemoral: 18F introducer should be inserted before crossing the valve with a guidewire• Non-iliofemoral: 18F introducer should be inserted AFTER crossing the valve with the super-stiff guidewire• Transfemoral: Valve preparation may be initiated after insertion of the 18F introducer• Pre-implantation balloon catheter selection:
– Use the minor annular axis as determined by CT angiography– Undersize the balloon according to previous guideline – but select a balloon that is at least 18mm and
no larger than 25mm in diameter – Preferred balloon characteristics: Short, straight, non-compliant
• Superstiff wire (1 cm tip) should be deployed in the left ventricle utilizing a pigtail catheter• Pre-implant dilatation of the native aortic valve should not performed until the CoreValve device is prepared
and ready for implantation • Identify you are in the perfect projection before implant by aligning radiopaque marker band on the delivery
catheter.• Maintain the pigtail position deep in the non-coronary sinus• Changing projection during the implant is not recommended (Might have to in 31mm)• Unless utilizing cine acquisition, fluoroscopy should be used throughout the entire deployment portion of the
procedure• Valve orientation should be instructed during proctoring sessions• Following deployment of the valve, use a 90 degree angiographic angle to assure that the loops are properly
detached from the catheter prior to withdrawing the delivery system• After deployment of the CoreValve device, close the capsule after withdrawing the delivery catheter to the
descending aorta

AcademiaMedical Education
The information in this document is intended for educational purposes and is not meant as a substitute for Instructions for Use or product training. Practice may vary based on clinical judgmentINTERNATIONAL. CAUTION: For distribution only in markets where CoreValve® is approved. Not for distribution in U.S. or Japan. Medtronic, Inc. 2013. All Rights Reserved.
Other Procedural Considerations
Evaluation of PVL • Involves a joint assessment of echo, angio and hemodynamics.
Proper echo and pressure tracing equipment and skills present in the cath lab. The actions to take if significant PVL should be based on an integrated analysis of the implanted valve including depth, expansion or both (see complication management presentation for details)
• AR Index: Implementation of AR index should be encouraged

AcademiaMedical Education
The information in this document is intended for educational purposes and is not meant as a substitute for Instructions for Use or product training. Practice may vary based on clinical judgmentINTERNATIONAL. CAUTION: For distribution only in markets where CoreValve® is approved. Not for distribution in U.S. or Japan. Medtronic, Inc. 2013. All Rights Reserved.
Other Procedural Considerations
Perc Closing Devices•Consider using contra-lateral crossing prior to access
vessel closure in case a vascular intervention is needed

AcademiaMedical Education
The information in this document is intended for educational purposes and is not meant as a substitute for Instructions for Use or product training. Practice may vary based on clinical judgmentINTERNATIONAL. CAUTION: For distribution only in markets where CoreValve® is approved. Not for distribution in U.S. or Japan. Medtronic, Inc. 2013. All Rights Reserved.
BEST PRACTICESMedtronic CoreValve Non-Iliofemoral Procedure
These best practices were created with detailed input, review and approval from Medtronic proctors.

AcademiaMedical Education
The information in this document is intended for educational purposes and is not meant as a substitute for Instructions for Use or product training. Practice may vary based on clinical judgmentINTERNATIONAL. CAUTION: For distribution only in markets where CoreValve® is approved. Not for distribution in U.S. or Japan. Medtronic, Inc. 2013. All Rights Reserved.
SUBCLAVIAN

AcademiaMedical Education
The information in this document is intended for educational purposes and is not meant as a substitute for Instructions for Use or product training. Practice may vary based on clinical judgmentINTERNATIONAL. CAUTION: For distribution only in markets where CoreValve® is approved. Not for distribution in U.S. or Japan. Medtronic, Inc. 2013. All Rights Reserved.
Access Routes
Indicated for use access routes:– Iliofemoral: Right or Left– Subclavian/Axillary: Right or Left
• Left preferred (versus right) due to delivery pathway’s typically better alignment with native aortic valve anatomy and less obstructive interaction with cranial perfusion
•Most appropriate access route selected by clinician based on patient anatomical characteristics

AcademiaMedical Education
The information in this document is intended for educational purposes and is not meant as a substitute for Instructions for Use or product training. Practice may vary based on clinical judgmentINTERNATIONAL. CAUTION: For distribution only in markets where CoreValve® is approved. Not for distribution in U.S. or Japan. Medtronic, Inc. 2013. All Rights Reserved.
Access
ACT
• Ensure appropriate ACT level is maintained
throughout procedure
Pigtail
• Iliofemoral or contralateral radial access
Temporary internal pacemaker catheter and
lead
• Internal jugular vein
* Caution: Use appropriate access/closure technique to avoid clinically unacceptable arterial stenosis at the access site.
Axillary Artery Double Purse-string Access
CoreValve delivery catheter system• Axillary artery example below:
- Pre-op CT to assess access- It is recommended that only Aspirin be given
prior to the procedure, other antiplatelet therapy may be administered post procedure
- Surgical cut down located approximately 2 cm below and parallel to left clavicle, and 4-5 cm lateral to midclavicular line
- Identify and place two (2) vessel loops around axillary artery. Do not apply significant force to vessel to prevent damage.
- Place two (2) standard double purse-string sutures* and create an oval-shaped axillary artery access incision starting at downstream edge of purse-string sutures.
- Consider adding incision in the anterior axillary line to create shallower delivery catheter entry angle to minimize risk of access site complications
- Use scalpel to control vessel opening while advancing sheath
- Use direct cannulation (recommend Cook introducer for kink resistance)
AcademiaMedical Education
The information in this document is intended for educational purposes and is not meant as a substitute for Instructions for Use or product training. Practice may vary based on clinical judgmentINTERNATIONAL. CAUTION: For distribution only in markets where CoreValve® is approved. Not for distribution in U.S. or Japan. Medtronic, Inc. 2013. All Rights Reserved.
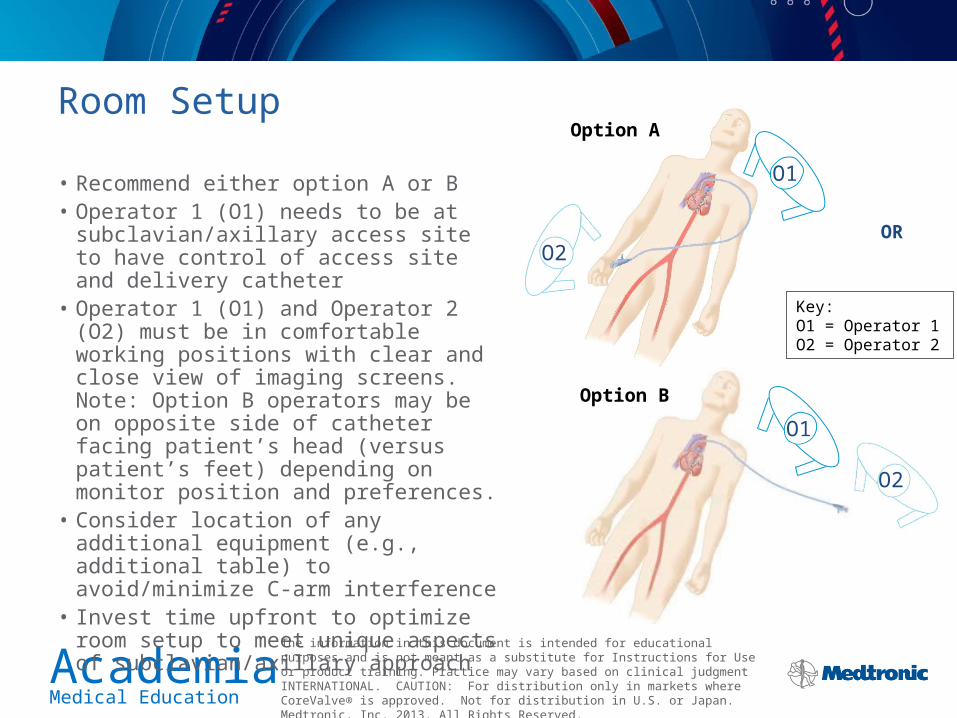
O2OR
Option ARoom Setup
• Recommend either option A or B• Operator 1 (O1) needs to be at
subclavian/axillary access site to have control of access site and delivery catheter
• Operator 1 (O1) and Operator 2 (O2) must be in comfortable working positions with clear and close view of imaging screens. Note: Option B operators may be on opposite side of catheter facing patient’s head (versus patient’s feet) depending on monitor position and preferences.
• Consider location of any additional equipment (e.g., additional table) to avoid/minimize C-arm interference
• Invest time upfront to optimize room setup to meet unique aspects of subclavian/axillary approach
Key:O1 = Operator 1O2 = Operator 2
O2
Option B
O1
O1

AcademiaMedical Education
The information in this document is intended for educational purposes and is not meant as a substitute for Instructions for Use or product training. Practice may vary based on clinical judgmentINTERNATIONAL. CAUTION: For distribution only in markets where CoreValve® is approved. Not for distribution in U.S. or Japan. Medtronic, Inc. 2013. All Rights Reserved.
Introducer Positioning
• Abduction of arm may help facilitate sheath passage • Advance 18 Fr introducer under direct fluoroscopy
over super stiff guidewire (to prevent dilator frominjuring ascending aorta) which has been positionedin the left ventricle apex
• Use caution when advancing introducer, especially:– Near stenotic and/or calcified regions– At thoracic inlet and subclavian artery origin
• Position distal end of 18 Fr introducer immediately distal (upstream) to innominate/brachiocephalic artery for catheter advancement, valve deployment, and catheter withdrawal
• O1 should always be aware of introducer position throughout procedure. Consider holding positioned introducer with one hand throughout procedure to stabilize placement.
• Consider placing a suture to secure introducer to skin

AcademiaMedical Education
The information in this document is intended for educational purposes and is not meant as a substitute for Instructions for Use or product training. Practice may vary based on clinical judgmentINTERNATIONAL. CAUTION: For distribution only in markets where CoreValve® is approved. Not for distribution in U.S. or Japan. Medtronic, Inc. 2013. All Rights Reserved.
Introducer Positioning with IMA Graft
• Strongly recommend using contralateral subclavian/axillary artery or ascending aorta (direct aortic) access
• Monitor cardiac function and patent ipsilateral IMA graft to ensure acceptable perfusion is maintained during intervention with 18 F introducer
• If signs of compromised perfusion become present, adjust position of 18 F introducer to maintain acceptable perfusion
• Subclavian artery straightening due to introducer advancement could potentially cause patent ipsilateral IMA graft occlusion
• Recommended that vessel diameter be ≥ 7.5mm to reduce the occurrence of ischemic complications

AcademiaMedical Education
The information in this document is intended for educational purposes and is not meant as a substitute for Instructions for Use or product training. Practice may vary based on clinical judgmentINTERNATIONAL. CAUTION: For distribution only in markets where CoreValve® is approved. Not for distribution in U.S. or Japan. Medtronic, Inc. 2013. All Rights Reserved.
DIRECT AORTIC
AcademiaMedical Education
The information in this document is intended for educational purposes and is not meant as a substitute for Instructions for Use or product training. Practice may vary based on clinical judgmentINTERNATIONAL. CAUTION: For distribution only in markets where CoreValve® is approved. Not for distribution in U.S. or Japan. Medtronic, Inc. 2013. All Rights Reserved.
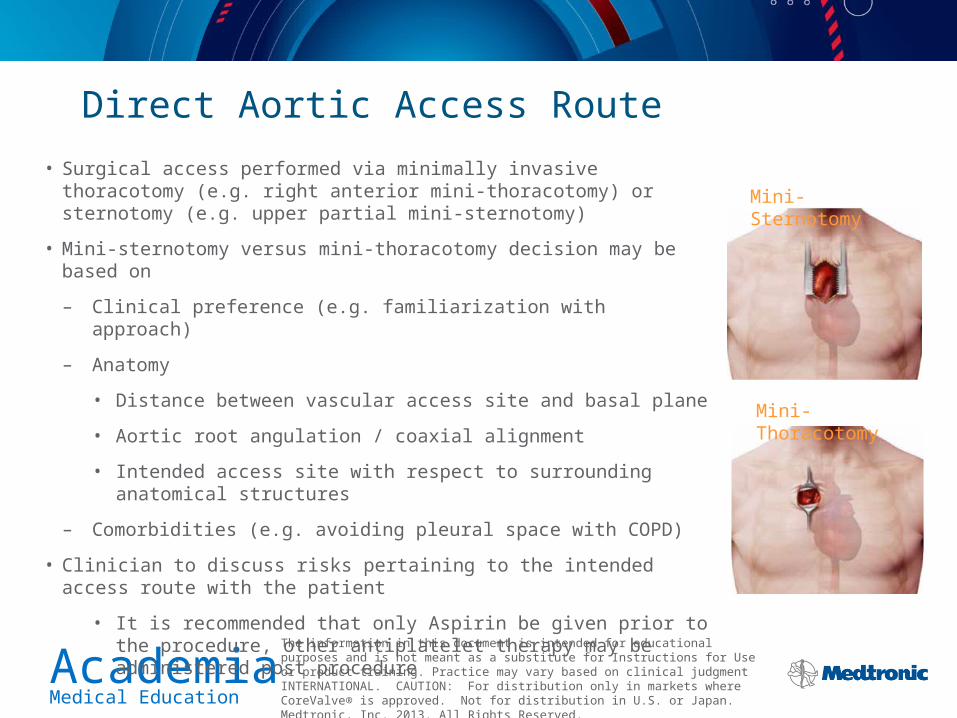
Direct Aortic Access Route
Mini-Sternotomy
Mini-Thoracotomy
• Surgical access performed via minimally invasive thoracotomy (e.g. right anterior mini-thoracotomy) or sternotomy (e.g. upper partial mini-sternotomy)
• Mini-sternotomy versus mini-thoracotomy decision may be based on
– Clinical preference (e.g. familiarization with approach)
– Anatomy
• Distance between vascular access site and basal plane
• Aortic root angulation / coaxial alignment
• Intended access site with respect to surrounding anatomical structures
– Comorbidities (e.g. avoiding pleural space with COPD)
• Clinician to discuss risks pertaining to the intended access route with the patient
• It is recommended that only Aspirin be given prior to the procedure, other antiplatelet therapy may be administered post procedure
AcademiaMedical Education
The information in this document is intended for educational purposes and is not meant as a substitute for Instructions for Use or product training. Practice may vary based on clinical judgmentINTERNATIONAL. CAUTION: For distribution only in markets where CoreValve® is approved. Not for distribution in U.S. or Japan. Medtronic, Inc. 2013. All Rights Reserved.
Access Route Considerations
Sternotomy vs. Thoracotomy: Preferred approach is surgeon specific (driven by surgeon’s experience and comfort level) but here are some options to be consideredReasons to consider sternotomy•Non-operated chest•Short, or a relatively vertical and long, ascending aorta•Aortic root and LVOT well aligned•Inexperience with re-op thoracotomy or CoreValve direct aortic procedures•Patients with elevated risk due to pulmonary injury (e.g., severe pulmonary hypertension, COPD)
Reasons to consider thoracotomy•RIMA present by sternum•Operated chest (i.e., redo)•Challenging angulation (e.g. horizontal aorta) that may present coaxial alignment challenges•Ability to perform tunnel cannulation, which can facilitate introducer stabilization and coaxial alignment

AcademiaMedical Education
The information in this document is intended for educational purposes and is not meant as a substitute for Instructions for Use or product training. Practice may vary based on clinical judgmentINTERNATIONAL. CAUTION: For distribution only in markets where CoreValve® is approved. Not for distribution in U.S. or Japan. Medtronic, Inc. 2013. All Rights Reserved.
Room Setup
• Plan room setup upfront
• Recommend pre-procedure planning (and training, if necessary) to ensure both operators understand and are proficient at their roles (e.g. access site management, wire management, catheter operations, fluoroscopy) throughout procedure
• Operator 1 (O1) needs to be at access site to have control of access site and delivery catheter system. Meticulous access site management is critical to avoiding access site complications
• Operator 1 (O1) and Operator 2 (O2) must be in comfortable working positions with clear and close view of imaging screens
• Consider location of any additional equipment (e.g., additional table) to avoid/minimize C-arm interference
• Consider use of third operator on patient’s left side to maintain dedicated control of introducer sheath throughout procedure
• Recommend extension table for catheter and/or wire
Room Setup Example

AcademiaMedical Education
The information in this document is intended for educational purposes and is not meant as a substitute for Instructions for Use or product training. Practice may vary based on clinical judgmentINTERNATIONAL. CAUTION: For distribution only in markets where CoreValve® is approved. Not for distribution in U.S. or Japan. Medtronic, Inc. 2013. All Rights Reserved.
Aortic Access
* Ensure double purse-string sutures are managed appropriately in the event they are needed to regain hemostasis during the procedure.
Bruschi G, et al. Direct Aortic Access Through Right Minithoracotomy for Implantation of Self-Expanding Aortic Bioprosthesis Valves . The Journal of Thoracic and Cardiovascular Surgery. 140 (3): 715-7 (2010).
1. Place graduated pigtail into noncoronary native aortic valve cusp and along greater curvature of ascending aorta
2. Perform minimally invasive surgical cut down (right internal mammary artery sparing if necessary). Use caution to avoid damage to any lung tissue present.
3. Perform aortography with radiographic instrument (e.g. forceps) pointing to aortic access site to confirm ≥6 cm basal plane to aortic access site distance is met
4. Manually palpate access site to confirm absence of calcification and suitability. Echocardiography may also be helpful tool for this assessment.
5. Place two (2) standard double purse-string sutures around access site using caution to avoid vessel dissection/tearing*. Consider suture type (e.g. pledgeted prolene) selection to minimize vessel trauma.
6. Gain arterial access via seldinger technique (or direct cannulation via scalpel puncture)
7. Follow standard CoreValve guidewire-catheter exchange sequence to place super stiff guidewire, prior to 18 Fr introducer insertion

AcademiaMedical Education
The information in this document is intended for educational purposes and is not meant as a substitute for Instructions for Use or product training. Practice may vary based on clinical judgmentINTERNATIONAL. CAUTION: For distribution only in markets where CoreValve® is approved. Not for distribution in U.S. or Japan. Medtronic, Inc. 2013. All Rights Reserved.
Introducer Access & Positioning
• Use of an 18 Fr kink-resistant introducer is recommended• Pre-shaping introducer may help optimize delivery trajectory to achieve coaxial
alignment with native aortic valve• Advance 18 Fr introducer under direct fluoroscopy over super stiff guidewire using
extreme caution to avoid aortic or left ventricular perforation, coronary or septum injury, or other trauma that could lead to bleeding, dissection, or thromboembolism by monitoring introducer dilator tip position
• Position distal end of introducer approximately 2 cm into the aortic lumen• Use extreme caution to maintain this recommended introducer position
throughout procedure to avoid introducer popout from the aortic vessel (proximal movement) or interaction with the aortic root complex anatomy (distal movement)
• Operator 1 should always be aware of introducer position throughout procedure• Introducer position management needs to control both axial and lateral
displacement, and may be accomplished by:o Securing introducer in place with one suture looped around the introducer length via
the flush port (axial securement) and a second suture wrapped around the distal introducer end (lateral securement), or
o A dedicated hand or operator to manually hold introducer in place*
• Introducer movement will move delivery catheter system (once it is placed through introducer)
* Caution: Due to close proximity of operators to fluoroscope, use caution to avoid unnecessary radiation exposure.
Image courtesy of Dr. Neil Moat.
Axial Securement Suture
Lateral Securement Suture

AcademiaMedical Education
The information in this document is intended for educational purposes and is not meant as a substitute for Instructions for Use or product training. Practice may vary based on clinical judgmentINTERNATIONAL. CAUTION: For distribution only in markets where CoreValve® is approved. Not for distribution in U.S. or Japan. Medtronic, Inc. 2013. All Rights Reserved.
Withdrawal, Closure, and Patient Care
Catheter Tip Retrieval and Withdrawal• With delivery catheter system tip distal
to introducer, advance capsule to tip and withdraw delivery catheter system from introducer
• Use caution to avoid catching delivery catheter system tip on introducer during catheter withdrawal
Introducer Withdrawal• Performed together by both operators in
a controlled manner• Carefully manage purse-string sutures
to maintain effective hemostasis • Consider rapid pacing for de-
cannulationSuper Stiff Guidewire Withdrawal• Use angiographic catheter to
remove guidewire
Closure
• Close per hospital protocol using appropriate closure technique to avoid dissection, tearing, and/or bleeding at access site
• Consider placing additional suture across double purse-string sutures and access site to ensure effective closure
• Consider rapid pacing or pharmacologic agent to reduce systolic blood pressure below 100 mm Hg during closure
• Perform post-procedure angiography to ensure acceptable closure
Post-Procedure Care
• Normal post-procedure care for any vascular access and minimally invasive thoracotomy/sternotomy procedure
• Consider epidural infusion into wound for assistance with pain management

AcademiaMedical Education
The information in this document is intended for educational purposes and is not meant as a substitute for Instructions for Use or product training. Practice may vary based on clinical judgmentINTERNATIONAL. CAUTION: For distribution only in markets where CoreValve® is approved. Not for distribution in U.S. or Japan. Medtronic, Inc. 2013. All Rights Reserved.
The information in this document is intended for educational purposes and is not meant as a substitute for Instructions for Use or product training. Practice may vary based on clinical judgment.
CoreValve is a registered trademark of Medtronic CV Luxembourg S.a.r.l. For more information and a complete list of adverse events, warning and contraindications reference CoreValve IFU.
Medtronic, Inc. 2013. All Rights Reserved.