type heading here
TRANSCRIPT

SSTTUUDDEENNTT MMAANNUUAALL
NNooiissee -- MMeeaassuurreemmeenntt
AAnndd IIttss EEffffeeccttss
JJaannuuaarryy 22000099

CONTENTS
ACKNOWLEDGEMENTS............................................................................................... i SYMBOLS & ABREVIATIONS ...................................................................................... ii 1. COURSE OVERVIEW ........................................................................................ 1
1.1 Introduction .............................................................................................. 1
1.2 Aim of Course .......................................................................................... 1
1.3 Learning Outcomes .................................................................................. 1
1.4 Format of Manual ..................................................................................... 2
2. INTRODUCTION TO SOUND ............................................................................ 3
2.1 Sound Propagation................................................................................... 3
2.2 Properties of Sound.................................................................................. 4
2.3 Sound Pressure, Power, and Intensity ..................................................... 8
2.4 Levels and Decibels ............................................................................... 10
2.4.1 The Decibel Scale and Use of Levels ........................................ 10
2.4.2 Common Sound Levels ............................................................. 11
2.4.3 Quantifying Sound Levels .......................................................... 12
2.4.4 Decibel Addition, Subtraction, and Averaging ............................ 12
2.4.5 Directivity of Sound Sources ...................................................... 18
2.4.6 Frequency Characteristics of Sound .......................................... 19
2.4.7 Weighted Sound Levels ............................................................. 21
2.4.8 The Human Audible Range of Hearing and Loudness .............. 23
2.4.9 Relationship between Sound Pressure Level and Sound Power level ................................................................................ 25
2.4.10 Time-Varying Noise Sources ..................................................... 26
2.5 Human Response to Sound ................................................................... 27
2.5.1 The Ear and its Response to Sound .......................................... 27
3. RISK ASSESSMENT AND NOISE SURVEYS ................................................. 44
3.1 Occupational Noise Management .......................................................... 44
3.2 Risk Assessment .................................................................................... 45

CONTENTS (Cont’d)
3.3 Exposure Levels Legislation for Noise ................................................... 45
3.4 Acoustical Instrumentation ..................................................................... 51
3.4.1 Sound Level Meters ................................................................... 51
3.4.2 Acoustical Calibrators ................................................................ 53
3.4.3 Frequency Analysis ................................................................... 54
3.4.4 Personal Noise Dosimeter ......................................................... 57
3.5 Acoustic Parameters and Measurement ................................................ 58
3.6 Assessment Surveys .............................................................................. 68
3.6.1 Instrumentation Requirements for Surveys ................................ 68
3.6.2 Preliminary Survey .................................................................... 70
3.6.3 Detailed Sound Level Survey .................................................... 71
3.6.4 Area and/or Equipment Sound Level Survey ............................. 73
3.6.5 Noise Exposure Survey ............................................................. 77
3.6.6 Measurements For Development of Noise Control .................... 90
4. NOISE CONTROL ENGINEERING ................................................................ 100
4.1 Sources of Machine Noise ................................................................... 102
4.2 Electric Motors ..................................................................................... 102
4.3 Industrial Fans ...................................................................................... 105
4.4 Compressors ........................................................................................ 107
4.5 Pumps .................................................................................................. 110
4.6 Hydraulic Noise .................................................................................... 111
4.7 Mechanical Impacts.............................................................................. 113
4.8 Panel or Structure Radiated Noise ....................................................... 113
4.9 Engineering Controls ............................................................................ 115
4.9.1 Some Approaches to Control at Source .................................. 115
4.9.2 Replacement With Low Noise Alternative ................................ 125
4.9.3 Treatment of the Sound Transmission Path ............................ 126
4.10 Administrative Noise Controls .............................................................. 149
4.10.1 Changes to Employee Work Routine ....................................... 150
4.10.2 Relocation of the Source and/or Worker .................................. 152

CONTENTS (Cont’d)
4.10.3 Use of Noise Refuge Areas, Control Rooms, Automation, and Remote Monitoring ........................................................... 154
4.10.4 Regular Maintenance of Equipment ........................................ 155
4.10.5 Noise Limits in Specifications .................................................. 157
5. HEARING PROTECTOR PROGRAMME ....................................................... 160
5.1 Types of HPDs ..................................................................................... 161
5.1.1 Foam Insert Plugs ................................................................... 161
5.1.2 Premolded Plugs ..................................................................... 162
5.1.3 Custom-molded Plugs ............................................................. 162
5.1.4 Semi-Insert or Canal Caps ...................................................... 163
5.1.5 Ear Muffs ................................................................................. 164
5.1.6 Combination of Ear Plugs and Ear Muffs ................................. 165
5.1.7 Special Devices ....................................................................... 165
5.2 Selection .............................................................................................. 168
5.3 HPD Selection Methods ....................................................................... 169
5.3.1 Octave-band Method ............................................................... 169
5.3.2 Noise Reduction Rating ........................................................... 172
5.3.3 Noise Reduction Rating (Subject Fit) ....................................... 173
5.3.4 Noise Level Reduction Statistic ............................................... 173
5.3.5 Single Number Rating.............................................................. 174
5.3.6 HML Method ............................................................................ 175
5.3.7 Sound Level Conversion .......................................................... 175
5.3.8 Classification Method .............................................................. 175
5.4 Fitting ................................................................................................... 177
5.4.1 Foam Earplugs ........................................................................ 177
5.4.2 Premolded Earplugs ................................................................ 178
5.4.3 Custom-Molded Earplugs ........................................................ 178
5.4.4 Semi-Insert/Canal Caps........................................................... 179
5.4.5 Earmuffs .................................................................................. 179
5.5 Visual Checks ...................................................................................... 180

CONTENTS (Cont’d)
5.6 Wearer Field Test to Check Fitting ....................................................... 184
5.6.1 Individual Hearing Protector Fit Testing ................................... 185
5.6.2 Field Microphone in Real Ear (F-MIRE) ................................... 185
5.6.3 Real Ear Attenuation at Threshold (REAT) .............................. 187
5.7 HPD Requirements .............................................................................. 188
5.7.1 Require Use ............................................................................. 188
5.7.2 Availability ................................................................................ 188
5.7.3 Warning Signs ......................................................................... 188
5.8 Training and Maintenance .................................................................... 189
5.8.1 Training .................................................................................... 189
5.8.2 Maintenance ............................................................................ 189
6. EDUCATION & TRAINING ............................................................................. 191
6.1 Introduction .......................................................................................... 191
6.2 Training in Use of Hearing Protectors .................................................. 192
6.2.1 Ear Hearing and Noise ............................................................ 193
6.2.2 Importance For Protecting Hearing .......................................... 193
6.2.3 Selection of Hearing Protectors ............................................... 194
6.2.4 Use and Proper Fitting of Hearing Protectors .......................... 194
6.2.5 Maintenance and Storage ........................................................ 195
6.3 Training to Undertake Noise Assessments .......................................... 195
6.3.1 Goals and Objectives .............................................................. 196
6.3.2 Basic Acoustics ....................................................................... 196
6.3.3 Need For Noise Control ........................................................... 197
6.3.4 Sound Measurement Instrumentation ...................................... 197
6.3.5 Measurement of Workplace Noise ........................................... 197
6.3.6 Occupational Noise Assessments ........................................... 198
6.3.7 Noise Reduction ...................................................................... 198
6.4 Training to Develop and Implement Noise Control Measures In the Workplace .................................................................................. 198
6.4.1 Goals and Objectives .............................................................. 199
6.4.2 Noise Sources and Transmission ............................................ 199

CONTENTS (Cont’d)
6.4.3 Understanding Noise Reduction and Control ........................... 200
6.5 Conclusion ........................................................................................... 200
7. AUDIOMETRIC TESTING .............................................................................. 201
7.1 Hearing Disorders ................................................................................ 201
7.1.1 Types of Hearing Loss ............................................................. 201
7.1.2 Noise Induced Hearing Loss (NIHL) ........................................ 203
7.1.3 Auditory Effects of Excessive Noise Exposure ........................ 205
7.1.4 Progression of Noise Induced Hearing Loss ............................ 207
7.1.5 Tinnitus .................................................................................... 208
7.1.6 Age-Related hearing Loss (ARHL) or Presbycusis .................. 208
7.1.7 Non-organic Hearing Loss ....................................................... 209
7.2 Rehabilitation ....................................................................................... 210
7.3 Audiometry ........................................................................................... 210
7.3.1 Guide to Audiometric Programme ........................................... 211
7.3.2 Equipment Calibration ............................................................. 220
7.3.3 Understanding the Audiogram ................................................. 220
7.3.4 Validity and Factors Affecting Audiometric Results ................. 222
7.3.5 Audiometric Testing Intervals and Conditions .......................... 223
8. REPORTING & RECORD KEEPING .............................................................. 228
8.1 Organizational Risk Management Plan ................................................ 228
8.2 Hazard Identification Assessments ...................................................... 229
8.3 Hazard Control Assessments ............................................................... 229
8.4 Hearing Protector Programmes ............................................................ 230
8.5 Audiometric Monitoring ......................................................................... 230
8.6 Continuing Risk Identification and Control Strategy Assessment ......... 231
9. GUIDELINES FOR AN EFFECTIVE HEARING CONSERVATION PROGRAMME ................................................................................................ 232
9.1 Noise Surveys ...................................................................................... 234
9.1.1 Instrumentation ........................................................................ 234

CONTENTS (Cont’d)
9.1.2 Survey of the Area and Equipment Noise Levels .................... 235
9.1.3 Noise Exposure Survey ........................................................... 236
9.2 Noise Control ....................................................................................... 237
9.2.1 Engineering Noise Control Options ......................................... 238
9.2.2 Administrative Noise Control Options ...................................... 238
9.2.3 Personal Protective Equipment (Hearing Protection Devices) ................................................................................... 238
9.3 HCP Training ........................................................................................ 240
9.3.1 Employee Training ................................................................... 240
9.3.2 Management Training .............................................................. 241
9.4 Audiometric Monitoring ......................................................................... 241
9.5 Determining HCP Effectiveness ........................................................... 242
9.6 Recordkeeping ..................................................................................... 243
9.7 Intervention Strategies For Prevention of NIHL .................................... 244
9.7.1 Identification of Employees at Risk For Hearing Loss (Developing STS) .................................................................... 244
9.8 Proactive Intervention Strategies ......................................................... 244
9.8.1 “Buy Quiet” Programme ........................................................... 244
9.8.2 Engineering Solutions .............................................................. 244
9.8.3 HPD Refit/Retrain For at Risk Employees ............................... 245
9.8.4 Audiometric Testing Schedule ................................................. 245
9.8.5 Special Events For Hearing Awareness and Appreciation....... 245
9.8.6 Field Audits of HPD Use .......................................................... 246
9.8.7 Training Courses For Management ......................................... 246
9.8.8 HPD For Off The Job Exposure ............................................... 246
9.9 Summary .............................................................................................. 246
10. ENVIRONMENTAL NOISE ASSESSMENT & CONTROL .............................. 247
10.1 European Union Environmental Noise Directive .................................. 249
10.2 United States Federal Government Guidelines and Regulations ......... 251
10.3 Other Approaches to Environmental Criteria ........................................ 253
10.4 Factors Other Than Absolute Sound Level Influencing Community Reaction to Noise ................................................................................. 253
CONTENTS (Cont’d)
10.5 Sound Propagation Outdoors ............................................................... 255
10.5.1 Geometrical Divergence .......................................................... 256
10.5.2 Air Attenuation or Atmospheric Absorption .............................. 257
10.5.3 Attenuation Due to Environmental Effects ............................... 257
10.5.4 Effects of Wind and Temperature ............................................ 260
10.5.5 Miscellaneous Attenuation Effects (Amisc) ................................ 262
10.6 Measuring Environmental Noise .......................................................... 263
10.7 Summary .............................................................................................. 264
11. REFERENCES ............................................................................................... 266
ii.
ACKNOWLEDGEMENTS
The original version of this manual was developed for BP International Ltd. by Dennis P Driscoll PE, President and principal consultant of Associates in Acoustics Inc. Reorganisation of and adding to the original material has been conducted by Ken Mikl and Marion Burgess at the University of Wollongong to fit the international student manual format and includes revisions made following a trial course in June 2008. The Occupational Hygiene Training Association Ltd would like to acknowledge the contribution of these organisations in funding and developing the material and is grateful for their permission to use and modify it.
Roger Alesbury Robert Anderson BP International plc Elliott H Berger Trudy Bishop Aearo Technologies American Industrial Hygiene Association (USA) British Occupational Hygiene Society (UK) Brüel & Kjaer
John Dobbie Gayle Hunting Institute of Noise Control Engineering (USA) Thomas Kupferer Terry McDonald Quest Technologies Inc Fred Tremmel Noral D Stewart PhD Laurie L Wells AuD
Supported by
This work is licensed under a Creative Commons Attribution-No Derivative Works Licence

ii.
SYMBOLS & ABBREVIATIONS a - absorption. Unit: m2, ft2 or metric Sabines
A - A frequency weighting (or filter) that corresponds with the response of
the human ear
Atotal - attenuation at each octave band for outdoor sound propagation,
composed of Adiv (geometrical divergence), Aair (air absorption), Aenv
(environmental effects) and Amisc (miscellaneous other factors). Unit: dB
ACGIH - American Conference of Governmental Industrial Hygienists
AI - articulation index. Unit: dimensionless
AIHA - American Industrial Hygiene Association (USA)
AMA - American Medical Association (USA)
ANSI - American National Standards Institute (USA)
ARHL - age related hearing loss
ASA - Acoustical Society of America. Also, until 1966, American Standards
Association (USA)
AS - Australian Standard
AS/NZS - joint Australian and New Zealand Standard
ASHRAE - American Society of Heating, Refrigerating and Air-Conditioning
Engineers (USA)
ASTM - American Society for Testing and Materials (USA)
BOHS - British Occupational Hygiene Society
c - speed of sound at sea level [344
ft/s
C - C frequency weighting (or filter) that is essentially flat over the range of
interest for occupational noise
CNEL - community noise equivalent level. Unit: dBA
COHC - Certified Occupational Hearing Conservationist (by CAOHC in USA)

iii.
SYMBOLS & ABBREVIATIONS (Cont’d) cps - cycles per second (also see hertz)
D - noise dose as a percentage of maximum permitted daily noise dose
dB - decibel
dBA - decibel measured using A frequency-weighting (also see LA). Note:
may also be written as dB(A).
dBC - decibel measured using C frequency-weighting (also see Lc). Note:
may also be written as dB(C).
DNL - day-night average sound level (A-weighting implicit). Unit: dBA (also
see Ldn)
EAT - A-weighted sound exposure with measurement time period, T. ECT
denotes C-weighting. (Note: reporting of T is optional). Unit: Pa2h
EC - European Community
EPA - Environmental Protection Agency (USA)
f - frequency (cycles per second). Unit: hertz (Hz)
fc - center frequency. Unit: Hz
FFT - Fast Fourier Transform which usually transforms from time domain to
frequency domain
F-MIRE - Field Microphone in real ear
h - hour
HCP - hearing conservation program
HL - hearing level. Unit: dB
HPD - hearing protection device
Hz - hertz (cycles/second; also see cps)
HML - High, Medium, Low, hearing protector rating. Unit: dB
I - sound intensity. Unit: watts/m²
Ioref - reference sound intensity (10-12 w/m2)

iv.
SYMBOLS & ABBREVIATIONS (Cont’d) IEC - International Electrotechnical Commission
IL - insertion loss. Unit: dB
ISO - International Organization for Standardization
kHz - kilohertz
LA - A-weighted sound level. Unit: dBA
LAeq,8hr - A-weighted equivalent-continuous sound level, also called average
sound level, with 3-dB exchange rate, normalized to 8 hours. Same as
LEX,8h as defined in ISO 1999, and LEP,d as defined in UK and sometimes
written as LA8h. Contrast with Leq,T which is a non-normalized quantity.
Unit: dBA
LAE - sound exposure level with A-weighting. Unit: dBA (also see SEL)
LAeq,T - see Leq,T
LAF(t) - A-weighted and fast response sound level as a function of time. Use of
S instead of F denotes slow response. Unit: dBA
LC - C-weighted sound level. Unit: dBC
Ldn - day-night average sound level (A-weighting implicit), use of LAdn is
optional. Unit: dBA (also see DNL). This metric is defined by the U.S.
EPA.
Lden - day-evening-night noise indicator (A-weighting implicit), as specified in
European Directive 2002/49/EC, and used to assess noise for overall
annoyance. (Note – as of this publication date the EC has not specified
the assessment method and has deferred the definition to Member
States and their legislation.)
Leq,T - equivalent-continuous sound level, also called average sound level,
during time period T, using a 3-dB exchange rate. Weighting must be
specified separately as in LAeq,T. Contrast to LA8hn for normalized
average sound level, but note that for an 8-hr. measurement, LA8hn =
LAeq,8h. Unit: dB, dBA, or dBC.

v.
SYMBOLS & ABBREVIATIONS (Cont’d) LEX,8h - sound pressure level equivalent to the noise exposure normalized to a
nominal 8-hour working day
LAeq,8h - sound pressure level equivalent to the noise exposure normalized to a
nominal 8-hour working day
LF - sound levels or sound pressure levels measured with fast time constant;
125-ms exponential weighted time average instrument response, often
called "fast response." (also see LS.)
LI - sound intensity level, dB
LN - percentile level that is exceed “n” percent of the measurement period.
Unit: dBA
Lp - sound pressure level. Unit: dB (also see SPL)
Lptot - total sound pressure level. Unit: dB (also see SPL)
PL - average sound pressure level. Unit dB
Lpk or Lpeak - peak sound pressure level. Unit dB
LS - sound levels or sound pressure levels measured with slow time
constant; 1-s exponential weighted time average instrument response,
often called "slow response." (also see LF)
LW - sound power level. Used with A or C subscript (e.g. LWA) denotes use
of A- or C-weighting. Unit: dB (also see PWL)
LWtot - total sound power level. Unit: dB (also see SPL)
Log or Lg - logarithm. When no subscript appears, base 10 is assumed. Note
either term “log” or “lg” are correct and will vary based on origin of
standard or reference.
m - meter (also known as metre)
m - mass. Unit: kg, lb
MIRE - Microphone in real ear
ms - 1/1000 s (millisecond)

vi.
SYMBOLS & ABBREVIATIONS (Cont’d) NHCA - National Hearing Conservation Association
NIHL - noise-induced hearing loss. Unit: dB
NIOSH - National Institute for Occupational Safety and Health
NIPTS - noise-induced permanent threshold shift. Unit: dB
NIST - National Institute of Standards and Technology (USA)
NRR - Noise Reduction Rating. Often a trailing subscript, as in NRR84, is used
to indicate the percentage of the population that is protected. Unit: dB
NRR(SF) - Noise Reduction Rating (Subject Fit). Unit: dB
NRSA - Noise Level Reduction Statistic for use with A-weighting
OSHA - Occupational Safety and Health Administration (USA)
p - sound pressure. Unit: Pa
poref - reference sound pressure (20
prms - root-mean-square sound pressure. Unit: Pa
ppeak - peak sound pressure. Unit: Pa
Pa - Pascal
PPE - personal protective equipment
PTS - permanent threshold shift. Unit: dB
PWL - sound power level. Unit: dB (also see LW)
Q - directivity factor. Unit: dimensionless
r - radius, effective radius of circle or sphere, or distance from source.
Unit: m, ft
REAT - real-ear attenuation at threshold. Unit: dB
rms or RMS - root-mean-square
RTA - real time analyser
Rw - weighted sound reduction index, used for transmission loss
s - second
vii.
SYMBOLS & ABBREVIATIONS (Cont’d) SEL - sound exposure level. Unit: dB (also see LAE)
SLM - sound level meter
SPL - sound pressure level. Unit: dB (also see Lp)
STC - sound transmission class. Unit: dB
STS - standard threshold shift in hearing, as defined in (USA) OSHA HCA.
Unit: dB
T - is the time it takes to complete one full cycle, it is proportional to the
frequency.
t - time. Unit: s, min, h
Te - effective duration of the working day Unit: h
Tc - criterion sound duration. In OSHA/MSHA practice, Tc = 8 h. Unit: h
TL - transmission loss. Unit: dB
TTS - temporary threshold shift. Unit: dB
TTS2 - temporary threshold shift measured two minutes post-exposure. Unit:
dB
TWA - A-weighted average sound level with 5-dB exchange rate and slow
meter response, applied in (USA) OSHA/MSHA practice. The TWA is
normalized to 8 hours. Contrast with LOSHA for a non-normalized
quantity. Unit: dBA
W - sound power. Unit: watts
Woref - reference sound power (10-12 acoustic watts)
Z - Z frequency weighting (or filter) that is flat over the range from 10 Hz to
20KHz
- wavelength. Unit: m, ft
µPa - micropascal (10-6Pa)
- density of air. Unit: kg/m³
- transmission coefficient. Unit: dimensionless
viii.
SYMBOLS & ABBREVIATIONS (Cont’d) - angular frequency = 2f. Unit: rad/s
n - angular natural frequency. Unit: rad/s
- ratio of viscous damping constant to critical damping value. Unit:
dimensionless
1.
1. COURSE OVERVIEW 1.1 INTRODUCTION This Course has been based in the most part on the international module
syllabus W503 – Noise – Measurement and Its Effects published by the
British Occupational Hygiene Society (BOHS), Faculty of Occupational
Hygiene. The BOHS administers a number of such modules; further
information on which can be obtained by visiting the BOHS website at
www.bohs.org.
At the time of publication every care has been taken to ensure that the
majority of topics covered in the BOHS syllabus for the subject (W503) have
been included in this Student Manual. Providers of training courses should
check the BOHS website for any changes in the course content.
The authors of this Student Manual take no responsibility for any material
which appears in the current BOHS syllabus for Module W503 which is not
covered in this manual.
1.2 AIM OF COURSE To provide the student with an appreciation of the nature of noise hazards
in the workplace and the effects of noise on people. It also details the
approach in carrying out noise assessments in the workplace and in the
general environment, and to determine the significance of measurement
data in relation to the various standards for compliance.
1.3 LEARNING OUTCOMES On successful completion of this module the student should be able to:
Describe the consequences to health and well being of excessive
noise exposure;
Understand the measurement (including dosimetry) of noise in relation
to current standards;
Conduct surveys in the workplace to assess risks from noise;

2.
Advise on the need and means of control, including personal
protective equipment;
Appreciate and advise on environmental noise assessment and
concerns; and
Understand current standards and good practice in these fields.
1.4 FORMAT OF MANUAL This manual has been designed to follow for the most part the syllabus for
this course as published by the BOHS. Similarly, the material provided in
this manual has been aligned with the presentations for each topic so
students can follow the discussion on each topic.
It should be recognised that the format presented in this manual represents
the views of the editors and does not imply any mandatory process or
format that must be rigidly observed. Presenters using this manual may
well choose to alter the teaching sequence or course material to suit their
requirements. In this regard the case studies and exercises are provided as
illustrative examples and alternate material relevant to a particular industry
may be used if desired.
In the final outcome, the aim of this manual is to transmit the principles of
noise measurement and an understanding of the effects of human exposure
to noise.

3.
2. THE PHYSICS OF SOUND 2.1 SOUND PROPAGATION
Sound is generally defined as fluctuations in pressure above and below the
ambient pressure of a medium that has elasticity and viscosity. The
medium may be a solid, liquid, or gas. Sound is also defined as the
auditory sensation evoked by the oscillations in pressure described above
(ANSI S1.1-1994 (R2004)). For assessing the nature of workplace noise,
the medium of primary concern is air. Noise is often used to describe
unwanted sound, but it is also often used interchangeably with sound as in
“sound source” or “noise source”.
Figure 2.1 – A vibrating tuning fork sets air molecules into motion as illustrated in the top image, which results in positive (compression)
and negative (rarefaction) excursions around atmospheric pressure as shown in the bottom illustration.
Sound perceived by the ear results from fluctuations in the pressure of the
air. These fluctuations are usually initiated by a vibrating surface or object,
such as the casing of a machine, or by air flow such as from compressed
air exhaust. In the example in Figure 2.2 the sound is created by a tuning
fork.

4.
As each molecule is set into vibration, it pushes against the adjacent
molecule, ie the air is compressed, and so the next molecule is set into
vibration. In this manner the sound wave is transmitted through the air. As
the direction of motion of the air molecules is the same as the direction of
motion of the wave front this is a longitudinal wave. This is unlike the wave
in water where the water molecules move up and down at right angles to
the propagation of the water wave, a transverse wave. For ease of
presentation the airborne sound wave is usually drawn as a sine wave, as
shown in Figure 2.2.
(Source: Brüel & Kjaer)
Figure 2.2 – Sound Pressure
2.2 PROPERTIES OF SOUND
The properties of sound waves are characterized by frequency, wavelength,
period, amplitude, and speed. Amplitude and Period are illustrated in
Figure 2.3 and described below for a simple sine wave.

5.
Time
Period, T
Amplitudey
Figure 2.3 - Sound wave, pressure variation around atmospheric
pressure
Amplitude is the maximum pressure variation above and below ambient or
atmospheric pressure. The higher the amplitude, the greater or louder the
sound level will be.
Period (T) is the time it takes to complete one full cycle, it is proportional to
the frequency.
The frequency (f) of a sound is the number of times per second a complete
wave passes a point. The number of cycles per second is termed Hertz
(Hz).
The Period and the frequency are simply related by the following equation
T = 1/f (seconds)
Speed (c) of sound in air is governed by density and air pressure which in
turn relates to temperature and elevation above sea level. A detailed
discussion of the various other mediums and their elasticity and density is
beyond the scope of this Manual, and the reader is referred to more
advance texts should additional details be desired. The speed of sound in
air is approximately 343 m/s. Thus sound travels about 1 kilometre in air in
3 seconds.
Wavelength (λ) is the length of one complete cycle, and is measured in
metres (m). It is related to the frequency (f) and speed of sound (c) by:
Wavelength (λ) = c/f metres

6.
Table 2.1 shows the relationship between wavelength and frequency. Note
that the higher the frequency, the shorter the wavelength; or conversely, the
lower the frequency, the longer the wavelength. This is important when
selecting appropriate noise control measures.
Table 2.1 - Wavelength in air at standard atmospheric conditions
Frequency Wavelength
100 Hz 3.44 m
1000 Hz 0.34 m
1,000 Hz 34.4 mm
10,000 Hz 3.4mm
Sine wave
Time
Am
pli
tud
e
Peak RMS
Peak to Peak
Figure 2.4 - shows some of the various options for measurement of amplitude of the sound wave which is represented here as a sine
pressure wave. The peak pressure is the greatest pressure for the sound wave
If the volume of a tone generator is turned up, the amplitude of the sound
pressure is increased - the sound becomes louder. Amplitude is thus a
convenient measure of the magnitude of the sound and can be related to its
intensity and loudness and ultimately the effect it has on the human ear.
7.
From consideration of the waveform, shown in Fig 2.4, there are various
options for determining the amplitude. The peak value occurs only for a
very short time period and so may not be very closely related to the
subjective impression of the sound. While an average may be more
appropriate, due to the symmetrical shape of the pressure wave the times
the amplitude is positive equals the times the amplitude is negative and so
the resultant „average‟ is zero. We need an "average" which takes into
account the magnitude of the sound pressure fluctuations but not their
direction (positive and negative). The one most commonly used is the root-
mean square (or RMS) sound pressure. This can best be described by
looking at the waveform shown in the diagram below.
Sound
Press.
p
sound pressure squared
Peak Sound
Pressure
Mean p squared
Time
RMS Sound Pressure
Figure 2.5 - Comparison of the pressure and the pressure squared signal with time
In effect the signal is first "squared", that is multiplied by itself. This has the
effect of producing a pressure squared waveform, which is always positive.
The next stage is to take the average (or mean value) of this pressure
squared waveform - called the "mean pressure squared". Finally, by taking
the square root of this value, we get back to a pressure - the root mean
square pressure (strictly the square root of the mean pressure squared)
referred to as RMS pressure.

8.
Most sound level meters have electronic circuits which convert the
microphone signal into an RMS value corresponding to the RMS sound
pressure. The RMS pressure is used because it can be related to the
average intensity of the sound and to the loudness of the sound. For a pure
(simple sine wave) tone it can be shown that the peak pressure and the
RMS pressure are simply related:
pRMS = ppeak = 0.707 x ppeak √2
For more complex signals, there is no simple relationship between the two.
Despite what has been said above, there are occasions when it is important
to measure the peak value of a complex sound waveform, or the peak to
peak value, In particular for loud impulsive noise, such as gunfire,
explosions or punch presses. The Crest Factor is the ratio of the peak
amplitude of a waveform to the RMS value. It is a measure of the
sharpness of the peak and short intense impulses will have high values of
crest factor.
2.3 SOUND PRESSURE, POWER, AND INTENSITY
Sound Power - Sound power is defined as the total sound energy
generated by the source per unit of time. Sound power is expressed in
units of watts (W). It is important to keep in mind that for all practical
situations the sound power of a source output is constant regardless of its
location (i.e. inside versus outside). Conversely, the sound intensity and
sound pressure will change as a function of the environment in which it is
located.

9.
Figure 2.6 - Sound radiating out from source
Sound Intensity - is defined as sound power per unit area (watts/m2).
Sound intensity is a vector quantity, in other words, it is specified by
direction. A point sound source will radiate sound power evenly in all
directions, assuming there are no reflective surfaces present. As the power
spreads spherically from its origin, the surface area in increases and so the
power per unit area decreases. The total power remains the same, but the
enclosing area is increasing, which results in a decrease in the sound
intensity. This is known as the inverse-square law.
Surface area of sphere = 4 r 2
At 1 metre from source, r=1 and the power will be spread over a sphere
whose surface area is 4 x1
At 2 metres, r=2 and the surface of the sphere will be 4 x 4 ie 4 times as
large
At 3 metres the surface will be 32 = 9 times bigger,
Therefore as the distance from source spreads the energy per unit area
diminishes.
10.
Sound Pressure - The variation of pressure superimposed on the
atmospheric pressure within the sonic range is called the sound pressure.
Sound pressure is expressed as force per unit area, and the preferred unit
is the Pascal (Pa). Keep in mind sound pressure is the “effect” of a
disturbance. The actual “cause” of the disturbance, and the resulting
reaction effect, is due to the driving force or sound power.
2.4 LEVELS AND DECIBELS 2.4.1 The Decibel Scale and Use of Levels
The intensity of the faintest sound a person with sensitive hearing can
detect is about 0.000,000,000,001 watts/m2, while the intensity of the sound
produced by a Saturn rocket at liftoff is greater than 100,000,000 watts/m2.
This is a range of 100,000,000,000,000,000,000. This is an extremely large
range in values. The human ear does not respond in a linear way but more
like in a logarithmic way. By applying logarithms1, and a reference value, a
new measurement scale is formed such that an increase of 1.0 represents a
tenfold increase in the ratio, also called a 1.0 Bel increase. The term Bel
was named by Bell Laboratories in honor of Alexander Graham Bell. The
application of logarithms has evolved to the use of 10 subdivisions of a log
value, or 1/10th of a Bel, which is the term you may be familiar: decibels (10
dB = 1 Bel). The decibel is abbreviated dB, and is a dimensionless quantity
independent of the system of units used. The dB scale is related to the way
the human ear responds to sound as 1 dB change in level is a just
noticeable difference under ideal listening conditions.
For sound in air, the expression for each acoustical property is as follows:
Sound Intensity Level: LI = 10 log
refI
I, dB
Sound Power Level: LW = 10 log
refW
W, dB
1 Note: Unless stated otherwise, all logarithmic functions are to the base 10 (log10) throughout this
manual.
11.
Sound Pressure Level: Lp = 10 log
ref2
2
p
p =20 log
refp
p, dB
The “L” in each expression stands for “Level,” and the I, W, and p terms
represent intensity, power, and pressure, respectively. Quite often the
terms LW and Lp are correspondingly abbreviated PWL and SPL. The
reference quantities are also related to human hearing as they nominally
correspond to the threshold of hearing at 1000 Hz:
Reference intensity (Iref) = 10-12 w/m2
Reference power (Wref) = 10-12 w
Reference pressure (pref) = 2 x 10⁻⁵ N/m2, or 20 µPa
Keep in mind sound power propagates in the form of pressure fluctuations
in air, and the root-mean square (rms) value of Intensity is
I = 2r4
W
(where r is distance from source),
And pressure fluctuations are found by:
I = cp
p 2
(where ρ is air density, and c is speed of sound)
Therefore, the two expressions may be equated and represented as:
p 2 = 2r4
W
c
Which illustrates where the p2 is inversely proportional to r2 (distance). This
becomes an important factor when estimating the noise level at distance
from a sound source.
2.4.2 Common Sound Levels
Figure 2.7 presents a comparison of decibels, sound power, and sound
pressure.

12.
BA 7666-11, 12
Sound Pressure, p[Pa]
Range of Sound Pressure Levels
140
120
100
80
60
40
20
0
Sound Pressure Level, Lp
[dB]100
10
1
0.1
0.01
0.001
0.000 1
0.000 01
860508/2
(Source: Brüel & Kjaer)
Figure 2.7 - Typical range of sound pressure levels for some common sounds
2.4.3 Quantifying Sound Levels
At this point it is useful to simply quantify how the human ear subjectively
assesses relative changes in sound intensity. A 1 dB change is barely
perceptible to a listener with very good hearing acuity. However, the ear
does not respond linearly to changes in sound level. For example, a 3 dB
difference would be just perceptible to the average listener, a 5 dB change
clearly noticeable, and a 10 dB increase would typically be perceived as
twice as loud. The study of the human perception of sound is complex and
often referred to as Psychoacoustics.
2.4.4 Decibel Addition, Subtraction, and Averaging
The workplace noise environment will often be comprised of more than one
noise source. Therefore, it is important to understand how the overall noise
level varies as new equipment is added or removed. Also, when desired, it
is useful to know how to average sounds or multiple sound measurements,
since workplace noise exposure is almost never constant throughout the
day.

13.
Because levels are logarithmic values, it is not possible to arithmetically add
or subtract them. Only the underlying physical quantities can be
manipulated. Since levels are represented by logarithmic expressions, it is
necessary to take the antilog of each level to determine the actual acoustic
intensity. This calculation is a fairly straightforward procedure using a
spreadsheet with the logarithmic formulas embedded. However, before we
look at use of a spreadsheet, it is important to understand how these
quantities are generated and learn alternative methods for manipulating
decibels.
a) Decibel Addition
The expression for adding two or more unrelated sound pressure
levels is as follows:
Lpt = 10 log
n
i 1
/10Lp i10 , dB
Where,
Lpt = total SPL, dB
Lpi = each individual (ith) SPL, dB
n = the total number of values or levels
Adding multiple sound power levels follows the same format:
LWt = 10 log
n
i 1
10/10L iW , dB
Where,
LWt = total PWL, dB
LWi = each individual (ith) PWL, dB
n = the total number of values or levels
14.
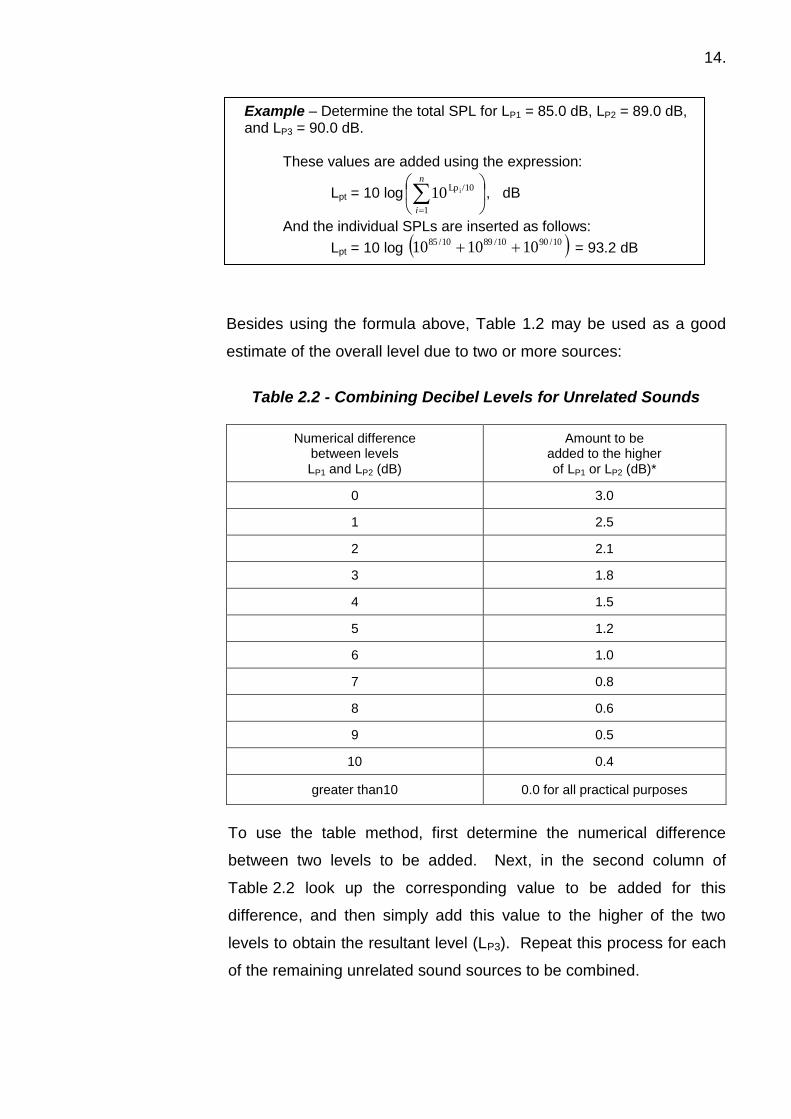
Besides using the formula above, Table 1.2 may be used as a good
estimate of the overall level due to two or more sources:
Table 2.2 - Combining Decibel Levels for Unrelated Sounds
Numerical difference between levels LP1 and LP2 (dB)
Amount to be added to the higher of LP1 or LP2 (dB)*
0 3.0
1 2.5
2 2.1
3 1.8
4 1.5
5 1.2
6 1.0
7 0.8
8 0.6
9 0.5
10 0.4
greater than10 0.0 for all practical purposes
To use the table method, first determine the numerical difference
between two levels to be added. Next, in the second column of
Table 2.2 look up the corresponding value to be added for this
difference, and then simply add this value to the higher of the two
levels to obtain the resultant level (LP3). Repeat this process for each
of the remaining unrelated sound sources to be combined.
Example – Determine the total SPL for LP1 = 85.0 dB, LP2 = 89.0 dB, and LP3 = 90.0 dB. These values are added using the expression:
Lpt = 10 log
n
i 1
/10Lp i10 , dB
And the individual SPLs are inserted as follows:
Lpt = 10 log 10/9010/8910/85 101010 = 93.2 dB

15.
Note: it is best to rank order the noise sources from lowest to highest,
and then begin Step 1 using the two lowest levels, working down
through the list to each successively higher number.
The table method above is often useful as a quick means to estimate
the total SPL due multiple noise sources without having to use a
pocket calculator or a spreadsheet with the requisite formulas
embedded.
This process can also be used to calculate the overall sound level if
the data for the sound level in separate frequency bands is known.
Each sound level is considered as a separate value and then they are
added in pairs to provide the overall or total sound level for that sound.
It can be important to ensure that the effect of the combination of the
sound levels with lower value are properly taken into consideration so
it is good practice to rearrange the numbers in ascending order before
commencing the addition process. The table is an example of a typical
layout to assist with this calculation however it is also possible to set
up a spread sheet for this determination.
Example – Use Table 2.2 to estimate the total SPL for the addition of three sound levels of 85.0 dB, 89.0 dB, and 90.0 dB. (The final result will be LPt).
Step 1: Rank ordering these values from low to high gives us 85.0, 89.0, and 90.0 dB. Step 2: The numerical difference between the two lowest levels 85 and 89 is 4 dB. From column 2 in Table 2.2 the corresponding value to add to the higher level, 89 dB is 1.5 dB, so the total for these two levels is 89 + 1.5 = 90.5 dB. Step 3: Now we combine the 90.5 dB with the third sound level of 90 dB. The difference is 0.5 dB so from Table 2.2 we see the amount to be added for a difference of 0.5 falls between 3 and 2.5. By interpolating between these numbers we can determine that the amount to be added is 2.8, which is added to the 90.5 giving an overall total of 93.3 dB which represents the total sound level for the three sounds.
16.
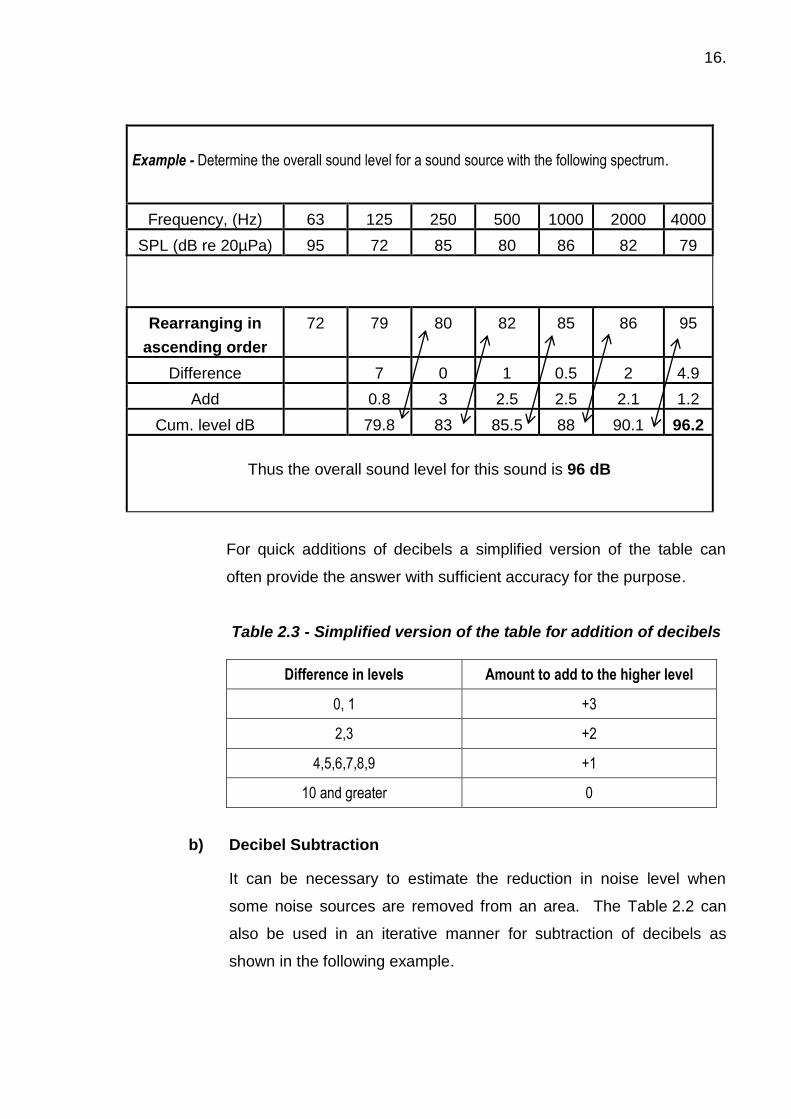
Example - Determine the overall sound level for a sound source with the following spectrum.
Frequency, (Hz) 63 125 250 500 1000 2000 4000
SPL (dB re 20µPa) 95 72 85 80 86 82 79
Rearranging in
ascending order
72 79 80 82 85 86 95
Difference 7 0 1 0.5 2 4.9
Add 0.8 3 2.5 2.5 2.1 1.2
Cum. level dB 79.8 83 85.5 88 90.1 96.2
Thus the overall sound level for this sound is 96 dB
For quick additions of decibels a simplified version of the table can
often provide the answer with sufficient accuracy for the purpose.
Table 2.3 - Simplified version of the table for addition of decibels
Difference in levels Amount to add to the higher level
0, 1 +3
2,3 +2
4,5,6,7,8,9 +1
10 and greater 0
b) Decibel Subtraction
It can be necessary to estimate the reduction in noise level when
some noise sources are removed from an area. The Table 2.2 can
also be used in an iterative manner for subtraction of decibels as
shown in the following example.

17.
c) Decibel Averaging
At times it is useful to average decibels, especially for repeated
measurements conducted at the same position over time. The
formula for averaging measured SPLs is as follows:
L p = 10 log
n
in 1
/10Lp i101
, dB
Where,
L p = average SPL, dB
Lpi = each individual (ith) SPL, dB
n = the total number of values or levels
Example – Use Table 2.2 to estimate the remaining SPL if the combined sound pressure level for two sources is 96 dB and one source, that is known to be 94 dB, is to be removed.
Step 1: Let the unknown source remaining be X dB. The 94 + X must combine to be 96 dB, that is the unknown source has led to an overall increase in level of 2 dB Step 2: From Table 2.2 an increase in overall level of 2 dB occurs when the difference in levels of the individual sources is 2 dB. So X must be 94-2 dB, ie 92 db Step 3: Checking this; for the addition of 94 + 92 dB, the difference is 2 dB so from Table 2.2 the total combined noise level is 2 dB higher than the higher source which in this example is 94 dB, giving a total of 96 dB.
Thus removing the source known to be 94 dB will lead to an overall level of 92 dB in the area.

18.
Note that when there is only a few dB difference in the individual levels
the logarithmic average is similar to the arithmetic average. In the
above example the range from the lowest to the highest is 5 and the
arithmetic average of 81+86+82+84 is 83.2 which would round off to
83.
2.4.5 Directivity of Sound Sources
Sound sources do not all radiate sound equally in all directions – this is
referred to as source directivity. Also the location of a source can affect the
level and distribution of the sound. The additional reflected sound from a
source placed against one reflecting surface, such as a hard floor, can lead
to a 3 dB increase in sound level. The same source located near 2
reflection surfaces could be 6 dB higher and in a corner with 3 refecting
surfaces could be 9 dB higher. Figure 2.8 shows this graphically for pure
spherical radiators and Table 2.4 shows the relationship between the
directivity factor and directivity index, which is in dB.. In practice the
increase in level is not as great as these theoretical values.
Example – Determine the average SPL for LP1 = 81.0 dB, LP2 = 86.0 dB, LP3 = 82.0 dB, and LP4 = 84.0 dB.
These values are averaged using the expression:
L p = 10 log
n
in 1
/10Lp i101
, dB
And the individual SPLs are inserted as follows:
L p = 10 log 1/4 10/8410/8210/8610/81 10101010 , dB
L p = 83.7 dB which rounded off would be 84 dB

19.
(Source: The Noise Manual, 5th Ed., Am. Ind. Hyg. Assoc.)
Figure 2.8 - Directivity factor, Q, for varying boundary conditions
Table 2.4 - Comparison of Directivity Factor and Directivity Index
Source Location
Directivity Factor, Q
Directivity Index (dB)
Suspended in space 1 0
On floor of large room 2 3
At intersection of one wall and floor 4 6
In the corner of a room 8 9
2.4.6 Frequency Characteristics of Sound
The frequency of sound is the number of times per second a disturbance
passes through both its positive and negative excursions around
atmospheric pressure, expressed in units of Hz. Workplace sounds are
invariably comprised of a broad spectrum of frequencies, which can to be
divided into smaller bandwidths to assist the analysis for risk assessment,
noise control, evaluation of hearing protection, etc. For this purpose, the
sound level meter may contain a filter set to measure the select bandwidths
of concern or a frequency analyser can be used. The most common
bandwidth for noise measurement is the octave band.
An octave band is defined as a range or band of frequencies where the
upper end frequency, f2, is two times the lower end, f1:
f2 = 2 f1, Hz
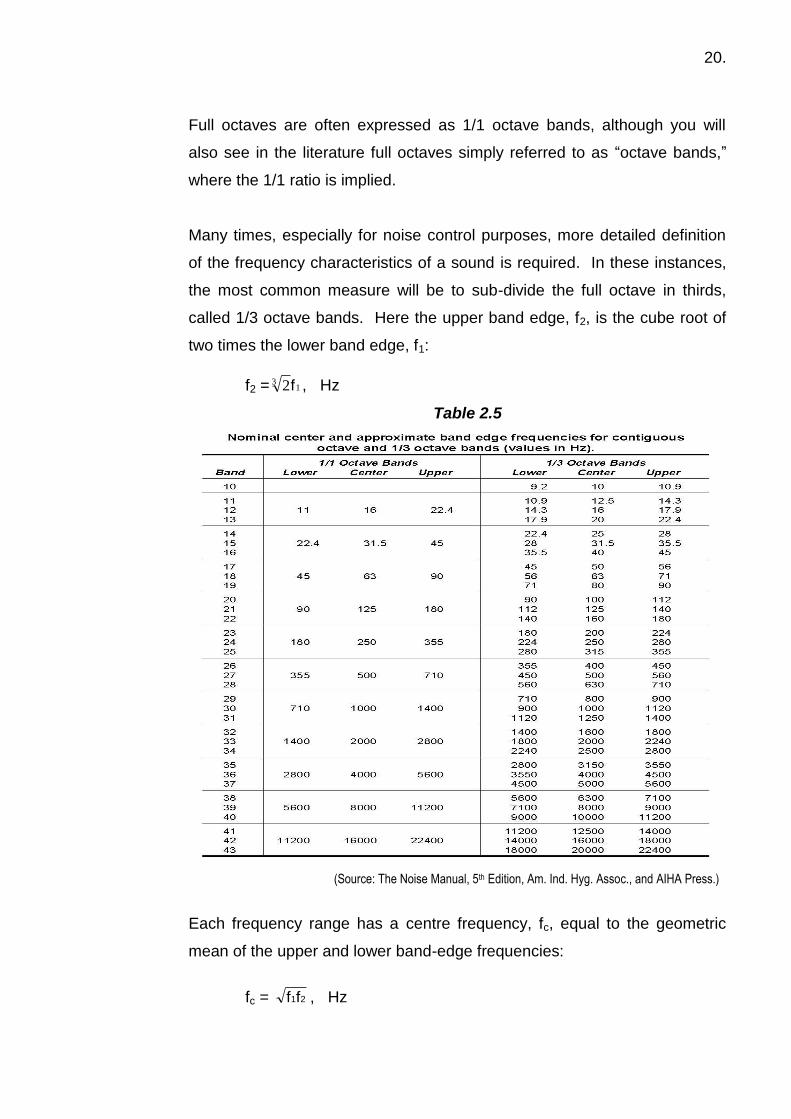
20.
Full octaves are often expressed as 1/1 octave bands, although you will
also see in the literature full octaves simply referred to as “octave bands,”
where the 1/1 ratio is implied.
Many times, especially for noise control purposes, more detailed definition
of the frequency characteristics of a sound is required. In these instances,
the most common measure will be to sub-divide the full octave in thirds,
called 1/3 octave bands. Here the upper band edge, f2, is the cube root of
two times the lower band edge, f1:
f2 = 13 2f , Hz
Table 2.5
(Source: The Noise Manual, 5th Edition, Am. Ind. Hyg. Assoc., and AIHA Press.)
Each frequency range has a centre frequency, fc, equal to the geometric
mean of the upper and lower band-edge frequencies:
fc = 21ff , Hz

21.
For example, the bandwidth for fc = 1000 Hz is 710-1400 Hz using a 1/1
octave band filter, and 900-1120Hz in 1/3 octave band metrics. Table 2.4
presents the lower, centre, and upper frequencies for both 1/1 and 1/3
octave bands.
The standard 1/1, 1/3 octave-band analysers are known as constant-
percentage bandwidth filters. As the centre frequency increases, so will the
width of each frequency band. On the other hand, narrow-band analysers
utilize a constant-bandwidth filter, selected by the user. Narrow-band
analysis is applicable primarily to advanced noise control measurement or
evaluation of specific sound sources such as emergency alarms.
2.4.7 Weighted Sound Levels
As will be discussed in the section on human hearing, the ear does not
respond equally to all frequencies. Thus for measurements relating to
human response it is necessary to include a filter in the measurement
process that is similar to the frequency response of the human ear. The A
weighting filter has been designed to have a similar frequency response to
the ear and measurements made with this filter are expressed as dBA.
Regulations for most occupational noise exposure are in terms of the A-
weighted sound level,
The A-weighted level is most readily obtained by measuring it with a sound
level meter set to the A-weighting frequency filter network. Essentially,
A-weighting SPLs reduce the importance of lower frequencies at 500 Hz or
less. The lower the frequency, the greater the A-weighted correction factor
becomes (see Table 2.6 and Figure 2.9). Conversely, the mid to high
frequencies from 2,000-4,000 Hz have a slight increase in overall
magnitude, as 1.2 and 1.0 decibels are added to the linear SPLs at these
frequencies and the very high frequencies are again are reduced as they
extend beyond normal hearing.
22.
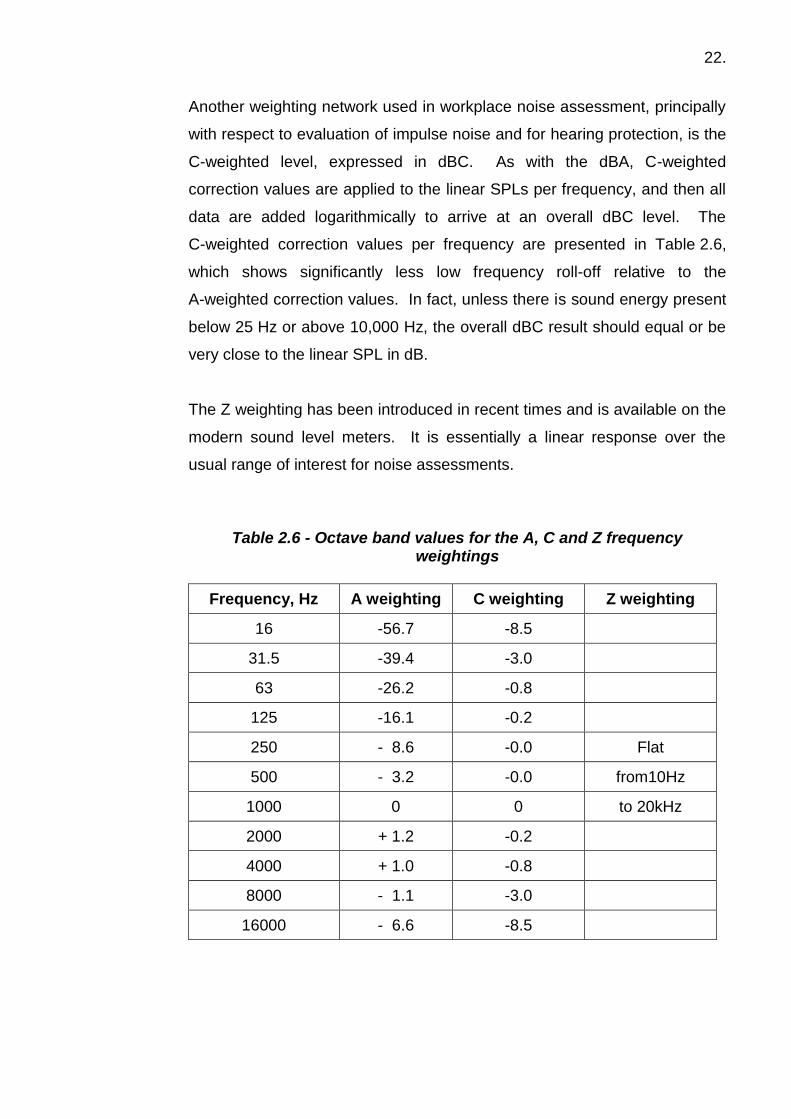
Another weighting network used in workplace noise assessment, principally
with respect to evaluation of impulse noise and for hearing protection, is the
C-weighted level, expressed in dBC. As with the dBA, C-weighted
correction values are applied to the linear SPLs per frequency, and then all
data are added logarithmically to arrive at an overall dBC level. The
C-weighted correction values per frequency are presented in Table 2.6,
which shows significantly less low frequency roll-off relative to the
A-weighted correction values. In fact, unless there is sound energy present
below 25 Hz or above 10,000 Hz, the overall dBC result should equal or be
very close to the linear SPL in dB.
The Z weighting has been introduced in recent times and is available on the
modern sound level meters. It is essentially a linear response over the
usual range of interest for noise assessments.
Table 2.6 - Octave band values for the A, C and Z frequency
weightings
Frequency, Hz A weighting C weighting Z weighting
16 -56.7 -8.5
31.5 -39.4 -3.0
63 -26.2 -0.8
125 -16.1 -0.2
250 - 8.6 -0.0 Flat
500 - 3.2 -0.0 from10Hz
1000 0 0 to 20kHz
2000 + 1.2 -0.2
4000 + 1.0 -0.8
8000 - 1.1 -3.0
16000 - 6.6 -8.5

23.
A weighting
-60
-50
-40
-30
-20
-10
0
10
16 31.5 62.5 125 250 500 1K 2k 4K 8K 16K
Frequency, Hz
Sou
nd p
ress
ure
leve
l, dB
..
Z weighting
C weighting
Figure 2.9 - Graphic representation of the A, C and Z weighting filters
2.4.8 The Human Audible Range of Hearing and Loudness
The accepted range in human hearing extends from 20 Hz up to 20,000 Hz.
However, it is a relatively small percentage of the population that can truly
detect sounds at the outer edges of this range. The threshold of hearing is
that SPL that is just barely detected by a listener. Figure 2.10 depicts the
equal-loudness contours for free-field conditions, with the minimum audible
field (MAF), shown by the dashed line. Inspection of the curves in
Figure 2.10 clearly shows human sensitivity is greatest from 2,000 to
5,000 Hz.

24.
(Source: ISO 226:1987 - Reproduced with permission of the International Organization for Standardization)
Figure 2.10 - Equal-loudness contours of pure tones for field (open-ear, frontal incidence) listening conditions. The numbers indicate the
loudness level, in phons, of the tones that fall on each contour
Figure 2.10 also shows how human hearing is a function of frequency and
amplitude of the sound wave. So a sound at one frequency may seem
louder (or softer) than a sound of equal pressure amplitude at a different
frequency.
When sounds exist below and above the audible frequency range in human
hearing, they are classified as Infrasound and Ultrasound, respectively.
Infrasound is low frequency and so has long wavelength it can travel long
distances and get around obstacles with little dissipation. Infrasonic sound
waves exist naturally in the form of earth tremors, electrical storms, and
volcanic activity. These low frequency sounds can also be generated by
industrial equipment, such as transformers, some compressors, or within
engine rooms. Infrasound is not harmful to human hearing; however,
excessive and prolonged exposure can lead to physical discomfort,
headaches, and even nausea at times.
25.
Ultrasound is short wavelength high frequency sound often used in
industry for cleaning parts, welding plastic parts together, and sealing
thermoplastic packaging. Ultrasonic devices operate at frequencies of
20,000 Hz and above, which are above the range in human hearing.
However, sub-harmonics of the ultrasonic tone can exist and cause
machine components to radiate audible airborne sound. Therefore, if you
are measuring sound levels in an area with ultrasonic devices; keep in mind
it may still be possible to measure audible sound levels due to this
equipment.
2.4.9 Relationship between Sound Pressure Level and Sound Power Level
SPL and PWL are related by the equation:
Lp = Lw + k, dB
Where,
Lp is the sound pressure level (SPL) in dB,
Lw is the sound power level (PWL) in dB, and
k is a constant factor, dependent upon the acoustics of the
environment, directivity of the source, and distance from the source.
The easiest way to explain the differences between sound pressure and
sound power is to consider the following analogy. Say we put a 100-watt
light bulb in the centre of a room that is completely painted with flat black
paint, including the floor. The illumination in the room will seem rather dim
or dull when compared to the identical set-up in a second room that is
completely covered with glossy white paint. As you can imagine the white
room will be significantly brighter. Nothing has changed as far as the power
output of the light bulb. Only the environment (room) conditions have
changed.
The same thing happens with sound. Recall that SPL is the effect (what we
hear) of a pressure disturbance and PWL is the cause of the disturbance.

26.
So following the concept described in the light bulb analogy, assume you
have a machine with a rated PWL of 90 dB and place it in a small room
where the floor and ceiling are both concrete, and the walls are brick; the
resultant SPL we hear could be as much as 110 dB due to the reflection
and build-up of sound energy inside the room. Conversely, if we take the
same 90 dB PWL machine and place it on the ground outside, the SPL may
only be on the order of 92 dB. Note the PWL is identical in both scenarios,
but the effect is dramatically different. This is due to differences in the
environment (k factor) that combines with the PWL to produce a specific
SPL.
2.4.10 Time-Varying Noise Sources
Besides having frequency and amplitude characteristics, many sounds also
vary with time, ie: have temporal qualities. The acoustical instrumentation,
meter settings, and measurement techniques for various sound
characteristics are presented in Chapter 3; however, at this point it is
important to understand the definition and concept of these temporal
qualities.
Equipment such as compressors, fans, and electric motors, generally
produce sounds that are continuous or steady-state. By definition steady-
state sounds remain relatively constant in time, varying by no more than
plus or minus (+/-) 3 dB. When machines operate through a range of tasks
or functions, they often generate intermittent sounds. So if equipment
generates sound levels that fluctuate more than 3 dB, then it is generally
classified as an intermittent noise source. For example, machines that
perform multiple tasks over a full-duty cycle often generate a range in sound
levels, such as the shear press example shown in Figure 2.11. The shear
press data exhibited has a full-duty cycle of 20 seconds, and the sound
levels range from approximately 98-107 dBA.

27.
Figure 2.11 - Intermittent sound levels produced by shear press cutting bar stock into individual billets. Measurements conducted
over one duty cycle.
Another temporal characteristic of sound is the instantaneous event,
such as an impact or impulse. An impact sound can be generated by the
solid collision between two objects, such as hammering, dropped
objects, a door slamming shut, metal-to-metal impacts, etc or by
explosions such as gun fire or explosive tools. Impulse sound is defined
as an event having an exponential rise time constant of 35 milliseconds,
and an asymmetric decay time constant of 1.5 seconds (Earshen, 2000).
It is important to note the terms impulse and impact sound are commonly
used interchangeably, despite the fact they have distinct characteristics.
In addition, these short-term events are also called transient sounds.
However, for occupational noise assessment and from a practical
standpoint, all these terms may be considered the same.
2.5 HUMAN RESPONSE TO SOUND 2.5.1 The Ear and its Response to Sound
Hearing is a critical human sense. Hearing facilitates communication with
each other and our environment. Sound adds richness to life, be it the
subtleties of language and humour, the emotions instilled by music, or the
connection felt to our surroundings.

28.
The unique and intricate anatomical and physiological design of the ear
allows for the presence, clarity, and quality of sound to be experienced.
Incredibly complex, the peripheral auditory system is delicate, yet rugged;
vulnerable yet remarkably resilient. The following brief overview of ear
anatomy and physiology gives an appreciation for our ears and how they
respond to sound.
a) Anatomy and Physiology: The Structure and Function of the Ear
The hearing mechanism is traditionally divided into three major parts:
the outer, middle, and inner ear. Refer to Figure 2.12 for these
demarcations as well as for labelled anatomical references. The ear
spans from the visible cartilaginous part on the outside of the head to
deep within the bony part of the skull. For the scope of this manual,
only the major anatomical sites and functions of the auditory system
are introduced.
(Source: Image used with permission from Elliott H. Berger, Aearo Technologies)
Figure 2.12 – Illustration of the major anatomical references of
the ear including the three divisions: external (outer), middle, and inner. The outer and middle ear consist of cartilage, the inner ear
is encased in bone.

29.
b) Outer (External) Ear
The outer ear, as shown in Figure 2.13, consists of the pinna, ear
canal and the eardrum or tympanic membrane. The outer ear
functions to direct and enhance sound waves into the ear and provides
some protection to the middle ear.
Figure 2.13 - The outer ear contains the pinna, ear canal, and tympanic membrane.
Figure 2.14 - Sound waves are channeled into the ear and enhanced by the shape and resonance characteristics of the ear
canal. The eardrum transfers the acoustic vibrations to the middle ear.

30.
Pinna:
The visible, cartilaginous portion of the ear helps to collect sound
waves, as illustrated in Figure 2.14. The bowl of the pinna, the concha,
is at the outside of the ear canal and aids in directing sound waves to
the ear canal. Having two ears allows sound localization because the
sound waves arrive at each ear at slightly different times. In addition to
auditory benefits, the pinna is naturally unique to each individual.
Auditory meatus or Earcanal:
The passage leading from the pinna to the eardrum funnels the sound
waves to the middle ear. Although most illustrations depict the ear
canal as being straight, it actually has an “S” shaped curve. The shape
of the canal acts as a closed end tube and has resonance properties
which amplify sounds between 2000 – 5000 Hz, an important feature
for allowing soft sounds to be audible. The ear canal is approximately
24 mm (1 inch) in length. The outer half of the canal wall is made of
cartilage and the inner half of bone. The canal is lined by skin
containing modified sweat glands which produce cerumen, or earwax,
and fine hairs; both features serve a protective purpose to the
eardrum.
Tympanic Membrane or Eardrum:
The eardrum is the terminal point of the outer ear and the originating
point of the middle ear. It seals the ear canal tube, captures the sound
vibrations, and passes them to the ossicular chain (middle ear bones)
by a connection at the umbo of the tympanic membrane. It is
comprised of three layers of semi-transparent tissue, similar to skin,
which grow continuously. Figure 2.15 exhibits a photograph of a
normal eardrum. The tympanic membrane must be in tact for normal
transduction of sound to occur.
31.
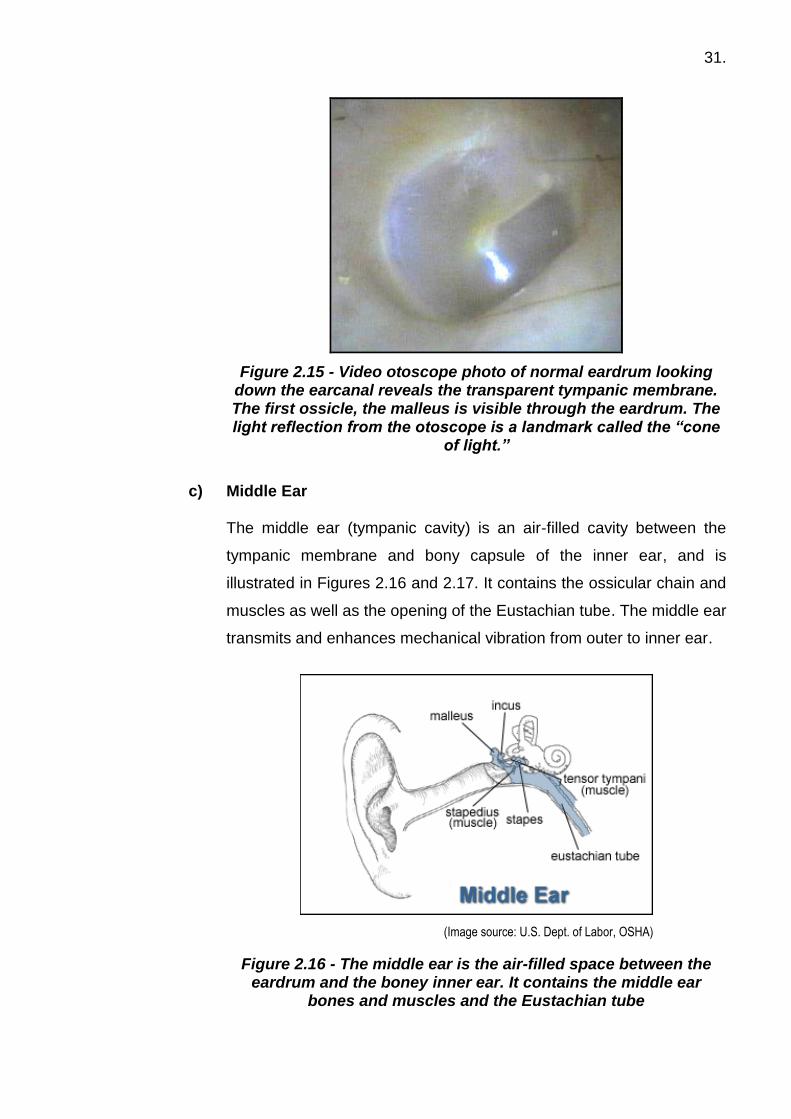
Figure 2.15 - Video otoscope photo of normal eardrum looking down the earcanal reveals the transparent tympanic membrane. The first ossicle, the malleus is visible through the eardrum. The light reflection from the otoscope is a landmark called the “cone
of light.”
c) Middle Ear The middle ear (tympanic cavity) is an air-filled cavity between the
tympanic membrane and bony capsule of the inner ear, and is
illustrated in Figures 2.16 and 2.17. It contains the ossicular chain and
muscles as well as the opening of the Eustachian tube. The middle ear
transmits and enhances mechanical vibration from outer to inner ear.
(Image source: U.S. Dept. of Labor, OSHA)
Figure 2.16 - The middle ear is the air-filled space between the eardrum and the boney inner ear. It contains the middle ear
bones and muscles and the Eustachian tube
32.
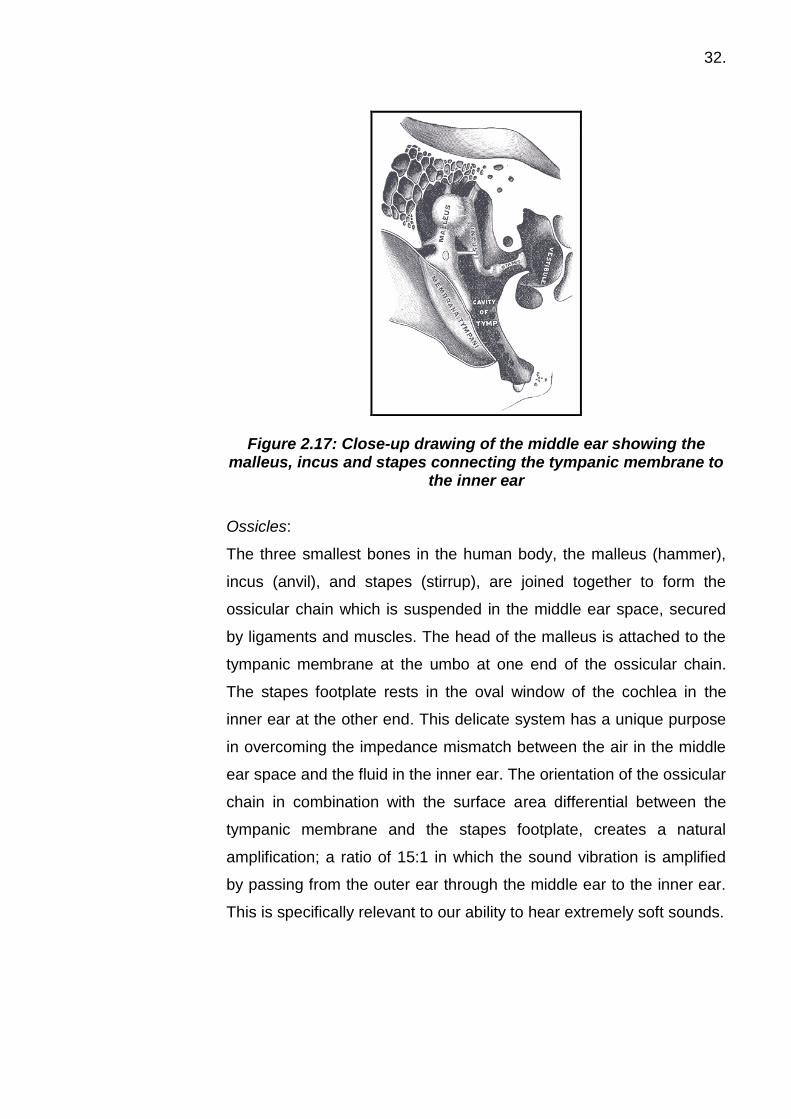
Figure 2.17: Close-up drawing of the middle ear showing the malleus, incus and stapes connecting the tympanic membrane to
the inner ear
Ossicles:
The three smallest bones in the human body, the malleus (hammer),
incus (anvil), and stapes (stirrup), are joined together to form the
ossicular chain which is suspended in the middle ear space, secured
by ligaments and muscles. The head of the malleus is attached to the
tympanic membrane at the umbo at one end of the ossicular chain.
The stapes footplate rests in the oval window of the cochlea in the
inner ear at the other end. This delicate system has a unique purpose
in overcoming the impedance mismatch between the air in the middle
ear space and the fluid in the inner ear. The orientation of the ossicular
chain in combination with the surface area differential between the
tympanic membrane and the stapes footplate, creates a natural
amplification; a ratio of 15:1 in which the sound vibration is amplified
by passing from the outer ear through the middle ear to the inner ear.
This is specifically relevant to our ability to hear extremely soft sounds.

33.
Muscles:
Also located in the middle ear cavity are two tiny muscles: the tensor
tympani and the stapedius. The tendon of the tensor tympani muscle
attaches to the handle of the malleus and the stapedius muscle
attaches to the neck of the stapes. Contraction of these muscles
cause the malleus to be pulled inward and the stapes to be pulled
away from the oval window, temporarily changing the vibratory
characteristics of the ossicular chain, and potentially providing a
protective mechanism against loud sound. The acoustic or aural reflex
refers to the immediate contraction of these muscles in response to a
loud sound. The reflex does not happen quickly enough to add
significant protection from sudden burst of sound, such as a gunshot,
however it can reduce vibratory stimulation for sustained sound. It is
more apt to be present and effective in younger ears than in older
ears.
Eustachian tube:
The Eustachian tube is an open tube passing downward and inward
from the middle ear space to the nasopharynx. The Eustachian tube is
about 45 mm (1.75 inches) in length. Its primary function is to
equalize pressure differences between the outer and middle ear
spaces for example when ascending or descending in an airplane.
d) Inner Ear
The inner ear, see Figure 2.18, is a fluid filled labyrinth within the
temporal bone. It contains the sensory mechanism of both auditory
and vestibular systems. Here, mechanical vibration is converted to
neural stimulation for hearing and balance.

34.
Figure 2.18 - The inner ear is a membranous tunnel encased in the temporal bone. It contains both the sense of hearing
(cochlea) and balance (semicircular canals).
Cochlea:
Often visualized as a snail shell, the cochlea is actually a fluid filled
tube, which spirals 2.5 times on itself within the temporal bone, as
shown in Figure 2.19. The tube is divided into three different parts by
membranes.
(Source: Griffith and Friedman, NIDCD)
Figure 2.19 - Illustration of a section through the cochlea
The upper and lower parts, called the scala vestibule and the scala
tympani respectively, both contain perilymph, a fluid rich in sodium.
These two compartments are joined by a small passage way, the
helicotrema, at the extreme end of the cochlea. The centre partition,
called the scala media, is filled with endolymph, a fluid high in
potassium.

35.
(Source: Image with permission from: http://upload.wikimedia.org/wikipedia/en/0/0c/Cochlea-crosssection.png)
Figure 2.20 – A cross section of one turn of the cochlea
illustrates the three fluid filled chambers: scala vestibuli, scala media and scala timpani. The oragn of Corti, containing the inner and outer hair cells, sits on the basilar membrane within the scala
media. This entire structure moves in response to sound.
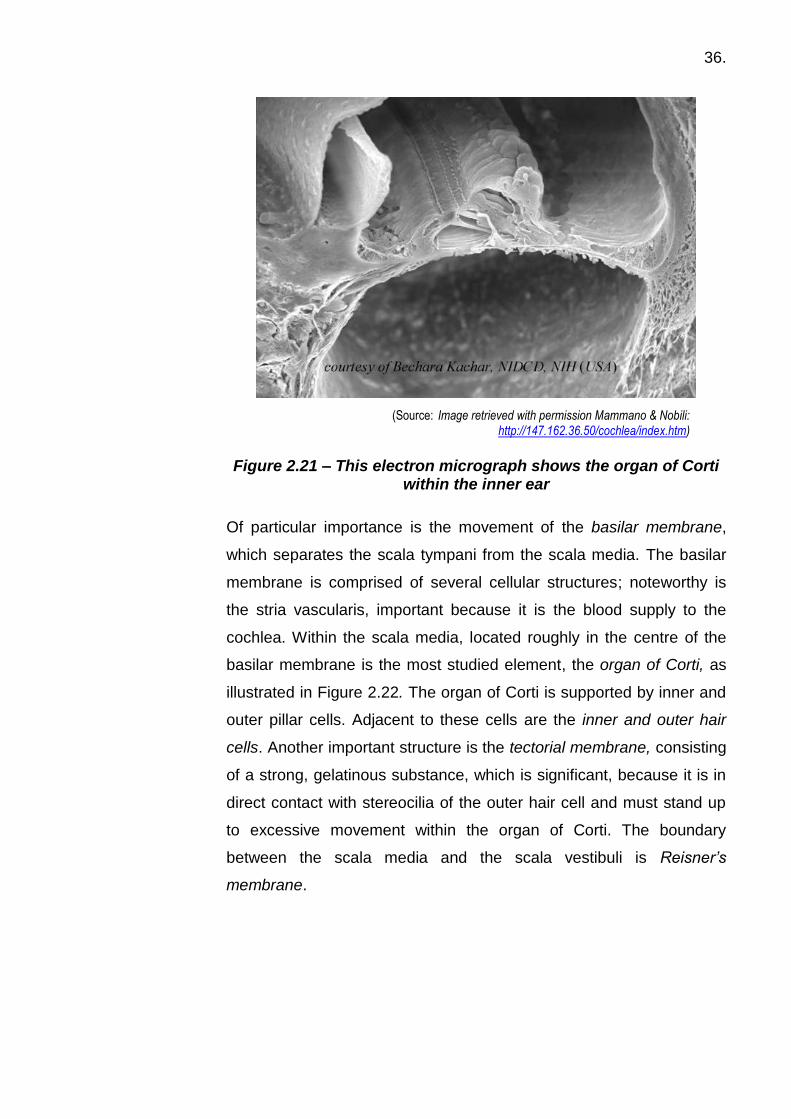
Figure 2.20 illustrates a cross-section of the cochlea and Figure 2.21
presents an electron micrograph of the organ of Corti within the
cochlear duct. The length of the cochlea is approximately 35 mm and
the beginning of the cochlea is referred to as the “base” and the other
extreme is called the “apex.” There are two openings, or windows at
the base. The stapes footplate rests in the oval window, which is the
entrance to the scala vestibuli. The round window is at the end of the
scala tympani. As the stapes vibrates, the pressure disturbance,
contained within the cochlea, causes the round window to move out as
the oval window is pushed inward, in synchrony with the mechanical
vibration of the stapes. As the fluids inside the chambers move, the
membranes separating the chambers also move.
36.
(Source: Image retrieved with permission Mammano & Nobili: http://147.162.36.50/cochlea/index.htm)
Figure 2.21 – This electron micrograph shows the organ of Corti
within the inner ear
Of particular importance is the movement of the basilar membrane,
which separates the scala tympani from the scala media. The basilar
membrane is comprised of several cellular structures; noteworthy is
the stria vascularis, important because it is the blood supply to the
cochlea. Within the scala media, located roughly in the centre of the
basilar membrane is the most studied element, the organ of Corti, as
illustrated in Figure 2.22. The organ of Corti is supported by inner and
outer pillar cells. Adjacent to these cells are the inner and outer hair
cells. Another important structure is the tectorial membrane, consisting
of a strong, gelatinous substance, which is significant, because it is in
direct contact with stereocilia of the outer hair cell and must stand up
to excessive movement within the organ of Corti. The boundary
between the scala media and the scala vestibuli is Reisner’s
membrane.

37.
(Source: Image with permission (Mammano and Nobili) retrieved from: http://147.162.36.50/cochlea/cochleapages/theory/index.htm)
Figure 2.22 - The organ of Corti rests on the basilar membrane (BM). It consists of supporting structures (PC = pillar cells, DC =
Dieter’s cells, and RL = reticular lamina.) and sensory cells (green). The sensory cells are one row of inner hair cells (IHC)
and three rows of outer hair cells (OHC), each topped with stereocilia (St) which contact the tectorial membrane (TM)
Outer hair cell:
The supporting cells of the organ of Corti hold outer and inner hair
cells in position. There are approximately 12,000 to 20,000 outer hair
cells organized in three rows. On top of each outer hair cell are more
than 100 stereocilia, arranged in a “W” shaped pattern, as shown in
the electron micrograph in Figure 2.23. The stereocilia are aligned
from tallest to shortest: the shorter stereocilia are connected to the
taller ones by tip-lengths, made up of protein substances. Tip-lengths
also connect across bundles of stereocilia. The direction of stereocilia
deflection, from the shortest to the tallest, or from the tallest to the
shortest, is caused by either an excitatory or inhibitory response
respectively. The shearing of the stereocilia corresponds with the
lengthening and shortening of the outer hair cells, an ability unique to
these cells.
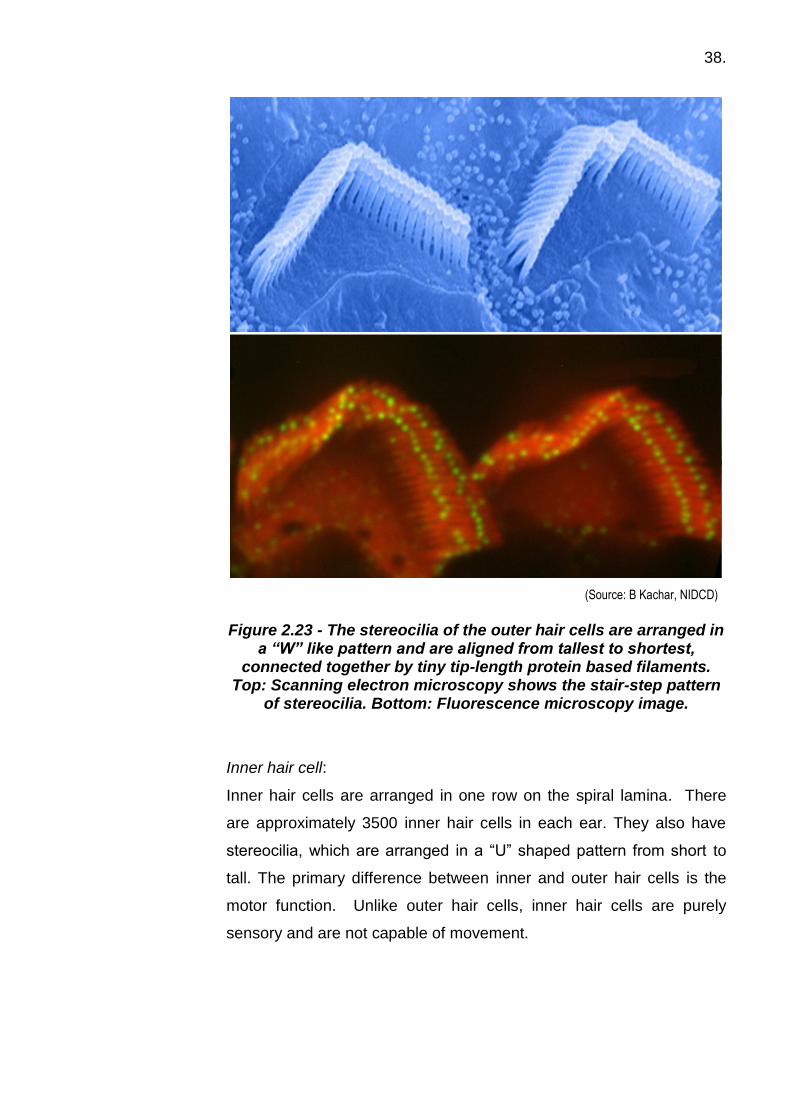
38.
(Source: B Kachar, NIDCD)
Figure 2.23 - The stereocilia of the outer hair cells are arranged in
a “W” like pattern and are aligned from tallest to shortest, connected together by tiny tip-length protein based filaments.
Top: Scanning electron microscopy shows the stair-step pattern of stereocilia. Bottom: Fluorescence microscopy image.
Inner hair cell:
Inner hair cells are arranged in one row on the spiral lamina. There
are approximately 3500 inner hair cells in each ear. They also have
stereocilia, which are arranged in a “U” shaped pattern from short to
tall. The primary difference between inner and outer hair cells is the
motor function. Unlike outer hair cells, inner hair cells are purely
sensory and are not capable of movement.
39.
e) Central Auditory Pathway
Once sound passes through the peripheral auditory structures it has
changed from vibratory energy to electrical stimulation and moves
through the brainstem to the primary auditory cortex located on the
temporal lobe of the brain. Referred to as the central auditory pathway,
the complex system of nerve fibres and synapses must be in tact to
make sound meaningful. The central auditory pathway enables fine
distinctions in timing which aid in sound localization and sophisticated
perceptions of sound quality.
f) Normal Hearing: Propagation of Sound through the Ear
For sound to travel through the ear, four different types of energy are
required. First, acoustical energy or sound waves set the tympanic
membrane into vibration synchronous to the sound pressure
compression and rarefaction cycles. The eardrum responds and the
acoustic energy is transduced to mechanical energy as the vibration is
transmitted by the movement of the eardrum and the ossicular chain.
At the stapes footplate, the medium through which the energy is
propagated changes from the air in the middle ear to the fluid
contained in the chambers of the inner ear. In the cochlear chambers,
as the oval window is pushed in, by the piston-like motion of the
stapes footplate, the perilymph in the scala vestibuli is displaced
inward, perpetuating the wave of energy, called a travelling wave,
through the helicotrema into the scala tympani. The vibration
continues, causing the round window, at the opposite end of the
cochlea, to protrude outward. The movement of the fluid causes the
membranous walls of the scala media, which houses the organ of
Corti, to move as well. Figure 2.24 shows a schematic drawing of the
middle ear connected to the cochlea. The cochlea has been unrolled
to visualize more easily its function as a closed-end tube: the wave
transmitted on the basilar membrane is shown.

40.
(Source: Image used with permission Mammano and Nobili. http://147.162.36.50/cochlea/cochleapages/overview/index.htm)
Figure 2.24 - A schematic representation of the propagation of sound waves: The middle ear is connected to an unrolled cochlea by the stapes. As the stapes footplate moves inward, the fluid in the inner ear is displaced creating the basilar membrane to move
in a wave-like motion
At the level of the organ of Corti, the energy is both mechanical and
electrochemical. The mechanical motion of the fluid and membrane
movement causes the stereocilia on top of the outer hair cells (OHCs)
to deflect. This deflection opens a “trap door” and allows a chemical
exchange inside the hair cells. The stereocilia are organized from
shorter to taller lengths. When the deflection is towards the tallest
stereocilia, the cell is hyperpolarized, causing the cell to lengthen and
become thinner. When the tip lengths bend towards the shortest
stereocilia, the cell becomes depolarized, causing the cell to shorten
and fatten. If the vibration detected by the outer hair cell is at its
natural resonant frequency, the vibration will be enhanced. This
repetitive shortening and lengthening of the outer hair cells pulls on
the connected membranes, increases the movement the system to the
degree that the inner hair cell stereocilia are deflected in like manner.
In summary, at this stage of propagation, there is mechanical energy
from the shearing of the stereocilia and electrochemical energy from
the chemical exchanges in the fluids of the outer and inner hair cells.
The depolarization of the hair cells causes the release of
neurotransmitters at the base of the hair cells.

41.
This chemical change creates an electrical signal that is sent to the
auditory cortex, thus the energy is now biochemical. The chemical
exchange thought to trigger the electrical stimulus involves the
endocochlear potential. There is an electrical potential difference
between the endolymph and the perilymph and it is hypothesized that
the potassium flow between the cochlear fluids allows the cells to be
more sensitive to minute pressure changes. The active process of the
outer hair cells, called the “silent cochlear amplifier” or “cochlear
amplifier” in effect pumps additional energy into the system by its
ability to move. This enables us to make fine distinctions between
frequencies and process them separately, known as frequency
selectivity, and allows very soft sounds to become audible. It also
creates an energy flow from the cochlea outwards to the outer ear
which is known as an otoacoustic emission.
A byproduct of the outer hair cell mobility is a wave initiated by the
movement of the basilar membrane. This wave of energy travels the
opposite direction through the ear, from the cochlea to the outer ear.
This phenomenon is called an otoacoustic emission (OAE). OAEs are
measured as acoustic energy in the outer ear canal. Useful for
defining and diagnosing ear pathologies, they are an important tool in
clinical evaluation of hearing disorders.
g) Pitch and Loudness Perception
Within the cochlea, sound is analysed for pitch and loudness
characteristics by way of mechanical properties of the basilar
membrane. The pitch of a sound is the human perception of the
physical characteristic of frequency, or the number of cycles per
second. Frequency is measured in Hertz, and is used interchangeably
to refer to the pitch of a sound. Pitch is determined by the position on
the basilar membrane of its maximum deflection in response to sound.
The basilar membrane, (and in fact the auditory pathway) is
“tonotopically” organized.

42.
Like the keys on a piano, there is a progression from low pitch to high
pitch from the apical end to the basal end of the basal end. So, if the
maximum deflection of the basilar membrane occurs in basal end, a
high pitch tone is perceived. Refer to Figure 2.25 for a diagram of the
tonotopic organization and of a travelling wave.
Figure 2.25 – The basilar membrane is tonotopically organized: it is responsive to high frequencies at its basal end and to
progressively lower frequencies at the apical end. Properties of the organ of Corti affect the transmission of the vibration creating
a traveling wave illustrated in an uncoiled cochlea. The point at which the traveling wave peaks corresponds to the frequency or
pitch perception of the sound.
The loudness of the sound is determined by the amplitude, or height of
the wave-like motion of the basilar membrane. The louder the sound,
the greater is the mechanical vibration and movement of the basilar
membrane, which increases both the number of hair cells that fire and
the rate at which they fire. The brain recognizes the pitch and the
loudness of the sound by the place and the rate of the hair cell
stimulation. By measuring hearing sensitivity of various frequencies,
the function of the ear can be assessed. The configuration of the
hearing loss, as revealed in audiometry findings, is valuable for
diagnosing ear pathologies, because pathologies affect the cochlea in
different ways, often in unique and identifiable patterns.

43.
h) Audible Range
Pitch/Frequency
Human hearing ranges in frequency from approximately 20 Hz (low
pitch) to 20,000 Hz (high pitch). Hearing is most sensitive to the
frequencies present in human speech, approximately 400 Hz –
5000 Hz. Vowel sounds tend to be lower in pitch while most consonant
sounds tend to be higher in pitch. The ability to understand speech
requires the ability to discriminate between subtle differences in
frequency.
Loudness/Intensity
The ear is very sensitive to changes in pressure, meaning it responds
to an incredible range of intensities. The threshold of human hearing,
defined as 0 dB at 1000 Hz, is equivalent to an intensity of 10-12
watts/m2. This means the ear can detect a pressure change of less
than one ten billionth of standard atmospheric pressure. On the other
extreme, the threshold of pain is 1013 watts/m2 which is equivalent to
130 dB. The dynamic range of hearing, from barely perceptible to
painful is so large due to the unique anatomical and physiological
properties of the ear, which amplify extremely soft sounds as well as
provides some inherent protective mechanisms against extremely loud
sounds.
The term “loudness” refers to the subjective perception of the strength
of a sound. Loudness is related to, but not identical to the physical
intensity of a sound because the ear is not equally sensitive to all
sounds. Two different sounds may seem to be the same loudness yet
have different intensities because hearing sensitivity varies by to
frequency. This concept is best illustrated by plotting equal loudness
curves (see Figure 2.9).

44.
3. RISK ASSESSMENT AND NOISE SURVEYS
3.1 OCCUPATIONAL NOISE MANAGEMENT Noise and sound surround us, how this impacts on an individual in an
occupational environment depends on many factors, some which are able
to be controlled and others not. However, the risk of exposure to these and
the resultant risk of adverse outcomes to the individual need to be
controlled or managed to an acceptable level.
The mantra for the control of any occupational hazard is
Identify the Hazard
Assess the Risk
Control the Hazard or Exposure
Each jurisdiction has its own slightly different approach but they all have the
same goal, that is to minimise the incidence of hearing loss or other
problems caused by excessive noise.
Identify the Hazard
This can be done by observation, discussion and measurement; it
should be done in consultation with employees. It will require an audit
of noisy processes and equipment and a ranking of the level of sound
level and quality.
Assess the Risk
Guidance as to acceptable levels and exposures can be obtained from
standards and legislation. The measurements obtained in the
identification stage may need to be supplemented to make a proper
assessment of risk for the employees. The measurement of the
“cause” side, ie noise sources is not sufficient to reveal the whole
picture Risk also needs to be assessed and monitored from the
“effect” side with the measurement of the possible damage caused.
This is done by audiometric assessment.
45.
Control the Hazard or Exposure
There are many ways to control a person‟s exposure to noise, ranging
from eliminating the source or process, changing the process,
controlling the noise at source, reducing the noise transmission from
the source to the receiver and as a last resort to issuing hearing
protection
The elements of a noise management programme are included in the
regulations or standards and in essence include:
● Assess the risks to your employees from noise at work;
● Take action to reduce the noise exposure that produces those risks;
● Provide your employees with hearing protection if you cannot reduce
the noise exposure enough by using other methods;
● Make sure the legal limits on noise exposure are not exceeded;
● Provide your employees with information, instruction and training;
● Carry out health surveillance where there is a risk to health
In each case noise measurements will have to be carried out to determine
the level of risk or to assist in methods of control. This is achieved by noise
surveys and will be covered in the later part of this chapter.
3.2 RISK ASSESSMENT
To carry out a comprehensive noise management programme it is first
necessary to determine the level of risk. This can only be done by
observation and measurement and then comparison to acceptable
standards or regulation.
3.3 EXPOSURE LEVELS AND LEGISLATION FOR NOISE
The general knowledge on the hazardous effects of noise exposure and
means to protect workers continues to evolve.
46.
Even today there is no simple answer as to what constitutes a “safe” noise
exposure limit. The answer is concealed in the intricate and diverse
variables associated with an individual‟s susceptibility to noise and with the
characteristics and magnitude of the noise exposure.
It is important to keep in mind that, by definition, exposure accounts for both
the magnitude of sound and duration a worker is exposed to various sound
levels. The A-weighted sound level is used in standards and regulations
since it provides a single-number value (broadband sound level) to assess
how humans perceive the loudness of sounds, and it correlates well with
hearing-damage risk due to long-term noise exposure. In contrast the
hearing damage risk from short impulsive noise like explosives is assessed
in terms of the Peak noise level in dBC.
Noise Exposure Criteria:
The principal challenge with setting an exposure limit is trying to balance
worker protection versus economic feasibility. Issues such as “what is an
acceptable level of NIHL?” and “how much noise can be tolerated by a work
population?” need to be considered when setting an exposure limit.
Presenting a detailed discussion on damage-risk criteria is beyond the
scope of this manual.
In the late 1960s to early 1970s, both ISO and the U.S. based National
Institute for Occupational Safety and Health (NIOSH) researched studies for
selecting an appropriate noise exposure limit. In 1971, ISO formalized the
standard “Assessment of Occupation Noise Exposure for Hearing
Conservation Purposes”. Similarly, in 1972 NIOSH published their “Criteria
for a Recommended Standard: Occupational Exposure to Noise” (NIOSH,
1998). Both scientific bodies recommended that an 8-hour noise exposure
of 85 dBA be the limit where hearing conservation measures need to be
implemented.

47.
Based on the ISO and NIOSH estimates, anywhere from 10-15 percent of
workers will be at excess risk for material impairment in hearing if exposed
unprotected to an 8-hour average of 85 dBA over a 40-year working lifetime.
Since the protection goal was to preserve hearing for speech discrimination,
to allow for direct comparison between the two reports or studies, material
impairment was defined to exist whenever a person‟s average hearing
threshold level for both ears exceeded a 25-dB “fence” at the pure-tone
audiometric test frequencies of 500, 1000, and 2000 Hz. Also, excess risk
is defined as the difference between the percentage of noise exposed and
non-noise exposed people that exceed the 25-dB fence. By design, an
effective hearing conservation programme will identity those susceptible
individuals exposed to 85 dBA or more in the early stages of NIHL (10-15
percent), before it becomes debilitating, which will permit implementation of
more effective measures to better protect them from workplace noise.
Consequently, a balance is maintained between preventing excess material
impairment for workers and the financial costs to an employer for at that
time the commonly used limit was 90 dBA.
In 1990, the ISO approved the second edition of ISO 1999, Acoustics –
Determination of Occupational Noise Exposure and Estimating of Noise-
Induced hearing Impairment” (ISO, 1990). Using different material
impairment formulae that excludes 500 Hz and includes 3000 and 4000 Hz,
ISO puts the excess risk for NIHL at 6 percent for workers exposed to
85 dBA on a daily basis throughout their working lifetime. Besides
consideration for speech discrimination, inclusion of 3000 and 4000 Hz in
the formula also considers the perception of everyday acoustic signals and
other quality of life issues, such as music appreciation.
In 1997, NIOSH re-analyzed the original research used to develop their
1972 recommended criteria, except in the more recent study NIOSH
included non-linear effects of noise exposure, as well as alternative material
impairment formulae.

48.
Based on the 1997 research, NIOSH concludes the excess risk is 8 percent
for workers with a noise exposure of 85 dBA over a 40-year working
lifetime. In the end, NIOSH confirmed their original criteria of 85 dBA as a
recommended noise exposure limit.
As a result of the ISO and NIOSH research, as well as most professional
association recommendations when hearing conservation measures need
to be implemented are:
a noise exposure criteria of 85 dBA for the 8-hour workday
noise exposure
AND
at no time during the day should the peak level exceed 140
dBC.
These are the criteria in national legislation or guidelines in the majority of
non EU countries
In 2003 the European Union passed the directive [2003/10/EC of the
European parliament and of the council] on the minimum health and safety
requirements regarding the exposure of workers to the risks arising from
physical agents (noise).
[http://eur-lex.europa.eu/LexUriServ/site/en/oj/2003/l_042/l_04220030215en00380044.pdf]
This directive included a staged approach with a lower and an upper action
level and an exposure limit. The UK Noise regulations have adopted this
and the criteria summarised in the Noise at work Guidance for employers on
the Control of Noise at Work Regulations 2005
[http://www.hse.gov.uk/noise/regulations.htm and select the link to „Noise at
Work‟(INDG362 (rev 1)] relate to:
The levels of exposure to noise of employees averaged over a working
day or week; and
● The maximum noise (peak sound pressure) to which employees are
exposed in a working day.
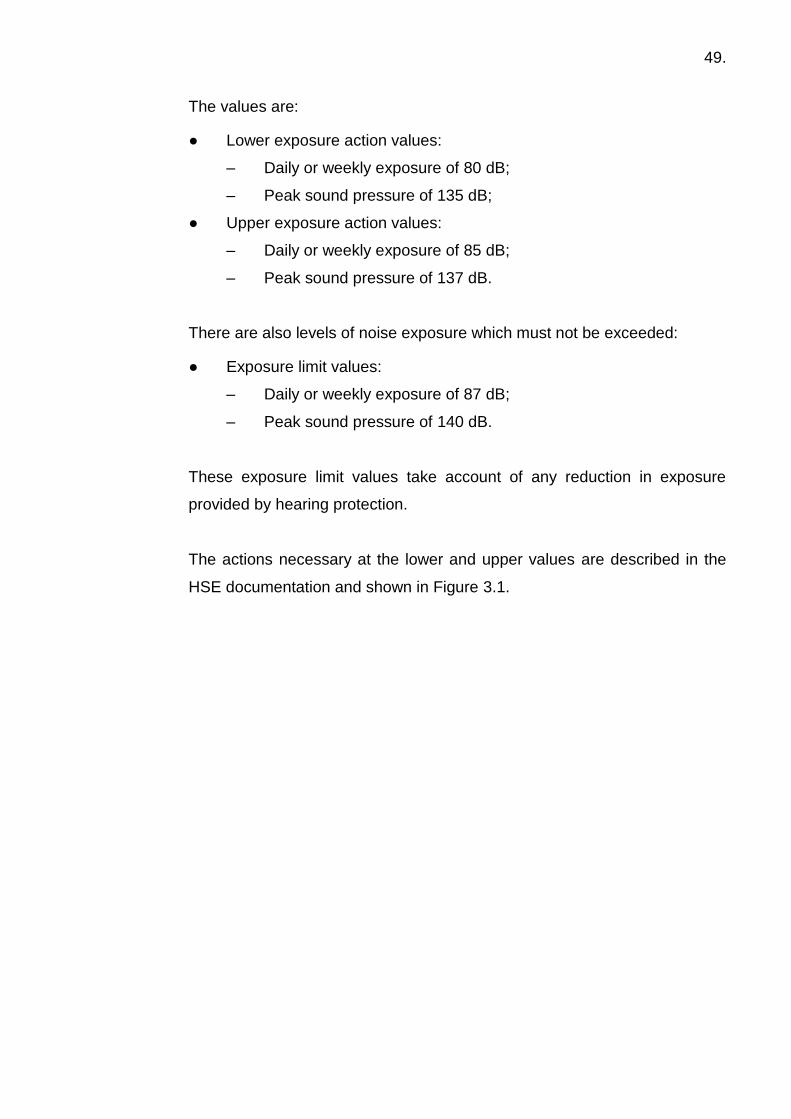
49.
The values are:
● Lower exposure action values:
– Daily or weekly exposure of 80 dB;
– Peak sound pressure of 135 dB;
● Upper exposure action values:
– Daily or weekly exposure of 85 dB;
– Peak sound pressure of 137 dB.
There are also levels of noise exposure which must not be exceeded:
● Exposure limit values:
– Daily or weekly exposure of 87 dB;
– Peak sound pressure of 140 dB.
These exposure limit values take account of any reduction in exposure
provided by hearing protection.
The actions necessary at the lower and upper values are described in the
HSE documentation and shown in Figure 3.1.
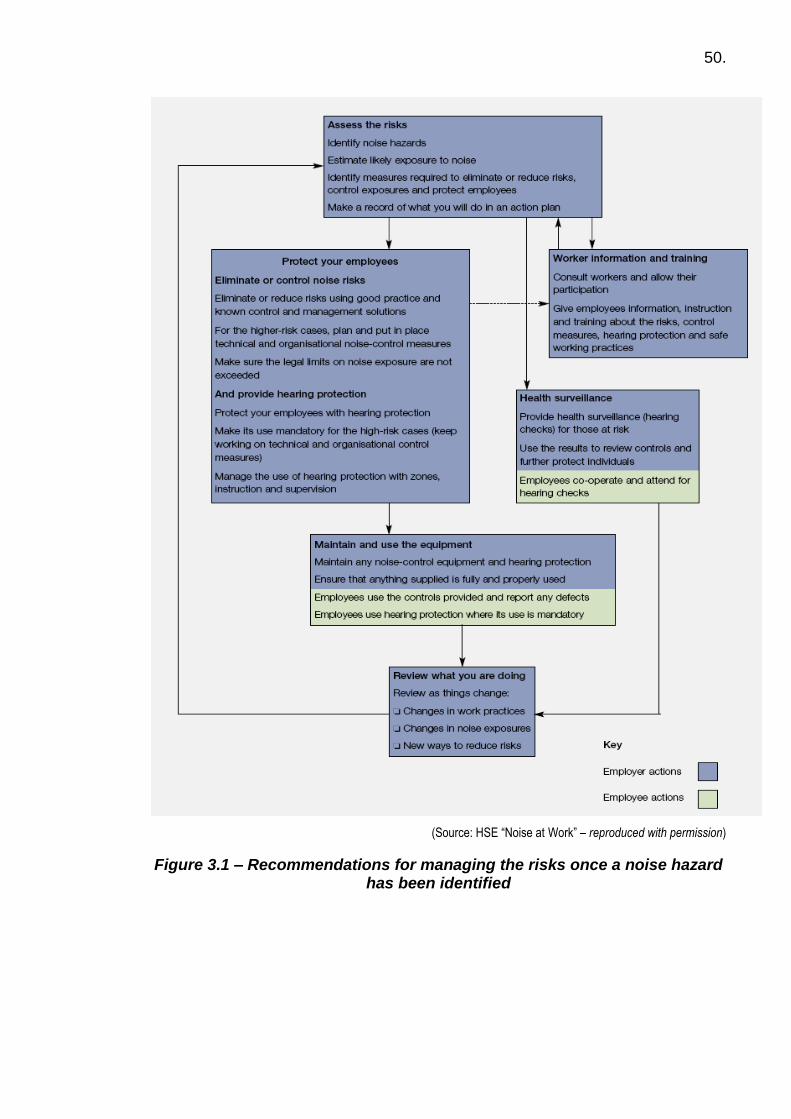
50.
(Source: HSE “Noise at Work” – reproduced with permission)
Figure 3.1 – Recommendations for managing the risks once a noise hazard has been identified
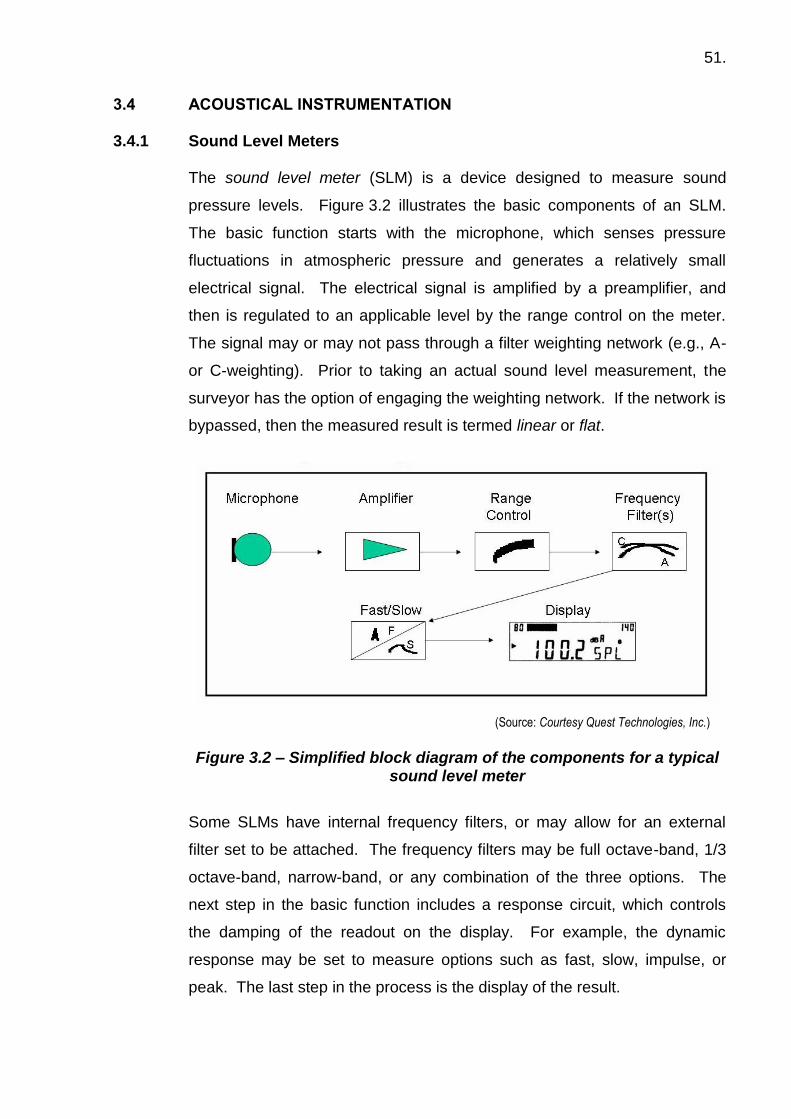
51.
3.4 ACOUSTICAL INSTRUMENTATION 3.4.1 Sound Level Meters
The sound level meter (SLM) is a device designed to measure sound
pressure levels. Figure 3.2 illustrates the basic components of an SLM.
The basic function starts with the microphone, which senses pressure
fluctuations in atmospheric pressure and generates a relatively small
electrical signal. The electrical signal is amplified by a preamplifier, and
then is regulated to an applicable level by the range control on the meter.
The signal may or may not pass through a filter weighting network (e.g., A-
or C-weighting). Prior to taking an actual sound level measurement, the
surveyor has the option of engaging the weighting network. If the network is
bypassed, then the measured result is termed linear or flat.
(Source: Courtesy Quest Technologies, Inc.)
Figure 3.2 – Simplified block diagram of the components for a typical
sound level meter
Some SLMs have internal frequency filters, or may allow for an external
filter set to be attached. The frequency filters may be full octave-band, 1/3
octave-band, narrow-band, or any combination of the three options. The
next step in the basic function includes a response circuit, which controls
the damping of the readout on the display. For example, the dynamic
response may be set to measure options such as fast, slow, impulse, or
peak. The last step in the process is the display of the result.

52.
The typical display with today‟s SLMs is digital (showing a number), but
there are also older SLMs in use that employ an analog display. Some
additional features may include functions such the capability to average or
integrate sound pressure levels (SPLs), automatic hold of the maximum and
minimum level, logging function (time-history of SPLs), and input/output
connectors for sending data to a printer and computer.
a) Types of SLMS
There are two types or classes of SLMs established by International
Standards. Class 1 is a precision meter, and Class 2 is a general
purpose instrument with lower performance specifications than
Class 1. Legislation should be consulted to ensure that the
measurements are undertaken with the appropriate class of SLM.
b) Types of Microphones and Their Use
Microphones are transducers that detect sound pressure and convert
it into an electrical signal for subsequent processing.
For occupational noise measurement there exist primarily three
microphone types, as depicted in Figure 3.3, which are random
incidence, direct incidence, and pressure microphones. Random
incidence microphones, also called omni-directional, measure sound
pressure levels more or less evenly from any direction, and are
designed for measurement in a diffuse field. It is common to use a
random incidence microphone by holding it at a 70-degree angle to the
noise source, which also facilitates reading the display. However for
occupational noise measurements it is more important to ensure that
the microphone is measuring the sound reaching the ear.
Direct incidence microphones, also known as free-field or
perpendicular-incidence, measure sound propagating toward the
microphone at a 0-degree angle (held perpendicular to source), and
are designed for measurement in free-field, ie non reverberant
conditions.

53.
Pressure microphones (pressure-response) are designed to measure
sound level accurately at a 90-degree angle to the source (held
parallel to source). They are often used to measure the high sound
levels associated with explosions or blasting.
The most common microphone supplied by SLM manufacturers for
occupational noise measurement is the random incidence or omni-
directional microphone. It is critical; however, that the user confirms
the microphone type by reviewing its specification or checking with the
manufacturer to ensure they are using the device properly.
It is also important to note that for all practical purposes most
microphones used for workplace noise measurement are one-half
inch (1.27 cm) or less in diameter. This means they are essentially
independent of the angle of sound incidence at frequencies below
approximately 6,000 Hz (Earshen, 2000).
(Source: Courtesy Quest Technologies, Inc.)
Figure 3.3 - Types of microphones and their use relative to the direction of sound propagation from the source
3.4.2 Acoustical Calibrators
An acoustical calibrator is a device that produces a fixed SPL at a fixed
frequency, and it is used to check the meter function before and after
carrying out a survey. This is known as a “field check”.

54.
The calibrator is used by inserting the survey instrument‟s microphone into
an appropriately sized adaptor, which in turn is tightly inserted into the
loudspeaker cavity on the calibrator. Next, following the SLM or dosimeter
directions for calibration, the oscillator internal to the calibrator produces a
fixed-reference frequency and output signal, which is boosted by an
amplifier, and then transmitted by a loudspeaker to the microphone.
Typically, the frequency is 1,000 Hz and the nominal output level may be
selectable. Figure 3.4 shows a typical acoustical calibrator used for field
calibration.
(Source: Courtesy Quest Technologies Inc.)
Figure 3.4 – Typical acoustical calibrator used for field calibration
3.4.3 Frequency Analysis
Frequency analysis is a vital tool used extensively for noise control ,
evaluation of hearing protectors, and environmental or community noise
assessment. Frequency analysis is conducted using an SLM with an
octave-band or 1/3 octave band filter. The characteristics of these filters
were discussed in section 2 of this manual.
Besides octave-band analyzers, high-resolution frequency filtering, known
as narrow-band analyzers are also available with more sophisticated SLMs.
These filters transform a signal from the time-domain representation into a
frequency-domain representation, while measuring all frequencies at once.
This method is known as Fast Fourier Transform (FFT) analysis.

55.
Narrow-band analyzers are used for advanced noise control efforts, such as
tracing a distinct tone to a specific piece of equipment.
Real-time Analysers:
The most efficient means to measure frequency or spectral data is to use a
real-time analyzer (RTA). Prior to the advent of RTAs, frequency
measurements had to be conducted using serial-band filters, which required
the operator to measure one frequency at a time. This process is fairly time
consuming, but also is difficult to complete for time-varying noise sources,
especially for intermittent or transient sounds. An RTA solves these
challenges by employing digital signal processing technology that allows
measurement of all frequencies of interest simultaneously (also known as
real time). Figure 3.5 presents the 1/3 octave-band data from an RTA
display for an internal combustion engine. As shown in the figure, this
engine has a peak frequency of concern at 3,150 Hz, which may be used
for noise control purposes, such as selecting a silencer to maximize
attenuation at this frequency.
(Source: Courtesy Quest Technologies Inc.)
Figure 3.5 - 1/3 octave-band spectral data for the maximum sound levels generated by an internal combustion engine. This image was
taken from the display of a Quest Technologies RTA model DLX

56.
RTAs were initially developed in the late 1970s, but they were very
expensive compared to serial-band filters, also RTAs were considerably
bigger than an SLM with an octave-band filter. In recent years with
advances in technology it is now possible to have a RTA in a hand held
SLM.
Figure 3.6 exhibits four hand-held RTAs available from different
manufacturers. As shown in the figure, these instruments are fairly compact
making them ideal for field use.
(Source: Courtesy Quest Technologies Inc Larson Davis Inc., Norsonic, and Brϋel & Kjaer)
Figure 3.6 - Compact hand-held RTAs
Typical features of a basic RTA include; Type 1 or Type 2 versions with an
1/1 or 1/3 octave-band analyzer, simultaneous measurement with different
weighting filters (A, C, Linear or Flat, etc.), user select logging capability
(sound level versus time), various environmental noise statistics, etc. Plus,
all RTAs have the capability to download data to a computer for post-survey
processing and analysis. Usually, the manufacturer has available data
management software supporting their RTA.

57.
3.4.4 Personal Noise Dosimeter
The noise dosimeter is basically an SLM designed to measure a worker‟s
noise exposure integrated over a period of time. The dosimeter is also
referred to as a noise dose meter or a personal sound exposure meter;
however, for purposes of this manual the term noise dosimeter is used.
Figure 3.7 depicts a simplified block diagram of a typical noise dosimeter.
Essentially, the microphone, preamplifier, weighting network, and dynamic
response are the same as for the SLM. The internal clock keeps track of
sampling time as well as the period the dosimeter may have been paused
(not sampling). The calculator computes the noise exposure, based on the
criterion level, exchange rate, and threshold level set up internally on the
instrument. Some dosimeters can measure using multiple criteria settings,
which may be for regulatory compliance and any other internal purpose for
the user. Next, the memory stores all times, calculations, and data. A
digital display may be used to read the survey results, and/or the data may
be downloaded to a computer or printer for post-survey analysis.
(Source: Courtesy Quest Technologies Inc.)
Figure 3.7 - Simplified block diagram for the components of a typical noise dosimeter

58.
The dosimeter output will typically be available as both noise dose and
noise exposure. Noise exposure may be shown in terms of a number of
descriptors such as Leq,8h, LEX,8H, or time-weighted average (TWA). Note:
the TWA is used predominately in the USA, and implies an eight-hour
average.
3.5 ACOUSTIC PARAMETERS AND MEASUREMENT Noise Measures
Rarely is workplace noise static or steady, and even if it was a moving
person would receive a variable exposure. Noise levels will generally
fluctuate to some degree as a function of variables such as the production
rate or speed of equipment, product being manufactured, cyclical nature of
machines, rotating equipment, process flow, etc. A meter can measure
sound in different ways, so the number on the meter face is not meaningful
unless it is understood what it represents.
There are two main types of weighting applied to the signal before a figure
is displayed. They are frequency weighting and time weighting.
Frequency Weighting:
For occupational assessments these are A, C & Z these have been
discussed in Section 2. The A weighting is the most common and has a
similar frequency response to that of the human ear.
Time Weighting:
Typically meters will have selectable time responses these are Slow, Fast,
Max, Impulse & Peak. This requires the meter to calculate the sound levels
by integration over differing time intervals within the total measurement
period.
For sound field exposure determinations Slow and Fast response
characteristics represent time constants of one (1) second and one-eighth
(1/8th) second, respectively. These dynamics determine how quickly the
instrument‟s display is updated with sound level data.

59.
In practice, the “slow” response can be used for providing an indication of
the overall level for time varying sounds when an integrating meter is not
available.
The “fast” response is used to obtain the limits of a sound, such as the
maximum or minimum, and is preferred when using the integration function
on the instrument. Some references and standards use subscripts “S” and
“F” for “slow” and “fast” response, respectively, with the reported level
shown as LS and LF. When no subscript is described, then it is assumed
the fast response was utilized.
A maximum or max hold is also available to allow for the determination of
the loudest excursion of the meter. .Should the Max be required it is
important to ensure that the time constant specified in the regulation or code
of practice is used.
Impulse response is defined as having an exponential rise time constant of
35 milliseconds, and an asymmetric decay time constant of 1.5 seconds. It
was thought that this could be used to describe impact sources, however it
is rarely used now and is not used for occupational noise,
Peak has replaced impulse and max in the occupational environment. The
peak SPL, Lpk or Lpeak, is defined as the greatest value of the absolute
instantaneous sound pressure (NB: this is the pressure and not the RMS
pressure – refer back to Figure 2.4) within a specified time interval,
expressed in units of dB. For occupational noise measurements, the
instrument must adequately measure a pulse of 100 microseconds (one ten
thousandth of a second) duration.

60.
Equivalent Continuous Sound Level:
For the measurement of varying sound fields it is necessary to average the
sound energy over a longer time period, a cycle of operation or the whole
work shift. Equivalent continuous sound level, expressed as Leq,T, is used to
quantify the average SPL for a given measurement period. It is worth
noting the term average sound level is also used and for all practical
purposes is functionally identical. To obtain an Leq,T measure, an integrating
SLM is used. The following equation may also be used to approximate the
average sound level from a series of individual SPLs:
n
i 1
10piL
iTeq, 10tT
1 log 10 L dB
Where,
i is the ith increment,
n is the total number of increments,
ti is the duration of ith increment,
Lpi is the SPL for each increment, and
T is the sum of all individual time increments.
Next, for averaging A-weighted sound levels, the expression is:
n
i 1
10AiL
iTAeq, 10tT
1 log 10 L dBA
Where, the LAi is now the A-weighted sound level for the increment.
The LAeq,T has many potential applications in standards and regulations
governing noise exposure, evaluating hearing protection effectiveness,
measuring the average level of equipment, and community noise
assessment. Each of these applications is described further in the
respective sections of this manual.
Although defined with the equations above, Figure 3.8 is useful to review for
clearly explaining and understanding the terminology and symbol notation.
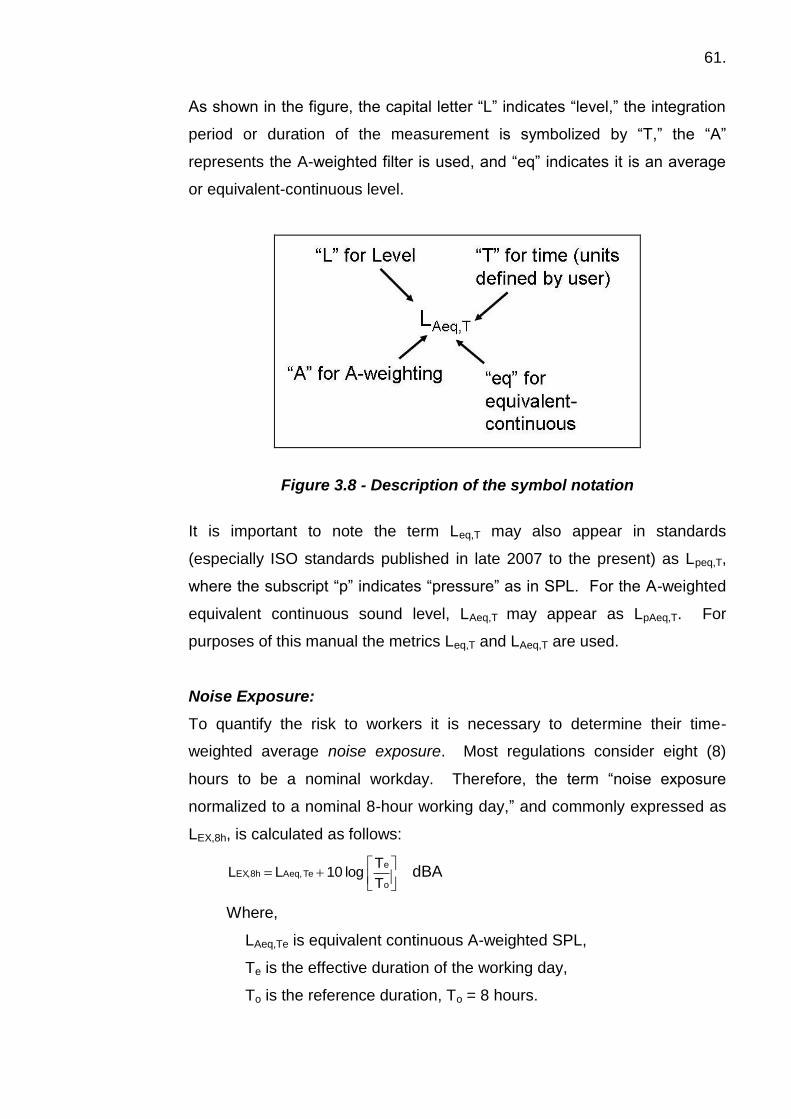
61.
As shown in the figure, the capital letter “L” indicates “level,” the integration
period or duration of the measurement is symbolized by “T,” the “A”
represents the A-weighted filter is used, and “eq” indicates it is an average
or equivalent-continuous level.
Figure 3.8 - Description of the symbol notation
It is important to note the term Leq,T may also appear in standards
(especially ISO standards published in late 2007 to the present) as Lpeq,T,
where the subscript “p” indicates “pressure” as in SPL. For the A-weighted
equivalent continuous sound level, LAeq,T may appear as LpAeq,T. For
purposes of this manual the metrics Leq,T and LAeq,T are used.
Noise Exposure:
To quantify the risk to workers it is necessary to determine their time-
weighted average noise exposure. Most regulations consider eight (8)
hours to be a nominal workday. Therefore, the term “noise exposure
normalized to a nominal 8-hour working day,” and commonly expressed as
LEX,8h, is calculated as follows:
o
e TeAeq,EX,8h
T
T log 10 L L dBA
Where,
LAeq,Te is equivalent continuous A-weighted SPL,
Te is the effective duration of the working day,
To is the reference duration, To = 8 hours.

62.
Note: the term above is also called the “daily noise exposure level” or simply
“noise exposure” in some references and standards. For this manual the
expression “noise exposure” is used.
In those instances where the effective duration of the workday is equal to
8 hours, then LEX,8h equals LAeq,8h. For longer or shorter workdays
normalizing all noise exposure results or data to an 8-hour day allows for
easy and direct comparison to internationally recognized noise standards
and regulations, whose noise criteria or exposure limits are typically based
on an 8-hour day.
Exchange Rate:
Regulations governing noise exposure specify that unprotected exposure
should be limited to a prescribed maximum noise level averaged over a
nominal day. This defines a limit, but does not describe how time-varying
noise levels should be handled when determining the noise exposure. If the
regulatory limit, which is a pressure squared quantity, is multiplied by the
work shift duration time, the product can be identified dimensionally as
energy. Alternatively, in terms of acoustic power, sound energy is the
product of power and time (sound energy = power x time). So, a doubling
of either power or time would result is a 3 dB increase in SPL; and a
corresponding halving of power or time would result is a 3 dB decrease.
This trade-off relationship is called the equal-energy rule.
The 3 dB trade-off relationship is called the exchange rate, which is
commonly used to describe the metric employed for worker noise exposure
determinations. Note: the exchange rate is also referred to as the doubling
rate, trading ratio, or time-intensity tradeoff. The concept here is that a
person can accumulate the same noise exposure during a nominal workday
by exchanging lower noise levels for more exposure time, or conversely,
exchanging higher noise levels for less exposure time.
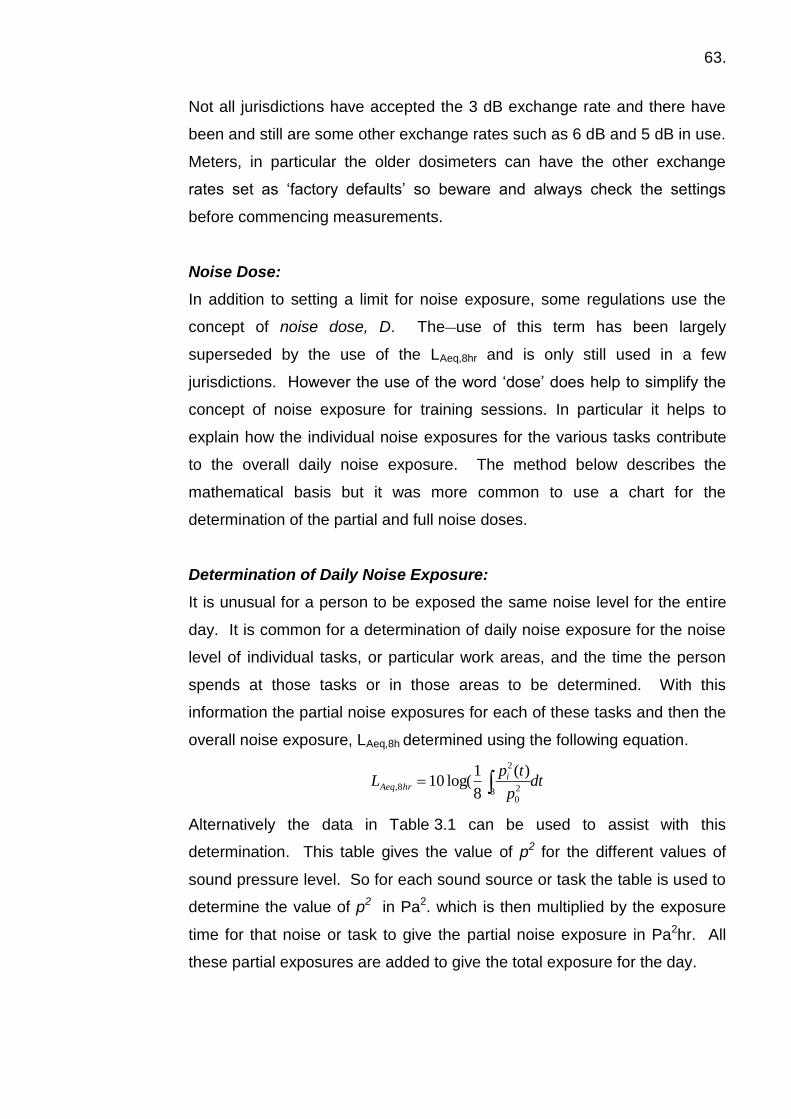
63.
Not all jurisdictions have accepted the 3 dB exchange rate and there have
been and still are some other exchange rates such as 6 dB and 5 dB in use.
Meters, in particular the older dosimeters can have the other exchange
rates set as „factory defaults‟ so beware and always check the settings
before commencing measurements.
Noise Dose:
In addition to setting a limit for noise exposure, some regulations use the
concept of noise dose, D. The use of this term has been largely
superseded by the use of the LAeq,8hr and is only still used in a few
jurisdictions. However the use of the word „dose‟ does help to simplify the
concept of noise exposure for training sessions. In particular it helps to
explain how the individual noise exposures for the various tasks contribute
to the overall daily noise exposure. The method below describes the
mathematical basis but it was more common to use a chart for the
determination of the partial and full noise doses.
Determination of Daily Noise Exposure:
It is unusual for a person to be exposed the same noise level for the entire
day. It is common for a determination of daily noise exposure for the noise
level of individual tasks, or particular work areas, and the time the person
spends at those tasks or in those areas to be determined. With this
information the partial noise exposures for each of these tasks and then the
overall noise exposure, LAeq,8h determined using the following equation.
dtp
tpL i
hrAeq 8 2
0
2
8,
)(
8
1log(10
Alternatively the data in Table 3.1 can be used to assist with this
determination. This table gives the value of p2 for the different values of
sound pressure level. So for each sound source or task the table is used to
determine the value of p2 in Pa2. which is then multiplied by the exposure
time for that noise or task to give the partial noise exposure in Pa2hr. All
these partial exposures are added to give the total exposure for the day.

64.
This is divided by 8 to normalize to the standard 8 hour day and the
resultant value in Pa2 is used to find from the chart the corresponding value
for the sound pressure level. The outcome of this is the LAeq,8hr which can
be compared with the regulatory limiting value.
Table 3.1 – Values of Pa2 for a range of sound pressure levels
DECIBEL TO PASCAL-SQUARED CONVERSION
dB Pa2 dB Pa
2 dB Pa
2 dB Pa
2 dB Pa
2
75 0.013 85 0.13 95 1.3 105 13 115 130
75.5 0.014 85.5 0.14 95.5 1.4 105.5 14 115.5 140
76 0.016 86 0.16 96 1.6 106 16 116 160
76.5 0.018 86.5 0.18 96.5 1.8 106.5 18 116.5 180
77 0.020 87 0.20 97 2.0 107 20 117 200
77.5 0.022 87.5 0.22 97.5 2.2 107.5 22 117.5 220
78 0.025 88 0.25 98 2.5 108 25 118 250
78.5 0.028 88.5 0.28 98.5 2.8 108.5 28 118.5 280
79 0.032 89 0.32 99 3.2 109 32 119 320
79.5 0.036 89.5 0.36 99.5 3.6 109.5 36 119.5 360
80 0.040 90 0.40 100 4.0 110 40 120 400
80.5 0.045 90.5 0.45 100.5 4.5 110.5 45 120.5 450
81 0.050 91 0.50 101 5.0 111 50 121 500
81.5 0.057 91.5 0.57 101.5 5.7 111.5 57 121.5 570
82 0.063 92 0.63 102 6.3 112 63 122 630
82.5 0.071 92.5 0.71 102.5 7.1 112.5 71 122.5 710
83 0.080 93 0.80 103 8.0 113 80 123 800
83.5 0.090 93.5 0.90 103.5 9.0 113.5 90 123.5 900
84 0.10 94 1.0 104 10 114 100 124 1000
84.5 0.11 94.5 1.1 104.5 11 114.5 110 124.5 1100
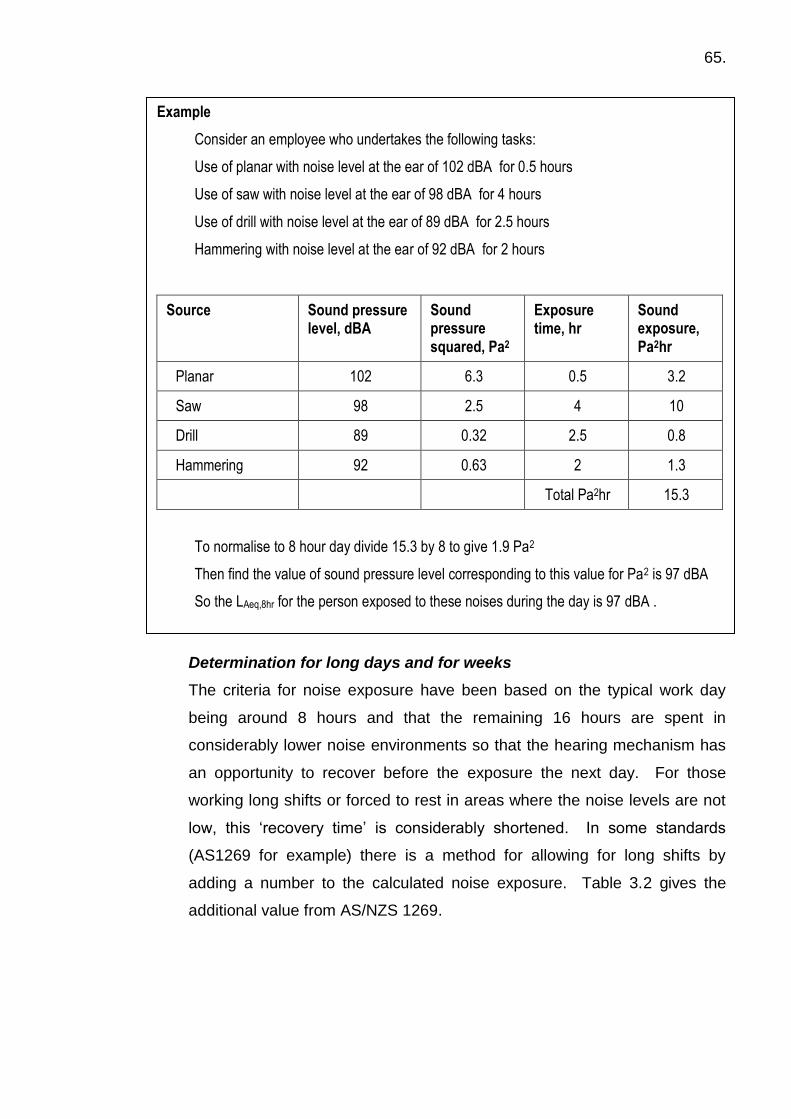
65.
Determination for long days and for weeks
The criteria for noise exposure have been based on the typical work day
being around 8 hours and that the remaining 16 hours are spent in
considerably lower noise environments so that the hearing mechanism has
an opportunity to recover before the exposure the next day. For those
working long shifts or forced to rest in areas where the noise levels are not
low, this „recovery time‟ is considerably shortened. In some standards
(AS1269 for example) there is a method for allowing for long shifts by
adding a number to the calculated noise exposure. Table 3.2 gives the
additional value from AS/NZS 1269.
Example
Consider an employee who undertakes the following tasks:
Use of planar with noise level at the ear of 102 dBA for 0.5 hours
Use of saw with noise level at the ear of 98 dBA for 4 hours
Use of drill with noise level at the ear of 89 dBA for 2.5 hours
Hammering with noise level at the ear of 92 dBA for 2 hours
Source Sound pressure level, dBA
Sound pressure squared, Pa2
Exposure time, hr
Sound exposure, Pa2hr
Planar 102 6.3 0.5 3.2
Saw 98 2.5 4 10
Drill 89 0.32 2.5 0.8
Hammering 92 0.63 2 1.3
Total Pa2hr 15.3
To normalise to 8 hour day divide 15.3 by 8 to give 1.9 Pa2
Then find the value of sound pressure level corresponding to this value for Pa2 is 97 dBA
So the LAeq,8hr for the person exposed to these noises during the day is 97 dBA .

66.
Table 3.2 - Amount to be added to the LAeq,8 to allow for long shifts
Shift length Adjustment to
LAeq,8
up to 10 hr 0
10 to 14 hr +1
14 to 20 hr +2
20 to 24 hr +3
So if the noise exposure, LAeq,8 is determined to be 89 dBA from a study of
the noise levels and the time at each activity, if the actual time exposed to
the noise is between 14 and 20 hours then the noise management plan
should be developed on the basis that the noise exposure is 89+2,
ie: 91 dBA.
If a worker has very different noise exposure from one day to another then
noise exposures determined from the averaged exposure over the entire
week can be determined. This is based on the assumption that the ear has
a longer recovery time during the days when the noise exposure is lower.
For the determination of the noise exposure using the data over the week,
the determination if made for each day in the usual manner. For each day
the Pa2 values are added and the total divided by 5 , ie always normalized
to a 5 day week, and the resultant LAeq,8 determined.

67.
If the worker regularly works for 6 or 7 days the total exposure over all the
work days should then be normalised to 5 days and the noise management
plan developed on the basis of that exposure level. So for each day the Pa2
values are added and the total divided by 5 , ie always normalized to a 5
day week. The resultant LAeq,8h is then determined from the table of Pa2 vs
dB and the noise management plan developed on the basis of that level.
Non auditory effects
Example
For a worker on a 6 day schedule the determinations of Pa2 for each day have been found to be
Monday 0.25
Tuesday 0.25
Wednesday 0.25
Thursday 0.25
Friday 0.25
Saturday 0.25
Total Pa2 for the 5 days 1.50 Pa2
divide by 5 0.3 Pa2 and from Table 3.1
LAeq,8h 89 dBA
Thus the noise management plan will need to be developed on the basis of noise exposure of 89 dBA.
Example
For a worker with very different tasks on Monday, Wednesday and Friday to Tuesday and Thursday, the determinations of Pa2 for each day have been found to be
Monday 0.06
Tuesday 0.63
Wednesday 0.06
Thursday 0.63
Friday 0.06
Total Pa2 for the 5 days 1.44 Pa2
divide by 5 0.29 Pa2 and from Table 3.1
LAeq,8h 88.5 dBA
Thus the noise management plan can be developed on the basis of noise exposure of
89 dBA.
68.
There is increasing evidence that non auditory factors can have an effect so
that a greater hearing loss is experienced than would be expected from the
noise levels alone. At this stage there is insufficient evidence to quantify
exactly the effect and the allowance that should be made to the noise
exposure criteria. However it is considered wise that noise management
should be implemented at lower noise levels should employees be exposed
to chemicals that are known to be ototoxic ie lead to hearing damage even
without exposure to noise. Some examples of industrial ototoxic agents are
solvents including toluene, styrene, trichloroethylene, carbon disulphide,
hexane and butanol, and toxic metals including lead, mercury and
trimethyltin. Also mixtures of solvents that include xylene, heptane and ethyl
benzene have been implicated in some ototoxic studies. Other factors that
have been considered to cause greater hearing loss when there is a
combined exposure with noise include smoking, vibration ands tress. On
the other hand antioxidants and high temperatures may provide some
protection from hearing damage.
3.6 ASSESSMENT SURVEYS 3.6.1 Instrumentation Requirements for Surveys
If a SLM is required in facilities with potentially combustible, explosive, or
similarly hazardous conditions; caution must used to ensure the meter is
intrinsically safe, or a hot-work permit is obtained, prior to working in these
environments.
All personal noise dosimeters should at least conform to the requirements
for Type-2 instruments. All acoustical calibrators should also comply with
appropriate standards, or their latest revision.
Other instrumentation such as frequency analysers, sound sources,
statistical analyser‟s computer software and hardware should all be
calibrated to the manufacturer‟s recommendations and used in accordance
with the manufacturer‟s handbooks.

69.
The procedures described in the manufacturer‟s owner‟s manual must be
followed to ensure proper use of each instrument.
All acoustical calibrators, sound level meters and noise dosimeters should
be periodically calibrated against certified standards, as required by the
manufacturer‟s instructions.
In addition, the SLM and/or noise dosimeter should be field checked before
and after each measurement session. The pre-survey check includes
verifying the instrument‟s accuracy, as well as performing any adjustments
needed to match the output signal of the calibrator. The post-survey check
is conducted without adjustment to verify that the instrument is still within
the tolerance limits of the calibrator output. If the post-survey check
indicates the reading is outside the limits (+/- 1 dB for Class 1 and +/- 2 dB
for Class 2 calibrators), then all survey data collected since the preceding
check are considered invalid or suspect and the measurements need to be
repeated until a valid post-survey check is achieved.
It is recommended practice to always use the microphone‟s wind screen
provided by the manufacturer. Even though there may not be any concern
for excess wind noise inside a facility the use of the windshield may reduce
erroneous results caused by the microphone touching clothing and giving a
false peak. The wind screen also helps protect the microphone from
potential contamination due airborne particulate, moisture or dripping liquid,
and physical damage due to accidentally bumping into machines or other
solid objects.
Additional instrumentation information to document and maintain with the
survey records includes the following:
Name of area or department,
Date,
Name of surveyor,
Manufacturer, model, and serial number for each instrument,

70.
Reason for survey (e.g. initial, change, periodic update, etc.).
3.6.2 Preliminary Survey
a) Purpose
The preliminary survey is a needs assessment. This survey identifies
those areas, equipment items, and/or job classifications needing a
more detailed sound survey as the noise levels may represent a
hazard for the workers in the area.
b) When to Conduct
A preliminary survey should be conducted after new equipment is
installed, process changes occur, or in those areas where no previous
sound level survey has been conducted.
c) Method for Conducting a Preliminary Survey
If a sound level meter is not available then an indication of the areas of
concern can be obtained subjectively. If one has to talk in a raised
voice at an arm‟s length from a listener to be understood above the
background noise, then this is an indication the sound level is greater
than 80 dBA. If a sound level meter is used and the resultant sound
level is 80 dBA or above, then a more detailed sound survey in those
areas should be performed to fully assess the environment. Prior to
conducting the preliminary survey, the sound level meter should be
calibrated and be set to measure the A-weighted sound level.
The person undertaking the preliminary survey should conduct a walk-
through the entire work area. A observations should be made at each
piece of equipment, work station, or any desired location for long
enough to make a clear determination as to whether or not the sound
level equals or exceeds 80 dBA. All portable and/or intermittent
sources, such as pneumatic hand-held tools, air compressors, saws,
etc., need to be measured as part of this survey.

71.
The presence of any sounds that could have excessive peak noise
levels should be noted. .
d) Reporting and Documentation
All areas less than 80 dBA should be documented as such.
Documentation may take the form of a memo to the file indicating the
date of the survey, the name of the surveyor, name of the area or
department inspected, and the fact it has been identified as a low
noise risk area.
For those areas with sound levels at 80 dBA or above, a detailed
sound survey should be scheduled and conducted as soon as
possible. Sound surveys may be necessary for many other purposes,
such as evaluating communications interference, evaluating rest
areas, etc., but these are beyond the scope of this manual.
For some work environments lower exposure limits may exist such as
for maritime and offshore personnel; and in these cases it is
recommended the preliminary survey be bypassed for these work
environments and comprehensive sound level and noise exposure
surveys be conducted.
3.6.3 Detailed Sound Level Survey
Once there are areas where potentially hazardous noise levels have
been identified, there are two general approaches to the detailed
survey.
One method involves determining the noise levels over a work
area or around each particular machine. This method is referred
to as an area or machinery noise survey.
The other method focuses on determining the noise exposure for
a person from data on the noise exposure for each of the tasks
carried out during the day.

72.
This is referred to as a personal noise exposure assessment but
it can relate to the noise exposure of other personnel undertaking
that particular work pattern.
A detailed sound level survey needs to be repeated whenever there
are changes to equipment or work patterns or at maximum intervals of
5 years, but in the normal work environment it would be unlikely that
process materials and operations remain constant for 5 years and
more often would be expected.
The findings are used to check that the noise management program is
appropriate and is being implemented correctly. It is important to
check the actual worker noise exposures as changes in work patterns
can result in changes to exposures, even when area and equipment
sound level surveys do not indicate a change in the sources.
Before commencing the detailed survey it is important to have a good
understanding of the workplace practices and the operation of the
machinery. This involves talking with management, with supervisors
and with employees. Its is only once you have a good understanding
of the factors that may important for assessing the noise exposure of
the workers that you can implement the appropriate sound level
survey procedure.
When undertaking the noise survey it is important to not just focus on
the measurements necessary for the determination of LAeq,8h as there
is also a need to determine if the peak noise level, LCpeak, exceed the
limiting level. Every report should have some reference to the
potential for excessive impact noise. If it is clear from subjective
assessment that there are no very loud impulse or impact noises in the
work area then this should be documented in the report. If there are
noticeable loud impact or impulse noises then they should be
measured at each location along with the LAeq.

73.
Modern instruments usually allow for these two measures to be
obtained simultaneously while older equipment requires the data to be
obtained separately.
For any noise hazard risk assessment there are three crucial noise
measurements which must be reported. These are:
Operational LAeq for each noise source and for each worker in the
area
Peak LCpeak for each worker people in the area
Estimation of LAeq,8h based on the typical work pattern for the
worker
For an individual noise assessment the noise level for each activity
and the time spent doing that activity should be clearly listed along
with the method of estimating the individual noise exposure, LAeq,8h.
For an area survey the data or the map should be clearly presented
and the areas where the noise levels are at a hazardous level should
be identified to prioritise noise control efforts. For a machinery noise
survey any work areas where the noise levels are likely to be
hazardous should be clearly identified and priority given to reducing
these high levels. For a noise control survey the detailed noise level
data on the sources should be provided and used in the justification for
the proposed noise control measures.
3.6.4 Area and/or Equipment Sound Level Survey
a) Purpose
The purpose of the area and equipment sound level survey is to
document all machines and components operating at 80 dBA or
above, identify required hearing protection areas, and create a priority
list of noise sources suitable for noise control treatment.
The detailed survey should be repeated on a regular schedule, such
as every two to five years, to validate or update existing data.

74.
b) Method for Conducting the Survey
Prior to the survey, the sound level meter should be calibrated and be
set to measure the A-weighted sound level.
For an area survey the measurement locations can be made in a
systematic manner using a predetermined grid superimposed on the
entire work area. Alternatively the measurements can be restricted to
those regions used by the workers in the area.
For a machinery noise survey where there are only a specified number
of worker locations, the measurements can be made at those worker
locations. Alternatively the measurement locations can be distributed
around the machine at an appropriate distance, which is typically 1m.
At each location the measurement microphone should be positioned
so that it has the best opportunity to obtain data on the noise level at
the ear of the person working in that area. The procedures in relevant
standards and codes of practice for workplace noise measurement
should be followed. Most recommend that the microphone should be
at:
0.1 to 0.2 m from operator ear when the operator is
present.
if no person is present then 1.5 m above ground for a
standing person or 0.8m above seat for a normally seated
person
It is important to beware of the effect of the presence of reflecting
surfaces and to note these down if they could be adding to the noise at
the worker ear. As a worker rarely keeps their head in the one fixed
location during their working activity it is also good practice to move
the microphone slowly around the general area of the selected
measurement location. Also if the measurements are made with the
worker present, repeat measurements should be made at the left and
the right ear as the noise exposure may be different.

75.
As discussed previously, although a windshield is rarely needed to
protect the microphone from wind it can be used to provide some
protection for the microphone.
The time, T, for each measurement location should be long enough to
ensure that the value of LAeq,T is truly representative of the entire task
or if it is a complex task then it needs to be long enough to include
each component of that task . For instance if the source is essentially
constant, a time of 30 sec to 1 minute may be sufficient. However if
the noise level varies as the product is processed, the time T needs to
be long enough to be representative of the entire task, tasks or worker
exposure.
Using a Band Saw as an example the time period may need to be long
enough to include set up, idling between cuts, cutting and staking of
the cut product To be representative the measurement time period
needs to be long enough to include three, four or more cycles of such
a process to allow for variance within the cycles.
It is critical to document the conditions at the time of survey, including
information such as production rate, any nearby equipment either in
operation or shut down, and any other operational variables.
Preferably, measurements should be collected during typical operating
conditions to record sound levels representative of normal daily
operation. If the sound environment is unusual or abnormal (i.e., due
to a temporary steam leak, equipment needing repair, etc.), then
document these sound levels and conditions separately in the
tabulated results and narrative report.
c) Sound Contour Map
Sound contour maps are an effective means to document the sound
levels in an area. These maps can provide a simple representation
of the sound field over a large area and identify those areas where the
noise exposure could be excessive.

76.
Various drawing software packages can be used to produce contour
maps and the technique can be used also to demonstrate the noise
levels around just one source.
Figure 3.9 - Example of a sound contour map showing sound level contours in 2-dBA increments. This map was generated
using AutoCAD 2004 and by manually drawing each contour line within the application programme.
Caution: it is important to keep in mind that sound contour maps are
simply a snapshot in time of the sound levels on the day of the survey.
The actual levels will vary from day-to-day, depending upon the
product, production rate, and equipment actually operating in the area.
Therefore, these maps should not be used to delineate fine lines on
the production floor as to where hearing protection is and is not
mandatory. Toward this latter item professional judgment needs to be
exercised. It is common practice; however, that companies will
designate the entire noise area, room, or department as a hearing
protection area if it contains any sound levels above a specific
threshold level, such as 85 dBA.
77.
d) Reporting and Documentation
Name of surveyor, survey date(s), measuring equipment,
measurement location, details of the operating equipment production
rate, any abnormal or unusual conditions, and measurement positions
should be noted on the data table and/or described in the narrative
report.
For an area survey the data or the map should be clearly presented
and the areas where the noise levels are at a hazardous level should
be identified to prioritise noise control efforts. For a machinery noise
survey any work areas where the noise levels are likely to be
hazardous should be clearly identified and priority given to reducing
these high levels.
3.6.5 Noise Exposure Survey
a) Purpose
The purpose of the noise exposure survey is to collect sufficient sound
level and/or noise exposure data for personnel in the area to enable
the hearing conservation programme administrator to make informed
decisions regarding management of the programme.
b) Methods for Conducting the Survey
Individual Noise Assessment: This involves shadowing workers
while they are carrying out their work or examples of their work. This
is normally done by holding an integrating SLM at arms length in
proximity of the workers ear and taking a sample for the duration of the
task while observing the process and noise sources during the task.
The LAeq and the peak measurements are recorded and the next task
is then undertaken. The data can be used in two main ways. One is to
gain an indication of the likelihood of each task to contribute to the
persons daily exposure. This method has the advantage of being
relatively quick and allowing noise exposure modelling or profiling.

78.
The noise levels for each task are listed and those in excess of
85 dBA or 140 dBC are identified for further investigation
Table 3.2 - Example of results in a Noise Survey Result Table. This tabulates the Equivalent Continuous Sound Level in (A) weighted, Peak noise level and the exposure time required to
exceed regulatory requirements.
No. Work Process or Operation
LAeqT LCpeak Complies with Regulatory
Requirements
1 Cushman Truckster 75 103 YES
2 Cushman Spray Unit 76 102 YES
3 Quad Runner 72 101 YES
4 Honda Bike 67 - YES
5 Mower Reelmaster 6700-D 83 102 YES
6 Mower Ransomes 213-D 83 102 YES
7 Mower John Deere 2653A 86 105 NO, if exposure exceeds 6 hrs 36 min
8 Mower John Deere F1145 90 115 NO, if exposure exceeds 2 hrs 32 min
9 Whipper Snipper Kawasaki 98 113 NO, if exposure exceeds 25 min
10 Blower Echo 94 108 NO, if exposure exceeds 1 hr 4 min
Predictive Noise Exposure Modeling
This method uses the data on the time or duration a worker is exposed
to sound from each source, activity, or task throughout the workday to
estimate the daily noise exposure. This process has been described in
Section 3.5 of this manual. Start by conducting interviews with the
supervisor and workers to clearly define the various work routines.
Personal observations of the workers are also recommended to help
understand the job functions. The LAeq,T is measured for a
representative time near to the operator‟s ear for each activity. An
example noise exposure estimate is shown in Figure 3.10. In this
example the job title is Carpenter and the department is the Wood
Shop.

79.
Figure 3.10 - Example application of spreadsheet to estimate the noise exposure for a Carpenter.
This assessment method is more applicable for those job activities or
classifications that have well-defined work routines or patterns, and
are exposed to continuous or consistently cyclic sound levels. It can
also be used as a screening tool applying worst-case assumptions.
That is, one can assume the worst case for the amount of time
workers spend in the highest noise locations. If this worst-case
estimate indicates that exposures would be well below an average of
85 dBA, then a more detailed risk assessment is not necessary.

80.
Personal Noise Dosimetry: One method for determining worker
noise exposure is through use of personal noise dosimeters. These
are designed to be worn by the worker for part or all the workday. The
microphone should be positioned, as per the manufacturer‟s
instructions. However, typically the microphone is located at the top
mid-section of the employee's shoulder or shirt collar. If the dosimeter
control unit is connected via a cable then the control unit must be
clipped to the wearer's belt or placed in a pocket. As dosimeter
technology continues to evolve, there are more models that have the
control unit and microphone in a self-contained device, which is
attached to the shoulder and a master control unit for downloading at
the end of the time period. Irrespective of the dosimeter configuration,
the microphone should not be covered by any clothing. Care should
be taken to ensure the dosimeter continues to be properly positioned
should the employee remove or put on a jacket or personal protective
clothing during the workday. Noise dosimeters continuously measure
and process A-weighted sound levels obtained then produce an
average level of noise exposure that occurred throughout the sample
period.
The dosimeter should be set to measure the A-weighted equivalent-
continuous sound level, LAeq,T, during the time period T, using a 3 dB
exchange rate and no threshold level. The peak detector weighting
should also be set.
Caution: some jurisdictions require monitoring using different
thresholds and/or exchange rates. For example, in some countries
dual threshold levels of 80 dB and 90 dB, and/or a 5 dB exchange
rate, may be required under the regulation. So it is essential that the
appropriate legislation be consulted and the measuring equipment be
set up in accordance with those requirements.
For a noise dosimetry survey the following procedures are
recommended:
81.
Perform a battery check, as per the manufacturer‟s instruction, to
ensure sufficient battery life exists for the intended sample
duration. If necessary, start with a new battery.
Calibrate the dosimeter just prior to starting the survey.
Explain to the person being monitored the purpose of the survey,
and address any questions or concerns they may have about
wearing the dosimeter.
Follow the dosimeter manufacturer‟s instructions for placement of
the microphone and, if applicable, place the main body of the
dosimeter on the person‟s belt where it will not interfere with their
work or be uncomfortable. If a belt is unavailable, then it is
acceptable to clip the dosimeter to the top of the pants or secure
it in a pocket. Typically the microphone is to be placed on center
of the shoulder with the cord behind the worker. Note: if the
source of sound is directional, then it is best to locate the
microphone on the side of the head closest to the source. Also, it
is best to place the microphone on the worker first before starting
the actual sample measurement to avoid extraneous noise from
bumps and taps on the microphone during the set up.
Explain to the wearer there is nothing they need to do other than
perform their normal duties and they are not to remove the
dosimeter or relocate the microphone once positioned by the
surveyor.
Explain to the person that if they are to wear additional clothing,
such as a jacket or fire-retardant clothes, it is critical the
microphone not be covered. It is critical to ask the worker about
this issue before mounting the microphone and, if necessary,
take appropriate steps to avoid this potential problem.
Obtain from the worker a brief description of their assignment or
“normal” duties they expect to perform throughout the day.
82.
Once the dosimeter is placed on the worker find out when they
are scheduled to finish work, then tell them what time and exactly
where you will meet them to collect the dosimeter. From the
author‟s experience, if you do not tell the person when and where
you will retrieve the dosimeter, they will often remove the
dosimeter themselves and bring it to you or give it to a supervisor
well before the actual end of the workday.
During the sample period, check with the person several times
throughout the day to ensure the microphone is still in its correct
position, and see if they have any questions you may be able to
address. Note: it is always a good practice to do an initial check
with the person within the first 15-30 minutes of the sample
period, as this will let the worker know you are observing them
and especially to ensure the dosimeter and/or microphone cable
are not interfering with their work.
Spend the first 30-60 minutes of the sample period in the vicinity
of the person or workers being monitored. Stay visually engaged
with the workers by doing area sound level measurements, or
any other industrial hygiene survey work. Observe the
production or process equipment to obtain an understanding of
its function and characteristics of its sound output. This
procedure will be useful later when reviewing the dosimetry
results and comparing them to the area and/or equipment sound
level data.
Meet the person at the pre-scheduled time and place, and only
the surveyor is to remove the dosimeter. Once carefully removed
immediately press the “Pause” key on the dosimeter, which will
internally store the data until downloaded or recorded by the
surveyor.

83.
Briefly interview the worker and determine if their workday was
normal, and if not, then find out what abnormal or unusual
conditions or events occurred that could adversely affect the
results.
If time and circumstances allow, permit the workers to observe
the preliminary results as they are readout and documented, and
then briefly discuss the results with the workers.
Verify the post-survey calibration.
Record all final results as soon as possible.
Post-survey, compare the dosimetry results to the area sound
level data. Judgment needs to be used to assess whether or not
the dosimetry results are reasonable, based on the magnitude of
sound levels measured in the area where each person wearing a
dosimeter worked. A word of caution: it is not unusual for the
dosimetry results to be as much as 5 dBA higher than some of
the equipment sound levels, due primarily to the on-the-body
versus off-the-body effects on the microphone (Earshen, 2000).
Note: these effects are minimized by proper dosimeter
microphone placement. When using area sound level data to
support the dosimetry results, the key is to look for consistency
between the results.
In addition to the check list above, there are a number of things that
can go wrong with a noise dosimetry survey, such as:
Failure to follow the manufacturer‟s instructions for placement of
the microphone.
Failure to START THE DOSIMETER. Note: it is best to position
the microphone on the worker first, then press the start or run key
on the dosimeter. This step prevents any measurement artifacts
that may result as the microphone is handled and secured to the
worker.

84.
However, it can also result in failure to start the dosimeter,
especially if the surveyor is distracted or besieged by a group of
workers all waiting for their turn to be set up with a dosimeter
The microphone was accidently pulled off, lost its wind screen,
covered up by clothing, or was rubbing on the person‟s clothing
or hair.
The person being surveyed tampered with the instrument or
microphone, either intentionally or inadvertently out of curiosity
about the meter. Common attempts to tamper with the
instrument include items such as shouting several times into the
microphone, scratching or thumping the microphone, removing
the battery for a brief moment, or removing the dosimeter and
laying it next to a loud machine or in a quiet area for an extended
period. Note: research has shown that attempts to intentionally
manipulate the results by shouting, thumping, or blowing into the
microphone may only add 1-2 decibels to the LAeq,8 or LEX,8h
results when the noise environment is in the mid-80 dBA range
(Royster, 1997). These effects are even smaller in environments
with higher sound levels (greater than 90 dBA). Frequent
observations of the worker will help prevent or minimize these
issues.
The person did not have a normal workday, or their workday was
not representative of the job title of activity you intended to
sample. For example, the person may be reassigned to another
activity after the sample is started, or has to attend a training
class or other meeting away from their normal work environment.
The person was working in a windy area. The manufacturer‟s
instruction manual should contain the maximum acceptable limit
for wind speed, both with and without using a microphone
windscreen.
Battery and/or instrument failure.

85.
Representative Worst-Case Monitoring: Representative monitoring
may be used to streamline the number of dosimetry samples needed.
When using this strategy observations and interviews are used to
identify similar exposure groups that have the same job function or
activity, and are exposed to similar sound sources. From groups
containing four or more employees, it is recommended at least three
individuals be selected for monitoring with personal noise dosimeters.
Three dosimetry samples are suggested to clearly establish the
highest or worst-case representative noise exposure that could
typically be encountered by any employee within a similar exposure
group. Professional judgment needs to be used when selecting those
individuals for monitoring. Toward the selection process, those
employees anticipated to be the highest exposed should be
designated for monitoring. When only one to three employees
comprise a job activity or classification, then each individual should be
sampled.
Because of mobility and the variation in sound levels often
experienced within a job function, it is best to monitor each employee
as close to an entire work shift as practical. Assuming the workers
who are monitored experience routine or normal work days, the noise
exposure results should then be presumed to be applicable to all
remaining employees within the particular job function. When more
than one valid dosimetry result exists for the same job activity, the
accepted procedure is to assign the highest noise exposure to all
personnel within the group.
Note that representative monitoring strategy is meant to be used to
establish the maximum exposure for a similar exposure group rather
than to determine the true average and range of exposures. This is a
precautionary approach that is protective of health while reducing the
amount of time needed for surveys.

86.
This strategy is usually the most suitable method to use when the
objective is ensuring regulatory compliance. Should a more exact
exposure be desired, then the statistical monitoring approach
described next is recommended.
Statistical Monitoring: When having difficulty clearly defining a
representative noise exposure statistical monitoring may be used. In
fact, statistical monitoring is preferred for individuals having job
activities or classifications with highly variable work schedules,
exposure to highly variable noise sources, and/or random mobility
throughout the workday
The objective of statistical sampling is to collect sufficient noise
exposure data to make informed decisions regarding risk assessment.
It is recommended that the sampling should include employees having
daily noise exposures of 85 dBA (TWA, LEX,8h, or LAeq,8 ≥85 dBA) on
more than 5% of their workdays (roughly 13 days per year).
Caution: it is important when using statistical sampling to maintain
randomness in the approach to selecting employees to be sampled.
For example, it is not appropriate to exclude workers on days when
you know their exposure will likely be “less than normal,” due to a
scheduled training class, personnel meeting, or other activity carried
out in a quiet setting.
Monitoring should be sufficient to be confident that the upper 5% of
exposures can be estimated with reasonable confidence. To establish
the number of dosimetry samples required to identify the top 20
percent noise exposed to within a 95 percent confidence level,
Table 3.1 should be used (Leidel, 1977).

87.
Table 3.1 - Sample Size for Top 20% and Confidence 0.95
Total Number in Job (N):
7-8 9-11 12-14 15-18 19-26 27-43 44-50
51-∞
Required Number of Samples (n):
6 7 8 9 10 11 12 14
Note: Use n=N if N≤6
Figure 3.11 is an example of statistical monitoring applied to the
members of an orchestra in order to develop a noise management
plan. The data for a position in the brass section was obtained for all
performances over a year. The large difference in individual
performance noise level related to the different performance programs.
This data was used to determine a long term noise exposure for a
person who played every performance – a very worst case that would
not be achieved as it was not possible for the one person to perform
every performance. The data was also used to develop a roster as
part of the noise management plan for the brass section.

88.
Predicted Noise Exposure Winter Schedule 1998 + Ballet
All Performances
70
75
80
85
90
95
1002
5-D
ec
04
-Ja
n
14
-Ja
n
24
-Ja
n
03
-F
eb
13
-F
eb
23
-F
eb
05
-M
ar
14
-M
ar
24
-M
ar
03
-A
pr
13
-A
pr
23
-A
pr
03
-M
ay
13
-M
ay
23
-M
ay
01
-Ju
n
11
-Ju
n
21
-Ju
n
01
-Ju
l
11
-Ju
l
21
-Ju
l
31
-Ju
l
10
-A
ug
20
-A
ug
30
-A
ug
09
-S
ep
19
-S
ep
29
-S
ep
09
-O
ct
19
-O
ct
29
-O
ct
dB
(A
)
Performance weekly average Long term Exposure
(Source: K Mikl)
Figure 3.11 Example of statistical monitoring data used to determine
long term noise exposure.
c) Data Analysis and Interpretation of Results
All noise exposure data should be normalized to an 8-hour average for
purposes of comparison with criteria. The 8-hour average noise
exposure should be referred to as the LAeq,8, but may be termed the
time-weighted average (TWA), especially in the United States.
However, LAeq,8h is preferred as it implies the equal-energy principle
(3 dB exchange rate) is used; whereas, TWA can be confused with the
same term which has been used by the Occupational Safety and
Health Administration in the U.S., which uses a 5 dB exchange rate in
the TWA calculation. Also, for purposes of this manual the phrase
“noise exposure” refers to the LAeq,8hr.
89.
d) Reporting and Documentation
For each sound survey a written record should be prepared. The
report should contain at least the following information:
Purpose of the survey,
Who conducted the survey,
Date(s) of the survey,
Survey procedure(s),
Instrumentation, including model and serial number,
Instrument settings and record of calibration check
Department, areas, process units, and/or job activities surveyed,
Any unusual conditions which would impact results,
All sound level data tables and/or maps,
Measurement data for each employee sampled,
Noise exposure assignments per job activity or classification,
Names and identification numbers of all employees per affected
job activity or classification,
Recommendations, and
Conclusions
The sound survey report and all data should be maintained for the
time period defined in the applicable legislation, which could be 40
years or even longer.
e) Employee Notification
All employees assigned a noise exposure, whether determined from
an actual or representative sample should be notified and provided an
explanation of the results.
90.
The notifications can be accomplished by posting the report and
results in the workplace, or through individual notification, such as
email or a written letter. Interpretation of the results should also be
discussed at a future safety meeting.
3.6.6 Measurements for Development of Noise Control a) Purpose
Assuming high noise exposures exist (above the criterion level) within
the facility, the most effective way to prevent NIHL is to eliminate the
risk to workers through implementation of effective noise control
measures. Toward this end, a comprehensive noise control survey
will assist with identification and/or quantification of the noise
characteristics of various sources. It is usual that such noise surveys
and the development of noise control methods are undertaken by
acoustic specialists.
The protocol for conducting a noise control survey will depend on the
goals and objectives for the survey. If the goal is to modify or treat the
source of noise, then significantly more detailed survey information will
be required as compared to the amount of data needed to simply treat
the sound transmission path. Controlling noise at the source requires
identification of the origin or source of noise, and definition of its
acoustical properties (i.e. frequency spectrum, sound level versus
time, etc.). This provides the necessary information for design of the
controls.
Treatment of the sound transmission path does not always require
clear identification of the root cause of noise, but instead relies heavily
on the frequency spectrum and room characteristics to provide the
information needed to select the acoustical materials.

91.
Finally, a word of caution, it is rare for a noise control effort to be a
one-shot deal. It is a lot like peeling an onion; quite often the noise
control programme will require multiple steps or phases to reach the
intended goal. It is however encouraging that in many instances the
most dramatic and measurable noise reduction will result from
successful implementation of control measures designed for the most
dominant sources. So it is important to be persistent and patient
because, as mentioned previously, the ultimate goal of eliminating the
risk to workers is the most effective way to prevent NIHL.
b) When to Conduct
When to conduct a noise control survey will depend on a variety of
factors, such as the acceptable level of risk (criterion level) in effect at
the facility, the goal of eliminating the need for HCP or the required
use of hearing protection, and/or a desire to attenuate a high noise
source regardless of the worker noise exposure.
As a minimum, a noise control survey should be conducted whenever
noise exposures exceed the criterion level, which at most facilities is
an LEX,8h of 85 dBA. In addition, a noise control survey may be
initiated to resolve a community or environmental noise concern, such
as complaints from neighbors, or when local noise limits or regulations
are exceeded.
c) Procedures, Data Analysis, and Interpretation of Results
The initial objective of all noise control projects should be directed
toward treating the source. However, if additional noise reduction is
required over and above what treatment of the source can provide, or
should modification of the source be cost-prohibitive, then the next
step would be to implement a path treatment that will effectively
prevent excessive noise from reaching the receiver. The survey
procedures described below are developed to address the primary
objective of treating the source.
92.
The same information collected will also apply for controlling noise
along the sound path and at the receiver‟s position. However, detailed
1/3 octave-band or narrow-band data recorded for source identification
are not necessary for path and/or receiver treatment. Measurement of
the full octave-band spectrum is usually sufficient to allow selection of
the appropriate noise control products for this type of noise control
treatment.
One of the most challenging aspects of noise control is identification of
the actual source. The following techniques may be used to help
identify the origins or sources of noise:
Start by conducting a quick cursory or walk-around sound survey
of each area while observing the overall A-weighted sound level
and peak level on the SLM to ensure all high noise areas and
equipment are identified for more detailed measurement.
For all equipment of concern, measure the overall A-weighted
sound level, peak level and frequency spectrum, and graph the
spectral data. Be sure to document the distance each
measurement was conducted from the source.
For equipment with cyclic or fluctuating sound levels, measure
the broadband sound level, in dBA, versus time, and log any
peak levels.
Compare frequency data from similar equipment, production
lines, etc.
Isolate components with temporary controls, or by turning on and
off individual items whenever possible.
One of the most effective methods for locating the source is to
measure the frequency spectrum and broadband sound level. Once
the data are measured, it is useful to graph the results to see the
frequency characteristics of the source.
93.
For most noise abatement problems, the measurements can be
accomplished with either 1/1 or 1/3 octave-band filters used with an
SLM. The advantage of a 1/3 octave-band measurement is that it
provides more detailed information or definition about the sound
emanating from a piece of equipment.
As an example of this approach consider the case of a vibratory bowl
used to feed plastic parts into an injection molding machine.
Figure 3.11 exhibits a comparison between the 1/3 octave-band
spectrum measured one metre above the vibratory bowl and the level
measured approximately 3 metres away at the typical operator‟s
position or background location. As depicted in the figure, the overall
or broadband sound level at one meter was 105.8 dBA, as compared
to 102.4 dBA at three metres in the background. To assist with the
identification of the primary noise sources, it is worth noting that
several frequency spectra were measured near all equipment items,
not just the vibratory bowl, in the immediate area. However, when
each spectrum was compared to the data at the operator‟s position,
only the vibratory bowl noise exhibited a similar spectral shape at the
primary frequencies of concern, which as shown in the figure are 500
Hz and above. This similar spectral shape is sometimes referred to as
the “acoustical fingerprint.” In other words, the acoustical fingerprint of
the vibratory bowl noise is all over the sound spectra measured at
3 metres. Note: the data at 500 Hz and above are of primary concern
because all sound levels are at or above 80 dBA, with the most critical
sound energy above 90 dBA starting at 1,000 Hz and above.
Therefore, as a result of this spectral comparison, it may be concluded
the vibratory bowl is the primary noise source controlling the levels
measured at the worker‟s location. This technique of graphical
comparison is one of the most effective ways to identify and help
quantify the primary noise source(s) making up the background sound
level where workers may be located or typically spend a significant
portion of their workday.

94.
Figure 3.11 - Using frequency data to identify the source of noise. Observe the similar spectral shapes between the measurements
one metre above the bowl compared to the background level with the bowl operating at a distance of 3 metres
Next, in Figure 3.11 a second reading is depicted at the operator‟s
position; except this measurement was conducted with the vibratory
bowl at idle. Since the noise level at the operator‟s position decreased
from 102.4 dBA to 92.4 dBA, these data reveal that the vibratory bowl
adds 10 dBA to the overall level at this position. As a result, we know
that if the bowl noise can be eliminated or controlled, the background
level will still be at least 92.4 dBA.
Recall the logarithmic math that when one sound level is 10 dB below
another sound level it does not for all practical purposes contribute to
the higher level. Therefore, to ensure the vibratory bowl noise will no
longer contribute to the background level, it will require for the
resultant sound level after treatment to be 10 dBA or more below the
background.

95.
At this point if our goal is to further reduce the background level below
90 dBA, or even 85 dBA, then it will require a continued effort to
identify the remaining dominant noise source(s) and implementation of
additional control measures.
Figure 3.12 - Sound level versus time as measured over one full machine cycle at the workstation for packaging operator
When the sound level fluctuates, with cyclic equipment and/or
production, it is useful to measure the overall A-weighted sound level
versus time. With this procedure it is important to observe and
document which events are occurring at specific times. Figure 3.12
exhibits the sound level measured at the operator's work station over
one full machine cycle. Since we are interested in viewing the sound
level as it is rapidly changing with time, employing the “fast” response
setting and a one-second logging rate on the SLM is recommended.
Certainly, shorter logging rates may be used, but a one-second rate is
usually sufficient. The process depicted in Figure 3.12 represents a
product-wrapping machine, which has a cycle time of approximately
95 seconds. The maximum noise level of 96 dBA occurs during the
release of compressed air, 33 seconds into the machine cycle.

96.
The other important events are also labeled in the figure, which
permits the identification of the sources and relative contribution of
each activity during the full wrapping cycle.
In industrial settings where there are multiple process lines with the
same equipment, it is useful to compare the frequency spectra for like
equipment and processes to identify differences in sound level that
may be easily remedied with effective maintenance or other
adjustments. Figure 3.13 depicts this comparison for two similar
process lines, both of which manufacture the same product and
operate at the same speed. Part of the process involves the use of a
pneumatically actuated device that punches a 1/2-inch hole in the
product as a final phase in its production. Inspection of this figure
reveals that Line #1 has an overall sound level 5-dBA higher than Line
#2. In addition, the spectrum depicted for Line #1 contains what
appears to be a fundamental frequency and some of its harmonics that
do not appear in the spectrum for Process Line #2. Consequently, it is
necessary to investigate the cause of these differences. Often
significant differences will be an indication of the need for
maintenance, as was the situation for the final punch mechanism of
Process Line #1. However, once maintenance corrects this problem,
additional noise control measures are still required (for both process
lines), if the objective is to reduce the overall noise level significantly
below 100 dBA.
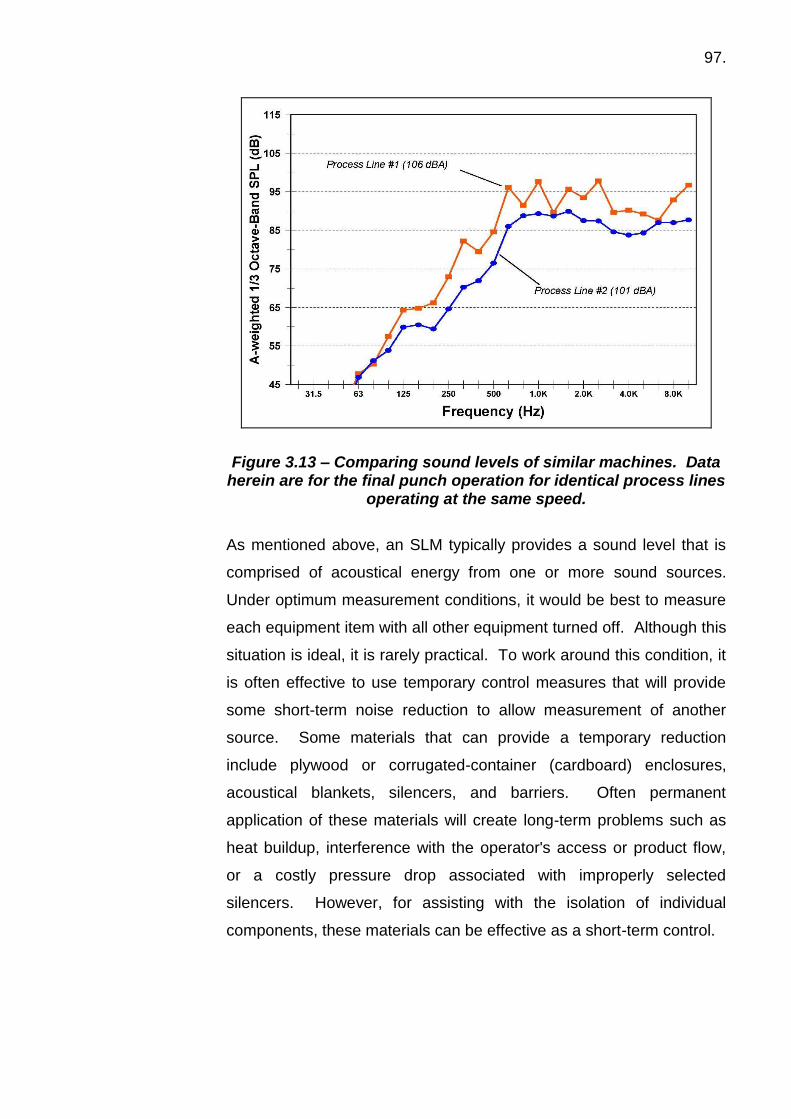
97.
Figure 3.13 – Comparing sound levels of similar machines. Data herein are for the final punch operation for identical process lines
operating at the same speed.
As mentioned above, an SLM typically provides a sound level that is
comprised of acoustical energy from one or more sound sources.
Under optimum measurement conditions, it would be best to measure
each equipment item with all other equipment turned off. Although this
situation is ideal, it is rarely practical. To work around this condition, it
is often effective to use temporary control measures that will provide
some short-term noise reduction to allow measurement of another
source. Some materials that can provide a temporary reduction
include plywood or corrugated-container (cardboard) enclosures,
acoustical blankets, silencers, and barriers. Often permanent
application of these materials will create long-term problems such as
heat buildup, interference with the operator's access or product flow,
or a costly pressure drop associated with improperly selected
silencers. However, for assisting with the isolation of individual
components, these materials can be effective as a short-term control.

98.
When the opportunity is available, another method for isolating a
particular machine or component is to turn on and off different
equipment, or sections of a production line. To effectively conduct this
type of diagnostic analysis the process must be capable of functioning
with the item turned off. Also, for this procedure to be legitimate it is
critical that the manufacturing process not be affected in any manner.
If the process is affected, then it is entirely possible the measurement
will not be representative of the sound level under normal conditions.
All valid data may then be rank ordered by magnitude of each sound
level, as one method to help prioritize sources for engineering noise
control.
d) Reporting and Documentation
The noise control survey should be documented with a written
narrative report, in a similar manner as the detailed survey previously
described. The report should contain at least the following
information:
Purpose of the survey,
Who conducted the survey,
Date(s) of the survey,
Survey procedure(s),
Instrumentation, including model and serial number,
Department, areas, equipment, and/or process units surveyed,
Any unusual conditions which would impact results,
All sound level data tables,
All graphical comparisons of select spectral data,
A rank-ordering of sound sources,
Noise control recommendations, including selection of materials
and/or noise control products.

99.
A list of potential noise control product companies that supply the
selected acoustical products, and their local representatives, if
available, and
Conclusions.

100.
4. NOISE CONTROL ENGINEERING
The most effective way to prevent noise-induced hearing loss (NIHL) is
through effective implementation of engineering noise controls at the
source, between the source and receiver or at the receiver. Removing or
reducing the cause of noise exposure is always the primary goal of any
hearing conservation programme. Since control of all excessive noise
sources can take an extended time the use of hearing protection is an
immediate but interim defence. Conversely, there are situations where no
feasible engineering controls exist, or they are cost prohibitive; and
therefore, reliance on hearing protection becomes the principal means for
preventing NIHL. In all workplaces a “buy quiet” approach should be
adopted when purchasing new or when upgrading items of plant or
equipment. A “buy quiet” policy is implemented by including noise limits in
the specifications or preferentially purchasing the lower noise plant or
equipment.
In determining the relative priority for implementing noise control measures,
the employee exposures, the occupancy of the space and the overall area
sound levels should be considered. Obviously, the desired result is to
obtain the maximum employee noise exposure reduction for the monetary
funds invested. Keep in mind noise exposures are a function of both the
source magnitude and duration of exposure by workers. It is important to
keep in mind a 3 dBA reduction in noise is significant; as it represents a
50% reduction in sound intensity. Unfortunately, noise control engineering
is not as easy as we may desire. Quite often it requires multiple steps to
reach sound level goal of 85 dBA to 80 dBA throughout the workplace.
Therefore, when the objective of the noise control effort is to eliminate all
hearing-loss risk, it will require both patience and persistence; however,
over time the success of these efforts will result in a safer environment for
employees and long-term cost savings to the employer.
There are many options available to control noise and with increasing
international efforts there are new and innovative solutions being developed
101.
An Effective noise control programme requires an understanding of:
How sound is generated,
How to identify the source(s) of noise,
What the options are for treating the source, path, and/or receiver,
How to determine the benefits and costs of noise control,
What appropriate noise control products, and resources are available
for selection and procurement, and
What other methods are available to reduce worker noise exposure.
The information listed above is critical for addressing existing noise
problems, as well as controlling noise during the procurement and design
phases for new equipment and facilities. Combining the knowledge of
acoustics and risk assessment as described in Chapters 2 and 3 with an
understanding of the manufacturing equipment and process, including all
production and maintenance constraints, a comprehensive and cost
effective noise control programme can be designed and implemented.
Without an informed approach, the likelihood of success and the effective
use of resources will be tenuous at best.
Some noise control challenges lend themselves to straight-forward
solutions. With an understanding of the principles of noise control and
proper use of acoustical materials, both occupational health professionals
and plant engineers can make significant progress in reducing equipment
noise levels and employee noise exposures. However, there are situations
where the acoustical environment is too complex, or the professional
overseeing the noise control programme simply does not have sufficient
time, so outsourcing the project often occurs. As a result, a noise control
engineer may be retained to conduct the detailed survey, identify the
sources, design the engineering controls, and develop a plan of action for a
client company.

102.
In this situation, the programme administrator needs to have a good working
knowledge of acoustics and noise control to effectively manage and/or
assist the consultant, plus direct the implementation of various
recommendations. To assist the reader in developing an understanding of
acoustics, as applied in real-world occupational environments, this chapter
focuses on the practical aspects of noise control engineering.
4.1 SOURCES OF MACHINE NOISE
Machinery noise is created for the most part by mechanical impacts, high-
velocity air, high-velocity fluid flow, vibrating surface areas of a machine,
and quite often by vibrations of the product being manufactured. It is
important to understand how noise is created before any attempts to
minimize it through good acoustical design are implemented. Similarly,
understanding the noise generating mechanisms is useful toward the overall
noise control programme, especially when it comes to facility design and/or
equipment selection. The earlier in the design stage that consideration is
given to the noise related aspects of a project, including equipment
selection and layout, the greater the probability of success will be in
preventing noise problems. Machinery noise control is a system challenge.
Each component in the system needs to be considered individually as a
potential noise source. This chapter discusses many common noise
sources, their acoustical characteristics, and presents design and/or
selection considerations for noise control. Later in this chapter more in-
depth noise control measures are discussed, especially as they relate
toward the retrofit of existing noise problems.
4.2 ELECTRIC MOTORS
The principal power source driving industrial equipment, such as fans or
blowers, pumps, generators, etc., is the electric motor. Essentially, an
electric motor converts electrical power into mechanical power, which
motivates the component machinery attached via a coupling or belt drive
mechanism.

103.
Figure 4.1 - Totally-enclosed fan cooled electric motor
The most common industrial motor type is the totally-enclosed fan-cooled
variety, as depicted in Figure 4.1. Noise within such motors is usually
Aerodynamic, Mechanical or Magnetic
Sources of Aerodynamic Noise and Considerations for Control:
Aerodynamic noise is generated by the fan used to move cooling air over
the body of the motor. Here there are two sources of fan noise. The first
being high velocity air striking the motor casing or body, and the second
being turbulent air created by rotation of the fan within the fan housing. The
first item will exist regardless of the fan type, as it is an essential component
regulating motor temperature.
However, the latter item can be addressed during the procurement stage.
Unless a direction of fan rotation is specified by the buyer, electric motors
are commonly supplied with a non-directional cooling fan. This fan type is
designed to provide the requisite cooling service, regardless of its direction
of rotation, i.e., clockwise versus counter-clockwise.

104.
.
Figure 4.2 - Close up of motor fan, showing the perpendicular (non-
directional) fan blades
Figure 4.2 depicts a non-directional fan, which shows the perpendicular fan
blades attached to a base plate, also called a hub. From an operational
standpoint, this fan works fairly well, except it simply generates excess air
noise. Therefore, one prudent step buyers can make use of when
purchasing electric motors is to specify a direction of rotation for the motor
cooling fan, which will permit the supplier to provide a more aerodynamic
fan. These fans only function in one direction of rotation, which permits the
manufacturer to use more streamlined or aerodynamic blades or airfoils.
From the author‟s experience, this form of noise control amounts to a noise
reduction on the order of 4-6 dBA at a distance one meter from the motor
fan.
Sources of Mechanical Noise and Considerations for Control:
Mechanical noise is due to the rotational forces exerted on the rotor or
shaft, which in turn passes vibratory energy into the attached components
and support structure. Other mechanical sources include friction, impact,
and unbalanced components. Selection of proper vibration isolation is
imperative with all motors to minimize the transfer of vibration. The latter
mechanical sources are controlled primarily during motor design and
fabrication, and by ensuring proper installation and maintenance.

105.
Source of Magnetic Noise and Consideration for Control:
Magnetic noise is due to the air gap between the rotor and stator that
results in excess eccentricity. This results in harmonics that occur at each
multiple of the motor rotational speed. The only control measure here is to
maintain the correct air gap, which typically occurs with machining or
adjustment.
Selection of Low-noise Motors:
It is important to keep in mind all motor manufacturers have available low-
noise units, built to tighter tolerances and higher-end components, and
buyers need to decide if these motors are warranted for their application.
Usually, these low-noise motors are desirable for locations where workers
will be directly and routinely exposed to their noise output.
For electric motors already in production, there are a number of retrofit
considerations, such as fan silencers, motor mounts, and acoustical
enclosures.
4.3 INDUSTRIAL FANS
Industrial fans or blowers utilize a power-driven rotating impeller to move
high volumes of air for a variety of manufacturing and production reasons.
All fans have at least one source of intake or inlet air, and another discharge
or outlet air path. Fans are usually driven by electric motors, via direct drive
or belts, but they may also be motivated by an internal combustion engine,
or a steam or gas turbine.
Figure 4.3 – Axial Fan
Figure 4.4 – Centrifugal Fan

106.
Types of Industrial Fans:
There are two common fan types in industry: axial and centrifugal. Axial
fans have a set of blades attached to a hub, which in turn is mounted to a
rotating shaft, as shown in Figure 4.3. Axial fans move air by creating a
vortex type flow. A centrifugal fan, Figure 4.4, has a number of fan blades
mounted around a hub, which moves air by centrifugal force.
(Source: U.S. Environmental Protection Agency)
Figure 4.5 - Various fan blade configurations for centrifugal fans
Controlling fan noise is best accomplished in the design stage. There are a
number of general guidelines that should be followed to prevent
unnecessary noise from fans. One of the most comprehensive guidelines is
published by the American Society of Hearing, Refrigerating, and Air-
Conditioning Engineers (Schaffer, 1991), which is presented herein with
some adaptation:
Guideline for Controlling Fan Noise in the Design Stage:
1. Efficient fan selection and design will minimize the noise output.
Carefully select the most efficient type and size of fan for the
application. When possible, a low discharge velocity is also preferred.
2. When practical, to move a fixed volume of air, it is best to use large
and slow moving fans instead of smaller, faster units.
3. Select the fan to operate on the right side of the fan curve, safely away
from the stall region.
4. Allow a clearance of at least 1 fan wheel diameter at all unducted
inlets and 1.5 wheel diameters at all unducted outlets.

107.
5. Use vibration isolation mounts or hangers, with auxiliary bases, if
required, for all fans over 1 hp located near noise-sensitive areas
(such as offices, conference rooms, etc.).
6. Attach ductwork to fans with an elastomeric flexible connector.
7. Inlet and discharge transitions should be gradual. The total included
angle within the transition should be no more than 15 degrees (1:7
slope).
8. In ducted installations, the nearest upstream and downstream silencer,
sound trap, elbow, offset, transition, or takeoff should be at least 3
equivalent duct diameters from the fan.
9. All duct fittings should be designed for low pressure drop, e.g., long
radius elbows with full radius turning vanes.
10. Because noise travels upstream and downstream from a fan, silencers
and/or duct liners are sometimes required in both the inlet and
discharge air paths. However, before adding a silencer to a fan
system, check to ensure all principles of good fan design are followed
as best as possible, which may eliminate the need for a silencer.
Additional noise controls for retrofit to fan systems include vibration
isolation, acoustical lagging of piping or ducts, and silencers.
4.4 COMPRESSORS
Types of Compressors:
Compressors and pumps can be sources of high-velocity fluid or gas flow
noise. Within industry there are two primary types of compressors
commonly used: dynamic and positive displacement. The dynamic
compressors include centrifugal and axial flow types. Positive displacement
types include reciprocating and rotary compressors.

108.
(Source: DH Goblin with permission)
Figure 4.6 - Cutaway view of a jet engine, which is a type of centrifugal compressor
Sources of Compressor Noise and Considerations for Control:
A centrifugal compressor, as exhibited by the cutaway diagram shown in
Figure 4.6, generates noise due to the interaction between air movement
over rotating and stationary vanes within the compressor. This action
generates tones at the blade pass frequency and its harmonics. Usually,
the compressor casing is substantial enough to attenuation this noise;
however, acoustical energy is also propagated into the connected piping
system, which can radiate high noise through the pipe wall. Centrifugal
compressors are primarily used for continuous, stationary service industries
such as chemical and petrochemical plants, oil refineries, and natural gas
processing plants. It is not uncommon for compressor noise to be mistaken
for pipe generated noise. Noise within a pipe can be effectively handled
with in-line silencers and/or acoustical insulation.
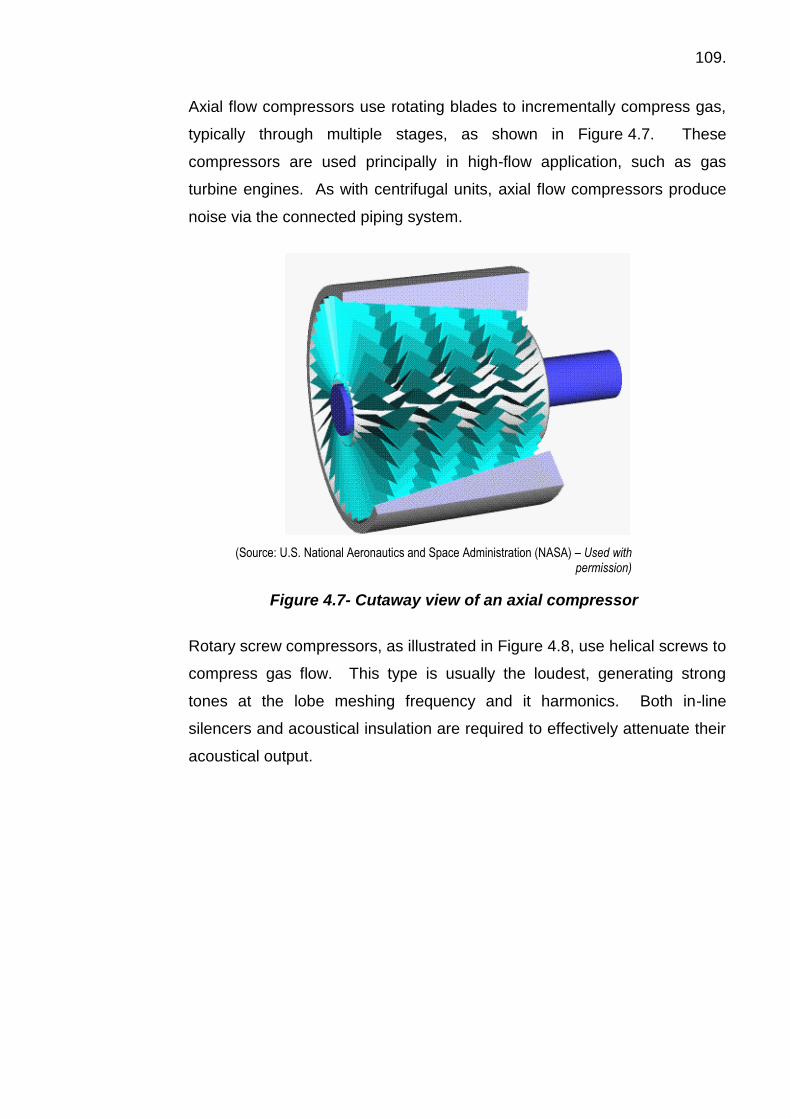
109.
Axial flow compressors use rotating blades to incrementally compress gas,
typically through multiple stages, as shown in Figure 4.7. These
compressors are used principally in high-flow application, such as gas
turbine engines. As with centrifugal units, axial flow compressors produce
noise via the connected piping system.
(Source: U.S. National Aeronautics and Space Administration (NASA) – Used with permission)
Figure 4.7- Cutaway view of an axial compressor
Rotary screw compressors, as illustrated in Figure 4.8, use helical screws to
compress gas flow. This type is usually the loudest, generating strong
tones at the lobe meshing frequency and it harmonics. Both in-line
silencers and acoustical insulation are required to effectively attenuate their
acoustical output.

110.
(Source: U.S. Federal Energy Management Program - Used with permission)
Figure 4.8 - Rotary screw compressor system
Reciprocating compressors use pistons attached to a crankshaft to
compress gas within individual cylinders. Noise from these units tends to
be primarily high frequency without any obvious tonal components. In
addition, secondary noise sources include piston and bearing impacts.
Overall, reciprocating compressors are typically the quietest of all variety of
compressors. These units are commonly used in refrigeration plants, oil
refineries, chemical and petrochemical plants, gas pipelines, and natural
gas processing plants.
4.5 PUMPS
Pumps are very similar to compressors in that they pressurize and move
liquids or gases. Pumps are classified into two major categories:
rotodynamic pumps and positive displacement pumps. Rotodynamic pumps
are based on bladed impellers that rotate within the fluid to impart a
tangential acceleration to the fluid and a consequent increase in the energy
of the fluid. The purpose of the pump is to convert this energy into pressure
energy of the fluid to be pushed through the associated piping system. It is
not too common for a pump itself to be noisy.
111.
Sources of Pump Noise and Considerations for Control:
When pumps do generate high noise levels, the sources are usually the
power (electric motor or internal combustion engine) used to drive it, the
shaft or coupling, and the associated piping system. For example, it is
possible for a long length of pipe to resonate at the pump running speed,
resulting in pipe vibration and airborne noise. This issue is eliminated by
changing the length of pipe by perhaps adding a longer loop in the line,
which will prevent any resonance. Later sections present a series of
modifications or design consideration to minimize high-velocity fluid or gas
flow in pipes. As far as other noise controls for pumps, typically retrofit
applications such as acoustical lagging (also called insulation or cladding),
vibration isolation, and/or enclosures are the primary options. In addition,
pump noise is also minimized by operating it as close as possible to the
design point, which is its maximum efficiency. Cavitation is avoided by
keeping adequate head on the pump suction.
4.6 HYDRAULIC NOISE
Hydraulic systems use pressurized hydraulic fluid to drive machinery and/or
its components. Noise due to hydraulics is usually associated with the
pump drive motor, actuators, fluid flow, including pulsations and cavitation.
Because of the relatively small size of hydraulic pumps, they tend not to be
sources of noise generation. Plus, quiet-design hydraulic pumps are readily
available from manufacturers, and should always be specified when
purchasing a unit. However, the coupling between the pump and motor can
generate tonal noise equivalent to the coupling rotational speed. The
coupling frequency (in Hz) is simply the shaft rotation speed (in rpm) divided
by 60. The pumping frequency is equivalent to the shaft rotation speed
times the number of pumping elements (vanes, pistons, gear teeth, etc.)
divided by 60. These tonal components are minimized through proper
selection of the pump operating parameters, careful installation, and proper
equipment maintenance.

112.
The pump will produce some degree of ripple or pulsation in the hydraulic
fluid. Improper use of hydraulic hose can be the most dominant noise
source associated with the system. These pulsations can cause hydraulic
lines and other machine components to vibrate and radiate airborne noise.
It is common to use a 90o bend in the hose when connecting a horizontal
line to a vertical line. Also, an 180o bend in a hose is universal. Research
by one hydraulic systems manufacturer shows these two configurations can
raise the noise level by 5 dBA. Figure 4.9 illustrates hydraulic line
configurations for short and long runs, as well as the resultant noise
condition. Therefore, proper installation of these lines is critical.
Figure 4.9 - Hydraulic line configurations and their resultant noise conditions
Hydraulic cylinders are mechanical actuators used to exert a linear force
through a linear stroke. Hydraulic cylinders are able to give pushing and
pulling forces up to millions of metric tons, with only a simple hydraulic
system. Noise can result when these cylinders are not maintained properly,
improperly isolated, or allowed to be overdriven. Good installation and
maintenance practices are required to minimize these noise effects.

113.
4.7 MECHANICAL IMPACTS
Mechanical impact noise is common in equipment utilizing air valves or
solenoids, punch press devices, riveting operations, application of impact
and percussive pneumatic hand tools on metal structures, etc. For
example, air valves are often used to move a mechanical part, such as a
push-rod or ram used to insert product into a carton, or cartons into a case
pack. Each time the air valve is employed the push-rod extends and
retracts, which in turn causes a structural impact at both ends of its stroke.
The more the driving force or harder the impact, the more noise is
generated.
Controlling impact noise requires proper set up and maintenance of
equipment and effective damping to reduce radiated noise from the
surrounding surfaces. Also keeping equipment operation within the initial
design parameters will help minimize impact forces on the system.
4.8 PANEL OR STRUCTURE RADIATED NOISE
Manufacturing and process equipment can generate vibratory energy, which
is transferred to a surface that may be an efficient radiator of sound. An
example would be an electric motor directly mounted to the metal casing of
a machine. Although the casing is not the origin of the acoustical energy, it
becomes a sounding board, typically radiating noise that exhibits a resonant
tone based on the vibrational characteristics of the panel or surface area.
Controlling panel radiated noise is best accomplished by dividing large
sections of a machine casing into smaller sub-sections, adding mass,
damping and stiffness where practical, or similar means available to
minimize the sound radiation efficiency of a panel. Although in the motor
example described above, the best control is to add vibration isolation at the
motor footings or attachment points.

114.
(Source: UNSW at ADFA)
Figure 4.10 – Roll former shear
(Source: UNSW at ADFA)
Figure 4.11 – Noise due to cutting induced noise
(Source: UNSW at ADFA)
Figure 4.12 – Noise reduction on roll former shear
Hydraulic
Shear
Air Bag
Shear
L max
over 8 dB(A) reduction in Leq achieved
L eq
So
un
d P
ressu
re L
evel
dB
(A)
L max
L eq
Sheet Damping
Modified Damping
Enclosure
Modified
Enclosure
12 dB(A) reduction in Lmax achieved
10 dB
(A)
0 1 2 Time (sec)
Soun
d p
ress
ure
(P
a)
roll forming
noise
noise due to fracturing metal
ringing noise
cutting-induced noisenoise due to
removal of sheet & stacking

115.
Figure 4.12, example of noise reduction from a roll former shear, where
much of the noise was radiated from the cut panel after the impact of the
shear. First the type of shear was changed, then improvement was
achieved by applying damping to the sheet immediately after the shear.
The last step was to install an enclosure which, even though it was carefully
designed it only provided limited noise reduction as there needed to be
openings for the product entry and exit..
4.9 ENGINEERING CONTROLS Reducing excessive equipment noise may be accomplished by treating the
source, sound transmission path, receiver, or any combination of these
options. A description of these control measures is contained herein.
4.9.1 Some Approaches to Control at Source
The best long-term solution to noise control is to treat the root cause of the
noise problem. However, for source treatment to be effective it almost
always requires a comprehensive noise control survey be conducted to
clearly identify the source and determine its relative contribution to the area
noise level and worker‟s noise exposure. Noise is caused for the most part
by mechanical impacts, high-velocity fluid flow, high-velocity air flow, and
vibrating surface areas of a machine.
a) Avoiding or Minimizing Impacts
Impacts due to the force of one object hitting another are a primary
noise generating mechanism. These collisions are often the result of
metal-to-metal impacts, parts hitting each other, or parts hitting hard
surfaces such as hopper bins, conveyor chutes, indexing of machines,
etc. When impact noise is identified as a cause of high noise, the
control options to investigate are reduction of the driving force,
reduction of the distance between impacting parts, dynamically
balancing rotating equipment, and maintaining equipment in good
working order.
116.
For example, many manufacturing plants use case packers or case
loaders to insert finished product into corrugated containers for
shipping. To examine the effect of impact noise generated by this
type, and similar indexing equipment, consider the following case
history. At a paint manufacturing facility, the case loader equipment
uses a push bar to insert finished cans of product into cardboard or
corrugated cases. The push bar is contained in a hollow cylindrical
housing positioned perpendicular to the conveyor line, and as each
can reaches a set point along the conveyor, the push bar extends and
inserts the can into a case on the opposite side of the conveyor. A
pneumatic or compressed air cylinder is used to motivate the push bar
in both directions (extension and retraction). During the noise survey
an average level or LAeq of 94 dBA was measured over a full duty cycle
of the push bar. Close observation of the process revealed the
loudest event occurred at the moment the push bar reached full
extension, where a heavy impact occurred at the end of its stroke.
Figure 4.13 exhibits the effect of the impact force (see the “Overall
level before adjustment”). This impact creates not only unnecessarily
high noise levels, but also causes excessive wear and tear on the
equipment. Therefore, to control the impact noise the following
options are recommended:
Option 1: Optimize the Pressure Setting:
Adjust the air cylinder for the push bar to its minimally acceptable
pressure setting needed to effectively perform the task. This setting
should be documented and maintained over time. In addition, quite
often employees may unnecessarily increase the equipment settings
without understanding the associated side effects such as an
increased noise level. Therefore, the employee education and training
component of the hearing conservation programme needs to include a
discussion about the noise control programme.

117.
specific information such as the required equipment settings, including
those of compressed air systems, the need to limit noise exposure,
and a candid explanation as to why employee cooperation is needed
to maintain all optimum settings, which are critical toward the success
of all noise controls over time. Note – Figure 4.13 shows the “Overall
level after adjustment,” which resulted in a 9 dBA reduction.
Figure 4.13 - Case loader noise levels before and after adjustment
Option 2: Cushion the Stops or Impact Points:
Should Option 1 not provide the desired effect, or be deemed
impractical, then another option for equipment motivated by air
cylinders or solenoid values would be to cushion the impact points with
a durable neoprene, polyurethane, or rubber pad or cushion.
Generally, a material having a shore-hardness on the order of 40-50 is
sufficient. However, it is advisable to verify this step with the
equipment manufacturer or their designated representative to ensure
the device will function as intended. Note – at times the actual impact
noise is generated within the air cylinder or valve, and here it is
necessary to insert the cushioned stops within the device.

118.
Another common impact noise arises from parts or product material
falling onto conveyor chutes, in vibratory feed bowls, hopper bins, etc.
The associated noise level will depend upon the potential energy prior
to the event. For example, parts dropping 10-20cm above a vibratory
feed bowl, which is typically a metal surface, will have more potential
energy and a higher impact noise than the same parts dropped a few
centimetres above the surface. Therefore, it is important to look for
ways to reduce or minimize the potential energy and free-fall height of
objects. Consider the example shown in Figure 4.14.
Figure 4.14 – Reduce potential energy by adding a slide transition from feed hopper into vibratory bowl
In this case history, metal ingots are delivered from a hopper via a
gravity feed trough into a lower vibratory bowl, which in turn vibrates to
orient and deliver parts to the next process station. The initial setup
had a 16cm drop between the feed trough and the top of the bowl.
The noise level at impact was approximately 93 dBA. To minimize the
free-fall height, and potential energy, a transition slide was added to
reduce the drop height to 6cm. This step reduced the impact noise by
5 dBA, with the resultant noise level on the order of 88 dBA. Bottom
line – always look for ways to reduce the potential energy between
impacting parts or components of machines and products.

119.
b) Pneumatic or Compressed Air Systems
High-velocity air from compressed air and pneumatic devices such as
air valves, solenoids, or air cylinders is one of the most common noise
sources within manufacturing equipment. The case history described
above for the paint can case loader is a prime example as to how
these air cylinders are used to actuate or move components within a
machine, except the source of noise there was due to push bar
impacts. However, in many air valve set ups it is the direct exhausting
of compressed air to atmosphere that generates excessive noise.
Additional compressed air applications involve the use of air guns or
nozzles, which are used to clean parts, blow off debris, and/or eject
product from a conveyor line.
The high noise levels are generated as the high-velocity compressed
air is mixed with the relatively still atmospheric air causing excessive
turbulence. The most dramatic noise level occurs whenever
compressed air encounters a sharp object, such as an edge of the
machine‟s casing or the product itself. It is important to note the
intensity of sound is proportional to the 8th power of the velocity of air
flow (Lord et al., 1980). Consequently, the first step in controlling
compressed air noise is to reduce the air velocity to as low a value as
practical. This adjustment can result in noise reductions on the order
of 5-20 dB. For example, consider the data exhibited in Figure 4.15
that was measured at a machine which forms the tapered necks on
aluminium cans. This equipment utilized a compressed air line to load
or move cans into position. The initial setting of the air regulator was
55 pounds per square-inch gauge (psig), which was desired by the
equipment operator, and resulted in an overall noise level of
approximately 122 dBA one foot from the source. By throttling down
the air pressure to 30 psig, the sound level dropped to 111 dBA at the
same measurement location. Finally, the air pressure was set to
20 psig, which was recommended by the equipment manufacturer,
and the noise level decreased to 103 dBA.

120.
Simply by re-setting the air pressure to the manufacturer‟s
specification of 20 psig the initial sound level was reduced by 19 dBA
and the equipment still functioned properly. This control measure did
not cost anything; in fact, there was an energy savings in the
company‟s cost for producing compressed air. Granted 103 dBA is
still excessively high, but it is a dramatic improvement over the original
condition. As previously mentioned in the case loader case history, it
is vital to educate and train all machine operators and maintenance
personnel on the need to run their equipment at the optimum settings
needed for production. It is common for an operator to unnecessarily
increase the air pressure in an attempt to deliver more power, when in
fact this higher pressure setting likely does not increase production,
but almost always generates a significantly higher noise level.
Figure 4.15 - Necker can infeed with air pressure set to 55, 30, and 20 psig. A difference in sound level of 19 dBA exists
between the high and low pressure setting.
c) High Velocity Fluid or Gas Flow
High-velocity fluid flow in pipe lines can often create excessive noise
as the transported medium passes through control valves or simply
passes through the piping. Frequently, noise is carried downstream
by the fluid, and/or vibratory energy is transferred to the pipe wall.

121.
A comprehensive acoustical survey can separate out the actual
source, which will help identify the appropriate noise control measures.
When deemed practical, some effective modifications for high-velocity
fluid or gas flow noise include:
Locate control valves in straight runs of pipe,
Locate all L‟s and T‟s at least 10 pipe diameters downstream of a
valve,
Ensure all pipe cross section reducers and expanders are at an
included angle of 15-20 degrees,
When choke valves are used in the line, turbulent mixing of the
medium will almost always exist and create excessive noise,
which will propagate over long distances of pipe length
downstream of the valve. In other cases, acoustical insulation
and/or an in-line silencer are the only available noise control
options.
Eliminate sudden changes of direction and influx of one stream
into another,
Limit the fluid-flow velocity to a maximum of 9.15 metres per
second (30 feet per second) for liquids,
To help ensure noise levels will be less than 85 dBA due to flow
or velocity of the medium being transported through a pipe, the
following rule of thumb is useful:
Design the system such that the flow velocity (in feet/seconds)
does not exceed 100 times the square root of the specific volume
(in cubic feet/lb.) for gases and vapours.
Maintain laminar flow for liquids (keep the Reynolds Number less
than 1,200)
When vibratory energy is transferred to the pipe wall, use flex
connectors and/or vibration isolation for the piping system, and/or
acoustical insulation, and

122.
When excessive noise in the fluid can not be controlled by any of
the options above, then installation of an in-line silencer is
needed.
d) Surface or Panel Radiated Noise
Machine casings or panels can be a source of noise when sufficient
vibratory energy is transferred into the metal structure and the panel is
an efficient radiator of sound. Typically, machine casings or large
metal surface areas have the potential to radiate sound when at least
one dimension of the panel is longer than 1/4th wavelength of the
sound. A thorough noise control survey will assist with identification of
the source of vibration and the existence of any surface radiated
sound. When a machine casing or panel is a primary noise source,
the most effective modification is to reduce its radiation efficiency. For
consideration, the following noise control measures should be
explored:
Use vibration isolation at the machine mountings
Divide vibrating surface areas into smaller sections,
Add stiffeners to large unsupported metal panels, such as
rectangular ducts or large machine casing sections,
Add small openings or perforations in large solid surfaces,
Use expanded metal, when practical, in place of thin metal
panels, and/or
Add vibration damping material to panels.
e) Vibration Damping
Vibration damping involves application of a material to the surface of a
structure to reduce its ability to vibrate and efficiently radiate airborne
noise. The primary use of vibration damping is to treat structural
resonances, which are inherent in systems comprised of stiffness and
mass.
123.
The noise reduction of all damping materials are in general frequency
and temperature dependent. In addition, damping materials have two
properties that affect the amount of noise reduction achieved when the
material is applied to a surface: the material loss factor, ηm, and
dynamic modulus, E' (Renninger, 1988; Ungar, 1988; Ungar and
Sturz, 1991; Rao, 1995). The material‟s loss factor is a measure of
how efficiently a product dissipates the energy stored in it and the
material's dynamic modulus is a measure of the material‟s stiffness
that comes into play when trying to predict the damping material's
effectiveness when applied to a surface.
Some common applications for vibration damping include:
Hopper bins and product chutes,
Thin metal machine casings or panels that radiate resonant
tones, such as pellet transfer lines, machine casings or panels,
compressor intake and exhaust ducts, etc.,
Metal enclosure walls,
Fan housings, and
Gearbox casings
f) Vibration Isolation
Most industrial equipment vibrates to some extent. Whether or not the
vibrating forces are severe enough to cause a problem needs to be
determined by comprehensive noise survey. As machines operate,
they produce either harmonic forces associated with unbalanced
rotating components, or impulsive forces attributed to impacts such as
punch presses, forging hammers, shearing actions, etc. Excessive
noise can be one result; however, more common is the potential
damage vibratory energy can cause to the equipment itself, the
building, and/or the product being manufactured.

124.
Quite often vibration problems are clearly identified by predictive-
maintenance programmes that exist within most industrial plants.
Assuming the root cause or source can not be effectively modified, the
next option for controlling undesirable vibration is to install vibration
isolation. Isolators come in the form of metal springs, elastomeric
mounts, and resilient pads. These devices serve to decouple the
relatively “solid” connection between the source and recipient of the
vibration. As a result, instead of the vibratory forces being transmitted
to other machine components or the building, they are readily
absorbed and dissipated by the isolators.
For selection of the appropriate isolation device(s), it is recommended
the expertise of trained professionals be used. It is critical to note that
improper selection and installation of isolators can actually make a
noise and vibration problem worse. Many manufacturers of vibration
isolation equipment have useful websites where existing problems can
be defined and solutions recommended.
Some common applications for vibration isolation are:
Pipe hangers,
HVAC equipment,
Flex connectors for piping systems,
Rotating machinery mounts and bases for electric motors,
compressors, turbines, fans, pumps, etc., and
Enclosure isolation.
g) Silencers
Silencers are devices inserted in the path of a flowing medium, such
as a pipeline or duct, to reduce the downstream sound level.
Typically, for industrial applications the medium is typically air.
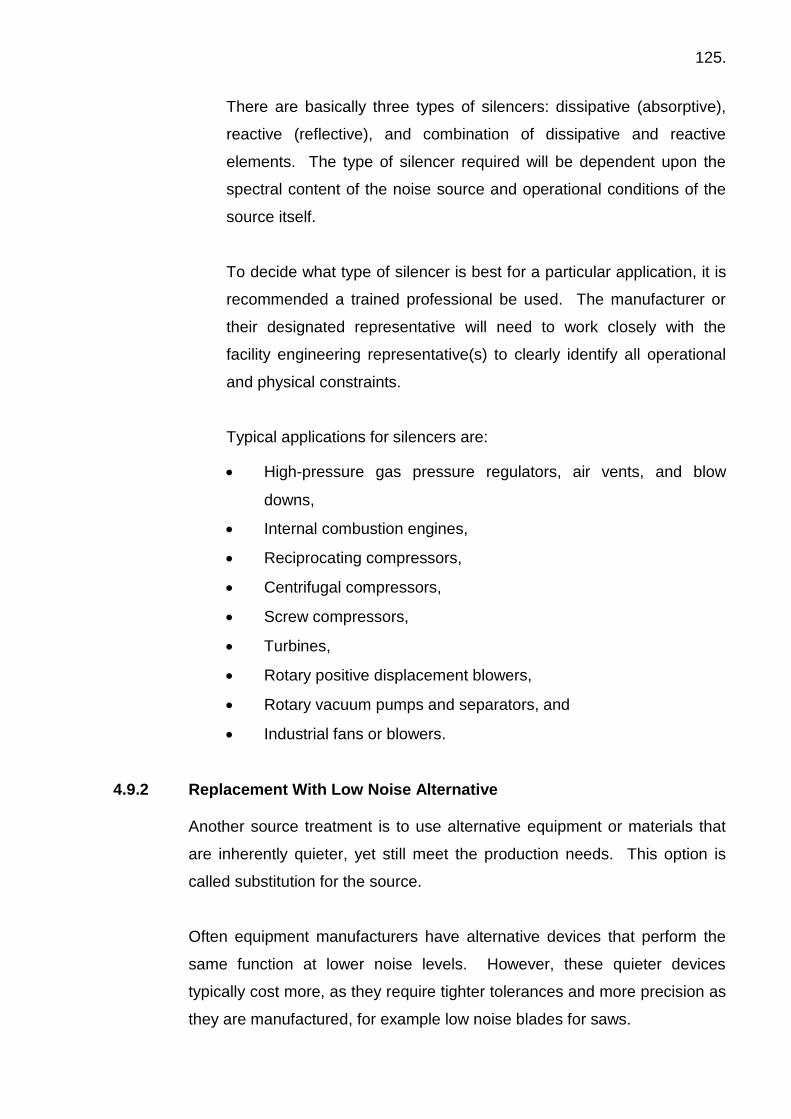
125.
There are basically three types of silencers: dissipative (absorptive),
reactive (reflective), and combination of dissipative and reactive
elements. The type of silencer required will be dependent upon the
spectral content of the noise source and operational conditions of the
source itself.
To decide what type of silencer is best for a particular application, it is
recommended a trained professional be used. The manufacturer or
their designated representative will need to work closely with the
facility engineering representative(s) to clearly identify all operational
and physical constraints.
Typical applications for silencers are:
High-pressure gas pressure regulators, air vents, and blow
downs,
Internal combustion engines,
Reciprocating compressors,
Centrifugal compressors,
Screw compressors,
Turbines,
Rotary positive displacement blowers,
Rotary vacuum pumps and separators, and
Industrial fans or blowers.
4.9.2 Replacement With Low Noise Alternative
Another source treatment is to use alternative equipment or materials that
are inherently quieter, yet still meet the production needs. This option is
called substitution for the source.
Often equipment manufacturers have alternative devices that perform the
same function at lower noise levels. However, these quieter devices
typically cost more, as they require tighter tolerances and more precision as
they are manufactured, for example low noise blades for saws.

126.
The supplier‟s or the manufacturer‟s website should be consulted to learn if
quieter equipment is available and at what additional cost.
Particular focus on quieter alternatives should be sought for:
Gears,
Bearings,
Fans or Blowers,
Control valves,
Trim valves,
Air compressors,
Pneumatic hand tools,
Air guns and nozzles,
Furnace burner nozzles,
Electric motors,
Pumps, and
Impact tools.
There may also be opportunities for alternative and quieter ways to
accomplish the task or intended service. Just some examples of source
substitution include using belt drives in place of gears, using an electric
motor to remove bolts etc in place of impacting and replacing omni-
directional fans on electric motors with unidirectional aerodynamic fans.
4.9.3 Treatment of the Sound Transmission Path
Assuming all available options for controlling noise at the source have been
exhausted, deemed infeasible, or simply do not provide sufficient noise
reduction, the next step in the noise control process is to determine ways to
treat the sound transmission path. Typical path treatments include adding
sound absorption materials to the room or equipment surfaces, sound
transmission loss materials between rooms, acoustical enclosures, barriers,
or any combination of these path treatments. Each treatment option is
described below.

127.
a) Sound Fields
It is important to understand and recognize how sound behaves as it
propagates from a source before determining the most effective way to
treat the sound transmission path. Consider the illustration shown in
Figure 4.16. As sound waves spread outward from a source (plotted
as log r) they pass through two regions, known as the free field and
reverberant field. In the free field, also termed the direct field, sound
travels in a direct line without any interruptions or reflections.
Conversely, in the reverberant field sound waves reflect off various
surfaces and add to the direct field sound waves causing an increase
in the sound level. The boundary between the direct field and
reverberant field varies as a function of frequency and according to the
absorption properties of the different surfaces encountered.
Therefore, the transition zone between the two sound fields does not
occur at a fixed location or distance from the source.
Figure 4.16 - Variation in SPL in an enclosed space with increasing distance from source

128.
In the near field SPLs will noticeably fluctuate with measurement
position. As a rule of thumb, the near field typically extends out from
the source up to a distance equal to one or two characteristic source
lengths (Lord et al., 1980). Next, to minimize the affect of the near
field, sound level measurements should be conducted at least one
wavelength from the source at the primary frequencies of concern.
For example the wavelength at 1,000 Hz is approximately 0.3 metres
so it is important to keep in mind that due to non-uniform sound wave
fluctuations, the near-field data may not be used to accurately
estimate or predict SPLs in the far field.
Further from the source in the free field the sound propagates as if
coming from a single source. Measurements taken outdoors with no
reflecting surfaces will display in theory, a 6-dB decrease in SPL for
every doubling of the distance from the noise source in the far-field
measurement region (free-field condition). In practice and in rooms
due to the non ideal nature of the sound fields the decrease is usually
less. But after a certain distance there will be a plateau in sound level
characterized by sound reflections in the reverberant field. This effect
is shown by the shaded region in the right-hand side of Figure 4.16.
When the sound wave reaches a solid surface some sound energy is
reflected, some absorbed and some transmitted, as illustrated in
Figure 4.17.

129.
Figure 4.17 - Sketch showing the different components of sound wave interaction with a solid surface
b) Sound Absorption Materials
Sound absorption materials can be used to reduce the buildup of
sound in the reverberant field. Any benefit from additional sound
absorption in the room will only be in the far field and not close to the
machinery (where the operator is often located).
From a conceptual viewpoint, adding sound absorption to the surfaces
of a room has both advantages and disadvantages as outlined below:
Advantages:
Can provide a reduction (up to 3 dB) in the reverberant sound
build-up, especially in pre-existing hard spaces,
Works best in relatively small volume rooms or spaces (less than
300 m3),
Can be purchased and installed at a reasonable cost, and
Works best on middle-to-high frequency noise.
Reflected
Incident
Transmitted
Absorbed
Flanking
130.
Disadvantages:
Room treatment does nothing to address the root cause of the
noise problem,
Can interfere with facility lighting, ventilation, and/or sprinkler
patterns,
Does not reduce any noise due to direct sound propagation,
Will have no measurable benefit to employees working primarily
in the direct field,
Cleaning and maintenance of porous sound absorbing materials
can be problematic,
The materials can deteriorate over several years, and may need
periodic replacement (perhaps every 7-10 years), and
Rarely does this form of treatment eliminate the need for hearing
protection.
Figure 4.18 is an example of the effect of sound absorption in a large room
as the distance from the source is increased.
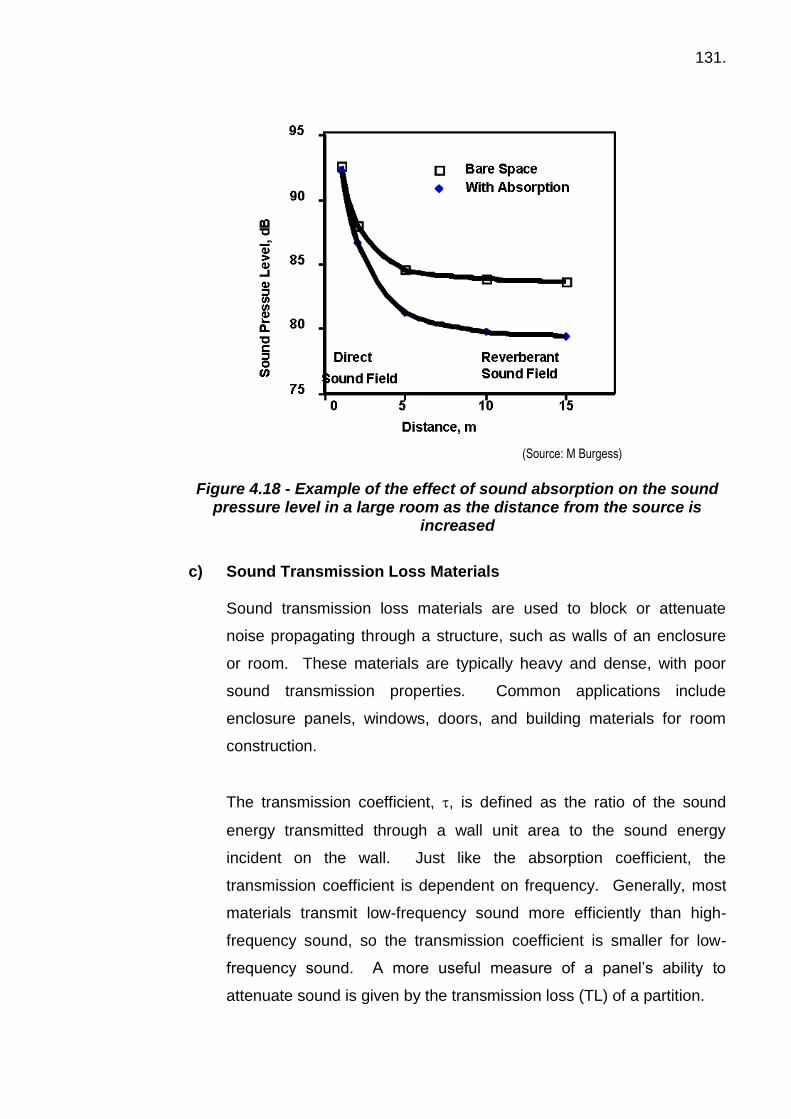
131.
(Source: M Burgess)
Figure 4.18 - Example of the effect of sound absorption on the sound
pressure level in a large room as the distance from the source is increased
c) Sound Transmission Loss Materials
Sound transmission loss materials are used to block or attenuate
noise propagating through a structure, such as walls of an enclosure
or room. These materials are typically heavy and dense, with poor
sound transmission properties. Common applications include
enclosure panels, windows, doors, and building materials for room
construction.
The transmission coefficient, , is defined as the ratio of the sound
energy transmitted through a wall unit area to the sound energy
incident on the wall. Just like the absorption coefficient, the
transmission coefficient is dependent on frequency. Generally, most
materials transmit low-frequency sound more efficiently than high-
frequency sound, so the transmission coefficient is smaller for low-
frequency sound. A more useful measure of a panel‟s ability to
attenuate sound is given by the transmission loss (TL) of a partition.

132.
It is important to note that the sound transmission loss performance
only applies when the construction is a complete partition, ie sealed to
the surroundings all around the perimeter.
Single-number ratings are often utilized as a specification for
acoustical performance of a partition or wall, and are commonly used
by engineers or architects when selecting materials for reducing sound
transmission between two areas or rooms.
There are two common methods for providing a single-number rating
of sound transmission loss.
ISO 717, Acoustics Ratings of Sound Insulation in Buildings and
of Building Elements, or regional or national variants on this
standard define the Weighted Sound Reduction Index (Rw).
ASTM 90, Standard Test Method for Laboratory Measurement of
Airborne Sound Transmission Loss of Building Partitions, define
the Sound Transmission Class (STC). Both methods produce
comparable, but not identical results.
Essentially, the test panel is placed in an opening in a wall separating
two adjacent reverberant rooms. A random noise generator is used to
introduce a high-volume sound in one room, which results in a portion
of the sound energy being transmitted through the test panel into the
second (receiving) room.
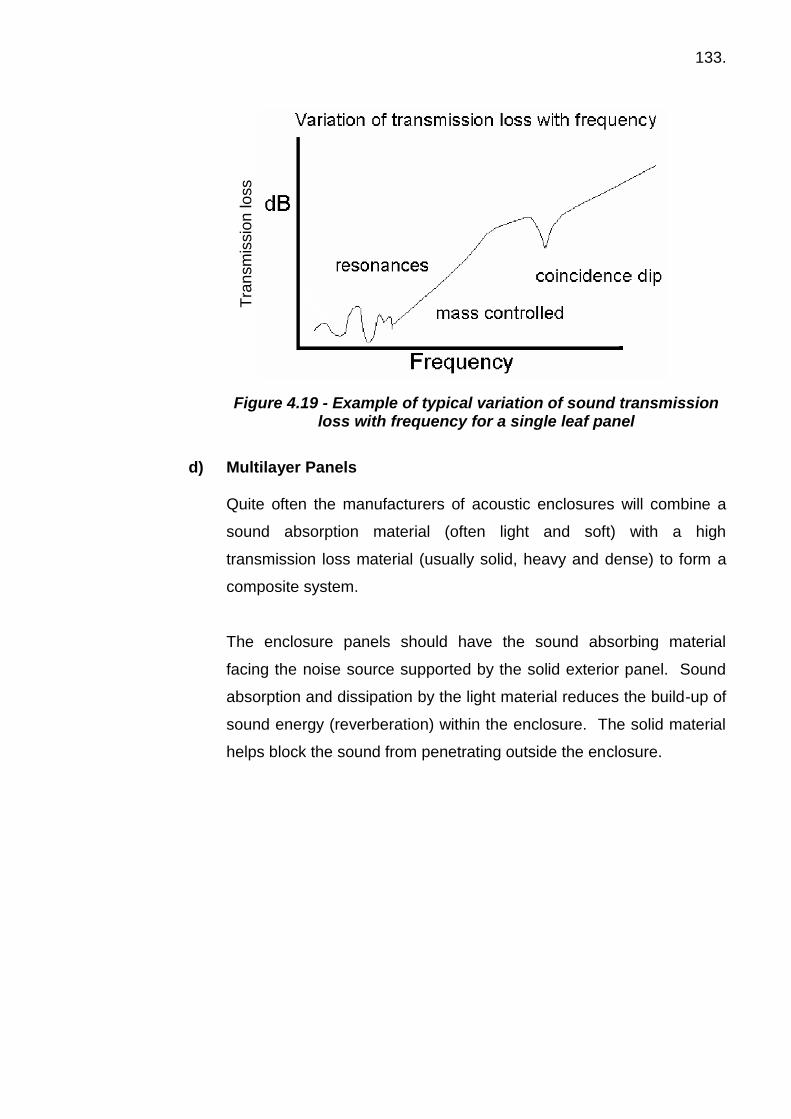
133.
Figure 4.19 - Example of typical variation of sound transmission loss with frequency for a single leaf panel
d) Multilayer Panels
Quite often the manufacturers of acoustic enclosures will combine a
sound absorption material (often light and soft) with a high
transmission loss material (usually solid, heavy and dense) to form a
composite system.
The enclosure panels should have the sound absorbing material
facing the noise source supported by the solid exterior panel. Sound
absorption and dissipation by the light material reduces the build-up of
sound energy (reverberation) within the enclosure. The solid material
helps block the sound from penetrating outside the enclosure.
Tra
nsm
issio
n lo
ss
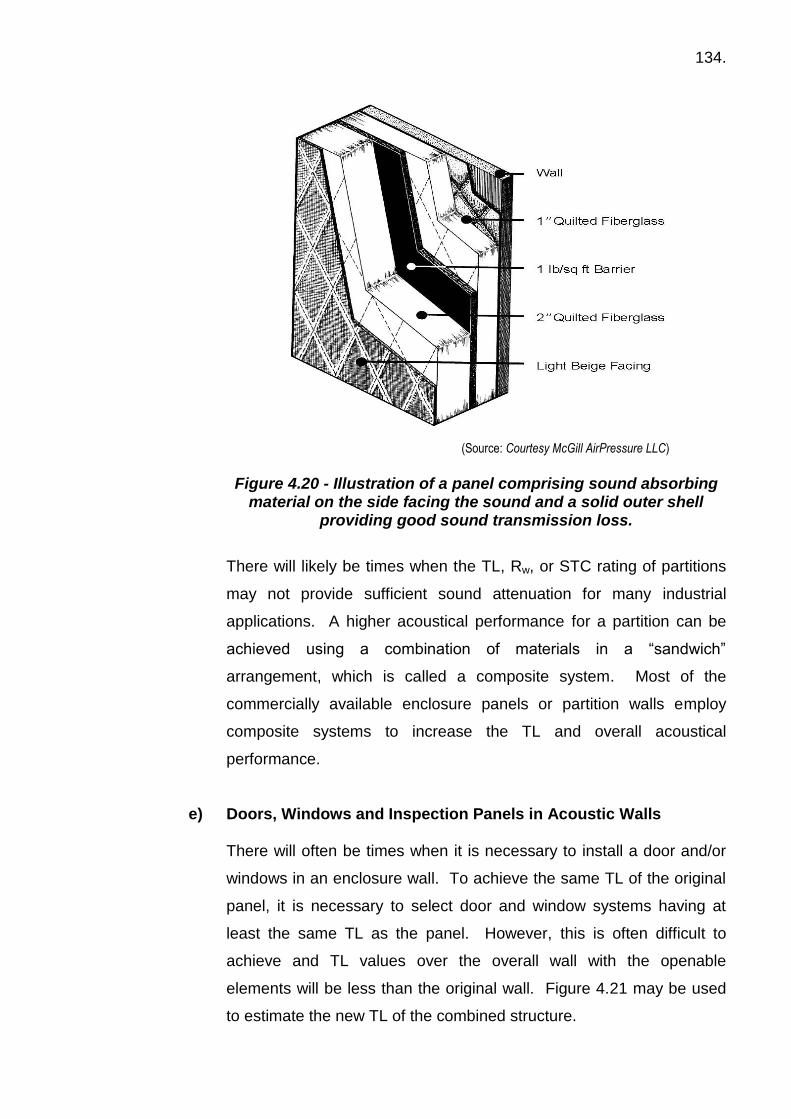
134.
(Source: Courtesy McGill AirPressure LLC)
Figure 4.20 - Illustration of a panel comprising sound absorbing
material on the side facing the sound and a solid outer shell providing good sound transmission loss.
There will likely be times when the TL, Rw, or STC rating of partitions
may not provide sufficient sound attenuation for many industrial
applications. A higher acoustical performance for a partition can be
achieved using a combination of materials in a “sandwich”
arrangement, which is called a composite system. Most of the
commercially available enclosure panels or partition walls employ
composite systems to increase the TL and overall acoustical
performance.
e) Doors, Windows and Inspection Panels in Acoustic Walls
There will often be times when it is necessary to install a door and/or
windows in an enclosure wall. To achieve the same TL of the original
panel, it is necessary to select door and window systems having at
least the same TL as the panel. However, this is often difficult to
achieve and TL values over the overall wall with the openable
elements will be less than the original wall. Figure 4.21 may be used
to estimate the new TL of the combined structure.

135.
Figure 4.21 - Composite transmission loss of walls with windows and/doors
Using this chart the effect on the overall TL of adding a component
with a low TL to a wall that has a high TL can be found as shown in
Figure 4.22. Even just a small area of window with the lower TL of 20
reduces the overall TL of the wall from 50 to 29 dB. Doubling, tripling
etc the area of low TL window only makes further small reductions in
the overall TL. The important message here is that it only takes very
small areas of wall with a lower TL to have a great effect on the noise
reduction properties of an enclosure wall.

136.
Sound reduction 50 dB Sound reduction 29 dB Sound reduction 25 dB
Sound reduction 23 dB Sound reduction 20 dBSound reduction 22 dB
Figure 4.22 - Effect of increasing window size on TL
f) Acoustical Enclosures
The acoustical enclosure is probably the most common path
treatment. Quite often enclosures are used to address multiple noise
sources all at once, or when there are no feasible control measures for
addressing the source.
Example - Determining the Composite Transmission Loss of an Enclosure Wall with a Window. A window is inserted into an enclosure wall. The TLs of the wall and window are 33 dB and 18 dB, respectively. The window occupies 10% of the total surface area of the wall. What is the composite TL?
Step 1. Determine the difference between the TLs of the wall and window. TL (wall) - TL (window) = 33 - 18 = 15 dB
Step 2. Use Figure and locate 15 dB along the vertical axis.
Step 3. Draw a horizontal line until it intersects with the 10% total area occupied curve.
Step 4. Extend a vertical line down until it meets the horizontal axis, which is at a point slightly above 6 dB.
Step 5. Subtract the approximate 6 dB resultant from the TL of the wall to obtain the effective TL of the composite wall.
TL (composite wall) = TL (wall) - 6 dB = 33 - 6 = 27 dB

137.
However, there are a number of pros and cons associated with this
form of noise control that should be considered by the user.
The pros of enclosures are as follows:
Does not require definitive identification of the source or root
cause of the noise problem,
A well constructed enclosure (no acoustical leaks) can provide
20-40 dB of noise reduction,
Can be installed in a relatively short time frame,
Can be purchased and installed at a reasonable cost, and
Provides significant noise reduction across a wide range of
frequencies.
The cons are:
Worker visual and physical access to equipment are restricted,
Can be difficult to provide acoustic seal around opening for
product or connections for services,
Repeated disassembly and reassembly of the enclosure often
results in the introduction of significant sound flanking paths via
small gaps and openings along the panel joints,
Heat build up inside the enclosure can be problematic,
Internal lighting, gas detection, and/or fire suppression may need
to be incorporated into the design,
Can create a confined space and related entry concerns for
workers,
The long-term potential for internal surface contamination from oil
mist or other airborne particulate is an issue and must be dealt
with through periodic cleaning or replacement of the sound
absorption material,
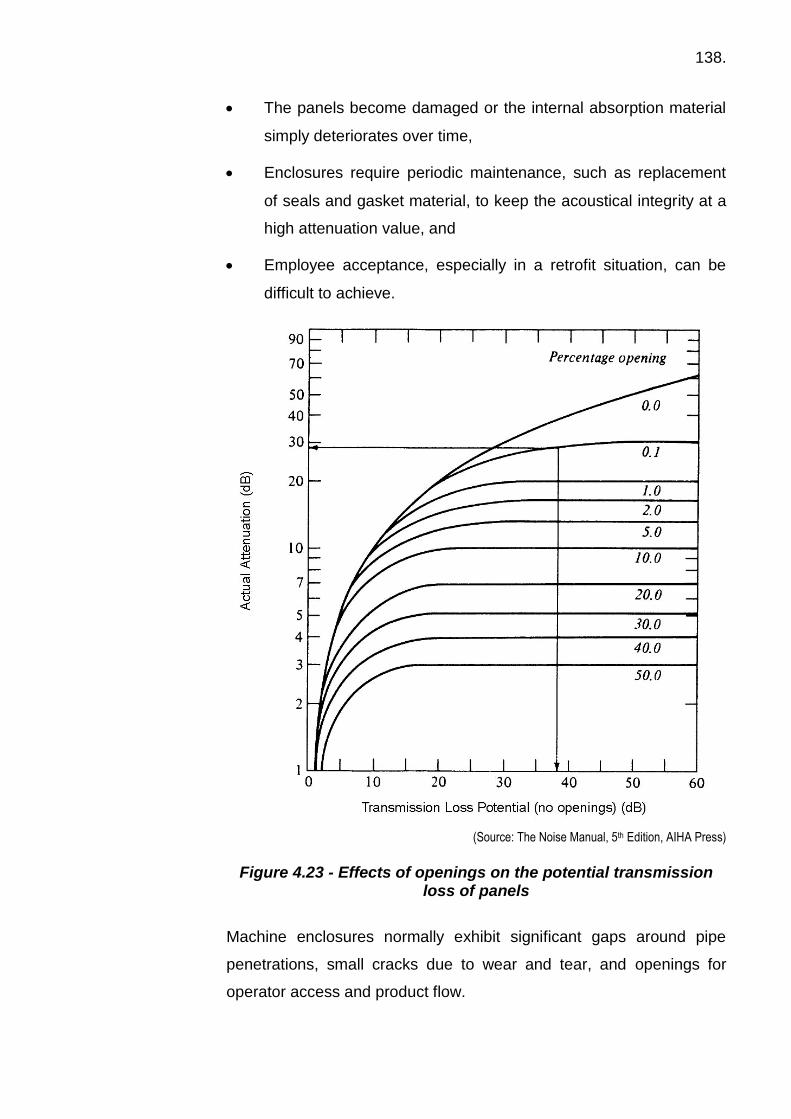
138.
The panels become damaged or the internal absorption material
simply deteriorates over time,
Enclosures require periodic maintenance, such as replacement
of seals and gasket material, to keep the acoustical integrity at a
high attenuation value, and
Employee acceptance, especially in a retrofit situation, can be
difficult to achieve.
(Source: The Noise Manual, 5th Edition, AIHA Press)
Figure 4.23 - Effects of openings on the potential transmission
loss of panels
Machine enclosures normally exhibit significant gaps around pipe
penetrations, small cracks due to wear and tear, and openings for
operator access and product flow.

139.
As a result, the actual noise reduction achieved will be less than that
estimated from the TL of the components alone. To account for
various openings in an enclosure panel, Figure 4.23 can be used to
estimate the actual TL. For example, in Figure 4.23 if a wall section
has a rated TL of 38 dB, and an opening on the order of 0.1 percent of
the surface area of the wall exists, the actual TL of the wall will be
28 dB. There is a 10-dB loss in potential TL due to this relatively small
opening. Therefore, to maintain the acoustical integrity of an
enclosure, it is critical to seal all cracks, gaps, and penetrations.
When it is necessary to have openings to permit product flow, it is
desirable to install an acoustically lined tunnel or chute over items
such as the conveyors. This will decrease the reduction in enclosure
TL due to these openings.
Similar principles apply to the construction of an enclosure around the
operator when it is not cost effective to install enclosures around the
noise sources. This enclosure then becomes a quiet space for the
operator who is required to wear hearing protection when it is
necessary to go into the main work area to attend to the equipment.
Guidelines for Building Acoustical Enclosures:
1. Enclosure Dimensions: There are no critical guidelines for the
size or dimensions of an enclosure. The best rule to follow is
bigger is better. It is critical that sufficient clearance be provided
between the noise source and enclosure panels to permit the
equipment to perform all intended movement without contacting
the enclosure and to allow for efficient ventilation, lighting,
maintenance, etc.
2. Enclosure Panels: The insertion loss or attenuation provided by
an enclosure is dependent upon the materials used in the
construction of the panels and how tightly the enclosure is
sealed.

140.
3. Seals: For maximum insertion loss all enclosure wall joints
should be tight-fitting. Openings around pipe penetrations,
electrical wiring, etc., should be sealed with flexible and non-
hardening mastic such as silicon caulk. It is critical to keep in
mind small openings in enclosures can significantly degrade the
acoustical performance. One of the most important people
around during the construction or installation of an enclosure is
the individual with a caulking or sealant gun.
4. Internal Absorption: To absorb and dissipate acoustical energy
the internal surface area of the enclosure should be lined with
sound absorbing materials. The manufacturer's published
absorption data provide the basis for matching the material
thickness and the absorption coefficients at each frequency to
the source frequencies with the highest SPLs. The product
vendor or manufacturer can also assist with selection of the most
effective material.
5. Protection of Absorption Material: To prevent the absorptive
material from getting contaminated, a splash barrier should be
applied over the absorptive lining. This should be of a very light
material, such as one-mil plastic film. The absorptive layer can
be retained if necessary with expanded metal, perforated sheet
metal, hardware cloth or wire mesh. However, the retaining
material must have at least 25 percent open area.
6. Enclosure Isolation: It is important the enclosure structure be
separated or isolated from the equipment to ensure mechanical
vibrations are not transmitted to the enclosure panels or any
surrounding surfaces, which can re-radiate noise. When parts of
the machine do come in contact with the enclosure, it is important
to include vibration isolation at the point of contact to minimize
any potential transmission path. If the floor vibrates due to
motion or movement of the machine, then vibration isolation
should be used under the machine.

141.
7. Product Flow: As with most production equipment, there will be a
need to move product into and out of the enclosure. The use of
acoustically lined channels or tunnels, can help minimize the loss
in attenuation due to the opening. As a rule of thumb, it is
recommended the length of all passageways be at least two
times longer than the inside width of the largest dimension of the
tunnel or channel opening.
8. Worker Access: Doors and windows may be installed to provide
physical and visual access to the equipment. It is recommended
ideas regarding the location and size of all doors and windows be
solicited from machine operators, which not only makes the
design more practical, but also improves the likelihood
employees will accept the enclosure system. It is important all
windows have nearly the same transmission loss properties as
the enclosure walls. All access doors should tightly seal around
all edges. To prevent operation of the equipment with the doors
open, it is recommended an interlocking system be included that
permits operation only when the doors are fully closed. To
facilitate access some industries support enclosures on hydraulic
lifts that can quickly move the enclosure out of the way.
9. Ventilation of Enclosure: In many enclosure applications, there
will be excessive heat build-up. To pass cooling air through the
enclosure, a quiet blower with sufficient air movement capability
should be installed on the outlet or discharge duct. Finally, the
intake and discharge ducts should be lined with absorptive
material.
10. Fire Prevention: Keep in mind that although most sound-
absorbing materials are listed as fire resistant, fires can and have
occurred when sparks and/or excessive internal heat ignites dust,
oil mist, etc., that accumulates on the surfaces of the material. In
addition, potentially harmful gas may be released by the burning
material, depending on its chemical composition.

142.
Therefore, if fire is a potential problem for your equipment and
enclosure application, it is recommended an internal fire
prevention or suppression system be installed, as is often
dictated by local fire codes.
Quite often for physical safety reasons, machines or components of a
machine are guarded with partial enclosures made from Lexan®,
Plexiglass®, or some other comparable polycarbonate material.
However, these guards often contain significant gaps or openings
along the panel edges that allow significant acoustical energy to
escape the enclosure. Although the intended purpose may be to
guard against personal injury, or some other function, it is entirely
possible to improve upon these partial enclosures to provide a
substantial noise reduction benefit. Consider the following case
history:
Figure 4.24 - Document feeder with Lexan® guards and covers. Note the small gaps along the covers’ edges and between
machine panels.
Figure 4.24 shows a document feeder, which is used to insert
documents into individual envelopes.
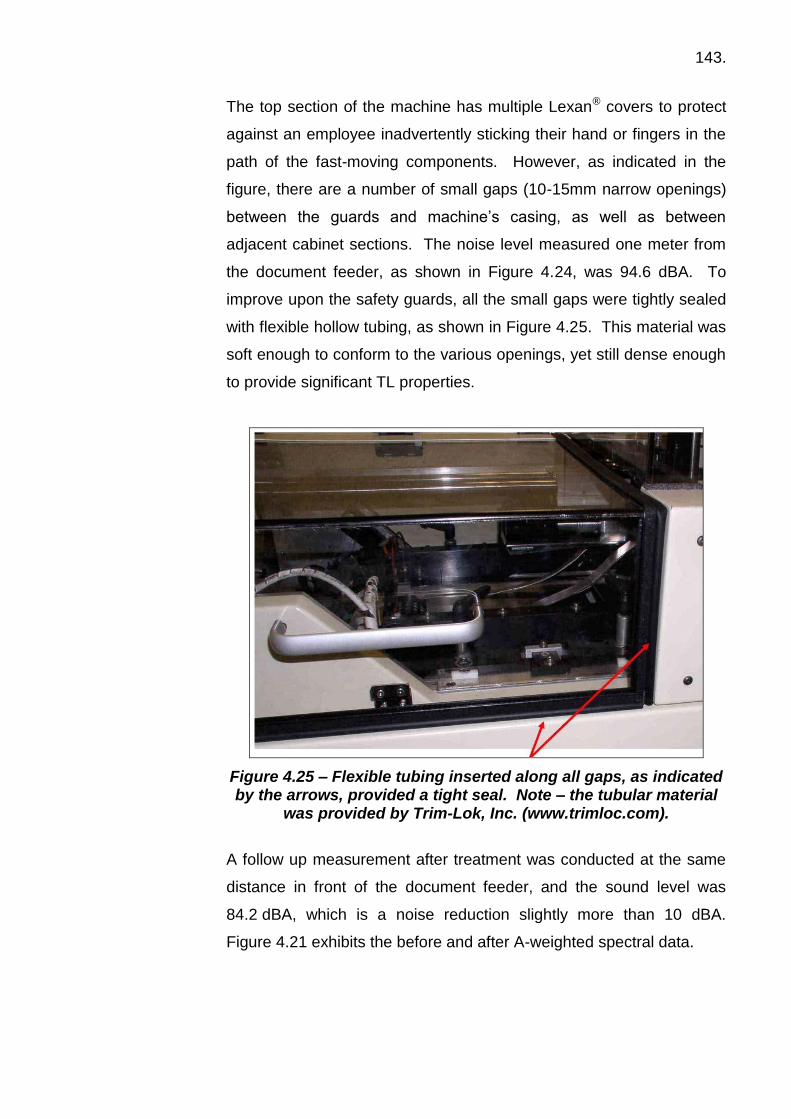
143.
The top section of the machine has multiple Lexan® covers to protect
against an employee inadvertently sticking their hand or fingers in the
path of the fast-moving components. However, as indicated in the
figure, there are a number of small gaps (10-15mm narrow openings)
between the guards and machine‟s casing, as well as between
adjacent cabinet sections. The noise level measured one meter from
the document feeder, as shown in Figure 4.24, was 94.6 dBA. To
improve upon the safety guards, all the small gaps were tightly sealed
with flexible hollow tubing, as shown in Figure 4.25. This material was
soft enough to conform to the various openings, yet still dense enough
to provide significant TL properties.
Figure 4.25 – Flexible tubing inserted along all gaps, as indicated by the arrows, provided a tight seal. Note – the tubular material
was provided by Trim-Lok, Inc. (www.trimloc.com).
A follow up measurement after treatment was conducted at the same
distance in front of the document feeder, and the sound level was
84.2 dBA, which is a noise reduction slightly more than 10 dBA.
Figure 4.21 exhibits the before and after A-weighted spectral data.

144.
Figure 4.26 – Flexible tubing effectively sealed off the sound flanking paths, and provided a noise reduction just over 10 dBA
The case history above discusses the use of flexible hollow tubing.
Some other materials useful for eliminating gaps or openings in safety
guards include felt strips, nylon brushes, weather stripping, silicone
caulk, flexible vinyl strips, heavy-duty duct tape, etc. When safety
guards are movable, to allow operator access, in most cases it is best
to attach the sealing material to the edges of the guard, which was the
case for the document feeder. In other instances, where the guards
do not move or need to be readily opened, the sealing material should
be tightly attached to both the guard edges and the machine to provide
optimum acoustical sealing.
g) Screens and Barriers
An acoustical barrier is a partial height partition inserted between the
noise source and receiver, as depicted in Figure 4.27, which helps
block or shield the receiver from the direct sound transmission path.

145.
Figure 4.27 - Illustration of a barrier wall inserted between the source and receiver
The noise reduction provided by a barrier is a direct function of its
relative location to the source and receiver, its effective dimensions,
and the frequency spectrum of the noise source.
The practical limits of barrier attenuation will range between 10-20 dB.
As a guide to maximizing the noise reduction capabilities of acoustical
barriers, the following recommendations are offered:
Locate the barrier as close as practical to either or both the
source and receiver,
The width of the barrier on either side of the noise source should
be at least twice its height (the wider the better),
The height should be as tall as practical above a notional line
between the source and receiver. This is the „effective height‟ of
the screen and indicated by the H on Figure 4.22.
The barrier should be solid and not contain any gaps or
openings, and
146.
If it is necessary to include a window for visual access to
equipment, then it is important for it to have similar noise
reduction properties to the main part of the partition.
h) Acoustical Insulation or Lagging
Airborne noise generated by piping systems is typically the result of
one or more of the following factors:
Noise in the liquid or gaseous medium being transported, which
radiates excessive acoustical energy through the pipe wall.
Vibratory energy transferred to the pipe wall, which may be an
efficient radiator of noise, and/or transfer of the vibratory energy
to other surface areas capable of radiating airborne noise.
Both forms of noise can result from: (1) the operation of rotating
equipment, such as compressors, pumps, etc., (2) control valves, (3)
excess velocity or turbulent flow within the medium being transported,
and (4) the movement of solid particles (i.e., resin pellets), all of which
transfer vibratory energy into the medium and/or the pipe wall.
Acoustical insulation, also known as lagging, is the most effective
noise control option whenever the pipe wall itself radiates a dominant
portion of the acoustical energy being transmitted, and an in-line
silencer is deemed to be infeasible. Note: the application of acoustical
insulation is not limited to pipes. For example, the same treatment
may be applied to fan housing, metal conveyor chutes, hopper bins,
and the like, as a means to absorb and attenuate sound transmission.
However, for purposes of discussion, the pipe application is used
primarily herein.
Pipe lagging consists of wrapping the exterior surface area of a pipe
with a sound absorption material (i.e., high-density fibreglass: greater
than 32 kg/m3, or 2 lb/ft3), then covering the absorptive material with a
jacketing material that has high sound transmission loss properties.

147.
Common absorption materials are fibreglass, acoustical foam, or
mineral wool. Aluminium (greater than1.4 mm thick), steel (greater
than 0.5 mm thick), or dense vinyl are typically used for the outer
barrier material. Figure 4.28 depicts two standard configurations for
pipes. In effect a tight-fitting cylindrical enclosure is formed around the
pipe line.
(Source: The Noise Manual, 5th Edition, AIHA Press)
Figure 4.28 - Standard configurations for single and double-layer
pipe insulation
Guidelines for Effective Acoustical Lagging Treatments
Configuration:
1. Provide a layer of resilient absorptive material between pipe
surface and outer shell of treatment. A layer of absorptive
material should be included; otherwise, there will not be anything
to absorb and dissipate the radiated sound energy.
2. Avoid any mechanical coupling between pipe surface and outer
shell of treatment, otherwise a transfer of vibratory energy may
occur, which in turn enables the outer shell to become a source
of sound radiation.
148.
3. Seal all edges and joints airtight. Even extremely small openings
(on the order of 0.1% of the total surface area) can significantly
degrade the noise reduction achieved. Recall Figure 4.18 for
small openings in enclosures - it also applies to the installation of
acoustical lagging.
4. Use special materials for high temperature applications. Select a
material that will not burn, melt, or decay from exposure to heat
and/or moisture.
5. To help absorb low-frequency energy a relatively thick layer of
absorption material is required (on the order of 10-15 cm). Recall
that low frequencies have relatively long wave lengths when
compared to higher frequencies, which makes it difficult to
attenuate noise at these lower frequencies.
6. Some means to avoid accumulation of condensation should be
included for cold piping. Usually drain taps are sufficient to
remove condensation.
Fabrication:
1. For thin-shelled pipes (wall thickness of 6 mm or less) apply a
layer of damping material or compound directly on the pipe‟s
outer surface. This damping treatment is not recommended for
thicker pipe walls (greater than 6 mm), as the wall thickness is
usually sufficient enough to minimize any potential resonant
tones.
2. Wrap the pipe with absorptive material.
3. Encapsulate the acoustical absorption material with lightweight
metal sheathing.
4. Overlap outside shell edges, compress the acoustical material
slightly and bond the joints.
5. Fill in irregular cross sections with loose acoustical material to
provide a uniform outer surface.

149.
4.10 ADMINISTRATIVE NOISE CONTROLS
Administrative noise controls involve management decisions that affect
worker noise exposure in a positive manner. These decisions may involve
one or more of the following actions:
Scheduling of shifts and to minimise exposure times
Reallocation of noisy tasks to more controllable areas
Analysis of work flows to minimise interaction between quiet and noisy
tasks
Institute proper use of noise refuge areas or control rooms
Equipment automation, remote control, and/or remote monitoring
Introduce maintenance and servicing schedules which ensure the
acoustic performance of equipment is maintained
Purchase and/or design specifications for limiting noise levels
Keep workers away from noisy areas whenever possible
For example, rotating two or more employees through a job activity with
high noise levels actually distributes the daily exposure among the
participants, thus lowering the overall exposure that would have been
received by a single worker. Another method of reducing exposure is to
isolate the worker in an acoustical booth or control room, assuming the job
activities require the worker to be stationary for extended periods of time.
These actions, as well as other ideas, are described below in more detail.
The principal difficulty with implementation of administrative controls is they
often require significant training and cooperation of both workers and
management to insure work schedules are followed, equipment is
maintained in good working order, purchase specifications are enforced,
etc. To overcome this difficulty or challenge, all employees, including
management, need to receive formal instruction.
150.
This needs to include a discussion about the facility‟s noise control
programme, specific information on each administrative control, and a
candid explanation as to why employee cooperation is needed to maintain
the success of all engineering and administrative controls over time.
The most important factor when evaluating the practicality of administrative
noise controls is to assess the amount of potential reduction in worker
exposure that can be effectively achieved. In other words, do the benefits
justify the costs, or would it be better to invest the funds in engineering
controls, or other actions? Therefore, all constraints will need to be
examined to determine whether or not administrative noise control
measures are feasible.
4.10.1 Changes to Employee Work Routine
Changing employee work routines is one way to affect noise exposure.
Rotating two or more employees through a job activity with high-noise levels
actually distributes the daily exposure among the participants. However,
rotating employees in this manner will at least double the number of
employees exposed to the source(s) of concern, and this procedure should
only be implemented if the resultant noise exposures for the affected
workers are still at safe or acceptable levels.
Figure 4.29 - Worker rotation used to distribute the daily noise exposure
151.
For example, Figure 4.29 exhibits a minute-by-minute time-history noise
exposure profile for an employee rotating through several work stations.
The facility is a glass bottle recycling centre. Before any administrative
controls were implemented, each worker performed one or two specific
tasks throughout the workday. The employee at the Waterknife station
spent the full shift at this location and had an LEX,8h of 105 dBA (Note: LEX,8h
is also known as LAeq,8 in some countries), which is an exceptionally high
noise exposure. There were two other operators, who split time between
the Bottle Puller, Saw Assist and De-palletizer (DPL) Assist stations. Both
workers‟ LEX,8h were approximately 91 dBA. Therefore, a job-rotation
schedule was devised and implemented to limit the time spent at the
Waterknife. Five separate tasks, lasting 30 minutes each, were set as the
rotation schedule.
These assignments were (1) Clean-up/Break, (2) Bottle Puller, (3) Saw
Assist, (4) Waterknife, and (5) DPL Assist. This cycle is repeated three
times per workday, with an additional 30 minutes of clean-up added to the
end of the shift (see Figure 4.23). As a result, the Waterknife operator‟s
LEX,8h is reduced from 105 dBA to 94 dBA, and the two 91 dBA exposures
are raised to 94 dBA. Granted the resultant exposure for the Waterknife
operator is still above 90 dBA; however, this lower exposure presents a
more manageable risk as part of the HCP. As for the elevated LEX,8h for the
two other operators, management decided this was acceptable on a
temporary basis until engineering controls could be implemented.
Professional judgment is required when designing a job-rotation schedule.
It is critical no additional workers be added to the HCP, or the affected
workers presently exposed to noise do not have their noise exposure raised
to levels where hearing protection is rendered potentially ineffective.
Toward this latter goal, if the resultant LEX,8h are kept to 95 dBA or less,
practically any hearing protector will be sufficient provided the device fits
well and is worn consistently and correctly.

152.
Table 4.1 provides another example of administrative control. The LAeq,3 h
for each category of performer in an orchestra for a particular program of
music has been used to determine the LAeq,8h for one and for two
performances in the one day. For some members the noise exposure
would become excessive if they played in two performances so rosters were
implemented as part of a noise management plan.
Table 4.1 - Example of the noise exposure for different members of an orchestra for one and two performances of a particular programme
Measured
Position
Performance LAeq,T dB 3h
1 performance gives LAeq,8
Daily
2 performances gives LAeq,8
Daily
1 Conductor 82 78 81
2 Strings 84 80 83
3 Strings 84 80 83
4 Brass 90 86 89
5 Strings 85 81 84
6 Strings/Harp 88 84 87
7 Bass 85 81 84
8 Wood 90 86 89
8a Horn right 90 86 89
9 Percussion 87 83 86
Requirement 85 85
(Source: K Mikl)
4.10.2 Planning the layout of the work area
Noise control by location of the source should be considered for the design
and equipment layout of new plant areas and for reconfiguration of existing
production areas. A simple rule to follow is to keep machines, processes,
and work areas of approximately equal noise level together; and separate
particularly noisy and particularly quiet areas by buffer zones having
intermediate noise levels. In addition, a single noisy machine should not be
placed in a relatively quiet, populated area.
153.
Reasonable attention to equipment layout from an acoustical point of view
will not eliminate all noise problems, but it will help minimize the overall
background noise level and provide more favourable working conditions.
Besides grouping equipment by like noise levels, the space density of
machines is also an important factor to consider. As sound waves spread
outward from a noise source, the sound level decreases with increasing
distance from the source, unless the room is total diffuse or reverberant.
Therefore, the closer machines are placed together, the greater the
opportunity for the buildup of sound energy due to multiple sources.
Similarly, the closer employees are to noisy equipment, the higher their
noise exposure. To effectively have a positive impact on worker noise
exposure, it is important to evaluate the interrelationship between the noise
source(s) and worker(s). One key fact to keep in mind is high noise levels
may exist and are acceptable, provided these levels do not contribute
significantly to worker noise exposure. This fact is often exhibited in
factories where large compressors are grouped together in a room by
themselves, isolated from any workers. Noise levels in these unmanned
compressor rooms can range from 95-105 dBA. However, the only people
exposed to compressor noise are maintenance or operating personnel that
conduct short excursions in the room to check gauges, inspect the
equipment, briefly clean up, etc., and then exit the space.
Another example can be seen in manufacturing plants. Specifically, when
workers service or operate production equipment, perhaps tending to a
number of stations up and down a manufacturing line, they will often walk or
move along the line approximately one meter away from the equipment.
When checking details the person may be very close to the machine and
hence exposed to much higher noise levels. By careful planning of the work
area, the machinery location and the controls this high noise exposure can
be minimised.
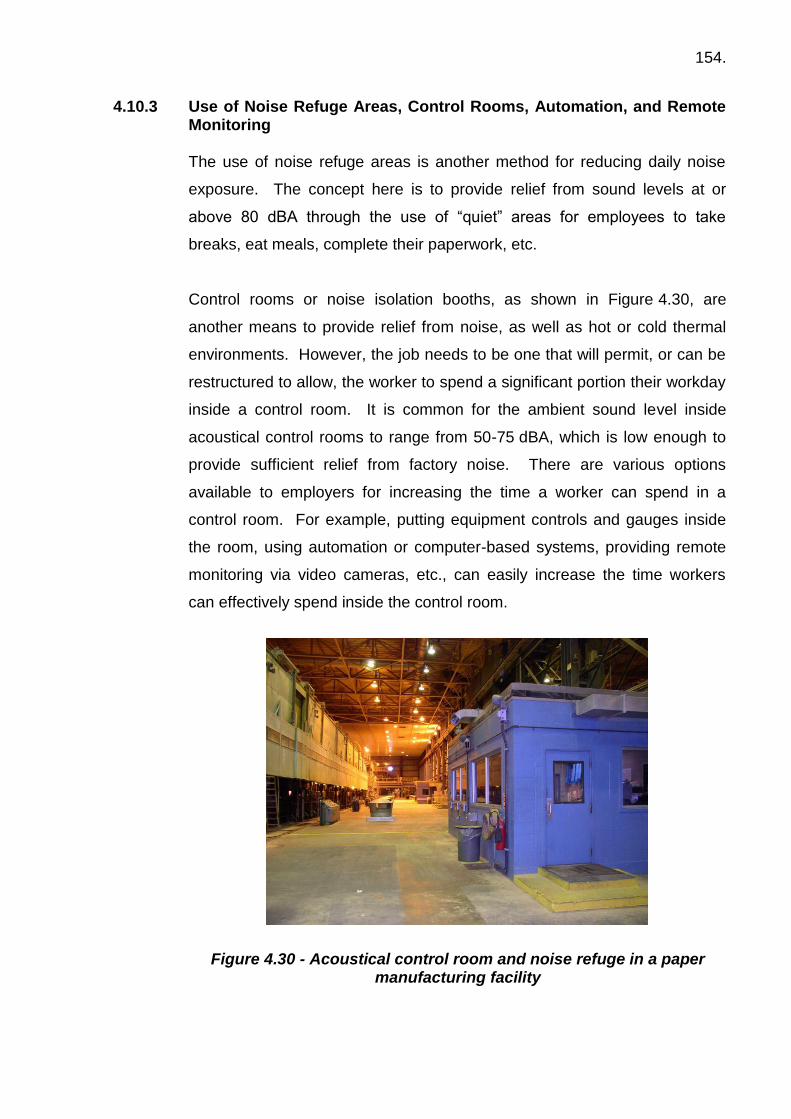
154.
4.10.3 Use of Noise Refuge Areas, Control Rooms, Automation, and Remote Monitoring
The use of noise refuge areas is another method for reducing daily noise
exposure. The concept here is to provide relief from sound levels at or
above 80 dBA through the use of “quiet” areas for employees to take
breaks, eat meals, complete their paperwork, etc.
Control rooms or noise isolation booths, as shown in Figure 4.30, are
another means to provide relief from noise, as well as hot or cold thermal
environments. However, the job needs to be one that will permit, or can be
restructured to allow, the worker to spend a significant portion their workday
inside a control room. It is common for the ambient sound level inside
acoustical control rooms to range from 50-75 dBA, which is low enough to
provide sufficient relief from factory noise. There are various options
available to employers for increasing the time a worker can spend in a
control room. For example, putting equipment controls and gauges inside
the room, using automation or computer-based systems, providing remote
monitoring via video cameras, etc., can easily increase the time workers
can effectively spend inside the control room.
Figure 4.30 - Acoustical control room and noise refuge in a paper manufacturing facility

155.
Control rooms or noise isolation booths are commercially available from the
majority of noise control product manufacturers that make acoustical
enclosures. Alternatively, the room or booth may be custom-designed and
fabricated in-house. For this latter item, the “Guidelines for Building
Enclosures” should be followed to ensure a high degree of attenuation is
achieved. To gain employee acceptance, it is always a good idea to include
their input in the decision process. When employees feel their ideas were
considered by management, they feel a sense of ownership and are
enthusiastic, or at least receptive, about working with this form of noise
control.
4.10.4 Regular Maintenance of Equipment
Equipment will often generate increased sound levels when it is in need of
adjustment, alignment, repair, etc. Therefore, maintaining all equipment at
its optimum performance condition should be the first step in any noise
control programme. Hand in hand with general mechanical maintenance,
which improves the performance and life-span of any piece of equipment,
an acoustical maintenance programme will ensure the equipment remains
within the noise limits specified by the company, or as the equipment should
generate under optimum conditions.
The following are recommended elements of an effective acoustical
maintenance programme:
Conduct an initial baseline sound level survey for each machine in
good working order while it operates under normal conditions. This
should consist of documenting the A-weighted sound level at fixed
locations for each machine or production line.
Talk to the operator as they often note the change in sound from the
machinery they work with
Periodically conduct a general sound survey of each machine, and
compare the operating sound level with the baseline sound level data.

156.
If noise generating elements are identified, or the sound levels indicate
at least an increase over the baseline data of 2 dBA, then appropriate
repair should be performed, and
Maintenance and operating personnel should be trained to observe
and listen for potential noise sources outside the norm for the
equipment of concern. They should become familiar with the noise
generating mechanisms of each machine and with the visual
inspection procedures. As part of an auditory and visual inspection,
the following checklist is useful:
1. A check should be made with each operator to identify any
machine problems that may be causing excessive time to be
spent at the machine.
2. All loose parts should be tightened and/or secured.
3. All machine controls should be checked for proper setting.
4. Air and steam leaks should be identified and fixed as soon as
possible.
5. All moving components should be checked for misalignment or
worn parts, such as bearings or belt drives.
6. Rotating parts should be checked for shaft alignment and
imbalance.
7. All regulators for compressed air or pneumatic cylinders should
be checked to ensure excessive impact forces do not occur at
each end of its stroke.
8. Compressed air mufflers or pneumatic silencers should be
checked to ensure they are in place and not damaged or
clogged.
9. The inspector or maintenance surveyor should listen for unusual
noises that may indicate component wear or other problems.
157.
When a noise-producing problem is identified during a visual and auditory
inspection, the problem should be corrected immediately if it involves only a
minor malfunction or adjustment, and even if the equipment appears to be
operating normally. If the problem requires more extensive attention, then it
should be labelled or tagged at the problem location and be scheduled for
service during the next maintenance round. Successful implementation of
an acoustical maintenance programme will ensure the correction of simple
and often overlooked noise problems. This process alone will yield
significant benefits in both the long-term life of the equipment and
minimizing the noise exposure risk to employees.
4.10.5 Noise Limits in Specifications
It is standard practice in today‟s business environment to use written
specifications to define requirements, including noise criteria, for equipment
procurement, installation, and acceptance. The most pro-active approach
to control noise in the facility design and equipment procurement stage
exists in Europe. In 1985, the twelve member states of the European
Community (EC) adopted "New Approach" Directives designed to address a
broad class of equipment or machinery, rather than individual standards for
each type of equipment. By the end of 1994 there were three "New
Approach" Directives issued that contained requirements on noise.
These Directives are: (1) Directive 89/392/EEC (EEC, 1989a), with two
amendments 91/368/EEC (EEC, 1991) and 93/44/EEC (EEC, 1993a), (2)
Directive 89/106/EEC (EEC, 1989b) and (3) Directive 89/686/EEC (EEC,
1989c), with one amendment 93/95/EEC (EEC, 1993b). The first item listed
above (89/392/EEC) is commonly called the Machinery Directive. This
Directive was revised in 2006 (2006/42/EC) to include more precise
requirements for noise and vibration. The Machinery Directive compels
machine manufacturers to include equipment noise control as an essential
part of machine safety. As a result, there has been a major emphasis on
the design of low-noise equipment since the late 1980s by manufacturers
interested in marketing within the EC.

158.
Within the United States, ANSI has published a standard entitled:
“Guidelines for the Specification of Noise of New Machinery” (ANSI, 1992,
(R2002)). This standard is a useful guide for writing an internal company
noise specification. In addition, this standard provides direction for
obtaining sound level data from equipment manufacturers. Once obtained
from the manufacturer, the data may then be used by plant designers while
planning equipment layouts. Because of the various types of distinctive
equipment and tools for which this standard has been prepared, there is no
single survey protocol appropriate for the measurement of sound level data
by manufacturers. As a result, this standard contains reference information
on the appropriate sound measurement procedure for testing a variety of
stationary equipment types. These survey procedures were prepared by
the appropriate trade or professional organization in the United States
responsible for a particular type or class of equipment.
For companies outside the EC and United States attempting to implement a
voluntary buy-quiet programme, the degree of success achieved is largely
dependent upon the timing and commitment of the entire management.
The first step in the programme is to establish acceptable noise criteria for
construction of a new plant, expansion of an existing facility, and purchase
of new equipment.
For the programme to be effective, the specified noise limits should be
viewed by both the purchaser and vendor as an absolute requirement.
When a product does not meet other equipment design parameters, such
as size, flow rate, pressure, allowable temperature rise, etc., it will be
deemed unacceptable by company management. Similarly, the decibel limit
(noise criteria) should be included with the list of required design
parameters; otherwise, the effectiveness of the buy-quiet programme will be
tenuous at best.

159.
The earlier in the design process that consideration is given to the noise-
related aspects of a project or equipment purchase, the greater the
probability of success. In many situations the factory designer or equipment
buyer will have a choice of equipment types. Knowledge of the noise
characteristics of the various equipment alternatives will allow the buyer to
specify the quieter ones.
Besides selection of the equipment, consideration of noise early in the
equipment layout design is essential. The layout designer should exercise
caution and take into account the additive effect of multiple noise sources
within a room. Relocating equipment on paper during the design phase of a
project is much easier than physically moving the equipment later,
especially once the equipment is in operation.
Validation of noise criteria requires a cooperative effort between company
personnel from departments such as engineering, purchasing, industrial
hygiene, environmental, safety, and legal. For example, industrial hygiene,
safety and/or environmental personnel may determine the desired noise
levels for equipment, as well as conduct sound surveys to qualify
equipment. Next, company engineers may write the purchase specification,
as well as select quiet types of equipment. The purchasing agent will most
likely administer the contract, and rely upon company lawyers for assistance
with enforcement. Involvement from all these parties should begin with the
inception of the project and continue through funding requests, planning,
design, bidding, installation, acceptance, and commissioning.
Even the most thorough and concise specification document is of little value
unless the onus of compliance is placed on the supplier or manufacturer.
Clear contract language should be used to define the means of determining
compliance. Company procedures designed to enact guarantees should be
consulted and followed. It may be desirable to include penalty clauses for
noncompliance. Foremost in enforcement is the purchaser's commitment to
seeing that the requirements are met. Compromise on the noise criteria in
exchange for cost, delivery date, performance, or other factors should be
the exception and not the rule.

160.
5. HEARING PROTECTOR PROGRAMME
Hearing protection devices (HPDs) consist of earplugs, earmuffs or
combinations of these and are used to reduce the level of sound reaching
the inner ear. HPDs should be used in designated high-noise areas until
feasible engineering and/or administrative noise control measures
effectively reduce work place noise exposure levels to acceptable levels.
There are several broad types of hearing protectors and several methods of
rating them for their comparative performance. The quoted performance
can differ significantly from the real world performance and these
differences must be given careful consideration when setting up a Risk
Management Strategy based on Hearing Protectors.
HPDs are only effective when they are worn at all times when in a noisy
environment. Due to the exponential increase in hazard from a small
decibel increase in noise exposure, removal for only short periods will
significantly degrade their effective performance.
Effect of removal of HPD
60
70
80
90
100
110
0:00
1:00
2:00
3:00
4:00
5:00
6:00
7:00
8:00
Time
dB
inside protector
Outside Protector
HP off 5min
In Ear Cumulative Leq
(Source: K Mikl)
Figure 5.1 – Effect of Removal of Hearing Protection Devices
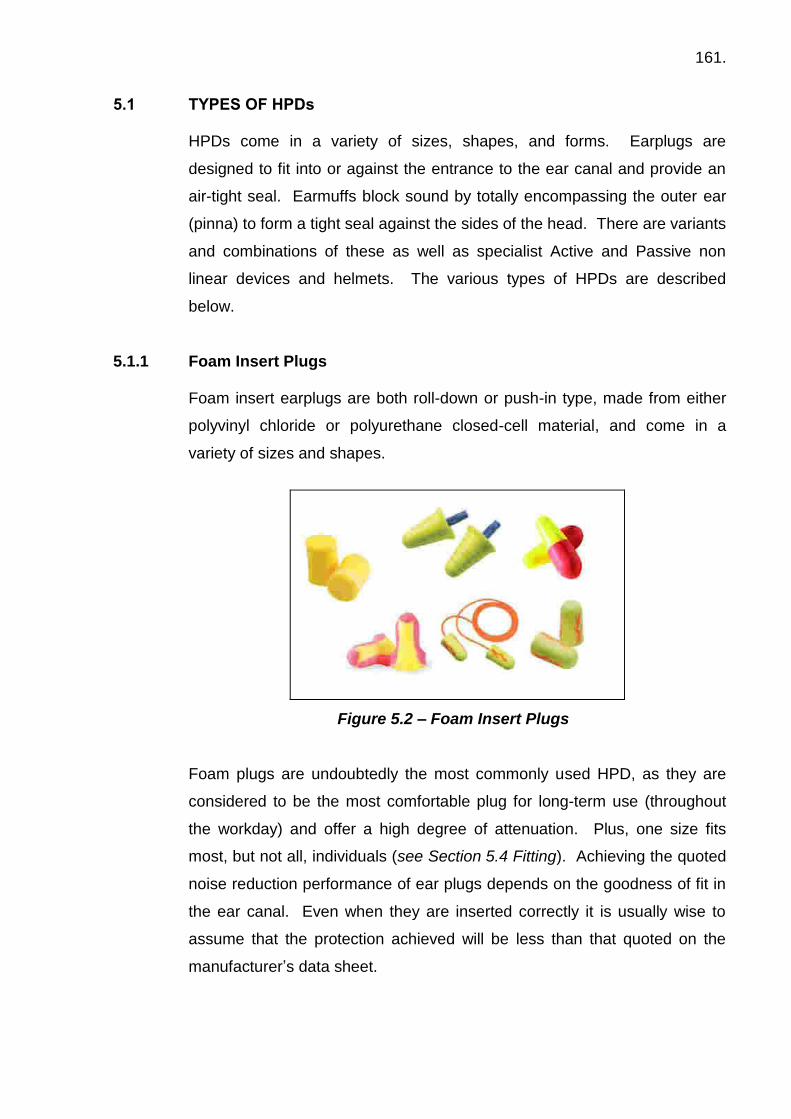
161.
5.1 TYPES OF HPDs
HPDs come in a variety of sizes, shapes, and forms. Earplugs are
designed to fit into or against the entrance to the ear canal and provide an
air-tight seal. Earmuffs block sound by totally encompassing the outer ear
(pinna) to form a tight seal against the sides of the head. There are variants
and combinations of these as well as specialist Active and Passive non
linear devices and helmets. The various types of HPDs are described
below.
5.1.1 Foam Insert Plugs
Foam insert earplugs are both roll-down or push-in type, made from either
polyvinyl chloride or polyurethane closed-cell material, and come in a
variety of sizes and shapes.
Figure 5.2 – Foam Insert Plugs
Foam plugs are undoubtedly the most commonly used HPD, as they are
considered to be the most comfortable plug for long-term use (throughout
the workday) and offer a high degree of attenuation. Plus, one size fits
most, but not all, individuals (see Section 5.4 Fitting). Achieving the quoted
noise reduction performance of ear plugs depends on the goodness of fit in
the ear canal. Even when they are inserted correctly it is usually wise to
assume that the protection achieved will be less than that quoted on the
manufacturer‟s data sheet.
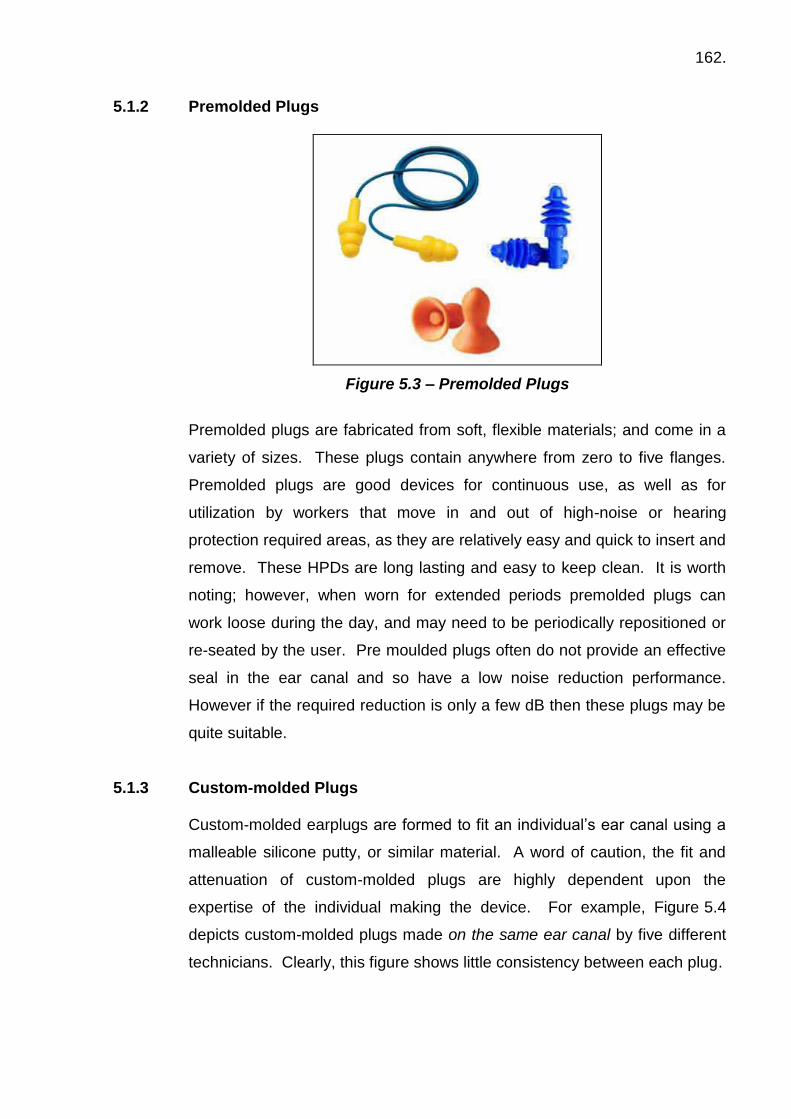
162.
5.1.2 Premolded Plugs
Figure 5.3 – Premolded Plugs
Premolded plugs are fabricated from soft, flexible materials; and come in a
variety of sizes. These plugs contain anywhere from zero to five flanges.
Premolded plugs are good devices for continuous use, as well as for
utilization by workers that move in and out of high-noise or hearing
protection required areas, as they are relatively easy and quick to insert and
remove. These HPDs are long lasting and easy to keep clean. It is worth
noting; however, when worn for extended periods premolded plugs can
work loose during the day, and may need to be periodically repositioned or
re-seated by the user. Pre moulded plugs often do not provide an effective
seal in the ear canal and so have a low noise reduction performance.
However if the required reduction is only a few dB then these plugs may be
quite suitable.
5.1.3 Custom-molded Plugs
Custom-molded earplugs are formed to fit an individual‟s ear canal using a
malleable silicone putty, or similar material. A word of caution, the fit and
attenuation of custom-molded plugs are highly dependent upon the
expertise of the individual making the device. For example, Figure 5.4
depicts custom-molded plugs made on the same ear canal by five different
technicians. Clearly, this figure shows little consistency between each plug.

163.
As with premolded plugs, custom devices will also need to be repositioned
from time to time throughout the day. Because of the high cost associated
with custom-molded devices, relative to foam or premolded plugs, the
employer needs to understand these devices are not permanent. They will
dry out, shrink, crack, become damaged, or even lost by the worker. So
there will be an associated replacement cost. A properly fitting custom
moulded plug can provide effective noise reduction and recent
developments offer the opportunity for „tuning‟ the performance of the plug
to better cope with the noise and any special hearing requirements of the
user.
(Source & Photo: Courtesy Aearo Technologies)
Figure 5.4 – Five Custom-molded Plugs made for the same ear canal by five different technicians
5.1.4 Semi-Insert or Canal Caps
Semi-insert type HPDs are essentially two soft earplugs or pods attached to
a narrow spring-loaded band that presses them against the entrance to the
ear canal.
Figure 5.5 – Semi-insert Device
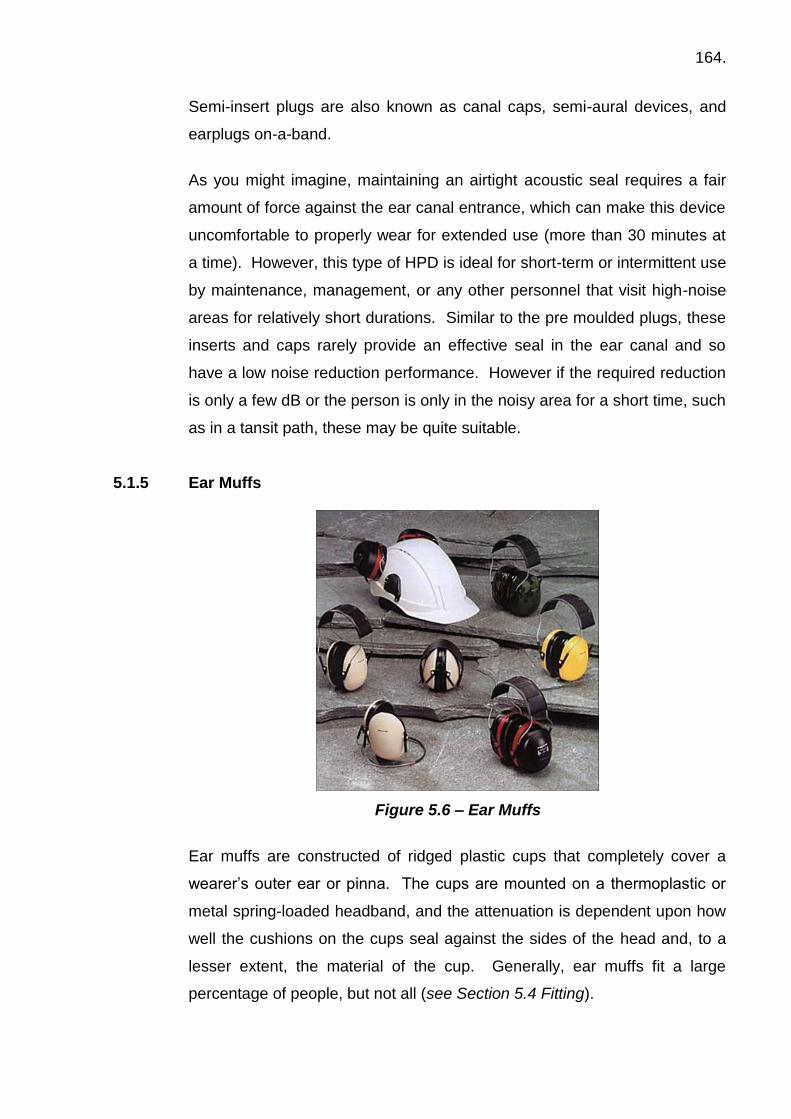
164.
Semi-insert plugs are also known as canal caps, semi-aural devices, and
earplugs on-a-band.
As you might imagine, maintaining an airtight acoustic seal requires a fair
amount of force against the ear canal entrance, which can make this device
uncomfortable to properly wear for extended use (more than 30 minutes at
a time). However, this type of HPD is ideal for short-term or intermittent use
by maintenance, management, or any other personnel that visit high-noise
areas for relatively short durations. Similar to the pre moulded plugs, these
inserts and caps rarely provide an effective seal in the ear canal and so
have a low noise reduction performance. However if the required reduction
is only a few dB or the person is only in the noisy area for a short time, such
as in a tansit path, these may be quite suitable.
5.1.5 Ear Muffs
Figure 5.6 – Ear Muffs
Ear muffs are constructed of ridged plastic cups that completely cover a
wearer‟s outer ear or pinna. The cups are mounted on a thermoplastic or
metal spring-loaded headband, and the attenuation is dependent upon how
well the cushions on the cups seal against the sides of the head and, to a
lesser extent, the material of the cup. Generally, ear muffs fit a large
percentage of people, but not all (see Section 5.4 Fitting).

165.
It is important to ensure compatibility of ear muffs with other personal
protective devices, such as face shields, safety glasses, hard hats, etc.
Well constructed and properly fitted ear muffs generally have a higher noise
reduction performance than plugs. However if the seals around the outer
ear is not good, the noise reduction provided by the muffs can be less than
that provided by good quality ear plugs. Also it should be noted that the
performance of cups mounted on hard hats do not usually provide as good
a seal as the same cups mounted on a headband. Consequently the
performance of hat mounted hearing protectors is less.
5.1.6 Combination of Ear Plugs and Ear Muffs
In very high noise areas it may be necessary to use both ear plugs and ear
muffs. In a work environment where the general noise level and working
environment is such that ear plugs are more suitable for the majority of the
time, ear muffs can be worn over the plugs for the shorter time periods of
higher noise level. It is important to realize that the performance of the
combination of the ear plug and ear muff is not determined by simply adding
the performance of each individually. Nor is it easy to calculate the
estimated performance due to the differences in performance across the
frequency spectrum of the different types of devices. The effectiveness of
the combination should be measured in a similar manner to the
measurement procedure for any HPD. Some manufacturers of a range of
HPD will have the data for the performance of the combination.
5.1.7 Special Purpose Protectors
Special types of HPDs are used to accommodate workers in differing
environments or special needs, such as;
Radio communication
Protection against extremely high noise environments
Devices which turn off and on automatically
Linear protection to provide good quality transmitted sound for
musicians
Devices with particular frequency response or
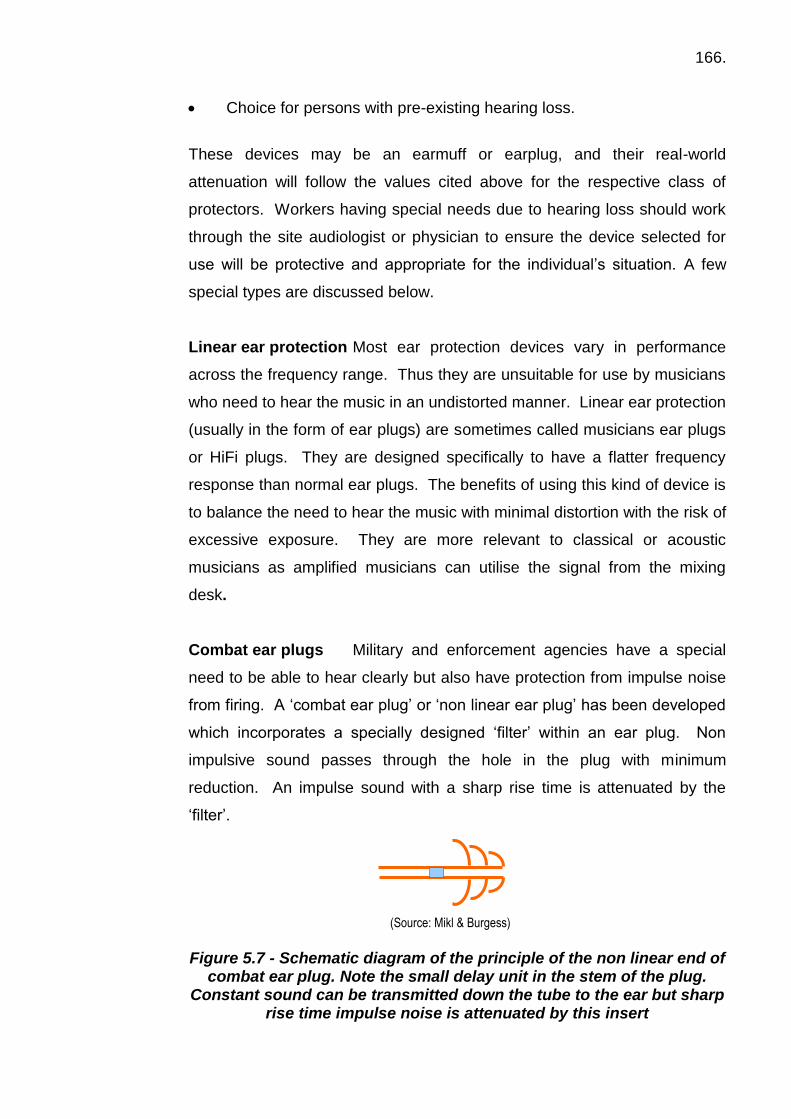
166.
Choice for persons with pre-existing hearing loss.
These devices may be an earmuff or earplug, and their real-world
attenuation will follow the values cited above for the respective class of
protectors. Workers having special needs due to hearing loss should work
through the site audiologist or physician to ensure the device selected for
use will be protective and appropriate for the individual‟s situation. A few
special types are discussed below.
Linear ear protection Most ear protection devices vary in performance
across the frequency range. Thus they are unsuitable for use by musicians
who need to hear the music in an undistorted manner. Linear ear protection
(usually in the form of ear plugs) are sometimes called musicians ear plugs
or HiFi plugs. They are designed specifically to have a flatter frequency
response than normal ear plugs. The benefits of using this kind of device is
to balance the need to hear the music with minimal distortion with the risk of
excessive exposure. They are more relevant to classical or acoustic
musicians as amplified musicians can utilise the signal from the mixing
desk.
Combat ear plugs Military and enforcement agencies have a special
need to be able to hear clearly but also have protection from impulse noise
from firing. A „combat ear plug‟ or „non linear ear plug‟ has been developed
which incorporates a specially designed „filter‟ within an ear plug. Non
impulsive sound passes through the hole in the plug with minimum
reduction. An impulse sound with a sharp rise time is attenuated by the
„filter‟.
(Source: Mikl & Burgess)
Figure 5.7 - Schematic diagram of the principle of the non linear end of
combat ear plug. Note the small delay unit in the stem of the plug. Constant sound can be transmitted down the tube to the ear but sharp
rise time impulse noise is attenuated by this insert
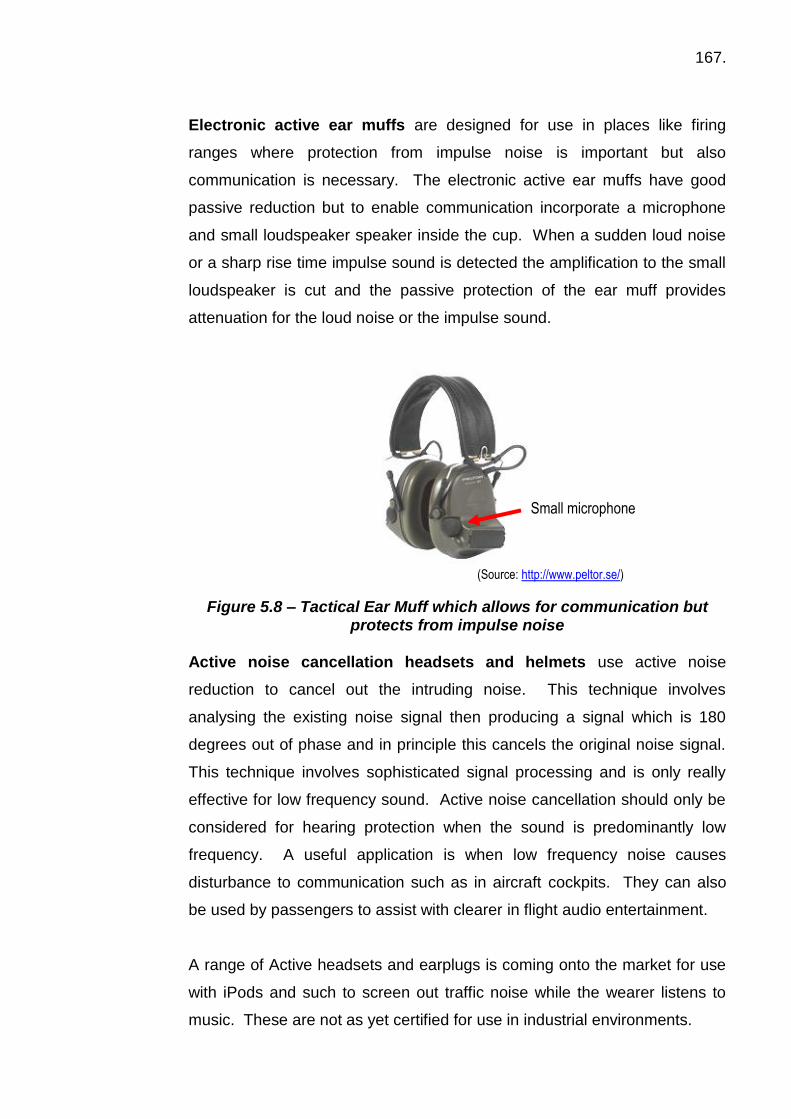
167.
Electronic active ear muffs are designed for use in places like firing
ranges where protection from impulse noise is important but also
communication is necessary. The electronic active ear muffs have good
passive reduction but to enable communication incorporate a microphone
and small loudspeaker speaker inside the cup. When a sudden loud noise
or a sharp rise time impulse sound is detected the amplification to the small
loudspeaker is cut and the passive protection of the ear muff provides
attenuation for the loud noise or the impulse sound.
(Source: http://www.peltor.se/)
Figure 5.8 – Tactical Ear Muff which allows for communication but protects from impulse noise
Active noise cancellation headsets and helmets use active noise
reduction to cancel out the intruding noise. This technique involves
analysing the existing noise signal then producing a signal which is 180
degrees out of phase and in principle this cancels the original noise signal.
This technique involves sophisticated signal processing and is only really
effective for low frequency sound. Active noise cancellation should only be
considered for hearing protection when the sound is predominantly low
frequency. A useful application is when low frequency noise causes
disturbance to communication such as in aircraft cockpits. They can also
be used by passengers to assist with clearer in flight audio entertainment.
A range of Active headsets and earplugs is coming onto the market for use
with iPods and such to screen out traffic noise while the wearer listens to
music. These are not as yet certified for use in industrial environments.
Small microphone

168.
Adaptive hearing protection is a relatively new concept that balances
speech enhancement with noise suppressions using sophisticated signal
processing. Sensear (www.sensear.com) has developed this technology
which can also be used to enable use of mobile phones and other
communication tools in a noisy environment.
5.2 SELECTION
Keep in mind when selecting HPDs there is no such thing as a “best”
hearing protector. The area noise levels, worker noise exposures,
communication needs, comfort, hearing ability, personal preference, and
interaction with other safety equipment all need to be considered when
selecting HPDs. In reality, the “best” HPD is the one that will be properly
used by workers at all times when working in high-noise areas.
As a minimum, the noise level under the protector should be reduced below
85 dBA. However, to avoid over protection it is recommended the level
under the protector be between 70-80 dBA. Overprotection can lead to a
feeling of isolation from the surroundings. Also, unnecessarily high
performance HPDs may be a little more uncomfortable and so there is a
tendency to remove them.
To achieve worker acceptance a variety of HPDs should be available. It is
recommended employees be allowed to choose from at least two different
types of ear plugs and ear muffs. However, even though employees may
select the type of earplug, they should not be allowed to choose the earplug
size without assistance from a properly trained individual.
169.
5.3 HPD SELECTION METHODS
There are a number of different methods used around the world to select
appropriate hearing protection. It is best to choose one method, if
appropriate or follow the local regulations. The methods each offer a
standardised way of comparing characteristics of different HPD and they do
not necessarily represent the in ear noise level in your workplace.
The methods range from the Octave band method to the single number
simple methods. They all have varying complexities in measurement of the
noise environment and calculating the appropriate HPD. The Octave band
method is the most complex and may be required for high noise level or
significantly tonal environments. Many regulations recommend the use of
the single number rating methods.
5.3.1 Octave-band Method The most precise method for estimating the “protected” level under the HPD
is to use the manufacturer‟s octave-band mean attenuation and standard
deviation data, along with the sound spectrum of the noise source(s), then
calculate a broadband level under the device. This method is commonly
known as the Octave-band Method or the Long Method and is considered
the gold standard for estimating performance for groups of users (Berger,
2000). In view of the variability in the real world performance, it should be
remembered that even though the calculation method may be precise, the
resultant is only an estimated “in-ear” level.
There are some variations but the common version of the Octave-band
Method de-rates the mean attenuation data of the HPDs at each frequency
by one standard deviation … to be conservative! The steps in the process
are:
● the A weighting is applied to each frequency of the linear spectrum for
the sound source to determine the A weighted level for each octave
band

170.
● one standard deviation is subtracted from each value across the
frequency spectrum for the quoted performance of the hearing
protector.
● the HPD performance minus one standard deviation is subtracted from
the A weighted levels across the frequency spectrum to estimate the in-
ear noise level
● the values for the in ear noise level across the frequency spectrum are
added using the usual dB addition rule and the overall A weighted
estimated in ear noise level is determined.
The following example demonstrates hearing protector evaluation using the
Octave-band Method.

171.
Example Calculation - Hearing Protector Evaluation Using Octave Band Method
1) In each octave band column sum the Noise level (line 1) and the A weighting (line 2) to calculate the A-weighted sound level of the source (line 3)
2) To determine the noise reduction of the protector, subtract one standard deviation (SD) from the mean attenuation specifications for the protector.
3) Subtract the mean minus one standard deviation (line 6) from the A-weighted sound level (line 3) to obtain the estimated in ear noise level (line 7)
4) Each of the octave band frequency values is added across the columns to determine the overall estimate of the in ear noise level in dBA for comparison with the criterion. (bottom RHS corner)
line Frequency (Hz): 125 250 500 1000 2000 4000 8000
Overall level
1 Linear Noise Level
dB 103 105 107 102 97 99 92 111
2 A-weighted
Correction dB -16.1 -8.6 -3.2 0 +1.2 +1.0 -1.1 --
3 A-weighted
Noise Level dBA 86.9 96.4 103.8 102 98.2 100.0 90.9 108
4 Mean Attenuation
of HPD 12.8 19 28.5 36.1 38.1 38.3 26.7 --
5 Standard Deviation 1.8 2.0 2.5 2.1 3.1 3.3 1.7 --
6 Mean-1 SD 11 17 26 34 35 35 25 --
7 Estimated in- ear
level, dBA 75.9 79 77.8 68 .263 65 65.9 83
Based on this example, the overall protected level under the HPD is 83 dBA, and the sound level in each octave band is less than 80 dBA; consequently, the earmuff may be an acceptable device. The figure below shows graphically the key data from the table
40.0
50.0
60.0
70.0
80.0
90.0
100.0
110.0
120.0
63 125 250 500 1,000 2,000 4,000 8,000 Total
Frequency
So
un
d P
res
su
re L
ev
el d
B
A weighted Source level
Source level
Estimated in-ear noise level

172.
5.3.2 Noise Reduction Rating
To simplify the estimation of attenuation for wearers, the U.S.
Environmental Protection Agency (EPA) in 1979 required manufacturers to
label their packaging with a single-number rating, which is termed the Noise
Reduction Rating (NRR) (EPA, 1979). Essentially, the NRR represents the
“effective” exposure under the HPD in dBA.
The NRR gained wide acceptance in the early 1980s primarily due to its
simplicity and the fact U.S. regulators allowed for its use in the Occupational
Safety and Health Administration‟s (OSHA‟s) Occupational Noise Exposure:
Hearing Conservation Amendment; Final Rule (OSHA, 1983). Under the
OSHA regulation, the procedure allows for the user to subtract the
manufacturer‟s published NRR value from the C-weighted noise exposure
to get the estimated A-weighted protected level under the device.
To estimate the real-world attenuation afforded by HPDs when using the
manufacturer‟s published NRR data and noise exposure, the following
derating scheme is recommended: (Note: in the expressions below LAeq,8
may be substituted with LEX,8h or TWA.)
For Single Hearing Protection:
LAeq,8 – [(NRR-7)x0.5] = Estimated LAeq,8 under the protector.
For Dual Hearing Protection (earmuffs worn over earplugs):
LAeq,8 – [(NRR of the better protector-7)x0.5] +5 = Estimated LAeq,8
under the combination of protectors.
As an alternative de-rating scheme, NIOSH (NIOSH, 1998) recommends
the following corrections or adjustments in the NRR:
For Earmuffs: Reduce the NRR by 25%,
For Formable plugs: Reduce the NRR by 50%, and
For all other plugs: Reduce the NRR by 70%.
173.
Then take the resultant NRR value and subtract it from the noise exposure
or sound level.
5.3.3 Noise Reduction Rating (Subject Fit) In 1995 the National Hearing Conservation Association‟s (NHCA‟s) Task
Force on Hearing Protector Effectiveness (Berger, 1996) proposed an
alternative labelling requirement for HPDs computed from Method B data
(subject-fit real-ear attenuation results) from ANSI S12.6-1997, Method’s for
Measuring the Real-Ear Attenuation of Hearing Protectors (ANSI, 1997).
Under this standard Method B data are deemed the most practical
estimates of field attenuation, primarily since the test subject fits the HPD,
as compared to Method A where the experimenter fits the device prior to
testing. The result is the new single-number descriptor termed
NRR(Subject Fit), or NRR(SF). It is the consensus of the professional
community, including NIOSH; the NRR(SF) better represents the real-world
attenuation achieved by groups of workers relative to the original NRR,
provided the workers are properly training in the use of their HPDs. To
estimate attenuation simply subtract the NRR(SF) from the A-weighted
noise exposure or worse-case sound level to find the “protected” level under
the device. Note: The 7-dB correction factor to adjust for C-weighted versus
A-weighted differences is not applied when using the NRR(SF).
5.3.4 Noise Level Reduction Statistic The most recent rating method to come out of the U.S., and the first one
actually embodied in an American National Standard, is the Noise Level
Reduction Statistic for use with A-weighting (NRSA), as described in ANSI
S12.68 (ANSI, 2007). This standard recognises the problem that no single-
number rating can accurately predict the range of performance achievable
from HPDs (Gauger and Berger, 2004). Therefore, it is recommended that
the simplified ratings be presented as pairs of numbers.
174.
One rating represents the level of protection for most users can achieve,
called the 80 percent value (NRSA80); and the other rating value
representing what a few highly proficient and motivated wearers can obtain
or exceed, called the 20 percent value (NRSA20). The difference between
the 80 percent and 20 percent value indicates the uncertainty factor and
range of HPD performance that may be anticipated. Finally, the particular
meaning of each value depends upon whether Method-A or Method-B data
(ANSI, 1997) are used, as defined below (ANSI, 2007):
Method A, NRSA80 (80th percentile value) – the protection that is
possible for most individually trained under to achieve or exceed.
Method B, NRSA80 (80th percentile value) – the protection that is
possible for most users to achieve or exceed.
Method A or Method B, NRSA20 (20th percentile value) – the protection
that is possible for a few motivated proficient users to achieve or
exceed. Note – the 20th percentile value will be the same regardless
of the procedure (Murphy, 2006).
To use the NRSA, users may take the A-weighted noise exposure or sound
pressure level and subtract the selected rating value to obtain the “effective”
level under the HPD.
5.3.5 Single Number Rating Within the European Union and affiliated countries the Single Number
Rating (SNR) is used and specified for compliance. The SNR method
requires the user to measure the C-weighted sound pressure level. The
SNR is calculated from Assumed Protection Values according to the
procedure in Annex D of BS EN ISO 4869-2:1995 “Acoustics – Hearing
Protectors – Part 2: Estimation of effective A-weighted sound pressure
levels when hearing protectors are worn” (ISO, 1995). As with the NRR, the
tests are completed by independent laboratories; however, the test
frequencies are slightly different than for those used to compute the NRR.

175.
5.3.6 HML Method The HML procedure takes into account the noise environment. Along with
the SNR rating the user will also see ratings for H (high-frequency noise), M
(mid-frequency noise), and L (low frequency noise). For example, an HPD
may be labelled SNR 28, H=33, M=24, L=14; which means the estimated
attenuation varies with the spectrum of the noise. Since the HML method
targets the noise spectrum it is potentially more accurate for predictive
purposes than the SNR rating. To use the HML ratings the user must know
both the A-weighted and C-weighted sound pressure levels for the noise
environment.
5.3.7 Sound Level Conversion
Australia and New Zealand used the Sound Level Conversion (SLC) rating,
till 2005. The SLC is an estimate of the attenuation achieved by 80 percent
of wearers (mean attenuation minus one standard deviation), assuming the
users are well-managed and trained in the proper use of the device. As
with the NRR and SNR, the SLC attenuation data are determined by
independent laboratories.
To choose HPD using this method the C-weighted noise level is measured
and the appropriate SLC value HPD is chosen to reduce the number to a
suitable level.
Worked Example
Workplace measured at 98 dBC
Required protected level 75 dBA
98-75 = 23 so a HPD with about SLC 23 is chosen.
5.3.8 Classification Method The AS/NZ standard recognises that wearing time is a most critical
parameter in obtaining protection and that variation in the noise
environment will often render accurate calculation redundant.

176.
Indeed a high attenuation protector will have its performance degraded
significantly if not worn all the time or the user enters another area.
Therefore the simplified class system was introduced to replace the
requirements for octave band, or C weighted measurement and it was
intended that the focus of the risk management strategy be moved to
engineering controls rather than technical fine tuning of an exact match
between noise environment and hearing protector, a goal which is
increasingly difficult in any complex noise environment.
Hearing protectors are chosen in a simple 5 class system which graduates
the noise hazard into 5 dB increments and assigns a class of HPD to cover
each level of increased risk.
The Focus of the risk management strategy needs to be on wearing time
and the contributory factors of comfort, fit, care and maintenance,
applicability to the area or work and clear policy and follow through.
Table 5.1 - AS/NZ Class Hearing Protector Required and comparison with the former SLC80 method
LAeq,8h dB(A) Class SLC80
Less than 90
90 to less than 95
95 to less than100
100 to less than105
105 to less than 110
110 or greater
1
2
3
4
5
requires specialist advice
10-13
14-17
18-21
22-25
>26
If the noise environment is narrow band in character with significant tonality
or has significant high or low frequency components or exhibits other
complexities, then the octave-band method should be used.

177.
5.4 FITTING
All hearing protectors need to be fitted when initially introduced to a worker.
A determination of ear health and physical attributes should be undertaken
to ensure a good seal is achieved. If multiple sizes are available they should
be checked to ensure the best fit for comfort and wear ability.
5.4.1 Foam Earplugs Most foam plugs are designed to be rolled down by the user and inserted
into the ear canal. After insertion the plug slowly expands and conforms to
the individual ear canal shape. The following roll-down procedure is
described in EARLOG19 (Berger, 1988): “to insert foam earplugs roll them
down between the thumb and index finger into a very thin crease-free
cylinder. The cylinder should be as small in diameter as possible. Crease-
free rolling is accomplished by squeezing lightly as one begins rolling, and
then applying progressively greater pressure as the plug becomes more
tightly compressed. Be sure to roll the plug into a cylinder rather than other
shapes such as a cone or a ball.”
By pulling up on the Pinna (external ear) or
pulling down on the lobe, you can straighten out
your ear canal, allowing for the correct and full
insertion of the plug into the canal. Each person
needs to determine which method works best for
him or her.
(Source: Illustration provided courtesy of Aearo Technologies)
Figure 5.11 - Pinna Pull Insertion Technique

178.
(Source: Illustration provided courtesy of Aearo Technologies)
Figure 5.12 – Proper versus Improper Insertion of Foam Plug
A plug is properly inserted when it is flush with or inside the tragus. Earplugs that
extend beyond the tragus (outside the ear) are not properly inserted.
Unlike other types of earplugs, foam earplugs should not be readjusted
while in the ear. If the initial fit is unacceptable, they should be removed, re-
rolled, and reinserted.
5.4.2 Premolded Earplugs Premolded earplugs come in varying sizes, such as small, medium, and
large. Since up to ten (10) percent of wearers can have two different size
ear canals, each ear needs to be fit separately (Berger, 1988). HPD
manufacturers provide ear gauges for sizing the ear canal. To obtain a
proper fit on multi-flanged plugs at least one of the flanges should
completely seal along the interior wall of the ear canal. Essentially an
airtight seal is formed, creating a blocked-up feeling to the wearer. As with
foam plugs, using the “pinna pull” technique illustrated in Figure 5.11 is
recommended for premolded plugs.
5.4.3 Custom-Molded Earplugs
Taking ear impressions for custom-molded earplugs needs to be completed
by a trained professional, such as an audiologist, or physician. The wearer
should receive one-on-one training from the professional on how to properly
insert the custom-molded plugs.
179.
5.4.4 Semi-Insert/Canal Caps Semi-insert earplugs, also known as canal caps, are quick and easy to use,
but are only recommended for short durations in high-noise areas. Because
of the pressure exerted by the band used to seal the earplug against the
entrance to the ear canal, continuous and effective use of this device
becomes very uncomfortable, even painful, usually after thirty (30) minutes.
To insert canal caps simply push the earplugs or pods into the entrance of
the ear canal. Typically, the band is positioned under the chin, but may also
be worn behind the head or over the head. However, in these latter two
positions less attenuation is provided, and the band often conflicts with the
wearing of hard hats. The “pinna pull” technique is useful for seating the
pods or plugs effectively at the entrance of the ear canal.
5.4.5 Earmuffs Although most earmuffs can successfully fit a large percentage of people,
the fitter should check the following:
Does the headband expand and contract enough to position the cups
securely over each pinna (outer ear)?
Can the entire pinna comfortably fit inside the earmuff cup?
Does the cup‟s cushion seal against the head all the way around the
ear, or are there excessive gaps caused by bone structure, bulky
eyeglass temples or facial hair? Studies have shown a 3-7 dB
reduction in attenuation by eyeglass temple „leaks‟ (Berger, 2000,
p.411).
If gaps are present, earmuffs can increase the level of noise reaching the
eardrum, especially in noise environments that are in the 125-250 Hz range
through the “resonance effect”.
To increase success in earmuff fitting, make sure the site stocks ones with
easily adjustable bands and good cushioning. Earmuffs should be checked
regularly because cracking and hardening of cushions can cause leaks.
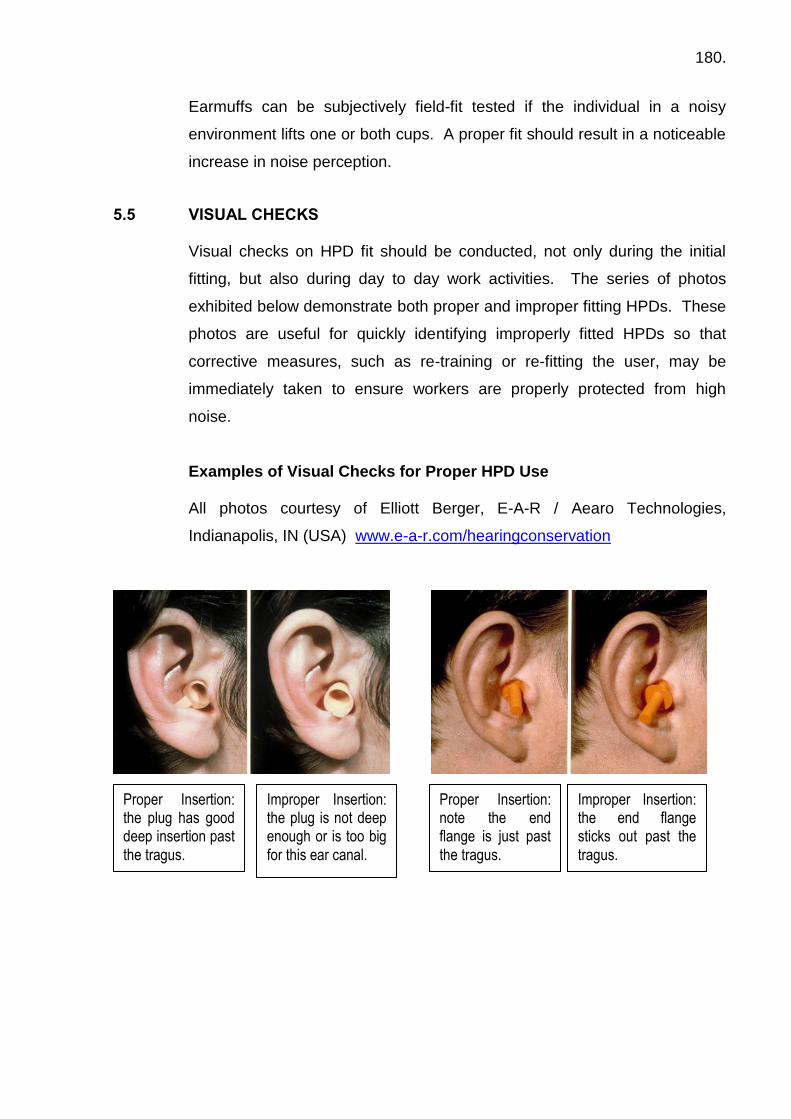
180.
Earmuffs can be subjectively field-fit tested if the individual in a noisy
environment lifts one or both cups. A proper fit should result in a noticeable
increase in noise perception.
5.5 VISUAL CHECKS Visual checks on HPD fit should be conducted, not only during the initial
fitting, but also during day to day work activities. The series of photos
exhibited below demonstrate both proper and improper fitting HPDs. These
photos are useful for quickly identifying improperly fitted HPDs so that
corrective measures, such as re-training or re-fitting the user, may be
immediately taken to ensure workers are properly protected from high
noise.
Examples of Visual Checks for Proper HPD Use All photos courtesy of Elliott Berger, E-A-R / Aearo Technologies,
Indianapolis, IN (USA) www.e-a-r.com/hearingconservation
Proper Insertion: the plug has good deep insertion past the tragus.
Improper Insertion: the plug is not deep enough or is too big for this ear canal.
Proper Insertion: note the end flange is just past the tragus.
Improper Insertion: the end flange sticks out past the tragus.

181.
Here are examples of the fit of a one-sized three-flanged earplug in extra small (left photo, third flange just barely enters the ear canal), medium (centre photo, third flange seals the ear canal), and extra-large ear canal (right photo, back edge of third flange is flush with canal entrance). NOTE - All three fits are proper for this type device, as it is not essential for the outer most flange on one-sized multi-flange plugs to seal the ear canal, as the lead flanges provide the acoustical seal.
The left photo shows a proper insertion of a formable earplug, which is fibreglass down in a sheathing material. The photo on the right is an improper insertion, as the device is too loose, or is not
inserted deeply enough to be of benefit.
The EAR Classic foam plug shown in the left photo is a proper insertion, as the end of the plug is just past the tragus. The photo on the right photo is an improper insertion of the Classic plug.

182.
Note how the ear lobe extends beyond the bottom of the earmuff cup, which will cause air leaks and a significant reduction in the delivered attenuation. This earmuff is not
properly sized for this individual.
Excessive hair over the ears can break the seal of the earmuff cups, significantly reducing the overall attenuation. The same affect is true for safety glass temple bars. All gaps or penetrations should be minimized as best as possible to achieve effective attenuation.
This earmuff is too big for this user. The headband is fully closed, but does not rest on the top of the head, as it should. Be careful to ensure HPDs are compatible with the wearer‟s anatomy.

183.
The earmuff head band on the left still maintains its original spring-loaded shape, while the muff on the right shows a head band that has been bent back enough over time to render this device less effective. The earmuff on the right should be discarded.
Both earmuff cushions show permanent impressions, which allow air leaks and reduces the attenuation. The cushions need to
be replaced.
These are the temples of doom. The indentions of this person‟s temples do not allow the earmuff cups to seal properly against the sides of the head, thus allowing noise to leak through. This person is not a good candidate for earmuffs
due to the shape of his head.
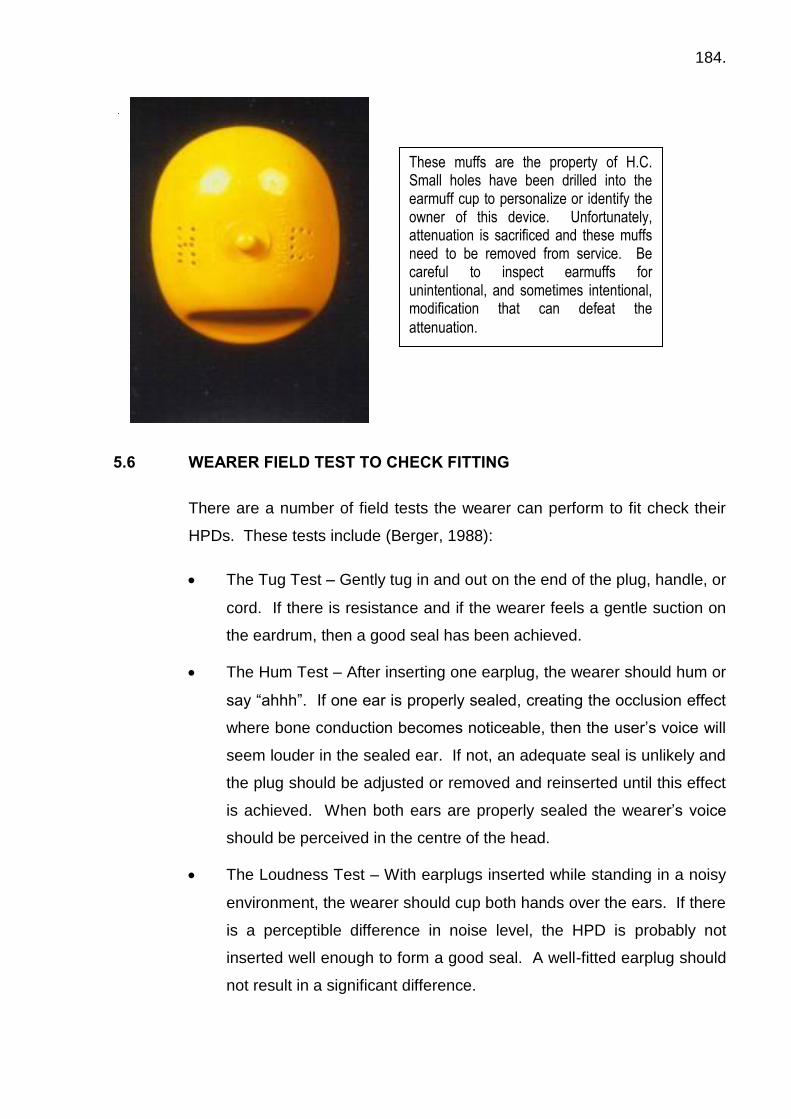
184.
5.6 WEARER FIELD TEST TO CHECK FITTING
There are a number of field tests the wearer can perform to fit check their
HPDs. These tests include (Berger, 1988):
The Tug Test – Gently tug in and out on the end of the plug, handle, or
cord. If there is resistance and if the wearer feels a gentle suction on
the eardrum, then a good seal has been achieved.
The Hum Test – After inserting one earplug, the wearer should hum or
say “ahhh”. If one ear is properly sealed, creating the occlusion effect
where bone conduction becomes noticeable, then the user‟s voice will
seem louder in the sealed ear. If not, an adequate seal is unlikely and
the plug should be adjusted or removed and reinserted until this effect
is achieved. When both ears are properly sealed the wearer‟s voice
should be perceived in the centre of the head.
The Loudness Test – With earplugs inserted while standing in a noisy
environment, the wearer should cup both hands over the ears. If there
is a perceptible difference in noise level, the HPD is probably not
inserted well enough to form a good seal. A well-fitted earplug should
not result in a significant difference.
These muffs are the property of H.C. Small holes have been drilled into the earmuff cup to personalize or identify the owner of this device. Unfortunately, attenuation is sacrificed and these muffs need to be removed from service. Be careful to inspect earmuffs for unintentional, and sometimes intentional, modification that can defeat the
attenuation.
185.
Conversely, the perceived noise level should increase markedly if the
user breaks the seal of each earplug or raises the cup of an earmuff
when in noise.
5.6.1 Individual Hearing Protector Fit Testing Even with appropriate focus on noise control, reliance on HPDs as the last
line of defence against occupational noise exposure is inevitable. As
discussed earlier, one critical failure in this process has historically been the
fact the labelled protection values on HPD are not reliable predictors of
actual HPD performance. Analysis of laboratory evaluations indicates
individual variability in HPD performance is large enough to make any
population-based, statistical assessment of HPD performance inappropriate
for individual workers.
If it is important to estimate how well HPDs work for individual users, they
must be tested on individual users. New and emerging technologies make
this possible. Individual fit testing can be used to select HPDs appropriate
for the noise exposure of individual workers; train workers on the protective
effect of proper HPD use/insertion techniques; identify workers who may not
be obtaining sufficient protection from their HPD of choice, enabling
alternate selection; document individual HPD performance for assist in
determination of work-relatedness of hearing loss; and for other purposes.
5.6.2 Field Microphone in Real Ear (F-MIRE) Microphone-in-Real-Ear (MIRE) techniques determine HPD performance by
measuring sound levels beneath the HPD to be tested. This approach has
been difficult to adapt to field use, as placing a microphone under the HPD
has historically required placing the cable connecting the microphone to the
data acquisition system between the HPD and the ear canal surface,
resulting in an acoustical leak. New techniques enable field use of adapted
MIRE technologies, referred to as F-MIRE

186.
One such system, called E-A-Rfit®, circumvents the leakage problem by
using specially probed HPDs with a sound bore integrated to the device. An
exterior (reference) microphone measures noise outside the HPD; an
interior (measurement) microphone measures noise through the sound
bore. The effect of the probe tube, transfer function of the open ear, and
other measurement conditions are addressed in the data acquisition
software to provide results comparable to Real-Ear Attenuation at Threshold
(REAT) testing (see below). The F-MIRE test is completely objective, as no
response is required of the subject, and only takes seconds to complete.
Attenuation is determined by comparison of internal and external sound
pressure level. An instrumented ear is shown in the Figure 5.13.
Figure 5.13 – F-MIRE Instrumented Ear
Measurement is conducted in a normalized sound field (approximately 90
dBA pink noise). Exterior noise minus interior noise plus compensation
factors yield an estimate of individual performance, or Personal Attenuation
Rating (PAR).
(Source: Courtesy of Aearo Technologies)
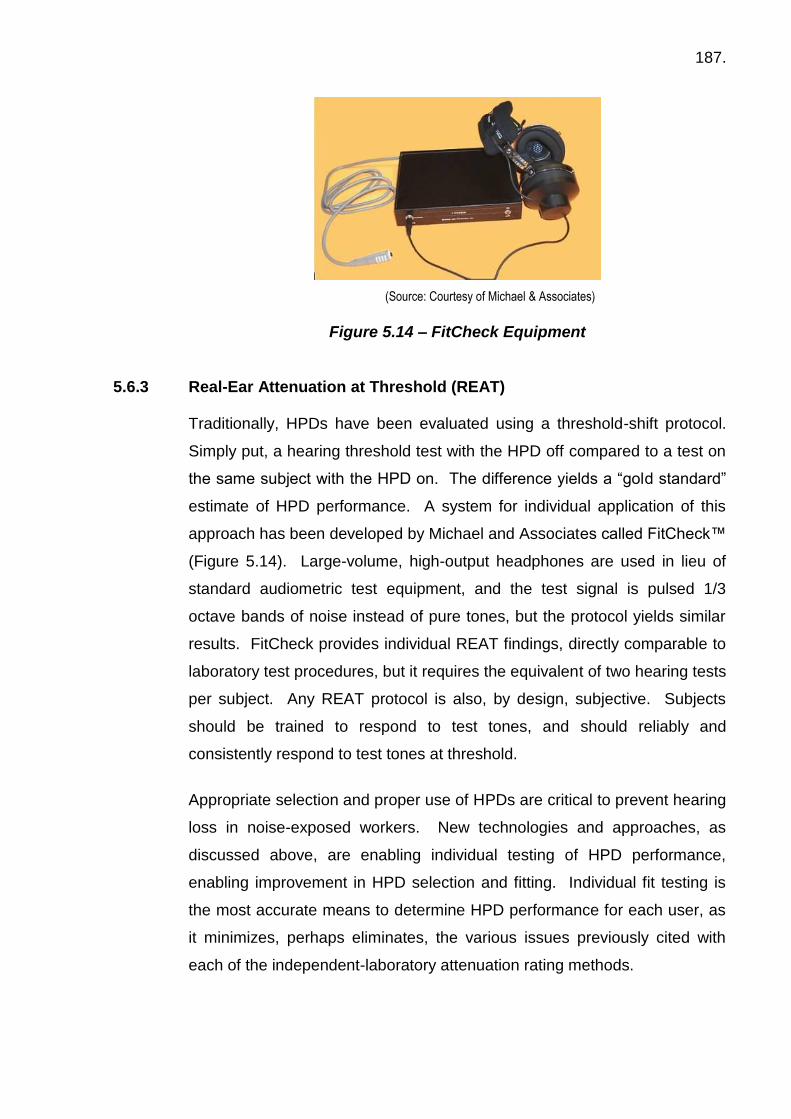
187.
(Source: Courtesy of Michael & Associates)
Figure 5.14 – FitCheck Equipment
5.6.3 Real-Ear Attenuation at Threshold (REAT) Traditionally, HPDs have been evaluated using a threshold-shift protocol.
Simply put, a hearing threshold test with the HPD off compared to a test on
the same subject with the HPD on. The difference yields a “gold standard”
estimate of HPD performance. A system for individual application of this
approach has been developed by Michael and Associates called FitCheck™
(Figure 5.14). Large-volume, high-output headphones are used in lieu of
standard audiometric test equipment, and the test signal is pulsed 1/3
octave bands of noise instead of pure tones, but the protocol yields similar
results. FitCheck provides individual REAT findings, directly comparable to
laboratory test procedures, but it requires the equivalent of two hearing tests
per subject. Any REAT protocol is also, by design, subjective. Subjects
should be trained to respond to test tones, and should reliably and
consistently respond to test tones at threshold.
Appropriate selection and proper use of HPDs are critical to prevent hearing
loss in noise-exposed workers. New technologies and approaches, as
discussed above, are enabling individual testing of HPD performance,
enabling improvement in HPD selection and fitting. Individual fit testing is
the most accurate means to determine HPD performance for each user, as
it minimizes, perhaps eliminates, the various issues previously cited with
each of the independent-laboratory attenuation rating methods.

188.
5.7 HPD REQUIREMENTS 5.7.1 Require Use
HPDs are should be worn in all areas with sound levels 85 dBA or greater.
The rule of thumb is: “if you have to raise your voice above the noise level
to talk to someone at arm‟s length away, then hearing protection may be
warranted.”
5.7.2 Availability
HPDs need to be readily available at locations or stations prior to entering a
high-noise area. For example, process unit control rooms and building
entrances are strategic locations for earplug dispenser boxes and earmuff
storage. For those facilities where noise sources may be intermittent or
unpredictable, all employees in the field should keep HPDs in their
possession at all times available for immediate use.
5.7.3 Warning Signs All work areas and intermittently used equipment (e.g., hand-held tools or
mobile equipment) that generate levels of 85 dBA or more should be posted
as hearing protection required areas. The figure below shows the typical
style of such warning signs. It is important that compliance with the signage
is required and that staff in the area are provided with HPD. If disposable
HPD are to be used, the dispenser should be available at the entrance to
the signed area and not at some distant location.

189.
Figure 5.15 – Example of Warning Signage
5.8 TRAINING AND MAINTENANCE
5.8.1 Training HPD wearers should be trained in the proper use and care of their
protectors during initial fitting, at the time of their annual hearing test, and
whenever observed to be improperly wearing HPDs.
5.8.2 Maintenance Earplugs, primarily re-useable premolded and custom plugs, should be
routinely inspected to ensure no damage or physical changes have
occurred to the device over time that would inhibit the ability to obtain an
airtight seal. Foam plugs may be re-used on average 5-10 times before the
cell structure breaks down, which can prevent proper insertion and/or an
effective seal. All plugs may be cleaned with a mild soap and water, when
needed.
190.
Earmuffs should be checked regularly because impressions, cracking, and
hardening of cushions can cause air leaks affecting the attenuation.
Replacement cushions are available from the manufacturer although it may
be more cost-effective to replace the aged ear muffs rather than keeping
stocks of replacement cushions. The headband should be routinely
inspected to ensure it still provides adequate pressure to seal the ear cups
against the side of the head.

191.
6. EDUCATION & TRAINING 6.1 INTRODUCTION
There is little point in setting up an occupational noise management
programme unless management and workers understand the reason for the
programme, the goals of the programme, the components of the entire
programme, the responsibilities of staff and the workers and the procedures
for the assessment and development of the programme. As the decision on
the appropriate noise controls and their implementation may take some time
to develop, there is likely to be a need for education and training over a
number of stages. Thus once it has been identified that a noise hazard
exists in the workplace the employer must understand the importance of
implementing noise management and the options available so that they can
provide guidance on what is applicable for their particular workplace. Those
exposed to the noise must also understand the hazard and the safety
systems that are installed immediately to reduce the risk of hearing
damage. This also provides the opportunity for explanation to the workers
of the possible options for long term reduction of the risk and for them to
have meaningful input into the process. Larger workplaces may have
personnel with the capacity to undertake noise assessments and also to
develop workplace noise controls. Additional training may be necessary to
develop their competencies in these areas.
Standards, codes of practice and other documents often provide guidance
for the content for training courses for the various personnel at a work place
where there is a noise hazard. These documents may include suggested
course syllabus which address the specific needs and which should be
followed in those jurisdictions where they apply. For other jurisdictions the
following suggestions for a syllabus for training programmes are loosely
based on the suggestions for course outlines and syllabus from the parts of
AS/NZS 1269
192.
6.2 TRAINING IN USE OF HEARING PROTECTORS
Once a noise hazard has been identified, some immediate action is required
to protect employees. If no engineering solution can be introduced
immediately then a hearing protector programme must be implemented
while other noise control methods are being considered.
While risk is being managed through a hearing protector programme it must
be holistically implemented. It is not sufficient to just provide protectors and
tell the staff to use them. It is important they understand where to use them,
how to use them properly and in particular the importance of wearing them
all the time in the noisy areas.
The following topics summarise the recommended inclusions for any
training session. The level to which each topic is covered depends on the
needs of the particular workplace and in most cases many of these topics
can be dealt with in an overview manner. Generally one to two hours
should be sufficient in the first instance. Audio visual material can be used
to cover most of the topics but it is essential to have „hands on‟
demonstrations of the use of the types of hearing protection that are
provided in the workplace.
Any form of protective device can be an annoyance. The temptation to not
wear hearing protection may be greater than for other forms of protective
devices as there is no immediate outcome of the exposure to the hazard,
other than a temporary loss of hearing and maybe ringing in the ears.
Unfortunately these effects can also be outcomes from recreational
activities like enjoying loud music or noisy sports cars and there can be the
perception that they are of little concern. So it is essential to provide regular
follow up education sessions to motivate and remind the workers of the
importance of protection of their hearing. These follow up sessions can
revise the topics covered in the first session and provide a good opportunity
for reviewing the condition of the hearing protectors and discussing any
particular difficulties workers may be encountering.
193.
These revision sessions need not be lengthy and can be in the form of
informal „tool box‟ OHS sessions.
6.2.1 Ear Hearing and Noise
a) Explain how the ear works including how hearing loss occurs and how
hearing is tested (audiometry).
b) Demonstrate types of noise including low and high frequency noise,
constant, and intermittent noise and impulse noise and highlight those
which are in the their workplace.
c) Discuss noise levels, decibels, noise measurement and noise
exposure. Give illustrations of various noise levels, ranging from a soft
whisper to a jet engine.
d) Identify high noise areas in the relevant workplace, e.g. by showing a
floor plan of the premises.
e) Discuss management and worker responsibilities and obligations
related to the hearing protector programme.
6.2.2 Importance For Protecting Hearing
a) Explain the importance of protecting hearing including the difficulties
experienced by people with hearing impairments and the limitations of
hearing aids, i.e. without sounding alarmist or using scare tactics,
discuss the social isolation and psychological problems associated
with mild and severe hearing loss.
b) Overview relevant legislation and discuss of the relevant noise
exposure criteria.
c) Explain engineering controls that are in place, such as barriers and
enclosures. Highlight any of their limitations to explain the continuing
need for wearing hearing protectors until further measures are in
place.

194.
6.2.3 Selection of Hearing Protectors
a) Summarise the outcomes of the noise assessment Including
identification of noise areas and tasks and the types of noise
encountered over a work shift.
b) Explain where the hearing protector zones will be located, the types of
signage in those zones and, if appropriate, the different types of
hearing protection to be worn in each zone.
c) Explain the selection of protections including types of hearing
protectors, the benefits, drawbacks and limitations of hearing
protectors, the importance of using the appropriate protectors in each
noise zone. Briefly explain the effects of overprotection (isolation,
poor communication).
d) Demonstrate the types of protectors that are available in the
workplace.
6.2.4 Use and Proper Fitting of Hearing Protectors
a) Emphasise the importance of wearing the hearing protector at all times
while in the noise hazard area, i.e. explain the accumulating effects of
noise and the highly destructive effects of removing the hearing
protector even for a very short time.
b) Demonstrate fitting techniques and check each individual can use their
selected protectors.
c) Discuss the importance of comfort including use in hot and cold
environments, perspiration, dirt and dust and the precautions when
used in combination with other safety equipment, e.g. hard hats,
respirators, goggles and similar.
d) Summarise good and bad habits; explain the reasons for not modifying
the hearing protectors and the need for good hygiene in particular
washing hands before use of ear plugs.
e) Provide the opportunity for the employees to discuss any medical,
physiological and psychological factors that may be applicable.

195.
6.2.5 Maintenance and Storage
a) Demonstrate how to clean the protectors.
b) Show where and how the equipment is to be stored.
c) Demonstrate how to inspect for defects and explain if policy is to
obtain replacement parts or to replace faulty protector.
d) Explain what to do if any problem occurs.
6.3 TRAINING TO UNDERTAKE NOISE ASSESSMENTS
In small and medium sized workplaces it may be more cost effective to
engage an acoustical consultant or occupational hygienist to undertake
workplace noise assessments on a regular basis. In larger companies there
could be occupational health and safety personnel and engineering staff
who could develop the competencies to undertake noise assessments,
develop appropriate noise management plans including the implementation
of basic noise control measures to minimise the use of hearing protectors.
It is usually necessary to revise and build upon the education and training
these personnel have obtained. The following topics can be used as the
basis for training courses and are similar to sections of AS/NZS 1269, other
standards and industry best practice. A workplace noise assessment
requires a good understanding of the principles of noise measurement, the
criteria for of occupational noise assessment and the options for noise
management to reduce the hazard. To properly develop the competencies
the following topics should be thoroughly understood and the personnel
should be required to demonstrate that they do have the competencies.
The training courses would generally be 3 to 5 days. Refresher courses of
1 to 2 days are suggested on a regular basis, typically every 5 years to
update skills including the use of modern instrumentation.
196.
6.3.1 Goals and Objectives
Those carrying out workplace noise assessments should be able to
demonstrate a thorough understanding of -
a) The objectives of the assessment.
b) The basic physics of sound.
c) The mechanism of hearing and the harmful effects of excess noise.
d) The correct usage and limitations of sound measuring instruments
required to gather data for noise assessments.
e) The information needed and methods used to determine occupational
noise exposures.
f) How to record results and explain them to people in the workplace.
g) The relevant statutory requirements, Codes of Practice and Standards.
h) The options for development of a noise management programme.
i) The principles of engineering noise control and noise management
measures.
j) When to advise that someone with more specialized knowledge on
noise measurement or noise control is required.
k) The selection of personal hearing protectors and the other
requirements for the workplace when hearing protectors are part of the
noise management plan.
6.3.2 Basic Acoustics
To control a hazard it is important to understand its source and mechanism
of operation. The following topics need to be covered:
a) The nature and physical properties of sound including; propagation,
absorption and transmission.
b) The descriptors for sound including decibels, sound pressure level and
sound power level.
197.
c) Types of sound sources including time variations and frequency
analysis.
d) A and C frequency weightings; „F‟ and „S‟ time weighting.
e) Signal measurement factors including rms and; peak.
f) Sound pressure level measurement including equivalent energy level,
LAeq,T, LAeq,8h, LCpeak.
g) Sound exposure, EA,T.
6.3.3 Need For Noise Control
a) Mechanism of hearing;
b) Effect of noise on hearing;
c) Work and social implications of noise induced hearing loss; and
d) Other effects of noise, e.g. interference with communication, masking
of warnings, tinnitus and other physiological effects.
6.3.4 Sound Measurement Instrumentation
a) Use and limitations of integrating-averaging sound level meters for
area and personal noise exposure measurements.
b) Use and limitations of personal sound exposure meters (dosimeters).
c) Need for calibration standards and noise measurement procedures
including field checks and periodic calibration by laboratories with
traceability to national standards.
6.3.5 Measurement of Workplace Noise
a) Noise assessments, i.e. preliminary assessments, detailed noise
exposure assessments, measurements for noise control and
monitoring;
b) Identification of sources and areas which contribute to exposure;
c) Effect of space characteristics on measurement accuracy; ie
reflections, standing waves etc;

198.
d) Recording of results; and
e) Explanation of results.
6.3.6 Occupational Noise Assessments
a) Details of relevant statutory requirements, Codes of Practice and
Standards.
b) Measurement and determination of extent of hazard with reference to
exposure standards.
c) Consideration of the options for effective noise management.
d) Report on assessment identifying the options with recommendations
for short and long term goals for reduction of the risk.
6.3.7 Noise Reduction
a) Engineering approach to noise reduction, i.e. reduction at source,
transmission path and receiver;
b) Identification of main sources for attention;
c) Strategies for noise reduction including vibration isolation;
d) Guidance on noise limits in specifications on new plant and buildings;
e) Benefits that can be gained by considering work techniques and
ensuring regular maintenance; and
f) Options for specialist advice from suppliers, manufacturers and
consultants.
6.4 TRAINING TO DEVELOP AND IMPLEMENT NOISE CONTROL
MEASURES IN THE WORKPLACE
In small and medium sized workplaces it may be more cost effective to
engage an acoustical consultant to propose noise control measures. In
larger companies there maybe engineering staff who could develop the
competencies to undertake noise assessments, understand the
requirements of noise management plans and then develop and implement
engineering noise control measures to reduce the hazard.

199.
It would be wise for these personnel to undertake a training course in
workplace noise assessment so they understand the assessment of
workplace noise, the standards that apply and the goals and objectives of
the noise management plan. The following topics can be used as the basis
for training courses and are derived from the sections of AS/NZS 1269. A
workplace noise assessment requires a good understanding of the
principles of noise measurement, the criteria for of occupational noise
assessment and the options for noise management to reduce the hazard.
To properly develop the competencies the following topics should be
thoroughly understood. The training course for engineering noise control
would generally be 3 to 5 days.
6.4.1 Goals and Objectives
Those developing workplace engineering noise control should:
a) Possess a basic understanding of the properties of materials in
relation to their function with respect to the transmission of sound;
b) Understand how noise is generated;
c) Understand how noise is transmitted;
d) Understand the principles of reducing noise;
e) Be able to carry out a simple diagnosis into the causes of the
generation of noise by machinery; and
f) Have the skills to begin to apply simple noise reduction/control
techniques to machines common in their workplace.
6.4.2 Noise Sources and Transmission
a) Measurement of sound and properties of materials.
b) Generation and transmission of sound.
c) Types of noise ie continuous, repetitive and impulsive noise.
d) Resonance.
200.
6.4.3 Understanding Noise Reduction and Control
a) Importance of machinery maintenance to minimise noise and vibration
b) Isolation of noise and vibration sources.
c) Machinery vibration damping and control.
d) Control of the radiation of noise from surfaces and adjoining areas.
e) Use of absorption to control reflected noise.
f) Partial and full height barriers to reduce sound transmission.
g) Design of enclosures for plant and machinery.
6.5 CONCLUSION
Although noise is a fundamental physical phenomenon, its monitoring,
control and risk management is not always straightforward. A proper
understanding of its basic cause and effects is important to the
implementation of any successful risk management strategy.
201.
7. AUDIOMETRIC TESTING
7.1 HEARING DISORDERS
Although the occupational setting is almost exclusively concerned with
noise-induced hearing loss, there are many other types of ear pathologies
and hearing disorders totally unrelated to noise exposure. Familiarization
with ear pathology and hearing loss is helpful since non-occupational
hearing loss will be encountered in the workforce and may need special
accommodations. In addition, NIHL should be differentiated from other
types of hearing loss.
7.1.1 Types of Hearing Loss
There are four basic types of hearing loss: conductive, sensory, neural, and
mixed.
Conductive
A conductive hearing loss occurs when the sound pathway is blocked
in the outer and/or middle ear, reducing the vibration that reaches the
inner ear. Hearing loss is present because the sound is not
transmitted effectively through the outer and middle ear to the normal
functioning inner ear. Often conductive hearing loss is treatable and
can be reversed. Perhaps the most common conductive hearing loss
is that caused by impacted earwax, or cerumen, in which the entire ear
canal is blocked. Once the cerumen is removed, the sound pathway is
restored and hearing returns to the original sensitivity. Pathologies of
the outer ear include (but are not limited to) outer ear infection or otitis
externa, perforated eardrum, foreign object in the ear canal, or a
deformity to the outer ear due to injury or genetic disorder. Of concern
to the audiometric examiner is recognizing when an external ear canal
condition either contraindicates performing a hearing test or interferes
with proper use of earplugs.

202.
Examples of middle ear pathologies causing conductive hearing loss
include otitis media (also known as middle ear infection), a
complication of chronic otitis media called cholesteatoma, and a
disease process hardening the ossicles called otoscerosis. All of these
pathologies require diagnostic audiology evaluation and medical
attention. The audiometric examiner is typically not involved in
diagnosis of hearing loss and should depend on other medical
professionals for this information.
Conductive hearing loss is diagnosed when bone conduction hearing
thresholds are better than air conduction thresholds. The difference
between air and bone thresholds is called air-bone gap, and defines
the degree of conductive hearing loss. The maximum degree of
conductive hearing loss is approximately 60 dB HL: sound louder than
60 dB HL will reach the inner ear via bone conduction. It is this type of
hearing loss that the cochlea implant can be used to improve hearing
as the implant provides direct stimulation to the hair cells
Sensorineural
Sensory hearing loss is specific to the cochlea and neural hearing loss
is due to pathology within the auditory nerve and/or central auditory
pathway. The term sensorineural hearing loss is used if the site of
lesion of the pathology has not been differentiated between the
cochlea and the neural pathway. As diagnostic tools become more
sophisticated it is more likely a site specific diagnosis can be made.
Compared to conductive hearing loss, sensorineural hearing loss is
less likely to be medically treatable and more apt to be permanent.
Examples of sensorineural hearing loss are age-related hearing loss
(ARHL), also called presbycusis, noise-induced hearing loss (NIHL),
Meniere‟s Disease, and vestibular schwannoma, which is a tumour on
the auditory nerve.
203.
Sensorineural hearing loss can also be caused by certain medications
which are toxic to the inner ear and there is some evidence suggesting
that environmental exposure to certain chemicals can increase the risk
of acquiring sensorineural hearing loss. Sensorineural hearing loss is
identified on the audiogram when air conduction and bone conduction
thresholds are equal and outside the normal range of hearing. In
addition to a reduction in hearing sensitivity, the clarity and quality of
sound can be affected. This causes distortion of sound and reduces
the ability to distinguish between similar sounds. Hearing impaired
people often say, “I hear you talking, but I can‟t understand what you
are saying.”
Mixed
Mixed hearing loss is a combination of both conductive and
sensorineural hearing loss. For example, an elderly person may have
sensorineural hearing loss due to presbycusis, and also have an
overlaying middle ear infection causing a conductive component. Once
the middle ear infection is resolved the mixed hearing thresholds will
return to the level of the sensorineural hearing loss. Sometimes mixed
hearing loss can be treated successfully by resolving the conductive
component. Examples of mixed hearing loss include chronic ear
infection, trauma to the ear, and certain ear diseases.
7.1.2 Noise Induced Hearing Loss (NIHL)
Noise-induced hearing loss (NIHL) is of primary concern in occupational
settings with high noise exposures. Characteristics of both the sound itself
(primarily intensity and duration), and the person exposed to the sound
(genetic make-up, health status, and other factors) determine how the ear is
affected by noise. In general, if stimulation is too loud for too long, damage
to the internal structures of the inner ear occur. The relationship between
the amount of noise exposure and the resulting hearing loss is complicated
because it is not linear.

204.
Impulse/Impact Noise
Both impulse and impact noises are short duration bursts of acoustic
energy. Impulse noise results from an explosive action, such as
gunfire, and impact noise occurs when two hard surfaces strike
together, such as a hammer on metal. Regardless of the distinctions,
both impact and impulse noise can cause “acoustic trauma” resulting
in significant hearing loss, tinnitus, and a sensation of fullness in the
ear. Although some recovery of hearing can occur in the hours
immediately following the noise exposure, acoustic trauma refers to
permanent hearing damage. As stated earlier, the degree of hearing
damage as a result of impulse/impact exposure depends on many
factors. Due to individual differences in genetic make-up, general
health status, and environmental conditions, the degree of damage is
not directly proportional to the noise level and varies from one person
to the next.
A single high level impulse noise can be more damaging than a
continuous noise of the same level or a series of impulses as the
sharp rise time of the signal does not allow time for the “acoustic
reflex” or “auditory reflex” or to come into operation. The acoustic
reflex is an involuntary muscle contraction triggered by high-intensity
sound. This contraction leads to the malleus (hammer) being pulled
away from ear drum thereby attenuating the transmission of vibrational
energy to the cochlea.
Biological diversity between individuals can result in a single exposure
to impulse noise causing permanent threshold shift in a given
individual while another individual may not show hearing damage until
multiple exposures over many years have occurred. Research based
on animal studies has indicated that there is a “critical level” of
exposure, below which, hearing loss increases by about 1-3 dB for
each dB of increase in peak level of the noise.

205.
However, above the critical level, hearing loss increases much more
rapidly: 3-7 dB of hearing loss for each dB of peak level increase. The
critical levels for humans have been accepted as 140 dBC peak SPL
for impulse noise.
Continuous and Intermittent Noise Exposure
Noise-induced hearing loss can occur after exposure to steady or
intermittent noise. When shift exposure is 8 hours or less there are
some recovery mechanisms which reduce the permanent damage.
These however rely on 16 or more hours in a quiet environment.
Where the work shift exposure is greater than 8 hours the recovery
time is insufficient and the hearing loss will be greater than expected
from the overall noise level. Adjustments must therefore be made to
the exposure criteria for long workshifts or when the resting area is not
quiet as may be the case where crew rest/sleep areas are provided
within a vessel or rig.
Temporary and Permanent Threshold Shifts A temporary threshold shift (TTS) is a hearing loss which shows some
recovery within 24-48 hours after the noise exposure stops. The more
intense (louder/longer) the exposure, the longer the expected recovery
period would be. Hearing loss which persists more than 30 days after
the noise exposure is considered to be permanent threshold shift
(PTS) since recovery is unlikely.
7.1.3 Auditory Effects of Excessive Noise Exposure
NIHL is a result of structural damage to the cochlea. In general, the larger
the hearing loss, the more widespread the damage is within the auditory
system.

206.
Intense blasts can cause such extreme vibration that the eardrum may
perforate and/or haemorrhage, the ossicles can fracture, and in severe
cases, the organ of Corti can be torn off the basilar membrane and
eventually deteriorate. Hearing loss from this extensive damage would be
profound and affect multiple frequencies.
(Source: David J Lim – Image used with permission)
NIHL from continuous, long-term exposure is more likely to be contained
within the cochlea, more specifically there will be structural damage to the
outer hair cells. The more severe the hearing loss, the more likely the
damage extends to the inner hair cells and supporting cells. Figures 7.1
and 7.2 compare normal stereocilia and those damaged by noise.
Figure 7.1 - Scanning electron micrograph of normal “undamaged” stereocilia. Credit - David J. Lim. Functional Structure of the Organ of Corti: A Review. Hearing Research, Elsevier 2b. 22 (1986) 117-
146. Retrieved from www.danagerousdecibels.org.

207.
(Source: Hunter-Duvar, I.M. – Image used with permission)
7.1.4 Progression of Noise Induced Hearing Loss
(Source: Image courtesy of Elliott H Berger, Aearo Technologies Inc)
Figure 7.3 - The progression of noise-induced hearing loss over time for workers exposed to approximately 100 dB SPL. The classic "noise
notch" appears first at 4000 Hz. It deepens and spreads to adjacent frequencies over time.
Figure 7.2 – Scanning electron micrograph of noise-damaged stereocilla. Credit: Hunter-Duvar, I.M. (1977). Morphology of
normal and acoustically damaged cochlea. SEM 1977, II, 421-428. Retrieved from www.dangerousdecibels.org.

208.
The clinical hallmark of noise-induced hearing loss is a “notch” in the
audiogram between 3000 – 6000 Hz, with better thresholds at the adjacent
frequencies. Typically, this occurs at 4000 Hz, giving rise to the commonly
used term, “a 4k notch” or “a 4k dip”. Recent research has revealed a higher
prevalence of 6000 Hz notches, especially in females, than previously
believed, making it more important to include 8000 Hz in the audiometric
test protocol. The progression of NIHL has been well-documented. Data
from a classic study is graphically represented in Figure 7.3: audiometric
tests from a population of jute weavers exposed to occupational noise of
approximately 100 dB SPL (Taylor, 1965). Note that over time the
audiometric “notch” deepens and spreads to adjacent frequencies. In the
first 10 – 15 years of noise exposure, the hearing loss accelerates most at
4000 Hz. Eventually, the hearing loss advances to the point where a notch
is no longer detectable.
It is important to note here that the „noise notch‟ occurs just at that part of
the frequency range which is most important for understanding speech.
7.1.5 Tinnitus
In addition to hearing loss, a common result of over exposure to noise is
tinnitus, commonly called ringing in the ears. Tinnitus refers to the
perception of sound with no corresponding external sound source. Tinnitus
is common in the general population, however it much more likely to be a
bothersome symptom for those who have a history of occupational and/or
military noise exposures. Those who suffer from chronic tinnitus may report
having difficulty falling asleep, reduced ability to concentrate, trouble
relaxing, and experiencing annoyance, irritability, frustration, and/or despair.
Although there are some treatments and coping strategies for tinnitus, there
is no known cure.
7.1.6 Age-Related Hearing Loss or Presbycusis
The aging process affects all aspects of the auditory system resulting in
hearing loss, known as age-related hearing loss (ARHL) or presbycusis.

209.
Specifically, hearing loss is primarily due to the loss and deterioration of
outer hair cells in the basal turn of the cochlea. The audiometric pattern is a
“sloping” audiogram: hearing sensitivity is worse at each higher frequency.
The degree of change is highly individualized.
Population studies show that by the later decades of life, there is little
difference between the audiometric configurations of presbycusis and
noise-induced hearing loss (NIHL). Since occupational NIHL typically
accrues over many years, the ear is aging as well as suffering cochlear
damage from over exposure to noise. Differentiating between the aging
affects and the noise affects in an exposed, aging employee is problematic
and there is no widespread consensus in the medical or legal community on
how this is done. Extensive research using population databases of
audiometric thresholds resulted in approval of an American standard (ANSI
S3.44) and an international standard (ISO-1990). Data used to develop the
standards are based on populations of industrially exposed workers with
continuous noise for a standard work week at that time (8 hours/day, 5
days/week). These standards attempt to quantify the amount of ARHL from
NIHL. Because sample sizes were small and cross-sectional rather than
longitudinal studies were used, the application of the standards to
individuals is somewhat controversial.
7.1.7 Non-organic Hearing Loss
The term non-organic hearing loss refers to cases in which there is no
apparent organic or physical cause. This occurs when the audiometric
findings indicate hearing loss exists, this is alleged to occur when an
individual is exaggerating the hearing levels purposely in order to appear as
if hearing loss exists to a greater degree than it really does. Other terms
used for this condition are functional hearing loss, or malingering. In rare
cases there is a psychological condition in which an individual functions as if
hearing impaired, although hearing is within normal limits. The clinical term
for this is pseudohypacusis and typically requires psychological referral and
treatment.

210.
Non-organic hearing loss may be suspected when responses during the
audiometric test are highly inconsistent, behaviour is inconsistent with the
admitted hearing loss, or when there is an ulterior motive for having hearing
loss. Cases of suspected non-organic hearing loss should be referred to an
audiologist for diagnostic audiology evaluation since there are many clinical
tests available to reveal actual hearing levels.
It is important to avoid accusing or labelling an individual who is exhibiting
inconsistent audiometric findings; rather consult the appropriate
professional since likely legitimate results can be obtained with more time
and special testing.
7.2 REHABILITATION
Persons with hearing loss can usually benefit from hearing aids, assistive
listening devices, and/or aural rehabilitation. Technological advancements
have significantly improved the ability to overcome the disabling affects of
mild hearing loss to restore communication and the appreciation of sound.
However, no electrical or mechanical device can ever restore normal
hearing. Workers with hearing loss may require particular solutions in the
workplace to ensure they hear salient communication and respond to
environmental sounds and auditory warning signals. For more information
on assisting the hearing impaired employees, refer to a document:
Innovative Workplace Safety Accommodations for Hearing Impaired
Employees, which can be retrieved from:
http://www.osha.gov/dts/shib/shib072205.html
7.3 AUDIOMETRY
Audiometric testing programmes can identify employees at risk of
developing permanent hearing loss due to over-exposure of work place
noise or by monitoring a worker‟s hearing thresholds over time, small
changes in hearing can be detected, allowing the opportunity to intervene
with education, hearing protection, and other preventative efforts. If
successful detection and intervention occur while the hearing shift is
temporary, this will avoid eventual permanent NIHL.

211.
Secondly, analysis of the audiometric database from a population of
workers can provide critical information about the quality of the Hearing
Conservation Programme and the hearing health of a given population.
Audiometric testing programmes should be designed for early identification
rather than simple documentation of hearing thresholds. As well, plans to
follow-up problematic audiometric findings should be in place. To be useful
for trend analysis and to drive HCP decisions, the audiometric data must be
reliable, valid, and accessible.
7.3.1 Guide to Audiometric Programme
a) Competent Audiometric Tester
Audiometric tests should be performed by a competent person. The
primary assessment may be by a trained Audiometrist.
Competent audiometric programmes require a person who can interact
with employees in a confidential and respectful manner to solicit
accurate, comprehensive information, and to obtain valid audiograms
and medical histories. There is opportunity to teach employees about
hearing and hearing protection during one-on-one sessions with
workers to review hearing test results and to select and fit hearing
protection devices. They should understand audiometric results in
order to identify abnormal audiograms and those with significant
changes in hearing. The need for medical referrals based on the
audiometric thresholds and medical information should be recognised.
Follow-up actions need to be managed and rigorous, accurate
recordkeeping is essential. Technical knowledge and trouble-shooting
skills are needed to keep computers and audiometric equipment
functioning properly. There is particular emphasis on communication
between the workplace supervisor and the employee, with prevention
of hearing loss the primary goal.

212.
b) Audiometric Database Management
The management and integrity of the audiometric database, including
recordkeeping and electronic record management is important in order
to ensure that audiograms are being correctly tracked and maintained
in accordance with internal company policies and relevant local and
country regulations.
c) Privacy Policies
The audiometric database contains personal medical and identifying
information and must be kept confidential. Individual hearing test
results and medical history information shall be safeguarded and
afforded the same treatment as other medical records.
d) Evaluation of HCP Effectiveness
Audiometric database analysis of population data can reveal trends
and audiometric variability. Reviewing individual audiometric records
to determine test validity and work relatedness of hearing loss. The
effectiveness of a HCP is measured by its ability to prevent
occupational hearing loss.
e) Employees Included in the Audiometric Testing Programme
If there is any chance the employees may be exposed to excessive
noise during their employment, an audiogram should be taken at the
commencement of employment, often referred to a base line
audiogram, and at the completion of their time with that employer,
often referred to as an exit audiogram. All employees who are
exposed at or above an LAeq,8 of 85 dBA should be enrolled in the HCP
and included in a regular, usually annual, audiometric monitoring
programme. Exemptions from the audiometric monitoring programme
are considered on an individual basis and should be documented.
Visitors to a company site, who are exposed to 85 dBA, should be
issued hearing protection devices and instructed in their use.

213.
If local government regulations do not allow for mandatory regular
audiometric testing every effort should be made by the employer to
encourage those workers potentially at risk of hearing loss to
participate in voluntary audiometric monitoring programme.
f) Audiometric Equipment Specifications
Audiometer An audiometer is an electronic instrument used to measure human
hearing sensitivity with calibrated pure tones of specific frequency and
varying intensity. Audiometers can be classified in different ways: by
the type of signal generated (pure-tone, speech, etc), The
audiometers used in HCP‟s are pure tone air conduction audiometers.
The most basic air conduction audiometer, termed screening
audiometer, is designed for pass/refer programmes intended to
identify individuals who have abnormal hearing. They have limited
features: for example they may have only four test frequencies (500,
1000, 2000, and 4000 Hz) and three different screening levels (20, 25,
40 dB HL). Other screening audiometers have a full range of
frequencies from 25oHz to 8k Hz and intensity control from 0-60dB in
5dB steps these are preferable for any HCP.
A diagnostic audiometer generates additional test signals such as
bone conducted pure tones, speech, narrow band noise, modulated
tones, etc. These stimuli are necessary for comprehensive
assessment of the auditory system and diagnosis of hearing loss.
Diagnostic audiometers are typically used in clinical settings by
professionals.
Another way to classify audiometers is by their mode of operation. All
of the following audiometers can be used in HCPs. Advantages and
disadvantages exist for each type so careful consideration is needed
to select suitable equipment.

214.
(Source: Grason-Stadler, Inc – Image used with permission)
Figure 7.4 – Example of a Manual Audiometer with Air Conduction Threshold Finding Capability
Manual Audiometer: conventional instrument, as shown in
Figure 7.4, which is operated manually by the examiner who
selects the frequency and intensity, presents the tone, and
records the results. Manual audiometers are stand alone units
which do not interface with computers. They are the least
expensive of audiometer types.
(Source: Tremetrics – Image used with permission)
Figure 7.5 – Example of a Microprocessor Audiometer with Built-in Printer

215.
Microprocessor or Automated Audiometer: the audiometric
test proceeds automatically by virtue of a computer chip
determining the sequence of tone presentations. Figure 7.5
exhibits a microprocessor audiometer. A standardized threshold
finding procedure is incorporated. The timing of tone
presentations is varied and a consistency of response is required
to minimize the likelihood of random responses being accepted
as true thresholds. Multiple options are available according to the
model and manufacturer; generally speaking these devices are
self-contained units with a subject-response button, some data
storage capability, and a built-in printer. Often microprocessors
interface with a personal computer and software programme.
Microprocessors have become popular in HCPs due to the
automation and advantages of electronic data storage and
recordkeeping. An automated audiometer should be able to
operate in a manual mode, allowing the audiometric examiner to
manipulate the controls and perform a manual threshold test.
Computer-controlled: a microprocessor audiometer driven by a
personal computer. These audiometers may be coupled to a
personal computer. Data is collected and stored directly on a
personal computer in a software programme dedicated to
audiometric evaluation. Many features are possible incorporated
including delivery of pre-recorded instructions in multiple
languages, cessation of test if ambient noise levels exceed
allowable levels, and extensive data storage and analysis
capability. They are frequently used in mobile audiometric test
vans due to their small size and portability.

216.
(Source: Benson Medical Instruments Co – Image used with permission)
Figure 7.6 - Example of a computer-controlled audiometer. The audiometer functions are accessed with
the computer keyboard
Bekesy, Automated, or Self-recording Audiometer: the
primary difference between this and the aforementioned
audiometers is that the test stimuli constantly increases or
decreases in accordance with the subject‟s response. The test
stimulus is a continuous tone of varying intensity. The listener is
instructed to press the response button as soon as the tone is
audible, and release the button when the tone becomes
inaudible. The tone increases and decreases in intensity
accordingly, and the excursions are traced on the audiogram.
Depending on the audiometer options, either the operator or the
audiometer software determines the valid threshold by counting
the number of repeated responses at the softest level. Figure 7.7
presents an example trace at 3000 Hz for a Bekesy-type
audiogram. Results can be difficult to interpret, therefore self-
recording audiometers are no longer widely used in occupational
settings. Bekesy audiometers may be used for research
purposes because the increments for both frequency and
intensity can be finer than other audiometer types.

217.
Figure 7.7 - Example of Bekesy threshold tracing at 3000 Hz
Audiometer manufacturers design equipment differently
regarding features and functionality. National standards have
been established to aid in achieving consistent and comparable
results, regardless of the audiometer type. Audiometers must
meet the American National Standard "Specification for
Audiometers" Standard (ANSI S3.6-2004) Microprocessor
audiometers should use automatic threshold procedures
consistent with ANSI S3.21-2004.
g) Other Methods for Hearing Assessment
Otoacoustic emission (OAE) is a sound which is generated from
within the inner ear. Studies have shown that OAEs disappear after
the inner ear has been damaged and so can be used as a measure
of inner ear health. There are two general types of otoacoustic
emissions: Spontaneous Otoacoustic Emissions and Evoked
Otoacoustic Emissions. The click-evoked OAE is a non-invasive
test for hearing defects and is now widely used for newborn babies
and for children who are too young to cooperate in conventional
hearing tests. The test may well become more common for general
audiometric screening.

218.
h) Audiometric Test Booth
A sufficiently quiet test environment is required to obtain meaningful
audiometric results. In addition, the test environment must be free of
distracting, interfering sounds, such as telephones ringing, audible
conversations, production and/or traffic noise, etc. To accomplish this,
it is strongly recommended to use a specially designed audiometric
test booth to isolate the listener from background noise. Maximum
levels of acceptable ambient sound levels are specified in standards
and discussed in the calibration section below. In addition to achieving
sufficiently quiet background noise levels, effort is needed to maintain
a consistent test environment from one year to the next. Maintaining
similar test environments allows comparison of test results across
time. Fluctuating noise during a test session can not only invalidate the
test results but can be extremely frustrating to the listener, thereby
undermining the value of the test. Sound booths must be maintained
regularly to keep the doors seals, ventilation fans, lights, panels, etc
functioning properly, providing an optimal test setting. In addition to
noise levels, the test environment should also be comfortable in terms
of temperature, ventilation, and size. The test environment should
invite the listener to both be relaxed and focused on the listening task.
(Source: Tremetrics – Image used with permission)
Figure 7.8 – Examples of two bioacoustics simulators. On
the left is a standard simulator with headphones mounted in the test position. The device on the right has sound level
monitoring capability at seven octave bands.

219.
i) Performance Checking - Bio-acoustic Simulator
A bio-acoustic simulator or electro-acoustic ear is an electronic device
designed to simulate a real listener for the purpose of verifying
consistent audiometer stimuli output. Figure 7.8 exhibits two models
available from one manufacturer. The premise is that a bio-acoustic
simulator has predetermined hearing thresholds which do not vary.
Each day that audiometric testing is conducted, a hearing test is first
performed on the bio-acoustic simulator. The thresholds should be the
same as the day the audiometer was initially calibrated (either as a
new audiometer or the day of the annual exhaustive calibration).
Changes in threshold levels at any frequency on the daily test,
compared to the initial test indicate audiometer malfunction.
Bioacoustic simulators are also designed with an optional built-in
microphone and octave band noise analyser to monitor ambient noise
levels in the test environment. If the ambient noise exceeds the
allowable level, a light is illuminated, alerting the COHC to discontinue
testing until the noise subsides. Documentation of the daily verification
checks should be maintained over time as proof of function.
j) Otoscope
An otoscope is a hand held device with a light source and magnifier
used to view the outer ear. Otoscopy is included in the audiometric
testing protocol to assess the status of the outer ear, identify
contraindications for performing an audiometric test and to judge the
size and direction of the ear canal which aids in the selection and
fitting of HPDs. There are no standards or specifications for the
otoscope. The condition of the ear canal should be documented on the
audiometric test form.

220.
7.3.2 Equipment Calibration
Each audiometer should undergo a full laboratory calibration every year, or
according to local country regulations. Unlike the daily verification, the
exhaustive calibration is performed by a professional calibration service,
often the audiometer manufacturer or equipment dealer. An exhaustive
calibration consists of the following measurements:
Sound pressure output,
Linearity of the attenuator,
Harmonic distortion,
Rise and decay time, and
Overshoot and “off” levels.
The professional calibration service chosen to conduct exhaustive
calibrations should use the following minimum equipment requirements:
Type 1 sound level meter, artificial mastoid (B&K 4930), frequency counter
and timer, manometer, cavities, and couplers. The instrumentation should
have annual calibration traceable to N.I.S.T. (National Institute of Standards
and Technology). The following services are expected from the service
provider:
Produce copies of current records of the equipment used to calibrate,
Use of the same calibration system used from year to year,
Documentation of the measurement error, and
No unnecessary adjustments to the audiometer.
Caution: each set of headphones is calibrated to one audiometer.
Headphones cannot be swapped or used with another audiometer without
recalibration.
7.3.3 Understanding the Audiogram
The audiogram is the graphical representation of hearing sensitivity. By
convention, frequency (Hz) is plotted from low to high pitch moving from the

221.
left to right on the audiogram. Intensity (dB HL) is plotted from soft to loud
moving from top to bottom on the audiogram. Air conducting thresholds are
indicated by an “X” for the left ear and an “O” for the right ear. Sometimes
the graphs are colour-coded: right ear results recorded in red and left ear
results recorded in blue. These parameters and symbols may differ between
countries so the legend should be consulted when interpreting test results.
The degree and configuration of the hearing sensitivity is easily revealed, as
is the difference between left and right ears.
The diagram shows an audiogram, note the Hearing Level scale. The lower
the hearing level appears on the scale, the louder the presented tone needs
to be in order to be heard.
Figure 7.9 - Audiogram illustrating regions of hearing sensitivity
Charting the hearing thresholds on an audiogram reveals the shape or
configuration of the hearing loss. Normal hearing is approximately the
same at each frequency and equal in both ears. The audiometric shape is
flat or a fairly straight line across the top of the audiogram.
Normal MILD
Mild MILD
Moderate MILD
Severe MILD
Profound MILD

222.
A sloping configuration shows hearing loss rolling off in the high
frequencies, which is commonly associated with age-related hearing loss, or
presbycusis. A reverse slope, meaning worse in the low frequencies and
improving in the higher frequencies, may occur with middle ear pathology or
an inner ear disorder called Meniere‟s disease. For occupational hearing
conservation the classic “noise notch” is significant and is indicative of
NIHL. Figure 7.10 depicts audiometric results recorded in a tabular format
and also plotted on an audiogram. The configuration of the thresholds is
easily seen on the graph and reveals a degree hearing loss in both ears
with a clear notch around 4000 Hz.
Figure 7.10 - Example hearing test results shown
7.3.4 Validity and Factors Affecting Audiometric Results
A valid audiogram reflects the listener‟s current audiometric thresholds. The
test may be invalid if for example, the employee was exposed to high level
noise without hearing protection shortly before a baseline test.

223.
A test may be judged invalid if the thresholds do not correspond to the
employee‟s communication ability, in other words, if the employee easily
answers medical history questions but audiometric responses show a
profound hearing loss in both ears, the test results are incongruent with the
employee‟s behaviour.
Some employees are difficult to test due to severe tinnitus yielding
inconsistent responses to test stimuli. If valid audiograms cannot be
obtained at the test site the employee should be referred to an audiologist
for a more extensive evaluation. Note: the test/retest reliability of
audiometric testing is ±5 dB. Therefore two consecutive tests that are within
5 dB at each frequency are not necessarily considered inconsistent.
7.3.5 Audiometric Testing Intervals and Conditions
Audiometric Tests are performed at different intervals and under different
conditions over the course of employment. Audiometric testing should be
provided at no cost to the employee.
Baseline Test
The baseline audiogram is the reference test, to which future
comparisons are made. Most often this is the first valid test conducted
in the HCP. The baseline test should be performed when the
employee has had no hazardous noise exposure for at least 14 hours
prior to the test, to avoid contaminating the thresholds with temporary
threshold shift. If this criterion is impossible to meet, the use of hearing
protection devices (HPD) may be substituted; however this practice is
discouraged and only should be used as a last resort. Ideally, the
baseline test is conducted at the start of employment prior to any work
place noise exposure, however should be conducted within six months
of enrolment in the HCP. The sooner the baseline is conducted the
better for purposes of employee education and documentation of
pre-existing hearing loss.

224.
Employees with hearing loss identified on the baseline test should be
notified and referred to the employee‟s personal physician and/or
audiologist to further investigate the cause of hearing loss and
possible treatment options. These cases should be reviewed
Annual Test
Annual tests should be conducted within 13 months of the baseline, or
previous annual test. Results of the annual test are compared to the
baseline audiogram to monitor hearing stability. Changes in hearing
are called threshold shifts and a reason for and a solution to them
needs to be developed.
Retest
The term “retest” is used when the audiometric test is repeated in
order to verify the results of an annual test. When a standard threshold
shift is detected, a retest should be done within 30 days of the annual
test date. (Retests may be done for purposes other than follow-up of a
significant threshold shift and may have different timelines). A retest
should be done with no hazardous noise exposure for at least 14
hours (sometimes referred to as a test done on “rested ears”) prior to
the test. HPD use may not be substituted for this criterion.

225.
Transfer or Exit Test
It is recommended that audiometric tests be conducted when an
employee has a change in noise exposure permitting removal from the
HCP (for example changing from production job to office job) or when
terminated from the company. Transfer or Exit tests are done for
purposes of documenting the hearing thresholds at the cessation of
noise exposure. Exit tests may be done within six months prior to the
termination date.
Figure 7.11 - Example of Standard Threshold Shift (STS) calculation. The gray thresholds are the baseline test. The
colored thresholds are the annual test. An STS is present when there is a 10 dB or greater difference between the averages for
thresholds at 2000, 3000, and 4000 Hz between the baseline and
the annual tests. In this example, both ears show STS.

226.
Significant Threshold Shift Intervention
Identification of Significant Threshold Shift is an early indicator of
decrease in hearing and requires intervention to;
- Prevent permanent changes in hearing
- Evaluate the need for modifications in the HCP and
- Alert employees to hearing health conditions which may require
medical attention.
The time periods in the next sections are very specific to a
particular jurisdiction. They can be treated as guidelines and
local legislation, standards and company policy should be
adopted.
Intervention Procedures
- Examine the overall noise exposure of the employee to
determine if elements of the noise management plan have not
been implemented As an interim measure provide HPD and
education programme for the exposed employees while longer
term solutions are being developed
- If employee is not using HPD that are part of the existing noise
management plan , then the employee should be fitted and
trained on the use and care of HPD and required to use them.
Employee should demonstrate proper HPD insertion and removal
and know when HPD use is required.
- If the employee currently uses HPD, then the HPD should be
refitted and the employee retrained on its use and care. The HPD
should be evaluated for suitability for the noise environment and
HPD with additional attenuation provided if needed.
- Retest within 30 days of the annual test under the conditions
specified for retests.

227.
Workers’ Compensation
Employees who seek compensation for hearing loss may undergo a
thorough work related investigation including complete diagnostic
audiology and medical examination by an ear, nose, and throat
physician, or other competent medical authority. The workplace may
also need to be assessed to determine if it was likely to have caused
the loss. Workers‟ Compensation varies regionally and specific
regulations should be consulted. Note: calculating hearing impairment
is typically done by using a specified formula intended to estimate
hearing disability and may be different to the determination of the
threshold shift.

228.
8. REPORTING & RECORD KEEPING
A proper risk management strategy must be transparent documented and
properly implemented. To ensure this occurs, a system of reporting and
documentation needs to be implemented and maintained.
Responsibility must be assigned and documented with key performance
criteria assigned to each level of management.
8.1 ORGANIZATIONAL RISK MANAGEMENT PLAN In consultation with employees an employer should document how all
occupational health and safety risks will be managed. The plan requires a
clear commitment and allocation of funding should allow for a consultative
structure to enable meaningful input from all employees and management.
In workplaces where there is the potential for excessive noise exposure, this
plan should include a component defining the noise management plan (or
hearing conservation programme).
An organisational chart can be used to show the links between OH&S and
finance, R&D sections production areas and senior management. The roles
and responsibilities for each part need to be incorporated into performance
indicators, position statements and job descriptions. In short unless a
hazard management plan is seen as an essential part of the work function
and culture it will not prosper.
In regard to management of noise this plan should include:
The level at which noise exposure needs to be addressed within the
organisation for both long and short term exposures.
The relationship of the organizational level to regulatory requirements.
The decision matrix for determining of implementation types of risk
controls.
Long and short term strategies for risk control.

229.
The conformance to the goals set should be part of the OH&S report to
management.
The accounts of the OH&S programmes should be prepared to reflect the
cost benefit of implementation strategies where possible. Performance to
budget is important and future planning of improvements needs to be
incorporated into the ongoing funding estimates.
8.2 HAZARD IDENTIFICATION ASSESSMENTS All areas of employment need to be risk assessed for their likelihood of
excessive noise exposure (see Section 3.6.2). The reports need to state
how and when the assessment was made and clearly identify hazardous
and non hazardous areas. A plan of the facility can be used to record those
areas which have been assessed as non hazardous. While it is not
essential to use a sound level meter at this stage it is important that this
assessment is undertaken with the full support of the OH&S committee.
The report on this first stage of noise hazard assessment needs to be
agreed to and signed off by the OH&S committee and retained in the OH&S
risk assessment file.
8.3 HAZARD CONTROL ASSESSMENTS Assessments to establish quantitatively the extent of the noise hazards and
to develop noise control procedures (see Section 3.6) are more detailed and
may include engineering, procedural and administrative recommendations.
The basis for the recommendations, including the measurement and
assessment procedures need to be clearly stated in the report both for
future reference and for the purpose of initiation the necessary actions. The
recommendations must be discussed and acted upon by the OH&S
committee in accordance with the “Organizational Risk Management Plan”.
The assessments need to be retained by the OH&S committee and a report
on compliance submitted to management.

230.
8.4 HEARING PROTECTOR PROGRAMMES The basis of all hearing protector programmes is that they are worn at all
times when there is a significant risk of excessive noise exposure (see
Section 5). The Hearing Protector requirement report must state clearly the
areas where HP is required. These areas need to be properly identified
with obvious signage so that all personnel can recognize them and wear the
appropriate HP. The location of stores of hearing protectors also needs to
be clearly identified.
The assessments need to be retained by the OH&S committee and a report
on compliance, methods of achieving compliance, budget for education and
spare parts, and management responsibilities should be submitted to
management.
8.5 AUDIOMETRIC MONITORING An assessment of the level of hearing capabilities for all the personal
potentially exposed to excessive noise should be undertaken (see
Section 7.3).
The reports on audiometric monitoring should provide a meaningful
interpretation of the data and recommendations as to the success or
otherwise of the noise management programme. Audiometric data as such
is historic and identification of a degradation in hearing only confirms a
failure in a control system.
Audiometric data is a private medical record and must be stored as
confidential material. Management reports should be of a statistical nature
and individuals should not be identified without their consent. It is important
that good use of this data be made to improve the workplace rather than
simply storing this data in the personal files of the employees with a view to
future compensation claims for loss of hearing.
231.
The report and recommendations should be prepared by the OH&S
committee and submitted to management.
8.6 CONTINUING RISK IDENTIFICATION AND CONTROL STRATEGY ASSESSMENT The Noise Management plan should include a component which defines the
procedures for ongoing Hazard Identification Assessments. These need to
determine the impact of changes in the workplace due to new equipment or
processes, changes in materials or building layout and structure or changes
in working patterns of noise exposed persons.
Hearing Protector Programmes need to be reassessed as to the
possibilities of other control methods. Audiometric data needs to be
reviewed to identify any trends that could be indicating systemic failures in
the noise management programme
The report, review and recommendations should be prepared by the OH&S
committee and submitted to management.

232.
9. GUIDELINES FOR AN EFFECTIVE HEARING CONSERVATION PROGRAMME
These Guidelines outline a “best practice” approach for implementing and
maintaining an effective HCP. They describe how to measure sound levels
and employee noise exposures, use engineering noise controls, select
appropriate hearing protection, educate and train management and noise
exposed employees, administer an audiometric testing programme, and
implement intervention steps to prevent hearing loss.
Readers should feel free to use this Guideline for upgrading their internal
HCP and should amend as necessary to ensure compliance with the
standards and legislation in their local area. Note: where the word “shall”
appears will need to be assessed by internal company representatives to
determine if they desire for these requirements to be absolute or simply
recommended, which in the latter case the word “should” needs to be used
in place of “shall”. Also, for purposes of this guideline, the term LAeq,8 is
used to express the 8-hour equivalent average noise exposure.
Based on extensive research by NIOSH and more than 30 years of
experience by the author in the subject, the following are the recommended
minimum requirements an HCP needed to effectively manage the risk and
prevent NIHL:
1. All work areas shall be surveyed for noise, and a detailed area and
equipment survey conducted in areas or for tasks identified as
potentially above 80 dBA.
2. A quantitative noise exposure assessment shall be made for all
workers whose duties include work in areas and tasks where ambient
noise exceeds 80 dBA.
3. Employees, and their management, shall be informed of the results of
their noise exposure assessment.

233.
4. Noise surveys shall be updated as often as necessary and should be
updated at least every two years. Noise surveys should also be
updated after the installation of new equipment or when process or
procedural changes occur that may affect noise exposures.
5. Noise control measures shall be used to reduce worker noise
exposures below the equivalent of an eight-hour average of 85 dBA.
To the extent feasible, engineering controls are preferred. Where
feasible engineering controls are not entirely adequate, feasible
procedural and administrative controls should be implemented. Where
even the combination of feasible engineering controls and
procedural/administrative controls is not fully effective, personal
protective equipment shall be used.
6. All work areas with sound levels 85 dBA and above shall be posted to
require all persons entering such areas to use appropriate hearing
protection devices, regardless of time spent in the designated area.
Management shall enforce such use of hearing protection in the
posted areas.
7. Hearing protection shall be readily available for persons entering areas
posted requiring use of hearing protection.
8. Persons whose work involves exposure to sound levels of 85 dBA or
more (without regard to duration) must receive initial and refresher
training regarding the effects of noise and procedures for preventing
NIHL.
9. Audiometric monitoring, conducted and supervised by qualified
personnel, shall be conducted annually for employees whose duties
involve exposure to the equivalent of an 8-hour average of 85 dBA or
more (without regard for personal protective equipment), other than
incidental exposures. Procedures shall include appropriate levels of
intervention where employees are found to have suffered temporary
NIHL.

234.
10. Permanent threshold shifts in hearing (as described herein) detected
by audiometry shall be reported to the appropriate persons and
intervention strategies implemented, unless it is determined by a
qualified physician or occupational audiologist that the shift was not
caused or aggravated by occupational noise exposure.
11. Periodic evaluation of the quality and effectiveness of the HCP shall
be performed.
12. Recordkeeping is required in all components of the HCP. Records of
area noise surveys, dosimetry, hearing protection available, and
audiometric testing shall be maintained for at least 30 years beyond
the last date of employment.
9.1 NOISE SURVEYS
Noise surveys are carried out for a number of different reasons and
objectives. Noise surveys may be necessary for many other purposes than
hearing loss prevention, such as evaluating communications interference,
recognition of emergency alarms and warning signals, evaluating rest
areas, etc, but these are beyond the scope of this practice. Noise surveys
relevant to this guideline are conducted to:
Identify employees who need to be included in the hearing HCP,
Determine area and equipment noise levels, and generate noise
contour maps,
Collect acoustical data for noise control engineering purposes,
Identify all hearing protection required areas, and
Enable the selection of the appropriate hearing protection devices.
9.1.1 Instrumentation
Instruments used in noise surveys must meet internationally recognized
performance standards and be properly maintained and calibrated.

235.
9.1.2 Survey of the Area and Equipment Noise Levels
The first step of a detailed survey is an Area and Equipment Survey. The
purpose of the area and equipment sound level survey is to document all
machines and components operating at 80 dBA or above, identify areas
and tasks where hearing protection is required, plan for noise exposure
assessments, and initiate a priority list of noise sources potentially suitable
for noise control treatment.
Area and equipment sound levels should be revalidated at least every two
years, after new equipment is installed, or when process changes occur that
may affect the area or equipment sound levels. To the extent practical,
noise surveys should address intermittent process cycles and reasonably
anticipated abnormal operating conditions (e.g., steam leaks, worn motor
bearings, misaligned couplings, etc.). Note – the biennial revalidation
process may only necessitate a walk-through and/or preliminary sound
survey, as described above, and comparison of the results to the current
detailed sound survey data. If the sound levels differ by 3 dBA or more,
either higher or lower, then the detailed survey should be updated.
Surveys should evaluate and document sound levels at each machine and
in each work area above 80 dBA. This should include documenting the
conditions at the time of survey. Measurements should be collected during
typical operating conditions and be supplemented when practical to
evaluate intermittent and abnormal conditions.
Measurement results may be presented graphically, as a noise contour
map, or in tabular form, whichever best communicates the nature of the
potential for exposure. Persons performing area and equipment surveys
require appropriate training and need to have demonstrated competency in
performing such surveys.

236.
9.1.3 Noise Exposure Survey
The second step of a detailed noise assessment is a Noise Exposure
Survey. Noise exposure surveys provide data to enable the programme
administrator to make informed decisions regarding actual employee
exposures, thus guiding management of the HCP. A noise exposure
determination shall be made for all employees who work in areas having
sound levels of 80 dBA or higher or who operate equipment generating
sound levels at or above 80 dBA.
After the initial noise exposure survey, re-evaluations should be conducted
at least every two years if biennial revalidation of the area and equipment
data concludes the sound levels have changed by 3 dBA or more.
However, checking is also necessary whenever new equipment is added,
old equipment removed or shut down, or process or work practice changes
occur that alter the area noise environment or worker exposure to the
environment.
One method for determining worker noise exposure is through use of
personal noise dosimeters. For HCP purposes the dosimeter shall be set to
measure the A-weighted equivalent-continuous sound level, LAeq,T, during
the time period T, using a 3-dB exchange rate and no threshold level. Note
that some jurisdictions may also require monitoring using different
thresholds or exchange rates. Where applicable, such monitoring should be
in addition to the health-based monitoring described in this Guideline. In
such cases it would be preferable to use equipment that can collect all data
simultaneously to assess against both standards.
An alternative is to estimate the individual noise exposure based on the
noise levels measured at the individual‟s ear plus data on the time of
exposure to each noise source. Then the daily noise exposure can be
determined.

237.
Representative noise exposure may be used where similar exposure groups
are identified that have the same job function or activity, and are exposed to
similar kinds of noise. Noise exposure profiling may be used to determine
noise exposure for certain very well-defined situations, where permissible
under applicable regulations.
All noise exposure data shall be normalized to an 8-hour average for
purposes of comparison to the HCP inclusion criteria under this practice
(8 hours at 85 dBA being defined as 100% of daily allowable dose or
comparable permissible exposure limit). Care must be exercised to avoid
confusion of the average derived using the criteria described in this practice
versus criteria used under various other measurement systems.
The noise survey report and all data shall be maintained for the time
required under local legislation. This may be as long as forty (40) years or
for the duration of employment plus 30 years for each impacted employee.
9.2 NOISE CONTROL
Engineering noise controls shall be used as the preferred means to prevent
hearing loss through reduction in area and equipment noise. Where
practical engineering controls are inadequate to reduce average noise
exposures to less than 85 dBA, administrative controls and personal
protective equipment shall be used to achieve adequate protection. The
principal goal of noise controls is to reduce all LAeq,8 noise exposures below
85 dBA. When determining the feasibility of a noise control option, it is
important to consider the interaction between the exposed workers and the
noise sources of concern. Noise sources should be prioritized for
implementation of feasible engineering noise controls based on the highest
rank order of their contribution to actual worker noise exposures.
238.
9.2.1 Engineering Noise Control Options
Reducing excessive equipment noise may be accomplished by treating the
source, sound transmission path, receiver, or any combination of these
options. Note that engineering controls for the receiver do not include
personal protective equipment. This refers to engineered provisions that
eliminate the need for the receiver to be in the area where the noise is
present or that isolate the receiver from the ambient noise environment.
9.2.2 Administrative Noise Control Options
Administrative controls involve changes to employee work routines that
affect their daily noise exposure in a positive manner. When designing
administrative controls it is important to consider the fact that rotating two or
more employees through a job activity with high-noise levels actually
distributes the daily exposure among the participants, thus lowering the
overall exposure that would have been received by a single worker.
However, rotating employees in this manner will at least double the number
of employees exposed. This option should only be implemented if the
resultant noise exposures for all of the affected workers would be such that
none would be at risk of noise-induced hearing loss. Where administrative
controls are used, training and supervision need to be sufficient to ensure
the controls are sustainable.
9.2.3 Personal Protective Equipment (Hearing Protection Devices)
Hearing protection devices (HPDs) consist of earplugs and earmuffs, and
are used to reduce the level of sound reaching the inner ear. HPDs shall be
used in designated high-noise areas until feasible engineering noise control
measures effectively reduce workplace noise exposures below 85 dBA or
where other controls have not yet proven feasible.
Selection of Hearing Protection Devices:
The type of HPDs to be used in each work environment will be made by
persons qualified to assess the suitability and effectiveness of such
equipment. HPDs must reduce worker noise exposure below 85 dBA.

239.
There is no “best” type of HPD. The most effective device is that which is
actually worn and worn properly. Thus, it is important to consider employee
comfort and practicality of use in the actual work environment. It is
recommended more than one type of HPD be provided in order to fit all
employees and to suit all tasks and conditions. However, although the
employee may select the type of HPD they prefer, it is imperative the
selection of size and fit be completed by qualified persons.
Devices used must be sufficient to control actual exposures to below an
average of 85 dBA, based on expected real-world attenuation predicted for
the type of device. To estimate the real-world attenuation afforded by HPDs,
it is recommended a scientifically acceptable derating scheme be used to
estimate the “protected” level or LAeq,8 under the protector. It is important to
keep in mind derating the manufacturer‟s attenuation rating may not be
applicable for determining regulatory compliance; and therefore, may need
to be performed as a separate calculation.
Special equipment may be necessary where communication in the noise
environment is critical. Selection of HPDs must take into consideration the
need for communication in the noise environment. As a minimum, all
values for the LAeq,8 under the protector must be reduced below 85 dBA.
However, to ensure optimum protection and communication capabilities it is
recommended the LAeq,8 under the protector be kept between 75-80 dBA.
Having the LAeq,8 under the protector less than 70 dBA poses a risk of
overprotection, which can lead to miscommunication or failure to recognize
emergency alarms and warning signals.
All hearing protectors need to be fitted when initially dispensed. Even
wearers of foam earplugs should have their ear canals inspected to ensure
there are no physical problems that might prevent a good seal from being
achieved. Wearers of ear muffs should be examined to ensure the wearer‟s
physical features do not preclude an adequate seal and that the headband
size is appropriate.
240.
HPDs are required to be worn in all areas with sound levels 85 dBA or
greater, regardless of the time that the individual is expected to be exposed.
Because the adequacy of single protection reaches of real-world
attenuation limit when exposures exceed 105 dBA, dual hearing protection
(muffs and plugs) is required when sound levels are greater than 105 dBA
(Berger 1996).
HPDs must be readily available at locations or stations where people are
expected to enter into a high-noise area. All areas of 85 dBA or more shall
be posted as “hearing protection required” areas. Equipment or areas of
105 dBA or more must be posted as “dual hearing protection required”
areas. Temporary high noise areas should be appropriately posted to the
extent reasonably practicable.
9.3 HCP TRAINING 9.3.1 Employee Training
Employees whose work involves exposure to sound levels of 85 dBA or
more (without regard to duration) must receive initial and refresher training
regarding the effects of noise and procedures for preventing noise induced
hearing loss. Teaching employees the value of good hearing is critical to
the overall success of the HCP. The emphasis is that noise-induced
hearing loss is 100% preventable. The intent of training should be not only
to inform employees about what is necessary to protect their hearing, but
also to generate life-long interest in hearing health and shape positive
attitudes and behaviors. Training should promote prevention of hearing
loss, such as use of HPDs, for hazardous noise both on and off the job.
Those responsible for presenting training need to be properly qualified to
present the training. In addition, the trainer should have specific knowledge
about the workplace noise exposures and information on the noise control
programme. Finally, all training must be documented and the effectiveness
of the training should be assessed and documented.

241.
9.3.2 Management Training
In addition to the employee training content, management has additional
need for education to deliver an effective HCP, thereby, minimizing worker‟s
compensation costs, reducing safety risks, and realizing all the other
benefits of hearing loss prevention. The content of management training
should be adapted to fit the role of the manager in ensuring the
effectiveness of the HCP.
9.4 AUDIOMETRIC MONITORING
Valid audiometric monitoring allows the assessment of HCP effectiveness.
Unless barred by law, participation in audiometric testing should be a
condition of employment for employees exposed to hazardous noise.
All employees identified as having an 8-hour average noise exposure equal
to or greater than 85 dBA shall receive:
A baseline audiogram upon initial exposure,
Annual audiometric monitoring exams for the duration of their
employment in which exposure continues to be above 85 dBA, and
Termination audiometric exam upon cessation of employment or
cessation of exposure to hazardous noise.
Audiometric monitoring shall be conducted by qualified personnel using
standardized, calibrated audiometric equipment and procedures. Results of
audiometric testing must be evaluated, or “professionally reviewed” by a
qualified audiologist or physician (referred to as the “professional
supervisor”) to identify recommended and required employee and employer
follow-up actions, revise baselines, determine work-relatedness, and to
manage the audiometric database. Local and country requirements shall be
met in addition to any internal company policies.
242.
Where allowed by law, employees whose exposure is only incidental may
be excluded from annual audiometric testing. Such employees still require
training. For purposes of this guideline, incidental exposure is defined as
exposure that does not exceed an LAeq,8 of 85 dBA on more than 5% of the
employee‟s workdays in any one year.
Any threshold shift in the audiogram should be investigated and checked. If
there is a real threshold shift then the noise management in the workplace
should be reassessed. If this is shown to be adequate the employee should
be counselled and further investigations undertaken to check why the
hearing loss is occurring. Once the reason has been uncovered action
should be taken to prevent further hearing loss.
9.5 DETERMINING HCP EFFECTIVENESS
Implementation of a prevention programme does not automatically
guarantee its success. Therefore, mechanisms for evaluating the quality
and effectiveness of the HCP must be included as a critical and ongoing
component of the HCP. The following are considered the minimum
components of a process for evaluating HCP effectiveness:
Individual HCP Effectiveness: Measuring HCP effectiveness for an
individual employee is accomplished by comparing the annual audiometric
test to the baseline audiometric test.
Additional investigation is needed for each employee experiencing
decrease in hearing.
Population HCP Effectiveness: Measuring effectiveness of the overall HCP
programme should include:
HCP Compliance Audits:
Internal HCP audits should be conducted annually to ensure
compliance with company policy and with local and country specific
regulations. This audit may be conducted by business unit staff, plant
management, or company peers.

243.
Audiometric Database Analysis:
The database should be regularly reviewed for trends. This should
include:
- Hearing health of company personnel; that is: prevalence of
hearing impairment in the workforce,
- Annual STS rate; that is: the number of newly detected STSs per
100 employees in the monitored population, and
- Other metrics as appropriate such as percentage of audiometric
tests completed on time, incidence of temporary threshold shifts
detected, etc.
9.6 RECORDKEEPING
Good records are essential to an effective HCP. Recordkeeping is required
in all components of the HCP. Records which must be retained include:
Noise measurements, including determinations of noise-free areas,
Noise exposure assessments, including notices to exposed
employees,
Employees included in the HCP,
Audiometric testing and medical history records, including notifications
to employees,
All HPDs available to and individually used by employees,
Training records for employees and management,
Noise control studies, including projects undertaken to reduce
exposure,
Local HCP programme and policy documents,
Determination of hearing protection device effectiveness,
Audits of HCP, and
Calibration of instruments.

244.
9.7 INTERVENTION STRATEGIES FOR PREVENTION OF NIHL
STS is intended to be the trigger point for intervention, subsequently
preventing an eventual permanent hearing shift. However, using other
metrics, more sensitive to the initial signs of NIHL combined with applying
early intervention strategies can be more effective in preventing NIHL.
9.7.1 Identification of Employees at Risk For Hearing Loss
Analysis of the audiometric database can reveal specific employees who
have the potential to develop an threshold shift.
By comparing threshold shift rates of specific departments and/or job
positions, those with the highest STS rates can be identified and targeted
for additional intervention.
Employees with extreme high noise exposures, such as greater than or
equal to 105 dBA LAeq,8 requiring dual HPD may be targeted for additional
intervention strategies.
9.8 PROACTIVE INTERVENTION STRATEGIES 9.8.1 “Buy Quiet” Programme
Reducing the employee noise exposures can be accomplished by
implementing a “Buy Quiet” programme, in which all new equipment or
production procedures must adhere to a company defined noise exposure
limit, less than 85 dBA LAeq,8. Company procedures can be established
requiring management approval before equipment or procedures are
installed. Any new buildings or procedures should be designed with noise
exposure limits in mind.
9.8.2 Engineering Solutions
Reducing the employee noise exposures may be accomplished by
examining the source of the noise and implementing engineering solutions
to reduce the noise at the source.

245.
Other options which should be considered are to reduce the noise between
the source and the employee or provide a noise reduction enclosure around
the employee.
9.8.3 HPD Refit/Retrain For At Risk Employees
Employees who are identified as being “at risk” or most likely to develop
threshold shift because of an early NIHL indicator, can be given additional
training and individual attention.
The employee can be counselled on hearing loss prevention, and the HPD
fit should be verified and documented. These employees could be checked
for proper HPD fit periodically throughout the year, rather than on an annual
basis.
9.8.4 Audiometric Testing Schedule
The audiometric test schedule can be adjusted to test high risk employees
more frequently. For example, employees exposed over 105 dBA LAeq,8,
may benefit from testing every 6 months. In addition, employees who have
experienced an STS, can be retested on “rested ears” (no noise exposure
at least 14 hours prior to the test) the day after the annual test showing the
STS. The more immediate the follow-up, the better the chance is to identify
temporary threshold shift due to excessive noise exposure.
9.8.5 Special Events For Hearing Awareness and Appreciation
Heightening the awareness of hearing and noise issues can foster a
hearing healthy environment. There are national events focused on hearing
as well as public health campaigns with educational materials and
resources, such as International Noise Awareness Day, Better Hearing
Month, etc.
246.
9.8.6 Field Audits of HPD Use
Periodic personal protective equipment checks can be conducted randomly
throughout the year, with an emphasis on proper hearing protection fit and
use. HPDs should also be checked for wear, damage, and need for
replacement.
9.8.7 Training Courses For Management
Additional training for managers and others responsible for enforcement of
HCP policies is helpful to explain the rationale behind the company rules.
Enhancing the knowledge of noise and hearing loss prevention increases
motivation for administering an effective HCP.
9.8.8 HPD For Off The Job Exposure
Employees should be encouraged to use HPDs away from work when
exposed to hazardous noise in recreational activities.
By including non-occupational noise exposure information in the employee
training and providing HPDs for use away from work, the employee may be
more willing and able to practice hearing loss prevention for all hazardous
exposures, both at work and outside the workplace.
9.9 SUMMARY
A “best practice” approach for implementing and maintaining an effective
HCP may be a little challenging in some workplaces but there are many
options for noise control and, as a last resort, for individual hearing
protectors. The proper implementation of a HCP should result in the
prevention of hearing loss from occupational noise exposure for all the
employees.
247.
10. INTRODUCTION TO ENVIRONMENTAL NOISE
The primary reasons for limiting noise in the community are to reduce
speech and/or sleep interference, and to limit annoyance. People are not
usually annoyed if the sound is of the level and quality they expect in their
community, and does not interfere with speech or sleep. A side effect of
annoyance is stress that can affect some health conditions. Economic
effects will also trigger complaints; increased noise in a previously quiet
community can change the value of property.
The quality of the sound and a community‟s characteristics also should be
considered. Much depends on the existing conditions and expectations of
the community. In densely populated areas, the emphasis is on controlling
the overall growth of noise. However, in quieter, less densely populated
areas, a new noise that might go undetected in a noisier community can
become very noticeable and cause complaints. Often, in these quieter
areas, the quality of the sound is as important as the quantity. Unusual
sounds such as discrete tones and impulsive sounds are more annoying.
Sometimes tones are masked near a source, but clearly audible in quieter
areas farther away. The frequency content of sound changes with distance.
A source with an acceptable spectrum nearby can sound like a rumble at
greater distances. Sounds with strong low-frequency content require
special attention (Berglund and Lindvall, 1995, Berglund et al., 1996). Most
criteria for environmental noise based on overall sound levels measured
outdoors assume a balanced or relatively even sound spectrum. When
there is strong low-frequency component the sound can more easily
penetrate buildings. Thus, such sounds are often more annoying indoors
than outdoors.
Approaches to regulating environmental noise vary significantly between
countries and also within a country, state, city, and/or local municipality. In
fact, it is not unusual to find places where no regulation exists.
Consequently, companies that operate multiple facilities can face
significantly different environmental noise challenges at various locations.

248.
An occupational health or safety professional may need to evaluate
environmental noise for several reasons:
1. Compliance of noise produced by facilities operating in regions with
local ordinances,
2. Determination of acceptable noise levels and noise characteristics for
new equipment,
3. Evaluation of site suitability for a new facility,
4. Resolution of complaints from neighbors, and
5. Social and corporate responsibilities.
Historically, research on environmental noise has concentrated on sources
related to transportation (airports, trains, highway and street traffic, etc.),
military (aircraft low-level flyovers, heavy vehicles maneuvering, firing
ranges, etc.), and ventilation systems (outside air conditioners and blowers,
noise from ventilation stacks, etc.). These sources are widespread, affect
large areas, and there are readily available mechanisms to fund the
research. This research has emphasized establishing acceptable quantities
of sound for typical areas that are affected, and reducing sound accordingly.
Less research is available on isolated and unique noise sources in quieter
communities where the noise is unexpected. An occupational health or
safety professional is most likely to be faced with noise from an industrial
plant disturbing a few local neighbors.
Measures of Environmental Noise
One of the most common environmental noise measures is the equivalent
continuous sound level (LAeq,T) (now called time-average sound level in
many standards). Some countries use the statistical based units for
assessing time varying noise.

249.
The most commonly used are the level exceeded for 10% of the time, LA10,
to represent the noise from the source and the level exceeded for 90% of
the time , LA90, to represent the background noise. Another metric is the
sound exposure level (SEL), symbolized as LAE. The SEL is used to
quantify accumulated exposure to noise from a single event by normalizing
all data to a one-second average. The SEL is useful for comparing the total
noise per event, such as aircraft flyovers, trains passing, highway noise,
etc., which allows for rank ordering each event.
Typically, measurements for environmental noise are A-weighted. The
C-weighted sound level is used in special circumstances related to
impulsive noise. A 3-dB (equal-energy) exchange rate is always used for
time-average sound levels. Octave-band or 1/3 octave-band levels are
sometimes used to evaluate sound quality.
A long-term average sound level over a 24-hour period is often used to
describe the acoustical climate of a community. The day-night average
sound level (DNL), symbolized as Ldn, has a 10-dBA night-time penalty
added to all sound between 10:00 p.m. and 7:00 a.m. before the average is
calculated, which is used predominantly in the U.S.A. A variation of this is
the day-evening-night sound level that adds an evening penalty of 5 dBA
from 7:00 p.m. until 11:00 p.m., and a 10-dBA penalty from 11:00 p.m. to
7:00 a.m., which is used throughout much of Europe.
In different countries there are some variations in the times used for the
day, evening and night to reflect the social traditions of the region.
10.1 EUROPEAN UNION ENVIRONMENTAL NOISE DIRECTIVE
In 1996 the European Union (EU) adopted and published The Green Paper
on Future Noise Policy (EC, 1996). Noise was recognised as one of the
primary environmental problems in Europe, adversely affecting more than
170 million EU citizens. Based on the foundation laid down in The Green
Paper, in May 2002 the EU formally approved the Environmental Noise
Directive 2002/49/EC (EU, 2002).
250.
The directive covers the effects of transportation and industrial noise on the
environment, and requires Member States to:
Determine environmental noise exposure by requiring sound
emissions noise contour mapping,
Inform the public on environmental noise and its effects,
Develop local action plans to reduce noise where applicable,
Preserve areas with acceptable noise quality, and
Continue to collect noise data for future policy.
The directive applies to:
Agglomerations or areas with populations more than 100,000 persons,
and
Transportation: major roads with traffic exceeding 3,000,000 vehicles
per year, railways with more than 30,000 train passages per year, and
municipal airports with more than 50,000 flights per year.
The directive lays down several deadlines, many of which are still pending,
to completely phase in the rule by 2012.
At this point, no noise limits or measurement methods are set under the
directive; however, Member States are requested to rely upon their own
legislation until common measurement procedures and noise limits become
mandatory. For those States without computational methods, Annex II of
the directive recommends following ISO 9613-2: Acoustics – Attenuation of
Sound During Propagation Outdoors – Part 2: General Method of
Calculation (ISO 1996).

251.
10.2 UNITED STATES FEDERAL GOVERNMENT GUIDELINES AND REGULATIONS
Most U.S. federal guidelines for community noise are based on the day-
night level, DNL (EPA, 1974), EPA recommended that DNL should be kept
below 55 dBA in residential areas "to protect public health and welfare with
an adequate margin of safety" (EPA, 1974). This level corresponds to that
normally present in a typical suburban community of about 770 people per
square kilometre. This goal did not consider economic or technological
feasibility and was not intended as a regulation.
The study recognised that many people lived in both quieter and noisier
areas, including densely populated urban areas. This study provided
methods to evaluate problems and potential for noise complaints based on
DNL. These involved adjusting or normalizing the DNL for specific
circumstances before comparing the DNL to criteria based primarily on
expectations in densely populated urban areas.
DNL works best for characterizing the long-term acoustical character of a
community as influenced by noise sources that are continually present as
steady-state sounds or frequently occurring events over most of the day
every day. DNL does not work well for infrequently occurring loud sounds
that may be disturbing to a community without strongly affecting the long-
term average sound level. DNL also is not a practical measure for
enforcement use by communities because of the long-term evaluations
needed to establish it.

252.
Consider the following example:
Example Calculation - A 24-hour measurement is conducted at the property line of a chemical plant, and the hourly Leq values are shown in the spreadsheet (entered in Column E, shaded in yellow):
As shown in the spreadsheet, Ld and Ln are 57.6 dBA and 53.9 dBA, respectively. Next, these results are entered into the DNL formula
)) 1010) (L
10L
dn
nd
(9)(10 (15)(10 24
1 log 10 L dBA
)) 1010) (53.9
1057.6
dn
(9)(10 (15)(10 24
1 log 10 L dBA
Ldn = 61.1 dBA
It is important to note that despite the fact no hourly average levels are over 60 dBA, we still calculate an Ldn of 61.1 dBA, which is due to the 10-dBA penalty applied to the average nighttime level. Based on an Ldn of 61.1 dBA and the EPA criteria, this DNL would be unacceptable for a residential development just beyond the chemical plant‟s property line.
253.
10.3 OTHER APPROACHES TO ENVIRONMENTAL CRITERIA
To overcome the limitations of the use of a time averaged level like Ldn or
Lden, many jurisdictions have developed environmental noise legislation
that specified noise levels that should not exceed at various times during
the day. A ten or fifteen minute average of the noise level is then compared
with the noise level considered to be suitable for the type of area and time
of day. An excess of 5 dB may be accepted but any greater excess
requires action to reduce the overall noise impact. An example of these
noise limits is provided in Table 10.1.
Table 10.1 – Example of Legislated Environmental Noise Limits
Guidance for Average Background Noise Levels, LA90,T
Type of Area Time of Day†
Day (0700-1800) Evening (1800-2200) Night (2200-0700)
Rural ie negligible transportation
40 35 30
Semi rural and low density transportation
45 40 35
Near some commerce or industry
50 45 40
Near dense transportation
55 50 45
Borders of industrial areas
60 55 50
Within industrial areas
65 60 55
† For Sundays and Public holidays the „night‟ may extend for another hour or so to 0800 or 0900 hr.
(Source: Mikl & Burgess – Based on the principles of AS 1055)
10.4 FACTORS OTHER THAN ABSOLUTE SOUND LEVEL INFLUENCING COMMUNITY REACTION TO NOISE
Most noise regulations are based on sound level, possibly with lower limits
at night or penalties for sounds with tonal or impulsive characteristics.

254.
However, research indicates many important factors influence community
reaction and annoyance produced by noise. Those identified by the EPA
(1974) were:
Frequency content of the noise,
Duration of the noise,
Time of day noise occurs,
Time of year the noise occurs,
History of prior exposure to the noise source,
Perceived attitude of the noise source owner,
Special characteristics of the noise that make it especially irritating,
Ratio of intruding noise level to normal background noise level.
Other studies have identified additional factors that are very much related to
community reaction and annoyance. These include whether the
complainant believes s/he is being ignored or treated unfairly, or perceives
the noise as:
Unnecessary, or unnecessarily loud,
A threat to personal health or safety,
A threat to economic investment (property value),
Beyond his or her control.
A most important factor is the difference in sound level between a new
noise and other expected and existing noise in the neighborhood. The most
significant finding of the EPA community reaction studies (EPA, 1974) was
that widespread complaints and legal actions are likely when the average
level of non-distinctive noise from a single source is regularly more than 5
dB above the average level of other existing sounds in the community.
Vigorous community action results for differences of 20 dB. Some noises
such as discrete tones are more irritating or difficult to ignore because of the
way they sound. People expect not only quiet, but a pleasant sound quality
if sound is audible. These unpleasant and distinctive sounds often cause
complaints if they are detectable at any level.
255.
The acoustical designers of vehicles, appliances, and other products today
spend much of their effort on "sound quality." Some common industrial
sources such as high-pressure or material-handling fans or positive-
displacement blowers produce strong discrete tones. Power presses can
produce repetitive impulsive sounds. Speech and music have information
content that makes them difficult to ignore. These factors affect the quality
of the sound in the community even at otherwise acceptable levels.
10.5 SOUND PROPAGATION OUTDOORS
Often a primary question one needs to answer is what will be the effect on
environmental noise when an industrial plant is built, expands, or adds new
equipment outside the building, or a residential subdivision encroaches
upon the facility‟s property line? To answer this question it is important to
know what factors affect outdoor sound propagation, and how to estimate
attenuation to select locations. Both ISO 9613-2 and ANSI S12.18,
American National Standard for Outdoor Measurement of Sound Pressure
Level (SPL) describe similar procedures for outdoor sound measurement,
including a discussion of the attenuation effects due to the various elements
mentioned above (ISO, 1996; and ANSI, 2004). These standards are
useful, not only for measurement procedures, but also for estimating SPLs
at different locations from the source. For sound radiating from a point
source in a free field, the SPL per octave band at a given distance may be
calculated from:
Lp = Lw - Atotal - 10.9 dB
where,
Lp = the octave-band sound pressure level, in dB, at the location of
interest,
Lw = the octave-band sound power level (PWL) of the source, in dB,
and
Atotal = the total attenuation at each octave band, in dB
The total attenuation (Atotal ) for each octave band is calculated by:
Atotal = Adiv + Aair + Aenv + Amisc dB
256.
where,
Adiv is the attenuation due to geometrical divergence,
Aair is the air absorption,
Aenv is the sound reduction due to the effects of the environment, and
Amisc is the attenuation resulting from all other factors, such as foliage,
barriers, etc.
Because high-frequency sounds have relatively short wavelengths their
sound energy will decrease rapidly with increasing distance due to
atmospheric absorption. Conversely, low-frequency sounds with much
longer wavelengths will often carry several kilometres from the source and
are usually the cause of complaints from citizens. This variation by
frequency should be accounted for when calculating the total attenuation.
Once the individual attenuation values are known for each octave band,
they can be logarithmically added together, and the resultant value may be
used along with the known PWL to estimate the SPL.
10.5.1 Geometrical Divergence
As sound propagates outdoors it generally decreases in magnitude with
increasing distance from the source. These spreading losses are due to
geometrical divergence, which occurs as sound waves propagate and
expand from a source, and in turn become less intense as they dissipate
over larger spherical areas. The divergence is not a function of frequency,
and attenuation is estimated by:
Adiv = 20 log r/r0 dB
Where,
r = distance from the point source in metres (m), and
r0 = reference distance of 1 m.
257.
For distances far from the source, the geometrical divergence results in a 6-
dB decrease per doubling of distance from a point source, which equates to
a 20-dB decrease for each tenfold increase of distance. For a line source,
such as a busy highway or long runs of noisy pipelines stretching
perpendicular to the measurement location (i.e., a petrochemical plant), the
geometrical divergence will be 3-dB decrease per doubling of distance.
10.5.2 Air Attenuation or Atmospheric Absorption
Sound energy decreases in a quiet calm atmosphere by two mechanisms:
(1) heat conduction and viscosity in the air, and (2) relaxation of air
molecules as they vibrate (Kurze and Beranek, 1988). The atmospheric
absorption losses depend on frequency, temperature and relative humidity.
Of these three factors, relative humidity is the dominant variable, followed
by the frequency and then the temperature.
10.5.3 Attenuation Due to Environmental Effects
In addition to divergence and air absorption, sound propagating from a
source is also attenuated by the environment, such as the ground, wind and
temperature gradients. Figure 10.1 illustrates the propagation path from
source to receiver. The magnitude of the reflected sound will depend upon
the type of ground surface, the angle of incidence (Ψ), and frequency
(Piercy and Daigle, 1991). ISO 9613-2 and ANSI S12.18 classify ground
surfaces for grazing angles less than 20o as follows (ISO, 1996; and ANSI,
2004):
Hard Ground - Open water, asphalt or concrete pavement, and other
ground surfaces having very low porosity tend to be highly reflective,
absorbing very little acoustic energy upon reflection. Tamped ground,
for example, as often occurs around industrial sites, can be considered
as hard ground.
Soft Ground - Ground covered by grass, shrubs, or other vegetation,
and all other porous grounds suitable for the growth of vegetation such
as farming land.

258.
Very Soft Ground - New-fallen snow is even more absorptive at low
frequencies than grass-covered ground, as is ground covered in pine
needles or similarly loose material. It is recommended by ANSI that
measurements above snow-covered ground be avoided unless
operation of the sound source is intimately tied with the ground
condition.
Mixed Ground - A ground surface which includes both hard and soft
areas.
At angles off the ground greater than 20o, which can commonly occur
at short ranges or in the case of elevated sources, soft ground
becomes a good reflector of sound and can be considered hard
ground.
(Source: From Piercy and Daigle - Used with permission)
Figure 10.1 - Paths for propagation from source S to receiver R. The direct ray is rd, and the ray reflected from the plane P (which
effectively comes from image source I) is rr, whose length is measured from plane P to R.

259.
Table 10.2
(Source: From Piercy and Daigle (1991) – Used with permission)
* Note: Refer to Figure 10.1 for illustration of rd and rr which are the paths for sound wave propagation from source to reviewer.
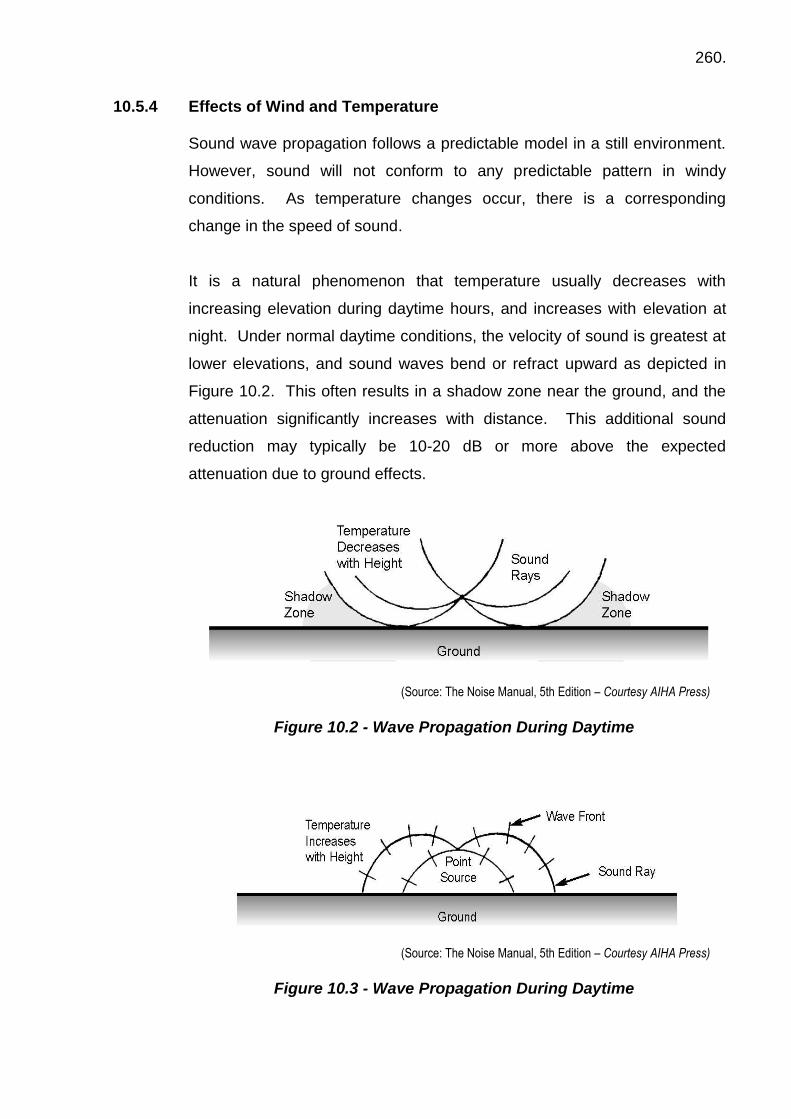
260.
10.5.4 Effects of Wind and Temperature
Sound wave propagation follows a predictable model in a still environment.
However, sound will not conform to any predictable pattern in windy
conditions. As temperature changes occur, there is a corresponding
change in the speed of sound.
It is a natural phenomenon that temperature usually decreases with
increasing elevation during daytime hours, and increases with elevation at
night. Under normal daytime conditions, the velocity of sound is greatest at
lower elevations, and sound waves bend or refract upward as depicted in
Figure 10.2. This often results in a shadow zone near the ground, and the
attenuation significantly increases with distance. This additional sound
reduction may typically be 10-20 dB or more above the expected
attenuation due to ground effects.
(Source: The Noise Manual, 5th Edition – Courtesy AIHA Press)
Figure 10.2 - Wave Propagation During Daytime
(Source: The Noise Manual, 5th Edition – Courtesy AIHA Press)
Figure 10.3 - Wave Propagation During Daytime

261.
Figure 10.3 exhibits the sound spreading pattern that occurs during
temperature inversions when the temperature increases with elevation.
This condition is more common at night due to radiation cooling of the
ground, and during sunrise and sunset. Since the speed of sound is faster
in warmer upper layers of air, sound waves will actually bend downward as
they propagate from the source. This condition results in little to no
attenuation due to the environment for several hundred metres, and
produces a favourable condition for sound propagation.
Figure 10.4 illustrates how sound wave propagation behaves with wind
gradients. As sound extends upwind, the spreading waves refract upward
and create a shadow zone with excess attenuation near the ground.
Because of this condition, it is not recommended that sound level
measurements be conducted upwind of the source. On the other hand, as
sound radiates downwind, the waves bend downward resulting in a
condition advantageous to propagation. This explains why sound levels
downwind of a noise source are more easily detected or heard as compared
to the listening conditions upwind. Consequently, it is recommended that
measurements be conducted downwind of the source.
(Source: The Noise Manual, 5th Edition – Courtesy AIHA Press)
Figure 10.4 - Wave Propagation With Wind
One other phenomenon that often occurs is sound traversing large
distances. Since spreading patterns for sound will vary or fluctuate with
increased elevation, wind and temperature, it is common to hear or detect
sound as a warble or intermittent event several kilometres away.
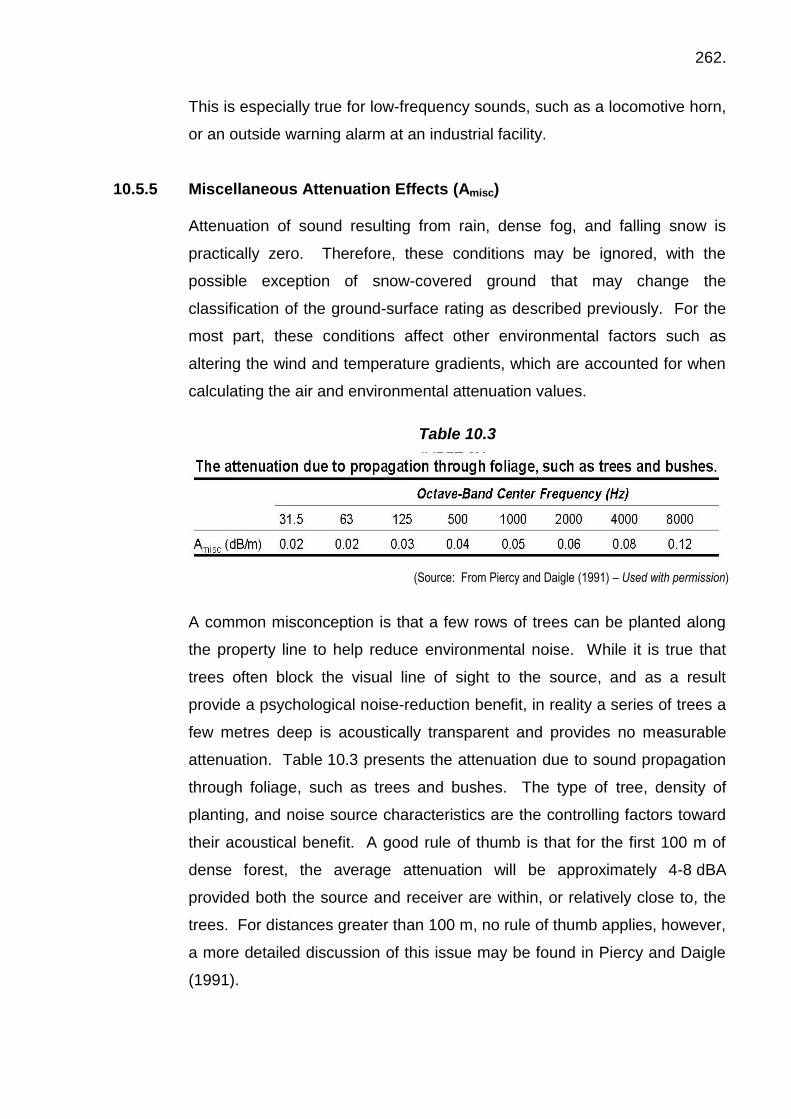
262.
This is especially true for low-frequency sounds, such as a locomotive horn,
or an outside warning alarm at an industrial facility.
10.5.5 Miscellaneous Attenuation Effects (Amisc)
Attenuation of sound resulting from rain, dense fog, and falling snow is
practically zero. Therefore, these conditions may be ignored, with the
possible exception of snow-covered ground that may change the
classification of the ground-surface rating as described previously. For the
most part, these conditions affect other environmental factors such as
altering the wind and temperature gradients, which are accounted for when
calculating the air and environmental attenuation values.
Table 10.3
(Source: From Piercy and Daigle (1991) – Used with permission)
A common misconception is that a few rows of trees can be planted along
the property line to help reduce environmental noise. While it is true that
trees often block the visual line of sight to the source, and as a result
provide a psychological noise-reduction benefit, in reality a series of trees a
few metres deep is acoustically transparent and provides no measurable
attenuation. Table 10.3 presents the attenuation due to sound propagation
through foliage, such as trees and bushes. The type of tree, density of
planting, and noise source characteristics are the controlling factors toward
their acoustical benefit. A good rule of thumb is that for the first 100 m of
dense forest, the average attenuation will be approximately 4-8 dBA
provided both the source and receiver are within, or relatively close to, the
trees. For distances greater than 100 m, no rule of thumb applies, however,
a more detailed discussion of this issue may be found in Piercy and Daigle
(1991).

263.
10.6 MEASURING ENVIRONMENTAL NOISE
A person measuring environmental noise must often comply with the
requirements of appropriate ordinances and standards. The referenced
standards provide technical guidelines, some of which are discussed briefly
in this section. The measurement guidelines should match the goal of the
sound survey. Some standards require that measurements be conducted
under the most favourable weather and physical conditions for sound
propagation. This requirement ensures that data are collected during sound
propagation conditions that typically correspond to a majority of complaints
from neighbours. However, the goal of many environmental noise
measurements is to document noise in the community for various
propagation conditions. Automatic noise loggers that can be left in location
for extended periods of time are of great assistance when assessing
environmental noise. It must however be remembered that such automatic
loggers will note the level from all the sound in the area and some of this
sound may not originate from the source under investigation. Attended
noise measurements may be required to supplement the automatic logger
data to confirm the noise levels from those sources.
(Source: The Noise Manual, 5th Edition AIHA – Used with permission)
Figure 10.5 – Example Time-History Log

264.
10.7 SUMMARY
Many industrial companies will face the potential of a community noise
problem. Each surrounding community is different and will tolerate varying
levels of noise. Factors influencing community tolerance include:
Visibility of noise source. Some members of the community may be
more concerned with “visual” noise sources (e.g. stacks, vents, etc.).
Noise sources that cannot be associated with the operation of the
facility or seem foreign to the community. Some members of the
community may interpret these sources as potentially dangerous.
Noise centred within a narrow frequency band (pure tones).
Noises that can startle the community (impulsive noise).
Noise that is random in occurrence and duration (may be related to
lack of control).
Low-frequency noise that may cause vibrations and/or resonances
within residential structures.
A very low pre-existing background noise level.
If a community noise problem is suspected, the following information should
be considered:
Review current local noise control ordinance. If there is none, refer to
any state guidelines for information on what is expected for monitoring
and compliance.
Conduct perimeter (property line) sound level measurements.
Compare to limits specified in the local ordinance. Check for pure
tones. Many ordinances have definitions and special restrictions for
tone generation.

265.
Be aware of the time of the noise complaint. Certain sounds may be
noticed at greater distances in the evening or early morning due to
meteorological effects, as well as lower background noise, and may
not be discernable during the day.
Additional follow-up steps may include the following:
Meet with the community/complainant. This shows that the company
is concerned about being a good neighbor. Sometimes the noise
complaint is related to another issue and noise is being used to get
attention and response.
Open Communications. Consider creating a "noise hot-line" that the
community can call 24 hours a day. Avoidance or quick resolution of a
noise issue is always in the plant‟s best interest. In addition, a
well-documented list of complaint calls can be cross-referenced with
plant operating conditions to track down possible problems.
Inform the community of any unusual noise emissions prior to noise
generation. Typically, complaints will come when a “normal” noise
environment changes. In addition, a noise generated between 7 p.m.
and 7 a.m. is generally more likely to cause complaints than an
identical noise occurring during daytime hours.
Elimination of noise sources may also cause complaints - if the old
noise source masked a dominant tone or other “offensive” noise.

266.
11. REFERENCES
ANSI (1992). “Guidelines for the Specification of Noise of New Machinery,”
American National Standards Institute, S12.16-1992, New York, NY.
ANSI (1994). “Acoustical Terminology,” S1.1-1994 (R2004), Acoustical
Society of America, New York, NY.
ANSI (1996). “Determination of Occupational Noise Exposure and
Estimation, American National Standards Institute, S3.44, 1996.
ANSI (1997). “Methods for Measuring the Real-Ear Attenuation of Hearing
Protectors,” S12.6-1997, Acoustical Society of America, New York, NY.
ANSI (2004). Specification for Audiometers, American national Standards
Institute, S3.6, 2004.
ANSI (2004). Methods for Manual Pure-Tone Threshold Audiometry,
American national Standards Institute, S3.21, 2004.
ANSI (2004). “Outdoor Measurement of Sound Pressure Level,” American
National Standard S12.18-1994 (R2004), Acoustical Society of America,
New York, NY.
ANSI (2007). “Methods of Estimating Effective A-weighted Sound Pressure
Levels When Hearing Protectors are Worn,” S12.68-2007. Acoustical
Society of America, New York, NY.
AS/NZS 1269.0:2005 Occupational noise management - Overview and
general requirements
AS/NZS 1269.1:2005 Occupational noise management - Measurement and
assessment of noise emission and exposure
AS/NZS 1269.2:2005 Occupational noise management - Noise control
management
AS/NZS 1269.3:2005 Occupational noise management - Hearing protector
program

267.
AS/NZS 1269.4:2005 Occupational noise management - Auditory
assessment
ASTM (1990). ASTM E90-02, Standard Test Method for Laboratory
Measurement of Airborne Sound Transmission Loss of Building Partitions,
West Conshohocken, PA.
Berger (1988). “EARLOG19 - Tips for Fitting Hearing Protectors,”
E·A·R/Aearo Technologies, Indianapolis, IN.
Berger, E. H. and Royster, L. H. (1996). “In Search of Meaningful Measures
of Hearing Protector Effectiveness,” Spectrum Suppl. 1, 13, p. 29.
Berger, E.H. (1996). “EARLog#13 – Attenuation of Earplugs Worn in
Combination with Earmuffs,” E-A-R/Hearing Protection Products,
Indianapolis, IN.
Berger, E.H. (2000). “Hearing Protection Devices,” Chapter 10, p. 428 in
The Noise Manual, Fifth Edition, Edited by Berger, E.H., Royster, L.H.,
Royster, J.D., Driscoll, D.P., and Layne, M.; published by American
Industrial Hygiene Association Press, Fairfax, Virginia.
Berger, E.H., Royster, L.H., Royster, J.D., Driscoll, D.P., and Layne, M.
(2000). The Noise Manual, Fifth Edition, Am. Ind. Hyg. Assoc. Press,
Fairfax, VA.
Berglund, B, Hassmen, P., and Job, R. F. S. (1996). “Sources and Effects of
Low-frequency Noise,” J. Acoust. Soc. Am. 99, 2985-3002.
Berglund, B. and Lindvall, T. (eds.). (1995). Community Noise [Archives of
the Center for Sensory Research Vol. 2(1)], Stockholm Univ. and Karolinska
Inst., Stockholm, Sweden.
Commonwealth of Australia “Occupational Health and Safety Code of
Practice 2008;
http://www.comlaw.gov.au/ComLaw/legislation/legislativeinstrument1.nsf/0/
1A0C4BAEC8DF6965CA257460001C2B4A/$file/OHS+code+of+Practice+2
008.doc
268.
Directive 2002/49/EC of the European Parliament and of the Council of 25
June 2002. (2002). Relating to the Assessment and Management of
Environmental Noise, Brussels, Belgium.
Earshen, J.J. (2000). “Sound Measurement: Instrumentation and Noise
Descriptors,” Chapter 3, The Noise Manual, 5th Edition, Edited by Berger,
E.H., Royster, L.H., Royster, J.D., Driscoll, D.P., and Layne, M.; published
by American Industrial Hygiene Association Press, Fairfax, Virginia, 2000.
EC (2003). Council Directive 2003/10/EC of 6 February 2003 on the
Minimum Health & Safety Requirements Regarding the Exposure of
Workers to the Risks Arising From Physical Agents (Noise), OJ No.L42/38,
15.2.2003.
EC (2006). Council Directive 2006/42/EC of 17 May 2006 on Machinery, OJ
L157, 9.6.2006.
EEC (1989a). Council Directive 89/392/EEC of 14 June 1989 on the
approximation of the laws of the Member States relating to machinery, OJ
No L 183, 29.6.1989, p.9.
EEC (1989b). Council Directive 89/106/EEC of 21 December 1989 on the
approximation of laws, regulations and administrative provisions of the
Member States relating to construction products, OJ No L 40, 11.2.89, p.
12.
EEC (1989c). Council Directive 89/686/EEC of 21 December 1989 on the
approximation of laws of Member States relating to personal protective
equipment, OJ No L 399, 30.12.89, p. 18.
EEC (1991). Council Directive 91/368/EEC of 20 June 1991 amending
Directive 89/392/EEC on approximation of the laws of Member States
relating to machinery, OJ No L 198, 22.7.1991, p. 16.
EEC (1993a). Council Directive 93/44/EEC of 14 June 1993 amending
Directive 89/392/EEC on approximation of the laws of Member States
relating to machinery, OJ No L 175, 19.7.93, p. 12.

269.
EEC (1993b). Council Directive 93/95/EEC of 20 October 1993 amending
Directive 89/686/EEC on the approximation of laws of Member States
relating to personal protective equipment, OJ No L 276, 9.11.93, p. 11.
EPA (1974). Information on Levels of Environmental Noise Requisite to
Protect Public Health and Welfare with an Adequate Margin of Safety, U. S.
Environmental Protection Agency, Report #550/9-74-004, Washington, DC.
EPA (1979). “Noise Labeling Requirements for Hearing Protectors,”
Environmental Protection Agency, Fed. Regist. 44(190), 40CFR Part 211,
56130-56147.
Gauger D, Berger EH., (2004). “A New Hearing Protector Rating: The
Noise Reduction Statistic for Use with A Weighting (NRSA).” In: Report
prepared at the request of the U.S. Environmental Protection Agency.
Version 2.5; April 29, 2004.
ISO (1990). ISO 1999 second edition, “Acoustics - determination of noise
exposure and estimation of noise-induced hearing impairment,” ISO
1999:1990, Geneva, Switzerland.
ISO (1995). “Acoustics – Hearing Protectors – Part 2: Estimation of
Effective A-weighted SPLs When Hearing Protectors are Worn,” ISO 4869-
2:1995, Geneva, Switzerland.
ISO (1996). “Acoustics – Attenuation of Sound During propagation Outdoors
– Part 2 General Method of Calculation” ISO 9613-2:1996 Geneva,
Switzerland.
ISO (1996). “Acoustics -- Rating of sound insulation in buildings and of
building elements -- Part 1: Airborne sound insulation,” ISO 717-1:1996,
Geneva, Switzerland.
Kurze, U. and L. L. Beranek (1988). “Sound Propagation Outdoors,” in
Noise and Vibration Control, edited by L. L. Beranek, Institute of Noise
Control Engineering of the USA, Inc., Poughkeepsie, NY, 1988, 164-193.

270.
Leidel, N.A., Busch, K.A., and Lynch, J.R. (1977). “Occupational Exposure
Sampling Strategy Manual,” NIOSH Publication No. 77-173, U.S.
Department of Health, Education, and Welfare, Cincinnati, OH.
Lord, H. W., Gatley, W. S., and Eversen, H. A., (1980). Noise Control for
Engineers, McGraw-Hill Book Co., New York, NY.
Murphy, W.J., Berger, E.H., Gauger, D., Witt, B., McKinley, R., Gerges, S.,
and Ahroon, W. (2006). “Results from the National Institute for
Occupational Safety and Health/Environmental Protection Agency
NIOSH/EPA Interlaboratory Comparison of American National Standards
Institute ANSI S12.6-1997 Methods A and B,” J. Acoust. Soc. Am. 120(5,
Pt. 2), p. 3160.
NIOSH (1998). “Criteria for a Recommended Standard,” Occupational Noise
Exposure, Revised Criteria,” DHHS (NIOSH) Pub. No. 98-126, Cincinnati,
OH.
NOHSC:1007(2000) “National Standard” Commonwealth of Australia;
http://www.ascc.gov.au/NR/rdonlyres/38A158B3-0F37-4ADC-B050-
7758F5529033/0/noisestandard.pdf
NOHSC:2009(2004) “National Code of Practice” Commonwealth of
Australia; http://www.ascc.gov.au/NR/rdonlyres/6EE85D16-7D1C-4FFC-
99E7-E611B7290E18/0/Noise_COP.pdf
OSHA (1983). “Occupational Noise Exposure; Hearing Conservation
Amendment; Final Rule,” Occ. Safety and Health Admin., 29CFR1910.95,
Fed. Register 48(46), 9738-9785.
Piercy, L. E. and Daigle, G. A. (1991). “Sound Propagation in the Open Air,”
in Handbook of Acoustical Measurements and Noise Control, Third Edition,
edited by C.M. Harris, McGraw-Hill, Inc., New York, NY, 1991, reprinted by
Acoustical Society of America, 1998, p.3.1-3.26.

271.
Royster, L.H. (1997). “The Frequency of Abnormal Sound Levels When
Using Noise Dosimeters to Establish the Employee‟s Daily TWA and the
Resulting Effects on the Measured Noise,” AIHA Conference and
Exposition, 1997, Dallas, TX.
Schaffer, M.E. (1991). A Practical Guide to Noise and Vibration Control for
HVAC Systems, American Society of Heating, Refrigerating and Air-
Conditioning Engineers, Inc. Atlanta, GA.
Taylor, W., Pearson, J., Mair, A., and Burns, W. (1965). Study of Noise and
Hearing in Jute Weaving. J. Acoust. Soc. Am., Vol 38, 113-120.