twitch - home | novationmusic.com · · 2015-04-02and company names and any other registered...
TRANSCRIPT

TWITCH User Guide
FA0257-01

2
English
Novation A division of Focusrite Audio Engineering Ltd.Windsor House, Turnpike Road, Cressex Business Park, High Wycombe, Bucks, HP12 3FX.United Kingdom Tel: +44 1494 462246 Fax: +44 1494 459920
e-mail: [email protected]: http://www.novationmusic.com
TrademarksThe Novation trademark is owned by Focusrite Audio Engineering Ltd. All other brand, product and company names and any other registered names or trade marks mentioned in this manual belong to their respective owners.
DisclaimerNovation has taken all possible steps to ensure that the information given here is both correct and complete. In no event can Novation accept any liability or responsibility for any loss or damage to the owner of the equipment, any third party, or any equipment which may result from use of this manual or the equipment which it describes. The information provided in this document may be modified at any time without prior warning. Specifications and appearance may differ from those listed and illustrated.

3
English
IMPORTANT SAFETY INSTRUCTIONS1. Read these instructions.2. Keep these instructions.3. Heed all warnings.4. Follow all instructions.5. Clean only with dry cloth.6. Do not install near any heat sources such as radiators, heat registers, stoves, or other
apparatus (including amplifiers) that produce heat.7. Do not defeat the safety purpose of the polarized or grounding-type plug. A polarized plug
has two blades with one wider than the other. A grounding type plug has two blades and a third grounding prong. The wide blade or the third prong are provided for your safety. If the provided plug does not fit into your outlet, consult an electrician for replacement of the obsolete outlet.
8. Protect the power cord from being walked on or pinched particularly at plugs, convenience receptacles, and the point where they exit from the apparatus.
9. Only use attachments/accessories specified by the manufacturer.10. Use only with the cart, stand, tripod, bracket, or table specified by the
manufacturer, or sold with the apparatus. When a cart is used, use caution when moving the cart/apparatus combination to avoid injury from tip-over.
11. Unplug this apparatus during lightning storms or when unused for long periods of time.12. Refer all servicing to qualified service personnel. Servicing is required when the
apparatus has been damaged in any way, such as power-supply cord or plug is damaged, liquid has been spilled or objects have fallen into the apparatus, the apparatus has been exposed to rain or moisture, does not operate normally, or has been dropped.
No naked flames, such as lighted candles, should be placed on the apparatus.
WARNING: Excessive sound pressure levels from earphones and headphones can cause hearing loss.
WARNING: This equipment must only be connected to USB 1.0 , 1.1 or 2.0 type ports.

4
English
ENVIRONMENTAL DECLARATION
Compliance Information Statement: Declaration of Compliance procedure
Product Identification: Novation TWITCH
Responsible party: American Music and Sound
Address: 5304 Derry Avenue #C Agoura Hills, CA 91301
Telephone: 800-994-4984
This device complies with part 15 of the FCC Rules. Operation is subject to the following two conditions: (1) This device may not cause harmful interference, and (2) this device must accept any interference received, including interference that may cause undesired operation.
For USA
To the User:1. Do not modify this unit! This product, when installed as indicated in the instructions
contained in this manual, meets FCC requirements. Modifications not expressly approved by Novation may void your authority, granted by the FCC, to use this product.
2. Important: This product satisfies FCC regulations when high quality shielded cables are used to connect with other equipment. Failure to use high quality shielded cables or to follow the installation instructions within this manual may cause magnetic interference with appliances such as radios and televisions and void your FCC authorization to use this product in the USA.
3. Note: This equipment has been tested and found to comply with the limits for a Class B digital device, pursuant to part 15 of the FCC Rules. These limits are designed to provide reasonable protection against harmful interference in a residential installation. This equipment generates, uses and can radiate radio frequency energy and, if not installed and used in accordance with the instructions, may cause harmful interference to radio communications. However, there is no guarantee that interference will not occur in a particular installation. If this equipment does cause harmful interference to radio or television reception, which can be determined by turning the equipment off and on, the user is encouraged to try to correct the interference by one or more of the following measures:
• Reorient or relocate the receiving antenna. • Increase the separation between the equipment and receiver. • Connect the equipment into an outlet on a circuit different from that to which the receiver
is connected. • Consult the dealer or an experienced radio/TV technician for help.

5
English
For CanadaTo the User:This Class B digital apparatus complies with Canadian ICES-003Cet appareil numérique de la classe B est conforme à la norme NMB-003 du Canada.
RoHS Notice
Focusrite Audio Engineering Limited has conformed and [its/this] product[s]
conform[s], where applicable, to the European Union’s Directive 2002/95/EC on
Restrictions of Hazardous Substances (RoHS) as well as the following sections of
California law which refer to RoHS, namely sections 25214.10, 25214.10.2, and 58012,
Health and Safety Code; Section 42475.2, Public Resources Code.
COPYRIGHT AND LEGAL NOTICESNovation is a registered trade mark and TWITCH is a trade mark of Focusrite Audio Engineering Limited.ITCH is a trade mark of Serato Inc Limited Partnership.All other trade marks and trade names are the property of their respective owners.2011 © Focusrite Audio Engineering Limited. All rights reserved.

6
English
CONTENTSIMPORTANT SAFETY INSTRUCTIONS . . . . . . . . . . . . . . . . . . . . . . . . . . . . . . . . . . . . . . . . 3
ENVIRONMENTAL DECLARATION. . . . . . . . . . . . . . . . . . . . . . . . . . . . . . . . . . . . . . . . . . . . 4
COPYRIGHT AND LEGAL NOTICES . . . . . . . . . . . . . . . . . . . . . . . . . . . . . . . . . . . . . . . . . . 5
INTRODUCTION . . . . . . . . . . . . . . . . . . . . . . . . . . . . . . . . . . . . . . . . . . . . . . . . . . . . . . . . . . 7Software Installation . . . . . . . . . . . . . . . . . . . . . . . . . . . . . . . . . . . . . . . . . . . . . . . . . . . . . 8TWITCH Overview . . . . . . . . . . . . . . . . . . . . . . . . . . . . . . . . . . . . . . . . . . . . . . . . . . . . . .10TWITCH Connection . . . . . . . . . . . . . . . . . . . . . . . . . . . . . . . . . . . . . . . . . . . . . . . . . . . . .19Getting Started . . . . . . . . . . . . . . . . . . . . . . . . . . . . . . . . . . . . . . . . . . . . . . . . . . . . . . . . 20
IMPORTING MUSIC. . . . . . . . . . . . . . . . . . . . . . . . . . . . . . . . . . . . . . . . . . . . . . . . . . . . . . . 23Adding files to the ITCH library . . . . . . . . . . . . . . . . . . . . . . . . . . . . . . . . . . . . . . . . . . . . 23How To Analyse Files . . . . . . . . . . . . . . . . . . . . . . . . . . . . . . . . . . . . . . . . . . . . . . . . . . . 25
LIBRARY NAVIGATION . . . . . . . . . . . . . . . . . . . . . . . . . . . . . . . . . . . . . . . . . . . . . . . . . . . . 27Searching . . . . . . . . . . . . . . . . . . . . . . . . . . . . . . . . . . . . . . . . . . . . . . . . . . . . . . . . . . . . 28Browsing . . . . . . . . . . . . . . . . . . . . . . . . . . . . . . . . . . . . . . . . . . . . . . . . . . . . . . . . . . . . . 28
MAIN SCREEN OVERVIEW. . . . . . . . . . . . . . . . . . . . . . . . . . . . . . . . . . . . . . . . . . . . . . . . . 32
DROPPING A TRACK IN . . . . . . . . . . . . . . . . . . . . . . . . . . . . . . . . . . . . . . . . . . . . . . . . . . . 36
MIXING. . . . . . . . . . . . . . . . . . . . . . . . . . . . . . . . . . . . . . . . . . . . . . . . . . . . . . . . . . . . . . . . . .37
BEAT GRID & SYNC . . . . . . . . . . . . . . . . . . . . . . . . . . . . . . . . . . . . . . . . . . . . . . . . . . . . . . 39Beat Grid . . . . . . . . . . . . . . . . . . . . . . . . . . . . . . . . . . . . . . . . . . . . . . . . . . . . . . . . . . . . . 39Synching Tracks . . . . . . . . . . . . . . . . . . . . . . . . . . . . . . . . . . . . . . . . . . . . . . . . . . . . . . . 42Master Clock . . . . . . . . . . . . . . . . . . . . . . . . . . . . . . . . . . . . . . . . . . . . . . . . . . . . . . . . . . 43
PERFORMANCE MODES . . . . . . . . . . . . . . . . . . . . . . . . . . . . . . . . . . . . . . . . . . . . . . . . . . 44Cue Points. . . . . . . . . . . . . . . . . . . . . . . . . . . . . . . . . . . . . . . . . . . . . . . . . . . . . . . . . . . . 44Slicer Mode . . . . . . . . . . . . . . . . . . . . . . . . . . . . . . . . . . . . . . . . . . . . . . . . . . . . . . . . . . . 46Loop Modes . . . . . . . . . . . . . . . . . . . . . . . . . . . . . . . . . . . . . . . . . . . . . . . . . . . . . . . . . . 48
THE FX SECTION . . . . . . . . . . . . . . . . . . . . . . . . . . . . . . . . . . . . . . . . . . . . . . . . . . . . . . . . 50
MIC AND AUX . . . . . . . . . . . . . . . . . . . . . . . . . . . . . . . . . . . . . . . . . . . . . . . . . . . . . . . . . . . 54
RECORDING . . . . . . . . . . . . . . . . . . . . . . . . . . . . . . . . . . . . . . . . . . . . . . . . . . . . . . . . . . . . 55
ORGANIzING YOUR LIBRARY . . . . . . . . . . . . . . . . . . . . . . . . . . . . . . . . . . . . . . . . . . . . . . 56
LIBRARY MANAGEMENT . . . . . . . . . . . . . . . . . . . . . . . . . . . . . . . . . . . . . . . . . . . . . . . . . . 59
SERATO SCRATCH LIVE COMPATIBILITY . . . . . . . . . . . . . . . . . . . . . . . . . . . . . . . . . . . . 60
HISTORY . . . . . . . . . . . . . . . . . . . . . . . . . . . . . . . . . . . . . . . . . . . . . . . . . . . . . . . . . . . . . . . 60
THE SETUP SCREEN . . . . . . . . . . . . . . . . . . . . . . . . . . . . . . . . . . . . . . . . . . . . . . . . . . . . . 62
WHITELABEL . . . . . . . . . . . . . . . . . . . . . . . . . . . . . . . . . . . . . . . . . . . . . . . . . . . . . . . . . . . 69
TROUBLESHOOTING . . . . . . . . . . . . . . . . . . . . . . . . . . . . . . . . . . . . . . . . . . . . . . . . . . . . . .70
TECHNICAL SPECIFICATION . . . . . . . . . . . . . . . . . . . . . . . . . . . . . . . . . . . . . . . . . . . . . . . .71

7
English
INTRODUCTIONWelcome to the ITCH manual for the Novation TWITCH.
Novation TWITCH is a DJ controller with a difference. Its unique controls enable you to do some awesome things using ITCH’s new performance tools. TWITCH comes with ITCH, a DJ software application from Serato which, among many other new features, can automatically beat-match tracks, freeing you to be creative with your DJ sets. TWITCH can also be used with other DJ software such as Native Instruments Traktor or Ableton Live, but please note that this manual is specific to its use with Serato ITCH. For more information on using TWITCH with other DJ software, please go to www.novationmusic.com/twitch
WHAT’S IN THE BOX?
The TWITCH has been carefully packed in the factory and the packaging was designed to withstand rough handling. Should the unit appear to have been damaged in transit, do not discard any of the packing material and notify the carrier immediately as they would be responsible.Save all the packing materials for future use if you ever need to ship the unit again.
Please check the list below against the contents of the packaging. If any items are missing or damaged, contact the Novation dealer or distributor where you purchased the unit.
• TWITCH• USB cable• CD-ROM containing ITCH installers for Mac and PC, Loopmasters content and user
guides• Quick start guide• Registration card• Focusrite / Novation product brochure• Loopmasters flyer• Plastic overlay for use with Traktor
POWER REQUIREMENTS
As TWITCH is powered via a USB connection you should be aware that although the USB specification states that a USB port should be able to supply 0.5 A at 5V, some computers - particularly laptops - are unable to supply this current. Unreliable operation of TWITCH may result in such a case. When powering TWITCH from a laptop’s USB port, it is strongly recommended that the laptop is powered from AC mains rather than its internal battery.

8
English
Software InstallationMinimum System RequirementsBefore installation, please ensure your computer meets the minimum system requirements:
Mac 10.5.8• Intel processor, 1.8 GHz core duo or better • 1 GB RAM
Mac 10.6• 32bit • Intel processor, 1.8 GHz core duo or better • 1 GB RAM
• 64 bit • Intel processor, 2.4 GHz core duo or better • 4 GB RAM
• 1024 x 768 screen resolution • Available USB Port • Hard disk space for music
OSX 10.4 is not supported by Novation TWITCH
Windows XP Service Pack 2 or higher• 32 bit• Intel processor, 1.8 Core 2 duo • 1 GB RAM
Windows 7• 32 bit• Intel processor, 1.8 Core 2 duo • 2 GB RAM • • 64 bit• Intel processor, 2.4 Core 2 duo • 4 GB RAM • • 1024 x 768 screen resolution • Available USB Port • Hard disk space for music
Windows Vista does not support Novation TWITCH

9
English
Installation (Mac OSX)
Before installing, we recommend you download and install the latest ITCH version from http://www.serato.com/downloads
• Browse using Finder to the location where the ITCH download was saved.• Double click the ITCH zip file to unpack,• Then double click the .dmg file to mount the image on your system, and browse to that
volume• Double click the file called “ITCH installer”:• Follow on-screen instructions to install ITCH.
Installation (PC)
Before installing, we recommend you download and install the latest ITCH version from http://www.serato.com/downloads.
IMPORTANT: Do NOT connect your TWITCH to your PC before you are prompted to do so. The installer will prompt you to connect it at the appropriate time.
• Browse using Windows Explorer to the location where the ITCH download installer was saved,
• Unpack the ITCH .zip file and browse to the extracted contents.• Double click the file called “ITCH_installer.exe”• Follow on-screen instructions to install ITCH.
Note: If Windows warns you that any of the drivers’ certificates cannot be verified, approve them anyway.

10
English
TWITCH Overview

11
English
TWITCH Rear Panel Connections
1 2 3 4 5 6 7 8
1 MASTER OUT (LEFT, RIGHT) - Two ¼” (6.35 mm) 3-pole (TRS) jack sockets, for connection to amplifiers, or other audio devices. The outputs are balanced.
2 BOOTH OUT (LEFT, RIGHT) - Two RCA (phono) sockets, for connection to a secondary amplifier or pair of powered monitor speakers. The outputs are unbalanced. The Booth Out level is adjustable independently of the Master Out level.
3 BOOTH OUTPUT SWITCH (MASTER, CUE) – normally Booth Out will be set to MASTER so that you can hear what everyone else hears. Occasionally, you may wish to set this to CUE when using additional external equipment (for example, another DJ mixer) to provide a separate headphone feed.
4 AUX INPUT (LEFT, RIGHT) – Two RCA (phono) sockets, for connection of additional sources such as CD or MP3 players, audio mixers, etc. The inputs are unbalanced.
5 AUX GAIN – trim control for the Aux Input, providing -10 to +36 dB of gain adjustment to allow levels of external equipment to be matched.
6 Direct Monitoring switch (ON, OFF) – determines whether monitoring of the Mic and/or Aux inputs is derived directly from within TWITCH (ON), i.e., exhibits zero latency; or is sourced via the computer (OFF) which results in latency (delay) being introduced.
7 USB PORT - Type B USB-compatible (both USB1 and USB2) socket for connection to PC or Mac. A standard USB Type A to B lead is supplied.
8 Security lock - A standard Kensington® computer-style security lock anchor point is provided. This can be used with a Kensington® MicroSaver Security cable (available from most computer suppliers) to secure TWITCH to a convenient immovable object.

12
English
Front Panel
9 10 11
9 MIC INPUT - ¼” (6.35 mm) 3-pole (TRS) electronically balanced jack socket for connecting a microphone for DJ, guest or announcement use. Always use a good quality dynamic microphone. Do not use a condenser (capacitor) microphone as TWITCH does not provide the phantom power this type of mic requires.
10 MIC GAIN - mic gain trim control with gain range of +12 to +60 dB. If a microphone is not connected, ensure that this gain control is set fully anti-clockwise, thus preventing any unwanted noise from entering the mix.
11 HEADPHONE SOCkET – Two 3-pole sockets for stereo headphones are fitted (¼” jack and 3.5 mm mini-jack). The use of high quality, closed-ear headphones is recommended.

13
English
Top Panel
Browse
15 1617 13 12 14 18
12 SCROLL – rotary encoder used to navigate through libraries, track lists, crates and folders. Also has a “push” function, used in certain navigation actions.
13 BACK – library navigation control.
14 FWD - library navigation control.
15 AREA – cycles through browsing modes; SHIFT+AREA provides a sort function.
16 VIEW – toggles the ITCH waveform display through various modes (including ‘off’).
17 LOAD A – loads the selected track into Deck A.
18 LOAD B – loads the selected track into Deck B.
See Hardware Navigation Controls on page 27 for further operational details.

14
English
Mixer Controls
Two sets of mixer controls are provided (for Decks A and B); the following descriptions apply to either.
19
26
27
28
22
23
24
25
20
21
19 Deck channel fader – the stereo fader adjusts the level of the deck’s audio sent to the master outputs. It can also function as FADER FX, see page 53.
20 Crossfader – normal crossfade function between the two decks.
21 Channel bargraph meter – will normally show the Master output level, but may additionally show other levels depending on various switch settings.
22 TRIM – the input gain trim pot should be adjusted to match the levels of different tracks, to reduce the possibility of overload and to optimise the fader’s control range.
23 HIGH – EQ control providing 6 or 12* dB of cut and boost at high frequencies.
24 MID – EQ control providing 6 or 12* dB of cut and boost at mid (e.g., speech) frequencies.
25 : LOW – EQ control providing 6 or 12* dB of cut and boost at low frequencies.
26 Headphone Cue select : press to route the Deck to the Cue system for headphone monitoring.
27 : FADER FX – allows sound effects (FX) to be added to the channel. Press to select an effect for the channel, and rotate to adjust the effect parameter (e.g. with Echo selected, echo time is adjusted). See page 53.
28 FX ON/OFF – reassigns the Deck channel fader as a FADER FX control. See page 53.
* EQ range selectable in SETUP menu.

15
English
Master
29 30 31 32
29 MASTER HEADPHONE LEVEL – controls the level of the output at the front headphone sockets.
30 MIX – the headphones may be used to monitor either the Cue system or the Master Output - or a mix of the two. The MIX control lets you adjust the mix; fully anticlockwise is Master only, fully clockwise is Cue only.
31 BOOTH – adjusts the level at the rear panel Booth Outputs.
32 MASTER - adjusts the level at the rear panel Master Outputs.

16
English
Deck Controls
Two sets of deck controls are provided (for Decks A and B); the following descriptions apply to either.
33
42 43 44
3748
34
40
41
45
35
36
4746 38 39
33 PLAY/PAUSE B H – starts a loaded track playing; a second press pauses playback. The button is illuminated green when the track is playing, and flashes in pause.
34 CUE – allows a cue point to be set and subsequently triggered; the track will then commence playing from the cue point. See page 45.
35 kEYLOCk – when pressed, stops the key of the track from changing when PITCH is varied. See page 31.
36 SYNC/AUTO – sets the tempo of the track to that defined by the Beat Grid on the other deck. Pressing SHIFT+SYNC/AUTO performs the same action even if the track on the other deck does not have a Beat Grid. See page 42.
37 PITCH – rotary control which adjusts the overall playback speed of the track, hence the BPM. If kEYLOCk is not enabled, pitch will vary as well. The control has coarse and fine modes; normal rotation provides fine adjustment, press and turn for coarse adjustment.
38 SWIPE – used in performance, in conjunction with the Touchstrip. See page 36.
39 DROP – used in performance, in conjunction with the Touchstrip. See page 36 .

17
English
40 TOUCHSTRIP – this replaces the traditional “platter” found on other DJ consoles, and permits live performance modes such as scratching, swiping, dropping, etc. See page 36.
41 HOT CUES – TWITCH allows eight cue points to be stored “on the fly” by pressing the Performance pads, to which the playhead can then instantly be relocated. See page 44.
42 SLICER – enables Slicer mode, which divides the track into equal length slices, and reallocates the Performance pads to trigger them. See page 46.
43 AUTOLOOP – enables Autoloop mode, which reallocates the Performance pads to trigger loops of various lengths. See page 48.
44 LOOP ROLL – enables Loop Roll mode, which reallocates the Performance pads to trigger momentary loops of various lengths. See page 49.
45 PERFORMANCE PADS – eight large soft pads intended to be used creatively in performance, whose function is defined by buttons 41 to 44 .
46 BEAT GRID SET/CLR – used in conjunction with the Beat Grid to move the playhead to the nearest transient. See page 39.
47 BEAT GRID ADJUST/SLIP - allows the Touchstrip to be set to modify how the Beat Grid functions. See page 39.
48 SHIFT – used in conjunction with certain other controls to perform additional functions.

18
English
Master FX
53 51 5254 55 56
50 49
49 ON/OFF – enables the Itch FX processor section. See page 50.
50 FX SELECT I H – scroll through the available effects.
51 DECK A – assigns the FX section to Deck A
52 DECK B – assigns the FX section to Deck B. Pressing DECK A+DECK B assigns the FX section to the Master outputs.
53 AUX – assigns the FX section to the rear panel Aux input.
54 DEPTH – adjusts the amount of effect added to the track.
55 MOD/X – adjusts one or two additional FX parameters; these will vary with the selected effect. The MODE knob has a ‘push-and-turn’ function, which varies the second parameter, where available.
56 : BEATS – with most effects, this adjusts the beat base of the effect in terms of the track’s tempo. See page 50.
Mic/Aux
58
57
59
57 LEVEL – adjusts the level of the rear panel Aux Input and the front panel Mic Input, after they have been summed together. Note that the individual sensitivities of these inputs may be adjusted with controls 5 and 10 .
58 Headphone – routes the Aux and Mic inputs to the Cue system
59 ON/OFF – enables both the Aux and Mic Inputs; either or both may be used.

19
English
TWITCH ConnectionConnecting the Novation TWITCH to your computer
1. Connect any additional audio sources (such as microphone, CD players, etc.) to TWITCH’s Aux Inputs.
2. Connect the output devices (speakers, power amplifiers, sub-mixers, recorders, etc.) to TWITCH’s Master and/or Booth Outputs.
3. Connect all equipment to the power supply, and turn on in the following order*: - the auxiliary input sources. - connect TWITCH to the computer with the USB cable (supplied). - the output devices.
4. Plug in your headphones.5. Start the Serato ITCH application.
USBMain Amplifier
CD / MP3 Player
Booth Amplifier
*When ending a session, reverse this operation by turning off the output devices first, then remove the USB connection and finally the auxiliary input sources.
NOTE: Ensure you connect TWITCH directly to your computer’s USB port and not through a USB hub.
20
English
Getting StartedStarting the Software
ITCH is installed in the following locations:
Mac OSX: ITCH will be installed to your applications folder. Double click the ITCH icon in the applications folder to launch. For easy launching you can click and drag this icon to the dock.
Windows (XP and 7): Start > Programs > ITCH
To start ITCH on Windows simply double click on the shortcut icon on your desktop, or browse your Start menu and click the ITCH.exe icon.
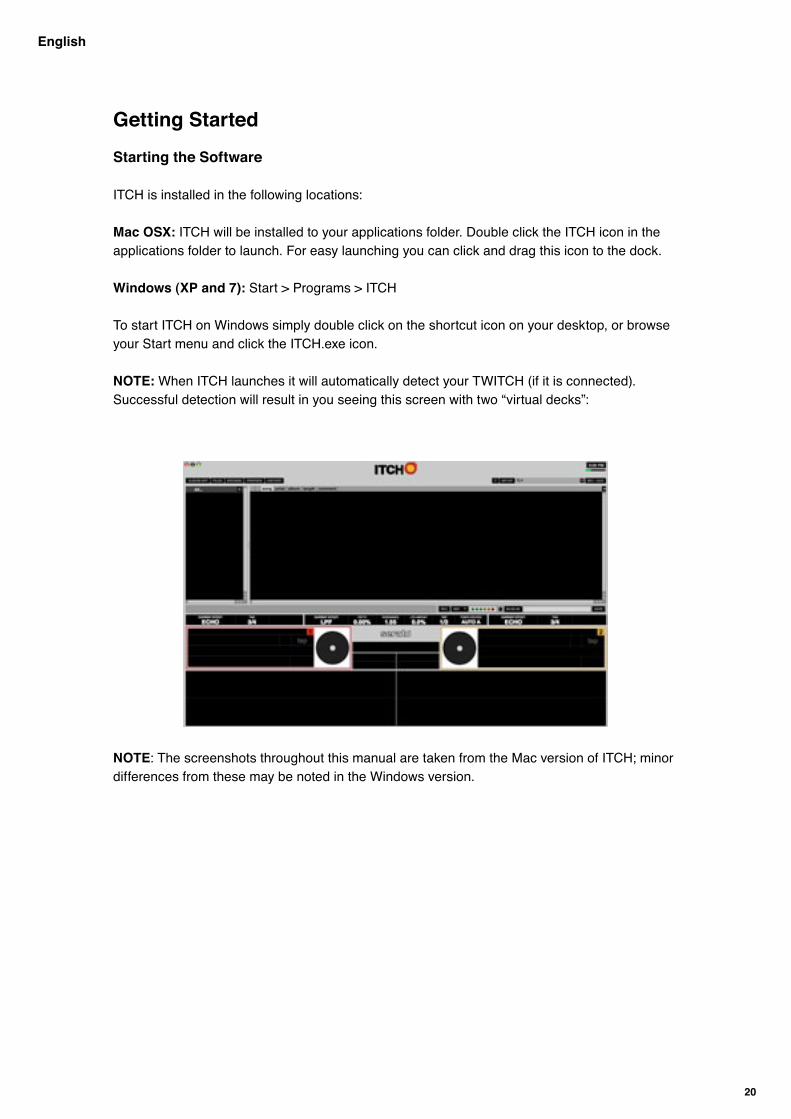
NOTE: When ITCH launches it will automatically detect your TWITCH (if it is connected). Successful detection will result in you seeing this screen with two “virtual decks”:
NOTE: The screenshots throughout this manual are taken from the Mac version of ITCH; minor differences from these may be noted in the Windows version.

21
English
Software OverviewThe following screenshot provides an overview of the ITCH main screen. Each point is covered in more detail later in the manual.
61 2 3 4 5 7 8
9 10
1319
2021
22
23
2728293032 33
242526
20
14 15 16 17 18
111231
34
35 36
37 38 3837 39 40 37
2728293032 33
24252634
1 Album Art: click to display the cover art for the album selected (toggles off).2 Files: click to display the Files Panel, which enables you to search for tracks on your hard
drive.3 Browse: displays the Browse Panel, which enables you to browse for tracks by genre,
BPM, etc.4 Prepare: displays the Prepare Panel, containing tracks you have pre-selected for your set.5 History: displays the History Panel, listing tracks that have already been played.
(The above buttons are all ‘toggle’ functions – a second click disables the Panel.)
6 Tool Tips: enables or disables the Tool Tip Display, which provides a dialog box with a description of an ITCH feature when you place your mouse over it.
7 Setup: switches to the software Setup screen. Click Setup again to return.8 Search: searches your Library for the text entered in this field.9 Crates: displays the list of Crates and Sub-Crates available.10 Library: displays the tracks available for loading.11 Mic / Aux: opens the AUX panel and routes the Mic / Aux channel to the main Mix or to
either side of the cross fader. See page 54.12 CPU usage meter: gives an indication of internal processor activity.13 Rec: starts or stops recording.14 Record Source Selector: select a recording source from this drop-down menu.15 Recording Meter: indicates the levels of the audio being recorded.16 Recording Timer: timer for current recording.17 Recording Filename: enter the name of the file you are currently recording here.18 Save: saves the current recording to the “Recordings” folder inside your Main Library folder.

22
English
19 Status Bar: displays various status messages.20 Virtual Deck: rotates during playback.21 Tempo-Matching Display: displays tempos of both Decks to help the mixing process.22 Beat-Matching Display: shows “transients” (usually the drum hits) to aid beat-matching.23 Waveform: waveforms of the currently loaded tracks. The top waveform is that on Deck A;
the bottom is that on Deck B.24 Track Overview: an overview of the currently loaded track’s entire waveform.25 Track Name: “Title” tag for the current track.26 Artist Name: “Artist” tag for the current track.27 key: Displays the track’s “key” ID3 tag (if available).28 BPM Field / Tap: displays track’s BPM. If there is no BPM for the track, it will display “Tap”
to prompt you to tap out a suggested tempo.29 Time Elapsed / Time Remaining: displays the current position of the Audio Pointer in the
track, either in terms of elapsed or remaining time. Click to toggle between the two.30 Pitch: shows applied pitch offset as a percentage (%) set by the PITCH control 37 ])31 Clock: display the computer’s internal real-time clock32 Playback Mode: toggles between “Single” and “Continuous” Playback Modes. SINGLE
Mode plays only one track, stopping when it is finished. CONTINUOUS Mode will automatically play the next track in the Crate when one track ends. This setting remains the same even when a new track is loaded.
33 Repeat Mode: toggles Repeat Mode On/Off for the track (when Playback Mode is set to SINGLE) or Crate (when Playback Mode is set to CONTINUOUS). When a new track is loaded, Repeat Mode defaults to OFF.
34 Loop Range: displays the range of any currently selected Auto Loop or Loop Roll. 35 Rescan ID3 Tags: re-reads file tags for the entire Library. Use this function if you have
edited or modified file tags in other software. Tip: Rescanning the tags is a handy way to identify any files that cannot be found (for instance, if the files have been re-named or moved). These tracks are shown red in the Library pane, with a “?” icon in the Status column.
36 Relocate Lost Files: if you have moved files which are already in your Library, they will show up as ‘not found’ (denoted by a “?” icon in the Status column) and be displayed in red. Drag and drop a folder from Finder (Mac) or Explorer (Windows) onto this button to search it, and any sub-folders, for these files. Doing this will update the Library with their new location. You can also click this button to scan your whole file system, including external drives connected to your computer, for missing files.
37 Effect: the currently selected effect applied to the channel (deck or master.). When browsing for a different effect to apply to the Deck, the name of the effect will be shown in this box (in a different colour).
38 FX Mix: the amount of current effect.39 Parameter: the parameter for the current effect, which can be adjusted with the parameter
knob. Generally, this is the intensity of the effect but may vary between effects.40 Tempo Source: the current BPM for the track, which helps determine the speed of the
current effect (if it is rate-based). When this field reads “AUTO A” or “AUTO B,” the effect will automatically follow the BPM of the track on Deck A or Deck B, respectively. If “MANUAL” is shown, it means neither Deck’s track has a BPM. You can set the BPM (and change it at any time) by using the TAP TEMPO button. You can also return to the track’s auto-BPM by holding down TAP TEMPO.

23
English
ImportIng musIc
Adding files to the ITCH libraryThere are several ways to add files to your ITCH library:
Press the AREA button 15 on your TWITCH to open the files panel where you can browse your hard drives for music to add. (AREA scrolls through the Files > Browse > Prepare > History options for the uppermost Panel.) The FWD 14 and BACK 13 buttons and the SCROLL control 12 can be used to navigate to the file required.
Loading a file to either deck from the Files panel will automatically add it to your library. You can also access the Files panel in ITCH using your mouse by clicking on the Files button 2 on the main screen. You can drop files and folders directly into the library (including crates) or straight onto either virtual deck.
Dragging a file or folder from Finder or Explorer into ITCH will also add the track to your library.
TIP: Dragging a folder into the crates view will instantly create a crate. Any external hard drive connected to your computer will show in the Files panel. You can add files to your library from an external drive just like you do from your computer’s internal hard drive. If the external hard drive is not connected when you run ITCH, any files residing on this drive will not be displayed in the library. However, ITCH retains their references and will display them as usual when the drive is reconnected.
The library information for files on your external drive is stored on the drive itself. This means if you add tracks on an external drive to your library and then plug that external drive into another machine running ITCH, the crates and tracks will automatically be visible in the other machine’s library.

24
English
Showing your iTunes libraryITCH can import your iTunes™ library into the Crates pane 9 , allowing you to play your iTunes music and access playlists. To enable this feature go to the SETup screen, click the LIbrArY tab and tick the Show iTunes library checkbox.
NOTE: The iTunes library can now be minimized by pressing the small triangle in the blue iTunes folder icon.
How to get music from CDs into ITCHITCH does not have a CD ripping function. We suggest you use a third-party application to convert your audio CDs into a suitable file type for ITCH. We recommend 320 kbps MP3 files for a good balance of audio quality and file size. ITCH can play Audio CDs direct from your computer’s CD ROM or DVD drive, however playback performance may be restricted by the speed of the drive and computer.
NOTE: We recommend ripping your CDs rather than playing from them directly. Ripping CDs while playing live is not a good idea as it places extra workload on the computer’s processor.
For more information on iTunes go to www.serato.com/articles/1905
Supported File Types.MP3.OGG (Ogg Vorbis).AAC.ALAC (Apple Lossless).AIF.WAV.WL.MP3 (Whitelabel)
Both fixed and variable bit rate files are supported. Tracks protected by Digital Rights Management (DRM) are not compatible with Serato ITCH.
About Corrupt Files If ITCH detects a corrupt file, it will tag it with one of two corrupt file icons:
It is very important that you delete any corrupt files from your library as they can cause the software to crash whether or not you play the file.

25
English
Preparing Your Files
Analysing FilesBefore you play your music in ITCH it is very important to analyse your files first.The ANALYZE FILES function processes the tracks in your library to detect file corruption, prepare the waveform overviews, and if enabled, calculate the BPM values.
How To Analyse FilesTo analyse your files, open ITCH with your hardware disconnected. On the lower right side of the main screen you will see the ANALYZE FILES button. Click this to automatically analyse all the tracks in your library.
tIp: You can also drag and drop individual folders, crates and files onto the button to analyse small or specific groups of files at a time.
To force ITCH to re-analyse all files, hold CTRL while clicking on the ANALYZE FILES button. Dragging a file, folder or crate which has already been analysed onto the button will also force ITCH to re-analyse these files.

26
English
Set Auto BPM
If this option is checked while analysing files, Serato ITCH will calculate the estimated tempos of your files. If it is confident that the Auto BPM estimate for a file is accurate, it will be written to an ID3 tag* in the file.
If you know that your file’s BPM is within a certain range, use the Range drop-down menu (on the right-hand side) to avoid double or half value BPMs. For example: you have a selection of house tracks, that you guess are in the 120-130 BPM range. Set the range to 68-135 BPM in the drop-down menu, which sets the lower and upper limits. Thus, when ITCH finds a 120 BPM file, it will know for sure that it is 120 BPM, and not 60 BPM (because 60 BPM is lower than the lower range limit of 68 BPM).
notE: As Auto BPM is part of the file analysis process, it will not apply to any files that already have already been analysed. Re-analyse these files with a new range to recalculate the BPM.
*NOTE: ID3 tags contain data about your tracks and are saved inside the files themselves. Genre, track name and artist are examples of common tag information.
Offline Player
The offline player is available when your TWITCH is not connected and will route its audio output through the current default audio device (soundcard). In most cases, this will be from your computer speakers. Load a track to the offline player by dragging and dropping onto the offline player or by pressing SHIFT + ←. If the end of the loaded track is reached, the next track in the current playlist will automatically start playing.
tIp: The offline player is a useful tool for preparing crates, auditioning tracks, and setting cue and loop points.

27
English
Track GainUse the track gain knob (top left of the offline player Panel) to adjust the volume of individual tracks in your library. Any adjustment made to the gain of a track is saved to the file and will be re-applied when it is loaded again. The level meter shows the level sent to the hardware interface after both individual track gain and master gain adjustments.
Library NavigationLibrary NavigationThe Library contains all the music that you have added to ITCH. By using browse and search you can easily narrow down your selection to find the track you want.
tIp: You can change the size of your library text by using the keyboard shortcuts CTRL & + and CTRL & -.
Hardware Navigation ControlsThe SCROLL knob 12 in the BROWSE section of TWITCH controls cursor movement in ITCH. Rotate the knob to navigate up and down through the Library; pressing the FWD 14 and BACK 13 buttons moves the cursor forward and back between the crates and Library. Use these same controls (or the SCROLL control’s push function) to move through the different browse fields when the Browse panel is open.
Pressing the AREA button to scroll through the options for the Files pane: Files > Browse > Prepare > History > Library. Note that selecting Library closes the Files pane.
The VIEW button 16 scrolls between three modes of displaying track waveforms: waveforms without Beat Grids, waveforms with Beat Grids or waveforms off.
Mouse and KeyboardAs well as using the hardware, you can also use the keyboard’s cursor (arrow) keys and the mouse to navigate the library. The cursor keys move the selection point UP, DOWN, FWD and BACK.

28
English
Searching
ITCH includes a search function to help you find tracks quickly and easily. Just enter text into the search box and ITCH will automatically find as you type.
tIp: Use the keyboard shortcut CTRL + F to jump to the search box. This keyboard shortcut will also take you out of any crate or playlist that you might be in and into your main library, so you can find any track in your collection. If you then click on a crate or playlist, the search query will be cleared.
To select which fields will be included in the search criteria, click on the left hand side of the search box. The drop down menu shows which fields are currently being used. Press ESC or the X button on the right of the search box to clear the search.
BrowsingTo browse through all your files, just scroll up or down with the SCROLL knob 12 on your TWITCH.
Clicking Browse 3 in ITCH will open the Browse panel above the main Library. This allows you to filter what is displayed in the Library area below. The filters are GENRE, BPM, ARTIST, and ALBUM. You can narrow your search by selecting the specific genre, BPM, artist, or album title you’re looking for, and the software will show the results on the main Library window. You can move between the four filters by pressing the SCROLL knob 12 or the FWD 14 and BACK 13buttons on the hardware, using the keyboard cursor keys, or by clicking with the mouse.

29
English
Library Status IconsThe column at the far left shows the status of each track; examples of these icons are below.
1: ITCH has detected some corruption in the MP3 file. If possible, re-encode the MP3.
2: The track has been imported from the iTunes library.
3: The track has been imported from iTunes but is corrupt.
4: The track cannot be found. Most likely the file has been renamed or moved.
5: ITCH is trying to import a track from the iTunes library, but cannot find the file.
6: The track is set to read only.
Prepare
The Prepare Panel is an area for holding tracks, much like preparing a set by lifting records partially out of your record bag. Click the PREPARE button 4 in ITCH, or use the AREA button 15 on TWITCH to open the Prepare Panel. Navigate through your library with the keyboard cursor keys and mouse, or the SCROLL 12 , FWD 14 and BACK 13 buttons on TWITCH to drag tracks or crates into the Prepare pane or onto the PREPARE button. These tracks will be removed from the Prepare pane once they have been played.
TIP: Pressing SHIFT 48 + ENTER 12 (the SCROLL knob’s push function), while a crate is selected in the Crate pane will load the contents of the crate into the Prepare pane.
All tracks in the Prepare Panel will be discarded when you exit ITCH.

30
English
Loading TracksOnce you have located the track you want to play in the Library you can load it to a deck using TWITCH, the mouse or the keyboard.
Hardware• Press LOAD A 17 to load to the left deck.• Press LOAD B 18 to load to the right deck.
Keyboard• Shift +← to load to the left deck.• Shift + → to load to the right deck.
Mouse• Drag the track to either the left or right virtual deck 20 or overview area 24 .
tIp: Use the keyboard shortcuts Shift + Alt + ← or Shift + Alt + → to unload a track from the Virtual Deck.
Starting PlaybackTo begin playback press the H B (PLAY/PAUSE) button for that deck on TWITCH. Playback will start from the beginning of the track. Pressing H B during playback will pause playback at the current position. Pressing it again will resume playback from that position.
notE: When play from start is selected in the setup screen (in PLAYBACK > On Track Load), the deck will try to skip any silence at the start of the track, and play from the start of the audio.
Adjusting GainThe TRIM knob 22 located at the top of TWITCH adjusts the audio input gain, allowing you to raise or lower the level of the track before you control the volume with the Channel Fader 19 during the mixing process. We recommend adjusting the gain so that the loudest sections of the track cause the two top segments of the LED METERS 21 to light up without being permanently lit. Setting TRIM for both decks in the same manner makes it easy to balance the mix between them with the EQ and faders.
If you set the TRIM control too high, the limiter in ITCH will activate to try and prevent the audio from clipping or distorting. When this occurs, the audio will start to be compressed and the limiter indicator (at the top of the ITCH screen) will illuminate, warning you to decrease the TRIM level.

31
English
EqualizingEach deck of TWITCH features a 3 band equaliser (EQ section) with low, mid and high controls.
The EQ controls are used to cut or boost specific frequency bands. You can use them to balance the sound of two tracks that have been mastered differently, to make a track sound “right” on your particular system, or for creative mixing techniques. With EQ, less is usually better - when boosting do so sparingly. Cutting frequencies is also usually better than boosting them. For example, if you have a track with too much mid range, rather than increasing bass and treble to compensate, it is better to reduce the mid frequencies.
The controls’ range of cut/boost can be set on the SETUP screen, at MIXER > HARDWARE > GENERAL.
KeylockNormally, changing the speed of a track results in an accompanying change of the pitch of the music. With KEYLOCK on, when you alter the speed, the track will retain its original pitch. This can be used to avoid two tracks sounding out of tune when mixing them together. KEYLOCK has scratch detection, so that the pitch processing is disabled when scratching, for a more natural scratching sound.

32
English
Main Screen OverviewVirtual deck
The virtual deck 20 shows the speed and position of a track. When a track is loaded, it changes from black to white with a black ‘radius bar’. As the track progresses, the bar will rotate. The circular progress bar around the edge is a visual representation of the location within the track, and it will begin flashing when 20 seconds of the track is left to warn you that the track is coming to its end.
notE: during normal play mode, the Touchstrip LEDs scroll from left to right during one rotation of the virtual deck.
Track DisplayWhen a track is loaded, its details – name 25 , artist 26 , length and pitched BPM 28 - are displayed in the track title bar. If any of this information missing from the file it will simply not be displayed. Below the track details, pitch 30 , Playback 32 , Repeat 33 and Performance Mode 34 parameters (as applicable) are displayed.
The time and remaining time are displayed in minutes and seconds.
The pitched BPM is the BPM of the track, as modified by the setting of the PITCH control 37 . If PITCH is set to 0%, the pitched BPM will be the track’s own inherent tempo.
Clicking on Playback allows you to select the Playback Mode:• Single means once the end of the track is reached, you will hear silence.• Cont means when the end of the track is reached, the next track in the playlist will be
loaded and playback will continue.
Clicking on Repeat lets you set the Repeat Mode:• OFF - no repeat• ON - when the end of the track is reached, it will return to the start and playback will im-
mediately recommence.

33
English
Tap TempoIf a track has no BPM value stored in its file, and the Beat Grid is not enabled, the tap tempo box is displayed in the track title bar instead of the BPM value. Click with the mouse, or press the keyboard shortcut ALT+SPACE BAR to activate the tempo tapper for the left deck (use the shortcut a second time to apply it to the right deck). To establish a BPM for the track, play the track and tap the space bar in time with the beat. After you’ve tapped the first beat, you can switch to double time tapping, halftime, start of each bar etc. The range is set by the first two taps, after that you can switch to any steady rhythm you feel comfortable with – quarter notes, half note, whole notes. The ESC key resets the BPM, the ENTER key saves the BPM to the track. You can also use the mouse if you prefer by clicking in the tap tempo box and clicking the mouse button in time.
notE: ITCH takes account of the current setting of the PITCH control when calculating the BPM using Tap Tempo.
Track Overview Display
This area 24 provides a preview of the waveform of the entire track and includes a marker to show the current position within the track (the white triangle). This view is useful for finding transitions within the track. The waveform is coloured according to the spectral content of the music; red indicates low frequency (bass) sounds, green mid frequency sounds (this generally includes vocal parts) and blue high frequency (treble) sounds. You can jump to different positions within the track by clicking on the track overview display. Grey lines behind the overview show the length of the track; a thin grey line every minute, and a thick grey line every 5 minutes. If you have not analysed your files the overview will be slowly created when you load the track onto a virtual deck. This takes a few seconds.
tIp: Analyse files before you play.
notE: In DROP mode, the Track Overview will display a marker corresponding to the drop point selected via the Touchstrip.

34
English
Main Waveform Display
This area 23 provides a close-up view of the track waveform (for each deck; Deck A is the upper), including the same colour-coding system as the Overview Display (above) to indicate the spectral content of the sound. You can switch to a three-band spectral view by pressing the CTRL key and clicking on the waveform.
Click on the waveform and move the mouse to ‘scrub’, or make fine adjustments to your position in the track.
TIP: The main waveform is centred on the current playhead position. Use the keyboard + and – keys to zoom in and out (display a longer or shorter time segment).
Note: The waveforms alter as the PITCH control is adjusted to make it easier to see when beats are aligned and in time.
Tempo Matching Display
The Tempo Matching Display area 21 is designed to aid tempo matching of the tracks on the two decks. ITCH detects the beats within the track and places a row of red peaks (for the track on Deck A) above a row of orange peaks (for the track on Deck B) in the tempo matching display area. When the two tracks are matched to the same tempo, the peaks will line up. This display does not show the relative timing of the beats, only the tempos of the tracks. The peaks will still line up when the tracks are playing at the same tempo, but are out of sync.
notE: The Tempo-matching display does not appear by default if SYNC is active.

35
English
Beat-Matching DisplayThis display 22 shows the position of beats within the track. When the peaks shown in this window are aligned, the two tracks’ beats are matched. You can easily tempo- and beat-match your two tracks by using the Tempo- and Beat-Matching Displays together.
Example:
1. As a track is playing in Deck A (the left deck), load and play a track in Deck B (the right deck). After a few seconds, orange peaks will appear in the Tempo-Matching Display (representing the tempo of Deck B’s track) below a set of red peaks (the tempo of Deck A’s track).
2. Adjust the pitch of Deck B’s track using the PITCH knob 37 until the orange peaks are aligned with the red peaks in the Tempo-Matching Display. Once they are aligned, the two tracks have the same tempo.
3. Next, align the markers in the Beat-Matching Display, using the Touchstrips while the SWIPE button 38 is illuminated. It is helpful to watch the colours passing by in the Main Waveform Display (remember that a kick drum will probably be red in colour, and a snare drum green or blue). This technique may speed up the process of beat-matching.
notE: Other (usually faster!) methods of beat-matching are available within TWITCH; see page 42.

36
English
Dropping a Track InTHE TOUCHSTRIP
TWITCH’s Touchstrip 40 replaces the platters found on other DJ controllers. Its primary use is to adjust the playback point within the currently loaded track. The default function of the Touchstrip differs between when the track is playing or when it is paused. However, this default function can be overriden using the two mode buttons SWIPE 38 and DROP 39 .
40
38 39
SWIPE - the default function of the Touchstrip is SWIPE mode. (Note that the SWIPE buttons are illuminated when TWITCH is first powered.) During playback, play speed is momentarily increased or decreased (and pitch correspondingly altered) by swiping the Touchstrip with a finger leftwards or rightwards respectively. This is equivalent to momentarily changing the pitch up or down to ‘nudge’ a record into time.
SCRATCH – pressing the SWIPE 38 button while a track is playing puts the Touchstrip into Scratch Mode. This is analogous to moving a vinyl turntable platter back and forth while a disc is actually playing. The SWIPE button blinks in this mode. Scratch can be cancelled by pressing SWIPE a second time.
PAUSE SWIPE - when the track is paused, swiping the touch strip moves the playhead backwards or forwards in time, producing the scratching effect obtained on a vinyl turntable when the platter is moved back and forth while it is not turning. This action is identical in both SWIPE and SCRATCH modes.
DROP – pressing DROP 39 enters a ‘needle drop’ mode allowing quick access to any position in the track. The Touchstrip becomes a representation of the total length of the track; touching it moves the playhead to a location in the track proportional to the position it is touched at. DROP Mode is automatically exited when you remove your finger from the Touchstrip.
FF-RWD – Pressing the DROP button twice, so that it flashes, enters a “Fast Forward – Rewind” mode. It is now possible fast-forward or rewind the track by moving the finger across the Touchstrip.

37
English
USEFUL TERMS:
Playhead: The position in a track from where audio is playing, or will play when some action is performed. When you select a track and just play it through, the playhead will start from the beginning of the track and stop at the end. If you interrupt this by pausing or using any of TWITCH’s Performance Modes, you will effectively be moving the playhead about.
Cue Point: A marked position in a track, which will be permanently stored by the software. You can set, return to, or delete Cue Points with TWITCH’s Hot Cues feature.
Temporary Cue Point: A marked position in a track, which will only remain while that track is still loaded in the Deck. You can set and return to the Temporary Cue Point with the CUE button.
mixing
Mixing & PlaybackThe previous sections of the manual have covered finding, loading and playing tracks. Once you have a track playing, the next step is to mix it into another track.
Finding the Next TrackFirst you’ll need to find the next track to mix in. Browse your library to find a suitable track.
tIp: The library’s BPM column is useful for finding a track with a similar tempo to the current track.
Loading it to the DeckLoad the next track to the desired virtual deck by pressing the LOAD A 17 or LOAD B 18 buttons on TWITCH. You can also drag and drop with the mouse.
Previewing in the HeadphonesWhen you load a track to a deck, the audio from that deck is is automatically routed to TWITCH’s Cue system; note that the Headphone Cue 26 button is illuminated. The track is sent to the headphones so that you can cue it up without it playing out to the main system. The MONITOR SELECT knob 30 controls the mix of what is sent to the headphones. You can balance the mix in the headphones between what is playing through the Master Outputs (MASTER) and the CUE system. The MONITOR LEVEL control 29 adjusts the headphone volume.

38
English
Finding the Right Part of the TrackWhen the track is paused (as when it is first loaded), the Touchstrip is always in Scratch mode. This allows you to scroll though the track and find the point at which you want the track to start.
tIp: For many genres, the first kick drum is a good point at which to start a track.
tIp: Set a cue point at the point in the track at which you want to start your mix, so you can return to it easily and save it for next time.
PlaybackPress the H B button on TWITCH to start playback. Pressing again will pause the track.
Continuous Auto-playClick the PLAYBACK MODE button 32 in ITCH’s virtual deck area to change it from SINGLE to CONT. In this mode, when one track finishes, the next track starts automatically. Load from a crate to play through the tracks in that crate, or from your library to play through your library, in order.
NOTE: play from start must be enabled in the Setup screen (Playback > On Song Load) for Continuous mode to work correctly. See page 62 for more details.
Getting the Tracks in TimeThe playback speed of the track may be varied with the PITCH control 37 . The range of the PITCH control (when SYNC is not active) is +50/-50% relative to the track’s initial tempo. The control has “fine” and “coarse” modes; rotating the knob while pressing it down will change the speed much more rapidly.
Rotating the control clockwise speeds the track up; anticlockwise slows it down. This allows you to take two tracks with different tempos and mix them together in time. The pitched BPM and the pitch % are shown in the ITCH track information display.
The simplest way to match the tracks’ speeds is to adjust the PITCH control of one deck until the BPM value is the same as that of the track that is already playing on the other deck. By repeatedly playing from the temporary cue point and fine tuning the control you can get the tracks playing at exactly the same speed.
notE: A double-press on the PITCH knob resets the track’s tempo to its standard pitch (i.e., 0% variation).

39
English
BEat Grid & SyncSee also Auto-Tempo, page 43.
Beat GridA Beat Grid is a series of markers superimposed on the track waveform that indicates the beats or transients in the music structure.
A Beat Grid allows ITCH to know precisely where each beat occurs, and locates the exact start of each bar. This accurate beat information opens up possibilities for users to further manipulate a track, and for precise track syncing and advanced looping features.
Analysing an audio file calculates the average BPM of a given track. Some tracks’ BPMs are linear, so setting an accurate beat grid is easy, only requiring you to set the first downbeat Beat Marker. If you have tracks with variable BPMs you can also set custom Beat Markers, which will snap the grid more accurately to the track.
Enable Beat GridTo activate the Beat Grid, ensure that the Enable Beat Grid checkbox on the Setup screen is ticked (SETUP > PLAYBACK > GENERAL).
Beat Grid Waveform View
The Beat Grid is placed on top of the waveform overview. It is displayed as follows:
• A full white vertical line is a Beat Marker indicating the beginning of each Beat Grid Bar.• Each Beat Marker has the bar number at the top.• The first Beat Marker is called the Downbeat Marker and is a thick red line on the first
beat.• The Downbeat Marker is always bar number 1.• Each Beat Grid Bar is divided up into 4 equal sub-bars, indicated by short white lines.• A thick red line also indicates a manually set Beat Marker.
Before creating a Beat GridSetting up a Beat Grid relies on the track having been analysed, so that an accurate BPM value is known. ITCH can then accurately set the Beat Grid markers on the track’s beats or transients. See page 25 for more information.

40
English
creating a Beat GridITCH will attempt to determine the first transient (this could be a kick drum or bass note) and will use this for the location of the Downbeat Marker.
Once the Downbeat Marker is set, ITCH uses the track’s BPM to automatically create a Beat Grid for the rest of the track. If the track’s BPM is very consistent, this could be all you need to do. But if the BPM varies, you may need to adjust the Beat Grid, or place further Beat Markers to allow for tempo variations.
To check if the Beat Grid has calculated the markers correctly you can skip forwards through the track to see if the markers fall on the beats or not (after a breakdown is a good place). It is also a good idea to go to the track’s outro and see if the markers are still falling on the beats.
Setting a Beat MarkerPressing the BEAT GRID SET button 46 will place a Beat Marker at the playhead position. By default, ITCH places the Beat Marker on the closest detected transient.
NOTE: On the keyboard, pressing X, or holding ALT while double-clicking on the waveform performs the same action.
TIP: Set new Beat Markers where there is a tempo change in the track to allow the tempo to warp around these points.

41
English
deleting a Beat MarkerIf you have set a Beat Marker incorrectly, you can delete it. To delete the closest marker to the playhead, press the SHIFT key 48 while pressing BEAT GRID SET.
Beat Marker deletion has multiple levels of “Undo”; pressing SHIFT + SET repeatedly will undo previously set Beat Markers.
Adjusting the Beat GridThe Beat Grid may not always be placed correctly and the markers may not line up exactly with the transients, so you may need to make occasional adjustments. To adjust the Beat Grid so that the markers are aligned with the musical transients, press and hold the ADJUST button 47 while using a “swipe gesture” on the Touchstrip (see below). The Beat Grid will expand or contract to follow your movements from your last set Beat Marker to the next Beat Marker (if there is no next Beat Marker set then it will adjust to the end of the track).

42
English
Slipping the Beat GridIf your Beat Grid is aligned perfectly with the track’s transients but the track’s Downbeat Marker is incorrect or the groove or feel is sounding slightly out, you may need to slip the Beat Grid. This will move the entire Beat Grid relative to the track, to get a perfect match to the other track’s groove.
To slip the Beat Grid, press both the SHIFT 48 and ADJUST 47 buttons while using a “swipe gesture” on the Touchstrip (see below).
Synching tracksTracks playing on the two decks may be synced together in two ways; which method is used will be determined by whether Beat Grids have been established (and enabled) for the tracks.
Sync Behaviour with Beat GridsPress SYNC on a deck to synchronise the Beat Grid of the currently loaded track to that of the track on the other deck.
The Master Clock, displayed in the virtual deck area 21 – see page 43, now displays the tempo that the both decks are playing at. If a deck has sync engaged, its number in the Master Clock is green - also the SYNC button on TWITCH will light. Adjusting the pitch on either deck now adjusts the tempo of the master clock, which adjusts both decks.
You can still use the Touchstrip to manipulate the audio, however the tracks can fall out of sync. Press SYNC again to re-sync the tracks.
To take a deck out of sync, press SHIFT + SYNC. The deck’s number in the master clock is no longer green and the SYNC button on TWITCH is no longer lit. When a deck is taken out of sync, it will revert to its original BPM.

43
English
Sync Behaviour without Beat GridsThis behaviour applies if you have the Enable Beat Grids option turned off in the SETUP page, or if the track loaded to the deck does not have a Beat Grid assigned.
Press SYNC on a deck to synchronise the tempo (BPM) of the currently loaded track to that of the track on the other deck. ITCH will also attempt to snap the closest transients of the tracks together.
The SYNC button on TWITCH will light. Adjusting the pitch on either deck now adjusts the tempo of both decks.
If the tracks fall out of sync, press SYNC again to re-sync the tracks.
To take a deck out of sync, press SHIFT + SYNC. The SYNC button on TWITCH is no longer lit. When a deck is taken out of sync, it will revert to its original BPM.
auto tempo BehaviourThis applies to all tracks, regardless of whether they have a Beat Grid, or if Beat Grids are enabled.
Press SHIFT + SYNC to synchronise the tempo (BPM) of the currently loaded track to that of the track on the other deck. This will not synchronise the Beat Grids or transients, it will only synchronise the tempo.
The Master Clock now displays the tempo the two decks are playing at. If a deck has auto tempo engaged, its number in the master clock is yellow - also the SYNC button on TWITCH will light. Adjusting the pitch on either deck now adjusts the tempo of the master clock, which adjusts both decks.
To take a deck out of auto tempo, press SHIFT + SYNC. The deck’s number in the master clock is no longer yellow and the SYNC button on TWITCH is no longer lit. When a deck is taken out of auto tempo, it will revert to its original BPM.
Master clockITCH uses a Master Clock to synchronise tracks together. The Master Clock is displayed in the virtual deck area 21 , replacing the Tempo-Matching display. It indicates which decks are currently synchronised to the master tempo value. The Tempo-Matching display may be restored by clicking on the area.

44
English
PErforMancE ModESTWITCH has eight large, illuminated soft pads 45 which can be used creatively while playing tracks. These Performance Pads can function in several different modes, and the mode is selected by the HOT CUES 41 , SLICER 42 , AUTO LOOP 43 and LOOP ROLL 43 buttons.
cue PointsYou can use cue points in ITCH to mark and trigger different parts of your tracks. The cue point markers are saved with the file in the track’s ID3 tag. This means they will be present each time you load the track.
HOT CUES is the initial function for the Performance Pads. (Note the HOT CUES button 41 is illuminated when TWITCH is first powered on). Up to eight cue points may be captured “on-the-fly”.
To create a cue point, press one of the Performance Pads for the deck. The button will light to show that a cue point has been set. To delete a cue point hold SHift 48 and press the Performance Pad for the point you want to delete.
Once a cue point is set, you can jump to it at any time by pressing the relevant Performance Pad.
If playback is paused, recalling a cue point will play from that point as long as the key is held down; the playhead will return to the cue point when the button is released and the audio will pause. If you press the H B button while you are holding down the HOT CUE button, playback will continue when you let both buttons go. This allows you to cue a track from Pause mode and then continue playback once you know the mix is right.
NOTE: Your cue points are saved to the file and recalled the next time it is loaded. They are not lost if the file is moved or renamed.

45
English
Visual aid: cue Point Status
Notice that the radius bar on the Virtual Deck jumps to the 12 o’clock position and changes colour when you set a cue point. This can be used to confirm that the playhead is at a cue point. Also, as the track plays from the cue point, the coloured portion of the radius bar will shorten by a fifth for each rotation. Likewise, as the cue point is approached, the coloured portion will lengthen. Note also that the bar has eight different colours, each corresponding to one of the eight cue points.
On TWITCH, the LEDs on the Touchstrip scroll from left to right during playback at the same rate as the rotating virtual deck. When a Cue is triggered, the LEDs restart their scrolling at the left.
temporary cueThe Temporary Cue function allows you to set a cue point within a track, which is not saved to the file. This is useful for marking a point in a track and then easily starting again from this point as you get your mix right. While paused you can use the Touchstrip to fine tune the playhead placement to ensure your cue point is set exactly on a downbeat.
Providing no temporary cue is already set, pressing the CUE button 34 while playback is paused will create one at the current playhead location. Once the cue is set, holding the CUE button while still in Pause will play from the temporary cue point until the button is released; then playback will pause and the playhead returns to the cue position. This is good for stuttering at the start of a track.
If you press the H B button whilst you are holding down the CUE button, playback will continue when you let both buttons go. This allows you to cue a track in from pause mode and then continue playback once you know the mix is right.
To change the location of a cue point, pause the deck with the playhead at a different location and press the CUE button again. The temporary cue point is also useful to start repeatedly from a preset point in the track. This allows you to easily drop in a few times until you get it right.
Note that the CUE button has a “default” position at the track start. If no cue point has been stored, pressing it during playback will return the playhead to the start of the track and pause there.

46
English
Slicer Mode
notE: Beat Grid must be enabled in the Setup menu (Setup > Playback > General) for Slicer Mode to be active.
SLicEr ModE 1:When Slicer Mode is selected (by pressing SLICER 42 ), playback continues, but the timeline is divided into 8 equal length slices aligned to the Beat Grid, and you will note that the Performance Pads illuminate in sequence and blocks of red highlight the waveform display, indicating each slice in turn.
If you press and hold any Performance Pad, playback will loop round the slice corresponding to the selected pad for as long as the pad is held; meanwhile, the playhead position will loop round the current eight-slice block. When the Performance Pad is released, playback immediately resumes from the current playhead position, but the Beat Grid ensures that the track’s beat is maintained. On the waveform display the “real” playhead position is indicated by a thin green vertical line. This is where playback will resume when a Performance Pad is released.
Note that only one block of eight slices is active at any one time, and this block occupies the width of the waveform display. Pressing a Performance Pad will perform the loop at the correspondingly-numbered slice in the current block of eight.
47
English
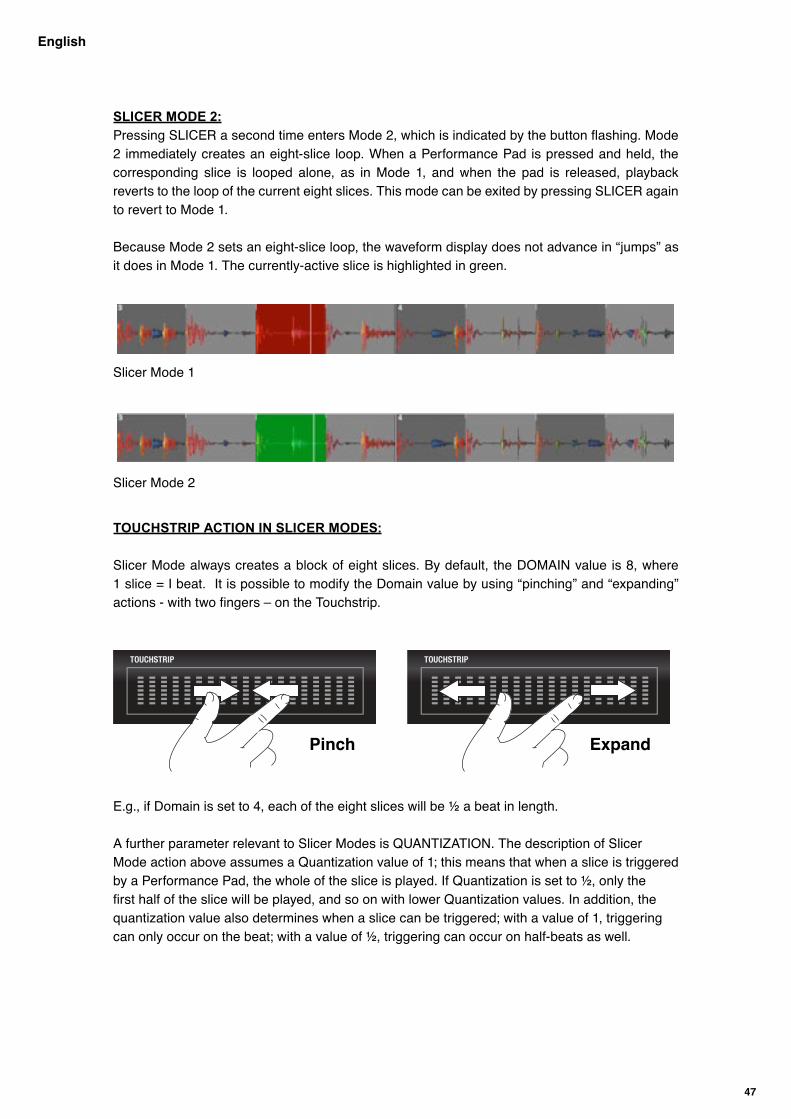
SLICER MODE 2:Pressing SLICER a second time enters Mode 2, which is indicated by the button flashing. Mode 2 immediately creates an eight-slice loop. When a Performance Pad is pressed and held, the corresponding slice is looped alone, as in Mode 1, and when the pad is released, playback reverts to the loop of the current eight slices. This mode can be exited by pressing SLICER again to revert to Mode 1.
Because Mode 2 sets an eight-slice loop, the waveform display does not advance in “jumps” as it does in Mode 1. The currently-active slice is highlighted in green.
Slicer Mode 1
Slicer Mode 2
TOuChSTRIP ACTION IN SLICER MODES:
Slicer Mode always creates a block of eight slices. By default, the DOMAIN value is 8, where 1 slice = I beat. It is possible to modify the Domain value by using “pinching” and “expanding” actions - with two fingers – on the Touchstrip.
ExpandPinch
E.g., if Domain is set to 4, each of the eight slices will be ½ a beat in length.
A further parameter relevant to Slicer Modes is QUANTIZATION. The description of Slicer Mode action above assumes a Quantization value of 1; this means that when a slice is triggered by a Performance Pad, the whole of the slice is played. If Quantization is set to ½, only the first half of the slice will be played, and so on with lower Quantization values. In addition, the quantization value also determines when a slice can be triggered; with a value of 1, triggering can only occur on the beat; with a value of ½, triggering can occur on half-beats as well.

48
English
Loop Modes
There are two types of loops, Auto Loop, and Loop Roll (see following section).
auto LoopPressing AUTO LOOP 43 assigns the Performance Pads as loop triggers for loops of eight different lengths, whose values may be between 32 beats and 1/32 beat. The pads dimly glow green and illuminate when active. The loop lengths are automatically mapped to the pads based on the Beat Grid for the track, with the shortest loop on Pad 1 and the longest on Pad 8.
1/16 1/8 1/4 1/2
1 2 4 8
The range of eight loop lengths used is definable (see page 49). For example, if the range set is 1/16 to 8 beats, pressing Performance Pad 5 immediately defines a segment of 1 beat’s duration, starting from the location at which the pad is pressed, which is then looped repeatedly. The pad illuminates to indicate an active loop. The pads have a ‘toggle’ function; that is, the loop is cancelled by a second press, when playback resumes from the end of the current looping segment.
A green block overlays the main waveform display to indicate the looped segment.
You can also define an Auto Loop in Pause mode.
auto Loop – Saved ModePressing AUTO LOOP a second time causes the button to flash. The Performance Pads are now redefined as SAVE buttons for eight “slots” (or memory locations) within the track’s ID3 tag. Thus you may save any active Auto Loop with the track, and it will automatically be reassigned to the same Performance Pad when the track is reloaded.
On initial entry to Auto Loop Saved Mode, all the Performance Pads will be unlit. When the active loop is saved by pressing a pad, the pad illuminates, because the loop is still active. Pressing AUTO LOOP again reverts to normal Auto Loop mode, and the Performance Pads will again control loop duration. On re-entering Saved Mode subsequently, you will notice that pads corresponding to saved loops are now lit at a lower intensity.
Note that when reloading the track, you must be in Auto Loop Saved Mode to access the stored loops.

49
English
A saved loop may be deleted by holding down SHIFT 48 while pressing the pad corresponding to the slot to be cleared.
toucHStriP action in auto LooP ModE:
The Touchstrip may be used to select the Auto Loop range. The loop durations set will always be a “consecutive” set of eight, but the set may be selected from a total of 16 durations, from 32 beats to1/32 beat, by single finger action on the Touchstrip. The Auto Loop Range is indicated in the Virtual Deck area of the screen.
1/8 1/4 1/2 1
2 4 8 16
Loop rollLoop roll performs a standard Auto Loop, but the Performance Pad action is momentary. When the pad is released, the playhead is returned to the position it would have had if it had not entered the loop. The range of values available for loop roll are 1/32 beat to 32 beats. Use short loop lengths to create “stutter” type effects.
As with Auto Loop Mode, the Touchstrip may be used to select the range of loop durations assigned to the Pads.
use of Swipe and drop in Performance ModesThe SWIPE and DROP buttons may be used in any of the four Performance Modes to enter Swipe, Scratch, Drop or FF-RWD modes. Playback defined by the Performance Pads will continue. However, the Touchstrip will become active for the Swipe, Scratch, Drop of FF-RWD Mode function, and will no longer be available to modify Auto Loop range, for example.
To return to the “normal” Performance Mode, press the relevant Performance Mode button.

50
English
the fX Section
TWITCH features three effects processors. Each deck features fader fX, which allows an effect to be applied to the track, controlled by the Channel Fader. In addition, there is a Master FX section, which can generate an effect that can be applied to either or both decks. A greater degree of effect control is available using the Master FX Section.
Master fX section 53 51 5254 55 56
50 49
The on/off button 49 switches the FX section on and off. The button illuminates when the FX section is on.
The dEcK a and dEcK B buttons 51 & 52 apply the Master FX processing to the respective decks. Pressing both buttons applies the Master FX to both decks.
The auX button 53 applies the Master FX processing to the Mic and Aux inputs.
notE: The DIRECT MONITORING switch 6 must be set to OFF for FX to be applied
to the Mic or Aux signals.
Effects parametersAll the effects may have their “amount” adjusted by the DEPTH control 54 . As the DEPTH control is turned clockwise, the sound of the track will become increasingly altered by the FX processing. The DEPTH control actually varies a specific parameter for each of the available effects, but you can generally just think of DEPTH as adjusting “amount”.
All of the effects have one additional parameter which may be adjusted, and several have two. The “first” additional parameter is adjusted with the MOD control 55 , and the second, if available, by pressing down on the MOD control and rotating (the ‘X’ control).
ThE EFFECTSThe two FX SELECT buttons 50 scroll through the available effects one at a time; effects are active immediately and do not need to be “recalled”. Details of the currently-active effect is displayed on-screen in the central pane of the Effects bar 37 .

51
English
The following effects are available:
rEVErBReverb simulates the natural acoustic of a real space such as a hall, cathedral, cave or other space. It is created by a carefully-generated, dense series of small delays of the audio signal. These mimic the sound reflections that would occur in a real space, with the sound bouncing around between walls and other surfaces. You can use the MOD control to adjust “Room size”, to simulate the effect of different spaces. dELayDelay is when the audio signal is repeated at a later time. The delayed signal creates an echo effect. Use the MOD control to vary ‘feedback’; this loops the delayed signal back into the input of the processor and makes the original signal repeat several times.
LPf (Low Pass filter)Akin to a tone control, the Low Pass Filter removes the upper part of the audio frequency spectrum, allowing only frequencies below the ‘filter cut-off point’ (adjusted with DEPTH) to pass. Varying the DEPTH produces a characteristic “sweeping” effect, which can be enhanced with Resonance, adjusted with the MOD control. A very low-frequency modulation can also be applied with the X control, which varies the filter frequency, creating a “wobbly” sound.
fLanGErThe flanger effect is created by mixing two identical sound sources together, one of them being slightly delayed relative to the other. The delay itself may be dynamically varied at a low frequency, this is adjusted by the MOD control. The delay is adjusted with the X control.
PHaSErThe phaser uses a series of moving, narrow-band filters distributed across the audio spectrum to create the characteristic “whooshing” sound associated with this classic effect. A low frequency oscillator controls the speed of the sweep (varied by the MOD control), and the “width” of the filters (the range of frequencies over which each is effective) is adjusted by the X control.
HPf (High Pass filter)The High Pass Filter acts in an identical manner to the Low Pass Filter, except that it rejects low frequencies and passes high frequencies. The controls have the same functions.
cruSHErThe Crusher is a digital effect which reduces the bit rate of the audio, reducing resolution. It also adds distortion. This results in a sound with a “grainy” quality which can be either glitchy or overdriven.
EcHoSimilar to Delay, Echo repeats the original signal a number of times (depending on the setting of MOD) before the echo trail dissipates. It emulates classic Tape Echo, giving a warmer, more analogue sound. An X parameter is available for Echo; this introduces filtering into the echo feedback, which adds further to the analogue simulation.

52
English
trEMoLo This effect is a cyclic modulation of the track’s volume, and can be used to lower and increase it rhythmically.
rEPEatErThis effect repeats segments of audio in a manner similar to the Loop Roll function, though incorporating an element of randomness as well. As well as mix depth, the probability that the current audio section will be repeated can be set with the MOD control, and the count at which the audio section will be repeated with the X control.
rEVErSErThis is a similar effect to Repeater, except that the repeated audio segments are replayed backwards, thus reversing the envelopes of the individual notes.
BraKErThe braker acts like a classic turntable-style ‘stop’ braking function, where the audio winds down before resuming playback once again.
The table below summarises the FX parameters controlled by the MOD and X controls for each effect. The DEPTH control is effective for all effects.
EffEct Mod controL X controLREVERB Room SizeDELAY FeedbackLPF Resonance LFO amountFLANGER LFO amount DelayPHASER Color (FE) QHPF Depth ResonanceCRUSHER Skew Low DriveECHO Feedback Feedback filterTREMOLO TypeREPEATER Chance CountREVERSER Chance CountBRAKER Brake chance Hold chance
time synchronisationITCH’s effects are synchronised to the track’s BPM. The effect parameters will modulate or repeat on a cyclic basis; the length of the cycle is set with the BEATS control 56 . Each of the time settings represent a division of a single beat. A value of ‘1/1’ means a cycle one beat long, and a value of ‘4/1’ means a 4-beat cycle (a whole bar). ‘1/4‘ indicates a quarter of a beat. i.e., a musical 16th. note).

53
English
fader fXFader FX is a TWITCH feature that allows the deck Channel fader to become an effects control, varying the FX Depth for each deck directly.
Each deck may have an individual effect applied to the track playing on it, in addition to the effects programmed in the master FX section described above.
19
27
28
Pressing the FADER FX ON/OFF button 28 enables Fader FX for the channel. The Channel Fader 19 becomes an FX Depth control, and this status is indicated by the topmost segment in the bargraph meter being illuminated.
You can select the effect you want by pressing the SELECT control 27 . The currently-applied effect is indicated at the left-hand (Deck A) or right-hand (Deck B) end of the Effects area of the screen display 37 . Note that only the following effects are available to the Fader FX feature:
• HPF• LPF• Phaser• Repeater• Echo• Delay• Flanger
Rotating the SELECT control varies the effect parameter. The table below lists the parameters that are controlled by the Channel fader and the SELECT rotary control for each of the available effects:
EffEct fadEr SELEct controL
HPF Cutoff frequency Resonance
LPF Cutoff frequency Resonance
Phaser Depth Time
Repeater Depth Time
Echo Depth Time
Delay Depth Time
Flanger Depth Time

54
English
Mic and auXMic and auX Mixing
TWITCH has inputs for a microphone and an auxiliary stereo line source. The gain of each input is adjustable at the front and rear panels respectively, 5 and 10 . The mono Mic signal and stereo Aux signal are summed, and their level and equalization is adjustable. The MIC/AUX signal can be assigned either to the whole Program Mix or either side of the CROSSFADER.
If the rear panel Direct Monitoring switch 6 is OFF, you can click on the Mic/Aux button 11 to open the metering/EQ panel. High, Mid and Low EQ controls are provided, as well as a 13-segment bargraph meter. Click the routing button to select where the MIC / AUX audio signal will be sent:
• Mix - the signal is sent to the Program Mix, whichever deck is play-ing.
• X-F A - the signal is mixed with Deck A’s audio only.• X-F B - the signal is mixed with Deck B’s audio only • Mute - The MIC / AUX signal will be muted.
The LEVEL knob 57 on TWITCH controls the gain for the MIC and AUX signals before they are sent to ITCH for mixing.

55
English
recording
Serato ITCH can make recordings of your Program Mix, or the MIC / AUX INPUT channel. Recording controls are grouped into a menu above Deck B in the software.
13 2 4
To record:
1. Click the Record Source Selector and select the signal to be recorded from the drop-down menu. Selecting mix will record the master output signal, post-faders and EQ, and pre-MASTER VOLUME. Selecting aux will record the MIC / AUX signal only.
2. Adjust the recording level using the appropriate controls for the source being recorded. The Recording Meter shows the signal level that will be recorded to disk. We recommend that you set your levels such that the loudest parts of the mix light the red segment only occasionally.
3. Click the REC button to start recording. The length of the recording will be displayed in the Recording Timer. Press it again to stop recording.
4. Enter a filename in the empty text field, and click SAVE. Recordings are saved as 16-bit 44.1 kHz stereo files (.AIFF) in the “Recorded” Crate in your Main Library folder. On Windows, the files can be accessed at My Documents > My Music > _ Serato _ > Recording, on Macs at Users > Music > _ Serato _ > Recording.
notE: You can select the file format and bit depth for your recording at PLAYBACk > RECORDING in the SETUP screen.

56
English
organizing your LibraryITCH can support an unlimited number of tracks – the only limitation is the size of your computer’s hard drive. A number of features are included to help you keep your music organized and find tracks quickly and easily. cratesITCH uses digital crates for quick access to your favourite collections. There is no limit to the number of crates you can create, and a track can be placed in more than one crate. The crate area is on the left hand side of the library.
For example, you could organize your tracks into the following crates, and – unlike physical discs of any kind - any one track could be filed in more than one crate:
• Hip Hop• French Hip Hop• Uk Hip Hop• Instrumental Hip Hop• Old School Hip Hop• Hip Hop LPs
To make a new crate, click the + button in the crate area’s header bar. To rename a crate, double click the crate name. You can change the order of tracks within a crate by dragging them up or down.
tiP: the Protect library checkbox in the setup screen (under the Library tab) may be ticked to prevent unintended changes to your crates. It prevents crates from being removed, edited or renamed. See page 66.
SubcratesYou can drag and drop crates into other crates to make subcrates.

57
English
Setting up columnsThe library can be customized to display columns with any or all of the fields listed below:
• Added – date file was added to library• Album• Artist• Bitrate (kbps)• BPM• Comment• Composer• Filename• Genre• Grouping• Key• Label• Length• Location – download source URL• Remixer• Sampling rate• Size (MB)• Track – track number on album• Year
Clicking on the triangle at the top right of the library will show the list so you can turn fields on and off. You can resize columns by grabbing the edge and dragging to the width you want.

58
English
Editing id3 tagsMany of a track’s textual fields can be freely edited in ITCH. Double-click on the field in the main library display to edit, and enter the revised text. Filename, length, size, bit rate and sampling cannot be edited, as this information is embedded in the file header itself. Note that the Protect library option (in SETUP > LIBRARY) must be off to permit editing. See page 66 for more info
tiP: use the keyboard shortcut CTRL+E to edit text. The arrow keys move the cursor (edit point) within text in the selected field; hold down the CTRL key and use the arrow keys to move between fields while remaining in edit mode. When you have more than one track selected, editing tags changes all the tracks in your selection (but you will first be asked for confirmation).
tiP: the second column in the library is a colour ident for that track, which can be used, for example, to match the track’s original label colour. The virtual deck assumes this colour when the track is loaded. Clicking the field in the library brings up a colour palette; select the colour required. The default colour is white.
notE: Tracks that are read-only have a ‘locked’ icon.
album artMP3 files can contain album artwork. Clicking the album art button 1 toggles the artwork panel on and off. There are many third party applications available for adding album art to MP3 files.
Library auto-BackupWhen it is installed, ITCH creates a folder on your hard disk called Serato where it stores your library database, crate data and other information. The Serato folder is located in the My Music folder on Windows systems and in the Music folder on Macs.
ITCH will also create a Serato folder on any external drive that is in use with ITCH.
The first time you close ITCH you will be prompted to back up your library. This creates a copy of the Serato folder on your system drive and also on any connected external drives containing a Serato folder. The backup folder is called SeratoBackup. After the initial backup, you will be prompted to back up if it is found that the last backup on that drive is more than a week old, or if no backup exists. ITCH only maintains ONE backup file at a time, so each time you back up, ITCH will overwrite the previous backup file.
notE: If you have an earlier version of ITCH or Scratch Live installed, the library folder will be called ScratchLIVE instead of Serato.

59
English
Library Management
notE: The RESCAN ID3 TAGS and RELOCATE LOST FILES buttons 35 & 36 are only visible if the Files pane is open. The FILES button 2 toggles the Files pane on and off.
rescan id3 tagsUse this function if you have edited or modified file tags in other software. It re-reads file tags for the entire library.
tiP: Re-scanning the tags is a convenient way to identify any files that can’t be found; for example, if the files have been re-named or moved. These tracks are then shown as red in the library pane, with a question mark icon in the status bar.
Relocate lost filesIf you alter the location of files of library tracks by some external file management operation, ITCH will subsequently be unable to find them and tag them “not found”. They will then be displayed in red. This situation can be resolved by dragging-and-dropping a folder from Finder (Mac) or Explorer (Windows) onto the relocate lost files button 36 . This will search it, and any sub-folders it may contain, for files currently tagged as “not found”. Doing this will update the database with their new location.
notE: The Relocate lost files function will search all attached drives for missing files and the procedure can take some time.

60
English
Serato Scratch Live compatibilitySerato ITCH uses the same library as Serato Scratch Live. If you are an existing Scratch Live user, all your music, loops and cue points will be available in ITCH. If you create a library in ITCH and then install Scratch Live, the music, loops and cues from ITCH will automatically be available in Scratch Live. Any changes made in either program will be written to the library so if you have existing cue and loop points, be aware of this when moving between systems.
History
ITCH maintains a log of the tracks you have played. The History button 5 opens a pane displaying this log, and also allows you to export ITCH session information as a data file.
Each session is listed by date and time. By clicking on the arrow symbol, you can view detailed information for a previous session. There are columns for the period (i.e. date of session), name of track and artist name.
In addition, these other categories listed below provide more detailed information about your sessions:
Start time - When viewing a track row, the start time of the track is displayed. When viewing a session row, the start time of the session is displayed with the date, using your computer’s internal clock.
End time - When viewing a track row, the end time of the track is displayed. When viewing a session row, the end time of the session is displayed with the date (in real time value).
Playtime - When viewing a track row, the total played time of the track is displayed (e.g. 00:03:00). When viewing a session row, the total elapsed time of the session is displayed with date (e.g. 10/09/10 01:38:16).
deck - The virtual deck on which the track was played will be displayed in the deck column. Note that TWITCH’s Deck A is listed as ‘1’, Deck B as ‘2’. The offline player will be listed as Offline.
notes - Use this field to record additional information about your tracks and each session (e.g., how you made the transition from one track to another).

61
English
Starting or Ending a Session - To start or end a session, click the corresponding button.
inserting a track - If you wish to add information to your session data for tracks not played in ITCH (i.e., if you also played vinyl discs or CDs), select the ITCH track you played immediately before, and click the INSERT TRACk button to create a blank track record. Double-click the fields and enter your information.notE: when exporting an .m3u playlist (see Export below), inserted tracks will not be included.
Export - You can export each session as a data file by pressing the EXPORT button. Select a session, choose your preferred file format from the drop-down list, and click EXPORT. Three export file formats are available:
• text - a simple text file containing your session information.• csv - a file for suitable use in spreadsheet software.• m3u - a playlist file, which can be imported into media players. Note that an .m3u file
does not contain audio itself, it only points to the location of your audio files.
tiP: You can make a new ITCH crate containing your session information. Select a session in the History pane and drag it to the + (create crate) button in the Crate pane. The new crate will be named with the session date.
Listing Behaviour - only the tracks you actually play are listed in the History log. The log uses an A-B algorithm, which means a track on deck A is only listed once the track on deck B has been changed or ejected. You can choose to show tracks which you have auditioned, but not actually played, by ticking the Show Unplayed Tracks checkbox. The log will then include these tracks in grey, as well as the tracks actually played.
You can also manually mark unplayed tracks as played, or vice versa. Select a track (or tracks) and click the MARk PLAYED or MARk UNPLAYED button as appropriate. (Note that only one of these two buttons appears, depending on whether the selected tracks is played or unplayed).

62
English
the Setup Screen
The SETUP screen allows you to alter system settings and to customize various aspects of ITCH. You can toggle between ITCH’s main screen and the SETUP screen at any time by clicking the SETUP button 7 .
Software VersionThe version and build number of ITCH are displayed in the lower left hand corner.
Clicking the CHECk FOR UPDATES button launches the computer’s default web browser to access the ITCH update page of the Serato website. This lets you check whether an updated version of ITCH is available. notE: The computer must have an Internet connection for this feature to work.
The computer’s real-time clock is displayed at the screen top left, and the small horizontal bargraph indicates percentage CPU usage.
SEtuP main area:The main area of the SETUP screen has five tabs: HARDWARE, PLAYBACk, LIBRARY, DISPLAY and MIXER.

63
English
hARDWARE Tab
firMwarE
If the UPDATE FIRMWARE button is displayed, it may be clicked to update the TWITCH firmware.
GEnEraL
uSB Buffer Size (Latency)ITCH processes audio data in small chunks, and this results in Touchstrip actions being translated into audio at a higher rate, which gives lower overall system latency. However, this requires more processing power and thus a higher CPU load, so lower buffer size settings require a more powerful computer to produce uninterrupted audio. If you want tighter control, you should try decreasing this setting, on the other hand, if you experience audio dropouts, you may need to increase this setting (or use a more powerful computer).
Platter SpeedApplies to virtual deck speeds of 33RPM or 45RPM. This function is not applicable to TWITCH hardware.

64
English
PLAyBACk Tab
GEnEraL
Playback keys use shift - with this option on, all cue point, loop, and general playback keys on the computer keyboard require shift or caps lock to function. This is a useful feature to prevent accidental keypresses.
Lock playing deck - with this option on, you can only load a track to a deck while it is paused. When off, a track may be loaded to a deck already in Play Mode, and the track will play immediately.
Hi-fi resampler - this option significantly reduces digital distortion at very slow or very fast playback speeds, increasing the CPU load slightly. This option is on by default.
use auto gain - auto gain enables you to set a uniform volume level for the tracks in your library. When a track is in auto gain mode, the track gain knob appears recessed. Check this box to enable auto gain. Provided you have analyzed your files, your tracks will now be loaded with the auto gain applied. Next to this box is a drop down menu, in which you set the target gain volume level. To find the optimum setting, load a track with an average volume level onto one of the Virtual Decks. Now play the track, and take note of the volume and LED lights inside the software. The idea is for the track volume to be sitting just under the clipping point (indicated by the LED meter red-lining). If the track is too quiet, unload it, then go to the Playback setup screen and boost the auto gain dB value more. Once you’ve made this adjustment, load the same track onto the Virtual Deck again. You’ll notice that the volume knob has automatically adjusted itself. keep making adjustments on the same track until it’s just below the clipping point. Once this is set you won’t need to adjust the target gain level ever again. Because the track you used had an average volume level, most of the other tracks in your library should be around the same volume. You may still need to make minor adjustments to some individual tracks, but once that’s done these will stay saved in the ID3 tag of the file.
tiP: Slightly too quiet is always better than too loud. If your LED meter is in the red, it is likely that it is clipping. Not only does clipping not sound very nice, it can damage your equipment.

65
English
Enable beat grid - this option enables all Beat Grid functionality. Beat Grid must be on for TWITCH’s Slice Mode to function. Disable this option if you don’t wish to use Beat Grid.
on SonG Load
play from start - positions the playhead at the start of each track when it is loaded. If this setting is off, new tracks will play from the last track time that the playhead had in the previous track. This option is on by default. It is overridden by instant doubles and play from first cue point options (see below).
notE: when play from start is on, the deck will try to skip any silence at the start of the track, and play from the start of the audio.
instant doubles - this allows you to quickly match the playhead position of the same file on both decks. With this option set, when you load a track on one deck that is already loaded on the other (it must be the same file), the playhead will jump to the current play position of the track that was loaded first. keylock and looping statuses are also copied. This setting overrides the play from start and play from first cue point options.
play from first cue point - enable this option to start all tracks from the first cue point after loading. This setting overrides the play from start option. If the track has no cue points set, it will play from the start.
RECORDINGBit depth - selects the recording bit depth to be 16 bit or 24 bit. Note that TWITCH only supports 16 bit recording.
file format - choose the file format for the recording. Select from Wave (.WAV) or AIFF (.AIF).
BRAkINGThis is a variable control which sets how fast the track stops when the deck is paused. Adjust with vertical movements of the mouse. Fully counter-clockwise, the stop is immediate. As the control is advanced clockwise, the stopping time increases. The longest setting simulates a slow turntable power-down.

66
English
LiBrary tab
SONG LIBRARy OPTIONS
Show itunes library – when enabled, the current default iTunes library and iTunes playlists are included in the ITCH library.
notE: The iTunes library can be minimized by clicking the small triangle in the blue iTunes folder icon.
notE: ITCH cannot play files that have been protected by Digital Rights Management systems, such as those previously sold through the Apple iTunes Music Store.
Protect library - uncheck this setting to remove tracks and crates from your library. When enabled your library is locked to prevent accidental track or crate deletion. Enabling this setting will also lock all file tags and crate names, so that no text can be changed.
custom crate columns - check this option to set custom column views for each crate and playlist. When the option is off (default), all crates will share the same column configuration as the ‘All...’ crate.
center on selected track - when this option is on, scrolling up and down in your library keeps the selected track in the middle of the library panel.
Show all file types - enable this option to show all files when importing tracks into your library. If this option is not selected, only files that ITCH can play will be displayed.
include subcrate tracks – when checked, tracks in subcrates are displayed in their parent crate. When off, browsing a crate will not show tracks that are in any subcrates of that crate.

67
English
display tab
uSER INTERFACE SETTINGS
Maximum screen updatesThe slider lets you lower ITCH’s screen refresh rate and potentially use less CPU. Users with slower computers or those running a recording program at the same time might like to do this if they are having performance problems. The default rate is 60 Hz (screen is refreshed 60 times per second). This setting applies to the entire ITCH user interface: the Virtual Decks, the waveforms, the library and the setup screen.
Horizontal waveforms - the main waveforms are displayed horizontally across the bottom of the ITCH screen.
Left Vertical waveforms - the main waveforms are displayed vertically on the left of the ITCH screen.
right Vertical waveforms - the main waveforms are displayed vertically on the right of the ITCH screen.

68
English
MiXEr tab
GENERALcroSSfadEr - the dropdown menu lets you configure the crossfader. There are three options: normal (standard crossfader action); reverse (crossfader works in opposite sense); disabled (the crossfader is disabled).
EQ – sets the maximum cut/boost range of the EQ controls – 6 dB or 12 dB.
outPut - allows you to set the audio output to be mono or stereo.
HEadrooM – sets how much headroom your device has before the internal limiter acts.Less headroom results in louder output, but has a greater chance of the limiter acting, especially when more than one audio channel is in the mix. With the initial headroom setting of 0 dB you can apply 3dB of gain per deck before the limiter starts working.
CuEoverdrive - increase this setting to give the level at the headphones output an extra boost. To prevent hearing damage, be careful not to set the level too high.
notE: Adding overdrive can reduce audio quality so is only recommended if you are encountering problems with your headphone level.
FADERSc/f curve - Adjusts the crossfader curve. Turn anticlockwise for a tighter “cut” and clockwise for a more gradual fade
u/f curve - Adjusts the channel fader (“upfader”) curve. Turn anticlockwise for a tighter “cut” and clockwise for a more gradual fade.

69
English
whitelabel
whitelabel audio filesWhitelabel audio files are a proprietary file format (file extension wl.mp3) developed by Serato. They are specially prepared for use in ITCH - with files pre-analysed, tagged with track and artist info, BPM and album art where possible.
Whitelabel audio files play as high quality 320kbps stereo audio in ITCH with TWITCH attached. Without TWITCH, or when playing these files through other MP3 software or devices, they will play only as 32kbps mono. Whitelabel audio files are promotional releases from record labels, and are available free to ITCH DJs from Whitelabel.net.
whitelabel .netThe Serato Whitelabel Delivery Network is a unique system that allows record labels to digitally deliver promotional releases directly to DJs. To download Whitelabel audio files and to sign up to receive updates on the latest promotional releases, visit http://www.whitelabel.net/
Locked whitelabel .net filesDue to some labels’ licensing requirements, certain Whitelabel audio files will require email and password verification to unlock them. If you have legitimately downloaded these tracks yourself, entering the email and password you use for Whitelabel.net will unlock the files for playback within ITCH. If you are still having problems unlocking these files, please contact Serato support at www.serato.com/support
whitelabel .net System requirementsWhitelabel.net is tested to work on these browsers:
• Internet Explorer 6+ (7+ highly recommended)• Firefox 3+• Safari 3+
You will also need to have Flash installed and Javascript enabled to be able to preview and download tracks.
notE: Running Whitelabel audio files through Mixed In key can cause the files to only play at 32kps in ITCH (even with a TWITCH attached). At this time we advise you not to use Mixed In key with Whitelabel audio files.

70
English
troubleshootingThe following suggestions may help if you are experiencing poor performance with ITCH:
• Check for updates using the CHECk FOR UPDATES button on the setup screen, or by visiting http://www.serato.com/itch
• Close any other active programs.• Disable wireless networking devices• Disable any bluetooth devices• Disable antivirus software• Disable screen savers• Disable sleep (hibernate/power saving) mode• Increase the USB buffer size• Connect TWITCH directly to a USB port on your computer, not via a USB hub• Try all USB ports, some may work better than others• Unplug any other USB devices• Run your laptop from its AC power supply
For more troubleshooting help visit www.serato.com

71
English
tEcHnicaL SPEcification
Key Performance figuresReal World ADC Dynamic Range: 102 dB (A-weighted)Real World DAC Dynamic Range: 100 dB (A-weighted)Chipset ADC/DAC Dynamic Range: 114 dB (A-weighted)Latency (Minimum Buffer Size): 77 samples
Microphone inputsDynamic Range (A-Weighted): 102 dBFrequency Response: 20 Hz - 20 kHz +/- 0.1 dBTHD+N: 0.01% (measured at 1 kHz with a 20 Hz/22 kHz
bandpass filter)Noise: EIN >120 dBu (measured with 50 dB of gain with
150 Ohm termination (20 Hz/22 kHz bandpass filter)Maximum Input level @ Minimum gain for 0 dBFS: +4 dBu
Line inputsDynamic Range (A-Weighted): 102 dBFrequency Response: 20 Hz - 20 kHz +/- 0.1 dBTHD+N: < 0.002% (measured with 0 dBFS input and
22 Hz/22 kHz bandpass filter)Noise: -92 dBu (22 Hz/22k Hz bandpass filter)
analogue audio outputs (¼” trS)Electronically balanced outputMaximum Output Level (0 dBFS): +7.0 dBuTHD+N: 0.0075% (-1 dBFS output, 20 Hz/22 kHz
bandpass filter)
analogue audio outputs (rca phono)Unbalanced outputMaximum output level (0dBFS): +7.0 dBuTHD+N: 0.0075% (-1 dBFS output, 20 Hz/20 kHz
bandpass filter)
Headphone outputsFrequency Response: 20 Hz-20 kHz +/- 0.1 dBDynamic Range: 102 dBSNR (A-weighted): 102 dBMaximum Output into 32R: +3 dBu (-1.4 dBV)Power into 32R: 24 mWOutput Impedance: < 7 ohmsLoad Impedance: > 24 ohms