twisted wire tutorial
TRANSCRIPT

Tutorial: Manually Twisted WireCreated by Gabriela ChristinaHTTP://CHRISTEJEWELRY.MULTIPLY.COMHTTP://CHRISTEJEWELRY.ETSY.COM
This lesson shows you how to create twisted wires manually by hand. This very easy technique is a great use for turning too many excess wires on the piece you are creating into intricate decoration of the piece, instead of trimming the wires and wasting them off. This also allows you to easily create “filigree” wire with very minimum tools (pliers only). And since it is manually created, it also allows you to have different looks of the twist depending on how far the angle between the 2 wires.
This tutorial is written as an EASY project. Please read the entire tutorial carefully before you start creating!
Materials: • Round wire, any metal and size of your
choice (from 18ga-28ga), length as needed
Tools: • Wire cutter• Nylon jaw pliers
Before we get start making the twisted wire, here are some tips you need to know to get a clean and even twisted wire:
1. Splay both wires evenly, same angle for each side from the meeting point of the two wires.
2. The farther the angle between the two wires, the smaller and neater the twist will be. The closer the angle, the bigger/longer the twist will be and usually less neat. Check out photo on the left to get a clearer picture of the difference.
3. I recommend at least 90° angle or more (at least 45° angle for each wire from the meeting point) to get neater and clear twist.
Copyright 2011 Gabriela Christina Page:1
90° angle
45° angle
A. MONOCOLOR TWISTED WIRE
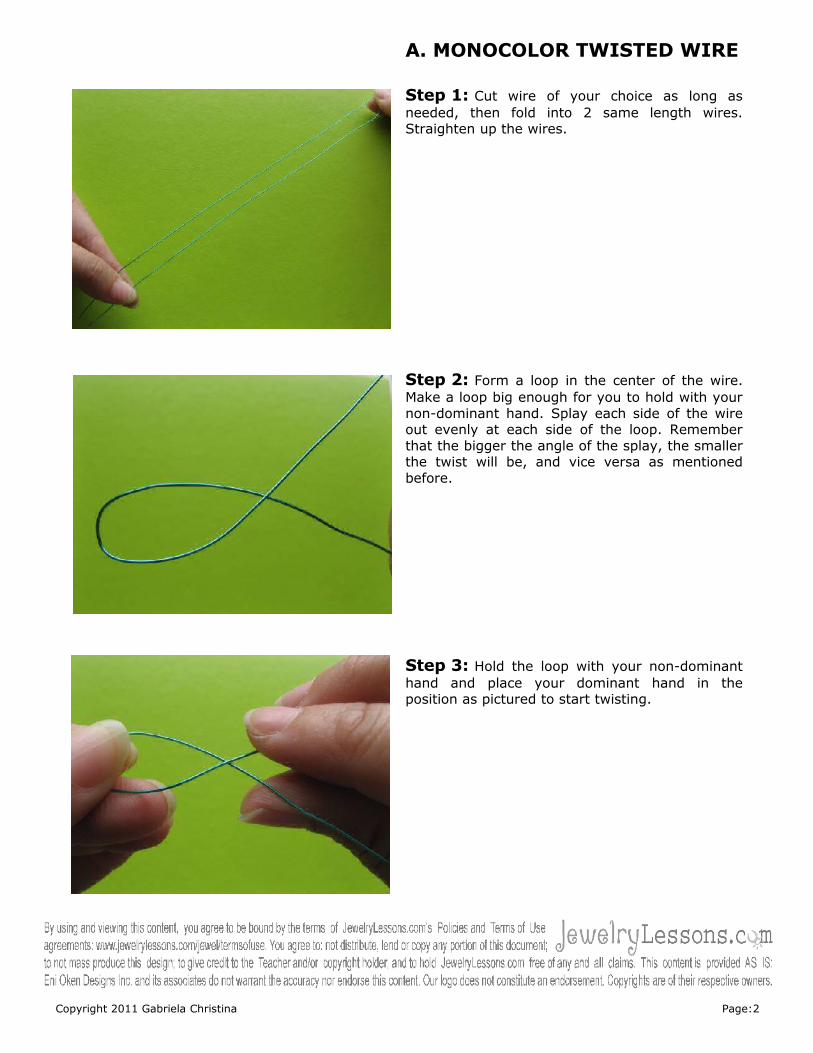
Step 1: Cut wire of your choice as long as needed, then fold into 2 same length wires. Straighten up the wires.
Step 2: Form a loop in the center of the wire. Make a loop big enough for you to hold with your non-dominant hand. Splay each side of the wire out evenly at each side of the loop. Remember that the bigger the angle of the splay, the smaller the twist will be, and vice versa as mentioned before.
Step 3: Hold the loop with your non-dominant hand and place your dominant hand in the position as pictured to start twisting.
Copyright 2011 Gabriela Christina Page:2
Pearl perimeter size = 5 cm

Step 4: Using your dominant hand, twist the wires backwards.
Step 5: Here is your first twist.
Step 6: Continue twisting and maintain the angle of the splay stay the same to get an even and clean twist.
Copyright 2011 Gabriela Christina Page:3

Step 7: Occasionally, check whether the twist are even and clean, if so, keep twisting. Otherwise, open up the twist, straighten the messy wires with nylon jaw pliers then continue twisting.
Step 8: When the twisted wire is getting long, move your non-dominant hand from the loop and grip the twisted wire to get a firm hold of it. The firm hold of your non-dominant hand will help you to continue twisting evenly and clean.
Step 9: When finished, straighten the twisted wire with nylon jaw pliers. Tips: When you have finished, also twist the loop to get the most use of your wire. Remember to splay wires on both sides of the loop evenly before twisting.
Copyright 2011 Gabriela Christina Page:4

Step 10: Cut each end using wire cutter, and your twisted wire is ready to use!
B. BICOLOR TWISTED WIRE
Step 11: To make a twisted wire from two different wire colors, cut the 2 wires with the same length. Cross the two end of the wires with the same angle from the meeting point.
Step 12: Hold the end of both wires with your non-dominant hand and use your dominant hand to twist the wires. To get started, place your dominant hand as pictured then start twisting backwards.
Copyright 2011 Gabriela Christina Page:5

Step 13: This is your first twist. Continue twisting with the same instructions as in part A step 6-10 monocolor twisted wire.
Keep smiling, keep shining, keep creating!
I hope you enjoyed this tutorial. For comments or questions, please go to JewelryLessons.com or email me at [email protected]
Please do not distribute, lend or copy. Do not mass produce. Please give credit to the Teacher. Use and view of this content constitutes an agreement to www.JewelryLessons.com’s Terms of Use.
Copyrights 2011 Gabriela Christina
Copyright 2011 Gabriela Christina Page:6

Here are some pieces created or embellished with manually twisted wire:
Copyright 2011 Gabriela Christina Page:7