tutorial: using java/jsp to write a web...
TRANSCRIPT
Page 1 Sally Kyvernitis, Temple University
Tutorial: Using Java/JSP to Write a Web API Contents
1. Overview .................................................................................................................................................................... 1
2. Download and Install the Sample Code ..................................................................................................................... 2
3. Study Code From the First JSP Page (where most of the code is in the JSP Page) .................................................... 3
4. Java Code in DbConn (Wrapper for Class java.sql.Connection) ................................................................................. 4
5. Learn about java.sql Classes: Connection, PreparedStatement, & ResultSet ........................................................... 6
6. Tunnel In if Working From Home (So Your Web App Can Connect to the Database) ............................................... 7
7. Execute the First JSP Page .......................................................................................................................................... 7
8. Execute the Second JSP Page (where most of the code has been moved to Java Classes) ....................................... 9
9. Study the Code of the Second JSP Page ..................................................................................................................... 9
10. ReRun Web APIs (JSP Pages) using Your Own Database Credentials ...................................................................... 10
11. Learn How to Recognize Errors ................................................................................................................................ 10
12. Learn How Database Connections are Handled and Why ....................................................................................... 12
1. Overview
In this tutorial, you will learn how to:
Create a NetBeans project that accesses a database.
Write a Web API that uses Java/JSP code to display database data using these classes from the java.sql
package:
o DriverManager, Connection, PreparedStatement, and ResultSet.
Handle database connections (a scarce and finite resource) in a web application
o Understand why this is different from how it was done in windows applications
How to recognize common errors: Missing Database Driver, Database unavailable, Syntax error in Sql
Statement, Error Extracting Data from Result Set (bad column name), Error Extracting Data from Result Set
(wrong data type).
Before you start, you should have completed the previous lab in which you designed your own database and
populated it with test data.
Page 2 Sally Kyvernitis, Temple University
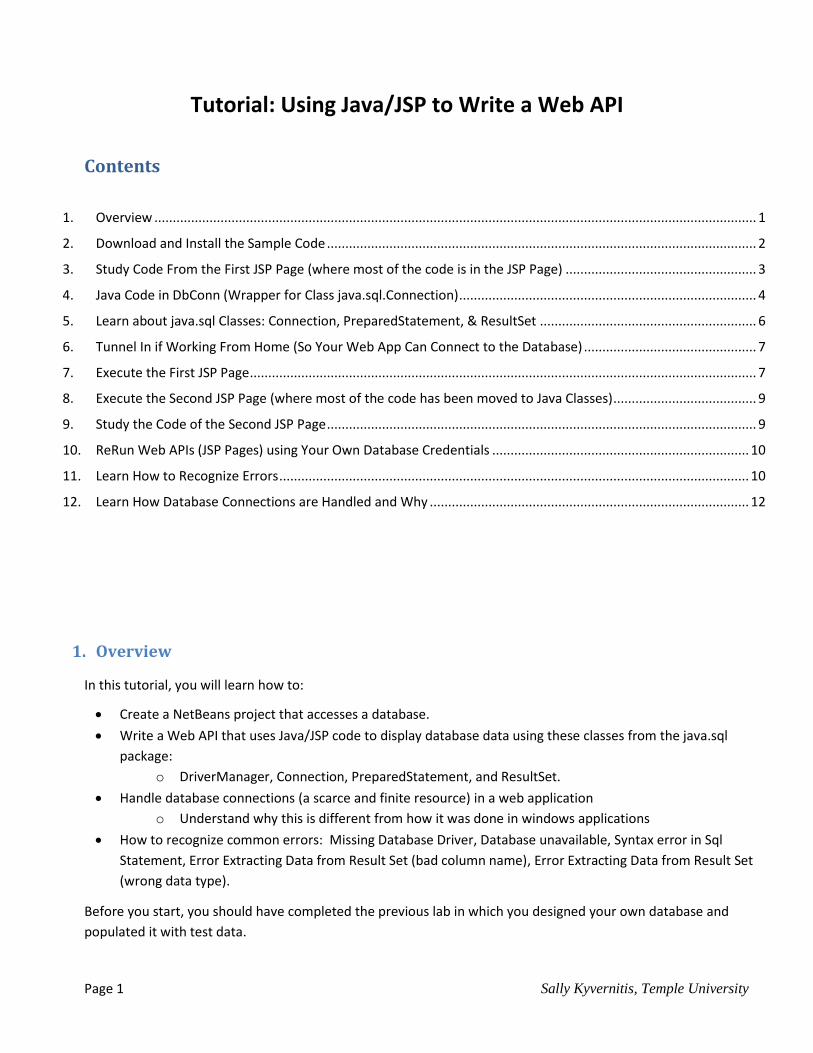
2. Download and Install the Sample Code
Download the sample code that’s in a zip file (see link from the same page where you got this tutorial document).
This is what is in the sample code (screen capture is from NetBeans project pane after the code is installed):
There is a separate document with detailed instructions for how you install sample code to your PC/Mac, but I will
provide a quick summary of how to do it here:
1. Extract the zip file.
2. From the extracted files, copy the two jar files from folder “projectName – build – web – WEB-INF – lib”
and save them under mydocs/netbeans projects (so you will know where to find them later).
gson.jar contains code that can convert between JSON and POJOs (plain old java objects).
mysql-connector-java.jar contains MySql database driver code.
NOTE: you will only have to save these two jar files once for the whole semester.
3. Create a new NetBeans Web Application (File – New Project – Java Web – Web Application). After
naming your project, accept all other defaults from the wizard.
4. In NetBeans, open the new project. Right click “Libraries” and select “Add JAR/folder”. Browse to
mydocs/NetBeans projects and select the two Jar files that you just stored there.
5. From the extracted files, copy all the java source code packages from folder “projectName – src – java”
and paste into the NetBeans project pane under “Source Packages”.
6. From the extracted files, copy everything EXCEPT WEB-INF from folder “projectName – web”. For this
project, you’ll only see JSP pages, but in other sample code, you’ll also find a lot of other types of files
(HTML files, CSS files, images, javascript code).
7. If you did everything right, your NetBeans project pane should now look like the image at the top of this
page.
Simpler Web API (most code is in the JSP page)
Web API with better code reuse (more code in classes)
Java class code, organized by package (dbUtils, etc).
JAR files (Java Archives containing compiled compressed code) that we need to use.
Page 3 Sally Kyvernitis, Temple University
3. Study Code From the First JSP Page (where most of the code is in the JSP Page)
<%@page contentType="application/json; charset=UTF-8" pageEncoding="UTF-8"%>
<%@page language="java" import="dbUtils.*" %>
<%@page language="java" import="model.webUser.*" %>
<%@page language="java" import="java.sql.PreparedStatement" %>
<%@page language="java" import="java.sql.ResultSet" %>
<%@page language="java" import="com.google.gson.*" %>
<%
// default constructor creates nice empty StringDataList with all fields "" (empty string, nothing null).
StringDataList strDataList = new StringDataList();
System.out.println("*** Ready to get Db Connection.");
DbConn dbc = new DbConn();
strDataList.dbError = dbc.getErr(); // returns "" if connection is good, else db error msg.
System.out.println("*** Db Error is this (empty string means all good): " + dbc.getErr());
if (strDataList.dbError.length() == 0) { // if got good DB connection,
try {
String sql = "SELECT web_user_id, user_email, user_password, membership_fee, birthday, "
+ "web_user.user_role_id, user_role_type "
+ "FROM web_user, user_role where web_user.user_role_id = user_role.user_role_id "
+ "ORDER BY web_user_id ";
System.out.println("*** Ready to prepare statement. Sql is: " + sql);
PreparedStatement stmt = dbc.getConn().prepareStatement(sql);
System.out.println("*** Ready to execute the sql.");
ResultSet results = stmt.executeQuery();
while (results.next()) {
System.out.println("*** Ready to extract one row from the result set.");
strDataList.add(results);
}
results.close();
stmt.close();
} catch (Exception e) {
System.out.println("*** Exception thrown, messages is: " + e.getMessage());
StringData sd = new StringData();
sd.errorMsg = "Exception thrown, messages is: " + e.getMessage();
strDataList.add(sd);
}
}
dbc.close(); // EVERY code path that opens a db connection, must also close it - no DB Conn leaks.
// This object (from the GSON library) can to convert between JSON <-> POJO (plain old java object)
Gson gson = new Gson();
out.print(gson.toJson(strDataList).trim());
%>
Page 4 Sally Kyvernitis, Temple University
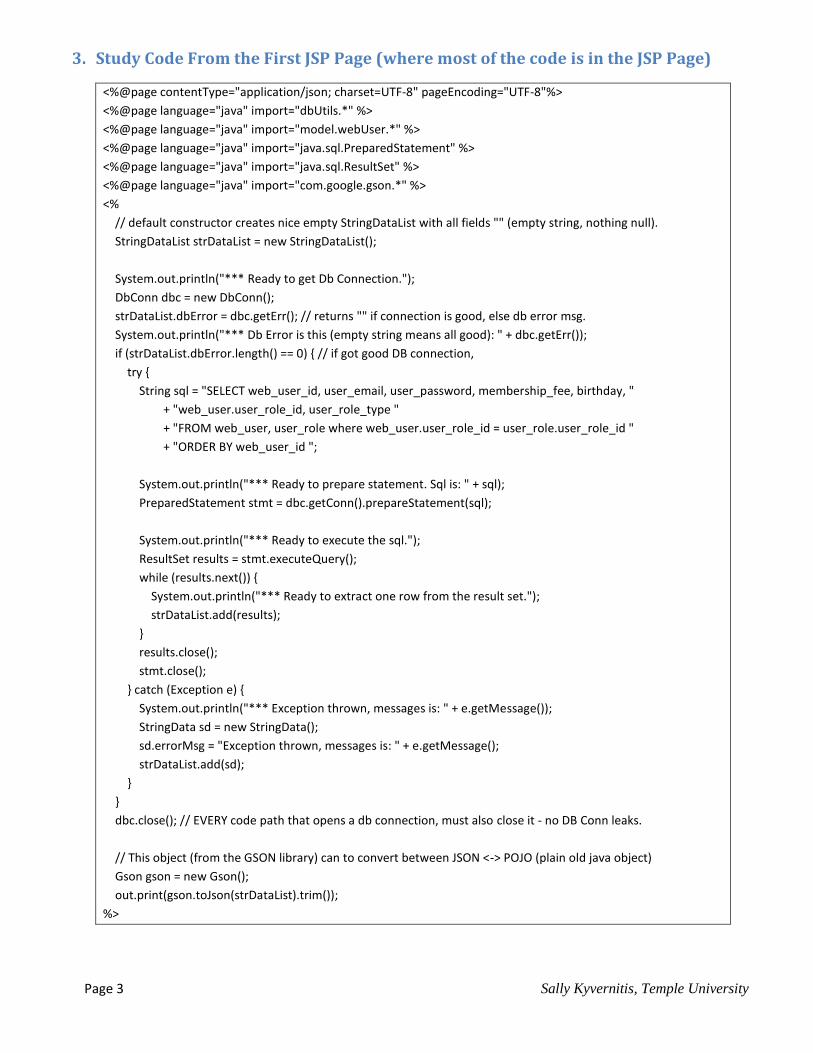
4. Java Code in DbConn (Wrapper for Class java.sql.Connection)
The following code is a wrapper class for java.sql.Connection. In addition to opening and closing a database
connection (which java.sql.Connection already does), DbConn always supplies the right database connection string
(two versions depending on whether the code is running on your PC/MAC in development mode or if it is
published code running on a temple server). It also keeps track of any database error messages relayed by the
DBMS.
package dbUtils; import java.sql.DriverManager; import java.sql.Connection; public class DbConn { // Wrapper class for database connection. Constructor opens connection.
// Close method closes connection. private String errMsg = ""; // empty string means no error (yet). private java.sql.Connection conn = null; public DbConn() { String dbAndPass = "sallyk_3308?user=sallyk&password=Vaca1415"; try { String DRIVER = "com.mysql.jdbc.Driver"; Class.forName(DRIVER).newInstance(); try { String url = "jdbc:mysql://localhost:3307/"+dbAndPass; // Assume running from home tunneling...
if (this.isTemple()) { // if true, running from temple/published url = "jdbc:mysql://cis-linux2.temple.edu:3306/"+dbAndPass; } this.conn = DriverManager.getConnection(url); } catch (Exception e) { // cant get the connection recordError("Problem getting connection:" + e.getMessage()); } } catch (Exception e) { // cant get the driver... recordError("Problem getting driver:" + e.getMessage()); } } // method private void recordError(String errorMsg) { this.errMsg = errorMsg; System.out.println("Error in DbConn. " + errorMsg); } public Connection getConn() { // Returns actual java database connection return this.conn; } public String getErr() { // returns “” if no error else returns the actual database error message. return this.errMsg; }
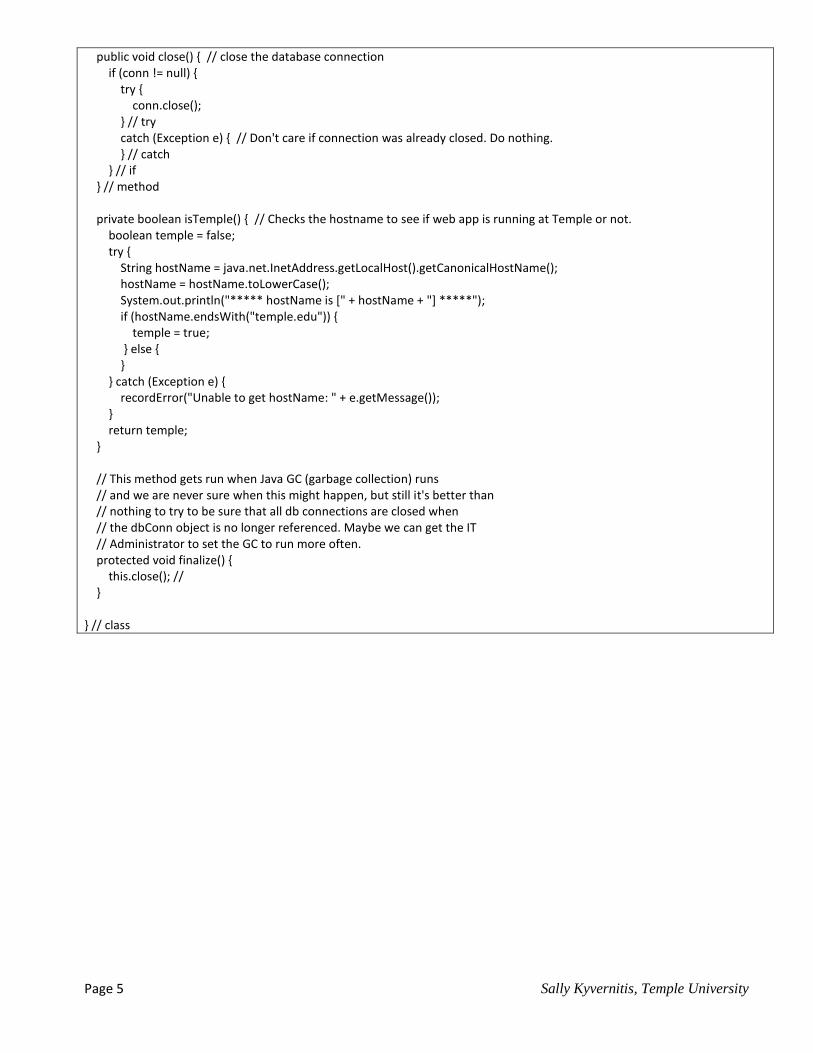
Page 5 Sally Kyvernitis, Temple University
public void close() { // close the database connection if (conn != null) { try { conn.close(); } // try catch (Exception e) { // Don't care if connection was already closed. Do nothing. } // catch } // if } // method private boolean isTemple() { // Checks the hostname to see if web app is running at Temple or not. boolean temple = false; try { String hostName = java.net.InetAddress.getLocalHost().getCanonicalHostName(); hostName = hostName.toLowerCase(); System.out.println("***** hostName is [" + hostName + "] *****"); if (hostName.endsWith("temple.edu")) { temple = true; } else { } } catch (Exception e) { recordError("Unable to get hostName: " + e.getMessage()); } return temple; } // This method gets run when Java GC (garbage collection) runs // and we are never sure when this might happen, but still it's better than // nothing to try to be sure that all db connections are closed when // the dbConn object is no longer referenced. Maybe we can get the IT // Administrator to set the GC to run more often. protected void finalize() { this.close(); // } } // class
Page 6 Sally Kyvernitis, Temple University
5. Learn about java.sql Classes: Connection, PreparedStatement, & ResultSet
JDBC stands for Java Database Connectivity, a Java API that enables Java programs to execute SQL statements on any
SQL-compliant database. Since nearly all relational database management systems (DBMSs) support SQL, and because
Java itself runs on most platforms, JDBC makes it possible to write a single database application that can run on
different platforms and interact with different DBMSs.
JDBC is similar to ODBC (open database connectivity), but is designed specifically for Java programs, whereas
ODBC is language-independent.
The sample code imports classes from the java.sql.package (see line two of the sample code).
The DriverManager is the basic service for managing a set of JDBC drivers
http://www.webopedia.com/TERM/J/JDBC.html
A Connection is like a telephone call between your application and the MySql database management
system. All connections that are opened must be closed (in EVERY code path) – or else your code has what
is known as a “database connection leak”. It is very easy to create a database connection leak and web apps
that have database connection leaks stop working properly with heavy usage.
A PreparedStatement is the SQL to be executed (e.g., “SELECT * FROM WEB_USER”)
The ResultSet is the data returned by the SQL SELECT statement. Using the “next()” method, you can only
access one row of data at a time, sequentially (first row, next row, etc).
Whenever you are working with a database, there is always the possibility of an exception being thrown. For
example, you attempt to connect to database that is down or unreachable, or you attempt to execute a SQL
statement that has a syntax error. That’s why you’ll see a lot of try/catch code and exception handling in web
applications.
Follow the code from the JSP page to see how the various classes and methods are used:
dbUtils.DbConn: a class which “wraps” the java.sql.Connection class. Our DbConn provides value by
providing YOUR database connection credentials, automatically determining which connection string should
be used, NOT throwing an exception if the wrapper’s close method is called when the database is already
closed.
view.WebUserView.listAllUsers: a method that performs a SQL select statement, then loops through the
result set while building an HTML <table> element that contains the data from the result set.
dbUtils.FormatUtils: a class full of static methods that take in various data types (like decimal, or date) and
return HTML <td> elements nicely formatted and aligned.
Page 7 Sally Kyvernitis, Temple University
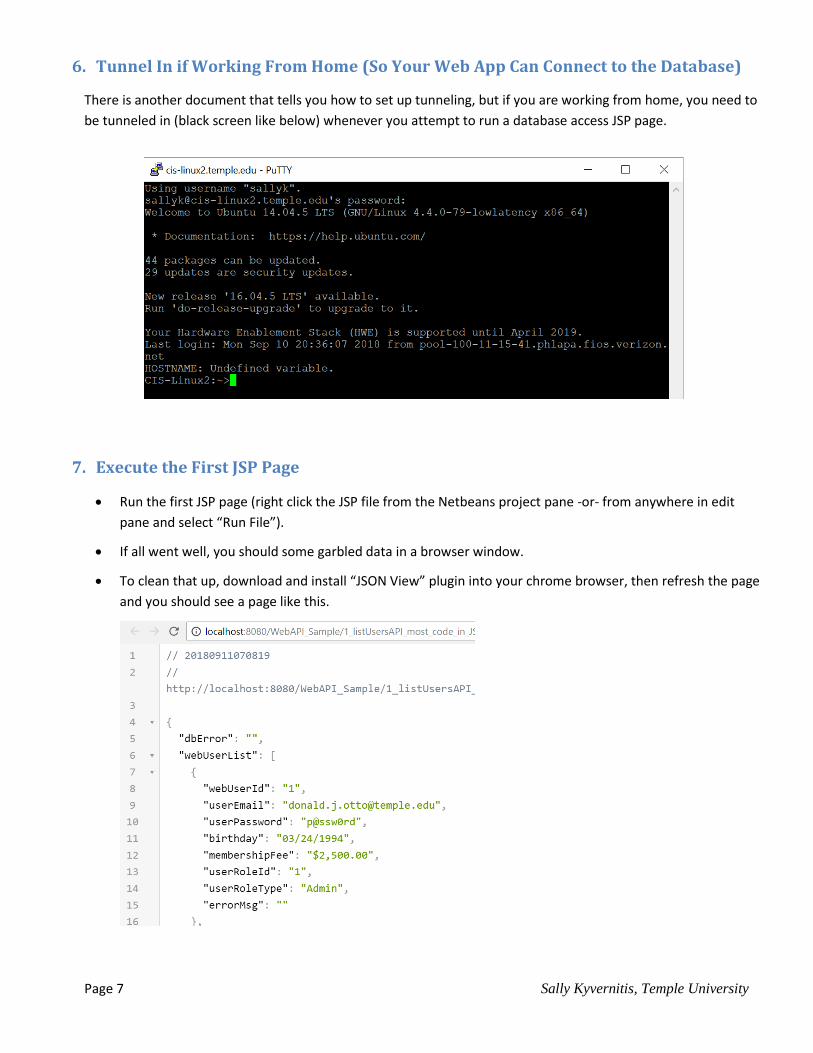
6. Tunnel In if Working From Home (So Your Web App Can Connect to the Database)
There is another document that tells you how to set up tunneling, but if you are working from home, you need to
be tunneled in (black screen like below) whenever you attempt to run a database access JSP page.
7. Execute the First JSP Page
Run the first JSP page (right click the JSP file from the Netbeans project pane -or- from anywhere in edit
pane and select “Run File”).
If all went well, you should some garbled data in a browser window.
To clean that up, download and install “JSON View” plugin into your chrome browser, then refresh the page
and you should see a page like this.
Page 8 Sally Kyvernitis, Temple University
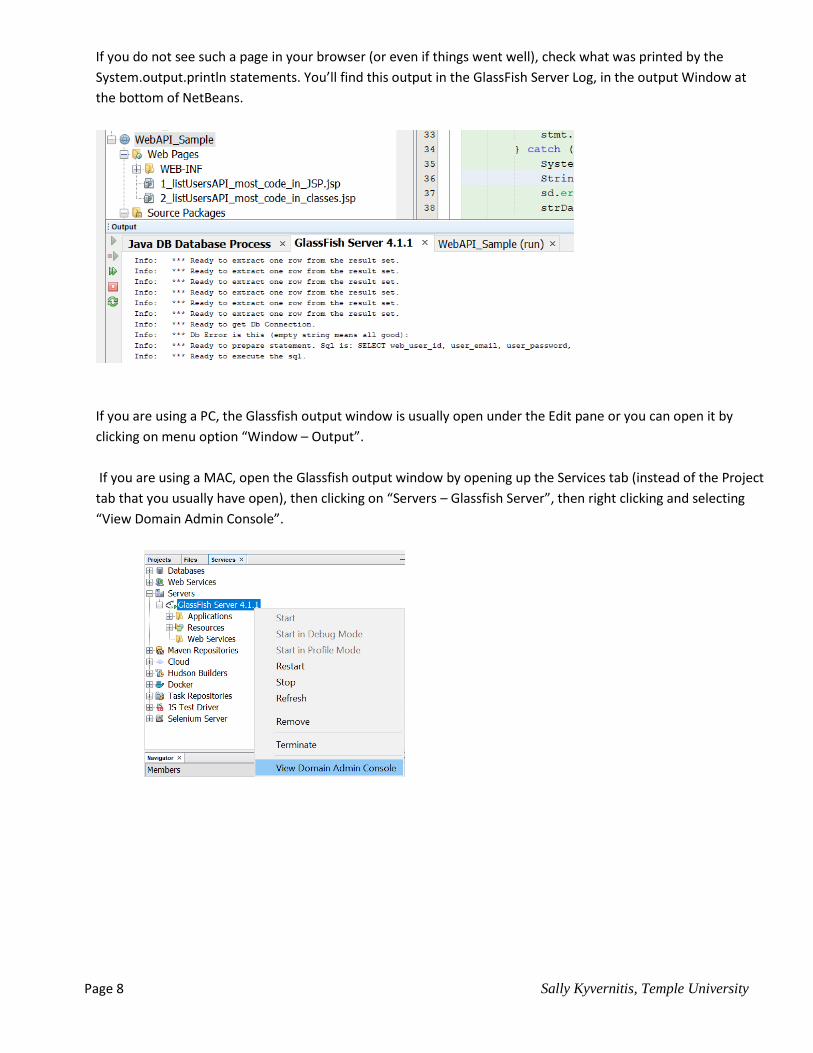
If you do not see such a page in your browser (or even if things went well), check what was printed by the
System.output.println statements. You’ll find this output in the GlassFish Server Log, in the output Window at
the bottom of NetBeans.
If you are using a PC, the Glassfish output window is usually open under the Edit pane or you can open it by
clicking on menu option “Window – Output”.
If you are using a MAC, open the Glassfish output window by opening up the Services tab (instead of the Project
tab that you usually have open), then clicking on “Servers – Glassfish Server”, then right clicking and selecting
“View Domain Admin Console”.
Page 9 Sally Kyvernitis, Temple University
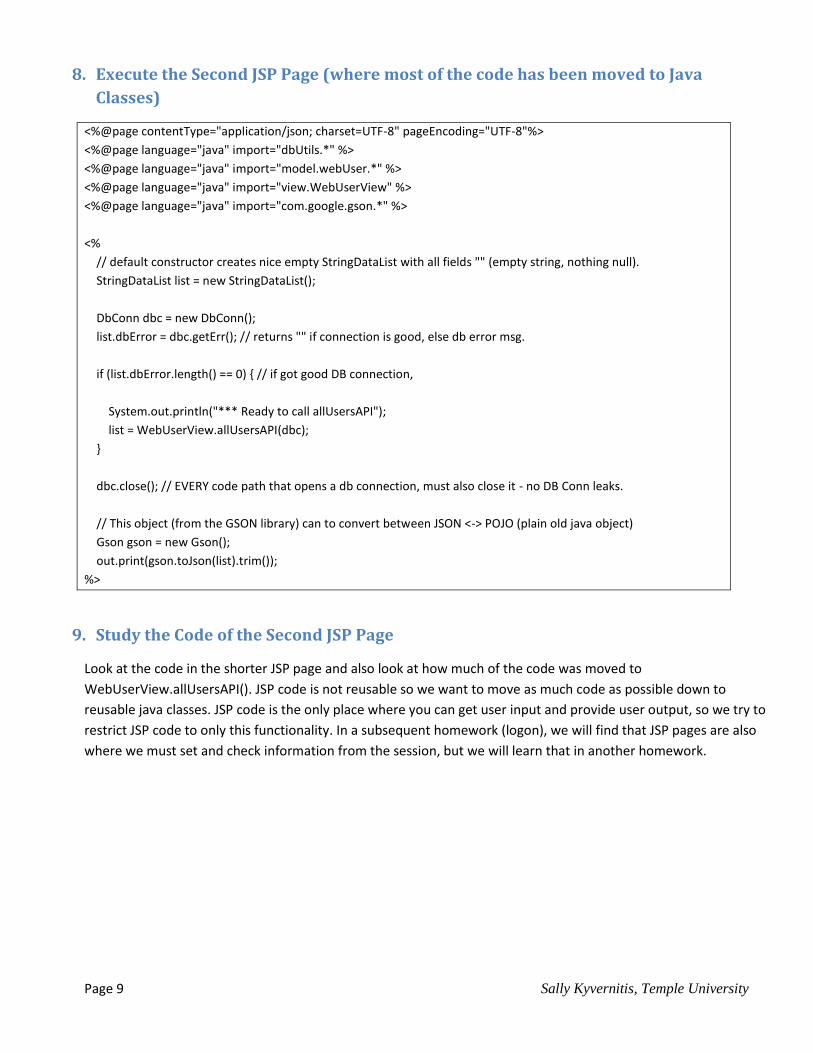
8. Execute the Second JSP Page (where most of the code has been moved to Java
Classes)
<%@page contentType="application/json; charset=UTF-8" pageEncoding="UTF-8"%>
<%@page language="java" import="dbUtils.*" %>
<%@page language="java" import="model.webUser.*" %>
<%@page language="java" import="view.WebUserView" %>
<%@page language="java" import="com.google.gson.*" %>
<%
// default constructor creates nice empty StringDataList with all fields "" (empty string, nothing null).
StringDataList list = new StringDataList();
DbConn dbc = new DbConn();
list.dbError = dbc.getErr(); // returns "" if connection is good, else db error msg.
if (list.dbError.length() == 0) { // if got good DB connection,
System.out.println("*** Ready to call allUsersAPI");
list = WebUserView.allUsersAPI(dbc);
}
dbc.close(); // EVERY code path that opens a db connection, must also close it - no DB Conn leaks.
// This object (from the GSON library) can to convert between JSON <-> POJO (plain old java object)
Gson gson = new Gson();
out.print(gson.toJson(list).trim());
%>
9. Study the Code of the Second JSP Page
Look at the code in the shorter JSP page and also look at how much of the code was moved to
WebUserView.allUsersAPI(). JSP code is not reusable so we want to move as much code as possible down to
reusable java classes. JSP code is the only place where you can get user input and provide user output, so we try to
restrict JSP code to only this functionality. In a subsequent homework (logon), we will find that JSP pages are also
where we must set and check information from the session, but we will learn that in another homework.

Page 10 Sally Kyvernitis, Temple University
10. ReRun Web APIs (JSP Pages) using Your Own Database Credentials
Edit both connection strings in class “DbConn” (in package dbUtils) so that it has your credentials for database
name, user name, and database password. Then re-run either (both) of the two pages. Assuming it ran OK in the
previous steps, here are some reasons things might not be working:
You did not enter your database credentials correctly. Remember that you need to enter your randomly
generated database password, NOT your TU portal password.
You are no longer tunneled in (the command window must be open, authenticated successfully, and not
“timed out”).
Your database does not have a web_user table with the exact design that mine has. Check the name of the
table, the names and data types of the table’s field names. Capitalization matters. Modify the SQL so that it
works with your database.
Your web_user table, may have some null values in it. If so, edit your data (using MySqlWorkbench) to get
rid of any null values.
11. Learn How to Recognize Errors
Throughout the semester, you will certainly encounter errors with your java/jsp code. The sample code places
much importance upon trapping, handling, and displaying all possible errors. Take a moment to learn how to
recognize some common errors.
Missing Database Driver. To simulate this error, remove the mysql driver. (Right click on the Jar file and
select “remove”). Or create a new project without adding a reference to the MySql Database Driver jar file.
Not Tunneled in. If you are not tunneled in (or your PC/MAC is unable to connect to cis-linux2’s MySql
database management system for any reason), you’ll see an error message like this:
problem getting connection:Communications link failure The last packet sent successfully
to the server was 0 milliseconds ago. The driver has not received any packets from the server.
Database unavailable. To simulate this error, change something in your connect string (perhaps incorrect
database name, or username or password)
Syntax error in Sql Statement. To simulate this error, change something in your sql statement (perhaps
misspell a keyword or table name or column name):
String sql="select user_email, user_password from webUser order by user_email";

Page 11 Sally Kyvernitis, Temple University
Error Extracting Data from Result Set (bad column name or wrong data type). In this sample code, data is
extracted from the SQL result set in one of the constructors of the StringData class (under the model
package). In this constructor, you could misspell a column name or try to convert data of one type using the
wrong data type for formatting method. Either of these would certainly cause an exception to be thrown,
but hopefully you should see signs of this problem – either on the page in the browser, or in the Glassfish
output window.

Page 12 Sally Kyvernitis, Temple University
12. Learn How Database Connections are Handled and Why
As mentioned previously, a “database connection” is like a telephone call between the web application and the
database. Before your web app can send commands to a database management system, the web app must place
a “call” and the DBMS must answer. A database connection is a very limited resource. To prevent the database
server’s memory from running out, the Database Administrator (job title) specifies a finite number of database
connections for each database. This means that any given database can only handle a finite number of calls at any
one point in time.
The DBMS should always be running on the database server -- or else the “database is not up”. When the DBMS
receives a request for a database connection (and it has one to give), the DBMS “answers the call” and one of its
finite database connections is consumed – until the caller closes the connection or the database connection times
out.
The timeout period for a database is also specified by a database administrator. In a windows application
(application that is installed on user’s PCs in an organization), the thought is that most users will be in the app all
day long. The software declares a single (static) database connection object per user and the sw never closes the
connection, just lets it time out after a certain period of inactivity. Prior to each database access, the sw checks to
see if the connection is open. If not, it reopens the connection and uses it. There is no need to worry about closing
every database connection that you open. It’s a very easy approach, but it only works with a very limited number
of potential users who expect to be in the app most of the time.
For web applications where the number of potential users is very large (and we don’t know how long each user
will be in the application), another approach is taken. Each page (that needs database access) opens one
connection (at the latest possible moment), uses it, then closes it as quickly as possible. The database connection
is treated as a scarce resource and never wasted. If the page needs to call several methods that all need database
access, the page get the open connection, passes it to those methods, then closes the connection. With this
approach, one must be very careful never to create a “database connection” leak which is any code path where a
database connection is opened but never close.