tutorial: using arcreader - esridownloads2.esri.com/support/documentation/ao_/797... · 1 2 3/4) ˚...
TRANSCRIPT
ArcGIS®
9Using ArcReader™

���������� ��� ������
�����������������
�������������������� �!���"��
#���� ��!����"��������������"$!�������%"�$������������ �����#���&��'������"��$�������������"���������&�����"���������&�� �������"�$������ ��������������"�(���������������&�)������)���*��"����������+����� ���&��'!��(�������$"��������!�������� ��!��(����!����)���"����"��!�"����"��)��"�$��������"����������"������)��(������ ��!������������������������!)�%"�����%����������!�����&�����(�����������,$������$��(�����������-�����"�.������)����)�/ +�&0��'����)��������)��1��2�3/4 )����
#���� ��!����"��������������"$!�����$(5�"�"�����&���$���"��
�����������������
��������������� �������������
�� ������������ �������������������
����� &���)��"$!������)���*������������������$�������$(5�"�����!�� ��6�"���������!����������������������7�����!���",$���������������#���#�8*6�.�#�8��79#����!���!$!)$��)�$���"����)�����"���$��(�������7�����!�����$(5�"������"�������� �����:��;<����234����������)��)������=>�+41/2?@:��;<����2341=>�+41/2?���*��:��;4���44*4���4�=��!!��"���#�"���"��8��*��!�$���� &���?@���8:���A;�<����232 4<=+BC411<?=#�"���"��8��?���*��8:���;��2�2� �=��!�$���� &���?)�������"�(��������"��*.��$ �"$���������)�/ +�&0��'����)��������)��1��2�3/4 )����
����)���������(�����)��"������)��"7��)����"7������)7��(�����)��".��)7��������+�&��')��"������)��"�8�)��"�.�)������8��(���������)�8�)&&&������������&��'�"�!)���&&&������"�!�������!��'�)�������������!��'�)�������"�!��'�� �����������������)���$��������!!$���)��"���������5$�����"�����
B���"�!�������������$"�!��������������������!��'����������������!��'�� ���������"�������!��'�&�����
Attribution.pmd 02/12/2004, 12:58 PM2
IN THIS CHAPTER
7
Quick-start tutorial 2••••• Exercise 1: Viewing a map
••••• Exercise 2: Querying a map
••••• Exercise 3: Printing a map
The best way to learn ArcReader is to try it yourself. This tutorial guidesyou through some basic ArcReader skills as you explore a map of Canada.
Exercise 1 introduces various ways that you can view a map in ArcReader.
Exercise 2 shows you how to query a map in ArcReader to get the mostinformation possible from it.
Exercise 3 walks you through printing a map from ArcReader.
Each exercise in this tutorial takes between 15 and 20 minutes to complete.You can either work through the entire tutorial at once or complete eachexercise one at a time.
Before you begin the exercises in this tutorial, install the ArcReader tutorialdata. To install the data, run the Tutorial setup during the ArcReaderinstallation. You also have the option of running the Tutorial setupindependently of the ArcReader installation.

8 USING ARCREADER
In this exercise, you will open and explore a published mapwith ArcReader. You will also use ArcReader to query dataon the map.
Starting ArcReader
1. Click Start on the Windows taskbar.
2. Click Programs, point to ArcGIS, and click ArcReader.
ArcReader opens.
Opening an existing published map
1. Click File and click Open.
Exercise 1: Viewing a map
1
2
1
2. Click the Look in dropdown arrow and navigate to themap folder on the local drive where you installed thetutorial. (C:\arcgis\arcexe82\ArcTutor is the defaultlocation.)
3. Double-click Gulf of St. Lawrence.pmf.
ArcReader opens the map.
2
QUICK-START TUTORIAL 9
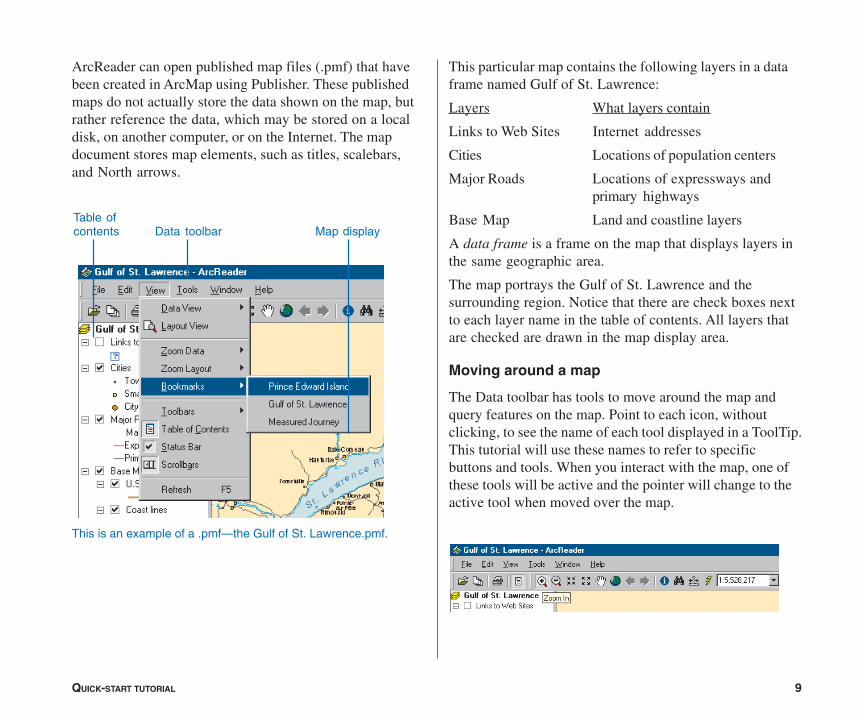
ArcReader can open published map files (.pmf) that havebeen created in ArcMap using Publisher. These publishedmaps do not actually store the data shown on the map, butrather reference the data, which may be stored on a localdisk, on another computer, or on the Internet. The mapdocument stores map elements, such as titles, scalebars,and North arrows.
This particular map contains the following layers in a dataframe named Gulf of St. Lawrence:
Layers What layers contain
Links to Web Sites Internet addresses
Cities Locations of population centers
Major Roads Locations of expressways andprimary highways
Base Map Land and coastline layers
A data frame is a frame on the map that displays layers inthe same geographic area.
The map portrays the Gulf of St. Lawrence and thesurrounding region. Notice that there are check boxes nextto each layer name in the table of contents. All layers thatare checked are drawn in the map display area.
Moving around a map
The Data toolbar has tools to move around the map andquery features on the map. Point to each icon, withoutclicking, to see the name of each tool displayed in a ToolTip.This tutorial will use these names to refer to specificbuttons and tools. When you interact with the map, one ofthese tools will be active and the pointer will change to theactive tool when moved over the map.
This is an example of a .pmf—the Gulf of St. Lawrence.pmf.
Table ofcontents Data toolbar Map display
10 USING ARCREADER
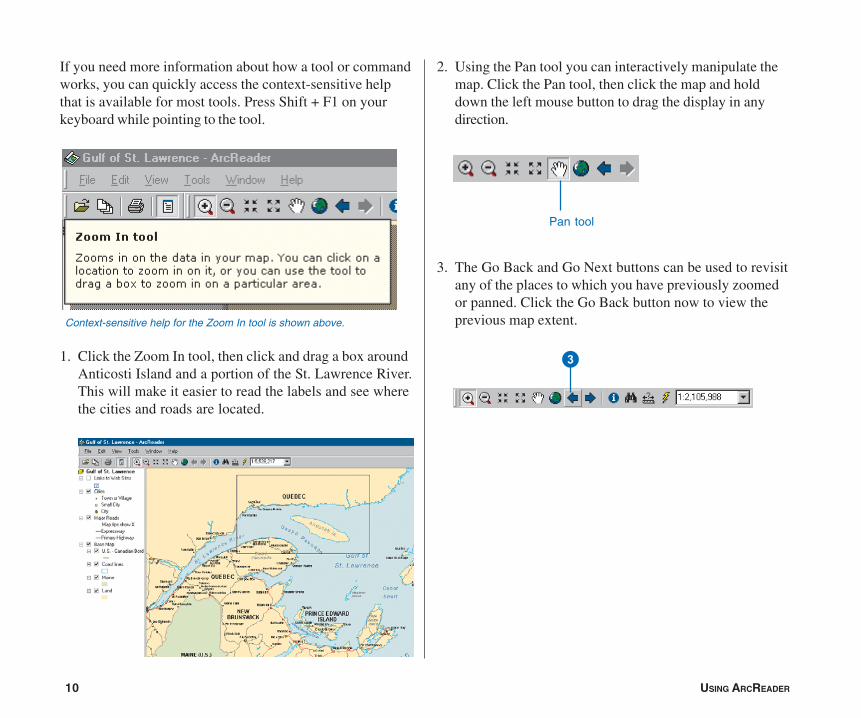
If you need more information about how a tool or commandworks, you can quickly access the context-sensitive helpthat is available for most tools. Press Shift + F1 on yourkeyboard while pointing to the tool.
1. Click the Zoom In tool, then click and drag a box aroundAnticosti Island and a portion of the St. Lawrence River.This will make it easier to read the labels and see wherethe cities and roads are located.
2. Using the Pan tool you can interactively manipulate themap. Click the Pan tool, then click the map and holddown the left mouse button to drag the display in anydirection.
3. The Go Back and Go Next buttons can be used to revisitany of the places to which you have previously zoomedor panned. Click the Go Back button now to view theprevious map extent.Context-sensitive help for the Zoom In tool is shown above.
Pan tool
3
QUICK-START TUTORIAL 11
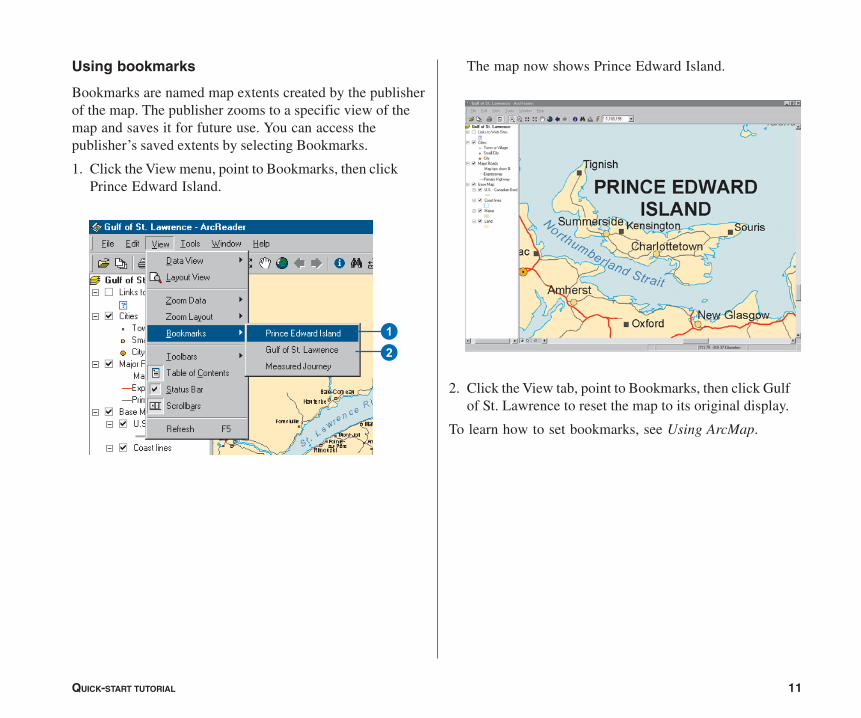
Using bookmarks
Bookmarks are named map extents created by the publisherof the map. The publisher zooms to a specific view of themap and saves it for future use. You can access thepublisher’s saved extents by selecting Bookmarks.
1. Click the View menu, point to Bookmarks, then clickPrince Edward Island.
The map now shows Prince Edward Island.
2. Click the View tab, point to Bookmarks, then click Gulfof St. Lawrence to reset the map to its original display.
To learn how to set bookmarks, see Using ArcMap.
12

12 USING ARCREADER
Turning layers on and off
The table of contents is where you turn map layers on andoff. To display a layer, check the Layer visibility check boxnext to its name. To turn the layer off, uncheck the box.
1. Check Links to Web Sites.
Notice the blue question mark symbols now draw on themap.
2. Uncheck the Links to Web Sites.
Notice that the layer is turned off and no longer displayson the map.
Getting information about layers
Each of the layers in a map has a set of properties that canbe viewed, allowing you to learn which features areavailable for that layer.
1. In the table of contents, right-click Major Roads andclick Properties.
2. Click the General tab.
1
Layer visibility check box
1

QUICK-START TUTORIAL 13
There are times when you may not want to change thelocation displayed on the map but still need to see moredetail. The ArcReader Magnifier Window allows you todo this.
1. Click Window and click Magnifier.
The Magnifier Window opens.
2. Click the title bar of the Magnifier Window and drag itover the map. While you are dragging it, the MagnifierWindow will show crosshairs to indicate which part ofthe display will be magnified.
3. When the crosshairs are over the portion of the map youwould like to magnify, release the mouse button. You willsee a magnified view of the location under the magnifier.
You can see whether the layer is displayed at all scalesor only within a specific range of scales and whetherMap Tips have been enabled for the layer. Map Tips areonscreen descriptions of map features that appear whenyou point to a feature. Later in this tutorial you will useMap Tips from this layer.
3. Click OK to close the Layer Properties dialog box.
Using the Magnifier Window
2
3
1
14 USING ARCREADER
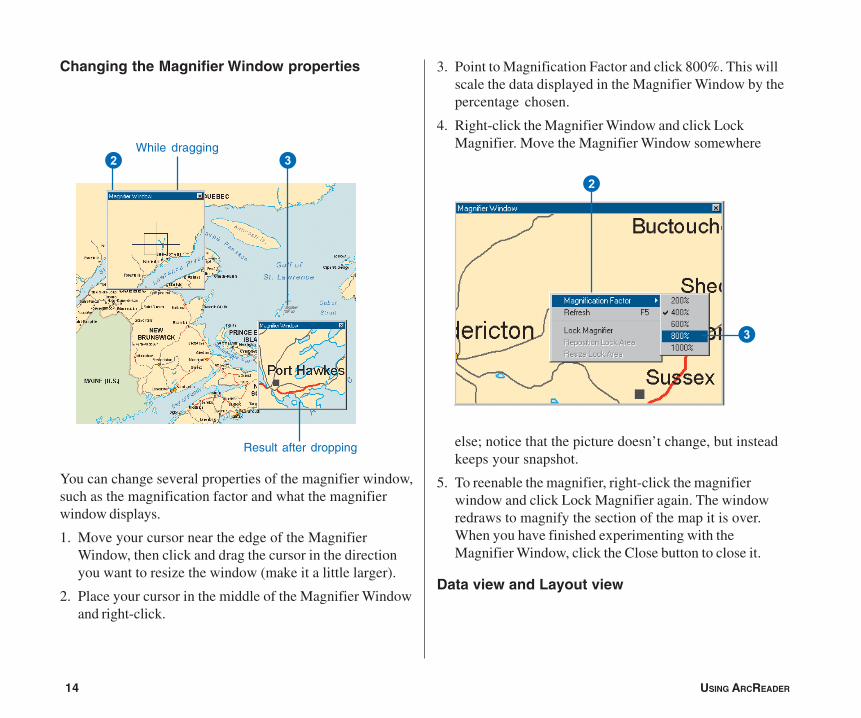
Changing the Magnifier Window properties
You can change several properties of the magnifier window,such as the magnification factor and what the magnifierwindow displays.
1. Move your cursor near the edge of the MagnifierWindow, then click and drag the cursor in the directionyou want to resize the window (make it a little larger).
2. Place your cursor in the middle of the Magnifier Windowand right-click.
3. Point to Magnification Factor and click 800%. This willscale the data displayed in the Magnifier Window by thepercentage chosen.
4. Right-click the Magnifier Window and click LockMagnifier. Move the Magnifier Window somewhere
else; notice that the picture doesn’t change, but insteadkeeps your snapshot.
5. To reenable the magnifier, right-click the magnifierwindow and click Lock Magnifier again. The windowredraws to magnify the section of the map it is over.When you have finished experimenting with theMagnifier Window, click the Close button to close it.
Data view and Layout view
2 3While dragging
Result after dropping
2
3

QUICK-START TUTORIAL 15
ArcReader is capable of displaying a map in either Dataview or Layout view. Up to this point this tutorial has beenusing Data view. Data view shows the contents of a dataframe. Layout view shows the map as it would appear on aprinted page. Layout view also shows map elements thataren’t contained within the data frame, such as the maptitle, legend, scalebar, and North arrow.
1. Click the View tab and click Layout View.
The map displays in Layout view. Notice the pageincludes a title, legend, scalebars, and some supportingtext. Also displayed is the Layout toolbar, which containstools for navigating in Layout view. Point to each icon,without clicking, to see the name of each tool.
The Layout tools in the Layout toolbar are used like thetools in the Data toolbar. They allow you to change the waythe page is displayed. Notice that the data tools are stillaccessible for changing the view of the data within the dataframe.
Page for map
Data view
Layout toolbar
Layout viewRefresh
1
There is a shortcut for switching between Data and Layoutview. In the scrollbar near the bottom of the map, there arethree small buttons. Clicking the globe icon switches toData view, clicking the page icon switches to Layout view,and clicking the arrow icon refreshes the map.
In this exercise, you learned various ways to view apublished map in ArcReader. In the next exercise, you willlearn how to query a map in ArcReader.

16 USING ARCREADER
A map in ArcReader typically contains more informationthan you initially see. For example, a feature may holdattribute information that is not labeled or displayed on themap. With ArcReader you can query that information oruse Map Tips to find a feature on the map.
Using Map Tips
The most readily accessible kind of map attributeinformation comes in the form of Map Tips. Map Tipscontain an attribute chosen by the map author that displayswhenever you hover any data tool over a feature on themap. Map Tips are only visible while in Data view.
1. Click the Data View button , located at the bottom-left part of the map.
2. Click any data tool and point to a road to see its name.
The Major Roads layer is the only layer in this map that hasMap Tips enabled. You can tell if Map Tips are enabled fora layer by right-clicking the layer name in the table ofcontents and clicking the General tab on the Propertiesdialog box.
Exercise 2: Querying a map
Road name
QUICK-START TUTORIAL 17
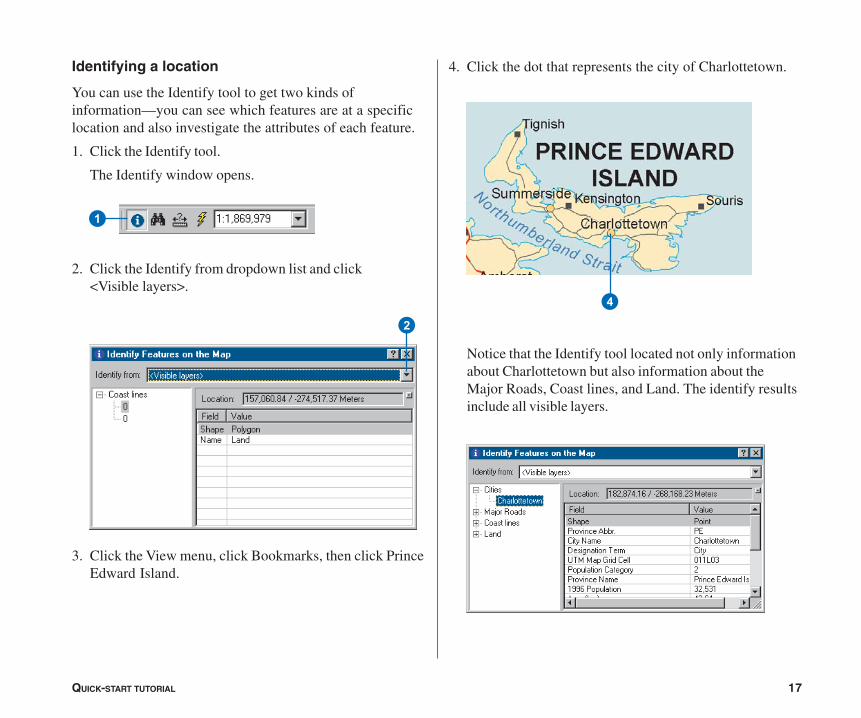
Identifying a location
You can use the Identify tool to get two kinds ofinformation—you can see which features are at a specificlocation and also investigate the attributes of each feature.
1. Click the Identify tool.
The Identify window opens.
2. Click the Identify from dropdown list and click<Visible layers>.
3. Click the View menu, click Bookmarks, then click PrinceEdward Island.
1
4
2
4. Click the dot that represents the city of Charlottetown.
Notice that the Identify tool located not only informationabout Charlottetown but also information about theMajor Roads, Coast lines, and Land. The identify resultsinclude all visible layers.

18 USING ARCREADER
Identify window commands
Right-clicking features, layers, or their attributes in theIdentify window opens a context menu with options forworking with the fields for that feature or layer.
1. Right-click a layer or feature. The options in the contextmenu allow you to zoom to features, center features,expand all the fields, collapse the Identify tree, sort thefields, or copy a record.
2. Right-click an item in the Value column. The options inthe context menu allow you to organize the Field values.You can hide or show all the fields, select all the fields,change the order of the fields (inverse selection), orcopy all the fields. If you click Copy, you can then pastethe information into another application, such as a texteditor or a spreadsheet.
3. Click the small dropdown button to the right of theLocation text box to open a menu that will allow you todisplay the location of the city in the units of yourchoice. Click Meters.
4. Close the Identify window.
Feature Attributes
Layer Location
1 2
3
4

QUICK-START TUTORIAL 19
Finding a location
In ArcReader it is easy to find a feature based on a nameor value using the Find tool.
1. Click the Find tool.
The Find dialog box appears.
2. In the Find text box, type “Lourdes”.
3. Click the In layers dropdown arrow and click<All layers>.
4. Click Find. ArcReader locates the city called Lourdesand shows it as a row in the Results section of thewindow.
1
Once you’ve found a place, you can use the Find dialog boxto navigate to or learn more about the feature.
5. In the Find dialog box, right-click Lourdes and clickZoom to feature(s). ArcReader zooms to the city ofLourdes.
6. Make sure the Find dialog box does not cover the city ofLourdes. In the Find dialog box, right-click Lourdes andchoose Flash feature. Lourdes will flash.
7. Right-click Lourdes and click Identify feature(s). TheIdentify Features on the Map dialog box, which containsall the attribute information for the city of Lourdes,appears.
3 4275 65 Results section of Find
dialog box
8. Close the Identify Features on the Map dialog box andthe Find dialog box.

20 USING ARCREADER
Using hyperlinks
Maps viewed with ArcReader may have hyperlinks toprovide additional information about certain features. TheGulf of St. Lawrence map contains hyperlinks in the Linksto Web Sites layer. Hyperlinks are only available in Dataview, and you will need an Internet connection to use thistool. Click the View menu, point to Bookmarks, click PrinceEdward Island, then continue with the exercise.
1. Check the Links to Web Sites layer in the table ofcontents. You should see a blue question mark appear onthe screen. If the question mark does not appear, zoomout until it becomes visible.
2. On the Data toolbar click the Hyperlink tool to activateit. Notice that a blue dot appears over the questionmark. This blue dot indicates hyperlinked features. TheLinks to Web Sites layer is the only layer with hyperlinksin this map.
3. Point the Hyperlink tool at the center of the blue dothyperlink. The cursor changes to a pointing hand. Clickto open your default Internet browser. The official Website of the Government of Prince Edward Island,Canada, where you can learn more about PrinceEdward Island, displays.
2 3
QUICK-START TUTORIAL 21
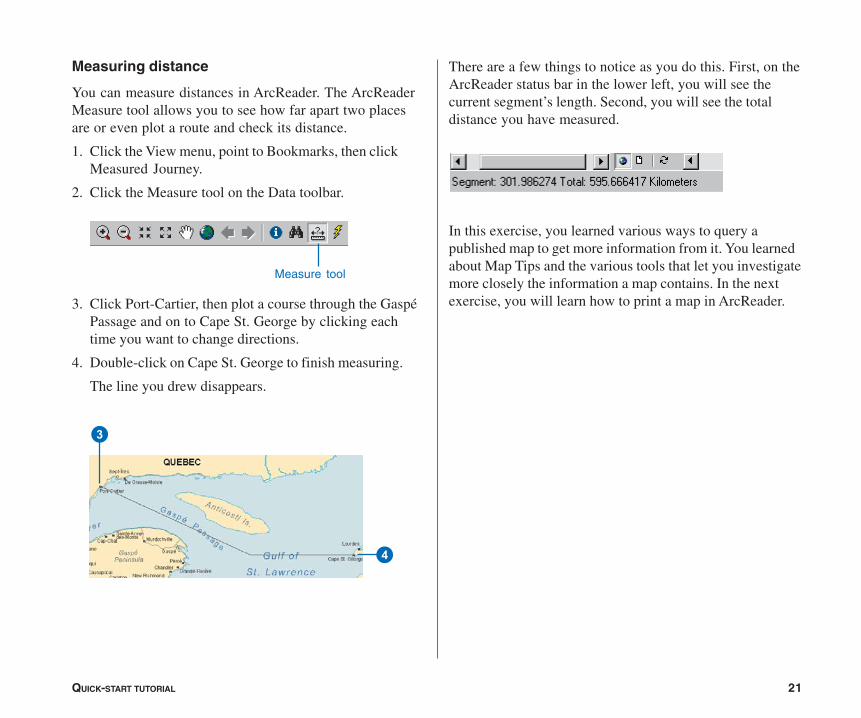
Measuring distance
You can measure distances in ArcReader. The ArcReaderMeasure tool allows you to see how far apart two placesare or even plot a route and check its distance.
1. Click the View menu, point to Bookmarks, then clickMeasured Journey.
2. Click the Measure tool on the Data toolbar.
3. Click Port-Cartier, then plot a course through the GaspéPassage and on to Cape St. George by clicking eachtime you want to change directions.
4. Double-click on Cape St. George to finish measuring.
The line you drew disappears.
There are a few things to notice as you do this. First, on theArcReader status bar in the lower left, you will see thecurrent segment’s length. Second, you will see the totaldistance you have measured.
In this exercise, you learned various ways to query apublished map to get more information from it. You learnedabout Map Tips and the various tools that let you investigatemore closely the information a map contains. In the nextexercise, you will learn how to print a map in ArcReader.
Measure tool
4
3
22 USING ARCREADER
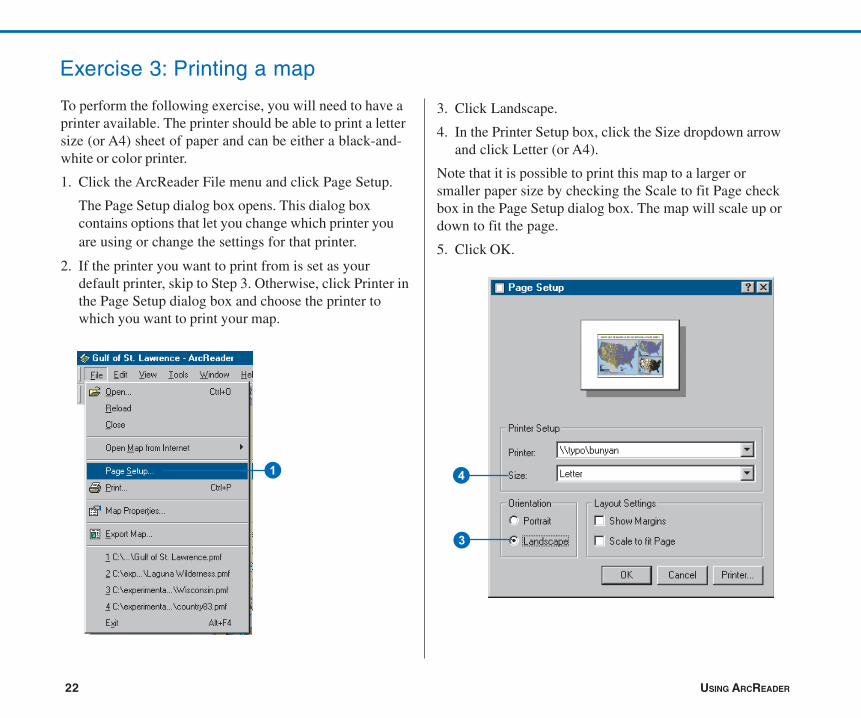
To perform the following exercise, you will need to have aprinter available. The printer should be able to print a lettersize (or A4) sheet of paper and can be either a black-and-white or color printer.
1. Click the ArcReader File menu and click Page Setup.
The Page Setup dialog box opens. This dialog boxcontains options that let you change which printer youare using or change the settings for that printer.
2. If the printer you want to print from is set as yourdefault printer, skip to Step 3. Otherwise, click Printer inthe Page Setup dialog box and choose the printer towhich you want to print your map.
Exercise 3: Printing a map
3. Click Landscape.
4. In the Printer Setup box, click the Size dropdown arrowand click Letter (or A4).
Note that it is possible to print this map to a larger orsmaller paper size by checking the Scale to fit Page checkbox in the Page Setup dialog box. The map will scale up ordown to fit the page.
5. Click OK.
1
3
4

QUICK-START TUTORIAL 23
Printing a map
1. Click the Layout View button.
It’s important to switch to Layout view because yourprinting results can vary depending on what view you arein. Printing in Data view will print the currently displayeddata frame at the current extent to the selected paper size.The printed data will be scaled to fit the page size selectedin Page Setup. When printing from Layout view, however,the entire published page is printed.
2. Click the File menu and click Print.
In Layout view the original page sizeis displayed on the status bar.
3. Click OK.
In this tutorial you have been introduced to viewing,querying, and printing published maps with ArcReader. Thenext chapter provides more detail about these tasks as wellas information about published maps and their uses inArcReader.
3
