tutorial - liris
TRANSCRIPT

Endex – Tutorial – G. Gesquière / G. Subsol - 12/09/2011 1 / 9
Tutorial http://www.lsis.org/endex/ G. Gesquière / G. Subsol
December, 14 2011
1. Endocast segmentation from a 3D mesh 1.1 Data Download the 3D model of the skull and mandible of the type specimen of Pan paniscus in STL format (RG9338-skull.stl) which is freely available at: http://www.metafro.be/primates/downloads
More information is given in (Balzeau et al. 2009). 1.2 Extra software
For format conversion, preprocessing (see section 1.3) and visualization, you can use the MeshLab software which is freely available at: http://meshlab.sourceforge.net/
For visualization, in particular with transparency functions, you can use the Paraview software
which is freely available at: http://www.paraview.org/ 1.3 Preprocessing The preprocessing step consists in:
Centering (i.e. the center of the 3D mesh is set at the location (0,0,0)) the 3D mesh in order to make the initial positioning of the deformable sphere easy;
Converting the 3D mesh in a format which is readable by Endex.
Run MeshLab File/Import Mesh <RG9338-skull.stl>

Endex – Tutorial – G. Gesquière / G. Subsol - 12/09/2011 2 / 9
Filters/Normal, Curvatures and Orientation/Transform: Move, Translate, Center Tick “translate center of bbox to the origin” Tick “Freeze Matrix”
Click on “Apply” and the mesh disappears from the screen as it is translated outside the field of view.
File/Export Mesh As… (e.g. RG9338-skull.center.obj) Select the “obj” format

Endex – Tutorial – G. Gesquière / G. Subsol - 12/09/2011 3 / 9
Tick “None”
1.4 Running the endocast segmentation software
Run Endex File/Open <RG9338-skull.center.obj > Mesh/Conversion/Create a point cloud
File/Export the point cloud (e.g. RG9338-skull.center.pts) Quit
This step is essential to convert the 3D mesh from its initial OBJ format into the required PTS format.

Endex – Tutorial – G. Gesquière / G. Subsol - 12/09/2011 4 / 9
Run Endex File/Open <icosa.smm>
You can see in white the deformable sphere which is located at the coordinates (0,0,0).
File/Import/New Point Cloud <RG9338-skull.center.pts> (warning: it may take 30 seconds) You can see now the points of the 3D mesh in blue.
By dragging (clicking on the left button + moving) the mouse, you can rotate the camera (i.e. the field
of view) around the origin. By clicking on you can zoom and unzoom.

Endex – Tutorial – G. Gesquière / G. Subsol - 12/09/2011 5 / 9 Use the keys W/X C/B B/N to move the sphere in order to position it in the middle of the
endocranial cavity. In this example, you have to push several times the key ‘B’. You can move the camera to assess if the sphere is correctly positioned.
To finish the initialization, click on to enlarge (resp. reduce) the sphere diameter in order that it is around half of the endocranial cavity one.
Endex – Tutorial – G. Gesquière / G. Subsol - 12/09/2011 6 / 9
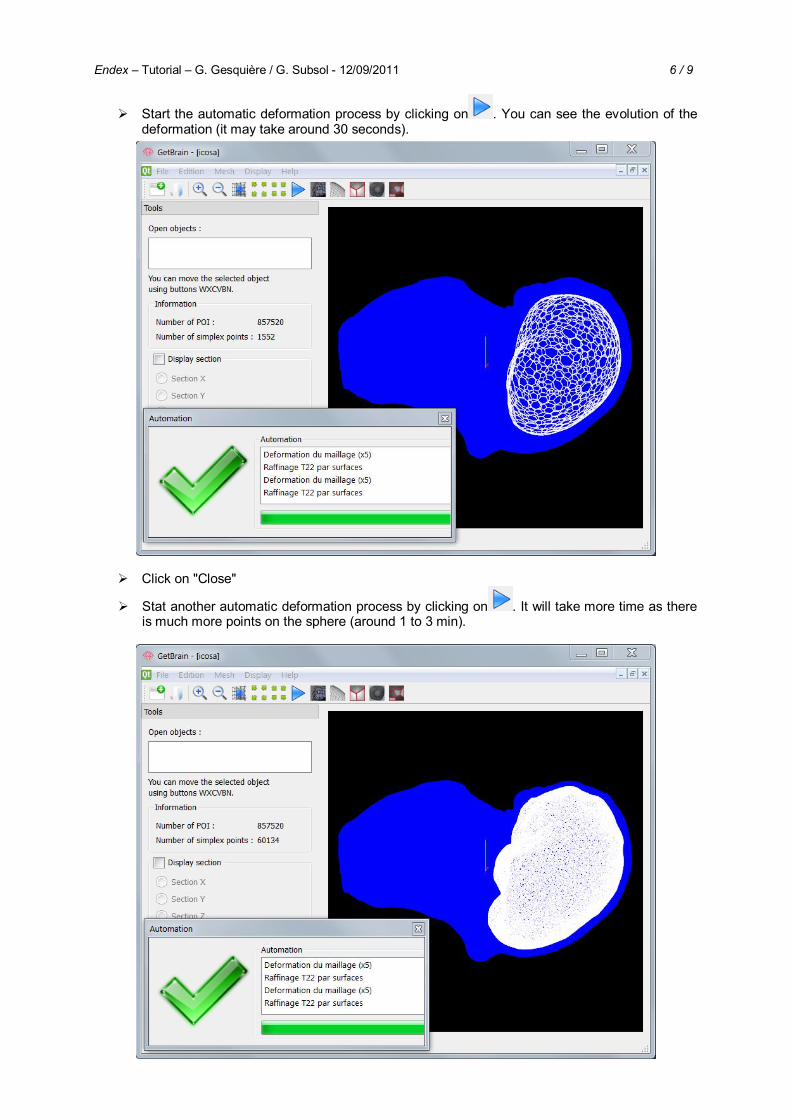
Start the automatic deformation process by clicking on . You can see the evolution of the deformation (it may take around 30 seconds).
Click on "Close"
Stat another automatic deformation process by clicking on . It will take more time as there is much more points on the sphere (around 1 to 3 min).
Endex – Tutorial – G. Gesquière / G. Subsol - 12/09/2011 7 / 9 Click on "Close" File/Export the mesh (e.g. RG9338.endocast.obj) Choose the .obj format (warning: saving the file can take up to 5 min).
Of course, you can launch supplementary automatic deformation steps. But be careful, they will take more and more time. In general 3 steps give accurate results. In our example, with 2 steps, we get a 3D mesh of 90,203 vertices and 180,402 faces.
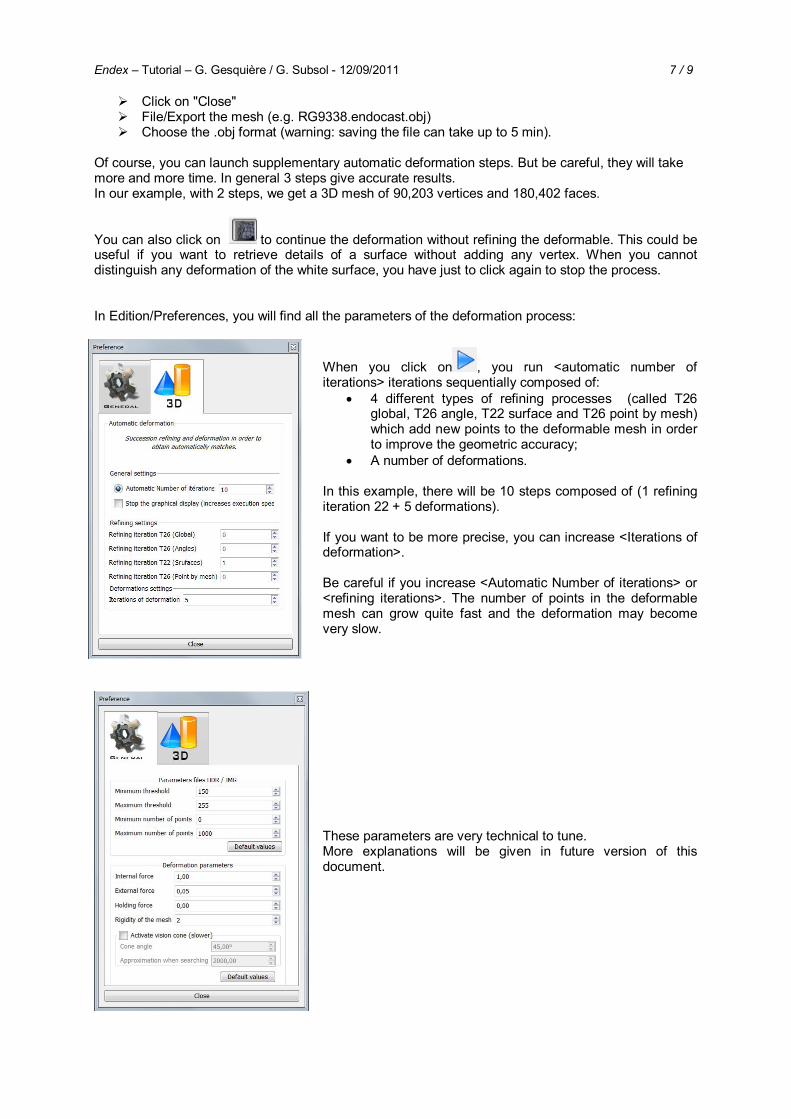
You can also click on to continue the deformation without refining the deformable. This could be useful if you want to retrieve details of a surface without adding any vertex. When you cannot distinguish any deformation of the white surface, you have just to click again to stop the process. In Edition/Preferences, you will find all the parameters of the deformation process:
When you click on , you run <automatic number of iterations> iterations sequentially composed of:
4 different types of refining processes (called T26 global, T26 angle, T22 surface and T26 point by mesh) which add new points to the deformable mesh in order to improve the geometric accuracy;
A number of deformations. In this example, there will be 10 steps composed of (1 refining iteration 22 + 5 deformations). If you want to be more precise, you can increase <Iterations of deformation>. Be careful if you increase <Automatic Number of iterations> or <refining iterations>. The number of points in the deformable mesh can grow quite fast and the deformation may become very slow.
These parameters are very technical to tune. More explanations will be given in future version of this document.

Endex – Tutorial – G. Gesquière / G. Subsol - 12/09/2011 8 / 9 1.5 Visualizing the results
Run MeshLab File/Import Mesh <RG9338.endocast.obj>
Run Paraview File/Open < RG9338.endocast.obj> File/Open <RG9338-skull.center.obj> By clicking the corresponding name in the “Pipeline Browser” windows, you can select the Display features in the “Object Inspector” window. By tuning the opacity of the skull to 0.5, you see the endocast by transparency.

Endex – Tutorial – G. Gesquière / G. Subsol - 12/09/2011 9 / 9 You may compare the result with the endocast presented in Figure 1.d of (Balzeau and Gilissen, 2010).
Endocast segmented by Endex / Endocast presented in (Balzeau and Gilissen, 2010) (Figure 1.d)
3. Bibliography (Balzeau and Gilissen, 2010) Balzeau, Antoine, Emmanuel Gilissen, Wim Wendelen, and Walter Coudyzer. 2009. “Internal cranial anatomy of the type specimen of Pan paniscus and available data for study.” Journal of Human Evolution 56 (2) (February): 205-208. doi:16/j.jhevol.2008.07.013.