tutorial exercises: tntsim3d free for windows
TRANSCRIPT

page 1
Tutorial
UsingTNTsim3D FREETM
for Windows
TNTsi
m3D
FREE

page 2
Before Getting Started
It may be difficult to identify the important points in some illustrations without acolor copy of this booklet. You can print or read this booklet in color fromMicroImages’ Web site. The Web site is also your source for the newest GettingStarted booklets on other topics. You can download an installation guide, sampledata, and the latest version of TNTlite.
http://www.microimages.com
TNTsim3D FREE is a free, standalone version of TNTsim3D™ for Windows. Itprovides you with the ultimate way to explore your geospatial data: real-time,interactive, 3D viewing. Use your joystick, keyboard, or mouse to move over andaround a simulated 3D landscape and view georeferenced spatial data from anyvantage point. TNTsim3D FREE uses files prepared with the Landscape Builderprocess in TNTmips®. Each landscape file contains a texture raster object pre-cisely matched to a terrain raster; the texture raster layer can include any visualcombination of geospatial data.
Prerequisite Skills TNTsim3D FREE is easy to use even if you have no previousexperience with geospatial analysis software. If you have used a flight simulatorsoftware program and have a joystick, you are already familiar with moving througha simulated 3D scene. But even those without a joystick can use the keyboard toeasily control movement, speed, and attitude.
Sample Data The exercises presented in this booklet use sample data distributedwith the TNT products. If you do not have access to a TNT products CD, youcan download the data from MicroImages’ web site. In particular, this bookletuses sample files BIGPINE.SIM and CRATERLK.SIM in the SIMDATA directory on theTNT V6.6 products CD. You can also use any of the other landscape files on theCD (or on MicroImages web site) with TNTsim3D FREE.
More Documentation This booklet is intended only as an introduction to thefeatures of TNTsim3D FREE. A companion Tutorial Exercises booklet coveringthe Landscape Builder in TNTmips is in preparation.
TNTmips and TNTlite® TNTmips comes in two versions: the professional ver-sion and the free TNTlite version. If you did not purchase the professionalversion (which requires a software license key), TNTmips operates in TNTlitemode, which limits object size and enables data sharing only with other copies ofTNTlite. TNTsim3D FREE is a standalone program that operates independentlyof TNTmips or TNTlite; it does not require a TNTmips software license key.
Randall B. Smith, Ph.D.,22 January 2002©MicroImages, Inc., 2002

page 3
� Download TNTsim3DFREE to a temporarydirectory on yourcomputer hard drive
� choose Run from theWindows Start menu
� click [Browse] in theRun window andnavigate to thetemporary directory
� select the file “SetupTNTsim3DFree.exe” andpress [OK]
� follow the instructions inthe InstallShield wizardto complete theinstallation
� download (or copy fromthe SIMDATA folder on theTNT V6.6 products CD)files BIGPINE.SIM andCRATERLK.SIM
Welcome to TNTsim3D FREEMost geospatial data that you work with is a selec-tive representation of a complex three-dimensionallandscape, but flat maps and images frequently con-vey little sense of the vertical dimension. Contoursand relief shading can be included with the map datafor this purpose, but the ideal way to visualize thetrue shape of your geospatial data is to combine thedata with an elevation model and “fly” over andaround a 3D scene, examining features from any van-tage point in real time.
TNTsim3D Free provides this capability. It allowsyou to move over 3D terrains using joystick, key-board, or mouse controls. You can control all aspectsof the viewer orientation (attitude), height abovethe surface, and speed. Special visual effects arealso available, such as automatic texture smoothingand atmospheric effects (fog / haze).
You create the data for the simulator using the Land-scape Builder process in TNTmips, which creates aterrain raster object and a texture raster object thatare specially optimized for real-time interactive 3Drendering. Both of these objects are stored togetherin a landscape file, a specialized type of TNT ProjectFile with the file extension *.sim.
TNTsim3D FREE is similar in many respects to flightsimulator software products. It uses similar 3D ren-dering principles and techniques and provides thesame real-time 3D movement. But the purpose offlight simulator software is to mimic the experienceof flight, including different weather conditions andthe flight characteristics of different types of air-craft; the background landscape is secondary. Thepurpose of TNTsim3D FREE, on the other hand, isto allow you to view your geospatial data as a land-scape. Its emphasis is on allowing you to movearound and over the simulated landscape in real timewhile maintaining the quality of the landscape ren-dering.
The exercises on pages 4-5cover hardware andsoftware requirements,launching TNTsim3D FREE,and loading data. Defaultkeyboard motion controlsand instructions forconfiguring other inputdevices are found on pages6-10. Pages 11-12 coverother input options and howto adjust the tradeoffbetween terrain quality andframe rate. Texturesmoothing, fog, and otherspecial effects arediscussed on pages 13-15.

page 4
Launching TNTsim3D FREE
STEPS� launch TNTsim3D FREE� if a Select Graphics
System window opens,select either DirectX orOpenGL and click [OK]
A shortcut to the program iscreated in the MicroImagesfolder shown in theWindows Start menu. Youcan launch TNTsim3D FREEfrom the Start menu, orcopy this shortcut to theWindows desktop. You canalso double-click on anyTNTsim3D landscape file tolaunch the program andload the data from that file.
Before running TNTsim3D FREE, make sure that ei-ther OpenGL v1.1 or Microsoft DirectX 8.0 (or a laterversion) is installed in your Windows system.OpenGL is a cross-platform program library for 3Drendering and 3D hardware acceleration. Supportfor OpenGL v1.1 is included with Windows98, NT4.0, and later versions of the Windows operation sys-tem. DirectX is a suite of Microsoft multimediaprogram libraries that include Direct3D for 3D ren-dering and hardware acceleration and DirectInputfor configuring motion controls for input devices(such as keyboard and joystick). The TNTsim3Dpage on the MicroImages web site provides links toinstructions on how to find what version of DirectXis installed and how to download and install updates.
If only DirectX or only OpenGL is installed on yourcomputer, TNTsim3D will open directly using thatgraphics system. If both DirectX and OpenGL areinstalled, before TNTsim3D opens you will be pre-sented with a window asking you to select whichgraphics system to use. In principle, DirectX andOpenGL provide similar capability and performancein 3D rendering. Both systems can take advantageof any 3D rendering capabilities built into your dis-play board to accelerate performance, which meanshigher frame rates and smoother movement. How-
ever, some display boards anddrivers may not provide equal sup-port for DirectX and OpenGL, so onemay perform better than the other onyour computer. You will need to ex-periment to determine which systemworks best for you. For best perfor-mance, make sure that you have themost recent Windows-certified driverfor your video display board, andfollow the manufacturer’s instruc-tions to adjust hardware accelerationsettings.
For information on and updates for the 3Dgraphics libraries used by TNTsim3D, go to:
• www.opengl.org• www.microsoft.com/directx

page 5
STEPS� choose Open from the
File menu� navigate to the directory
into which you copiedthe landscape files(*.SIM)
� select BIGPINE.SIM
� choose Wireframe fromthe View menu
� repeat the previous stepto return to solid view
� select Options from theView menu andexamine the Displaypanel, then click [OK]
Loading a Landscape FileTNTsim3D opens by default with a single windowon your desktop. The File and View menus provideaccess to most of the program controls. The Filemenu is used to open a landscape file and to exit theprogram. This menu also shows the last four land-scape files you have used, providing easy loadingof recently-used data.
When you open a landscape file, TNTsim3D readsthe terrain raster in the file and constructs a 3D modelof the terrain surface. The surface model is a mesh ofinterlocking 3D triangles that provides an efficientapproximation of the terrain surface. The textureraster object is then draped over this surface model.To see the surface model alone,choose View / Wireframe; this menuoption acts as a toggle betweensolid and wireframe view modes.The state you have set when youexit the program is used by defaultwhen you next open it.
You can resize the TNTsim3D win-dow by dragging any edge or corner,or use the standard Windows maxi-mize/restore button on the right sideof the window title bar. Keep in mind,though, that increasing the windowsize puts a larger demand on video memory and mayreduce the speed and smoothness of movementthrough the simulation. In some instances your at-tempt to enlarge the window may exceed the amountof available video memory. TNTsim3D in that casereturns to the previous window size and displays anerror message explaining the problem. DirectX ap-pears to be more demanding of videomemory than OpenGL. If both graphicssystems are available on your computer,you can switch between them using theGraphics System menu on the Displaypanel of the Options window.
wireframe view
solid view
You can switch betweenDirectX and OpenGL on thefly using the GraphicsSystem menu on theOptions / Display panel.

page 6
First Flight: Using Keyboard Controls
Default input controlsettings. If DirectX isinstalled there are noNum key assignments.
Although you may already have a joystick or otherflight control device installed on your computer, let’suse the keyboard for your first flight, because a num-ber of actions have been pre-assigned to specifickeys. These default input control settings are shownthe first time that you open the TNTsim3D Controlswindow. You can keep this window open on yourdesktop as a quick reference to the keyboard con-trols while you try them out.
The keyboard controls allow you to move in variousdirections through the scene, control forward andbackward speed, and change your viewing orienta-tion (attitude). The attitude controls use the samemotions that would apply to an aircraft: pitch, roll,and turn. If you are not familiar with these terms,
pitch affects the vertical angle in the direction offlight, roll affects the angle of the wings relativeto the horizontal, and turn affects the heading(the horizontal direction of flight).
The way in which you use a key on the key-board depends upon which control is assignedto it. The general motion controls (Altitude Up/Down, Forward/Backward, Slide Right/Left/Up/Down, Pitch Up/Down, Roll Right/Left, Turn Left/Right) move you at a specified speed (discussedlater) as long as the key is held down. To moveforward without having to continue holding akey down, use the Throttle Up Key, which in-creases your speed by a fixed amount each timeit is pressed. The Throttle Down key slows yourforward speed and, if you slow down to a stop,moves you backward at increasing speed. The
Throttle 0 key stops the motion begun by the otherThrottle keys, while Roll 0 levels the wings of thevirtual plane. The Look Right/Left/Up/Down keysdirect your view in a particular direction as long asthey are held down. The Altitude Lock key acts asan on/off toggle for maintaining the current altitude.
STEPS� choose Show Controls
from the View menu� using the keyboard
motion controls shown,experiment with movingthrough the 3D scene
The normal view direction isstraight ahead in thedirection of flight. Use theLook Right/Left/Up/Downkeys to temporarily look inother directions.

page 7
STEPS� use the left mouse
button to drag thePosition Status baroutside the TNTsim3Dwindow, forming aseparate window
� select Recenter fromthe View menu
� select Restore InitialViewpoint from theView menu
A simulation opens with a default viewer positionabove the upper left corner of the scene, pointingtoward the scene center. As you fly around, infor-mation on your viewing position is shown by defaultin a Position Status bar at the bottom of theTNTsim3D window. This bar shows your horizontal(x y) position (in map coordinates if the simulationobjects are georeferenced), altitude above sea leveland height above the terrain surface (both in meters),and angles in degrees for pitch, roll, and heading.You can use the mouse to drag and redock the Posi-tion Status bar at the other edges ofthe window or move it outside theTNTsim3D window to form a sepa-rate auxillary window. An option onthe View menu also allows you totoggle the Position Status bar on andoff.
In some situations, especially if youare flying relatively fast, you may getdisoriented and lose track of whereyou are and of your attitude. Youmay find yourself pointing up to thesky and not know where the terrain is, or fly rightthrough the terrain surface and end up underneathit. The position status information can help youfigure out where you are. In the latter case, for ex-ample, the Height Above Surface parameter wouldshow a negative value. You could then use the Al-titude Up control to move back above the surface.
If you can’t get yourself reoriented manually, ordon’t want to bother, there are two short cuts avail-able on the View menu. You can use the Recenteroption to maintain your current position but reori-ent the view toward the center of the scene. If that isnot sufficient, you can choose Restore Initial View-point, which jumps the viewer position andorientation back to those of the starting point.
Keeping Track of Where You Are
The Status Bar at thebottom of the TNTsim3Dwindow shows the currentprogram status and alsoacts as a tool tip when youopen a menu, providing adescription for the menuoption you have currentlyhighlighted.
Drag the Position Statusbar to reposition it.

page 8
Find Surface Coordinates with the MouseSTEPS� move the mouse cursor
within the TNTsim3Dwindow
� note how the MousePosition and MouseElevation values in thePosition Status listupdate continuouslyupdate
As we have seen, knowing your viewing position inthe simulation is important. But TNTsim3D enablesyou to view georeferenced spatial data, so you maybe more interested in finding the map coordinatesand surface elevation of particular locations on thelandscape surface. With TNTsim3D you can usethe mouse to determine point coordinates for anyvisible portion of the scene.
When you place the mouse over some point on thescene in the TNTsim3D window, the program projectsa sight line from the viewer position through thescreen position of the cursor and on to the corre-sponding position on the landscape surface. The
horizontal (x y) map coordi-nates of this position arereported as the Mouse Posi-tion item in the Position Statuslist. (If the landscape objectsare not georeferenced, the lineand column numbers of thecorresponding terrain rastercell are shown.) The MouseElevation entry shows the cor-responding surface elevation,which is interpolated from theclosest terrain raster cells alongthe sight line. These coordi-
nate readouts are updated continuously as youmove the mouse cursor over the scene. Deter-mining the positions of any number of scenelocations is quick and easy.

page 9
STEPS� from the View menu
select Options� click on the Input tab� if you have a Configure
DirectInput button at thebottom of the panel,press it
� click on the Keyboardtab and edit thekeyboard controls if youwish
� click [OK] on theDirectInput window andthe Options window
TNTsim3D uses the DirectInput software compo-nent of DirectX to allow you to configure the flightcontrols for your keyboard or other input device.You can reconfigure the controls while operatingthe simulator in either DirectX or OpenGL, butDirectX must be installed on your system in orderfor you to do so. (OpenGL does not provide aninput configuration utility.) If you do not haveDirectX installed, there will be no DirectInput pushbutton on the Options window Input panel, and youwill be limited to using the default keyboard con-trols. If so, this would be a good time to downloadand install the latest version of DirectX fromMicrosoft (see page 4).
The DirectInput window has a tabbed panelfor a joystick or other game controller (ifone is installed in your system), the key-board, and the mouse. The right side ofthe keyboard panel lists the keys and thecurrently assigned action for each. Tochange the assignment for a key, click onits entry in the list or press the key on thekeyboard. Either action highlights the con-trol entry and shows a scrolling list ofavailable actionsin the lower leftportion of thepanel. To activatethe action list,press Enter (ordouble-click onthe control entry)and select a newaction from thescrolled list.
Configuring Input Controls
DirectInput control window

page 10
Configuring a JoystickSTEPSIf you have a joystick orother game controller, makesure that it is:� plugged into your
computer� set up and calibrated in
Microsoft Windows
Then proceed to� press the Configure
DirectInput button on theOptions window Inputpanel
� select the tabbed panelfor your controller
� configure the stick(axis) controls and thebutton controls
� close the DirectInputand Options windows
� practice moving with thejoystick, supplementedby keyboard controls asneeded
A joystick, yoke, or similar game controller givesyou more realisitic, intuitive control over your move-ments in TNTsim3D. The lowest-cost joysticks haveonly two rotation axes, so you must change roll andpitch (bank the plane) to make turns. Higher-priced(but still inexpensive) joysticks allow the stick totwist, providing three axes of rotation and indepen-dent control of turn, roll, and pitch. They also havea separate throttle control that can be operated withyour other hand, as well as a number of buttons thatcan control other motions.
You can also use the mouse as a motion control, butonly in a very limited way. The mouse is better usedto interact with the data in the TNTsim3D window,as described later.
TNTsim3D allows simultaneous use of different in-put devices. So even if you have a joystick, youmay still want to use the keyboard to control someactions. For example, if your joystick does not havea throttle control, you can use the throttle up, throttledown, and throttle 0 controls on the keyboard tocontrol your speed.
Sample actionassignments that Ihave set for the 3-axis joystick I useat MicroImages. Imove the stickforward or back tochange pitch, sideto side to roll, andtwist it to turn.

page 11
Setting Other Input OptionsSTEPS� from the View menu
select Options� click on the Input tab� change the value in the
Speed Forward /Backward field to 500
� turn on the MinimumHeight check box andchange the height valueto 400
� click [OK] on the Optionswindow
� use any controls tomove closer to theterrain surface until youreach the minimumheight you have set
The Input panel on the Options window also pro-vides other settings that affect your movementthrough the simulation. In the upper left part of thepanel are three linear speed settings: Up / Down,Left / Right, and Forward / Backward. All are ini-tially set to the same velocity (in meters per second),which is based on the areal dimensions of the land-scape. The default speed is computed to traversethe maximum extent (height or width) of your land-scape in 120 seconds. Each of these linear speedvalues sets the speed used by the associated mo-tion control. When you use the throttle controls toincrement speed, the Speed Forward / Backwardvalue sets an upper velocity limit. You can changeany of these linear speeds to move more quickly.But keep in mind that at faster speeds thescene changes rapidly, forcing TNTsim3Dto read more data more quickly, and theimage information held in memory must beupdated more frequently. Your movementsmay become less smooth, and you may seemore transient rendering artifacts.
Flight following the ups and downsof terrain at minimum height of 400 m.
The settings in the upper right part of thepanel control the angular speeds (in de-grees per second) for pitch, roll, and turn.The default values are independent of thelandscape characteristics, and anychanges you make are retained foruse in later sessions. You can alsoset both minimum and maximumheight values, which are also re-tained until reset. Setting a minimumheight prevents you from flyingthrough and then under the terrainsurface. If you set the same valuefor minimum and maximum height,you can maintain a constant heightabove the surface while flying in anydirection.

page 12
Terrain Quality and Frame RateSTEPS� turn on the Wireframe
view mode (View /Wireframe)
� select Options from theView menu
� click on the Terrain tab� increase the Quality
setting to 90 and click[OK], and note theincreased detail in thewireframe
� reset the Qualitypercentage to 75
To improve both quality and frame rate, try the following:� shut down other programs to free computer resources for TNTsim3D� make the TNTsim3D window smaller� make sure your graphics card’s 3D acceleration options are turned on� get a graphics card with faster 3D acceleration and more video memory� get more random access memory (RAM) for your computer
A new terrain model is builtfor each frame using onlythe visible part of theterrain. The level of terraindetail varies spatially ineach frame. More detail is shown(by smaller terrain triangles) in theforeground and in areas ofgreater local relief. As you movethrough the simulation, the amountof detail for a particular area maychange, but height values areautomatically adjusted to producegradual rather than abrupt visualchanges in local detail.
You can also set a VerticalExaggeration scaling factorfor the terrain model to varythe vertical scale.
As you use TNTsim3D, you will likely want to movethrough each landscape smoothly and realisticallyand at the same time see the maximum possible scenedetail. But achieving these twin goals may exceedthe resources available on your computer, so youmay need to choose which of them is more impor-tant to you for a particular simulation session.
You can make that choice in TNTsim3D by using thesettings on the Options window’s Terrain panel,where a pair of radio buttons allow you to give pref-erence to either quality or frame rate. Quality refersto the amount of detail in the surface model createdfrom the terrain raster in the landscape file. Qualityis expressed numerically as a percentage; setting ahigher percentage produces a surface model thatshows more of the detail in the terrain raster. Framerate is the number of times the scene is redrawn eachsecond. A higher frame rate produces smoother,more natural movement through the landscape.
If you choose the Quality preference, TNTsim3D usesavailable resources to maintain your target terrainquality and reduces the frame rate if necessary. Ifyou choose the Frame Rate preference, the programinstead attempts to maintain your target frame rate
and lets the terrain qual-ity vary as needed. Theeffects of these selec-tions depend greatly onthe hardware capabili-ties of your computer;they are more significantfor newer, faster com-puters and graphicscards.

page 13
Texture SmoothingSTEPS� turn off the Wireframe
view mode (View /Wireframe)
� select Options from theView menu and click onthe Effects tab
� left-click on theBackground Color colorsample button
� use the resulting Colorwindow to select a lightblue background colorand click [OK]
� if the Smooth Texturecheckbox on the Effectspanel is active (notdimmed), turn it on
� click OK on the Optionswindow
unsmoothed smoothed
TNTsim3D window with newbackground color and DirectX texturesmoothing enabled. Magnified viewsof boxed area are shown above withand without texture smoothing.
The Effects panel of the Options window lets youcontrol a number of visual effects for your simula-tions, including background color, fog, and texturesmoothing. The Background Color control allowsyou to pick the background color from a standardpalette or define one or more custom colors for useas backgrounds.
The Smooth Texture option is available only whenyou are using DirectX as the graphics renderingsystem for TNTsim3D. Smoothing has two majoradvantages: it reduces the blocky appearance of fore-ground texture cells viewed at close range, and itreduces “sparkle” in the more distant portions ofthe moving image. If you have a modern graphicsboard with 3D acceleration, the smoothing is per-formed by the graphicshardware itself, so there isminimal impact on framerate. (If your board doesnot support hardwaresmoothing, the DirectXsoftware performs thesmoothing, though moreslowly).
page 14
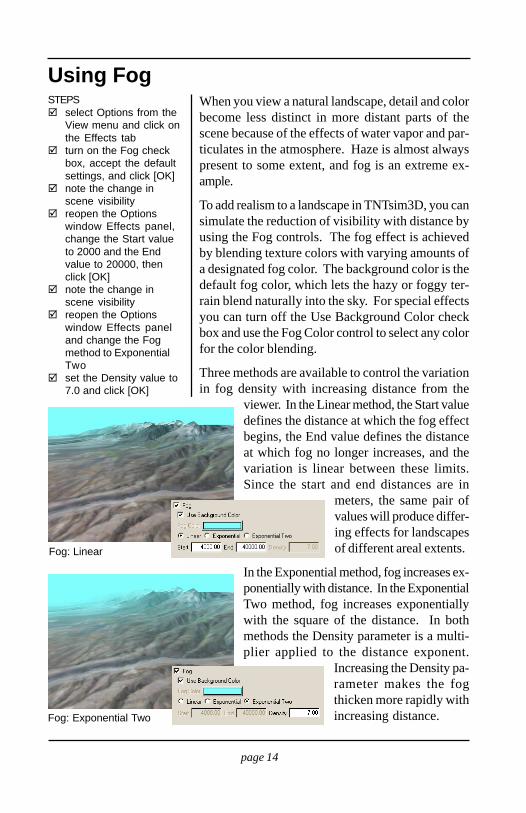
Using FogSTEPS� select Options from the
View menu and click onthe Effects tab
� turn on the Fog checkbox, accept the defaultsettings, and click [OK]
� note the change inscene visibility
� reopen the Optionswindow Effects panel,change the Start valueto 2000 and the Endvalue to 20000, thenclick [OK]
� note the change inscene visibility
� reopen the Optionswindow Effects paneland change the Fogmethod to ExponentialTwo
� set the Density value to7.0 and click [OK]
When you view a natural landscape, detail and colorbecome less distinct in more distant parts of thescene because of the effects of water vapor and par-ticulates in the atmosphere. Haze is almost alwayspresent to some extent, and fog is an extreme ex-ample.
To add realism to a landscape in TNTsim3D, you cansimulate the reduction of visibility with distance byusing the Fog controls. The fog effect is achievedby blending texture colors with varying amounts ofa designated fog color. The background color is thedefault fog color, which lets the hazy or foggy ter-rain blend naturally into the sky. For special effectsyou can turn off the Use Background Color checkbox and use the Fog Color control to select any colorfor the color blending.
Three methods are available to control the variationin fog density with increasing distance from the
viewer. In the Linear method, the Start valuedefines the distance at which the fog effectbegins, the End value defines the distanceat which fog no longer increases, and thevariation is linear between these limits.Since the start and end distances are in
meters, the same pair ofvalues will produce differ-ing effects for landscapesof different areal extents.
In the Exponential method, fog increases ex-ponentially with distance. In the ExponentialTwo method, fog increases exponentiallywith the square of the distance. In bothmethods the Density parameter is a multi-plier applied to the distance exponent.
Increasing the Density pa-rameter makes the fogthicken more rapidly withincreasing distance.
Fog: Linear
Fog: Exponential Two

page 15
STEPS� reopen the Options
window Effects panel,turn off the Fog checkbox, then click [OK]
� choose Open from theFile menu
� navigate to the directoryinto which you copiedthe landscape files(*.SIM) from theTNTproducts 6.6 CD
� select CRATERLK.SIM
� choose Options fromthe View menu and clickon the Extras tab
� turn on the ShowCompass checkbox
� notice how thecompass rotates as youmove through thelandscape
Using the Compass GraphicThe Extras panel on the Options window lets youturn on a rotating compass graphic that is shown inthe lower right corner of the simulation window. Thecompass graphic can help you keep track of yourdirection of view in three dimensions.
The graphic consists of a central sphere, arrows thatpoint in the four cardinal directions (north, east,south, and west), and arrows for the four intermedi-ate directions (northwest and so on). The northarrow, other cardinal arrows, and intermediate arrowsare shown in separate colors. (Color controls letyou change the arrow colors if you wish.) If thelandscape objects are georeferenced, the north ar-row points in the north direction; otherwise it pointsparallel to the column direction in the rasters.
The compass points are drawn to lie in the horizon-tal plane, so the compass image provides a visualcue to your attitude relative to thehorizontal. This attitude informationis enhanced by shading effects onthe points and central sphere, whichare illuminated from above.
Enter a new Size value to changethe size of the compass graphic.

page 16
Advanced Software for Geospatial Analysis
M icro Im a g es, In c .11th Floor - Sharp Tower206 South 13th StreetLincoln, Nebraska 68508-2010 USA
Voice: (402) 477-9554 email: [email protected]: (402) 477-9559 internet: www.microimages.com
MicroImages, Inc. publishes a complete line of professional software for advanced geospatialdata visualization, analysis, and publishing. Contact us or visit our web site for detailed prod-uct information.
TNTmips TNTmips is a professional system for fully integrated GIS, image analysis, CAD,TIN, desktop cartography, and geospatial database management.
TNTedit TNTedit provides interactive tools to create, georeference, and edit vector, image,CAD, TIN, and relational database project materials in a wide variety of formats.
TNTview TNTview has the same powerful display features as TNTmips and is perfect forthose who do not need the technical processing and preparation features of TNTmips.
TNTatlas TNTatlas lets you publish and distribute your spatial project materials on CD-ROM at low cost. TNTatlas CDs can be used on any popular computing platform.
TNTserver TNTserver lets you publish TNTatlases on the Internet or on your intranet.Navigate through geodata atlases with your web browser and the TNTclient Java applet.
TNTlite TNTlite is a free version of TNTmips for students and professionals with smallprojects. You can download TNTlite from MicroImages’ web site, or you can orderTNTlite on CD-ROM.
Indexbackground color................................13,14compass graphic.....................................15Direct3D......................................................4DirectInput..........................................4,9,10DirectX..................................................4,5,9File menu..................................................5fog.............................................................14frame rate............................................7,12input controls, configuring...................9,10input controls, viewing..............................6keyboard controls.....................................6mouse coordinates....................................8OpenGL..................................................4,5,9
Options windowDisplay panel......................................5Effects panel...............................13,14Extras panel.....................................15Input panel....................................9-11Terrain panel....................................12
position status.......................................7,8recenter.........................................................7restore initial viewpoint............................7speed settings..........................................11terrain......................................................3terrain quality.........................................12texture......................................................3texture smoothing....................................3wireframe mode.......................................5
TNTsi
m3D
FREE