tutorial d’installation de
TRANSCRIPT
DOHONE
https://www.my-dohone.com Tél. : +(237) 243 265 918
email : [email protected]
1
DHN
Date of last modification :
22/05/2021
INSTALLATION TUTORIAL FOR
THE ONLINE PAYMENT API
DOHONE
https://www.my-dohone.com Tél. : +(237) 243 265 918
email : [email protected]
2
Summary
I. Introduction .......................................................................................................................................... 3
I.1 Company Overview ...................................................................................................................... 3
I.2 Context of the document ............................................................................................................. 3
II. Pre-requisites ........................................................................................................................................ 3
II.1 Technical Competences ............................................................................................................... 3
II.2 The Merchant Code ..................................................................................................................... 3
III. Installation ............................................................................................................................................ 4
III.1 Phase 1 : intégration .................................................................................................................... 4
III.1.1 Basic integration ........................................................................................ Erreur ! Signet non défini.
III.1.2 Integration in the CMS WordPress ........................................................................................................... 7
III.1.3 Integration in CMS Joomla .......................................................................................................................... 8
III.1.4 Integration in CMS PrestaShop............................................................................................................... 10
III.2 Phase 2 : response and outcome ............................................................................................... 12
III.2.1 Step 1: Verification of the origin and integrity of the request ................................................... 13
III.2.2 Step 2 ............................................................................................................. Erreur ! Signet non défini.
III.2.3 Step 3 ................................................................................................................................................................ 15
III.2.4 Step 4 ................................................................................................................................................................ 15
III.2.5 Step 5 ................................................................................................................................................................ 15

DOHONE
https://www.my-dohone.com Tél. : +(237) 243 265 918
email : [email protected]
3
I. Introduction
I.1 Company Overview
DOHONE (INNOV FOR YOU) is a Cameroonian company that has specialized since 2015 in highly
secure e-commerce solutions, helping its customers to implement innovative processes at the heart of
their business, as well as in the integration of next-generation solutions.
I.2 Context of the document
This document is a DOHONE online payment api installation manual, on your online sales site. This
module will allow your customers to pay for your items or services directly online.
II. Pre-requisites
II.1 Technical Competences
The installation of this module is simple, but nevertheless requires technical skills in the development
of sites or web applications.
II.2 The Merchant Code
Before you begin the installation, rest assured that you have already created an account on
DOHONE. And to have already received by mail your merchant code. This unique identifier
code is obtained following your request, and will be used later in this tutorial.
If you do not yet have a merchant code, write a simple email addressed to [email protected]. In
this mail, you simply ask that you want to have a merchant code, linked to your account, and specify
the phone number of your account. You will receive it later in the hours or minutes that follow.
Attention, to receive your merchant code, you will have to have completed the administrative
formalities :
Contract signature
Deposit of a trade register for your company, necessary for operators and financial
administrations, in the fight against money laundering and web-crime.
DOHONE
https://www.my-dohone.com Tél. : +(237) 243 265 918
email : [email protected]
4
III. Installation
III.1 Phase 1 : intégration
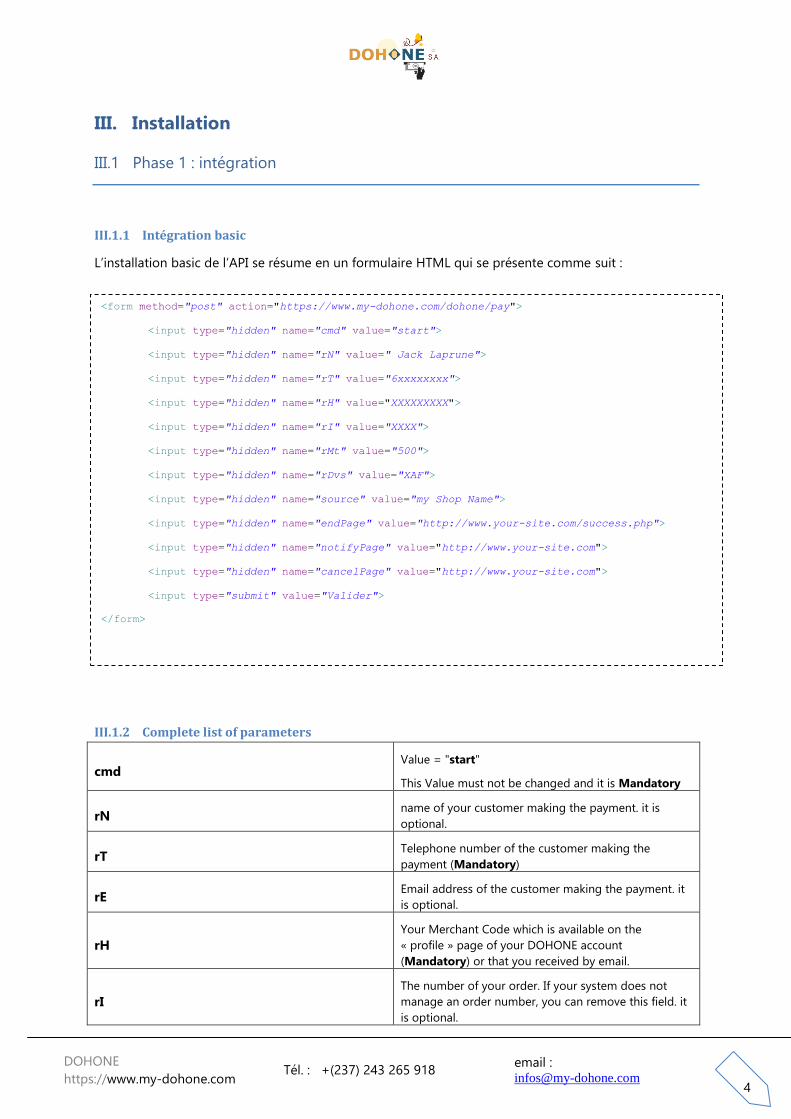
III.1.1 Intégration basic
L’installation basic de l’API se résume en un formulaire HTML qui se présente comme suit :
III.1.2 Complete list of parameters
cmd Value = "start"
This Value must not be changed and it is Mandatory
rN name of your customer making the payment. it is
optional.
rT Telephone number of the customer making the
payment (Mandatory)
rE Email address of the customer making the payment. it
is optional.
rH
Your Merchant Code which is available on the
« profile » page of your DOHONE account
(Mandatory) or that you received by email.
rI
The number of your order. If your system does not
manage an order number, you can remove this field. it
is optional.
<form method="post" action="https://www.my-dohone.com/dohone/pay">
<input type="hidden" name="cmd" value="start">
<input type="hidden" name="rN" value=" Jack Laprune">
<input type="hidden" name="rT" value="6xxxxxxxx">
<input type="hidden" name="rH" value="XXXXXXXXX">
<input type="hidden" name="rI" value="XXXX">
<input type="hidden" name="rMt" value="500">
<input type="hidden" name="rDvs" value="XAF">
<input type="hidden" name="source" value="my Shop Name">
<input type="hidden" name="endPage" value="http://www.your-site.com/success.php">
<input type="hidden" name="notifyPage" value="http://www.your-site.com">
<input type="hidden" name="cancelPage" value="http://www.your-site.com">
<input type="submit" value="Valider">
</form>

DOHONE
https://www.my-dohone.com Tél. : +(237) 243 265 918
email : [email protected]
5
rMt
TOTAL amount of purchases (Mandatory). This is the
amount that will need to be paid by your customer. By
default, the currency of this amount is the euro, Unless
you specify another currency under the 'rDvs'
parameter below.
rDvs
The currency corresponding to the amount you
specified. This parameter is optional. In case you do
not specify this parameter, the currency is EUR. You
have the choice between 3 currencies only: EUR, XAF,
USD
rOnly
This is optional. If you want your API to only display
certain operators, you can specify those operators
here. 1 = MTN, 2 = Orange, 3 = Express Union, 5 =
Visa via UBA, 10 = Dohone, 14 = Visa via Wari, 15 =
Wari card, 16 = VISA / MASTERCARD, 17 = YUP.
You can specify more than one, separated by a comma.
Example: 1, 2, 3, 17
In the event that you choose just one operator, the
customer's payment telephone must be the telephone
provided under the "rT" parameter.
rLocale the choice of language. fr or en
source The commercial name of your site (Mandatory)
endPage Redirection address in case of SUCCESS payment
(Mandatory)
notifyPage Automatic notification address of your site in case of
successful payment (optional)
cancelPage Redirection address in case of cancellation of payment
by the customer (Mandatory)
logo
a url address leading to the logo of your site if you
want to see this logo appear during payment
(Optional)
motif
the pattern is optional. If specified, it will be recorded
in your DOHONE history (Excel version). This can be
important for your accounting.
numberNotifs
Number of times / attempts to notify your server by
DOHONE, to your notifyPage. Default = 1. Max = 5.
DOHONE will notify your server this number of times,
for each transaction. This parameter is optional.
rUserId
In critical payers' security environments against Web-
Crime, or in environments where you continually
contact DOHONE via the same http session (for any
client combined), This setting allows DOHONE to
better manage your clients. You provide the ID of your
customer's account in your system. This parameter is
optional.
DOHONE
https://www.my-dohone.com Tél. : +(237) 243 265 918
email : [email protected]
6
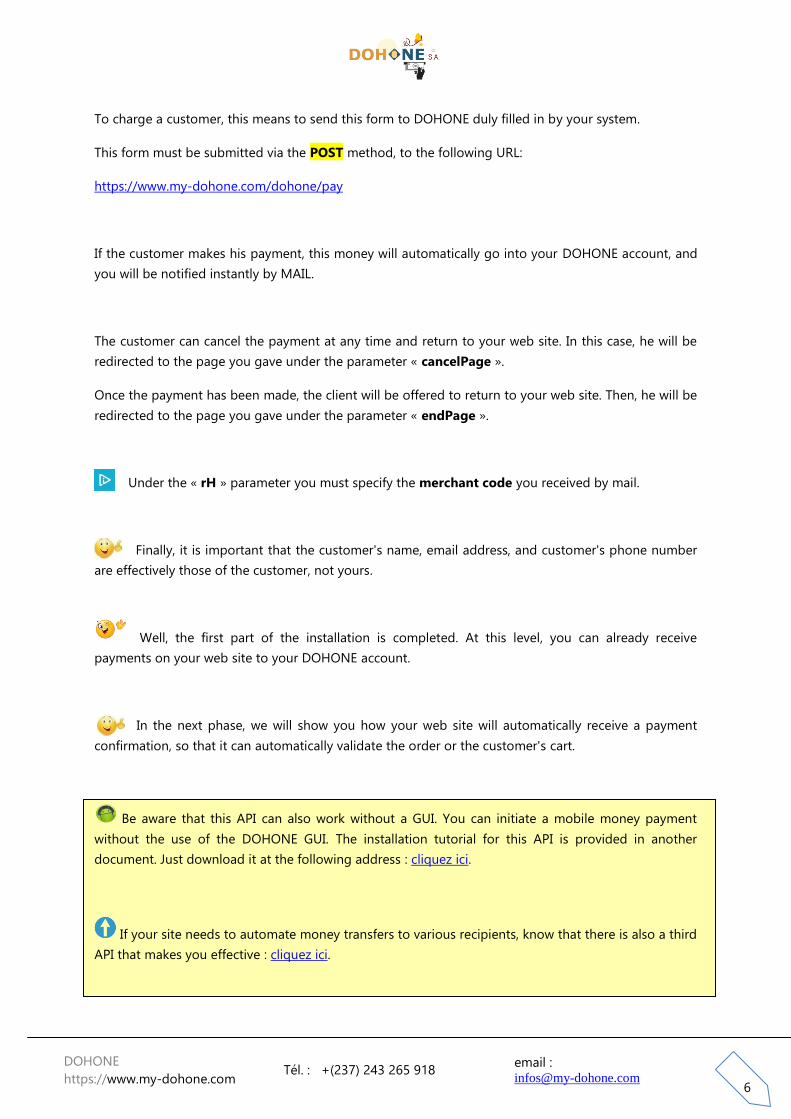
To charge a customer, this means to send this form to DOHONE duly filled in by your system.
This form must be submitted via the POST method, to the following URL:
https://www.my-dohone.com/dohone/pay
If the customer makes his payment, this money will automatically go into your DOHONE account, and
you will be notified instantly by MAIL.
The customer can cancel the payment at any time and return to your web site. In this case, he will be
redirected to the page you gave under the parameter « cancelPage ».
Once the payment has been made, the client will be offered to return to your web site. Then, he will be
redirected to the page you gave under the parameter « endPage ».
Under the « rH » parameter you must specify the merchant code you received by mail.
Finally, it is important that the customer's name, email address, and customer's phone number
are effectively those of the customer, not yours.
Well, the first part of the installation is completed. At this level, you can already receive
payments on your web site to your DOHONE account.
In the next phase, we will show you how your web site will automatically receive a payment
confirmation, so that it can automatically validate the order or the customer's cart.
Be aware that this API can also work without a GUI. You can initiate a mobile money payment
without the use of the DOHONE GUI. The installation tutorial for this API is provided in another
document. Just download it at the following address : cliquez ici.
If your site needs to automate money transfers to various recipients, know that there is also a third
API that makes you effective : cliquez ici.

DOHONE
https://www.my-dohone.com Tél. : +(237) 243 265 918
email : [email protected]
7
III.1.3 Integration in the CMS WordPress
To integrate the payment module of Dohone in your website realize with wordpress, you have to
download first the module on the address: Belong Here.
Unzip the file and put the “dohone” folder in your wordpress modules directory (…/wp-
content/plugins/),
open the “notif.php” in your text editor, and set up “your confirmation action” of your
payment after receiving the notification of Dohone server. (Ref. Chapter III.2)
Put the file in a public directory of your website.
Open your wordpress dashboard and go to the plugins; you would see a new plugin name
“DOHONE” as illustrated in the following picture:
Activate the plugin so that you can be able to use it in your website. After that, go to the
submenu Settings/Dohone and set up your API configuration :
In the field <<Entrer le lien vers la page de notification en cas de succès de la transaction>> :
enter the link (URL) of the notif.php page that you have already set. Then, Save the settings.

DOHONE
https://www.my-dohone.com Tél. : +(237) 243 265 918
email : [email protected]
8
Put this short code << [dohone_pay_form] >> in the specific page that you want to make the
payment. This is the result that you would get :
Good job you have integrate successfully the module of the API Dohone in your website.
NB: Please don’t forget to set up all the settings of the “pay-dohone.php” file that is located in the
“dohone” folder.
III.1.4 Integration in CMS Joomla
To integrate the payment module of Dohone in your website realize with joomla, you have to
download first the module on the address: Belong Here.
Unzip the file and go to your website dashboard
Click on the menu “extensions” and go to the submenu “Manage/Install”
Upload the zip file “dohone” and Joomla would install it

DOHONE
https://www.my-dohone.com Tél. : +(237) 243 265 918
email : [email protected]
9
Open the “notif.php” in your text editor, and set up your “confirmation action” of your
payment after receiving the notification of Dohone server. (Ref. Chapter III.2)
Put the file in a public directory of your website.
Open your joomla dashboard and go to the extensions/modules ; you would see a new
plugin name DOHONE as illustrated in the following picture:
Activate the plugin so that you can be able to use it in your website. After that, click on the
module and set up your API configuration.
In the field <<Entrer le lien vers la page de notification en cas de succès de la
transaction>> : enter the link (URL) of the notif.php page that you have already set.
Good job you have integrate successfully the module of the API Dohone in your website.
NB: Please don’t forget to set up all the settings of the helper.php file that is located in the
…/modules/mod_dohone folder.
DOHONE
https://www.my-dohone.com Tél. : +(237) 243 265 918
email : [email protected]
10
III.1.5 Integration in CMS PrestaShop
To integrate the payment module of Dohone in your website realize with PrestaShop, firstly you have
to download the module on the address : Belong Here.
Unzip the file and go to your website dashboard
Click on the submenu modules and services and click on Install module
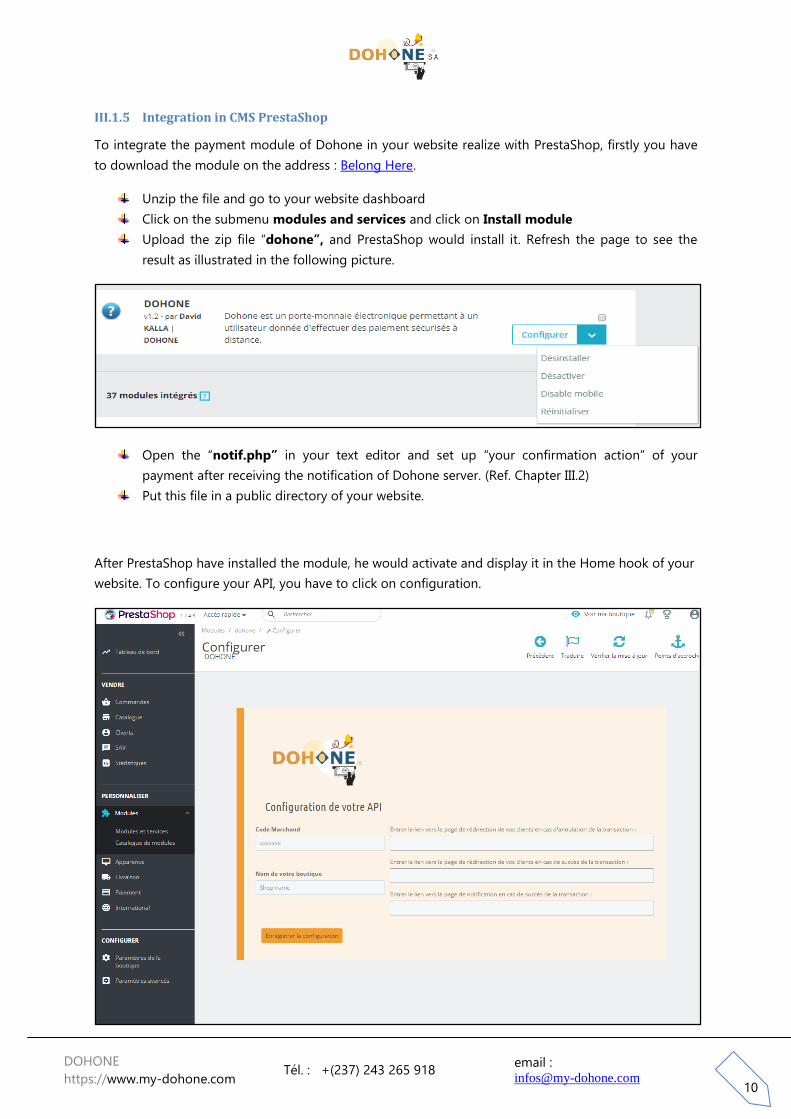
Upload the zip file “dohone”, and PrestaShop would install it. Refresh the page to see the
result as illustrated in the following picture.
Open the “notif.php” in your text editor and set up “your confirmation action” of your
payment after receiving the notification of Dohone server. (Ref. Chapter III.2)
Put this file in a public directory of your website.
After PrestaShop have installed the module, he would activate and display it in the Home hook of your
website. To configure your API, you have to click on configuration.

DOHONE
https://www.my-dohone.com Tél. : +(237) 243 265 918
email : [email protected]
11
In the field <<Entrer le lien vers la page de notification en cas de succès de la transaction>> :
enter the link (URL) of the notif.php page that you have already set.
Good job you have integrate successfully the module of the API Dohone in your website.
NB: Please don’t forget to set up all the settings of the “dohone.tpl” file that is located in the
…/modules/dohone folder.

DOHONE
https://www.my-dohone.com Tél. : +(237) 243 265 918
email : [email protected]
12
III.2 Phase 2 : response and outcome
Your site or system will certainly need to be notified of the success of the payment transaction
(whether the customer has clicked on the back button, or not), so that your website can validate the
order or shopping cart of this customer, or do other operations specific to you.
All this happens on the page you specified via the parameter « notifyPage ».
This page is called in the background, automatically when the payment is made, without the
user realizing it. In fact this does not happen on the Internet user's browser; but it is rather the
DOHONE server itself which automatically launches this page (HTTP request) upon successful payment.
So while the user will still be on the end-of-payment page on DOHONE, your website will already have
received an http request in background to notify you of the success of the operation.
This http request from DOHONE is sent via the GET method and contains 7 main parameters :
The identifier of the command you sent, here under the parameter « rI »
The amount that the customer paid, here under the parameter « rMt »
The currency corresponding to this amount, under the parameter « rDvs »
The reference of this transaction on the DOHONE side, under the parameter named
« idReqDoh »
The merchant code of the DOHONE account that received this payment. That is, your
merchant code normally, unless the request would have been diverted by a third
party. Under the parameter « rH ».
The method of payment (operator) of the customer, under the parameter « mode »
The reason for payment you specified at the start of the payment request, under the
parameter « motif »,
The hash : it is a hash generated by DOHONE via MD5 Method, which will allow you
to check the integrity and the origin of this notification. Under the parameter named
"hash". To use this parameter, go to chapter III.2.1.2.
This request is to notify you that your order XXXX has just been paid a certain amount, in a certain
currency, and that the reference of this transaction on DOHONE is XXXXXXXXX.
Upon receipt of this request, you must carry out the following 4 operations in your system, in
order to validate your basket or your order in complete safety.
1. Make sure that this query to your page comes from DOHONE. Because a hacker
should not have fun making such a request to validate his order himself. You should
therefore ask DOHONE if it recognizes a transaction whose reference is XXXXXXXXXX,

DOHONE
https://www.my-dohone.com Tél. : +(237) 243 265 918
email : [email protected]
13
and that this transaction was used to pay an amount equal to XXXXX XAF, for your
order XXXX. Dohone will answer yes or no.
2. Verify that the identifier of the command in question exists in your database, and that
it has not yet been validated.
3. Verify that the amount you know of your order is the amount you receive from
DOHONE. Because a hacker could arrange to pay correctly to DOHONE a lower
amount, and you pass this notification to validate the order for an even higher
amount.
4. Verify that the "Merchant Code" that received the payment is yours.
5. The last step is simply to save the command finally, if all the barriers are checked and
crossed.
III.2.1 Step 1: Verification of the origin and integrity of the request
III.2.1.1 Method 1 : By Hashing (encryption) via MD5
The first method to verify the integrity and origin of the notification you just received from DOHONE is
to perform an MD5 hash comparison.
In fact, DOHONE sends you a string of encrypted characters, via the “hash” parameter; you must
succeed in reconstituting this chain by doing the same encryption; then you compare your result to
the chain transmitted by DOHONE. If the two channels are identical, you can continue processing the
payment of the customer, with confidence.
It is therefore an MD5 (base 16) encryption, of the concatenation of some of your parameters with
your hashing code linked to your account. This code of hash is obtained by consulting your "profile
parameter page" on your DOHONE account online, or following your request, by mail addressed to
Below is the formula for generating the value of the hash parameter:
MD5 ( idReqDoh + rI + rMt + hashing code)
NB : the sign + here means just concatenation. And there is no space between these parameters.
- idReqDoh : Payment ID in your DOHONE account. Parameter that you receive when notifying
DOHONE to your server.
DOHONE
https://www.my-dohone.com Tél. : +(237) 243 265 918
email : [email protected]
14
- rI : Reference of the transaction in your system. Parameter that you know in your system and
that you also receive when notifying DOHONE to your server. This is your order reference,
which you sent to DOHONE during the initialization of the payment. If you do not manage the
command references in your system, ignore this setting here.
- rMt : the amount of the initial transaction that you sent to DOHONE for payment (in FCFA,
XAF). It’s parameter you also receive when notifying DOHONE to your server (in XAF). This
amount must be in XAF, and must not contain any spaces, no "points", no "commas" (just
numbers).
- Code de hashage : this is your signature code, which will allow encryption privately. The hash
code is obtained by consulting your "profile setting page" on your DOHONE account online.
In summary, you concatenate the 4 parameters without space between them, and you encode the
result in MD5 BASE 16.
The result obtained must be similar to the value that DOHONE sends to you in the "hash" parameter,
during the notification to your server.
For example :
String to encrypt : 6154698745212458 + 1001 + 3000 + 20E16B94120019CA879
MD5 (61546987452124581001300020E16B94120019CA879)
Result encrypted : b891d6a8aed2038c06a0aefc9e6381a7
III.2.1.2 Method 2: By sending the "Verify" command to DOHONE (OBSOLET)
This method is obsolete. It is no longer functional on DOHONE. We unadvise to use it.
To do this with DOHONE, simply return the same received parameters to DOHONE at the address :
https://www.my-dohone.com/dohone/pay
Before sending this http request, add a new parameter named « cmd » with the value « verify ».
You can send this request via POST or GET, according to your convenience.
For example :
https://www.my-
dohone.com/dohone/pay?cmd=verify&rI=13&rMt=10400&idReqDoh=98778451
DOHONE give you the result, « OK » text or « NO », depending on whether or not it recognize this
transaction
DOHONE
https://www.my-dohone.com Tél. : +(237) 243 265 918
email : [email protected]
15
III.2.2 Step 2
You must verify in your database that the order identifier that arrives by this request exists and that it
was not yet validated.
III.2.3 Step 3
Verify that the amount you know of your order is the amount you receive from DOHONE. Because a
hacker could arrange to pay correctly to DOHONE a lower amount, and you pass this notification to
validate the order for an even higher amount.
III.2.4 Step 4
Verify that the "Merchant code" that received the payment is yours. In the event that a hacker could
misappropriate your payment request, it is recommended to verify that the payment made by the
customer has been deposited in your DOHONE account to you. To do this, you must compare the
value of the « rH » parameter you receive with your « merchant code » that you know.
III.2.5 Step 5
Finally save the command in your database, if all barriers are checked and crossed. The treatment of
step 5 is done at your convenience, depending on your objectives.
DOHONE
https://www.my-dohone.com Tél. : +(237) 243 265 918
email : [email protected]
16
If you have arrived here, you have successfully completed the installation. It only needs to be
tested and used. Congratulations.
Note : Please note that (and remember that), the request sent automatically by DOHONE to your
«notifyPage» is made directly from the DOHONE server, and not from the browser of the user. So
while you are processing this query on this page, do not expect to find any values that you would
have set in session. Because everything happens as if it were another session squarely.
Note : Remember that this query issued by the DOHONE server is done in the background. So do
not bother to put "echo" on your page, or "print". They will not be displayed on the browser screen.
Because everything happens in the background. To see your execution traces, you have to write logs
on file, then go to the file. Similarly, for your tests, do not use the « localhost » address in the
«notifyPage» parameter sent to dohone on the form, because DOHONE will not be able to join your
localhost remotely.
Note : Remember that when the customer ends up paying, he will be offered to return to your
site. Thus, the redirect on the page « endpage ».
Do not hesitate to write to us in case of question to the address [email protected].
Dohone thanks you.