tutorial - creating a componentbioma.jrc.ec.europa.eu/tutorials/creating_component.pdf · 1 –...
TRANSCRIPT

Tutorial:Creating a component
Fumagalli D., Ferrari G.
2016
Introducing BioMA
2 Tutorial - Creating a component
This publication is a Technical report by the Joint Research Centre (JRC), the European Commission’s science and knowledge service. It aims to provide evidence-based scientific support to the European policymaking process. The scientific output expressed does not imply a policy position of the European Commission. Neither the European Commission nor any person acting on behalf of the Commission is responsible for the use that might be made of this publication.
JRC Science Hubhttps://ec.europa.eu/jrc
© European Union, 1995-2017
The reuse of the document is authorised, provided the source is acknowledged and the original meaning or message of the texts are not distorted. The European Commission shall not be held liable for any consequences stemming from the reuse.
How to cite this report: D. Fumagalli, G. Ferrari, Introducing BioMA: Tutorial - Creating a component, rel. 2, EUR, June 2014
Printed in Italy

Tutorial - Creating a component 1
Contents
1 About this tutorial . . . . . . . . . . . . . . . . . . . . . . . . . . . . . . . . . . . . . . . . . . . . . . . . . . . . . . . . . . 3Web resources of interest. . . . . . . . . . . . . . . . . . . . . . . . . . . . . . . . . . . . . . . . . . . . . . . . . 3
What you will learn . . . . . . . . . . . . . . . . . . . . . . . . . . . . . . . . . . . . . . . . . . . . . . . . . . . . . . . . . . . . . . . 4Contents of the tutorial package . . . . . . . . . . . . . . . . . . . . . . . . . . . . . . . . . . . . . . . . . . . . . . 4
2 Tutorial’s Steps . . . . . . . . . . . . . . . . . . . . . . . . . . . . . . . . . . . . . . . . . . . . . . . . . . . . . . . . . . . . 7Step 1 ‐ Prepare the environment . . . . . . . . . . . . . . . . . . . . . . . . . . . . . . . . . . . . . . . . . . . . . . . . . . . 8
Download and unzip the tutorial package. . . . . . . . . . . . . . . . . . . . . . . . . . . . . . . . . . . . 8Verify your system settings. . . . . . . . . . . . . . . . . . . . . . . . . . . . . . . . . . . . . . . . . . . . . . . . 8Download and install SharpDevelop . . . . . . . . . . . . . . . . . . . . . . . . . . . . . . . . . . . . . . . . 9Install the Domain Class Coder (DCC) . . . . . . . . . . . . . . . . . . . . . . . . . . . . . . . . . . . . . . . 9Install Strategy Class Coder (SCC). . . . . . . . . . . . . . . . . . . . . . . . . . . . . . . . . . . . . . . . . . 10Install Models Parameter Editor (MPE) . . . . . . . . . . . . . . . . . . . . . . . . . . . . . . . . . . . . . 10
Step 2 ‐ Create the project in SharpDevelop . . . . . . . . . . . . . . . . . . . . . . . . . . . . . . . . . . . . . . . . . . 11Creating the project . . . . . . . . . . . . . . . . . . . . . . . . . . . . . . . . . . . . . . . . . . . . . . . . . . . . 11Creating an empty Interface . . . . . . . . . . . . . . . . . . . . . . . . . . . . . . . . . . . . . . . . . . . . . . 13Defining a method for the strategy’s logics. . . . . . . . . . . . . . . . . . . . . . . . . . . . . . . . . . 14
Step 3 ‐ Create the Domain Classes in DCC . . . . . . . . . . . . . . . . . . . . . . . . . . . . . . . . . . . . . . . . . . . 17
Step 4 ‐ Build the project in SharpDevelop . . . . . . . . . . . . . . . . . . . . . . . . . . . . . . . . . . . . . . . . . . . 21Adding the files to the project . . . . . . . . . . . . . . . . . . . . . . . . . . . . . . . . . . . . . . . . . . . . 21Adding the DLLs references to the project . . . . . . . . . . . . . . . . . . . . . . . . . . . . . . . . . . 22Building the project. . . . . . . . . . . . . . . . . . . . . . . . . . . . . . . . . . . . . . . . . . . . . . . . . . . . . 22
Step 5 ‐ Create the strategies in SCC. . . . . . . . . . . . . . . . . . . . . . . . . . . . . . . . . . . . . . . . . . . . . . . . . 25
Step 6 ‐ Build the projects in SharpDevelop. . . . . . . . . . . . . . . . . . . . . . . . . . . . . . . . . . . . . . . . . . . 29Adding the SCC file to the project . . . . . . . . . . . . . . . . . . . . . . . . . . . . . . . . . . . . . . . . . 29Adding the DLLs’ references . . . . . . . . . . . . . . . . . . . . . . . . . . . . . . . . . . . . . . . . . . . . . . 30Building the two projects . . . . . . . . . . . . . . . . . . . . . . . . . . . . . . . . . . . . . . . . . . . . . . . . 31
Step 7 ‐ Enter the model code in SharpDevelop . . . . . . . . . . . . . . . . . . . . . . . . . . . . . . . . . . . . . . . 32
Step 8 ‐ Create the parameters class for the strategy . . . . . . . . . . . . . . . . . . . . . . . . . . . . . . . . . . . 33Creating the parameters class in DCC . . . . . . . . . . . . . . . . . . . . . . . . . . . . . . . . . . . . . . 33Adding the parameters class to the project . . . . . . . . . . . . . . . . . . . . . . . . . . . . . . . . . 34
Step 9 ‐ Create the parameters file for the strategy . . . . . . . . . . . . . . . . . . . . . . . . . . . . . . . . . . . . 36
What’s Next? . . . . . . . . . . . . . . . . . . . . . . . . . . . . . . . . . . . . . . . . . . . . . . . . . . . . . . . . . . . . . . . . . . . 38

CONTENTS
2 Tutorial - Creating a component
Tutorial - Creating a component 3
1About this tutorial
This document is targeted to the advanced users of the BioMA Software Framework who want to create their own components.
For scientific information about the models used please refer to the documentation of the specific components.
The topics are organized as follows:
• “What you will learn” on page 4
• “Tutorial’s Steps” on page 7
Web resources of interest
Resource What you will find
BioMA Framework User Guide
A comprehensive Web‐based help that provides a description of the BioMA framework, as well as an overview of its main components.
BioMA Framework Portal The BioMA portal, which links to all components’ available documentation.
Composition Layer documentation
A document addressed to advanced users who want to deepen their knowledge on how the composition layer of the BioMA framework is coded.
Model Layer documentation It provides a description of the Model Layer of BioMA where fine granularity models are implemented as discrete units.
1 – ABOUT THIS TUTORIAL
4 Tutorial - Creating a component
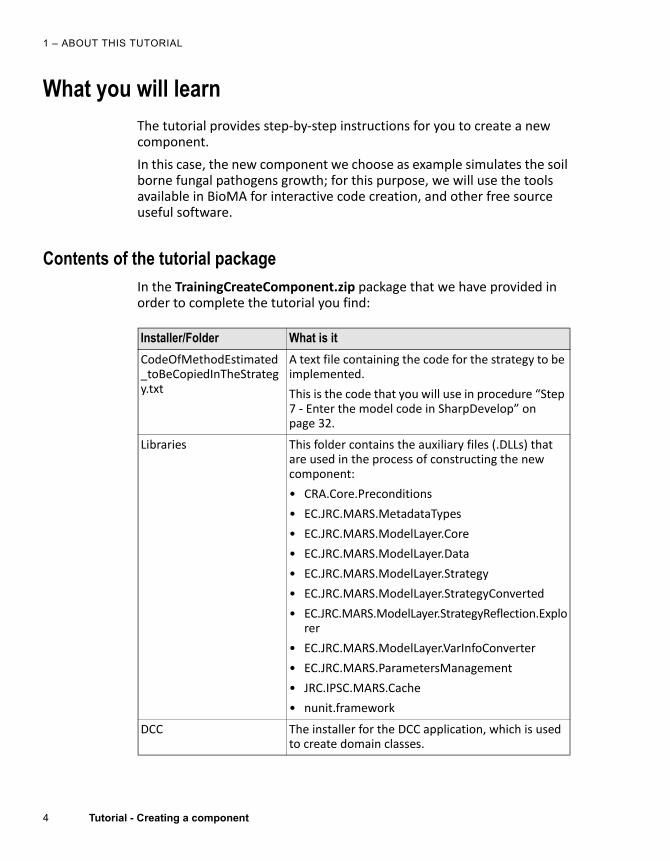
What you will learnThe tutorial provides step‐by‐step instructions for you to create a new component.
In this case, the new component we choose as example simulates the soil borne fungal pathogens growth; for this purpose, we will use the tools available in BioMA for interactive code creation, and other free source useful software.
Contents of the tutorial package
In the TrainingCreateComponent.zip package that we have provided in order to complete the tutorial you find:
Installer/Folder What is it
CodeOfMethodEstimated_toBeCopiedInTheStrategy.txt
A text file containing the code for the strategy to be implemented.
This is the code that you will use in procedure “Step 7 ‐ Enter the model code in SharpDevelop” on page 32.
Libraries This folder contains the auxiliary files (.DLLs) that are used in the process of constructing the new component:
• CRA.Core.Preconditions
• EC.JRC.MARS.MetadataTypes
• EC.JRC.MARS.ModelLayer.Core
• EC.JRC.MARS.ModelLayer.Data
• EC.JRC.MARS.ModelLayer.Strategy
• EC.JRC.MARS.ModelLayer.StrategyConverted
• EC.JRC.MARS.ModelLayer.StrategyReflection.Explorer
• EC.JRC.MARS.ModelLayer.VarInfoConverter
• EC.JRC.MARS.ParametersManagement
• JRC.IPSC.MARS.Cache
• nunit.framework
DCC The installer for the DCC application, which is used to create domain classes.
5
WHAT YOU WILL LEARN
Tutorial - Creating a component
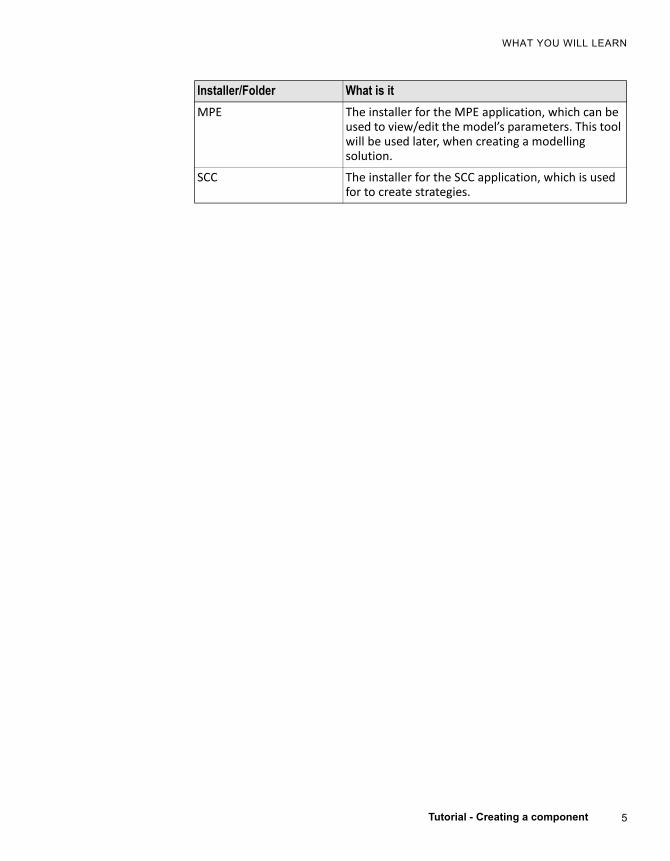
MPE The installer for the MPE application, which can be used to view/edit the model’s parameters. This tool will be used later, when creating a modelling solution.
SCC The installer for the SCC application, which is used for to create strategies.
Installer/Folder What is it
1 – ABOUT THIS TUTORIAL
6 Tutorial - Creating a component
Tutorial - Creating a component 7
2Tutorial’s Steps
This tutorial is aimed to modelers and guide them through the steps for creating a component containing a strategy, from the very beginning.
At the end of the tutorial, you will have a component called MY.EXAMPLE.SoilBorne containing a strategy called RGRYanHunt.
The steps are organized as follows:
• “Step 1 ‐ Prepare the environment” on page 8
• “Step 2 ‐ Create the project in SharpDevelop” on page 11
• “Step 3 ‐ Create the Domain Classes in DCC” on page 17
• “Step 4 ‐ Build the project in SharpDevelop” on page 21
• “Step 5 ‐ Create the strategies in SCC” on page 25
• “Step 6 ‐ Build the projects in SharpDevelop” on page 29
• “Step 7 ‐ Enter the model code in SharpDevelop” on page 32
• “Step 8 ‐ Create the parameters class for the strategy” on page 33
• “Step 9 ‐ Create the parameters file for the strategy” on page 36
2 – TUTORIAL’S STEPS
8 Tutorial - Creating a component
Step 1 - Prepare the environmentThis step involves:
• “Download and unzip the tutorial package” on page 8
• “Verify your system settings” on page 8
• “Download and install SharpDevelop” on page 9
• “Install the Domain Class Coder (DCC)” on page 9
• “Install Strategy Class Coder (SCC)” on page 10
Download and unzip the tutorial package
The ZIP package you will download includes this PDF and all the files you need to complete the tutorial (see “Contents of the tutorial package” on page 4).
To download it:
1 Go to the Agri4Cast Resources Portal (http://agri4cast.jrc.ec.europa.eu/DataPortal/Index.aspx?o=s). Do the following:
a. If you are not registered yet, click Register at the top‐right, then follow the instructions to register.
b. In the Create BioMA Component Tutorial area, click the Download Resources button and download the TrainingCreateComponent.zip file.
2 Unzip the TrainingCreateComponent.zip package we have provided in a folder at your choice in your PC.
Verify your system settings
In order to complete the tutorial, you must have:
• Windows PC (at least 2/3 GB of RAM)
• Administrative rights on the machine
• Microsoft .NET 3.5 (or above) installed
• A developer IDE (Integrated Developer Environment) installed. This can either be:
‐ Visual Studio 2008/2010, or
9
STEP 1 - PREPARE THE ENVIRONMENT
Tutorial - Creating a component
‐ SharpDevelop 5.0 Beta 1 (free and open source, downloadable from www.icsharpcode.net. See below for instructions.)
• Drivers to use a SQL Server Compact Edition database. You can download the drivers here: http://www.microsoft.com/en‐us/download/details.aspx?displaylang=en&id=5783
• In the settings of the PC, the dot ('.') must be set as the decimal separator. To check this setting:
‐ Access the Windows Control Panel (click the Start button, then select Control Panel > Clock, Language, and Region > Region and Language).
‐ In the Region and Language window, click Additional settings.
‐ Be sure that the Decimal symbol is set to “point” (.).
Download and install SharpDevelop
SharpDevelop is the free and open‐source IDE (Integrated Developer Environment) that allows writing applications in languages including C#, VB.NET and Boo projects on Microsoft's .NET platform.
To install SharpDevelop:
1 Download the latest version here: www.icsharpcode.net
2 Follow the instructions to install the application. As a result, a shortcut will be created on the desktop.
3 Double‐click the shortcut to launch the application.
Install the Domain Class Coder (DCC)
DCC is a Windows application that allows generating C# code to be used as domain classes. These latter contain the values and the attributes for each variable used to model a given domain.
Note:
If you have Microsoft Visual Studio 2008 or above installed in your PC, you can use it rather than using SharpDevelop. The procedure for creating and editing a project is very similar.
2 – TUTORIAL’S STEPS
10 Tutorial - Creating a component
To install DCC:
1 Copy the DCC folder that you find in the TrainingCreateComponent.zip package in any location in your computer. Suggested folder: C:\Program Files (x86)\JRC\DCC.
2 Since no installation is required, open DCC by launching the .exe file that you will find in the same folder.
Install Strategy Class Coder (SCC)
SCC is a Microsoft Windows application which facilitates implementing a model class (a strategy) according to the specifications of the ModelLayer used in the BioMA platform. The relevant code is provided by SCC by generating a C# code class.
To install and launch SCC:
1 Run the setup.exe file that is located within the SCC folder of the TrainingCreateComponent.zip package.
2 The software will be installed in folder C:\Program Files (x86)\JRC\SCC. The installation process will install a shortcut on the desktop.
3 Double‐click the shortcut to launch SCC.
Install Models Parameter Editor (MPE)
MPE is and application that dynamically creates a graphical user interface to manage model parameters.
1 Run the setup.exe file that is located within the MPE folder of the TrainingCreateComponent.zip package.
2 The software will be installed in folder C:\Program Files (x86)\JRC\MPE. The installation process will install a shortcut on the desktop.
3 Double‐click the shortcut to launch MPE.
Go to the next step:
• “Step 2 ‐ Create the project in SharpDevelop” on page 11
11
STEP 2 - CREATE THE PROJECT IN SHARPDEVELOP
Tutorial - Creating a component
Step 2 - Create the project in SharpDevelop
In this tutorial, we will use SharpDevelop to create a component able to simulate soil borne fungal pathogens growth. We will call this component MY.EXAMPLE.SoilBorne, and we will assign it a strategy (mathematical function) called RGRYanHunt, as it follows the algorithm proposed by Yan and Hunt (year) for fungal soil borne pathogens growth.
In this case, we only use one strategy to build the component, but usually a component includes more than one strategy.
In this step, you will complete the following tasks:
• “Creating the project” on page 11
• “Creating an empty Interface” on page 13
• “Defining a method for the strategy’s logics” on page 14
Creating the project
To create the project in SharpDevelop:
1 Launch SharpDevelop by double‐clicking the shortcut that has been created on the desktop after the installation process (see “Download and install SharpDevelop” on page 9).
2 From the SharpDevelop menu bar, select File > New > Solution. The New Project window will be displayed:
Note:
If you have Microsoft Visual Studio 2008 or above installed in your PC, you can use it rather than using SharpDevelop. The procedure for creating and editing a project is very similar.

2 – TUTORIAL’S STEPS
12 Tutorial - Creating a component
3 Be sure that, in the Categories frame, the C# is selected in order to see the options corresponding to this programming language on the Templates frame.
4 In the Templates frame, click Class Library.
5 In the Name text box, enter MY.EXAMPLE.SoilBorne, then click Create.
By default, the project will be saved under the SharpDevelop Projects folder, but you can chose any folder location.
6 In the Projects left pane, expand the newly created solution:
13
STEP 2 - CREATE THE PROJECT IN SHARPDEVELOP
Tutorial - Creating a component
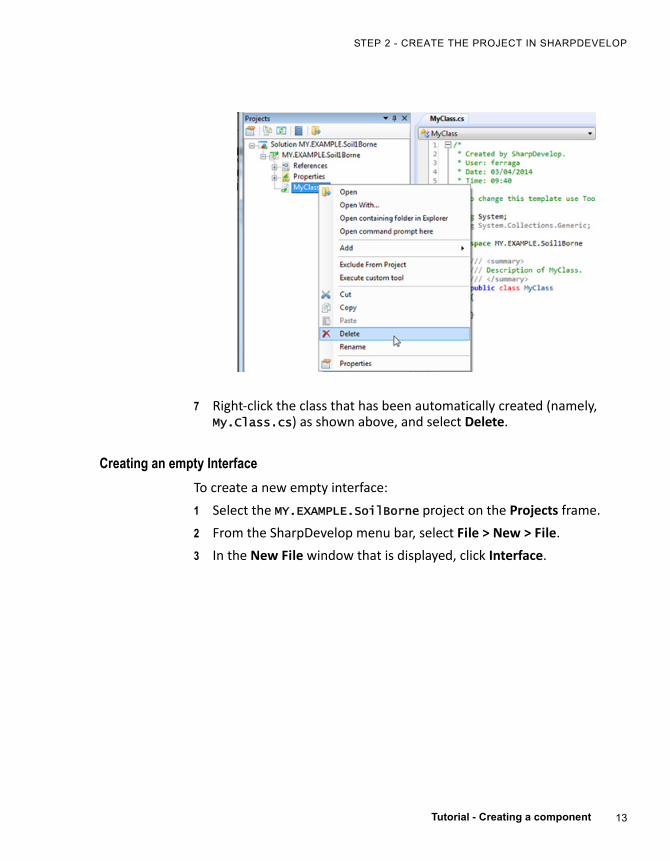
7 Right‐click the class that has been automatically created (namely, My.Class.cs) as shown above, and select Delete.
Creating an empty Interface
To create a new empty interface:
1 Select the MY.EXAMPLE.SoilBorne project on the Projects frame.
2 From the SharpDevelop menu bar, select File > New > File.
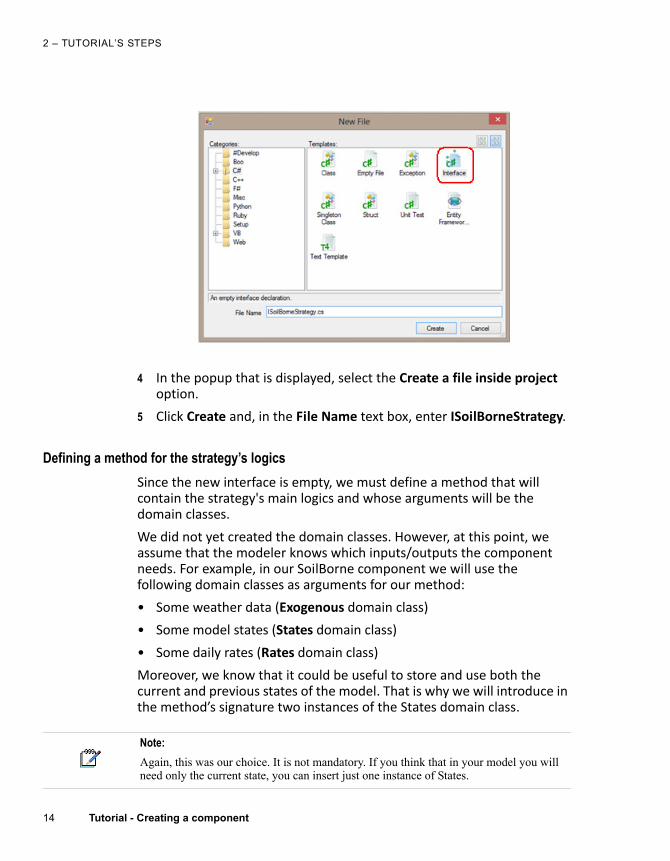
3 In the New File window that is displayed, click Interface.
2 – TUTORIAL’S STEPS
14 Tutorial - Creating a component
4 In the popup that is displayed, select the Create a file inside project option.
5 Click Create and, in the File Name text box, enter ISoilBorneStrategy.
Defining a method for the strategy’s logics
Since the new interface is empty, we must define a method that will contain the strategy's main logics and whose arguments will be the domain classes.
We did not yet created the domain classes. However, at this point, we assume that the modeler knows which inputs/outputs the component needs. For example, in our SoilBorne component we will use the following domain classes as arguments for our method:
• Some weather data (Exogenous domain class)
• Some model states (States domain class)
• Some daily rates (Rates domain class)
Moreover, we know that it could be useful to store and use both the current and previous states of the model. That is why we will introduce in the method’s signature two instances of the States domain class.
Note:
Again, this was our choice. It is not mandatory. If you think that in your model you will need only the current state, you can insert just one instance of States.
15
STEP 2 - CREATE THE PROJECT IN SHARPDEVELOP
Tutorial - Creating a component
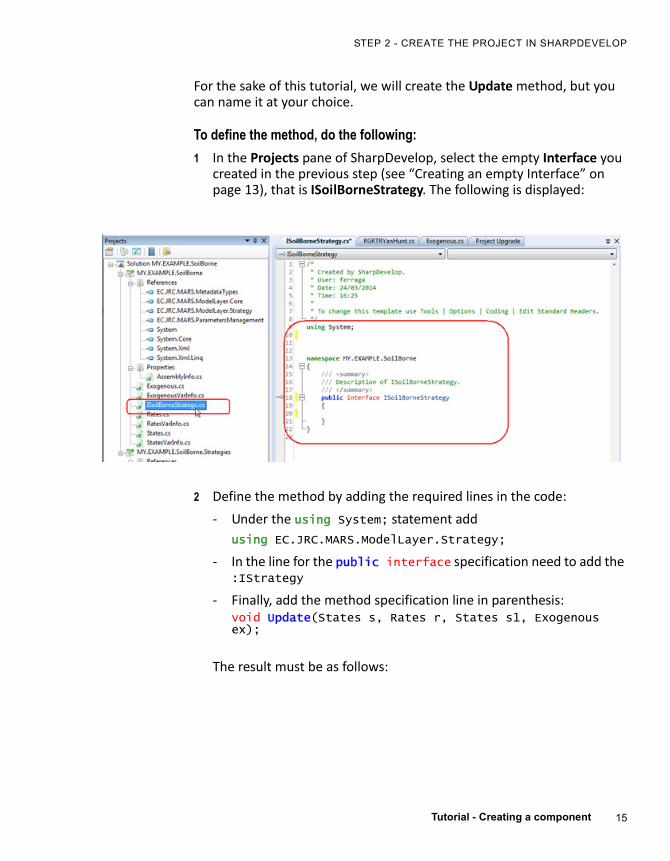
For the sake of this tutorial, we will create the Update method, but you can name it at your choice.
To define the method, do the following:
1 In the Projects pane of SharpDevelop, select the empty Interface you created in the previous step (see “Creating an empty Interface” on page 13), that is ISoilBorneStrategy. The following is displayed:
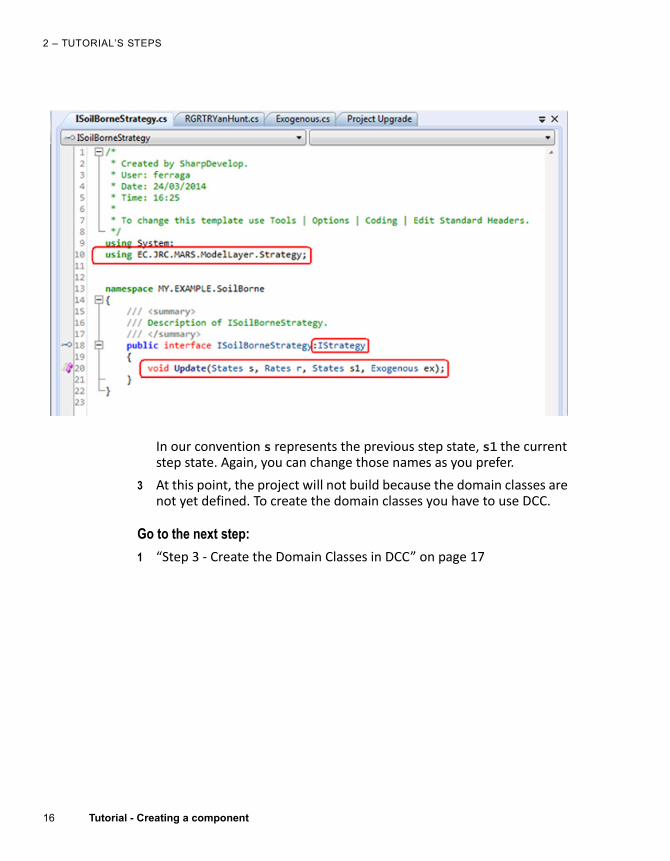
2 Define the method by adding the required lines in the code:
‐ Under the using System; statement add
using EC.JRC.MARS.ModelLayer.Strategy;
‐ In the line for the public interface specification need to add the :IStrategy
‐ Finally, add the method specification line in parenthesis:void Update(States s, Rates r, States s1, Exogenous ex);
The result must be as follows:
2 – TUTORIAL’S STEPS
16 Tutorial - Creating a component
In our convention s represents the previous step state, s1 the current step state. Again, you can change those names as you prefer.
3 At this point, the project will not build because the domain classes are not yet defined. To create the domain classes you have to use DCC.
Go to the next step:
1 “Step 3 ‐ Create the Domain Classes in DCC” on page 17
17
STEP 3 - CREATE THE DOMAIN CLASSES IN DCC
Tutorial - Creating a component
Step 3 - Create the Domain Classes in DCCTo model a domain, we define data‐types called domain classes, following the approach by Rizzoli et al. (1998). Domain classes are characterized by a set of data attributes, the value properties, and a set of methods to set and get the value, and to get the attributes.
A domain class implements the interface IDomainClass (defined in library EC.JRC.MARS.ModelLayer.Core.dll).
In our example, we will use DCC to generate the States, Rates, and Exogenous domain classes of the pathogen component. DCC allows editing directly the classes’ properties, as well as loading an existing XML definition file.
In our example, we will manually create three domain classes/properties:
• Exogenous/ SoilTemperatureLayer1, SoilTemperatureLayer2
• States/ RelativeGrowth
• Rates/ RelativeGrowthRate
To define the domain classes:
1 Launch DCC: double‐click the .exe file that you find in the installation folder, which usually is C:\Program Files (x86)\JRC\DCC.
(If needed, see “Install the Domain Class Coder (DCC)” on page 9).
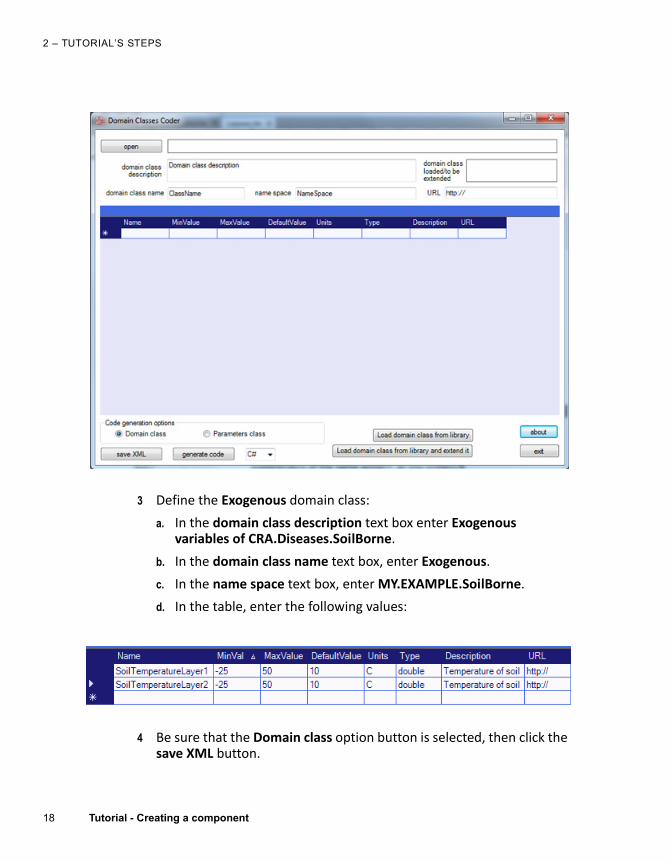
2 The following is displayed:
Tip:
For further information on how to use DCC, refer to the embedded Help. To reach it, click the About button, then click Help.
2 – TUTORIAL’S STEPS
18 Tutorial - Creating a component
3 Define the Exogenous domain class:
a. In the domain class description text box enter Exogenous variables of CRA.Diseases.SoilBorne.
b. In the domain class name text box, enter Exogenous.
c. In the name space text box, enter MY.EXAMPLE.SoilBorne.
d. In the table, enter the following values:
4 Be sure that the Domain class option button is selected, then click the save XML button.
19
STEP 3 - CREATE THE DOMAIN CLASSES IN DCC
Tutorial - Creating a component
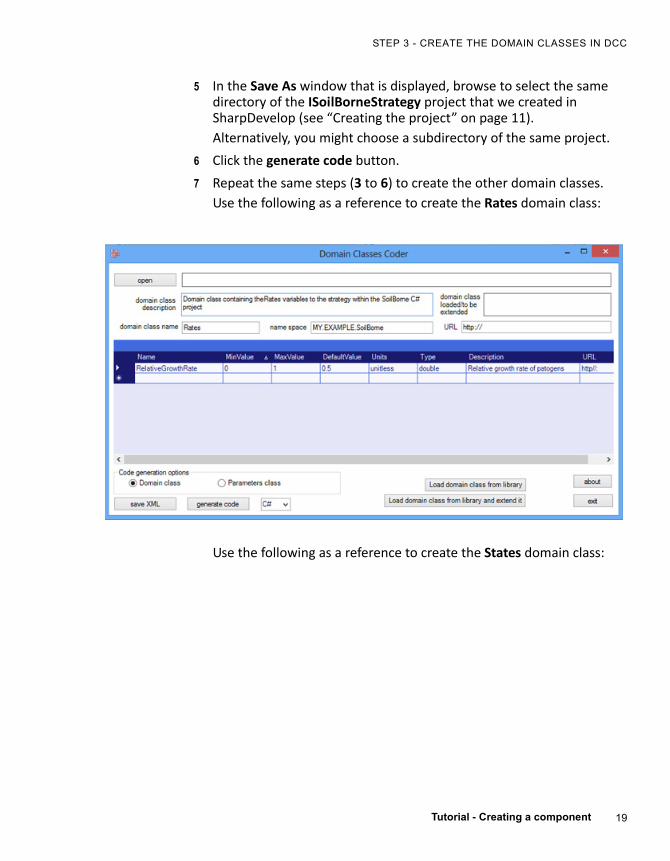
5 In the Save As window that is displayed, browse to select the same directory of the ISoilBorneStrategy project that we created in SharpDevelop (see “Creating the project” on page 11).
Alternatively, you might choose a subdirectory of the same project.
6 Click the generate code button.
7 Repeat the same steps (3 to 6) to create the other domain classes.
Use the following as a reference to create the Rates domain class:
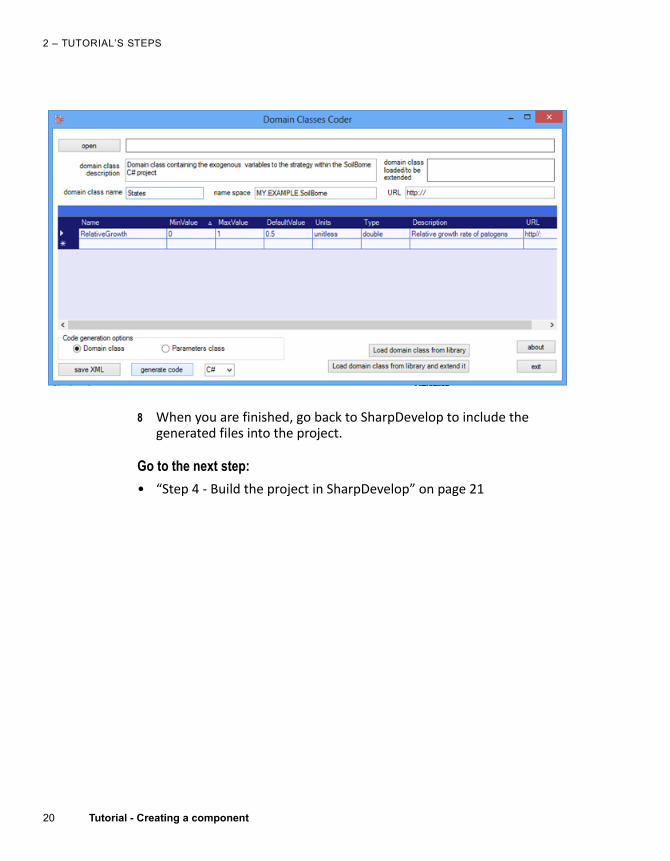
Use the following as a reference to create the States domain class:
2 – TUTORIAL’S STEPS
20 Tutorial - Creating a component
8 When you are finished, go back to SharpDevelop to include the generated files into the project.
Go to the next step:
• “Step 4 ‐ Build the project in SharpDevelop” on page 21
21
STEP 4 - BUILD THE PROJECT IN SHARPDEVELOP
Tutorial - Creating a component
Step 4 - Build the project in SharpDevelopAfter creating the domain classes in DCC, we must include complete three steps in SharpDevelop in order to build the project.
The three steps are:
• “Adding the files to the project” on page 21
• “Adding the DLLs references to the project” on page 22
• “Building the project” on page 22
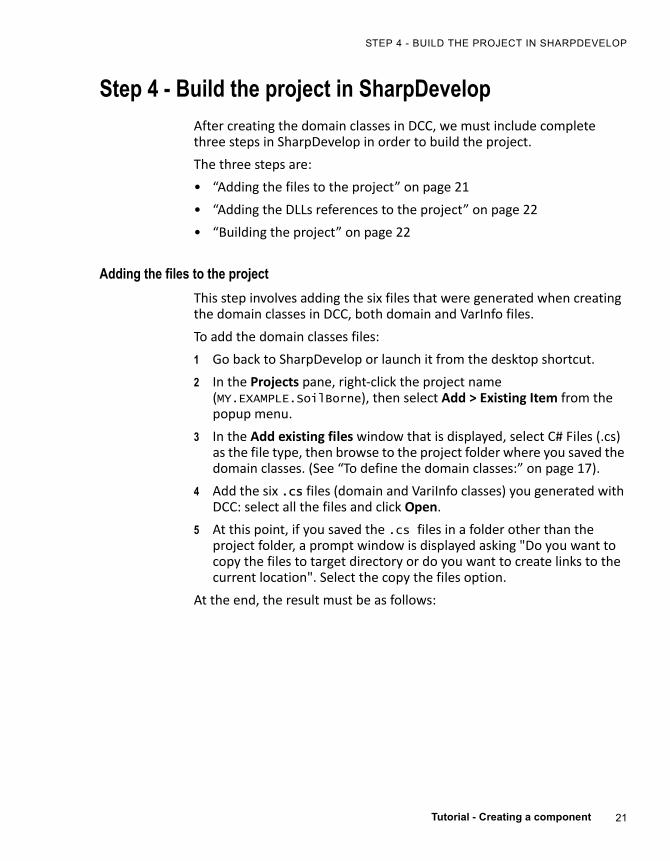
Adding the files to the project
This step involves adding the six files that were generated when creating the domain classes in DCC, both domain and VarInfo files.
To add the domain classes files:
1 Go back to SharpDevelop or launch it from the desktop shortcut.
2 In the Projects pane, right‐click the project name (MY.EXAMPLE.SoilBorne), then select Add > Existing Item from the popup menu.
3 In the Add existing files window that is displayed, select C# Files (.cs) as the file type, then browse to the project folder where you saved the domain classes. (See “To define the domain classes:” on page 17).
4 Add the six .cs files (domain and VariInfo classes) you generated with DCC: select all the files and click Open.
5 At this point, if you saved the .cs files in a folder other than the project folder, a prompt window is displayed asking "Do you want to copy the files to target directory or do you want to create links to the current location". Select the copy the files option.
At the end, the result must be as follows:
2 – TUTORIAL’S STEPS
22 Tutorial - Creating a component
Adding the DLLs references to the project
This step involves referencing the model layer’s DLLs, which you can find within the tutorial package.
To add the DLLs references:
1 In the Projects pane, right‐click the References folder under MY.EXAMPLE.SoilBorne, then select Add Reference.
2 In the Add References window that is displayed, select the .NET Assembly Browser tab.
3 Browse to the TrainingCreateComponent folder, then open the Libraries subfolder and select the following DLLs:
‐ EC.JRC.MARS.MetadataTypes.dll
‐ EC.JRC.MARS.ModelLayer.Core.dll
‐ EC.JRC.MARS.ModelLayer.Strategy.dll
‐ EC.JRC.MARS.ParametersManagement.dll
4 Click OK in the lower right corner of the Add reference window.
Building the project
In this step you will build the model and change the default settings of SharpDevelop.
23
STEP 4 - BUILD THE PROJECT IN SHARPDEVELOP
Tutorial - Creating a component
To build the project:
1 In the Projects pane, right‐click the project name (MY.EXAMPLE.SoilBorne) and select Build. The project should build successfully.
However, by default SharpDevelop will create a project targeting .NET Framework 4. You must change this setting as everything in Bioma is compiled versus the .NET framework 3.5.
2 Right‐click the project name again, then select Properties.
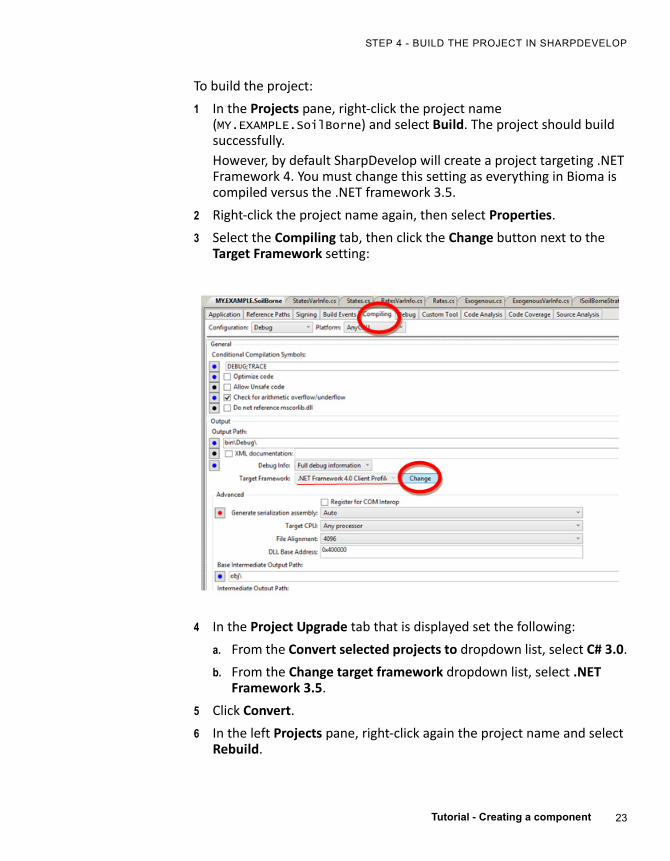
3 Select the Compiling tab, then click the Change button next to the Target Framework setting:
4 In the Project Upgrade tab that is displayed set the following:
a. From the Convert selected projects to dropdown list, select C# 3.0.
b. From the Change target framework dropdown list, select .NET Framework 3.5.
5 Click Convert.
6 In the left Projects pane, right‐click again the project name and select Rebuild.
2 – TUTORIAL’S STEPS
24 Tutorial - Creating a component
7 Do not close the SharpDevelop project since we will switch back to it later.
Go to the next step:
• “Step 5 ‐ Create the strategies in SCC” on page 25
25
STEP 5 - CREATE THE STRATEGIES IN SCC
Tutorial - Creating a component
Step 5 - Create the strategies in SCCOnce the DLL containing domain classes and interfaces is built, the application SCC can be used to generate the skeleton and the code according with the adopted architecture. This allows the modeler to focus in the implementation of the model algorithm.
It is recommended to place the domain classes and strategies in different projects. Thus, before launching SCC, we will create in SharpDevelop a new project to host the strategies.
To create in SharpDevelop a new project to host the strategies:
Repeat the step “Creating the project” on page 11, but give the project a new name, that is, add Strategies at the end to indicate that it is the strategies’ container.
In our case, the new project’s name will be:
• MY.EXAMPLE.SoilBorne.Strategies.
To create the strategies in SCC
1 Launch SCC from the desktop shortcut.
2 Load the domain classes already created and compiled:
a. Click the Data‐Interfaces DLL button.
b. Browse to the folder MY.EXAMPLE.SoilBorne\MY.EXAMPLE.SoilBorne\bin\Debug\ and select MY.EXAMPLE.SoilBorne.dll:
Important note:
Please, remember to convert to .NET 3.5 Framework the newly created project, as you have done for the MY.EXAMPLE.SoilBorne project. For detailed instructions, see “Building the project” on page 22.
Tip:
For further information on how to use SCC, refer to the embedded Help. To reach it, click the About button, then click Help.
2 – TUTORIAL’S STEPS
26 Tutorial - Creating a component
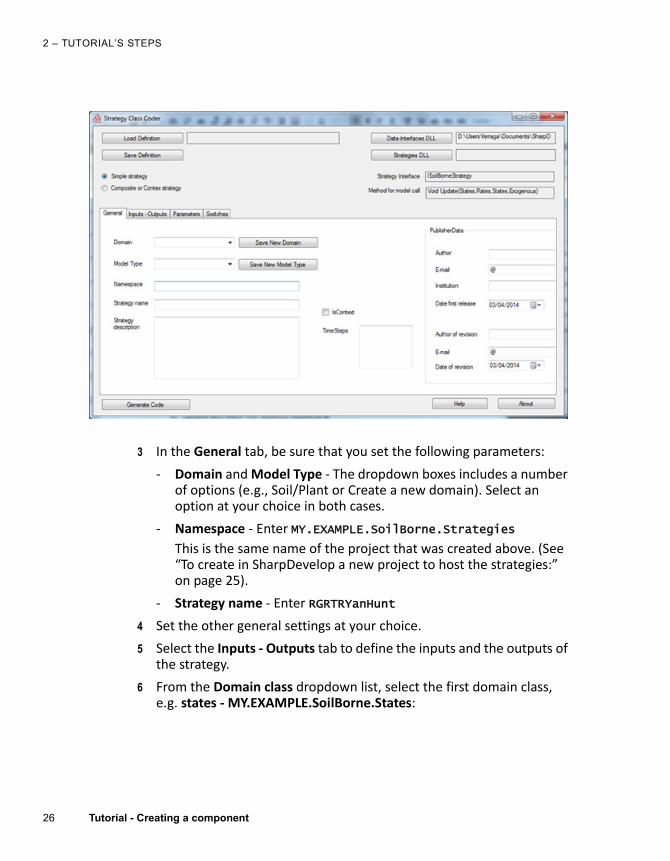
3 In the General tab, be sure that you set the following parameters:
‐ Domain and Model Type ‐ The dropdown boxes includes a number of options (e.g., Soil/Plant or Create a new domain). Select an option at your choice in both cases.
‐ Namespace ‐ Enter MY.EXAMPLE.SoilBorne.Strategies
This is the same name of the project that was created above. (See “To create in SharpDevelop a new project to host the strategies:” on page 25).
‐ Strategy name ‐ Enter RGRTRYanHunt
4 Set the other general settings at your choice.
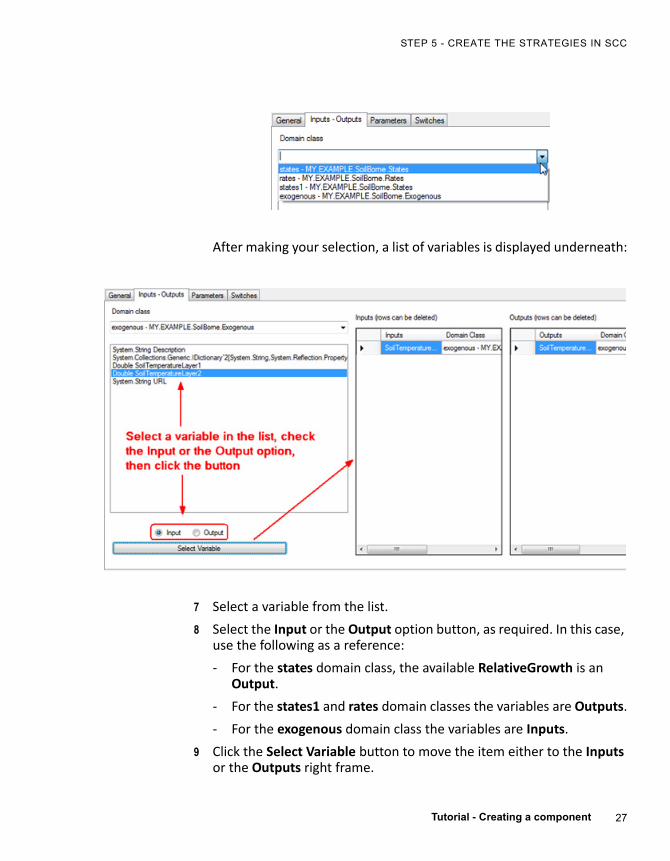
5 Select the Inputs ‐ Outputs tab to define the inputs and the outputs of the strategy.
6 From the Domain class dropdown list, select the first domain class, e.g. states ‐ MY.EXAMPLE.SoilBorne.States:
27
STEP 5 - CREATE THE STRATEGIES IN SCC
Tutorial - Creating a component
After making your selection, a list of variables is displayed underneath:
7 Select a variable from the list.
8 Select the Input or the Output option button, as required. In this case, use the following as a reference:
‐ For the states domain class, the available RelativeGrowth is an Output.
‐ For the states1 and rates domain classes the variables are Outputs.
‐ For the exogenous domain class the variables are Inputs.
9 Click the Select Variable button to move the item either to the Inputs or the Outputs right frame.
2 – TUTORIAL’S STEPS
28 Tutorial - Creating a component
10 To delete a Inputs or Outputs’ row, select the row and press Delete on your keyboard.
11 Repeat steps 6 to 9 for each Domain classes.
12 Select the Parameters tab, then set the following values:
13 Click the Generate code button at the bottom of the window to generate the class code.
14 In the Save As window that is displayed, save the code in the directory of the project MY.EXAMPLE.SoilBorne.Strategies with the name RGRTRYanHunt.cs.
15 In the popup that displays, click Yes if you want to see the generated code at this point. Otherwise, click No.
16 To save the current configuration for future reuse, click the Save definition button at the top‐left of window.
Go to the next step:
• “Step 6 ‐ Build the projects in SharpDevelop” on page 29
29
STEP 6 - BUILD THE PROJECTS IN SHARPDEVELOP
Tutorial - Creating a component
Step 6 - Build the projects in SharpDevelopIn this step we will complete three tasks:
• “Adding the SCC file to the project” on page 29
• “Adding the DLLs’ references” on page 30
• “Building the two projects” on page 31
Adding the SCC file to the project
This task involves adding the strategies file that we have generated with SCC in Step 5 to the ad‐hoc project that we have created in SharpDevelop. (See “To create in SharpDevelop a new project to host the strategies:” on page 25).
To add the SCC file:
1 Go back to SharpDevelop.
2 In the Projects left pane, right‐click the MY.EXAMPLE.SoilBorne.Strategies ad‐hoc project.
3 From the popup menu, select Add > Existing item.
4 In the window that is displayed, select C# Files (*.cs) as the file type, then browse to select the RGRTRYanHunt.cs file you.
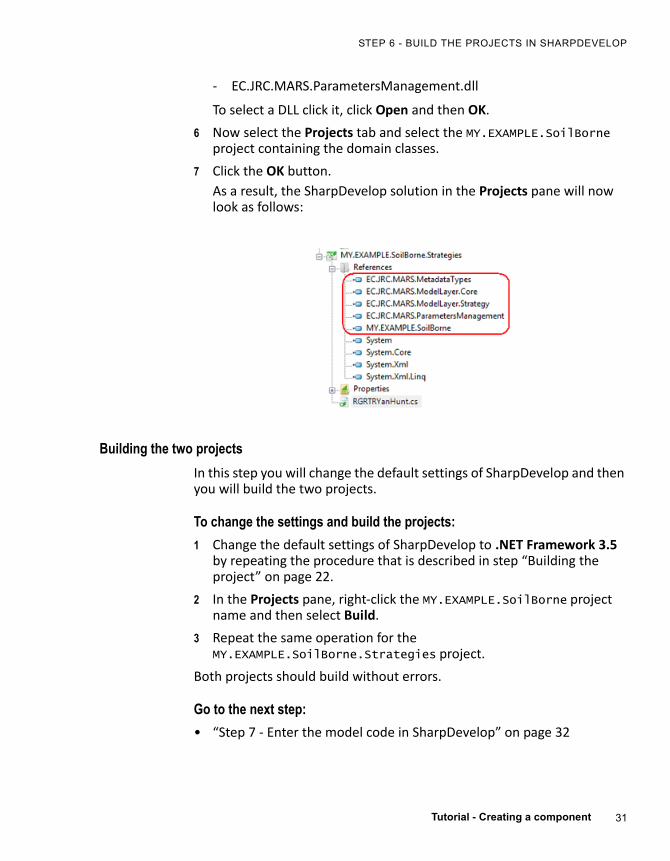
As a result, the SharpDevelop solution in the Projects pane will look as follows:
2 – TUTORIAL’S STEPS
30 Tutorial - Creating a component
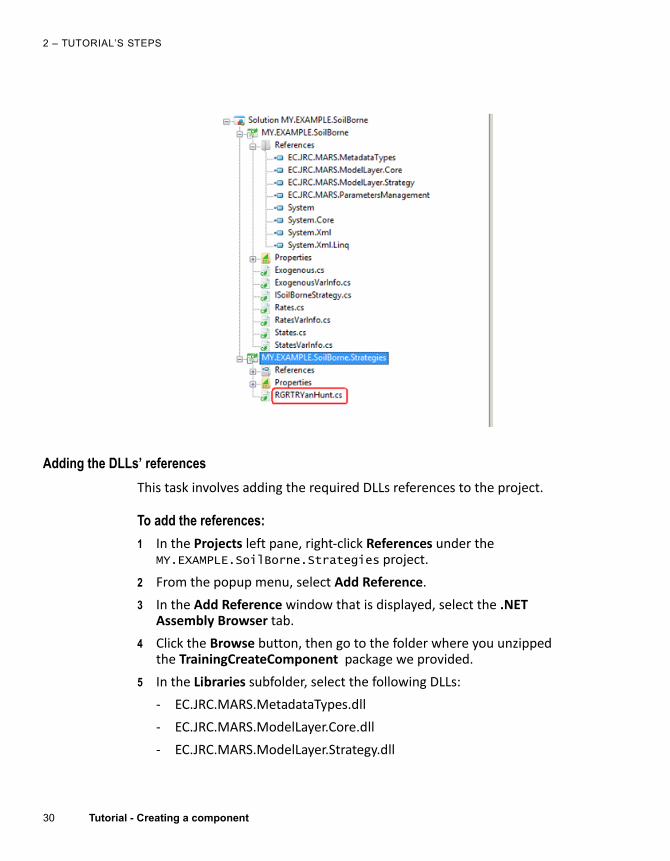
Adding the DLLs’ references
This task involves adding the required DLLs references to the project.
To add the references:
1 In the Projects left pane, right‐click References under the MY.EXAMPLE.SoilBorne.Strategies project.
2 From the popup menu, select Add Reference.
3 In the Add Reference window that is displayed, select the .NET Assembly Browser tab.
4 Click the Browse button, then go to the folder where you unzipped the TrainingCreateComponent package we provided.
5 In the Libraries subfolder, select the following DLLs:
‐ EC.JRC.MARS.MetadataTypes.dll
‐ EC.JRC.MARS.ModelLayer.Core.dll
‐ EC.JRC.MARS.ModelLayer.Strategy.dll
31
STEP 6 - BUILD THE PROJECTS IN SHARPDEVELOP
Tutorial - Creating a component
‐ EC.JRC.MARS.ParametersManagement.dll
To select a DLL click it, click Open and then OK.
6 Now select the Projects tab and select the MY.EXAMPLE.SoilBorne project containing the domain classes.
7 Click the OK button.
As a result, the SharpDevelop solution in the Projects pane will now look as follows:
Building the two projects
In this step you will change the default settings of SharpDevelop and then you will build the two projects.
To change the settings and build the projects:
1 Change the default settings of SharpDevelop to .NET Framework 3.5 by repeating the procedure that is described in step “Building the project” on page 22.
2 In the Projects pane, right‐click the MY.EXAMPLE.SoilBorne project name and then select Build.
3 Repeat the same operation for the MY.EXAMPLE.SoilBorne.Strategies project.
Both projects should build without errors.
Go to the next step:
• “Step 7 ‐ Enter the model code in SharpDevelop” on page 32
2 – TUTORIAL’S STEPS
32 Tutorial - Creating a component
Step 7 - Enter the model code in SharpDevelopThe modeler has to write the model algorithm inside the placeholder in the code just generated, that is, to implement the method Estimate of the RGRTRYanHunt class.
To enter the model code:
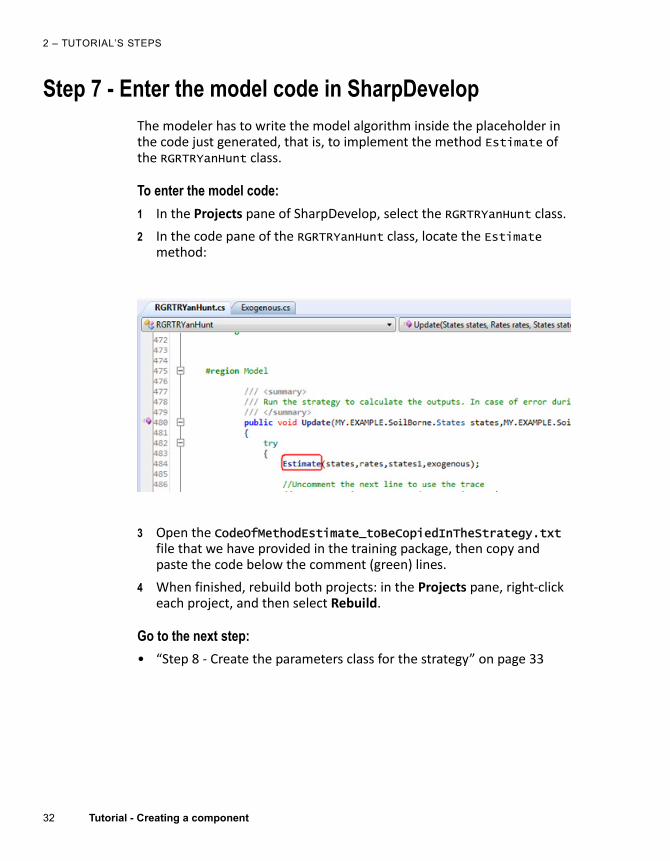
1 In the Projects pane of SharpDevelop, select the RGRTRYanHunt class.
2 In the code pane of the RGRTRYanHunt class, locate the Estimate method:
3 Open the CodeOfMethodEstimate_toBeCopiedInTheStrategy.txt file that we have provided in the training package, then copy and paste the code below the comment (green) lines.
4 When finished, rebuild both projects: in the Projects pane, right‐click each project, and then select Rebuild.
Go to the next step:
• “Step 8 ‐ Create the parameters class for the strategy” on page 33
33
STEP 8 - CREATE THE PARAMETERS CLASS FOR THE STRATEGY
Tutorial - Creating a component
Step 8 - Create the parameters class for the strategyThis step involves completing two tasks:
• “Creating the parameters class in DCC” on page 33
• “Adding the parameters class to the project” on page 34
Creating the parameters class in DCC
To create the parameters class:
1 Launch DCC by double‐clicking the .exe file in the installation folder.
2 In the lower part of the DCC window, select the Parameters class option button.
3 Click the Load parameters class from strategy button.
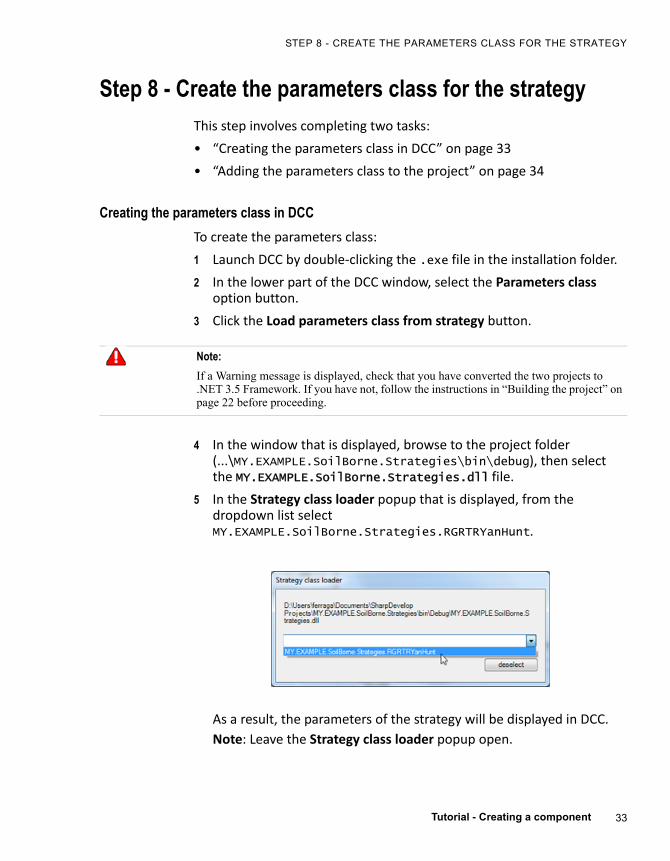
4 In the window that is displayed, browse to the project folder (...\MY.EXAMPLE.SoilBorne.Strategies\bin\debug), then select the MY.EXAMPLE.SoilBorne.Strategies.dll file.
5 In the Strategy class loader popup that is displayed, from the dropdown list select MY.EXAMPLE.SoilBorne.Strategies.RGRTRYanHunt.
As a result, the parameters of the strategy will be displayed in DCC.
Note: Leave the Strategy class loader popup open.
Note:
If a Warning message is displayed, check that you have converted the two projects to .NET 3.5 Framework. If you have not, follow the instructions in “Building the project” on page 22 before proceeding.
2 – TUTORIAL’S STEPS
34 Tutorial - Creating a component
6 Click the Generate code button, then browse to the MY.EXAMPLE.SoilBorne.Strategies folder. This way, the class will be generated within the project’s folder.
The class file name will be automatically saved with the name RGRTRYanHunt_Parameters.cs.
7 Finally, we will save the parameters class in XML format: to do this, click the Save XML button.
8 In the popup that opens, browse to the MY.EXAMPLE.SoilBorne.Strategies folder, name the file RGRYanHunt_ParametersDCC.xml and click Save.
Adding the parameters class to the project
To add the class to the project in SharpDevelop:
1 Go back to SharpDevelop.
2 In the Projects left‐pane, right‐click the MY.EXAMPLE.SoilBorne.Strategies project, then select Add > Existing item.
3 Set C# Files (*.cs) as the file type, then select the RGRTRYanHunt_Parameters.cs you previously created with DCC.
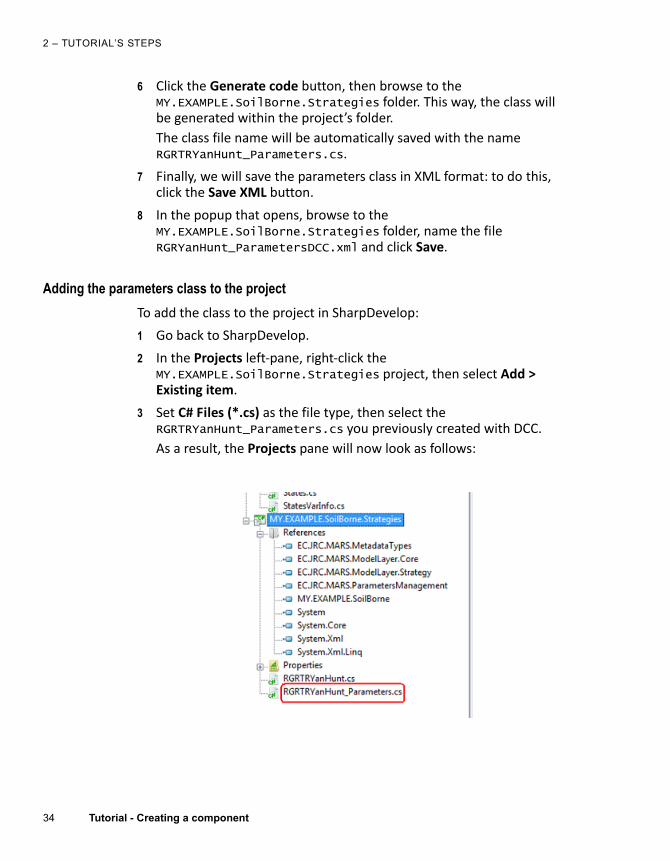
As a result, the Projects pane will now look as follows:
35
STEP 8 - CREATE THE PARAMETERS CLASS FOR THE STRATEGY
Tutorial - Creating a component
4 To complete the procedure, rebuild both projects: in the Projects pane, right‐click each project (MY.EXAMPLE.SoilBorne and MY.EXAMPLE.SoilBorne.Strategies) and select Rebuild.
5 Wait for the build to complete successfully.
Go to the next step:
• “Step 9 ‐ Create the parameters file for the strategy” on page 36
2 – TUTORIAL’S STEPS
36 Tutorial - Creating a component
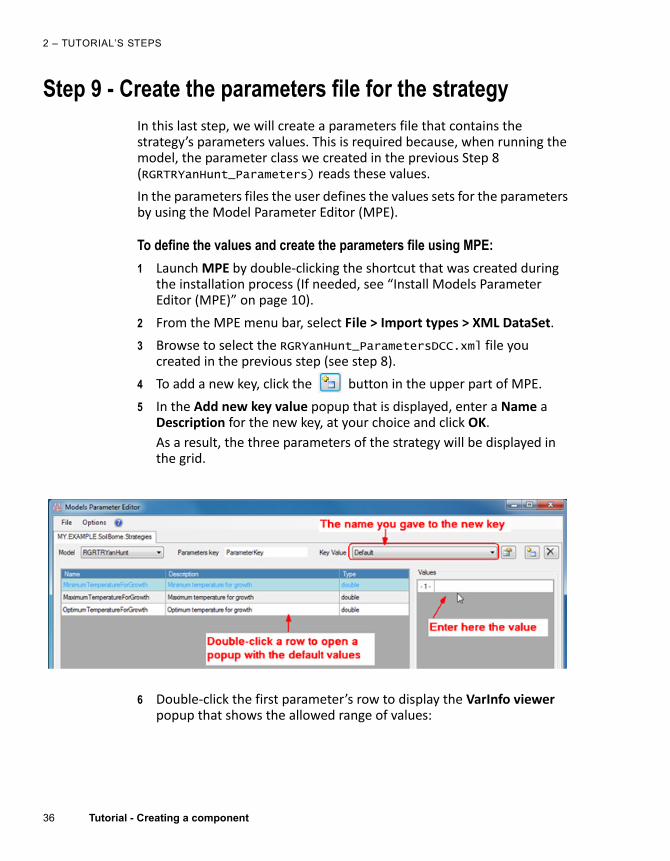
Step 9 - Create the parameters file for the strategyIn this last step, we will create a parameters file that contains the strategy’s parameters values. This is required because, when running the model, the parameter class we created in the previous Step 8 (RGRTRYanHunt_Parameters) reads these values.
In the parameters files the user defines the values sets for the parameters by using the Model Parameter Editor (MPE).
To define the values and create the parameters file using MPE:
1 Launch MPE by double‐clicking the shortcut that was created during the installation process (If needed, see “Install Models Parameter Editor (MPE)” on page 10).
2 From the MPE menu bar, select File > Import types > XML DataSet.
3 Browse to select the RGRYanHunt_ParametersDCC.xml file you created in the previous step (see step 8).
4 To add a new key, click the button in the upper part of MPE.
5 In the Add new key value popup that is displayed, enter a Name a Description for the new key, at your choice and click OK.
As a result, the three parameters of the strategy will be displayed in the grid.
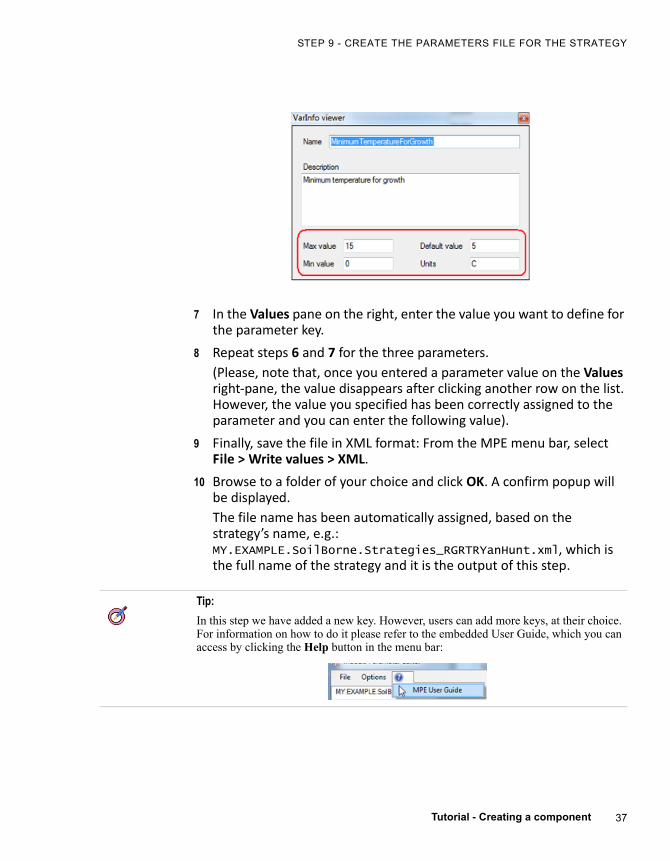
6 Double‐click the first parameter’s row to display the VarInfo viewer popup that shows the allowed range of values:
37
STEP 9 - CREATE THE PARAMETERS FILE FOR THE STRATEGY
Tutorial - Creating a component
7 In the Values pane on the right, enter the value you want to define for the parameter key.
8 Repeat steps 6 and 7 for the three parameters.
(Please, note that, once you entered a parameter value on the Values right‐pane, the value disappears after clicking another row on the list. However, the value you specified has been correctly assigned to the parameter and you can enter the following value).
9 Finally, save the file in XML format: From the MPE menu bar, select File > Write values > XML.
10 Browse to a folder of your choice and click OK. A confirm popup will be displayed.
The file name has been automatically assigned, based on the strategy’s name, e.g.: MY.EXAMPLE.SoilBorne.Strategies_RGRTRYanHunt.xml, which is the full name of the strategy and it is the output of this step.
Tip:
In this step we have added a new key. However, users can add more keys, at their choice. For information on how to do it please refer to the embedded User Guide, which you can access by clicking the Help button in the menu bar:
2 – TUTORIAL’S STEPS
38 Tutorial - Creating a component
What’s Next?In this tutorial we have created a new component including one strategy.
However, to build a modelling solution for a specific purpose, you must connect more model components to each other and define the order of execution in the model. Each component includes specific inputs, outputs, parameters, and so forth.
For this purpose, you can follow the instructions that are provided in the Tutorial ‐ Creating a modeling solution, which is tailored to advanced users (such as modelers) who want to create their own modelling solutions.