tutorial about unix basics
TRANSCRIPT

8/12/2019 Tutorial About UNIX Basics
http://slidepdf.com/reader/full/tutorial-about-unix-basics 1/11
1
University of TorontoAPS 105 — Computer Fundamentals
A Tutorial about UNIX BasicsFall 2011
I. INTRODUCTION
This document serves as your introduction to the computers we will be using in this course.They are running a variant of the UNIX operating system called Linux, and specifically theversion compiled by Red Hat, called Red Hat Enterprise Linux (RHEL). UNIX is significantlydifferent from the Windows operating system that you may have used previously, but similarto the Mac OS X operating system, which is another UNIX variant.
This document is in the form of a tutorial that will gradually take you through the basicsof interacting with the computer. It is highly recommended that you read this document, to be
better prepared for Lab 1.
After you have read this document, you are encouraged to continue your introduction to thelaboratory computing environment by reading the main ECF web site:
http://www.undergrad.engineering.utoronto.ca/Student Life/Engineering Computing Facility.htm
II . LOGGING INTO THE COMPUTER SYSTEM
The first thing you must do when you begin your work on the computer is to “log in” tolet the system know that it is you who is using the system. Access to the system is controlledto maintain its security; only those with accounts on the Engineering Computing Facility (ECF)system can access it. To login, you must have two pieces of information: a login name and apassword. All undergraduate engineering students are automatically given an account when
they register. If you do not already have a login name and password, you will be told how toobtain them in the next section.
Your login name (or “login”) is a six to eight character string that is your identity on thecomputer network. Your password is a variable length character string that should be knownonly to you. Your password serves as a key to your account much as you would use a key togain entry to your locked house. In fact, not even the system knows your password; it onlykeeps an encrypted version. Later in the lab you will be shown how to change your password.
Never give your password to someone else or let someone use your account. Doing so isagainst University policy and the other user can leave open a “back door” into your account toaccess it later, even if you change your password.
Just as you login to the computer when you begin to use it, you must logout of the computer
when you are finished using it. If you must logout before you reach the end of the tutorial, readthe final section of the tutorial which instructs you on how to logout. After you logout, do notturn the computer off.
III. GETTING YOU R L OGIN N AM E
This is how you get your account name if you have never logged in before.At any ECF terminal in SF 1012 or SF 1013, you should see a window that asks for a username.
In the username field, type account (all lower case). Then follow the instructions that appear.You will need to know your UTORid to proceed. By following these steps you will learn yourECF username and initial password. You’ll learn how to change it later on in this document.
8/12/2019 Tutorial About UNIX Basics
http://slidepdf.com/reader/full/tutorial-about-unix-basics 2/11
2
IV. THE X WINDOW S YSTEM
After logging in, you will be presented with a sequence of windows. After reading each one,click on the okay button in the lower left corner of the window to make it go away (or justwait and it will eventually disappear on its own). Linux will then start up the X Window System(Also referred to as X11). You will see as you progress in this course that the X Window Systemof the UNIX operating system is a powerful one to work in because of its ability to have the
computer work on a number of different things at once, a concept known as multitasking. Youcan even run programs on different computers and have their windows appear on your screen.The X Window System also allows you to conveniently organize the windows on the screen.For now, we will learn the basics about manipulating windows.
When the X Window System starts up, there will be a taskbar along the bottom of the screen.There may also be windows on the screen or you may have to create them yourself. When youlog out, the desktop is saved so that the windows and their positions are saved for your nextlogin session.
Most of your work will be done using terminal windows. Start a new terminal window by right-clicking some unoccupied portion of the screen, and select Open Terminal from the menu thatpops up.1 A terminal window will pop up. The window can be moved around on the screen
with the mouse by clicking and holding the left mouse button over the title bar (along the topof the window) and dragging it to another location. Give this a try.
You can also change the size of a window using the mouse. Move the cursor to the lowerright corner of the window. You should see the cursor change to an arrow or an L-shape thataligns with the corner of the window. To make the window bigger, press the mouse button, dragthe cursor away from the window, and then release the mouse button.
At the top right of the window are three little boxes to control the window. The × closes thewindow, the middle one maximizes the window size, and the left one makes it makes it shrinkto an icon on the taskbar. To make the window reappear, click on its name in the task bar.
In the terminal window, you should see some introductory messages about the system fol-lowed by the UNIX prompt which may vary but will usually end with the character $ or %.
We will show the prompt simply as %. You can issue commands directly to the UNIX operatingsystem at this prompt. The first command you will enter will tell UNIX to create a new window.In the terminal window, enter the following command:
% xterm &
The xterm command stands for X Terminal and it creates a new terminal window thathas a UNIX prompt at which you can enter commands. You can now use either the originalterminal window or the new xterm window to issue UNIX commands. You can create additionalwindows with the xterm & command if you like and have several windows on the screen.Despite having many windows on the screen, only one window is active at a time. The active
window has a highlighted border, and all text typed at the keyboard is directed to the activewindow. You can make another window active by clicking the title bar, the same way MicrosoftWindows works.
When you create new windows with the xterm command, the ampersand (&) is an optionalcomponent of the command. By default, commands are executed in the foreground. Adding anampersand to the end of a command instructs UNIX to execute it in the background. Commandsthat are executed in the foreground must complete before anything else can be done in the
1You can create an icon in your task bar for this very useful terminal window by right clicking the empty middle part of thetask bar (called the pane), and navigating through the menus as follows: Add to Panel → Application Launcher → Accessories→ terminal.

8/12/2019 Tutorial About UNIX Basics
http://slidepdf.com/reader/full/tutorial-about-unix-basics 3/11
3
window that started them. So if you call up a new window using the xterm command anddo not include an ampersand, you will not be able to use the window from which you calledup the new one until the new xterm window is closed. When a command is executed in the
background, the command line from which it was called can continue to accept commands whilethe background command is executing. When creating new windows from the command line,you should always add an ampersand at the end of the command so that you can use both the
new and the original windows.
V. CHANGING Y OUR PASSWORD
At this point an important task that you should perform is to change your password. Remem- ber that the password to your account is the only security measure keeping your account privateso you should choose your password carefully and keep it an absolute secret. You change thepassword by using the passwd command. Your password should be at least 6 characters long,with 7 or 8 being preferable. Try to use a mixture of numbers and letters in both upper andlower case, making it less likely that someone will be able to guess your password. In particular,do not use any names or single words that could be found in a dictionary. Since computers aregood at tedious tasks, people have written programs that can try to guess your password using
a dictionary and other guessing schemes.Use the following command to change your password:
% passwd
As you type both the old and new passwords, the characters will not be visible on the screen.This is deliberate, to prevent others from seeing your password by looking over your shoulder.Because you cannot see your password, you are asked to type it twice, on the theory that youare unlikely to make the same typing mistake twice.
VI. FIL E O RGANIZATION
Data and programs that you use are stored as files on a disk. There are many types of files:some are software programs that can be executed, other files contain text that can be read, whileother files contain images that can be displayed on the screen. Two things that all files have incommon are that they can be stored, and that they all have a name. We will soon take a look atsome files on the ECF computer system.
As we add more files to computer storage the number of files grows to the point where itis hard to keep track of them all. For this purpose, files are organized into directories. You canthink of directories as being like file folders. File folders are used to organize papers, articles,and other things and are named according to their contents. You may well be familiar with theconcept of folders from the Windows operating system. In UNIX, folders are called directories.
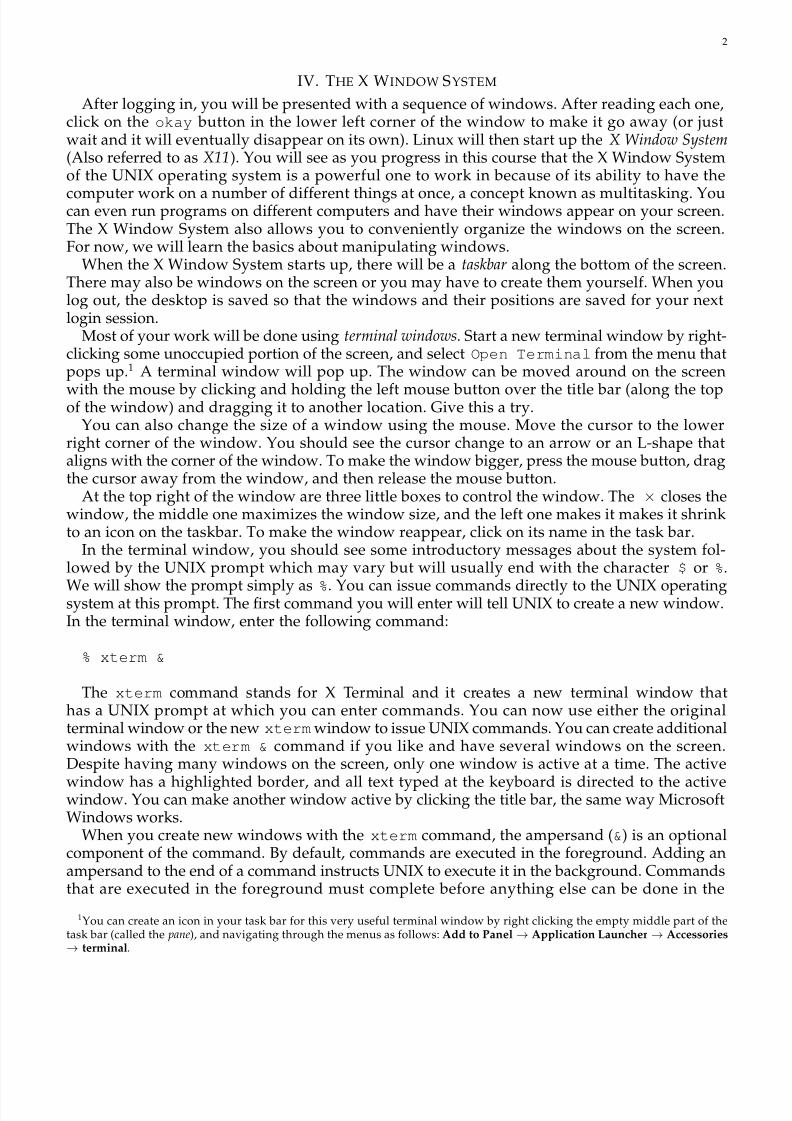
If you mapped out the directory and file organization onto a graphical representation, youwould get a tree-like structure as shown in the diagram. At the top is the root directory. It isrepresented by a slash character, which is its name. The root directory may contain files, and itwill also contain other directories. The files and directories within the root directory are shownas nodes below and attached to the root directory. These directories may have files and otherdirectories contained within them and these are shown as nodes below and attached to theparent directory. This pattern can be repeated many times.

8/12/2019 Tutorial About UNIX Basics
http://slidepdf.com/reader/full/tutorial-about-unix-basics 4/11
4
...
... bli janderstff ...
... prof
spool bin u
/
UNIX file organization
In the figure, tff is a subdirectory of prof, and u is the parent directory of prof.It is the files that are actually important when it comes to running programs, whereas the
directories are only there to organize the files. When you want to work with files, you generallyhave immediate access to the files in one directory only. This directory is called the workingdirectory. To find out what the present working directory is, type in the following command:
% pwd
UNIX will respond with a string that looks like /u/prof/bli. This string describes a paththrough the directory tree from the root directory to the present working directory. Reading itfrom left to right, the path starts at the root directory, which contains the directory named u,which contains the directory prof, which contains the directory bli. While your directory pathmay be different, it always reflects your present working directory.
You can change the present working directory using the cd command, which is short for “change directory.” The cd command takes an argument, which is an extra term that is input afterthe command. In this case the argument is the path of the directory to which you want to move.There has to be a space between the command and the argument. Try the following:
% c d /
Then enter the pwd command. You will see that the present working directory is as you haverequested — the root directory. Now try the following:
% c d / u
Entering the pwd command will show that you are now in the directory requested. Finally,
enter:
% cd
and this will take you back to your home directory as you can verify using the pwd commandonce again. Every time you wish to return to your home directory from anywhere else, you justneed to use the command cd without any parameters. the home directory is a special directorythat is created for you. The home directory is yours and yours alone, and you may freely createfiles and subdirectories within your home directory.
Up until now, we have been specifying the path from the root directory to the desired directory

8/12/2019 Tutorial About UNIX Basics
http://slidepdf.com/reader/full/tutorial-about-unix-basics 5/11
5
as the argument to the cd command. This is called the absolute path. It is not necessary to alwaysgive the absolute path as the argument and usually one does not do so. Rather, one can usewhat is known as a relative path.
To see how relative paths work, start by going to the root directory by entering cd /. Nowgo to the u directory by entering the following command:
% c d u
If you do a pwd command, you will see that you are now in /u even though you did nothave the slash beginning the argument of the cd command. Because the argument did not beginwith a slash, UNIX understood you to mean go to the u directory from the present workingdirectory, which is /.
Again, if you enter the pwd command you will see how you have moved into the new directory.There are two important short forms that are used to specify directories. Two consecutive
periods (..) refers to the parent directory of the current directory, so if you use the commandcd .. the parent directory will become the working directory. The other important short formis the ∼ character, which refers to your home directory. No matter where you are in the directory
tree, entering cd ∼
will make your home directory the working directory. Of course, as we justmentioned, with the cd command, you can get even simpler than that and enter just cd to makeyour home directory the working directory.
Practice using these short forms. First, enter a command to go directly to your home directory(cd ∼ or cd), then back up the directory tree, one directory at a time, using the cd .. command.Then return to your home directory once again.
Now you should have a good understanding of navigating around directories. But of course,the interesting part is not directories, but what they contain. To determine what a directorycontains, one uses the ls command, which stands for “list” and instructs UNIX to list thecontents of the present working directory, which will include any files and subdirectories. Nowlet us see what we can find using the ls command. Go to the root directory and enter:
% ls
You will see some text (strings) arranged in columns. The ls command is displaying the namesof files and subdirectories contained in the root directory. Try using ls in the /u directory andin other directories if you wish.
Now go to your home directory and enter ls. There is probably no output. This is because asa new user, you have not created any new files or directories. However, even though ls doesnot show you any files in your home directory, there are some there that are hidden. To showall the files, including those that are hidden, enter:
% l s - a
Some filenames will be displayed. The names of hidden files are easily distinguishable asthey all begin with a period. When your account was created, your home directory and a fewhidden files were automatically created for you. These files are hidden because you would notnormally work with them as you would with your program files. Hidden files usually containspecial information for the computer system on various things such as how to set up your screendisplay or how to respond to your commands. You may want to explore some of these files anddetermine what they do some other time.
One last variation on the ls command that you will probably find helpful is:

8/12/2019 Tutorial About UNIX Basics
http://slidepdf.com/reader/full/tutorial-about-unix-basics 6/11
6
% ls -al
The final l stands for long form and entering this command will show all files and directorieswith more descriptive information for each item. A concise summary of directory and fileorganization can be found in the Getting Started With UNIX manual(see: http://www.ecf.utoronto.ca/ecf/docs/unix/).
VII. MANIPULATING D IRECTORIES AND F ILES
In the previous section, it was shown how to explore the directory tree and how to look atexisting directory contents. Now you will learn the basic commands for changing directory andfile organization. For the most part, this will be constrained to directories and files within yourown home directory.
Changing the directory tree structure is accomplished through the use of two basic commands:one that creates new directories, and one that destroys them. The mkdir command makes a newdirectory. To illustrate its use, go to your home directory and create a new directory there byentering
% cd ∼
% mkdir aps105
The argument supplied with this command is the name of the new directory, aps105. Youcan verify that a new directory was made by using the ls command. Notice that, by default,the new directory is placed within the present working directory.
Removing directories that are no longer required is just as easy. To do so, you go to thedirectory in which the unwanted directory is contained, then use the command:
% rmdir <directoryName>
Note that a directory cannot be removed unless it contains no other files and no otherdirectories.
Basic file manipulation is achieved through the commands that copy, move and delete files.The cp (copy) command is used to make a duplicate of an existing file. It takes two arguments:the first argument is the name of the file to be copied, the second argument is the new name of the new duplicate file. In your home directory, enter the following command:
% cp .login new.file
This command has made a copy of the hidden file .login and called it new.file which is
not a hidden file because its name does not begin with a period. Verify that the copy was madeusing the ls command.The mv (move) command changes the name of a file, and can also move a file into a different
directory (an idea that will be discussed shortly). Try the following:
% mv new.file newname.file
Again, the ls command will show you the change that was made.Finally, files can be deleted by using the rm (remove) command. Delete the new file that you
created with the following:

8/12/2019 Tutorial About UNIX Basics
http://slidepdf.com/reader/full/tutorial-about-unix-basics 7/11
7
% rm newname.file
Up until now, the file and directory manipulation commands have been demonstrated tooperate only within the present working directory. These commands are in fact more versatilethan this because it is possible to work with files and directories other than those in the presentworking directory. To work with a file or directory outside of the present working directory, you
must supply its path rather than just its name for the command argument. Absolute or relativepaths can be used.For example, cp can be used to make a duplicate of a file that is not within the present working
directory. Use the following command to copy the C program hello.c which is located in thedirectory /share/copy/aps105f to your home directory:
% cp /share/copy/aps105f/hello.c .
The first argument of the cp command is the source file; here it contains the absolute path of the hello.c program file. The second argument is a single period, a commonly used short formthat represents the present working directory. UNIX interprets this command to mean place a
copy of the file hello.c
(located in /share/copy/aps105f
) in the current directory and giveit the same name: hello.c. Now try using the mv command to place this file in the aps105
directory you created earlier:
% mv hello.c aps105/hello.c
The mkdir, rmdir, and rm commands also can take paths as arguments. Experiment withthese commands some more until you get the hang of it. Use the UNIX manual as a reference.
VIII. CREATING, COMPILING AND R UNNING A C PROGRAM
There are two approaches to creating, compiling and running the C programs that you will
write for this course: Either you can use a separate tool to perform each of these actions – a texteditor to create the program file, a compile command to compile it, and another command to runit; Or, you can use an Integrated Development Environment (called IDE), which allows you toperform many tasks from a single, usually graphical program interface. The next sections addressthe first technique. Though you will probably find the IDE much easier to use, you should makean effort to learn the editor-based approach in the event that an IDE is not available to you inyour future work environment (most likely if you wish to work on computers located thousandsof miles away from you, such as a web server).
IX. TEX T EDITING
The most basic and most important files that you will be working with are text files. A textfile consists of readable text that can be created using the keys on a standard keyboard. Textfiles are used for various purposes so you will want to have a good knowledge of how to workwith them. In this course, you will be making text files that will serve as C programs.
You can create or make changes to a text file using what is called a text editor. There are severaltext editing programs available for use on the computer network. The editor you should learnto use for your lab assignments is called nedit, and you should try using it fairly soon. Call upnedit on your computer using the command:
% nedit &

8/12/2019 Tutorial About UNIX Basics
http://slidepdf.com/reader/full/tutorial-about-unix-basics 8/11
8
The nedit window that pops up differs slightly from the xterm windows we have beenusing. This window is specifically designed for editing text files. There are two areas we needto understand in this window. Along the top of the window is a menu bar with categories of actions that may be performed. The bottom is a large empty box and it is here where the textfile is composed. nedit starts up with this section cleared so you can create a file from scratch.
Let us create a simple text file. Move the mouse so that the cursor is pointing in this section.
Then write some simple text in this box such as your name or “testing testing 1 2 3 ...”Now lets save our file. Because this is a new file, it has yet to be named. To save our newfile select File → SaveAs from the menu bar. Another pop-up box will be displayed whichallows us to identify the new filename and where (in which directory) we wish to store this file.Point the cursor inside the box labelled Save File As and append test.txt to the path whichis displayed, then click on the OK button. You have just created a new text file. Select File →
Exit from the Menu bar to close the nedit window.To see that a new text file was created, go to the xterm window and enter an ls command.
The file test.txt should appear in the directory listing.Open up an nedit window again using the command written above. Besides creating new
files, nedit can be used to change existing files. To open an existing file, select File → Open
from the menu bar. Another pop-up box displays our directory and file listing. Select the filewe have just created by double-clicking on test.txt. The file you created is loaded into thetext file section. You can now edit the file. Point with the mouse just after the first testing
word and click. Now press the backspace key on the keyboard several times until the word iserased. Now, type in the word Editing. Notice that (modified) has been added to the windowlabel next to the name of your file. This tells you that you have made changes to the file, buthave not saved them. To save this file (which has already been named), select File → Save
from the menu bar and your changes will be saved. Finally, select File → Exit from the menu bar to exit the editor.
If you explore the nedit menu bar, you will discover features that will probably help youwith future programming exercises. Search allows you to look for words, or replace them inyour text. Preferences will allow you to highlight the structure (syntax) of your C programsand show your line numbers (useful for finding problems). Shell will allow you to executecommands to compile your C programs without exiting the editor – your compilation errorswill be displayed in nedit so that you can make immediate corrections. The Shell optionsmay be too difficult for you at first, but as your Unix comfort-level increases, you may want toexperiment with this.
Other editors you may want to try out are pico, which is also for beginners, and vi or emacs
which are for more advanced users.Editors are useful for creating and editing text files, but if you just want to read the contents
of a text file, you can use one of several UNIX commands at an xterm window. This saves youfrom having to start up a text editor to view the file. The most convenient command for typingout a text file is the more command, but most UNIX systems have a better version of more,called less. Entering more (or less) along with the text file name as an argument types outthe file in the xterm window, (one screen at a time, if the file is longer than one screen). Youcan advance through the file by pressing the space bar. Try using the more command as follows:
% more test.txt
X. COMPILING AND R UNNING A C PROGRAM
Now try to compile the hello.c program. From a terminal window, go to the aps105
directory and start the C compiler by typing:

8/12/2019 Tutorial About UNIX Basics
http://slidepdf.com/reader/full/tutorial-about-unix-basics 9/11
9
% gcc -o hello hello.c
You run this program by entering the following:
% ./hello
You should now see the output of the program, saying Hello world!
XI. SUBMITTING YOUR LAB ASSIGNMENTS
Once you have a C program working as your solutions for one of the labs, you can submit itelectronically to be marked. To submit your lab programs, run the command as follows:
% submitaps105f 1 simple.c
This command will submit the file simple.c for lab 1. You can continue to work on yourown version of simple.c without affecting your submission. To submit code for other labs,replace the 1 with the lab number.
If you choose to resubmit a file again after making changes, the older version is replaced withthe newer one. However, you can never erase files once they are submitted.
To view the list of files you have submitted for lab 1:
% submitaps105f -l 1
Note the -l is a dash-ell. This command will show you the files submitted, one per line. Thecolumns show a variety of details, such as the time each was submitted and the size of thesubmitted file. Use this information to remind you which version you have submitted, sincethere is no way for you to read your submitted files. You must submit your solutions for eachlab assignment before the due date given in the lab handout.
XII. TRANSFERRING F ILES B ETWEEN COMPUTERS: scp
When logged in to a computer on the ECF system you are using what is known as a distributed file system. This simply means that your files are visible to any ECF machine you happen to belogged in to, be it p42.ecf.utoronto.ca or p100.ecf.utoronto.ca. As long as you doall your work on ECF machines, you do not need to worry about having to transfer files.
However, for APS105, many of you may elect to work at home (or elsewhere), and will haveto transfer your files to ECF so that they can be submitted for marking. To do this, you can usea utility named scp, which is a secure version of cp, and behaves in a very similar manner. Topractice using scp, we will copy a file from whichever machine you are currently logged in toto p100.ecf. Try typing
% scp hello.c [email protected]:hello2.c
where yourLogin should be replaced with whatever your login name is. You will be promptedfor your password. You may also be given a warning the first time you transfer a file to a newmachine, that looks like this:
The authenticity of host ’p100.ecf (128.100.8.150)’ can’t be established.
RSA key fingerprint is 62:b8:e7:02:67:5c:1e:3b:de:e0:cd:cf:37:7d:7f:d7.
Are you sure you want to continue connecting (yes/no)? yes

8/12/2019 Tutorial About UNIX Basics
http://slidepdf.com/reader/full/tutorial-about-unix-basics 10/11
10
It’s OK to answer ’yes’.Since we were copying the file to the same file system, this command has been demonstrated
in a way that copies the file to a new name, hello2.c. Typing ls -l will show the new copy. If you wanted to copy the file to a machine on another system, say seth.eecg, without changingits name, you would type
% scp hello.c [email protected]:
If you wanted to copy a file from that remote system,2 you could type
% scp [email protected]:simple.c .
The main difference between scp and cp is the addition of the construct username@system:
at the beginning of the name of either the file being copied or the location the file is being copiedto. The ‘:’ character is important, as it tells scp where the pathname begins. When the firstcharacter after the ‘:’ is not /, scp assumes that a pathname relative to the login name’s homedirectory is being used. So, for example, the command
% scp someFile [email protected]:aps105/
Copies the file someFile from the present working directory on the machine you are currentlylogged into, to the aps105 subdirectory of the home directory of user bli on p100.ecf. Thecommand
% scp someFile [email protected]:/tmp/
would transfer the file to the /tmp directory on p100.ecf — this is an example of using anabsolute pathname.
In order to transfer files from a PC running windows, you will need to download a Windowsversion of scp. If you use Google to search for WinSCP or PuTTY you will find free programsfor Windows that transfer files to and from your PC. In particular, the PuTTY download pagehas a utility pscp which behaves the same as scp.
If you use a Mac running Mac OS X, the good news is that all command-line utilities that wehave discussed before work well, since Mac OS X is another variant of UNIX. You just need tostart the Terminal application in /Applications/Utilities/ , and enter your commands.
XIII. LOGGING I NT O ECF REMOTELY
You may choose to work from a remote location, but directly on the ECF computers. You cando so by logging into the ECF computers remotely, using the ssh command from any otherUNIX computer, including Linux and Mac OS X. The ssh command can be used as follows:
% ssh -l bli p100.ecf.utoronto.ca
where bli is your ECF login name, and -l is dash-ell. You will be prompted for your ECFpassword to log in.
If you find that the backspace key does not work at all after you log in, you need to type thefollowing command after you log in:
2In the following examples, the name seth.eecg.utoronto.edu is a real machine, but since you (almost certainly) do nothave your own account on this machine, you cannot expect these examples to work if you try them.

8/12/2019 Tutorial About UNIX Basics
http://slidepdf.com/reader/full/tutorial-about-unix-basics 11/11
11
% stty intr ˆC
If you wish to avoid entering this command every time you log in, you need to add it to theend of a file called .login in your home directory, by using a terminal text editor such as vi
or pico. Note that nedit will not work well in a ssh terminal, since it requires the X WindowSystem to display its graphical user interface.
If you use a Windows computer, you need to install a SSH client application, such as PuTTYthat we have previously mentioned, or one of many other alternatives available on Windows.For more information, refer to the web page at http://www.openssh.org/windows.html.
XIV. ELECTRONIC MAI L
To receive or send email messages using your ECF account, simply visit:https://postbox.ecf.utoronto.ca/webmail/src/login.php
If you wish to have mail that is sent to your ECF account forwarded to you at another address,or to set up automatic replies, please also visit the web site above, and follow the instructionsthere.
Important: You are required to read e-mail sent to you at your ECF email address, as it may
contain important announcements from the First Year Office or the ECE Undergraduate Office.
XV. BROWSING THE W EB
You should be able to use the FireFox button (the icon depicting planet earth encircled by amouse and its cord) on the task bar to start FireFox, a high-quality web browser. If not, you canstart FireFox by typing, in a window:
% firefox &
After a delay, you may see a window asking you if you will accept various terms and
conditions. Read it and then click the OK box if you wish to proceed.
XVI. LOGGING O UT
To log out, use the Actions menu on the top, and then choose Log out.Never forget to log off when you are done! If you do not log out, someone will be able to
get unauthorized access to your programs and other files after you leave the terminal. Once inyour account, they can easily copy your solutions to a remote computer by using scp.