truly integrated cam: inventor hsm is a well-oiled...
TRANSCRIPT

Truly Integrated CAM: Inventor HSM is a Well-Oiled Machine Gavin Bath – CADPRO Systems Limited
PE5895 Learn to extend the power of Autodesk, Inc.’s, fully integrated CAM Solution for Inventor
software by complementing it with Vault software. You will learn about the workflows used to create machine code for the CNC (computer numerical control) machining of your parts, and you will also learn the benefits of using an integrated CAM system. Data management is often a nightmare for companies that maintain design files separately from files containing manufacturing information such as toolpaths. In this class you will see just how easily you can maintain both in a single file, using Inventor HSM software and Vault software.
Learning Objectives At the end of this class, you will be able to:
• Learn how to set up stock and create toolpaths for machining inside Inventor software
• Learn how to post process toolpaths to convert to machine code
• Perform typical data management processes like revision changes for machined parts.
• Understand the benefits of a truly integrated CAM Solution
About the Speaker
Gavin Bath is currently employed by New Zealand’s largest Autodesk Reseller in a role split between
technical support/consulting and software development, usually in the form of customization for
Autodesk, Inc., products. His focus is primarily AutoCAD Inventor software, Vault software, and the
Autodesk HSM CAM products. Before becoming a technical consultant, he spent about 10 years as a
mechanical designer using Inventor software and Vault software. Gavin has worked in a variety of
industries, including aerospace, defense, consumer products, and materials, and he has handled
equipment for everything from logging to mining to food. In these areas he has designed machinery,
equipment, and products involving a huge variety of materials and manufacturing processes. Gavin
places utmost emphasis on manufacturability in the design work he does as a result of having always
worked very closely with the manufacturing environment. This has taught him to adapt and calibrate his
digital-prototyping tools to give real-world results.
@gavinbath
Truly Integrated CAM: Inventor HSM is a Well-Oiled Machine
2
Introduction
This document is intended to function primarily as a step-by-step guide to the workflows which will be
demonstrated in this class. Some additional background information is included for those who have never
used CAM software or are otherwise unfamiliar with the process of creating machine code from CAD
models. This handout does not cover all of the information that will be discussed in the class and should
be looked at as supplementary information.
CAM Overview
CAM – Computer Aided Manufacturing
How does it work?
Toolpath The model geometry is analysed and a 3D path for the cutting tool is fitted to it, based on a particular strategy for removing the material. Many factors go into the toolpath calculation including the geometry of the tool, its specifications, considerations for providing a good surface finish etc.
Post-processing To generate the machine code that will drive a particular CNC (Computer Numeric Control) machine, the toolpath and associated information has to be interpreted and translated. This is because there are a huge array of different types of machines, with different capabilities and functions, so the languages that run them can differ greatly. In order to get up and running with a CAM package, you need to acquire a post-processor to suit the controller of your machine. The Autodesk Post Development team can customize / modify / create this for you.
DNC While most machine controllers have the ability to load a program from some form of removable media (such as a disk or USB flash drive,) often the most efficient way to transfer data to the machine is through a network cable. With this method, the machine code can be drip-fed to the machine controller at a rate that it can keep up with, which allows huge programs to be processed, even if they are larger than the memory of the machine. This is called DNC, or Direct Numerical Control.
2.5D / 3D / 3+2 / 5 Simultaneous / Turning The HSM technology comes in three versions, with varying levels of price and capability. The lowest tier is the 2.5D InventorHSM Express / HSMXpress for Solidworks. Every CAM vendor seems to define 2.5D slightly differently, but in HSM it basically means that for most operations, the Z-level step downs are taken between each path in the X-Y plane. You can't generally have all 3 machine axes moving simultaneously. There are a few exceptions to the rule, including helical entry, and tracing an edge that varies in Z, for example when trimming a molded component. Here are a few examples showing the differences.

Truly Integrated CAM: Inventor HSM is a Well-Oiled Machine
3
Why Integrated CAM?
When you hear people refer to others as “being scared of change,” they’re probably talking about
engineers. And it’s no wonder, change can be a difficult thing to manage in a manufacturing environment.
The more steps in the process, the more places there are for something to get missed. When an issue
with a product becomes evident, and a change is required, the change usually has to flow through a
number of different departments, people, and software systems, as seamlessly as possible. For the
purposes of this discussion, we’ll simplify the journey to just the design and manufacturing.
Now, any designer who has used a relatively modern 3D CAD package, most likely takes for granted the
fact that when he updates his 3D model, his 2D drawing of that component will update itself automatically
to reflect the change. This is because the drawing and modelling environments are tightly integrated, and
the files are tightly linked to each other. When it comes time to manufacture the component with CNC
machinery, usually a CAM definition needs to be created for that item that will store all the information
regarding tooling, toolpath strategies and other CNC specific information. It is often at this point, that the
nice seamless links get broken, and new files need to be created in parallel using other software
packages.
The difficulty comes when changes to the design information have to be manually kept in sync with
changes to the manufacturing data. If the designer changes the widget from Rev. A to Rev. B, production
need to be aware that the file has changed, update their files to match, and then remember to align the
new CAM revision with the new CAD revision. With InventorHSM, the CAM information is stored inside
the same .ipt or .iam CAD files as the design data. This means only one file per component to revise, and
the CAM operators can be brought into the same data management system as the designers and
engineers, using Autodesk Vault.
The following workflows will be discussed and performed live in the class presentation. They are
designed to simulate some typical engineering change scenarios, and follow the data through the system
using two hypothetical characters, Dave Designer and Matt Machinist.
If you prefer watching videos to step by step written tutorials, I have created Screencasts of the various
CAM tutorials below. To see the data management processes though, you’ll have to attend the class.
1. Setup Stock 2. Create Toolpath 3. Post-process Code
Truly Integrated CAM: Inventor HSM is a Well-Oiled Machine
4
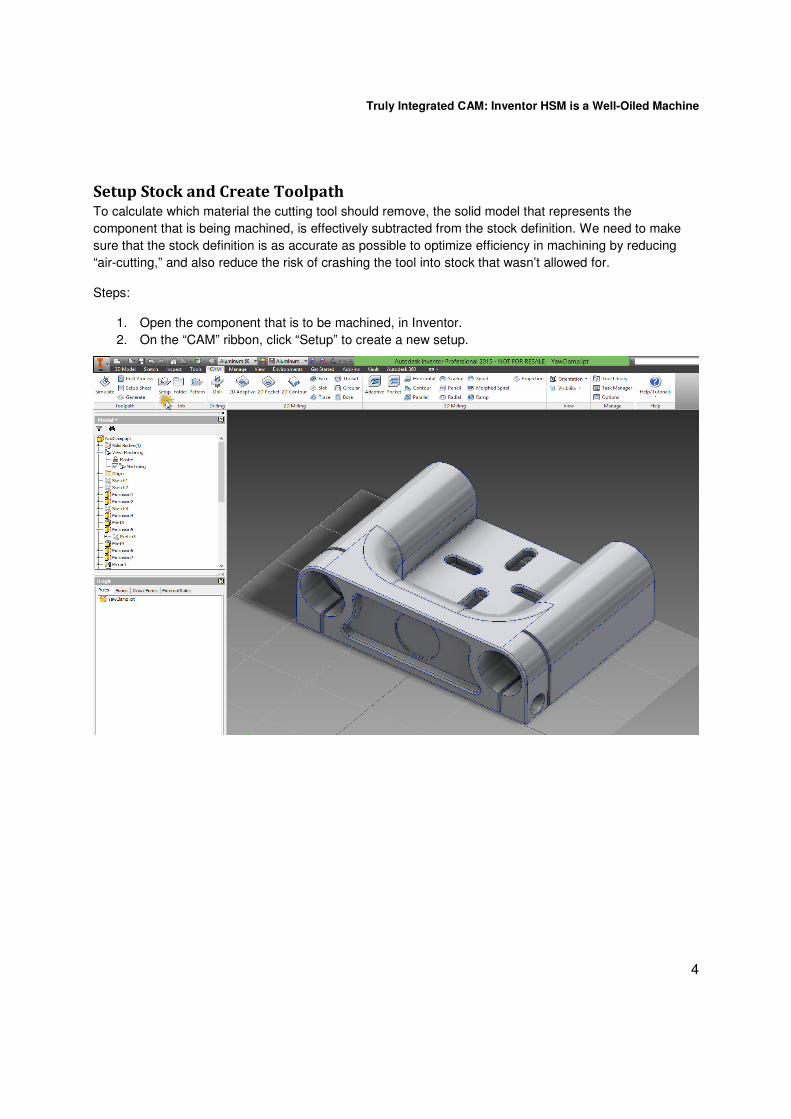
Setup Stock and Create Toolpath To calculate which material the cutting tool should remove, the solid model that represents the
component that is being machined, is effectively subtracted from the stock definition. We need to make
sure that the stock definition is as accurate as possible to optimize efficiency in machining by reducing
“air-cutting,” and also reduce the risk of crashing the tool into stock that wasn’t allowed for.
Steps:
1. Open the component that is to be machined, in Inventor.
2. On the “CAM” ribbon, click “Setup” to create a new setup.
Truly Integrated CAM: Inventor HSM is a Well-Oiled Machine
5
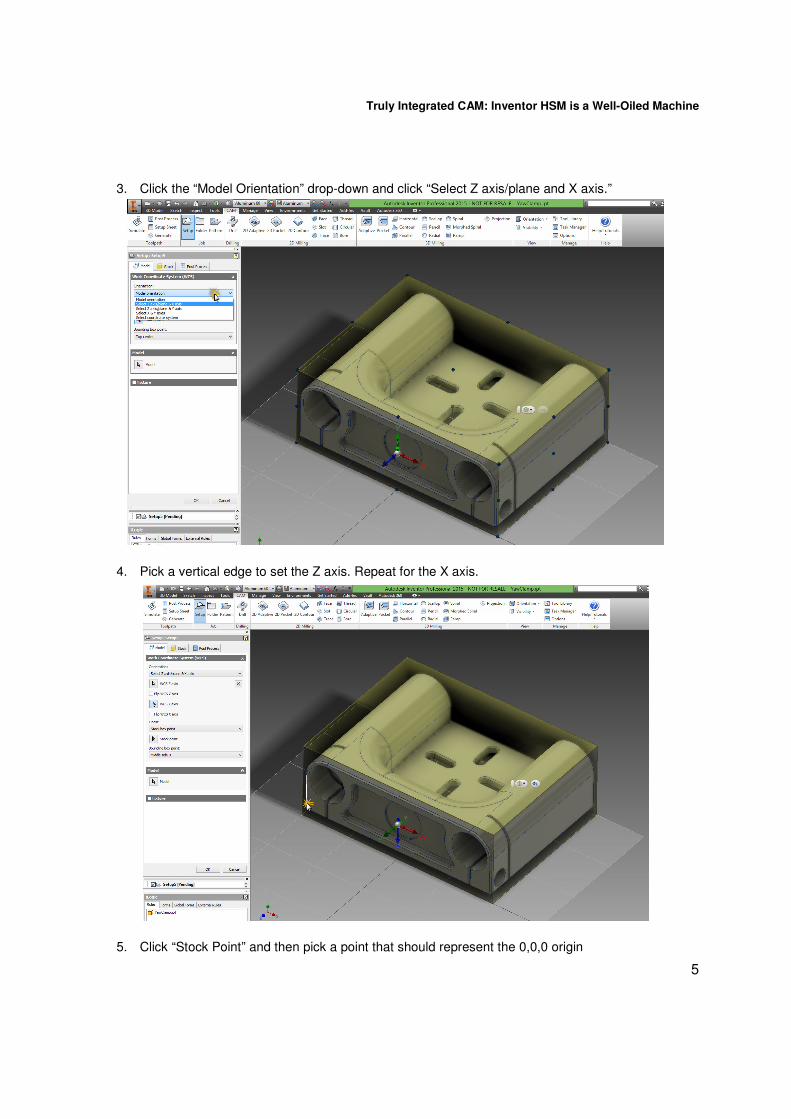
3. Click the “Model Orientation” drop-down and click “Select Z axis/plane and X axis.”
4. Pick a vertical edge to set the Z axis. Repeat for the X axis.
5. Click “Stock Point” and then pick a point that should represent the 0,0,0 origin
Truly Integrated CAM: Inventor HSM is a Well-Oiled Machine
6
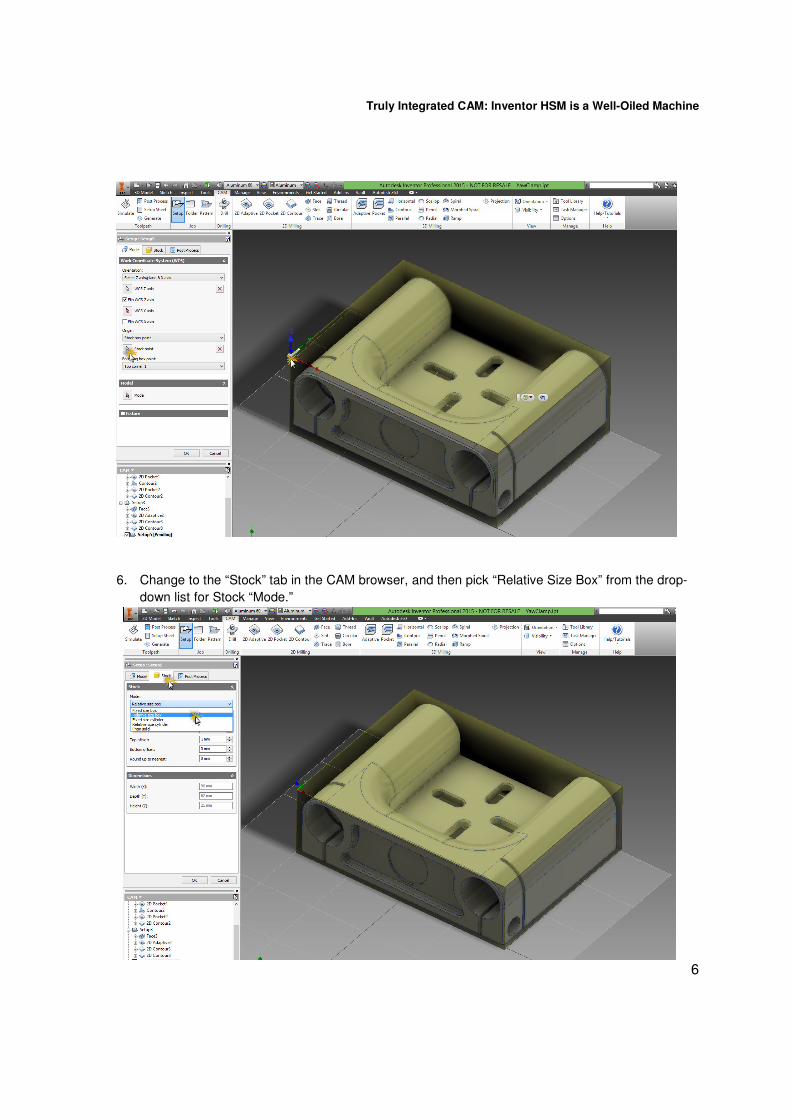
6. Change to the “Stock” tab in the CAM browser, and then pick “Relative Size Box” from the drop-
down list for Stock “Mode.”
Truly Integrated CAM: Inventor HSM is a Well-Oiled Machine
7
7. Type ‘10’ in the “Bottom offset” box to add extra stock to the bottom of the part for clamping.
8. Change to the “Post Process” tab and give the program a number and a comment. Consideration
should be given to whether the job will be run as separate programs, or a single program, based
on fixturing, and number of machine axes and ability to index the part.
9. Click “OK” to finish the setup.
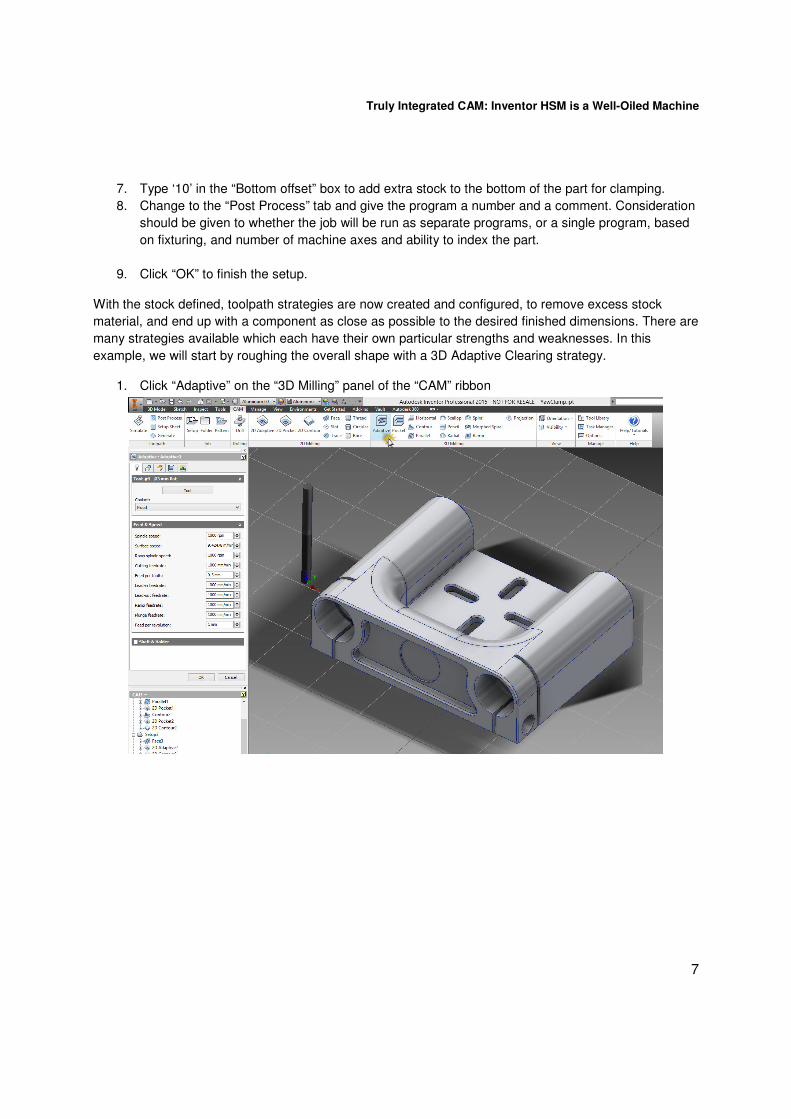
With the stock defined, toolpath strategies are now created and configured, to remove excess stock
material, and end up with a component as close as possible to the desired finished dimensions. There are
many strategies available which each have their own particular strengths and weaknesses. In this
example, we will start by roughing the overall shape with a 3D Adaptive Clearing strategy.
1. Click “Adaptive” on the “3D Milling” panel of the “CAM” ribbon

Truly Integrated CAM: Inventor HSM is a Well-Oiled Machine
8
2. Click “Tool” then expand the “By Type” folder and select “Flat Mill,” then pick the Ø10mm x 45mm
flute length cutter and click “Select.”
3. Change the “Spindle Speed to 8000RPM
4. Change the “Cutting Feedrate” to 2400mm/min
5. Change the “Feed per tooth” to 0.075mm
6. Click “OK”
7. Select the “Adaptive1” toolpath that you just created, and click “Simulate” on the CAM ribbon
Truly Integrated CAM: Inventor HSM is a Well-Oiled Machine
9
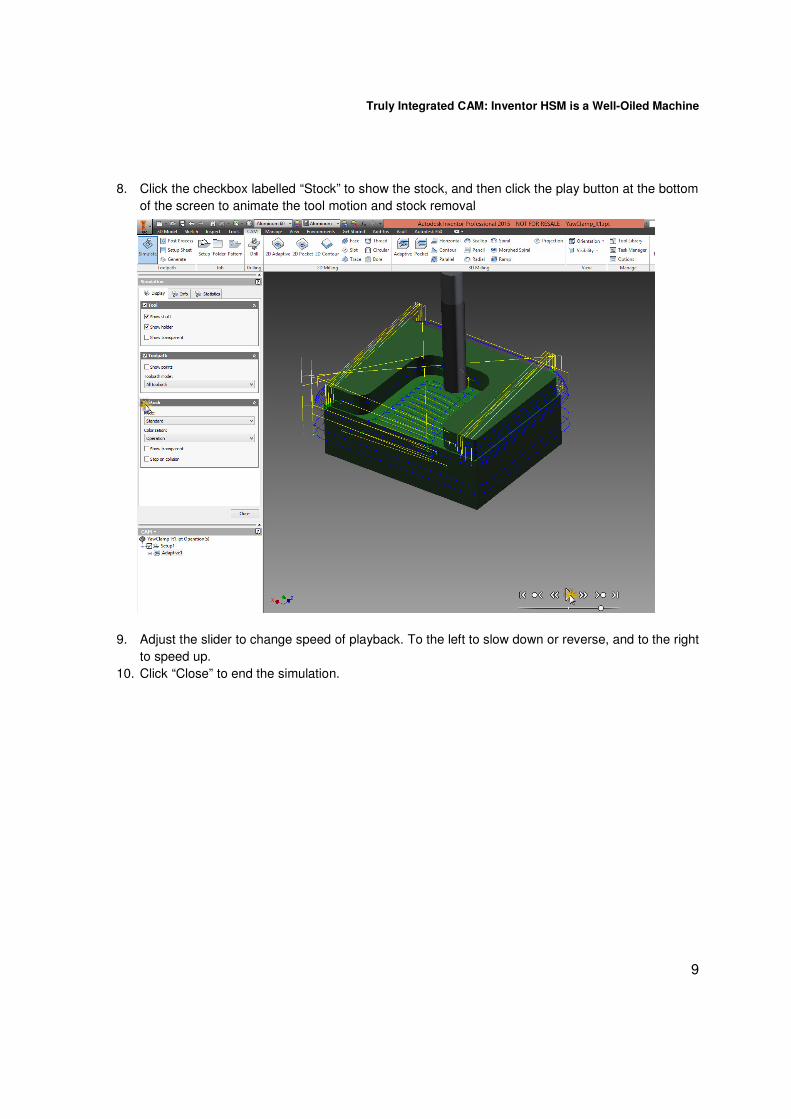
8. Click the checkbox labelled “Stock” to show the stock, and then click the play button at the bottom
of the screen to animate the tool motion and stock removal
9. Adjust the slider to change speed of playback. To the left to slow down or reverse, and to the right
to speed up.
10. Click “Close” to end the simulation.
Truly Integrated CAM: Inventor HSM is a Well-Oiled Machine
10
Post Process Toolpaths to Convert to Machine Code
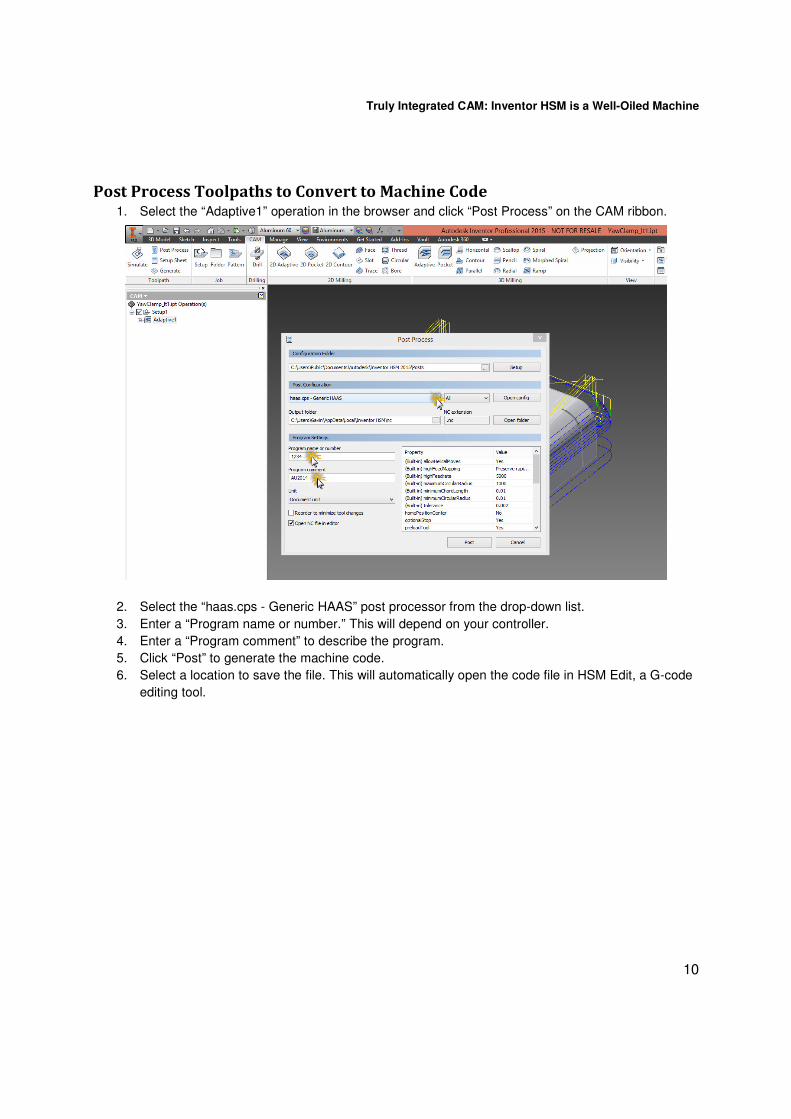
1. Select the “Adaptive1” operation in the browser and click “Post Process” on the CAM ribbon.
2. Select the “haas.cps - Generic HAAS” post processor from the drop-down list.
3. Enter a “Program name or number.” This will depend on your controller.
4. Enter a “Program comment” to describe the program.
5. Click “Post” to generate the machine code.
6. Select a location to save the file. This will automatically open the code file in HSM Edit, a G-code
editing tool.
Truly Integrated CAM: Inventor HSM is a Well-Oiled Machine
11
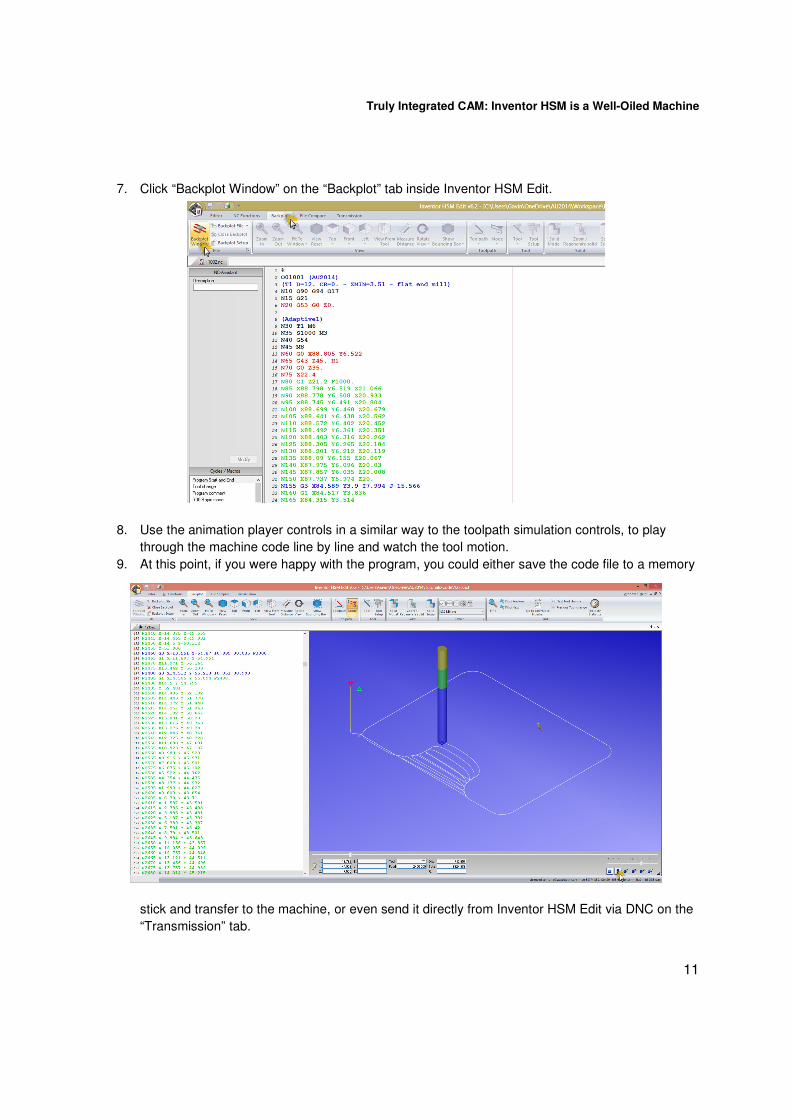
7. Click “Backplot Window” on the “Backplot” tab inside Inventor HSM Edit.
8. Use the animation player controls in a similar way to the toolpath simulation controls, to play
through the machine code line by line and watch the tool motion.
9. At this point, if you were happy with the program, you could either save the code file to a memory
stick and transfer to the machine, or even send it directly from Inventor HSM Edit via DNC on the
“Transmission” tab.

Truly Integrated CAM: Inventor HSM is a Well-Oiled Machine
12
Perform Typical Data Management Processes For this section, we will assume that you already have Vault Professional installed and configured. We
will be using both the standalone Vault Professional 2015 client, and the Vault Professional 2015 addin
for Inventor. The following steps should be imagined as being performed by two different users, with
different roles. They are Dave Designer, and Matt Machinist. Dave’s steps are in blue, and Matt’s are in
orange.
1. Open Inventor and log in to Vault
2. Click “Open” on the Vault Ribbon, to open a file from vault. This ensures that we get the latest
version of the file.
3. Locate and select the file that you want to work on, and click “Open.”
Truly Integrated CAM: Inventor HSM is a Well-Oiled Machine
13
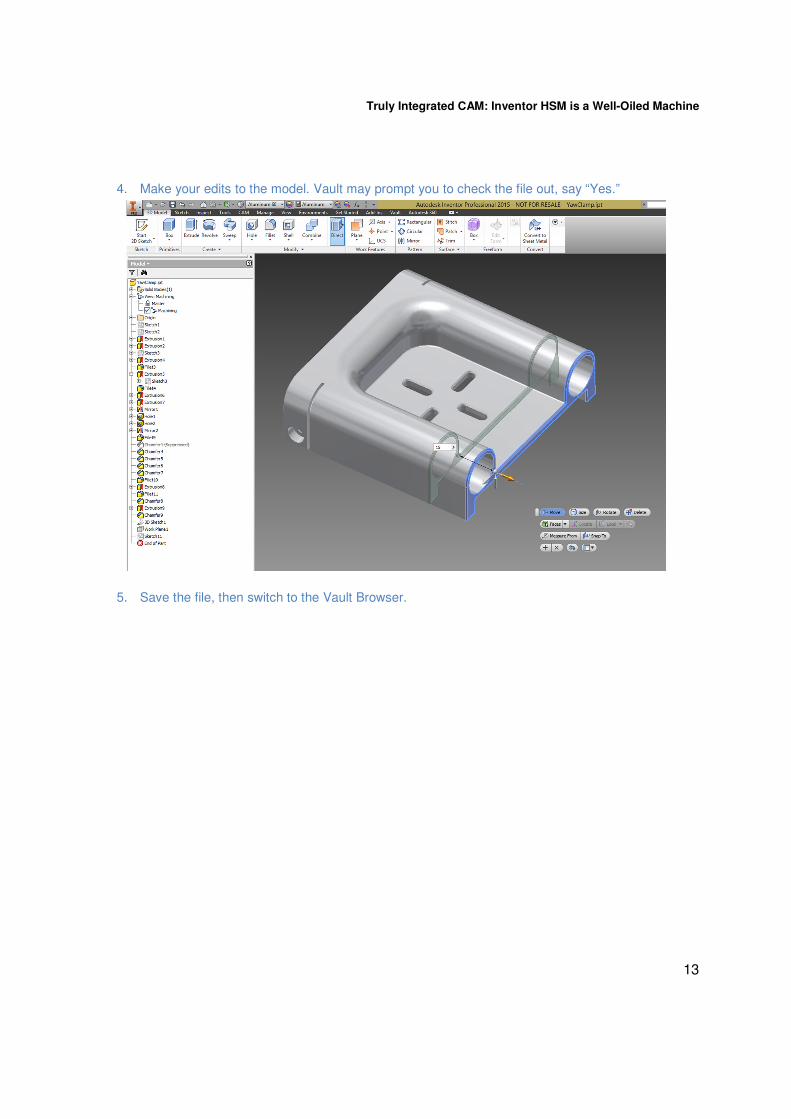
4. Make your edits to the model. Vault may prompt you to check the file out, say “Yes.”
5. Save the file, then switch to the Vault Browser.
Truly Integrated CAM: Inventor HSM is a Well-Oiled Machine
14
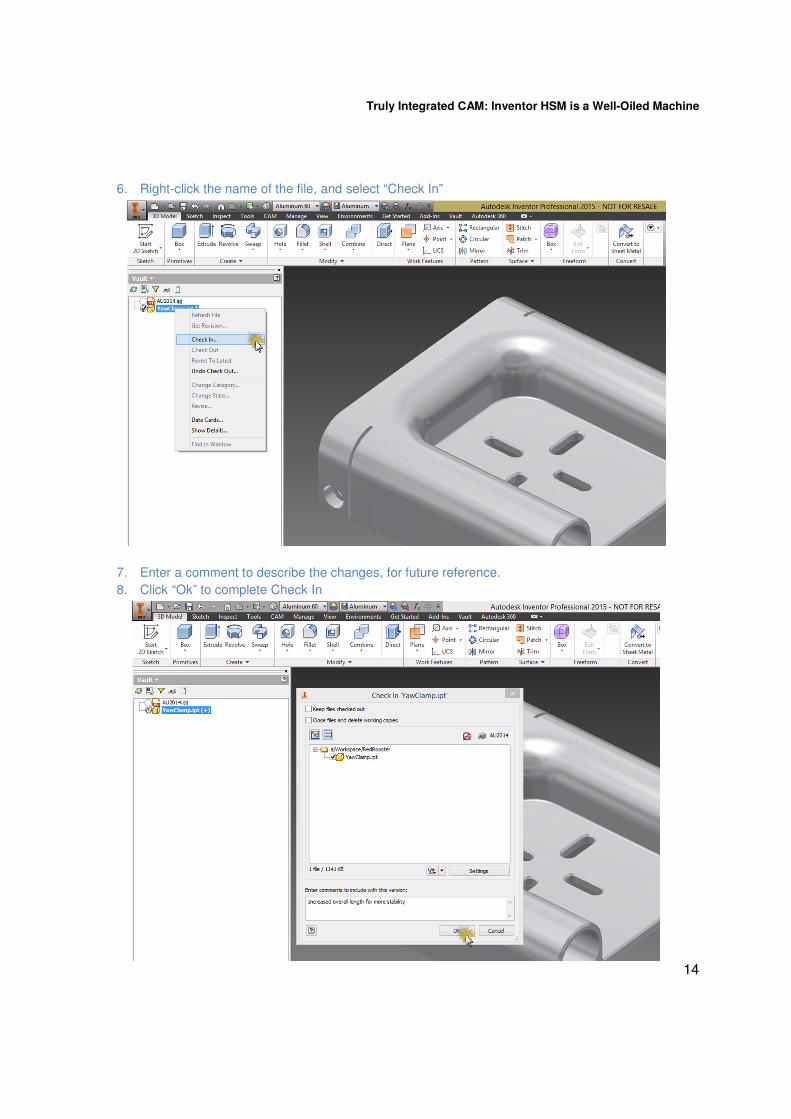
6. Right-click the name of the file, and select “Check In”
7. Enter a comment to describe the changes, for future reference.
8. Click “Ok” to complete Check In
Truly Integrated CAM: Inventor HSM is a Well-Oiled Machine
15
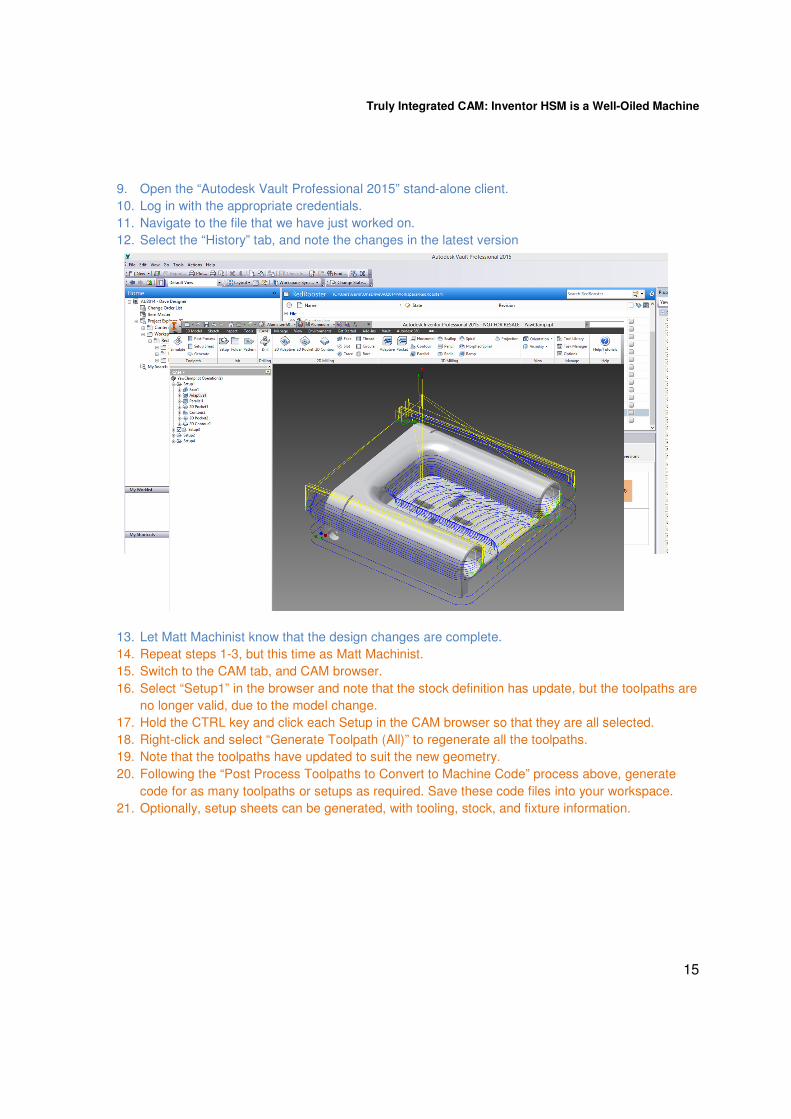
9. Open the “Autodesk Vault Professional 2015” stand-alone client.
10. Log in with the appropriate credentials.
11. Navigate to the file that we have just worked on.
12. Select the “History” tab, and note the changes in the latest version
13. Let Matt Machinist know that the design changes are complete.
14. Repeat steps 1-3, but this time as Matt Machinist.
15. Switch to the CAM tab, and CAM browser.
16. Select “Setup1” in the browser and note that the stock definition has update, but the toolpaths are
no longer valid, due to the model change.
17. Hold the CTRL key and click each Setup in the CAM browser so that they are all selected.
18. Right-click and select “Generate Toolpath (All)” to regenerate all the toolpaths.
19. Note that the toolpaths have updated to suit the new geometry.
20. Following the “Post Process Toolpaths to Convert to Machine Code” process above, generate
code for as many toolpaths or setups as required. Save these code files into your workspace.
21. Optionally, setup sheets can be generated, with tooling, stock, and fixture information.
Truly Integrated CAM: Inventor HSM is a Well-Oiled Machine
16
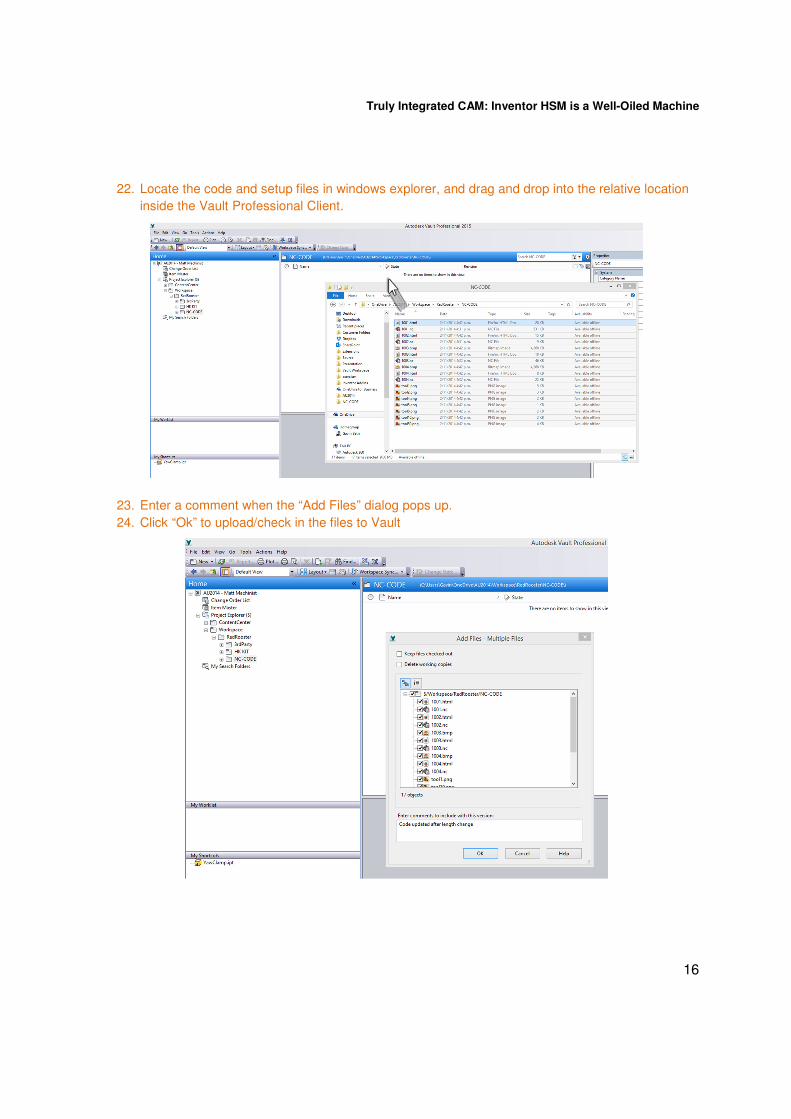
22. Locate the code and setup files in windows explorer, and drag and drop into the relative location
inside the Vault Professional Client.
23. Enter a comment when the “Add Files” dialog pops up.
24. Click “Ok” to upload/check in the files to Vault
Truly Integrated CAM: Inventor HSM is a Well-Oiled Machine
17
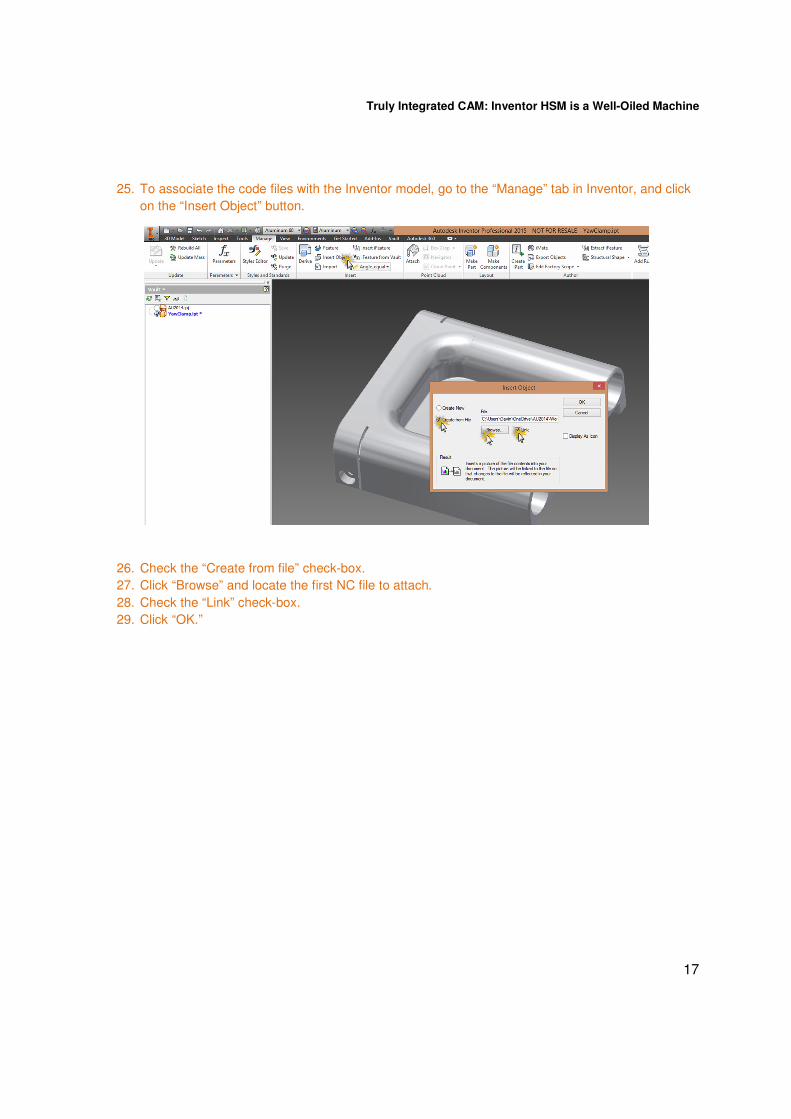
25. To associate the code files with the Inventor model, go to the “Manage” tab in Inventor, and click
on the “Insert Object” button.
26. Check the “Create from file” check-box.
27. Click “Browse” and locate the first NC file to attach.
28. Check the “Link” check-box.
29. Click “OK.”
Truly Integrated CAM: Inventor HSM is a Well-Oiled Machine
18
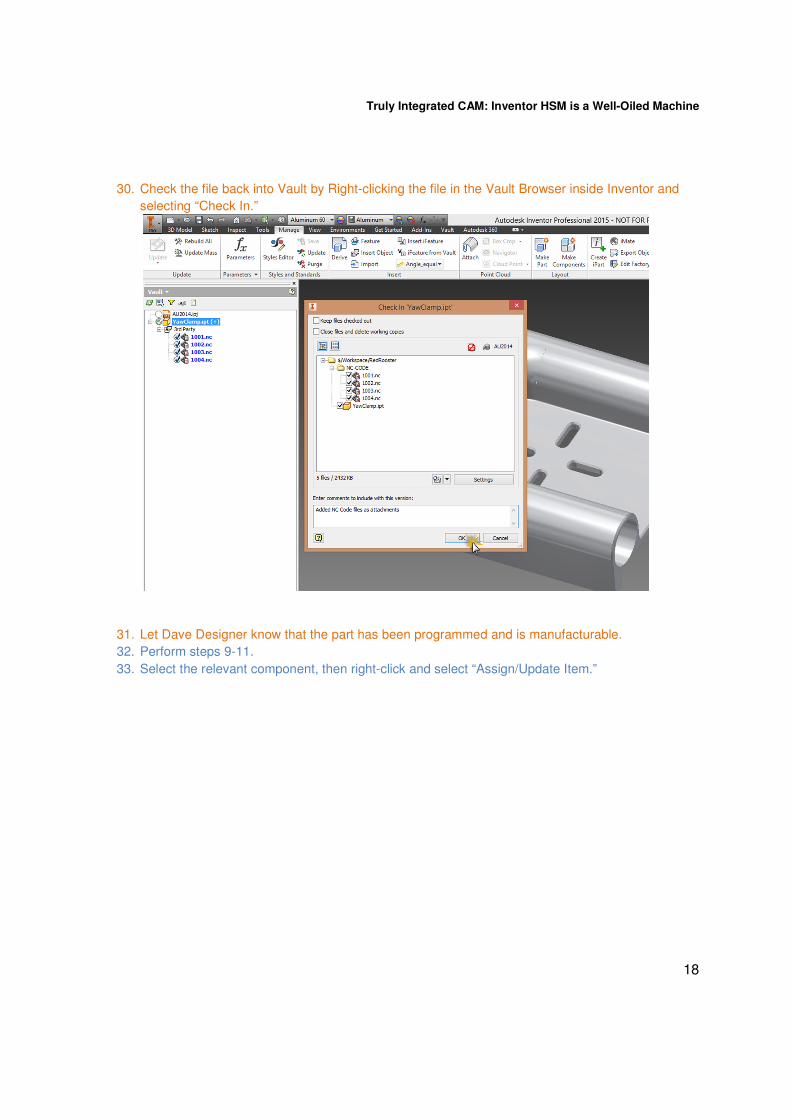
30. Check the file back into Vault by Right-clicking the file in the Vault Browser inside Inventor and
selecting “Check In.”
31. Let Dave Designer know that the part has been programmed and is manufacturable.
32. Perform steps 9-11.
33. Select the relevant component, then right-click and select “Assign/Update Item.”
Truly Integrated CAM: Inventor HSM is a Well-Oiled Machine
19
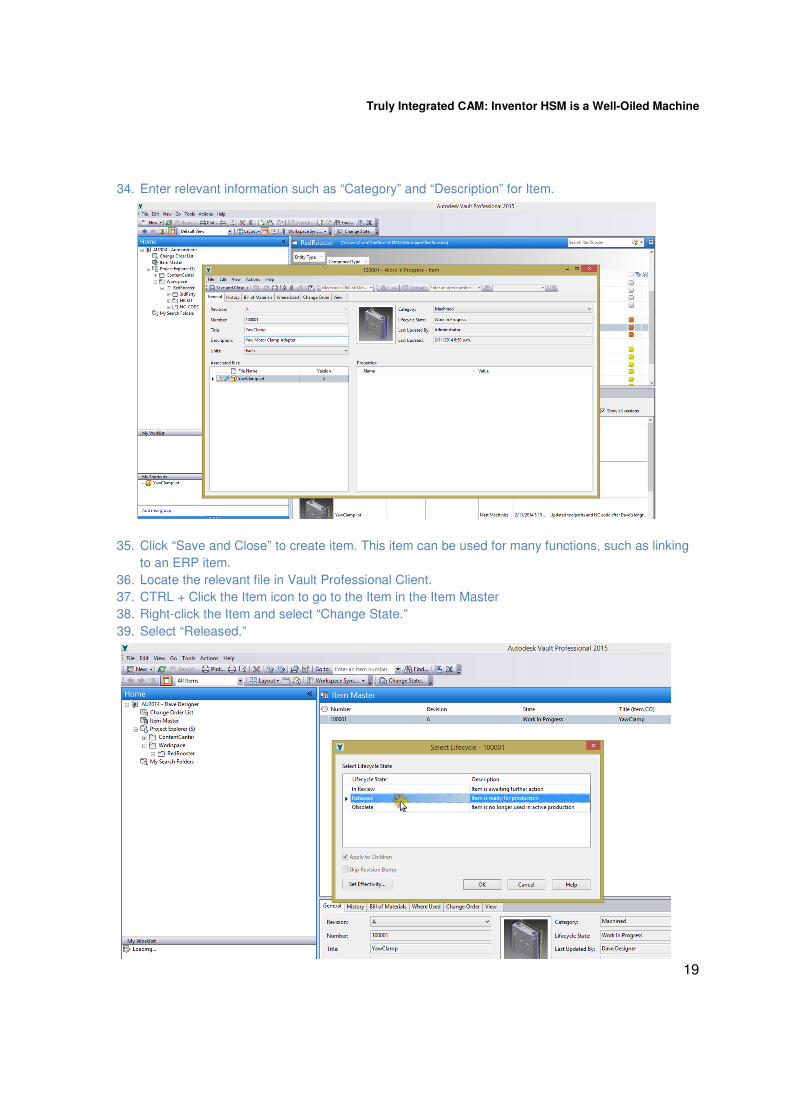
34. Enter relevant information such as “Category” and “Description” for Item.
35. Click “Save and Close” to create item. This item can be used for many functions, such as linking
to an ERP item.
36. Locate the relevant file in Vault Professional Client.
37. CTRL + Click the Item icon to go to the Item in the Item Master
38. Right-click the Item and select “Change State.”
39. Select “Released.”
Truly Integrated CAM: Inventor HSM is a Well-Oiled Machine
20
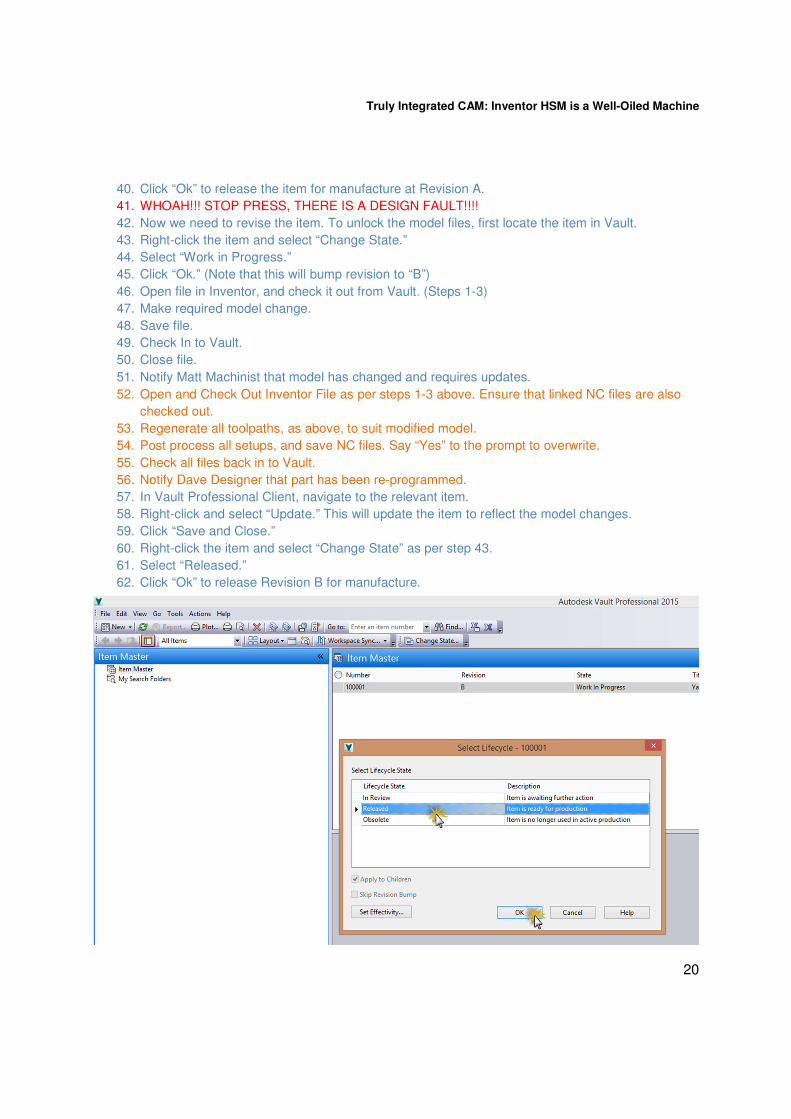
40. Click “Ok” to release the item for manufacture at Revision A.
41. WHOAH!!! STOP PRESS, THERE IS A DESIGN FAULT!!!!
42. Now we need to revise the item. To unlock the model files, first locate the item in Vault.
43. Right-click the item and select “Change State.”
44. Select “Work in Progress.”
45. Click “Ok.” (Note that this will bump revision to “B”)
46. Open file in Inventor, and check it out from Vault. (Steps 1-3)
47. Make required model change.
48. Save file.
49. Check In to Vault.
50. Close file.
51. Notify Matt Machinist that model has changed and requires updates.
52. Open and Check Out Inventor File as per steps 1-3 above. Ensure that linked NC files are also
checked out.
53. Regenerate all toolpaths, as above, to suit modified model.
54. Post process all setups, and save NC files. Say “Yes” to the prompt to overwrite.
55. Check all files back in to Vault.
56. Notify Dave Designer that part has been re-programmed.
57. In Vault Professional Client, navigate to the relevant item.
58. Right-click and select “Update.” This will update the item to reflect the model changes.
59. Click “Save and Close.”
60. Right-click the item and select “Change State” as per step 43.
61. Select “Released.”
62. Click “Ok” to release Revision B for manufacture.

Truly Integrated CAM: Inventor HSM is a Well-Oiled Machine
21
63. Finished.
These tutorials are available in an alternative format on Autodesk Screencast. QR codes above.
Useful links for background reading:
� Download 2.5D for free: http://cam.autodesk.com/
� Discussion forum: http://camforum.autodesk.com/
� YouTube: https://www.youtube.com/user/AutodeskCAM
� CADPRO Systems: http://www.cadpro.co.nz
� HSMWorks Down-under: http://www.hsmworks.co.nz
� Design & Motion Blog: http://designandmotion.net/
I look forward to seeing you in class at AU2014, in a few weeks’ time.