triplog user guide - opie accounting and tax, llc · 10.1 backup to sd card ... triplog is a...
TRANSCRIPT

0
TripLog GPS Mileage Tracker User Guide
* TripLog -- An Android App, Version 4.4.x
* May 20, 2012

0
Abstract TripLog is an Android GPS mileage tracking app that runs on the powerful Android operating system 1.6 or above. This guide is packed with exciting features that TripLog offers.

1
Table of Contents 1. Highlighted Features 2. Getting Started 2.1 Installing TripLog 2.2 Setting up your vehicle 2.3 The layout 2.4 Basic local settings 3. Starting a new Trip 3.1 The basics 3.2 Manual mileage entry 3.3 Automatic GPS mileage tracking 3.4 Activities and Notes 3.5 Locations 3.6 Parking and tolls 3.7 Take receipt photos 4. Trips List View 4.1 Navigation 4.2 Edit trip 4.3 Query driving distance 4.4 Create return trip 4.5 Copy trip 4.6 Copy one day of trips 4.7 Delete trip 4.8 Delete one day of trip 5. Fuel/Gasoline 5.1 Adding fuel purchase 5.2 Filled up 5.3 Fuel efficiency calculation 6. Vehicle Expenses 6.1 Categories and sub-categories 6.2 Take receipt photos 6.3 Make copies 7. Reports 7.1 The Reports 7.2 Email reports and logs 7.3 Purchase the reports 7.4 Choose email program to send 8. Locations 8.1 Add, edit, and delete 8.2 Merge to another location 8.3 Import new from contacts 8.4 Export to contacts 9. Purchases 9.1 Make purchase 9.2 Refresh purchase status

2
10. Data Transfer 10.1 Backup to SD card 10.2 Backup and email the file 10.3 Backup to Amazon cloud 10.4 Automatic daily backup 10.5 Daily backup to Amazon cloud 10.6 Restore from SD card 10.7 Restore from Amazon cloud 10.8 Restore missing photos 11 Reset/Replace Phone 11.1 Backup and restore data 11.2 Carry over purchases 12. Sharing 12.1 Share this app 13. More Settings 13.1 Data entry default date 13.1 Warning mileage threshold 13.3 Primary email account 13.4 Business activities 13.5 Mileage rates 13.6 Email Us and Rate Us 13.7 Did You Know? 14. Home Screen Widget 14.1 Install 14.2 Icons 14.3 Mileage today 14.4 GPS tracking
15. Vehicles 15.1 Add Vehicles 16. Auto Start 16.1 Automatically start mileage tracking 16.2 Automatically stop mileage tracking 17. FAQ

3
1. Highlighted Features TripLog is a reliable and sophisticated Android business app that helps you track your business trips by logging and storing mileage, fuel costs, tolls and parking. You can upload receipt photos to Amazon Cloud. You never have to worry about losing your receipts. With an auto start, built-in GPS, TripLog begins recording your trip the minute you take off. Use your device to transmit yearly, quarterly and monthly e-mail of vehicle reports and logs for tax deduction or mileage reimbursement. TripLog’s select features allow you to * track your mileage without having to set your starting point. TripLog does this for you with its auto start feature. * measure your fuel economy. * pinpoint your current location. * capture, store, and transmit images of your travel receipts. * record the last fuel entry and trip related logs for efficient trip tracking. * track trips with IRS Standard Mileage Rates that can be customized for business, medical, charity, and relocation expenses. * track your tax audit logs and monthly, quarterly and annually reports and transmit as CSV and HTML files e-mailed. * backup your trip data to an SD card or in the Cloud. * create automatic backups of your data on a daily basis.
2. Getting Started 2.1 Installing TripLog Installing TripLog is fairly quick and easy. You can install the software one of two ways: A. On the phone. You can install this app from Android Market (now Google Play Store) by searching for TripLog. Once TripLog displays, click Install to continue. B. On the web. Log into Google Play Store using your Google account and navigate to https://play.google.com/store/apps/details?id=com.esocialllc.vel. Click Install. The Google servers will push the app to your device.

4
2.2 Setting up your vehicle Start the TripLog app after agreeing to the End User License agreement. When the Add Vehicle dialog displays, follow the instructions below: Step 1 Enter the vehicle year in the YEAR section. Step 2 In Make field, enter the name of your car manufacturer (e.g. Chevrolet, BMW etc.). You can either manually type in the name, or select from the dropdown list. Step 3 Enter the vehicle model. Step 4 If your vehicle is a commercial truck, check the Commercial Truck option. Step 5 Click the SAVE button (See Fig. 1).
Fig 1
2.3 The Layout The interface of TripLog is very user friendly. You don’t have to be a tech wizard to operate this app. It is effortless to operate and yields precise trip stats. The tabs on the top navigation bar of the home page allow direct access to the four main categories: Trips, Fuel, Expenses and Reports (See Fig. 2).

5
Fig. 2
To view additional settings, use default Android Menu button on your device. The Menu will display at the bottom of your screen as shown in Fig 3.
Fig. 3
2.4 Basic Local Settings From the menu options, select Settings. 2.4.1 Selecting the Date Format Choose the preferred date format by going to Menu>Settings>Date Format, and select the date format of your choice. Available date formats include “dd/mm/yy”, “yy/mm/dd”, “dd-mm-yy”, and more.

6
2.4.2 Selecting your default currency TripLog allows you to select from a set of commonly used currencies. Select your currency by going to Menu>Settings>Currency Symbol. Your currency selection will be applied to the user interface and the reports. 2.4.3 Selecting the default System of Unit TripLog allows you to store mileage and volume details using any system of measurement. You may choose to use miles or kilometers, gallon or liter by adjusting your settings in Menu>Settings>System of Unit. 2.4.4 Gasoline Price Use this feature to set the standard tenth of a cent of the fuel price applicable in your region (for example, in the United States, the fuel price typically ends with 0.9 cents). The value however, may vary from country to country. Simply go to Menu>Settings>Fuel Price Ending option. A menu will pop out various values (e.g. 0.000, 0.001, 0.002 etc.). Choose the rate applicable in your region or enter it manually by selecting the Manually Enter option (See Fig 4). Then you will need to enter the tenth of a cent for each fuel unit price, e.g. $4.015
Fig 4
3. Starting a new Trip
3.1 The Basics

7
Once you set up your vehicle using the Add Vehicle menu, you are all set to exploit the extensive trip logging features TripLog has to offer. The rich and user friendly graphic user interface of the app makes it immensely easy to execute various operations efficiently. To mark the beginning of a new trip, select Trips (this is the default tab that displays, when the app is launched). At the bottom of the Trip window, you will see the Start Trip button as shown in the Fig. 5
Fig 5
When you click the Start Trip button, the trip page will display a number of fields and options allowing you to input your trip data (See Fig. 6).
Fig 6

8
The app automatically displays the vehicle name and the date as shown in the previous figure (Fig. 6). However, you can change the date and vehicle by clicking on the date button or vehicle dropdown list.
Below the Vehicle dropdown selection, there is the Beginning Odometer Reading section. Enter the current Odometer reading of your vehicle (See Fig. 7). Click on the button with pen icon to enter the digits or click + or – button to increment or decrement the number.
Fig 7
Now you are all set to start your trip while the app keeps track of the mileage record. You can track your mileage in two separate and distinct ways. You can either turn on your device’s built-in GPS or manually enter the odometer reading or mileage.
3.2 Manual mileage entry Click the Save button to save the partial trip and go back to the main trips list. Once you reach the destination, click End Trip button; and the Ending Odometer Reading section will show up. Alternatively, you can enter the Ending Odometer Reading immediately by checking the Enter Ending Odometer box below the Mileage Tracking field, enter the odometer reading, and the mileage will be calculated and displayed instantly (See Fig. 8). Then click on the Save button to save the trip.

9
Fig. 8
Entering past trips? Manual entry is ideal for entering past trips. The default date is today’s date, but you can change it by going to menu>Settings>Data Entry Default Date>choose Use last data entry date. Please remember you need to always choose Add New Location… for a different place; otherwise, the new location will overwrite the old one. The app will automatically find your current location. If you find it undesirable, you can turn it off by going to menu>Settings>uncheck Use Location Service.
3.3 Automatic GPS mileage tracking Once you entered the beginning odometer reading, you can choose to use GPS to calculate the mileage by clicking on the Start GPS Tracking button. Note, if you have GPS service deactivated in your phone, the app will alert and redirect to the Location and Security Settings page, where you can enable the Use GPS Satellites option. Once activated, click device Back button and click the Start GPS Tracking button again. The GPS receiver in your phone will keep tracking the distance you travel. The mileage driven will display on the Notification screen (see Fig 8a).

10
Fig. 8a When you reach the destination, mark an end to the trip by hitting the Stop button. The final odometer reading will be displayed instantly, and the mileage driven will be populated, plus driving time and average speed.
Feel like grabbing a sandwich? If you have to stop by somewhere during a trip, simply tap the Pause button in the Mileage Tracking field to pause the GPS tracking. It will turn off the GPS and will conserve battery. As soon as you are ready to go, enable it again by clicking on the Resume button. Please note that using the GPS receiver drains battery power faster.
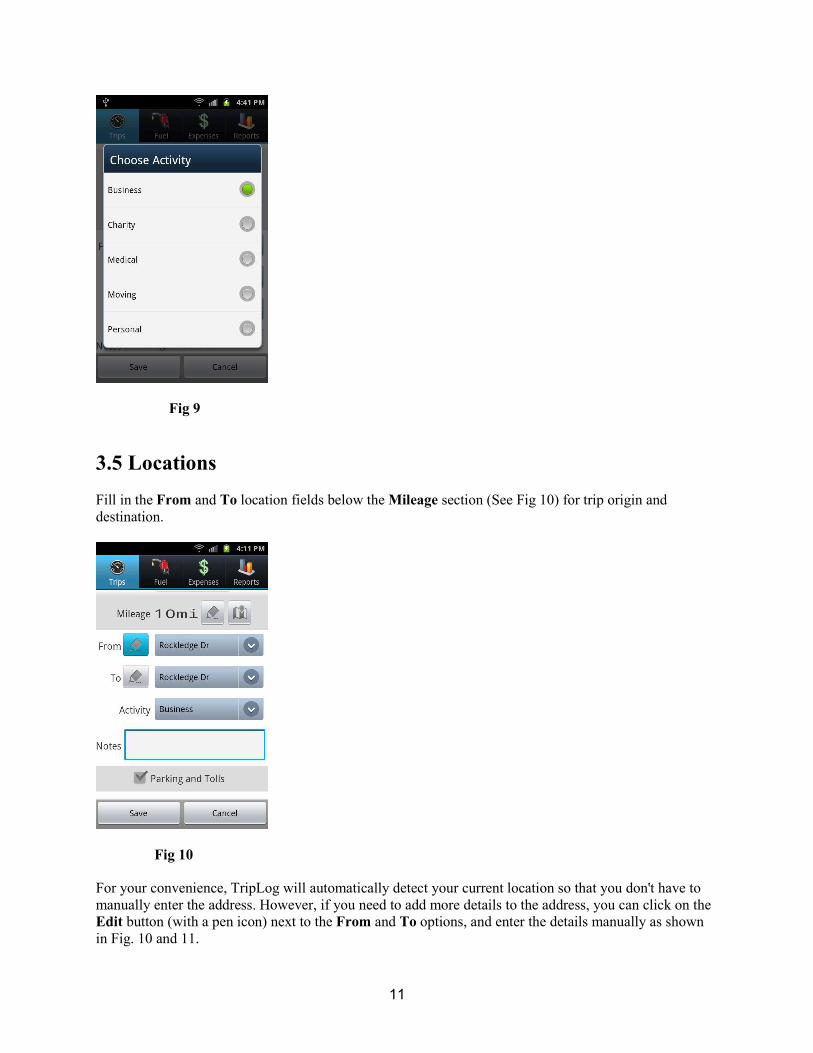
3.4 Activities and Notes Check the Activity box (See Fig. 9) for the purpose of your trip. You can customize the activities for multiple businesses or customers. For example, if you have a main job as a freelance editor, and a side job as a pizza delivery person, you can create an Activity and name it “Freelancer” and another one as “Delivery Person”. Please go to Menu>Settings>Business Activities for more information. You can also enter additional notes for the purpose of the trip in the Notes box just below Activity.
11
Fig 9
3.5 Locations Fill in the From and To location fields below the Mileage section (See Fig 10) for trip origin and destination.
Fig 10 For your convenience, TripLog will automatically detect your current location so that you don't have to manually enter the address. However, if you need to add more details to the address, you can click on the Edit button (with a pen icon) next to the From and To options, and enter the details manually as shown in Fig. 10 and 11.

12
Fig 11 If you want to enter a new location, never reuse an existing one, because it will overwrite the old location. Instead, select Add New Location… from the popup selection (See Fig 11a).
Fig 11a
3.6 Parking and Toll expenses This section allows you to enter all parking and toll expenses incurred during a trip. Check the Parking and Tolls checkbox to turn on the fields (See Fig 12).

13
Fig 12 Enter the parking and toll expenses using the ‘+’ and ‘-’ buttons, or click the Edit option (with a pen icon) to the right of either Parking or Toll field (refer to Fig 13 and 14).
Fig 13 Fig 14
Looking for Scale and Lumpers expenses? If you have set up the vehicle as a commercial truck (refer to section 2.2 and 14.1), you will see two more fields for Scale and Lumpers below Parking and Tolls.

14
3.7 Take receipt photos Click the Attach Receipt button and follow the instructions to take receipt photos (See Fig 15).
Fig 15 Click on the Launch button and the app will start the camera app. Capture the image of your receipt and click the Save button at the bottom as shown in Fig 16.
Fig 16 The saved image will be automatically uploaded to Amazon cloud storage for viewing and downloading from the HTML reports.

15
Fig 17 Once all required data has been entered, you can save the trip log, and the total vehicle related cost during your trip will be calculated in real time.
4. Trip List View Once you are done saving your entire trip details, you can easily view or modify the details later, as well as carry out a various other operations as explained below.
4.1 Navigation Navigating through the trip records is fairly easy. Simply go to the Trips tab, and use the left or right arrow buttons to jump to the previous or next month (See Fig 18).

16
Fig 18 For additional menu options, expand the date entry, then click on a trip and choose the desired option from the list. See Fig 19.
Fig 19
4.2 Edit Trip This allows you to modify the selected trip. Just click on the Edit option and it will display the trip form. Make any necessary changes and click Save or Cancel buttons.

17
4.3 Query Driving Distance Use this feature to calculate the total distance covered during the trip. The app sends query to Google Maps server to provide estimated driving distances using the default suggested route.
4.4 Create Return Trip This creates a return trip of the selected trip. The origin and destination locations are reversed and the odometer readings are added up. All the other information remains the same.
4.5 Copy Trip The Copy Trip feature enables you to copy a trip for future travel to the same destination. You can specify the number and frequency of trips. For example, a trip taken on May 1, 2012 may be copied to your next travel date scheduled in the next 2 weeks. Then two new trips will be created on May 8, 2012 and May 15, 2012.
4.6 Copy One Day of Trips Similar to Copy Trip, this will copy each trip of the day.
4.7 Delete Trip Use this feature to delete the selected trip from database permanently.
4.8 Delete One Day of Trips Similar to Delete Trip, this will delete all trips of the day.
5. Fuel/Gasoline This section helps you keep records of the fuel purchases. In addition, it also tells you the fuel economy (MPG or L/100km) of the vehicle.
5.1 Adding Fuel Purchase Click the Fuel tab, and the Add Fuel Purchase button (See Fig 20).

18
Fig 20 The default date and the last vehicle will be automatically selected. In the Volume Price section, enter the price-per-gallon (or liter) value of the purchase. Use the ‘+’ and ‘-’, or click at the Edit button (with a pen icon) to the right of the Volume Price field (See Fig 21).
Fig 21 Repeat the aforementioned step while filling in the Total Cost section too, and enter the total amount you paid for the refill. Once done with refilling, enter the vehicle’s odometer reading in the Odometer Reading section.
5.2 Filled up

19
The Filled Up box below the Odometer Reading section works as an indicator if the vehicle is fully refueled, and subsequently can be used for calculating the fuel efficiency (See Fig 22).
5.3 Fuel Efficiency Calculation When you repeat the aforementioned process during the next fill-up, TripLog will automatically calculate the fuel efficiency (MPG or miles per unit fuel) of the vehicle as shown in the Fig. 22.
Fig 22
6. Vehicle Expenses This section keeps track of the vehicle related expenses, e.g. fuel purchases, repairing and maintenance costs, taxes and so on. To add an expense, go to Expenses tab; and click Add Vehicle Expense at the bottom end of the screen (See Fig 23).
Don’t see the MPG yet?
To start calculating the MPG or L/100km, you need to enter at least TWO filled-up fuel purchases.

20
Fig. 23
This brings up the expense data entry form (See Fig 24).
Fig 24
6.1 Categories and sub-categories
Once the date and vehicle are set, click the Category option and select the expense category as shown in Fig 25.

21
Fig 25
As you can see, there are plenty of options in the Category list to choose from including Gasoline, Oil, Insurance, Repair and Maintenance and many more. However, if you can’t find the category you are looking for, scroll down to the bottom and choose the Other Expenses option. When you do, Subcategory edit box will appear below the Category (See Fig 26). You can enter any text as the subcategory, or click the down triangle button to select from the previously entered subcategories.
Fig 26 Enter the expense total costs and the odometer reading of your vehicle.
6.2 Take receipt photos
Similar to section 3.7, you can attach receipt photos for the vehicle expense (See Fig 27).

22
Fig 27
Once you click on the Launch button, the camera app will be activated instantly. Take the picture of the receipt and hit the Save button as shown in Fig 28.
Fig 28 Once the images are saved, TripLog automatically uploads them to Amazon cloud storage. 6.3 Make Copies In order to spare you from the headache of entering the same expense records, TripLog allows you to make copies of an expense entry, and repeat it on a daily/weekly/biweekly/monthly/bimonthly/ quarterly/yearly basis. To take advantage of this feature, click on the expense entry that you want to copy, and when the Vehicle Expense menu appears, select the Make Copies option and follow the instructions.
23
Tips
Copying expenses is an ideal way to enter recurring expenses, such as monthly interest charges, quarterly engine oil change, etc.
7. Reports
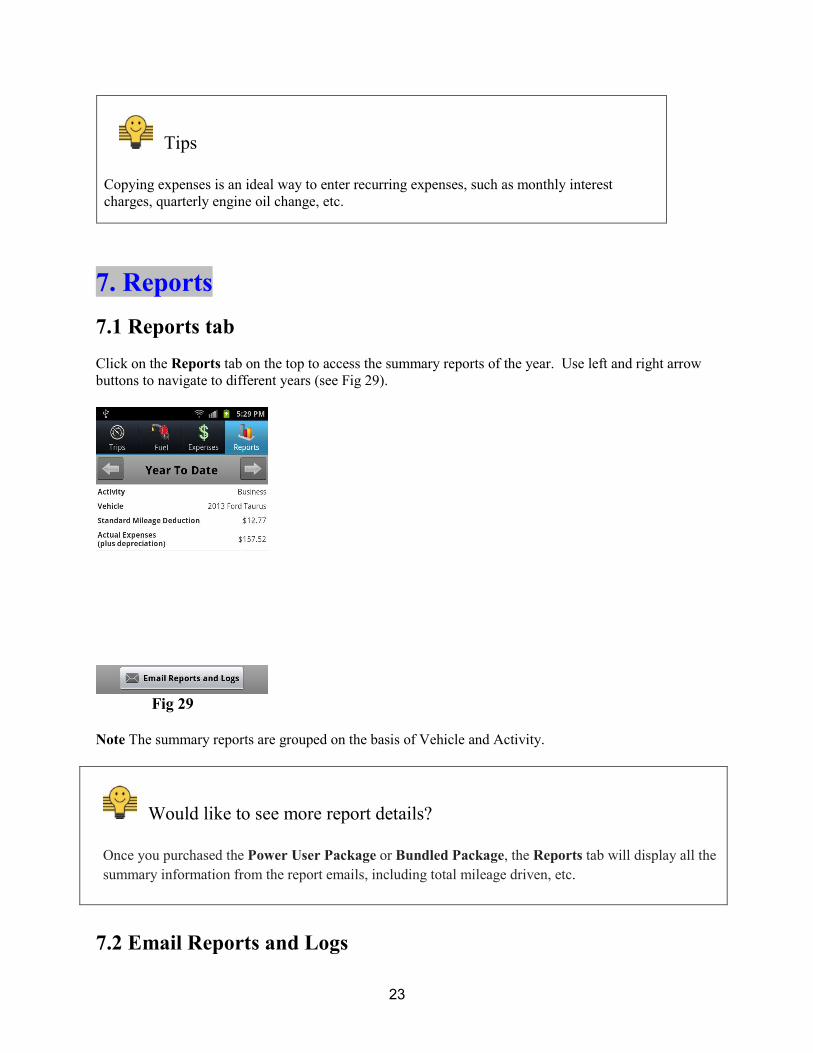
7.1 Reports tab Click on the Reports tab on the top to access the summary reports of the year. Use left and right arrow buttons to navigate to different years (see Fig 29).
Fig 29 Note The summary reports are grouped on the basis of Vehicle and Activity.
Would like to see more report details? Once you purchased the Power User Package or Bundled Package, the Reports tab will display all the summary information from the report emails, including total mileage driven, etc.
7.2 Email Reports and Logs

24
Emailing your logs and reports is also pretty simple and can be accomplished by clicking the Email Reports and Logs button at the bottom of the Reports screen (See Fig 30).
Fig 30 Once the Choose Reports to Email menu appears, proceed on as follows Step 1 Choose the year you want to access a report from. For example, if you want a report of the year 2011, find the year on the menu and click on it (See Fig 30). If you want to generate a report from any particular date range, select the Any Date Range option and select the Start Date and End Date. Then click on the Send Reports button. Step 2 Once you select the year, you can select yearly, quarterly, or monthly reports (See Fig 31)

25
Fig 31 The yearly and quarterly reports require purchase, but monthly reports are free. Step 3 TripLog will generate the report and attach to the email. The report is sent to you in HTML format. It is recommended that you download the file, instead of using the View option in your inbox.
7.3 Purchase the Reports To purchase the reports, you can choose either Single-year option or Multi-year option. The One-year option gives you access to all the reports of a particular year at any time. The Multi-year option on the other hand gives you unlimited access to all the reports of any particular year, as well as future years (See Fig 32)
Fig 32 Click on either button will bring you the Google checkout payment screen (See Fig 33). Follow the instructions to enter payment information and click Accept & buy button to make purchase. You can review the purchases by going to menu>Purchases (See Fig 34). Go to chapter 9 for more information.

26
Fig 33 Fig 34
7.4 Choose email program to send To send TripLog reports via email, you don’t require signing up or configuring any new email id, instead, the app performs the action with your existing email program (usually the one you are already logged in through your Android device). However you will be asked first which email program you would like to use (see Fig 36).
Fig 36 The reports are attached to the email automatically, without requiring any sort of user input (See Fig 37).

27
Fig 37
Having trouble sending reports through email? First, please make sure your device has SD card installed, and is not connected to computer via USB cable. Then choose Gmail, Yahoo Mail, or the built-in Email app to send attachment.
.
8. Locations Manage the trip locations.
8.1 Add, edit, and delete For adding, editing or deleting a location, first go to the Manage Locations page (Menu>Locations). See Fig 38.

28
Fig. 38 If you want to add a new location, simply click on the Add Location button on the bottom. A dialog box will appear as shown in Fig 39, where you can enter the location information. You can either do it manually, or by importing from your phone’s contact list.
Fig 39 Click Find Latitude/Longitude by Address button to query Google Maps to find the approximate latitude and longitude of the location (See Fig 40).

29
Fig 40 To edit or delete a location, just click on the location entry, and select the desired option from the menu (See Fig 41)
Fig 41
8.2 Merge to another location You can merge an existing location to another one. You will be asked to choose the other location to merge to. For example, location A and B are duplicates, and B is more precise. So you would select location A, choose Merge to Another Location option, and then select location B. What it does is delete location A from database and modify any trip that had location A to point to location B. The result is all the references of location A will be replaced by location B.

30
8.3 Import from Contacts
You can add a new location by importing name and address from your Android device contact list. Select the Import from Contacts option and you will be redirected to the Contacts as shown in the Fig 42.
Fig 42
Select the desired entry and the name and address will be automatically added to the new location as shown in Fig 43
Fig 43

31
8.4 Export to Contacts
You can also export a location your Android device contact list. Select the Export to Contacts option. Follow the instructions and the location entry will be copied to your phone book as well.
Fig 44
9. Purchases
9.1 Make Purchase TripLog is available in various attractive and affordable packages so that you can pay for only those features that you desire. Mentioned below are the details of the various paid packages that you can purchase or subscribe to. Power User Package Get all essential features with the Power User Package. Unlimited multi-year reports, automatic daily backup, and unlimited photo taken for a one-time charge. Executive Package allows the unlimited home screen widget use and automatically start trip when power is plugged in. This is one-time charge, too. Amazon Cloud Storage If you want to use the Amazon Cloud platform to back up your data and upload receipt photos, subscribe to this service for a yearly subscription fee. 2012 Reports and Logs gives you full access to your year 2012 reports and full logs, purchased at one-time charge.

32
Bundled Package gives you all the features, including Power User Package, Executive Package, one year subscription of Amazon Cloud Storage and all the reports, for a one-time fee with discount. After a year, you can choose to continue the Amazon Cloud Storage by subscribe to it on yearly basis. All the other features remain available even after a year. To purchase a package, click on the item and select Buy Now. Follow the Google checkout page to select payment methods (See Fig 45), enter credit card information (See Fig 46), and wait for payment being authorized (See Fig 47).
Fig 45 Fig 46 Fig 47
9.2 Refresh purchase status
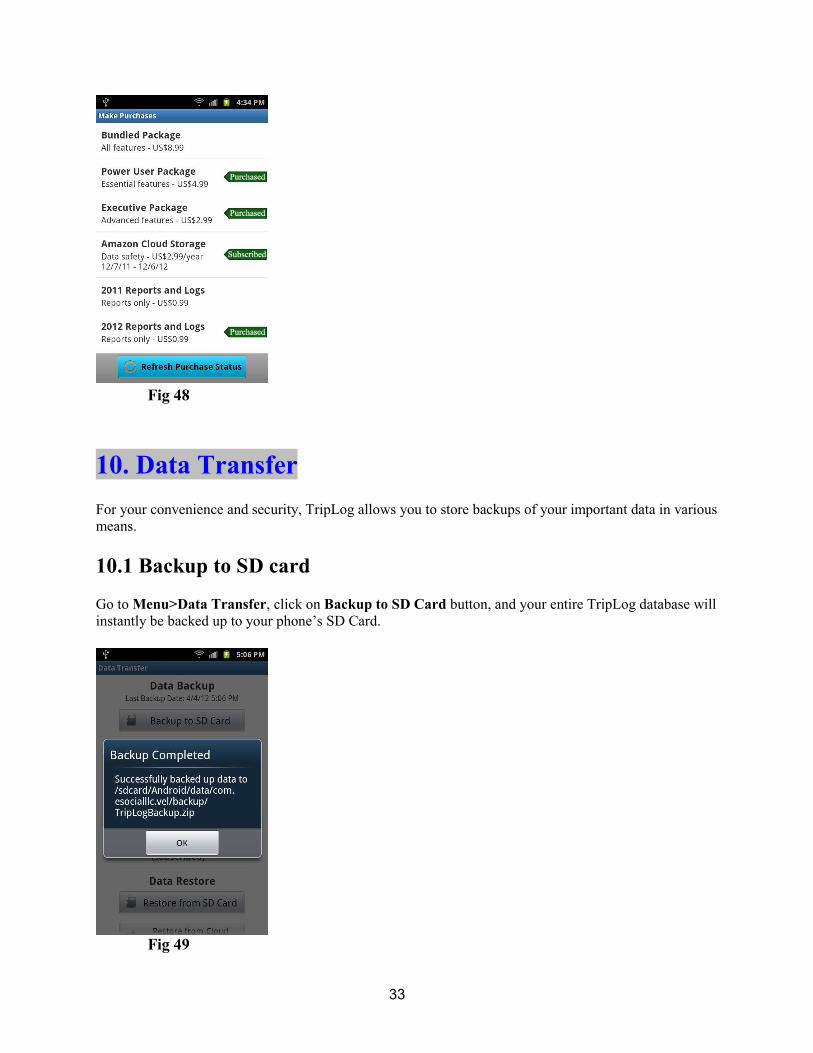
It usually takes a minute or two for Google payment system to complete the transaction. When it does, you will be notified if the purchase was made through or not. If in some cases, it takes more than 5 minutes, you can manually check the status. Just click the Refresh Purchase Status button. You should see the tags showing the status (See Fig 48). If you don’t see that, the particular feature won’t be available to you. Contact us for more assistance if you don’t see the expected status for more than 24 hours.
33
Fig 48
10. Data Transfer For your convenience and security, TripLog allows you to store backups of your important data in various means. 10.1 Backup to SD card Go to Menu>Data Transfer, click on Backup to SD Card button, and your entire TripLog database will instantly be backed up to your phone’s SD Card.
Fig 49

34
10.2 Backup and email the file Not only you can back up your data to your SD Card, but you can also Email it to yourself, or for that matter to anyone else. The process is pretty simple. Step 1 Go to Menu>Data Transfer. Step 2 Touch/click on Backup and Email (See Fig 50)
Fig 50 (Note TripLog will back up to SD Card before attaching and sending the email.) Step 3 Once you are done with Step 2, you will be redirected to the Choose Email Program menu. The email is automatically generated with the backup file attached. All you need to do is choose your Email program, and enter recipient's Email ID (See Fig 51).

35
Fig 51
10.3 Backup to Amazon cloud If you are already subscribed to Amazon Cloud Storage, you can upload the backup file to the cloud. In addition, you will also enjoy the privilege of uploading unlimited number of receipt photos to the cloud. This way, you will never lose your valuable data even when your phone is lost or damaged. To take advantage of this feature, all you need to do is go to Menu>Data Transfer, then click on the Backup to Amazon Cloud button, and enter your email address (See Fig 52, 53). You need to enter the same email address when you restore from the cloud. That’s your unique key. IMPORTANT! Make sure the email address does not have capital letters, or leading and trailing whitespaces.
36
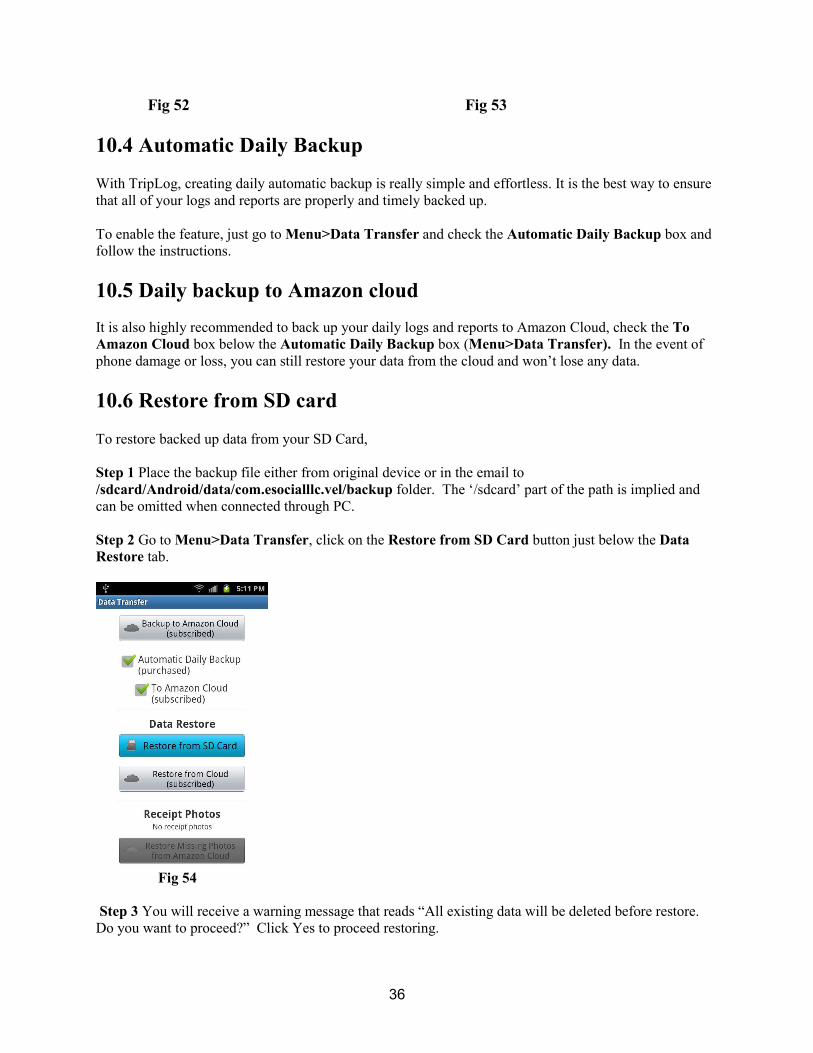
Fig 52 Fig 53 10.4 Automatic Daily Backup With TripLog, creating daily automatic backup is really simple and effortless. It is the best way to ensure that all of your logs and reports are properly and timely backed up. To enable the feature, just go to Menu>Data Transfer and check the Automatic Daily Backup box and follow the instructions. 10.5 Daily backup to Amazon cloud It is also highly recommended to back up your daily logs and reports to Amazon Cloud, check the To Amazon Cloud box below the Automatic Daily Backup box (Menu>Data Transfer). In the event of phone damage or loss, you can still restore your data from the cloud and won’t lose any data. 10.6 Restore from SD card To restore backed up data from your SD Card, Step 1 Place the backup file either from original device or in the email to /sdcard/Android/data/com.esocialllc.vel/backup folder. The ‘/sdcard’ part of the path is implied and can be omitted when connected through PC. Step 2 Go to Menu>Data Transfer, click on the Restore from SD Card button just below the Data Restore tab.
Fig 54 Step 3 You will receive a warning message that reads “All existing data will be deleted before restore. Do you want to proceed?” Click Yes to proceed restoring.

37
10.7 Restore Data from the Amazon Cloud Restoring backup data from the cloud is easier than ever before. All you need to do is, go to Menu>Data Transfer, and click on the Restore from Cloud option, and enter the same email address you used during backing up (Fig 55, 56).
Fig 55 Fig 56 10.8 Restore missing photos This feature helps you find out any missing/accidentally deleted receipt photos from your device. If the lost or deleted photos have been uploaded to the cloud before, recovering them is very easy. Just go to Menu>Data Transfer, and click on the Restore Missing Photos from Amazon Cloud option.
11 Reset/Replace Devices IMPORTANT! Before you reset or replace your Android device, BACK UP the data through TripLog app. Android system or 3rd party app backups are not sufficient. Proper backing up will ensure your data can be restored correctly. The following sections explain how to back up and restore. 11.1 Backup and restore data You have two options to back up data. The easiest way for restore is to back up to Amazon cloud. This will ensure fast, secure and effortless restore. To do so, please visit section 10.3 Backup to Amazon cloud. After install TripLog on the new device, simply restore data from the cloud; see section 10.7 Restore from Amazon Cloud. Another way to back up to an SD card is to email a copy to yourself. Please read section 10.2 Backup and Email the file. Once you have the backup zip file on your PC, and reset or setup a new phone, copy

38
the zip file to /sdcard/Android/data/com.esocialllc.vel/backup folder. Create one, if the folder is not there. Install TripLog, and follow the instructions in section 10.6 Restore from SD card. Note, DO NOT backup your data just to the SD card. Always create a backup to cloud, or at lease email the backup file to your inbox. Nevertheless, we highly recommend you choose automatic daily backup to ensure your data is safe. With daily backup to Amazon cloud option, we even keep all your backup versions on the server.

39
11.2 Carry over purchases Any of your purchases made through TripLog can be carried over to your other Android devices. First, make sure you use the same email address as the primary account. You can view it by opening Play Store > Menu > Accounts. Next, install TripLog as usual, then go to Menu > Purchases > Refresh Purchase Status. All your previous purchases will be recognized.
12. Sharing 12.1 Share this app If you are happy with the robust performance delivered by TripLog, and want to make your friends and family aware of the great benefits they can get, then help spread the word by going to Menu>Share, and share it via Email, Facebook, Twitter, eBuddy and other available options (Fig 57).
Fig 57
13. More Settings Go to Menu>Settings to change app settings. For basic settings, please go to section 2.4 Basic Settings. 13.1 Data Entry Default Dates The default is Use Today’s Date, which will always take today’s date as the trip, fuel, or expense entry date. Use Last Data Entry Date means that the entry date is set to the most recent similar entry date.

40
For example, if today is April 10 and the last trip entry date is April 8, then when you start a new trip, the date field will be set to Apr 10 if you chose Use Today’s Date; or April 8 if you chose Use Last Data Entry Date. To configure the default entry date for your trips, fuel purchases, and expenses, go to Menu>Settings>Data Entry Default Date, and select from the options.
13.2 Warning Mileage Threshold To prevent mistakes, TripLog pops up a warning message when a trip mileage exceeds a threshold. To change the threshold, go to Menu>Settings>Warning Mileage Threshold, and enter your preferred mileage threshold value (See Fig 58).
Fig 58 13.3 Primary Email Address When you have to reset or replace your devices, please use the same email address here to back up on the old device, and restore on the new device through Amazon cloud. 13.4 Business activities
Tips
Choose Use Last Data Entry Date for faster manually input of past written logs.

41
TripLog’s rich and extensive features also help you immensely manage your various personal and business activities for tax purposes. Go to Menu>Settings>Business Activities, and select the relevant option from the Manage Business Activities list as shown in Fig 59.
Fig 59 As you click on any of those as shown in the above image, a menu entitled Activity will pop up featuring three options Add, Edit and Delete. To add a new activity, select the Add button and simply follow the instructions. The same way, edit or delete an existing entry by Selecting the Edit or Delete options from the menu.
13.5 Mileage rates
Update the Standard Mileage Rate in order to come up with a precise estimate of the tax deduction or reimbursement. To perform the task, go to Menu>Settings>Mileage Rates and choose the entry from the Update Standard Mileage Rates screen as shown in Fig 60.
Having side jobs or working for multiple clients?
For example, you can rename “Business” activity to “My main job” and create another activity “Moonshine job” and assign to Business category for the same mileage rates.

42
Fig 60 13.6 Email Us and Rate Us If you have any questions or suggestions that you would like us to address, go to Menu>Settings>Email Us (See Fig 61) and choose your preferred Email program from the menu that appears.
Fig 61 Similarly, you can also rate the app as well as give your feedback in TripLog Google Play Store page. All you need to do is go to Menu>Settings>Rate Us, and the app will automatically redirect you to the Google Play Store (Android Market) page.

43
13.7 Did You Know? This feature reminds you tips and tricks about TripLog wide range of exciting features, and tax related fun facts. Go to Menu>Settings>Did You Know. Use the Next and Previous buttons to scroll between various tricks and fun facts.
14. Home Screen Widget For instant access, add the TripLog widget to your home screen. Not only you will be gaining an easy and quick access to the application this way, you will also be notified with the daily mileage data (with real time updates) right on your device home screen.
14.1 Install To add the TripLog widget to your home screen, Step 1 Long click (press and hold) at any empty space of your home screen, and when the Add to Home Screen menu appears, select Widgets (See Fig 62).
Fig 62 Step 2 Navigate through the list of available widgets in the Choose Widget menu, and select TripLog (See Fig 63).

44
Fig 63 Step 3 Select the settings (See Fig 64).
Fig 64 Step 4 The TripLog widget should appear (See Fig 65).

45
Fig 65 Note To remove the TripLog widget from the home screen, touch it and hold until the TRASH icon appears on the bottom of the screen. Drag the widget to the TRASH bin. Once the TRASH icon turns red, release your finger.

46
14.2 Icons The TripLog home screen widget carries in it the four most commonly used icons that one would like to have an easy and quick access to. They are Run TripLog, Start/Stop Trip and GPS Tracking, Add Fuel and Add Expense. With these four icons being there right on your home screen, you no longer need to launch the app by going to your phone’s main Menu. Instead, just a tap on any of the four icons will launch TripLog right away. 14.3 Mileage today The Mileage Today field in the TripLog widget fetches you real time updates on the total mileage driven during the day (See Fig 66).
Fig 66
14.4 GPS tracking With the TripLog widget installed, you can enable GPS Tracking by merely a touch/click on the Start Tracking option marked by the logo. Once the trip is started, the number of miles/kilometers driven will show up on the widget (See Fig 67).

47
Fig 67
15. Vehicles 15.1 Adding Vehicle TripLog allows you to add multiple vehicles, and saves each individual vehicle logs separately. The process is as simple as setting up the first vehicle while activating the app. Step 1 Go to Menu>Vehicles. Step 2 Touch/click on Add Vehicle. Step 3 In the Add Vehicle menu, enter the current year, the name of the vehicle manufacturer, as well as the vehicle model in the respective fields (See Fig 68)

48
Fig 68 Note In case it is a commercial truck, check the Commercial Truck option before saving the settings.
16. Auto Start 16.1 Automatically start mileage tracking To spare you the pain of manually accessing TripLog in order to start GPS tracking every time you begin a new trip, the app brings you a handy feature called Auto Start (Menu>Settings>Enable Trip Auto Start). See Fig 69.
Fig 69

49
Once enabled, this feature allows the app to automatically start tracking your mileage when all the three following events happen. A) GPS is turned on
To turn on the GPS receiver, swipe down the notification bar, and click the GPS icon. If it’s highlighted, the GPS is enabled.
B) Power cord is plugged in
As soon as you plug in the power cord of your car charger into your Android device, TripLog instantly activates itself, starts GPS and monitors the speed.
C) Vehicle is moving more than 5 mph or 8 km/h, or timed out
When the vehicle is moving more than 5 miles per hour or 8 kilometers per hour, the TripLog starts a new trip and GPS mileage tracking.
If no movement within 3 minutes, TripLog will quit monitoring to preserve battery. 16.2 Automatically stop mileage tracking
With the Auto Start option enabled, you need not worry at all about stopping the mileage tracking manually. TripLog does it automatically whenever the:
A) Vehicle is stopped and B) Power cord is unplugged Once the trip is stopped, the trip form will pop up, and you need to enter the rest of the information and click Save.
17. FAQ
Q1. The app is activated every time I charge my phone. How do I make it stop? A1. This is the Auto Start feature. It’s very useful when you plug in the power using your car charger.
However, the app will start even when you plug it in through the AC wall mount. Essentially, you have three options you can use:
1. Plug in your device using your PC USB cable. Even when the PC is in sleep mode, it will charge your phone.
2. If you don’t need the Auto Start feature, you can turn it off by navigating to: menu>Settings> and unchecking Enable Trip Auto Start.
3. The app will automatically stop after 3 minutes of no GPS signal or physical movement. Once it times out, the app will stop running the GPS and will quit on its own.
Q2. The app appears to keep running on the notification bar. How do I stop it? A2. The TripLog icon on the notification bar indicates the app is reading GPS signals and tracking
mileage. To stop the trip, open TripLog, tap the Start or Stop Trip button to open the trip entry form. Click the Stop button—the button with the red square icon that looks like a STOP sign.

50
Q3. The button always says “Stop Trip”. How do I finish a trip? A3. A Trip is complete when the mileage is over zero (0) miles. Click on the Stop Trip button to edit
your mileage.
Q4. I get an error message when uploading photos or backing up files to the Amazon cloud. A4. Most likely there was no internet connectivity at the time of uploading files. Please try to connect to
Wi-Fi, the next time you start the app. Photos can be pretty big and they tend to take up quite a while to upload. If the problem persists, please click the Report button on the error message box. We will identify any other causes.
Q5. I get an error message when sending reports or backing up data. A5. Please make sure the device has an SD card installed, the card is not full, and the device is not
connected to computer through a USB cable. Q6. The location I entered got overwritten by a new location. A6. Don’t reuse a location. Always select Add New Location… when you are entering a new location. Q7. I cannot open the zip file or the content of the file doesn't make sense to me. A7. The zip file is for data backups and is recognizable to TripLog app. For more human readable
content, please go to the Reports tab and click the Email Reports and Logs button. Q8. How do I enter a new expense category? A8. This app is mainly for vehicle related expenses. The main categories are unchangeable. However,
you can add subcategories under Other Expense category. Q9. I live outside of the United States and as a result the reports show incorrect character encoding. What do I do about the incorrect character encoding issue? A9. TripLog reports use UTF-8 as the international character set. To view the HTML file, change your
browser Character Encoding to Unicode (UTF-8). To open the CSV file, import text data in Microsoft Excel, instead of opening the file directly. To import data, please follow the instructions at http://blogs.office.com/b/microsoft-excel/archive/2010/06/11/importing-text-files-in-an-excel-sheet.aspx. Choose comma (,) as the delimiter. Or, you can open the HTML file directly from Excel.
Q10. Why does the app need to read my account and personal information? A10. The app has a feature to import/export your location name and address from the device to your
contacts. It only reads those two fields and never uploads this information to a server. The app also reads the device’s primary email account and uses it as the unique key to upload backup files to the Amazon cloud. To restore the backed up files, you can retrieve these files using the same email address (your primary email address) that you used to back up your files. Please be assured, TripLog does NOT share your email address or contacts with any 3rd party.
Q11. I have Amazon cloud or Dropbox account, why do I have to pay for the Amazon storage from your app? A11. This app uses the Amazon S3 Cloud as its Storage business account. This storage is separate from a
regular consumer’s Amazon account and connects via separate channels. The benefits of an Amazon cloud solution are:
1. Anonymous file sharing without explicit user actions. Your receipt photos are uploaded to Amazon cloud and the links are available in the HTML reports. They are available to anyone you send the reports to. However, the long unique and unpredictable URLs prevent people from guessing the links of your photos, which makes them very secure.

51
2. Amazon S3 data centers are all over the world. TripLog chooses four (4) major locations in the states of Oregon and Virginia. Whereas, the rest of the locations are in states within Ireland and Singapore; these locations serve local users. To see and verify the locations that you are using, please go to Menu>Amazon Cloud Data Center Location.