trip ticket program · e) print a ticket by hitting ctrl-p. see upper menu line in ticket screen...
TRANSCRIPT

Florida Trip Ticket Quick Start
Technical Support: 225-744-0807
For quick overview, view Tutorial Videos via Trip Ticket program’s main screen Help menu.
1. Fill out Dealer Information a) Enter required fields color-coded in light blue: dealer name, dealer license number, dealer prefix. b) Dealer prefix is unique to each dealer and state assigned. Call Tom Mauer at 727-896-8626 if unknown. c) Set the County default so it fills in automatically on the ticket screen. d) SER Dealer # is required for dealers with a federal license. If hold multiple licenses, see Chapter 8.2. e) Click on the Update button to save your edits.
2. Add a Fisherman/Vessel - Required before creating a ticket a) Click on the Fisherman/Vessels button on the main screen. b) In Fisherman section, enter the required fisherman fields: License Type, License Number, Last Name or
Vessel Name, and Trip Type Default. Click the Add button to save the fisherman. c) In Vessel section, at least one vessel must be added for each fisherman. d) If Vessel's Name field is left blank, then program will create the name of N/A. e) If the fisherman has no vessel, then click on the No Vessel button. f) If the fisherman's vessel is unknown, click on the Unknown Vessel button. g) Enter the required CG Number or State #. h) Click the Add Button in the Vessel section. i) If the fisherman has more than one license, then a fisherman’s record must be made for each license. j) In Fisherman section, if the vessel is the licensed entity, then enter the vessel name in the fisherman’s last
name field and also enter the vessel’s information again in the vessel section.
3. Create a Ticket
a) Click on the New Ticket button on the main screen to create a ticket. b) Using the TAB key on the keyboard will take you from required field to field in the order the program
expects the data to be entered. c) Ticket information - enter at the top of the screen, then hit the Save key in the middle of the screen. The
Catch data screen now displays and is ready for entries. d) Catch Data of Ticket screen (bottom half of Ticket screen)
Enter at least one species record in color-coded, required fields. Hit the Save button in Catch area.
For shrimp species, click the Alt Shrimp Entry key for time-saving, alternate data entry screen. e) Print a ticket by hitting Ctrl-P. See upper menu line in ticket screen for more print options. f) Start a new ticket from the ticket screen by hitting Ctrl-N or by clicking New on menu line.
4. Send Data to State
a) Click on the Send State Data/Negative Reports button on the main screen. b) Select a predefined Date Range or enter Begin and End Dates to select tickets ready to be sent with
displayed unload dates. For Negative Reports, see e). c) Verify computer is connected to Internet. Click on the Send State Data button to send your official data. d) The program will provide notification of success of transmission. e) Send Negative Reports by clicking on the Negative Reports button in the Send State Data screen. In the
Negative Reports screen, select the Begin and End Dates. Click on the Send Negative Report to State (FL) button located in the State Negative Reporting screen.
5. Send Data to Federal Agency (Federal Dealers Only) a) Click on Send Fed Data/Negative Reports button on main screen. Follow same protocol in step 4.
Note 1: Defaults have been setup throughout the program to speed up the data entry process. You are not
required to use the defaults and may change the defaulted value. Note 2: Use tab, type ahead, defaults, and your own unique species code for fast data entry. See manual. Note 3: The state only collects the information that is currently collected on the official state’s paper tickets.

1
Trip Ticket Manual
Table of Contents
Chapter 1 Introduction 3
Chapter 2 Dealer Information Setting Up Dealer Information 4
Set-Up for Dealers with Federal License 6
Activate Optional Sign-on Screen 6
Adding Optional Additional Users 6
Chapter 3 Using the Trip Ticket Program
Entering Fisherman/Vessel Information 8
Entering Trip Tickets 10
For State License Dealer 10
For Dealer with Federal License 13
Using Alternative Shrimp Entry Screen 14
Modifying Trip Tickets 14
Split Trip Tickets 15
Paying Fisherman 15
Using the Find Ticket Screen 16
Deductions 17
Chapter 4 Creating/Sending Trip Ticket Data File
For State License Dealer
Send Ticket Data File to State Agency 20
Send Negative Report to State Agency 21
For Dealer with Federal License
Send Ticket Data File to Federal Agency 22
Send Negative Report to Federal Agency 23
Chapter 5 Species Screen 24
Chapter 6 Price Defaults 25
Chapter 7 Updating Prices 26

2
Chapter 8 Federal License Dealer Reporting
Requirements for All Federal Dealers 28
Requirements for Federal Dealers who handle HMS 28
Chapter 9 Utilities
Compacting the Database 30
Archiving the Database 30
Changing the Database 31
Backing up the Database 32
Create Data File 33
Deactivate All Fishermen 33
Chapter 10 Reports 34
Chapter 11 Trip Ticket Extra and Useful Features
Trace Register 35
IFQ Login Screen 35
Trip Ticket Web Browser 35
Chapter 12 Technical Support 36

3
Chapter 1
Introduction to the Trip Ticket Program
The Trip Ticket Program automates the process of collecting and reporting information on seafood species as
required by Florida Fish and Wildlife Conservation Commission. Trip Ticket can be run on a single Microsoft
Windows based machine or the database can be networked, if desired.
The Trip Ticket program accomplishes the following:
Completely replaces the paper ticket system.
Collects all information required by the state.
Sends information electronically to the state agency
Sends information electronically to the federal agency for Dealers with additional Federal License
Tracks all monies owed and paid to fisherman
Tracks deductions
Generates various reports/receipts
Will print checks and export data
Allows default data to be entered automatically
Time Saving / Speedy Ticket Entry Tips
Trip tickets can be entered in a matter of seconds. The more you customize the program to your needs and the
more you use the keyboard, the faster your ticket creation will be.
Tab and Type
Push the mouse aside. Use the Tab key to take you from field to field. Located at the top of several drop-down
lists is a blank space for the search and type-ahead feature.
Use The Enter Key rather than clicking on a Button
If a button that you need to click becomes highlighted with a dotted box just inside the button box (because you
tabbed to it), hit the Enter key. Hitting Enter when the button is highlighted is the same as clicking on the
button with the mouse.
Defaults
Setup default values on the fisherman/vessels and species screens. These default values will fill in
automatically in the ticket screen. If the default value is correct, then pass over it. If the default value is not
appropriate, then change it on the ticket screen.
Customized Species Codes
Create species codes that have meaning to you. Then use your species code on the ticket screen to quickly
select the correct species and bypass data elements on the ticket screen. This feature will save many keystrokes.
See the Species screen section and the section on entering tickets for more information.
Field Color Coding Blue - Required, Yellow - Read-only, White – Optional

4
Chapter 2
Dealer Information
2.1 Setting up Dealer Information
Dealer information must be set up before the program can be used to enter trip tickets. This screen (Figure
2.1.1) will automatically display the first time the program is started.
Boxes color-coded in light blue are required.
Figure 2.1.1
Enter the dealer name and the dealer’s license number. Dealer Prefix is a unique two or three letter code
assigned to each dealer by the state. Dealer prefix is required.
The Next Ticket Number field is important because it sets the initial ticket number that will be put on a ticket.
The Next Ticket Number can be any number between 1 and 9999999. Next Ticket Number is used by the
program to automatically generate the next ticket number and should start with 1 for all new installations unless
given the unusual exception that Trip Ticket is installed on two separate computers. Call technical support in
this case. The manual option to enter next ticket number is also available for the unusual exception, but call
technical support before using this feature as well.
County Default is used to set the default county of the landing on the Trip Ticket screen..
Price Trigger is used by the program in the Trip Ticket screen to identify a transaction with a price per unit
number that exceeds the Price Trigger value entered in the Dealer screen. It does not prevent the transaction
from being saved. The Price Trigger value can be changed. Set to large number, such as 10,000, if user does
not want to be notified when a price per unit in a transaction is larger than the Price Trigger value entered in the
Dealer screen.

5
SER Federal Dealer Info section only applies to dealers with one or more federal licenses. See Section 2.2.
Next Tracking Number and the local and state tax fields are optional and used by the Deductions screen.
Deductions By Fisherman determines if deductions are applied to a fisherman versus being applied to a vessel.
Traceability Information is provided by Trip Ticket dealers for eventual use by consumers as a means to view
details of seafood purchase. The Traceability Info fields in the Dealer screen are part of this mechanism and
used only by Dealers participating in the Trace Register Program. For more information, refer to Chapter 10.
Default Boxes
Automatically Backup Database option is used to back up the Trip Ticket database to Bluefin Data LLC every
time data is sent to the agency. This is a free, secure backup service that allows data and settings to be restored
in a timely manner in the event of a computer crash.
Soak Unit Hours is used to default Soak Units to Hours on the ticket screen. Time Fished Hours is used to
default the time fished field on the ticket screen to Hours. In both cases, if Hours is not checked, then Days will
default.
The Networked check box should be checked if Trip Ticket is installed and used on networked computers. This
maintains the next available ticket number current on all networked computers.
By selecting Sort Gear by Code option, the gear drop down list will be sorted with the codes and corresponding
gear description in numeric, ascending order. The sort can be changed as needed within the Trip Ticket screen
to sort gear alphabetically or by gear description as well.
Activate Sign On screen is an option that, if checked, will cause a login screen to appear each time the program
is started. If this option is checked, create a login ID via the Users screen before exiting Trip Ticket program
(see Chapter 2.3). This feature can be used if you want to prevent unauthorized users from starting up the
program.
IFQ default provides a menu item in the Trip Ticket screen that provides access to the Individual Fishing Quota
Online System website and Bluefin Data Website. The IFQ Approval Code is entered in the provided field in
the Trip Ticket screen if IFQ is turned on by checking the IFQ box.
Default Unload Date to Last Used saves time by defaulting to last unload date of last trip ticket. If not checked,
Unload Date will default to today's date.
Show Update Notice at Start-up will display a list of Trip Ticket program updates on start-up of the Trip Ticket
program. This default can be deselected from the Program Update Notice.
Check for License Expiration Date option will provide notice of expired license date for fisherman selected on
the Ticket screen.
Currency to 3 Decimal Places option will display prices to 3 decimal places rather than default of 2 decimal
places.
Turn off Find File. Leave unchecked unless Trip Ticket support personnel tell you otherwise.
Use Inventory default is used by Dealers participating in the Trace Register Program.
After entering the information, click on the Update button to save the changes.

6
2.2 Set-up for Dealers with Federal License
Effective January 1, 2013, all dealers with a federal license are required to enter a federal license into the Dealer
set-up screen.
Entering SER Dealer # in the Dealer screen enables the sending of ticket data to the federal agency. If a federal
dealer has multiple federal licenses, enter the SER federal dealer number. If the federal dealer does not have an
SER federal dealer number, then contact Dave Gloeckner (SE NMFS) at 305-361-4257. For dealers with HMS
license, call the HMS Management Division helpline at 301-427-8590. Trip Ticket technical support can help
with this as well. Having the correct license in the Dealer screen is instrumental in the reporting of accurate
data to all agencies.
After entering SER Dealer #, the Default Port optional field will appear and is used to set the default port of the
landing on the Trip Ticket screen.
Dealers who handle HMS species must enter their email address in the Dealer set-up screen.
Refer to Chapter 4 for creating a ticket and sending the data file to the federal agency via the Send Fed
Data/Negative Reports menu item on the main Trip Ticket screen. Refer to Chapter 8 for additional information
regarding Federal Dealers.
2.3 Activate Optional Sign-On Screen
The program provides an optional sign-on screen. It can be activated by setting the “Activate Sign On screen”
flag on the Dealer information setup screen (Figure 2.1.1). Logins are added from the main screen Edit/Users
menu item.
Note: There must always be at least one user name and password when the sign on screen is invoked.
2.4 Adding Optional Additional Users
If the optional sign-on screen is invoked, at least one user name and password should be added to the Users
screen. To add users select the Users menu item under Edit menu. This will open the User screen (Figure
2.3.1).
Figure 2.3.1
Select the Add button to add a new username and password. This opens the second part of the screen that has
space provided for the username and password (Figure 2.3.2).
7
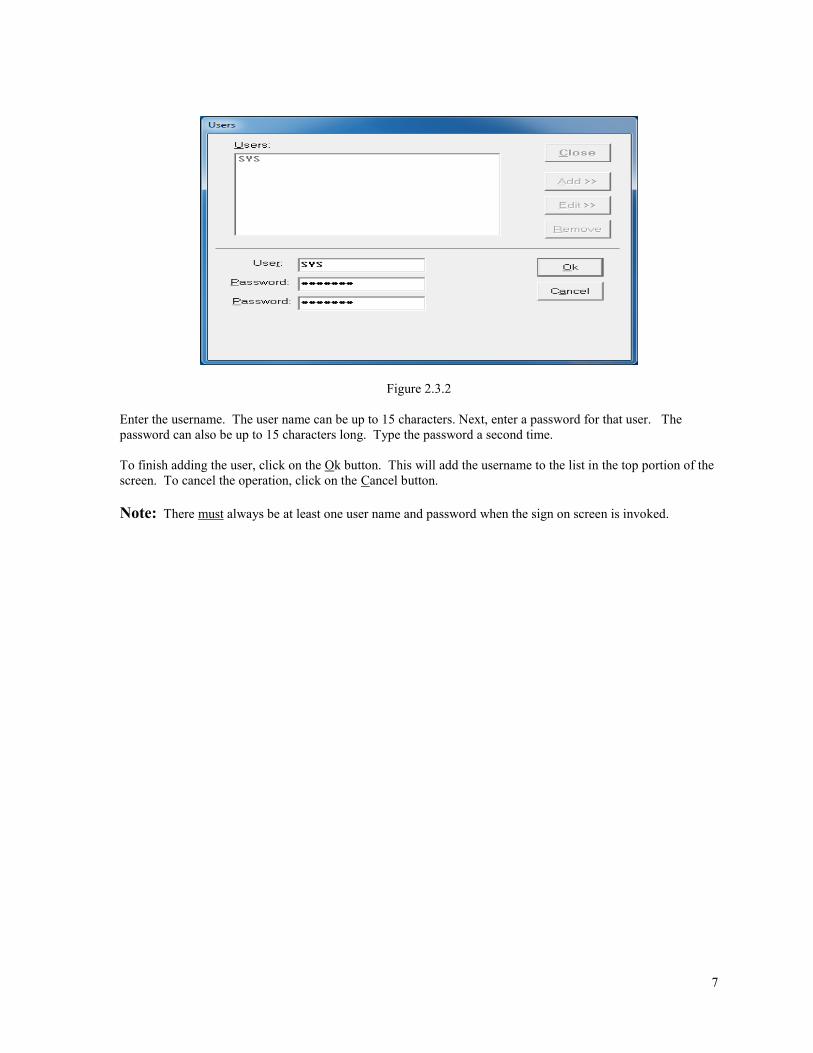
Figure 2.3.2
Enter the username. The user name can be up to 15 characters. Next, enter a password for that user. The
password can also be up to 15 characters long. Type the password a second time.
To finish adding the user, click on the Ok button. This will add the username to the list in the top portion of the
screen. To cancel the operation, click on the Cancel button.
Note: There must always be at least one user name and password when the sign on screen is invoked.

8
Chapter 3
Using the Trip Ticket Program
3.1 Entering the Fisherman/Vessel Information
Before a fisherman is linked to a Trip Ticket, they must first be added using the Fisherman/Vessel screen
(Figure 3.1.1). To reach this screen, click on the Fishermen/Vessels button on the main screen.
Figure 3.1.1
The Fisherman/Vessel screen is divided into two sections. Fishing license information is entered in the top
section and the vessel used by the fishing license holder is entered in the lower vessel section. In Florida, either
the fisherman or the vessel may be the license holder. If the fisherman is the license holder, then enter the
fisherman’s information in the top section and enter the fisherman’s vessel in the lower section. If the vessel is
the licensed entity, then enter the vessel name in the last name field of the upper section and also enter all of
vessel’s information in the lower section.
The vessel in the lower section is linked to individual fishing licenses. If the fishing license holder is a
fisherman, then it is possible that the fisherman uses more than one vessel on different occasions. If this is the
case, then each vessel the fisherman uses must be linked to his license. This is done by adding multiple vessels
to one fishing license. It is also possible that two or more licensed fisherman share the same vessel. In this
case, the same vessel needs to be linked to each individual fishing license.

9
Add a Fisherman
To add a new license, click on the New button (or click on the very top of the license list). This clears all fields
and prepares the program to accept a new fisherman. Start by selecting the license type from the drop down list.
Enter the fishing license number. If the fishing license was issued to a fisherman, then enter the fisherman’s
first and last names. If the fishing license was issued to a vessel, then enter the vessel’s name in the Last Name
(or Vessel Name) field. License Type, License Number, and Last Name are the only required fields in the upper
section. The additional personal data fields are available because dealers requested them. If used, these
additional fields are not sent in the data file to the state.
Area and Trip Type defaults, if filled in, will default values to the ticket screen when the fisherman is selected.
After all license information is entered, click the Add button. The Licensee’s name will appear in the box on
the left side of the screen.
Add Fisherman's Vessel/No Vessel/Unknown Vessel
Fill in the license holder’s vessel information. Always link a vessel to a fishing license even if the fisherman
does not have a vessel. In that case, then click on the No Vessel button. To link a vessel to a fisherman, first
enter a vessel name. If the vessel does not have a name, then leave it blank. The program will enter N/A as
vessel name if that field is left blank. Or click on the Unknown Vessel button if vessel name is unknown.
The No Vessel button is for fishermen that did not use a vessel to catch the seafood that they sell. A vessel
must be designated by adding a vessel or select the No Vessel or Unknown Vessel buttons
The vessel’s hull number is required. Enter either the Coast Guard Documentation Number or State
Registration Number. If the vessel number is not known, then enter 6 zeros in the Coast Guard # field.
The gear code, gear quantity, gear sets, and species defaults are optional. Use them only if you wish to have
default values automatically fill in to the ticket screen.
When all the vessel information is entered, click on the vessel section Add button. This will link the vessel to
the fishing license (fisherman) and add the vessel to the vessel list.
Update Fisherman's Information
To update an existing fisherman’s record, click on the fisherman in the list and all of that fisherman’s
information will appear. Edit the desired fields, then click on the Update button to save the changed
information. Be sure to hit the Update button to save any edits to an existing fisherman’s record.
To edit the vessel, select the vessel from the list, then make the changes and click the Update button on the
Vessels section to save the changes.
Return to Main screen
To return to the main menu click the Close button located in the upper right hand corner of the
Fisherman/Vessel screen.
Note: If a fisherman (fishing license) does not have a vessel linked to it, that fisherman will not appear
in the Fisherman list on the Trip Ticket screen.

10
3.2 Entering Trip Tickets
Figure 3.2.1
Click on the New Ticket button (Figure 3.2.1) on the main screen to create a new ticket. The program will
automatically select the next available ticket number. The ticket number assigned to the new ticket can be
found below the New Ticket button. The ticket number is pending until the header information is saved. The
trip ticket number (all 7 characters) may also be entered manually via the File\New Ticket (Manual) menu item,
but this is typically not recommended. Both new ticket options open the Trip Ticket Information Screen (Figure
3.2.2).
State License Dealer
Figure 3.2.2
Trip Ticket Header Information for State License Dealer
The focus is initially set to the start date field which defaults to the current date. Change this date as necessary.
Hit the Tab key to leave the Start date and go to the Unload Date, which also defaults to the current date. Edit
the Unload Date, if necessary. Hit Tab and the focus shifts to the Number of Crew field. Enter the number of
crew, then hit Tab to shift focus to the Fisherman’s name field. Type in the fisherman’s last name and the list
will automatically go to that fisherman’s name in the list. Another way to select the fisherman’s name is to click
on the down arrow to the right of the fisherman’s name box. This provides the complete list of active fisherman
in the database. Select the fisherman from the list by clicking on his/her name.

11
If you start a ticket, then discover that the fisherman is not in the list, you may go directly to the fisherman
screen from the Ticket screen by selecting the Add Fisherman menu item. If you enter the Fisherman screen
this way, you will be brought directly back to the Ticket screen and the fisherman list on the Ticket screen will
include the fisherman you just added.
If you wish to select a fisherman by vessel name, then click on the small button directly below the fisherman
name list box. That button will bring up a list of vessels (Figure 3.2.3).
Figure 3.2.3
Choose the desired vessel/fisherman name. Click on the Select button. This will fill in the fisherman’s name
on the Ticket screen.
Enter the Time Fished and verify the appropriate unit (Hours or Days).
The Tracking Number field is an optional field that may be set to a number and/or characters of your choice and
is used as a tool to quickly help identify a specific ticket. The Find Ticket screen provides the means for finding
a report using the Tracking Number.
Click the Save button to save this ticket. The Catch section displays in the lower half of the Ticket screen after
the Ticket header information is successfully saved (Figure 3.2.4).
Figure 3.2.4
Trip Ticket Screen with Catch Section for State License Dealer

12
The Tab key can be used for fast data entry.
The Fisherman can be changed for each species transaction in the Trip Ticket. It defaults to the Fisherman’s
Name in the Trip Ticket header.
The information that was entered on the Fisherman/Vessel screen fills the appropriate boxes. Area, Gear Code,
Gear Sets, Gear Quantity, Species Code, and Species Description will fill in automatically if defaulted.
Enter Area fished and Depth. Depending on the species, Quantity and Price per Unit are the only remaining
required fields.
For certain gear, Gear Sets, Gear Qty, and Soak Time are required fields and would be highlighted in light blue.
As you enter the Species Code, the species description list follows. If you do not know the Species Code, then
use the Species Description drop down list to select the species.
Enter Grade, Count or Size, Unit, and Disposition if necessary or appropriate for the species.
If your species has a market designation, such as crab, then enter the market value in the box under the title
Market
For shrimp species, enter a count such as 21/25 in the Count/Size box. Or click on the Alt Shrimp Entry
button, which brings up a screen designed specifically for fast data entry for shrimp species. (Figure 3.2.7)
Click on the Save button down in the Catch area to save the species catch information. A summary of the catch
record will appear in the list at the bottom of the screen.
The transaction information is not saved until it appears in the list at the bottom of the screen. After a species is
saved, the focus will return to the species code box in anticipation of another species entry
After entering the transactions, notice that the total amount due displays in the Total Purchases box located in
the upper right hand section of the screen (Figure 3.2.5). Total purchases, deductions, and Total Paid may not
be edited directly on the ticket screen. Total paid is the difference between total purchases and deductions. A
value will appear in the Total Paid box only after the ticket is marked paid either by check or cash.
Figure 3.2.5
To leave the Trip Ticket screen and return to the main menu click on the Close button or select the Close menu.

13
Dealer with Federal License
Entering a trip ticket for a Dealer with a Federal License is basically the same as entering a trip ticket for a State
License Dealer, but with a few additional, required/optional fields.
Figure 3.2.6
Trip Ticket Screen with Catch Section for Dealer with Federal License
The Trip Ticket header requires the Port Landed and has an optional Logbook Number field.
The Catch section requires Grade, Market, Units, and Disposition.
Market is a new, required field. For most species, the Market will default to unclassified.
To report a HMS species, the ticket must be designated HMS by first clicking the HMS checkbox in the Ticket
screen and then entering all HMS required fields. Refer to Chapter 8 for details on creating a ticket that
includes a HMS species.
14
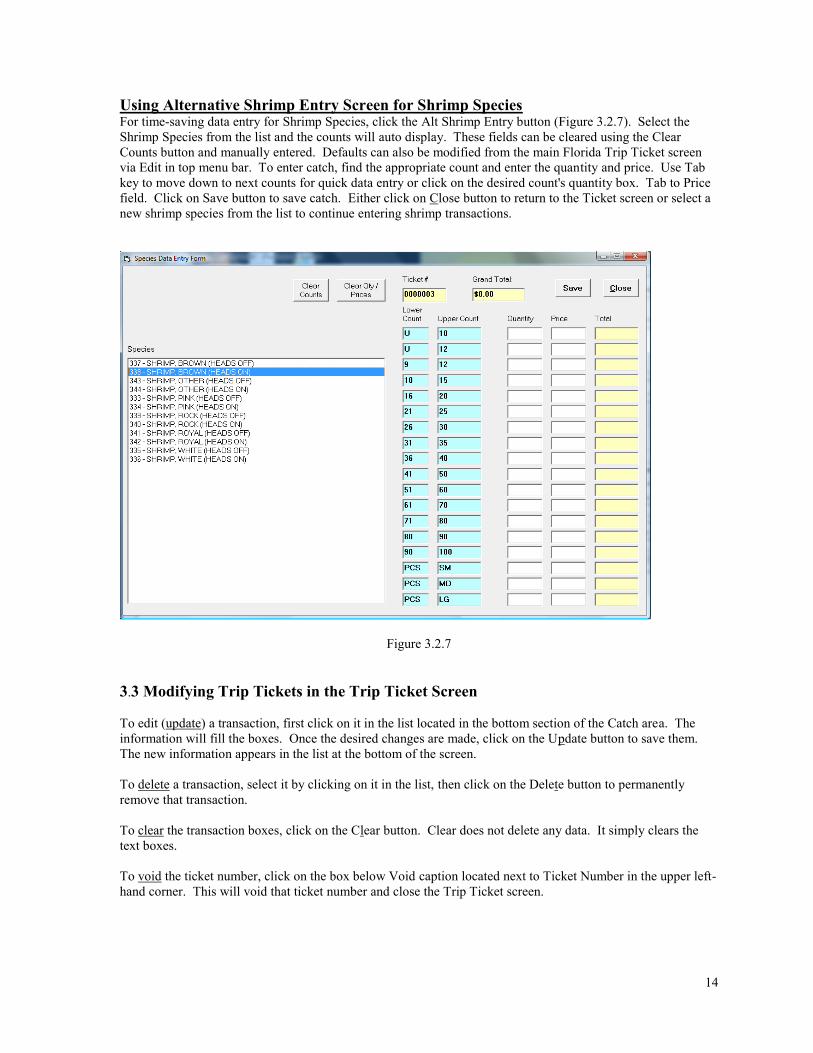
Using Alternative Shrimp Entry Screen for Shrimp Species For time-saving data entry for Shrimp Species, click the Alt Shrimp Entry button (Figure 3.2.7). Select the
Shrimp Species from the list and the counts will auto display. These fields can be cleared using the Clear
Counts button and manually entered. Defaults can also be modified from the main Florida Trip Ticket screen
via Edit in top menu bar. To enter catch, find the appropriate count and enter the quantity and price. Use Tab
key to move down to next counts for quick data entry or click on the desired count's quantity box. Tab to Price
field. Click on Save button to save catch. Either click on Close button to return to the Ticket screen or select a
new shrimp species from the list to continue entering shrimp transactions.
Figure 3.2.7
3.3 Modifying Trip Tickets in the Trip Ticket Screen
To edit (update) a transaction, first click on it in the list located in the bottom section of the Catch area. The
information will fill the boxes. Once the desired changes are made, click on the Update button to save them.
The new information appears in the list at the bottom of the screen.
To delete a transaction, select it by clicking on it in the list, then click on the Delete button to permanently
remove that transaction.
To clear the transaction boxes, click on the Clear button. Clear does not delete any data. It simply clears the
text boxes.
To void the ticket number, click on the box below Void caption located next to Ticket Number in the upper left-
hand corner. This will void that ticket number and close the Trip Ticket screen.

15
3.4 Split Trip Tickets
A single trip may be split among multiple tickets as follows. Place a check in the Split Ticket box, then enter
the split ticket number in the Split Ticket # field. The first ticket of the split ticket series establishes the split
ticket number. The split ticket number must then be placed in the Split Ticket # field for all subsequent tickets
created for the trip.
3.5 Paying Fisherman
Pay Fisherman is an optional part of the program used to track payments to fishermen. A ticket can be marked
as paid on the Ticket screen or on the Pay Fisherman screen (Figure 3.5.1). This screen can be called up by
clicking the Pay Fisherman button from the main screen or from the menu bar in the Ticket screen.
Figure 3.5.1
This screen provides a list of all active fishermen. As each fisherman is selected, the tickets which are not
marked as paid display in the list as shown above.
Before a ticket is marked as paid by clicking the Pay Now button, the ticket(s) must be selected from the list in
bottom section of screen by clicking on the ticket number(s).
The Select All button selects all tickets from the list and displays the total in the box under the Total Paid
caption. To select a single ticket, click on that ticket in the list and only the total from that ticket displays in the
Total To Pay box. Multiple tickets may be selected by holding down the Ctrl key while clicking on the ticket
number.
If the Check option is chosen, the user can enter a check number in the box provided. To mark the ticket as
paid, click the Pay Now button. This will mark the ticket as paid and it will be removed from the Pay Ticket
screen.
Click on the Clear button to clear the fields on the screen. Click on the Close button to leave the screen.
Figure 3.5.1 does not show the optional check writing features that are available. If the check writing feature is
desired, then these features will be displayed.

16
3.6 Using the Find Ticket Screen
The Find Ticket screen (Figure 3.6.1) is designed to locate a specific trip ticket. There are a number of different
ways to use this screen and it is called up using the Find Ticket button from the main screen.
Figure 3.6.1
The Find Ticket screen allows the user to search on one or multiple criteria. For example, the user can enter a
last name, or a last name and a date range or just a date range. The possibilities for searches are many. The
Pre-defined Date Ranges are used to automatically fill in the desired date range. A search for Tracking Number
ignores all other search criteria. To view the list of all tickets, click on the Show All button. The Show All
button will not display voided tickets unless the Include Voided Tickets checkbox is selected.
To perform a search, first enter the desired criteria and then click on the Search button. After clicking the
Search button, the list fills with the tickets that match the search criteria or the user is informed that no tickets
meet that criteria.
To open a ticket, click on the ticket number in the list and then click on the Open button.
This screen is also used if the user knows the ticket number. Simply enter the ticket number in the box to the
left of the Open button and click on the Open button. This will open the ticket on the Trip Ticket screen.
Leading zeroes are not required when manually entering a ticket number.
Notice that the fisherman’s name also appears next to the Pay button. The user can access the Pay Fisherman
screen from here to pay the fisherman listed for the selected ticket.
The Status column displays whether or not the completed or updated ticket has been sent to the state agency
and/or federal agency for dealers with a federal license. It also displays incomplete for incomplete tickets.
The Update Prices feature allows you to update prices across multiple tickets. First, use the search criteria of
the Find Ticket screen to create a list of tickets, then click on the Update Prices button. See Chapter 7,
Updating Prices for more information about this feature.
The Delete Ticket menu item allows the selected ticket to be deleted.
Ticket Totals Report menu item
Clicking this menu for the selected ticket pulls up a printable Ticket Totals Report for given Ticket Number.

17
3.7 Deductions
The Deductions feature is an optional part of the program that can be entered two different ways on two
different screens. From the Main screen, the Deductions menu item calls up the Deduction screen in Figure
3.7.1
Figure 3.7.1
Deduction Screen I – Accessed from Main screen
This screen is used if you wish to enter deductions before you know the ticket number to which the deduction
will be linked. The deduction must first be linked to a vessel or a fisherman. The vessel or fisherman list is
built according to the setup on the Dealer screen. That is, the list will be built for either vessels or fishermen,
not a mix of both.
Next, select an item description. The means has been provided for each user to build a unique list of deductions
by clicking on the small button above the item description list. This small button brings up a screen (Figure
3.7.2) that allows the user to build their list of deductions.

18
Figure 3.7.2
After the deduction item is selected (Figure 3.7.1), enter the quantity and cost of the deducted item. The user
may optionally enter the sales tax for the deducted item. The small buttons above the local and state sales tax
boxes provide for automatic calculation of the sales taxes. The sales tax rates are entered in the Dealer screen.
The program will automatically calculate the subtotal of the deducted item. This subtotal may not be edited
directly. Today’s date is entered in the date field. The user may edit this date, if necessary.
An optional tracking number may be tied to a deduction. This can be an invoice number or any number the user
wishes. Deduction reports by tracking number may be generated. An optional note may be added for each
deduction. The tracking number of a non-transferred deduction can be edited by using the Update Selected Item
button above the non-transferred deduction list (Figure 3.7.1).
Click on the Save New Item button to save the deduction into the non-transferred deduction list. It is from this
list that a deduction can be selected and transferred to a ticket. It is also possible to update a non-transferred
deduction by first clicking on the item in the list. Edit the item, then hit the Update Selected Item button.
At this point or some time later, the deduction may be transferred to a specific ticket by inserting the ticket
number underneath the Transfer button, then by clicking on the Transfer button. The following conditions must
be met before a deduction will actually link to a ticket: 1) The vessel or fisherman must match the one on the
ticket, and 2) the total deductions may not be greater than the ticket total.
Non-transferred deductions may be paid directly by the fisherman. In this case, enter PAID where the ticket
number is normally entered below the Transfer button, then hit the Transfer button. This will cause the
deduction item to be transferred without becoming attached to a ticket.
Deductions reports may be generated by clicking on the Reports button. There are basically two different
deductions reports: 1) An itemized list of deductions for each Vessel/Fisherman within a given date range, or 2)
a deductions summary report that provides totals for each deduction for a given date range. The itemized list
can be generated for a single vessel/fisherman or for all vessels/fishermen.

19
Dealer Deduction Screen Accessed from Trip Ticket System
The Dealer Deductions screen (Figure 3.7.4) linked to a specific ticket is accessed from the Trip Ticket screen
by clicking on the Deductions button above the Deductions box in the upper right part of the Trip Ticket screen
Figure 3.7.3
Figure 3.7.4
Deduction Screen II – Accessed from Trip Ticket Screen
All deductions tied to a specific ticket show up on this screen. Deductions may be entered directly on this
screen or the user may go to the other deduction screen by clicking on the Previously Entered Deductions
button.
To add an item, first enter the description, and then add the cost and quantity. The program automatically
calculates the sub total and the grand total. To add the deduction to the list, click on the Save Item button. This
will add the information to the list at the bottom of the screen and allow you to enter another item.
To edit an item, click on the item in the list and the information fills the boxes at the top of the screen and
enables the Update Item button. Make the necessary changes and click on the Update button to save those
changes.
To delete an item, click on it in the list. Next, click on the Delete button to remove it permanently. The Close
button closes this screen and brings the program back to the trip ticket screen.

20
Chapter 4
Creating/Sending Trip Ticket Data File
4.1 Send Ticket Data File to State Agency
Figure 4.1.1
Use the Send State Data / Negative Reports button on the main screen (Figure 4.1.1) to send in trip ticket data to
the state. Dealers who hold both state and federal dealer licenses must send the same ticket data in twice; once
to the state and once to the federal agency. Refer to section 4.3 for sending to the federal agency. Use the new
Negative Reports screen accessed from the Send State Data screen to send Negative Reports. Refer to section
4.2.
In the center of the Send Data screen (Figure 4.1.2) is a list of tickets that have been created or edited and not
yet been sent to the agency. To send ticket data, first enter the date range of the tickets to be sent. Pre-defined
date ranges have been provided for convenience. Tickets with unload dates that fall in this date range are
included in the file that will be sent. State-required data must be sent in monthly.
To start the send process for the selected date range, click the Send State Data button. After the file is sent, a
message box will appear informing the user that the file was sent successfully. If for some reason the file was
not sent successfully, the user will be informed of this. Files successfully sent will be displayed in the Send
State Data screen in the Data Files Sent section. Click the Close button to return to the Main screen.
Figure 4.1.2

21
4.2 Send Negative Report to State Agency
The state requires that a landings report is sent for each month. If the dealer has no landings for a given
calendar month, then a Negative Report should be sent in.
To send a Negative Report to the state, click the Negative Reports button in the Send State Data screen. This
brings up the Negative Reports screen (figure 4.2.1). Select a date range and click on the Send Negative Report
to State (FL) button. After the file is sent, a message box will appear informing the user that the Negative
Report file was sent successfully. Negative Reports successfully sent will be displayed in the Data Files Sent
section of both the Negative Reports screen and the Send State Data screen.. Call technical support for any
issues with sending of data. Click the Close button to return to the Send State Data screen.
Figure 4.2.1

22
4.3 Send Ticket Data File to Federal Agency
Figure 4.3.1
Dealers who hold both state and federal dealer licenses must send the same ticket data in twice; once to the state
and once to the federal agency. Use the Send Fed Data / Negative Reports button on the main screen (Figure
4.3.1) to send in trip ticket data to the federal agency as often as the federal agency requires. It is likely that the
federal reporting requirement is weekly as of 1/1/2013, but this user's guide is not the official word for this and
federal reporting requirements are subject to change. Use the new Negative Reports screen accessed from the
Send Fed Data screen to send Negative Reports to the federal agency. Refer to section 4.4.
In the center of the Send Federal Data screen (Figure 4.3.2) is a list of tickets that have not yet been sent to the
agency. To send ticket information, first enter the date range of the tickets to be sent. Pre-defined date ranges
have been provided for convenience. Tickets with unload dates that fall in this date range are included in the
file that will be sent.
To start the send process for the selected date range, click the Send Federal Data button. Files successfully sent
will be displayed in both the Send State Data and Send Federal Data screens in the Data Files Sent section. Call
technical support for any issues with sending of data. Click the Close button to return to the Main screen.
Figure 4.3.2

23
4.4 Send Negative Report to Federal Agency
Federal agencies require that a landings report is sent for each reporting period (weekly, for example). If the
dealer has no landings for a given reporting period, then a Negative Report should be sent in.
To send a Negative Report to the federal agency, click the Negative Reports button in the Send Federal Data
screen. This brings up the Negative Reports screen (figure 4.4.1). Select a date range. Weekly date ranges are
provided with Next and Back button in the pre-defined date range section. A Reason For Negative Report
comment box is provided for HMS dealers only. All federal dealers must check the Acknowledgement before
sending the negative report.
To send the Negative Report, click on the Send Negative Report to NMFS (Federal) button. After the file is
sent, a message box will appear informing the user that the Negative Report file was sent successfully. If the
file was not sent successfully, the user will be informed of this. Negative Reports successfully sent will be
displayed in the Data Files Sent section. Call technical support for any issues with sending of data. Click the
Close button to return to the Send Federal Data screen.
Figure 4.4.1

24
Chapter 5
Species Screen
Figure 5.1.1
The Species screen is accessed from the main menu. This screen is used to view the entire species list and to set
default units, grade, and/or market for the species. The use of this screen is optional. You may narrow down
the species list by typing the name of the species you wish to view in the Orange Filter box. For instance,
typing Amber into the filter box will cause the list to only show those species with the word amber in them.
If you wish to assign default Units or Grade or Market to a species, first select the species by clicking on it to
highlight it. Enter the desired default value or reminder for the selected species and click on the appropriate
Update button. The program will inform you that the default values were updated with a message box. The
default values will automatically appear on the Ticket screen each time the species is selected.
The Alt Species Code feature may be used to assign a user-defined species code to a species. The user-defined
text code can then be used to select a species on the Trip Ticket screen. For instance, the code of AMB has
been assigned to Amberjack. The official code is 103 and that is the code that will be sent with the data file.
But the user-defined code AMB will now be in the Species Code drop down list in the Ticket screen and can be
used to call up Amberjack on the Ticket screen. Click the Update button in the Alt Species Code box to save
the Alt Species Code.

25
Chapter 6
Price Defaults
Figure 6.1.1
The Price Default screen (Figure 6.1.1) is accessed via the Edit menu item on the main screen.
The Price Default screen provides the dealer with the ability to set up prices that will fill in automatically to the
ticket screen when that particular species and count/size combination is selected.
To set up a price default, first select a species. Provide a description for the price default and designate a
count/size, if one is appropriate. Count/size is not required. Add a price and hit the Add button.
To edit a price default that already exists, first click on the item in the list, edit the desired field, then hit the
Update button.
A price default may be deleted by first clicking on it in the list, then hit the Delete button.

26
Chapter 7
Updating Prices
A dealer does not always know that price of the catch when it is off-loaded; yet, they may desire or be required
to enter the price in the Trip Ticket program. In this case, a price of zero may be entered into the program.
Then, when the price is known, it may be entered one of three ways:
1. Go back to the ticket via the Find Ticket screen, select the species transaction in the list at the bottom of the
Ticket screen, edit the price, then click on the Update button in the lower section.
2. Go to the ticket and click on the button labeled P just above the price box. This will call up the Edit Price
screen (Figure 7.1.1) where all of the species for the ticket are shown on one screen. Only the price field can be
modified. The Next button is used when more than 15 species entries exists on the ticket. Change the Price
field and click on the Update Price(s).
Figure 7.1.1

27
3. The Update Prices screen (Figure 7.1.2) from the Find Ticket screen (Figure 3.6.1). First create a list of
tickets to update using the Find Ticket search function. Search for the tickets by date, etc and click on the
Search button. Once the list is built, click on the Update Prices button. The left-hand column contains all of the
tickets from the Find Ticket screen. Select those on the left that you wish to change, then click on the Arrow
pointing to the right to send to the Tickets To Update list on the right. Only the tickets in the right-hand column
will be edited.
Once the list of tickets to edit is established, select the species to which the price will be changed. The Species
Description list will be populated only by those species related to those tickets in the first list. Enter the new
price, then click on the Update Prices button. Prices must be changed species by species.
Figure 7.1.2
If desired, click on tickets in the second list to show a list of species related to that ticket.
Click the Close button to return to the Find Ticket screen.

28
Chapter 8
Federal License Dealer Reporting
The Trip Ticket program was modified to incorporate additional federal reporting requirements for federally
licensed dealers. Dealers only reporting to the state are not affected by these new requirements. Listed below
are changes that apply to all federal dealers and are included in the latest release. Also listed are requirements
for dealers who handle Highly Migratory Species (HMS).
8.1 Requirements for all Federal Dealers
1. Enter the Federal Dealer number in the Dealer Information screen. This activates the federal fields.
2. Federal data fields that are now required include: Port landed, Grade, Market, Unit, and Disposition.
3. Use the new Federal Send Data screen to send Trip Ticket data files to the federal agency.
4. Use the new Negative Reports screen accessed from the Federal Send Data screen to send Negative
Reports to the federal agency.
5. Use the Send State Data screen to send Trip Ticket data files to the state agency.
6. Use the new Negative Reports screen accessed from the State Send Data screen to send Negative
Reports to the state agency.
7. All federal dealers who report HMS must follow the HMS reporting guidelines even if the dealer does
not hold an HMS license. Start reporting HMS on a ticket by clicking on the HMS checkbox. Any
given ticket may contain both HMS and non-HMS species.
8.2 Requirements for Federal Dealers who handle HMS
8. HMS dealers must enter their current email address in the Dealer Information Screen.
9. Additional HMS fields on the ticket screen include: Date Landed, Vessel's Logbook Number or Reason
for no vessel logbook number (list of reasons found under HMS menu item), HMS Catch Region, Total
Sales Price or No Sales Price, How Fins were attached (for non-Whole shark species) See Figure 8.2.1.
10. In Catch Area of Ticket screen, HMS species requires Total Sales price or the No Sale option checked.
A numeric value of 0 may be entered for Total Sales price, if unknown. A ticket with a zero Total
Sales Price or No Sale transaction should be updated and resubmitted once the price is known. Refer to
agency policy on HMS reporting for more information regarding Price and Total Sales field
requirements.
11. The header of an HMS ticket will contain the option: Fished in the Atlantic Shark Research Fishery
checkbox for reporting of Sandbar shark. Check this option if any species was caught in this area. If
Sandbar Shark was caught, Trip Ticket will prompt that this option be checked. If this option is
checked, then enter the agency observer’s Observer ID.
12. For any HMS species entered on a ticket, dealers must enter acceptable HMS Gear and Disposition
Codes. Each of the acceptable codes is marked with (hms).
NOTE: If a federal dealer has multiple federal licenses, enter the SER federal dealer number. If the dealer
does not have an SER federal dealer number, then contact Dave Gloeckner (SE NMFS) at 305-361-4257. For
dealers with HMS license, call the HMS Management Division helpline at 301-427-8590. Trip Ticket technical
support can help with this as well. Having the correct license in the Dealer screen is instrumental for accurate
reporting of data to all agencies.
NOTE: For dealers holding HMS license
Highly Migratory Species Management Division helpline: 301-427-8590.

29
Figure 8.2.1 Ticket with HMS Shark species

30
Chapter 9
Utilities
9.1 Compacting the Database
This operation removes all unnecessary space from the database. This will also increase the speed of the
program and increase data integrity. The program will periodically perform this action automatically. This
menu item allows the user to perform the operation manually.
To compact the database, select Compact Database from the Utilities menu. The program informs the user
when the operation is complete.
9.2 Archiving the Database
Archiving the database lets the user remove old information from the database and store it in a separate
database. This will increase the efficiency of the program by not allowing the database to grow too large and
should be done periodically. How often this function is performed is entirely up to the user depending on
volume of trip tickets. Annually is usually sufficient. Remember, though, that this function actually removes
data from the working database and places it in an archive database, thus making it unavailable when using the
primary database.
To archive the database, select Archive Database from the Utilities menu. Once selected, the Archive Database
screen appears (Figure 9.2.1).
Figure 9.2.1
Enter the date range. Tickets in the database that fall between the Begin Date and the End Date are removed
from the current database and placed in the archive database. Notice the box under the Save Archive to label.
This indicates where the archived database will be stored. It is best to accept the default location for the
database if the user is unfamiliar with designating the location for a file. To archive the database, click on the
Archive Now button.
31
Note: The program will automatically name the archived database: TArc****.mdb where **** represent the
month and year of the selected End Date specified for the archiving process.
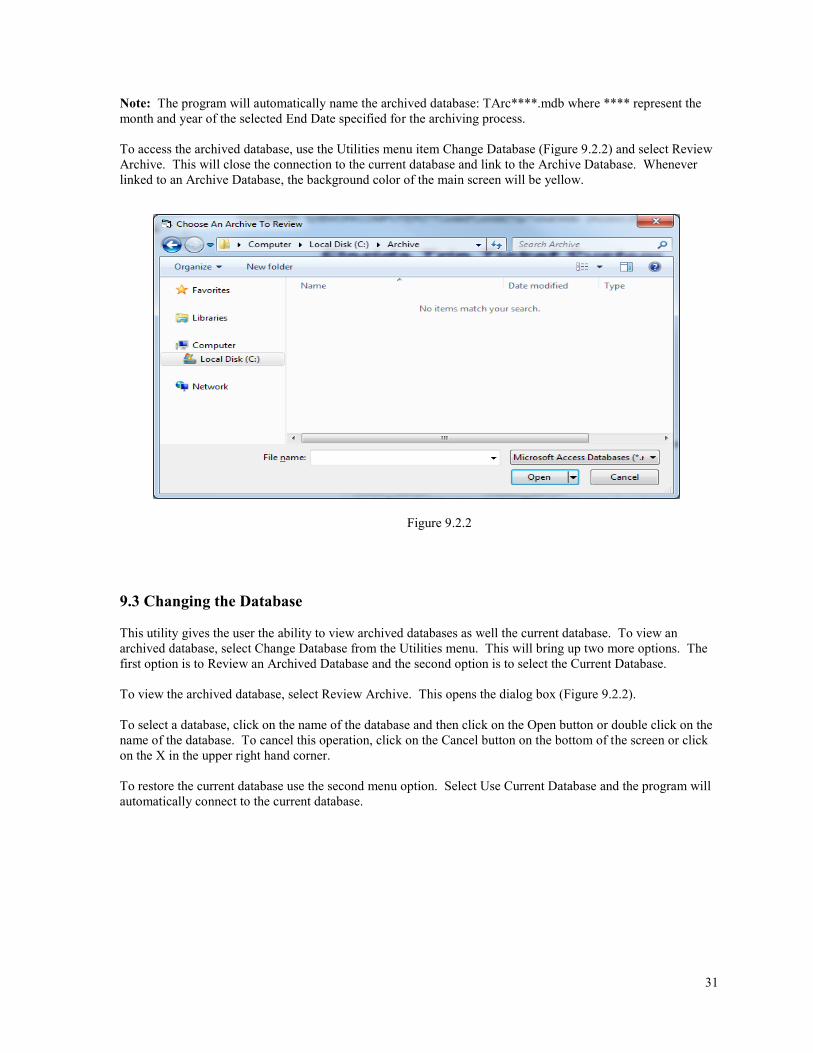
To access the archived database, use the Utilities menu item Change Database (Figure 9.2.2) and select Review
Archive. This will close the connection to the current database and link to the Archive Database. Whenever
linked to an Archive Database, the background color of the main screen will be yellow.
Figure 9.2.2
9.3 Changing the Database
This utility gives the user the ability to view archived databases as well the current database. To view an
archived database, select Change Database from the Utilities menu. This will bring up two more options. The
first option is to Review an Archived Database and the second option is to select the Current Database.
To view the archived database, select Review Archive. This opens the dialog box (Figure 9.2.2).
To select a database, click on the name of the database and then click on the Open button or double click on the
name of the database. To cancel this operation, click on the Cancel button on the bottom of the screen or click
on the X in the upper right hand corner.
To restore the current database use the second menu option. Select Use Current Database and the program will
automatically connect to the current database.

32
9.4 Backing up the Database
There are 3 methods to back-up the Trip Ticket database:
1. The first method is done automatically once a day. Every new day the program is used, the database is
automatically backed up to the C:\Program Files\TripTicketBU folder.
2. Backup DB to Bluefin Data (Figure 9.4.1) is a second option for backing up the database. While connected
to the Internet, you may click on this button located on the program’s main screen and a copy of your database
will be sent to Bluefin Data for safekeeping. If the option on the Dealer setup screen labeled “Automatically
Backup Database” is checked, then the database will be backed up via Internet every time you send in data. If
the option on the Dealer Setup screen labeled “Prompt for Database Backup” is checked, then the program will
ask if you wish to the have database backed up via the Internet every time you send in data.
Figure 9.4.1
3. Backup Database Locally is the third method of backing up your database. This option is accessed via the
Utilities menu item on the program’s main screen (Figure 9.4.2).Select the backup location if you do want the
backup file saved in the default location, then click on the Backup Now button. If you wish to save the backup
file compacted, then check the Compact File option. The Compact File option may have to be used when
saving a backup file to a floppy disk. It is not recommended to Compact File unless necessary.
Figure 9.4.2

33
9.5 Create Data File
Create Data File (Figure 9.5.1) is a utility designed to allow the user to export data from the trip ticket database
into a tab-delimited file format. In other words, it allows the user to export data in a format that can be read by
a spread-sheet program, such as Microsoft Excel. The content of the report can be narrowed down by species
and an All Shrimp Species option is available.
Figure 9.5.1
9.6 Deactivate All Fishermen
This menu item in the utilities menu takes all active fishermen and deactivates them. Perform this procedure
with extreme caution because once the fishermen are deactivated they will no longer appear in the list for trip
tickets. And they will have to be activated again, manually one by one. To activate an existing fisherman, go to
the Fisherman/Vessel screen, uncheck the Hide Inactive Fisherman box by clicking on it, select the fisherman
from the list of all active and inactive fishermen, and check the Active Box for the selected fisherman. Click on
the Update button .
When the Deactivate All Fishermen item is selected, a message box appears to prompt the user to continue
(Figure 9.6.1). To continue deactivating all fishermen click on the Yes button. To cancel the operation, click
on the No Button.
Figure 9.6.1

34
Chapter 10
Reports
The reports provided by the program are accessed from different locations. There are four reports available
from the main menu (Figure 10.1.1).
Figure 10.1.1
Active Fishermen provides a list of all active fishermen in the database. Summary By Fisherman provides a
list of transactions for one or all fisherman for a given date range. Summary By Species provides a list of
transactions for one or all species for a given date range. Summary By Boat provides a list of transactions for
one or all boats for a given date range.
A Trip Ticket Summary can be printed from the Trip Ticket screen (Figure 10.1.2).
Figure 10.1.2
Select the Print 1 Ticket option from the menu or hit the Control and P keys simultaneously while looking at
the Trip Ticket screen. Print Preview (Ctrl-T) brings up a copy of the ticket on the screen for viewing before
sending it to the printer. Print Ticket Info With Deductions (Ctrl-D) will generate a report with an itemized
list of deductions, if any, for that specific ticket.

35
Chapter 11
Trip Ticket Extra and Useful Features
11.1 Gulf Seafood Trace Register Program
Traceability Information is provided by Trip Ticket dealers for eventual use by consumers as a means to view
details of seafood purchase. The Traceability Info fields in the Dealer screen are part of this mechanism and
used only by Dealers participating in the Trace Register Program. Participating dealers can send a ticket to
Trace Register from the Ticket screen by clicking on the Send To TR menu item. If the Dealer is not a Trace
Register participant, than this menu item is not visible. For more information about the Trace Register program,
please visit the Gulf States Marine Fisheries Commission website at www.gsmfc.org, the Trace Register
website at www.traceregister.com, or call Bluefin Data at phone number 225-744-0807.
11.2 IFQ Login Screen
The IFQ Login screen can be conveniently accessed from the Ticket screen by clicking on the IFQ Login screen
menu item.
11.3 Trip Ticket Web Browser
The Trip Ticket Web Browser can be conveniently accessed from the main Trip Ticket screen by clicking on
the Read Me button in the lower right-hand corner. To go directly to the Bluefiin Data Website, click on the
Bluefin Data Website menu item. There is also an Update Notes menu item which provides user with updates
to each new version of Trip Ticket. The User's Manual can be pulled up from the Read Me button as well.

36
Chapter 12
Technical Support
If questions or problems arise, call Bluefin Data for technical support at 225-744-0807.
Or you can email questions or comments to [email protected]. Please include phone number where you
may be reached.
Support hours are somewhat flexible. The standard hours are Monday through Friday from 8:00 AM to 4:00
PM CST. If you need help outside those hours, the call will be answered, if possible. Otherwise, leave a
message and your call will be returned.
Client satisfaction is our ultimate goal! If there are additional features that you would like to see implemented,
or if there is some aspect of the program or its function that does not meet your criteria, then please provide
suggestions. All comments for improvement are welcome!