trim work index - dreamgreenhome.com
TRANSCRIPT

30 Greenway, NW Suite 11 Glen Burnie, Maryland 21061
tel 410.528.8899 fax 410.558.6312
www.gbalternatives.com
VERSION 1 _ 02-07-2007
INTERIOR TRIM WORK SPECIFICATIONS
FOR 1744 JOHNSON ST.

30 Greenway, NW Suite 11 Glen Burnie, Maryland 21061
tel 410.528.8899 fax 410.558.6312
www.gbalternatives.com
Green Building Alternatives, LLC is soliciting Interior Trim Work proposals for a row home rehab project in Federal Hill, Baltimore.
About us and the project
Green Building Alternatives, LLC, is a startup green building business owned by Erik and Laura Steensen. We’re initially focused on rehabbing this Baltimore City row home in Federal Hill for resale. Among the most quantifiably “Green” aspects of the project is that it will be Energy Star certified.
Project description
It’s a single family row home located across from Riverside Park in Federal Hill, Baltimore that has been gutted. We expect rough-in and insulation to be complete mid-February.
Address of the property
1744 Johnson St Baltimore, MD 21230
Bid request
We are asking each interested party for two proposals.
1. Labor and materials
2. Labor only (we supply materials)
Documentation downloads
The latest drawings and specifications organized by trade can be downloaded from http://www.gbalternatives.com/johnsonst
Note: The team members that compiled the specifications and drawings are not experts in either of the trades represented. Please review the documents with a critical eye and tell us if you see errors, bad design, or if you think there are better design alternatives.
Proposal submission
Please submit bids via fax or email. If you have comments or questions and prefer to talk with us by phone or in person, please include proposed dates and times when you are available in your message. Leticia Machado Phone: 410-528-8899 Fax: 410-558-6312 Email: [email protected]

INDEX
Page 2 – Interior Trim Work Specifications
Page 3 – Room by Room Detail
Page 4 – Architectural Plans: Basement Plan
Page 5 – Architectural Plans: First Floor Plan
Page 6 – Architectural Plans: Second Floor Plan
Page 7 – Architectural Plans: Third Floor Plan
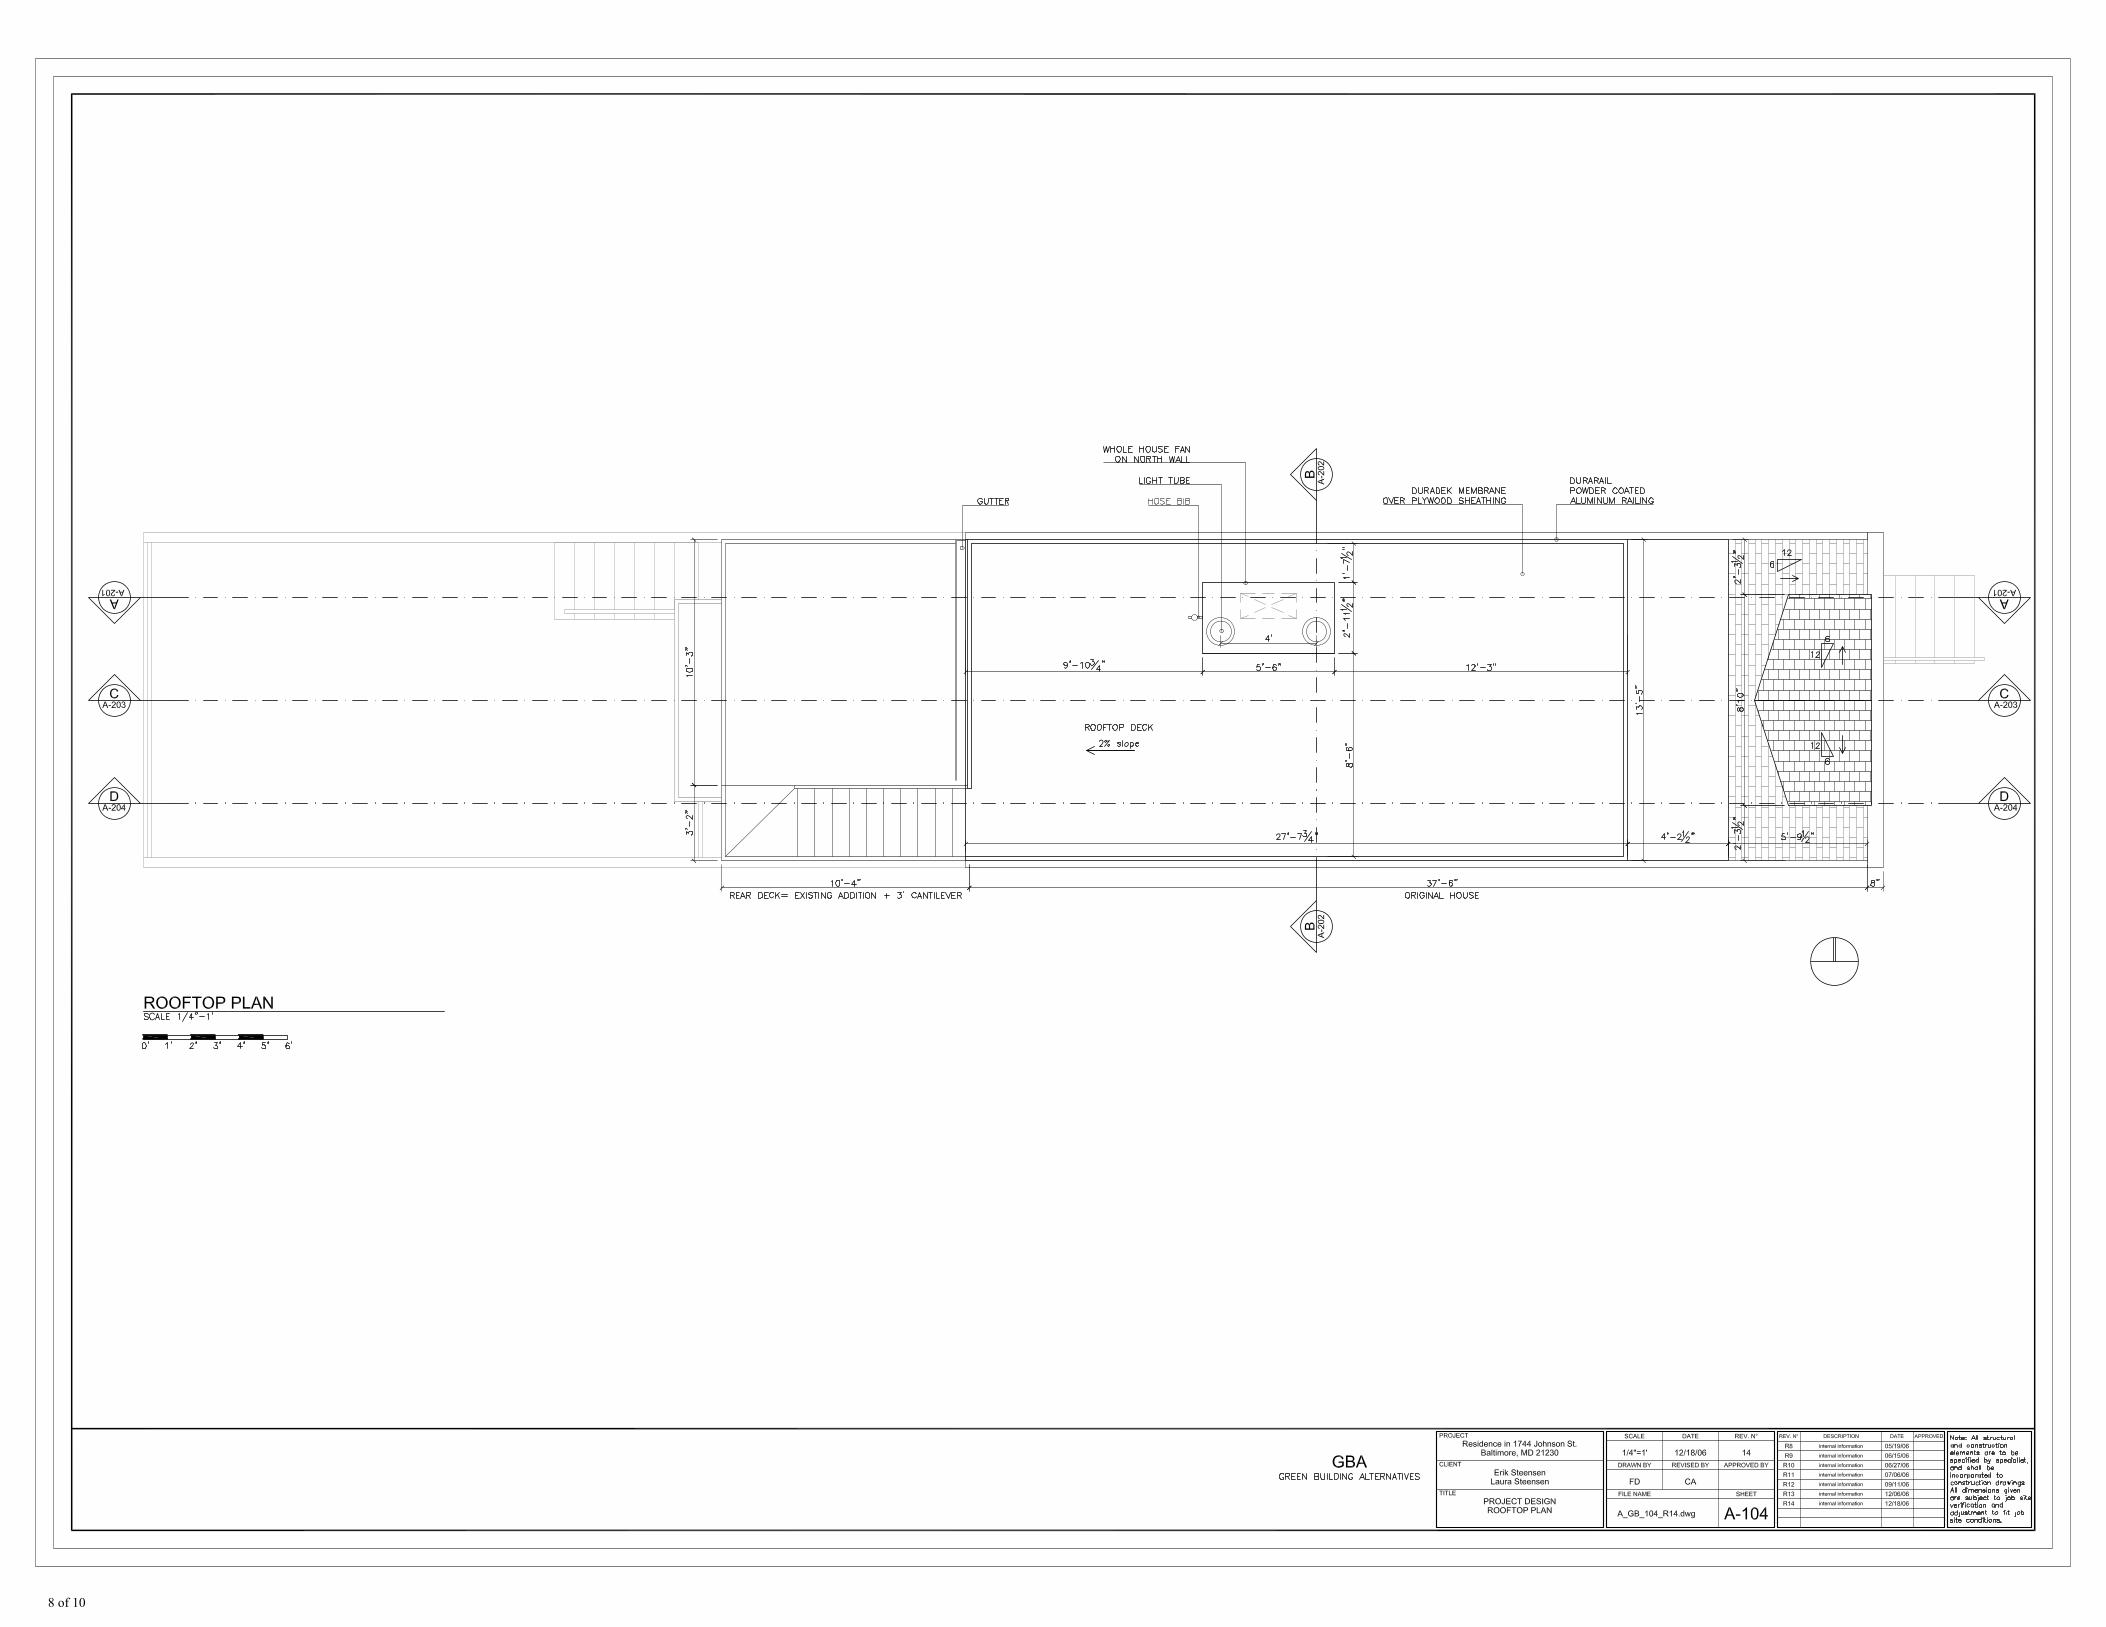
Page 8 – Architectural Plans: Rooftop Plan
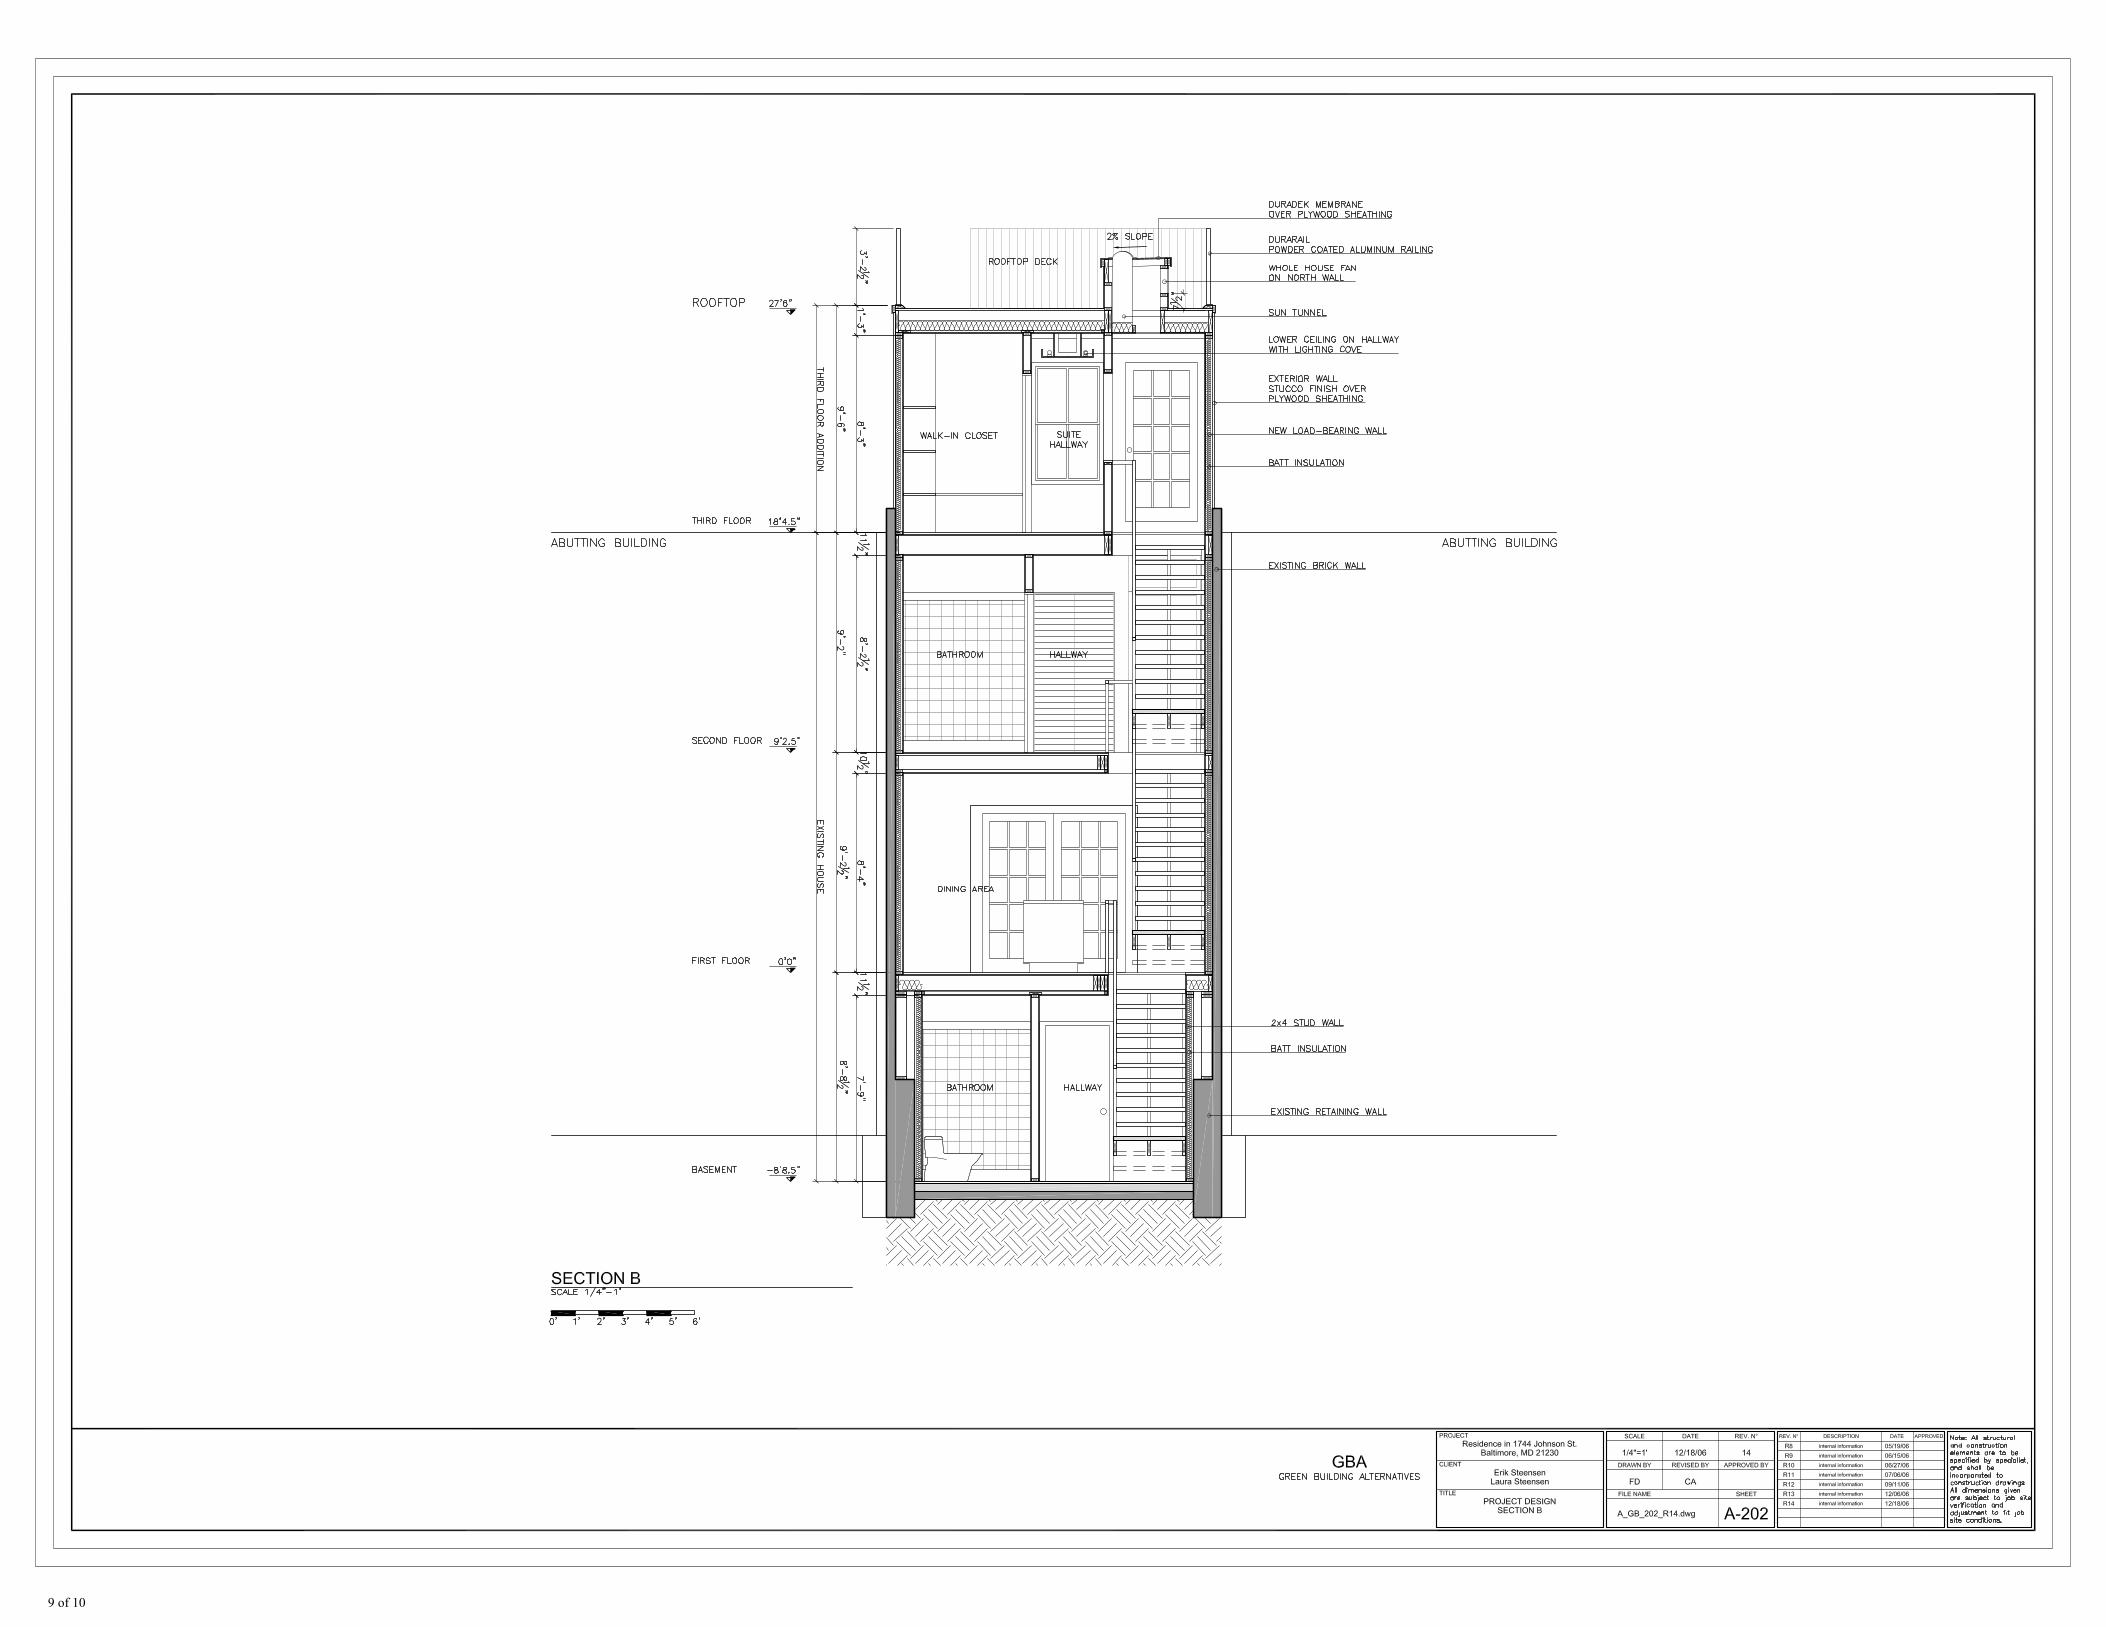
Page 9 – Architectural Plans: Section B
Page 10 – Architectural Plans: Section C
Appendix – Moulding Installation by Focal Point
1 of 10

SPECIFICATIONS
Option 1:
06200 – Finish Carpentry – All architectural trim and woodwork shall be No. 1 grade material
suitable for appropriate finishes. Wood that will be stained shall be clear of knots with concealed joints.
06220 – Millwork - Interior Trim - Moisture content for interior woodwork shall be 8-10 percent to
reduce excess shrinking. Install quarter round molding between hardwood floor or other hard surface
material and baseboard trim.
In Dining Area-Kitchen opening install door casing pilasters and frieze.
Base Molding: Oak or similar
Crown Molding: Oak or similar
Chair Rail: Oak or similar
Window and Door Casing: Oak or similar
06400 – Custom or Pre-fabricated Woodwork - Provide and install custom woodwork as described
on construction documents. Pre-fabricated woodwork should be specified below.
Option 2:
06200 – Finish Carpentry – All architectural trim and woodwork shall be No. 1 grade material
suitable for appropriate finishes. Wood that will be stained shall be clear of knots with concealed joints.
06220 – Millwork - Interior Trim - Moisture content for interior woodwork shall be 8-10 percent to
reduce excess shrinking. Provide and install interior wood trim as shown in construction documents.
Install quarter round molding between hardwood floor or other hard surface material and baseboard trim.
Provide and install interior high-density polyurethane trim. Install quarter round molding between
hardwood floor or other hard surface material and baseboard trim.
In Dining Area-Kitchen opening install door casing pilasters and frieze.
Base Molding: Oak or similar
Crown Molding: Siena Style by Focal Point, or similar
Chair Rail: Siena Style by Focal Point, or similar
Window and Door Casing: Siena Style by Focal Point, or similar
2 of 10

RoomPerimeter
(ft)Notes
Hallway + Staircase 31,92
Bedroom 55,25
Bedroom Closet 15,58
Bedroom Linen Closet 10,25 No Trim Work
Bathroom 26,50 No Trim Work
Mechanical Room 37,42 No Trim Work
Storage Area 38,92 No Trim Work
Sub-totals 102,75
Living Room / Dining Area / Staircase 89,50
Kitchen 47,75
Sub-totals 137,25
Hallway + Staircase 50,17
Closet W/D 13,38 No Trim Work
Heat Pump Closet 12,17 No Trim Work
Front Bedroom 54,71
Front Bedroom Closet 18,08 No Trim Work
East Bathroom 28,83 No Trim Work
West Bathroom 28,83 No Trim Work
Rear Bedroom 51,63
Rear Bedroom Closet 13,88 No Trim Work
Sub-totals 156,50
Hallway + Staircase 44,08
Master Bedroom Hallway 47,17
Master Bedroom 55,83
Linen Closet 10,92 No Trim Work
Walk-in Closet 24,00
Master Bathroom 33,67 No Trim Work
Sub-totals 171,08
TOTALS 567,58
THIRD FLOOR
ROOM BY ROOM DETAIL
BASEMENT
FIRST FLOOR
SECOND
FLOOR
3 of 10

4 of 10

5 of 10

6 of 10

7 of 10
8 of 10
9 of 10

10 of 10

General• Use only Focal Point AD3 Adhesive #33333.• Focal Point mouldings have the same density and workability as
white pine.• Mouldings that have been stored in hot conditions should be
allowed to cool down to normal temperatures before installation.• Focal Point mouldings are factory primed.
1. Cutting • Mark projection and depth on walls and ceilings. These dimensions
can be found in the chart on the back of this sheet.• Cut 45˚compound miters for inside and outside corners (do not
cope inside corners). Apply Focal Point Adhesive #33333 and fasten with trim screws or finish nails.
• Cut butt joints for all straight joints, apply AD3 Adhesive to both edges.(do not use scarf or lap joints).
• For large profiles (8” face or larger) apply 1/4” bead of AD3 Adhesive #33333 to the top and bottom bedding edges on the back side of moulding (see figure 1) or apply AD3 Adhesive #33333 to inside wall and ceiling marks.
• Cut mouldings 1/4” longer and spring into place. If necessary, screw a wooden block to the wall and spring moulding against the block. Screw or nail moulding into place then remove the block (see Figure 2).
• Screw or nail moulding every 16”.• Remove excess wet adhesive with mineral spirits.
2. Finishing• Caulk mouldings to wall and ceiling using a paintable latex caulk.• Fill screw or nail holes with vinyl spackle.• Cover joints with vinyl spackle and lightly sand with fine grit paper.• If factory primer is sanded off, apply vinyl spackle to area, lightly
sand, and prime.• Use a high-quality latex or oil-based paint.• Do NOT use lacquer paints.
See Moulding Cut Guide for propertable and blade cut angles
Important InformationUse only Focal Point Adhesive.
Call your local dealer with any questions.
© FOCAL POINT 2000 L201-3000
Figure 1
Figure 2
Block
Pattern Match
BeddingEdges
ButtJoint
PleaseRead AndFollow All
InstallationInstructions
Carefully
MouldingInstallation
3006 Anaconda DriveTarboro • North Carolina •27886p 800.662.5550 f 800.352.9049
www.focalpointap.com