trend microâ„¢ incorporated reserves the right to make changes to
TRANSCRIPT


Trend Micro™ Incorporated reserves the right to make changes to this document and to the products described herein without notice. Before installing and using the product, please review the readme files, release notes, and the latest version of the Administrator’s Guide, which are available from Trend Micro’s website at:
http://downloadcenter.trendmicro.com/
Trend Micro and the Trend Micro logo are trademarks or registered trademarks of Trend Micro Incorporated. All other product or company names may be trademarks or registered trademarks of their owners.
Copyright © 2008-2010 Trend Micro Incorporated. All rights reserved. No part of this publication may be reproduced, photocopied, stored in a retrieval system, or transmitted without the express prior written consent of Trend Micro Incorporated.
Release Date: August 2010
Document Part No: APEM24478/100616

Trend Micro™ Threat Management Services Portal (On-premise) 2.6 Administrator’s Guide
The Administrator’s Guide for Trend Micro™ Threat Management Services Portal (On-premise) is intended to introduce the main features of the product, provide deployment information for your production environment, and provide information on configuring and using the product. Read through this document prior to deploying or using the product.
Detailed information about how to use specific features are available in the online help file and the online Knowledge Base at Trend Micro’s website.
Trend Micro always seeks to improve its documentation. Your feedback is always welcome. Please evaluate this documentation on the following site:
http://www.trendmicro.com/download/documentation/rating.asp

Contents
PrefaceDocumentation ................................................................................................viii
Audience .............................................................................................................. ix
Document Conventions ................................................................................... ix
Chapter 1: Introducing Threat Management Services Portal (On-premise)
About Threat Management Services Portal ................................................ 1-2
About Trend Micro Threat Management Services .................................... 1-2
Product Form Factor ..................................................................................... 1-6
Product Servers ............................................................................................... 1-6
Features and Benefits ..................................................................................... 1-8
Chapter 2: Installing Threat Management Services PortalInstallation Overview ..................................................................................... 2-2
System Requirements ..................................................................................... 2-2
Installation Checklist ...................................................................................... 2-4
Installing TMSP ............................................................................................... 2-5
Chapter 3: Getting StartedAccessing the Web-based Administrative Console ................................... 3-2
Navigating the Administrative Console .................................................. 3-3
Running the Configuration Wizard .............................................................. 3-6
iii

Trend Micro™ Threat Management Services Portal (On-premise) 2.6 Administrator’s Guide
Chapter 4: Configuring SettingsCreating a Customer Account .......................................................................4-2
Configuring System Time Settings ...............................................................4-5
Configuring Network Interface Settings ......................................................4-6
Managing the Contact List .............................................................................4-7
Configuring Event Notifications ................................................................4-10Configuring Notification Settings ..........................................................4-13
Registering Products to TMSP ....................................................................4-14
Chapter 5: Viewing and Analyzing InformationManaging the Customer Account .................................................................5-2
Managing Reports ...........................................................................................5-5Configuring Log Sources for Reports .....................................................5-5Report Types ...............................................................................................5-7Downloading Reports Generated Periodically ......................................5-9Sending Reports Generated Periodically ..............................................5-11Downloading Reports Generated Upon Request ...............................5-13
Performing Threat Mitigation Tasks ..........................................................5-14Downloading Forensic Data ...................................................................5-16Managing Pattern Files Issued by Trend Micro ...................................5-18
Viewing Nonconforming Endpoints .........................................................5-24
Monitoring Registered Products .................................................................5-27Downloading Registered Product Logs ................................................5-29Deleting a Registered Product ................................................................5-33
Downloading TMSP Logs ...........................................................................5-33Downloading Consolidated Logs ..........................................................5-34Downloading System Logs .....................................................................5-34
Chapter 6: MaintenanceManaging the Product License and Activation Codes ...............................6-2
Modifying the Customer Account ................................................................6-3
iv

Contents
Configuring Proxy Settings ............................................................................ 6-4
Updating Threat Correlation Rules .............................................................. 6-5
Updating Malware Mapping Settings ........................................................... 6-6
Performing Log Maintenance Tasks ............................................................ 6-7
Chapter 7: Using the PortalAccessing the Portal ....................................................................................... 7-2
Navigating the Portal ...................................................................................... 7-3
Security Dashboard ........................................................................................ 7-7Organization Dashboard .......................................................................... 7-8All Monitored Networks Dashboard .................................................... 7-14Monitored Network Dashboard ............................................................ 7-18All Endpoints Dashboard ....................................................................... 7-21Endpoint Dashboard ............................................................................... 7-24All Threats Dashboard ............................................................................ 7-26Threat Dashboard .................................................................................... 7-29
Traceable Incidents ....................................................................................... 7-31Incident Source Dashboard .................................................................... 7-32
Reports ........................................................................................................... 7-34
Account Details ............................................................................................. 7-35
Chapter 8: Getting HelpBefore Contacting Technical Support ......................................................... 8-2
Trend Community ..................................................................................... 8-2The Trend Micro Knowledge Base ......................................................... 8-2Security Information Center ..................................................................... 8-2
Contacting Trend Micro ................................................................................ 8-3Technical Support ...................................................................................... 8-3TrendLabs ................................................................................................... 8-4Sending Suspicious Files to Trend Micro ............................................... 8-4Documentation Feedback ........................................................................ 8-5
v

Trend Micro™ Threat Management Services Portal (On-premise) 2.6 Administrator’s Guide
Appendix A: Creating a New Virtual MachineCreating a New Virtual Machine ..................................................................A-2
Appendix B: Creating an Installation CDISO Recorder Power Toy Example ............................................................ B-2
Appendix C: Product Terminology and Concepts
Index
vi

Preface
Preface
Welcome to the Administrator’ Guide for the on-premise edition of Trend Micro™ Threat Management Services Portal (TMSP). This manual contains information about product setup and configuration.
This preface discusses the following topics:• Documentation on page viii• Audience on page ix• Document Conventions on page ix
vii

Trend Micro™ Threat Management Services Portal (On-premise) 2.6 Administrator’s Guide
DocumentationThe product documentation consists of the following:
The Administrator’s Guide and readme file are available at the following website:
http://www.trendmicro.com/download
TABLE P-1. Product documentation
DOCUMENTATION DESCRIPTION
Administrator’s Guide
A PDF document that discusses product setup and configuration
Help HTML files compiled in WebHelp format that provide "how to's", usage advice, and field-specific information.
To access the Help, open the product console and then click the help icon.
Readme file Contains a list of known issues and basic installation steps. It may also contain late-breaking product information not found in the Help or printed documentation
Knowledge Base An online database of problem-solving and troubleshooting information. It provides the latest information about known product issues. To access the Knowledge Base, go to the following website:
http://esupport.trendmicro.com/support
viii

Preface
AudienceThe documentation for this product is written for IT managers and administrators in medium and large enterprises. The documentation assumes a basic knowledge of security systems, including:• Antivirus and content security protection• Network concepts (such as IP address, Subnet Mask, LAN settings)• Network devices and their administration• Network configuration (such as the use of VLAN, SNMP)
Document ConventionsTo help you locate and interpret information, this document uses the following conventions.
TABLE P-2. Document conventions
CONVENTION DESCRIPTION
ALL CAPITALS Acronyms, abbreviations, and names of certain commands and keys on the keyboard
Bold Menus and menu commands, command buttons, tabs, options, and tasks
Italics References to other documentation or new technology components
LOGS > LOG MAINTENANCE
A "breadcrumb" found at the start of procedures that helps users navigate to the relevant web console screen. Multiple breadcrumbs means that there are several ways to get to the same screen.
Note: textProvides configuration notes or recommendations
ix

Trend Micro™ Threat Management Services Portal (On-premise) 2.6 Administrator’s Guide
Tip: textProvides best practice information and Trend Micro recommendations
WARNING! textProvides warnings about activities that may harm computers on your network
TABLE P-2. Document conventions (Continued)
CONVENTION DESCRIPTION
x

Chapter 1
Introducing Threat Management Services Portal (On-premise)
This chapter introduces product features, capabilities, and technology.
This chapter discusses the following topics:• About Threat Management Services Portal on page 1-2• About Trend Micro Threat Management Services on page 1-2• Product Form Factor on page 1-6• Product Servers on page 1-6• Features and Benefits on page 1-8
1-1

Trend Micro™ Threat Management Services Portal (On-premise) 2.6 Administrator’s Guide
About Threat Management Services PortalTrend Micro™ Threat Management Services Portal (TMSP) builds intelligence about your organization’s network by providing meaningful reports at the executive or administrative level. Administrative-level reports keep IT security personnel informed about the latest threats and provide action items that help defend the network from these threats. Executive-level reports inform key security stakeholders and decision makers about the network’s overall security posture, allowing them to fine tune security policies and strategies to address the latest threats.
TMSP processes logs from both Threat Discovery Appliance and Threat Mitigator and then correlates them with a set of proprietary rules to generate reports.
TMSP is part of Trend Micro Threat Management Services, a network security overwatch service that seamlessly integrates into your existing security infrastructure. Threat Management Services is powered by the Trend Micro Smart Protection Network™.
About Trend Micro Threat Management ServicesToday’s workplace is changing as new and emerging technologies enable people to work with increased mobility. This shift has brought about a new type of threat, one that can enter a network through these technologies and is sophisticated enough to evade detection by existing security infrastructure. For example, threats are unknowingly introduced into the network by employees and guests who bring with them infected mobile computers and portable storage devices. Technologies such as peer-to-peer applications, streaming media, instant messaging, and other potential infection channels can be easily exploited by hackers and cyber criminals, especially if usage is unregulated.
Organizations without dedicated security personnel and with lenient security policies are increasingly exposed to threats, even if they have basic security infrastructure in place. Once discovered, these threats may have already spread to many computing resources, taking considerable time and effort to eliminate completely. Unforeseen costs related to threat elimination can also be staggering.
1-2

Introducing Threat Management Services Portal (On-premise)
Trend Micro Threat Management Services provides organizations with an effective way to discover, mitigate, and manage stealthy and zero-day internal threats. Threat Management Services brings together security experts and a host of solutions to provide ongoing security services. These services ensure timely and efficient responses to threats, identify security gaps that leave the network vulnerable to threats, help minimize data loss, significantly reduce damage containment costs, and simplify the maintenance of network security.
Threat Management Services combines years of Trend Micro network security intelligence and in-the-cloud servers that are part of Trend Micro's Smart Protection Network to identify and respond to next-generation threats.
The following diagrams illustrate how Threat Management Services work:
FIGURE 1-1. Threat discovery activities
threat discovery
threat correlation
Web Reputation Services
Core switch
Threat Discovery Appliance
TMSP On-premise
Smart Protection Server
incidentanalysisandreports
Endpoints
Threats
Smart Protection Network
1-3

Trend Micro™ Threat Management Services Portal (On-premise) 2.6 Administrator’s Guide
FIGURE 1-2. Threat mitigation activities
Smart Protection Network
Smart Protection Server
Threat Discovery Appliance
Threat Mitigator
TMSP On-premise
File Reputa-
tionServices
threat cleanup
threat mitigation
mitigation request
mitigation request
mitigation query
Endpoints
root cause analysis and reports
1-4

Introducing Threat Management Services Portal (On-premise)
FIGURE 1-3. Advanced mitigation activities
Smart Protection Network
Smart Protection Server
Threat Mitigator
TMSP On-premise
File Reputa-
tionServices threat mitigation
reports
forensic data
upload
forensic data upload
pattern deployment
Trend Micro TrendLabs
Endpoints
Unresolved threat
threat cleanup
forensic data sending
pattern issuance
Administrator
1-5

Trend Micro™ Threat Management Services Portal (On-premise) 2.6 Administrator’s Guide
Product Form FactorIn this product release, TMSP is available as an on-premise application that can be installed on a bare metal server or a VMware™ virtual machine.
TMSP as a Trend Micro hosted service is also available in this release. Please contact your Trend Micro representative for information about the hosted service.
Product ServersTMSP comes with a set of servers, each responsible for a specific task. Assign a unique IP address for each server at various stages of deployment.
Administrative ServerThis server hosts the user interface for the product’s web-based administrative console. From this console, you can perform key administrative tasks, such as:• Creating a customer account• Controlling access to the end user portal• Configuring settings for reports, notifications, and logs• Generating reports• Running tasks that are part of the threat mitigation process, such as downloading
forensic data or deploying a custom pattern
Assign an IP address for the administrative server during the installation process. The administrative server uses port 80 by default. After the installation, log on to the web-based administrative console using the following information:• URL: http://<Administrative Console IP address>/admin• User name: admin• Password: 123456
Tip: Trend Micro recommends changing the password from the administrative console after logging on.
1-6

Introducing Threat Management Services Portal (On-premise)
PortalThe portal is a separate user interface accessed by users who want to view the network’s security status and download reports. These users are typically employees who have a stake in your organization’s IT security but who do not have the authority to manage product settings.
The portal provides a dynamic representation of the network monitored by your threat management solution. It also provides the network’s threat profile and allows users to download reports generated by TMSP.
Assign an IP address for the portal from the configuration wizard, which appears when you log on to the administrative console for the first time. The portal uses port 443 by default.
When you create a customer account, configure the logon credentials (user name and password) for the portal. After you configure the credentials, send the credentials and the portal URL to the users. The portal’s URL is:
https://<Portal IP address>/tms2
For details, see Creating a Customer Account on page 4-2.
Log ServerThe log server accepts logs from Threat Discovery Appliance or Threat Mitigator using the rsync protocol. For a list of logs received from both products, see Downloading Registered Product Logs on page 5-29.
Assign an IP address for the log server from the configuration wizard, which appears when you log on to the administrative console for the first time. The log server uses ports 443 and 22 by default.
1-7

Trend Micro™ Threat Management Services Portal (On-premise) 2.6 Administrator’s Guide
Status ServerThe status server receives the following information from Threat Discovery Appliance:• Heartbeat message. For details, see Heartbeat on page C-2.• Outbreak Containment Services logs
The status server receives the following information from Threat Mitigator:• Heartbeat message• Forensic data
Note: Threat Management Agent installed on an endpoint collects forensic data when cleanup is unsuccessful and uploads the data to Threat Mitigator.
Send the data to Trend Micro for analysis. After the analysis, Trend Micro issues a custom pattern in response to the threat. When you receive the pattern and upload it to TMSP from the administrative console, the status server stores the pattern and notifies Threat Mitigator to download the pattern.
Assign an IP address for the status server from the configuration wizard, which appears when you log on to the administrative console for the first time. The status server uses ports 443 and 22 by default.
Central Authentication Server (CAS)The CAS server authenticates users that log on to the portal and administrative console. It also authenticates registered products before they send logs and data to TMSP.
Features and BenefitsTMSP provides the following features and benefits:• Enhances visibility with executive summary reports• Allows real-time access to business risk meters, threat statistics, and infection trends• Improves effective incident response with daily reports• Helps mitigate new and unknown threats by facilitating the collection of forensic
data and the issuance of solutions to address these threats
1-8

Chapter 2
Installing Threat Management Services Portal
This chapter details the steps for installing Threat Management Services Portal (TMSP).
This chapter discusses the following topics:• Installation Overview on page 2-2• System Requirements on page 2-2• Installation Checklist on page 2-4• Installing TMSP on page 2-5
2-1

Trend Micro™ Threat Management Services Portal (On-premise) 2.6 Administrator’s Guide
Installation OverviewTMSP is packaged as an ISO file, and is installed on a purpose-built, hardened, performance-tuned 64-bit Linux operating system that is included in the package.
Run the installation on a bare metal server or a VMware virtual machine that meets the requirements listed in System Requirements on page 2-2. The bare metal installation boots from an installation CD (which contains the ISO file) to begin the process, while the VMware installation requires connecting the virtual CD/DVD drive to either the physical drive containing the installation CD or the ISO file.
WARNING! The installation process formats the host machine to install TMSP. Back up needed data on the host machine before installation.
System RequirementsTMSP requires the following resources:
TABLE 2-1. TMSP system requirements
RESOURCES REQUIREMENTS
Host machine Minimum Requirements
• CPU: 2.0GHz processor
• RAM: 2GB
• Hard disk space: 50GB
• Network interface card (NIC): 1 NIC
2-2

Installing Threat Management Services Portal
Host machine Recommended RequirementsThe recommended requirements depend on the number of Threat Discovery Appliances you plan to register to TMSP.
For 5 Threat Discovery Appliances:
• CPU: Intel™ Xeon™ X5450
• RAM: 4GB
• Hard disk space: 300GB
For 20 Threat Discovery Appliances:
• CPU: Intel Xeon X5470
• RAM: 8GB
• Hard disk space: 1TB
For 50 Threat Discovery Appliances:
• CPU: Intel Xeon X5680
• RAM: 16GB
• Hard disk space: 2TB
Note: The installer can use several hard disk drives to install TMSP. To install successfully, at least one of the hard disk drives must meet the minimum disk space requirement.
Browser To access the administrative console and portal, use Windows Internet™ Explorer™ 8.0.
TABLE 2-1. TMSP system requirements (Continued)
RESOURCES REQUIREMENTS
2-3

Trend Micro™ Threat Management Services Portal (On-premise) 2.6 Administrator’s Guide
Installation ChecklistPrepare the following before installation:
TABLE 2-2.
REQUIREMENT DETAILS YOUR VALUE
Host machine: The host machine can either be a bare metal server or a VMware virtual machine.
ISO file or Installation CD
TMSP is packaged as an ISO file. Obtain the ISO file or the bootable installation CD containing the ISO file before installation.
To install on a bare metal server, use the bootable installation CD. To install the product on a VMware virtual machine, use the installation CD or the ISO file.
Static IP addresses
Prepare four static IP addresses belonging to the same subnetwork (subnet). Assign these IP addresses to the following servers that make up TMSP:
• Administrative server
• Portal
• Status server
• Log server
The IP address for the administrative server is assigned during installation. The other IP addresses are assigned after installation, from the web-based administrative console.
For details about the product servers, see Product Servers on page 1-6.
2-4

Installing Threat Management Services Portal
Installing TMSPThis topic covers installation on both bare metal server and VMware virtual machine.
Note: TMSP does not need a network connection during installation, but it must connect to the Internet when using the configuration wizard from the web-based administrative console.
To install TMSP:
1. Perform the following steps if installing on a bare metal server:
a. Insert the installation CD into the CD/DVD drive.
Note: If you wish to create your own installation CD from the ISO file, follow the steps in Creating an Installation CD on page B-1.
b. Power on the bare metal server and then boot from the installation CD.
2. Perform the following steps if installing on a VMware virtual machine:
WARNING! If you install on a VMware ESX server, disable the snapshot feature for the virtual machine because the snapshot might exhaust hard disk space.
a. Create a virtual machine on the VMware ESX server. For details, see Creating a New Virtual Machine on page A-2.
b. Start the virtual machine.
c. Perform any of the following steps:
• If you have an installation CD, insert the CD into the physical CD/DVD drive of the ESX server host, and then connect the virtual CD/DVD drive of the virtual machine to the physical CD/DVD drive.
• If you have an ISO file, connect the virtual CD/DVD drive of the virtual machine to the ISO file.
d. Restart the virtual machine by clicking VM > Send Ctrl+Alt+Del on the VMware web console.
2-5

Trend Micro™ Threat Management Services Portal (On-premise) 2.6 Administrator’s Guide
3. When the Installation Menu screen appears, select Install TMSP and press [Enter].
FIGURE 2-1. Installation Menu screen
The other options on this menu are as follows:• System Recovery: Select this option to recover a Threat Management Services
Portal system. Before launching this operation, ensure that you have obtained system recovery instructions from, or are being guided by, your support provider.
• System Memory Test: Select this option to perform memory diagnostic tests to rule out any memory issues.
• Exit Installation: Select this option to exit the installation process and to boot from other media.
2-6

Installing Threat Management Services Portal
4. Read the license agreement and click Accept to continue.
FIGURE 2-2. License Acceptance screen
Note: From this screen on, you can access the readme from a button in the lower left hand corner of the installation screen.
2-7

Trend Micro™ Threat Management Services Portal (On-premise) 2.6 Administrator’s Guide
5. Select the keyboard language for the system and then click Next.
FIGURE 2-3. Keyboard Language Selection screen
6. Choose the hard disk drive to use for installation.
FIGURE 2-4. Hard Disk Drive Selection screen
2-8

Installing Threat Management Services Portal
a. Select the check box for the hard disk drive.
b. If you selected several hard disk drives, ensure that at least one of them satisfies the minimum disk space requirement specified in System Requirements on page 2-2.
c. Ensure that you have backed up needed data on the selected hard disk drives. When you proceed to the next step, the installer permanently removes all existing data on the hard disk drives.
d. Click Next.
e. When prompted to remove existing data, click Yes.
FIGURE 2-5. Data removal confirmation message
The installer checks if the system’s resources are adequate and then displays the result on the next screen.
2-9

Trend Micro™ Threat Management Services Portal (On-premise) 2.6 Administrator’s Guide
7. Check for any nonconforming components (highlighted on the screen). The installation stops if the requirements for critical components are not satisfied. If all components are satisfactory, click Next.
FIGURE 2-6. Hardware Components Summary screen
2-10

Installing Threat Management Services Portal
8. Configure network settings.
FIGURE 2-7. Network Settings screen
a. Select the network device that will be active on boot.
2-11

Trend Micro™ Threat Management Services Portal (On-premise) 2.6 Administrator’s Guide
b. Type the following network interface settings for the device:
Note: After the installation, you can change network interface settings from the administrative console.
• A static IP address
Tip: Record the IP address. The IP address forms part of the URL used for accessing the administrative console.
• The subnet mask next to the static IP address• A host name that is resolvable to the IP address• Default gateway• Primary DNS server• (Optional) Secondary DNS server
c. Click Next.
2-12

Installing Threat Management Services Portal
9. Specify your time zone and then click Next.
FIGURE 2-8. Time Zone screen
Note: You can change the time zone from the administrative console after installation.
2-13

Trend Micro™ Threat Management Services Portal (On-premise) 2.6 Administrator’s Guide
10. Record the credentials for the root and administrative accounts.
FIGURE 2-9. Account Password screen
Threat Management Services Portal uses two levels of administrative privileges to secure the system.• Root account: Use the root account to gain access to the operating system
shell. This account has all the rights to the product.• Administrative account: Use the built-in administrative account to access the
product’s administrative console. This account has all the rights to the product’s application, but has no access rights to the operating system shell.
Note: The built-in administrative account does not display in the installation screen because Trend Micro has pre-configured the account credentials.
2-14

Installing Threat Management Services Portal
a. Record the following credentials for the administrative account:• User name: admin • Password: 123456
Tip: After the installation, log on to the web-based administrative console to change the account password.
b. Record the user name for the root account, which is root.
c. Type and confirm the password for the root account.
The root account password must be a minimum of six characters and a maximum of 32 characters. As you type, the meter on the right indicates the strength of the password. For best security, create a highly unique password only known to you. You can use both upper and lower case alphabetic characters, numerals, and any special characters found on your keyboard to create the password.
d. Click Next.
2-15

Trend Micro™ Threat Management Services Portal (On-premise) 2.6 Administrator’s Guide
11. Review the pre-installation summary.
FIGURE 2-10. Pre-installation Summary screen
a. To proceed with the installation, click Next.
Note: To return to the previous screens and make changes, click Back.
b. When prompted to begin the installation, click Continue.
FIGURE 2-11. Pre-installation confirmation message
2-16

Installing Threat Management Services Portal
12. When the installation is complete, read the instructions in the screen and then click Reboot to restart the system.
FIGURE 2-12. Installation Complete screen
Note: To view installation logs, open /root/install.log.
• For a bare metal installation: The installation CD automatically ejects. Remove the CD from the drive to prevent reinstallation.
• For a virtual machine installation: Trend Micro recommends disconnecting the CD-ROM device from the virtual machine now that TMSP is installed.
2-17

Trend Micro™ Threat Management Services Portal (On-premise) 2.6 Administrator’s Guide
After Threat Management Services Portal restarts, the command line interface (CLI) logon screen appears.
FIGURE 2-13. CLI logon screen
Tip: Trend Micro recommends logging on to the web-based administrative console instead of the CLI to configure product settings. The administrative console provides all the settings that you need to configure for the product to perform its functions.
13. Log on to the web-based administrative console using the built-in administrative account. For details, see Accessing the Web-based Administrative Console on page 3-2.
2-18

Chapter 3
Getting Started
This chapter introduces the settings you need to configure immediately after installing Threat Management Services Portal (TMSP).
This chapter discusses the following topics:• Accessing the Web-based Administrative Console on page 3-2• Running the Configuration Wizard on page 3-6
3-1

Trend Micro™ Threat Management Services Portal (On-premise) 2.6 Administrator’s Guide
Accessing the Web-based Administrative Console
TMSP provides a built-in web-based administrative console through which you can configure and manage the product.
To log on to the administrative console:
1. Open a browser window.
For a list of supported browsers, see System Requirements on page 2-2.2. Type the following URL:
http://<Administrative Server IP Address>/admin
3. Type the default logon credentials.• User name: admin • Password: 123456
Tip: Change the password after logging on by navigating to the Contact List screen. For details, see Managing the Contact List on page 4-7.
4. Click Log On.
3-2

Getting Started
Navigating the Administrative ConsoleThe administrative console consists of the banner, the main menu bar, and the main content window.
Administrative Console BannerThe administrative console banner on top of the screen displays the name of the product, contains the Log Off link, and a provides drop-down menu listing several navigational options.
FIGURE 3-1. Product console banner
Click Log Off from any screen at any time to log off from the console and return to the logon screen.
The navigational options from the drop-down menu are as follows:
TABLE 3-1. Navigational options in the banner’s drop down menu
OPTION DESCRIPTION
Contents and Index Opens the Help
Knowledge Base Opens the search page of the Trend Micro Knowledge Base
Security Info Opens the Trend Micro Security Information page, where you can get the latest Trend Micro advisories on malware, spyware/grayware, and other security issues
Sales Opens the Trend Micro sales web page, where you can contact your regional sales representative
Support Provides information on how to get online, telephone, and email support
3-3

Trend Micro™ Threat Management Services Portal (On-premise) 2.6 Administrator’s Guide
Main Menu BarThe main menu bar comprises of several menu items that allow you to configure product settings. A "+" icon before a menu item indicates that the menu item has several sub-menu items.
FIGURE 3-2. The main menu bar
About Provides information about Threat Management Services Portal
TABLE 3-1. Navigational options in the banner’s drop down menu (Continued)
OPTION DESCRIPTION
3-4

Getting Started
Main Content WindowThe main content window displays information relevant to the menu item selected in the main menu bar. Configure settings or issue tasks from this window (see an example in Figure 3-3).
Click the Help icon at the top right corner of the window to access context-sensitive help.
FIGURE 3-3. A main content window showing proxy server settings
3-5

Trend Micro™ Threat Management Services Portal (On-premise) 2.6 Administrator’s Guide
Running the Configuration WizardThe Configuration Wizard displays when you log on to the administrative console for the first time. The wizard guides you through the settings you need to configure to enable the full functionality of TMSP.
If you cancel any of the required steps, TMSP will only be partially operable.
The wizard includes the following steps:
TABLE 3-2. Configuration wizard steps
STEP DETAILS
Step 1: Product License
Use a valid Activation Code to activate the product license and enable your Trend Micro product. A product will not be operable until activation is complete.
Obtain the Activation Code from Trend Micro.
Step 2: Product Servers
Assign unique static IP addresses to the following product servers:
• Portal
• Log server
• Status server
Ensure that these IP addresses are not currently in use.
For details about these servers, see Product Servers on page 1-6.
Step 3:Proxy Settings (optional)
Specify proxy settings if you want TMSP to use proxy settings for Internet connection.
TMSP needs Internet connection to check the status of the product license from the Trend Micro Online Registration site.
Step 4: Email Delivery Settings
Configure settings that TMSP will use when sending event notifications and reports through email.
3-6

Getting Started
Step 1: Activating the product license
1. Click New Activation Code.2. In the new screen that appears, type the Activation Code.
An Activation Code has 37 characters (including the hyphens) specified in the following format:
xx-xxxx-xxxxx-xxxxx-xxxxx-xxxxx-xxxxx
3. Click Activate.4. Click Save and Next >.
The license status is updated, indicating that the product has been activated.5. To confirm the status, click Check status online.6. Click Save and Next >.
Step 2: Assigning static IP addresses to the product servers
1. Type the IP addresses in the text boxes provided.2. Click Save and Next>.
Step 3: (Optional) Configuring proxy settings
1. Select Use a proxy server for Internet connection.2. Select the proxy protocol.3. Type the proxy server name or IP address and the port number.4. If the proxy server requires authentication, type the Username and Password.5. Click Save and Next>.
Step 4: Configuring email delivery settings
1. Type the sender’s email address.2. Type the SMTP server name or IP address and the port number.3. If the SMTP server requires authentication, type the Username and Password.4. Click Finish.
3-7

Trend Micro™ Threat Management Services Portal (On-premise) 2.6 Administrator’s Guide
After Exiting the WizardAfter you exit the wizard, you can access it again by navigating to Administration > Configuration Wizard.
You can also perform the steps individually by navigating to the following screens:
Step 1: Product License
Administration > Product License
Step 2: Product Servers
Administration > Network Interface Settings > IP Addresses of Product Servers section
Step 3: Proxy Settings Administration > Proxy Settings
Step 4: Email Delivery Settings
Administration > Notification Settings > Email Delivery Settings section
3-8

Chapter 4
Configuring Settings
This chapter explains how to configure Threat Management Services Portal (TMSP) settings from the administrative console.
This chapter discusses the following topics:• Creating a Customer Account on page 4-2• Configuring System Time Settings on page 4-5• Configuring Network Interface Settings on page 4-6• Managing the Contact List on page 4-7• Configuring Event Notifications on page 4-10• Registering Products to TMSP on page 4-14
4-1

Trend Micro™ Threat Management Services Portal (On-premise) 2.6 Administrator’s Guide
Creating a Customer AccountThreat Discovery Appliance or Threat Mitigator servers that register to TMSP (collectively known as registered products) automatically belong to a group. TMSP processes raw logs from the product group to create meaningful reports.
A product group has a corresponding customer account. Registering a product to TMSP requires specifying the group’s customer account.
Note: If you have access to a product, register it to TMSP from the product’s web-based console.
An organization typically needs only one customer account, unless the organization is composed of networks that are not linked together and therefore are completely independent of each other. If products that monitor linked networks are grouped under different customer accounts, TMSP will not be able to report the security posture of the entire network.
A customer account is assigned to an account owner, who must have access to the administrative console. The default owner is the TMSP administrator.
To add a customer account:PATH: CUSTOMERS
1. Click Add.2. In the Credentials for Registering Products section:
a. Type the user name and password that TMSP uses to authenticate registered products.
b. Confirm the password.
Tip: These credentials are specified in a registering product’s web-based console during registration. If you are not the product’s administrator, record the credentials and send them to the administrator. For details about registering a product to TMSP, see Registering Products to TMSP on page 4-14.
4-2

Configuring Settings
3. In the Contact Person section:a. Type the account owner’s first name and last name.
b. (Optional) Type an email address.
Tip: The contact person is typically you, the TMSP administrator.
4. In the Portal Logon Account section:a. Type the user name and password that users will use to log on to the portal.
For details about the portal, see Portal on page 1-7.
b. Confirm the password.
Note: Send the portal logon credentials and the portal’s URL to users. The portal’s URL is https://<Portal IP address>/tms2.
Configure the portal’s IP address from Administration > Network Interface Settings if you have not done so. For details, see Configuring Network Interface Settings on page 4-6.
Users can change the password from the portal. However, the user-configured password is overridden if you modify the password from the administrative console.
5. In the Trend Micro Services section:a. Select the language to use in reports and in the portal.
b. In the Managed by field, select an administrative account. This is the account used by the owner of the customer account you are creating.
Note: The default owner is you, the TMSP administrator using the built-in administrative account admin.
If you have created custom administrative accounts from the Contact List screen, you can select one of these accounts in the Managed by field. For details about custom administrative accounts, see Managing the Contact List on page 4-7.
4-3

Trend Micro™ Threat Management Services Portal (On-premise) 2.6 Administrator’s Guide
c. In the Service type field, select the Trend Micro Services that your service agreement with Trend Micro allows you to avail.
d. Type the validity period of the services.
6. In the Company Information section, specify the following information used for reference purposes:• Your organization’s name• The industry segment to which your organization belongs• Your organization’s size based on the number of endpoints in the network• Your organization’s postal address and main telephone number
7. Click Save.
After Creating the Customer AccountAfter you create the customer account, and before you register products to TMSP using the customer account, configure the following settings:• System time settings: Configure system time settings to ensure that the system
time in TMSP and registered products are consistent. For details, see Configuring System Time Settings on page 4-5.
• Network interface settings: Configure the IP addresses for the product servers if you have not done so from the configuration wizard. Also configure TMSP to send a notification if a registered product did not send a heartbeat message to TMSP within a certain time period. For details, see Configuring Network Interface Settings on page 4-6.
• Report and notification recipients: Specify who can receive reports and who will receive notifications when events that require user intervention occur. For details, see Managing the Contact List on page 4-7.
• Event notifications: Select which events will trigger TMSP to send notifications to notification recipients. For example, TMSP can send a notification if it cannot exchange heartbeat messages with registered products. The notification allows a registered product’s administrator to check if the product has problems connecting to TMSP. For details, see Configuring Event Notifications on page 4-10.
4-4

Configuring Settings
Configuring System Time SettingsTMSP integrates with registered products. If the system times in TMSP and the registered products are not synchronized, information may become unreliable and cause confusion. Configure TMSP to synchronize its system time with a Network Time Protocol (NTP) server to avoid these issues.
To configure system time settings:PATH: ADMINISTRATION > SYSTEM TIME
1. View the current date and time for TMSP.2. Synchronize time with an NTP server or set the system time manually.
To synchronize time with an NTP server:a. Type the NTP server address.
b. Click Synchronize Now.
To set the system time manually:a. Click the calendar icon to select the current date.
b. Specify the time in the format hh:mm:ss.
3. Select the time zone to use.4. Click Save.
4-5

Trend Micro™ Threat Management Services Portal (On-premise) 2.6 Administrator’s Guide
Configuring Network Interface SettingsNetwork interface settings include the IP addresses for the servers that make up TMSP and the heartbeat setting for registered products.
To configure network interface settings:PATH: ADMINISTRATION > NETWORK INTERFACE SETTINGS
1. Specify static IP addresses for the following:• Portal• Log server• Status server• Administrative server• Default gateway• Primary DNS server• (Optional) Secondary DNS server
For details about the product servers (portal, log server, status server, and administrative server), see Product Servers on page 1-6.
Tip: The IP addresses for the log server and status server are specified in a registering product’s web-based console during registration. If you are not the product’s administrator, record the IP addresses and send them to the administrator. For details about registering a product to TMSP, see Registering Products to TMSP on page 4-14.
2. Configure the registered product heartbeat setting by specifying the number of minutes. Type a value between 20 and 720. If TMSP does not receive a heartbeat message from the product within the specified number of minutes, it sends an email notification so that the email recipient can check the connection status of the registered product.
Note: Specify the email recipients in the Notifications screen. For details, see Configuring Event Notifications on page 4-10.
3. Click Save.
4-6

Configuring Settings
Managing the Contact ListThe Contact List screen lists two groups of users: administrators and notification recipients.
AdministratorsTMSP has a built-in administrative account called admin. This account has full access to the administrative console and cannot be removed.
TMSP allows you to create a custom administrative account, which has limited access to the administrative console. Users who log on using this account can manage the customer account assigned to them.
If you have created only one customer account (which Trend Micro recommends), you do not need to create a custom administrative account. Use the admin account to manage the customer account and the TMSP system.
The default password for the admin account is 123456. For improved security, Trend Micro recommends changing the password after logging on for the first time and periodically thereafter. Passwords must contain 6 to 16 alphanumeric characters (such as 0-9, a-z, A-Z). The following symbols are also accepted:
! \ " # $ % & ' ( ) * + , - . / : ; < = > ? @ [ ] ^ _ ` { | } ~
The following are guidelines for creating a safe password:• Avoid words found in the dictionary.• Intentionally misspell words.• Use phrases or combine words.• Use both uppercase and lowercase letters.
If you lose the password, there is no way to recover it. Contact your support provider for assistance in resetting the password.
4-7

Trend Micro™ Threat Management Services Portal (On-premise) 2.6 Administrator’s Guide
To add a custom administrative account:PATH: CONTACT LIST
1. Click Add.2. In the screen that appears, type the following information:
• Account name• First name• Last name• Email address• Password (Confirm the password in the next field)• SMS
3. Click Save.
To modify the built-in or custom administrative account:PATH: CONTACT LIST
1. Click Edit.2. Modify account information, such as the password.3. Click Save.
To delete a custom administrative account:PATH: CONTACT LIST
1. Click Delete.2. Confirm that you want to delete the account and click OK.
4-8

Configuring Settings
Notification RecipientsNotification recipients can receive periodic reports and event notifications through email. Event notifications inform users about items that require user intervention.
For details about sending periodic reports, see Sending Reports Generated Periodically on page 5-11. For details about event notifications, see Configuring Event Notifications on page 4-10.
Note: The administrator can also receive the same periodic reports and event notifications sent to notification recipients.
To add a notification recipient:PATH: CONTACT LIST
1. Click Add.2. In the screen that appears, type the following information:
• First name• Last name• Email address• SMS
3. Click Save.
To modify information for a notification recipient:PATH: CONTACT LIST
1. Click Edit.2. Modify the information in the screen that appears.3. Click Save.
To delete a notification recipient:PATH: CONTACT LIST
1. Click Delete.2. Confirm that you want to delete the account and click OK.
4-9

Trend Micro™ Threat Management Services Portal (On-premise) 2.6 Administrator’s Guide
Configuring Event NotificationsConfigure TMSP to send notifications when certain events occur. These events usually require user intervention.
Notification recipients receive notifications through email. Configure the recipient list in the Contact List screen ( see Managing the Contact List on page 4-7) and the email delivery settings in the Notification Settings screen (see Configuring Notification Settings on page 4-13).
To configure event notifications:PATH: CUSTOMERS
1. Click Configure under the Notifications column.2. Select the notification recipients for the following events:
TABLE 4-1. Events that trigger notifications
EVENT DESCRIPTION RECOMMENDED ACTION
RECOMMENDEDRECIPIENTS
Outbreak Containment Services triggered
Outbreak Containment Services in Threat Discovery Appliance blocked and disconnected malware activities that have the potential of causing an outbreak.
TMSP uses malware mapping settings to determine the malware name reflected in the notification. For details about malware mapping, see Updating Malware Mapping Settings on page 6-6.
Investigate if malware activities have been halted. If the malware is actually harmless, a recipient can delete the malware name entry from the Malware Mapping Settings screen.
Administrators for TMSP and Threat Discovery Appliance
4-10

Configuring Settings
Threat sample ready
Threat Mitigator uploaded a .zip file containing forensic data to TMSP.
Send the .zip file to Trend Micro for analysis. For details, see Downloading Forensic Data on page 5-16.
TMSP administrator
Registered product and services expiration
• The license for a registered product has expired.
• Subscription to Trend Micro Services has expired. Configure TMSP to send email notifications before the subscription expires. For details, see Configuring Notification Settings on page 4-13.
Renew the license or the subscription immediately.
Administrators for TMSP and registered products
No heartbeat received from registered product
TMSP detects that a registered product has not sent a heartbeat message within a time interval.
Configure the time interval in Administration > Network Interface Settings. For details, see Configuring Network Interface Settings on page 4-6.
Ensure that the registered product can connect to the network.
Administrators for TMSP and registered products
TABLE 4-1. Events that trigger notifications (Continued)
EVENT DESCRIPTION RECOMMENDED ACTION
RECOMMENDEDRECIPIENTS
4-11

Trend Micro™ Threat Management Services Portal (On-premise) 2.6 Administrator’s Guide
3. Click Save.
Too many/Too few incidents
There are too many or too few threat incidents.
Configure the number of incidents in Administration > Notification Settings. For details, see Configuring Notification Settings on page 4-13.
The notification for this event is only sent once. When TMSP sends the first notification, it will not send notifications even if the threshold is met.
Check if the threat detection settings in Threat Discovery Appliance is working properly.
Administrators for TMSP and registered products
TABLE 4-1. Events that trigger notifications (Continued)
EVENT DESCRIPTION RECOMMENDED ACTION
RECOMMENDEDRECIPIENTS
4-12

Configuring Settings
Configuring Notification SettingsNotification settings include notification triggers and email delivery settings. Notification triggers are for expiring subscriptions to Trend Micro Services and the Incident Monitor feature.
TMSP can send a notification before your subscription to Trend Micro services expires so that you can renew the subscription. Contact your Trend Micro representative for renewal details.
WARNING! If your subscription expires, TMSP no longer generates reports and Trend Micro cannot send custom patterns for endpoints that require further mit-igation.
TMSP has an Incident Monitor feature used for testing the threat detection function in Threat Discovery Appliance. Incident Monitor requires you to define the number of threats considered too many or too few and the time period for detection. TMSP will send a one-time notification when the number of threat incidents during the time period exceeds or is below the threshold. When you receive the notification, adjust threat detection settings in Threat Discovery Appliance accordingly.
Configure email delivery settings that TMSP will use when sending event notifications and periodic reports.
To configure notification settings:PATH: ADMINISTRATION > NOTIFICATION SETTINGS
1. Specify when TMSP sends notifications for the expiring subscription. TMSP can send notifications 30, 15, 10, 5, 3, or 1 day before the subscription expires.
2. Configure TMSP to send a notification when the number of threats is too many or too few. When you select Too few or Too many:a. Type the number of incidents.
b. Type the time period (in number of days).
4-13

Trend Micro™ Threat Management Services Portal (On-premise) 2.6 Administrator’s Guide
3. Configure email delivery settings.a. Type the sender’s email address.
b. Type the SMTP server name or IP address and the port number.
c. If the SMTP server requires authentication, type the User name and Password.
4. Click Save.
Registering Products to TMSPAfter you have created a customer account and configured the necessary product settings, start to register products to TMSP.
If you are not the product’s administrator, send the following information to the administrator:• IP addresses for the log server and status server• Credentials for registering products (user name and password)
After a product registers, it displays in the Registered Products screen. For details, see Monitoring Registered Products on page 5-27.
4-14

Configuring Settings
IP Addresses for the Log Server and Status ServerConfigure the IP addresses for the Log Server and Status Server in Administration > Network Interface Settings if you have not done so.
Specify the IP addresses in the registering product’s Threat Management Services Portal screen, in the Server Settings section.
FIGURE 4-1. The Server Settings section in the registering product’s web-based console
4-15

Trend Micro™ Threat Management Services Portal (On-premise) 2.6 Administrator’s Guide
Credentials for Registering ProductsCredentials for registering products are set when you created the customer account. For details, see Creating a Customer Account on page 4-2.
Specify the credentials in the registering product’s Threat Management Services Portal screen, in the Server authentication section.
FIGURE 4-2. The Server authentication section in the registering product’s web-based console
4-16

Chapter 5
Viewing and Analyzing Information
This chapter includes information about reports and tasks after setting up a customer account in Threat Management Services Portal (TMSP).
This chapter discusses the following topics:• Managing the Customer Account on page 5-2• Managing Reports on page 5-5• Performing Threat Mitigation Tasks on page 5-14• Viewing Nonconforming Endpoints on page 5-24• Monitoring Registered Products on page 5-27• Downloading TMSP Logs on page 5-33
5-1

Trend Micro™ Threat Management Services Portal (On-premise) 2.6 Administrator’s Guide
Managing the Customer AccountThe Customer Accounts screen shows information about the account you have created and allows you to launch various tasks.
Account InformationView the following information relevant to the customer account and the registered products assigned to the account:
TABLE 5-1. Information in the Customer Accounts screen
COLUMN NAME INFORMATION
Account The account name
Company Name The name of your organization
Incidents The number of threat incidents in the network
TMSP correlates detection logs received from Threat Discovery Appliance with threat correlation rules to determine the number of incidents.
TMSP updates the number of incidents once per day. It starts to correlate logs at 2:00 a.m.
Last Received The date and time TMSP last received logs from a registered product
The information refreshes as soon as a registered product finishes uploading logs.
TMSP does not control the log uploading schedule. The schedule is set in the registered product’s web-based console.
Trend Micro Services
The Trend Micro services included in your threat management strategy
See Trend Micro Services on page C-6 for details.
Managed By The owner of the customer account
5-2

Viewing and Analyzing Information
TasksIn addition to providing account information, the Customer Accounts screen also allows you launch the following tasks:
Valid From The date the subscription to Trend Micro services became valid
Before your subscription to the services expires, contact your Trend Micro representative for information on how to renew the subscription.
Security Compliance
Whether Security Compliance is enabled or disabled in Threat Discovery Appliance. For details about Security Compliance, see Security Compliance on page C-3.
TMSP updates the status of Security Compliance each time it exchanges a heartbeat message with Threat Discovery Appliance.
TABLE 5-2. Tasks in the Customer Accounts screen
TASK DETAILS
Add an account Add an account if none exists.
An organization typically needs only one customer account, unless the organization is composed of networks that are not linked together and therefore are completely independent of each other. If products that monitor linked networks are grouped under different customer accounts, TMSP will not be able to report the security posture of the entire network.
To add an account, click Add. For details, see Creating a Customer Account on page 4-2.
TABLE 5-1. Information in the Customer Accounts screen (Continued)
COLUMN NAME INFORMATION
5-3

Trend Micro™ Threat Management Services Portal (On-premise) 2.6 Administrator’s Guide
Perform threat mitigation tasks
Send forensic data to Trend Micro and manage patterns used for custom cleanup.
To perform threat mitigation tasks, click the hyperlink under the Account column. For details, see Performing Threat Mitigation Tasks on page 5-14.
Manage reports Download periodic and on-demand reports and add or remove report recipients.
To manage reports, click Manage. For details, see Managing Reports on page 5-5.
View nonconforming endpoints
Check endpoints with unresolved threats and those that encountered threat mitigation issues. Threat Mitigator reports these endpoints to TMSP.
To view nonconforming endpoints, click View. For details, see Viewing Nonconforming Endpoints on page 5-24.
Configure notifications
When certain events occur, TMSP sends notifications to the product administrator and notification recipients.
To configure notifications, click Configure. For details, see Configuring Event Notifications on page 4-10.
Download logs Download consolidated logs, which provides information about threat correlation results.
To download logs, click Download. For details, see Downloading Consolidated Logs on page 5-34.
Edit account Modify the customer account details to ensure that information is up-to-date.
To edit the account, click Edit. For details, see Modifying the Customer Account on page 6-3.
TABLE 5-2. Tasks in the Customer Accounts screen
TASK DETAILS
5-4

Viewing and Analyzing Information
Managing ReportsInformation in reports generated by TMSP allows you to:• Examine potential vectors of infection• Identify malware, information leakage, affected assets, infection sources, and
disruptive applications• Uncover sensitive data loss and regulatory compliance violations• Pinpoint specific problem areas by IP address• Evaluate the effectiveness of your web, messaging, and endpoint security• Increase visibility into your security so that you can better understand how the
threats occur, where they enter your network, and how to address your security gaps
Configuring Log Sources for ReportsTMSP creates reports based on logs uploaded by registered products. For a list of logs received from registered products and how TMSP processes them, see Downloading Registered Product Logs on page 5-29.
TMSP has a default log source called All Registered Products. This log source enables TMSP to generate a comprehensive report, showing your network’s overall security posture. This report is useful for people who oversee your network’s infrastructure, such as the Chief Security Officer.
Delete Account Remove a customer account. Before removing an account, ensure that you create a new account if no other account exists and then register products to the new account.
Deleting an account does not automatically remove reports for the account. TMSP removes the reports from its database based on the log maintenance schedule configured in Administration > Log Maintenance.
To remove the customer account, click Delete. When prompted to confirm the deletion, click OK.
TABLE 5-2. Tasks in the Customer Accounts screen
TASK DETAILS
5-5

Trend Micro™ Threat Management Services Portal (On-premise) 2.6 Administrator’s Guide
Generate targeted reports by adding log sources and narrowing down the scope to several registered products. A targeted report has many uses. Consider the following scenarios:• If a network segment is vulnerable to threats, create a report from Threat Discovery
Appliances that monitor this network segment so you can track user activities and take preventive action.
• If there are registered products in different geographical locations, with a dedicated administrator in each location, create a report from registered products in each location and send the report to the administrator.
To add log sources for reports:PATH: CUSTOMERS
1. Click Manage under the Reports column. The Reports screen appears.2. Click Add Log Source. The Add Log Source screen appears.3. Type a descriptive name for the log source.4. Select one or several registered products from the product list on the left section of
the screen.a. To view a group of registered products, select a log source group from the
View dropdown box.• All Registered Products: Shows all registered products• Ungrouped Registered Products: Shows registered products that do not
belong to any previously created log sources• <Log source name>: Shows registered products belonging to a
previously created log source
b. To select several adjacent entries, click the first entry, press and hold the [Shift] key, and scroll up or down the list.
c. To select several non-adjacent entries, press and hold the [Ctrl] key and click your preferred entries.
d. Click Add. The selected registered products are added to the product list on the right section of the screen.
e. To remove a registered product you selected, click the trash bin icon .
5-6

Viewing and Analyzing Information
5. Click Save. The Reports screen appears.6. Configure the reports to generate from the log source. For details, see Report Types
on page 5-7.
To manage log sources:PATH: CUSTOMERS
1. Click Manage under the Reports column. The Reports screen appears.2. To edit log source settings, click Edit and then make changes in the screen that
appears.3. To delete a log source, click Delete.
Report TypesTMSP provides the following report types that are available as PDF files.
TABLE 5-3. Report types
REPORT TYPE DESCRIPTION AVAILABILITY
Administrative Report
An Administrative Report summarizes threats detected in the network.
This report is useful for people who need to constantly monitor the network for threats, such as members of the IT security team.
Daily
5-7

Trend Micro™ Threat Management Services Portal (On-premise) 2.6 Administrator’s Guide
Executive Report
An Executive Report provides a detailed account of the monitored network’s overall security posture.
The report provides the network’s risk profile, the impact of risks to your network infrastructure and your organization as a whole, and recommended actions.
This report is useful for people who oversee your network’s overall security infrastructure, such as the Chief Security Officer. It is also useful for people with a stake in IT security, such as company executives.
Weekly, monthly, or upon request
Upsell Report An Upsell Report provides a summary of the monitored network’s overall security posture and presents a list of Trend Micro solutions and services that address specific security concerns in the network.
Upon request
TABLE 5-3. Report types (Continued)
REPORT TYPE DESCRIPTION AVAILABILITY
5-8

Viewing and Analyzing Information
Downloading Reports Generated PeriodicallyReports that generate daily, weekly, or monthly are collectively known as periodic reports.
TMSP starts to generate a daily Administrative Report at 2:00 am of the following day.
A weekly Executive Report combines data generated from Sunday to Saturday of a particular week. TMSP starts to generate the report on Sunday of the following week.
A monthly Executive Report combines data for all the days of the month. TMSP starts to generate the report on the first day of the next month.
After a periodic report generates, TMSP displays a link to the report on the administrative console. When you click the link, the report downloads immediately.
Important details about periodic reports:• When TMSP needs to generate several periodic reports on a particular day, it
follows a report generation order. For example, if a month ends on a Saturday (which is also the end of a particular week), TMSP needs to generate all three periodic reports. TMSP generates the daily report first, followed by the weekly report, and then the monthly report.
• TMSP provides a Report Builder feature that aggregates reports for a given date range and then archives them into a .zip file. The .zip file is available immediately for download but cannot be sent automatically as an email attachment.
• The language used in periodic reports and in the email containing the reports depends on the language selected for the customer account. For details, see Creating a Customer Account on page 4-2.
5-9

Trend Micro™ Threat Management Services Portal (On-premise) 2.6 Administrator’s Guide
To download reports generated periodically:PATH: CUSTOMERS
1. Click Manage under the Reports column. The Reports screen appears.2. Click Download under the Periodic Reports column. A new screen appears,
presenting you a monthly calendar view and a Report Builder feature at the lower section of the screen.
3. To download reports using the monthly calendar view:a. Use the buttons on top of the screen to switch to a different month.
b. To download a daily report, go to the day of the month, click Daily, and save the PDF file.
c. To download a weekly report, go to a Saturday of the month, click Weekly, and save the PDF file.
d. To download a monthly report, go to the last day of the month, click Monthly, and save the PDF file.
e. Click the re-generate button if:
• There are errors generating a daily report.
Note: You can only re-generate a daily report. If you wish to re-generate a weekly or monthly report, request an on-demand report and specify the particular week or month. For details about on-demand reports, see Downloading Reports Generated Upon Request on page 5-13.
TMSP removes the existing daily report from its database before generating a new report.
• You changed the report language from the Customer Accounts screen. The re-generated report will be in the new language that you have chosen.
5-10

Viewing and Analyzing Information
4. To download reports using Report Builder:a. Type a date in the From and To fields or use the calendar icon to select a date.
b. Select whether to aggregate daily, weekly, or monthly reports for the date range you specified.
For example, if you choose weekly reports and the date range is from June 1 to June 21, 2010, the .zip file you will download will have 3 weekly reports in it. The first report covers the week ending June 5, the second report covers the week ending June 12, and the last report covers the week ending June 19.
c. Click Download.
d. Save the .zip file.
Sending Reports Generated PeriodicallyTMSP can automatically send reports generated periodically as email attachments. You can choose the report recipients from a list of email addresses.
The email body is in plain text or HTML format. TMSP uses HTML format if the language for the customer account is Simplified Chinese. If the language is not Simplified Chinese, TMSP uses plain text format. For details about the customer account, see Creating a Customer Account on page 4-2.
Configure email delivery settings in the Notification Settings screen (see Configuring Notification Settings on page 4-13).
To send reports generated periodically as email attachments:PATH: CUSTOMERS
1. Click Manage under the Reports column. The Reports screen appears.2. Click Configure under the Report Sending Settings column. The Report Sending
Settings screen appears.
5-11

Trend Micro™ Threat Management Services Portal (On-premise) 2.6 Administrator’s Guide
3. Select one or several email addresses from the list on the left section of the screen.
Note: The email addresses in the list belong to:
- The contact person specified when you created the customer account
- The administrator/notification recipients listed in the Contact List screen
a. To select several adjacent entries, click the first entry, press and hold the [Shift] key, and scroll up or down the list.
b. To select several non-adjacent entries, press and hold the [Ctrl] key and click your preferred entries.
c. Click Add. The selected email addresses are added to the list on the right section of the screen.
d. To remove an email address you selected, click the trash bin icon .
4. Select the report types to send.5. (Optional) Attach a top 10 malware report to the email. The report is available as a
.csv file.
Note: This option is only available if the language for the customer account is Simplified Chinese.
6. Click Save.
5-12

Viewing and Analyzing Information
Downloading Reports Generated Upon RequestA report that generates upon a user’s request is called an on-demand report. The report is a single PDF file that combines data for a given date range.
The report is not immediately available for download because TMSP needs to consolidate data for the given date range and then generate a single PDF file. The amount of time it takes to generate the report depends on the date range you specified and the type of report selected. Among the report types, Executive Reports take the longest to generate because of the amount of data in the report.
The language used in an on-demand report can be set when you make a report request.
To download reports generated upon request:PATH: CUSTOMERS
1. Click Manage under the Reports column. The Reports screen appears.2. Click Download under the On-demand Reports column. A new screen appears.3. Type a date in the From and To fields or use the calendar icon to select a date.4. Select a language for the report.5. Select a report type.6. Click Generate.7. In the table at the lower section of the screen, check the report generation status,
including any errors encountered during report generation.8. When the report has been generated:
a. Click Download.
b. Save the PDF file.
9. To remove the report from the product database, click Delete.
5-13

Trend Micro™ Threat Management Services Portal (On-premise) 2.6 Administrator’s Guide
Performing Threat Mitigation TasksPerform threat mitigation tasks if you have Threat Mitigator as part of your threat management strategy.
When threats are not be removed completely from an endpoint during post-assessment cleanup, the following tasks are initiated:1. Threat Management Agent notifies Threat Mitigator about the event (that is, that
there are unresolved threats in the endpoint).2. Threat Mitigator logs the event.3. When the Threat Mitigator administrator checks the logs and finds out about the
event, the administrator initiates case submission from Threat Mitigator’s Threat Management screen.
FIGURE 5-1. Threat Mitigator Threat Management screen - Submit a Case section
5-14

Viewing and Analyzing Information
During case submission:a. Threat Mitigator notifies the agent to collect forensic data that will be used to
analyze unresolved threats. The agent encrypts the data and archives it into a .zip file.
FIGURE 5-2. Sample .zip file containing forensic data
b. The agent uploads the .zip file to Threat Mitigator.
c. Threat Mitigator uploads the .zip file to TMSP.
4. After TMSP receives the .zip file, it displays the file name in the administrative console’s Case List screen.
5. If you enabled event notifications, TMSP sends an email informing you about the .zip file.
Note: Configure notifications from the Notifications screen. For details, see Configuring Event Notifications on page 4-10.
5-15

Trend Micro™ Threat Management Services Portal (On-premise) 2.6 Administrator’s Guide
6. Perform the following threat mitigation tasks:a. Download and send the forensic data (.zip file) to Trend Micro. For details, see
Downloading Forensic Data on page 5-16.
b. Manage pattern files issued by Trend Micro. For details, see Managing Pattern Files Issued by Trend Micro on page 5-18.
Note: In addition to managing forensic data and pattern files, you can also monitor nonconforming endpoints, which are endpoints that require threat mitigation or those with threat mitigation issues. For example, if the Threat Management Agent was unable to run cleanup because the custom pattern is corrupted, you can re-issue the pattern from TMSP. For details, see Viewing Nonconforming Endpoints on page 5-24.
Downloading Forensic DataDownload the .zip file containing forensic data from the following locations:• The administrative console’s Case List screen• The notification that TMSP sent through email
Note: TMSP sends the notification if you enabled the "Threat Sample Ready" notification. For details, see Configuring Event Notifications on page 4-10.
After downloading the .zip file, send it to Trend Micro for analysis.
To download the .zip file (event notification enabled):
1. Click the hyperlink in the email notification.2. Save the file to your preferred location.
To download the .zip file (event notifications disabled):
1. In the administrative console, click Customers in the main menu.2. Click the hyperlink under the Account column. The Case List screen appears.
5-16

Viewing and Analyzing Information
3. Locate the case. In the Case List section, information about the case displays in the following columns:
TABLE 5-4. Column names and the information that display in each column when the .zip file becomes available
COLUMN NAME INFORMATION
Case ID Blank
The case ID is initially blank. When you submit the .zip file to Trend Micro, a Trend Micro Threat Management Advisor will issue a case ID.
Status Any of the following status messages:
• New Case Received: You will see this status if no action has been performed on the case
• Administrator Notified About New Case: You will see this status only if you enabled notifications and if the notification was sent.
Received The date and time the .zip file was uploaded to TMSP
Updated N/A
This column indicates the date and time you manually updated the case. Since you have not done an update, the data is N/A.
Mitigation Server The Threat Mitigator server that uploaded the .zip file
Pattern ID N/A
The Pattern ID will only have a value if you upload a custom pattern or specify smart protection patterns.
Endpoint The endpoint from which the .zip file was created
Download A link to the .zip file containing forensic data
5-17

Trend Micro™ Threat Management Services Portal (On-premise) 2.6 Administrator’s Guide
4. Under Download, click the .zip file. The file starts to download. When the download is complete, information in the Status column changes to Threat Sample Downloaded.
After downloading the .zip file:
1. Send the file to Trend Micro.2. When you receive a case ID from Trend Micro, update the case ID.
a. In the administrative console, click Customers in the main menu.
b. Click the hyperlink under the Account column. The Case List screen appears.
c. Click the hyperlink under the Case ID column.
d. In the Edit Case screen that appears, type the case ID.
e. Click Apply. The Updated column refreshes, indicating the date and time you updated the case.
Managing Pattern Files Issued by Trend MicroAfter analyzing threats, Trend Micro notifies you of the pattern required to eliminate the threats. The pattern can be a custom pattern or smart protection patterns.
Custom PatternTrend Micro creates a custom pattern in response to a particular threat. The availability of custom patterns depends on your service agreement with Trend Micro. Contact your Trend Micro representative for details about your service agreement.
When threat signatures in the custom pattern are added to smart protection patterns, Trend Micro notifies you to download smart protection patterns instead.
A custom pattern can either be a Bandage Pattern or a Controlled Pattern. For details, see Bandage Pattern on page C-1 and Controlled Pattern on page C-1.
Tip: TMSP does not remove custom patterns from its database. Contact your support provider for help on removing these patterns.
5-18

Viewing and Analyzing Information
To manage custom patterns:
1. Obtain the custom pattern from Trend Micro and save it to a computer. When you obtain the pattern, Trend Micro also provides you the following information:• The type of custom pattern (Bandage Pattern or Controlled Pattern)• The custom pattern’s version• The case ID issued by Trend Micro when you sent the forensic data
2. Open the administrative console and click Customers in the main menu.3. Click the hyperlink under the Account column. The Case List screen appears.4. In the Upload Custom Pattern section, choose whether to upload a Bandage
Pattern or a Controlled Pattern.5. Type the version for the pattern.6. Type a description for the pattern. For example, type the endpoint for which the
pattern was created.7. Click Browse, locate the pattern file, and click Open.8. Click Submit. The custom pattern is uploaded to TMSP.9. When the upload is complete:
a. Go to the Pattern List section and verify that a new entry was created. This new entry has the following information:
TABLE 5-5. Information in the Pattern List section
COLUMN NAME INFORMATION
Pattern ID The ID number for the pattern
Note: The product automatically generates the ID number. For example, if the entry is the third one to be created, the number is 3.
Type The custom pattern type
File Name The file name for the custom pattern
Status Not Applied
5-19

Trend Micro™ Threat Management Services Portal (On-premise) 2.6 Administrator’s Guide
b. Go to the Case List section and locate the case. Information in the Status column changes to Threat Mitigator Notified About Pattern.
Threat Mitigator automatically downloads the custom pattern the next time it connects to TMSP.
10. Verify that Threat Mitigator has downloaded the pattern.• In the Pattern List section, information in the Status column changes to
Downloaded. This means that Threat Mitigator has started to download the pattern.
• If manual pattern deployment is enabled in Threat Mitigator (the Threat Mitigator administrator controls this setting), navigate to Threat Mitigator’s Threat Management screen. When you click Require custom cleanup, the custom pattern displays in the table at the lower section of the screen.
Version The custom pattern version
Uploaded The date and time you uploaded the custom pattern
Uploaded By The administrator account that you used to log on to the administrative console
Description The description for the custom pattern
Target Case ID The hyperlink under this column points to a new screen that provides the following information:
• Case ID: The case ID for which the custom pattern was created
• Received: The date and time forensic data (.zip file) was uploaded to TMSP
• Endpoint: The endpoint for which the custom pattern was created
Mark the Resolved check box later when you have confirmed that the custom pattern has eliminated unresolved threats.
TABLE 5-5. Information in the Pattern List section (Continued)
COLUMN NAME INFORMATION
5-20

Viewing and Analyzing Information
After Threat Mitigator deploys the custom pattern to the endpoint, Threat Management Agent runs custom cleanup using the custom pattern.
11. Check the custom cleanup status from Threat Mitigator’s threat event logs. If cleanup was successful:a. In the administrative console, click Customers in the main menu.
b. Click the hyperlink under the Account column. The Case List screen appears.
c. Go to the Pattern List section and click the hyperlink under the Target Case ID column.
d. In the screen that opens, mark the check box under Resolved.
e. Click Save and then Back.
f. Go to the Case List section. Under the Case ID column, click the hyperlink of the case you just resolved.
g. In the new screen that appears, change the status to Closed.
h. Specify the reason for closing the case. For example, you can state that the custom pattern has eliminated unresolved threats from the endpoint.
i. Click Apply. In the Case List section, information in the Status column changes to Case Closed.
Smart Protection PatternsTrend Micro regularly releases smart protection patterns (either Smart Scan Agent Pattern or Smart Scan Pattern, or both) through the Trend Micro ActiveUpdate server to respond to the latest threats. These patterns are continuously available for download as long as the product license is valid. Information about specific pattern versions that you can use to eliminate unresolved threats can be obtained from Trend Micro.
For detailed information about smart protection patterns, see Smart Protection on page C-4.
Trend Micro may notify you to update one or both smart protection patterns if:• Threat signatures in a custom pattern have been added to smart protection patterns• Your service agreement with Trend Micro does not entitle you to custom patterns
5-21

Trend Micro™ Threat Management Services Portal (On-premise) 2.6 Administrator’s Guide
To manage smart protection patterns:
1. Obtain the following information about smart protection patterns from Trend Micro:• The type of smart protection pattern to use to eliminate unresolved threats
(Smart Scan Pattern or Smart Scan Agent Pattern, or both)• The version for the patterns
2. Open the administrative console and click Customers in the main menu.3. Click the hyperlink under the Account column. The Case List screen appears.4. In the Specify Smart Protection Patterns section, choose the pattern to use to
eliminate unresolved threats.5. Type the pattern version.
• If you choose Smart Scan Pattern, type the pattern version in the text box provided.
• If you choose Smart Scan Agent Pattern, type the pattern version in the text box provided.
• If you choose both Smart Scan Pattern and Smart Scan Agent Pattern, type the pattern versions in the two text boxes.
6. Type a description for the pattern. For example, type the endpoint to which to deploy the pattern.
7. Click Submit.
TMSP notifies Threat Mitigator about the patterns.• If the pattern is the Smart Scan Agent Pattern, Threat Mitigator downloads the
pattern from its update source, which is the Trend Micro ActiveUpdate server by default.
• If the pattern is the Smart Scan Pattern, view the pattern version that the smart protection source is using from Threat Mitigator’s Threat Management screen.
8. If you chose Smart Scan Agent Pattern, verify that Threat Mitigator has downloaded the pattern.• In the Pattern List section, information in the Status column changes to
Downloaded. This means that Threat Mitigator has started to download the pattern.
• In the Case List section, information in the Status column changes to Threat Mitigator Notified About Pattern.
5-22

Viewing and Analyzing Information
• If manual pattern deployment is enabled in Threat Mitigator (the Threat Mitigator administrator controls this setting), navigate to Threat Mitigator’s Threat Management screen. When you click Require custom cleanup, the pattern displays in the table at the lower section of the screen.
After Threat Mitigator deploys the pattern to the endpoint, Threat Management Agent runs custom cleanup using the pattern.
9. Check the custom cleanup status from Threat Mitigator’s threat event logs. If cleanup was successful:a. In the administrative console, click Customers in the main menu.
b. Click the hyperlink under the Account column. The Case List screen appears.
c. Go to the Pattern List section and click the hyperlink under the Target Case ID column.
d. In the screen that opens, mark the check box under Resolved.
e. Click Save and then Back.
f. Go to the Case List section. Under the Case ID column, click the hyperlink of the case you just resolved.
g. In the new screen that appears, change the status to Closed.
h. Specify the reason for closing the case. For example, you can state that the pattern has eliminated unresolved threats from the endpoint.
i. Click Apply. In the Case List section, information in the Status column changes to Case Closed.
No Pattern RequiredIn case of a false alarm, Trend Micro notifies you that no pattern is required. You can proceed to close the case if you receive such notice.
To close a case because no pattern is required:
1. Open the administrative console and click Customers in the main menu.2. Click the hyperlink under the Account column. The Case List screen appears.3. In the Specify Smart Protection Patterns section, choose None.
5-23

Trend Micro™ Threat Management Services Portal (On-premise) 2.6 Administrator’s Guide
4. Type a description. For example, state that no pattern is required because no threat was detected in the forensic data sent to Trend Micro.
5. Click Submit.6. Go to the Pattern List section and click the hyperlink under the Target Case ID
column.7. In the screen that opens, mark the check box under Resolved.8. Click Save and then Back.9. Go to the Case List section. Under the Case ID column, click the hyperlink of the
case you just resolved.10. In the new screen that appears, change the status to Closed.11. Specify the reason for closing the case. For example, state that the case is a false
alarm.12. Click Apply. In the Case List section, information in the Status column changes
to Case Closed.
Viewing Nonconforming EndpointsEndpoints with unresolved threats and those that encountered threat mitigation issues are considered nonconforming. Threat Mitigator reports these endpoints to TMSP.
To view nonconforming endpoints:PATH: CUSTOMERS
1. Click View under the Nonconforming Endpoints column.2. Select from the following tabs:
5-24

Viewing and Analyzing Information
• Nonconforming Endpoints: Displays the IP addresses of nonconforming endpoints
TABLE 5-6. Information in the Nonconforming Endpoints table
COLUMN TITLE INFORMATION
IP Address Shows the IP addresses and host names of nonconforming endpoints. Host names are enclosed in parentheses.
Filter the IP addresses that display by selecting one of the following items in the dropdown box below the IP Address column:
• Any of the last 5 days: Shows endpoints that are nonconforming on any of the last 5 days
• All of the last 5 days: Shows endpoints that are nonconforming on all of the last 5 days
• All of the last 3 days: Shows endpoints that are nonconforming on all of the last 3 days
• Yesterday: Shows endpoints that are nonconforming during the previous day
• <IP address>: Shows the nonconforming endpoint
<Second to sixth column>
The column titles indicate the dates of the last five days and the total number of threat events detected on each date. For example, a column with the title 2010-06-30 (23) means that there are a total of 23 threat events detected on all nonconforming endpoints on June 30, 2010.
Each cell shows the number of threat events detected on an endpoint for a particular date.
5-25

Trend Micro™ Threat Management Services Portal (On-premise) 2.6 Administrator’s Guide
• Yesterday’s Nonconforming Endpoints: Provides a graph that shows threat events logged from nonconforming endpoints at various hours of the previous day
• Yesterday’s Threat Mitigation Issues: Displays the IP addresses of endpoints with threat mitigation issues
Last Threat Sample Received
Shows the date and time forensic data was received from the endpoint
N/A displays if there is no forensic data in TMSP for the particular endpoint, which can happen for many reasons. For example, an agent may have collected data but encountered problems uploading the data to Threat Mitigator.
Last Pattern Deployed
Shows the date and time Threat Mitigator downloaded a custom pattern from TMSP
N/A displays if Threat Mitigator has not received any pattern from TMSP.
TABLE 5-7. Information in the Yesterday’s Threat Mitigation Issues table
COLUMN TITLE INFORMATION
IP Address Shows the IP addresses and host names of endpoints that encountered mitigation issues. Host names are enclosed in parentheses.
Filter the IP addresses that display by selecting one of the following items in the dropdown box below the IP Address column:
• All: Shows endpoints with threat mitigation issues during the previous day
• <IP address>: Shows the endpoint with threat mitigation issues
TABLE 5-6. Information in the Nonconforming Endpoints table (Continued)
COLUMN TITLE INFORMATION
5-26

Viewing and Analyzing Information
Monitoring Registered ProductsThe Registered Products screen shows a table with a list of all the Threat Discovery Appliance and Threat Mitigator servers that have registered to TMSP. TMSP refreshes the list as soon as a product registers.
The Registered Products screen shows the following information:
Agent Initialization Issue
Indicates endpoints that encountered errors initializing Threat Management Agent
Internal Error Indicates endpoints that encountered agent component errors
Pattern Not Found
Indicates endpoints that do not have a pattern required for threat mitigation
Configuration Error
Indicates endpoints with corrupted threat mitigation components or files
TABLE 5-8. Information displayed in the Registered Products screen
COLUMN NAME INFORMATION
Customer Account
The customer account
Product Threat Discovery Appliance or Threat Mitigator
Host Name The host name for the registered product
Version The version for the registered product
Build The build number for the registered product
TABLE 5-7. Information in the Yesterday’s Threat Mitigation Issues table
COLUMN TITLE INFORMATION
5-27

Trend Micro™ Threat Management Services Portal (On-premise) 2.6 Administrator’s Guide
The Registered Products screen also allows you to perform the following tasks:• Download logs received from registered products. For details, see Downloading
Registered Product Logs on page 5-29.• Delete a registered product. For details, see Deleting a Registered Product on page 5-33.
GUID The GUID for the registered product
Security Compliance
Indicates whether Security Compliance is enabled or disabled
Security Compliance is a separately licensed feature in Threat Discovery Appliance that detects and logs violations to compliance rules set for specific industries. For details, see Security Compliance on page C-3.
Status Last Received
The date and time refer to:
• The last time TMSP received raw logs from the registered product
• The last time TMSP and the registered product exchanged a heartbeat message. The exchange was initiated using the Test Connection feature in Threat Discovery Appliance or Threat Mitigator.
Logs Last Received
The date and time TMSP last inserted logs into its database
TABLE 5-8. Information displayed in the Registered Products screen (Continued)
COLUMN NAME INFORMATION
5-28

Viewing and Analyzing Information
Downloading Registered Product LogsYou can download most of the logs that registered products send to TMSP.
Threat Discovery Appliance LogsTMSP receives the following logs from Threat Discovery Appliance:
TABLE 5-9. Logs that Threat Discovery Appliance sends to TMSP
LOGS DESCRIPTION DOWNLOADABLE
Detection logs
Detection logs contain information about security threats, including malware activities blocked by Outbreak Containment Services.
TMSP analyzes detection logs and then correlates them with a set of rules to calculate the number of unique threat incidents in the network.
Information about threat incidents and the risk they pose is available in the administrative and executive reports.
Yes
Application filter logs
Application filter logs contain information about potential security threats that disruptive applications may introduce into the network.
Information about disruptive applications and the risk they pose is available in the executive reports.
Yes
5-29

Trend Micro™ Threat Management Services Portal (On-premise) 2.6 Administrator’s Guide
Threat Discovery Appliance also sends network configuration data to TMSP. Network configuration data includes:• Monitored Networks • Registered Domains• Registered Services
TMSP displays network configuration data in reports and in various places in the administrative console. You can view network configuration data from the Threat Discovery Appliance web console.
URL filtering logs
URL filtering logs contain information about websites and pages that Trend Micro smart protection technology verifies to be fraudulent or known sources of threats.
Information about the websites and pages and the risk they pose is available in the executive reports.
Note: URL filtering logs cannot be viewed from the Threat Discovery Appliance web console.
Yes
Security compliance logs
Security compliance logs contain information about violations to security compliance rules.
Information about the security compliance violations and the risk they pose is available in the executive reports.
Note: Security compliance logs cannot be viewed from Threat Discovery Appliance web console.
No
Contact your support provider for assistance in extracting these logs from TMSP.
TABLE 5-9. Logs that Threat Discovery Appliance sends to TMSP (Continued)
LOGS DESCRIPTION DOWNLOADABLE
5-30

Viewing and Analyzing Information
Threat Mitigator LogsTMSP receives the following logs from Threat Mitigator:
To download detection or threat event logs:PATH: REGISTERED PRODUCTS
1. Click Download under the Detection/Threat Event Logs column.2. In the screen that displays, type a date in the From and To fields or use the calendar
icon to select a date.3. Click Download.4. Save the .csv file to your preferred location.
TABLE 5-10. Logs that Threat Mitigator sends to TMSP
LOGS DESCRIPTION DOWNLOADABLE
Threat event logs
Threat Mitigator sends logs related to threat mitigation, including threat cleanup and custom pattern deployment.
Information about endpoints with threat mitigation issues is available in:
• The executive and administrative reports
• The administrative console. For details, see Viewing Nonconforming Endpoints on page 5-24.
Yes
Root cause logs
Threat Mitigator sends logs that trace the root cause of infections. Use these logs to:
• Pinpoint malware infection channels
• Break the infection chain
• Make behavioral security adjustments
Information about the root cause of infections is available in the executive and administrative reports.
No
Contact your support provider for assistance in extracting these logs from TMSP.
5-31

Trend Micro™ Threat Management Services Portal (On-premise) 2.6 Administrator’s Guide
To download URL filtering logs:PATH: REGISTERED PRODUCTS
1. Click Download under the URL Filtering Logs column.2. Select the monitored networks to obtain logs from. You can also click Specific
monitored network and then type the monitored network names in the text box provided. Separate names by commas.
3. Optionally include endpoints that do not belong to any monitored network.4. Select the network zone for monitored networks.5. Type a date in the From and To fields or use the calendar icon to select a date.6. Choose the IP addresses in the monitored networks to obtain logs from.
• All: Includes all IP addresses for the selected monitored networks, including IP addresses of endpoints that do not belong to any monitored network if you chose that option
• IP address range: Type the IP addresses in the fields provided.7. Click Download.8. Save the .csv file to your preferred location.
To download application filter logs:PATH: REGISTERED PRODUCTS
1. Click Download under the Application Filter Logs column.2. Select the monitored networks to obtain logs from. You can also click Specific
monitored network and then type the monitored network names in the text box provided. Separate names by commas.
3. Optionally include endpoints that do not belong to any monitored network.4. Select the network zone for monitored networks.5. Type a date in the From and To fields or use the calendar icon to select a date.6. Choose the IP addresses in the monitored networks to obtain logs from.
• All: Includes all IP addresses for the selected monitored networks, including IP addresses of endpoints that do not belong to any monitored network if you chose that option
• IP address range: Type the IP addresses in the fields provided.
5-32

Viewing and Analyzing Information
7. Click Download.8. Save the .csv file to your preferred location.
Deleting a Registered ProductA product’s administrator may unregister the product from the product’s web-based console. During unregistration, the product does not notify TMSP that it is being unregistered so TMSP does not remove the product on the registered products list. You will need to manually remove the product by clicking Delete in the screen. If you are not the product’s administrator, ask the administrator to inform you of the unregistration so you can remove the product from the list.
If you delete a product still registered to TMSP, the product’s logs that are currently in the TMSP database are not automatically removed, but they will no longer be available for download. When the product sends logs again, the product is added to the registered products list.
To delete a registered product:PATH: REGISTERED PRODUCTS
1. Locate the product you wish to delete and then click Delete.2. Click OK to confirm the deletion.
Downloading TMSP LogsYou can download the following logs that TMSP generates:• Consolidated logs• System logs
For details about these logs, see Downloading Consolidated Logs on page 5-34 and Downloading System Logs on page 5-34.
To download logs sent by registered products, see Downloading Registered Product Logs on page 5-29.
5-33

Trend Micro™ Threat Management Services Portal (On-premise) 2.6 Administrator’s Guide
Downloading Consolidated LogsTMSP stores the threat correlation results in consolidated logs. TMSP performs threat correlation when it receives detection logs from Threat Discovery Appliance to determine the number of threat incidents in the network.
To download consolidated logs:PATH: CUSTOMERS
1. Click Download under the Logs column.2. Type a date in the From and To fields or use the calendar icon to select a date.3. Click Download.4. Save the .csv file.
Downloading System LogsTMSP records the following events in system logs:• A user attempts to log on to the administrative console. TMSP records both
successful and unsuccessful logon attempts.• A customer account is created.• A customer account is edited.• A notification recipient or an administrative account is added in the Contact List
screen.
To download system logs:PATH: ADMINISTRATION > SYSTEM LOGS
1. Type a date in the From and To fields or use the calendar icon to select a date.2. Click Download.3. Save the .csv file.
5-34

Chapter 6
Maintenance
This chapter explains how to perform maintenance tasks for Threat Management Services Portal (TMSP).
This chapter discusses the following topics:• Managing the Product License and Activation Codes on page 6-2• Modifying the Customer Account on page 6-3• Configuring Proxy Settings on page 6-4• Updating Threat Correlation Rules on page 6-5• Updating Malware Mapping Settings on page 6-6• Performing Log Maintenance Tasks on page 6-7
6-1

Trend Micro™ Threat Management Services Portal (On-premise) 2.6 Administrator’s Guide
Managing the Product License and Activation Codes
To use the functionality of TMSP, obtain an Activation Code from Trend Micro and then activate the license. An Activation Code has 37 characters (including the hyphens) specified in the following format:xx-xxxx-xxxxx-xxxxx-xxxxx-xxxxx-xxxxx
You can activate or renew the license in the Product License screen. Reminders will display during the following instances:• 30 days before expiration• When the license expires
Note: During this time, TMSP disables updates for threat correlation rules. Outdated threat correlation rules may lead to inaccurate reports.
To manage the product license:PATH: ADMINISTRATION > PRODUCT LICENSE
ADMINISTRATION > CONFIGURATION WIZARD > STEP 1
1. Click New Activation Code.2. Type the Activation Code in the screen that opens and click Save.3. Read and then agree to the license agreement, which displays when activating the
license for the first time.
Note: You cannot activate the license if you do not agree to the license agreement.
4. Back in the Product License screen, click Update Information to refresh the screen with the new license details. This screen also provides a link to the Trend Micro website where you can view detailed information about the license.
6-2

Maintenance
Modifying the Customer AccountYou may need to modify the customer account from time to time to ensure that account information is current.
To modify the customer account:PATH: CUSTOMERS
1. Click Edit.2. Modify account information in the screen that opens.3. Click Save.
Perform additional tasks if you modified any of the following information:1. If you modified the credentials for registering products and you have access to the
registered products’ web console:a. Open the web-based console of the product.
b. Navigate to the Threat Management Services Portal screen.
c. Type the credentials in the Server authentication section.
d. Click Save.
If you do not have access to a registered product’s web console, send the credentials to the product administrator.
2. If you modified the portal logon account, send the new logon credentials to the portal users.
3. (Optional) Notify your Trend Micro representative of changes to the following information:• Contact person• Trend Micro services• Company information
6-3

Trend Micro™ Threat Management Services Portal (On-premise) 2.6 Administrator’s Guide
Configuring Proxy SettingsSpecify proxy settings if you want TMSP to use proxy settings for Internet connection.
TMSP needs Internet connection to check the status of the product license from the Trend Micro Online Registration site.
To configure proxy settings:PATH: ADMINISTRATION > PROXY SETTINGS
1. Select Use a proxy server for Internet connection.2. Select the proxy protocol.3. Type the proxy server name or IP address and the port number.4. If the proxy server requires authentication, type the User name and Password.5. Click Save.
6-4

Maintenance
Updating Threat Correlation RulesWhen TMSP receives detection logs from Threat Discovery Appliance, it correlates the logs with the threat correlation rules to calculate the unique number of threat incidents in the network. Information about threat incidents is available in the reports.
Trend Micro updates threat correlation rules periodically to fine tune the metrics used for calculating threat incidents. This procedure is necessary because the nature, prevalence, and classification of threats change over time.
Your Trend Micro representative will contact you when updated threat correlation rules become available.
Note: When you upload the file containing threat correlation rules, malware mapping settings are also updated. For details about malware mapping settings, see Updating Malware Mapping Settings on page 6-6.
To update threat correlation rules:PATH: ADMINISTRATION > THREAT CORRELATION RULES
1. Type the full path of the file or click Browse to locate the file.2. Click Upload.
6-5

Trend Micro™ Threat Management Services Portal (On-premise) 2.6 Administrator’s Guide
Updating Malware Mapping SettingsTMSP identifies malware that may potentially cause an outbreak by correlating malware mapping settings with Outbreak Containment Services logs. Trend Micro defines and updates malware mapping settings.
Note: Threat Discovery Appliance sends Outbreak Containment Services logs to TMSP immediately after it generates them.
When TMSP receives Outbreak Containment Services logs, it scans the logs for content contained in malware mapping settings (see the Content column in the Malware Mapping Settings screen). If content in the logs and in the malware mapping settings is an exact match, TMSP extracts the malware name (the name that appears in the Malware Name column) and then reflects the name in the event notifications. If there is no match, TMSP does not send an event notification.
Note: For details about event notifications, see Configuring Event Notifications on page 4-10.
Important details about malware mapping settings:• If there is no malware name under the Malware Name column, Trend Micro does
not have enough information about the malware at the time the malware mapping settings were created. In the event notifications, the malware name is N/A.
• If you see a particular malware name that you consider harmless or that you do not want to be notified about, locate the malware name in the Malware Mapping Settings screen and then click Delete.
• When you update threat correlation rules (see Updating Threat Correlation Rules on page 6-5 for details), TMSP removes all existing malware mapping settings and then adds the settings contained in the threat correlation rules. If you removed malware names previously but see them again after the update, manually remove them again if you still consider them harmless.
• In the Malware Mapping Settings screen, you can ignore the numbers under the internal KBID and external KBID columns as these are Trend Micro-assigned numbers.
6-6

Maintenance
Performing Log Maintenance TasksTMSP stores logs in the product’s hard disk. Delete logs manually or configure a log deletion schedule to keep the size of logs from occupying too much space on the hard disk.
To configure log maintenance settings:PATH: ADMINISTRATION > LOG MAINTENANCE
1. Select the logs to delete. You can delete raw logs and reports.
Note: Raw logs include all logs received from registered products. For details, see Downloading Registered Product Logs on page 5-29.
2. Select automatically delete logs older than __ days and then type the age of logs by number of days. The minimum number of days is 15.
TMSP deletes logs once per day. For example, if the current date is June 30, 2010 and the age of the logs you typed is 15 days, all logs generated on June 15 or earlier are automatically deleted. On July 1, 2010, all logs generated on June 16 are automatically deleted.
3. Select Delete Now to delete the logs immediately.4. Click Save.
6-7

Trend Micro™ Threat Management Services Portal (On-premise) 2.6 Administrator’s Guide
6-8

Chapter 7
Using the Portal
This chapter describes how to view and interpret information in the portal.
Note: The intended reader of this chapter is the portal user. This user has access to the portal but does not have access to the administrative console.
This chapter discusses the following topics:• Accessing the Portal on page 7-2• Navigating the Portal on page 7-3• Security Dashboard on page 7-7• Traceable Incidents on page 7-31• Reports on page 7-34• Account Details on page 7-35
7-1

Trend Micro™ Threat Management Services Portal (On-premise) 2.6 Administrator’s Guide
Accessing the PortalTo access the portal, obtain the portal’s URL and logon credentials (user name and password) from the TMSP administrator.
The portal displays in the language set by the TMSP administrator. Confirm the language from the administrator before accessing the portal. If you prefer a different language, ask if the language is supported.
To log on to the portal:
1. Open an Internet Explorer browser window.
Note: TMSP supports Windows Internet Explorer 8.0.
2. Type the following URL:
https://<Portal IP address>/tms2
3. Type the logon credentials.4. Click Log On.5. If you see the license agreement screen, read the license details and click Agree.
The portal opens.
7-2

Using the Portal
Navigating the PortalThe portal consists of three panels.
Main MenuOn the top left side of the portal is the main menu consisting of several menu items. On the right side is the main content window that displays information relevant to the menu item selected. When you log on to the portal, the default menu item is the Security Dashboard.
FIGURE 7-1. The portal’s main menu
The main menu includes the following menu items:• Security Dashboard: Shows threat information in your organization. For details,
see Security Dashboard on page 7-7.• Traceable Incidents: Provides an information map that illustrates the source of a
threat incident. For details, see Traceable Incidents on page 7-31.• My Report: Allows you to download reports that TMSP downloads periodically.
For details, see Reports on page 7-34.• My Account: Shows the portal account details initially configured by the TMSP
administrator. For details, see Account Details on page 7-35.• Log Off: Logs you off from the portal
7-3

Trend Micro™ Threat Management Services Portal (On-premise) 2.6 Administrator’s Guide
Alert Level and Current Risk LevelDirectly below the main menu is an information-only panel that presents an alert level based on the number of infected hosts and threat incidents. This panel also shows the network’s current risk profile.
FIGURE 7-2. Alert Level and Current Risk Level panel
TMSP shows any of the following alert levels:• Severe: There is at least one critical-risk incident or five moderate-risk incidents.• High: There is at least one moderate-risk incident or five low-risk incidents.• Elevated: There is at least one low -risk incident or five information-only incidents• Normal: There is at least one information-only incident.
7-4

Using the Portal
The risk profile shows the following risk types:• System compromise: Shows the risk posed by unauthorized external parties
gaining partial or complete control of endpoints. Malware such as IRC bots have the ability to connect to malicious servers to get commands from external parties, essentially creating a backdoor to the network.
• Information loss: Shows the risk posed by unauthorized external parties stealing and sending out sensitive user and corporate data. Many types of malware have the ability to monitor a user's activities. For example, malware can log keystrokes or actively search the endpoint for confidential documents to steal.
• Network disruption: Shows the risk posed by malware that consume network resources. Malware such as spambots and network worms often consume large amounts of network bandwidth, thereby affecting overall network performance.
• Infection spread: Shows the risk posed by malware that propagate to other endpoints in the network. Malware, such as network worms, has the ability to locate and infect endpoints that have security vulnerabilities.
A green-colored bar indicates a low risk level. The bar turns yellow if the risk level is elevated, orange if the risk level is high, and red if the risk level is severe.
7-5

Trend Micro™ Threat Management Services Portal (On-premise) 2.6 Administrator’s Guide
Recent IncidentsThe Recent Incidents panel presents a summary of incidents for the past two days.
FIGURE 7-3. Recent Incidents panel
Click More >> to view details about these incidents and to check other incidents that occurred more than two days ago. A list of endpoints and incidents display in the dashboard at the right side of the screen. For details, see All Endpoints Dashboard on page 7-21.
7-6

Using the Portal
Security DashboardUse the Security Dashboard to view threat events and statistics.
FIGURE 7-4. Security Dashboard
The upper section of the dashboard contains several icons. The portal can display a maximum of 10 icons.
The icon at the center is the focal point of the dashboard and displays a set of data at the lower section of the dashboard. Clicking an icon at the periphery moves it to the center and changes the data at the lower section accordingly.
At the lower section of the dashboard, you can control the scope of the data that displays by specifying the number of days in Show data for the past days and clicking Update. By default, the portal will display data for the past 7 days.
7-7

Trend Micro™ Threat Management Services Portal (On-premise) 2.6 Administrator’s Guide
The portal provides the following dashboards:• Organization Dashboard• All Monitored Networks Dashboard• Monitored Network Dashboard• All Endpoints Dashboard• Endpoint Dashboard• All Threats Dashboard• Threat Dashboard
Organization DashboardThe Organization Dashboard displays by default each time you access the Security Dashboard. This dashboard presents a summary of your organization’s threat data.
FIGURE 7-5. Organization Dashboard
7-8

Using the Portal
Dashboard DataThe Organization Dashboard shows the following data:
Current Risk ProfileThis section shows your organization’s risk profile based on the following risk types.
FIGURE 7-6. Current Risk Profile section
• System compromise: Shows the risk posed by unauthorized external parties gaining partial or complete control of endpoints. Malware such as IRC bots have the ability to connect to malicious servers to get commands from external parties, essentially creating a backdoor to the network.
• Information loss: Shows the risk posed by unauthorized external parties stealing and sending out sensitive user and corporate data. Many types of malware have the ability to monitor a user's activities. For example, malware can log keystrokes or actively search the endpoint for confidential documents to steal.
7-9

Trend Micro™ Threat Management Services Portal (On-premise) 2.6 Administrator’s Guide
• Network disruption: Shows the risk posed by malware that consume network resources. Malware such as spambots and network worms often consume large amounts of network bandwidth, thereby affecting overall network performance.
• Infection spread: Shows the risk posed by malware that propagate to other endpoints in the network. Malware, such as network worms, has the ability to locate and infect endpoints that have security vulnerabilities.
<x> Riskiest EndpointsThis section shows endpoints with the most number of threat incidents. The portal can display a maximum of 10 endpoints.
FIGURE 7-7. <x> Riskiest Endpoints section
Clicking a host name/IP address opens the Endpoint Dashboard. Clicking a monitored network opens the Monitored Network Dashboard.
7-10

Using the Portal
Incidents, Past <x> DaysThis section shows the number of incidents using a graph and pie charts.
FIGURE 7-8. Incidents, Past <x> Days section
• The line graph shows the number of incidents by threat type.• The pie charts break down incidents by severity level, protocol, and threat type.
7-11

Trend Micro™ Threat Management Services Portal (On-premise) 2.6 Administrator’s Guide
Top <x> Users of Disruptive ApplicationsThis section shows the host names/IP addresses of users who have used disruptive applications the most number of times. The portal can display a maximum of 10 host names/IP addresses.
FIGURE 7-9. Top <x> Users of Disruptive Applications section
Disruptive applications include instant messaging, streaming media, and peer-to-peer applications. They are considered disruptive because they slow down the network, are a security risk, and are generally a distraction to employees.
Clicking a host name/IP address opens the Endpoint Dashboard. Clicking a monitored network opens the Monitored Network Dashboard.
7-12

Using the Portal
Document Traffic StatisticsThis section shows the number of inbound or outbound documents exchanged through HTTP, SMTP, IM (instant messaging), FTP, and other protocols.
FIGURE 7-10. Document Traffic Statistics section
Switching to Another DashboardAt the upper section of the dashboard, click an icon at the periphery to switch to another dashboard. The available icons are:
• All Monitored Networks Dashboard
• All Endpoints Dashboard
• All Threats Dashboard
7-13

Trend Micro™ Threat Management Services Portal (On-premise) 2.6 Administrator’s Guide
All Monitored Networks DashboardThe All Monitored Networks Dashboard displays threat data for all the networks monitored by Threat Discovery Appliance.
FIGURE 7-11. All Monitored Networks Dashboard
7-14

Using the Portal
Dashboard DataThe All Monitored Networks Dashboard shows the following data:
Incidents, Past <x> DaysThis section shows the number of incidents using graphs and a pie chart.
FIGURE 7-12. Incidents for past <x> days section
• The line graph shows the number of incidents detected in each monitored network.• The bar graph shows the percentage of incident change in each monitored network.
A number higher than zero means an increase in the number of incidents, zero means that there is no change in the number of incidents, and a number lower than zero means a decrease in the number of incidents.
7-15

Trend Micro™ Threat Management Services Portal (On-premise) 2.6 Administrator’s Guide
For example, if there are 30 incidents 7 days ago and there are currently 30 incidents, the percentage change is 0. If there are currently 15 incidents, the percentage change is -50. If there are currently 60 incidents, the percentage change is 100.
• The pie chart breaks down the incidents by monitored network.
Disruptive Applications, Past <x> DaysThis section shows the number of times users in each monitored network accessed disruptive applications.
FIGURE 7-13. Disruptive Applications, Past <x> Days section
7-16

Using the Portal
Switching to Another DashboardAt the upper section of the dashboard, click an icon at the periphery to switch to another dashboard. The available icons are:
• Monitored Network Dashboard
Note: The portal can display up to 6 monitored networks. If the current number of monitored networks is higher, the portal randomly selects 6 networks to display.
• Organization Dashboard
• All Endpoints Dashboard
• All Threats Dashboard
7-17

Trend Micro™ Threat Management Services Portal (On-premise) 2.6 Administrator’s Guide
Monitored Network DashboardThe Monitored Network Dashboard displays threat data for a network monitored by Threat Discovery Appliance. In the following example, the name of the monitored network is Europe.
FIGURE 7-14. Monitored Network Dashboard
Dashboard DataThe Monitored Network Dashboard shows the following data:
Current Risk Profile (Monitored Network)This section is similar to the Current Risk Profile section in the Organization Dashboard. The only difference is that data in this section is specific to the monitored network.
For details, see Current Risk Profile on page 7-9.
Incidents, Past <x> Days (Monitored Network)This section is similar to the Incidents Trend for Past <x> Days section in the Organization Dashboard. The only difference is that data in this section is specific to the monitored network.
For details, see Incidents, Past <x> Days on page 7-11.
7-18

Using the Portal
Incident Details, Past <x> DaysThis section shows endpoints that harbor threats.
FIGURE 7-15. Incident Details, Past <x> Days section
• Clicking a host name/IP address opens the Endpoint Dashboard.• Clicking a monitored network opens the Monitored Network Dashboard.• Clicking a threat type opens the Threat Dashboard.• Clicking Details opens a new window with details about the threat. For more
information, see Threat Details on page 7-20.
7-19

Trend Micro™ Threat Management Services Portal (On-premise) 2.6 Administrator’s Guide
Threat DetailsThe Threat Details window has 3 tabs: Threat Impact, Recommended Actions, and Other Infected Endpoints.
FIGURE 7-16. Threat Details window with 3 tabs
7-20

Using the Portal
Switching to Another DashboardAt the upper section of the dashboard, click an icon at the periphery to switch to another dashboard. The available icons are:• Endpoint Dashboard
Note: The portal can display up to 8 endpoints with threats. If the current number of endpoints with threats is higher, the portal randomly selects 8 endpoints to display.
Threat-free endpoints do not display in this dashboard.
• All Monitored Networks Dashboard
All Endpoints DashboardThe All Endpoints Dashboard displays threat data for all endpoints with threats.
FIGURE 7-17. All Endpoints Dashboard
7-21

Trend Micro™ Threat Management Services Portal (On-premise) 2.6 Administrator’s Guide
Dashboard DataThe All Endpoints Dashboard shows the following data:
Recent Incidents for All EndpointsThis section shows all endpoints with threat data.
FIGURE 7-18. Recent Incidents for All Endpoints section
• Clicking a host name/IP address opens the Endpoint Dashboard.• Clicking a monitored network opens the Monitored Network Dashboard.• Clicking a threat type opens the Threat Dashboard.• Clicking Details opens a new window with details about the threat. For more
information, see Threat Details on page 7-20.
7-22

Using the Portal
Switching to Another DashboardAt the upper section of the dashboard, click an icon at the periphery to switch to another dashboard. The available icons are:• Endpoint Dashboard
Note: The portal can display up to 6 endpoints with threats. If the current number of endpoints with threats is higher, the portal randomly selects 6 endpoints to display.
Threat-free endpoints do not display in this dashboard.
• Organization Dashboard
• All Monitored Networks Dashboard
• All Threats Dashboard
7-23

Trend Micro™ Threat Management Services Portal (On-premise) 2.6 Administrator’s Guide
Endpoint DashboardThe Endpoint Dashboard displays threat data for a particular endpoint. In the following example, the endpoint’s host name is Host01.
FIGURE 7-19. Endpoint Dashboard
Dashboard DataThis dashboard shows the following data:
<Host Name/IP Address>This section provides information about the endpoint.
FIGURE 7-20. Endpoint information section
7-24

Using the Portal
Current Risk Profile (Endpoint)This section is similar to the Current Risk Profile section in the Organization Dashboard. The only difference is that data in this section is specific to the endpoint.
For details, see Current Risk Profile on page 7-9.
Incident Details, Past <x> DaysThis section shows all threats in the endpoint.
FIGURE 7-21. Security Incidents for Past <x> Days section
• Clicking a monitored network opens the Monitored Network Dashboard.• Clicking a threat type opens the Threat Dashboard.• Clicking Details opens a new window with details about the threat. For more
information, see Threat Details on page 7-20.
7-25

Trend Micro™ Threat Management Services Portal (On-premise) 2.6 Administrator’s Guide
Switching to Another DashboardAt the upper section of the dashboard, click an icon at the periphery to switch to another dashboard. The available icons are:
• Threat Dashboard
Note: The portal can display up to 7 threats. If the current number of threats is higher, the portal randomly selects 7 threats to display.
• Monitored Network Dashboard
• All Endpoints Dashboard
All Threats DashboardThe All Threats Dashboard displays all threats detected in endpoints.
FIGURE 7-22. All Threats Dashboard
7-26

Using the Portal
Dashboard DataThe All Threats Dashboard shows the following data:
Threats, Past <x> DaysThis section shows the number of threats using graphs and a pie chart.
FIGURE 7-23. Threats, Past <x> Days section
7-27

Trend Micro™ Threat Management Services Portal (On-premise) 2.6 Administrator’s Guide
• The first line graph shows the number of times a particular threat was detected.• The pie charts show the most prevalent threats, known malware downloads, and
incidents by threat type, respectively.• The second line graph shows incidents by threat types.
Switching to Another DashboardAt the upper section of the dashboard, click an icon at the periphery to switch to another dashboard. The available icons are:
• Threat Dashboard
Note: The portal can display up to 6 threats. If the current number of threats is higher, the portal randomly selects 6 threats to display.
• Organization Dashboard
• All Monitored Networks Dashboard
• All Endpoints Dashboard
7-28

Using the Portal
Threat DashboardThe Threat Dashboard displays data for a particular threat. In the following example, the threat is a type of worm.
FIGURE 7-24. Threat Dashboard
Dashboard DataThe Threat Dashboard shows the following data:
Threat InformationThis section provides a description of the threat.
FIGURE 7-25. Threat Information section
7-29

Trend Micro™ Threat Management Services Portal (On-premise) 2.6 Administrator’s Guide
Infected Endpoints, Past <x> DaysThis section shows all endpoints affected by the threat.
FIGURE 7-26. Infected Endpoints, Past <x> Days section
• Clicking a host name/IP address opens the Endpoint Dashboard.• Clicking a monitored network opens the Monitored Network Dashboard.• Clicking Details opens a new window with details about the threat. For more
information, see Threat Details on page 7-20.
Switching to Another DashboardAt the upper section of the dashboard, click an icon at the periphery to switch to another dashboard. The available icons are:• Endpoint Dashboard
Note: The portal can display up to 8 endpoints affected by the threat. If the current number of endpoints affected by the threat is higher, the portal randomly selects 8 endpoints to display.
• All Threats Dashboard
7-30

Using the Portal
Traceable IncidentsThe Traceable Incidents Dashboard shows the source of a particular incident.
FIGURE 7-27. Traceable Incidents screen
The incident source can be any of the following:
• Endpoints harboring a particular threat. The threat is indicated by a red icon .
• A server (indicated by a CPU icon ) that propagates threats. For example, an external web server sends an instant message with a malicious URL to endpoints.
The portal displays incident sources in the left menu and in the main window found at the right side of the screen. A maximum of 10 sources will display in the main window.
To narrow down the number of incident sources, specify the number of days in Show data for the past days and click Update. By default, the portal will display incident sources detected in the last 7 days.
To view data for a particular incident source, click an item in the left menu or an icon in the main window. The Incident Source Dashboard displays.
7-31

Trend Micro™ Threat Management Services Portal (On-premise) 2.6 Administrator’s Guide
Incident Source DashboardThe Incident Source Dashboard shows the incident source and the affected endpoints.
FIGURE 7-28. Incident Source Dashboard
Dashboard DataThe Incident Source Dashboard shows the following data:
Incident Source InformationThis section shows the incident cause, type, and description.
FIGURE 7-29. Incident Source Information section
7-32

Using the Portal
Incident Source DetailsThis section shows a list of affected endpoints.
FIGURE 7-30. Incident Source Details section
Clicking a host name/IP address, monitored network, and threat type opens a separate dashboard.
Clicking Details opens a new window with details about the threat. For more information, see Threat Details on page 7-20.
Switching to Another ViewAt the upper section of the dashboard:• Click the endpoint icon at the periphery to view the Endpoint Dashboard and
view threat details for the affected endpoint.
Note: The portal can display up to 8 affected endpoints. If the current number of affected endpoints is higher, the portal randomly selects 8 endpoints to display.
• Click the traceable incidents icon to view all incident sources.
To view another incident source, click its icon in the main menu.
7-33

Trend Micro™ Threat Management Services Portal (On-premise) 2.6 Administrator’s Guide
ReportsThe portal provides the following report types that are available as PDF files.
To download reports:
1. In the main menu, click My Report.2. Select a date from the monthly calendar. Use the arrows on top of the calendar to
switch to a different month.
The available reports display on the right side of the screen.3. Click the link to the report. The report begins to download.4. Save the PDF file.
TABLE 7-1. Report types
REPORT TYPE DESCRIPTION AVAILABILITY
Administrative Report
An Administrative Report summarizes threats detected in the network.
Daily
Executive Report
An Executive Report provides a detailed account of the monitored network’s overall security posture.
The report provides the network’s risk profile, the impact of risks to your network infrastructure and your organization as a whole, and recommended actions.
Weekly and monthly
7-34

Using the Portal
Account DetailsThe TMSP administrator configures the account details that display on the My Account screen. You can change any of the account details that need to be updated.
The TMSP administrator can override the changes that you made. Inform the TMSP administrator if you plan to change any of the details to ensure that your changes are not overridden.
To modify the account details:
1. Click My Account.2. Supply new information in the fields provided.3. Click Save.
7-35

Trend Micro™ Threat Management Services Portal (On-premise) 2.6 Administrator’s Guide
7-36

Chapter 8
Getting Help
This chapter discusses the following topics:• Before Contacting Technical Support on page 8-2• Contacting Trend Micro on page 8-3
8-1

Trend Micro™ Threat Management Services Portal (On-premise) 2.6 Administrator’s Guide
Before Contacting Technical SupportBefore contacting technical support, please consider visiting the following Trend Micro online resources.
Trend CommunityGet help, share your experiences, ask questions, and discuss security concerns in the forums with fellow users, enthusiasts, and security experts.
http://community.trendmicro.com/
The Trend Micro Knowledge BaseThe Trend Micro Knowledge Base, maintained at the Trend Micro website, has the most up-to-date answers to product questions. You can also use Knowledge Base to submit a question if you cannot find the answer in the product documentation. Access the Knowledge Base at:
http://esupport.trendmicro.com
Trend Micro updates the contents of the Knowledge Base continuously and adds new solutions daily. If you are unable to find an answer, however, you can describe the problem in an email and send it directly to a Trend Micro support engineer who will investigate the issue and respond as soon as possible.
Security Information CenterComprehensive security information is available at the Trend Micro website.
http://www.trendmicro.com/vinfo/
Information available:• List of viruses and malicious mobile code currently "in the wild," or active• Computer virus hoaxes• Internet threat advisories• Virus weekly report
8-2

Getting Help
• Virus Encyclopedia, which includes a comprehensive list of names and symptoms for known viruses and malicious mobile code
• Glossary of terms
Contacting Trend Micro
Technical SupportTrend Micro provides technical support, pattern downloads, and program updates for one year to all registered users, after which you must purchase renewal maintenance. If you need help or just have a question, please feel free to contact us. We also welcome your comments.
Trend Micro Incorporated provides worldwide support to all registered users.• Get a list of the worldwide support offices at:
http://www.trendmicro.com/support• Get the latest Trend Micro product documentation at:
http://downloadcenter.trendmicro.com/
In the United States, you can reach the Trend Micro representatives through phone, fax, or email:
Trend Micro, Inc.
10101 North De Anza Blvd., Cupertino, CA 95014
Toll free: +1 (800) 228-5651 (sales)
Voice: +1 (408) 257-1500 (main)
Fax: +1 (408) 257-2003
Web address:
http://www.trendmicro.com
Email: [email protected]
8-3

Trend Micro™ Threat Management Services Portal (On-premise) 2.6 Administrator’s Guide
Speeding Up Your Support CallWhen you contact Trend Micro, to speed up your problem resolution, ensure that you have the following details available:• Microsoft Windows and Service Pack versions• Network type• Computer brand, model, and any additional hardware connected to your computer• Amount of memory and free hard disk space on your computer• Detailed description of the install environment• Exact text of any error message given• Steps to reproduce the problem
TrendLabsTrendLabsSM is the global antivirus research and support center of Trend Micro. Located on three continents, TrendLabs has a staff of more than 250 researchers and engineers who operate around the clock to provide you, and every Trend Micro customer, with service and support.
You can rely on the following post-sales service:• Regular virus pattern updates for all known "zoo" and "in-the-wild" computer
viruses and malicious codes• Emergency virus outbreak support• Email access to antivirus engineers• Knowledge Base, the Trend Micro online database of technical support issues
TrendLabs has achieved ISO 9002 quality assurance certification.
Sending Suspicious Files to Trend MicroIf you think you have an infected file but the scan engine does not detect it or cannot clean it, Trend Micro encourages you to send the suspect file to us. For more information, refer to the following site:
http://subwiz.trendmicro.com/subwiz
8-4

Getting Help
You can also send Trend Micro the URL of any website you suspect of being a phish site, or other so-called "disease vector" (the intentional source of Internet threats such as spyware and viruses).• Send an email to the following address and specify "Phish or Disease Vector" as the
subject.
[email protected]• You can also use the web-based submission form at:
http://subwiz.trendmicro.com/subwiz
Documentation FeedbackTrend Micro always seeks to improve its documentation. If you have questions, comments, or suggestions about this or any Trend Micro document, please go to the following site:
http://www.trendmicro.com/download/documentation/rating.asp
8-5

Trend Micro™ Threat Management Services Portal (On-premise) 2.6 Administrator’s Guide
8-6

Appendix A
Creating a New Virtual Machine
This appendix describes how to create a new virtual machine that will host TMSP.
A-1

Trend Micro™ Threat Management Services Portal (On-premise) 2.6 Administrator’s Guide
Creating a New Virtual MachineThe actual installation of VMware ESX is not covered in this document. Please refer to the VMware product documentation to install this product.
The steps outlined below detail the process for creating a new virtual machine in VMware ESX to install TMSP. Please use the following steps as a guideline for creating the virtual machine for your environment. The number of CPUs, NICs, memory, and hard disk space selected should reflect the TMSP requirements listed in System Requirements on page 2-2.
Note: The screens in this procedure may appear in a different order and the options available in each screen may vary depending on the VMware ESX version.
To create the virtual machine:
1. From the VMware ESX menu bar, select File > New > Virtual Machine.
A-2

Creating a New Virtual Machine
2. When the Configuration screen appears, click Custom and then click Next.
FIGURE A-1. Configuration screen
A-3

Trend Micro™ Threat Management Services Portal (On-premise) 2.6 Administrator’s Guide
3. When the Name and Location screen appears, type a name for the virtual machine and then click Next.
FIGURE A-2. Name and Location screen
A-4

Creating a New Virtual Machine
4. When the Datastore screen appears, select the datastore where the virtual machine will reside and then click Next.
FIGURE A-3. Datastore screen
A-5
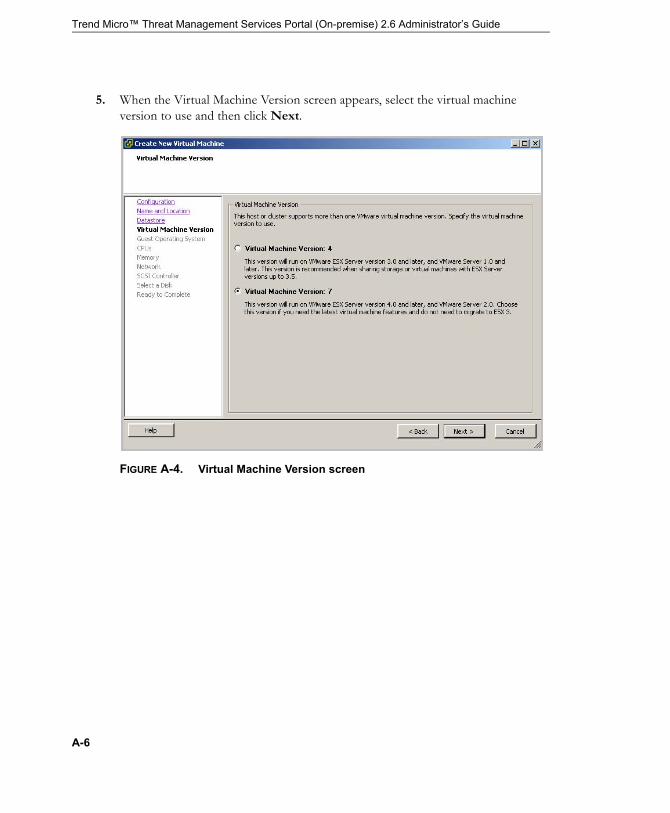
Trend Micro™ Threat Management Services Portal (On-premise) 2.6 Administrator’s Guide
5. When the Virtual Machine Version screen appears, select the virtual machine version to use and then click Next.
FIGURE A-4. Virtual Machine Version screen
A-6

Creating a New Virtual Machine
6. When the Guest Operating System screen appears, select Linux > Other Linux (64-bit) and then click Next.
FIGURE A-5. Guest Operating System screen
A-7

Trend Micro™ Threat Management Services Portal (On-premise) 2.6 Administrator’s Guide
7. When the CPUs screen appears, select the number of processors for the virtual machine and then click Next.
FIGURE A-6. CPUs screen
Tip: TMSP takes advantage of the Virtual SMP, so select the maximum number of virtual processors available.
A-8

Creating a New Virtual Machine
8. When the Memory screen appears, allocate at least 2GB (2048MB) of memory for TMSP and then click Next.
FIGURE A-7. Memory screen
A-9

Trend Micro™ Threat Management Services Portal (On-premise) 2.6 Administrator’s Guide
9. When the Network screen appears, configure at least 1 NIC for TMSP and then click Next.
FIGURE A-8. Network screen
A-10

Creating a New Virtual Machine
10. When the SCSI Controller screen appears, select the I/O adapter type that is appropriate for your virtual disk and then click Next.
FIGURE A-9. SCSI Controller screen
A-11

Trend Micro™ Threat Management Services Portal (On-premise) 2.6 Administrator’s Guide
11. When the Select a Disk screen appears, select the type of disk to use (Create a new virtual disk in this procedure) and then click Next.
FIGURE A-10. Select a Disk screen
A-12

Creating a New Virtual Machine
12. When the Create a Disk screen appears, allocate at least 50GB hard disk space for TMSP and then click Next.
FIGURE A-11. Create a Disk screen
A-13

Trend Micro™ Threat Management Services Portal (On-premise) 2.6 Administrator’s Guide
13. When the Advanced Options screen appears, leave the default selections and then click Next.
FIGURE A-12. Advanced Options screen
A-14
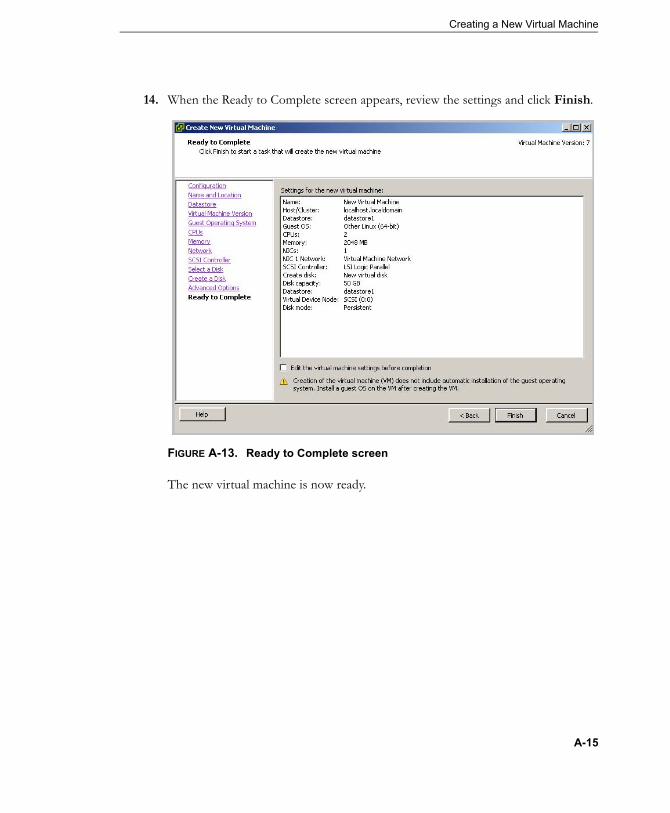
Creating a New Virtual Machine
14. When the Ready to Complete screen appears, review the settings and click Finish.
FIGURE A-13. Ready to Complete screen
The new virtual machine is now ready.
A-15

Trend Micro™ Threat Management Services Portal (On-premise) 2.6 Administrator’s Guide
A-16

Appendix B
Creating an Installation CD
There are many third-party software applications that you can use to create CDs from ISO files, including software that came with your CD/DVD writer or commercial applications such as Nero™ by Nero AG. This appendix demonstrates the creation of an Installation CD (on Windows XP) by using a readily accessible freeware tool called ISO Recorder Power Toy. This tool is a Windows XP freeware utility that uses native Windows functionality to create the CD.
Download ISO Recorder from the following location:
http://isorecorder.alexfeinman.com/isorecorder.htm
B-1

Trend Micro™ Threat Management Services Portal (On-premise) 2.6 Administrator’s Guide
ISO Recorder Power Toy ExampleDownload and install ISO Recorder onto the Windows XP computer. Once the tool is installed, use the following steps to create the installation CD.
To create an installation CD from the TMSP ISO file:
1. Obtain a blank CD-R.2. Insert the CD-R into the CD writer.3. Start Windows Explorer.4. Locate the ISO file, right-click the file, and then select Copy image to CD.
FIGURE B-14. Copy image to CD option
This process opens the ISO Recorder Wizard.
B-2

Creating an Installation CD
5. Ensure that the source is the location of the ISO file and the recorder is the CD/DVD writer.
FIGURE B-15. Source and recorder information screen
6. Click Next.
The recording wizard starts to create the installation CD.
B-3

Trend Micro™ Threat Management Services Portal (On-premise) 2.6 Administrator’s Guide
7. Click Finish once the CD writer has completed writing the contents of the CD.
FIGURE B-16. Operation complete screen
The installation CD is now ready to use. The installation CD is a bootable CD that can be used on both bare metal and VMware virtual machine installations. For installation instructions, see Installing Threat Management Services Portal on page 2-1.
B-4

Appendix C
Product Terminology and Concepts
Bandage PatternA Bandage Pattern (also called BPR) is a pre-release version of a Trend Micro anti-malware database available for manual download. This pattern has not undergone full validation or integration testing and is intended to provide emergency protection prior to the availability of a Controlled Pattern (also called CPR) or smart protection patterns. A pattern signature included in a Bandage Pattern may or may not be incorporated into a subsequent Controlled Pattern or smart protection patterns.
Controlled PatternA Controlled Pattern (also called CPR) is a manually loadable, pre-release version of a Trend Micro anti-malware database, designed to provide users with additional protection in between smart protection pattern releases.
Disruptive ApplicationsInstant messaging, streaming media, and peer-to-peer applications are considered to be disruptive because they slow down the network, are a security risk, and are generally a distraction to employees. Threat Discovery Appliance logs activities on these applications and sends the logs to TMSP.
C-1

Trend Micro™ Threat Management Services Portal (On-premise) 2.6 Administrator’s Guide
HeartbeatTrend Micro products exchange heartbeat messages to initiate communication with each other. When communication is established, the products proceed with the required operation. For example, the initiating product starts to upload logs to the receiving product or requests the other product to quarantine a non-compliant endpoint.
Products exchange heartbeat messages at regular (and usually pre-determined) intervals. Some products offer users the ability to configure the time interval.
Threat Discovery Appliance and Threat Mitigator initiate a heartbeat message exchange with TMSP every 10 minutes.
Monitored NetworksA monitored network consists of IP addresses that Threat Discovery Appliance monitors for threats. By defining monitored networks, Threat Discovery Appliance can identify whether threats originate from within or outside the network.
Threat Discovery Appliance is set to automatically monitor the following IP address blocks reserved by the Internet Assigned Numbers Authority (IANA) for private networks:• 10.0.0.0 - 10.255.255.255• 172.16.0.0 - 172.31.255.255• 192.168.0.0 - 192.168.255.255
Nonconforming EndpointsAn endpoint is considered nonconforming if the Threat Management Agent installed in the endpoint reports the following threat mitigation issues:• There are unresolved threats in an endpoint after Threat Management Agent runs
routine cleanup. To resolve these threats, send forensic data to Trend Micro.• Trend Micro issued a pattern to eliminate the threats but the agent encountered
issues while downloading the pattern.• Threat Management Agent downloaded the pattern but encountered issues
launching custom cleanup.
C-2

Product Terminology and Concepts
Outbreak Containment ServicesOutbreak Containment Services in Threat Discovery Appliance blocks and disconnects malware activities that have the potential of causing an outbreak. After collecting Outbreak Containment Services logs, Threat Discovery Appliance sends the logs immediately to TMSP.
Registered DomainsA registered domain in Threat Discovery Appliance is an internal or external email domain that Threat Discovery Appliance considers trustworthy. By identifying trustworthy email domains, Threat Discovery Appliance can detect and classify email traffic from unknown or unauthorized domains.
Registered ProductsTMSP integrates with a registered product to perform most of its functions. A registered product can either be Threat Discovery Appliance or Threat Mitigator.
Registered ServicesA registered service in Threat Discovery Appliance is an internal or external service or server pairs that Threat Discovery Appliance considers trustworthy. By identifying trustworthy services or servers, Threat Discovery Appliance can detect and classify network traffic from unknown or unauthorized services or locations. For example, a Domain Name System (DNS) is generally a trusted service within the network, but a hacker outside or even from within the network could launch a network attack masquerading as a DNS response. By registering your local (internal) DNS servers, you enable Threat Discovery Appliance to determine which DNS traffic needs to be monitored and which is trusted and authorized.
Security ComplianceSecurity Compliance is a separately licensed feature in Threat Discovery Appliance that extracts meaningful content from various file formats and archives. Security Compliance checks whether the content contains information regulated by compliance rules. Threat Discovery Appliance logs violations to compliance rules and then uploads the logs to TMSP.
C-3

Trend Micro™ Threat Management Services Portal (On-premise) 2.6 Administrator’s Guide
Compliance rules are contained in templates. Threat Discovery Appliance comes with a set of predefined templates for specific industries and regulations, such as:• Payment Card Industry Data Security Standard (PCI-DSS)• California Security Breach Information Act (SB-1386)• Health Insurance Portability and Accountability Act (HIPAA)• Financial Services Modernization Act (GLBA)• US Personally Identifiable Information Act (US PII)
See the Threat Discovery Appliance Administrator’s Guide for details about Security Compliance.
Smart ProtectionTrend Micro smart protection technology provides File and Web Reputation Services to point products. Trend Micro delivers these services through smart protection sources. The following table provides a comparison between the currently available smart protection sources:
TABLE C-1. Smart protection sources
BASIS OF COMPARISON SMART PROTECTION SOURCE
TREND MICRO SMART PROTECTION NETWORK SMART PROTECTION SERVER
Purpose Smart Protection Network is a globally scaled, Internet-based infrastructure that provides File and Web Reputation Services to Trend Micro products that leverage smart protection technology.
Smart Protection Server provides the same File and Web Reputation Services offered by Smart Protection Network but is intended to localize these services to the corporate network to optimize efficiency.
Administration Trend Micro hosts and maintains this service.
A point product’s administrator installs and manages this server.
C-4

Product Terminology and Concepts
About Web Reputation Services
Web Reputation Services tracks the credibility of web domains by assigning a reputation score based on factors such as a website's age, historical location changes and indications of suspicious activities discovered through malware behavior analysis. To increase accuracy and reduce false positives, Trend Micro web reputation technology assigns reputation scores to specific pages or links within sites instead of classifying or blocking entire sites since there are times that only portions of legitimate sites are hacked and reputations can change dynamically over time.
About File Reputation Services
File Reputation Services uses two lightweight patterns that work together to provide the same protection offered by Trend Micro conventional anti-malware patterns. These patterns are collectively referred to as smart protection patterns.
Smart Scan Pattern contains majority of the pattern definitions. A smart protection source hosts the Smart Scan Pattern and updates it several times a day. By default, the smart protection source updates the pattern from the Trend Micro ActiveUpdate server.
Point products (such as Threat Mitigator) that leverage smart protection technology do not download the Smart Scan Pattern. The point product verifies potential threats against the pattern by sending scan queries to the smart protection source.
Smart Scan Agent Pattern contains all the other pattern definitions not found on the Smart Scan Pattern. The point product hosts the Smart Scan Agent Pattern and updates it daily. By default, the point product updates the pattern from the Trend Micro ActiveUpdate server.
Connection protocol
HTTPS HTTP/HTTPS
TABLE C-1. Smart protection sources (Continued)
BASIS OF COMPARISON SMART PROTECTION SOURCE
TREND MICRO SMART PROTECTION NETWORK SMART PROTECTION SERVER
C-5

Trend Micro™ Threat Management Services Portal (On-premise) 2.6 Administrator’s Guide
The point product, using the Smart Scan Agent Pattern and advanced filtering technology, can verify whether a file is infected without sending scan queries to the smart protection source. The point product only sends scan queries if it cannot determine the risk of the file during scanning. A point product that cannot verify a file’s risk locally and is unable to connect to a smart protection source after several attempts flags the file for verification. When connection to a smart protection source is restored, all the files that have been flagged are re-scanned. The appropriate scan action is then performed on files that have been confirmed as infected.
Trend Micro ServicesThe Trend Micro threat management offering includes the following services:
TABLE C-2. Threat management services
SERVICE DESCRIPTION
Threat Discovery Services
These services continuously monitor networks for stealthy malware infections and generate daily and weekly infection reports.
Threat Remediation Services
These services provide early outbreak warnings and expert advisory to diagnose, contain, and remediate security threats.
Threat Lifecycle Management Services
These services combine automated threat remediation and root-cause analysis technology with proactive security planning from a dedicated Trend Micro Threat Management Advisor.
C-6

Product Terminology and Concepts
Each service has the following features and benefits:
TABLE C-3. Features and benefits for each service
FEATURE/BENEFIT THREAT DISCOVERY
THREAT REMEDIATION
THREAT LIFECYCLE
MANAGEMENT
Network overwatch threat discovery
Yes Yes Yes
Network security assessment reports (manual – daily / weekly)
Yes Yes Yes
Proactive threat monitoring & early warning notifications
No Yes Yes
Threat containment and remediation advisory services
No Yes Yes
24x7 access to Trend Micro Threat Management Advisors
No Yes Yes
Automated threat remediation technology
No No Yes
Threat infection root-cause analysis
No No Yes
Bi-annual threat outbreak drills for best practice responses
No No Yes
Customized Threat Security Management Plan
No No Yes
Quarterly Executive Business Review
No No Yes
Annual threat landscape updates briefings
No No Yes
C-7

Trend Micro™ Threat Management Services Portal (On-premise) 2.6 Administrator’s Guide
C-8

Index
AActivation Code 3-6, 6-2
administrative account 2-14, 4-7
administrative console 1-6, 3-2, 4-7
banner 3-3main content window 3-5main menu bar 3-4password 4-7
administrative report 5-7
administrative server 1-6, 4-6
alert level 7-4
All Endpoints Dashboard 7-21
All Monitored Networks Dashboard 7-14
All Threats Dashboard 7-26
application filter logs 5-29
Bbandage pattern 5-18, C-1
bare metal server 2-2, 2-5
browser requirements 2-3
Ccompany information 4-4
configuration wizard 3-6
contact list 4-7
controlled pattern 5-18, C-1
credentials
administrative console 3-2portal 4-3, 7-2registered products 4-2, 4-14
custom patterns 5-18–5-19, 5-26
customer account 4-2, 5-2, 6-3
Ddaily administrative report 5-7, 5-9, 7-34
dashboard 7-3, 7-7
detection logs 5-29
disruptive applications 7-12, 7-16, C-1
document traffic statistics 7-13
documentation feedback 8-5
Eemail delivery settings 3-6, 4-13
Endpoint Dashboard 7-24
event notifications 4-10, 5-4
executive report 5-7
Ffeatures and benefits 1-8
forensic data 4-11, 5-4, 5-14, 5-26
form factor 1-6
Hheartbeat 4-6, 4-11, 5-28, C-2
IN-1

Trend Micro™ Threat Management Services Portal (On-premise) 2.6 Administrator’s Guide
host machine requirements 2-2
IIncident Monitor 4-12–4-13
incident source 7-31
Incident Source Dashboard 7-32
installationchecklist 2-4keyboard language 2-8network settings 2-11nonconforming components 2-10overview 2-2procedure 2-5requirements 2-2
installation CD 2-4, B-1
ISO file 2-4, B-1
Kkeyboard language 2-8
Knowledge Base 3-3, 8-2
Llicense 3-6, 6-2
license agreement 2-7
log server 1-7, 3-6, 4-6, 4-14
log sources 5-5
logsconsolidated logs 5-4, 5-34from registered products 5-29maintenance 6-7raw logs 5-28, 6-7system logs 5-34
Mmalware mapping settings 6-6
monitored network C-2
Monitored Network Dashboard 7-18
monthly executive report 5-7, 5-9, 7-34
Nnetwork interface settings 4-6
network settings 2-11
nonconforming components 2-10
nonconforming endpoints 5-4, 5-24, C-2
notification recipients 4-9
notifications 4-10, 5-4
settings 4-13NTP server 4-5
Oon-demand reports 5-13
Organization Dashboard 7-8
Outbreak Containment Services 4-10, 6-6, C-3
Ppassword
administrative console 3-2, 4-7portal 4-3root account 2-15
periodic reports 5-9, 7-34
send through email 5-11portal 1-7, 3-6, 4-3, 4-6, 7-2
account 7-3, 7-35dashboard 7-3, 7-7language 4-3navigation 7-3reports 7-34traceable incidents 7-3, 7-31
proxy settings 3-6, 6-4
Rrecipients
IN-2

Index
notifications 4-9reports 5-11
registered domain C-3
registered products 4-2, 5-5, 5-27, C-3
credentials 4-2, 4-14expiration 4-11heartbeat 4-6, 4-11logs 5-2, 5-29removing from TMSP 5-33
registered service C-3
registering to TMSP 4-14
Report Builder 5-9
reports 7-34
language 4-3, 5-9–5-10log sources 5-5manage 5-4–5-5on-demand reports 5-13periodic reports 5-9portal 7-34re-generate 5-10send through email 5-11top 10 malware report 5-12types 5-7
risk profile 7-4, 7-9, 7-18, 7-25
riskiest endpoints 7-10
root account 2-14
root cause logs 5-31
rsync 1-7
SSecurity Compliance 5-3, 5-28, C-3
logs 5-30Security Dashboard 7-3, 7-7
Security Information Center 8-2
smart protection patterns 5-21–5-22
smart protection sources C-4
Smart Scan Agent Pattern 5-21, C-5
Smart Scan Pattern 5-21, C-5
static IP address 2-4, 3-6
status server 1-8, 3-6, 4-6, 4-14
suspicious files 8-4
system requirements 2-2
system time 4-5
Tthreat correlation rules 6-5–6-6
Threat Dashboard 7-29
threat detection 4-13
Threat Discovery Services C-6
threat event logs 5-31
threat incidents 5-2, 6-5, 7-11, 7-15, 7-18, 7-22, 7-25, 7-27
Threat Lifecycle Management Services C-6
Threat Management Services 1-2
threat mitigation tasks 5-4, 5-14
download and send forensic data 5-16manage pattern files 5-18no mitigation required 5-23
Threat Remediation Services C-6
threat sample 4-11
TMSPabout 1-2consolidated logs 5-4, 5-34features and benefits 1-8form factor 1-6installation overview 2-2license and Activation Code 6-2reports 5-5, 7-34servers 1-6, 2-4, 3-6, 4-6system logs 5-34system requirements 2-2threat correlation rules 6-5
IN-3

Trend Micro™ Threat Management Services Portal (On-premise) 2.6 Administrator’s Guide
top 10 malware report 5-12
traceable incidents 7-3, 7-31
Trend Micro services 4-3, 4-13, 5-2, C-6
expiration 4-11
Uupsell report 5-7
URL filtering logs 5-30
Vvirtual machine
create A-2VMware virtual machine 2-2, 2-5
creating A-2
Wweekly administrative report 7-34
weekly executive report 5-7, 5-9
IN-4