trane map configuration instructions - iis windows … to trane maptm user guide for more details on...
TRANSCRIPT

Page 1 of 24
Trane MAPTM Configuration Instructions
Purpose: The purpose of this document is to provide instructions on how to:
1. Configure Google Gmail accounts to work with the Trane MAPTM application
2. Setup Gmail and Microsoft Exchange email, calendars, and contact lists on the iPad
3. Setup the Trane MAPTM application to use Gmail and Microsoft Exchange calendars and contact
lists
4. How to schedule appointments to show up as engagements in the Trane MAPTM application
Not Covered: Configuration of Microsoft Exchange email accounts, calendars, and contact lists. Please
contact your local IT support team for assistance with creating Microsoft Exchange email
accounts.
Table of Contents
Trane MAPTM Configuration Instructions......................................................................................................................... 1
Gmail Setup Instructions......................................................................................................Error! Bookmark not defined.
Step 1 - Create a Gmail Account ................................................................................................................................... 2
Step 2 - Setup Gmail Calendar ...................................................................................................................................... 2
Step 3 - Setup Gmail Contact List.................................................................................................................................. 4
Step 4 – Scheduling an Appointment............................................................................................................................ 6
iPad Gmail Setup............................................................................................................................................................ 10
Step 1 - Getting Started.............................................................................................................................................. 10
Step 2 – Enter Account Information ........................................................................................................................... 11
Step 3 – Enable Mail, Contacts, and Calendars ........................................................................................................... 12
iPad Microsoft Exchange Email Setup............................................................................................................................. 13
Step 1 - Getting Started.............................................................................................................................................. 13
Step 2 – Enter Account Information ........................................................................................................................... 14
Step 3 – Enable Mail, Contacts, and Calendars ........................................................................................................... 15
iPad Contact List Sync Verification.................................................................................................................................. 16
iPad Calendar Sync Verification...................................................................................................................................... 18
Trane MAPTM Email/Calendar/Contact Setup.................................................................................................................. 20
Step 1 – Trane MAPTM Email/Calendar Configuration.................................................................................................. 20
Step 2 – Trane MAPTM Calendar Sync Verification....................................................................................................... 23

Page 2 of 24
Gmail Setup Instructions
Step 1 - Create a Gmail Account1. Set up a Gmail account, which includes an email account, contact list, and online calendar. You can
set up a Gmail account here: https://accounts.google.com/newaccount
Step 2 - Setup Gmail Calendar1. From your Gmail home screen, Select Calendar
2. If this is the first time setting up Google calendar for this account, Verify the correct Time Zone is
selected and click Continue.
3. Select Calendar Setting widget in upper right corner of screen and select Calendar Settings

Page 3 of 24
4. Go to the General tab on Calendar Settings
5. Verify your correct time zone and any other setting you would like to set and click Save. If you saved
settings, you will need to select Calendar settings from the widget again before proceeding to the next
step.
6. Go to the Calendars tab on Calendar Settings
7. Select Notifications
8. Verify that email notifications of New events, changed event, and cancelled events are checked

Page 4 of 24
9. Click on Save
10. Close Calendar Settings and your calendar - Calendar settings are now complete
Step 3 - Setup Gmail Contact List
Contact List Notes
You have the option of either sharing a single calendar and contact list for all of your Retail Sales
Professionals or individual calendars and contact lists for each Retail Sales Professional.
If you decide to share one calendar/contact list for all Retail Sales Professionals, you must enter
each Retail Sales Professional in the contact list.
If you will use individual calendars and contact lists for each Retail Sales Professional, you must
enter that Retail Sales Professional in the contact list.
The Retail Sales Professional email address that is entered in the contact list MUST exactly match
the email address entered in Trane MAPTM application Settings module, or calendar entries will not
be displayed in the Trane MAPTM Clients module.
1. From your Gmail home screen, select Contacts
2. Click on the New Contact button

Page 5 of 24
3. Enter the Retail Sales Professional name and email address in the contact list. For a Retail Sales
Professional, the only required contact information is name and email address.
4. After entering the Retail Sales Professional’s information on the New Contact screen, click on My
Contacts and verify that the Retail Sales Professional is listed in the contact list.
5. Retail Sales Professional Contact List setup is complete.

Page 6 of 24
Step 4 – Scheduling an Appointment
Scheduling Appointment Notes
For a client to show up as an engagement in the Clients module of the application, they need
to be defined in the contact list and there needs to be a calendar entry for the appointment
The information from the contact list that will be displayed in the Trane MAPTM Clients
module is:
o Client name
o Phone numbers
o Home address
o Email
To define a “bill-to” address that is different than the job site address, enter the bill-to
address as the work address in the contact list
When scheduling the appointment, invite both the Retail Sales Professional and client to the
appointment.
In order for the clients name to appear in the Trane MAPTM Client module, only invite the
Retail Sales Professional and client to the appointment.
1. In Gmail Contact list, enter a contact

Page 7 of 24
2. Go to Gmail calendar
3. Click the Create button to create a new calendar event
4. Enter the appointments title, time, location, and description.

Page 8 of 24
5. Under Add Guests, Select the contact the Retail Sales Professional will meet with. Once you start
typing characters in the field, it will look up contacts in the contact list. Select the home owner that
was entered in the contact list.
.
6. After selecting the contact, the guest list should contain the name of the Retail Sales Professional and
the client.
7. Click the SAVE button

Page 9 of 24
8. You will be prompted to send invitations. If you want to send an invite to the client, click the Send
button. Otherwise, click the Don’t Send button.
9. You should see the calendar entry on the Gmail calendar. You are done setting up the appointment

Page 10 of 24
iPad Gmail Setup
iPad Gmail Setup Notes
Only use this section if you are going to use Gmail email, calendar, and contact list on your
iPad
Step 1 - Getting Started1. Open the Settings application on your iPad
2. Open Mail, Contact, Calendars
3. Press Add Account
4. Select Microsoft Exchange - NOT Gmail.

Page 11 of 24
Step 2 – Enter Account Information1. In the Email field, enter your full Google Account email address. If you use an @googlemail.com
address, you may see an "Unable to verify certificate" warning when you proceed to the next step.
2. Leave the Domain field blank.
3. Enter your full Google Account email address as the Username.
4. Enter your Google Account password as the Password.
5. Enter the Retail Sales Professional Name as the Description, and tap Next.
6. When the new Server field appears, enter m.google.com.
7. Press Next at the top of the screen

Page 12 of 24
Step 3 – Enable Mail, Contacts, and Calendars1. Verify Mail, Contacts, and Calendars are all turned on.
2. If not, turn all three on and click Save.
3. Unless you want to delete all the existing Contacts and Calendars on your iPad, select the Keep on my
iPad option if prompted. This will also allow you to keep syncing with your computer via iTunes.
4. You should now see you Gmail account listed on the iPad.

Page 13 of 24
iPad Microsoft Exchange Email Setup
iPad Microsoft Exchange Setup Notes
Only use this section if you are going to use Microsoft Exchange email, calendar, and contact
list on your iPad
Talk to your Exchange support person/administrator for setting to use in this section
Step 1 - Getting Started1. Open the Settings application on your iPad
2. Open Mail, Contact, Calendars
3. Press Add Account
4. Select Microsoft Exchange

Page 14 of 24
Step 2 – Enter Account Information1. In the Email field, enter your full Exchange Account email address.
2. Enter Domain if specified by your Exchange administrator otherwise leave the Domain field blank.
3. Enter your Exchange Account name as the Username.
4. Enter your Exchange password as the Password.
5. Enter the Retail Sales Professional’s Name as the Description
6. Press Next at the top of your screen again.
7. Enter the server information provided by your Exchange administrator and press Next.
8. If you receive an Unable to Verify Certificate dialog box, contact your Exchange administrator to
troubleshoot the issue.
9. Press Next at the top of the screen again

Page 15 of 24
Step 3 – Enable Mail, Contacts, and Calendars1. Verify Mail, Contacts, and Calendars are all turned on.
2. Unless you want to delete all the existing Contacts and Calendars on your iPad, select the Keep on my
iPad option if prompted. This will also allow you to keep syncing with your computer via iTunes.
3. You should now see you Exchange account listed on the iPad.

Page 16 of 24
iPad Contact List Sync Verification
1. Open Contacts on the iPad
2. Press on the red Groups ribbon on the top left of the page
3. Verify the contact list you defined is listed as a contact group

Page 17 of 24
4. Select the Contacts associated with the email address setup and verify any contacts you have added
are listed.
5. If you are not seeing contacts, wait a few minutes for the iPad to sync.
6. If after a few minutes you are still not seeing the contacts, verify that the iPad email configuration
steps were performed correctly.
7. If after verifying the configuration was performed correctly and you still are not seeing the contacts,
contact your Trane MAPTM support point person for troubleshooting.

Page 18 of 24
iPad Calendar Sync Verification
1. Open Calendar on the iPad
2. Press on the Calendars button
3. Select the calendar associated with the Retail Sales Professional’s email address. Exchange calendars
will be titled Calendar.
Page 19 of 24
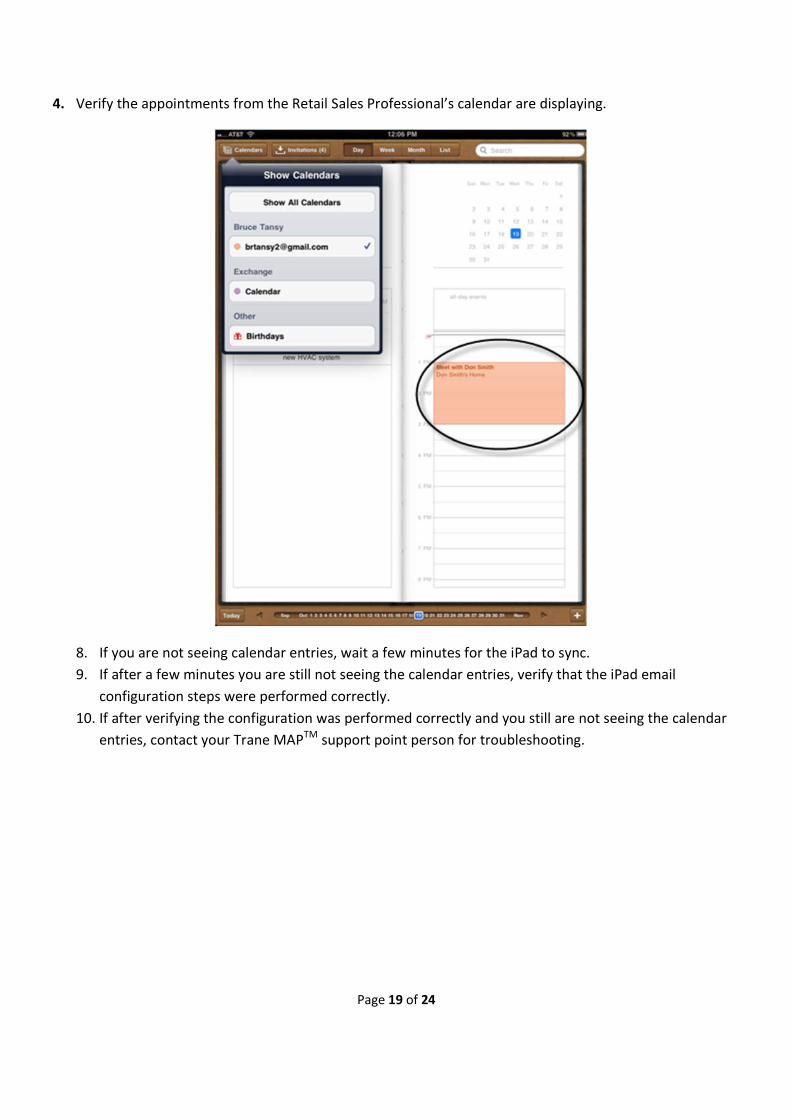
4. Verify the appointments from the Retail Sales Professional’s calendar are displaying.
8. If you are not seeing calendar entries, wait a few minutes for the iPad to sync.
9. If after a few minutes you are still not seeing the calendar entries, verify that the iPad email
configuration steps were performed correctly.
10. If after verifying the configuration was performed correctly and you still are not seeing the calendar
entries, contact your Trane MAPTM support point person for troubleshooting.

Page 20 of 24
Trane MAPTM Email/Calendar/Contact Setup
Trane MAPTM setup Notes
Refer to Trane MAPTM user guide for more details on configuration and setup of the Trane
MAPTM application on the Comfort Specialist page at www.ComfortSite.com. The Trane
MAPTM User’s Guide can be found under Program Documents.
Step 1 – Trane MAPTM Email/Calendar Configuration1. Open the Trane MAPTM application
2. Enter your ComfortSiteTM ID and password and press Login

Page 21 of 24
3. Select Resources menu option
4. Select Settings

Page 22 of 24
5. Enter the Retail Sales Professional email address that was configured on the iPad. The Retail Sales
Professional email address that is entered in the contact list MUST exactly match the email address
entered in Trane MAPTM application Settings module, or calendar entries will not be displayed in the
Clients module.
6. Select the Calendar associated with the Retail Sales Professional’s email

Page 23 of 24
Step 2 – Trane MAPTM Calendar Sync Verification1. Select the Main Menu option
2. Select Clients
3. Select View Engagements

Page 24 of 24
4.
5. Press the refresh Chasing Arrows button at bottom of the engagement window.
6. Verify that appointments from calendar are displaying.
7. If you are not seeing appointments, wait a few minutes for the application to sync.
8. If after a few minutes you are still not seeing the appointments, contact your Trane MAPTM support
point person for troubleshooting.
9. Email, contact list, calendar configuration is complete.