training guide omplete window says … some issues were found. heck the job log. job log says...
TRANSCRIPT

Training Guide
Advanced Data Mining
2018 Andar User Group Conference Mason, OH
7300 Warden Avenue, Suite 503 Markham, Ontario Canada L3R 9Z6 Phone: 905-479-3780 Toll Free: 877-479-3780 Fax: 905-479-1047 e-Mail: [email protected] Web: www.AndarSoftware.com.com Copyright © 2018 Andar Software Ltd. All rights reserved. No part of this document may be transmitted, stored in a retrieval system, or reproduced in any way without the written permission of Andar Software. Trainings, demos, presentations, etc., (whether on-site or web-based) may not be recorded, photographed, captured, etc., in any way without the written permission from Andar Software.

2018 User Group – Advanced Data Mining Page 3 of 27
Contents 1. Basic Data Mining Concepts .................................................................................................................. 4
2. More Complex Selections ...................................................................................................................... 5
Comments Section ............................................................................................................................ 5
Operators .......................................................................................................................................... 5
Clear Selected Accounts ................................................................................................................... 7
Using a Warehouse as Part of Selection .......................................................................................... 7
Call Another DMO in a DMO ............................................................................................................. 7
3. Roll Up Accounts/Data ........................................................................................................................... 8
4. Working with Employees........................................................................................................................ 8
5. Working with Transactions ..................................................................................................................... 9
6. Extracting Designations ....................................................................................................................... 10
7. Mailing Lists and Usages ..................................................................................................................... 11
The basics ....................................................................................................................................... 11
Two Methods for Creating a Mailing List Usage ............................................................................. 11
Comparison of Two Methods .......................................................................................................... 13
Mailing List Usage Options ............................................................................................................. 13
8. Running Canned Reports .................................................................................................................... 15
9. e-Mailing Output ................................................................................................................................... 15
10. Extract Table ................................................................................................................................... 16
11. Transpose ....................................................................................................................................... 16
12. Using SQL in Data Mining ............................................................................................................... 17
Using SQL to Select Accounts ........................................................................................................ 18
Using SQL to Alter the Extract ........................................................................................................ 19
13. Extract Tables Report (MIG) ........................................................................................................... 25
14. General Letters (MIG) ..................................................................................................................... 26

2018 User Group – Advanced Data Mining Page 4 of 27
1. BASIC DATA MINING CONCEPTS
Section vs. condition
section is the main DMO step; condition qualifies or defines a section (indented)
Selecting vs. extracting
selecting = rows; extracting = columns
Selecting Accounts
Only active accounts are chosen by default. You do not need to have a select condition from the Bio tab.
Avoid select conditions which should be extract conditions.
It’s not necessary to always save accounts in a warehouse. There is a temporary warehouse called *Current.
Extracting Data
Must always extract from at least one Bio tab. This picks up the account number.
If no accounts are selected
Job Complete window says “… some issues were found. Check the job log”.
Job log says “WARNING: No data found for insert into new Extract SQL table…”.
First data row of spreadsheet has “** No data found”.

2018 User Group – Advanced Data Mining Page 5 of 27
If no spreadsheet is created, it means:
there is no Extract/download or Download section.
the DMO ended in error.
Exercises a. Select all Organizations in the Manufacturing node. (Start with Select Accounts >
Organizations.) Extract Organization Name, ECC name and work phone number (from the Contacts tab), and last year overall employee gift.
b. Select all ECC Contacts of Organizations in the Manufacturing node. (Start with Select Accounts > Contacts.) Extract Organization Name, Individual name (i.e. the ECC’s name), ECC’s work phone number (from the Phone tab), and last year overall employee gift.
c. Create a DMO that selects Individuals with a current year gift of $1,000 or more. (Use the Gift tab. Include all types of gifts: Employee, Indiv, Other, etc., but only in the UW Campaign.) Save accounts in a warehouse. (We will use this later.)
2. MORE COMPLEX SELECTIONS
COMMENTS SECTION
allows you to add your own comments, usually to explain a more complex DMO
will show up as tooltip text for the section
printed out the DMO Report
OPERATORS
AND ................Both first and second conditions are true for selected accounts. OR ...................First or second condition is true for selected accounts. (Or both could be true.) AND NOT ........First condition is true and second condition is false for selected accounts. OR NOT ...........First condition is true or second condition is false for selected accounts. (Rarely
used)
Used to join multiple Select conditions.
Rule of Thumb: If you have both ANDs and ORs, use parentheses.
Remember from grade school - in an equation we do:
what's in parentheses first
then multiplication and division
then adding and subtracting
E.g. 6 + 3 x 2 = 12 But (6 + 3) x 2 = 18
Similarly, in a DMO we do the ANDs first, then the ORs

2018 User Group – Advanced Data Mining Page 6 of 27
Example: You want all your Direct Mail donors who gave this year or last year.
Donor Name Node 2011 Gift 2012 Gift Lloyd Skinner Direct Mail $500 $0 Mike Hamilton Direct Mail $250 $250 April Isaac Direct Mail $0 $100 Nora Wilson Direct Mail $0 $0 Brenda Lucas Leadership $2500 $0 Randy Tripp Leadership $1000 $1000 Taylor George Leadership $0 $1200
This DMO:
Select Individual Accounts Where: Ind. in Structure Node ‘Direct Mail (10)’ AND Ind. Gift 2012 … OR Ind. Gift 2011 …
will select these accounts:
Lloyd Skinner Mike Hamilton April Isaac Brenda Lucas Randy Tripp
But this DMO:
Select Individual Accounts Where: Ind. in Structure Node ‘Direct Mail (10)’ AND ( Ind. Gift 2012 … OR Ind. Gift 2011 … )
will select these accounts: Lloyd Skinner Mike Hamilton April Isaac

2018 User Group – Advanced Data Mining Page 7 of 27
CLEAR SELECTED ACCOUNTS
Removes from the *Current warehouse, all Accounts that have been selected so far
Does not delete accounts from Saved Account Warehouses or Mailing Lists
When save accounts to a Warehouse or Mailing List
this copies accounts from *Current warehouse to the specified Warehouse or ML
they remain in *Current warehouse until cleared
USING A WAREHOUSE AS PART OF SELECTION
In the Select Accounts section, where a relationship is involved
As a Select condition
Example: Find all United Way volunteers who are neither a Leadership giver nor the spouse of a Leadership giver.
CALL ANOTHER DMO IN A DMO
Insert Section > Execute > Another Data Mining Operation
submits another, existing DMO to refresh a warehouse or mailing list Exercises
For these exercises, extract just the Individual name
a. Pull all ECCs of all Organizations in the Manufacturing node. Include Organizations with no ECC contact. If the Organization has multiple ECCs, include all of them. Pull the same columns as above. (Start by making a copy of your DMO from 1.b.)
b. Select Loyal Contributors (under Dates) and Business Owners (demographic ‘Owns Own Business’) that you haven’t communicated with in the past 6 months.
c. Select all Individuals who were United Way volunteers during the 2013 calendar year. Exclude those who are $1,000+ donors or the spouse of a $1,000+ donor. Execute the DMO created in 1c as part of your larger DMO.
d. Select all employees of Organizations in the Retail node. Exclude employees of Superstore and its subsidiaries. (Account #3244 Superstore Yonge and Sheppard is the Parent account.)
e. Select all Loyal Contributors and their spouses. Save in a warehouse. Extract from the General Rel tab so you can see who has the spouse relationship. Hint: you must have a Clear Selected Accounts section.

2018 User Group – Advanced Data Mining Page 8 of 27
3. ROLL UP ACCOUNTS/DATA
Method
Select all subsidiary accounts > save in warehouse
Clear selected accounts
Select Organizations with desired conditions
Add another condition AND NOT in the Subsidiary warehouse
Note: Child billing accounts automatically excluded when select from the A/R tab; when extract from the A/R tab, transactions are on consolidated billing account.
Select and Extract Conditions
Can select accounts based on:
Gift RU
Numerical – Number of Employees Roll Up
RankingRU
TrackParmRU
Can extract same RU data, plus
Leadership – check the ‘Include Subsidiaries’ box.
Numerical – check the ‘Include Subsidiaries’ box to roll up any numerical info.
Cannot use Node Ranking (MIG), Pattern or Track Analyze for rollup Exercises
Find the top 20 accounts, based on current year C+E+S gifts. Pull the rank and position. Also from the General Rel tab, extract the Group Number Hierarchy for the Parent/subsidiary relationship.
o Start by using the Ranking tabs. Keep the results. o Create a second DMO using the Ranking RU tabs. Compare to the Ranking tab.
You decide the Roll Up dollars are what you need, but subsidiaries should not be included in your extract.
4. WORKING WITH EMPLOYEES
Select Accounts > Employees
Effective Date Selects Employee Relationships that are unexpired on the selected date
Select a single employer per employee Selects just one relationship per individual, looking first for the preferred employer, then for the most recently created relationship.
Gift extract > Account Type > Both
Extracted gift will match BOTH the Org and Ind accounts in the selected warehouse.
Must extract from both Org and Ind Bio tabs.
Note: Workplace Special Event transactions do not create an employee relationship.

2018 User Group – Advanced Data Mining Page 9 of 27
Exercises
Pull all employees of Andar Software. Extract the 2012 employee gift from the Gift tab.
o First use Account Type = Individual. Check Campaign Type = Employee. Compare the total to Helix’s employee gift on the Camp History sub-tab.
o Try using Account Type = Both. What is the difference? Why does the total still not agree with Helix’s total employee gift amount?
5. WORKING WITH TRANSACTIONS
Selecting accounts based on Transactions
Select Accounts > Transactions
Get both Organization and Individual accounts in the warehouse, like employee and contact relationships
Not based on employee relationship, but on combination of accounts on transactions
Includes memos unless deselect memo trans types
Selection based on existence of a transaction – even if net amount is zero Select Accounts > Individuals > Trans tab
Get only Individual accounts in the warehouse
Does not matter if transaction has an Organization account number also Select Accounts > Organizations > Trans tab
Get only Organization accounts in the warehouse
Will not consider transactions that have an Individual account number also. e.g.
Company ABC has only a batch payroll transaction
Company MNO has a batch payroll transaction and many non-batch
Company XYZ has only non-batch payroll transactions
If you select Organizations from Trans tab and select payroll transaction type, will get only Company ABC and Company MNO.
With all these three, can select accounts with transaction in any status (incl. open envelopes)
c.f. Gift tab, which looks only at processed transactions
Extracting from the Trans tab
Extract will have one row per selected transaction; c.f. Gift tab which is one row per account.
Two sub-tabs:
Attributes – you are selecting the transaction rows
Transactions with account numbers matching the extracted Bio tab(s) will be selected. i.e.
If you extract from the Bio (Ind) tab only, transactions matching the Individual account will be selected.

2018 User Group – Advanced Data Mining Page 10 of 27
If you extract from both the Bio (Ind) and the Bio (Org) tabs, transactions matching both accounts will be selected.
Data – here you select the columns you need in your extract.
Note: Account numbers and names can be extracted here. Exercises
a. Using Select Accounts > Transactions, select donors who pledged through Helix in 2012. Extract the 2012 employee gift from the Gift tab.
b. Again using Select Accounts > Transactions, select donors who pledged through Helix in 2012.
i. Extract the Ind Bio tab. Extract 2012 employee transactions from the Trans tab. Choose Accounting Date, Total Pledge and Transaction Type.
ii. Extract both the Ind and Org Bio tab. How is this different than just extracting the Ind Bio tab?
c. You started using the Event Participation transaction types in 2011. You need to verify that all Event Participation transaction types entered in 2011 had the Event account and occurrence entered.
i. Select Individuals that have any of the 4 Employee or 4 Individual Event Participation transaction types. Extract the 2011 Event Participation transactions. Check the Total Pledge and Event boxes (this pulls Event account, name, occurrence, start and end date and time).
ii. You realize there are also Corporate Event Participation transactions. Add to your DMO to pull these 4 transaction types as well.
6. EXTRACTING DESIGNATIONS
There are two ways to extract designations:
Example: Pull designations for Macmillian employees with a current year gift.
Use Data Mining
Extract from Trans tab, then Desig tab
You will get one row per designation, i.e. could have multiple rows per person
You will also get rows for payment transactions
Use Designations Download Utility
Use Data Mining to extract all desired data except designations.
Save output as .csv file.
Go to Donor Choice Management > DC Administration > Designations Download Utility
adds columns for designations to an existing spreadsheet
get one row per Individual account
done on *Local processor - no Job Completed window
Go to System > My Output. Output name is Designations Download.

2018 User Group – Advanced Data Mining Page 11 of 27
Exercises a. Start by making a copy of your DMO from 5.b.ii. Extract the 2012 designations of Helix
employees. Extract Total Donation and Designated Account #/Name. b. Save your output from the above exercise to My Documents. Use the Designations
Download Utility to add the 2012 designations to this output.
7. MAILING LISTS AND USAGES
THE BASICS
Mailing List (ML) – is a changing list of accounts. It also includes:
7 pecking orders for Name, Address, Salutation, e-Mail Address, Phone Number, Fax Number and Contact Type
Mailing List Usage default values
Mailing List Usage (MLU) – keeps a record of each time a Mailing List is used.
You add a Mailing List Usage to a Mailing List each time you use the list.
It is a snapshot of who was contacted, along with their pecked name, address, salutation, e-mail, etc. (using the ML pecking orders)
The MLU can also refine the list of accounts in the ML by merging combined accounts, eliminating duplicates, excluding Anonymous or Opt Out accounts. i.e. an account may be in the ML but not the MLU.
Also used for:
Summarizing pledge data from pledges entered with the MLU source code
E-mail tracking e.g. number of reads and clicks, number subscribed / unsubscribed to e-newsletter
TWO METHODS FOR CREATING A MAILING LIST USAGE
Using Menu Options
Step 1 – Use Data Mining to create a Mailing List

2018 User Group – Advanced Data Mining Page 12 of 27
Step 2 – Create Mail List Usage Communications > Mailing List Management > Mailing Lists
High-light Mailing List > click Usage > click Add
Step 3 – Wait for Ready status, then download Mailing List High-light Usage > click Download
Choose Field Separator = comma Compare EMPLOYERNAME1 (column R), which is part of the address, to
ORGNAME1 (column CW), which is the Org in the Mailing List.
Step 4 – Delete Unnecessary Mailing List Usages High-light Usage > click Delete
Through Data Mining
Step 1 – Use Data Mining to create a Mailing List
Step 2 – In the same DMO, Create Mailing List Usage Insert Section > Create Mailing List Usage
Select the Mailing List name to get Usage defaults
Step 3 – Extract Data and Download Insert Section > Extract Data and Download
Remember to update with the Mailing List Name!
Step 4 – Add Extract Conditions Extract from the Mailing tab!
Step 5 – Delete Unnecessary Mailing List Usages Communications > Mailing List Management > Mailing Lists
High-light Mailing List > click Usage > high-light Usage > click Delete

2018 User Group – Advanced Data Mining Page 13 of 27
COMPARISON OF TWO METHODS
Using Menu Options Through Data Mining
Knowledge of
Data Mining
Not required Required
Data in extract Limited to name, address, etc. Anything that Data Mining allows
List of Usages Tend to be well maintained. This is
important when relying on MLUs to track
when an account is contacted.
Tend to become a mess. Not as important
when using Communications to track
when an account is contacted.
Additional
Options
- add to existing file
- all upper case
- none
Date Used and
Status
When download, Date Used is populated
and Status changes to ‘Used’
Date Used is not populated and Status
remains at ‘Ready’
Comments
Good when one person can create ML in
DMO and another person does mail
merge and envelope stuffing. Schedule
DMOs to refresh MLs nightly so they are
up to date when needed.
Users tend to forget to select the ML
under 'Extract/download data from …'
section. Cannot extract from Mailing tab.
If don't do this, there is not much point to
using ML and MLU.
MAILING LIST USAGE OPTIONS
Exclude Anonymous Accounts Based on checkbox under Account Profile > Contact Info > Privacy Dfts
Merge Combined Givers
To get one row per Combined Giver Group
Based on Current Year Combined Giver Relationship AND on having the selected salutation type on only one account in the group.
Combined account with the selected salutation is put into the Usage, even if account was not in the original selection. Other combined account(s) is/are simply excluded from the Usage.
If none or more than one of the combined givers has the selected salutation, they won't be merged.
Override merged account’s salutation with the selected salutation type - will override pecked salutation.
Override merged account’s name with Combined Giver Name - will override pecked name.

2018 User Group – Advanced Data Mining Page 14 of 27
Also Merge Combined Giver with picked employer address - If an employer address is pecked:
If the box is checked, the Combined Giver Group will be sent one piece of mail using the pecked employer address.
If the box is not checked, the accounts in the Combined Givers Group will not be merged.
Remove duplicate individuals at different organizations
E.g. Select Employee Campaign Coordinators. Same ECC is on multiple subsidiary accounts. Check this box so ECC will get only one piece of mail. Organization with the Preferred Employer flag will be included.
Can also mean the same account is in Mailing List twice - once with an organization account and once without. When checked, the row without an organization account will be removed from the MLU.
Take the attached organization as employer
For address pecking, instead of using the organization from the Employment Relationship, the organization in the Mailing List is used to get the address.
Most often the organization in the Mailing List is the Employer, but not always. E.g. You have selected Board Members based on Affiliation relationships but those individuals don't actually work at those Orgs.
NOT recommended in most situations.
Include Opt In/Exclude Opt Out Accounts
Based on rules on Account Profile > Contact Info > Contact Rules.
Only include opt in accounts – An account will be included in the Usage if it has the opt in flag for the current month. i.e. opt out and unspecified are excluded.
Exclude opt out accounts – An account will be excluded from the Usage if it has the opt out flag for the current month. i.e. opt in and unspecified included.
The system date is used to compare with the effective date range.
Andar users who have the Major Gift license can additionally refine the Include/Exclude accounts based on Category.
Exclude ‘Blank’ Accounts
An account will be excluded from the Usage if it has no data for every selected Mail Type. E.g. You select By Postal and By e-Mail Mail Types and the account has no pecked address and no pecked e-mail.
Generate Care Of Account (MIG)
If an account is the Addressee in a Care Of relationship (under General Relationships), contact information for the Care Of Host will be extracted in place of the Addressee’s contact information.

2018 User Group – Advanced Data Mining Page 15 of 27
Mail Types
Has two purposes:
Controls which data is extracted.
Used in conjunction with Include Opt In/Exclude Opt Out and Exclude Blank Accounts.
Exercises
Create a Mailing List for the Kick-off invitation.
Invite all Leadership givers (excluding Active Community Investors, who give $500 – 999) and invite current United Way volunteers. Send to their home address. Merge Combined Givers.
Add to the same DMO. We need to also invite all CEOs and ECCs. Send to their workplace address. Be sure to exclude those CEOs and ECCs who are leaders or volunteers.
8. RUNNING CANNED REPORTS
Insert Section > Reports
Presented with a tree of all Andar reports, in Main Menu order
Drill Down > select Report
Presented with Report options on the right-hand side
When running the report by Warehouse is an option, you can select the *Current warehouse (exception is the DC Summary Management Report)
Cannot select Saved Parameters from here Exercises
Select Orgs in the state of Ohio (based on Street Address). Run the Allocable Designations Report for this *Current warehouse. (Found under DC Reports.)
9. E-MAILING OUTPUT
Insert Section > e-Mail Output
For e-mailing DMO outputs to one or more recipients. E-Mail will contain attachments of all output generated by previous steps.
Required:
Who to send to, e.g. one account, mailing list, warehouse, send to user executing this data mining operation
Subject line – prompted if blank
E-mail text or template
Clear Output Section
Removes previous outputs (extracts and reports) so they won’t be e-mailed again.
For example:
Create an extract and e-mail to User A.

2018 User Group – Advanced Data Mining Page 16 of 27
Clear Output
Create a report and e-mail to User B.
This ensures User B does not get User A’s extract.
Exercises
Select accounts managed by Loaned Executive William Ackroyd. Extract Org Name, and the Goal, Reported, and Processed for the current year employee campaign. E-mail his report to yourself, by keying your e-mail address into the ‘To Recipient Address’ field.
Repeat for LE Drew Terrell.
Don’t forget to Clear Accounts and to Clear Output.
10. EXTRACT TABLE
For more advanced Data Mining functions, it’s important to understand what’s going on behind the scenes.
The Extract Data and Download section does two things:
Extract Data
Creates a database table in the data extract database (separate from your production database)
The table is populated with rows and columns you requested
By default, this table is named TEMPxxx and the table is deleted after the DMO runs
However, you can choose to rename and retain the extract table
Download Extract to My Output
Copies data from the extract table into a csv file and puts it in My Output
Sometimes you do not need the download step, you want to perform additional operations on the extract table before you download it. You can control this section by:
Changing Extract Table Name and Description
Unchecking Download Extract to Output
Changing Output Name (do this even on simple DMOs)
Unchecking Delete Extract Table After Download
There are also separate sections for:
Extract Data
Download Data to My Output
11. TRANSPOSE
Enables extracting all accounts in the same general relationship in a single row
Example: Pull all leadership givers. Get the individual and combined gift amounts, individual and combined leader levels, employer, and birthdate of each. Need one row per couple.

2018 User Group – Advanced Data Mining Page 17 of 27
Steps:
Select accounts and Extract data as usual
Extract from General Rel tab
Select Group Number Hierarchy
If working with Combined Givers, select Salutation Type.
Click on ‘Extract/download data from…’
Uncheck the Delete Extract Table After Download box
May optionally uncheck Download Extract To Output
Click on Update.
Insert Section > Transpose Extract Table
Select columns to display on other account(s)
Note the top half of the screen has same options as Extract Data and Download
May optionally change the Output Name
Click on Insert Section.
Exercises
Pull your current Board of Directors. Pull their Assistant if they have one (relationship = Supervisor/Assistant). Include the Individual Work phone number of both.
12. USING SQL IN DATA MINING
Need to know the name of your:
Data extract schema and database; typically it’s DataExtract.Andar (Look under System Preferences > General > Data extract table prefix)
Production schema; typically it’s Andar
Those who are hosted by UPIC and IT Collaborative (and some other customers, as well) will have different schema and database names.
Where to find column and table names:
1. Help > Contents > Andar Database Tables (down and to the right)
Click on this link, then click on table description, or
Click on Complete List of Andar Database Tables and Fields
2. Locate desired data on the Andar screen
Click Help > What is this?
Click on field on in table column > look for help items
About “tablename” database file
About “columnname” database field

2018 User Group – Advanced Data Mining Page 18 of 27
USING SQL TO SELECT ACCOUNTS
Use the SQL tab to insert conditions into the query Data Mining is building.
Unless testing a column in Individuals or Organizations, begin with exists (…) or accountnumber in (…)
Queries that do not use production database name are more portable (can used in Training database or shared with other users)
The note above the query window will tell you how to link the selected account type (Org, Ind, employees, etc.) to other tables.
Query text is limited to 4096 characters.
Example: Pull the Individual accounts that were updated by a Connector import during a certain date range. We want just the ones that were updated, not those that were created.
Example: On the billing schedule there is a checkbox ‘Do not issue statement’. We think this has been used incorrectly. Find all the Orgs with this box checked in years 2010 – 2013.
Example: Find Individual accounts that have the same e-mail address for Main and Work.
Both of these queries will work:
exists (select * from andar.emails mn join andar.emails wk on mn.accountnumber = wk.accountnumber where i.accountnumber = mn.accountnumber and mn.emailtype = 'Main' and wk.emailtype = 'Work' and mn.emailaddress = wk.emailaddress)

2018 User Group – Advanced Data Mining Page 19 of 27
i.accountnumber in (select mn.accountnumber from andar.emails mn join andar.emails wk on mn.accountnumber = wk.accountnumber where mn.emailtype = 'Main' and wk.emailtype = 'Work' and mn.emailaddress = wk.emailaddress)
USING SQL TO ALTER THE EXTRACT
After the Extract step, we can run SQL queries on the temporary table to:
delete rows from the extract
delete columns from the extract (non-MIG)
add a column for
a calculated amount
string manipulation
to bring in other data
change column headers (non-MIG)
General Steps:
1. Start by creating and submitting a DMO that selects accounts and extracts as usual, without any SQL queries.
2. From the csv file, get the names of the columns you will need to copy and paste into the SQL queries.
3. Change the Extract/download data section to simply Extract Data by unchecking the box ‘Download Extract to Output’.
4. Add SQL queries: Insert Section > Execute > SQL Statement In the queries, use the TEMPxxx table name found in the Extract data section.
5. As the last step, Insert Section > Download Extract to My Output Enter the Output Name. This will be the Name you see under System > My Output, instead of Extract Data Download.
Sample queries are supplied at the end of this document for you to copy and paste.
Example 1 - Deleting Rows
Pull the current volunteers on the Golf Tourney Organizing Committee (GTOC) and include their volunteer hours. In addition to rows for the GTOC, you can get a row for any other volunteer opportunity that a GTOC member is on. Remove these from the extract.

2018 User Group – Advanced Data Mining Page 20 of 27
1. Here is the DMO we start with.
2. We need to know the column name for Opportunity number (VOLASSIGNED_IND_ANY_OPSNUMBER) and that the GTOC opportunity number is 24.
3. Uncheck the ‘Download Extract to Output’ box in the Extract/download data from… section.
4. Add an SQL statement to delete rows where the Opportunity is not GTOC. Make sure the TEMP table number matches that in the Extract data section.

2018 User Group – Advanced Data Mining Page 21 of 27
5. Insert Download Extract to My Output section. Enter the Output Name.
Now our output looks like this:
Example 2 – Changing column headers, deleting columns and adding a column
Pull the Orgs in the Major Firms node. Include the CEO name and work number, two years of Corporate gift, and the % change in the gift amount.
1. Here is the DMO we start with. When extracting from the Contacts tab, check the box ‘Exclude effective date from column heading in extract table’.

2018 User Group – Advanced Data Mining Page 22 of 27
2. We want to change the column headers for the two gift amounts. Our calculation will use the new column headers. We also want to delete those extra columns (contact type, account number, sort field) for the CEO.
3. Uncheck the ‘Download Extract to Output’ box in the Extract/download data from… section.
4. Add SQL Queries
a. Change the column headers. (Don’t forget to change the TEMP table number.) You can change more than one header in the same SQL Statement section, but it will become difficult to read. (This print screen was made to be readable – the queries will run together as one long string.)
b. Add a column to your TEMP table with this query:
c. Calculate the values for the new column.
d. Delete the unwanted CEO columns.

2018 User Group – Advanced Data Mining Page 23 of 27
5. Insert Download Extract to My Output section.
Now our output looks like this:
Exercises To Select Accounts
a. Find Individual accounts created by Connector#102. Extract name, gender, anonymous flag and birthdate. (To see how the Create User is formatted for Connector imports, see account 41897 as an example. Go to Audit Log tab > Audit sub-tab.)
b. Select Individuals that have the Do Not Merge flag checked on the Main Bio. c. Find both Individuals and Orgs that have a billing schedule with the flag ‘No Overriding
Thru Transactions’ checked in the previous or current year. To Alter the Extract
d. Select individuals who designated to the Education service category. Extract designations. Delete rows that are not designations to Education.
e. In your DMO extract from exercise 1a, delete the Contact Type and Contact Sort field columns.
f. Select Manufacturing accounts. For current and previous year, extract the total of the Corp + Empl + Special Event gifts (in one column).
a. Add a column and calculate the % increase. i. Change the Gift column headers to something readable.
ii. Concatenate Org Names 1 and 2.

2018 User Group – Advanced Data Mining Page 24 of 27
SQL queries for you to copy and paste:
delete from dataextract.andar.TEMPxxx where VOLASSIGNED_IND_ANY_OPSNUMBER <> 24
<> means not equal to
execute ('use dataextract exec sp_rename [andar.TEMPxxx.from column name], [to column name], [COLUMN] ')
alter table dataextract.andar.TEMPxxx add Per_Change decimal(5,2)
(5,2) means 5 digits in total including 2 digits after the decimal. You may use other data types such as:
char(40) for a name char(8) for a date int for a campaign year
update dataextract.andar.TEMPxxx set Per_Change = ( [2012_Gift] - [2011_Gift] ) / [2011_Gift] * 100
alter table dataextract.andar.TEMPxxx add Full_Org_Name char(81)
update dataextract.andar.TEMPxxx set Full_Org_Name = rtrim(orgname1) + ‘ ‘ + ltrim(orgname2) alter table dataextract.andar.TEMPxxx drop column CNT_ORG_CEO_CONTACTTYPE, CNT_ORG_CEO_ACCOUNTNUMBER, CNT_ORG_CEO_SORTFIELD

2018 User Group – Advanced Data Mining Page 25 of 27
13. EXTRACT TABLES REPORT (MIG)
For generating a pdf report based on data in an Extract Table, or Sorting, excluding columns, renaming columns in a csv report.
Steps:
Select accounts and Extract data as usual
Click on ‘Extract/download data from…’
Uncheck the Delete Extract Table After Download box
Click on Update.
Insert Section > Reports > Data Mining > Extract Tables Report
Sorting and Summaries tab
Select columns for sorting
Click on for ascending / descending
Use Top, Up, Down, Bottom to change order of sort fields
For each sort field, optionally select New Page or New Lines, and Summary Operations
Columns tab
Select columns to print on report
Use Add, Remove, Move Up, Move Down to change list and order
Use Insert New Line when you want to “stack” data items; check New Line on first field after --- Line separator ---.
For each column, update Header, Layout and Label tabs
System tab
Select pdf or csv report
Summaries, Layout and Label not supported in csv report
A report can also be created and saved from menu option Data Mining > Extract Tables Report based on an existing Extract Table.
Exercises
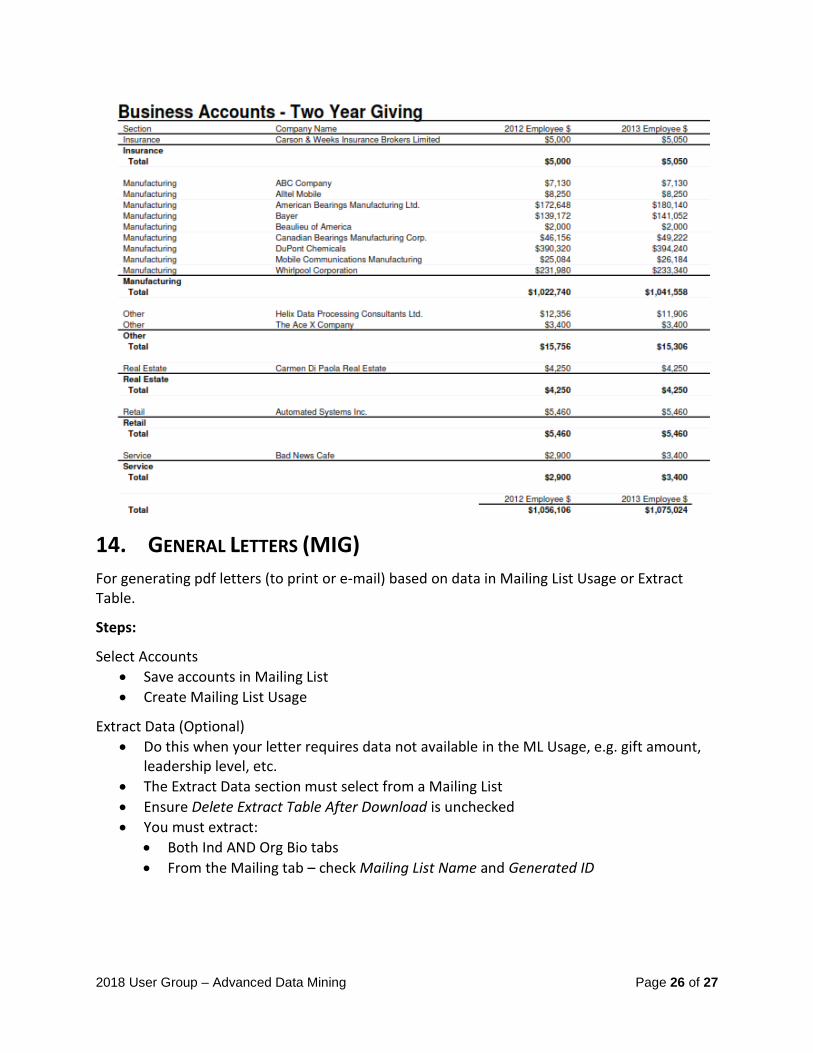
Select all Organizations in the 2013 MAIN Business node (and child nodes). Using the Pattern tab, include only Orgs with Employee giving in both 2012 and 2013. Then create a PDF report like the one on the following page.
2018 User Group – Advanced Data Mining Page 26 of 27
14. GENERAL LETTERS (MIG)
For generating pdf letters (to print or e-mail) based on data in Mailing List Usage or Extract Table.
Steps:
Select Accounts
Save accounts in Mailing List
Create Mailing List Usage
Extract Data (Optional)
Do this when your letter requires data not available in the ML Usage, e.g. gift amount, leadership level, etc.
The Extract Data section must select from a Mailing List
Ensure Delete Extract Table After Download is unchecked
You must extract:
Both Ind AND Org Bio tabs
From the Mailing tab – check Mailing List Name and Generated ID

2018 User Group – Advanced Data Mining Page 27 of 27
Create a General Letter Template
Can be done:
Inside the DMO using the Create General Letter section, selecting Mailing List or
Extract Table, and clicking green + icon
Can use only current Extract Table
Note: To update an existing General Letter template from within a DMO, click on the folder icon. Status must be Open to update.
Under menu option Communications > General Letters > General Letters Templates Maintenance
Find ML Usage fields under Insert Options > Note Variable
Can also insert fields from a selected Extract Table
Create General Letter
Template status must be Ready
Can be done:
Inside the DMO using the Create General Letter section
Under menu option Communications > General Letters > Create General Letters
Select PDF letter options: single PDF, mailing labels, e-mail PDF as attachment or embedded in e-mail body
Select Communication Log options: communicator, type, subject, attachment Exercises
Start by making a copy of your DMO from 7.a. Remove all select conditions except for Volunteers (so our jobs will run faster). Create General Letters for this Mailing List, using the Kickoff Invite template. Create PDF letters only. Put all letters into a single PDF. Do not create Communication Logs.
End of Training Guide

End of Workbook
End of Workbook