trailer for two - doityourselfrv · trailer for two a full-length mattress waiting for you when y...
TRANSCRIPT
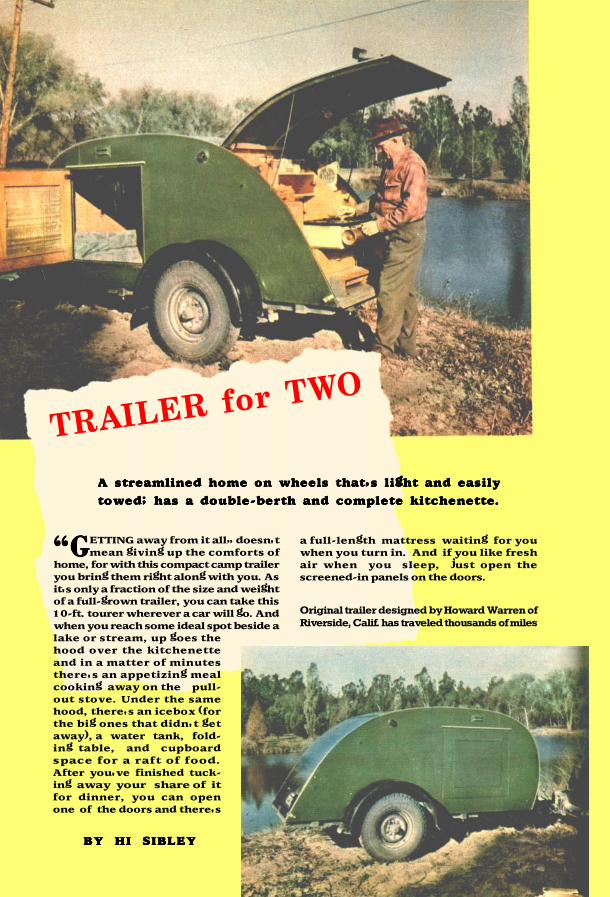
TRAILER for TWO
a full-length mattress waiting for youwhen you turn in. And if you like freshair when you sleep, just open thescreened-in panels on the doors.
ETTING away from it all� doesn'tmean giving up the comforts of
home, for with this compact camp traileryou bring them right along with you. Asit's only a fraction of the size and weightof a full-grown trailer, you can take this10-ft. tourer wherever a car will go. Andwhen you reach some ideal spot beside alake or stream, up goes thehood over the kitchenetteand in a matter of minutesthere's an appetizing mealcooking away on the pull-out stove. Under the samehood, there's an icebox (forthe big ones that didn't getaway), a water tank, fold-ing table, and cupboardspace for a raft of food.After you've finished tuck-ing away your share of itfor dinner, you can openone of the doors and there's
�G�G�G�G�G
Original trailer designed by Howard Warren ofRiverside, Calif. has traveled thousands of miles
A streamlined home on wheels that�s light and easilyA streamlined home on wheels that�s light and easilyA streamlined home on wheels that�s light and easilyA streamlined home on wheels that�s light and easilyA streamlined home on wheels that�s light and easilytowed; has a double-berth and complete kitchenette.towed; has a double-berth and complete kitchenette.towed; has a double-berth and complete kitchenette.towed; has a double-berth and complete kitchenette.towed; has a double-berth and complete kitchenette.
BY HI SIBLEYBY HI SIBLEYBY HI SIBLEYBY HI SIBLEYBY HI SIBLEY

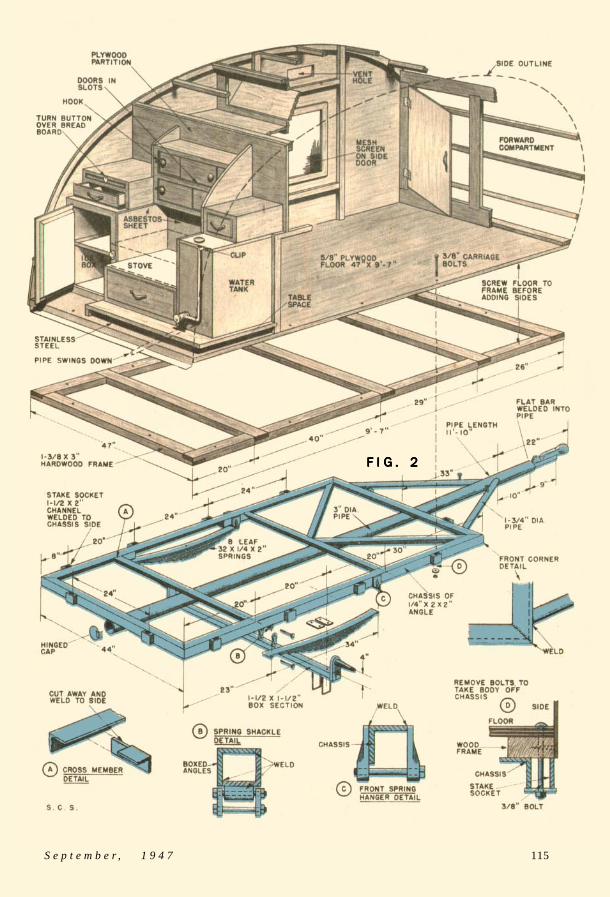
The interior of the trailer has good sit-ting headroom and a bureau with plenty ofstorage space for clothes. There's even anelectric light for reading in bed. Now let's take a look at the drawings onthese pages and then get on with the actualconstruction. The trailer has a weldedangle-iron chassis that's illustrated in Fig.2. This doesn't extend the full length of thebody so that you can remove the camp bodyand substitute an open box type. If thismight give your wife ideas about building arock garden, then make the chassis the fulllength of the body and play safe. The chassis should be built up of 1/4by 2by 2 in. angle iron, mitered and welded at
Above: Standard hitch connects trailer and car.Threaded caster levels body floor when parked.
F I G . IF I G . IF I G . IF I G . IF I G . I
113
BUILD WITH BLUEPRINTS Mechanix Illustated conducts a blueprint andplan service for its readers. You will find a partiallist of available blueprints and plans on page 162.
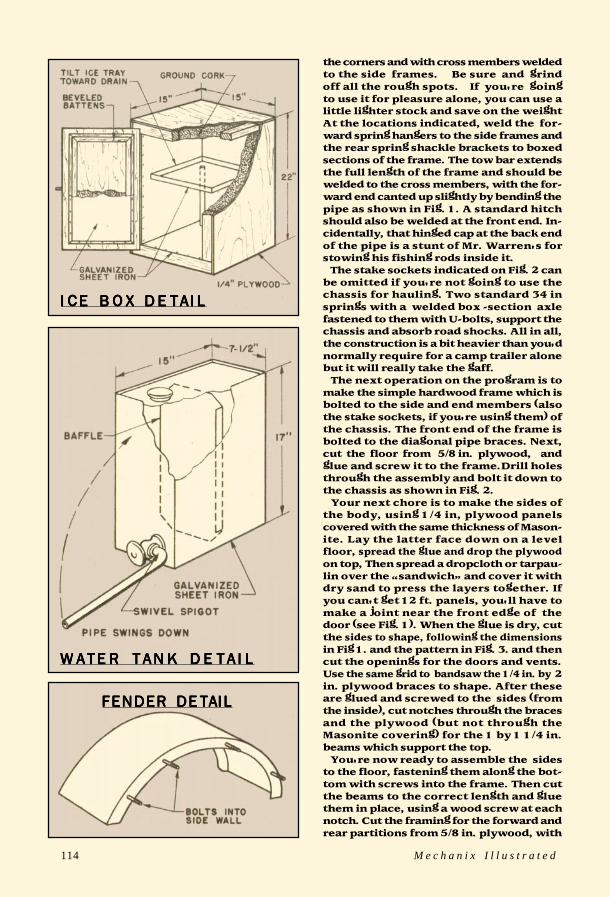
the corners and with cross members weldedto the side frames. Be sure and grindoff all the rough spots. If you're goingto use it for pleasure alone, you can use alittle lighter stock and save on the weightAt the locations indicated, weld the for-ward spring hangers to the side frames andthe rear spring shackle brackets to boxedsections of the frame. The tow bar extendsthe full length of the frame and should bewelded to the cross members, with the for-ward end canted up slightly by bending thepipe as shown in Fig. 1. A standard hitchshould also be welded at the front end. In-cidentally, that hinged cap at the back endof the pipe is a stunt of Mr. Warren's forstowing his fishing rods inside it. The stake sockets indicated on Fig. 2 canbe omitted if you're not going to use thechassis for hauling. Two standard 34 insprings with a welded box -section axlefastened to them with U-bolts, support thechassis and absorb road shocks. All in all,the construction is a bit heavier than you'dnormally require for a camp trailer alonebut it will really take the gaff. The next operation on the program is tomake the simple hardwood frame which isbolted to the side and end members (alsothe stake sockets, if you're using them) ofthe chassis. The front end of the frame isbolted to the diagonal pipe braces. Next,cut the floor from 5/8 in. plywood, andglue and screw it to the frame.Drill holesthrough the assembly and bolt it down tothe chassis as shown in Fig. 2. Your next chore is to make the sides ofthe body, using 1/4 in, plywood panelscovered with the same thickness of Mason-ite. Lay the latter face down on a levelfloor, spread the glue and drop the plywoodon top, Then spread a dropcloth or tarpau-lin over the �sandwich� and cover it withdry sand to press the layers together. Ifyou can't get 12 ft. panels, you'll have tomake a joint near the front edge of thedoor (see Fig. 1). When the glue is dry, cutthe sides to shape, following the dimensionsin Fig 1. and the pattern in Fig. 3. and thencut the openings for the doors and vents.Use the same grid to bandsaw the 1/4 in. by 2in. plywood braces to shape. After theseare glued and screwed to the sides (fromthe inside), cut notches through the bracesand the plywood (but not through theMasonite covering) for the 1 by 1 1/4 in.beams which support the top. You're now ready to assemble the sidesto the floor, fastening them along the bot-tom with screws into the frame. Then cutthe beams to the correct length and gluethem in place, using a wood screw at eachnotch. Cut the framing for the forward andrear partitions from 5/8 in. plywood, with
114 M e c h a n i x I l l u s t r a t e d
I C E B OI C E B OI C E B OI C E B OI C E B O X D E TX D E TX D E TX D E TX D E T A I LA I LA I LA I LA I L
WWWWW AAAAA T E R TT E R TT E R TT E R TT E R T A N K D E TA N K D E TA N K D E TA N K D E TA N K D E T A I LA I LA I LA I LA I L
FENDER DETFENDER DETFENDER DETFENDER DETFENDER DETAILA ILA ILA ILA IL
115S e p t e m b e r , 1 9 4 7
F I G . F I G . F I G . F I G . F I G . 22222
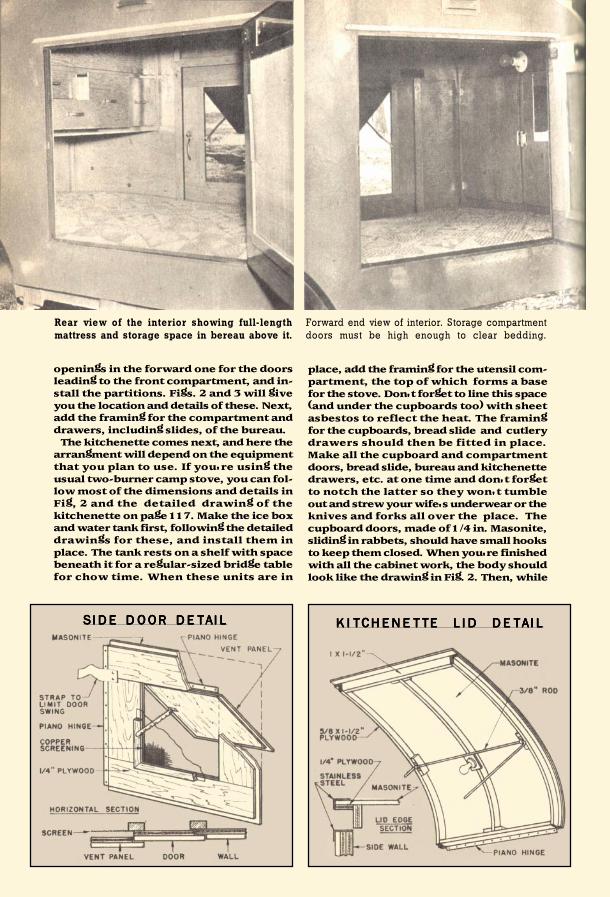
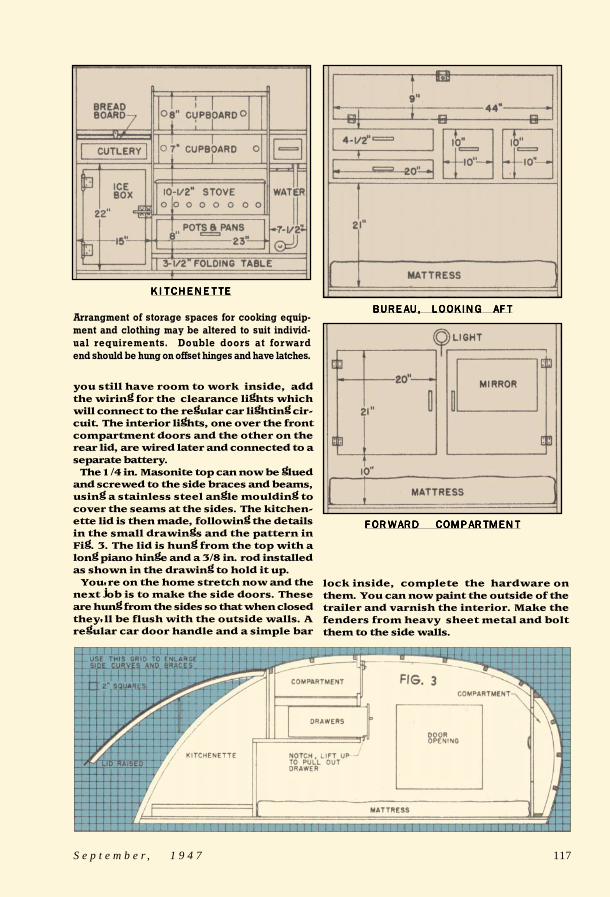
openings in the forward one for the doorsleading to the front compartment, and in-stall the partitions. Figs. 2 and 3 will giveyou the location and details of these. Next,add the framing for the compartment anddrawers, including slides, of the bureau. The kitchenette comes next, and here thearrangment will depend on the equipmentthat you plan to use. If you're using theusual two-burner camp stove, you can fol-low most of the dimensions and details inFig, 2 and the detailed drawing of thekitchenette on page 117. Make the ice boxand water tank first, following the detaileddrawings for these, and install them inplace. The tank rests on a shelf with spacebeneath it for a regular-sized bridge tablefor chow time. When these units are in
place, add the framing for the utensil com-partment, the top of which forms a basefor the stove. Don't forget to line this space(and under the cupboards too) with sheetasbestos to reflect the heat. The framingfor the cupboards, bread slide and cutlerydrawers should then be fitted in place.Make all the cupboard and compartmentdoors, bread slide, bureau and kitchenettedrawers, etc. at one time and don't forgetto notch the latter so they won't tumbleout and strew your wife's underwear or theknives and forks all over the place. Thecupboard doors, made of 1/4 in. Masonite,sliding in rabbets, should have small hooksto keep them closed. When you're finishedwith all the cabinet work, the body shouldlook like the drawing in Fig. 2. Then, while
Rear view of the interior showing full-lengthmattress and storage space in bereau above it.
Forward end view of interior. Storage compartmentdoors must be high enough to clear bedding.
K I TK I TK I TK I TK I T C H E N E T T E C H E N E T T E C H E N E T T E C H E N E T T E C H E N E T T E L I D L I D L I D L I D L I D D E TD E TD E TD E TD E T A I LA I LA I LA I LA I LS I D E D O O R D E TS I D E D O O R D E TS I D E D O O R D E TS I D E D O O R D E TS I D E D O O R D E T A I LA I LA I LA I LA I L
lock inside, complete the hardware onthem. You can now paint the outside of thetrailer and varnish the interior. Make thefenders from heavy sheet metal and boltthem to the side walls.
you still have room to work inside, addthe wiring for the clearance lights whichwill connect to the regular car lighting cir-cuit. The interior lights, one over the frontcompartment doors and the other on therear lid, are wired later and connected to aseparate battery. The 1/4 in. Masonite top can now be gluedand screwed to the side braces and beams,using a stainless steel angle moulding tocover the seams at the sides. The kitchen-ette lid is then made, following the detailsin the small drawings and the pattern inFig. 3. The lid is hung from the top with along piano hinge and a 3/8 in. rod installedas shown in the drawing to hold it up. You're on the home stretch now and thenext job is to make the side doors. Theseare hung from the sides so that when closedthey'll be flush with the outside walls. Aregular car door handle and a simple bar
Arrangment of storage spaces for cooking equip-ment and clothing may be altered to suit individ-ual requirements. Double doors at forwardend should be hung on offset hinges and have latches.
117S e p t e m b e r , 1 9 4 7
K I T C H E N E T T EK I T C H E N E T T EK I T C H E N E T T EK I T C H E N E T T EK I T C H E N E T T E
BUREAU, LOOKING AFTBUREAU, LOOKING AFTBUREAU, LOOKING AFTBUREAU, LOOKING AFTBUREAU, LOOKING AFT
FORWARD COMPARTMENTFORWARD COMPARTMENTFORWARD COMPARTMENTFORWARD COMPARTMENTFORWARD COMPARTMENT