trail making testmedavante.vo.llnwd.net/v1/external/merck/prodromal...confi dential - merck sharp...
TRANSCRIPT

Confi dential - Merck Sharp & Dohme Corp.,
a subsidiary of Merck & Co., Inc., Whitehouse Station, New Jersey, USAPrinted in USA031302
US (English) (V1.0_00_2.0)
Trail Making Test
General Instructions
The patient should understand that when taking this test it is important to work as quickly as possible and to try to avoid making mistakes. The most common examiner error in administering this test occurs when a patient makes a mistake. Correct administration procedure requires that the examiner stop the patient as soon as an error is made and return the patient to the last correct circle reached. This must be done quickly and efficiently, as the stopwatch is kept running during this time. The patient should not be penalized in his/her time score because of an examiner’s lengthy verbalization or slowness in making corrections. Errors count against the patient’s performance (by increasing the time score) because the stopwatch runs continuously until the test is completed (or discontinued).
Specifi c Instructions
The patient and examiner should be seated comfortably at a table. When ready to begin the test, place the sample side of Part A on the table directly in front of the patient. The bottom of the test sheet should be approximately six inches from the edge of the table.
Give the patient a pencil and say:
On this page are some numbers (point). Begin at number 1 (point to 1) and draw a line from 1 to 2 (point to 2), 2 to 3 (point to 3), 3 to 4 (point to 4), and so on, in order, until you reach the end (point to the circle marked “end”). Draw the lines as fast as you can. Ready — Begin!
If the patient completes the sample item correctly in a manner demonstrating that he/she understands what to do, say:
Good! Let’s try the next one.
Turn the paper over and give Part A of the test.
If the patient makes a mistake on Sample A, point out the error and explain it. The following explanations of mistakes serve as illustrations.
1. You started with the wrong circle. This is where you start (point to number 1).
2. You skipped this circle* (point to the circle the patient omitted). You should go from number 1 (point) to 2 (point), 2 to 3 (point to 3), and so on, until you reach the circle marked “end” (point).
If the patient cannot complete Sample A, take his/her hand and guide the pencil, using the eraser end, through the trail. Then say:
Now you try it.
Return the pencil to the patient with the point down and say:
Remember, begin at number 1 (point) and draw a line from 1 to 2 (point to 2), 2 to 3 (point to 3), 3 to 4
(point to 4) and so on, in order, until you reach the circle marked “end” (point).
Do not skip around, but go from one number to the next in the proper order. Remember to work as
fast as you can. Ready — Begin!
If the patient succeeds this time, proceed to Part A. If the patient still has difficulty, repeat the above procedure until the task is completed successfully or it becomes evident that the patient cannot do the task.
After the patient has completed Sample A, turn the paper over to Part A and say:
On this page are numbers. Do this the same way. Begin at number 1 (point to 1) and draw a line
from 1 to 2 (point to 2), 2 to 3 (point to 3), 3 to 4 (point to 4), and so on, in order, until you reach the
end (point). Remember to work as fast as you can. Ready — Begin!
* If it is clear that the patient intended to touch a circle but missed it, do not count it as an omission. Remind the patient, however, to be sure to touch each of the circles when drawing the connecting lines.
Page-1
Train
ing

Confi dential - Merck Sharp & Dohme Corp.,
a subsidiary of Merck & Co., Inc., Whitehouse Station, New Jersey, USAPrinted in USA031302
US (English) (V1.0_00_2.0)
Trail Making Test (Continued)Start timing as soon as the instruction is given to begin. The examiner must watch the patient closely in order to catch any errors as soon as they are made. If the patient makes an error, call it to his/her attention immediately, return the patient’s pencil to the last correct circle, and continue the test from that point. Do not stop timing while correcting the patient’s error.
After the patient completes Part A, take the test sheet and record the time in seconds. Errors contribute to evaluation of the performance principally by increasing the total performance time.
Next, tell the patient:
That’s fi ne. Now we’ll try another one.
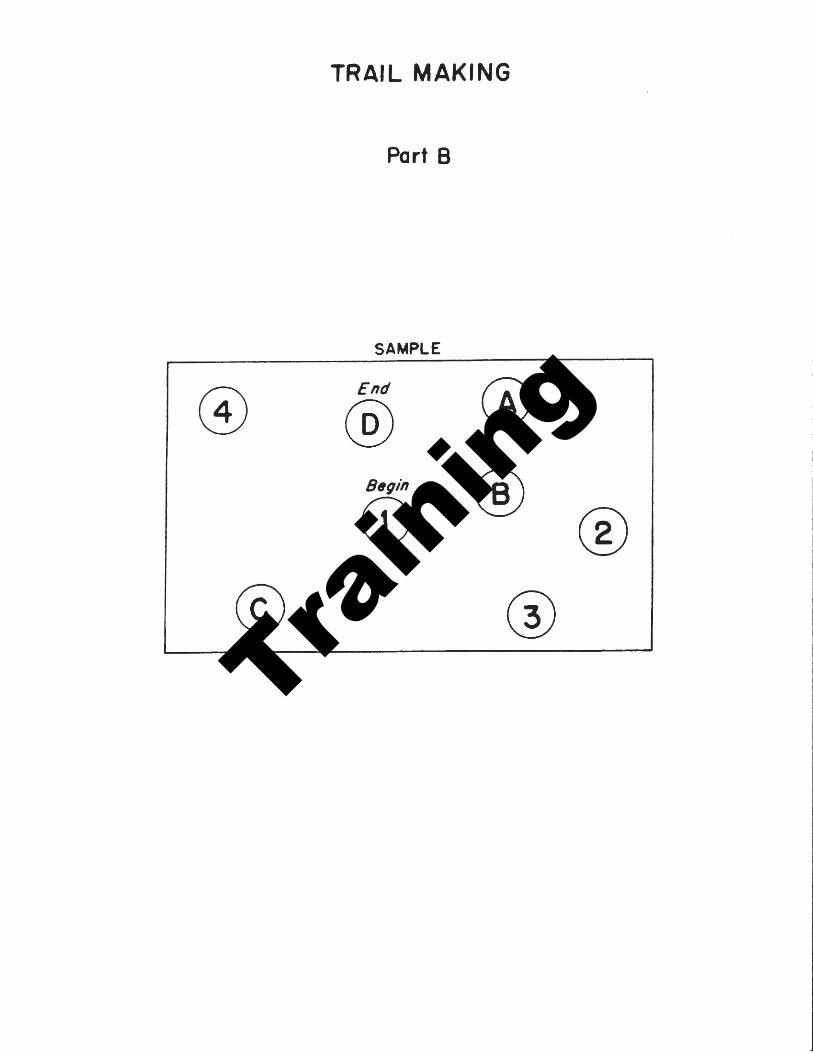
Place the sample side of Part B on the table in front of the patient, in the same position as the sheet for Part A was placed. Point to the sample and say:
On this page are some numbers and letters. Begin at 1 (point) and draw a line from 1 to A (point to A), A to 2 (point to 2), 2 to B (point to B), B to 3 (point to 3), 3 to C (point to C), and so on, in order, until
you reach the end (point to the circle marked “end”). Then say:
Remember, fi rst you have a number (point to 1), then a letter (point to A), then a number (point to 2), then a letter (point to B), and so on. Draw the lines as fast as you can. Ready — Begin!
If the patient completes Sample B correctly, say:
Good. Let’s try the next one.
Proceed immediately to Part B.
If the patient makes a mistake on Sample B, point out the error and explain why it is incorrect. The following explanations of mistakes serve as illustrations:
1. You started with the wrong circle. This is where you start (point to number 1).
2. You skipped this circle* (point to the circle the patient omitted). You should go from 1 (point to 1) to A (point to A), A to 2 (point to 2), 2 to B (point to B), B to 3 (point to 3), and so on until you reach
the circle marked “end” (point).
If the patient cannot complete Sample B, take his/her hand and guide the pencil, using the eraser end, through the circles. Then say:
Now you try it. Remember, you begin at number 1 (point) and draw a line from 1 to A (point to A), A to 2 (point to 2), 2 to B (point to B), B to 3 (point to 3), and so on until you reach the circle marked
“end” (point). Ready — Begin!
If the patient succeeds this time, go on to Part B. If not, repeat the procedure until the task is performed suc-cessfully or it becomes evident that the patient cannot do the task.
After the patient has completed the sample, turn the paper over to Part B and say:
On this page are both numbers and letters. Do this the same way. Begin at number 1 (point to 1) and draw a line from 1 to A (point to A), A to 2 (point to 2), 2 to B (point to B), B to 3 (point to 3), 3 to C
(point to C), and so on, in order, until you reach the end (point to the circle marked “end”).
Remember, fi rst you have a number (point to 1), then a letter (point to A), then a number (point to 2), then a letter (point to B), and so on. Do not skip around, but go from one circle to the next in the
proper order. Draw the lines as fast as you can. Ready — Begin!
Start timing as soon as the patient is told to begin. Remember to be alert for mistakes. If the patient makes an error, point it out immediately, return the patient to the last correct circle, and continue the test from that point. Do not stop timing.
After the patient completes Part B, take the test sheet and record the time in seconds. Errors contribute to the evaluation of the performance principally by increasing the total performance time.
* If it is clear that the patient intended to touch a circle but missed it, do not count it as an omission. Remind the patient, however, to touch each of the circles.
Scoring:
Part A and Part B are scored separately. The score for each part is the number of seconds required tocomplete each task and the number of errors.
Page-2
© 2008 The Neuropsychology Center, P.C. © 1979, 1992 Ralph M. Reitan, Ph.D.
Train
ing

Train
ing

Train
ing
Train
ing

Train
ing

I confi rm this information is accurate. Staff Initials: Date:
Confi dential - Merck Sharp & Dohme Corp.,
a subsidiary of Merck & Co., Inc., Whitehouse Station, New Jersey, USAPrinted in USA
Compound Protocol Visit Randomization No.Screening No. (Site - Sequence No.)
__ __ __ __-__ __ __ __ __ __ __ __ __ __ __
031302US (English) (V1.0_00_2.0)
AN EFFICACY AND SAFETY TRIAL OF MK-8931 IN SUBJECTS WITH PRODROMAL AD
MK-8931 019
TM
TRAIL MAKING TEST
Time to complete (seconds)
Trail Making Test Score - Part A
Number of errors
Specify completion date: ___________________DD-Mon-YYYY
Time to complete (seconds)
Trail Making Test Score - Part B
Number of errors
Train
ing