total workforce management services (twms) quick user guide
TRANSCRIPT
Total Workforce Management
Services (TWMS)
Quick User Guide
Managing IDPs - Workforce
Manager
Revision 4.0
Periodic updates to the IDP module may not be reflected in this document. March 2016

The Individual Development Plan (IDP):
• is a document created by an employee and his/her supervisor to address training and career plans
• serves as the "blueprint" for all short-term and long-term training and developmental actions which will enhance the employee’s performance and career goals
• is a living document, and should be reviewed by the employee and their supervisor as changes are made due to progress of the employee’s professional development and changes or revisions in career objectives
2
Managing IDPs in TWMS
Managing IDPs – Workforce Manager – Revision 4.0
TWMS allows an employee and their supervisor to develop the employee’s IDP by writing
specific goals, objectives, and selecting training course titles and/or documenting developmental
activities that will support them. The selected course titles and developmental activities should
enhance the skills and knowledge for the employee’s present position and their future career
goals. Course titles are selected from the TWMS Course Table and function as the prompt to
enroll in the selected course(s). Requests for training should be in accordance with this plan and
subject to funding availability. Developmental activities are manually typed into the IDP and are
not courses or programs. Developmental activities are specific activities, events, conferences,
actions, etc. for the employee to participate in. Note: Approved SF182 forms, not the IDP,
compile the employee’s official record of training and academic achievements.
March 2016

There are three separate privileges that are available in TWMS related to the (IDP) module:
1. IDP Administration - Allows access to the IDP Administration Tool under Tools & Functions
2. IDP Administration/Manage Default Settings - Allows access to the IDP Administration Tool under Tools & Functions. Also allows the ability to manage default KSAs and Developmental Training for all users within a BSO
3. IDP Management - Allows the user access to and management of the IDP via the "Training/Educ/Cert & Skills" form for all employee's within their scope regardless of the user’s supervisory role
3
IDP Privileges in TWMS
Managing IDPs – Workforce Manager – Revision 4.0
If you are listed as a supervisor in TWMS then you will automatically have access to your subordinates’ IDP through their "Training/Educ/Cert & Skills" form. You will not need any additional privileges through your existing TWMS account. You can also access your subordinates’ IDPs in the “My Workforce” view available in your self-service.
This user guide focuses on the Workforce Management side of the IDP module in TWMS and is meant for Supervisors, IDP Administrators, and other related personnel. The employee (self-service) side is detailed in a separate user guide, “My IDP”.
March 2016
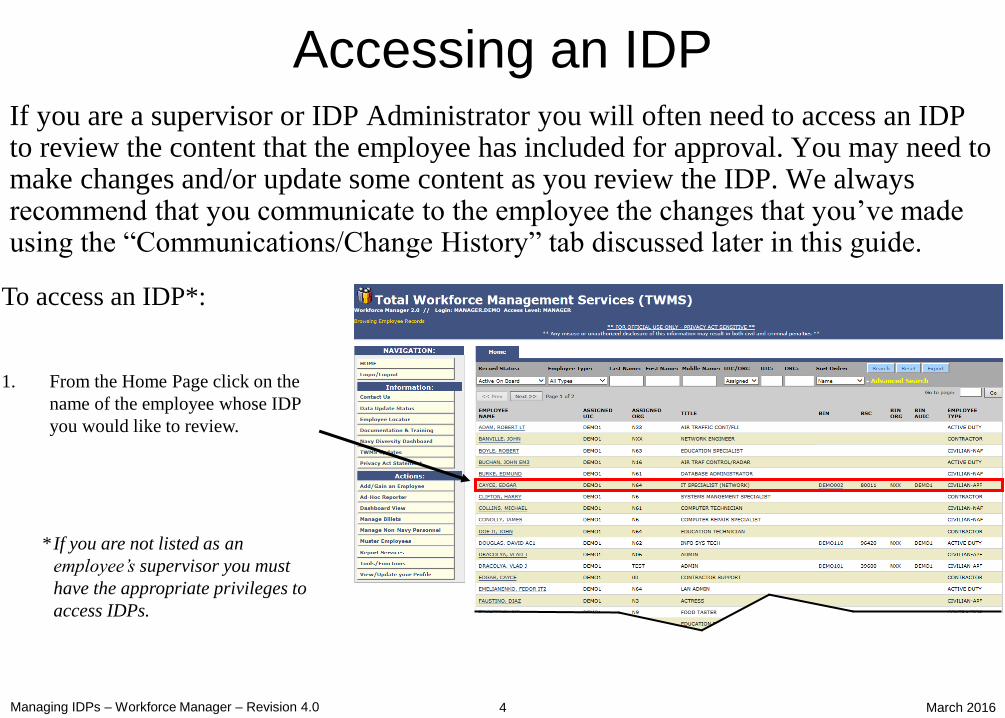
If you are a supervisor or IDP Administrator you will often need to access an IDP to review the content that the employee has included for approval. You may need to make changes and/or update some content as you review the IDP. We always recommend that you communicate to the employee the changes that you’ve made using the “Communications/Change History” tab discussed later in this guide.
Managing IDPs – Workforce Manager – Revision 4.0
To access an IDP*:
Accessing an IDP
1. From the Home Page click on the
name of the employee whose IDP
you would like to review.
* If you are not listed as an
employee’s supervisor you must
have the appropriate privileges to
access IDPs.
4 March 2016

All IDPs can be accessed from the employee’s Training/Educ/Cert & Skills form. If you are the supervisor for this employee or you have the appropriate privilege you will have access to their IDP.
Managing IDPs – Workforce Manager – Revision 4.0
Accessing an IDP
2. Click the Training/Educ/Cert
& Skills button to view the
training form for the selected
employee.
3. Click the IDP tab.
5
*For Official Use Only* * Safeguard in accordance with the provisions of the Privacy Act*
March 2016

*For Official Use Only* * Safeguard in accordance with the provisions of the Privacy Act*
6
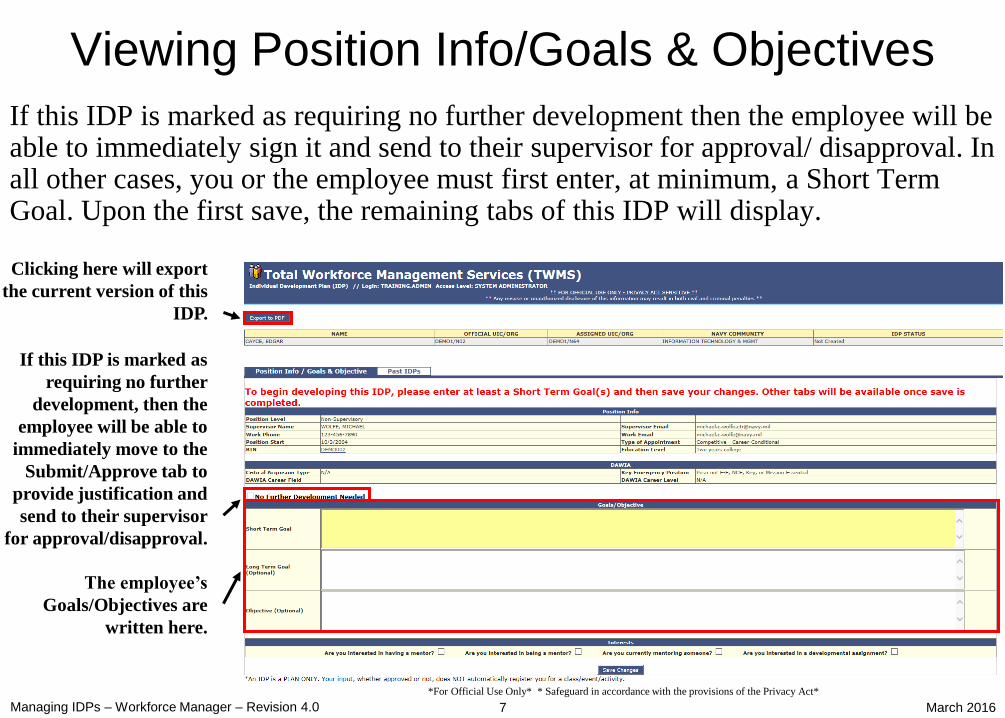
The IDP will open in a new window and is available for edits, updates, and/or approvals. If the IDP has not been created then the current view will display two tabs. The first tab, “Position Information/Goals & Objectives”, is the default view and is shown below. In addition to displaying the employee’s Position Information, this tab also displays if they are a member of the DAWIA workforce.
Viewing Position Info/Goals & Objectives
Information about the
employee’s position is
displayed here.
Information about the
employee and the current
status of their IDP is
displayed in the header.
DAWIA information
required for the
employee’s position is
displayed here.
March 2016 Managing IDPs – Workforce Manager – Revision 4.0
*For Official Use Only* * Safeguard in accordance with the provisions of the Privacy Act*
7
If this IDP is marked as requiring no further development then the employee will be able to immediately sign it and send to their supervisor for approval/ disapproval. In all other cases, you or the employee must first enter, at minimum, a Short Term Goal. Upon the first save, the remaining tabs of this IDP will display.
Viewing Position Info/Goals & Objectives
The employee’s
Goals/Objectives are
written here.
If this IDP is marked as
requiring no further
development, then the
employee will be able to
immediately move to the
Submit/Approve tab to
provide justification and
send to their supervisor
for approval/disapproval.
March 2016
Clicking here will export
the current version of this
IDP.
Managing IDPs – Workforce Manager – Revision 4.0

8
The first step in creating an IDP is to enter the employee’s goals and objectives. At least one Short Term Goal is required before being able to save an employee’s IDP for the first time.
Adding Goals and Objectives to an IDP
To add goals and
objectives to an IDP:
1. Write the required
short term goals here.
2. Write the long term
goals here.
3. Write the expected
objectives here.
4. Click Save Changes.
Managing IDPs – Workforce Manager – Revision 4.0
*For Official Use Only* * Safeguard in accordance with the provisions of the Privacy Act*
March 2016
9
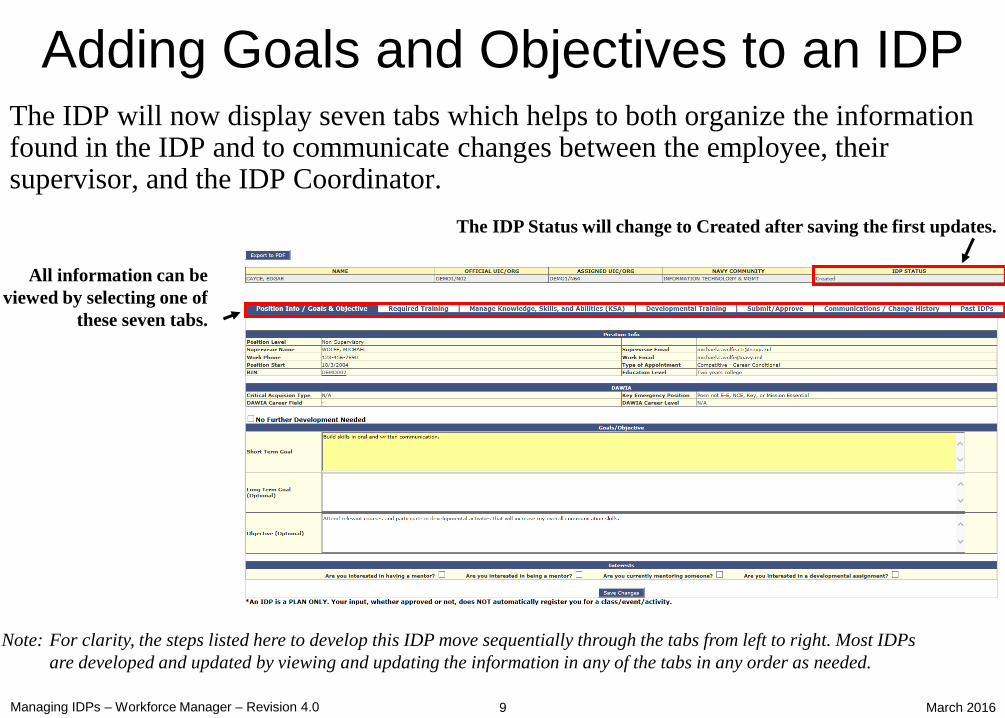
The IDP will now display seven tabs which helps to both organize the information found in the IDP and to communicate changes between the employee, their supervisor, and the IDP Coordinator.
Adding Goals and Objectives to an IDP
Note: For clarity, the steps listed here to develop this IDP move sequentially through the tabs from left to right. Most IDPs
are developed and updated by viewing and updating the information in any of the tabs in any order as needed.
March 2016
All information can be
viewed by selecting one of
these seven tabs.
The IDP Status will change to Created after saving the first updates.
Managing IDPs – Workforce Manager – Revision 4.0

*For Official Use Only* * Safeguard in accordance with the provisions of the Privacy Act*
10
The “Required Training” tab displays a link to the employee’s completed training as well as a list of their current training requirements. If they are assigned to a billet it will also display any required training and/or certifications associated with that billet. Information displayed here is read-only.
Viewing Completed/Required Training
Training and certifications
required of the employee’s
assigned billet will be
displayed here.
The list of all outstanding
training requirements will
be displayed here.
Clicking this link will open
a new window displaying
the employee’s completed
training.
Managing IDPs – Workforce Manager – Revision 4.0
1. Click the Required
Training tab.
To view the employee’s completed/required training:
March 2016
11
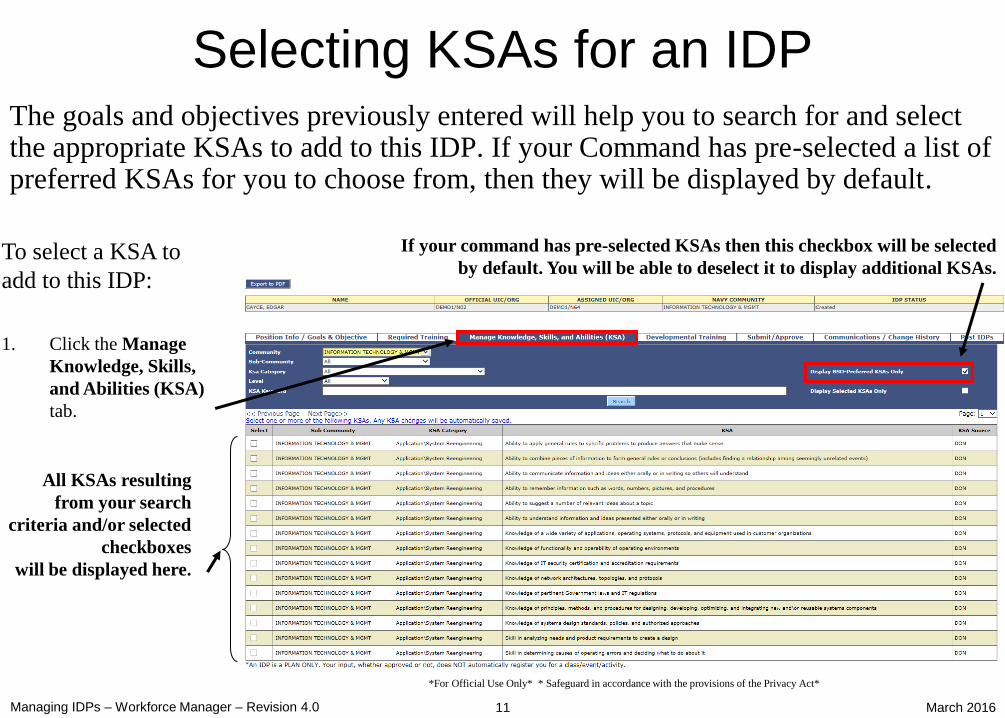
The goals and objectives previously entered will help you to search for and select the appropriate KSAs to add to this IDP. If your Command has pre-selected a list of preferred KSAs for you to choose from, then they will be displayed by default.
Selecting KSAs for an IDP
*For Official Use Only* * Safeguard in accordance with the provisions of the Privacy Act*
March 2016
1. Click the Manage
Knowledge, Skills,
and Abilities (KSA)
tab.
To select a KSA to
add to this IDP:
If your command has pre-selected KSAs then this checkbox will be selected
by default. You will be able to deselect it to display additional KSAs.
All KSAs resulting
from your search
criteria and/or selected
checkboxes
will be displayed here.
Managing IDPs – Workforce Manager – Revision 4.0

12
The Navy Community the employee is assigned to will also determine the initial list of the displayed KSAs. KSAs are organized first by Community, then by Sub-Community, then by KSA Category, and finally Level. KSAs are NOT required in order to complete the IDP.
Selecting KSAs for an IDP
The Navy Community the
employee is currently a
member of will
automatically be selected
in the Community
dropdown list.
You can use the page
controls to scroll through
all the displayed KSAs.
*For Official Use Only* * Safeguard in accordance with the provisions of the Privacy Act*
March 2016 Managing IDPs – Workforce Manager – Revision 4.0

13
2. Select any
combination of the
four dropdown lists.
The more selections
you make the fewer
KSAs will be
displayed.
3. Click Search.
Selecting and entering your KSA search criteria will help you to display only the KSAs that are relevant for the employee. The steps detailed here will show you how to select one or more KSAs to add to an IDP.
Selecting KSAs for an IDP
You can also search for KSAs by a keyword search.
*For Official Use Only* * Safeguard in accordance with the provisions of the Privacy Act*
March 2016 Managing IDPs – Workforce Manager – Revision 4.0

14
4. Select the
checkbox(es)
corresponding to the
KSA(s) you would
like to add to this
IDP.
5. Repeat steps 2-3 to
add other KSAs to
this IDP.
All KSA selections/deselections will be automatically saved as part of thisIDP.
Selecting KSAs for an IDP
Remember that with this checkbox selected, your search results
will only display the KSAs preferred by your command. You
can deselect it to display any additional KSAs.
*For Official Use Only* * Safeguard in accordance with the provisions of the Privacy Act*
March 2016 Managing IDPs – Workforce Manager – Revision 4.0
15
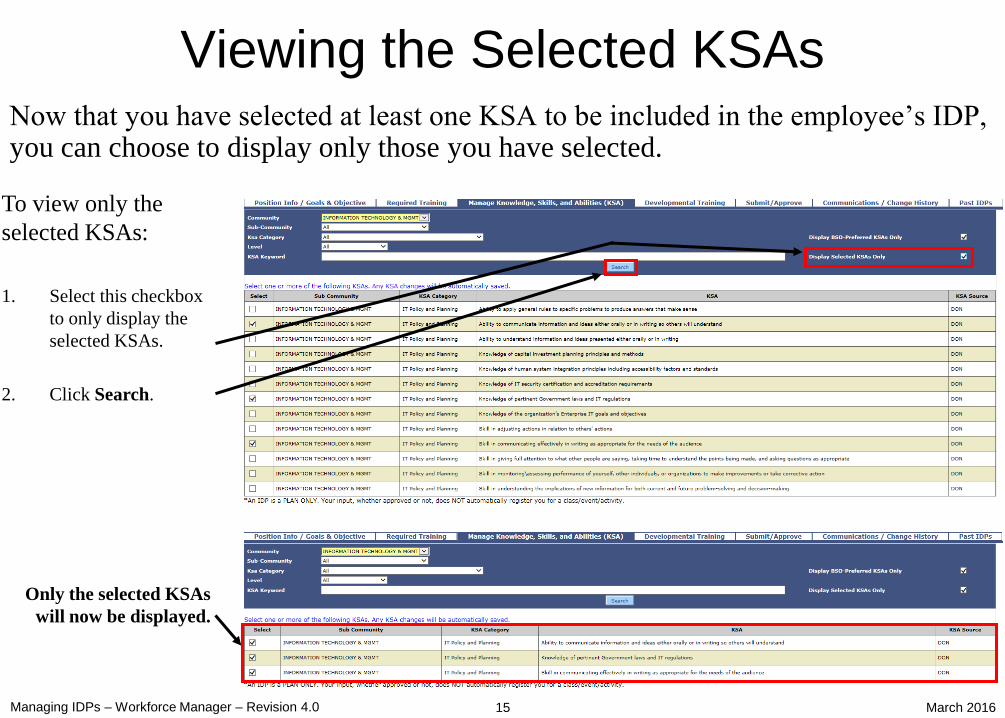
1. Select this checkbox
to only display the
selected KSAs.
2. Click Search.
Now that you have selected at least one KSA to be included in the employee’s IDP, you can choose to display only those you have selected.
Viewing the Selected KSAs
Only the selected KSAs
will now be displayed.
To view only the
selected KSAs:
March 2016 Managing IDPs – Workforce Manager – Revision 4.0

16
The information entered on the “Developmental Training” tab shown below forms the heart of the employee’s IDP. Developmental training is comprised of both courses and/or activities that the employee will complete within a specified timeframe as agreed to between them and their supervisor. Courses are selected from the TWMS Course Table or, if not found, entered manually. Developmental Activities are always entered manually. All training courses and developmental activities added to this IDP are subject to the approval of the employee’s supervisor.
Adding Developmental Training
The employee’s short
term and/or long term
courses and activities
will be displayed here.
You will be able to add
either a course or an
activity to this IDP by
first clicking one of
these buttons.
*For Official Use Only* * Safeguard in accordance with the provisions of the Privacy Act*
March 2016
To add developmental training to this IDP:
1. Click the Developmental Training tab.
Managing IDPs – Workforce Manager – Revision 4.0

17
1. Click the Add New
Course button.
2. Select the Priority
from the dropdown
list and also enter the
Anticipated
Completion date.
3. If this course is to be
associated to a
selected KSA then
select it from the
dropdown list.
4. Click the Search
button to first
determine if the
course title is in the
TWMS Course Table.
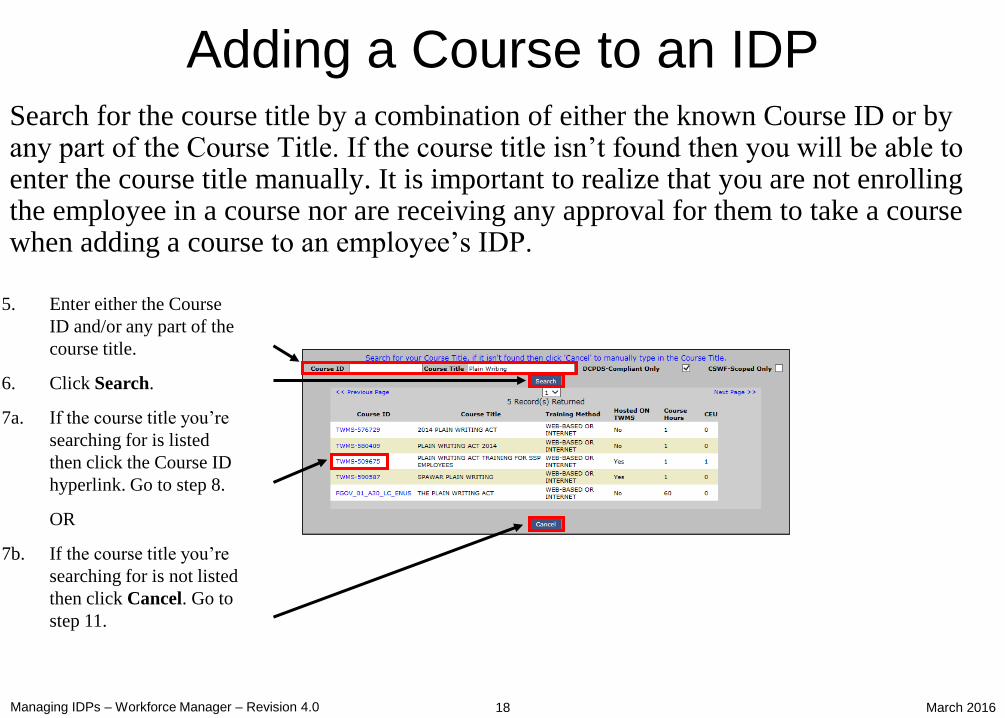
Courses added to an employee’s IDP are first searched for in the TWMS Course Table. You will be able to associate a course to any of the previously selected KSAs but it is not required. Repeat the steps below to add as many courses to the IDP.
Adding a Course to an IDP
To add a course to an
IDP:
March 2016 Managing IDPs – Workforce Manager – Revision 4.0
18
5. Enter either the Course
ID and/or any part of the
course title.
6. Click Search.
7a. If the course title you’re
searching for is listed
then click the Course ID
hyperlink. Go to step 8.
OR
7b. If the course title you’re
searching for is not listed
then click Cancel. Go to
step 11.
Search for the course title by a combination of either the known Course ID or by any part of the Course Title. If the course title isn’t found then you will be able to enter the course title manually. It is important to realize that you are not enrolling the employee in a course nor are receiving any approval for them to take a course when adding a course to an employee’s IDP.
Adding a Course to an IDP
Managing IDPs – Workforce Manager – Revision 4.0 March 2016
19
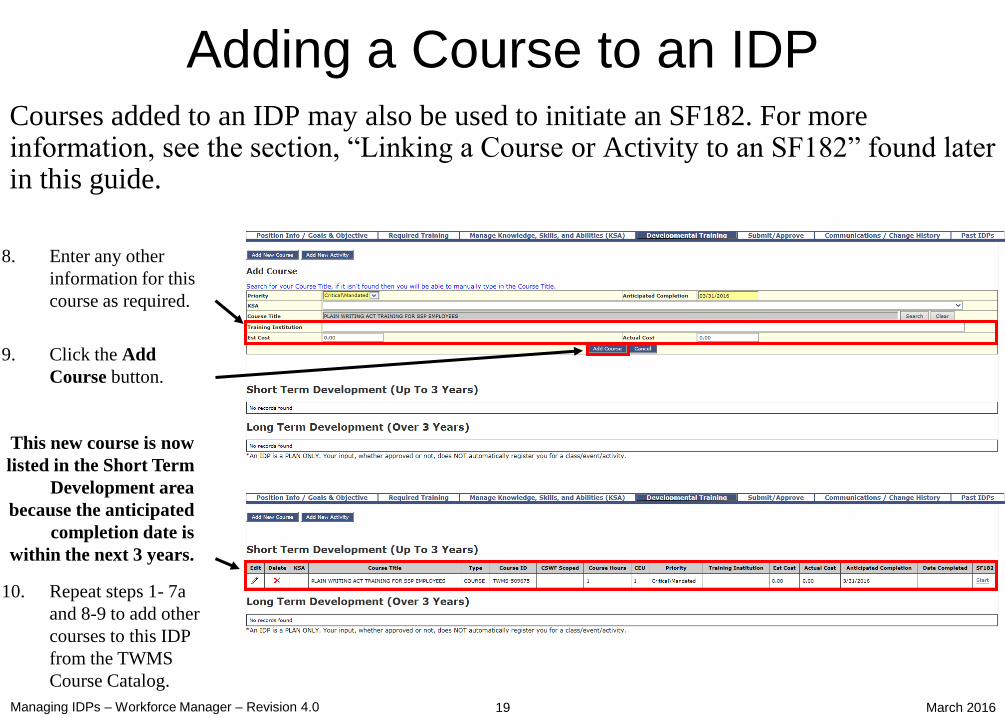
8. Enter any other
information for this
course as required.
9. Click the Add
Course button.
10. Repeat steps 1- 7a
and 8-9 to add other
courses to this IDP
from the TWMS
Course Catalog.
Courses added to an IDP may also be used to initiate an SF182. For more information, see the section, “Linking a Course or Activity to an SF182” found later in this guide.
Adding a Course to an IDP
This new course is now
listed in the Short Term
Development area
because the anticipated
completion date is
within the next 3 years.
Managing IDPs – Workforce Manager – Revision 4.0 March 2016

20
11. Manually enter the
course title for the
course you want to
add to this IDP.
12. Enter any other
information for this
course as required.
13. Click the Add
Course button.
Courses added to an IDP may also be used to initiate an SF182. For more information, see the section, “Linking a Course or Activity to an SF182” found later in this guide.
Adding a Course to an IDP
This new course is now
listed in the Short Term
Development area
because the anticipated
completion date is
within the next 3 years.
A KSA has been selected to associate with this new course.
The associated KSA is displayed here for this new course.
Managing IDPs – Workforce Manager – Revision 4.0 March 2016
14. Repeat steps 1- 7b and
11-13 to add other courses
to your IDP not from the
TWMS Course Catalog.

21
1. Click the Add New
Activity button.
2. Select the Priority
from the dropdown
list and also enter the
Anticipated
Completion date.
3. Enter the description
of the developmental
activity.
4. Click the Add
Activity button.
Activities added to an IDP are always manually entered. You will be able to associate an activity to any of the previously selected KSAs but it is not required. Repeat the steps below to add additional activities to the IDP.
Adding an Activity to an IDP
To add an activity to
your IDP:
March 2016 Managing IDPs – Workforce Manager – Revision 4.0

This new activity is now
listed in the Short Term
Development area
because the anticipated
completion date is
within the next 3 years.
22
Activities added to an IDP may also be used to initiate an SF182. For more information, see the section, “Linking a Course or Activity to an SF182” found later in this guide.
Adding an Activity to an IDP
Managing IDPs – Workforce Manager – Revision 4.0 March 2016
5. Repeat steps 1- 4 to add
other activities to this IDP.
*For Official Use Only* * Safeguard in accordance with the provisions of the Privacy Act*
23
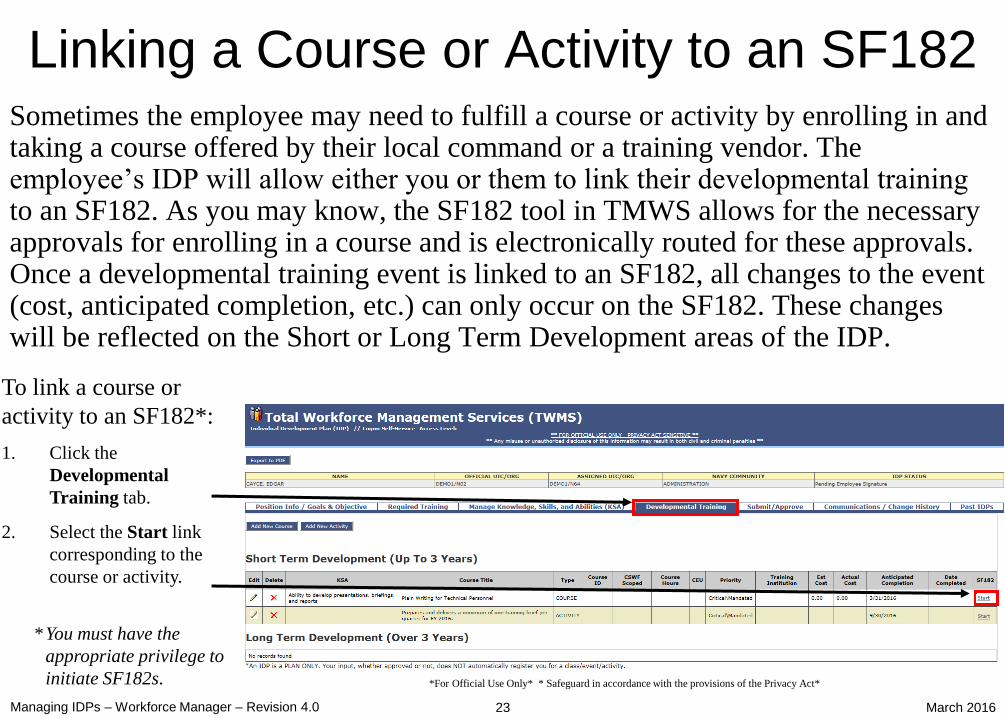
Sometimes the employee may need to fulfill a course or activity by enrolling in and taking a course offered by their local command or a training vendor. The employee’s IDP will allow either you or them to link their developmental training to an SF182. As you may know, the SF182 tool in TMWS allows for the necessary approvals for enrolling in a course and is electronically routed for these approvals. Once a developmental training event is linked to an SF182, all changes to the event (cost, anticipated completion, etc.) can only occur on the SF182. These changes will be reflected on the Short or Long Term Development areas of the IDP.
Linking a Course or Activity to an SF182
1. Click the
Developmental
Training tab.
2. Select the Start link
corresponding to the
course or activity.
To link a course or
activity to an SF182*:
Managing IDPs – Workforce Manager – Revision 4.0
* You must have the
appropriate privilege to
initiate SF182s.
March 2016

*For Official Use Only* * Safeguard in accordance with the provisions of the Privacy Act*
24
Your view will now display a new SF182 linked to the selected course or activity. Initially, only the “Section A – Trainee Information” tab of the employee’s SF182 will display. This section must be completed first before the other sections will display.
Linking a Course or Activity to an SF182
March 2016
The employee’s information will
always display in the header
when viewing their SF182s. The
initial status is “Not Created”.
3. Enter any relevant
information for this SF182
that doesn’t already appear.
Fields appearing in yellow
background are required.
4. Click the Save Changes
button.
Click here to return to the
employee’s IDP.
Managing IDPs – Workforce Manager – Revision 4.0
25
After saving the information in Section A, the remaining sections of the SF182 will display. You are now able to complete the information required in these other sections. The “Section B – Training Course Data” tab is displayed below.
Linking a Course or Activity to an SF182
Note: Please refer to the “My SF182” Quick user guide for more information on completing and routing your SF182s.
March 2016
After the initial save, the status
of your SF182 will change to
“Not Routed”.
5. Click the Section B –
Training Course Data tab.
6. Enter the information as
appropriate. Fields having a
yellow background are
required.
7. Click the Save Changes
button.
Managing IDPs – Workforce Manager – Revision 4.0
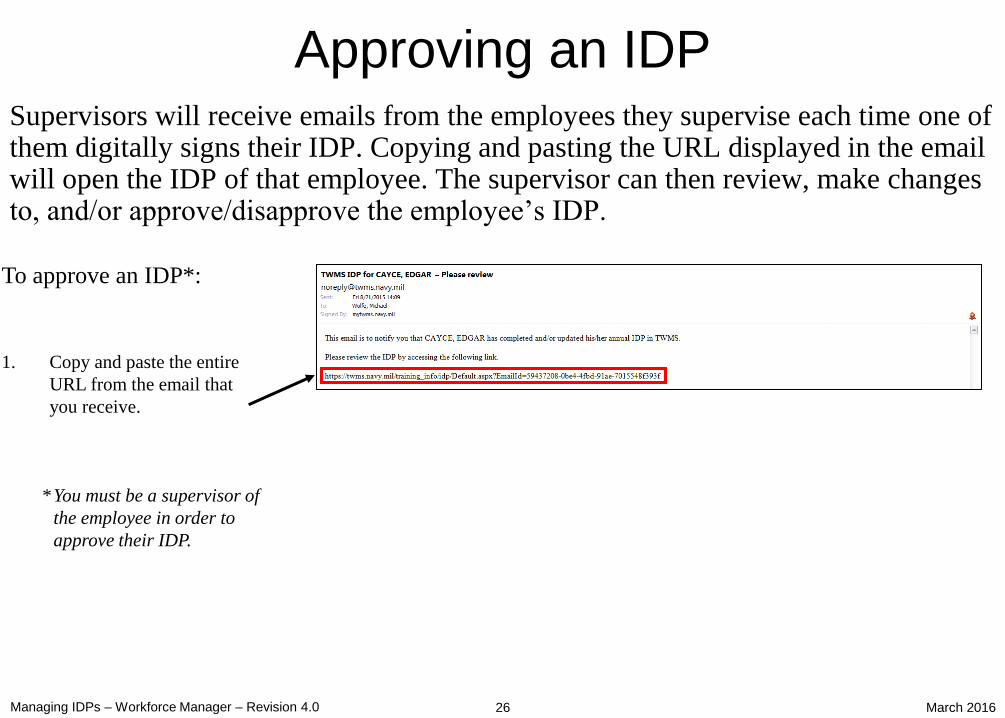
Supervisors will receive emails from the employees they supervise each time one of them digitally signs their IDP. Copying and pasting the URL displayed in the email will open the IDP of that employee. The supervisor can then review, make changes to, and/or approve/disapprove the employee’s IDP.
Managing IDPs – Workforce Manager – Revision 4.0
To approve an IDP*:
Approving an IDP
1. Copy and paste the entire
URL from the email that
you receive.
* You must be a supervisor of
the employee in order to
approve their IDP.
26 March 2016

27
This employee’s IDP will open in a new window. The default view is the Submit/Approve tab shown below. Before deciding to approve/disapprove the IDP, you will be able to review it and/or make any necessary changes. After approving the IDP, the employee can begin to complete their developmental training. You will only be able to sign IDPs that have the IDP Status: Pending Supervisor Approval.
Approving an IDP
*For Official Use Only* * Safeguard in accordance with the provisions of the Privacy Act*
2. For each tabbed
section, review the
information this
employee has
included in their IDP.
For more
information, follow
the steps found
earlier in this guide.
3. Make any necessary
changes as needed
prior to approving
this IDP.
4. If necessary, click the
Submit/Approve tab.
Note: After the employee has submitted their signature, the IDP
Status will change to “Pending Supervisor Approval”.
Managing IDPs – Workforce Manager – Revision 4.0 March 2016
28
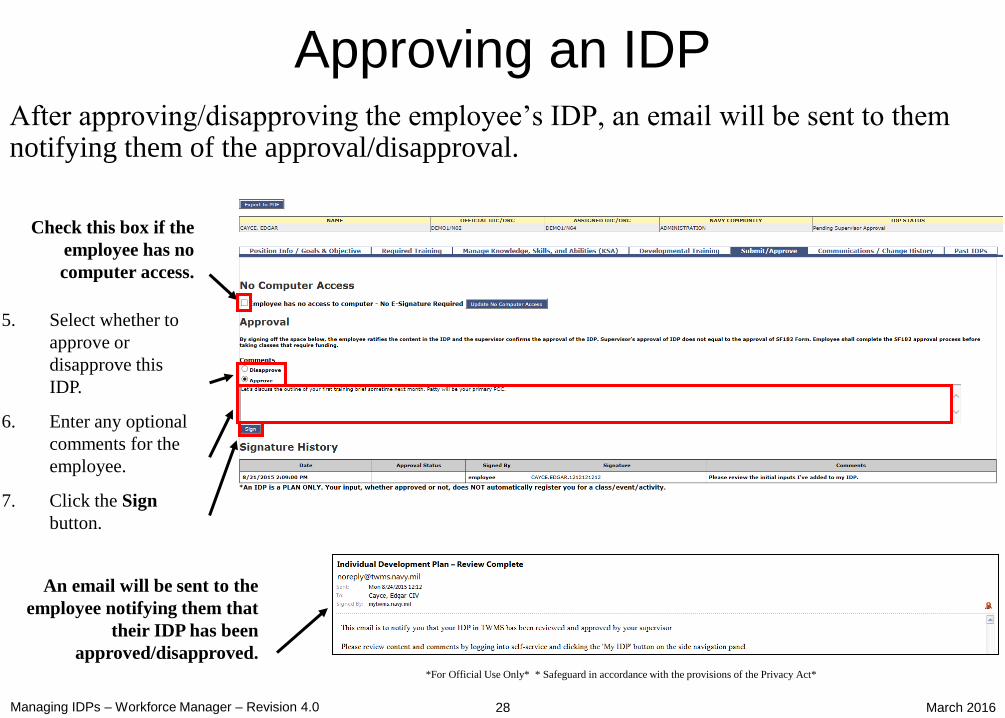
After approving/disapproving the employee’s IDP, an email will be sent to them notifying them of the approval/disapproval.
Approving an IDP
*For Official Use Only* * Safeguard in accordance with the provisions of the Privacy Act*
5. Select whether to
approve or
disapprove this
IDP.
6. Enter any optional
comments for the
employee.
7. Click the Sign
button.
Managing IDPs – Workforce Manager – Revision 4.0
Check this box if the
employee has no
computer access.
An email will be sent to the
employee notifying them that
their IDP has been
approved/disapproved.
March 2016

29
The status of this IDP will change to reflect your approval. If the employee makes any changes to the IDP after it has been approved the status will change to “Updated”. The employee must re-submit their signature for supervisor approval of these changes.
Approving an IDP
*For Official Use Only* * Safeguard in accordance with the provisions of the Privacy Act*
Managing IDPs – Workforce Manager – Revision 4.0
Note: After the supervisor has approved the IDP, the
IDP Status will change to “Approved”.
The signature history
has also been updated
displaying any
comments made by
the supervisor.
Feedback here
displays no further
action required.
March 2016

30
If an employee has no computer access then, as their supervisor, you will still be able to approve their IDP from a hard copy. Open the employee’s IDP in TWMS and then navigate to the Submit/Approve tab shown below.
Approving an IDP for Users with No Computer Access
*For Official Use Only* * Safeguard in accordance with the provisions of the Privacy Act*
Managing IDPs – Workforce Manager – Revision 4.0
Note: The IDP Status will usually be “Not Created”. To approve an IDP
for users with no
computer access*:
1. Click the checkbox.
2. Click the Update
No computer
Access button.
* You must be a
supervisor of the
employee in order to
approve their IDP.
March 2016

31
You will have the ability to upload a scanned PDF file of the employee’s IDP that is signed by both you and the employee.
Approving an IDP for Users with No Computer Access
*For Official Use Only* * Safeguard in accordance with the provisions of the Privacy Act*
Managing IDPs – Workforce Manager – Revision 4.0
Note: The IDP Status will now say
“Pending Supervisor Approval”.
3. Click the Browse
button.
4. Locate and select
the employee’s IDP
to upload.
5. Click Open.
March 2016

32
Approving an IDP for Users with No Computer Access
Managing IDPs – Workforce Manager – Revision 4.0
6. Click the Upload
button.
Once the IDP has been
uploaded then it can be
viewed by clicking the
“View Doc” button.
March 2016
*For Official Use Only* * Safeguard in accordance with the provisions of the Privacy Act*
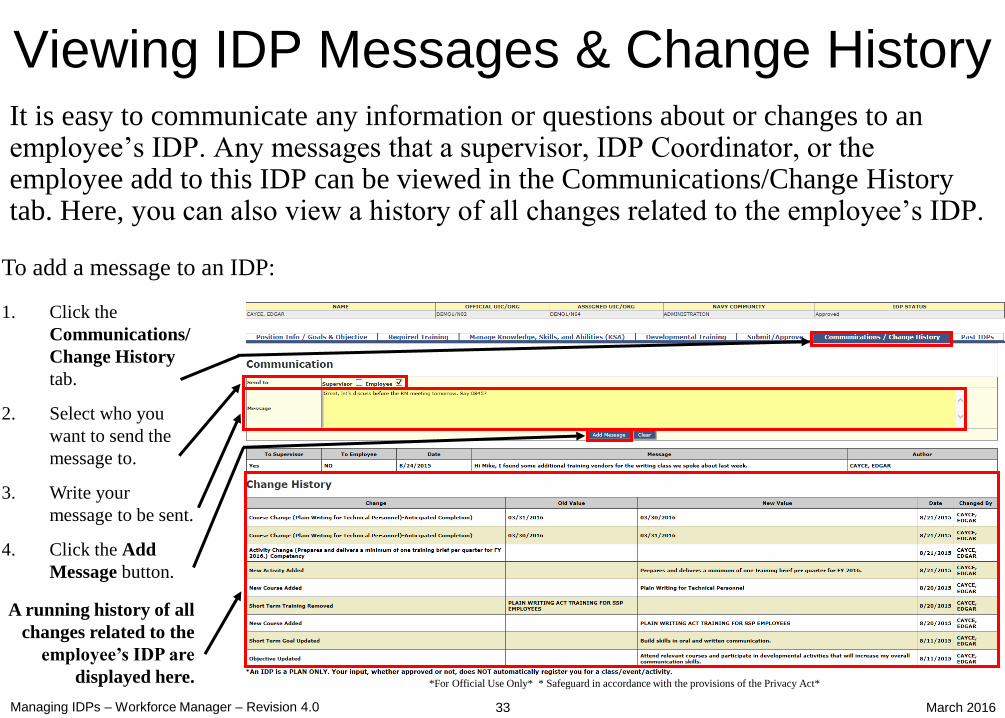
33
1. Click the
Communications/
Change History
tab.
2. Select who you
want to send the
message to.
3. Write your
message to be sent.
4. Click the Add
Message button.
It is easy to communicate any information or questions about or changes to an employee’s IDP. Any messages that a supervisor, IDP Coordinator, or the employee add to this IDP can be viewed in the Communications/Change History tab. Here, you can also view a history of all changes related to the employee’s IDP.
Viewing IDP Messages & Change History
To add a message to an IDP:
A running history of all
changes related to the
employee’s IDP are
displayed here.
Managing IDPs – Workforce Manager – Revision 4.0 March 2016

*For Official Use Only* * Safeguard in accordance with the provisions of the Privacy Act*
34
An email will be sent to the employee notifying them that a message has been added by you in regards to their IDP.
Viewing IDP Messages & Change History
The added message is
now displayed.
Here is a sample email that is
sent to the employee after
adding a message to their IDP.
Managing IDPs – Workforce Manager – Revision 4.0 March 2016

*For Official Use Only* * Safeguard in accordance with the provisions of the Privacy Act*
35
1. Click the
Past IDPs tab.
2. Click the Print icon
next to any of the
IDPs you would like
to view. The
selected IDP will
open in a new
window for saving
or printing.
You will be able to review any previous IDPs that have been archived by you as the employee’s supervisor or as an IDP Coordinator. Past IDPs are for viewing or printing purposes only and cannot be altered in any way.
IDP History
To view past
IDPs:
Managing IDPs – Workforce Manager – Revision 4.0 March 2016
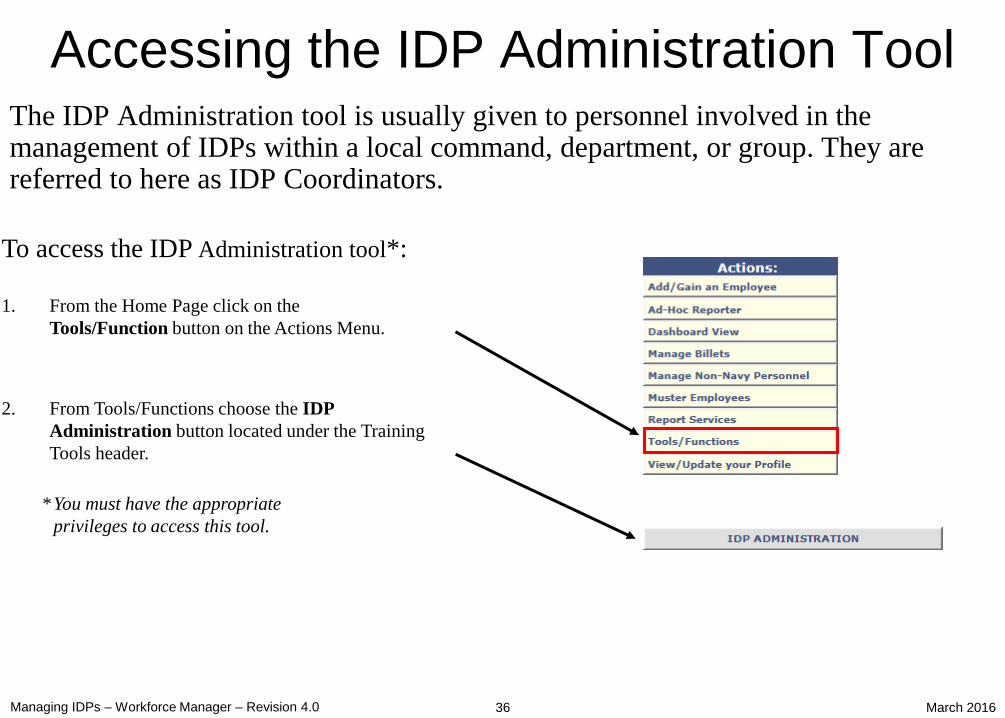
The IDP Administration tool is usually given to personnel involved in the management of IDPs within a local command, department, or group. They are referred to here as IDP Coordinators.
Managing IDPs – Workforce Manager – Revision 4.0
To access the IDP Administration tool*:
Accessing the IDP Administration Tool
1. From the Home Page click on the
Tools/Function button on the Actions Menu.
2. From Tools/Functions choose the IDP
Administration button located under the Training
Tools header.
* You must have the appropriate
privileges to access this tool.
36 March 2016
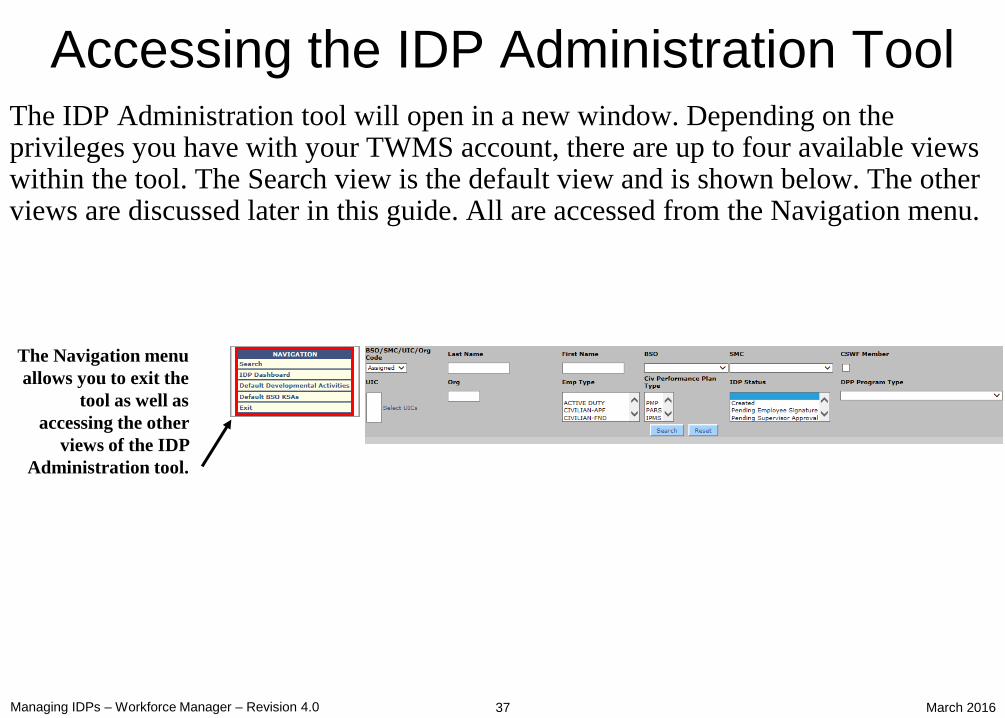
37
The IDP Administration tool will open in a new window. Depending on the privileges you have with your TWMS account, there are up to four available views within the tool. The Search view is the default view and is shown below. The other views are discussed later in this guide. All are accessed from the Navigation menu.
Accessing the IDP Administration Tool
Managing IDPs – Workforce Manager – Revision 4.0
The Navigation menu
allows you to exit the
tool as well as
accessing the other
views of the IDP
Administration tool.
March 2016

1. Select and/or enter your
search criteria here.
2. Click the Search button.
38
The IDP Administration tool allows you to send specific messages, export various lists of IDP information, or archive IDPs. These actions will only affect the employees that you have selected within your scope of access.
Searching for Employees
*For Official Use Only* * Safeguard in accordance with the provisions of the Privacy Act*
Click here to reset your search criteria.
Managing IDPs – Workforce Manager – Revision 4.0
To search for employees:
The number of records returned
based on your search criteria is
displayed here.
Your search results are
displayed here.
March 2016

1. Click the Select All button or
click an individual checkbox
corresponding to the employee
you want to select.
2. Click the Search button.
39
You must first select one or more employee(s) before you can send specific messages, export a list of IDP information, or archive IDPs.
Selecting Employees
*For Official Use Only* * Safeguard in accordance with the provisions of the Privacy Act*
Managing IDPs – Workforce Manager – Revision 4.0
To select employees:
Clicking the “De-Select All” button
or clicking an individual checkbox a
second time will either deselect all
employees or deselect an individual
employee respectively.
March 2016
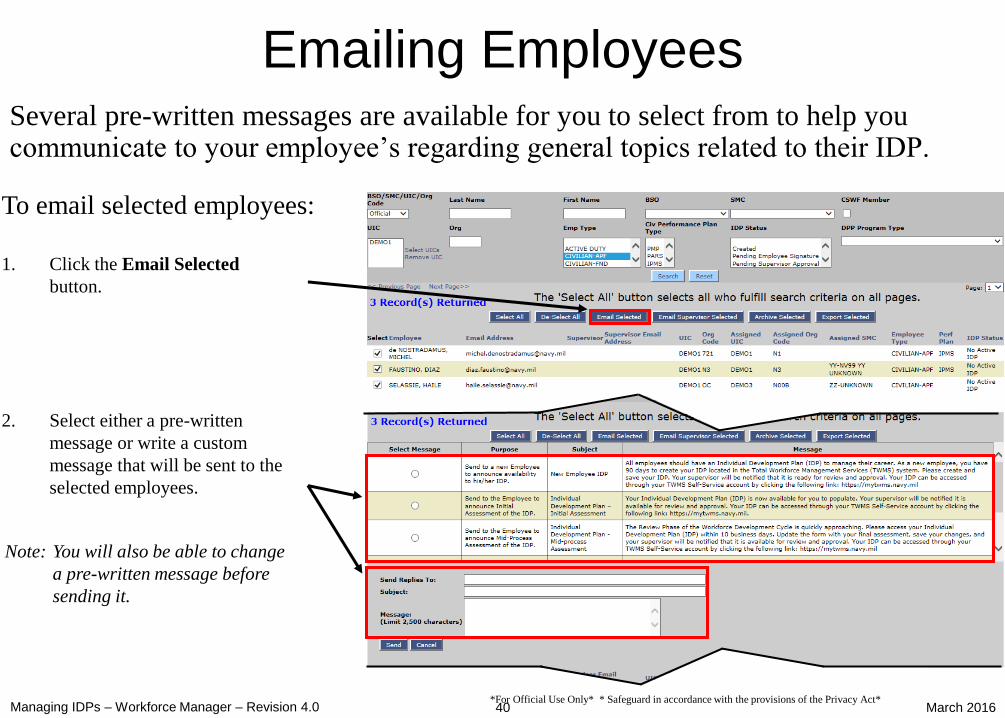
1. Click the Email Selected
button.
2. Select either a pre-written
message or write a custom
message that will be sent to the
selected employees.
40
Several pre-written messages are available for you to select from to help you communicate to your employee’s regarding general topics related to their IDP.
Emailing Employees
*For Official Use Only* * Safeguard in accordance with the provisions of the Privacy Act* Managing IDPs – Workforce Manager – Revision 4.0
To email selected employees:
Note: You will also be able to change
a pre-written message before
sending it.
March 2016

3. Make any necessary changes to
the Subject line, the body of the
message, or the email address
of who should receive replies.
By default, the reply email
address will be the person who
is sending the message.
4. Click the Send button.
41
You also have the ability to write a custom message to the employees you have selected.
Emailing Employees
*For Official Use Only* * Safeguard in accordance with the provisions of the Privacy Act*
Managing IDPs – Workforce Manager – Revision 4.0
Selecting a pre-written message will
populate the Subject line and the
Message text box.
Here is a sample email that is sent
to the employee after the IDP
Coordinator sends a message.
March 2016

1. Click the Archive Selected button.
42
The IDP Administration tool allows you to archive IDPs of selected employees. Once an IDP is archived it cannot be changed. Typically, only IDPs having an “Approved” status are archived.
Archiving IDPs
*For Official Use Only* * Safeguard in accordance with the provisions of the Privacy Act*
Managing IDPs – Workforce Manager – Revision 4.0
To archive IDPs for selected
employees:
After an IDP is archived for the
selected employees, the IDP Status for
each will change to “No Active IDP”.
Note: The IDP Status for this
employee’s IDP is “Approved”.
March 2016

1. Click the Export Selected button.
2. Click Open.
43
The IDP Administration tool allows you to export IDP-related information to an Excel spreadsheet for the employees you have selected.
Exporting IDP Information
*For Official Use Only* * Safeguard in accordance with the provisions of the Privacy Act*
Managing IDPs – Workforce Manager – Revision 4.0
To export the information of
IDPs for selected employees:
Displayed here are
the IDP fields
exported to Excel.
Note: After exporting this information, you will be able to save and/or print the spreadsheet.
March 2016

1. Click the IDP Dashboard
button.
2. Enter and/or select any
filters for the graphs you
like displayed.
3. Click the View Graph
button.
44
The IDP Administration tool allows you to view dashboard information for IDPs within your scope of access. The information can be displayed by pie or column charts. This view can be accessed from the IDP Dashboard button on the Navigation Menu.
IDP Dashboard
Managing IDPs – Workforce Manager – Revision 4.0
To view IDP Dashboard
information:
March 2016

4. Repeat steps 2-3 to view
other IDP Dashboard
information.
5. Click the Reset button to
clear all filters.
45
Selecting different filters from the dashboard will display new information.
IDP Dashboard
Managing IDPs – Workforce Manager – Revision 4.0
Here we have selected to only view the
percentages, by employee type, of IDPs
having the IDP Status of “Created”.
March 2016
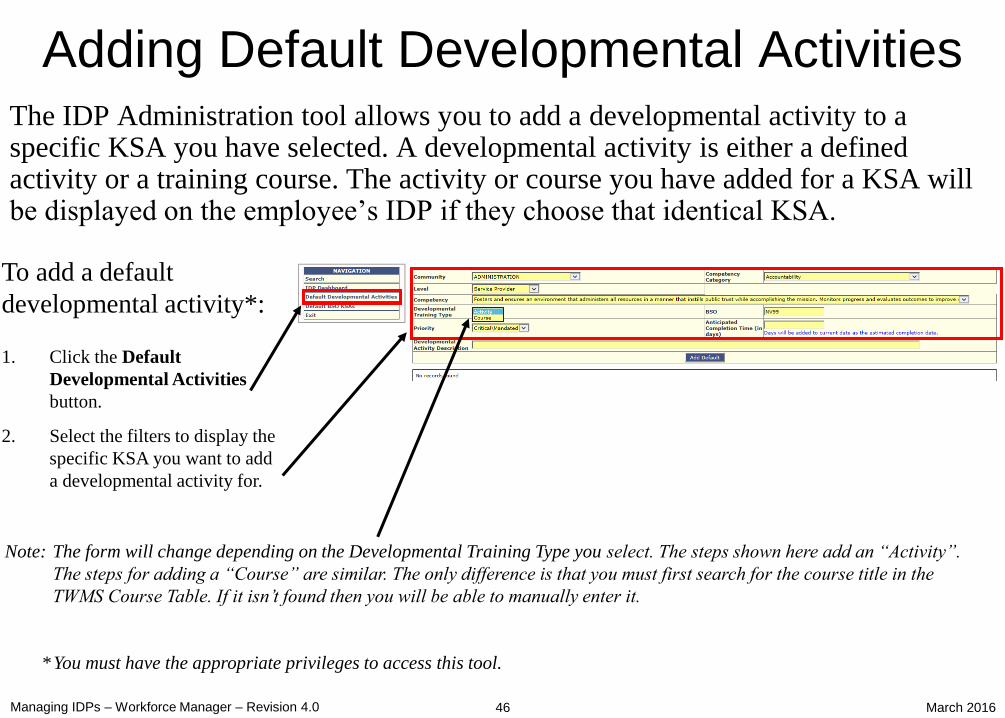
1. Click the Default
Developmental Activities
button.
2. Select the filters to display the
specific KSA you want to add
a developmental activity for.
46
The IDP Administration tool allows you to add a developmental activity to a specific KSA you have selected. A developmental activity is either a defined activity or a training course. The activity or course you have added for a KSA will be displayed on the employee’s IDP if they choose that identical KSA.
Adding Default Developmental Activities
Managing IDPs – Workforce Manager – Revision 4.0
To add a default
developmental activity*:
* You must have the appropriate privileges to access this tool.
Note: The form will change depending on the Developmental Training Type you select. The steps shown here add an “Activity”.
The steps for adding a “Course” are similar. The only difference is that you must first search for the course title in the
TWMS Course Table. If it isn’t found then you will be able to manually enter it.
March 2016

3. Enter the number of days this
developmental activity must be
completed within when it is
added to the employee’s IDP.
4. Enter a description for this
activity.
5. Click the Add Default button.
6. Repeat steps 2-5 to add other
activities.
47
KSAs in which you have added a default Developmental Activity for will be displayed to help the employee develop their IDP. These activities aren’t required to be added by the employee.
Adding Default Developmental Activities
Managing IDPs – Workforce Manager – Revision 4.0
The default activity for the
selected KSA is displayed here.
You can now edit or delete it as
necessary.
March 2016

1. Click the Default BSO
KSAs button.
2. Select the search criteria to
display the specific KSAs
you want to add
as a default.
3. Click the Search button.
48
The IDP Administration tool also allows you to add specific KSAs you would like to displayed as defaults for all employees within your BSO. In addition to the ones you can select here for the employee, all Department of the Navy (DON) KSAs will always be displayed. The employee will also have the ability to view all KSAs in their IDP regardless of whether it has been selected as a default.
Adding Default BSO KSAs
Managing IDPs – Workforce Manager – Revision 4.0
To add a default KSA*:
* You must have the appropriate
privileges to access this tool.
March 2016
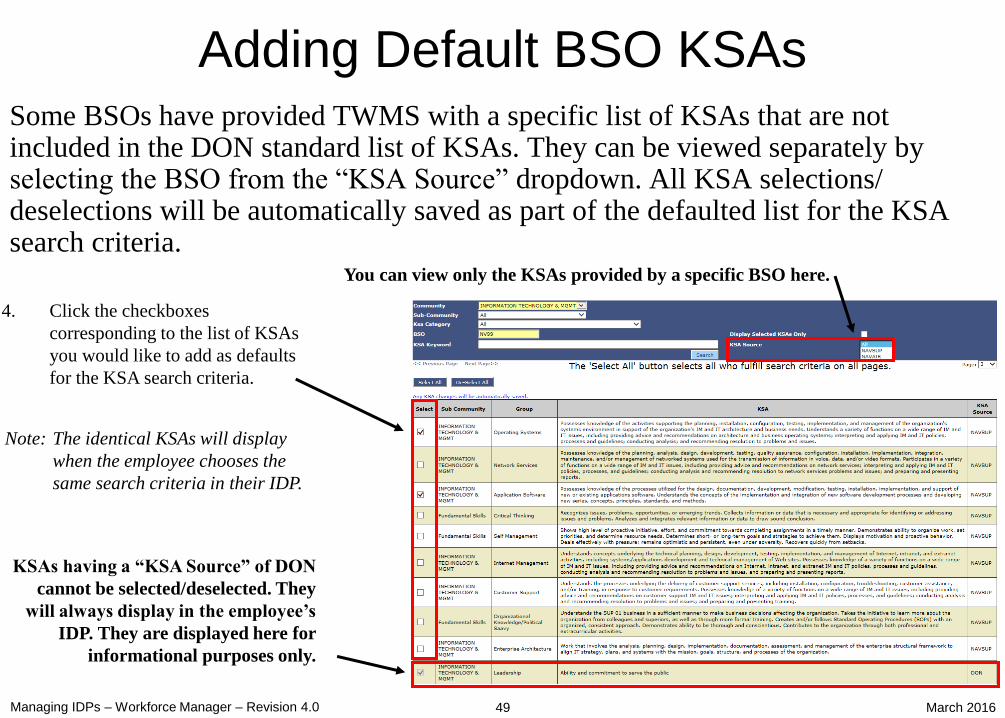
4. Click the checkboxes
corresponding to the list of KSAs
you would like to add as defaults
for the KSA search criteria.
49
Some BSOs have provided TWMS with a specific list of KSAs that are not included in the DON standard list of KSAs. They can be viewed separately by selecting the BSO from the “KSA Source” dropdown. All KSA selections/ deselections will be automatically saved as part of the defaulted list for the KSA search criteria.
Adding Default BSO KSAs
Managing IDPs – Workforce Manager – Revision 4.0
Note: The identical KSAs will display
when the employee chooses the
same search criteria in their IDP.
KSAs having a “KSA Source” of DON
cannot be selected/deselected. They
will always display in the employee’s
IDP. They are displayed here for
informational purposes only.
You can view only the KSAs provided by a specific BSO here.
March 2016