toadstool needle book - generation q...
TRANSCRIPT

Toadstool Needle BookBy Cassie Barden

Woodland-themed motifs are a favorite for us both, so coming up with a new design to go with the Woodland Sewing Set was really fun. And who doesn’t love the iconic, retro toadstool? The amanita muscaria is a sym-bol of good-luck, famous for forming “fairy rings,” and is quite poisonous, causing delirium and hallucinations. Eye-catching and adorable (as fungi go), this colorful character makes a great appliqué motif, and sewn up as a needle-book amanita muscaria will definitely earn a place in your sewing kit. This needle book is very easy to put together with a few colors of felt, embroidery floss and only two stitch types.
Materials• 1 8x8” sheet of wool-blend felt in each of the following colors: • Light tan, for mushroom stem• Mushroom (a medium brownish-grey), for book cover• Red, for mushroom cap• White, for mushroom spots• Spring green, for grass• Dark olive green, for book lining• Forest green, for book pages• Embroidery floss in white, red, spring green, mushroom and dark olive green.• Freezer paper• One size 4 sew-on snap
Instructions1. Transfer the template designs (see page 5) to your felt using the freezer paper. (For more info on using freezer paper, see the section on design transfer above).2. Cut out all the designs using small, sharp scissors and peel off the freezer paper.3. Referring to the embroidery illustrations below, use a blanket stitch and 2 strands from a skein of matching embroidery floss, stitch the toadstool pieces to the mushroom-colored cover in the following order:
i. Light tan toadstool stemii. Red toadstool capiii. Spring green grass (I recommend using a small running stitch for this one, as those points can be rather fussy with a blanket stitch)iv. White spots
2

3
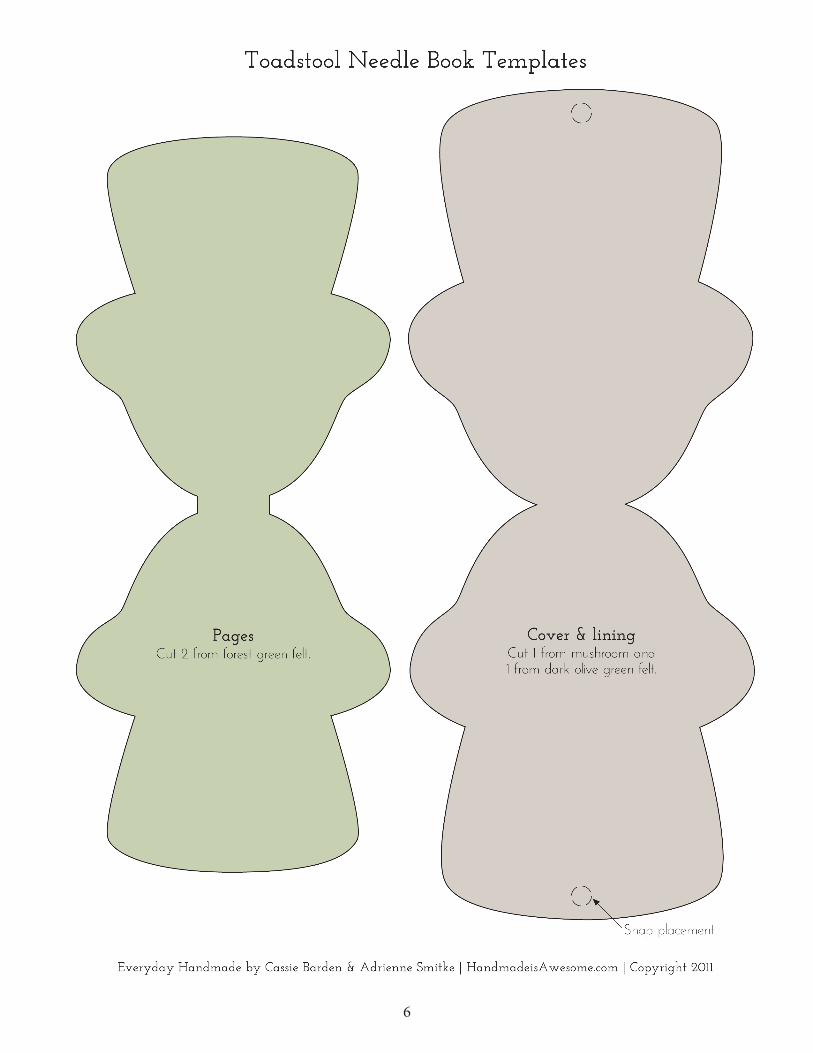
4. Using the matching olive embroidery floss, stitch either side of the snap to the center bottom edges of the needle book lining felt (see photos or templates for reference on the snap placement).
5. Layer the lining with the cover, wrong sides together, and using the mushroom colored embroidery floss, blanket stitch around the entire edge to secure them together.
6. Center the two forest green pages on the lining side of the needle book. Using matching top and bobbin threads, machine stitch across the spine of the book twice.

4
7. Fill the pages with your pins and needles, and you’re done!
Pattern templates are on the next page and when you’re finished, show off your completed project by adding a photo of your Mushroom Needle Book to our Everyday Handmade flickr group: http://www.flickr.com/groups/everydayhandmade.
For more info on Everday Handmade, project photos from the book, information about trunk shows, and more, visit our website: handmadeisawesome.com.

5
Assembly diagram
Placementguides
Toadstool Needle Book Templates
Everyday Handmade by Cassie Barden & Adrienne Smitke | HandmadeisAwesome.com | Copyright 2011
Embroiderystitching line
6