tm1 salary module - services - anu salary module data entry and report ..... 1 2. salary general...
TRANSCRIPT

TM1 Salary Module Data Entry and Report

Table of Contents 1. Accessing Salary Module Data Entry and Report ...................................................... 1
2. Salary General Information ........................................................................................ 4
3. HR Assumptions ........................................................................................................ 5
4. Report – Salary Summary .......................................................................................... 6
5. Entering Data ............................................................................................................. 9
a. Single Employee Input ............................................................................................... 9
i. Job Detail ................................................................................................................... 9
ii. GLC Distribution ....................................................................................................... 14
iii. Results ..................................................................................................................... 16
b. Casual Employees ................................................................................................... 19
c. New Employees ....................................................................................................... 23
d. Salary Group Employees ......................................................................................... 26
Last updated date: Friday, 29 July 2016
Planning Systems Team, Finance & Business Services
TM1 Budgeting Webpage
https://services.anu.edu.au/information-technology/software-systems/tm1-budgeting
The Australian National University
Canberra ACT 2601 Australia
www.anu.edu.au
CRICOS Provider No. 00120C

TM1 Salary Module: Data Entry and Report
1. Accessing Salary Module Data Entry and Report • Go to TM1 web.
• Log into TM1 with your UDS account (HORUS password).
• On the Main Menu, select Recurrent Funds or Special Purpose Funds subject to the fund you wish to budget for.
• On the Recurrent Funds Main Menu, under Salary, four options are available: The Australian National University | Page 1 of 27

TM1 Salary Module: Data Entry and Report
HR Assumptions This template includes assumptions associated with salary calculations (e.g. the rate and period of EB Salary Increase from current year onwards, Levy rates) for your information. Salary Summary Select this template if you wish to see the budgeted or actual summary of all employees in your area (e.g. Total Salaries, FTE). This template also enables you to get into budget data entry templates by Employee. Casual Employees Select this template if you wish to enter a lump sum for casual salaries by Salary Group category (e.g. Academic, Professional Admin, Research Assistant). New Employees Select this template if you wish to create a new employee to enter salary budget for.
The Australian National University | Page 2 of 27

TM1 Salary Module: Data Entry and Report
• On the Special Purpose Funds Main Menu, under Salary, one more option is available in addition to the aforementioned four options in Recurrent Funds Main Menu:
Salary Group Employees Select this template if you wish to enter a lump sum budget for salaries by Salary Group category (e.g. Academic, Professional Admin, Research Assistant) for future years with the exception of budget year (e.g. if the budget year is 2017, use this template for salary budget from 2018 onwards). This template is useful to budget salaries for the life of the project where you may not have information about individual staff working on the project in future years. We do not recommend this data entry template for budget year entries. To enable more meaningful management reporting (e.g. YTD Actual salaries vs Budget report by employee), use the templates that provide you with the ability to enter budget by Employee for budget year.
The Australian National University | Page 3 of 27

TM1 Salary Module: Data Entry and Report
2. Salary General Information • For the Budget Cycle, the uni-wide salary data is loaded to TM1 Working
Budget once a year (i.e. mid-year upload). • HRMS salary data by employee is planned to be loaded to TM1 Actual
fortnightly (still in discussion - to be confirmed). This includes pay information by natural account (e.g. 5001, 5021) as well as by earnings element (e.g. Base Salary, Market Loading, Superannuation).
The Australian National University | Page 4 of 27

TM1 Salary Module: Data Entry and Report
3. HR Assumptions • To open the report, go to Main Menu > Recurrent Funds/Special Purpose
Funds > HR Assumptions. • A set of assumptions from current year onwards used for calculating salary
budget is listed in this template. Please note that ACT Payroll Tax rate is used for calculating salaries for all employees.
The Australian National University | Page 5 of 27

TM1 Salary Module: Data Entry and Report
4. Report – Salary Summary • To open the report, go to Main Menu > Recurrent Funds/Special Purpose
Funds > Salary Summary. • Select a GLC or a parent GLC (e.g. project, department, budget unit, College,
or Portfolio) from the Department drop-down list. More details about navigation for the drop-down lists and search function are available in the TM1 Tips and Techniques.
• Select a type of display from the Display drop-down menu. The default value Project Only will display employees for the selected department by project. If you select Expand All, this option will also display consolidated departments.
• Select a fund type from the Fund drop-down menu. The default value will display staff under all funds.
The Australian National University | Page 6 of 27

TM1 Salary Module: Data Entry and Report
• Select Working Budget or Actual from the Version drop-down menu. Actual data from HR is for the information only.
• Click on the Refresh Report button. This will display all employees under
selected criteria.
• To export the report, please refer to the exporting options in the TM1 Tips and
Techniques. • To enter salaries for Working Budget, click any cells (other than GLC,
Employee ID, Employee Name and FTE) for a particular employee you wish to budget for. For example, to select an employee, first click on the Total Salary column of the desired employee row and then press the Single Employee Input button.
• Two options are available after the selection and you can select templates depending on your preference:
Option 1: Single Employee Input button next to Refresh Report button
Option 2: Separate Job Detail, GLC Distribution, and Results button at the top
o Option 1 - Single Employee Input: If you click on the Single Employee Input button, it will bring you to the salary data entry template with three different tabs for the selected employee. Three tabs are Job Detail, GLC Distribution, and Results. The three tabs are located at the bottom of the template.
The Australian National University | Page 7 of 27

TM1 Salary Module: Data Entry and Report
o Option 2 - Separate Job Detail, GLC Distribution, and Results: Three
different tabs in Single Employee Input can be also opened individually. Three buttons are located at the top of the Salary Summary report. If you open all these three reports through the buttons, each template can be switched at the top of the view.
The Australian National University | Page 8 of 27

TM1 Salary Module: Data Entry and Report
5. Entering Data
a. Single Employee Input
i. Job Detail
• To open the template, go to Main Menu > Recurrent Funds/Special Purpose Funds > Salary Summary and select one template from two options on Salary Summary. If you select Option 2 (i.e. individual templates), make sure to click on the Job Detail button.
• Job detail records for the selected employee will be displayed in the template.
• Hire Date is displayed at the top next to the Employee drop-down list. • You can select Working Budget or Actual from the Version drop-down menu.
Where you select Actual, this will display the most recently-uploaded actual data from HRMS (planned to be fortnightly-updated in TM1 – to be confirmed).
• During the budget cycle, if you wish to use the most up-to-date HRMS data in TM1 (Actual Version), you can import Actual into Working Budget by clicking on the Update Employee Details from HR button. Once you click on this button, the prompt will remind you that data import will override any changes made to Working Budget previously. Click Continue if you wish to copy Actual data to Working Budget. This override is restricted to the selected employee for Job Details only.
• Type the number of new lines you want add for budgeting. The default value is set to two lines, meaning the template will add two additional new lines automatically after saving data.
• Click on the Refresh button if you made any changes to the selections and
wish to refresh the template.
The Australian National University | Page 9 of 27

TM1 Salary Module: Data Entry and Report
• For salary budgets, HRMS records since the start of previous year will be
displayed for the selected employee. • Fields in the Job Detail template are as follows:
Field Minimum required field?
Effective Date
Yes with the format of YYYY-MM-DD (e.g. 2017-03-01)
It is critical to order Effective Date chronologically. Otherwise, higher record number in Working Budget will override any previous record numbers. For example, if record 8 has FTE 0.5 from 2017-02-01 Effective Date while record 9 has FTE 1 from 2016-12-31, then record 9 will override record 8, calculating salaries based on 1 FTE.
Action Reason Desc
No For information only. Enter any useful descriptions as appropriate. An example record from HRMS is “Mass Salary Change (EA Incr)”.
Position Number
No Position number from in HRMS. Displayed in the Salary Summary report.
Position Description
No Position description from HRMS. Displayed in the Salary Summary report. Enter any useful descriptions as appropriate.
Std Hours No Standard hours from HRMS. For information only. FTE Yes Full-time equivalent. Displayed in the Salary Summary report.
Eligibility Group No
Categorised into Academic, General and Casual by Salary Group. To change Eligibility Group, enter Effective Date and FTE for a new record. Select an option from the drop-down menu in Eligibility Group and press F9 key on your keyboard (or click on the Refresh button). This will bring the list of options in Salary Level field under the selected Eligibility Group. If you do not enter anything in this field for a new record, a previous record will be automatically filled in after pressing the Recalculate button.
The Australian National University | Page 10 of 27

TM1 Salary Module: Data Entry and Report
Field Minimum required field?
Salary Level No
To change Salary Level, enter Effective Date and FTE for a new record. Select an option from the drop-down menu in Salary Level field. If you cannot see any options, make sure to select Eligibility Group first and press F9 (or click on the Refresh button). If you do not enter anything in this field, a previous record will be automatically filled in after pressing the Recalculate button.
Annual Salary No
Populated based on ANU Salary Table automatically after you click on the Recalculate button later once you complete all data entry – you cannot enter any data into this field.
Salary Adj No
This field is the annualised amount for allowances/adjustments based on the payrun uploaded to TM1. If you want to change the amount, create new record with Effective Date and FTE, then type the amount in Salary Adj.
Super Rate No
Calculated based on actual superannuation payment over salaries (base + other earnings). The rate may not be 17% where the selected employee receives non-superable allowances/adjustments. Start a new record, and type a superannuation rate in the Super Rate field with Effective Date and FTE if you want to change the existing rate.
Emp Status No Shows whether the employee is active or terminated. For example, a fixed-term employee will have a future dated Effective Date with Emp Status “T”.
Alternate GLC for Base Salary
No
You can transfer a lump sum base salary (e.g. loadings) from an existing charge code to a new GLC. Enter Effective Date and FTE for a new record first. Then, you will need to type the original GLC, new GLC and $ amount to transfer. Make sure correct GLCs are used.
The Australian National University | Page 11 of 27

TM1 Salary Module: Data Entry and Report
Field Minimum required field?
Alternate GLC for Oncosts
No
You can transfer a selected oncost(s) (from superannuation, workers compensation, payroll tax and long service leave) to a different GLC. Enter Effective Date and FTE for a new record first. Then, you will need to type a new GLC to be charged with oncosts and enter “Yes” for the selected oncost(s). Make sure a correct GLC is used.
One-off Amount No
Will add a lump sum amount into the period that Effective Date of the new record belongs to (make sure to enter Effective Date and FTE for the new record). This field is useful in budgeting bonus or termination payout.
• Fields highlighted in grey at the right corner of the template are for information
only. GRD represents Salary Level while Job Code shows Salary Level with Salary Group Category (e.g. G6ADM – professional admin staff with ANU level 6). Step is for Salary Step while Step Entry Date shows the increment dates that occurred in the past. This information is displayed so that you can take into consideration when budgeting (e.g. step increment). Job FCN is to identify an activity code for the employee (e.g. research only). Emp Dept shows HR department of the employee while Emp Term shows whether the employee is continuing.
The Australian National University | Page 12 of 27

TM1 Salary Module: Data Entry and Report
• Frequent scenarios are listed below (e.g. change FTE, Salary Level, Salary
Adj, Super Rate): Scenario Data Entry
FTE change To change FTE, type the date in the Effective Date field and type a new FTE (e.g. 0.25 or 1).
Salary Level change
To change salary level for the employee, type the date in the Effective Date field, type a FTE, select Eligibility Group from the drop-down menu and press F9 key on your keyboard (or click on the Refresh button). Then select a salary level from Salary Level drop-down menu.
Salary Adj change
The amount to be entered in Salary Adj field is an annualised amount. First, type the date in the Effective Date field and a FTE. Then, enter an annualised allowance or adjustment into the Salary Adj field.
Super Rate change To change the super rate, type the date in the Effective Date field and type a FTE & a new super rate (e.g. 17% or 9.5%).
Termination To terminate the selected employee, type the date in the Effective Date field and “T” in the Emp Status field.
Transfer market loadings to a new GLC
To transfer a lump sum amount to a new GLC, type the date in the Effective Date field, enter a FTE, and type GLCs and a lump sum amount in GLC From, GLC To, Amount fields respectively under Alternate GLC for Base Salary.
Transfer LSL to a non-project based GLC
To transfer an entire oncost(s) to a different GLC, type the date in the Effective Date field, enter a FTE, and type a GLC to send the oncost(s) to, and enter “Yes” to the LSL field under Alternate GLC for Oncosts.
Termination payout
To budget a payout amount on Termination, type the data in the Effective Date field, type a FTE, and enter a lump sum payout amount in One-off Amount field. Where there are multiple GLCs for the selected employee, the lump sum payout will be split between these GLCs.
• You can enter comments by year at the bottom of the template and these comments will be displayed in Salary Summary report by employee.
• Press the Recalculate button after data entries. This action ensures what you
changed will be reflected in other reports.
The Australian National University | Page 13 of 27

TM1 Salary Module: Data Entry and Report
• After completing data entry in Job Detail, you can navigate to other pages by
switching tabs at the bottom of template in Single Employee Input or clicking other buttons at the top (above Refresh button) of the template in a separate Job Detail template.
ii. GLC Distribution
• To open the template, go to Main Menu > Recurrent Funds/Special Purpose Funds > Salary Summary and select one template from two options on Salary Summary. If you select Option 2 (i.e. individual templates), make sure to click on the GLC Distribution button.
• GLC distribution records for the selected employee are displayed in this template. If you are on Single Employee Input, you cannot change Employee on this template – go to Job Detail tab to change the employee.
• You can select Working Budget or Actual from the Version drop-down menu.
However, if you are on Single Employee Input, you cannot change Version on this template – go to Job Detail tab to change the version. Where you select Actual, this will display the most recently-uploaded actual data from HRMS (fortnightly updated in TM1).
• Similar to Job Detail, during the budget cycle, if you wish to use the most up-to-date HRMS data in TM1 (first, have a look at Actual Version to see whether there are many changes), you can import Actual into Working Budget by clicking on the Update Employee Details from HR button. Once you click on this button, the prompt will remind you that data import will override any changes made to Working Budget previously. Click Continue if you wish to copy Actual data to Working Budget. Again, this override is restricted to the selected employee for GLC Distribution only.
The Australian National University | Page 14 of 27

TM1 Salary Module: Data Entry and Report
• Type the number of new lines you want add for budgeting. The default value is set to two lines, meaning the template will add two additional new lines automatically after saving data.
• Click on the Refresh button if you made any changes to the selections.
• For salary budgets, HRMS records since the start of previous year will be
displayed for the selected employee. • Fields in the GLC Distribution template are as follows:
Field Minimum required field?
Effective Date
Yes with the format of YYYY-MM-DD (e.g. 2017-03-01)
It is critical to order Effective Date chronologically. Otherwise, higher record number in Working Budget will override any previous record numbers. For example, if record 2 that has Effective Date 2017-01-01 with 50:50 splits while record 3 has one GLC (no split) with 2016-10-31, then record 3 will override record 2, charging all salaries and oncosts into one GLC.
Eligibility Group
Yes Categorised into Academic, General and Casual by Salary Group.
GLCs Yes
The format must be Fund.Department.Project (e.g. R.12345.00). Nine GLC splits are available on the current template.
% Yes The format must be in a number (50:50 without % sign). Please refer to the screen image above.
• You can enter comments by year at the bottom of the template and these comments will be displayed in Salary Summary report by employee.
The Australian National University | Page 15 of 27

TM1 Salary Module: Data Entry and Report
• Press the Recalculate button after GLC data entries. This action ensures what
you changed will be reflected in other reports.
• After completing data entry in GLC Distribution, you can navigate to other
pages by switching tabs at the bottom of template in Single Employee Input or clicking other buttons at the top (above Refresh button) of the template in a separate GLC Distribution template.
iii. Results
• To open the template, go to Main Menu > Recurrent Funds/Special Purpose Funds > Salary Summary and select one template from two options on Salary Summary. If you select Option 2 (i.e. individual templates), make sure to click on the Results button.
• Results template displays the selected employee’s salaries and oncosts by GLC distribution and period. If you are on Single Employee Input, you cannot change Employee on this template – go to Job Detail tab to change the employee.
• Select a year that you wish to check the results of your salary data entry.
The Australian National University | Page 16 of 27

TM1 Salary Module: Data Entry and Report
• You can select Working Budget or Actual from the Version drop-down menu.
Where you select Actual, this will display the most recently-uploaded actual data from HRMS (planned to be fortnightly- updated in TM1 – to be confirmed).
• You can select a fund from the Funds drop-down menu. The default value is All Funds.
• Click on the Refresh button if you made any changes in the selections.
The Australian National University | Page 17 of 27

TM1 Salary Module: Data Entry and Report
• Salaries and oncosts for the selected employee will be displayed by GLC and Period. You can expand “+” signs to see the details under particular salaries.
• You can navigate back to other templates by switching tabs at the bottom of
Single Employee Input or clicking other buttons at the top (next to Refresh button) of the template in a separate Results.
The Australian National University | Page 18 of 27

TM1 Salary Module: Data Entry and Report
b. Casual Employees
• To open the template, go to Main Menu > Recurrent Funds/Special Purpose Funds > Casual Employees.
• Select a year that you wish to budget for.
• Select a GLC to enter budget for (e.g. R.24510.00) – The GLC has to be at
the lowest project level. To select a GLC, click the drop-down menu and type the GLC you wish to search for. If you wish to enter budget for a particular department, add “.00” at the end (e.g. R.24510 to R.24510.00). More details about navigation for the drop-down menus and search function is available in the TM1 Tips and Techniques.
The Australian National University | Page 19 of 27

TM1 Salary Module: Data Entry and Report
• Press F9 key on your keyboard. This will enable your data entry into cells.
• Select a salary group you wish to budget for and select Yes or No from the
drop-down menu of the Casuals to receive Super field. • Select Yes or No from the drop-down menus of the On Costs included in total
budget amount field for Super, Payroll Tax and Workers Comp. For example, if you select Yes for all three fields, your lump sum entry will include these on-costs and back-calculate base salary amounts based on HR assumptions.
• Enter a lump sum amount ($) and relevant FTE per period. Please ensure that
you enter the best estimate for FTE as this information is used for FTE reports and regularly provided to senior management.
The Australian National University | Page 20 of 27

TM1 Salary Module: Data Entry and Report
• If you want to copy the same information to other periods, highlight the cells you wish to copy from and press Ctrl + C on your keyboard. You will get the prompt below, then click OK.
• Highlight the cells you wish to copy to and press Ctrl+V on your keyboard.
• If you scroll to the right, you can enter comments. These comments will be
displayed in the Salary Summary report.
• Click on the Recalculate button to save the data.
The Australian National University | Page 21 of 27

TM1 Salary Module: Data Entry and Report
• The results are shown below the data entry cells. These results will be also displayed in the Salary Summary report under the Casual salary group.
The Australian National University | Page 22 of 27
TM1 Salary Module: Data Entry and Report
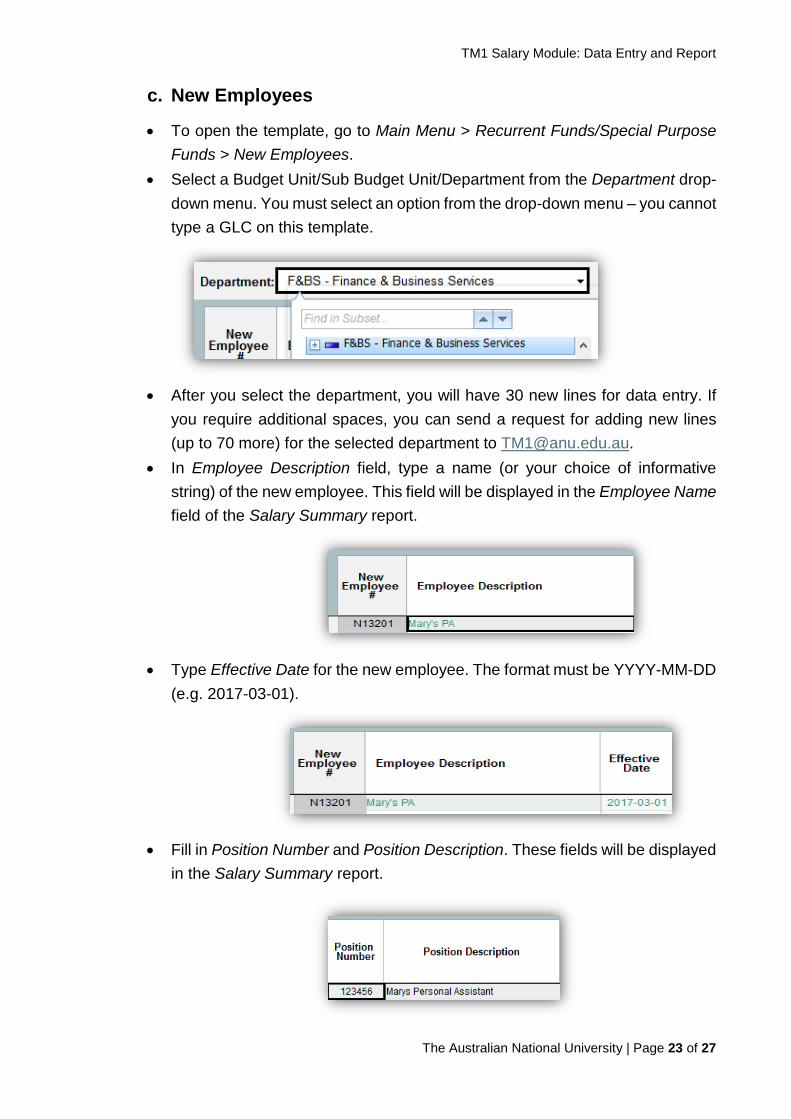
c. New Employees
• To open the template, go to Main Menu > Recurrent Funds/Special Purpose Funds > New Employees.
• Select a Budget Unit/Sub Budget Unit/Department from the Department drop-down menu. You must select an option from the drop-down menu – you cannot type a GLC on this template.
• After you select the department, you will have 30 new lines for data entry. If
you require additional spaces, you can send a request for adding new lines (up to 70 more) for the selected department to [email protected].
• In Employee Description field, type a name (or your choice of informative string) of the new employee. This field will be displayed in the Employee Name field of the Salary Summary report.
• Type Effective Date for the new employee. The format must be YYYY-MM-DD
(e.g. 2017-03-01).
• Fill in Position Number and Position Description. These fields will be displayed
in the Salary Summary report.
The Australian National University | Page 23 of 27

TM1 Salary Module: Data Entry and Report
• Populate FTE numbers. For example, if two new employees are to be hired at the same Salary Level and on the same/similar Effective Date, you can enter 2 into the FTE field. The FTE field will be displayed in the Salary Summary report.
• Select an option from the Eligibility Group drop-down menu and press F9 key
on your keyboard (or click on the Refresh button). This will bring the list of options in Salary Level field under the selected Eligibility Group.
• Select an option from the Salary Level drop-down menu.
• The Annual Salary field will be automatically populated after you click on the Recalculate button later.
The Australian National University | Page 24 of 27

TM1 Salary Module: Data Entry and Report
• You can enter annualised allowances or adjustments in the Salary Adj field.
• Type a superannuation rate (without %) in the Super Rate field.
• Enter GLC distribution information – select Eligibility Group from the drop-
down menu, type the GLC (the lowest project level), and type the percent without % sign. You have two data entry sections for the GLC distribution on this template. If you need to split GLCs additionally, go to the GLC Distribution template and use N number (e.g ) on this template to retrieve the new employee’s GLC data and split it further.
• When all data entry is done, click on the Recalculate button to create the new employee. If you wish to make any changes and add comments to the new employee ID, go to either Job Detail or GLC Distribution templates, and use N number to enter additional data.
The Australian National University | Page 25 of 27

TM1 Salary Module: Data Entry and Report
d. Salary Group Employees
Tip: Salary Group Employees template is similar to Casual Employees
template. The only difference is the Long Service Leave oncosts in Salary Group Employees (no LSL for casuals).
• To open the template, go to Main Menu > Special Purpose Funds > Salary
Group Employees. • Select a year that you wish to budget for. We strongly recommend that you
budget salaries by employee for Budget Year. This template is useful in entering salaries in future years other than Budget Year for Special Purpose Fund. For example, if Budget Year is 2017, this template can be used for SPF salary budget from 2018 and onwards.
• Select a GLC to enter budget (e.g. S.12345.01) – The GLC has to be at the
lowest project level. To select a GLC, click on the drop-down menu and type the GLC you wish to search for. More details about navigation for the drop-down menus and search function is available in the TM1 Tips and Techniques.
The Australian National University | Page 26 of 27

TM1 Salary Module: Data Entry and Report
• Press F9 key on your keyboard. This will enable your data entry into cells.
• Determine a salary group you wish to budget for and select Yes or No from
the drop-down menu of the Salary Group to receive super? field.
• Select Yes or No from the drop-down menus of the On Costs included in total budget amount field for Super, Payroll Tax and Workers Comp. For example, if you select Yes for all three fields, your lump sum entry will include these on-costs and back-calculate base salary amount based on HR assumptions.
The Australian National University | Page 27 of 27

TM1 Salary Module: Data Entry and Report
• Enter a lump sum amount ($) and relevant FTE per period. Please ensure that you enter the best estimate for FTE as this information is used for FTE reports and regularly provided to senior management.
• If you want to copy the same information to other periods, highlight the cells you wish to copy from and press Ctrl + C on your keyboard. You will get the prompt message below and click OK.
• Highlight the cells you wish to copy to and press Ctrl+V on your keyboard.
• If you scroll to the right, you can enter comments. These comments will be
displayed in the Salary Summary report.
The Australian National University | Page 28 of 27

TM1 Salary Module: Data Entry and Report
• Click on the Recalculate button to save the data.
• The results are shown below the data entry cells. These results will be also displayed in the Salary Summary report under the Salary Group Employees.
The Australian National University | Page 29 of 27