time & attendance job aid - cardinal project aids/time... · time & attendance job aid ......
TRANSCRIPT
Time & Attendance Job Aid
501 TA362 Time Entry Scenarios
1 of 24 Rev 03/30/2017
About Time Entry Scenarios
This job aid contains various scenarios for entering time on the Timesheet. Use the Table of Contents below to
view the list of scenarios and the page number where each can be accessed.
Important Reminders:
Enter and submit hours worked on the Timesheet at a minimum of weekly and at the end of the pay
period.
Check entries the day after hours are submitted to view and correct any errors.
Check the Reported Time Status at the end of each week / pay period and ensure hours worked and
absences submitted are approved.
TABLE OF CONTENTS
Page
Overview - When to Enter & Submit Time Entered in the Timesheet Grid ......................................................... 2
Overview - When to Enter & Submit Absences ................................................................................................... 4
Scenario 1: Entering Regular Time ..................................................................................................................... 6
Scenario 2: Making a Timesheet Adjustment ...................................................................................................... 9
Scenario 3: Uncompensated Overtime and Straight Overtime ......................................................................... 11
Scenario 4: Reporting Holiday and Leave the Same Week .............................................................................. 13
Scenario 5: Using Compensatory (Comp) Leave .............................................................................................. 17
Scenario 6: Editing an Absence Once Submitted ............................................................................................. 19
Scenario 7: Reporting Intermittent FMLA .......................................................................................................... 21
Scenario 8: Cancelling an Absence ................................................................................................................... 23
Time & Attendance Job Aid
501 TA362 Time Entry Scenarios
2 of 24 Rev 03/30/2017
Overview - When to Enter & Submit Time Entered in the Timesheet Grid
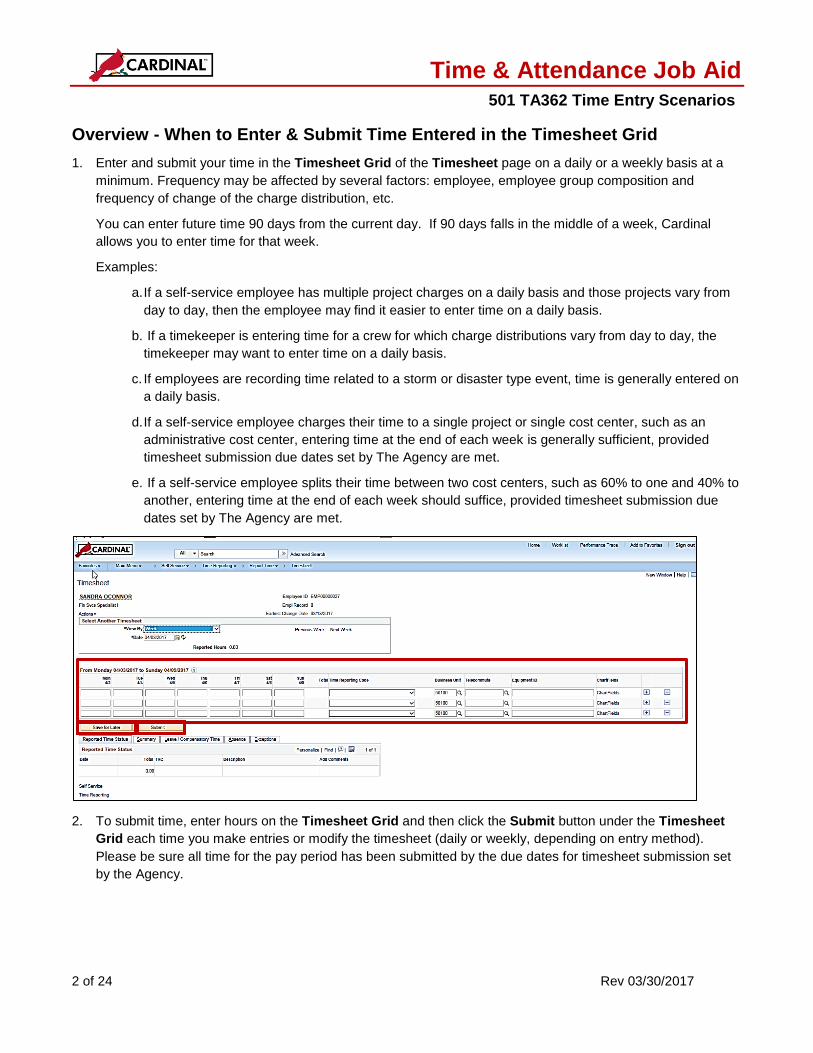
1. Enter and submit your time in the Timesheet Grid of the Timesheet page on a daily or a weekly basis at a
minimum. Frequency may be affected by several factors: employee, employee group composition and
frequency of change of the charge distribution, etc.
You can enter future time 90 days from the current day. If 90 days falls in the middle of a week, Cardinal
allows you to enter time for that week.
Examples:
a. If a self-service employee has multiple project charges on a daily basis and those projects vary from
day to day, then the employee may find it easier to enter time on a daily basis.
b. If a timekeeper is entering time for a crew for which charge distributions vary from day to day, the
timekeeper may want to enter time on a daily basis.
c. If employees are recording time related to a storm or disaster type event, time is generally entered on
a daily basis.
d. If a self-service employee charges their time to a single project or single cost center, such as an
administrative cost center, entering time at the end of each week is generally sufficient, provided
timesheet submission due dates set by The Agency are met.
e. If a self-service employee splits their time between two cost centers, such as 60% to one and 40% to
another, entering time at the end of each week should suffice, provided timesheet submission due
dates set by The Agency are met.
2. To submit time, enter hours on the Timesheet Grid and then click the Submit button under the Timesheet
Grid each time you make entries or modify the timesheet (daily or weekly, depending on entry method).
Please be sure all time for the pay period has been submitted by the due dates for timesheet submission set
by the Agency.
Time & Attendance Job Aid
501 TA362 Time Entry Scenarios
3 of 24 Rev 03/30/2017
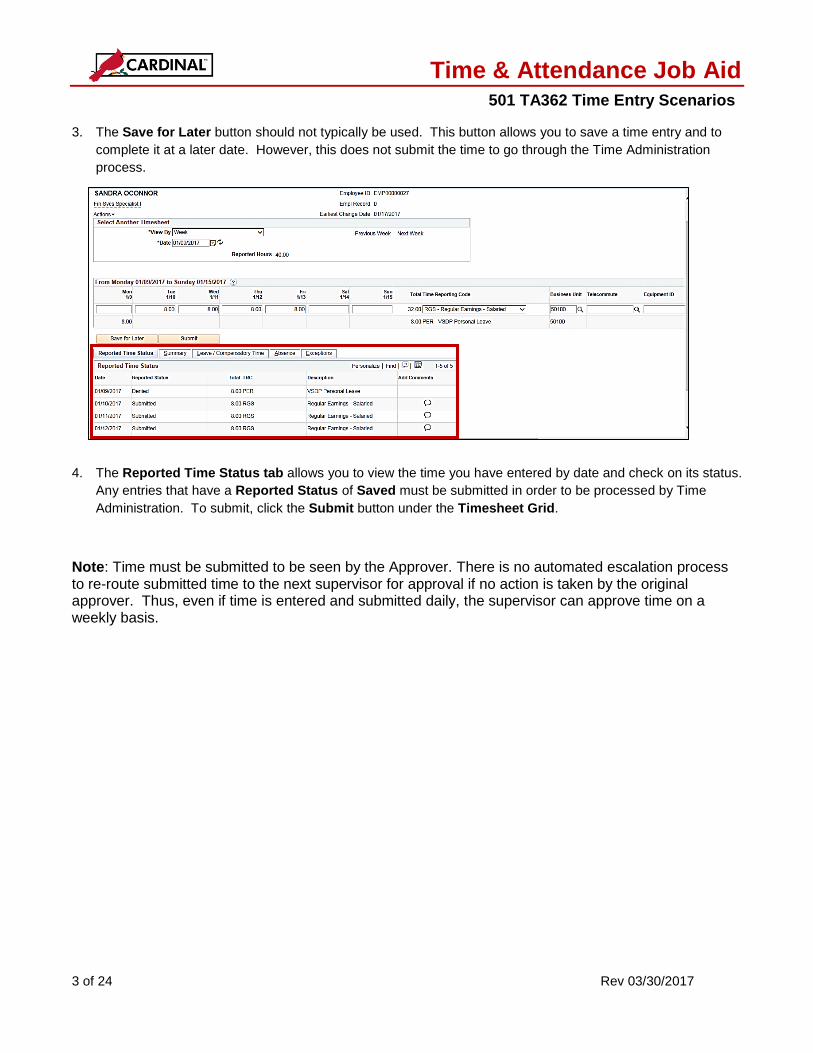
3. The Save for Later button should not typically be used. This button allows you to save a time entry and to
complete it at a later date. However, this does not submit the time to go through the Time Administration
process.
4. The Reported Time Status tab allows you to view the time you have entered by date and check on its status.
Any entries that have a Reported Status of Saved must be submitted in order to be processed by Time
Administration. To submit, click the Submit button under the Timesheet Grid.
Note: Time must be submitted to be seen by the Approver. There is no automated escalation process to re-route submitted time to the next supervisor for approval if no action is taken by the original approver. Thus, even if time is entered and submitted daily, the supervisor can approve time on a weekly basis.
Time & Attendance Job Aid
501 TA362 Time Entry Scenarios
4 of 24 Rev 03/30/2017
Overview - When to Enter & Submit Absences
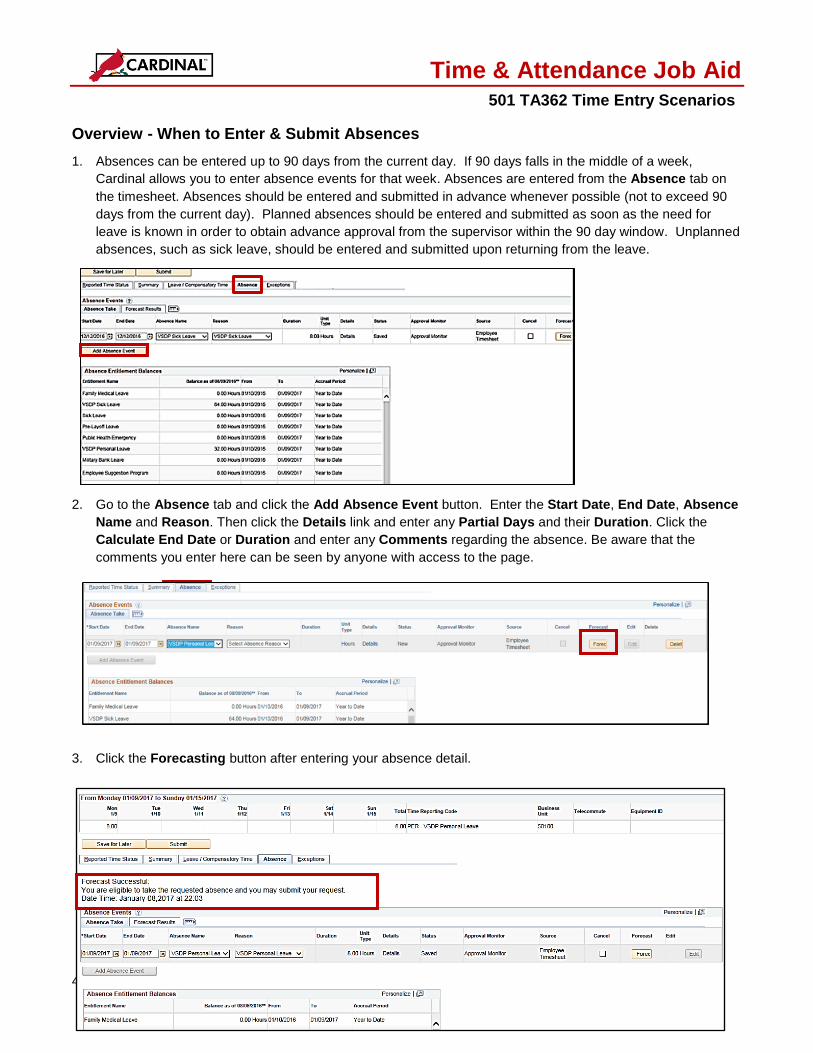
1. Absences can be entered up to 90 days from the current day. If 90 days falls in the middle of a week,
Cardinal allows you to enter absence events for that week. Absences are entered from the Absence tab on
the timesheet. Absences should be entered and submitted in advance whenever possible (not to exceed 90
days from the current day). Planned absences should be entered and submitted as soon as the need for
leave is known in order to obtain advance approval from the supervisor within the 90 day window. Unplanned
absences, such as sick leave, should be entered and submitted upon returning from the leave.
2. Go to the Absence tab and click the Add Absence Event button. Enter the Start Date, End Date, Absence
Name and Reason. Then click the Details link and enter any Partial Days and their Duration. Click the
Calculate End Date or Duration and enter any Comments regarding the absence. Be aware that the
comments you enter here can be seen by anyone with access to the page.
3. Click the Forecasting button after entering your absence detail.
Time & Attendance Job Aid
501 TA362 Time Entry Scenarios
5 of 24 Rev 03/30/2017
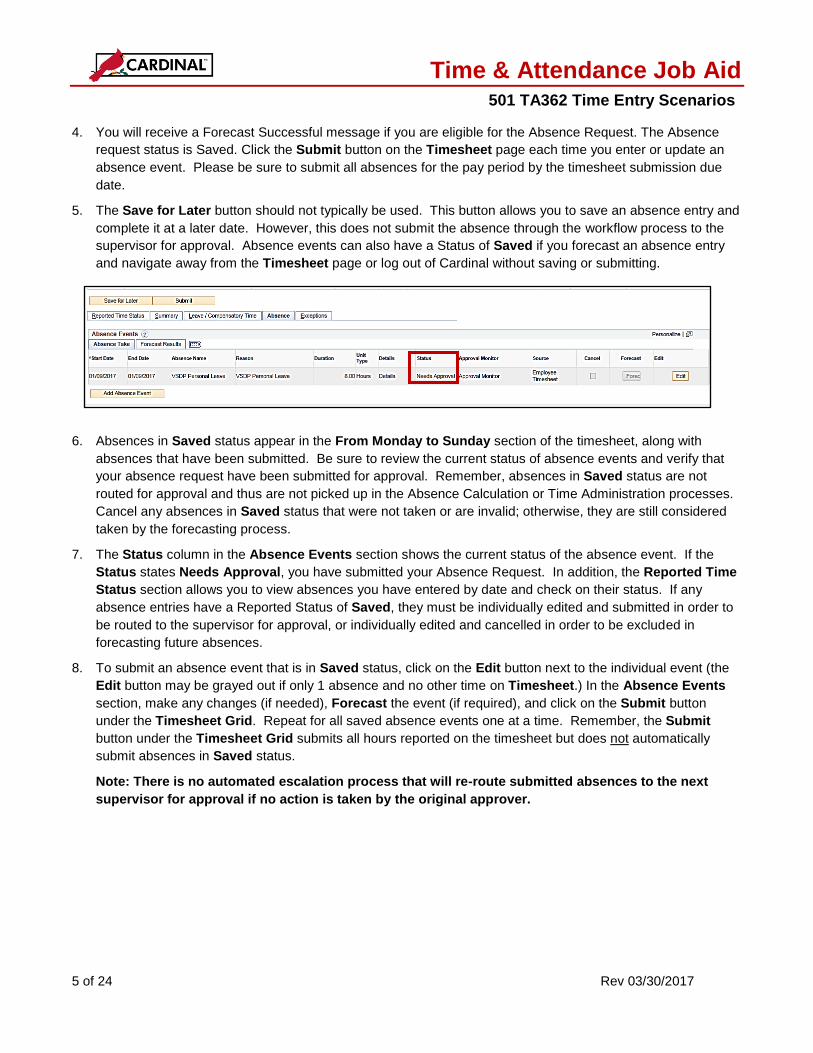
4. You will receive a Forecast Successful message if you are eligible for the Absence Request. The Absence
request status is Saved. Click the Submit button on the Timesheet page each time you enter or update an
absence event. Please be sure to submit all absences for the pay period by the timesheet submission due
date.
5. The Save for Later button should not typically be used. This button allows you to save an absence entry and
complete it at a later date. However, this does not submit the absence through the workflow process to the
supervisor for approval. Absence events can also have a Status of Saved if you forecast an absence entry
and navigate away from the Timesheet page or log out of Cardinal without saving or submitting.
6. Absences in Saved status appear in the From Monday to Sunday section of the timesheet, along with
absences that have been submitted. Be sure to review the current status of absence events and verify that
your absence request have been submitted for approval. Remember, absences in Saved status are not
routed for approval and thus are not picked up in the Absence Calculation or Time Administration processes.
Cancel any absences in Saved status that were not taken or are invalid; otherwise, they are still considered
taken by the forecasting process.
7. The Status column in the Absence Events section shows the current status of the absence event. If the
Status states Needs Approval, you have submitted your Absence Request. In addition, the Reported Time
Status section allows you to view absences you have entered by date and check on their status. If any
absence entries have a Reported Status of Saved, they must be individually edited and submitted in order to
be routed to the supervisor for approval, or individually edited and cancelled in order to be excluded in
forecasting future absences.
8. To submit an absence event that is in Saved status, click on the Edit button next to the individual event (the
Edit button may be grayed out if only 1 absence and no other time on Timesheet.) In the Absence Events
section, make any changes (if needed), Forecast the event (if required), and click on the Submit button
under the Timesheet Grid. Repeat for all saved absence events one at a time. Remember, the Submit
button under the Timesheet Grid submits all hours reported on the timesheet but does not automatically
submit absences in Saved status.
Note: There is no automated escalation process that will re-route submitted absences to the next
supervisor for approval if no action is taken by the original approver.
Time & Attendance Job Aid
501 TA362 Time Entry Scenarios
6 of 24 Rev 03/30/2017
Scenario 1: Entering Regular Time
1. In this scenario, time is being entered for regular hours worked for three different charge distributions.
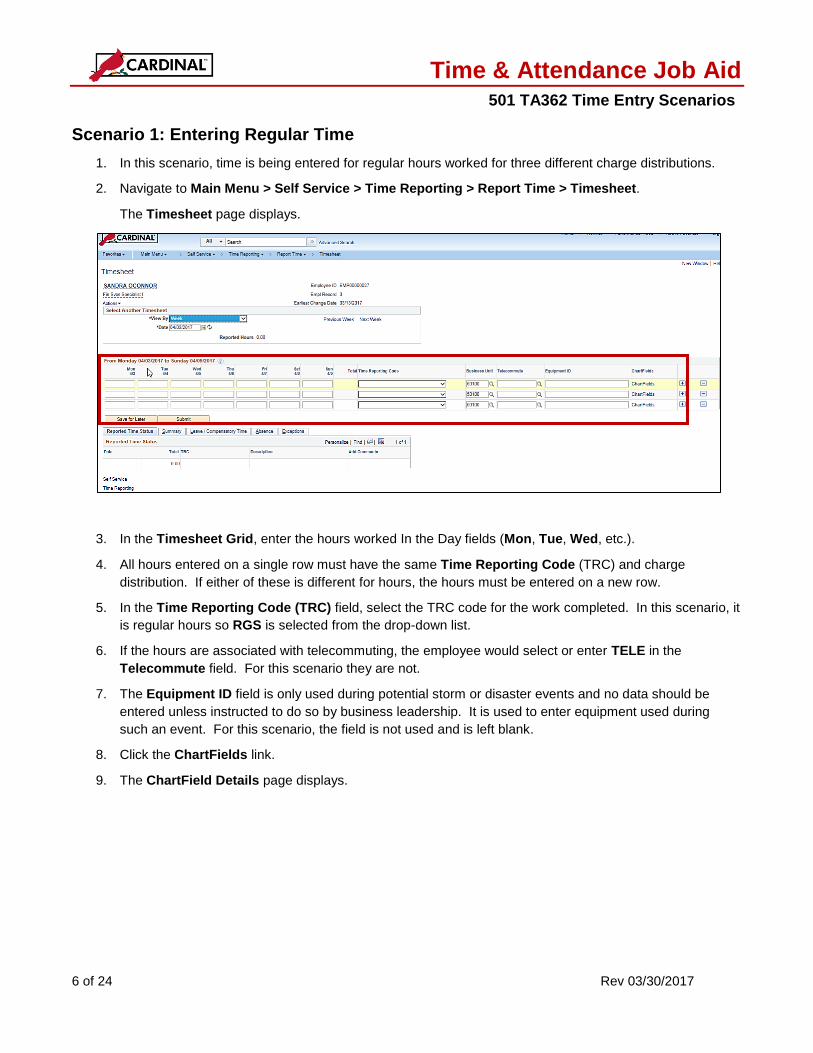
2. Navigate to Main Menu > Self Service > Time Reporting > Report Time > Timesheet.
The Timesheet page displays.
3. In the Timesheet Grid, enter the hours worked In the Day fields (Mon, Tue, Wed, etc.).
4. All hours entered on a single row must have the same Time Reporting Code (TRC) and charge
distribution. If either of these is different for hours, the hours must be entered on a new row.
5. In the Time Reporting Code (TRC) field, select the TRC code for the work completed. In this scenario, it
is regular hours so RGS is selected from the drop-down list.
6. If the hours are associated with telecommuting, the employee would select or enter TELE in the
Telecommute field. For this scenario they are not.
7. The Equipment ID field is only used during potential storm or disaster events and no data should be
entered unless instructed to do so by business leadership. It is used to enter equipment used during
such an event. For this scenario, the field is not used and is left blank.
8. Click the ChartFields link.
9. The ChartField Details page displays.
Time & Attendance Job Aid
501 TA362 Time Entry Scenarios
7 of 24 Rev 03/30/2017
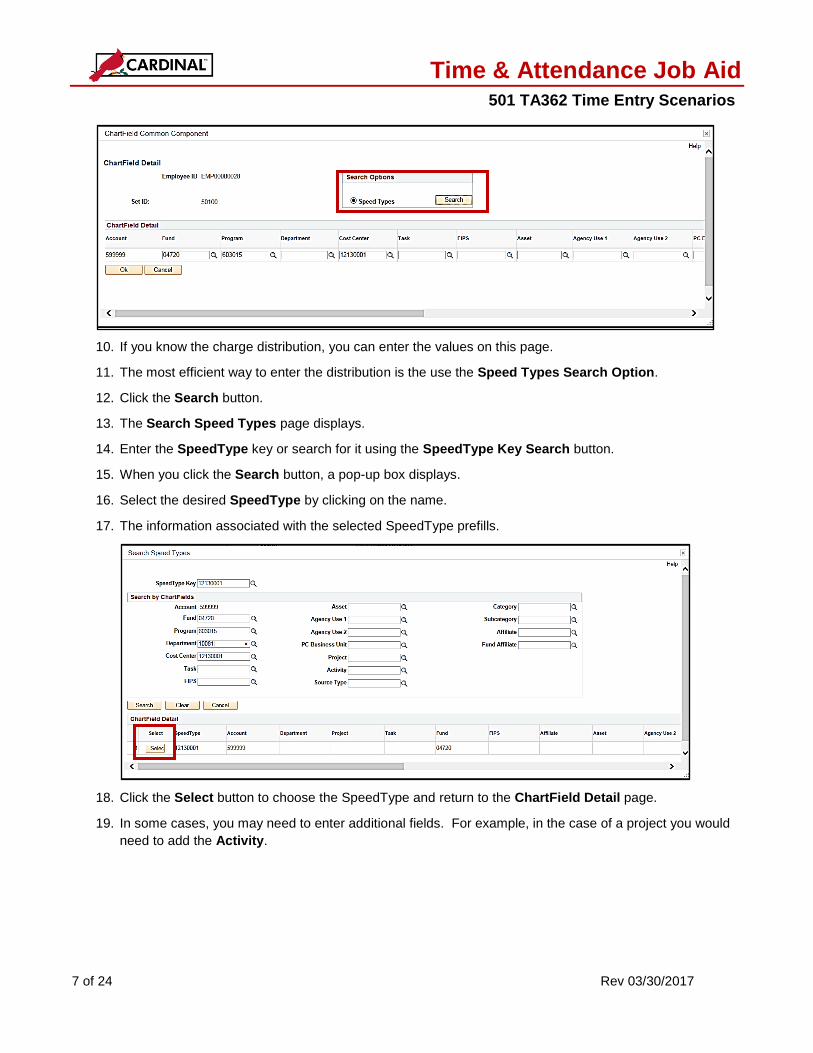
10. If you know the charge distribution, you can enter the values on this page.
11. The most efficient way to enter the distribution is the use the Speed Types Search Option.
12. Click the Search button.
13. The Search Speed Types page displays.
14. Enter the SpeedType key or search for it using the SpeedType Key Search button.
15. When you click the Search button, a pop-up box displays.
16. Select the desired SpeedType by clicking on the name.
17. The information associated with the selected SpeedType prefills.
18. Click the Select button to choose the SpeedType and return to the ChartField Detail page.
19. In some cases, you may need to enter additional fields. For example, in the case of a project you would
need to add the Activity.
Time & Attendance Job Aid
501 TA362 Time Entry Scenarios
8 of 24 Rev 03/30/2017
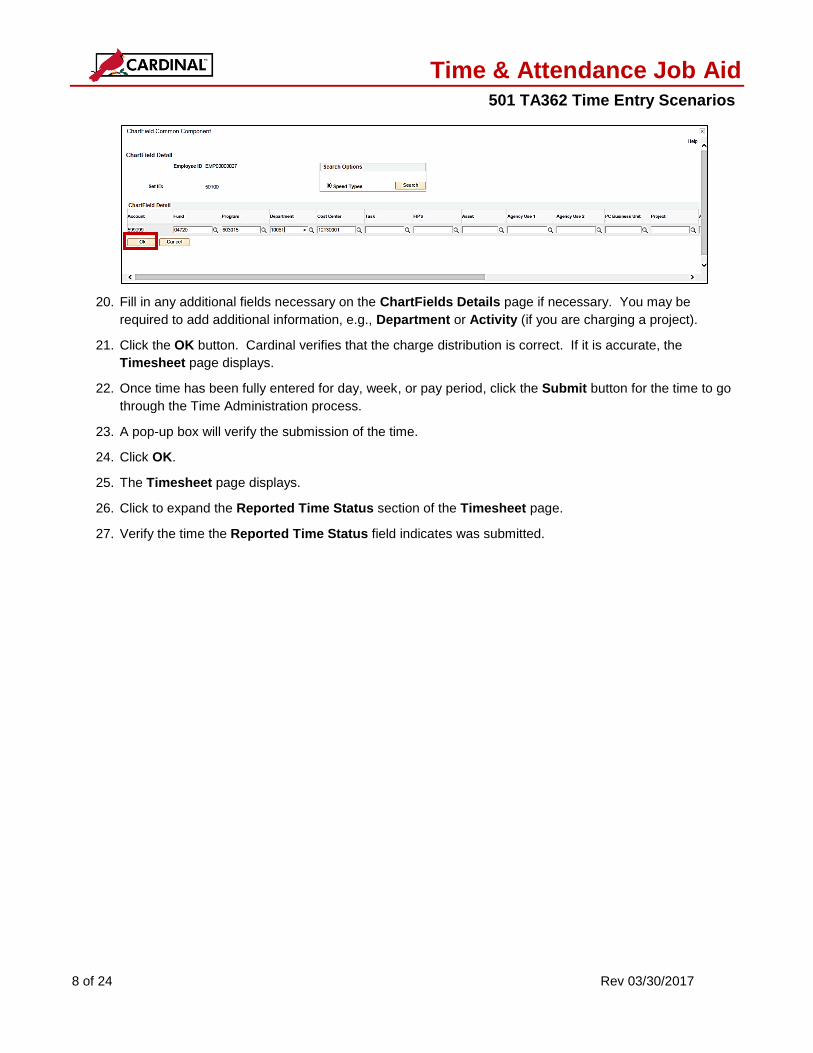
20. Fill in any additional fields necessary on the ChartFields Details page if necessary. You may be
required to add additional information, e.g., Department or Activity (if you are charging a project).
21. Click the OK button. Cardinal verifies that the charge distribution is correct. If it is accurate, the
Timesheet page displays.
22. Once time has been fully entered for day, week, or pay period, click the Submit button for the time to go
through the Time Administration process.
23. A pop-up box will verify the submission of the time.
24. Click OK.
25. The Timesheet page displays.
26. Click to expand the Reported Time Status section of the Timesheet page.
27. Verify the time the Reported Time Status field indicates was submitted.
Time & Attendance Job Aid
501 TA362 Time Entry Scenarios
9 of 24 Rev 03/30/2017
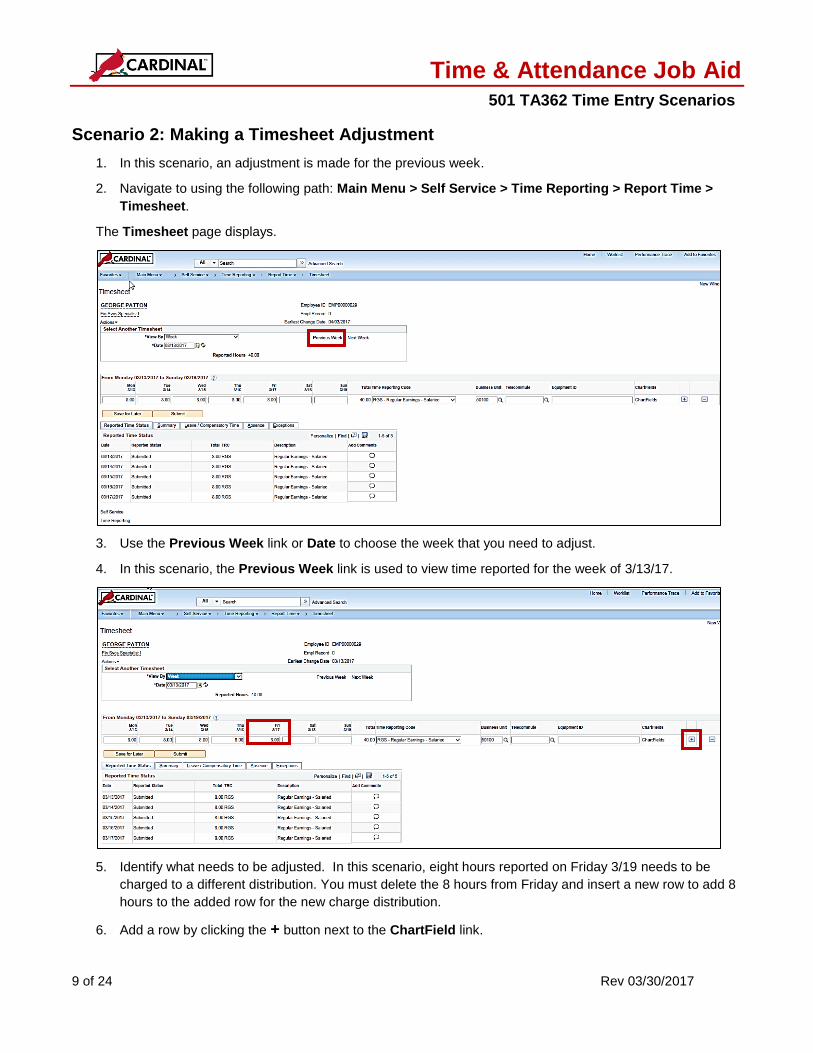
Scenario 2: Making a Timesheet Adjustment
1. In this scenario, an adjustment is made for the previous week.
2. Navigate to using the following path: Main Menu > Self Service > Time Reporting > Report Time >
Timesheet.
The Timesheet page displays.
3. Use the Previous Week link or Date to choose the week that you need to adjust.
4. In this scenario, the Previous Week link is used to view time reported for the week of 3/13/17.
5. Identify what needs to be adjusted. In this scenario, eight hours reported on Friday 3/19 needs to be
charged to a different distribution. You must delete the 8 hours from Friday and insert a new row to add 8
hours to the added row for the new charge distribution.
6. Add a row by clicking the + button next to the ChartField link.

Time & Attendance Job Aid
501 TA362 Time Entry Scenarios
10 of 24 Rev 03/30/2017
7. Enter the 8 hours correcting the charge distribution on the timesheet.
8. Select the Time Reporting Code. For this scenario it is RGS.
9. Click the ChartField link.
Note: To see specific information for entering charge distributions, see steps 9-20 of Scenario 1 on this job
aid.
10. After all time has been entered, click the Submit button to have the time go through the Time
Administration process.
11. A pop-up box will verify your submission. Click OK.
12. Verify the time was submitted by checking the Reported Time Status section on the Timesheet page.
Time & Attendance Job Aid
501 TA362 Time Entry Scenarios
11 of 24 Rev 03/30/2017
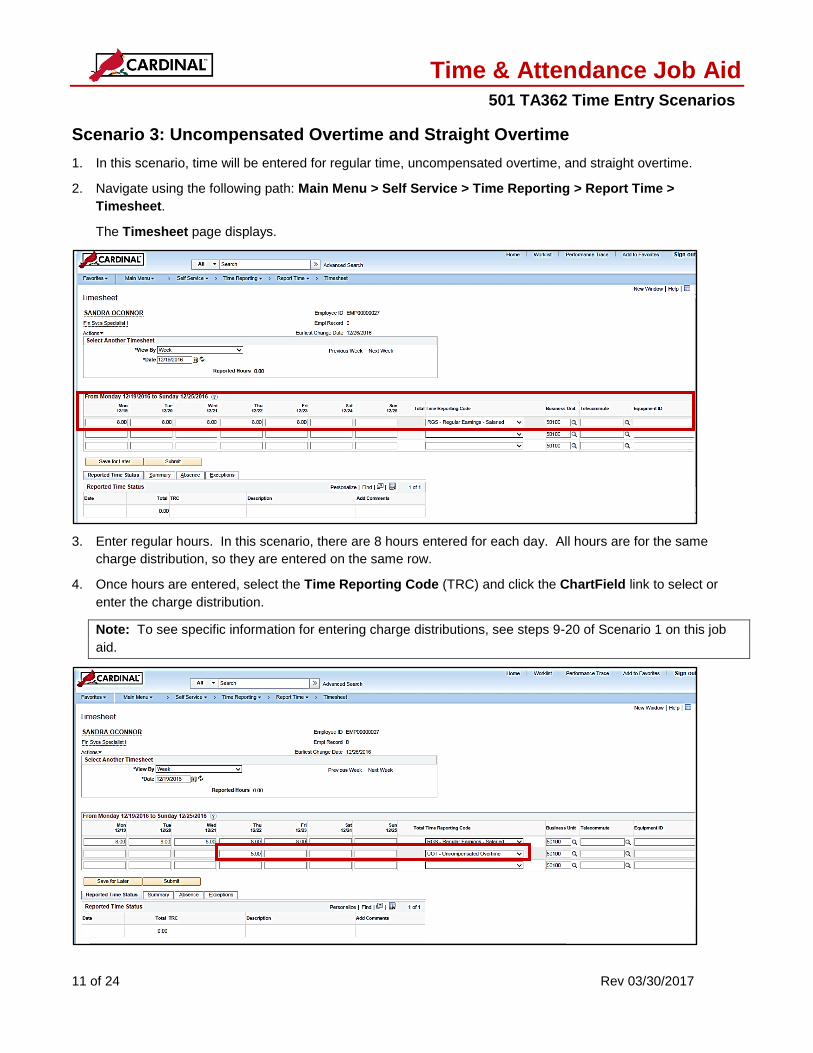
Scenario 3: Uncompensated Overtime and Straight Overtime
1. In this scenario, time will be entered for regular time, uncompensated overtime, and straight overtime.
2. Navigate using the following path: Main Menu > Self Service > Time Reporting > Report Time >
Timesheet.
The Timesheet page displays.
3. Enter regular hours. In this scenario, there are 8 hours entered for each day. All hours are for the same
charge distribution, so they are entered on the same row.
4. Once hours are entered, select the Time Reporting Code (TRC) and click the ChartField link to select or
enter the charge distribution.
Note: To see specific information for entering charge distributions, see steps 9-20 of Scenario 1 on this job
aid.
Time & Attendance Job Aid
501 TA362 Time Entry Scenarios
12 of 24 Rev 03/30/2017
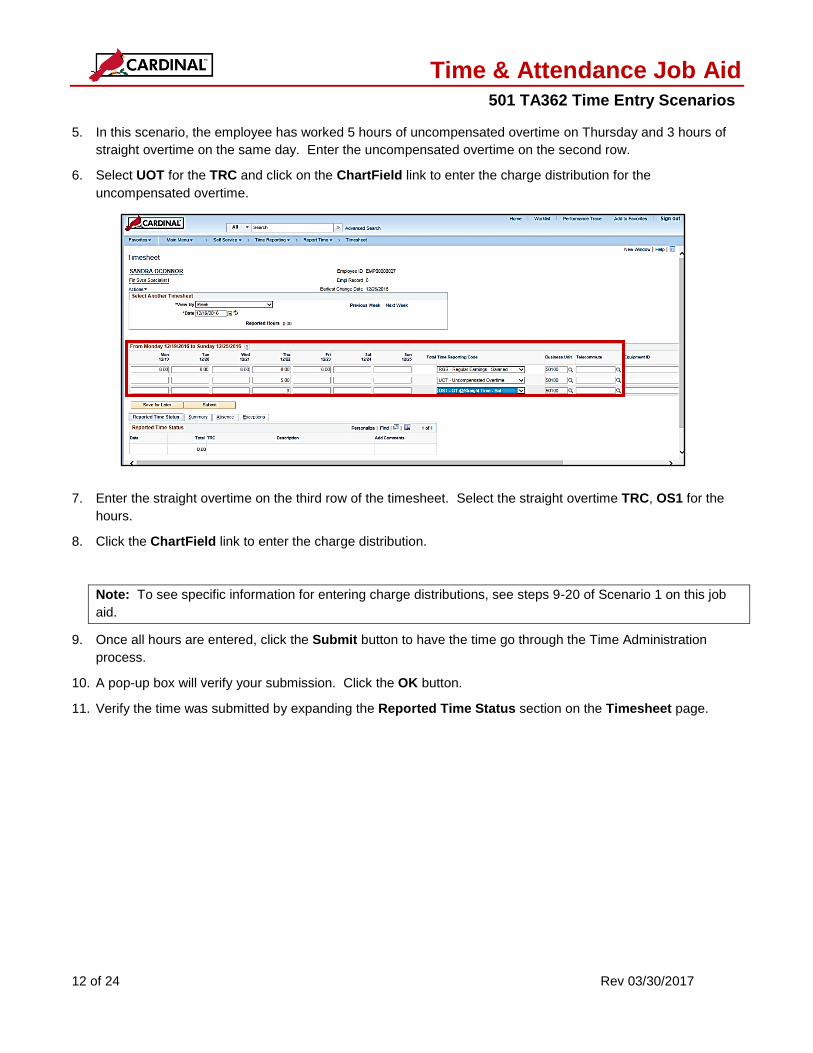
5. In this scenario, the employee has worked 5 hours of uncompensated overtime on Thursday and 3 hours of
straight overtime on the same day. Enter the uncompensated overtime on the second row.
6. Select UOT for the TRC and click on the ChartField link to enter the charge distribution for the
uncompensated overtime.
7. Enter the straight overtime on the third row of the timesheet. Select the straight overtime TRC, OS1 for the
hours.
8. Click the ChartField link to enter the charge distribution.
Note: To see specific information for entering charge distributions, see steps 9-20 of Scenario 1 on this job
aid.
9. Once all hours are entered, click the Submit button to have the time go through the Time Administration
process.
10. A pop-up box will verify your submission. Click the OK button.
11. Verify the time was submitted by expanding the Reported Time Status section on the Timesheet page.
Time & Attendance Job Aid
501 TA362 Time Entry Scenarios
13 of 24 Rev 03/30/2017
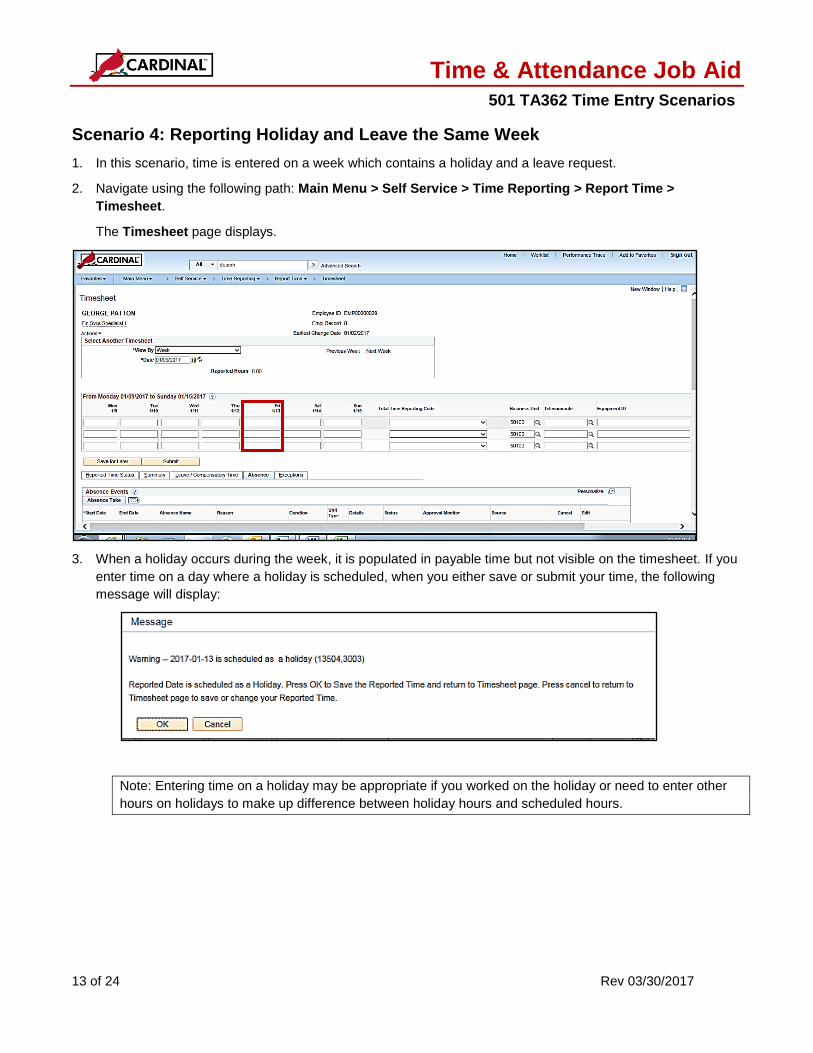
Scenario 4: Reporting Holiday and Leave the Same Week
1. In this scenario, time is entered on a week which contains a holiday and a leave request.
2. Navigate using the following path: Main Menu > Self Service > Time Reporting > Report Time >
Timesheet.
The Timesheet page displays.
3. When a holiday occurs during the week, it is populated in payable time but not visible on the timesheet. If you
enter time on a day where a holiday is scheduled, when you either save or submit your time, the following
message will display:
Note: Entering time on a holiday may be appropriate if you worked on the holiday or need to enter other
hours on holidays to make up difference between holiday hours and scheduled hours.
Time & Attendance Job Aid
501 TA362 Time Entry Scenarios
14 of 24 Rev 03/30/2017
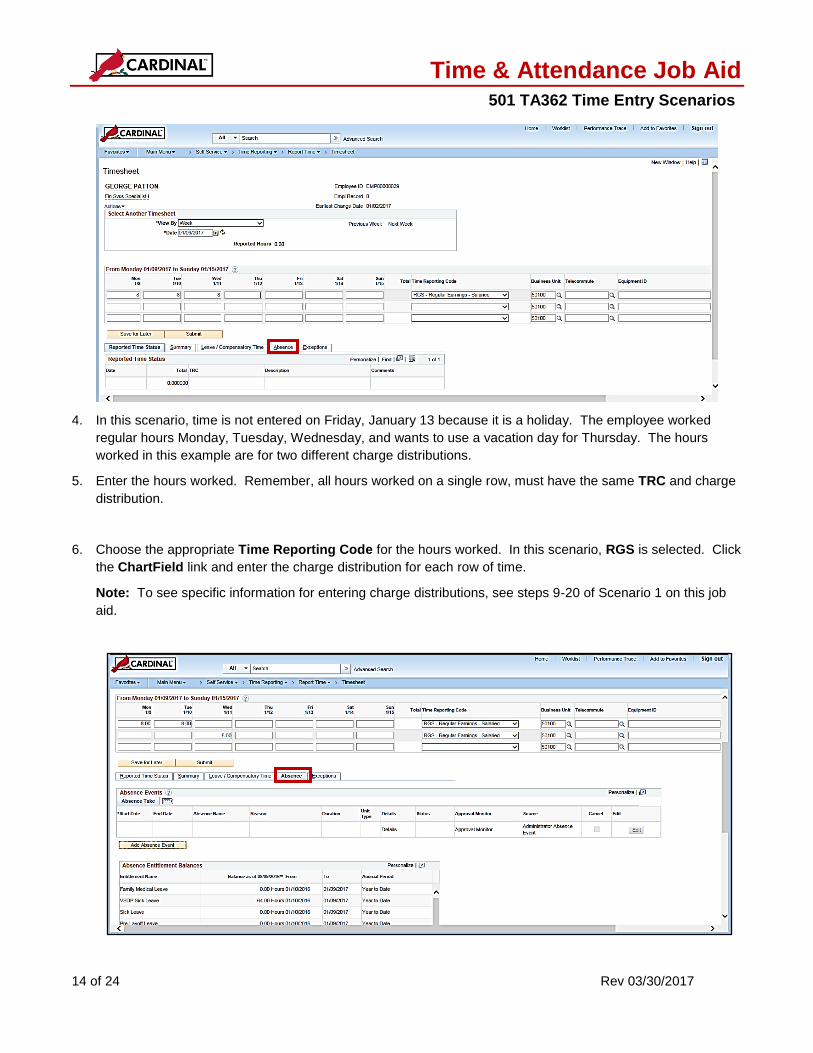
4. In this scenario, time is not entered on Friday, January 13 because it is a holiday. The employee worked
regular hours Monday, Tuesday, Wednesday, and wants to use a vacation day for Thursday. The hours
worked in this example are for two different charge distributions.
5. Enter the hours worked. Remember, all hours worked on a single row, must have the same TRC and charge
distribution.
6. Choose the appropriate Time Reporting Code for the hours worked. In this scenario, RGS is selected. Click
the ChartField link and enter the charge distribution for each row of time.
Note: To see specific information for entering charge distributions, see steps 9-20 of Scenario 1 on this job
aid.
Time & Attendance Job Aid
501 TA362 Time Entry Scenarios
15 of 24 Rev 03/30/2017
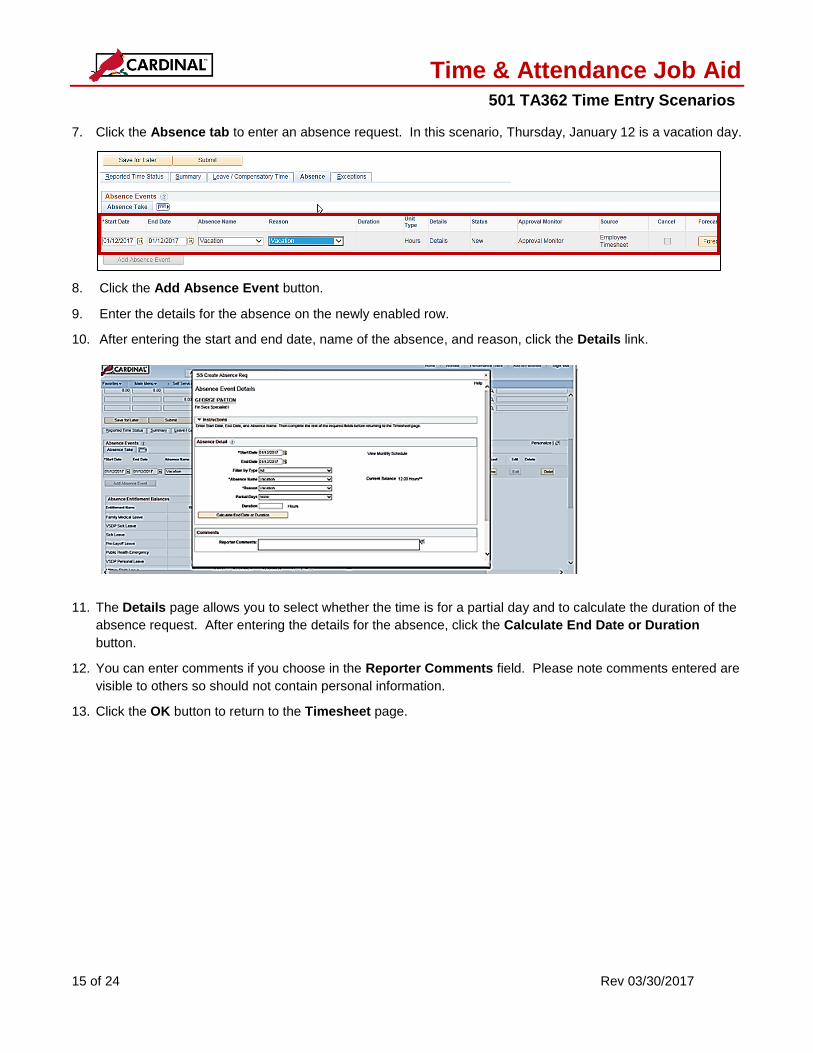
7. Click the Absence tab to enter an absence request. In this scenario, Thursday, January 12 is a vacation day.
8. Click the Add Absence Event button.
9. Enter the details for the absence on the newly enabled row.
10. After entering the start and end date, name of the absence, and reason, click the Details link.
11. The Details page allows you to select whether the time is for a partial day and to calculate the duration of the
absence request. After entering the details for the absence, click the Calculate End Date or Duration
button.
12. You can enter comments if you choose in the Reporter Comments field. Please note comments entered are
visible to others so should not contain personal information.
13. Click the OK button to return to the Timesheet page.
Time & Attendance Job Aid
501 TA362 Time Entry Scenarios
16 of 24 Rev 03/30/2017
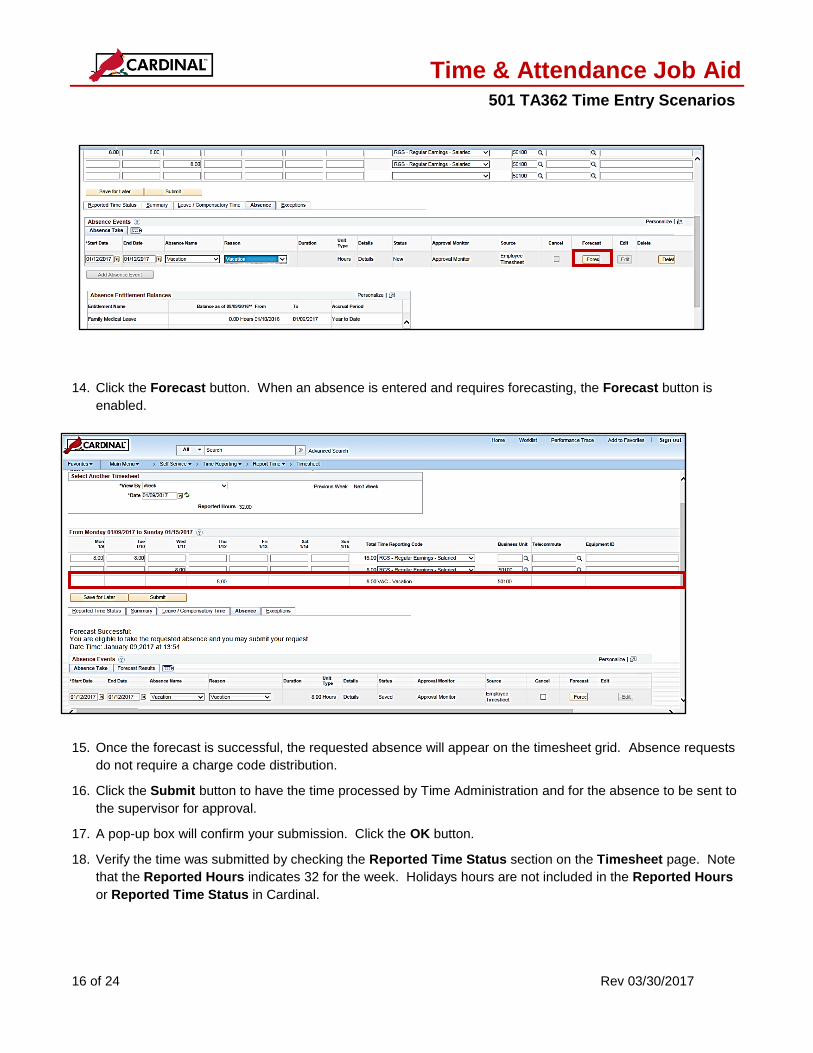
14. Click the Forecast button. When an absence is entered and requires forecasting, the Forecast button is
enabled.
15. Once the forecast is successful, the requested absence will appear on the timesheet grid. Absence requests
do not require a charge code distribution.
16. Click the Submit button to have the time processed by Time Administration and for the absence to be sent to
the supervisor for approval.
17. A pop-up box will confirm your submission. Click the OK button.
18. Verify the time was submitted by checking the Reported Time Status section on the Timesheet page. Note
that the Reported Hours indicates 32 for the week. Holidays hours are not included in the Reported Hours
or Reported Time Status in Cardinal.
Time & Attendance Job Aid
501 TA362 Time Entry Scenarios
17 of 24 Rev 03/30/2017
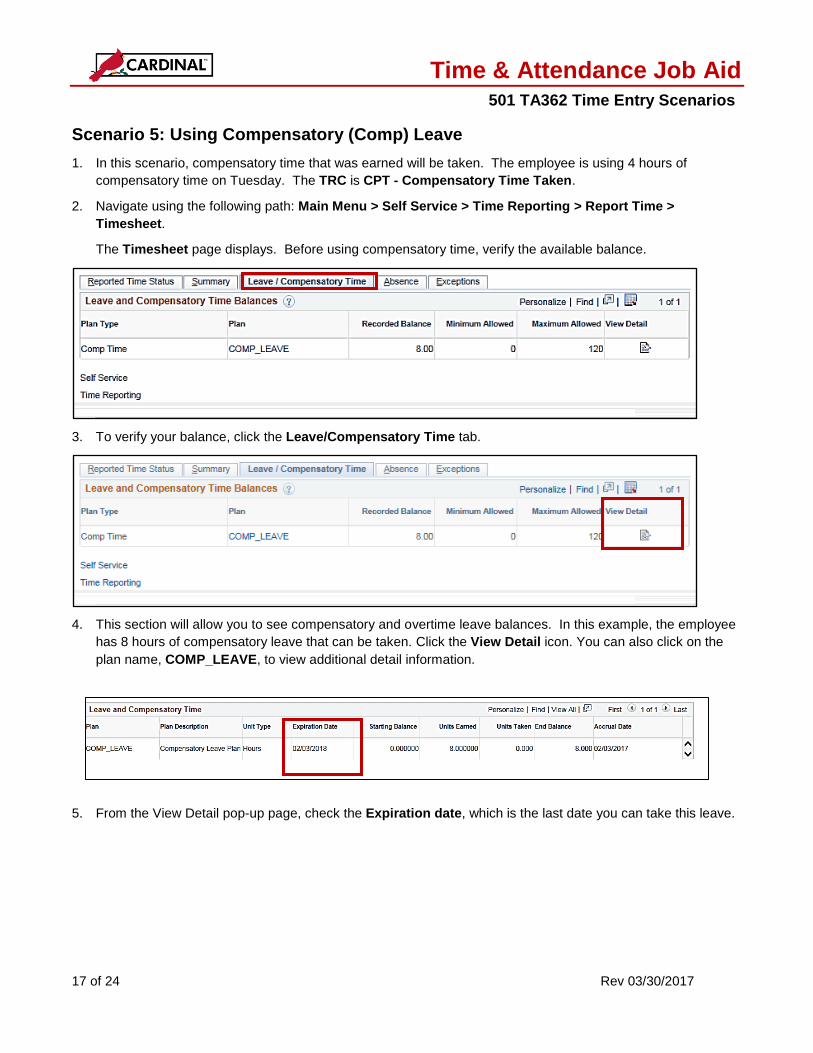
Scenario 5: Using Compensatory (Comp) Leave
1. In this scenario, compensatory time that was earned will be taken. The employee is using 4 hours of
compensatory time on Tuesday. The TRC is CPT - Compensatory Time Taken.
2. Navigate using the following path: Main Menu > Self Service > Time Reporting > Report Time >
Timesheet.
The Timesheet page displays. Before using compensatory time, verify the available balance.
3. To verify your balance, click the Leave/Compensatory Time tab.
4. This section will allow you to see compensatory and overtime leave balances. In this example, the employee
has 8 hours of compensatory leave that can be taken. Click the View Detail icon. You can also click on the
plan name, COMP_LEAVE, to view additional detail information.
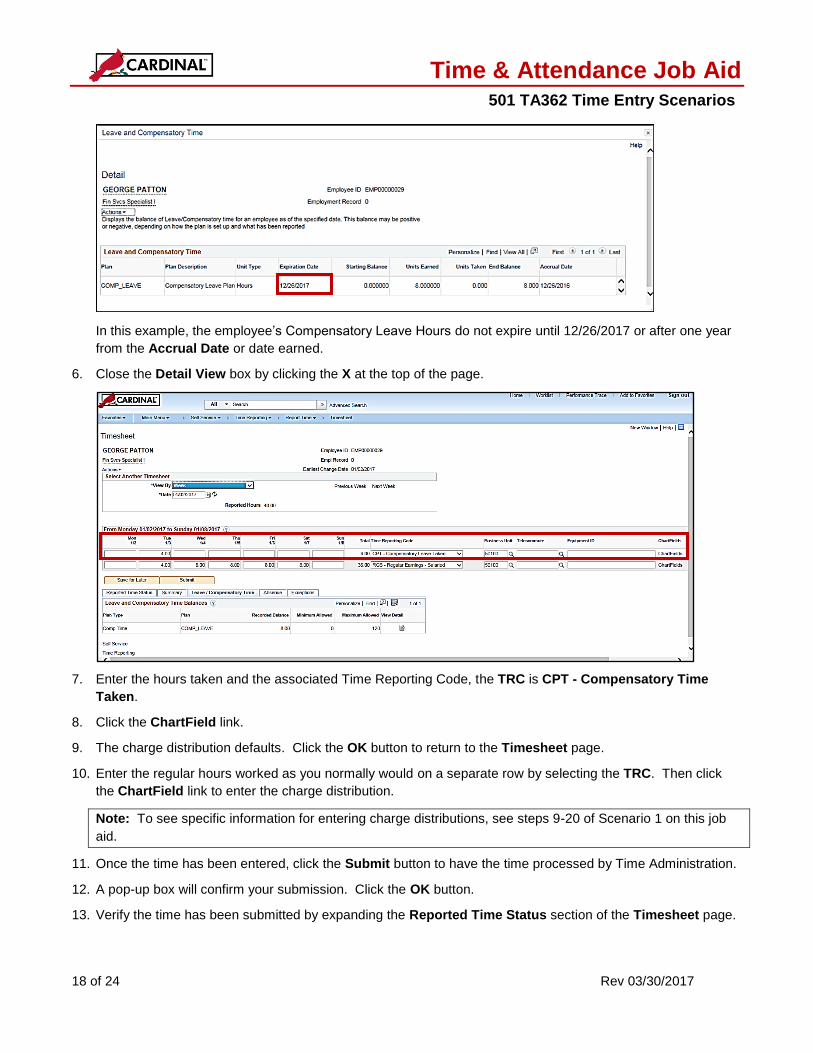
5. From the View Detail pop-up page, check the Expiration date, which is the last date you can take this leave.
Time & Attendance Job Aid
501 TA362 Time Entry Scenarios
18 of 24 Rev 03/30/2017
In this example, the employee’s Compensatory Leave Hours do not expire until 12/26/2017 or after one year
from the Accrual Date or date earned.
6. Close the Detail View box by clicking the X at the top of the page.
7. Enter the hours taken and the associated Time Reporting Code, the TRC is CPT - Compensatory Time
Taken.
8. Click the ChartField link.
9. The charge distribution defaults. Click the OK button to return to the Timesheet page.
10. Enter the regular hours worked as you normally would on a separate row by selecting the TRC. Then click
the ChartField link to enter the charge distribution.
Note: To see specific information for entering charge distributions, see steps 9-20 of Scenario 1 on this job
aid.
11. Once the time has been entered, click the Submit button to have the time processed by Time Administration.
12. A pop-up box will confirm your submission. Click the OK button.
13. Verify the time has been submitted by expanding the Reported Time Status section of the Timesheet page.

Time & Attendance Job Aid
501 TA362 Time Entry Scenarios
19 of 24 Rev 03/30/2017
Scenario 6: Editing an Absence Once Submitted
In this scenario, an absence request will be edited once it has been submitted.
1 Navigate using the following path: Main Menu > Self Service > Time Reporting > Report Time >
Timesheet.
The Timesheet page displays.
2. Confirm the timesheet is on the week that requires the adjustment. If the timesheet is not on the week that
requires the adjustment, use the Previous Week link or the Date field to display the correct week. In this
scenario, the adjustment needs to be made for the current week which displays.
3. Click the Absence tab to open the Absence Events section of the Timesheet page.
4. Click the Edit button on the row of the absence that needs to be adjusted. This opens that row so that
changes can be made. Edit button may be grayed out in some cases (if only 1 absence is entered and no
other time in the week) so user may not need to click on edit button.
5. Select the absence type you want to change using the drop-down menu in Absence Name field.
6. Choose the Reason from the pull down. Typically, this will be the same as the name of the absence.
7. Click the Details link to open the details page.
Time & Attendance Job Aid
501 TA362 Time Entry Scenarios
20 of 24 Rev 03/30/2017
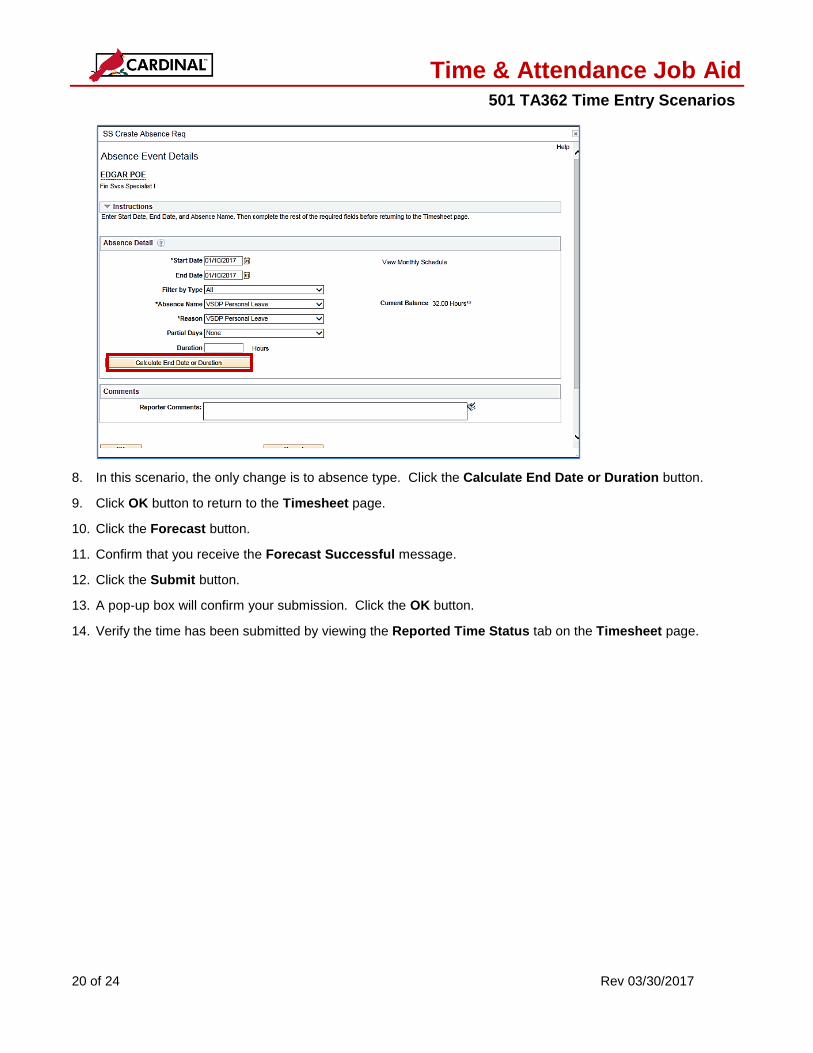
8. In this scenario, the only change is to absence type. Click the Calculate End Date or Duration button.
9. Click OK button to return to the Timesheet page.
10. Click the Forecast button.
11. Confirm that you receive the Forecast Successful message.
12. Click the Submit button.
13. A pop-up box will confirm your submission. Click the OK button.
14. Verify the time has been submitted by viewing the Reported Time Status tab on the Timesheet page.

Time & Attendance Job Aid
501 TA362 Time Entry Scenarios
21 of 24 Rev 03/30/2017
Scenario 7: Reporting Intermittent FMLA
1. In this scenario, intermittent FMLA will be used. The employee has already been approved for FMLA and an
Administrator added the appropriate balance in Cardinal for the employee. The employee will use FMLA for
Thursday and Friday.
2. Navigate using the following path: Main Menu > Self Service > Time Reporting > Report Time >
Timesheet.
The Timesheet page displays.
3. Click the Absence tab to open the Absence Events section of the Timesheet.
4. Click the Add Absence Event.
5. Enter the Start Date.
6. Enter the End Date if different than the start date.
7. Absence Name: Select Family and Medical Leave.
8. Reason: Select the type of FLMA (family, personal or military).
9. Click the Details link.
10. In this example, the employee is taking 2 days, so no adjustments need to be made to the entries.
11. Click the Calculate End Date or Duration button.
12. Click the OK button to return to the Timesheet page.
13. Click the Forecast button.
14. The Forecast Successful message displays.
15. The hours are populated in the Timesheet Grid at the top of the page.
Time & Attendance Job Aid
501 TA362 Time Entry Scenarios
22 of 24 Rev 03/30/2017
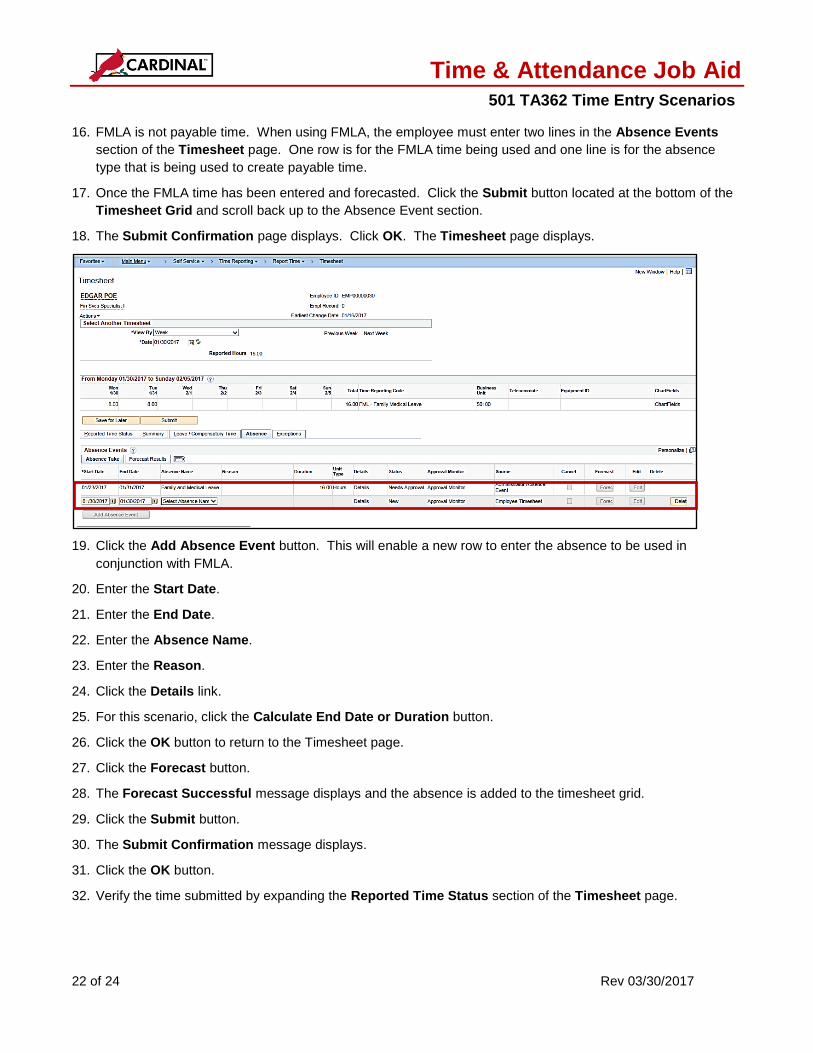
16. FMLA is not payable time. When using FMLA, the employee must enter two lines in the Absence Events
section of the Timesheet page. One row is for the FMLA time being used and one line is for the absence
type that is being used to create payable time.
17. Once the FMLA time has been entered and forecasted. Click the Submit button located at the bottom of the
Timesheet Grid and scroll back up to the Absence Event section.
18. The Submit Confirmation page displays. Click OK. The Timesheet page displays.
19. Click the Add Absence Event button. This will enable a new row to enter the absence to be used in
conjunction with FMLA.
20. Enter the Start Date.
21. Enter the End Date.
22. Enter the Absence Name.
23. Enter the Reason.
24. Click the Details link.
25. For this scenario, click the Calculate End Date or Duration button.
26. Click the OK button to return to the Timesheet page.
27. Click the Forecast button.
28. The Forecast Successful message displays and the absence is added to the timesheet grid.
29. Click the Submit button.
30. The Submit Confirmation message displays.
31. Click the OK button.
32. Verify the time submitted by expanding the Reported Time Status section of the Timesheet page.
Time & Attendance Job Aid
501 TA362 Time Entry Scenarios
23 of 24 Rev 03/30/2017
Scenario 8: Cancelling an Absence
1. In this scenario, an absence request will be cancelled once it has been submitted. The same process applies
to cancel an absence that has been saved.
2. Navigate using the following path: Main Menu > Self Service > Time Reporting > Report Time >
Timesheet.
The Timesheet page displays.
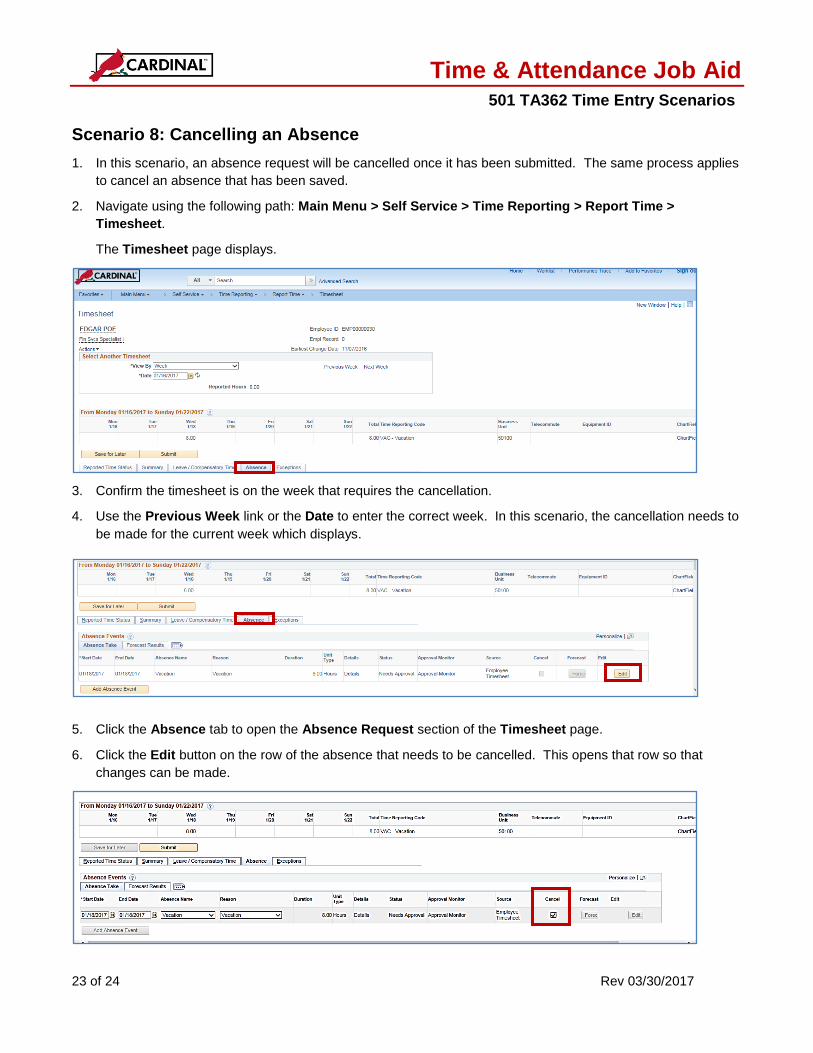
3. Confirm the timesheet is on the week that requires the cancellation.
4. Use the Previous Week link or the Date to enter the correct week. In this scenario, the cancellation needs to
be made for the current week which displays.
5. Click the Absence tab to open the Absence Request section of the Timesheet page.
6. Click the Edit button on the row of the absence that needs to be cancelled. This opens that row so that
changes can be made.
Time & Attendance Job Aid
501 TA362 Time Entry Scenarios
24 of 24 Rev 03/30/2017
7. Select the checkbox in the Cancel field.
8. Click the Submit button.
9. A pop-up box will confirm your submission. Click the OK button.
10. Verify the time does not appear on the Timesheet Grid or in the Reported Time Status section of the
Timesheet page to confirm that it has been cancelled.
NOTE: If you accidentally cancel an absence and need to undo your cancellation:
1. Click the Edit button next to the absence that was cancelled in error. 2. Edit at least one of the fields (dates, absence name, or hours). Making a change revokes the
cancellation. 3. Forecast the absence event (if applicable for the absence entered). 4. If you need to change fields back to their original values, click the Edit button. 5. Change the field(s) previously edited back to the original request. 6. Forecast (if applicable for the absence type entered). 7. Click the Save for Later or Submit button.