tianjin samsung opto-electronics co.,ltd. korp. 14 37 …€¦ · tianjin samsung opto-electronics...
TRANSCRIPT

Thank you for buying a Samsung Camera.
This manual will guide you through using the Digimax V4/ Digimax 4500 Super, including taking images, downloading
images and using the MGI PhotoSuite III SE software. Please read this manual before using your new camera.
6806-1432
SAMSUNG TECHWIN CO., LTD.OPTICS & DIGITAL IMAGING DIVISION
145-3, SANGDAEWON 1-DONG, JUNGWON-GU,SUNGNAM-CITY, KYUNGKI-DO, KOREA 462-121TEL : (82) 31-740-8086,8088, 8090, 8092, 8099FAX : (82) 31-740-8398, 8111
SAMSUNG OPTO-ELECTRONICS AMERICA, INC.HEADQUARTERS 40 SEAVIEW DRIVE, SECAUCUS, NJ07094, U.S.A.TEL : (1) 201-902-0347FAX : (1) 201-902-9342
WESTERN REGIONAL OFFICE18600 BROADWICK ST., RANCHO DOMINGUEZ, CA 90220, U.S.A.TEL : (1) 310-537-7000 FAX : (1) 310-537-1566
SAMSUNG OPTO-ELECTRONICS UK LTD. SAMSUNG HOUSE, 3 RIVERBANK WAY, GREAT WEST ROAD, BRENTFORD,MIDDLESEX,TW8 9RE, U.K.TEL : (44) 20-8232-3280 FAX : (44) 20-8569-8385
SAMSUNG OPTO-ELECTRONICS GMBHAM KRONBERGER HANG 6D-65824 SCHWALBACH/TS., GERMANYTEL : (49) 6196 66 53 03FAX : (49) 6196 66 53 66
SAMSUNG FRANCE S.A.S.BP 51 TOUR MAINE MONTPARNASSE 33, AV .DU MAINE 75755, PARIS CEDEX 15, FRANCEHOTLINE PHOTO NUMÉRIQUE : 00 800 22 26 37 27(Numéro Vert-Appel Gratuit)TEL : (33) 1-4279-2282/5 FAX : (33) 1-4320-4510
SAMSUNG TECHWIN MOSCOW OFFICE KORP. 14 37-A LENNINGRADSKY PRO-KTMOSCOW, 125167, RUSSIATEL : (7) 095-258-9296, 9298, 9299FAX : (7) 095-258-9297
TIANJIN SAMSUNG OPTO-ELECTRONICS CO.,LTD.7 PINGCHANG ROAD NANKAI DIST., TIANJINP.R CHINAPOST CODE:300190TEL : (86) 22-2761-8867FAX : (86) 22-2761-8864
"DIGIMAX 4500SUPER MODEL IS DESIGNED WITH SHD (SUPER HIGH DEFINITION) OPTICS,HOWEVER, ALL PHOTOS USED IN THE INSTRUCTION MANUAL SHOW THE DIGIMAX V4 WITHSCHNEIDER LENS FOR ILLUSTRATION PURPOSES ONLY"
Internet address - http : //www.samsungcamera.com/
The CE Mark is a Directive conformitymark of the European Community (EC) ENGLISH

2
Use this camera in the following order
Instructions
Set up the cameradriver
Before connecting the USB cable to the PC and thiscamera, you have to set up the camera driver. Install thecamera driver that is contained in the Application S/W CD-ROM. (p.110)
Take a picture (p.26)
Insert the supplied USB cable into the PC USB port andthe camera USB connection terminal.(p.99)
Check the camera power. If the power is turned off, slidethe camera switch to power it on.
Take a picture
Insert the USBcable
Check the camerapower
Check [Removable Disk]
Do not insert the cigar jack plug tothe DC input connection point as thisresults in electric shock or severedamage to your camera.
Open Window’s EXPLORER and search for [Removable Disk].

RE
AD
Y
3
Contents
Getting to know your camera 5
About the symbols 6
Caution 6
Warning 7
Danger 8
Special features 9
This digital camera can be used for 10
Manufacturer's contents 12
Identification of features 13
Front & Top 13
Back & Bottom 13
Side 14
5-function button 14
Mode dial 15
Connecting to Power 17
Inserting the memory card 20
Instructions on how to use the
memory card 21
Selecting the date and time 23
Language 25
LCD monitor indicator 27
Starting recording mode 29
Using the camera button to adjust the
camera 32
LCD button 32
SHUTTER button 32
WIDE / TELE button 33
UP/ Voice memo button 35
MACRO / SUPER MACRO button 36
FLASH button 37
SELF-TIMER / REMOTE button 40
MENU/ OK button 42
MF button 43
+/- button 44
Using the LCD monitor to adjust the
camera 46
How to use the menu 48
Size 49
Quality 50
A/S/M 51
Metering 53
Shooting 54
White Balance 56
Effect 57
Sharpness 58
My SET mode menu 59
Mode 59
Change 60
Starting the play mode 62
LCD monitor indicator 64
Information button 65
READY
RECORDINGPLAY

4
Contents
Thumbnail & Wide /
Tele & Trimming button 65
Thumbnail / Enlargement /
Trimming button 66
UP / Voice memo button 67
DOWN / LEFT / RIGHT button 68
MENU / OK button 68
DELETE button 69
PLAY & PAUSE button 70
Setting up the play back function
using the LCD monitor 71
Slide show 72
Protect 73
Resize 74
Delete all 75
DPOF : Standard 76
DPOF : Index 77
DPOF : Cancel 78
Setup menu 79
File 80
Power off 81
Language 82
Format 83
Date set 85
Time set 86
Date type 87
Imprint 88
Sound 89
LCD brightness 90
Video 91
Connecting to an external monitor 92
Quick view 93
MyCAM menu 94
Start up image 94
Start up sound 95
Shutter sound 95
List of camera function 96
Starting PC mode 99
Important notes 101
Warning indicator 102
Before contacting a service center 103
Specifications 106
Software Notes 108
About the software 108
Setting up the application software 110
Removing the USB Driver for
Windows 98SE 116
Removable Disk 118
Removing the removable disk 119
Setting up the USB Driver for MAC 121
Using the USB Driver for MAC 121
Digimax Viewer 122
MGI PhotoSuite III SE 123
FAQ 138
SOFTWARE

RE
AD
Y
5
Thank you for buying a Samsung Digital Camera.Prior to using this camera, please read the user manual thoroughly.Keep the manual in a safe place.
Getting to know your camera
About the symbols
This manual contains instructions on using this camera that will help you to use this camera safely andcorrectly. This will help prevent danger and injury to others.
DANGERDANGER indicates an imminently hazardous situation which, if not avoided, will result in
death or serious injury.
WARNINGWARNING indicates a potentially hazardous situation, which, if not avoided, could result
in death or serious injury.
CAUTIONCAUTION indicates a potentially hazardous situation, which, if not avoided, may result in
a minor or moderate injury.
NOTICENOTICE indicates a factor, which, if not avoided, may result in camera malfunction or
poor image quality.
INFORMATIONINFORMATION indicates a factor, which should assist further in the operation of the
camera.

6
About the symbols
The camera mode icons will be marked on the right side of the title bar. The title is available only in themarked camera mode. Refer to below.
Caution
Leaking, overheating, or burst batteries could result in fire or injury.Use batteries with the correct specification for the camera.Do not short circuit, heat or dispose of batteries in fire.Do not use old batteries with new ones, or mix brands of batteries.Ensure the batteries are positioned correctly with regard to polarity (+ / -).
When the camera is not in use for long periods, always unplug the camera from its power source.Do not fire the flash while it is in contact with hands or objects. Do not touch the flash after using itcontinuously. It may cause burns.Do not move the camera while it is switched on, if you are using the AC Power Adapter. After use,always switch off the camera before unplugging the adapter from the AC Power wall socket. Thenmake sure that any connector cords or cables to otherdevices are disconnected before moving the camera.Failure to do so may damage the cords or cables andcause a fire or electric shock.
Icon Mode dial Camera working mode Icon Mode dial Camera working mode
Easy mode Program mode
Portrait mode Night mode
Aperture priority mode Shutter priority mode
Manual mode Movie clip mode
User set mode Voice recording mode
Play mode

RE
AD
Y
7
Do not use the flash in close proximity topeople or animals. Positioning the flash tooclose to your subject’s eyes, may causeeyesight damage.
When taking photographs, never point the lensof the camera directly into very strong light.This may result in permanent damage to thecamera or your eyesight.
Do not leave this camera in places subject toextremely high temperatures, such as asealed vehicle, direct sunlight or other placesof extreme variances in temperature.Exposure to extreme temperatures mayadversely affect the camera’s internalcomponents and could cause a fire.
When in use, do not cover the camera or ACPower Adapter. This may cause heat to buildup and distort the camera body or cause a fire.Always use the camera and its accessories ina well-ventilated area.
For safety reasons keep this product and accessories out of reach of children or animals to preventaccidents e.g.:
Swallowing batteries or small camera accessories. In case of accidents, please consult a doctor immediately.There is a risk of permanent eye damage if the flash is operated at a distance of less than onemeter from a person’s eyes. There is a possibility of injury from the camera’s moving parts.
Batteries and camera may become hot during prolonged use and it may result in cameramalfunction. Should this be the case, allow the camera to sit idle for a few minutes to allow it time tocool.
Warning

8
Danger
Do not attempt to modify this camera in anyway. This may result in fire, injury, electricshock or severe damage to you or yourcamera. Internal inspection, maintenance andrepairs should be carried out by your dealer orSamsung Camera Service Center.
Please do not use this product in closeproximity to flammable or explosive gases, asthis could increase the risk of explosion.
Should any form of liquid or a foreign object enter the camera, do not use it. Switch off the camera,and then disconnect the power source (batteries or AC Power Adapter). You must contact yourdealer or Samsung Camera Service Center. Do not continue to use the camera as this may cause afire or electric shock.
Do not insert or drop metallic or inflammableforeign objects into the camera through accesspoints e.g. CARD slot and battery chamber.This may cause a fire or electric shock.
Do not operate this camera with wet hands.This could pose a risk of electric shock.
RE
AD
Y
9
Special features
This digital camera has the following features.
A fine resolution of 4.0 mega pixels
A 3X optical and 4X digital zoom lens
A superior Schneider lens
9 power source options (a world first!)
A Super macro(6cm) function
3 different “My SET” modes
An FCC warning
This device has been tested in accordance with the limits of a class B digital device under item 15of the FCC rules. These limits are designed to provide protection against harmful interference incommercial installation. This equipment generates, absorbs and can emit radio frequency energy.If it is not installed and used in accordance with the instructions, it may cause harmful interferenceto radio communication. There is however, no guarantee that interference will not occur in a somesituations. Should any interference occur when this device is in operation, please try one or more ofthe following measures.
Change the location and direction of any aerial.Increase distance between camera and affected device.Use a different socket away from the affected device.Please contact a Samsung agent or a radio/TV engineer.
This device complies with part 15 of the FCC Rules.

10
This digital camera can be used for
Printing images using adedicated printer, DPOF-compatible printer or DPOF-equipped photo lab.(p.76)
Down loading image filesfrom camera tocomputer.(p.100)
Editing images on a PC.(p.123)
Taking a picture.(refer to page 26)
Viewing images on a TVscreen or external monitor(refer to page 92)

RE
AD
Y
11
This digital camera can be used for
Inserting images directly into anyelectronic document
Taking a self-portrait and using theimage to personalize name cards
You can even create your own unique gift-wrap paper by using your digital images
Creation of a digital photo album
Recording your voice(refer to page 35)
Recording a movie clip(refer to page 30)

12
Please check that you have the correct contents before using this product.
Manufacturer's contents
Battery pack
marked contents are optional.
Digital Camera Pouch USB cableAV cable
Camera strap Product warrantySoftware CD User manual
SD memory card
Digimax Premium Power Pack : SLB-1437 KIT
Battery charger Cigar jack for car AC adapterRechargeable battery
Remote controlCR-V3 battery

RE
AD
Y
13
Identification of features
Front & Top
Back & Bottom
Shutter button (p.32)
Flash fading control sensor
Remote control sensor
Power switch
Microphone
Self-timer lamp
Viewfinder
Lens
Viewfinder
Autofocus indicatorlamp(Green)
Flash indicatorlamp(Red)
Mode dial (p.15)
Mode dial Lamp
WIDE/THUMBNAILbutton (p.33/65)
5-function button
TELE/Digital zoombutton (p.33/66)
Speaker
LCD monitorTripod socket PLAY mode button
DC inputconnection point
USB/ AV connectionterminal
+&-/PLAY & PAUSEbutton (p.44/70)
MF / DELETEbutton (p.43/69)
LCD/INFROMATIONbutton (p.32/65)
Flash
Strap eyelet

14
Identification of features
Side
5-function button
FLASH / LEFT button(p.37/68)
MACRO / SUPER MACRO / DOWN button(p.36/68)
SELF-TIMER/REMOTE/ RIGHTbutton (p.40/68)
Voice memo / UP button(p.35/67)
Battery chamberMemory card slot
Memory card cover/Battery chamber cover
MENU/ OK button (p.42/68)

RE
AD
Y
15
Mode dial
EASY
You can select the desired working mode by using the mode dial located on the back of the camera.This digital camera has 8 working modes. These are listed below.
Easy modeTo make camera operation easier, a bare minimum of camerasettings are required in this mode, such as image size. ( forprinting, memo and email)
PROGRAM
Program modeIn program mode, you can take a properly exposed photograph.Moreover you can select all camera settings except aperture andshutter speed.
PORTRAITPortrait modeThis is used for just portrait or both portrait and landscape shots.
NIGHT SCENE
Night scene modeThis mode is used at night or against a dark background.

16
Mode dial
A/S/M
Aperture priority / Shutter priority / Manual modeThe Aperture and Shutter can be set manually in the A/ S/ M mode.
MOVIE CLIP
Movie clip modeA movie clip can be recorded as long as the available recordingtime allows.Image size and type are listed below.- Image size : 288 X 208- File type : *.AVI
MySET
User set modeYou can set your preferences and save them in this mode. There are 3 kinds of user setting modes.
VOICE RECORDING
Voice recording modeYou can do voice recording and other audio in this mode.

RE
AD
Y
17
Connecting to Power
There are two ways in which to provide the camera with power. You can use batteries (AA Alkaline,CR-V3, Ni-MH, Li-ion), or alternatively, you can use an AC(100 ~ 250V) Adapter (DC 5V 2.0A).
3. To close the battery chamber cover, push it until it clicks.
2. Insert the batteries taking note of the polarity (+ / -).
1. Open the battery chamber cover by pushing in the direction of the arrow.
Using the batteries
Battery condition indicatorThere are 3 indicators for battery condition that are displayed on the LCD monitor.
: The batteries are fully charged.
: Prepare new batteries.
: There is no battery capacity. Replace with new batteries.
Inserting the AA type battery Inserting the CR-V3 type battery

18
Connecting to Power
NOTICEImportant information about battery usage- It is easy to buy the alkaline batteries, but the duration for using batteries varies inaccordance with the battery manufacturers or photography conditions.
- Please remove the batteries if the camera will not be used for long periods.Batteries can lose power over time and are prone to leaking if kept inside the camera.
- We recommend high capacity ALKALINE batteries as manganese batteries cannot deliversufficient power.
- Low temperatures (below O˚C) can affect the performance of the batteries and you mayexperience reduced battery life.
- Batteries will usually recover at normal temperatures.- Do not use old and new batteries at the same time.- During extended use of the camera, the camera body may become warm. This is perfectly normal.- If you are planning to use this camera for long periods of time, it is advisable to use an AC adapter.
INFORMATIONThis camera will automatically switch off when not in use for a period of time.Refer to [POWER OFF] function (p.81).We recommend batteries for digital camera (Within a year from the date of manufacture).The batteries are listed below.Non rechargeable batteries : AA type - Alkaline, Ni-Mn, Ni-Zn, Lithium
CR-V3 type - LithiumRechargeable batteries : AA type - Ni-MH, Ni-Cd (over 1000mA)
Exclusive type - SLB-1437 (Digimax V4 only)SBP-1103 (CR-V3 type)

RE
AD
Y
19
Connecting to Power
If you have access to a mains supply, using an AC Adapterallows the camera to be used for long periods of time.Plug the adapter into the connection point (DC IN 5V) on thecamera. Remove the batteries when using the AC adapter.
Using the Digimax Premium Power Pack ( Optional : SLB-1437 KIT )
The Digimax Premium Power Pack contains a rechargeableinternal Li-ion battery, a battery charger, a cigar jack for car andan AC adapter for use with Digimax V4.
Using the Digimax battery pack ( Optional : SBP-3605, 5V)
The Digimax Battery Pack is a rechargeable external Li-ionbattery for use with most digital cameras.
These optional battery packs provide long lasting power and their operating performances are muchimproved over Ni-MH and Alkaline batteries. This is due to the mass storage lithium ion cell.Contact your local dealer or the nearest authorized Samsung camera service center to buy the optionalbattery packs.
Using the AC power adapter
DANGERAlways turn off the power before taking the AC adapter out of the mains supply.As with all mains powered devices, safety is important. Ensure that neither the camera noradapter comes into contact with water or metallic materials.Please ensure that you use an AC adapter with the correct specification for the camera.Failure to do so may affect your warranty.

20
Inserting the memory card
1. Turn the power off using the power switch. Open the memorycard cover and press the memory card as shown in the imageand release.
2. Remove the memory card and close the memory card cover.
3. To close, push the card cover against the arrow until youhear a click.If the card cover does not close, check that the memory cardis inserted correctly. Do not force the memory card.
2. Insert the memory card all the way into the memory card slot.The Label stuck to the memory card and the front side of thecamera should face in the same direction. The memory cardpins and the LCD monitor should face in the same direction.
1. Turn off the camera power and pull the memory card cover inthe direction of the arrow to open.
Removing the memory card

RE
AD
Y
21
Instructions on how to use the memory card
NOTICEIf you open the memory card cover when the camera power is turned on, the power will turnoff automatically.Don’t remove the memory card when the Autofocus indicator lamp(Green) is blinking as thismay cause damage to data in the memory card.
You can use both an SD memory card and Multi Media Card (MMC).We recommend using the SD memory card as the Multi-Media Card need more time to stored theimage than the SD memory card.
When using a 32MB SD memory card, the specified shooting capacity will be as follows. (These figures are intended as an indication of expected performance).These figures are approximate as image capacities can be affected by variables such as memoryperformance and subject matter.
The SD memory card has a write protect switch thatprevents image files from being deleted or formatted. Bysliding the switch to the bottom of the SD memory card, thedata will be protected. By sliding the switch to the top of theSD memory card, the data protection will be canceled.Check the switch position before taking an image.
Recorded image size TIFF Super fine Fine Normal
2272X1704 (Large) 2 12 25 38
2272X1504 (Photo) 2 14 29 43
1120X840 (Medium) 8 53 106 159
544X408 (Small) 35 225 451 676
Print Memo E-mail
14 106 676
Writeprotectswitch
Label
Card pins
SD(Secure Digital) memory card
EASY mode

22
Instructions on how to use the memory card
Maintenance of the memory cardTurn off the camera power whenever the memory card is being inserted or removed.Repeated use of the memory card will eventually reduce the memory card s performance.Should this be the case, you will need to purchase a new memory card.Wear and tear on the memory card is not covered by the Samsung warranty.The memory card is an electronic precision device. Do not bend, drop or subject the memory cardto any heavy impact.Do not store the memory card in an environment with strong electronic or magnetic fields, e.g.near loud speakers or TV receivers.Please do not use or store in an environment where there are extremes in temperature.Do not allow the memory card to become dirty or to come into contact with any liquid. Should this happen, clean the memory card with a soft cloth.Please keep the memory card in its case when not in use.During and after periods of extended use, you may notice that the memory card is warm. This is perfectly normal.Do not use the memory card that is used in another digital camera or memory card reader.Do not use the memory card formatted by another digital camera or memory card reader.
Preserving the memory card dataIf the memory card is subjected to any of the following, the recorded data may become corrupted :- When the memory card is used incorrectly.- If the power is switched off or the memory card is removed while recording, deleting (formatting)or reading.
Samsung cannot be held responsible for lost data.It is advisable to copy important data onto other media as back-up e.g. floppy disks, hard disks,CD etc.If there is insufficient memory available : If you press the shutter button for the shot, [CARD FULL !] message is displayed and the camerawill not operate. To optimize the amount of memory in the camera, replace the memory card ordelete unnecessary images stored on the memory.

RE
AD
Y
23
Selecting the date and time
You can record the date and time with the image data in the memory card.
2. Select the [SETUP] tab by pressing the RIGHT button.Select the [FORMAT] menu by pressing the DOWN/button. Press the DOWN / button again and the next menu page will bedisplayed.Press the UP or DOWN button and select [DATE SET].
3. Shift the cursor to the [DATE SET] sub menu by pressing theRIGHT button.
1. Turn on the power and press the MENU button.The recording mode menu will be displayed in the RECORDING mode, and the play mode menuwill be displayed in the PLAY mode. (There is no associated menu in VOICE RECORDING mode.)
INFORMATIONDate setting range : 2002/01/01 ~ 2050/12/31
(Leap years and months are corrected automatically)The default is 2003/01/01. 12:00 p.m.
MOVE:
PLAY SETUP MyCAM
CHANGE:
‘03/01/01
12:00 PM
YY/MM/DD
OFF
DATE SET
TIME SET
D.TYPE
IMPRINT
BACK:
PLAY SETUP MyCAM
SET:OK
DATE SET
TIME SET
D.TYPE
IMPRINT
YEAR
03 /01/01

24
Selecting the date and time
6. To select the correct time, select [TIME SETUP] at step 2.Press the MENU button again and the menu will be cancelled.
5. Press the OK button to confirm the setting.To return to the main menu or cancel the setting, press the LEFT button.
4. Select the correct date by pressing the 5-function button. RIGHT button : selects YEAR/ MONTH/ DAY item.UP or DOWN button : changes the value of each item.
NOTICEIf the batteries are removed, the date and time settings will remain for approximately 1 hour.After approximately 1 hour, the date and time will be changed to the default date and time.If the batteries are removed for a period longer than 1 hour, it may be necessary to reset thedate and time.
BACK:
PLAY SETUP MyCAM
SET:OK
DATE SET
TIME SET
D.TYPE
IMPRINT
MOVE:
PLAY SETUP MyCAM
CHANGE:
DATE SET
TIME SET
D.TYPE
IMPRINT
‘03/01/01
12:00 PM
YY/MM/DD
OFF
MONTH
03/ 01 /01

RE
AD
Y
25
Language
There is a choice of languages that can be displayed on the LCD monitor.
INFORMATIONThe default language is ENGLISH.You can select 15 languages. Those are listed below.English, Korean, T. Chinese, S. Chinese, Japanese, Russian, Germany, Spanish, French,Italian, Danish, Dutch, Swedish, Finnish, Portuguese.Even if the camera is restarted, the language setting will be maintained.Even if the [SOUND] function is [ON], the sound will not activate in this menu.
1. Turn on the power and press the MENU button.The recording mode menu will be displayed in RECORDING mode, and the play mode menu will bedisplayed in the PLAY mode. (There is no associated menu in VOICE RECORDING mode.)
2. Select the [SETUP] tab by pressing the RIGHT button.Press the UP or DOWN button and select [LANGUAGE].
3. Shift the cursor to the [LANGUAGE] sub menu by pressing theRIGHT button and select the language that you want by pressingthe UP or DOWN button.
4. Press the OK button to confirm the setting.To return to the main menu or cancel the setting, press the LEFT button.Press the MENU button again and the menu will be cancelled.
BACK:
PLAY SETUP MyCAM
SET:OK
FILE
PWR OFF
LANGUAGE
FORMAT
ENGLISH
EXIT:MENU
PLAY SETUP MyCAM
PAGE:
FILE
PWR OFF
LANGUAGE
FORMAT
SERIES
OFF
ENGLISH
NO
26
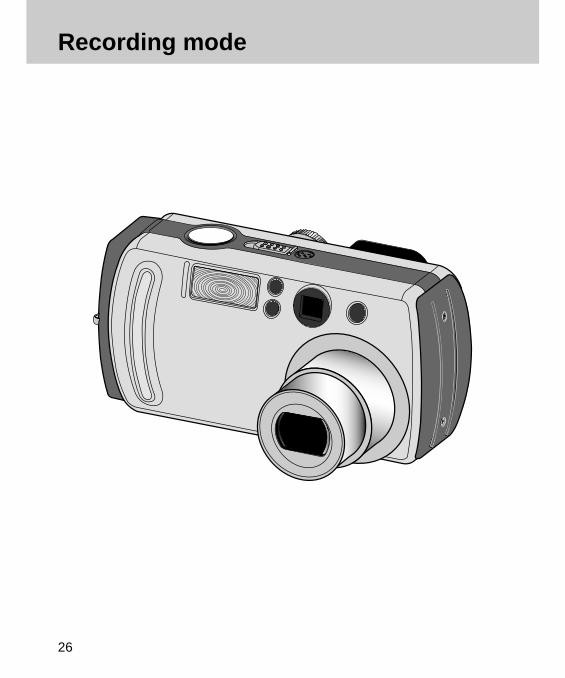
Recording mode

RE
CO
RD
ING
27
LCD monitor indicator
The LCD monitor displays information about the shooting functions and selections.
Image & Full Status
No. Description Icons Page
1 Recording mode p.15
2 Camera shake warning p.31
3 Flash p.37
4 Self-timer, Remote p.40
5 Voice memo p.35
6 Macro/ Super macro p.36

28
LCD monitor indicator
No. Description Icons Page
7 Metering p.53
8 ISO p.55
9 Exposure compensation p.44
Aperture compensation F5.6 p.44
Shutter speed compensation 1/250 p.44
10 Manual focus p.43
11 Date / Time 2003/01/31 10:34 AM
12 White Balance p.56
13 Sharpness p.58
14 Image quality p.50
15 Image size p.49
Continuous shot, AEB p.54
16 Number of available shots remaining 161
Remaining time( Movie clip/ Voice recording) 00:01:40 (hour : minute : second)
17 Auto focus frame
18 Zoom / Digital Zoom p.33
19 Battery p.17
20 Aperture value F5.6 p.45
Shutter speed 1/250 p.45

29
RE
CO
RD
ING
Starting recording mode
1. Insert the batteries (p.17).Insert the batteries taking note of the polarity (+ / -).
2. Insert the memory card (p.20).3. Close the memory card cover.4. Slide the power switch to turn on the camera.5. Select the PROGRAM mode by rotating the mode dial.6. Point the camera towards the subject and compose the image by
using either the viewfinder or LCD monitor.7. Press the shutter button to capture an image.
[DELETE] message may be displayed after taking a picture.Refer to p.93 for more information about [DEL. ANSWER].
Recording a still image
PROGRAM mode
PROGRAM mode
INFORMATIONManner modePressing the power button over 2 seconds changes the buzzer and start-up sound setting toOFF, though you have set the settings to ON. If you wish to hear the buzzer sound and start-up sound, set the [SOUND] and [S.SOUND] settings in the SETUP mode to ON.There are two LED lamps (one green, one red) positioned next to the viewfinder.- If the camera is in focus when you press the shutter button halfway, the green LED willilluminate and you can take an image. If the camera can focus on the subject, theautofocus frame in the center of the LCD monitor will change from white to green.
- If the red lamp illuminates, the flash can fire.- If the red lamp blinks, the flash is being charged.- When an image is being stored onto the memory card, the green lamp blinks slowly. Whenthe image data has been stored, the green LED light will go out. After the green LED lighthas gone out, you can resume taking images.
NOTICEA Blinking autofocus indicator lamp means that the camera cannot focus on the subject.Should this be the case, the camera is unable to capture an image clearly.

30
Starting recording mode
Recording audioSteps from 1-4 are the same as those for recording a still image.5. Select the VOICE RECORDING mode by rotating the mode dial.6. Press the shutter button to record audio.
- Press the shutter button once and audio is recorded for aslong as the available recording time allows. The recordingtime will be displayed on the LCD monitor.
- Audio will still be recorded if the shutter button is released.- If you wish to stop recording, press the shutter button again.
VOICE RECORDING mode
MOVIE CLIP mode
MOVIE CLIP mode
VOICE RECORDING mode
Recording a Movie clipSteps from 1-4 are the same as those for recording a still image.5. Select the MOVIE CLIP mode by rotating the mode dial.6. Point the camera towards the subject and compose the
image by using either the viewfinder or LCD monitor.7. Press the shutter button to take a movie clip.
Press the shutter button once and movie clips arerecorded for as long as the available recording time allows.Movie clips will still be recorded if the shutter button isreleased.If you wish to stop recording, press the shutter button again.Image size and type are listed below.- Image size : 288 x 208- File type : *.AVI
INFORMATIONThe available recording time may vary depending on shooting conditions and camera settings.

31
RE
CO
RD
ING
Starting recording mode
NOTICECamera shake warning.When the Flash Off or Slow synchro mode is selected in a low lighting condition, the camerashake warning indicator ( ) may appear on the LCD monitor. In this case, use a tripod,support the camera on a solid surface or change the flash mode to flash shot mode.Backlight compensated shotsWhen taking an outdoor shot, avoid facing the sun, as the image may be dark because ofthe strong backlight. In backlight conditions, please use the exposure compensation in thePROGRAM or A/S/M mode. (refer to page 51).Avoid obstructing the lens or the flash when you capture an image.As there can be some differences between what is seen through the Viewfinder and theresulting image when taken at a range closer than 1.5m, it is recommended that you use theLCD monitor to compose these shots.Using the LCD monitor extensively will drain the batteries.We recommend turning off the LCD monitor and using the optical viewfinder as often aspossible in order to extend battery life.Under certain conditions the auto focus system may not perform as expected.- When photographing a subject that has little contrast.- If the subject is highly reflective or shiny.- If the subject is moving at high speed.- When there is strong reflected light, or when the background is very bright.- When the subject matter has only horizontal lines or the subject is very narrow (such as a stick or flagpole).
- The subject is too dark.
INFORMATIONA distance of 40cm between you and the camera (microphone) is the best distance torecord sound.

32
Using the camera button to adjust the camera
You can check the recording status in the LCD monitor.
Image & full information
Pressing the LCD button
Pressing the LCD button
Pressing the LCD button
Image & basic information LCD off
Pressing the LCD button in the RECORDING (EASY,PROGRAM, PORTRAIT, NIGHT SCENE, A/S/M, MOVIE CLIP,My SET) mode will change the display as shown below.
Used for taking an image or recording audio in the RECORDING(EASY, PROGRAM, PORTRAIT, NIGHT SCENE, A/S/M, MOVIECLIP, USER SET, VOICE RECORDING) mode.
In EASY, PROGRAM, PORTRAIT, NIGHT SCENE, A/S/M,MySET mode- Pressing the shutter button down halfway activates theautofocus and checks the condition of the flash.
- Pressing the shutter down fully takes the image and stores the relevant data regarding the shot.In MOVIE CLIP, VOICE RECORDING mode- Pressing the shutter down fully takes the movie clip or records the audio. Press the shutter buttononce and the movie clip or the audio is recorded for as long as the available recording time allows.Movie clips or audio will still be recorded if the shutter button is released. If you wish to stoprecording, press the shutter button again.
SHUTTER button
LCD button

33
RE
CO
RD
ING
INFORMATIONTo use the digital zoom the LCD monitor has to be turned on.Images taken using the digital zoom may take a little longer for the camera to process.Allow time for this to take place.The digital zoom cannot be used in continuous shots, AEB shots and movie clip shots.You may notice a decrease in image quality when using the digital zoom.When the maximum (3X) optical zoom is selected, pressing the zoom button T increases thedigital zoom ratio by 0.1 steps.If the movie clip is being recorded, the zoom operation cannot be activated.
WIDE / TELE button
WIDE zoom
Pressing theTELE button
Pressing theTELE button
TELE zoom Digital zoom 2.0X
Used for digital or optical zooming in / out.This camera has a 3X optical zoom and a 4X digital zoom function. Using both will offer a total zoomratio of 12X.When you press the zoom (W/T) button, the zoom bar will display in the upper centre of the LCD monitor.
Zoom TELEOptical zoom TELE- Pressing the zoom button T.This will zoom into the subject i.e. the subject will appear nearer.
Digital zoom TELE- When the maximum (3X) optical zoom is selected, pressing the zoom button T activates the digitalzoom software.
- Releasing zoom button T stops the digital zooming at the required setting.- Once the maximum digital zoom (4X) is achieved, pressing the zoom button T will have no effect.- You can check the digital zoom rate with the [X1.1 ~ X 4.0] numerical mark next to the zoom bar.

34
WIDE / TELE button
Zoom WIDEOptical zoom WIDE- Pressing the zoom button W.This will zoom out from the subject i.e. the subject will appear further away.
- Pressing the W button continuously will set the camera to its minimum zoom setting i.e. the subjectappears at its furthest from the camera.
Digital zoom WIDE- When the digital zoom is in operation, pressing the zoom button W will reduce the digital zoomingin steps.
- Releasing zoom button W stops digital zooming.- Pressing the W button will reduce the digital zoom and then it will proceed to reduce the opticalzoom until the minimum setting is reached.
NOTICETake care not to touch the lens to avoid taking an unclear image and possibly causingcamera malfunction. If the image is dim, turn the camera power off and on again to modifythe lens position.Take care not to press the lens as this may cause a camera malfunction.When the camera is turned on, take care not to touch the camera s moving lens parts asthis may cause the resulting image to be dim and unclear.Take care not to touch the lens during the zoom operation as this may cause damage.
TELE zoom
Pressing theWIDE button
Pressing theWIDE button
Optical zoom 2X WIDE zoom
Digital zoom 4X
Pressing theWIDE button
Pressing theWIDE button
Digital zoom 2X Optical zoom 3X

35
RE
CO
RD
ING
INFORMATIONA distance of 40cm between you and the camera (microphone) is the best distance torecord a voice memo.Voice memo function is inactivated after finishing a voice memo.If you a record a new voice memo to an image that had a voice memo, the existing voicememo is deleted and a new voice memo will be recorded.
Camera working mode Setting
EASY
PROGRAM
PORTRAIT User can select the voice memo on / off
NIGHT SCENE
A/ S/ M, MySET
MOVIE CLIP User can select the sound recording on / off
VOICE RECORDING Not Available
Voice memo setting
UP/ Voice memo ( ) button
When the menu is displayed on the LCD monitor, pressing the UP button makes the menu cursormove up or change the sub menu value.When the menu is not displayed on the LCD monitor, the UP button operates as the voice memobutton. You can add your voice to a stored still image.
Recording a voice memo1. Rotate the mode dial to the RECORDING( except MOVIE
CLIP, VOICE RECORDING) mode.2. Press the VOICE MEMO button.
If the voice memo indicator is displayed on the LCD monitor,the setting is completed.
3. Press the shutter button and take a picture.The picture is stored on the memory card.
4. Voice memo will be recorded for ten seconds from themoment the picture is stored. In the middle of the sound recording, pressing the shutterbutton will stop the voice memo.

36
MACRO ( ) / SUPER MACRO ( ) button
When the menu is displayed on the LCD monitor, pressing the DOWN button makes the menucursor move down or changes the sub menu value.When the menu is not displayed on the LCD monitor, the button operates as the MACRO ( ) /SUPER MACRO ( ) button. The photography range is 0.06m ~ 0.8m.Selecting the MACRO/ SUPER MACRO1. Rotate the mode dial to the RECORDING (except PORTRAIT, NIGHT SCENE, VOICE
RECORDING) mode.2. Press the MACRO button. The macro indicator will be displayed on the LCD monitor.
Press the MACRO button until the desired MACRO mode indicator displays on the LCD monitor.In the MOVIE CLIP mode, only the macro mode can be used.
3. Take a picture with the desired macro mode.
Selecting the macro mode Selecting the super macro mode
NOTICEThe super macro can be activated only in the wide zoom mode.You cannot use the zoom(wide/tele) button in the super macro mode.
Icon Macro mode Definition
Used for macro shots (0.3 m ~ 0.8m).
Used for macro shots (0.06m ~ 0.3m).
MACRO
SUPER MACRO
Macro mode type

37
RE
CO
RD
ING
Camera working mode Setting ( marked camera working mode is the default setting.)
EASY
PROGRAM
PORTRAIT Normal (Fixed)
NIGHT SCENE Normal (Fixed)
A/ S/ M, USER SET Normal Macro Super macro
MOVIE CLIP Normal Macro
VOICE RECORDING Not Available
Macro mode setting
INFORMATIONWhen the macro or super macro mode is selected, It is possible that camera shake willoccur. If this is the case, use a tripod to eliminate this.When super macro is selected, the flash mode is changed to Flash off automatically.
FLASH ( ) button
Selecting the Auto flash
Normal Macro Super macro
When the menu is displayed on the LCD monitor, pressing the LEFT button makes the cursor shift tothe main menu.When the menu is not displayed on the LCD monitor, the LEFT button operates as the FLASH ( )button.
Selecting the flash mode1. Rotate the mode dial to the RECORDING ( except MOVIE CLIP, VOICE RECORDING) mode.2. Press the FLASH ( ) button until the desired FLASH
mode indicator displays on the LCD monitor.Use the correct flash to suit the environment.
MACRO ( ) / SUPER MACRO ( ) button

38
FLASH ( ) button
Indicator Flash mode Indicator
Definition If the subject or background is dark, the camera flash will operate automatically.
Flash mode indicator
Red eyereduction
Slow synchro
Fill in flash
Flash offThe flash does not fire. Select this mode when capturing images in a place or situationwhere flash photography is prohibited. When you take an image in a low light condition,the camera shake warning indicator ( ) will display on the LCD monitor.
If a subject or background is dark, the camera flash will work automaticallyand will reduce the red-eye effect by using the red-eye reduction function.
The flash fires regardless of available light. The intensity of the flash will becontrolled, according to the prevailing conditions. The brighter the background or subject is, the less intense the flash will be.
The flash will operate in conjunction with a slow shutter speed in order to obtain thecorrect exposure. We recommend using a tripod. When you take an image in a low lightcondition, the camera shake warning indicator ( ) will display on the LCD monitor.
INFORMATIONUsing the flash frequently will reduce the life of the batteries.Under normal operating conditions the charging time for the flash is normally within 7seconds. If the batteries are weak, the charging time will be longer.In super macro mode, continuous shot or AEB mode, the flash function will not operate.

RE
CO
RD
ING
39
NOTICETake photographs within the flash range.The flash ranges are listed below.
The image quality is not guaranteed if the subject is too close or highly reflective.The LCD monitor is turned off for a while after using the flash to recharge it.
Flash mode setting
Camera working mode Setting ( marked camera working mode is the default setting.)
EASY Red eye reduction Off
PROGRAM, MySET Auto Red eye reduction Fill in Slow synchro Off
PORTRAIT Red eye reduction Fill in Off
NIGHT SCENE Slow synchro Off
A/ S/ M Off Fill in Slow synchro
MOVIE CLIP Flash off (Fixed)
VOICE RECORDING Not Available
ISO Auto 100 200 400
WIDE 0.8 ~ 3m 0.8 ~ 2.6m 1 ~ 3.7m 1 ~ 5.2m
TELE 0.8 ~ 2m 0.8 ~ 1.5m 1 ~ 2.1m 1 ~ 2.9m
WIDE 0.3 ~ 0.8m 0.3 ~ 0.8m 0.3 ~ 0.8m 0.3 ~ 0.8m
TELE 0.3 ~ 0.8m 0.3 ~ 0.8m 0.3 ~ 0.8m 0.3 ~ 0.8m
Normal focus
MACRO
FLASH ( ) button

40
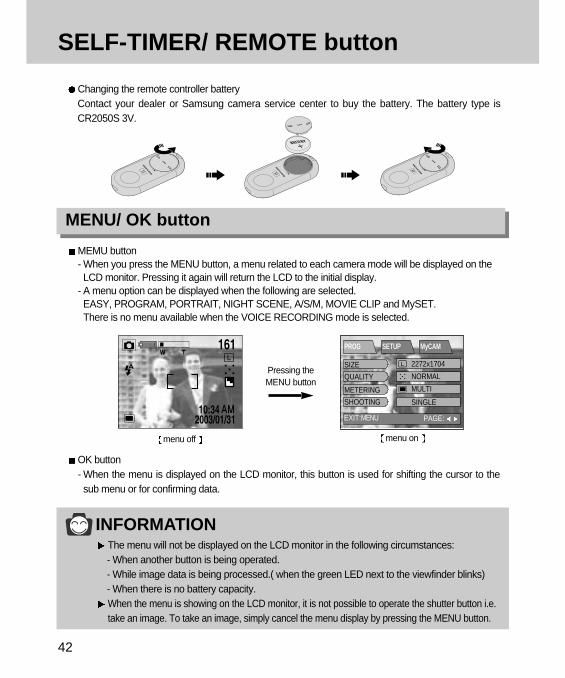
SELF-TIMER / REMOTE button
When the menu is displayed on the LCD monitor, pressing the RIGHT button makes the cursor shiftto the sub menu.When the menu is not displayed on the LCD monitor, the RIGHT button operates as the SELF-TIMER ( ) / REMOTE ( ) button.Selecting the self-timer1. Rotate the mode dial to the RECORDING ( except VOICE RECORDING) mode.2. Press the SELF-TIMER button until the desired mode indicator displays on the LCD monitor.
- Selecting the self-timer mode : Pressing the shutter button will allow an interval of ten secondsbefore the image is taken. After that, the self-timer is cancelled.
- Selecting the remote mode : Pressing the shutter button in the remote controller will allow aninterval of 2 seconds before the image is taken.In the remote mode, you cannot use the shutter button.
Selecting the 2sec. self-timer mode Selecting the remote mode
Self-timer/ remote mode definition
Indicator Mode Definition
2s Pressing the shutter button will allow an interval of 2 seconds before the image is taken.
10s Pressing the shutter button will allow an interval of 10 seconds before the image is taken.
Remote mode You can take a picture with the remote controller.

RE
CO
RD
ING
41
INFORMATION Self-timer lamp In 10s self-timer : For the first seven seconds, the LED blinks at one second intervals.
For the final three seconds, the LED blinks quickly at 0.5 second intervals.In 2s self-timer : The LED blinks at 2second intervals.If you operate the Power switch, Mode dial, and Self-timer button during the self-timeroperation, the self-timer function is cancelled.Use a tripod to prevent the camera from shaking.
Self-timer/ remote mode setting
Camera working mode Setting ( marked camera working mode is the default setting.)
EASY Off 10s self-timer Remote
PROGRAM
PORTRAIT
NIGHT SCENE
A/ S/ M, MySET
MOVIE CLIP Off Remote
VOICE RECORDING Not Available
Off 2s self-timer 10s self-timer Remote
SELF-TIMER / REMOTE button
Remote control rangeWhen you take a picture by using theremote control, refer to the illustrationas shown alongside about the remotecontrol range.
Shutter button on the remote control
42
SELF-TIMER/ REMOTE button
INFORMATION The menu will not be displayed on the LCD monitor in the following circumstances:- When another button is being operated.- While image data is being processed.( when the green LED next to the viewfinder blinks)- When there is no battery capacity.When the menu is showing on the LCD monitor, it is not possible to operate the shutter button i.e.take an image. To take an image, simply cancel the menu display by pressing the MENU button.
MEMU button- When you press the MENU button, a menu related to each camera mode will be displayed on theLCD monitor. Pressing it again will return the LCD to the initial display.
- A menu option can be displayed when the following are selected. EASY, PROGRAM, PORTRAIT, NIGHT SCENE, A/S/M, MOVIE CLIP and MySET.There is no menu available when the VOICE RECORDING mode is selected.
OK button - When the menu is displayed on the LCD monitor, this button is used for shifting the cursor to thesub menu or for confirming data.
menu off menu on
Pressing theMENU button
EXIT:MENU
PROG SETUP MyCAM
PAGE:
SIZE
QUALITY
METERING
SHOOTING
2272x1704
NORMAL
MULTI
SINGLE
Changing the remote controller batteryContact your dealer or Samsung camera service center to buy the battery. The battery type isCR2050S 3V.
MENU/ OK button

43
RE
CO
RD
ING
MF button
In dark conditions, the autofocus may not function. If this occours, press the MF button and you canselect manual focus.After changing the focus manually, the image can be dim. Take care when using this function.
While pressing the MF button, the MF bar will be displayed onthe LCD monitor.
While pressing the MF button, select desired focus value bypressing the UP/ DOWN button and take a picture.- Pressing the UP button : Focus at long range.- Pressing the DOWN button : Focus at close range.
Release the MF button and the MF bar will disappear. If youchange the focus value, the MF indicator will be displayed atthe bottom of the LCD monitor.
INFORMATION If you didn’t change the focus value while pressing the MF button, the auto focus is activated.The manual focus function is disabled in the EASY and VOICE RECORDING mode.The MF bar is divided into 3 parts according to the photography range.
When the photography range is within 0.06m ~ 0.3m, the flash mode is changed to FLASHOFF automatically. When you press the MF button, the numerical indicators will display on the right side of theLCD monitor. The figures are distances from the camera lens.The numerical indicators are just for your reference. Focus the subject by using the LCDmonitor when using the manual focus.
Part of the MF bar Photography range
1st part 0.8m ~ infinity
2nd part 0.3m ~ 0.8m
3rd part (only in wide zoom mode) 0.06m ~ 0.3m
Pressing the MF button
After changing the focus value

44
+/- button
This camera automatically adjusts the exposure according to the ambient lighting conditions.However, you can select the exposure value by using this button.You can select the shutter speed and aperture value in the A/S/M mode.
In the PROGRAM, PORTRAIT, MySET mode- While pressing the +/- button, select the desired exposurevalue by pressing the LEFT/ RIGHT button.
Aperture priority mode( A )- While pressing the +/- button, select the desired aperturevalue by pressing the UP/ DOWN button.
- While pressing the +/- button, select the desired exposurevalue by pressing the LEFT/ RIGHT button.
Shutter priority mode( S )- While pressing the +/- button, select the desired shutterspeed by pressing the UP/ DOWN button.
- While pressing the +/- button, select the desired exposurevalue by pressing the LEFT/ RIGHT button.
RECORDING mode
Aperture priority mode
Shutter priority mode

RE
CO
RD
ING
45
+/- button
INFORMATION If you change the exposure value, the expose indicator ( ) will be displayed on the bottomof the LCD monitor.When the camera is turned on again, the exposure compensation setting returns to 0.0EV(discarding the exposure compensation).Exposure compensation setting range : -2.0 ~ +2.0 EV (0.5 EV steps)If you increase the exposure value, the image will be brighter. If you decrease the exposurevalue, the image will be darker.The aperture value (Av) or shutter speed (Tv) can be selected according to the P/A/S/Mmode in the MySET mode.Decreasing or increasing the exposure value may lead to images being under or overexposed (too dark or too bright).
Manual mode( M )- While pressing the +/- button, select the desired shutter speed bypressing the UP/ DOWN button.
- While pressing the +/- button, select the desired aperture value bypressing the LEFT/ RIGHT button.In the manual mode, the exposure value can’t be compensated.Refer to page 51 for information on selecting the aperture priority /shutter priority / manual mode. Manual mode

46
Using the LCD monitor to adjust the camera
Main menu Sub menu Secondary menu Camera working mode
SIZE PRINT( 2272 x 1504 /SUPER FINE) EASY
MEMO( 1120 x 840 /FINE)
E-MAIL( 544 x 408 /NORMAL)
2272 x 1704
2272 x 1504
1120 x 840
544x 408
QUALITY TIFF
SUPER FINE
FINE
NORMAL
P/A/S/M P/A/S/M MySET 1/2/3
A/S/M APERTURE PRIORITY
SHUTTER PRIORITY
MANUAL
METERING MULTI
SPOT
SHOOT MODE SINGLE
CONTINUOUS
AEB
ISO AUTO
100
200
400
PROGRAM, PORTRAIT,
NIGHT SCENE, A/S/M,
MySET 1/2/3
PROGRAM, PORTRAIT,
NIGHT SCENE, A/S/M,
MySET 1/2/3
A/S/M, MySET 1/2/3
PROGRAM, PORTRAIT,A/S/M, MySET 1/2/3
PROGRAM, A/S/M([AUTO]
is not available), MySET
1/2/3
EASY, PROGRAM,PORTRAIT, MySET 1/2/3# of prints
±0.5 EVEASY, PROGRAM,
PORTRAIT, MySET 1/2/3
Using the LCD monitor to adjust the camera- Recording functions can be changed by using the LCD monitor.- In the RECORDING (EASY, PROGRAM, PORTRAIT, NIGHT SCENE, A/S/M, MOVIE CLIP, MySET,
VOICE RECORDING) mode, pressing the MENU button displays the menu on the LCD monitor.- The following functions are available, depending on the mode you have selected.

47
RE
CO
RD
ING
Using the LCD monitor to adjust the camera
Main menu Sub menu Secondary menu Camera working mode
WHITE BALANCE AUTO
DAYLIGHT
CLOUDY
FLUORESCENT
TUNGSTEN
EFFECT NORMAL
BLACK & WHITE
sRGB
SUNSET
SHARPNESS SOFT
NORMAL
VIVID
PROGRAM, A/S/M, MOVIE
CLIP, MySET 1/2/3
PROGRAM, A/S/M,
MOVIE CLIP, MySET 1/2/3
PROGRAM, A/S/M,
MOVIE CLIP, MySET 1/2/3
INFORMATIONThe menu will not be displayed on the LCD monitor in the following circumstances:- When another button is being operated.- While image data is being processed. ( when the green LED next to the viewfinder blinks)- When there is no battery capacity.When the menu is showing on the LCD monitor, it is not possible to operate the shutterbutton i.e. capture an image. To capture an image, simply cancel the menu display bypressing the MENU button.
48
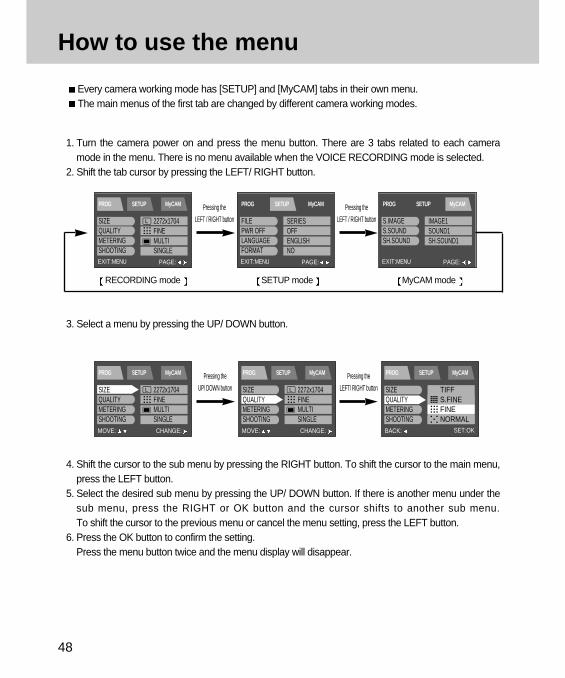
How to use the menu
Every camera working mode has [SETUP] and [MyCAM] tabs in their own menu. The main menus of the first tab are changed by different camera working modes.
1. Turn the camera power on and press the menu button. There are 3 tabs related to each cameramode in the menu. There is no menu available when the VOICE RECORDING mode is selected.
2. Shift the tab cursor by pressing the LEFT/ RIGHT button.
3. Select a menu by pressing the UP/ DOWN button.
4. Shift the cursor to the sub menu by pressing the RIGHT button. To shift the cursor to the main menu,press the LEFT button.
5. Select the desired sub menu by pressing the UP/ DOWN button. If there is another menu under thesub menu, press the RIGHT or OK button and the cursor shifts to another sub menu. To shift the cursor to the previous menu or cancel the menu setting, press the LEFT button.
6. Press the OK button to confirm the setting.Press the menu button twice and the menu display will disappear.
RECORDING mode
EXIT:MENU
PROG SETUP MyCAM
PAGE:
SIZEQUALITYMETERINGSHOOTING
2272x1704FINEMULTISINGLE
SETUP mode MyCAM mode
Pressing the
LEFT / RIGHT button
Pressing the
LEFT / RIGHT button
MOVE:
PROG SETUP MyCAM
CHANGE:
SIZEQUALITYMETERINGSHOOTING
2272x1704FINEMULTISINGLE
Pressing the
UP/ DOWN button
Pressing the
LEFT/ RIGHT button
MOVE:
PROG SETUP MyCAM
CHANGE:
SIZEQUALITYMETERINGSHOOTING
2272x1704FINEMULTISINGLE
BACK:
PROG SETUP MyCAM
SET:OK
SIZEQUALITYMETERINGSHOOTING
TIFFS.FINEFINENORMAL
EXIT:MENU
PROG SETUP MyCAM
PAGE:
FILEPWR OFFLANGUAGEFORMAT
SERIESOFFENGLISHNO
EXIT:MENU
PROG SETUP MyCAM
PAGE:
S.IMAGES.SOUNDSH.SOUND
IMAGE1SOUND1SH.SOUND1

49
RE
CO
RD
ING
Size
You can select the image size you require.
1. Rotate the mode dial to the RECORDING mode and press the MENU button.2. Press the DOWN button and the cursor will be shifted to the main menu.3. Select [SIZE] menu by pressing the UP/DOWN button.4. Press the RIGHT button and the cursor will shift to the [SIZE] sub menu.
5. Press the OK button to confirm the setting.Press the menu button twice and the menu display will be disappeared. Take a picture.
INFORMATIONA large image uses more memory, so increasing the image size will reduce the total numberof shots you can store in the memory.Even though the camera is restarted, the image size setting is maintained.
EASY modeSelect the desired sub menu by pressing the UP/DOWN button.- PRINT : Taking a picture for printing
(2272 X 1504 / Super fine)- MEMO : Taking a picture for a web site image
(1120 X 840 / Fine)- E-MAIL : Taking a picture for e-mail
(544 X 408/ Normal)PROGRAM, PORTRAIT, NIGHT SCENE, A/S/M, MySET 1/ 2/ 3 modeSelect the desired sub menu by pressing the UP/DOWN button.
- 2272x1704 (LARGE)
- 2272x1504 (PHOTO)
- 1120x840 (MEDIUM)
- 544x408 (SMALL)
BACK:
EASY SETUP MyCAM
SET:OK
SIZE
SHOOTING
MEMO
BACK:
PROG SETUP MyCAM
SET:OK
SIZE
QUALITY
METERING
SHOOTING
2272x1704
2272x1504
1120x840
544x408

50
Quality
In RECORDING mode, you can select the image quality (Data compression rate).
INFORMATIONThe higher the QUALITY setting, the better the final image will be. However, the high quality setting willrequire more memory and therefore reduce the number of images you can store on the memory.SUPER FINE is the highest quality and NORMAL is the lowest setting. Choose the settingappropriate for your needs.The image file is stored in *.jpg (Default). But, if you select TIFF in the quality menu, theimage file is stored in *.tif.TIFF format is an uncompressed image file format for an expert. If you take a picture with theTIFF file format, the number of available shots is decreased and the time for recording theimage file will be longer because the TIFF file size is bigger than the JPG file format.When the TIFF file is being recorded to the memory card, a [PLEASE WAIT!] message willbe displayed on the LCD monitor.This file format complies with DCF(Design rule for Camera File system).Even if the camera should be restarted, the quality setting is maintained.But, if you select TIFF quality, the quality setting will be changed to FINE after restarting the camera.When using the 32MB SD memory card, the specified shooting capacity will be as follows.(These figures are intended as an indication of expected performance)
QUALITY IMAGE SIZE L P M STIFF 2 2 8 35Super fine 12 14 53 225Fine 25 29 106 451Normal 38 43 159 676
1. Rotate the mode dial to the RECORDING mode and press the MENU button.2. Press the DOWN and the cursor will be shifted to the main menu.
3. Select [QUALITY] menu by pressing the UP/DOWN button.4. Press the RIGHT button and the cursor will shift to the
[QUALITY] sub menu.5. Select the desired sub menu by pressing the UP/DOWN button.
- TIFF : TIFF - FINE :
- SUPER FINE : - NORMAL :
6. Press the OK button to confirm the setting.Press the menu button twice and the menu display willdisappear. Take a picture.
BACK:
PROG SETUP MyCAM
SET:OK
SIZE
QUALITY
METERING
SHOOTING
TIFF
S.FINE
FINE
NORMAL

51
RE
CO
RD
ING
A / S / M
In this mode you can select the shutter speed or aperture value to your preference.
1. Rotate the mode dial to the A/ S/ M mode and press theMENU button.
2. Press the DOWN button and the cursor will be shifted to themain menu.
3. Select [A/S/M] menu by pressing the UP/DOWN button.4. Press the RIGHT button and the cursor will shift to the [A/S/M]
sub menu.5. Select the desired sub menu by pressing the UP/DOWN button.
Aperture priority ( A ) : You can select the aperture value in this mode.The camera calculates the best shutter speed automaticallyto the proper exposure value.Shutter priority ( S ) : You can select the shutter speed in this mode.The camera calculates the best aperture value automaticallyto the proper exposure value.Manual ( M ) :You can select the shutter speed and the aperture value in this mode.
6. Press the OK button to confirm the setting.Press the menu button twice and the menu display will disappear. Take a picture.
INFORMATIONAfter pressing the shutter button half way down, the values that were changed in the A/S/Mmode will be applied to the picture.If the aperture value or shutter speed is out of the limit of application, the value that is displayedon the LCD monitor will show as red. However, you will still be able to take a picture.
BACK:
A/S/M SETUP MyCAM
SET:OK
SIZE
QUALITY
A/S/M
METERING
A
S
M
EXIT:MENU
A/S/M SETUP MyCAM
PAGE:
SIZE
QUALITY
A/S/M
METERING
2272x1704
FINE
A
MULTI
It warns that : To be the properly exposed, the aperture value
should be smaller than F 2.8. The minimum aperture
value that you can select is F 2.8.

52
A / S / M
Aperture priority mode ( A )- The small aperture value is used for portraits to separate thesubject from the background.The large aperture value is used for landscape photographs tokeep the foreground and background in focus.
- While pressing the +/- button, select the desired aperturevalue by pressing the UP/ DOWN button.
- To change the exposure value, press the LEFT/ RIGHTbutton by pressing the +/- button.
- Point the camera towards the subject and compose the imageand take a picture.
Shutter priority mode ( S )- Fast shutter speeds are used in sport photography to capture
action shots. Slow shutter speeds can be used to show the flowof motion such as water cascading over a waterfall.
- While pressing the +/- button, select the desired shutter speedby pressing the UP/ DOWN button.
- To change the exposure value, press the LEFT/ RIGHTbutton by pressing the +/- button.
- Point the camera towards the subject and compose the imageand take a picture.
Manual mode ( M )- You can select the shutter speed and the aperture value inthis mode.
- While pressing the +/- button, select the desired shutter speedby pressing the UP/ DOWN button.
- While pressing the +/- button, select the desired aperturevalue by pressing the LEFT/ RIGHT button.
- Point the camera towards the subject and compose the imageand take a picture.

53
RE
CO
RD
ING
Metering
When the camera cannot calculate a desired exposure, you can change the metering method.
INFORMATIONThe default metering mode is Multi pattern metering.If the subject is not the centre of the focus, do not use the spot metering as there may be anexposure error. In this case, use exposure compensation.
BACK:
PROG SETUP MyCAM
SET:OK
SIZE
QUALITY
METERING
SHOOTING
MULTI
SPOT
EXIT:MENU
PROG SETUP MyCAM
PAGE:
SIZE
QUALITY
METERING
SHOOTING
2272x1704
FINE
MULTI
SINGLE
1. Rotate the mode dial to the RECORDING mode and press theMENU button.
2. Press the DOWN button and the cursor will be shifted to themain menu.
3. Select the [METERING] menu by pressing the UP/DOWN button.4. Press the RIGHT button and the cursor will shift to the
[METERING] sub menu.5. Select the desired sub menu by pressing the UP/DOWN button.
- Multi pattern metering : Exposure will be calculated based on an average of theavailable light in the image area. However, the calculation willbe biased towards the centre of the image area.
- Spot metering : Use this function when there is backlight or whenphotographing a subject that has little contrast. In backlightingconditions adjust the light metering to suit the subject matter.
6. Press the OK button to confirm the setting.Press the menu button twice and the menu display will disappear. Take a picture.

54
Shooting
You can select the continuous shooting or AEB shooting in this menu.
AEB is not available in the A/S/M mode.
1. Rotate the mode dial to the RECORDING mode and press the MENU button.2. Press the DOWN button and the cursor will be shifted to the main menu.3. Select the [SHOOTING] menu by pressing the UP/DOWN button.4. Press the RIGHT button and the cursor will shift to the
[SHOOTING] sub menu.5. Select the desired sub menu by pressing the UP/DOWN button.
- SINGLE : you can take only one picture at a time.- CONTINUOUS : In this mode, you can capture moving
subjects continuously.- AEB (Auto Exposure Bracket) : In this mode, you can take a
3-image bracket of a scene.There is an over exposed image, normally exposed image andunder exposed image in a bracket.
When you select continuous shot or AEB, you can select the exposure bracket and the number ofcontinuous shots in [SHOOTING] sub menu.
6. Press the OK button to confirm the setting.Press the menu button twice and the menu display will disappear. Take a picture.
INFORMATIONThe flash mode is set to “flash off” in continuous shooting and AEB shooting. After completing thecontinuous or AEB shot, the shooting mode is changed to [SINGLE] automatically.Once a continuous sequence has begun, it will continue until the selected number of shotshas been taken. Releasing the shutter button will not interrupt this function.The maximum number of shots in a sequence is governed by the image settings.Using a 32MB SD memory card, the specified shooting capacity will be as follows.(These figures are intended as an indication of expected performance)
If you change the image size or quality after selecting the continuous shot or AEB shot, theshooting mode will be turned to single shot mode automatically.
Quality Size Large Photo Medium SmallTIFF N/A N/A N/A N/ASuper fine 3 3 14 59Fine 6 7 28 99Normal 10 11 42 99
BACK:
PROG SETUP MyCAM
SET:OK
SIZE
QUALITY
METERING
SHOOTING
SINGLE
CONTINUOUS
AEB

55
RE
CO
RD
ING
Shooting
INFORMATIONContinuous and AEB shots cannot be selected in the TIFF image quality format.To take the continuous shot, the number of available shots must be more than 2 becausethe minimum number of the continuous shots are 2. To take the AEB shots, the number ofavailable shots must be more than 3 because of the same reason.Camera shake can be a problem when using the AEB shooting mode and it takes time tostore the AEB image to the memory. We recommend using a tripod.
You can select the camera’s sensitivity to light by selecting the ISO sub menu. The speed or specificlight-sensitivity of a camera is rated by ISO numbers.
1. Rotate the mode dial to the RECORDING mode and press the MENU button.2. Press the DOWN button and the cursor will be shifted to the main menu.3. Select the [SHOOTING] menu by pressing the UP/DOWN button.4. Press the DOWN button on the [SHOOTING] menu and the next menu page will be displayed.5. Select the [ISO] menu by pressing the UP/DOWN button.
8. Press the OK button to confirm the setting.Press the menu button twice and the menu display will disappear. Take a picture.
6. Press the RIGHT button and the cursor will shift to the [ISO] sub menu.7. Select the desired sub menu by pressing the UP/DOWN button.
- AUTO : The camera's sensitivity is automaticallychanged by variables such as lighting value orsubject brightness.
- 100/ 200/ 400 : In the same lighting conditions, the higher theISO value is, the faster the shutter speed willbe. However, the images can be saturated in very bright conditions.
INFORMATIONThe higher the number, the more sensitive it is to light. As with film, the higher speedsusually induce more electronic noise so the image gets grainier.When the power is turned off, the changed setting value returns to the initial value.[AUTO] is not applied to A/S/M mode.
ISO
BACK:
PROG SETUP MyCAM
SET:OK
ISO
W.B
EFFECT
SHARP
AUTO
100
200
400

56
White Balance
The white balance control allows you to adjust the colors to appear more natural looking.
1. Rotate the mode dial to the RECORDING mode and press theMENU button.
2. Press the DOWN button and the cursor will be shifted to the mainmenu.
3. Select the [SHOOTING] menu by pressing the UP/DOWN button.4. Press the DOWN button on the [SHOOTING] menu and the next
menu page will be displayed.5. Select the [W.B] menu by pressing the UP/DOWN button.6. Press the RIGHT button and the cursor will shift to the [W.B] sub menu.7. Select the desired sub menu by pressing the UP/DOWN button.
- AUTO : The camera automatically selects theappropriate white balance settings, dependingon the prevailing lighting conditions.
- DAYLIGHT : For taking images outside.- CLOUDY : For taking images under a cloudy and
overcast sky.- FLUOR. : For shooting under fluorescent lighting.- TUNGSTEN : For shooting under tungsten (standard light bulb) lighting.
8. Press the OK button to confirm the setting.
Press the menu button twice and the menu display will disappear. Take a picture.
INFORMATIONDifferent lighting conditions may cause a color cast on your images.When the power is turned off, the changed setting value returns to the initial value.
BACK:
PROG SETUP MyCAM
SET:OK
ISO
W.B
EFFECT
SHARP
AUTO
DAYLIGHT
CLOUDY
FLUOR.
EXIT:MENU
PROG SETUP MyCAM
PAGE:
SIZE
QUALITY
METERING
SHOOTING
2272x1704
FINE
MULTI
SINGLE

57
RE
CO
RD
ING
Effect
Using the camera’s digital processor, it is possible to add special effects to your images.
1. Rotate the mode dial to the RECORDING mode and press theMENU button.
2. Press the DOWN button and the cursor will be shifted to the main menu.3. Select the [SHOOTING] menu by pressing the UP/DOWN button.4. Press the DOWN button on the [SHOOTING] menu and the next
menu page will be displayed.5. Select the [EFFECT] menu by pressing the UP/DOWN button.6. Press the RIGHT button and the cursor will shift to the [EFFECT]
sub menu.7. Select the desired sub menu by pressing the UP/DOWN button.
- NORMAL : No effect is added to the image.- B & W : Converts the image to black and white.- sRGB : sRGB is a device independent standard color
model. Devices supporting sRGB can display theexact image color.
- SUNSET : Used for capturing images at sunset8. Press the OK button to confirm the setting.
Press the menu button twice and the menu display will disappear.Take a picture.
INFORMATIONWhen the power is turned off, the changed setting value returns to the initial value.
BACK:
PROG SETUP MyCAM
SET:OK
ISO
W.B
EFFECT
SHARP
NORMAL
B & W
sRGB
SUNSET
EXIT:MENU
PROG SETUP MyCAM
PAGE:
SIZE
QUALITY
METERING
SHOOTING
2272x1704
FINE
MULTI
SINGLE

58
Sharpness
You can select the sharpness of still image.
1. Rotate the mode dial to the RECORDING mode and press theMENU button.
2. Press the DOWN button and the cursor will be shifted to the main menu.3. Select the [SHOOTING] menu by pressing the UP/DOWN button.4. Press the DOWN button on the [SHOOTING] menu and the next
menu page will be displayed.5. Select the [SHARP] menu by pressing the UP/DOWN button.6. Press the RIGHT button and the cursor will shift to the [SHARP] sub menu.7. Select the desired sub menu by pressing the UP/DOWN button.
- SOFT : This gives smooth edges and the final imagewill have a soft appearance.
- NORMAL : This setting will give a standard finish to thefinal image.
- VIVID : This will give the image a crisp and clearappearance.
8. Press the OK button to confirm the setting.Press the menu button twice and the menu display will disappear.Take a picture.
INFORMATION When the power is turned off, the changed setting value returns to the initial value.
BACK:
PROG SETUP MyCAM
SET:OK
ISO
W.B
EFFECT
SHARP
EXIT:MENU
PROG SETUP MyCAM
PAGE:
SIZE
QUALITY
METERING
SHOOTING
2272x1704
FINE
MULTI
SINGLE
SOFT
NORMAL
VIVID

59
RE
CO
RD
ING
My SET mode menu
You can select your favorite settings that have been saved in this menu.
1. Rotate the mode dial to the MySET mode and press theMENU button.
2. Press the DOWN button and the cursor will be shifted to themain menu.
3. Select the [MODE] menu by pressing the UP/DOWN button.4. Press the RIGHT button and the cursor will shift to the
[MODE] sub menu.5. Select the desired sub menu by pressing the UP/DOWN
button.6. Press the OK button to confirm the setting.
Press the menu button twice and the menu display willdisappear. Take a pictureTo apply this function to the camera, change the MySETmode menu or press the DOWN button and select theCHANGE menu.Refer to the CHANGE menu.
You can select your favorite settings and save them in this menu
Main menu Sub menuMODE MYSET1
MYSET2 MYSET3
CHANGE NOYES
Mode
EXIT:MENU
MySET SETUP MyCAM
PAGE:
MODE
CHANGE
MYSET1
NO
BACK:
MySET SETUP MyCAM
SET:OK
MODE
CHANGEMYSET1
MYSET2
MYSET3

60
Change
The loaded My SET setting will be applied to the camera from this menu.
1. Rotate the mode dial to the MySET mode and press the MENU button.2. Press the DOWN button and the cursor will be shifted to the main
menu.3. Select the [CHANGE] menu by pressing the UP/DOWN button.4. Press the RIGHT button and the cursor will shift to the [CHANGE]
sub menu.5. Select the desired sub menu by pressing the UP/DOWN button.
- Selecting [NO] : The My SET menu will not be changed.- Selecting [YES] : You can change your favorite menus.
Refer to page 49 ~ 58 for information aboutthe menus.
6. Press the OK button to confirm the setting.Press the menu button twice and the menu display will disappear.Take a picture
INFORMATIONP/A/S/M in the main menu stands for Program mode(P), Aperture priority(A), Shutter priority(S)and Manual mode(M). You can save one of the camera modes in the My SET mode.
EXIT:MENU
MySET SETUP MyCAM
PAGE:
MODE
CHANGE
MYSET1
NO
BACK:
MySET SETUP MyCAM
SET:OK
MODE
CHANGE NO
YES

61
PL
AY
Play mode
62
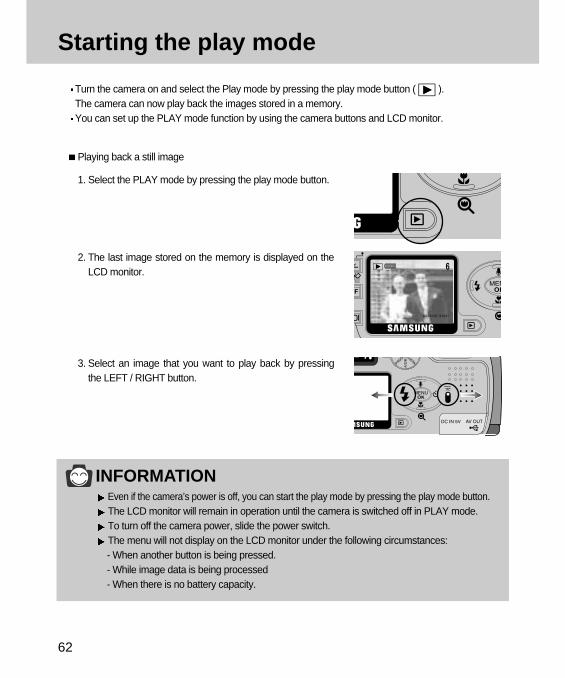
Starting the play mode
Turn the camera on and select the Play mode by pressing the play mode button ( ). The camera can now play back the images stored in a memory.You can set up the PLAY mode function by using the camera buttons and LCD monitor.
1. Select the PLAY mode by pressing the play mode button.
2. The last image stored on the memory is displayed on theLCD monitor.
3. Select an image that you want to play back by pressingthe LEFT / RIGHT button.
Playing back a still image
INFORMATIONEven if the camera’s power is off, you can start the play mode by pressing the play mode button.The LCD monitor will remain in operation until the camera is switched off in PLAY mode.To turn off the camera power, slide the power switch.The menu will not display on the LCD monitor under the following circumstances:- When another button is being pressed.- While image data is being processed- When there is no battery capacity.

63
PL
AY
Starting the play mode
Playing back a movie clipSteps from 1-2 are the same as those to play back a still image.3. Select the recorded movie clip that you want to play back by using
the LEFT/RIGHT button. If you select a movie clip, the movie clipindicator ( ) will be displayed on the LCD monitor.
4. Press the play & pause button ( ) to play back a movieclip file.- To pause while playing back a movie clip file, press the play& pause button again.
- Press the play & pause button and the movie clip file will restart.- To stop play back, press the LEFT/RIGHT button.
Playing back a recorded voiceSteps from 1-2 are the same as those to play back a still image.3. Select the recorded voice that you want to play back by
using the LEFT/RIGHT button. If you select a recordedvoice file, the voice indicator ( ) will be displayed onthe LCD monitor.
4. Press the play & pause button ( ) to play back arecorded voice.- To pause playing back a recorded voice, press the play &pause button again.
- Press the play & pause button and the recorded voicewill restart.
- To stop play back, press the LEFT/RIGHT button.

64
LCD monitor indicator
The LCD monitor displays information about the shooting conditions.
No. Description Icons Page
1 Play mode
2 Movie clip
3 Voice memo p.67
4 Protect indicator p.73
5 DPOF indicator p.76~78
6 Recording date 2003:01:31
7 Stored image number 6
8 Battery
9 Voice recording p.30
SIZE 2272X1704 : image sizeAV F2.8 : aperture valueTV 1/60 : shutter speedISO 100 : ISO sensitivityFLASH OFF : Whether using the flash or notDATE 2003:01:31 : recording date

65
PL
AY
You can view up to 9 images at a time and trim an image.The last image stored on the memory is displayed on the LCD monitor.Press the 5 function button and you can play back another image.
Thumbnail button ( )- Press the thumbnail button.- The thumbnail display will highlight the image that had been showing at the time the thumbnailmode was selected.
- Press the 5 function button to move to a desired image.- To view an image separately, press the enlargement button ( ).
Information button
The shooting information will be displayed on the LCD monitor.The last image stored in the memory is displayed on the LCD monitor.Pressing the LCD button in the PLAY mode will change the display as shown below.
Image & Icons
Pressing theinformation
button
Pressing theinformation
button
Pressing theinformation
button
Image & information Image only
Thumbnail & Wide / Tele & Trimming button
Normal display mode Thumbnail display mode
Pressing the thumbnail ( ) button
Highlighted image
press the enlargement( ) button

66
Thumbnail / Enlargement / Trimming button
Image enlargement- Select an image that you want to enlarge and press theenlargement button.
- Different parts of the image can be viewed by pressing the 5function button.
- Pressing the thumbnail button will zoom back to the original fullsized image.
- The location indicator is in the bottom left side of the LCD monitor.
Trimming : You can extract part of the image that you want andsave it separately.
- Select a section that you want to trim by pressing the 5 functionbutton. Press the OK button and a message will be displayed asshown alongside.
- Select [YES] or [NO] by pressing the LEFT/ RIGHT button andpress the OK button.Selecting [YES] : a trimmed image that has the latest file name
will be displayed on the LCD monitor.Selecting [NO] : an initial image will be displayed.
INFORMATION The maximum enlargement rate in proportion to the image size.
If an image is enlarged, the enlargement indicator will be displayed in the bottom left of theLCD monitor.Movie clip, TIFF and WAV files can’t be enlarged.You may notice a decrease in image quality when you enlarge them.The image size of the trimmed image cannot be defined as it extracts only the part of theimage displayed on the LCD monitor.If there is little memory space to save the trimmed image, the image can’t be trimmed.
Image size Large (Photo) Middle Small
Maximum enlargement rate X8.3 X4.3 X2.1

67
PL
AY
UP / Voice memo button
1. Press the play mode button.2. Press the 5 function button to select an image that you wish to
add sound to.3. Press the voice memo button ( ) and the voice memo
indicator will display. The camera is now ready to record audio.
4. Press the shutter button to start recording.The [RECORDING] message will be displayed on the LCDmonitor (as shown) and audio is recorded to the still image for10 seconds.
5. Recording can be stopped by pressing the shutter button again.
6. [ ] icon will be displayed on the LCD monitor after finishingthe voice memo.
INFORMATIONAudio can’t be recorded onto a movie clip file.When you press the shutter button to stop the audio recording, press the shutter buttonhalfway and the buzzer sound will not be recorded.A distance of 40cm between you and the camera (microphone) is the best distance torecord sound.
When the menu is displayed on the LCD monitor, pressing the UP button makes the menu cursormove up or change the sub menu value.When the menu is not displayed on the LCD monitor, the UP button operates as the voice memo button.You can add your audio to a stored still image.

68
DOWN / LEFT / RIGHT button
DOWN / LEFT / RIGHT buttons activate the following.
DOWN button When the menu is displayed on the LCD monitor, pressing the DOWN button makes the menucursor move down or change the sub menu value.LEFT buttonWhen the menu is displayed on the LCD monitor, pressing the LEFT button makes the cursor shift tothe main menu.RIGHT buttonWhen the menu is displayed on the LCD monitor, pressing the RIGHT button makes the cursor shiftto the sub menu.
INFORMATIONThe menu will not be displayed on the LCD monitor in the following circumstances:- When another button is being operated.- While image data is being processed. (when the green LED next to the viewfinder blinks)- When there is no battery capacity.
MENU / OK button
MENU buttonWhen you press the MENU button, the play mode menu will be displayed on the LCD monitor.Pressing it again will return the LCD to the initial display.OK buttonWhen the menu is displayed on the LCD monitor, the OK button is used for confirming data that ischanged by using the 5 function button.

69
PL
AY
DELETE ( ) button
This deletes an image stored on the memory card.
1. Press the play mode button.2. Press the LEFT/ RIGHT button to select the image that you
want to delete, and press the delete ( ) button.
3. A message as shown alongside will be displayed on the LCD monitor.
NOTICEBefore deleting an image from the camera, you should download (p.100) the image to yourcomputer or protect (p.73) the image, if you want to keep it.
4. To cancel the deletion, press the LEFT button. Press the OK button and a message as shown alongside will bedisplayed on the LCD monitor.Select [DELETE] or [CANCEL] by pressing the UP/DOWNbutton and press the OK button.
Selecting [DELETE] : Once an image has been deleted, theprevious image in the sequence willappear on the LCD monitor.
Selecting [CANCEL] : The image will be displayed on the LCD monitor.

70
PLAY & PAUSE ( ) button
When the menu is not displayed on the LCD monitor, press the PLAY & PAUSE button to play andpause the movie clip, or a still image that has a voice memo or audio recording file.
1. Press the play mode button.
2. Press the LEFT/ RIGHT button to select an image that hasvoice memo, movie clip or audio recording file.
INFORMATIONThe selected image plays back as a single image display.When the image is playing, the play & pause button, power switch and mode dial can be activated.When the image is paused, the left/ right button, power switch and mode dial can be activated.
3. Pressing the PLAY & PAUSE button activates the following.- If an image is showing, but there is no sound (or movement) : Plays the sound clip or starts the
movie clip.- If the image is playing : The progress is paused.- If the PLAY & PAUSE button is pressed when the image is paused, the sound or movement will resume.
To select another image, pause the progress and press the LEFT/RIGHT button.
Initial play mode Playing Pause

71
PL
AY
Setting up the play back function using the LCD monitor
Main menu Sub menu Secondary menu
SLIDE SHOW
(Default : OFF)
REPEAT ON
OFF
PROTECT ONE PICTURE UNLOCK
LOCK
ALL PICTURES UNLOCK
LOCK
RESIZE 1024 x 768
640 x 480
320 x 240
LOGO
DELETE ALL NO
YES
STANDARD ONE PICTURE
ALL PICTURES
INDEX PRINT NO
YES
CANCEL STANDARD
INDEX
OFF, 01 ~ 10 SEC.
00 ~ 30 PRINTS
00 ~ 30 PRINTS
PLAY mode functions can be changed by using the LCD monitor.In the PLAY mode, pressing the MENU button displays the menu on the LCD monitor.

72
Slide show
Images can be displayed continuously at pre-set intervals.You can view the slide show by connecting the camera to an external monitor.
INFORMATION The default is OFF and the loading time depends on the image size and quality.The slide show will start from an image that was displayed on the LCD monitor. The [POWER OFF] function can’t be activated. While the slide show is playing, only the firstframe of an AVI file is displayed.If there is only an image in the memory card, the slide show will not start.
1. Press the play mode button and press the menu button.2. Press the DOWN button and the cursor will be shifted to the main menu.3. Select the [SLIDE] menu by pressing the UP/DOWN button.4. Press the RIGHT button and the cursor will shift to the [SLIDE]
sub menu.5. Select the desired sub menu by pressing the UP/DOWN button.
- If you select [01 ~ 10SEC], you can select the [REPEAT]secondary menu.Select [01 ~ 10SEC] and press the RIGHT button and the cursorwill shift to the secondary menu.
6. Select the desired menu by pressing the UP/DOWN button.- [OFF] : If a cycle is completed, the slide show will stop
automatically.- [ON] : Even once a cycle(from the first image to the last
image) is completed, the slide show will continue torepeat itself.
7. Press the OK button to confirm the setting.Press the menu button twice and the slide show will start.8. To pause the slide show, press the play & pause button. To start the slide show again, press the
play & pause button again. Press the menu button twice again and the slide show will stop.
BACK:
PLAY SETUP MyCAM
SET:OK
SLIDE
PROTECT
RESIZE
DEL. ALL
01 SEC
BACK:
PLAY SETUP MyCAM
SET:OK
SLIDE
PROTECT
RESIZE
DEL. ALL
REPEAT
OFF
ON

73
PL
AY
Protect
This is used to protect specific shots from being accidentally erased (LOCK).It also releases images that have been previously protected (UNLOCK).
1. Press the play mode button and press the menu button.2. Press the DOWN button and the cursor will be shifted to the main menu.3. Select the [PROTECT] menu by pressing the UP/DOWN button.4. Press the RIGHT button and the cursor will shift to the
[PROTECT] sub menu.5. Select the desired sub menu by pressing the UP/DOWN button.
- [ONE PIC.] : Only an image that is displayed on the LCDmonitor is protected or unprotected.
- [ALL PICS.] : All of the stored images are protected orunprotected.
6. Select [LOCK] or [UNLOCK] by pressing the UP/ DOWN buttonand press the OK button.- [UNLOCK] : Discards the protect function.- [LOCK] : Sets up the PROTECT function.If you need to protect another image, press the LEFT/ RIGHTbutton.(In case of selecting [ONE PIC]
7. Press the shutter button and the menu will disappear. If youprotect an image, the protect icon will be displayed on the LCDmonitor. (An unprotected image has no indicator)
NOTICEAn image in LOCK mode will be protected from [DELETE] or [DELETE ALL] functions, butwill NOT be protected from the [FORMAT] function.
BACK:
PLAY SETUP MyCAM
SET:OK
SLIDE
PROTECT
RESIZE
DEL. ALL
ONE PIC.
ALL PICS.
EXIT:MENU
PLAY SETUP MyCAM
PAGE:
SLIDE
PROTECT
RESIZE
DEL. ALL
OFF
LOCK
LOGO
NO
EXIT:SHUTTERMOVE PIC. : SET:OK
UNLOCK
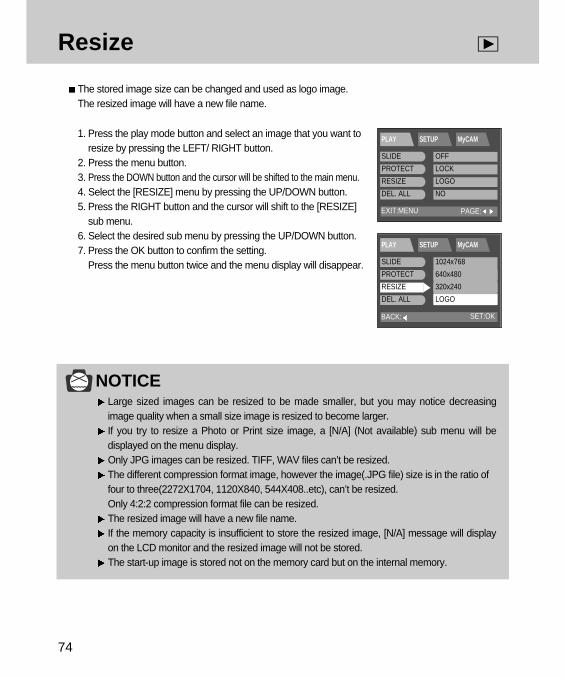
74
Resize
The stored image size can be changed and used as logo image. The resized image will have a new file name.
NOTICELarge sized images can be resized to be made smaller, but you may notice decreasingimage quality when a small size image is resized to become larger.If you try to resize a Photo or Print size image, a [N/A] (Not available) sub menu will bedisplayed on the menu display.Only JPG images can be resized. TIFF, WAV files can’t be resized.The different compression format image, however the image(.JPG file) size is in the ratio offour to three(2272X1704, 1120X840, 544X408..etc), can’t be resized.Only 4:2:2 compression format file can be resized.The resized image will have a new file name.If the memory capacity is insufficient to store the resized image, [N/A] message will displayon the LCD monitor and the resized image will not be stored.The start-up image is stored not on the memory card but on the internal memory.
1. Press the play mode button and select an image that you want toresize by pressing the LEFT/ RIGHT button.
2. Press the menu button.3. Press the DOWN button and the cursor will be shifted to the main menu.4. Select the [RESIZE] menu by pressing the UP/DOWN button.5. Press the RIGHT button and the cursor will shift to the [RESIZE]
sub menu.6. Select the desired sub menu by pressing the UP/DOWN button.7. Press the OK button to confirm the setting.
Press the menu button twice and the menu display will disappear.
BACK:
PLAY SETUP MyCAM
SET:OK
SLIDE
PROTECT
RESIZE
DEL. ALL
1024x768
640x480
320x240
LOGO
EXIT:MENU
PLAY SETUP MyCAM
PAGE:
SLIDE
PROTECT
RESIZE
DEL. ALL
OFF
LOCK
LOGO
NO

75
PL
AY
Delete all
This enables you to clear all unprotected images from the memory.
NOTICERemember that this will permanently delete unprotected images. Important shots should be stored on a computer before deletion takes place.
1. Press the play mode button and press the menu button.2. Press the DOWN button and the cursor will be shifted to the main menu.3. Select the [DEL. ALL] menu by pressing the UP/DOWN button.4. Press the RIGHT button and the cursor will shift to the [DEL. ALL]
sub menu.5. Select the desired sub menu by pressing the UP/DOWN button
and press the OK button.- Selecting [NO] : The display returns to the initial menu.- Selecting [YES] : A [PLEASE WAIT!] message will display and all
the unprotected images are deleted. If therearen’t protected images, all the images aredeleted and a [NO IMAGE!] message willdisplay.
6. If you select [NO], press the menu button twice and the menudisplay will disappear.If a [NO IMAGE!] message is displayed on the LCD monitor afterselecting [YES], press the play mode button or rotate the modedial. The message will disappear.
BACK:
PLAY SETUP MyCAM
SET:OK
SLIDE
PROTECT
RESIZE
DEL. ALL
NO
YES
EXIT:MENU
PLAY SETUP MyCAM
PAGE:
SLIDE
PROTECT
RESIZE
DEL. ALL
OFF
LOCK
LOGO
NO

76
DPOF : Standard
DPOF(Digital Print Order Format) allows you to embed printing information on your memory card.Select the pictures to be printed and how many prints to make.(Print quantity : 0 ~ 30 )The DPOF indicator will display on the LCD monitor when an image that has DPOF informationplays back. Images can then be printed on DPOF printers, or at an increasing number of photolaboratories.This function is not available for Movie clips and WAV files.
This function allows you to embed print quantity information on a stored image.
1. Press the play mode button and select an image that you want toembed a print quantity by pressing the LEFT/ RIGHT button.
2. Press the menu button.3. Press the DOWN button and the cursor will be shifted to the main menu.4. Select the [DEL. ALL] menu by pressing the UP/DOWN button.5. Press the DOWN button on the [DEL. ALL] menu and the next
menu page will be displayed.6. Select [STANDARD] menu by pressing the UP/DOWN button.7. Press the RIGHT button and the cursor will shift to the
[STANDARD] sub menu.8. Select the desired sub menu by pressing the UP/DOWN button.
- [ONE PIC.] : Specifies the number of copies for a selectedimage. If you need to embed a print quantity onanother image, press the LEFT/ RIGHT button.
- [ALL PICS.] : Specifies the number of copies for all imagesexcept for movie clips and voice recording files.
9. Press the OK button and a display to select the quantity will display on the LCD monitor.10. Select the print quantity by pressing the UP/DOWN button.11. Press the OK button to confirm the setting.12. If an image carries DPOF instructions, the DPOF indicator ( ) will show.
Press the shutter button and the camera working mode is turned to the play mode.
BACK:
PLAY SETUP MyCAM
SET:OK
STANDARD
INDEX
CANCEL
ONE PIC.
ALL PICS.
EXIT:SHUTTERMOVE PIC. : SET:OK
00 PRINTS

77
PL
AY
DPOF : Index
INFORMATIONThe number of copy is 1.There is no indicator for the index print.If the index print was set, the [INDEX] sub menu will be displayed as [YES] on the LCDmonitor.The first printed image is the first stored image.
This function will specify the number of copies (except for movie clips and sound clip) for index prints.
1. Press the play mode button and press the menu button.2. Press the DOWN button and the cursor will be shifted to the main menu.3. Select the [DEL. ALL] menu by pressing the UP/DOWN button.4. Press the DOWN button on the [DEL. ALL] menu and the next
menu page will be displayed.5. Select [INDEX] menu by pressing the UP/DOWN button.6. Press the RIGHT button and the cursor will shift to the [INDEX]
sub menu.7. Select the desired sub menu by pressing the UP/DOWN button.8. Press the OK button to confirm the setting.
Press the menu button twice and the menu display will disappear.
BACK:
PLAY SETUP MyCAM
SET:OK
STANDARD
INDEX
CANCEL
NO
YES
EXIT:MENU
PLAY SETUP MyCAM
PAGE:
SLIDE
PROTECT
RESIZE
DEL. ALL
OFF
LOCK
LOGO
NO

78
DPOF : Cancel
This is used for canceling the STANDARD or INDEX DPOF function.
1. Press the play mode button and press the menu button.2. Press the DOWN button and the cursor will be shifted to the main menu.3. Select the [DEL. ALL] menu by pressing the UP/DOWN button.4. Press the DOWN button on the [DEL. ALL] menu and the next
menu page will be displayed.5. Select [CANCEL] menu by pressing the UP/DOWN button.6. Press the RIGHT button and the cursor will shift to the [CANCEL]
sub menu.7. Select the desired sub menu by pressing the UP/DOWN button.
- [STANDARD] : Pre-set print quantity is canceled.- [INDEX] : Index print is canceled.
8. Press the menu button twice and the menu display will disappear.
BACK:
PLAY SETUP MyCAM
SET:OK
STANDARD
INDEX
CANCEL STANDARD
INDEX
EXIT:MENU
PLAY SETUP MyCAM
PAGE:
SLIDE
PROTECT
RESIZE
DEL. ALL
OFF
LOCK
LOGO
NO

79
PL
AY
Setup menu
Main menu Sub meun Secondary menuFILE RESET
SERIESPOWER OFF(Default : 3 MIN)LANGUAGE ENGLISH FRENCH
KOREAN ITALIANCHINESE 1 DUTCHCHINESE 2 DANISHJAPANESE FINNISHRUSSIAN SWEDISHGERMANY PORTUGUESESPANISH
FORMAT NOYES
DATA SET
TIME SET 12:00 AM/PMDATE TYPE 'YY/MM/DD
MM/DD/'YYDD/MM/'YY
IMPRINT OFFDATEDATE&TIME
SOUND ONOFF
LCD BRIGHTNESS LOWNORMAL HIGH
VIDEO OUT NTSCPAL
QUICK VIEW
DEL.ANSWER OFFON
In this mode, you can set up basic settings.Every camera working mode has [SETUP] tab in their own menu.
OFF / 1~10MIN
2003/01/01
OFF/ 1~3SEC.

80
File
This enables you to name files
1. Press the menu button and press the RIGHT button to select[SETUP](Second) tab.
2. Press the DOWN button and the cursor will be shifted to the main menu.3. Select the [FILE] menu by pressing the UP/DOWN button.4. Press the RIGHT button and the cursor will shift to the [FILE] sub menu.5. Select the desired sub menu by pressing the UP/DOWN button.
- [RESET] : Using reset, the next file name will be set from 0001even after formatting, deleting all or inserting a newmemory card.
- [SERIES] : Under this system, the file name will directly followthe last stored file name, regardless of any actionssuch as file deletion or formatting.
6. Press the OK button to confirm the setting.Press the menu button twice and the menu display will disappear.
INFORMATIONThe first stored folder name is 100SSCAM, and first name is SV400001.Whenever you store an image, the file number is increased by 1.The file number is named from SV400001 to SV409999 automatically, 9999 files will bestored in a folder. Using SERIES, the sequence starts at 100SSCAM and increases in increments of 1.(e.g :101SSCAM, 102SSCAM…)The files used with the memory card conform to the DCF(Design rule for Camera Filesystem) format.
BACK:
PLAY SETUP MyCAM
SET:OK
FILE
PWR OFF
LANGUAGE
FORMAT
RESET
SERIES
EXIT:MENU
PLAY SETUP MyCAM
PAGE:
FILE
PWR OFF
LANGUAGE
FORMAT
SERIES
OFF
ENGLISH
NO

81
PL
AY
Power off
This function switches the camera off after a set amount of time in order to prevent unnecessarybattery drainage.
1. Press the menu button and press the RIGHT button to select[SETUP](Second) tab.
2. Press the DOWN button and the cursor will be shifted to the main menu.3. Select the [PWR OFF] menu by pressing the UP/DOWN button.4. Press the RIGHT button and the cursor will shift to the [PWR
OFF] sub menu.5. Select the desired sub menu by pressing the UP/DOWN button.
- Selecting [OFF] : The power off function will not operate.- Selecting [ON] : A menu will be displayed on the LCD monitor
as shown alongside.6. Select the desired time by pressing the UP/DOWN button.7. Press the OK button to confirm the setting.
Press the menu button twice and the menu display will disappear.
INFORMATIONEven if the batteries or AC adapter are removed and inserted again, the power off setting willbe preserved.Note that the automatic power off does not operate if the camera is in slide show or PC mode.
BACK:
PLAY SETUP MyCAM
SET:OK
FILE
PWR OFF
LANGUAGE
FORMAT
OFF
ON
BACK:
PLAY SETUP MyCAM
SET:OK
FILE
PWR OFF
LANGUAGE
FORMAT
01 MIN
EXIT:MENU
PLAY SETUP MyCAM
PAGE:
FILE
PWR OFF
LANGUAGE
FORMAT
SERIES
OFF
ENGLISH
NO

INFORMATIONThe default language is ENGLISH.You can select 15 languages. Those are listed below.English, Korean, T. Chinese, S. Chinese, Japanese, Russian, Germany, Spanish, French,Italian, Portuguese, Danish, Swedish, Finnish, Dutch.Even if the camera is restarted, the language setting will be maintained.Even if the [SOUND] function is [ON], the sound will not activate in this menu.
82
There is a choice of languages that can be displayed on the LCD monitor.
Language
1. Press the menu button and press the RIGHT button to select[SETUP](Second) tab.
2. Press the DOWN button and the cursor will be shifted to the main menu.3. Select the [LANGUAGE] menu by pressing the UP/DOWN button.4. Press the RIGHT button and the cursor will shift to the
[LANGUAGE] sub menu.5. Select the desired sub menu by pressing the UP/DOWN button.6. Press the OK button to confirm the setting.
Press the menu button and the menu display will disappear.
EXIT:MENU
PLAY SETUP MyCAM
PAGE:
FILE
PWR OFF
LANGUAGE
FORMAT
SERIES
OFF
ENGLISH
NO
BACK:
PLAY SETUP MyCAM
SET:OK
FILE
PWR OFF
LANGUAGE
FORMAT
ENGLISH

83
PL
AY
Format
This is used for formatting the memory card.
1. Press the menu button and press the RIGHT button to select[SETUP](Second) tab.
2. Press the DOWN button and the cursor will be shifted to the mainmenu.
3. Select the [FORMAT] menu by pressing the UP/DOWN button.4. Press the RIGHT button and the cursor will shift to the [FORMAT]
sub menu.5. Select the desired sub menu by pressing the UP/DOWN button.
- Selecting [NO] : The image will be displayed on the LCDmonitor. Press the menu button twice and themenu display will disappear.
- Selecting [YES] : The memory card is formatted.(A [NO IMAGE !] message will be displayedafter formatting in play mode)
INFORMATIONBefore using the memory card, it must be initialized.- New memory card, unformatted memory card.- A memory card that has a file this camera can’t recognize or one that has been taken fromanother camera.
NOTICEAll the files in the memory are deleted by the [FORMAT] function. Before formatting thememory, it is advisable to copy important data onto other media as back-up e.g. floppydisks, hard disks, CD etc.Do not use the memory card formatted by another digital camera or memory card reader.
BACK:
PLAY SETUP MyCAM
SET:OK
FILE
PWR OFF
LANGUAGE
FORMAT
NO
YES
EXIT:MENU
PLAY SETUP MyCAM
PAGE:
FILE
PWR OFF
LANGUAGE
FORMAT
SERIES
OFF
ENGLISH
NO

84
Format
NOTICEWhen you format the memory card in your PC that runs on Windows 2000 or XP, pleaseselect the FAT file system.
Formatting on a PC1. Select [Removable Disk] in the [Windows Explorer].
2. Press the right mouse button and select [Format].
3. Select [FAT] file format type and click the [Start] button.

85
PL
AY
Date set
You can change the imprinted date.
1. Press the menu button and press the RIGHT button to select[SETUP](Second) tab.
2. Press the DOWN button and the cursor will be shifted to the main menu.3. Select the [FORMAT] menu by pressing the UP/DOWN button.4. Press the DOWN button on the [FORMAT] menu and the next
menu page will be displayed.5. Select the [DATE SET] menu by pressing the UP/DOWN button.6. Press the RIGHT button and the cursor will shift to the [DATE
SET] sub menu.7. Select the desired sub menu by pressing the UP/DOWN button.
RIGHT button : selects YEAR/ MONTH/ DAY item.UP/ DOWN button : changes the value of each item.
8. Press the OK button to confirm the setting.Press the menu button twice and the menu display will disappear.
EXIT:MENU
PLAY SETUP MyCAM
PAGE:
FILE
PWR OFF
LANGUAGE
FORMAT
SERIES
OFF
ENGLISH
NO
MOVE:
PLAY SETUP MyCAM
CHANGE:
‘03/01/01
03:58 PM
YY/MM/DD
OFF
DATE SET
TIME SET
D.TYPE
IMPRINT
BACK:
PLAY SETUP MyCAM
SET:OK
DATE SET
TIME SET
D.TYPE
IMPRINT
YEAR
03 /01/01

86
You can change the imprinted time.
Time set
1. Press the menu button and press the RIGHT button to select[SETUP](Second) tab.
2. Press the DOWN button and the cursor will be shifted to themain menu.
3. Select the [FORMAT] menu by pressing the UP/DOWN button.4. Press the DOWN button on the [FORMAT] menu and the
next menu page will be displayed.5. Select [TIME SET] menu by pressing the UP/DOWN button.6. Press the RIGHT button and the cursor will shift to the [TIME
SET] sub menu.7. Select the desired sub menu by pressing the UP/DOWN button.
RIGHT button : selects HOUR, MINUTE, AM/PM item.UP/ DOWN button : changes the value of each item.
8. Press the OK button to confirm the setting.Press the menu button twice and the menu display willdisappear.
BACK:
PLAY SETUP MyCAM
SET:OK
DATE SET
TIME SET
D.TYPE
IMPRINT
MOVE:
PLAY SETUP MyCAM
CHANGE:
DATE SET
TIME SET
D.TYPE
IMPRINT
‘03/01/01
03:58 PM
YY/MM/DD
OFF
EXIT:MENU
PLAY SETUP MyCAM
PAGE:
FILE
PWR OFF
LANGUAGE
FORMAT
SERIES
OFF
ENGLISH
NO
HOUR
03 : 58 PM

87
PL
AY
Date type
You can select date type that is imprinted on the image.
1. Press the menu button and press the RIGHT button to select[SETUP](Second) tab.
2. Press the DOWN button and the cursor will be shifted to the main menu.3. Select the [FORMAT] menu by pressing the UP/DOWN button.4. Press the DOWN button on the [FORMAT] menu and the next
menu page will be displayed.5. Select [D.TYPE] menu by pressing the UP/DOWN button.6. Press the RIGHT button and the cursor will shift to the [D.TYPE]
sub menu.7. Select the desired sub menu by pressing the UP/DOWN button.
‘YY/ MM/ DD: Year/ Month/ DayMM/ DD/ ‘YY: Month/ Day/ YearDD/ MM/ ‘YY: Day/ Month/ Year
8. Press the OK button to confirm the setting.Press the menu button twice and the menu display will disappear.
BACK:
PLAY SETUP MyCAM
SET:OK
DATE SET
TIME SET
D.TYPE
IMPRINT
YY/MM/DD
MM/DD/ YY
DD/MM/ YY
EXIT:MENU
PLAY SETUP MyCAM
PAGE:
FILE
PWR OFF
LANGUAGE
FORMAT
SERIES
OFF
ENGLISH
NO

88
Imprint
There is an option to include DATE/TIME on still images.
1. Press the menu button and press the RIGHT button to select[SETUP](Second) tab.
2. Press the DOWN button and the cursor will be shifted to the mainmenu.
3. Select [FORMAT] menu by pressing the UP/DOWN button.4. Press the DOWN button on the [FORMAT] menu and the next
menu page will be displayed.5. Select the [IMPRINT] menu by pressing the UP/DOWN button.6. Press the RIGHT button and the cursor will shift to the [IMPRINT]
sub menu.7. Select the desired sub menu by pressing the UP/DOWN button.
- OFF : DATE & TIME will not be stamped on the image file.- DATE : Only DATE will be stamped on the image file.- DATE&TIME : DATE & TIME will be stamped on the image file.
8. Press the OK button to confirm the setting.Press the menu button twice and the menu display will disappear.
INFORMATIONDate & Time are imprinted at the bottom right side of the LCD monitor.Date will be imprinted as DATE TYPE setting.TIME is imprinted in the following way : [Hour / Minute/ Second] and hours are shown usingthe 12 hour clock.The imprint function is unaffected by the camera being switched on and off.Date & Time is imprinted as you set it in the DATE SET, TIME SET menu.The imprint function is applied only to the still image.
BACK:
PLAY SETUP MyCAM
SET:OK
DATE SET
TIME SET
D.TYPE
IMPRINT
OFF
DATE
DATE&TIME
EXIT:MENU
PLAY SETUP MyCAM
PAGE:
FILE
PWR OFF
LANGUAGE
FORMAT
SERIES
OFF
ENGLISH
NO

89
PL
AY
Sound
A beep will sound when you press the camera button and an error takes place. You can check thecamera condition with this function.
1. Press the menu button and press the RIGHT button to select[SETUP](Second) tab.
2. Press the DOWN button and the cursor will be shifted to the main menu.3. Select the [FORMAT] menu by pressing the UP/DOWN button.4. Press the DOWN button on the [FORMAT] menu and the next
menu page will be displayed.5. Select the [IMPRINT] menu by pressing the UP/DOWN button.6. Press the DOWN button on the [IMPRINT] menu and the next
menu page will be displayed.7. Select the [SOUND] menu by pressing the UP/DOWN button.8. Press the RIGHT button and the cursor will shift to the [SOUND]
sub menu.9. Select the desired sub menu by pressing the UP/DOWN button.
- [ON] : The sound function is activated.- [OFF] : The sound function is not activated.
10. Press the OK button to confirm the setting.Press the menu button twice and the menu display willdisappear.
INFORMATIONEven though the SOUND function is set to [OFF], you can hear Movie clip, voice memo andsound clip file.
BACK:
PLAY SETUP MyCAM
SET:OK
SOUND
LCD
VIDEO
Q.VIEW
ON
OFF
EXIT:MENU
PLAY SETUP MyCAM
PAGE:
FILE
PWR OFF
LANGUAGE
FORMAT
SERIES
OFF
ENGLISH
NO

90
LCD brightness
You may adjust the LCD brightness
1. Press the menu button and press the RIGHT button to select[SETUP](Second) tab.
2. Press the DOWN button and the cursor will be shifted to the main menu.3. Select the [FORMAT] menu by pressing the UP/DOWN button.4. Press the DOWN button on the [FORMAT] menu and the next
menu page will be displayed.5. Select the [IMPRINT] menu by pressing the UP/DOWN button.6. Press the DOWN button on the [IMPRINT] menu and the next
menu page will be displayed.7. Select [LCD] menu by pressing the UP/DOWN button.8. Press the RIGHT button and the cursor will shift to the [LCD] sub menu.9. Select the desired sub menu by pressing the UP/DOWN button.
There are LOW, NORMAL and HIGH sub menu in the [LCD] menu.10. Press the OK button to confirm the setting.
Press the menu button twice and the menu display willdisappear.
BACK:
PLAY SETUP MyCAM
SET:OK
SOUND
LCD
VIDEO
Q.VIEW
DARK
NORMAL
BRIGHT
EXIT:MENU
PLAY SETUP MyCAM
PAGE:
FILE
PWR OFF
LANGUAGE
FORMAT
SERIES
OFF
ENGLISH
NO

91
PL
AY
Video
INFORMATIONSelect the correct movie standard for the outer monitor. PAL mode can support only BDGHINTSC : U.S.A, Canada, Japan, South Korea, Taiwan, Mexico.PAL : Australia, Austria, Belgium, China, Denmark, Finland, Germany, U.K., Holland, Italy,
Kuwait, Malaysia, New Zealand, Singapore, Spain, Sweden, Switzerland, Thailand,Norway.
Even if the [SOUND] function is [ON], the sound will not activate in this menu.
The Movie output signal from the camera can be NTSC or PAL. Your choice of output will begoverned by the type of machine (monitor or TV, etc.) to which the camera is connected.
1. Press the menu button and press the RIGHT button to select[SETUP](Second) tab.
2. Press the DOWN button and the cursor will be shifted to the main menu.3. Select the [FORMAT] menu by pressing the UP/DOWN button.4. Press the DOWN button on the [FORMAT] menu and the next
menu page will be displayed.5. Select the [IMPRINT] menu by pressing the UP/DOWN button.6. Press the DOWN button on the [IMPRINT] menu and the next
menu page will be displayed.7. Select [VIDEO] menu by pressing the UP/DOWN button.8. Press the RIGHT button and the cursor will shift to the [VIDEO]
sub menu.9. Select the desired sub menu by pressing the UP/DOWN button.10. Press the OK button to confirm the setting.
Press the menu button twice and the menu display will disappear.BACK:
PLAY SETUP MyCAM
SET:OK
SOUND
LCD
VIDEO
Q.VIEW
NTSC
PAL
EXIT:MENU
PLAY SETUP MyCAM
PAGE:
FILE
PWR OFF
LANGUAGE
FORMAT
SERIES
OFF
ENGLISH
NO

92
Connecting to an external monitor
Connecting to an external monitorIn RECORDING/ PLAY mode, you can view the stored still images or movie clips by connecting thecamera to an external monitor via the video cable. When the camera is connected to an externalmonitor, the LCD monitor will be turned off automatically.
INFORMATIONWhen using a TV as an external monitor, you will need to select the external or AV channelof the TV.There will be a digital noise on the external monitor, but it is not a malfunction.If the image is not in the centre of the screen, use the TV controls to centre it.When the camera is connected to an external monitor, the menu will be visible on the externalmonitor and the menu functions are the same as those indicated on the LCD monitor.

93
PL
AY
Quick view
You can briefly review the last image captured during the pre-set time.
1. Press the menu button and press the RIGHT button to select[SETUP](Second) tab.
2. Press the DOWN and the cursor will be shifted to the main menu.3. Press the DOWN button until the [Q. VIEW] menu is selected.4. Press the RIGHT button and the cursor will shift to the [Q.VIEW]
sub menu.5. Select the desired sub menu by pressing the UP/DOWN button.
- [OFF] : The quick view function can’t be activated.- [1 ~ 3 SEC] : The captured image is briefly displayed during the
selected time.6. Press the OK button to confirm the setting.
Press the menu button twice and the menu display will bedisappeared.
* Setting up the [DEL, ANSWER] functionIf you select [1~3SEC] sub menu at the step 5, press the RIGHTbutton and the [DEL. ANSWER] menu will be displayed.Select the desired [DEL. ANSWER] sub menu by pressing theUP/DOWN button.- Selecting [OFF] : A [DEL. ANSWER] message will not display.- Selecting [ON] : You can delete the captured image at once.
* Using the [DEL.ANSWER] menuIf you select [ON] at the [DEL.ANSWER] menu, a message asshown alongside will be displayed after taking a picture.- Selecting [YES] : the captured image is deleted.- Selecting [NO] : the captured image is stored.
INFORMATIONThe quick view function doesn’t apply to the movie clip and sound clip file.[Q.VIEW] function is not adjusted to the TIFF file type.
BACK:
PLAY SETUP MyCAM
SET:OK
SOUND
LCD
VIDEO
Q.VIEW
1 SEC
BACK:
PLAY SETUP MyCAM
SET:OK
SOUND
LCD
VIDEO
Q.VIEW
DEL.ANSWER
OFF
ON
EXIT:MENU
PLAY SETUP MyCAM
PAGE:
FILE
PWR OFF
LANGUAGE
FORMAT
SERIES
OFF
ENGLISH
NO

94
1. Press the menu button and press the RIGHT button twice toselect [MyCAM](Third) tab.
2. Press the DOWN button and the cursor will be shifted to the main menu.3. Select the [S. IMAGE] menu by pressing the UP/DOWN button.4. Press the RIGHT button and the cursor will shift to the [S.
IMAGE] sub menu.5. Select the desired sub menu by pressing the UP/DOWN button.6. Press the OK button to confirm the setting.
Press the menu button twice and the menu display will disappear.
NOTICEOnly a image that is save as a LOGO at the [RESIZE] sub menu can be used as the USER IMAGE.If the USER IMAGE was not saved, no image will be displayed on the LCD monitor at thetime of camera power on. Refer to p.74 for selecting the USER IMAGE.The USER IMAGE will not be deleted by the [DEL.ALL] or [FORMAT] menu.
MyCAM menu
You can set up a start up image, start up sound and shutter sound.Every camera working mode has the MyCAM menu.
Start up image
You can select the image that is first displayed on the LCD monitor whenever the camera is turned on.
MOVE:
PLAY SETUP MyCAM
CHANGE:
S.IMAGE
S.SOUND
SH.SOUND
IMAGE2
SOUND1
SH.SOUND1
BACK:
PLAY SETUP MyCAM
SET:OK
S.IMAGE
S.SOUND
SH.SOUND
IMAGE 2

95
PL
AY
Start up sound
You can select the sound that is activated whenever the camera is turned on.
1. Press the menu button and press the RIGHT button twice toselect [MyCAM](Third) tab.
2. Press the DOWN button and the cursor will be shifted to the main menu.3. Select the [S. SOUND] menu by pressing the UP/DOWN button.4. Press the RIGHT button and the cursor will shift to the [S.
SOUND] sub menu.5. Select the desired sub menu by pressing the UP/DOWN button.6. Press the OK button to confirm the setting.
Press the menu button twice and the menu display will disappear.
1. Press the menu button and press the RIGHT button twice toselect [MyCAM](Third) tab.
2. Press the DOWN button and the cursor will be shifted to the main menu.3. Select the [SH. SOUND] menu by pressing the UP/DOWN button.4. Press the RIGHT button and the cursor will shift to the [SH.
SOUND] sub menu.5. Select the desired sub menu by pressing the UP/DOWN button.6. Press the OK button to confirm the setting.
Press the menu button twice and the menu display will disappear.
Shutter sound
You can select the shutter sound.
MOVE:
PLAY SETUP MyCAM
CHANGE:
S.IMAGE
S.SOUND
SH.SOUND
IMAGE2
SOUND1
SH.SOUND1
BACK:
PLAY SETUP MyCAM
SET:OK
S.IMAGE
S.SOUND
SH.SOUND
OFF
SOUND1
SOUND2
SOUND3
BACK:
PLAY SETUP MyCAM
SET:OK
S.IMAGE
S.SOUND
SH.SOUND
OFF
SH. SOUND1
SH. SOUND2
SH. SOUND3
MOVE:
PLAY SETUP MyCAM
CHANGE:
S.IMAGE
S.SOUND
SH.SOUND
IMAGE2
SOUND1
SH.SOUND1

96
List of camera function
SIZE Print(Photo / Super Fine) ( ) - - - - - - - - - - - -
Memo(Middle / Fine) - - - - - - - - - - - -
E-mail (Small / Normal) - - - - - - - - - - - -
Large ( ) ( ) ( ) ( ) ( ) ( ) - ( ) - - - -
Photo - - - - -
Middle - - - - -
Small - - - - -
288 x 208pixels - - - - - - - ( ) - - - - -
QUALITY Tiff (1:1) - - - - -
Super Fine(1:4) - - - - -
Fine (1:8) ( ) ( ) ( ) ( ) ( ) ( ) - ( ) - - - -
Normal (1:12) - - - - -
1:12 - - - - - - - ( ) - - - - -
ZOOM Optical ZOOM - - - -
Digital ZOOM - -
METERING Multi-Pattern ( ) ( ) ( ) ( ) ( ) ( ) ( ) ( ) ( ) - - - -
Spot - - - -
FOCUS AF ( ) ( ) ( ) ( ) ( ) ( ) ( ) ( ) ( ) - - - -
MF (indicator) - - - -
SHOOTING Single ( ) ( ) ( ) ( ) ( ) ( ) ( ) ( ) - - - -
Continuous - - - -
AEB - - - -
ISO AUTO ( ) ( ) ( ) ( ) ( ) - - - -
100 ( ) ( ) ( ) - - - -
200 - - - -
400 - - - -
W.BALANCE Auto ( ) ( ) ( ) ( ) ( ) ( ) ( ) ( ) ( ) - - - -
Daylight - - - -
Cloudy - - - -
Fluorescent - - - -
Tungsten - - - -
EFFECT Normal ( ) ( ) ( ) ( ) ( ) ( ) ( ) ( ) ( ) - - - -
B&W - - - -
sRGB - - - -
Sunset - - - -
SHARPNESS Soft - - - -
Normal ( ) ( ) ( ) ( ) ( ) ( ) ( ) ( ) ( ) - - - -
Vivid - - - -
MODE DIAL Function
: Default, : After restarting the camera, : Selectable , X: Not Available, -: Not Selectable

97
PL
AY
List of camera function
FLASH Auto ( ) ( ) - - - -
Red eye (with Auto) ( ) ( ) - - - -
Fill-in - - - -
Slow sync.(with Red eye) ( ) - - - -
Off ( ) ( ) ( ) ( ) - - - -
EVC -0.5 ~ -2.0EV (1/2 EV step) - - - -
0.0EV ( ) ( ) ( ) ( ) ( ) ( ) ( ) ( ) - - - -
+0.5 ~ +2.0EV (1/2 EV step) - - - -
SELFTIMER Off ( ) ( ) ( ) ( ) ( ) ( ) ( ) ( ) ( ) - - - -
2 sec. - - - -
10 sec. - - - -
Remote control - - - -
AF Normal (80cm ~ ∞) ( ) ( ) ( ) ( ) ( ) ( ) ( ) ( ) ( ) - - - -
ZONE Macro (30 ~80cm) - - - -
Super Macro (6 ~30cm) - - - -
AUDIO Off ( ) ( ) ( ) ( ) ( ) ( ) ( ) ( ) - - - -
(Voice memo) On ( ) - - - -
A/S/M A/S/M (A) (P) - - - -
SET Av (F5.6) (F5.6) (F5.6) - - - -
Tv (1/250) (1/250) (1/250) - - - -
SLIDE SHOW OFF /1~10 sec.(1sec step) - - - - - - - - - - (OFF)
Repeat Off - - - - - - - - - - ( )
Repeat On - - - - - - - - - -
PROTECT Unlock - - - - - - - - - - ( )
Lock - - - - - - - - - -
DPOF Index (1 print) - - - - - - - - - -
Standard (0 ~30 prints) - - - - - - - - - -
EDIT Trimming - - - - - - - - - -
Resize - - - - - - - - - -
DELETE ALL - - - - - - - - -
FILE NAME Reset ( )
Series
POWER OFF OFF /1~10 min. (3 min)
LANGUAGE 15 Languages (English)
DATE 2002.01.01 ~2050.12.31 (2003.01.01 )
MODE DIAL Function

98
List of camera function
IMPRINT Off ( )
Date
Date &Time
DATE TYPE YYYY/MM/DD ( )
DD/MM/YYYY
MM/DD/YYYY
SOUND EFFECT On ( )
Off
START-UP IMAGE Off
IMAGE 1 ( )
IMAGE 2
IMAGE 3
USER IMAGE
START-UP SOUND Off
SOUND 1 ( )
SOUND 2
SOUND 3
SHUTTER SOUND Off
SH.SOUND 1 ( )
SH.SOUND 2
SH.SOUND 3
LCD BRIGHTNESS 0 ~2 Level (1 Level )
VIDEO OUT NTSC ( )
PAL
QUICK VIEW Off /1~3 sec (1 sec)
Delete answering On
Delete answering Off ( )
MODE DIAL Function

99
PL
AY
Starting PC mode
If you insert the USB cable into the USB connection terminal, the camera working mode will changeto the PC mode automatically.In this mode, you can download stored images to your PC through the USB cable.The LCD monitor is always turned off in PC mode.The autofocus indicator lamp(red) lamp blinks when the files are transferring via the USB connection.
Connecting the camera to PC1. Turn the PC power on.2. Turn the camera power on.3. Connect the PC and the camera via the USB cable.
- Insert the small plug of the USB cable into the camera USB connection terminal.- Insert the large connector of the USB cable into the USBport of the PC
- The plugs must be firmly inserted.
Disconnecting the camera and PCRefer to the following page- WIN 98SE : p.119 - WIN 2000/ME/XP : p.119
INFORMATIONThe camera driver must be installed before using PC mode.To save battery power, it is recommended that you use an AC adaptor(Optional) whenconnecting the camera to a computer.

100
Downloading stored imagesOnce you have downloaded images to your PC, they can be edited and printed.
Starting PC mode
1. Connect the camera to your PC with the USB cable.
2. On your computer’s desktop display, select [My computer] anddouble click [Removable Disk DCIM 100SSCAM]. The image files will then be displayed.
3. Select an image and press the right mouse button.
4. A pop-up menu will open.Click [Cut] or [Copy] menu[Cut] : cuts a selected file.[Copy] : copies files.
5. Click a folder that you want to paste the file.
6. Press the right mouse button and a pop-up menu will open. Click [Paste].
7. An image file is transferred from camera to your PC.
- By using [Digimax Viewer], you can see the stored images in the memory directly on the PC monitorand you can copy or move the image files.

101
PL
AY
Important notes
Your new Samsung camera is a precision instrument. Whilst it is designed to withstand general wearand tear, there are some important points that will help you get maximum service and reliability fromyour camera. The following should be avoided :- Severe changes in temperature and humidity.- Dust and dirt.- Direct sunlight or the inside of a vehicle in hot weather.- Environments where there is high magnetism or excessive vibration.- Areas with high explosives or which are highly flammable materials.- Pesticides, etc.Sand can be particularly troublesome to cameras.- Sand or other small particulates can cause severe malfunctions.Ensure that there is no contact with sand or similar particles.
Extremes in temperature may cause problems.- If the camera is transferred from a cold to a warm and humid environment, condensation can formon the delicate electronic circuitry. If this occurs, turn the camera off and wait for at least 1 hour untilall moisture is dispersed. Moisture build up can also occur in the MEMORY CARD. If this happens,turn off the camera and remove the MEMORY CARD. Wait until the moisture has dispersed.
If the digital camera is not used for a long period, an electric discharge can occur. It is a good idea toremove the batteries and the MEMORY CARD, the camera is not used for some time.If the camera is exposed to electronic interference, it will turn itself off to protect the MEMORY CARD.Maintenance- Use a soft brush (available from photo stores) to GENTLY clean the lens and LCD assemblies. If this does not work, lens-cleaning paper with lens cleaning fluid can be used.
- Clean the camera body with a soft cloth. Do not allow this camera to come into contact withsolvent materials such as benzol, insecticide, thinners etc.This may damage the body shell of the camera and also affect its performance.
- Rough handling can damage the LCD monitor. Take care to avoid damage and keep the camera inits protective carry case at all times when not in use.
DO NOT attempt to disassemble or modify the camera. It contains delicate parts and there are highvoltage circuits that can cause electric shocks.Under certain conditions, static electricity can cause the flash unit to fire.This is not harmful to the camera and is not a malfunction.When images are uploaded or downloaded, the data transfer may be affected by static electricity. Inthis case, disconnect and re-connect the USB cable before trying the transfer again.
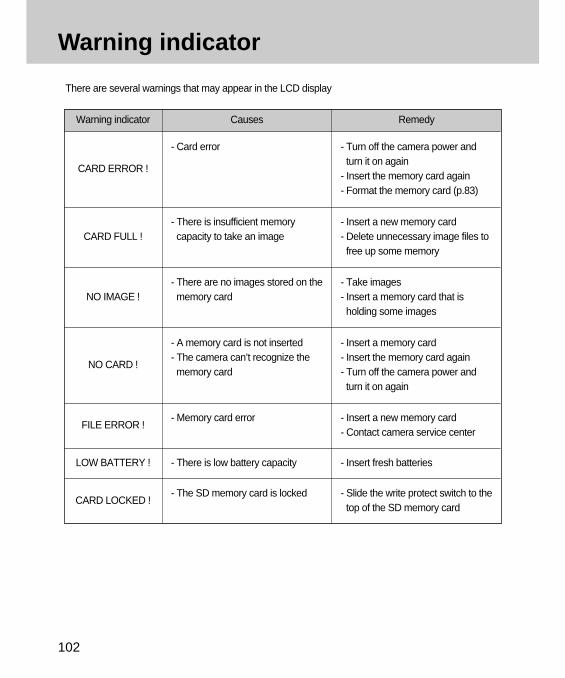
102
Warning indicator
There are several warnings that may appear in the LCD display
Warning indicator
CARD ERROR !
CARD FULL !
NO IMAGE !
NO CARD !
FILE ERROR !
LOW BATTERY !
CARD LOCKED !
Causes
- Card error
- There is insufficient memorycapacity to take an image
- There are no images stored on thememory card
- A memory card is not inserted- The camera can’t recognize thememory card
- Memory card error
- There is low battery capacity
- The SD memory card is locked
- Turn off the camera power andturn it on again
- Insert the memory card again- Format the memory card (p.83)
- Insert a new memory card- Delete unnecessary image files tofree up some memory
- Take images- Insert a memory card that isholding some images
- Insert a memory card- Insert the memory card again- Turn off the camera power andturn it on again
- Insert a new memory card- Contact camera service center
- Insert fresh batteries
- Slide the write protect switch to thetop of the SD memory card
Remedy

103
PL
AY
Before contacting a service center
Symptom
The camera doesn’tswitch on
The camera power isdown whilst in use
Batteries drain quickly
Camera does not take images when
pressing the Shutter button
Causes
- There is low battery capacity- An AC Power Adapter is notconnected
- The batteries are exhausted- The Camera is turned offautomatically due to the Autopower off function
- The Adapter plug is not connectedsecurely
- The Camera is being used in lowtemperatures
- Mixing old and new batteries orbattery types
- The memory card is not inserted
- There is insufficient memorycapacity
- The memory card has not beenformatted
- The memory card is exhausted- The camera power is off- The batteries are exhausted- The SD card is locked
- Insert fresh batteries- Connect an AC Power Adapter
- Insert fresh batteries- Slide the power switch toreactivate camera
- Remove and re-insert the plug
- Keep the camera in warmconditions (i.e. inside a coat orjacket) and only remove it in orderto take images
- Insert fresh batteries (all of whichshould be of the same type)
- After turning the camera off, inserta new memory card
- Delete unnecessary image files
- Format the memory card (p.83)
- Insert a new memory card- Turn the camera power on- Insert fresh batteries- Slide the write protect switch to thetop of the SD memory card
Remedy

104
Before contacting a service center
Symptom
The images areunclear
The flash does not fire
Incorrect date andtime is displayed
The camera buttonsdo not operate
Memory card error
Causes
- The focus mode is not correct.
- The autofocus was not activated
- Taking a picture beyond the flash range- The lens is smudged or dirty.
- FLASH OFF mode have beenselected
- The date and time have been setincorrectly or the camera hasadopted the default settings
- Camera malfunction
- Incorrect memory card format
- If the subject is closer than 0.8m,select macro shot mode.
- Use Fixed focus when you can’tuse auto focus mode.
- Take a picture within the flash range- Clean the lens
- Dis-engage FLASH OFF mode
- Reset the date and time correctly
- Remove /re-insert batteries andswitch camera on
- Re-format the memory card (p.83)
Remedy

105
PL
AY
Before contacting a service center
Symptom
Color of imagedifferent to original
scene
Images are too bright
No image on externalmonitor
When using the PC’s explorer,‘Removable Disk’ file does not show
Causes
- White balance setting is incorrect
- Exposure is excessive
- The external monitor has not beenconnected properly with thecamera
- There are incorrect files in thememory card
- Cable connection is incorrect- The camera is off- There are no batteries, thebatteries are exhausted or the ACadapter is not connected
- The operating system is notWindows 98, 98SE, 2000, ME,XP/ Mac OS 9.0~10.2.Alternatively the PC does notsupport USB
- USB driver is not installed
- Select appropriate White balance
- Reset exposure compensation
- Check the connection cables
- Insert a memory card that havecorrect files
- Check the connection- Turn the camera on- Insert new batteries or check theadapter connection
- Install Windows 98, 98SE, 2000,ME, XP/ Mac OS 9.0~10.2 to PCthat supports USB
- Install "USB Storage Driver"
Remedy

106
Specifications
Type 1/1.8" CCDImage Sensor Effective Pixels Approx. 4.0 Mega pixels
Total Pixels Approx. 4.1 Mega pixelsFocal Length Schneider Lens f = 7.7 ~ 23.1mm (35mm film equivalent : 38~114mm)
Lens F No. F2.7 ~ F4.9Digital Zoom Still Image mode : 1.0X ~ 4.0X
Play mode : 1.0X ~ 8.3X (depends on image size)Optical Viewfinder Real image optical viewfinderLCD Monitor 1.5" color TFT LCD (117,600 dots)Type TTL auto focus, Manual focus Range Normal : 80cm ~ infinity, Macro : 30 ~ 80cm,
Super Macro : 6 ~ 30cm (Wide only)Type Mechanical and Electronic shutterSpeed 4 ~ 1/2,000 sec. (Manual : max. 15 sec.)Control Program AE, Shutter Priority AE, Aperture Priority AE or
Manual Exposure / Metering : Multi, SpotCompensation ±2.0EV (0.5EV steps)ISO Equivalent Auto, 100, 200, 400Modes Auto, Auto & Red-eye reduction, Fill-in flash, Slow sync, Flash off
Flash Range Wide : 0.3 ~ 3.0m, Tele : 0.3 ~ 2.0mRecharging Time Approx. 7 sec.
Sharpness Soft, Normal, VividEffect Normal, B&W, sRGB, SunsetWhite Balance Auto, Daylight, Cloudy, Fluorescent, Tungsten
Voice Recording (max. 2 hour)Voice Memo on Still Image (max. 10 sec.)
Date Imprinting Date&Time, Date, Off (user selectable)Still Image Modes : Easy, Program, A/S/M, My Set, Night Scene, Portrait
Macro : Macro, Super MacroContinuous : Single, Continuous, AEBSelf-timer : 10 sec., 2 sec., Remote control (optional)
Movie Clip Voice On, Off (user selectable)Size : 288x208 (Recording time : memory capacity dependent)
Media SD / MMC card (up to 256MB guaranteed)File Format Still Image : TIFF, JPEG (DCF), DPOF
Movie Clip : AVI (MJPEG)Voice : WAV
Viewfinder
Exposure
Shooting
Storage
Voice Recording
Focusing
Shutter
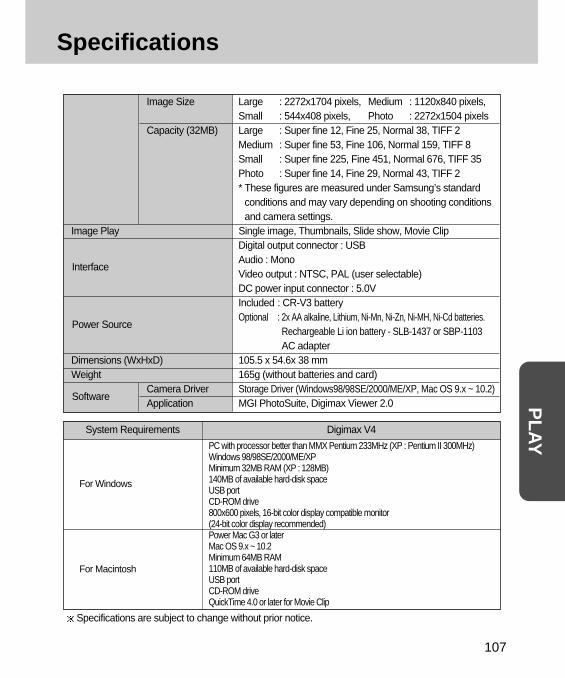
107
PL
AY
Specifications
Image Size Large : 2272x1704 pixels, Medium : 1120x840 pixels,Small : 544x408 pixels, Photo : 2272x1504 pixels
Capacity (32MB) Large : Super fine 12, Fine 25, Normal 38, TIFF 2Medium : Super fine 53, Fine 106, Normal 159, TIFF 8Small : Super fine 225, Fine 451, Normal 676, TIFF 35Photo : Super fine 14, Fine 29, Normal 43, TIFF 2* These figures are measured under Samsung’s standard
conditions and may vary depending on shooting conditionsand camera settings.
Image Play Single image, Thumbnails, Slide show, Movie ClipDigital output connector : USBAudio : MonoVideo output : NTSC, PAL (user selectable)DC power input connector : 5.0VIncluded : CR-V3 battery Optional : 2x AA alkaline, Lithium, Ni-Mn, Ni-Zn, Ni-MH, Ni-Cd batteries.
Rechargeable Li ion battery - SLB-1437 or SBP-1103AC adapter
Dimensions (WxHxD) 105.5 x 54.6x 38 mmWeight 165g (without batteries and card)
Camera Driver Storage Driver (Windows98/98SE/2000/ME/XP, Mac OS 9.x ~ 10.2)Application MGI PhotoSuite, Digimax Viewer 2.0
System Requirements
For Windows
For Macintosh
Digimax V4
Specifications are subject to change without prior notice.
PC with processor better than MMX Pentium 233MHz (XP : Pentium II 300MHz)Windows 98/98SE/2000/ME/XPMinimum 32MB RAM (XP : 128MB)140MB of available hard-disk spaceUSB portCD-ROM drive800x600 pixels, 16-bit color display compatible monitor(24-bit color display recommended)Power Mac G3 or laterMac OS 9.x ~ 10.2Minimum 64MB RAM110MB of available hard-disk spaceUSB portCD-ROM driveQuickTime 4.0 or later for Movie Clip
Interface
Power Source
Software

108
Software Notes
Please ensure that you read the instruction manual carefully before use.
The attached software is a camera driver and image editing software tool for Windows.Under no circumstances should all or part of either the software or the user manual be reproduced.Copyright for both software is licensed only for use with a camera.In the unlikely event of a manufacturing fault, we will repair or exchange your camera. We cannot,however, be held responsible in any way for damage caused by inappropriate use.Using a Hand-made PC or a PC that has not been guaranteed by the manufacturer is not covered bythe Samsung warranty.Before reading this manual, you should have a basic knowledge of computers and O/S (Operating Systems).Windows is a registered trademark of Microsoft.Macintosh, Mac is the registered trademark of Apple computer, USA.
After inserting the CD-ROM provided with this camera into the CD-ROM drive, the following window shouldautomatically run. Before connecting the camera to the PC, you should first install the camera driver.
Setting up the application program
Access to the Samsung camera web-site.
Click the [Install] menu on the Autorun frame and all of application software is installed.
Camera driver : This enables images to transfer between the camera and PC.This camera uses the USB Storage Driver as the camera driver. You can use the camera as a USBcard reader. After installing the driver and connecting this camera to the PC, you can find[Removable Disk] in [Windows Explorer] or [My computer]. A USB Storage Driver is provided onlyfor Windows. A USB Driver for MAC is not included with the Application CD. But you can use thecamera with Mac OS 9.0~10.2.
Setting up the camera driver for WINDOWS (p.110)
About the software

SO
FT
WA
RE
109
About the software
Digimax Viewer 2.0 :This is a program for viewing stored images. You can see the stored images in the memory directlyon a PC monitor. You can also copy, move or delete the images and enlarge /downscale the imagesizes with Digimax Viewer.For windows only.
Setting up Digimax Viewer (p.111) Using Digimax Viewer (p.122)
MGI PhotoSuite III SE : Image editing programImage editing program for downloaded images. For Windows only.
Setting up MGI PhotoSuite III SE (p.112) Using MGI PhotoSuite III SE (p.123)
Internet link : You can visit the Samsung web-site through the internet.http://www.samsungcamera.com : Englishhttp://www.samsungcamera.co.kr : Korean
INFORMATIONCheck the system requirements (p.107) before setting up the driver.You should allow 5~10 seconds for running the automatic setup program according to thecapability of the computer. If the frame does not show, run the [Windows Explorer] andselect [Samsung.exe] in the CD-ROM Drive root directory.

110
Setting up the application software
You can visit the Samsung web-site through the internet.
http://www.samsungcamera.com : Englishhttp://www.samsungcamera.co.kr : Korean
To use this camera with a PC, install the application software first. After this has been done, the storedimages in the camera can be moved to the PC and can be edited by an image editing program.
1. Click the [Install] menu in the Autorun frame.The Digimax V camera driver is installed automatically.
3. A window for which you can select application software will bedisplayed. Select the application program and click the [Install] button.Refer to page.106 for more information about the application program.
2. Installation is complete. Click the [Finish] button.
[Click !]
[Click !]
[Click !]
NOTICEDisable other programs before installing the application software.Before installing the application software, disconnect the USB connection.
INFORMATIONIf you select [Cancel] at step 3, the application program installation will be cancelled.

SO
FT
WA
RE
111
Setting up the application software
4. The [Digimax Viewer 2.0] installation window will be displayed asshown below. Click the [Next] button.
5. The Software License Agreement window will be displayed. If youagree to this, click [Yes], the window will then move to the nextstep. If you disagree, click [ No ] and the install program will becanceled.
6. Select a destination folder and click [Next].
7. Select the Program folder and click [Next].
INFORMATIONIf you select [Cancel] at step 4, a window for installing MGI PhotoSuite III SE will bedisplayed.
[Click !]
[Click !]
[Click !]
[Click !]

112
Setting up the application software
8. Installation is completed. Click the [Finish] button and a window forinstalling MGI PhotoSuite III SE will be displayed.
10. A [Welcome] window will be displayed. Click the [Next] button.
11. The Software License Agreement window will be displayed. If youagree to this, click [Yes], the window will then move to the nextstep. If you disagree, click [ No ] and the install program will becanceled.
INFORMATION If you select [Cancel] at the step 9, a window for restarting the computer will be displayed.
[Click !]
9. The [MGI PhotoSuite III SE] installation window will be displayedas shown below. Click the [OK] button.
[Click !]
[Click !]
[Click !]
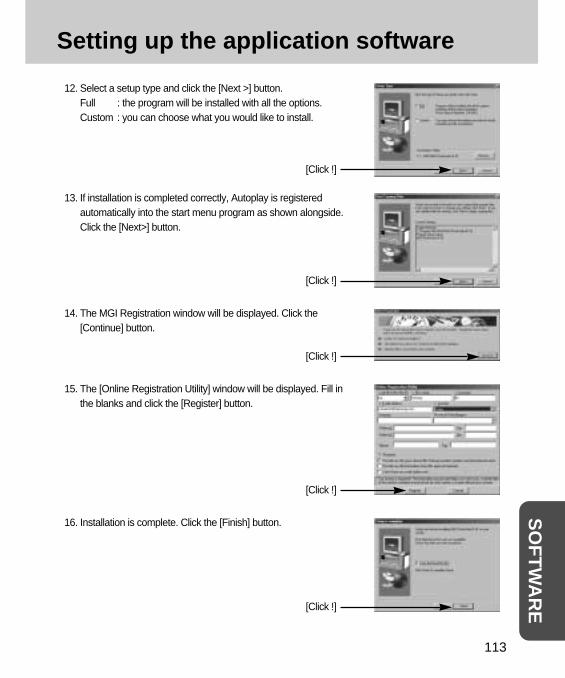
SO
FT
WA
RE
113
Setting up the application software
12. Select a setup type and click the [Next >] button.Full : the program will be installed with all the options.Custom : you can choose what you would like to install.
13. If installation is completed correctly, Autoplay is registeredautomatically into the start menu program as shown alongside.Click the [Next>] button.
14. The MGI Registration window will be displayed. Click the[Continue] button.
15. The [Online Registration Utility] window will be displayed. Fill inthe blanks and click the [Register] button.
16. Installation is complete. Click the [Finish] button.
[Click !]
[Click !]
[Click !]
[Click !]
[Click !]

114
Setting up the application software
INFORMATIONA [Read me] file will open.Click the Close button to close the file.
17. To use the [REMOVABLE DISK], you have to restart yourcomputer. Click [Finish] button and the computer will restart.
18. After restarting the computer, connect the PC to the camera with the USB cable.
19. Turn the camera power on. [Found New Hardware Wizard] willopen and the computer will recognize the camera.
* If you have ever installed an image viewer program or your OS isWindows XP, an image viewer program will open. If the imageviewer program opens, the camera driver was setupsuccessfully.
[Click !]
20. If you can see [Removable Disk] under [My computer], thecamera driver installation is successful. Now you can transferimage files from the camera to PC via the USB cable.

SO
FT
WA
RE
115
Setting up the application software
INFORMATIONIf you have installed the camera driver, [Found NewHardware Wizard] may not open.After the [Found New Hardware Wizard] window opens,a window may open to select the camera driver filelocation. In this case, select the[C:\WINDOWS\INF\OTHER] folder.If you can s find the [INF\OTHER] folder, check the[Show all files] button in [Window's Explorer View Folder option View].Before connecting the camera to the PC, You shouldfirst install the camera driver.After installing the camera driver, you have to restartyour PC.If you connect the camera to the PC before installing the camera driver, the [Found NewHardware Wizard] will open. In this case, cancel the [Found New Hardware Wizard] anddisconnect the camera. Install the camera driver and connect the camera to the PC again.Should the computer not find the camera driver after installation, please try one or more ofthe following measures.1. Delete the camera driver (p.116), and re-install the driver.2. Refer to FAQ (p.138) to check for a possible solution to the problem.3. If your PC s central processing unit is VIA chip (This is shown in the USB Host Controller),
download the patch file from the Samsung Camera web page.(http://www.samsungcamera.com)

116
Removing the USB Driver for Windows 98SE
To remove the USB driver, refer to the process shown below.
1. Trace [Start Settings] and click [Control Panel]
2. Double-click [Add/Remove programs].

SO
FT
WA
RE
117
Removing the USB Driver for Windows 98SE
[Click!]
4. A window will open. Click the [OK] button and thecamera driver will be removed.
5. Uninstall is complete.Click the [Finish] button and the window will disappear.
3. The [Add/Remove Programs Properties] window willopen. Click [Digimax V] and click the [Add/Remove]button.

118
Removable Disk
To use this camera as a Removable Disk, install (p.110) the USB Driver.
1. Before turning the camera power on, connect the camera to the PC with the USB cable.2. Click [Removable Disk] under [My computer] or [Windows Explorer].3. Image files stored in the Removable Disk (DCIM 100SSCAM) can be transferred to the PC.
NOTICEImportant information whilst using the Removable Disk
The [Removable Disk] indicator will not show when the camera power is off.We recommend that you should copy the images to the PC to view them. Opening imagesdirectly from the removable disk may be subject to unexpected disconnection.When uploading images from the PC to the camera, ensure that the uploaded file namesare not the same as those already stored on the memory. When you upload a file that is not taken by this camera toRemovable Disk, the [FILE ERROR!] message will bedisplayed on the LCD monitor in the PLAY mode, andnothing is displayed in THUMBNAIL mode.The green lamp next to the viewfinder will blink, when a file istransferred (copy or deletion) between the PC and the camera. Do not remove the USBcable until the lamp stops blinking. To remove the USB cable in Windows 2000/ME/XP, usethe [Unplug or Eject Hardware] icon on the task bar.

119
SO
FT
WA
RE
Removing the removable disk
Windows 98SE1. Check whether the camera and PC are transferring a file. If the green lamp (next to viewfinder)
blinks, you have to wait until the LED illuminates.
2. Unplug the USB cable.
Windows 2000/ME/XP (The illustrations may be different from the real display in accordance with the Windows O/S.)
1. Check whether the camera and PC are transferring a file.If the green lamp (next to viewfinder) blinks, you have to wait until the LED illuminates.
2. Double-click the [Unplug or Eject Hardware] icon onthe task bar.
3. The [Unplug or Eject Hardware] window will open.Select the [USB Mass Storage Device] and click the[Stop] button.
[Click!]
[Double-click]

120
Removing the removable disk
5. A [Safe to Remove Hardware] window will open.Click the [OK] button.
7. Unplug the USB cable.
6. A [Unplug or Eject Hardware] window will open.Click the [Close] button and the removable disk willbe removed safely.
4. The [Stop a Hardware device] window will open.Select the [SAMSUNG DIGIMAX V4 USB Device]and click the [OK] button.
[Click!]
[Click!]
[Click!]

121
SO
FT
WA
RE
Setting up the USB Driver for MAC
1. A USB Driver for MAC is not included with the Application CD as MAC OS supports the camera driver.
2. Check the MAC OS. You can check the MAC OS version during MAC OS start-up. This camera is compatible with MAC OS 9.X~10.2.
3. Connect the camera to the Macintosh and turn the camera power on in PC mode.
4. A new icon (Untitled) will be displayed on the desktop after connecting the camera to the MAC.
Using the USB Driver for MAC
1. Double click a new icon (Untitled) on the desktop and the folder in the memory will be displayed.
2. Select an image file and copy or move it to MAC.
NOTICEIf you use Mac OS 10.0 or later, you may experience an error occurring when you transferfiles from the PC to the camera.

122
Digimax Viewer
This software is only compatible with Windows.
1. To open Digimax Viewer, click the [ Start Programs Samsung Digimax Viewer 2.0 Digimax Viewer 2.0 ]and Digimax Viewer 2.0 will then open.
3. You can easily use the Digimax viewer program as itoffers FILE menu and TOOL bar.And, you can use the pop up menu. Click an image andpress the right mouse button.
2. If the [Auto Launch] option is selected, this program will be executed automatically with recognizingthe camera.
Digimax Viewer functions are listed below.- Basic function : Copy, Move, Delete, Rotate, Rename, changing file type, Resize, Property.- Advanced function : Print, Slide show, Export, Sending e-mail, On-line print, Web album etc.
INFORMATIONRefer to the [Help] menu in Digimax viewer 2.0 for further information.

123
SO
FT
WA
RE
MGI PhotoSuite III SE
This software is only compatible with Windows.To open MGI PhotoSuite lll SE, click the [Start Programs MGI PhotoSuite lll SE MGIPhotoSuite lll SE] and MGI PhotoSuite lll SE will then open.

124
MGI PhotoSuite III SE
Get
Get images.
Prepare
A number of photo editing activities can be performed within this module.
Compose
Use your photos in a variety of fun, creative and interesting ways.
Organize
Organize your photos and other media files into albums.
Share
Save your results to show to others.
Print hard copies of photos and projects.
An introduction to the Welcome screen

125
SO
FT
WA
RE
MGI PhotoSuite III SE
Introduction to navigation bar
Back
Return to the previous step.
Home
Return to Welcome screen.
Help
Display help window.
Get
Get images.
Prepare
A number of photo editing activities can be performed within this module.
Compose
Use your photos in a variety of fun and interesting ways.
Organize
Organize your photos and other media files into albums.
Share
Save your results to show to others.
Print hard copies of photos and projects.
Browse
Browse the web site.

126
MGI PhotoSuite III SE
To obtain images from the computer
1. To acquire images, Click the large [Get] button on the
Welcome screen, or the [Get] button on the Navigation
bar. Click [Computer] from the list of options displayed on
the activity panel.
2. The Open file selector is displayed. Now select the image
file and click [open].
3. The Welcome screen will change to the next work step,
with the selected image displayed.
GET

127
SO
FT
WA
RE
MGI PhotoSuite III SE
When you obtain images from the digital camera.
Before transferring an image file, check the USB connection.
1. To acquire images, click the large [Get] button on the
Welcome screen, or the [Get] button on the Navigation
bar. Click [Computer] from the list of options displayed on
the activity panel.
2. The Open file selector is displayed. Click [Look in :] to
choose [Removable Disk( :)] and click [open] for the open
file window to be displayed.
3. Select the [ DCIM 100sscam ] folder. Then select an
image and click [ Open ].

128
MGI PhotoSuite III SE
4. The Welcome screen will change to the next work step, with the selected image displayed.
NOTICE When you use the Digimax camera, only [Computer] and
[Album] from the list of options displayed are available.
You will be able to obtain images from the digital camera.
[Computer and Album Only]

129
SO
FT
WA
RE
MGI PhotoSuite III SE
Acquiring images from an Album.
Refer to page 133 for more information about creating an Album.
1. To acquire images, click the large [Get] button on the
Welcome screen, or the [Get] button on the Navigation
bar. Click [Album] from the list of options displayed on the
activity panel.
2. After selecting Album on the [ Choose a photo album],
click an image in the album and click [Open].
3. The Welcome screen will change to the next work step,
with the selected image displayed.

130
MGI PhotoSuite III SE
PREPARE
When the image is loaded, the step changes to Prepare automatically.
Menu for [PREPARE] steps
Rotate & Crop
You can rotate, flip or crop images along with a host of others.
Touchup
Remove Red eye, Remove Scratches etc.. are available in this menu.
Special Effects
A number of special effects can be applied.
Stitching
Join a series of photos together to create a sweeping panoramic effect.

131
SO
FT
WA
RE
MGI PhotoSuite III SE
COMPOSE
Add text, Compound Images etc. are available in this step.
Menu of [COMPOSE] steps
Collages : A collage consists of several photos
or sections of photos arranged
together on a common background.
Photo Layouts : The Photo Layouts activity includes
many collage and layout options.
Cards & tags : Use your photos to create items such
as Gift Tags, Greeting Cards,
Invitations, Postcards, and Sports
Cards.
Calendars : Use your photos to create a variety of
calendars (monthly, quarterly,
seasonal, yearly).
Collections : Photos can also be used to create a
variety of items for business
purposes.
Fun stuff : You can create magazine covers,
Backgrounds etc. in this menu.
Business : You can make business items such
as business cards, certificates, signs,
labels, promotions, name tags,
stationary
Frames & Edges : Add frames and edge effects to your
photos according to predefined
templates.

132
MGI PhotoSuite III SE
ORGANIZE
Organize your photos and other media files into albums.
Menu of [ORGANIZE] steps
[ Choose a photo album to view or edit]
Select Album : To create an Album, click [Organize] in
the welcome screen or navigation bar.
Album.. : Open Master Album.
[ Select a photo, and choose an action below.]
- Open : Open selected image.
- Delete : Delete selected image.
- Properties... : view image information.
[ Choose an action to manage your album.]
- Add : click [Add] to add an image to an Album.
- Sort : click [Sort] to Sort saved images.
- Search : click [Search] to Search saved images.
- Reset : click [Reset] to reset the setting.
- Update : click [Update] to update images.
- Create Slide Show : click [Create Slide Show] to create
a Slide Show.
Always start on this page : If you select this option, the
program will start in [Organize].

133
SO
FT
WA
RE
MGI PhotoSuite III SE
Creating an Album
1. To create an Album, click the large Organize button on
the Welcome screen, or the Organize button on the
Navigation bar.
2. Click [Album..] in [ Choose a photo album to view or
edit.]
3. The Master Album window will be displayed, then click
[New..].
4. Put a new Album name in the New Album window and
click [OK]. A new album will now be created.
5. A [Master Album] window will open. Click the [OK] button.
?O@K O@K? O@K? ?O@K ?O@K ?O2@@@@@@@@@@@@6?2@@@@@@W2@@@@@@@@@@@@@@@@@@@@@@@@@@@@@@@@@@@@@@@@@@@@@@@@@@@@@@@@@@@@@@@@@@@@@@@@@@@@@@@@@@@@@@@@@@@@@@@@@@@@@@@@@@@@@@@@@@@@@@@@@@@@@@@@@@@@@@@@@@@@@@@@@@@@@@@@@@@@@@@@@@@@@@@@@@@@@@@@@@@@@@@@@@@@@@@@@@@@@@@@@@@@@@@@@@@@@@@@@@@@@@@@@@@@@@@@@@@@@@@@@@@@@@@@@@@@@@@@@@@@@@@@@@@@@@@@@@@@@@@@@@@@@@@@@@@@@@@@@@@@@@@@@@@@@@@@@@@@@@@@@@@@@@@@@@@@@@@@@@@@@@@@@@@@@@@@@@@@@@@@@@@@@@@@7@@@@@@@@@@@@@@@@@@@@@@@@@@@@@@@@@@@@@@@@@@@@@@@@@@@@@@@@@@@@@@@@@@@@@@@@@@@@@@@@@@@@@@@@@@@@@@@@@@@@@@@@@@@@@@@@@@@@@@@@@@@@@@@@@@@@@@@@@@@@@@@@@@@@@@@@@@@@@@@@@@@@@@@@@@@@@@@@@@@@@@@@@@@@@@@@@@@@@@@@@@@@@@@@@@@@@@@@@@@@@@@@@@@@@@@@@@@@@@@@@@@@@@@@@@@@@@@@@@@@@@@@@@@@@@@@@@@@@@@@@@@@@@@@@@@@@@@@@@@@@@@@@@@@@@@@@@@@@@@@@@@@@@@@@@@@@@@@@@@@@@@@@@@@@@@@@@@@@@@@@@@@@@@@@@@@@@@@@@@@@@@@@@@@@@@@@@@@@@@@@@@@@@@@@@@@@@@@@@@@@@@@@@@@@@@@@@@@@@@@@@@@@@@@@@@@@@@@@@@@@@@@@@@@@@@@@@@@@@@@@@@@@@@@@@@@@@@@@@@@@@@@@@@@@@@@@@@@@@@@@@@@@@@@@@@@@@@@@@@@@@@@@@@@@@@@@@@@@@@@@@@@@@@@@@@@@@@@@@@@@@@@@@@@@@@@@@@@@@@@@@@@@@@@@@@@@@@@@@@@@@@@@@@@@@@@@@@@@@@@@@@@@@@@@@@@@@@@@@@@@@@@@@@@@@@@@@@@@@@@@@@@@@@@@@@@@@@@@@@@@@@@@@@@@@@@@@@@@@@@@@@@@@@@@@@@@@@@@@@@@@@@@@@@?@@@@@@@@@@@@@@@@@@@@@@@@@@@@@@@@@@@@@@@@@@@@@@@@@@@@@@@@@@@@@@@@@@@@@@@@@@@@@@@@@@@@@@@@@@@@@@@@@@@@@@@@@@@@@@@@@@@@@@@@@@@@@@@@@@@@@@@@@@@@@@@@@@@@@@@@@@@@@@@@@@@@@@@@@@@@@@@@@@@@@@@@@@@@@@@@@@@@@@@@@@@@@@@@@@@@@@@@@@@@@@@@@@@@@@@@@@@@@@@@@@@@@@@@@@@@@@@@@@@@@@@@@@@@@@@@@@@@@@@@@@@@@@@@@@@@@@@@@@@@@@@@@@@@@@@@@@@@@@@@@@@@@@@@@@@@@@@@@@@@@@@@V'@(Y@@@@@@@@@@@@@@@@@?@@?@@@@@@@@@@?I'@@@@@@@@@@@(M?@eI4@@@@@@@@@@@@@@@@@@@@@@@@@@@@@@@@@@@@@@@@@@@@@@@@@@@@@@@@@@@@@@@@@@@@@@@@@@@@@@@@@@@@@@@@@@@@@@@@@@@@@@@@@@@@@@@@@@@@@@@@@@@@@@@@@@@@@@@@@@@@@@@@@@@@@@@@@@@@@@@@@@@@@@@@@@@@@@@@@@@@@@@@@@@@@@@@@@@@@@@@@@@@@@@@@@@@@@@@@@@@@@@@@@@@@@@@@@@@@@@@@@@@@@@@@@@@@@@@@@@@@@@@@@@@@@@@@@@@@@@@@@@@@@@@@@@@@@@@@@@@@@@@@@@@@@@@LN@HJ@@@@@@@@@@@@@@@@@?@@?3@eI@M??@eS(M??@@?W@@@e?@fW(?'@?f?I'@@@@@@@@@@@@@@@@@@@@@@@@@@@@@@@@@@@@@@@@@@@@@@@@@@@@@@@@@@@@@@@@@@@@@@@@@@@@@@@@@@@@@@@@@@@@@@@@@@@@@@@@@@@@@@@@@@@@@@@@@@@@@@@@@@@@@@@@@@@@@@@@@@@@@@@@@@@@@@@@@@@@@@@@@@@@@@@@@@@@@@@@@@@@@@@@@@@@@@@@@@@@@@@@@@@@@@@@@@@@@@@@@@@@@@@@@@@@@@@@@@@@@@@@@@@@@@@@@@@@@@@@@@@@@@@@@@@@@@@@@@@@@@@@@@@@@@@@@@@)T@T&@@@@@@@@@@@@@@@@5fV'fO2@@e7He?@@?7@@@@??@e?@@He@?e@?@?N@@@@@@@@@@@@@@@@@@@@@@@@@@@@@@@@@@@@@@@@@@@@@@@@@@@@@@@@@@@@@@@@@@@@@@@@@@@@@@@@@@@@@@@@@@@@@@@@@@@@@@@@@@@@@@@@@@@@@@@@@@@@@@@@@@@@@@@@@@@@@@@@@@@@@@@@@@@@@@@@@@@@@@@@@@@@@@@@@@@@@@@@@@@@@@@@@@@@@@@@@@@@@@@@@@@@@@@@@@@@@@@@@@@@@@@@@@@@@@@@@@@@@@@@@@@@@@@@@@@@@@@@@@@@@@@@@@@@@@@@@@@@@@@@@@@@@@@@@@@@@?@@@@@@@@@@@@@@@@@@Hg?@?'@R'@e@??@?@5?@@@@H?f?@5??'@?e@?@??@@@@@@@@@@@@@@@@@@@@@@@@@@@@@@@@@@@@@@@@@@@@@@@@@@@@@@@@@@@@@@@@@@@@@@@@@@@@@@@@@@@@@@@@@@@@@@@@@@@@@@@@@@@@@@@@@@@@@@@@@@@@@@@@@@@@@@@@@@@@@@@@@@@@@@@@@@@@@@@@@@@@@@@@@@@@@@@@@@@@@@@@@@@@@@@@@@@@@@@@@@@@@@@@@@@@@@@@@@@@@@@@@@@@@@@@@@@@@@@@@@@@@@@@@@@@@@@@@@@@@@@@@@@@@@@@@@@@@@@@@@@@@@@@@@@@@@@@@@@(R@R'@@@@@@@@@@@@@@@@W26?@e?@?S5??@L?3L?3X@Y?@@@@?@@?e?(Y??V'?e@?@??@@@@@@@@@@@@@@@@@@@@@@@@@@@@@@@@@@@@@@@@@@@@@@@@@@@@@@@@@@@@@@@@@@@@@@@@@@@@@@@@@@@@@@@@@@@@@@@@@@@@@@@@@@@@@@@@@@@@@@@@@@@@@@@@@@@@@@@@@@@@@@@@@@@@@@@@@@@@@@@@@@@@@@@@@@@@@@@@@@@@@@@@@@@@@@@@@@@@@@@@@@@@@@@@@@@@@@@@@@@@@@@@@@@@@@@@@@@@@@@@@@@@@@@@@@@@@@@@@@@@@@@@@@@@@@@@@@@@@@@@@@@@@@@@@@@@@@@@@@@HJ@LN@@@@@@@@@@@@@@@@@@@@@W@K?O&YO&@)KV)KV@@@@@@@@?@@W26K?O26K?O@X@?@@@@@@@@@@@@@@@@@@@@@@@@@@@@@@@@@@@@@@@@@@@@@@@@@@@@@@@@@@@@@@@@@@@@@@@@@@@@@@@@@@@@@@@@@@@@@@@@@@@@@@@@@@@@@@@@@@@@@@@@@@@@@@@@@@@@@@@@@@@@@@@@@@@@@@@@@@@@@@@@@@@@@@@@@@@@@@@@@@@@@@@@@@@@@@@@@@@@@@@@@@@@@@@@@@@@@@@@@@@@@@@@@@@@@@@@@@@@@@@@@@@@@@@@@@@@@@@@@@@@@@@@@@@@@@@@@@@@@@@@@@@@@@@@@@@@@@@@@@@@@@W&@)X@@@@@@@@@@@@@@@@@@@@@@@@@@@@@@@@@@@@@@@@@@@@@@@@@@@@@@@@@@@@@@@@@@@@@@@@@@@@@@@@@@@@@@@@@@@@@@@@@@@@@@@@@@@@@@@@@@@@@@@@@@@@@@@@@@@@@@@@@@@@@@@@@@@@@@@@@@@@@@@@@@@@@@@@@@@@@@@@@@@@@@@@@@@@@@@@@@@@@@@@@@@@@@@@@@@@@@@@@@@@@@@@@@@@@@@@@@@@@@@@@@@@@@@@@@@@@@@@@@@@@@@@@@@@@@@@@@@@@@@@@@@@@@@@@@@@@@@@@@@@@@@@@@@@@@@@@@@@@@@@@@@@@@@@@@@@@@@@@@@@@@@@@@@@@@@@@@@@@@@@@@@@@@@@@@@@@@@@@@@@@
@@@@@@@@@@@@@@@@@@@@@@@@@@@@@@@@@@@@@@@@@@@@@@@@@@@@@@@@@@@@@@@@@@@@@@@@@@@@@@@@@@@@@@@@@@@@@@@@@@@@@@@@@@@@@@@@@@@@@@@@@@@@@@@@@@@@@@@@@@@@@@@@@@@@@@@@@@@@@@@@@@@@@@@@@@@@@@@@@@@@@@@@@@@@@@@@@@@@@@@@@@@@@@@@@@@@@@@@@@@@@@@@@@@@@@@@@@@@@@@@@@@@@@@@@@@@@@@@@@@@@@@@@@@@@@@@@@@@@@@@@@@@@@@@@@@@@@@@@@@@@@@@@@@@@@@@@@@@@@@@@@@@@@@@@@@@@@@@@@@@@@@@@@@@@@@@@@@@@@@@@@@@@@@@@@@@@@@@@@@@@@@@@@@@@@@@@@@@@@@@@@@@@@@@@@@@@@@@@@@@@@@@@@@@@@@@@@@@@@@@@@@@@@@@@@@@@@@@@@@@@@@@@@@@@@@@@@@@@@@@@@@@@@@@@@@@@@@@@@@@@@@@@@@@@@@@@@@@@@@@@@@@@@@@@@@@@@@@@@@@@@@@@@@@@@@@@@@@@@@@@@@@@@@@@@@@@@@@@@@@@@@@@@@@@@@@@@@@@@@@@@@@@@@@@@@@@@@@@@@@@@@@@@@@@@@@@@@@@@@@@@@@@@@@@@@@@@@@@@@@@@@@@@@@@@@@@@@@@@@@@@@@@@@@@@@@@@@@@@@@@@@@@@@@@@@@@@@@@@@@@@@@@@@@@@@@@@@@@@@@@@@@@@@@@@@@@@@@@@@@@@@@@@@@@@@@@@@@@@@@@@@@@@@@@@@@@@@@@@@@@@@@@@@@@@@@@@@@@@@@@@@@@@@@@@@@@@@@@@@@@@@@@@@@@@@@@@@@@@@@@@@@@@@@@@@@@@@@@@@@@@@@@@@@@@@@@@@@@@@@@@@@@@@@@@@@@@@@@@@@@@@@@@@@@@@@@@@@@@@@@@@@@@@@@@@@@@@@@@@@@@@@@@@@@@@@@@@@@@@@@@@@@@@@@@@@@@@@@@@@@@@@@@@@@@@@@@@@@@@@@@@@@@@@@@@@@@@@@@@@@@@@@@@@@@@@@@@@@@@@@@@@@@@@@@@@@@@@@@@@@@@@@@@@@@@@@@@@@@@@@@@@@@@@@@@@@@@@@@@@@@@@@@@@@@@@@@@@@@@@@@@@@@@@@@@@@@@@@@@@@@@@@@@@@@@@@@@@@@@@@@@@@@@@@@@@@@@@@@@@@@@@@@@@@@@@@@@@@@@@@@@@@@@@@@@@@@@@@@@@@@@@@@@@@@@@@@@@@@@@@@@@@@@@@@@@@@@@@@@@@@@@@@@@@@@@@@@@@@@@@@@@@@@@@@@@@@@@@@@@@@@@@@@@@@@@@@@@@@@@@@@@@@@@@@@@@@@@@@@@@@@@@@@@@@@@@@@@@@@@@@@@@@@@@@@@@@@@@@@@@@@@@@@@@@@@@@@@@@@@@@@@@@@@@@@@@@@@@@@@@@@@@@@@@@@@@@@@@@@@@@@@@@@@@@@@@@@@@@@@@@@@@@@@
?I
?@@@@@@@@@@@@@@@@@@@@@@@@@@@@@@@@@@@@@@@@@@@@@@@@@@@@@@@@@@@@@@@@@@@@@@@@@@@@@@@@@@@@@@@@@@@@@@@@@@@@@@@@@@@@@@@@@@@@@@@@@@@@@@@@@@@@@@@@@@@@@@@@@@@@@@@@@@@@@@@@@@@@@@@@@@@@@@@@@@@@@@@@@@@@@@@@@@@@@@@@@@@@@@@@@@@@@@@@@@@@@@@@@@@@@@@@@@@@@@@@@@@@@@@@@@@@@@@@@@@@@@@@@@??@@@@@@@@@@@@@@@@@@@@@@@@@@@@@@@@@@@@@@@@@@@@@@@@@@@@@@@@@@@@@@@@@@@@@@@@@@@@@@@@@@@@@@@@@@@@@@@@@@@@@@@@@@@@@@@@@@@@@@@@@@@@@@@@@@@@@@@@@@@@@@@@@@@@@@@@@@@@@@@@@@@@@@@@@@@@@@@@@@@@@@@@@@@@@@@@@@@@@@@@@@@@@@@@@@@@@@@@@@@@@@@@@@@@@@@@@@@@@@@@@@@@@@@@@@@@@@@@@@@@@@@0M?@@? O2@@@@@@@@@@@@@@@@@@@@@@@@@@@@@@@@@@@@@@@@@@@@@@@@6X?@@? W2@@@@@@@@@@@@@@@@@@@@@@@@@@@@@@@@@@@@@@@@@@@@@@@@@@@)X??@@? 7(M? ?I'@)X?@@? ?J(Y N@@)X?hg?@@? W&H? J@@@1?hg?@@? 7@ ?@f?@ 7@@@@?hg?@@? @@ @? @@@@@?hg?@@? @@L? @? @@@@@?hg?@@? 3@)K ?@he@??@e@?hf@@@@5?hg?@@? N@@@@6K?he@?heO@K?@??@e@?he?J@@@(Y?hg?@@? ?3@@@@@@@@@@@@@@f?W2@@@@@@@@@@@@@@@@@@@@@@@6KfO&@@@H?@5? ?N@@@@@@@@@@@@@@fO&@@@@@@@@@@@@@@@@@@@@@@@@@@@@@@@@@@@??@H? @@@@@@@@@@@@@@@@@@@@@@@@@@@@@@@@@@@@@@@@@@@@@@@@@@@@0M?@?@?@?@?@?@?@?@?@?@?@?@?@ ?W2@@@@@@@@@@@@@@@@@@@@@@@@@@@@@@@@@@@@@@@@@@@@@@@@@6K?@ W&@@@@@@@@@@@@@@@@@@@@@@@@@@@@@@@@@@@@@@@@@@@@@@@@@@@@6X?@ ?W&(M? ?@@@@1?@ ?7(YheW2@6X? J@@@@@L?hg?@ J@H?h?O&@@@)K ?O&@@@@@1?hg?@ 7@e?W2@@@@@@@@@?@@@@@@@@@@@@@@@@@@@@@@@@@@@@@@@@@@@@@@@@@@?hg?@ @@L?W&@@@@@@@@@@@@@@@@@@@@@@@@@@@@@@@@@@@@@@@@@@@@@@@@@@@@@?hg?@ @@)?&@@@@@@@@@@@@@?@@@@@@@@@@@@?@@@@@@@@@@@@@@@@@@@(M?@@@@@?hg?@ @@@@@@@@@@@@@@@@?@@@@@@@@@@@@@@@@@@@@@@@@@@@@@@@@@(Y?J@@@@5?hg?@ 3@@@@@@@@@@@@@@@@@@@@@@@@@@@@@@@@@@@@@@@@@@@@@@@@@H?W&@@@(Y?hg?@ V'@@@@@@@@@@@@@@@@@@@@@@@@@@@@@@@@@@@@@@@@@@@@@@@@?O&@@@@H?@ ?N@@@@@@@@@@@@@@@@@@@@@@@@@@@@@@@@@@@@@@@@@@@@@@@@@@@@@@@??@ @@@@@@@@@@@@@@@@@@@@@@@@@@@@@@@@@@@@@@@@@@@@@@@@@@@@0M?@?@?@?@?@?@?@?@?@?@?@?@?@ ?W2@@@@@@@@@@@@@@@@@@@@@@@@@@@@@@@@@@@@@@@@@@@@@@@@@6K?@ W&@@@@@@@@@@@@@@@@@@@@@@@@@@@@@@@@@@@@@@@@@@@@@@@@@@@@6X?@ ?W&(M? ?@@@@)X?hg?@ ?7(Yg@@6K ?@@@@@1?hg?@ J@H?e?O@X@@@@@@@6?2@@6?2@6?2@@@6KO2@@@@@@@@@@@@@@@@@@@@@@@?hg?@ 7@e?W2@@@@@?@@@@@@@@@@@@@@@@@@@@@@@@@@@@@@@@@@@@@@@@@@@@@@?hg?@ @@L?W&@@@@@@@@@@@@@@@@@@@@@@@@@@@@@@@@@@@@@@@@@@@@@@@@@@@@@?hg?@ @@)?&@@@@@@@@@@@@@@@@@@@@@@@@@@@@@@@@@@@@@@@@@@@@@@(M?@@@@@?hg?@ 3@@@@@@@@@@@@@@@@@@@@@@@@@@@@@@@@@@@@@@@@?@@?@@@@@0Y?J@@@@5?hg?@ N@@@@@@@@@@@@@@@@@@@@@@@@@@@@@@@@@@@@@@@@@@@@@@@@XeO&@@@(Y?hg?@ ?3@@@@@@@@@@@@@@@@@@@@@@@@@@@@@@@@@@@@@@@@@@@@@@@)?2@@@@(Y?@ ?V'@@@@@@@@@@@@@@@@@@@@@@@@@@@@@@@@@@@@@@@@@@@@@@@@@@@@(Y??@ V4@@@@@@@@@@@@@@@@@@@@@@@@@@@@@@@@@@@@@@@@@@@@@@@@@@0Y?@?@?@?@?@?@?@?@?@?@?@?@?@ ?W2@@@@@@@@@@@@@@@@@@@@@@@@@@@@@@@@@@@@@@@@@@@@@@@@@@6X??@ W&0?4@@@@@@@@@@@@@@@@@@@@@@@@@@@@@@@@@@@@@@@@@@@@@@@@@)X?@ ?W&< ?@@)X?hg?@ ?75? J@@@1?hg?@ J@H? 7@@@@?hg?@ 7@ ?@e?@h?@ @@@@@?hg?@ @@L?hfJ5g@?e@??@g@? @@@@@?hg?@ @@)Khf7Hg@?e@??@ @@@@5?hg?@ 3@@@6Khe@??@hf?@e@? @@@@H?hg?@ N@@@@@@@@@@@@@@@@?f/K?O@Kh@?O@?2@@6Kh@@@5?@ ?3@@@@@@@@@@@@@@@?fV@@@@@@@@@@@@@@@@@@@@@@@@@@6?2@@@@(Y?@ ?V'@@@@@@@@@@@@@@@@@@@@@@@@@@@@@@@@@@@@@@@@@@@@@@@@@@@@0Y??@ V4@@@@@@@@@@@@@@@@@@@@@@@@@@@@@@@@@@@@@@@@@@@@@@@@@0M??@?@?@?@?@?@?@?@?@?@?@?@ O2@@@6K?O2@@6KfO@K?fO26Ke?O2@6K?@ ?@@@@@@@@@@@@@@@@@@@@@@@@@@@@@@@@@@@@@@@@@@@@@@@@@@@@6X??@ J(M? ?I4@@@)X?@ ?W&H ?@@)X?hg?@ W&5? J@@@1?hg?@ 7@H? ?@e@@f?@ 7@@@@?hg?@ @@ ?@ 3@@@@?hg?@ @@L? ?@hf?@ ?@@@@?hg?@ @@)K ?@e@@e?@f?@ 7@@@5?hg?@ 3@@@@6K?he?@e@@ ?J@@@@H?hg?@ N@@@@@@@@@@@@@@@@@@@e@@W26KO@K?eO2@@@@@@@@@6K?fO&@@@5?@ ?3@@@@@@@@@@@@@@@@@@@@@@@@@@@@@6?2@@@@@@@@@@@@@@@@@@@@@@(Y?@ ?V4@@@@@@@@@@@@@@@@@@@@@@@@@@@@@@@@@@@@@@@@@@@@@@@@@@@@0Y??@ ?I4@@@@@@@@@@@@@@@@@@@@@@@@@@@@@@@@@@@@@@@@@@@@@@@0M?@?@?@?@?@?@?@?@?@?@?@?@ O2@@@@@@@@@@@@@@@@@@@@@@@@@@@@@@@@@@@@@@@@@@@@@@@@6X?@ W2@@@@@@@@@@@@@@@@@@@@@@@@@@@@@@@@@@@@@@@@@@@@@@@@@@@)X??@ 7(M? ?I'@)X?@ ?J(Y N@@)X?hg?@ W&H? J@@@1?hg?@ 7@ ?W-Xf?@ 7@@@@?hg?@ @@ @??7R1 @@@@@?hg?@ @@L? @??3T5 @@@@@?hg?@ 3@)K ?V+Y @@@@5?hg?@ N@@@@6K? O@K??W&KO)X?/K ?J@@@(Y?hg?@ ?@@@@@@@@@@@@@@@@@@@@@@@@6?&@@@@)KV@@@@@@@@@@6K?fO&@@@H?@L? ?3@@@@@@@@@@@@@@@@@@@@@@@@@@@@@@@@@@@@@@@@@@@@@@@@@@@@@@@??@@? ?V4@@@@@@@@@@@@@@@@@@@@@@@@@@@@@@@@@@@@@@@@@@@@@@@@@@@0M

134
MGI PhotoSuite III SE
Add images to the album
1. Select [ Choose an action to manage your album.
Add..] to add images to the album.
2. Click [Computer] in Add Photos menu.
NOTICE[Digital Camera(Direct)], [Scanner(TWAIN)], [Digital Camera(TWAIN)] sources can't be used.
[Click!]
[Click!]

135
SO
FT
WA
RE
MGI PhotoSuite III SE
3. A [Add photo to Album] window will open. Select images
that you want to add. Click the [Add] button.
4. Adding images is complete.
[Click!]

136
MGI PhotoSuite III SE
Saving or sharing images.
Menu of [SHARE] steps
SHARE
Save
To save the active file according to its current name and
path.
Save As
To assign a new name or path to the file.
Send E-mail
e-mailing images.
Slide Show
Viewing images as a slide show.

137
SO
FT
WA
RE
MGI PhotoSuite III SE
You can print images.
Menu for the [PRINT] steps
Printing images.
Print Multiples
Print multiple copies of a photo or project, or one copy of
each of the photos included in an album, according to a
predefined template.
Choose a printer, an orientation, the print size, and the
number of copies. You can then print the images.
INFORMATIONFor more information, please refer to the Help file in [Help MGI PhotoSuite lll help].
138
FAQ
Please check the following if the USB connection malfunctions.
[Case 1] The camera power is off.
Turn the camera power on. We recommend using an AC power adapter in PC mode.
If you use batteries, check the battery condition.
[Case 2] USB Driver is not installed correctly.
Install the USB Driver correctly. Refer to page 110.
[Case 3] The USB cable is not connected or you are using a cable with an incorrect specification.
Use a USB cable with the correct specification.
[Case 4] Occasionally the computer recognizes the USB as another device.
Install the camera driver correctly. Turn the camera power off and remove the USB
cable.
Connect the USB cable again and turn the camera power on. The computer should now
recognize the camera.
[Case 5] There is an unexpected error during file transfer.
Turn the camera power off and on again. Transfer the file again.

139
SO
FT
WA
RE
FAQ
[Case 6] How do I know my computer supports a USB Interface?
Check the USB port in your computer or keyboard.
Check OS version. USB Interface is available in Windows 98, 98SE, 2000, ME .XP.
Check [Universal serial bus controller] in Device Manager. Do the following to check
[Universal serial bus controller].
Win 98/ME : Trace [Start Setting Controller System Device Manager
Universal serial bus controller]
Win 2K : Trace [Start Setting Controller System Hardware Device Manager
Universal serial bus controller].
Win XP : Trace [Start Control Panel Performance and Maintenance System
Hardware Device Manager Universal Serial Bus controller].
There must be USB Host Controller and USB root hub under [Universal serial bus
controller].
When all the conditions mentioned above are met, the computer can support the USB
interface.
[Case 7] When using the USB hub.
There may be a problem in connecting the camera to the PC through the USB hub if the
PC and the hub are not compatible. Wherever possible, connect the camera to the PC
directly.
[Case 8] Are other USB cables connected to the PC?
The camera may malfunction when it is connected to the PC at the same time as another
USB cable. In this case, disconnect the other USB cable, and connect only one USB
cable to the camera.

Thank you for buying a Samsung Camera.
This manual will guide you through using the Digimax V4/ Digimax 4500 Super, including taking images, downloading
images and using the MGI PhotoSuite III SE software. Please read this manual before using your new camera.
6806-1432
SAMSUNG TECHWIN CO., LTD.OPTICS & DIGITAL IMAGING DIVISION
145-3, SANGDAEWON 1-DONG, JUNGWON-GU,SUNGNAM-CITY, KYUNGKI-DO, KOREA 462-121TEL : (82) 31-740-8086,8088, 8090, 8092, 8099FAX : (82) 31-740-8398, 8111
SAMSUNG OPTO-ELECTRONICS AMERICA, INC.HEADQUARTERS 40 SEAVIEW DRIVE, SECAUCUS, NJ07094, U.S.A.TEL : (1) 201-902-0347FAX : (1) 201-902-9342
WESTERN REGIONAL OFFICE18600 BROADWICK ST., RANCHO DOMINGUEZ, CA 90220, U.S.A.TEL : (1) 310-537-7000 FAX : (1) 310-537-1566
SAMSUNG OPTO-ELECTRONICS UK LTD. SAMSUNG HOUSE, 3 RIVERBANK WAY, GREAT WEST ROAD, BRENTFORD,MIDDLESEX,TW8 9RE, U.K.TEL : (44) 20-8232-3280 FAX : (44) 20-8569-8385
SAMSUNG OPTO-ELECTRONICS GMBHAM KRONBERGER HANG 6D-65824 SCHWALBACH/TS., GERMANYTEL : (49) 6196 66 53 03FAX : (49) 6196 66 53 66
SAMSUNG FRANCE S.A.S.BP 51 TOUR MAINE MONTPARNASSE 33, AV .DU MAINE 75755, PARIS CEDEX 15, FRANCEHOTLINE PHOTO NUMÉRIQUE : 00 800 22 26 37 27(Numéro Vert-Appel Gratuit)TEL : (33) 1-4279-2282/5 FAX : (33) 1-4320-4510
SAMSUNG TECHWIN MOSCOW OFFICE KORP. 14 37-A LENNINGRADSKY PRO-KTMOSCOW, 125167, RUSSIATEL : (7) 095-258-9296, 9298, 9299FAX : (7) 095-258-9297
TIANJIN SAMSUNG OPTO-ELECTRONICS CO.,LTD.7 PINGCHANG ROAD NANKAI DIST., TIANJINP.R CHINAPOST CODE:300190TEL : (86) 22-2761-8867FAX : (86) 22-2761-8864
"DIGIMAX 4500SUPER MODEL IS DESIGNED WITH SHD (SUPER HIGH DEFINITION) OPTICS,HOWEVER, ALL PHOTOS USED IN THE INSTRUCTION MANUAL SHOW THE DIGIMAX V4 WITHSCHNEIDER LENS FOR ILLUSTRATION PURPOSES ONLY"
Internet address - http : //www.samsungcamera.com/
The CE Mark is a Directive conformitymark of the European Community (EC) ENGLISH