this workbook is under license. - the elementary woodshop
TRANSCRIPT


This workbook is under license.
The author grants permission to print pages from this workbook only under the terms and conditions of the Licensing Agreement.
The Elementary Woodshop TM
Small parts for the woodwork project may be choking hazards. Supervision is to be used with young children.
The Elementary Woodshop (Peter Farkas) may not be held liable for any injury to any person
using products manufactured by The Elementary Woodshop (Peter Farkas).
The information provided in this workbook has been developed by Peter Farkas, B. Ed. The Elementary WoodshopTM
The information in this workbook may not be reproduced
by any means without the prior written permission of the author.
www.theelementarywoodshop.ca [email protected]
© 2016

APPLIED DESIGN, SKILLS AND TECHNOLOGIES Teacher’s Introduction
This instructional unit has been designed by a High School Technology Education
Teacher to introduce Grade 4 students to Applied Design, Skills and Technologies (ADST)
through woodworking.
Worksheets have been designed to complement the planter project by promoting cross-
curricular activities including math, science and technical drawing. Traditional Aboriginal
perspectives and knowledge of the cedar tree are presented. Students will also learn
about trade careers.
The worksheets support elementary teachers by providing step-by-step assembly
instructions and lessons designed to keep students engaged in Applied Design, Skills and
Technologies; the finished project is a tangible result of skill, technical knowledge and
pride in workmanship. Teachers may use the worksheets independent of each other or
as a complete teaching unit.
The planter project addresses the following Curricular Competencies for ADST which
students are expected to be able to do in Grade 4:
✓ Ideating ✓ Prototyping
✓ Sharing ✓ Making
✓ Choose appropriate technologies for specific tasks
✓ Identify the skills required for a task and develop those skills as needed
✓ Use materials, tools and technologies in a safe manner and with an awareness of the safety of others
Introducing elementary students to the world of technical fields through project-based
learning gives them a head-start to hands-on learning and an important opportunity to
taste their potential in the real world.
EV201231PL

Table of Contents
Section 1 Math ......................................................................................... 1 Shapes Measuring
Section 2 Materials Technology ................................................................ 5 Softwood Trees of British Columbia
Traditional Aboriginal Perspectives and Knowledge of the Cedar Tree
Wood Technology Lumber Production
Section 3 Assembly ................................................................................. 16 Fastening Techniques
Tools and Tool Safety Sanding
Assembly Jigs Planter Assembly
Section 4 Technical Drawing ................................................................... 27
Section 5 Science and Nature ................................................................. 33
Plants and Flowers Seed Germination
Section 6 Design Challenge ..................................................................... 40
Section 7 Introduction to Trades ............................................................ 42
Section 1 Math
1
Shapes
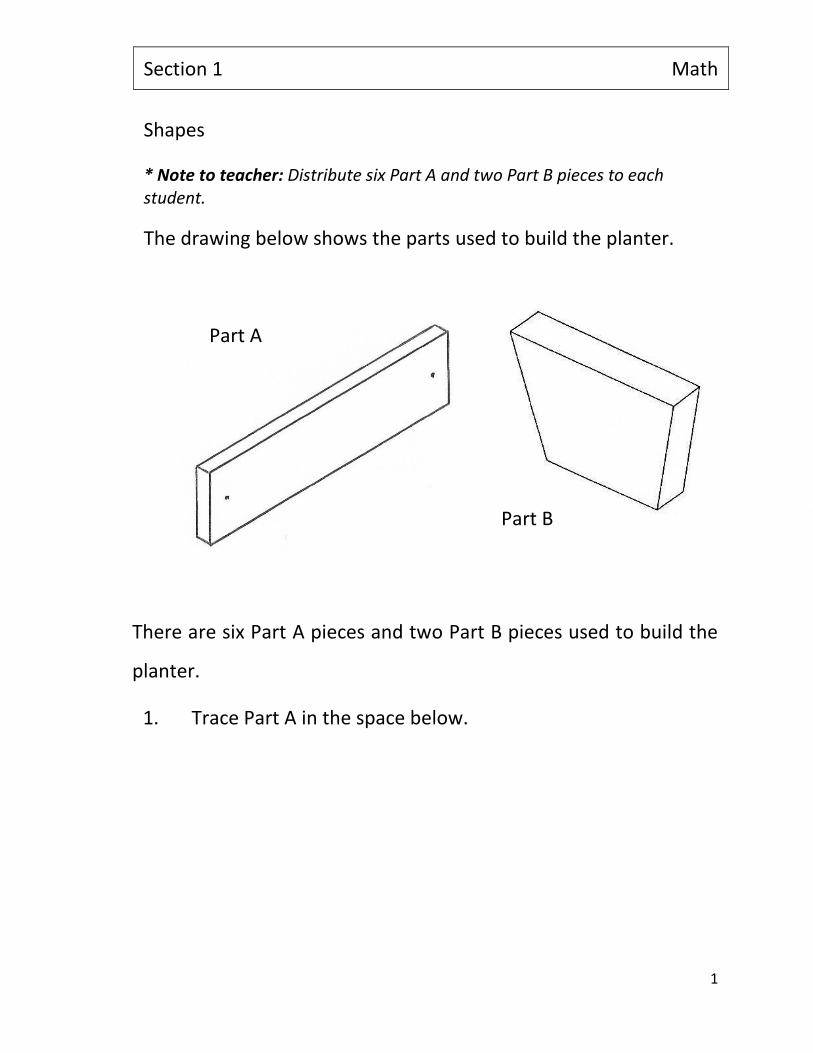
* Note to teacher: Distribute six Part A and two Part B pieces to each student.
The drawing below shows the parts used to build the planter.
There are six Part A pieces and two Part B pieces used to build the
planter.
1. Trace Part A in the space below.
Part A
Part B

Section 1 Math
2
2. Part A has four sides. What shape is Part A? _________________________________________________
3. This shape also has four sides.
What is the name of this shape?
_________________________________________________
4. What is the difference between the two shapes?
_________________________________________________
5. Trace Part B in the space below.

Section 1 Math
3
6. Part B has four sides. What shape is Part B?
_________________________________________________
7. What is the difference between the shape of Part B and the
shape in Question 3?
_________________________________________________
_________________________________________________
Measuring
1. Measure the length of Part A with a ruler.
How long is Part A? __________ millimetres long.
2. There are six Part A pieces in the planter kit.
If you lined up all six pieces end to end, how long would they
be?
The total length would be ___________ millimetres.

Section 1 Math
4
3. If a carpenter wanted to find a piece of wood to cut one Part
B from, what size would it need to be?
Measure length of Part B
Measure height of Part B
The piece of wood needs to be ________ millimetres long
and ________ millimetres high.
4. Draw a rectangle using these measurements in the space
below.

Section 2 Materials Technology
5
Softwood Trees of British Columbia
Trees are categorized as hardwood trees or softwood trees.
Softwood trees stay green all year. They have needles instead of
leaves. Softwood trees are also called coniferous or evergreen
trees.
Nearly all trees logged in BC are
softwood trees.
Softwood trees are sawn into lumber. The most common trees
logged in BC are pine, spruce, fir and cedar. Pine, spruce and fir
are used extensively in the construction industry to build houses.
Cedar is used for patio furniture, sundecks, fences and siding for
houses. Cedar also has great spiritual and cultural importance to
some Aboriginal peoples of the west coast of British Columbia.

Section 2 Materials Technology
6
Traditional Aboriginal Perspectives and Knowledge
of the Cedar Tree
In Aboriginal culture, all living things are treated with great
respect. The cedar tree has a special place in the lives of
Aboriginal peoples in British Columbia. The cedar has a spirit and
it may be known as the Tree of Life, or the Mother Tree. Many
items are made from the different parts of the tree and these
items are gifts from the cedar.
The main part of the cedar tree is the trunk which can be used to
carve a house post or canoe. This is because cedar is soft, has
straight grain with a lack of knots and it has natural oils that
protect it from rotting. Other parts of the tree are the branches,
outer bark and the inner bark, the roots, and long thin hanging
branches called withes.
The following page shows some of the many uses of the cedar
tree which are an important part of Aboriginal culture.

Section 2 Materials Technology
7
Items that may be made from parts of the cedar tree:
Basket Cradle Paddle
Blanket Diaper Rattle
Bowl Fishing Net Rope
Box Hat Roof Boards
Canoe House Framing Spear
Ceremonial Pole Mask Spoon
Clothing Mat Thread
Hat
Bentwood Box
Paddle
Arrow

Section 2 Materials Technology
8
Great consideration goes into selecting a
cedar tree for carving a pole and when it is
chosen, a ceremony of respect and gratitude
may be performed for the tree. The pole is
designed to represent a family’s ancestry with
symbols that have spiritual significance to that
family. When the carving is complete, a pole
raising ceremony takes place and the
significance of the pole is shared with
everyone attending.
This pole stands in Duncan, BC and was carved
from a cedar tree by Gwe-la-y-gwe-le-gwa-les,
(Richard Hunt) who is from the Kwagu’l Tribe
in Alert Bay, BC.
The symbols carved on this pole represent special dances that
were performed by the carver’s family. These dances belong to
the family and may only be danced by them. Does your family
have a tradition that is important to you? ___________________
_____________________________________________________

Section 2 Materials Technology
9
*Note to teacher: Distribute softwood samples.
Examine the softwood samples (pine, cedar and fir).
1. Which softwood has the strongest odour?
_________________________________________________
2. Which softwood is the heaviest?
_________________________________________________
3. Which softwood is darkest in colour?
_________________________________________________
4. Which softwood do you think is used to build the planter?
_________________________________________________

Section 2 Materials Technology
10
Wood Technology
1. The rings you see at the end of a log represent every year
the tree was alive.
The rings on a log are called annual rings.
2. Count the rings in the above diagram.
How many years was this tree alive? .
* Note to teacher: Distribute sample of log slice.
3. Your teacher will show you a slice of a small log.
How many rings do you count on the sample?
How old was this tree? years old.

Section 2 Materials Technology
11
Wood grain
Annual rings
When a log is cut lengthways you can see long lines which
are called wood grain. The wood grain connects to the
annual rings.
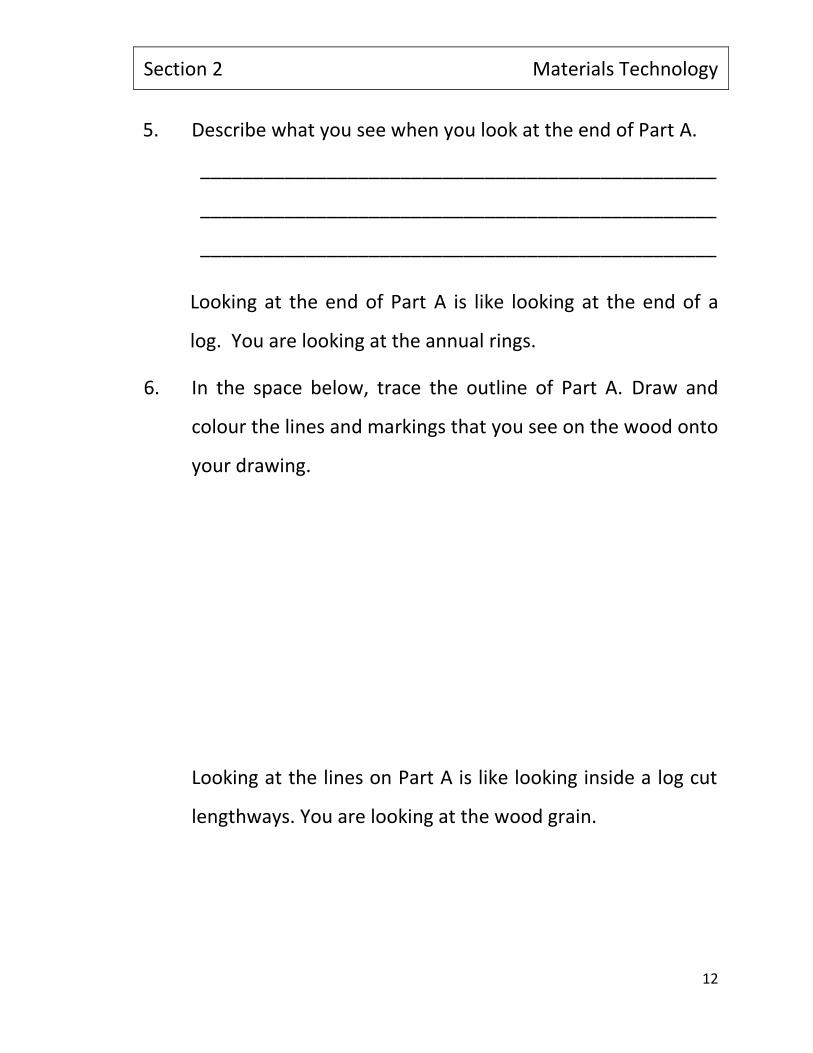
4. Examine the end of Part A.
End of Part A
Section 2 Materials Technology
12
5. Describe what you see when you look at the end of Part A.
_________________________________________________
_________________________________________________
_________________________________________________
Looking at the end of Part A is like looking at the end of a
log. You are looking at the annual rings.
6. In the space below, trace the outline of Part A. Draw and
colour the lines and markings that you see on the wood onto
your drawing.
Looking at the lines on Part A is like looking inside a log cut
lengthways. You are looking at the wood grain.
Section 2 Materials Technology
13
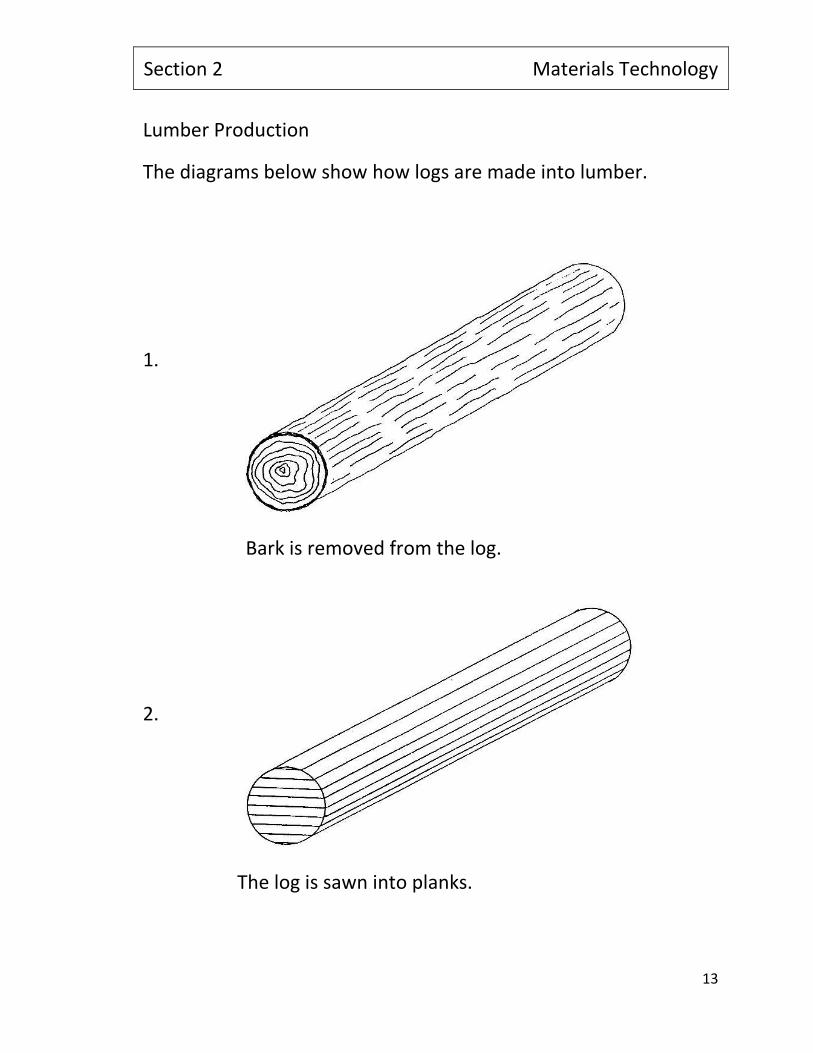
Lumber Production
The diagrams below show how logs are made into lumber.
1.
2.
The log is sawn into planks.
Bark is removed from the log.

Section 2 Materials Technology
14
3.
Planks are trimmed to specified widths.
4.
The end result is a stack of finished lumber.

Section 2 Materials Technology
15
Many communities in British Columbia have sawmills. Logs are
transported from the forest in logging trucks to a sawmill where
they are sawn into finished lumber. The finished lumber is trucked
to lumber yards where we buy our building supplies, or it is
shipped to other communities and to other countries. There are
many jobs in the forest industry including fallers who cut the trees
down, logging truck drivers who transport the logs and sawmill
workers who cut the logs into lumber.
Write a story about a British Columbia tree. Begin your story with
the tree living in the forest and end your story with a stack of
lumber in the lumber yard. Add diagrams to your story to show
how the tree becomes lumber.

Section 3 Assembly
16
Planter Assembly
✓ Fastening Techniques
✓ Sequencing ✓ Tools and Tool Safety
✓ Hand / Eye Coordination
✓ Assembly Jigs ✓ Finishing Techniques
✓ Following Instructions ✓
✓ Use of Working Drawings
PARTS LIST
Part Name Quantity
A Sides and Bottom 6
B End 2
Part B
Part A

Section 3 Assembly
17
Fastening Techniques
GLUING AND CLAMPING
Wood parts can be attached to each other with wood glue. The parts are held together with clamps until the glue has set. This creates a strong permanent joint.
NAILS
In many types of construction such as housebuilding, lumber can be held together permanently with nails.
SCREWS
Screws are used to hold wood parts together. Screws create a stronger joint than nails and also allow parts to be disassembled.

Section 3 Assembly
18
Tools and Tool Safety
Hand tools are simple tools used for constructing items and
power tools use electricity or battery power to operate. Power
tools can sometimes be used in place of hand tools to make the
job faster and easier.
The proper use of all tools is important for the project you are
building and most importantly for your own safety. Always follow
instructions on how to use tools safely, including the proper way
to hold them.
Hammer
The most common hammer used in woodworking is the claw
hammer. It allows for nails to be driven into the wood and for the
removal of bent nails.
Always hold a hammer near the end of the handle as shown in the diagram!
SAFETY TIP

Section 3 Assembly
19
A tidy work area is a safe work area. Keep your work area clear of
clutter and keep all loose clothing, jewelry and hair out of the way
of tools at all times.
Eye protection and hearing protection must always be used with
power tools and even with some hand tools.
Why do you think it is important to use eye protection when using
a hammer and nails? ____________________________________
________________________________________________

Section 3 Assembly
20
Hand Saws
Hand saws are used to saw wood into required lengths and
widths. Rip saws are designed for cutting lengthwise with the
grain and crosscut saws are designed for cutting across the grain.
SAFETY TIP
When using a hand saw, always secure the wood in a
clamp or vise and KEEP HANDS AWAY FROM
TEETH OF SAW
Rip Saw Crosscut Saw

Section 3 Assembly
21
Sanding Sandpaper is used for smoothing rough wood. Sandpaper can be
wrapped around a wooden sanding block and held in your hand to
rub back and forth on the wood to smooth it. There are also
power sanders that use electricity to speed up the process.
Sandpaper has tiny particles of sand glued onto it. It can be
coarse, medium or fine. The coarser the sandpaper, the larger the
particles of sand. The coarseness of sandpaper is designated by a
number; fine sandpaper has a higher number than coarse
sandpaper. For example, #400 sandpaper is finer than #40
sandpaper.
In traditional Aboriginal culture, some First Nations people use the
dried skin of a dogfish to sand wood.
Sanding Block
*Note to teacher: Distribute sanding blocks and pre-cut coarse and medium sandpaper.

Section 3 Assembly
22
Before planter assembly, lightly sand
rough surfaces of all pieces with medium grit sandpaper.
* Note to teacher: Have students select the smoothest side of each Part A piece to represent the front of each piece.
There are six Part A pieces. Using a sanding block and coarse grit
sandpaper, round off the two long edges of one side of each Part
A piece. Finish with medium grit sandpaper.
Sand these edges on the front
side of each Part A piece until
they are rounded.
Rounded edges

Section 3 Assembly
23
Assembly Jigs If you are working on a project it is much easier with a partner. If
you are working on your own, an assembly jig is like a pair of
helping hands. An assembly jig is a custom-made device that will
hold parts in position for accurate and repetitive assembly. In
many manufacturing plants jigs are used for mass production.
Assembly Jig for the planter

Section 3 Assembly
24
Assembly Jig 1 Planter end pieces placed in grooves
of Assembly Jig 1
Assembly Jig 2 Planter placed in Assembly Jig 2

Section 3 Assembly
25
Assembly
Fit two end pieces
Part ‘B’ into the
grooves in Assembly
Jig 1 as shown in the
diagram.
Glue and nail two
bottom strips Part ‘A’
onto the end pieces
Part ‘B’. Wipe off
excess glue with
damp paper towel.
Remove the planter from the assembly jig.

Section 3 Assembly
26
Turn the planter on its
side and place in
Assembly Jig 2. Glue
and nail two side strips
Part ‘A’ to end pieces
Part ‘B’.
Repeat this step for
the other side of the
planter.
Sand all sharp edges of
the planter with medium
grit sandpaper.
Finish the planter with
non-toxic paint or varnish.

Section 4 Technical Drawing
27
Technical Drawing
When you built your planter, you used a set of plans. The plans
included drawings. These drawings are called technical drawings.
Anything that is built is designed first, and a set of plans need to
be drawn. A good example of this is a house; a set of plans is
needed before a house can be built. The drawing of these plans
(also called blueprints) is called technical drawing or drafting, and
is the job of a draftsperson or an architect.
You are going to draw a plan for a front view and an end view of
your finished planter.

Section 4 Technical Drawing
28
1. Using a ruler and pencil, fill in the dotted lines on the
drawing below.
This drawing is a full size front view of the planter.
End View Front View

Section 4 Technical Drawing
29
2. Measure your full size front view drawing.
The planter is millimetres long
and millimetres high.
Technical drawings show the size of a part using arrows and
lines, as in the diagram below. These are called dimension
lines.
90 mm
35 mm

Section 4 Technical Drawing
30
3. On the front view drawing of the planter below, draw
dimension lines for the length and the height. Record
measurements on the dimension lines for the length and the
height in millimetres.

Section 4 Technical Drawing
31
4. Using a ruler and a pencil, fill in the dotted lines on the
end view drawing below.
Section 4 Technical Drawing
32
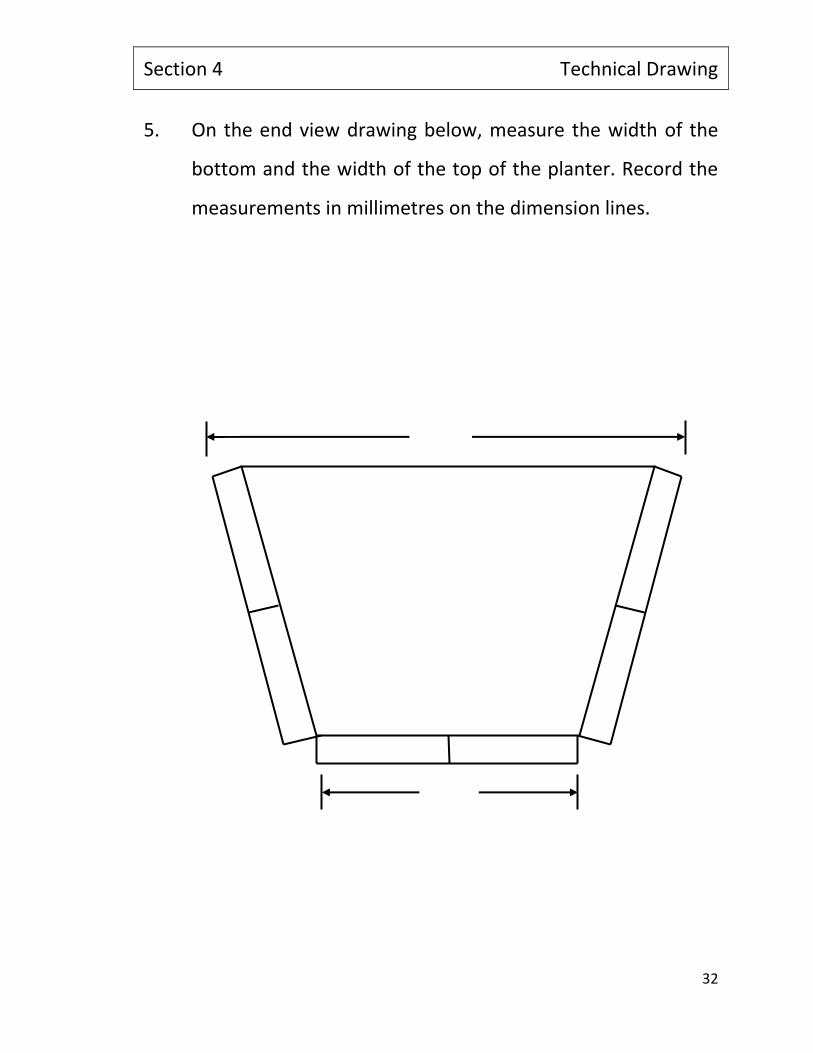
5. On the end view drawing below, measure the width of the
bottom and the width of the top of the planter. Record the
measurements in millimetres on the dimension lines.

Section 5 Science and Nature
33
Plants and Seed Germination
Colour the flowers and leaves.

Section 5 Science and Nature
34
Plants and Flowers Different categories of plants and flowers have different life
cycles.
Annual Plants and Flowers
Annual plants and flowers complete their life cycle in one year.
Flowers bloom brightly through summer and into the fall and then
the plant dies. If you want the same kind of plants in your garden
next year you will have to buy new plants to replace them or start
new plants by planting seeds.
Perennial Plants and Flowers
Perennial plants and flowers live for many years. The flowers will
bloom year after year. The plant will grow bigger and in many
cases can be divided into more plants which will continue
growing. Some perennials live well over twenty years and can
become very large bushes or shrubs.

Section 5 Science and Nature
35
Word Search
R O S E
K
T
R T U
L
I P
M L I
L
A C
D A I
S
Y O
I N B
W
Z D
P A N
S
Y R
Look for these flowers in the puzzle and circle each word. The word ROSE has been done for you.
These are flowers you might find in your own garden.
ROSE PANSY TULIP DAISY LILAC

Section 5 Science and Nature
36
Germination
Germination is a word that is used to describe the process of a
seed growing into a plant.
In order to grow, plants need soil, water, oxygen, the right
temperature and the right light conditions – some prefer lots of
sunshine while some grow better in the shade.
Just like people need vitamins and minerals to be healthy, plants
also need nutrients to grow. They get their nutrients from the
minerals in the soil they are grown in.
All seeds need enough water to keep them moist but not too wet.
Watering your seeds regularly so the soil does not dry out is
important; some plants prefer more water than other plants.
Seeds germinate best when they have been soaked in water
before planting. This softens the seed coat. The germination stage
begins when seeds have been planted and ends when shoots
emerge from the soil. Now that you have built your planter it’s
time to plant your nasturtiums.
Section 5 Science and Nature
37
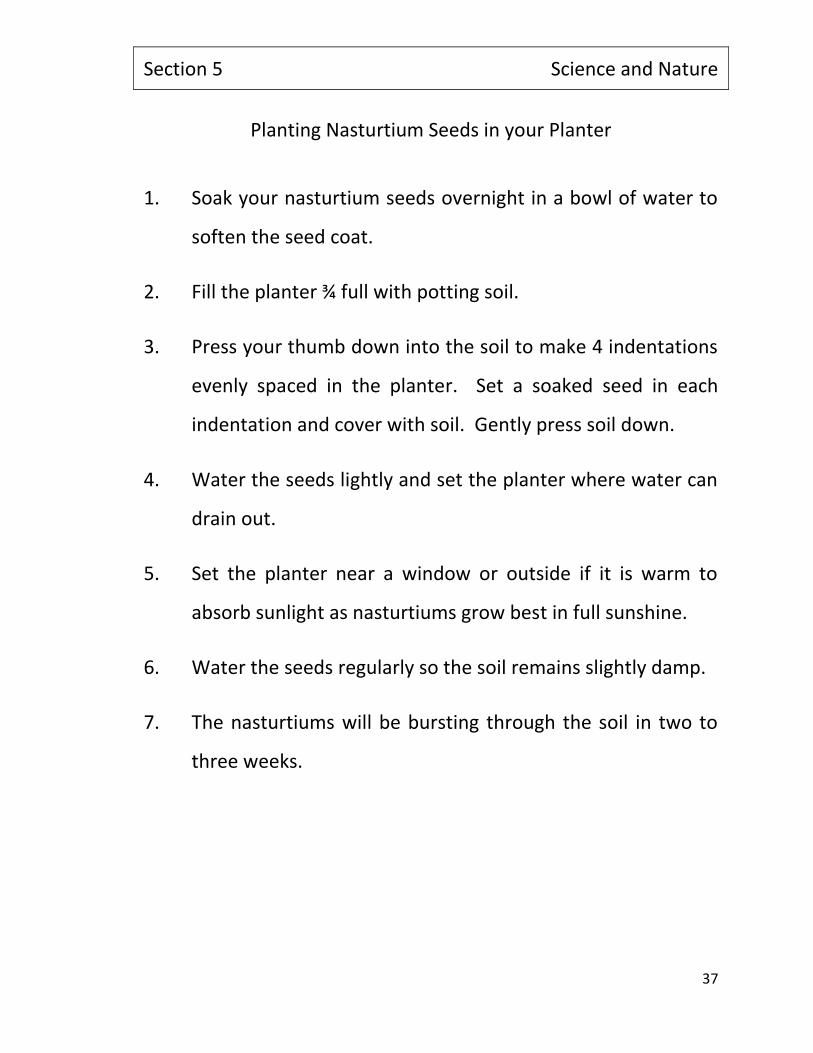
Planting Nasturtium Seeds in your Planter
1. Soak your nasturtium seeds overnight in a bowl of water to
soften the seed coat.
2. Fill the planter ¾ full with potting soil.
3. Press your thumb down into the soil to make 4 indentations
evenly spaced in the planter. Set a soaked seed in each
indentation and cover with soil. Gently press soil down.
4. Water the seeds lightly and set the planter where water can
drain out.
5. Set the planter near a window or outside if it is warm to
absorb sunlight as nasturtiums grow best in full sunshine.
6. Water the seeds regularly so the soil remains slightly damp.
7. The nasturtiums will be bursting through the soil in two to
three weeks.

Section 5 Science and Nature
38
When your nasturtium seeds have been planted they will begin to
germinate:
1. The seed coat breaks open.
2. The root emerges from the seed.
3. The shoot emerges, containing the stem and leaves.

Section 5 Science and Nature
39
Watch your Seeds Grow in your Planter
Draw a picture of the shoot emerging from the soil.
Draw a picture of your nasturtium flowers and leaves.

Section 6 Design Challenge
40
Congratulations! You have built your planter and your nasturtiums
are growing. Let’s think about how you can make your planter
into a hanging basket. Drilling holes in the ends of your planter
and attaching a wire or heavy string is one way your planter can
become a hanging basket.

Section 6 Design Challenge
41
Your design challenge is to design a different hanging basket.
After you think of a design, you need to sketch your ideas onto
paper and think about which building materials will work for your
hanging basket.
Wood is just one material that can be used, but there are other
building materials such as a large plastic pop bottle or even a tin
can. Think of other building materials you can use to build a
hanging basket.
The next step is for your group to select the design that you would
like to build together.
Choose your building materials and enjoy being creative!
* Note to teacher: Have students brainstorm different building materials.

Section 7 Introduction to Trades
42
What is a trade career?
Trade careers are based on practical hands-on skills. The people
who work in these careers build our buildings and our
communities. There are different trade careers that suit many
different interests.
Some tradespeople like to build things.
Carpenter

Section 7 Introduction to Trades
43
Some tradespeople like to analyze (figure things out).
Some tradespeople like to operate machinery.
Heavy Equipment Operator
Electrician

Section 7 Introduction to Trades
44
Some tradespeople like to fix things.
Some tradespeople like to create things.
Automotive Service Technician
Baker

Section 7 Introduction to Trades
45
Some tradespeople like to work outdoors.
Think about what you like to do.
• Do you like to build things?
• Do you like to figure things out?
• Do you like to operate things?
• Do you like to fix things?
• Do you like to create things?
• Do you like being outdoors?
Landscape Horticulturist

Section 7 Introduction to Trades
46
A man or woman who is learning a trade is called an apprentice.
An apprentice learns from a master in the trade; this master is
called a journeyperson.
Many trades are also called “Red Seal” trades. A journeyperson
who receives a Red Seal certificate may use their skills in their
trade anywhere in Canada.
Do you know any tradespeople? Ask the tradespeople that you
know what they like the most about their job.
What trade do you think might be involved in building wood
planters and what trade do you think might be involved in
working with plants? ____________________________________
______________________________________________________
Do you know the name of the trade being demonstrated in the
diagram below? ________________________________________
