the ultimate ultimate poultry watering guide - val-co · detrimental effect on flock performance....
TRANSCRIPT

The Ultimate Poultry Watering Guide
Welcome to the Ultimate Poultry Watering Guide
Ultimate

Welcome to The Ultimate Poultry Watering Guide
An effective watering system only performs as well as the farmer knows how to make it. It seems like such a simple thing, but sometimes even the smallest errors can have a detrimental effect on flock performance. Not to worry, we’re here to explain everything that you need to know to make your VAL-CO watering system (or - *gasp* - another system) work as well as it can.
The one thing to know about chicken physiology to understand why we water them the way we do:
Chickens can’t swallow.
There is a split in their hard palate so they cannot create the vacuum to swallow, so they just tilt their heads back and let water slide down their throat. Chickens have no problems drinking because of it, but they are physiologically limited to how much they can consume at a given time.
Only about one-third of the water pumped into a chicken house comes out in bird weight; the other two-thirds is either ventilated out or stuck in the litter. The key to great performance is getting as much water into the birds as possible, and this means careful maintenance, sanitation, and procedure. We’re going to walk you through flow rates and water pressure, line height and slope adjustments, and even water quality and maintenance so that you can make the most of your sanitation regimen and get the best bird performance possible.

Flow Rates and Water Pressure
Broilers consume ~1.75 pounds (.80 kg) of water for every 1 pound (.45kg) of feed. The ratio is a constant, but the amounts will increase over the birds’ lifespan. This means that we need to know how much water a bird requires at each stage of its life.
Remember, that due to chicken physiology there is a maximum rate at which they can consume water, and this rate changes with age. We know that, at most, a 9-lb. (4.08 kg) bird can consume water at a rate of 85ml per minute. To determine what this rate is at any weight or age, use this equation:
[(Bird Age in weeks) x 7] + 20 = Flow Rate
This equation creates a target sweet spot for producers where the drinker flow rate matches the beak capacity of the bird. Drinker flow rates are important to note, but the water pressure in the drinker line influences the flow rate.
Too much water pressure results in wasted water because too much water comes out when the nipple is triggered. It can also result in leaky nipples because it will inhibit the shut off mechanism from sealing properly. Too little pressure doesn’t allow the birds to drink enough, resulting in decreased performance.
Actual flow rates are a combination of standpipe pressure, drinker type, and triggering action of the drinker (side triggering or vertical triggering). Remember that the system needs to be able to keep up with demand, and that pressure will be reduced by inadequate sizing of incoming water lines, inadequate well capacity, and too little pressure at the regulator.
TOO MUCH WATER
1. Spillage leads to poor litter quality.
2. Ammonia levels increase, potentially causing respiratory and eye problems.
3. Footpad health problems and decreased bird mobility.
4. Breast blisters and condemnations.
TOO LITTLE WATER
1. Decreased water consumption leads to decreased food consumption.
2. Dusty conditions in the barn lead to other respiratory health problems.
[(Bird Age in weeks) x 7] + 20 = Flow Rate

As a general guideline, you should provide at least 25 psi (pounds per square inch) or 1.72 bar of pressure to the regulator, but no more than 75 psi (5.17 bar) for a standard regulator. If your supply is above 75 psi, incoming to the house a high-pressure preregulator should be installed to help improve the life and efficacy of the watering system. For producers with less than 25 psi available (perhaps a water tank mounted on a tower providing only 3 to 15 psi) there are low-pressure intakes available to get the most out of your system.
Day old chicks require about 1-2” of visible standpipe pressure. As they grow, increase the pressure every other day based on bird performance and litter conditions.
If you notice that that litter has become too damp, stop raising the pressure until the litter conditions have returned to normal (litter should be just damp enough that it clumps and then crumbles when squeezed into a ball). Once the litter conditions have stabilized, continue adjusting the pressure incrementally.
Bird Age Typical Visible Standpipe Pressure for VR150 drinker (in.)
Day-old chicks 1-2”Day 3 3-4”
Day 5 5-6”Week 1 6-7”Week 2 9-10”Week 3 12-13”Week 4 15-16”Week 5 17-18”

Slopes and Line Heights
Line height plays a key role in controlling water waste, litter conditions, and bird performance.
Remember how we said birds drink by simply tilting their heads back? Well, if the drinker line is at the proper height, chickens can drink more easily because their necks are already extended in the right position.
If the line is too low, most of the water ends up in the litter, resulting in higher fuel and energy costs to ventilate it out (or severe health issues if it’s trapped inside). If the line is too high, birds can only peck at the trigger instead of activating it properly, so they don’t consume enough water, resulting in poor weight and performance.
The easiest way to determine if the height is suitable is to watch the birds. If they sit to drink, the line is too low. If they stretch their necks straight up, stand on their toes, or hop, the line is too high. Here are some age guidelines to help you make appropriate adjustments:
For day-old chicks, drinkers should be just above eye level and the barn should be lit well enough that the chicks are drawn to the shiny metal pin, so that they learn to drink from the nipples. By the end of growout, birds should be comfortably reaching towards the bottom of the trigger pin to drink.
Uneven floors make consistent height adjustment nearly impossible, so it’s important that floors are smooth and level. A gradual grade is ok as long as there is no greater than 4” of drop. If there is greater than 4” of drop, they’re considered “sloped lines” and need to be treated a little bit differently.
Day-old Chicks Eye level
2-3 Days 30-45° angle
4-10 Days 60° angle
10 Days - Growout 70-80° angle

Slopes
Sloped houses result in uneven water pressure from one end of the house to the other. Uneven pressure often results in reduced growth and lack of uniformity across the flock, as well as bird density issues and litter problems. To accommodate the slope, the water lines should be broken into smaller sections, and a slope regulator should be added at certain intervals across the house. A slope regulator lowers the incoming water pressure to a more appropriate level to counteract the problems associated with sloped lines.
Air locks
Air locks can be a common problem if watering lines are uneven. They occur in high spots in the line and can prevent water flow to the sections beyond the air lock. This is an even bigger issue with young birds, as pressures are too low to force the water through the air lock.
Adjust the lines carefully so they are straight. As an added precaution, raise the regulator just slightly so air can escape through the standpipe.
Here’s a tip!
Increase the lifespan of the regulator by turning back
the pressure to 2-4” immediately after removing the birds from the
house. Leave the pressure at a low level until the start of
the next flock.
Water Maintenance and Sanitation
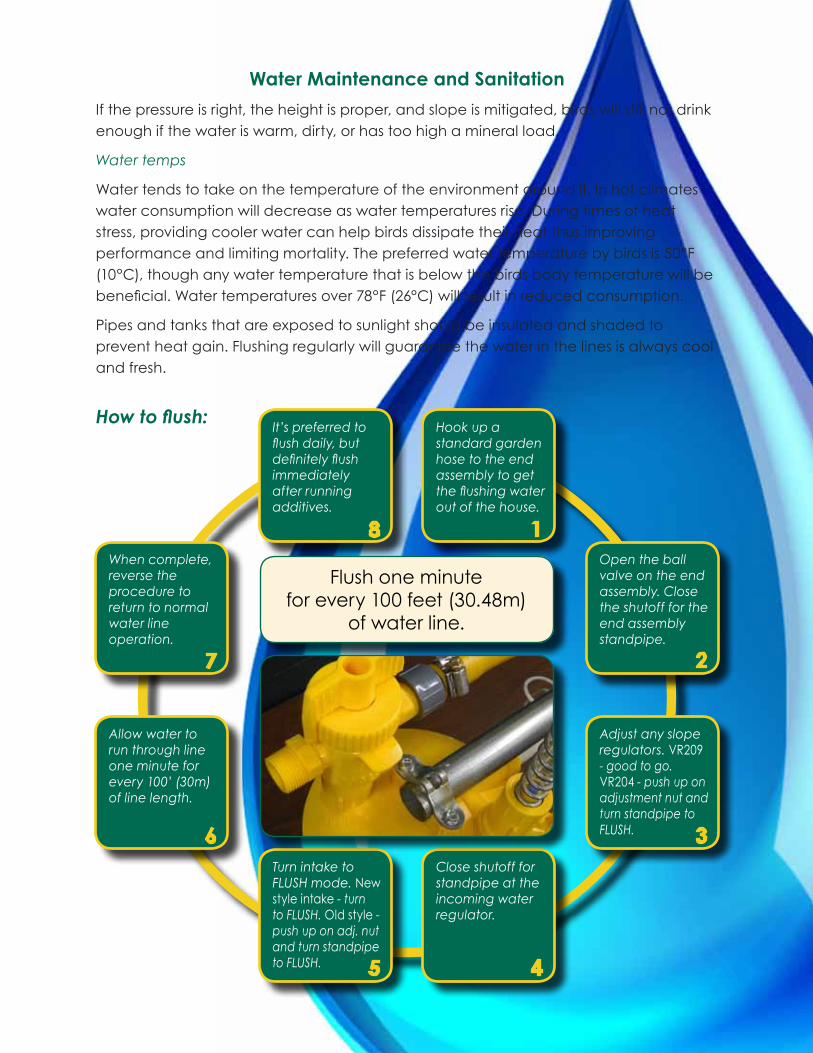
If the pressure is right, the height is proper, and slope is mitigated, birds will still not drink enough if the water is warm, dirty, or has too high a mineral load.
Water temps
Water tends to take on the temperature of the environment around it. In hot climates water consumption will decrease as water temperatures rise. During times of heat stress, providing cooler water can help birds dissipate their heat thus improving performance and limiting mortality. The preferred water temperature by birds is 50°F (10°C), though any water temperature that is below the birds body temperature will be beneficial. Water temperatures over 78°F (26°C) will result in reduced consumption.
Pipes and tanks that are exposed to sunlight should be insulated and shaded to prevent heat gain. Flushing regularly will guarantee the water in the lines is always cool and fresh.
How to flush:Hook up a standard garden hose to the end assembly to get the flushing water out of the house.
Adjust any slope regulators. VR209 - good to go. VR204 - push up on adjustment nut and turn standpipe to FLUSH.
When complete, reverse the procedure to return to normal water line operation.
Turn intake to FLUSH mode. New style intake - turn to FLUSH. Old style - push up on adj. nut and turn standpipe to FLUSH.
Open the ball valve on the end assembly. Close the shutoff for the end assembly standpipe.
Close shutoff for standpipe at the incoming water regulator.
It’s preferred to flush daily, but definitely flush immediately after running additives.
Allow water to run through line one minute for every 100’ (30m) of line length.
Flush one minute for every 100 feet (30.48m)
of water line.
1
2
3
45
6
7
8

To understand how to properly maintain and sanitize water, you must first understand some basic principles about water and how they can affect your birds. The pH measurement indicates whether water is acidic or alkaline. Acidic water has a pH of <7 and will affect digestion, corrode watering equipment, and impair the use of water soluble vaccines and medications. Water with a pH of >7 is alkaline, or basic. The effects on equipment are not as severe, but too much alkalinity (>8) will impart a bitter taste to the birds, resulting in decreased water and food consumption. The preferred pH range is 6.0 to 6.8 while the birds can tolerate a pH range between 4 and 8.
Water hardness is caused primarily by the presence of Calcium and Magnesium. It requires more soap or detergent for cleaning and is known to leave behind caked on scale which, if not removed, can clog water lines. The hardness itself is not known to have a direct effect on poultry performance, though it can reduce the effectiveness of some medications and will require a more labor-intensive cleaning and maintenance program.
Drinking water should always be clear, tasteless, odorless, and colorless. Let’s repeat that: Drinking water should always be clear, tasteless, odorless, and colorless. The quality of the water consumed by the birds has a direct influence on their performance. If you have noticed less than ideal performance and cannot explain it, check the water.
7 - Neutral 14 - Basic1 - Acidic
CLOUDY
Presence of clay, silt, and organic material.
RUST COLORED
Excess iron.
BLUE HUE
Excess copper.
BLACK
Hydrogren sulfide combined with iron.
ROTTEN EGG SMELL
Hydrogen sulfide.
Does your water look like any of these?

You can’t know what is in your water simply by looking at it, you must have it tested. Once you have it tested, you can treat the water, and the water lines, more thoroughly. Total dissolved solids (TDS) is a measure of salinity (concentration of dissolved salts in water) measured in parts per million (ppm). Birds can adapt to higher levels to some extent, but frequent, abrupt changes may affect performance. The following minerals are commonly found dissolved in water and have, in too high a concentration, certain effects on the birds.
Cleanliness
Biofilm is a collection of bacteria and other organisms that live together in a sticky film inside the pipes, regulators, and nipple drinkers. It protects itself with a mucous membrane (better known as slime) that neutralizes cleaners, and as it grows and spreads, it releases bacteria into the water that your birds are drinking. You need to know what is in your water in order to treat it, and here’s how to find that out.
Chloride:
Detrimental to metabolism if greater than 14ppm and sodium is high. If sodium is normal, chloride levels up to 25ppm can be tolerated.
Laxative Effect:
Sodium - concentrations over 50ppm are detrimental when combined with high sulfate or chloride levels.
Calcium & Magnesium - also responsible for hard water build-up.
Potassium - acts similar to sodium.
Sulfate - Laxative effect is temporary until birds become accustomed to its presence.
Bitter Taste:
Manganese
Copper - in quantities greater than 1ppm.
Sulfate - High levels create bitter taste.
Nitrate:
Interferes with the blood’s ability to absorb oxygen and will affect weight gain, feed conversion, and performance when between 3 - 20ppm.

Testing and swabbing
We know that biofilm is a tricky thing. It grows quickly, harbors bacteria, protects that bacteria from cleaning agents, and then releases those bacteria back into the water, potentially causing severe health issues. But how much bacteria are actually inside the pipes?
Doing a drip sample gives us just a vague idea. More accurately, it’s a representation of how much bacteria are being released into the water, but it doesn’t tell us how much bacteria are living in the line itself. By swabbing the inside of the line, we can test the biofilm to get a better idea of how much of it is actually present. Additionally, we can better tell the efficacy of our sanitation routine by swabbing before and after cleaning the lines.
Mary Scanting and Dr. Susan Watkins of The University of Arkansas have outlined the swabbing procedure step-by-step, and we share it with you here:
1. Shut the water off to the water line being tested.
2. Remove the cap from the end of the water line or detach the drain hose from
the end of the line and allow excess water to drain out so the sponge will be
absorbing biofilm and not just water. If a valve cap is present, remove it. Do
not sample through the valve cap as it will not be a representative sample.
Sample as close as possible to the standpipe.
3. Wipe off the outside threads of the water line with 91% alcohol in case your
sponge brushes against them when you swab.
4. Wipe down a pair of extra-long tweezers (these need to be 6 to 8 inches long)
with alcohol or dip in alcohol. Use a flame starter to burn off alcohol and
sterilize tweezers.
5. Remove the cap of the swab vial while being extremely cautious not to touch
the edge of the vial or the inside of the cap against anything.
6. Put the sterilized tweezers into the vial and grasp the sponge. Push the sponge
against the inside of the vial and turn to squeeze out the excess moisture.
7. Remove the sponge from the vial and insert into the end of the open pipe,
being extremely careful not to touch anything as the sponge enters the pipe.
8. Insert the sponge at least 4 inches into the pipe, twisting it as you go in and
back out. Swabbing water lines can be done for any type of line, but just
make sure to remove any parts that will prevent you from getting the sponge
into the true water line.
9. Replace the sponge into the BPD or sterile water in the 50 ml vial and tightly
close the cap to prevent leakage. Vigorously shake the vial to release an
even number of bacteria from the sponge into the BPD solution. Carefully
label the sample with a waterproof marker and then store the sample at
refrigeration temperature (40° 45°F), even in transport until the sample arrives
at the lab. For best results, samples should be submitted to the lab within 24 to
48 hours. Repeat this procedure for each testing site, being sure to sterilize the
tweezers before using them for each sponge.

Your local Extension can run the tests for you and provide a report. Using the information provided, you can start to develop a program that will improve the water quality in the poultry house, and the performance quality of the birds.
When should water lines be cleaned?
Biofilms can re-emerge in as little as 2-3 days if the conditions are right, so doing a thorough deep clean in conjunction with a daily sanitation program will ensure that the water is always safe to drink.
This varies with initial water quality, but as a baseline:
A daily sanitation program should be employed to make deep cleanings more effective.
What should you use to clean the water lines?
There are several options, some more effective than others. Their effectiveness will depend on your water quality and content, so you should first know your source, and the baseline of the dissolved solids in your water. Chlorine: Chlorine is not the best choice for areas where chloride levels are already high, as too much chlorine in the water will back birds off from drinking and damage the system. Chlorine solutions work best in pH 4 to 7. You must have the proper level of chlorine at the end of the water line farthest from the water source to ensure that chlorine is doing its job. You should have 3 to 5 ppm of free chlorine at the end of the line for your sanitation program to be effective. More than 5 ppm may be too strong; less than 3 ppm chlorine is likely too weak and will be ineffective against organisms in the water supply.
Hydrogen peroxide: Stabilized hydrogen peroxide is growing in popularity as a cleaning agent in drinker lines. The stabilizer keeps the sanitizer from converting to water and oxygen before it finishes the cleaning job. It works well on biofilms. It is non-corrosive to the drinker system and effective on bacteria, fungi, and viruses. It breaks down algae thoroughly enough that it will usually pass through nipple drinkers without causing the nipple to clog or stick.
Citric Acid: Commonly used in the past, new research has shown that citric acid may be giving biofilms a “food source”, making it an ineffective cleaning solution.
Here’s a tip!
Flush water lines weekly to remove particles that may
interfere with the water flow, and always flush after administering
medications or supplements to prevent biofilm from
developing!
• At least every 4 months
• Always between flocks

General Cleaning Procedure
Remember to NEVER use petroleum-based cleaners on water lines – they can attack the plastic and rubber components and severely degrade the system as a whole. Here is a partial list of banned cleaners to never use on your watering system:
Mix cleaning solution per manufacturer’s instructions
Fill watering system with solution
Allow solution to sit 1 - 3 hours
Flush system with plain water using high pressure
Check filters, valves, and nipples for clogging from debris
Adjust regulator pressure to normal operating pressure
• Acetone
• Alpha-Chloronapthalene
• Amchem Risoline 322, 421, 804, and 53.
• Andis Hair Clipper Lube
• Balkamp Sil Glyde
• Benzene
• Brake Fluid
• Bromine
• Butyl Ether
• Carbon Tetrachloride
• Chloroform
• Diethyl Ketone
• Dishwashing Detergents
• Formaldehyde
• Gasoline
• Intra Multi-Des - [Didecyl Dimethyl Ammonium Chloride (C22H48ClN)]
• Isopropyl Alcohol
• Petroleum Jelly
• Pine Oil
• Porion Ink
• PVC Upholstery Materials
• Toothpaste
• Turpentine
800-99VALCO(+1) 419-678-8731
www.val-co.com©2017 Valco Companies, Inc.
Scan the QR Code or visit val-co.it/TheWaterBook to download a PDF of The Ultimate Poultry Watering Guide.
For more information, or to send in your comments, please email us at [email protected]. We look forward to connecting with you!