the shear path roof to foundation division for wood framed
TRANSCRIPT

5/31/2019
1
The Shear Path – Roof to FoundationFor Wood Framed Structures
Karyn Beebe, P.E., LEED AP
APA –The Engineered Wood Association
Quality
Services
Division
Technical
Services
Division
Field
Services
Division
Market Communications
Division
Learning Objectives
• Understand the complete lateral load
path
• Identify common framing errors within
this path
• Discuss code requirements for critical
details
Load Path
“Any system of method of construction to be used shall be based
on a rational analysis in accordance with well established
principles of mechanics. Such analysis shall result in a system
that provides a complete load path capable of transferring loads
from their point of origin to the load-resisting elements.”
(CBC 2010 1604.4)
VERTICAL HORIZONTAL
Vertical (Gravity) Load Path

5/31/2019
2
Lateral Load PathBig Picture
WIN
D L
OA
D
RESISTANCE (wall bracing)
RESISTANCE (wall bracing)
Loaded wall versus resisting walls
1
2
A B
Floor/Roof sheathing (diaphragm)
Lateral Loads: National Issue
Wind Hazard Earthquake Hazard
Lateral Loads(Wind)
F = PAEffort is devoted
to determining:
P – wind pressure
Lateral Loads(Seismic)
F = maEffort is devoted
to determining:
a – acceleration
Wood – Light and Flexible
General Modes of Failure
Racking
Uplift
Overturning
Base Shear

5/31/2019
3
UPLIFT
3-D Connector
Whole House Effects of Lateral Forces
Racking
Lateral Forces
Racking – Rowlett/Garland Tornados 2015

5/31/2019
4
Base Shear Whole House Effects of Lateral Forces
Base Shear
Overturning
February 2008
Macon Co.
‘Super Tuesday’
Tornado
Whole House Effects of Lateral Forces
Overturning
How Do Shear Walls Work?
Wall Framing Hinge
Hinge
How Do Shear Walls Work?
Panelresistanceimparted towall framing(Prevents hinging)
Wall Framing

5/31/2019
5
Overturning
Overturning
Overturning
Overturning
Studs – to – Structure Lateral Load
▪ Cladding transfers the wind load to the studs
▪ Studs transfer the wind load to the roof and floor
diaphragms
▪ Studs must span from diaphragm to diaphragm
Studs – to – StructureLateral Load -Tall Walls
Studs – to – StructureLateral Load -Tall Walls
The spliced studs
‘hinged’ in this location
Building for High Wind Resistance

5/31/2019
6
Roof Sheathing Connection Roof Sheathing Connection
Texas Tornado – December 2015
Nebraska Tornado – June 2017
• Proper spacing of staples (Table R602.3(2))
• Proper orientation of staples to ensure
both legs are engaged
Roof Sheathing - to - Roof Rafters/TrussesUplift Load
Gable Ends
Fayetteville, North Carolina – 2011 Tornados Texas Tornado – December 2015

5/31/2019
7
Nebraska Tornado – June 2017
Gable-end Framing
Tie gable end walls back to the structureGable end truss
top chordTension-tie strap, attach with
(8) 10d common nails, each
end of strap Roof Trusses
(3) 10d common
nails (typical)
2" x 4" continuous
lateral brace @ 6' on
center. Lateral brace
sized to extend from
end wall to over 3
interior trusses plus 6".
2x4 flatwise blocking
between truss bottom chords
Gable end truss
bottom chord
Resisting Pressure on Components and Cladding
Sheath gable end walls with wood structural panels,
such as plywood or oriented strand board (OSB)
8d Common nails - 4" on
center perimeter of panel
Wood structural panel sheathing
8d Common nails - 4" on
center perimeter of panel
nailed to the top of the double
top plate
Gable end truss top chord
Gable end truss vertical
web member
Gable end truss bottom chord
8d Common nails - 6" on center
along intermediate framing
Roof Rafters/Trusses - to - Top PlatesLateral and Uplift Loads
This connection must handle
loads from two different
directions.
Lateral load from
roof diaphragm
Uplift load from
roof sheathing
Toe-nailing is acceptable per
code (as long as loads are within
allowable limits), but isn’t the
best option.
Roof Rafters/Trusses - to - Top PlatesLateral and Uplift Loads
Coaling, Alabama – 2011 Tornados
Watch for splitting of the
member when toe-nails are
aligned along the grain
Missouri Tornado – 2003
Roof Rafters/Trusses - to - Top PlatesLateral and Uplift Loads
5/31/2019
8
▪ Fig 8 – SP-1154
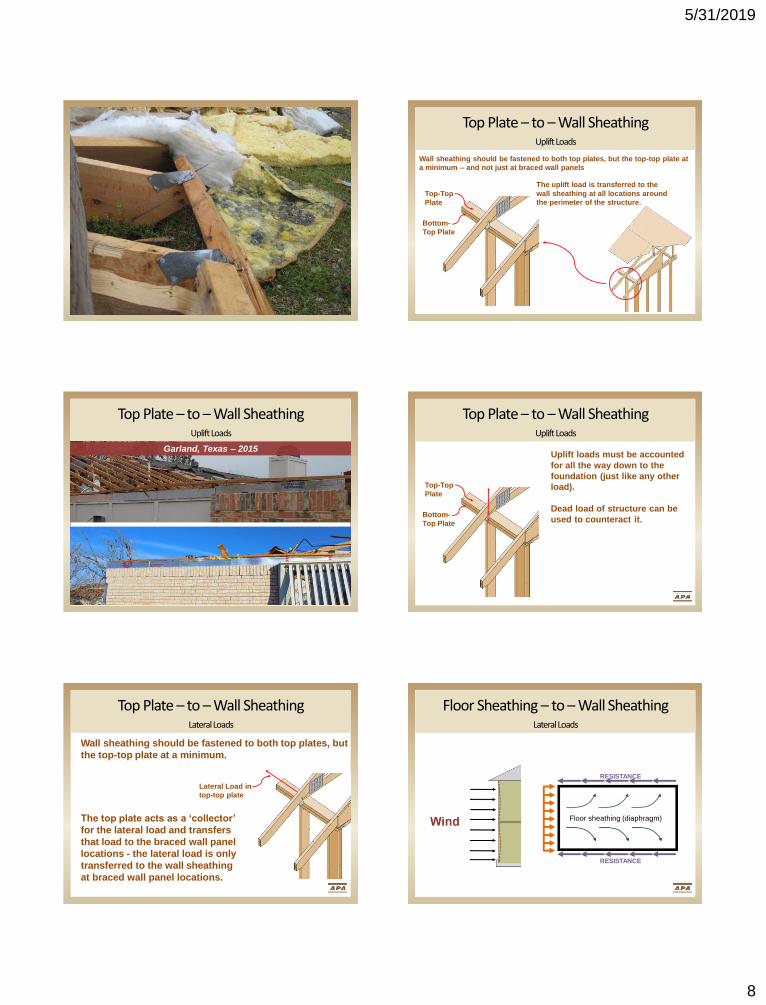
Top Plate – to –Wall SheathingUplift Loads
Top-Top
Plate
Bottom-
Top Plate
Wall sheathing should be fastened to both top plates, but the top-top plate at
a minimum – and not just at braced wall panels
The uplift load is transferred to the
wall sheathing at all locations around
the perimeter of the structure.
Garland, Texas – 2015
Top Plate – to –Wall SheathingUplift Loads
Top Plate – to –Wall SheathingUplift Loads
Top-Top
Plate
Bottom-
Top Plate
Uplift loads must be accounted
for all the way down to the
foundation (just like any other
load).
Dead load of structure can be
used to counteract it.
Top Plate – to –Wall SheathingLateral Loads
Wall sheathing should be fastened to both top plates, but
the top-top plate at a minimum.
The top plate acts as a ‘collector’
for the lateral load and transfers
that load to the braced wall panel
locations - the lateral load is only
transferred to the wall sheathing
at braced wall panel locations.
Lateral Load in
top-top plate
RESISTANCE
RESISTANCE
Floor sheathing (diaphragm)
Floor Sheathing – to –Wall SheathingLateral Loads

5/31/2019
9
The load is transferred from the floor sheathing into
the joist blocking or rim board/joist.
The blocking or rim board/joist acts as a ‘collector’
for the lateral load and transfers that load to the
braced wall panel locations
The load is transferred into the sheathing at the
braced wall panel locations – depends on
how/where the braced wall panels are attached.
Floor Sheathing – to –Wall SheathingLateral Loads
Wall sheathing should be fastened to the rim board
or the top plates.
Blocking or
rim board/joist
2nd floor
sheathing
2nd floor
wall
1st floor
wall
Wall sheathing
Wall Sheathing – to – FramingLateral Loads
• The wall sheathing and framing work
together to move the lateral load down to
the base of the wall
• The engineer may require a tighter
fastener spacing than the standard
spacing required by code (6” o.c. edges,
12” o.c. field for WSP) if the panel is a
shear panel (engineered).
Lateral Load from
stories above
▪ Fig 21 – SPE-1118
Missouri Tornado – 2003 Nebraska Tornado – June 2017
Wall Sheathing
Texas Straight Line Wind – March 2017
Wall Sheathing
Texas Straight Line Wind – March 2017

5/31/2019
10
Wall Sheathing – to – Sill PlateLateral and Uplift Loads
• Sheathing must be fastened to the
bottom plate.
• Make sure staples are aligned parallel to
the bottom plate to ensure both legs are
engaged.
• At this point, uplift loads from the
suction on the roof are at their smallest
due to dead load of the structure.
Attachment to sill plate
Wall Sheathing – to – Sill PlateLateral and Uplift Loads
Wall Sheathing – to – Sill PlateLateral and Uplift Loads
Tornados of the South – 2011 Garland, Texas – 2015
Wall Sheathing – to – Sill PlateLateral and Uplift Loads
Sill Plate – to – FoundationLateral and Overturning Loads
• At this point, the
lateral loads and
the overturning
loads are at their
maximum.
• Anchor bolts transfer the
lateral loads from the sill
plate to the foundation.
• Hold downs
transfer the
overturning
loads from the
structure to the
foundation
Texas Tornado – December 2015
Sill Plate – to – FoundationLateral and Uplift Loads

5/31/2019
11
Texas Tornado – December 2015
Sill Plate – to – FoundationLateral and Uplift Loads
This is where all
the wind load is
trying to go!
If the wind load cannot get out of the structure and
into the foundation, it will take the home with it.
No anchor bolts
– PAFs only!
Governing Codes for Engineered Wood Design
2016 CBC (2015 IBC)
▪Chapter 23 Wood
▪NDS-2015 (National Design
Specification for Wood
Construction)
▪SDPWS-15 (Special Design
Provisions for Wind and
Seismic)
Wood Structural Panels are by definition either Plywood or OSB (2302 & R202)
Wood Shear Wall and Diaphragms Design
▪ Function of: fastener’s size, spacing and panel thickness
▪ Values in Tables in SDPWS-08
▪ Alternately, capacities can be calculated by principles of mechanics
Wood's Strength Direction
▪ Rated Sheathing▪ Floor, wall or roof
▪ Plywood or OSB
Roof Covering
A P ARATED SHEATHING
32/16SIZED FOR SPACING
EXPOSURE 1
THICKNESS 0.451 IN.
000
PS 2-10 SHEATHING
PRP-108 HUD-UM-40
15/32 CATEGORY
High load diaphragms

5/31/2019
12
GE Warehouse
Ontario, CA
▪SDPWS-08 4.2.7.1.2
▪Uses multiple rows of nails
▪ASD capacity up to 1800 plf (seismic)
▪ASD capacity up to 2520 plf (wind)
▪Shall be subject to special inspection
IAW CBC Section 1704.6.1
High Load Diaphragms
Loads were
limited by lumber
splitting.
2 x 4
Footnotes to High-Load Diaphragm Table
3” nominal, two lines of fasteners
High-Load Diaphragm Fastening Pattern (SDPWS-15 Fig 4C)
Wood's Strength Direction
▪ Rated Sheathing▪ Floor, wall or roof
▪ Plywood or OSB
A P ARATED SHEATHING
32/16SIZED FOR SPACING
EXPOSURE 1
THICKNESS 0.451 IN.
000
PS 2-10 SHEATHING
PRP-108 HUD-UM-40
15/32 CATEGORY
Height to width ratio (SDPWS-08 Figure 4D & 4E)
▪For shear walls and
perforated shear walls
▪ h:w must not exceed 2:1
or 3.5:1 ratio

5/31/2019
13
Height to width ratio (SDPWS-08 Figure 4F)
▪For force transfer
around opening
shear walls
▪ h:w must not exceed 2:1
or 3.5:1 ratio
Aspect ratio (SDPWS-15 4.3.4.2)
▪Definition of h and w is the same as previous
code
▪ ALL shear walls with 2:1 < aspect ratios <= 3.5:1 shall
apply reduction factor, aspect ratio factor
▪ Aspect Ratio Factor (WSP) = 1.25-0.125h/bs
▪ Formerly applied only to high seismic
Excerpt Fig. 4E
h:w ratio FTAO
Excerpt Fig 4D
h:w ratio Segmented
Shear distribution to shear walls in line(SDPWS-15 4.3.3.4.1)
▪ Individual shear walls in line shall provide the
same calculated deflection. Exception:
▪Nominal shear capacities of shear walls having
2:1<aspect ratio<=3.5:1 are multiplied by 2bs/h for
design. Aspect ratio factor (4.3.4.2) need not be
applied.
Excerpt Fig. 4E
h:w ratio FTAO
Excerpt Fig 4D
h:w ratio Segmented
Wood Moves
▪ Wall sheathing expands
Space panels 1/8" min.(ends & edges)
Wood Moves
▪ High Risk Application
▪ Parallel to supports
▪ Edge nailing 4" o.c. or closer
▪ Long lasting rainy weather
▪ Others…
High risk because the conditions may reduce edge gap’s effectiveness in absorbing panel expansion.
Wood Moves

5/31/2019
14
Consistency Counts
▪ Overdriven fasteners
Overdriven Not Overdriven
Consistency Counts
Overdriven Fasteners
Overdriven
Fasteners
Overdriven
DistanceAction
< 20% < 1/8" None
> 20% < 1/8"Add 1 for every
two overdrivenAny > 1/8"
APA Publication TT-012
Consistency Counts
Overdriven
Fasteners
Overdriven
DistanceAction
Any
Due to
Thickness
Swelling
None
Overdriven Fasteners
APA Publication TT-012
Staggered Nailing
Nailing not staggered Nailing staggered
Framing
Wood Structural
Panel
Nail
1/8" Gap
Between Panels
Nailing not staggered Nailing staggered
Material Properties of Wood
▪ Splitting happens because wood is relatively weak perpendicular to grain▪ Nails too close (act like a wedge)
Material Properties of Wood
Splitting will not
occur perpendicular
to grain, no matter
how close nails are
Splitting occurs
parallel to grain
Staggering
Staggering a line of
nails parallel to wood
grain minimizes
splitting

5/31/2019
15
Material Properties of Wood
▪ Staggered nailing in tightly nailed shear wall helps prevent splitting of framing
Load Path Continuity
Load Path Continuity Shear Wall Design Challenges
Shear Wall Design Challenges(SDPWS 4.3.5)
Segmented Force Transfer
1. Code does not provide guidance for this method
2. Different approaches using rational analysis could be used
Perforated
1. Code provides specific requirements
2. The capacity is determined based on empirical equations and tables
1. Aspect Ratio up to 2:1 for wind and seismic
2. Aspect ratio up to 3.5:1, if allowable shear is reduced by 1.25-0.125h/bs
Segmented Wood Shear Walls(SDPWS-08/15 Section 4.3.5.1)
H H H H
vv
V
h
b▪ Only full height
segments
are considered
▪ Max aspect ratio
* 2:1 – without adjustment
* 3.5:1 – with adjustment
* New to SDPWS-15
Aspect ratio h:bs as shown in figure

5/31/2019
16
Perforated Shear Wall(SDPWS-15 4.3.5.3)
▪ Openings accounted
for by empirical
adjustment factor
▪ Hold-downs only at ends
▪ Uplift between hold
downs, t, at full height
segments is also
required
▪ Limited to 870 plf
(ASD, seismic)Aspect ratio applies to full
height segment (dotted)
H Hv
t
V
h
FTAO(SDPWS-08/15 Section 4.3.5.2)
H Hv
V
h
b
▪Openings accounted for by strapping or framing ▪ “based on a
rational analysis”
▪Hold-downs only at ends
▪H/w ratio defined by wall pier
Aspect ratio h:b as shown in figure
Test Data Test Plan
▪12 wall configurations tested (with and without
FTAO applied)
▪Wall nailing; 10d commons (0.148” x 3”) at 2”
o.c.
▪Sheathing; 15/32 Perf Cat oriented strand board
(OSB) APA STR I
▪All walls were 12 feet long and 8 feet tall
▪Cyclic loading protocol following ASTM E2126,
Method C, CUREE Basic Loading Protocol
Wall 3
Objective:
No FTAO, compare to
Wall 1 and 2. Examine
effect of compression
blocking.
2x flatwise
blocking
Nail sheathing to blocking
same as edge nail spacing Wall 4
Objective:
FTAO, compare to Wall 1.
Examine effect of straps
Wall is symmetric,
sheathing on right pier
not shown for clarity
Wall is symmetric,
sheathing and force transfer
load measurement on right
pier not shown for clarity
2x flatwise
blocking
Plan view detail (2) HTT22 &
calibrated bolt
12'-0"Wall1
Objective:
Est. baseline case for
3.5:1 segmented wall
Wall 2
Objective:
No FTAO, compare to Wall 1.
Co = 0.93. Examine effect of
sheathing above and below
opening w/ no FTAO. Hold
down removed.
2'-3" 2'-3"
8'-0
"3'-0
"3
'-1
0"
Test Plan
Wall 3
Objective:
No FTAO, compare to
Wall 1 and 2. Examine
effect of compression
blocking.
2x flatwise
blocking
Nail sheathing to blocking
same as edge nail spacing Wall 4
Objective:
FTAO, compare to Wall 1.
Examine effect of straps
Wall is symmetric,
sheathing on right pier
not shown for clarity
Wall is symmetric,
sheathing and force transfer
load measurement on right
pier not shown for clarity
2x flatwise
blocking
Plan view detail (2) HTT22 &
calibrated bolt
Segmented
Perforated
FTAO
12'-0"
Wall 7
Objective:
Est. baseline case for 2:1
segmented wall
4'-0" 4'-0"
Wall 8
Objective:
Compare FTAO to Wall 7
Wall is symmetric,
sheathing and force
transfer load
measurement on right
pier not shown for clarity
2x flatwise
blocking
Wall 5
Objective:
FTAO, compare to Wall
4. Examine effect of
straps with larger
opening
5'-0
"
2'-0"
2x flatwise
blocking
Wall is symmetric,
sheathing and force
transfer load
measurement on right
pier not shown for clarity
Wall 6
Objective:
Compare to Wall 4. Examine
effect of sheathing around
opening
2x flatwise
blocking
Wall is symmetric,
sheathing and force
transfer load
measurement on right
pier not shown for clarity1'-1
0"
Test Plan
Wall 5
Objective:
FTAO, compare to Wall
4. Examine effect of
straps with larger
opening
5'-0
"
2'-0"
2x flatwise
blocking
Wall is symmetric,
sheathing and force
transfer load
measurement on right
pier not shown for clarity
Wall 6
Objective:
Compare to Wall 4. Examine
effect of sheathing around
opening
2x flatwise
blocking
Wall is symmetric,
sheathing and force
transfer load
measurement on right
pier not shown for clarity1'-1
0"
12'-0"
Wall 7
Objective:
Est. baseline case for 2:1
segmented wall
4'-0" 4'-0"
Wall 8
Objective:
Compare FTAO to Wall 7
Wall is symmetric,
sheathing and force
transfer load
measurement on right
pier not shown for clarity
2x flatwise
blocking
FTAO with bigger opening FTAO with C-shaped panel

5/31/2019
17
Wall 11Wall 12
Objective:
FTAO for asymmetric
multiple pier wall.
Objective:
FTAO for 3.5:1 Aspect
ratio pier wall. No
sheathing below
opening. One hold
downs on pier (pinned
case)
4'-0"2'-6"2'-0"1'-6"
2'-0"
4'-0
"
Wall is symmetric,
sheathing and force
transfer load
measurement on right pier
not shown for clarity
2'-4
"4
'-0
"
5'-0
"
Wall 9
Objective:
Compare FTAO to Wall 7
and 8. Collect FTAO data
for wall with larger
opening
Wall 10
Wall is symmetric,
sheathing and force
transfer load
measurement on right pier
not shown for clarity
Objective:
FTAO for 3.5:1 Aspect ratio
pier wall. No sheathing below
opening. Two hold downs on
pier (fixed case)
2'-0" 2'-0"
7'-0
"
Wall is symmetric, sheathing
and force transfer load
measurement on right pier not
shown for clarity
Test Plan
5'-0
"
Wall 9
Objective:
Compare FTAO to Wall 7
and 8. Collect FTAO data
for wall with larger
opening
Wall 10
Wall is symmetric,
sheathing and force
transfer load
measurement on right pier
not shown for clarity
Objective:
FTAO for 3.5:1 Aspect ratio
pier wall. No sheathing below
opening. Two hold downs on
pier (fixed case)
2'-0" 2'-0"
7'-0
"
Wall is symmetric, sheathing
and force transfer load
measurement on right pier not
shown for clarity
Wall 11Wall 12
Objective:
FTAO for asymmetric
multiple pier wall.
Objective:
FTAO for 3.5:1 Aspect
ratio pier wall. No
sheathing below
opening. One hold
downs on pier (pinned
case)
4'-0"2'-6"2'-0"1'-6"
2'-0"
4'-0
"
Wall is symmetric,
sheathing and force
transfer load
measurement on right pier
not shown for clarity
2'-4
"4
'-0
"
FTAO with
multiple
openings and
asymmetric
piers
Measured vs Predicted Strap Forces
Diekmann
Technique
Top Bottom Top Bottom Top Bottom Top/Bottom Top Bottom
Wall 4a 687 1,485 178% 82% 652% 183% 132% 406% 115%
Wall 4b 560 1,477 219% 83% 800% 184% 133% 499% 115%
Wall 4c (3)668 1,316 183% 93% 670% 207% 149% 418% 129%
Wall 4d 1,006 1,665 122% 73% 445% 164% 118% 278% 102%
Wall 5b 1,883 1,809 65% 68% 327% 256% 173% 204% 160%
Wall 5c (3)1,611 1,744 76% 70% 382% 265% 187% 238% 166%
Wall 5d 1,633 2,307 75% 53% 377% 201% 141% 235% 125%
Wall 6a 421 477 291% 256% 1063% 571% 410% 663% 357%
Wall 6b 609 614 201% 199% 735% 444% 319% 458% 277%
Wall 8a 985 1,347 118% 86% 808% 359% 138% 269% 120%
Wall 8b (4)1,493 1,079 78% 108% 533% 449% 124% 177% 150%
Wall 9a 1,675 1,653 69% 70% 475% 383% 185% 217% 166%
Wall 9b 1,671 1,594 69% 73% 476% 397% 185% 218% 172%
Wall 10a 1,580 n.a. (5)73% n.a. (5)
496% n.a. (5) n.a. (5) n.a. (5) n.a. (5)
Wall 10b 2,002 n.a. (5)58% n.a. (5)
391% n.a. (5) n.a. (5) n.a. (5) n.a. (5)
Wall 11a 2,466 n.a. (5)47% n.a. (5)
318% n.a. (5) n.a. (5) n.a. (5) n.a. (5)
Wall 11b 3,062 n.a. (5)38% n.a. (5)
256% n.a. (5) n.a. (5) n.a. (5) n.a. (5)
Wall 12a 807 1,163 81% 94% 593% 348% 128% n.a. (5) n.a. (5)
Wall 12b 1,083 1,002 60% 109% 442% 403% 138% n.a. (5) n.a. (5)
Error (2) For Predicted Strap Forces at ASD Capacity (%)
Wall ID
Measured Strap
Forces (lbf) (1)
Drag Strut Technique Cantilever Beam Technique
SEAOC/Thompson
Technique
Local Response
▪ The response curves
are representative for
wall 1 & 2
▪ Compares segmented
piers vs. sheathed with
no straps
▪ Observe the increased
stiffness of perforated
shear (Wall 2) vs. the
segmented shear (Wall 1)
Local Response
Comparison of opening size vs. strap forces
▪ Compared Wall 4 to 5
▪ Effect of enlarged opening
▪ Failure mode
▪ Decreased stiffness
▪ Increased strap forces
Global Response
▪ Comparison of opening size
vs. strap forces
▪ Wall 4 vs. 5 reduction in stiffness
with larger opening
▪ Wall 4 & 5d demonstrated
increased stiffness as well as
strength over the segmented
walls 1 & 2
▪ Larger openings resulting in both
lower stiffness and lower strength.
▪ Relatively brittle nature of the perforated walls
▪ Shear walls resulted in sheathing tearing
-20,000
-15,000
-10,000
-5,000
0
5,000
10,000
15,000
20,000
-5 -4 -3 -2 -1 0 1 2 3 4 5
Ap
plie
d L
oa
d (
lbf)
Top of Wall Displacement (inches)
Wall - 4d
Wall - 5d
Conclusions
▪ 12 assemblies tested, examining the three approaches to
designing and detailing walls with openings
▪ Segmented
▪ Perforated Shear Wall
▪ Force Transfer Around Openings
▪ Walls detailed for FTAO resulted in better global response

5/31/2019
18
Conclusions
▪ Comparison of analytical methods with tested values for
walls detailed as FTAO
▪ The drag strut technique was consistently un-conservative
▪ The cantilever beam technique was consistently ultra-conservative
▪ SEAOC/Thompson provides similar results as Diekmann
▪ SEAOC/Thompson & Diekmann techniques provided reasonable
agreement with measured strap forces
▪ Better guidance to engineers will be developed by APA for
FTAO
▪ Summary of findings for validation of techniques
▪ New tools for IRC wall bracing
C-shaped Panels
▪ APA FTAO Test Wall 6
▪ Framing status quo
▪ Reduce/eliminate
strap force
Wall 5
Objective:
FTAO, compare to Wall
4. Examine effect of
straps with larger
opening
5'-0
"
2'-0"
2x flatwise
blocking
Wall is symmetric,
sheathing and force
transfer load
measurement on right
pier not shown for clarity
Wall 6
Objective:
Compare to Wall 4. Examine
effect of sheathing around
opening
2x flatwise
blocking
Wall is symmetric,
sheathing and force
transfer load
measurement on right
pier not shown for clarity1'-1
0"
Advancements in FTAO
Strapping Above and Below Openings
▪ SDWPS Section 4.3.5.2 specifies collectors
▪ Full length horizontal elements.
Top & Bottom Plates, drag struts,
beams, etc..
▪ Transfer forces from diaphragm
into shear wall
▪ Strapping is not a collector
▪ Can be discontinuous
▪ Resists internal tension forces
not shear
▪ Similar to hold downs at end of wall
Multiple Openings
▪ APA FTAO Testing Wall 12
▪ Multiple openings
▪ Asymmetric pier widths
▪ Diekmann Rational Analysis
Wall 11Wall 12
Objective:
FTAO for asymmetric
multiple pier wall.
Objective:
FTAO for 3.5:1 Aspect
ratio pier wall. No
sheathing below
opening. One hold
downs on pier (pinned
case)
4'-0"2'-6"2'-0"1'-6"
2'-0"
4'-0
"
Wall is symmetric,
sheathing and force
transfer load
measurement on right pier
not shown for clarity
2'-4
"4
'-0
"
www.apawood.org/FTAO
3’-6” 3’-0” 4’-0” 6’-0” 4’-0” 3’-6”2’-0”
6’-8”
2’-8” 2’-8”
8’-
0”
V
V = 3,750 lbs
26’-0”
www.apawood.org/FTAO

5/31/2019
19
FTAO Technical Note: Form T555
▪ Technical Note: Design for
Force Transfer Around
Openings (FTAO)
▪ APA Form T555
▪ Presents a rational
analysis for applying FTAO
to walls with asymmetric
piers and walls with
multiple openings
▪ Based on Wall 12 testing
configuration
FTAO Technical Note: Form T555
▪ Provides a design example
for FTAO wall with two
window openings
▪ FTAO Calculator:
Companion to Technical
Note
APA FTAO Calculator
▪ Excel-based tool released January 2018
▪ Based on design methodology developed by
Diekmann
▪ Calculates:
▪ Max hold-down force for uplift resistance
▪ Required horizontal strap force above and below openings
▪ Max shear force for sheathing attachments
▪ Max deflection
▪ Design example corresponds with FTAO Technical
Note (Form T555)
APA FTAO Calculatorwww.apawood.org/FTAO
FTAO Calculator: Design Examplewww.apawood.org/FTAO
FTAO Calculator: Three Openingswww.apawood.org/FTAO
www.apawood.org/FTAO

5/31/2019
20
FTAO Calculator: Design Output
Design output:
▪ Required sheathing capacity
▪ Required strap force above and below openings
▪ Required hold-down force
▪ Maximum deflection
FTAO Calculator: Final Output
Final Design Output
▪ Summary of input
parameters
▪ FTAO shear wall analysis
▪ Summary of final design
requirements
▪ Total calculated deflection
▪ Three-page shear wall
design to include in
calculation package
▪ Print directly from Excel
▪ Save as PDF
2015/2018 IRC Wood Wall Bracing Provisions
▪ http://shop.iccsafe.or
g/a-guide-to-the-
2015-irc-wood-wall-
bracing-provisions-
1.html
Load Path
R301.1 Application
The construction
of buildings…
shall result in a…
complete load path…
for the transfer of all loads…
to the foundation.
Foundation
3.7
Load
Braced
Wall
Panel
Prescribed
material & nailing
Calculated load,
material & nailing
Hold-downcapacity calculated
Stiffened Walls
BracedWall
Panel(BWP)
ShearWall
VS.
Wall Bracing
R602.10 Wall Bracing
"Where a building, or portion
thereof, does not comply with
one or more of the bracing
requirements in this section,
those portions shall be designed
and constructed in accordance
with Section R301.1.ʺ

5/31/2019
21
Simply BracingAPA Wall Bracing Calculator
www.apawood.org/calculator
121
APA Wall Bracing Calculator
Benefits:
▪ The user locates the
bracing segments, which
offers user creativity while
automating the code check
flagging incorrect or
insufficient design.
▪ The output makes plan
review clear, concise, and
implementation into the
construction plans
straightforward.
122
APA Wall Bracing Calculator
Benefits:
▪ Integrated code
sections for quick
reference
▪ Designer control
over the project
details
▪ Storage on your
personal computer
123
IRC Wall Bracing Primer
1. Establish Design Criteria
2. Define BWLs
3. Define BWPs in each BWL
4. Define the required length of bracing per
BWL in accordance with the Wind &
Seismic tables
5. If step 3 > 4, done. If step 3 < 4, add
additional BWPs.
124
APA Wall Bracing Calculator
Step 1
▪ Entering Project
Information
▪ New Project
▪ Import Existing
Project
125
APA Wall Bracing Calculator
Step 1
▪ Design Criteria
▪ Code
▪ SDC
▪ Wind Speed
▪ Number of Stories, etc.
126

5/31/2019
22
APA Wall Bracing Calculator
Step 2
▪ Wall Line Details
▪ Distance to adjacent BWL
▪ Line Length
▪ Wall Height
▪ Gypsum, Blocking, etc.
127
APA Wall Bracing Calculator
Step 3
▪ Wall Line Segment
Details
▪ Length BWPs
▪ BWP material
▪ BWP spacing
▪ Total Compliant
Bracing: Wind/Seismic
128
APA Wall Bracing Calculator
Step 4
▪ Producing a Project
Report
▪ PDF or Print
▪ Summary Elevations
▪ Wind & Seismic factors
▪ Qualified Bracing vs.
Required Bracing
129
Karyn Beebe, P.E., LEED APPhone: 858-668-7161
Help Desk
Phone: (253) 620-7400
www.apawood.org